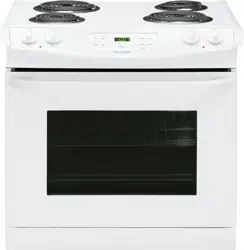
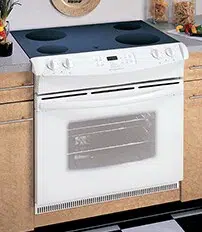
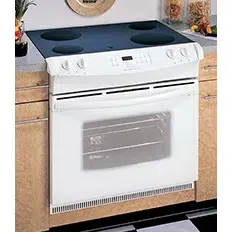
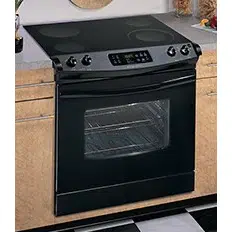
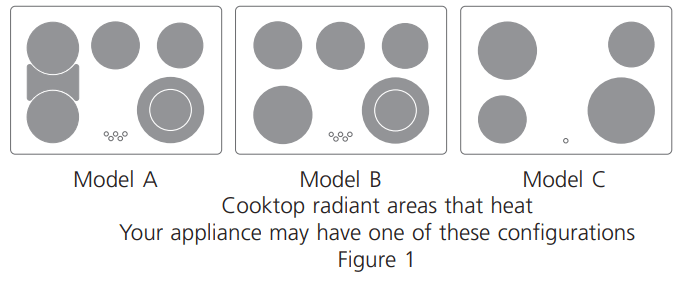
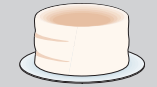
The ceramic cooktop has radiant surface elements located below the surface of the glass. The design of the ceramic cooktop outlines the area of the surface element underneath. Make sure the diameter of the pan matches the diameter of the element outline on the cooktop (See Figure 1).
Heat is transferred up through the surface of the cooktop to the cookware. Only flat-bottom cookware should be used. The type and size of cookware, the number of surface elements in use and their settings, are all factors that will affect the amount of heat that will spread to areas beyond the surface elements. The areas surrounding the elements may become hot enough to cause burns.
About the Radiant Surface Elements
The element temperature rises gradually and evenly. As the temperature rises, the element will glow red. To maintain the selected setting, the element will cycle on and off. The heating element retains enough heat to provide a uniform and consistent heat during the off cycle. For efficient cooking, turn off the element several minutes before cooking is complete. This will allow residual heat to complete the cooking process.
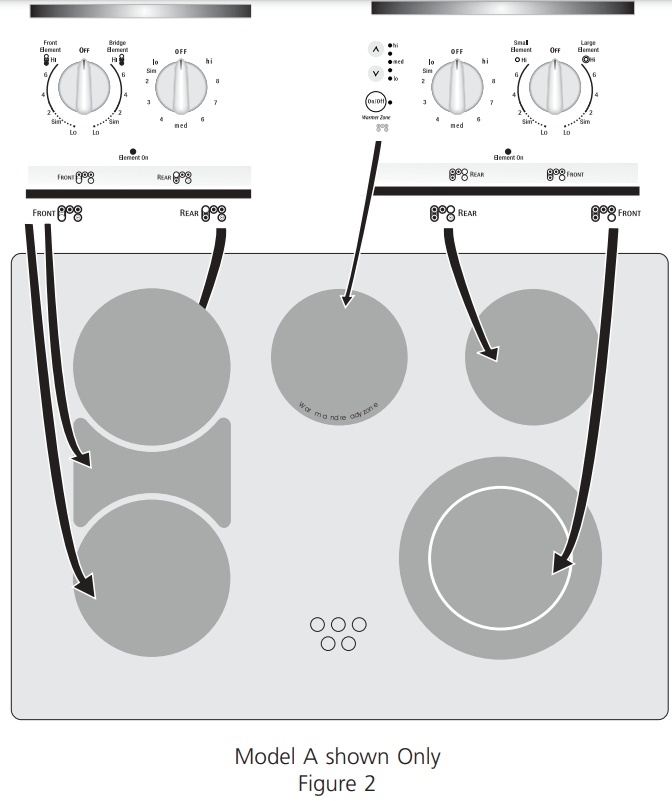
To Operate the Single Surface Elements:
1. Place correctly sized cookware on the radiant surface element.
2. Push in and turn the surface control knob in either direction to the desired setting (Figure 2). Turn the knob to adjust the setting if desired. Start most cooking operations on a higher setting and then turn to a lower setting to finish cooking. Each surface element provides a constant amount of heat at each setting. A glowing red surface heating area extending beyond the bottom edge of the cookware indicates the cookware is too small for the surface heating area.
3. When cooking has completed, turn the surface control knob to OFF before removing the cookware. Note: The Surface Indicator light will come on when the control knob will be turn on and will continue to glow until the glass cooktop has cooled down to a moderate level. The light may remain on even though the controls are turned OFF.
Oven Baking
For best cooking results, heat the oven before baking cookies, breads, cakes, pies or pastries, etc... There is no need to preheat the oven for roasting meat or baking casseroles.
The cooking times and temperatures needed to bake a product may vary slightly from your previously owned appliance
Baking Problems and Solutions Baking Problems
Baking Problems
Causes
Corrections
Cookies and biscuits burn on the bottom.
Cookies and biscuits put into the oven before the preheating time is completed.
Allow oven to preheat to desired temperature before placing food in oven.
Oven rack overcrowded.
Choose pan sizes that will permit 5.1 cm to 10.2 cm (2” to 4”) of air space on all sides when placed in the oven.
Dark pan absorbs heat too fast.
Use a medium-weight aluminum baking sheet.
Cakes too dark on top or bottom
Cakes put in oven before oven is preheated.
Allow oven to preheat to the selected temperature before placing food in the oven.
Rack position too high or too low.
Use proper rack position for baking needs.
Oven too hot.
Set oven temperature 25°F/12°C lower than recommended.
Cakes not done in center
Oven too hot.
Set oven temperature 25°F/12°C lower than recommended.
Incorrect pan size.
Use pan size suggested in recipe.
Pan not centered in oven.
Use proper rack position and place pan so there are at least 2” (5.1 cm) of space on all sides of pan.
Glass cookware slow heat conductor.
Reduce temperature and increase cook time or use shiny bakeware.
Cakes not level.
Oven not level.
Place a marked glass measuring cup filled with water on the center of the oven rack. If the water level is uneven, refer to the installation instructions for leveling the oven
Pan too close to oven wall or rack overcrowded.
Use proper rack position and place pan so there are at least 2” (5.1 cm) of space on all sides of pan.
Pan warped.
Do not use pans that are dented or warped.
Oven light left on while baking.
Do not leave the oven light on while baking.
Foods not done when cooking time is over.
Oven too cool.
Set oven temperature 225°F/12°C higher than suggested and bake for the recommended time.
Oven overcrowded.
Be sure to remove all pans from the oven except the ones to be used for baking.
Oven door opened too frequently
Open oven door only after the shortest recommended baking time.
General Cleaning
Cleaning Various Parts of Your Range
Before cleaning any part of the range, be sure all controls are turned OFF and the range is COOL. REMOVE SPILLOVERS AND HEAVY SOILING AS SOON AS POSSIBLE. REGULAR CLEANING WILL REDUCE THE NUMBER OF MAJOR CLEANING LATER.
Surfaces
How to Clean
Aluminum & Vinyl
Use hot, soapy water and a cloth. Dry with a clean cloth.
Painted and Plastic Control Knobs, Body Parts, and Decorative Trim
For general cleaning, use hot, soapy water and a cloth. For more difficult soils and built-up grease, apply a liquid detergent directly onto the soil. Leave on soil for 30 to 60 minutes. Rinse with a damp cloth and dry. DO NOT use abrasive cleaners on any of these materials; they can scratch.
Before cleaning the control panel, turn all controls to OFF and remove the control knobs. To remove, pull each knob straight off the shaft. Clean using hot, soapy water and a dishcloth. Rinse with a clean water using a dishcloth. Be sure to squeeze excess water from the cloth before wiping the panel; especially when wiping around the controls. Excess water in or around the controls may cause damage to the appliance. Be sure to rinse the cleaners as bluish stains may occur during heating and cannot be removed. DO NOT use abrasive cleaners on any of these materials; they can scratch. To replace knobs after cleaning, line up the flat sides of both the knob and the shaft; then push the knob into place.
Stainless Steel (some models)
Oven Door & Drawer Front Panel and Decorative Trim
Clean Stainless Steel with hot, soapy water and a dishcloth. Rinse with clean water and a cloth. Do not use cleaners with high concentrations of chlorides or chlorines. Do not use harsh scrubbing cleaners. Only use kitchen cleaners that especially made for cleaning Stainless Steel as Stainless Steel Magic, or other similar cleaners are recommended. Always follow the manufacturer's instructions. Be sure to rinse the cleaners from the surface as bluish stains may occur during heating that cannot be removed.
Surface Elements and Drip Bowls (some models)
Surface elements can be unplugged and removed to make cleaning the drip bowls easier. The surface elements clean themselves when they are turned on. Food spilled on a hot element will burn off. Food spilled on a cold element can be cleaned with a damp cloth any remaining soil will burn off the next time element is used. NEVER IMMERSE A SURFACE ELEMENT IN WATER. To remove surface element and drip bowls, follow the instructions under General Cleaning.
To clean drip bowls, wash in hot, soapy water or in the dishwasher. Rinse and dry while still warm. Hard-to-remove, burned-on soils can be removed by soaking the drip bowls for about 20 minute in a slightly diluted liquid cleanser or solution made of equal parts ammonia and water. A nylon scrubber may be used after soaking. DO NOT use abrasive cleanser or steel wool, as they will scratch the surface. Always rinse with clean water and polish, and dry with a soft cloth. To replace drip bowls and surface elements, follow the instructions under General Cleaning.
Porcelain Enamel
Broiler Pan and Insert, Door Liner, Body Parts and Warmer Drawer and Drawer Cavity
Gentle scouring with a soapy scouring pad will remove most spots. Rinse with a 1:1 solution of clear water and ammonia. If necessary, cover difficult spots with an ammonia-soaked paper towel for 30 to 40 minutes. Rinse with clean water and a damp cloth, and then scrub with a soap-filled scouring pad. Rinse and wipe dry with a clean cloth. Remove all cleaners or the porcelain may become damaged during future heating. DO NOT use spray oven cleaners on the cooktop.
Oven Racks
Oven racks should be removed from the oven during self-clean cycle for cleaning. When removed, clean by using a mild, abrasive cleaner following manufacturer’s instructions. Rinse with clean water and dry.
If the racks are cleaned in the self-clean cycle, their color will turn slightly blue and the finish will be dull. After the self-clean cycle is complete, and the oven has cooled, rub the sides of the racks with wax paper or a cloth containing a small amount of baby oil or salad oil (this will make the racks glide easier into the rack positions).
Oven door
To clean oven door, wash with hot, soapy water and a clean cloth. DO NOT immerse the door in water.
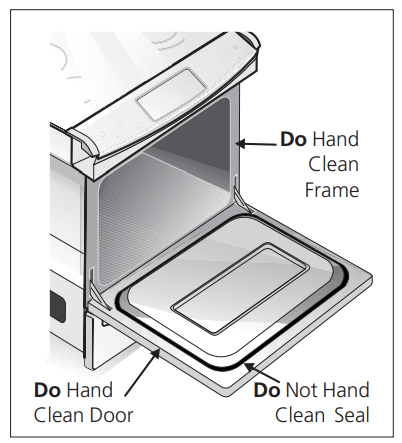
DO NOT clean the oven door gasket. The oven door gasket is made of a woven material, on self cleaning models, which is essential for a good seal. Care should be taken not to rub, damage or remove the gasket.
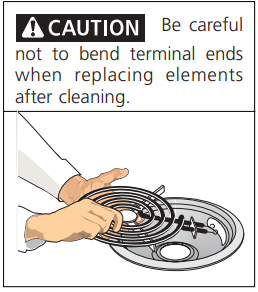
Cooktop Cleaning - Coil Surface Element Models Only
To Remove and Replace Surface Elements and Drip Bowls (some models)
ATTENTION: Never leave covers on the coil elements as they could be permanently damaged if the coil is turned on by accident.
Prior to cleaning the coil elements make sure they are cold and that control knobs are turned to OFF
Coil elements clean themselves when they are turned on.
Coil elements and drip bowls are removable and allow to clean the drip bowls
To remove a coil element, push against the front edge and lift element up and out.
To clean by hand, wash the drip bowls in hot sudsy water. For hard to remove spots, use nylon scrubber with soap. Rinse and dry will still warm.
SURFACES
CLEANING AGENTS
INSTRUCTIONS
Porcelain enamel (cooktop, surface under cooktop)
Mild cleaners or soap-filled steel wool pads.
Use a damp sponge or dampened soap pad, rinse and dry.
Insert - Control Panel
Hot, soapy water or cleaner cream.
Use a clean soapy, dampened cloth or paper towel, remove soil and dry. Do not use abrasive products.
Correct and consistent cleaning is essential to maintaining your porcelain enamel cooktop. If food spills and grease spatters are not removed, they may burn onto the surface of the cooktop and cause permanent discoloration.
Daily Cleaning
For normal soil:
1. Allow cooktop surface to cool.
2. Wipe off spills and spatters using a clean paper towel or a clean cloth with warm, soapy water.
3. If needed, use a soapy steel wool pad or other mild household cleaners.
4. Be sure to rinse off the cleaners or the porcelain may become damaged during future heating.
For heavy, burned-on soil:
1. Allow cooktop surface to cool.
2. Use a soap filled scouring pad with warm water or cover heavily soiled spots with a solution of clear water and ammonia. Scour gently. Rinse and wipe dry with a clean cloth.
3. If any soil remains, apply a few drops of a recommended cooktop cleaning cream on the spots and rub gently using a clean damp cloth or scouring pad. Buff with a dry cloth until all soil and cream are removed. Frequent cleaning with the cooktop cleaning cream leaves a protective coating which helps in preventing scratches and abrasions.
For sugary spillovers:
Sugary spills can chemically damage your cooktop surface. Therefore, you must begin cleaning the spills while the cooktop is still hot. Use caution when following the steps below.
1. Turn off all surface units and remove all pans immediately.
2. Wearing an oven mitt, wipe up carefully or move hot spills away from the element area with a clean damp cloth.
3. Allow the cooktop to cool. Follow the instructions above for heavy, burned-on soil.
COOKTOP CLEANING / POLISHING CREAM can be purchased through authorized service centers or major department stores.
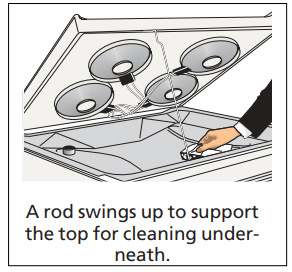
To Raise the Top for Cleaning (some models)
1. Grasp the sides and lift from the front. A lift-up rod will support the top in its raised position. Only lift the top high enough to allow the support rod to rest in place under the front of the cooktop.
2. Clean underneath using a clean cloth and hot, soapy water.
3. To lower the top, lift the top slightly and lower the rod. Lower the range top down into the range frame.
When lowering the lift-up range top, grasp the sides with fingertips only. Be careful not to pinch fingers. DO NOT drop or bend the range top when raising or lowering. This could dama
Cooktop Cleaning - Ceramic Glass Cooktop Models
Special Caution for Aluminum Foil and Aluminum Coking Utensils
1) Aluminum foil
Use of aluminum foil will damage the cooktop. Do not use under any circumstances.
2) Aluminum utensils
The melting point of aluminum being much lower than that of other metals, care must be taken when aluminum pots or pans are used. If allowed to boil dry, not only will the utensil be ruined, but also permanent damage in the form of breakage, fusing or marking may affect the ceramic glaa surface
Sliding aluminum or copper clad bottom pans on the cooktop can cause metal markings on the cooktop surface. These marks should be removed immediately after the cooktop has cooled using the cooktop cleaning cream. Metal marks can become permanent if not removed prior to future use.
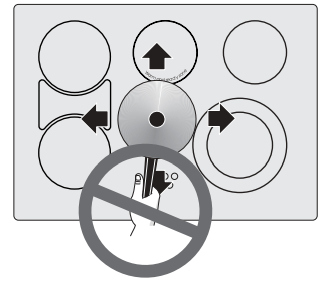
Cookware (cast iron, metal, ceramic or glass) with rough bottoms can mark or scratch the cooktop surface. Do not slide anything metal or glass across the cooktop. Do not use your cooktop as a cutting board or work surface in the kitchen. Do not cook foods directly on the cooktop surface without a pan. Do not drop heavy or hard objects on the glass cooktop, they may cause it to crack
Things to Remember
AVOID using bleach and don't use ammonia to clean the ceramic surface.
Do not put plastic items on warm cooking areas.
Never slide oven racks across cooktop surface. They may scratch or metalmark the cooktop.
If cooktop should break, do not use cooktop or attempt to clean it. Call your authorized service technician immediately.
Never use a trivet or metal stand between the cooking utensil and the ceramic cooktop. The ceramic surface may be scratched, metal marked or etched by such items.
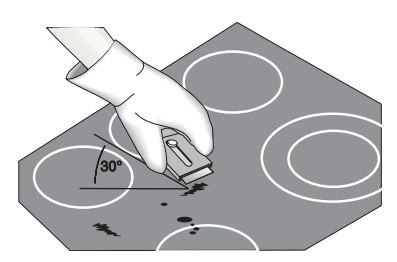
Sugary spills can cause pitting of your cooktop surface. Therefore, you must begin cleaning the spills while the cooktop is still hot. Use caution when following the steps below.
a) Turn off all surface units and remove all pans immediately.
b) Wearing an oven mitt, use a razor blade scraper to scrape the hot spill out of the cooking zone to a cooler area on the cooktop.
c) Allow the cooktop to cool.
Use and Care of Glass Surface
Problem
Cause
To Prevent
To Remove
Fine "brown lines (tiny scratches or abrasion which have collected soil).
Coarse particles (salt, sand, or grit) between bottom of cookware and cooktop that are not removed before cooking.
Using incorrect cleaning materials.
Clean cooktop after every use. Use cleaner creme daily.
Tiny scratches are not removable.
They can be minimized by continual use of cleaner creme.Such scratches do not affect cooking.
Metal marking (mark or black marks).
Sliding or scraping metal utensils or oven shelves across cooktop.
Do not slide cookware across cooktop.
Apply cleaner creme with dampened paper towel to a cooled surface.
Brown streaks and specks.
Cleaning with a sponge or dishcloth that has been used for other kitchen tasks.
Use cleaner creme with clean damp paper towel.
Use a small amount of cleaner creme with clean, damp paper towel.
NOTE: Due to the high intensity of heat generated by the surface elements, the glass surface will turn green when the element will be turned off. This phenomenon is normal and the glass will come back to its original white color after it has completely cooled down. (White glass cooktops only).
Cleaning Materials for Ceramic Glass Cooktop
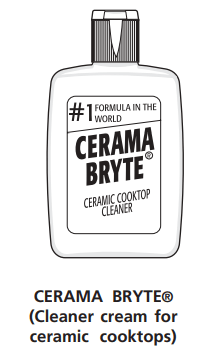
Some cleaning materials may contain an ingredient which can damage the cooktop. Use recommended materials only (see below). Cleaner cream should be used regularly. Prior to using your cooktop for the first time, apply a cleaner cream to the ceramic surface. A sample of CERAMA BRYTE® cleaner cream is supplied with your range. More are available in stores if needed. Use only recommended cleaning products and follow these basic cleaning suggestions.
1. BEFORE THE COOKTOP IS USED. Thoroughly clean and saturate the cooktop with cleaner cream.
a) Dampen clean paper towel and clean unit.
b) Wipe off with another clean, damp paper towel; then wipe dry.
2. For normal daily cleaning, apply a dab of cleaner cream in the center of each unit-area to be cleaned. Start with approximately 1/8 teaspoon. (Apply more if needed). Then, proceed as stated above in (a and b).
3. Make sure bottom of cookware and cooking area are clean and dry.
4. Select heat settings and cookware large enough for food and liquid. This stops boilovers and spatterings.
5. Wipe up food spills and spatters before they burn into surface.
Do Use on Ceramic Glass Cooktop
1. Baking soda.
2. Non-impregnated plastic and nylon pads.
3. For burned on material, scrape with single-edged razor blade, held at a 30° angle.
4. Ceramic glass cleaning cream.
5. CERAMA BRYTE® cleaner cream.
Do not Use on Ceramic Glass Cooktop
1. Avoid pads, that can leave marks and scratches.
2. Avoid heavy-duty cleansing powders, these can scratch, depending on their abrasiveness and cleaning pressure applied.
3. Avoid chemical oven cleaners. These can etch the cooktop surface and are caustic.
Special Cleaning Instructions for Mineral Deposits and Discolorations
Problem: A gray brown stain that is not removed when using cleaner cream.
Cause: Condensation, when cooking, often collects and drips from cookware. The minerals found in water supply and foods may cause a gray or brown film to develop on cooktop. This film is so thin it cannot be felt and appears to be under cooktop.
To Prevent: Daily and proper use of cleaner cream.
To Remove:
– Wet surface with water and sprinkle on cleaner cream.
– Scrub with clean, damp paper towel until stain disappears.
– Clean remaining paste away with damp paper towel.
– Apply dab of cleaner cream and polish with a clean paper towel.
Oven Cleaning
Cleaning the Regular Oven (non self-clean oven, some models)
Make sure the oven is cool and that all control knobs are et OFF position. Cleaning the oven is a lot easier when the door is removed.
1. Remove the oven door; see under To Remove and Replace the Oven Door in this Owner's Guide.
2. Empty the oven including the racks.
3. You can wash the broiler pan, grid and racks in the kitchen sink.
4. Clean oven lining thoroughly with soap and a wet cloth and wipe with a dry cloth
To remove burned-on fat on oven walls, moisten soiled parts with household ammonia, using a wet cloth. Follow suggested manufacturer's cleaning method. (Do not remove the oven door when using ammonia.)
Complete cleaning with a damp cloth and use a fine steel wool scouring agent if necessary.
The lower element can be moved up for cleaning purposes.
5. Replace racks in the oven. Reinstall oven door.
Cleaning the Self-Clean Oven (some models)
Adhere to the following cleaning precautions:
- Allow the oven to cool before cleaning.
- Wear rubber gloves when cleaning any exterior parts of the oven manually.
DO NOT use commercial oven cleaners or oven protective coatings in or around any art of the self-cleaning oven. DO NOT clean the oven door gasket. The gasket on the oven door is essential for a good seal. Care should be taken not to rub, damage or move the gasket. DO NOT cooking or foil could melt and damage the oven surface.
A self-cleaning oven cleans itself with high temperatures (well above cooking temperatures) which eliminate soil completely or reduce it to a fin powdered ash you can which away with damp cloth.
Preparing the Oven for Self-Cleaning
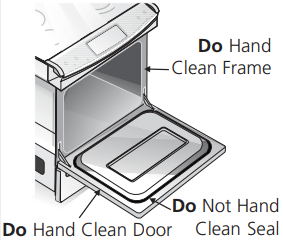
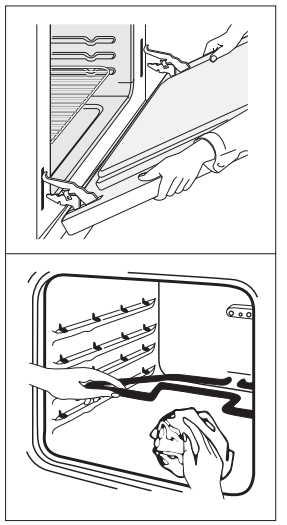
1. Remove all excess spillovers in the oven cavity before starting the self-cleaning cycle. To clean, use hot soapy water and a cloth. Large spillovers can cause heavy smoke or fire when subjected to high temperatures. DO NOT allow food spills with a high sugar or acid content (such as tomatoes, sauerkraut, fruit juices or pie filling) to remain on the surface as they may cause a dull spot even after cleaning.
2. Clean any soil from the oven frame and the door liner (see illustration). These areas heat sufficiently during self-cleaning cycle to burn soil on. Clean with soap and water.
3. Remove the broiler pan and insert, all utensils and any foil. These items do not withstand high cleaning temperatures
4. Oven racks may be left in the oven or may be removed. If they go through the clean cycle, their color will turn slightly dull. After the cycle is completed and the oven has cooled, rub the sides of the racks with wax paper or a cloth containing a small amount of baby oil or salad oil. This will make the racks glide easier.
What to Expect During Cleaning
While the oven is in operation, the oven heats to temperatures much higher than those used in normal cooking. Sounds of metal expansion and contraction are normal. Odor is also normal as the food soil is being removed. Smoke may appear through the oven vent, located on the top of the control panel.
If heavy spillovers are not wiped up before cleaning, they may flame and cause more smoke and odor than usual. This is normal and safe and should not cause alarm. If available, use an exhaust fan during the self-cleaning cycle.
Setting the Controls for Self-Clean Cycle
For the setting of the clean cycle, refer to Timer or Electronic Oven Control Guide.
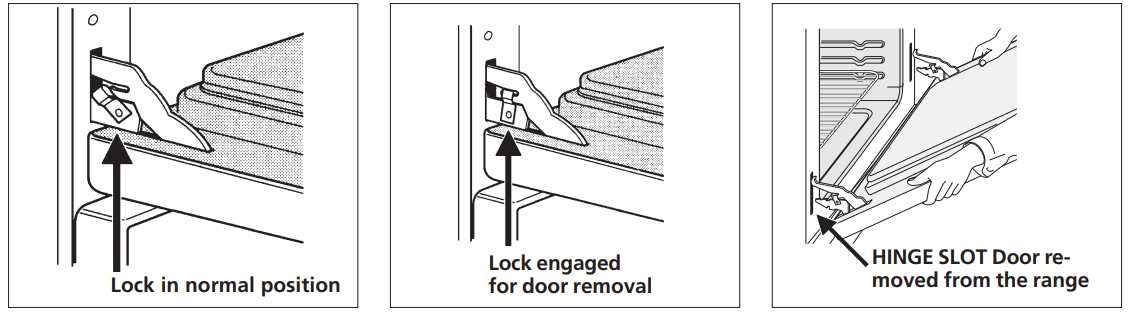
To Remove and Replace Oven Door
1. Open the door to the fully opened position.
2. Pull up the lock located on both hinge supports and engage it in the hook of the hinge levers. You may have to apply a little downward pressure on the door to pull the locks fully over the hooks.
3. Grab the door by the sides, pull the bottom of the door up and toward you to disengage the hinge supports. Keep pulling the bottom of the door toward you while rotating the top of the door toward the range to completely disengage the hinge levers.
4. Proceed in reverse to reinstall the door.
Make sure the hinge supports are fully engaged before unlocking the hinge levers.
The door is heavy. For safe, temporary storage, lay the door flat with the inside of the door facing down.
Removable Outer Door Glass Panel (some models)
Applicable only to models with an external glass panel not held with a frame. This design allows you to clean the inside face of the exterior door panel as well as the hidden face of the door inner glass. There are two different kinds of glass panel; one with a lower metal trim fixed on the underside of the glass panel and the other one with a lower metal support rail.
To remove the external door glass panel:
1. Pull the door off the range as per instructions under “To Remove and Replace Oven Door” in “Cleaning the Appliance” section and lay the door flat.
2. Using a screwdriver, remove the screws fastening the glass lower metal trim or the glass assembly.
3. Grab both sides of the glass panel and slowly pull it out of the door upper moulding. Lay the glass flat.
To replace the external door panel:
1. Grab the sides of the glass panel and carefully insert the glass into the door top moulding.
2. Replace the glass lower trim or the glass assembly using the locking screws.
3. Replace the door onto the range as per “To Remove and Replace Oven Door” in “Cleaning the Appliance” section.
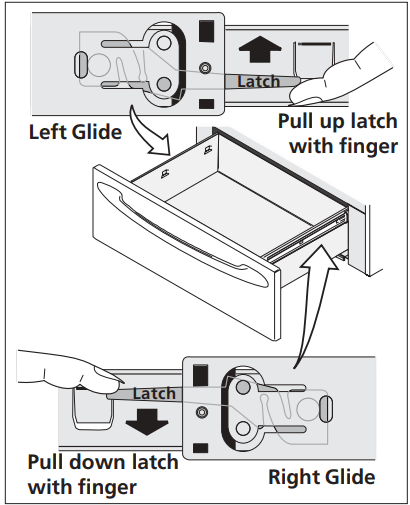
To Remove and Replace Warmer Drawer (some models)
To remove Warmer Drawer
1. Turn power off before removing the warmer drawer.
2. Open the drawer to the fully opened position.
3. Locate the latches on both sides of the warmer drawer.
4. Pull up on the left glide latch and push down on the right glide latch.
5. Pull the drawer away from the range.
6. To clean warmer drawer, gently scour with a soapy scouring pad, this will remove most spots. Rinse with a 1:1 solution of clear water and ammonia. If necessary, cover difficult spots with an ammonia-soaked paper towel for 30 to 40 minutes. Rinse with clean water and a damp cloth. Remove all cleaners or the porcelain may become damaged during future heating. DO NOT use spray oven cleaners on the cooktop.
To Replace Warmer Drawer:
1. Align the glide latches on both sides of the drawer with the slots on the drawer.
2. Push the drawer back into the range.
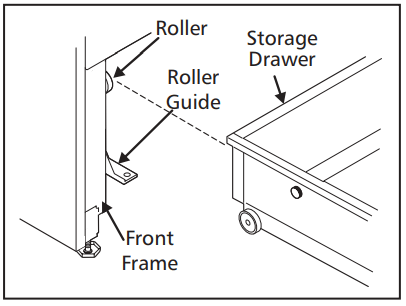
Storage Drawer (some models)
Use the storage drawer for storing cooking utensils. The drawer can de removed to facilitate cleaning under the range. Use care when handling the drawer.
To open the storage drawer, push the drawer in gently and it will spring open. To close, push the drawer until you hear a click, which indicates that the spring is compressed, and the drawer is closed.
To remove the drawer:
1. Pull empty drawer out to the roller guide stop.
2. Tilt the drawer up and pull it out over the rollers.
To replace the drawer:
1. Insert the rear end of the drawer into the opening.
2. Fit the drawer end rollers onto the guide rails.
3. Push the drawer in until it stops, then lift to allow the rollers to clear the roller guide stop, and push in.
Changing Oven Light
On some models an interior oven light will turn on automatically when the oven door is opened.
The oven light may be turned on when the door is closed by using the oven light switch located on the control panel.
On a self clean oven the lamp is covered with a glass shield held in place by a wire holder.
THIS GLASS SHIELD MUST BE IN PLACE WHENEVER THE OVEN IS IN USE.
To replace the light bulb:
1. Turn the power off at the main source.
2. Wear a leather-faced glove for protection against possible broken glass.
3. Replace bulb with a 40 watt appliance bulb only.
4. For self-cleaning oven, press wire holder to one side to release glass shield, change bulb and be sure to replace glass shield.
Before You Call
Before you call for service, review this list. It may save you time and expense. The list includes common occurrences that are not the result of defective workmanship or materials in this appliance. You will be charged for a service call while the appliance is in warranty if the problem is not caused by defective product workmanship or materials.
Your new appliance is a carefully engineered product. Many times, what appears to be a reason to call for service requires nothing more than a simple adjustment you can easily make in your own home or is normal operating characteristic of appliance under certain conditions.
This list is applicable to a variety of models; some of the items will not necessarily apply to your appliance.
OCCURRENCE
POSSIBLE CAUSE/SOLUTION
Range is not level.
Poor installation. Place oven rack in center of oven. Place a level on the oven rack. Adjust leveling legs at base of range until the rack is level. When range is level, cooktop may appear out of alignment if countertop is not level.
Weak, unstable floor. Be sure floor is level and can adequately support range. Contact a carpenter to correct sagging or sloping floor.
Kitchen cabinet misalignment may make range appear to be unlevel. Be sure cabinets are square and have sufficient room for range clearance.
Cannot move appliance easily. Appliance must be accessible for service.
Cabinets not square or are built in too tight. Contact a cabinet maker to correct the problem.
Contact builder or installer to make appliance accessible.
Carpeting interferes with range. Provide sufficient space so range can be lifted over carpet.
Entire range or oven does not operate.
Make sure cord/plug is tightly into outlet.
Service wiring is not complete.
Power outage. Check house lights to be sure. Call your local electric company for service.
* Oven control beeps and displays F1, F2, F3 or F9
This oven is equipped with a state of the art electronic oven controller. Among the many features is a full time oven circuit diagnostics system. The controller constantly monitors the internal circuitry as well as several crucial oven circuits to insure they are all operating correctly. If at any time one of these systems fails, the controller will immediately stop the current operation and beep continuously (flashing an error code of “F1, F2, F3”, or “F9” in the controller display window.
Electronic control has detected a fault condition. Press STOP/CLEAR to clear the display and stop the beeping. Reprogram oven. If fault remains, record fault number. Press STOP/CLEAR and contact authorized servicer.
Oven light does not work.
Replace or tighten bulb. See Changing Oven Light in this owner’s Guide for instructions.
Surface unit does not heat.
No power to the appliance. Check steps under “Entire Range or Oven Does Not Operate” in this Before you Call checklist.
Incorrect control setting. Make sure the correct control is on for the surface unit to be used.
Surface units too hot or not hot enough.
Incorrect control setting. Make sure the correct control is on for the surface unit to be used.
Lightweight or warped pans used. Use only flat, evenly balanced, medium or heavyweight cookware. Flat pans heat better than warped pans. Cookware materials and weight of the material affect heating. Heavy-and medium- weight pans heat evenly. Because lightweight pans heat unevenly, foods may burn easily.
Drip bowls are pitting or rusting.
Foods with acids, such as tomatoes, if allowed to stand in/on bowls will cause corrosion. Remove and wash drip bowls as soon as possible after spillover.
Normal environment. Houses along sea coast are exposed to salt air. Protect bowls as much as possible from direct exposure to salt air.
Drip bowls turning color or distorted out of shape.
Bottom surface of cookware extends beyond surface elements and touches cooktop surface. This can cause high enough temperatures to discolor the drip bowls. DO NOT use cookware of this type. Pan sizes should be matched to the size of the element. Replacement drip bowls may be purchased from your dealer.
Scratches or abrasions on cooktop surface.
Coarse particles such as salt or sand between cooktop and utensils can cause scratches. Be sure cooktop surface and bottoms of utensils are clean before usage. Small scratches do not affect cooking and will become less visible with time.
Cleaning materials not recommended for ceramic-glass cooktop have been used. See “Cooktop Cleaning - Ceramic Glass Cooktop Models” section under General Cleaning.
Cookware with rough bottom has been used. Use smooth, flat-bottomed cookware.
Metalmarks
Sliding or scraping of metal utensils on cooktop surface. Do not slide metal utensils on cooktop surface. Use a ceramic-glass cooktop cleaning cream to remove the marks. “Cooktop Cleaning - Ceramic Glass Cooktop Models” section under General Cleaning.
Brown streaks or specks.
Boilovers are cooked onto surface. Use razor blade scraper to remove soil. “Cooktop Cleaning - Ceramic Glass Cooktop Models” section under General Cleaning.
Areas of discoloration with metallic sheen.
Mineral deposits from water and food. Remove using a ceramic-glass cooktop cleaning cream. Use cookware with clean, dry bottoms.
Poor baking results.
Many factors affect baking results. Make sure the proper rack position is used. Center food in the oven and space pans to allow air to circulate. Allow the oven to preheat to the set temperature before placing food in the oven. Try adjusting the recipe's recommended temperature or baking time. If you feel the oven is too hot or cool, see “Adjusting Oven Temperature” in the Electronic Oven Control guide.
Fan noise during cooking operation.
A cooling fan may automatically turn on and off to cool internal parts. It is normal, and the fan may continue to run even after oven is turned off.
Flames inside oven or smoking from vent.
Excessive spillovers in oven. Set self-clean cycle for a longer cleaning time.
Excessive spillovers in oven. This is normal, especially for pie spillovers or large amounts of grease on the oven bottom. Wipe up excessive spillovers before starting the self-clean cycle. If flames or excessive smoke are present, stop the self-clean cycle and follow the steps under "Stopping or Interrupting the Self-Cleaning Cycle" in the Electronic Oven Control guide.
Oven smokes excessively during broiling.
Control(s) not set properly. Follow instructions under “Setting Oven Controls”.
Make sure oven is opened to Broil Stop Position.
Meat too close to the element. Reposition the rack to provide proper clearance between the meat and the element. Preheat broil element. Preheat broil element for searing.
Grid on broiler pan wrong side up and grease not draining. Always place grid on the broiler pan with ribs up and slots down to allow grease to drip into pan.
Grease has built up on oven surfaces. Regular cleaning is necessary when broiling frequently. Old grease or food spatters cause excessive smoking.
Control(s) not set properly. Follow instructions under “Oven Cleaning” in the Electronic Oven Control Guide.
Self-cleaning cycle does not work.
Self-cleaning cycle was interrupted. Stop time must be 3 to 4 hours past the start time. Follow steps under “Stopping or Interrupting the Self-Cleaning Cycle” in the Electronic Oven Control Guide.
Failure to clean bottom, front top or oven, frame or door area outside oven seal. These areas are not in the self-cleaning area, but get hot enough to burn on residue. Clean these areas before the self-cleaning cycle is started. Burned-on residue can be cleaned with a stiff nylon brush and water or nylon scrubber. Be careful not to damage the oven seal.
Avoid Transportation Damage to your Range
If you have to move your range into/out of your residence or when moving to a new home, it is suggested that you take the following precautions:
1. Screw in the levelling legs under the range.
2. Remove the racks and other utensils from the oven, and from the lower drawer.
3. Use adhesive tape to firmly secure the door and the drawer to the side panels. Also attach the electric power cord in the same manner.
4. Use a two-wheeled trolley with strap and fasten the range to it. Cover the appliance with a heavy blanket to prevent scratches and dents.
5. Avoid pulling or pushing the control panel when moving the appliance.


 The door is heavy. For safe, temporary storage, lay the door flat with the inside of the door facing down.