Owner's Guide Television
TV Control Switch & Operation

- Up direction
- Down direction
- Volume / Info / Sources List selection and Standby-On switch
The Control button allows you to control the Volume / Programme / Source and Standby-On functions of the TV.
To change volume: Increase the volume by pushing the button up. Decrease the volume by pushing the button down.
To change channel: Press the middle of the button in, the information banner will appear on the screen. Scroll through the stored channels by pushing the button up or down.
To change source: Press the middle of the button in twice(for the second time in total), the source list will appear on the screen. Scroll through the available sources by pushing the button up or down.
To turn the TV off: Press the middle of the button in and hold it down for a few seconds, the TV will turn into standby mode.
To turn on the TV: Press the middle of the button in, the TV will turn on.
Notes:
- If you turn the TV off, this cycle starts again beginning with the volume setting.
- Main menu OSD cannot be displayed via control button.
Operation with the Remote Control
Press the Menu button on your remote control to display main menu. Use the directional buttons and OK button to navigate and set. Press Return/Back or Menu button to quit a menu screen.
Input Selection
Once you have connected external systems to your TV, you can switch to different input sources. Press the Source button on your remote control consecutively to select the different sources.
Changing Channels and Volume
You can change the channel and adjust the volume by using the Programme +/- and Volume +/- buttons on the remote.
Using Main TV Menu
When the Menu button is pressed, the main TV menu will appear at the bottom of the screen. You can navigate through the menu items using the directional buttons on the remote. To select an item or see the sub-menu options of the highlighted menu press OK button. When you highlight a menu option some of the sub-menu items of this menu may appear on the upper side of the menu bar for quick access. To use a quick acess item, highlight it, press OK and set as desired using the Left/Right directional buttons. When finished press OK or Back/Return button to exit.
Press Exit button to close the main menu.
1. Home
When main menu is opened Home menu bar will be highlighted. The content of the Home menu can be customised by adding options from other menus. Just highlight an option and press the Down direction button on the remote. If you see Add to Home option you can add it to the Home menu. Same way you can delete or change the position of any item in the Home menu. Press the Down direction button and select the delete or move icon and press OK. In order to move a menu item use the Right and Left direction buttons to select the position that you want the item to move to and press OK.
2. TV
2.1. Guide
You can access the electronic programme guide menu using this option. Refer to Electronic Programme Guide section for more information.
2.2. Channels
You can access the Channels menu using this option. Refer to Using the Channel List section for more information.
2.3. Timers
You can set timers for future events using the options of this menu. You can also review the previously created timers under this menu.
To add a new timer select the Add Timer tab using the Left/Right buttons and press OK. Set the sub-menu options as desired and when finished press OK. A new timer will be created.
To edit a previously created timer, highlight that timer, select the Edit Selected Timer tab and press OK. Change the sub-menu options as desired and press OK to save your settings.
To cancel an already set timer, highlight that timer, select Delete Selected Timer tab and press OK. A confirmation message will be displayed. Highlight Yes and press OK to proceed. The timer will be cancelled. It is not possible to set timers for two or more events that will broadcasted in different channels at the same time interval. In this case you will be asked to choose one of these timers and cancel others. Highlight the timer you want to cancel and press OK, Options menu will be displayed. Then highlight Set/Cancel and press OK to cancel that timer. You will have to save changes after that. In order to do that press OK, highlight Save Changes and press OK again.
2.4. Recordings
You can manage your recordings using the options of this menu. You can playback, edit, delete or sort previously recorded events. Highlight a tab by using the Left or Right direction button and press OK to see available options.
Recording Settings
You can also configure your recording preferences using the Settings tab in the Recordings menu. Highlight Settings tab by using Left or Right button and press OK. Then select the desired item in the sub-menu and set by using Left or Right button.
Start early: You can set recording timer’s starting time to start earlier by using this setting.
End late: You can set recording timer’s end time to end later by using this setting.
Max Timeshift: This setting allows you to set the maximum duration for the timeshift recording. Available options are approximate and the actual recording time may change in practice depending on the broadcast. The reserved and free storage space values will change according to this setting. Make sure that you have enough free space otherwise instant recording may not be possible.
Auto discard: You can set the Discard type as None, Oldest, Longest or Shortest. If it is not set to None, you can set the Unplayed option as Included or Excluded. These options determine the preferences for deleting the recordings in order to obtain more storage space for ongoing records.
Hard disk information: You can view detailed information about the USB storage device connected to your TV. Highlight and press OK to see and press Back/Return to close.
Format Disk: If you want to delete all files on the connected USB storage device and convert the disk format to FAT32, you can use this option. Press OK button while the Format Disk option is highlighted. A menu will appear on the screen, requiring you to enter the PIN(*). After you enter the PIN, a confirmation message will be displayed. Select Yes and press OK to start formatting the USB storage device. Select No and press OK to cancel.
(*) Default PIN could have been set to 0000 or 1234. If you have defined the PIN(is requested depending on the country selection) during the First Time Installation use the PIN that you have defined.
3. Settings
You can manage the settings of your TV using the options of this menu. Refer to Settings Menu Contents section for more information.
4. Apps
When your TV is connected to the Internet related contents will also be available, including Apps related contents. Using the Apps menu you can access and manage your applications. You can add new apps from the market or delete the existing ones. Refer to Apps section for more information.
5. Source
You can manage your input source references using the options of this menu. To change the current source highlight one of the options and press OK.
5.1. Source Settings
Edit the names, enable or disable selected source options. There are also Regular, Enhanced and Disabled options available for HDMI sources. Regular and Enhanced options are affecting the colour settings of the selected HDMI source. To be able to watch 4K or HDR/HLG images from an HDMI source related source setting should be set as Enhanced if the connected device is compatible with HDMI 2.0 and subsequent versions. Set as Regular if the connected device is HDMI 1.4 compatible. Set accordingly or disable the related HDMI source by setting as Disabled.
Remote Control
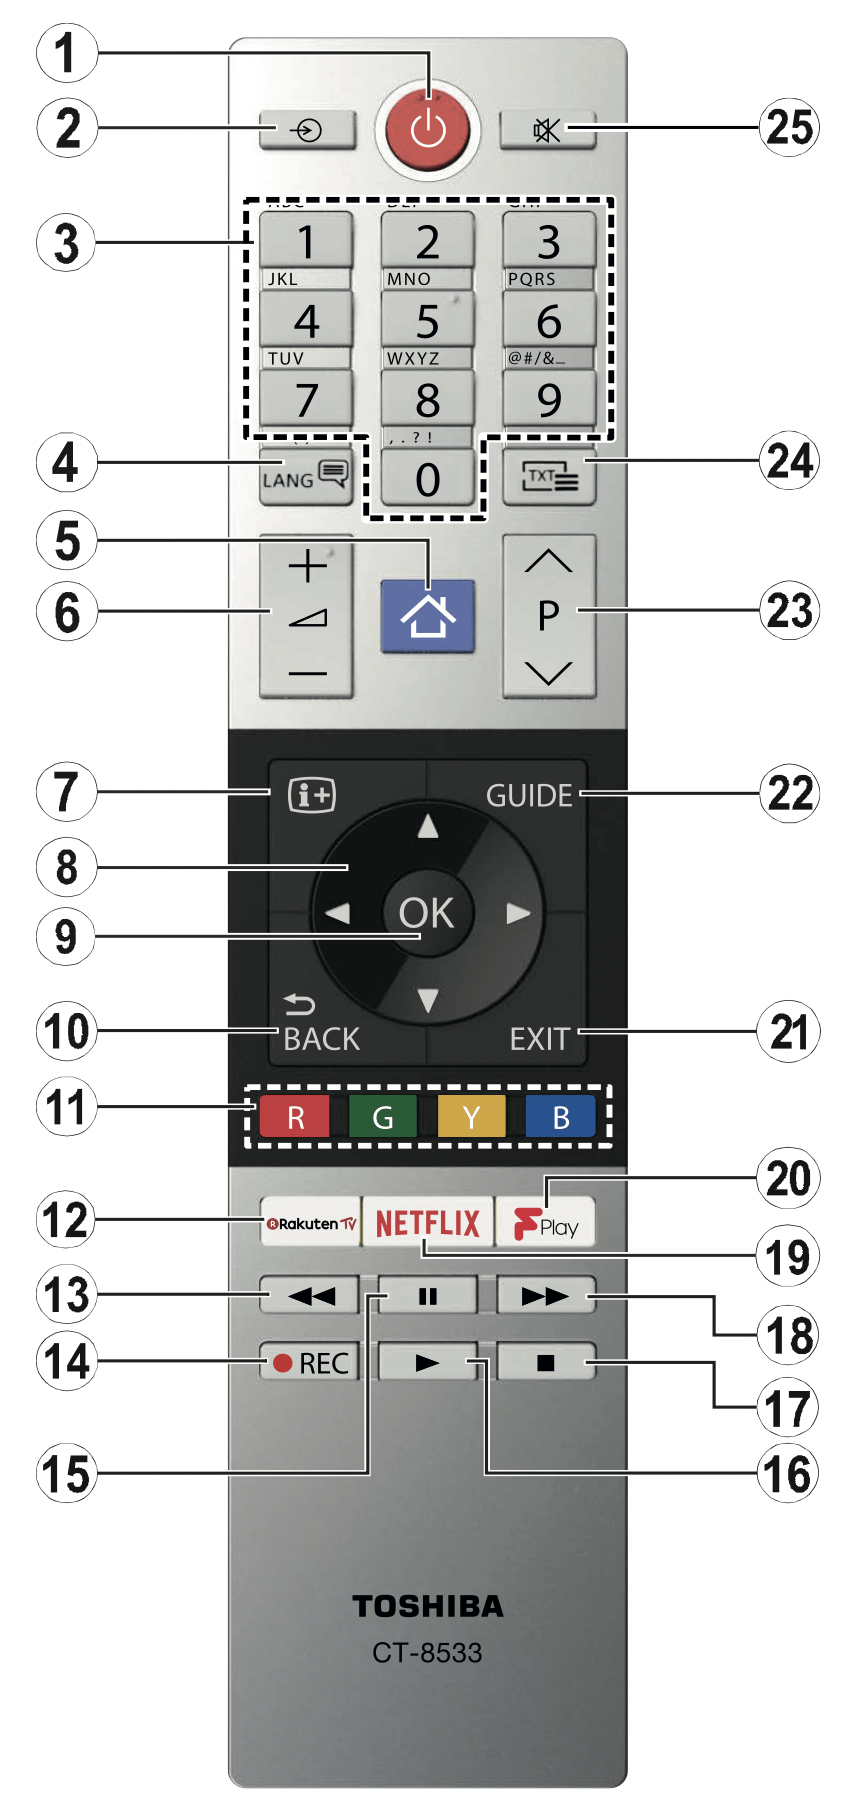
- Standby: Switches On / Off the TV
- Source: Shows available broadcast and content sources
- Numeric buttons: Switches the channel, enters a number or a letter in the text box on the screen.
- Language: Switches among sound modes (analogue TV), displays and changes audio/subtitle language and turns subtitles on or off (digital TV, where available)
- Menu: Displays TV menu
- Volume +/-
- Info: Displays information about on-screen content, shows hidden information (reveal - in TXT mode)
- Directional buttons: Helps navigate menus, content etc. and displays the subpages in TXT mode when pressed Right or Left
- OK: Confirms user selections, holds the page (in TXT mode), views Channels menu (DTV mode)
- Back/Return: Returns to previous screen, previous menu, opens index page (in TXT mode)
- Coloured Buttons: Follow the on-screen instructions for coloured button functions
- Rakuten TV: Launches the Rakuten TV application
- Rewind: Moves frames backwards in media such as movies
- Record: Records programmes
- Pause: Pauses the media being played, starts timeshift recording
- Play: Starts to play selected media
- Stop: Stops the media being played
- Fast Forward: Moves frames forward in media such as movies
- Netflix: Launches the Netflix application
- Freeview Play: Connects to the Freeview Play platform where you can access available catch-up TV services
- Exit: Closes and exits from displayed menus or returns to previous screen
- Guide: Displays the electronic programme guide
- Programme +/-
- Text: Displays teletext (where available), press again to superimpose the teletext over a normal broadcast picture (mix)
- Mute: Completely turns off the volume of the TV
Remote Control- 2 (optional)

- Standby: Switches On / Off the TV
- Menu: Displays TV menu
- Volume +/-
- Guide: Displays the electronic programme guide
- Directional buttons: Helps navigate menus, content etc. and displays the subpages in TXT mode when pressed Right or Left
- OK: Confirms user selections, holds the page (in TXT mode), views Channels menu (DTV mode)
- Back/Return: Returns to previous screen, previous menu, opens index page (in TXT mode)
- Coloured Buttons: Select the coloured button you want to use from the dialogue box and press OK. Follow the on-screen instructions for coloured button functions
- Media Playback, Record (if available) and Language Buttons: Select the button you want to use from the dialogue box and press OK. Use the media buttons to control the playback of the media. Control elements to play, pause, stop, rewind and fast forward the media will be available. Select the REC button and press OK to record a programme or select the Pause(II) button and press OK to start timeshift recording. Select the LANG. button and press OK to switch among sound modes (analogue TV), display and change audio/subtitle language and turn subtitles on or off (digital TV, where available)
- Rakuten TV: Launches the Rakuten TV application
- Netflix: Launches the Netflix application
- Freeview Play: Connects to the Freeview Play platform where you can access available catch-up TV services
- Numeric, Text and CEC Buttons: Select the button you want to use from the dialogue box and press OK. Use the numeric buttons to switch the channel, enter a number or a letter in the text box on the screen. Select the TEXT button and press OK to display teletext (where available). Press again to superimpose the teletext over a normal broadcast picture (mix). Select the CEC button and press OK to terminate the function that enables you to control the connected CEC device with the TV remote.
- Exit: Closes and exits from displayed menus or returns to previous screen
- Source: Shows available broadcast and content sources
- Programme +/-
Connections

See the illustrations on the left side. You can use YPbPr to VGA cable to enable YPbPr signal via VGA input. You cannot use VGA and YPbPr at the same time. To enable PC/YPbPr audio, you will need to use the back audio inputs with a YPbPr/PC audio cable for audio connection. When using the wall mounting kit (available from a third party in the market, if not supplied), we recommend that you plug all your cables into the back of the TV before mounting on the wall. Insert or remove the CI module only when the TV is SWITCHED OFF. You should refer to the module instruction manual for details of the settings. The/ Each USB input of your TV supports devices up to 500mA. Connecting devices that have current value above 500mA may damage your TV. When connecting equipment using a HDMI cable to your TV, to guarantee sufficient immunity against parasitic frequency radiation and trouble-free transmission of high definition signals, such as 4K content, you have to use a high speed shielded (high grade) HDMI cable with ferrites.
WARNING: If you want to connect a device to the TV, make sure that both the TV and the device are turned off before making any connection. After the connection is done, you can turn on the units and use them.
Switching On/Off
To Switch the TV On
Connect the power cord to a power source such as a wall socket (220-240V AC, 50 Hz).
To switch on the TV from standby mode either:
- Press the Standby button, Programme +/- or a numeric button on the remote control.
- Press the middle of the side function switch on the TV in.
To Switch the TV Off
Press the Standby button on the remote control or press the middle of the side function switch on the TV in and hold it down for a few seconds, the TV will switch into standby mode.
To power down the TV completely, unplug the power cord from the mains socket.
Note: When the TV is switched into standby mode, the standby LED can blink to indicate that features such as Standby Search, Over Air Download or Timer is active. The LED can also blink when you switch on the TV from standby mode.
General TV Operation
Using the Channel List
The TV sorts all stored stations in the channel list. You can edit this channel list, set favourites or set active stations to be listed by using the Channels menu options. Press the OK button to open the channel list. You can filter the listed channels or make advanced changes in the current list using the Filter and Edit tab options. Highlight the tab you want and press OK to see available options.
Managing the Favourite Lists
You can create four different lists of your favourite channels. Enter the TV > Channels menu or press the OK button in order to open the Channels menu. Highlight the Edit tab and press OK to see the editing options and select the Tag/Untag channel option. Select the desired channel on the list by pressing the OK button while the channel is highlighted. You can make multiple choices. You can also use the Tag/ Untag all option to select all channels on the list. Then press Back/Return button to return to the Edit menu options. Select Add/Remove Favourites option and press the OK button again. Favourite channel list options will be displayed. Set the desired list option to On. The selected channel/s will be added to the list. In order to remove a channel or channels from a favourite list follow the same steps and set the desired list option to Off.
You can use the filtering function in the Channels menu to filter the channels in the channel list permanently according to your preferences. For instance, using the options of the Filter tab, you can set one of your four favourite lists to be displayed every time the channel list is opened.
Configuring Parental Settings
The Parental menu options can be used to prohibit users from viewing of certain programmes, channels and using of menus. These settings are located in the Settings > System > Parental menu.
To display parental lock menu options, a PIN should be entered. After coding the correct PIN, Parental menu will be displayed.
Menu Lock: This setting enables or disables access to all menus or installation menus of the TV.
Guidance: This setting enables or disables access some of the MHEG applications. Disabled applications can be released by entering the right PIN.
Internet Lock: If this option is set to ON, the open browser application in the portal will be disabled. Set to OFF to release the application again.
Set PIN: Defines a new PIN number.
Default CICAM PIN: This option will appear as greyed out if no CI module is inserted into the CI slot of the TV. You can change the default PIN of the CI CAM using this option.
Note: Default PIN could have been set to 0000 or 1234. If you have defined the PIN(is requested depending on the country selection) during the First Time Installation use the PIN that you have defined.
Some options may not be available depending on the model and/or on the country selection in the First Time Installation.
Electronic Programme Guide
By means of electronic programme guide function of your TV you can browse the event schedule of the currently installed channels on your channel list. It depends on the related broadcast whether this feature is supported or not.
To access the programme guide, press the Guide button on your remote. You can also use the Guide option under TV menu.
There are 2 different types of schedule layouts available, Timeline Schedule and Now/Next. To switch between these layouts highlight the tab with the name of the alternative layout on the upper side of the screen and press OK.
Use the directional buttons to navigate through the programme guide. Use the Back/Return button to use the tab options on the upper side of the screen.
Timeline Schedule
In this layout option, all events of the listed channels will be displayed by timeline. You can use the directional buttons to scroll through the list of the events. Highlight an event and press OK to display event options menu.
Press Back/Return button to use available tab options. Highlight Filter tab and press OK to see the filtering options. To change the layout highlight Now/Next and press OK. You can use the Previous Day and Next Day options to display the events of the previous and next day.
Highlight Extras tab and press OK to access below options.
Highlight Genre: Displays Highlight Genre menu. Select a genre and press OK. The events in the programme guide matching the selected genre will be highlighted.
Guide Search: Displays searching options. Using these options, you can search the programme guide database in accordance with the selected criteria. Matching results will be listed.
Now: Displays current event of the highlighted channel.
Zoom: Highlight and press OK to see events in a wider time interval.
Now/Next Schedule
In this layout option, only the current and next events of the listed channels will be displayed. You can use the directional buttons to scroll through the list of the events.
Press Back/Return button to use available tab options. Highlight Filter tab and press OK to see the filtering options. To change the layout highlight Timeline Schedule and press OK.
Event Options
Use the directional buttons to highlight an event and press OK button to display Options menu. The following options are available.
Select Channel: Using this option, you can switch to the selected channel in order to watch it. The programme guide will be closed.
More Info: Display detailed information on the selected event. Use up and down directional buttons to scroll through the text.
Set Timer on Event / Delete Timer on Event: Select Set Timer on Event option and press OK. You can set timers for future events. To cancel an already set timer, highlight that event and press the OK button. Then select Delete Timer on Event option. The timer will be cancelled.
Record / Delete Rec. Timer: Select the Record option and press the OK button. If the event is going to be broadcasted at a future time, it will be added to Timers list to be recorded. If the selected event is being broadcasted at the moment, recording will start immediately.
To cancel an already set record timer, highlight that event and press the OK button and select the option Delete Rec. Timer. The record timer will be cancelled.
IMPORTANT: Connect a USB disk to your TV while the TV is switched off. You should then switch on the TV to enable the recording feature.
Notes: You cannot switch to any other channel while there is an active recording or timer on the current channel.
It is not possible to set timer or record timer for two or more individual events at the same time interval.
Integrated Catch-Up Services
You can enjoy Freeview Play catch-up TV services that work directly through the electronic programme guide. Whilst you are on a channel use the directional buttons to scroll back in time through the timelinebased guide. You will see contents from last few days. Available catch-up contents may change according to broadcasters and will be marked with a play icon. Highlight the content you want to play back and press the OK button.
Make sure that your TV is connected to your home network in order to use the catch-up services. For further information regarding this matter and other requirements for Freeview Play services refer to the Connectivity and Freeview Play Platform sections.
Teletext Services
Press the Text button to enter. Press again to activate mix mode, which allows you to see the teletext page and the TV broadcast at the same time. Press once more to exit. If available, sections in the teletext pages will become colour-coded and can be selected by pressing the coloured buttons. Follow the instructions displayed on the screen.
Digital Teletext
Press the Text button to view digital teletext information. Operate it with the coloured buttons, cursor buttons and the OK button. The operation method may differ depending on the contents of the digital teletext. Follow the instructions displayed on the digital teletext screen. When the Text button is pressed again, the TV returns to television broadcast.
BBC Red Button+ (RB+)
While watching BBC channels, press the Red button to access Red Button+ services provided by the BBC. On the opening page you can access to BBC’s main services such as BBC iPlayer, BBC News, BBC Sport and many others. There are also links to the home pages of the related applications available. Use the navigation buttons on the TV’s remote control to move through the application. Press Exit button to close and exit.
Software Upgrade
Your TV is capable of finding and updating the firmware automatically via the broadcast signal or via Internet.
Software upgrade search via user interface
On the main menu select Settings > System and then More. Navigate to Software upgrade and press the OK button. Then select Scan for upgrade and press OK button to check for a new software upgrade.
If a new upgrade is found, it starts to download the upgrade. After the download is completed, a warning will be displayed, press OK button to complete software upgrade process and restart TV.
3 AM search and upgrade mode
Your TV will search for new upgrades at 3:00 o’clock if Automatic scanning option is set to Enabled and if the TV is connected to an aerial signal or to Internet. If a new software is found and downloaded successfully, it will be installed at the next power on.
Note: Do not unplug the power cord while led is blinking during the reboot process. If the TV fails to come on after the upgrade, unplug, wait for two minutes then plug it back in.
Connectivity
Wired Connectivity
To Connect to a Wired Network
- You must have a modem/router connected to an active broadband connection.
- Connect your TV to your modem/router via an Ethernet cable. There is a LAN port at the rear (back) of your TV.

- Broadband ISP connection
- LAN (Ethernet) cable
- LAN input on the rear side of the TV
To configure wired settings refer to the Network section in the Settings menu.
- You might be able to connect your TV to your LAN depending on your network’s configuration. In such a case, use an Ethernet cable to connect your TV directly to the network wall outlet.

- Network wall socket
- LAN input on the rear side of the TV
Configuring Wired Device Settings
Network Type
The Network Type can be selected as Wired Device, Wireless Device or Disabled, in accordance with the active connection to the TV set. Select this as Wired Device if you are connecting via an Ethernet cable.
Internet Speed Test
Highlight Internet Speed Test and press the OK button. TV will check the internet connection bandwidth and display the result when complete.
Advanced Settings
Highlight Advanced Settings and press the OK button. On the next screen you can change the IP and DNS settings of the TV. Highlight the desired one and press Left or Right button to change the setting from Automatic to Manual. Now you can enter the Manual IP and / or Manual DNS values. Select the related item in the drop down menu and enter the new values using the numeric buttons of the remote. Highlight Save and press the OK button to save settings when complete.
Wireless Connectivity
To Connect to a Wireless Network
The TV cannot connect to the networks with a hidden SSID. To make your modem’s SSID visible, you should change your SSID settings via the modem’s software.

1. Broadband ISP connection A Wireless-N router (IEEE 802.11a/b/g/n) with simultaneous 2.4 and 5 GHz bands is designed to increase bandwidth. These are optimized for smoother and faster HD video streaming, file transfers and wireless gaming.
- The frequency and channel differ depending on the area.
- The transmission speed differs depending on the distance and number of obstructions between the transmission products, the configuration of these products, the radio wave conditions, the line traffic and the products that you use. The transmission may also be cut off or may get disconnected depending on the radio wave conditions, DECT phones or any other Wi-Fi 11b appliances. The standard values of the transmission speed are the theoretical maximum values for the wireless standards. They are not the actual speeds of data transmission.
- The location where the transmission is most effective differs depending on the usage environment.
- The Wireless feature of the TV supports 802.11 a,b,g & n type modems. It is highly recommended that you should use the IEEE 802.11n communication protocol in order to avoid any possible problems while watching videos.
- You must change your modem’s SSID when there are any other modems around with the same SSID. You can encounter connection problems otherwise. Use a wired connection if you experience problems with a wireless connection.
Configuring Wireless Device Settings
Open the Network menu and select Network Type as Wireless Device to start connection process.
Highlight Scan Wireless Networks option and press OK to start a search for available wireless networks. All found networks will be listed. Highlight your desired network from the list and press OK to connect.
Note: If the modem supports N mode, you should set N mode settings.
If the selected network is password-protected, enter the correct key by using the virtual keyboard. You can use this keyboard via the directional buttons and the OK button on the remote control.
Wait until the IP address is shown on the screen.
This means that the connection is now established. To disconnect from a wireless network, highlight Network Type and press Left or Right buttons to set as Disabled.
If your router has WPS, you can directly connect to the modem/router without entering a password or adding the network first. Highlight Press WPS on your wifi router option and press OK. Go to your modem/router device and press the WPS button on it to make the connection. You will see a connection confirmation on your TV once the devices have paired. Select OK to proceed. No further configuration is required.
Highlight Internet Speed Test and press the OK button to check your internet connection speed. Highlight Advanced Settings and press the OK button to open the advanced setting menu. Use directional and numeric buttons to set. Highlight Save and press the OK button to save settings when complete.
Other Information
The status of the connection will be displayed as Connected or Not Connected and the current IP address, if a connection is established.
Connecting to your mobile device via Wi-Fi
- If your mobile device has Wi-Fi feature, you can connect it to your TV via a router, in order to access the content in your device. For this, your mobile device must have an appropriate sharing software.
- Connect your TV to your router following the steps mentioned in the sections above.
- Afterwards, connect your mobile device to the router and then activate the sharing software on your mobile device. Then, select files that you want to share with your TV.
- If the connection is established correctly, you will be able to access the shared files installed on your mobile device via the AVS(audio video sharing) feature of your TV.
- Highlight the AVS option in the Sources menu and press OK, available media server devices in the network will be displayed. Select your mobile device and press the b button to continue.
- If available, you can download a virtual remote controller application from the server of your mobile device application provider.
Note: This feature may not be supported on all mobile devices.
Troubleshooting & Tips
TV will not turn on
Make sure the power cord is plugged in securely to a wall outlet. Press the Power button on the TV.
Poor picture
- Check if you have correctly tuned the TV.
- Low signal level can cause picture distortion. Please check antenna connections.
- Check if you have entered the correct channel frequency if you have performed manual tuning.
No picture
- TV is not receiving any signal. Make sure the correct source has been selected.
- Is the antenna connected properly?
- Is the antenna cable damaged?
- Are suitable plugs used to connect the antenna?
- If you are in doubt, consult your dealer.
No sound
- Check if the TV sound is muted. Press the Mute button or increase the volume to check.
- Sound is coming from only one speaker. Check the balance settings from Sound menu.
Remote control - no operation
- The batteries may be exhausted. Replace the batteries.
- The batteries maybe inserted incorrectly. Refer to the section “Inserting the Batteries into the Remote”.
No signal on an input source
- It is possible that no device is connected.
- Check the AV cables and connections from your device.
- Check the device is switched on.
Recording unavailable
To record a programme, you should first correctly connect a USB storage device to your TV, while the TV is switched off. You should then switch on the TV to enable the recording feature. If you cannot record, check the storage device is correctly formatted and there is sufficient space.
USB is too slow
If a “USB storage device writing speed too slow to record” message is displayed on the screen while starting a recording, try restarting the recording. If you still get the same error, it is possible that your USB storage device does not meet the speed requirements. Try using a different USB storage device.
Connectivity Troubleshooting
Wireless Network Not Available
- Ensure that any firewalls of your network allow the TV wireless connection.
- Try searching for wireless networks again, using the Network menu screen.
If the wireless network does not function properly, try using the wired network in your home. Refer to the Wired Connectivity section for more information on the process.
If the TV does not function using the wired connection, check the modem (router). If the router does not have a problem, check the internet connection of your modem.
Connection is Slow
See the instruction book of your wireless modem to get information on the internal service area, connection speed, signal quality and other settings. You need to have a high speed connection for your modem.
Disruption during playback or slow reactions
You could try the following in such a case:
Keep at least three meters distance from microwave ovens, mobile telephones, Bluetooth devices or any other Wi-Fi compatible devices. Try changing the active channel on the WLAN router.
Internet Connection Not Available / Audio Video Sharing Not Working
If the MAC address (a unique identifier number) of your PC or modem has been permanently registered, it is possible that your TV might not connect to the internet. In such a case, the MAC address is authenticated each time when you connect to the internet. This is a precaution against unauthorized access. Since your TV has its own MAC address, your internet service provider cannot validate the MAC address of your TV. For this reason, your TV cannot connect to the internet. Contact your internet service provider and request information on how to connect a different device, such as your TV, to the internet.
It is also possible that the connection may not be available due to a firewall problem. If you think this causes your problem, contact your internet service provider. A firewall might be the reason of a connectivity and discovery problem while using the TV in Audio Video Sharing mode or while browsing via Audio Video Sharing feature.
Invalid Domain
Ensure that you have already logged on to your PC with an authorized username/password and also ensure that your domain is active, prior to sharing any files in your media server program on your PC. If the domain is invalid, this might cause problems while browsing files in Audio Video Sharing mode.