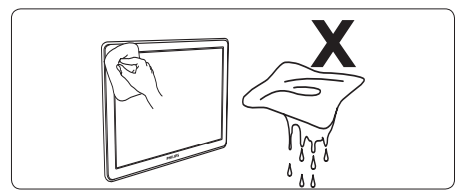
Turn off and unplug the power cord before cleaning the screen.
Clean the screen with a soft, dry cloth. Do not use substances such as household cleaning agents as these may damage the screen.
To avoid deformations or color fading, wipe off water droplets as soon as possible.
Do not touch, push, rub or strike the screen with hard objects as this may damage the screen permanently.
Where possible, avoid stationary images that remain on-screen for extended periods of time. If you must use stationary images, reduce the screen contrast and brightness to avoid screen damage.
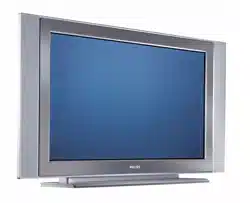
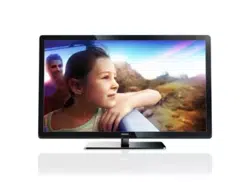
Your TV
This section describes the controls and functions of your TV.
Television overview
Front and side controls
Power switch
Channel up/down Menu
The MENU key can be used as an OK key in some submenus.
Volume up/down
Remote control sensor
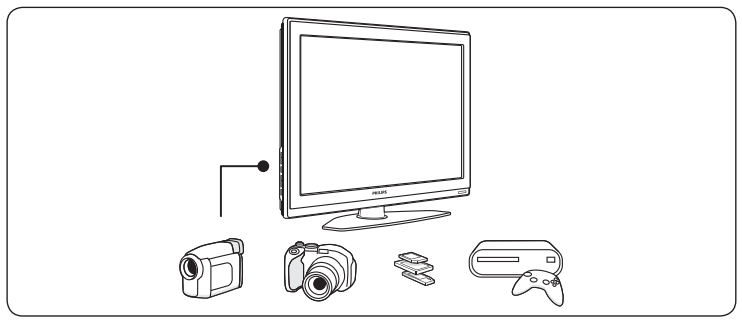
Side connectors
Use the TV side connectors to connect to mobile devices such as a camera or high definition game console. You can also connect a pair of headphones or a USB memory device.
Back connectors
Use the TV back connectors to connect to the antenna or cable, and to permanent devices such as a high definition disc player, DVD player, or VCR.
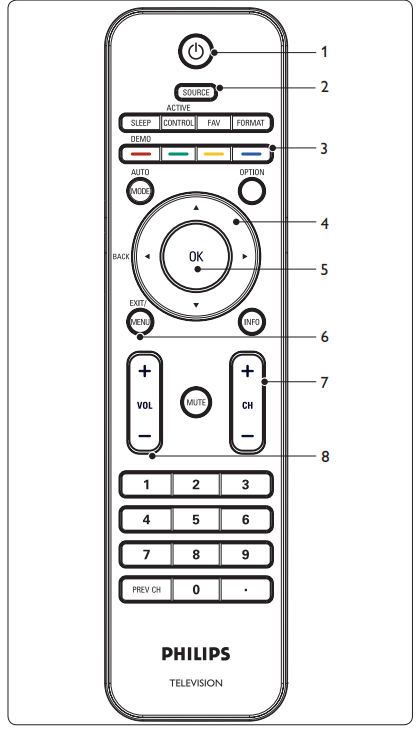
Remote control
Standby / ON
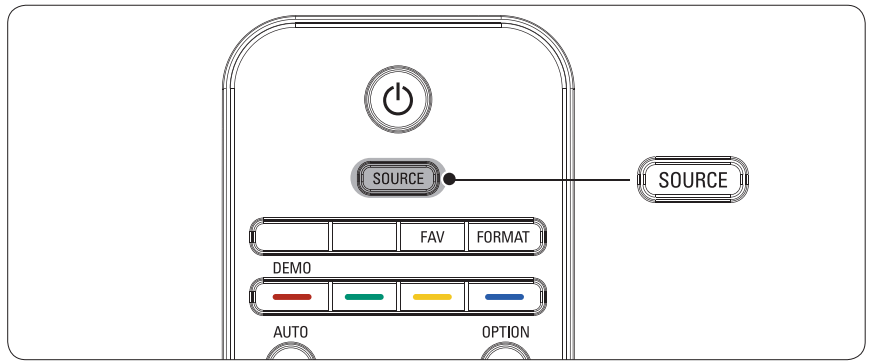
Source selection
Color buttons
Cursor buttons
OK button
Menu button
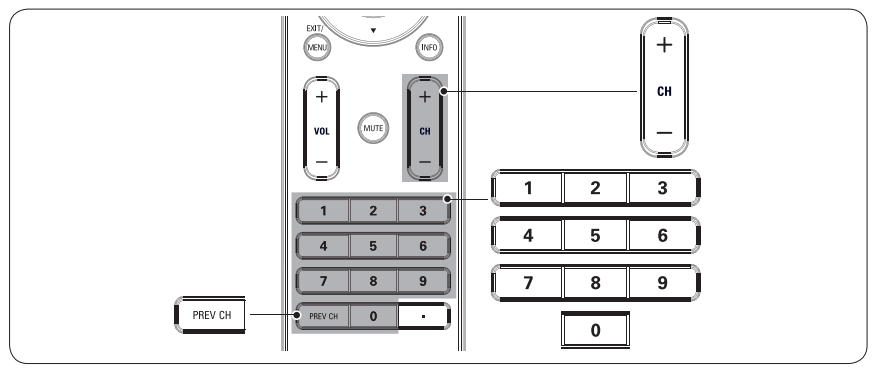
Channel selection
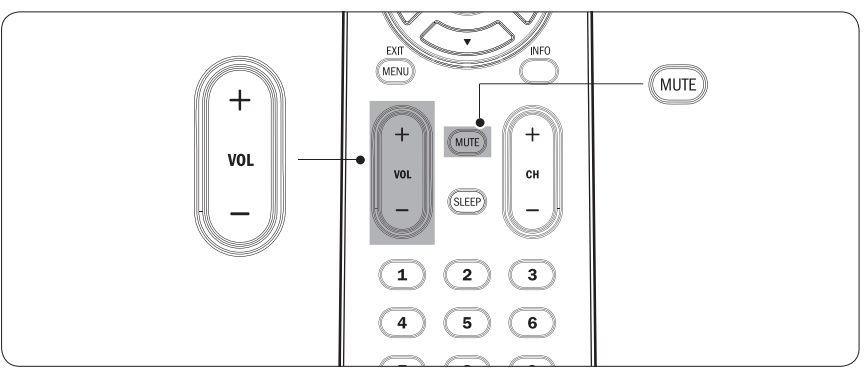
Volume
Get started
This section describes how to position and connect your TV, and how to perform your first-time installation.
Position the TV
Warning
Do not insert the power plug into the wall socket before all the connections are made.
Large screen TVs are heavy. Two people are required to carry and handle the TV.
Before you move your TV, disconnect the cables to prevent breakage.
Wherever you decide to position your TV, ensure that you always have easy access to the power cord or plug to disconnect the TV from the power.
If the TV is mounted on a swivel base or swivel arm, ensure no strain is placed on the power cord when the TV is swivelled. Strain on the power cord can loosen connections.
For ideal viewing conditions, position the TV where light does not fall directly on the screen.
The ideal viewing distance for watching TV is three times its screen size.
Kensington security slot
Your TV is equipped with a Kensington Security Slot at the back of the TV.
If you connect an anti-theft Kensington lock (not supplied), position the TV within reach of a permanent object that can be attached to the lock
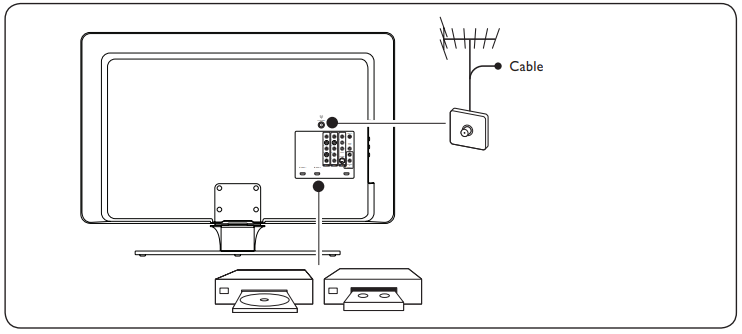
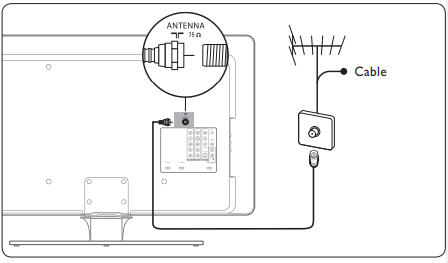
Connect the antenna or cable
This section describes how to connect your TV to an antenna, cable, Direct Broadcast Satellite, and to a set-top box.
Connect to an antenna
Any DTV programs that are broadcast in your area can be received for free through an antenna connection.
Contact your local content provider or your local electronics retailer if you are unsure about what HDTV programs are available in your area.
Broadcasters are transitioning from analog to digital TV. This means that a given broadcaster can have channels available either in analog or in digital, or both analog and digital at the same time.
The TV has stereo sound if the broadcasting channel makes it available
Connect to a cable
When your TV is connected to the cable socket, you may receive free digital and high definition programming (depending on your cable provider). Digital and high definition cable channels can be recognized by the format of the channel number. The channel number includes a dot "." For example, 11.1, 46.30, 108.201. Contact your cable provider for more information.
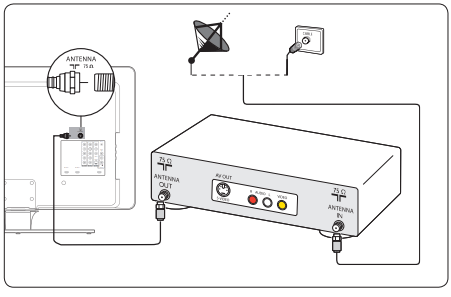
Connect to a Direct Broadcast Satellite (DBS)
There are two main DBS systems: DirecTV and DishNetwork. These systems require a separate, proprietary set-top box to decode signals and send them to the TV. The set-top box contains a digital TV tuner for receiving off-air digital television broadcasts.
Contact your local DBS provider for more information about the connections and the TV channels.
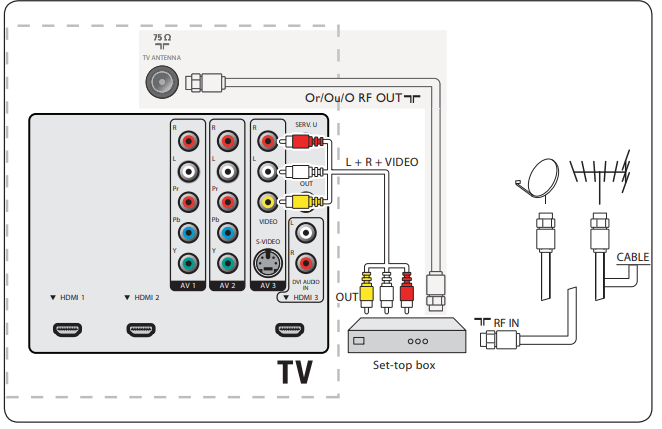
Connect to a set-top box
A cable box or satellite set-top box can be connected to the TV through the following connections:
ANT
A/V (Composite Video and Audio)
S-Video
YPbPr (Component Video Input)
HDMI
For information about how to connect a set-top box, see the Quick Start Guide provided.
Connect a set-top box through RF IN/OUT
If the TV is connected to a cable box or satellite set-top box via a coaxial connection, set the TV to channel 3 and 4, or the channel specified by the service provider.
Connect a set-top box through component video input or HDMI
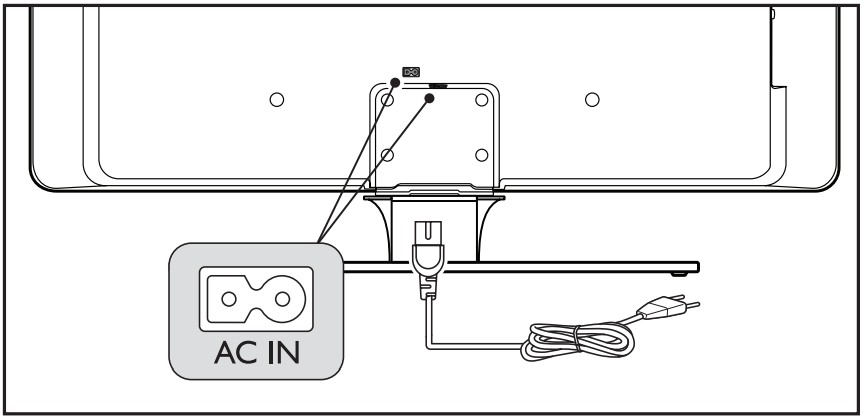
Connect the power cord
WARNING: Verify that your voltage corresponds with the voltage printed at the back of theTV. Do not insert the power cord if the voltage is different.
To connect the power cord
1. Locate the power connector at the back of the TV. The location of the power connector varies according to TV model.
2. Insert the power cord fully into the TV power connector.
3. Connect the power cord plug to the power outlet. Ensuring that the cord is tightly secured at both ends.
To disconnect theTV from the power outlet
The TV set is always connected to the power. You can disconnect the TV from the power by doing one of the following tasks:
Unplug the power cord located at the back of the TV.
Unplug the power cord from the power socket outlet.
Pull the power cord by the plug - do not pull on the power cord.
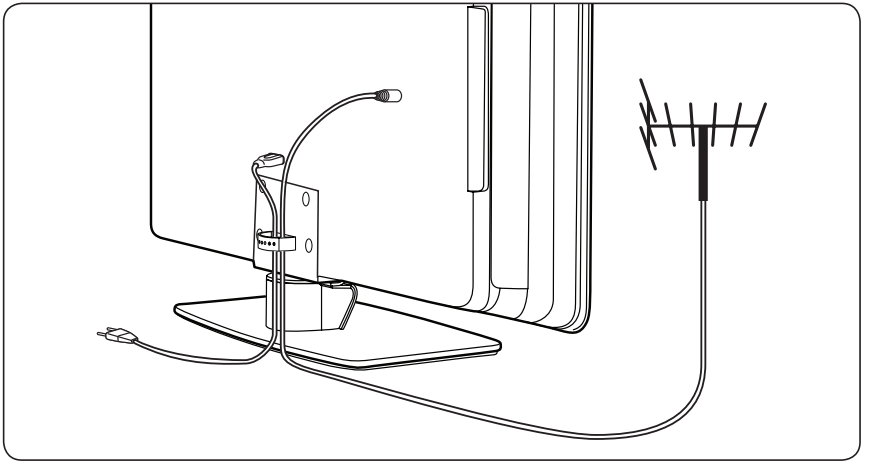
Manage cables
Route your power cord, antenna cable and all other device cables through the cable holder at the back of the TV. This holder helps keep your cables tidy and easily manageable.
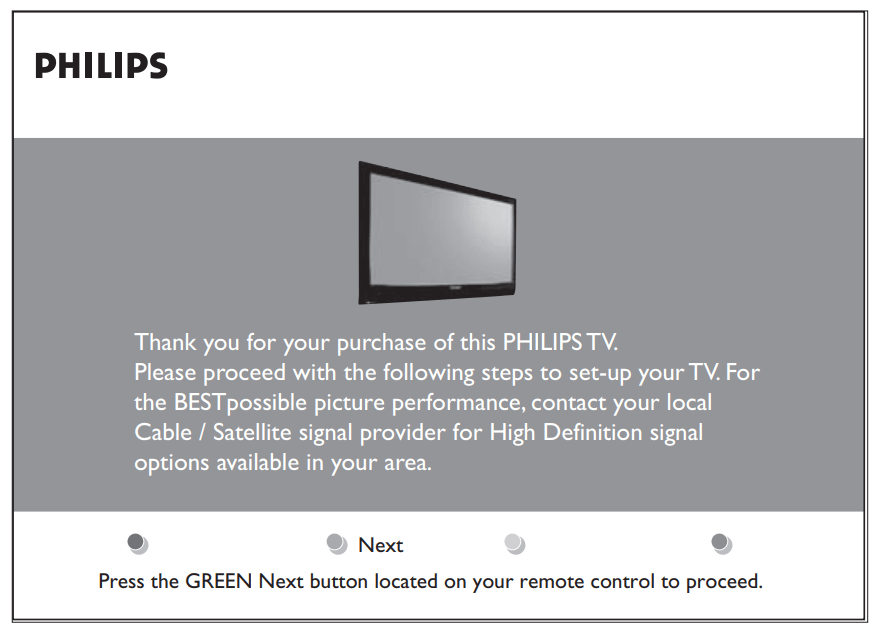
Switch on and setup theTV
The TV switches on automatically after connecting the power cord.
Follow the on-screen instructions to select your language and complete your TV setup. Installation takes approximately 10 minutes.
Note: If you connect your TV to a cable box or satellite set-top box, you do not need to install channels. Press the red button on the remote control to exit the channel installation stage of the setup.
Finish the setup by selecting your location:
If you choose Retail store your settings will be are erased each time you turn off the TV. This mode is only to be used for retail store displays.
If you choose Home you are guided through a choice of picture display options. Use the left and right cursor to select your preferred screen.
Use your TV
Switch yourTV on/off or to standby
To switch theTV on
Press POWER at the right side of the TV.
To switch to standby
Press . on the remote control.
To switch on from standby without the remote control
Press POWER at the right side of the TV to switch the TV off.
Press POWER again to switch the TV on.
To switch off
Press POWER at the right side of the TV.
Watch TV
Switch channels
Press a number (1 to 999) or press CH+ or CH- on your remote control. For digital channels, press a number (1 to 999) followed by a dot "." and then the corresponding sub channel number (1 to 999). Ex. 108.30. Press
PREV CH to return to the previously viewed TV channel.
Adjust volume Press
VOL+ or VOL- on your remote control. Press
MUTE on your remote control to mute the sound. Press MUTE again or press VOLUME - or + to restore the sound.
Note: You can also adjust the volume by pressing VOLUME - or + on the side controls of the TV.
To increase the headphone volume, press the volume button on the TV or remote control. When headphones are plugged into the TV, the loud speakers are automatically muted.
Watch channels from a set-top box
Switch on the set-top box. The picture from your set-top box might appear automatically on your screen.
Use the remote control of your set-top box to select channels.
If the picture does not appear Press
1. SOURCE repeatedly to select the connected set-top box and wait a few seconds for the picture to appear.
2. Use the remote control of your set-top box to select channels.
Watch connected devices
Switch the connected device on. The picture from your connected device might appear automatically on the TV.
If the picture does not appear Press
SOURCE repeatedly to select the connected device and wait a few seconds for the picture to appear.
Watch a DVD
Insert a DVD disc in your player.
Press Play on the remote control of your player. The picture from the player might appear automatically on your screen.
If the picture does not appear Press
SOURCE repeatedly to select the DVD player and wait a few seconds for the picture to appear
Use more of your TV
Understand the remote control
Switches the TV on from standby or back to standby. The TV is never powered off completely unless it is physically unplugged.
SOURCE: Selects connected devices.
FAV: To display a list of all channels marked as favorite (including subchannels).
FORMAT: Selects a picture format. See Change picture format on page 14.
Color keys Selects tasks.
OPTION: Activates the quick access menu. For information, see Use the quick access menu on the next page.
OK To display the channel list or to activate a setting.
Cursor buttons :To navigate through the menus.
INFO: Press to display information about the selected TV channel and program or accessory device. The quality and accuracy of the information on the information banner are transmitted from broadcasters. You may see a difference in broadcast time if the broadcaster is from a different time zone area.
+ CH - Channel up/down: Switches to the next or previous channel.
MUTE: Mutes or restores sound.
Number keys 0-9: Selects a channel, page or setting.
( . ): Press the dot (.) for digital channels.
PREV CH: Returns to the previously-viewed channel.
+VOL- Volume up/down: Increases or decreases volume.
MENU / EXIT: Toggles the menu on or off.
BACK: To return to the previous menu.
AUTO MODE: Toggles between preset picture and sound settings. For information, see Use Auto Mode on page 16.
DEMO: Toggles the demo menu on or off. For information, see Use the demo mode on page 25.
SLEEP: To set a delay after which the TV switches to standby. For information, see Set the sleeptimer on page 17.
Active Control: The TV continuously measures and corrects incoming signals to provide the best picture possible.
Use the quick access menu
The quick access menu gives direct access to some often needed menu items.
Note: When digital channels are installed and broadcast, the relevant digital options are displayed in the quick access menu.
1. Press OPTION on the remote control.
2. Press or and then OK to access one of the following menus:
Audio language: For digital channels only, where multiple audio languages are broadcast.
Closed captions: See View closed captions (subtitles) on page 21.
Picture format: See Change picture format on the next page.
Equalizer: See Change sound settings on page 15.
Clock: See Set the clock on page 17.
Change picture and sound settings
Change picture settings
This section describes how to adjust your picture settings.
1. Press MENU on the remote control.
2. Press to enter the TV settings menu.
3. Press and to select the Picture menu.
4. Press or to select one of the picture settings, and press to enter the setting.
5. Press or to adjust the setting, and press or OK to confirm the change.
6. Press Menu to exit.
Change picture settings by using the setting assistant
This section guides you through a picture settings wizard.
1. Press MENU on the remote control.
2. Press to enter the Settings assistant menu.
3. Press to highlight Start now, and press OK to start the Settings assistant. You are guided through a choice of picture display options. Press the color keys, cursor keys and OK to make your selections and store your setup
Use Auto Mode
1. Press Auto Mode to set your TV to a predefined picture and sound setting.
2. Press or to select one of the following settings:
Personal The customized settings you defined by using the Picture menu.
Sports Vivid picture settings and clear sound for high action.
Standard For normal TV viewing.
Movie Brilliant picture settings for a cinematic experience.
Game Optimized for PCs, games consoles and playstations.
Power saver Eco friendly settings for lower power consumption.
Change your TV installation
The first time you switch on your TV you select the language for the TV menus and make basic choices for picture and sound settings. Use this chapter to reinstall the TV, to set preferences in the TV menus, or to tune new TV channels.
Select your menu language
1. Press MENU on the remote control and select Installation > Language.
2. Select a language and press OK to confirm your choice.
3. Press to return to the Installation menu.
Set your location to home
You can set the location of your TV to Home or Retail store. Choosing Home gives you full flexibility to change predefined settings for picture and sound.
Press MENU on the remote control and select Installation > Preferences > Location.
Select Home and press OK to confirm your choice.
Press to return to the Installation menu.
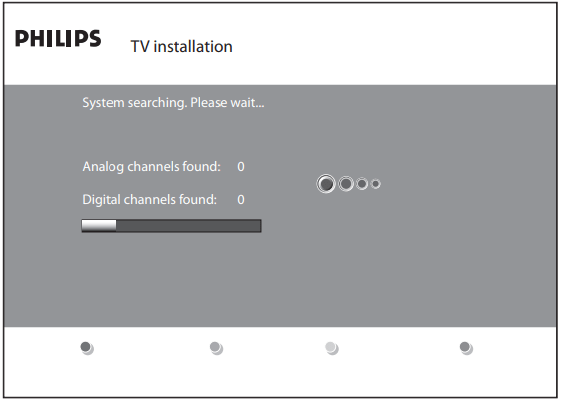
Tune channels automatically
This section describes how to search for and store channels automatically. Before you tune channels, ensure that you are registered with your cable TV provider and that your equipment is correctly connected.
Press MENU on the remote control and select Installation > Channels > Autoprogram > Start Now.
Press OK to start the installation. If you run Autoprogram when you have locked channels, a message appears asking to enter your PIN code. Enter your PIN code in order to complete the installation. If you have forgotten your PIN, reset it as described in Set or change your PIN on page 18.
Select Cable or Antenna and press OK.
When Antenna is selected, the TV detects antenna signals. It searches for NTSC and ATSC channels available in your area.
When Cable is selected, the TV detects signals supplied by cable. It searches for NTSC, ATSC, and QAM modulated channels available in your area. When autoprogramming is complete, this message appears "Channel search completed".
Follow the on-screen instructions to complete the installation.
Optimize the signal quality from your antenna
You can optimize your signal quality by tuning in ATSC channels with weak signals, and adjusting the antenna.
Press1. MENU on the remote control and select Installation > Channels > Installation mode.
Select Antenna and press to confirm your choice.
Press and to enter Weak channel installation.
Highlight a channel from the list of TV channels and press the green color button on the remote control. The signal strength for the channel is displayed.
Adjust your antenna to maximize the signal strength.
Press MENU to exit
Uninstall and reinstall channels
This section describes how to uninstall and reinstall a stored channel. When a channel is uninstalled it is removed from the list of channels. Uninstalled channels are not reinstalled during an installation update.
Press MENU on the remote control and select Installation > Channels > Uninstall channels.
Press to enter the list of stored channels.
Press or to select the channel you want to uninstall, and press the green key on the remote control. The channel is removed from the channel list. Press the green key again to reinstall the channel.
Press MENU to exit.
Return your settings to default values
This section describes how to return picture and sound settings to their default values. The channel installation settings are not affected.
Press MENU on the remote control and select Installation > Reset AV settings.
Press to highlight Start now, and press OK to reset the AV settings.
Press Menu to exit.
Update yourTV software
Philips continuously tries to improve its products and we strongly recommend that you update the TV software when updates are available.
New software can be obtained from your dealer or downloaded from the www.philips.com/welcome website. Use the type number of your TV (e.g. 42PFL5603D/27) to find information.
For information about using a USB device, see Notes for the use of USB devices on page 36.
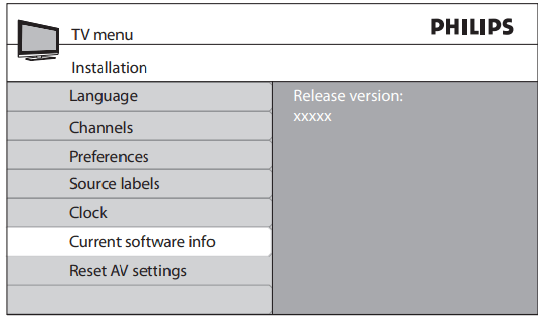
Check your current software version
1. Press MENU on the remote control and select Installation > Current software info
The version and a description of the current software is displayed.
Prepare for the software upgrade
You require the following equipment:
A PC with web browsing capability.
An archive utility that supports the ZIP-format (e.g. WinZip for Windows or StuffIt for Mac OS).
A USB memory stick.
Download the software
On your PC, open a web browser and go to www.philips.com/ welcome.
Find information and software related to your TV and download the latest software upgrade file to your PC.
Decompress the ZIP-file and copy the “autorun.upg” file to the root directory of your the USB device.
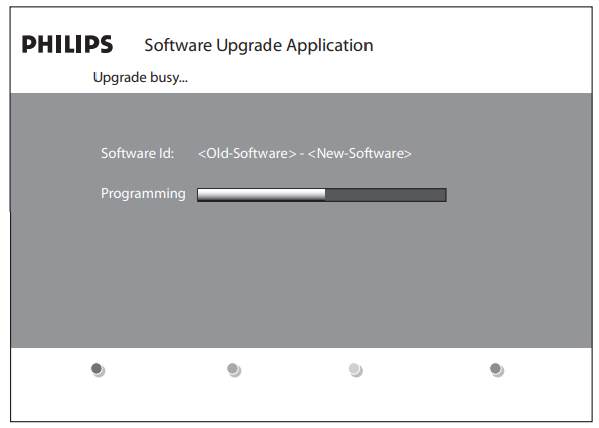
Upgrade software
Prepare the software upgrade as described above.
Connect your USB device to the USB port on the side of your TV. The TV scans the USB device for the updated software and automatically enters the upgrade mode.
Read the instructions on-screen and confirm that you want to continue with the installation. You see a screen similar to this
When the software upgrade is complete, remove the USB device.
Disconnect the TV from the power socket outlet.
Reconnect the TV to the power socket outlet.
Press Power at the side of the TV to switch the TV on. The TV starts up with the new software.
Connect devices
Connection overview
Antenna input
AV1: Component video input. Y Pb Pr and Audio L/R connectors for DVD, digital receiver or game console, etc.
AV2: Second component video input.
AV3: Composite video input to be used together with Audio L/R connectors for camcorder, game console, etc.
Service UART: For use only by authorized service personnel.
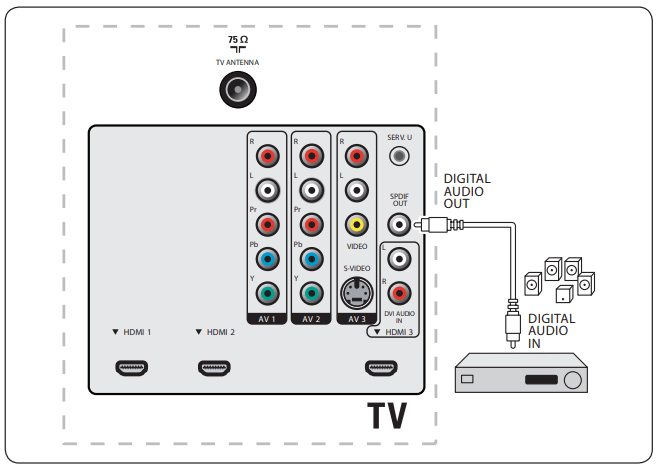
SPDIF Out: Digital audio out.
DVI Audio IN for HDMI 3.
HDMI 3 In: HDMI in connector for Blu-ray Disc player, HD digital receiver or HD game console, etc.
S-Video (AV3): S-Video input connector to be used together with Audio L/R connectors for camcorder, game console, etc. Note: When you use the S-Video (AV3) for video signals, do not use the composite video input on AV3 for video signals.
HDMI 2 In: Second HDMI in connector.
HDMI 1 In: First HDMI in connector.
Headphones: Stereo Mini Jack.
Video (Side): Video input cinch connector to be used together with Audio L/R connectors for camcorder, game console, etc.
S-Video (Side): S-Video input connector to be used together with Audio L/R connectors for camcorder, game console, etc. Note: When you use the S-Video (side) for video signals, do not use the video (side) input for video signals.
HDMI 4 In (Side): HDMI in connector for Blu-ray Disc player, HD digital receiver or HD game console, etc.
USB: USB connector.
Select your connection quality
This section describes how you can enhance your audio visual experience by connecting your devices with the best possible connectors
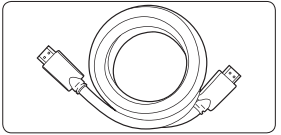
HDMI - Highest quality
HDMI produces the best audio visual quality possible. Both audio and video signals are combined in one HDMI cable, providing an uncompressed, digital interface between your TV and HDMI devices. You must use HDMI to experience full high definition video. You must also use HDMI cables to use Philips EasyLink as described in Use Philips EasyLink on page 25.
Use only a certified HDMI cable
Tip: If your device only has a DVI connector, use a DVI-HDMI adaptor to connect your device to a HDMI connector on the TV. As such a connection does not support sound, you must connect a separate audio cable from the device to the Audio L/R input connectors on the TV.
Note: Philips HDMI supports High-bandwidth Digital Contents Protection (HDCP). HDCP is a form of Digital Rights Management that protects high definition content in DVD or Blu-ray discs.
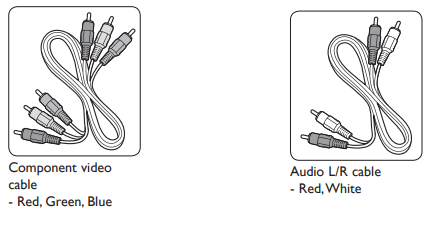
Component (YPbPr) - High quality
Component (Y Pb Pr) video provides better picture quality than S-Video or composite video connections. Though component video supports high definition signals, picture quality is lower than HDMI and is analog.
When connecting a component video cable, match the cable colors to the connectors on the back of the TV. Also, connect an Audio L/R cable to the red and white Audio L/R input connectors.
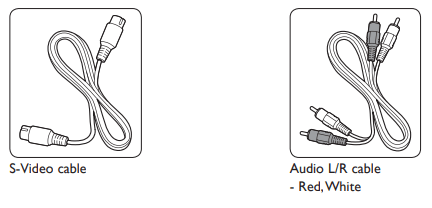
S-Video - Good quality
An analog connection, S-Video provides better picture quality than composite video. When connecting your device with S-Video, plug the S-Video cable to the S-Video connector on the side of the TV. You must connect a separate Audio L/R cable from the device to the red and white Audio L/R in/out connectors on the side of the TV.
Composite - Basic quality
Composite video provides basic analog connectivity, usually combining a (yellow) video cinch cable with (red and white) Audio L/R cinch cable. Match the cable colors when connecting to the composite video and audio L/R input connectors on the side of the TV.
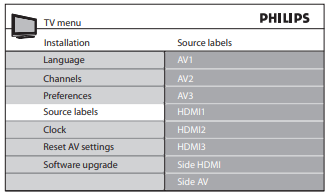
Label your connections
When you connect devices, you can label the connections to help you to later identify where devices are connected.
1. Press MENU on the remote control and select Installation > Source Labels.
2. Press to enter the list of available connections.
3. Press or to highlight a connection in the list.
4. Press to enter the list of devices for the connection, and press or to highlight a device.
5. Press to confirm your choice.
6. Press MENU to exit
Connect your devices
This section describes how to connect a selection of devices with different connectors. Note that different types of connectors may be used to connect a device to your TV. The following sections describe examples only, other configurations are possible.
When connecting composite or component cables, match the cable colors to the connectors on the TV.
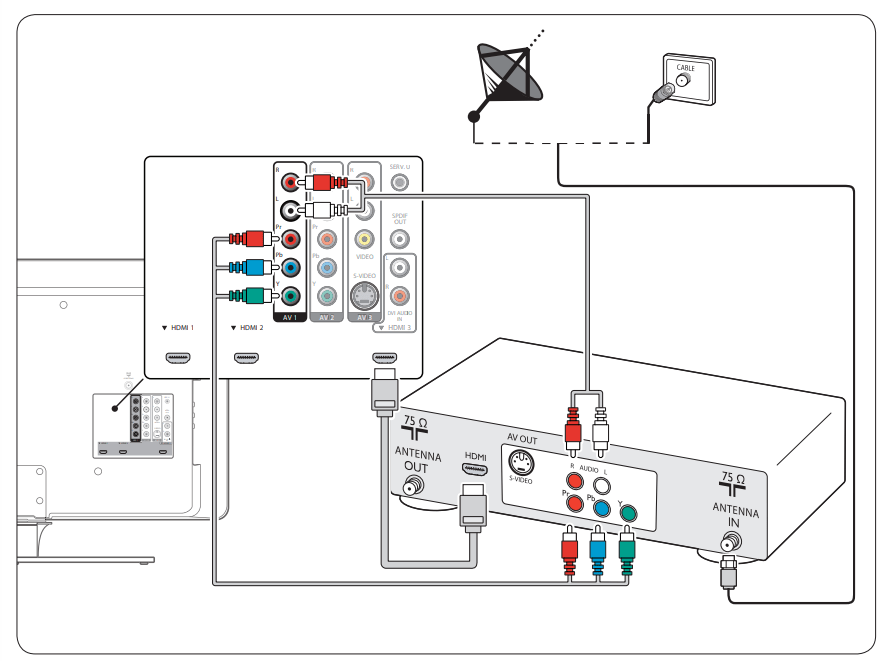
Connect a set-top box and a DVD player/recorder via composite connectors
Warning: Do not place your recorder too close to the screen because some recorders can be susceptible to signals.
Connect a DVD recorder or VCR and a second A/V device via composite connectors
If your recorder has an S-VHS video jack: for improved picture quality, connect an S-Video cable with the S-Video input and connect the audio cables to the audio L and R input jacks of AV3/side AV. D
Note
When you use an S-Video connector, do not connect any device to the AV3/side AV video jack.
If you use mono equipment, the left loudspeaker reproduces sound but the right speaker does not. Use a mono to stereo adapter (not supplied) for sound reproduction via all internal loudspeakers.
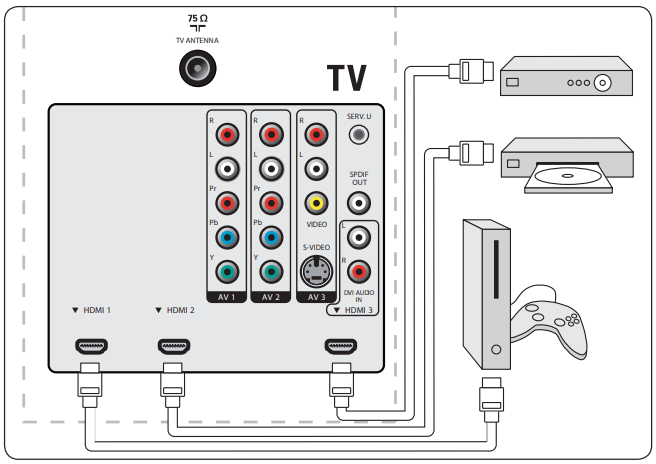
Connect a set-top box, DVD player/recorder and game console via HDMI
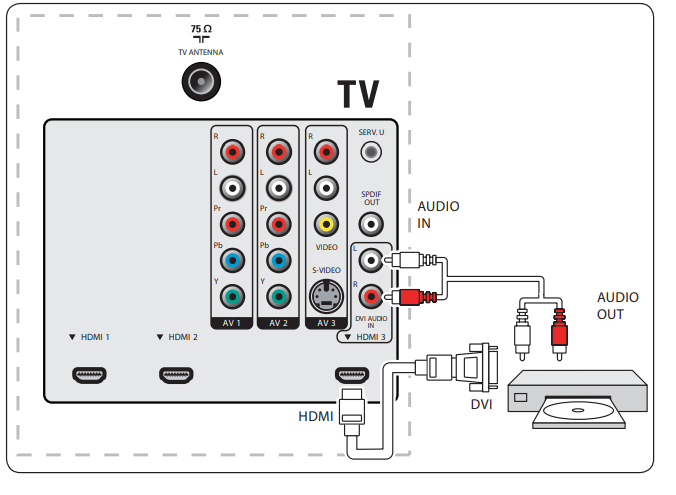
Connect a DVD player/recorder via HDMI-DVI and DIGITAL AUDIO OUT connectors
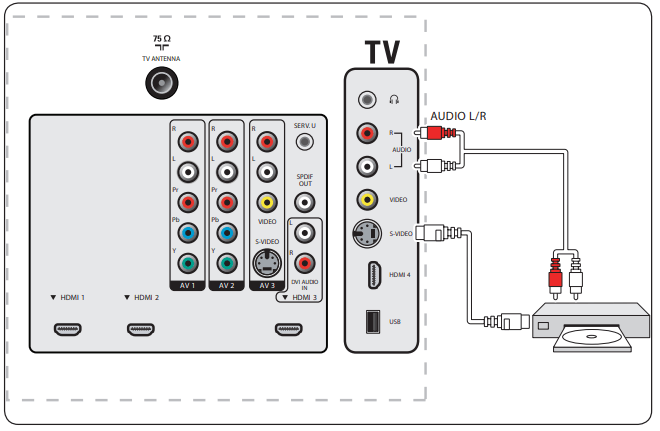
Connect a DVD player via S-Video and audio connectors
Warning: When using the S-Video (AV3) connector, do not connect any device to the AV3 composite video input.
Connect a set-top box via a composite connector
If your device has an S-VHS video jack: For improved picture quality, connect a S-Video cable with the S-Video input of AV3/side AV and connect the audio cables to the audio L and R input jacks of AV3/side AV.
Warning
When using the S-Video connector do not connect any device to the video jack of AV3 or the side AV.
Only the left loudspeaker reproduces sound for mono equipment. Use a mono to stereo adapter (not supplied) for sound reproduction via all internal loudspeakers.
Connect a DVD player/recorder via component video output connectors (YPbPr) and analog audio
Selected TV models are capable of displaying 1080i, 1080p, 720p and 480p DTV signals when connected to a DTV tuner cable box. Select the output of the cable box to either 1080i, 1080p, 720p or 480p. A DTV signal must be available in your area.
Connect a digital home theater amplifier
Warning: Due to legal requirements, it is possible that with certain copy protected PCM audio qualities from a accessory device connected to the HDMI input, the digital audio signal is muted.
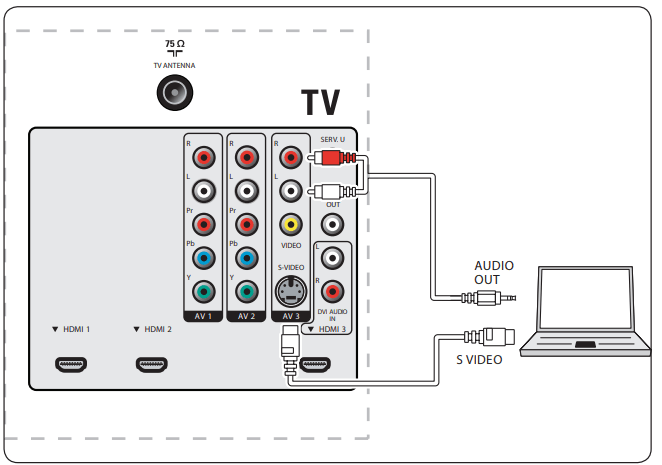
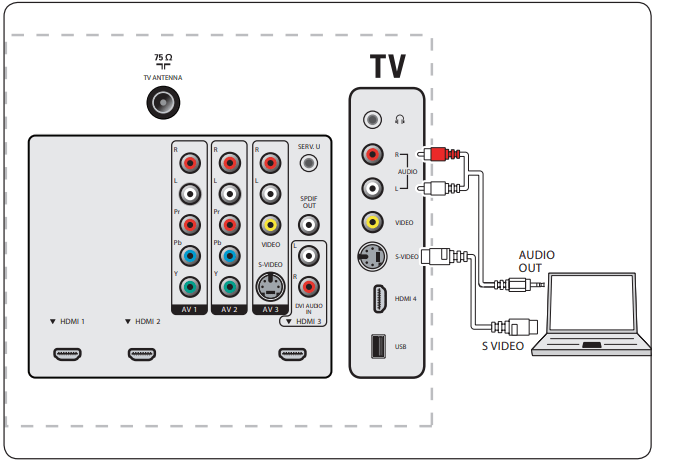
Connect a PC
Connect a PC with an S-Video connector at the back
Connect a PC with an S-Video connector at the side
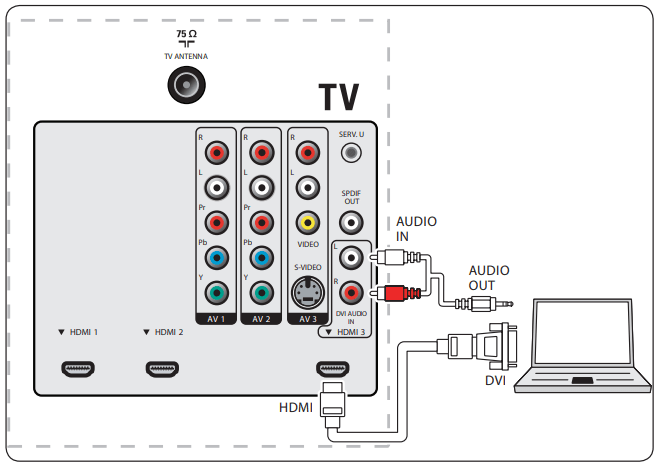
Connect a PC with a DVI connector
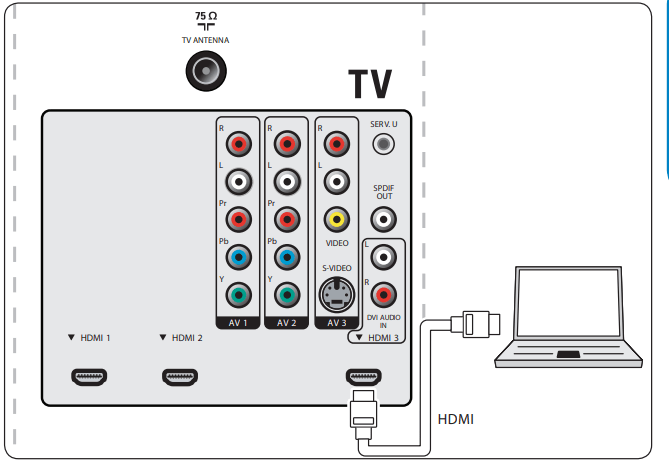
Connect a PC with an HDMI connector
Glossary
Term
Meaning
DVI
Digital Visual Interface
A digital interface standard created by the Digital Display Working Group (DDWG) to convert analog signals into digital signals to accommodate both analog and digital monitors.
RGB signals
Red, Green and Blue signals
These are the three video signals, red, green & blue, which make up the picture. Using these signals improves picture quality.
S-VHS signals
Super-VHS signals
These are 2 separate Y/C video signals from the S-VHS and Hi-8 recording standards. The luminance signals Y (black and white) and chrominance signals C (color) are recorded separately on the tape. This provides better picture quality than with standard video (VHS and 8 mm) where the Y/C signals are combined to provide only one video signal.
16:9
TV format
Refers to the ratio between the length and height of the screen. Wide screen televisions have a ratio of 16 by 9, conventional screen TV sets have a ratio of 4 by 3.
HDMI
High definition Multimedia Interface
Provides an uncompressed, all digital audio/video interface between the TV and any HDMI-equipped audio/video component, such as set-top box, DVD player and A/V receiver.HDMI supports enhanced or high-definition video plus two-channel digital audio.
System
Television pictures are not broadcast in the same way in all countries. There are different standards: BG, DK, I, and LL’. The System setting is used to select these different standards. This is not to be confused with PAL or SECAM color coding. PAL is used in most countries in Europe, Secam in France, Russia and most African countries. The United States and Japan use a different system called NTSC. The inputs AV1 and AV2 are used to read NTSC coded recordings.
HDCP
High-bandwidth Digital Content Protection
A specification developed by Intel for protecting digital entertainment that uses the DVI interface. HDCP encrypts content the transmission of digital content between the video source or transmitter such as a computer, DVD player or set-top box and the digital display or receiver such as a monitor, television or projector.
BBE
Barcus Berry Electronics
A sound enhancement technology.
EasyLink
Philips EasyLink
Enables one-touch play and one-touch standby with EasyLink compliant devices that are connected to your TV by HDMI.
Troubleshooting
Symptoms
Possible cause
What should you do
No power or indicator light.
The TV is not connected to the power.
1. Press POWER at the right side of the TV, or press . on the remote control.
2. Ensure the power cord is connected tightly to the TV power connector and to the power socket outlet.
3. Remove the power cord from the power socket outlet, wait 60 seconds and reconnect the power cord.
4. Connect the TV to a different power socket outlet.
Error message on the screen with HDMI connection.
HDCP authentication fail.
1. Ensure that your HDMI cable is certified.
2. Press SOURCE on the remote control to switch to another source and then switch back to the HDMI source.
3. Reset the accessory device and the TV.
Turn on the TV
Select the HDMI channel
Turn on the accessory device
4. While the TV and the accessory device are powered on, unplug either end of the HDMI cable and then reinsert the cable.
No sound is detected from the PC.
Incorrect HDMI port is connected.
1. Connect a DVI-HDM cable to the HDMI 3 port on the TV.
Audio cable is not connected.
2. Connect an audio cable to the DVI AUDIO IN port on the TV.
3. Press SOURCE on the remote control, and select the HDMI 3 source.
TV does not respond to the remote control.
Batteries are installed incorrectly, or low battery power.
1. Ensure the indicator light on the TV blinks when the remote control buttons are pressed.
2. Ensure that you are using the remote control supplied with the TV.
3. Ensure that the batteries of the remote control are inserted according to the illustration on the remote control and that the batteries do not need to be replaced.
4. Remove the power cord from the power socket outlet, wait 60 seconds and reconnect the power cord.
The picture is distorted. It is stretched out, has short, fat, black bars on the side or top.
Broadcast video format.
1. Press the FORMAT button on the remote control to select the best picture format.
2. For some accessory devices, the picture format has to be set in the accessory device.
The picture is mostly red and green, or the picture is missing red when the TV is connected to an accessory device via component cables.
Insecure/incorrect connection.
Ensure all the connections are made according to the color code.
Push the component cables all the way into the YPbPr sockets on the TV.
No sound on the TV loudspeaker.
Volume level is set to zero.
1. Increase the volume.
Sound is muted.
2. Press MUTE on the remote control.
Headphones are connected.
3. Ensure the headphones are not plugged into the TV.
Audio cable is not connected.
4. For AV connection, ensure that the Audio L/R cable is connected as described in Connect your devices on page 31.
If you are using a component cable, ensure that you have not crossed the red audio cable with the red video cable.
Accessory device audio output setting is incorrect.
5. For HDMI connections, some accessory devices have an HDMI audio output setting that must be turned on for HDMI to HDMI connections.
Bad picture quality with a coaxial connection.
Standard definition channels are not as clear as high definition channels.
1. Connect the devices via component or HDMI cables.
No picture or sound.
Incorrect channel
1. Ensure you have selected the correct channel.
Incomplete channel installation.
1. If the TV receives channels via an AV connection, set the TV to the correct source input.
2. If the TV is connected directly to the wall via a coaxial connection, perform the auto-installation again.
Cannot control your TV and connected devices with one remote control.
1. Confirm that the connected devices are EasyLink compliant and are connected to your TV via an HDMI cable. Not all brands of devices such as DVD players use the same system as Philips EasyLink. Other brands might not work with Philips EasyLink.
Notes for the use of USB devices
Digital Content Issues
Only FAT (DOS) formatted (initialized) portable memory is supported. Errors in this formatting can result in unreadable content. If such problems appear try to re-format the card. Be aware that formatting the card will also delete all the content on it (pictures, music, …).
The following file types are supported: .jpg, .jpeg, .mp3, .alb, .m3u and .pls.
Only linear JPEG picture formats are supported. Progressive JPEG and JPEG2000 encodings are not supported.
The length of a filename or directory name is limited to the length specified by the FAT16/32 file systems.
Max. levels of nested directories is 19.
Never use the supported file type extensions (.jpg, .jpeg, .mp3, .alb, .m3u and .pls) as extensions for directories as these directories will be treated as corrupted files.
The MP3 decoder does not support MPEG1 Layer 1 or Layer 2 playback.
MP3 Pro files can be played with normal MP3 quality.
The access and response time of the content on a device can differ depending on the type or brand of the device.
The access and response time of the content on a device will increase the more unsupported or corrupted files are on the device.
Digital Camera Issues
If a USB connection between your digital camera and the TV isn’t working, you can try the solutions below to resolve your problem.
Make sure your digital camera is switched on and verify if the configuration of your digital camera is correct (see the manual of your digital camera for more information).
Some digital cameras allow you to switch off the USB interface. Make sure that the USB interface is switched on before connecting to the TV.
If you have a digital camera with only internal memory (no removable memory) you can try to copy the content manually to a USB memory device (e.g. Philips KEY product) using a personal computer.
Some digital cameras allow you to switch between PTP (Picture Transfer Protocol) or “PC Link” and USB Mass Storage or “PC Drive”. Make sure that you select USB Mass Storage or “PC Drive” on your digital camera.
If your camera supports different interface settings be sure to try them one by one or contact the reseller of your camera to find out the correct setting.
USB Memory Device Issues
Devices connected to the USB port of your TV must be “Mass Storage Class” compliant. If your device (digital camera. MP3 player, portable hard disk, …) is not “Mass Storage Class” compliant it will not be detected by the content browser of the TV.
The following subsets of the Mass Storage Class specification are supported:
The implementation of the TV is based on the “Universal Serial Bus Mass Storage Class Specification Overview” (v1.2, June 23, 2003) including all documents referenced by the document. The document can be found on the USB standardization website (www.usb.org).
Full support of the USB Mass Storage Class Bulk-Only Transport (bInterfaceProtocol = 50h).
Full support of SubClass Code = 05h; SFF-8070i spec.
Full support of SubClass Code = 06h; SCSI transparent command set.
For large USB memory devices, when you are in the Content Browser, it may take a long time before you can access your files.
When using a USB portable hard disk: Due to the high power consumption of the hard disk, it is advised to use the external power supply of the portable hard disk to guarantee proper working under all conditions.

 POWER at the right side of the TV.
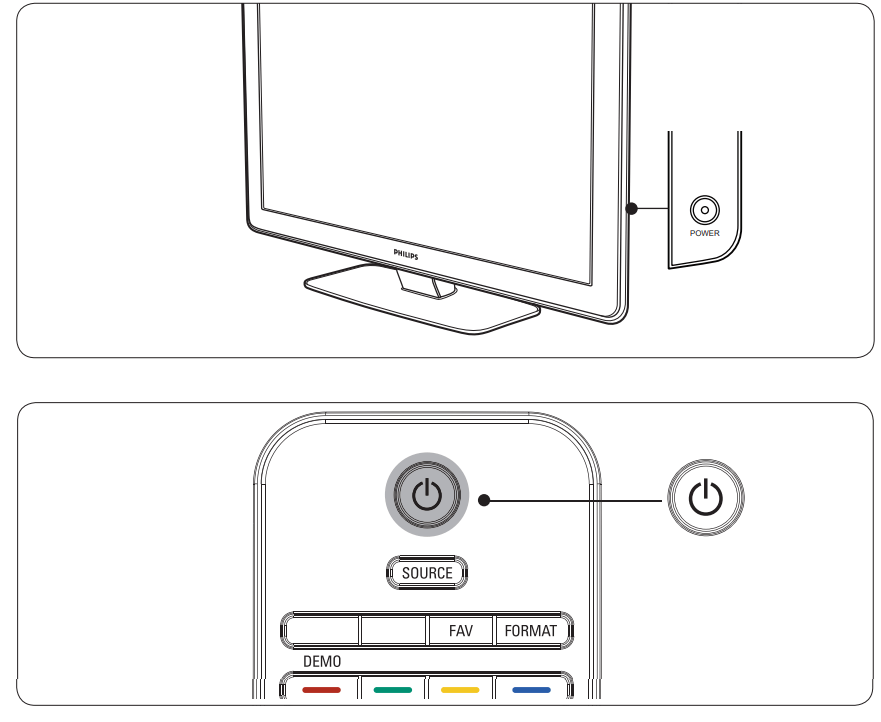
 on the remote control of your player. The picture from the player might appear automatically on your screen.
 Switches the TV on from standby or back to standby. The TV is never powered off completely unless it is physically unplugged.
  :To navigate through the menus.
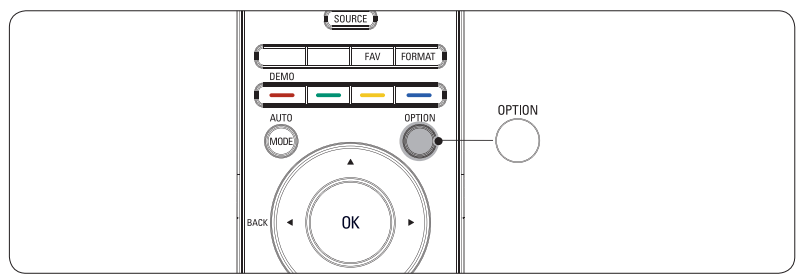
 or
or  and then OK to access one of the following menus:
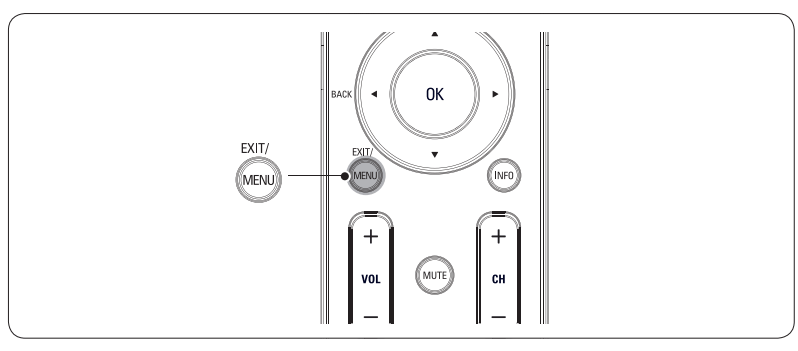
 to enter the TV settings menu.
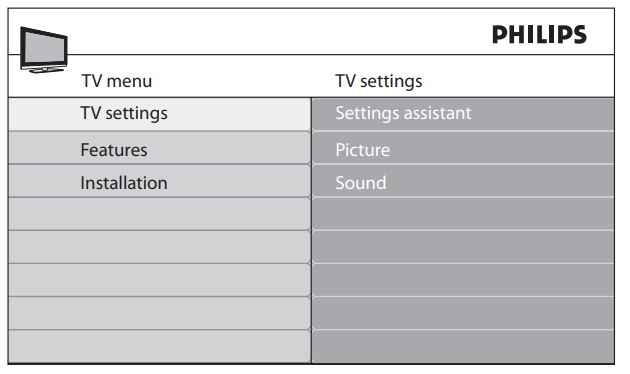
 and
and  to select the Picture menu.
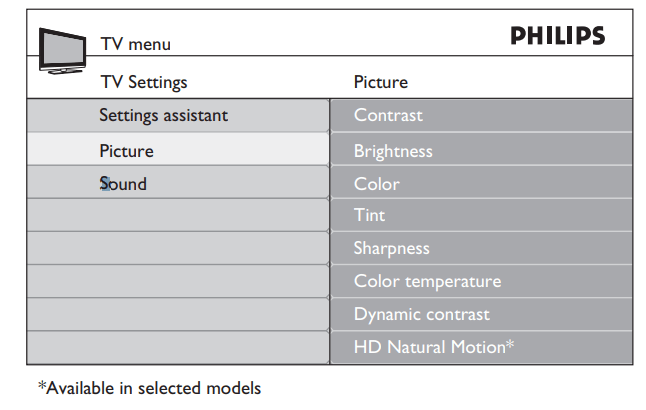
 or
or  to select one of the picture settings, and press
  to enter the setting.
  or OK to confirm the change.
 to enter the Settings assistant menu.
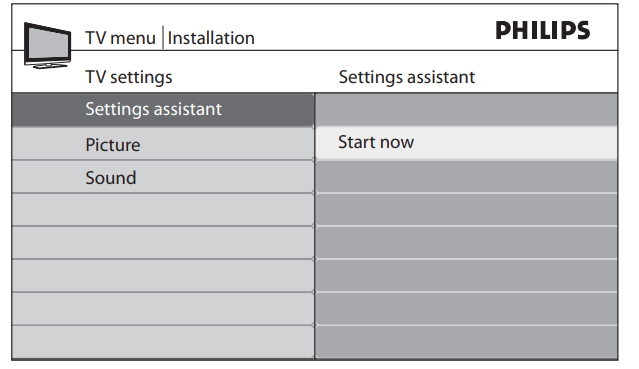
 to highlight Start now, and press OK to start the Settings assistant. You are guided through a choice of picture display options. Press the color keys, cursor keys and OK to make your selections and store your setup
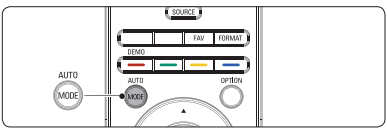
 or
or  to select one of the following settings:
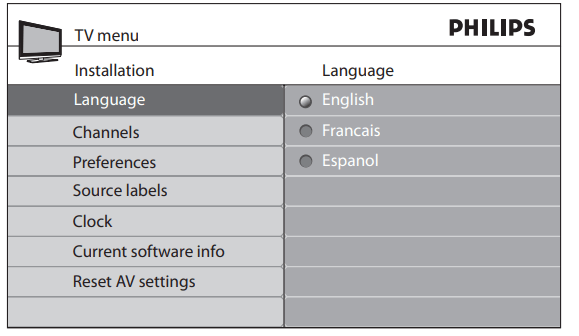
 to return to the Installation menu.
 to return to the Installation menu.
 to confirm your choice.
  and
and  to enter Weak channel installation.
 to select the channel you want to uninstall, and press the green key on the remote control. The channel is removed from the channel list. Press the green key again to reinstall the channel.
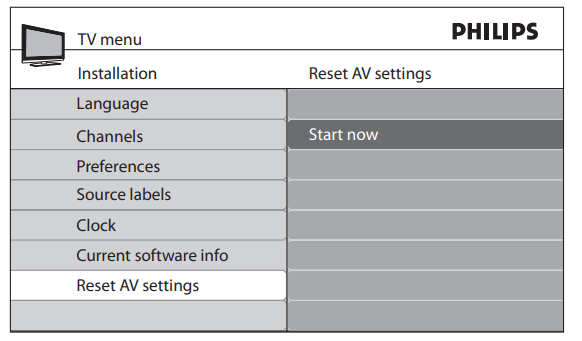
 at the side of the TV to switch the TV on. The TV starts up with the new software.
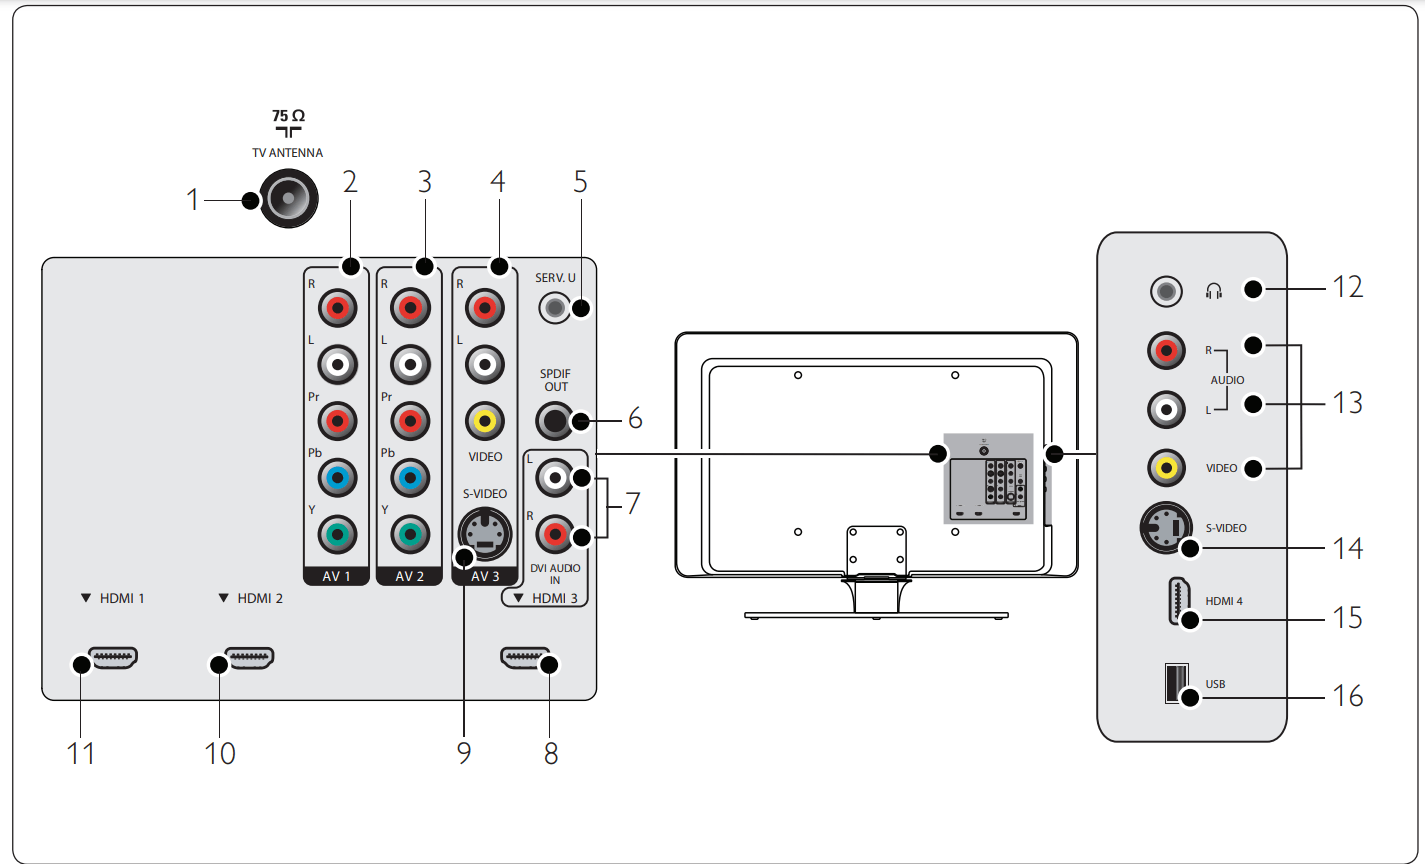

 to enter the list of available connections.
  or
or  to highlight a connection in the list.
  to confirm your choice.
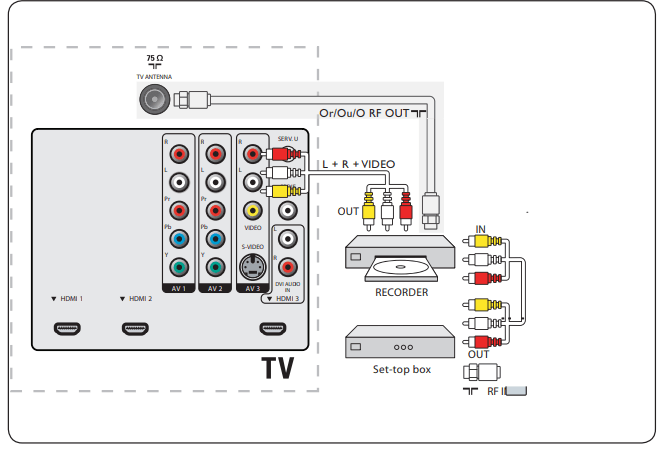


 POWER at the right side of the TV, or press . on the remote control.