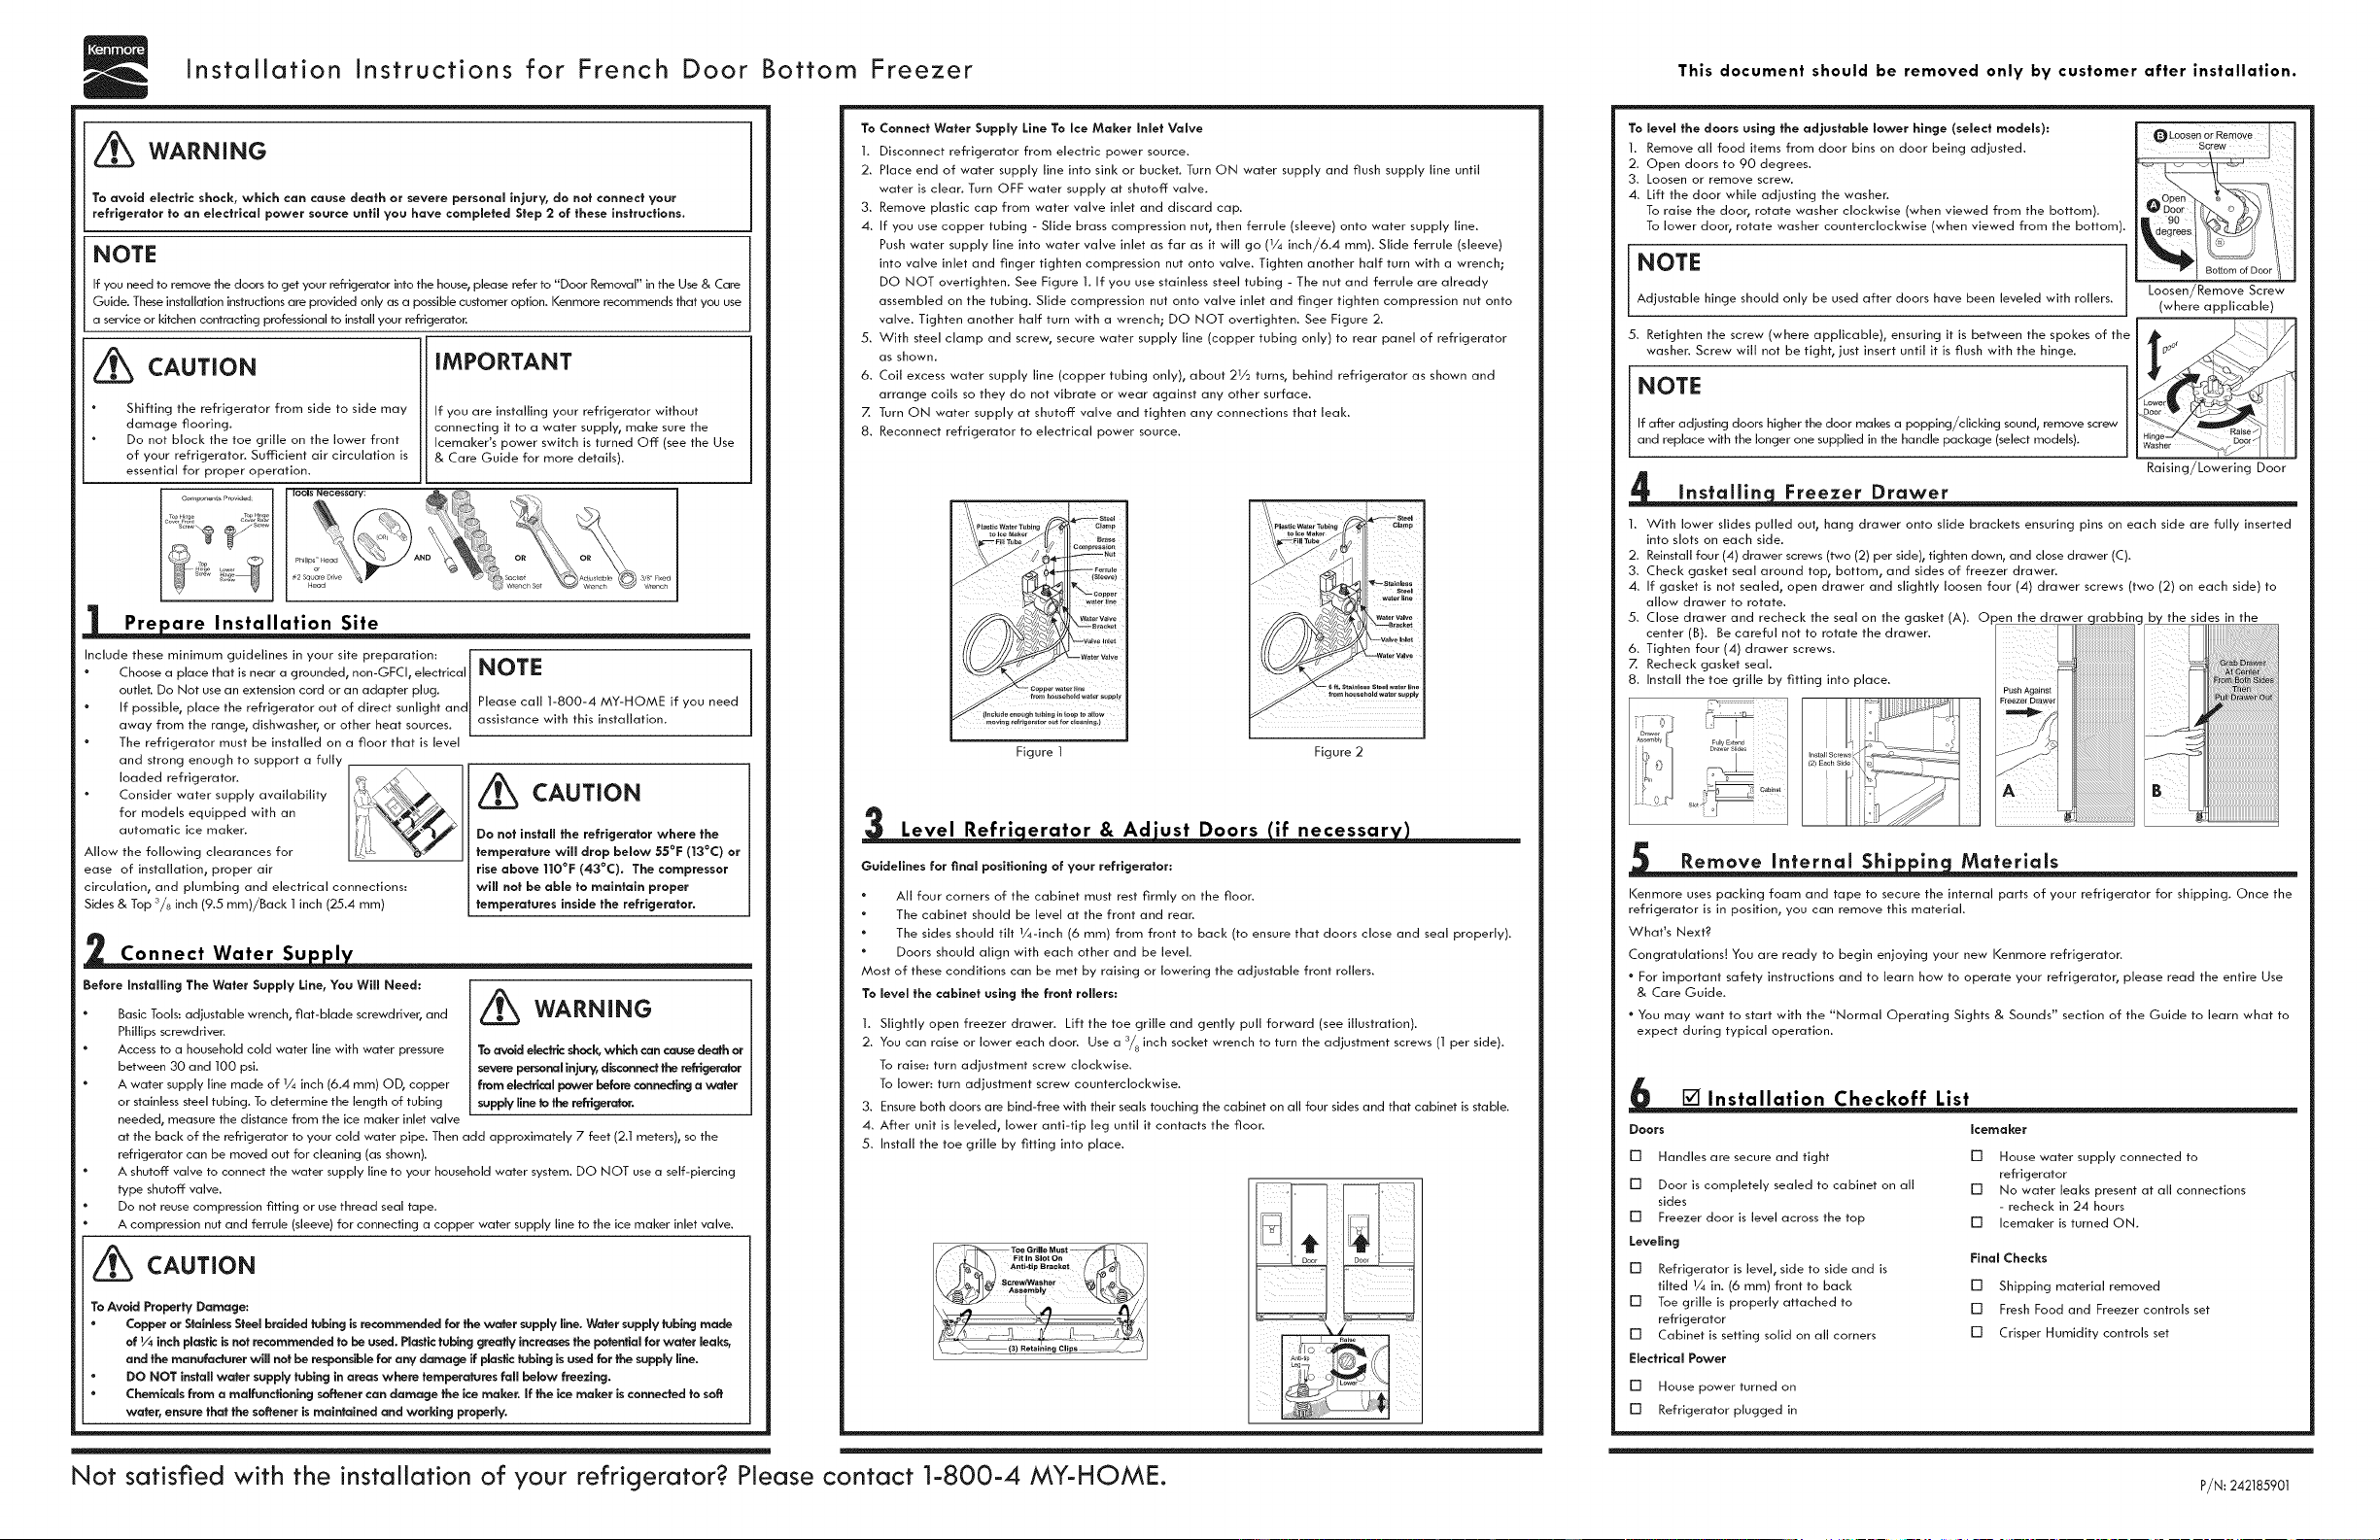
Installation Instructions for French Door Bottom Freezer This document should be removed only by customer after installation.
WARNING
To avoid electric shock, which can cause death or severe personal injury, do nat connect your
refrigerator to an eJectrlcal power source untlm you have campmeted Step 2 of these instructions.
NOTE
If you need to remove the doors to get your refrigerator into the house, please refer to "Door Removal" in the Use & Care
Guide. These installation instructions are provided only as a possible customer option. Kenmore recommends that you use
a service or kitchen contracting professional to install your refrigerator.
_ CAUTION iMPORTANT
Shifting the refrigerator from side to side may If you are installing your refrigerator without
damage flooring, connecting it to a water supply, make sure the
Do not block the toe grille on the lower front Icemaker's power switch is turned Off (see the Use
of your refrigerator. Sufficient air circulation is & Care Guide for more details).
essential for proper operation.
l Components Provi4ed: IOOIS Necessary:
Pre are Installation Site
Include these minimum guidelines in your site preparation: J
• Ch ..... place that i...... g ..... ded ...... GFCI, electrical NOTE
outlet. Do Not use an extension cord or an adapter plug.
° If possible, place the refrigerator out of direct sunlight and Please call 1-800-4 MY-HOME if you need
away from the range, dishwasher, or other heat sources, assistance with this installation.
The refrigerator must be installed on a floor that is level
and strong enough to support a fully
loaded refrigerator. _ ._\Consider water supply availability
for models equipped with an
automatic i.... I.... I/
Allow the following clearances for temperature wlil drop below 55°F (|3°C) or
ease of installation, proper air rise above 110°F (43°C). The compressor
circulation, and plumbing and electrical connections: will not be able to maintain proper
Sides & Top 3/8 inch (9.5 mm)/Back 1 inch (25.4 mm) temperatures inside the refrigerator.
Before Installing The Water Supply Line, You Will Need:
"as_cTools:adiustabl...... h,fiatblad...... dr_ver,and _ WARNING
Phillips screwdriver.
Access to a household cold water line with water pressure To avoid electric shock, which can cause death or
between 30 and 100 psi. severe personal injury disconnec! the reMgerater
A water supply line made of V4 inch (6.4 mm) OD, copper from eledrlcal power befare canneding a water
or stainless steel tubing. To determine the length of tubing supply line _ the refrigerator.
needed, measure the distance from the ice maker inlet valve
at the back of the refrigerator to your cold water pipe. Then add approximately 7 feet (2.1 meters), so the
refrigerator can be moved out for cleaning (as shown).
A shutoff valve to connect the water supply line to your household water system. DO NOT use a self-piercing
type shutoff valve.
Do not reuse compression fitting or use thread seal tape.
A compression nut and ferrule (sleeve) for connecting a copper water supply line to the ice maker inlet valve.
_$ CAUTION
To Avoid Property Damage:
• Copper or Stainless Steel braided tubing is recommended for the water supply line. Water supply tubing made
of 1¼ inch plastic is not recommended to be used. Plastlc tubing greatly increases the potential far water leaks,
and the manufacturer will not be responsible for any damage if plastic tubing is used far the supply llne.
• DO NOT install water supply tubing in areas where temperatures fall below freezing.
• Chemicals from a malfunctioning softener can damage the ice maker. If the ice maker is connected to soft
water, ensure that the softener is maintained and working properly.
To Connect Water Supply Line To Ice Maker Inlet Valve
1. Disconnect refrigerator from electric power source.
2. Place end of water supply line into sink or bucket. Turn ON water supply and flush supply line until
water is clear. Turn OFF water supply at shutoff valve.
3. Remove plastic cap from water valve inlet and discard cap.
4. If you use copper tubing - Slide brass compression nut, then ferrule (sleeve) onto water supply line.
Push water supply line into water valve inlet as far as it will go (V4 inch/6.4 mm). Slide ferrule (sleeve)
into valve inlet and finger tighten compression nut onto valve. Tighten another half turn with a wrench;
DO NOT overtighten. See Figure 1. If you use stainless steel tubing - The nut and ferrule are already
assembled on the tubing. Slide compression nut onto valve inlet and finger tighten compression nut onto
valve. Tighten another half turn with a wrench; DO NOT overtighten. See Figure 2.
5. With steel clamp and screw, secure water supply line (copper tubing only) to rear panel of refrigerator
as shown.
6. Coil excess water supply line (copper tubing only), about 21/2 turns, behind refrigerator as shown and
arrange eoiis so they do not vibrate or wear against any other surface.
7, Turn ON water supply at shutoff valve and tighten any connections that leak,
8, Reconnect refrigerator to electrical power source.
\ pl_tic w_ter T_blr_ C!_mp
-_F T_beJ l_.. ii r_ss
Water valve
Oopper wa_eHi_
fl_ ho_sehoM water s_pp_y
moving ref_igerat_ a_t f_ _lea ning,)
Figure I Figure 2
Level Refri erator & Ad'ust Doors if necessar
Guidelines far final positioning of your refrigerator:
All four corners of the cabinet must rest firmly on the floor.
The cabinet should be level at the front and rear.
The sides should tilt V4-inch (6 mm) from front to back (to ensure that doors close and seal properly).
Doors should align with each other and be level.
Most of these conditions can be met by raising or lowering the adjustable front rollers.
To level the cabinet using the front rollers:
1. Slightly open freezer drawer. Lift the toe grille and gently pull forward (see illustration).
2. You can raise or lower each door. Use a 3/8 inch socket wrench to turn the adjustment screws (1 per side).
To raise: turn adjustment screw clod<wise.
To lower., turn adjustment screw counterclockwise.
3. Ensureboth doors are bind-free with their seals touching the cabinet on all four sidesand that cabinet is stable.
4. After unit is leveled, lower anti-tip leg until it contacts the floor.
5. Install the toe grille by fitting into place.
Not satisfied with the installation of your refrigerator? Please contact 1-800-4 MY-HOME.
To level the doors using the adjustable lower hinge (select models):
1. Remove all food items from door bins on door being adjusted.
2. Open doors to 90 degrees.
3. Loosen or remove screw.
4. Lift the door while adjusting the washer.
To raise the door, rotate washer clockwise (when viewed from the bottom).
To lower door, rotate washer counterclockwise (when viewed from the bottom).
NOTE
Adjustable hinge should only be used after doors have been leveled with rollers.
5. Retighten the screw (where applicable), ensuring it is between the spokes of the
washer. Screw will not be tight, just insert until it is flush with the hinge.
NOTE
If after adjusting doors higher the door makes a popping/clicking sound, remove screw
and replace with the longer one supplied in the handle package (select models).
m Loosen or Remove ]
S_ew _ I
Open ®
Loosen/Remove Screw
(where applicable)
Raising/Lowering Door
Installin Freezer Drawer
1. With lower slides pulled out, hang drawer onto slide brackets ensuring pins on each side are fully inserted
into slots on each side.
2. Reinstall four (4) drawer screws (two (2) per side), tighten down, and close drawer (C).
3. Check gasket seal around top, bottom, and sides of freezer drawer.
4. If gasket is not sealed, open drawer and slightly loosen four (4) drawer screws (two (2) on each side) to
allow drawer to rotate.
B IIII
_(((((((((((((((((((((((((((((((((((((
Remove Internal Shi in Materials
Kenmore uses packing foam and tape to secure the internal parts of your refrigerator for shipping. Once the
refrigerator is in position, you can remove this material.
What's Next?
Congratulations! You are ready to begin enjoying your new Kenmore refrigerator.
° For important safety instructions and to learn how to operate your refrigerator, please read the entire Use
& Care Guide.
° You may want to start with the "Normal Operating Sights & Sounds" section of the Guide to learn what to
expect during typical operation.
[] Installation Checkoff List
Doors Icemaker
[] Handles are secure and tight [] House water supply connected to
refrigerator
[] Door is completely sealed to cabinet on all [] No water leaks present at all connections
sides - recheck in 24 hours
[] Freezer door is level across the top [] Icemaker is turned ON.
Leveling
Final Checks
[] Refrigerator is level, side to side and is
tilted V4 in. (6 mm) front to back [] Shipping material removed
[] Toe grille is properly attached to [] Fresh Food and Freezer controls set
refrigerator
[] Cabinet is setting solid on all corners [] Crisper Humidity controls set
Electrical Power
[] House power turned on
[] Refrigerator plugged in
P/N: 242185901
Instructions d'installation pour les r6frig6rateurs 6 portes frangaises 6 cong61ateur en bas Cedocume.t.edevrait tre e. ev p= c ie.tqu' p s ri.st notio..
_ AVERTISSEMENT
Pour _viter des chocs _lectrlques suscel_ibJes de causer de graves bJessures ou Ja mort, ne brancbez pas votre
r_frig_rateur _ une source d'ollmentation en _lectridt_ ovant d'ovoir termin_ J'_tope 2 de ces instructions.
REMARQUE
Si vous dev_z enIever Ies portes de votre r6frig6rateur pour le faire entrer dans votre demeure, veuillez vous reporter 6 Ia
section ({ D6pose des portes )_qui se trouve dons Ie guide d'utilisation et d'entretien. Ces instructions d'instalIation ne sont
fournies que pour vous donner la possibilit6 d'installer I'appareiL Nous vous recommandons de faire appel 6 un sous-
contractant professionnet de service ou sp6cialis6 en cuisines pour installer votre r6frig6rateur.
rENTION
Le del _ment tat6ral du r6frig6rateur peut
endomma( er Ie rev6tement de sol.
N'obstruez pos Ia grille de protection situ6e 6
I'avantde votre r6frig6rateur. Une circulation d'air
sefflsonte ._stessentielIe au ban fonctionnement de
votre r6frig6rateur.
iMPORTANT
Si vous instaIIez votre r6frigSrateur sans le raccorder
6 une conduite d'alimentation en eau, assurez-vous
que Finterrupteur de Ia machine 6 gIagons est en
position d'arr6t (reportez-vous au Guide d'utilisation et
d'entretien pour plus de d6tails).
c0mpo_a,_ro_rr,is:
_,_;_ _,, ....
Avant I'installation
Tenez compte des 616ments suivants dons la pr6poraflon de I'emplacernent
d'installafion :
Choisissez un emplacement pr6s d'une pdse 6tectrique mise 6 Ia terre,
sans disjoncteur de fuite de terre. N'utilisez pos de rallonge 6lectrique
ou de fiche d'adaptation.
Si possible, placez le r6frig6rateur 6 Fabd du soteil direct et loin de Ia
cuisiniSre, du Iave-vaisselle et de toute autre source de chaIeur.
Le r6frig6rateur doit Btre install6 sur un plancher qui est de niveau et qui
est assez soIide pour supporter Ie poids d'un _ _'_H
r6fricj6rateur rempli 6 pleine capocit6.
Pour Ies modgles 6quip6s d'une machine b !_:_''
glagons automatique, prenez en consid6ration !'/_i _
I'alimentati ..... ii_ _
Pr_voyez Ies degagements suivants pour faciliter
I'installation, assurer une circulation d'air appropnee
et raccorder la ptomberie et les branchements 61ectriques : C6t6s et dessus :
9,4 mm (3/_ po) Arri6re :2,5 cm (1po)
NOTE J
Pour obtenir de I'assistance retativement b ceffe
instaIIation, veuilIez appeter au 1800-4 MY-HOME
_ CAUTION
N'instaJJez pas Je r_fflg_rateur _ un endroit
ob Ja temperature pourralt descendre en
dessous de 13°C (55°F) ou s'6Jever _ plus de
43°C 010°F). Le cornpresseur ne pourrolt
pas molntenlr des temperatures appropri_es
J'int_rleur du r_frlg6roteur.
Raccordement de I alimentation en eau
Avont d'instoJJer J'afimentation en eau, vous aurez besoin : r_
" D .... tiIsdeb ..... ivants:Uned6bmolett .... t...... is_ _. AVERTISSEMENT
pointe plate et un tournevis PhiIIips I
* Un acc6s b Ia canaIisation d'eau froide domestique d'une I
pression situ6e entre 30 et 100 Ib/po _. I Pour _v_r un ¢hoc _le_l'_ue _i I:_rro_ causer
* Une conduite d'alimentafion en eau en ouivre ou en acier de groves blessures ou m_rne la mort, coupez
inoxydable, d'un diam6tre ext6rieur de 6 mm (V4 po). Pour rolimentation $1edrique du r_frlg6roteur ova_ de
d6terminer Ia Iongueur de Ia conduite en ouivre n6cessaire, vous Jeraccorder _ J'alimer_c_ion en eau.
devez meserer la distance entre Ie robinet d'arriv6e d'eau de Ia
machine b glagons derri6re Ie r6frig6rateur et Ia conduite d'eau froide. Puts, ajoutez approximativement 2,1 m6tres
(7 pieds) afin de pouvoir d6placer le r6frig6rateur au moment du nettoyage (tel qu'ilIustr6).
Un robinet d'arr_t qui raccorde la conduite d'alimentation en eau b votre syst6me de distribution d'eau domestique.
N'UTILISEZ PAS de robinets d'arr6t de type auto-perceur.
Ne pos r6utiliser Ia bague de compression ou du ruban d'6tanch6it6 pour joints filet6s.
Un 6crou b compression et one bague (un raccord) pour raccorder la conduite d'alimentation en eau en cuivre au
robinet d'arriv6e d'eau de la machine b glagons.
_ ATTENTION
Pour _viter des dommages mat_rleJs :
® Nous recommandons d'utillser des tubes tress6s en cuivre ou en acler inoxydable pour ro[imentation en eau.
Les tubes d'oJimer_ation en eau en plosticlue de _/_po ne sont pas recommand_s. Les tubes en pJosticlue
augmen_nt grandement Jerisque de fultesd'eou et JefobrJcantne sera pas responsabJe des dommages causes
dons Je cos ob des tubes en pJasJique sont utills_s pour Ja condulte d'ollmentotion.
® N'instaJJez pas de tube d'oJlmentatlon en eau dons des endroits e×pos_s ou gel.
® Les prodults chlmlques provenant d'un odouc_sseur d'eou d6fectueux peuvent endommager la machine
gJo_ons. S;Ja machine _ gJo_ons est raccord_e _ de J'eau odoucie, ossurez=vous clue J'odoucisseur taft tablet
d'un entretlen od_cluat et qu'il fonctionne correctemer_.
Si vous
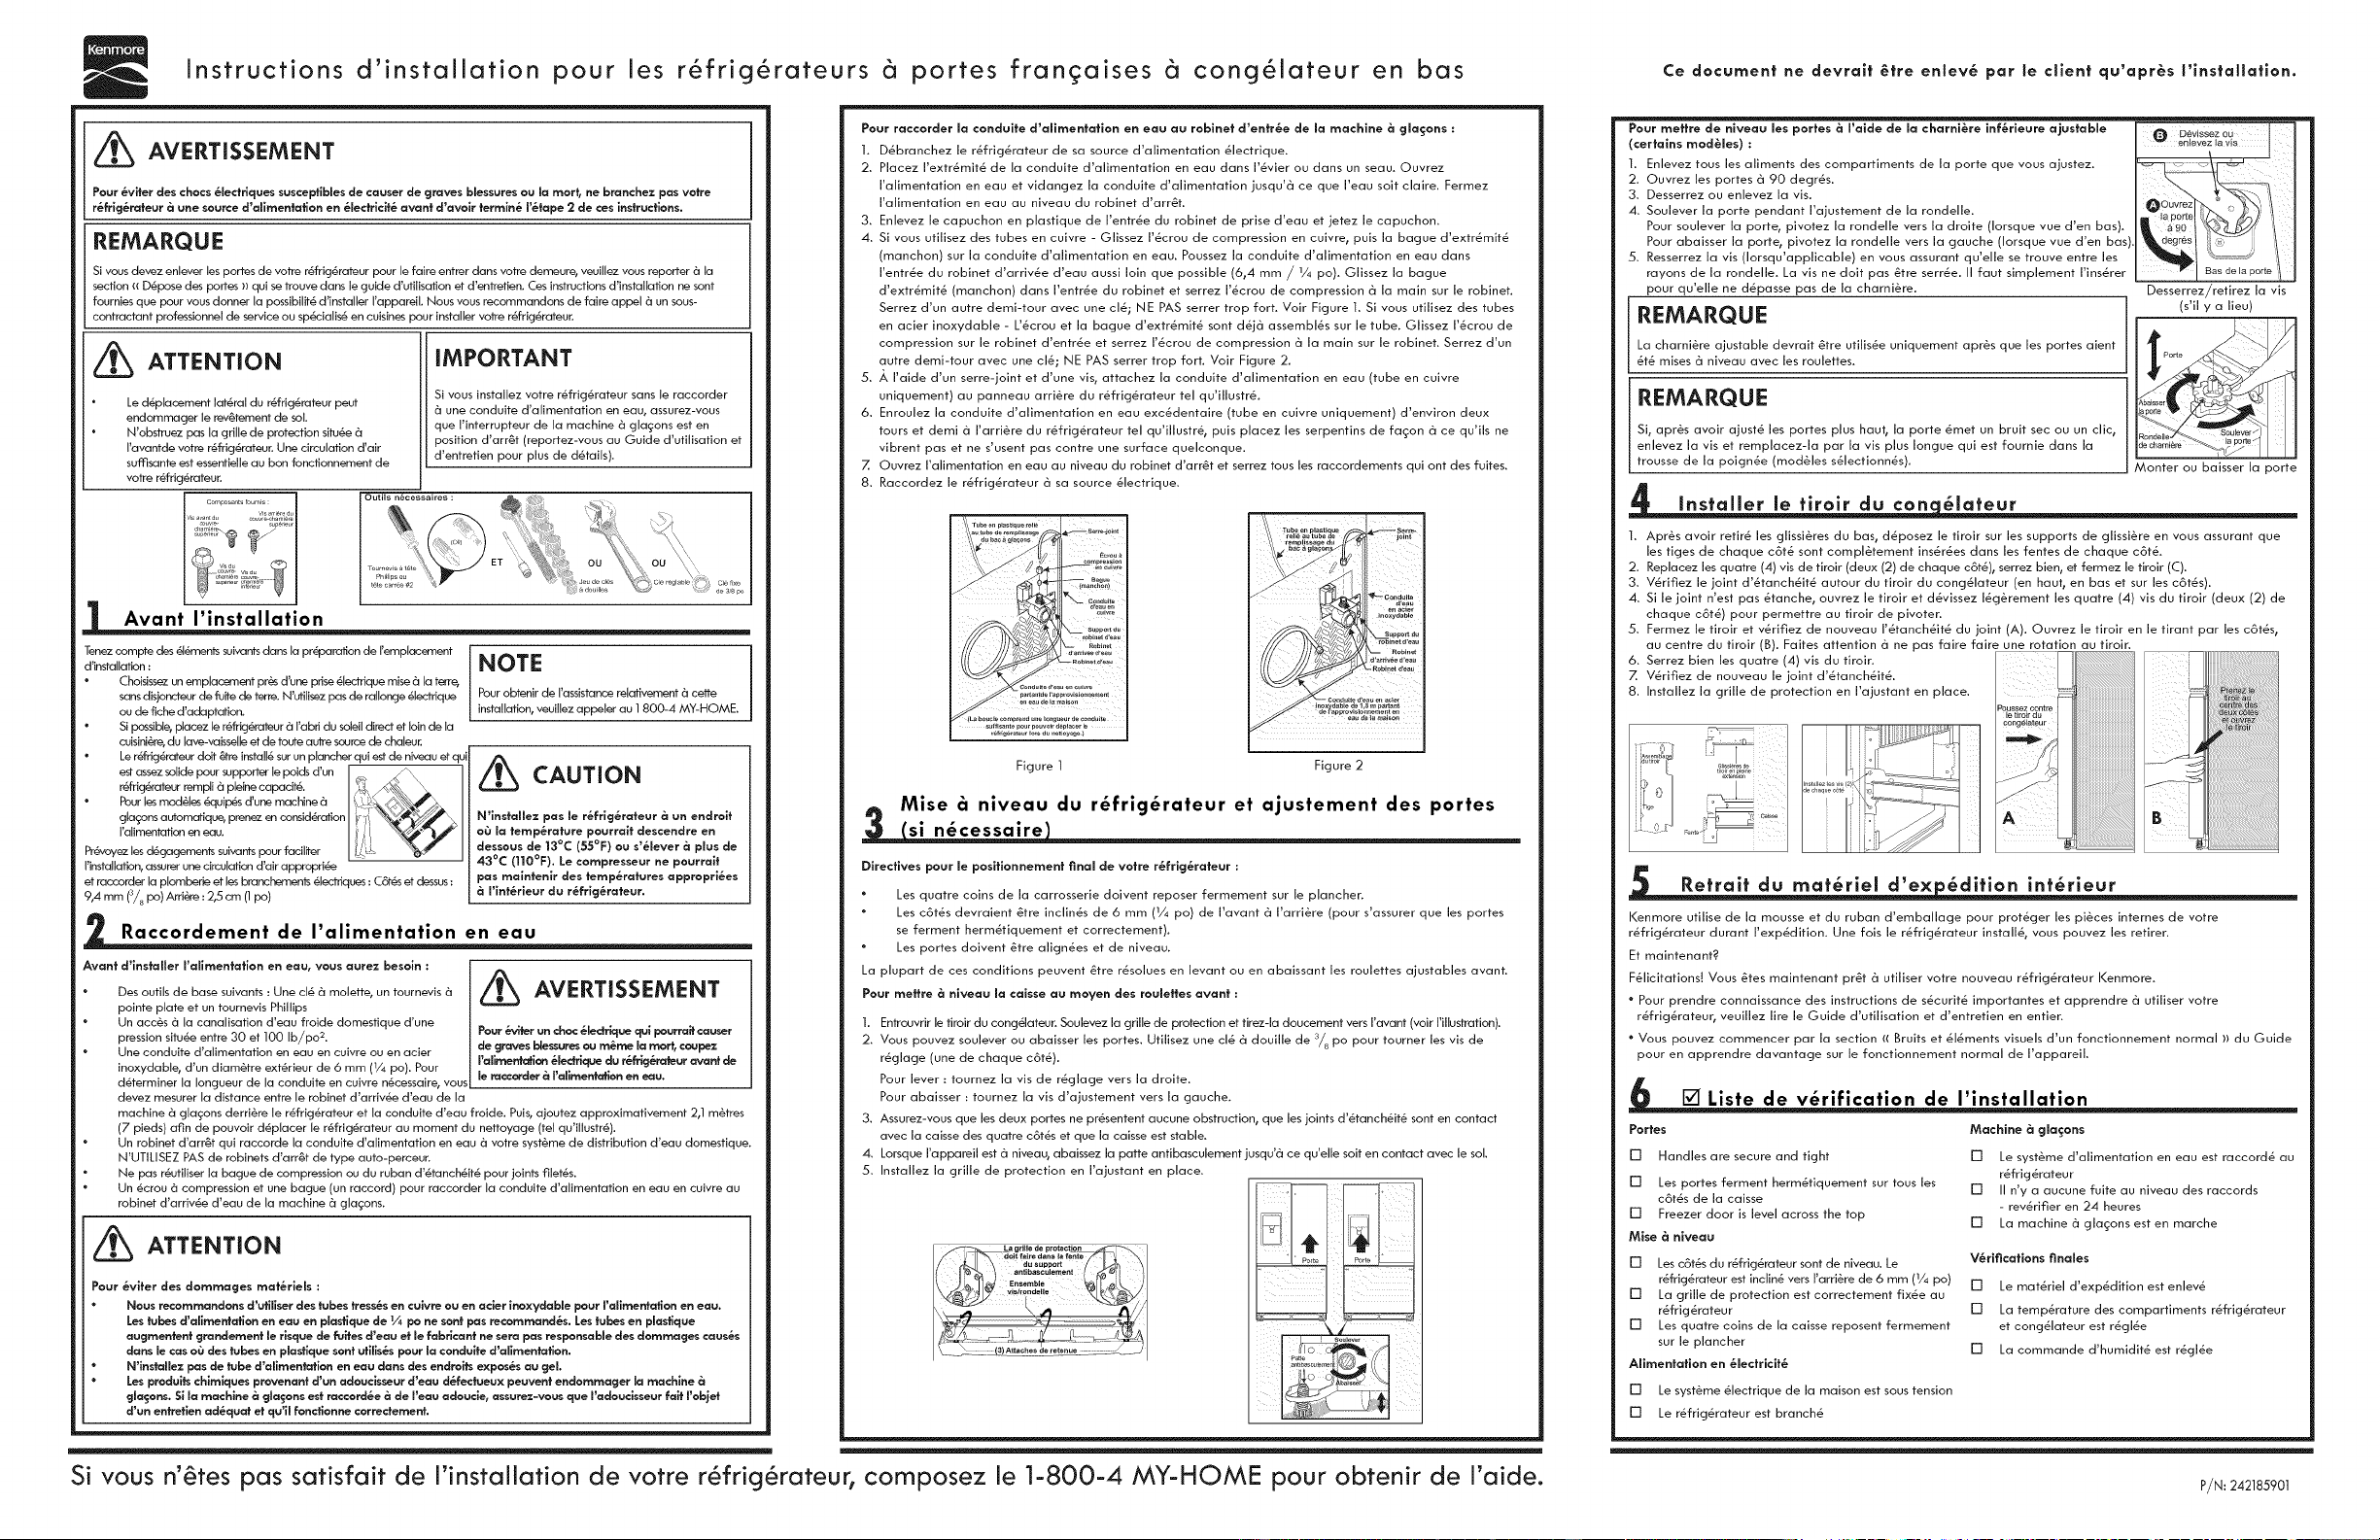
Pour raccorder Ja condulfe d'allmen_atlon en eau au robinef d'enfr_e de Ja machine _ gla_:ons :
1. D_branchez ]e r_frig6rateur de sa source d'a]imentation _]ectrique.
2. Placez I'extr_mit_ de la conduite d'alimentation en eau dans I'_vier ou dans un seau. Ouvrez
I'alimentation en eau et vidangez la conduite d'alimentation jusqu'_ ce que I'eau soit claire• Fermez
I'alimentation en eau au niveau du robinet d'arr6t.
3. Enlevez le capuchon en plastique de I'entr_e du robinet de prise d'eau et jetez le capuchon.
4. Si vous utilisez des tubes en cuivre - Glissez I'_crou de compression en cuivre, puts la hague d'extr_mit_
(manchon) sur la conduite d'alimentation en eau. Poussez la conduite d'alimentation en eau dans
I'entr6e du robinet d'arriv_e d'eau aussi loin que possible (6,4 mm / 1/4 po). Glissez la hague
d'extr_mit_ (manchon) dans I'entr_e du robinet et serrez 1'6crou de compression _ la main sur le robinet.
Serrez d'un autre derni-tour avec une cl_; NE PAS serrer trap fort. Voir Figure 1. Si vous utilisez des tubes
en acier inoxydable - L'_crou et la bague d'extr_mit_ sont d6j_ assembles sur le tube. Glissez I'_crou de
compression sur le robinet d'entr_e et serrez I'_crou de compression _ la main sur le robinet. Serrez d'un
autre demi-tour avec une el6; NE PAS serrer trap fort. Voir Figure 2.
5. ,_, I'aide d'un serre-joint et d'une vis, attachez la conduite d'alimentation en eau (tube en cuivre
uniquement) au panneau arri@re du r_frig_rateur tel qu'illustr_.
6. Enroulez la conduite d'alimentation en eau exe6dentaire (tube en cuivre uniquement) d'environ deux
tours et demi _ I'arri@re du r_frig@ateur tel qu'illustr_, puts placez les serpentins de fagon _ ce qu'ils ne
vibrent pas et ne s'usent pas contre une surface quelconque.
7. Ouvrez I'alimentation en eau au niveau du robinet d'arr6t et serrez tous les raccordements qui ant des fuites.
8. Raccordez le r_frig_rateur _ sa source _lectrique.
Figure 1 Figure 2
Mise _ niveau du r_frig_rateur et ajustement des portes
si n_cessaire
Directives pour le posltlonnement final de votre r_frlg_rateur :
Les quatre coins de la carrosserie doivent reposer fermement sur le plancher.
Les c6t_s devraient 6tre inclines de 6 mm (V4 po) de Pavant _ Parri_re (pour s'assurer que les portes
se ferment herm_tiquement et correctement).
Les portes doivent @tre align6es et de niveau.
La plupart de ces conditions peuvent @tre r_solues en levant ou en abaissant les roulettes ajustables avant.
Pour meffre _ niveau Ja caisse au moyen des roulettes avant :
1. Entrouvrir le tiroir du cong61ateur. Soulevez la grille de protection et tirez-la doucement vers I'avant (voir I'illustration).
2. Vous pouvez soulever ou abaisser les portes. Utilisez une cl_ _ douille de _/_ po pour tourner les vis de
r6glage (une de chaque c6t_).
Pour lever : tournez la vis de r_glage vers la droite.
Pour abaisser : tournez la vis d'ajustement vers la gauche.
3. Assurez-vous que les deux portes ne pr_sentent aucune obstruction, que les joints d'_tanch6it_ sont en contact
avec la caisse des quatre c6t_s et que la caisse est stable.
4. Lorsque I'appareil est _ niveau, abaissez la patte antibasculement jusqu'_ ce qu'elle soit en contact avec le sol.
5. Installez la grille de protection en I'ajustant en place•
n'6tes pas satisfait de I'installation de votre r6frig6rateur, composez le 1-800-4 MY-HOME pour obtenir de I'aide.
Pour me||re de nlveau Jes portes _ ralde de Ja charni_re inf_rleure ajus|abJe _ D6vissezOU I I
(cer|aJns mod$Jes) : enlevez lavJs
1. Enl .... tous les aliments d ..... partiments de la porte q ....... justez. _ _:_ _ _;_'I_ _ I
2. O ..... Jes portes 6 90 degr_s. _ \_-_q I
3. Desserrez ou enlevez la vis. _ _ _\ /
, , _Ouvrez ,
4 Soul .... la porte pendant lajust .... t de I..... delle O_[_ "_ ' "_%' / J
• ' la porte
Pour souJever ]a porte, pivotez la rondel]e vers ]a droite (Iorsque vue d'en bas).
P.... bat .... la porte, pivotez I.... dell ..... la gauche (Iorsq ..... d'en has _egr6_ t Ib_-_- / I
5. Resserrez la vis (Iorsqu'applicable) en vous assurant qu'elle se trouve entre les
rayons de a ronde e. La vis ne dolt pas @tre serr6e, taut simp ement insurer _ Basdela parle
pour qu'elle ne d_passe pas de la charni@re. Desserrez/retirez la vis
REMARQUE Is',Y a lieu)
Lo charni6re ajustable devrait 6tre utilis6e uniquement apr6s que les portes aient L ._'_'_._,_ _._/ I
_t_ mises 8 niveau avec les roulettes. Po_e
REMARQUE
St, apr6s avoir ajust@ les portes plus haut, la porte _met un bruit sec ou un clic,
enlevez la vis et remplacez-la par la vis plus Iongue qui est fournie dans la
trousse de la poign_e (modUles s61ectionn_s). Monter ou baisser la porte
installer le tiroir du con 61ateur
1. Apr@s avoir retir_ les glissi6res du has, d6posez le tiroir sur les supports de glissi_re en vous assurant que
les tiges de chaque c6t8 sont compl@tement ins_r6es dons les fentes de chaque c6t&
2. Replaeez les quatre (4) vis de tiroir (deux (2) de chaque c6t8), serrez bien, et fermez le tiroir (C).
3. V_rifiez le joint d'_tanch6it_ autour du tiroir du cong_lateur (en haut, en bas et sur les c6t_s).
4. Si le joint n'est pas @tanche, ouvrez le tiroir et d6vissez I@g@rement les quatre (4) vis du tiroir (deux (2) de
chaque c6t_) pour permettre au tiroir de pivoter.
5. Fermez le tiroir et v_rifiez de nouveau 1'6tanch_it_ du joint (A). Ouvrez le tiroir en le tirant par les c6t_s,
au centre du tiroir (B). Faites attention 8 ne pas faire faire une rotation au tiroir.
6. Serrez bien les quatre (4) vis du tiroir.
7. V6rifiez de nouveau le joint d'6tanch6it&
8. Installez la grille de protection en I'ajustant en place.
'oussez contre I
le t_roirdu I
con_6]ateur
iiiililililililililililililililililililililililililililili!
B IIII
r
Retrait du mat6riel d ex 6dition int6rleur
Kenmore utilise de la mousse et du ruban d'emballage pour prot_ger les pi@ces internes de votre
r6frig@ateur durant I'exp_dition. Une fois le r_frig_rateur install6, vous pouvez les retirer.
Et maintenant?
F_licitations! Vous @tes maintenant pr@t 8 utiliser votre nouveau r_frig@ateur Kenmore.
° Pour prendre connaissance des instructions de s_curit_ importantes et apprendre 8 utiliser votre
r_frig@ateur, veuillez lire le Guide d'utilisation et d'entretien en entien
° Vous pouvez commencer par la section {( Bruits et 61_ments visuels d'un fonctionnement normal }) du Guide
pour en apprendre davantage sur le fonctionnement normal de I'appareil.
[] Liste de v_rification de I installation
Portes
[] Handles are secure and tight
[] Les portes ferment herm&tiquement sur tousles
c6t&s de la caisse
[] Freezer door is level across the top
Mise _ nlveau
[] Les c6t6s du r6frig@ateur sont de niveau. Le
r_frig@ateur est inclind vers I'arri6re de 6 mm (1/4po)
[] La grille de protection est correctement fix_e au
r_frig@ateur
[] Les quatre coins de la caisse reposent fermement
sur le plancher
Allmentation en _lectrlclt_
Machine _ gla_:ons
[] Le syst6me d'alimentation en eau est raccord6 au
r_frig@ateur
[] II n'y a aucune fuite au niveau des raccords
- rev@ifier en 24 heures
[] La machine 8 glagons est en marche
V_rlficatlons finales
[] Le mat6riel d'exp6dition est enlev_
[] La temp@ature des compartiments r_frig_rateur
et cong61ateur est r_gl_e
[] La commande d'humidit& est r_gl6e
[] Le syst&me 61ectrique de la maison est sous tension
[] Le r_frig@ateur est branch6
P/N: 242185901