• Remove all packing material, any stickers, and the plastic band around the power plug.
• Remove and save literature.
• Please visit www.prodprotect.com/applica to register your warranty.
• Wash all removable parts as instructed in CARE AND CLEANING section of this manual.
BLENDING JAR ASSEMBLY
1. Turn blending jar upside down and place flat on counter top or work surface.
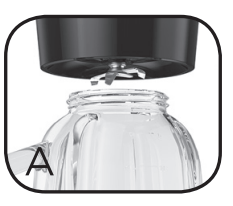
2. Place the blade assembly in bottom opening of the jar with blades down. (A)
Caution: Blades are sharp. Handle carefully
3. Place the jar base onto the blending jar and rotate clockwise until tight. It is important to tighten to avoid leaking while blending
4. Turn assembled jar right side up.
5. Place the dual-opening lid on blender jar.
6. Uncoil power cord from storage area under the blender base.
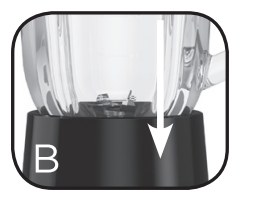
7. Place the jar assembly on blender base. (B).
8. Blender is now ready for use
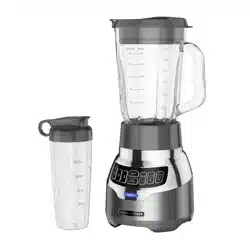
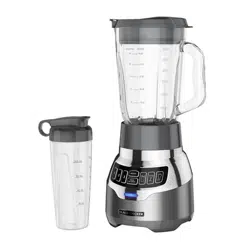
POWERCRUSH QUIET TECHNOLOGY DIGITAL BLENDER
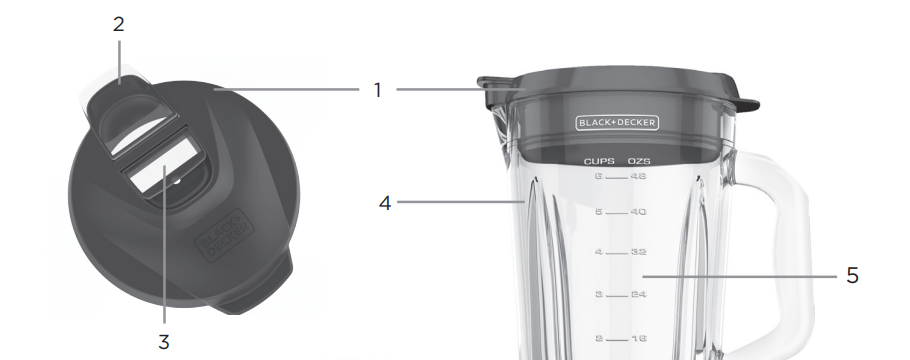
Dual-opening lid (Part# BL1550-01) gray
Pour Spout
Ingredient Slot
Blending jar (Part# BL1130-03)
Handle
Blade assembly (Part# BL1210BG-02)
Jar base (Part# BL1550-02) gray
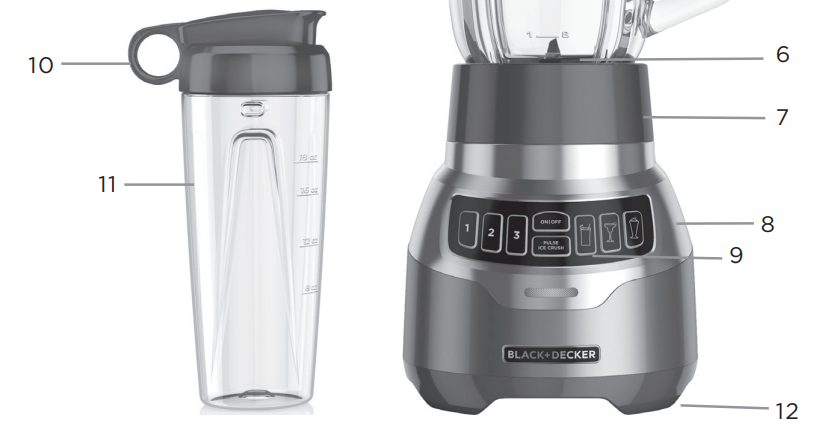
Base
Digital Control Panel
Single serve jar travel lid (Part# BL1550-03)
Single serve jar (Part# BL1550-04)
Cord storage (under base)
Non-skid rubber feet
USING YOUR BLENDER
Important: Appliance should always have lid in place when in use.
Caution: Do not place blender jar onto base when motor is running.
1. Make sure appliance is OFF.
2. Place ingredients to be blended into jar. For best results, add ingredients in the following order:
a. Liquids
b. Powders
c. Soft foods
d. Hard foods
e. Ice cubes last
Tip: When using frozen fruits it is not necessary to also add ice
3.. Place lid on jar; make sure the pour spout and ingredient slot are closed.
4. Plug power cord into outlet. Press ON/OFF button. LED should turn a solid color to signify the blender is in standby mode. After 60 seconds the unit will automatically power off if no buttons are pressed. The LED will blink slowly when the blender is in use.
Note: When in use, do not leave blender unattended. When using hard foods, such as ice or cheese, keep one hand on the lid to keep blender in place.
5. Select the speed that best suits your desired task. (See SPEED CHART)
6. When blending thick mixtures, such as smoothies and milkshakes, use the PULSE/Ice Crush button for several seconds, then release. Repeat to mix ingredients and then run continuously until food has reached desired consistency. Releasing pulse stops the blending and the unit returns to STANDBY. You may use a spatula or utensil to move ingredients and thick mixtures around in the blender jar, but only after stopping the blender. Turn the blender OFF before using a utensil.
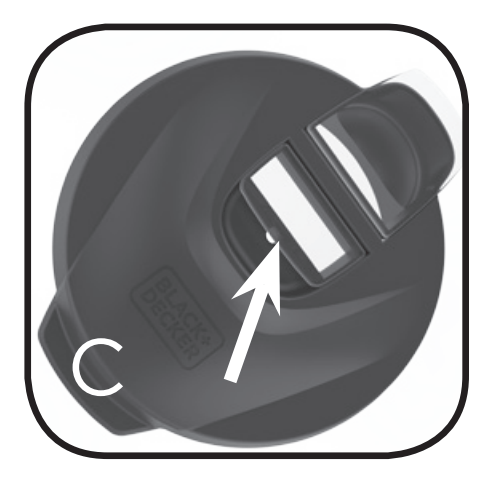
7. Open the ingredient slot to add ingredients while the blender is running. Drop ingredients through the opening. (C).
Important: Do not remove the lid while the blender is running
8. When finished, press ON/OFF to stop blending. Make sure blades have completely stopped before attempting to remove the blending jar from the base(refer to TROUBLESHOOTING for any issues).
9. Press ON/OFF to power off and unplug the blender.
10. To remove the jar, grasp the handle and lift up.
11.Open pour spout to serve.
Note: Unit will auto shutoff after 60 seconds without use
12.Always unplug the appliance when not in use
USING THE PREPROGRAMMED FUNCTIONS
Fill the assembled blender jar with the desired ingredients.
Place the dual-opening lid on the jar.
Place the jar on the base.
Press desired preprogrammed button. The blender will automatically mix and blend the following recipes with the press of a button:
- Smoothie: 30 seconds to blend fruits and vegetables to a smooth consistency.
- Icy drinks: Perfect for classic icy drinks like Margaritas with small ice crystals.
- Shake/Mix: Create thick, smooth and creamy frozen treats or use to combine other ingredients together.
USING THE SINGLE SERVE BLENDER JAR
Note: Do not blend hot liquids in the single serve jar.
1. Place the single serve blender jar on a flat surface with the open end facing up. Fill the jar with ingredients. Do not fill ingredients past the Max fill line.
Note: For best results, add ingredients in the following order:
a. Liquids
b. Ice
c. Hard Foods
d. Soft Foods
e. Powders
2. Place blade assembly in the jar opening with blades down.
3. Place jar base onto jar and rotate clockwise until it is tight. It is important to tighten to prevent leaking during blending.
4. Turn single serve jar upside down and place on the blender base.
5. Select speed 1 or use PULSE/Ice Crush to blend to desired consistency.
6. Once blending has finished, remove the single serve jar by lifting off the base. Turn the jar over and place it on a flat surface.
Note: Always make sure blades have stopped moving before removing jar
Important: If the jar gets stuck on the blending base or begins to loosen from the jar base, follow these steps:
a. Unplug the unit
b. Turn the jar clockwise to tighten jar onto the jar base
7. Remove the jar base from the single serve jar by turning counterclockwise. Then carefully remove blade assembly
8. Place the single serve jar drinking lid on the single serve jar and enjoy your delicious drinks on-the-go.
Caution: Blades are sharp. Handle carefully.
CARE AND CLEANING
This product contains no user serviceable parts. Refer service to qualified service personnel.
1. Before cleaning, turn off and unplug the appliance.
2. Lift the blending jar by the handle off the base.
3. Remove jar base by turning it counterclockwise until loose.
4. Remove the blade assembly.
Caution: Blades are sharp. Handle carefully
5. Remove lid.
6. Wash removable parts by hand or in the dishwasher. Place the jar on the bottom rack and the rest of the parts on the top rack only
CLEANING TIPS:
For quick cleanup, combine 1 cup hot water and a drop of liquid dish soap in the blending jar.
Cover and blend on Speed 2 for about 30 seconds.
Discard liquid and rinse thoroughly.
Important:
Do not place the jar parts in boiling liquids.
Do not immerse the base in liquid. Wipe the base with a damp cloth and dry thoroughly.
Remove stubborn spots by rubbing with a damp cloth and nonabrasive cleaner.
Note: If liquids spill onto the base, wipe with a damp cloth and dry thoroughly. Do not use rough scouring pads or cleansers on parts or finish.
BLENDING TIPS AND TECHNIQUES
Cut food into pieces no larger than 3⁄4" for use in the blender.
When preparing foods that have several different kinds of ingredients, always add liquid ingredients first.
When ingredients splatter onto the sides of the jar or the mixture is very thick, press the ON/OFF button to turn appliance off. Remove the lid and use a rubber spatula to scrape down the sides of the jar and to redistribute the food, pushing food toward the blades. Replace the lid and continue blending.
When making bread crumbs or blending dry goods, make sure blending jar and blade assembly are completely dry.
The PULSE/ICE CRUSH function is helpful when short bursts of power are needed, such as when preparing thick smoothies or milkshakes. Do not use pulse for more than 10 seconds at a time. Release the PULSE/ICE CRUSH button regularly, allow the blender to rest briefly, then continue.
Do not run blender for longer than 1 ½ minutes at a time.
Do not use if blender jar is chipped or cracked.
It is helpful to begin the blending process on the lowest speed and then increase to a higher speed, if necessary.
To stop blending at any time, press the ON/OFF button.
When blending hot ingredients open the ingredient slot. Cover lid with a cloth to avoid splattering and use speed 1. Do not blend more than 2 ½ to 3 cups at a time.
Always operate the blender with the lid on the jar.
Do not store foods in the blending jar.
Do not overfill the blender (the blender is more efficient with less rather than more)
DO NOT USE BLENDER TO BLEND:
Large pieces of frozen foods
Tough foods such as raw turnips, sweet potatoes and potatoes
Bones
Hard salami, pepperoni
Boiling liquids (cool for 5 minutes before place in blending jar)
Egg whites
Dough
Meats
SPEED AND FUNCTION CHART
Function
Food Type
Speed Setting
1
Stir
Mix
Crumb
Prepare salad dressings.
Mix ingredients for baked goods.
Make crumbs: cookie, cereal, bread.
Blend in the single serve jar.
2
Chop
Whip
Blend
Chop fruits, vegetables.
Whip whipped cream or butter.
Blend smoothies, sauces
3
Dressings
Batters
Dips
Puree fruits and vegetables.
Blend milkshakes and malts.
Grind hard cheeses and coconut.
Pulse/Ice Crush
Pulse
Ice
Pulse to desired consistency. Crush ice to snow texture.
30 Second Smoothie
Smoothies
Preset function
Icy Drinks
Margaritas
Daiquiris
Preset function
Mix/Shakes
Mix
Milkshakes
Preset function
TROUBLESHOOTING
Problem
Possible Cause
Solution
LED blinking quickly (100 msec/time)
Blender overheated or button held longer than 30 seconds.
Unit must be reset. Unplug to reset. Let unit cool for at least 20 minutes.
Blender stops/ goes into STANDBY mode
Blending time exceeds 2.5 minutes.
Re-select appropriate speed setting to start blender.
IMPORTANT SAFEGUARDS
When using electrical appliances, always follow basic safety precautions to reduce the risk of fire, electric shock, and/or injury, including the following:
• Read all instructions.
• To protect against risk of electrical shock, do not put blender base, cord or plug in water or other liquid.
• Close supervision is necessary when any appliance is used by or near children.
• Unplug from outlet when not in use, before assembly/disassembly and before cleaning.
• Avoid contacting moving parts.
• Do not operate any appliance with a damaged cord or plug or after the appliance malfunctions or is dropped or damaged in any manner. Contact Customer Service for examination, repair or electrical or mechanical adjustment by calling the appropriate toll-free number listed in this manual. This appliance has important markings on the plug blade. The attachment plug or entire cordset (if plug is molded onto cord) is not suitable for replacement. If damaged, the appliance must be replaced.
• The use of attachments, including canning jars, not recommended or sold by the appliance manufacturer may cause a risk of injury to persons.
• Do not use outdoors.
• Do not let cord hang over the edge of table or counter, or touch hot surfaces
• Keep hands and utensils out of container while blending to reduce the risk of severe injury to persons or damage to the blender. A scraper may be used but must be used only when the blender is not running.
• Blades are sharp. Handle carefully.
• To reduce the risk of injury, never place cutter assembly blades on base without the jar properly attached.
• Always operate blender with cover in place.
• Do not blend hot liquids in the single serve jar.
• Do not use appliance for other than intended use.
• This appliance is not intended for use by persons (including children) with reduced physical, sensory or mental capabilities, or lack of experience and knowledge, unless they have been given supervision or instruction concerning use of the appliance by a person responsible for their safety.
• Children should be supervised to ensure that they do not play with the appliance.
• Do not place on or near a hot gas or electric burner or in a heated oven.
Yes, you are able to puree fruits and vegetables in this blender.
#3 Price of the product ? Can deliver in pakiylahre
This blender operates at 900 watts, 120 volts, 60 hertz, and 7.5 amps. Under the Key Features section there is a Specifications box that indicates this Black+Decker blender requires 120 Volts – 60 Hz electric power service, such as that which is used in North America. Please do not attempt to use this blender with any other electric power service.