Operating Instructions OutbackCam
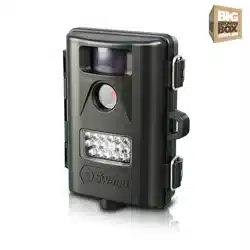
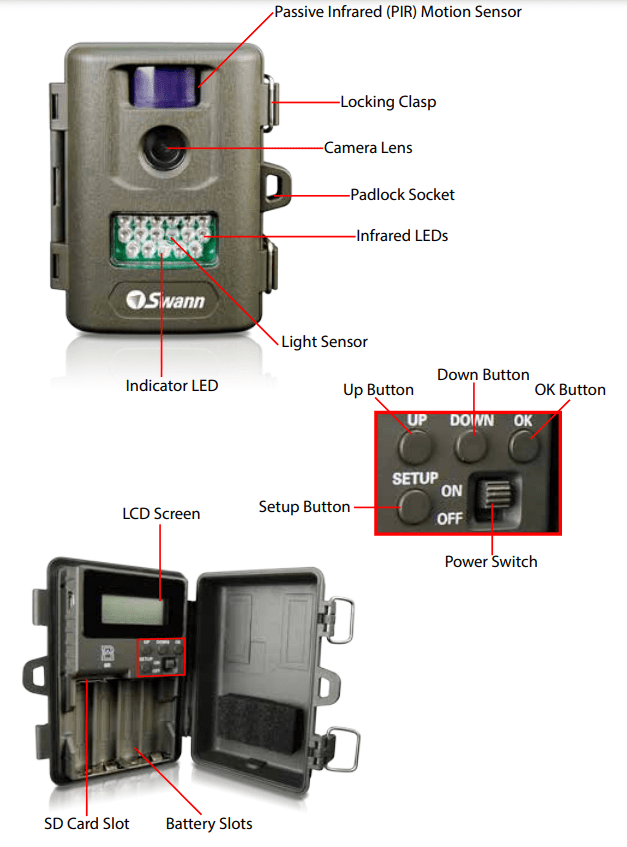
Layout
Preparing the OutbackCam
About the PIR Sensor
- Avoid facing the OutbackCam towards nearby objects, as these can cause numerous false triggers (see page 11 for more information).
- We strongly suggest that you ensure that there are no objects closer than 10ft/3m from the PIR sensor.
- The Passive Infrared (PIR) sensor detects moving heat sources. It does this by using a series of lenses which redirect the infrared light radiation towards a sensor, which detects the intensity of that infrared light. These special lenses break up the infrared light, allowing the sensor to detect any appreciable shift in the origin of the heat source. Objects too close to the PIR sensor will be out of “focus” and cause false triggers.
- The reason that the OutbackCam can operate so long on battery power is due to the clever integration of the PIR. The PIR doesn’t need much power to run, unlike a camera which requires quite a lot. If the camera was to remain on constantly, even the best AA batteries wouldn’t last a full day.
- Thus, most of the time, the PIR sensor is the only active component of the camera. The camera and the infrared LEDs which support the night vision feature only kick in when something moves in front of the PIR sensor. The area of detection and the view of the camera are shown in the diagram below.

- There is a small gap towards the center of the PIR sensors viewing area. Bear this in mind whilst placing the OutbackCam.
- Note that the actual range of the camera is, technically, limitless (for example, it can see the sun, and that’s a really, really long way away). The practical limit is the distance the subject can be from the camera before being ‘too small’ to see much detail. The distance at which this occurs depends on how much detail you want in your image.
Night Vision Range
- The range of the night vision (10m/32ft) is shown in the diagram. This is an average range - the actual range will be affected by environmental conditions (such as humidity, fog or smoke) and the color and brightness of the objects being observed. Note that infrared brightness isn’t the same as visual brightness - some white objects can appear black under infrared light, and vice versa.
- For the best night vision performance, use still image mode. Still images require less illumination than video, as the electronic shutter can be “open” longer.
Mounting the OutbackCam
Inserting Batteries and an SD Card
Undo the two clips on the side of the OutbackCam and open the case. Before inserting batteries or an SD card, ensure that the OutbackCam is turned OFF.
To install/change batteries:
- Locate the battery slots, on the rear of the camera unit.
- Remove any old batteries.
- Insert new ones observing the polarity shown in the battery slots.
- Use only fresh batteries. Do NOT mix battery types.
- You may need to re-configure the OutbackCam when you swap batteries.
To insert an SD card:
- If there is an SD card in the slot already, remove it. To release the SD card, push it into the slot for a moment then release, and it will ‘pop’ out.
- Face the SD card so that the data connectors are face down, with the 45° cut corner orientated to the top right hand side
Attaching the Strap
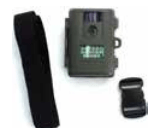
The included strap can be used to attach the OutbackCam to any structure which the strap can fit around. Ensure you have the required components. You’ll need the fabric strap, and the two halves of the clasp (pictured clipped together, facing “top-side” up).

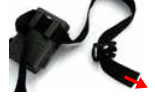
1. Feed the fabric strap through the two spaces provided on the rear of the OutbackCam. Un-clip and separate the two halves of the clasp.
2. Feed one end of the strap though the bottom side of the second hole of one clasp, as pictured to the left.
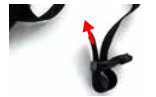
3. Loop the end of the strap back through the first slot in the clasp, as shown to the left.
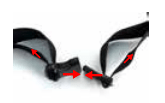
4. Repeat for the other half of the clasp. To tighten the strap, simply pull on the loose ends of the strap protruding from the clasp. If you find that the strap slips out of one or both ends of the clasp, then this indicates that the clasp is upside-down.
Operating the OutbackCam

- Setting up the OutbackCam: When the OutbackCam is turned on, the SETUP button will access the menu system. The UP and DOWN buttons are used for navigation, while the OK button selects or confirms an option.
- Date: For setting the OutbackCam’s date. Use the up and down buttons to adjust a value, and the OK button to set a value and move on to the next. When selected, the date will be shown in the numerical display four digits at a time, first the YEAR and then the MONTH and DAY.
- Time: For setting the OutbackCam’s time. It will display the time in 24-hour format, allowing you to select first the HOUR and then the MINUTE.
- Delay: The amount of time that must elapse between recordings before the OutbackCam will record again. The time is selected first in MINUTES then in SECONDS.
- Format: If you want to clear all the data from an SD card and prepare it for use in the OutbackCam, this is the option you’ll want. Before selecting pressing OK, the screen will show a total count of the number of recordings made by the OutbackCam. When Format is selected, the numerical display will display “FONO”. These are two options, where FO means “format” and NO means not to format.
Mode
Choose between file types, and select quality/duration.
- 1P: The OutbackCam will take one photograph each time it detects motion or the time-lapse interval triggers image capture.
- 3P: The OutbackCam will take three photographs in quick succession each time it detects motion or is triggered to record based on the time-lapse interval.
- Movie: The OutbackCam will record short videos when motion is detected or the time-lapse interval elapses. You can set the duration of the video between 5 seconds and 60 seconds.
- HI/LO: Quality settings. HI quality images require about twice as much space as LO quality images, and contain approximately twice as much detail.
Status
You can choose between motion detection and/or time-lapse operation.
- TL (Time Lapse): The OutbackCam will capture images at pre-set intervals, creating a time-lapse record of everything that happens. Once you select TL as your unit status, then you’ll be able to select the time interval in MINUTES and SECONDS.
- PIR (Passive InfraRed): The trigger for the OutbackCam to capture images/video will be the passive infrared motion sensor.
- PIR+TL: Will trigger the OutbackCam to capture images/video at set intervals and when it detects motion.
Duty
Choose the Active Duty period for the OutbackCam.
- Duty Time: You can define two times, a start time and an end time. Only during the selected period will the OutbackCam capture images/videos.
- The two times are formatted in 24-hour time and corrospond to the OutbackCam’s internal clock (set in the TIME menu).
SD Card Indicator
- When present, shows that the OutbackCam has detected an SD card and that it is able to save images or video to it.
- As you fill the card with images and/or videos, the used space will increase (indicated by horizontal lines filling the image of the SD card).
Viewing Recorded Images/Videos
Transferring data via the SD Card
- Alternately, you can just take the SD card out of the OutbackCam and pop it into an SD card reader on your computer. Many computers these days (particularly notebooks) come with SD card readers built in. If you don’t have a built in card reader, you can purchase a stand alone card reader which connects via USB, or use a USB to SD adaptor - both of these are quite inexpensive.
- Once the SD card has been detected by the computer, it will appear as a Mass Storage Device, and can be accessed in the same way as if you connected the Digtal Eye directly to the PC, as detailed above.
Playing AVI Files
- It may be the case that your computer has difficulty playing back the AVI files created by the OutbackCam. If this is the case, we suggest trying VLC Media Player, a great little program which is available free from www.videolan.org/vlc. There are versions available for almost every operating system available, and it’s a good choice for playing back the AVI files that the OutbackCam creates.
- There should be no such problem with the still images (JPG files). This file format has been around a long time (actually about twenty years, which in the computing world is practically forever) and the vast majority of devices have no problem displaying them. If you’re having problems viewing the files on a PC, then this is more likely to be the result of a faulty SD card than the file being incompatible with your system.
Note: The mini-USB port is for manufacturer’s use only. The USB port is used for loading firmware onto the OutbackCam.
False Triggers & How to Avoid Them
- The PIR sensor is not infallible. It has been designed to use the absolute minimum amount of power possible, which does lead to false triggers occurring in some locations. False triggers occur whenever the PIR sensor “thinks” it detects motion when, in fact, there is no motion to be detected (or, at least, no movement you want to be detected).
- Even the “occasional” false trigger can be extremely annoying. For example: say you setup the OutbackCam to take three photos per motion event, and place it in a position which, for only one hour a day, receives one false trigger per minute. At the end of a month, this will add up to more than 5000 photos of nothing!
Suggested solutions:
- Avoid placing the OutbackCam facing areas with a large and/or dynamic temperature range. For example, an area consisting of both sunny and shady areas will, on a clear day, create some hot areas and some cool ones. As a result, any routine movement (such as wind in trees or a passing shadow and so on) will trigger the PIR sensor.
- Do not aim the OutbackCam directly at an object less than 16ft/5m away. In fact, the farther anything is from the sensor, the better. If there’s nothing within the sensor range except the people/animals you want to detect, then there’s nothing that will cause a false trigger.
- Test your setup. Configure and place the camera and leave for at least an hour. If the area you’re monitoring has a large temperature difference between day and night, then a full day test is recommended. Multiply the number of false triggers you get by the amount of time you plan to leave the OutbackCam in that location to get a feel for how many false triggers you’ll be dealing with over the course of the camera’s deployment.
- Don’t use the OutbackCam with low batteries - under-powering the unit will increase the frequency of false triggers, and may cause data corruption. Remember to replace all batteries at once, and do not mix battery types.
- If all else fails, try altering the Record Delay timing. A longer Record Delay will reduce the number of false triggers you experience, though it is unlikely to prevent them completely.
Low Battery Warning
- If the AA batteries in the OutbackCam are running low, the indicator light on the front of the OutbackCam (the one buried in the infrared LED bank) will blink three times when the unit powered on. This is an indication that you should change the batteries immediately
Tips and Tricks
What can I use the OutbackCam for?
- The short answer: How many things can you think of?
- The longer answer: With the exceptions of illegal activity (such as recording people in certain environments without their knowledge - check the law in your locality!) or exposure to extreme environments (such as strapping it to a submarine or space shuttle or filming a roast dinner from inside the oven) just about anything. Here are just a couple of suggestions:
- Home security. A great option for securing a yard or garage. You can place it in your yard/garage/wherever and not have to run cables for power for video signals. Just remember to check the batteries regularly!
- Covert surveillance. It’s neat, discreet and (somewhat) petite. That, and you can put it where you need it and come back to get it a few weeks later. If you set it up right, it’ll operate autonomously for weeks on end.
- Animal monitoring. If you’ve ever wondered “Hey... where did my chickens go?” then find the fox responsible with the OutbackCam. Whether you’re looking for wildlife or monitoring your herd, any warm-blooded animals can be detected and recorded by the OutbackCam (though your local Sasquatch might slip past - they’re just camera shy).
What can I mount the OutbackCam on?
- The short answer: almost anything except air, other gasses, spider-web or a prayer.
- The slightly longer answer is anything which will provide the OutbackCam with sturdy enough support to ensure it stays there for the entire time. The OutbackCam is built tough, and will probably survive being dropped or falling off its mount (though no guarantees, folks - bad stuff does happen, and we all get unlucky sooner or later). However, you certainly don’t want a bunch of pictures of the ground, even if they’re at extremely artistic angles - so whatever you mount it on, be sure it’s tough enough to go the distance!
- What’s an AVI file? Come to that, what’s a JPEG? What’s the difference?
- A JPEG file is a format for storing still images. It’s a ‘compression’ technique, allowing you to store many more images on your SD card than would be the case if they were not compressed, whilst still retaining the vast majority of the visual details. JPEG is a widely supported format, and can be viewed on just about any computer or computer-like device about today. Even most DVD players can display JEPG images (though they often need to be burnt to a DVD first).
- An AVI file is a container for storing video data. They can use a variety of compression formats, so not all AVI files will be compatible with all computer systems. If you run into this problem, we suggest using VLC Media Player. It’s available free online for just about any operating system. Grab it from www.videolan.org/vlc.
What are the best kind of batteries to use?
- The best choice of battery depends on your individual needs. Typically, we recommend alkaline batteries with the highest milliampere hour (mAh) rating possible. mAh is a measurement of how much power a battery contains, whereas the volt (V) measurement is a measure of how much of that power it will release at a time. All AA batteries are around 1.5V, regardless of their mAh rating. If you’re planning to keep using the OutbackCam on a regular basis, then rechargeable batteries will prove the most economical choice in the long term.
- If the batteries in the OutbackCam are nearly exhausted, the IR LEDs won’t be as bright - this can lead to capturing dark (or completely black) images at night.
- Always replace the batteries regularly!
How do I know my OutbackCam won’t be stolen?
- The short answer: That’s just the chance you take.
- The longer answer: Sure, you (and we) can’t guarantee that someone with light fingers won’t find the camera and pilfer it - but there are some things you can do to minimise the chances of this happening. Here are some suggestions.
- Mount the OutbackCam somewhere out of sight, or at least somewhere which isn’t obvious. People can’t take what they don’t know is there.
- Make use of the padlock clasp, and use as sturdy a padlock as will fit. Locks are great deterrents.
- If you’re really need to secure the OutbackCam, then you can consider using a security lock and chain, like those typically employed as bicycle locks. If the chain is too thick to fit through the padlock socket, try attaching it to the padlock itself.
How many images/videos can I fit on my SD card?
- Short answer: Depends how big your SD card is
- Long answer: Individual 15 second video recordings range from between 15 to 30MB a piece, depending on the complexity of the images and the speed of motion within the scene. So, for arguments sake (and for ease of math) we’ll say that the “average” size of a video is 25MB. Thus, 40 videos will make 1GB. So, if you exploit the maximum capacity of the OutbackCam and use a 32GB card, you’ll be able to store 1200 or more video recordings. That’s one recording per hour for 53 days!
- Still images at high quality are typically require about a megabyte (500KB) and at low quality approximately half that amount (500KB). Which means you’ll get a little over 30, 000 images to our aforementioned 32GB SD card (assuming it’s not already full of video, of course). Which is one picture every ten minutes for about 7 months. If that’s not enough, then try low quality pictures - you’ll get somewhere in the vicinity of 60, 000 pictures on the card.
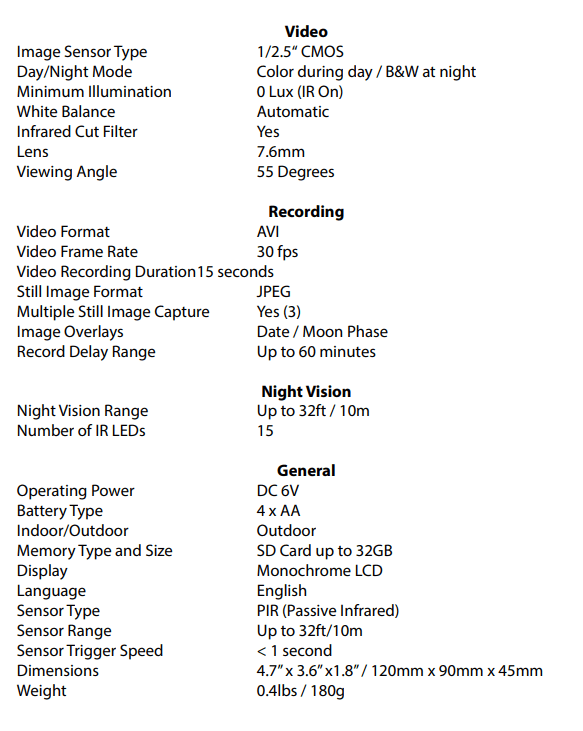
Technical Specifications