


en
7DEOHRIFRQWHQWV
>HQ@
,QVWUXFWLRQPDQXDO%XLOWLQRYHQ
8 ,QWHQGHGXVH
( ,PSRUWDQWVDIHW\LQIRUPDWLRQ
*HQHUDOLQIRUPDWLRQ
&OHDQLQJIXQFWLRQ
] &DXVHVRIGDPDJH
*HQHUDOLQIRUPDWLRQ
7 (QYLURQPHQWDOSURWHFWLRQ
6DYLQJHQHUJ\
(QYLURQPHQWDOO\IULHQGO\GLVSRVDO
* *HWWLQJWRNQRZ\RXUDSSOLDQFH
&RQWUROSDQHO
%XWWRQV
'LVSOD\
7\SHVRIKHDWLQJDQGIXQFWLRQV
7HPSHUDWXUHVHOHFWRU
&RRNLQJFRPSDUWPHQWIXQFWLRQV
_ $FFHVVRULHV
6KHOISRVLWLRQV
/RFNLQJIXQFWLRQ
7HOHVFRSLFUDLOVHW
6SHFLDODFFHVVRULHV
K %HIRUHXVLQJIRUWKHILUVWWLPH
6HWWLQJWKHWLPHRQWKHFORFN
%DNLQJRXWWKHRYHQ
&OHDQLQJWKHDFFHVVRULHV
)LWWLQJWKHWHOHVFRSLFVKHOIVHW
1 2SHUDWLQJWKHDSSOLDQFH
6ZLWFKLQJWKHRYHQRQDQGRII
5RWDU\VSLW
$XWRPDWLFVDIHW\VZLWFKRIIIXQFWLRQ
O 7LPHVHWWLQJRSWLRQV
2YHUYLHZRIWKHWLPHVHWWLQJRSWLRQV
2SHUDWLQJWKHHOHFWURQLFFORFN
6HWWLQJWKHDXWRPDWLFWLPHU
A &KLOGSURRIORFN
$FWLYDWLQJWKHFKLOGSURRIORFN
'HDFWLYDWLQJWKHFKLOGSURRIORFN
Q %DVLFVHWWLQJV
/LVWRIEDVLFVHWWLQJV
&KDQJLQJWKHEDVLFVHWWLQJV
6HWWLQJHQHUJ\VDYLQJPRGH
D &OHDQLQJ
6XLWDEOHFOHDQLQJDJHQWV
.HHSLQJWKHDSSOLDQFHFOHDQ
&OHDQLQJWKHFRRNLQJFRPSDUWPHQW
. &OHDQLQJIXQFWLRQ
3\URO\WLFVHOIFOHDQLQJ
p 5DLOV
'HWDFKLQJWKHVKHOIVXSSRUWV
5HILWWLQJWKHVKHOIVXSSRUWV
q $SSOLDQFHGRRU
5HPRYLQJDQGLQVWDOOLQJWKHGRRUSDQHOV
5HPRYLQJDQGILWWLQJWKHDSSOLDQFHGRRU
3 7URXEOHVKRRWLQJ
)DXOWPHVVDJHV
5HSODFLQJWKHRYHQOLJKWEXOE
4 &XVWRPHUVHUYLFH
(QXPEHUDQG)'QXPEHU
0DQXIDFWXUHULQIRUPDWLRQ
J 7HVWHGIRU\RXLQRXUFRRNLQJVWXGLR
7DEOHRIGLVKHV
7LSVIRUXVLQJ\RXUDSSOLDQFH
3URGXNWLQIR
$GGLWLRQDOLQIRUPDWLRQRQSURGXFWVDFFHVVRULHV
UHSODFHPHQWSDUWVDQGVHUYLFHVFDQEHIRXQGDW
ZZZERVFKKRPHFRPDQGLQWKHRQOLQHVKRS
ZZZERVFKHVKRSFRP

en ,QWHQGHGXVH
8,QWHQGHGXVH
,QWHQGHG X VH
5HDG WKHVH LQVWUXFWLRQV FDUHIXOO\ 2QO\ WKHQ ZLOO
\RXEHDEOHWRRSHUDWH\RXUDSSOLDQFHVDIHO\
DQG FRUUHFWO\ 5HWDLQ WKH LQVWUXFWLRQ PDQXDO DQG
LQVWDOODWLRQLQVWUXFWLRQVIRUIXWXUHXVHRUIRU
VXEVHTXHQWRZQHUV
7KLVDSSOLDQFHLVRQO\LQWHQGHGWREHIXOO\ILWWHG
LQDNLWFKHQ2EVHUYHWKHVSHFLDOLQVWDOODWLRQ
LQVWUXFWLRQV
&KHFNWKHDSSOLDQFHIRUGDPDJHDIWHU
XQSDFNLQJLW'RQRWFRQQHFWWKHDSSOLDQFHLILW
KDVEHHQGDPDJHGLQWUDQVSRUW
2QO\DOLFHQVHGSURIHVVLRQDOPD\FRQQHFW
DSSOLDQFHVZLWKRXWSOXJV'DPDJHFDXVHGE\
LQFRUUHFWFRQQHFWLRQLVQRWFRYHUHGXQGHU
ZDUUDQW\
7KLVDSSOLDQFHLVLQWHQGHGIRUGRPHVWLFXVH
RQO\7KHDSSOLDQFHPXVWRQO\EHXVHGIRUWKH
SUHSDUDWLRQRIIRRGDQGGULQN7KHDSSOLDQFH
PXVWEHVXSHUYLVHGGXULQJRSHUDWLRQ2QO\XVH
WKLVDSSOLDQFHLQGRRUV
7KLVDSSOLDQFHLVLQWHQGHGIRUXVHXSWRD
PD[LPXPKHLJKWRI PHWUHVDERYHVHD
OHYHO
7KLV DSSOLDQFH LV QRW LQWHQGHG IRU RSHUDWLRQ ZLWK
DQH[WHUQDOFORFNWLPHURUDUHPRWHFRQWURO
7KLV DSSOLDQFH PD\ EH XVHG E\ FKLOGUHQ RYHU WKH
DJH RI \HDUV ROG DQG E\ SHUVRQV ZLWK UHGXFHG
SK\VLFDOVHQVRU\RUPHQWDOFDSDELOLWLHVRUE\
SHUVRQV ZLWK D ODFN RI H[SHULHQFH RU NQRZOHGJH
LIWKH\DUHVXSHUYLVHGRUDUHLQVWUXFWHGE\D
SHUVRQUHVSRQVLEOHIRUWKHLUVDIHW\KRZWRXVH
WKHDSSOLDQFHVDIHO\DQGKDYHXQGHUVWRRGWKH
DVVRFLDWHGKD]DUGV
&KLOGUHQPXVWQRWSOD\ZLWKRQRUDURXQGWKH
DSSOLDQFH&KLOGUHQPXVWQRWFOHDQWKH
DSSOLDQFHRUFDUU\RXWJHQHUDOPDLQWHQDQFH
XQOHVVWKH\DUHDWOHDVW \HDUVROGDQGDUH
EHLQJVXSHUYLVHG
.HHSFKLOGUHQEHORZWKHDJHRI \HDUVROGDWD
VDIHGLVWDQFHIURPWKHDSSOLDQFHDQGSRZHU
FDEOH
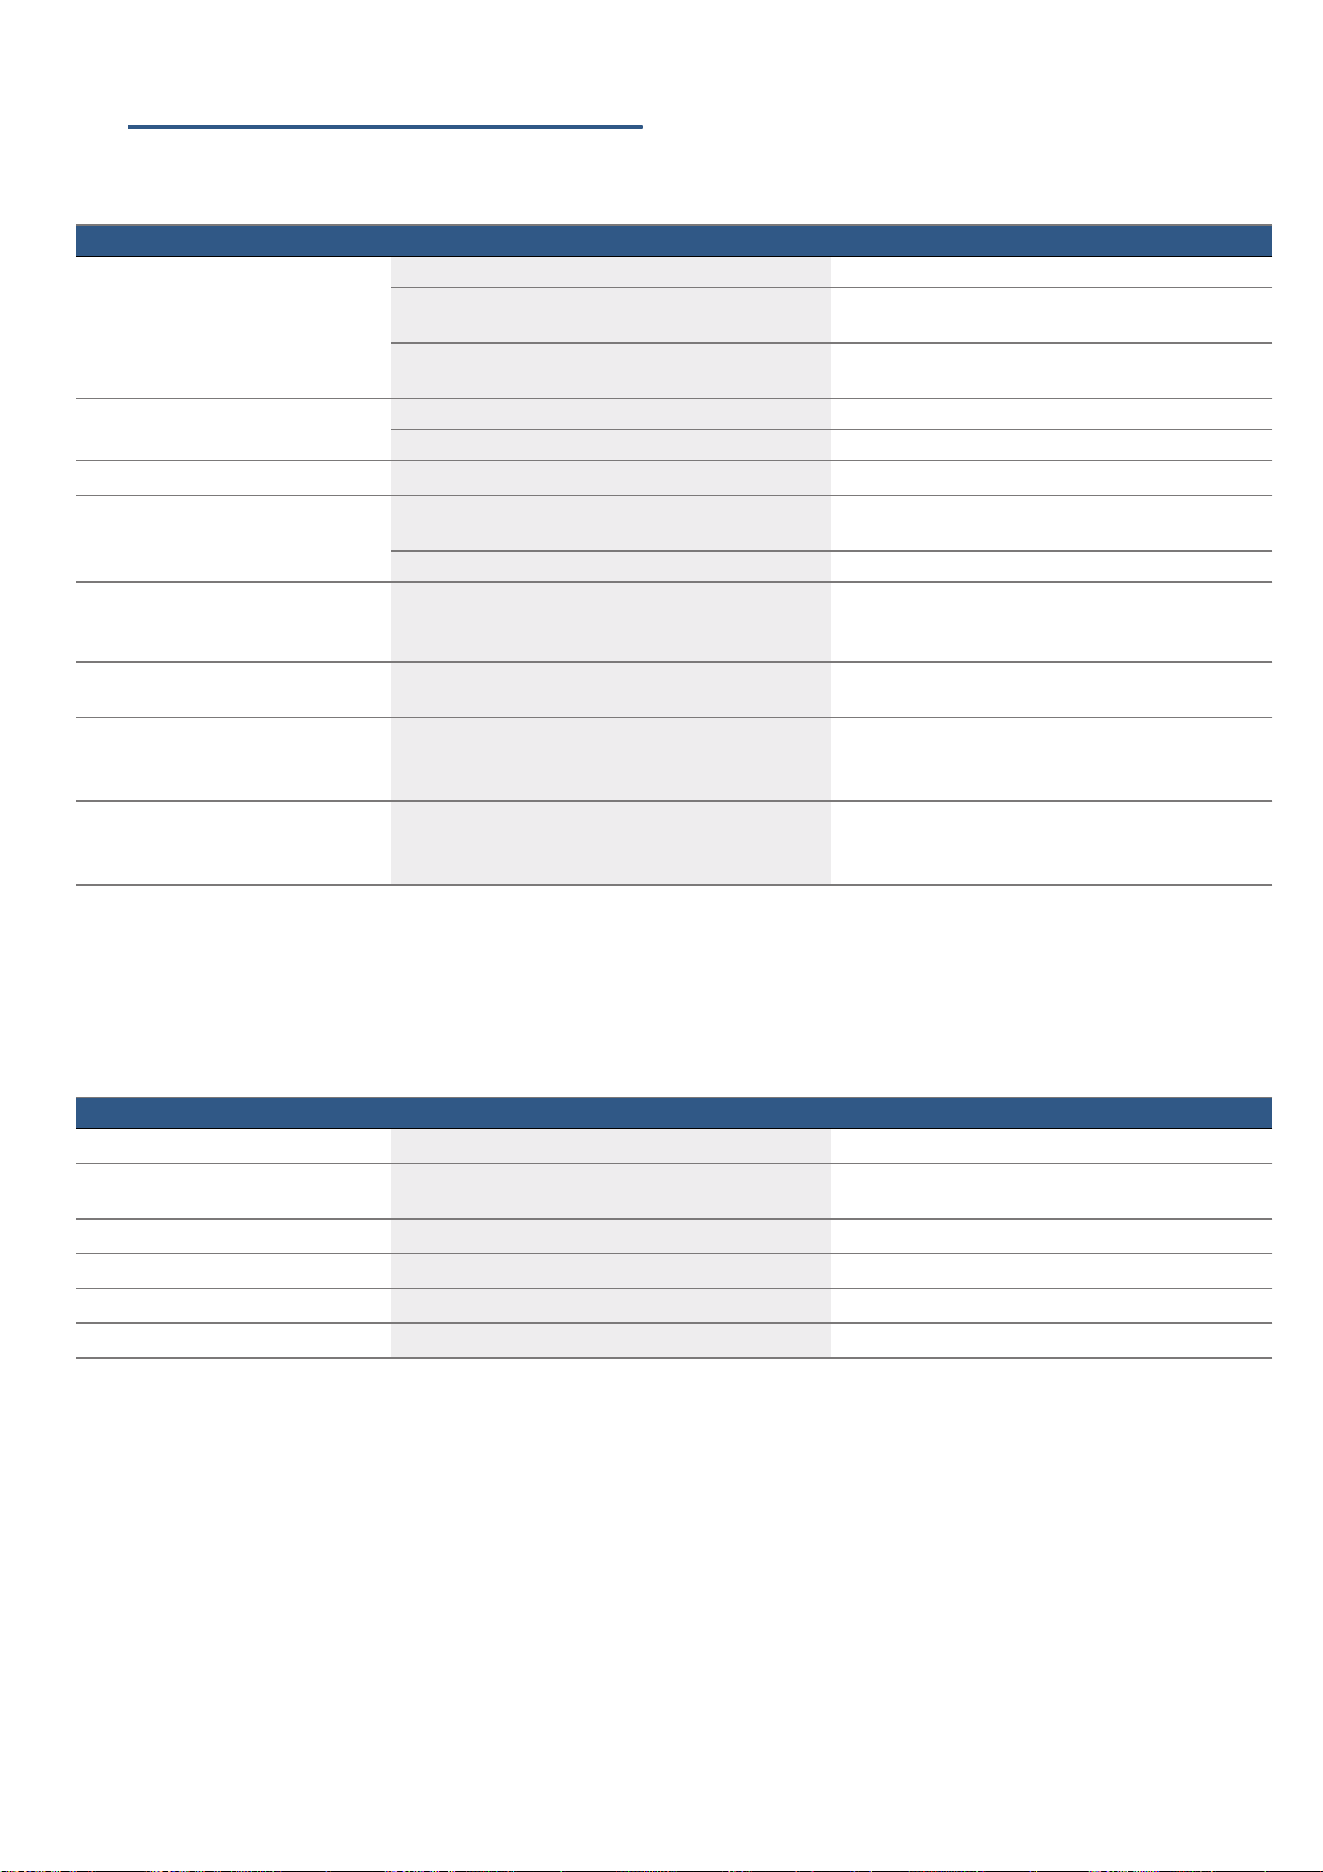
$OZD\VVOLGHDFFHVVRULHVLQWRWKHFRRNLQJ
FRPSDUWPHQWWKHULJKWZD\URXQG
~ $FFHVVRULHVRQ SDJH
(,PSRUWDQWVDIHW\
LQIRUPDWLRQ
,PSRUWDQW VDIHW\ LQIRUPDWLRQ
*HQHUDOLQIRUPDWLRQ
::DUQLQJ² 5LVNRIILUH
■ &RPEXVWLEOHLWHPVVWRUHGLQWKHFRRNLQJ
FRPSDUWPHQWPD\FDWFKILUH1HYHUVWRUH
FRPEXVWLEOHLWHPVLQWKHFRRNLQJ
FRPSDUWPHQW 1HYHU RSHQ WKH DSSOLDQFH GRRU
LIWKHUHLVVPRNHLQVLGH6ZLWFKRIIWKH
DSSOLDQFHDQGXQSOXJLWIURPWKHPDLQVRU
VZLWFKRIIWKHFLUFXLWEUHDNHULQWKHIXVHER[
5LVNRIILUH
■ /RRVHIRRGUHPQDQWVIDWDQGPHDWMXLFHV
PD\FDWFKILUH%HIRUHXVLQJWKHDSSOLDQFH
UHPRYHWKHZRUVWRIWKHIRRGUHPQDQWVIURP
WKHFRRNLQJFRPSDUWPHQWKHDWLQJHOHPHQWV
DQGDFFHVVRULHV
5LVNRIILUH
■ $ GUDXJKW LV FUHDWHG ZKHQ WKH DSSOLDQFH GRRU
LV RSHQHG *UHDVHSURRI SDSHU PD\ FRPH LQWR
FRQWDFWZLWKWKHKHDWLQJHOHPHQWDQGFDWFK
ILUH'RQRWSODFHJUHDVHSURRISDSHUORRVHO\
RYHUDFFHVVRULHVGXULQJSUHKHDWLQJ$OZD\V
ZHLJKWGRZQWKHJUHDVHSURRISDSHUZLWKD
GLVKRUDEDNLQJWLQ2QO\FRYHUWKHVXUIDFH
UHTXLUHGZLWKJUHDVHSURRISDSHU
*UHDVHSURRISDSHUPXVWQRWSURWUXGHRYHU
WKHDFFHVVRULHV
::DUQLQJ² 5LVNRIEXUQV
■ 7KHDSSOLDQFHEHFRPHVYHU\KRW1HYHU
WRXFKWKHLQWHULRUVXUIDFHVRIWKHFRRNLQJ
FRPSDUWPHQWRUWKHKHDWLQJHOHPHQWV
$OZD\VDOORZWKHDSSOLDQFHWRFRROGRZQ
.HHSFKLOGUHQDWDVDIHGLVWDQFH
5LVNRIVHULRXVEXUQV
■ $FFHVVRULHV DQG RYHQZDUH EHFRPH YHU\ KRW
$OZD\VXVHRYHQJORYHVWRUHPRYH
DFFHVVRULHVRURYHQZDUHIURPWKHFRRNLQJ
FRPSDUWPHQW
5LVNRIEXUQV
■ $OFRKROLFYDSRXUVPD\FDWFKILUHLQWKHKRW
FRRNLQJFRPSDUWPHQW1HYHUSUHSDUHIRRG
FRQWDLQLQJODUJHTXDQWLWLHVRIGULQNVZLWKD
KLJKDOFRKROFRQWHQW2QO\XVHVPDOO
TXDQWLWLHVRIGULQNVZLWKDKLJKDOFRKRO
FRQWHQW2SHQWKHDSSOLDQFHGRRUZLWKFDUH
5LVNRIEXUQV
■ 7KH WHOHVFRSLF VKHOYHV EHFRPH KRW ZKHQ WKH
DSSOLDQFHLVLQXVH7DNHVSHFLDOFDUHQRWWR
JHWEXUQWZKHQWKH\DUHSXOOHGRXW

,PSRUWDQWVDIHW\LQIRUPDWLRQ HQ
::DUQLQJ² 5LVNRIVFDOGLQJ
■ 7KHDFFHVVLEOHSDUWVEHFRPHKRWGXULQJ
RSHUDWLRQ1HYHUWRXFKWKHKRWSDUWV.HHS
FKLOGUHQDWDVDIHGLVWDQFH
5LVNRIVFDOGLQJ
■ :KHQ\RXRSHQWKHDSSOLDQFHGRRUKRW
VWHDP FDQ HVFDSH 6WHDP PD\ QRW EH YLVLEOH
GHSHQGLQJRQLWVWHPSHUDWXUH:KHQ
RSHQLQJGRQRWVWDQGWRRFORVHWRWKH
DSSOLDQFH 2SHQ WKH DSSOLDQFH GRRU FDUHIXOO\
.HHSFKLOGUHQDZD\
5LVNRIVFDOGLQJ
■ :DWHULQDKRWFRRNLQJFRPSDUWPHQWPD\
FUHDWHKRWVWHDP1HYHUSRXUZDWHULQWRWKH
FRRNLQJFRPSDUWPHQWZKHQWKHFRRNLQJ
FRPSDUWPHQWLVKRW
::DUQLQJ² 5LVNRILQMXU\
■ 6FUDWFKHGJODVVLQWKHDSSOLDQFHGRRUPD\
GHYHORSLQWRDFUDFN'RQRWXVHDJODVV
VFUDSHUVKDUSRUDEUDVLYHFOHDQLQJDLGVRU
GHWHUJHQWV
5LVNRILQMXU\
■ 7KH KLQJHV RQ WKH DSSOLDQFH GRRU PRYH ZKHQ
RSHQLQJDQGFORVLQJWKHGRRUDQG\RXPD\
EHWUDSSHG.HHS\RXUKDQGVDZD\IURPWKH
KLQJHV
::DUQLQJ² 5LVNRIHOHFWULFVKRFN
■ ,QFRUUHFW UHSDLUV DUH GDQJHURXV 5HSDLUV PD\
RQO\ EH FDUULHG RXW E\ RQH RI RXU WUDLQHG DIWHU
VDOHVHQJLQHHUV,IWKHDSSOLDQFHLVIDXOW\
XQSOXJ WKH PDLQV SOXJ RU VZLWFK RII WKH IXVH LQ
WKHIXVHER[&RQWDFWWKHDIWHUVDOHVVHUYLFH
5LVNRIHOHFWULFVKRFNDQGVHULRXVLQMXU\
■ 7KHFDEOHLQVXODWLRQRQHOHFWULFDODSSOLDQFHV
PD\PHOWZKHQWRXFKLQJKRWSDUWVRIWKH
DSSOLDQFH1HYHUEULQJHOHFWULFDODSSOLDQFH
FDEOHVLQWRFRQWDFWZLWKKRWSDUWVRIWKH
DSSOLDQFH
5LVNRIHOHFWULFVKRFN
■ 'RQRWXVHDQ\KLJKSUHVVXUHFOHDQHUVRU
VWHDPFOHDQHUVZKLFKFDQUHVXOWLQDQ
HOHFWULFVKRFN
5LVNRIHOHFWULFVKRFN
■ :KHQUHSODFLQJWKHFRRNLQJFRPSDUWPHQW
EXOE WKH EXOE VRFNHW FRQWDFWV DUH OLYH %HIRUH
UHSODFLQJ WKH EXOE XQSOXJ WKH DSSOLDQFH IURP
WKHPDLQVRUVZLWFKRIIWKHFLUFXLWEUHDNHULQ
WKHIXVHER[
5LVNRIHOHFWULFVKRFN
■ $GHIHFWLYHDSSOLDQFHPD\FDXVHHOHFWULF
VKRFN 1HYHU VZLWFK RQ D GHIHFWLYH DSSOLDQFH
8QSOXJWKHDSSOLDQFHIURPWKHPDLQVRU
VZLWFKRIIWKHFLUFXLWEUHDNHULQWKHIXVHER[
&RQWDFWWKHDIWHUVDOHVVHUYLFH
5LVNRIHOHFWULFVKRFN
■ 'RQRWXVHLIWKHSRZHUFDEOHRUDSSOLDQFHLV
GDPDJHG,IDIDXOWRFFXUVSXOOWKHPDLQV
SOXJRUVZLWFKRIIWKHPDLQVYROWDJH
LPPHGLDWHO\
&OHDQLQJIXQFWLRQ
::DUQLQJ² 5LVNRIILUH
■ /RRVH IRRG UHVLGXHV JUHDVH DQG PHDW MXLFHV
PD\FDWFKILUHGXULQJWKHFOHDQLQJIXQFWLRQ
%HIRUH VWDUWLQJ WKH FOHDQLQJ IXQFWLRQ UHPRYH
FRDUVHGLUWIURPWKHFRRNLQJFRPSDUWPHQW
DQGIURPWKHDFFHVVRULHV
5LVNRIILUH
■ 7KHDSSOLDQFHZLOOEHFRPHYHU\KRWRQWKH
RXWVLGHGXULQJWKHFOHDQLQJIXQFWLRQ1HYHU
KDQJ FRPEXVWLEOH REMHFWV HJ WHD WRZHOV RQ
WKHGRRUKDQGOH'RQRWSODFHDQ\WKLQJ
DJDLQVWWKHIURQWRIWKHDSSOLDQFH.HHS
FKLOGUHQDZD\IURPWKHDSSOLDQFH
5LVNRIILUH
■ ,IWKHGRRUVHDOLVGDPDJHGDODUJHDPRXQW
RI KHDW ZLOO EH JHQHUDWHG DURXQG WKH GRRU 'R
QRWVFUXERUUHPRYHWKHVHDO1HYHURSHUDWH
WKHDSSOLDQFHLIWKHVHDOLVGDPDJHGRU
PLVVLQJ
::DUQLQJ² 5LVNRIVHULRXVGDPDJHWR
KHDOWK
7KHDSSOLDQFHZLOOEHFRPHYHU\KRWGXULQJWKH
FOHDQLQJIXQFWLRQ7KHQRQVWLFNFRDWLQJRQ
EDNLQJWUD\VDQGWLQVLVGHVWUR\HGDQGQR[LRXV
JDVHVDUHUHOHDVHG1HYHUFOHDQQRQVWLFN
EDNLQJWUD\VDQGEDNLQJWLQVXVLQJWKHFOHDQLQJ
IXQFWLRQ2QO\FOHDQHQDPHOOHGDFFHVVRULHV
XVLQJWKHFOHDQLQJIXQFWLRQ
::DUQLQJ² 5LVNRIKDUPWRKHDOWK
7KHFOHDQLQJIXQFWLRQKHDWVXSWKHFRRNLQJ
FRPSDUWPHQW WR D YHU\ KLJK WHPSHUDWXUH VR WKDW
IRRGUHPQDQWVOHIWRYHUIURPURDVWLQJJULOOLQJ
DQGEDNLQJZLOOEXUQRII7KLVSURFHVVUHOHDVHV
YDSRXUVZKLFKFDQLUULWDWHWKHPXFRXV
PHPEUDQHV:KLOHWKHFOHDQLQJIXQFWLRQLV
UXQQLQJ NHHS WKH NLWFKHQ ZHOO YHQWLODWHG 'R QRW
UHPDLQLQWKHURRPIRUORQJSHULRGV.HHS
FKLOGUHQDQGSHWVDZD\)ROORZWKHLQVWUXFWLRQV
HYHQ ZKHQ XVLQJ WKH 'HOD\HG VWDUW IXQFWLRQ ZLWK
DGHOD\HGHQGWLPH
::DUQLQJ² 5LVNRIEXUQV
■ 7KHFRRNLQJFRPSDUWPHQWEHFRPHV
H[WUHPHO\KRWGXULQJWKHFOHDQLQJIXQFWLRQ
1HYHURSHQWKHDSSOLDQFHGRRU$OORZWKH
DSSOLDQFHWRFRROGRZQ.HHSFKLOGUHQDZD\
IURPWKHDSSOLDQFH
5LVNRIEXUQV
■ ;7KHDSSOLDQFHEHFRPHVYHU\KRWRQWKH
RXWVLGHGXULQJWKHFOHDQLQJIXQFWLRQ1HYHU
WRXFK WKH DSSOLDQFH GRRU $OORZ WKH DSSOLDQFH
WRFRROGRZQ.HHSFKLOGUHQDWDVDIH
GLVWDQFH

en &DXVHVRIGDPDJH
]&DXVHVRIGDPDJH
&DXVHV RI GD PDJH
*HQHUDOLQIRUPDWLRQ
&DXWLRQ
■ $FFHVVRULHVIRLOJUHDVHSURRISDSHURURYHQZDUHRQ
WKHFRRNLQJFRPSDUWPHQWIORRUGRQRWSODFH
DFFHVVRULHV RQ WKH FRRNLQJ FRPSDUWPHQW IORRU 'R QRW
FRYHUWKHFRRNLQJFRPSDUWPHQWIORRUZLWKDQ\VRUWRI
IRLORUJUHDVHSURRISDSHU'RQRWSODFHRYHQZDUHRQ
WKH FRRNLQJ FRPSDUWPHQW IORRU LI D WHPSHUDWXUH RI RYHU
&KDVEHHQVHW7KLVZLOOFDXVHKHDWWR
DFFXPXODWH7KHEDNLQJDQGURDVWLQJWLPHVZLOOQR
ORQJHUEHFRUUHFWDQGWKHHQDPHOZLOOEHGDPDJHG
■ $OXPLQLXPIRLO$OXPLQLXPIRLOLQWKHFRRNLQJ
FRPSDUWPHQW PXVW QRW FRPH LQWR FRQWDFW ZLWK WKH GRRU
JODVV7KLVFRXOGFDXVHSHUPDQHQWGLVFRORXUDWLRQRI
WKHGRRUJODVV
■ :DWHULQDKRWFRRNLQJFRPSDUWPHQWGRQRWSRXU
ZDWHULQWRWKHFRRNLQJFRPSDUWPHQWZKHQLWLVKRW
7KLVZLOOFDXVHVWHDP7KHWHPSHUDWXUHFKDQJHFDQ
FDXVHGDPDJHWRWKHHQDPHO
■ 0RLVWXUHLQWKHFRRNLQJFRPSDUWPHQW2YHUDQ
H[WHQGHGSHULRGRIWLPHPRLVWXUHLQWKHFRRNLQJ
FRPSDUWPHQW PD\ OHDG WR FRUURVLRQ $OORZ WKH FRRNLQJ
FRPSDUWPHQWWRGU\DIWHUXVH'RQRWNHHSPRLVWIRRG
LQWKHFORVHGFRRNLQJFRPSDUWPHQWIRUH[WHQGHG
SHULRGVRIWLPH'RQRWVWRUHIRRGLQWKHFRRNLQJ
FRPSDUWPHQW
■ &RROLQJZLWKWKHDSSOLDQFHGRRURSHQ)ROORZLQJ
RSHUDWLRQ DW KLJK WHPSHUDWXUHV RQO\ DOORZ WKH FRRNLQJ
FRPSDUWPHQWWRFRROGRZQZLWKWKHGRRUFORVHG'R
QRWWUDSDQ\WKLQJLQWKHDSSOLDQFHGRRU(YHQLIWKH
GRRULVRQO\OHIWRSHQDFUDFNWKHIURQWRIQHDUE\
IXUQLWXUHPD\EHFRPHGDPDJHGRYHUWLPH
2QO\OHDYHWKHFRRNLQJFRPSDUWPHQWWRGU\ZLWKWKH
GRRURSHQLIDORWRIPRLVWXUHZDVSURGXFHGZKLOVWWKH
RYHQZDVRSHUDWLQJ
■ )UXLWMXLFHZKHQEDNLQJSDUWLFXODUO\MXLF\IUXLWSLHVGR
QRWSDFNWKHEDNLQJWUD\WRRJHQHURXVO\)UXLWMXLFH
GULSSLQJ IURP WKH EDNLQJ WUD\ OHDYHV VWDLQV WKDW FDQQRW
EHUHPRYHG,ISRVVLEOHXVHWKHGHHSHUXQLYHUVDOSDQ
■ ([WUHPHO\GLUW\VHDO,IWKHVHDOLVYHU\GLUW\WKH
DSSOLDQFHGRRUZLOOQRORQJHUFORVHSURSHUO\GXULQJ
RSHUDWLRQ7KHIURQWVRIDGMDFHQWXQLWVFRXOGEH
GDPDJHG$OZD\VNHHSWKHVHDOFOHDQ ~ &OHDQLQJ
RQ SDJH
■ $SSOLDQFHGRRUDVDVHDWVKHOIRUZRUNWRS'RQRWVLW
RQ WKH DSSOLDQFH GRRU RU SODFH RU KDQJ DQ\WKLQJ RQ LW
'RQRWSODFHDQ\FRRNZDUHRUDFFHVVRULHVRQWKH
DSSOLDQFHGRRU
■ ,QVHUWLQJDFFHVVRULHVGHSHQGLQJRQWKHDSSOLDQFH
PRGHODFFHVVRULHVFDQVFUDWFKWKHGRRUSDQHOZKHQ
FORVLQJWKHDSSOLDQFHGRRU$OZD\VLQVHUWWKH
DFFHVVRULHVLQWRWKHFRRNLQJFRPSDUWPHQWDVIDUDV
WKH\ZLOOJR
■ &DUU\LQJWKHDSSOLDQFHGRQRWFDUU\RUKROGWKH
DSSOLDQFH E\ WKH GRRU KDQGOH 7KH GRRU KDQGOH FDQQRW
VXSSRUWWKHZHLJKWRIWKHDSSOLDQFHDQGFRXOGEUHDN
(QYLURQPHQWDOSURWHFWLRQ HQ
7(QYLURQPHQWDOSURWHFWLRQ
(QYLURQPHQWDO SURWHFWLRQ
<RXUQHZDSSOLDQFHLVSDUWLFXODUO\HQHUJ\HIILFLHQW+HUH
\RX FDQ ILQG WLSV RQ KRZ WR VDYH HYHQ PRUH HQHUJ\ ZKHQ
XVLQJ WKH DSSOLDQFH DQG KRZ WR GLVSRVH RI \RXU DSSOLDQFH
SURSHUO\
6DYLQJHQHUJ\
■ 2QO\SUHKHDWWKHDSSOLDQFHLIWKLVLVVSHFLILHGLQWKH
UHFLSHRULQWKHWDEOHVLQWKHRSHUDWLQJLQVWUXFWLRQV
■ /HDYHIUR]HQIRRGWRGHIURVWEHIRUHSODFLQJLWLQWKH
FRRNLQJFRPSDUWPHQW
■ 8VHEDNLQJWLQVWKDWDUHGDUNFRORXUHGSDLQWHGEODFN
RUKDYHDQHQDPHOFRDWLQJ7KHVHDEVRUEWKHKHDW
SDUWLFXODUO\ZHOO
■ 5HPRYHDQ\XQQHFHVVDU\DFFHVVRULHVIURPWKH
FRRNLQJFRPSDUWPHQW
■ 2SHQWKHDSSOLDQFHGRRUDVLQIUHTXHQWO\DVSRVVLEOH
ZKHQWKHDSSOLDQFHLVLQXVH
■ ,W LV EHVW WR EDNH VHYHUDO FDNHV RQH DIWHU WKH RWKHU 7KH
FRRNLQJFRPSDUWPHQWVWD\VZDUP7KLVUHGXFHVWKH
EDNLQJWLPHIRUWKHVHFRQGFDNH<RXFDQSODFHWZR
FDNHWLQVQH[WWRHDFKRWKHULQWKHFRRNLQJ
FRPSDUWPHQW
■ )RU ORQJHU FRRNLQJ WLPHV \RX FDQ VZLWFK WKH DSSOLDQFH
RII PLQXWHVEHIRUHWKHHQGRIWKHFRRNLQJWLPHDQG
XVHWKHUHVLGXDOKHDWWRILQLVKFRRNLQJ
(QYLURQPHQWDOO\IULHQGO\GLVSRVDO
'LVSRVHRISDFNDJLQJLQDQHQYLURQPHQWDOO\IULHQGO\
PDQQHU
7KLVDSSOLDQFHLVODEHOOHGLQDFFRUGDQFHZLWK
(XURSHDQ 'LUHFWLYH (8 FRQFHUQLQJ XVHG
HOHFWULFDODQGHOHFWURQLFDSSOLDQFHVZDVWH
HOHFWULFDO DQG HOHFWURQLF HTXLSPHQW :((( 7KH
JXLGHOLQH GHWHUPLQHV WKH IUDPHZRUN IRU WKH UHWXUQ
DQGUHF\FOLQJRIXVHGDSSOLDQFHVDVDSSOLFDEOH
WKURXJKRXWWKH(8
en *HWWLQJWRNQRZ\RXUDSSOLDQFH
**HWWLQJWRNQRZ\RXU
DSSOLDQFH
*HWWLQJ WR NQRZ \RXU DSSOLDQFH
,Q WKLV VHFWLRQ ZH ZLOO H[SODLQ WKH LQGLFDWRUV DQG FRQWUROV
<RXZLOODOVRILQGRXWDERXWWKHYDULRXVIXQFWLRQVRI\RXU
DSSOLDQFH
1RWH 'HSHQGLQJRQWKHDSSOLDQFHPRGHOLQGLYLGXDO
GHWDLOVDQGFRORXUVPD\GLIIHU
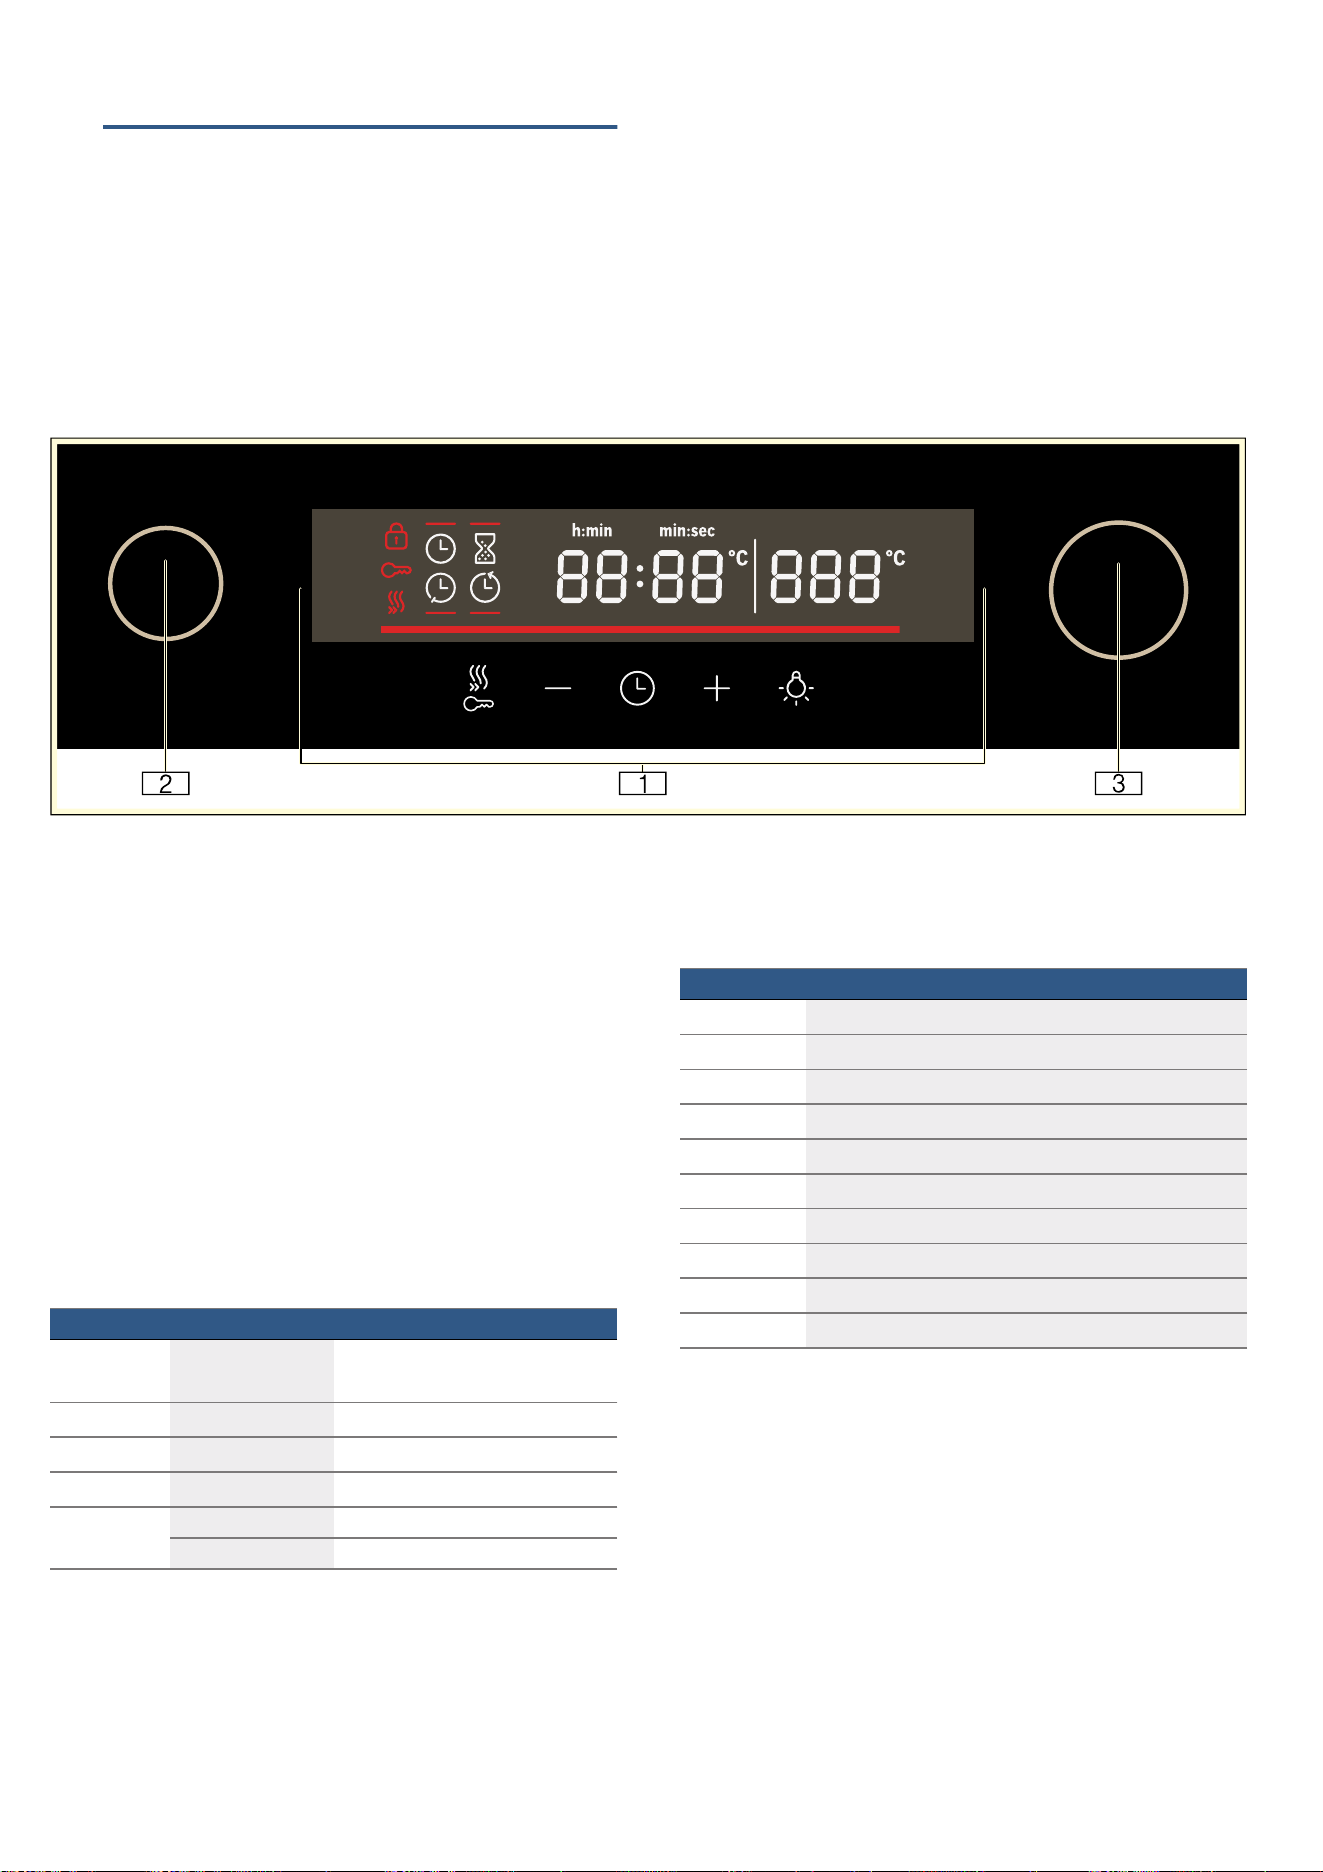
&RQWUROSDQHO
<RXFDQVHW\RXUDSSOLDQFHVYDULRXVIXQFWLRQVRQWKH
FRQWUROSDQHO%HORZ\RXZLOOVHHDQRYHUYLHZRIWKH
FRQWUROSDQHODQGWKHOD\RXWRIWKHFRQWUROV
%XWWRQV
<RXZLOOILQGDEULHIH[SODQDWLRQRIWKHYDULRXVEXWWRQV
EHORZ
,IDEXWWRQLVQRWRSHUDWLRQDODQDXGLEOHVLJQDOZLOOVRXQG
'LVSOD\
7KHGLVSOD\LVVWUXFWXUHGVRWKDWWKHLQIRUPDWLRQFDQEH
UHDGDWDJODQFH
7KHYDOXHWKDW\RXFDQFXUUHQWO\VHWLVLQIRFXV,WLV
GLVSOD\HGLQZKLWHOHWWHULQJZLWKDGDUNEDFNJURXQG
( %XWWRQVDQGGLVSOD\
7KHEXWWRQVDUHWRXFKNH\VZLWKVHQVRUV
XQGHUQHDWK6LPSO\WRXFKDV\PEROWRVHOHFWWKH
IXQFWLRQ
7KH GLVSOD\ VKRZV V\PEROV IRU DFWLYH IXQFWLRQV DQG
WKHWLPHVHWWLQJRSWLRQV
0 )XQFWLRQVHOHFWRU
8VH WKH IXQFWLRQ VHOHFWRU WR VHW WKH KHDWLQJ IXQFWLRQ
RURWKHUIXQFWLRQV
<RXFDQWXUQWKHIXQFWLRQVHOHFWRUFORFNZLVHRUDQWL
FORFNZLVHIURPWKH2IISRVLWLRQ
8 7HPSHUDWXUHVHOHFWRU
8VH WKH WHPSHUDWXUH VHOHFWRU WR VHW WKH WHPSHUDWXUH
IRU WKH KHDWLQJ IXQFWLRQ RU VHOHFW WKH VHWWLQJ IRU RWKHU
IXQFWLRQV
<RXFDQDOVRWXUQWKHWHPSHUDWXUHVHOHFWRU
FORFNZLVHRUDQWLFORFNZLVH,WGRHVQRWKDYHDQ
2IISRVLWLRQ
%XWWRQ ([SODQDWLRQ
v
7LPHVHWWLQJ
RSWLRQV
6HWWKHWLPHU
t
GXUDWLRQ
y
HQGWLPH
{
DQGFORFNWLPH
v
A
0LQXV 5HGXFHWKHVHWWLQJYDOXH
@
3OXV ,QFUHDVHWKHVHWWLQJYDOXH
B /LJKWLQJ 6ZLWFKWKHLQWHULRUOLJKWLQJRQ
RII
]
5DSLGKHDWXS 6ZLWFKUDSLGKHDWXSRQRII
&KLOGSURRIORFN $FWLYDWHDQGGHDFWLYDWHWKH
FKLOGSURRI ORFN LQ VWDQGE\ PRGH
6\PERO ([SODQDWLRQ
G
5DSLGKHDWXS
t
7LPHU
y
'XUDWLRQ
{
(QGWLPH
v
&ORFNWLPH
‰‰‰‰ 7LPH
bbbbb
7HPSHUDWXUHLQGLFDWRU
D &KLOGSURRIORFN
n
'RRUORFN
‰‰‰ 7HPSHUDWXUH
*HWWLQJWRNQRZ\RXUDSSOLDQFH HQ
7\SHVRIKHDWLQJDQGIXQFWLRQV
8VHWKHIXQFWLRQVHOHFWRUWRVHWWKHW\SHVRIKHDWLQJDQG
RWKHUIXQFWLRQV
7RPDNHVXUH\RXDOZD\VXVHWKHULJKWW\SHRIKHDWLQJWR
FRRN\RXUIRRGZHKDYHH[SODLQHGWKHGLIIHUHQFHVDQG
DSSOLFDWLRQVEHORZ
1RWH )RU HDFK KHDWLQJ IXQFWLRQ WKH DSSOLDQFH VSHFLILHV D
GHIDXOW WHPSHUDWXUH RU OHYHO <RX FDQ DFFHSW WKLV YDOXH RU
FKDQJHLWLQWKHDSSURSULDWHDUHD
7HPSHUDWXUHVHOHFWRU
8VH WKH WHPSHUDWXUH VHOHFWRU WR VHW WKH WHPSHUDWXUH 7KH
WHPSHUDWXUHWKDWKDVEHHQVHWZLOOEHVKRZQRQWKH
GLVSOD\
1RWH 7KH WHPSHUDWXUH FDQ EH VHW LQ GHJUHH LQFUHPHQWV
XSWR &DQGLQGHJUHHLQFUHPHQWVWKHUHDIWHU
7HPSHUDWXUHLQGLFDWRU
7KHWHPSHUDWXUHLQGLFDWRUEDUVVKRZWKHKHDWLQJXS
SKDVHVRUUHVLGXDOKHDWLQWKHFRRNLQJFRPSDUWPHQW
+HDWLQJIXQFWLRQ 7HPSHUDWXUH
VHWWLQJ
8VH
Û 2IISRVLWLRQ ,QWKLVSRVLWLRQWKHRYHQLVVZLWFKHGRII
<
'KRWDLU & )RUFRRNLQJIRRGRQRQHRUWZROHYHOV7KHIDQVGLVWULEXWHWKHKHDWIURPWKH
ULQJVKDSHGKHDWLQJHOHPHQWVLQWKHEDFNSDQHOHYHQO\DURXQGWKHFRRNLQJ
FRPSDUWPHQW
N
$LUUHFLUFXODWLRQ & )RUEDNLQJFDNHVDQGEDNHGLWHPVRQRQHOHYHO7KHIDQVGLVWULEXWHWKHKHDW
IURPWKHKHDWLQJHOHPHQWVHYHQO\DURXQGWKHFRRNLQJFRPSDUWPHQW
$
3L]]DVHWWLQJ & )RUFRRNLQJIUHVKSL]]DDQGIUR]HQSURGXFWVHJFKLSVRUVWUXGHO7KHKHDWLQJ
HOHPHQWV DQG IDQV KHDW TXLFNO\ DQG GLVWULEXWH WKH KHDW HYHQO\ DURXQG WKH FRRN
LQJFRPSDUWPHQW
B
'HIURVWLQJ & )RUGHIURVWLQJHJPHDWSRXOWU\EUHDGDQGFDNHV7KHIDQFDXVHVWKHZDUP
DLUWRFLUFXODWHDURXQGWKHIRRG
$
%RWWRPKHDWLQJ & 8VH ZKHQ \RX ZDQW WR FRRN WKH IRRG IRU D OLWWOH ORQJHU 7KH KHDW LV HPLWWHG RQO\
IURPEHORZ
q
&OHDQLQJ &OHDQLQJVHWWLQJV
ORZ
PHGLXP
KLJK
)RUUXQQLQJDFRRNLQJFRPSDUWPHQWVHOIFOHDQLQJSURJUDPPH
(
)XOOVXUIDFHJULOO *ULOOVHWWLQJV
ORZ
PHGLXP
KLJK
)RUJULOOLQJIODWLWHPVVXFKDVVWHDNVRUVDXVDJHVIRUPDNLQJWRDVWDQGIRU
EURZQLQJIRRG
7KHZKROHDUHDEHORZWKHJULOOHOHPHQWEHFRPHVKRW
F
5RWDU\VSLW *ULOOVHWWLQJV
ORZ
PHGLXP
KLJK
5RWDU\VSLW)RUURDVWVUROOHGURDVWLQJMRLQWVDQGSRXOWU\
7
&LUFXODWHGDLUJULOO & )RU EDNLQJ RU URDVWLQJ PHDW SRXOWU\ DQG ZKROH ILVK 7KH IDQ FDXVHV WKH KRW DLU
WRFLUFXODWHDURXQGWKHIRRG
8
*HQWOHWRSERWWRPKHDWLQJ & )RUJHQWO\FRRNLQJVHOHFWHGW\SHVRIIRRGHJ PHDWYHJHWDEOHVRQRQHOHYHO
ZLWKRXWSUHKHDWLQJ
7KLVKHDWLQJIXQFWLRQLVXQVXLWDEOHIRUIRRGWKDWULVHVDVLWEDNHVHJ EUHDG
%
7RSERWWRPKHDWLQJ & )RU FDNHV EDNHV DQG OHDQ MRLQWV +HDW LV HPLWWHG HYHQO\ IURP DERYH DQG EHORZ
+HDWLQJXSLQGL
FDWRU
7KHKHDWLQJXSLQGLFDWRUGLVSOD\VWKHULVLQJ
WHPSHUDWXUHLQWKHFRRNLQJFRPSDUWPHQW
:KHQDOOEDUVDUHILOOHGWKHRSWLPDOWLPHIRU
SODFLQJ WKH IRRG LQ WKH RYHQ KDV EHHQ UHDFKHG
,QWKHJULOODQGFOHDQLQJVHWWLQJVWKHEDUVDUH
DOODOUHDG\ILOOHGDWWKHVWDUW
7KHEDUVDUHQRWILOOHGIRUWKHJHQWOHWRSERW
WRPKHDWLQJKHDWLQJW\SH
5HVLGXDOKHDW
LQGLFDWRU
:KHQWKHDSSOLDQFHLVVZLWFKHGRIIWKHWHP
SHUDWXUHLQGLFDWRUVKRZVWKHUHVLGXDOKHDWLQ
WKHFRRNLQJFRPSDUWPHQW2QFHWKHWHPSHUD
WXUHKDVGURSSHGWRDSSUR[LPDWHO\&WKH
LQGLFDWRUJRHVRXW
en $FFHVVRULHV
&RRNLQJFRPSDUWPHQWIXQFWLRQV
6RPHIXQFWLRQVPDNH\RXUDSSOLDQFHHDVLHUWRXVH7KLV
IRU H[DPSOH HQDEOHV WKH FRRNLQJ FRPSDUWPHQW WR EH ZHOO
OLWDQGDFRROLQJIDQWRSUHYHQWWKHDSSOLDQFHIURP
RYHUKHDWLQJ
2SHQLQJWKHDSSOLDQFHGRRU
,I\RXRSHQWKHDSSOLDQFHGRRUGXULQJDQRSHUDWLRQWKH
RSHUDWLRQ LV SDXVHG 2SHUDWLRQ FRQWLQXHV WR UXQ ZKHQ \RX
FORVHWKHGRRU
,QWHULRUOLJKWLQJ
:KHQ\RXRSHQWKHDSSOLDQFHGRRUWKHLQWHULRUOLJKWLQJ
VZLWFKHVRQ,IWKHGRRUUHPDLQVRSHQIRUORQJHUWKDQ
PLQXWHVWKHOLJKWLQJVZLWFKHVRIIDJDLQ
,QPRVWRSHUDWLQJPRGHVWKHLQWHULRUOLJKWLQJZLOOVZLWFK
RQ DV VRRQ DV WKH DSSOLDQFH LV VWDUWHG 2QFH WKH SURJUDP
LVFRPSOHWHWKHOLJKWLQJZLOOVZLWFKRII
1RWH ,Q7RSERWWRPKHDWLQJJHQWOHPRGHWKHLQWHULRU
OLJKWLQJZLOOEHVZLWFKHGRIIDXWRPDWLFDOO\DIWHU
DSSUR[ PLQXWH,WFDQEHVZLWFKHGRQXVLQJWKH
B EXWWRQ
&RROLQJIDQ
7KHFRROLQJIDQVZLWFKHVRQDQGRIIDVUHTXLUHG7KH
ZDUPDLUHVFDSHVDERYHWKHGRRU
:LWKWKHJHQWOHWRSERWWRPKHDWLQJKHDWLQJW\SHWKH
FRROLQJIDQVZLWFKHVRIIDQGRQPRUHIUHTXHQWO\WRVDYH
HQHUJ\
&DXWLRQ
'R QRW FRYHU WKH YHQWLODWLRQ VORWV 2WKHUZLVH WKH RYHQ ZLOO
RYHUKHDW
7RFRROWKHFRRNLQJFRPSDUWPHQWPRUHTXLFNO\DIWHU
RSHUDWLRQWKHFRROLQJIDQFRQWLQXHVWRUXQIRUDFHUWDLQ
SHULRGDIWHUZDUGV
_$FFHVVRULHV
$FFHVVRULHV
<RXUDSSOLDQFHLVDFFRPSDQLHGE\DUDQJHRI
DFFHVVRULHV+HUH\RXFDQILQGDQRYHUYLHZRIWKH
DFFHVVRULHV LQFOXGHG DQG LQIRUPDWLRQ RQ KRZ WR XVH WKHP
FRUUHFWO\
6KHOISRVLWLRQV
7KHEDNLQJWUD\DQGWKHEDNLQJDQGURDVWLQJVKHOIFDQEH
PRYHGLQWRIRXUGLIIHUHQWKHLJKWVZLWKLQWKHFRRNLQJ
FRPSDUWPHQW $OZD\V LQVHUW WKHP DV IDU DV WKH\ ZLOO JR VR
WKDWWKHDFFHVVRULHVGRQRWWRXFKWKHGRRUSDQHO(QVXUH
WKDW\RXDOZD\VLQVHUWWKHDFFHVVRULHVLQWRWKHFRRNLQJ
FRPSDUWPHQWWKHULJKWZD\URXQG
::DUQLQJ² 5LVNRIILUH
8QGHU QR FLUFXPVWDQFHV VKRXOG D URDVWLQJ WLQ EDNLQJ WUD\
IU\LQJSDQRUDQ\RWKHUIRUPRIFRRNZDUHEHSODFHG
GLUHFWO\RQWKHRYHQIORRU7KLVFDXVHVWKHIORRURIWKH
DSSOLDQFHWRRYHUKHDWDQGFDQVHULRXVO\GDPDJHWKH
DSSOLDQFH
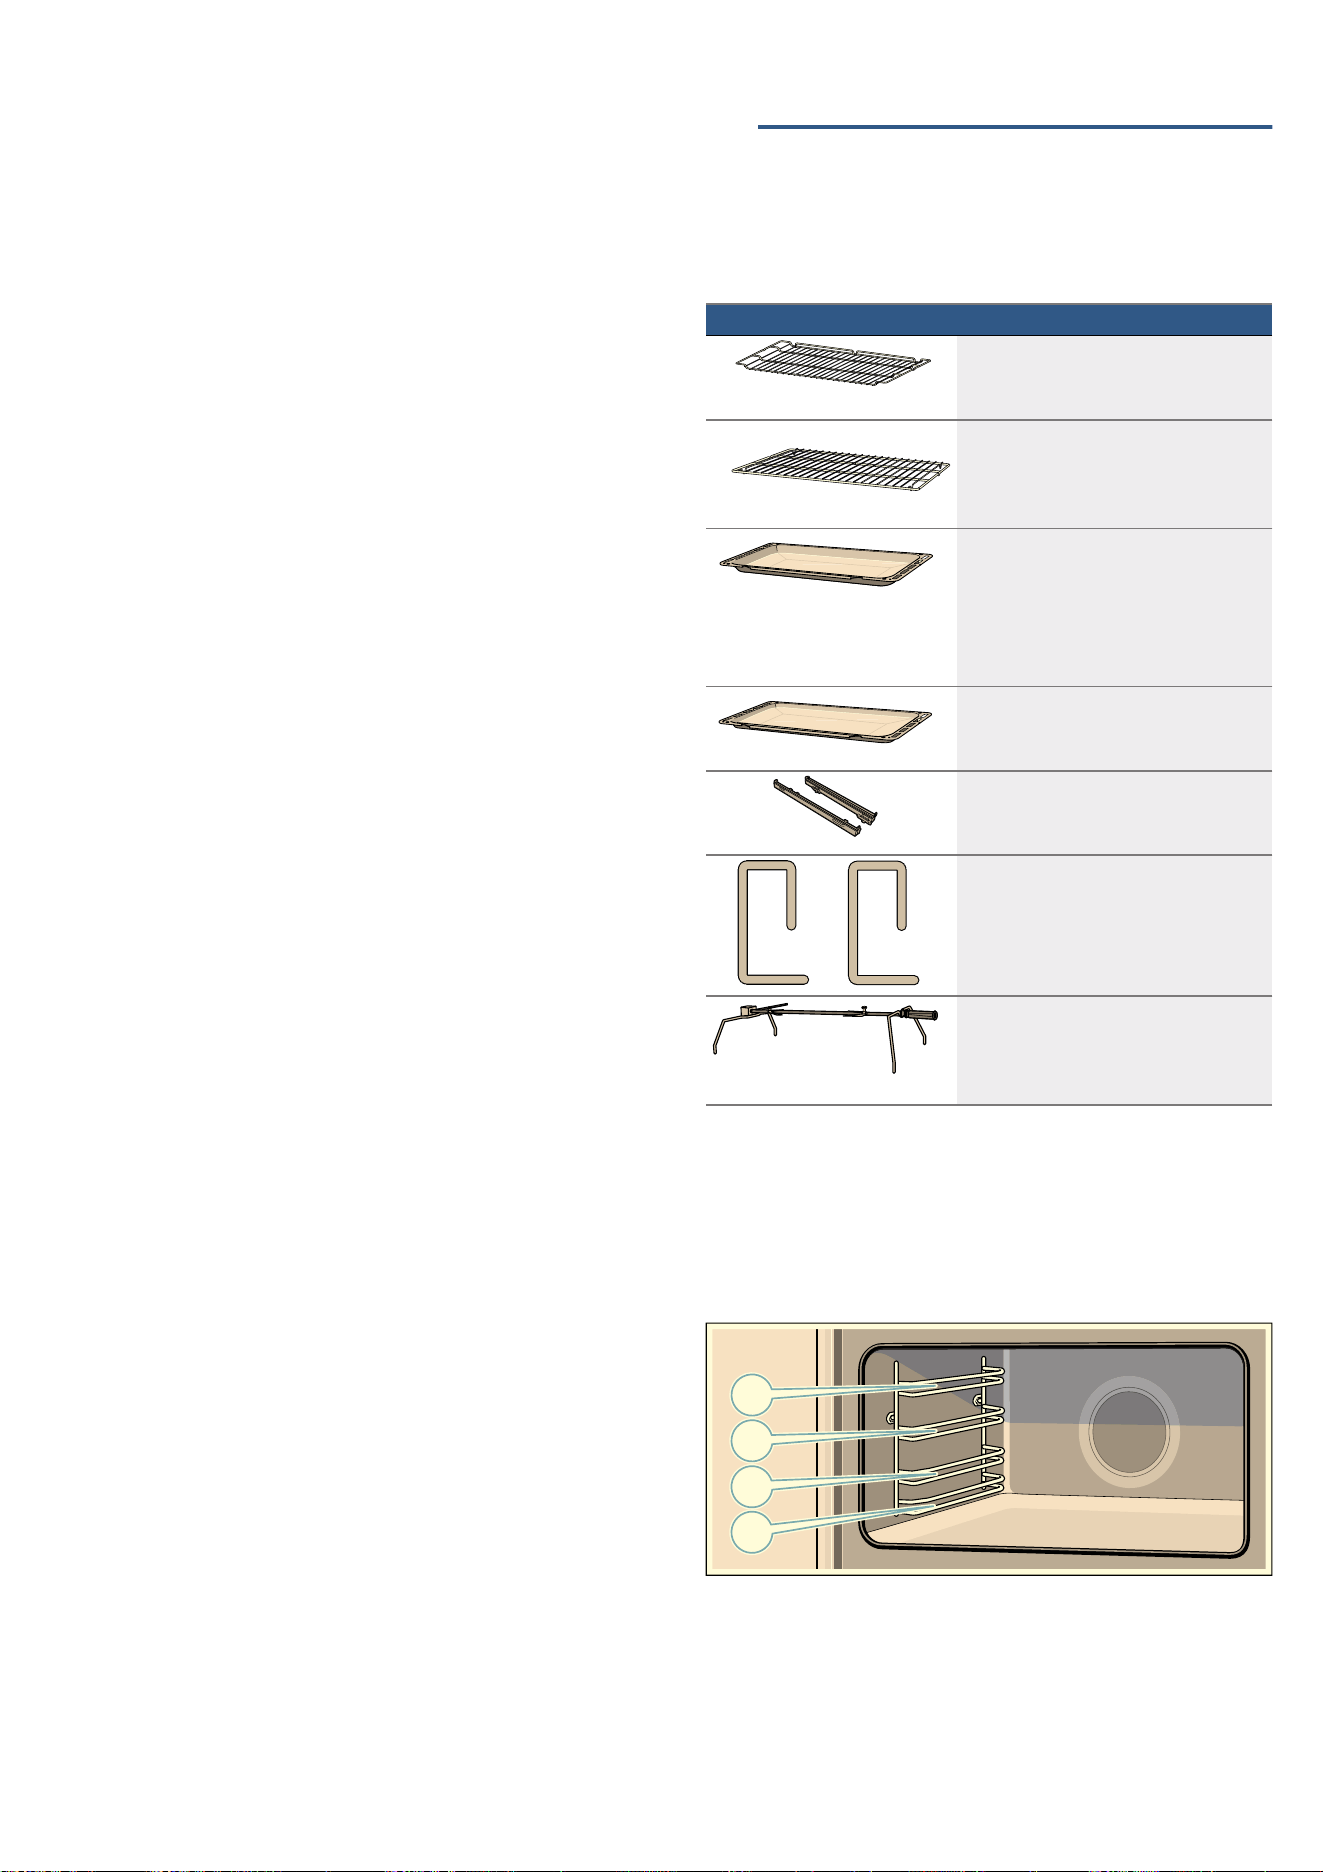
$FFHVVRULHV 'HVFULSWLRQ
%DNLQJDQGURDVWLQJVKHOI
)RUFRRNZDUHFDNHWLQVMRLQWVRI
PHDW JULOOHG LWHPV DQG IUR]HQ IRRG
:LUHLQVHUW
'HVLJQHGWREHSODFHGLQWRWKHXQL
YHUVDOSDQRUWKHEDNLQJWUD\)RU
SUHSDULQJODUJHTXDQWLWLHVRIIRRG
8QLYHUVDOSDQ
)RUPRLVWFDNHVSDVWULHVIUR]HQ
PHDOV DQG ODUJH URDVWV 7KH XQLYHU
VDOSDQFDQEHXVHGWRFDWFKGULS
SLQJIDWZKHQ\RXDUHJULOOLQJ
GLUHFWO\RQWKHZLUHUDFN
(QDPHOEDNLQJWUD\
)RUWUD\EDNHVDQGVPDOOEDNHG
SURGXFWV
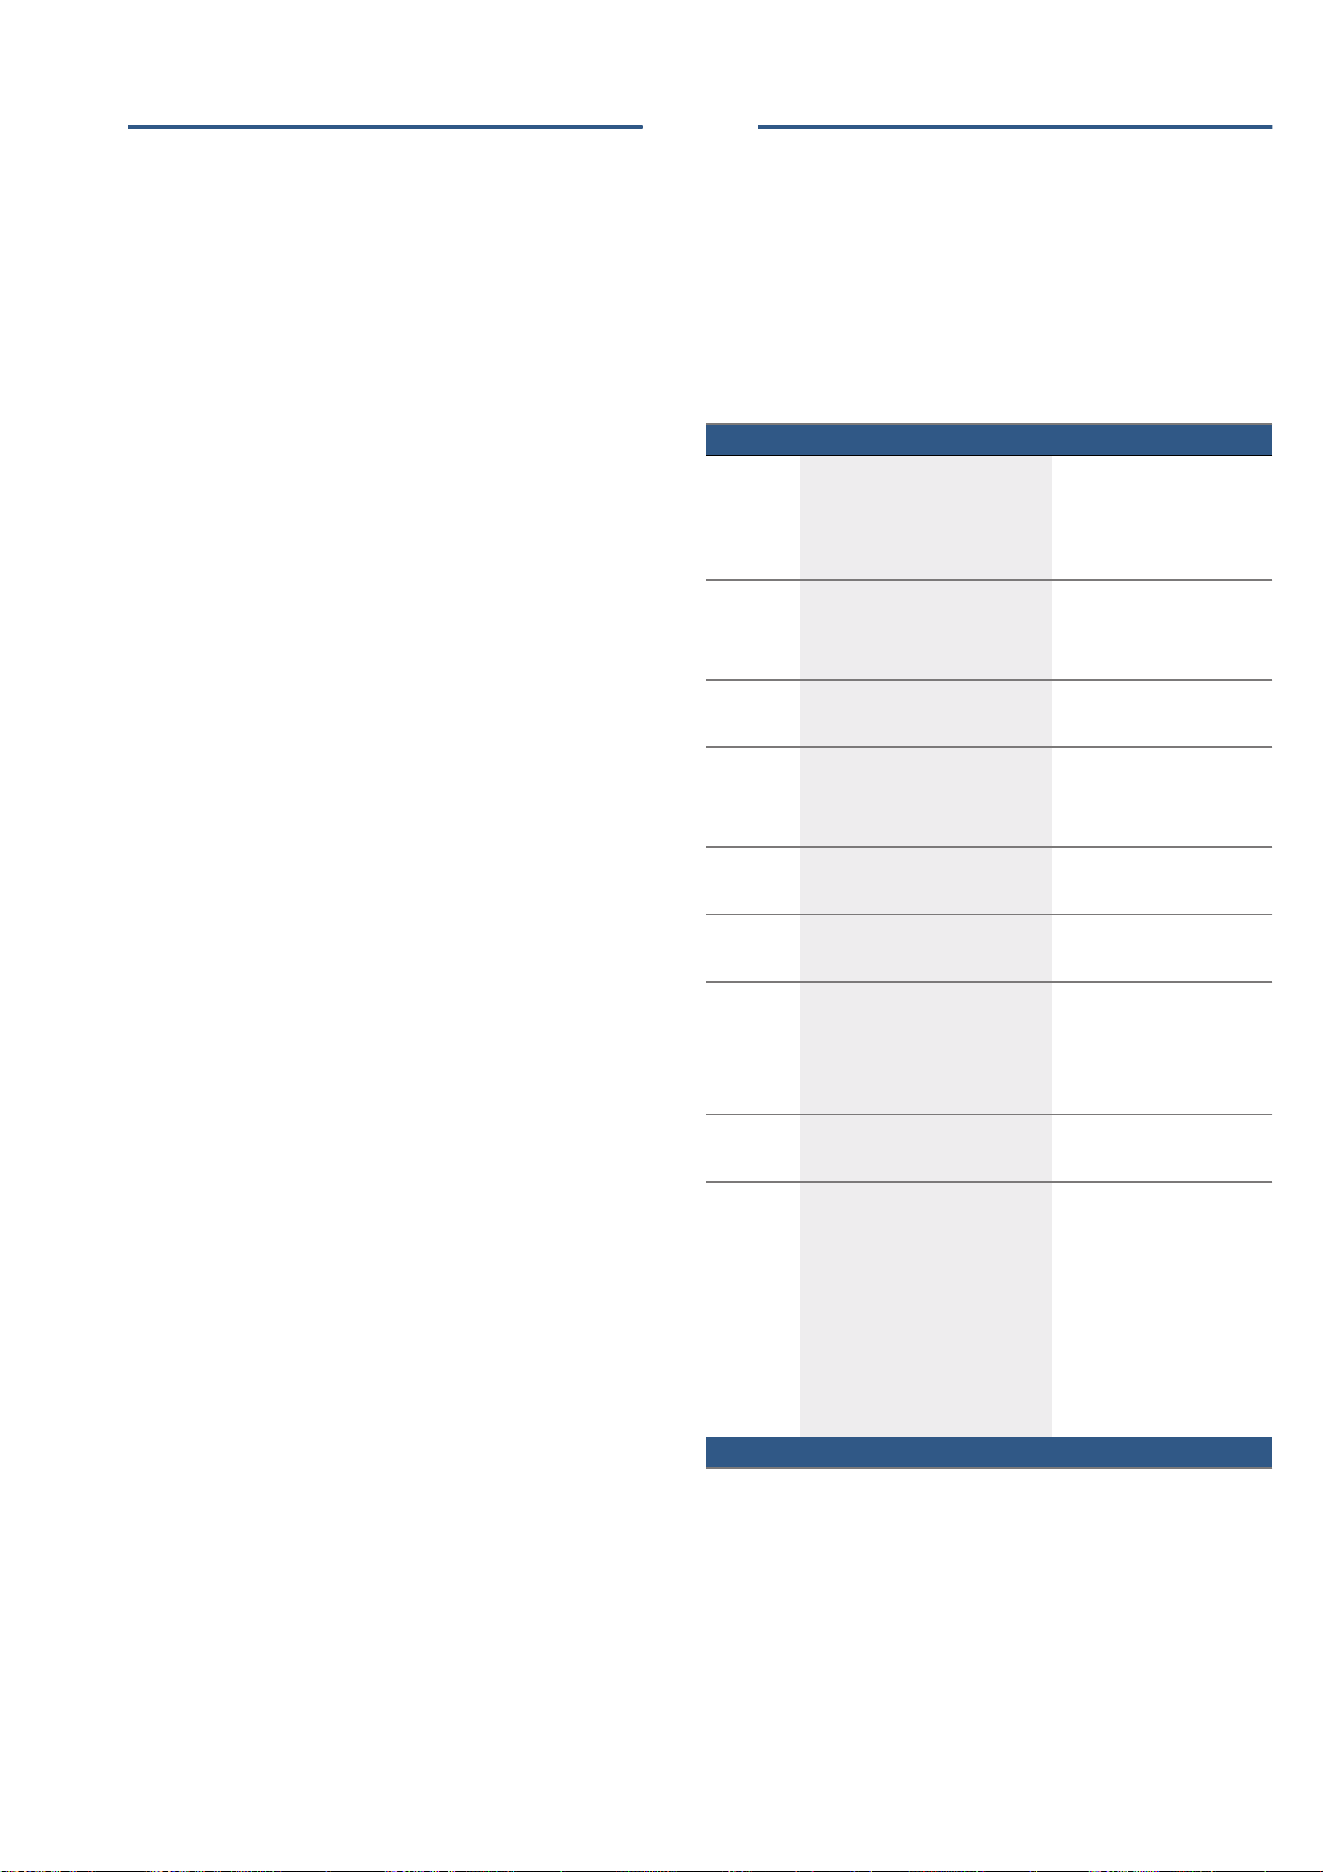
7HOHVFRSLFUDLOVHW
<RXFDQXVHWKHSXOORXWUDLOVWR
SXOOWKHDFFHVVRULHVRXWIXUWKHU
/RFNLQJSLQV
)RUORFNLQJWKHKLQJHV
5RWDU\VSLW
)RUURDVWLQJMRLQWVRIPHDWDQG
ODUJHSRXOWU\8VHRQO\LQFRPELQD
WLRQ ZLWK WKH HQDPHOOHG EDNLQJ WUD\
$FFHVVRULHV HQ
/RFNLQJIXQFWLRQ
7KH DFFHVVRULHV FDQ EH SXOOHG RXW DSSUR[LPDWHO\ KDOIZD\
EHIRUH WKH\ ORFN LQ SODFH7KH ORFNLQJ IXQFWLRQ SUHYHQWV WKH
DFFHVVRULHVIURPWLOWLQJZKHQWKH\DUHSXOOHGRXW7KH
DFFHVVRULHVPXVWEHLQVHUWHGLQWRWKHFRRNLQJ
FRPSDUWPHQWFRUUHFWO\IRUWKHWLOWSURWHFWLRQWRZRUN
SURSHUO\
:KHQLQVHUWLQJWKHZLUHUDFNHQVXUHWKDWWKHOXJ ‚LVDW
WKH UHDU DQG LV IDFLQJ GRZQZDUGV 7KH RSHQ VLGH PXVW EH
IDFLQJWKHDSSOLDQFHGRRUDQGWKHFXUYDWXUHPXVWEHDW
WKHERWWRPLH ¾
:KHQLQVHUWLQJEDNLQJWUD\VHQVXUHWKDWWKHOXJ ‚LVDW
WKH UHDU DQG LV IDFLQJ GRZQZDUGV 7KH VORSLQJ HGJH RI WKH
DFFHVVRU\ ƒPXVWEHIDFLQJWRZDUGVWKHDSSOLDQFHGRRU
([DPSOHLQWKHSLFWXUH8QLYHUVDOSDQ
7HOHVFRSLFUDLOVHW
::DUQLQJ² 5LVNRIEXUQV
7KH WHOHVFRSLF VKHOYHV EHFRPH KRW ZKHQ WKH DSSOLDQFH LV
LQXVH7DNHVSHFLDOFDUHQRWWRJHWEXUQWZKHQWKH\DUH
SXOOHGRXW
7KHSXOORXWUDLOVDOORZ\RXWRSXOODFFHVVRULHVRXW
FRPSOHWHO\ :KHQ LQVHUWLQJ WKH DGDSWHU IRU WKH EDNLQJ WUD\
DQG URDVWLQJ VKHOI HQVXUH WKDW LW ORFNV LQWR SODFH LQ IURQW RI
WKHWDERQWKHSXOORXWUDLOV
6SHFLDODFFHVVRULHV
<RXFDQEX\DFFHVVRULHVIURPWKHDIWHUVDOHVVHUYLFH
D
D
D
D
E
$FFHVVRULHV 'HVFULSWLRQ
(QDPHOOHGEDNLQJWUD\ )RUWUD\EDNHVDQGVPDOOEDNHG
LWHPV
$IWHUVDOHVVHUYLFHQXPEHU
8QLYHUVDOSDQ )RUPRLVWFDNHVSDVWULHVIUR]HQ
PHDOVDQGODUJHURDVWV
7KHXQLYHUVDOSDQFDQEHXVHGWR
FDWFKGULSSLQJIDWZKHQ\RXDUH
JULOOLQJGLUHFWO\RQWKHZLUHUDFN
$IWHUVDOHVVHUYLFHQXPEHU
%DNLQJDQGURDVWLQJVKHOI )RUFRRNZDUHFDNHWLQVMRLQWVRI
PHDW JULOOHG LWHPV DQG IUR]HQ IRRG
$IWHUVDOHVVHUYLFHQXPEHU
7HOHVFRSLFVKHOIVHW 7HOHVFRSLFVKHOIVHWIRURQHOHYHO
$IWHUVDOHVVHUYLFHQXPEHU

en %HIRUHXVLQJIRUWKHILUVWWLPH
K%HIRUHXVLQJIRUWKHILUVW
WLPH
%HIRUHXVLQJIRUWKHILUVWWLPH
,Q WKLV VHFWLRQ \RX FDQ ILQG RXW ZKDW \RX PXVW GR EHIRUH
XVLQJ\RXURYHQWRSUHSDUHIRRGIRUWKHILUVWWLPH
5HPRYHWKHDSSOLDQFHSDFNDJLQJDQGGLVSRVHRILW
DSSURSULDWHO\
6HWWLQJWKHWLPHRQWKHFORFN
2QFHWKHDSSOLDQFHLVFRQQHFWHGWRDSRZHUVXSSO\
‚ƒ‹‹ ZLOO IODVK RQ WKH GLVSOD\ DQG WKH v V\PERO ZLOO EH
FRQWLQXRXVO\OLW6HWWKHWLPH
8VHWKH ARU @ EXWWRQWRVHWWKHWLPH
3UHVVWKH v EXWWRQ
1RWH 2QFHWKHSHULRGDOORZHGIRUVHWWLQJWKHFORFN
WLPHKDVHODSVHGWKHFORFNWLPHZLOODXWRPDWLFDOO\EH
VDYHG
7KHWLPHKDVQRZEHHQVHW
%DNLQJRXWWKHRYHQ
3UHFOHDQLQJWKHRYHQ
5HPRYHWKHDFFHVVRULHVDQGWKHVKHOIVXSSRUWVIURP
WKHFRRNLQJFRPSDUWPHQW ~ 5DLOVRQ SDJH
&RPSOHWHO\UHPRYHDQ\OHIWRYHUSDFNDJLQJHJVPDOO
SLHFHVRISRO\VW\UHQHIURPWKHFRRNLQJFRPSDUWPHQW
6RPH SDUWV DUH FRYHUHG ZLWK D SURWHFWLYH ILOP 5HPRYH
WKLVVFUDWFKSURWHFWLRQILOP
&OHDQWKHRXWVLGHRIWKHDSSOLDQFHZLWKDVRIWGDPS
FORWK
&OHDQWKHFRRNLQJFRPSDUWPHQWZLWKKRWVRDS\ZDWHU
+HDWLQJXSWKHRYHQ
7RUHPRYHWKHQHZFRRNHUVPHOOKHDWXSWKHRYHQZKHQ
LWLVHPSW\DQGFORVHG
1RWH 0DNH VXUH WKDW WKHUH LV QR OHIWRYHU SDFNDJLQJ VXFK
DVSRO\VW\UHQHSHOOHWVLQWKHFRRNLQJFRPSDUWPHQW
%HIRUHKHDWLQJXSWKHDSSOLDQFHZLSHWKHVPRRWK
VXUIDFHVLQWKHFRRNLQJFRPSDUWPHQWZLWKDVRIWGDPS
FORWK.HHSWKHNLWFKHQYHQWLODWHGZKLOHWKHDSSOLDQFHLV
KHDWLQJ
7XUQWKHIXQFWLRQVHOHFWRUWR %
7XUQWKHWHPSHUDWXUHVHOHFWRUWRWKHPD[LPXP
WHPSHUDWXUH
6ZLWFKWKHRYHQRIIDIWHU KRXU
1RWH :KHQWKHDSSOLDQFHLVKHDWLQJXSIRUWKHILUVWWLPH
\RXPD\KHDUFUDFNOLQJQRLVHVFRPLQJIURPWKHRYHQ
5HFOHDQLQJWKHRYHQ
&OHDQWKHFRRNLQJFRPSDUWPHQWZLWKKRWVRDS\ZDWHU
5HILWWKHKRRNLQUDFNV
,IQHFHVVDU\FOHDQWKHGRRUSDQHOV ~ $SSOLDQFH
GRRURQ SDJH
&OHDQLQJWKHDFFHVVRULHV
%HIRUHXVLQJWKHDFFHVVRULHVFOHDQWKHPWKRURXJKO\
XVLQJDFORWKDQGZDUPVRDS\ZDWHU
)LWWLQJWKHWHOHVFRSLFVKHOIVHW
,QVWUXFWLRQV RQ ILWWLQJ WKH WHOHVFRSLF VKHOI VHW DUH HQFORVHG
ZLWKWKHVHW
2SHUDWLQJWKHDSSOLDQFH HQ
12SHUDWLQJWKHDSSOLDQFH
2SHUDWLQJ WKH DSSOLDQFH
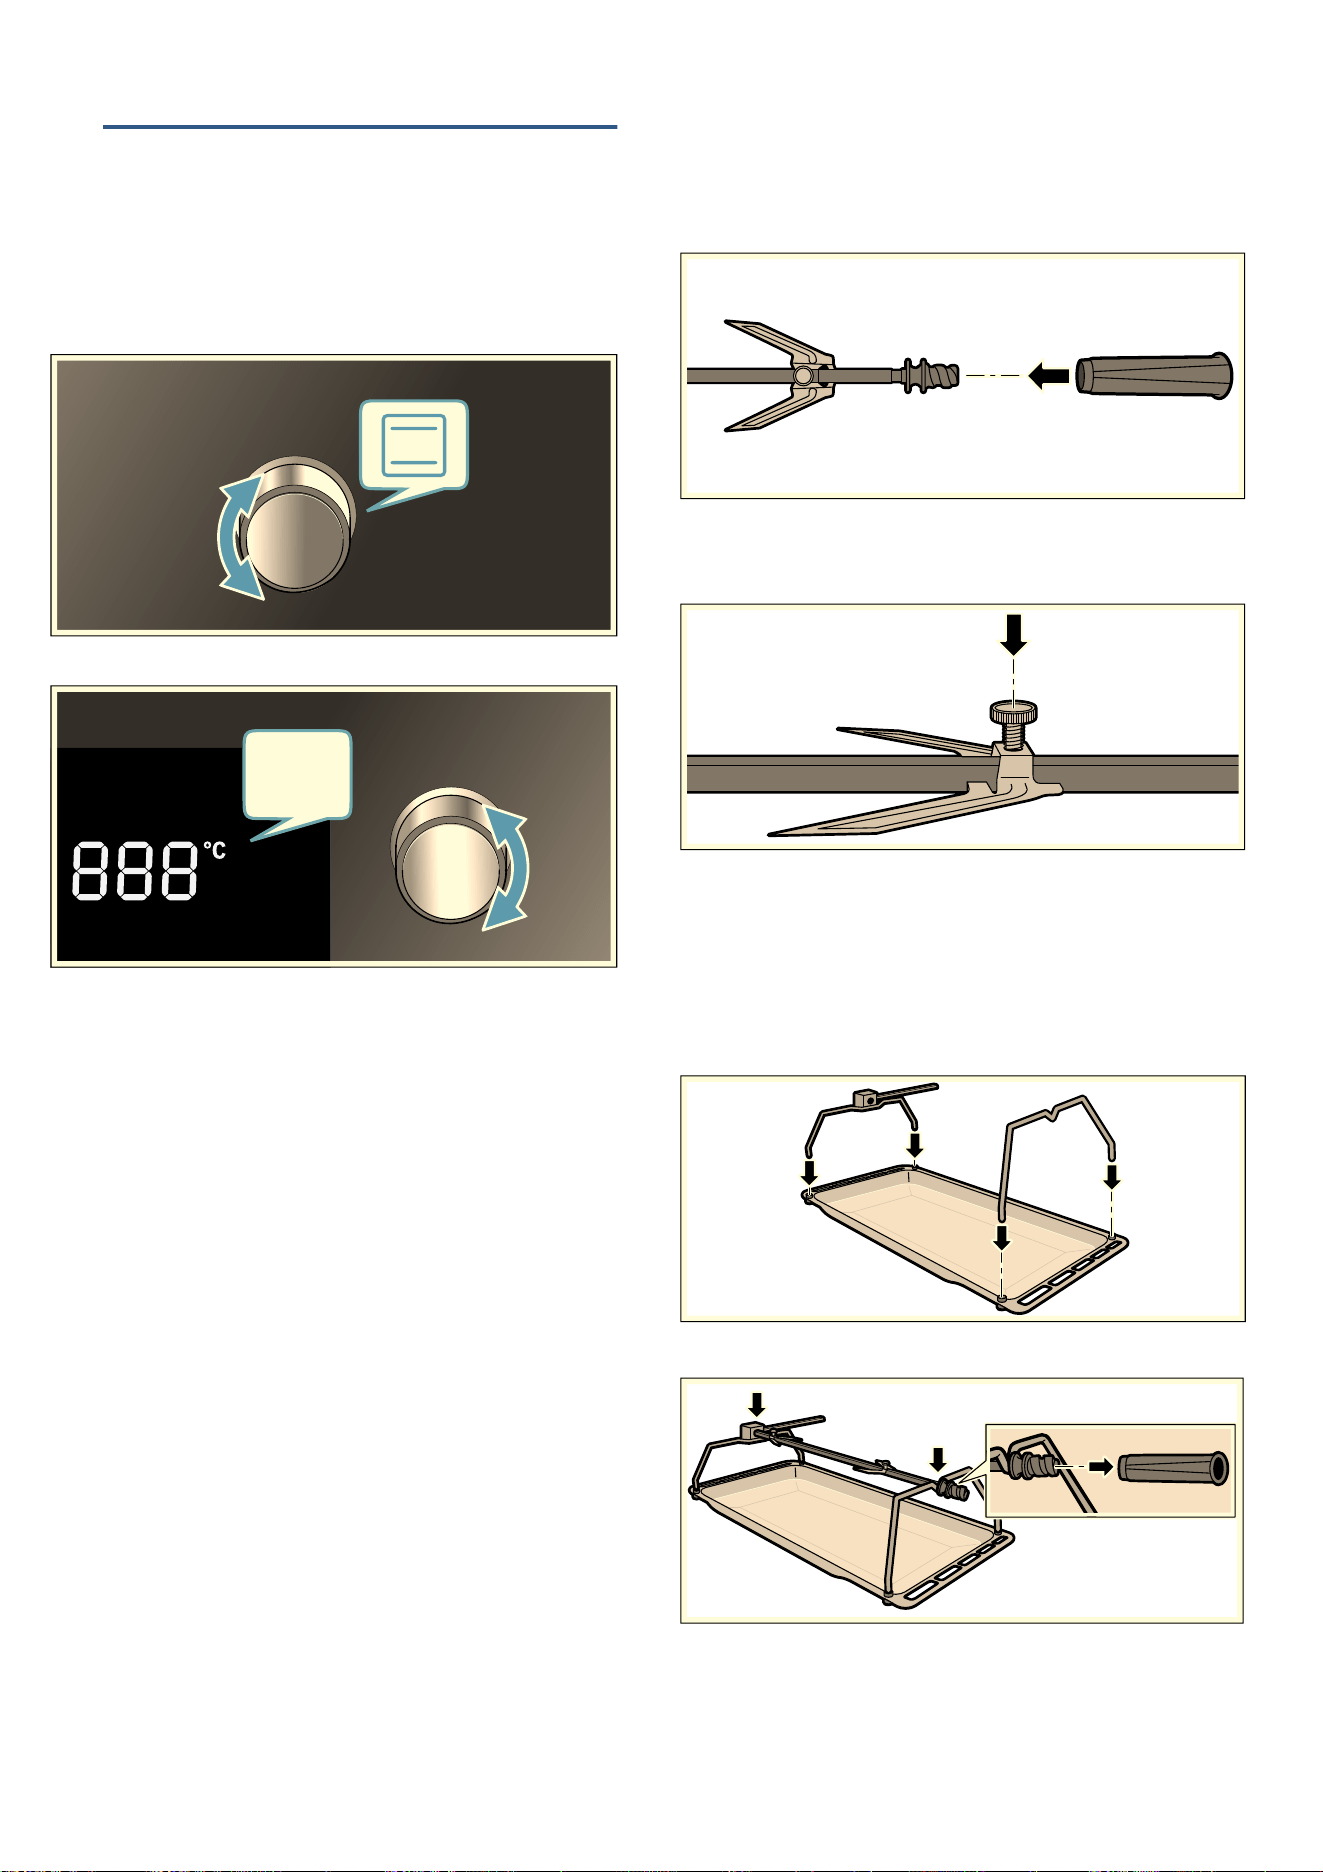
6ZLWFKLQJWKHRYHQRQDQGRII
6ZLWFKLQJRQWKHRYHQ
8VHWKHIXQFWLRQVHOHFWRUWRVHWWKHKHDWLQJIXQFWLRQ
1RWH (DFKIXQFWLRQKDVDGHIDXOWWHPSHUDWXUHRUJULOO
VHWWLQJ
8VHWKHWHPSHUDWXUHVHOHFWRUWRDOWHUWKHWHPSHUDWXUH
RUJULOOVHWWLQJ
7KHRYHQZLOOWKHQEHJLQWRKHDW
1RWH 7KHWHPSHUDWXUHLQGLFDWRUZLOOVKRZWKHFXUUHQW
VWDWXVRIWKHKHDWLQJXSSKDVH
&KDQJLQJVHWWLQJV
7KHKHDWLQJIXQFWLRQDQGWHPSHUDWXUHRUJULOOVHWWLQJFDQ
EHFKDQJHGDWDQ\WLPHXVLQJWKHUHOHYDQWVHOHFWRU
6ZLWFKLQJRIIWKHRYHQ
7XUQWKHIXQFWLRQVHOHFWRUWRWKH2IISRVLWLRQ
6ZLWFKLQJRQWKHUDSLGKHDWXSIXQFWLRQ
7RKHDWXSWKHFRRNLQJFRPSDUWPHQWDVUDSLGO\DV
SRVVLEOHSUHVVWKH ] EXWWRQ
1RWH 5DSLGKHDWXSLVDYDLODEOHIRU'KRWDLUPRGHDLU
UHFLUFXODWLRQPRGHWKHSL]]DVHWWLQJDQGWRSERWWRP
KHDWLQJ
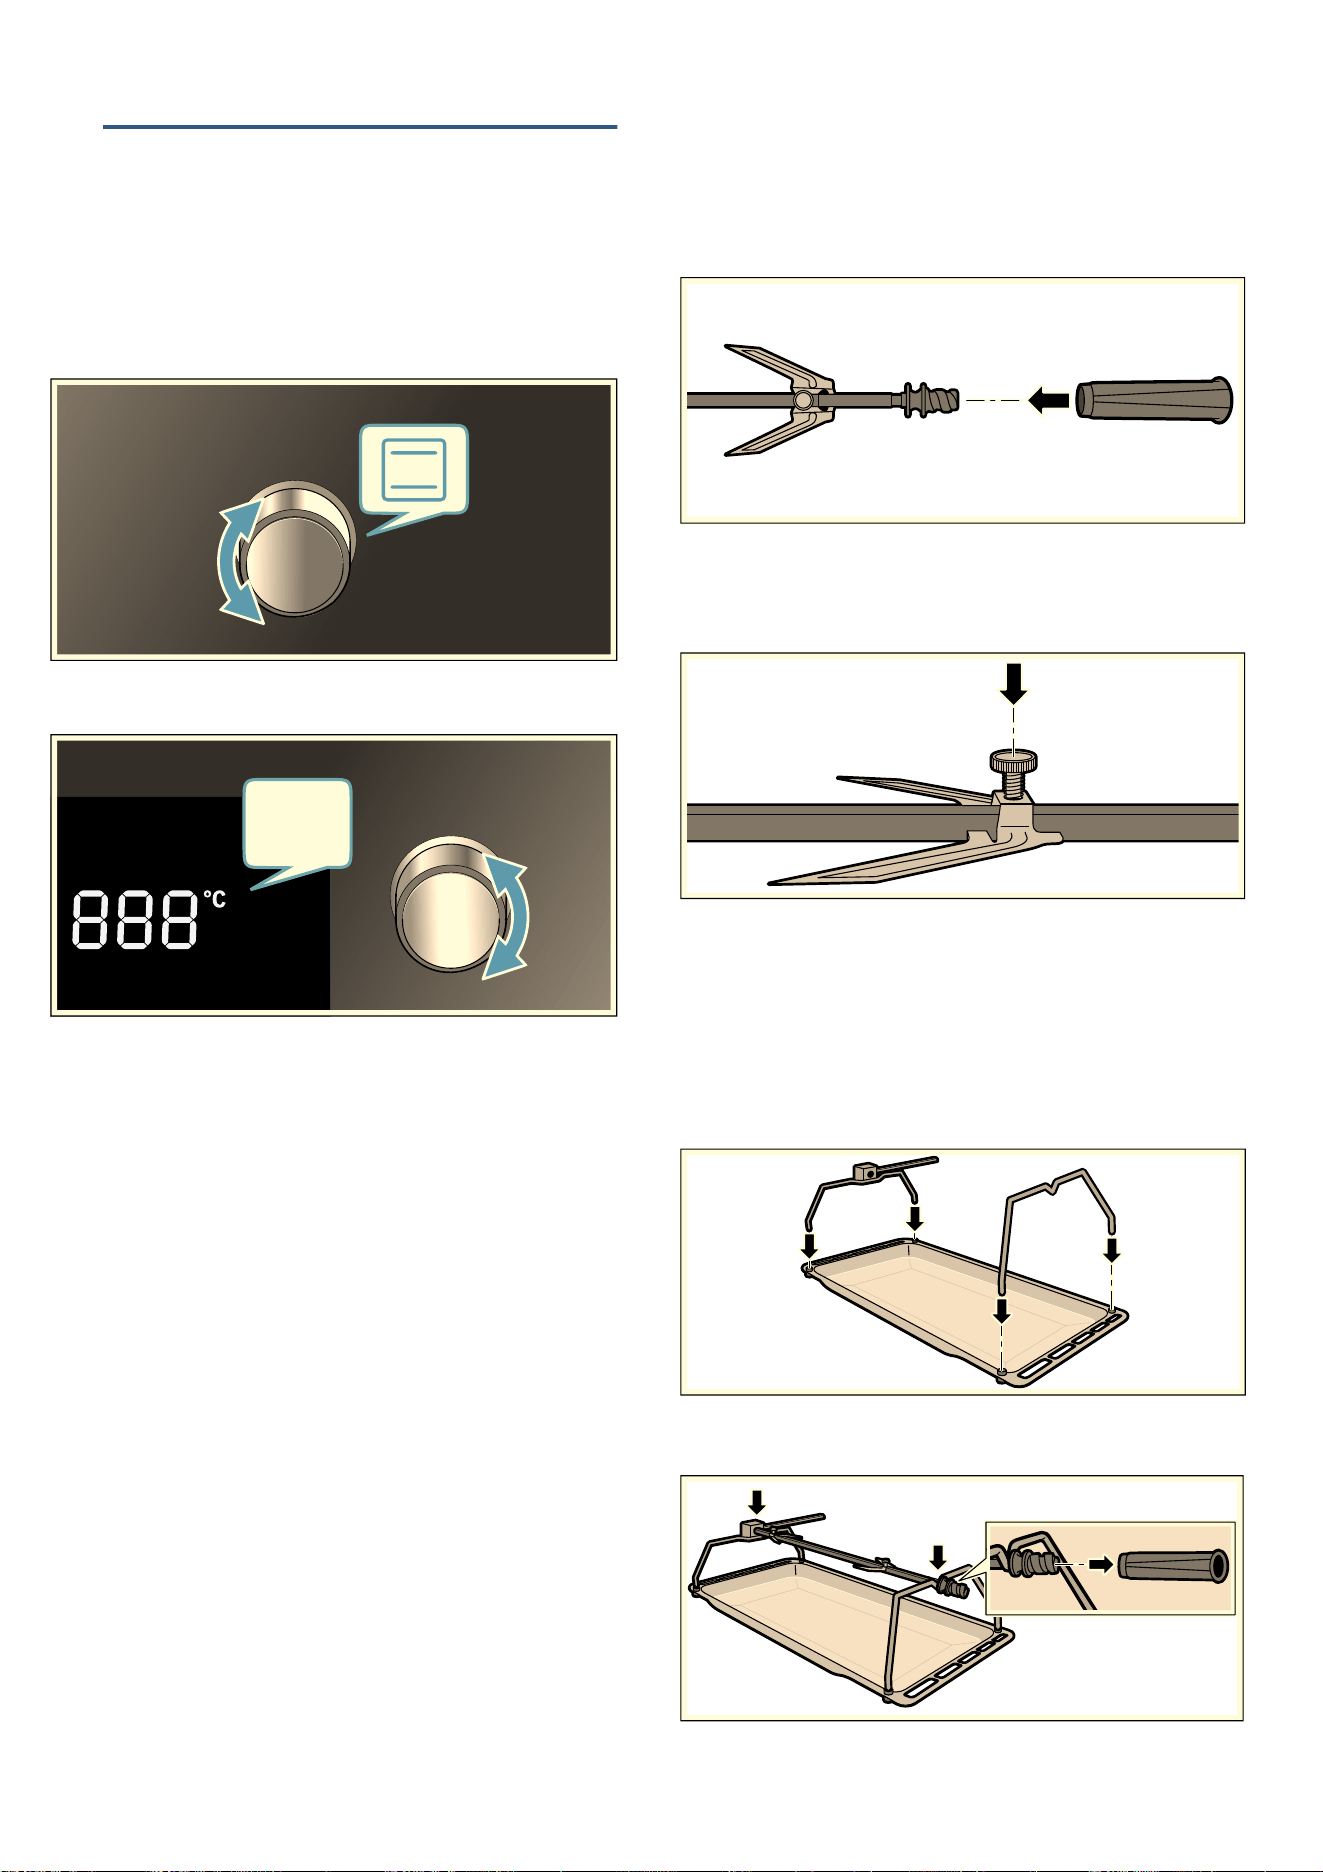
5RWDU\VSLW
3UHSDULQJWKHURWDU\VSLW
6OLGHDUHWDLQLQJFOLSRQWRWKHURWDU\VSLWDQGVFUHZRQ
WKHKDQGOH
3ODFHWKHURDVWDVFORVHDVSRVVLEOHWRWKHFHQWUHRI
WKHURWDU\VSLW
8VHUHWDLQLQJFOLSVWRVHFXUHWKHURDVWLQSODFH
8VHPLOOHGVFUHZVWRVHFXUHWKHUHWDLQLQJFOLSV
,QVHUWLQJWKHURWDU\VSLW
::DUQLQJ² 5LVNRI EXUQV
1HYHU WRXFK WKH KRW VXUIDFHV RI WKH FRRNLQJ FRPSDUWPHQW
RUWKHKHDWLQJHOHPHQWV&KLOGUHQPXVWEHNHSWDWDVDIH
GLVWDQFHIURPWKHDSSOLDQFHDWDOOWLPHV2SHQWKH
DSSOLDQFHGRRUFDUHIXOO\+RWVWHDPPD\HVFDSH
,QVHUWWKHURWDU\VSLWIUDPHLQWRWKHWKUHDGHGEXVKHV
3ODFHWKHURWDU\VSLWRQWRWKHURWDU\VSLWIUDPHDQG
XQVFUHZWKHKDQGOH
&
en 7LPHVHWWLQJRSWLRQV
6OLGHWKHXQLYHUVDOSDQLQWRVKHOISRVLWLRQDQGVOLGH
WKHURWDU\VSLWLQWRWKHPRWRUPRXQW
&ORVHWKHDSSOLDQFHGRRU
6ZLWFKLQJRQWKHURWDU\VSLW
1RWH :KHQ XVLQJ WKH URWLVVHULH VSLW KHDW WKH RYHQ XVLQJ
WKH ( KHDWLQJIXQFWLRQ,QVHUWWKHURWLVVHULHVSLWEHIRUH
VHWWLQJWKH F KHDWLQJIXQFWLRQ
7XUQWKHIXQFWLRQVHOHFWRUWR F
6HWWKHJULOOVHWWLQJ
1RWH 3RXUVRPHZDWHULQWRWKHXQLYHUVDOSDQWRFDWFK
DQ\IDWWKDWGULSVRXW
5HPRYLQJWKHURWDU\VSLW
::DUQLQJ² 5LVNRI EXUQV
1HYHU WRXFK WKH KRW VXUIDFHV RI WKH FRRNLQJ FRPSDUWPHQW
RUWKHKHDWLQJHOHPHQWV&KLOGUHQPXVWEHNHSWDWDVDIH
GLVWDQFHIURPWKHDSSOLDQFHDWDOOWLPHV2SHQWKH
DSSOLDQFHGRRUFDUHIXOO\+RWVWHDPPD\HVFDSH
2SHQLQJWKHDSSOLDQFHGRRU
6ORZO\SXOOWKHXQLYHUVDOSDQXQWLOLWLVKDOIZD\RXWRI
WKHFRRNLQJFRPSDUWPHQW
&RPSOHWHO\ UHPRYH WKH XQLYHUVDO SDQ IURP WKH FRRNLQJ
FRPSDUWPHQWDQGVHWLWRQWKHZRUNWRS
6FUHZ RQ WKH KDQGOH DQG UHPRYH WKH JULOO VSLW IURP WKH
JULOOVSLWIUDPH
$XWRPDWLFVDIHW\VZLWFKRIIIXQFWLRQ
7KHDSSOLDQFHKDVDQDXWRPDWLFVDIHW\FXWRXWIXQFWLRQ
7KHRYHQVZLWFKHVRIIDXWRPDWLFDOO\DIWHU KRXUV
O7LPHVHWWLQJRSWLRQV
7LPHVHWWLQJ RSWLRQV
<RXUDSSOLDQFHKDVGLIIHUHQWWLPHVHWWLQJRSWLRQV
2YHUYLHZRIWKHWLPHVHWWLQJRSWLRQV
2SHUDWLQJWKHHOHFWURQLFFORFN
6HWWLQJWKHWLPHU
7KH WLPHU KDV QR HIIHFW RQ KRZ WKH RYHQ ZRUNV 7KH WLPHU
GXUDWLRQ FDQ EH VHW WR EHWZHHQ VHFRQGV DQG KRXUV
7KHGXUDWLRQFDQEHVHWLQVHFRQGLQFUHPHQWVXSWR
PLQXWHVLQPLQXWHLQFUHPHQWVIURP PLQXWHVWR
KRXUDQGWKHQLQPLQXWHLQFUHPHQWV
3UHVVWKH v EXWWRQ
7KH t V\PEROZLOOEHOLW
8VHWKH @DQG AEXWWRQVWRVHWWKHUHTXLUHGGXUDWLRQ
$QDXGLEOHVLJQDOZLOOVRXQGRQFHWKHWLPHKDV
HODSVHG
1RWHV
■ 7RFKDQJHWKHUHPDLQLQJWLPHSUHVVWKH v EXWWRQ
7KHQFKDQJHWKHUHPDLQLQJWLPHXVLQJWKH @DQG A
EXWWRQV
■ 7RVWRSWKHWLPHUFRXQWLQJGRZQVHWWKHUHPDLQLQJ
WLPHWR]HUR
6ZLWFKLQJRIIWKHVLJQDOWRQH
7RVZLWFKWKHVLJQDORIISUHVVDQ\EXWWRQRURSHQWKH
DSSOLDQFHGRRU
1RWH $IWHUDVKRUWWLPHWKHDXGLEOHVLJQDOZLOOVWRS
DXWRPDWLFDOO\
7LPHVHWWLQJRSWLRQ 8VH
t
7LPHU 7KHWLPHUIXQFWLRQVOLNHDQHJJ
WLPHU,WUXQVLQGHSHQGHQWO\RI
WKH DSSOLDQFH ZKHQ LW LV KHDWLQJ
DQGRIRWKHUWLPHVHWWLQJ
RSWLRQV DQG GRHV QRW DIIHFW WKH
DSSOLDQFH
v
&ORFNWLPH :KHQQRRWKHUIXQFWLRQLVUXQ
QLQJLQWKHIRUHJURXQGWKH
DSSOLDQFHZLOOVKRZ\RXWKH
WLPHRIGD\RQWKHGLVSOD\
y
&RRNLQJWLPH 2QFHWKHVHWFRRNLQJWLPHKDV
HODSVHGWKHDSSOLDQFHZLOO
DXWRPDWLFDOO\VWRSKHDWLQJ
{
(QGWLPH (QWHUDFRRNLQJWLPHDQGWKH
UHTXLUHGHQGWLPH7KHDSSOL
DQFHZLOOVWDUWXSDXWRPDWLFDOO\
VR WKDW LW ILQLVKHV FRRNLQJ DW WKH
UHTXLUHGWLPH

7LPHVHWWLQJRSWLRQV HQ
6HWWLQJWKHHOHFWURQLFFORFN
<RXFDQDOWHUWKHFORFNLI\RXQHHGWRHJIURPVXPPHU
WRZLQWHUWLPH7RGRWKLVWKHRYHQPXVWEHVZLWFKHGRII
3UHVVWKH v EXWWRQ
7KH t V\PEROZLOOEHOLW
3UHVVWKH v EXWWRQDJDLQ
7KH v V\PEROZLOOEHOLW
8VHWKH @DQG AEXWWRQVWRVHWWKHFXUUHQWWLPH
6HWWLQJWKHDXWRPDWLFWLPHU
7KH HOHFWURQLF FORFN FDQ EH XVHG WR VZLWFK WKH RYHQ RQ RU
RIIDXWRPDWLFDOO\
6HWWLQJWKHFRRNLQJWLPH
<RXFDQVHWWKHFRRNLQJWLPHIRU\RXUIRRGRQWKH
DSSOLDQFH 7KLV SUHYHQWV WKH IRRG IURP DFFLGHQWDOO\ EHLQJ
FRRNHGIRUWRRORQJDQGPHDQVWKDW\RXGRQRWKDYHWR
VWRSZKDW\RXDUHGRLQJWRVZLWFKRIIWKHRYHQ
6HWWKHW\SHRIKHDWLQJDQGWKHWHPSHUDWXUH\RX
UHTXLUH
7KHRYHQZLOOVWDUW
3UHVVWKH v EXWWRQWZLFH
8VHWKH @DQG A EXWWRQVWRVHWWKHUHTXLUHGFRRNLQJ
WLPH
1RWH 7KHFRRNLQJWLPHFDQEHVHWWREHWZHHQ
VHFRQGV DQG KRXUV 7KH FRRNLQJ WLPH FDQ EH VHW
LQPLQXWHLQFUHPHQWVXSWRKRXUDQGWKHQLQ
PLQXWHLQFUHPHQWV
7KH y V\PEROZLOOEHOLW
7KHFRRNLQJWLPHKDVHODSVHG
$QDXGLEOHVLJQDOZLOOVRXQG7KHDSSOLDQFHZLOOVWRS
KHDWLQJ
7RVZLWFKWKHVLJQDORIISUHVVDQ\EXWWRQRURSHQWKH
DSSOLDQFHGRRU
1RWH $IWHUDVKRUWWLPHWKHDXGLEOHVLJQDOZLOOVWRS
DXWRPDWLFDOO\
7XUQWKHIXQFWLRQVHOHFWRUWRWKH2IISRVLWLRQ
6HWWLQJWKHHQGWLPH
%DNLQJ RU URDVWLQJ VWDUWV IRU WKH VHW GXUDWLRQ DW D ODWHU WLPH
ZKLFK\RXFKRVH
6HWWKHW\SHRIKHDWLQJDQGWKHWHPSHUDWXUH\RX
UHTXLUH
7KHRYHQZLOOVWDUW
3UHVVWKH v EXWWRQWZLFH
8VHWKH @DQG A EXWWRQVWRVHWWKHUHTXLUHGFRRNLQJ
WLPH
1RWH 7KHFRRNLQJWLPHFDQEHVHWWREHWZHHQ
VHFRQGV DQG KRXUV 7KH FRRNLQJ WLPH FDQ EH VHW
LQPLQXWHLQFUHPHQWVXSWRKRXUDQGWKHQLQ
PLQXWHLQFUHPHQWV
7KH y V\PEROZLOOEHOLW
3UHVVWKH v EXWWRQDJDLQ
8VHWKH @DQG A EXWWRQVWRVHWWKHHQGWLPH
1RWH :KHQWKHEXWWRQLVILUVWSUHVVHGDYDOXHZLOOEH
VXJJHVWHGRQWKHGLVSOD\7KLVVXJJHVWHGYDOXHLV
FDOFXODWHGXVLQJWKHFXUUHQWWLPHRQWKHFORFNDQGWKH
FRRNLQJWLPH7KLVYDOXHFDQEHFKDQJHGXVLQJWKH @
DQG A EXWWRQV
7KH { V\PERO ZLOO EH OLW 7KH GLVSOD\ ZLOO VKRZ WKH HQG
WLPH7KHDSSOLDQFHZLOOQRZVZLWFKWRVWDQGE\PRGH
7KHFRRNLQJWLPHKDVHODSVHG
$QDXGLEOHVLJQDOZLOOVRXQG7KHDSSOLDQFHZLOOVWRS
KHDWLQJ
7RVZLWFKWKHVLJQDORIISUHVVDQ\EXWWRQRURSHQWKH
DSSOLDQFHGRRU
1RWH $IWHUDVKRUWWLPHWKHDXGLEOHVLJQDOZLOOVWRS
DXWRPDWLFDOO\
7XUQWKHIXQFWLRQVHOHFWRUWRWKH2IISRVLWLRQ
en &KLOGSURRIORFN
A&KLOGSURRIORFN
&KLOGSURRI ORFN
7KHRYHQKDVDFKLOGSURRIORFNWRSUHYHQWFKLOGUHQIURP
VZLWFKLQJLWRQE\DFFLGHQW
1RWH ,I WKH KRE LV EHLQJ XVHG LW ZLOO QRW EH DIIHFWHG E\ WKH
FKLOGSURRIORFNRQWKHRYHQ
$FWLYDWLQJWKHFKLOGSURRIORFN
7KHDSSOLDQFHPXVWEHVZLWFKHGRII
3UHVVDQGKROGWKH ] EXWWRQIRUDSSUR[ VHFRQGV
7KH D V\PEROZLOODSSHDURQWKHGLVSOD\7KHFKLOGSURRI
ORFNKDVQRZEHHQDFWLYDWHG
'HDFWLYDWLQJWKHFKLOGSURRIORFN
3UHVVDQGKROGWKH ] EXWWRQIRUDSSUR[ VHFRQGV
7KH
D V\PEROZLOOJRRXWRQWKHGLVSOD\7KHFKLOGSURRI
ORFNKDVQRZEHHQGHDFWLYDWHG
Q%DVLFVHWWLQJV
%DVLF VHWWLQJV
7KHUHDUHYDULRXVVHWWLQJVDYDLODEOHWR\RXLQRUGHUWR
KHOSXVH\RXUDSSOLDQFHHIIHFWLYHO\DQGVLPSO\<RXFDQ
FKDQJHWKHVHVHWWLQJVDVUHTXLUHG
/LVWRIEDVLFVHWWLQJV
'HSHQGLQJ RQ WKH IHDWXUHV RI \RXU DSSOLDQFH QRW DOO EDVLF
VHWWLQJVZLOOEHDYDLODEOH
%DVLFVHWWLQJ 2SWLRQV
™‹‚ $XGLEOHVLJQDOGXUDWLRQ
XSRQFRPSOHWLRQRIDFRRN
LQJWLPHRUWLPHUGXUDWLRQ
‚ DSSUR[VHFRQGV
ƒ DSSUR[VHF
RQGV
„ DSSUR[PLQXWHV
™‹ƒ $PRXQWRIWLPHXQWLODVHW
WLQJLVDSSOLHG
‚ DSSUR[ VHFRQGV
ƒ DSSUR[ VHFRQGV
„ DSSUR[ VHFRQGV
™‹„ %XWWRQWRQHWKDWVRXQGV
ZKHQDEXWWRQLVWRXFKHG
‹ RII
‚ RQ
™‹… %ULJKWQHVVRIWKHGLVSOD\
LOOXPLQDWLRQ
‚ GDUN
ƒ PHGLXP
„ EULJKW
™‹† 'LVSOD\WLPHRIGD\ ‹ KLGHWKHWLPH
‚ GLVSOD\WKHWLPH
™‹‡ ,QWHULRUOLJKWLQJRQZKHQ
DSSOLDQFHLQRSHUDWLRQ
‹ QR
‚ \HV
™‹ˆ &RROLQJIDQUXQRQWLPH ‚ VKRUW
ƒ PHGLXP
„ ORQJ
… H[WUDORQJ
™‹‰ 5HVHWDOOYDOXHVWRIDFWRU\
VHWWLQJV
‹ QR
‚ \HV
™‹Š $FWLYDWHGHPRPRGH
'HPRPRGHLVSURYLGHGIRU
GHPRQVWUDWLRQSXUSRVHV
RQO\WKHRYHQGRHVQRW
DFWXDOO\KHDWLQ'HPR
PRGH 'HPR PRGH FDQ RQO\
EHDFWLYDWHGZLWKLQPLQ
XWHVRIFRQQHFWLQJWKH
DSSOLDQFHWRWKHPDLQV
SRZHUVXSSO\
‹ QR
‚ \HV
)DFWRU\VHWWLQJ

&OHDQLQJ HQ
&KDQJLQJWKHEDVLFVHWWLQJV
7KHIXQFWLRQVHOHFWRUPXVWEHVHWWRWKH2IISRVLWLRQ
3UHVVDQGKROGWKH v EXWWRQIRUDSSUR[ VHFRQGV
7KHILUVWEDVLFVHWWLQJZLOODSSHDURQWKHGLVSOD\
HJ
™‹‚ ‚
8VHWKHWHPSHUDWXUHVHOHFWRUWRFKDQJHWKHVHWWLQJDV
UHTXLUHG
8VHWKH @EXWWRQWRQDYLJDWHWRWKHQH[WEDVLFVHWWLQJ
8VH WKH A RU @ EXWWRQ WR FRQWLQXH JRLQJ WKURXJK DOO WKH
EDVLFVHWWLQJVDVGHVFULEHGDERYHDQGXVHWKH
WHPSHUDWXUHVHOHFWRULI\RXZDQWWRFKDQJHDQ\RI
WKHVHVHWWLQJV
:KHQ \RX KDYH ILQLVKHG SUHVV DQG KROG WKH v EXWWRQ
DJDLQIRUDSSUR[ VHFRQGVWRFRQILUPWKHVHWWLQJV
7KLVDSSOLHVDOOWKHEDVLFVHWWLQJV
<RXFDQFKDQJHWKHEDVLFVHWWLQJVDJDLQDWDQ\WLPH
'HPRPRGHFDQRQO\EHDFWLYDWHGZLWKLQPLQXWHVRI
FRQQHFWLQJWKHDSSOLDQFHWRWKHPDLQVSRZHUVXSSO\
1RWH <RXUFKDQJHVWRWKHEDVLFVHWWLQJVZLOOEHUHWDLQHG
HYHQDIWHUDSRZHUIDLOXUH
6HWWLQJHQHUJ\VDYLQJPRGH
<RXFDQVDYHHQHUJ\E\UHGXFLQJWKHGLVSOD\
EULJKWQHVV<RX FDQ VHW WKH GLVSOD\ EULJKWQHVV XQGHU EDVLF
VHWWLQJ ™‹…
1RWH 7KLVVHWWLQJFKDQJHVWKHEULJKWQHVVRIWKHGLVSOD\
ZKLOHWKHDSSOLDQFHLVLQRSHUDWLRQ,QVWDQGE\PRGHWKH
DSSOLDQFHDXWRPDWLFDOO\UHGXFHVWKHGLVSOD\EULJKWQHVV
7KHGLVSOD\LVDWLWVGLPPHVWDWQLJKWEHWZHHQWKHKRXUV
RIDQG
D&OHDQLQJ
&OHDQLQJ
:LWK JRRG FDUH DQG FOHDQLQJ \RXU DSSOLDQFH ZLOO UHWDLQ LWV
DSSHDUDQFH DQG UHPDLQ IXOO\ IXQFWLRQLQJ IRU D ORQJ WLPH WR
FRPH :H ZLOO H[SODLQ KHUH KRZ \RX VKRXOG FRUUHFWO\ FDUH
IRUDQGFOHDQ\RXUDSSOLDQFH
::DUQLQJ² 5LVNRIHOHFWULFVKRFN
'R QRW XVH DQ\ KLJKSUHVVXUH FOHDQHUV RU VWHDP FOHDQHUV
ZKLFKFDQUHVXOWLQDQHOHFWULFVKRFN
::DUQLQJ² 5LVNRIEXUQV
7KH DSSOLDQFH EHFRPHV YHU\ KRW 1HYHU WRXFK WKH LQWHULRU
VXUIDFHVRIWKHFRRNLQJFRPSDUWPHQWRUWKHKHDWLQJ
HOHPHQWV $OZD\V DOORZ WKH DSSOLDQFH WR FRRO GRZQ .HHS
FKLOGUHQDWDVDIHGLVWDQFH
6XLWDEOHFOHDQLQJDJHQWV
2EVHUYHWKHIROORZLQJLQIRUPDWLRQWRHQVXUHWKDWWKH
GLIIHUHQWVXUIDFHVDUHQRWGDPDJHGE\XVLQJWKHZURQJ
W\SHRIFOHDQLQJDJHQW
'RQRWXVHDQ\RIWKHIROORZLQJ
RQWKHRYHQ
■ $Q\KDUVKRUDEUDVLYHFOHDQLQJDJHQWV
■ &OHDQLQJDJHQWVZLWKDKLJKFRQFHQWUDWLRQRIDOFRKRO
■ +DUGVFRXULQJSDGVRUVSRQJHV
■ +LJKSUHVVXUHFOHDQHUVRUVWHDPFOHDQHUV
:DVKQHZVSRQJHFORWKVWKRURXJKO\EHIRUHXVH
$UHD &OHDQLQJ
$SSOLDQFHH[WHULRU
6WDLQOHVVVWHHO
IURQW
+RWVRDS\ZDWHU
&OHDQ ZLWK D GLVK FORWK DQG WKHQ GU\ ZLWK D VRIW
FORWK
5HPRYHIOHFNVRIOLPHVFDOHJUHDVHVWDUFK
DQG DOEXPLQ HJ HJJ ZKLWH LPPHGLDWHO\ &RU
URVLRQFDQIRUPXQGHUVXFKIOHFNV
6SHFLDOVWDLQOHVVVWHHOFOHDQLQJSURGXFWVVXLW
DEOHIRUKRWVXUIDFHVDUHDYDLODEOHIURPRXU
DIWHUVDOHV VHUYLFH RU IURP VSHFLDOLVW UHWDLOHUV
$SSO\ D YHU\ WKLQ OD\HU RI WKH FOHDQLQJ SURGXFW
ZLWKDVRIWFORWK
&RQWUROSDQHO +RWVRDS\ZDWHU
&OHDQ ZLWK D GLVK FORWK DQG WKHQ GU\ ZLWK D VRIW
FORWK
'RQRWXVHJODVVFOHDQHURUDJODVVVFUDSHU
'RRUSDQHOV +RWVRDS\ZDWHU
&OHDQ ZLWK D GLVK FORWK DQG WKHQ GU\ ZLWK D VRIW
FORWK
'R QRW XVH D JODVV VFUDSHU RU D VWDLQOHVV VWHHO
VFRXULQJSDG
'RRUKDQGOH +RWVRDS\ZDWHU
&OHDQ ZLWK D GLVK FORWK DQG WKHQ GU\ ZLWK D VRIW
FORWK
,IGHVFDOHUFRPHVLQWRFRQWDFWZLWKWKHGRRU
KDQGOH ZLSH LW RII LPPHGLDWHO\ 2WKHUZLVH DQ\
VWDLQVZLOOQRWEHDEOHWREHUHPRYHG

en &OHDQLQJ
1RWHV
■ 6OLJKWGLIIHUHQFHVLQFRORXURQWKHIURQWRIWKH
DSSOLDQFH DUH FDXVHG E\ WKH XVH RI GLIIHUHQW PDWHULDOV
VXFKDVJODVVSODVWLFDQGPHWDO
■ 6KDGRZVRQWKHGRRUSDQHOVZKLFKORRNOLNHVWUHDNV
DUHFDXVHGE\UHIOHFWLRQVPDGHE\WKHLQWHULRUOLJKWLQJ
■ (QDPHOLVEDNHGRQDWYHU\KLJKWHPSHUDWXUHV7KLV
FDQFDXVHVRPHVOLJKWFRORXUYDULDWLRQ7KLVLVQRUPDO
DQGGRHVQRWDIIHFWRSHUDWLRQ
7KHHGJHVRIWKLQWUD\VFDQQRWEHFRPSOHWHO\
HQDPHOOHG$VDUHVXOWWKHVHHGJHVFDQEHURXJK
7KLVGRHVQRWLPSDLUWKHDQWLFRUURVLRQSURWHFWLRQ
.HHSLQJWKHDSSOLDQFHFOHDQ
$OZD\VNHHSWKHDSSOLDQFHFOHDQDQGUHPRYHGLUW
LPPHGLDWHO\VRWKDWVWXEERUQGHSRVLWVRIGLUWGRQRWEXLOG
XS
::DUQLQJ² 5LVNRIILUH
/RRVHIRRGUHPQDQWVIDWDQGPHDWMXLFHVPD\FDWFKILUH
%HIRUHXVLQJWKHDSSOLDQFHUHPRYHWKHZRUVWRIWKHIRRG
UHPQDQWVIURPWKHFRRNLQJFRPSDUWPHQWKHDWLQJ
HOHPHQWVDQGDFFHVVRULHV
7LSV
■ &OHDQWKHFRRNLQJFRPSDUWPHQWDIWHUHDFKXVH7KLV
ZLOOHQVXUHWKDWGLUWFDQQRWEHEDNHGRQ
■ $OZD\V UHPRYH IOHFNV RI OLPHVFDOH JUHDVH VWDUFK DQG
DOEXPLQHJHJJZKLWHLPPHGLDWHO\
■ 8VHWKHXQLYHUVDOSDQIRUEDNLQJYHU\PRLVWFDNHV
■ 8VHVXLWDEOHRYHQZDUHIRUURDVWLQJHJDURDVWLQJ
GLVK
&OHDQLQJWKHFRRNLQJFRPSDUWPHQW
3RXUOLWUHVRIZDWHULQWRWKHFHQWUHRIWKHFRRNLQJ
FRPSDUWPHQWIORRU
6HWWKH $KHDWLQJIXQFWLRQ
8VH WKH WHPSHUDWXUH FRQWUROOHU WR VHW D WHPSHUDWXUH RI
&
6ZLWFKRIIWKHDSSOLDQFHDIWHUPLQXWHV
$OORZWKHDSSOLDQFHWRFRROGRZQ
&OHDQWKHFRRNLQJFRPSDUWPHQWZLWKDFORWK
::DUQLQJ² 5LVNRIEXUQV
7KH DSSOLDQFH EHFRPHV YHU\ KRW 1HYHU WRXFK WKH LQWHULRU
VXUIDFHVRIWKHFRRNLQJFRPSDUWPHQWRUWKHKHDWLQJ
HOHPHQWV $OZD\V DOORZ WKH DSSOLDQFH WR FRRO GRZQ .HHS
FKLOGUHQDWDVDIHGLVWDQFH
$SSOLDQFHLQWHULRU
(QDPHOOHGVXU
IDFHV
+RWVRDS\ZDWHURUDYLQHJDUVROXWLRQ
&OHDQ ZLWK D GLVK FORWK DQG WKHQ GU\ ZLWK D VRIW
FORWK
6RIWHQEDNHGRQIRRGUHPQDQWVZLWKDGDPS
FORWKDQGVRDS\ZDWHU8VHVWDLQOHVVVWHHO
ZLUHZRRORURYHQFOHDQHUWRUHPRYHVWXEERUQ
GLUW
&DXWLRQ
1HYHU XVH RYHQ FOHDQHU LQ WKH FRRNLQJ FRP
SDUWPHQW ZKHQ LW LV VWLOO ZDUP 7KLV PD\ GDP
DJH WKH HQDPHO 5HPRYH DOO IRRG UHPQDQWV
IURP WKH FRRNLQJ FRPSDUWPHQW DQG WKH DSSOL
DQFH GRRU EHIRUH \RX QH[W KHDW XS WKH DSSOL
DQFH
/HDYHWKHFRRNLQJFRPSDUWPHQWRSHQWRGU\
DIWHUFOHDQLQJLW
,WLVEHVWWRXVHWKHFOHDQLQJIXQFWLRQ
~ &OHDQLQJIXQFWLRQRQ SDJH
1RWH )RRG UHVLGXHV FDQ FDXVH ZKLWH GHSRV
LWV WR IRUP 7KHVH DUH KDUPOHVV DQG GR QRW DI
IHFWKRZWKHDSSOLDQFHZRUNV
5HPRYHXVLQJOHPRQMXLFHLIUHTXLUHG
*ODVVFRYHUIRU
WKHLQWHULRUOLJKW
LQJ
+RWVRDS\ZDWHU
&OHDQ ZLWK D GLVK FORWK DQG WKHQ GU\ ZLWK D VRIW
FORWK
,IWKHFRRNLQJFRPSDUWPHQWLVKHDYLO\VRLOHG
XVHRYHQFOHDQHU
'RRUSDQHOV +RWVRDS\ZDWHU
&OHDQZLWKDGLVKFORWKDQGGU\ZLWKDVRIW
FORWK
'R QRW XVH D JODVV VFUDSHU RU D VWDLQOHVV VWHHO
VFRXULQJSDG
,WLVEHVWWRFOHDQWKHGRRUSDQHOVDORQJZLWK
WKHUHVWRIWKHFRRNLQJFRPSDUWPHQW
~ &OHDQLQJWKHFRRNLQJFRPSDUWPHQW
RQ SDJH
'RRUVHDO
'RQRWUHPRYH
+RWVRDS\ZDWHU
&OHDQZLWKDGLVKFORWK
'RQRWVFRXU
'RRUFRYHU PDGHIURPVWDLQOHVVVWHHO
8VHVWDLQOHVVVWHHOFOHDQHU)ROORZWKHPDQX
IDFWXUHUVLQVWUXFWLRQV'RQRWXVHVWDLQOHVV
VWHHOFDUHSURGXFWV
PDGHIURPSODVWLF
&OHDQXVLQJKRWVRDS\ZDWHUDQGDGLVKFORWK
'U\ ZLWK D VRIW FORWK 'R QRW XVH JODVV FOHDQHU
RUDJODVVVFUDSHU
5HPRYHWKHGRRUFRYHUIRUFOHDQLQJ
5DLOV +RWVRDS\ZDWHU
6RDNDQGFOHDQZLWKDGLVKFORWKRUEUXVK
3XOORXWV\VWHP +RWVRDS\ZDWHU
&OHDQZLWKDGLVKFORWKRUDEUXVK
'RQRWUHPRYHWKHOXEULFDQWZKLOHWKHSXOORXW
UDLOVDUHSXOOHGRXW²LWLVEHVWWRFOHDQWKHP
ZKHQWKH\DUHSXVKHGLQ'RQRWFOHDQLQWKH
GLVKZDVKHU
$FFHVVRULHV +RWVRDS\ZDWHU
6RDNDQGFOHDQZLWKDGLVKFORWKRUEUXVK
,IWKHUHDUHKHDY\GHSRVLWVRIGLUWXVHDVWDLQ
OHVVVWHHOVFRXULQJSDG
&OHDQLQJIXQFWLRQ HQ
.&OHDQLQJIXQFWLRQ
&OHDQLQJ IXQFWL RQ
<RXU DSSOLDQFH KDV D VHOIFOHDQLQJ IXQFWLRQ <RX FDQ XVH
WKHVHOIFOHDQLQJIXQFWLRQWRFOHDQWKHFRRNLQJ
FRPSDUWPHQW
3\URO\WLFVHOIFOHDQLQJ
<RXFDQXVH3\URO\WLFVHOIFOHDQLQJPRGHWRFOHDQWKH
FRRNLQJFRPSDUWPHQWZLWKQRHIIRUWDWDOO7KHFRRNLQJ
FRPSDUWPHQWLVKHDWHGXSWRDYHU\KLJK
WHPSHUDWXUH5HVLGXHVIURPURDVWLQJJULOOLQJDQGEDNLQJ
ZLOOEXUQ
5XQQLQJ WKLV FOHDQLQJ SURJUDPPH UHTXLUHV DSSUR[LPDWHO\
NLORZDWWKRXUVGHSHQGLQJRQWKHWLPHVHW7KH
FOHDQLQJSURJUDPPHFDQEHVHWWRUXQIRUEHWZHHQ
KRXUV PLQXWHVDQG KRXUV PLQXWHV
1RWH )RU\RXUVDIHW\WKHFRRNLQJFRPSDUWPHQWGRRU
ORFNVDXWRPDWLFDOO\,WFDQQRWEHRSHQHGDJDLQXQWLOWKH
ORFNLQGLFDWRUOLJKW nJRHVRXW7KHLQWHULRUOLJKWLQJ
UHPDLQVRIIZKLOHWKHDSSOLDQFHLVEHLQJFOHDQHG
::DUQLQJ² 5LVNRIVHULRXVGDPDJHWRKHDOWK
7KHDSSOLDQFHZLOOEHFRPHYHU\KRWGXULQJWKHFOHDQLQJ
IXQFWLRQ 7KH QRQVWLFN FRDWLQJ RQ EDNLQJ WUD\V DQG WLQV LV
GHVWUR\HGDQGQR[LRXVJDVHVDUHUHOHDVHG1HYHUFOHDQ
QRQVWLFNEDNLQJWUD\VDQGEDNLQJWLQVXVLQJWKHFOHDQLQJ
IXQFWLRQ2QO\FOHDQHQDPHOOHGDFFHVVRULHVXVLQJWKH
FOHDQLQJIXQFWLRQ
::DUQLQJ² 5LVNRIEXUQV
■ 7KHFRRNLQJFRPSDUWPHQWEHFRPHVH[WUHPHO\KRW
GXULQJ WKH FOHDQLQJ IXQFWLRQ 1HYHU RSHQ WKH DSSOLDQFH
GRRU$OORZWKHDSSOLDQFHWRFRROGRZQ.HHSFKLOGUHQ
DZD\IURPWKHDSSOLDQFH
5LVNRIEXUQV
■ ;7KHDSSOLDQFHEHFRPHVYHU\KRWRQWKHRXWVLGH
GXULQJWKHFOHDQLQJIXQFWLRQ1HYHUWRXFKWKH
DSSOLDQFHGRRU$OORZWKHDSSOLDQFHWRFRROGRZQ
.HHSFKLOGUHQDWDVDIHGLVWDQFH
5LVNRIEXUQV
■ 7KHDSSOLDQFHEHFRPHVYHU\KRW1HYHUWRXFKWKH
LQWHULRUVXUIDFHVRIWKHFRRNLQJFRPSDUWPHQWRUWKH
KHDWLQJHOHPHQWV$OZD\VDOORZWKHDSSOLDQFHWRFRRO
GRZQ.HHSFKLOGUHQDWDVDIHGLVWDQFH
%HIRUHUXQQLQJWKHFOHDQLQJIXQFWLRQ
&DXWLRQ
6KHOIVXSSRUWVDQGSXOORXWUDLOVJHWGHPDJHGLIWKH\DUH
OHIW LQ WKH FRRNLQJ FRPSDUWPHQW ZKHQ LW LV FOHDQHG %HIRUH
\RX VWDUW WKH FOHDQLQJ IXQFWLRQ UHPRYH WKH VKHOI VXSSRUWV
DQGSXOORXWUDLOVIURPWKHFRRNLQJFRPSDUWPHQW
5HPRYHWKHVKHOIVXSSRUWVDQGSXOORXWUDLOVIURPWKH
FRRNLQJFRPSDUWPHQW
5HPRYHWKHZRUVWRIWKHIRRGUHVLGXHVDQGUHPQDQWV
IURPWKHFRRNLQJFRPSDUWPHQW
&OHDQWKHLQVLGHRIWKHDSSOLDQFHGRRUDQGDORQJWKH
HGJHVRIWKHFRRNLQJFRPSDUWPHQWLQWKHDUHDDURXQG
WKHVHDO'RQRWVFUXEWKHVHDO
::DUQLQJ² 5LVNRIILUH
■ /RRVHIRRGUHPQDQWVIDWDQGPHDWMXLFHVPD\FDWFK
ILUHZKHQWKHFOHDQLQJIXQFWLRQLVLQSURJUHVV%HIRUH
\RXVWDUWWKHFOHDQLQJIXQFWLRQDOZD\VUHPRYHWKH
ZRUVWRIWKHIRRGUHVLGXHVDQGUHPQDQWVIURPWKH
FRRNLQJFRPSDUWPHQW
5LVNRIILUH
■ 7KHDSSOLDQFHZLOOEHFRPHYHU\KRWRQWKHRXWVLGH
GXULQJWKHFOHDQLQJIXQFWLRQ1HYHUKDQJFRPEXVWLEOH
REMHFWVHJWHDWRZHOVRQWKHGRRUKDQGOH'RQRW
SODFH DQ\WKLQJ DJDLQVW WKH IURQW RI WKH DSSOLDQFH .HHS
FKLOGUHQDZD\IURPWKHDSSOLDQFH
6WDUWLQJ
7XUQWKHIXQFWLRQVHOHFWRUWRWKH q KHDWLQJIXQFWLRQ
8VHWKHWHPSHUDWXUHVHOHFWRUWRVHWDFOHDQLQJVHWWLQJ
1RWH 0RYLQJWKHIXQFWLRQVHOHFWRUZKLOHWKHFOHDQLQJ
F\FOHLVLQSURJUHVVZLOOVWRSWKHS\URO\WLFVHOIFOHDQLQJ
SURJUDP
2QHPLQXWHDIWHUWKHFOHDQLQJF\FOHS\URO\WLFVHOI
FOHDQLQJ KDV EHJXQ WKH RYHQ GRRU LV ORFNHG WR SUHYHQW LW
IURP EHLQJ RSHQHG 7KH LQGLFDWRU OLJKW n OLJKWV XS WR VKRZ
WKDWWKLVGRRUORFNKDVEHHQDFWLYDWHG2QFHWKHGRRUORFN
KDVEHHQDFWLYDWHGLWLVQRORQJHUSRVVLEOHWRVHOHFWDQ\
IXQFWLRQV7RVHOHFWIXQFWLRQVZDLWXQWLOWKH n LQGLFDWRU
OLJKWJRHVRXW
1RWH <RXFDQFRQWLQXHWRXVHWKHWLPHUZKLOHWKH
S\URO\WLFVHOIFOHDQLQJSURJUDPLVLQSURJUHVV7KH
GXUDWLRQ\RXVHWZLOOKDYHQRHIIHFWRQWKHS\URO\WLFVHOI
FOHDQLQJIXQFWLRQ
1RWH <RX ZLOO QRW EH DEOH WR XVH WKH LQWHULRU OLJKWLQJ ZKLOH
WKHS\URO\WLFVHOIFOHDQLQJSURJUDPPHLVLQSURJUHVV
&DQFHOOLQJ
7RFDQFHODSURJUDPPHWXUQWKHIXQFWLRQVHOHFWRUWRWKH
2IISRVLWLRQ
(QGLQJ
2QFHWKHVHOIFOHDQLQJIXQFWLRQKDVUXQWKURXJKWRWKH
HQGDQDXGLEOHVLJQDOZLOOVRXQG7KHDSSOLDQFHGRRU
FDQQRWEHRSHQHGXQWLOWKH 5 V\PEROJRHVRXW
2QFHWKHFOHDQLQJIXQFWLRQKDVHQGHG
2QFHWKHFRRNLQJFRPSDUWPHQWKDVFRROHGGRZQXVHD
GDPS FORWK WR ZLSH RII WKH DVK WKDW KDV EHHQ OHIW EHKLQG LQ
WKHFRRNLQJFRPSDUWPHQWDQGDURXQGWKHDSSOLDQFHGRRU
1RWH 9HU\EDGVRLOLQJPD\FDXVHZKLWHGHSRVLWVWR
UHPDLQRQWKHHQDPHOVXUIDFHV7KLVLVUHVLGXHIURPWKH
IRRG DQG LV KDUPOHVV ,W GRHV QRW DIIHFW SHUIRUPDQFH <RX
FDQUHPRYHWKHVHUHVLGXHVXVLQJOHPRQMXLFHLIUHTXLUHG
&OHDQLQJVHWWLQJ 'XUDWLRQ
KRXUV PLQXWHV
KRXUV
KRXUV PLQXWHV
en 5DLOV
p5DLOV
5DLOV
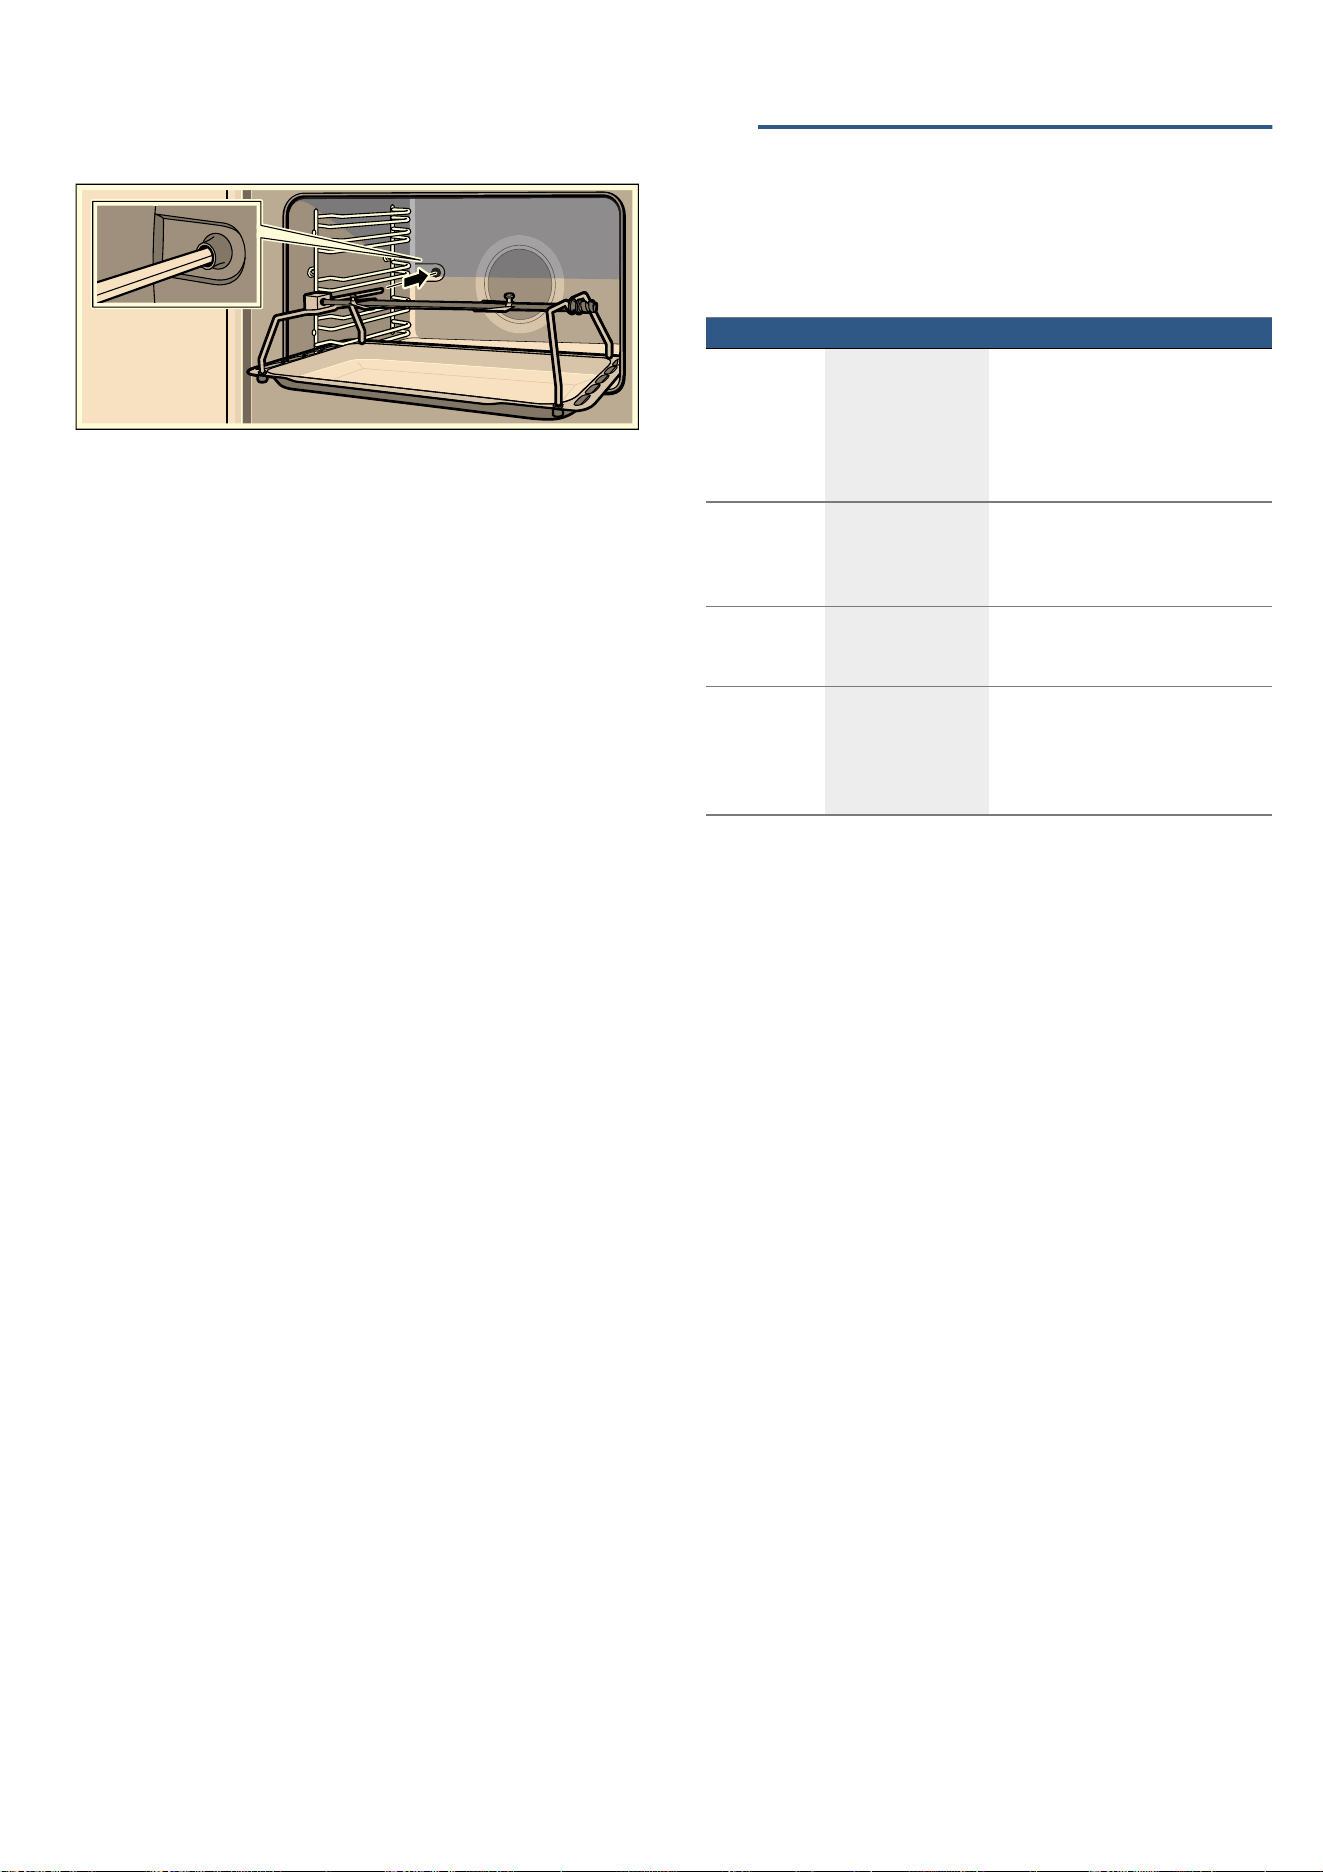
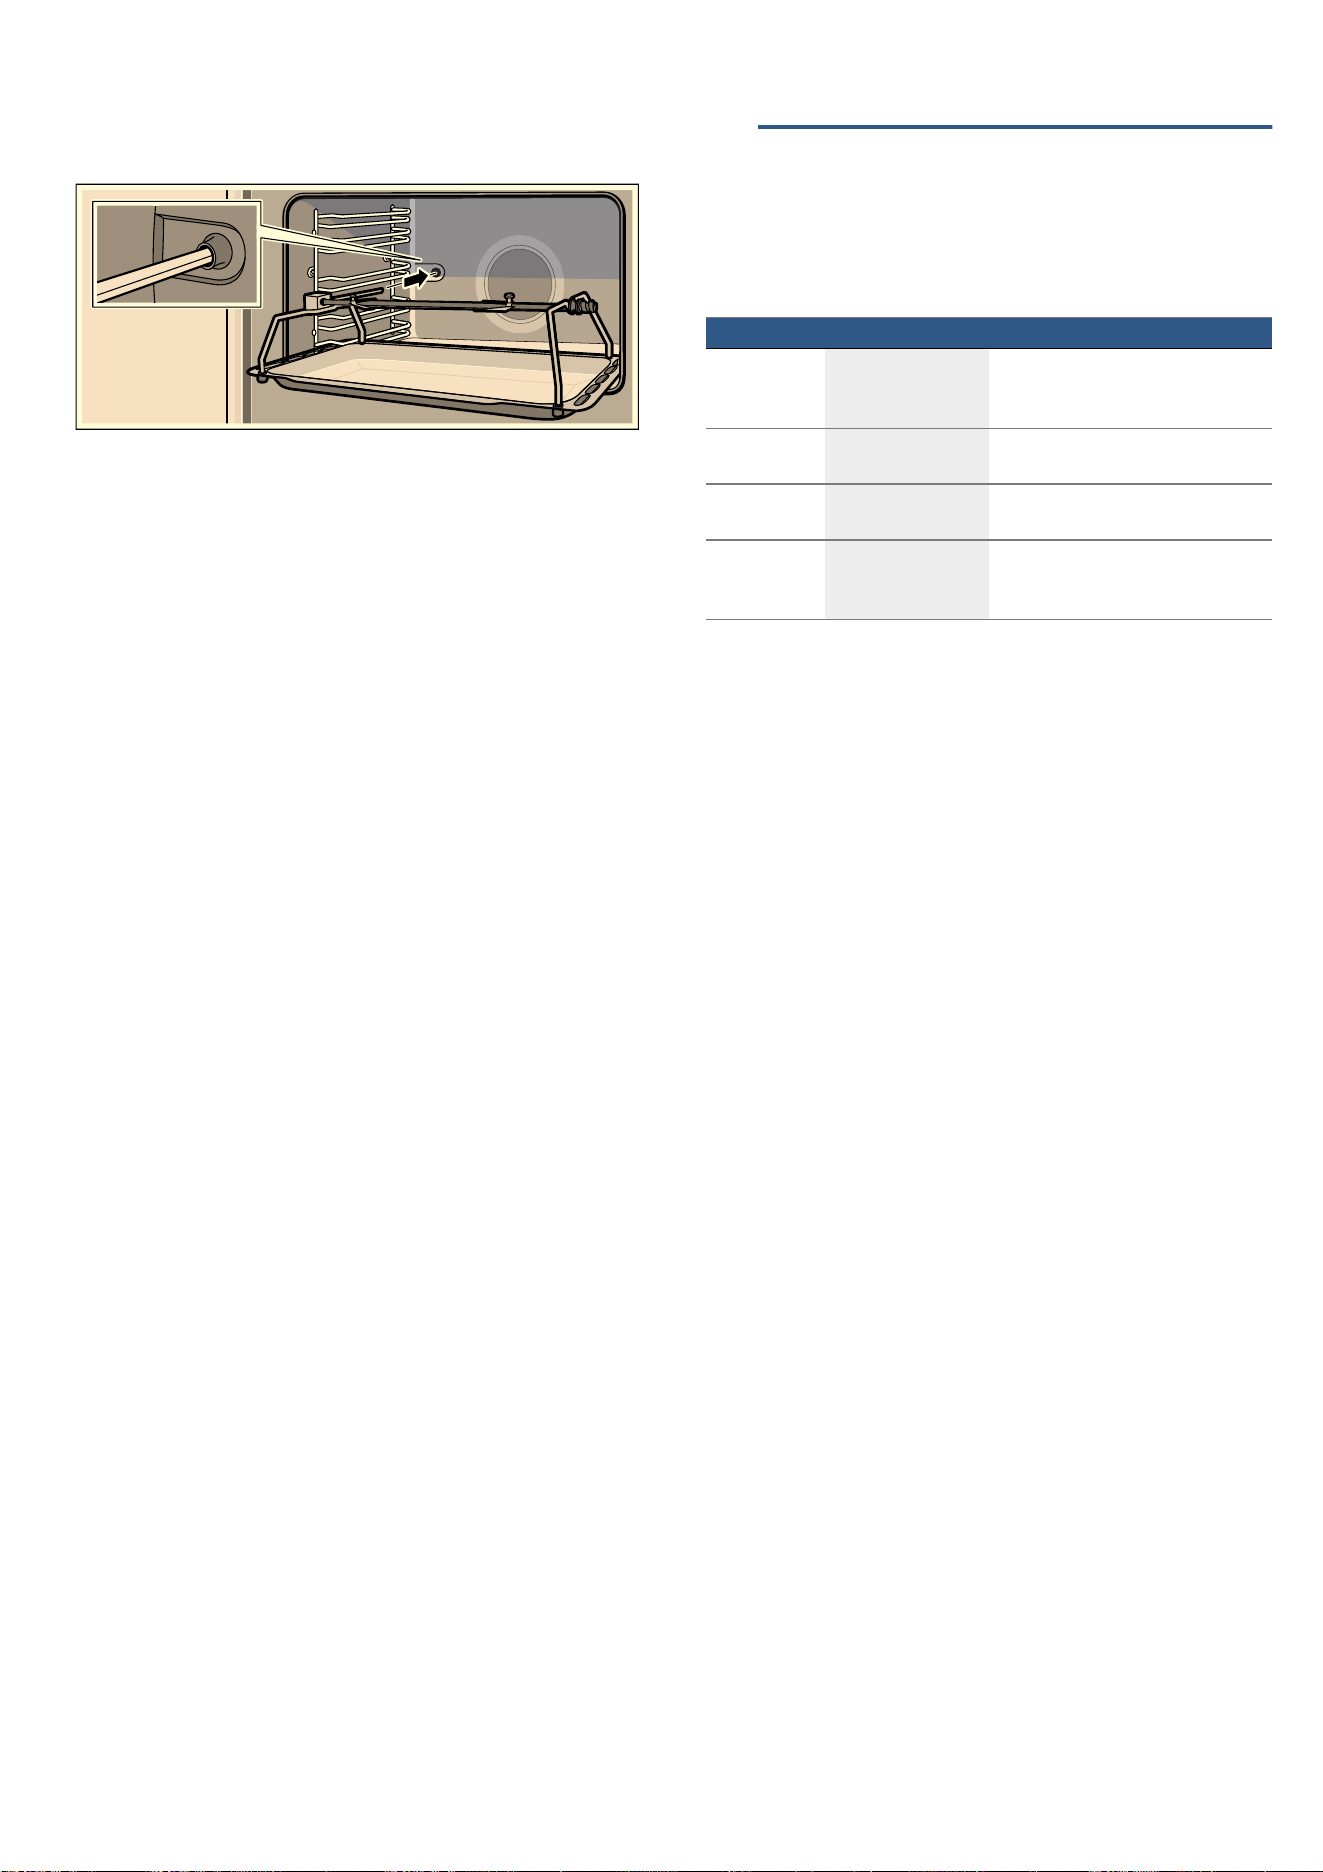
'HWDFKLQJWKHVKHOIVXSSRUWV
7KH VKHOI VXSSRUWV DUH HDFK IL[HG WR WKH VLGH SDQHOV RI WKH
FRRNLQJFRPSDUWPHQWDWWKUHHSRLQWV
*ULSWKHIURQWRIWKHVKHOIVXSSRUWDQGSXOOLWURXQGWR
WKHPLGGOHRIWKHFRRNLQJFRPSDUWPHQW
7KH IURQW KRRN RI WKH VKHOI VXSSRUW ZLOO FRPH RXW RI WKH
KROH
6ZLQJWKHVKHOIVXSSRUWURXQGIXUWKHUDQGSXOOLWRXWRI
WKHUHDUKROHVLQWKHVLGHSDQHO
5HPRYHWKHVKHOIVXSSRUWVIURPWKHFRRNLQJ
FRPSDUWPHQW
5HILWWLQJWKHVKHOIVXSSRUWV
,QVHUW WKH KRRNV RI WKH VKHOI VXSSRUW LQWR WKH UHDU KROHV
LQWKHVLGHSDQHO
3XVKWKHIURQWKRRNRIWKHVKHOIVXSSRUWLQWRWKHKROH
q$SSOLDQFHGRRU
$SSOLDQFH GRRU
:LWK JRRG FDUH DQG FOHDQLQJ \RXU DSSOLDQFH ZLOO UHWDLQ LWV
DSSHDUDQFHDQGUHPDLQIXOO\IXQFWLRQDOIRUDORQJWLPHWR
FRPH7KLVZLOOWHOO\RXKRZWRFOHDQWKHDSSOLDQFHGRRU
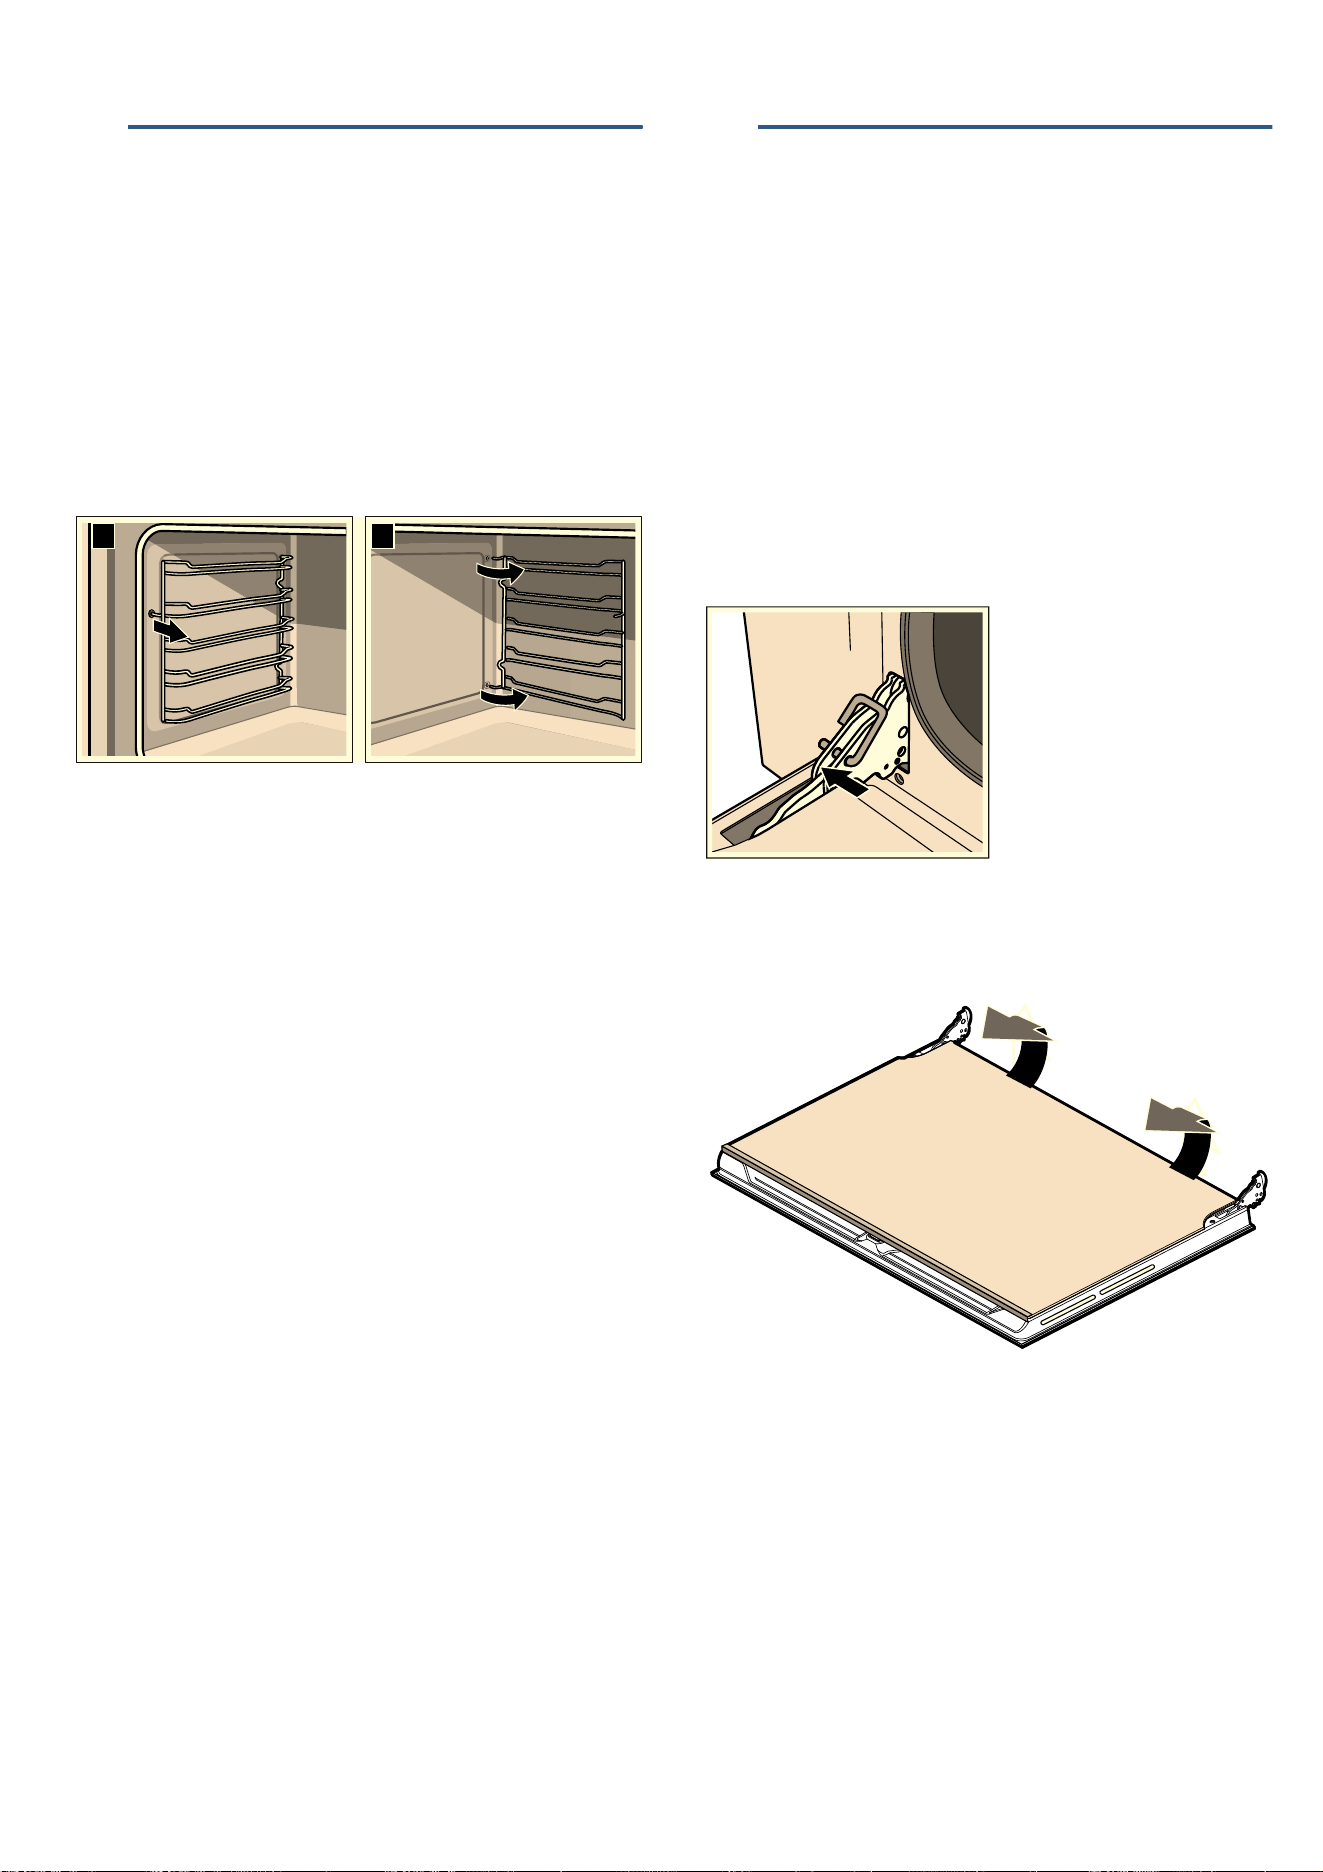
5HPRYLQJDQGLQVWDOOLQJWKHGRRUSDQHOV
7RIDFLOLWDWHFOHDQLQJ\RXFDQUHPRYHWKHJODVVSDQHOV
IURPWKHRYHQGRRU
5HPRYLQJWKHGRRUSDQHOV
2SHQWKHRYHQGRRUIXOO\
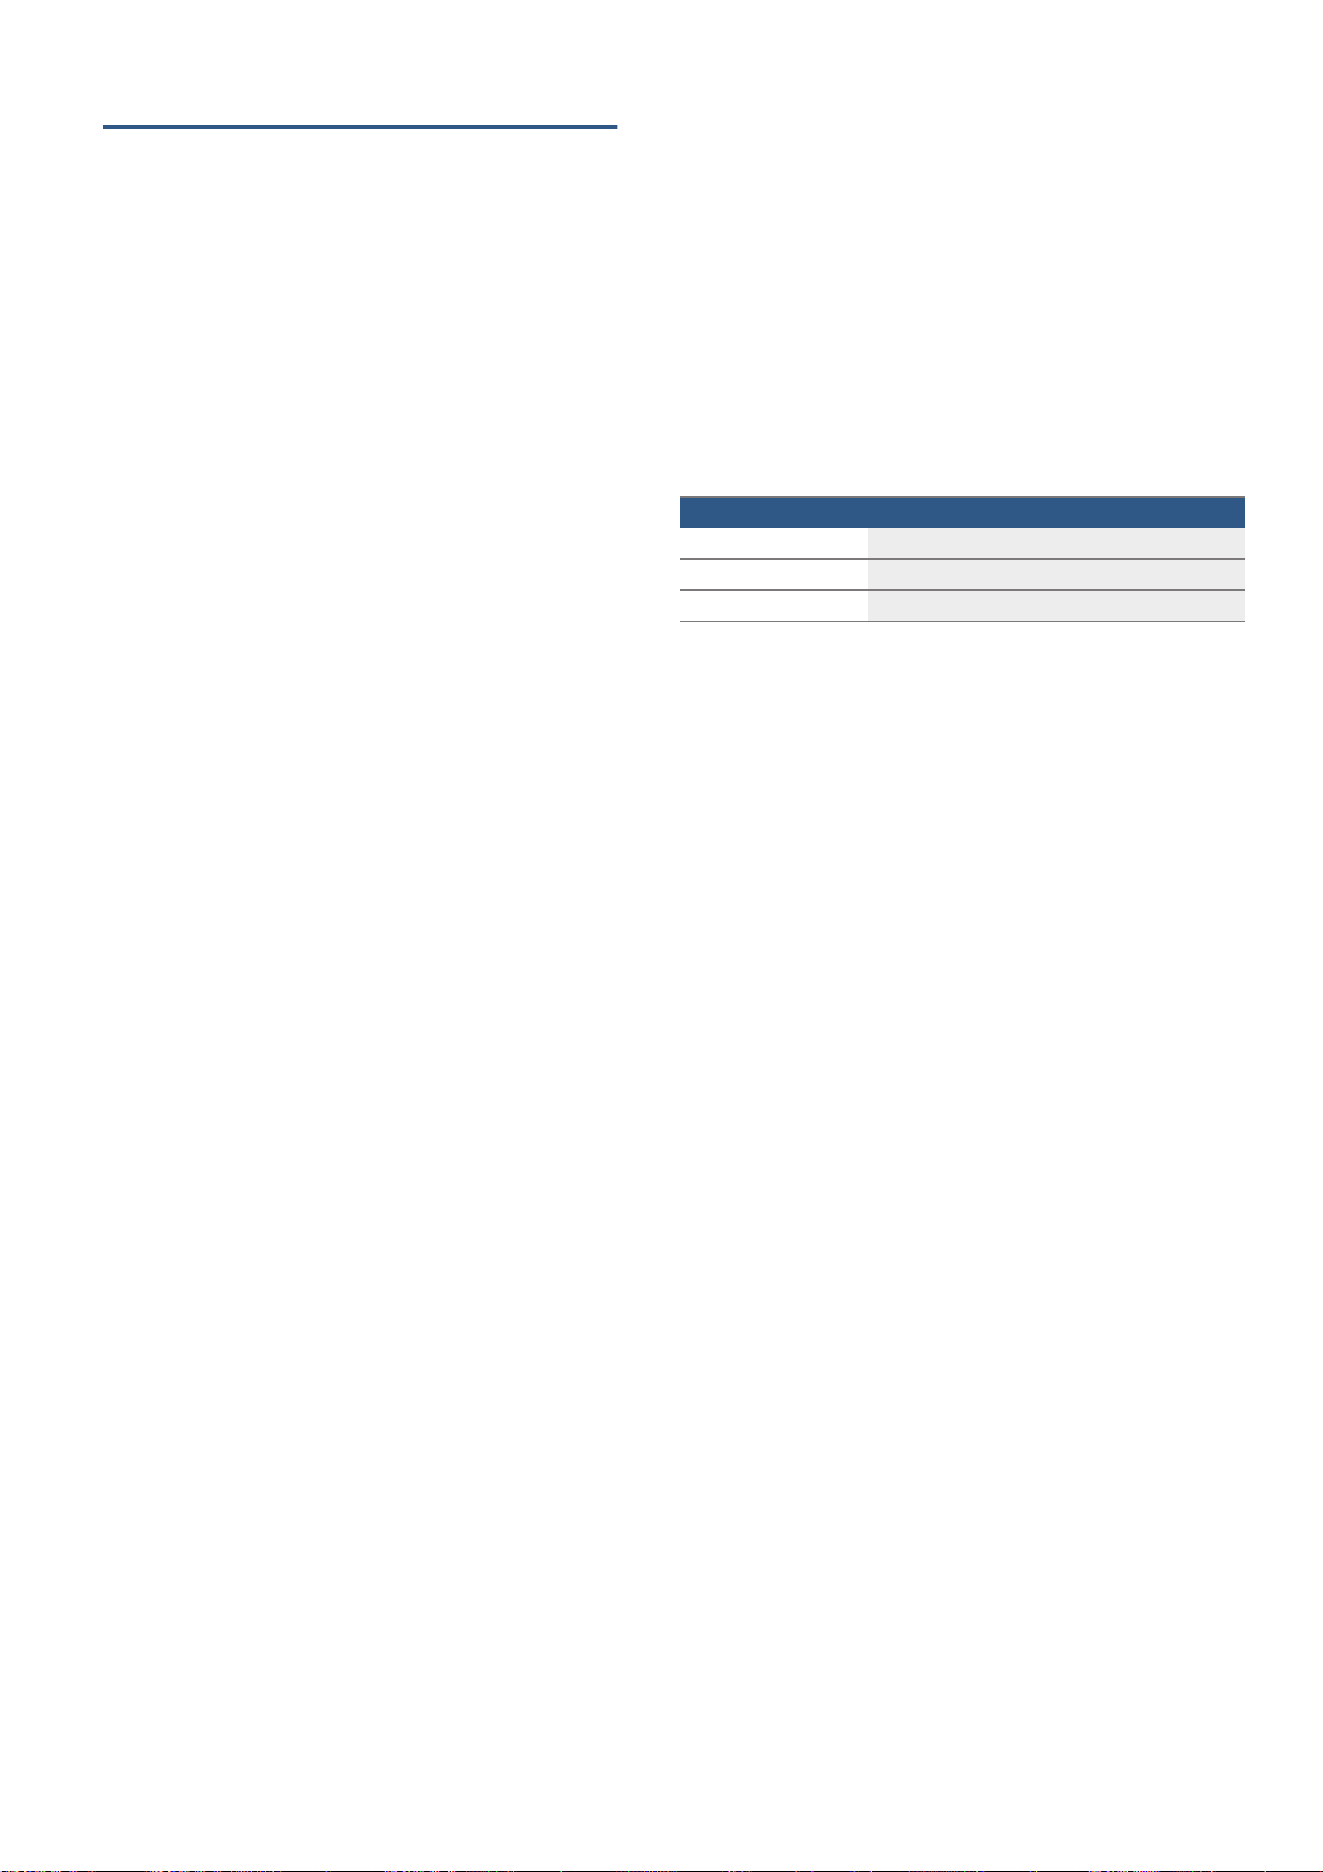
/RFNWKHWZRKLQJHVRQWKHOHIWDQGULJKWXVLQJWKH
ORFNLQJSLQ
1RWH 7KHORFNLQJSLQVPXVWEHIXOO\LQVHUWHGLQWRWKH
KROHVLQWKHKLQJHV
8VHERWKKDQGVWROLIWWKHERWWRPRIWKHLQQHUSDQHO
XQWLOWKHIDVWHQLQJSLQVFRPHRXWRIWKHKROGHU
&DUHIXOO\SXOOWKHWRSRIWKHLQQHUSDQHORXWRIWKH
UHWDLQLQJVWULSDQGOLIWLWWRFRPSOHWHO\IUHHWKHSDQHO
IURPWKHGRRU
D
E
$SSOLDQFHGRRU HQ
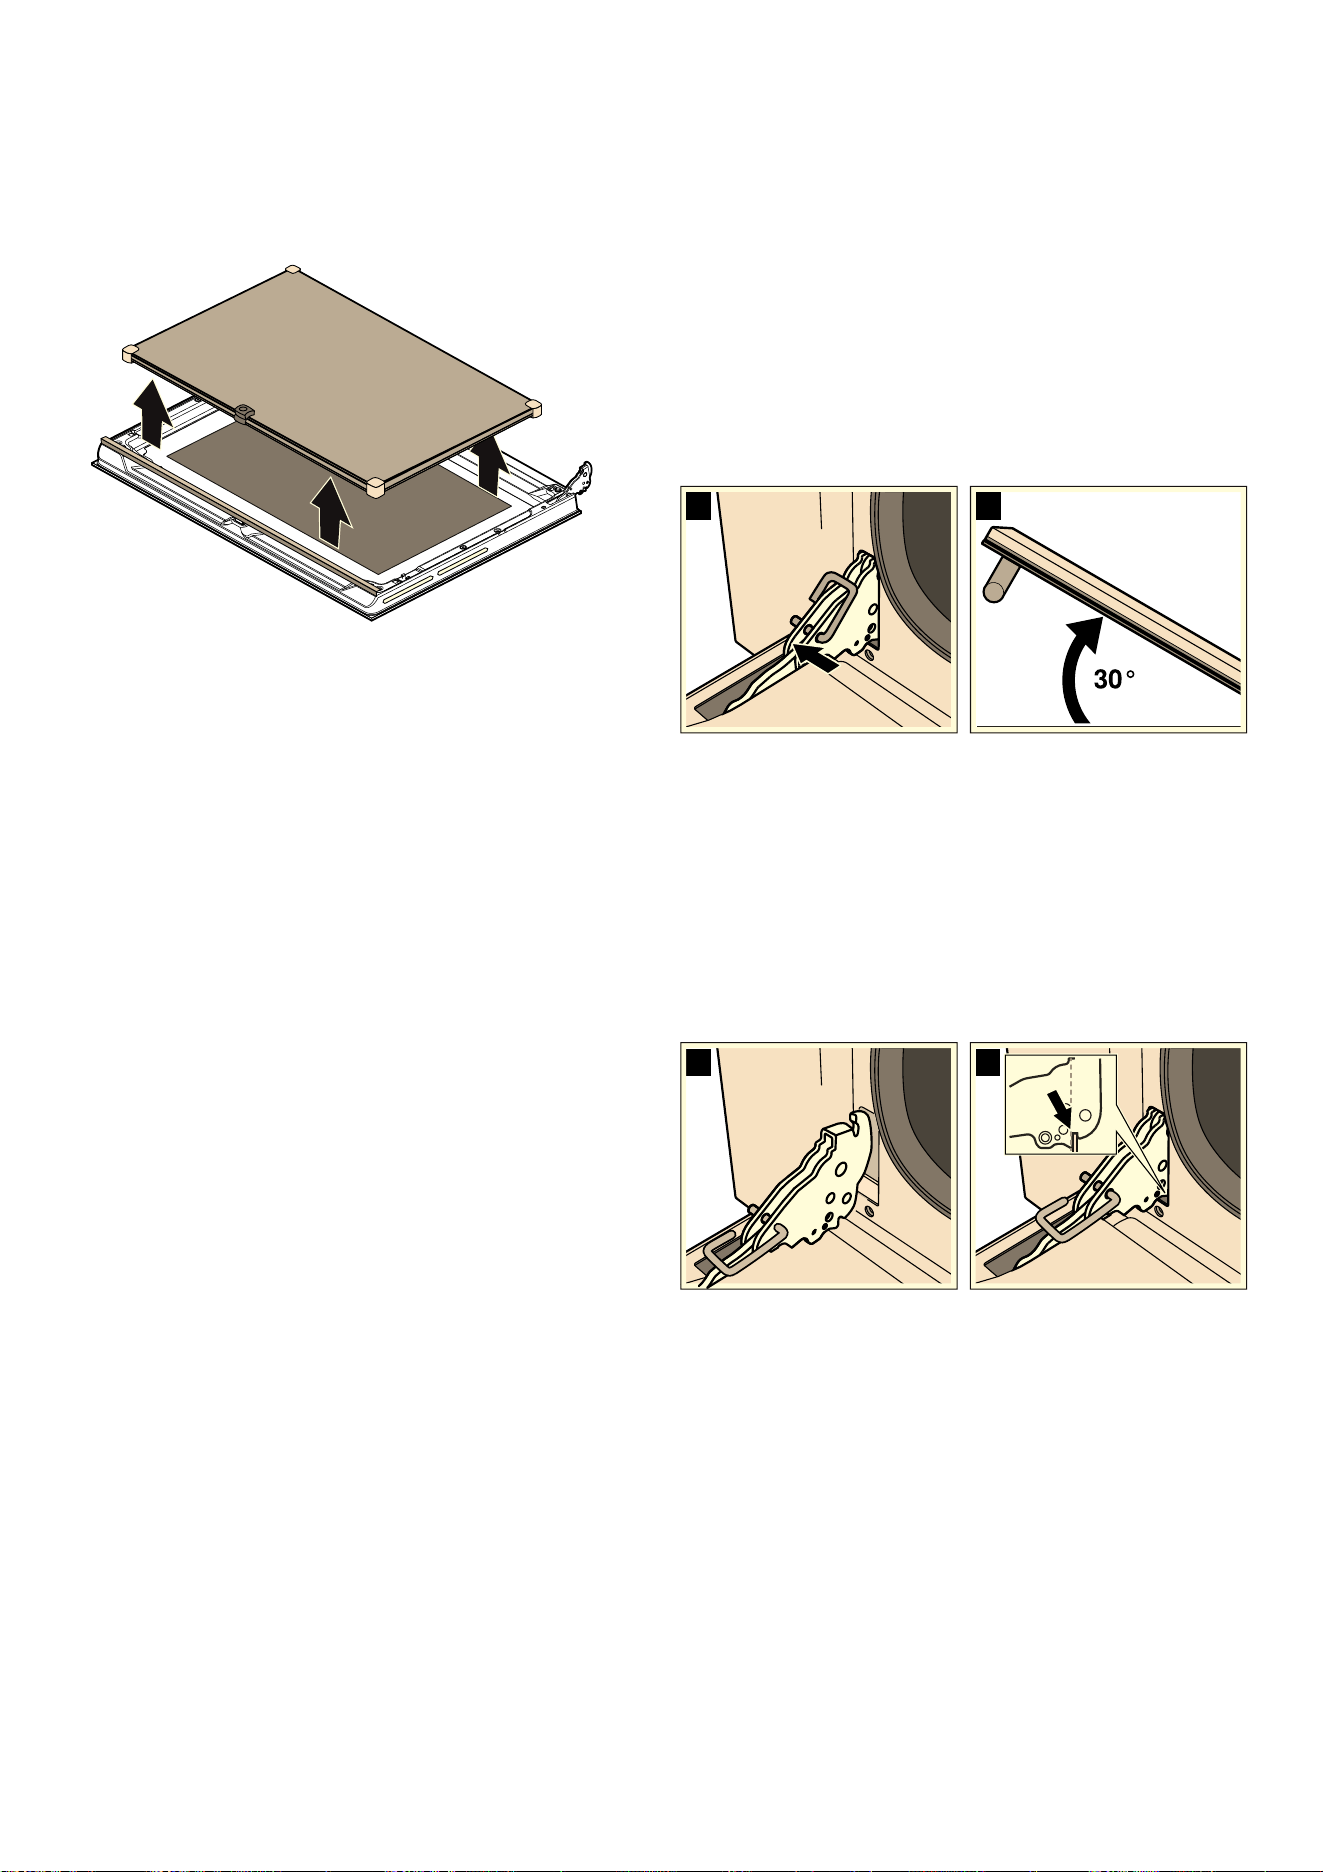
5HPRYHWKHWZRPLGGOHSDQHOVDORQJZLWKWKHLU
KROGHUV
1RWH 7KHWZRPLGGOHSDQHOVDUHQRWIDVWHQHGXVLQJ
UHWDLQLQJSLQVLQVWHDGWKH\DUHKHOGLQSODFHXVLQJ
KROGHUV
5HPRYH WKH KROGHUV WR VHSDUDWH WKH WZR PLGGOH SDQHOV
IURPRQHDQRWKHU
&OHDQWKHSDQHOVZLWKJODVVFOHDQHUDQGDVRIWFORWK
::DUQLQJ² 5LVNRILQMXU\
6FUDWFKHG JODVV LQ WKH DSSOLDQFH GRRU PD\ GHYHORS LQWR D
FUDFN'RQRWXVHDJODVVVFUDSHUVKDUSRUDEUDVLYH
FOHDQLQJDLGVRUGHWHUJHQWV
)LWWLQJWKHGRRUSDQHOV
5HLQVHUWWKHWZRPLGGOHSDQHOV
1RWHV
² <RX ZLOO NQRZ WKDW \RX KDYH LQVHUWHG WKH WZR PLGGOH
SDQHOVFRUUHFWO\ZKHQ\RXFDQVHHWKH/RZ(
V\PERORQERWKSDQHOV
² 0DNHVXUHWKDWWKHSDQHOVDUHVHDWHGFRUUHFWO\$OO
KROGHUVPXVWOD\IODWDJDLQVWWKHRXWHUSDQHO
5HLQVHUWWKHLQQHUSDQHO
1RWH 7KHSDQHOPXVWILUVWEHLQVHUWHGLQWRWKH
UHWDLQLQJEDU7KHWZRIDVWHQLQJSLQVPXVWWKHQ
HQJDJHLQWKHKROGHUVSURYLGHGIRUWKHP
5HPRYHWKHORFNLQJSLQVDQGFORVHWKHRYHQGRRU
5HPRYLQJDQGILWWLQJWKHDSSOLDQFHGRRU
,IWKHRYHQLVYHU\KHDYLO\VRLOHGWKHRYHQGRRUFDQEH
UHPRYHGIRUHDVLHUFOHDQLQJ1RUPDOO\KRZHYHUWKLVLV
QRWQHFHVVDU\
5HPRYLQJWKHDSSOLDQFHGRRU
2SHQWKHRYHQGRRUIXOO\
/RFNWKHWZRKLQJHVRQWKHOHIWDQGULJKWXVLQJWKH
ORFNLQJSLQ D
1RWH 7KHORFNLQJSLQVPXVWEHIXOO\LQVHUWHGLQWRWKH
KROHVLQWKHKLQJHV
7DNHKROGRIWKHVLGHVRIWKHRYHQGRRUZLWKERWK
KDQGVDQGFORVHWKHRYHQGRRUE\DSSUR[ E
/LIWWKHRYHQGRRUVOLJKWO\DQGSXOOLWRXW
1RWH 'RQRWFORVHWKHRYHQGRRUIXOO\RWKHUZLVHWKH
KLQJHVFRXOGEHFRPHEHQWDQGWKHHQDPHOFRXOGEH
GDPDJHG
)LWWLQJWKHDSSOLDQFHGRRU
7DNHKROGRIWKHVLGHVRIWKHRYHQGRRUZLWKERWK
KDQGV
6OLGHWKHKLQJHVLQWRWKHVORWVLQWKHRYHQ D
1RWH 7KHQRWFKDWWKHERWWRPRIWKHKLQJHVPXVW
HQJDJHLQWRWKHIUDPHRIWKHRYHQ E
/RZHUWKHGRRU
5HPRYHWKHORFNLQJSLQV
::DUQLQJ² 5LVNRILQMXU\
,IWKHRYHQGRRUIDOOVRXWDFFLGHQWDOO\RUDKLQJHVQDSV
VKXWGRQRWUHDFKLQWRWKHKLQJH&DOOWKHDIWHUVDOHV
VHUYLFH
::DUQLQJ² 5LVNRILQMXU\
7KHGRRUPD\QRWFORVHSURSHUO\LIWKHGRRUKLQJHVKDYH
QRWHQJDJHGFRUUHFWO\7KLVZLOODOORZKHDWWRHVFDSHDQG
WKHSDUWVRIWKHDSSOLDQFHPD\EHFRPHYHU\KRW7R
SUHYHQWWKLVIURPKDSSHQLQJUHPRYHWKHGRRUDJDLQ
7KHQUHILWWKHGRRUDVVKRZQLQWKHGUDZLQJPDNLQJVXUH
WKDW WKH JURRYH RQ WKH XQGHUVLGH RI WKH KLQJHV HQJDJHV LQ
WKHRYHQIUDPH
DE
ED
en 7URXEOHVKRRWLQJ
37URXEOHVKRRWLQJ
7URXEOH VKRRWLQJ
)DXOWPHVVDJHV
,IDIDXOWPHVVDJHEHJLQQLQJZLWK “§§DSSHDUVRQWKH
GLVSOD\VHWWKHIXQFWLRQVHOHFWRUWR2II,IWKHIDXOW
PHVVDJHGRHVQRWGLVDSSHDUSOHDVHFRQWDFWRXUDIWHU
VDOHVVHUYLFH
)DXOW 3RVVLEOHFDXVH 1RWHVUHPHG\
7KHDSSOLDQFHGRHVQRWZRUN
7KHSOXJLVQRWSOXJJHGLQWRWKHPDLQV &RQQHFWWKHDSSOLDQFHWRWKHSRZHUVXSSO\
3RZHUFXW &KHFNZKHWKHURWKHUNLWFKHQDSSOLDQFHVDUHZRUN
LQJ
7KHFLUFXLWEUHDNHULVIDXOW\ &KHFNLQWKHIXVHER[WRPDNHVXUHWKDWWKHIXVH
IRUWKHDSSOLDQFHLV2.
7KHDSSOLDQFHFDQQRWEHVWDUWHG 7KHDSSOLDQFHGRRULVQRWIXOO\FORVHG &ORVHWKHDSSOLDQFHGRRU
7KHDSSOLDQFHLVQRWVZLWFKHGRII 6ZLWFKWKHDSSOLDQFHRIIDQGEDFNRQDJDLQ
‚ƒ‹‹LVIODVKLQJRQWKHGLVSOD\ 3RZHUIDLOXUH 5HVHWWKHFORFN
7KHLQWHULRUOLJKWLQJLVQRWZRUNLQJ *HQWOHWRSERWWRPKHDWLQJPRGHLVDFWLYH ,QJHQWOHWRSERWWRPKHDWLQJPRGHWKHLQWHULRU
OLJKWLQJLVQRWVZLWFKHGRQ
7KHEXOELVIDXOW\ 5HSODFHWKHEXOE
$OOIRRGWKDWLVFRRNHGLQWKHRYHQ
EXUQVZLWKLQDQH[WUHPHO\VKRUW
SHULRGRIWLPH
7KHUPRVWDWIDXOW\ &DOOWKHDIWHUVDOHVVHUYLFH
'RRUSDQHOVDUHVWHDPHGXS 7KLV LV QRUPDO DQG UHVXOWV IURP GLIIHUHQFHV LQ WHP
SHUDWXUH
+HDWWKHDSSOLDQFHXSWR&DQGWKHQVZLWFKLW
EDFNRIIDIWHUPLQXWHV
$OWKRXJK WKH DSSOLDQFH LV VZLWFKHG
RQLWFDQQRWEHRSHUDWHGWKH
D V\PEROLVVKRZQRQWKHGLVSOD\
7KHFKLOGSURRIORFNLVDFWLYDWHG 3UHVVDQGKROGWKH
]
WRXFKEXWWRQXQWLOWKH
D V\PEROJRHVRXW
7KHDSSOLDQFHGRRUZLOOQRWRSHQ
WKH
n
V\PEROLVVKRZQRQWKHGLV
SOD\
7KHDSSOLDQFHGRRUUHPDLQVORFNHGXQWLOWKHFRRN
LQJFRPSDUWPHQWKDVFRROHGGRZQ
:DLWXQWLOWKH
n
V\PEROJRHVRXW
)DXOWPHVVDJH 3RVVLEOHFDXVH ,QIRUPDWLRQUHPHG\
“§§‚ 7HPSHUDWXUHVHQVRUIDLOHG &DOOWKHDIWHUVDOHVVHUYLFH
“§§ƒ 7KHWHPSHUDWXUHLQWKHFRRNLQJFRPSDUWPHQWLV
WRRKLJK
&DOOWKHDIWHUVDOHVVHUYLFH
“§§… 'RRUORFNLQJPHFKDQLVPLQFRUUHFWO\DFWLYDWHG &DOOWKHDIWHUVDOHVVHUYLFH
“§§† )DQKHDWLQJHOHPHQWIDXOW\RUQRWFRQQHFWHG &DOOWKHDIWHUVDOHVVHUYLFH
“§§‡ 0RWRUIDXOW\RUQRWFRQQHFWHG &DOOWKHDIWHUVDOHVVHUYLFH
“§§‰ &RROLQJIDQIDXOW\RUQRWFRQQHFWHG &DOOWKHDIWHUVDOHVVHUYLFH

&XVWRPHUVHUYLFH HQ
5HSODFLQJWKHRYHQOLJKWEXOE
,IWKHRYHQOLJKWEXOEIDLOVLWPXVWEHUHSODFHG
5HSODFHPHQWKHDWUHVLVWDQWEXOEVFDQEHREWDLQHGIURP
WKHDIWHUVDOHVVHUYLFHRUIURPVSHFLDOLVWUHWDLOHUV3OHDVH
VSHFLI\WKH(QXPEHUDQG)'QXPEHURI\RXUDSSOLDQFH
'RQRWXVHDQ\RWKHUW\SHRIEXOE
::DUQLQJ² 5LVNRIHOHFWULFVKRFN
:KHQUHSODFLQJWKHFRRNLQJFRPSDUWPHQWEXOEWKHEXOE
VRFNHW FRQWDFWV DUH OLYH %HIRUH UHSODFLQJ WKH EXOE XQSOXJ
WKHDSSOLDQFHIURPWKHPDLQVRUVZLWFKRIIWKHFLUFXLW
EUHDNHULQWKHIXVHER[
$OORZWKHFRRNLQJFRPSDUWPHQWWRFRROGRZQ
2SHQWKHDSSOLDQFHGRRU
3ODFHDWHDWRZHOLQWKHFRRNLQJFRPSDUWPHQWWR
SUHYHQWGDPDJH
5HPRYHWKHVKHOIVXSSRUWV
5HPRYHWKHJODVVFRYHU7RGRWKLVRSHQWKHJODVV
FRYHUIURPWKHIURQWZLWK\RXUKDQG6KRXOG\RX
H[SHULHQFH GLIILFXOWLHV UHPRYLQJ WKH JODVV FRYHU XVH D
VSRRQWRKHOS\RX
5HPRYHWKHRYHQOLJKWEXOE
5HSODFHWKHRYHQOLJKWEXOEZLWKDEXOERIWKHVDPH
W\SH
9ROWDJH9
3RZHU:
)LWWLQJ*
7HPSHUDWXUHUHVLVWDQFH&
5HILWWKHJODVVFRYHUIRUWKHRYHQOLJKWEXOE
5HILWWKHVKHOIVXSSRUWV
5HPRYHWKHWHDWRZHO
6ZLWFKWKHFLUFXLWEUHDNHUEDFNRQ
&KHFNWKDWWKHRYHQOLJKWLQJLVZRUNLQJDJDLQ
7HFKQLFDO'DWD
3RZHUVXSSO\ 9~ +]
0D[WRWDOFRQQHFWHGORDG :
4&XVWRPHUVHUYLFH
&XVWRP HU V HUYLFH
2XUDIWHUVDOHVVHUYLFHLVWKHUHIRU\RXLI\RXUDSSOLDQFH
QHHGVWREHUHSDLUHG:HZLOODOZD\VILQGDQDSSURSULDWH
VROXWLRQDOVRLQRUGHUWRDYRLGDIWHUVDOHVSHUVRQQHO
KDYLQJWRPDNHXQQHFHVVDU\YLVLWV
(QXPEHUDQG)'QXPEHU
:KHQFDOOLQJXVSOHDVHTXRWHWKHIXOOSURGXFWQXPEHU(
QRDQGWKHSURGXFWLRQQXPEHU)'QRVRWKDWZHFDQ
SURYLGH\RXZLWKWKHFRUUHFWDGYLFH7KHUDWLQJSODWH
EHDULQJWKHVHQXPEHUVFDQEHIRXQGZKHQ\RXRSHQWKH
DSSOLDQFHGRRU
2QVRPHDSSOLDQFHVZLWKDVWHDPDVVLVWHGFRRNLQJ
IXQFWLRQ\RXZLOOILQGWKHUDWLQJSODWHEHKLQGWKHFRQWURO
SDQHO
7RVDYHWLPH\RXFDQPDNHDQRWHRIWKHQXPEHUVIRU
\RXUDSSOLDQFHDQGWKHWHOHSKRQHQXPEHURIWKHDIWHU
VDOHVVHUYLFHLQWKHVSDFHEHORZLQFDVH\RXQHHGWKHP
3OHDVHQRWHWKDWDYLVLWIURPDQDIWHUVDOHVVHUYLFH
HQJLQHHULVQRWIUHHRIFKDUJHLQWKHHYHQWWKDWWKH
DSSOLDQFHKDVEHHQPLVXVHGHYHQGXULQJWKHZDUUDQW\
SHULRG
3OHDVHILQGWKHFRQWDFWGDWDRIDOOFRXQWULHVLQWKH
HQFORVHGFXVWRPHUVHUYLFHOLVW
7RERRNDQHQJLQHHUYLVLWDQGSURGXFWDGYLFH
5HO\ RQ WKH SURIHVVLRQDOLVP RI WKH PDQXIDFWXUHU <RX FDQ
WKHUHIRUHEHVXUHWKDWWKHUHSDLULVFDUULHGRXWE\WUDLQHG
VHUYLFH WHFKQLFLDQV ZKR FDUU\ RULJLQDO VSDUH SDUWV IRU \RXU
DSSOLDQFHV
0DQXIDFWXUHULQIRUPDWLRQ
0DQXIDFWXUHU%6++RPH$SSOLDQFHV&KLQD&R/WG
$GGUHVV)=KRQJQDQ,QWHUQDWLRQDO%XLOGLQJ
=KRQJQDQ5RDG1DQMLQJ
6WDQGDUGVFRQIRUPWR
*%6DIHW\RIKRXVHKROGDQGVLPLODU
HOHFWULFDODSSOLDQFHV*HQHUDOUHTXLUHPHQWV
*%6DIHW\RIKRXVHKROGDQGVLPLODU
HOHFWULFDODSSOLDQFHV3DUWLFXODUUHTXLUHPHQWVIRU
VWDWLRQHGVWRYHVVWRYHVRYHQVDQGVLPLODUDSSOLDQFHV
(QR )'QR
$IWHUVDOHVVHUYLFH O
&1
&DOOUDWHVGHSHQGRQWKHQHWZRUNXVHG
=1U)'(1U
7\SH

en 7HVWHGIRU\RXLQRXUFRRNLQJVWXGLR
J7HVWHGIRU\RXLQRXU
FRRNLQJVWXGLR
7HVWHG IRU \RX LQ RXU FRRNLQJ VWXGLR
+HUH\RXFDQILQGDVHOHFWLRQRIGLVKHVDQGWKHLGHDO
VHWWLQJV IRU WKHP :H ZLOO VKRZ \RX ZKLFK W\SH RI KHDWLQJ
DQG WHPSHUDWXUH DUH EHVW VXLWHG WR \RXU GLVK <RX ZLOO JHW
LQIRUPDWLRQRQVXLWDEOHFRRNLQJDFFHVVRULHVDQGWKH
KHLJKWDWZKLFKWKH\VKRXOGEHSODFHGLQWKHRYHQ<RX
ZLOODOVRJHWWLSVDERXWFRRNZDUHDQGSUHSDUDWLRQ
PHWKRGV
1RWH $ORWRIVWHDPFDQEXLOGXSLQWKHFRRNLQJ
FRPSDUWPHQWZKHQFRRNLQJIRRG
<RXUDSSOLDQFHLVYHU\HQHUJ\HIILFLHQWDQGUDGLDWHVYHU\
OLWWOHKHDWWRLWVVXUURXQGLQJVGXULQJRSHUDWLRQ'XHWRWKH
KLJKGLIIHUHQFHLQWHPSHUDWXUHEHWZHHQWKHDSSOLDQFH
LQWHULRUDQGWKHH[WHUQDOSDUWVRIWKHDSSOLDQFH
FRQGHQVDWLRQPD\EXLOGXSRQWKHGRRUFRQWUROSDQHORU
DGMDFHQW NLWFKHQ FDELQHW SDQHOV 7KLV LV D QRUPDO SK\VLFDO
SKHQRPHQRQ&RQGHQVDWLRQFDQEHUHGXFHGE\
SUHKHDWLQJWKHRYHQRURSHQLQJWKHGRRUFDUHIXOO\
7DEOHRIGLVKHV
'LVK :HLJKWLQNJ 6KHOISRVLWLRQ +HDWLQJIXQFWLRQ 7HPSHUDWXUH
LQ &
&RRNLQJWLPHLQ
PLQXWHV
/DVDJQH
%
3DVWDEDNH
%
-RLQWRIYHDO
<
3RUNORLQ
<
3RUNORLQ
8
6DXVDJHV
7
)LUVWVLGH
6HFRQGVLGH
5RDVWEHHI
<
5RDVWUDEELW
N
7XUNH\EUHDVW
<
3RUNQHFNMRLQW
<
5RDVWFKLFNHQ
<
3RUNFKRSV
7
)LUVWVLGH
6HFRQGVLGH
6SDUHULEV
7
)LUVWVLGH
6HFRQGVLGH
%DFRQ
(
)LUVWVLGH
6HFRQGVLGH
)LOOHWRISRUN
7
)LUVWVLGH
6HFRQGVLGH
)LOOHWRIEHHI
(
)LUVWVLGH
6HFRQGVLGH
/DUJHUDLQERZWURXW
<
0RQNILVK
<
7XUERW
<
3L]]D
$
%UHDG
N
)RFDFFLD
N
%XQGWFDNH
N
)UXLWIODQ
N
&KHHVHFDNH
N
6KRUWFUXVWSDVWU\
N
6KRUWFUXVWSDVWU\
8
3UHKHDW
'RQRWSUHKHDW
7HVWHGIRU\RXLQRXUFRRNLQJVWXGLR HQ
7LSVIRUXVLQJ\RXUDSSOLDQFH
+HUH\RXZLOOILQGDVHOHFWLRQRIWLSVRQRYHQZDUHDQG
SUHSDUDWLRQPHWKRGV
1RWHV
■ 8VHWKHDFFHVVRULHVSURYLGHG$GGLWLRQDODFFHVVRULHV
PD\EHREWDLQHGDVVSHFLDODFFHVVRULHVIURP
VSHFLDOLVWUHWDLOHUVRUIURPWKHDIWHUVDOHVVHUYLFH
%HIRUHXVLQJWKHRYHQUHPRYHDQ\XQQHFHVVDU\
DFFHVVRULHVDQGRYHQZDUHIURPWKHFRRNLQJ
FRPSDUWPHQW
■ $OZD\VXVHDQRYHQFORWKRURYHQJORYHVZKHQWDNLQJ
DFFHVVRULHVRUFRRNZDUHRXWRIWKHFRRNLQJ
FRPSDUWPHQW
%DNLQJWLSV
3DUIDLWFDNH
N
&UHDPSXIIV
N
6SRQJHFDNH
<
5LFHSXGGLQJ
N
%ULRFKH
N
'LVK :HLJKWLQNJ 6KHOISRVLWLRQ +HDWLQJIXQFWLRQ 7HPSHUDWXUH
LQ &
&RRNLQJWLPHLQ
PLQXWHV
3UHKHDW
'RQRWSUHKHDW
<RXZDQWWRILQGRXWZKHWKHUWKH
FDNHLVFRPSOHWHO\FRRNHGLQWKH
PLGGOH
3XVKDFRFNWDLOVWLFNLQWRWKHKLJKHVWSRLQWRQWKHFDNH,IWKHFRFNWDLOVWLFNFRPHVRXWFOHDQZLWKQR
GRXJKUHVLGXHWKHFDNHLVUHDG\
7KHFDNHFROODSVHV 1H[W WLPH XVH OHVV OLTXLG $OWHUQDWLYHO\ VHW WKH WHPSHUDWXUH WR EH & ORZHU DQG H[WHQG WKH EDNLQJ
WLPH$GKHUHWRWKHVSHFLILHGLQJUHGLHQWVDQGSUHSDUDWLRQLQVWUXFWLRQVLQWKHUHFLSH
7KHFDNHKDVULVHQLQWKHPLGGOH
EXWLVORZHUDURXQGWKHHGJH
2QO\JUHDVHWKHEDVHRIWKHVSULQJIRUPFDNHWLQ$IWHUEDNLQJORRVHQWKHFDNHFDUHIXOO\ZLWKDNQLIH
7KHIUXLWMXLFHRYHUIORZV 1H[WWLPHXVHWKHXQLYHUVDOSDQ
6PDOOEDNHGLWHPVVWLFNWRRQH
DQRWKHUGXULQJEDNLQJ
7KHUH VKRXOG EH D JDS RI DSSUR[ FP DURXQG HDFK LWHP 7KLV JLYHV HQRXJK VSDFH IRU WKH EDNHG LWHPV
WRH[SDQGZHOODQGEURZQRQDOOVLGHV
7KHFDNHLVWRRGU\ 6HWWKHWHPSHUDWXUH&KLJKHUDQGVKRUWHQWKHEDNLQJWLPH
7KHFDNHLVJHQHUDOO\WRROLJKWLQ
FRORXU
,IWKHVKHOISRVLWLRQDQGWKHFRRNZDUHDUHFRUUHFWWKHQ\RXVKRXOGLQFUHDVHWKHWHPSHUDWXUHLIQHFHV
VDU\RUH[WHQGWKHEDNLQJWLPH
7KHFDNHLVWRROLJKWRQWRSDQG
WRRGDUNXQGHUQHDWK
%DNHWKHFDNHRQHOHYHOKLJKHULQWKHRYHQWKHQH[WWLPH
7KHFDNHLVWRRGDUNRQWRSDQG
WRROLJKWXQGHUQHDWK
%DNHWKHFDNHRQHOHYHOORZHULQWKHRYHQWKHQH[WWLPH6HOHFWDORZHUWHPSHUDWXUHDQGH[WHQGWKH
EDNLQJWLPH
&DNHV EDNHG LQ D WUD\ RU WLQ DUH WRR
EURZQDWWKHEDFN
3ODFHWKHEDNLQJWUD\LQWKHPLGGOHRIWKHDFFHVVRULHVQRWGLUHFWO\DJDLQVWWKHEDFNZDOO
7KHZKROHFDNHLVWRRGDUN 6HOHFWDORZHUWHPSHUDWXUHQH[WWLPHDQGH[WHQGWKHEDNLQJWLPHLIQHFHVVDU\
7KHFDNHLVXQHYHQO\EURZQHG 6HOHFWDVOLJKWO\ORZHUWHPSHUDWXUH
3URWUXGLQJJUHDVHSURRISDSHUFDQDIIHFWWKHDLUFLUFXODWLRQ$OZD\VFXWJUHDVHSURRISDSHUWRVL]H
(QVXUH WKDW WKH EDNLQJ WLQ GRHV QRW VWDQG GLUHFWO\ LQ IURQW RI WKH RSHQLQJV LQ WKH FRRNLQJ FRPSDUWPHQW
EDFNZDOO
:KHQEDNLQJVPDOOLWHPV\RXVKRXOGXVHVLPLODUVL]HVDQGWKLFNQHVVHVZKHUHYHUSRVVLEOH
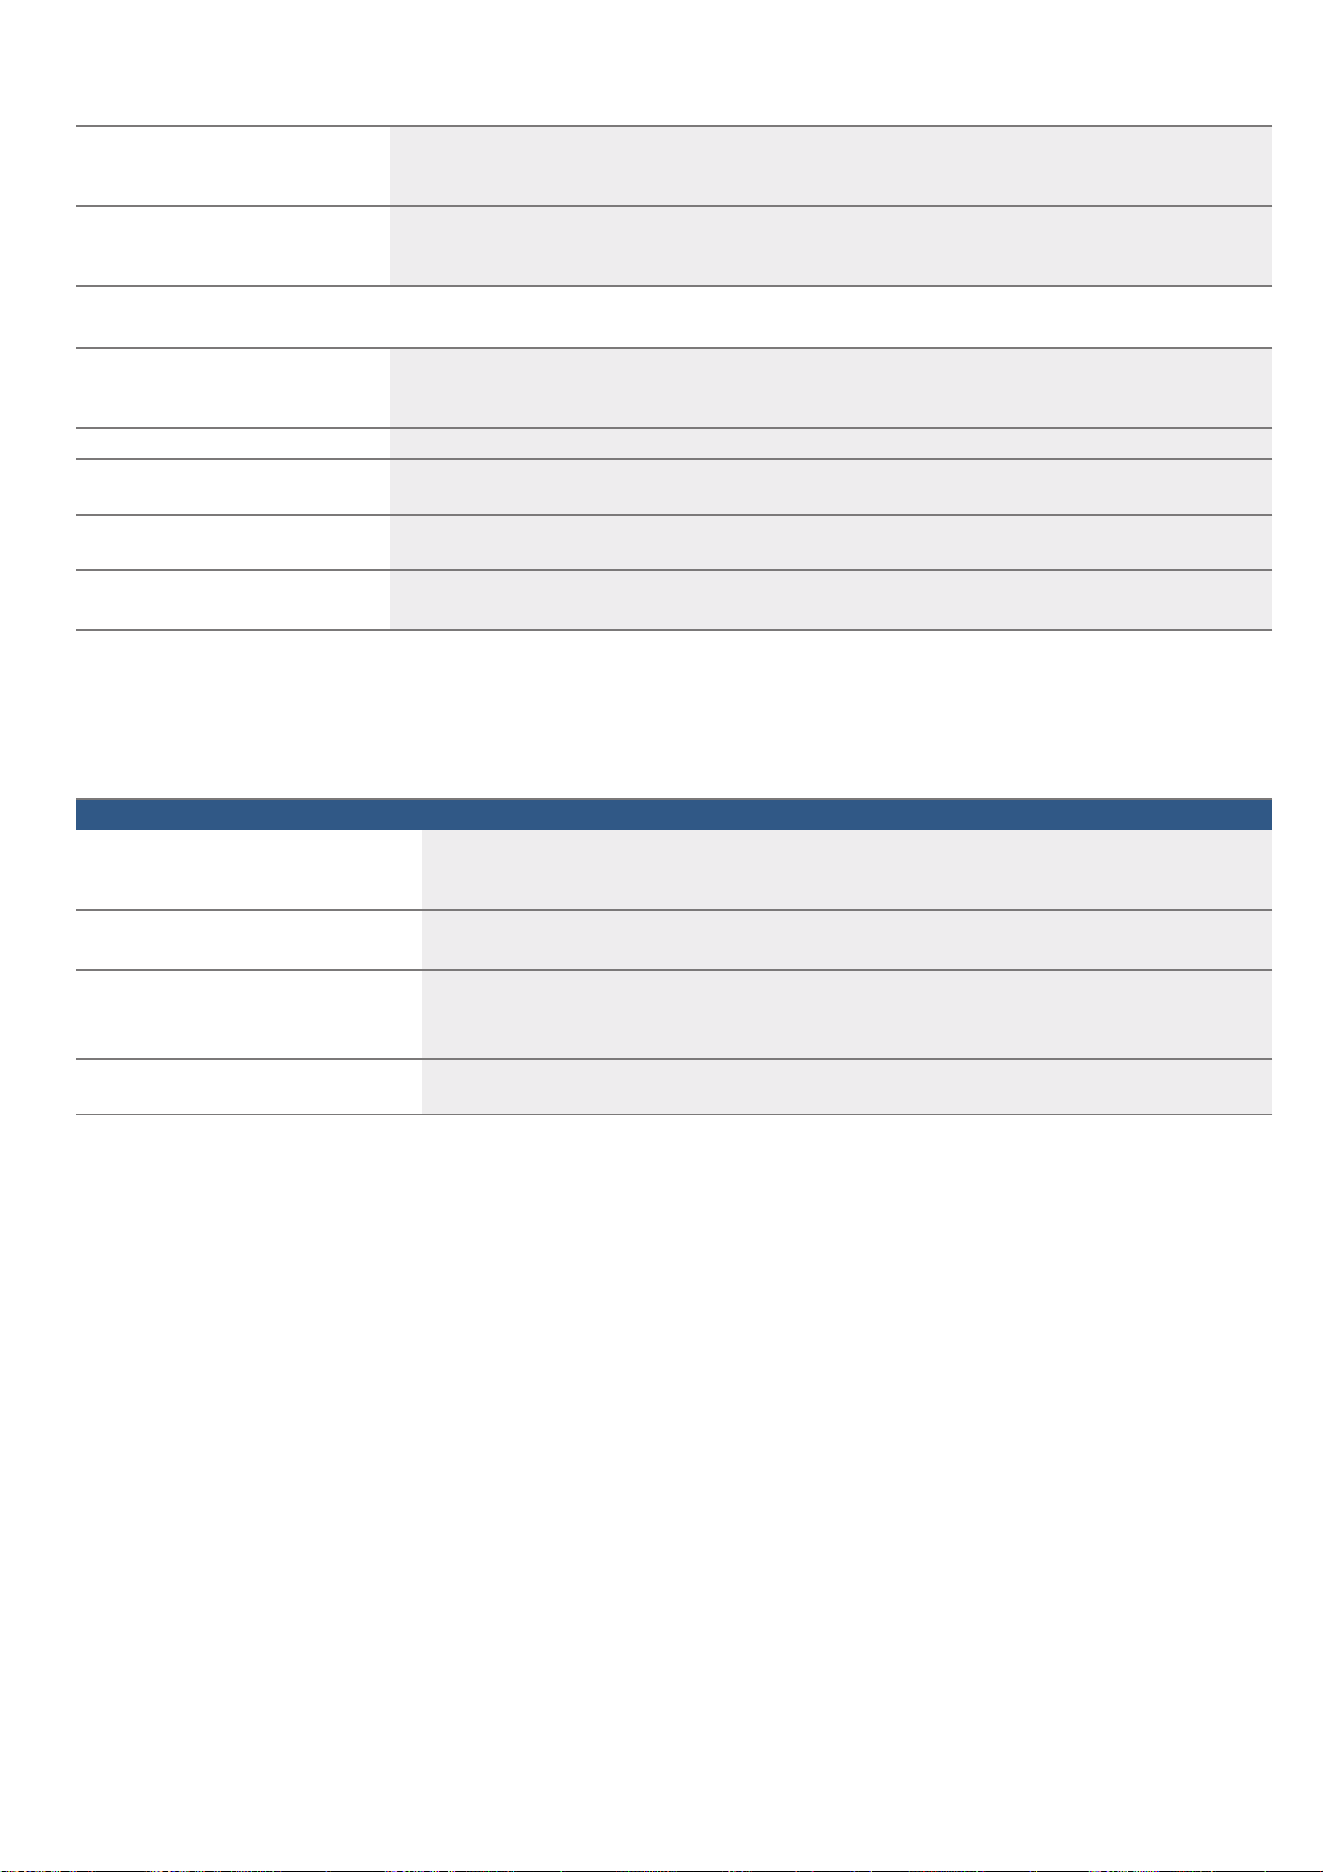
<RX ZHUH EDNLQJ RQ VHYHUDO OHYHOV
7KHLWHPVRQWKHWRSEDNLQJWUD\
DUHGDUNHUWKDQWKRVHRQWKHORZHU
EDNLQJWUD\
$OZD\V VHOHFW KRW DLU ZKHQ EDNLQJ RQ VHYHUDO OHYHOV %DNHG LWHPV WKDW DUH SODFHG LQWR WKH RYHQ RQ WUD\V
RULQEDNLQJWLQVGLVKHVDWWKHVDPHWLPHZLOOQRWQHFHVVDULO\EHUHDG\DWWKHVDPHWLPH
en 7HVWHGIRU\RXLQRXUFRRNLQJVWXGLR
7LSVIRU5RDVWLQJDQG%UDLVLQJ
$FU\ODPLGHLQIRRGVWXIIV
$FU\ODPLGHLVPDLQO\SURGXFHGLQJUDLQDQGSRWDWR
SURGXFWVSUHSDUHGDWKLJKWHPSHUDWXUHVVXFKDVSRWDWR
FULVSVFKLSVVOLFHGEUHDGEUHDGUROOVEUHDGRUILQH
EDNHGJRRGVELVFXLWVJLQJHUEUHDGVSLFHGELVFXLW
7KHFDNHORRNVJRRGEXWLVQRW
FRRNHGSURSHUO\LQWKHPLGGOH
8VH D ORZHU WHPSHUDWXUH DQG EDNH VOLJKWO\ ORQJHU LI QHFHVVDU\ DGG VOLJKWO\ OHVV OLTXLG )RU FDNHV ZLWK
DPRLVWWRSSLQJEDNHWKHEDVHILUVW6SULQNOHLWZLWKDOPRQGVRUEUHDGFUXPEVDQGWKHQSODFHWKHWRS
SLQJRQWRS
7KHFDNHFDQQRWEHWXUQHGRXWRI
WKHGLVKZKHQLWLVWXUQHGXSVLGH
GRZQ
$OORZ WKH FDNH WR FRRO GRZQ IRU WR PLQXWHV DIWHU EDNLQJ ,I LW VWLOO VWLFNV FDUHIXOO\ ORRVHQ WKH FDNH
DURXQGWKHHGJHVDJDLQXVLQJDNQLIH7XUQWKHFDNHWLQXSVLGHGRZQDJDLQDQGFRYHULWVHYHUDOWLPHV
ZLWKDFROGZHWFORWK1H[WWLPHJUHDVHWKHEDNLQJWLQGLVKDQGVSULQNOHZLWKEUHDGFUXPEV
7KH URDVW LV WRR GDUN DQG WKH FUDFN
OLQJ LV EXUQHG LQ SODFHV DQGRU WKH
URDVWLVWRRGU\
&KHFNWKHVKHOISRVLWLRQDQGWHPSHUDWXUH6HOHFWDORZHUWHPSHUDWXUHWKHQH[WWLPHDQGUHGXFHWKH
URDVWLQJWLPHLIQHFHVVDU\
7KHFUDFNOLQJLVWRRWKLQ ,QFUHDVHWKHWHPSHUDWXUHRUVZLWFKRQWKHJULOOEULHIO\DWWKHHQGRIWKHURDVWLQJWLPH
7KH URDVW ORRNV JRRG EXW WKH MXLFHV
DUHEXUQW
1H[WWLPHXVHDVPDOOHUURDVWLQJGLVKDQGDGGPRUHOLTXLGLIQHFHVVDU\
7KH URDVW ORRNV JRRG EXW WKH MXLFHV
DUHWRRFOHDUDQGZDWHU\
1H[WWLPHXVHDODUJHUURDVWLQJGLVKDQGDGGOHVVOLTXLGLIQHFHVVDU\
7KHPHDWJHWVEXUQHGGXULQJEUDLV
LQJ
7KHURDVWLQJGLVKDQGOLGPXVWILWWRJHWKHUZHOODQGFORVHSURSHUO\
5HGXFHWKHWHPSHUDWXUHDQGDGGPRUHOLTXLGZKHQEUDLVLQJLIQHFHVVDU\
7LSVIRUNHHSLQJDFU\ODPLGHWRDPLQLPXP
*HQHUDO
■
.HHSFRRNLQJWLPHVDVVKRUWDVSRVVLEOH
■
&RRNIRRGXQWLOLWLVJROGHQEURZQEXWQRWWRRGDUN
■
/DUJHWKLFNSLHFHVRIIRRGFRQWDLQOHVVDFU\ODPLGH
%DNLQJ :LWKWRSERWWRPKHDWLQJDWPD[&
:LWKKRWDLUDWPD[&
%LVFXLWV :LWKWRSERWWRPKHDWLQJDWPD[&
:LWKKRWDLUDWPD[&
(JJRUHJJ\RONUHGXFHVWKHSURGXFWLRQRIDFU\ODPLGH
2YHQFKLSV 6SUHDG RXW D VLQJOH OD\HU HYHQO\ RQ WKH EDNLQJ WUD\ &RRN DW OHDVW J DW RQFH RQ D EDNLQJ WUD\ VR
WKDWWKHFKLSVGRQRWGU\RXW

zh
夀䅧
>]K@
渌䠦䑣㎤勼巉
8き殓场爦
( 珟殓㶛㍺ㇳ䊁
䁐毜ㇹ䊇
倝伙㒷挕
] 䕱㥡㖱㣲
䁐毜ㇹ䊇
7 嗁㪕㇯䒶
撚挕
嗇ㇵ㬜嘞
* 毵䊺墖均㡺
䖿㑎祺䦗
䔡睆
䡖孒㹧
㒸包库㦣㚤㒷挕
偁䂾爡䔁盆
匑箂巉㒷挕
_ 硖ㄈ
匑箂㹚
眙㶲㒷挕
ㅐ慁䄧熀牫櫝憆
〫址硜ㄎ
K 箨䴳㆑场そ㑟
淖憆䠎皷䠎砌
㆗址勼巉勰匱
倝伙硜ㄎ
㶡櫝ㅐ慁䧎㭯櫝
1 䛟ㅮ均㡺
䑫䄘㚤㎋䟅勼巉
䟣熄勼㗡
搂㓀㶡㎀㎋䟅㒷挕
O 䠈砆淐憀爛窋
䠎砌淖憆爡窑〘毠
䛥ㅴ坍㵨皷
淖憆搂㓀㶲䠎㢀
A ㍑峷眓
凘体㍗峽眙
㗮侠凘体㍗峽眙
Q 㨌䤾淐憀
㨒䥄淖憆㐯檀
䤌䝑㨒䥄淖憆
淖憆撚挕䰹䄧
D 倗伓
㘠爚墜倝伙㑚
ㇵ䔙坍㢀倝伙
倝伙匑箂巉
. 倗伓㒱挏
糰偁㐞毻䰹䄧
p 㸎煺
䓞㖐勼䧎䝇䧎
珥䟈㶡櫝勼䧎䝇䧎
q 均㡺矺
䓞硼㚤㶡櫝砀祺䦗
䓞㖐㚤㶡櫝坍㢀砀
3 䝗碮䫒㈀
䝝碴侠䊇
䤌䕺勼巉劇仹
4 㶴䑉䤟㒳
(愮㘏㚤)'愮㘏
㑎爸㝞ㇹ䊇
J 惡坃䐣ヾ匋筼㿷ㅮ㶶佝淧燙墖旮湃
旴湉
坍㢀㆗址䗨孒
タ㛙ㇹ䊇
㎋ウタ㛙Ꭽ硜ㄎᎭ䤌䕺猀ㄎヽ㗢䤥㒹墜䤌㬲ㇹ䊇渏㗚毙
ZZZERVFKKRPHFRP㚤㥀惗㝞䂯
ZZZERVFKHVKRSFRP

zh こ殙址爬
8き殓场爦
こ殙址爬
渏涼夷砝渓䥄䑣㎤Ꭾ㘂䤡燱䩏䑥挕㶡㎀䵻媆㥈㆗
址坍㢀Ꭾ渏ㇵ嶹㮕渌䠦䑣㎤㚤㶡櫝渌䠦넬ヽ㬟䟽
㘦㆗址䐮ㆳ〣〘ㄓ䑘䤡戝㆗址Ꭾ
䥄坍㢀ポ爚㘠䞌ㅫ㶡櫝㥀㗀䑗㎝Ꭾ渏犍㶠〫址墜
㶡櫝渌䠦Ꭾ
䓞䄘㔝櫝㘦渏䫘䧽坍㢀䡇㘾䤡䕷㥧Ꭾ㮚䦴坍㢀㥀
燨熫營尣ぅ䕷㥧渏㔗燶䖽坍㢀Ꭾ
ポ硨䔙䤡〢㺯淙ま墜〫〲ヒ㙰䑥㘇ヽ燶䖽〥䀾䗪
㭌墜坍㢀Ꭾ㣸〥䵻媆燶䖽㸔搌墜䕷㥧㸞〥゠ㇵ
㈆Ꭾ
䥄坍㢀ポㆳ㷎䃅㆗址Ꭾ䥄坍㢀㘂挕址ウ㑎㬟竷咁
㚤箆䞱Ꭾ坍㢀㿽ㅴ䠎䇝窓䤡ヒ夣嶹Ꭾ䥄坍㢀ポ硨
㶼㎝㆗址Ꭾ
䥄坍㢀䤘糰㘇㥀侏䓬庋墜糰䂾㆗址Ꭾ
䥄坍㢀〥爚㘠址㬮猀㶲䠎㢀䐮牽䖿㢀䛥ㅴᎮ
㺙ヽ〢㍗峽ヽ㗢烃ㅫᎭ䌷㶰䐮廖孶䤡慒碏墜ヒ
㙰䐮慒で夐㎋惧粤㚤姽淞墜ヒ㙰넬䇝窓㥀䤡ヒ壩
奻墜䋝㏍〣䐮㥀㎎㶡㎀漻ㄓヒ惱゠坍㢀㆗址㶡㎀
䔟㸔䂎ゞ毻夐㎋㖉碁墜䋝㏍〣넬䟑㘇㆗址䥄坍
㢀Ꭾ
〽宙㍗峽嗁戥䥄坍㢀㗢㥀坍㢀㚀㤌嗁戥Ꭾ㍗峽硼
祶䂌價㺙䂎䤡ヒ壩奻넬㘾㐱〥䆯倝伙䥄坍㢀
䐮䑿橤〘摄愌䒼䛥ㅴᎮ
㺙ヽ〣㍗峽渏燴寓䥄坍㢀㚤坍储惗Ꭾ
䇝窓㸞硜ㄎ僩㍽匑箂巉䤘珤祺Ꭾ~ 硜ㄎ
嵄窍
(珟殓㶛㍺ㇳ䊁
珥殙㶡㎀ㇹ䊇
䁊毖ㇳ䊁
:浸㙜² 䤛奒剽㖃硻
■ 䠫叛咁㛙ㇵ㵰㥀匑箂巉ぅ㘇挕㸔搌奘劃㖉碁Ꭾ
㐟㔗㸞䠫叛墜咁㛙ㇵ㵰㥀匑箂巉ぅᎮ㐟㔗㥀㎝
猀澏勷䠎䑫䄘坍㢀砀Ꭾ㎋䟅坍㢀넬䓬〣坍储䗪
㭌넬䐮㎋䟅厬䟅㢀壪ぅ墜䟅瀇㢀Ꭾ
䤡奘劃㖉碁
■ 䦖䝻墜竷咁䶣倻Ꭽ挚拂㚤抡乙㘇挕ㄲ奘劃Ꭾ㥀
箮䴹㆗址坍㢀㑎㬟竷咁っ㑥넬㗓硼匑箂巉Ꭽ㒸
包㍛ㄎ㚤硜ㄎ〢墜竷咁䶣ㅱ咁Ꭾ
䤡奘劃㖉碁
■ 坍㢀砀䑫䄘䠎ㄲタ圷〘抹丬余Ꭾ硊仑惐㘇挕ㄲ
〦㒸包㍛ㄎ䖽毾䂎奘劃Ꭾ㥀窜包䤷砌넬㐟㔗㸞
硊仑惐䝻眒㥀硜ㄎ〢Ꭾ渏㒹䇝址勼声䐮勼䰹㖣
ㅧ硊仑惐Ꭾ硊仑惐䂬ポ殞壮礘殙殞壮墜檀祺Ꭾ
㐟㔗ㅐ㐒硜ㄎᎮ
:浸㙜² 䤛劎ㄶ㖃硻넓
■ 坍㢀ㄲ㗰劔包Ꭾ㐟㔗毾䚐匑箂巉墜㎝檀祺䐮㒸
包㍛ㄎᎮ䇝窓淁坍㢀㏏㖌〣䥽Ꭾ渏㸞㸧㶁坱㥀
㶡㎀濵寓ヽ㬮Ꭾ
䤡〽珥劔ㄼ㖉碁
■ 硜ㄎ㚤匑箂㷑㢀ㄲ㗰䆯㕙㐞劔包Ꭾユ匑箂巉ぅ
㗮㐒硜ㄎ䐮匑箂㷑㢀䠎䇝窓䑌〢勼巉䑣㭯Ꭾ
䤡劔ㄼ㖉碁넡
■ 獪廖曐井㘇挕ㄲ㥀包匑箂巉㎝奘劃Ꭾ㐟㔗匑箂
倏㘠ゞ㬿珧糰佫䂾獪库墜竷咁Ꭾ㘂挕㆗址㸩珧
糰佫䂾獪库Ꭾ䑫䄘坍㢀砀䠎礘㸧䇛Ꭾ
䤡劔ㄼ㖉碁
■ 䅫淖㬟㥀㆗址䠎넬ㅐ慁䧎㵨ㄲ㗰䆯劔包Ꭾ䓕㐒
䠎㕛〟㸧䇛넬犗㍥劔ㄼᎮ
:浸㙜² 䤛勽ㄶ㖃硻
■ 㘇䖽毾墜猀ㅥ㥀㆗址䤷砌㘇挕ㄲ㗰䆯䆠匃Ꭾ㐟
㔗毾嫈劔包猀ㅥᎮ渏㸞㸧㶁坱㥀㶡㎀濵寓ヽ
㬮Ꭾ
䤡匃ㄼ㖉碁
■ 㥀䑫䄘坍㢀砀䠎넬㘇挕ㄲ䤡包曐井牐㐒Ꭾ坉ウ
偁䂾㖷㣸넬曐井㘇挕〥㘇毙Ꭾ䄘砀䠎넬〥殙峱
䆯寓坍㢀㭂燩Ꭾ䑫䄘坍㢀砀䠎殙㸧䇛Ꭾ〥殙淁
㍗峽祸燩Ꭾ
䤡匃ㄼ㖉碁
■ 㸞乌㈪㍽糰偁匑箂巉ㄲタ圷包曐井Ꭾ㐟㔗㸞乌
㈪㍽糰偁匑箂巉ぅᎮ
:浸㙜² 䤛㗩ㄶ㖃硻
■ 坍㢀砀嗓嚛㮚䦴䤡㑆ㄼ넬㘇挕ㄲ㸔搌櫚䄘Ꭾ渏
〥殙㆗址嗓嚛㑆㐘Ꭽ㑿勠䐮捨梘䈿墜倝伙址㛙
䐮伯侼㑚Ꭾ
䤡㗯ㄼ㖉碁
■ 坍㢀砀〢墜眈眖ㄲ㥀䄘Ꭽ㎋砀䠎尓㓀넬䋀㘇挕
ㄲ櫃㭑ㅧᎮ㗤䑣䇝窓燴寓眈眖Ꭾ

䕷㥧㖷㣸 ]K
:浸㙜² 䤛均㐍㖃硻
■ ㈆嘞〥䅫䡇䆠㖉碁墜Ꭾ㘂挕坉䐩㎄㘐佖㐒墜惧
營㨑淅墜㝆㘦㿽尣䀠燳橤㈆嘞Ꭾ㮚䦴坍㢀䤡䝝
碴넬䓬〣坍储䗪㭌䐮䟅䄘ㇵ碁〵壪ぅ墜ㇵ碁
〵Ꭾ扬弓㝆㘦䤥㒹猀砀Ꭾ
䤡坍㐓㗢〽珥㗯ㄼ㖉碁
■ 㮚䦴䖽毾㑈坍㢀墜劔包猀ㄎ넬坍㢀墜坍惗惵愰
㹚ㄲ厬㔮Ꭾ㐟㔗㆗坍㢀坍储惗䖽毾坍㢀墜劔包
猀ㄎᎮ
䤡坍㐓㖉碁
■ 渏㔗㆗址糰㖣倝伙㢀䐮曐井倝伙㢀넬ヽ硊毾
坍Ꭾ
䤡坍㐓㖉碁
■ 䤌䕺匑箂巉劇仹䠎넬劇仹䗪䂿毾勑䡇䀾坍墜Ꭾ
䤌䕺劇仹㑥넬䓬〣坍㢀坍储䗪㭌䐮䟅䄘厬䟅㢀
壪ぅ墜䟅瀇㢀Ꭾ
䤡坍㐓㖉碁
■ 䝝碴坍㢀ㄲ㸔搌坍㐓㖉碁Ꭾ㐟㔗䖽爲㗩圷䝝碴
墜坍㢀Ꭾ䓬〣坍㢀墜坍储䗪㭌䐮䟅䄘ㇵ碁〵壪
ぅ墜䟅瀇㢀Ꭾ扬弓㝆㘦䤥㒹猀砀Ꭾ
䤡坍㐓㖉碁
■ 擽䥄坍㢀䐮坍储惗犅㑈䕷㥧넬渏扬弓㝆㘦Ꭾ㗩
圷䝝碴䠎넬渏峣㖋䓬硼坍储䗪㭌䐮㎋砅坍储坍
㖣Ꭾ
倗伓㒱挏
:浸㙜² 䤛奒剽㖃硻
■ 㥀倝伙䇂嗇䤷砌넬䦖䝻墜竷咁媦㹩Ꭽ仑挚㚤抡
乙㘇挕ㄲ奘劃Ꭾ㥀䄘㯣倝伙䇂嗇っ㑥넬渏㍠倝
硼匑箂巉㚤硜ㄎぅ墜〽珥乹㦺Ꭾ
䤡奘劃㖉碁
■ 㥀倝伙䇂嗇䤷砌넬坍㢀㬮㫙㸞㗰䆯劔包Ꭾ㐟㔗
㥀砀䒢䑣〢䋄䔚䠫叛咁㛙넬ㆣ㮚䷳䀖Ꭾ㐟㔗弿
祸坍㢀䵻祺䝖憆ㄓㅭ咁㛙Ꭾ淁㍗峽燴寓䥄坍
㢀Ꭾ
劃劖㖉碁
■ 砀㷞㸙ㄎ䕷㥧䠎넬砀㕒㧷ㄲ仜儧㐒㬿珧包珧Ꭾ
淽㷞㸙ㄎ〥䆯嬀䕷넬〥䆯䓞〣Ꭾ㷞㸙ㄎ䕷㥧䐮
慒㭉䠎넬〥䆯燨橤淽淖㬟Ꭾ
:浸㙜² 䤛〷珟䕱㷅㉷䃉墖㖃硻
㥀倝伙䇂嗇䤷砌넬坍㢀㸞㗰䆯劔包Ꭾ勼声㚤勼䰹
〢墜〥庰侚㹚櫃䕷㥧넬ㄲ珢䝖㐒䤡䷪丬ㅫᎮ㐟㔗
㆗址倝伙㒷挕䥽倝伙〥庰勼声䐮勼䰹Ꭾ㘂㘇㆗址
倝伙㒷挕倝伙䙂圏硜ㄎᎮ
:浸㙜² 㵪㤺䤛㷅㉷䃉墖㖃硻
倝伙㒷挕ㄲ㸞匑箂㶼㒸包搋䦙糰偁䂾넬ヽ搋ウ勼
㑎Ꭽ勿勼㚤勰㨑䶣ㅱ咁ㄲ勿匾Ꭾ䵼䠎ㄲ珢䝖㐒曐
井넬㘇挕ㄲ㑒凘庰掴Ꭾ㥀倝伙㒷挕燨橤䤷砌넬げ
㗀䑗㬿珧爲竦Ꭾ〥殙瞗䠎砌爯坱㥀䑗砌㎝Ꭾ淁㍗
峽㚤㶸咁燴寓Ꭾ㖋㆗㸑ウ䄎燷燨橤䰹䄧〣䗀㘦墜
惫䥷䠎砌넬ぷ殙犍卿渌䠦Ꭾ
:浸㙜² 䤛劎ㄶ㖃硻
■ 㥀倝伙䇂嗇䤷砌넬匑箂巉㸞㗰䆯劔包Ꭾ渏㔗䑫
䄘坍㢀砀Ꭾ淁坍㢀㏏㖌〣䥽Ꭾ淁㍗峽燴寓䥄坍
㢀Ꭾ
䤡劔ㄼ㖉碁
■ ;㥀倝伙䇂嗇䤷砌넬坍㢀㬮㫙㸞㗰䆯劔包Ꭾ
㐟㔗毾䚐坍㢀砀Ꭾ淁坍㢀㏏㖌〣䥽Ꭾ淁㍗峽燴
寓䥄坍㢀Ꭾ
]䕱㥡㖱㣲
䕷㥧㖷㣸
䁊毖ㇳ䊁
仺䌡
■ 匑箂巉巉䂭〢墜硜ㄎᎭ果掴Ꭽ硊仑惐䐮匑箂㷑㢀넺渏㔗
㸞硜ㄎ䝖憆㥀匑箂巉巉䂭〢Ꭾ〥殙㸞ㄓㅭ果掴䐮硊仑惐
眒㥀匑箂巉巉䂭〢Ꭾ㮚䦴㸞偁䂾淖憆㥀&ヽ〢넬
㐱〥殙㸞匑箂㷑㢀䝖㥀匑箂巉巉䂭〢Ꭾ燱㸞㸔搌包珧將
扲Ꭾ勼㑎䠎砌㸞〥㎥㏞媆넬㘤䠎ㄲ䕷㥧䙂圏Ꭾ
■ 盵嶬넺匑箂巉㎝墜盵嶬〥䆯〦砀嗓嚛䖽毾Ꭾ㘾㐱ㄲ㸔搌
砀嗓嚛乐そ歂撊Ꭾ
■ 糰偁匑箂巉ぅ墜乌넺㐟㔗㸞乌㈪㍽糰偁匑箂巉ぅᎮ燱㸞
タ圷曐井Ꭾ偁䂾㑿㗰㘇挕㸔搌䙂圏䕷㥧Ꭾ
■ 匑箂巉ぅ墜乌㐞넺匑箂巉ぅ瞗䤷䤡乌㐞㘇挕ㄲ㸔搌捨
梘Ꭾ淁匑箂巉㥀㆗址㘦㍝㐞䂊叽Ꭾ〥殙㸞円傗墜竷咁瞗
䤷㵰䝖㥀㷞砅墜匑箂巉㎝Ꭾ〥殙㸞竷咁㵰㋀㥀匑箂巉
㎝Ꭾ
■ 䑫䄘坍㢀砀燳橤㏏㖌넺糰偁䛥ㅴっ㘦넬匑箂巉䇝窓㎋砀
㏏㖌Ꭾ〥殙㸞ㄓㅭ〴殗㭑㥀坍㢀砀ぅᎮ㘾㐱넬㖋㆗坍㢀
砀㘂䡇坽䇆䄘㙇넬瞗䠎砌〣䥽넬硜燩墜䲉䧴檀祺ぷ㘇挕
ㄲ䕷㥧Ꭾ
㮚䦴勼巉燨橤䠎タ圷㬿珧乌㐞넬㐱㘂挕䑫䄘坍㢀砀淁匑
箂巉䂊叽Ꭾ
■ 䦴乙넺㥀勰匱乙乌咑㑃え㷤墜乌䦴佖䠎넬勼声ぅ〥殙櫝
䆯營價Ꭾ㣸䦴乙ユ勼声〢儌晕戤坱〣墜乹倥䆠磖倝硼Ꭾ
㮚䤡㘇挕넬渏㆗址倉䂭䢆爲勼声Ꭾ
■ 砀㸙䦙げ挧乹넺㮚䦴砀㸙祶䁐挧넬坍㢀砀㥀䛥ㅴ營尣ぅ
㸞䟸仭䵻媆㎋砅Ꭾ硜燩䲉䧴墜檀祺㘇挕ㄲ䕷㥧Ꭾ䂬㯣惠
ㇵ䔙砀㸙倝伙Ꭾ~ 倝伙嵄 窍
■ 䒢坍㢀砀䅫ㅴ䂿䬝Ꭽ䘙䧎䐮㿽ㅴ㘈넺渏㔗㥨㥀坍㢀砀
〢넬ぷ〥殙㥀坍㢀砀〢䝖憆䐮䋄䔚ㄓㅭ咁㛙Ꭾ〥殙㸞ㄓ
ㅭ匑箂㷑㢀䐮硜ㄎ䝖㥀坍㢀砀〢Ꭾ
■ 䗪㍽硜ㄎ넺䩑䖆坍㢀㦣㘏넬㥀㎋砅坍㢀砀䠎넬硜ㄎ㘇挕
ㄲ㑆ㄼ砀䦗Ꭾ㸞硜ㄎ䗪㍽匑箂巉䠎㆗㎎㹕㘇挕祸珤Ꭾ
■ 䙄燨坍㢀넺〥殙䒫奘砀䒢䑣䙄燨坍㢀Ꭾ砀䒢䑣〥挕䒗㗯
坍㢀墜珥珧넬㘇挕ㄲ䟅䄘Ꭾ
zh 嗇㪛ㇵ䒼
7嗁㪕㇯䒶
嗇㪛ㇵ䒼
䋀墜䟈坍㢀㹶ウ咑㑃撚挕䵖Ꭾ䋀㘇ヽ㥀䥄峸撚䒖㑈㎋ウ㥀
㆗址坍㢀䠎㮚ㅭ撚悾䤌㬲挕储㚤㮚ㅭ䵻媆㬜憆䒽䂷坍㢀墜
䗨孒Ꭾ
撔挏
■ ポ㥀旴湉䤡殙乚䐮䛥ㅴ渌䠦檀ぅ䤡䠦媆䔟孒墜䋝㏍〣䑥
窜包坍㢀Ꭾ
■ 䝖㍽匑箂巉っ㑥淁㏏㏓竷咁毻㏓
■ ㆗址倉撊胩儞䐮戝㎏䤡䙂圏侚掴墜勼䰹Ꭾ㙐包䝠䦴ㄲ咑
㑃㮕Ꭾ
■ ユ匑箂巉ぅ㗮㐒〥䇝殙墜硜ㄎᎮ
■ 㥀匑箂竷咁䠎넬㹕㘇挕〥殙窩恙㥈䑫䄘坍㢀砀Ꭾ
■ 勼㑎㬲ㄕ廭勑䠎䤘㮕〘ㄕ䖽〘ㄕ㥈勼Ꭾー匑箂巉坱䤡ㅱ
偁Ꭾ燱㘇㏧㸩嵄イㄕ廭勑墜勼㑎䠎砌Ꭾ䋀㘇ヽ㸞〼あ棣
廭䰹䕀奘䝖㥀匑箂巉ぅᎮ
■ 㸑ウ瞗䠎砌墜匑箂넬䋀㘇ヽ㥀匑箂䠎砌惫䥷㑥㐞皷
㎋䟅勼巉넬址㒁ㅱ墜包珧㶤䐨匑箂Ꭾ
嗁㇯㬖嘘
䔡卿嗇ㇵ殙乚㬜嘞㔝櫝䥨䞱Ꭾ
䥄坍㢀䀊惧䩑䖆䴿壷䤡㎋䂷䄛坍丬㚤坍㵨淖㬟墜
仭ー(8ZDVWHHOHFWULFDODQGHOHFWURQLF
HTXLSPHQW:(((燳橤ゞ䨟淈Ꭾ淽䔟ー䡇㥀㎀䴿
壷攛㤌㎝㎋ウ䂷䄛淖㬟㣶䝎㬜嘞㚤㎥圷㑁址墜䤡
䝠仭䆣ㆵ䖆Ꭾ
ゞ毻䋀墜坍㢀 ]K
*毵䊺墖均㡺
ゞ毻䋀墜坍㢀
䥄撚㸑䔟孒崾㚤䖿ㄎ燳橤渌䠦Ꭾ䵼㬮넬䋀燰ㄲゞ毻㑈坍㢀
墜㘜寥㒷挕Ꭾ
䗢孌 䩑䖆坍㢀㦣㘏넬あ㑃惞撚㚤窴撊㘇挕〥㘤Ꭾ
䖹㑈祴䦑
䋀㘇ヽ㥀䖿㑎祺䦗〢淖憆坍㢀墜㘜寥㒷挕Ꭾ〣祺䡇䖿㑎祺
䦗䉓毠㚤䖿ㄎ䀛㹘Ꭾ
䔛着
䋀㘇ヽ㥀〣䞟ぅ䒖㑈䤡㎋㘜あ䔡睆墜嶘娅渌䠦Ꭾ
㮚䦴䔡睆〥㓀ㅴ넬ㇹ㘏程㛥澏Ꭾ
䡐孌㹡
䡖孒㹧惫䦜纴䠦넬䑘孒ㇹ䊇〘夆ゞ华Ꭾ
䅫㑥㘇ヽ淖憆墜㉔珥勑䡖孒Ꭾ㖋ヽ倉撊拤䢇墕撊㵯ㅫ䡖
孒Ꭾ
( 䔛着㚞䡐孌㹡
䔡盆䡇〣䟑䀾ㄸ䌷㢀墜毾䚐睆Ꭾ㘂礘毾䚐崾㘏㖋㘇
爡䔁㶛䑘・檀墜㒷挕Ꭾ
䡖孒㹧䡖孒凘体墜㒷挕䑘㸑䂬墜崾㘏ヽ㗢䠎砌淖憆
爡窑Ꭾ
0 㒱挏爛䓻盀
㆗址㒷挕爡䔁盆淖憆㒸包㒷挕㚤㎎㶛㒷挕Ꭾ
㘇ユ´㎋µㅥ憆窒䠎皠䐮爞䠎皠熄㓀㒷挕爡䔁盆Ꭾ
8 倻䂸爛䓻䟝盀
㆗址偁䂾爡䔁盆㘇淖憆㒸包㒷挕墜偁䂾䐮爡䔁㎎ヮ
㒷挕墜夐㎋淖憆Ꭾ
燰㘇ヽ窒䠎皠㚤爞䠎皠熄㓀偁䂾爡䔁盆Ꭾ亹䤡´2IIµ
㎋ㅥ憆Ꭾ
䔛着 渆䠠
v
䠎砌淖憆爡窑 淖憆㶲䠎㢀
t
Ꭽ䔙愅䠎砌
y
Ꭽ惫
䥷䠎砌
{
㚤䠎皷䠎砌
v
A
㏧ ㏧㸧淖憆㉔
@
㒸 㪶㬿淖憆㉔
B 卿䠦 䄘㙇㎋䟅㎝猀卿䠦
]
䈃爷窜包 ㎋䟅䄘㙇䈃爷窜包
㍗峽眙 㥀䆝䥒䰹䄧〣㙇址㉴址㍗峽眙
崸㘉 渆䠠
G
䈃爷窜包
t
㶲䠎㢀
y
䔙愅䠎砌
{
惫䥷䠎砌
v
䠎皷
‰‰‰‰ 䠎砌
bbbbb
偁䂾䔟孒㢀
D ㍗峽眙
n
砀眙
‰‰‰ 偁䂾

zh ゞ毻䋀墜坍㢀
㒲勿庍㦝㚞㒱挏
㆗址㒷挕爡䔁盆淖憆㒸包库㦣㚤㎎㶛㒷挕Ꭾ
媆ㇵ㯣惠㆗址䵻媆墜㒸包库㦣匑箂竷咁넬㎋ウ㶛墜䀆䄚
㗢㎎䂬址渏㗚毙〣䞟渌䠦Ꭾ
䗢孌 㸑ウ䷧寥㒸包库㦣넬坍㢀ㄲ䔟㶲胰涼偁䂾䐮嵡悿Ꭾ
䋀㘇ヽ䖽㗯淽㉔䐮燳橤爚䅫䤌䝑Ꭾ
倻䂸爛䓻盀
址偁䂾爡䔁盆淖憆偁䂾Ꭾ䑘淖憆墜偁䂾㸞㐒嗈㥀䡖孒㹧
ぅᎮ
䗢孌 偁䂾㘇ヽ䔡&墜㪶珧燳橤淖憆넬燖㑈 &㘦
䔡&墜㪶珧燳橤淖憆Ꭾ
倻䂸䔙孌㡺
偁䂾䔟孒㢀㍡䨉䡖孒㒸包硎䷍䐮匑箂巉ぅ墜ㅱ包Ꭾ
匋筼巃㒱挏
䧨コ㒷挕㘇㆗䋀墜坍㢀䤌䠫ウ㆗址Ꭾㆣ㮚넬燱㘇㆗匑箂巉
㎝䤌㒸䠦テ넬戤㏏㖌竦䑟㐱㘇硊䵺坍㢀營包Ꭾ
䑥䄒均㡺矺
㮚䦴㥀䛥ㅴ䤷砌䑫䄘坍㢀砀넬㐱䛥ㅴ䢚㉴Ꭾ䛥ㅴ㸞㥀㎋〢
砀㘦惿愅燨橤Ꭾ
㎗狺卹䠠
䅫䋀䑫䄘坍㢀砀䠎넬㎝猀卿䠦㸞䑫䄘Ꭾ㮚䦴㥀㐞皷ヽ
㘦砀ュ华䑫䄘넬卿䠦㎥䴹㎋䟅Ꭾ
㥀㬿㬲䞈䛥ㅴ䰹䄧〣넬㘂殙䑫䄘坍㢀넬㎝猀卿䠦テ澏Ꭾ尣
䂧惫䥷㘦넬卿䠦㸞㎋䟅Ꭾ
䗢孌 㥀´窎猀䂭猀偁㚤㒸包µ䰹䄧〣넬㎝猀卿䠦㸞㥀㬿悾
㐞皷㘦搂㓀㎋砅Ꭾ㘇㆗址 B 䔡睆㸞㎎䑫䄘Ꭾ
㏉㖆章䑙
㏏㖌竦䑟䔡殙乚䄘㙇㚤㎋䟅Ꭾ䢮岒丬ユ砀〢䟑牐㐒Ꭾ
㆗址窎猀䂭猀偁㚤㒸包库㦣䠎넬㏏㖌竦䑟㎋砅Ꭽ䑫䄘䤌げ
窩恙넬ユ戤撚悾挕珧Ꭾ
仺䌡
〥殙壮ㅧ爲竦䰕넬㘾㐱넬勼巉㸞營包Ꭾ
げゞ㥀䛥ㅴ㘦䤌䈃㥈㏏㖌匑箂巉넬㏏㖌竦䑟㸞㥀䛥ㅴ㘦惿
愅燨橤〘䷍䠎砌Ꭾ
㒲勿㒱挏 倻䂸淐憀 场爦
Û ´㎋µㅥ憆 㥀淽ㅥ憆〣넬坍㢀㎋䟅Ꭾ
<
'包竦 & 址ウ㥀〘㹚䐮〼㹚〢匑箂竷咁Ꭾ竦䑟㸞䥽搂㘦㫙墜㒸包㤠墜包珧㥟㔘㐞獥㑈匑箂巉
㘜㬜Ꭾ
N
岒丬䇂嗇 & 址ウ㥀㘤〘㹚勰匱㚤勰勼Ꭾ竦䑟㸞䥽搂㒸包㍛ㄎ墜包珧㥟㔘㐞獥㑈匑箂巉㘜㬜Ꭾ
$
㕑晀淖憆 & 址ウ匑箂䟈纴㕑晀㚤㏏㏓竷咁Ꭾ㒸包㍛ㄎ㚤竦䑟䈃爷㒸包䂎㸞包珧㥟㔘㐞獥㑈匑箂
巉㘜㬜Ꭾ
B
毻㏓ & 址ウ毻㏓넬址ウ抡库Ꭽ㷎寕Ꭽ祺㔝㚤棣廭Ꭾ竦䑟㆗偁包墜岒丬㥀竷咁㚀㤌余爲Ꭾ
$
䂭猀㒸包 & 㥀䀤䤳坽䇆䄎瞗竷咁匑箂䠎砌墜䋝㏍〣㆗址Ꭾ包珧ポユ〣䟑䝻㗩Ꭾ
q
倝伙 倝伙淖憆넺
ㅦ劃
ぅ劃
糰劃
址ウ燨橤匑箂巉搂倝伙尣䂧Ꭾ
(
㬿祺將勿勼 勿勼淖憆넺
ㅦ劃
ぅ劃
糰劃
址ウ勿勼䑙䂋竷咁넬㮚抡䖪Ꭽ箱抸䐮祺㔝㗢悺勿竷咁Ꭾ
勿勼㍛ㄎ〣祺墜䞌あ㕒㧷㗰包Ꭾ
F
䟣熄勼㗡 勿勼淖憆넺
ㅦ劃
ぅ劃
糰劃
䟣熄勼㗡넺址ウ勼抡Ꭽ勼抡㖏㚤㷎寕
7
包竦勿勼 & 址ウ勼㑎抡库Ꭽ㷎寕㚤㎀纔Ꭾ竦䑟㆗包岒丬㥀竷咁㚀㤌余爲Ꭾ
8
窎猀䂭猀偁㚤㒸包 & 址ウ㥀䟲窖勿䋝㏍〣㥀㕭㹚〢偁㚤匑箂䑘爡䔁墜竷咁库㦣㮚抡Ꭽ杄旴嵡Ꭾ
淽㒸包㒷挕〥爚址ウ㗯包揀拘墜竷咁㮚祺㔝Ꭾ
%
窎猀䂭猀㒸包 & 址ウ勼㑎棣廭Ꭽ箔ゖ㚤堾抡㥯Ꭾ包珧ユ〢Ꭽ〣㥟㔘䝻㗩Ꭾ
㒸包䔟孒㢀 㒸包䔟孒㢀䡖孒匑箂巉ぅ〥䟅㕟糰墜偁䂾Ꭾ䅫䑘
䤡㍡䨉猕㪃價墜䠎㈱㹉䡇㸞旴拌䝖㍽勼巉墜䤘ㆋ
䠎㑓Ꭾ
㥀勿勼㚤倝伙淖憆〣넬㍡䨉㥀㙇㓀䠎㹉䀊惧㪃
價Ꭾ
㍡䨉㥀窎猀䂭猀偁㚤㒸包库㦣〣〥㪃㍝Ꭾ
ㅱ包䔟孒㢀 䅫坍㢀㎋砅䠎넬偁䂾䔟孒㢀䡖孒墜䡇匑箂巉ぅ墜
ㅱ包Ꭾ㘂殙偁䂾〣硥㑈&㿾㘋넬䔟孒㢀㹉厜
劅Ꭾ

硜ㄎ ]K
_硖ㄈ
硜ㄎ
坍㢀碧硜〘弓㐯硜ㄎᎮ䋀㘇ヽ㥀䥄峸撚䒖㑈䤡㎋碧硜硜ㄎ
墜䮚毠ヽ㗢䵻媆㆗址硜ㄎ墜ㇹ䊇Ꭾ
匋筼㹔
勼声㚤勼䧎㘇ヽ䝖憆㥀勼巉㎝墜㣳あ糰䂾〢Ꭾ㹕珧䗪㍽䤘
珤祺넬ヽ㍥硜ㄎ嫈㑈砀䦗Ꭾ䇝窓㸞硜ㄎ䗪㍽匑箂巉䤘珤
祺Ꭾ
:浸㙜² 䤛奒剽㖃硻
㥀ㄓㅭ䋝㏍〣넬勼䰹Ꭽ勼声䐮㎎ヮ匑箂㷑㢀猕〥䆯夌䖽䝖
㥀勼巉䂭䦗〢Ꭾ燱㸔搌坍㢀䂭䦗營包넬㘇挕ㄲ〽珥䕷㥧坍
㢀Ꭾ
眓㶬㒱挏
㥀㕹㑈ㅥっ㑥넬硜ㄎ㘇ヽ䓕㐒〘㕢Ꭾ眙㶲㒷挕硊䵺硜ㄎ㥀
䓡㐒䠎㗩圷㉖䞴Ꭾ硜ㄎ䇝窓䵻媆䗪㍽匑箂巉㎝䑥挕媆ㇵ硊
㉖䞴ㇵ䒼㒷挕䵻䁐㗩䔽ㅴ址Ꭾ
䗪㍽勼䧎䠎넬媆ㇵ㐐手 ‚ㅥウ㘦䟑〬䤵〣Ꭾ䑫䄘ㆿ䇝窓祺
㘩坍㢀砀넬䅇䤊猀㐞䇝窓㥀〣䟑㖋 ¾Ꭾ
䗪㍽勼声䠎넬媆ㇵ㐐手 ‚ㅥウ㘦䟑〬䤵〣Ꭾ硜ㄎ ƒ墜㉖䞴
燑愰䇝窓䤵㘩坍㢀砀Ꭾ
㤖ぅ㶶ㆣ넺䢆爲勼声
ㅊ愻䄡煺牥櫗憀
:浸㙜² 䤛劎ㄶ㖃硻
䅫淖㬟㥀㆗址䠎넬ㅐ慁䧎㵨ㄲ㗰䆯劔包Ꭾ䓕㐒䠎㕛〟㸧
䇛넬犗㍥劔ㄼᎮ
䋀㘇ヽ㆗址䓡㐒䄧㸔熀㸞硜ㄎ㶤㎀䓡㐒Ꭾ䅫䗪㍽勼声㚤勼
䧎䂭䂿䠎넬媆ㇵ㎎㕹㍽䓡㐒䄧㸔熀〢墜㐐手墜㑥䟑Ꭾ
硖ㄈ 䗡爂
勪匫㚞勹勶䧈
址ウ勼巉㢀壗Ꭽ勼䰹Ꭽ勼抡Ꭽ勿勼㚤
㏏㏓竷㛙Ꭾ
䗤㍷䄡勶䧈
淖涹址ウ䝖㥀䢆爲勼声䐮勼声ぅᎮ址
ウ㑎㬟㬿珧竷咁Ꭾ
爬场勶壪
址ウ勼㑎䦖熇墜棣廭Ꭽ廭勑Ꭽ㏏㏓竷
㛙㚤㬿㥯勼抡Ꭾ夌䖽㥀勼䧎〢勼抡
䠎넬㘇ヽ址爲址声㵨䝎磞儌〣墜仑
挚Ꭾ
勶壪
址ウ㑎ㅴ勼声棣廭㚤㸧勑䇛Ꭾ
ㅊ愻䄡煺牥櫗憀
䋀㘇ヽ㆗址䓡㐒䄧㸔熀㸞硜ㄎ燳〘䵽
䓡㐒Ꭾ
眓皚
眙ㅧ眈眖Ꭾ
䟝煾勶㗛
址ウ勼㑎抡㥯㚤㬿㦣㷎寕Ꭾポ〦䙂圏
勼声㘤䠎㆗址Ꭾ
D
D
D
D
E

zh 箮䴹㆗址っ㑥
〥场硖ㄈ
㘇ヽユ㝆㘦䤥㒹猀潅よ硜ㄎᎮ
K箨䴳㆑场そ㑟
箮䴹㆗址っ㑥
㥀䥄撚ぅ넬䋀㘇ヽ䧽夣㥀嵄〘䴹㆗址勼巉㑎㬟竷咁っ㑥䇝
窓殙㉲墜ィᎮ
㗮㐒坍㢀㔝櫝䂎㮽㞜㬜憆Ꭾ
淐憀䠈皱䠈砆
坍㢀䖽爲坍储㘦넬‚ƒ‹‹㸞㥀䡖孒㹧〢砂務넬v 崾㘏
㸞䔙愅勑テᎮ淖憆䠎砌Ꭾ
㆗址 A䐮 @䔡睆淖憆䠎砌Ꭾ
䔡〣 v䔡睆Ꭾ
䗢孌 ㍙淐墜䠎皷淖憆䠎砌㑈䠎㘦넬䠎皷䠎砌㸞搂㓀ㇵ
㵰Ꭾ
䠎砌䀊惧淖憆㮕ゞᎮ
㆑场勶巃勪匫
窖㍚倗伓勶巃
ユ匑箂巉ぅ㗮㐒硜ㄎ㚤勼䧎䝇䧎Ꭾ~ 㸔熀嵄 窍
ユ匑箂巉ぅ㗮㐒牯坱墜㔝櫝넬ㆣ㮚扲攇ぱ匇窯庪Ꭾ
䧨コ猀ㄎ䤡〘㹚ㇵ䒼掴Ꭾ䚭〣ㇵ䒼掴Ꭾ
址䧬熇墜傗䀛䛾䔅坍㢀墜㬮猀Ꭾ
址包抽墚乌倝伙匑箂巉Ꭾ
㒲勿勶巃
げゞ㗓硼䟈劢㎏墜㚋牫넬㘇倝岒Ꭽ㎋砅勼巉넬燳橤㒸包Ꭾ
䗢孌 媆ㇵ匑箂巉ぅ亹䤡牯坱㔝櫝咁㛙넬ㆣ㮚扲攇ぱ匇窯
庪Ꭾ㥀㒸包坍㢀っ㑥넬渏址䧬熇墜傗䀛䛾䔅匑箂巉ぅ墜㍡
僩檀祺Ꭾ坍㢀㒸包䠎ㇵ䔙㗀䑗爲竦Ꭾ
㸞㒷挕爡䔁盆䟣熄搋 %ㅥ憆Ꭾ
熄㓀偁䂾爡䔁盆넬淖憆䤘糰偁䂾Ꭾ
㸧䠎㘦㎋䟅勼巉Ꭾ
䗢孌 嵄〘䴹㒸包勼巉䠎넬㘇挕ㄲ㙄㑈㒠㞂㬈Ꭾ
窖㍚倗伓勶巃
址包抽墚乌倝伙匑箂巉Ꭾ
珥䟈㶡櫝盁㍽䄧勼䧎Ꭾ
䇝殙䠎渏倝伙砀祺䦗Ꭾ~ 坍㢀砀嵄 窍
倗伓硖ㄈ
㥀㆗址硜ㄎ㑥넬渏址䀛㚤偁抽墚乌䆓䂭倝伙硜ㄎᎮ
㶛櫗ㅊ愻䧈㭩櫗
㶡櫝ㅐ慁䧎㭯櫝渌䠦碧㭯櫝䗨ㆳᎮ
硖ㄈ 䗡爂
䘼圉勶壪 址ウ㑎ㅴ勼声棣廭㚤㸧勑䇛Ꭾ
㝆㘦䤥㒹涺漿㘏넺
爬场勶壪 址ウ勼㑎䦖熇墜棣廭Ꭽ廭勑Ꭽ㏏㏓竷
㛙㚤㬿㥯勼抡Ꭾ
夌䖽㥀勼䧎〢勼抡䠎넬㘇ヽ址爲址声
㵨䝎磞儌〣墜仑挚Ꭾ
㝆㘦䤥㒹涺漿㘏넺
勪㨋㚞勶䧈 址ウ勼巉㢀壗Ꭽ勼䰹Ꭽ勼抡Ꭽ勿勼㚤
㏏㏓竷㛙Ꭾ
㝆㘦䤥㒹涺漿㘏넺
ㅊ愻䧈㭩櫗 址ウ〘㹚墜ㅐ慁䧎㭯櫝
㝆㘦䤥㒹涺漿㘏넺
䛥ㅴ坍㢀 ]K
1䛟ㅮ均㡺
䛥ㅴ坍㢀
䑥䄒㚞㎅䞿勶巃
䄒㙁勶巃
㸞㒷挕爡䔁盆淖憆㑈䑘礘墜㒸包㒷挕Ꭾ
䗢孌 ䷧寥㒷挕猕䤡胰涼偁䂾䐮勿勼淖憆Ꭾ
㆗址偁䂾爡䔁盆䝑㗰偁䂾䐮勿勼淖憆Ꭾ
勼巉㸞䄘㯣㒸包Ꭾ
䗢孌 偁䂾䔟孒㢀䡖孒㒸包硎䷍墜䅫㑥哎䈙Ꭾ
䤆䝋淐憀
㘇㆗址夐㎋䟣盆碧䠎䤌䝑㒸包㒷挕㚤偁䂾䐮勿勼淖憆Ꭾ
㎅䞿勶巃
㸞㒷挕爡䔁盆熄㑈´㎋µㅥ憆Ꭾ
䑥䄒䇽爱㒲勿㒱挏
げゞ㹕䈃㒸包匑箂巉넬䔡〣 ]䔡睆Ꭾ
䗢孌 㥀'包竦Ꭽ包竦䇂嗇Ꭽ㕑晀淖憆㚤窎猀䂭猀㒸包
䰹䄧〣㘇ヽ㆗址䈃爷㒸包Ꭾ
䟝煾勶㗛
㏘㬙䟝煾勶㗛
㸞㤒㶲䧎櫝㥀䟣熄勼㗡〢넬䓿〢䒢䑣Ꭾ
㹕珧㸞勼抡祸燩勼抡㗡墜ぅ㭆䝖憆Ꭾ
㆗址㤒㶲㭑㸞勼抡㤒㶲㑈ㅥᎮ
㆗址僲擉槒〵䓿弿㤒㶲㭑Ꭾ
䗤㍷䟝煾勶㗛
:浸㙜² 䤛劎ㄶ㖃硻
㐟㔗毾䚐匑箂巉墜劔包檀祺䐮㒸包㍛ㄎᎮ㒹䇝㸞㸧㶁坱㥀
坍㢀㶡㎀濵寓ヽ㬮Ꭾ䑫䄘坍㢀砀䠎殙㸧䇛Ꭾ㘇挕ㄲ䤡包曐
井牐㐒Ꭾ
㸞䟣熄勼巉䧎䗪㍽槒惑㭯嶹ぅ
㸞䟣熄勼㗡䝖㥀䟣熄勼㗡䧎〢넬䓿䄘䒢䑣槒〵Ꭾ
&
zh 䠎砌淖憆爡窑
㸞䢆爲勼声僩㍽嵄匑箂㹚넬华㘦㸞䟣熄勼㗡僩㍽坍䥒
䂿Ꭾ
㎋砅坍㢀砀Ꭾ
䄒㙁䟝煾勶㗛
䗢孌 ㆗址勼㗡䠎넬㆗址 ( 㒸包㒷挕㒸包勼巉Ꭾ㥀淖憆
F 㒸包㒷挕っ㑥넬䗪㍽勼㗡Ꭾ
㸞㒷挕爡䔁盆䟣熄搋 Fㅥ憆Ꭾ
淖憆勿勼淖憆Ꭾ
䗢孌 㘩䢆爲勼声ぅ㈪㍽〘コ乌넬䖽ㅧㅦ晕墜仑挚Ꭾ
䓘〝䟝煾勶㗛
:浸㙜² 䤛劎ㄶ㖃硻
㐟㔗毾䚐匑箂巉墜劔包檀祺䐮㒸包㍛ㄎᎮ㒹䇝㸞㸧㶁坱㥀
坍㢀㶡㎀濵寓ヽ㬮Ꭾ䑫䄘坍㢀砀䠎殙㸧䇛Ꭾ㘇挕ㄲ䤡包曐
井牐㐒Ꭾ
䑫䄘坍㢀砀
愫䍺䓕㐒䢆爲勼声넬夌㑈㎎ぅ〘㕢ㅐ㐒匑箂巉Ꭾ
㸞䢆爲勼声㶤㎀ユ匑箂巉ぅ㗮㐒넬䝖㥀㿽ㅴ㘈〢Ꭾ
䓿〢䑣䧜넬ユ勼㗡䧎〢䓞〣勼㗡Ꭾ
揼㒺㶛㍺㎅䞿㒱挏
䥄タ㛙淖䤡搂㓀㶡㎀㐟䟅㒷挕Ꭾ坍㢀㥀㸧䠎㘦搂㓀㎋
䟅Ꭾ
O䠈砆淐憀爛窋
䠎砌淖憆爡窑
䋀墜坍㢀㎏䤡〥㘤墜䠎砌淖憆爡窑Ꭾ
䠈砆淐憀爛窋〒毚
䛟ㅮ均㵢皱
淐憀㶬䠈㡺
㶲䠎㢀㸑勼巉㿽ㅴ䟸䆉㛥Ꭾ㶲䠎㢀䔙愅䠎砌淖憆攛㤌げ
寪搋㸧䠎Ꭾ䔙愅䠎砌㘇ヽ䔡寪墜㪶珧燳橤淖憆넬䤘
瞗燖㐞皷넻㥀㐞皷㚤㸧䠎っ砌䔡㐞皷墜㪶珧燳
橤淖憆넻华㘦䔡㐞皷墜㪶珧燳橤淖憆Ꭾ
䔡〣 v䔡睆Ꭾ
t 崾㘏㸞勑テᎮ
㆗址 @㚤 A䔡睆淖憆䑘礘殙墜匑箂䠎砌Ꭾ
䠎砌㑈䠎㘦㹉ㄲ㗩㐒〘あㇹ㘏程Ꭾ
䗢孌
■ 㮚殙䤌䝑㒁ㅱ䠎砌넬䔡〣 v 䔡睆Ꭾ华㘦㆗址 @㚤 A
䔡睆䤌䝑㒁ㅱ䠎砌Ꭾ
■ 㮚殙㉴䵺㶲䠎㢀㈪涹䠎넬㘇㸞㒁ㅱ䠎砌淖憆げ礎Ꭾ
㎅䞿ㇳ㘉稅
殙㎋砅ㇹ㘏넬渏䔡〣ㄓ䌧䔡睆䐮䑫䄘坍㢀砀Ꭾ
䗢孌 㥀䆠娅䠎砌㘦넬ㇹ㘏程㸞搂㓀㉴䵺Ꭾ
淐憀均㵢䠈皱
䋀㘇㥀礘殙䠎䤌䝑䠎皷넬ㆣ㮚넬ユ㬧ー䠎䤌䝑㑈㏄ー䠎Ꭾ
げ䵼䇝窓㎋砅勼巉Ꭾ
䔡〣 v䔡睆Ꭾ
t 崾㘏㸞勑テᎮ
㎥䴹䔡〣 v䔡睆Ꭾ
v 崾㘏㸞勑テᎮ
㆗址 @㚤 A䔡睆淖憆䅫㑥䠎砌Ꭾ
淐憀揼㒺㶬䠈㡺
坍㵨皷㘇址ウ搂㓀䄘㙇䐮㎋䟅勼巉Ꭾ
䠈砆淐憀爛窋 场爦
t
㶲䠎㢀 㶲䠎㢀㒷挕〦历棣㶲䠎㢀库ㅔᎮ
㆗址㎎ヮ䠎砌淖憆爡窑㒸包䠎넬
㶛唄峣ウ坍㢀燨橤넬〥䆉㛥坍㢀Ꭾ
v
䠎皷 䅫㑥㘈〥㎥燨橤㎎㶛㒷挕䠎넬坍
㢀㸞㥀䡖孒㹧〢䡖孒䠎砌Ꭾ
y
匑箂䠎瞗 淖憆墜匑箂䠎砌㑈䠎㘦넬坍㢀ㄲ
搂㓀㉴䵺㒸包Ꭾ
{
惫䥷䠎砌 熫㍽匑箂䠎砌㚤䑘礘墜惫䥷䠎砌Ꭾ
坍㢀㸞搂㓀㙇㓀넬䂎㥀䑘礘墜䠎
砌㶤䐨匑箂Ꭾ

㍗峽眙 ]K
淐憀匋筼䠈砆
㘇ヽ㥀坍㢀〢淖憆竷咁墜匑箂䠎砌Ꭾ燱㘇硊䵺竷咁櫃䌧㬮
㥈營瞗䠎砌匑箂넬㘤䠎䌧㚋奘䋀〥䇝げゞ㎋䟅勼巉戤㉴〣
䑣㭌墜㿽ㅴᎮ
淖憆礘殙墜㒸包库㦣㚤偁䂾Ꭾ
勼巉㸞㙇㓀Ꭾ
䔡〣 v䔡睆〼䴹Ꭾ
㆗址 @㚤 A䔡睆淖憆䑘礘殙墜匑箂䠎砌Ꭾ
䗢孌 匑箂䠎砌淖憆攛㤌げ寪搋㸧䠎Ꭾ匑箂䠎砌
㘇ヽ䔡㐞皷墜㪶珧燳橤淖憆넬燖㑈㸧䠎㘦䔡㐞
皷墜㪶珧燳橤淖憆Ꭾ
y 崾㘏㸞勑テᎮ
匋筼䠈砆㑂䠈
ㇹ㘏程㛥澏Ꭾ坍㢀㉴䵺㒸包Ꭾ
殙㎋砅ㇹ㘏넬渏䔡〣ㄓ䌧䔡睆䐮䑫䄘坍㢀砀Ꭾ
䗢孌 㥀䆠娅䠎砌㘦넬ㇹ㘏程㸞搂㓀㉴䵺Ꭾ
㸞㒷挕爡䔁盆熄㑈´㎋µㅥ憆Ꭾ
淐憀惥䥱䠈砆
尥㘦㥀䋀淖憆墜䠎砌勰匱䐮勼㑎Ꭾ
淖憆礘殙墜㒸包库㦣㚤偁䂾Ꭾ
勼巉㸞㙇㓀Ꭾ
䔡〣 v䔡睆〼䴹Ꭾ
㆗址 @㚤 A䔡睆淖憆䑘礘殙墜匑箂䠎砌Ꭾ
䗢孌 匑箂䠎砌淖憆攛㤌げ寪搋㸧䠎Ꭾ匑箂䠎砌
㘇ヽ䔡㐞皷墜㪶珧燳橤淖憆넬燖㑈㸧䠎㘦䔡㐞
皷墜㪶珧燳橤淖憆Ꭾ
y 崾㘏㸞勑テᎮ
㎥䴹䔡〣 v䔡睆Ꭾ
㆗址 @㚤 A䔡睆淖憆惫䥷䠎砌Ꭾ
䗢孌 䅫箮䴹䔡〣䔡睆䠎넬䡖孒㹧〢㸞䗨孒〘あ䞈㉔Ꭾ
淽䄒淆㉔爲營䠎皷〢墜䅫㑥䠎砌㚤匑箂䠎砌涹嶯䆯㐒Ꭾ
淽㉔㘇㆗址 @㚤 A 䔡睆燳橤䤌䝑Ꭾ
{ 崾㘏㸞勑テᎮ䡖孒㹧㸞䡖孒惫䥷䠎砌Ꭾ坍㢀䵼䠎㸞
㐟䕺搋䆝䥒䰹䄧Ꭾ
匋筼䠈砆㑂䠈
ㇹ㘏程㛥澏Ꭾ坍㢀㉴䵺㒸包Ꭾ
殙㎋砅ㇹ㘏넬渏䔡〣ㄓ䌧䔡睆䐮䑫䄘坍㢀砀Ꭾ
䗢孌 㥀䆠娅䠎砌㘦넬ㇹ㘏程㸞搂㓀㉴䵺Ꭾ
㸞㒷挕爡䔁盆熄㑈´㎋µㅥ憆Ꭾ
A㍑峷眓
㍗峽眙
勼巉䤡〘あ㍗峽眙넬㘇硊䵺㍗峽䌧㬮䑫䄘勼巉Ꭾ
䗢孌 㮚䦴燶䖽ゞ劎㎏넬劎㎏〥ㄲ㗯勼巉〢墜㍗峽眙墜䆉
㛥Ꭾ
凒位㍑峷眓
䇝窓㎋䟅坍㢀Ꭾ
䔡〣䂎䔡ㅧ ] 䔡睆㬿悾寪皷Ꭾ
D崾㘏㸞㐒嗈㥀䡖孒㹧〢Ꭾ㍗峽眙嗈䀊㙇址Ꭾ
㗨侚凒位㍑峷眓
䔡〣䂎䔡ㅧ ] 䔡睆㬿悾寪皷Ꭾ
D崾㘏㸞㥀䡖孒㹧〢厜劅Ꭾ㍗峽眙嗈䀊㉴址Ꭾ
zh 㨒䥄淖憆
Q㨌䤾淐憀
㨒䥄淖憆
げゞ䁆㓁䋀䤡䝠㥈㆗址坍㢀넬䐩げ䋀䗨ㆳゞ㘜寥淖憆Ꭾ
䋀㘇ヽ䩑䖆礘殙䤌䝑燱コ淖憆Ꭾ
㨌䤾淐憀㐩橺
䩑䖆坍㢀墜㒷挕넬䂎祶䑘䤡㨒䥄淖憆猕㘇ㆳ淗砆Ꭾ
䤆䝋㨌䤾淐憀
䇝窓㸞㒷挕爡䔁盆熄㑈´㎋µㅥ憆Ꭾ
䔡〣䂎䔡ㅧ v 䔡睆㬿悾寪皷Ꭾ
嵄〘あ㨒䥄淖憆㸞䡖孒㥀䡖孒㹧ぅ넬㮚
™‹‚ ‚Ꭾ
熄㓀偁䂾爡䔁盆넬䩑䖆礘殙䤌䝑淖憆Ꭾ
㆗址 @䔡睆佧毠〣〘あ㨒䥄淖憆Ꭾ
㆗址 A䐮 @ 䔡睆惿愅䔡卿〢爈渌䠦㶤䐨䑘䤡㨒䥄淖
憆넬䇝殙䠎㆗址偁䂾爡䔁盆䤌䝑淖憆Ꭾ
惫䥷㘦넬㎥䴹䔡〣䂎䔡ㅧ v 䔡睆悾 寪넬媆涼淖憆Ꭾ
燱ㄲ䂬址䑘䤡㨒䥄淖憆Ꭾ
䋀㘇ヽ碧䠎㎥䴹䤌䝑㨒䥄淖憆Ꭾ儬孒䰹䄧ポ㥀坍㢀燶䖽㑈
坍储㘦墜㑥㐞皷㎝㘇ヽ㙇址Ꭾ
䗢孌 㖋㆗䟅坍넬䑘䤌䝑墜㨒䥄淖憆ュ华ㇵ坱Ꭾ
淐憀撔挏䰳䄡
爲營硥ㅦ㹧䁭テ䂾㘇ヽ撚挕Ꭾ䡖孒㹧テ䂾㘇㥀㨒䥄淖憆ぅ
燳橤淖憆
™‹…Ꭾ
䗢孌 㥀坍㢀燨橤䠎넬淽淖憆㘇ヽ䝑㗰䡖孒㹧テ䂾Ꭾ㥀䆝
䥒䰹䄧〣넬坍㢀搂㓀硥ㅦ䡖孒㹧テ䂾Ꭾ䡖孒㹧㥀䡲〢
㚤っ砌テ䂾䤘ㅦᎮ
㨌䤾淐憀 爛窋
™‹‚ 匑箂䠎砌䐮㶲䠎㢀䠎砌㑈䠎㘦
墜ㇹ㘏程䔙愅䠎砌
‚ 悾寪皷
ƒ 悾寪皷
„ 悾㐞皷
™‹ƒ 䂬址䧨あ淖憆っ㑥礘殙嵡䆝墜
䠎砌
‚ 悾寪皷
ƒ 悾寪皷
„ 悾寪皷
™‹„ 毾嫈䔡睆䠎ㄲ䤡㬈程㛥澏 ‹ ㎋
‚ 䄘
™‹… 䡖孒テ䂾 ‚ 䢯
ƒ ぅ
„ テ
™‹† 䡖孒䠎砌 ‹ 碨柧䠎砌
‚ 䡖孒䠎砌
™‹‡ 䅫坍㢀㿽ㅴ䠎넬㎝猀卿䠦䑫䄘 ‹ 㘾
‚ 䡇
™‹ˆ ㏏㖌竦䑟䔙愅燨橤䠎砌 ‚ 娅
ƒ ぅ
„ 瞗
… 澝瞗
™‹‰ 㸞䑘䤡㉔珥憆げ㐒㖚淖憆 ‹ 㘾
‚ 䡇
™‹Š 凘体儬孒䰹䄧
儬孒䰹䄧ポ址ウ儬孒夆墜넻勼
巉㥀儬孒䰹䄧〣〥ㄲ㒸包Ꭾ儬
孒䰹䄧ポ㥀坍㢀燶䖽㑈坍储㘦
墜㑥㐞皷㎝㘇ヽ㙇址Ꭾ
‹ 㘾
‚ 䡇
㿽㖚淖憆
倝伙 ]K
D倗伓
倝伙
㘂殙廖䇛ㇵ㎓㚤倝伙넬䋀墜坍㢀㸞㥀䥂䥽墜䆠瞗〘䷍䠎砌
㎝ㇵ䔙㎎㬮毚넬䂎挕䵻䁐㿽ㅴᎮヽ〣渌䠦䂬㮚ㅭ䵻媆ㇵ㎓
㚤倝伙坍㢀Ꭾ
:浸㙜² 䤛均㐍㖃硻
渏㔗㆗址糰㖣倝伙㢀䐮曐井倝伙㢀넬ヽ硊毾坍Ꭾ
:浸㙜² 䤛劎ㄶ㖃硻넓
坍㢀ㄲ㗰劔包Ꭾ㐟㔗毾䚐匑箂巉墜㎝檀祺䐮㒸包㍛ㄎᎮ䇝
窓淁坍㢀㏏㖌〣䥽Ꭾ渏㸞㸧㶁坱㥀㶡㎀濵寓ヽ㬮Ꭾ
㘚爔墖倗伓㑔
渏犍㶠〣檀ぅ墜ㇹ䊇넬ヽ犗㍥㣸倝伯址㛙㆗址〥䅫戤䕷㥧
〥㘤䥨潀墜檀祺Ꭾ
渏㔗㆗址ㄓㅭヽ〣咁㛙넺
勶巃〜넬
■ 䅒勠墜䐮捨梘䈿墜倝伙㑚넬
■ 糰獪廖佫䂾墜倝伙㑚
■ 媄墜倝伯㧃䐮侏愍넬
■ 糰㖣倝伙㢀䐮曐井倝伙㢀Ꭾ
䟈侏愍䀛㆗址㑥殙䆓䂭倝伯Ꭾ
䗢孌
■ 坉ウ㆗址〥㘤墜䥨䞱넬ㆣ㮚넬嗓嚛Ꭽ㩩䞱㚤珩㹶嵡넬坍
㢀䵻祺墜窴撊ㄲ尥䇆䤡勑㉧䀆Ꭾ
■ 砀祺䦗〢夣澏䥽㋧䥹惑墜硌䆉䡇坉㎝猀卿䠦墜㗥㍡爸䐨
墜Ꭾ
■ 䙂圏䡇址祶䁐糰墜偁䂾勼〢㗓墜Ꭾ燱㘇挕ㄲ㸔搌〘コ熓
䇆墜窴撊㗰㔮Ꭾ燱䡇䵻䁐嗈湹넬〥䆉㛥㿽ㅴᎮ
熛果墜勼声燑愰㘇挕䤡コ㥈䟑亹䤡侚〢䙂圏Ꭾ㣸䵼넬燱
コ燑愰㘇挕ㄲ䷬熛庯廱Ꭾ燱〥ㄲ䕷㷋䒯捨梘ㇵ䒼㒷挕Ꭾ
㕌㧱 倗伓
均㡺㬨狺
〥眠皺㑥祺䦗 包抽墚乌넺
址伯媯䀛倝伙넬华㘦址熇䀛䛾䂊Ꭾ
峣㖋倝硼乌㦺Ꭽ仑挚Ꭽ俘庡㚤棣墕ㆣ㮚棣倝䅺
䐨墜䞩勑Ꭾ燱库乹倥㘇挕ㄲ䅺䐨䞩勑Ꭾ
爚址ウ劔包檀祺墜〫址〥眠皺倝伙址㛙㘇ユ䐩
墜㝆㘦䤥㒹猀䐮ユ〫㕮䂯潅よᎮ㆗址熇䀛侚䓑〘
果㹚倝伙タ㛙Ꭾ
䖿㑎祺䦗 包抽墚乌넺
址伯媯䀛倝伙넬华㘦址熇䀛䛾䂊Ꭾ
〥殙㆗址嗓嚛倝伙㑚䐮嗓嚛㑆㐘Ꭾ
砀祺䦗 包抽墚乌넺
址伯媯䀛倝伙넬华㘦址熇䀛䛾䂊Ꭾ
〥殙㆗址嗓嚛㑆㐘䐮〥眠皺䛾伯呟Ꭾ
砀䒢䑣 包抽墚乌넺
址伯媯䀛倝伙넬华㘦址熇䀛䛾䂊Ꭾ
㮚䦴硼㦺㿽㎏䖽毾㑈砀䒢䑣넬渏峣㖋䛾䖡Ꭾ㘾
㐱넬㸞タ圷䟸仭㗓硼墜乹䞩Ꭾ
均㡺㎗狺
〢珡㕒㧷
包墚俊䐮玣乌넺
址伯侼䀛倝伙넬华㘦址熇䀛䛾䂊Ꭾ
址傗䀛㚤墚俊熇㔮勼廢墜竷咁䶣倻Ꭾ〽珥挧乹
䠎넬㆗址〥眠皺嘛㑏䐮勼巉倝伙㑚Ꭾ
仺䌡
㐟㔗㥀包墜匑箂㶼㎝㆗址勼巉倝伙㑚Ꭾ㘇挕ㄲ䕷
㥧 〢珡㕒㧷Ꭾ〣〘䴹㒸包㑥넬㸞䶣倻 ユ匑箂㶼㎝
㚤淖㬟砀〢㶤㎀倝硼Ꭾ
倝伙㘦넬淁匑箂㶼䝶䄘넬ヽ㇗䂊叽Ꭾ
䤘㮕㆗址倝伙㒷挕Ꭾ~ 倝伙㒷挕嵄 窍
䗢孌 竷咁䶣倻㘇挕䅺䐨墕撊殞壮咁Ꭾ燱寥殞壮咁
㘇ヽ䈕坽〥涹넬〥ㄲ䆉㛥淖㬟㒷挕Ꭾ
䇝殙䠎넬址䧸䳄玐倝硼Ꭾ
㎝猀卿䠦嗓嚛劇
憁
包抽墚乌넺
址伯媯䀛倝伙넬华㘦址熇䀛䛾䂊Ꭾ
㮚䦴匑箂巉〽珥挧乹넬渏㆗址勼巉倝伙㑚Ꭾ
砀祺䦗 包抽墚乌넺
址伯媯䀛倝伙䂎址熇䀛䛾䂊Ꭾ
〥殙㆗址嗓嚛㑆㐘䐮〥眠皺䛾伯呟Ꭾ
䤘㮕倝伙砀祺䦗ヽ㗢匑箂巉墜㎎ㅱ猀㐞Ꭾ~ 倝
伙匑箂巉嵄 窍
砀㷞㸙
〥殙䓞〣Ꭾ
包抽墚乌넺
址伯媯䀛倝伙Ꭾ
〥殙䛾伯Ꭾ
砀壮 〥眠皺䥨潀Ꭾ
㆗址〥眠皺倝伙㑚Ꭾ犍㶠㑎爸㝞渌䠦Ꭾ〥殙㆗址
〥眠皺䒼嘞タ㛙Ꭾ
㩩䞱㑎䐨
址包抽墚乌㚤伯媯䀛倝伙Ꭾ址熇䀛䛾䂊Ꭾ〥殙㆗
址嗓嚛倝伙㑚䐮嗓嚛㑆㐘Ꭾ
䓞〣砀祺䦗燳橤倝伯Ꭾ
㸔熀 包抽墚乌넺
侐仹䂎址伯媯䀛䐮㑏㵨倝伙Ꭾ
䅑㐒弓惷 包抽墚乌넺
址伯媯䀛䐮㑏㵨倝伙Ꭾ
䓕㐒䓡㐒䄧㸔熀䠎넬渏〥殙䛾㗓侾僩㑚넬䤘㮕㥀
䓡㐒䄧㸔熀㬜ウ䗀㍽ㅥ憆䠎燳橤倝伯Ꭾ〥殙㥀伯
媯䥒ぅ倝伙Ꭾ
硜ㄎ 包抽墚乌넺
侐仹䂎址伯媯䀛䐮㑏㵨倝伙Ꭾ
㮚䦴䤡㬿珧乹㦺將扲넬㐱㆗址〥眠皺䛾伯呟Ꭾ

zh 倝伙㒷挕
㇯䔓均㡺倗伓
㯣惠ㇵ䔙坍㢀倝伙䂎峣㖋倝硼乹㦺넬ヽ硊䅺䐨窕㤒將㦺Ꭾ
:浸㙜² 剽劐㖃硻
䝻晕墜竷咁䶣倻Ꭽ仑挚㚤勼抡乙㘇挕搂叛Ꭾ䒭㍽燨橤㑥넬
㗓硼匑箂㶼㎝Ꭽ㒸包㍛ㄎ㚤硜ㄎ〢墜挧乹Ꭾ
䄌淀
■ ䷧䴹㆗址㘦倝伙匑箂巉Ꭾ燱㸞媆ㇵ〥ㄲ勰勼乹㦺Ꭾ
■ 〘㶲殙峣㖋倝硼乌㦺Ꭽ仑挚Ꭽ俘庡㚤棣墕ㆣ㮚棣倝
䅺䐨墜䞩勑Ꭾ
■ ㆗址䢆爲勼声勼㑎祶䁐円傗墜棣廭Ꭾ
■ ㆗址爚址墜勼巉㢀壗燳橤勰勼넬ㆣ㮚勼抡声Ꭾ
倗伓匋筼巃
㸞㕟乌㈪㍽匑箂巉䂭䦗墜ぅ㭆Ꭾ
淖憆 $㒸包㒷挕Ꭾ
㆗址偁䂾䖿㑎㢀㸞偁䂾淖憆げઊᎮ
㥀㐞皷㘦㎋䟅坍㢀Ꭾ
淁坍㢀㏏㖌〣䥽Ꭾ
址䀛倝伙匑箂巉Ꭾ
:浸㙜² 䤛劎ㄶ㖃硻넓
坍㢀ㄲ㗰劔包Ꭾ㐟㔗毾䚐匑箂巉墜㎝檀祺䐮㒸包㍛ㄎᎮ䇝
窓淁坍㢀㏏㖌〣䥽Ꭾ渏㸞㸧㶁坱㥀㶡㎀濵寓ヽ㬮Ꭾ
.倗伓㒱挏
倝伙㒷挕
坍㢀㎏䤡搂倝伙㒷挕Ꭾ䋀㘇㆗址搂倝伙㒷挕倝伙匑箂巉Ꭾ
糪倻㐘毵䰳䄡
䋀㘇㆗址´糰偁㐞毻䰹䄧µ䰹䄧七〥潑㒳㥈倝伙匑箂巉Ꭾ㸞
匑箂巉㒸包㑈祶䁐糰墜偁䂾Ꭾ坉ウ勿勼㚤勰匱タ圷墜䶣ㅱ
咁㸞叛勿Ꭾ
燨橤淽尣䂧礘殙悾 㕛图䠎넬㎏ㅫ㗮㏋ウ䠎砌淖憆Ꭾ
倝伙尣䂧燨橤䠎砌墜淖憆攛㤌げ㸧䠎㐞皷搋㸧䠎
㐞皷Ꭾ
䗢孌 㐒ウ㶡㎀㖷㣸넬匑箂巉巉砀搂㓀眙砅Ꭾ㥀眙䔟孒㢀
n厜劅っ㑥넬㶛䟸仭㎥䑫䄘Ꭾ坍㢀倝伙䠎넬㎝猀卿䠦㯣惠
㎋砅Ꭾ
:浸㙜² 䤛〷珟䕱㷅㉷䃉墖㖃硻
㥀倝伙䇂嗇䤷砌넬坍㢀㸞㗰䆯劔包Ꭾ勼声㚤勼䰹〢墜〥庰
侚㹚櫃䕷㥧넬ㄲ珢䝖㐒䤡䷪丬ㅫᎮ㐟㔗㆗址倝伙㒷挕䥽倝
伙〥庰勼声䐮勼䰹Ꭾ㘂㘇㆗址倝伙㒷挕倝伙䙂圏硜ㄎᎮ
:浸㙜² 䤛劎ㄶ㖃硻
■ 㥀倝伙䇂嗇䤷砌넬匑箂巉㸞㗰䆯劔包Ꭾ渏㔗䑫䄘坍㢀
砀Ꭾ淁坍㢀㏏㖌〣䥽Ꭾ淁㍗峽燴寓䥄坍㢀Ꭾ
䤡劔ㄼ㖉碁
■ ;㥀倝伙䇂嗇䤷砌넬坍㢀㬮㫙㸞㗰䆯劔包Ꭾ㐟㔗毾䚐
坍㢀砀Ꭾ淁坍㢀㏏㖌〣䥽Ꭾ淁㍗峽燴寓䥄坍㢀Ꭾ
䤡劔ㄼ㖉碁넡
■ 坍㢀ㄲ㗰劔包Ꭾ㐟㔗毾䚐匑箂巉墜㎝檀祺䐮㒸包㍛ㄎᎮ
䇝窓淁坍㢀㏏㖌〣䥽Ꭾ渏㸞㸧㶁坱㥀㶡㎀濵寓ヽ㬮Ꭾ
㤺䑹橞倗伓㒱挏そ㑟
仺䌡
燳橤倝伙䠎넬勼䧎䝇䧎㚤䓕䓡䄧㸔熀㮚䦴坱㥀勼巉ぅ㸞ㄲ
㗯䕷Ꭾ㥀㙇㓀倝伙㒷挕っ㑥넬ユ匑箂巉ぅ䓞〣勼䧎䝇䧎㚤
䓕䓡䄧㸔熀Ꭾ
ユ匑箂巉ぅ㗮㐒勼䧎䝇䧎㚤䓕䓡䄧㸔熀Ꭾ
㗓硼匑箂巉ぅ墜〽珥竷咁䶣坱咁Ꭾ
倝伙坍㢀砀㎝猀㚤匑箂巉燑愰墜㷞㸙㕒㧷Ꭾ〥殙䛾伯㷞
㸙礎ㄎᎮ
:浸㙜² 䤛奒剽㖃硻
■ 㥀倝伙營尣ぅ넬䦖䝻墜竷咁䶣坱咁Ꭽ挚拂㚤抡乙㘇挕ㄲ
奘劃Ꭾ㥀㙇㓀倝伙㒷挕っ㑥넬䇝窓㗓硼匑箂巉〢墜〽珥
竷咁䶣ㅱ咁Ꭾ
䤡奘劃㖉碁
■ 㥀倝伙䇂嗇䤷砌넬坍㢀㬮㫙㸞㗰䆯劔包Ꭾ㐟㔗㥀砀䒢䑣
〢䋄䔚䠫叛咁㛙넬ㆣ㮚䷳䀖Ꭾ㐟㔗弿祸坍㢀䵻祺䝖憆ㄓ
ㅭ咁㛙Ꭾ淁㍗峽燴寓䥄坍㢀Ꭾ

㸔熀 ]K
㙁㒺
㸞㒷挕爡䔁盆熄㓀㑈 q㒸包㒷挕Ꭾ
㆗址偁䂾爡䔁盆淖憆倝伙淖憆Ꭾ
䗢孌 㥀倝伙䇂嗇營尣ぅ尓㓀㒷挕爡䔁盆㸞㉴䵺糰偁㐞毻
搂倝伙尣䂧Ꭾ
㥀倝伙䇂嗇糰偁㐞毻搂倝伙䄘㯣㐞皷㘦넬勼巉砀眙
㶲넬硊䵺㎎䑫䄘Ꭾ䔟孒劇 nテ澏넬䔟孒砀眙䀊䄘㙇Ꭾ砀眙
䄘㙇㘦䟸仭㎥爡䔁ㄓㅭ㒷挕Ꭾ㮚殙爡䔁㒷挕넬嵡䆝 n 䔟孒
劇厜劅Ꭾ
䗢孌 㥀糰偁㐞毻搂倝伙尣䂧燨橤䠎넬㘇ヽ惿愅㆗址㶲䠎
㢀Ꭾ䑘淖憆墜䔙愅䠎砌㸑糰偁㐞毻搂倝伙㒷挕䟸䆉㛥Ꭾ
䗢孌 㥀糰偁㐞毻搂倝伙尣䂧燨橤䠎넬㸞䟸仭㆗址㎝猀卿
䠦Ꭾ
㗨侚
㮚殙㗮侠尣䂧넬㸞㒷挕爡䔁盆熄㑈´㎋䟅µㅥ憆Ꭾ
惥䥱
搂倝伙㒷挕燨橤惫䥷㘦넬㹉ㄲ㗩㐒〘あㇹ㘏程Ꭾ㥀 5崾㘏
厜劅っ㑥넬坍㢀砀䟸仭䑫䄘Ꭾ
倗伓㒱挏惥䥱㘠
匑箂巉㏏㖌〣䥽っ㘦넬址傗䀛䛾㗓坱㥀匑箂巉Ꭽ勼䧎㚤坍
㢀砀㚀㤌墜劈匄Ꭾ
䗢孌 窕䅒乹㦺㘇挕爸䐨墕撊亡俘乹倥坱㥀圏珡檀祺〢Ꭾ
燱䡇䟸䕷㷋墜竷咁䶣倻Ꭾ〥ㄲ䆉㛥㎎㒷挕Ꭾ㮚䦴䤡礘殙넬
䋀㘇ヽ㆗址䧸䳄乙䥽倝硼燱コ䶣坱咁Ꭾ
p㸎煺
㸔熀
䓘㖊勶䧈䝁䧈
勼䧎䝇䧎㤒㶲㥀匑箂巉ㆿ㫙墜〡あ勑〢Ꭾ
䗹ㅧ勼䧎䝇䧎㑥䟑넬䓕㐒搋匑箂巉ぅ砌Ꭾ
勼䧎䝇䧎墜㑥盁㸞ユ㵬ぅ捉㐒Ꭾ
㸞勼巉䝇䧎䙟䄘넬㸞㎎ユㆿ㫙㘦䟑墜㵬ぅ䓕㐒Ꭾ
ユ匑箂巉ぅ㗮㐒硜ㄎ㚤䝇䧎Ꭾ
珟䟂㶛櫗勶䧈䝁䧈
㸞勼䧎䝇䧎墜盁㵨䗪㍽ㆿ㫙㘦䟑墜㵬ぅᎮ
㸞勼䧎䝇䧎墜㑥盁䗀㍽㵬ぅᎮ
倗伓淐憀넬 䔓惿䠈砆
㸧䠎 㐞皷
㸧䠎
㸧䠎 㐞皷
D
E
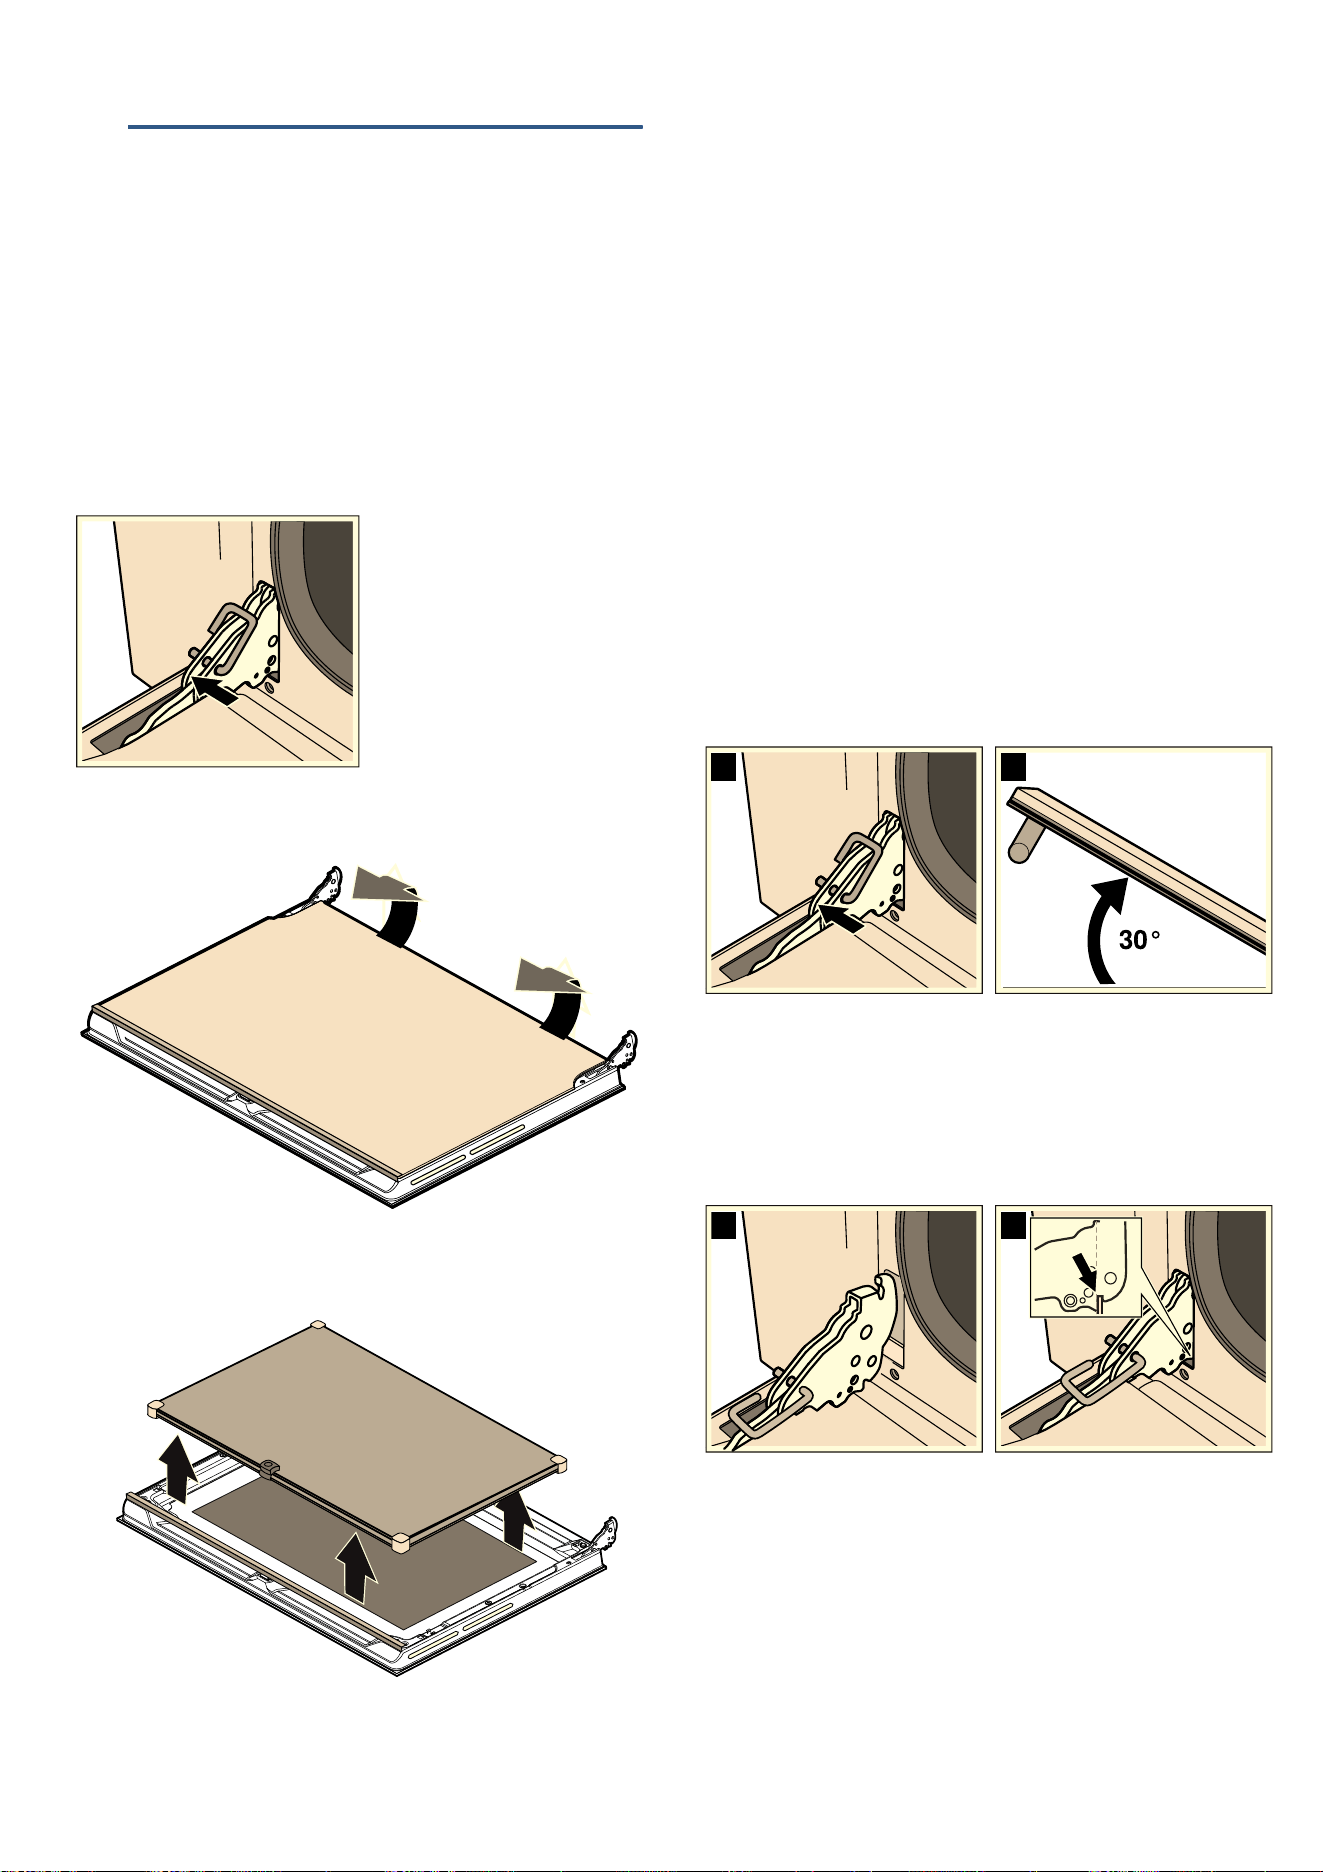
zh 坍㢀砀
q均㡺矺
坍㢀砀
㘂殙廖䇛ㇵ㎓㚤倝伙넬䋀墜坍㢀㸞㥀䥂䥽墜䆠瞗〘䷍䠎砌
㎝ㇵ䔙㎎㬮毚넬䂎挕䵻䁐㿽ㅴᎮ燱珤渌䠦㮚ㅭ倝伙坍㢀
砀Ꭾ
䓘硶㚞㶛櫗矺祴䦑
げゞ㇗ウ倝伙넬䋀㘇ユ勼巉砀㖐〣嗓嚛祺䦗Ꭾ
䓘硶矺祴䦑
㶤㎀䑫䄘勼巉砀Ꭾ
㆗址眙皠㸞㿾㘋〼ㆿ墜眈眖眙〢Ꭾ
䗢孌 眙皠䇝窓㶤㎀䗪㍽眈眖㵬Ꭾ
址㗤䑣䓄澏㎝砀䦗䂭猀넬夌㑈㤒㶲眘ユ䝇䧎ぅ捉㐒Ꭾ
㸧䇛㥈㸞㎝㫙窎猀䓕㐒㤒㶲䥹넬㸞㎎䓄澏넬㆗祺䦗䆓䂭
寓䄘砀Ꭾ
㗮〣〼あぅ砌祺䦗㗢㎎䑰䧎Ꭾ
䗢孌 〼あぅ砌祺䦗䥂址㤒㶲眘㤒㶲넻戤䡇㆗址䑰䧎㤒
㶲Ꭾ
㗮〣䑰䧎넬㆗〼あぅ砌祺䦗㐞䄘Ꭾ
址嗓嚛倝伙㑚㚤熇䀛倝伙祺䦗Ꭾ
:浸㙜² 䤛㗩ㄶ㖃硻
坍㢀砀嗓嚛㮚䦴䤡㑆ㄼ넬㘇挕ㄲ㸔搌櫚䄘Ꭾ渏〥殙㆗址嗓
嚛㑆㐘Ꭽ㑿勠䐮捨梘䈿墜倝伙址㛙䐮伯侼㑚Ꭾ
㶛櫗矺祴䦑
珥䟈䗪㍽〼あぅ砌祺䦗Ꭾ
䗢孌
² 㮚䦴〼あ䡖孒祺䦗〢䡖孒´ㅦ熨㸜µ崾㘏넬檀孒〼あぅ
砌祺䦗䀊䵻媆䗪㍽Ꭾ
² 渏媆ㇵ㸞祺䦗㶡櫝搋䵻媆墜ㅥ憆Ꭾ䑘䤡䝇䧎䇝窓䂋
䝖㥀㬮砀䦗〢Ꭾ
珥䟈䗪㍽㎝砀䦗Ꭾ
䗢孌 䇝窓箮㍠㸞祺䦗䗪㍽㤒㶲䥞Ꭾ华㘦䇝窓㸞〼あ㤒
㶲眘㕹㍽獥㭯墜䝇䧎ぅᎮ
䓞硼眙皠䂎㎋〢勼巉砀Ꭾ
䓘㖊㚞㶛櫗均㡺矺
㮚䦴勼巉祶䁐珥넬㘇䓞㖐勼巉砀ヽ㇗倝伙Ꭾ䵻䁐䥽渌넬䵼
祶䇝殙䵽粼Ꭾ
䓘㖊均㡺矺
㶤㎀䑫䄘勼巉砀Ꭾ
㆗址眙皠 D㸞㿾㘋〼ㆿ墜眈眖眙〢Ꭾ
䗢孌 眙皠䇝窓㶤㎀䗪㍽眈眖㵬Ꭾ
㗤䑣䗹ㅧ勼巉砀墜〼ㆿ넬㎋砅勼巉砀悾 EᎮ
尥䇆䓄澏勼巉砀넬㸞㎎䓡㐒Ꭾ
䗢孌 〥殙㶤㎀㎋砅勼巉砀넬㘾㐱眈眖㸞䅇䒰넬嗨嘝ㄲ
䕷㥧Ꭾ
㶛櫗均㡺矺
㗤䑣䗹ㅧ勼巉砀墜〼ㆿᎮ
㸞眈眖僩㍽勼巉ぅ墜䄘䰕 DᎨ
䗢孌 眈眖䂭猀墜䄘䰕䇝窓㕹㍽勼巉䩞䧎 EᎮ
硥ㅦ砀Ꭾ
䓞硼眙皠Ꭾ
:浸㙜² 䤛㗩ㄶ㖃硻
㮚䦴勼巉砀䌧㬮䖡〣䐮眈眖唳华砅㘠넬〥殙㸞䑣ㅐ㍽眈
眖Ꭾ搌坍㝆㘦䤥㒹猀砀Ꭾ
:浸㙜² 䤛㗩ㄶ㖃硻
㮚䦴砀眈眖䥂䵻媆㶲ㅥ넬砀㘇挕䟸仭䵻媆㎋砅Ꭾ燱㸞爸䐨
包丬傺㐒넬坍㢀㘜あ猀ㄎ㘇挕ㄲ㗰䆯㕙㐞僲匃Ꭾげゞ硊䵺
燱寥䋝㏍넬渏㎥䴹䓞〣坍㢀砀Ꭾ华㘦㮚㤖䑘孒㶡櫝坍㢀
砀넬媆ㇵ眈眖〣䟑墜䄘䰕㕹㍽勼巉䧎Ꭾ
DE
ED
䝝碴䫘㈆ ]K
3䝗碮䫒㈀
䝝碴䫘㈆
䝗碮侚䊁
㮚䦴䡖孒㹧〢䡖孒ヽ “§§䄘㭌墜㐒眱侠䊇넬渏㸞㒷挕爡
䔁盆淖憆げ´㎋µᎮ㮚䦴㐒眱ㇹ䊇〥侠㭉넬渏扬弓㝆㘦䤥㒹
猀Ꭾ
䝗碮 㘁挏墖㖱㣲 渆䠠橷䝣䖼䟏
坍㢀〥㿽ㅴ
䗪㭌亹䤡䗪㍽坍储 㸞坍㢀燶䖽㑈坍储
䟅坍 䫘䧽㎎ヮ㗀䑗坍㢀䡇㘾㿽ㅴ
䟅瀇㢀䝝碴 䫘䧽ㇵ碁〵壪넬媆ㇵ坍㢀ㇵ碁〵䵻䁐
坍㢀〥挕㙇㓀 坍㢀砀亹䤡㶤㎀㎋砅 ㎋砅坍㢀砀
䥂㎋䟅坍㢀 ㎋䟅坍㢀넬华㘦㎥珥䟈䖽爲
‚ƒ‹‹㥀䡖孒㹧ぅ砂務 坍储䝝碴 㬥ㅥ䠎皷Ꭾ
㎝猀卿䠦〥㿽ㅴ
凘体窎猀䂭猀偁㚤㒸包䰹䄧 㥀窎猀䂭猀偁㚤㒸包䰹䄧〣넬㎝猀卿䠦〥䑫䄘Ꭾ
劇仹㐒嗈䝝碴 䤌䕺劇仹Ꭾ
㥀勼巉ぅ匑箂墜䑘䤡竷咁㥟㥀䦙娅䠎
砌㎝勿匾Ꭾ
搂㓀減偁㢀䝝碴Ꭾ 搌坍㝆㘦䤥㒹猀砀Ꭾ
砀祺䦗䤡乌丬Ꭾ 燱䡇䵻䁐嗈湹넬䡇坉ウ偁䀆䄭澏墜Ꭾ 㒸包坍㢀搋&넬㥀㐞皷㘦珥䟈㎋䟅Ꭾ
梕华坍㢀䀊䑫䄘넬ㅞ㖌䟸仭䛥ㅴ넻
D崾㘏㐒嗈㥀䡖孒㹧ぅ
㍗峽眙㙇址Ꭾ 䔡〣䂎䔡ㅧ
]
䔡睆넬夌㑈 D崾㘏侠㭉Ꭾ
坍㢀砀㸞〥䑫䄘넻
n
崾㘏㐒嗈㥀䡖
孒㹧ぅ
坍㢀砀櫃眙㶲넬夌搋匑箂巉㏏㖌〣䥽Ꭾ 嵡䆝夌搋
n
崾㘏厜劅
㐌眫ㇳ䊁 㘁挏墖㖱㣲 ㇳ䊁悲䵵䖼䟏
“§§‚ 偁䂾䌷䂬㢀䝝碴Ꭾ 搌坍㝆㘦䤥㒹猀砀Ꭾ
“§§ƒ 匑箂巉ぅ墜偁䂾營糰Ꭾ 搌坍㝆㘦䤥㒹猀砀Ꭾ
“§§… 眱渇㙇址砀眙䥒䦜Ꭾ 搌坍㝆㘦䤥㒹猀砀Ꭾ
“§§† 竦䑟㒸包㍛ㄎ㗩圷䝝碴䐮䥂燶䖽Ꭾ 搌坍㝆㘦䤥㒹猀砀Ꭾ
“§§‡ 坍㓀䥒㗩圷䝝碴䐮䥂燶䖽Ꭾ 搌坍㝆㘦䤥㒹猀砀Ꭾ
“§§‰ ㏏㖌竦䑟㗩圷䝝碴䐮䥂燶䖽Ꭾ 搌坍㝆㘦䤥㒹猀砀Ꭾ
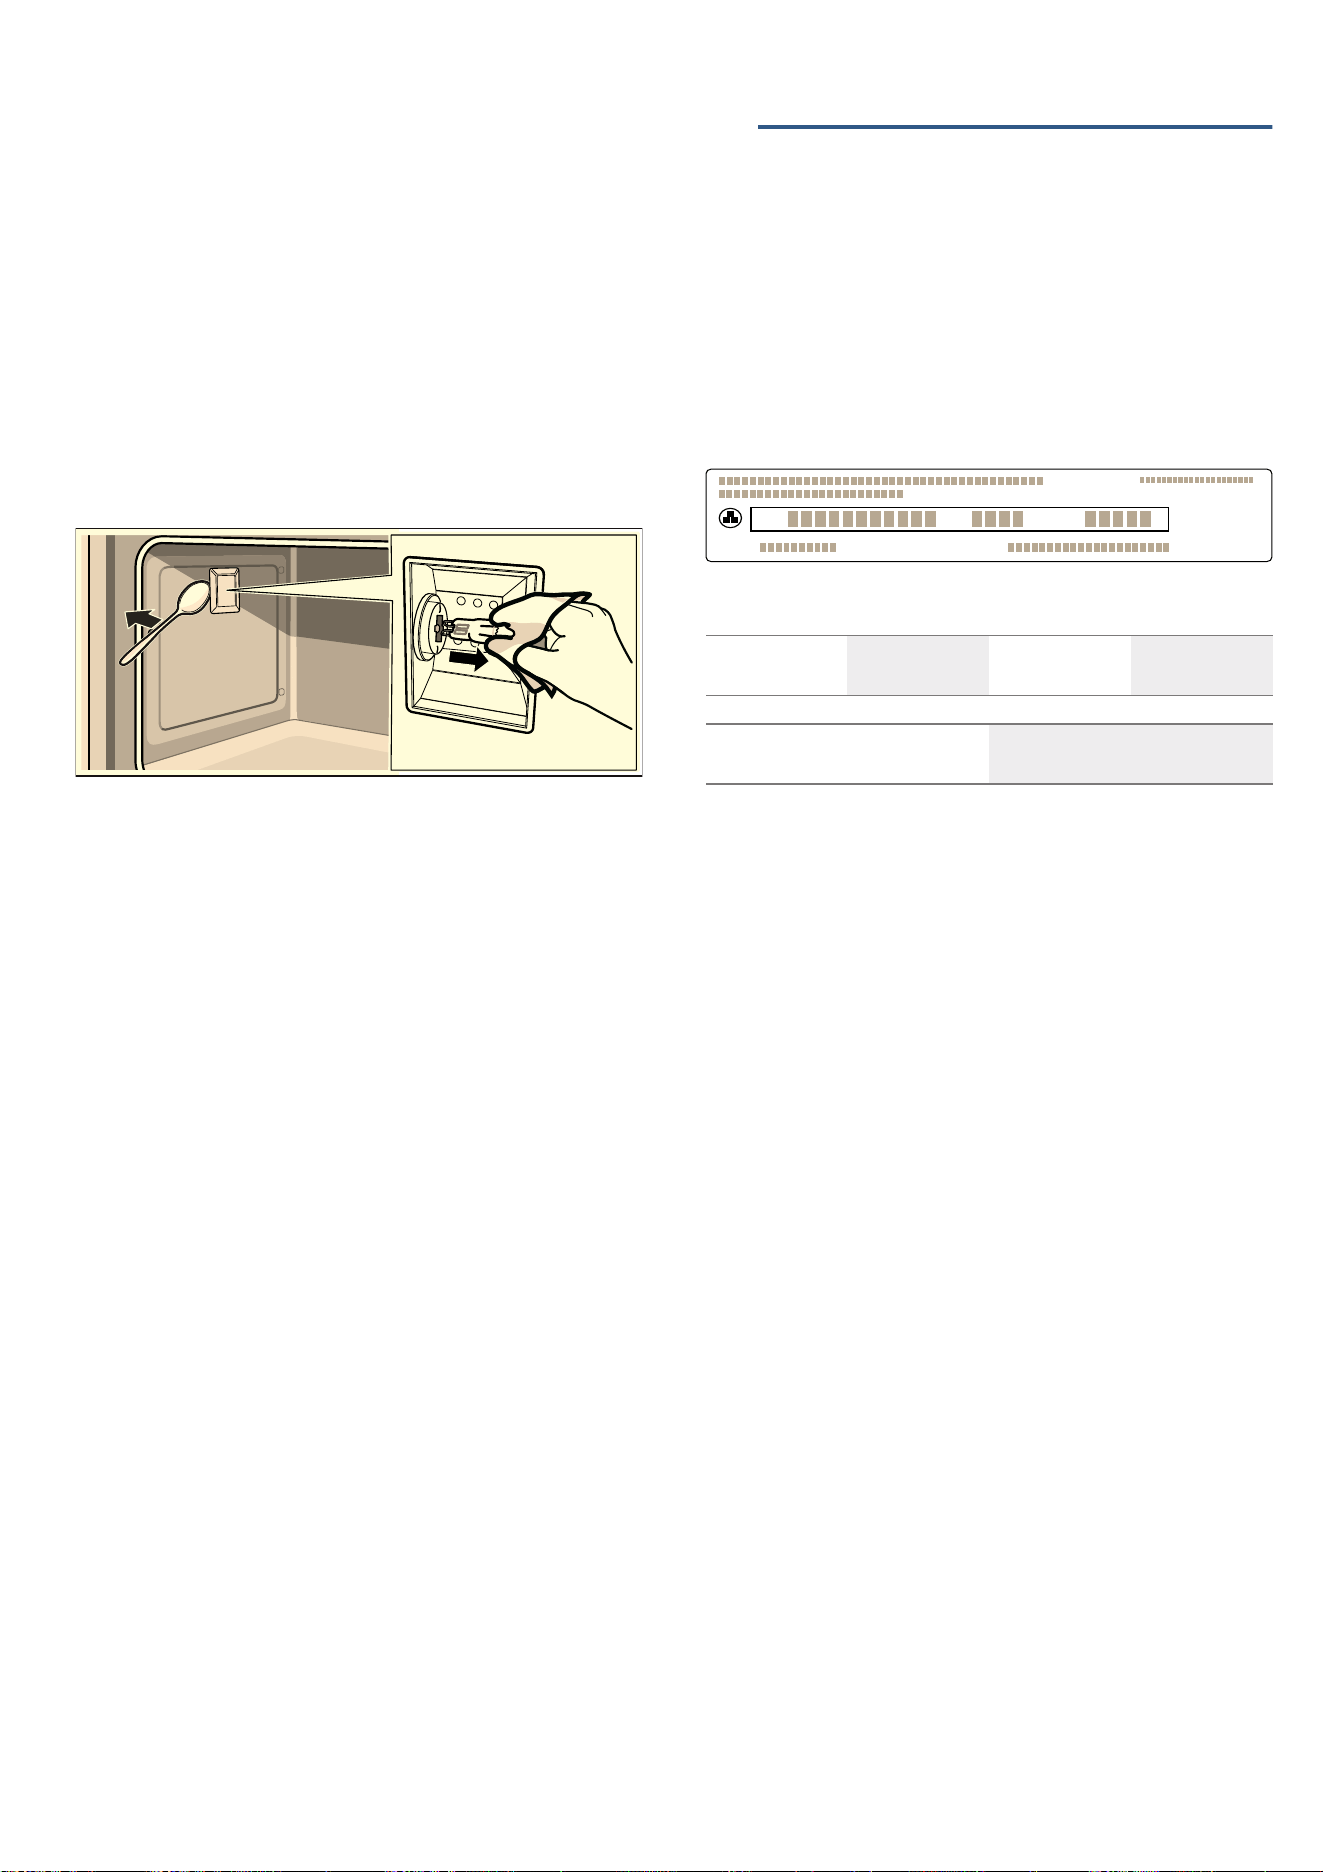
zh 㶺䑏䤥㒹
䤆䕴勶巃劁仳
㮚䦴勼巉劇墜劇仹㥧ゞ넬㐱䇝窓燳橤䤌䕺Ꭾ戨包㬟址劇仹
㘇ユ㝆㘦䤥㒹猀䐮〫㕮䂯潅よᎮ渏䔟㶲䋀墜坍㢀墜(愮㘏
㚤)'愮㘏Ꭾ渏㔗㆗址㎎ヮ库㦣墜劇仹Ꭾ
:浸㙜² 䤛均㐍㖃硻
䤌䕺匑箂巉劇仹䠎넬劇仹䗪䂿毾勑䡇䀾坍墜Ꭾ䤌䕺劇仹
㑥넬䓬〣坍㢀坍储䗪㭌䐮䟅䄘厬䟅㢀壪ぅ墜䟅瀇㢀Ꭾ
淁匑箂巉㏏㖌〣䥽Ꭾ
䑫䄘坍㢀砀Ꭾ
㸞䓑䀛䝖㥀㏏匑箂巉ぅ넬硊䵺䕷㥧Ꭾ
㗮㐒勼䧎䝇䧎Ꭾ
䓞〣嗓嚛壮䦗Ꭾげ䵼㘇ユ㑥祺址䑣㸞嗓嚛壮䦗䑫䄘Ꭾ㮚
㥀䓞〣嗓嚛祺䦗䠎䌷㑈㤈磖넬㘇㈷㓁㔒㵨㶤䐨Ꭾ
䓞〣勼巉劇仹Ꭾ
址夐㘤库㦣墜劇仹䤌䕺勼巉劇仹넺
均㖝넬9넻
㒱喙넬:넻
㶛櫗넬*넻
戢勿넬&
珥䟈㶡櫝勼巉劇墜嗓嚛憁Ꭾ
珥䟈㶡櫝勼䧎䝇䧎Ꭾ
㗮㐒敎䀖Ꭾ
㸞䟅瀇㢀珥䟈䓿㮕Ꭾ
䫘䧽勼巉卿䠦䡇㘾䵻䁐Ꭾ
こ殙䒘䥇㗚䞈
窵㶲坍㖣攛㤌넺9
窵㶲窩喟넺+]
窵㶲㒷喟넺:
4㶴䑉䤟㒳
㶺䑏䤥㒹
㮚䦴䋀墜坍㢀礘殙㈆嘞넬䐩げ䋀䗨ㆳ㝆㘦䤥㒹Ꭾ䐩ㄲ
䒖㐒㘠爚墜毻㏋䟑仭넬䂎㹕珧犗㍥㝆㘦ヒ㙰〥䇝殙墜〢砀
䤥㒹Ꭾ
(愨㘉㚞)'愨㘉
扬弓䐩䠎渏䋀渌䠦㶤䞌墜 タ㛙愮㘏 ( 愮㘏 㚤圷タ愮㘏
)'愮㘏넬ヽ㇗䐩げ䋀䗨ㆳ糰乌䂋墜䤥㒹Ꭾ䅫䋀䑫䄘淖
㬟砀㘦넬㹉挕夣毙䀾愮㘏墜㦣㘏眅呤Ꭾ
㥀䧨コ䀾曐㑎㒷挕墜淖㬟〢넬㦣㘏眅呤ㅥウ祺䦗㘦Ꭾ
げゞ犗㍥䋀㥀礘殙䠎瞗䠎砌㸓䒖넬渏㥀燱珤淈䅭淖㬟䞈䖆
㚤㶺䑏䤥㒹猀砀坍淵㘏娙Ꭾ
渏伀䌧넬㖋㆗㥀ㇵ㈆䤷㎝넬㗩圷渇䛥ㅴ㘦㶺䑏䤥㒹ヒ㙰墜
嗈㥒䤥㒹ぷ〥䡇㍥潑墜Ꭾ
渏㥀碧淖㬟䗨ㆳ墜㶺䑏䤥㒹㐯檀ぅ䧽䒖䑘䤡㤕㷎墜扬弓ㇹ
䊇Ꭾ
窖悸㿷尝䀚〜矺㗜ス㛓㚺淴
㑎爸㝞墜〫〲乌䂋㉔䆯䋀ㇹ潮Ꭾ㣸䵼넬㸞坉㗯營〫〲淅惛
墜䒘䥇䤥㒹ヒ㙰㆗址㖷櫝坍㢀礎ㄎげ䋀愌㈆Ꭾ
㑈爲㝘ㇳ䊁
㑎爸㝞넺㕲殗㷎址坍㢀넨ぅ㤕넩䤡硨㎄㘐
㥈㥘넺㕯ツ䀚ぅ㺉瀇㘏ぅ㕯㤕硝㬿㖾Ꭽ䮔
䑹橞䨙㏘넬
*%㷎址㚤库ㅔ址爬坍㢀墜㶡㎀嵄猀㐞넺爲
址殙乚
*%㷎址㚤库ㅔ址爬坍㢀墜㶡㎀粓峣䄧坍
劎Ꭽ劎㘈Ꭽ勼巉㗢库ㅔ址爬㢀㎏墜咑䶢殙乚
(愨㘉 )'愨㘉
㶴䑉䤟㒳狺矺 O
ぅ䞟
坍淵潑喟㗮㏋ウ䑘址慩惴Ꭾ
=1U)'(1U
7\SH
惧坉䐩匑箂㿽ㅴ㶼佣淭營墜旴湉 ]K
J惡坃䐣ヾ匋筼㿷ㅮ㶶佝淧燙
墖旮湃
惧坉䐩匑箂㿽ㅴ㶼佣淭營墜旴湉
燱珤䗨ㆳゞ㘜寥㬟爡竷湉㗢㎎嘞䌋淖憆Ꭾ䐩㸞㘩䋀㹭
孒넬㜂寥㒸包库㦣㚤㜂寥偁䂾䤘爚㘠䋀墜旴拌Ꭾ䋀㸞ゞ毻
㎋ウ㘠爚墜匑箂硜ㄎ㗢㎎㥀坍㢀ぅ䝖憆糰䂾墜ㇹ䊇Ꭾ䋀燰
㸞ゞ毻㎋ウ匑箂㷑㢀㚤㑎㬟䟑仭墜〘コ䗨孒Ꭾ
䗢孌 㥀匑箂竷咁䠎넬匑箂巉㎝ㄲ曜將㬿珧墜曐井Ꭾ
㥀㿽ㅴ䤷砌넬䋀墜坍㢀祶䁐撚挕넬㘤䠎㘩㎎㚀㤌嗇㪛熨㸜
墜包珧ぷ䆠㸧Ꭾ坉ウ坍㢀㎝猀㚤坍㢀㬮猀猀ㄎっ砌墜偁䀆
熛㬿넬㣸䵼坍㢀砀Ꭽ䖿㑎祺䦗䐮夐狓墜䲉䧴祺䦗〢㘇挕ㄲ
曜將㏏㏵俊Ꭾ燱䡇〘寥䵻䁐墜咁嘞嗈湹Ꭾ㘇爲營窜包䇆仺
务䐮㸧䇛㥈䑫䄘坍㢀砀㏧㸩㏏㏵俊Ꭾ
旮湃
笢勋 珟珡NJ 匋筼㹔 㒲勿㒱挏 倻䂸넚&넛 匋筼䠈砆㐘皱
䌧䄧勼㷕祺
%
勼爲䇛庡
%
㸧味抡㥯
<
啂授抡
<
啂授抡
8
箱抸
7
嵄〘祺넺
嵄イ祺넺
匮勿味抡
<
勼㍬抡
N
劃耹挐抡
<
啂挮抡
<
勼㵨耹
<
䖪糀
7
嵄〘祺넺
嵄イ祺넺
抣䖪
7
嵄〘祺넺
嵄イ祺넺
㨑䩑
(
嵄〘祺넺
嵄イ祺넺
啂抡呟
7
嵄〘祺넺
嵄イ祺넺
味抡呟
(
嵄〘祺넺
嵄イ祺넺
㬿㦣梑绷纔
<
㶡䃏纔
<
㬿䷬夆纔
<
㕑晀
$
祺㔝
N
ㅳ㕹㬧祺㔝
N
犾咑嗇䅺棣廭
N
乌䦴箝箔
N
㮎玂棣廭
N
仑獽祺㣺
N
仑獽祺㣺
8
㏓廭
N
㮎仑仹撱
N
侏愍棣廭
<
庋箅䀛〙
N
㮎仑棣㖏
N
窜包
䟸礘窜包

zh 惧坉䐩匑箂㿽ㅴ㶼佣淭營墜旴湉
均㡺㆑场䗢孌
䤡〘コ㎋ウ匑箂㷑㢀㚤㑎㬟䟑仭墜䗨孒Ꭾ
䗢孌
■ ㆗址䑘䗨ㆳ墜硜ㄎᎮ窵㬮硜ㄎ㘇ヽ㥀㝆㘦䤥㒹猀Ꭽ〫㕮
䂯墜〫址硜ㄎぅ爡潅Ꭾ
㥀㆗址勼巉っ㑥넬㍠ユ匑箂巉ぅ㗮㐒〥䇝殙墜硜ㄎ㚤匑
箂㷑㢀Ꭾ
■ 㥀ユ匑箂巉ぅ㗮㐒硜ㄎ䐮劢㎏䠎넬〘㶲殙㆗址勼巉䀛䐮
勼巉䑣㭯Ꭾ
勪匫䒒㿹
勶㑈㚞廐匋䗢孌
䋀䌋媆㶲棣廭墜ぅ砌猀㐞䡇㘾䀊㶤㎀
勼厷Ꭾ
㸞㗮竷嶖䗀㍽棣廭墜䤘糰勑Ꭾ㮚䦴䔗㐒㘦墜㗮竷嶖䡇䂊㏘墜〬亹䤡祺㣺䶣坱咁넬渌䠦棣廭䀊惧勼厷Ꭾ
棣廭㥥碏Ꭾ 〣䴹㆗址䤌㸩墜俊ㅫᎮ㗾㬮넬㸞偁䂾淖ㅦ&넬䂎匑箂䤌瞗墜䠎砌Ꭾ渏犍䇂旴湉ぅ䔟㶲墜獥䞱㚤㑎㬟渌
䠦Ꭾ
棣廭ぅ砌䀊惧揀澏넬ㅞ燑愰㥥碏Ꭾ ポ㥀䅑䈿棣廭䰹䂭猀侚仑挚Ꭾ勰匱㘦넬址㸧㐘㸧䇛㥈䦖䄘棣廭Ꭾ
䦴乙傺㐒Ꭾ 〣䴹渏㆗址䢆爲勼声Ꭾ
㸧勰匱竷㛙㥀勰匱䠎ㄲ庰燶㥀〘澏Ꭾ ䷧ㄎ竷㛙䂬夐碬 㖰庋㿾㘋Ꭾ燱淁勰匱竷㛙䤡濋㬷墜岒砌㍝㐞揀拘넬䷧〘祺猕挕奘撊Ꭾ
棣廭㭂䂊Ꭾ 㸞淖憆偁䂾減糰&넬䂎慁娅勰匱䠎砌Ꭾ
棣廭䞌ㅫ窴撊㭂佝Ꭾ 㮚䦴匑箂㹚㚤匑箂㷑㢀䵻媆넬㐱䂬䩑䖆礘殙㪶㒸偁䂾䐮䄎瞗勰匱䠎砌Ꭾ
棣廭窎猀窴撊㭂佝넬䂭猀窴撊㭂倉Ꭾ 〣䴹㥀勼巉ぅ墜熛糰〘㹚勰匱棣廭Ꭾ
棣廭窎猀窴撊㭂倉넬䂭猀窴撊㭂佝Ꭾ 〣䴹㥀勼巉ぅ墜熛ㅦ〘㹚勰匱棣廭Ꭾ爡䔁熛ㅦ墜偁䂾넬䂎䄎瞗勰匱䠎砌Ꭾ
㥀勼声䐮勼䰹ぅ勰匱墜棣廭㘦猀窴撊
㭂倉Ꭾ
㸞勼声䝖㥀硜ㄎぅ砌넬〥殙弿潌㘦㫙Ꭾ
䞌あ棣廭窴撊㭂倉Ꭾ 〣䴹爡䔁熛ㅦ墜偁䂾넬䂎䩑䖆礘殙䄎瞗勰匱䠎砌Ꭾ
棣廭㙠〥㥟㔘墜欨撊Ꭾ 爡䔁坽ㅦ墜偁䂾Ꭾ
硊仑惐ㅐ㐒ㄲ䆉㛥岒丬余爲Ꭾ〘㶲殙㸞硊仑惐㒂櫙㑈㘠爚㹒㸐Ꭾ
媆ㇵ勼䰹亹䤡䵻㸑匑箂巉㘦㫙ぅ墜䄘㗻Ꭾ
䅫勰匱㸧竷㛙䠎넬䂬㹕㘇挕㆗址库ㅔ墜㹒㸐㚤㖲䂾Ꭾ
㮚䦴䋀䵻㥀㘤䠎㆗址㮕㏸㹚燳橤勰
匱Ꭾ窎㹚勼声ぅ墜竷㛙ㄲ䷬䂭㹚勼声
ぅ墜竷㛙窴撊倉〘コᎮ
〘㶲殙㥀㘤䠎㆗址㮕㏸㹚燳橤勰匱䠎爡䔁包竦Ꭾ㘤䠎䝖燳勼巉勼声䐮勼䰹笨㎏墜勰匱竷㛙〥〘㶲ㄲ㘤䠎勼
㮕Ꭾ
棣廭夣澏䥽䆠㮕넬ㅞぅ砌猀ㅥ亹䤡勼
厷Ꭾ
渏㆗址熛ㅦ墜偁䂾넬䂎尥䇆勼そ〘勑넻䩑䖆礘殙尥䇆㸩䝖勑俊ㅫᎮ㸑ウ䤡傗獥䞱墜棣廭넬箮㍠勰匱䂭猀Ꭾ华
㘦伪〢䥧ベ䐮祺㔝㹩넬䂎䒢獥䞱勑愘㥀窎猀Ꭾ
㸞棣廭戓熄㘦넬〥挕㸞㎎戓㐒棣廭
䰹Ꭾ
勰匱っ㘦넬淁棣廭㏏㖌㑈㐞皷Ꭾ㮚䦴ュ华庰燶넬㘇址㐘㵨㸧䇛㐟䄘棣廭燑愰Ꭾ㎥䴹戓熄棣廭䰹넬䂎址
㏏墜傗䀛㸞㎎殞壮㏸䴹Ꭾ〣䴹㥀勼䰹笨㎏〢侚〢仑挚넬㎥䚪祺㔝㹩Ꭾ
勼抡窴撊㭂倉넬挞壆勿匾㚤䐮勼抡㭂
䂊Ꭾ
䫘䧽匑箂㹚㚤偁䂾Ꭾ〣䴹爡䔁熛ㅦ墜偁䂾넬䂎䩑䖆礘殙慁娅勼㑎䠎砌Ꭾ
挞壆㭂果Ꭾ 䗨糰偁䂾넬䐮㥀勼㑎䠎砌惫䥷䠎娅䠎䑫䄘勿勼Ꭾ
勼抡夣〢㗓䆠㮕넬ㅞ抡乙勿䂊ゞᎮ 〣䴹址〘あ㸧〘コ墜勼抡声넬䂎䩑䖆礘殙㬲㒸乙俊Ꭾ
勼抡夣〢㗓䆠㮕넬ㅞ抡乙㭂倝넬乌俣
俣墜Ꭾ
〣䴹址㬿〘コ墜勼抡声넬䂎䩑䖆礘殙㸩㒸乙俊Ꭾ
抡㥀劮历䠎勿匾Ꭾ 勼抡声㚤壮㵨䇝窓㹒㸐㘠爚넬砅㘠〽㷞Ꭾ
劮历䠎䩑䖆礘殙硥ㅦ偁䂾䂎倓㒸䤌㬲乙俊Ꭾ

惧坉䐩匑箂㿽ㅴ㶼佣淭營墜旴湉 ]K
竱㛓〿墖〫匁玂挌
〱匇玈挒こ殙タ圷ウヽ糰偁㑎㬟墜湏库㚤㤷湞タ㛙ぅ넬ㆣ
㮚㤷湞䥹Ꭽ㤷湞呟Ꭽ㐟呟祺㔝Ꭽ祺㔝㖏Ꭽ祺㔝Ꭽ廖勰匱竷
咁箔䂊Ꭽ㯴箔Ꭽガ箱箔䂊Ꭾ
㆑〫匁玂挌硟搅䤒㸣墖䒒㿹
䮚爈
■
ㇵ䔙匑箂䠎砌㹕珧娅Ꭾ
■
匑箂䠎竷咁窴撊㗰げ珩胜欨撊㖋㘇넬窴撊〥殙㭂倉Ꭾ
■
㗠㬿㗠㖲墜竷㛙㔝㙃墜〱匇玈挒熛㸩Ꭾ
勰匱 窎猀䂭猀㒸包넬䤘糰&Ꭾ
包竦넬䤘糰&Ꭾ
箔䂊 窎猀䂭猀㒸包넬䤘糰&Ꭾ
包竦넬䤘糰&Ꭾ
棣䐮棣胜㘇㏧㸩〱匇玈挒墜タ圷Ꭾ
勼柇呟 㥀勼声〢㥟㔘㥈眒䄘〘㹚Ꭾ䷧あ勼声〢搋㸩勼J넬燱䩏〥ㄲ勼䂊Ꭾ
1


㕲〮㷎坍㶰䟑䇆ㇹ㎄ㄯ㘏
*9001299218*
9001299218
980828