
created by: Impala Services Ltd.Page size: 139.7 x 107.95 mm
B072PZLZ25
Notebook Lift Stand
Support Pour Notebook
Höhenverstellbarer Notebook-Standfuß
Supporto Sollevabile per Notebook
Soporte Para Portátil
ノートブックリフトスタンド
笔记本电脑增高托架
B072PZLZ25-AmazonBasics-Laptop Lift Stand-IM-V03 (EU).indb 1 8/23/17 4:57 PM
English ..................................... 3
Français ................................. 16
Deutsch .................................. 29
Italiano ................................... 42
Español .................................. 55
日本語 ..................................... 68
中文 ........................................ 81
B072PZLZ25-AmazonBasics-Laptop Lift Stand-IM-V03 (EU).indb 2 8/23/17 4:57 PM
3
Welcome Guide
•
English
Notebook Lift Stand
Contents:
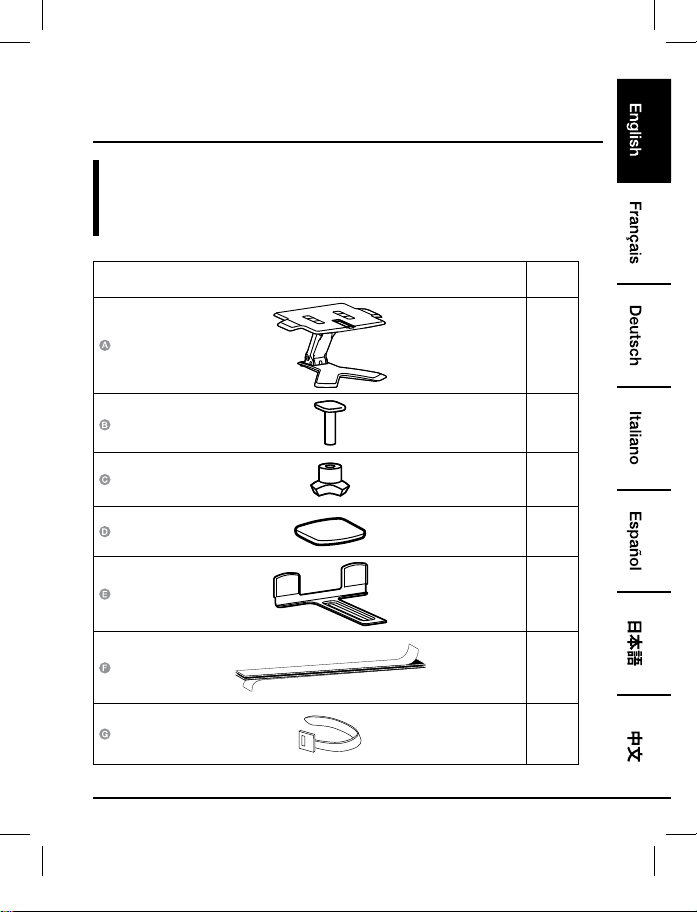
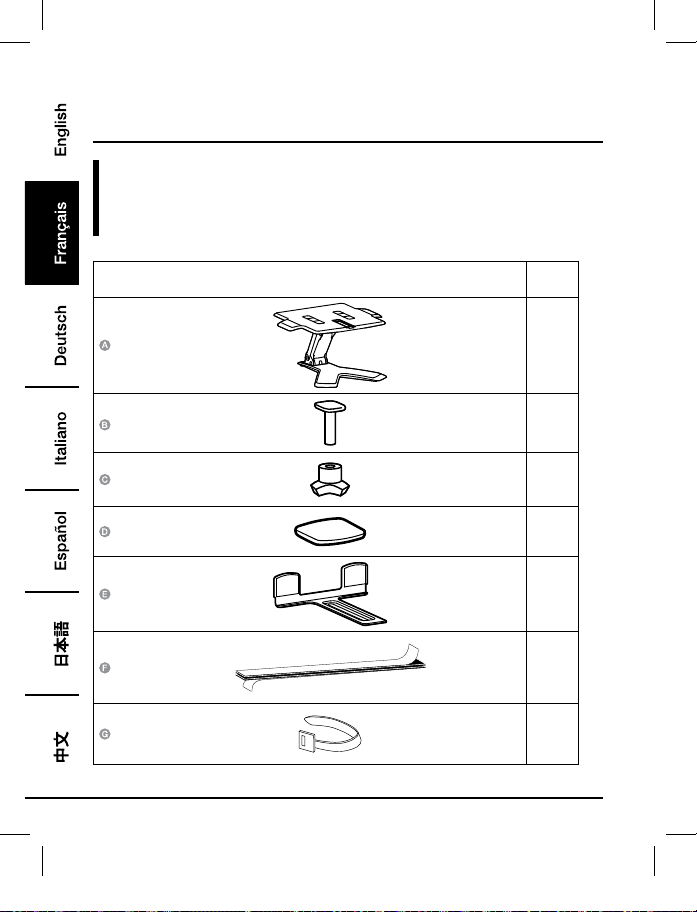
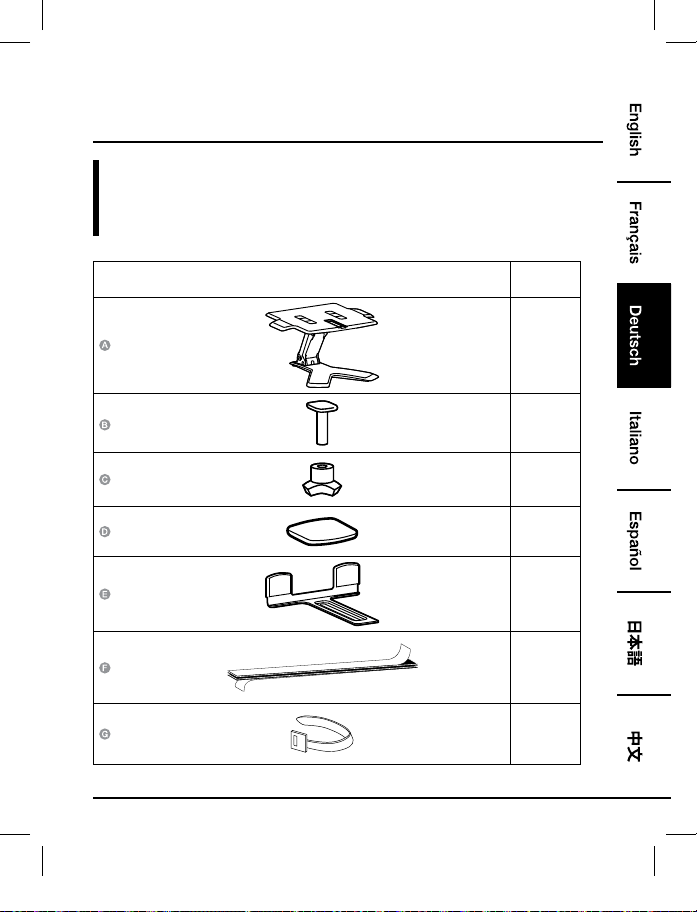
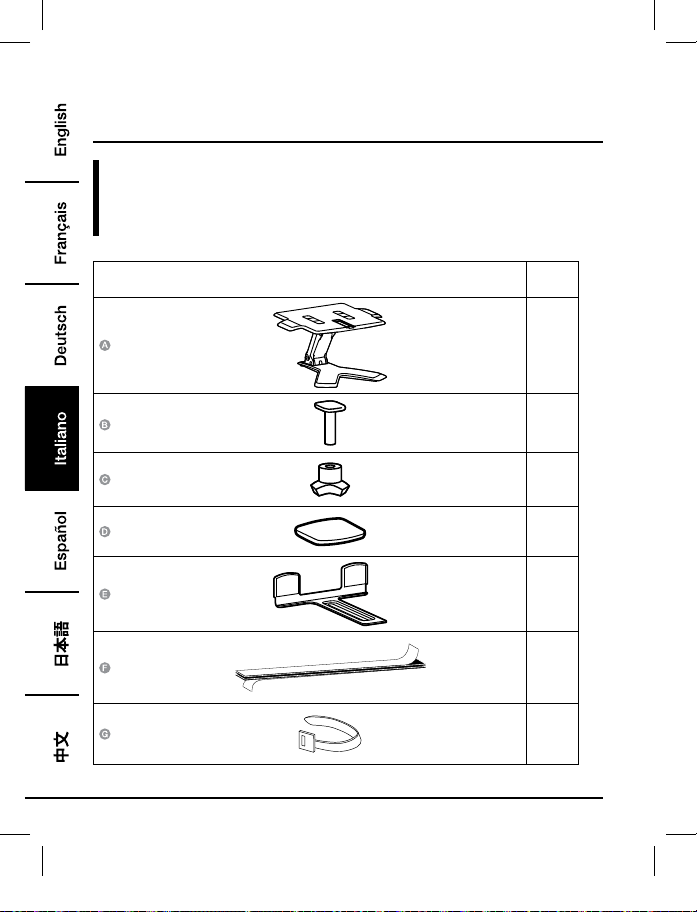
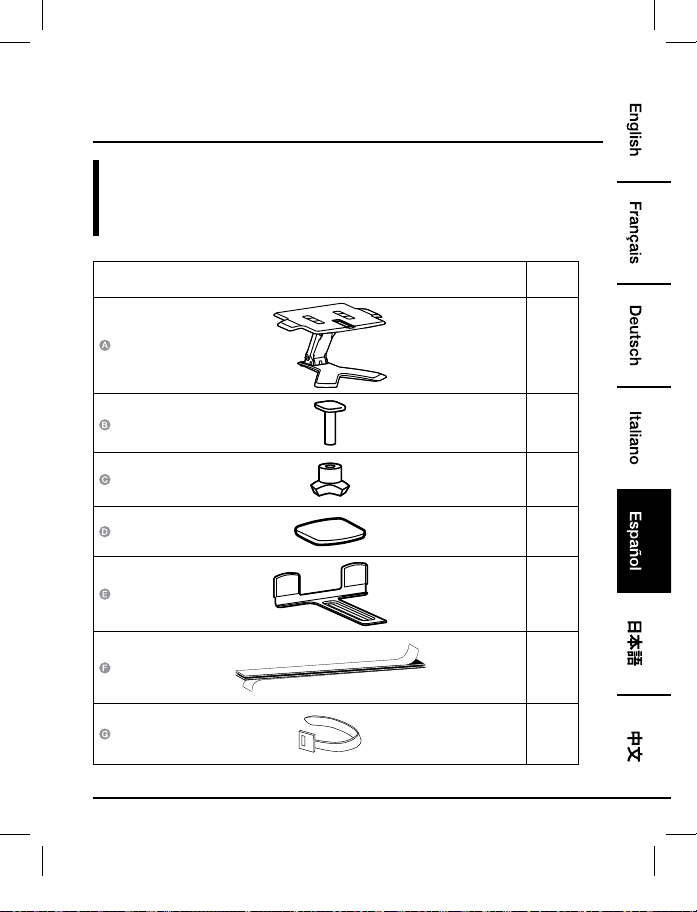
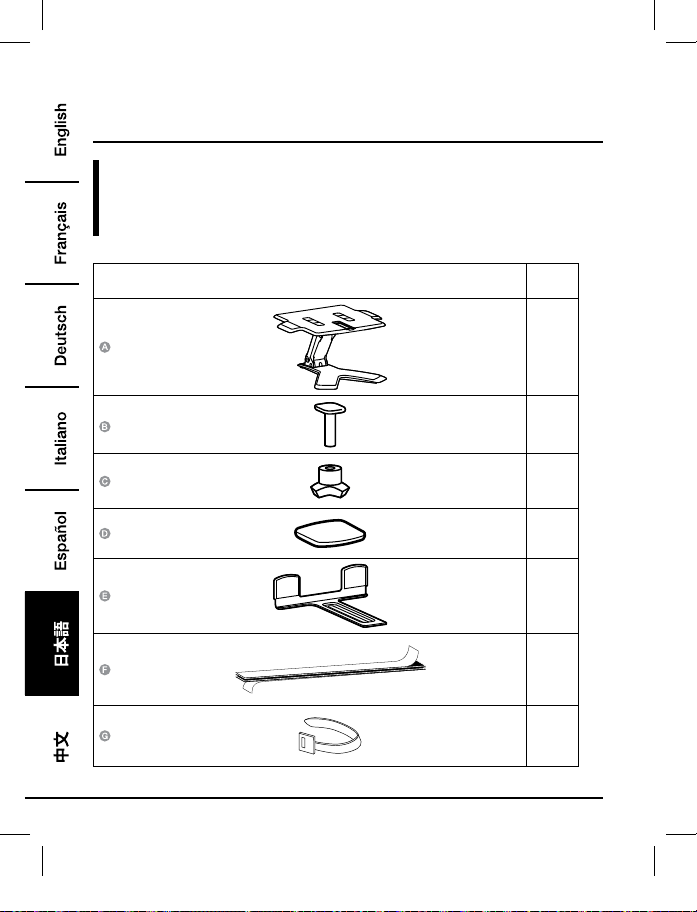
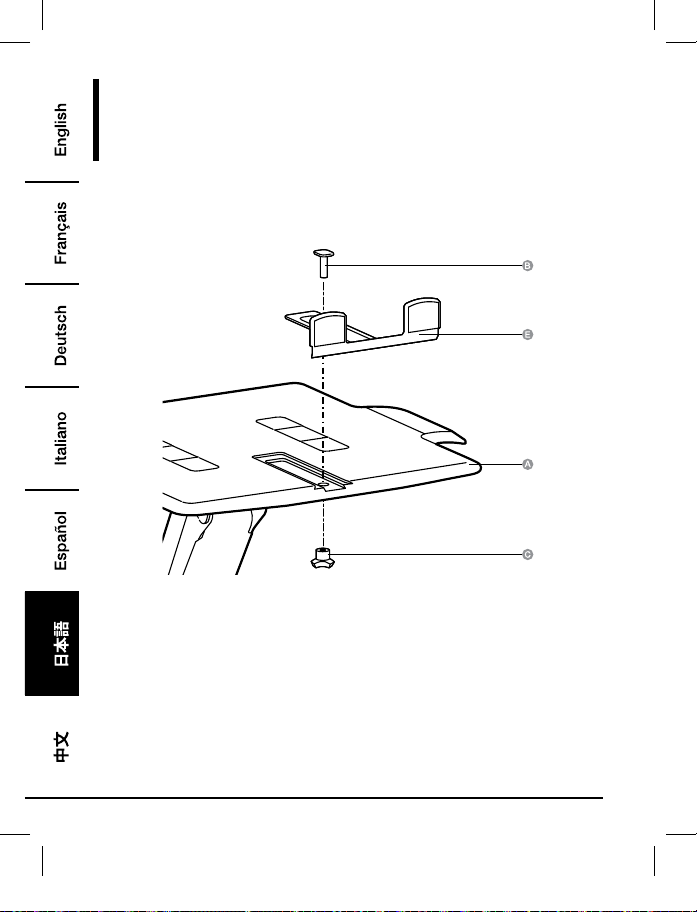
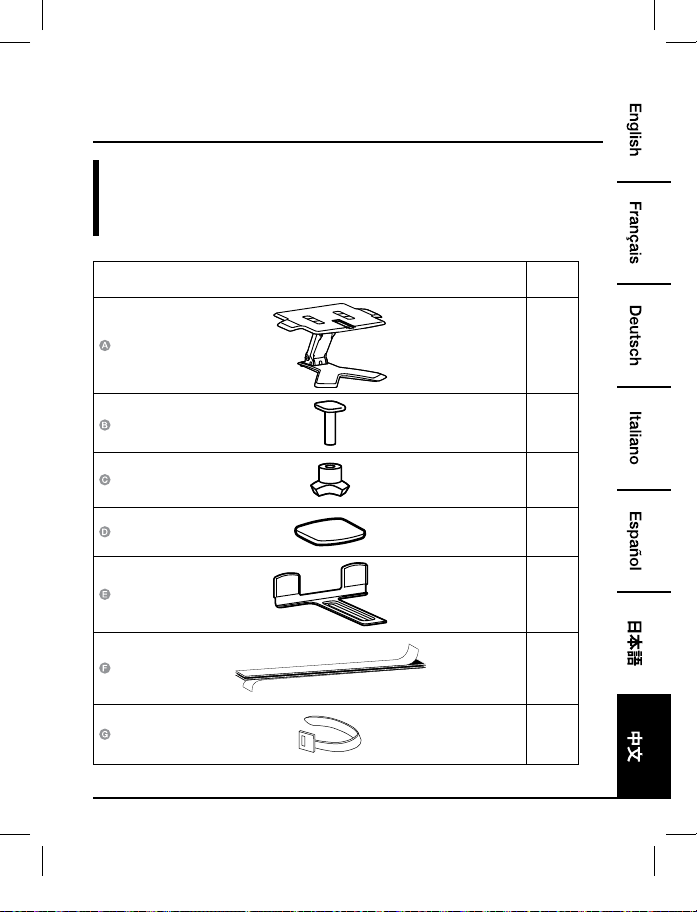
Before getting started, ensure the package contains the following components:
Part Qty
1
1
1
4
1
1
2
B072PZLZ25-AmazonBasics-Laptop Lift Stand-IM-V03 (EU).indb 3 8/23/17 4:57 PM
4
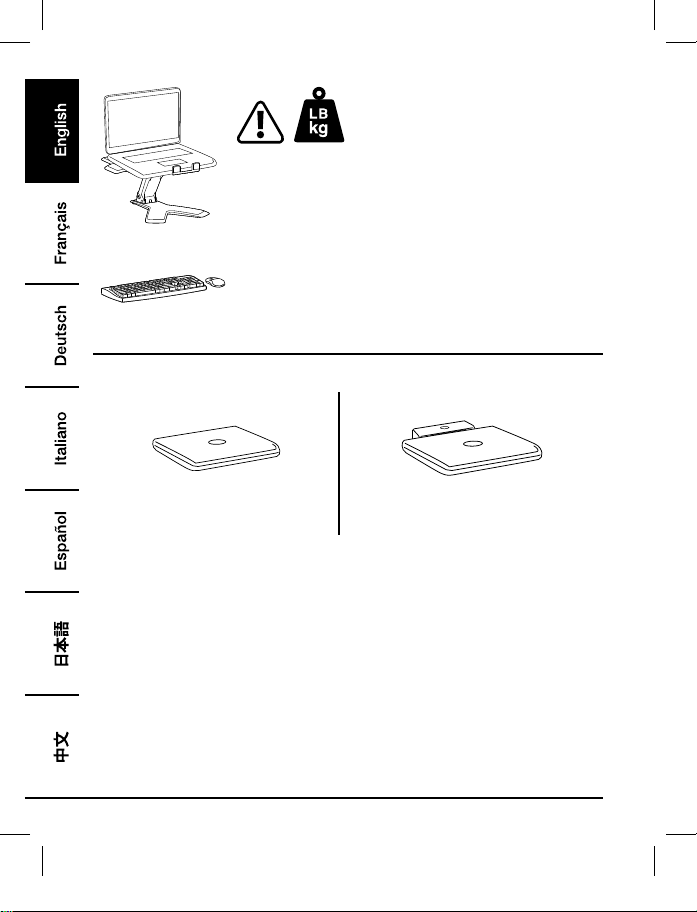
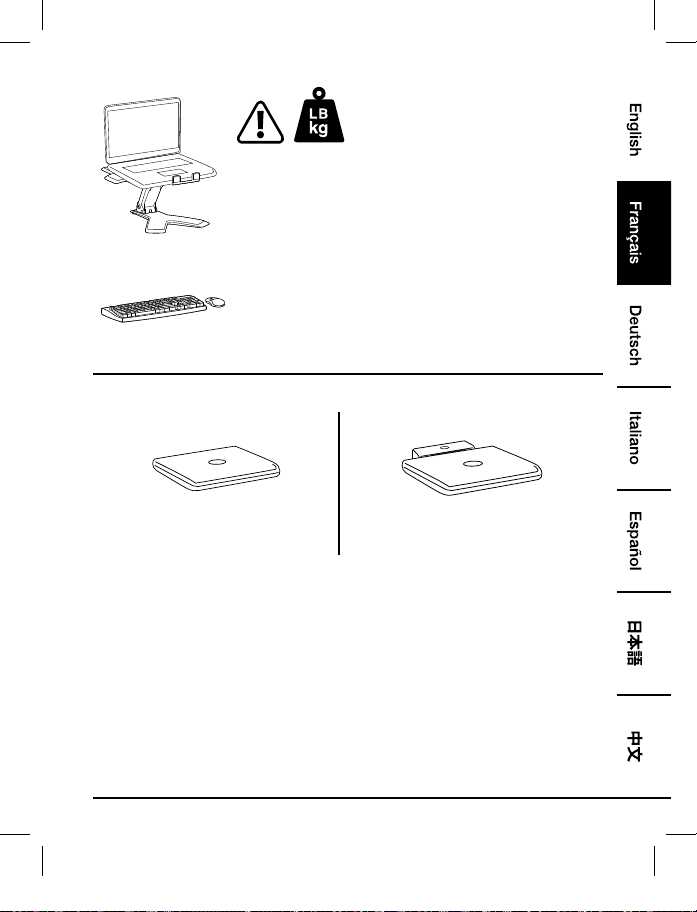
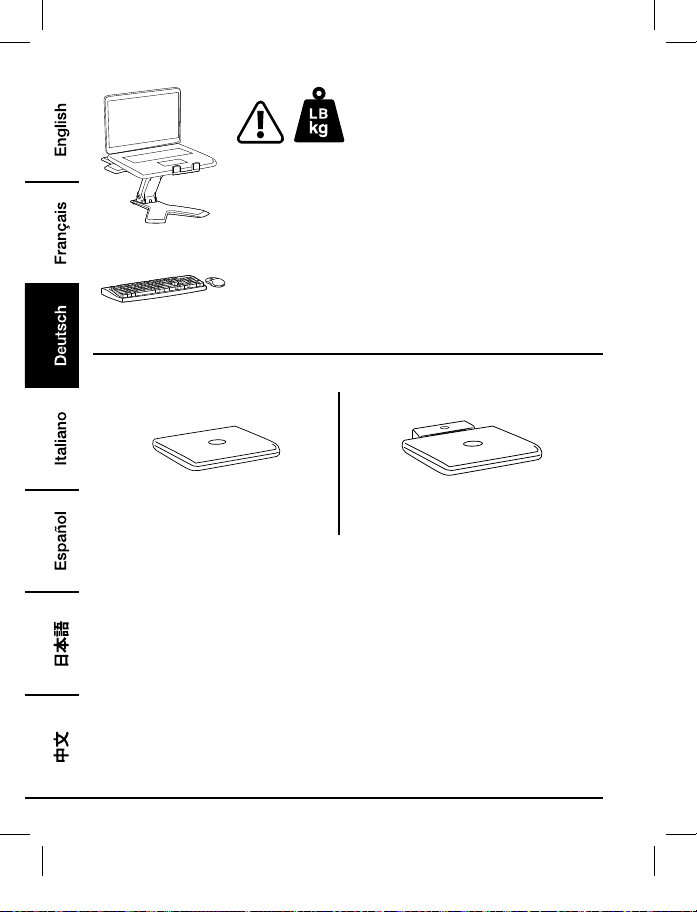
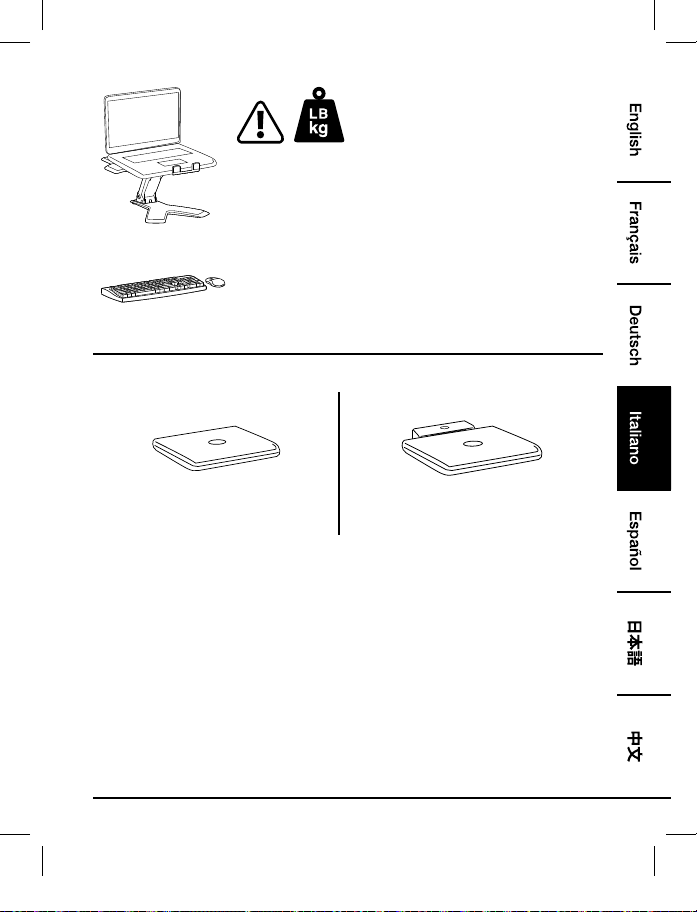
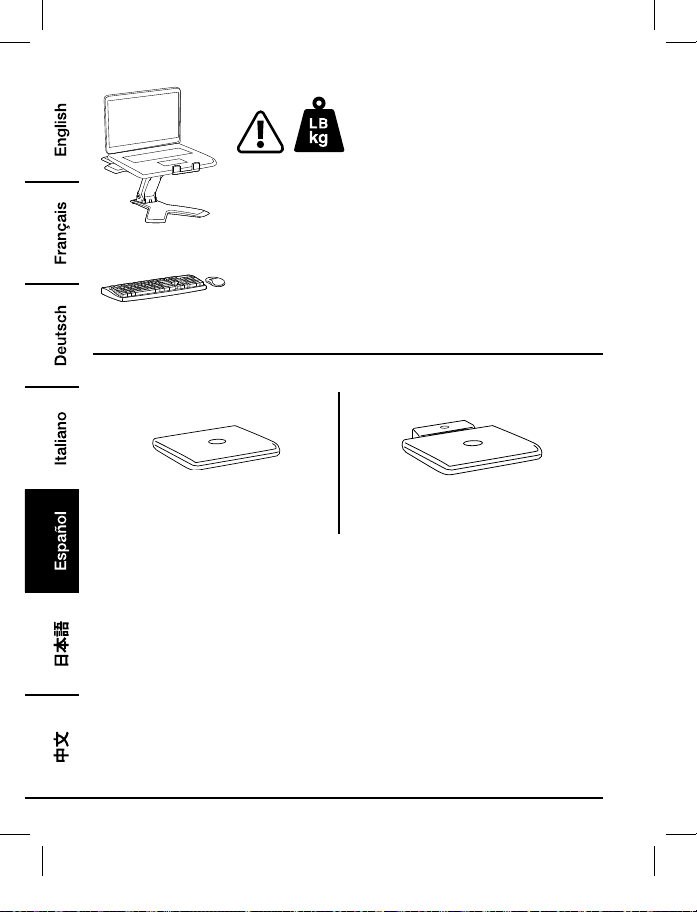
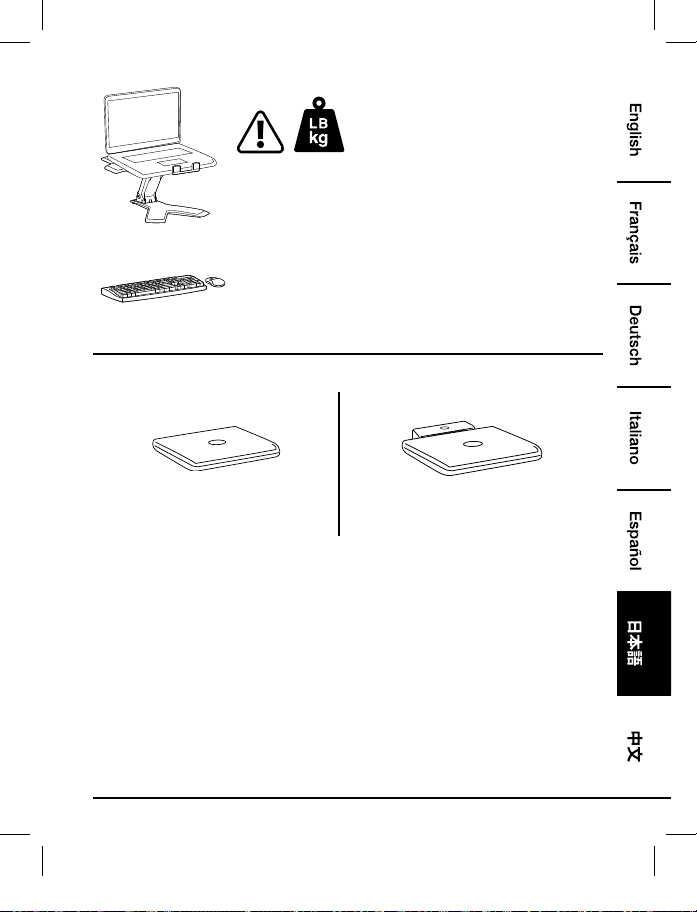
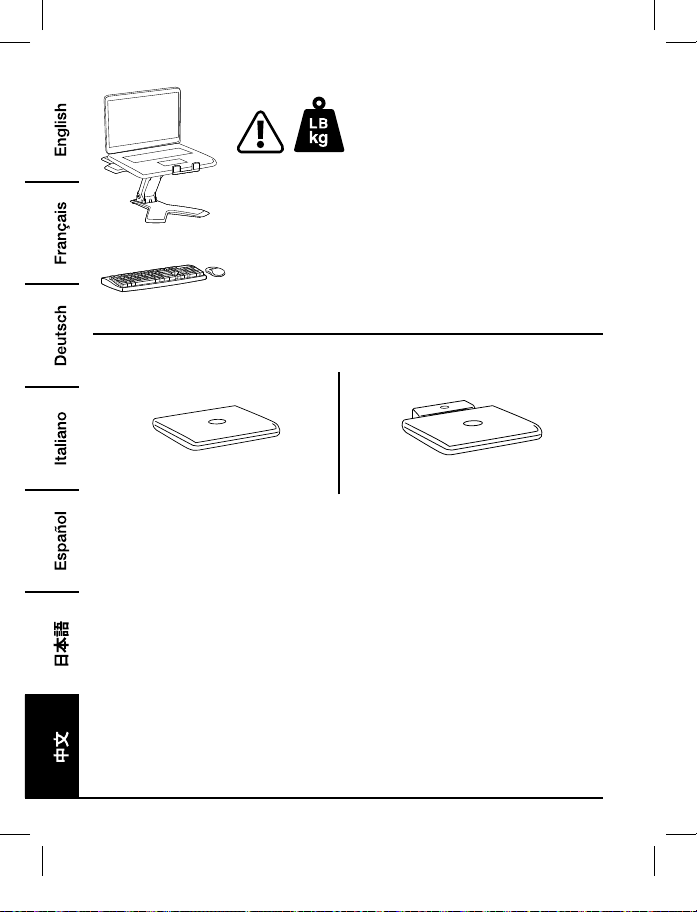
2 - 11 lbs. (0.9 - 5 kg)
CAUTION: DO NOT EXCEED MAXIMUM LISTED WEIGHT
CAPACITY. SERIOUS INJURY OR PROPERTY DAMAGE MAY
OCCUR!
NOTE: This product is meant to be used with an independent
keyboard and mouse (purchased separately). Use of the laptop
keyboard is not recommended.
3
4
Notebook Only
Notebook with Docking Station or Port
Replicator
B072PZLZ25-AmazonBasics-Laptop Lift Stand-IM-V03 (EU).indb 4 8/23/17 4:57 PM
5
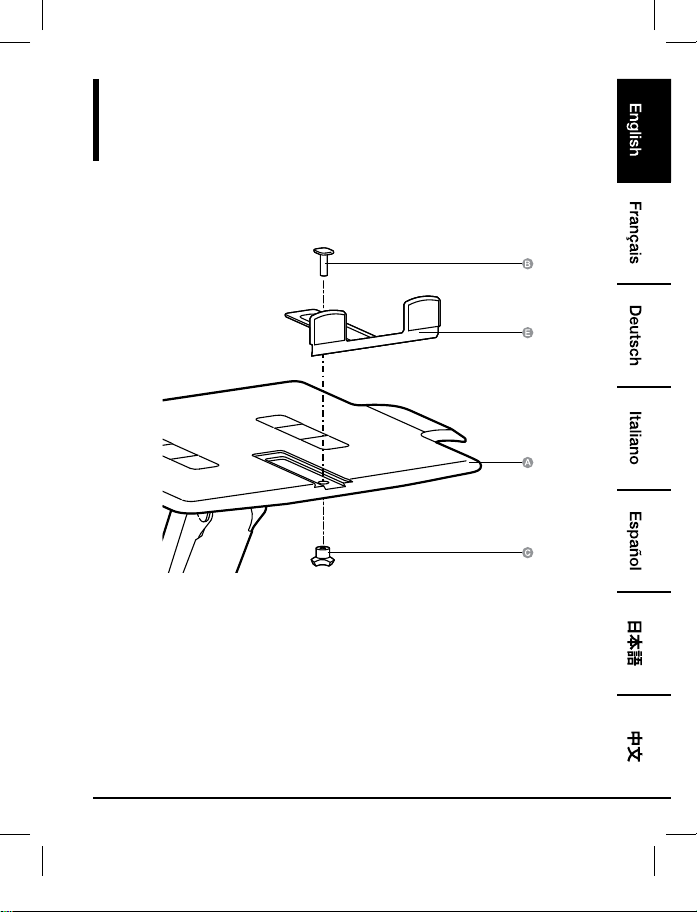
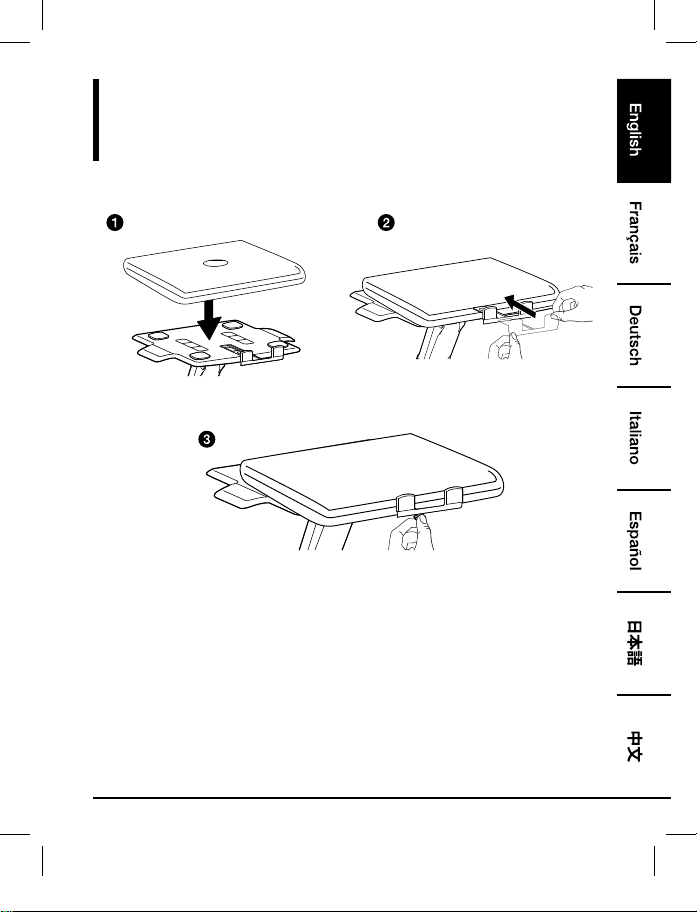
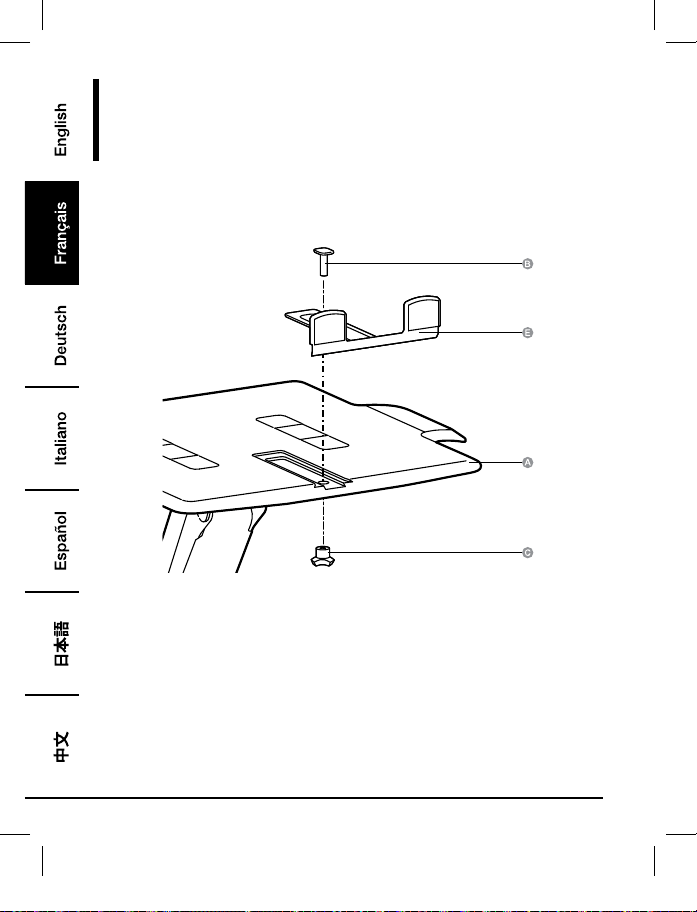
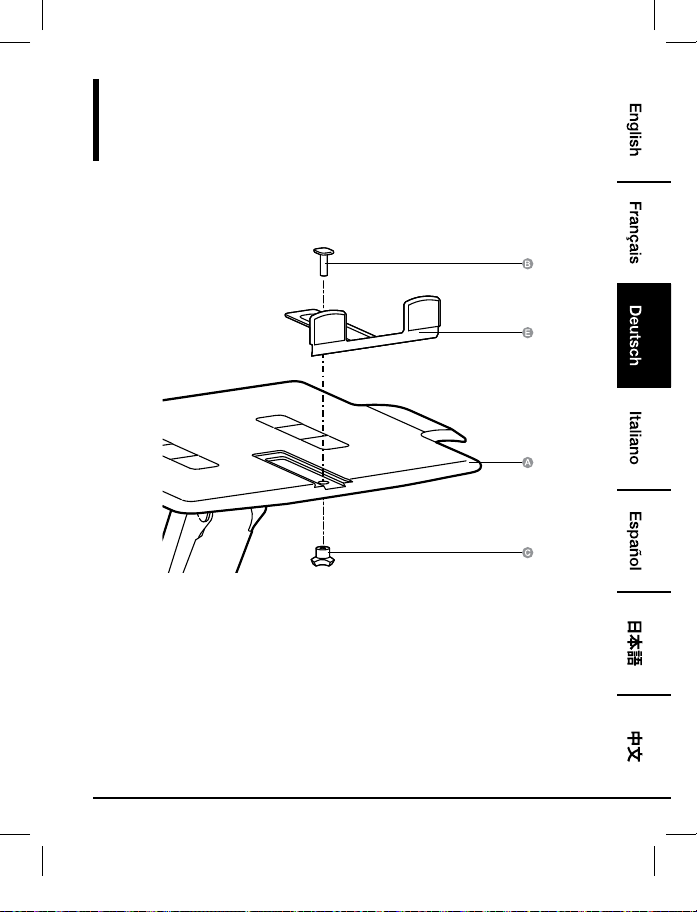
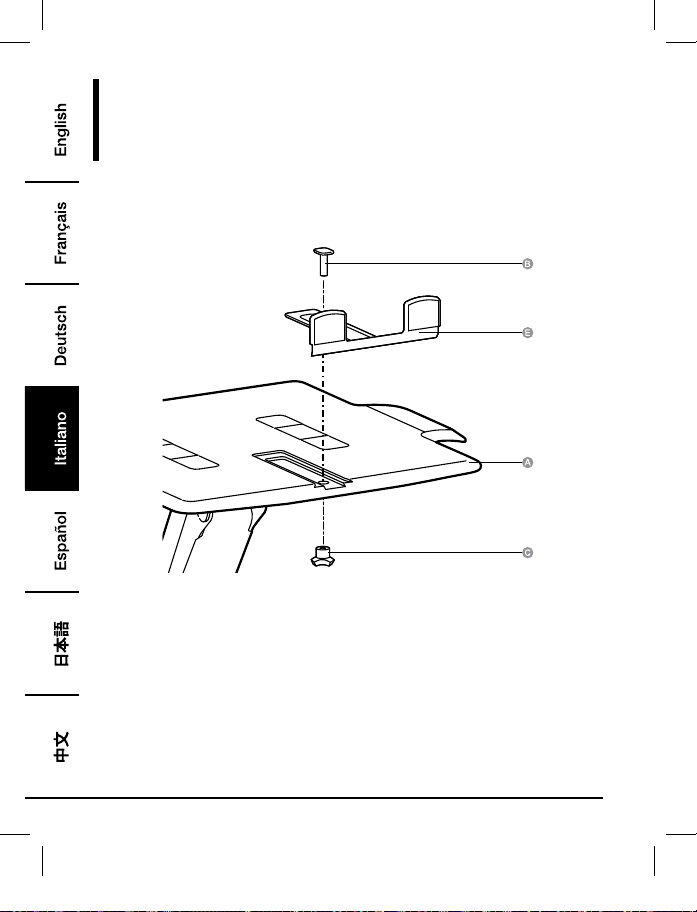
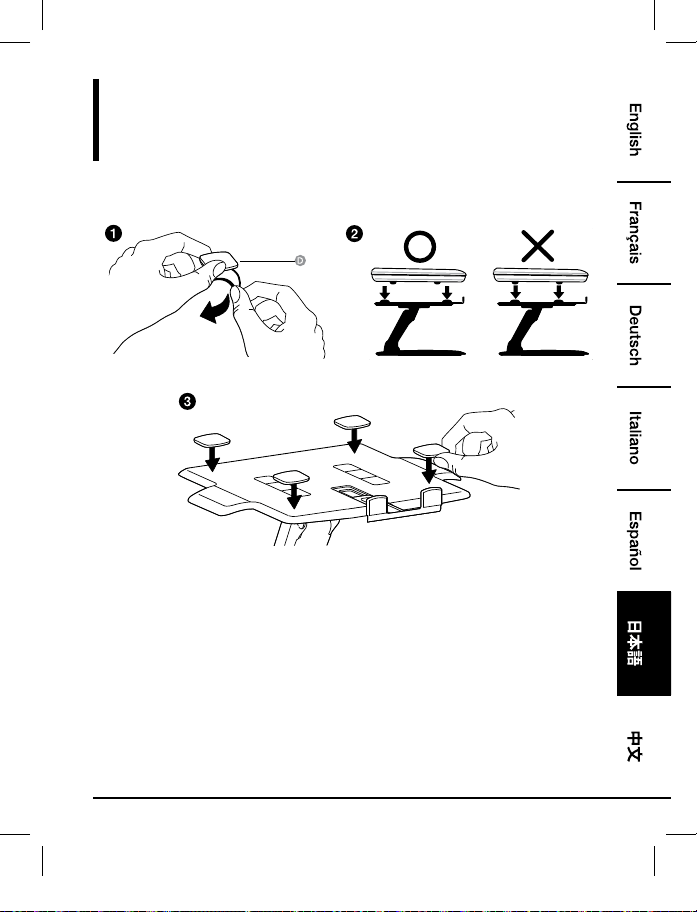
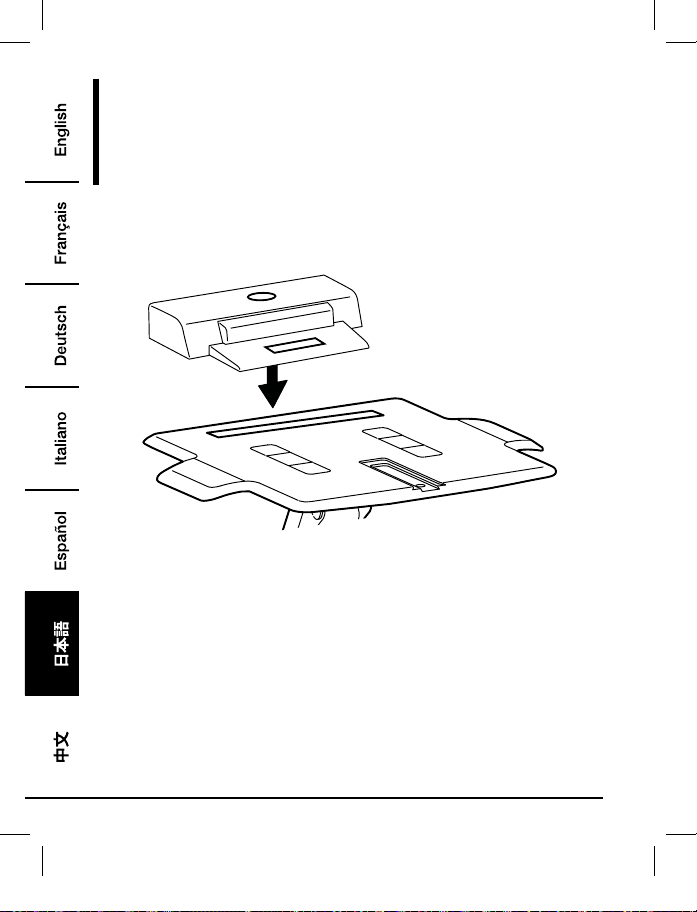
Assembly
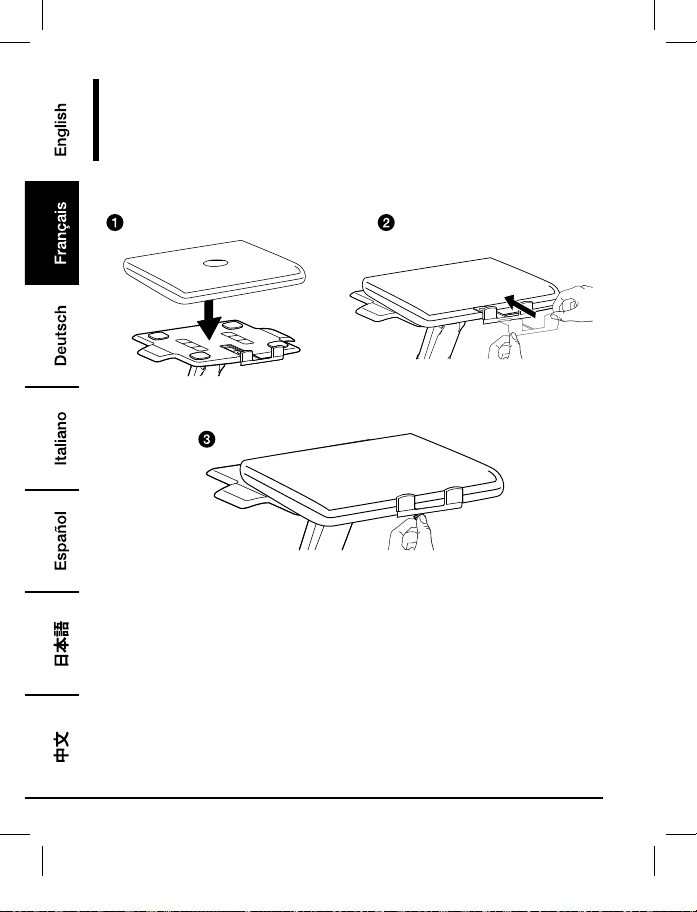
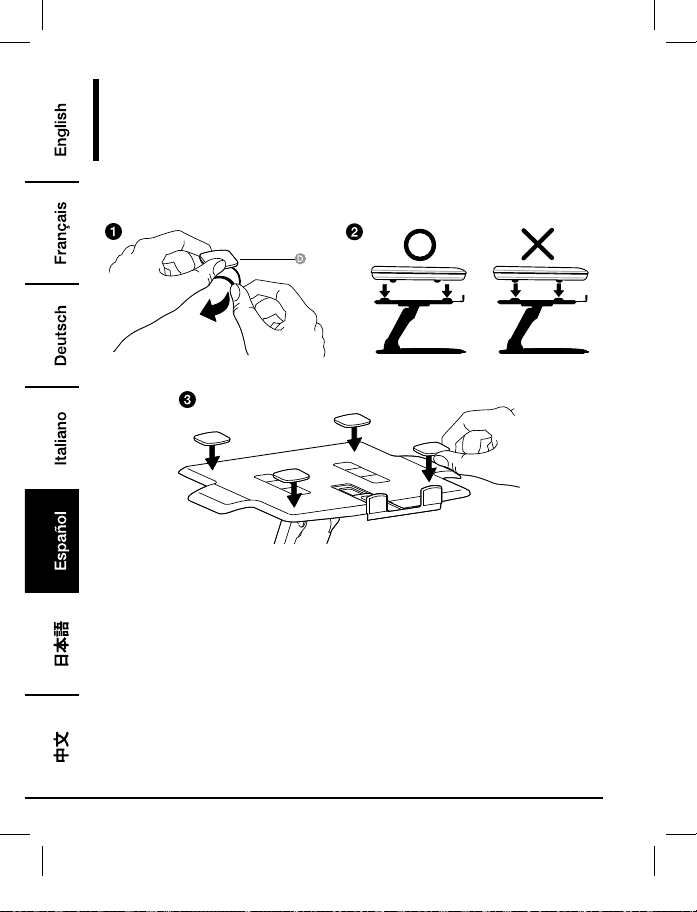
Step 1:
Notebook Only
B072PZLZ25-AmazonBasics-Laptop Lift Stand-IM-V03 (EU).indb 5 8/23/17 4:57 PM
6
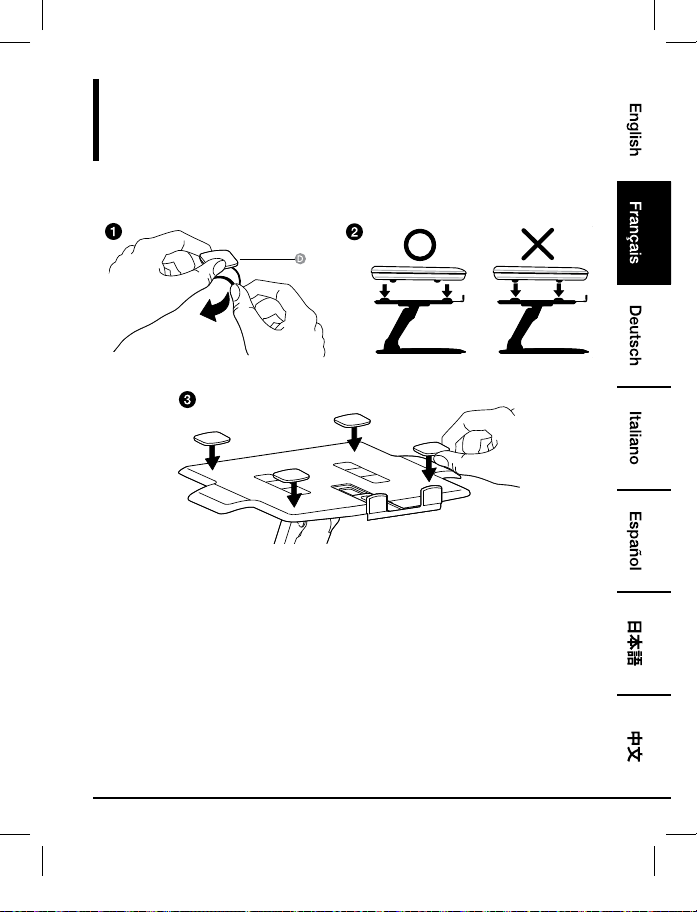
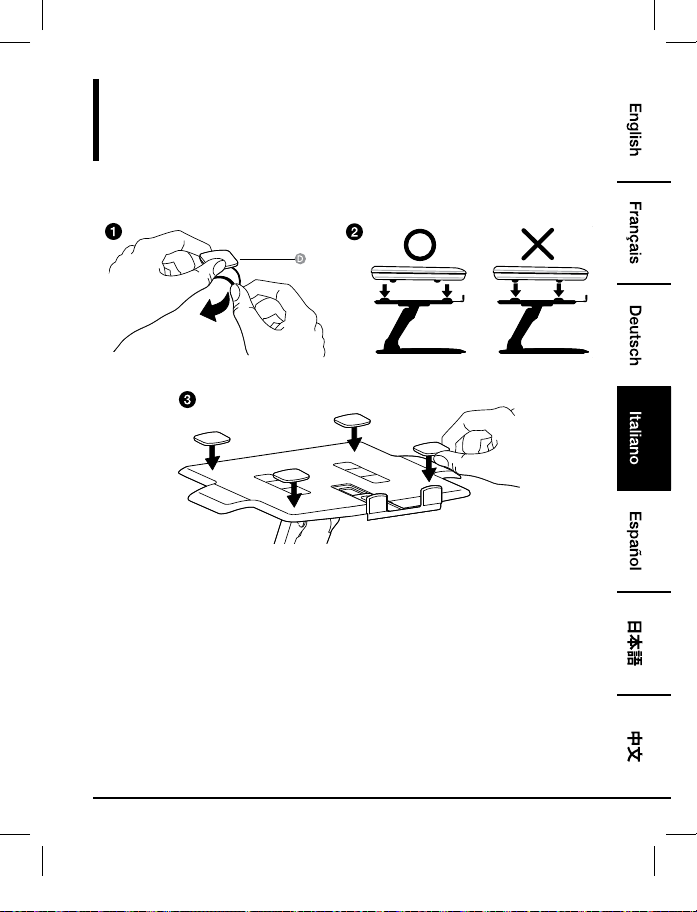
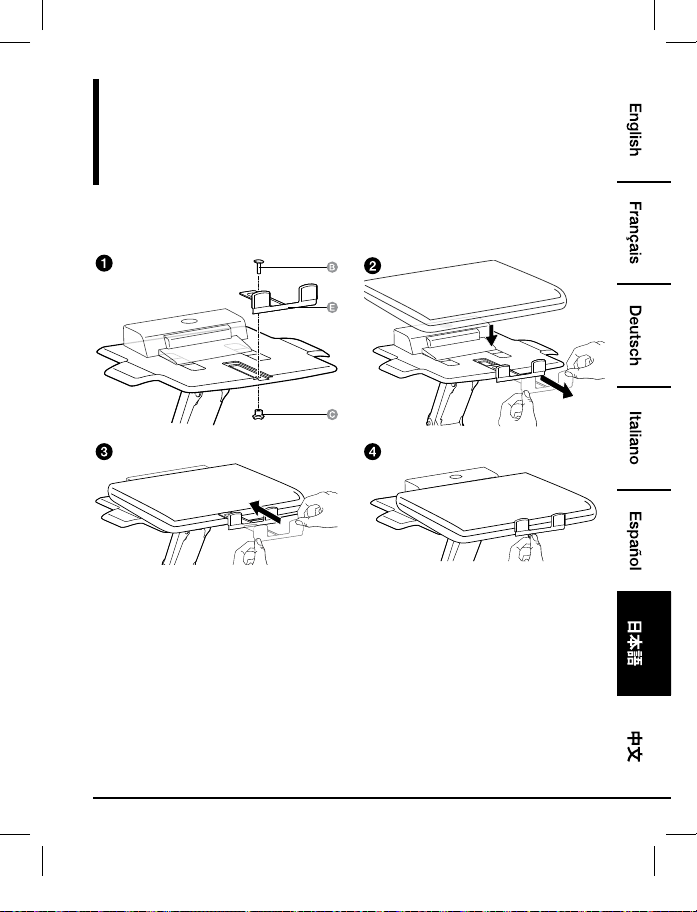
Assembly
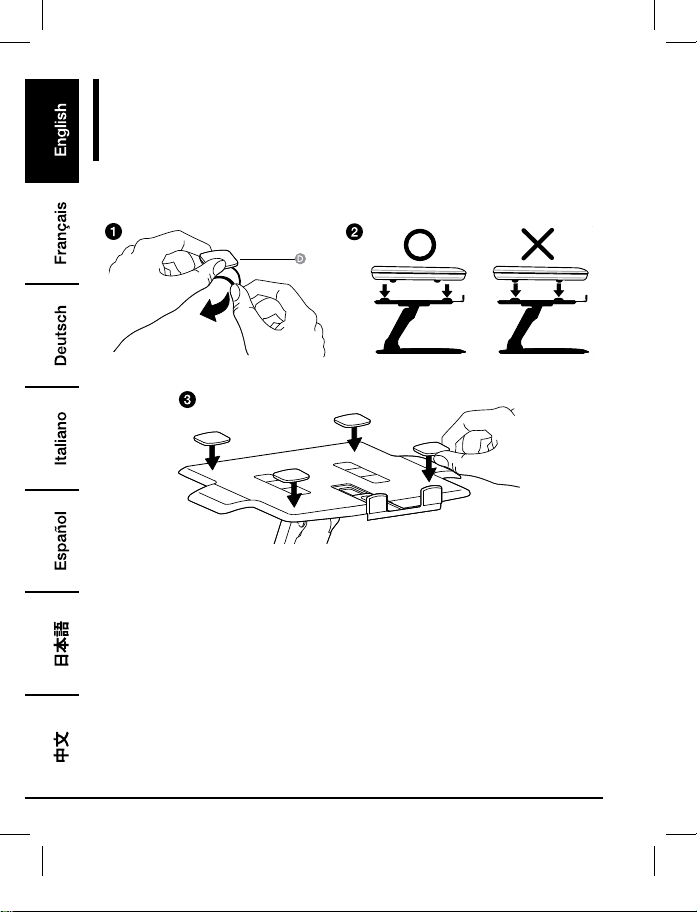
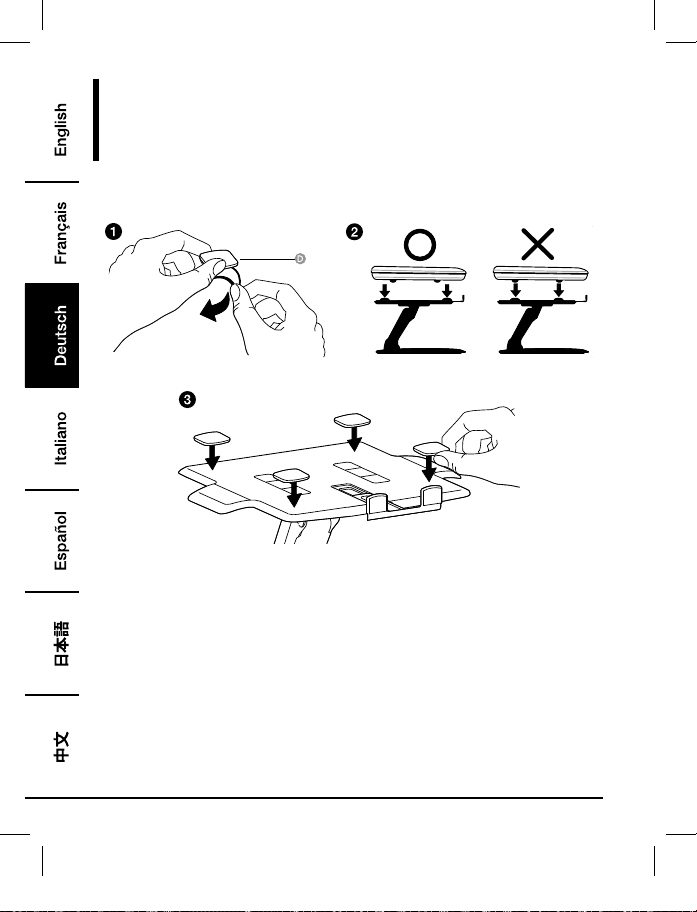
Step 2:
Notebook Only
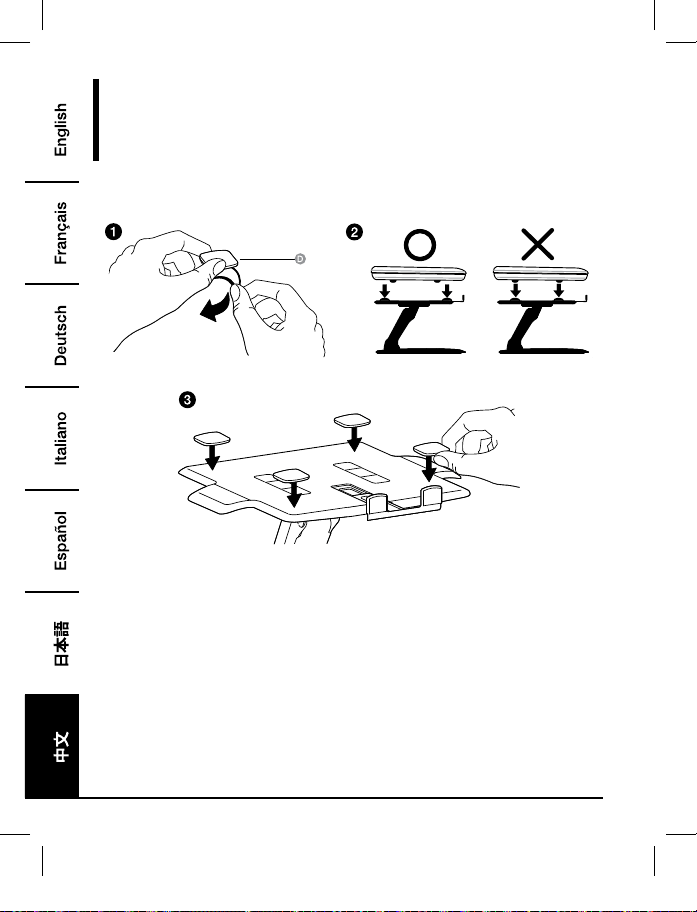
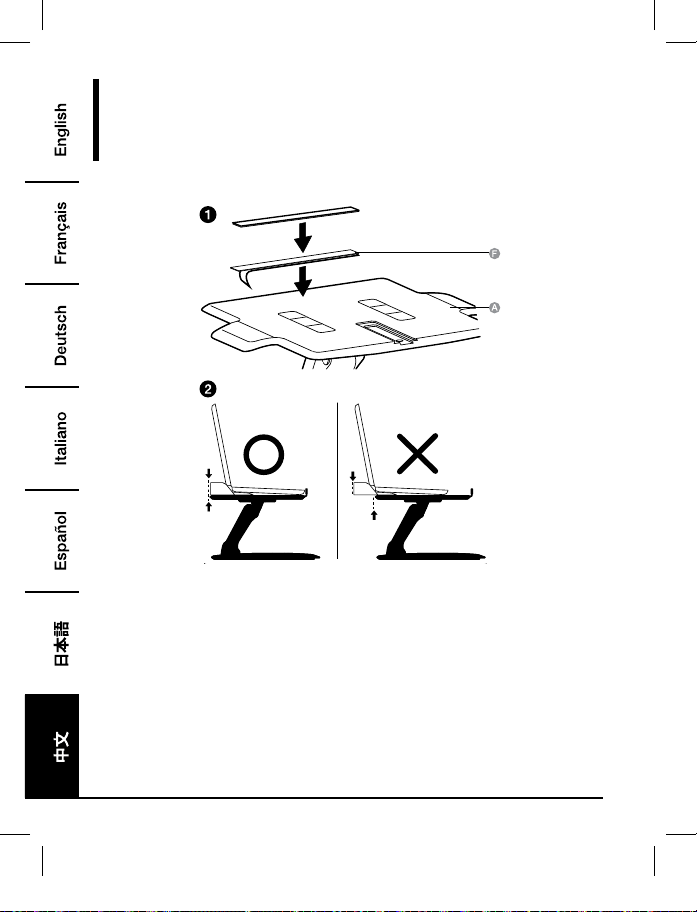
• Place pads where bottom surface of equipment will rest. Do not place pads where equipment
feet will rest.
• All pads must be attached to the lift stand to prevent equipment from sliding.
B072PZLZ25-AmazonBasics-Laptop Lift Stand-IM-V03 (EU).indb 6 8/23/17 4:57 PM
7
Assembly
Step 3:
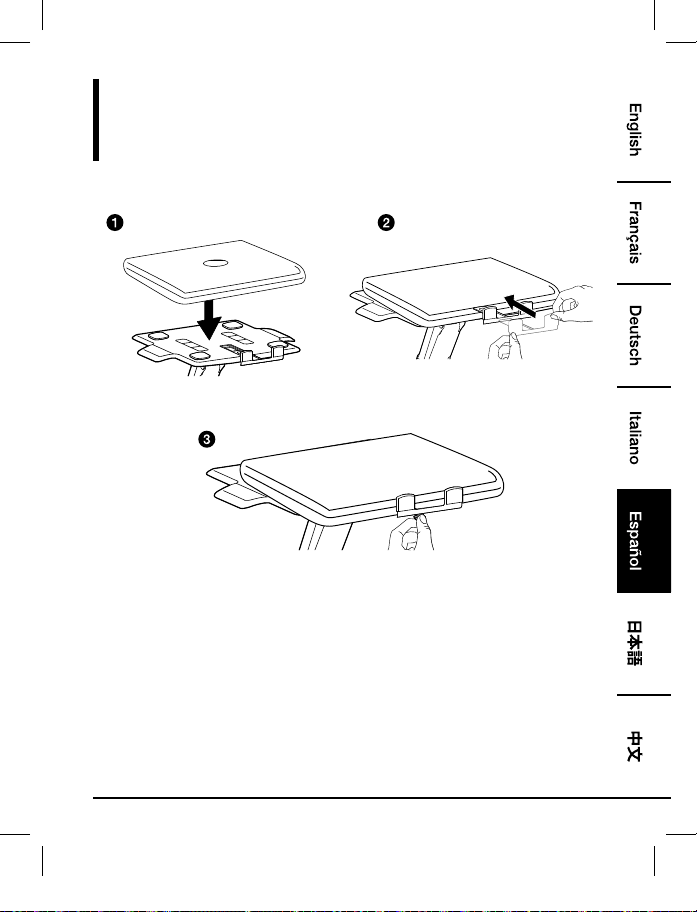
Notebook Only
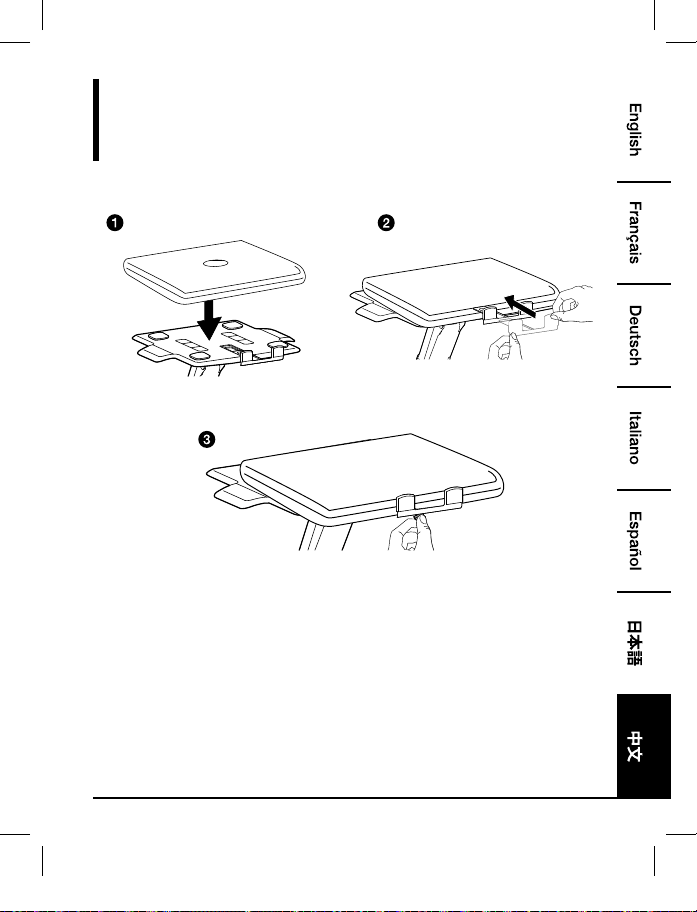
• Center equipment horizontally on tray.
B072PZLZ25-AmazonBasics-Laptop Lift Stand-IM-V03 (EU).indb 7 8/23/17 4:57 PM
8
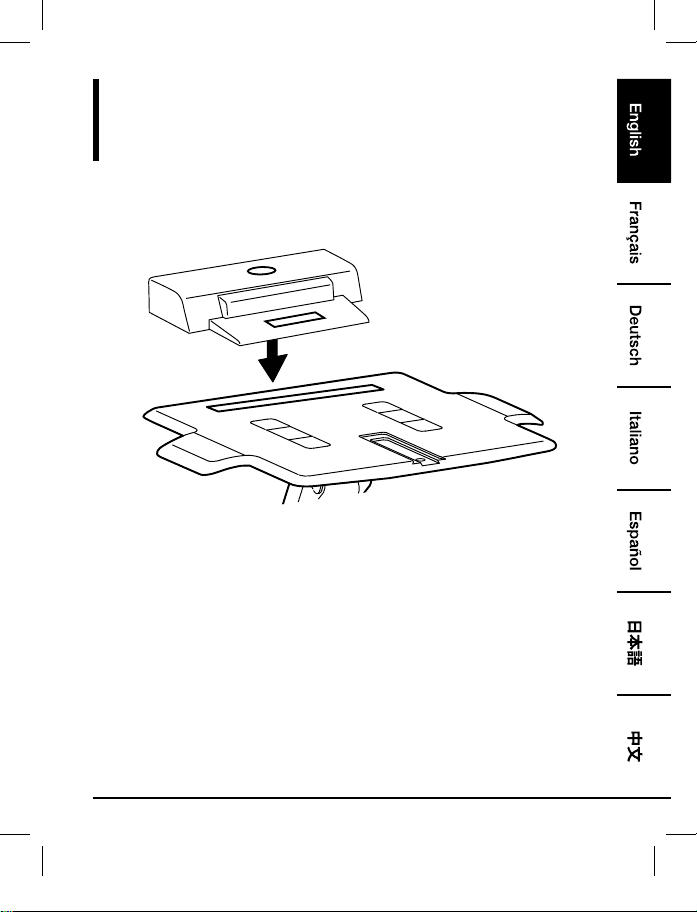
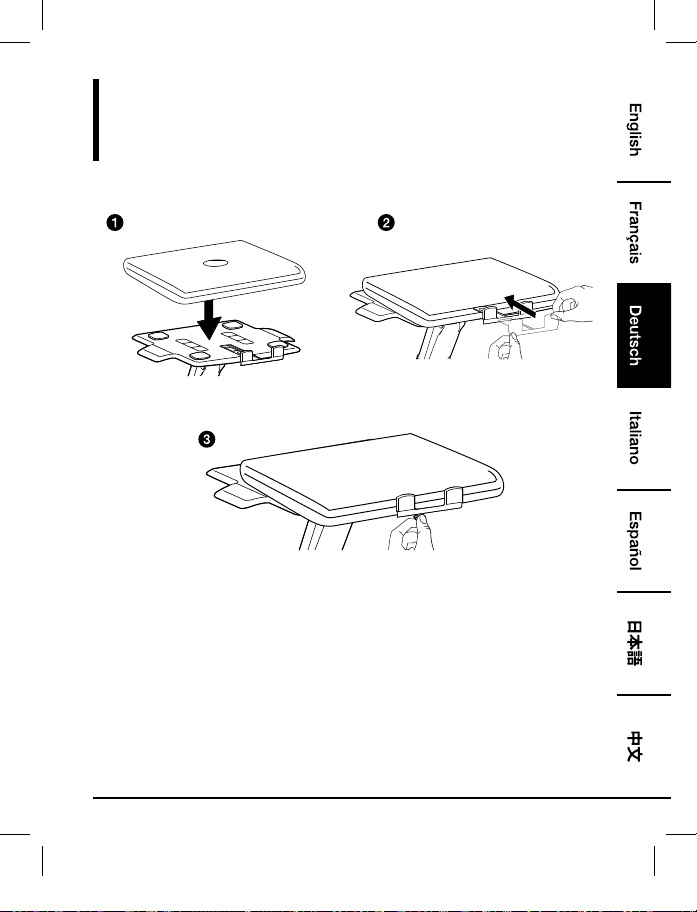
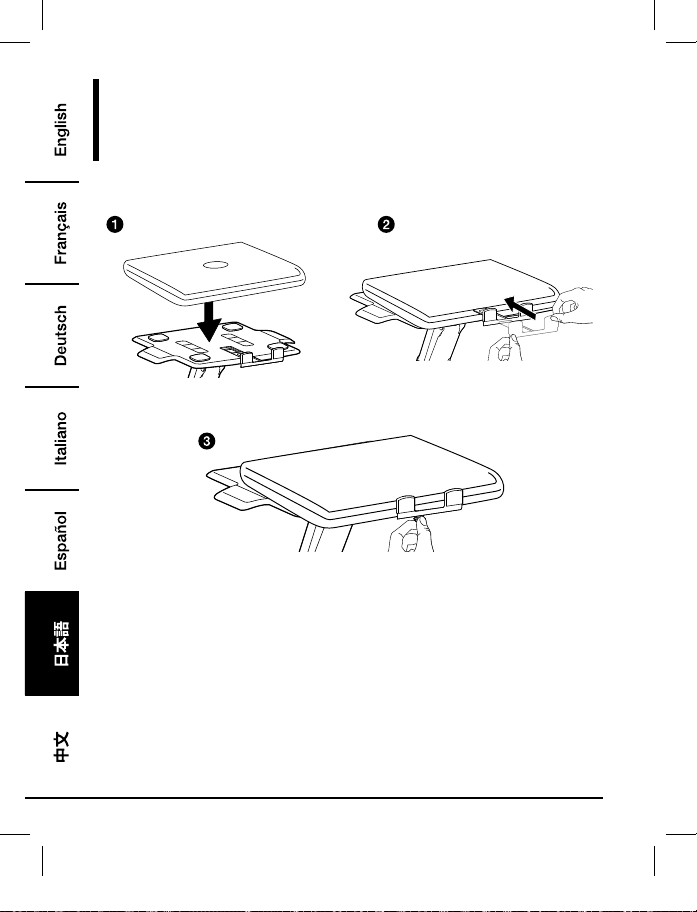
Assembly
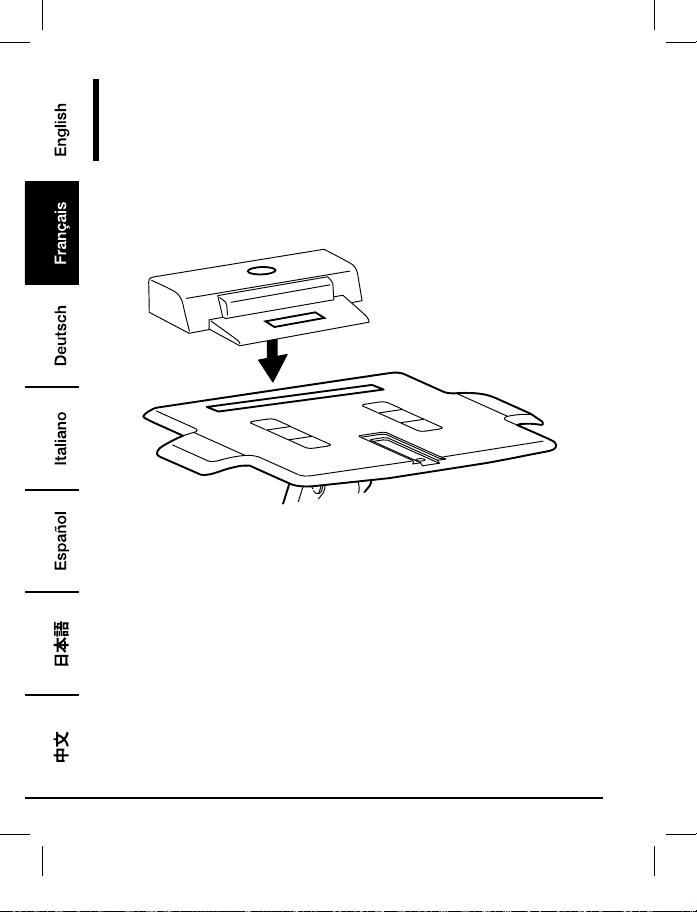
Step 1:
Notebook with Docking Station or Port Replicator
• Place docking station/port replicator at rear of tray. DO NOT let docking station/port replicator
hang off the back of the tray.
B072PZLZ25-AmazonBasics-Laptop Lift Stand-IM-V03 (EU).indb 8 8/23/17 4:57 PM
9
Assembly
Step 2:
Notebook with Docking Station or Port Replicator
• Center equipment horizontally on tray.
B072PZLZ25-AmazonBasics-Laptop Lift Stand-IM-V03 (EU).indb 9 8/23/17 4:57 PM

10
Assembly
Step 3:
Notebook with Docking Station or Port Replicator
B072PZLZ25-AmazonBasics-Laptop Lift Stand-IM-V03 (EU).indb 10 8/23/17 4:57 PM
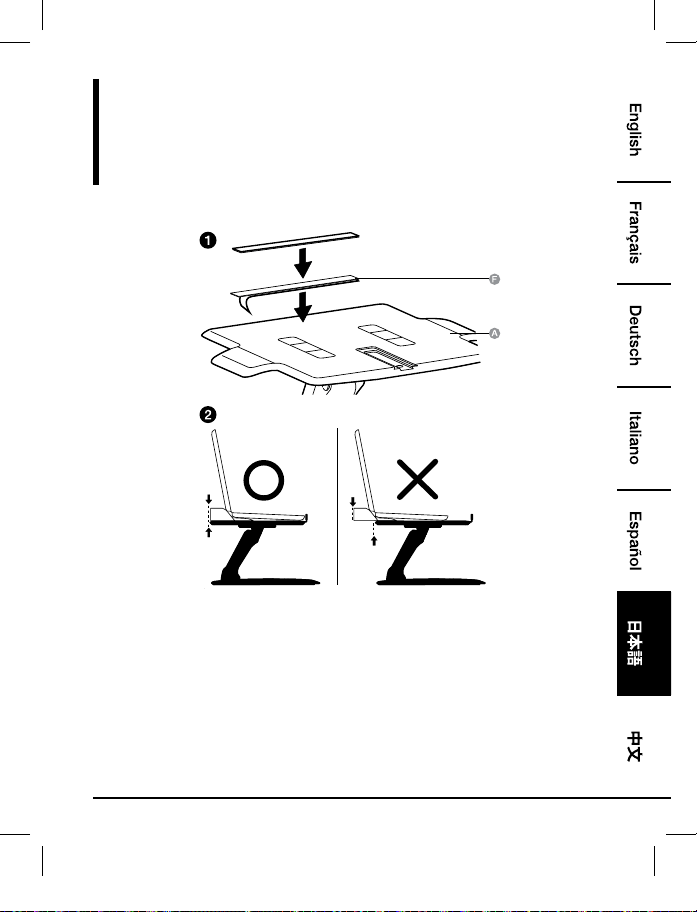
11
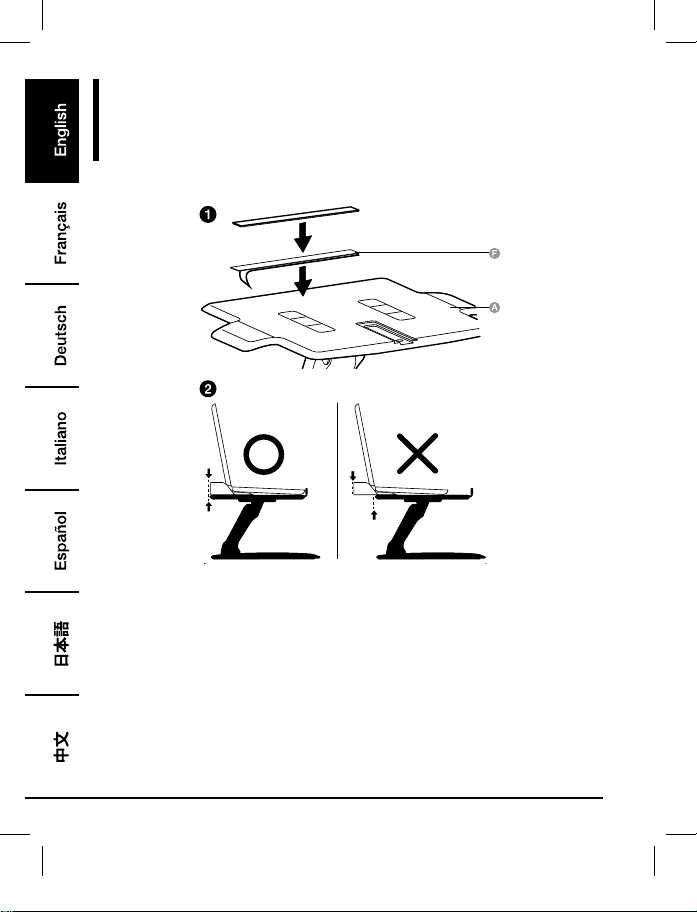
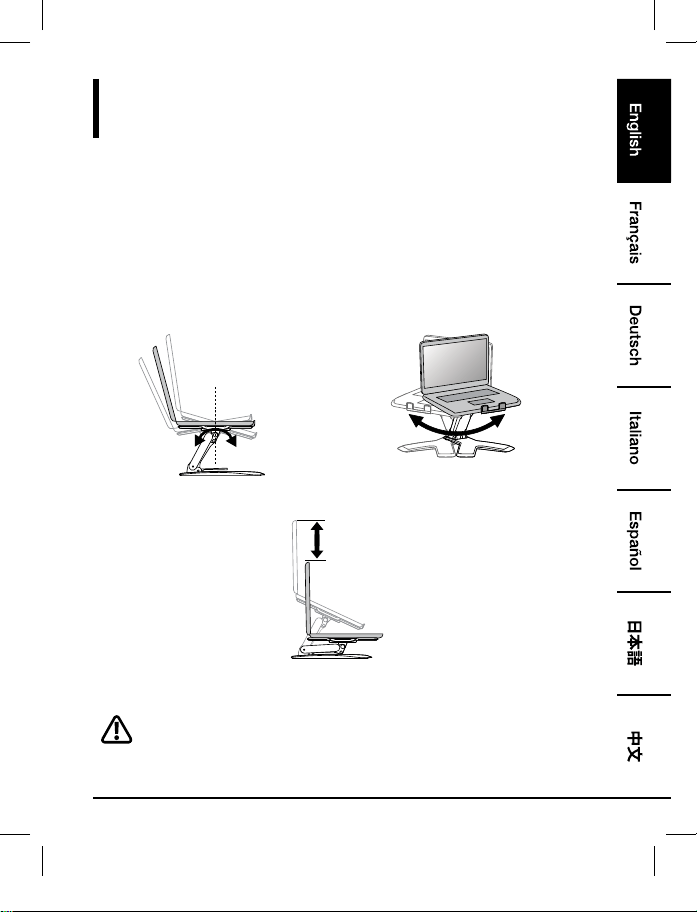
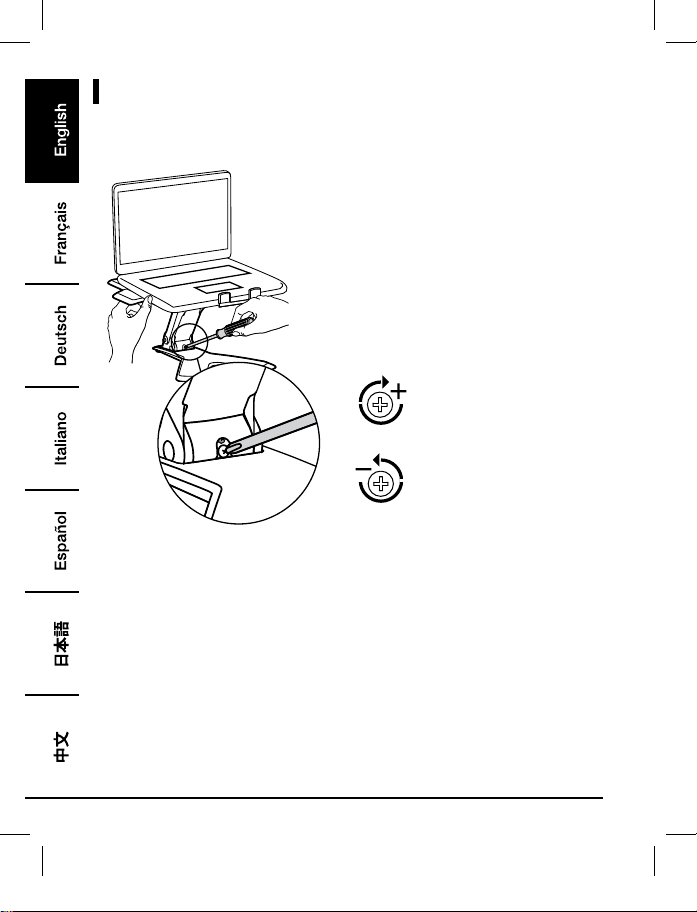
Adjustment
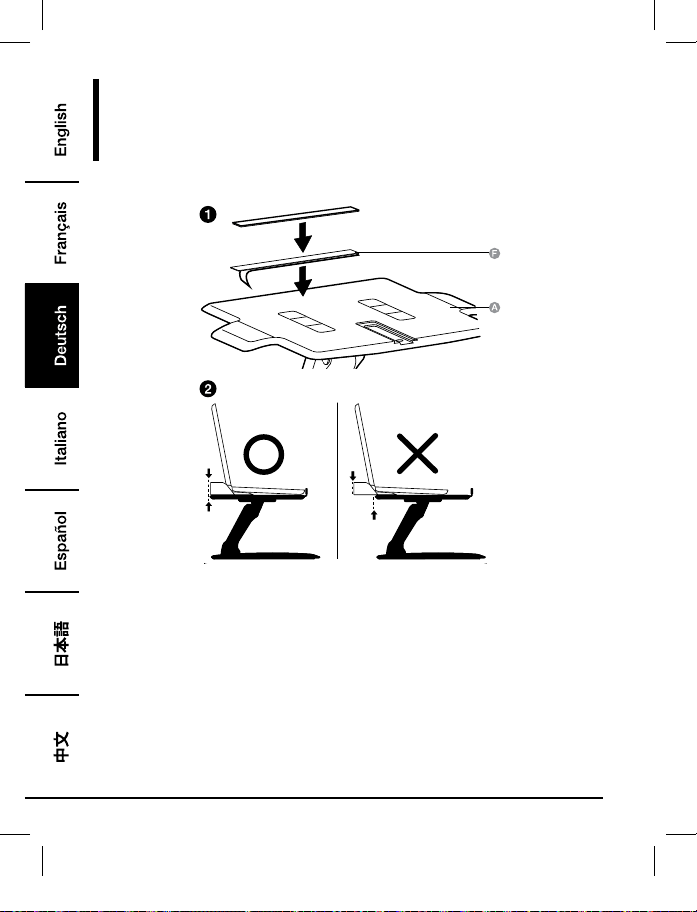
Step 4:
It is important that you adjust this product according to the weight of the mounted equipment
as described in the following steps. Any time equipment is added or removed from this product,
resulting in a change in the weight of the mounted load, you should repeat these adjustment steps
to ensure safe and optimum operation.
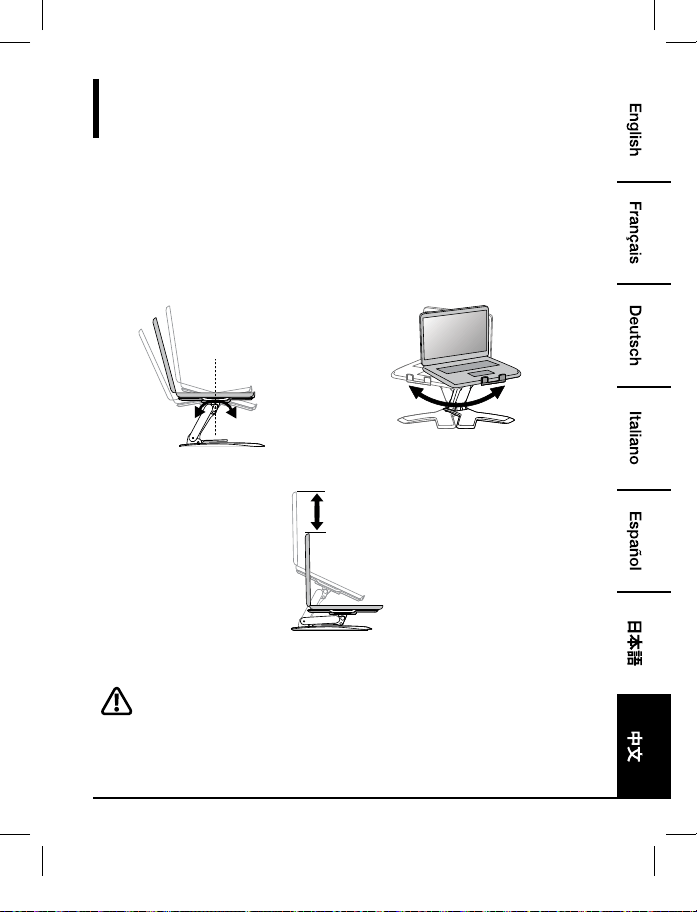
Adjustments should move smoothly and easily through the full range of motion and stay where
you set it. If adjustments are difficult and do not stay in the desired position, follow the instructions
to loosen or tighten the tension to create a smooth, easy adjustment motion. Depending on your
product and the adjustment, it may take several turns to notice a difference.
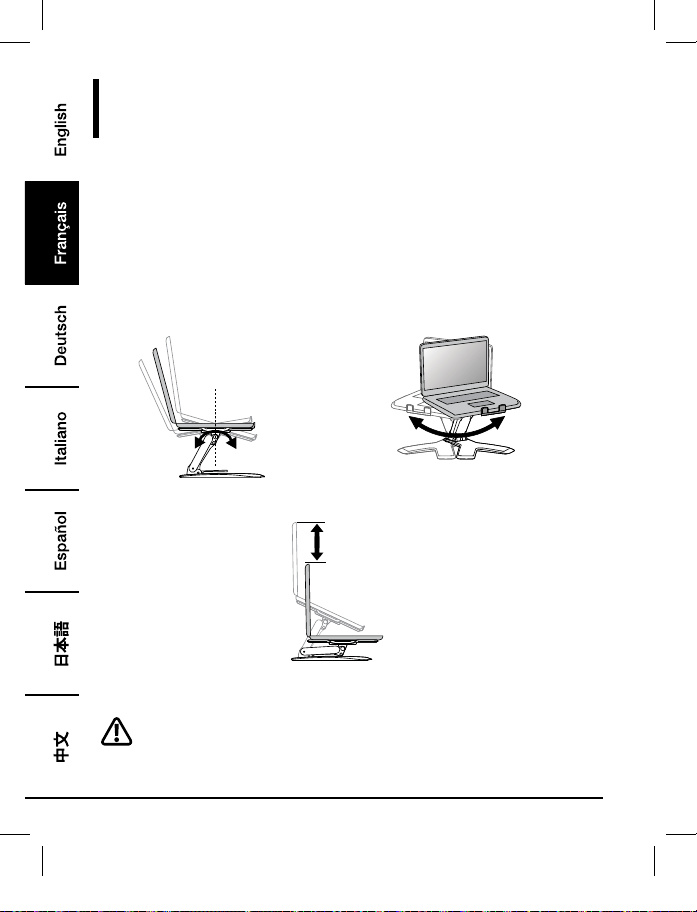
+15˚ -25˚
360˚
Tilt – Forward and Backward Pan – Side-to-side
5.9"
(150 mm)
Lift – Up and down
Lift tray to "full up" position before adjusting.
B072PZLZ25-AmazonBasics-Laptop Lift Stand-IM-V03 (EU).indb 11 8/23/17 4:57 PM
12
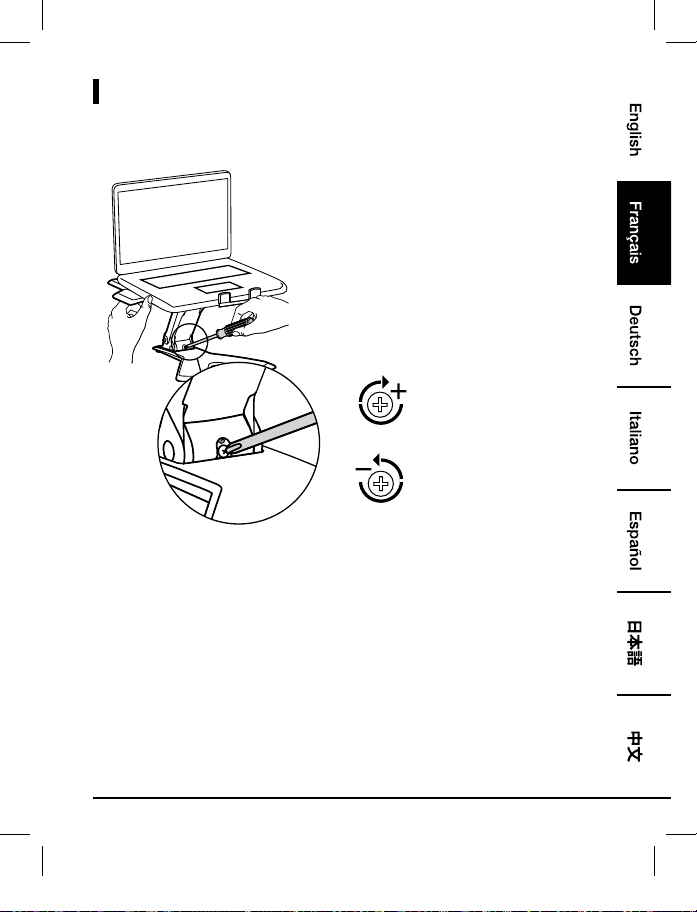
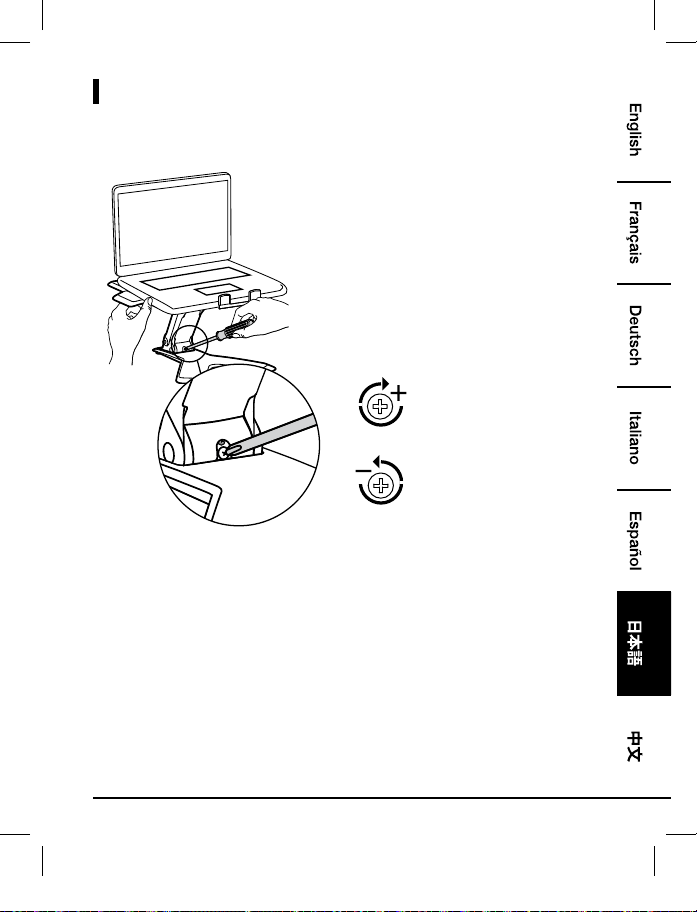
Adjustments
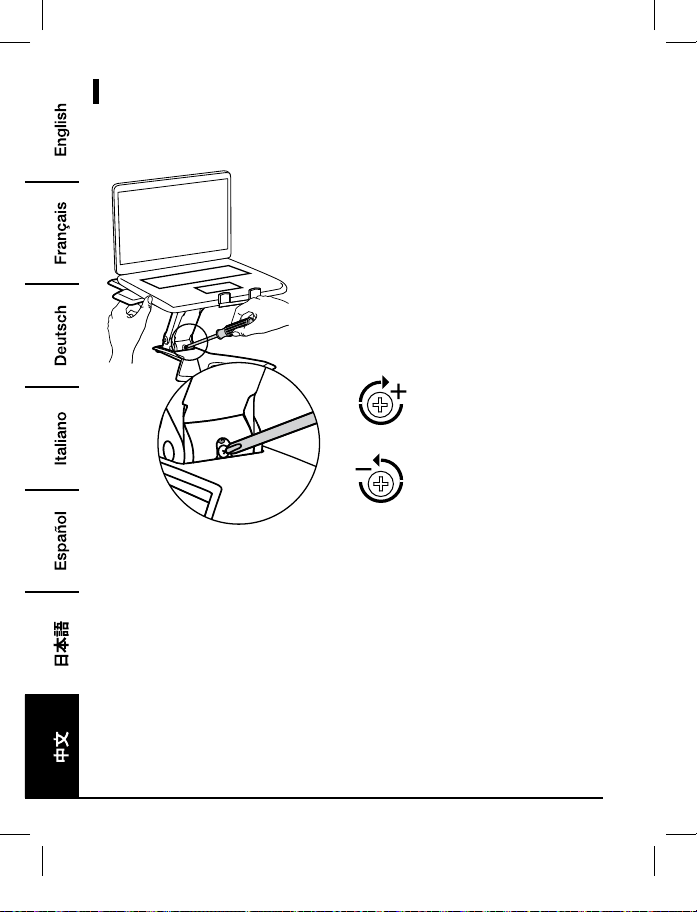
To increase tension - Turn
Clockwise
To decrease tension - Turn
Counterclockwise
• Follow these instructions to tighten or loosen tension.
• NOTE: Screw might need to be turned about 3 - 10 full revolutions before noticing a change in
tension.
B072PZLZ25-AmazonBasics-Laptop Lift Stand-IM-V03 (EU).indb 12 8/23/17 4:57 PM
13
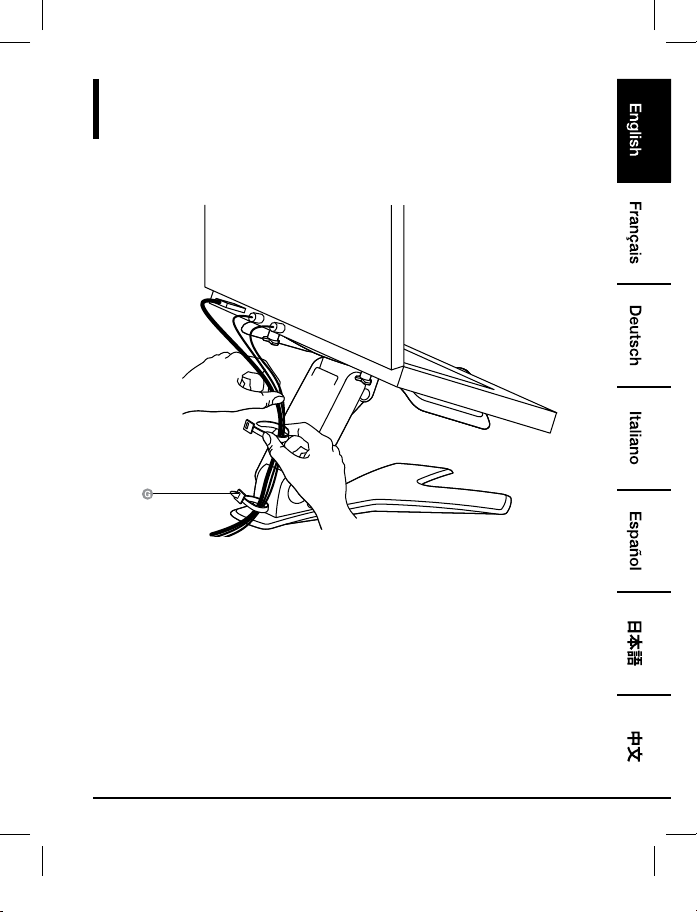
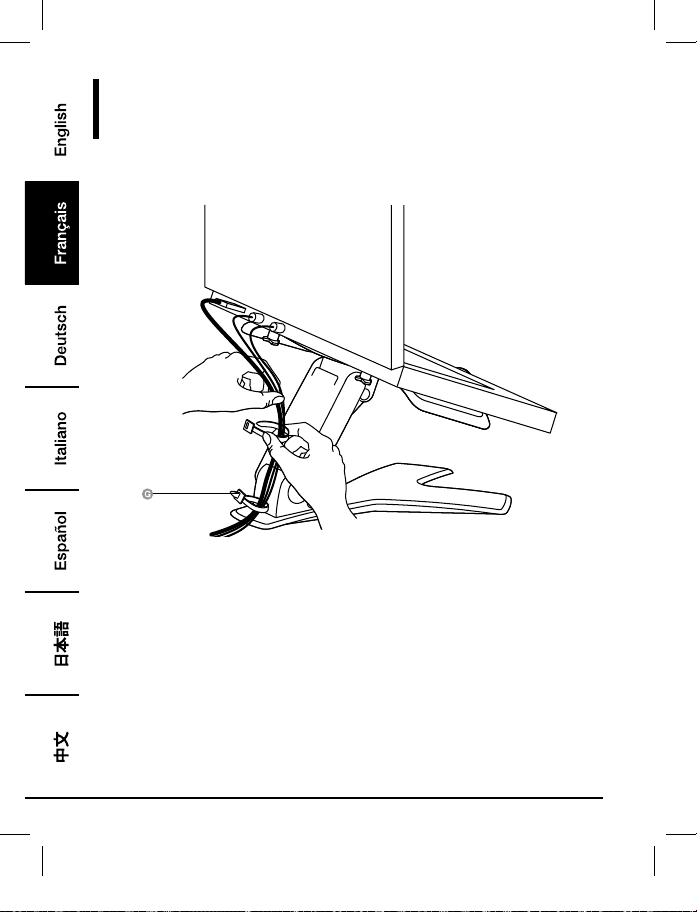
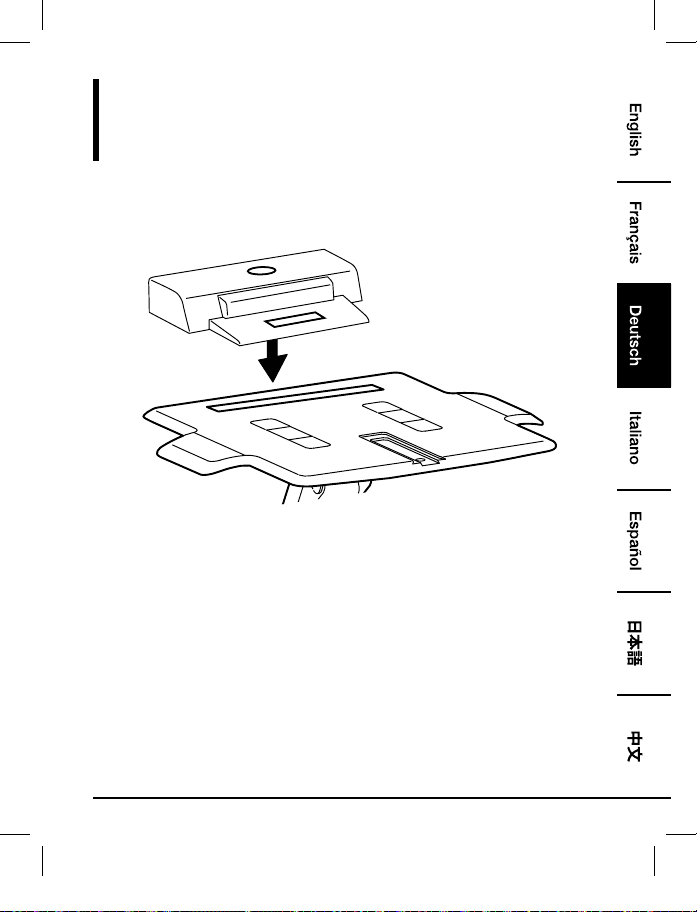
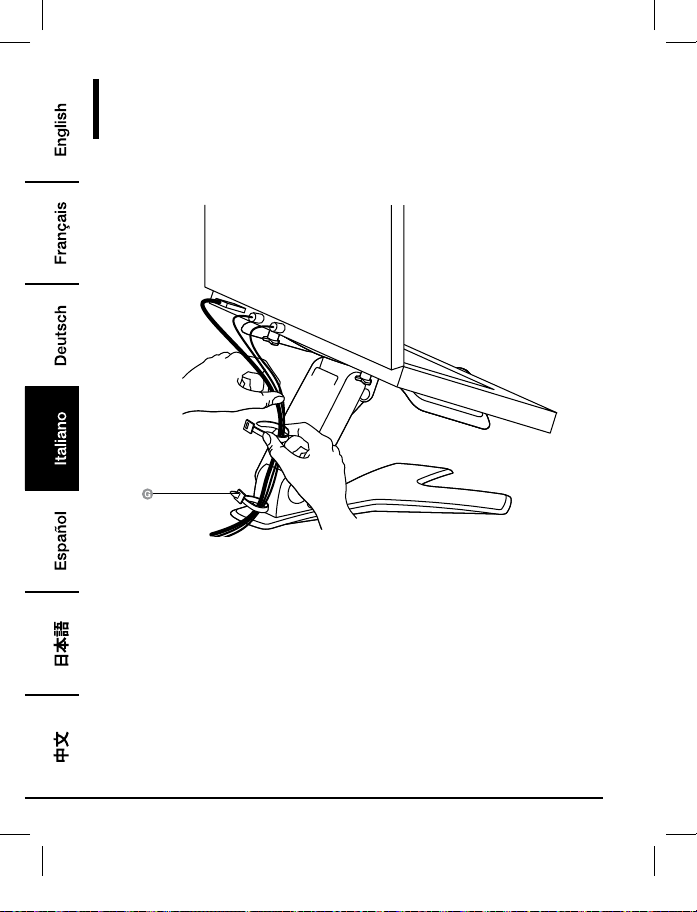
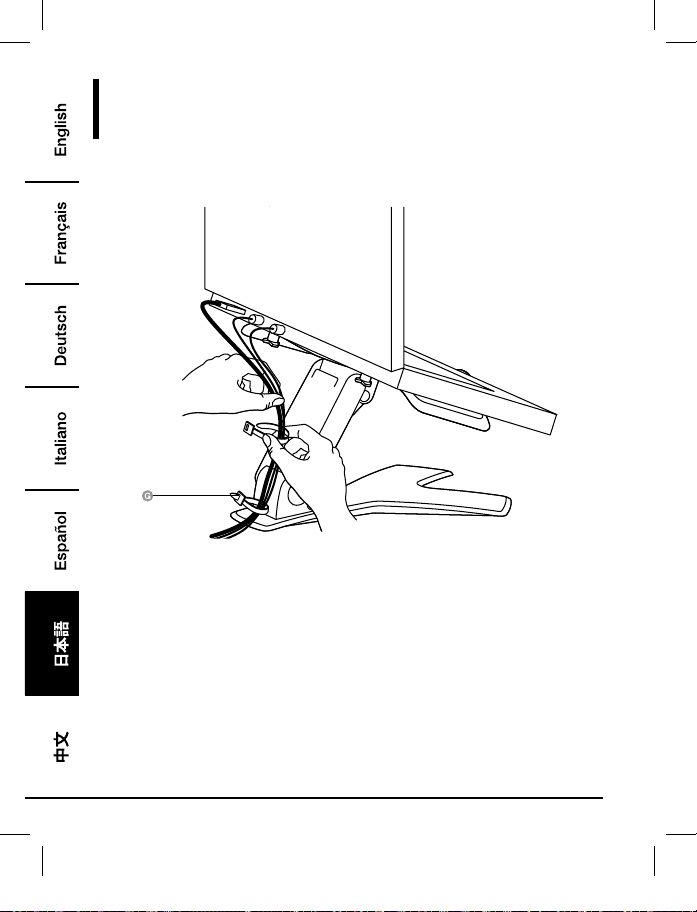
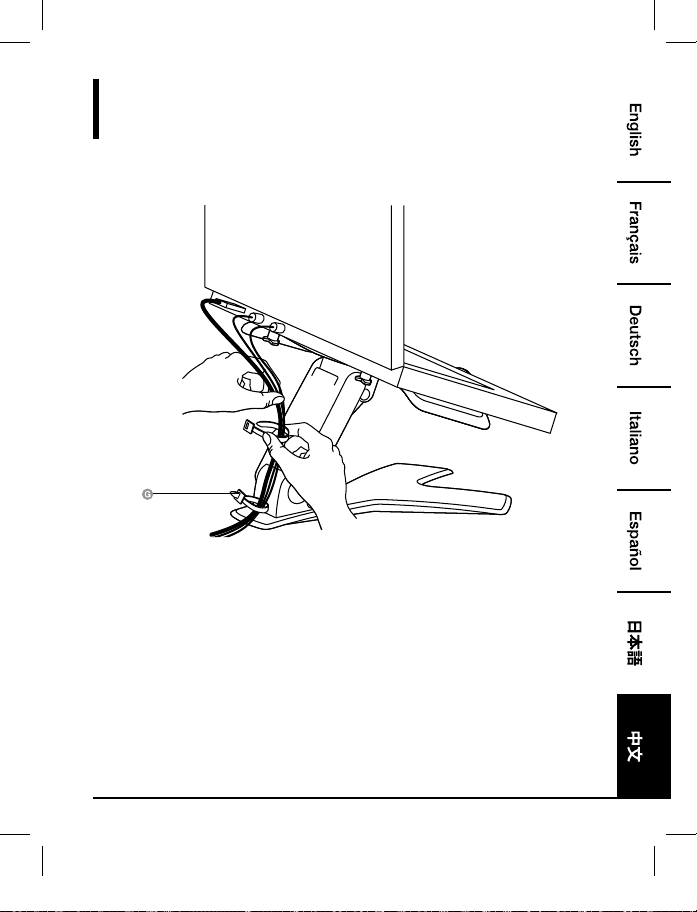
Cable Routing
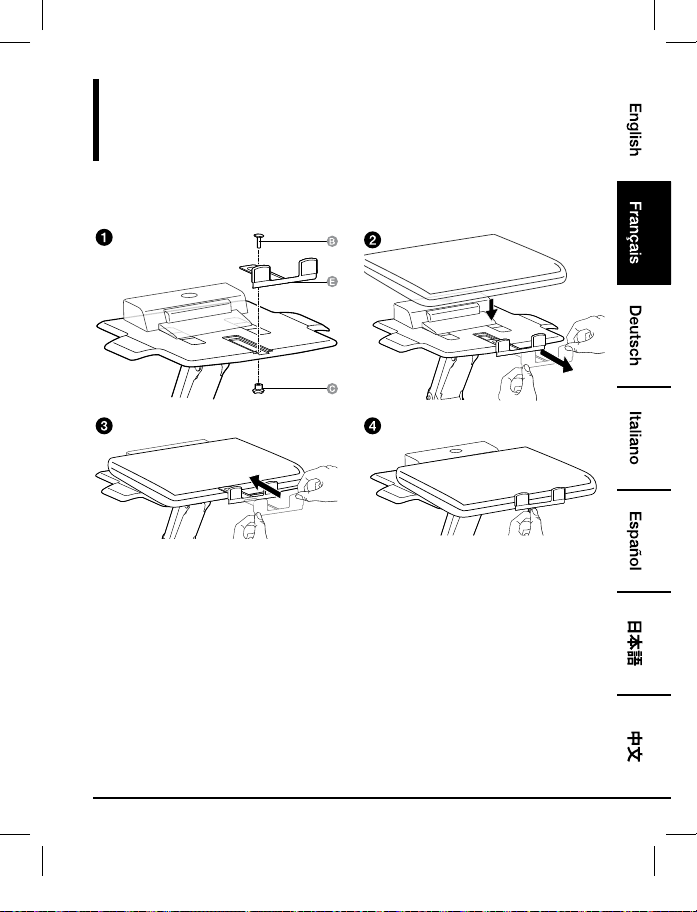
Step 5:
B072PZLZ25-AmazonBasics-Laptop Lift Stand-IM-V03 (EU).indb 13 8/23/17 4:57 PM
14
Warranty Information
To obtain a copy of the warranty for this product:
Visit amazon.com/AmazonBasics/Warranty
— or —
Contact Customer Service at 1-866-216-1072
B072PZLZ25-AmazonBasics-Laptop Lift Stand-IM-V03 (EU).indb 14 8/23/17 4:57 PM
15
Feedback
Love it? Hate it?
Let us know with a customer review.
AmazonBasics is committed to delivering customer-driven products that live up to your high
standards. We encourage you to write a review sharing your experiences with the product.
Please visit: amazon.com/review/review-your-purchases#
For further services:
Visit amazon.com/gp/help/customer/contact-us
— or —
Contact Customer Service at 1-866-216-1072
B072PZLZ25-AmazonBasics-Laptop Lift Stand-IM-V03 (EU).indb 15 8/23/17 4:57 PM
16
Guide de Bienvenue
•
Français
Support Pour Notebook
Contenu:
Avant de commencer, veuillez vous assurer que l’emballage contient les composants suivants:
Composant Qté
1
1
1
4
1
1
2
B072PZLZ25-AmazonBasics-Laptop Lift Stand-IM-V03 (EU).indb 16 8/23/17 4:57 PM
17
2 - 11 lb. (0,9 - 5 kg)
ATTENTION: NE PAS DÉPASSER LA CAPACITÉ DE CHARGE
MAXIMALE INDIQUÉE. DANS LE CAS CONTRAIRE, CELA
POURRAIT PROVOQUER DES BLESSURES GRAVES OU DES
DOMMAGES MATÉRIELS!
REMARQUE: Ce produit est destiné à être utilisé avec un clavier
et une souris indépendants (achetés séparément). L’utilisation
du clavier de l’ordinateur portable n’est pas recommandée.
3
4
Notebook seul
Notebook avec station d’accueil ou
duplicateur de ports
B072PZLZ25-AmazonBasics-Laptop Lift Stand-IM-V03 (EU).indb 17 8/23/17 4:57 PM
18
Montage
Étape1:
Notebook Seul
B072PZLZ25-AmazonBasics-Laptop Lift Stand-IM-V03 (EU).indb 18 8/23/17 4:57 PM
19
Montage
Étape2:
Notebook Seul
• Placez les pieds antidérapants à l’endroit où reposera la surface inférieure de l’appareil. Ne
placez pas de pieds antidérapants à l’endroit où reposeront les pieds de l’appareil.
• Tous les pieds antidérapants doivent être fixés sur le support afin d’éviter tout glissement de
l’appareil.
B072PZLZ25-AmazonBasics-Laptop Lift Stand-IM-V03 (EU).indb 19 8/23/17 4:57 PM
20
Montage
Étape3:
Notebook Seul
• Positionnez l’appareil horizontalement au centre du plateau.
B072PZLZ25-AmazonBasics-Laptop Lift Stand-IM-V03 (EU).indb 20 8/23/17 4:57 PM
21
Montage
Étape1:
Notebook Avec Station D’accueil Ou Duplicateur De Ports
• Placez la station d’accueil/le duplicateur de ports à l’arrière du plateau. NE LAISSEZ PAS la
station d’accueil/le duplicateur de ports pendre à l’arrière du plateau.
B072PZLZ25-AmazonBasics-Laptop Lift Stand-IM-V03 (EU).indb 21 8/23/17 4:57 PM
22
Montage
Étape2:
Notebook Avec Station D’accueil Ou Duplicateur De Ports
• Positionnez l’appareil horizontalement au centre du plateau.
B072PZLZ25-AmazonBasics-Laptop Lift Stand-IM-V03 (EU).indb 22 8/23/17 4:57 PM
23
Montage
Étape3:
Notebook Avec Station D’accueil Ou Duplicateur De Ports
B072PZLZ25-AmazonBasics-Laptop Lift Stand-IM-V03 (EU).indb 23 8/23/17 4:57 PM
24
Réglage
Étape4:
Il est important de régler le produit en fonction du poids de l’appareil placé dessus, comme décrit
dans les étapes suivantes. À chaque fois qu’un appareil est placé ou retiré du produit, entraînant
un changement du poids de la charge supportée, vous devez suivre à nouveau ces étapes de
réglage afin d’assurer une utilisation sûre et optimale.
Les réglages doivent s’effectuer doucement et aisément en passant par la gamme complète de
mouvement, et rester dans la position que vous avez choisie. Si les réglages sont difficiles à effectuer et
ne restent pas dans la position souhaitée, suivez les instructions pour déserrer ou resserrer la tension
afin de créer un mouvement de réglage doux et aisé. En fonction de votre produit et du réglage,
plusieurs tours peuvent s’avérer nécessaires afin de remarquer une différence.
+15˚ -25˚
360˚
Inclinaison – Avant et Arrière Glissement – D’un côté à l’autre
5.9"
(150 mm)
Rehaussement/Abaissement – Vers le haut et vers le bas
Relevez le plateau au maximum avant de le régler.
B072PZLZ25-AmazonBasics-Laptop Lift Stand-IM-V03 (EU).indb 24 8/23/17 4:57 PM
25
Réglages
Pour augmenter la tension
- Tournez dans le sens des
aiguilles d’une montre
Pour diminuer la tension -
Tournez dans le sens inverse des
aiguilles d’une montre
• Suivez ces instructions pour serrer ou déserrer la tension.
• REMARQUE: Il peut s’avérer nécessaire d’effectuer environ 3 à 10 tours de vis complets avant
de remarquer un changement au niveau de la tension.
B072PZLZ25-AmazonBasics-Laptop Lift Stand-IM-V03 (EU).indb 25 8/23/17 4:57 PM
26
Acheminement des Câbles
Étape5:
B072PZLZ25-AmazonBasics-Laptop Lift Stand-IM-V03 (EU).indb 26 8/23/17 4:57 PM
27
Informations Sur La Garantie
Pour obtenir une copie de la garantie portant sur ce produit:
Veuillez visiter amazon.fr/AmazonBasics/Warranty
— ou —
Contactez le service clients au 08 00 94 77 15
B072PZLZ25-AmazonBasics-Laptop Lift Stand-IM-V03 (EU).indb 27 8/23/17 4:57 PM
28
Vos Avis
Vous l’adorez? Vous le détestez?
Faites-le nous savoir en laissant un commentaire.
AmazonBasics s’engage à vous offrir des produits axés sur les besoins de la clientèle et répondant
à vos normes élevées. Nous vous encourageons à rédiger un commentaire visant à partager vos
expériences sur le produit.
Veuillez visiter : amazon.fr/review/review-your-purchases#
Pour obtenir d’autres services:
Veuillez visiter amazon.fr/gp/help/customer/contact-us
— ou —
Contactez le service clients au 08 00 94 77 15
B072PZLZ25-AmazonBasics-Laptop Lift Stand-IM-V03 (EU).indb 28 8/23/17 4:57 PM
29
Bedienungsanleitung
•
Deutsch
Höhenverstellbarer Notebook-Standfuß
Inhalt:
Bevor Sie beginnen, prüfen Sie, ob die Verpackung die folgenden Teile enthält:
Teil Anzahl
1
1
1
4
1
1
2
B072PZLZ25-AmazonBasics-Laptop Lift Stand-IM-V03 (EU).indb 29 8/23/17 4:57 PM
30
2 - 11 lbs.(0,9 - 5 kg)
VORSICHT: ÜBERSCHREITEN SIE DIE ANGEGEBENE
MAXIMALE KAPAZITÄT NICHT. DIES KANN ZU SCHWEREN
VERLETZUNGEN ODER SACHBESCHÄDIGUNGEN FÜHREN!
HINWEIS:Dieses Produkt ist zur Verwendung mit einer
gesonderten Tastatur und Maus (separat erhältlich) vorgesehen.
Die Verwendung der Laptop-Tastatur wird nicht empfohlen.
3
4
Nur Notebook
Notebook mit Docking-Station oder Port-
Replikator
B072PZLZ25-AmazonBasics-Laptop Lift Stand-IM-V03 (EU).indb 30 8/23/17 4:57 PM
31
Montage
Schritt 1:
Nur Notebook
B072PZLZ25-AmazonBasics-Laptop Lift Stand-IM-V03 (EU).indb 31 8/23/17 4:57 PM
32
Montage
Schritt 2:
Nur Notebook
• Positionieren Sie die Pads dort, wo die untere Fläche des Gerätes aufliegt. Positionieren Sie die
Pads nicht dort, wo die Füße des Gerätes aufliegen.
• Alle Pads müssen an dem Standfuß befestigt werden, um ein Rutschen des Gerätes zu
vermeiden.
B072PZLZ25-AmazonBasics-Laptop Lift Stand-IM-V03 (EU).indb 32 8/23/17 4:57 PM
33
Montage
Schritt 3:
Nur Notebook
• Zentrieren Sie das Gerät horizontal auf der Ablage.
B072PZLZ25-AmazonBasics-Laptop Lift Stand-IM-V03 (EU).indb 33 8/23/17 4:57 PM
34
Montage
Schritt 1:
Notebook mit Docking-Station oder Port-Replikator
• Positionieren Sie die Docking-Station/den Port-Replikator an der Rückseite der Ablage.Lassen
Sie die Docking-Station/den Port-Replikator NICHT über die Rückseite der Ablage hinaus
hängen.
B072PZLZ25-AmazonBasics-Laptop Lift Stand-IM-V03 (EU).indb 34 8/23/17 4:57 PM
35
Montage
Schritt 2:
Notebook mit Docking-Station oder Port-Replikator
• Zentrieren Sie das Gerät horizontal auf der Ablage.
B072PZLZ25-AmazonBasics-Laptop Lift Stand-IM-V03 (EU).indb 35 8/23/17 4:57 PM
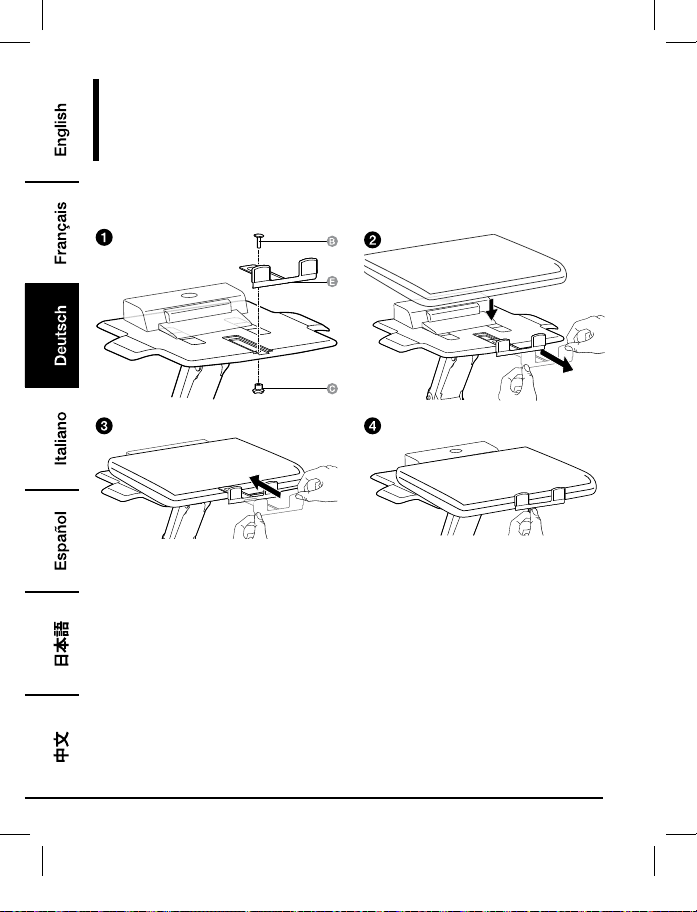
36
Montage
Schritt 3:
Notebook mit Docking-Station oder Port-Replikator
B072PZLZ25-AmazonBasics-Laptop Lift Stand-IM-V03 (EU).indb 36 8/23/17 4:57 PM
37
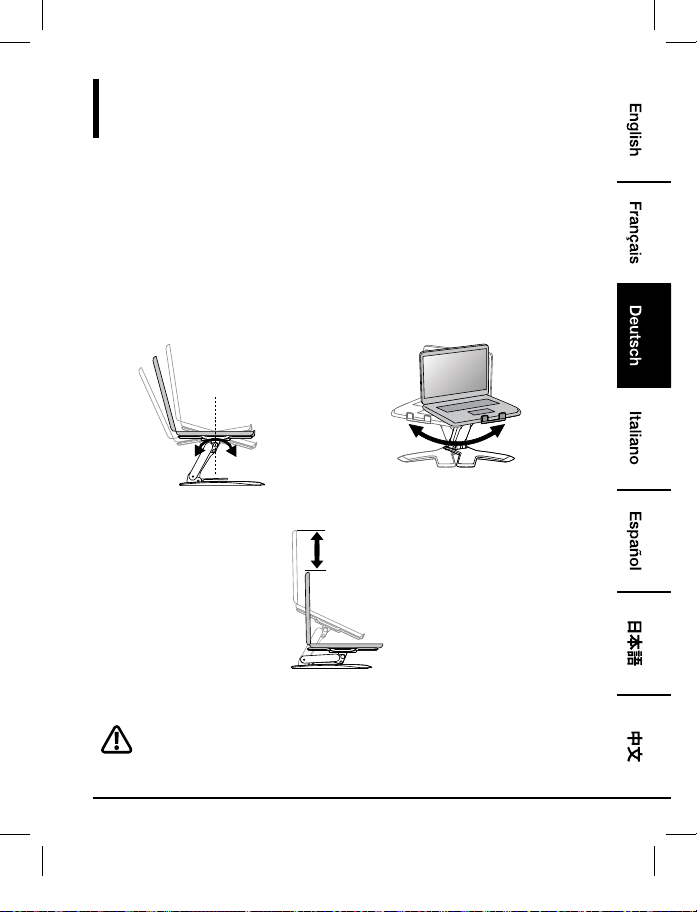
Einstellen
Schritt 4:
Es ist wichtig, dass Sie dieses Produkt dem Gewicht des befestigten Gerätes anpassen, wie in
den folgenden Schritten beschrieben.Immer, wenn ein Gerät auf diesem Produkt abgestellt oder
entfernt wird, was zu einer Veränderung im Gewicht der abgestellten Last führt, sollten Sie diese
Schritte zur Anpassung wiederholen, um einen sichern und optimalen Betrieb zu gewährleisten.
Die Anpassungen sollten gleichmäßig und leicht während der gesamten Bewegung erfolgen
und das Produkt sollte in der eingestellten Position verbleiben.Wenn die Anpassungen schwierig
durchzuführen sind und das Produkt nicht in der gewünschten Position verbleibt, folgen Sie
den Anweisungen zur Verringerung oder Erhöhung der Spannung, um für eine gleichmäßige,
leichte Anpassung zu sorgen.Abhängig von Ihrem Produkt und der Anpassung kann es mehrere
Umdrehungen benötigen, bis Sie einen Unterschied feststellen.
+15˚ -25˚
360˚
Kippen – Vorwärts und Rückwärts Schwenken – Von Seite zu Seite
5.9"
(150 mm)
Anheben – Hinauf und hinunter
Heben Sie die Ablage vor der Anpassung bis zur obersten Position an.
B072PZLZ25-AmazonBasics-Laptop Lift Stand-IM-V03 (EU).indb 37 8/23/17 4:57 PM
38
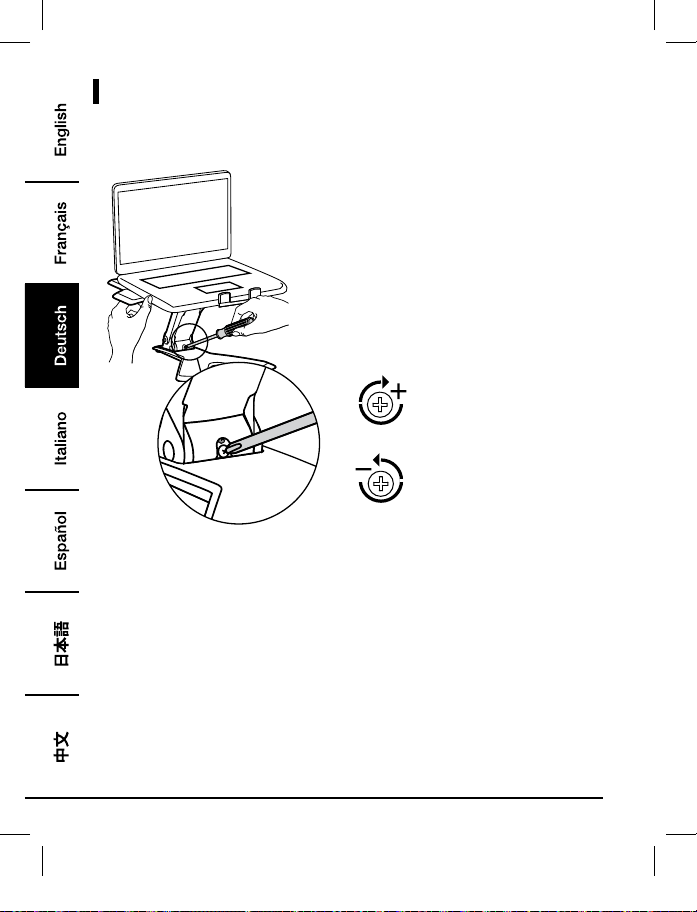
Nachstellen
Zur Erhöhung der Spannung – Im
Uhrzeigersinn drehen
Zur Verringerung der Spannung –
Gegen den Uhrzeigersinn drehen
• Folgen Sie diesen Anweisungen, um die Spannung zu erhöhen oder zu verringern.
• HINWEIS: Die Schrauben müssen eventuell um 3 bis 10 volle Umdrehungen gedreht werden,
bevor Sie eine Änderung der Spannung feststellen.
B072PZLZ25-AmazonBasics-Laptop Lift Stand-IM-V03 (EU).indb 38 8/23/17 4:57 PM
39
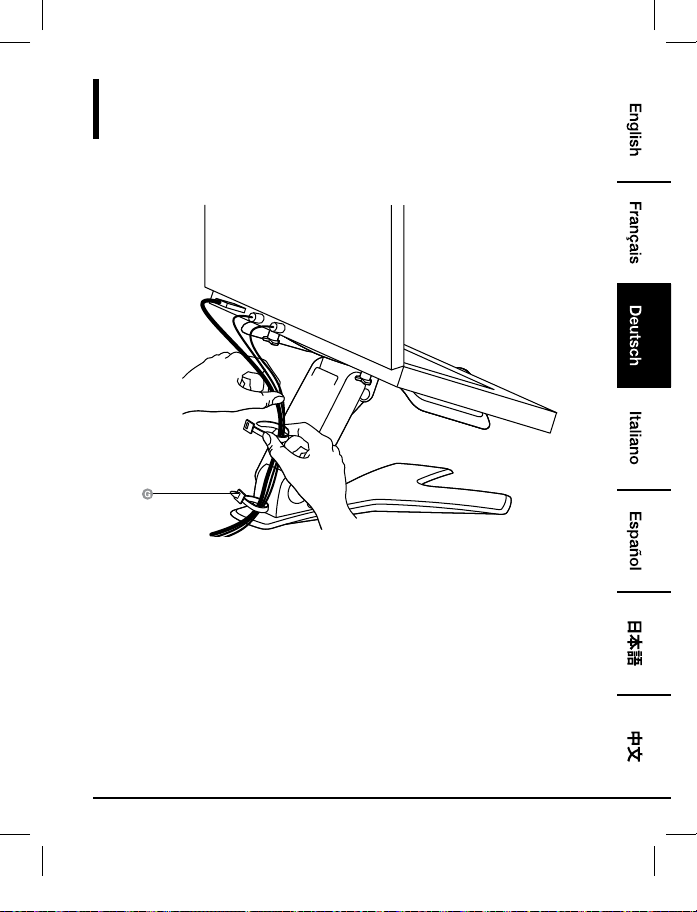
Kabel verlegen
Schritt 5:
B072PZLZ25-AmazonBasics-Laptop Lift Stand-IM-V03 (EU).indb 39 8/23/17 4:57 PM

40
Gewährleistung
Eine Kopie der Gewährleistung für dieses Produkt erhalten Sie unter
Besuchen Sie amazon.de/AmazonBasics/Warranty
— oder —
Wenden Sie sich an den Kundendienst unter 08 00-3 63 84 69
B072PZLZ25-AmazonBasics-Laptop Lift Stand-IM-V03 (EU).indb 40 8/23/17 4:57 PM

41
Feedback
Gefällt es Ihnen? Gefällt es Ihnen nicht?
Dann bewerten Sie das Produkt auf unserer Webseite!
AmazonBasics setzt sich für die Bereitstellung kundenorientierter Produkte ein, um Ihre hohen
Qualitätsstandards zu erfüllen. Bitte schreiben Sie eine Rezension, in der Sie Ihre Erfahrungen mit
dem Produkt teilen.
Bitte besuchen Sie: amazon.de/review/review-your-purchases#
Möchten Sie mehr wissen?
Besuchen Sie amazon.de/gp/help/customer/contact-us
— oder —
Wenden Sie sich an den Kundendienst unter 08 00-3 63 84 69
B072PZLZ25-AmazonBasics-Laptop Lift Stand-IM-V03 (EU).indb 41 8/23/17 4:57 PM
42
Guida di Benvenuto
•
Italiano
Supporto Sollevabile per Notebook
Contenuto:
Prima di iniziare, assicurarsi che la confezione contenga i seguenti componenti:
Parte Qtà
1
1
1
4
1
1
2
B072PZLZ25-AmazonBasics-Laptop Lift Stand-IM-V03 (EU).indb 42 8/23/17 4:57 PM
43
2 - 11 lb (0,9 - 5 kg)
ATTENZIONE: NON SUPERARE LA MASSIMA CAPACITA’
DI CARICO ELENCATA. POTREBBERO VERIFICARSI GRAVI
LESIONI O DANNI ALLA PROPRIETA’!
NOTA: Questo prodotto è destinato ad essere utilizzato con una
tastiera e un mouse indipendenti (comprati separatamente).
L’utilizzo della tastiera del laptop non è consigliato.
3
4
Solo Notebook
Notebook con Docking Station o Replicatore
di Porte
B072PZLZ25-AmazonBasics-Laptop Lift Stand-IM-V03 (EU).indb 43 8/23/17 4:57 PM
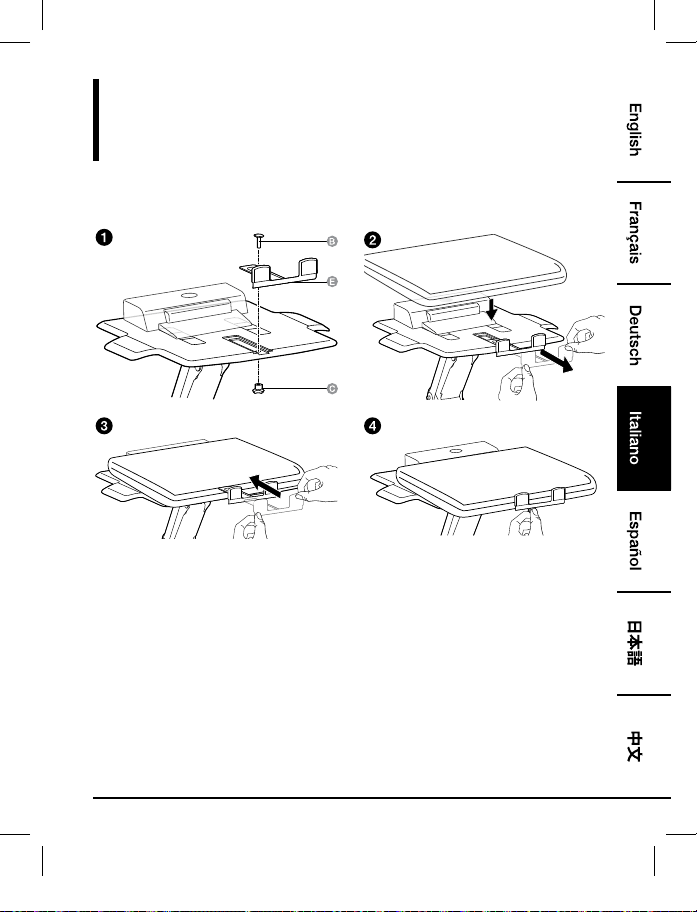
44
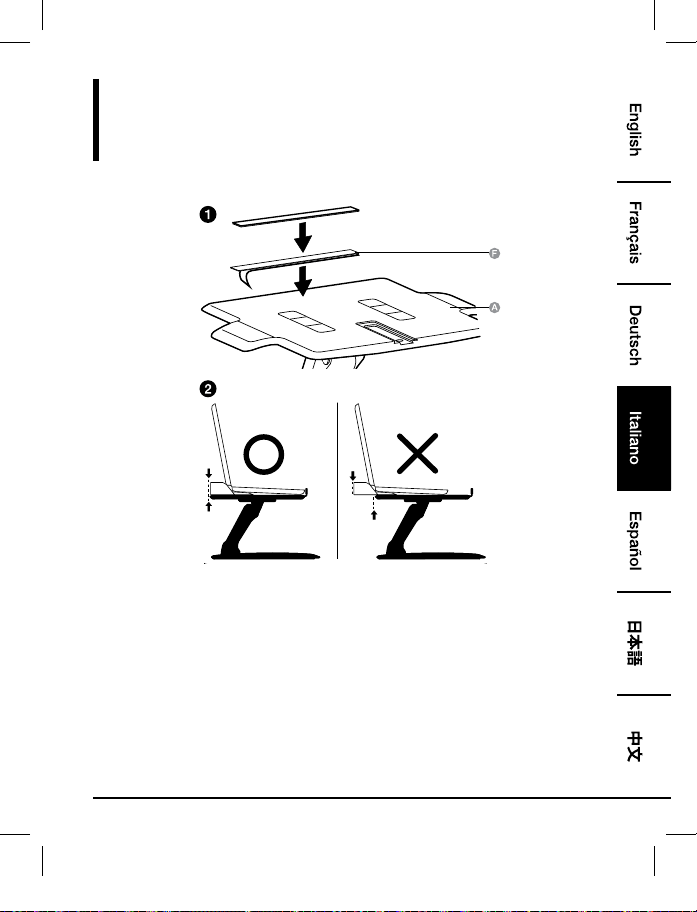
Montaggio
Passo 1:
Solo Notebook
B072PZLZ25-AmazonBasics-Laptop Lift Stand-IM-V03 (EU).indb 44 8/23/17 4:57 PM
45
Montaggio
Passo 2:
Solo Notebook
• Posizionare i cuscinetti dove poggia la superficie inferiore dell’attrezzatura. Non mettere i
cuscinetti dove poggiano i piedini dell’attrezzatura.
• Tutti i cuscinetti devono essere attaccati al supporto per evitare che l’attrezzatura scivoli.
B072PZLZ25-AmazonBasics-Laptop Lift Stand-IM-V03 (EU).indb 45 8/23/17 4:57 PM

46
Montaggio
Passo 3:
Solo Notebook
• Centrare l’attrezzatura orizzontalmente sul vassoio.
B072PZLZ25-AmazonBasics-Laptop Lift Stand-IM-V03 (EU).indb 46 8/23/17 4:57 PM
47
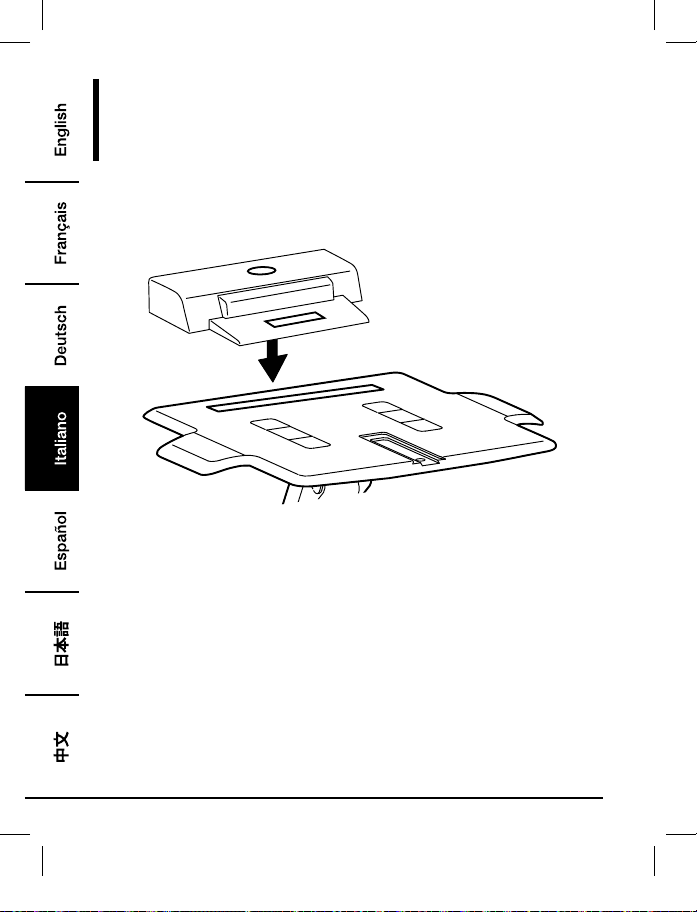
Montaggio
Passo 1:
Notebook con Docking Station o Replicatore di Porte
• Posizionare la docking station/replicatore di porte sul retro del vassoio. NON lasciare che la
docking station/replicatore di porte sporgano fuori dal retro della base.
B072PZLZ25-AmazonBasics-Laptop Lift Stand-IM-V03 (EU).indb 47 8/23/17 4:57 PM
48
Montaggio
Passo 2:
Notebook con Docking Station o Replicatore di Porte
• Centrare l’attrezzatura orizzontalmente sul vassoio.
B072PZLZ25-AmazonBasics-Laptop Lift Stand-IM-V03 (EU).indb 48 8/23/17 4:57 PM
49
Montaggio
Passo 3:
Notebook con Docking Station o Replicatore di Porte
B072PZLZ25-AmazonBasics-Laptop Lift Stand-IM-V03 (EU).indb 49 8/23/17 4:57 PM
50
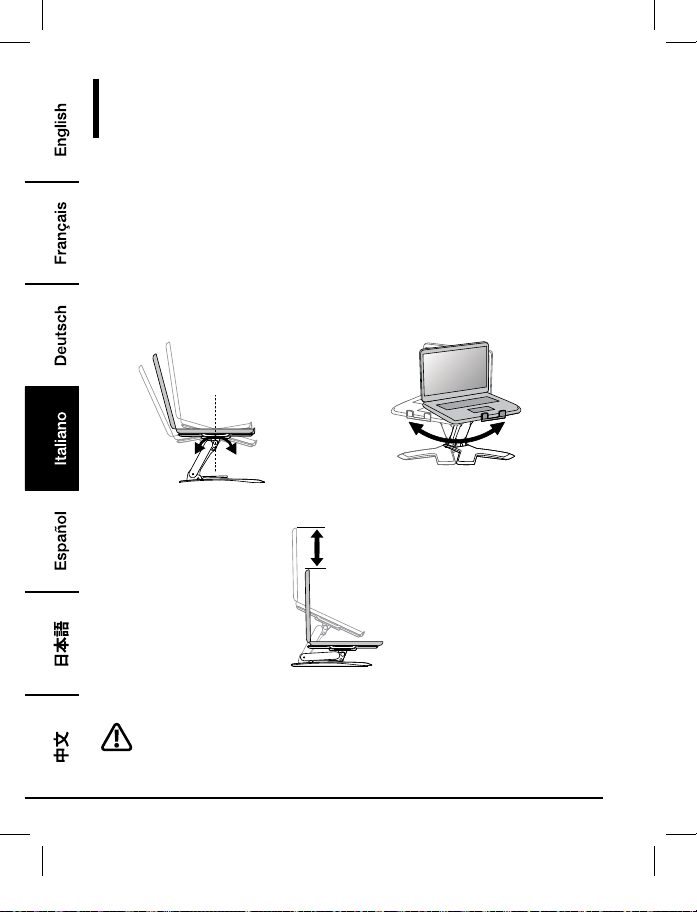
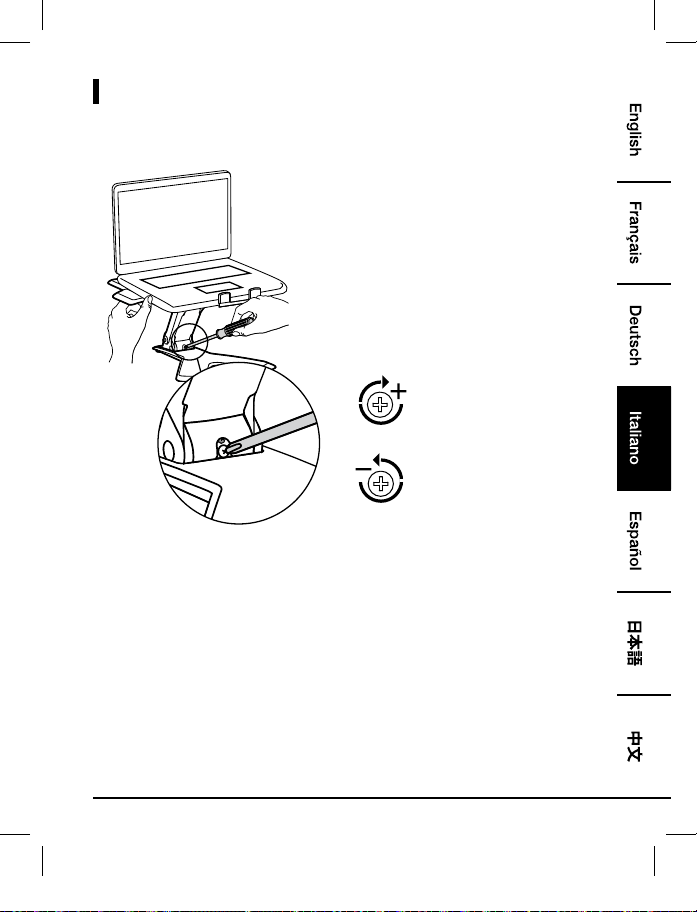
Regolazione
Passo 4:
È importante che regoliate questo prodotto in funzione del peso dell’attrezzatura montata come
descritto nei prossimi passaggi. In qualsiasi momento un apparecchio viene aggiunto o rimosso
da questo prodotto, con una conseguente variazione nel peso del carico montato, si dovranno
ripetere questi passaggi di regolazione per assicurare un funzionamento sicuro e ottimale.
Le regolazioni dovrebbero far muovere l’apparecchio in modo fluido e semplice per tutto l’intervallo
di movimento e tenerlo fermo dove è stato collocato. Se le regolazioni sono complicate e non
restano nella posizione desiderata, seguire le istruzioni per allentare o stringere la tensione per
creare un movimento di regolazione fluido e semplice. In funzione del vostro prodotto e della
regolazione, si potrebbero impiegare diverse rotazioni per notare una differenza.
+15˚ -25˚
360˚
Inclinazione – Avanti e Indietro Pan – da lato a lato
5.9"
(150 mm)
Sollevamento – Su e Giù
Sollevare la base in posizione “completamente su” prima di regolare.
B072PZLZ25-AmazonBasics-Laptop Lift Stand-IM-V03 (EU).indb 50 8/23/17 4:57 PM
51
Regolazioni
Per aumentare la tensione -
Ruotare in Senso Orario
Per diminuire la tensione -
Ruotare in Senso Antiorario
• Seguire queste istruzioni per stringere o allentare la tensione.
• NOTA: Potrebbe essere necessario girare la vite per circa 3 - 10 rivoluzioni complete prima di
notare una variazione nella tensione.
B072PZLZ25-AmazonBasics-Laptop Lift Stand-IM-V03 (EU).indb 51 8/23/17 4:57 PM
52
Instradamento del Cavo
Passo 5:
B072PZLZ25-AmazonBasics-Laptop Lift Stand-IM-V03 (EU).indb 52 8/23/17 4:57 PM
53
Informazioni Di Garanzia
Per ottenere una copia della garanzia del prodotto:
Visita amazon.it/AmazonBasics/Warranty
— o —
Contattare il Servizio Clienti al
800 62 88 05
B072PZLZ25-AmazonBasics-Laptop Lift Stand-IM-V03 (EU).indb 53 8/23/17 4:57 PM

54
Feedback
Ti piace? Oppure no?
Faccelo sapere scrivendo la tua recensione.
AmazonBasics si impegna a distribuire prodotti orientati al cliente che siano all’altezza degli
standard più elevati. Pertanto, invitiamo i clienti a scrivere una recensione per condividere le proprie
esperienze con il prodotto.
Visitare:
amazon.it/review/review-your-purchases
Per ulteriori servizi:
Visita amazon.it/gp/help/customer/contact-us
— o —
Contattare il Servizio Clienti al
800 62 88 05
B072PZLZ25-AmazonBasics-Laptop Lift Stand-IM-V03 (EU).indb 54 8/23/17 4:57 PM
55
Guía de Bienvenida
•
Español
Soporte Para Portátil
Contenido:
Antes de comenzar, compruebe que el embalaje incluye los siguientes componentes:
Componente Cant.
1
1
1
4
1
1
2
B072PZLZ25-AmazonBasics-Laptop Lift Stand-IM-V03 (EU).indb 55 8/23/17 4:57 PM
56
2 - 11 lbs. (0,9 - 5 kg)
CUIDADO: NO SUPERE EL PESO MÁXIMO INDICADO. ¡PODRÍA
OCASIONAR LESIONES GRAVES O DAÑOS A LA PROPIEDAD!
NOTA: Este producto se ha diseñado para usar con un teclado y
un ratón independientes (no incluidos). No se recomienda el uso
del teclado del portátil.
3
4
Solo portátil
Portátil con estación base o replicador de
puertos
B072PZLZ25-AmazonBasics-Laptop Lift Stand-IM-V03 (EU).indb 56 8/23/17 4:57 PM
57
Montaje
Paso 1:
Solo Portátil
B072PZLZ25-AmazonBasics-Laptop Lift Stand-IM-V03 (EU).indb 57 8/23/17 4:57 PM
58
Montaje
Paso 2:
Solo Portátil
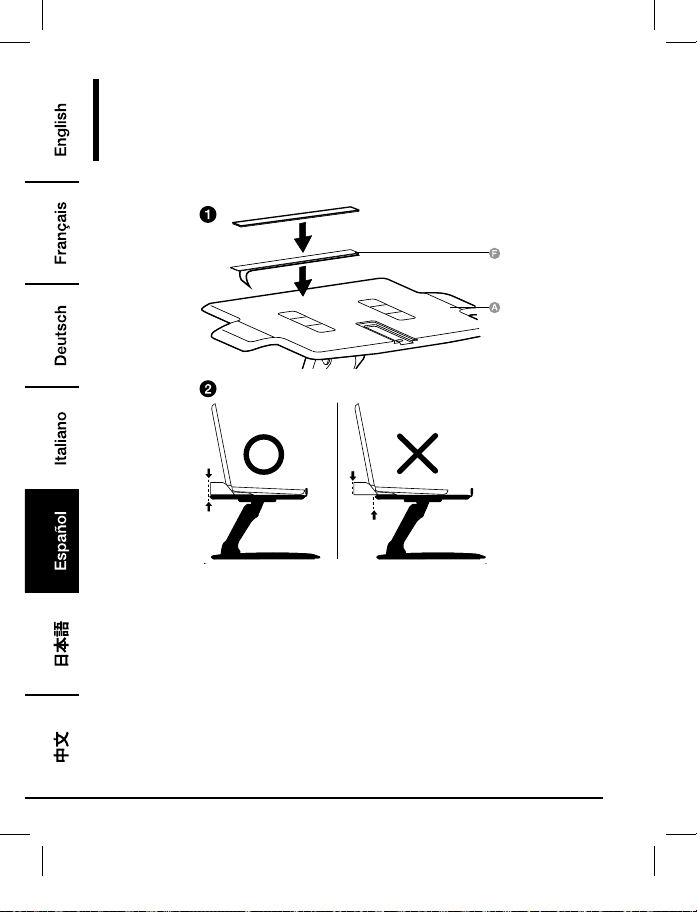
• Coloque las almohadillas donde repose la superficie inferior del equipo. No coloque las
almohadillas donde reposen los soportes del equipo.
• Todas las almohadillas deben colocarse en el soporte para evitar que el equipo se deslice.
B072PZLZ25-AmazonBasics-Laptop Lift Stand-IM-V03 (EU).indb 58 8/23/17 4:57 PM
59
Montaje
Paso 3:
Solo Portátil
• Centre el equipo horizontalmente en la bandeja.
B072PZLZ25-AmazonBasics-Laptop Lift Stand-IM-V03 (EU).indb 59 8/23/17 4:57 PM
60
Montaje
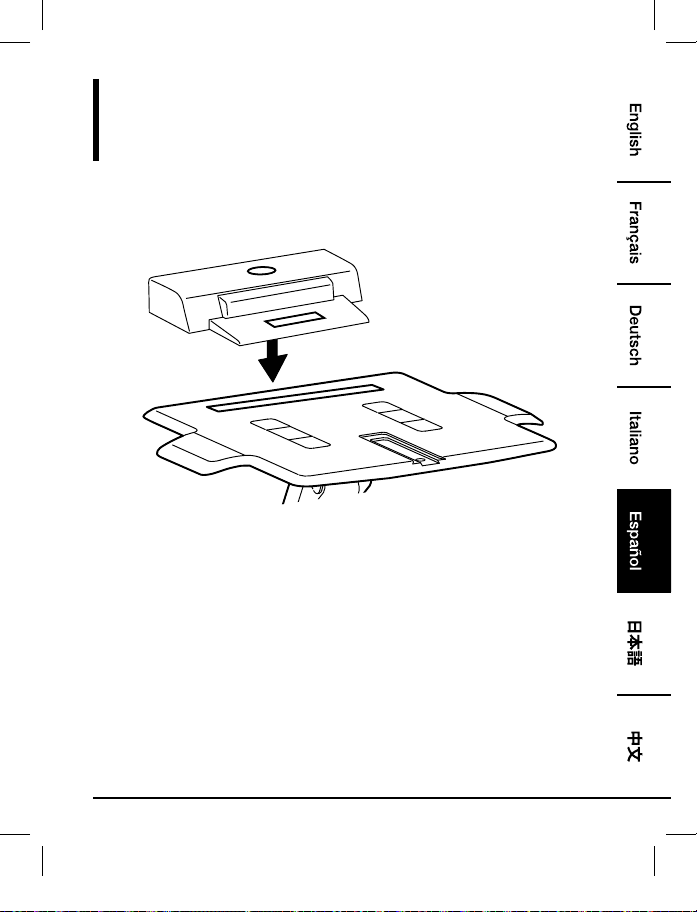
Paso 1:
Portátil Con Estación Base o Replicador De Puertos
• Coloque la estación base o el replicador de puertos en la parte trasera de la bandeja. La
estación base/replicador de puertos NO DEBE colgar en la parte posterior de la bandeja.
B072PZLZ25-AmazonBasics-Laptop Lift Stand-IM-V03 (EU).indb 60 8/23/17 4:57 PM
61
Montaje
Paso 2:
Portátil Con Estación Base o Replicador De Puertos
• Centre el equipo horizontalmente en la bandeja.
B072PZLZ25-AmazonBasics-Laptop Lift Stand-IM-V03 (EU).indb 61 8/23/17 4:57 PM

62
Montaje
Paso 3:
Portátil Con Estación Base o Replicador De Puertos
B072PZLZ25-AmazonBasics-Laptop Lift Stand-IM-V03 (EU).indb 62 8/23/17 4:57 PM

63
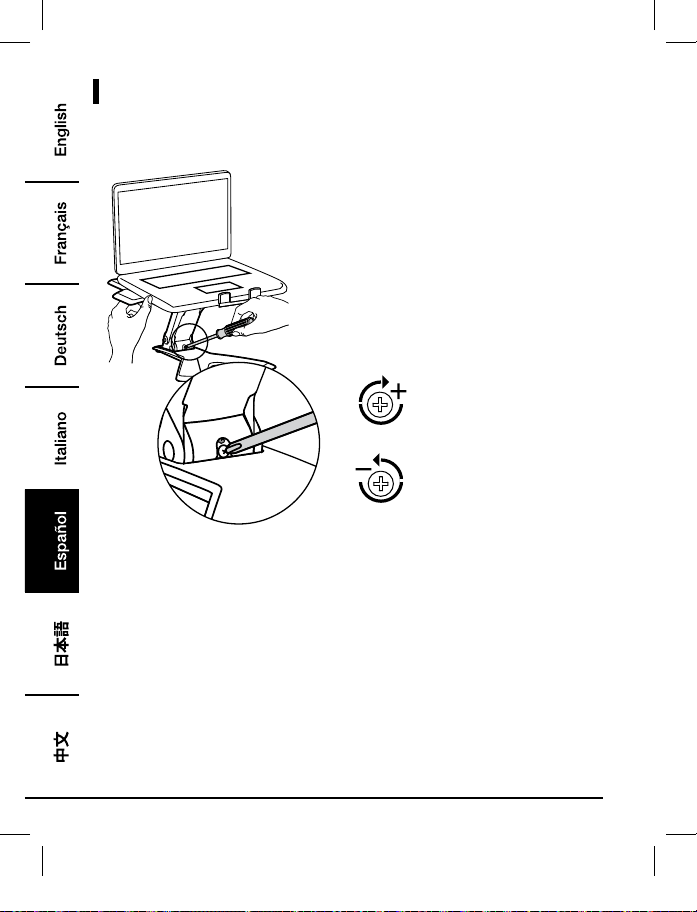
Ajuste
Paso 4:
Es importante que ajuste este producto según el peso del equipo montado como se describe
en los pasos siguientes. Cada vez que añada o retire algún equipo de este producto y, en
consecuencia, el peso de la carga montada cambie, deberá repetir estos pasos de ajuste para
garantizar un funcionamiento óptimo y seguro.
Los ajustes deben moverse con suavidad y fácilmente en todo su rango de movimiento y
permanecer donde los establezca. Si los ajustes son difíciles y no permanecen en la posición
deseada, siga las instrucciones para aflojar o apretar la tensión con el fin de crear un movimiento
de ajuste suave y fácil. En función del producto y del ajuste, es posible que necesite varias vueltas
para observar la diferencia.
+15˚ -25˚
360˚
Inclinación – Hacia delante y hacia atrás Panorámica – De lado a lado
5.9"
(150 mm)
Elevación – Arriba y abajo
Levante la bandeja hasta la posición de "máxima elevación" antes de ajustar.
B072PZLZ25-AmazonBasics-Laptop Lift Stand-IM-V03 (EU).indb 63 8/23/17 4:57 PM
64
Ajustes
Para aumentar la tensión - Girar
a la derecha
Para disminuir la tensión - Girar a
la izquierda
• Siga estas instrucciones para apretar o aflojar la tensión.
• NOTA: Es posible que el tornillo deba girar entre 3 y 10 vueltas antes de observar un cambio
en la tensión.
B072PZLZ25-AmazonBasics-Laptop Lift Stand-IM-V03 (EU).indb 64 8/23/17 4:57 PM
65
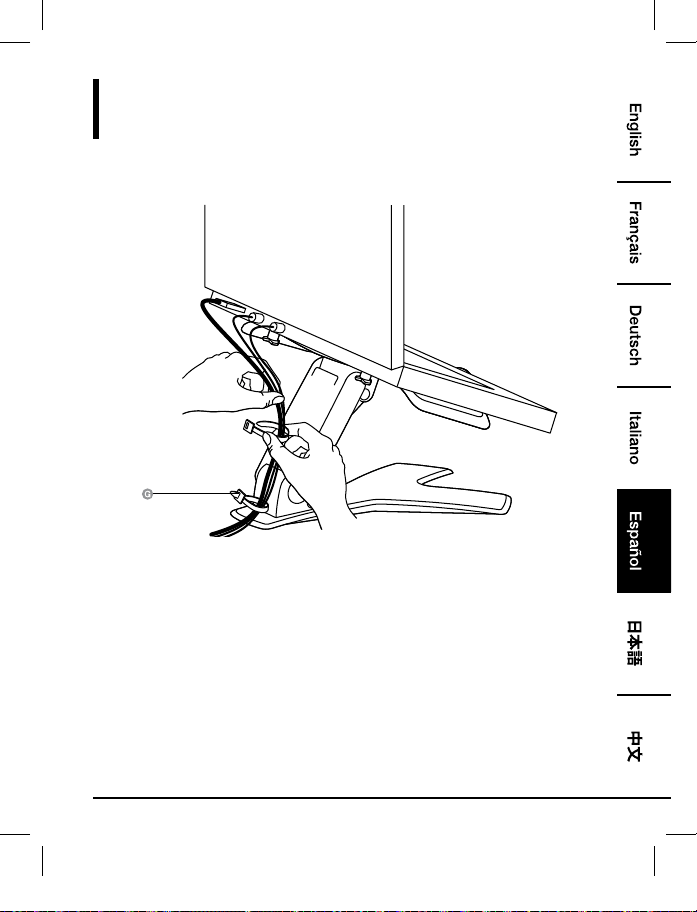
Trazado de Los Cables
Paso 5:
B072PZLZ25-AmazonBasics-Laptop Lift Stand-IM-V03 (EU).indb 65 8/23/17 4:57 PM
66
Información Sobre La Garantía
Para obtener una copia de la garantía de este producto:
Visite amazon.es/AmazonBasics/Warranty
— o —
Póngase en contacto con Atención al cliente en el 0900 803 711
B072PZLZ25-AmazonBasics-Laptop Lift Stand-IM-V03 (EU).indb 66 8/23/17 4:57 PM
67
Comentarios
¿Le encanta? ¿No le gusta nada?
Escriba una opinión como cliente.
En AmazonBasics nos comprometemos a proveer productos pensados para satisfacer a nuestros
clientes y que estén a la altura de sus elevados estándares de calidad. Le animamos a que escriba
una opinión sobre su experiencia con el producto.
Por favor, visite: amazon.es/review/review-your-purchases#
Para otros servicios:
Visite amazon.es/gp/help/customer/contact-us
— o —
Póngase en contacto con Atención al cliente en el 0900 803 711
B072PZLZ25-AmazonBasics-Laptop Lift Stand-IM-V03 (EU).indb 67 8/23/17 4:57 PM
68
ウェルカムガイド
•
日本語
ノートブックリフトスタンド
内容:
スタートする前に、パッケージに以下のものが含まれていることを必ず確認してください。
パーツ 数量
1
1
1
4
1
1
2
B072PZLZ25-AmazonBasics-Laptop Lift Stand-IM-V03 (EU).indb 68 8/23/17 4:57 PM
69
2 - 11 ポンド(0.9 - 5 kg)
注意:記載されている最大重量容量を超えないようにしてくださ
い。大怪我や家屋へのダメージにつながることがあります!
注意:この製品は独立したキーボードとマウス(別に購入した
物)と共に使うようになっています。ラップトップのキーボード
の使用はお勧めしません。
3
4
ノートブックのみ
ドッキングステーションまたはポートレプリ
ケーター付きノートブック
B072PZLZ25-AmazonBasics-Laptop Lift Stand-IM-V03 (EU).indb 69 8/23/17 4:57 PM
70
組み立て
ステップ 1:
ノートブックのみ
B072PZLZ25-AmazonBasics-Laptop Lift Stand-IM-V03 (EU).indb 70 8/23/17 4:57 PM
71
組み立て
ステップ 2:
ノートブックのみ
•• 機器の底面が来るところにパッドを置きます。機器の「足」が来る位置にはパッドを置か
ないでください。
•• 装置が滑らないよう、全てのパッドをリフトスタンドにつけてください。
B072PZLZ25-AmazonBasics-Laptop Lift Stand-IM-V03 (EU).indb 71 8/23/17 4:57 PM
72
組み立て
ステップ 3:
ノートブックのみ
•• 機器をトレーの中央に、水平に置きます。
B072PZLZ25-AmazonBasics-Laptop Lift Stand-IM-V03 (EU).indb 72 8/23/17 4:57 PM
73
組み立て
ステップ 1:
ドッキングステーションまたはポートレプリケーター付き
ノートブック
•• ドッキングステーション/ポートレプリケーターをトレイの後方に位置させます。ドッキン
グステーション/ポートレプリケーターがトレイ後方から「はみ出さないように」してくだ
さい。
B072PZLZ25-AmazonBasics-Laptop Lift Stand-IM-V03 (EU).indb 73 8/23/17 4:57 PM
74
組み立て
ステップ 2:
ドッキングステーションまたはポートレプリケーター付き
ノートブック
•• 機器をトレーの中央に、水平に置きます。
B072PZLZ25-AmazonBasics-Laptop Lift Stand-IM-V03 (EU).indb 74 8/23/17 4:57 PM
75
組み立て
ステップ 3:
ドッキングステーションまたはポートレプリケーター付き
ノートブック
B072PZLZ25-AmazonBasics-Laptop Lift Stand-IM-V03 (EU).indb 75 8/23/17 4:57 PM
76
調整
ステップ 4:
この製品を、乗せる機器の重量に合せて調節することが大切です、以下の手順で行ってくださ
い。この製品に機器を乗せるまたは取り除くたびに乗せる物の重量は変わります、安全かつ最
高の操作を保証するためにはそのつど以下の手順を繰り返してください。
調整する場合、全ての範囲の動きがスムーズかつラクであり、設定した位置にとまっている必
要があります。調整が困難で希望の位置でとまらない場合は、スムーズでラクな調整動作を作
り出すため、テンションをきつく、またはゆるくする手手順に従ってください。お手持ちの製
品および調整にもよりますが、違いを感じるために数回転させる必要がある場合があります。
+15˚ -25˚
360˚
傾ける•-•前後 パンさせる•-•左右
5.9"
(150 mm)
リフトする•-•上下
調整する前に、トレイを「一番上」の位置にしてください。
B072PZLZ25-AmazonBasics-Laptop Lift Stand-IM-V03 (EU).indb 76 8/23/17 4:57 PM
77
調整
テンションをきつくする•-•時計
回りにまわす
テンションをゆるくする•-•反時
計回りにまわす
•• この手順でテンションをきつく、またはゆるくしてください。
•• 注意:テンションの違いを感じるのにネジを•3~10•回転(360度回転)させる必要がある
かも知れません。
B072PZLZ25-AmazonBasics-Laptop Lift Stand-IM-V03 (EU).indb 77 8/23/17 4:57 PM
78
ケーブルルーティング
ステップ 5:
B072PZLZ25-AmazonBasics-Laptop Lift Stand-IM-V03 (EU).indb 78 8/23/17 4:57 PM
79
保証について
この製品の保証書のコピーを入手するには:
ホームページ: amazon.jp/AmazonBasics/Warranty
-•または•-
カスタマーサービス 0120-899-276 にご連絡ください。
B072PZLZ25-AmazonBasics-Laptop Lift Stand-IM-V03 (EU).indb 79 8/23/17 4:57 PM
80
フィードバック
気に入っていただけましたか?お気に召しませんでしたか?
カスタマーレビューでお知らせください。
Amazonベーシック•は、皆様の高い水準に答えることのできるような消費者志向型の製品をお
届けするのを旨としています。この製品についてのレビューで製品についてのご意見をお聞か
せください。
レビューはこちらへ:•amazon.jp/review/review-your-purchases#
更なるサービスについては:
こちらのリンクへ•amazon.jp/gp/help/customer/contact-us
-•または•-
カスタマーサービス•0120-899-276•にご連絡ください。
B072PZLZ25-AmazonBasics-Laptop Lift Stand-IM-V03 (EU).indb 80 8/23/17 4:57 PM
81
欢迎指南
•
中文
笔记本电脑增高托架
内装物:
在开始组装之前,确保包装内包含以下组件:
部件 数量
1
1
1
4
1
1
2
B072PZLZ25-AmazonBasics-Laptop Lift Stand-IM-V03 (EU).indb 81 8/23/17 4:57 PM
82
2 - 11 磅(0.9 - 5 千克)
注意:不要超出列出的最大承重量。有可能发生严重人身伤害或者
物品损坏!
注意:本品需与独立键盘和鼠标配合使用(单独购买)。不推荐使
用笔记本电脑本身的键盘。
3
4
仅笔记本电脑 带有扩展坞或多端口转接器的笔记本电脑
B072PZLZ25-AmazonBasics-Laptop Lift Stand-IM-V03 (EU).indb 82 8/23/17 4:57 PM
83
组装
步骤 1:
仅笔记本电脑
B072PZLZ25-AmazonBasics-Laptop Lift Stand-IM-V03 (EU).indb 83 8/23/17 4:57 PM
84
组装
步骤 2:
仅笔记本电脑
• 放置贴垫,以便将笔记本电脑底面坐于其上。勿将贴垫放于笔记本电脑防滑脚将会触及的地
方。
• 必须将所有贴垫粘贴于增高托架上,以防止笔记本电脑滑落。
B072PZLZ25-AmazonBasics-Laptop Lift Stand-IM-V03 (EU).indb 84 8/23/17 4:57 PM
85
组装
步骤 3:
仅笔记本电脑
• 将笔记本电脑居中水平放置于托架上。
B072PZLZ25-AmazonBasics-Laptop Lift Stand-IM-V03 (EU).indb 85 8/23/17 4:57 PM
86
组装
步骤 1:
带有扩展坞或多端口转接器的笔记本电脑
• 将扩展坞/多端口转接器放置于托架后部。切勿让扩展坞/多端口转接器从托架后部探出。
B072PZLZ25-AmazonBasics-Laptop Lift Stand-IM-V03 (EU).indb 86 8/23/17 4:57 PM

87
组装
步骤 2:
带有扩展坞或多端口转接器的笔记本电脑
• 将笔记本电脑居中水平放置于托架上。
B072PZLZ25-AmazonBasics-Laptop Lift Stand-IM-V03 (EU).indb 87 8/23/17 4:57 PM

88
组装
步骤 3:
带有扩展坞或多端口转接器的笔记本电脑
B072PZLZ25-AmazonBasics-Laptop Lift Stand-IM-V03 (EU).indb 88 8/23/17 4:57 PM
89
调整
步骤 4:
按如下描述根据所放置的笔记本电脑的重量调节本品,这点很重要。无论何时一旦往产品上加载
或者移除笔记本电脑而引起负载重量的变化时,您都应该重复这些调节步骤来确保安全,并优
化操作。
在全范围和角度的移动中,调节应该流畅简单,且可随时固定于您设置的位置。如果调节困难且
不能固定于预想位置,根据说明放松或收紧张力,以使调节移动流畅简单。根据您的产品和调节
方式,有可能需要多试几次才能发现差别。
+15˚ -25˚
360˚
倾斜度 – 前后 水平角度 – 一边到另一边
5.9"
(150 mm)
提起和降低
调节前,把托架完全提升。
B072PZLZ25-AmazonBasics-Laptop Lift Stand-IM-V03 (EU).indb 89 8/23/17 4:57 PM
90
调节
增大张力 - 顺时针旋转
减小张力 – 逆时针旋转
• 按照这些说明收紧或放松张力。
• 注意:有可能需要把螺丝拧 3-10 个整圈才能体现出张力的变化。
B072PZLZ25-AmazonBasics-Laptop Lift Stand-IM-V03 (EU).indb 90 8/23/17 4:57 PM
91
归捋线缆
步骤 5:
B072PZLZ25-AmazonBasics-Laptop Lift Stand-IM-V03 (EU).indb 91 8/23/17 4:57 PM
92
保修信息
如需获得此产品的保修信息:
访问 amazon.cn/AmazonBasics/Warranty
— 或 —
拨打 400-810-5666 联系客服人员
B072PZLZ25-AmazonBasics-Laptop Lift Stand-IM-V03 (EU).indb 92 8/23/17 4:57 PM
93
反馈
喜欢这款产品?不喜欢这款产品?
让我们通过客户评论了解您的想法和意见。
亚马逊倍思以客户为导向,致力于供应满足客户高标准的产品。我们邀请您填写评论,分享您使
用产品的体验。
请访问:amazon.cn/review/review-your-purchases
如需更多服务:
访问 amazon.cn/gp/help/customer/contact-us
— 或 —
拨打 400-810-5666 联系客服人员
B072PZLZ25-AmazonBasics-Laptop Lift Stand-IM-V03 (EU).indb 93 8/23/17 4:57 PM

MADE IN CHINA
amazon.com/AmazonBasics
B072PZLZ25-AmazonBasics-Laptop Lift Stand-IM-V03 (EU).indb 94 8/23/17 4:57 PM