www.philips.com/welcome
BDL3245E
BDL4245E
BDL4645E
User Manual (English)
BDL3245E / BDL4245E / BDL4645E
ii
Safety Instructions
Warnings and Precautions
KNOW THESE SAFETY SYMBOLS
CAUTION: TOREDUCETHERISKOFELECTRICSHOCK,DONOTREMOVECOVER(ORBACK).NOUSERSERVICEABLEPARTSINSIDE.
REFERSERVICINGTOQUALIFIEDSERVICEPERSONNEL.
Thissymbolindicateshighvoltageispresentinside.Itisdangeroustomakeanykindofcontactwithanyinsidepartofthisproduct.
Thissymbolalertsyouthatimportantliteratureconcerningoperationandmaintenancehasbeenincludedwiththisproduct.
Note to CATV system installer:ThisreminderisprovidedtocallCATVsysteminstaller’sattentiontoArticle820-40oftheNationalElectricalCode(Section
54ofCanadianElectricalCode,PartI),thatprovidesguidelinesforpropergroundingand,inparticular,speciesthatthecablegroundshallbeconnected
tothegroundingsystemofthebuildingasclosetothepointofcableentryaspractical.
CAUTION: FCC/CSAregulationsstatethatanyunauthorizedchangesormodicationstothisequipmentmayvoidtheuser’sauthoritytooperateit.
CAUTION: Topreventelectricshock,matchthewidebladeofplugtothewideslot,andfullyinserttheplug.
IMPORTANT: OneFederalCourthasheldthatunauthorizedrecordingofcopyrightedTVprogramsisaninfringementofU.S.copyrightlaws.Certain
Canadianprogramsmayalsobecopyrightedandanyunauthorizedrecordinginwholeorinpartmaybeinviolationoftheserights.
TOPREVENTDAMAGEWHICHMAYRESULTINFIREORELECTRICSHOCKHAZARD,DONOTEXPOSETHISAPPLIANCETORAINOR
MOISTURE.
TheSocket-outletshallbeinstalledneartheapparatusandshallbeeasilyaccessible.
Read and follow these instructions when connecting and using your computer monitor:
• Unplugthemonitorifyouarenotgoingtouseitforanextensiveperiodoftime.
• Unplugthemonitorifyouneedtocleanitwithaslightlydampcloth.Thescreenmanybewipedwithadryclothwhenthepoweris
off.However,neverusealcohol,solventsorammonia-basedliquids.
• Consultaservicetechnicianifthemonitordoesnotoperatenormallywhenyouhavefollowedtheinstructionsinthismanual.
• Thecasingcovershouldbeopenedonlybyqualiedservicepersonnel.
• Keepthemonitoroutofdirectsunlightandawayfromstovesoranyotherheatsource.
• Removeanyobjectthatcouldfallintotheventsorpreventpropercoolingofthemonitor’selectronics.
• Donotblocktheventilationholesonthecabinet.
• Keepthemonitordry.Toavoidelectricshock,donotexposeittorainorexcessivemoisture.
• IfturningoffthemonitorbydetachingpowercableorDCpowercord,waitfor6secondsbeforeattachthepowercableorDC
powercordfornormaloperation.
• Toavoidtheriskofshockorpermanentdamagetothesetdonotexposethemonitortorainorexcessivemoisture.
• Whenpositioningthemonitor,makesurethepowerplugandoutletareeasilyaccessible.
• IMPORTANT:Alwaysactivateascreensaverprogramduringyourapplication.Ifastillimageinhighcontrastremainsonthe
screenforanextendedperiodoftime,itmayleavean‘after-image’or‘ghostimage’onthefrontofthescreen.Thisisawell-known
phenomenonthatiscausedbytheshortcomingsinherentintheLCDtechnology.Inmostcasestheafterimagewilldisappear
graduallyoveraperiodoftimeafterthepowerhasbeenswitchedoff.Beawarethattheafter-imagesymptomcannotberepaired
andisnotcoveredunderwarranty.
BDL3245E / BDL4245E / BDL4645E
iii
Regulatory Information
CE Declaration of Conformity
MMDdeclareunderourresponsibilitythattheproductisinconformitywiththefollowingstandards
• EN60950-1:2006+A11:2009(SafetyrequirementofInformationTechnologyEquipment)
• EN55022:2006+A1:2007(RadioDisturbancerequirementofInformationTechnologyEquipment)
• EN55024:1998+A1:2001+A2:2003(ImmunityrequirementofInformationTechnologyEquipment)
• EN61000-3-2:2006(LimitsforHarmonicCurrentEmission)
• EN61000-3-3:2008(LimitationofVoltageFluctuationandFlicker)followingprovisionsofdirectivesapplicable
• 2006/95/EC(LowVoltageDirective)
• 2004/108/EC(EMCDirective)
• 2005/32/EC(EuP,Energy-usingProductDirective)ECNo.642/2009Implementing
• 93/68/EEC(AmendmentofEMCandLowVoltageDirective)andisproducedbyamanufacturingorganizationonISO9000level.
Federal Communications Commission (FCC) Notice (U.S. Only)
ThisequipmenthasbeentestedandfoundtocomplywiththelimitsforaClassBdigitaldevice,pursuanttoPart15oftheFCC
Rules.Theselimitsaredesignedtoprovidereasonableprotectionagainstharmfulinterferencewhentheequipmentisoperatedin
acommercialenvironment.Thisequipmentgenerates,usesandcanradiateradiofrequencyenergyand,ifnotinstalledandusedin
accordancewiththeinstructionsmanual,maycauseharmfulinterferencetoradiocommunications.Operationofthisequipmentin
aresidentialareaislikelytocauseharmfulinterferenceinwhichcasetheuserwillberequiredtocorrecttheinterferenceathisown
expense.
Changesormodicationsnotexpresslyapprovedbythepartyresponsibleforcompliancecouldvoidtheuser’sauthoritytooperatethe
equipment.
UseonlyRFshieldedcablethatwassuppliedwiththemonitorwhenconnectingthismonitortoacomputerdevice.
Topreventdamagewhichmayresultinreorshockhazard,donotexposethisappliancetorainorexcessivemoisture.
THISCLASSBDIGITALAPPARATUSMEETSALLREQUIREMENTSOFTHECANADIANINTERFERENCE-CAUSINGEQUIPMENTREGULATIONS.
ThisdevicecomplieswithPart15oftheFCCRules.Operationissubjecttothefollowingtwoconditions:(1)thisdevicemaynot
causeharmfulinterference,and(2)thisdevicemustacceptanyinterferencereceived,includinginterferencethatmaycauseundesired
operation.
BDL3245E / BDL4245E / BDL4645E
iv
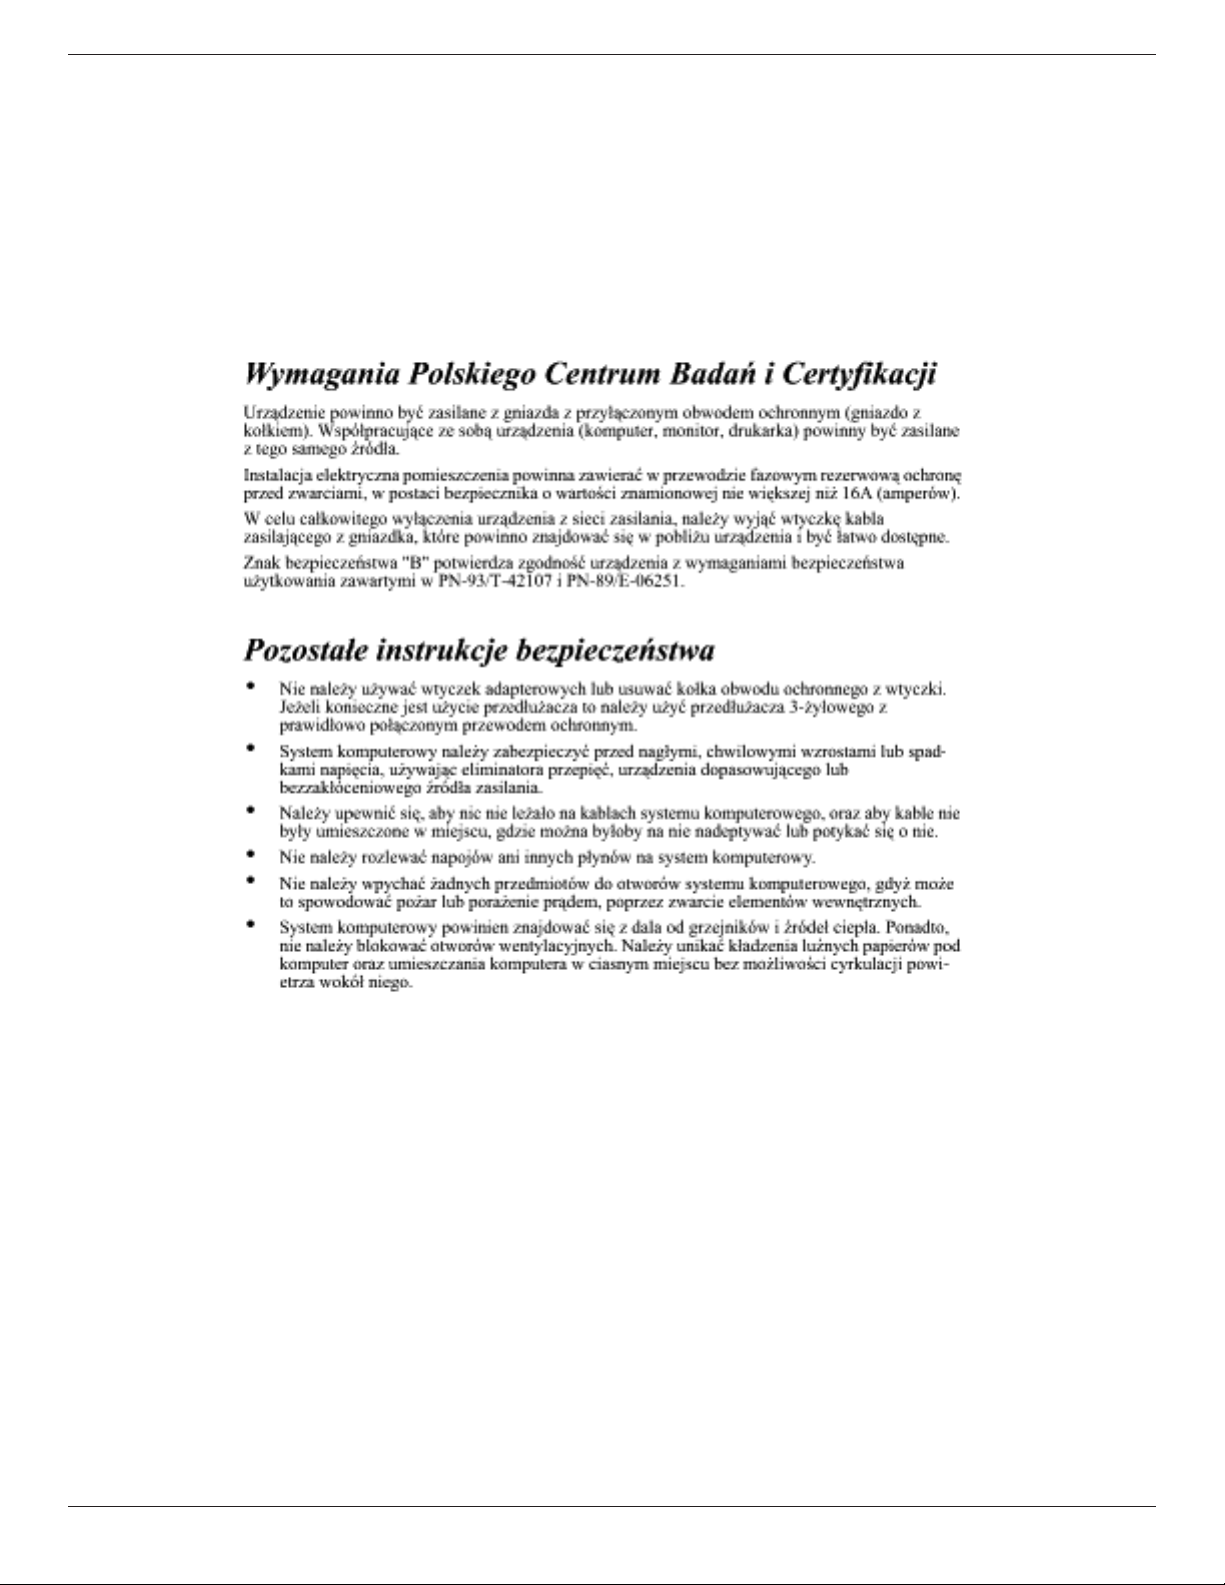
Polish Center for Testing and Certication Notice
Theequipmentshoulddrawpowerfromasocketwithanattachedprotectioncircuit(athree-prongsocket).Allequipmentthatworkstogether(computer,
monitor,printer,andsoon)shouldhavethesamepowersupplysource.
Thephasingconductoroftheroom’selectricalinstallationshouldhaveareserveshort-circuitprotectiondeviceintheformofafusewithanominalvalue
nolargerthan16amperes(A).
Tocompletelyswitchofftheequipment,thepowersupplycablemustberemovedfromthepowersupplysocket,whichshouldbelocatednearthe
equipmentandeasilyaccessible.
Aprotectionmark“B”conrmsthattheequipmentisincompliancewiththeprotectionusagerequirementsofstandardsPN-93/T-42107andPN-89/
E-06251.
Electric, Magnetic and Electronmagnetic Fields (“EMF”)
1. MMDmanufacturesandsellsmanyproductstargetedatconsumers,which,likeanyelectronicapparatus,ingeneralhavetheabilitytoemitandreceive
electromagneticsignals.
2. OneofMMDs’leadingBusinessPrinciplesistotakeallnecessaryhealthandsafetymeasuresforourproducts,tocomplywithallapplicablelegal
requirementsandtostaywellwithintheEMFstandardsapplicableatthetimeofproducingtheproducts.
3. MMDiscommittedtodevelop,produceandmarketproductsthatcausenoadversehealtheffects.
4. MMDconrmsthatifitsproductsarehandledproperlyfortheirintendeduse,theyaresafetouseaccordingtoscienticevidenceavailabletoday.
5. MMDplaysanactiveroleinthedevelopmentofinternationalEMFandsafetystandards,enablingMMDtoanticipatefurtherdevelopmentsin
standardizationforearlyintegrationinitsproducts.

BDL3245E / BDL4245E / BDL4645E
v
Information for U.K. only
(A)
(B)
WARNING - THIS APPLIANCE MUST BE EARTHED.
Important:
Thisapparatusissuppliedwithanapprovedmoulded13Aplug.Tochangeafuseinthistypeofplug
proceedasfollows:
1. Removefusecoverandfuse.
2. FitnewfusewhichshouldbeaBS13625A,A.S.T.A.orBSIapprovedtype.
3. Retthefusecover.
Ifthettedplugisnotsuitableforyoursocketoutlets,itshouldbecutoffandanappropriate3-pin
plugttedinitsplace.
Ifthemainsplugcontainsafuse,thisshouldhaveavalueof5A.Ifaplugwithoutafuseisused,thefuse
atthedistributionboardshouldnotbegreaterthan5A.
NOTE: Theseveredplugmustbedestroyedtoavoidapossibleshockhazardshoulditbeinserted
intoa13Asocketelsewhere.
How to connect a plug
Thewiresinthemainsleadarecolouredinaccordancewiththefollowingcode:
BLUE-“NEUTRAL”(“N”)
BROWN-“LIVE”(“L”)
GREEN&YELLOW-“EARTH”(“E”)
1. TheGREEN&YELLOWwiremustbeconnectedtotheterminalintheplugwhichismarkedwith
theletter“E”orbytheEarthsymbolorcolouredGREENorGREEN&YELLOW.
2. TheBLUEwiremustbeconnectedtotheterminalwhichismarkedwiththeletter“N”orcoloured
BLACK.
3. TheBROWNwiremustbeconnectedtotheterminalwhichmarkedwiththeletter“L”or
colouredRED.
Beforereplacingtheplugcover,makecertainthatthecordgripisclampedoverthesheathofthelead
-notsimplyoverthethreewires.
BDL3245E / BDL4245E / BDL4645E
vi
China RoHS
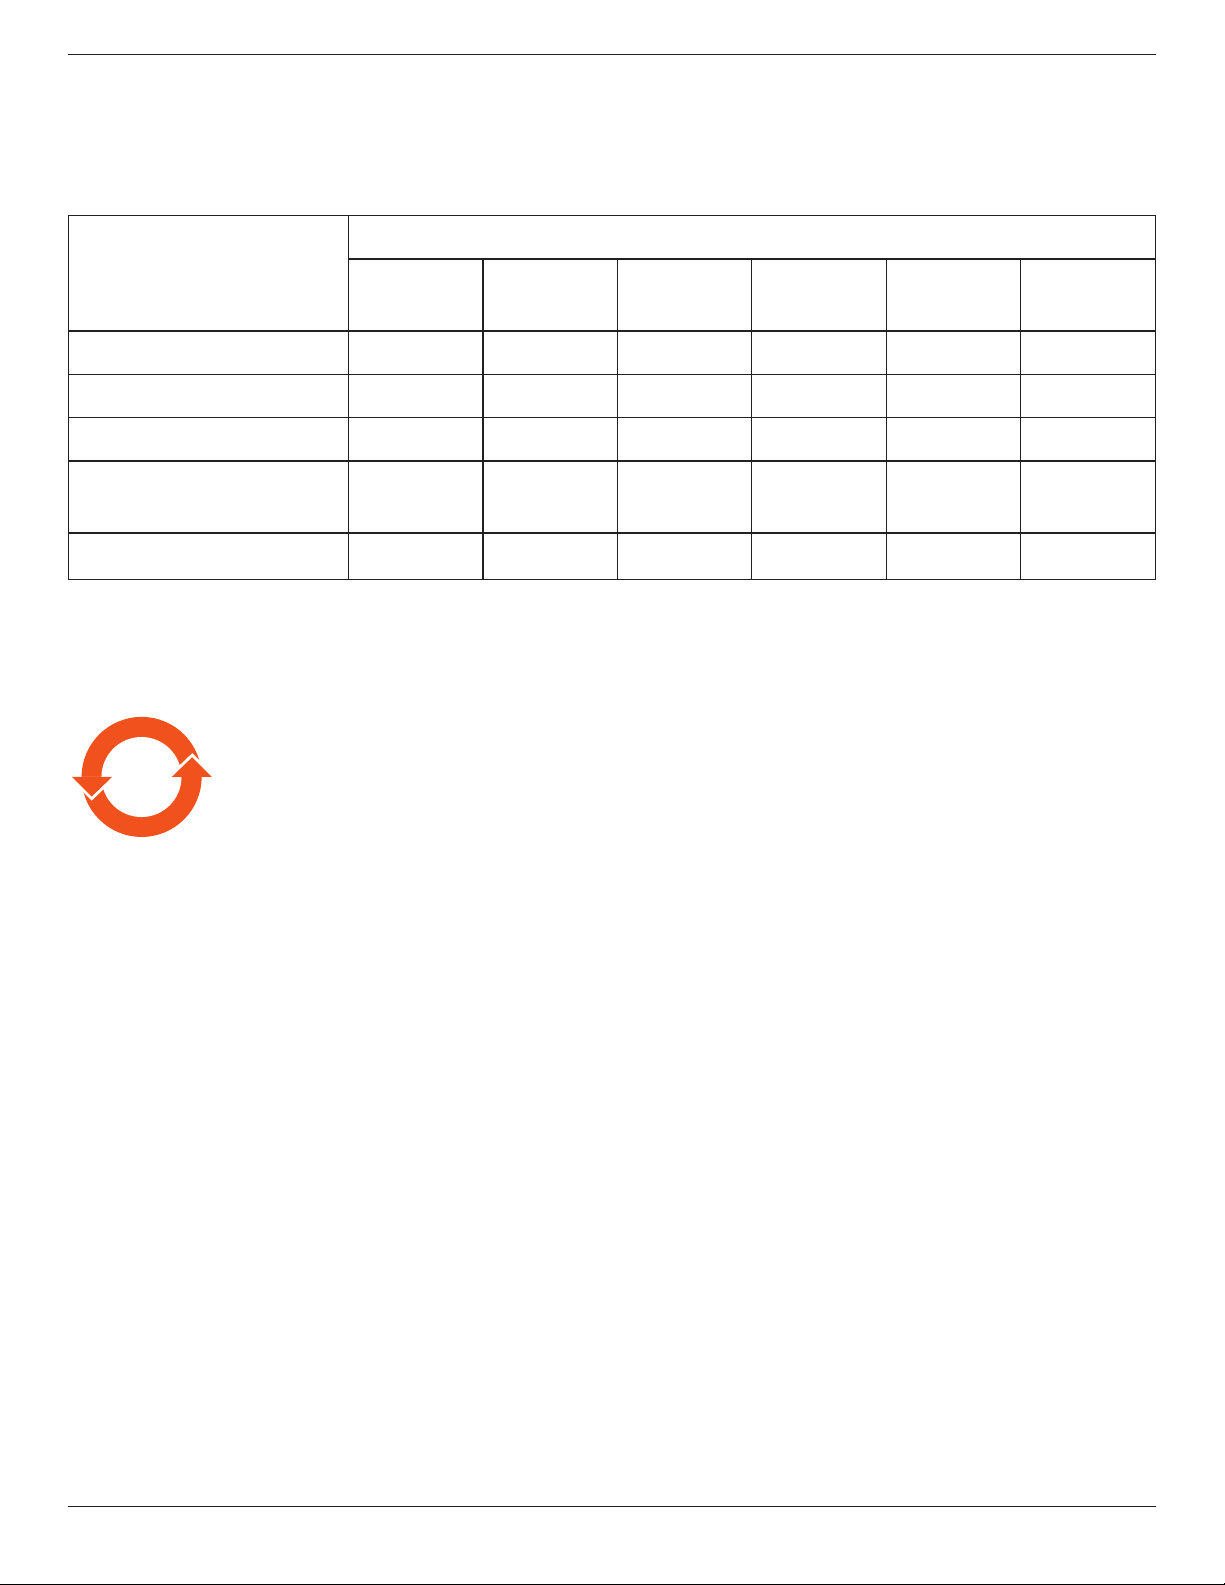
中国电子信息产品污染控制标识要求(中国RoHS法规标示要求)产品中有毒有害物质或元素
的名称及含量
部件名称
有毒有害物质或元素
铅
(Pb)
汞
(Hg)
镉
(Cd)
六价铬
(Cr6+)
多溴联苯
(PBB)
多溴二苯醚
(PBDE)
外壳 O O O O O O
液晶面板 X X O O O O
电路板组件 X O O O O O
附件
(遥控器,电源线,连接线)
X O O O O O
遥控器电池 X O O O O O
O: 表示该有毒有害物质在该部件所有均质材料中的含量均在SJ/T11363-2006标准规定的限量要求以下.
X: 表示该有毒有害物质至少在该部件的某一均质材料中的含量超出SJ/T11363-2006标准规定的限量要求.
10
環保使用期限
此標識指期限(十年),電子信息產品中含有的有毒有害物質或元素在正常使用的條件下不會發生外泄或突變
,電子信息產品用戶使用該電子信息產品不會對環境造成嚴重污染或對其人身、財產造成嚴重損害的期限。
BDL3245E / BDL4245E / BDL4645E
vii
North Europe (Nordic Countries) Information
Placering/Ventilation
VARNING:
FÖRSÄKRADIGOMATTHUVUDBRYTAREOCHUTTAGÄRLÄTÅTKOMLIGA,NÄRDUSTÄLLERDINUTRUSTNINGPÅPLATS.
Placering/Ventilation
ADVARSEL:
SØRGVEDPLACERINGENFOR,ATNETLEDNINGENSSTIKOGSTIKKONTAKTERNEMTTILGÆNGELIGE.
Paikka/Ilmankierto
VAROITUS:
SIJOITALAITESITEN,ETTÄVERKKOJOHTOVOIDAANTARVITTAESSAHELPOSTIIRROTTAAPISTORASIASTA.
Plassering/Ventilasjon
ADVARSEL:
NÅRDETTEUTSTYRETPLASSERES,MÅDUPASSEPÅATKONTAKTENEFORSTØMTILFØRSELERLETTEÅNÅ.
End-of-Life Disposal
YournewTV/Monitorcontainsmaterialsthatcanberecycledandreused.Specializedcompaniescanrecycleyourproducttoincreasetheamountof
reusablematerialsandtominimizetheamounttobedisposedof.
PleasendoutaboutthelocalregulationsonhowtodisposeofyouroldmonitorfromyourlocalPhilipsdealer.
(For customers in Canada and U.S.A.)
Thisproductmaycontainleadand/ormercury.Disposeofinaccordancetolocal-stateandfederalregulations.Foradditionalinformationonrecycling
contactwww.eia.org(ConsumerEducationInitiative)
Waste Electrical and Electronie Equipment-WEEE
Attention users in European Union private households
Thismarkingontheproductoronitspackagingillustratesthat,underEuropeanDirective2002/96/EGgoverningusedelectrical
andelectronicappliances,thisproductmaynotbedisposedofwithnormalhouseholdwaste.Youareresponsiblefordisposalofthis
equipmentthroughadesignatedwasteelectricalandelectronicequipmentcollection.Todeterminethelocationsfordroppingoffsuch
wasteelectricalandelectronic,contactyourlocalgovernmentofce,thewastedisposalorganizationthatservesyourhouseholdorthe
storeatwhichyoupurchasedtheproduct.
Attention users in United States:
LikeallLCDproducts,thissetcontainsalampwithMercury.PleasedisposeofaccordingtoallLocal,StateandFederalLaws.Forthedisposalorrecycling
information,contact:www.mygreenelectronics.comorwww.eiae.org.
End of Life Directives-Recycling
YournewTV/Monitorcontainsseveralmaterialsthatcanberecycledfornewusers.
LikeallLCDproduces,thissetcontainsalampwithMercury.PleasedisposeofaccordingtoallLocal.StateandFederallaws.
AsanENERGYSTARPartner,MMDhasdeterminedthatthisproductmeetstheENERGYSTARguidelinesforenergyefciency.

BDL3245E / BDL4245E / BDL4645E
viii
Table Of Contents
4. OSD Menu (Need Check) .................................15
4.1. NavigatingtheOSDMenu.............................15
4.1.1. NavigatingtheOSDmenuusingthe
remotecontrol........................................15
4.1.2. NavigatingtheOSDmenuusingthe
monitor’scontrolbuttons.................15
4.2. OSDMenuOverview........................................15
4.2.1. Picturemenu............................................15
4.2.2. Screenmenu............................................16
4.2.3. Audiomenu..............................................16
4.2.4. PIPmenu....................................................17
4.2.5. Conguration1menu..........................17
4.2.6. Conguration2menu..........................18
4.2.7. Advancedoptionmenu.....................19
5. Input Mode (Need Check) ..................................22
6. Pixel Defect Policy .................................................23
6.1. PixelsandSub-Pixels............................................23
6.2. TypesofPixelDefects+DotDenition.23
6.3. BrightDotDefects...............................................23
6.4. DarkDotDefects.................................................24
6.5. ProximityofPixelDefects................................24
6.6. PixelDefectTolerances......................................24
7. Cleaning and Troubleshooting (Need Check) .25
7.1. Cleaning......................................................................25
7.2. Troubleshooting......................................................26
8. Technical Specications (Need Check) ............27
1. Unpacking and Installation ..................................... 1
1.1. Unpacking.....................................................................1
1.2. PackageContents.....................................................1
1.3. InstallationNotes......................................................1
1.4. InstallingandRemovingTableStands.............2
1.5. MountingonaWall.................................................3
1.6. MountinginPortraitPosition.............................4
1.6.1. Howtousethelogoguiderfor
portraitposition........................................4
1.6.2. Howtoremovethelogo.....................4
2. Parts and Functions ................................................. 5
2.1. ControlPanel..............................................................5
2.2. Input/OutputTerminals.........................................6
2.3. RemoteControl........................................................7
2.3.1. Generalfunctions.....................................7
2.3.2. Insertingthebatteriesintheremote
control.............................................................8
2.3.3. Handlingtheremotecontrol.............8
2.3.4. Operatingrangeoftheremote
control.............................................................8
3. Connecting External Equipment .......................... 9
3.1. UsingtheSwitchCover........................................9
3.2. ConnectingExternalEquipment(DVD/
VCR/VCD)................................................................10
3.2.1. UsingCOMPONENTvideo
input..............................................................10
3.2.2. UsingHDMIvideoinput...................10
3.3. ConnectingaPC....................................................11
3.3.1. UsingVGAinput.....................................11
3.3.2. UsingDVIinput......................................11
3.3.3. UsingHDMIinput.................................12
3.4. ExternalAudioConnection.............................13
3.4.1. Connectingexternalspeakers........13
3.4.2. Connectingexternalaudio
device...........................................................13
3.5. ConnectingMonitorsinaDaisy-chain
Conguration...........................................................14
3.5.1. Videoconnection..................................14
3.5.2. Audioconnection..................................14
BDL3245E / BDL4245E / BDL4645E
1
1. Unpacking and Installation
1.1. Unpacking
• Thisproductispackedinacarton,togetherwiththestandardaccessories.
• Anyotheroptionalaccessorieswillbepackedseparately.
• Theweightoftheproductdiffers-dependingonthetype.Duetothesizeandweight,itisrecommendedtomoveitby2people.
• Afteropeningthecarton,ensurethatthecontentisingoodconditionandcomplete.
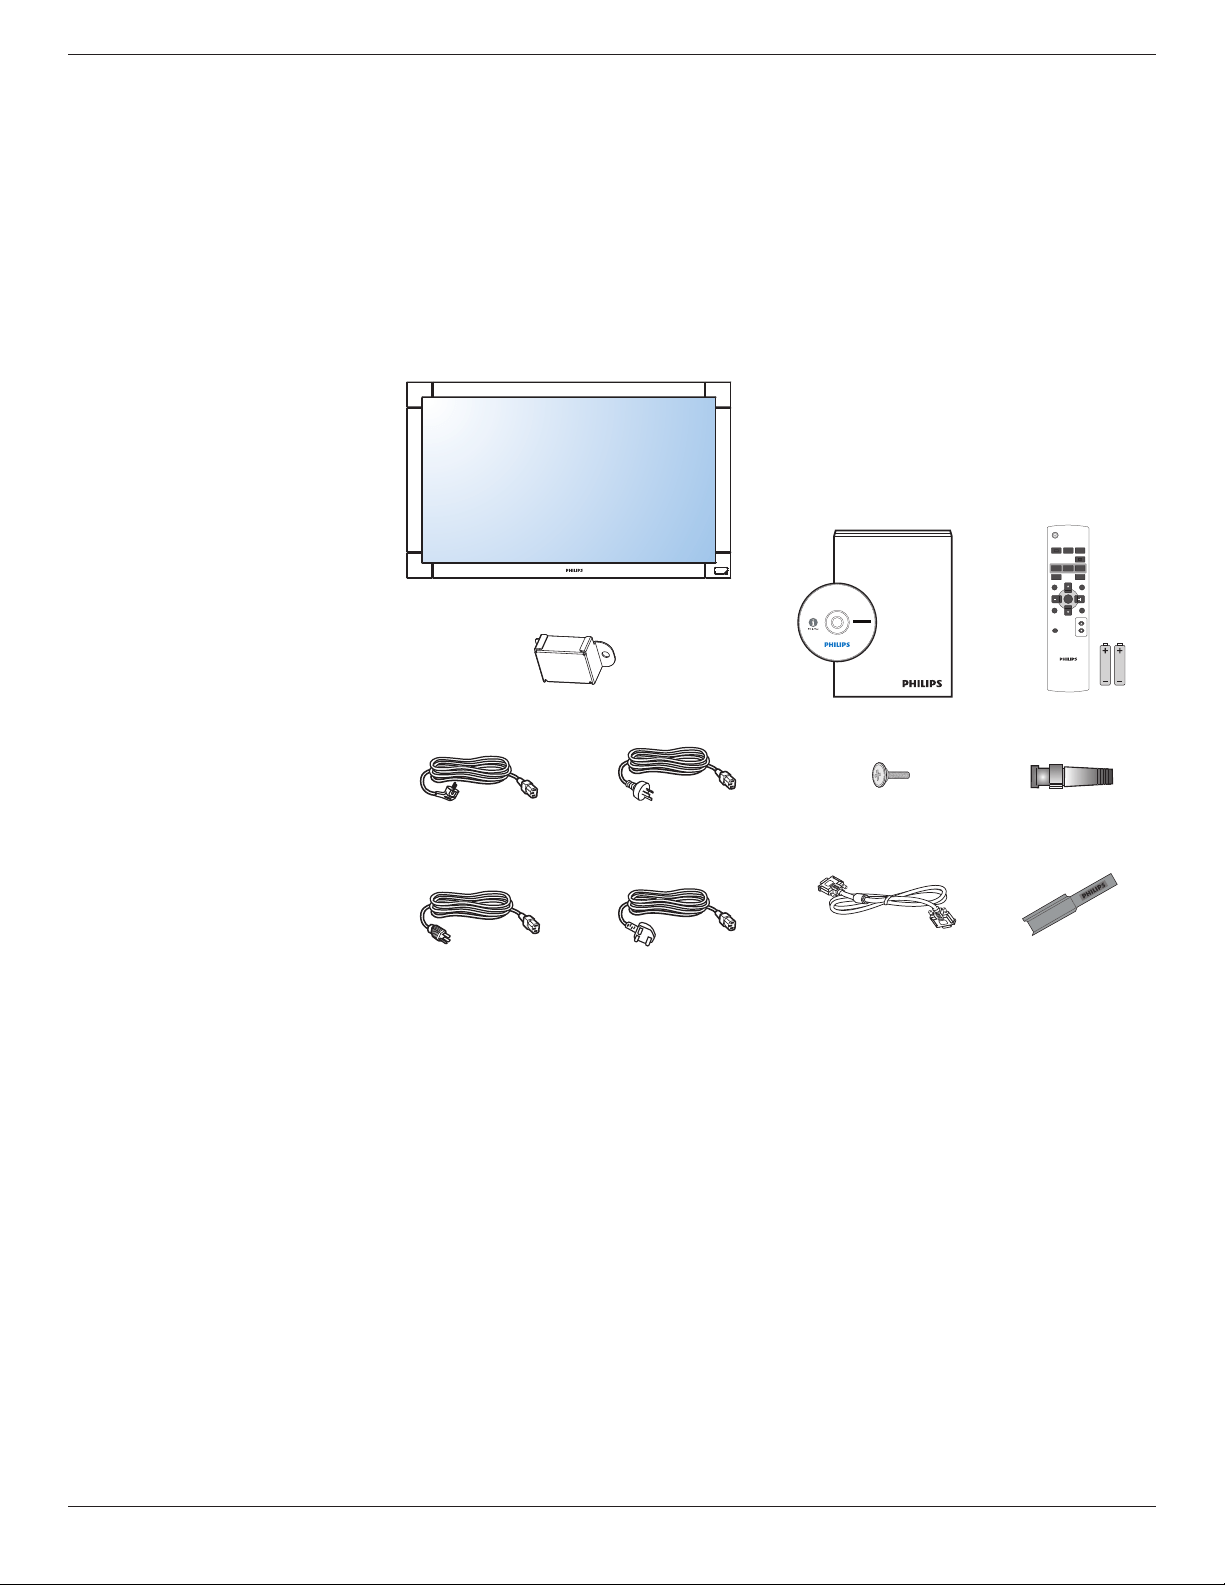
1.2. Package Contents
Pleaseverifythatyoureceivedthefollowingitemswithyourpackagecontent:
• LCDmonitor
• CDROM
• RemotecontrolwithAAAbatteries
• Powercord(1.8m)
• VGAsignalcable(1.8m)
• QuickInstallationGuide
• Tablestand
• Mainswitchcover
• Screwformainswitchcover(M3x8)
• BNC-to-RCAadapter(x5)
• Logoguider
Main switch cover
* The supplied power cord varies depending on destination.
For EU For China
For North America For UK
POWER
SMART
VIDEO
SOURCE
PIP
INPUTON/OFF CHANGE
BRIGHTNESSCONTRAST
DISPLAY
AUTO
ADJUST
MUTE
VOL UP
VOL DOWN
EXIT
MENU
SET
AUDIO
SOURCE
User’s Manual
Remote Control
and AAA Batteries
Screw for Main switch cover
(M3 x 8) x 1
BNC-RCA adapter x 5
Video Signal Cable
(D-SUB to D-SUB Cable)
Logo guider
NOTES:
• Pleasemakesurethatforallotherregions,applyapowercordthatconformstotheACvoltageofthepowersocketandhasbeenapprovedbyand
complieswiththesafetyregulationsoftheparticularcountry.
• Youmightliketosavethepackageboxandpackingmaterialforshippingthemonitor.
1.3. Installation Notes
• Duetothehighpowerconsumption,alwaysusetheplugexclusivelydesignedforthisproduct.Ifanextendedlineisrequired,pleaseconsultyour
serviceagent.
• Theproductshouldbeinstalledonaatsurfacetoavoidtipping.Thedistancebetweenthebackoftheproductandthewallshouldbemaintained
forproperventilation.Avoidinstallingtheproductinthekitchen,bathroomoranyotherplaceswithhighhumiditysoasnottoshortentheservicelife
oftheelectroniccomponents.
• Theproductcannormallyoperateonlyunder4000maltitude.Itmightabnormallyfunctioninlocationsover4000maltitudeanddonotinstalland
operatethere.

BDL3245E / BDL4245E / BDL4645E
2
1.4. Installing and Removing Table Stands
To install table stands:
1. Poweroffthemonitor.
2. Spreadaprotectivesheetonaatsurface.
3. Grabthecarryinghandlesandplacethemonitorface-downontheprotectivesheet.
4. Afterinsertingthestandintheguideblock,tightenthescrewsonbothsidesofthemonitor.
NOTE: Thelong-endsideofthestandshouldfacetothefrontwhileinstalling.
Thumbscrews
Carrying handle
Longer portions directs to the front
Table stand
To remove table stands:
1. Poweroffthemonitor.
2. Spreadaprotectivesheetonaatsurface.
3. Grabthecarryinghandlesandplacethemonitorface-downontheprotectivesheet.
4. Removescrewsusingascrewdriverandplacetheminasafeplaceforreuse.
BDL3245E / BDL4245E / BDL4645E
3
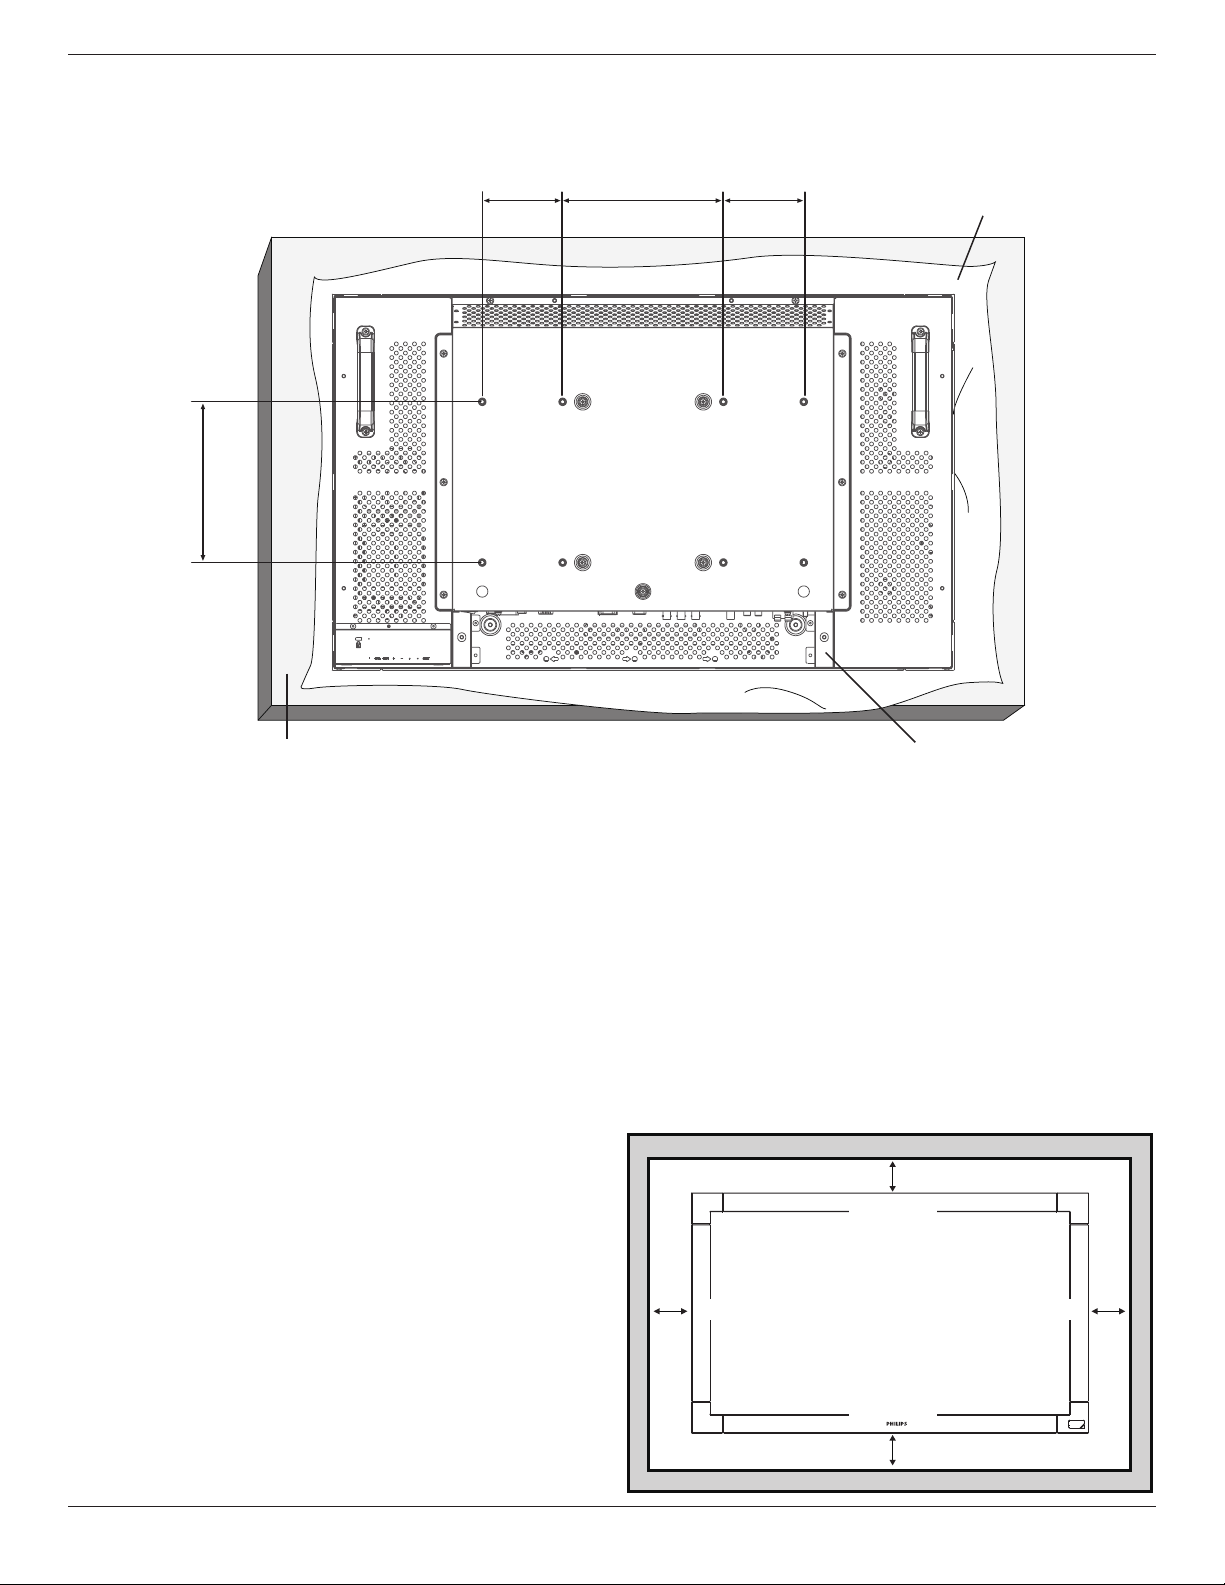
1.5. Mounting on a Wall
Tomountthismonitortoawall,youwillhavetoobtainastandardwall-mountingkit(commerciallyavailable).Usingmountinginterfacethatcomplieswith
TÜV-GSand/orUL1678standardinNorthAmericaisrecommended.
100
200
200 100
Protective Sheet
Tabletop standTable
1. Layaprotectivesheetonatable,whichwaswrappedaroundthemonitorwhenitwaspackaged,beneaththescreensurfacesoasnottoscratchthe
screenface.
2. ThisdevicecannotbeusedorinstalledwithouttheTabletopStandorothermountingaccessory.Makesureallthesestuffsarereadyforwall-mount
installation.
3. Followtheinstructionsthatcomewiththebasemountingkit.Failuretofollowcorrectmountingprocedurescouldresultindamagetotheequipment
orinjurytotheuserorinstaller.Productwarrantydoesnotcoverdamagecausedbyimproperinstallation.
4. Forthewall-mountingkit,useM6mountingscrews(havingalength10mmlongerthanthethicknessofthemountingbracket)andtightenthem
securely.(Recommendedtorque:470-635N•cm).
Caution:
Topreventthemonitorfromfalling:
• Installthemonitorwithmetalbracketsforwallorceilinginstallation(commerciallyavailable)onyourownresponsibility.Fordetailedproceduresof
installation,refertotheinstructionsofthemetalbrackets.
• Tolessentheprobabilityofinjuryanddamageresultingfromfallofthemonitorincaseofearthquakeorotherdisaster,besuretoconsultthebracket
manufacturerforinstallationlocation.
Ventilation Requirements for enclosure locating
Toallowheattodisperse,leavespacebetweensurroundingobjectsasshown
inthediagrambelow.
100 mm 100 mm
100 mm
100 mm
BDL3245E / BDL4245E / BDL4645E
4
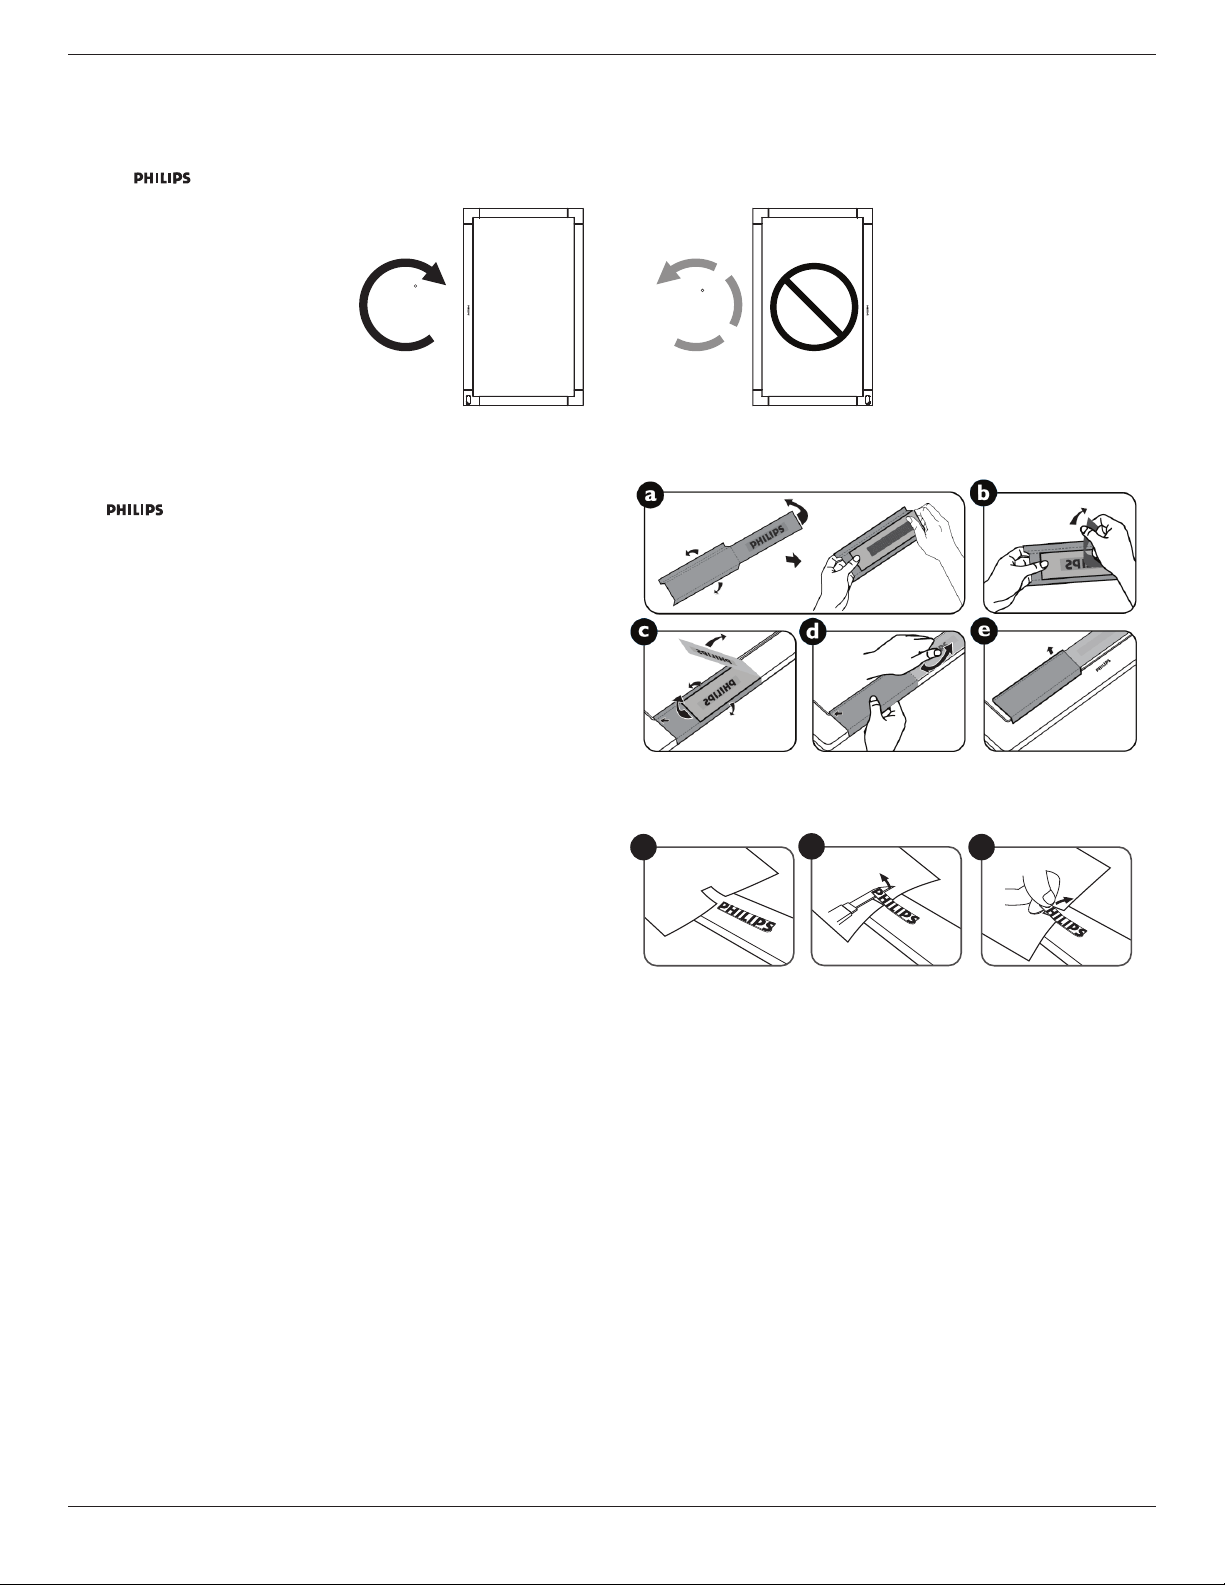
1.6. Mounting in Portrait Position
Thismonitotcanbeinstalledinportraitposition.
1. Removethetablestandiftheyareattached.
2. The“ ”logoshouldbeontheLEFTsidewhenfacingthemonitor.
90
90
1.6.1. How to use the logo guider for portrait position
a. Beforeapplying,makesurethattheguiderisingoodcondition.Foldthe
“ ”logobackinattheendoftheguider.
b. Peeloffthebacksideoftheprotectivelmfromthelogo.
c. Adjustthelogoguidertoalignitwiththelongsideofthefrontbezel
andpresstheguiderwithyourhand.
d. Keeppressingtheguiderwithyouronehandandusetheotherhandto
foldthelogoout.Makesurethatthelogoisalignedwiththefrontshort
bezel.Pressrmlyandrepeatedlyonthelogotomakethelogostick
tightonthefrontbezel.
e. Removetheguider.
1.6.2. How to remove the logo
1. Prepareapieceofpaperwithacuttingareaoflogoasaprotectorto
preventthefrontbezelfromscratching.
2. Usingaknife,carefullyremovethelogostickerwiththepaperplacing
beneath.
3. Tearoffthelogosticker.
1
2
3
NOTE: Wheninstallingthemonitoronawall,pleaseconsultaprofessionaltechnicianforproperinstalling.Themanufactureracceptsnoliabilityfor
installationsnotperformedbyaprofessionaltechnician.
BDL3245E / BDL4245E / BDL4645E
5
2. Parts and Functions
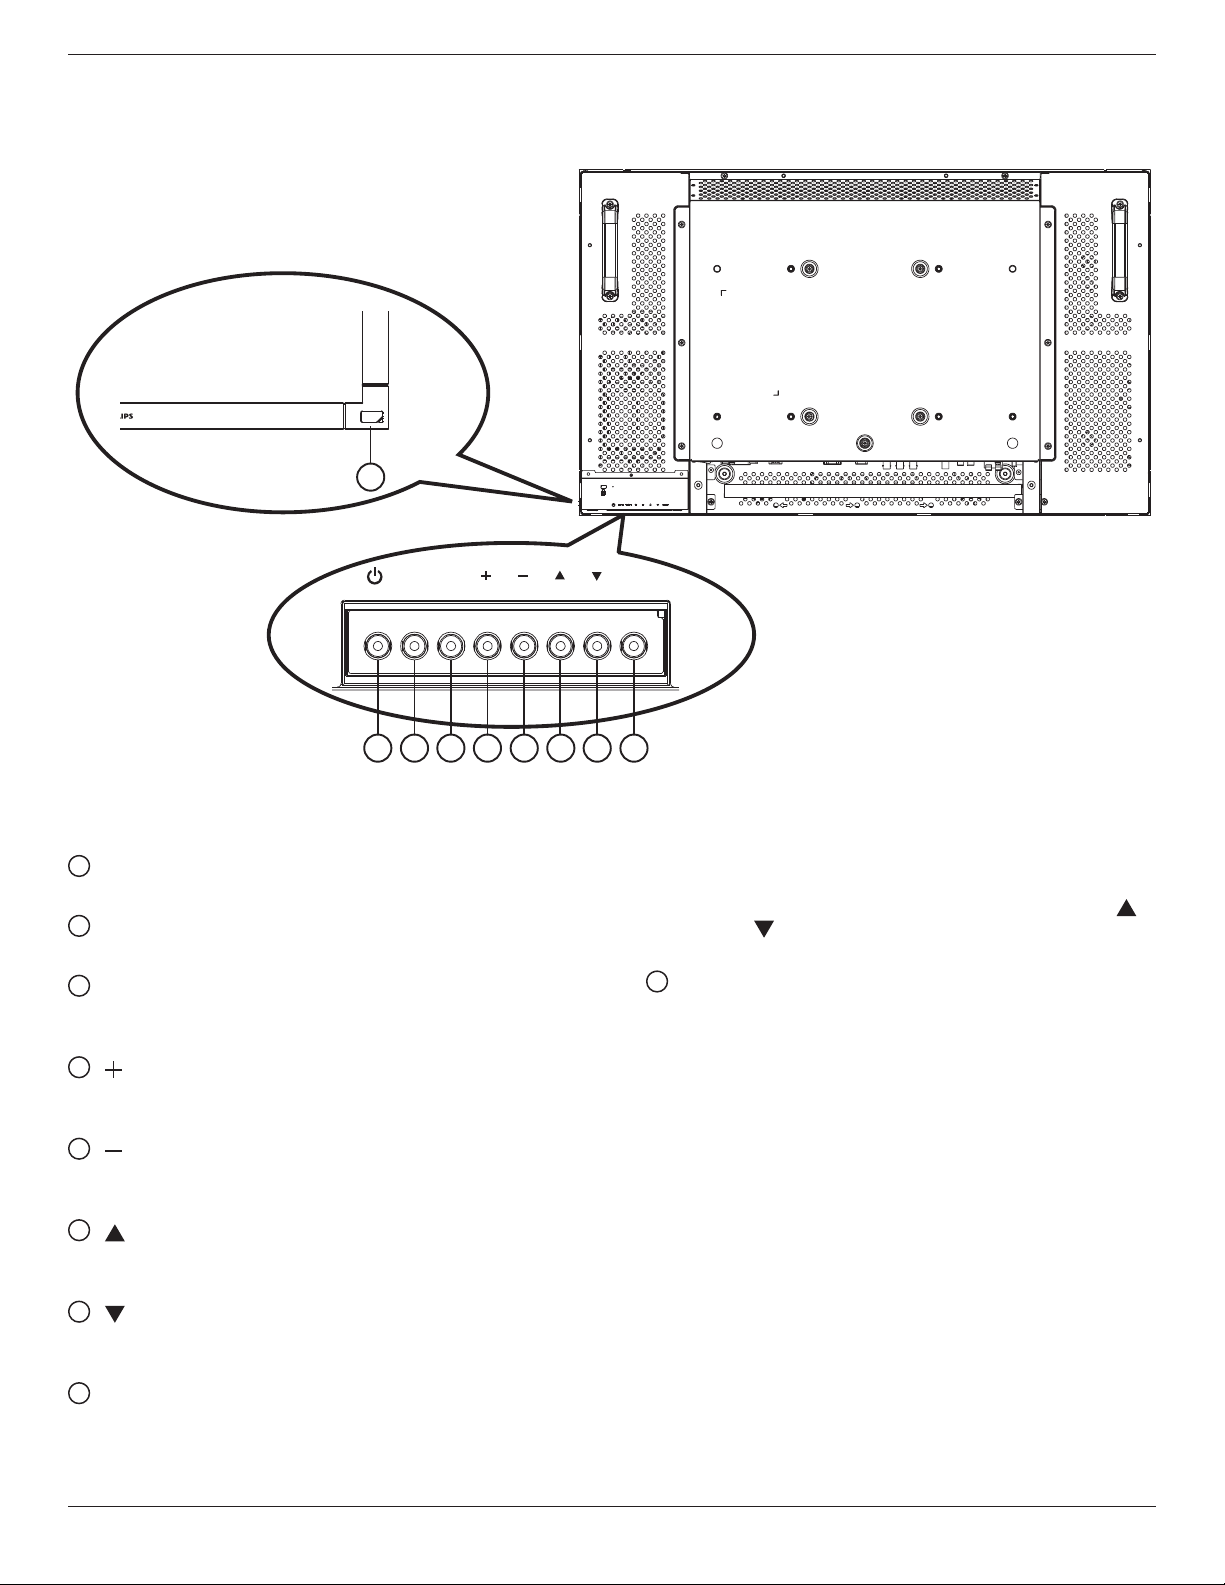
2.1. Control Panel
MUTE INPUT
MENU
1
9
2 3 4 5 6 7 8
1
POWER button
Switchthepoweronorputthemonitortostandby.
2
MUTE button
SwitchtheaudiomuteON/OFF.
3
INPUT button
SetthefunctionwhileOSDmenuison,ortoactivateinput
selectionmenuwhileOSDmenuisoff.
4
[ ] button
IncreasetheadjustmentwhileOSDmenuison,ortodecreasethe
audiooutputlevelwhileOSDmenuisoff.
5
[ ] button
DecreasetheadjustmentwhileOSDmenuison,ortodecreasethe
audiooutputlevelwhileOSDmenuisoff.
6
[ ] button
MovethehighlightbaruptoadjusttheselecteditemwhileOSD
menuison.
7
[ ] button
MovethehighlightbardowntoadjusttheselecteditemwhileOSD
menuison.
8
MENU button
ReturntopreviousmenuwhileOSDmenuison,ortoactivatethe
OSDmenuwhenOSDmenuisoff.
NOTE: “Keyboard Control Lock Mode”Thisfunctioncompletely
disablestheaccesstoallKeyboardControlfunctions.To
enableordisablethekeyboardcontrollock,pressboth[ ]
and[ ]buttonsandholddowncontinuouslyformorethan
3(three)seconds.
9
Remote control sensor and power status indicator
• Receivescommandsignalsfromtheremotecontrol.
• Indicatestheoperatingstatusofthemonitor:
- Lightsgreenwhenthemonitoristurnedon
- Lightsredwhenthemonitorisinstandbymode
- LightsamberwhenthemonitorentersDPMSmode
- When{SCHEDULE}isenabled,itwouldblinkgreenandred
- Iftheindicatorblinksred,ittellsthatafailureisdetected
- Offwhenthemainpowerofthemonitoristurnedoff
BDL3245E / BDL4245E / BDL4645E
6
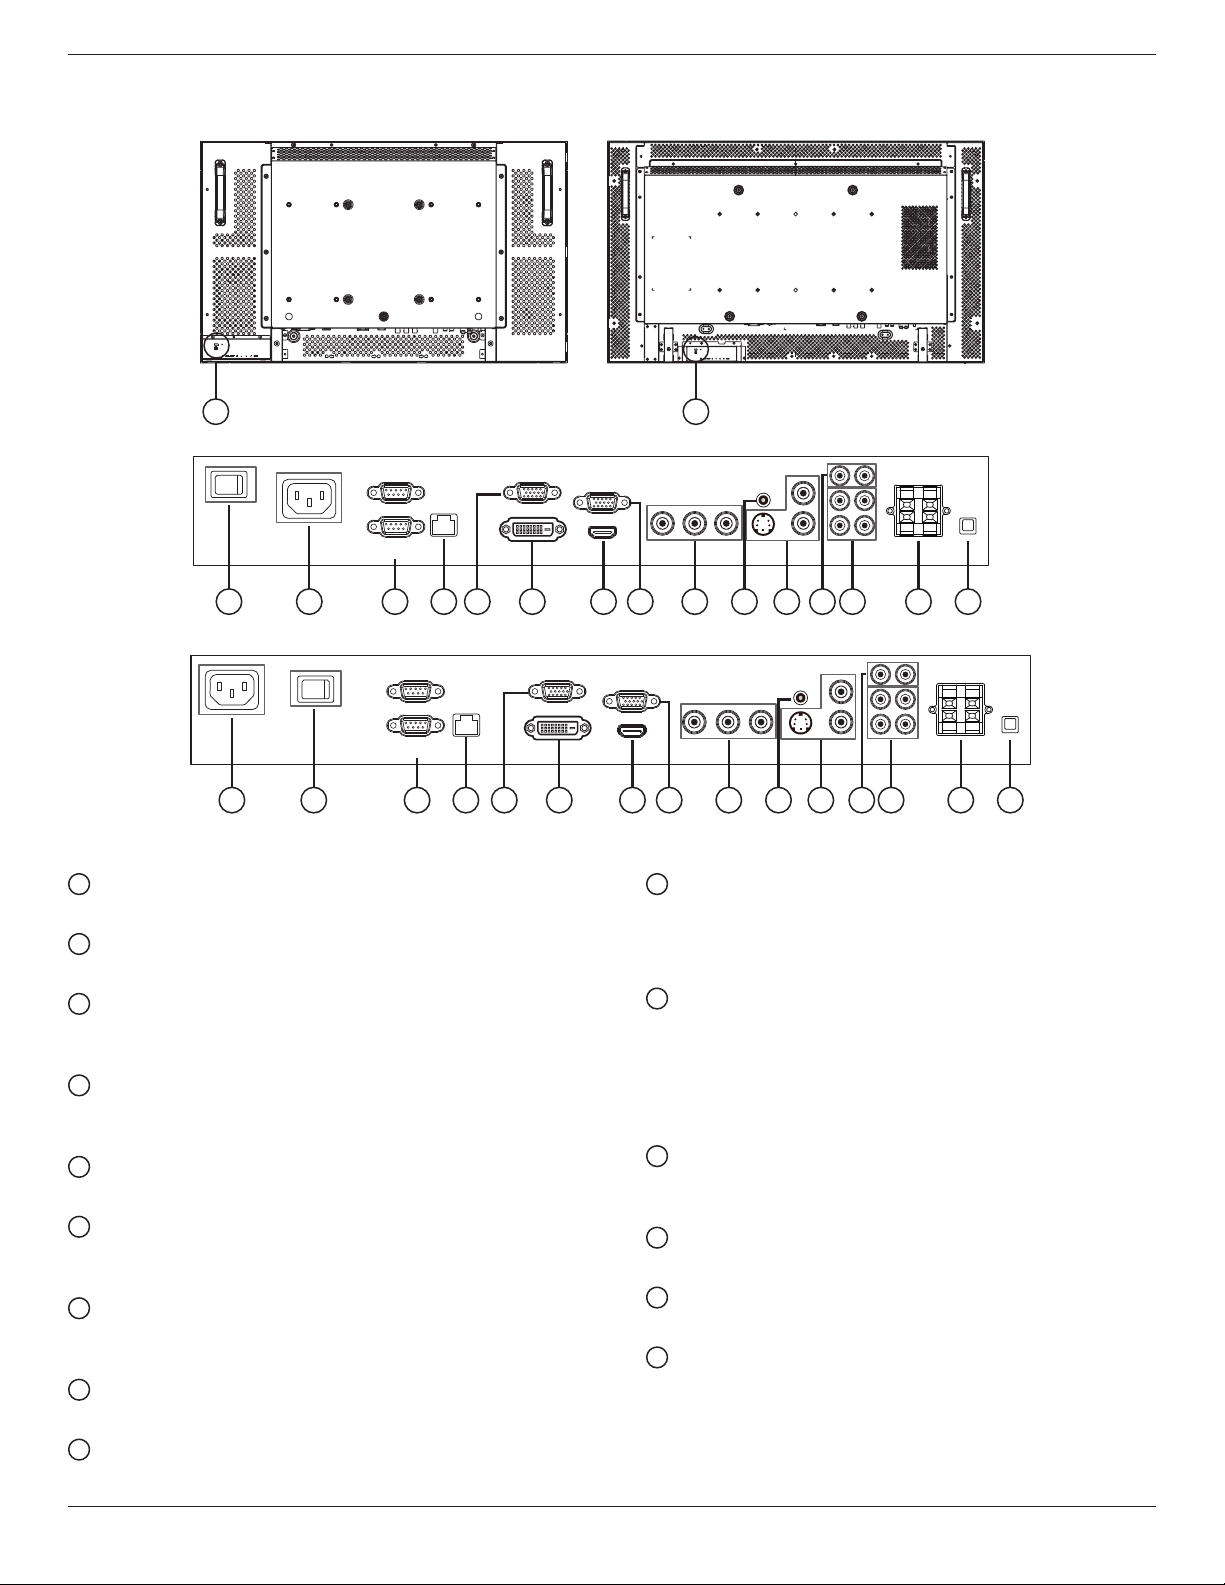
2.2. Input/Output Terminals
(OUT)
BDL3245E BDL4245E/BDL4645E
BDL3245E
BDL4245E/BDL4645E
1 2 3 4 6 7 9 1110 13 141085
1515
(IN)
(OUT)
Pr Pb Y
(IN)
(IN)
(OUT)
1
12
(OUT)
12 3 4 6 7 9 1110 13 141085
(IN)
(OUT)
3
2
Pr Pb Y
(IN)
(IN)
(OUT)
1
12
3
2
1
MAIN POWER SWITCH
Presstoswitchthemainpoweron/off.
2
AC IN
Connectthesuppliedpowercordtothewalloutlet.
3
RS232C (OUT/IN)
RS232Cnetworkinput/outputconnectionfortheuseofloop-
throughfunction.
4
RJ-45
LANcontrolfunctionfortheuseofremotecontrolsignalfrom
controlcenter.
5
VGA OUT (D-Sub)
OutputtheVGAsignalfromtheVGAIN(D-Sub).
6
DVI-D IN
ConnecttheDVI-DoutputofaPC,ortheHDMIoutputofanAV
devicebyusingaDVI-HDMIcable.
7
HDMI IN
ConnecttheHDMIoutputofanAVdevice,ortheDVI-Doutputof
aPCbyusingaDVI-HDMIcable.
8
VGA IN (D-Sub)
ConnectthecomputerVGAoutput.
9
COMPONENT IN (BNC)
ConnectthecomponentYPbProutputfromexternalAVdevice.
10
AUDIO IN 1, 2, 3
ConnectaudioinputfromexternalAVdevice.
• AUDIO IN 1:3.5mmstereophonejack
• AUDIO IN 2, 3:RCAphonejack
11
VIDEO IN/OUT
• S-VIDEO IN (Mini DIN 4 pin):ConnecttheS-VIDEO(Y/C
separatesignal)input.
• VIDEO IN (BNC):Connectthecompositevideosignalinput.
• VIDEO OUT (BNC):Connectthecompositevideosignal
outputfromVIDEOIN(BNC).
12
AUDIO OUT R/L (RCA)
ConnecttheaudiosignaloutputfromAUDIOIN1,2,or3jackto
anexternalAVdevice.
13
SPEAKERS OUT R/L
Connecttheaudiooutputtoexternalspeakers.
14
SPEAKER SWITCH
Presstoswitchtheinternalspeakeron/off.
15
Kensington Lock
Forsecurityandtheftprevention.
BDL3245E / BDL4245E / BDL4645E
7
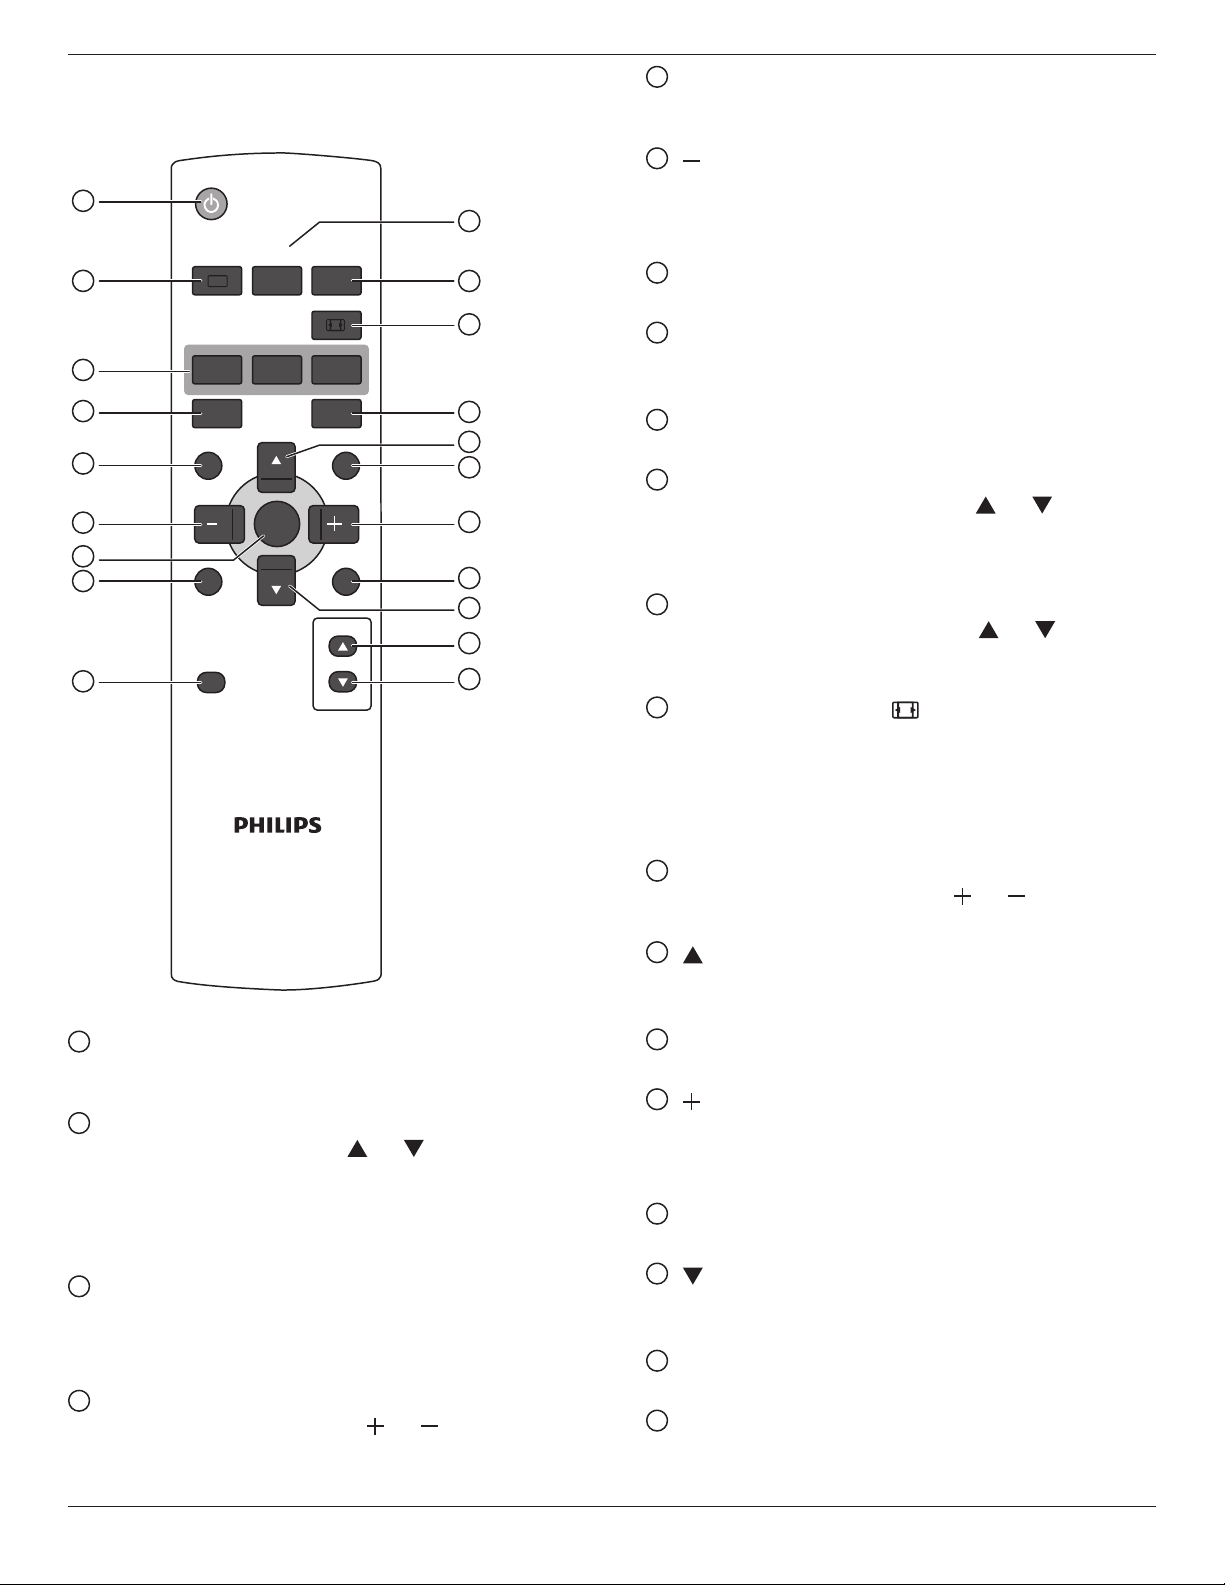
2.3. Remote Control
2.3.1. General functions
POWER
SMART
VIDEO
SOURCE
PIP
INPUTON/OFF CHANGE
BRIGHTNESSCONTRAST
DISPLAY
AUTO
ADJUST
MUTE
VOL UP
VOL DOWN
EXIT
MENU
SET
AUDIO
SOURCE
1
10
11
12
13
14
15
16
17
18
19
20
2
3
4
5
6
7
8
9
1
[POWER] button
Presstoswitchonthemonitorfromstandbymode.Pressagainto
turnitoffandbackintostandbymode.
2
[SMART] button
PresstotoggleSmartMenu.Press[ ]or[ ]buttontoselect
menuoptions.Press[SET]buttontoconrmandexittheselection.
• Standard:Usedfornormalimages(factorysetting)
• Highbright:UsedformovingimagesuchasVideo
• sRGB:Usedfortextbasedimages
3
[PIP] (Picture In Picture) button
[ON/OFF]: TurnPIPmodeON/OFF.
[INPUT]: Selecttheinputsignalforthesub-picture.
[CHANGE]:Togglebetweenthemainpictureandsubpicture.
4
[CONTRAST] button
PresstotoggleContrastMenu.Press[ ] or[ ]buttontoadjust
thevalue.Press[MENU]buttontoconrmandexit.
5
[DISPLAY] button
Presstoturnon/offtheinformationOSDdisplayedontheupper
rightcornerofthescreen.
6
[ ] button
• PresstomovetheselectionleftinOSDmenu.
• PresstodecreasethevalueinOSDmenu.
• Presstomovethesub-pictureleftinPIPmode.
7
[SET] button
PresstoactivatethesettingwithOSDmenu.
8
[AUTO ADJUST] button
PresstoruntheAutoAdjustfunction.
NOTE:ThisbuttonisfunctionalforVGAinputonly.
9
[MUTE] button
Presstoturnthemutefunctionon/off.
10
[VIDEO SOURCE] button
PresstotoggleVideoSourceMenu.Press[ ]or[ ]button
toselectoneofthevideosourcesamongHDMI,DVI-D,VGA,
Component,S-Video,orVideo.Press[SET]buttontoconrmand
exit.
11
[AUDIO SOURCE] button
PresstotoggleAudioSourceMenu.Press[ ]or[ ]buttonto
selectoneoftheaudiosourcesamongHDMI,AUDIO1,AUDIO2,
orAUDIO3.Press[SET]buttontoconrmandexit.
12
Picture Format button
PresstoswitchscreenaspectratioamongFULL,NORMAL,
DYNAMIC,CUSTOM,REAL,or21:9.
DYNAMICand21:9modeareusedforVideoinputsourceonly.
PCsignal:FULL,NORMAL,CUSTOMandREAL.
Videosignal:FULL,NORMAL,DYNAMIC,CUSTOMandREAL.
13
[BRIGHTNESS] button
PresstotoggleBrightnessMenu.Press[ ] or[ ]buttontoadjust
thevalue.Press[MENU]buttontoconrmandexit.
14
[ ] button
• PresstomovetheselectionupinOSDmenu.
• Presstomovethesub-pictureupinPIPmode.
15
[MENU] button
PresstoturntheOSDmenuon/off.
16
[ ] button
• PresstomovetheselectionrightinOSDmenu.
• PresstoincreasethevalueinOSDmenu.
• Presstomovethesub-picturerightinPIPmode.
17
[EXIT] button
PresstoturnbacktothepreviousOSDmenu.
18
[ ] button
• PresstomovetheselectiondowninOSDmenu.
• Presstomovethesub-picturedowninPIPmode.
19
[VOL UP] button
Presstoincreasetheaudiooutputlevel.
20
[VOL DOWN] button
Presstodecreasetheaudiooutputlevel.

BDL3245E / BDL4245E / BDL4645E
8
2.3.2. Inserting the batteries in the remote control
Theremotecontrolispoweredbytwo1.5VAAAbatteries.
Toinstallorreplacebatteries:
1. Pressandthenslidethecovertoopenit.
2. Alignthebatteriesaccordingtothe(+)and(–)indicationsinsidethe
batterycompartment.
3. Replacethecover.
Caution:
Anincorrectuseofbatteriescanresultinleaksorbursting.Becarefulespeciallyaboutthefollowingpoints.
• Place“AAA”batteriesmatchingthe(+)and(–)signsoneachbatterytothe(+)and(–)signsofthebatterycompartment.
• Donotmixbatterytypes.
• Donotcombinenewbatterieswithusedones.Itcausesshorterlifeorleakageofbatteries.
• Removethedeadbatteriesimmediatelytopreventitfromliquidleakinginthebatterycompartment.Don’ttouchexposedbatteryacid,itcause
damagetoyourskin.
NOTE: Ifyoudonotintendtousetheremotecontrolforalongperiod,removethebatteries.
2.3.3. Handling the remote control
• Donotsubjecttostrongshock.
• Donotallowwaterorotherliquidtosplashtheremotecontrol.Iftheremotecontrolgetswet,wipeitdryimmediately.
• Avoidexposuretoheatandsteam.
• Otherthantoinstallthebatteries,donotopentheremotecontrol.
2.3.4. Operating range of the remote control
Pointthetopoftheremotecontroltowardthemonitor’sremotecontrol
sensorwhenpressingabutton.
Usetheremotecontrolwithinadistanceoflessthan10m/33ftawayfrom
themonitor’ssensor,andahorizontalandverticalangleoflessthan30
degrees.
NOTE: Theremotecontrolmaynotfunctionproperlywhentheremote
controlsensoronthemonitorisunderdirectsunlightorstrong
illumination,orwhenthereisanobstacleinthepathofsignal
transmission.
POWER
SMART
VIDEO
SOURCE
PIP
INPUTON/OFF CHANGE
BRIGHTNESSCONTRAST
DISPLAY
AUTO
ADJUST
MUTE
VOL UP
VOL DOWN
EXIT
MENU
SET
AUDIO
SOURCE
30 30

BDL3245E / BDL4245E / BDL4645E
9
3. Connecting External Equipment
3.1. Using the Switch Cover
Acoverforthemainswitchisprovidedtopreventthemonitorfrombeingturnedonoroffaccidentally.
Tolockthecoverintoposition:
1. Alignandinsertthecovertotheditchlocatedbesidethemainswitch.
2. Usethescrewtolockthecover.
BDL3245E:
1
2
Screw
Main switch cover
BDL4245E / BDL4645E:
1
2
Screw
Main switch cover
BDL3245E / BDL4245E / BDL4645E
10
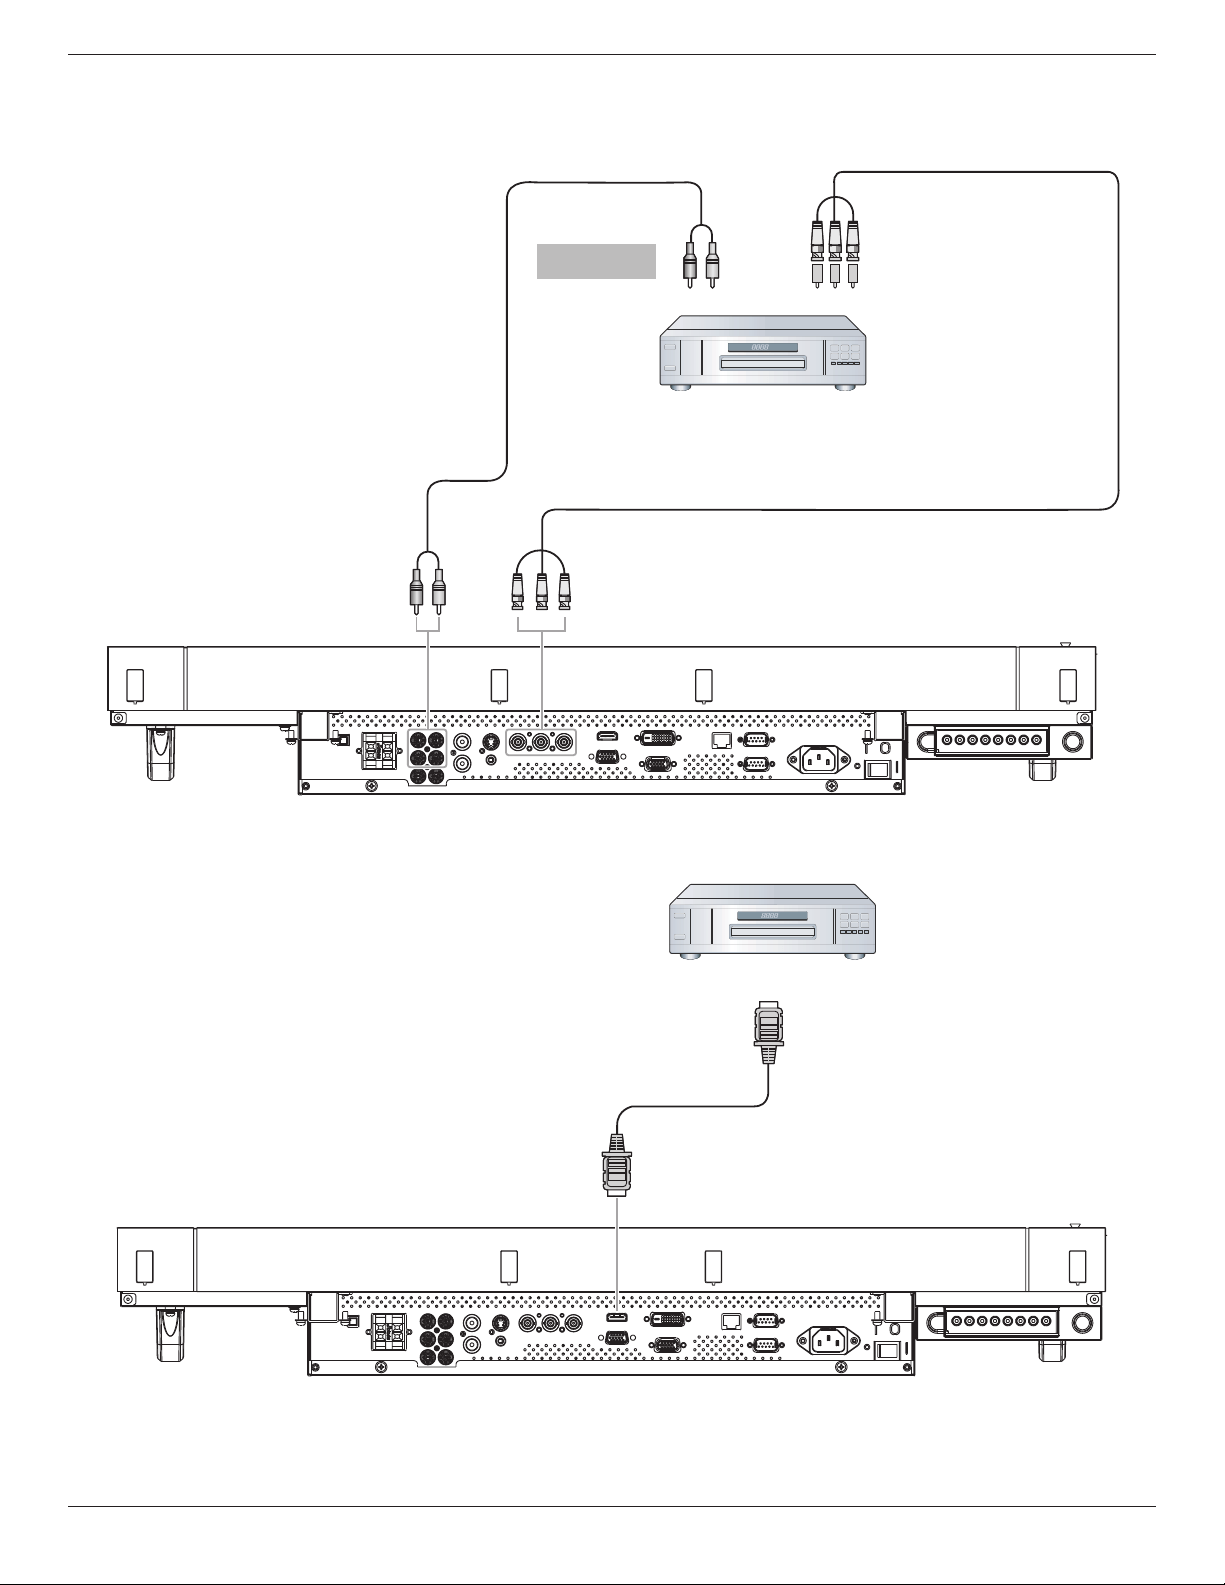
3.2. Connecting External Equipment (DVD/VCR/VCD)
3.2.1. Using COMPONENT video input
Audio Output
To [AUDIO IN 2, 3]
DVD / VCR / VCD
COMPONENT
(YPbPr)
COMPONENT
(YPbPr)
3.2.2. Using HDMI video input
DVD / VCR / VCD
HDMI connector
HDMI connector
BDL3245E / BDL4245E / BDL4645E
11
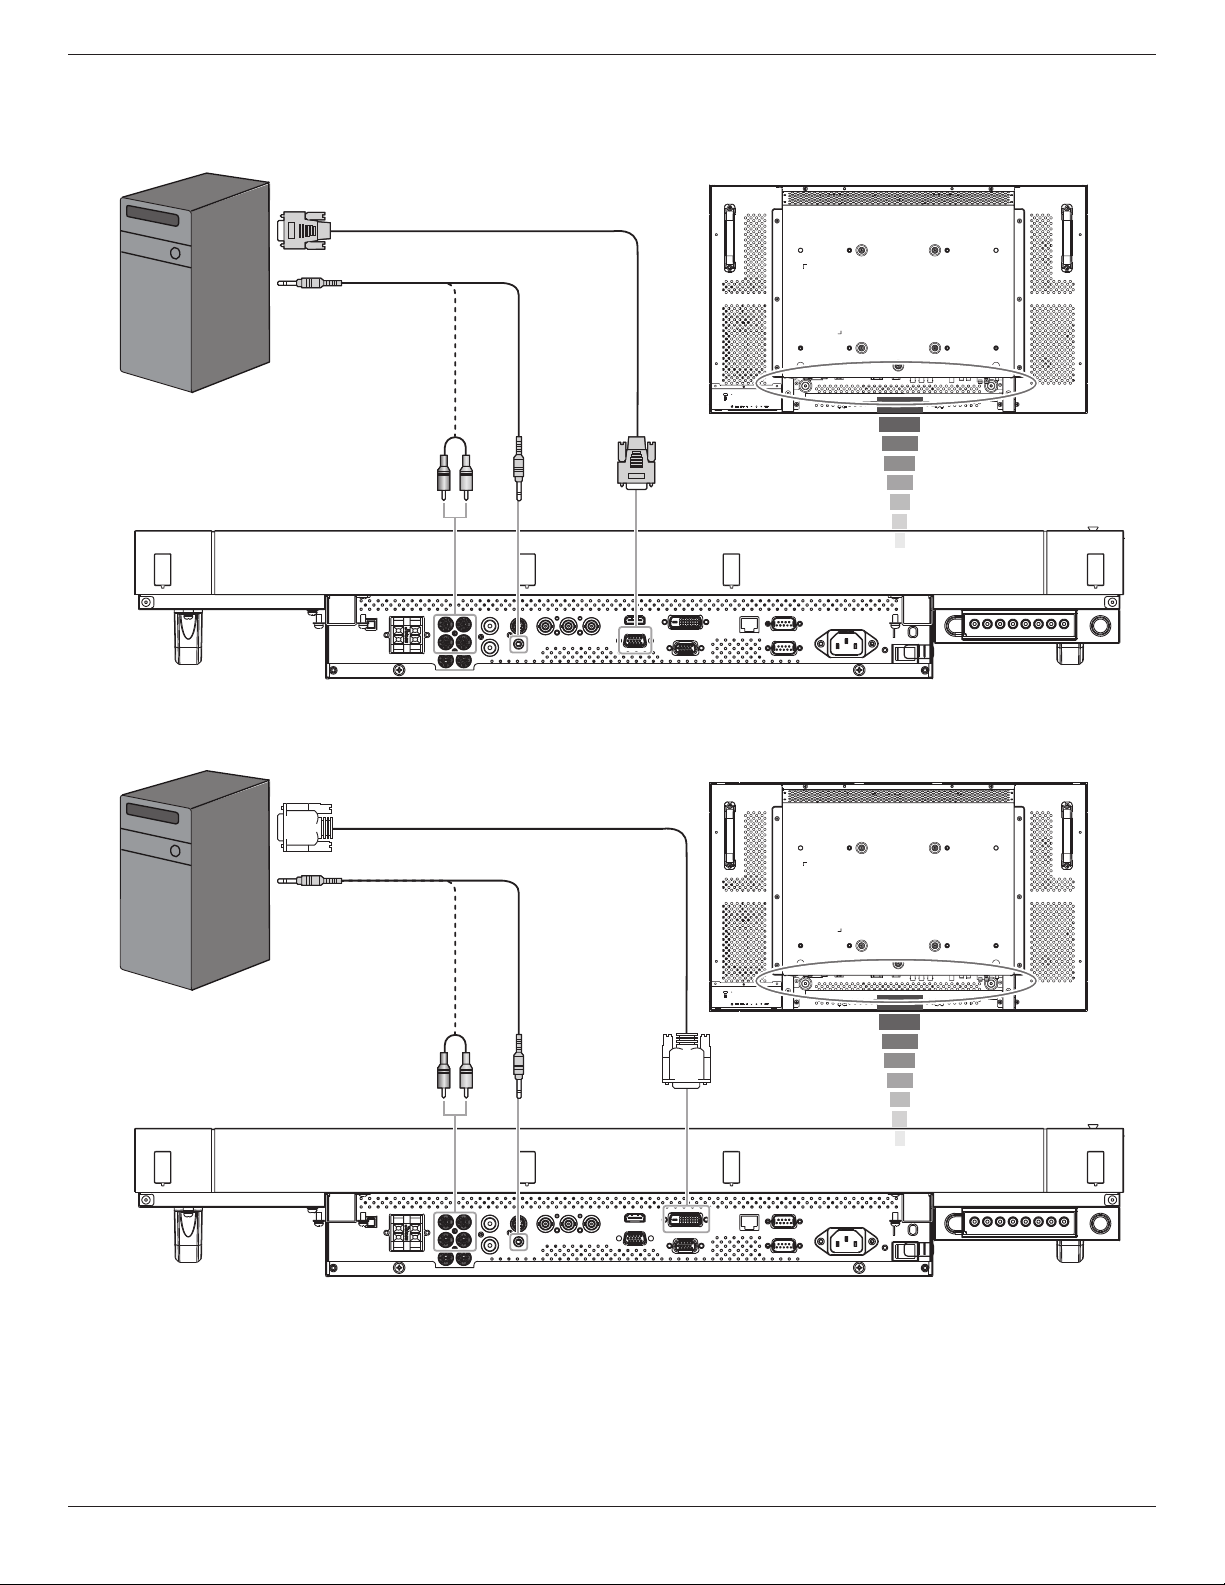
3.3. Connecting a PC
3.3.1. Using VGA input
To [VGA IN]
PC or IBM compatible
From analog VGA output
Mini D-Sub 15 pin
From audio output
To [AUDIO IN 1, 2, 3]
3.3.2. Using DVI input
From audio output
To [DVI IN]
PC or IBM compatible
From DVI output
To [AUDIO IN 1, 2, 3]
BDL3245E / BDL4245E / BDL4645E
12
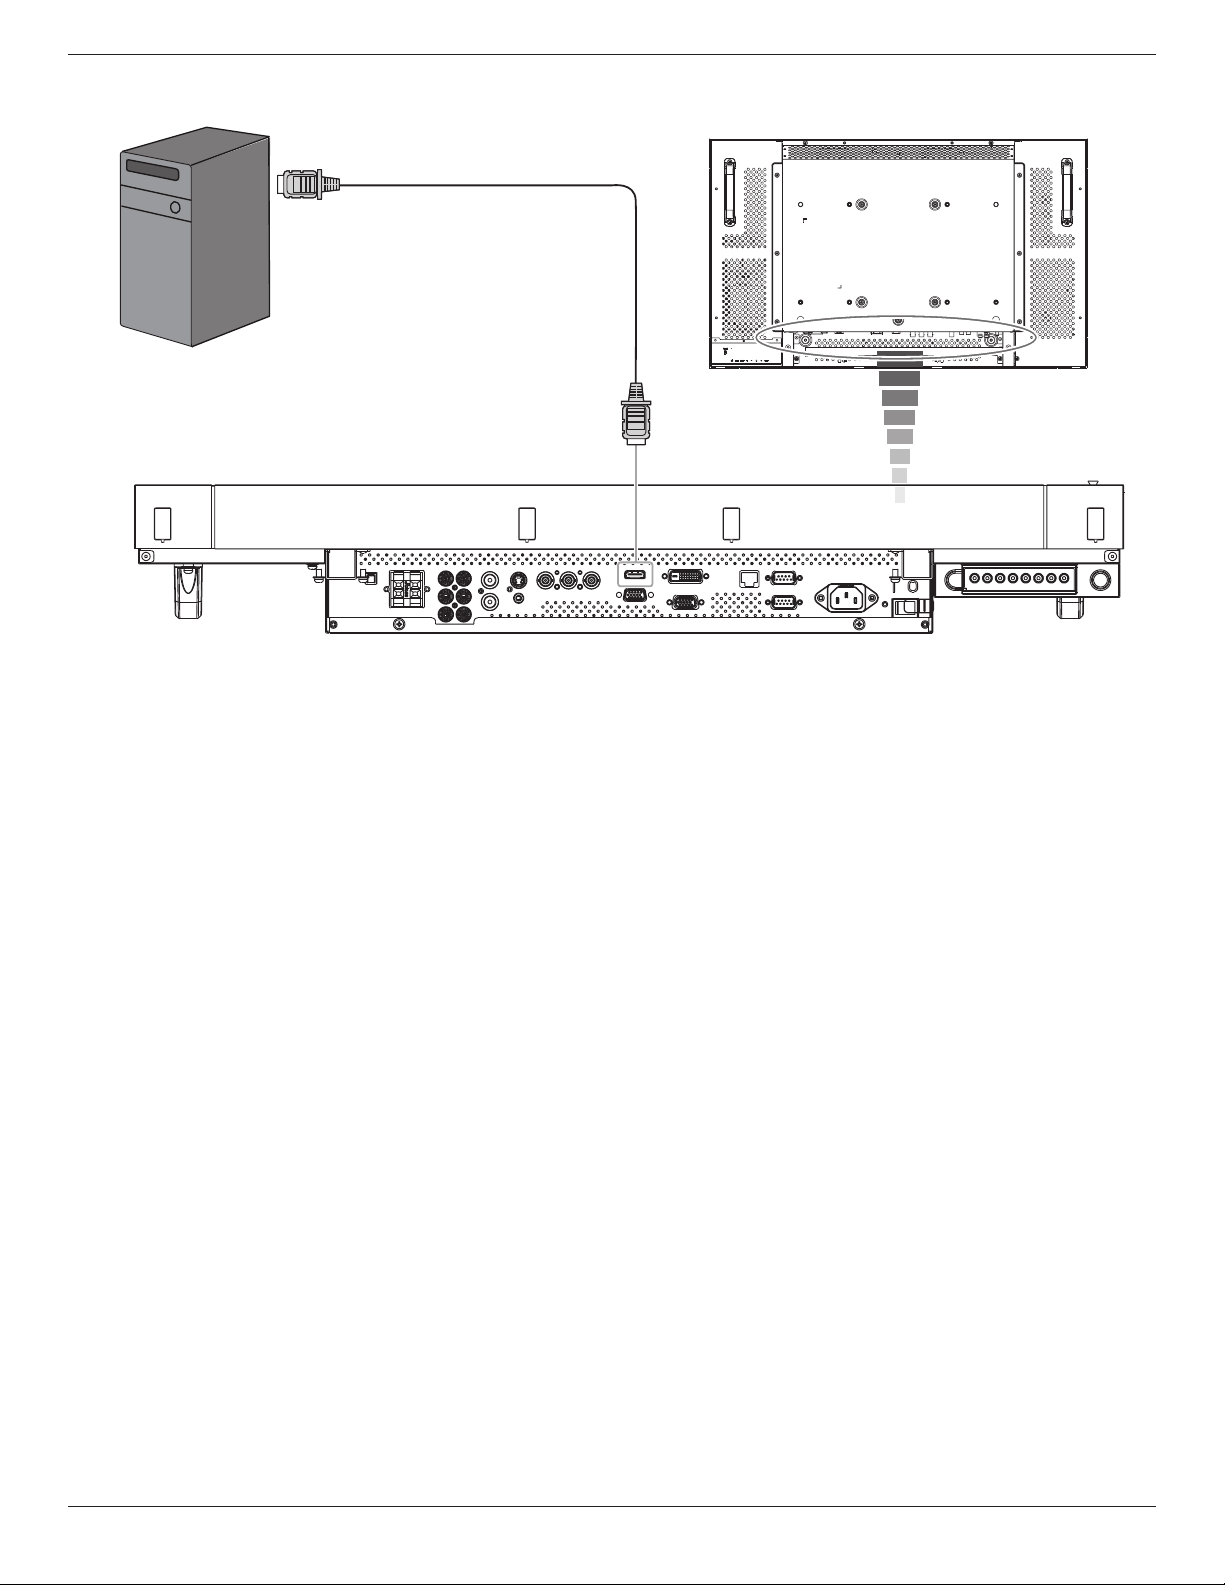
3.3.3. Using HDMI input
To [HDMI IN]
PC or IBM compatible
From HDMI output
BDL3245E / BDL4245E / BDL4645E
13
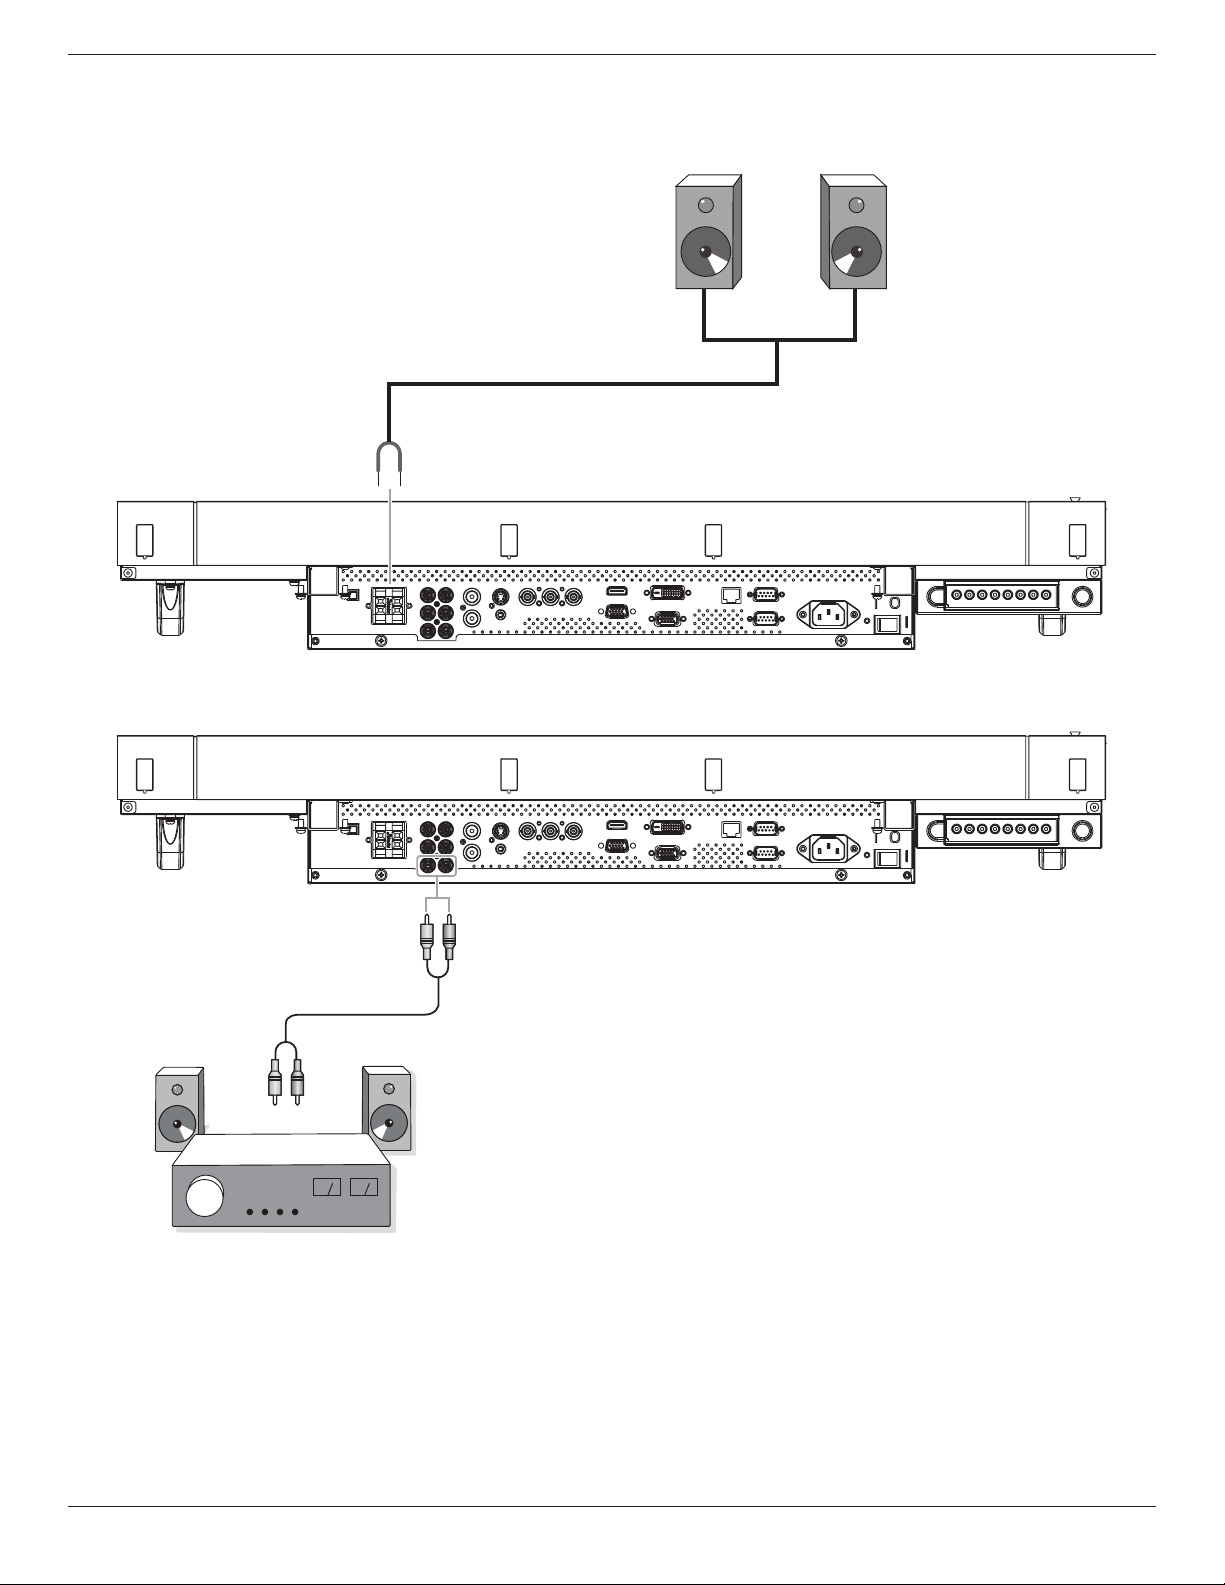
3.4. External Audio Connection
3.4.1. Connecting external speakers
External speaker
3.4.2. Connecting external audio device
Stereo Amplifier
RCA
Audio In
To [AUDIO OUT]
BDL3245E / BDL4245E / BDL4645E
14
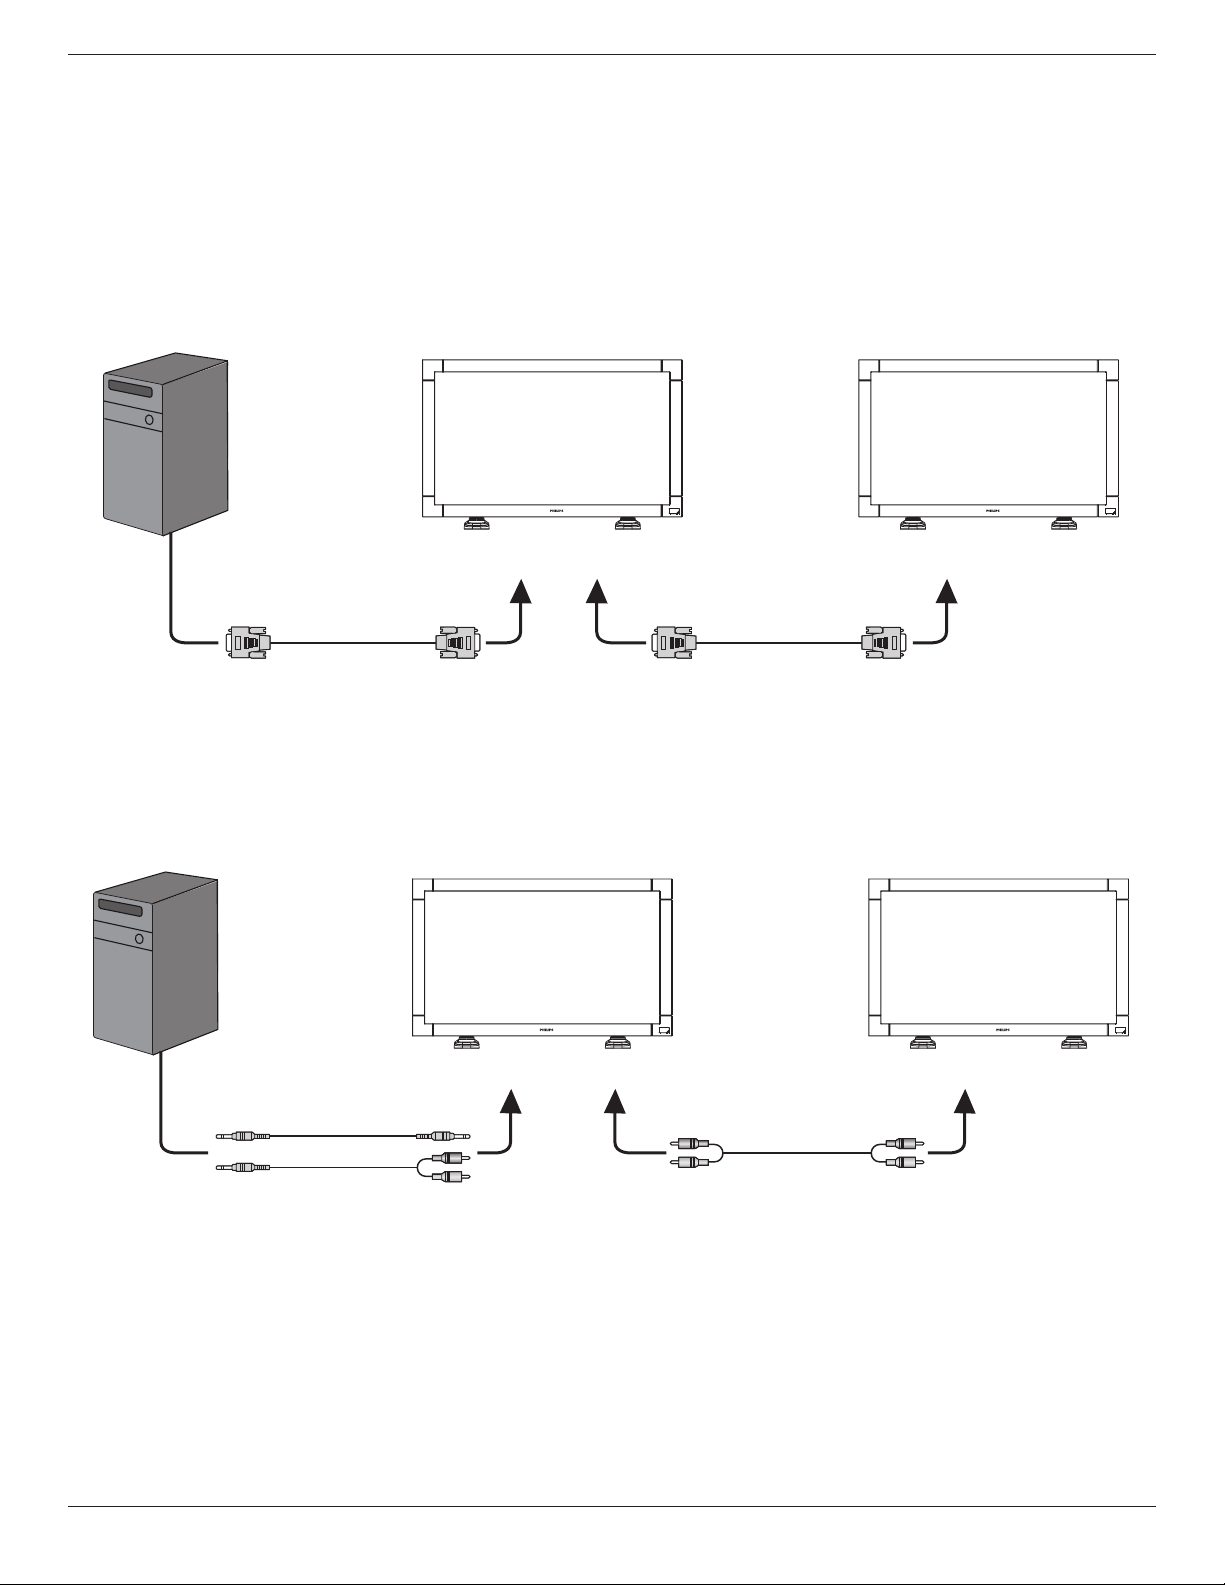
3.5. Connecting Monitors in a Daisy-chain Configuration
Youcaninterconnectmultiplesetsofthismonitortocreateadaisy-chaincongurationforapplicationslikeaTVwall.
NOTE: Maximum25displays(5x5)canbeusedinadaisy-chainconguration.
3.5.1. Video connection
Doonethefollowingconnections:
• Connectthe[RS232COUT]connectorofmonitor1tothe[RS232CIN]connectorofmonitor2.
• Connectthe[VGAOUT]connectorofmonitor1tothe[VGAIN]connectorofmonitor2.
• Connectthe[VIDEOOUT]connectorofmonitor1tothe[VIDEOIN]connectorofmonitor2.
To RS-232C IN
RS-232C Cable
PC
To RS-232C OUT To RS-232C IN
RS-232C Cable
3.5.2. Audio connection
Doonethefollowingconnections:
• Connectthe[AUDIOOUT]connectorofmonitor1tothe[AUDIOIN2]OR[AUDIOIN3]connectorofmonitor2.
• Connectthe[VGAOUT]connectorofmonitor1tothe[VGAIN]connectorofmonitor2.
• Connectthe[VIDEOOUT]connectorofmonitor1tothe[VIDEOIN]connectorofmonitor2.
To [AUDIO IN 1, 2, 3] To [AUDIO IN 2, 3]
PC
To [AUDIO OUT]
BDL3245E / BDL4245E / BDL4645E
15
4. OSD Menu (Need Check)
AnoverallviewoftheOn-ScreenDisplay(OSD)structureisshown
below.Youcanuseitasareferenceforfurtheradjustingyourmonitor.
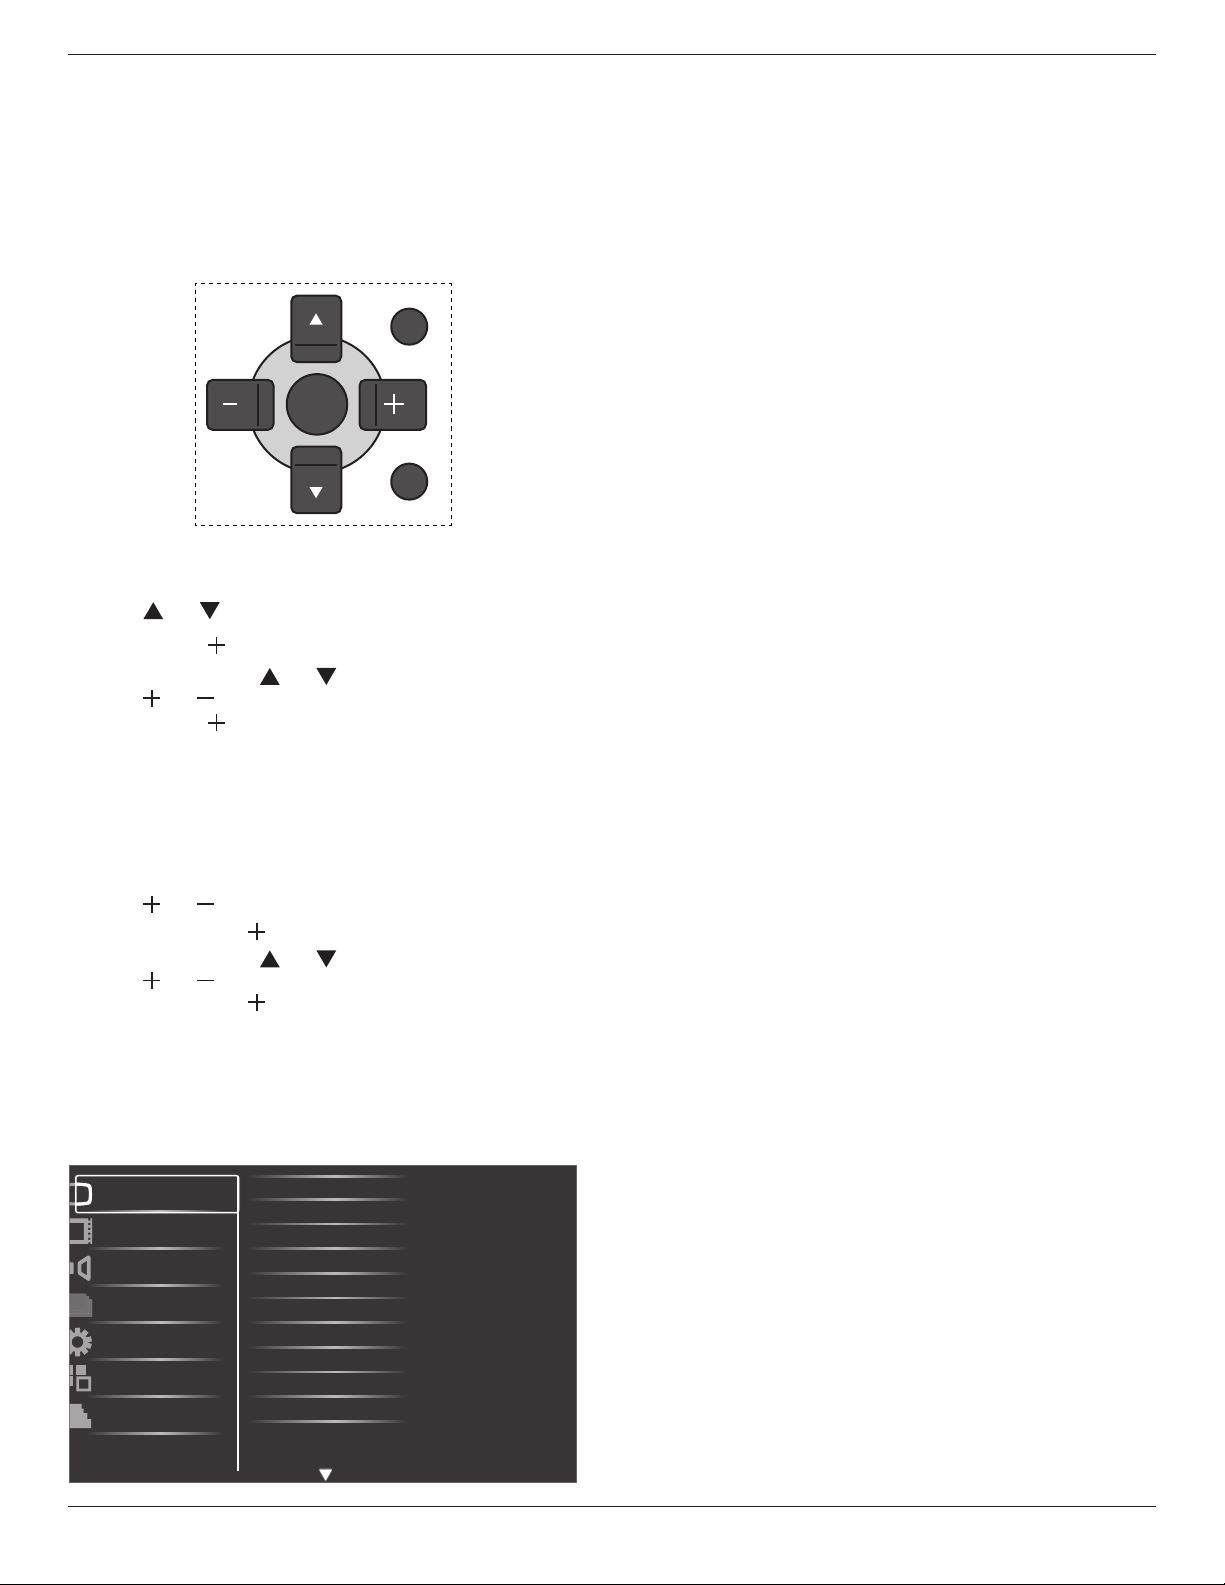
4.1. Navigating the OSD Menu
4.1.1. Navigating the OSD menu using the
remote control
EXIT
MENU
SET
1. Press[MENU]buttonontheremotecontroltodisplaytheOSD
menu.
2. Press[ ]or[ ]buttontochoosetheitemyouwanttoadjust.
3. Press[SET]or[ ]orbuttontoenterthesubmenu.
4. Inthesubmenu,press[ ]or[ ]buttontotoggleamongitems,
press[ ]or[ ]buttontoadjustsettings.Ifthereisasubmenu,
press[SET]or[ ]buttontoenterthesubmenu.
5. Press[EXIT]buttontoreturntothepreviousmenu,orpress
[MENU]buttontoexittheOSDmenu.
4.1.2. Navigating the OSD menu using the
monitor’s control buttons
1. Press[MENU]buttontodisplaytheOSDmenu.
2. Press[ ]or[ ]buttontochoosetheitemyouwanttoadjust.
3. Press[SOURCE]or[ ]buttontoenterthesubmenu.
4. Inthesubmenu,press[ ]or[ ]buttontotoggleamongitems,
press[ ]or[ ]buttontoadjustsettings.Ifthereisasubmenu,
press[SOURCE]or[ ]buttontoenterthesubmenu.
5. Press[MENU]buttontoreturntothepreviousmenu,orpress
[MENU]buttonseveraltimestoexittheOSDmenu.
4.2. OSD Menu Overview
4.2.1. Picture menu
Brightness
Contrast
Sharpness
Black level
Tint
Color
Color temperature
Color control
Smart contrast
Smart picture
Picture
Screen
Audio
PIP
Configuration1
Configuration2
Advanced option
Noise reduction
Brightness
AdjusttheoverallimagebrightnessbychangingtheintensityoftheLCD
panel’sbacklight.
Contrast
Adjusttosharpenthepicturequality.Theblackportionsofthepicture
becomericherindarknessandthewhitebecomebrighter.
Sharpness
Adjusttoimprovedetail.
Black level
Adjusttochangetheimagebrightness.
Noise reduction
Adjusttoremovethenoiseintheimage.Youcanselectasuitablenoise
reductionlevel.
Theoptionsare:{Off}/{Low}/{Medium}/{High}.
NOTE: ThisitemisfunctionalforHDMI(Videomode),S-Video,Video,
andYPbPrinputsonly.
Tint
Adjusttochangethecolortintoftheimage.
Thetonecolorbecomesgreenishbyincreasingthevalue,andbecomes
purplishbydecreasingthevalue.
NOTE: ThisitemisfunctionalforHDMI(Videomode),S-Video,Video,
andYPbPrinputsonly.
Color
Adjusttoincreaseordecreasetheintensityofcolorsintheimage.
NOTE: ThisitemisfunctionalforS-Video,Video,andYPbPrinputs
only.
Color temperature
Selectacolortemperaturefortheimage.Theimagelooksreddish
withalowercolortemperature,andlooksbluishwithahighercolor
temperature.
Theoptionsare:{3000K}/{4000K}/{5000K}/{6500K}/{7500K}/
{9300K}/{10000K}/{Native}/{User}.
Color control
Withthisfunctionyoucanadjustthecolortonesoftheimageprecisely
bychangingtheR(Red),G(Green)andB(Blue)settingsindependently.
NOTE: Thisitemisfunctionalonlywhen{Color temperature}isset
to{User}.
Smart contrast
Whenturnedon,thisfunctionhelpsenhanceimagecontrastwhen
displayingdarkscenes.
Smart picture
Thefollowingsmartpicturemodesareavailablefor:
• PCmode:{Standard}/{Highbright} /{sRGB}.
• Videomode:{Standard}/{Highbright}/{Cinema}.
Video source
Selectavideoinputsource.
Picture reset
ResetallsettingsinthePicturemenu.

BDL3245E / BDL4245E / BDL4645E
16
4.2.2. Screen menu
H position
V position
Clock
Clock phase
Custom zoom
Screen reset
Picture
Screen
Audio
PIP
Configuration1
Configuration2
Advanced option
Zoom mode
H position
Adjustthehorizontalplacementofthepicture.
V position
Adjusttheverticalplacementofthepicture.
Clock
Adjustthewidthoftheimage.
NOTE: ThisitemisfunctionalforVGAinputonly.
Clock phase
Adjusttoimprovethefocus,clarityandstabilityoftheimage.
NOTE: ThisitemisfunctionalforVGAinputonly.
Zoom mode
Thepicturesyoureceivemaybetransmittedin16:9format(wide
screen)or4:3format(conventionalscreen).The16:9pictures
sometimeshaveablackbandatthetopandbottomofthescreen
(letterboxformat).
Thisfunctionallowsyoutooptimizethepicturedisplayonscreen.The
followingzoommodesareavailablefor:
• PCmode:{Full}/{Normal}/{Custom}/{Real}.
• Videomode:{Full}/{Normal}/{Dynamic}/{Custom}/{Real}/
{21:9}.
Full
Thismoderestoresthecorrectproportions
ofpicturestransmittedin16:9usingthefull
screendisplay.
Normal
Thepictureisreproducedin4:3formatand
ablackbandisdisplayedoneithersideofthe
picture.
Dynamic
Filltheentirescreenbystretching4:3pictures
non-proportionally.
Custom
Choosetoapplythecustomzoomsettingsin
theCustomZoomsubmenu.
Real
Thismodedisplaystheimagepixel-by-pixel
onscreenwithoutscalingtheoriginalimage
size.
21:9
Thepictureisenlargedto16:9format.This
modeisrecommendedwhendisplaying
picturesthathaveblackbandsatthetopand
bottom(letterboxformat).
Custom zoom
Youcanusethisfunctiontofurthercustomizethezoomsettingstosuit
theimageyouwanttodisplay.
NOTE: ThisitemisfunctionalonlywhentheZoom modesettingis
settoCustom.
Zoom
Expandsthehorizontalandverticalsizesofthe
imagesimultaneously.
H zoom
Expandsthehorizontalsizeoftheimageonly.
V zoom
Expandstheverticalsizeoftheimageonly.
H position
Movesthehorizontalpositionoftheimageleft
orright.
V position
Movestheverticalpositionoftheimageupor
down.
Screen reset
ResetallsettingsintheScreenmenu.
4.2.3. Audio menu
Balance
Treble
Bass
Volume
Audio source
Audio reset
Picture
Screen
Audio
PIP
Configuration1
Configuration2
Advanced option
Mute
Balance
Adjusttoemphasizeleftorrightaudiooutputbalance.
Treble
Adjusttoincreaseordecreasehigher-pitchedsounds.
Bass
Adjusttoincreaseordecreaselower-pitchedsounds.
BDL3245E / BDL4245E / BDL4645E
17
Volume
Adjusttoincreaseordecreasetheaudiooutputlevel.
Mute
Turnthemutefunctionon/off.
Audio source
Selecttheaudioinputsourceaccordingtotheaudiosignalsource
connectedtotheaudioinputandHDMIsocketsonthemonitor.
Theoptionsare:{HDMI}/{Audio1}/{Audio2}/{Audio3}.
Audio reset
ResetallsettingsintheAUDIOmenu.
4.2.4. PIP menu
PIP
PIP input
PIP change
PIP size
PIP reset
Picture
Screen
Audio
PIP
Configuration1
Configuration2
Advanced option
PIP audio
PIP
SelectthePIP(Picture-in-Picture)mode.
Theoptionsare:{Off}/{PIP}/{POP}/{PBP aspect}/{PBP full}.
PIP input
Selecttheinputsignalforthesub-picture.
PIP change
Exchangebetweenthemainpictureandsubpicture.
PIP size
SelectthesizeofthesubpictureinthePIP(Picture-in-Picture)mode.
Theoptionsare:{Small}/{Medium}/{Large}.
PIP audio
SelecttheaudiosourceinthePIP(Picture-in-Picture)mode.
• {Main}-Selectaudiofromthemainpicture
• {Sub}-Selectaudiofromthesubpicture.
PIP reset
ResetallsettingsinthePIPmenu.
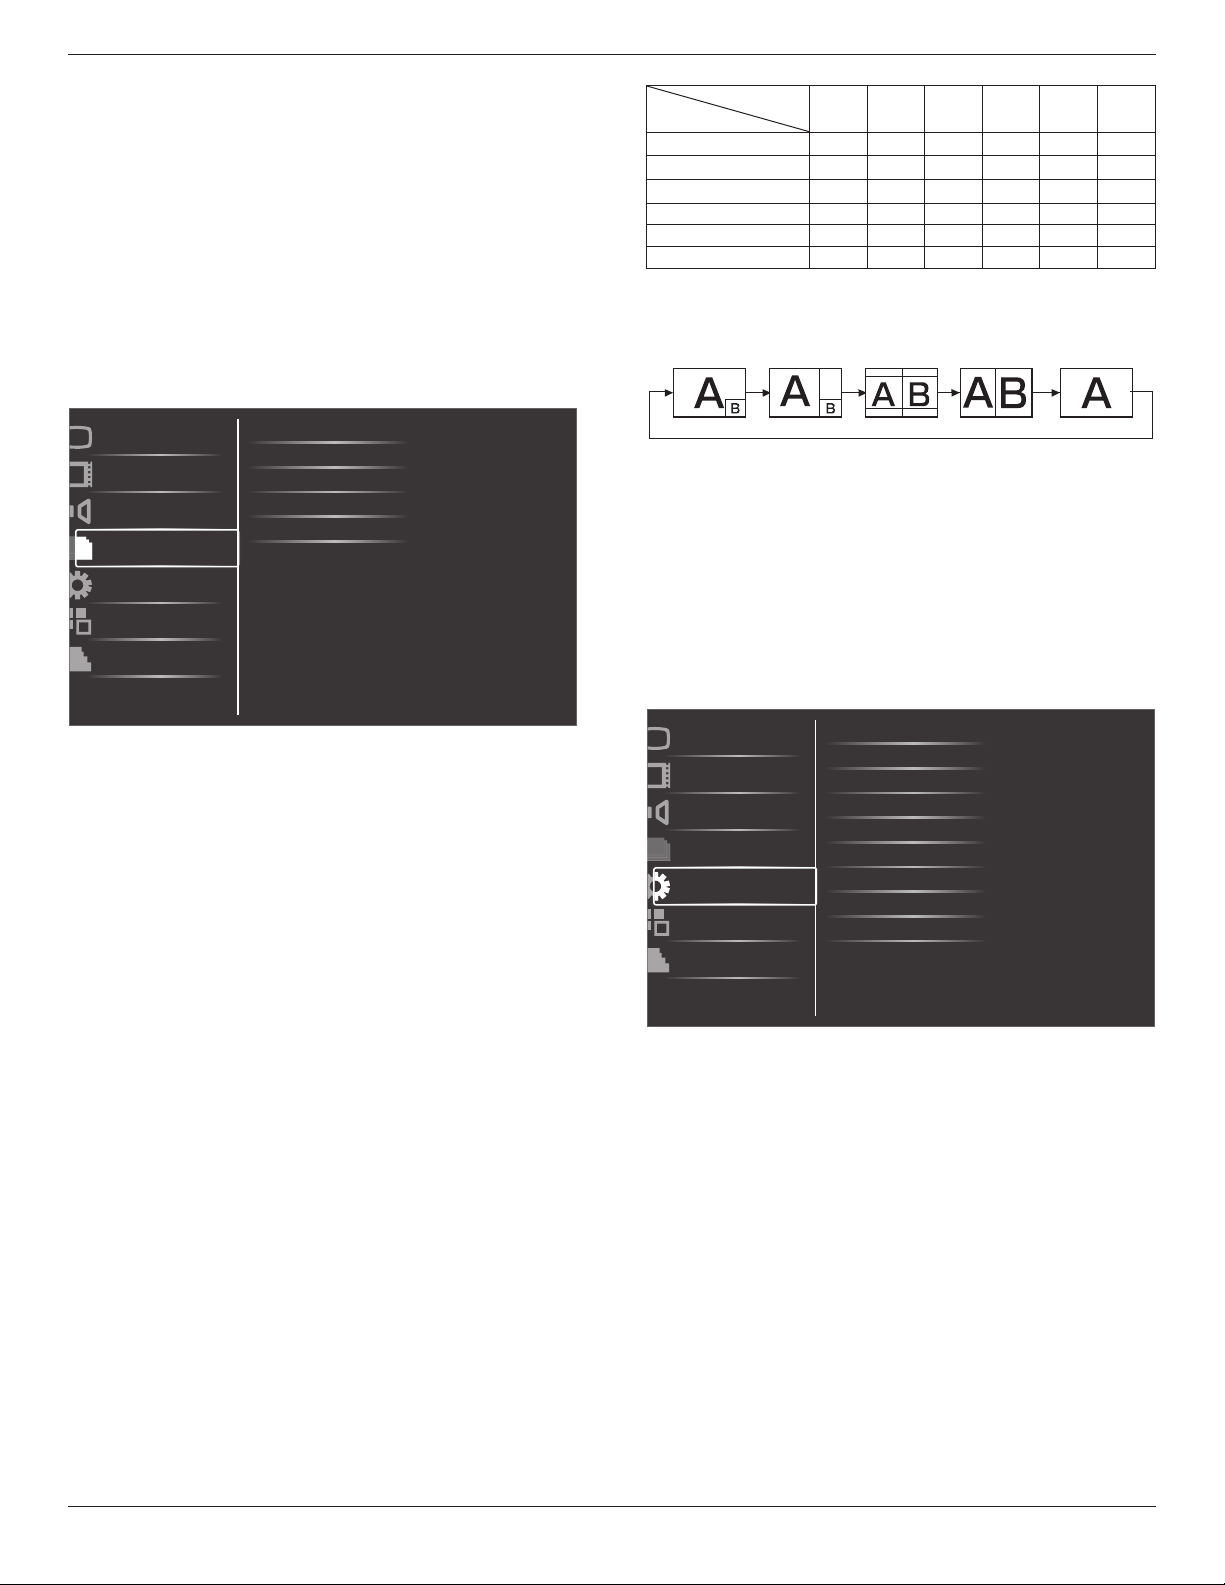
NOTES:
• ThePIPfunctionisavailableonlyforcertainsignalsource
combinationsasshowninthetablebelow.
• TheavailabilityofthePIPfunctionwillalsodependontheresolution
oftheinputsignalbeingused.
MainPicture
SubPicture
DVI VGA HDMI YPbPr S-Video Video
DVI X X X X O O
VGA X X X X O O
HDMI X X X X O O
YPbPr X X X X O O
S-Video O O O O X X
Video O O O O X X
(O:PIPfunctionavailable,X:PIPfunctionunavailable)
Bypressingthe[PIP ON/OFF]buttonontheremotecontrol,youcan
changethemodeintheordershownbelow:
PIP POP
PBP aspect PBP full
Off
TheresolutionsinthePIPandPOPmodesareconguredasfollows:
PIPSIZE {SMALL} :320x240pixels
{Medium} :480x320pixels
{LARGE} :640x480pixels
POPSIZE:450x338pixels
NOTE: ImagesdisplayedinthesubpicturealwaystthePIPsizes
shownaboveirrespectiveoftheaspectratiooftheinput
image.
4.2.5. Configuration1 menu
Switch on state
Auto adjust
Power save
Language
Color system
Picture
Screen
Audio
PIP
Configuration1
Configuration2
Advanced option
Panel saving
Network control port
Network settings
Configuration reset
Factory reset
Switch on state
Selectthemonitorstatususedforthenextpoweringon.
Theoptionsare:{Power off}/{Forced on}/{Last status}.
Auto adjust
Usethisfunctiontoletthemonitorautomaticallyoptimizethedisplay
ofVGAinputimage.
NOTE: ThisitemisfunctionalforVGAinputonly.
Power save
Setthemonitortoreducethepowerautomatically.
• {RGB}-Select{On}toletthemonitorenterDPMSmodewithno
signaldetectedfromtheHDMIGraphicmode,HDMI,DVI-D,or
VGAinputsafterthreesuccessivecycles.
• {VIDEO}-Select{On}toletthemonitorenterpowersavingmode
withnosignaldetectedfromtheHDMIVideomodeorYPbPr
inputsafterthreesuccessivecycles.
BDL3245E / BDL4245E / BDL4645E
18
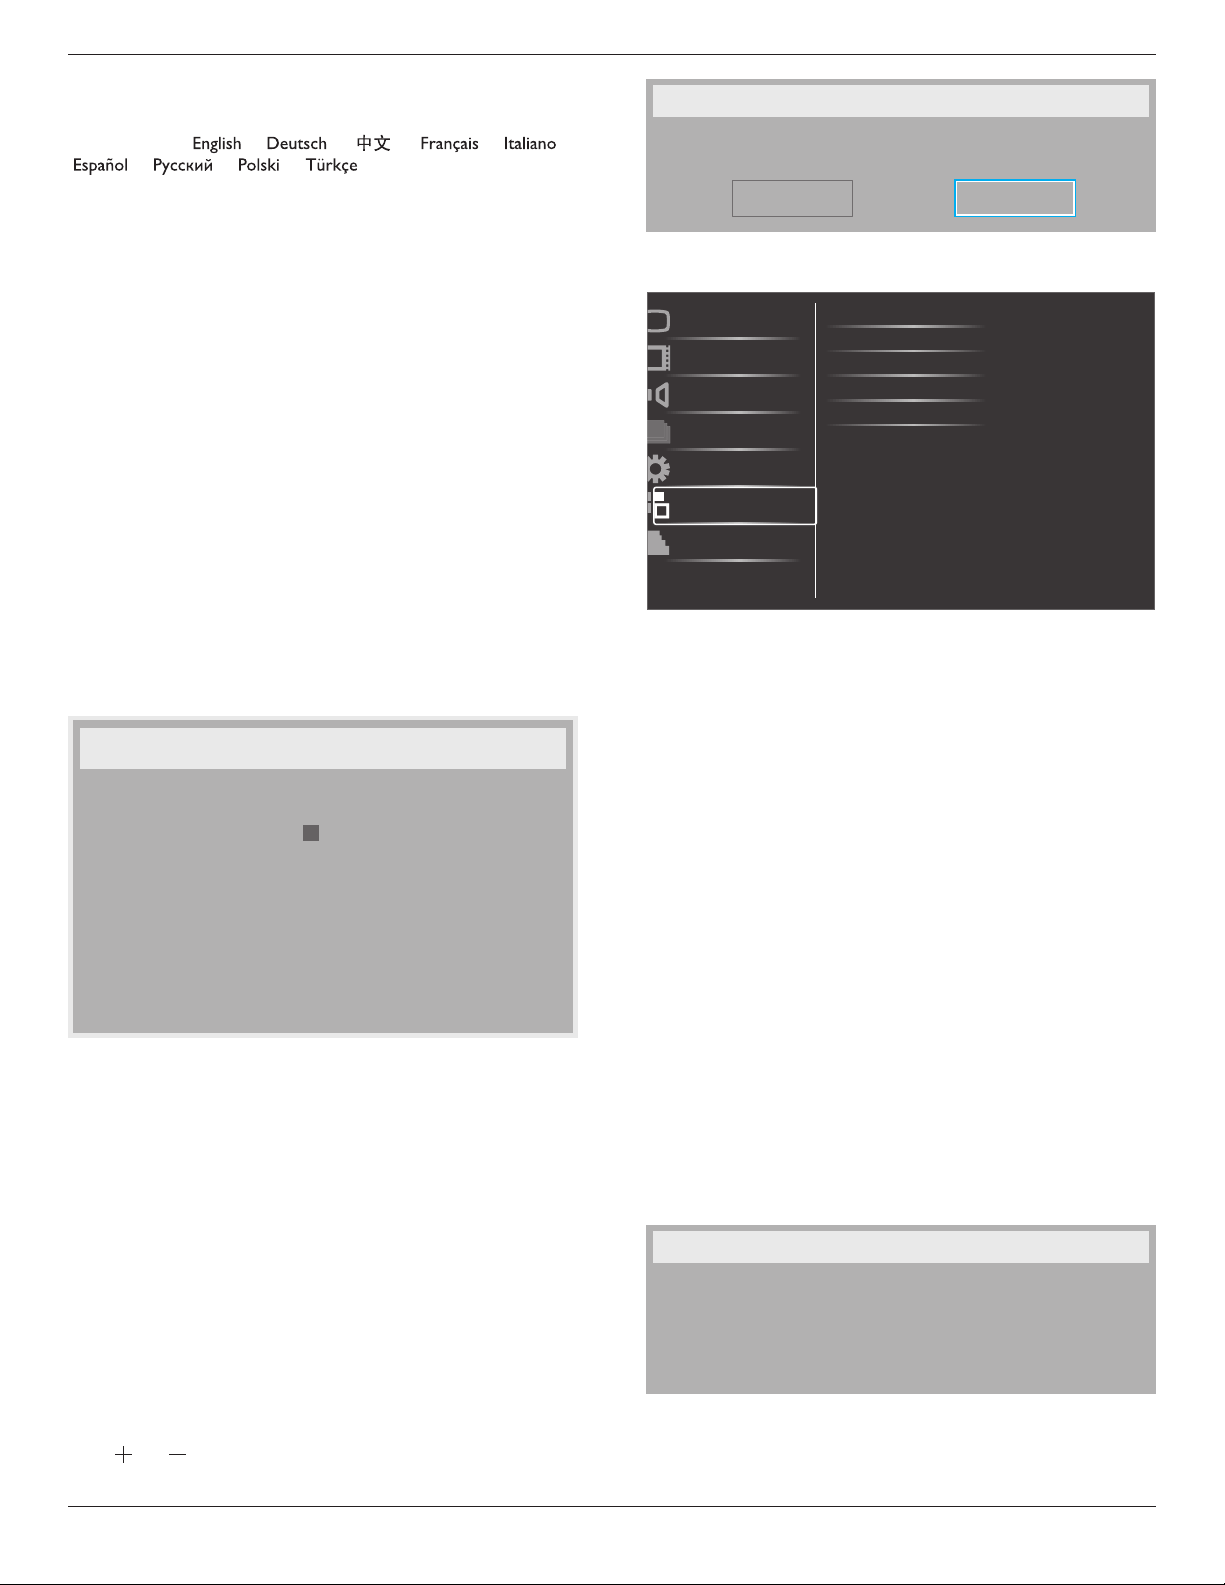
Language
SelectthelanguageusedintheOSDmenu.
Theoptionsare:{ }/{ }/{ }
/{ }
/
{ }/
{ }/{ }/
{ }/{ }.
Panel saving
Choosetoenablethepanelsavingfunctionstoreducetheriskofthe
“image persistence”.
• {Cooling Fan}-Select{On}toturnonthecoolingfanallthe
time.Select{Auto}toturnon/offthecoolingfanaccordingtothe
monitortemperature.
NOTE: Thespeedofthecoolingfanispre-setto{low},{mid},or
{high}speedeachat50°C,58°C,or63°Crespectively.The
monitorwillautomaticallyshutdownbyreachingapreset
criticaltemperatureof82°C.
• {Brightness}-Select{On}andthebrightnessoftheimagewillbe
reducedtoanappropriatelevel,andtheBrightnesssettinginthe
Picturemenuwillbecomeunavailable.
• {Pixel shift}-Selectthetimeinterval({Auto}/{10~900}Seconds
/{Off})forthemonitortoslightlyexpandtheimagesizeandshift
thepositionofpixelsinfourdirections(up,down,left,orright).
Network control port
Selectthenectworkcontrolport.
Theoptionsare:{RJ-45}/{RS-232}.
Network settings
Assign{IP},{Subnet Mask},and{Default gateway}forthedisplay.
Network settings
Network host name
DHCP
IP address
Subnet mask
Default gateway
Login user name
Login password
0
0
0
0
0
0
-
-
-
a d m i n
0
[ SET ]
change [SET] in STORE
0
Disable
0
0
0
0
0
-
-
-
0
0
0
0
0
0
0
0
0
-
-
-
• DHCP-ChoosetoenableordisabletheDHCPfunction.Ifenabled,
thedisplaywillbeassignedIPaddress,SubnetmaskandDefault
gatewayautomatically.Ifdisabled,youwillbepromptedtoenterthe
followingvaluemanually.Finally,press[SET]buttontostoreandsave
thechosenvalues.
• IPaddress
• Subnetmask
• Defaultgateway
• Loginusername
• Loginpassword
Conguration reset
ResetallsettingsintheConguration1menu.
Factory reset
ResetallthesettingsintheOSDmenusof{Picture},{Screen},{Audio},
{PIP},{Conguration1},{Conguration2},and{Advanced option}.
Press[ ]or[ ]buttontoselect[Reset],andthenpress[SET]button
todothereset.
Factory reset
Cancel
Reset
4.2.6. Configuration2 menu
OSD turn off
Information OSD
Off timer
OSD H-position
Monitor information
Picture
Screen
Audio
PIP
Configuration1
Configuration2
Advanced option
OSD V-position
OSD turn off
SettheperiodoftimetheOSDmenustaysonthescreen.
Theoptionsare:{5 ~ 120}seconds.
Information OSD
SettheperiodoftimetheinformationOSDdisplayedontheupper
rightcornerofthescreen.TheinformationOSDwilldisplaywheninput
signalischanged.
TheinformationOSDwillremainonthescreenwith{Off}selection.
Theoptionsare:{1 ~ 60}seconds.
Off Timer
Setthemonitortoturnitselfofftostandbymodewithinanamountof
timespecied.
Theoptionsare:{Off,1 ~ 24}hours.
NOTE: Whenthe“Offtimer”isactivated,the“Schedule”settingswill
bedisabled.
OSD H-position
AdjustthehorizontalpositionoftheOSDmenu.
OSD V-position
AdjusttheverticalpositionoftheOSDmenu.
Monitor Information
Displaystheinformationaboutyourmonitor,includingmodelnumber,
serialnumber,operatinghoursandsoftwareversion.
Monitor information
Model name:
Serial:
Operation Hours:
Sw Version:
BDL3245E
VER 0.203
0 H 3M
BDL3245E / BDL4245E / BDL4645E
19
4.2.7. Advanced option menu
Input resolution
Black level expansion
Gamma selection
Scan mode
Film mode
IR control
Keyboard control
Tiling
Heat status
Date and time
Picture
Screen
Audio
PIP
Configuration1
Configuration2
Advanced option
Scan conversion
Input resolution
SettheresolutionoftheVGAinput.Thisisonlyrequiredwhenthe
monitorisunabletodetecttheVGAinputresolutioncorrectly.
NOTE: ThisitemisfunctionalforVGAinputonly.
Theoptionsare:
• {1024x768/1280x768/1360x768}
• {1400x1050/1680x1050}
• {1600x1200/1920x1200}
• {Auto}:Determinestheresolutionautomatically.
Theselectedsettingswillbecomeeffectiveafterturningoffthepower
andturnitonagain.
Black level expansion
Selectasuitableblacklevelexpansionsettingtorevealmoredetailsin
thedarkpartsofanimage.
Theoptionsare:{Off}/{Low}/{Medium}/{High}.
NOTE: ThisitemisfunctionalforVideomodeinputsonly.
Gamma selection
Selectadisplaygammavaluetobestsuittheimageandoptimizeimage
brightnessandcontrast.
Theoptionsare:{Native}/{2.2}/{2.4}/{S gamma}.
Scan mode
Changethedisplayareaoftheimage.
• {Overscan}-Displayabout95%oftheoriginalsizeoftheimage.
Therestoftheareassurroundingtheimagewillbecutoff.
• {Underscan}-Displaytheimageinitsoriginalsize.
NOTE: ThisitemisfunctionalforHDMI-Videotiming,DVI-D(HD
timing),DP(HDtiming),andYPbPrinputsonly.
Scan conversion
ChoosetoenableordisabletheIP(InterlacetoProgressive)conversion
function.
• {Progressive}-EnabletheIPconversionfunction(recommended).
Onceenabled,theinterlaceinputsignalwillbeconvertedto
progressiveformatforbetterdisplayquality.
• {Interlace}-DisabletheIPfunction.Thismodeissuitablefor
displayingmotionpictures,butitincreasesthechanceofimage
retention.
Film mode
Choosetoturnonoroffthelmmodeframeconversionfunction.
• {Auto} -Enablethelmmodeframeconversionfunctionfor
moviesandmotionpictures.Themonitorconvertsa24frames-
per-second(24fps)inputsignalformattoDVDvideosignalformat.
Oncethisfunctionisenabled,itisrecommendedthatyousetthe
{Scan conversion}functionto{Progressive}.
• {Off}- Disablethelmmodeframeconversionfunction.Thismode
issuitableforTVbroadcastingandVCRsignals.
IR control
Selecttheoperationmodeoftheremotecontrolwhenmultiple
monitorsareconnectedviatheRS232Cconnection.
• {Normal} -Allmonitorscanbeoperatednormallybytheremote
control.
• {Primary}-Designatethismonitorastheprimarymonitorfor
remotecontroloperation.Onlythismonitorcanbeoperatedby
theremotecontrol.
• {Secondary}-Designatethismonitorasthesecondarymonitor.This
monitorcannotbeoperatedbytheremotecontrol,andwillonly
receivethecontrolsignalfromtheprimarymonitorviatheRS232C
connection.
• {Lock}-Locktheremotecontrolfunctionofthismonitor.Tounlock,
pressandholdthe[DISPLAY]buttonontheremotecontrolfor5
(ve)seconds.
Keyboard control
Choosetoenableordisablethemonitorkeyboard(controlbuttons)
function.
• {Lock}-Disablethekeyboardfunction.
• {Unlock}-Enablethekeyboardfunction.
Tiling
Withthisfunctionyoucancreateasinglelarge-screenmatrix(display
wall)thatconsistsofupto25setsofthismonitor(up to 5-set each at
the vertical and horizontal side).Thisfunctionrequiresadaisy-chain
connection.
Tiling
H monitors
V monitors
Position
Frame comp.
Enable
Switch On Delay
1
1
1
No
No
Off
Example: 2 x 2 screen matrix (4 monitors)
Hmonitors=2monitors
Vmonitors=2monitors
1 2
3 4
H monitors
V monitors
Position
BDL3245E / BDL4245E / BDL4645E
20
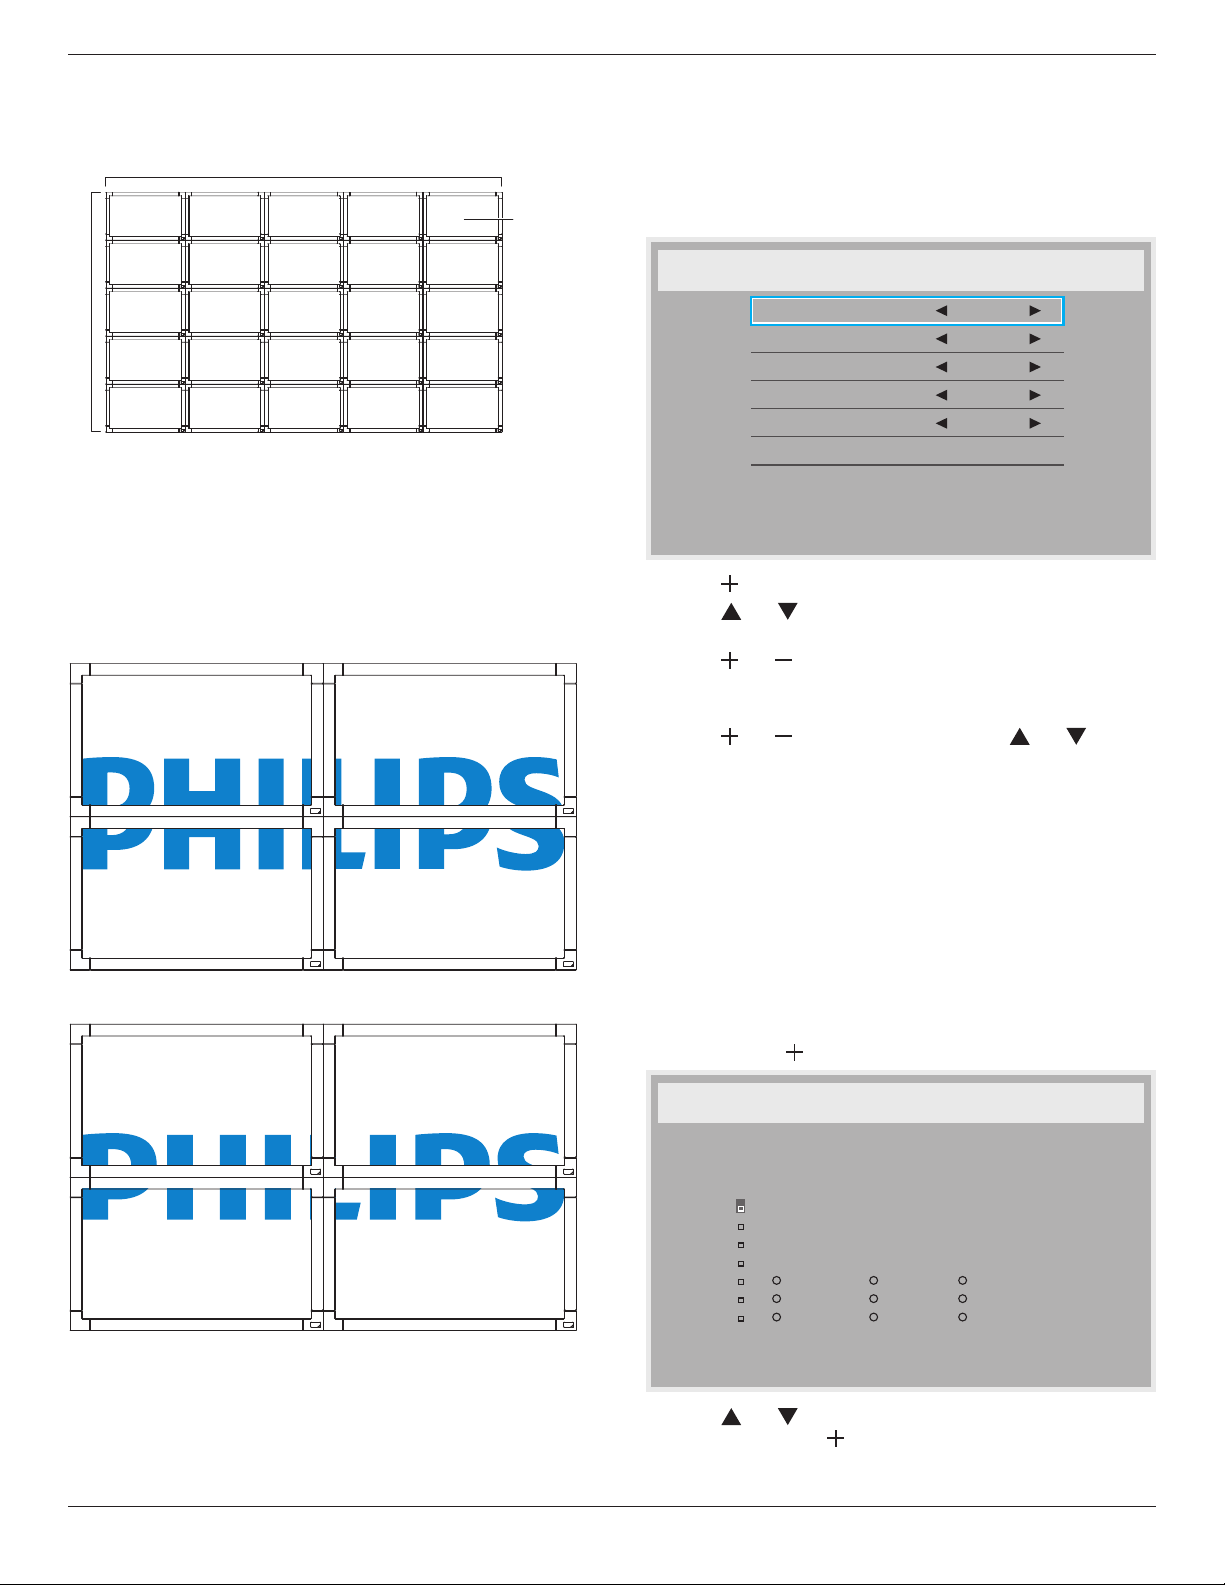
Example: 5 x 5 screen matrix (25 monitors)
Hmonitors=5monitors
Vmonitors=5monitors
1 2
6 7
3 4
8 9
5
10
11 12 13 14 15
16 17 18 19 20
21 22 23 24 25
H monitors
V monitors
Position
• H monitors-Selectthenumberofmonitorsonthehorizontalside.
• V monitors-Selectthenumberofmonitorsontheverticalside.
• Position-Selectthepositionofthismonitorinthescreenmatrix.
• Frame comp.-Choosetoturntheframecompensationfunctionon
oroff.Ifturnedon,themonitorwilladjusttheimagetocompensate
forthewidthofthemonitorbezelsinordertoaccuratelydisplay
theimage.
Frame comp. - Off
Frame comp. - On
• Enable:ChoosetoenableordisabletheTilingfunction.Ifenabled,
themonitorwillapplythesettingsinHmonitors,Vmonitors,
Position,andFramecomp.
• Switch On Delay:{Off/Auto/2,4,6,8,10,20,30,40,50}
NOTE: TheTilingfunctionwillbedisabledwhenthe[ON/OFF]
buttonforPIPispressed.
Heat status
Thisfunctionallowsyoutocheckthethermalstatusofthemonitorat
anytime.Theaccuracyofthetemperatureindicatedis+/-5degrees(C
orF).
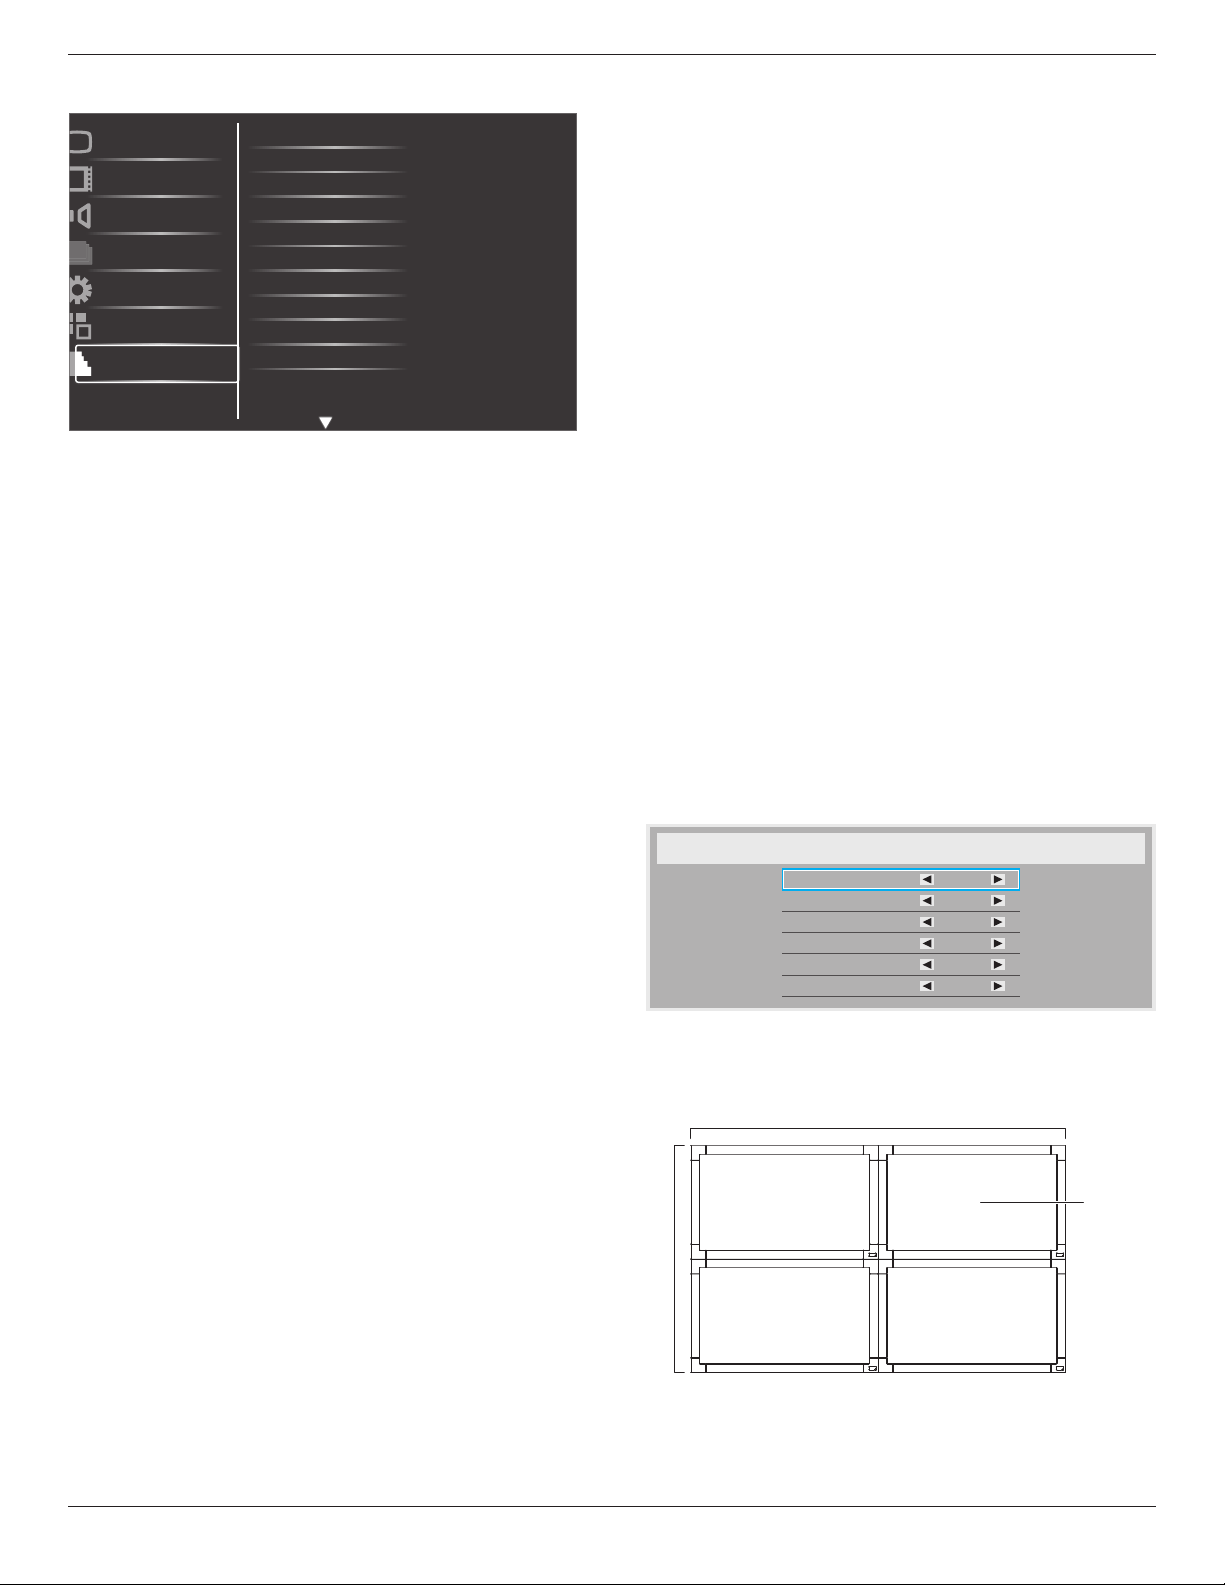
Date and time
Adjustthecurrentdateandtimeforthemonitor’sinternalclock.
Date and time
Year
Month
Day
Hour
Minute
Daylight saving time
Current date time
2011 . 08 . 04 20 : 20 : 17
Press [SET] to set clock
2011
08
04
20
20
1. Press[ ]buttontoenterthesubmenu.
2. Press[ ]or[ ]buttontotoggleamongthe{Year},{Month},
{Day},{Hour},{Minute},and{Daylight saving time}settings.
3. Press[ ]or[ ]buttontoadjustallsettingsexcept{Daylight
saving time}.
4. Press[SET]buttontoenterthe{Daylight saving}submenu.
5. Press[ ]or[ ]buttontoselectitem,press[ ]or[ ]button
toadjust.
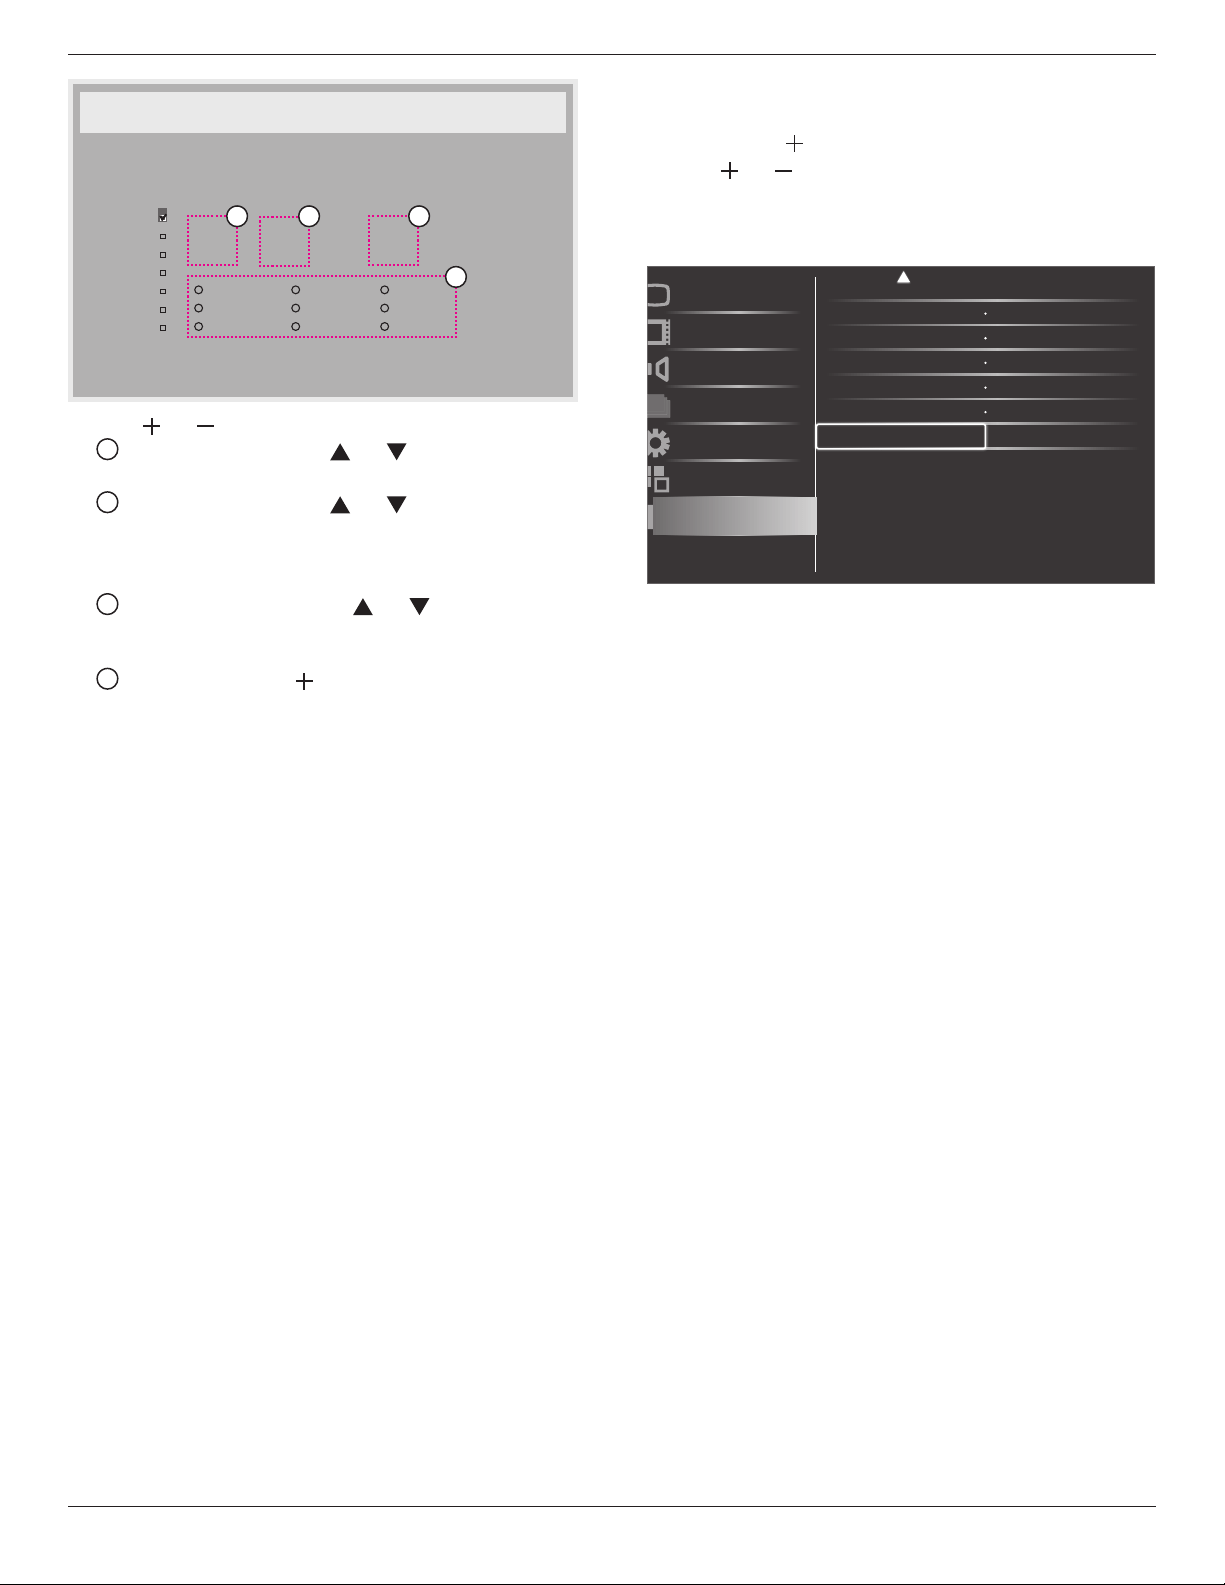
Schedule
Thisfunctionallowsyoutoprogramupto7(seven)differentscheduled
timeintervalsforthemonitortoactivate.
Youcanselect:
• Thetimeforthemonitortoturnonandturnoff.
• Thedaysinaweekforthemonitortoactivate.
• Whichinputsourcethemonitorwilluseforeachscheduled
activationperiod.
NOTE: Youshouldsetupcurrentdateandtimein{Date and time}
menubeforeusingthisfunction.
1. Press[SET]or[ ]buttontoenterthesubmenu.
Schedule
Today
1
2
3
4
5
7
6
2011 . 08 . 04 THU 20 : 19 : 55
On
_
:
_
_
:
_
_
Every day
Off Input
Wed
SAT
MON
THU
SUN
TUE
FRI
Every week
2. Press[ ]or[ ]buttontoselectascheduleitem(itemnumber1
~7),andthenpress[ ]buttontomarkittheitemnumber.
BDL3245E / BDL4245E / BDL4645E
21
Schedule
Today
1
2
3
4
5
7
6
2011 . 08 . 04 THU 20 : 19 : 55
On
_
:
_
_
:
_
_
Every day
Off Input
Wed
SAT
MON
THU
SUN
TUE
FRI
Every week
4
1 32
3. Press[ ]or[ ]buttontoselecttheschedule:
1
Power-onschedule:Press[ ]or[ ]buttontosetthehour
andminuteforthemonitortoturnon.
2
Power-offschedule:Press[ ]or[ ]buttontosetthehour
andminuteforthemonitortoturnoff.
Selectorleaveanempty“__”forboththehourandminuteslotif
youdonotwanttousethispower-onorpower-offschedule.
3
Input-sourceselection:Press[ ]or[ ]buttontoselectan
inputsource.Ifnoinputsourceisselected,theinputsource
willremainthesameaslastselected.
4
Dateschedule:Press[ ]buttontoselectwhichdayina
weekthisscheduleitemwillbetakeeffect,andthenpressthe
[SET]button.
4. Formoreschedulesettings,press[EXIT]buttonandthenrepeat
thestepsabove.Acheckmarkintheboxnexttothenumberof
thescheduleitemindicatesthattheselectedscheduleisineffect.
NOTES:
• The{Every day}selectioninascheduleitemtakespriorityover
otherweeklyschedules.
• Ifthescheduleoverlap,thescheduledpower-ontimetakespriority
overscheduledpower-offtime.
• Iftherearetwoscheduleitemsprogrammedforthesametime,the
highestnumberedscheduletakespriority.
Monitor ID
SettheIDnumberforcontrollingthemonitorviatheRS232C
connection.EachmonitormusthaveanuniqueIDnumberwhen
multiplesetsofthismonitorareconnected.
DDC/CI
ChoosetoturnonorofftheDDC/CIcommunicationfunction.Select
{On}fornormaluse.
Smart power
Setthemonitortoreducethepowerconsumptionautomatically.
Theoptionsare:{Off}/{Medium}/{High}.
Auto signal detection
Choosetoletthemonitordetectanddisplayavailablesignalsources
automatically.
• {ON}-Setthemonitortodisplaytheimageautomaticallyoncea
signalisconnected.
• {OFF}-Onceasignalisconnected,itcanonlybeselectedmanually.
Advanced option reset
ResetallsettingsintheAdvancedoptionmenu.
1. Press[SET]or[ ]buttontoenterthesubmenu.
2. Press[ ]or[ ]buttontoselect{Reset}andpressthe[SET]
buttontorestoresettingstofactorypresetvalues.
3. Pressthe[EXIT]buttonorselect{Cancel}andpressthe[SET]
buttontocancelandthenreturntothepreviousmenu.
Schecule
Monitor ID
DDC/CI
Auto signal detection
Action
Off
Off
On
Action
Action
Advanced option reset
Picture
Screen
Audio
PIP
Configuration1
Configuration2
Advanced option
Smart power
BDL3245E / BDL4245E / BDL4645E
22
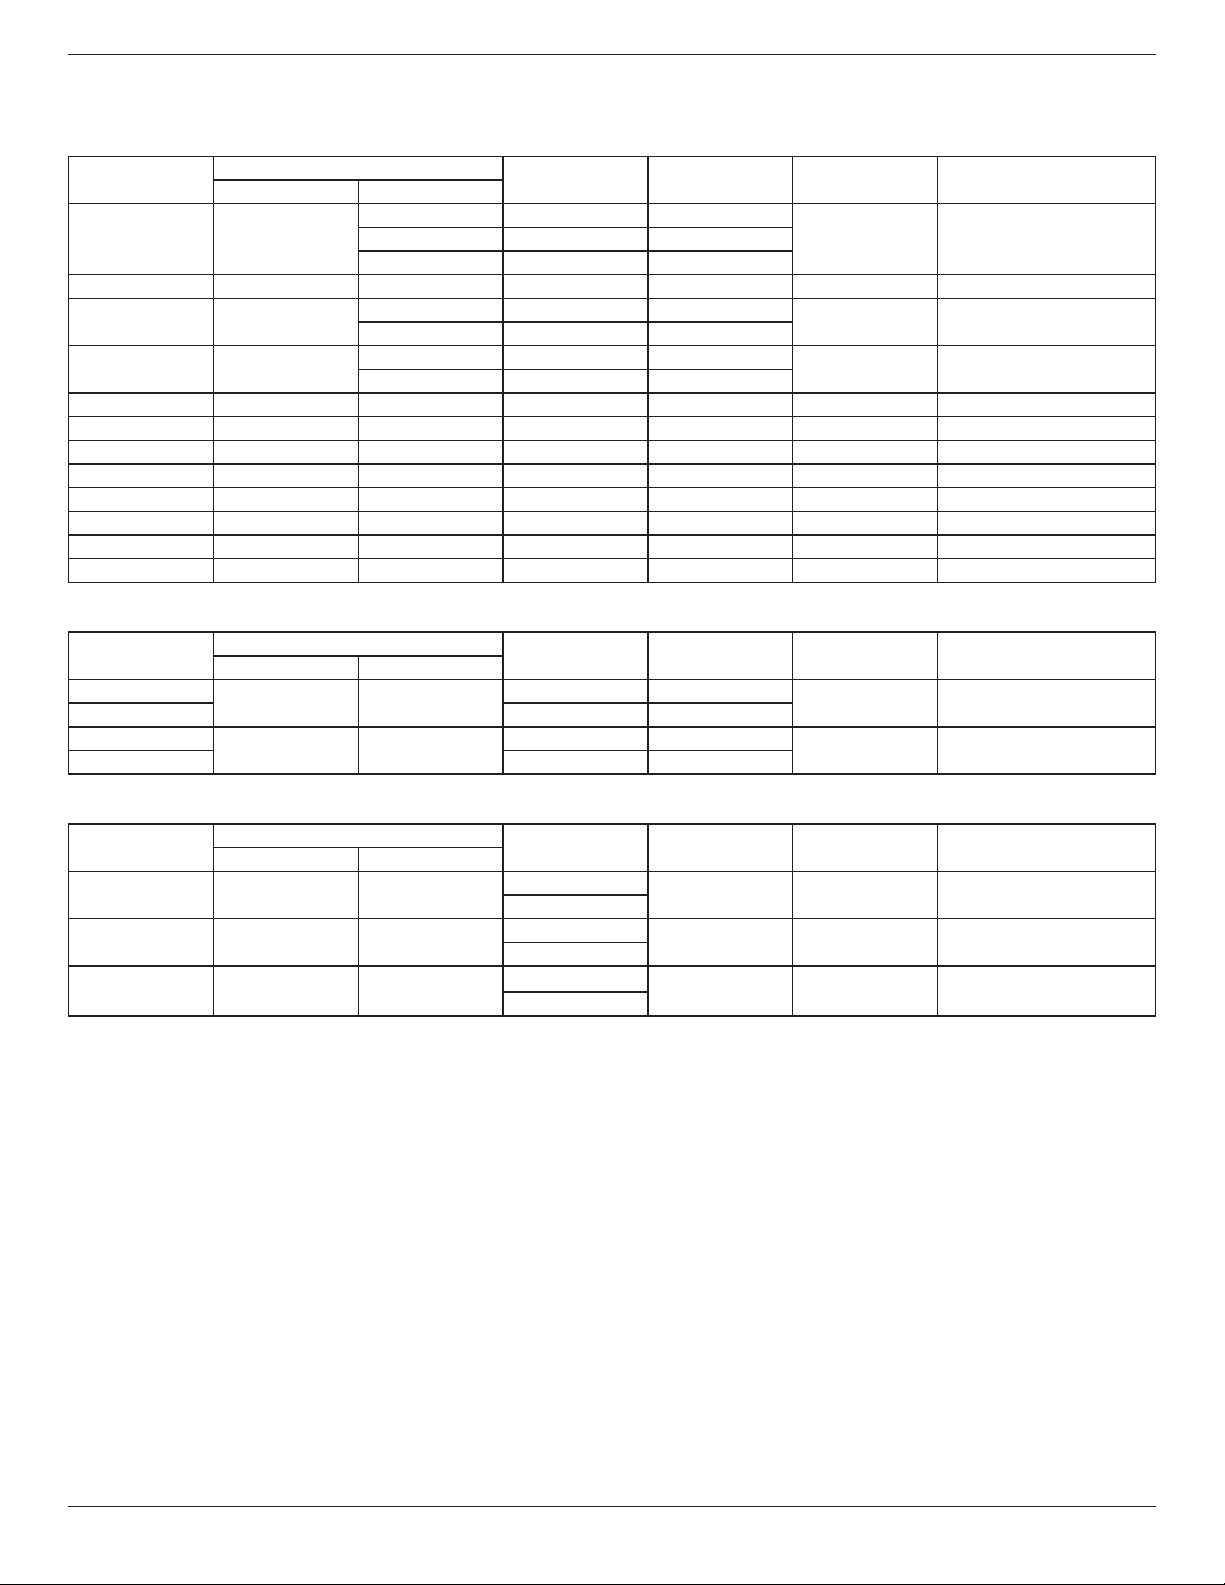
5. Input Mode (Need Check)
VGA Resolution
Standard
Resolution
ActiveResolution
RefreshRate PixelRate AspectRatio StandforMode
HPixels VLines
VGA 640
480 60Hz 25.175MHz
4:3 VideoGraphicArray72Hz 72Hz 31.5MHz
75Hz 75Hz 31.5MHz
WVGA 720 400 70Hz 33.75MHz 16:9 WideVideoGraphicArray
SVGA 800
600 60Hz 40MHz
4:3 SuperVGA
75Hz 75Hz 49.5MHz
XGA 1024
768 60Hz 65MHz
4:3 ExtendedGraphicArray
75Hz 75Hz 78.75MHz
WXGA 1280 768 60Hz 79.5MHz 5:3 WideXGA
WXGA 1280 800 60Hz 79.5MHz 16:10 WideXGA
SXGA 1280 960 60Hz 108MHz 4:3 SuperXGA
SXGA 1280 1024 60Hz 108MHz 5:4 SuperXGA
WXGA 1360 768 60Hz 85.5MHz 16:9 WideXGA
WXGA 1366 768 60Hz 85.5MHz 16:9 WideXGA
UXGA 1600 1200 60Hz 162MHz 4:3 UltraXGA
HD1080 1920 1080 60Hz 148.5MHz 16:9 HD1080
SDTV Resolution
Standard
Resolution
ActiveResolution
RefreshRate PixelRate AspectRatio StandforMode
HPixels VLines
480i
720 480
29.97Hz 13.5MHz
4:3 ModiedNTSCStandard
480p 59.94Hz 27MHz
576i
720 480
25Hz 13.5MHz
4:3 ModiedPALStandard
576p 50Hz 27MHz
HDTV Resolution
Standard
Resolution
ActiveResolution
RefreshRate PixelRate AspectRatio StandforMode
HPixels VLines
720p 1280 720
50Hz
74.25MHz 16:9 NormallyDVBMode
60Hz
1080i 1920 1080
25Hz
74.25MHz 16:9 NormallyATSCMode
30Hz
1080p 1920 1080
50Hz
148.5MHz 16:9 NormallyATSCMode
60Hz
• ThePCtextqualityisoptimuminHD1080mode(1920x1080,60Hz).
• YourPCdisplayscreenmightappeardifferentdependingonthemanufacture(andyourparticularversionofWindows).
• CheckyourPCinstructionbookforinformationaboutconnectingyourPCtoadisplay.
• Ifaverticalandhorizontalfrequency-selectmodeexists,select60Hz(vertical)and31.5KHz(horizontal).Insomecases,abnormalsignals(suchas
stripes)mightappearonthescreenwhenthePCpoweristurnedoff(orifthePCisdisconnected).Ifso,pressthe[INPUT]buttontoenterthe
videomode.Also,makesurethatthePCisconnected.
• WhenhorizontalsynchronoussignalsseemirregularinRGBmode,checkPCpowersavingmodeorcableconnections.
• ThedisplaysettingstablecompliestotheIBM/VESAstandards,andbasedontheanaloginput.
• TheDVIsupportmodeisregardedassametothePCsupportmode.
• Thebesttimingfortheverticalfrequencytoeachmodeis60Hz.
BDL3245E / BDL4245E / BDL4645E
23
6. Pixel Defect Policy
Philipsstrivestodeliverthehighestqualityproducts.Weusesomeoftheindustry’smostadvancedmanufacturingprocessesandpracticestringentquality
control.However,pixelorsub-pixeldefectsonthePDP/TFTpanelsusedinPlasma-&LCD-displaysaresometimesunavoidable.Nomanufacturercan
guaranteethatallpanelswillbefreefrompixeldefects,butPhilipsguaranteesthatanyPlasma-&LCD-displayswithanunacceptablenumberofdefects
willberepairedduringthewarrantyperiodinlinewithyourlocalguaranteeconditions.
ThisnoticeexplainsthedifferenttypesofpixeldefectsanddenestheacceptabledefectlevelforthisLCDscreen.Inordertoqualifyforrepairunder
warranty,thenumberofpixeldefectsmustexceedacertainlevelwhichisgiveninthereferencetable.IftheLCDscreeniswithinspecicationawarranty
exchange/claimbackwillberefused.Additionally,becausesometypesorcombinationsofpixeldefectsaremorenoticeablethanothers,Philipssetseven
higherqualitystandardsforthose.
6.1. Pixels and Sub-Pixels
subpixel
pixel
Apixel,orpictureelement,iscomposedofthreesub-pixelsintheprimarycolorsofred,greenand
blue.Manypixelstogetherformanimage.Whenallsub-pixelsofapixelarelit,thethreecolored
sub-pixelstogetherappearasasinglewhitepixel.Whenallaredark,thethreecoloredsub-pixels
togetherappearasasingleblackpixel.Othercombinationsoflitanddarksub-pixelsappearas
singlepixelsofothercolors.
6.2. Types of Pixel Defects + Dot Definition
Pixelandsub-pixeldefectsappearonthescreenindifferentways.Therearethreecategoriesofpixeldefectsandseveraltypesofsub-pixeldefectswithin
eachcategory.
Dot denition = What is a defective “Dot”? :
Oneormoredefective,adjacentsub-pixelaredenedasone“dot”.Theno.ofdefectivesub-pixelsarenotrelevanttodeneadefectivedot.Thismeans
thatadefectivedotcanconsistofone,twoorthreedefectivesub-pixelswhichcanbedarkorlit.
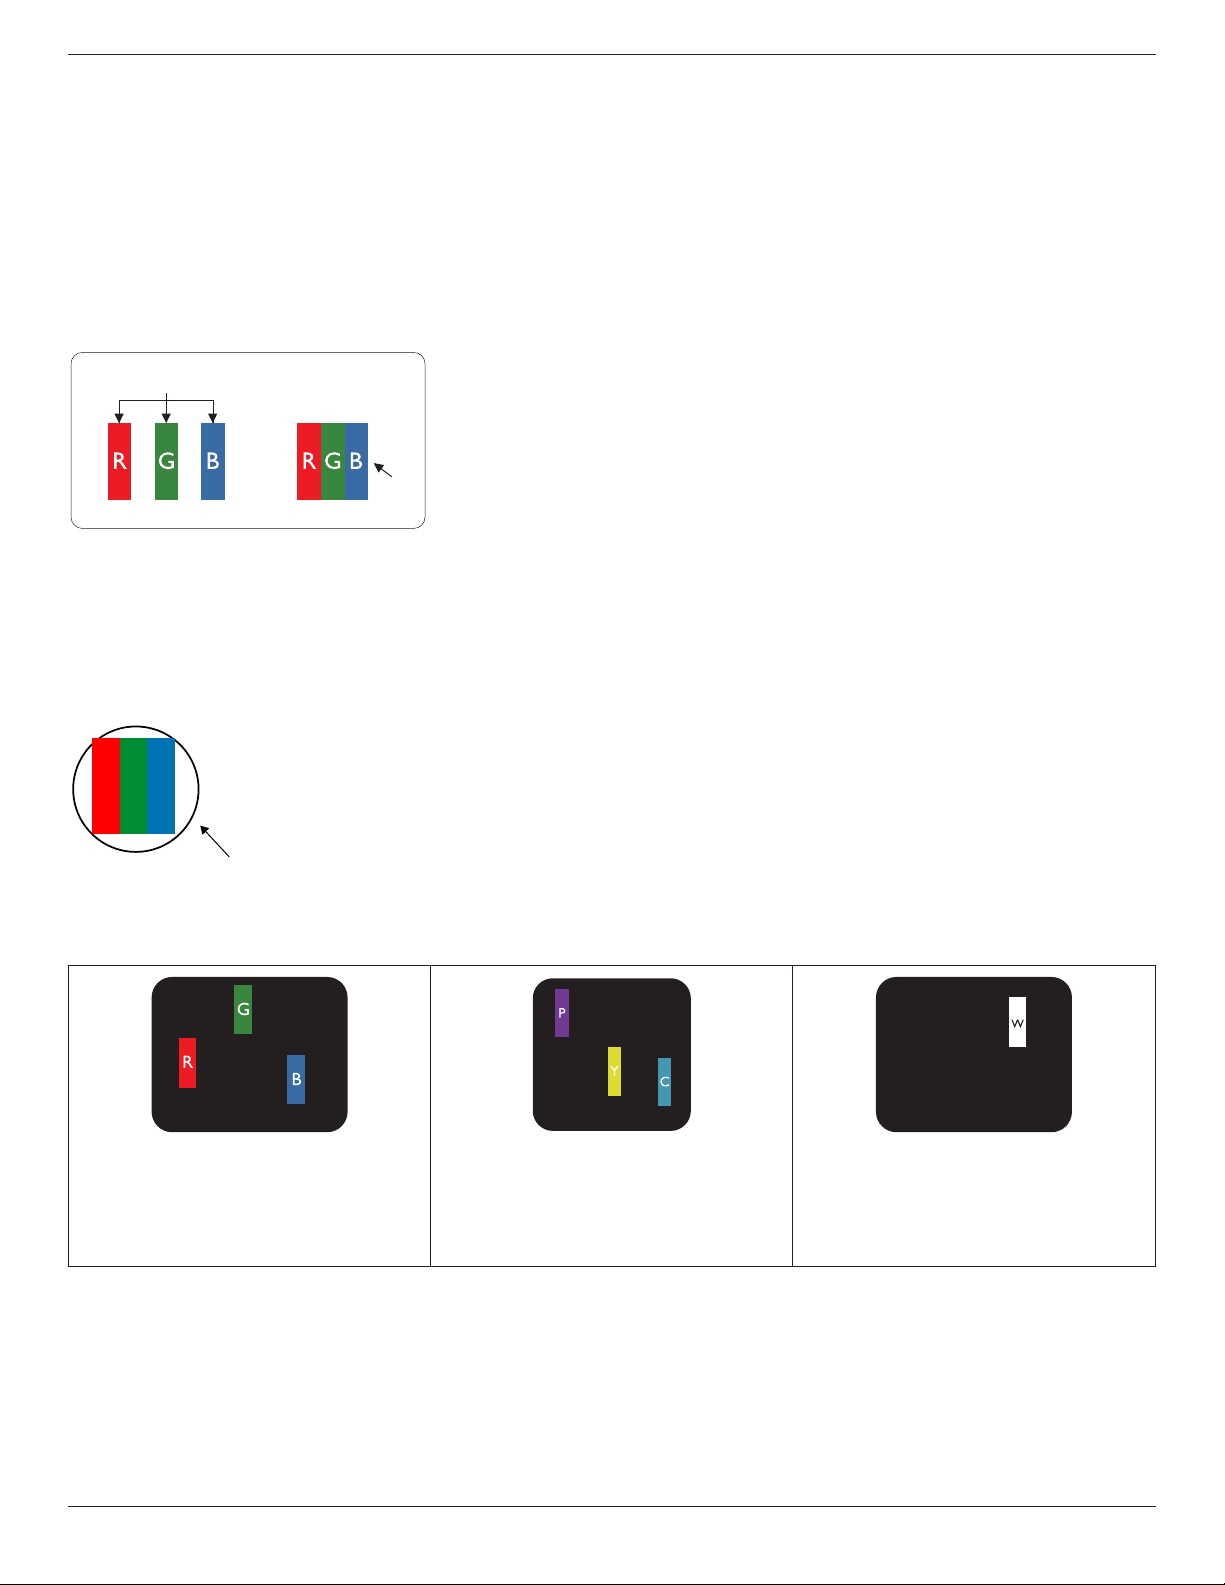
RR G B
Onedot=OnePixel;consistsofthreesub-pixelsofRed,Green,andBlue.
6.3. Bright Dot Defects
Brightdotdefectsappearaspixelsorsub-pixelsthatarealwayslitor“on”.Thesearetheexamplesofbrightdotdefects:
Onelitred,greenorbluesubpixel Twoadjacentlitsubpixels:
Red+Blue=Purple
Red+Green=Yellow
Green+Blue=Cyan(LightBlue)
Threeadjacentlitsubpixels(onewhitepixel)
BDL3245E / BDL4245E / BDL4645E
24
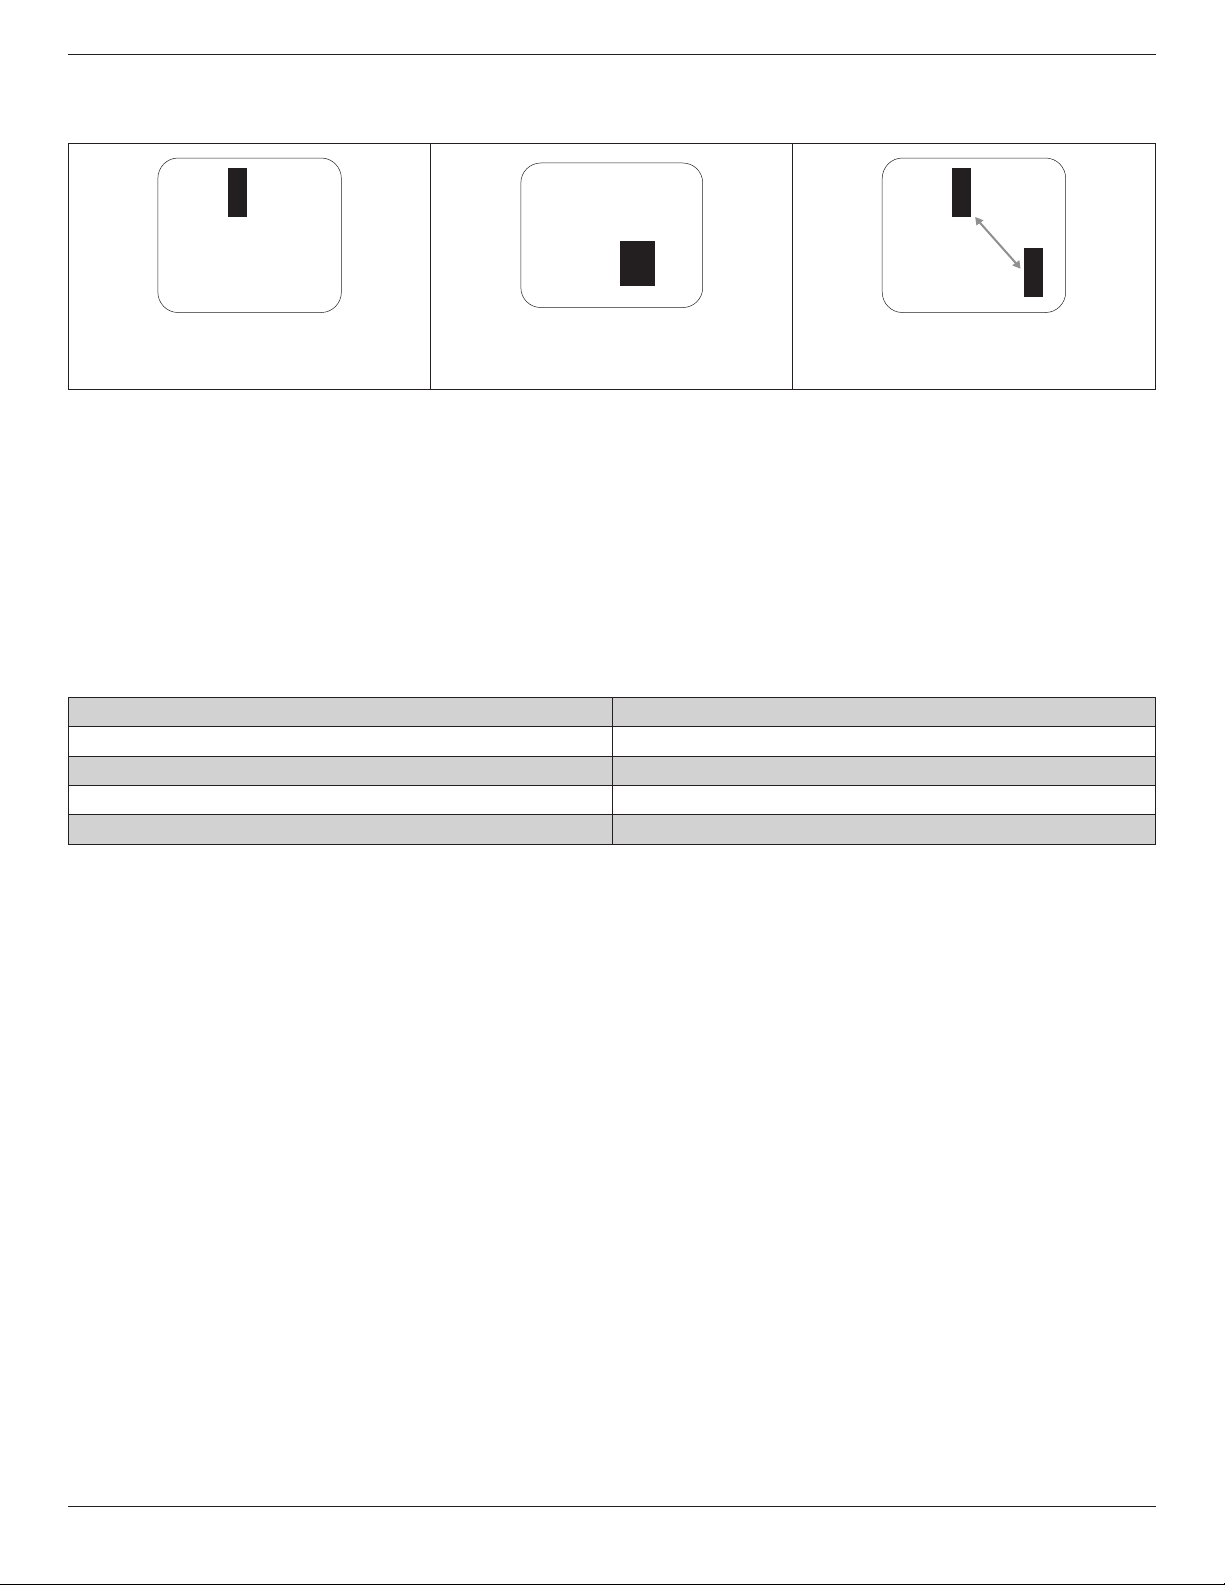
6.4. Dark Dot Defects
Blackdotdefectsappearaspixelsorsub-pixelsthatarealwaysdarkor“off”.Thesearetheexamplesofblackdotdefects:
Onedarkdot Twoadjacentdarkdots=1pairofdarkdots Twodarkdots,specicationsdenesthe
minimumdistancebetweendarkdots
6.5. Proximity of Pixel Defects
Becausepixelandsub-pixelsdefectsofthesametypethatarenearbyoneanothermaybemorenoticeable,Philipsalsospeciestolerancesforthe
proximityofpixeldefects.Inthetablebelowyoucanndspecicationsabout:
• Allowedamountofadjacentdarkdots=(adjacentdarkdots=1pairofdarkdots)
• Minimumdistancebetweendarkdots
• Totalno.ofalldefectivedots
6.6. Pixel Defect Tolerances
Inordertoqualifyforrepairduetopixeldefectsduringthewarrantyperiod,aPDP/TFTpanelinaPhilipsPlasma/LCD-displaymusthavepixelorsub-
pixeldefectsexceedingthetoleranceslistedinthefollowingtable.
BRIGHTDOTEFFECT ACCEPTABLELEVEL
1litsubpixel 2
BLACKDOTEFFECT ACCEPTABLELEVEL
1darksubpixel 10
TOTALDOTDEFECTSOFALLTYPES 12
NOTE:*1or2adjacentsubpixeldefects=1dotdefect

BDL3245E / BDL4245E / BDL4645E
25
7. Cleaning and Troubleshooting (Need Check)
7.1. Cleaning
Cautions When Using the Display
• Donotbringyourhands,faceorobjectsclosetotheventilationholesofthedisplay.Topofdisplayisusuallyveryhotduetothehightemperature
ofexhaustairbeingreleasedthroughtheventilationholes.Burnsorpersonalinjuriesmayoccurifanybodypartsarebroughttooclose.Placing
anyobjectnearthetopofthedisplaycouldalsoresultinheatrelateddamagestotheobjectaswellasthedisplayitself.
• Besuretodisconnectallcablesbeforemovingthedisplay.Movingthedisplaywithitscablesattachedmaydamagethecablesandthuscasereor
electricshockdanger.
• Disconnectthepowerplugfromthewalloutletasasafetyprecautionbeforecarryingoutanytypeofcleaningormaintenanceprocedure.
Front Panel Cleaning Instructions
• Thefrontofthedisplayhasbeenspeciallytreated.Wipethesurfacegentlyusingonlyacleaningclothorasoft,lint-freecloth.
• Ifthesurfacebecomesdirty,soakasoft,lint-freeclothinamilddetergentsolution.Wringtheclothtoremoveexcessliquid.Wipethesurfaceof
thedisplaytoremovedirt.Thenuseadryclothofthesametypetodry.
• Donotscratchorhitthesurfaceofthepanelwithngersorhardobjectsofanykind.
• Donotusevolatilesubstancessuchasinsertsprays,solventsandthinners.
Cabinet Cleaning Instructions
• Ifthecabinetbecomesdirty,wipethecabinetwithasoft,drycloth.
• Ifthecabinetisextremelydirty,soakalint-freeclothinamilddetergentsolution.Wringtheclothtoremoveasmuchmoistureaspossible.Wipe
thecabinet.Useanotherdryclothtowipeoveruntilthesurfaceisdry.
• Donotallowanywaterordetergenttocomeintocontactwiththesurfaceofthedisplay.Ifwaterormoisturegetsinsidetheunit,operating
problems,electricalandshockhazardsmayresult.
• Donotscratchorhitthecabinetwithngersorhardobjectsofanykind.
• Donotusevolatilesubstancessuchasinsertsprays,solventsandthinnersonthecabinet.
• DonotplaceanythingmadefromrubberorPVCnearthecabinetforanyextendedperiodsoftime.

BDL3245E / BDL4245E / BDL4645E
26
7.2. Troubleshooting
Symptom Possible Cause Remedy
No picture is displayed 1. Thepowercordisdisconnected.
2. Themainpowerswitchonthebackofthe
monitorisnotswitchedon.
3. Theselectedinputhasnoconnection.
4. Themonitorisinstandbymode.
1. Pluginthepowercord.
2. Makesurethepowerswitchisswitchedon.
3. Connectasignalconnectiontothemonitor.
Interference displayed on the monitor or
audible noise is heard
Causedbysurroundingelectricalappliancesor
uorescentlights.
Movethemonitortoanotherlocationtoseeis
theinterferenceisreduced.
Color is abnormal Thesignalcableisnotconnectedproperly. Makesurethatthesignalcableisattachedrmly
tothebackofthemonitor.
Picture is distorted with abnormal patterns 1. Thesignalcableisnotconnectedproperly.
2. Theinputsignalisbeyondthecapabilitiesof
themonitor.
1. Makesurethatthesignalcableisattached
rmly.
2. Checkthevideosignalsourcetoseeifit
isbeyondtherangeofthemonitor.Please
verifyitsspecicationswiththismonitor’s
specicationsection.
Display image doesn’t ll up the full size of the
screen
Thezoommodeisnotcorrectlyset. UsetheZoommodeorCustomzoomfunction
intheScreenmenutonetunedisplaygeometry
andtimefrequencyparameter.
Can hear sound, but no picture Improperlyconnectedsourcesignalcable. Makesurethatbothvideoinputsandsound
inputsarecorrectlyconnected.
Can see picture but no sound is heard 1. Improperlyconnectedsourcesignalcable.
2. Volumeisturnedallthewaydown.
3. [MUTE]isturnedon.
4. Noexternalspeakerconnected.
1. Makesurethatbothvideoinputsandsound
inputsarecorrectlyconnected.
2. Press[VOL UP]or[VOL DOWN]buttonto
hearsound.
3. SwitchMUTEoffbyusingthe[MUTE]
button.
4. Connectexternalspeakersandadjustthe
volumetoasuitablelevel.
Some picture elements do not light up
Somepixelsofthedisplaymaynotturnon. Thismonitorismanufacturedusinganextremely
highlevelofprecisiontechnology:however,
sometimessomepixelsofthemonitormaynot
display.Thisisnotamalfunction.
After-Images can still be seen on the monitor
after the monitor is powered off. (Examples
of still pictures include logos, video games,
computer images, and images displayed in 4:3
normal mode)
Astillpictureisdisplayedforanoverextended
periodoftime
Donotallowastillimagetobedisplayedfor
anextendedperiodoftimeasthiscancausea
permanentafter-imagetoremainonthemonitor.
BDL3245E / BDL4245E / BDL4645E
27
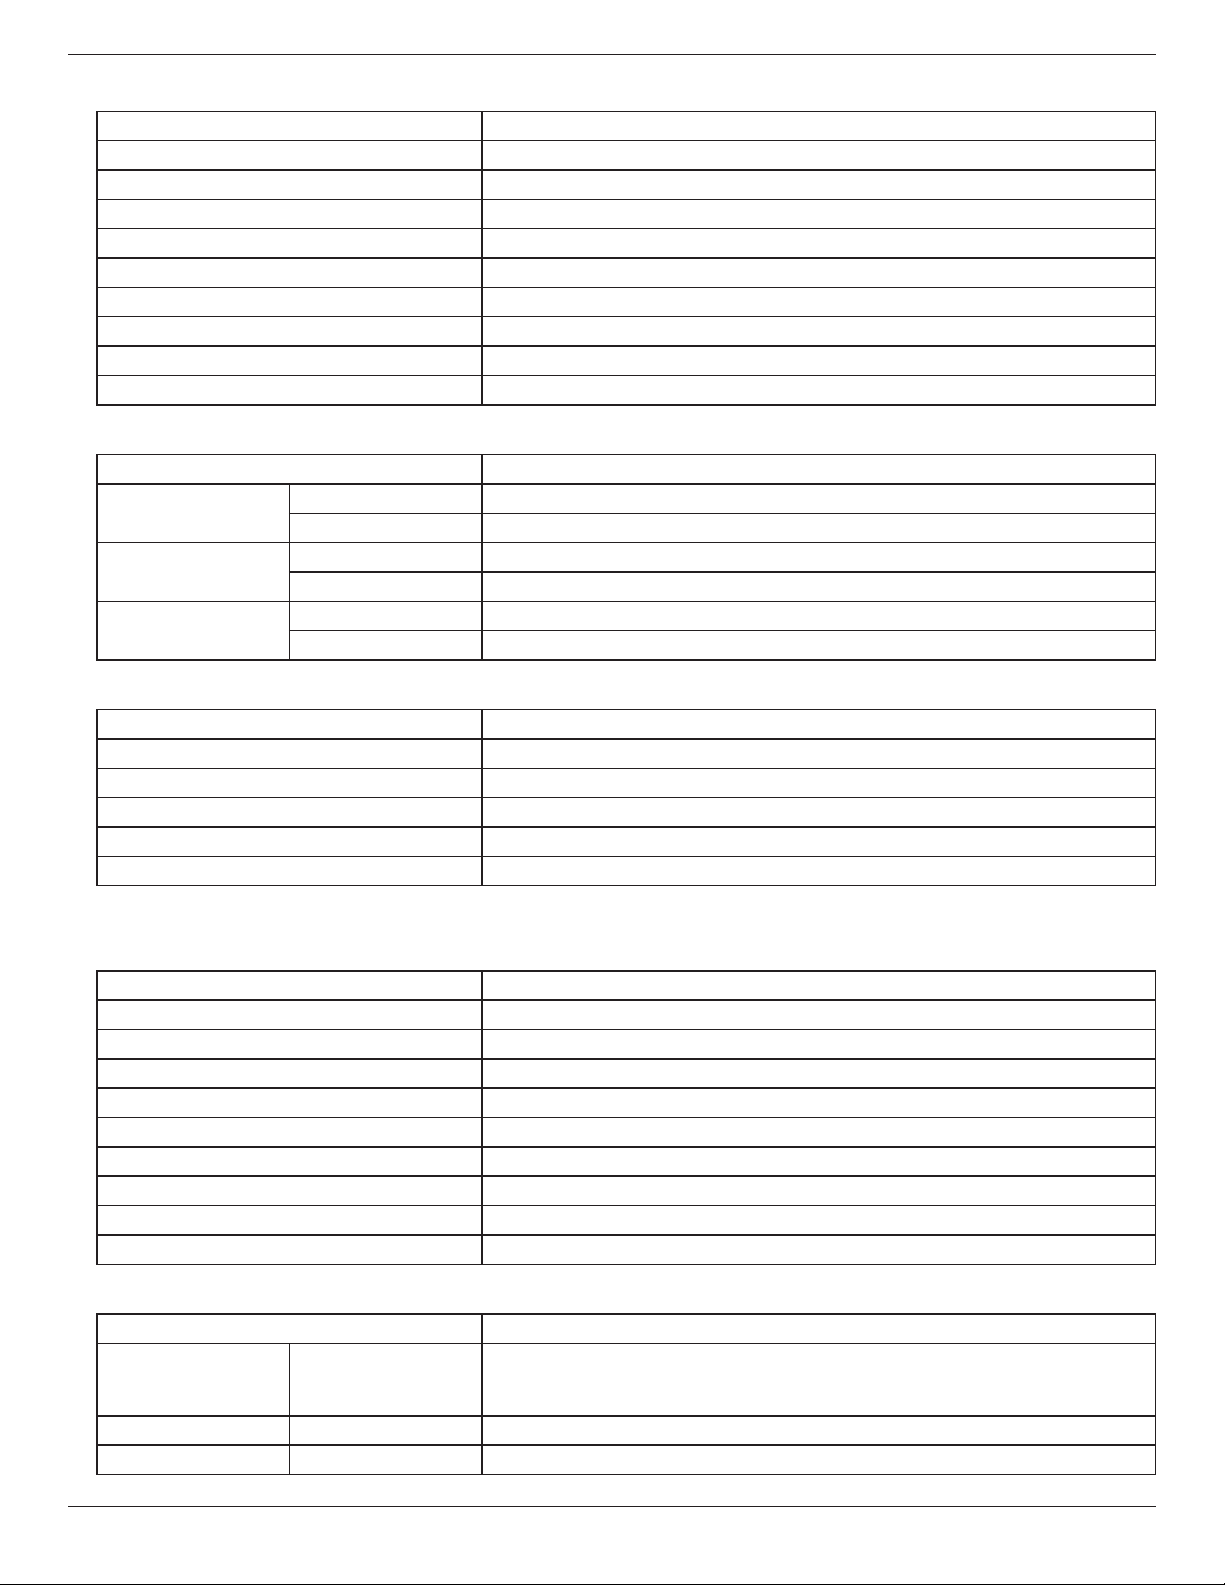
8. Technical Specifications (Need Check)
BDL3245E
Display
Item Specications
ScreenSize(ActiveArea) 32”LCD
Aspectratio 16:9
Numberofpixels 1920(H)x1080(V)
Pixelpitch 0.36375(H)x0.36375(V)[mm]
Displayablecolors 1.06Bcolors
Brightness(typical) 500cd/m2
Dynamiccontrastratio 3000:1
Contrastratio(typical) 1450:1
Viewingangle 178degrees
In/Out Terminals
Item Specications
SpeakerOutput InternalSpeaker 10W(L)+10W(R)[RMS]/8Ω
1Way1SpeakerSystem
82dB/W/M/160Hz~13KHz
AudioOutput RCAJackx1 0.5V[rms](Normal)/2Channel(L+R)
AudioInput
RCAJackx2
0.5V[rms](Normal)/2Channel(L+R)
RS232C D-SubJackx2
(9pin)
TXD+RXD(1:1)
RJ-45 RJ-45Jackx1
(8pin)
10/100LanPort
HDMIInput HDMIJackx1
(TypeA)(18pin)
DigitalRGB:TMDS(Video+Audio)
MAX:Video-720p,1080p,1920x1080/60Hz(WUXGA)Audio-48KHz/2Channel(L+R)
SupportsLPCMonly
DVI-DInput DVI-Djack DigitalRGB:TMDS(Video)
VGAInput D-SubJackx1
(15pin)
AnalogRGB:0.7V[p-p](75Ω),H/CS/V:TTL(2.2kΩ),SOG:1V[p-p](75Ω)
MAX:720p,1080p,1920x1080/60Hz(WUXGA)
VGAOutput D-SubJackx1
(15pin)
AnalogRGB:0.7V[p-p](75Ω),H/CS/V:TTL(2.2kΩ),SOG:1V[p-p](75Ω)
MAX:720p,1080p,1920x1080/60Hz(WUXGA)
ComponentInput RCAJackx1 Y:1V[p-p](75Ω),Pb:0.7V[p-p](75Ω),Pr:0.7V[p-p](75Ω)
MAX:480i,576i,480p,576p,720p,1080i,1080p
General
Item Specications
PowerSupply AC100~240V,50~60Hz
PowerConsumption(Max) 160W
PowerConsumption(typ.) 140W
PowerConsumption(Standby&Off) <1W(RS232inactive)
Dimension(WithStand)[WxHxD] 1252.1x773.2x405.1mm
Dimension(WithoutStand)[WxHxD] 1252.1x722.9x121.8mm
Weight(WithStand) 26.4Kg
Weight(WithoutStand) 38.7Kg
GrossWeight 47.2Kg
BDL3245E / BDL4245E / BDL4645E
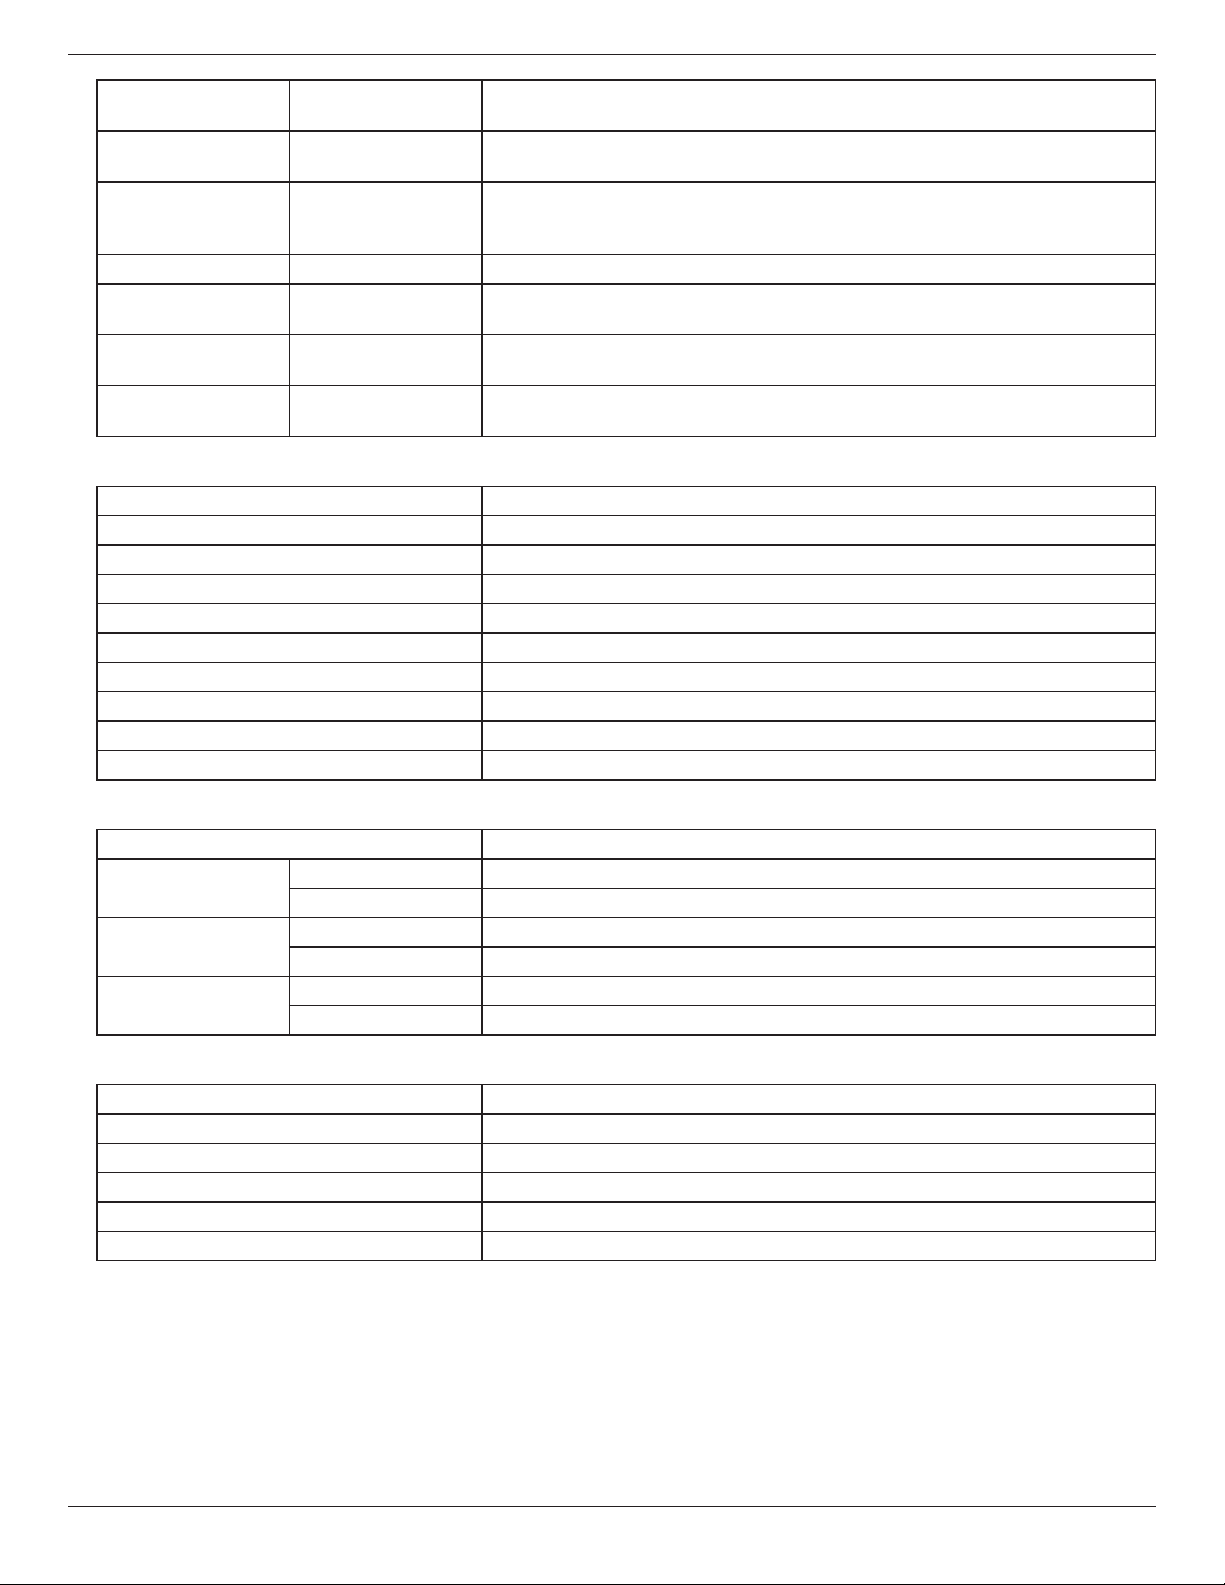
28
Environmental Condition
Item Specications
Temperature Operational 0~40°C
Storage -20~60°C
Humidity Operational 20~80%RH(Nocondensation)
Storage 5~95%RH(Nocondensation)
Pressure
Operational 795~1013hPa(Altitude:0~4,500m)
Storage/Shipment 300~1013hPa(Altitude:0~9,000m)
Internal Speaker
Item Specications
Type 1Way1Speaker
Input 10W(RMS)
Impedance 8Ω
OutputSoundPressure 82dB/W/M
FrequencyResponse 160Hz~13KHz
BDL4245E
Display
Item Specications
ScreenSize(ActiveArea) 42”LCD
Aspectratio 16:9
Numberofpixels 1920(H)x1080(V)
Pixelpitch 0.36375(H)x0.36375(V)[mm]
Displayablecolors 1.06Bcolors
Brightness(typical) 450cd/m2
Dynamiccontrastratio 3000:1
Contrastratio(typical) 4000:1
Viewingangle 178degrees
In/Out Terminals
Item Specications
SpeakerOutput InternalSpeaker 10W(L)+10W(R)[RMS]/8Ω
1Way1SpeakerSystem
82dB/W/M/160Hz~13KHz
AudioOutput RCAJackx1 0.5V[rms](Normal)/2Channel(L+R)
AudioInput RCAJackx2 0.5V[rms](Normal)/2Channel(L+R)
RS232C D-SubJackx2
(9pin)
TXD+RXD(1:1)
RJ-45 RJ-45Jackx1
(8pin)
10/100LanPort
HDMIInput HDMIJackx1
(TypeA)(18pin)
DigitalRGB:TMDS(Video+Audio)
MAX:Video-720p,1080p,1920x1080/60Hz(WUXGA)Audio-48KHz/2Channel(L+R)
SupportsLPCMonly
DVI-DInput DVI-Djack DigitalRGB:TMDS(Video)
VGAInput D-SubJackx1
(15pin)
AnalogRGB:0.7V[p-p](75Ω),H/CS/V:TTL(2.2kΩ),SOG:1V[p-p](75Ω)
MAX:720p,1080p,1920x1080/60Hz(WUXGA)
VGAOutput D-SubJackx1
(15pin)
AnalogRGB:0.7V[p-p](75Ω),H/CS/V:TTL(2.2kΩ),SOG:1V[p-p](75Ω)
MAX:720p,1080p,1920x1080/60Hz(WUXGA)
ComponentInput RCAJackx1 Y:1V[p-p](75Ω),Pb:0.7V[p-p](75Ω),Pr:0.7V[p-p](75Ω)
MAX:480i,576i,480p,576p,720p,1080i,1080p
BDL3245E / BDL4245E / BDL4645E
29
General
Item Specications
PowerSupply AC100~240V,50~60Hz
PowerConsumption(Max) 260W
PowerConsumption(typ.) 230W
PowerConsumption(Standby&Off) <1W(RS232inactive)
Dimension(WithStand)[WxHxD] 991.6x621x329.6mm
Dimension(WithoutStand)[WxHxD] 991.6x584x115.5mm
Weight(WithStand) 24.7Kg
Weight(WithoutStand) 23Kg
GrossWeight 28Kg
Environmental Condition
Item Specications
Temperature Operational 0~40°C
Storage -20~60°C
Humidity Operational 20~80%RH(Nocondensation)
Storage 5~95%RH(Nocondensation)
Pressure
Operational 795~1013hPa(Altitude:0~4,500m)
Storage/Shipment 300~1013hPa(Altitude:0~9,000m)
Internal Speaker
Item Specications
Type 1Way1Speaker
Input 10W(RMS)
Impedance 8Ω
OutputSoundPressure 82dB/W/M
FrequencyResponse 160Hz~13KHz
BDL4645E:
Display
Item Specications
ScreenSize(ActiveArea) 46”LCD
Aspectratio 16:9
Numberofpixels 1920(H)x1080(V)
Pixelpitch 0.36375(H)x0.36375(V)[mm]
Displayablecolors 1.06Bcolors
Brightness(typical) 400cd/m2
Dynamiccontrastratio 3000:1
Contrastratio(typical) 5000:1
Viewingangle 178degrees
In/Out Terminals
Item Specications
SpeakerOutput InternalSpeaker 10W(L)+10W(R)[RMS]/8Ω
1Way1SpeakerSystem
82dB/W/M/160Hz~13KHz
AudioOutput RCAJackx1 0.5V[rms](Normal)/2Channel(L+R)
AudioInput RCAJackx2 0.5V[rms](Normal)/2Channel(L+R)
BDL3245E / BDL4245E / BDL4645E
30
RS232C D-SubJackx2
(9pin)
TXD+RXD(1:1)
RJ-45 RJ-45Jackx1
(8pin)
10/100LanPort
HDMIInput HDMIJackx1
(TypeA)(18pin)
DigitalRGB:TMDS(Video+Audio)
MAX:Video-720p,1080p,1920x1080/60Hz(WUXGA)Audio-48KHz/2Channel(L+R)
SupportsLPCMonly
DVI-DInput DVI-Djack DigitalRGB:TMDS(Video)
VGAInput D-SubJackx1
(15pin)
AnalogRGB:0.7V[p-p](75Ω),H/CS/V:TTL(2.2kΩ),SOG:1V[p-p](75Ω)
MAX:720p,1080p,1920x1080/60Hz(WUXGA)
VGAOutput D-SubJackx1
(15pin)
AnalogRGB:0.7V[p-p](75Ω),H/CS/V:TTL(2.2kΩ),SOG:1V[p-p](75Ω)
MAX:720p,1080p,1920x1080/60Hz(WUXGA)
ComponentInput RCAJackx1 Y:1V[p-p](75Ω),Pb:0.7V[p-p](75Ω),Pr:0.7V[p-p](75Ω)
MAX:480i,576i,480p,576p,720p,1080i,1080p
General
Item Specications
PowerSupply AC100~240V,50~60Hz
PowerConsumption(Max) 270W
PowerConsumption(typ.) 250W
PowerConsumption(Standby&Off) <1W(RS232inactive)
Dimension(WithStand)[WxHxD] 1091.1x681.7x329.6mm
Dimension(WithoutStand)[WxHxD] 991.6x645.7x133mm
Weight(WithStand) 26.7Kg
Weight(WithoutStand) 26Kg
GrossWeight 31Kg
Environmental Condition
Item Specications
Temperature Operational 0~40°C
Storage -20~60°C
Humidity Operational 20~80%RH(Nocondensation)
Storage 5~95%RH(Nocondensation)
Pressure
Operational 795~1013hPa(Altitude:0~4,500m)
Storage/Shipment 300~1013hPa(Altitude:0~9,000m)
Internal Speaker
Item Specications
Type 1Way1Speaker
Input 10W(RMS)
Impedance 8Ω
OutputSoundPressure 82dB/W/M
FrequencyResponse 160Hz~13KHz
ThisLCDmonitorsupportsHDMICEC(ConsumerElectronicsControl)protocolthroughtheOneWirefunction.Thisgivesyoutheabilitytocontrol
yourdisplaythroughtheHDMIconnectorusingCECcommands.Thecommandmanualforthisfunctionisavailableseparately.
NOTE: Philipsdoesnotguarantee100%interoperabilitywithallHDMICECdevices.

2011 © Koninklijke Philips Electronics N.V. All rights reserved.
Philips and the Philips Shield Emblem are registered trademarks of
Koninklijke Philips Electronics N.V. and are used under license from
Koninklijke Philips Electronics N.V.
Specications are subject to change without notice.