1
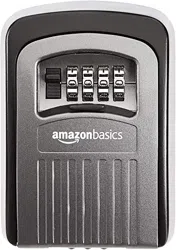
4-Digit Key Storage Lock Box
4-Coffre à Clé à Combinaison
4-Schlüssel-Schließfach mit Zahlenkombination
4-Cassetta di Sicurezza Portachiavi a Cifre
4-Caja Fuerte para Llaves con Código de Acceso Digital
4-Sleutelkluis met Cijfercombinatie
4-桁キーストーレッジロックボックス
EN
Warranty Information
To obtain a copy of the warranty for this product:
US: amazon.com/AmazonBasics/Warranty
UK: amazon.co.uk/basics-warranty
US: +1-866-216-1072 / UK: +44 (0) 800-279-7234
Feedback and Help
Love it? Hate it? Let us know with a customer review.
US: amazon.com/review/review-your-purchases#
UK: amazon.co.uk/review/review-your-purchases#
US: amazon.com/gp/help/customer/contact-us
UK: amazon.co.uk/gp/help/customer/contact-us
B07SZ78BQ5
4
2
5
3
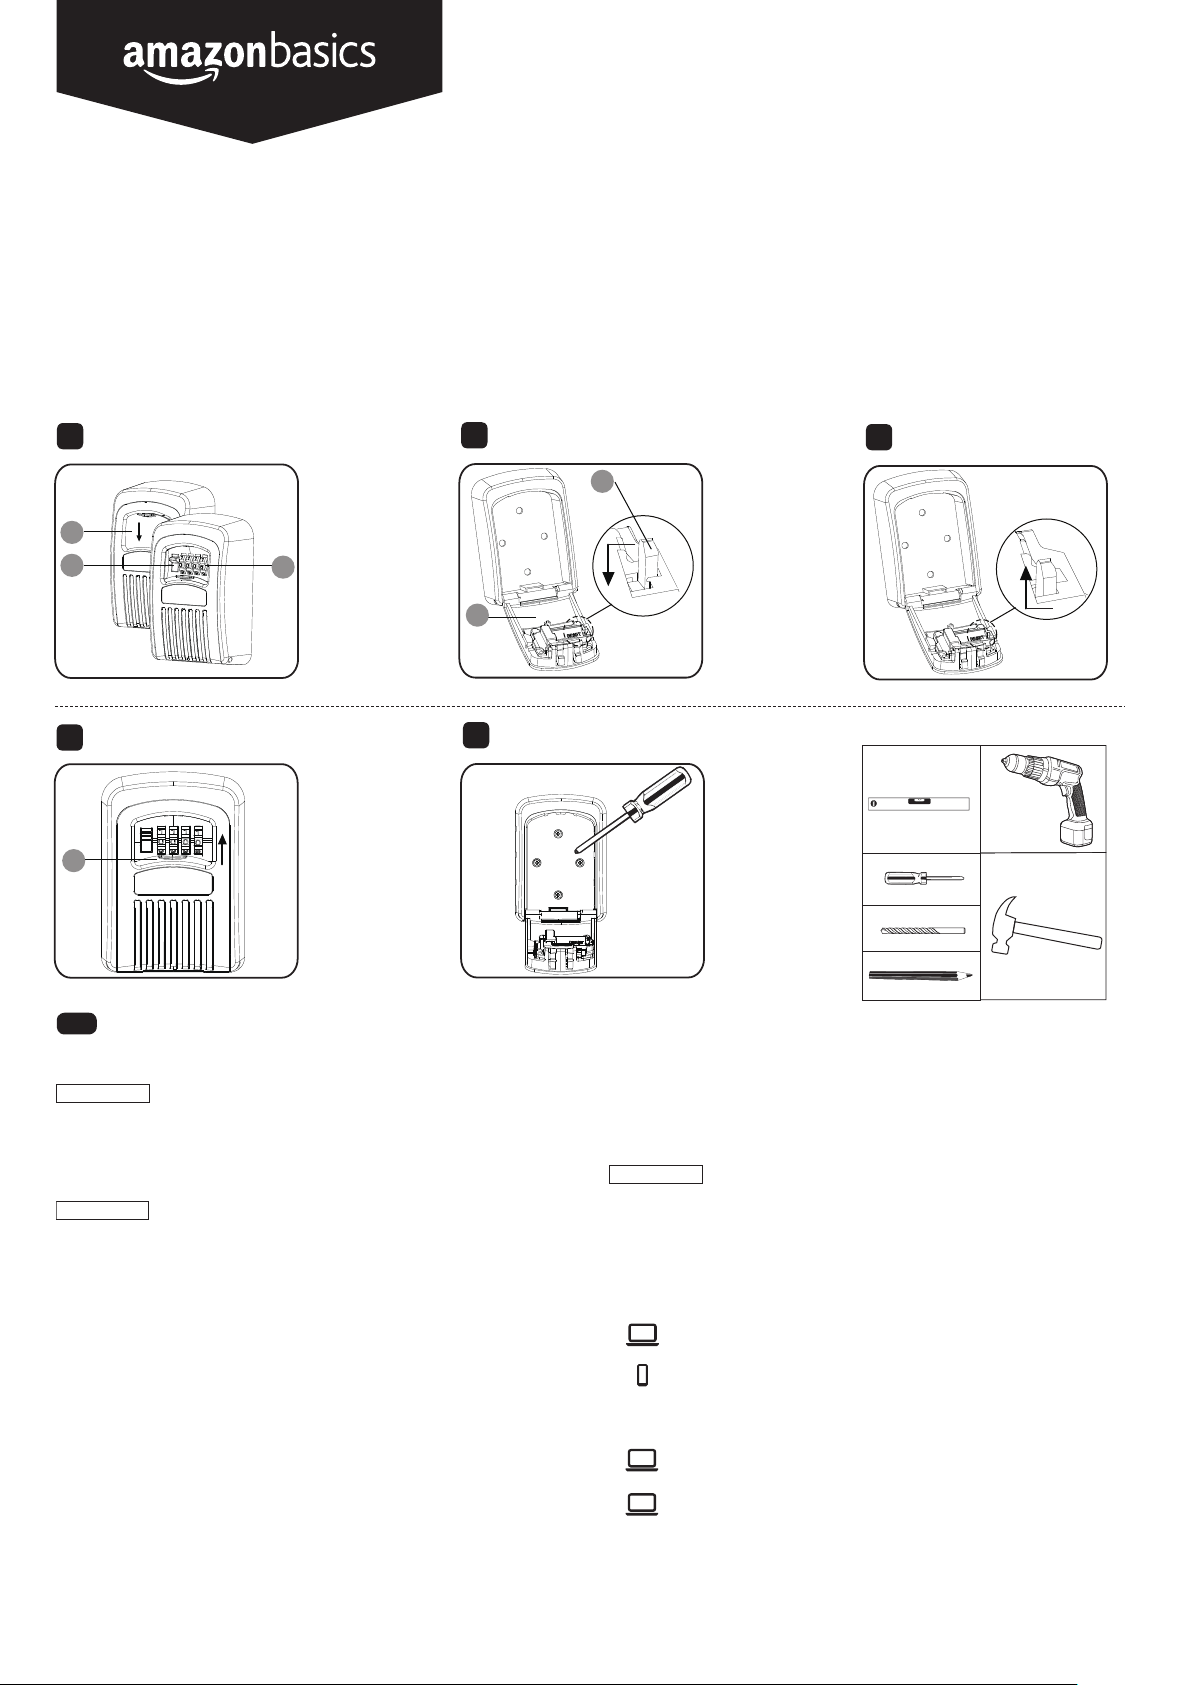
Step 7: Mark the position of the screw holes on the desired surface.Remove lock.
Drill holes.Use hammer to t wall plug (if necessary).
Step 8: Position lock.Insert and tighten screws. Close the Storage Compartment (D).
Scramble the Combination Dials (C) and close Shutter Hatch (A).
1.It is suggested that you mount the lock in a discrete location away
from direct eye line.
2.Keep shutter hatch closed to increase weather resistance and to
conceal the Dials (C) from view.
NOTICE
A
B
D
E
A
C
Step 1: Open Shutter Hatch (A) to reveal the Dial (C) and the Opening Lever (B).
Press down on the Opening Lever (B).
Step 2: Open the door to reveal the setting mechanism.Push the Reset Lever (E)
left and pull towards you.
Step 3: Rotate Dials (C) to your preferred combination.Push the Reset Lever (E)
up and to the right. Double-check your combination before closing the
Storage Compartment (D) door.
Caution
This product contains small items that could be a choking hazard if swallowed. Keep
these items away from young children.
• Make Sure to read and understand these instructions before attempting to
operate and change the combination of this lock.
Step 4: Close the Storage Compartment (D). Scramble the combination Dials (C)
to lock the front door and conceal your combination. Close the
Shutter Hatch (A).
The default combination is 0-0-0-0. To change the combination,
follow the steps below.
You will need a phillips head screwdriver, pencil, a level, drill bit,
drill and hammer.
Step 5: Wall Mounting. Open the door, as above.Position the lock on the desired
mounting surface (see note 1). Use the level to check that the lock
is vertical.
NOTICE
NOTICE
DE
Gewährleistung
Eine Kopie der Gewährleistung für dieses Produkt erhalten Sie unter:
amazon.de/basics-garantie
DE: +49 (0) 800-363-8469 / AT: +43 0800-8866-3238
Feedback und Hilfe
Gefällt es Ihnen? Gefällt es Ihnen nicht? Dann bewerten Sie das Produkt auf unserer
Webseite!
amazon.de/review/review-your-purchases#
amazon.de/gp/help/customer/contact-us
IT
FR
Informations Sur La Garantie
Pour obtenir une copie de la garantie portant sur ce produit :
FR : amazon.fr/basics-garantie
CA : amazon.ca/AmazonBasics/Warranty
FR : +33 (0) 800-947-715 / CA : +1-877-586-3230
Vos Avis et Aide
FR : amazon.fr/review/review-your-purchases#
CA : amazon.com/review/review-your-purchases#
FR : amazon.fr/gp/help/customer/contact-us
CA : amazon.ca/gp/help/customer/contact-us
Étape 6: Marquez la position des trous de vis sur la surface choisie puis enlevez le
dispositif de verrouillage.Percez les trous. Utilisez un marteau pour enfoncer les
chevilles (si nécessaire).
Étape 7 : Positionnez le dispositif de verrouillage. Introduisez puis serrez les vis.
Fermez le Compartiment de Rangement (D).Brouillez la combinaison en tournant
les Molettes (C) puis fermez la Trappe (A).
1.Il est conseillé de monter le dispositif de verrouillage à un endroit
discret, loin des regards.
2.Gardez la trappe fermée pour une meilleur résistance aux
intempéries et dissimuler les Molettes (C).
REMARQUE
Étape 1 : Ouvrez la Trappe (A) pour faire apparaître les Molettes (C) et le Levier
d'Ouverture (B).
Étape 2 : Ouvrez la porte pour révéler le mécanisme de réglage, poussez le Levier de
Réinitialisation (E) vers la gauche puis tirez-le vers vous.
Étape 3 : Faites tourner les Molettes (C) jusqu’à obtenir le code souhaité. Poussez le
Levier de Réinitialisation (E) vers le haut puis vers la droite. Vériez bien
votre combinaison avant de fermer la porte du Compartiment de
Rangement (D).
Ce produit contient de petites pièces susceptibles de constituer un risque
d’étouffement en cas d’ingestion. Maintenez ces pièces hors de la portée des
jeunes enfants.
• Assurez-vous de lire et d'assimiler ces instructions avant d'essayer d'utiliser ou
de modier la combinaison de ce dispositif de verrouillage.
Étape 4 : Fermez le Compartiment de Rangement (D). Brouillez la combinaison en
tournant les Molettes (C) pour verrouiller la porte et dissimuler votre code.
Fermez la Trappe (A).
La combinaison par défaut est 0-0-0-0. Pour modier la
combinaison, procédez de la manière suivante.
Étape 5 : Montage au mur. Ouvrez la porte comme décrit plus haut, puis positionnez
le dispositif de verrouillage sur la surface de montage choisie (voir
remarque 1). Utilisez le niveau pour assurer un montage bien vertical.
Attention
Vous aurez besoin d'un tournevis cruciforme, d'un crayon, d'un
niveau, d'une mèche, d'une perceuse et d'un marteau.
REMARQUE
Schritt 7: Positionieren Sie das Schloss. Setzen Sie die Schrauben ein und ziehen
Sie sie fest. Schließen Sie das Schließfach (D).Verstellen Sie die
Ziffernräder (C) und schließen Sie die Verschlussklappe (A).
1.Es wird empfohlen, das Schloss an einem diskreten Ort außerhalb
des direkten Sichtfeldes zu montieren.
2.Halten Sie die Verschlussklappe geschlossen, um die
Witterungsbeständigkeit zu erhöhen und die Ziffernräder (C) zu
verbergen.
HINWEIS
Schritt 1: Öffnen Sie die Verschlussklappe (A), um die Ziffernräder (C) und den
Öffnungshebel (B) freizulegen.Drücken Sie den Öffnungshebel (B) nach
unten.
Schritt 2: Öffnen Sie die Tür, um den Einstell-Mechanismus freizulegen. Drücken Sie
den Reset-Hebel (E) nach links und ziehen Sie ihn in Ihre Richtung.
Schritt 3: Stellen Sie die Ziffernräder (C) auf die gewünschte Kombination ein.
Drücken Sie den Reset-Hebel (E) nach oben und nach rechts. Überprüfen
Sie Ihre Kombination nochmals nach, bevor Sie das Schließfach (D)
schließen.
Dieses Produkt enthält Kleinteile, die beim Verschlucken eine Erstickungsgefahr
darstellen können. Halten Sie diese Teile von Kleinkindern fern.
Stellen Sie sicher, dass Sie diese Anweisungen gelesen und verstanden haben,
bevor Sie das Schloss verwenden und die Zahlenkombination ändern.
Schritt 4: Schließen Sie das Schließfach (D). Verstellen Stellen Sie die Ziffernräder (C),
um die Tür zu verriegeln und Ihre Kombination zu verbergen. Schließen Sie
die Verschlussklappe (A).
Die Standardkombination ist 0-0-0-0. Um die Kombination zu
ändern,führen Sie die folgenden Schritte aus.
Schritt 5: Wandmontage. Öffnen Sie die Tür, wie oben beschrieben. Positionieren Sie
das Schloss an der gewünschte Montageäche (siehe Hinweis 1).
Verwenden Sie eine Wasserwaage, um zu überprüfen, ob das Schloss
senkrecht positioniert ist.
HINWEIS
Schritt 6: Markieren Sie die Position der Montagelöcher auf der gewünschten
Oberäche. Entfernen Sie das Schloss.Bohren Sie die Löcher. Verwenden
Sie einen Hammer, um Dübel anzubringen (falls erforderlich).
Passo 2: Aprire lo sportello per scoprire il meccanismo di regolazione. Spingere la
leva di reset (E) a sinistra e tirare verso di sé.
Passo 3: Ruotare i selettori (C) sulla combinazione preferita. Spingere la leva di reset
(E) verso l'alto e verso destra. Ricontrollare la combinazione prima di
chiudere lo sportello del vano portaoggetti (D).
Passo 4: Chiudere il vano portaoggetti (D). Rimescolare i selettori di combinazione (C)
per bloccare lo sportello anteriore e nascondere la combinazione. Chiudere
lo sportello dell'otturatore (A).
Passo 5: Montaggio su parete. Aprire lo sportello, come sopra. Posizionare il lucchetto
sulla supercie di montaggio desiderata (vedi nota 1). Usare una livella per
controllare che sia il lucchetto sia verticale.
Vorsicht
Sie benötigen einen Kreuzschlitzschraubendreher, einen Bleistift,
eine Wasserwaage, einen Bohrer, eine Bohrmaschine und einen
Hammer.
HINWEIS
Passo 1: Aprire lo sportello dell'otturatore (A) per scoprire i selettori (C) e la leva di
apertura (B).Premere verso il basso la leva di apertura (B).
Questo prodotto contiene elementi di piccole dimensioni che potrebbero causare il
rischio di soffocamento se ingeriti. Tenere questi elementi fuori dalla portata dei
bambini.
• Assicurarsi di aver letto e compreso le presenti istruzioni prima di tentare
diazionare e modicare la combinazione di questo lucchetto.
La combinazione predenita è 0-0-0-0. Per cambiare la
combinazione,seguire i passaggi sopra.
AVVISO
Attenzione
Saranno necessari un cacciavite a croce, una matita, una livella, una
punta da trapano, un trapano e un martello.
AVVISO
REMARQUE
•
Informazioni Di Garanzia
Per ottenere una copia della garanzia del prodotto:
amazon.it/basics-garanzia +39 (0) 800-628-805
Feedback e Aiuto
Ti piace? Oppure no? Faccelo sapere scrivendo la tua recensione.
amazon.it/review/review-your-purchases#
amazon.it/gp/help/customer/contact-us
NL
Garantie Informatie
Om een kopie van de garantie voor dit product te krijgen:
amazon.nl/basics-garantie +31 8000227380
Feedback en Hulp:
Vind je het leuk? Vind je het niet leuk? Beoordeel het product dan op onze website!
amazon.nl/review/review-your-purchases#
amazon.nl/gp/help/customer/contact-us
ES
Comentarios y Ayuda
¿Le encanta? ¿No le gusta nada? Escriba una opinión como cliente.
ES: amazon.es/review/review-your-purchases#
MX: amazon.com.mx/review/review-your-purchases#
ES: amazon.es/gp/help/customer/contact-us
MX: amazon.com.mx/gp/help/customer/contact-us
ES: +34 (0) 900-803-711 / MX: +52 (0) 442-348-9587
Información Sobre La Garantía
Para obtener una copia de la garantía de este producto:
ES: amazon.es/basics-garantia
Paso 7: Coloque la caja. Inserte y apriete los tornillos. Cierre el compartimento de
almacenaje (D).Mezcle las ruedas del selector de la combinación (C) y cierre
la tapa (A).
1.Es aconsejable montar la caja fuerte en un lugar discreto y lejos
de la línea visual directa.
2.Mantenga la tapa cerrada para mayor resistencia al clima y para
ocultar el selector de la combinación (C).
AVISO
Paso 1: Abra la tapa (A) para ver el selector de la combinación (C) y la palanca de
apertura (B).Presione la palanca de apertura (B).
Paso 2: Abra la puertecilla para ver el mecanismo de ajuste. Presione la palanca de
reinicio (E) hacia la izquierda y tire hacia usted.
Paso 3: Gire el selector de la combinación (C) a la combinación preferida. Presione la
palanca de reinicio (E) hacia arriba y hacia la derecha. Vuelva a vericar su
combinación antes de cerrar la puerta del compartimiento de
almacenamiento (D).
Este producto incluye objetos pequeños que pueden suponer un peligro de asxia si
se ingieren. Manténgalos alejados de los niños.
•
Primero lea y comprenda estas instrucciones antes de intentar utilizar y cambiar
la combinación de esta caja.
Paso 4: Cierre el compartimento de almacenaje (D). Mezcle el selector de la
combinación (C) para bloquear la puerta delantera y oculte la combinación.
Cierre la tapa (A).
La combinación por defecto es 0-0-0-0. Para cambiar la
combinación,siga los pasos siguientes.
Paso 5: Montaje en la pared. Abra la puerta, como se indica. Coloque la caja en la
supercie de montaje deseada (véase nota 1). Utilice el nivel para comprobar
que la caja está en posición vertical.
AVISO
Paso 6: Marque la posición de los oricios de los tornillos en la supercie deseada.
Extraiga la caja.Perfore los agujeros. Utilice un martillo para encajar el taco (si
fuera necesario).
Atención
Necesitará un destornillador de punta Phillips, un lápiz, un nivel, una
broca, un taladro y un martillo.
AVISO
Stap 7: Plaats de sleutelkluis op de gewenste positie. Breng de schroeven aan en
draai ze vast. Sluit het opbergvak (D).Draai de cijferrollen (C) en sluit het
luikje (A).
1.Het wordt aanbevolen om de sleutelkluis in een discrete locatie en
uit het directe gezichtsveld te monteren.
2.Houd het luikje dicht voor een betere weerstand tegen de
weersomstandigheden en voor het verbergen van de cijferrollen (C).
OPMERKING
Stap 1: Open het luikje (A) om de cijferrollen (C) en de openingshendel (B) te onthullen.
Duw de openingshendel (B) omlaag.
Stap 2: Open de deur om het instelmechanisme te onthullen. Duw de resethendel (E)
naar links en trek het naar u toe.
Stap 3: Draai de cijferrollen (C) naar uw gewenste combinatie. Duw de resethendel (E)
omhoog en naar rechts. Controleer nogmaals uw combinatie voordat u het
deurtje van het opbergvak (D) sluit.
Dit product bevat kleine onderdelen die verstikking kunnen veroorzaken wanneer ze
worden ingeslikt. Houd deze onderdelen uit de buurt van kleine kinderen.
• Lees en begrijp deze instructies voordat u dit product gebruikt en de combinatie
van het slot wijzigt.
Stap 4: Sluit het opbergvak (D). Draai de cijferrollen (C) om het deurtje aan de voorkant
te vergrendelen en uw combinatie geheim te houden. Sluit het Luikje (A).
De standaardcombinatie is 0-0-0-0. Om de combinatie te wijzigen,
voer onderstaande stappen uit.
Stap 5: Maak de kluis vast aan de muur. Open het deurtje, zoals hierboven beschreven.
Breng de sleutelkluis aan op het gewenste montage-oppervlak (zie opmerking
1). Controleer of de sleutelkluis verticaal is aangebracht met behulp van een
waterpas.
OPMERKING
Stap 6: Markeer de positie van de schroefgaten op het gewenste oppervlak. Verwijder
de sleutelkluis.Boor gaten. Gebruik een hamer om de muurpluggen aan te
brengen (indien nodig).
Voorzichtig
U hebt het volgend gereedschap nodig: een kruiskopschroevendraaier,
een potlood, een waterpas, een boortje, een boormachine en een
hamer.
OPMERKING
Passo 7: Posizionare il lucchetto. Inserire e serrare le viti. Chiudere il vano
portaoggetti (D).Rimescolare i selettori di combinazione (C) e chiudere lo
sportello dell'otturatore (A).
1.Si consiglia di montare il lucchetto in un punto discreto, lontano
dalla linea di visuale diretta.
2.Tenere lo sportello dell'otturatore chiuso per aumentare la
resistenza agli agenti atmosferici e per nascondere i selettori (C) alla
vista.
AVVISO
Passo 6: Segnare la posizione dei fori delle viti sulla supercie desiderata. Rimuovere
il lucchetto.Praticare i fori. Utilizzare il martello per montare il tassello (se
necessario).
JP
保証について
この製品の保証書のコピーを入手するには:
amazon.jp/AmazonBasics/Warranty
+81 (0) 120-899-276
フィードバックとサポート
気に入っていただけましたか?お気に召しませんでしたか?カスタ
マーレビューでお知らせください。
amazon.jp/review/review-your-purchases#
amazon.jp/gp/help/customer/contact-us
中国製
HECHO EN CHINA
GEMAAKT IN CHINA
PRODOTTO IN CINA
HERGESTELLT IN CHINA
FABRIQUÉ EN CHINE
MADE IN CHINA
ステップ7:ロックインサートの位置を決め、ネジを締めます。収
納コンパートメント(D)を閉じます。暗証番号ダイ
アル(C)を回してシャッターハッチ(A)を閉じます。
1.目の高さを避けた、ちょっと離れた場所にロックを
取り付けることをお勧めします。
2.シャッターハッチは常に閉じておいてください、こ
れは風雨への対処と共にダイアル(C)が人目につかな
いようにするためでもあります。
通知
ステップ1:シャッターハッチ(A)を開き、ダイアル(C)およびオ
ープンレバー(B)を露出します。オープンレバー(B)
を下に押します。
ステップ2:ドアを開いて設定メカニズムを露出します。リセット
レバー(E)を左に押してから自分のほうに引きます。
ステップ3:ダイアル(C)を、好みの暗証番号までまわします。リ
セットレバー(E)を上に、さらに右に押します。収納
コンパートメント(D)のドアを閉じる前に暗証番号を
ダブルチェックしてください。
本製品は飲み込めば窒息の危険性のある小さいパーツを含んでい
ます。これらは小さいお子様から遠ざけてください。
• 以下を行う前にこれらの指示をよく読み理解してくださいこ
のロックの操作や暗証番号の変更を行う。
ステップ4:収納コンパートメント(D)を閉じます。フロントドア
を閉じ、暗証番号を隠すため、暗証番号ダイアル(C)
をかき混ぜます。シャッターハッチ(A)を閉じます。
工場出荷時の暗証番号は0-0-0-0です。暗証番号を変
更するには、以下のステップに従ってください。
ステップ5:壁へのマウント。上図のようにドアを開きます。ロッ
クを好みのマウンティング面に位置させます(Note1
参照)。ロックが水平であることを水準器で確認し
てください。
通知
ステップ6:好みの表面にネジ穴の位置に印をつけ、ロックを取り
除きます。ドリルで穴をあけます。ウォールプラグを
挿入するにはハンマーを使います(必要であれば)。
注意
プラスドライバー、鉛筆、水準器、ドリルビットおよ
びハンマーが必要となります。
通知