
z
Take and review some test shots initially to make sure the images were recorded correctly.
Please note that Canon Inc., its subsidiaries and afliates, and its distributors are not liable for
any consequential damages arising from any malfunction of a camera or accessory, including
memory cards, that result in the failure of an image to be recorded or to be recorded in a way
that is machine readable.
z
The user’s unauthorized photographing or recording (video and/or sound) of people or
copyrighted materials may invade the privacy of such people and/or may violate others’ legal
rights, including copyright and other intellectual property rights. Note that restrictions may apply
even when such photographing or recording is intended solely for personal use.
z
The camera warranty is valid only in the area of purchase. In case of camera problems while
abroad, return to the area of purchase before contacting a Customer Support Help Desk.
z
Although the screen is produced under extremely high-precision manufacturing conditions and
more than 99.99% of the pixels meet design specications, in rare cases some pixels may be
defective or may appear as red or black dots. This does not indicate camera damage or affect
recorded images.
z
When the camera is used over an extended period, it may become warm. This does not
indicate damage.
Preliminary Notes and Legal Information
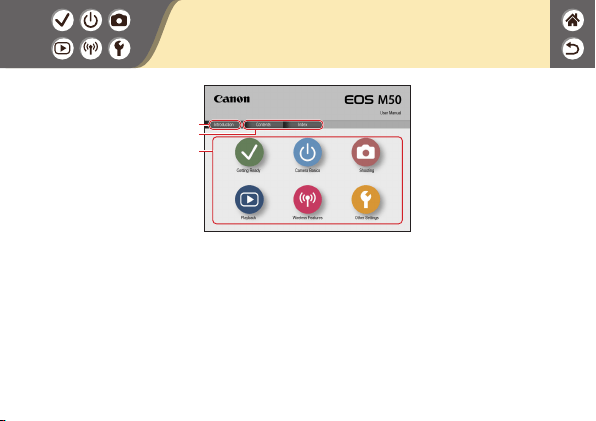
(1)
(2)
(3)
(1) Jump to this page
This section introduces manual navigation and conventions.
(2) Jump to the table of contents and index pages
(3) Jump to the rst page of a section, by clicking one of the six sections
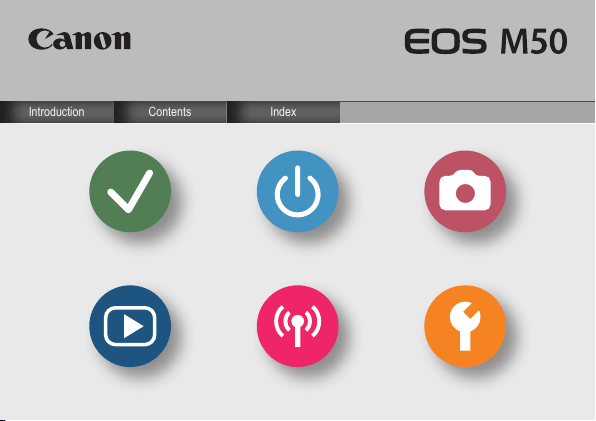
Introduction
Top Page
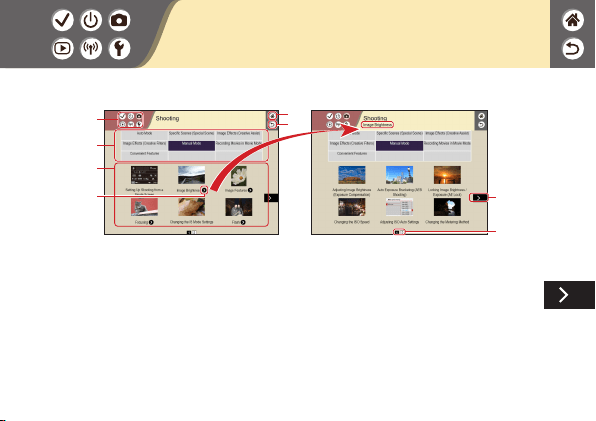
Introduction
Portal Pages
Portal pages are gateways to each section.
(1)
(4)
(2)
(5)
(6)
(3)
(7)
(8)
(1) Section icons
Click an icon to jump to the section’s portal page.
(2) Jump to the rst page
(3) Return to the previous page
(4) Section themes
Topics in the selected theme are shown in (5). Note that some portal pages do not include
themes.

Introduction
Portal Pages
(5) Topics in the selected theme. Click a topic title to jump to the topic page.
(6) Indicates multiple topics
(7) Indicates that the information continues on the next page
(8) Identies the current page among multiple portal pages

Introduction
Topic Pages
(1)
(2)
(3)
(4)
(5)
(6)
(1)
(2)
(3)
(1) Section icons
Click an icon to jump to the section’s portal
page.
(2) Jump to the rst page
(3) Return to the previous page
(4) Indicates that the information is continued
from the previous page
(5) Indicates that the information continues on
the next page
(6) Numbers in some gures and illustrations
correspond to numbers in the steps
Introduction
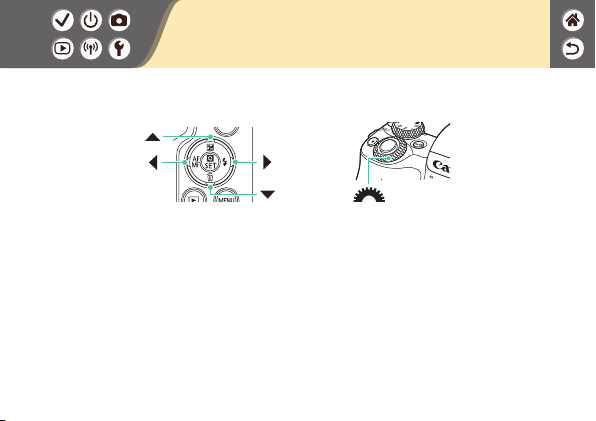
Manual Conventions
z
Instructions in this manual may include icons representing camera buttons and dials.
z
The following camera controls are represented by icons.
z
On-screen icons and text are indicated in brackets.
z
Instructions in this manual apply to the camera under default settings.
z
For convenience, all lenses and mount adapters are simply referred to as “lenses” and “mount
adapters,” whether they are included or sold separately.
z
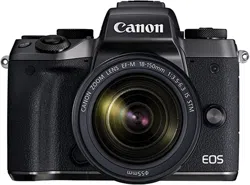
Illustrations in this manual show the camera with the EF-M 15-45mm f/3.5-6.3 IS STM lens
attached as an example.
z
For convenience, all supported memory cards are simply referred to as the “memory card.”

Contents
Preliminary Notes and Legal Information
Introduction
Contents
Safety Instructions
Getting Ready
Attaching the Strap
Charging the Battery Pack
Preparing a Memory Card
Inserting/Removing the Battery Pack and Memory Card
Setting the Date, Time, and Time Zone
Setting the Display Language
Attaching a Lens
Detaching a Lens
Attaching EF and EF-S Lenses
Detaching EF and EF-S Lenses
Using a Tripod with EF or EF-S Lenses
Using EF or EF-S Lens Image Stabilization
Holding the Camera

Camera Basics
Trying the Camera Out
Part Names
On/Off
Shutter Button
Viewnder
Shooting Modes
Adjusting the Screen Angle
Frames on the Shooting Screen
Shooting Display Options
Playback Display Options
Using the Quick Control Screen
Using the Menu Screen
Entering Characters
Indicator Display
Touch Operations
Shooting
Auto Mode
Specic Scenes (Special Scene)
Contents

Image Effects (Creative Assist)
Image Effects (Creative Filters)
Manual Mode
Recording Movies in Movie Mode
Convenient Features
Playback
Viewing
Finding
Managing
Erasing Images
Editing Stills
Applying Your Favorite Effects (Creative Assist)
Processing RAW Images with the Camera
Editing Movies
Wireless Features
Available Wireless Features
Preparing to Use Wireless Features
Connecting to Bluetooth Enabled Smartphones via Wi-Fi
Connecting to NFC-Compatible Android Smartphones via Wi-Fi
Connecting to Smartphones via Wi-Fi with the Wi-Fi Button
Contents

Other Settings
Adjusting Screens/Messages to Match Your Skill Level
Selecting and Creating Folders
Changing File Numbering
Auto Rotation of Vertical Images
Formatting Memory Cards
Low-Level Formatting
Using Eco Mode
Adjusting Power-Saving Features
Changing the Display Language
Adjusting Screen Brightness
Reducing Red-Eye
Changing the Image Display Period after Shots
Changing the Video System
Customizing Shooting Information Display
Customizing Playback Information Display
Muting Camera Sounds
Muting Audio Feedback
Adjusting the Touch-Screen Panel
Contents


Safety Instructions
Be sure to read these instructions in order to operate the product safely.
Follow these instructions to prevent injury or harm to the operator of the product or others.
WARNING
Denotes the risk of serious injury or death.
z
Keep the product out of the reach of young children.
A strap wrapped around a person’s neck may result in strangulation.
The hot shoe cap is dangerous if swallowed. If swallowed, seek immediate medical assistance.
z
Use only power sources specied in this instruction manual for use with the product.
z
Do not disassemble or modify the product.
z
Do not expose the product to strong shocks or vibration.
z
Do not touch any exposed internal parts.
z
Stop using the product in any case of unusual circumstances such as the presence of
smoke or a strange smell.
z
Do not use organic solvents such as alcohol, benzine or paint thinner to clean the
product.
z
Do not get the product wet. Do not insert foreign objects or liquids into the product.
z
Do not insert foreign objects or liquids into the product.
z
Do not use the product where ammable gases may be present.
This may cause electric shock, explosion or re.

z
For products featuring a viewnder, do not look through the viewnder at strong light
sources such as the sun on a bright day or lasers and other strong articial light
sources.
This may harm your vision.
z
Observe the following instructions when using commercially available batteries or
provided battery packs.
- Use batteries/battery packs only with their specied product.
- Do not heat batteries/battery packs or expose them to re.
- Do not charge batteries/battery packs using non-authorized battery chargers.
- Do not expose the terminals to dirt or let them come into contact with metallic pins or other
metal objects.
- Do not use leaking batteries/battery packs.
- When disposing of batteries/battery packs, insulate the terminals with tape or other means.
This may cause electric shock, explosion or re.
If a battery/battery pack leaks and the material contacts your skin or clothing, ush the exposed area
thoroughly with running water. In case of eye contact, ush thoroughly with copious amounts of clean
running water and seek immediate medical assistance.
Safety Instructions

z
Observe the following instructions when using a battery charger or AC adapter.
- Periodically remove any dust buildup from the power plug and power outlet using a dry cloth.
- Do not plug in or unplug the product with wet hands.
- Do not use the product if the power plug is not fully inserted into the power outlet.
- Do not expose the power plug and terminals to dirt or let them come into contact with metallic
pins or other metal objects.
z
Do not touch the battery charger or AC adapter connected to a power outlet during
lightning storms.
z
Do not place heavy objects on the power cord. Do not damage, break or modify the
power cord.
z
Do not wrap the product in cloth or other materials when in use or shortly after use when
the product is still warm in temperature.
z
Do not leave the product connected to a power source for long periods of time.
This may cause electric shock, explosion or re.
z
Do not allow the product to maintain contact with the same area of skin for extended
periods of time during use.
This may result in low-temperature contact burns, including skin redness and blistering, even if the
product does not feel hot. The use of a tripod or similar equipment is recommended when using the
product in hot places and for people with circulation problems or less sensitive skin.
Safety Instructions

z
Follow any indications to turn off the product in places where its use is forbidden.
Not doing so may cause other equipment to malfunction due to the effect of electromagnetic waves
and even result in accidents.
CAUTION
Denotes the risk of injury.
z
Do not re the ash near the eyes.
It may hurt the eyes.
z
Strap is intended for use on the body only. Hanging the strap with any product attached
on a hook or other object may damage the product. Also, do not shake the product or
expose the product to strong impacts.
z
Do not apply strong pressure on the lens or allow an object to hit it.
This may cause injury or damage to the product.
z
Flash emits high temperatures when red. Keep ngers, any other part of your body, and
objects away from the ash unit while taking pictures.
This may cause burns or malfunction of the ash.
z
Do not leave the product in places exposed to extremely high or low temperatures.
The product may become extremely hot/cold and cause burns or injury when touched.
Safety Instructions

CAUTION
Denotes the possibility of property damage.
z
Do not aim the camera at intense light sources, such as the sun on a clear day or an
intense articial light source.
Doing so may damage the image sensor or other internal components.
z
When using the camera on a sandy beach or at a windy location, be careful not to allow
dust or sand to enter the camera.
z
Wipe off any dust, grime, or other foreign matter on the ash with a cotton swab or cloth.
The heat emitted from the ash may cause foreign matter to smoke or the product to malfunction.
z
Remove and store the battery pack/batteries when you are not using the product.
Any battery leakage that occurs may cause product damage.
z
Before you discard the battery pack/batteries, cover the terminals with tape or other
insulators.
Contacting other metal materials may lead to re or explosions.
z
Unplug any battery charger used with the product when not in use. Do not cover with a
cloth or other objects when in use.
Leaving the unit plugged in for a long period of time may cause it to overheat and distort, resulting in
re.
Safety Instructions

z
Do not leave any dedicated battery packs near pets.
Pets biting the battery pack could cause leakage, overheating, or explosion, resulting in product
damage or re.
z
If your product uses multiple batteries, do not use batteries that have different levels
of charge together, and do not use old and new batteries together. Do not insert the
batteries with the + and – terminals reversed.
This may cause the product to malfunction.
Safety Instructions

(
1
)
(
2
)
(
3
)
(
4
)
(
1
)
(
2
)
Attaching the Strap Charging the Battery Pack Preparing a Memory Card
Inserting/Removing the Battery
Pack and Memory Card
Setting the Date, Time, and
Time Zone
Setting the Display Language
(
1
)
(
2
)
(
1
)
(
2
)
(
3
)
(
1
)
(
2
)
Attaching a Lens Detaching a Lens Attaching EF and EF-S Lenses
Getting Ready
1 2
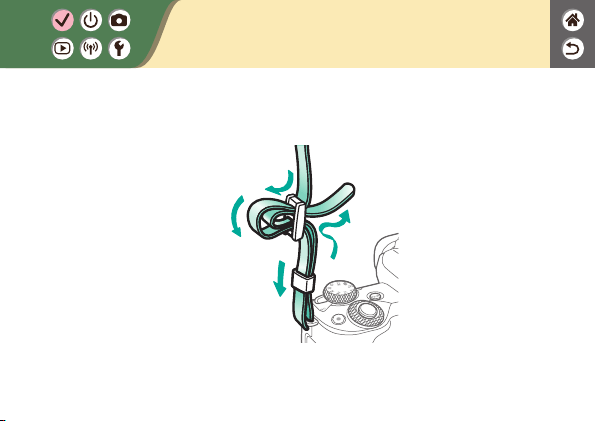
Attaching the Strap
(
1
)
(
2
)
(
3
)
(
4
)

1
Remove the
battery cover
2
Insert the battery
pack
(
2
)
(
3
)
(
1
)
3
Charge the battery
pack
(
1
)
(
2
)
z
Charging: Orange
z
Fully charged: Green
Charging the Battery Pack

Charging the Battery Pack
4
Remove the
battery pack
(
1
)
(
2
)

Preparing a Memory Card
Use the following memory cards (sold separately), in any capacity.
z
SD memory cards*
1
z
SDHC memory cards*
1
*
2
z
SDXC memory cards*
1
*
2
*1 Cards conforming to SD standards. However, not all memory cards have been veried to work
with the camera.
*2 UHS-I memory cards are also supported.

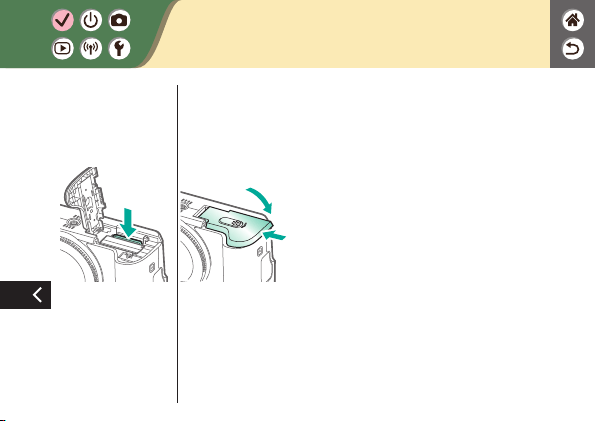
1
Open the memory
card/battery cover
(
1
)
(
2
)
2
When inserting the
battery pack:
(
2
)
(
1
)
Terminals
When removing the
battery pack:
3
When inserting the
memory card:
(1)
(
2
)
Inserting/Removing the Battery Pack and
Memory Card
Inserting/Removing the Battery Pack and
Memory Card
When removing
the memory card:
4
Close the memory
card/battery cover
(
1
)
(
2
)
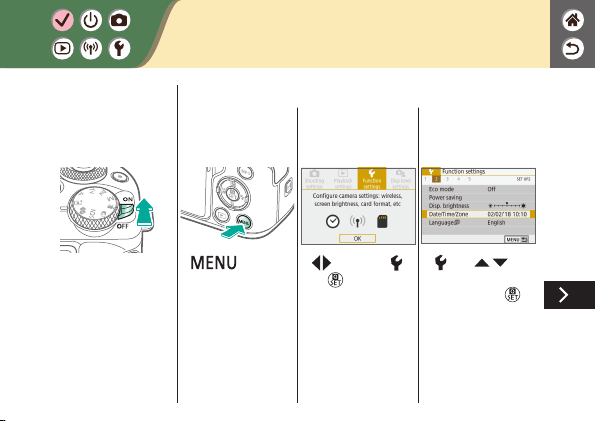
1
Turn the camera
on
2
Access the menu
screen
z
button
z
/ buttons → [ ]
→
button
z
[ 2] → /
buttons → [Date/
Time/Zone] →
button
Setting the Date, Time, and Time Zone

3
Set the time zone
z
/ buttons to
choose an option →
button
z
button
z
/ buttons to
navigate →
button →
/
buttons to choose
[OK] →
button
4
Set the date and
time
z
/ buttons to
navigate →
button → /
buttons to adjust →
button
Setting the Date, Time, and Time Zone

z
/ buttons to
choose [OK] →
button
Setting the Date, Time, and Time Zone

Setting the Display Language
1
Access the menu
screen
z
button
z
/ buttons → [ ]
→
button
z
[ 2] →
/ buttons →
[Language
]
2
Set the display
language
z
/ / / buttons
to choose an option

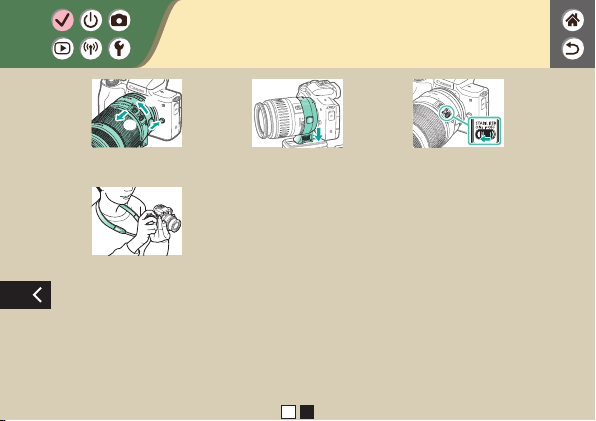
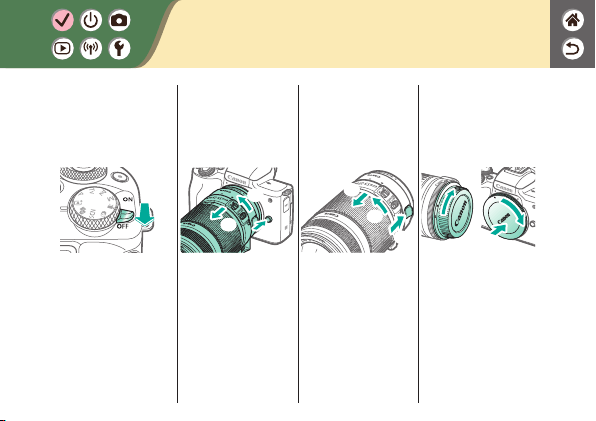
Attaching a Lens
1
Make sure the
camera is off
2
Remove the lens
cap and body cap
3
Attach the lens
(
1
)
(
2
)
4
Remove the front
lens cap
(
1
)
(
2
)
(
1
)
Attaching a Lens
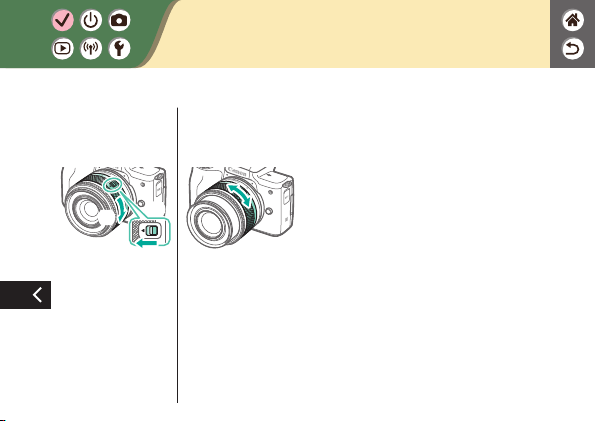
5
Prepare to shoot
(
1
)
(
2
)
z
Press (1) as you turn
(2) slightly, and then
release (1).
z
Turn (2) a little more
until it clicks.
z
Zoom in or out before
focusing.

Detaching a Lens
1
Make sure the
camera is off
2
Detach the lens
(
1
)
(
2
)
(
3
)
z
Press (1) as you turn
the lens toward (2)
until it stops.
z
Remove it in the
direction shown (3).
3
Attach the lens
cap and body cap
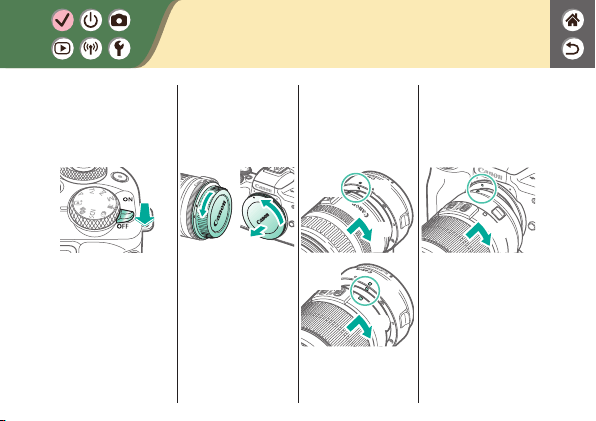
Attaching EF and EF-S Lenses
1
Make sure the
camera is off
2
Remove the lens
cap and body cap
3
Attach an optional
adapter to the lens
(
1
)
(
2
)
EF
lenses
(
1
)
(
2
)
EF-S
lenses
4
Attach the adapter
to the camera
(
1
)
(
2
)
Detaching EF and EF-S Lenses
1
Make sure the
camera is off
2
Detach the adapter
(
3
)
(
1
)
(
2
)
z
Press (1) as you turn
the adapter toward (2)
until it stops.
z
Remove it in the
direction shown (3).
3
Detach the lens
(
3
)
(
2
)
(
1
)
z
Slide (1) as you turn
the lens toward (2)
until it stops.
z
Remove it in the
direction shown (3).
4
Attach the lens
cap and body cap

Using a Tripod with EF or EF-S Lenses
1
Attach the tripod
mount to the
adapter
(
1
)
(
2
)
2
Attach the tripod to
the tripod mount
socket
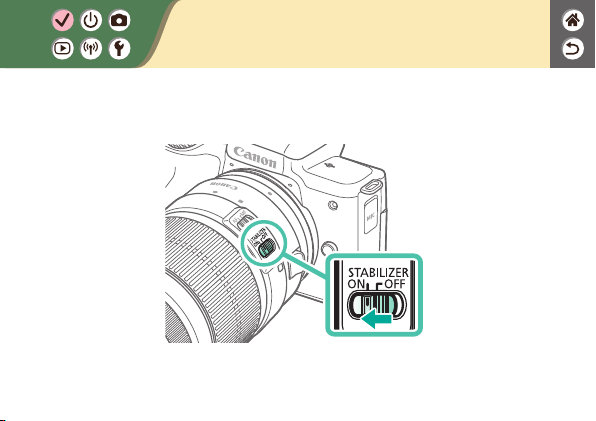
Using EF or EF-S Lens Image
Stabilization

Holding the Camera
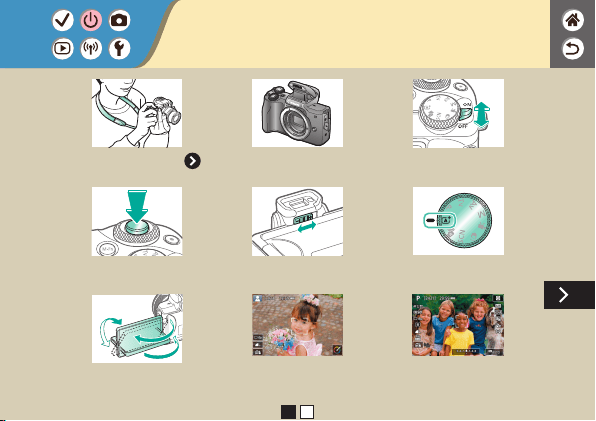


1
Turn the camera
on
2
Set the mode
z
Set the shooting
mode →
button
(1) (3)(2)
z
(1) Scene icon
z
(2) Remaining
number of shots
z
(3) Remaining
recording time
Trying the Camera Out
Shooting Stills (Scene Intelligent Auto)
z
For fully automatic selection of the optimal settings for
specic scenes, simply let the camera determine the subject
and shooting conditions.
z
Frames are displayed around faces and subjects that have
been detected, indicating that they are in focus.

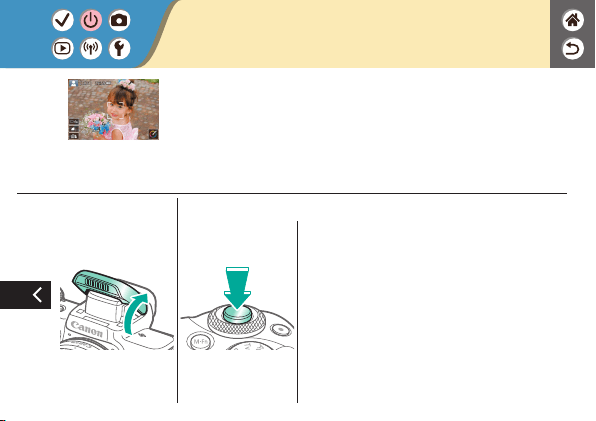
3
Zoom in or out, as
needed
4
Focus
z
Press the shutter
button lightly.
z
The camera beeps
twice after focusing.
z
An AF point is
displayed around
positions in focus.
Trying the Camera Out
Shooting Stills (Scene Intelligent Auto)
z
For fully automatic selection of the optimal settings for
specic scenes, simply let the camera determine the subject
and shooting conditions.
z
Frames are displayed around faces and subjects that have
been detected, indicating that they are in focus.
5
Raise the ash as
needed
6
Shoot
z
After you shoot, the
image is displayed for
about two seconds.
z
Even while the shot
is displayed, you can
take another shot by
pressing the shutter
button again.
Trying the Camera Out
Shooting Stills (Scene Intelligent Auto)
z
For fully automatic selection of the optimal settings for
specic scenes, simply let the camera determine the subject
and shooting conditions.
z
Frames are displayed around faces and subjects that have
been detected, indicating that they are in focus.

1
Turn the camera
on
2
Set the mode
z
Set the shooting
mode →
button
(1) (3)(2)
z
(1) Scene icon
z
(2) Remaining
number of shots
z
(3) Remaining
recording time
Trying the Camera Out
Recording Movies (Scene Intelligent Auto)
z
For fully automatic selection of the optimal settings for
specic scenes, simply let the camera determine the subject
and shooting conditions.
z
Frames are displayed around faces and subjects that have
been detected, indicating that they are in focus.
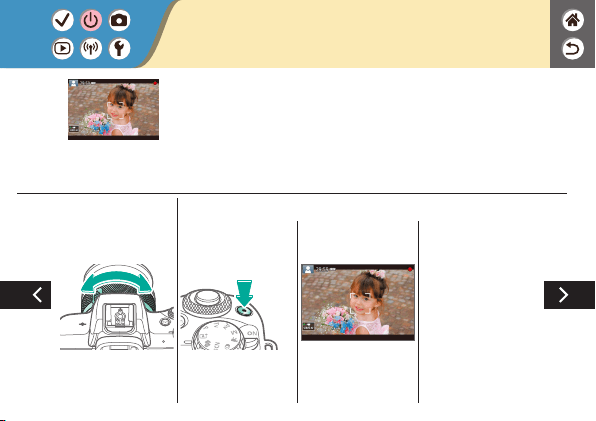
3
Zoom in or out, as
needed
4
Start recording
z
Frames are displayed
around any detected
faces that are in
focus.
Trying the Camera Out
Recording Movies (Scene Intelligent Auto)
z
For fully automatic selection of the optimal settings for
specic scenes, simply let the camera determine the subject
and shooting conditions.
z
Frames are displayed around faces and subjects that have
been detected, indicating that they are in focus.

5
Stop recording
Trying the Camera Out
Recording Movies (Scene Intelligent Auto)
z
For fully automatic selection of the optimal settings for
specic scenes, simply let the camera determine the subject
and shooting conditions.
z
Frames are displayed around faces and subjects that have
been detected, indicating that they are in focus.
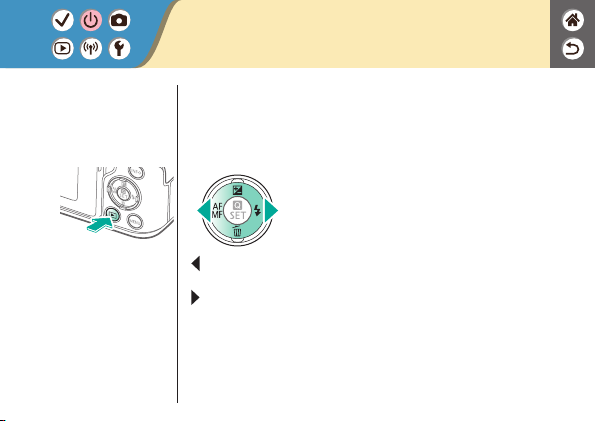
1
Set display to
playback
2
Browse your
images
z
button: Previous
image
z
button: Next image
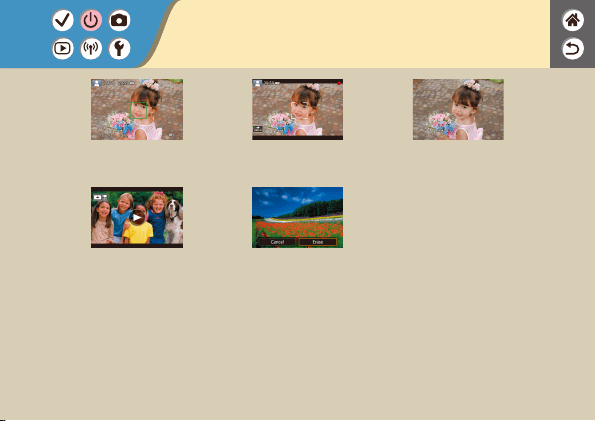
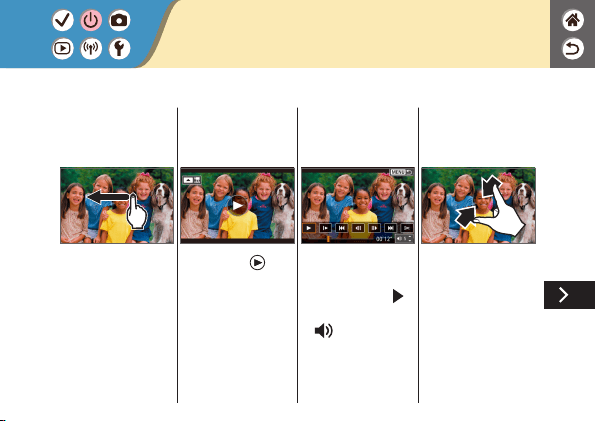
Trying the Camera Out
Viewing Stills
Trying the Camera Out
Viewing Movies
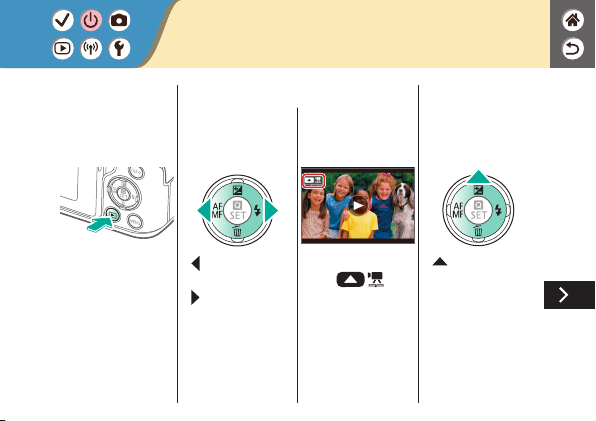
1
Set display to
playback
2
Browse your
images
z
button: Previous
image
z
button: Next image
z
Movies are labeled
with [
].
3
Play the movie
z
button: Display
movie playback panel

z
/ buttons → [ ]
4
Adjust the volume
Trying the Camera Out
Viewing Movies
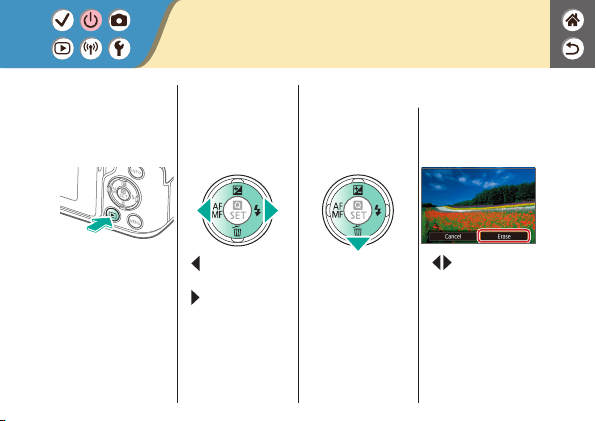
1
Set display to
playback
2
Browse your
images
z
button: Previous
image
z
button: Next image
3
Erase
z
/ buttons →
[Erase]
Trying the Camera Out
Erasing Images
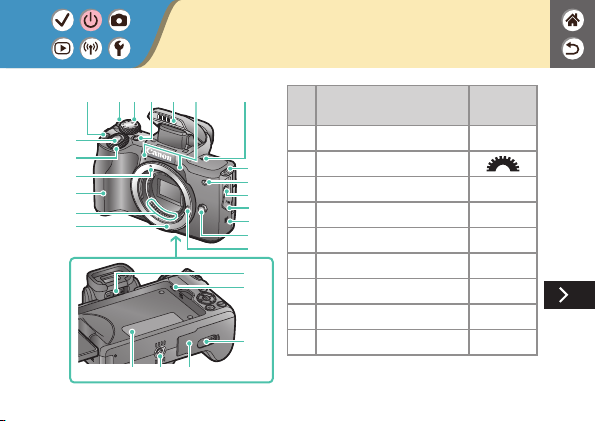
Part Names
Front
(
7
) (
8
) (
10
) (
11
)
(
12
)
(
14
)
(
16
)
(
18
)
(
19
)
(
20
)
(
23
)
(
22
)
(
21
)
(
26
)
(
24
) (
25
)
(
1
)
(
2
)
(
5
)
(
4
)
(
15
)
(
9
)
(
13
)
(
6
)
(
3
)
(
17
)
No. Name
Symbol in
This Manual
(1) Shutter button
(2) Main dial
(3)
EF-M lens mount index
(4) Grip
(5) Contacts
(6) Lens mount
(7) Movie button
(8) Power switch
(9) Mode dial

(
7
) (
8
) (
10
) (
11
)
(
12
)
(
14
)
(
16
)
(
18
)
(
19
)
(
20
)
(
23
)
(
22
)
(
21
)
(
26
)
(
24
) (
25
)
(
1
)
(
2
)
(
5
)
(
4
)
(
15
)
(
9
)
(
13
)
(
6
)
(
3
)
(
17
)
No. Name
Symbol in
This Manual
(10) Multi-function button
(11)
Flash
(12) Microphone
(13) Focal plane mark
(14) Strap mount
(15) Lamp
(16)
External microphone IN
terminal
(17) Terminal cover
(18) N-Mark
Part Names
Front

(
7
) (
8
) (
10
) (
11
)
(
12
)
(
14
)
(
16
)
(
18
)
(
19
)
(
20
)
(
23
)
(
22
)
(
21
)
(
26
)
(
24
) (
25
)
(
1
)
(
2
)
(
5
)
(
4
)
(
15
)
(
9
)
(
13
)
(
6
)
(
3
)
(
17
)
No. Name
Symbol in
This Manual
(19)
Lens release button
(20) Lens lock pin
(21) Dioptric adjustment knob
(22) Speaker
(23) DC coupler terminal cover
(24) Serial number (Body number)
(25) Tripod socket
(26) Memory card/battery cover
Part Names
Front

No. Name
Symbol in
This Manual
(1)
Screen / Touch-screen panel
(2) Viewnder
(3) Hot shoe
(4) Flash-sync contacts
(5) Indicator
(6) Strap mount
(7) Digital terminal
(8) HDMI
TM
terminal
(9) Wi-Fi button
Part Names
Back
(
11
)
(
4
)(
2
)
(
19
)
(
18
)
(
17
)
(
16
)
(
15
)
(
14
)
(
13
)
(
8
)
(
9
)
(
7
)
(
6
)
(
5
)
(
10
)
(
12
)
(
1
)
(
3
)

No. Name
Symbol in
This Manual
(10) Quick Control / Set button
(11)
Auto focus / Manual focus /
Left button
(12) Playback button
(13)
AE lock button
Playback: Magnify
(14)
AF point selection button
Playback: Index
(15) Information button
(16)
Exposure compensation /
Up button
(
11
)
(
4
)(
2
)
(
19
)
(
18
)
(
17
)
(
16
)
(
15
)
(
14
)
(
13
)
(
8
)
(
9
)
(
7
)
(
6
)
(
5
)
(
10
)
(
12
)
(
1
)
(
3
)
Part Names
Back
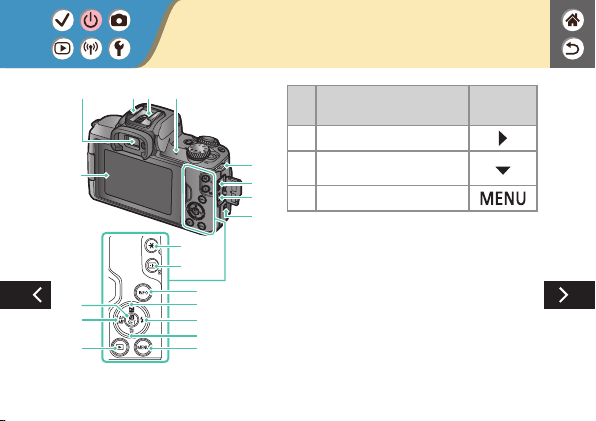
No. Name
Symbol in
This Manual
(17) Flash / Right button
(18)
Single-image erase /
Down button
(19) Menu button
(
11
)
(
4
)(
2
)
(
19
)
(
18
)
(
17
)
(
16
)
(
15
)
(
14
)
(
13
)
(
8
)
(
9
)
(
7
)
(
6
)
(
5
)
(
10
)
(
12
)
(
1
)
(
3
)
Part Names
Back

No. Name
(1) Focusing ring
(2) Hood mount
(3) Filter-mounting thread
(4) Lens retraction switch
(5) Lens mount index
(6) Zoom ring
(7) Lens retraction index
(8) Zoom position index
(9) Contacts
Part Names
Lens
(
1
)
(
2
)
(
3
)
(
4
)
(
5
)
(
6
)
(
7
)
(
8
)
(
9
)

On/Off
z
Turn on: [ON]
z
Turn off: [OFF]

Shutter Button
1
Press halfway
(Press lightly to
focus)
z
The camera beeps
twice.
2
Press all the way
down
(From the halfway
position, press fully
to shoot)
z
The camera shoots.
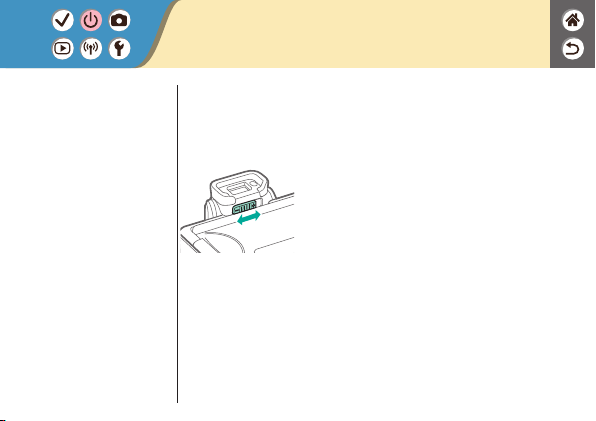
Viewnder
1
Switch display
modes
z
To use the viewnder,
activate it by holding
it near your eye.
2
Adjust the diopter
z
Adjust it with the
screen open.

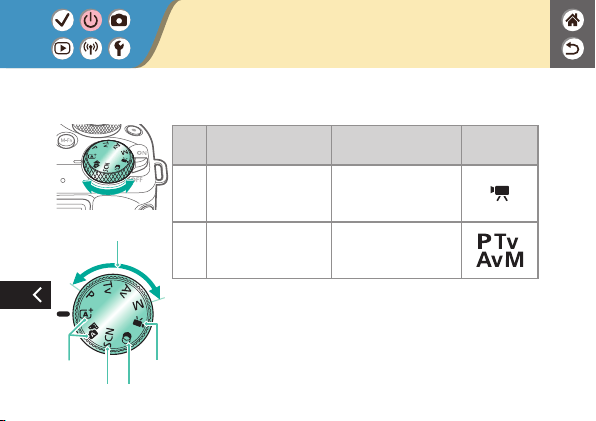
Shooting Modes
Use the mode dial to access each shooting mode.
No. Mode Function
Symbol in
This Manual
(1)
Scene Intelligent Auto
Mode / Hybrid Auto Mode
Fully automatic shooting,
with camera-determined
settings.
/
(2) Special Scene Mode
Shooting with optimal
settings for specic
scenes.
(3) Creative Filters Mode
Shooting with a variety of
added effects.
(
5
)
(
4
)
(
3
)
(
1
)
(
2
)
Use the mode dial to access each shooting mode.
No. Mode Function
Symbol in
This Manual
(4) Movie Recording Mode For movie recording.
(5) P, Tv, Av, and M Modes
Shooting a variety of
ways, with your preferred
settings.
/ /
/
Shooting Modes
(
5
)
(
4
)
(
3
)
(
1
)
(
2
)

Adjusting the Screen Angle
(
2
)
(
3
)
(
1
)(
1
)
z
Toward (1): The screen opens to about 180°.
z
Toward (2): The screen swivels about 180°.
z
(3): Tilt the screen toward the front to close it.

Frames on the Shooting Screen
White frame
z
Displayed around the
subject or person’s
face detected as the
main subject.
Green frame
z
Displayed after the
camera focuses when
you press the shutter
button halfway.
Blue frame
z
Displayed as the
camera continues
to focus on moving
subjects. Displayed
as long as you press
the shutter button
halfway.
Orange frame
z
Displayed if the
camera cannot focus
when you press
the shutter button
halfway.
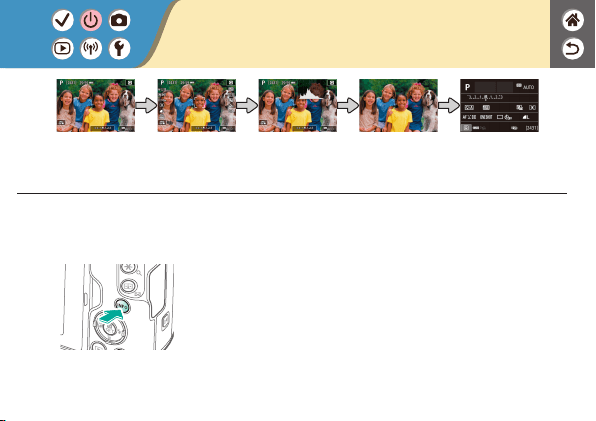
Shooting Display Options
1
Switch display
modes
Shooting
information 1
Shooting
information 2
Histogram No information
display
INFO. Quick
Control screen
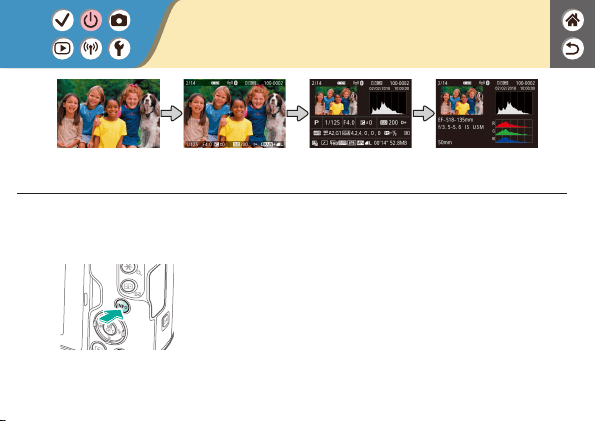
Playback Display Options
1
Switch the display
modes
No information
display
Information display 1
(summary)
Information display 2
(details)
Information display 3
(details)

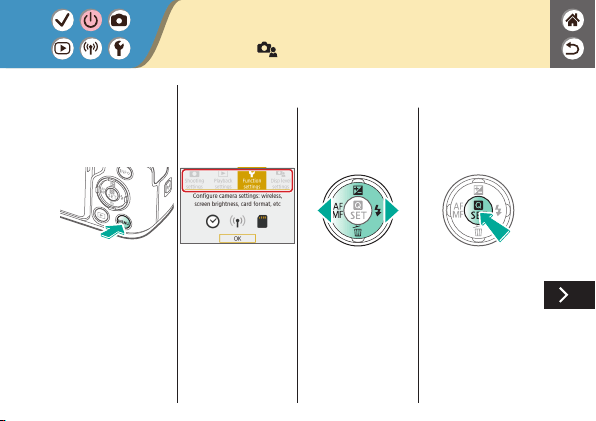
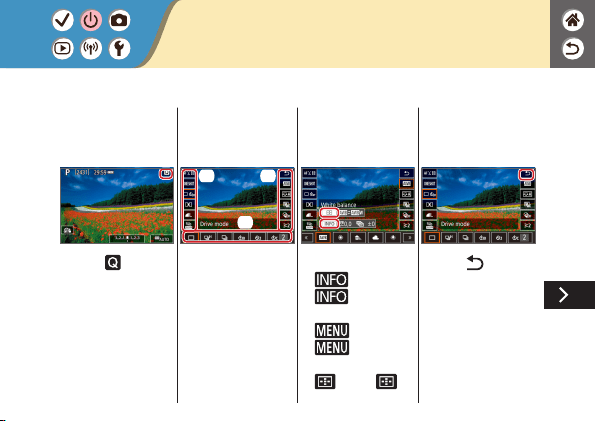
Using the Quick Control Screen
1
Access the setting
screen
(1) (1)
(2)
z
(1) Setting items
z
(2) Setting options
2
Choose the setting
item
3
Choose the setting
option

z
To set items labeled
[
], press the
button.
z
To set items labeled
[
], press the
button.
z
To set items labeled
[
], turn the
dial.
4
Conrm your
choice and exit
Using the Quick Control Screen
Using the Menu Screen
(When set to [ ] → [Menu display] → [Guided])
1
Access the menu
screen
2
Choose a main tab

(1)
(3)
(4)
(2)
z
(1) Main tab
z
(2) Sub-tab
z
(3) Setting items
z
(4) Setting options
3
Choose a sub-tab
4
Choose the setting
item
z
Some items are
selected with the
/ buttons on a
different screen, after
you press the
button initially.
Using the Menu Screen
(When set to [ ] → [Menu display] → [Guided])

5
Choose the setting
option
6
Conrm your
choice and exit
7
Return to the
shooting screen
z
Press the
button to return to
the screen in step 2,
and press it again to
return to the shooting
screen.
Using the Menu Screen
(When set to [ ] → [Menu display] → [Guided])
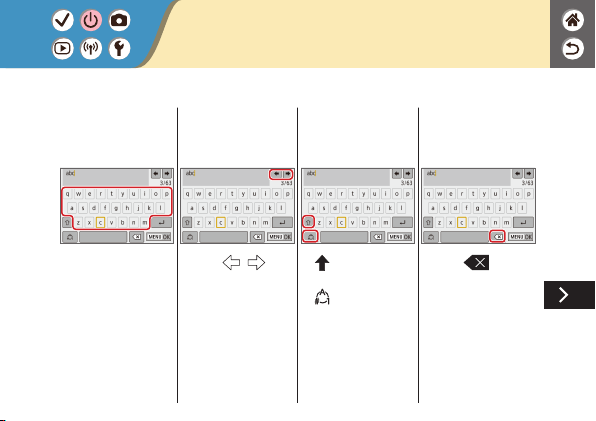
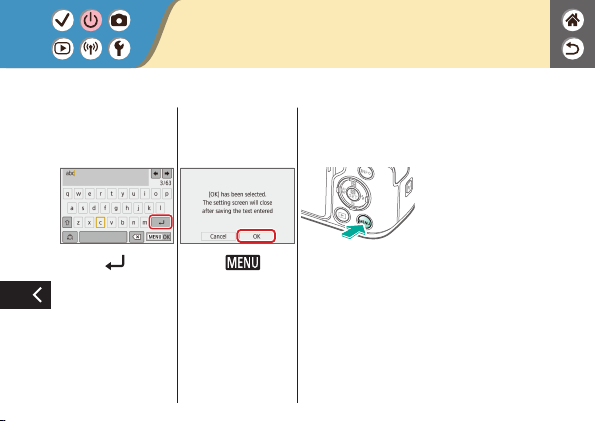
Entering Characters
Entering
characters
z
Touch a character to
enter it.
Moving the cursor
z
Touch [ ]/[ ].
Switching input
modes
z
[ ]: Switch to
uppercase
z
[
]: Switch to
numbers or symbols
Deleting
characters
z
Touch [ ].
Entering line
breaks
z
Touch [ ].
Conrming input
z
Touch [ ], and
then touch [OK].
Returning to the
previous screen
Entering Characters
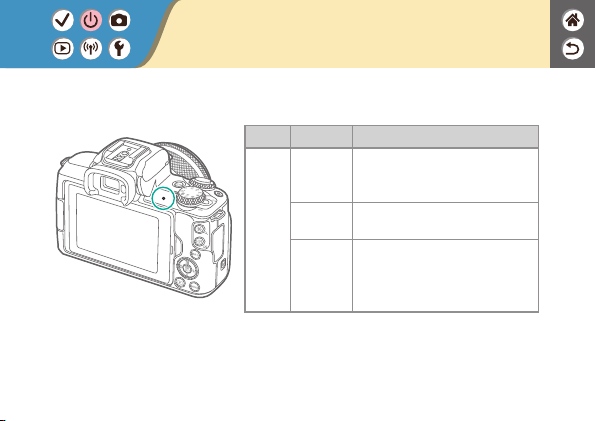
Color Status Camera Status
Green
On
z
Recording stills to the memory
card, or reading stills from the
card
Slow
blinking
z
Connected to a computer
z
Display off
Blinking
z
Recording movies to the
memory card, or reading
movies from the card
z
Transmitting via Wi-Fi
Indicator Display
Indicator display varies depending on the camera status.

Touch Operations
Quick Control Screen
Accessing the
setting screen
z
Touch [ ].
Setting up the
camera
(1) (1)
(2)
z
Touch a setting item (1)
→ option (2).
Switching screens
z
For items labeled
[
], touch
[
].
z
For items labeled
[
], touch
[
].
z
For items labeled
[
], touch [ ].
Returning to the
previous screen
z
Touch [ ].

Adjusting amounts
on bars
z
Touch or drag the bar.
Touch Operations
Quick Control Screen

Touch Operations
MENU
Setting up the
camera
(1)
(3)
(4)
(2)
z
Touch a main tab (1)
→ sub tab (2) →
setting item (3) →
option (4).
Returning to the
previous screen
z
Touch [ ].
Adding/removing
check marks
z
Touch a check box.
Instead of pressing
the
button
z
Touch [ ].

Touch Operations
MENU
Instead of pressing
the
button
z
Touch [ ].
Instead of pressing
the
button
z
Touch [ ].
Touch Operations
Playback
Viewing images
individually
z
Next image: Drag left
z
Previous image: Drag
right
Playing movies
z
Play: Touch [ ]
Operations during
movies
z
Stop: Touch the
screen
z
Resume: Touch [
]
z
Adjust volume: Touch
[
]
Switching to index
display

Displaying fewer
images
Magnifying images
z
Quickly touch twice.
Reducing
magnied images
z
Restore original size:
Touch [
]
Touch Operations
Playback


1
Set the shooting
mode
z
mode →
button
2
Compose the shot
and shoot
Hybrid Auto Mode
You can make a short movie of the day just by shooting stills. The
camera records 2 – 4-second clips of scenes before each shot,
which are later combined in a digest movie.


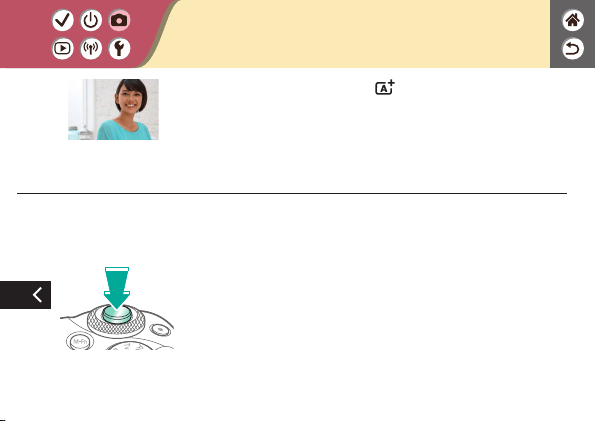
Portrait
Capture subjects that stand out against a blurred background,
with smooth skin tone and soft-looking hair.
1
Set the shooting
mode
z
mode →
button
z
/ buttons →
[
] → button
2
Shoot
Specic Scenes (Special Scene)

Specic Scenes (Special Scene)
Self Portrait
For self-portraits, customizable image processing includes skin
smoothing as well as brightness and background adjustment to
make yourself stand out.
Smooth skin
Processes images to make skin look smoother.
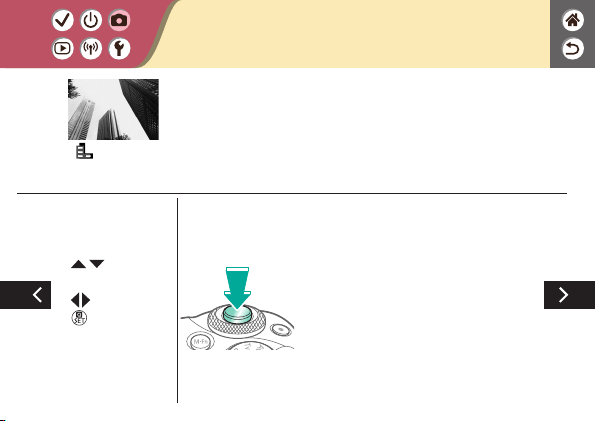
Landscape
Capture wide-open landscapes or similar scenery in sharp focus
from near to far, with blue skies and greenery reproduced vividly.
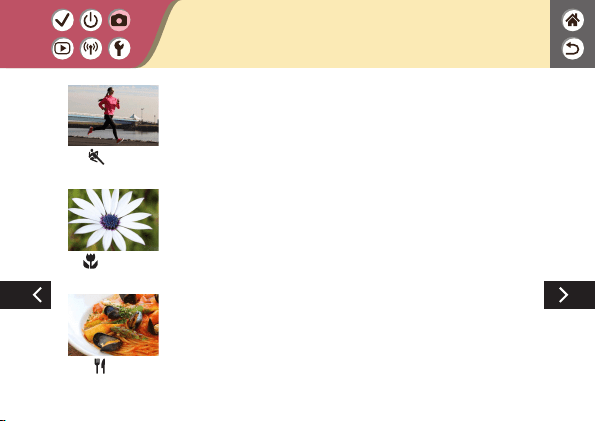
Specic Scenes (Special Scene)
Sports
Shoot continuously as the camera keeps moving subjects in
focus.
Close-up
Take close-ups of owers or other small objects to show them
enlarged in your shots.
Food
Adjust color tones to make food look fresh and vibrant.

Handheld Night
Scene
Take beautiful shots of evening scenes or portraits with evening
scenery in the background.
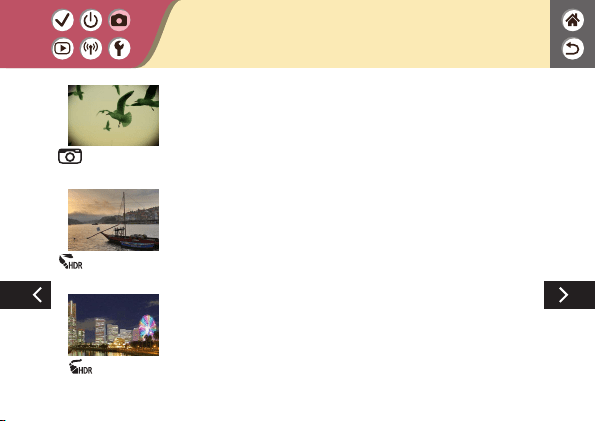
HDR Backlight
Control
Three consecutive images are captured at different brightness
levels each time you shoot, and the camera combines image
areas with optimal brightness to create a single image. This mode
can reduce the washed-out highlights and loss of detail in
shadows that tend to occur in shots with mixed bright and dark
image areas.
Silent Mode
Shoot quiet scenes without making shutter sounds or other
operating sounds.
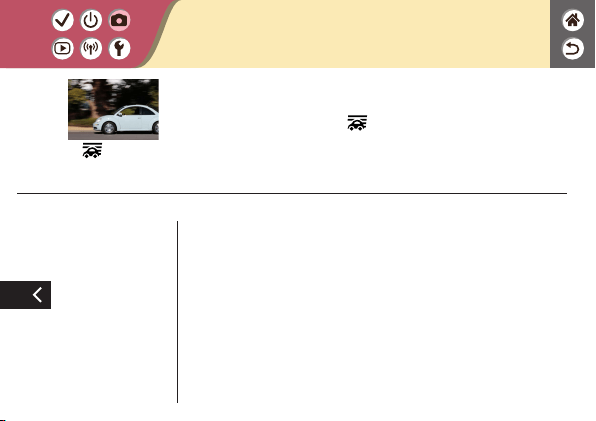
Specic Scenes (Special Scene)

Panning
By panning, you can blur the background to convey a sense of
speed.
Attach a lens compatible with [
] mode to reduce subject
blurring and keep subjects clear and sharp.
1
Set the shooting
mode
z
mode →
button
z
/ buttons →
[
] → button
2
Shoot
z
Before shooting,
press the shutter
button halfway as
you move the camera
so that it follows the
subject.
Capturing Subjects Against Flowing
Backgrounds
Panning
By panning, you can blur the background to convey a sense of
speed.
Attach a lens compatible with [
] mode to reduce subject
blurring and keep subjects clear and sharp.
z
Keep the moving
subject in the frame
displayed, and press
the shutter button all
the way down.
z
Even after you have
pressed the shutter
button fully, continue
moving the camera to
follow the subject.
Capturing Subjects Against Flowing
Backgrounds

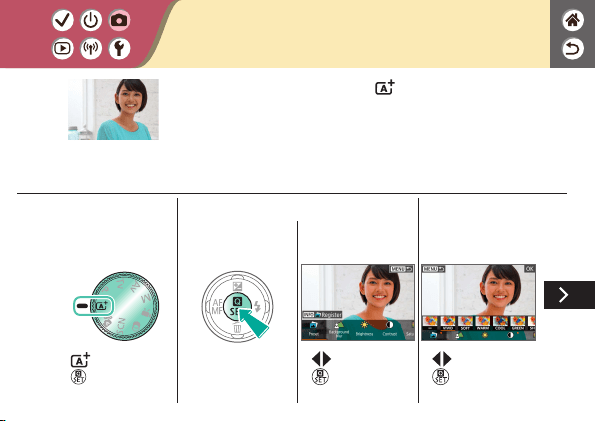
Shoot with your preferred effects in mode by adjusting
background blur, brightness, or other options.
Easy to set up, by choosing from presets saved on the camera.
1
Set the shooting
mode
z
mode →
button
2
Access the setting
screen
z
/ buttons →
button
3
Choose the setting
item
z
/ buttons →
button
Shooting with Your Favorite Effects
4
Shoot
Shoot with your preferred effects in mode by adjusting
background blur, brightness, or other options.
Easy to set up, by choosing from presets saved on the camera.
Shooting with Your Favorite Effects


1
Set the shooting
mode
z
mode →
button
z
/ buttons →
[
] → button
2
Adjust the effect
level
Image Effects (Creative Filters)
Grainy B/W
Take monochrome pictures with a gritty, rough feeling.
z
/ buttons →
[Filter effect level] →
/ buttons →
button
3
Shoot
Image Effects (Creative Filters)
Grainy B/W
Take monochrome pictures with a gritty, rough feeling.
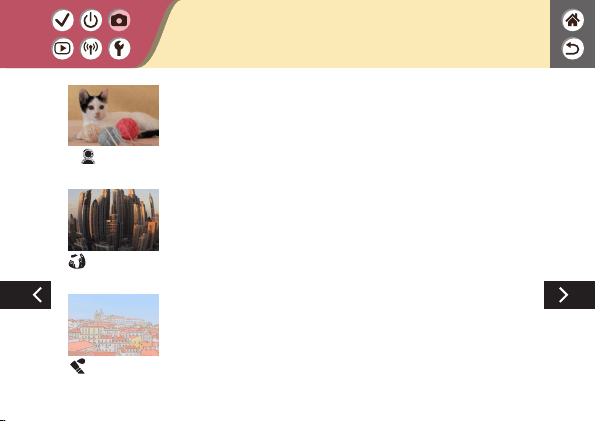
Image Effects (Creative Filters)
Soft focus
Shoot images as if a soft focus lter were attached to the camera.
Fish-eye effect
Shoot with the distorting effect of a sh-eye lens.
Water painting
effect
Soften colors, for photos resembling watercolor paintings.
Toy camera effect
Shoot images resemble shots from a toy camera, with vignetting
(darker, blurred image corners) and modied color overall.
HDR art standard
Add an effect to make shots resemble low-contrast paintings with
at tones.
HDR art vivid
Add an effect to make shots resemble vivid illustrations.
Image Effects (Creative Filters)

HDR art bold
Add an effect to make shots resemble oil paintings, with bold
edges.
HDR art
embossed
Add an effect to make shots resemble old, faded photos with bold
edges and dark ambiance.
Image Effects (Creative Filters)

1
Set the shooting
mode
z
mode →
button
z
/ buttons →
[
] → button
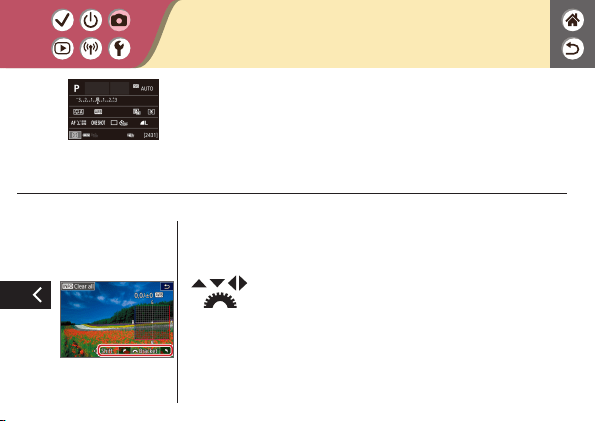
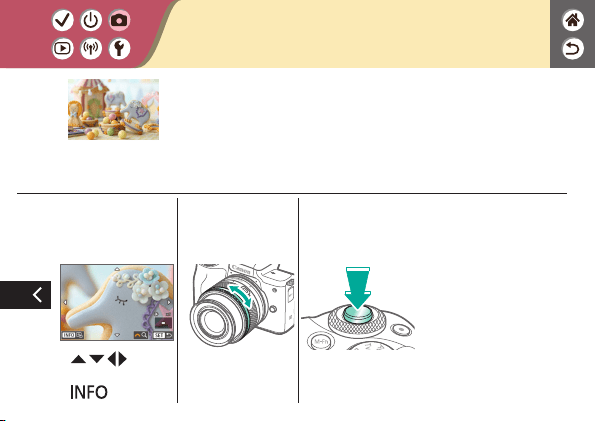
Creative Filters (Miniature Effect)
Miniature effect
Creates the effect of a miniature model, by blurring image areas
outside a selected area.

2
Choose the
position to keep in
focus and the area
not to blur
z
Move the frame:
button →
/ buttons
Creative Filters (Miniature Effect)
Miniature effect
Creates the effect of a miniature model, by blurring image areas
outside a selected area.

z
Move the AF point:
button →
/ / / buttons
3
Return to the
shooting screen
4
Shoot
Creative Filters (Miniature Effect)
Miniature effect
Creates the effect of a miniature model, by blurring image areas
outside a selected area.
Setting Up Shooting from a Single
Screen
1
Set the shooting
mode
z
mode →
button
2
Access the INFO.
Quick Control
screen
z
Press the
button a few times.
z
button
3
Choose a function
The INFO. Quick Control screen provides convenient,
single-screen access to a variety of shooting settings.
Setting Up Shooting from a Single
Screen
The INFO. Quick Control screen provides convenient,
single-screen access to a variety of shooting settings.
4
Set up the camera
z
/ buttons or
dial to adjust
z
/ buttons or
button to
adjust
z
/ buttons or
button to adjust
Setting Up Shooting from a Single
Screen
The INFO. Quick Control screen provides convenient,
single-screen access to a variety of shooting settings.
z
/ / / buttons
or
dial to
adjust
Adjusting Image Brightness
(Exposure Compensation)
Auto Exposure Bracketing (AEB
Shooting)
Locking Image Brightness /
Exposure (AE Lock)
Changing the ISO Speed Adjusting ISO Auto Settings Changing the Metering Method
Shooting
Image Brightness
1 2
Auto Mode Specic Scenes (Special Scene) Image Effects (Creative Assist)
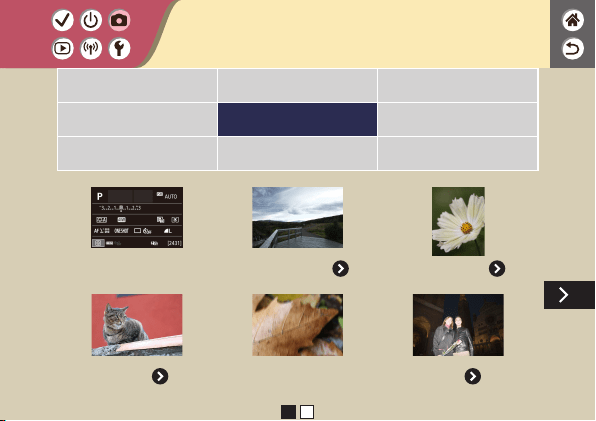
Image Effects (Creative Filters) Manual Mode Recording Movies in Movie Mode
Convenient Features
Auto Correction of Brightness and
Contrast (Auto Lighting Optimizer)
Shooting Bright Subjects
(Highlight Tone Priority)
Deactivating Exposure
Simulation
Shooting
Image Brightness
1 2
Auto Mode Specic Scenes (Special Scene) Image Effects (Creative Assist)
Image Effects (Creative Filters) Manual Mode Recording Movies in Movie Mode
Convenient Features
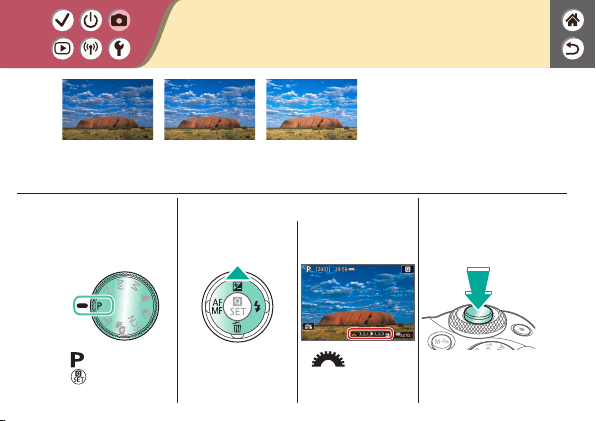
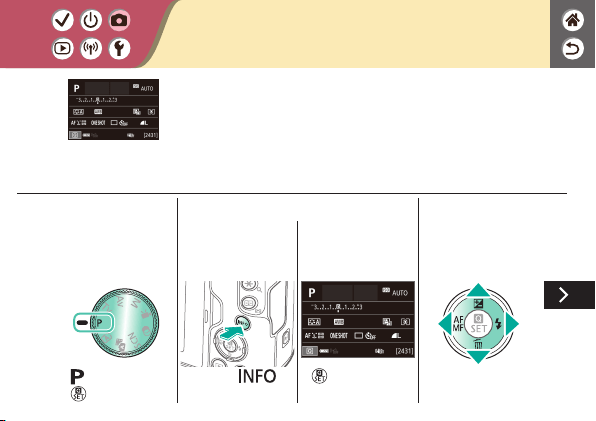
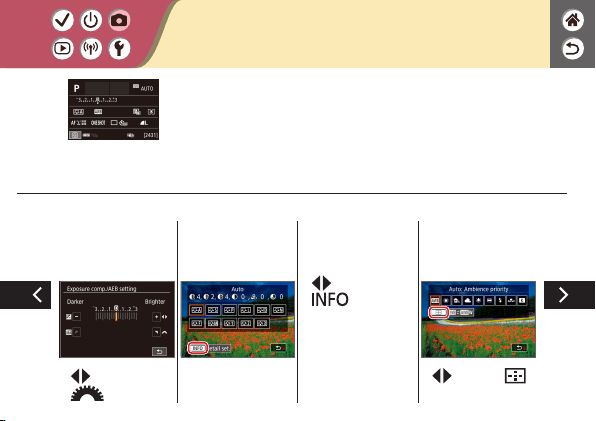
Adjusting Image Brightness (Exposure
Compensation)
Set toward −
±0 Set toward +
Standard exposure is
adjustable in 1/3-stop
increments, in a range of −3
to +3.
1
Set the shooting
mode
z
mode →
button
2
Set up the camera
z
dial
3
Compose the shot
and shoot

1
Set the shooting
mode
z
mode →
button
2
Access the menu
screen
z
button →
[
] → button
3
Set up the camera
z
[ 2] → [Expo.
comp./AEB]
z
Exposure
compensation:
/
buttons
AEB:
dial
Auto Exposure Bracketing (AEB
Shooting)
Underexposure Overexposure
Three images are captured at different exposure
levels each time you shoot. Bracketing width is
adjustable in 1/3-stop increments in a range of ±2
stops, centered on the exposure compensation
level.
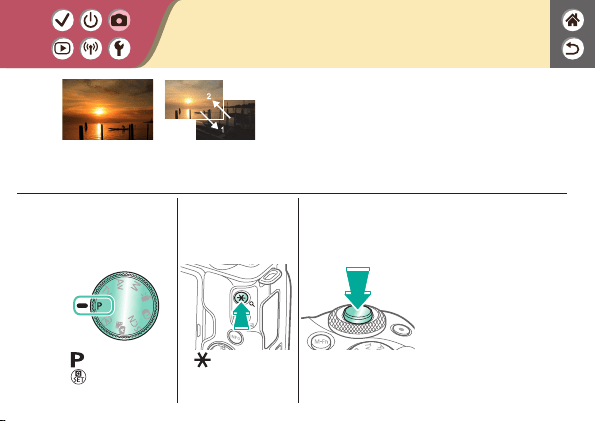
Locking Image Brightness / Exposure
(AE Lock)
1
Set the shooting
mode
z
mode →
button
2
Lock the exposure
z
[ ] is displayed,
and the exposure is
locked.
3
Compose the shot
and shoot
Without AE lock
2
1
AE lock
Before shooting, you can lock the exposure, or
you can specify focus and exposure separately.
1
Set the shooting
mode
z
mode →
button
2
Access the ISO
speed bar
z
Touch [ ].
3
Set up the camera
z
/ buttons
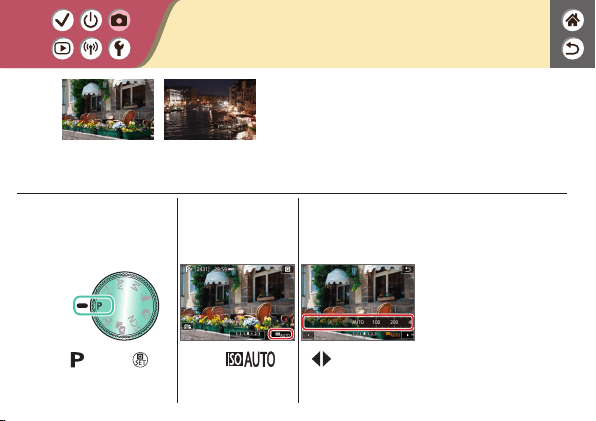
Changing the ISO Speed
Low
High
Choose [AUTO] to have the ISO speed set
automatically to match the shooting mode and
scene, or adjust the ISO speed manually to suit
how you are shooting. Higher values increase
ISO speed while lower values decrease it.

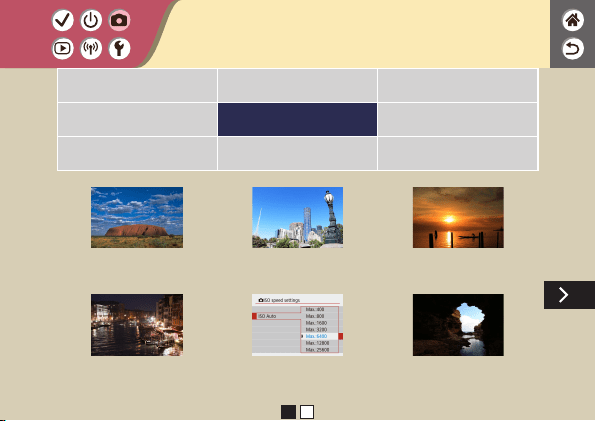
Adjusting ISO Auto Settings
Maximum set low Maximum set high
You can limit the maximum ISO speed set
automatically.
1
Set the shooting
mode
z
mode →
button
2
Access the menu
screen
z
button →
[
] → button
3
Set up the camera
z
[ 2] → [ ISO
speed settings] →
[ISO Auto] → choose
an option

1
Set the shooting
mode
z
mode →
button
2
Access the setting
screen
3
Set up the camera
(1)
(2)
z
[ ] → choose an
option
Changing the Metering Method
Choose how the camera determines brightness.

1
Set the shooting
mode
z
mode →
button
2
Access the setting
screen
3
Set up the camera
(1)
(2)
z
[ ] → choose an
option
Auto Correction of Brightness and
Contrast (Auto Lighting Optimizer)
Disable Low Standard High

1
Set the shooting
mode
z
mode →
button
2
Access the menu
screen
z
button →
[
] → button
3
Set up the camera
z
[ 2] → [Highlight
tone priority] →
choose an option
Shooting Bright Subjects (Highlight Tone
Priority)
Improve gradation in bright image areas to avoid loss of detail in
subject highlights.
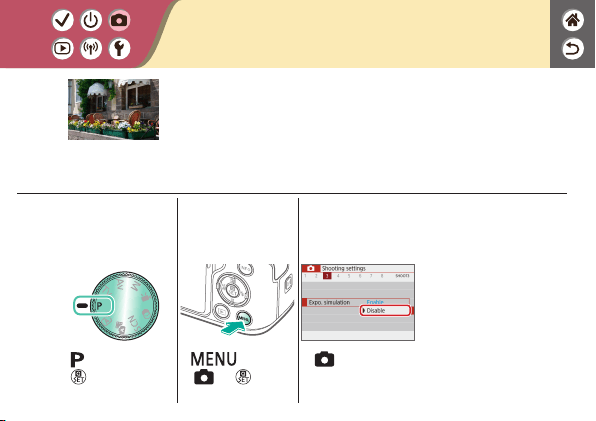
Deactivating Exposure Simulation
1
Set the shooting
mode
z
mode →
button
2
Access the menu
screen
z
button →
[
] → button
3
Set up the camera
z
[ 3] →
[Expo. simulation] →
[Disable]
Images are displayed at a brightness simulating the actual
brightness as captured. For this reason, screen brightness is also
adjusted in response to changes in exposure compensation. This
feature can be disabled to keep the screen at a brightness
convenient for shooting, unaffected by exposure compensation.

Choosing Color Tones (Picture
Style)
Customizing Picture Styles Saving Customized Picture
Styles
Capturing Natural Colors (White
Balance)
Custom White Balance Manually Correcting White
Balance
Shooting
Image Features
1 2
Auto Mode Specic Scenes (Special Scene) Image Effects (Creative Assist)
Image Effects (Creative Filters) Manual Mode Recording Movies in Movie Mode
Convenient Features
Manually Setting White Balance
Color Temperature
Correcting Lens Aberrations Reducing Noise in High-ISO
Shooting
Using Multi Shot Noise
Reduction
Reducing Noise at Slow Shutter
Speeds
Shooting
Image Features
1 2
Auto Mode Specic Scenes (Special Scene) Image Effects (Creative Assist)
Image Effects (Creative Filters) Manual Mode Recording Movies in Movie Mode
Convenient Features

Choosing Color Tones (Picture Style)
Standard
Landscape
Choose color settings that express scenes or
subjects well.
1
Set the shooting
mode
z
mode →
button
2
Access the setting
screen
3
Set up the camera
(1)
(2)
z
[ ] → choose
an option

Customizing Picture Styles
Customize parameters of Picture Styles, such as contrast or saturation.
1
Set the shooting
mode
z
mode →
button
2
Access the setting
screen
3
Set up the camera
(1)
(2)
(3)
z
[ ] →
choose an option →
button

Customizing Picture Styles
Customize parameters of Picture Styles, such as contrast or saturation.
z
Choose an item:
/ buttons
z
Customize:
/ buttons

Saving Customized Picture Styles
Save presets (such as [ ] or [ ]) that you have customized as new styles. You
can create several Picture Styles with different settings for parameters such as
sharpness or contrast.
1
Set the shooting
mode
z
mode →
button
2
Access the setting
screen
3
Set up the camera
(1)
(2)
(3)
z
[ ] → choose a
user-dened style no.
→
button
Saving Customized Picture Styles
Save presets (such as [ ] or [ ]) that you have customized as new styles. You
can create several Picture Styles with different settings for parameters such as
sharpness or contrast.
z
Choose an item:
/ buttons
z
Customize:
/ buttons
1
Set the shooting
mode
z
mode →
button
2
Access the setting
screen
3
Set up the camera
(1)
(2)
z
[ ] → choose an
option
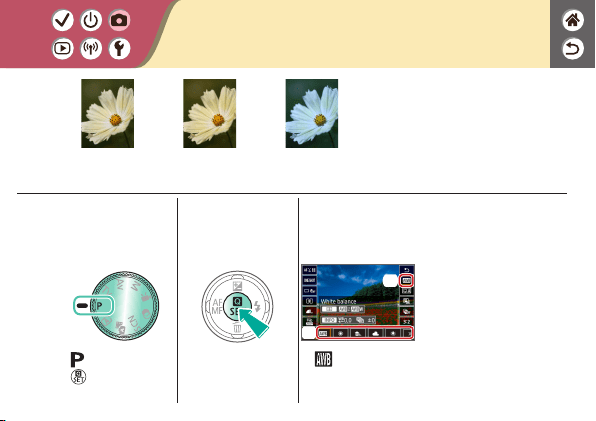
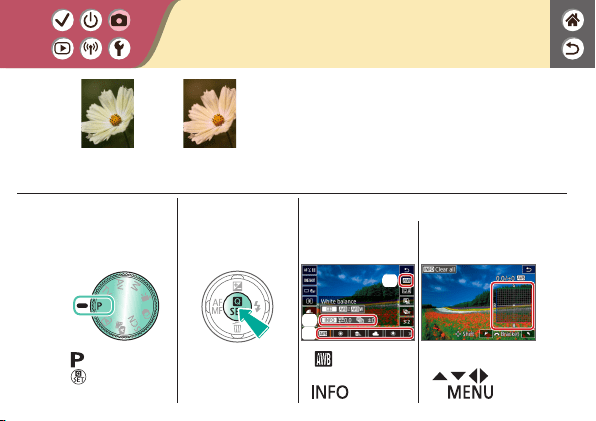
Capturing Natural Colors (White
Balance)
Daylight Cloudy Tungsten light
By adjusting white balance
(WB), you can make image
colors look more natural for
the scene you are shooting.
1
Set the shooting
mode
z
mode →
button
2
Shoot a white
object
z
Use a plain white
object that lls the
screen.
z
Focus and shoot.
3
Access the menu
screen
z
button →
[
] → button
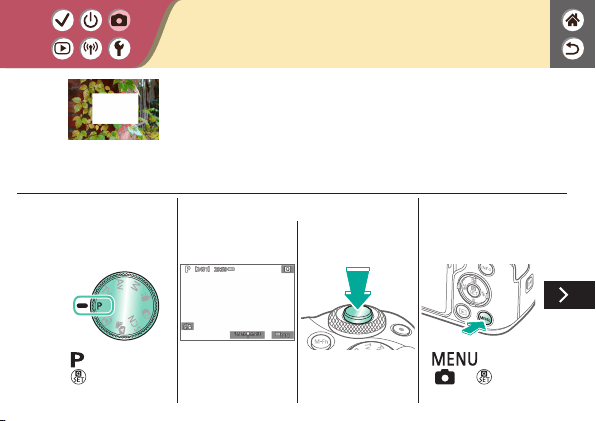
Custom White Balance
Loading white
For image colors that look natural under the light in your shot,
adjust white balance to suit the light source where you are
shooting. Set the white balance under the same light source that
will illuminate your shot.
4
Load the white
data
z
[ 4] → [Custom
White Balance]
z
Select your image
from step 2 →
button → [OK] →
button
5
Return to the
shooting screen
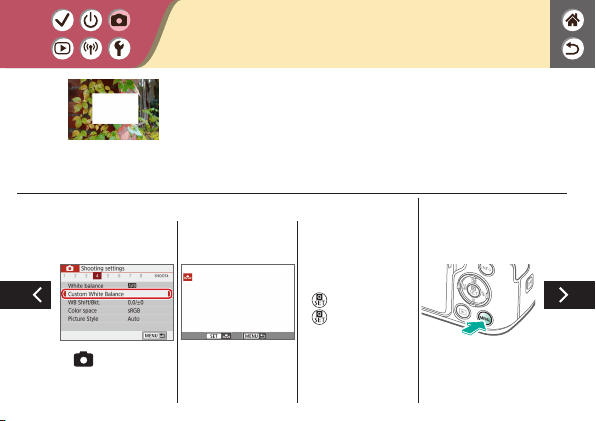
Custom White Balance
Loading white
For image colors that look natural under the light in your shot,
adjust white balance to suit the light source where you are
shooting. Set the white balance under the same light source that
will illuminate your shot.

6
Access the setting
screen
7
Set up the camera
(1)
(2)
z
[ ] → [ ]
Custom White Balance
Loading white
For image colors that look natural under the light in your shot,
adjust white balance to suit the light source where you are
shooting. Set the white balance under the same light source that
will illuminate your shot.
1
Set the shooting
mode
z
mode →
button
2
Access the setting
screen
3
Set up the camera
(1)
(3)
(2)
z
[ ] → choose an
option →
button
z
Adjust:
/ / / buttons
→
button
Manually Correcting White Balance
Daylight shot Corrected
You can manually correct white balance. This
adjustment can match the effect of using a
commercially available color temperature
conversion lter or color-compensating lter.
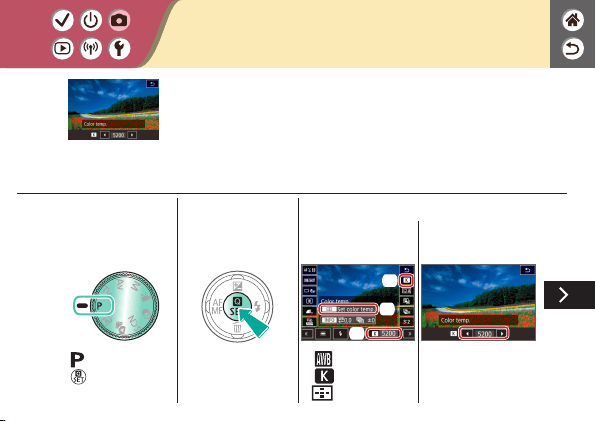
1
Set the shooting
mode
z
mode →
button
2
Access the setting
screen
3
Set up the camera
(1)
(2)
(3)
z
[ ] →
[
5200] →
button
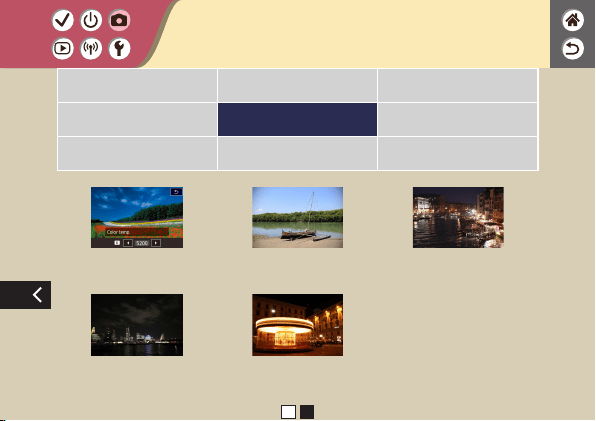
Manually Setting White Balance Color
Temperature
A value can be set representing the white balance color
temperature.

Manually Setting White Balance Color
Temperature
A value can be set representing the white balance color
temperature.
z
Choose a color
temperature:
/ buttons →
button

1
Set the shooting
mode
z
mode →
button
2
Access the menu
screen
z
button →
[
] → button
3
Set up the camera
z
[ 1] → [Lens
aberration correction]
z
Choose an item
without [
]
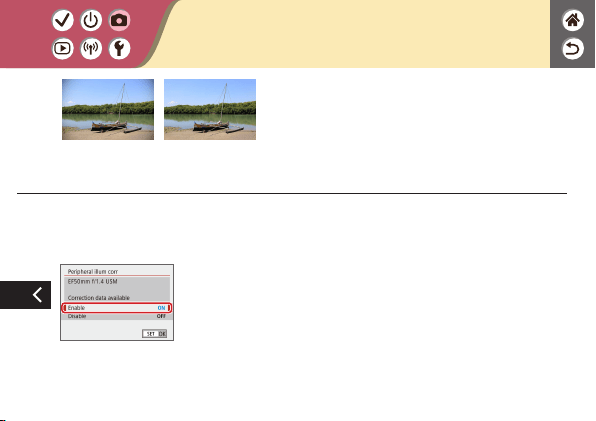
Correcting Lens Aberrations
Example: Peripheral
illumination correction
→ Disable
Example: Peripheral
illumination correction
→ Enable
Correct a variety of image issues from lens
characteristics.
Correcting Lens Aberrations
Example: Peripheral
illumination correction
→ Disable
Example: Peripheral
illumination correction
→ Enable
Correct a variety of image issues from lens
characteristics.

Reducing Noise in High-ISO Shooting
1
Set the shooting
mode
z
mode →
button
2
Access the menu
screen
z
button →
[
] → button
3
Set up the camera
z
[ 5] → [High ISO
speed NR] → choose
an option
You can choose from 3 levels of noise reduction: [Standard], [High],
[Low]. This function is especially effective when shooting at high
ISO speeds.

Using Multi Shot Noise Reduction
1
Set the shooting
mode
z
mode →
button
2
Access the menu
screen
z
button →
[
] → button
3
Set up the camera
z
[ 5] → [High ISO
speed NR] → [
]
Automatically combine four images captured at once to reduce
noise. Compared to setting [High ISO speed NR] to [High], this
feature minimizes loss of image quality while reducing noise.

Reducing Noise at Slow Shutter Speeds
1
Set the shooting
mode
z
mode →
button
2
Access the menu
screen
z
button →
[
] → button
3
Set up the camera
z
[ 5] → [Long exp.
noise reduction] →
choose an option
Reduce noise from long exposures at shutter speeds of one
second or slower.

Shooting in Manual Focus
Mode
Fine-Tuning the Focus Easily Identifying the Focus
Area (MF Peaking)
Choosing the AF Method Magnifying Display to Check
the Focus
Shooting with Subject Eyes in
Focus
Shooting
Focusing
1 2
Auto Mode Specic Scenes (Special Scene) Image Effects (Creative Assist)
Image Effects (Creative Filters) Manual Mode Recording Movies in Movie Mode
Convenient Features

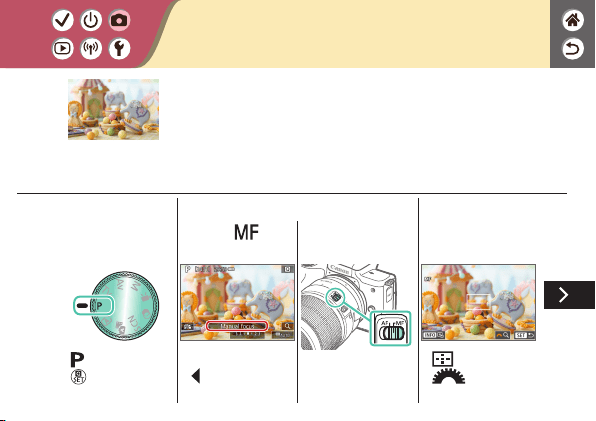
Shooting in Manual Focus Mode
1
Set the shooting
mode
z
mode →
button
2
Choose [ ]
z
EF-M lenses:
button → [Manual
focus]
z
Other lenses: set
switch to MF
3
Activate
magnication
z
button →
dial
When focusing is not possible in AF mode, use manual focus. To
make focusing easier, magnify the display.
Shooting in Manual Focus Mode
4
Display an area to
focus on
z
/ / / buttons
z
Center display again:
button
5
Focus
6
Shoot
When focusing is not possible in AF mode, use manual focus. To
make focusing easier, magnify the display.

Fine-Tuning the Focus
1
Set the shooting
mode
z
mode →
button
2
Access the menu
screen
z
button →
[
] → button
3
Set up the camera
z
[ 7] → [Lens
electronic MF] →
[Enable after
One-Shot AF]
Autofocus Focusing ring
After autofocusing when using a lens compatible
with this feature, you can ne-tune the focus by
turning the focusing ring.

4
Focus
z
Hold the shutter
button halfway down.
5
Shoot
Fine-Tuning the Focus
Autofocus Focusing ring
After autofocusing when using a lens compatible
with this feature, you can ne-tune the focus by
turning the focusing ring.

Easily Identifying the Focus Area (MF
Peaking)
1
Set the shooting
mode
z
mode →
button
2
Access the menu
screen
z
button →
[
] → button
3
Set up the camera
z
[ 7] → [MF
peaking settings] →
[Peaking] → [On]
z
Choose an item.
MF peaking off
MF peaking on
Edges of subjects in focus are displayed in color
to make manual focusing easier. You can adjust
the colors and the sensitivity (level) of edge
detection as needed.

1
Set the shooting
mode
z
mode →
button
2
Access the setting
screen
3
Set up the camera
(1)
(2)
z
[ ] → choose
an option
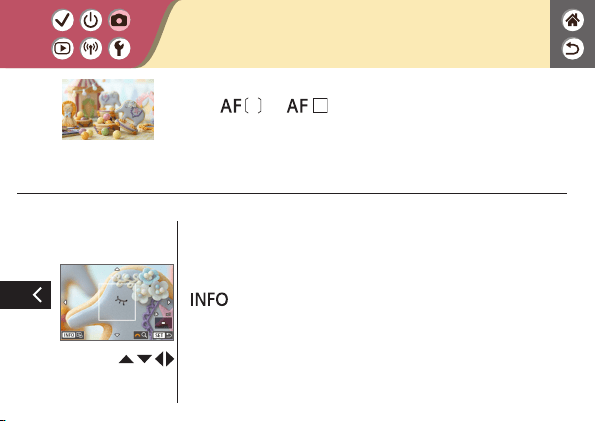
Choosing the AF Method
+Tracking
Zone AF
1-point AF
Change the auto focus (AF)
mode to suit shooting
conditions.

1
Set the shooting
mode
z
mode →
button
2
Activate
magnication
3
Zoom in or out, as
needed
Magnifying Display to Check the Focus
Display can be magnied to check the focus when the AF method
is set to [
] or [ ].
4
Choose an area to
focus on
z
Press the / / /
buttons to display an
area to focus on.
z
To center the display
again, press the
button.
Magnifying Display to Check the Focus
Display can be magnied to check the focus when the AF method
is set to [
] or [ ].

1
Set the shooting
mode
z
mode →
button
2
Access the menu
screen
z
button →
[
] → button
3
Set up the camera
(1)
(2)
z
[ 6] →
[Eye Detection AF]
→ [Enable]
4
Aim the camera at
the subject
Shooting with Subject Eyes in Focus
In close-ups of people’s faces, you can shoot with the subject’s
eyes in focus.

5
Shoot
Shooting with Subject Eyes in Focus
In close-ups of people’s faces, you can shoot with the subject’s
eyes in focus.
1
Set the shooting
mode
z
mode →
button
2
Access the setting
screen
3
Set up the camera
(1)
(2)
z
[ ] →
[
]
4
Focus
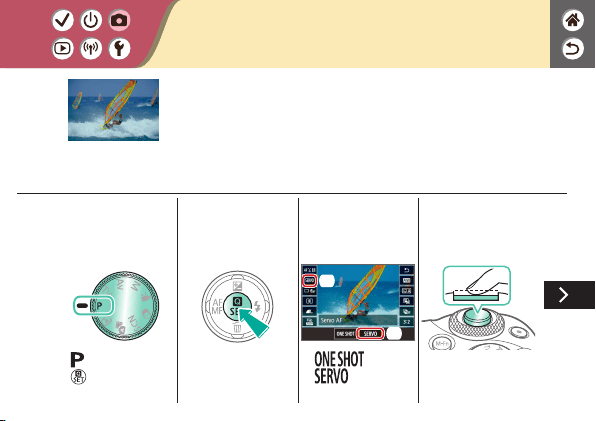
Shooting with Servo AF
This mode helps avoid missing shots of subjects in motion,
because the camera continues to focus on the subject and adjust
the exposure as long as you press the shutter button halfway.

5
Shoot
Shooting with Servo AF
This mode helps avoid missing shots of subjects in motion,
because the camera continues to focus on the subject and adjust
the exposure as long as you press the shutter button halfway.

1
Set the shooting
mode
z
mode →
button
2
Access the menu
screen
z
button →
[
] → button
3
Set up the camera
(1)
(2)
z
[ 6] →
[Continuous AF] →
[Disable]
Changing the Focus Setting
Enable: Focus on
moving subjects
Disable: Focus on
stationary subjects
You can change default camera operation of
constantly focusing on subjects it is aimed at,
even when the shutter button is not pressed.
Instead, you can limit camera focusing to the
moment you press the shutter button halfway.

1
Choose a subject
2
Shoot
Choosing Subjects by Touch
You can choose subjects by touching a person’s
face or other things displayed on the screen.

1
Set the shooting
mode
z
mode →
button
2
Access the menu
screen
z
button →
[
] → button
3
Set up the camera
(1)
(2)
z
[ 7] →
[IS settings] →
[IS mode] → choose
an option
Changing the IS Mode Settings
On Off
Congure image stabilization via the camera
menu when using an EF-M lens with image
stabilization.
Changing the Flash Mode Adjusting the Flash Exposure
Compensation
Shooting with the FE Lock
Changing the Flash Timing Changing the Flash Metering
Mode
Adjusting the Flash Output
Shooting
Flash
Auto Mode Specic Scenes (Special Scene) Image Effects (Creative Assist)
Image Effects (Creative Filters) Manual Mode Recording Movies in Movie Mode
Convenient Features

1
Choose the ash
mode
z
button → choose
an option
Changing the Flash Mode
You can change the ash mode to match the shooting scene.
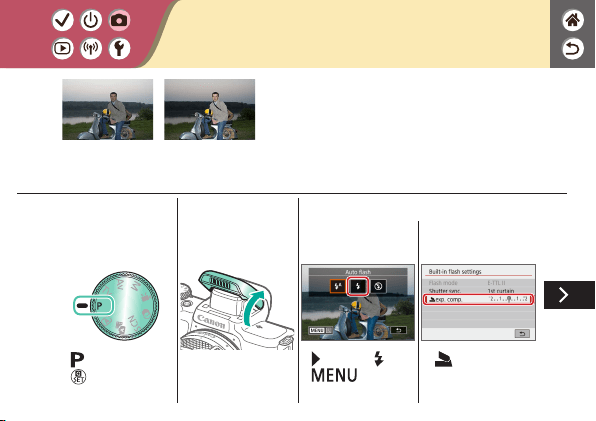
Adjusting the Flash Exposure
Compensation
Set toward −
Set toward +
Just as with regular exposure compensation, you
can adjust the ash exposure from –2 to +2
stops, in 1/3-stop increments.
1
Set the shooting
mode
z
mode →
button
2
Raise the ash
3
Set up the camera
z
button → [ ] →
button
z
[ exp. comp.]

Adjusting the Flash Exposure
Compensation
z
Adjust as needed.
Set toward −
Set toward +
Just as with regular exposure compensation, you
can adjust the ash exposure from –2 to +2
stops, in 1/3-stop increments.
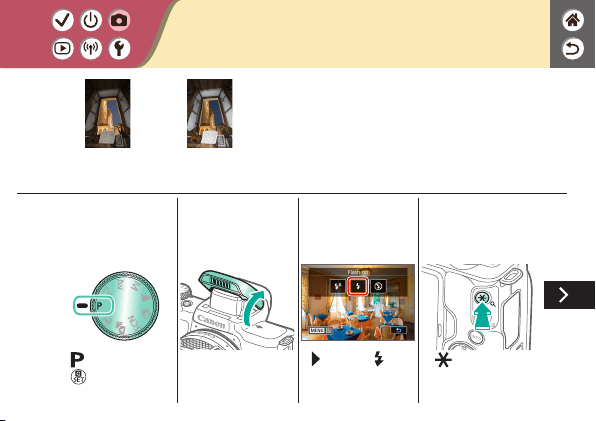
1
Set the shooting
mode
z
mode →
button
2
Raise the ash
3
Choose the ash
mode
z
button → [ ]
4
Lock the ash
exposure
z
[ ] is displayed,
and the exposure is
locked.
Shooting with the FE Lock
FE lock Without FE lock
(overexposed)
Just as with the AE lock, you can lock the
exposure for ash shots.
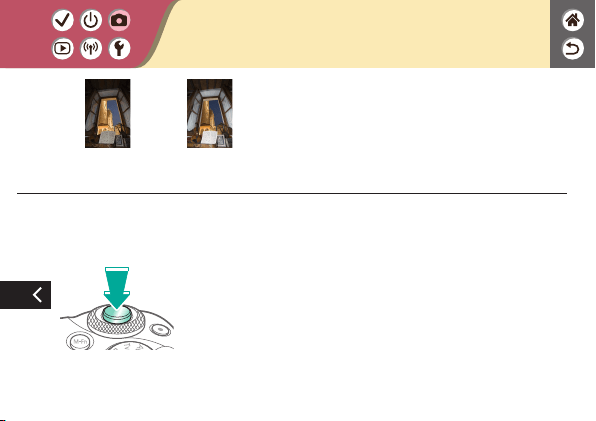
Shooting with the FE Lock
5
Compose the shot
and shoot
FE lock Without FE lock
(overexposed)
Just as with the AE lock, you can lock the
exposure for ash shots.

1
Set the shooting
mode
z
mode →
button
2
Access the menu
screen
z
button →
[
] → button
3
Set up the camera
z
[ 1] →
[Flash control]
z
[Built-in ash settings]
Changing the Flash Timing
1st-curtain ash 2nd-curtain ash
Change the timing of the ash and shutter
release.
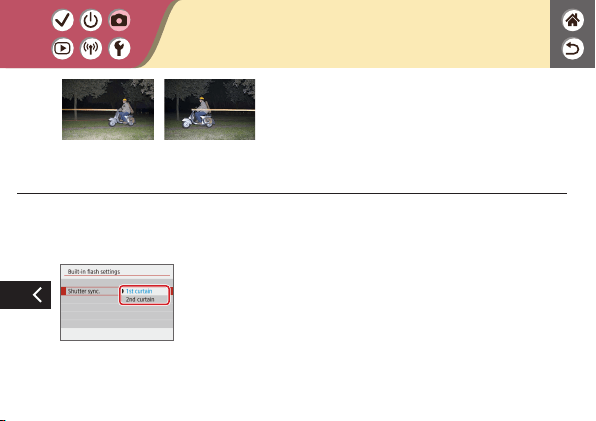
z
[Shutter sync.]
→ choose an option
Changing the Flash Timing
1st-curtain ash 2nd-curtain ash
Change the timing of the ash and shutter
release.

1
Set the shooting
mode
z
mode →
button
2
Access the menu
screen
z
button →
[
] → button
3
Set up the camera
z
[ 1] →
[Flash control]
(1)
(2)
z
[E-TTL II meter.] →
[Average]
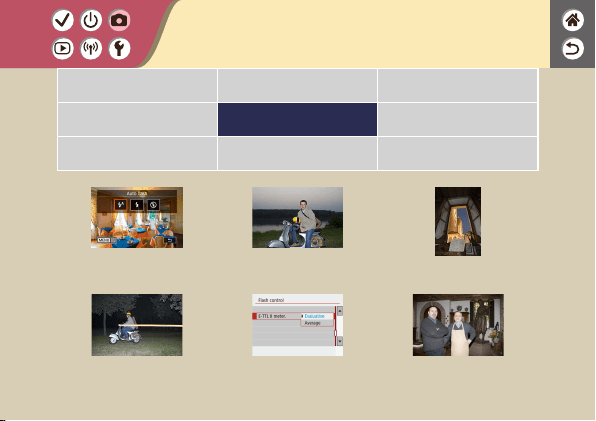
Changing the Flash Metering Mode
Evaluative Average
[Evaluative] ash metering, which enables
standard ash exposure, can be changed to
average ash metering across the metering
area, as when using an externally metered ash.
Adjusting the Flash Output
Flash output:
Minimum
Flash output:
Maximum
Choose from the three ash levels in
/ /
modes.
1
Set the shooting
mode
z
/ /
modes →
button
2
Access the menu
screen
z
button →
[
] → button
3
Set up the camera
z
[ 1] →
[Flash control]
z
[Built-in ash settings]

z
[Flash mode] →
[Manual ash]
z
[ ash output] →
choose an option
Adjusting the Flash Output
Flash output:
Minimum
Flash output:
Maximum
Choose from the three ash levels in
/ /
modes.
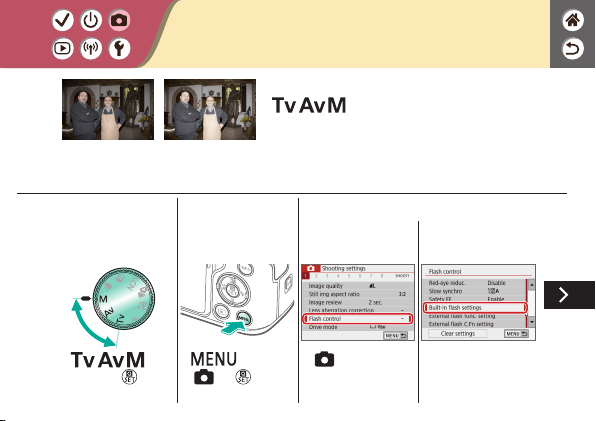
Specic Shutter Speeds (Tv
Mode)
Specic Aperture Values (Av
Mode)
Specic Shutter Speeds and
Aperture Values (M Mode)
Shooting Long Exposures
(Bulb)
Recording Movies at Specic
Shutter Speeds and Aperture Values
Shooting
Specic Shutter Speeds and Apertures
Auto Mode Specic Scenes (Special Scene) Image Effects (Creative Assist)
Image Effects (Creative Filters) Manual Mode Recording Movies in Movie Mode
Convenient Features
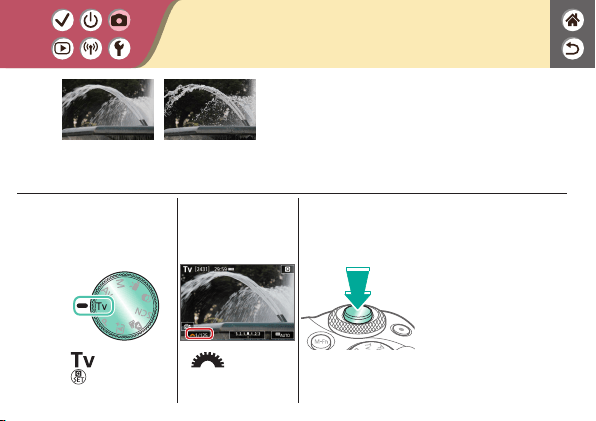
1
Set the shooting
mode
z
mode →
button
2
Set the shutter
speed
z
dial
3
Shoot
Specic Shutter Speeds (Tv Mode)
Slow Fast
Set the shutter speed before shooting. The
camera automatically adjusts the aperture value
to suit your shutter speed.
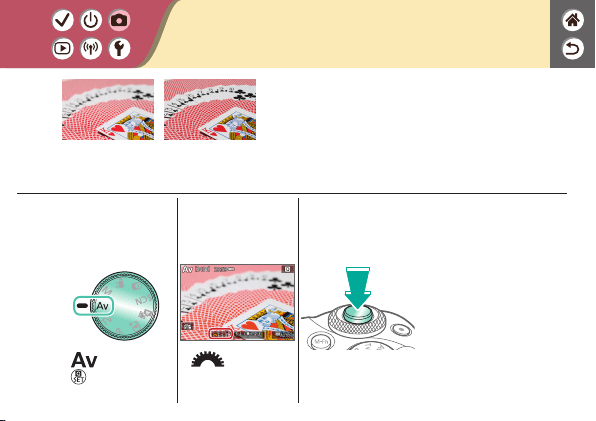
1
Set the shooting
mode
z
mode →
button
2
Set the aperture
value
z
dial
3
Shoot
Specic Aperture Values (Av Mode)
Small Large
Set the aperture value before shooting. The
camera automatically adjusts the shutter speed
to suit your aperture value.
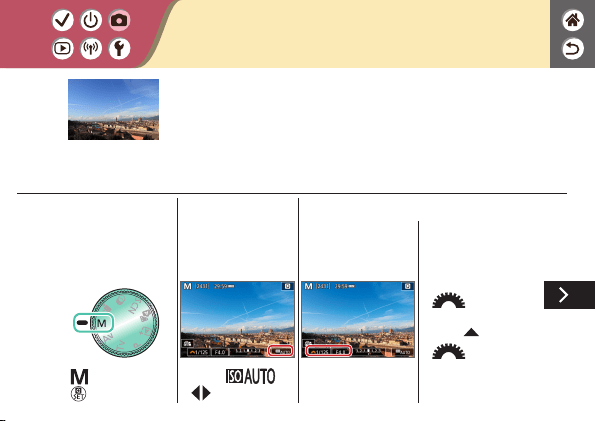
1
Set the shooting
mode
z
mode →
button
2
Set the ISO speed
z
Touch [ ] →
/ buttons
3
Set the shutter
speed and aperture
value
z
Set the shutter speed:
dial
z
Set the aperture
value:
button →
dial
Specic Shutter Speeds and Aperture
Values (M Mode)
Set the shutter speed, aperture value, and ISO speed before
shooting to obtain the desired exposure.

Specic Shutter Speeds and Aperture
Values (M Mode)
4
Shoot
Set the shutter speed, aperture value, and ISO speed before
shooting to obtain the desired exposure.
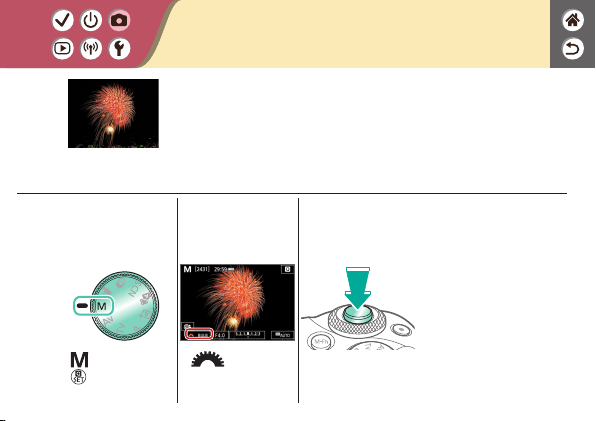
1
Set the shooting
mode
z
mode →
button
2
Set up the camera
z
dial → [BULB]
3
Shoot
Shooting Long Exposures (Bulb)
With bulb exposures, shots are exposed for as long as you hold
down the shutter button all the way down.
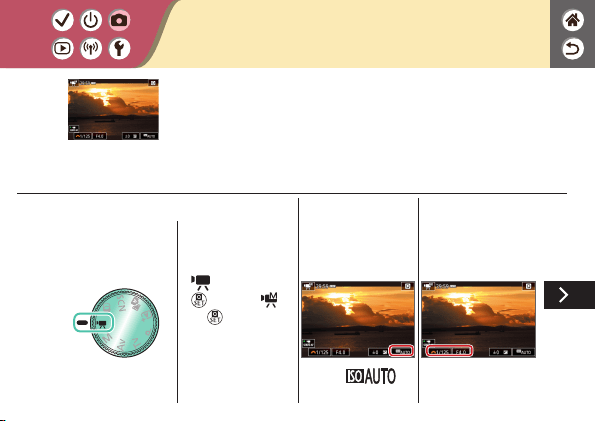
1
Set the shooting
mode
z
mode →
button → [ ]
→
button
2
Set the ISO speed
z
Touch [ ]
3
Set the shutter
speed and aperture
value
Recording Movies at Specic Shutter
Speeds and Aperture Values
Manual movie
Set the shutter speed, aperture value, and ISO speed before
recording.

z
Set the shutter speed:
dial
z
Set the aperture
value:
button →
dial
4
Start recording
Recording Movies at Specic Shutter
Speeds and Aperture Values
Manual movie
Set the shutter speed, aperture value, and ISO speed before
recording.
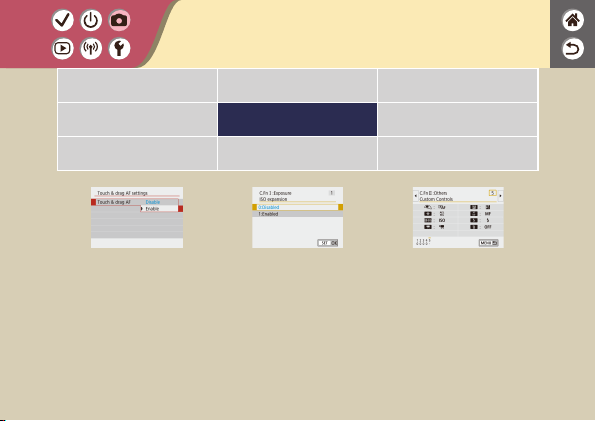
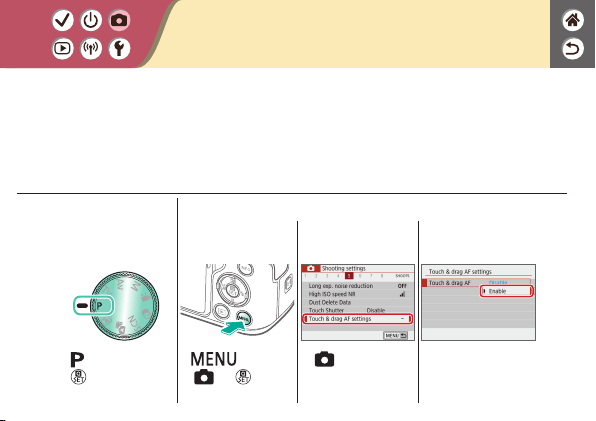
Conguring Touch & Drag AF
With Touch & Drag AF, you can move the AF point by touching or dragging the screen
while looking through the viewnder.
1
Set the shooting
mode
z
mode →
button
2
Access the menu
screen
z
button →
[
] → button
z
[ 5] → [Touch &
drag AF settings]
z
[Touch & drag AF] →
[Enable]
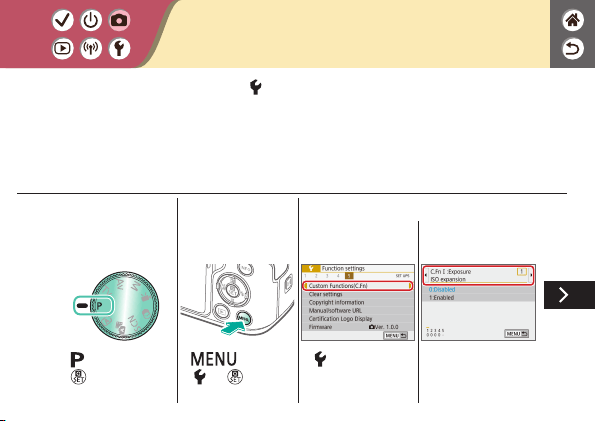
Conguring Custom Functions
Congure custom functions on the [ 5] tab of the menu to customize how the camera
works to suit your shooting preferences.
You can also assign commonly used functions to specic buttons.
1
Set the shooting
mode
z
mode →
button
2
Access the menu
screen
z
button →
[
] → button
3
Set up the camera
z
[ 5] → [Custom
Functions(C.Fn)] →
choose an item
z
Choose a function.
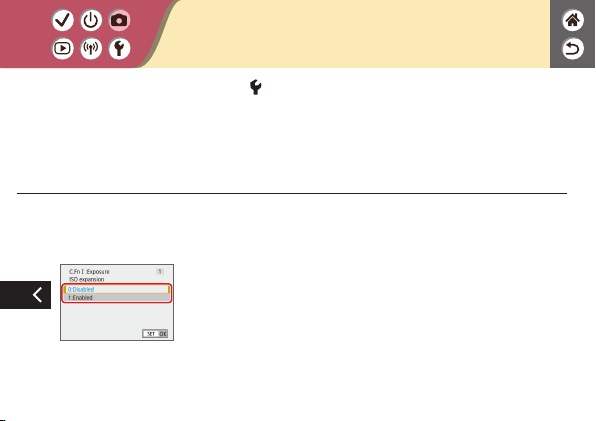
Conguring Custom Functions
Congure custom functions on the [ 5] tab of the menu to customize how the camera
works to suit your shooting preferences.
You can also assign commonly used functions to specic buttons.
z
Choose an option.
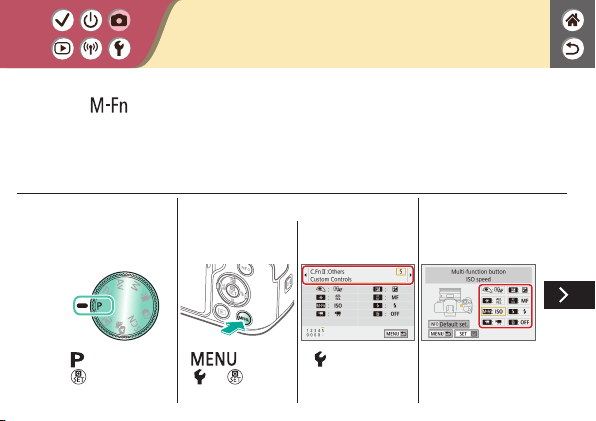
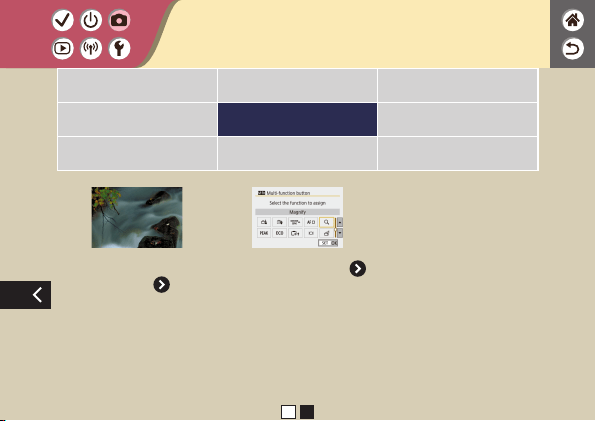
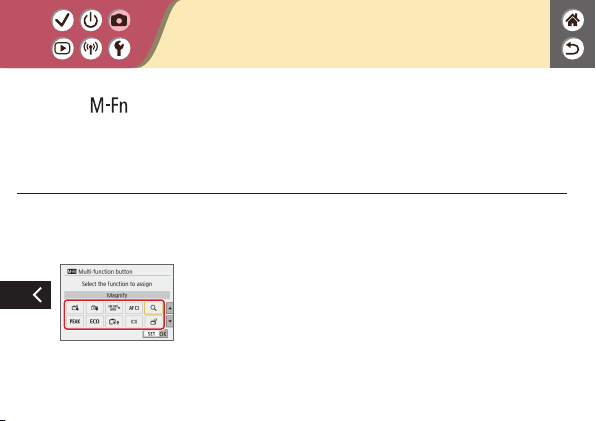
Assigning Functions to Buttons
Reassign functions of buttons, such as the shutter button, or assign common functions
to the
button.
1
Set the shooting
mode
z
mode →
button
2
Access the menu
screen
z
button →
[
] → button
z
[ 5] → [Custom
Functions(C.Fn)] →
[Custom Controls]
3
Choose the control
to assign
z
Choose a button or
dial to assign.
Assigning Functions to Buttons
Reassign functions of buttons, such as the shutter button, or assign common functions
to the
button.
4
Choose the
function to assign
Recording Movies Locking Movie Brightness Adjusting Movie Brightness
Disabling Auto Slow Shutter Recording Time-Lapse Movies Miniature Model Effect in
Movies (Miniature Effect Movie)
Shooting
1 2
Auto Mode Specic Scenes (Special Scene) Image Effects (Creative Assist)
Image Effects (Creative Filters) Manual Mode Recording Movies in Movie Mode
Convenient Features
Adjusting the Recording
Volume
Deactivating the Wind Filter Using the Attenuator
Correcting Camera Shake
when Recording Movies
Shooting
1 2
Auto Mode Specic Scenes (Special Scene) Image Effects (Creative Assist)
Image Effects (Creative Filters) Manual Mode Recording Movies in Movie Mode
Convenient Features
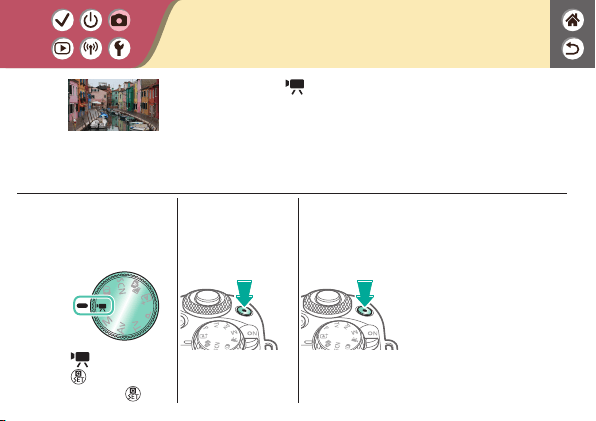
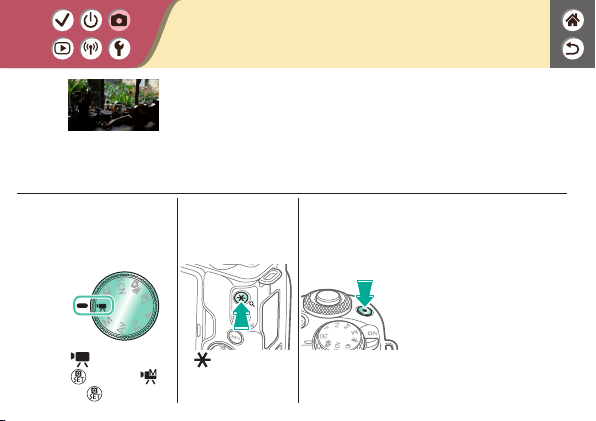
Recording Movies
Record movies in mode using a variety of effects and
features.
1
Set the shooting
mode
z
mode →
button → choose
a mode →
button
2
Start recording
3
Stop recording
1
Set the shooting
mode
z
mode →
button → [ ]
→
button
2
Lock the exposure
z
[ ] is displayed,
and the exposure is
locked.
3
Start recording
Locking Movie Brightness
You can lock the exposure while recording.

Adjusting Movie Brightness
Set toward − Set toward +
With auto exposure, you can adjust exposure
within a range of −3 to +3 stops.
1
Set the shooting
mode
z
mode →
button → choose
a mode →
button
2
Adjust the
exposure
z
Set the exposure:
button →
dial
3
Start recording
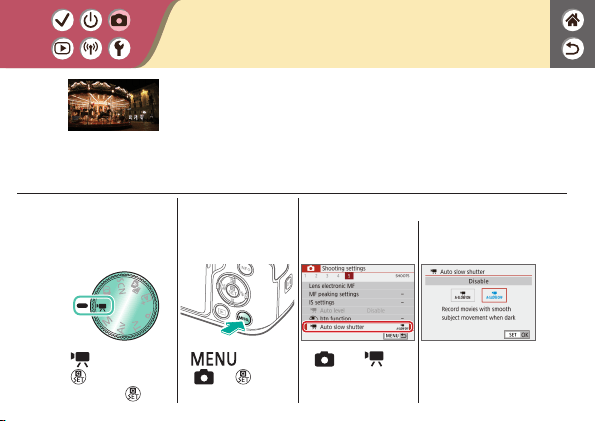
1
Set the shooting
mode
z
mode →
button → choose
a mode →
button
2
Access the menu
screen
z
button →
[
] → button
3
Set up the camera
z
[ 5] → [ Auto
slow shutter]
z
[A-SLOW OFF]
Disabling Auto Slow Shutter
Auto slow shutter can be disabled if movement in movies is
rough. However, under low light, movies may look dark.
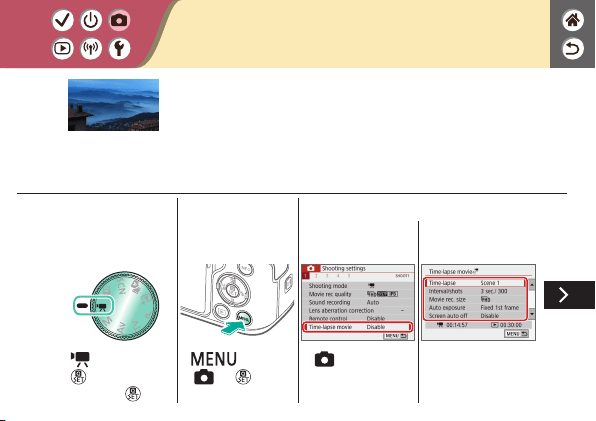
1
Set the shooting
mode
z
mode →
button → choose
a mode →
button
2
Access the menu
screen
z
button →
[
] → button
3
Set up the camera
z
[ 1] →
[Time-lapse movie]
z
[Time-lapse] →
choose a scene
→ adjust as needed
Recording Time-Lapse Movies
Time-lapse movies combine images that are shot automatically at
a specied interval. Any gradual changes of the subject (such as
changes in a landscape) are played back in fast motion.
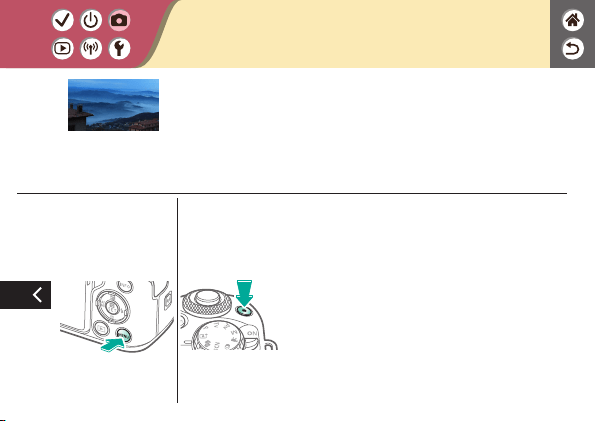
4
Return to the
shooting screen
5
Secure the camera
and start recording
Recording Time-Lapse Movies
Time-lapse movies combine images that are shot automatically at
a specied interval. Any gradual changes of the subject (such as
changes in a landscape) are played back in fast motion.
1
Set the shooting
mode
z
mode →
button → choose a
mode →
button
2
Access the setting
screen
3
Set up the camera
(1)
(2)
z
[ ] → choose an
option
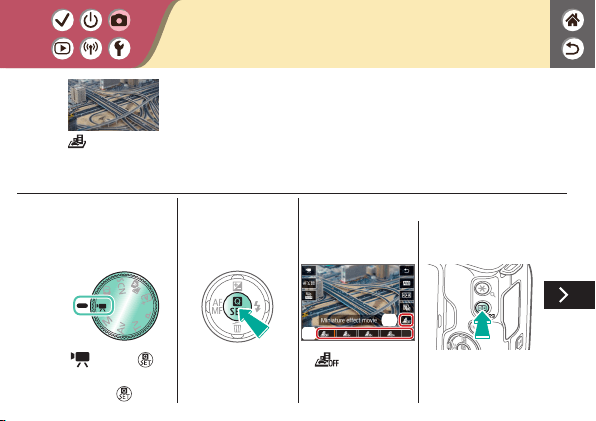
Miniature Model Effect in Movies
(Miniature Effect Movie)
Miniature effect
movie
Creates the effect of a miniature model in movies, by blurring
image areas outside a selected area.
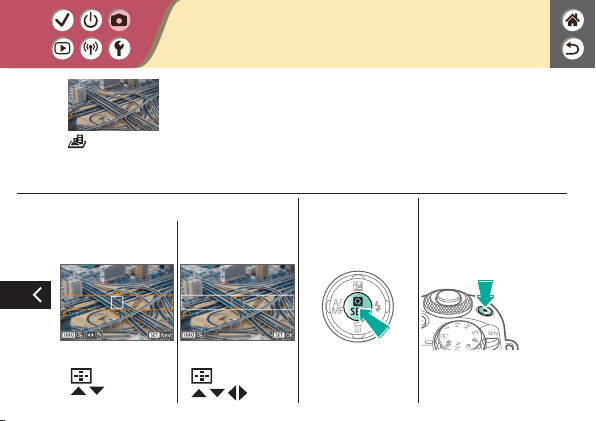
Miniature Model Effect in Movies
(Miniature Effect Movie)
Miniature effect
movie
Creates the effect of a miniature model in movies, by blurring
image areas outside a selected area.
z
Move the frame:
button →
/ buttons
z
Move the AF point:
button →
/ / / buttons
4
Return to the
shooting screen
5
Start recording
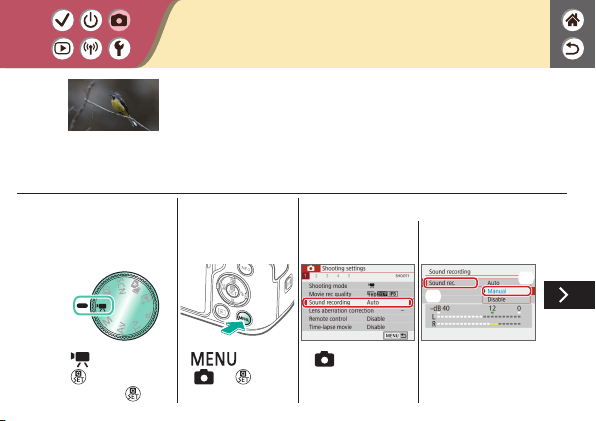
1
Set the shooting
mode
z
mode →
button → choose
a mode →
button
2
Access the menu
screen
z
button →
[
] → button
3
Set up the camera
z
[ 1] → [Sound
recording]
(1)
(2)
z
[Sound rec.] →
[Manual]
Adjusting the Recording Volume
Adjusting the recording
volume
When set to [Auto], the recording level (volume) is automatically
adjusted during recording. If you prefer to adjust the level
manually to suit the scene, change it to [Manual].

z
[Rec. level] → /
buttons
Adjusting the Recording Volume
Adjusting the recording
volume
When set to [Auto], the recording level (volume) is automatically
adjusted during recording. If you prefer to adjust the level
manually to suit the scene, change it to [Manual].

1
Set the shooting
mode
z
mode →
button → choose
a mode →
button
2
Access the menu
screen
z
button →
[
] → button
3
Set up the camera
z
[ 1] →
[Sound recording]
z
[Wind lter/
Attenuator]
Deactivating the Wind Filter
Noise from windy recording sites can be reduced with the wind
lter. If there is no wind, recordings may sound unnatural when
this option is used. In this case, set [Wind lter] to [Disable].

(1)
(2)
z
[Wind lter] →
[Disable]
Deactivating the Wind Filter
Noise from windy recording sites can be reduced with the wind
lter. If there is no wind, recordings may sound unnatural when
this option is used. In this case, set [Wind lter] to [Disable].
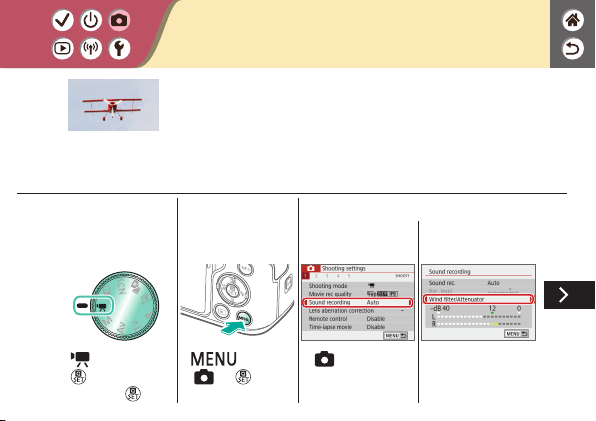
1
Set the shooting
mode
z
mode →
button → choose
a mode →
button
2
Access the menu
screen
z
button →
[
] → button
3
Set up the camera
z
[ 1] → [Sound
recording]
z
[Wind lter/
Attenuator]
Using the Attenuator
Recording in noisy
places
The attenuator can prevent audio distortion at noisy recording
sites. Three options are available: [Enable], [Disable], or [Auto]
for automatic activation/deactivation as needed.

(1)
(2)
z
[Attenuator] →
[Enable]
Using the Attenuator
Recording in noisy
places
The attenuator can prevent audio distortion at noisy recording
sites. Three options are available: [Enable], [Disable], or [Auto]
for automatic activation/deactivation as needed.
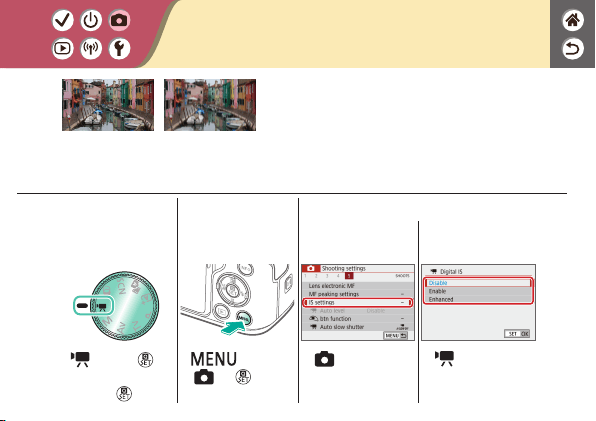
1
Set the shooting
mode
z
mode →
button → choose a
mode →
button
2
Access the menu
screen
z
button →
[
] → button
3
Set up the camera
z
[ 5] →
[IS settings]
z
[ Digital IS] →
choose an option
Correcting Camera Shake when
Recording Movies
Enable Disable
In-camera image stabilization corrects camera
shake when you record movies. Camera shake
can be corrected even without a lens that is
equipped with image stabilization.

Auto Mode Specic Scenes (Special Scene) Image Effects (Creative Assist)
Image Effects (Creative Filters) Manual Mode Recording Movies in Movie Mode
Convenient Features
Continuous Shooting Using the Self-Timer Shooting by Touching the
Screen (Touch Shutter)
Changing Image Quality Capturing in RAW Format Preventing the AF-Assist
Beam from Firing
Shooting
1 2
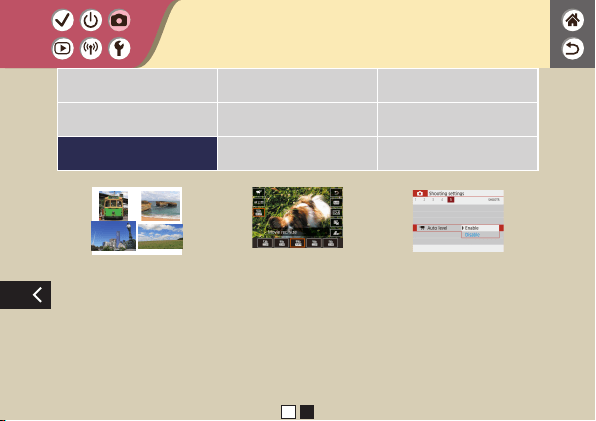
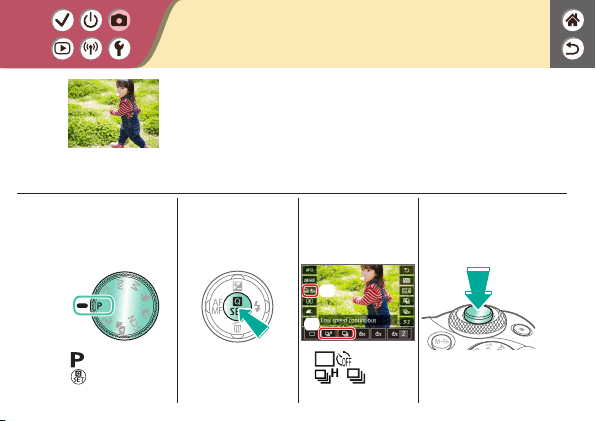
1
Set the shooting
mode
z
mode →
button
2
Access the setting
screen
3
Set up the camera
(1)
(2)
z
[ ] →
[
]/[ ]
4
Shoot
z
Keep holding the
shutter button all the
way down.
Continuous Shooting
Hold the shutter button all the way down to shoot continuously.
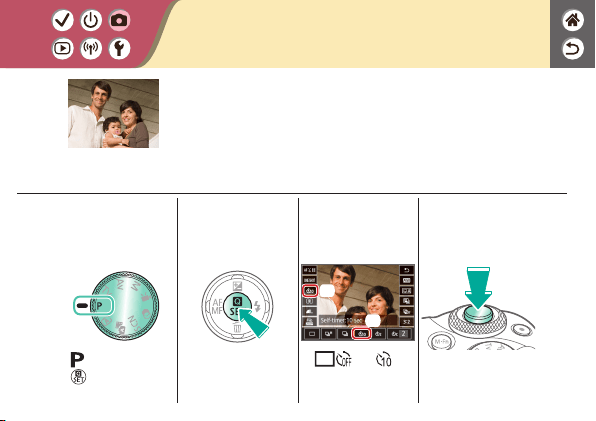
1
Set the shooting
mode
z
mode →
button
2
Access the setting
screen
3
Set up the camera
(2)
(1)
z
[ ] → [ ]
4
Shoot
Using the Self-Timer
With the self-timer, you can include yourself in group photos or
other timed shots. The camera will shoot about 10 seconds after
you press the shutter button all the way down.

1
Set up the camera
z
Touch [ ] and
change it to [
].
2
Shoot
Shooting by Touching the Screen (Touch
Shutter)
With this option, instead of pressing the shutter button, you can
simply touch the screen and release your nger to shoot.
The camera focuses on subjects and adjusts image brightness
automatically.
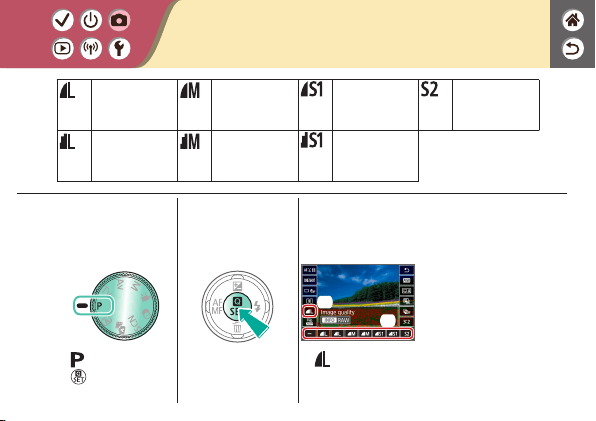
1
Set the shooting
mode
z
mode →
button
2
Access the setting
screen
3
Set up the camera
(1)
(2)
z
[ ] → choose an
option
Changing Image Quality
24.0 megapixels/
high quality
Approx. 10.6
megapixels/high
quality
Approx. 5.9
megapixels/high
quality
Approx. 3.8
megapixels/
normal quality
24.0 megapixels/
normal quality
Approx. 10.6
megapixels/
normal quality
Approx. 5.9
megapixels/
normal quality

1
Set the shooting
mode
z
mode →
button
2
Access the setting
screen
3
Set up the camera
(3)
(2)
(1)
z
[ ] → choose
JPEG image quality
→
button
z
Choose the method
of shooting in RAW.
Capturing in RAW Format
The camera can capture images in JPEG and RAW format.
RAW images are “raw” data, before processing to create JPEGs.
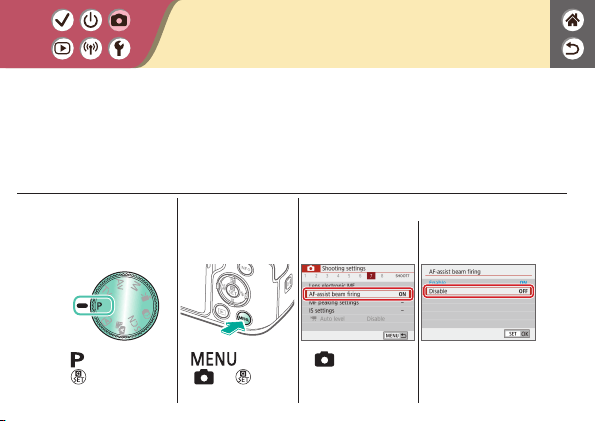
1
Set the shooting
mode
z
mode →
button
2
Access the menu
screen
z
button →
[
] → button
3
Set up the camera
z
[ 7] → [AF-assist
beam ring]
z
[Disable]
Preventing the AF-Assist Beam from
Firing
The lamp lights up to help you focus when you press the shutter button halfway in
low-light conditions. This lamp can be deactivated.
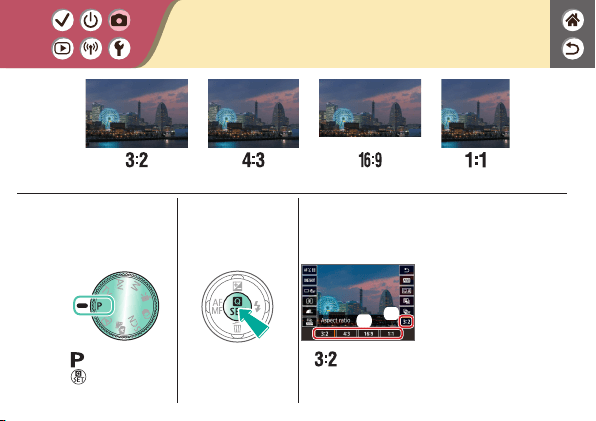
1
Set the shooting
mode
z
mode →
button
2
Access the setting
screen
3
Choose the setting
item
(1)
(2)
z
[ ] → choose an
option
Changing the Aspect Ratio
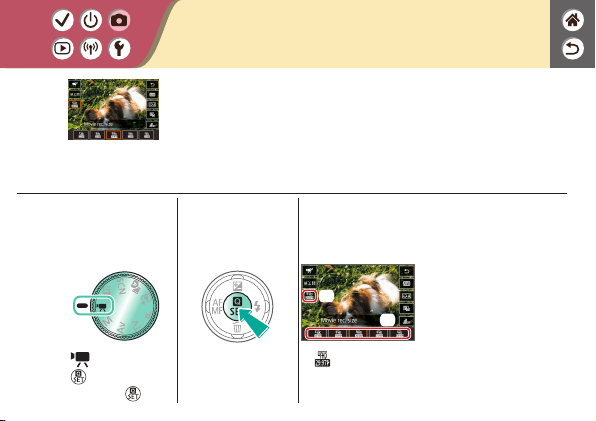
1
Set the shooting
mode
z
mode →
button → choose
a mode →
button
2
Access the setting
screen
3
Set up the camera
(2)
(1)
z
[ ] → choose an
option
Changing Movie Recording Size
Adjust the movie recording size. The frame rate indicates how
many frames are recorded per second, and your options depend
on the NTSC or PAL setting.
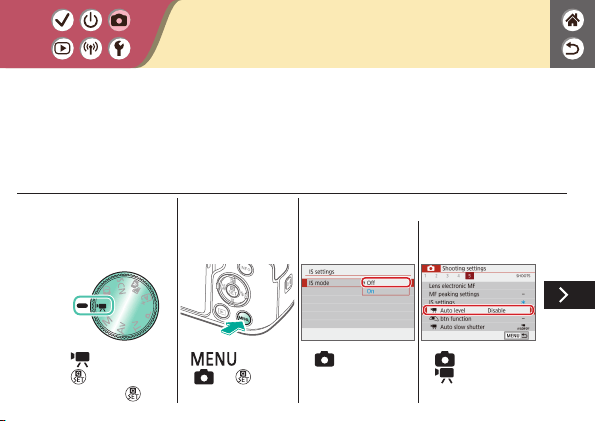
Using Auto Level
Auto leveling helps keep movies straight as you record them.
1
Set the shooting
mode
z
mode →
button → choose
a mode →
button
2
Access the menu
screen
z
button →
[
] → button
3
Set up the camera
z
[ 5] →
[IS settings] →
[IS mode] → [Off]
z
[ 5] →
[
Auto level]
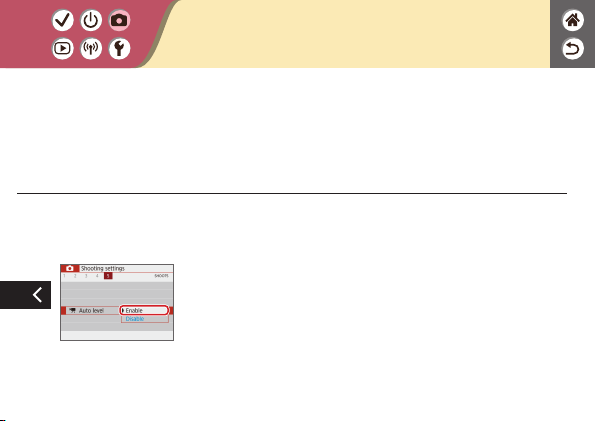
Using Auto Level
z
[Enable]
Auto leveling helps keep movies straight as you record them.

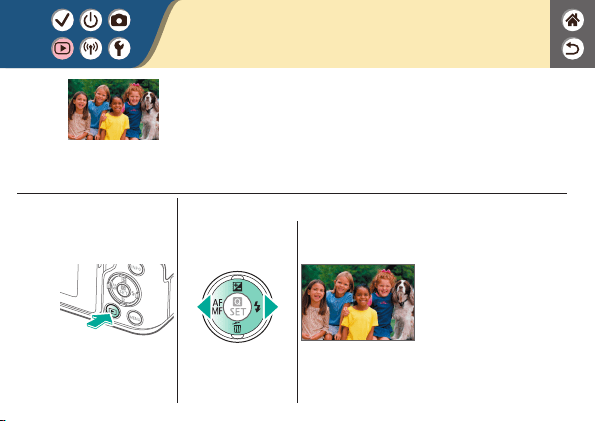
1
Set display to
playback
2
Browse your
images
Viewing Stills
After shooting images, you can view them on the screen.
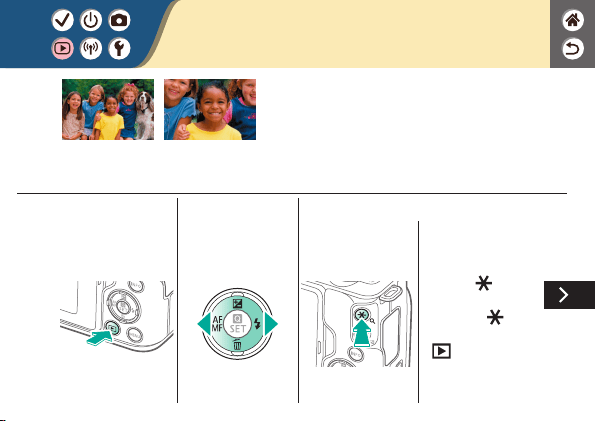
Magnifying Images
1
Set display to
playback
2
Browse your
images
3
Magnify or reduce
the image
displayed
z
Magnify: button
z
Magnify further: keep
holding the
button
z
Single-image display:
button
Images you play back can be magnied.

z
Reduce: button
z
Reduce further: keep
holding the
button
4
Move the area
shown, as needed
z
Move:
/ / / buttons
z
Single-image display:
button
Magnifying Images
Images you play back can be magnied.
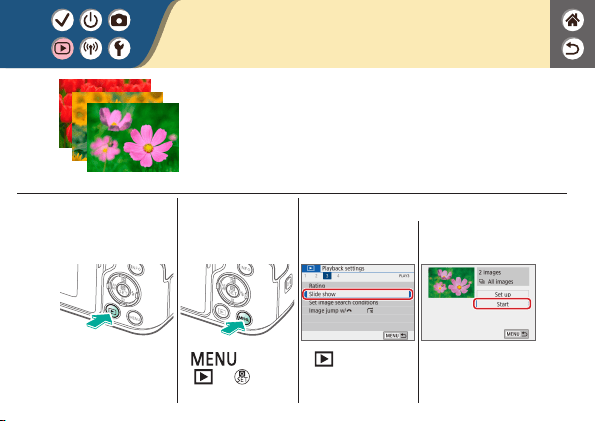
Viewing Slideshows
1
Set display to
playback
2
Access the menu
screen
z
button →
[
] → button
3
Set up the camera
z
[ 3] →
[Slide show]
z
[Start]
Automatically play back images from a memory card.
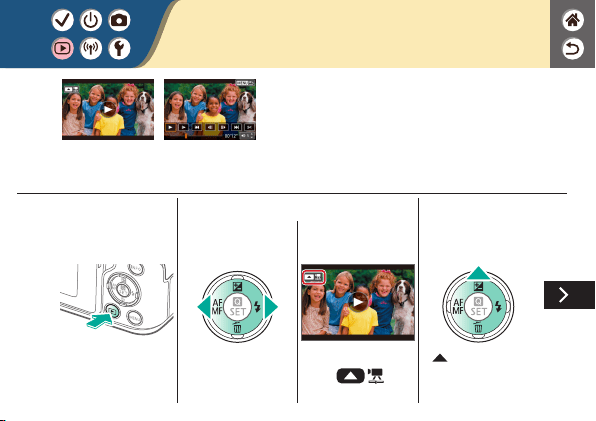
Viewing Movies
1
Set display to
playback
2
Browse your
images
z
Movies are labeled
with [
].
3
Play the movie
z
button: Display
movie playback panel
After recording movies, you can view them on
the screen.
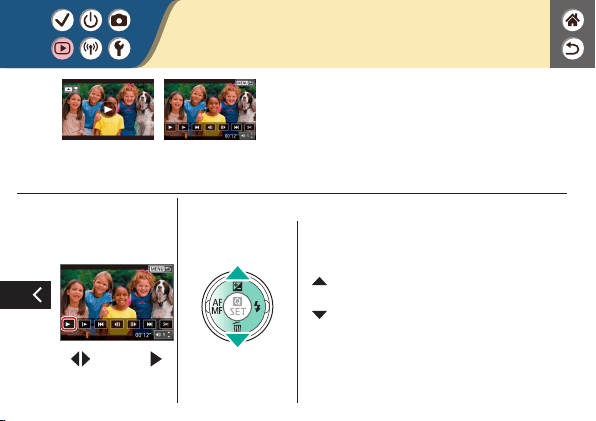
z
/ buttons → [ ]
4
Adjust the volume
z
Increase the volume:
button
z
Decrease the volume:
button
Viewing Movies
After recording movies, you can view them on
the screen.

Viewing Digest Movies
1
Set display to
playback
2
Browse your
images
z
Digest movies
are labeled with
[
].
3
Play the movie
A short movie of scenes that include your shots in mode is
created automatically. Playing a digest movie shows the scenes
captured that day.

z
[ ]
4
Adjust the volume
z
Increase the volume:
button
z
Decrease the volume:
button
Viewing Digest Movies
A short movie of scenes that include your shots in mode is
created automatically. Playing a digest movie shows the scenes
captured that day.

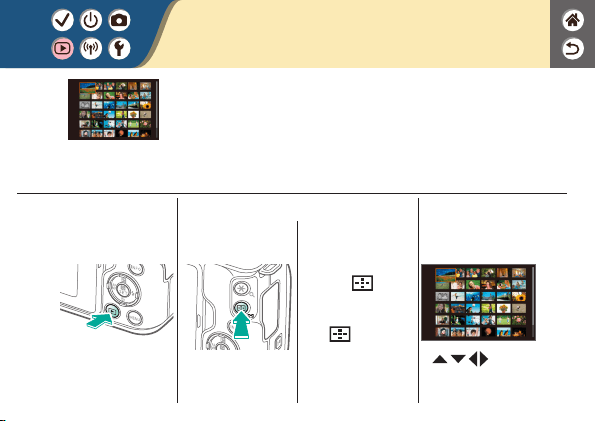
Finding Images in an Index
1
Set display to
playback
2
Display images in
an index
z
Display multiple
images:
button
z
Increase the images
per screen: press
the
button
repeatedly
3
Find the images
z
/ / / buttons
By displaying multiple images in an index, you can quickly nd
the images you are looking for.

Finding Images Matching Specied
Conditions
Find desired images quickly on a memory card full of images by
ltering image display according to your specied conditions.
1
Set display to
playback
2
Access the setting
screen
3
Find the images
z
[ ]
z
/ buttons to
navigate →
/
buttons to adjust

z
Matching images are
displayed in yellow
frames.
Find desired images quickly on a memory card full of images by
ltering image display according to your specied conditions.
Finding Images Matching Specied
Conditions

Finding Images with the Main Dial
1
Access the menu
screen
z
button →
[
] → button
2
Specify a search
condition
z
[ 3] → [Image
jump w/
]
z
Choose an option.
3
Set display to
playback
Use the main dial to nd and jump between desired images
quickly according to your specied conditions.

Finding Images with the Main Dial
4
Find the images
Use the main dial to nd and jump between desired images
quickly according to your specied conditions.
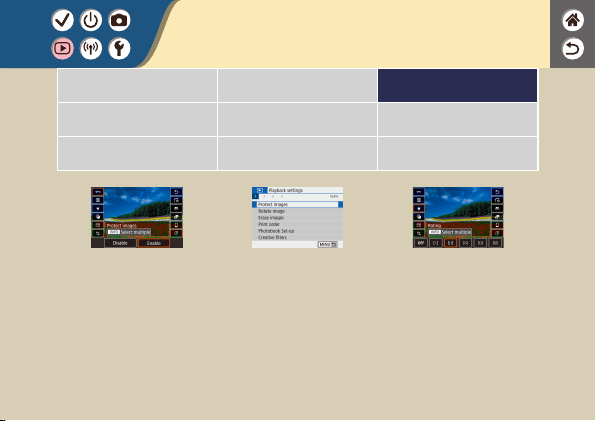
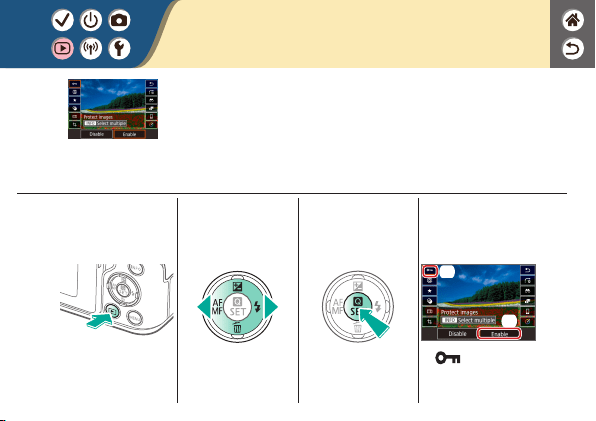
Protecting Individual Images
1
Set display to
playback
2
Browse your
images
3
Access the setting
screen
4
Protect
(1)
(2)
z
[ ] → [Enable]
Individual images can be protected to prevent accidental erasure
of important images.

Protecting Multiple Images
1
Access the menu
screen
z
button →
[
] → button
2
Set up the camera
z
[ 1] →
[Protect images]
z
Choose a selection
method.
z
Select images:
Choose an image →
button
Images can be protected either with [ ] on the setting screen
or with [Protect images] in the [
] menu.
[Protect images] can be used for individual images, ranges of
images, or entire folders or memory cards.
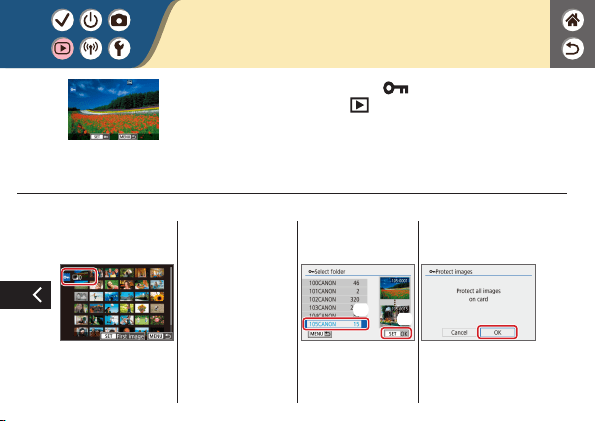
Protecting Multiple Images
z
Select range: Choose
the rst image →
choose the last image
(1)
(2)
z
All images in folder:
Choose a folder →
[OK]
z
All images on card:
[OK]
Images can be protected either with [ ] on the setting screen
or with [Protect images] in the [
] menu.
[Protect images] can be used for individual images, ranges of
images, or entire folders or memory cards.
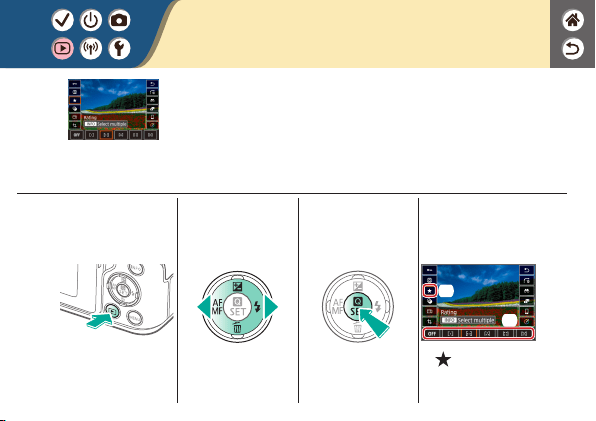
Rating Images
1
Set display to
playback
2
Browse your
images
3
Access the setting
screen
4
Set up the camera
(2)
(1)
z
[ ] → choose an
option
Organize images by rating them on a scale of 1 – 6.
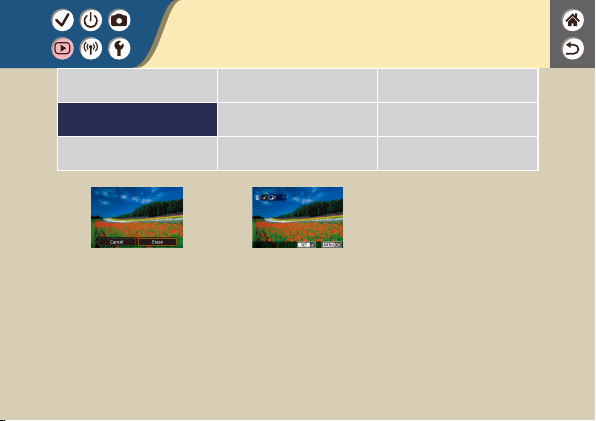

Erasing Individual Images
1
Set display to
playback
2
Browse your
images
3
Erase
z
[Erase]
You can choose and erase unneeded images one by one. Be
careful when erasing images, because they cannot be recovered.

Erasing Multiple Images at Once
1
Access the menu
screen
z
button →
[
] → button
2
Set up the camera
z
[ 1] → [Erase
images]
z
Choose a selection
method.
You can choose multiple images to erase at once. Be careful
when erasing images, because they cannot be recovered.
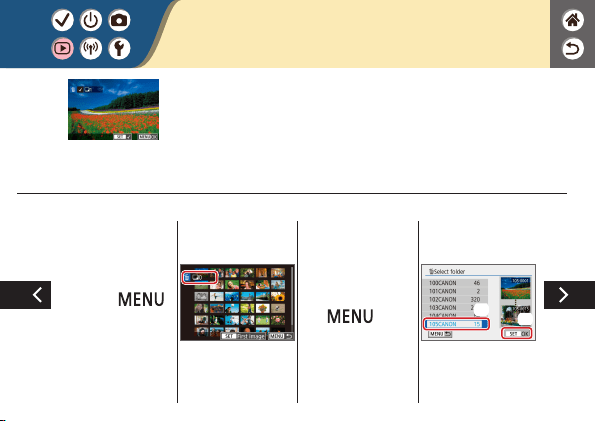
Erasing Multiple Images at Once
z
Select and erase
images: Choose an
image →
button → [OK]
z
Select range: Choose
the rst image →
choose the last image
→
button
→ [OK]
(1)
(2)
z
All images in folder:
Choose a folder →
[OK]
You can choose multiple images to erase at once. Be careful
when erasing images, because they cannot be recovered.

Erasing Multiple Images at Once
z
All images on card:
[OK]
You can choose multiple images to erase at once. Be careful
when erasing images, because they cannot be recovered.

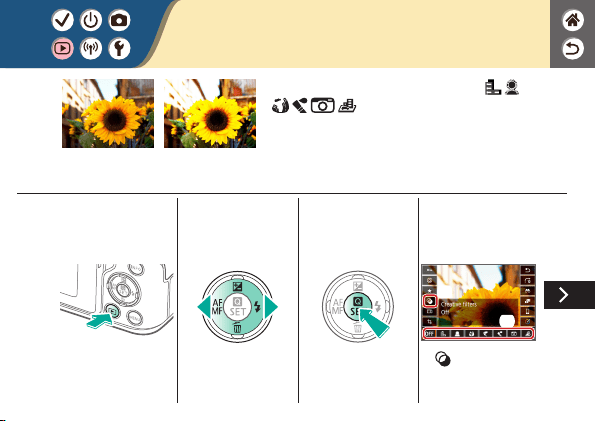
Applying Filter Effects (Creative Filters)
1
Set display to
playback
2
Browse your
images
3
Access the setting
screen
4
Set up the camera
(1)
(2)
z
[ ] → choose an
option
Apply effects equivalent to shooting in [ / /
/ / / ] modes to images and save
them as separate images.

z
Adjust the effect level:
/ buttons
5
Save
z
button → [OK]
Applying Filter Effects (Creative Filters)
Apply effects equivalent to shooting in [ / /
/ / / ] modes to images and save
them as separate images.
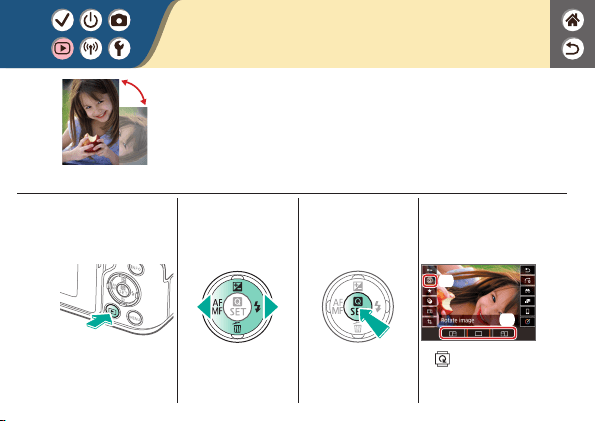
Rotating Images
1
Set display to
playback
2
Browse your
images
3
Access the setting
screen
4
Rotate the image
(1)
(2)
z
[ ] → choose an
option
Change the orientation of images and save them.

Correcting Red-Eye
1
Access the menu
screen
z
button →
[
] → button
2
Correct red-eye
z
[ 2] → [Red-eye
correction]
z
Choose an image:
/ buttons
z
Correct:
button
3
Save
z
[OK]
Automatically corrects images affected by red-eye. You can save
the corrected image as a separate le.
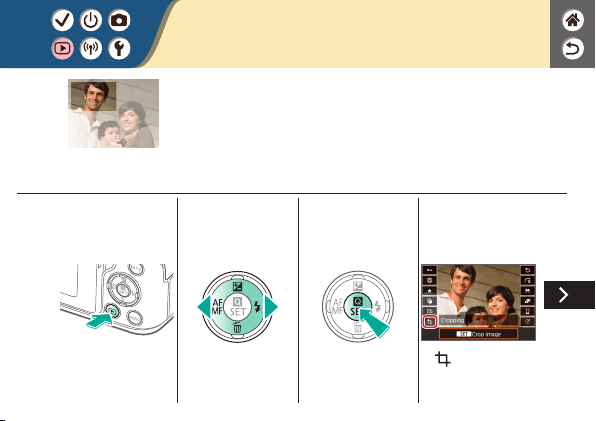
Cropping
1
Set display to
playback
2
Browse your
images
3
Access the setting
screen
4
Crop the image
z
[ ]
You can specify a portion of an image to save as a separate image
le.

Cropping
You can specify a portion of an image to save as a separate image
le.
z
Move to another
setting item:
dial
z
Resize or move the
cropping frame,
straighten the image,
or change the aspect
ratio.
z
Resizing the frame
Reduce:
button
Enlarge:
button
z
Move the frame:
/ / / buttons
z
Straighten the image:
[
] → dial

Cropping
You can specify a portion of an image to save as a separate image
le.
z
Change the aspect
ratio: [
] →
button
z
Preview the image:
[
] → button
z
Save as a new image:
[
] → button →
[OK]
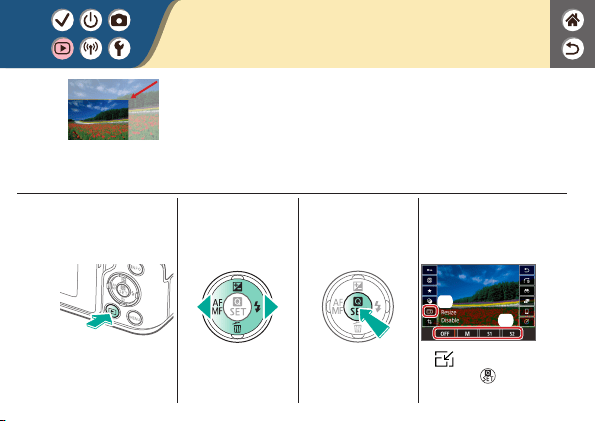
Resizing Images
1
Set display to
playback
2
Browse your
images
3
Access the setting
screen
4
Resize
(1)
(2)
z
[ ] → choose an
option →
button
→ [OK]
Save a smaller version of an image, with fewer pixels.

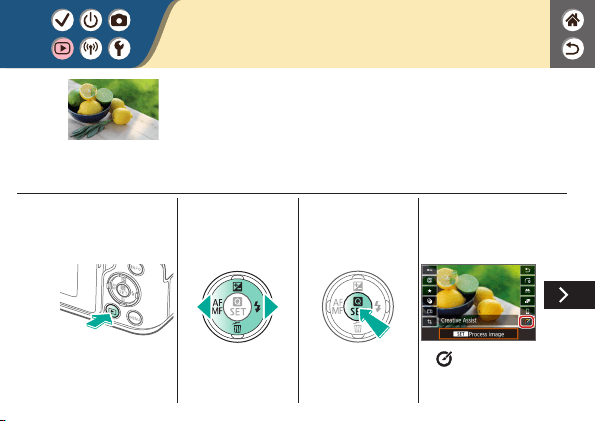
Applying Your Favorite Effects (Creative
Assist)
1
Set display to
playback
2
Choose a RAW
image
3
Access the setting
screen
4
Choose the setting
item
z
[ ]
Apply effects that you like to RAW images and save as new
JPEGs.

Applying Your Favorite Effects (Creative
Assist)
5
Set up the camera
z
/ buttons to
choose an item
z
/ buttons to set
6
Save
z
button → [OK]
Apply effects that you like to RAW images and save as new
JPEGs.

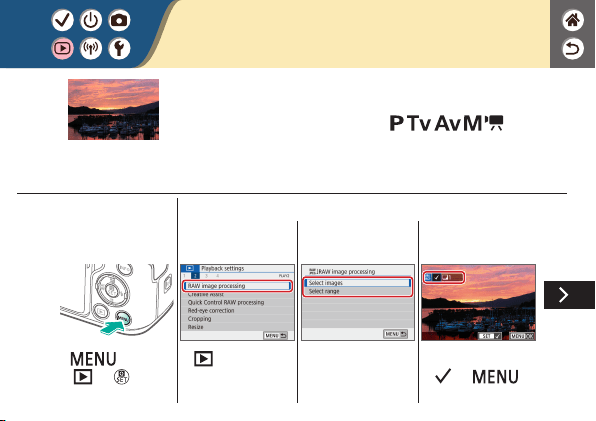
Processing RAW Images
1
Access the menu
screen
z
button →
[
] → button
2
Set up the camera
z
[ 2] → [RAW
image processing]
z
Choose a selection
method.
z
Choose an image →
[
] →
button
Process images captured in RAW format on the camera. The
original RAW image is retained, and a copy is saved as a JPEG.
Available when the mode dial is set to
/ / / / .
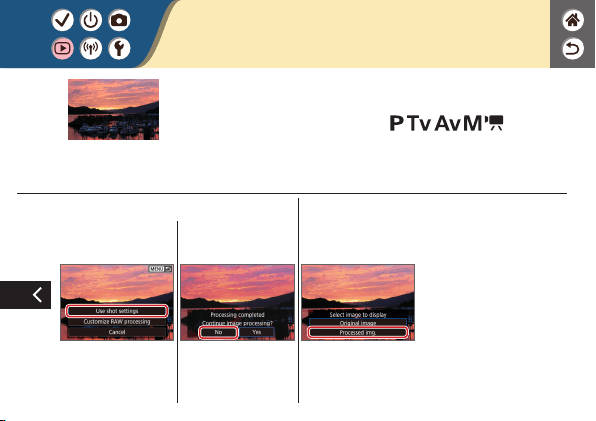
z
[Use shot settings] →
[OK]
3
Check
z
[Processed img.]
Processing RAW Images
Process images captured in RAW format on the camera. The
original RAW image is retained, and a copy is saved as a JPEG.
Available when the mode dial is set to
/ / / / .


Removing the Beginning/End of Movies
1
Set display to
playback
2
Browse your
movies
z
Choose a movie →
button
3
Edit the movie
z
Movie playback panel
→ [
]
4
Specify a portion
to remove
z
Cut beginning: [ ]
z
Cut end: [
]
You can remove unneeded portions from the beginning and end
of movies. Note that digest movies cannot be removed.

z
/ buttons →
decide the part to
remove →
button
5
Check
z
[ ]
6
Save
z
[ ] → choose an
option
z
Choose an option.
Removing the Beginning/End of Movies
You can remove unneeded portions from the beginning and end
of movies. Note that digest movies cannot be removed.

Reducing File Sizes
1
Set display to
playback
2
Browse your
movies
z
Choose a movie →
button
3
Edit the movie
z
Movie playback panel
→ [
] → [ ]
4
Save
z
[New le]
Movie le sizes can be reduced by compressing movies.

z
[Compress & sav.]
Reducing File Sizes
Movie le sizes can be reduced by compressing movies.

Editing Digest Movies
1
Set display to
playback
2
Browse your
images
z
Digest movies
are labeled with
[
].
3
Access the setting
screen
Individual chapters (clips) recorded in mode can be erased,
as needed. Be careful when erasing clips, because they cannot be
recovered.
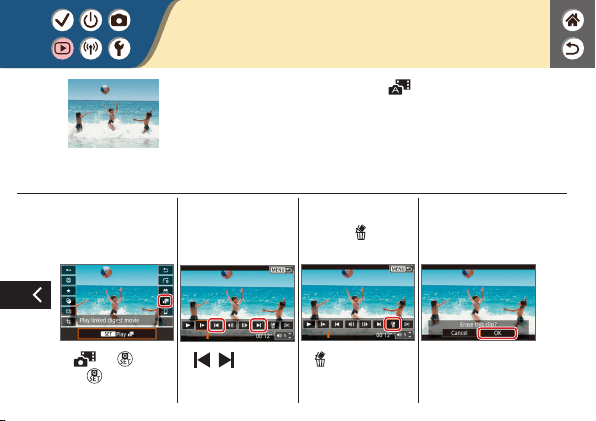
4
Start and then
pause playback
z
[ ] → button
→
button during
playback
5
Select the clip to
erase
z
[ ]/[ ]
6
Choose [ ]
z
[ ]
7
Erase
z
[OK]
Editing Digest Movies
Individual chapters (clips) recorded in mode can be erased,
as needed. Be careful when erasing clips, because they cannot be
recovered.


Available Wireless Features
Connecting to smartphones
Control the camera remotely and browse images on the camera over a Wi-Fi connection by using the
dedicated Camera Connect app on smartphones or tablets.
You can also geotag images and use other features when connected by Bluetooth
®
* and Wi-Fi.
* Bluetooth low energy technology (hereafter referred to as “Bluetooth”)
Connecting to computers
Control the camera remotely from a computer connected via Wi-Fi by using EOS Utility, software used
with EOS cameras. With Image Transfer Utility 2, images on the camera can also be sent to a
computer automatically.
Connecting to printers
Print images over a Wi-Fi connection from printers compatible with PictBridge (wireless LAN)
technology.
Connecting to Web services
Share images with friends or family on social media or the CANON iMAGE GATEWAY online photo
service for Canon customers after you complete member registration (free of charge).
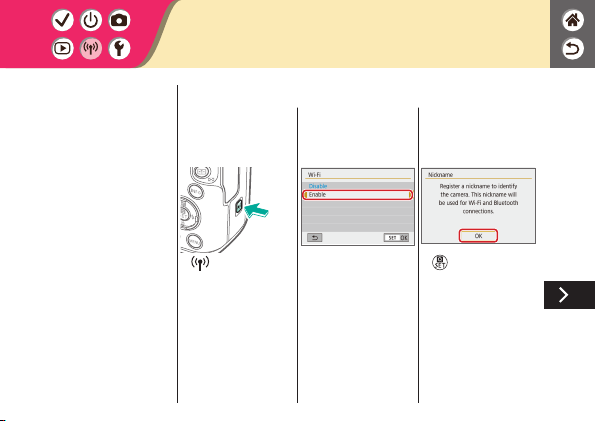
Preparing to Use Wireless Features
1
Turn the camera
on
2
Set up a Wi-Fi
connection
z
button
z
[Wi-Fi] → [Enable]
z
button

z
button →
[OK]
3
Exit the Wi-Fi
settings
z
Press the button
to dismiss this screen.
4
Install Camera
Connect
z
Download and install
Camera Connect
from the App Store/
Google Play.
Preparing to Use Wireless Features

Connecting to Bluetooth Enabled
Smartphones via Wi-Fi
1
Get ready
z
See “Preparing to Use
Wireless Features”
(or when nished, go
to the next step).
2
Pair with the
smartphone
z
button →
[
] → [ 1] →
[Wireless
communication
settings]
z
[Bluetooth function]
→ [Bluetooth
function] again →
[Smartphone] →
button
z
[Pairing] → [Do not
display]
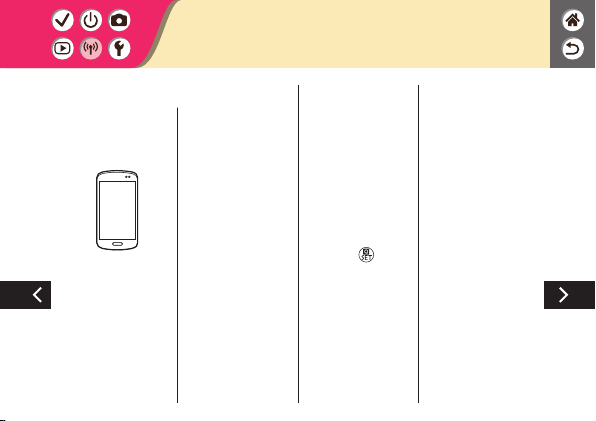
z
On the smartphone,
turn on Bluetooth
and start Camera
Connect.
z
Touch the nickname
of the camera for
pairing.
z
In iOS, also touch
[Pair].
3
Use the camera to
complete pairing
z
On the pairing
conrmation screen,
choose [OK].
z
On the pairing
notication screen,
press the
button.
4
Connect via Wi-Fi
and use Camera
Connect
Connecting to Bluetooth Enabled
Smartphones via Wi-Fi
In Android
z
Choose a function
other than [Bluetooth
remote controller].
z
After the devices are
connected via Wi-Fi,
a screen for the
selected function is
displayed.
In iOS
z
Choose a function
other than [Bluetooth
remote controller].
z
Touch the button
displayed on the
smartphone to copy
the password, as
instructed.
z
In the Wi-Fi settings
displayed, choose the
SSID of the camera
to connect to.
z
Touch the password
eld and paste the
password to establish
a connection.
z
Display the Camera
Connect screen.
z
In a moment, a
Wi-Fi connection
is established, and
a screen for the
selected function
is displayed on the
smartphone.
Connecting to Bluetooth Enabled
Smartphones via Wi-Fi

Connecting to Bluetooth Enabled
Smartphones via Wi-Fi
5
End the
connection
z
button →
[Disconnect,exit] →
[OK]
To reconnect
z
To reconnect, simply
touch the desired
operation in Camera
Connect.
To send images
from the camera to
a smartphone
z
During image
playback, press the
button.
z
[ ] → button →
button

Connecting to Bluetooth Enabled
Smartphones via Wi-Fi
z
On the screen
displayed, choose
images and how to
send them.

Connecting to NFC-Compatible Android
Smartphones via Wi-Fi
1
Get ready
z
See “Preparing to Use
Wireless Features”
(or when nished, go
to the next step).
2
Establish the
connection
z
Touch the marks
together.
z
Camera Connect
starts up on the
smartphone,
and the devices
are connected
automatically.
3
Establish a Wi-Fi
connection
z
[OK] → button
z
[Wi-Fi on] is displayed
on the camera.
4
Use Camera
Connect
z
Use Camera Connect
to shoot remotely,
browse images on the
camera, or save them
to the smartphone.
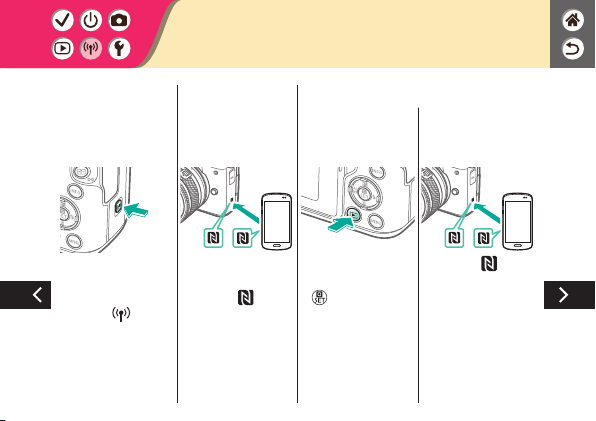
Connecting to NFC-Compatible Android
Smartphones via Wi-Fi
5
End the
connection
z
When the [Wi-Fi
on] screen is not
displayed on the
camera,
button
→ [Disconnect,exit]
→ [OK]
To reconnect
z
Turn on the camera
and smartphone and
touch the
marks
together.
z
Once the devices are
connected, you can
use Camera Connect.
To send images
from the camera to
a smartphone
z
During image
playback, press the
button.
z
Touch the marks
together.

z
Once the devices are
connected, press the
button, and on
the screen displayed,
choose images and
how to send them.
Connecting to NFC-Compatible Android
Smartphones via Wi-Fi
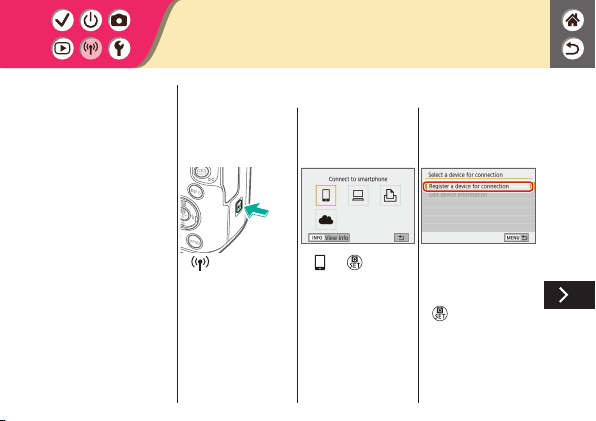

Connecting to Smartphones via Wi-Fi
with the Wi-Fi Button
z
Check the SSID and
password.
z
On the smartphone,
nd Wi-Fi networks
and choose the one
with the camera’s
SSID.
z
On the smartphone,
enter the password
displayed on the
camera.
z
After conrming the
Wi-Fi connection,
start Camera Connect
and choose the
camera to connect to.
z
On the camera: [OK]
→
button

Connecting to Smartphones via Wi-Fi
with the Wi-Fi Button
3
End the
connection
z
button →
[Disconnect,exit] →
[OK]
To reconnect
z
Start Camera
Connect.
z
Touch [Easy
Connection Guide]
and choose a camera
to connect to.
z
To connect, follow the
instructions shown in
the guide.
To send images
from the camera to
a smartphone
z
During image
playback, press the
button.
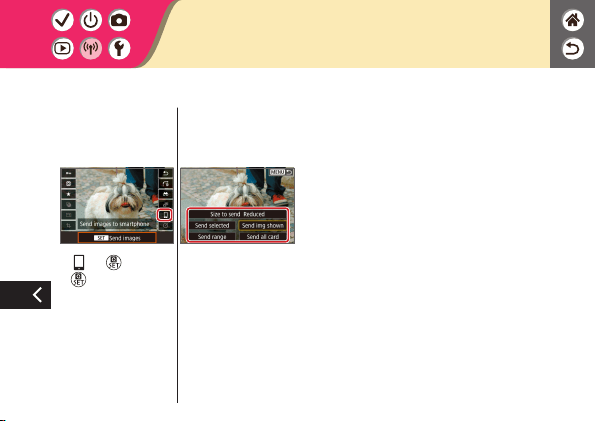
Connecting to Smartphones via Wi-Fi
with the Wi-Fi Button
z
[ ] → button →
button
z
On the screen
displayed, choose
images and how to
send them.


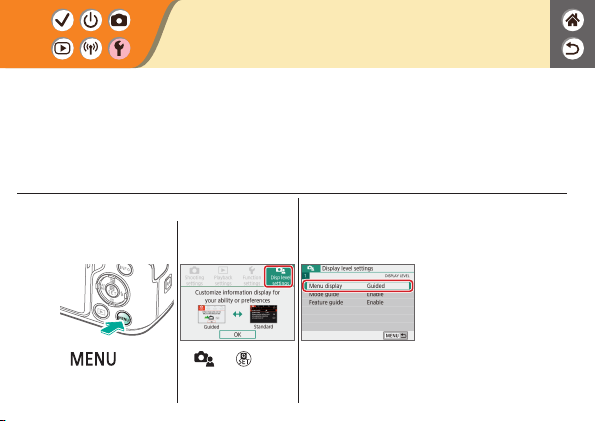
1
Access the menu
screen
z
button
z
[ ] → button
2
Set up the camera
z
Choose an item →
choose an option
Adjusting Screens/Messages to Match
Your Skill Level
You can adjust how information is presented to suit your ability or preference. You can
also hide the guidance normally displayed when you switch shooting modes or choose
setting items.

1
Access the menu
screen
z
button →
[
] → button
2
Access the folder
selection screen
z
[ 1] → [Select
folder]
3
Set up the camera
z
Select folders: simply
select a folder
z
Create folders:
[Create folder] →
[OK]
Selecting and Creating Folders
You can select or create folders where images are saved. New folders can be created by
selecting [Create folder] on the folder selection screen.

1
Access the menu
screen
z
button →
[
] → button
2
Set up the camera
z
[ 1] → [File
numbering]
z
[Auto reset]
Changing File Numbering
Your shots are automatically numbered in sequential order (0001 – 9999) and saved in
folders that store up to 9,999 images each. You can change how the camera assigns le
numbers.

1
Access the menu
screen
z
button →
[
] → button
2
Set up the camera
z
[ 1] → [Auto rotate]
z
Choose an option.
Auto Rotation of Vertical Images
Specify whether images shot in vertical orientation are rotated automatically for larger
display on the camera or a computer.
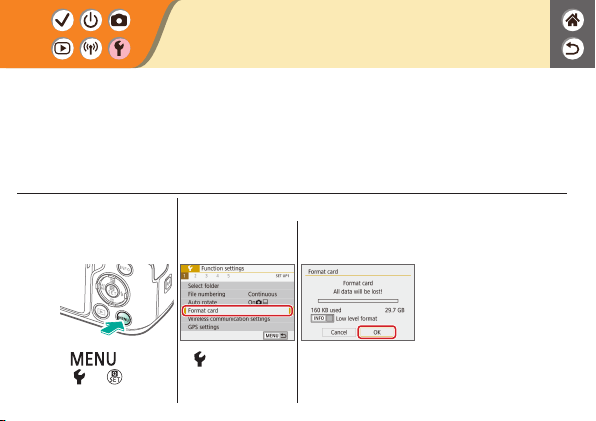
1
Access the menu
screen
z
button →
[
] → button
2
Set up the camera
z
[ 1] → [Format
card]
z
[OK]
Formatting Memory Cards
Before using a new memory card or a card formatted in another device, you should
format the card with this camera.
Formatting erases all data on a memory card, which cannot be recovered.
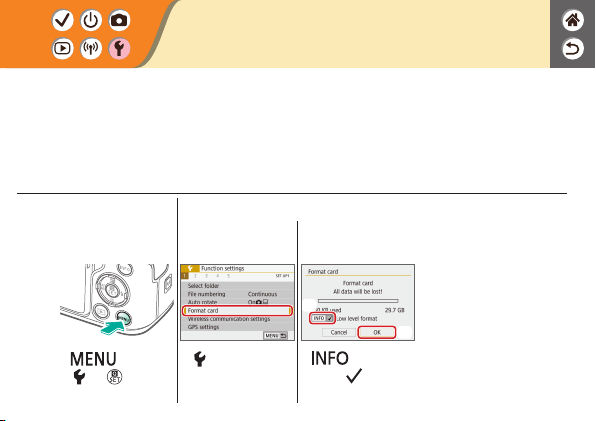
1
Access the menu
screen
z
button →
[
] → button
2
Set up the camera
z
[ 1] →
[Format card]
(2)
(1)
z
button to
select (
) → [OK]
Low-Level Formatting
Perform low-level formatting if the camera is not working correctly, reading/writing of
images on the memory card is slower, continuous shooting is slower, or movie recording
suddenly stops.
Low-level formatting erases all data on a memory card, which cannot be recovered.

1
Access the menu
screen
z
button →
[
] → button
2
Choose the setting
item
z
[ 2] → [Eco mode]
z
[On]
Using Eco Mode
This function allows you to conserve battery power in shooting mode. When the camera
is not in use, the screen darkens to save battery life.
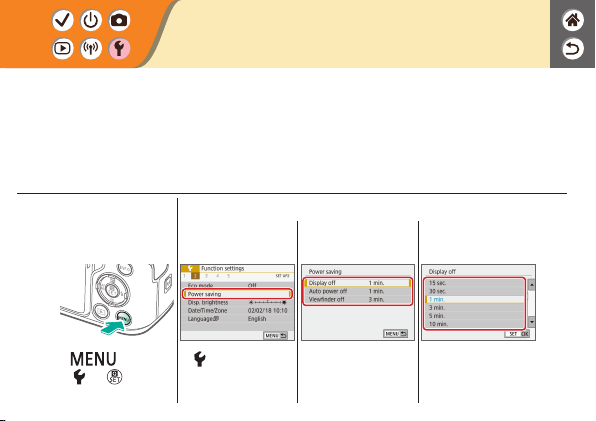
1
Access the menu
screen
z
button →
[
] → button
2
Set up the camera
z
[ 2] → [Power
saving]
z
Choose an item.
z
Choose an option.
Adjusting Power-Saving Features
Adjust the timing of automatic deactivation of the camera, screen, and viewnder (Auto
power off, Display off, and Viewnder off).
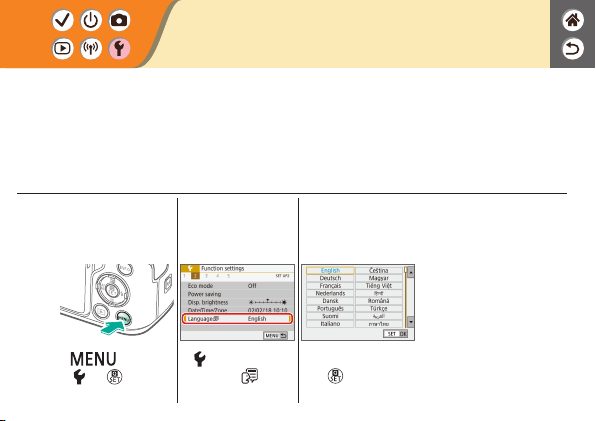
1
Access the menu
screen
z
button →
[
] → button
2
Choose the setting
item
z
[ 2] →
[Language
]
3
Set up the camera
z
Choose a language
→
button
Changing the Display Language
Change the display language as needed.
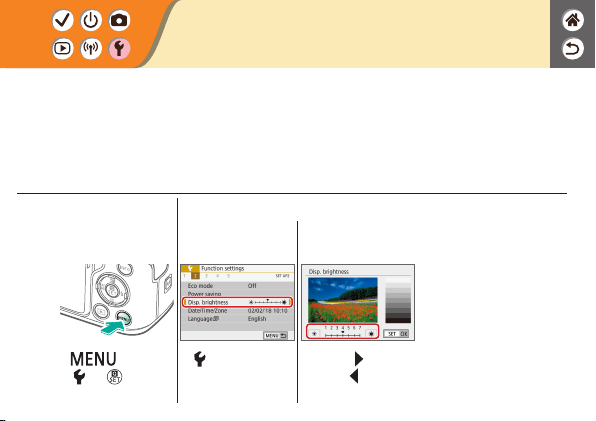
1
Access the menu
screen
z
button →
[
] → button
2
Set up the camera
z
[ 2] → [Disp.
brightness]
z
Brighter: button
z
Darker:
button
Adjusting Screen Brightness
Viewnder and screen brightness can be adjusted separately.
Viewnder brightness can be set when the viewnder is active.

1
Access the menu
screen
z
button →
[
] → button
2
Set up the camera
z
[ 1] → [Flash
control]
z
[Red-eye reduc.]
z
[Enable]
Reducing Red-Eye
To help prevent red-eye, the camera can illuminate the red-eye reduction lamp before
ring the ash in low-light shots.

1
Access the menu
screen
z
button →
[
] → button
2
Set up the camera
z
[ 1] → [Image
review]
z
Choose an option.
Changing the Image Display Period after
Shots
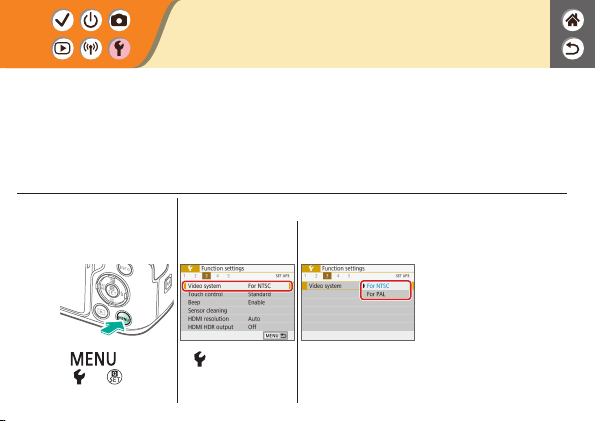
1
Access the menu
screen
z
button →
[
] → button
2
Set up the camera
z
[ 3] →
[Video system]
z
Choose an option.
Changing the Video System
Set the video system of any television used for display. This setting determines the
image quality (frame rate) available for movies.
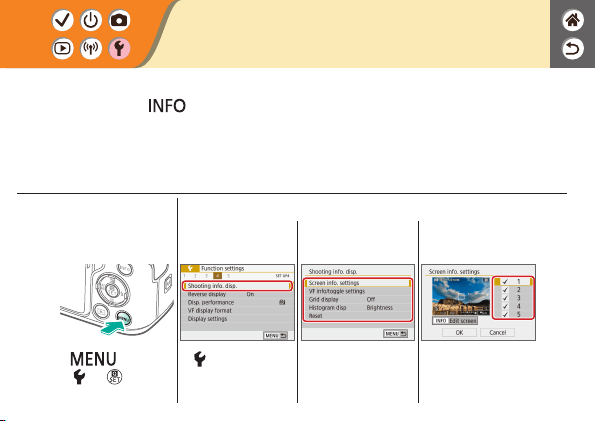
1
Access the menu
screen
z
button →
[
] → button
2
Set up the camera
z
[ 4] →
[Shooting info. disp.]
z
Choose an item.
z
Choose an option →
[OK]
Customizing Shooting Information
Display
A grid can be shown on the shooting screen. You can also choose the type of histogram
shown when the button is pressed.

Customizing Playback Information
Display
The shooting information displayed changes each time you press the button
when display is set to playback. You can customize the information displayed.
1
Access the menu
screen
z
button →
[
] → button
2
Set up the camera
z
[ 4] → [Playback
information display]
z
Choose an option →
[OK]

1
Access the menu
screen
z
button →
[
] → button
2
Set up the camera
z
[ 3] → [Beep]
z
[Disable]
Muting Camera Sounds
Prevent the camera from playing sounds when you press the shutter button halfway or
activate the self-timer.

1
Access the menu
screen
z
button →
[
] → button
2
Set up the camera
z
[ 3] → [Beep]
z
[Touch ]
Muting Audio Feedback
Prevent the camera from playing sounds as feedback after camera operations, such as
pressing buttons or touching the screen.
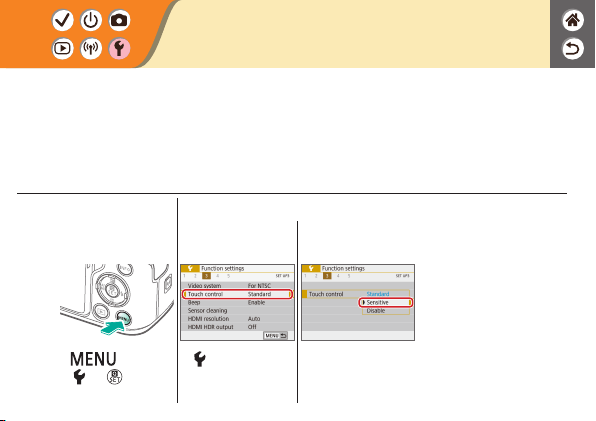
1
Access the menu
screen
z
button →
[
] → button
2
Set up the camera
z
[ 3] →
[Touch control]
z
[Sensitive]
Adjusting the Touch-Screen Panel
Sensitivity of the touch-screen panel can be increased, so that the camera responds to a
lighter touch.
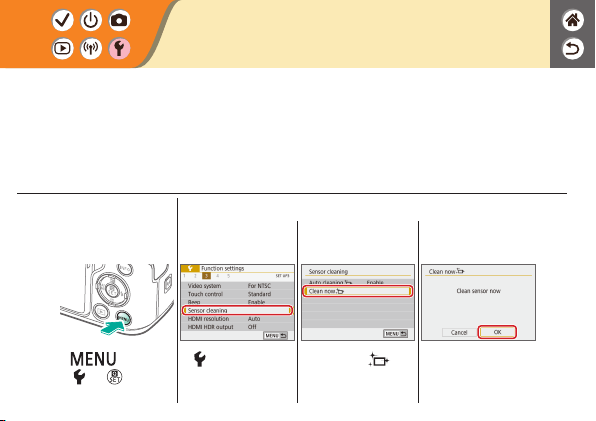
1
Access the menu
screen
z
button →
[
] → button
2
Set up the camera
z
[ 3] → [Sensor
cleaning]
z
[Clean now ]
z
[OK]
Activating Sensor Cleaning
The image sensor is automatically cleaned to remove dust whenever you turn the
camera on or off, or when the camera shuts off in Power saving mode. You can activate
cleaning as needed.
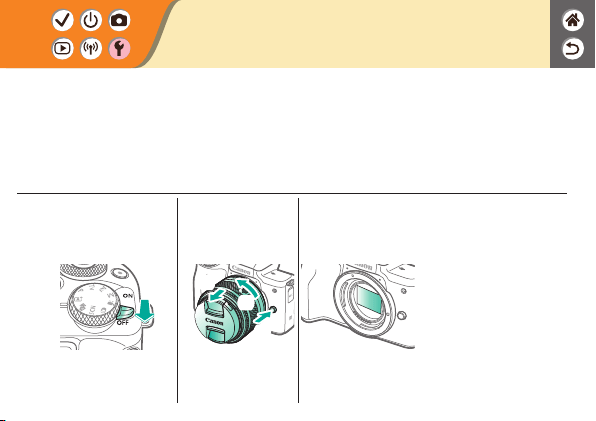
1
Make sure the
camera is off
2
Detach the lens
(
1
)
(
2
)
(
3
)
3
Clean the sensor
Cleaning the Sensor Manually
Any dust that remains after automatic cleaning can also be removed by using an optional
blower or other specialized tool.
The surface of the image sensor is extremely delicate. If the sensor must be cleaned
manually, we recommend requesting service from a Customer Support Help Desk.

1
Access the menu
screen
z
button →
[
] → button
2
Set up the camera
z
[ 5] → [Clear
settings]
z
[Clear all camera
settings]
z
[OK]
Restoring Default Camera Settings
Restore default camera settings in / / / / modes.
You can also clear custom functions (except [Custom Controls] settings) by using [Clear
all Custom Func. (C.Fn)].

1
Access the menu
screen
z
button →
[
] → button
2
Set up the camera
z
[ 5] → [Copyright
information]
z
Choose an item.
z
Enter a name →
button →
[OK]
Setting Copyright Information to Record
in Images
To record the author’s name and copyright details in images, set this information
beforehand.
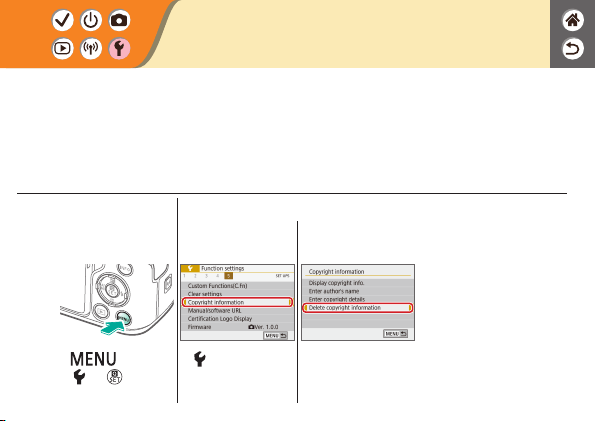
1
Access the menu
screen
z
button →
[
] → button
2
Set up the camera
z
[ 5] → [Copyright
information]
z
[Delete copyright
information] → [OK]
Deleting All Copyright Information
You can delete both the author’s name and copyright details at the same time.

1
Access the menu
screen
z
button →
[
] → button
2
Check
z
[ 5] → [Certication
Logo Display]
Checking Certication Logos
Some logos for certication requirements met by the camera can be viewed on the
screen. Other certication logos appear in this manual, on the camera packaging, or on
the camera body.

Index
Numbers
1-point AF 148
A
AEB shooting 114
AE lock 115
AF points 148
AF-point zoom 143
Aspect ratio 208
Auto Lighting Optimizer 119
Auto mode (shooting mode) 42
Av (shooting mode) 171
B
Battery pack
Charging 22
Eco mode 284
Black and white images 98
Bulb exposure 174
C
Camera
Resetting 298
Camera Connect 261
CANON iMAGE GATEWAY 260
Charging 22
Chromatic aberration correction 136
Cleaning (image sensor) 296, 297
Close-up (shooting mode) 87, 89
Color temperature 133, 134
Color (white balance) 129
Compression 205
Creative Assist (shooting mode) 94
Creative lters 238

Index
Cropping 242
Custom white balance 130
D
Date/time/zone
Settings 27
Display language 30
Display period 289
E
Eco mode 284
Editing
Cropping 242
Red-eye correction 241
Resizing images 245
Erasing 233, 234
Exposure
AE lock 115
Compensation 113
FE lock 162
Eye Detection AF 151
F
Face+Tracking 148
Favorites 231
FE lock 162
File numbering 280
Fish-eye effect (shooting mode) 98, 100
Flash
FE lock 162
Flash exposure compensation 160
Flash metering 166
Flash output 167

Flash timing 164
Mode 159
Flash exposure compensation 160
Focusing
AF points 148
MF peaking 147
Servo AF 153
Focus range
Manual focus 143
Food (shooting mode) 87, 89
G
Grainy B/W (shooting mode) 98
Grid lines 291
H
Handheld night scene (shooting mode) 87,
90
HDR art bold (shooting mode) 98, 102
HDR art embossed (shooting mode) 98, 102
HDR art standard (shooting mode) 98, 101
HDR art vivid (shooting mode) 98, 101
HDR Backlight Control (shooting mode) 87,
90
High ISO speed noise reduction 138
Hybrid Auto (shooting mode) 84
I
Image dust prevention 296, 297
Images
Display period 289
Erasing 233, 234
Index

Image stabilization 157
Index display 222
Indicator 75
ISO speed 116
J
Jump display 225
L
Lamp 207, 288
Landscape (shooting mode) 87, 88
Lens
Attaching 31, 34
Detaching 33, 35
Lock release 33, 35
Long exposure 174
Long exposure noise reduction 140
M
Macro photography 89
Magnied display 214
Manual focus 143
Memory cards 24
Menu
Basic operations 70
Touch operations 79
Metering method 118
MF (Manual focusing) 143
M-Fn button 53, 181
MF peaking 147
Miniature effect movie (shooting mode) 191
Miniature effect (shooting mode) 103
Movies
Editing 253, 255, 257
Index

Image quality (pixel count/frame rate)
209
M (shooting mode) 172
Multi-function button 53, 181
Multi Shot Noise Reduction 139
N
Noise reduction
High ISO speed 138, 139
Long exposure 140
P
Panning 91
Part names 52
Peripheral illumination correction 136
Picture Style 124, 125, 127
Pixel count (image size) 205
Playback
Digest movies 219
Image search 223
Index display 222
Jump display 225
Magnied display 214
Movies 217
Slideshows 216
Stills 213
Touch operations 81
Portrait (shooting mode) 87
Protect images 228, 229
Protecting 228, 229
P (shooting mode) 113
Index

Q
Quick Control screen
Basic operations 68
Touch operations 77
R
Rating 231
RAW 206
RAW image processing 250
Red-eye correction 241
Resetting 298
Resizing images 245
Rotating 240
S
Saturation 125
Screen
Display language 30
Searching 223
Self portrait (shooting mode) 87, 88
Self-timer
Using the self-timer 203
Sending images to a smartphone 263, 268,
271
Sensor cleaning 296
Servo AF 153
Silent Mode (shooting mode) 87, 90
Slideshows 216
Smooth skin (shooting mode) 87, 88
Soft focus (shooting mode) 98, 100
Sounds 293, 294
Sports (shooting mode) 87, 89
Strap 21
Index


Precautions for Wireless Features
z
Before goods or technologies in the camera regulated by the Foreign Exchange and Foreign
Trade Act are exported (which includes bringing them outside Japan or showing them to
non-residents in Japan), export or service transaction permission may be required from the
Japanese government.
z
Because this product includes American encryption items, it falls under U.S. Export
Administration Regulations, and cannot be exported to or brought into a country under U.S.
trade embargo.
z
Be sure to make notes of the Wi-Fi settings you use.
z
The wireless settings saved to this product may change or be erased due to incorrect operation
of the product, the effects of radio waves or static electricity, or accident or malfunction.
z
Please note that Canon accepts no responsibility for direct or indirect damages or loss of
earnings resulting from a degradation or disappearance of content.
z
When transferring ownership, disposing of the product, or sending it for repair, restore the
default wireless settings by erasing any settings you have entered.
z
Canon will not make compensation for damages resulting from loss or theft of the product.
z
Canon accepts no responsibility for damages or loss resulting from unauthorized access or use
of target devices registered on this product due to loss or theft of the product.
z
Be sure to use the product as directed in this manual.

z
Be sure to use the wireless function of this product within the guidelines noted in this manual.
Canon accepts no responsibility for damages or loss if the function and product are used in
ways other than as described in this manual.
Precautions for Wireless Features

z
Microsoft and Windows are trademarks or registered trademarks of Microsoft Corporation in the
United States and/or other countries.
z
Macintosh and Mac OS are trademarks of Apple Inc., registered in the U.S. and other countries.
z
App Store, iPhone, and iPad are trademarks of Apple Inc.
z
The SDXC logo is a trademark of SD-3C, LLC.
z
HDMI, the HDMI logo and High-Denition Multimedia Interface are trademarks or registered
trademarks of HDMI Licensing LLC.
z
Wi-Fi
®
, Wi-Fi Alliance
®
, WPA™, WPA2™ and Wi-Fi Protected Setup™ are trademarks or
registered trademarks of the Wi-Fi Alliance.
z
The Bluetooth
®
word mark and logos are registered trademarks owned by Bluetooth SIG, Inc.
and any use of such marks by Canon Inc. is under license. Other trademarks and trade names
are those of their respective owners.
z
The N-Mark is a trademark or registered trademark of NFC Forum, Inc. in the United States and
in other countries.
z
All other trademarks are the property of their respective owners.
z
This device incorporates exFAT technology licensed from Microsoft.
Trademarks and Licensing

z
This product is licensed under AT&T patents for the MPEG-4 standard and may be used for
encoding MPEG-4 compliant video and/or decoding MPEG-4 compliant video that was encoded
only (1) for a personal and non-commercial purpose or (2) by a video provider licensed under
the AT&T patents to provide MPEG-4 compliant video. No license is granted or implied for any
other use for MPEG-4 standard.
Trademarks and Licensing

z
Unauthorized reproduction of this guide is prohibited.
z
All measurements based on Canon testing standards.
z
Information subject to change without notice, as are product specications and appearance.
z
Illustrations and screenshots in this guide may differ slightly from the actual equipment.
z
The above items notwithstanding, Canon cannot be held liable for any loss arising from the use
of this product.
Disclaimer

CT0-D164-A © CANON INC. 2018