Use&Care Manual
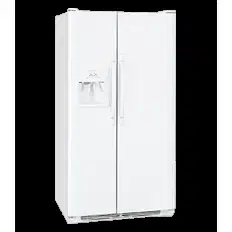
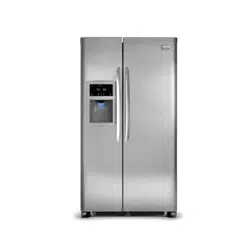
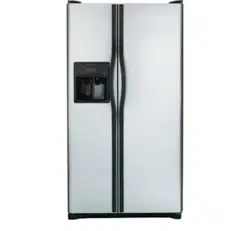
Refrigerator
Side by Side
PN: 241856001 (April 2009)
READ AND SAVE THESE INSTRUCTIONS
TABLE OF CONTENTS
Important Safety Instructions ........................ 2
Installation .............................................. 3
Connecting Water Supply ............................. 4
Door Removal Instructions ........................... 5
Mechanical Temperature Controls .................. 6
Electronic Temperature Controls .................... 7
Automatic Ice & Water Dispenser ................... 9
Normal Operating Sounds & Sights ................14
Care and Cleaning ....................................15
Major Appliance Warranty Information ............16
Before you Call ........................................17
Features at a Glance .................................19
Got Questions?
Need Parts or Service?
Before Calling Your
Local Repair Service - CALL:
(United States)
1-800-944-9044
(Canada)
1-800-265-8352
√ Resolve many service issues over the phone at
your convenience!
√ If we can’t resolve your service issue, we’ll
schedule a reputable local service technician for
you!
√ Order Genuine Electrolux Parts & Accessories
√ Purchase Extended Warranty Protection
Solutions Hotline
2
IMPORTANT SAFETY INSTRUCTIONS
FOR YOUR SAFETY
• Donotstoreorusegasoline,orotherammableliquidsin
thevicinityofthisoranyotherappliance.Readproductlabels
forwarningsregardingammabilityandotherhazards.
• Donotoperatetherefrigeratorinthepresenceof
explosivefumes.
• Avoidcontactwithanymovingpartsofautomaticicemaker.
• Removeallstaplesfromthecarton.Staplescancause
severecuts,andalsodestroynishesiftheycomein
contactwithotherappliancesorfurniture.
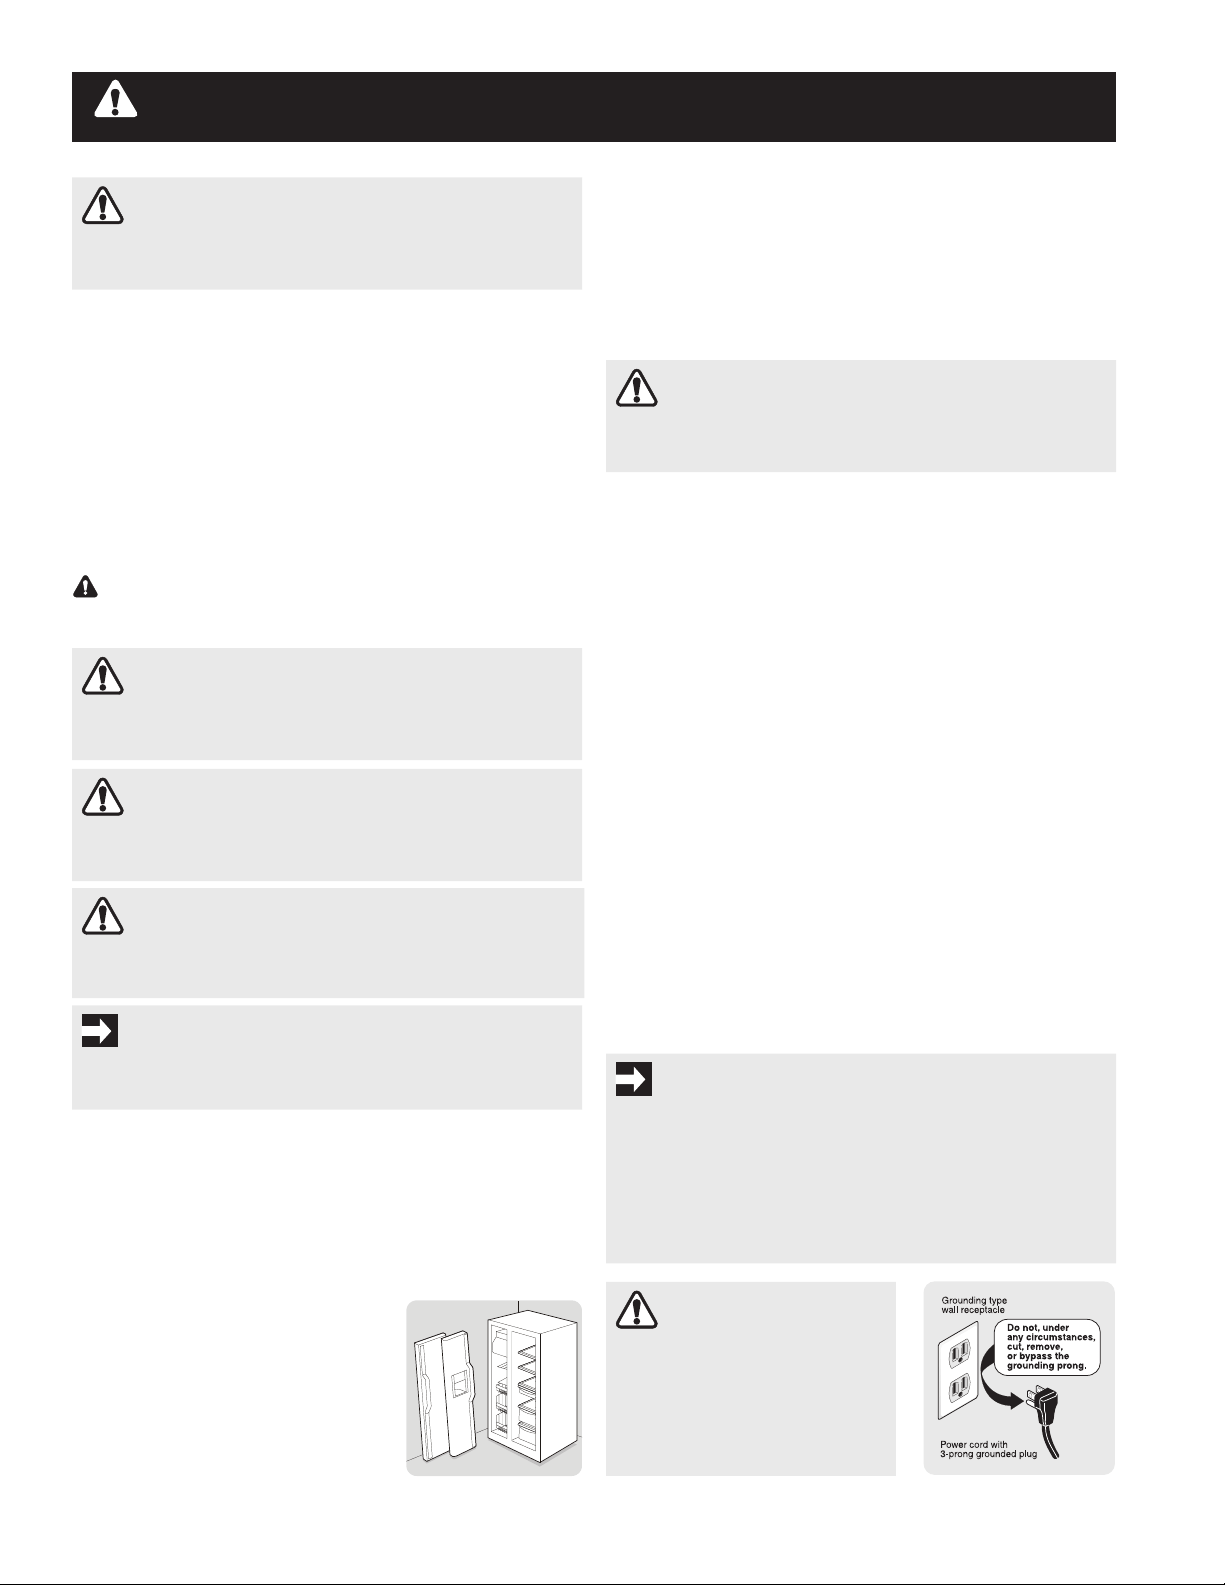
ELECTRICAL INFORMATION
• The refrigerator must be plugged into its own
dedicated 115 Volt, 60 Hz., 15 Amp, AC only electrical
outlet.Thepowercordoftheapplianceisequippedwith
athree-pronggroundingplugforyourprotectionagainst
electricalshockhazards.Itmustbepluggeddirectlyintoa
properlygroundedthreeprongreceptacle.Thereceptacle
mustbeinstalledinaccordancewithlocalcodesand
ordinances.Consultaqualiedelectrician. Avoid
connectingrefrigeratortoaGroundFaultInterruptor(GFI)
circuit.Do not use an extension cord or adapter plug.
• Ifthepowercordisdamaged,itshouldbereplacedby
anauthorizedservicetechniciantopreventanyrisk.
• Neverunplugtherefrigeratorbypullingonthepower
cord.Alwaysgriptheplugrmly,andpullstraightout
fromthereceptacletopreventdamagingthepowercord.
• Unplugtherefrigeratorbeforecleaningandbefore
replacingalightbulbtoavoidelectricalshock.
• Performancemaybeaffectedifthevoltagevariesby
10%ormore.Operatingtherefrigeratorwithinsufcient
powercandamagethecompressor.Suchdamageis
notcoveredunderyourwarranty.
• Donotplugtheunitintoanelectricaloutletcontrolledby
awallswitchorpullcordtopreventtherefrigeratorfrom
beingturnedoffaccidentally.
WARNING
Please Read All Instructions Before Using This Refrigerator.
WARNING
These Guidelines Must Be Followed To Ensure That Safety
Mechanisms In This Refrigerator Will Operate Properly.
IMPORTANT
PressingandholdingtheOn/Offbuttonfor3seconds,locatedon
theleftsideofthetemperaturecontrolpanel(Electroniccontrols),
orturningtheFreezerandFreshFoodcontrolsto“0”(Mechanical
controls)willdisableyourrefrigerator’scoolingsystem,butdoes
notdisconnectthepowertothelightbulbandotherelectrical
components.Toturnoffpowertoyourrefrigeratoryoumust
unplugthepowercordfromtheelectricaloutlet.
CAUTION
To avoid personal injury or
property damage, handle
tempered glass shelves carefully.
Shelves may break suddenly if
nicked, scratched, or exposed to
sudden temperature change.
DEFINITIONS
Thisisthesafetyalertsymbol.Itisusedtoalertyouto
potentialpersonalinjuryhazards.Obeyallsafetymessagesthat
followthissymboltoavoidpossibleinjuryordeath.
CHILD SAFETY
Destroyorrecyclethecarton,plasticbags,andanyexterior
wrappingmaterialimmediatelyaftertherefrigeratorisunpacked.
ChildrenshouldNEVER usetheseitemstoplay.Cartonscovered
withrugs,bedspreads,plasticsheetsorstretchwrapmay
becomeairtightchambers,andcanquicklycausesuffocation.
PROPER DISPOSAL OF YOUR REFRIGERATOR
OR FREEZER
Risk of child entrapment
Childentrapmentandsuffocationare
notproblemsofthepast.Junkedor
abandonedrefrigeratorsorfreezersare
stilldangerous–eveniftheywillsitfor
“justafewdays.”Ifyouaregettingridof
youroldrefrigeratororfreezer,please
followtheinstructionsbelowtohelppreventaccidents.
Before you throw away your old refrigerator/freezer:
• Removedoors.
• Leaveshelvesinplacesochildrenmaynoteasilyclimb
inside.
• Haverefrigerantremovedbyaqualiedservice
technician.
WARNING
WARNING indicates a potentially hazardous situation which,
if not avoided, could result in death or serious injury.
CAUTION
CAUTION indicates a potentially hazardous situation which,
if not avoided, may result in minor or moderate injury.
IMPORTANT
IMPORTANTindicatesinstallation,operationormaintenance
informationwhichisimportantbutnothazard-related.
DANGER
DANGER indicates an imminently hazardous situation
which, if not avoided, will result in death or serious injury.
3
ThisUse&CareManualprovidesgeneraloperatinginstructions
foryourmodel.Usetherefrigeratoronlyasinstructedinthis
Use&CareManual.Before starting the refrigerator, follow
these important first steps.
LOCATION
• Chooseaplacethatisnearagroundedelectricaloutlet.
Do Notuseanextensioncordoranadapterplug.
• Ifpossible,placetherefrigeratoroutofdirectsunlight
andawayfromtherange,dishwasherorotherheat
sources.
• Therefrigeratormustbeinstalledonaoorthatislevel
andstrongenoughtosupportafullyloadedrefrigerator.
• Considerwatersupplyavailabilityformodelsequipped
withanautomaticicemaker.
INSTALLATION
INSTALLATION
Installation Clearances
• Allowthefollowingclearancesforeaseofinstallation,
properaircirculation,andplumbingandelectrical
connections:
Sides&Top--------------------3/8”
Back-----------------------------1”
DOOR OPENING
Yourrefrigeratorshouldbepositionedtoalloweasyaccessto
acounterwhenremovingfood.Forbestuseofdrawersand
freezerbaskets,therefrigeratorshouldbeinapositionwhere
boththerefrigeratorandfreezerdoorscanbefullyopened.
LEVELING
Allfourcornersofyourrefrigeratormustrestrmlyonasolid
oor.Yourrefrigeratorisequippedwithadjustablefrontrollers
tohelplevelyourunit.Toensureproperdoorsealandassist
doorclosing,therefrigeratorshouldbetilted1/4”(6mm),front
toback.
CAUTION
Do Not install the refrigerator where the temperature
will drop below 55°F (13°C) or rise above 110°F (43°C).
The compressor will not be able to maintain proper
temperatures inside the refrigerator.
Do Not block the toe grille on the lower front of your
refrigerator. Sufficient air circulation is essential for the
proper operation of your refrigerator.
NOTE
Ifyourrefrigeratorisplacedwiththedoorhingesideagainst
awall,youmayhavetoallowadditionalspacesothedoor
canbeopenedwider.
3 Checkbothdoorstobesuresealstouchcabinetonall
foursides.
Raise
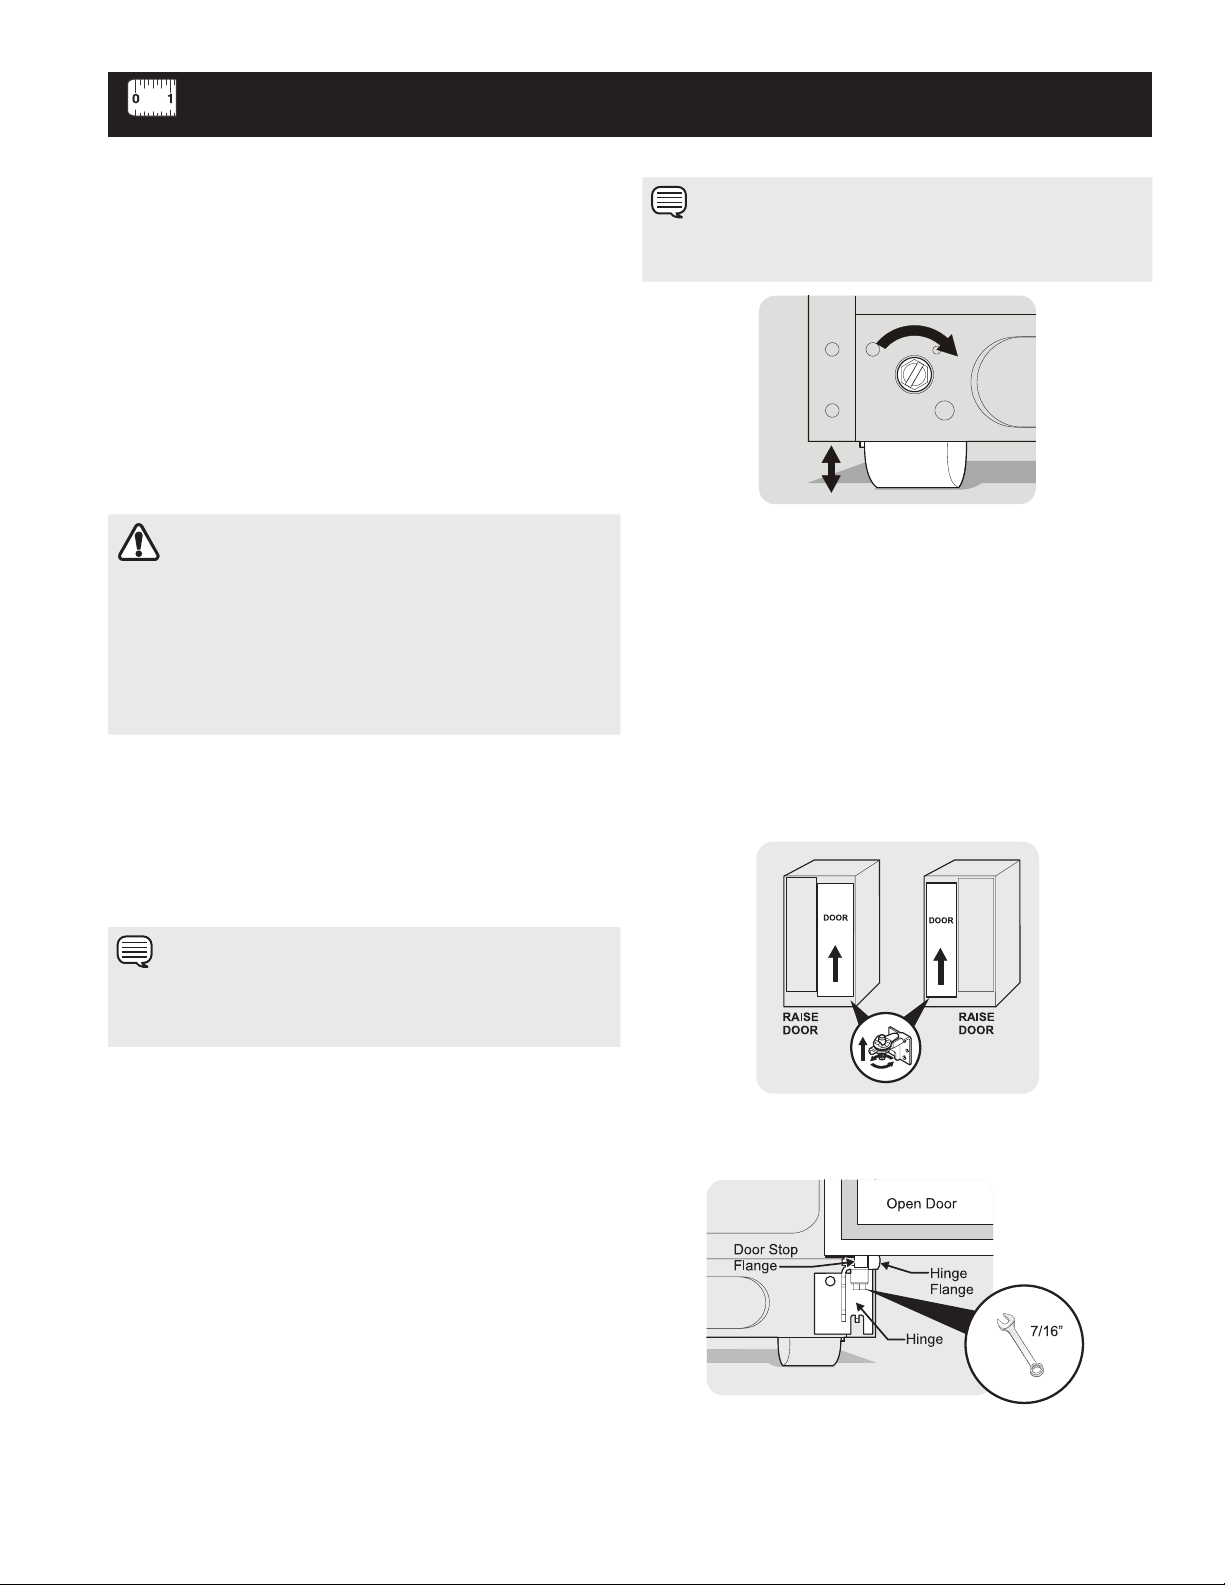
To Level Your Refrigerator:
1 Removetoegrille.
2 Useat-bladescrewdriveror3/8”socketwrenchtoadjust
frontrollers.
NOTE
Therefrigeratordoorsaredesignedtoshutbythemselves
withina20degreeopening.
3 Afterleveling,verifydoorstopcontactslowerhingeand
topofdoordoesnotcontactupperhingethroughfull
movementofdoor(fromfullyclosedtofullyopen).
4 Replacethetoegrillebyttingitintoplace.
NOTE:Leveltheunitwiththeadjustablerollersbeforeleveling
thedoors.
To level the doors using the adjustable lower hinge (some
models):
1 Iftherefrigeratordoorislowerthanthefreezerdoor,
raisetherefrigeratordoorbyturningtheadjustment
screwcounterclockwiseusinga⁷/
16
inchwrench.(See
illustration.)
2 Ifthefreezerdoorislowerthantherefrigeratordoor,
raisethefreezerdoorbyturningtheadjustment
screwcounterclockwiseusinga⁷/
16
inchwrench.(See
illustration.)
4
CONNECTING WATER SUPPLY
Before Installing The Water Supply Line, You Will Need:
• Basic Tools: adjustablewrench,at-bladescrewdriver,
andPhillips
TM
screwdriver.
• Accesstoahouseholdcoldwaterlinewithwater
pressurebetween30and100psi.
• Awatersupplylinemadeof¼inch(6.4mm)OD,copper
orstainlesssteeltubing.Todeterminethelengthoftubing
needed,measurethedistancefromtheicemakerinlet
valveatthebackoftherefrigeratortoyourcoldwater
pipe.Thenaddapproximately7feet(2.1meters),sothe
refrigeratorcanbemovedoutforcleaning(asshown).
• Ashutoffvalvetoconnectthewatersupplylinetoyour
householdwatersystem.DO NOTuseaself-piercing
typeshutoffvalve.
• Acompressionnutandferrule(sleeve)forconnectinga
copperwatersupplylinetotheicemakerinletvalve.
To Connect Water Supply Line To Ice Maker Inlet Valve
1 Disconnectrefrigeratorfromelectricpowersource.
2 Placeendofwatersupplylineintosinkorbucket.Turn
ONwatersupplyandushsupplylineuntilwaterisclear.
TurnOFFwatersupplyatshutoffvalve.
3 Removeplasticcapfromwatervalveinletanddiscardcap.
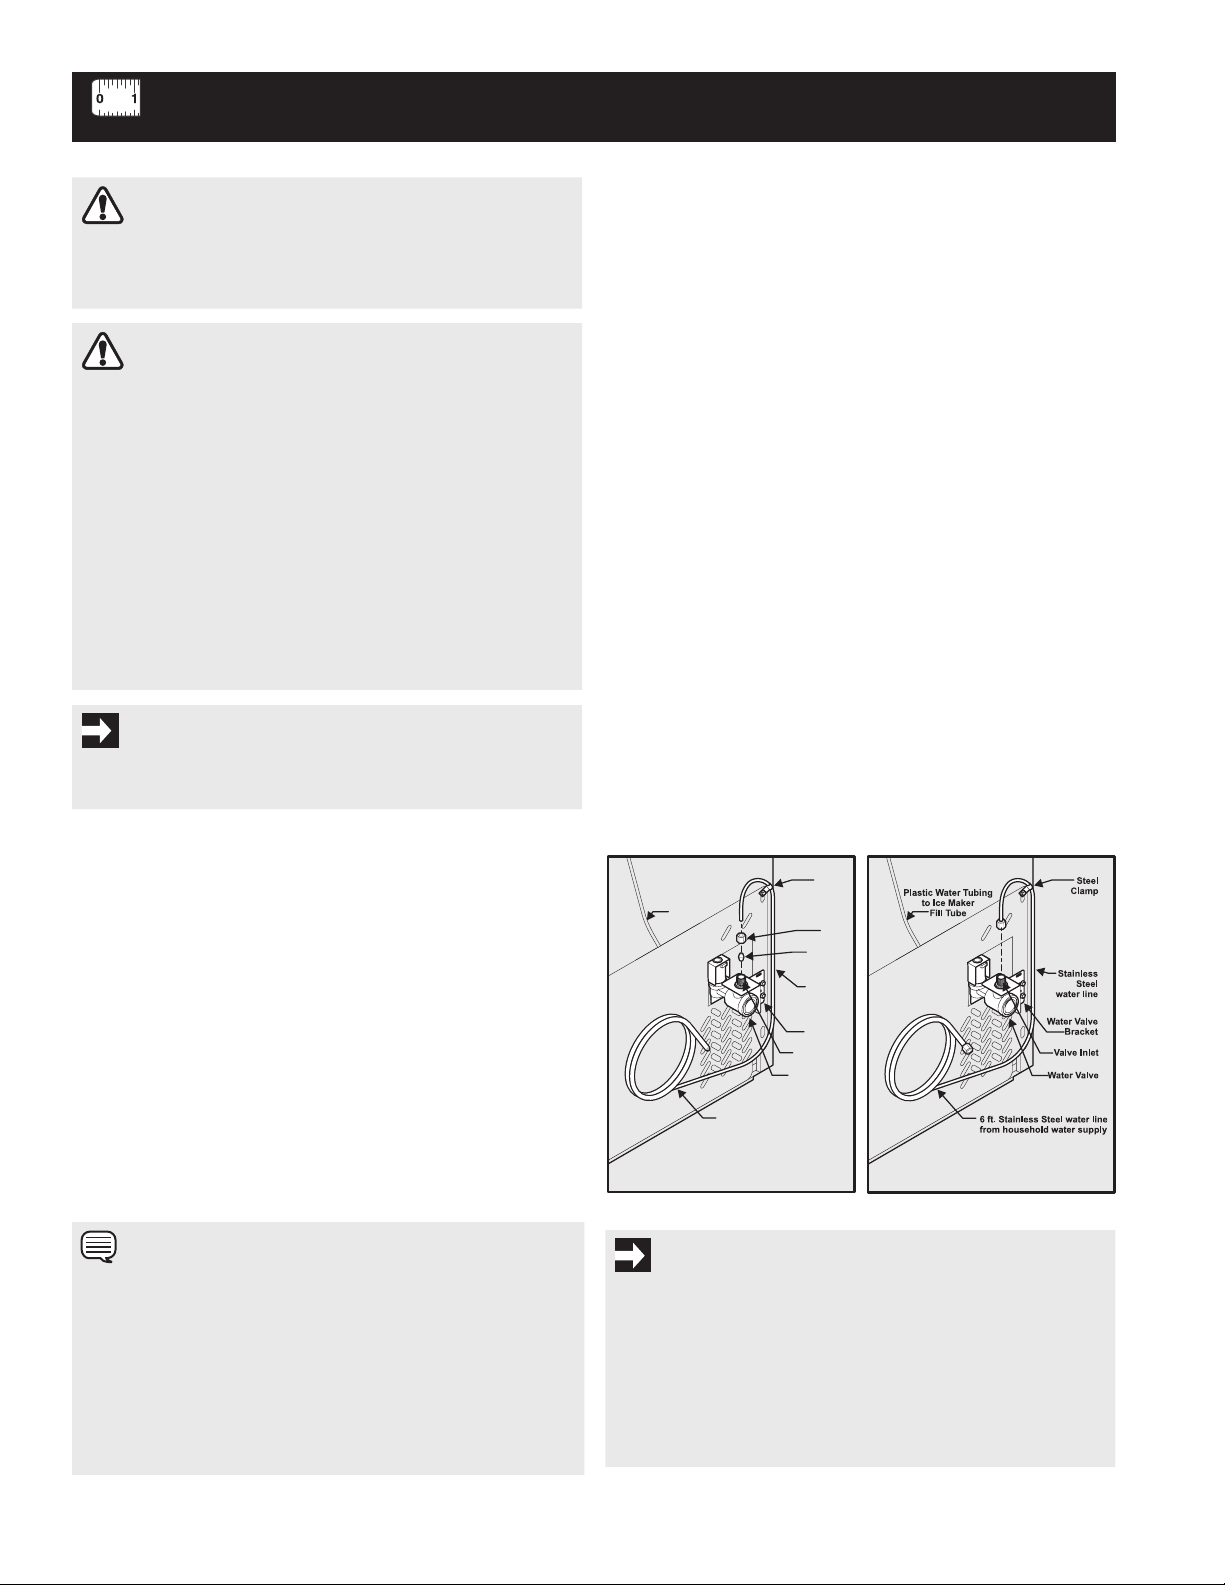
4 If you use copper tubing-Slidebrasscompressionnut,
thenferrule(sleeve)ontowatersupplyline.Pushwater
supplylineintowatervalveinletasfarasitwillgo(¼
inch/6.4mm).Slideferrule(sleeve)intovalveinletand
ngertightencompressionnutontovalve.Tightenanother
halfturnwithawrench;DO NOT overtighten.SeeFigure1.
If you use stainless steel tubing-Thenutandferrule
arealreadyassembledonthetubing.Slidecompression
nutontovalveinletandngertightencompressionnut
ontovalve.Tightenanotherhalfturnwithawrench;DO
NOTovertighten.SeeFigure2.
5 Withsteelclampandscrew,securewatersupplyline
(coppertubingonly)torearpanelofrefrigeratorasshown.
6 Coilexcesswatersupplyline(coppertubingonly)about
2½turnsbehindrefrigeratorasshownandarrangecoils
sotheydonotvibrateorwearagainstanyothersurface.
7 TurnONwatersupplyatshutoffvalveandtightenany
connectionsthatleak.
8 Reconnectrefrigeratortoelectricalpowersource.
9 Toturnicemakeron,lowerwiresignalarm(side
mounted)orsettheicemaker’sON/OFFpowerswitch
tothe“I”position(rearmounted).
WARNING
To avoid electric shock, which can cause death or severe
personal injury, disconnect the refrigerator from electrical
power before connecting a water supply line to the refrigerator.
CAUTION
To Avoid Property Damage:
• Copperorstainlesssteelbraidedtubingisrecommended
for the water supply line. Water supply tubing made of ¼”
plastic is not recommended to be used. Plastic tubing
greatly increases the potential for water leaks, and the
manufacturer will not be responsible for any damage if
plastic tubing is used for supply line.
• DONOTinstallwatersupplytubinginareaswhere
temperatures fall below freezing.
• Chemicalsfromamalfunctioningsoftenercan
damage the ice maker. If the ice maker is connected
to soft water, ensure that the softener is maintained
and working properly.
IMPORTANT
Ensurethatyourwatersupplylineconnectionscomplywithall
localplumbingcodes.
NOTE
Checkwithyourlocalbuildingauthorityforrecommendations
onwaterlinesandassociatedmaterialspriortoinstallingyour
newrefrigerator.Dependingonyourlocal/statebuildingcodes,
ElectroluxrecommendsforhomeswithexistingvalvesitsSmart
Choicewaterlinekit5305513409(witha6ft.stainlesssteel
waterline)andforhomeswithoutanexistingvalve,Electrolux
recommendsitsSmartChoicewaterlinekit5304410264(with
a20ft.copperwaterlinewithself-tappingsaddlevalve).Please
refertowww.frigidaire.com/storeformoreinformation.
IMPORTANT
Afterconnectingthewatersupply,referto“HowtoPrimethe
WaterSupplySystem”forimportantinformationaboutpriming
anemptywatersupplysystem.
Your refrigerator’s water supply system includes several
tubing lines, a water filter, a water valve, and a water tank. To
ensure that your water dispenser works properly, this system
must be completely filled with water when your refrigerator is
first connected to the household water supply line.
Copper water line
from household water supply
(Includeenough tubing in loop to allow
moving refrigerator out for cleaning.)
Ferrule
(Sleeve)
Copper
water line
WaterValve
Valve Inlet
Water Valve
Bracket
Steel
Clamp
Plastic Water Tubing
to Ice Maker
Fill Tube
Brass
Compression
Nut
Figure 1 Figure 2
5
DOOR REMOVAL INSTRUCTIONS
DOOR REMOVAL INSTRUCTIONS:
Ifitisnecessarytomovetherefrigeratorthroughnarrowdoorways,followthesestepsto
removethedoors.
Before you start:
1 Makesuretheelectricalpowercordisunpluggedfromthewalloutlet.
2 Removeanyfoodfromthedoorshelves.
3 Closethedoors.
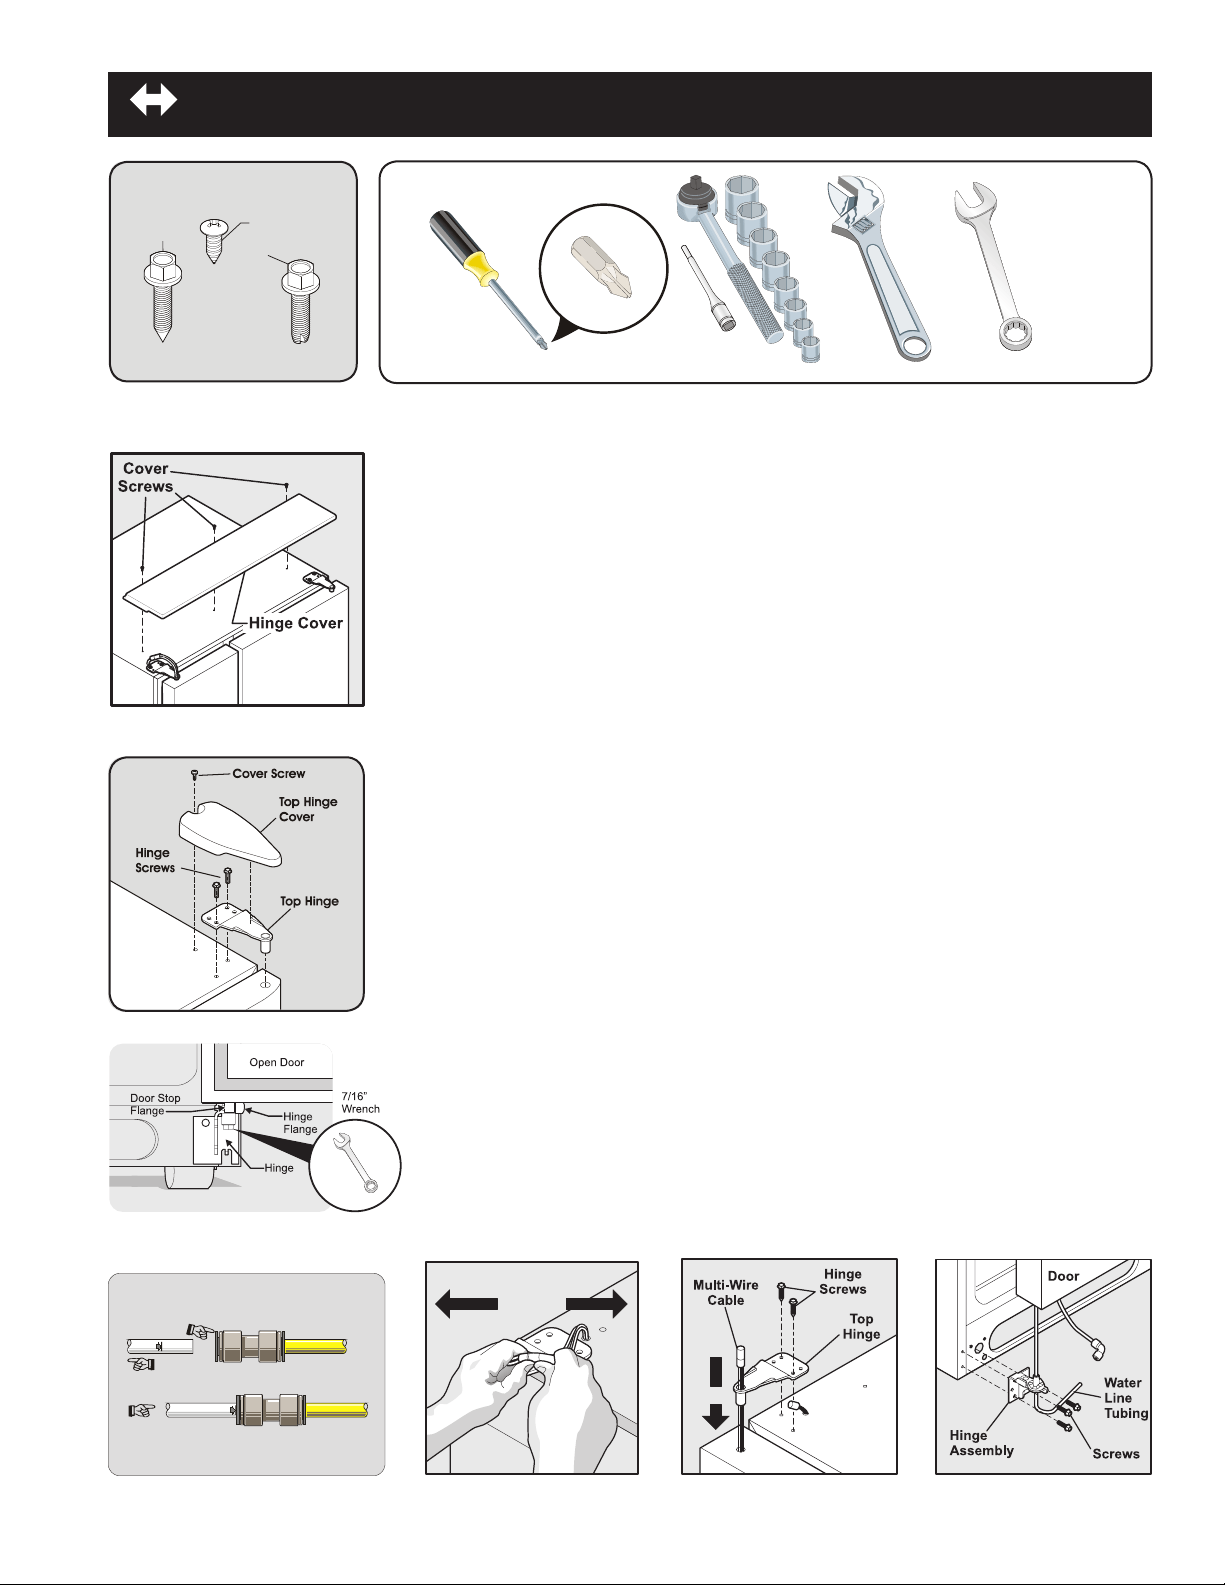
To remove the hinge cover: (some models)
1 Removethethreescrewsfromthecoveroverthetopdoorhinges.
2 Pullthecoverforwardaboutahalfinchandliftitoff.
To remove the refrigerator door:
1 Removetophingecoverscrewonrefrigeratordoorandremovecover.(somemodels)
2 Tracelightlyaroundthedoor’stophingewithapencil.Thismakesreinstallation
easier.
3 Removethetwoscrewsfromthetophinge.Liftthedooroffofthebottomhingeand
setitaside.
4 Removethethreebottomhingescrewsandhinge,ifnecessary.
To remove the freezer door:
1 Detachthemulti-wirecableconnectorlocatedabovethetophinge.Graspbothsides
oftheconnectorrmlyandpullapart.
2 Removetophingecoverscrewonfreezerdoorandremovecover.(somemodels)
3 Tracelightlyaroundthedoor’stophingewithapencil.Thismakesreinstallation
easier.
4 Detachthewatertubefromtheconnectorlocatedbelowthefreezerdoor.The
connectorreleaseswhenyoupressitsoutersleeveinward.
5 Removethescrewsfromthetophingeandpullthemulti-wirecablethroughit.
6 Liftthedooroffofthebottomhinge.Laythedooronitssidetoavoiddamagetothe
Removethethreebottomhingescrewsandhinge,ifnecessary.
Toreinstalltherefrigeratorandfreezerdoors,reversetheabovesteps.
Adjustable
Wrench
Socket
Wrench Set
OR
Phillips head
and
Flat Head
Screw Driver
™
Tools Necessary:
3/8”
Fixed
Wrench
TopHinge
CoverScrew
Bottom
Hinge
Screw
T o p
Hinge
Screw
TO DISCONNECT
1.Pressouterringagainstface
offitting
2.Pullto
removetube
TO CONNECT
Inserttubeand
pushuntilmarktouchesfaceoffitting
or
7/16”
and
6
MECHANICAL TEMPERATURE CONTROLS
COOL DOWN PERIOD
Toensuresafefoodstorage,allowtherefrigeratortooperatewiththedoorsclosedforatleast8to12hoursbeforeloadingitwith
food.
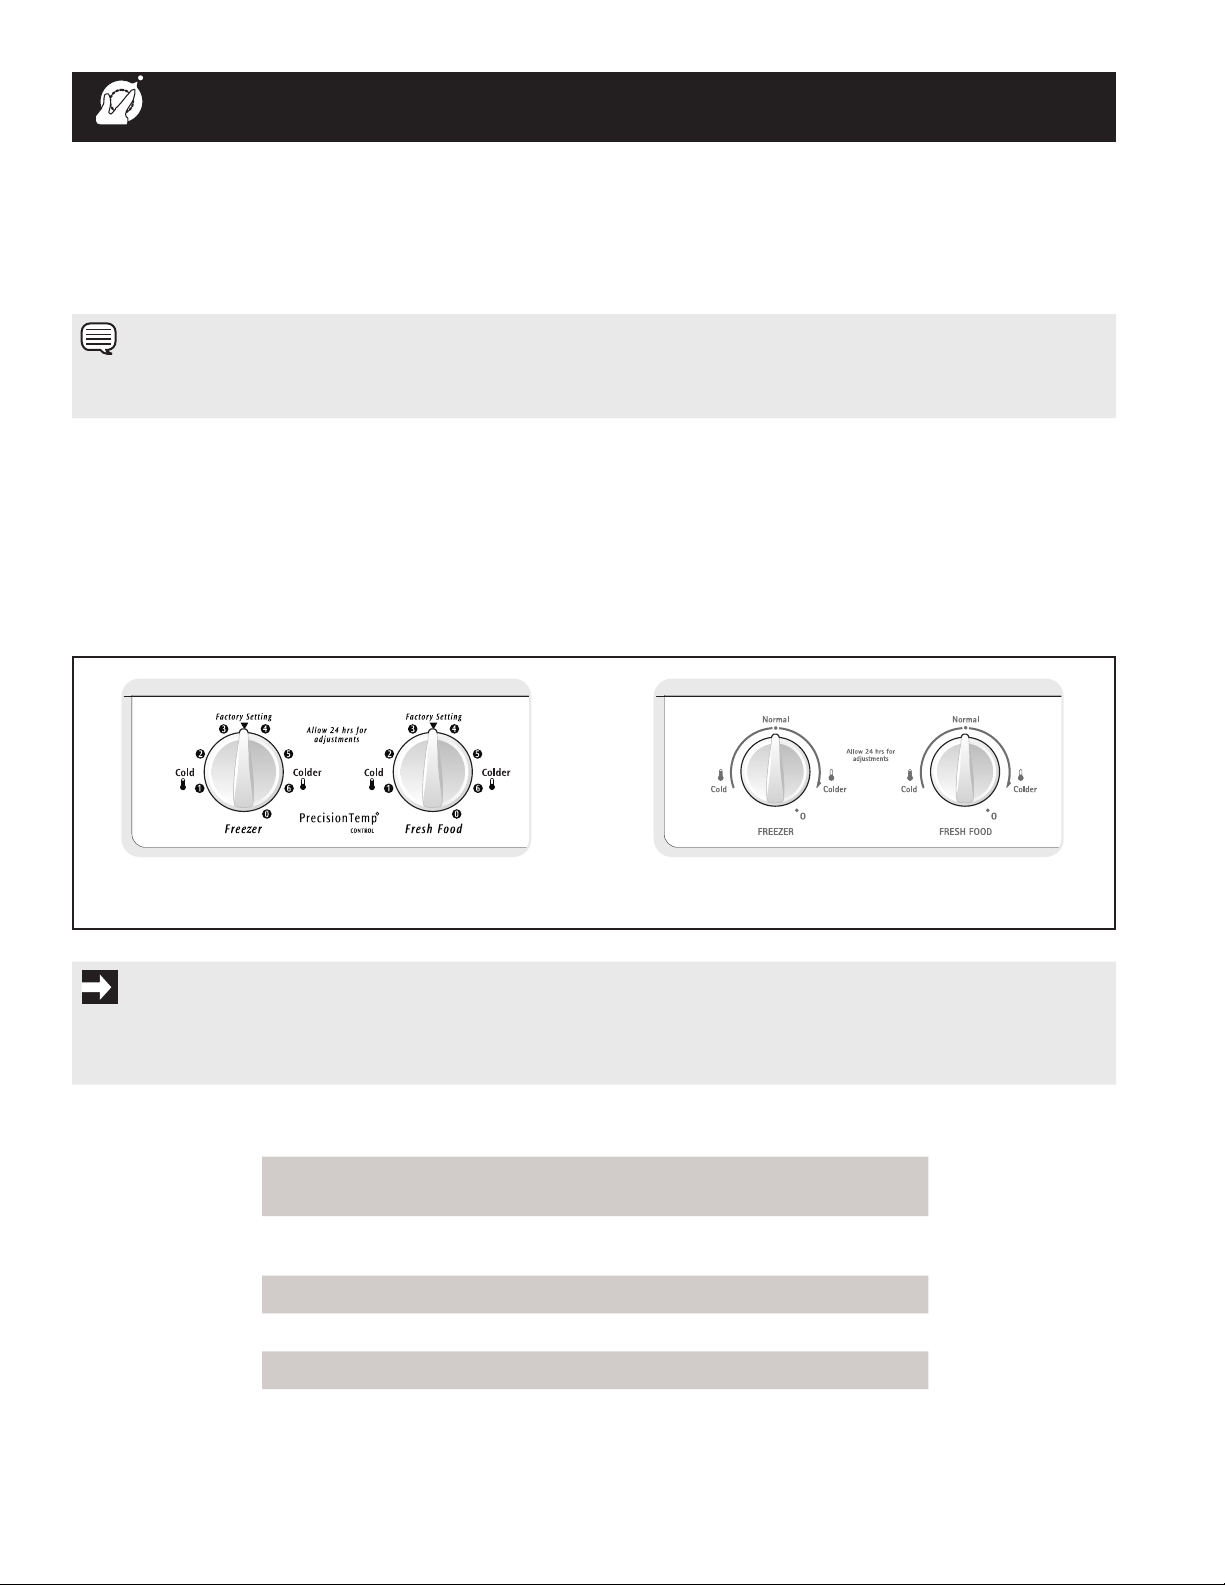
REFRIGERATOR & FREEZER CONTROLS
Refrigerator&FreezerControls
(Featuresmayvaryaccordingtomodel.)
TEMPERATURE ADJUSTMENT
• After24hours,adjustthecontrolsasneeded.Adjust temperatures gradually; move the knob in small increments,
allowing the temperature to stabilize.
• Forcoldertemperatures,turntheknobtowardsColder.
• Forwarmertemperatures,turntheknobtowardsCold.
Tomaintaintemperatures,afancirculatesairintherefrigeratorandfreezercompartments.Forgoodcirculation,donotblockcold
airventswithfooditems.
NOTE
Whenchangingcontrolsettings,wait24hoursforthetemperaturetostabilizebeforemakingadditionalchanges.
IMPORTANT
TurningtheFreezerandFreshFoodControlsto“0”turnsoffthecompressorandpreventsyourrefrigeratorfromcooling,but
doesnotdisconnectthepowertothelightbulbandotherelectricalcomponents.Toturnoffpowertoyourrefrigeratoryoumust
unplugthepowercordfromtheelectricaloutlet.
Temperature Adjustment
If Fresh Food compartment is too warm
Turn Fresh Food Control Slightly Towards
Colder.
If Fresh Food compartment is too cold
Turn Fresh Food Control Slightly Towards
Cold.
If Freezer compartment is too warm Turn Freezer Control Slightly Towards Colder.
If Freezer compartment is too cold Turn Freezer Control Slightly Towards Cold.
*To Turn Refrigerator Off Turn Freezer and Fresh Food Controls to 0.

7
ALLOWING COOLING TIME BEFORE USE
Toensuresafefoodstorage,allowyourrefrigeratortooperatewiththedoorsclosedforatleast8to12hoursbeforeplacingfood
inside.Duringthiscoolingperiod,youdonotneedtoadjustthecontrols,whicharepresetatthefactory.
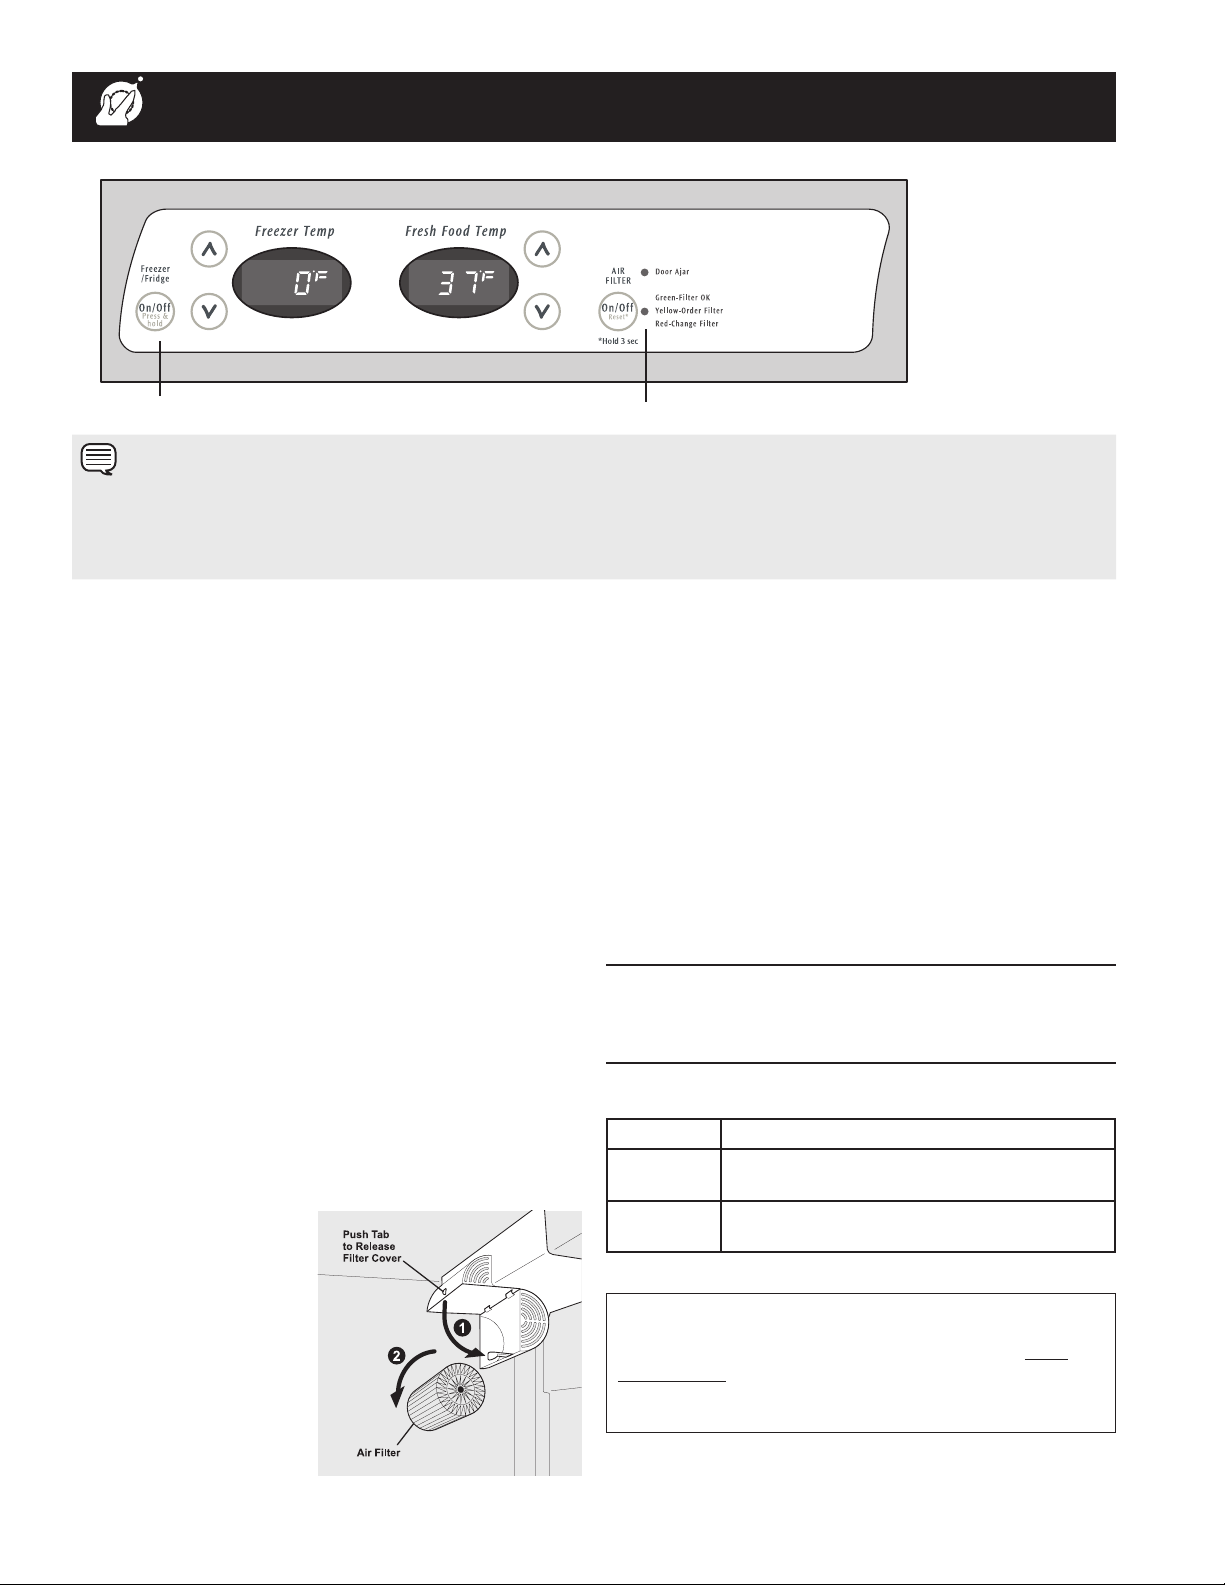
SETTING COOLING TEMPERATURES
Yourrefrigeratorcomeswithastate-of-the-artelectronicdigitalcontrolsystem.Thesystem’scontrolpanelislocatedatthetopof
thethefreshfoodcompartment.
Thetwodigitaldisplaysonthelefthalfofthecontrolpanelindicatethecurrentsettingsortemperaturesofyourfreezerandfresh
foodcompartments.Themodelswitha2-digittemperaturedisplayareforreferenceonly,anddonotdisplaythecurrentaccurate
compartmenttemperature.Shouldyoudesiretoseewhatthecurrentaccuratetemperatureis,placeaseparatethermometer
insidethefreezerorfreshfoodcompartmentinthedesiredlocation.
(SingleDigitDisplay-Featuresmayvary.)
TEMPERATURE ADJUSTMENT
Toadjustthetemperaturetoahigherorlowersetting,
presstheUp (Cold)orDown (Colder) buttonclosest
tothedisplay.Thersttimeyoupressthebutton,the
displayshowscurrentsettingyouentered.Eachpress
ofthebuttonafterthatchangesthesettingbyone.
Thedisplayshowsyournewsettingmomentarily,then
changesbacktothecurrenttemperature.
ELECTRONIC TEMPERATURE CONTROLS
NOTE
Theadvancedelectronic
controlsysteminyour
refrigeratorincludes
additionaldisplaymodes
thatserviceprofessionals
canusetorapidlydiagnose
performanceissues.
IF TEMPERATURE DISPLAYS FLASH...
Ifeveryouseebothtemperaturedisplayscontinuouslyashing,itmay
indicatethatthecontrolsystemhasdetectedaperformanceproblem.Call
yourservicerepresentative,whocaninterprettheashingmessage.
Tomaintaintemperatures,afancirculatesairintherefrigeratorandfreezer
compartments.Forgoodcirculation,donotblockcoldairventswithfood
items.
Temperature Control Range
Freezer Fresh Food
Fahrenheit Centigrade Fahrenheit Centigrade
Warmest 6º -14º 47º 8º
Warmer
Factory Setting Midpoint 0º -18º 37º 3º
Colder
Coldest -6º -21º 33º 1º
Temperature Adjustment
If Fresh Food compartment is too warm
Adjust Fresh Food control one degree
colder by pressing Down (Colder)
button.
If Fresh Food compartment is too cold
Adjust Fresh Food control one degree
warmer by pressing the Up (Cold) button.
If Freezer compartment is too warm
Adjust Freezer control one degree colder
by pressing Down (Colder) button.
If Freezer compartment is too cold
Adjust Freezer control one degree warmer
by pressing the Up (Cold) button.
Numeric Display
Freezer Fresh Food
Warmest 1 1
FactorySetting 6 6
Coldest 9 9
8
TURNING THE COOLING SYSTEM ON AND
OFF
Youcandisablethecoolingsysteminyourrefrigerator
bypressingtheOn/Offbuttonlocatedontheleftsideof
thetemperaturecontrolpanel.Toensurethatyoudonot
accidentallyturnoffthecoolingsystem,thebuttondoesnot
workunlessyoupressandholditforthreeseconds.Onceyou
disablethecoolingsystem,allrefrigerationtothefreezerand
freshfoodcompartmentsstops.Toturnthecoolingsystemback
on,youmustagainpressandholdtheOn/Offbuttonforthree
moreseconds.
AIR FILTER INDICATOR & STATUS LIGHTS
Yourrefrigerator’sairlterneedstobereplacedfromtimeto
time.Youcanmonitortheneedforreplacementbyreferringto
thestatuslightwhiletheairlteris“ON”.Toturnontheairlter,
presstheAIR FILTERbutton.Toturnofftheairlter,pressthe
AIR FILTERbutton.Toresettheairlter,presstheAIR FILTER
buttonandholdfor3seconds.
REPLACING THE AIR FILTER
Ingeneral,youshouldchangetheairltereverysixmonthsto
ensureoptimallteringofrefrigeratorodors.Youmaywantto
adjustthistimeperioddependingonthetypesandamountsof
foodyoutypicallystoreinyourrefrigerator.
To replace your air filter:
1 Pushtheplastic
bubbletablocated
onthesideofthe
airlterhousing.
Thisreleasesthe
hingedbottomhalf
todropopen.
2 Removetheold
lteranddiscardit.
ELECTRONIC TEMPERATURE CONTROLS (CONTINUED)
Cooling System On/Off Button
Indicator
Toordernewairltercartridges,contactthedealerwhere
youboughtyourrefrigerator,contactElectroluxSolutions
Hotlineat1-800-944-9044,orgotoourwebsiteatwww.
frigidaire.com.Itwouldbebenecialtoordersome
cartridgeswhenyourstinstallyourrefrigerator.Besureand
askforairlterreplacementcartridge,part#241504902.
NOTE
PressingtheOn/Offbuttononthecontrolpaneldisablesyourrefrigerator’scoolingsystembutdoesnotdisconnectpowertolightsand
otherelectricalcomponents.Toturnoffpowertoyourrefrigeratoryoumustunplugthepowercordfromthewalloutlet.
Eachtimeyoumakesettingsonthecontrolpanel,asingleaudibletoneacknowledgesyourinput.
3 Unpackagethenewlterandplaceitinsidethehinged
bottomhalfofthehousing.
4 Pushthehingedbottomhalfupwarduntilthetabsnaps
intoclosedposition.
5 PressandholdtheFilter Resetbuttonontheelectronic
controlpanelfor3seconds.WhentheFilter OKlight
comeson,thestatushasbeenreset.
6 PressandholdtheFilter Reset buttonfor3seconds
againtoturnoffthelterstatussystem.
RESPONDING TO ALARMS (Audible Tones &
Indicator Lights)
Yourrefrigerator’scontrolsystemcanconveythefollowing
informationthroughaudibletonesandthealarmindicatorlights.
Green FilterOK.
Yellow Airlterisabout80percentused.Please
orderanewone.
Red Airlteris100percentused.Pleasechange
now.
Air Filter Status Light (not available on all models)
Door
Ajar
Flashing
Green
Freezeror
refrigeratordoor
hasbeenopenfor
overveminutes.
Closedoor
todisable
andreset
alarm.
9
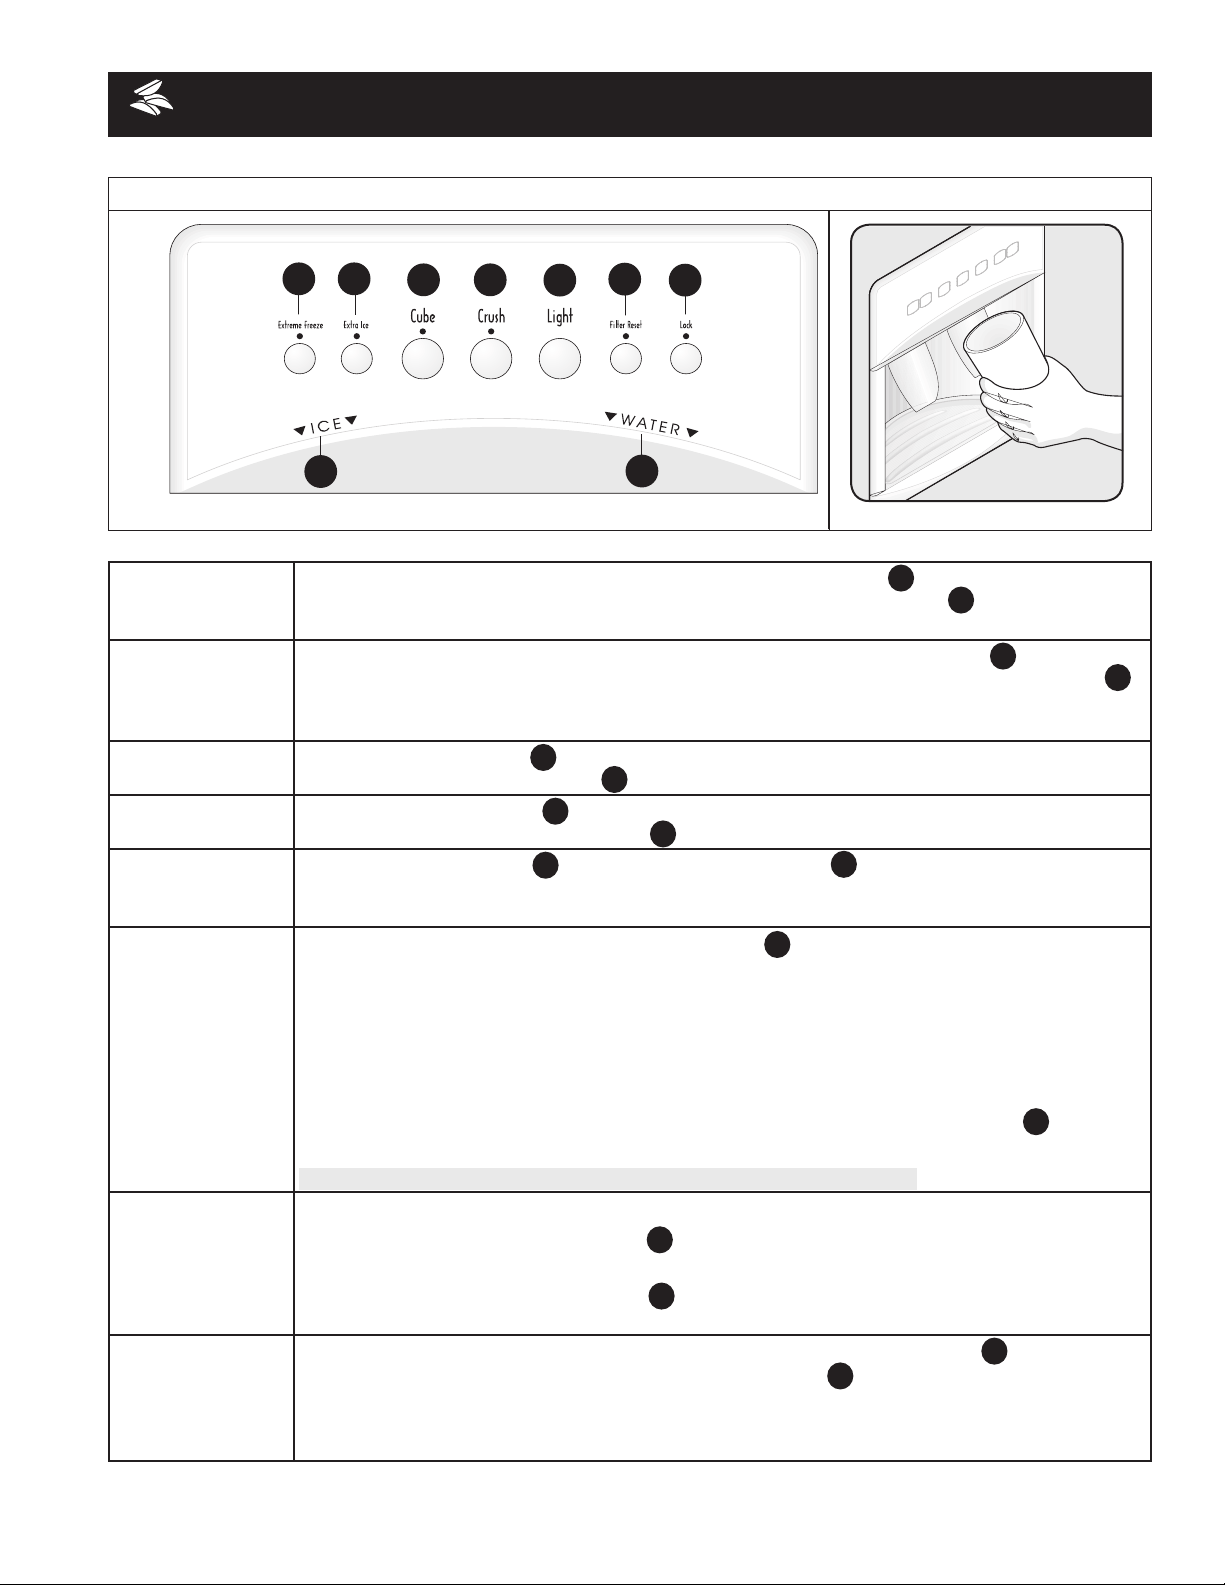
AUTOMATIC ICE & WATER DISPENSER
AUTOMATIC ICE & WATER DISPENSER OPERATING INSTRUCTIONS
Features may vary according to model.
1 2
3 4
5
6
7
8
9
1
1
2
3
4
7
7
9
8
8
5
5
6
6
2
9
EXTREME FREEZE
Tofreezefoodatafasterratetopreservefreshness,pushtheTouchPadfor3-5secondstoactivate
thisfeature.AgreenlightwillappearabovetheTouchPad.PushtheTouchPadagainfor3-5
secondstodeactivate.
EXTRA ICE
Toincreaseiceproductionforspecialoccasions,suchasparties,pushtheTouchPadfor3-5
secondstoactivatethisfeature.AgreenlightwillappearabovetheTouchPad.PushtheTouchPad
againfor3-5secondstodeactivate.ExtraIceshouldproduce25percentto50percentmoreiceevery24
hours.
CUBE
PresstheCUBETouchPadtogetcubedice.AgreenlightwillappearabovetheTouchPad.Press
glassagainstICEdispensingpaddleasfarupaspossibletocatchallice.
CRUSH
PresstheCRUSHTouchPadtogetcrushedice.AgreenlightwillappearabovetheTouchPad.
PressglassagainstICEdispensingpaddleasfarupaspossibletocatchallice.
LIGHT
PresstheLIGHTTouchPadtoturnondispenserlight.Pressagaintoturnthelightoff.Thelight
alsoturnsonautomaticallywheniceand/orwaterisdispensed.Replacelightbulbwithanappliancebulb
ofthesamewattage.
FILTER STATUS
TheFILTERSTATUSindicatorlightabovetheTouchPadwilllightupeachtimethedispenseris
used.Thefollowinglterlightindicationsare:
Green Thelterisstilloperatingwithinitsspeciedlifecycle.
Amber Thelterhasreachedapproximately80percentofitsusefullife.Thisistherecommendedtime
topurchaseareplacementlter.
Red Thelteris100percentusedup.Changethelterassoonaspossible.
Aftertheltercartridgehasbeenchanged,pressandholdtheFILTERRESETTouchPadfor10-15
seconds.
NOTE:TheGreen,AmberandRedlightswillashwhenresetiscompleted.
LOCK
TheIce&WaterDispensercanbelocked outtopreventunwanteduse.
To Lock OutPresstheLOCKTouchPadfor3-5seconds.ARedlightwillappearabovetheTouch
Pad.
To UnlockPresstheLOCKTouchPadfor3-5secondsuntiltheRedlightabovetheTouchPad
goesout.
WATER
Tooperatethewaterdispenser,pressaglassagainsttheWATERdispensingpaddle.Tostop
dispensingwater,pulltheglassawayfromthedispensingpaddle.Dispensedwaterisnotcold.For
colderwater,addcrushediceorcubesbeforedispensingwater.Adriptraylocatedatthebaseofthe
dispensercatchessmallspillsandallowsthemtoevaporate.Thisdriptrayisremovableanddishwasher
safe.Donotpourwaterandexcessiceinthisareabecausethereisnodrain.
10
HOW TO PRIME THE WATER SUPPLY SYSTEM
Yourrefrigerator’swatersupplysystemincludesseveraltubing
lines,awaterlter,awatervalveandawatertank.To ensure
that your water dispenser works properly, this system must
be completely filled with water when your refrigerator is
first connected to the household water supply line and
whenever you replace the water filter.
TO PRIME THE WATER SUPPLY SYSTEM:
• Beginllingthetankbypressingandholdingadrinking
glassagainstthewaterdispenserpaddle.
• Keeptheglassinthispositionuntilwatercomesoutof
thedispenser.Therewillbenoticeablespurtsand
sputtersasthesystempushesairoutthroughthe
systemanddispensernozzle.Thisisnormal.This may
take about 1½ minutes.
• Continuedispensingwaterforabout3minutestoush
thesystemofanyairandimpurities.Emptyglassas
needed.
HOW THE ICE MAKER WORKS
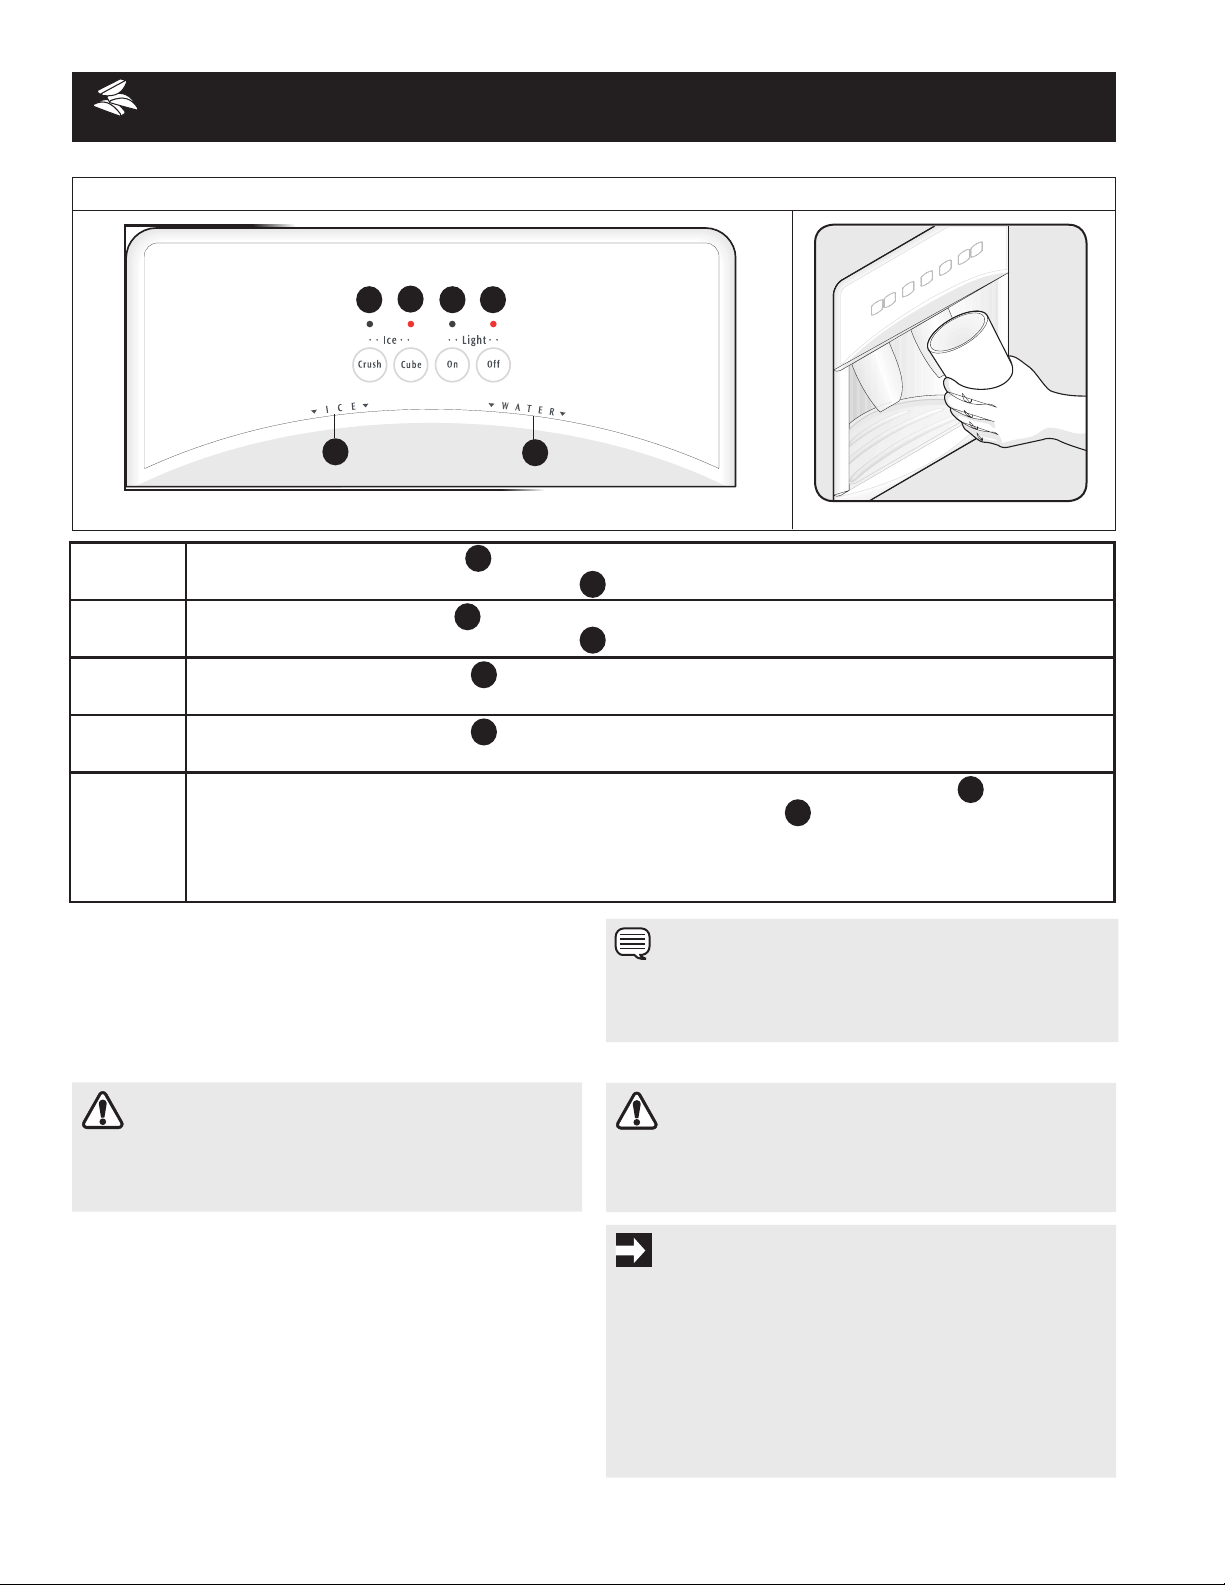
AUTOMATIC ICE & WATER DISPENSER (CONTINUED)
AUTOMATIC ICE & WATER DISPENSER OPERATING INSTRUCTIONS
Features may vary according to model.
Crushed PresstheCrushedTouchPadtogetcrushedice.AredindicatorwillappearabovetheTouchPad.
PressglassagainstICEdispensingpaddleasfarupaspossibletocatchallice.
Cubed PresstheCubedTouchPadtogetcubedice.AredindicatorwillappearabovetheTouchPad.
PressglassagainstICEdispensingpaddleasfarupaspossibletocatchallice.
LightOn PresstheLightOnTouchPadtoturnondispenserlight.Aredindicatorwillappearabovethe
TouchPad.
LightOff PresstheLightOffTouchPadtoturnoffdispenserlight.Aredindicatorwillappearabovethe
TouchPad.
Water Tooperatethewaterdispenser,pressaglassagainsttheWATERdispensingpaddle.Tostop
dispensingwater,pulltheglassawayfromthedispensingpaddle.Dispensedwaterisnotcold.
Forcolderwater,addcrushediceorcubesbeforedispensingwater.Adriptraylocatedatthebase
ofthedispensercatchessmallspillsandallowsthemtoevaporate.Thisdriptrayisremovableand
dishwashersafe.Donotpourwaterandexcessiceinthisareabecausethereisnodrain.
4
3
2
1
5
6
5
6
5
43
2
1
6
CAUTION
For proper dispenser operation, recommended water
supply pressure should fall between 30 psi and 100 psi.
Excessive pressure may cause water filter to malfunction.
NOTE
Thewaterdispenserhasabuilt-indevicethatshutsoffthe
waterowafter3minutesofcontinuoususe.Toresetthis
shutoffdevice,simplyreleasethedispenserpaddle.
CAUTION
Chemicals from a malfunctioning softener can damage the
ice maker. If the ice maker is connected to soft water, ensure
that the softener is maintained and working properly.
IMPORTANT
Youricemakerisshippedfromthefactorywiththewire
signalarmintheONposition(sidemounted)orwiththe
switchturnedON(rearmounted).Toensureproperfunction
ofyouricemaker,hookupwatersupplyimmediatelyorturn
icemakerOFFbyliftingthewiresignalarmuntilitclicks
andlocksintheUPposition(sidemounted)orturntheOn/
OffswitchtotheOff(0)position. If the ice maker is not
turned off and the water supply is not connected, the
water valve will make a loud chattering noise.
11
AUTOMATIC ICE & WATER DISPENSER (CONTINUED)
.
Theicemakerandcontainerarelocatedinthetopofthe
freezercompartment.Aftertherefrigeratorisinstalledproperly
andhascooledforseveralhours,theicemakercanbegin
makingicewithin24hours.Airinnewplumbinglinesmay
causetheicemakertocycletwoorthreetimesbeforemakinga
fulltrayofice.Withnousage,itwilltakeapproximatelytwodays
tolltheicecontainer.
Becauseofnewplumbingconnections,therstproductionof
icecubesmaybediscoloredorhaveanoddavor.Discardice
madeduringtherst24hours.
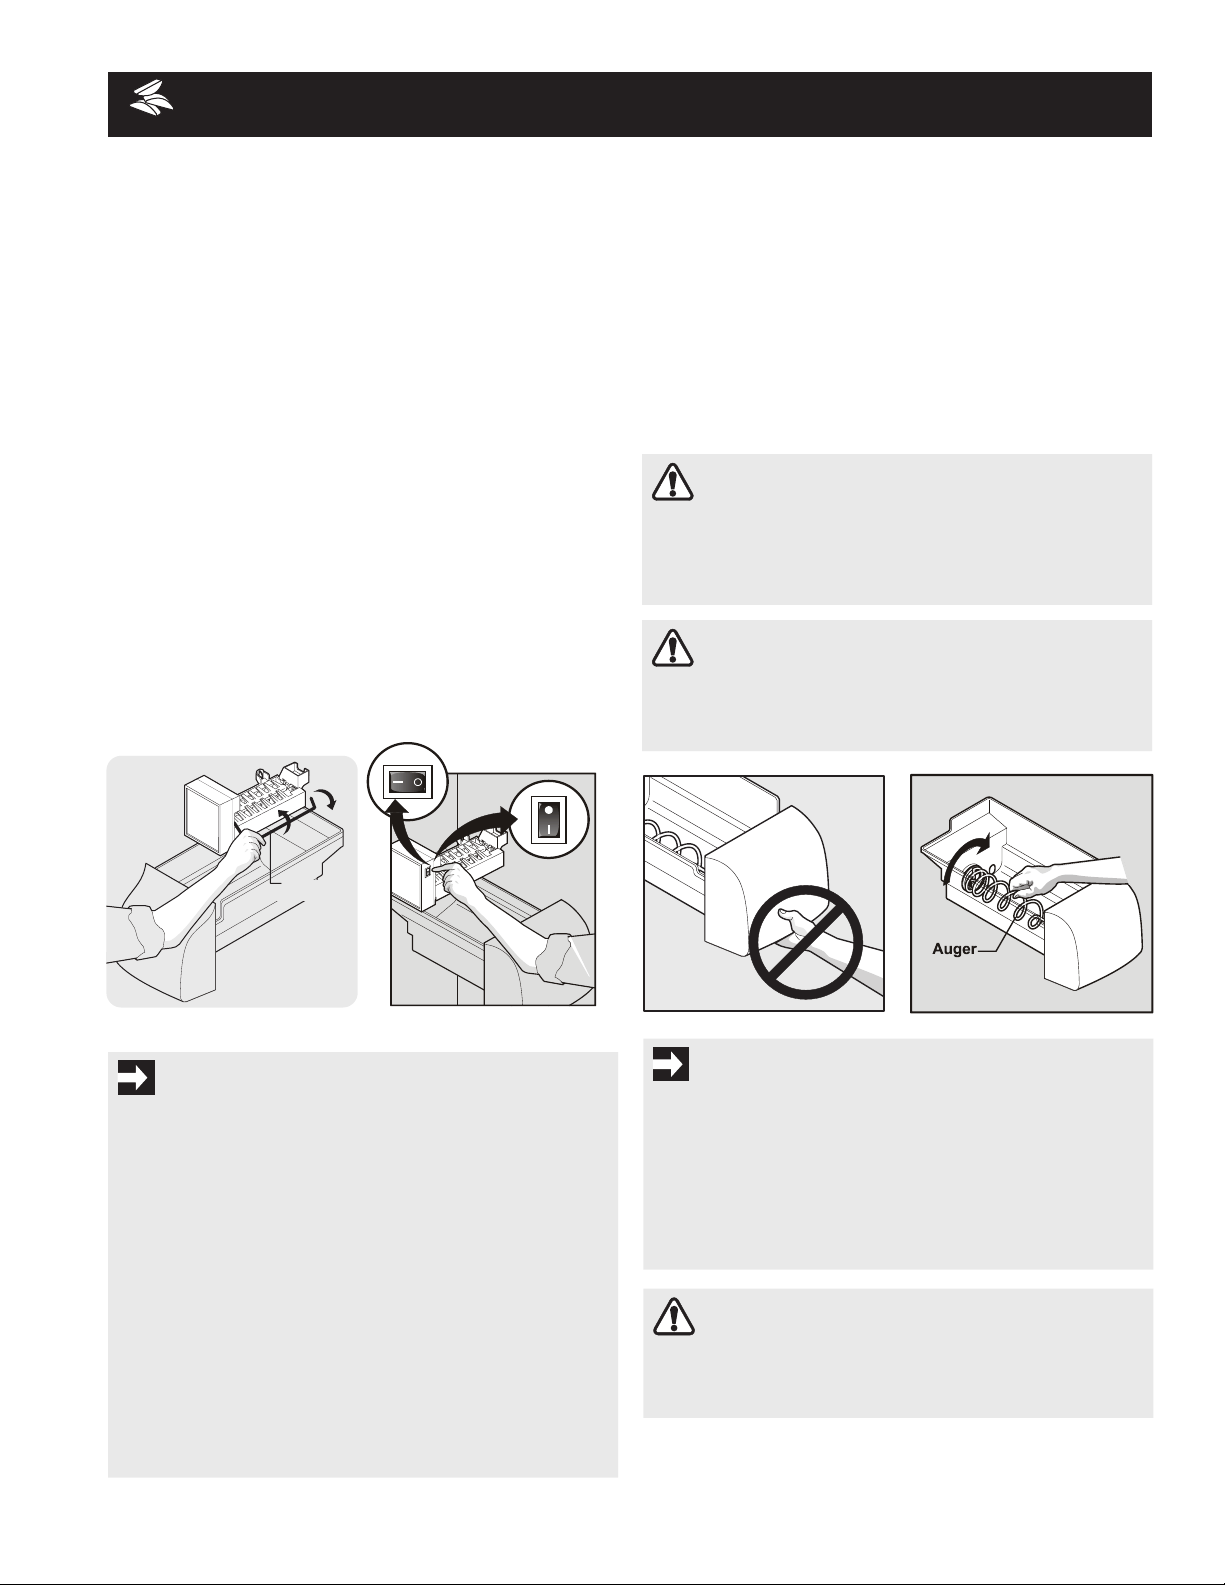
TURNING YOUR SIDE MOUNTED ICE MAKER ON/OFF
Tobeginiceproduction,lowerthewiresignalarmtotheDOWN
orONposition.Theicemakerturnsoffautomaticallywhenthe
icecontainerbecomesfull.Tostoptheicemaker,raisethewire
signalarmuntilitclicksandlocksintheUPorOFFposition
(seeFigure1).
TURNING YOUR REAR MOUNTED ICE MAKER ON/OFF
Iceproductioniscontrolledbytheicemaker’sON/OFFpower
switch.Togainaccesstotheicemaker,pulltheicecreamshelf
out.Presstheswitchtothe“O”positiontoturnitOffandpress
ittothe“I”positiontoturnitOn(seeFigure2).Theicemaker
alsohasabuilt-inwiresignalarm,whichautomaticallystopsice
productionwhentheicebinisfull.DO NOTusethissignalarm
tomanuallystoptheicemaker.
OFF
ON
OR
ON
OFF
Wire
Signal Arm
Figure 1
Figure 2
ICE PRODUCTION: WHAT TO EXPECT
How Much Ice Will a Side Mounted Ice Maker Produce in 24
Hours?
Asidemountedicemakerwillproduce4to4.5poundsofice
every24hours,dependingonusageconditions.Iceisproduced
atarateof8cubesevery75to90minutes.
How Much Ice Will a Rear Mounted Ice Maker Produce in 24
Hours?
Arearmountedicemakerwillproduce3to4poundsofice
every24hours,dependingonusageconditions.Iceisproduced
atarateof8cubesevery75to90minutes.
IMPORTANT
SmallIcecubesoricechipsjammingintheicemaker
maybeasignthatyourwaterlterneedschanging.Ifyou
haveasidemountedicemakeryoumayalsoexperience
hollowcubes—partiallyfrozencubeswithwaterinside.
Whenthesecubesareharvestedtheybreakopenandspill
waterovertheothericecubesintheicecontainer,forming
asolidmassofice.Asthewaterlternearstheendofits
usefullifeandbecomescloggedwithparticles,lesswateris
deliveredtotheicemakerduringeachcycle.Theicemaker
can’tlleverycubeintheicemakermold,leadingtosmall
cubesorchipsthatcangetcaughtbetweentheiceejector
bladesandthestripper.Remember, if your ice maker is
jamming with small ice cubes or it’s been six months
or longer since you last changed your water filter –
replace the water filter with a new one. Poor quality
household water may require the filter to be changed
more frequently.
CAUTION
If the dispensing paddle is pushed for more than four
minutes, the dispenser motor may overload and stop.
The overload protector will reset automatically after
three or four minutes.
WARNING
Do not use the ice chute as a handle when removing or
replacing the ice storage bin. Do not put fingers up ice
chute. Surfaces there may be sharp.
IMPORTANT
Whenremovingorreplacingtheicebin,DONOTrotate
theaugerintheicebin.Iftheaugerisaccidentallyrotated,
youmustrealigntheaugerbyturningitin90°turnsuntil
theicebintsintoplacewiththedrivemechanism.If the
auger is not properlyalignedwhenreplacingtheicebin,
therefrigeratorwillonlydispenseCrushedIce.Thefreezer
doormayalsonotcloseproperlycausingwarmairtoleak
intothefreezer.
CAUTION
NEVER use an ice pick or similar sharp instrument to
break up the ice. This could damage the ice storage bin
and dispenser mechanism.
12
AUTOMATIC ICE & WATER DISPENSER (CONTINUED)
PURESOURCE
TM
* ICE AND WATER FILTER
(SOME MODELS)
Ordernewltercartridgesthroughthedealerwhereyou
boughttherefrigerator,contacttheElectroluxSolutionsHotline
at1-800-944-9044,orgotoourwebsiteatwww.frigidaire.
com.Itmightbegoodtoordersomeltercartridgeswhen
yourstinstallyourrefrigerator.BesuretoaskfortheRG-100
PureSource™*replacementcartridge.
System Startup:
Watersupplydoesnotneedtobeturnedoff,however,donot
useiceandwaterdispenserwhileinstallinglter.Thelter
cartridgehasalreadybeeninstalledinthelterhousingatthe
factory.RefertotheHowtoPrimetheWaterSupplySystem
sectiontoproperlyllthesystemwithwater.
Changing the Filter:
Waterconditionsvarythroughouttheworld,butchangingthe
waterlterevery6-9monthsnormallywillensurethehighest
possiblewaterquality.Ice jams in the ice maker and/or
hollow ice cubes (partially frozen cubes with water inside),
may also be a sign that your water filter needs changing.
TheFilterStatuslightwillturnredafter400gallonsofwater
hasowedthroughtheiceandwaterdispenser.Also,ifthelter
hasbeeninarefrigeratorthathasnotbeeninuseforawhile
(duringmovingforexample),changethelterbeforereinstalling
therefrigerator.Thedispensersystemwillalsooperatewithout
ltration(withltercartridgeremoved).
* WhiteWestinghouseusesthenameCrystalClearinsteadofPureSource,buttheyarethesamelter.
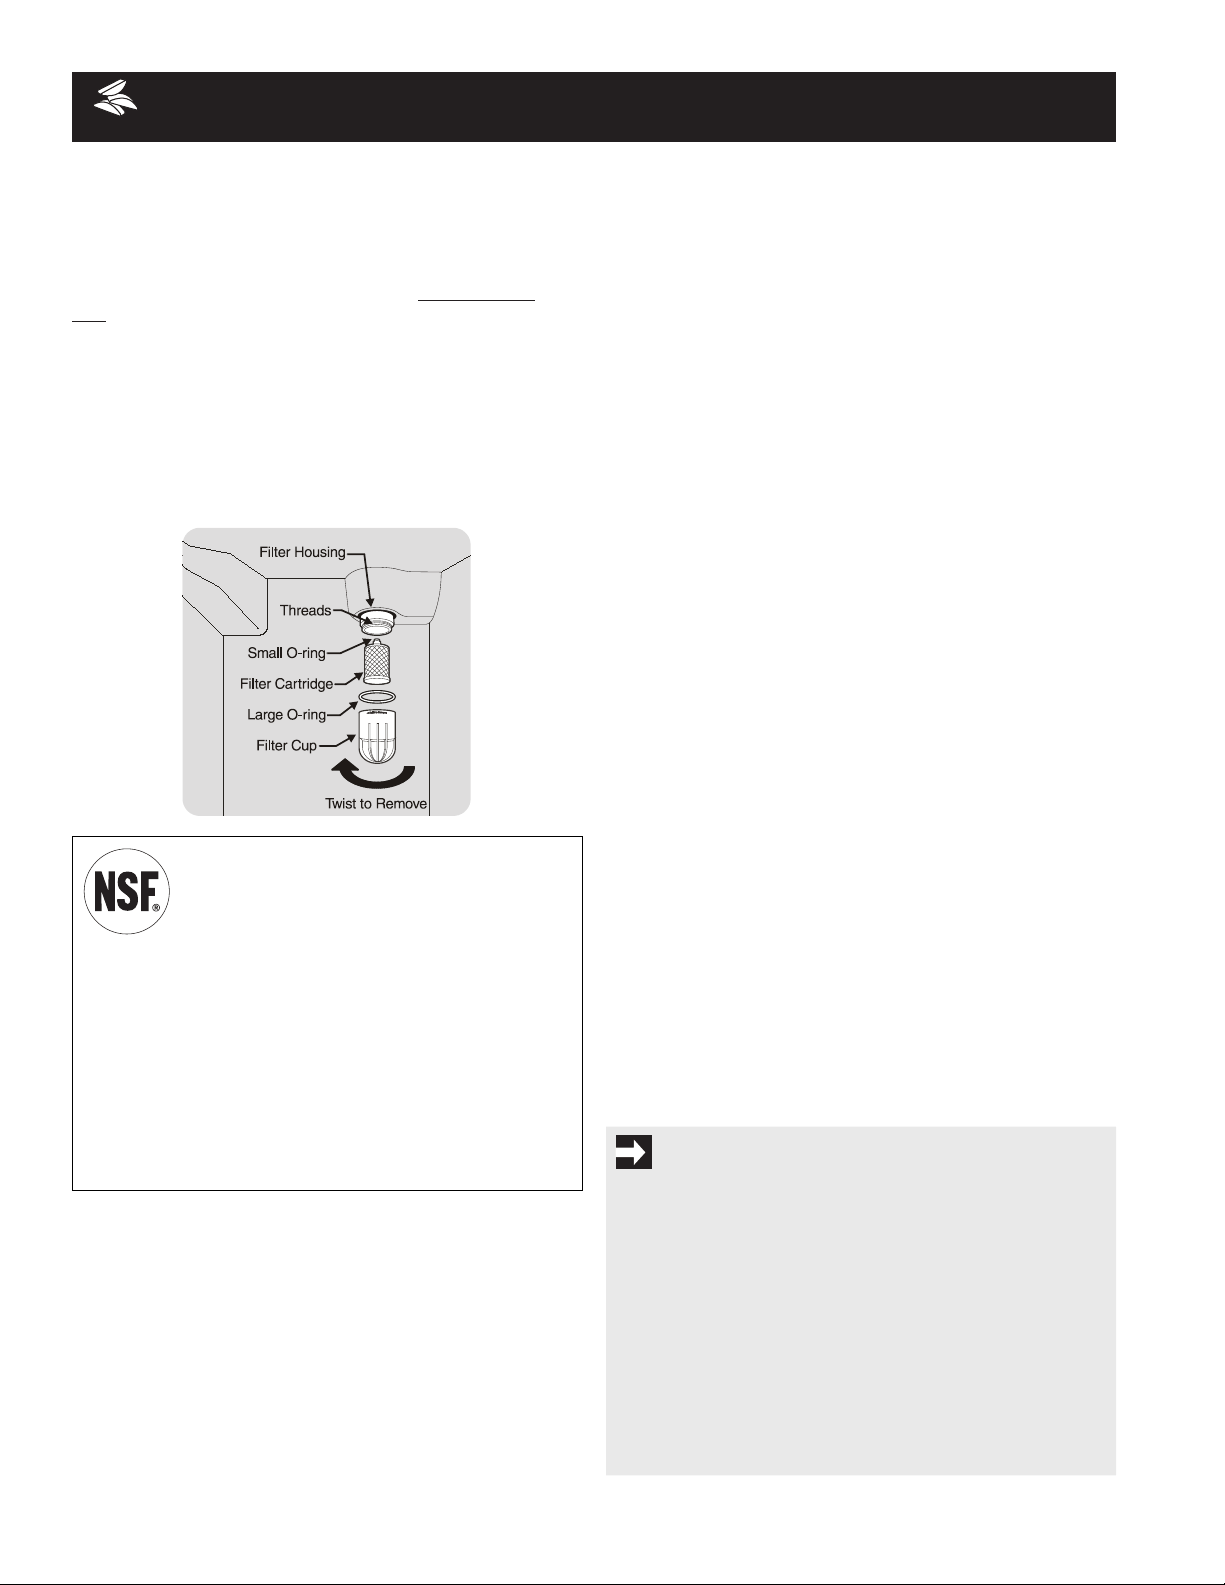
ThePureSource™*NGRG-2000IceandWater
FilterSystemwiththeRG-100cartridgeis
testedandcertiedbyNSFInternational,the
nationallyrecognizedandrespected,notfor
prot,certicationorganizationforpublichealth
safety.ThePureSource™*systemistestedandcertied
toANSI/NSFStandard42.Seeperformancedatasheetfor
specications.Thissystemshouldnotbeusedonwaterthat
ismicrobiologicallyunsafeorwithwaterofunknownquality
unlessthewaterhasbeenadequatelydisinfectedbeforeor
aftertravelingthroughtheltrationsystem.
•RatedCapacity-400gallons
•Ratedserviceow-.5GPM
•MaximumRatedPressure-100PSI,Minimum30PSI
•MaximumOperatingTemp.-100°F,Minimum33°F
To change filter:
Itisnotnecessarytoturnthewatersupplyofftochangethelter.
1 Openfreezerdoorandleaveopenuntillterchangeis
complete.
2 TurnOFFsidemountedicemakerbyraisingwiresignal
armtotheUPposition.TurnOFFrearmountedicemaker
bypressingON/OFFpowerswitchtothe“O”position.
3 Holdltercuprmly,andunscrewtowardsleft.(Somewater
couldleakoutasyouremovecup.Thisisnormal.)Filter
cartridgeshouldcomedownwithcup.Ifcartridgeremainsin
housing,pulldowngently,whiletwistinglterbackandforth.
4 Rinseoutcupunderrunningwater.
5 Thelargeo-ringthatsealstheltersystemtsinthe
o-ringgrooveinsidethecup.Shouldtheo-ringfallout
duringltercartridgereplacement,simplyplaceitback
inthegroovepriortoscrewingthecupbackinplace.If
theo-ringbecomesdamaged,youwillneedtoorderone
fromtheElectroluxSolutionsHotline.
6 Discardoldltercartridge.
7 Removenewltercartridgefrompackaging.Placeincup.
Theendwiththesmallo-ringshouldbeup,outofthecup.
8 Screwcup,withlter,backontohousing.Do Not Use
Wrench To Reinstall Cup.Filtercartridgewillself-align
ascupistightened.Besurecupiscompletelytightened
withPureSource™ logofacingoutward.Do Not Tighten
Past Stop.
9 TurnONsidemountedicemakerbyloweringwiresignal
armtotheDOWNposition.TurnONrearmountedice
makerbypressingON/OFFpowerswitchtothe“I”position.
10 Checkforleaks.Openrefrigeratordoor.Wipeanywater
dropletsfromtheltercup.Fillaglasswithwater.If
thereisaleak,unscrewltercup,andreinsertthelter
cartridge.CheckplacementoflargeO-ring.Reinstalllter
cup,makingcertainitistightenedcompletely.
11 To prime filter system and purge air from water line,
continueushingthesystemforapproximately3minutes
toassurethatthepurestwaterpossibleisstoredin
thewatertank.There will be noticeable spurts and
sputters as the system pushes air out through the
system and out the dispenser nozzle. This is normal.
IMPORTANT
Resetting The Filter Status Light (some models)
Afterreplacingtheltercartridge,itwillbenecessarytopress
theFilterStatusResetbuttonlocatedontheiceandwater
dispenser.ThiswillresettheFilterStatuslight.PushtheReset
buttonuntilthegreen,redandamberlightsash(10-15
seconds).Pleaserefertothecompletedispenseroperating
instructionsattachedtotheinsideofthefreezerdoor.
On models without a Filter Status reset button, thereisa
setofReminderStickersincludedintheenvelopethattheUse
& Care Manualcamein.Chooseadatedstickerthatindicates
6-9months(dependingonyourwaterqualityandusage)
fromthedateofinstallation.Placethestickeronthefrontof
theltercuptoremindyouwhenitistimetochangethelter.
13
AUTOMATIC ICE & WATER DISPENSER (CONTINUED)
Changing the Filter:
Waterconditionsvarythroughouttheworld,butchangingthe
waterlterevery6-9monthsnormallywillensurethehighest
possiblewaterquality.Ice jams in the ice maker and/or hollow
ice cubes (partially frozen cubes with water inside), may also
be a sign that your water filter needs changing. TheFilter
Statuslightwillturnredafterapproximately400gallonsofwater
hasowedthroughtheiceandwaterdispenser.Also,ifthelter
hasbeeninarefrigeratorthathasnotbeeninuseforawhile
(duringmovingforexample),changethelterbeforereinstalling
therefrigerator.Thedispensersystemwillalsooperatewithout
ltration(withltercartridgeremovedandbypassinstalled).
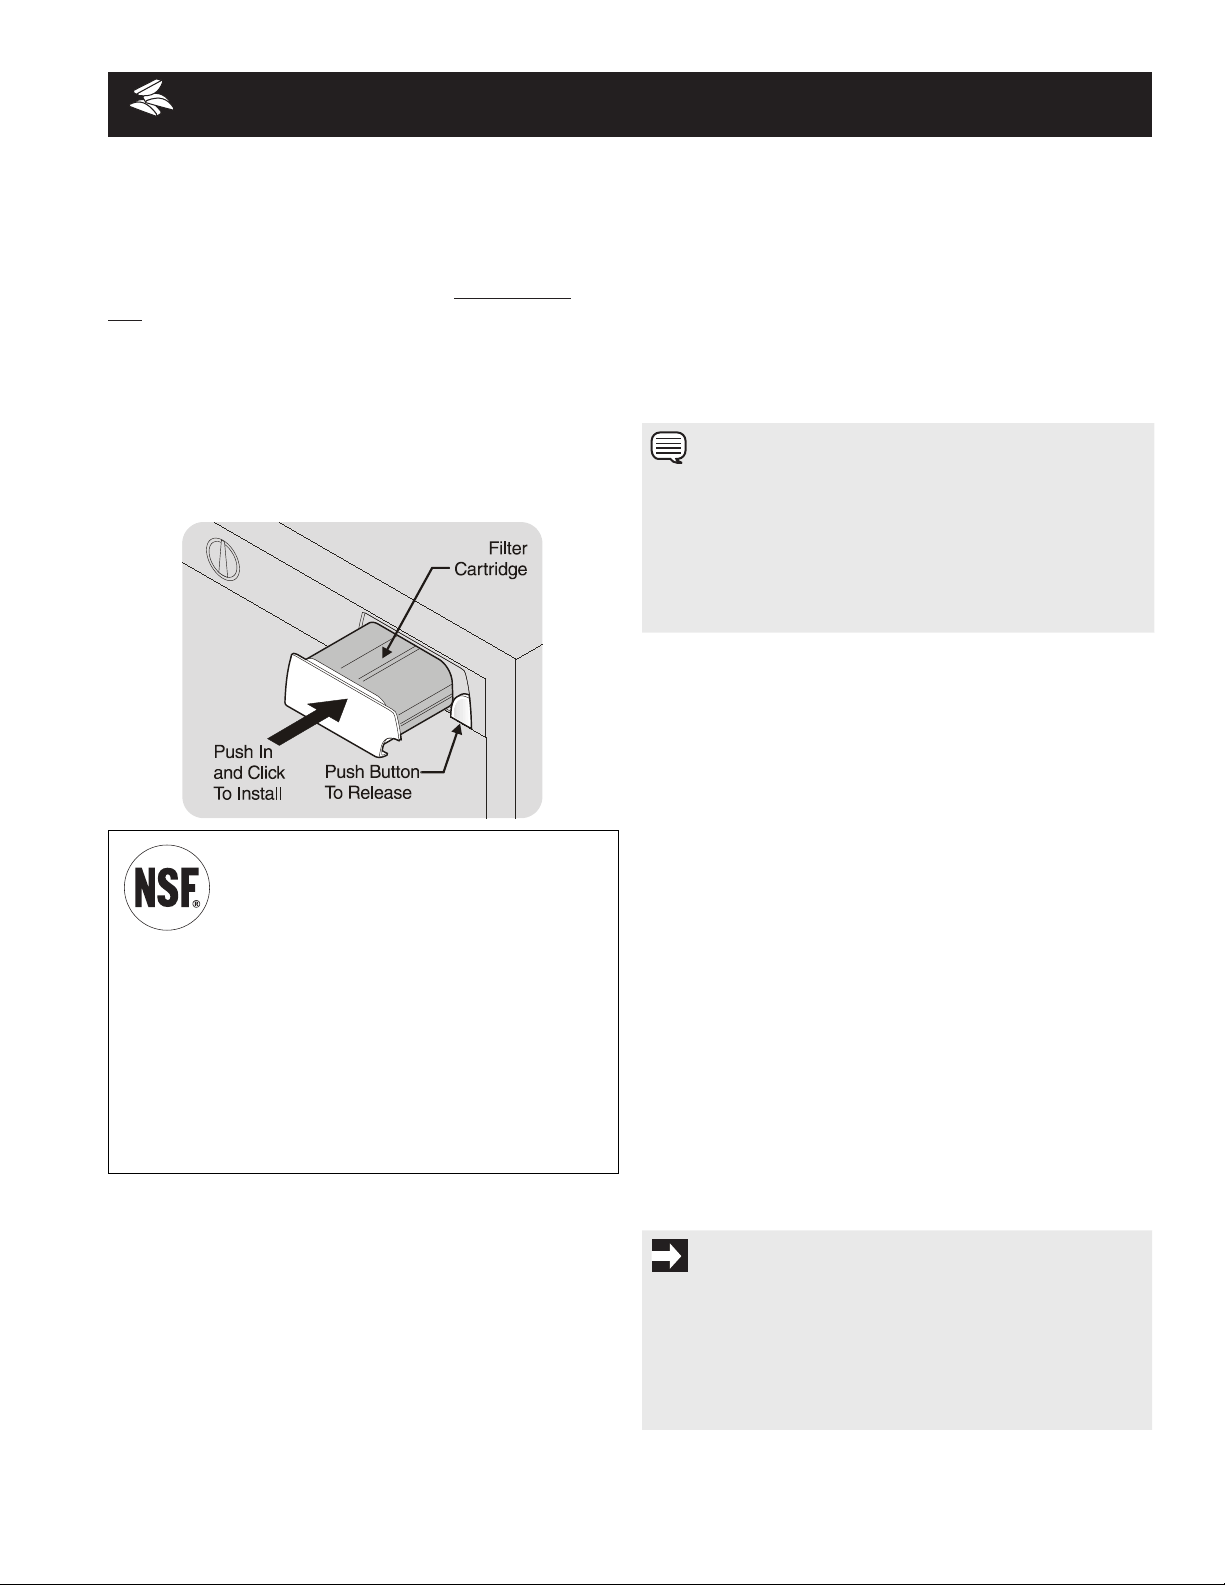
PURESOURCE2
TM
* ICE AND WATER FRONT
FILTER (SOME MODELS)
Ordernewltercartridgesthroughthedealerwhereyou
boughttherefrigerator,contacttheElectroluxSolutionsHotline
at1-800-944-9044,orgotoourwebsiteatwww.frigidaire.
com.Itmightbegoodtoordersomeltercartridgeswhen
yourstinstallyourrefrigerator.BesuretoaskfortheFC-100
PureSource™*replacementcartridge.
System Startup:
Watersupplydoesnotneedtobeturnedoff,however,donot
useiceandwaterdispenserwhileinstallinglter.
Theltercartridgehasalreadybeeninstalledinthelter
housingatthefactory.RefertotheHowtoPrimetheWater
SupplySystemsectiontoproperlyllthesystemwithwater.
ThePureSource2
TM*
IceandWaterFilter
SystemNGFC2000withthePureSource2
TM*
cartridgeFC100istestedandcertiedbyNSF
International,thenationallyrecognizedand
respected,notforprot,certicationorganization
forpublichealthsafety.ThePureSource2
TM*
Filtersystemis
testedandcertiedtoANSI/NSFStandards42and53.See
performancedatasheetforspecications.Thissystemshould
notbeusedonwaterthatismicrobiologicallyunsafeorwith
waterofunknownqualityunlessthewaterhasbeenadequately
disinfectedbeforeoraftertravelingthroughtheltrationsystem.
•RatedCapacity-400gallons
•Ratedserviceow-.5GPM
•MaximumRatedPressure-100PSI,Minimum30PSI
•MaximumOperatingTemp.-100°F,Minimum33°F
To change filter:
Itisnotnecessarytoturnthewatersupplyofftochangethelter.
1 TurnOFFsidemountedicemakerbyraisingwiresignal
armtotheUPposition.TurnOFFrearmountedicemaker
bypressingON/OFFpowerswitchtothe“O”position.
2 PushtheFilterReleaseButton,locatedtotherightof
theltercartridge,toreleasethelterfromthehousing.
Tominimizethepossibilityofthelterfallingoutofthe
housingduringremoval,itwouldbebesttoholdthe
lterasitmovesouttowardyou.
3 Pulltheoldltercartridgestraightoutofthehousing.
4 Discardtheoldlter.
5 Removethenewltercartridgefromthepackaging.
Removecapsfromlterandinsertintothelterhousing
thesamewaytheoldonecameout.
6 Whenthecartridgeisalmostin,youwillfeelitstop
againsttheclipassemblyinthebackofthehousing.The
clipassemblyholdstheltercartridgermlyinplace.At
thispoint,youwillneedtopushrmlyuntilthecartridge
snapsfullyinplace.Whencompletelyinplace,thefront
oftheltercartridgewillbeushwiththefrontofthe
housing.
7 TurnONsidemountedicemakerbyloweringwiresignal
armtotheDOWNposition.TurnONrearmountedice
makerbypressingON/OFFpowerswitchtothe“I”
position.
8 Fillaglasswithwater.Asyouaredoingthis,checkfor
leaksatthelterhousing.
9 To prime filter system and purge air from water line,
continueushingthesystemforapproximately3minutes
toassurethatthepurestwaterpossibleisstoredin
thewatertank.There will be noticeable spurts and
sputters as the system pushes air out through the
system and out the dispenser nozzle. This is normal.
* WhiteWestinghouseusesthenameCrystalClearinsteadofPureSource,buttheyarethesamelter.
NOTE
Asmallamountofwatermaybereleasedduringthis
operation.Youshouldhaveapapertowelordishcloth
handytowipeupanywaterthatmaydripoutofthelteror
housing.Twosmallholesnearthebackofthehousinghave
beenaddedforanyexcesswatertoescape.Itwouldbe
besttoclearawayanyfoodnearthisareaonthetopshelf
inadvanceofremovingthelter.
IMPORTANT
Resetting The Filter Status Light (some models)
Afterreplacingtheltercartridge,itwillbenecessaryto
presstheFilterResetbuttonlocatedontheiceandwater
dispenser.ThiswillresettheFilter Statuslight.Pushthe
resetbuttonuntilthegreen,redandamberlightsash
(10-15seconds).
14
NORMAL OPERATING SOUNDS & SIGHTS
UNDERSTANDING THE SOUNDS YOU MAY
HEAR
Yournewhigh-efciencyrefrigeratormaymakeunfamiliarsounds.
Theseareallnormalsoundsandsoonwillbecomefamiliartoyou.
Theyalsoindicateyourrefrigeratorisoperatingasdesigned.Hard
surfaces,suchasvinylorwoodoors,walls,andkitchencabinetsmay
makesoundsmorenoticeable.Listedbelowaredescriptionsofsome
ofthemostcommonsoundsyoumayhear,andwhatiscausingthem.
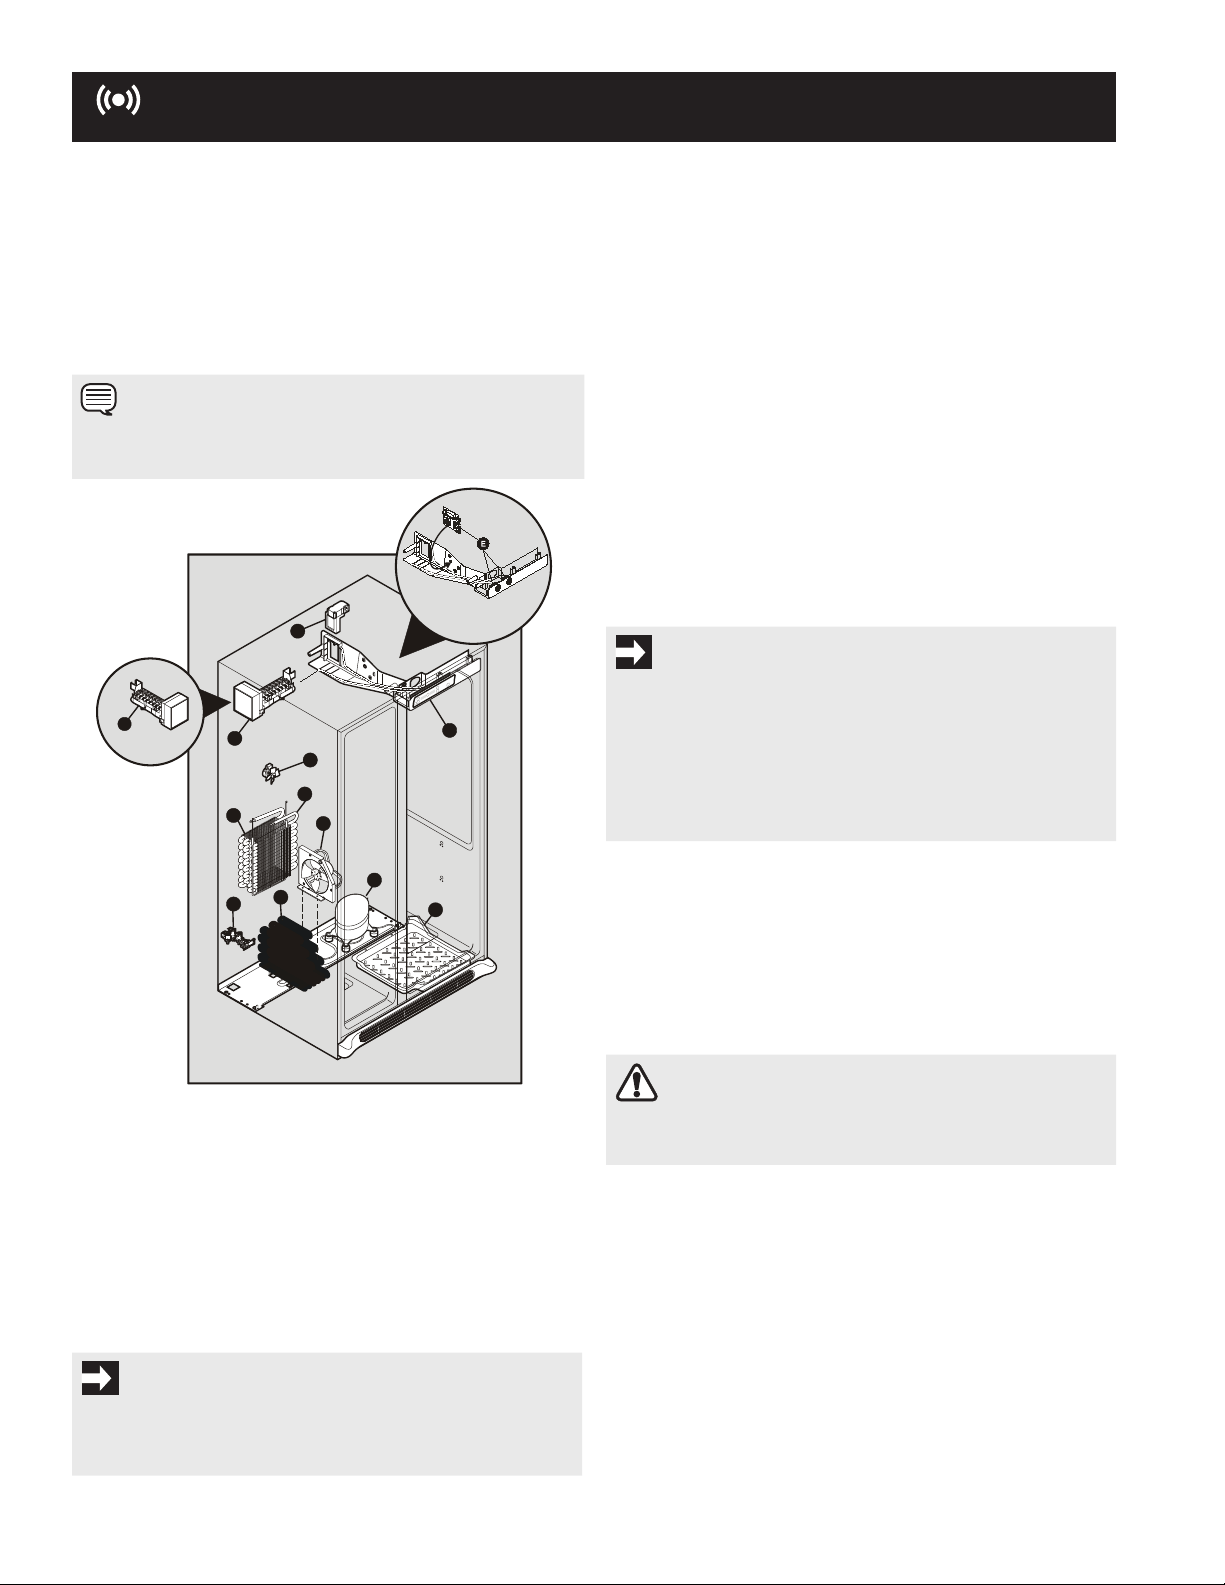
A. Evaporator
Theowofrefrigerantthroughtheevaporatormaycreate
aboilingorgurglingsound.
B. Evaporator Fan
Youmayhearairbeingforcedthroughtherefrigeratorby
theevaporatorfan.
C. Defrost Heater
Duringdefrostcycles,waterdrippingontothedefrost
heatermaycauseahissingorsizzlingsound.After
defrosting,apoppingsoundmayoccur.
D. Automatic Ice Maker
Ifyourrefrigeratorisequippedwithanautomaticice
maker,youwillhearicecubesfallingintotheicebin.
E. Cold Control & Automatic Defrost Control
Thesepartscanproduceasnappingorclickingsound
whenturningtherefrigeratoronandoff.
F. Condenser Fan
Youmayhearairbeingforcedthroughthecondenserby
thecondenserfan.
G. Compressor
Modern,high-efciencycompressorsoperatemuch
fasterthanoldermodels.Thecompressormayhavea
high-pitchedhumorpulsatingsound.
H. Water Valve
Ifyourrefrigeratorisequippedwithanautomaticice
maker,youwillhearabuzzingsoundasthewatervalve
openstolltheicemakerduringeachcycle.
I. Drain Pan (not removable)
Youmayhearwaterrunningintothedrainpanduringthe
defrostcycle.
J. Condenser
Maycreateminimalsoundsfromforcedair.
K. Motorized Damper
Mayproducealighthummingduringoperation.
F
A
C
H
J
G
I
D
K
E
B
D
OR
OR
REPLACING LIGHT BULBS
1 Unplugrefrigerator.
2 Wearglovesasprotectionagainstpossiblebrokenglass.
3 Removelightcover,ifnecessary.
4 Unscrewandreplaceoldbulbwithanappliancebulbof
thesamewattage.
5 Replacelightcover,ifnecessary.
6 Remembertoplugtherefrigeratorbackin.
NOTE
Rigidfoaminsulationisveryenergyefcient,butisnota
soundinsulator.
IMPORTANT
Duringtheautomaticdefrostcycle,youmaynoticearedglow
intheventsonthebackwallofyourfreezercompartment.
Thisisnormalduringthedefrostcycle.
CAUTION
Wear gloves when replacing light bulbs to avoid getting
cut.
IMPORTANT
YouricemakeristurnedOnatthefactorysoitcan
workassoonasyouinstallyourrefrigerator.Toensure
properfunctionofyouricemaker,connectawatersupply
immediatelyorturntheIcemakeroffbyliftingthewire
signalarmtothe“up”orOFFposition(sidemounted)orthe
icemaker’sOn/OffpowerswitchturnedOff-settothe“0”
position(rearmounted).
15
CARE & CLEANING
Keepyourrefrigeratorandfreezercleantopreventodorbuild-up.Wipeupanyspillsimmediatelyandcleanbothsectionsatleast
twiceayear.Never usemetallicscouringpads,brushes,abrasivecleanersorstrongalkalinesolutionsonanysurface.Do not
washanyremovablepartsinadishwasher.Always unplug the power cord from the electrical outlet before cleaning.
CAUTION
• Whenmovingtherefrigerator,pullstraightout.Donotshifttherefrigeratorfromsidetosideasthismaydamagethe
floor. Be careful not to move the refrigerator beyond the plumbing connections.
• Dampobjectssticktocoldmetalsurfaces.Donottouchrefrigeratedsurfaceswithwetordamphands.
• NeveruseCHLORIDEtocleanstainlesssteel.
NOTE
• TheON/OFFbuttonontheElectronicControlonlycontrolsyourrefrigerator’scoolingsystem.Toturnoffpowertoyour
refrigeratoryoumustunplugthepowercordfromtheelectricaloutlet.
• Donotuserazorbladesorothersharpinstrumentswhichcanscratchtheappliancesurfacewhenremovingadhesivelabels.
Anyglueleftfromtapeorlabelscanberemovedwithamixtureofwarmwaterandmilddetergent,or,touchtheglueresidue
withthestickysideoftapeyouhavealreadyremoved.Donotremovetheserialplate.
IMPORTANT
Iftherefrigeratorisgoingtobestoredormovedinfreezingtemperatures,thewaterintheiceandwatersystemmustbe
drainedcompletely.Failuretodosocouldresultinwaterleakswhentherefrigeratorisputbackintoservice.Contactaservice
representativetoperformthisoperation.
Care & Cleaning Tips
Part What To Use Tips and Precautions
Interior &
Door Liners
Soap and water•
Baking soda and •
water
Use 2 tablespoons of baking soda in 1 quart of warm water. Be sure to wring
excess water out of sponge or cloth before cleaning around controls, light
bulb or any electrical part.
Door Gaskets Soap and water• Wipe gaskets with a clean soft cloth.
Drawers &
Bins
Soap and water• Use a soft cloth to clean drawer runners and tracks. Do not wash any removable
items (bins, drawers, etc.) in dishwasher.
Glass Shelves Soap and water•
Glass cleaner•
Mild liquid sprays•
Allow glass to warm to room temperature before immersing in warm water.
Toe Grille Soap and water•
Mild liquid sprays•
Vacuum attachment•
Vacuum dust from front of toe grille. Remove toe grille (see Installation Instruc-
tions). Vacuum backside and wipe with sudsy cloth or sponge. Rinse and dry.
Exterior &
Handles
Soap and water•
Non Abrasive Glass •
Cleaner
Do not use commercial household cleaners containing ammonia, bleach or alcohol
to clean handles. Use a soft cloth to clean smooth handles. DO NOT use a dry
cloth to clean smooth doors.
Exterior &
Handles
(Stainless
Steel Models
Only)
Soap and water•
Stainless Steel •
Cleaners
Never use CHLORIDE or cleaners with bleach to clean stainless steel.
Clean stainless steel front and handles with non-abrasive soapy water and a dish-
cloth. Rinse with clean water and a soft cloth. Use a non-abrasive stainless steel
cleaner. These cleaners can be purchased at most home improvement or major
department stores. Always follow manufacturer’s instructions. Do not use house-
hold cleaners containing ammonia or bleach.
NOTE: Always clean, wipe and dry with the grain to prevent scratching.
Wash the rest of the cabinet with warm water and mild liquid detergent. Rinse
well, and wipe dry with a clean soft cloth.
NOTE
Donotuseabrasivecleanerssuchaswindowsprays,scouringcleansers,ammableuids,cleaningwaxes,concentrated
detergents,bleaches,orcleanserscontainingpetroleumproductsonplasticparts,interiordoors,gaskets,orcabinetliners.Do
notusepapertowels,scouringpads,orotherabrasivecleaningmaterials.
16
Your appliance is covered by a one year limited warranty. For one year from your original date of
purchase, Electrolux will pay all costs for repairing or replacing any parts of this appliance that prove
to be defective in materials or workmanship when such appliance is installed, used and maintained in
accordance with the provided instructions.
This warranty does not cover the following:
1. Products with original serial numbers that have been removed, altered or cannot be readily determined.
2. Product that has been transferred from its original owner to another party or removed outside the USA or
Canada.
3. Rust on the interior or exterior of the unit.
4. Products purchased “as-is” are not covered by this warranty.
5. Food loss due to any refrigerator or freezer failures.
6. Products used in a commercial setting.
7. Service calls which do not involve malfunction or defects in materials or workmanship, or for appliances
not in ordinary household use or used other than in accordance with the provided instructions.
8. Service calls to correct the installation of your appliance or to instruct you how to use your appliance.
9. Expenses for making the appliance accessible for servicing, such as removal of trim, cupboards, shelves,
etc.,which are not a part of the appliance when it is shipped from the factory.
10. Service calls to repair or replace appliance light bulbs, air filters, water filters, other consumables, or
knobs, handles, or other cosmetic parts.
11. Surcharges including, but not limited to, any after hour, weekend, or holiday service calls, tolls, ferry trip
charges, or mileage expense for service calls to remote areas, including the state of Alaska.
12. Damages to the finish of appliance or home incurred during installation, including but not limited to floors,
cabinets, walls, etc.
13. Damages caused by: services performed by unauthorized service companies; use of parts other than
genuine Electrolux parts or parts obtained from persons other than authorized service companies; or
external causes such as abuse, misuse, inadequate power supply, accidents, fires, or acts of God.
DISCLAIMER OF IMPLIED WARRANTIES; LIMITATION OF REMEDIES
CUSTOMER’S SOLE AND EXCLUSIVE REMEDY UNDER THIS LIMITED WARRANTY SHALL BE PRODUCT
REPAIR OR REPLACEMENT AS PROVIDED HEREIN. CLAIMS BASED ON IMPLIED WARRANTIES, INCLUDING
WARRANTIES OF MERCHANTABILITY OR FITNESS FOR A PARTICULAR PURPOSE, ARE LIMITED TO ONE YEAR
OR THE SHORTEST PERIOD ALLOWED BY LAW, BUT NOT LESS THAN ONE YEAR. ELECTROLUX SHALL NOT
BE LIABLE FOR CONSEQUENTIAL OR INCIDENTAL DAMAGES SUCH AS PROPERTY DAMAGE AND INCIDENTAL
EXPENSES RESULTING FROM ANY BREACH OF THIS WRITTEN LIMITED WARRANTY OR ANY IMPLIED
WARRANTY. SOME STATES AND PROVINCES DO NOT ALLOW THE EXCLUSION OR LIMITATION OF INCIDENTAL
OR CONSEQUENTIAL DAMAGES, OR LIMITATIONS ON THE DURATION OF IMPLIED WARRANTIES, SO THESE
LIMITATIONS OR EXCLUSIONS MAY NOT APPLY TO YOU. THIS WRITTEN WARRANTY GIVES YOU SPECIFIC
LEGAL RIGHTS. YOU MAY ALSO HAVE OTHER RIGHTS THAT VARY FROM STATE TO STATE.
Keep your receipt, delivery slip, or some other appropriate payment record to establish the warranty period
should service be required. If service is performed, it is in your best interest to obtain and keep all receipts.
Service under this warranty must be obtained by contacting Electrolux at the addresses or phone
numbers below.
Exclusions
If You Need
Service
This warranty only applies in the USA and Canada. In the USA, your appliance is warranted by Electrolux Major Appliances
North America, a division of Electrolux Home Products, Inc. In Canada, your appliance is warranted by Electrolux Canada Corp.
Electrolux authorizes no person to change or add to any obligations under this warranty. Obligations for service and parts under
this warranty must be performed by Electrolux or an authorized service company. Product features or specifications as described
or illustrated are subject to change without notice.
USA
1.800.944.9044
Electrolux Major Appliances
North America
P.O. Box 212378
Augusta, GA 30907
Canada
1.800.265.8352
Electrolux Canada Corp.
5855 Terry Fox Way
Mississauga, Ontario, Canada
L5V 3E4
Major Appliance Warranty Information
MAJOR APPLIANCE WARRANTY INFORMATION
17
BEFORE YOU CALL
Visitourwebsiteat
www.frigidaire.com.
1-800-944-9044 (UnitedStates)
1-800-265-8352 (Canada)
PROBLEM CAUSE CORRECTION
AUTOMATIC ICE MAKER
Ice maker is not mak-
ing any ice.
Ice maker wire signal arm is in •
the “up” or OFF position.
Ice maker power switch is Off.•
Ice maker has small cube •
caught in mechanism.
Saddle valve on cold water •
pipe is clogged or restricted by
foreign material.
Move wire signal arm to the “down” or • ON position. (side
mounted)
Turn power switch to On (“• I”) position. (rear mounted)
Remove small cube from ice maker. The ice and water •
ltercartridgemaybeclogged.Replaceltercartridge.
Turn off household water line valve. Remove valve. En-•
sure that valve is not a self-piercing saddle valve. Clean
valve. Replace valve if necessary.
Ice maker is not mak-
ing enough ice.
Ice maker is producing less ice •
than you expect.
Check to see if water dispenser •
is dispensing slower than normal.
Side mounted ice maker should produce 4 to 4.5 pounds •
(approximately 4 quarts) of ice every 24 hours. A rear
mounted ice maker should produce 3 to 4 pounds (ap-
proximately 3½ quarts) of ice every 24 hours. Quick
Ice option should produce up to 50% more ice every 24
hours.
Ifitis,replacetheiceandwaterltercartridge.•
Ice maker will not stop
making ice.
Ice maker wire signal arm is •
being held down by some item
in the freezer.
Move item and release wire signal arm. Remove any ice •
cubes that are frozen together over the wire signal arm.
Ice cubes are freezing
together.
Ice cubes are not being used •
frequently enough.
Ice cubes are hollow (partially •
frozen cubes with water inside).
Freezer control is set too warm.•
Remove ice container and discard ice from container. Ice •
maker will produce fresh supply.
Theiceandwaterltercartridgemaybeclogged.Re-•
placeltercartridge.
Set freezer control to colder setting. Allow 24 hours for •
temperature to stabilize.
ICE DISPENSER
Dispenser will not dis-
pense ice.
Ice storage container is empty.•
Freezer temperature is set too •
warm.
Household water line valve is •
not open.
Ice dispensing arm has been held •
in for more than 4-5 minutes.
Whentherstsupplyoficeisdroppedintothecontainer,•
the dispenser should operate.
Turn freezer control to a higher setting so that ice cubes •
willbemade.Whenrstsupplyoficeismade,dispenser
should operate.
Openhouseholdwaterlinevalve.Allowsufcienttime•
for the ice to be made. When ice is made, the dispenser
should operate.
Motor is overloaded. Motor over load protector will reset •
in approximately 3 minutes. Ice can then be dispensed.
Ice dispenser is
jammed.
Ice has melted and frozen •
around auger due to infrequent
use,temperatureuctuations,
and/or power outages.
Ice cubes are jammed between •
ice maker and back of ice
container.
Remove ice container, thaw, and empty the contents. •
Clean container, wipe dry, and replace in proper position.
When new ice is made, dispenser should operate.
Remove ice cubes that are jamming the dispenser.•
OPENING/CLOSING OF DOORS/DRAWERS
Door(s) will not close. Door was closed too hard, caus-•
ing other door to open slightly.
Refrigerator is not level. It •
rocksontheoorwhenmoved
slightly.
Refrigerator is touching a wall •
or cabinet.
Close both doors gently.•
Ensureoorislevelandsolid,andcanadequatelysup-•
port the refrigerator. Contact a carpenter to correct a
saggingorslopingoor.
Ensureoorislevelandsolid,andcanadequatelysup-•
port the refrigerator. Contact a carpenter to correct a
saggingorslopingoor.
Drawers are difcult to
move.
Food is touching shelf on top of •
drawer.
Track that drawers slide on is •
dirty.
Remove top layer of items in drawer.•
Ensure drawer is properly installed on track.•
Clean drawer, rollers, and track. See • Care & Cleaning.
18
BEFORE YOU CALL (CONTINUED)
PROBLEM CAUSE CORRECTION
RUNNING OF REFRIGERATOR
Compressor does not
run.
Freezer control is set to “OF” •
or “0”.
Refrigerator is in defrost cycle.•
Plug at electrical outlet is dis-•
connected.
House fuse blown or tripped •
circuit breaker.
Power outage.•
Set freezer control. •
This is normal for a fully automatic defrost refrigerator. •
The defrost cycle occurs periodically, lasting about 30
minutes.
Ensure plug is tightly pushed into outlet.•
Check/replace fuse with a 15 amp time-delay fuse. Reset •
circuit breaker.
Check house lights. Call local electric company.•
Refrigerator runs too
much or too long.
Room or outside weather is •
hot.
Doors are opened too frequent-•
ly or too long.
Fresh Food/freezer door may •
be slightly open.
Freezer control is set too cold.•
Fresh Food/freezer gasket is •
dirty, worn, cracked, or poorly
tted.
Condenser is dirty.•
It’s normal for the refrigerator to work longer under •
these conditions.
Warm air entering the refrigerator causes it to run more. •
Open doors less often.
Ensure refrigerator is level. Keep food and contains from •
blocking door. See PROBLEM column OPENING/CLOSING
OF DOORS/DRAWERS.
Set Fresh Food control to warmer setting until refrig-•
erator temperature is satisfactory. Allow 24 hours for
temperature to stabilize.
Clean or change gasket. Leaks in door seal will cause •
refrigerator to run longer in order to maintain desired
temperatures.
Clean condenser. See Care & Cleaning.•
Compressor goes off
and on frequently.
Thermostat keeps the refrigera-•
tor at a constant temperature.
This is normal. Refrigerator goes on and off to keep •
temperature constant.
DIGITAL TEMPERATURE DISPLAY
Digital temperature
displays are ashing.
Electronic control system has •
detected a performance prob-
lem.
Call your Electrolux service representative, who can •
interpretanymessagesornumbercodesashingonthe
digital displays.
WATER DISPENSER
Dispenser will not dis-
pense water.
Household water line valve is •
not open.
Iceandwaterltercartridgeis•
clogged.
Filter not fully installed.•
Open household water line valve. See • PROBLEM col-
umn AUTOMATIC ICE MAKER.
Replaceltercartridge.•
Pushlterinuntilyouheara“click”.•
Water has an odd taste
and/or odor.
Water has been in the tank for •
a period of time.
Unit not properly connected to •
cold water line.
Draw and discard 10-12 glasses of water to freshen the •
supply and completely rinse out the tank.
Connect unit to cold water line that supplies water to the •
kitchen faucet.
Water pressure is ex-
tremely low.
Cut-off and cut-on pressures •
are too low (well systems only).
Reverse osmosis system is in •
regenerative phase.
Have someone turn up the cut-off and cut-on pressure •
on the water pump system (well systems only).
It is normal for a reverse osmosis system to be below 20 •
psi during the regenerative phase.
WATER/MOISTURE/FROST INSIDE REFRIGERATOR
Moisture collects on
inside of refrigerator
walls.
Weather is hot and humid.•
Door is slightly open.•
The rate of frost buildup and internal sweating increases.•
See • PROBLEM column OPENING/CLOSING OF
DOORS/DRAWERS.
Water collects on bot-
tom side of drawer
cover.
Vegetables contain and give off •
moisture.
It is not unusual to have moisture on the bottom side of •
the cover.
Move humidity control (some models) to lower setting.•
Water collects in bot-
tom of drawer.
Washed vegetables and fruit •
drain while in the drawer.
Dry items before putting them in the drawer. Water col-•
lecting in bottom of drawer is normal.
WATER/MOISTURE/FROST OUTSIDE REFRIGERATOR
Moisture collects on
outside of refrigerator
or between doors.
Weather is humid.•
Door is slightly open, causing •
cold air from inside refrigerator
to meet warm air from outside.
This is normal in humid weather. When humidity is •
lower, the moisture should disappear.
See • PROBLEM column OPENING/CLOSING OF
DOORS/DRAWERS.
19
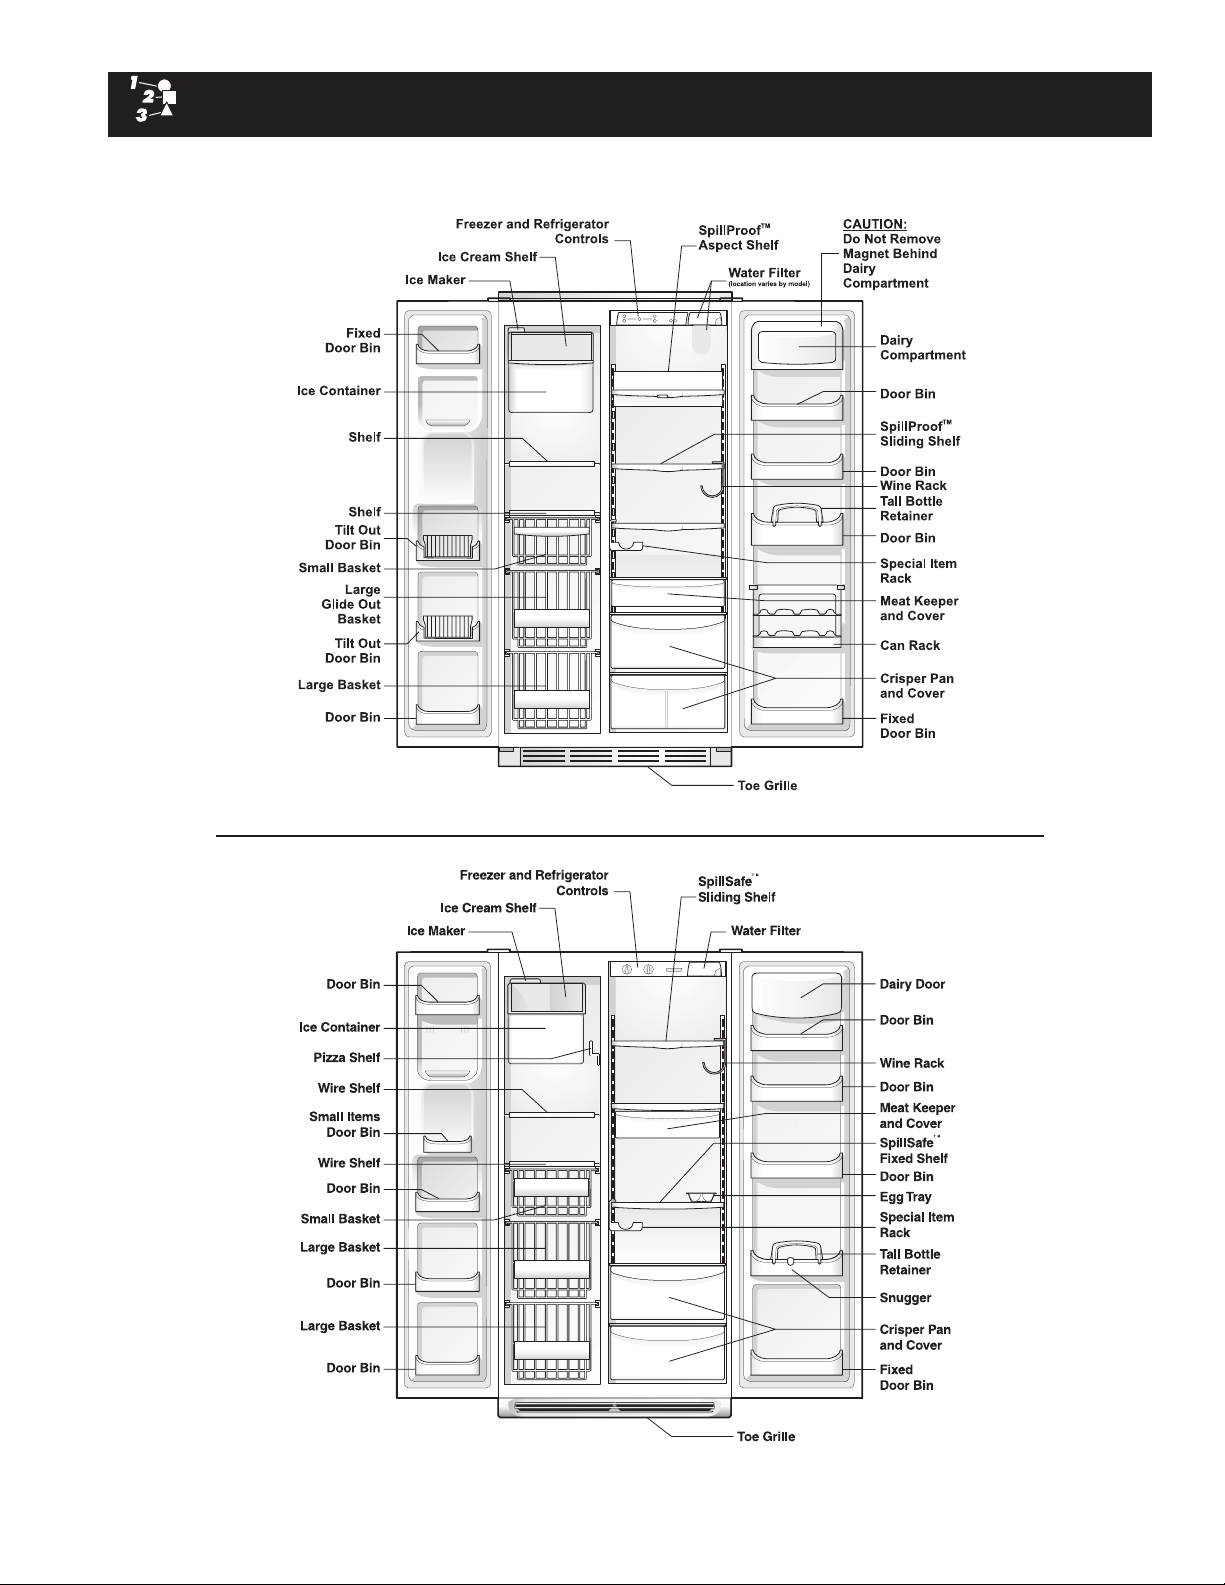
FEATURES AT A GLANCE
Features may vary according to model
Electronic Controls
Mechanical Controls