Owner's Guide Ovens
Your new oven
We will now describe your new oven. This chapter explains the functions of the control panel and its individual elements. Information is also provided about the oven's accessories and internal components.
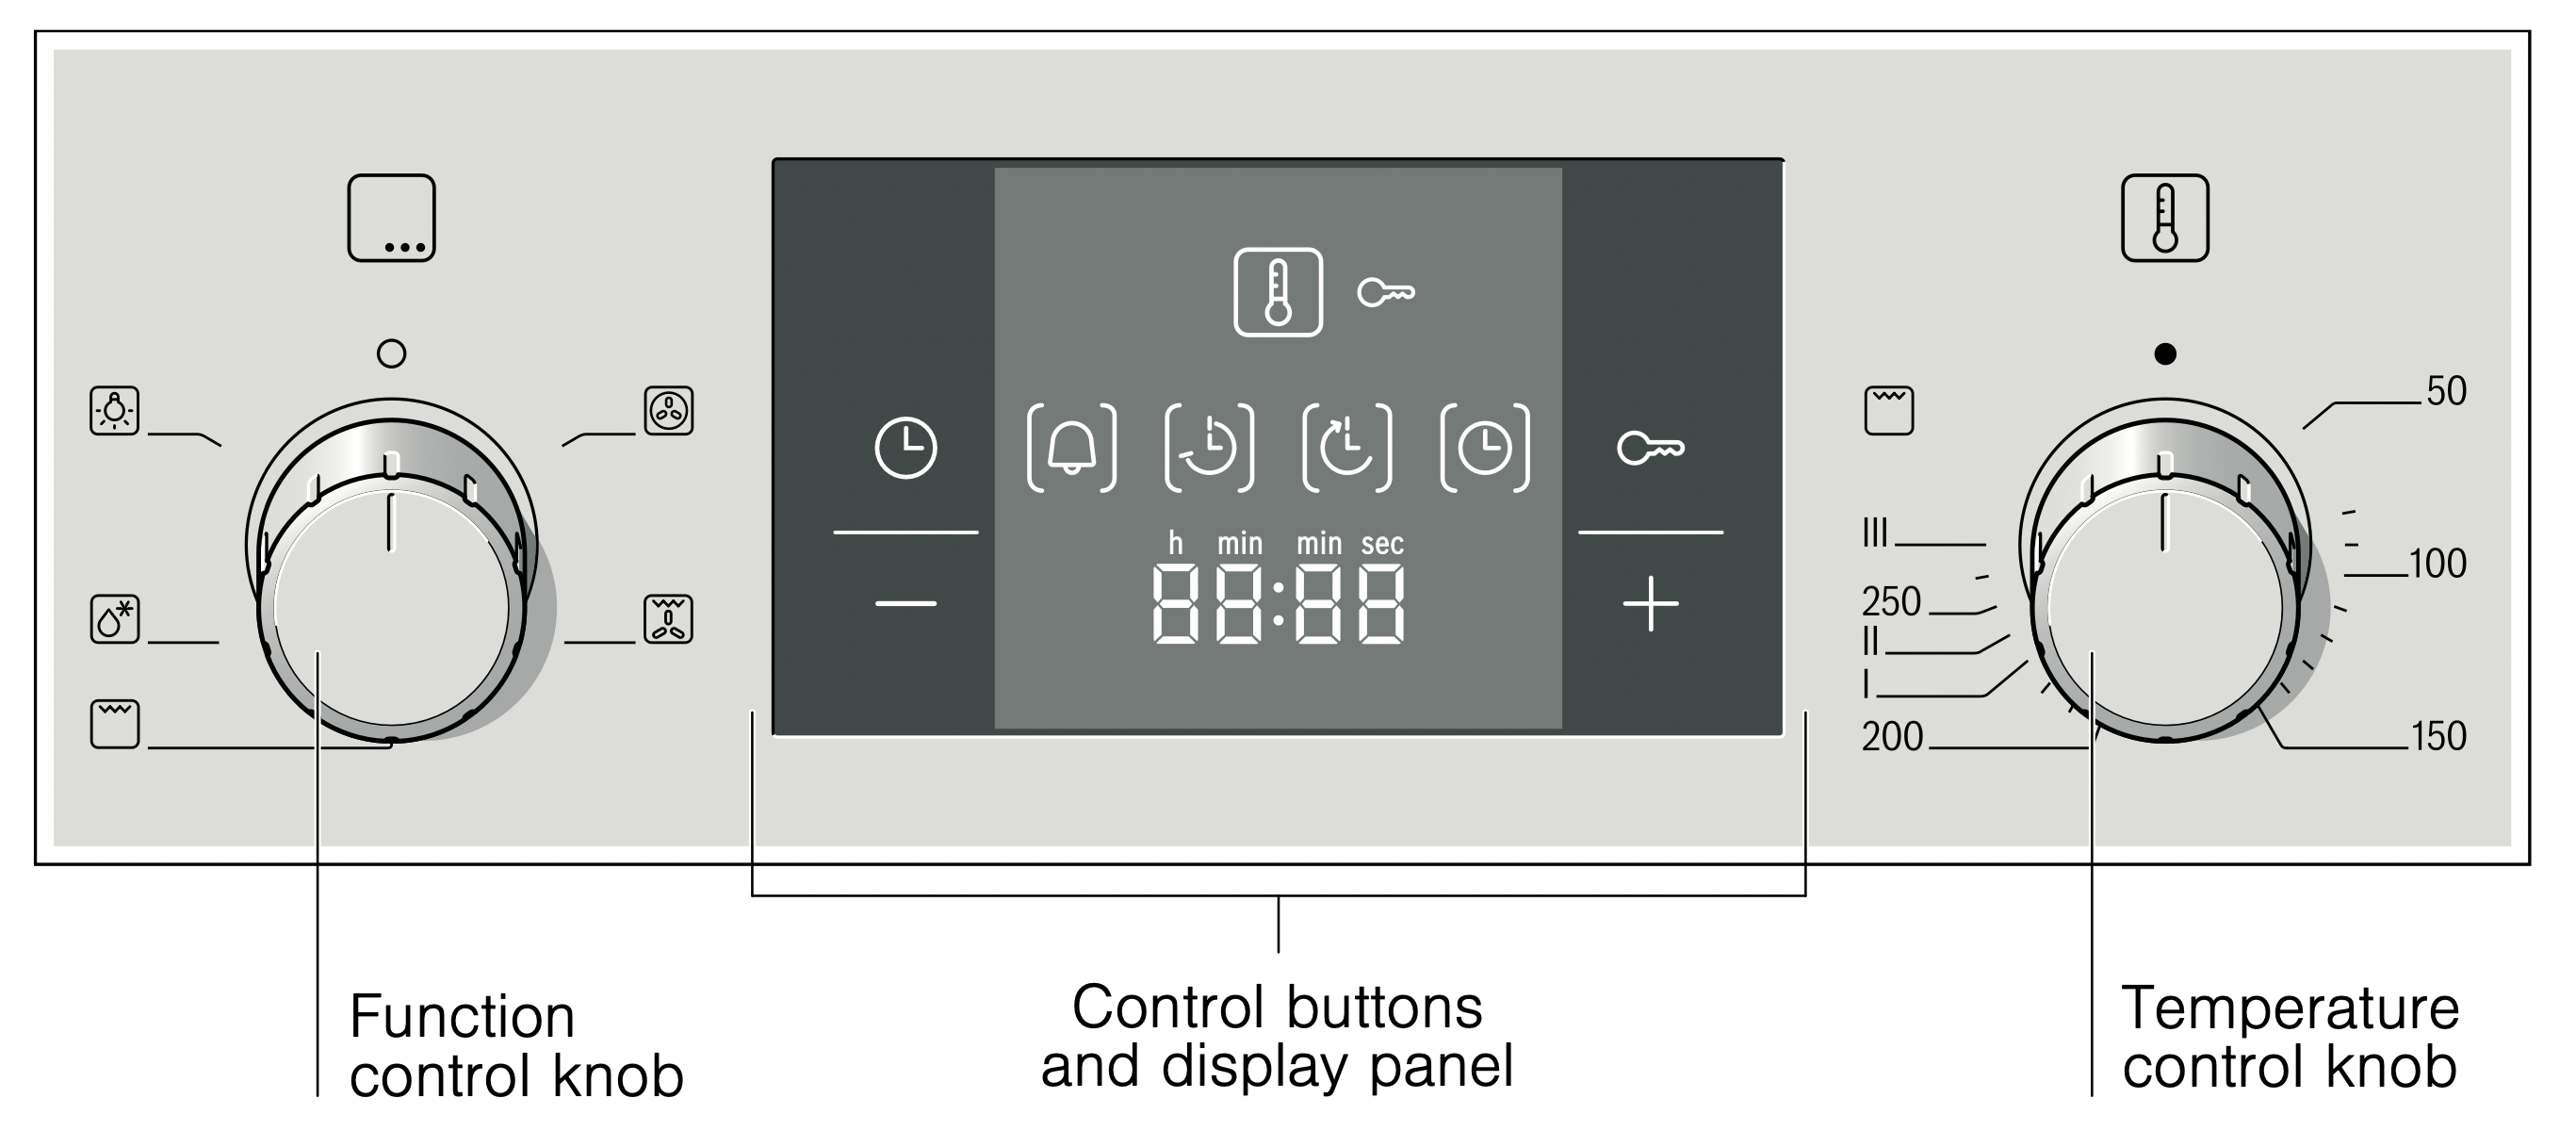
Control panel
Below is a general overview of the control panel. The display panel cannot show all the symbols at the same time. Elements may vary depending on the model.
Retractable control knobs
In some ovens, the control knobs are retractable. The control knob is retracted or returned by pressing it when at the zero setting.
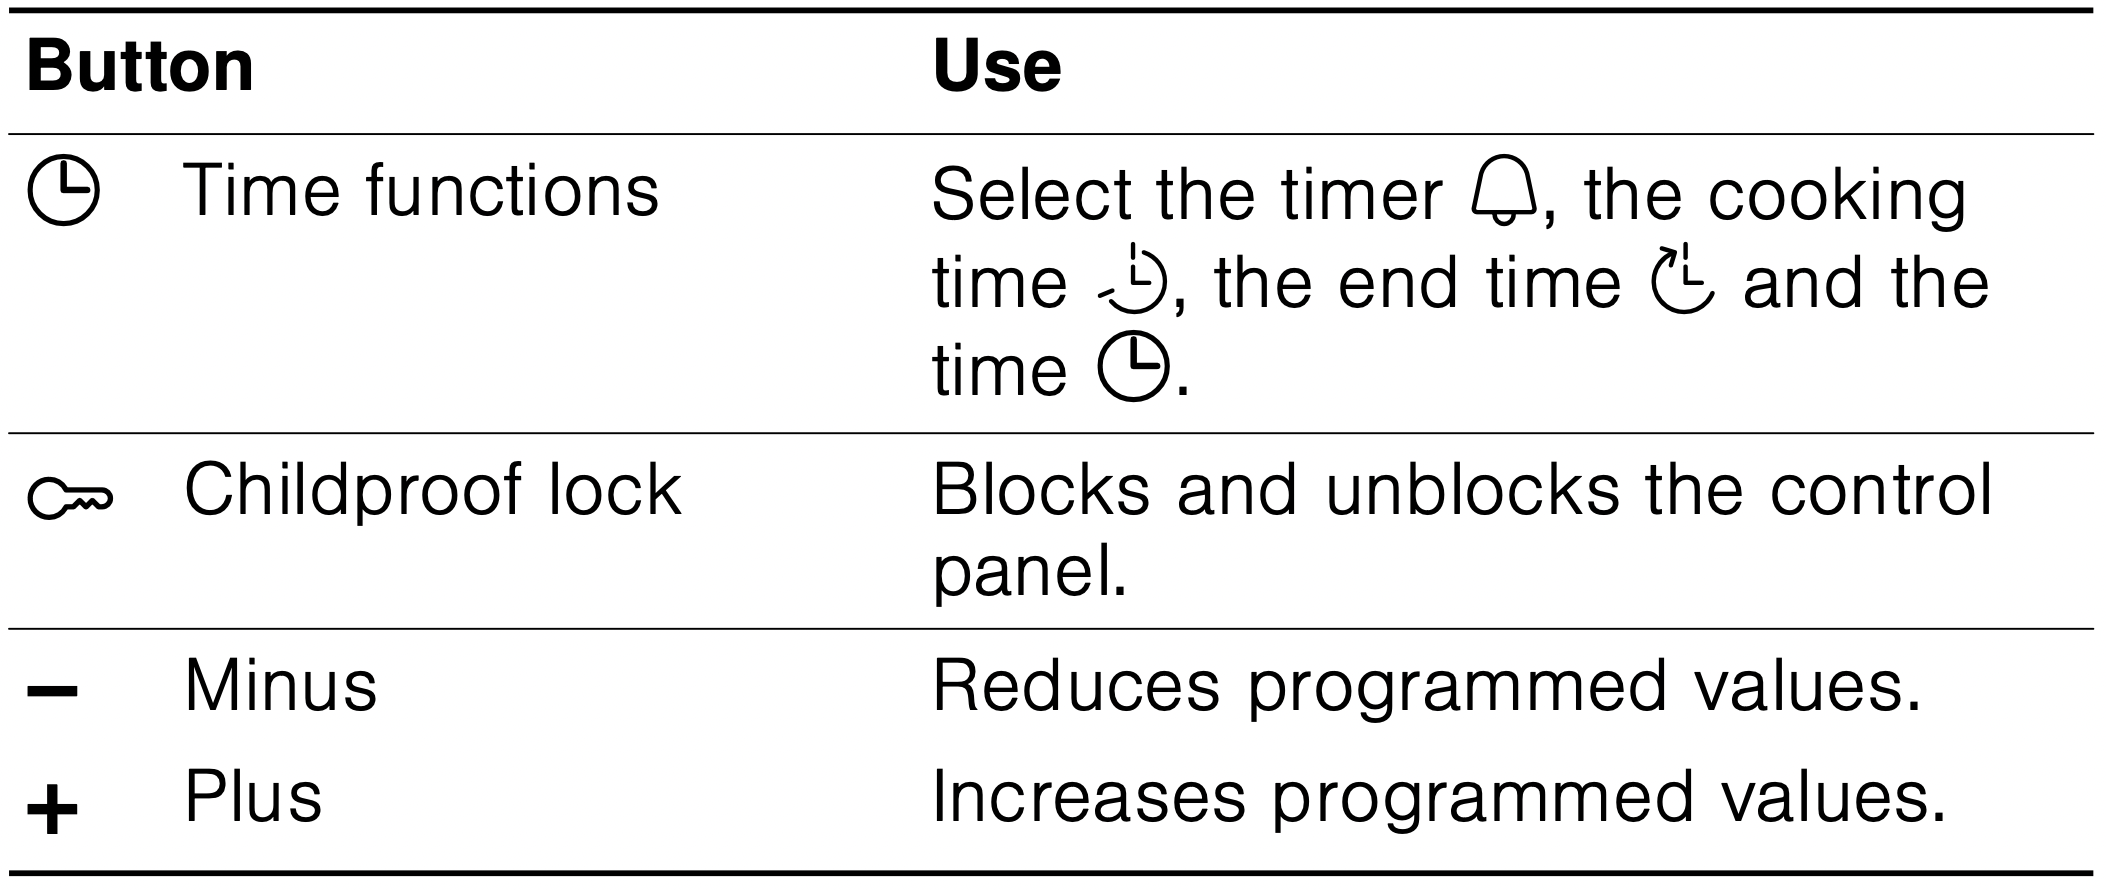
Buttons
There are sensors under each button. Do not press hard on the buttons. Only press the relevant symbol.
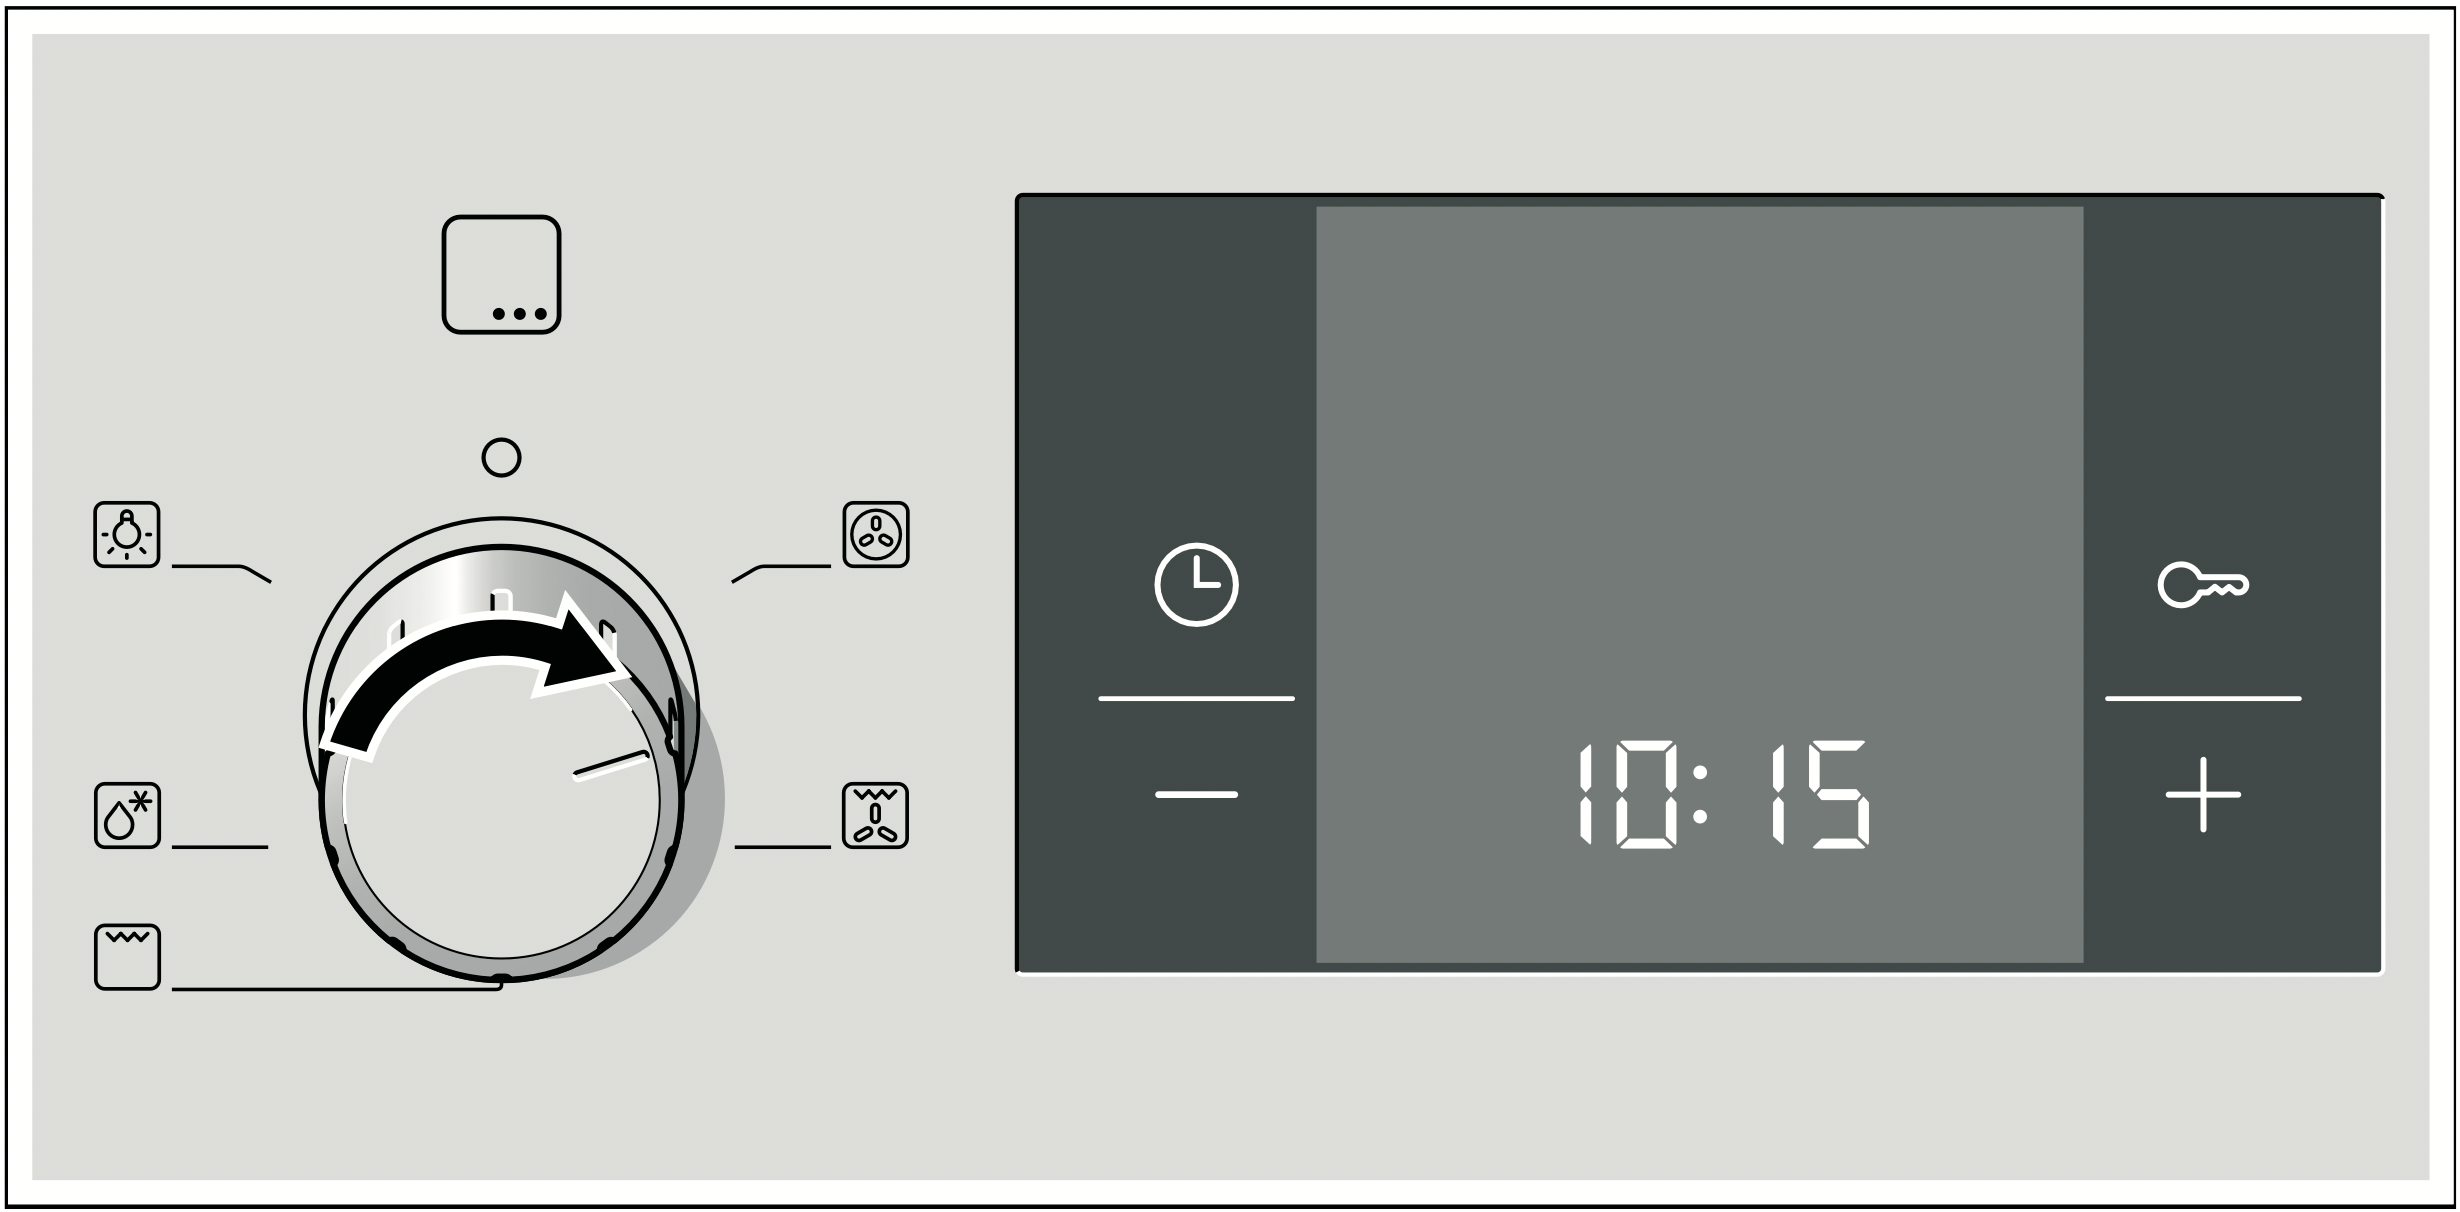
Function control knob
The function control knob is used to select the type of heating.
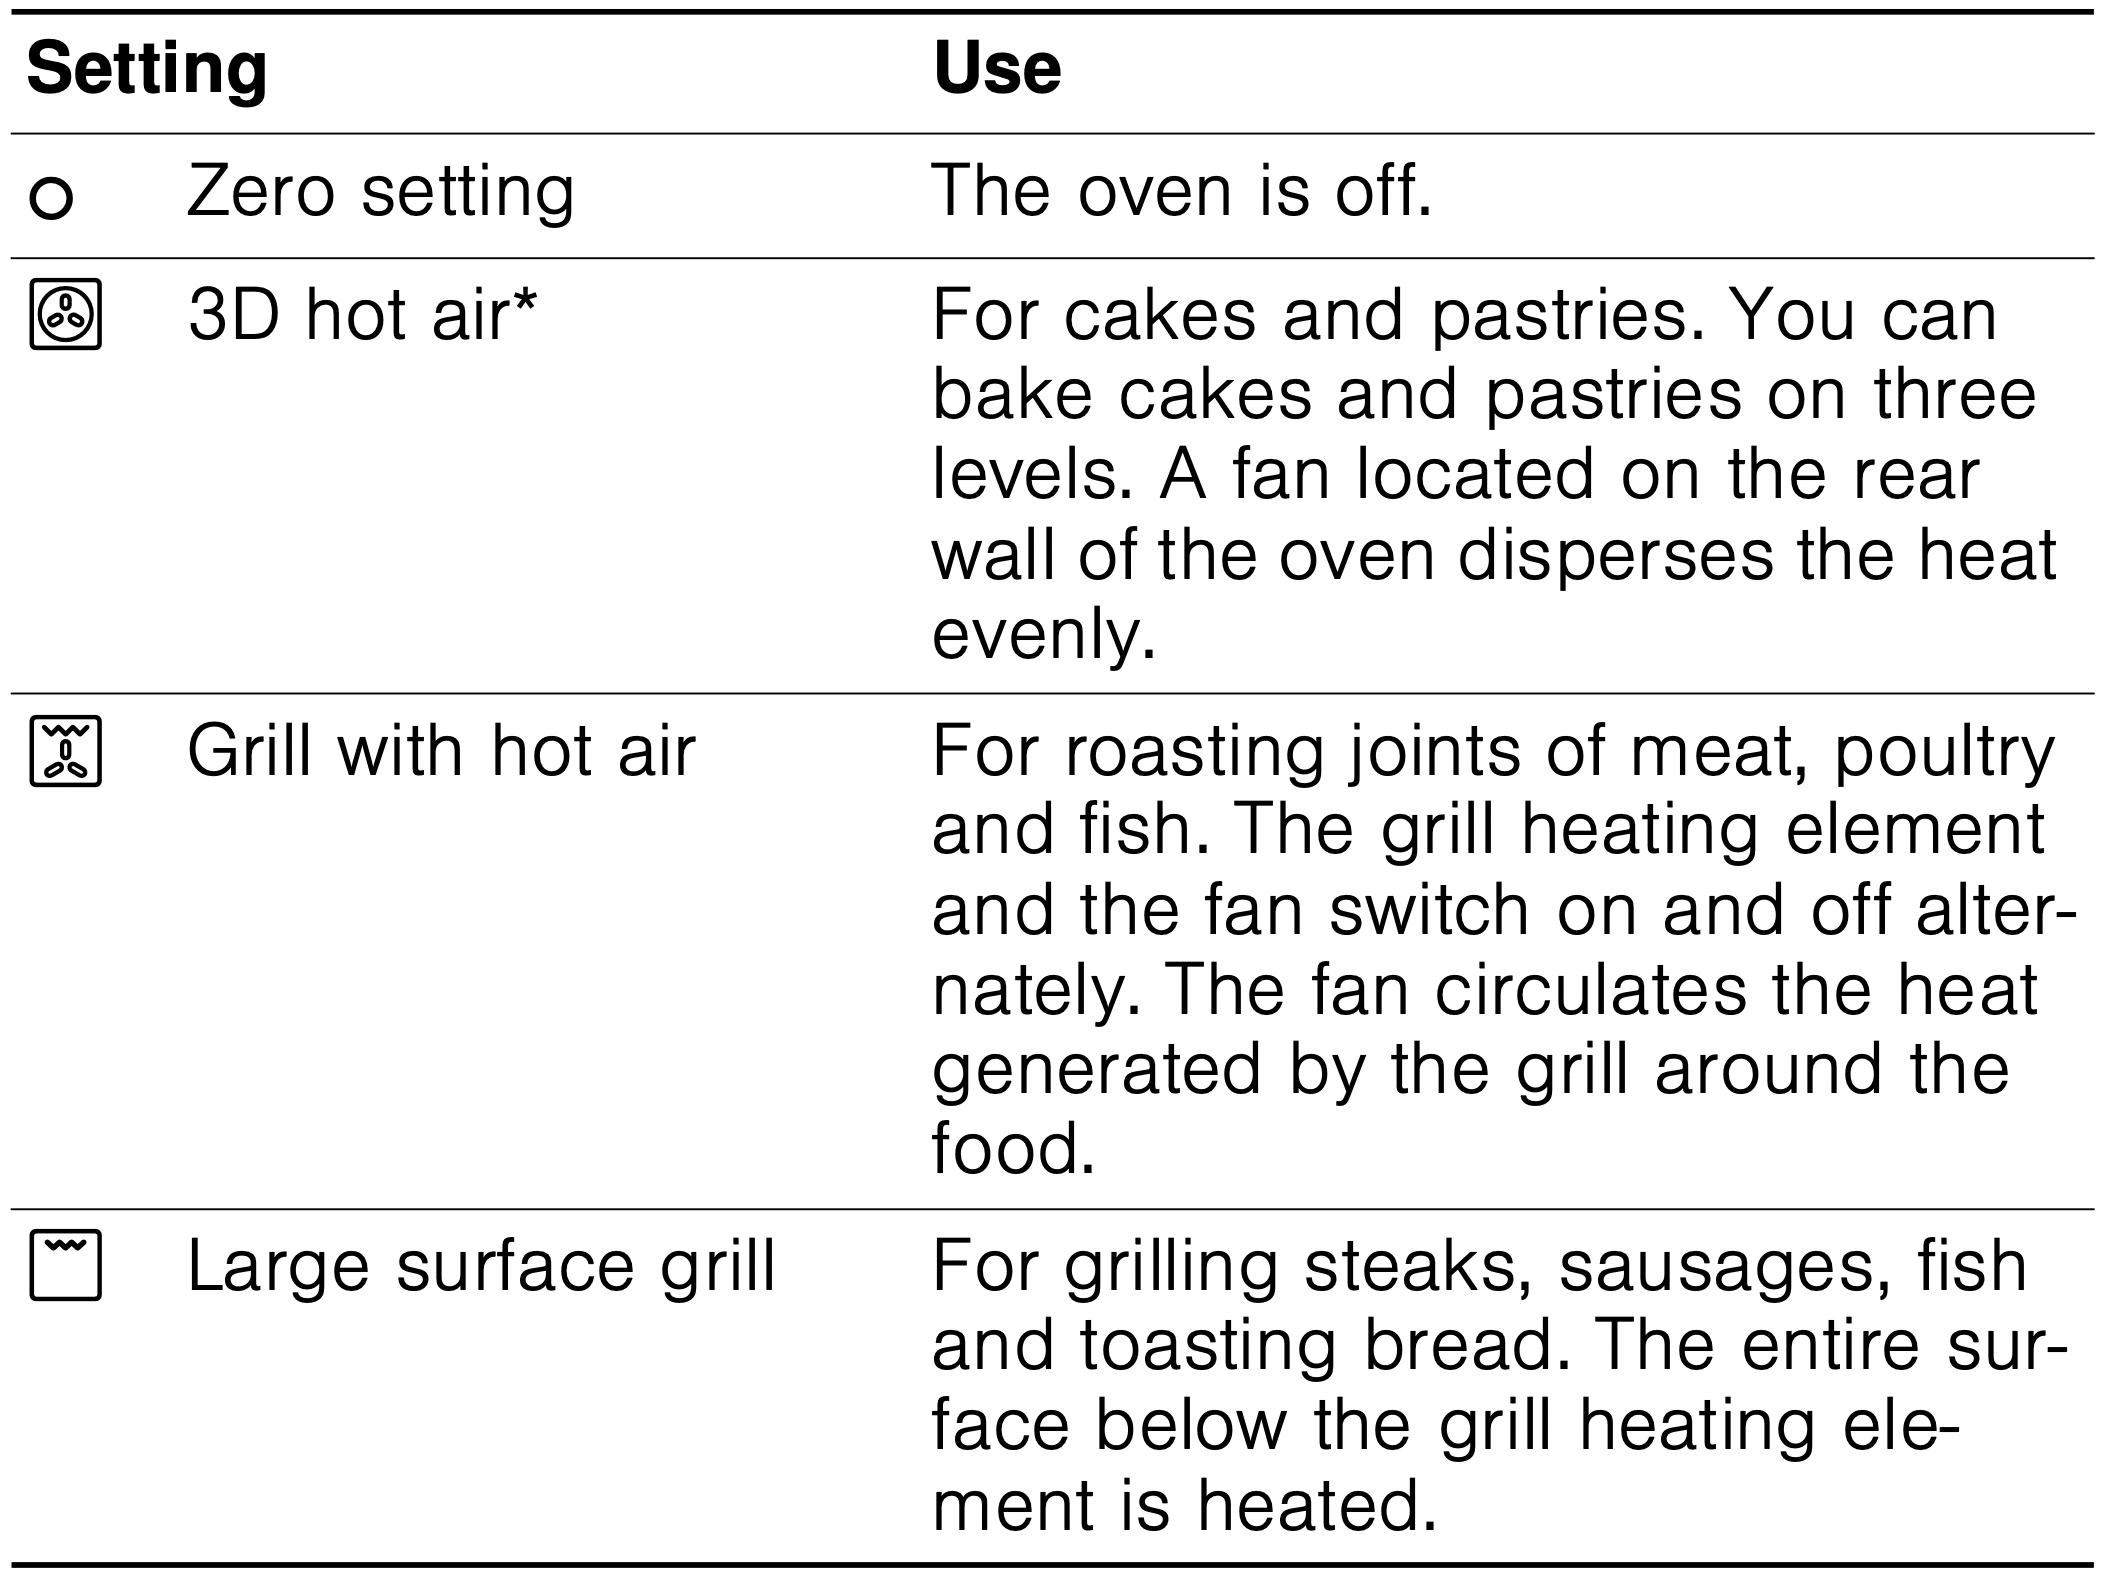
* Type of heating used to determine the appliance's energy efficiency rating according to EN60350.
Once a type of heating has been selected the oven light is turned on.
Control buttons and display panel
The buttons are used to set different additional functions. The set values are shown on the display panel.
On the display panel, the brackets [ ] indicate the symbol for the time function selected.
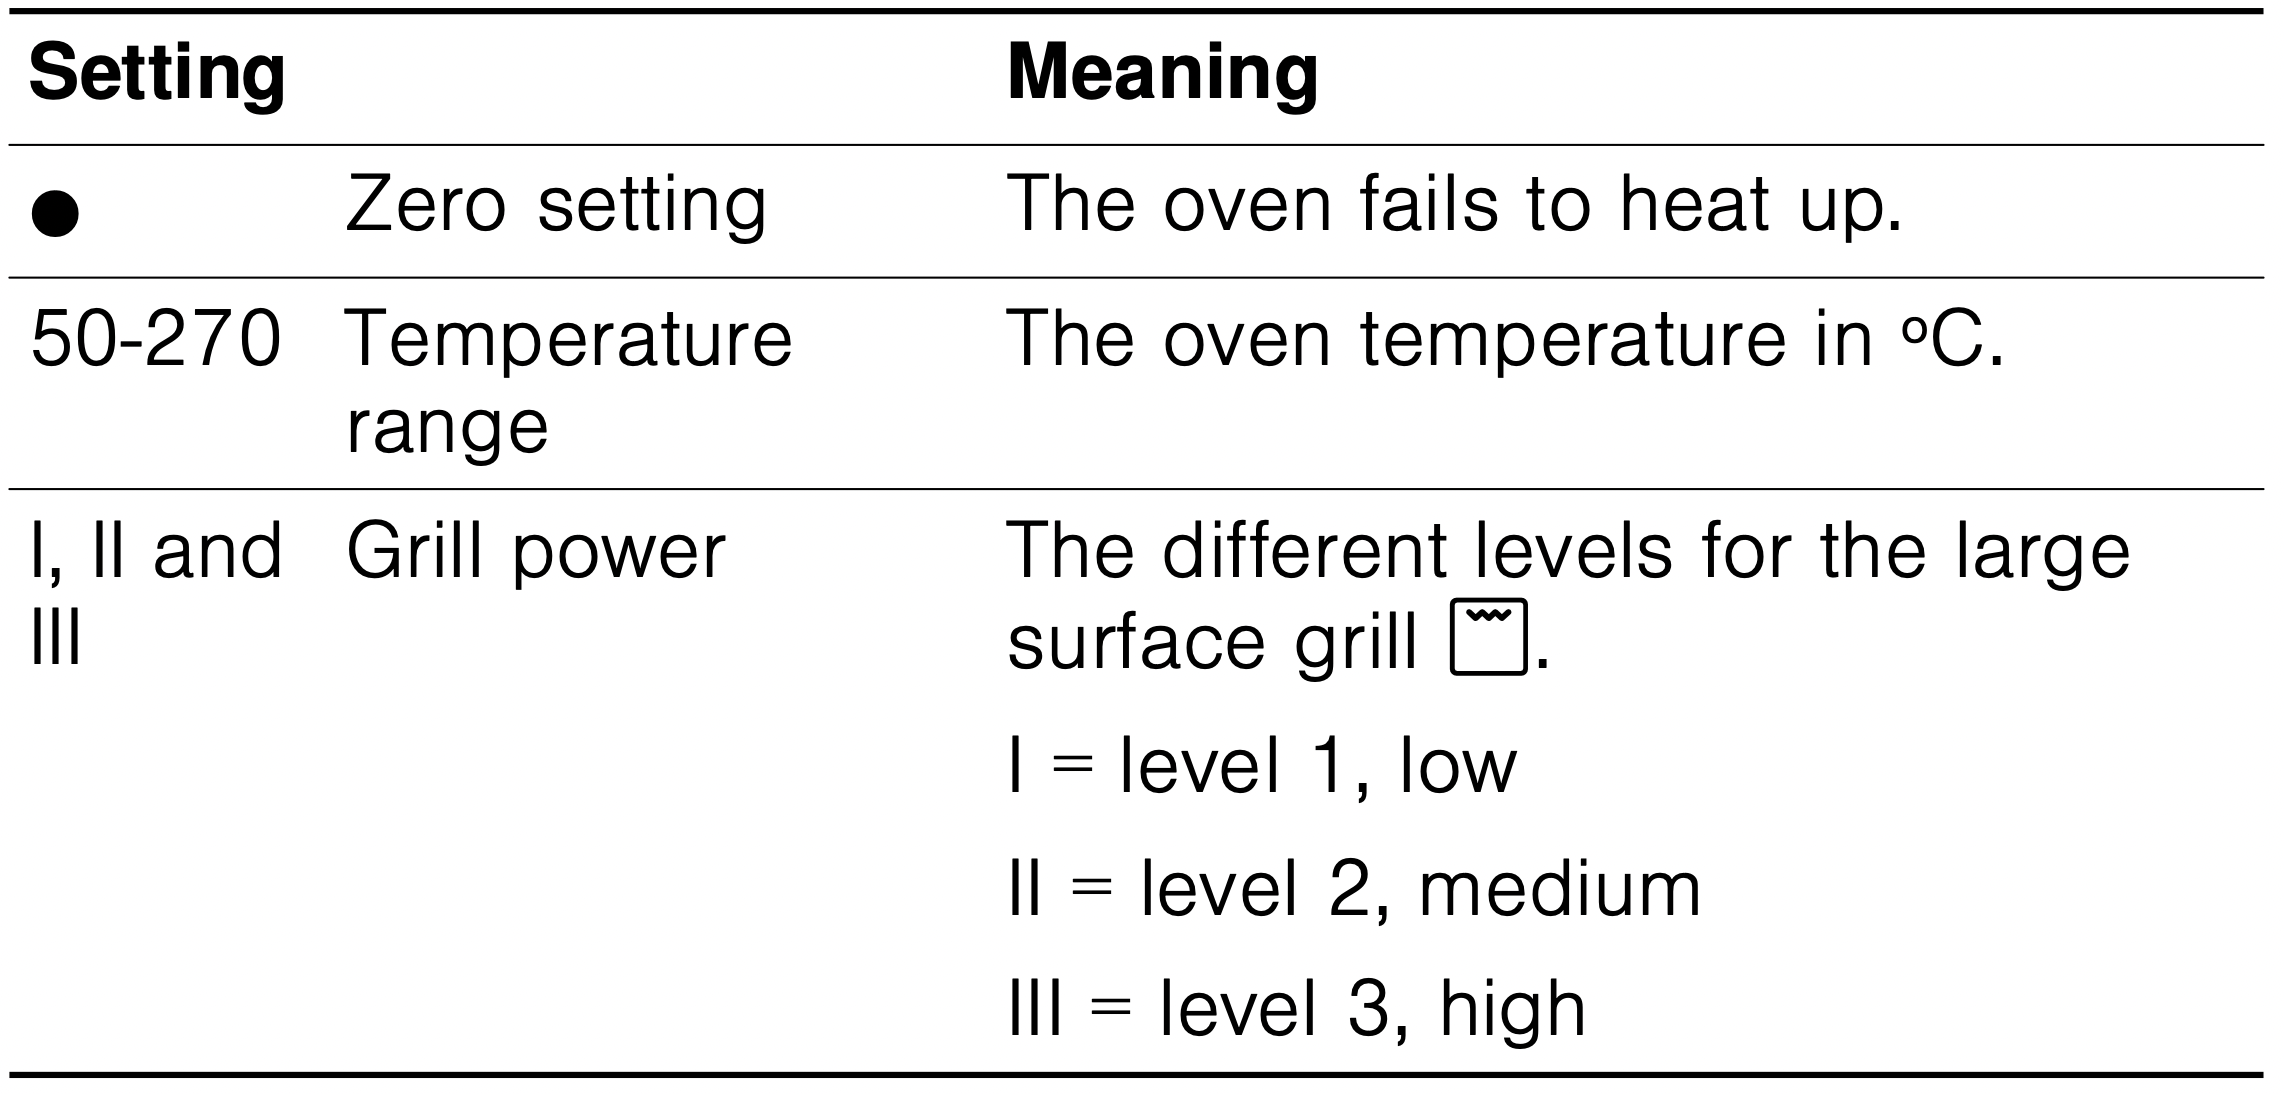
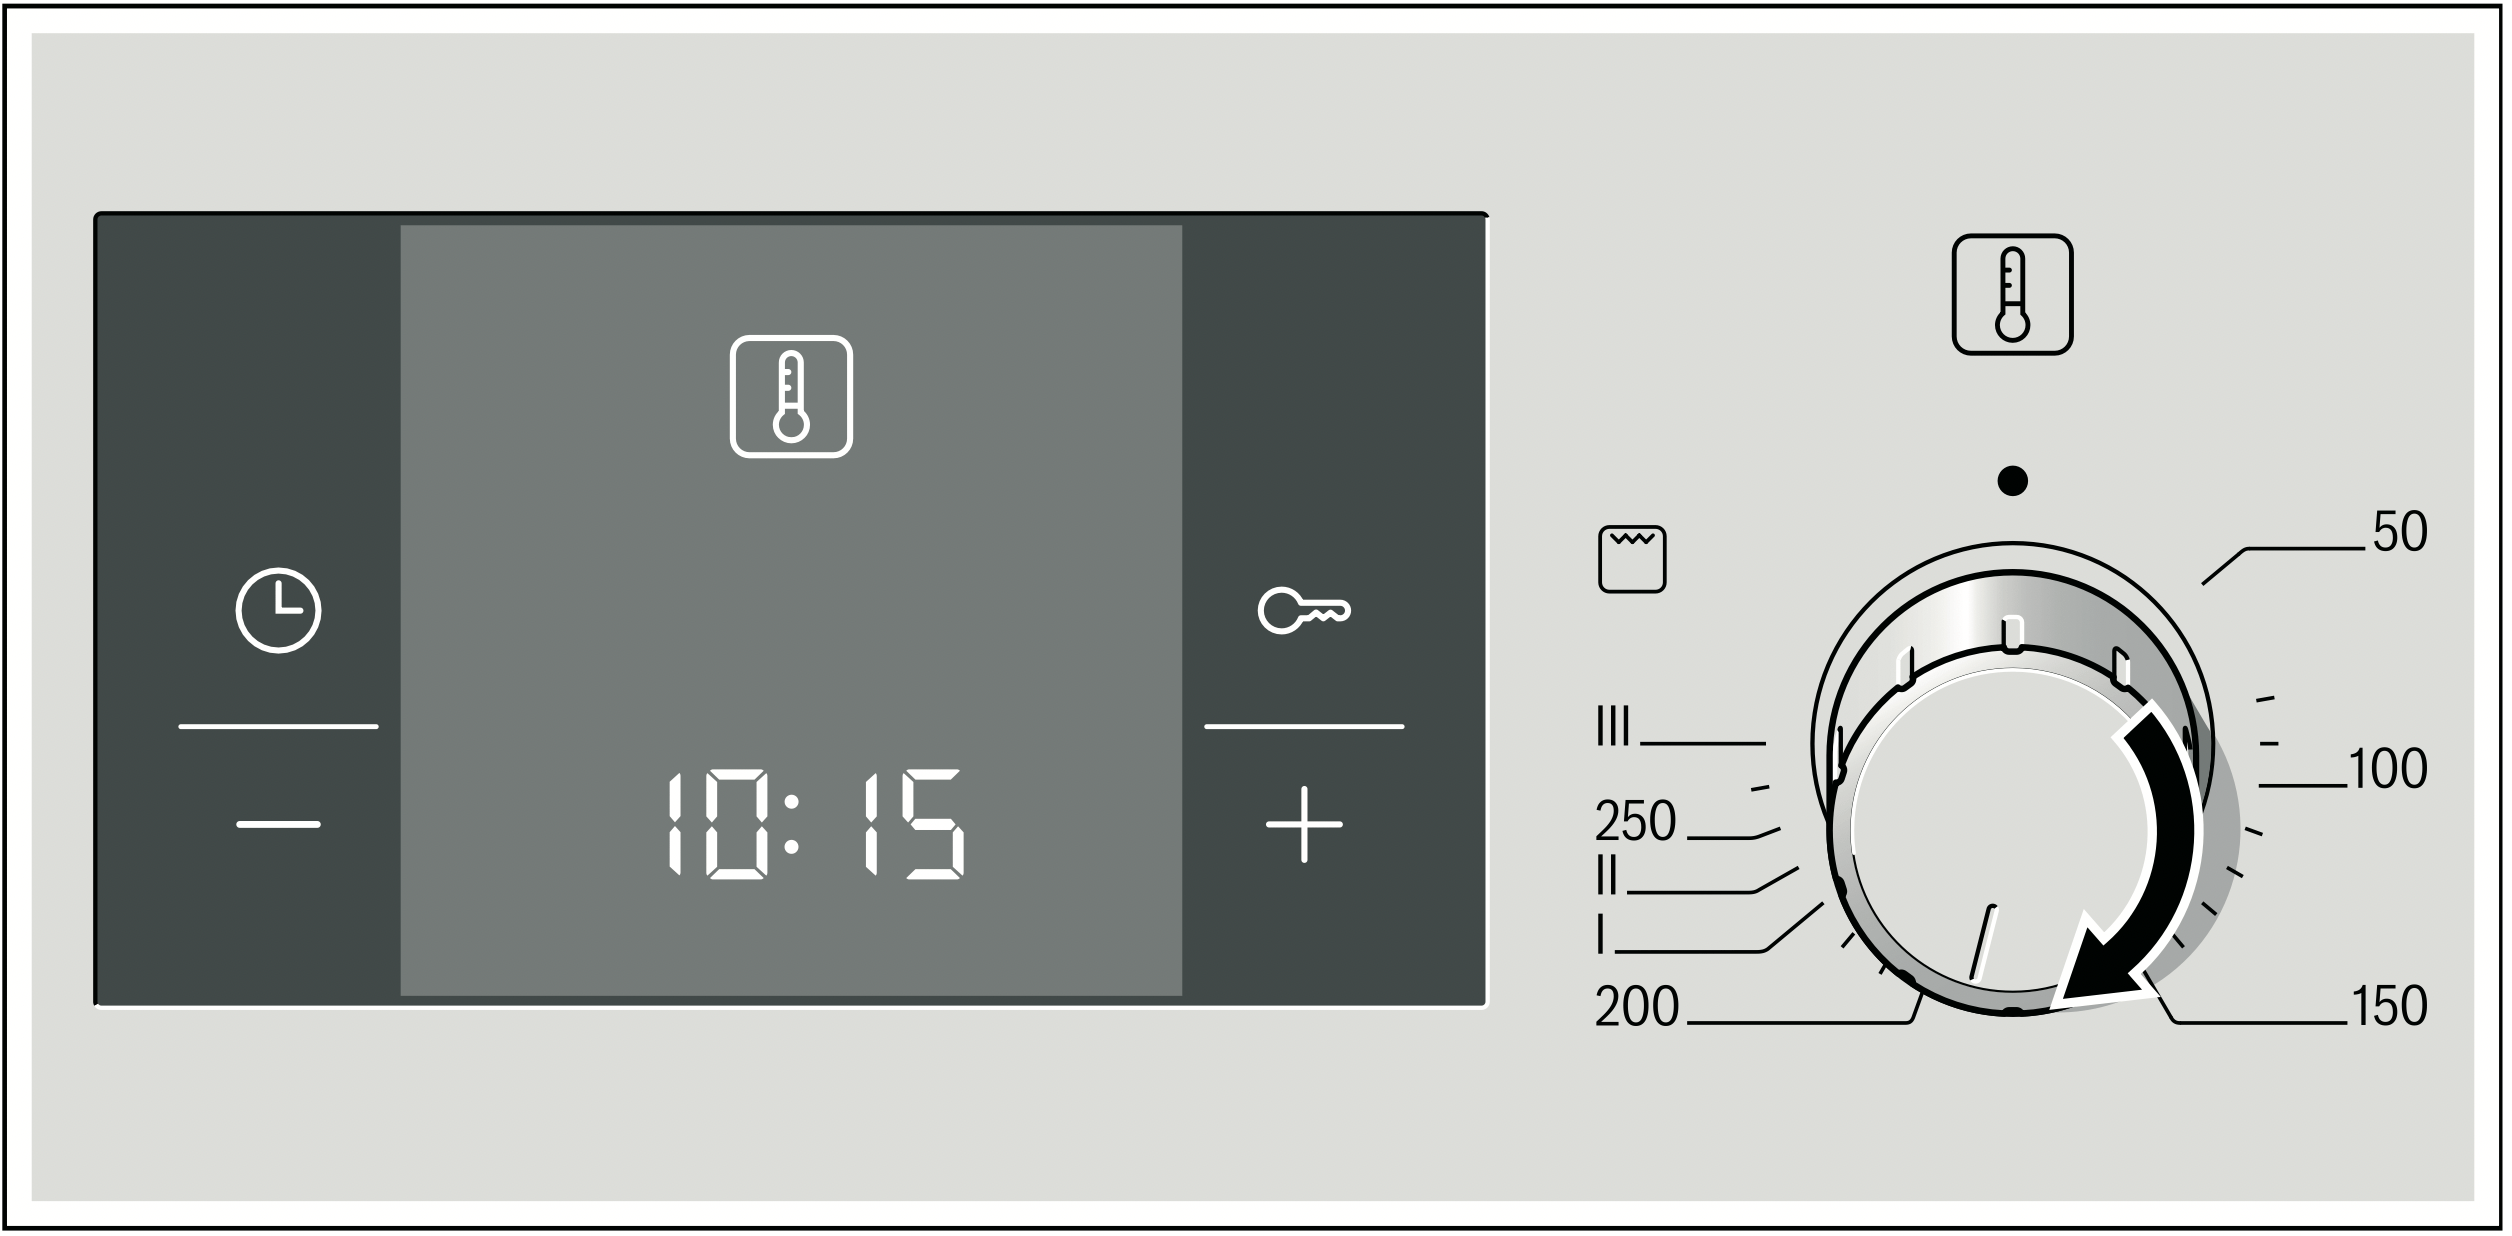
Temperature control knob
The temperature control knob is used to select the temperature or the grill power level.
When the oven is heating, the  symbol lights up on the display panel. This light goes off when heating is paused. The symbol does not come on with the light function
  or the defrost function
  .
.
Note: If grilling for more than 15 minutes, turn the temperature control knob to the low setting.
Inside the oven
There is a light inside the oven. A fan prevents the oven from overheating.
Fan
The fan can be turned on and off as necessary. The hot air escapes through the top of the door. Warning! Do not cover the vent. The oven could overheat.
The fan remains on for a certain length of time after the oven has been switched off so that it can cool down more quickly.
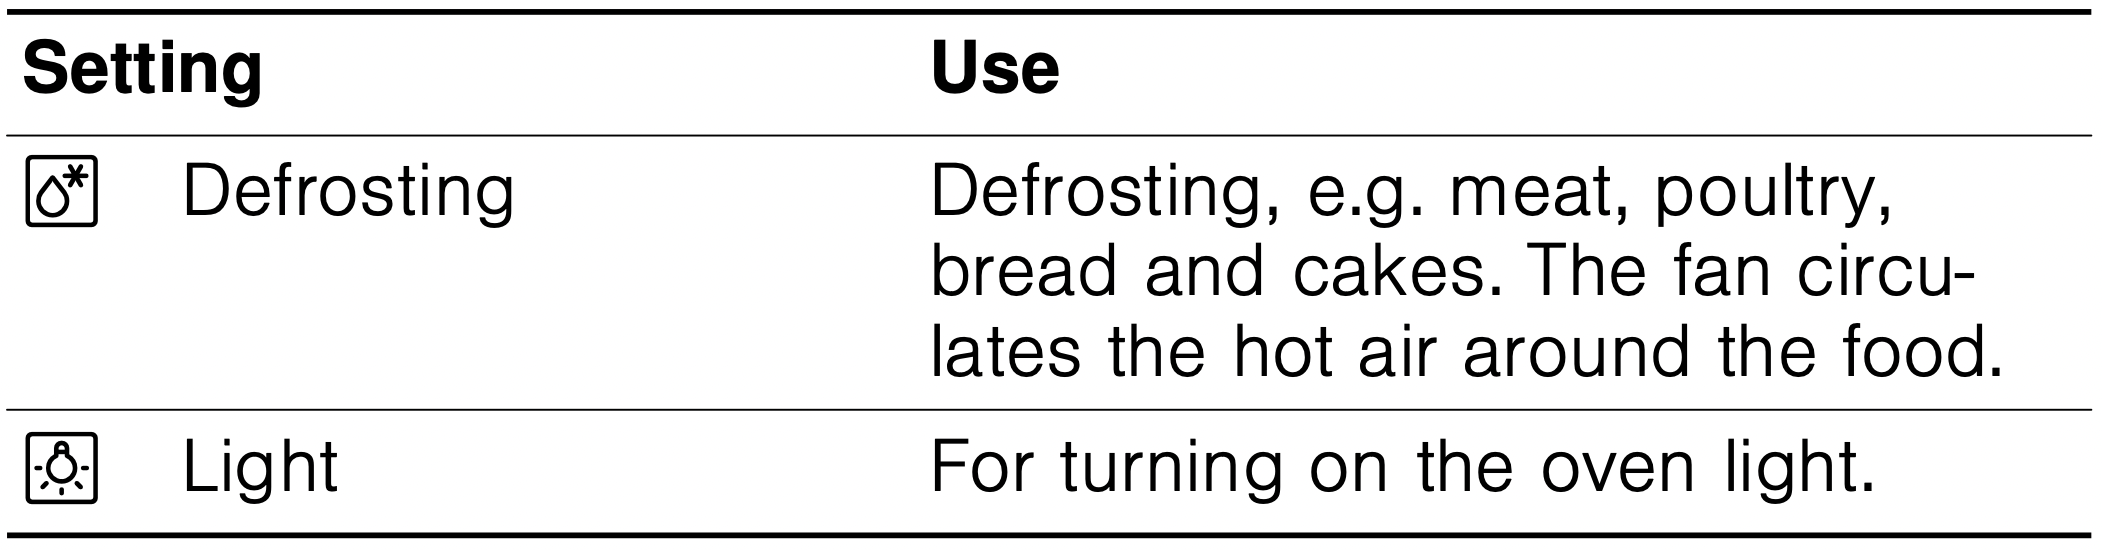
Light
The oven light remains on while the oven is working. However, the light can be turned on without the oven being on by setting the function control knob to .
Your accessories
The accessories supplied with your appliance are suitable for making many meals. Ensure that you always insert the accessories into the cooking compartment the right way round.
There is also a selection of optional accessories, with which you can improve on some of your favourite dishes, or simply to make working with your oven more convenient.
Inserting the accessories
The accessories can be placed inside the oven on 5 different levels. Always insert them as far as possible so that the accessories do not touch the door glass.
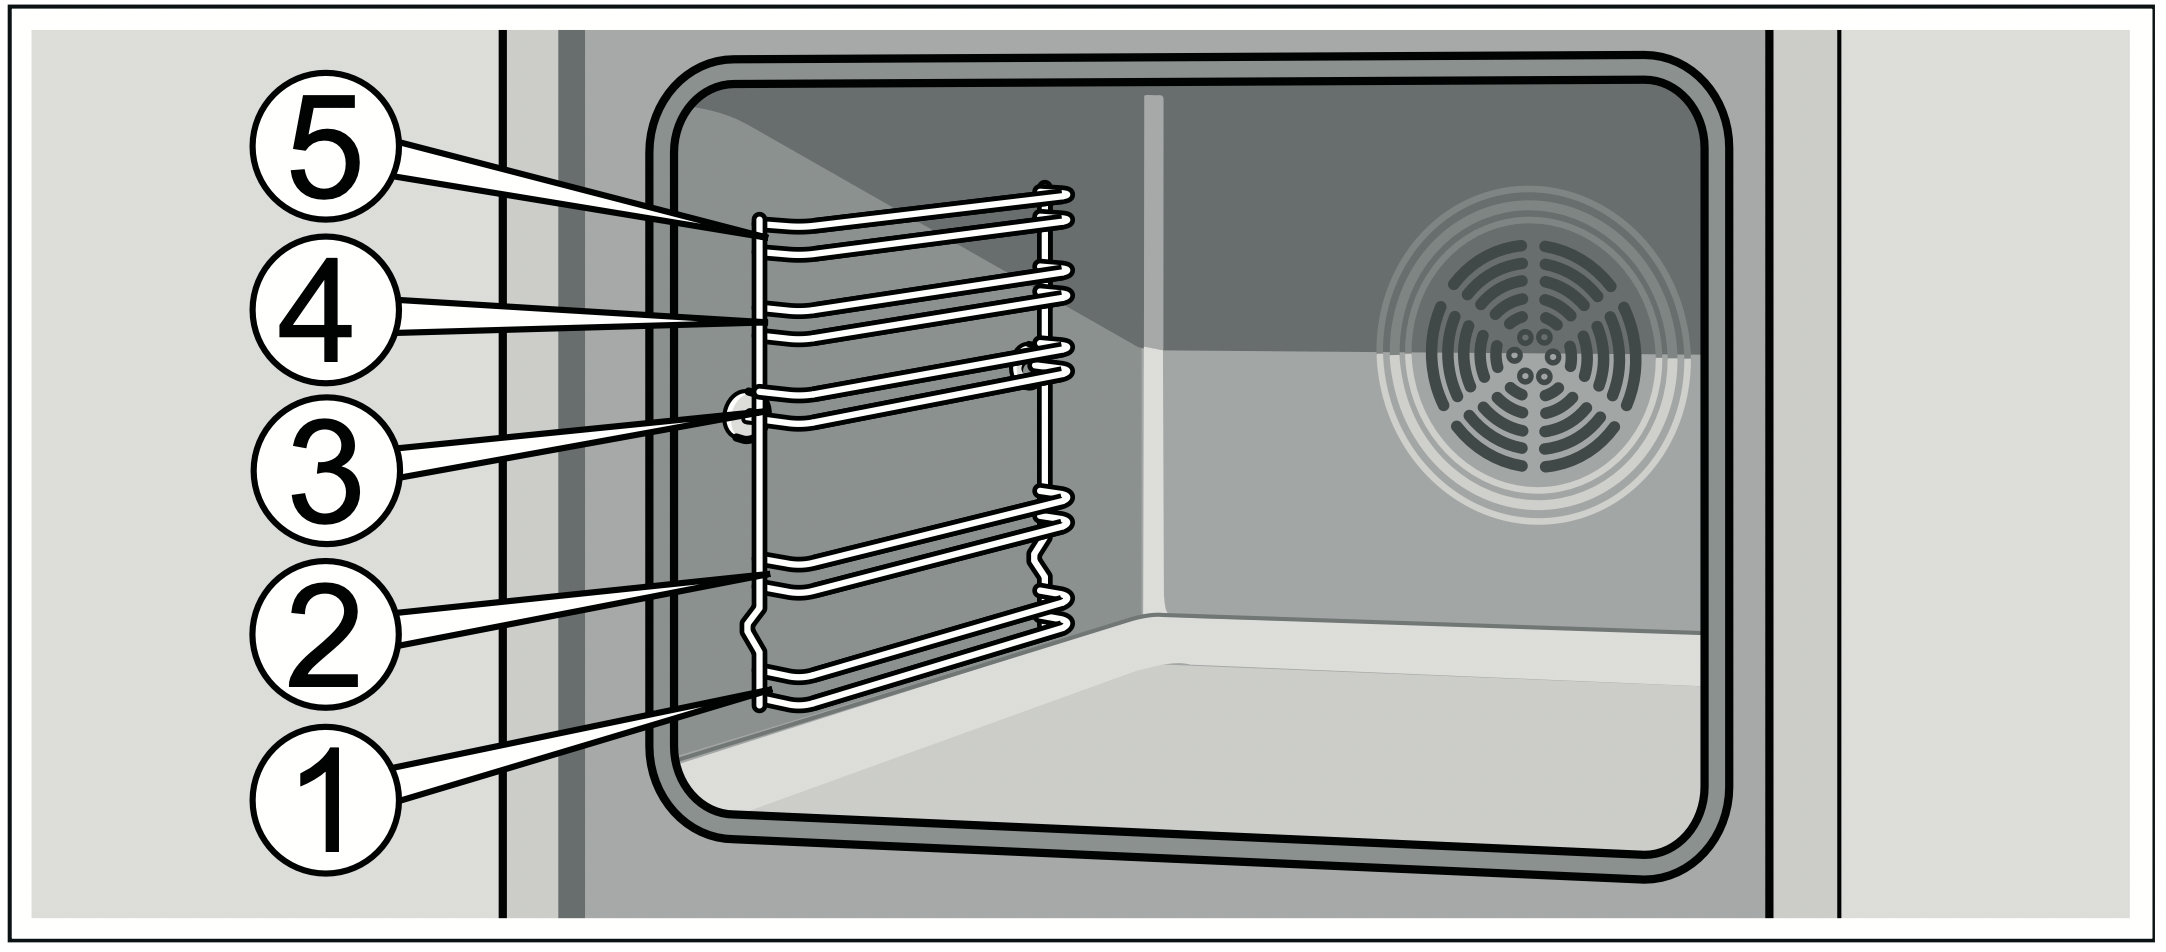
The accessories can be removed halfway until they are secured. This makes it easy to remove food.
When inserting an accessory in the oven, make sure the curvature is at the rear. This is the only way to ensure it fits perfectly.
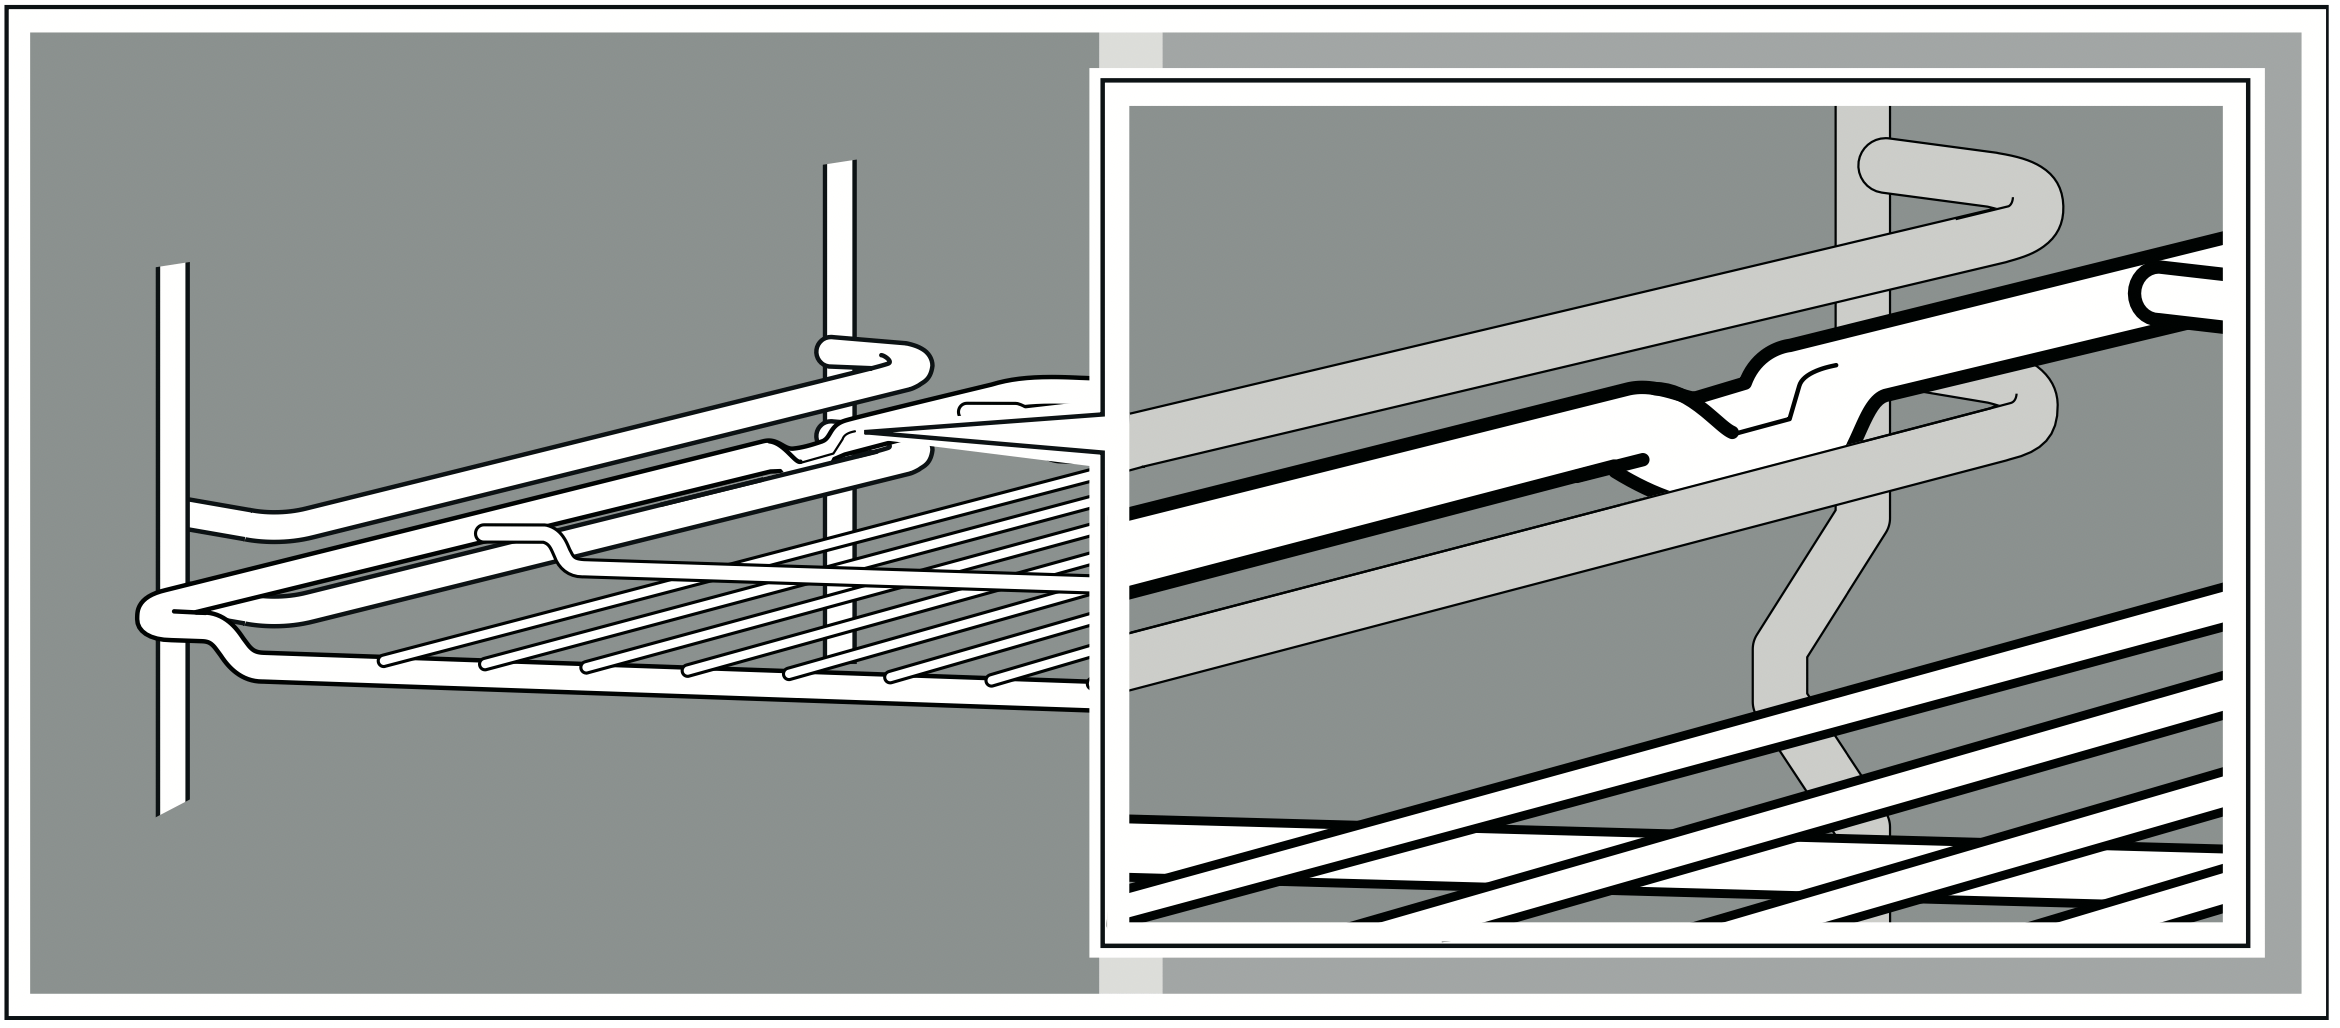
Depending on the equipment, if the appliance has guide rails, these will interlock slightly when fully removed. This means the accessory can be easily inserted. To unlock, reinsert the guide rails in the oven exerting slight pressure.
Note: Accessories may deform as they heat up. This deformation will disappear when they cool. This does not affect the normal operation.
Your oven is supplied with only some of the following accessories.
Accessories may be purchased from the Technical Assistance Service, from specialist retailers or on the Internet. Enter the HEZ number.
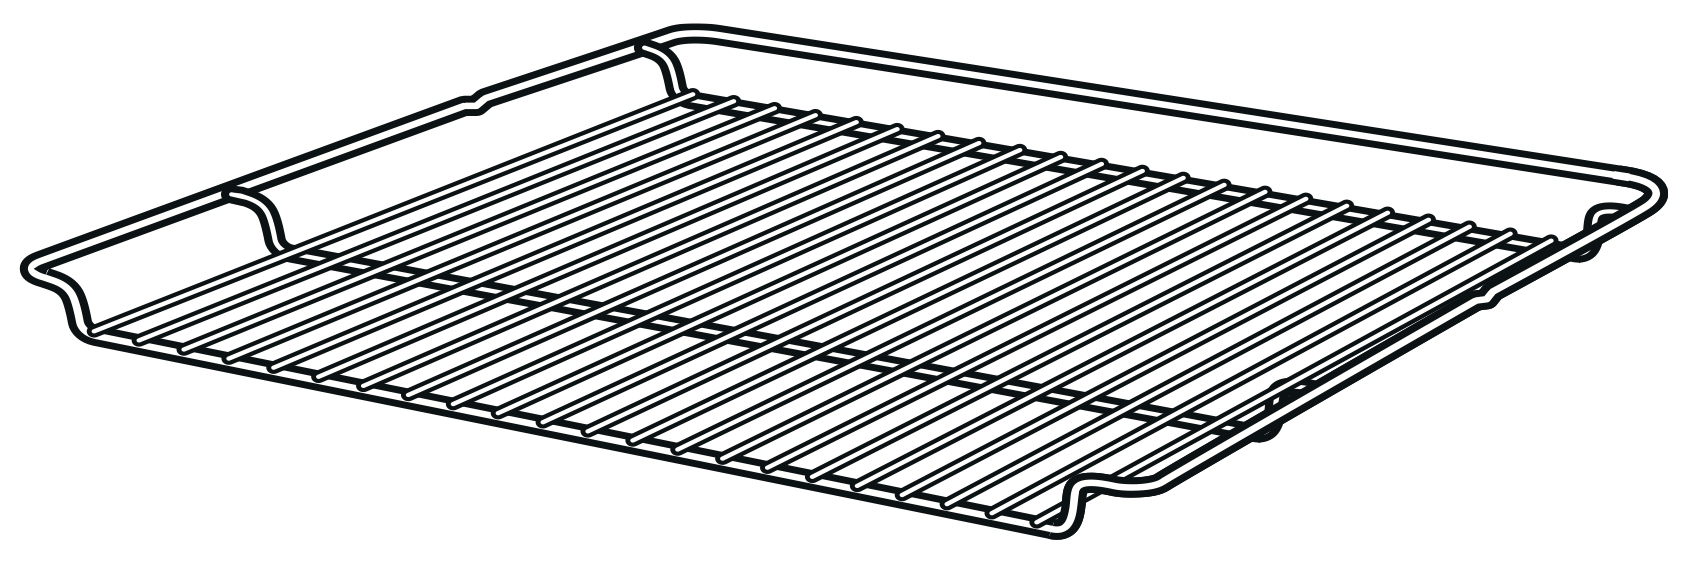 |
Wire shelf
For cookware, baking tins, roasts, grilled items and frozen meals.
Insert the wire shelf with the open end facing the oven door and the curvature downwards  . .
|
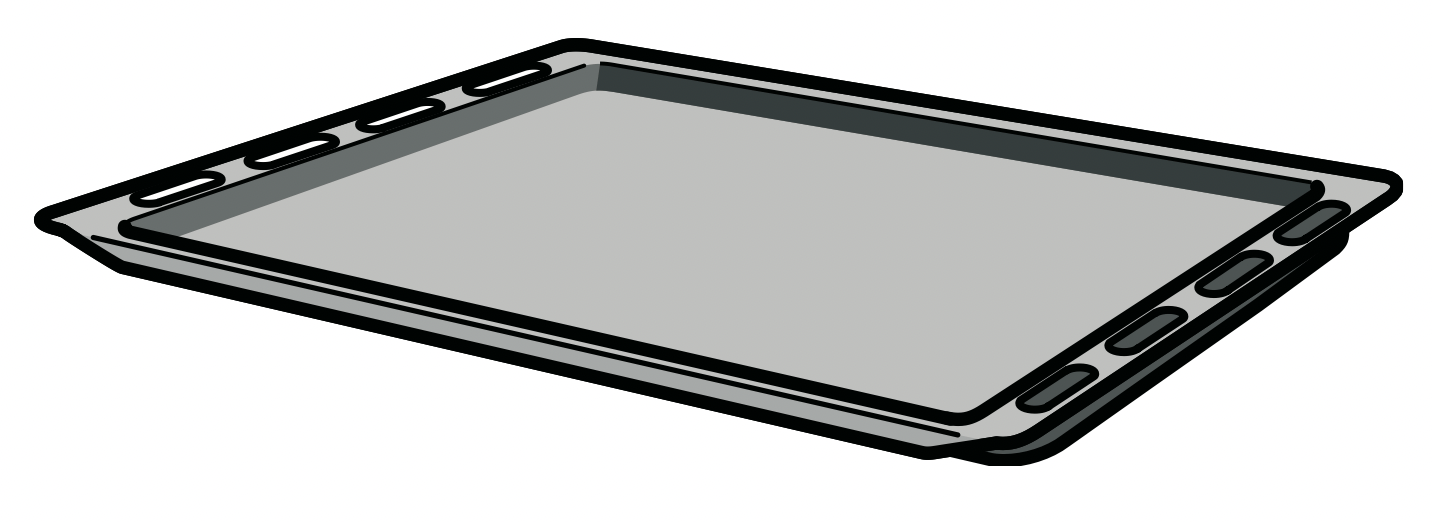 |
Flat enamel oven tray
For cakes, pastries and biscuits.
Place the tray in the oven with its raised lip facing the door.
|
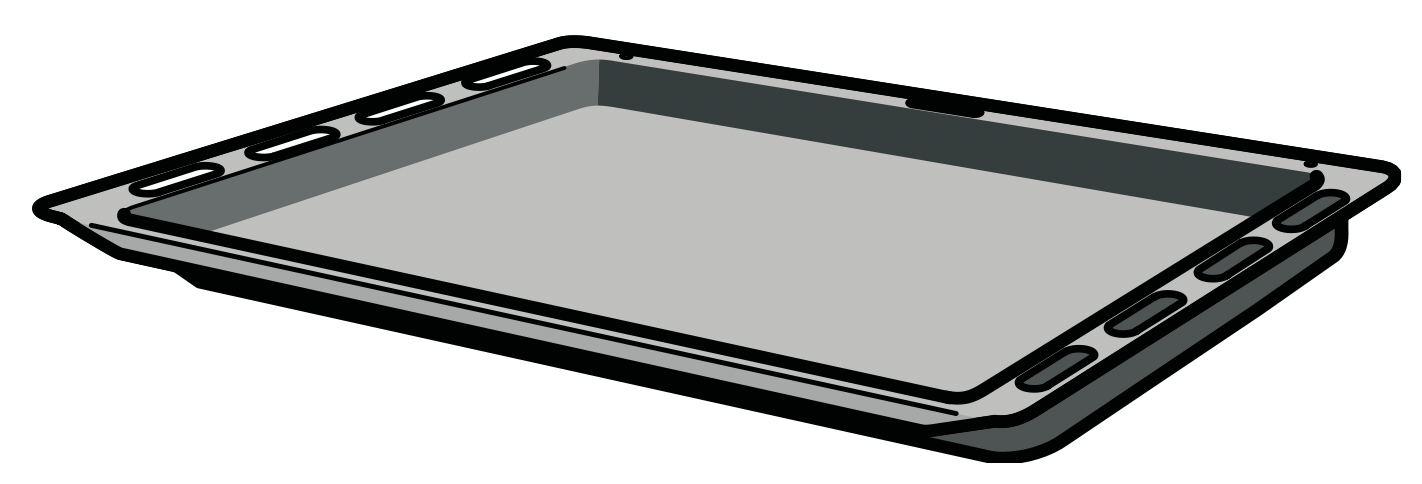 |
Universal deep enamel tray
For juicy cakes, pastries, frozen meals and large joints for roasting. This can also be used as a tray to collect the fat when roasting directly on the wire shelf.
Place the tray in the oven with its raised lip facing the door.
|
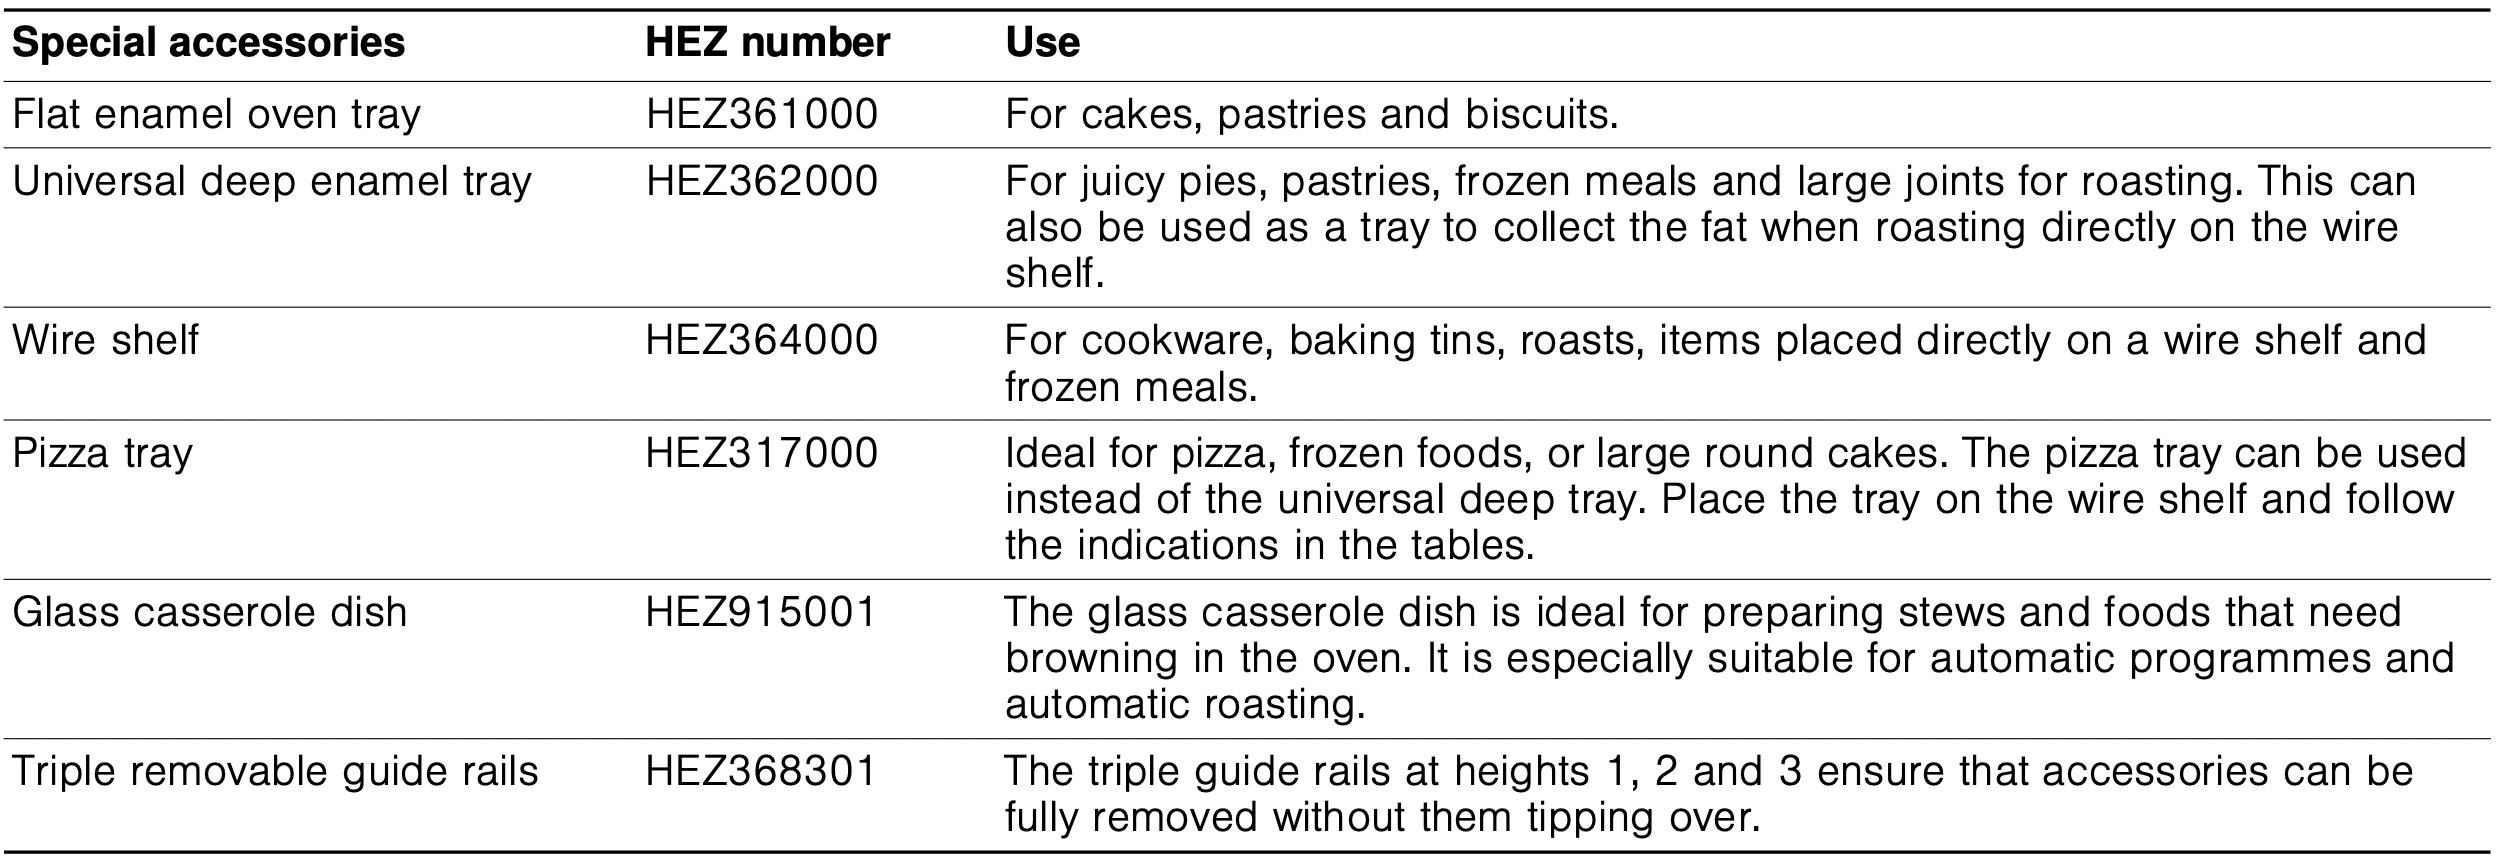
Special accessories
Accessories may be purchased from the Technical Assistance Service or from specialist retailers. There is a wide range of accessories available for the oven in our catalogues and on the Internet. Ordering online and the availability of special accessories changes from country to country. Consult your purchase documentation.
Not all of the special accessories are suitable for all appliances. When purchasing, always give the exact name (E Nr.) of your appliance.
Before using the oven for the first time
In this section, you can find out what you must do before using your oven to prepare food for the first time. First read the section on Safety information.
Setting the time
Once the oven has been connected, the  symbol and four zeros are shown flashing on the display panel. Set the time.
- Press the button.
The display shows the time 
- Set the time with the buttons + or -
The programmed time is displayed after a few seconds.
Heating the oven
To remove the "new" smell, heat the oven empty with the door closed. The most effective option is to heat the oven for one hour with 3D  hot air at 240 ºC. Make sure that no packaging has been left in the oven first.
- Use the function control knob to select 3D hot air.
- Select 240 ºC with the temperature control knob.
Turn the oven off after one hour. To do this, turn the control knob to zero.
Cleaning the accessories
Before using the accessories for the first time, clean them thoroughly using a cloth, hot water and a little soap.
Programming the oven
There are different ways to programme the oven. Programming the type of heating, temperature or grill power. The oven can be programmed with the cooking time (duration) and the end time for each dish. For more information, see the chapter Setting the time functions.
Type of heating and temperature
Example in the picture: 3D hot air at 190 ºC.
- Select the type of heating using the function control knob.
- Select the temperature or grill power level with the temperature control knob.
The oven will begin to heat up.
Switching off the oven
Turn the function selector to the off position.
Changing the settings
The type of heating and temperature or grill setting can be changed at any time using their respective selectors.
Setting the time functions
This oven has various time functions. The sensor activates the menu and moves through the different functions. The time symbols remain lit up while settings are programmed. The square brackets [ ] indicate the time function selected. You can modify an already programmed time function directly with the sensors + or - , provided the time symbol is situated between square brackets [ ].
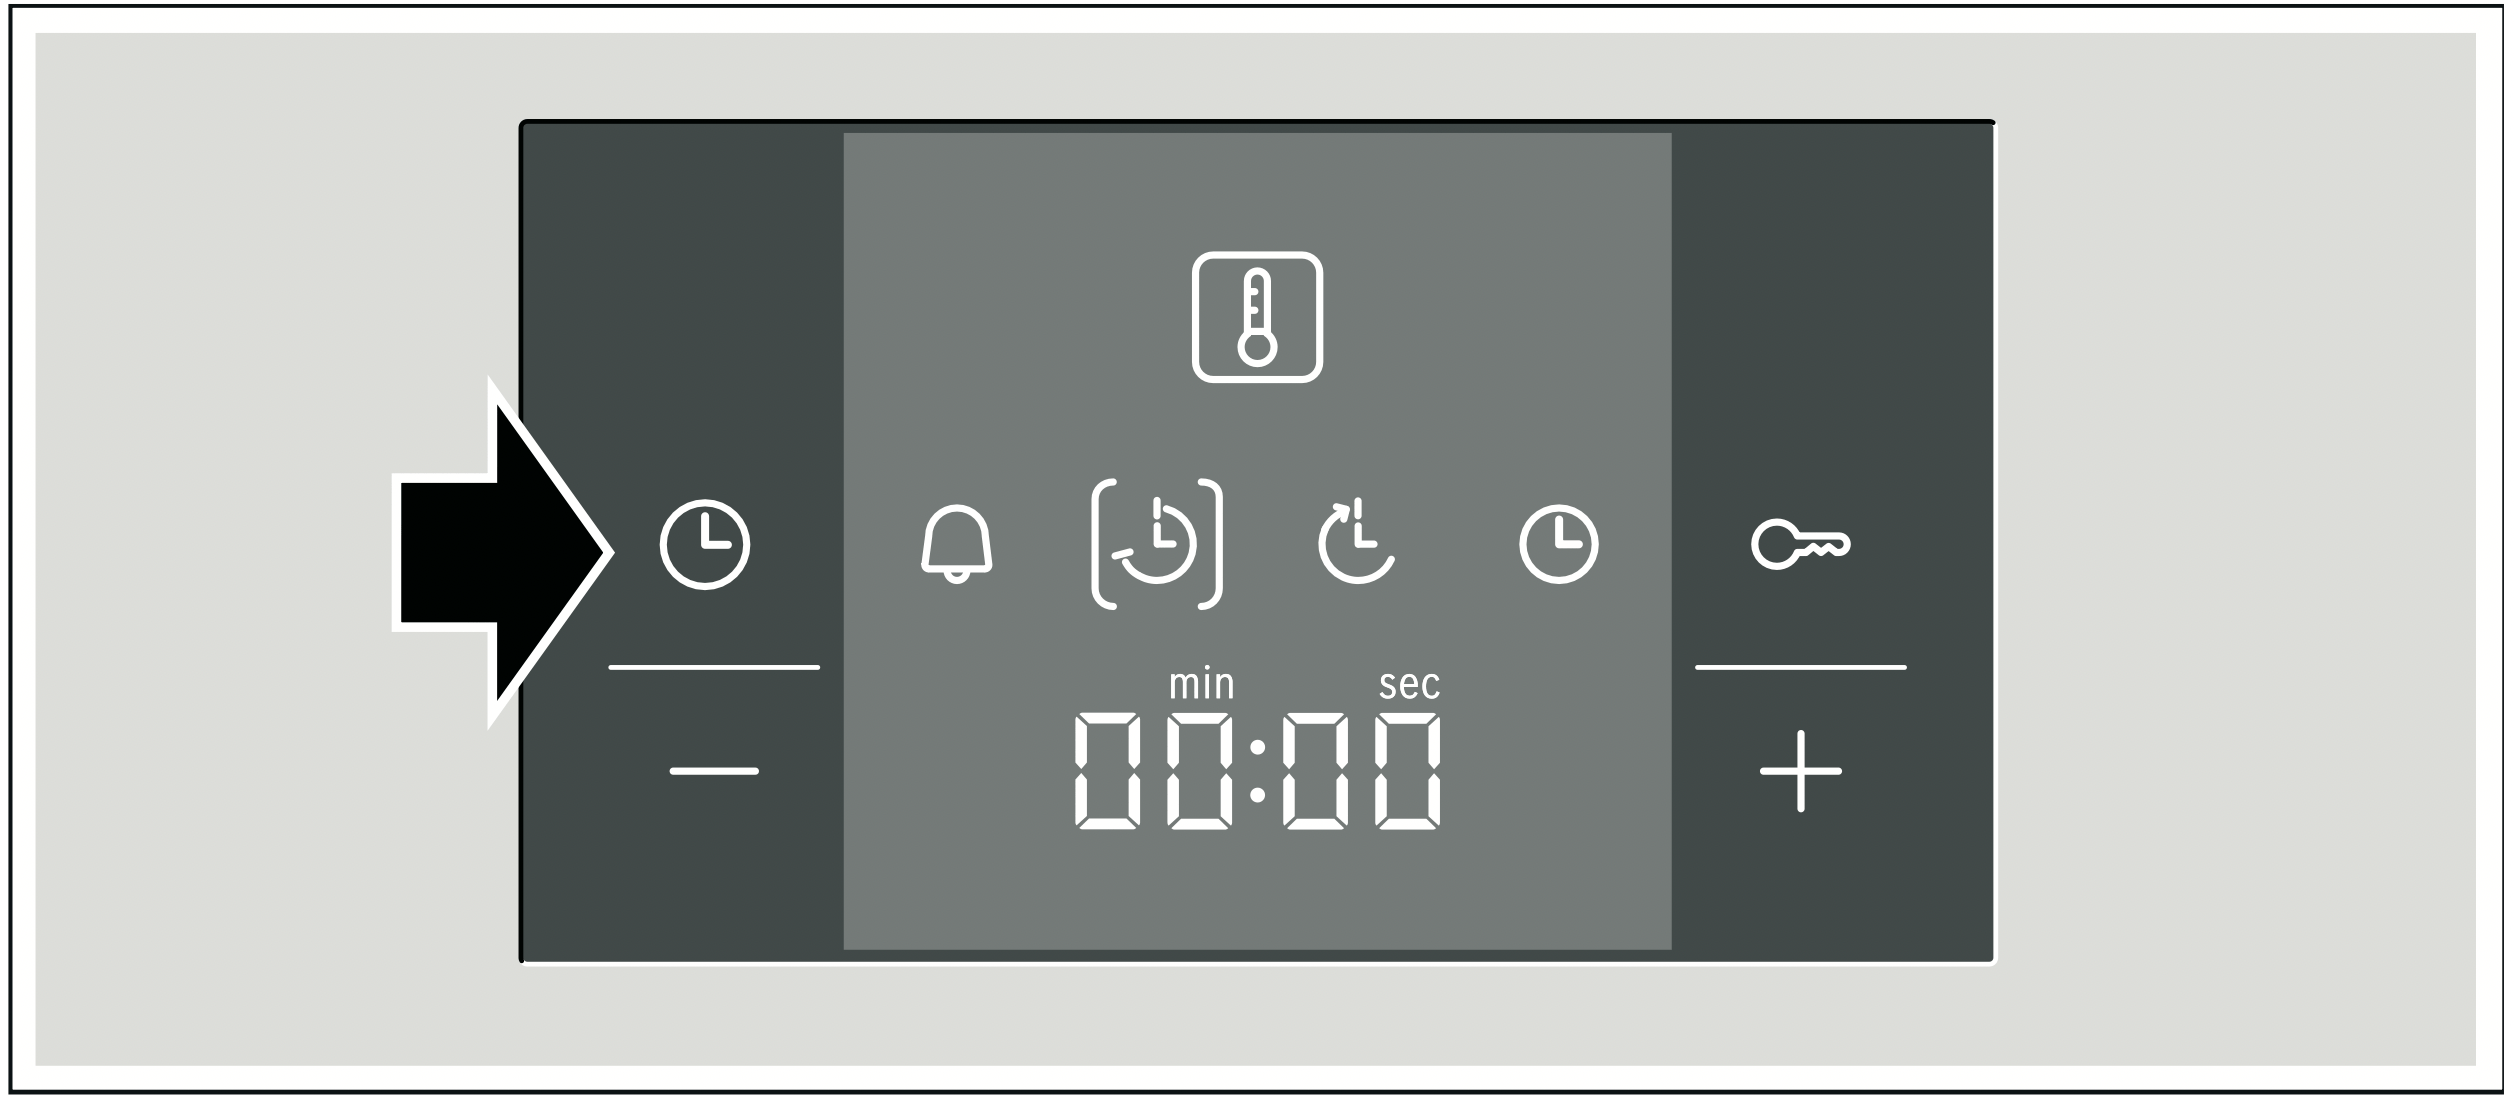
Timer
The timer works independently of the oven. The timer has its own beep. This can be used to distinguish whether the time set for the timer or the automatic oven shut-off have finished (cooking time).
- Press the button once .
The time symbols light up on the display panel, the square brackets are next to  .
.
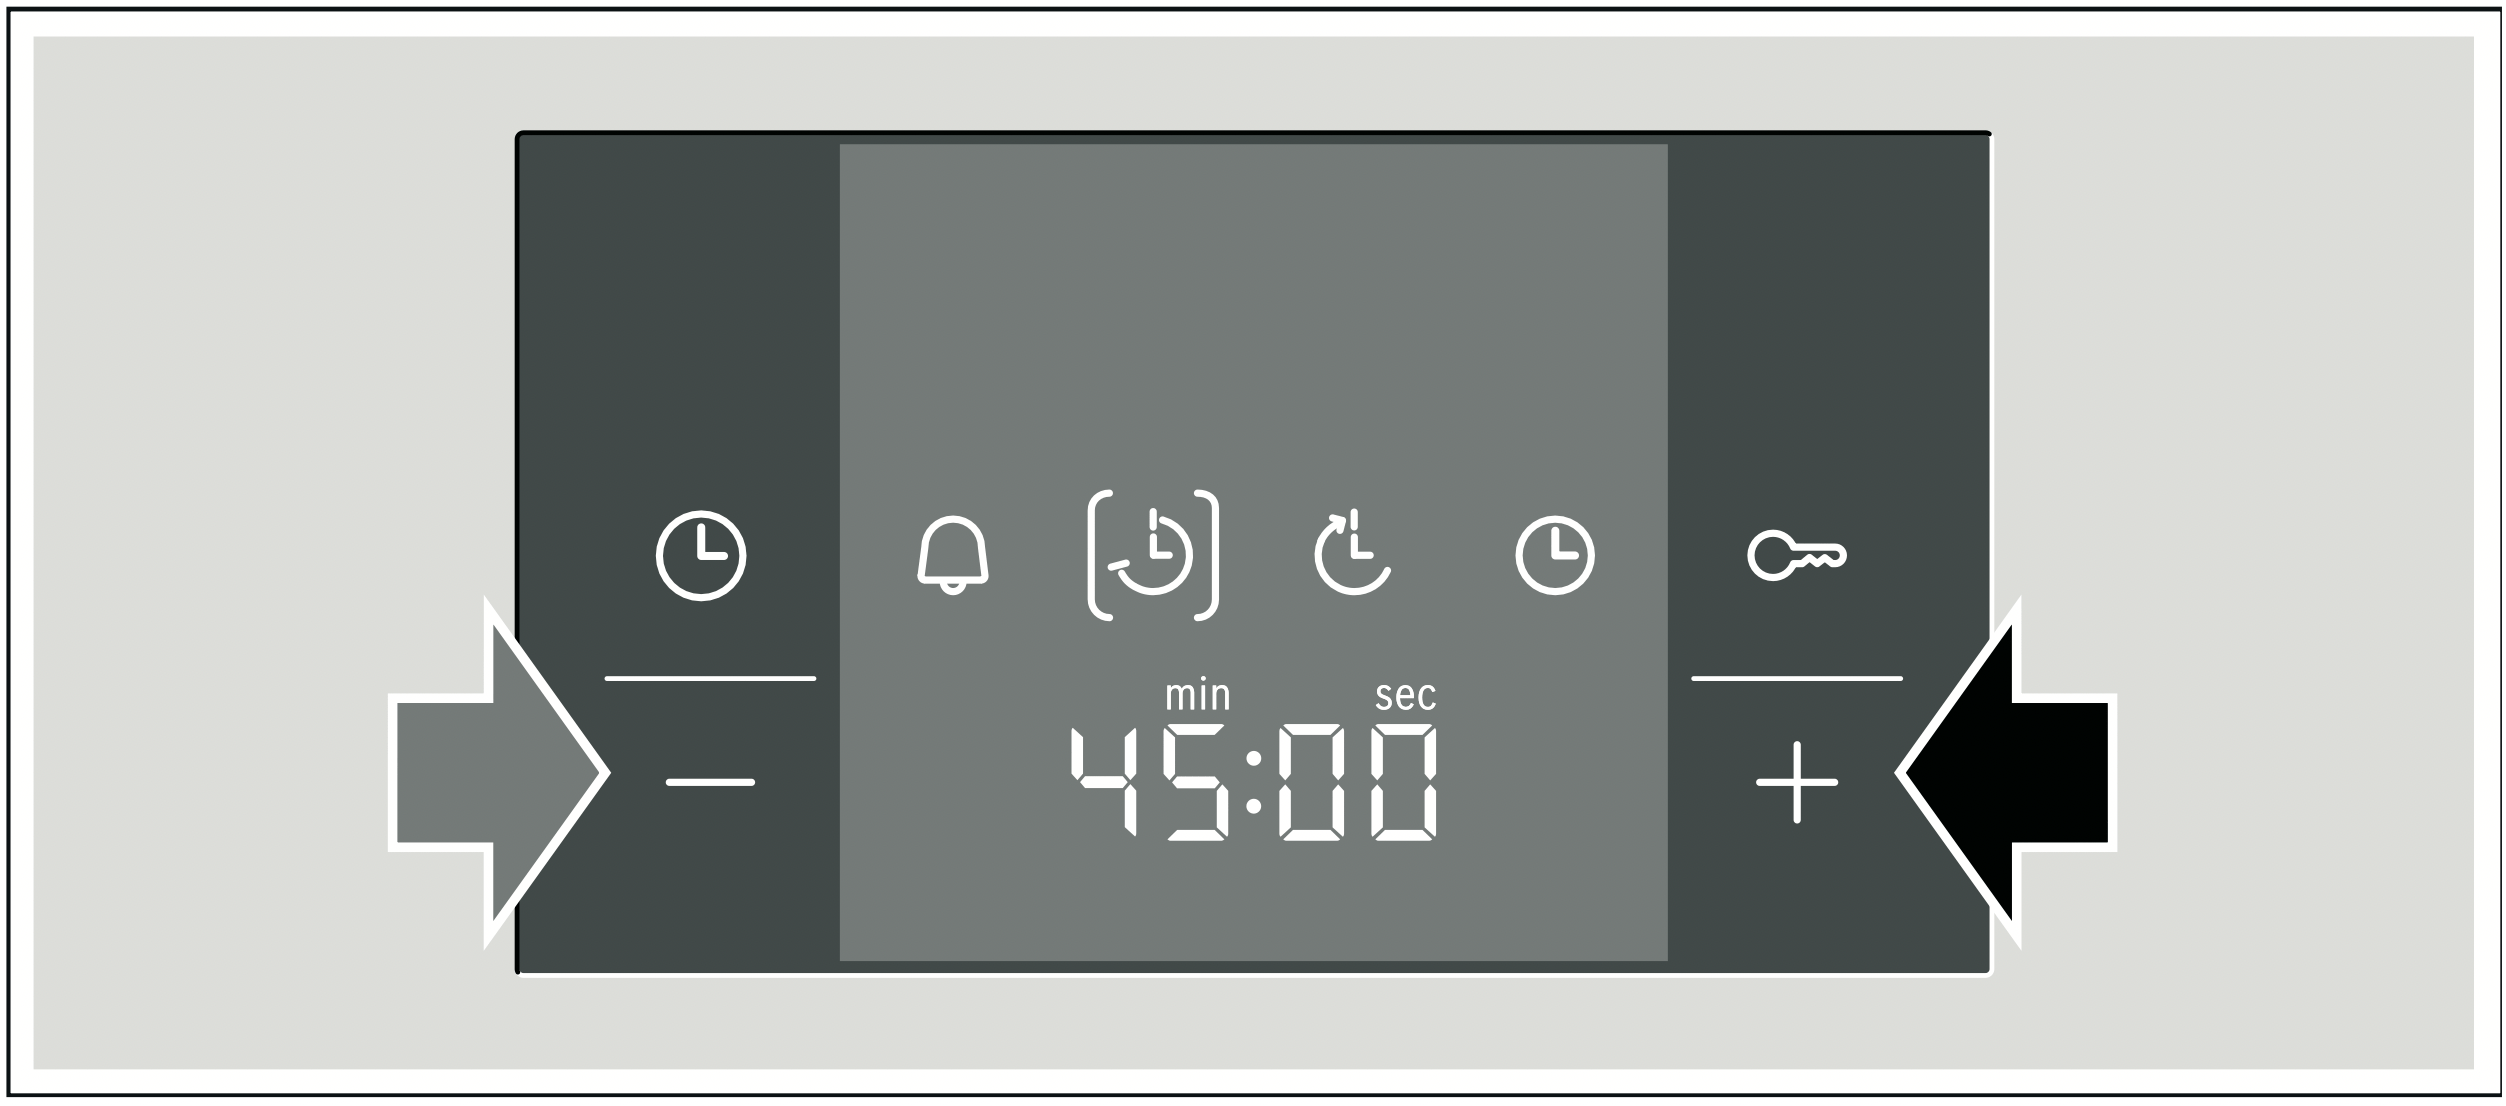
- Set the timer using the + or - buttons.
Value suggested for the + button = 10 minutes.
Value suggested for the - button = 5 minutes.
The programmed time is shown after a few seconds. The time set for the timer starts to count down. The symbol [] lights up on the display panel and the timer's progress is shown. The other time symbols switch off.
The time set for the timer has elapsed
A beep will sound. The display panel will show  . Switch off the timer using the button.
Changing the time on the timer.
Change the time set for the timer using the + or - buttons. The new time is shown after a few seconds.
Cancelling the timer
Resetting the timer to with the button - . The new time is shown after a few seconds. The timer switches off.
Viewing the time settings
If several time functions are programmed, the corresponding symbols light up on the display panel. The symbol for the time function in the foreground is in brackets.
To view the timer , the cooking time  , the end time
  or the actual time , press the sensor repeatedly until the brackets are around the required symbol. The corresponding value will be shown for a few seconds on the display panel.
Cooking time
The oven allows you to set the cooking time for each type of food. The oven switches off automatically when the cooking time has finished. This avoids interrupting other tasks to switch the oven off or exceeding the cooking time by mistake.
Example in the picture: cooking time: 45 minutes.
- Select the type of heating using the function control knob.
- Select the temperature or grill power level with the temperature control knob.
- Press the button twice.
The display panel will show . The time symbols light up, the square brackets are next to .
- Set the cooking time with the + or - buttons.
Value suggested for the + button = 30 minutes
Value suggested for the - button = 10 minutes
The oven will switch on after a few seconds. The display panel shows the cooking time elapsed and the [] symbol comes on. The other time symbols switch off.
The cooking time has finished
A beep will sound. The oven will stop heating. The display panel will show . Press the button. Programme a new cooking time with the + or - buttons. Or press the button twice and turn the function control knob to the zero setting. The oven is off.
Changing the cooking time
Change the cooking time with the + or - buttons. The new time is shown after a few seconds. If the timer has been programmed, first press the button.
Cancelling the cooking time
Reset the cooking time to with the button - . The new time is shown after a few seconds. The time has been cancelled. If the timer has been programmed, first press the button.
Viewing the time settings
If several time functions are programmed, the corresponding symbols light up on the display panel. The symbol for the time function in the foreground is in brackets.
To view the timer , the cooking time , the end time or the actual time , press the sensor repeatedly until the brackets are around the required symbol. The corresponding value will be shown for a few seconds on the display panel.
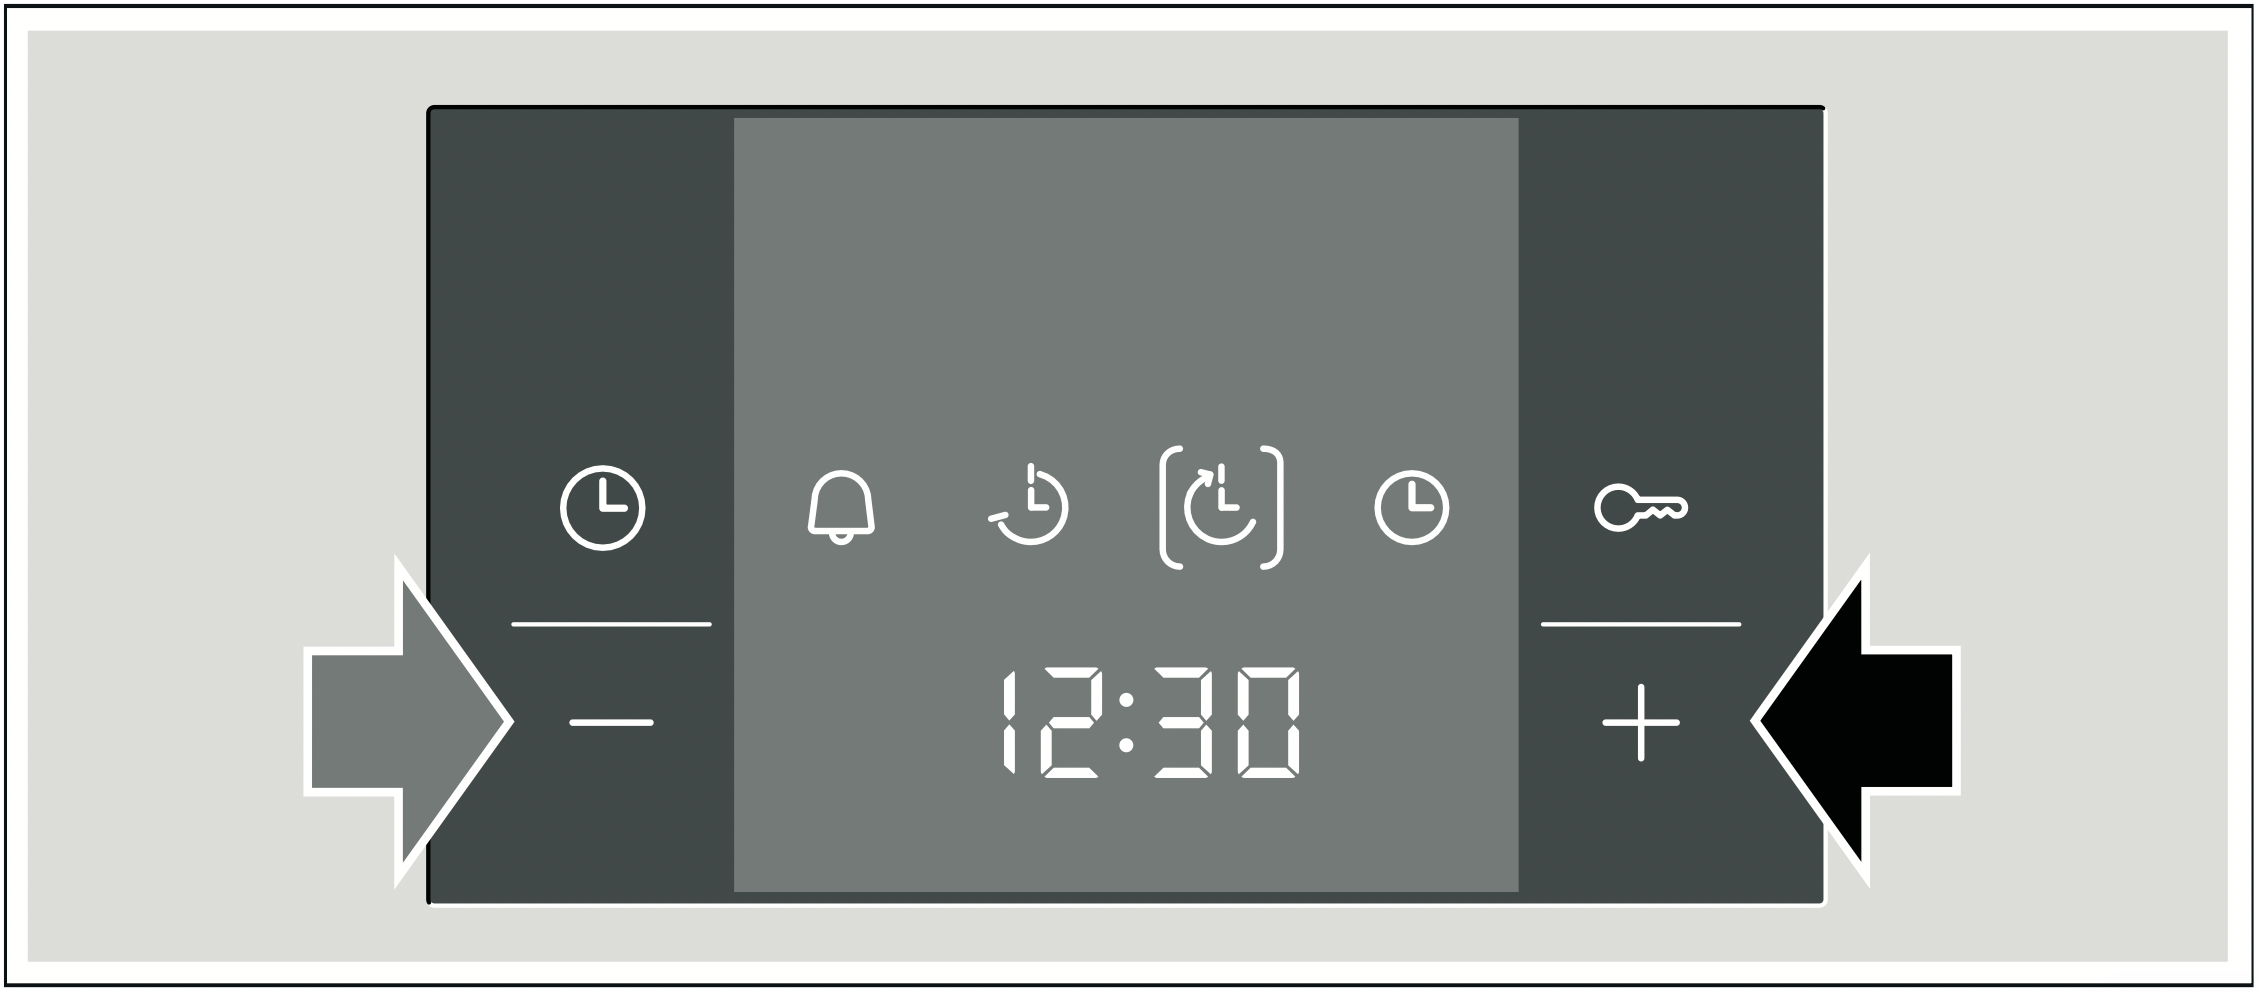
End time
The oven allows you to set the time when you want the food ready. The oven switches on automatically and switches off at the set time. For example, the food may be placed in the oven in the morning and the oven set so that it is ready at midday.
Ensure that the food will not go off if it is in the oven for too long.
Example in the picture: It is now 10:30 am, the cooking time is 45 minutes and the oven should switch off at 12:30 pm.
- Set the function control knob.
- Set the temperature control knob.
- Press the button twice.
- Set the cooking time with the + or - buttons.
- Press the button.
The square brackets are shown next to . The time the dish will be ready is displayed.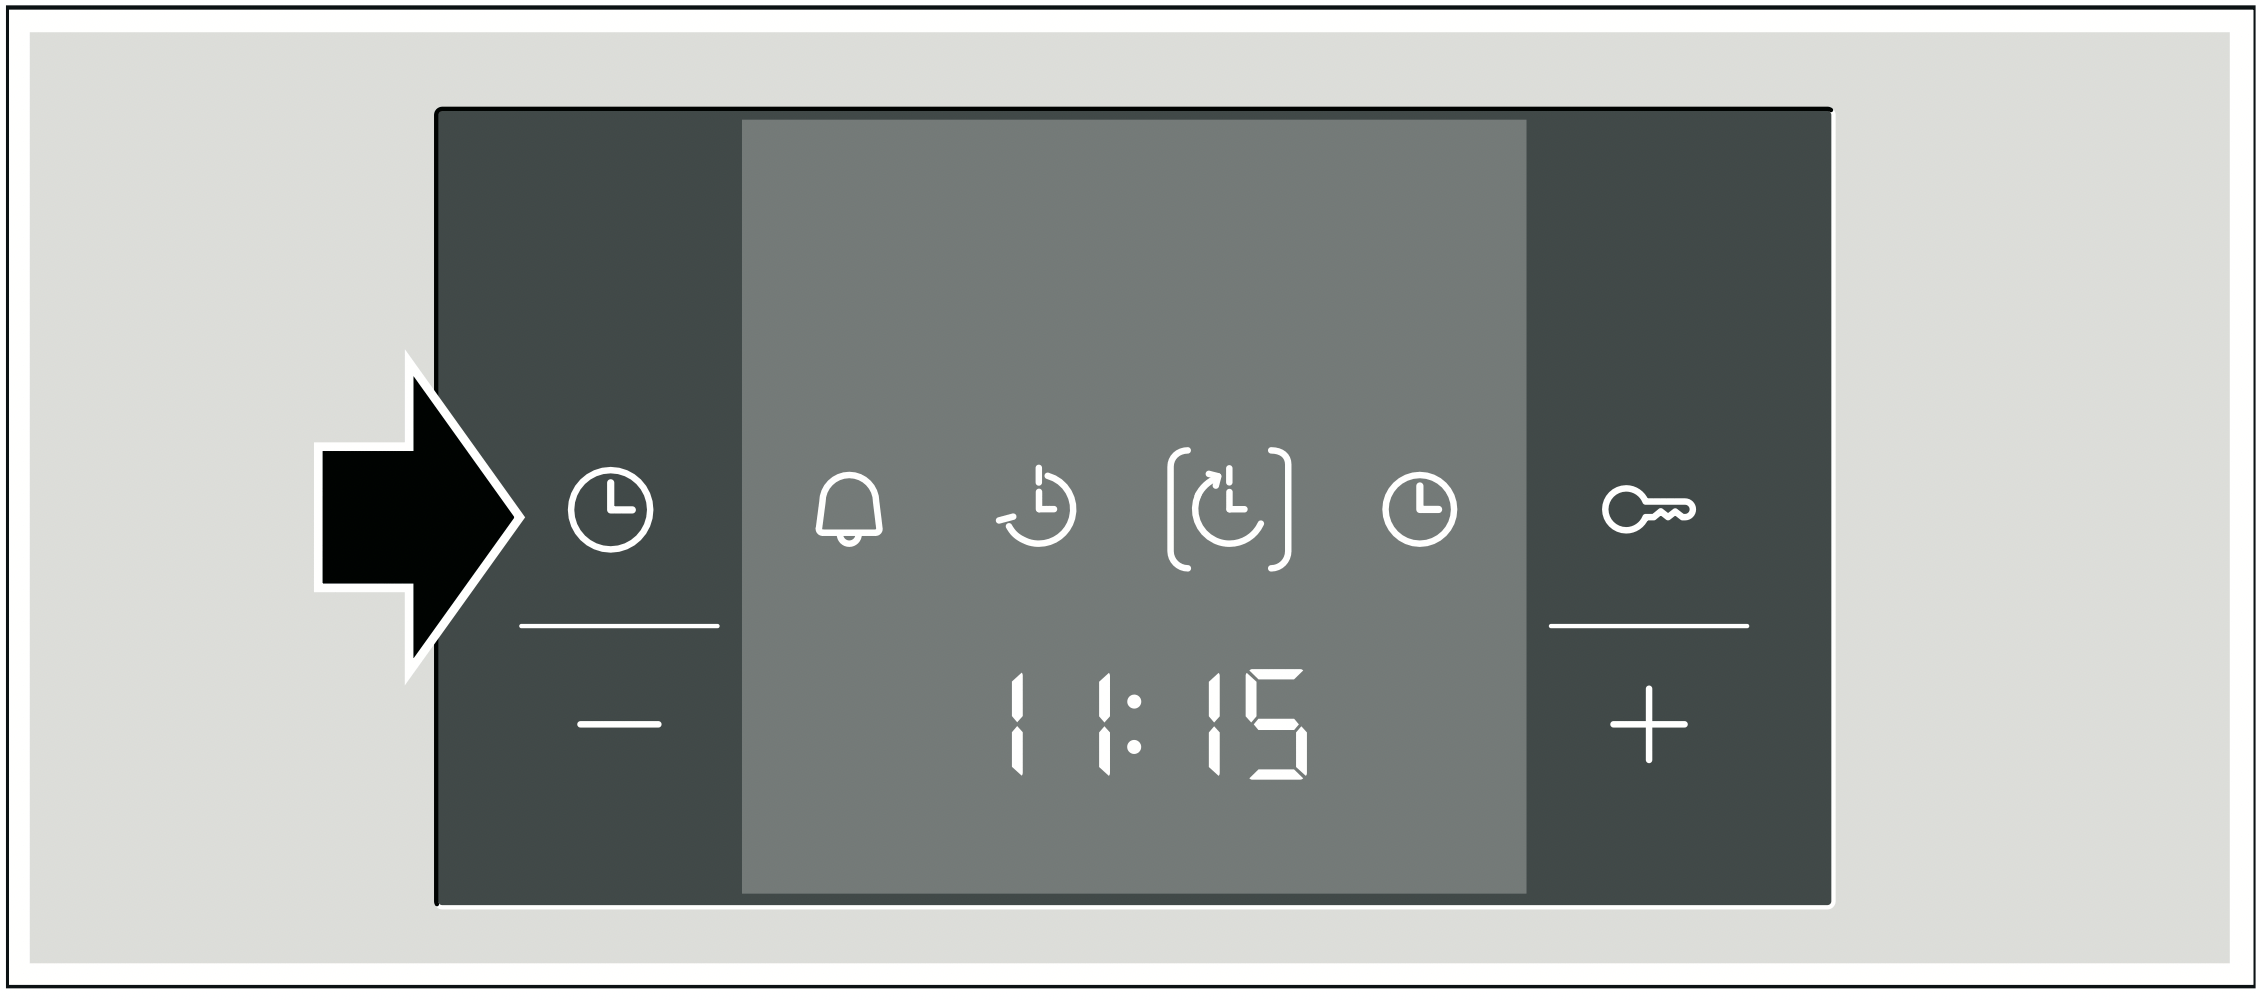
- Delay the end time using the + or - buttons.
The oven displays the programmed time after a few seconds and is set to standby. The time when the dish will be ready is displayed and the end time symbol will be shown in square brackets. The symbols and turn off. When the oven is turned on, cooking time progress is shown and the symbol appears in square brackets. The symbol is turned off.
The cooking time has finished
A beep will sound. The oven will stop heating. The display panel will show . Press the button. Programme a new cooking time with the + or - buttons. Or press the button twice and turn the function control knob to the zero setting. The oven is off.
Changing the end time
Change the end time using the buttons + or - . The new time is shown after a few seconds. If the timer has been programmed, first press the button twice. Do not change the end time if the cooking time has already started to count down. The final result may not be the same.
Cancelling the end time
Reset the end time to the current time by pressing - . The new time is shown after a few seconds. The oven switches on. If the timer has been programmed, first press the button twice.
Viewing the time settings
If several time functions are programmed, the corresponding symbols light up on the display panel. The symbol for the time function in the foreground is in brackets.
To view the timer , the cooking time , the end time or the actual time , press the sensor repeatedly until the brackets are around the required symbol. The corresponding value will be shown for a few seconds on the display panel.
Time
Once the oven has been connected or after a power cut, a flashing symbol and four zeros are shown on the display panel. Set the time.
- Press the button.
The display panel displays the time .
- Set the time with the buttons + or - .
The programmed time is displayed after a few seconds.
Changing the time
No other time function can be programmed.
- Press the button four times.
The time symbols light up on the display panel, the brackets are located next to .
- Adjust the time with the buttons + or - .
The programmed time is displayed after a few seconds.
Hiding the clock
You can hide the clock. For more information, please refer to the section Changing the basic settings.
Childproof lock
The oven includes a childproof lock to prevent it being turned on accidentally.
The oven does not react to any setting. The timer and time can be programmed when the childproof lock is on.
When the heating type and temperature or grill level are programmed, the childproof lock turns off the heating.
Activating the childproof lock
No cooking time or end time should already be set.
Press the  button for approximately four seconds.
The display panel shows the symbol . The childproof lock is now activated.
Turning off the childproof lock
Press the button for approximately four seconds.
The symbol in the display panel goes off. The childproof lock is now deactivated.
Changing the basic settings
This oven has different basic settings. The settings can be adapted to the user's own needs.
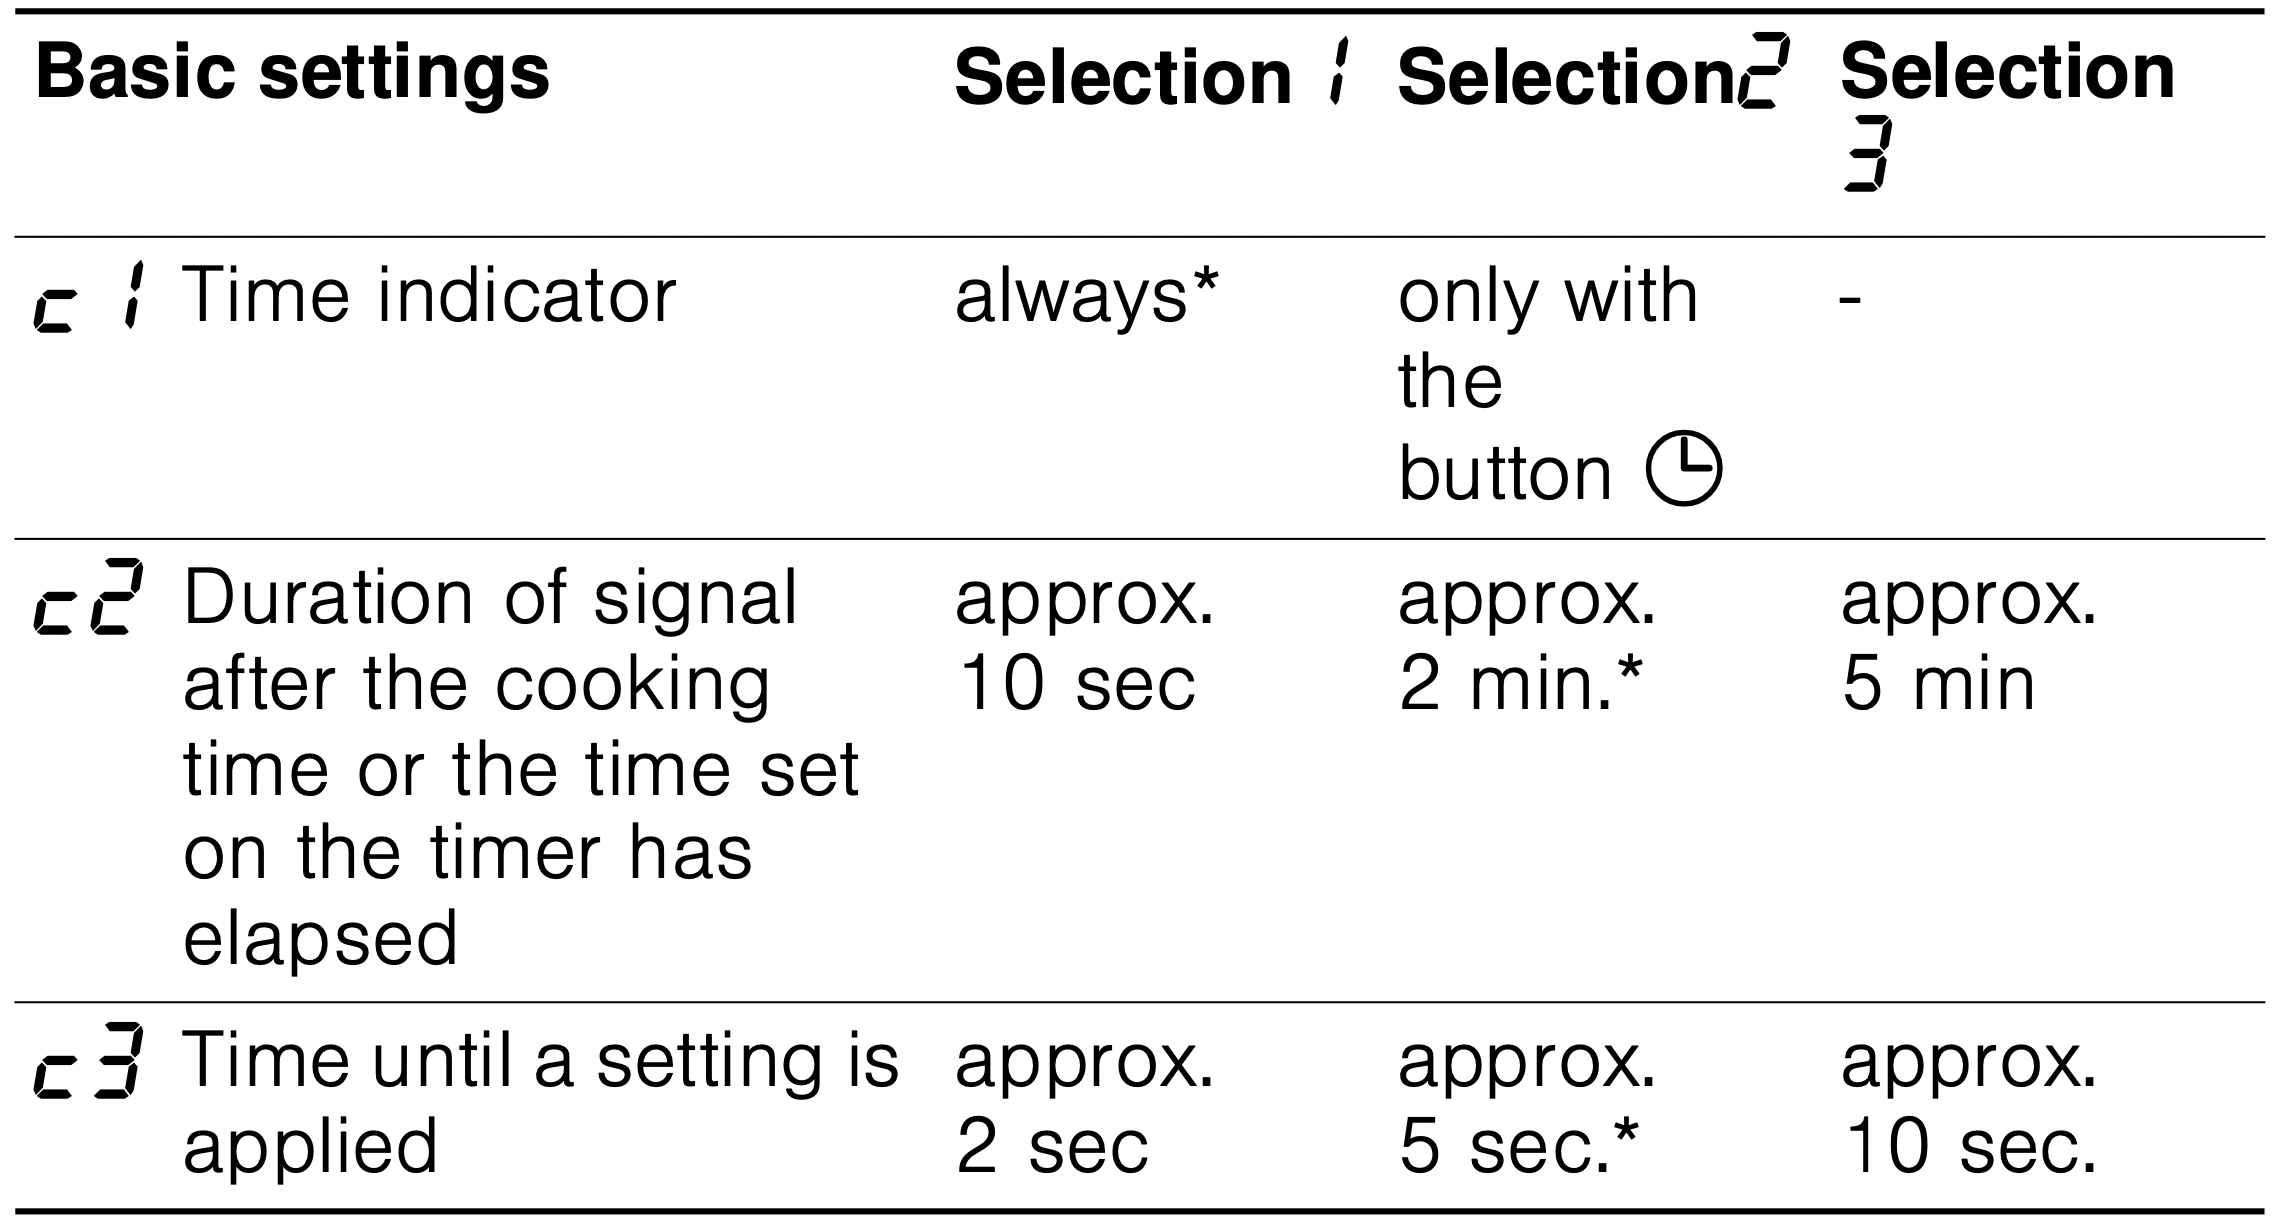
* Default setting
No other time function can be programmed.
- Press the button for approximately 4 seconds.
The display panel will show the current basic setting for the time, e.g.  ‚ for the Selection
  .
.
- Set the basic setting using the buttons + or -.
- Confirm with the button.
The display panel shows the following basic setting. Using the button select the levels and using the buttons + or - make the setting.
- Press the button for approximately 4 seconds.
All basic settings have been applied.
The basic settings can be changed again at any time.
Care and cleaning
If cleaned and properly cared for, your oven will keep its bright appearance and operating performance for many years to come. Advice on how to care for and clean your oven is provided below.
Notes
- Different colours may be seen in your front panel due to the various materials used in its manufacture, such as glass, plastic and metal.
- Dark patches in the door's glass panel may seem to be dirt but they are in fact reflections from the oven light.
- Enamel burns at very high temperatures. This may cause slight discolouration. This is normal and does not affect the oven's operation. The edges of thin baking trays may not be completely enamelled. They may therefore feel slightly rough, although their corrosive protection will be unaffected.
Cleaning products
Follow the indications provided in the table to avoid damaging the various oven surfaces by using unsuitable cleaning products. Do not use
- abrasive or acidic cleaning products
- strong products containing alcohol
- scourers or hard sponges
- high-pressure or steam cleaners
Wash new dishcloths thoroughly before use.
| Zone |
Cleaning products |
| Front panel |
Hot water and a little soap:
Clean with a dishcloth and dry with a soft cloth. Do not use a glass cleaning product or a glass scraper.
|
| Stainless steel |
Hot water and a little soap:
Clean with a dishcloth and dry with a soft cloth. Immediately remove any water marks, grease, cornflower or egg white stains since corrosion could occur underneath these marks or stains.
Special products for the care of stainless steel and which are suitable for hot surfaces may be obtained from Technical Assistance Service centres and specialist retail outlets. Use a very fine soft cloth to apply the cleaning product.
|
| Glass panel |
Glass cleaning products:
Clean using a soft cloth. Do not use a glass scraper.
|
| Display |
Glass cleaning products:
Clean using a soft cloth. Do not use alcohol, vinegar or other abrasive or acidic cleaning products.
|
| Glass panels on oven door |
Glass cleaning products:
Clean using a soft cloth. Do not use a glass scraper.
|
| Glass cover for the oven light |
Hot water and a little soap:
Clean with a dishcloth.
|
The seal
Do not remove! |
Hot water and a little soap:
Clean with a dishcloth. Do not rub.
|
| Wire shelves or rails |
Hot water and a little soap:
Soak and clean using a dishcloth or brush.
|
| Sliding guides |
Hot water and a little soap:
Clean with a dishcloth or a brush. Do not leave this to soak or wash in a dishwasher.
|
| Accessories |
Hot water and a little soap:
Soak and clean using a dishcloth or brush.
|
Cleaning the self-cleaning surfaces in the oven interior
The inside rear and side walls and top of some ovens may be lined with a highly porous ceramic lining. This lining absorbs splashes produced during baking and roasting, dissolving them while the oven is working. This cleaning will be most effective at higher temperatures and during longer cooking times.
Proceed as follows if the oven is still dirty after being used several times:
- Thoroughly clean the bottom and any walls that do not have this lining.
- Programming the 3D Hot air function.
- Empty the oven and then leave it on with the door closed for approximately 2 hours at maximum temperature.
The ceramic lining will regenerate. Once the oven has cooled down, remove any brown and white stains with water and a soft sponge.
Slight discolouration of the lining does not affect its self-cleaning performance.
Caution!
- Do not use abrasive cleaning products. These would scratch and impair the highly porous lining.
- Never use oven cleaning products on ceramics. If oven cleaner is spilled on this accidentally, immediately remove it using lots of water and a sponge.
Cleaning the oven's enamelled bottom and walls
Use a cleaning cloth and hot water with a little soap or vinegar.
If very dirty, use a fine steel scourer or a special oven cleaning product. These must only be used when the oven interior is cold. Do not use metal scourers or special oven cleaning products on self-cleaning surfaces.
Light
The oven light can be turned on manually to facilitate cleaning.
Turning on the oven light
Turn the function control knob to the position.
The light will come on. The temperature control knob must be turned off.
Turning the oven light off
Turn the function control knob to the Ûposition.
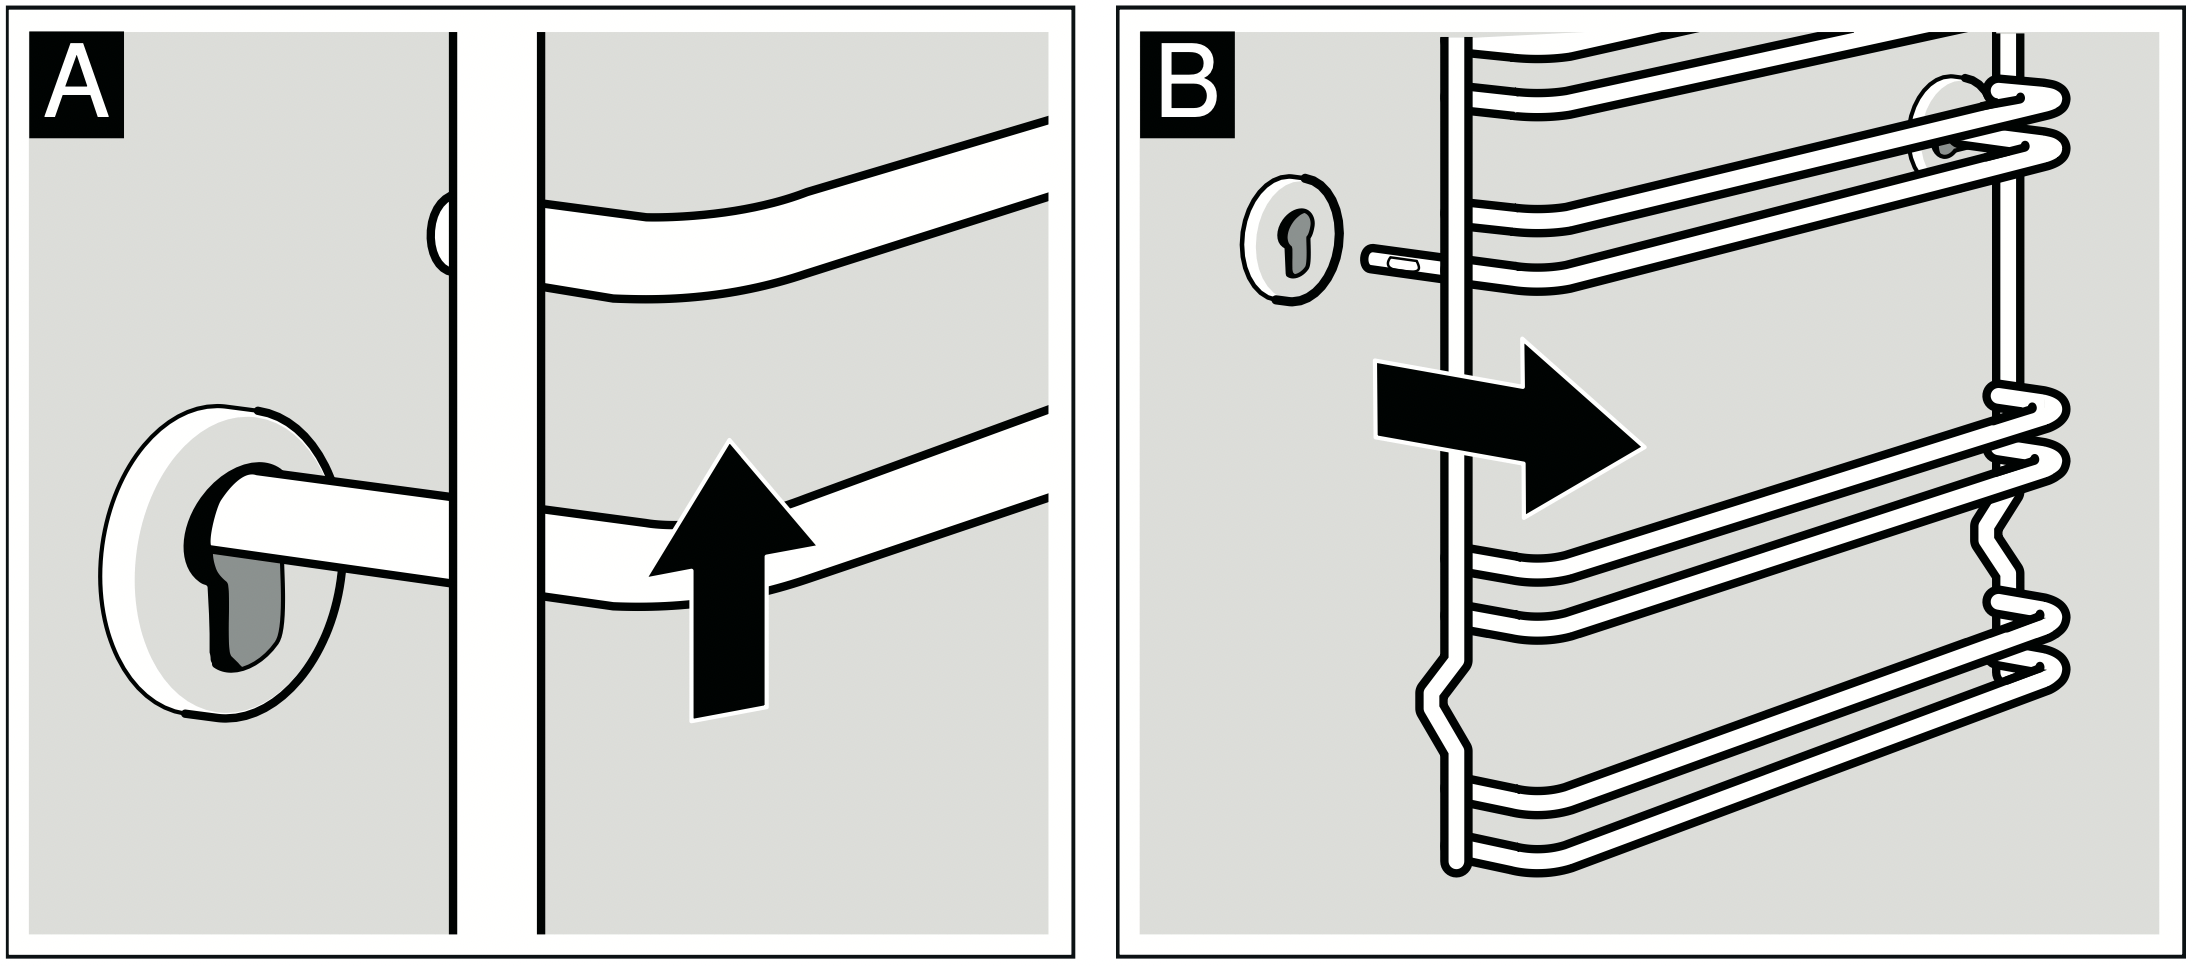
Removing and refitting the wire shelves or left and right hand side rails
The wire shelves or left and right hand side rails can be removed for cleaning. The oven must be cold.
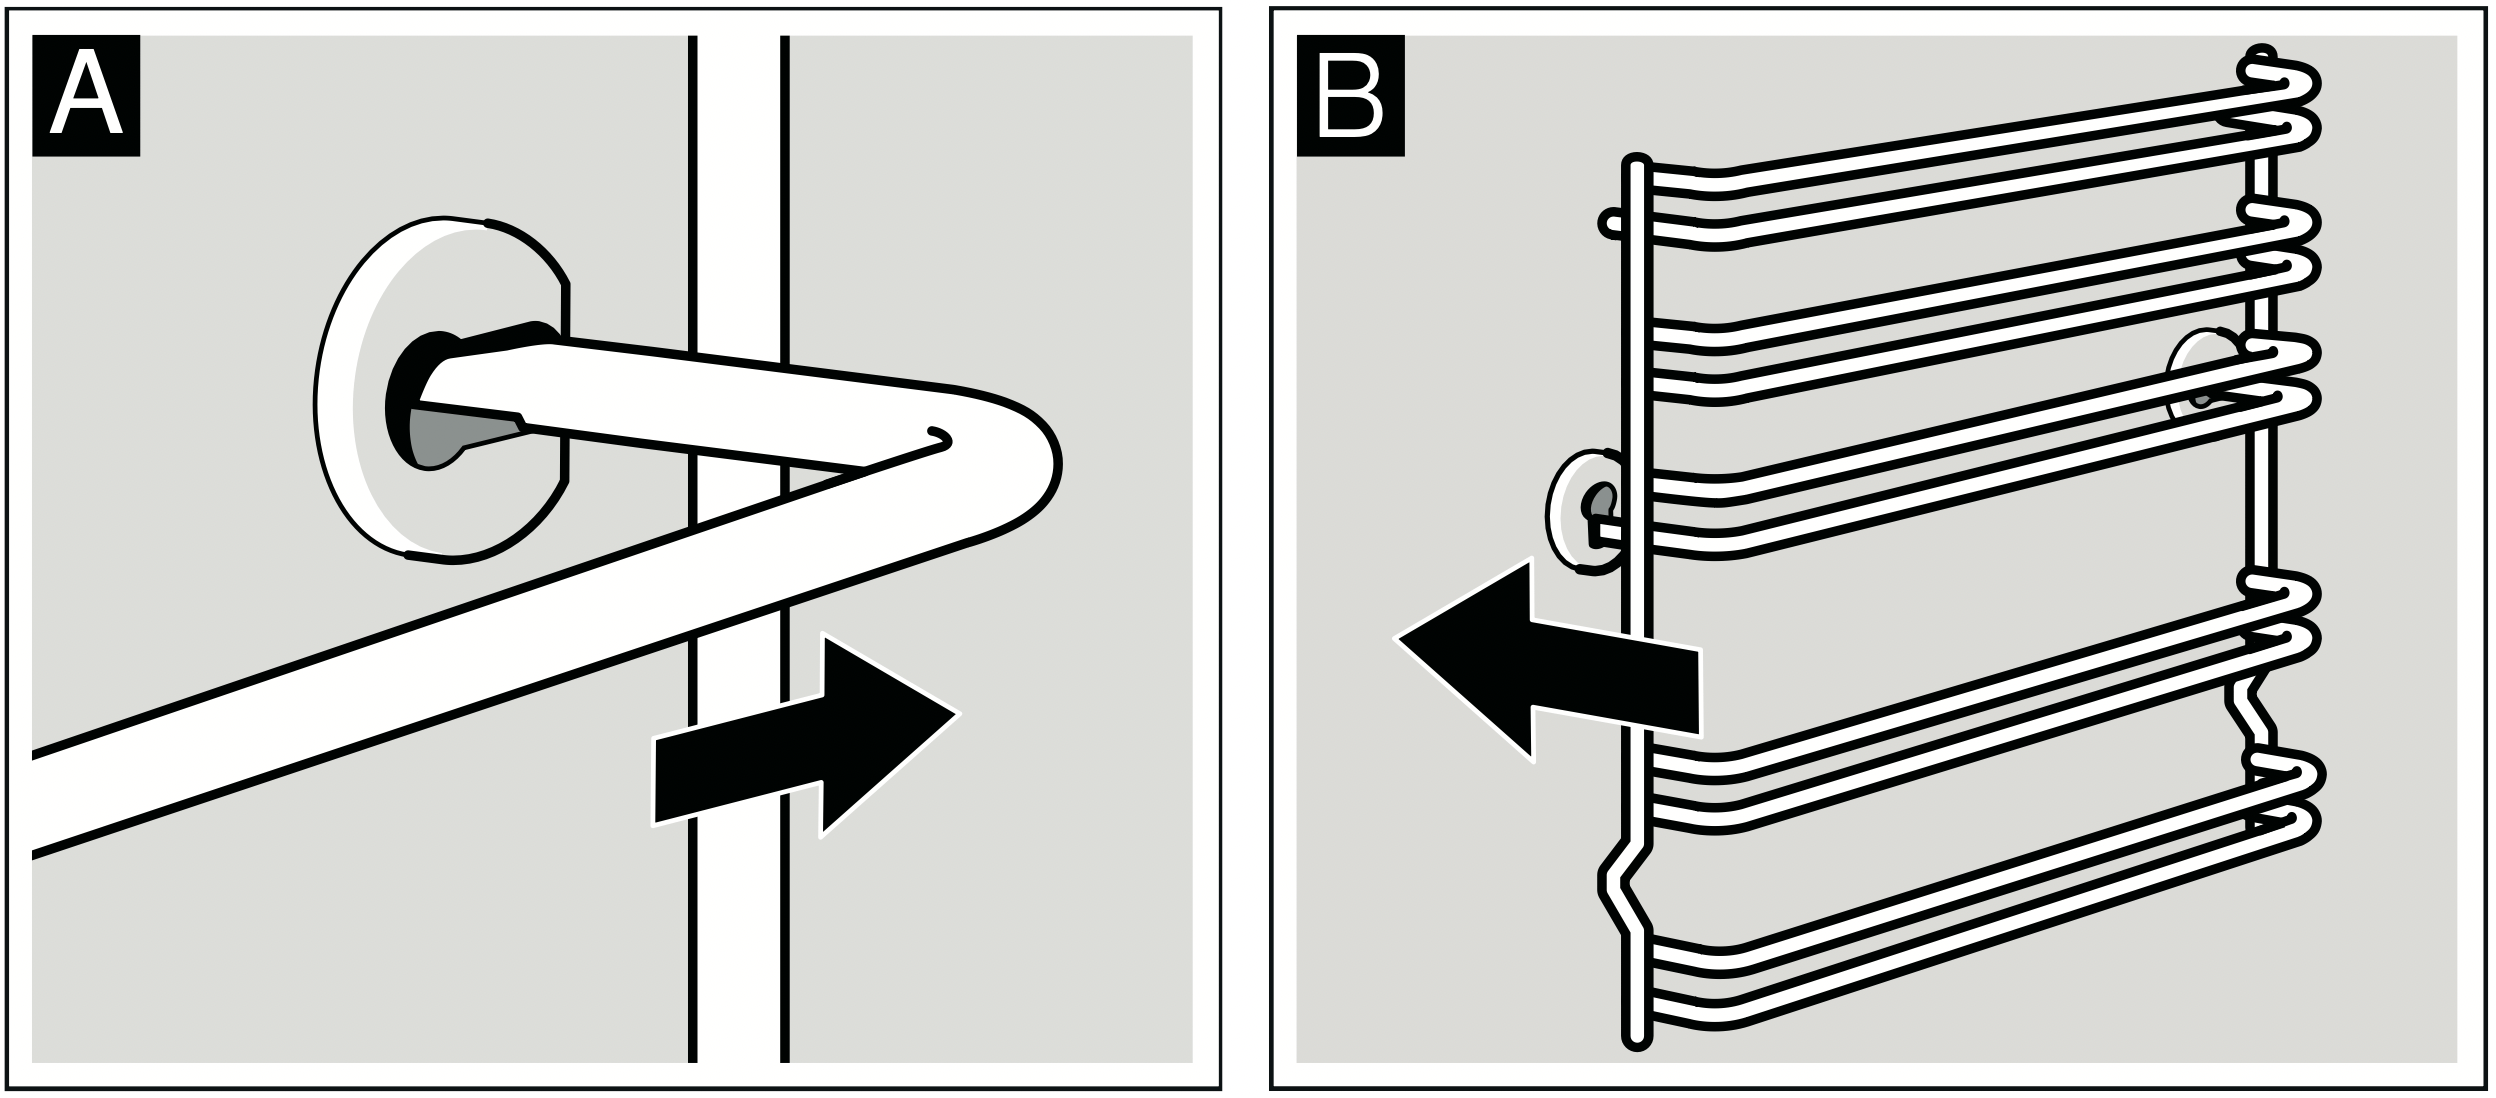
Release the guides or rails
- Lift the front of the guide or rail and release it (figure A).
- Then pull the guide or rail forwards completely and remove it (figure B).
Clean the guides or rails with detergents and a sponge. The use of a brush is recommended for stubborn stains.
Install the wire shelves or rails
- First insert the shelf or the rail in the rear groove by pushing it back slightly (figure A)
- Then insert it in the front groove (figure B).
Wire shelves or rails can be adjusted on the left and right hand side. Their curvature should always be face down.
Unhooking and hanging the oven door
The front panel can be unhooked to help remove the oven door and clean the glass panels.
The oven door hinges are fitted with a locking lever. The door cannot be unhooked if the locking lever is closed (figure A). Once the locking lever has been opened to unhook the door (figure B), the hinges will be locked in position. This prevents the door from suddenly closing.
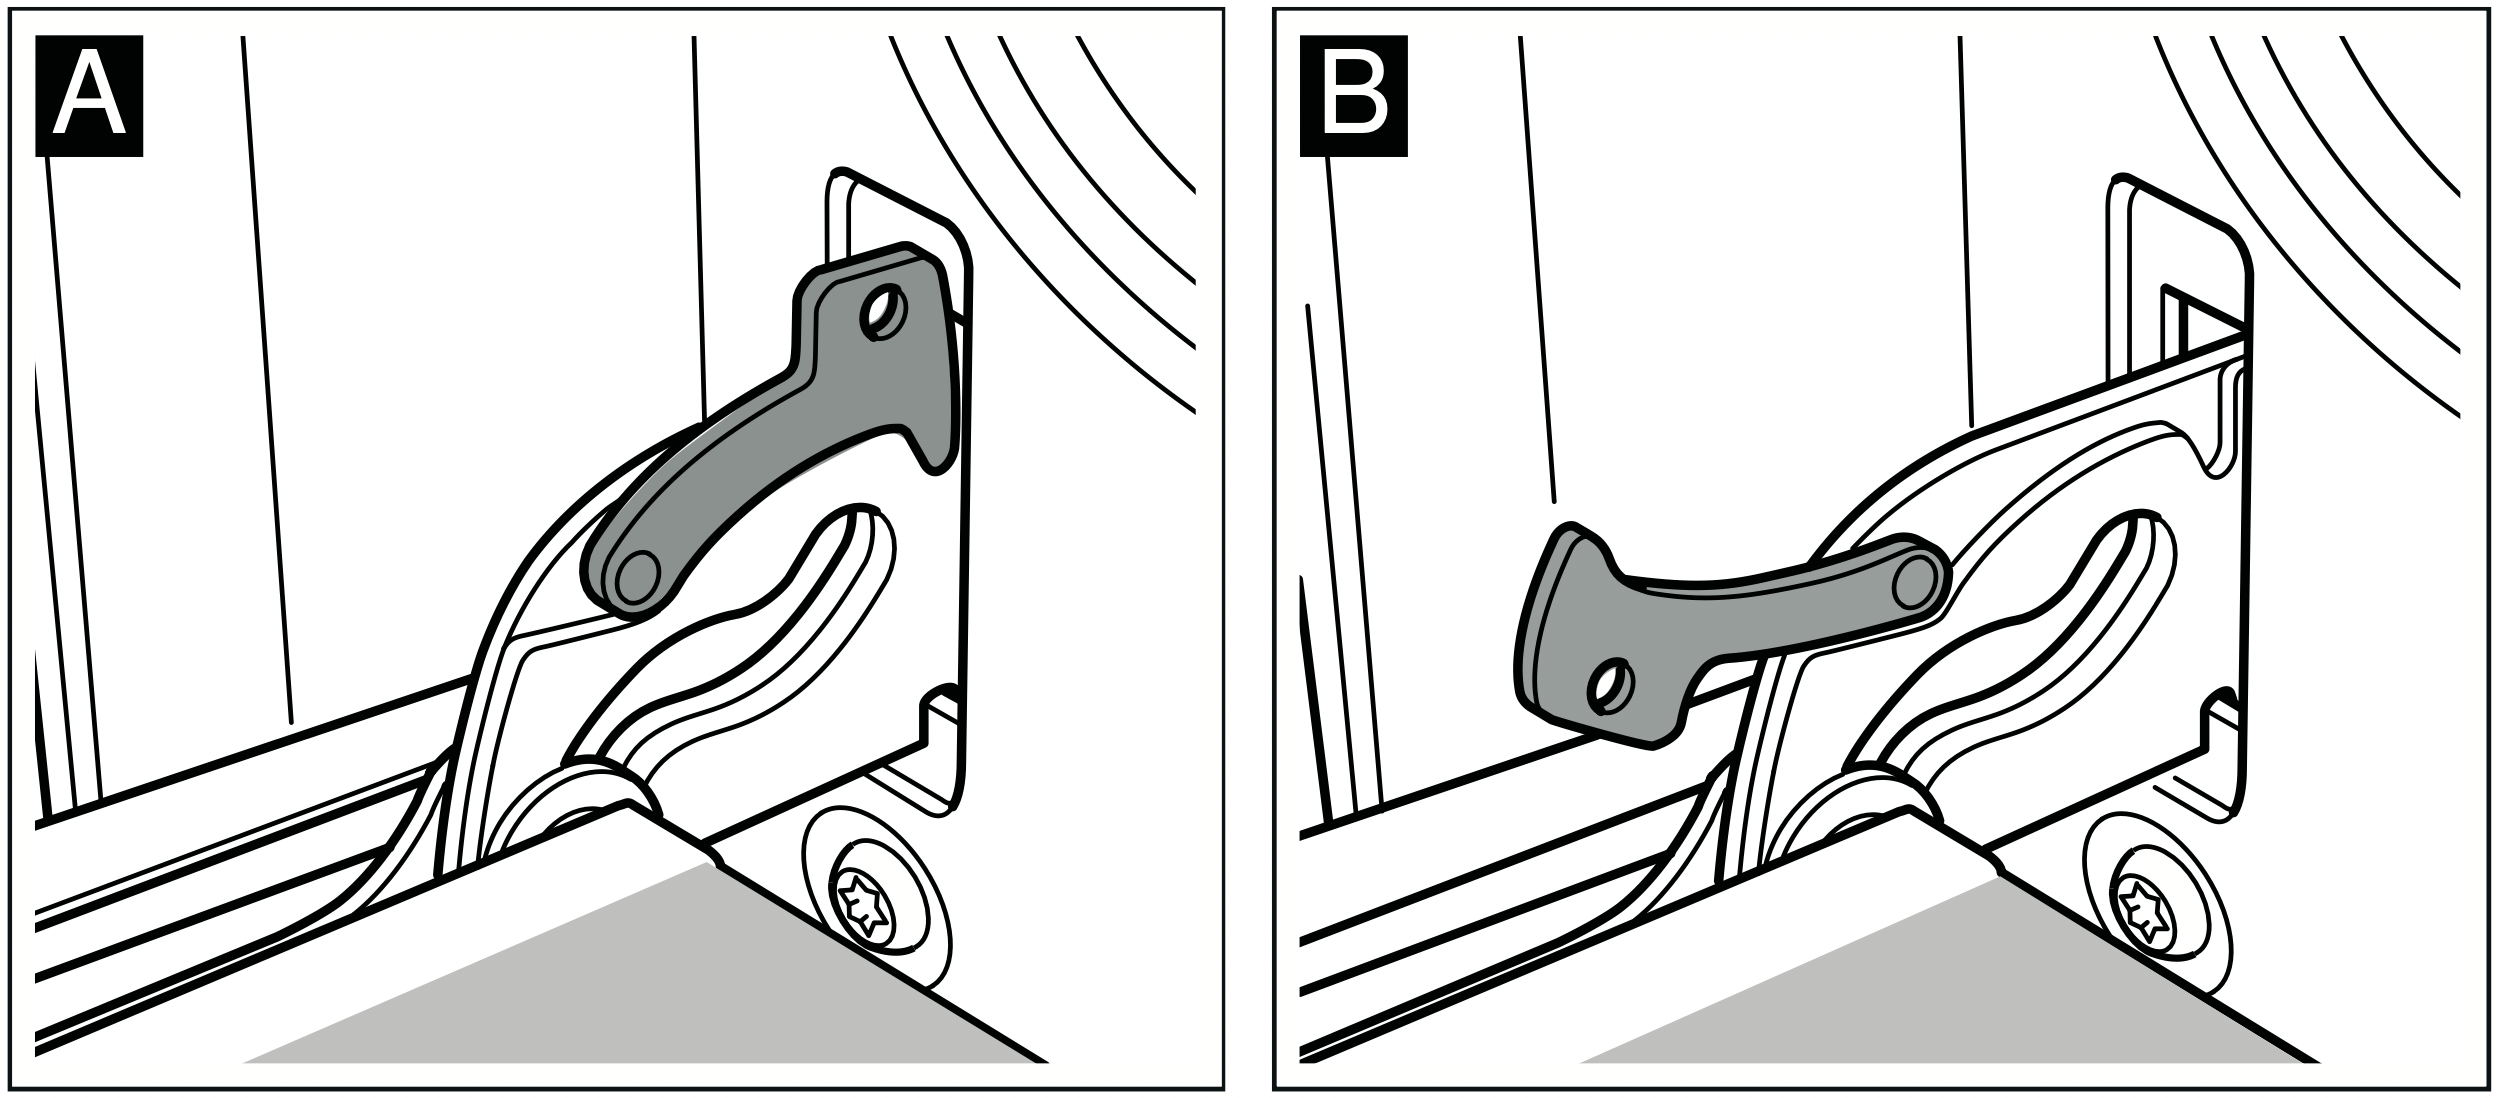
Risk of injuries! The hinges may close suddenly if they are not locked in position by the lever. Note that the locking levers are always closed, apart from when unhooking the door, when the levers must be open.
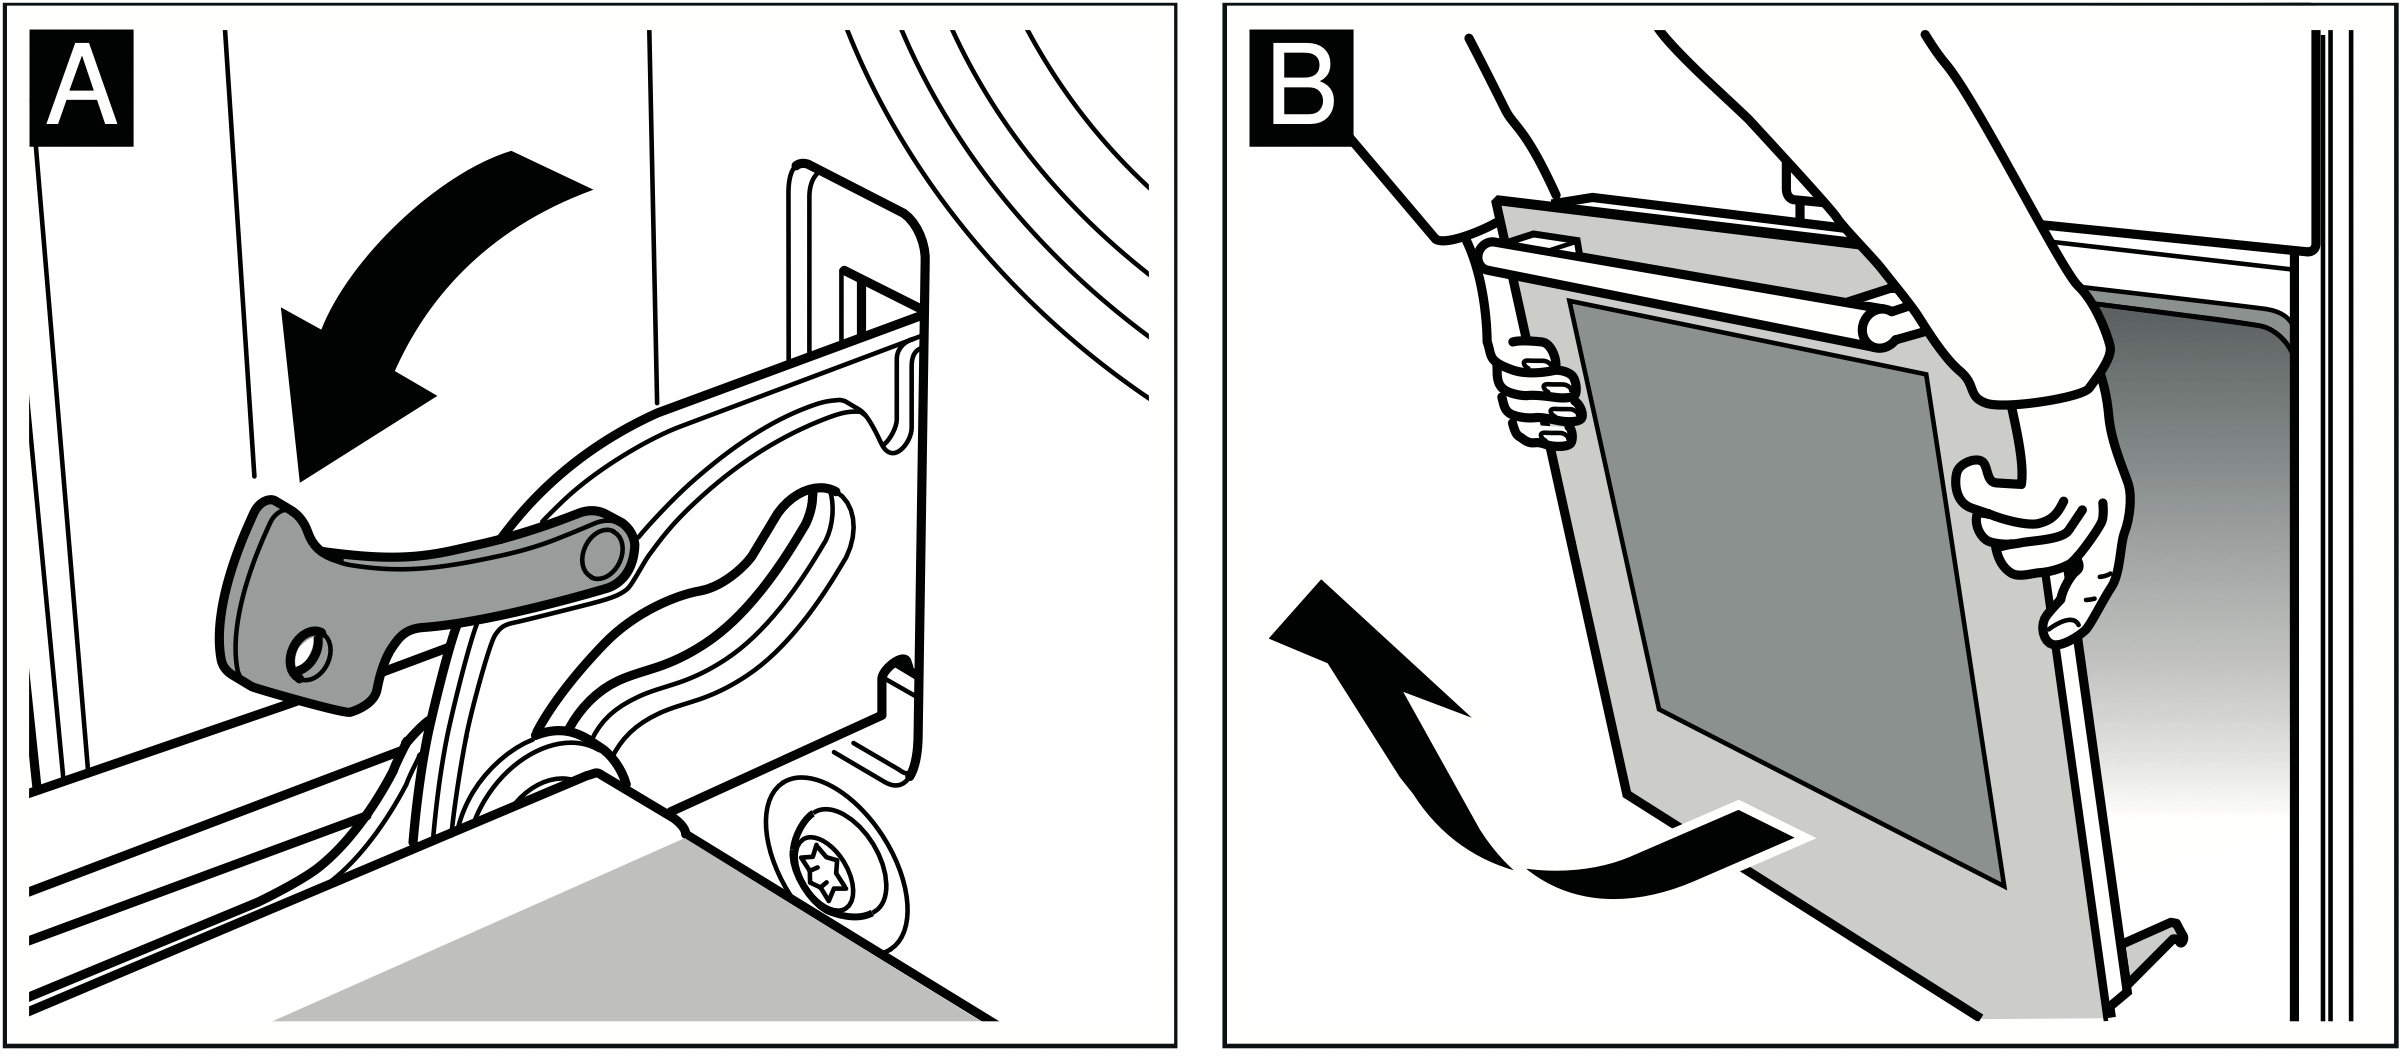
Unhooking the door
- Fully open the oven door.
- Remove both locking levers located on the right and left hand sides (figure A).
- Fully close the oven door as far as possible (figure B). Grip the left and right hand sides of the door with both hands. Close the door slightly more and remove it.
Hanging the door
Rehang the door by following the same steps but in reverse order.
- When refitting the door, check that both hinges are positioned exactly inside their respective openings (picture A).
- The bottom groove of the hinges must fit snugly on both sides.
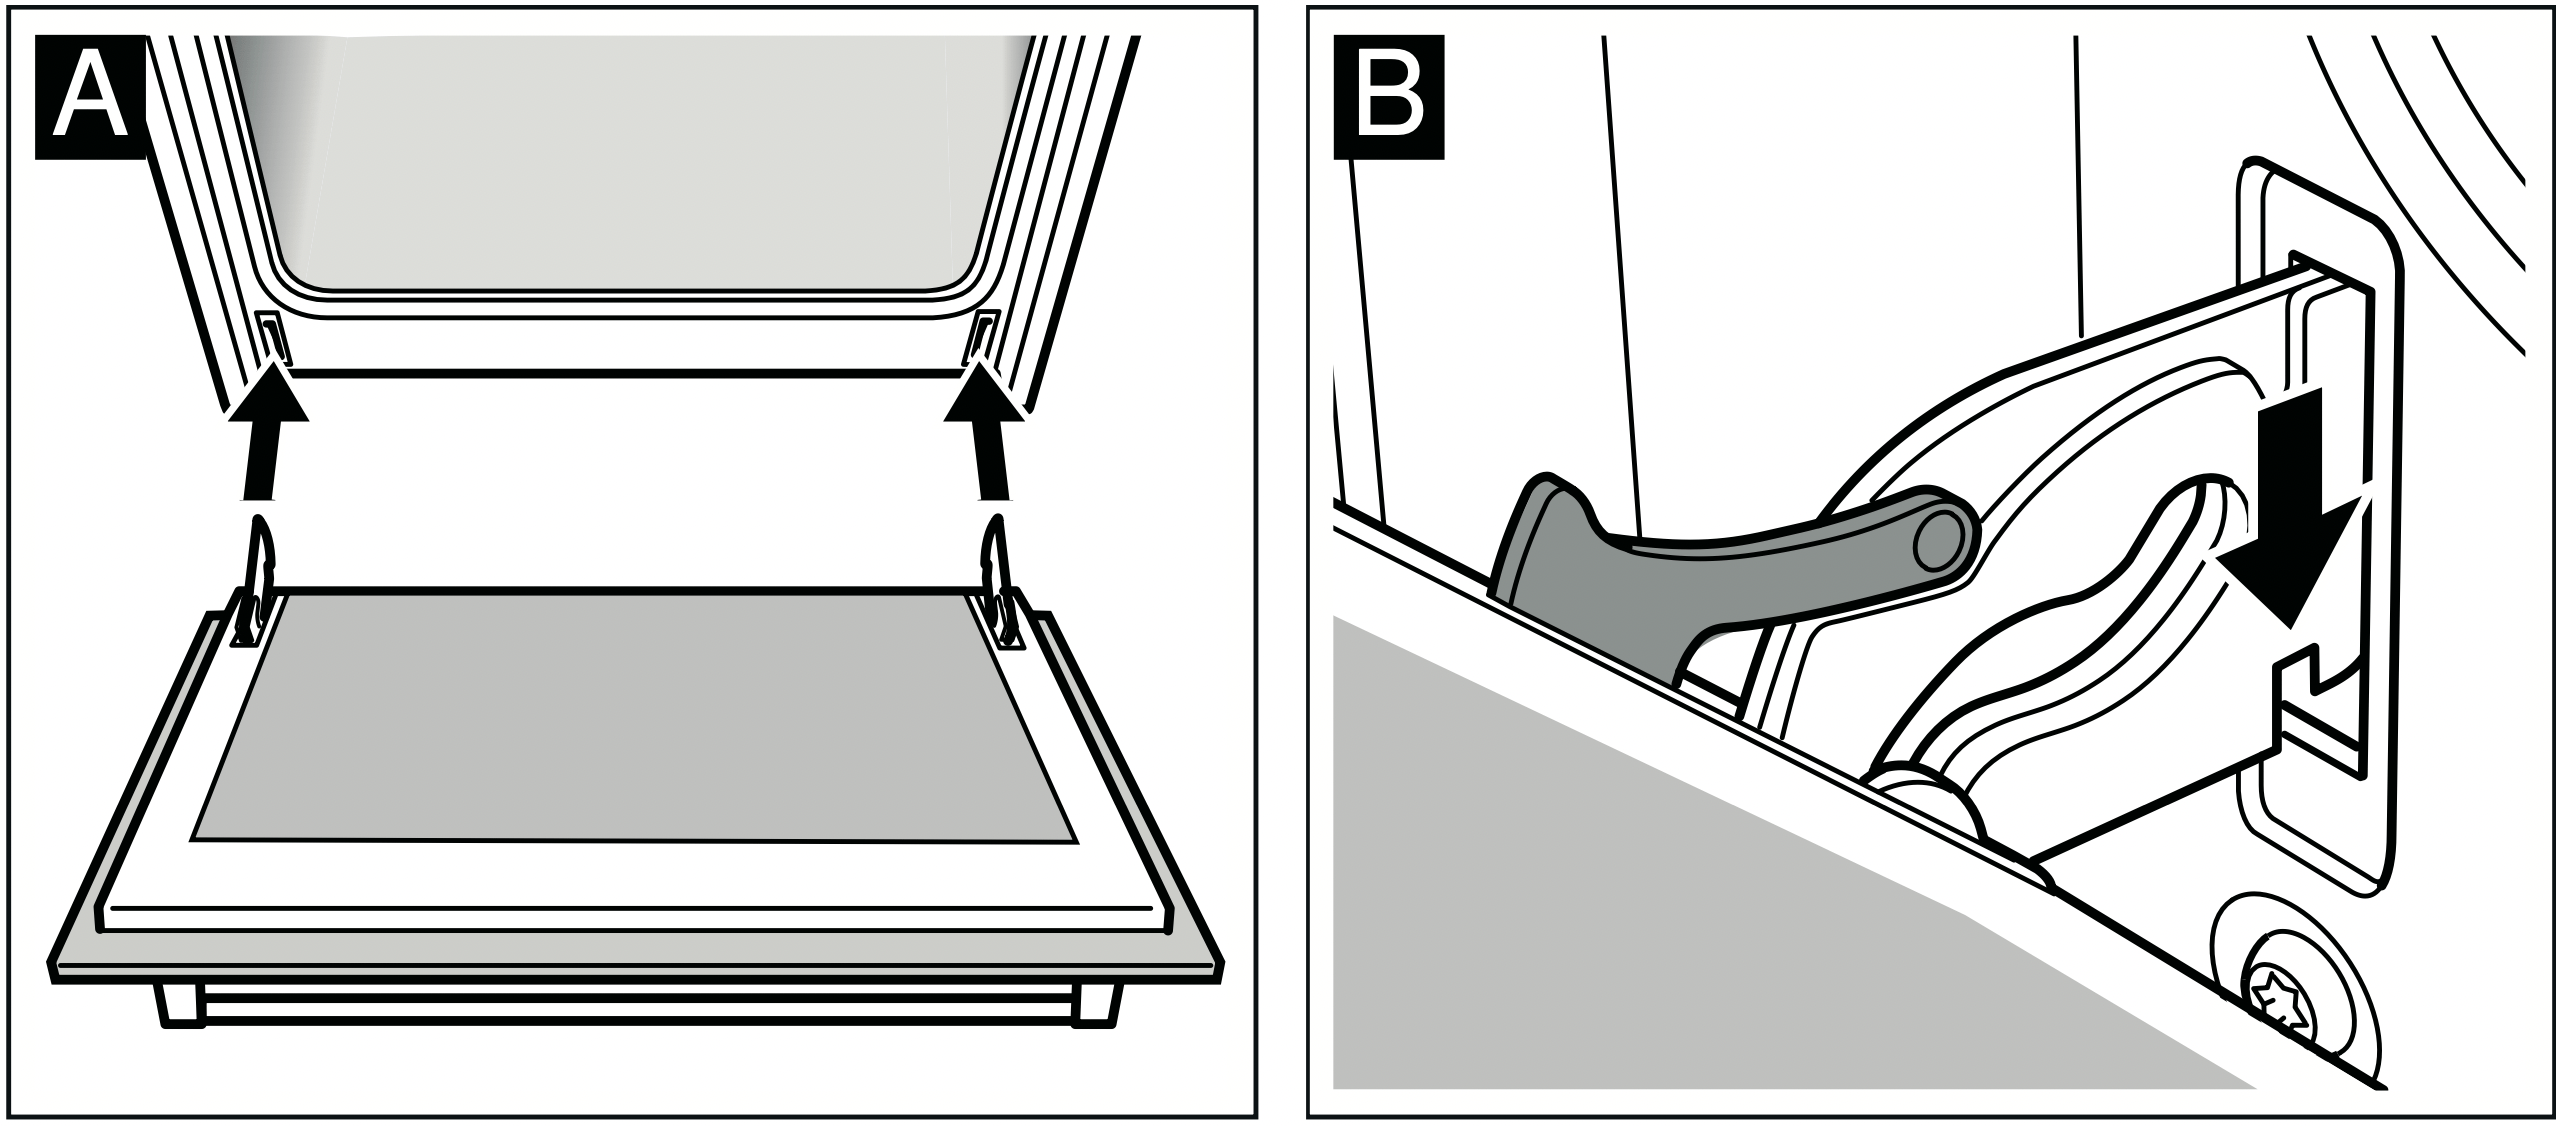
The door may be left crooked if the hinges are not mounted properly.
- Reclose the attachment levers (picture C). Close the oven door.
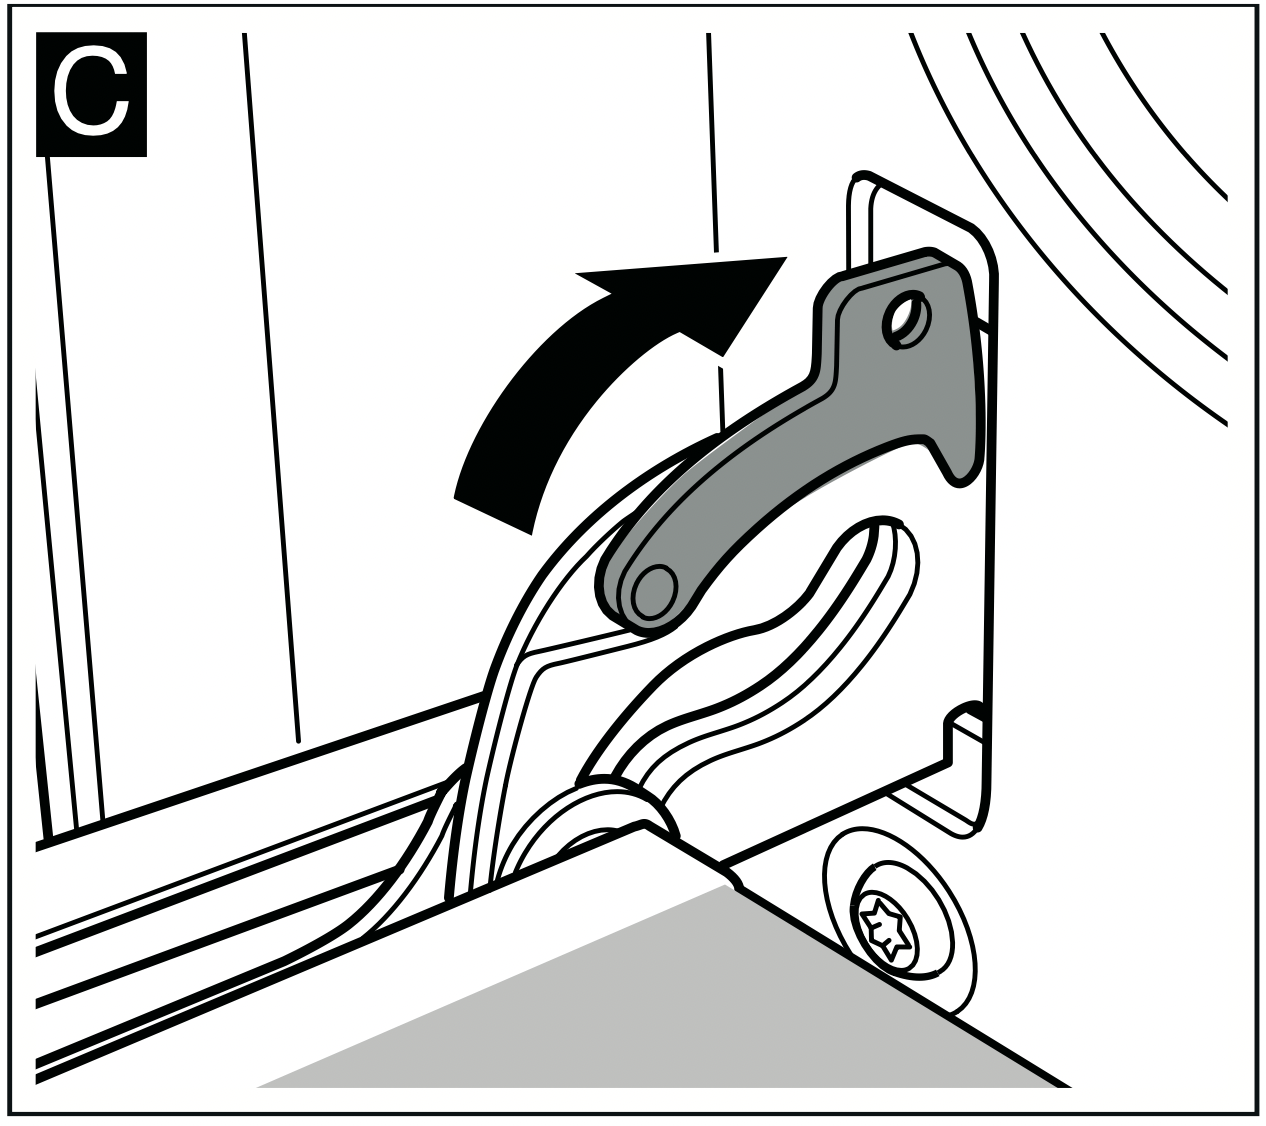
Risk of injuries! Do not touch the hinges; the door might accidentally fall or a hinge might suddenly close. Notify the Technical Assistance Service.
Removing and installing the door panels
To facilitate cleaning, you can remove the glass panels from the oven door.
Dismantling
- Unhook the oven door and place it on a cloth with its handle pointing downwards.
- Remove the upper cover from the oven door. To do this, press with your fingers on the tabs on the left and right (Figure A).
- Lift and remove the top glass panel (Figure B).
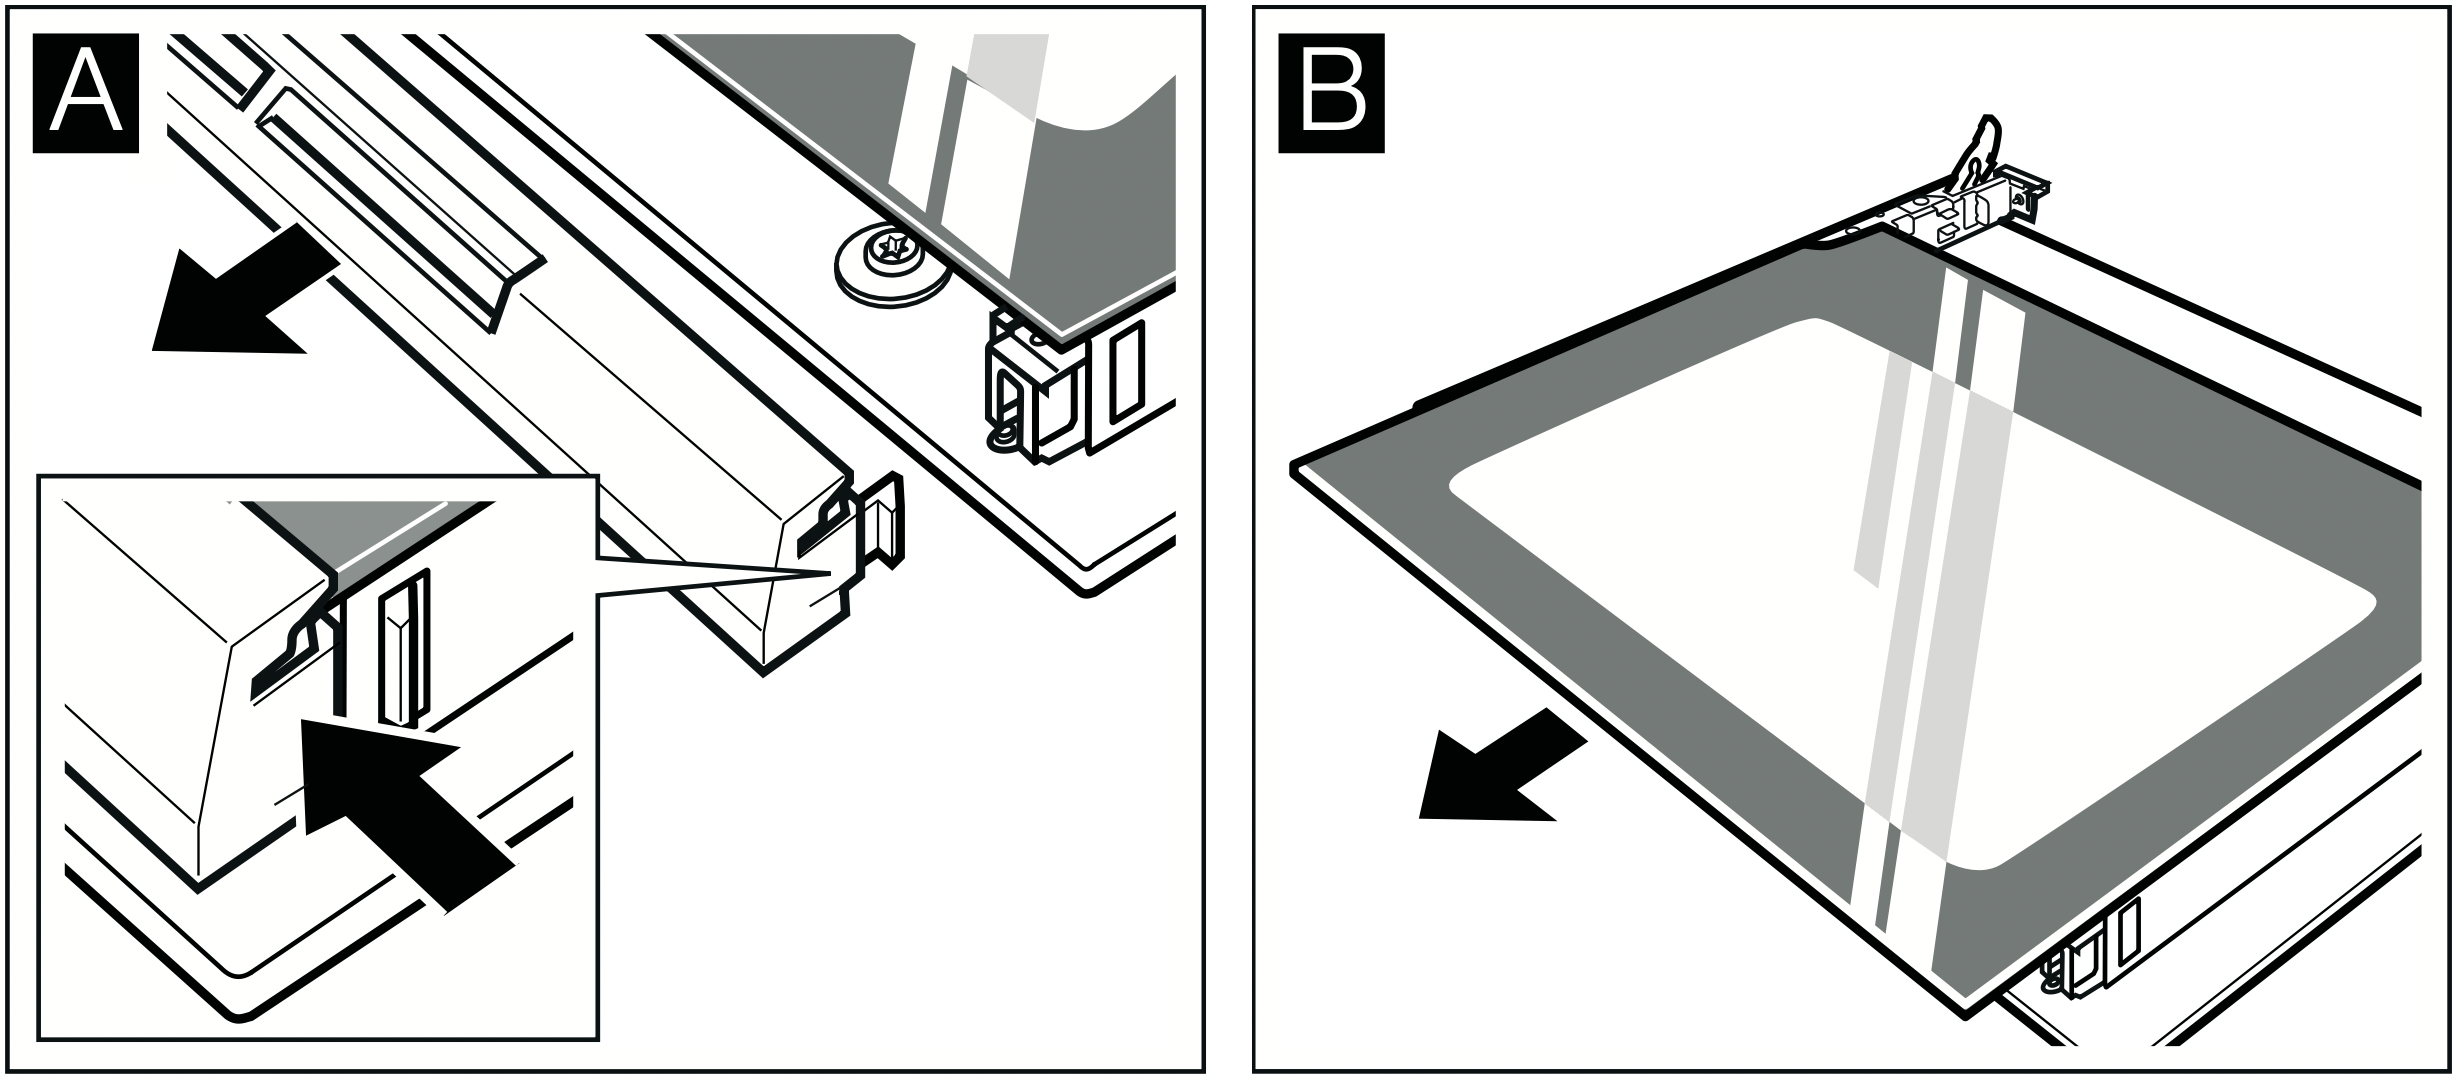
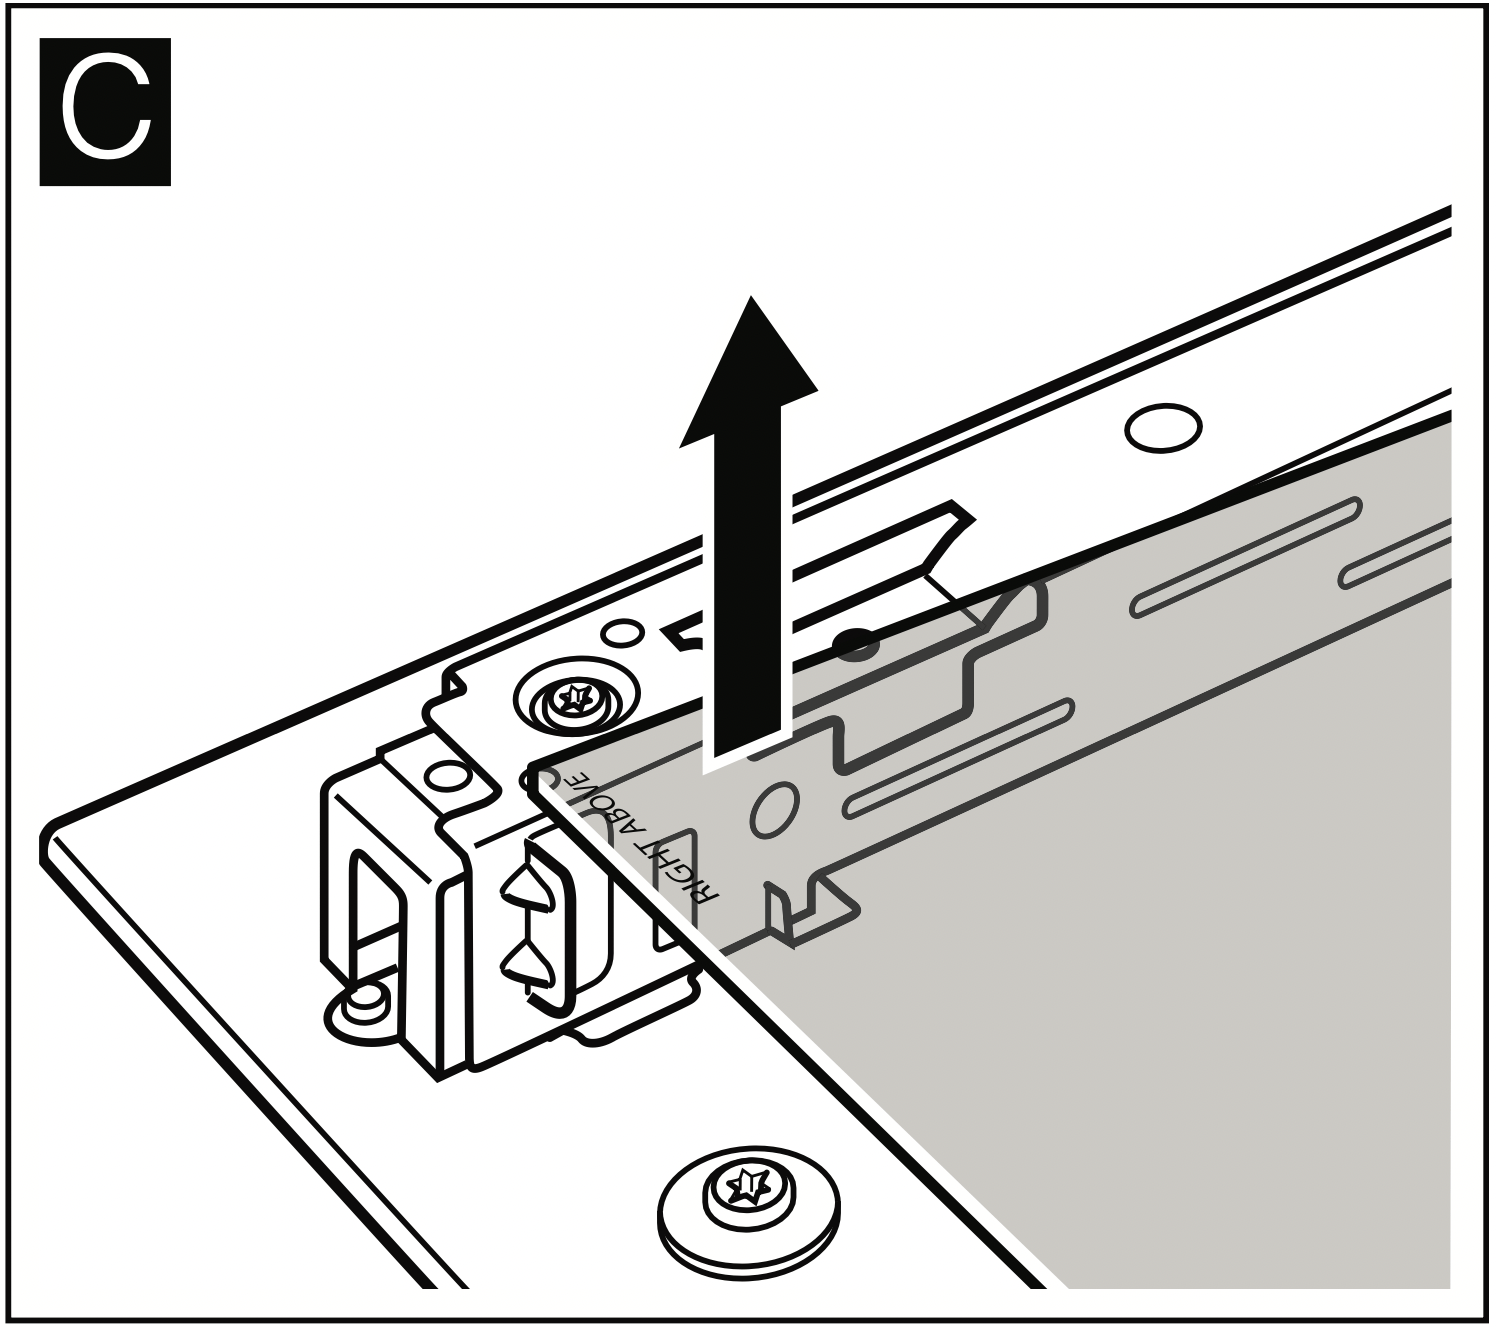
In doors with three glass panels, the following step will also be necessary:
- Lift and remove the glass panel (Figure C).
Clean the glass panels using a glass cleaning product and a soft cloth.
Do not use abrasive or corrosive cleaning products, glass scrapers or hard metal scourers as these could damage the glass.
Risk of injury! Scratched glass in the appliance door may develop into a crack. Do not use a glass scraper, or sharp or abrasive cleaning aids or detergents.
Installing
Follow steps 2 to 4 with doors that have two glass panels.
When installing, ensure that the "right above" inscription on the lower left part is inverted.
- Insert the glass panel by tilting it backwards (Figure A).
- Insert the upper glass panel on both mounts by tilting it backwards. Ensure that its smooth surface is facing outwards. (Figure B)
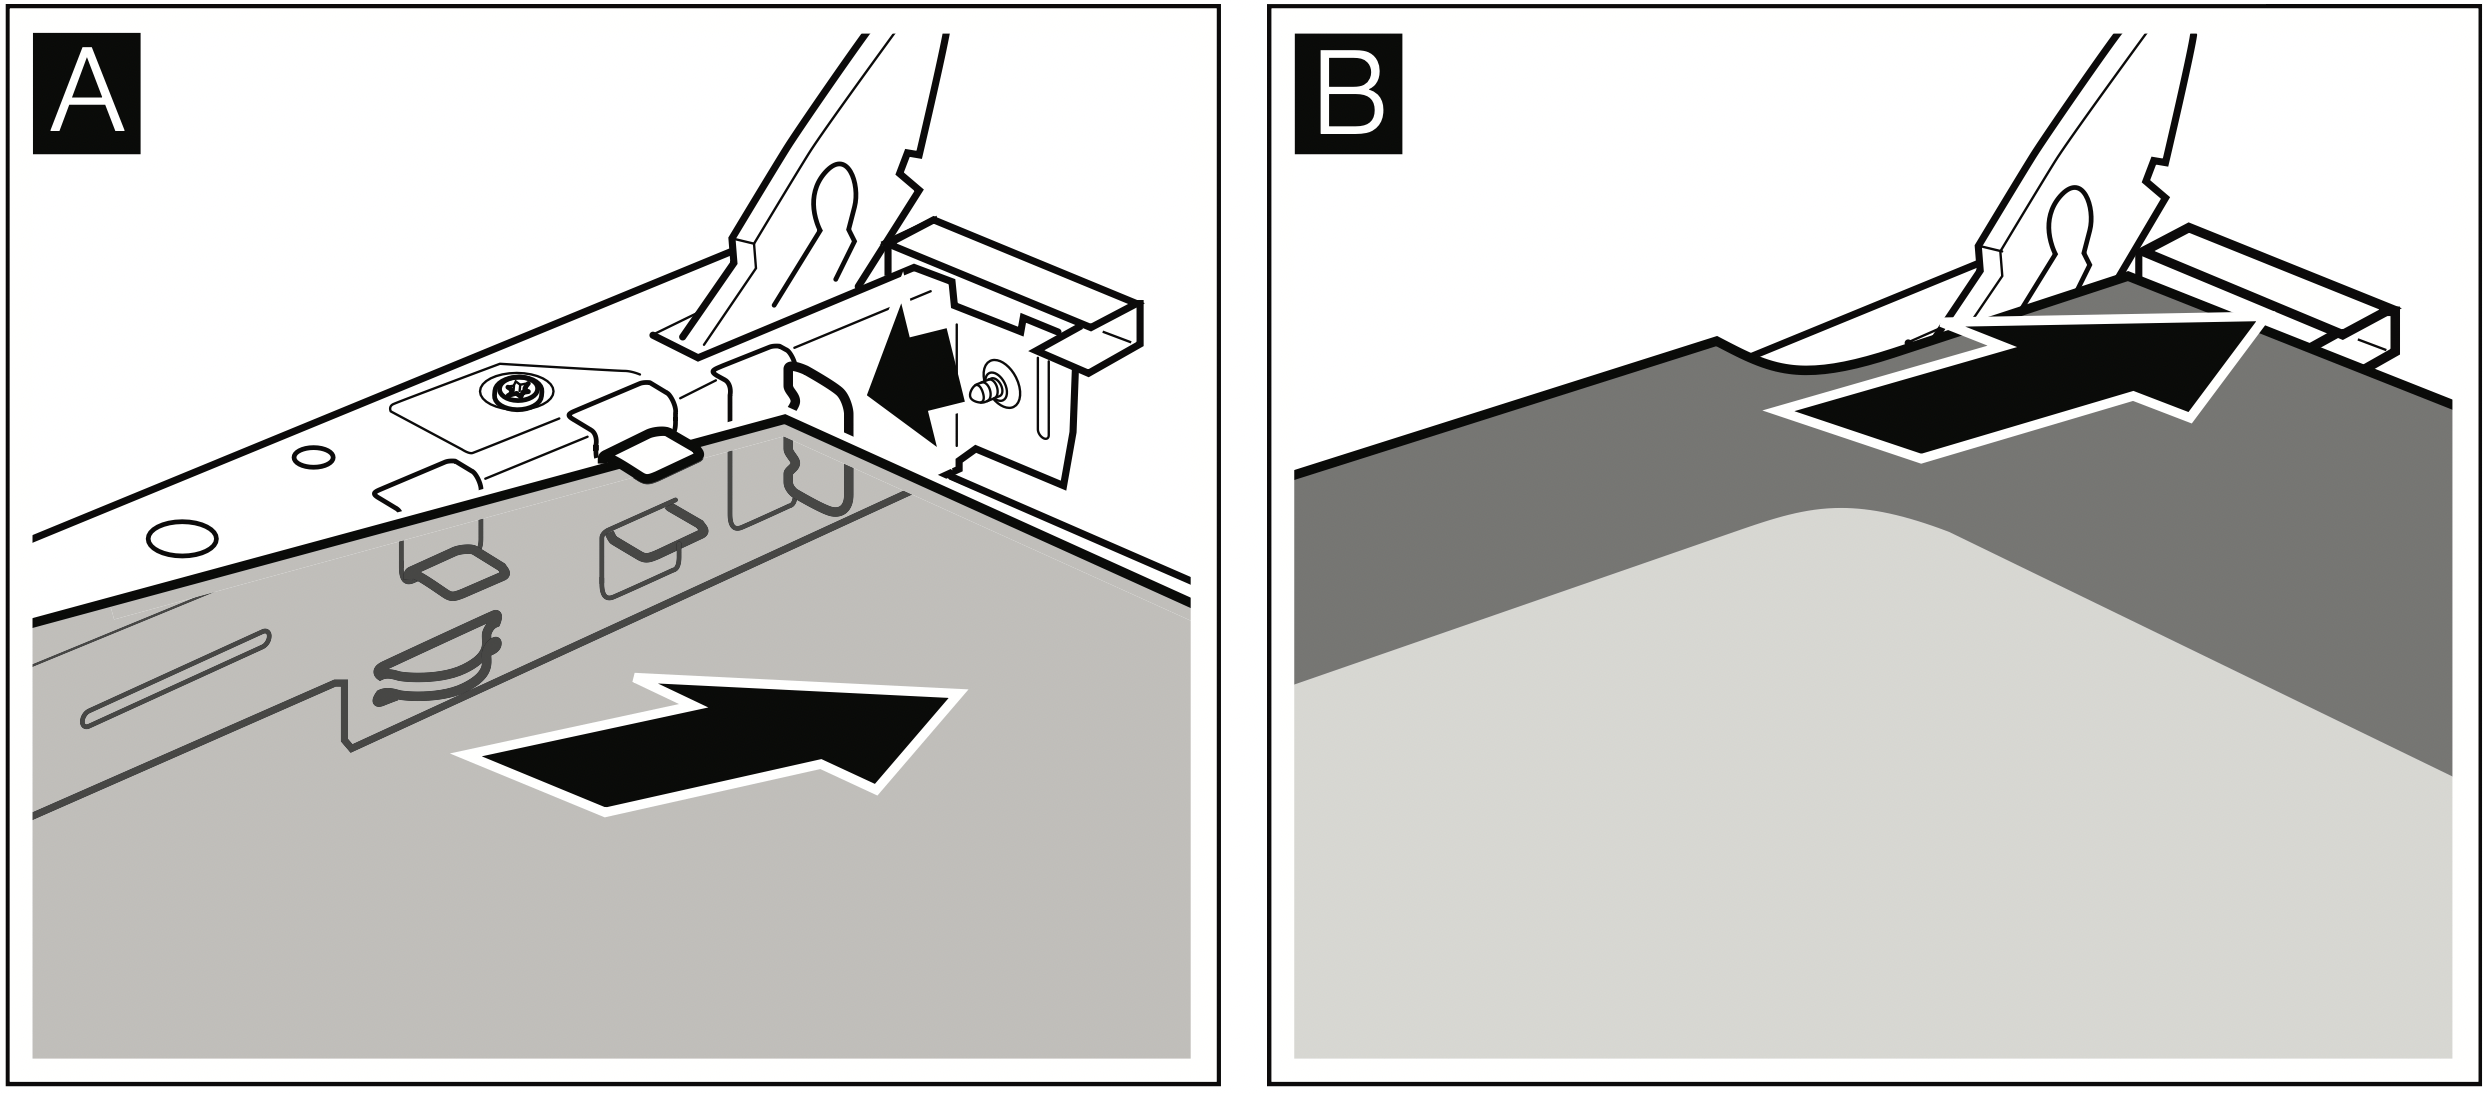
- Fit and tighten the cover.
- Refit the oven door.
Once the glass panels have been correctly fitted, the oven is ready to use.
Troubleshooting
Quite often, when there is a malfunction, it is usually a small irregularity which is easy to rectify. Before contacting the Technical Assistance Service, try to determine the cause of the fault using the following table.
Troubleshooting table
| Fault |
Possible cause |
Solution/advice |
| The oven does not work. |
The fuse has blown. |
Check the state of the fuse in the fuse box.
|
| Power cut. |
Check that the light in the kitchen and other household appliances are working.
|
| The display panel shows a flashing symbol and four zeros. |
Power cut. |
Set the time once again.
|
| The oven does not heat up. |
There is dust on the contacts.
|
Turn the control knobs several times in both directions. |
Error messages
When the display panel shows an error message with  , press the button. The message will disappear. The set time function will be deleted. If the error message does not disappear, call the Technical Assistance Service.
The following error messages can be solved by the user.
| Error message |
Possible cause |
Solution/advice |
 |
A button has been pressed for too long or has got stuck. |
Press all of the buttons one by one. Check if any button is stuck, covered or dirty. |
Risk of electric shock! Incorrect repairs can be dangerous. Repairs may only be carried out by qualified personnel from the Technical Assistance Service.
Changing the oven bulb
If the oven light bulb is damaged it must be replaced. Special 25 W, E14, 220 V-240 V heat-resistant light bulbs (to 300 ºC temperature) can be obtained from the Technical Support Service or in specialist shops. Only use this type of bulb.
Risk of electrical discharge and the resulting shock! Disconnect the appliance from the mains. Ensure that this is turned off.
- Place a dishcloth into the cold oven to avoid damage.
- Remove the glass protection by unscrewing it to the left.

- Replace the bulb with a similar bulb.
- Screw the protection glass back into place.
- Remove the dishcloth and switch the oven back on at the mains.
Protective glass panels
Damaged protective glass panels must be replaced. Protective glass panels cay be obtained from the Technical Assistance Service. Please quote your appliance's product number and production number.