This Use & Care Guide provides general operating instructions for your model. Use the refrigerator only as instructed in this Use & Care Guide. Before starting the refrigerator, follow these important first steps.
Location
Choose a place that is near a grounded electrical outlet. Do Not use an extension cord or an adapter plug.
If possible, place the refrigerator out of direct sunlight and away from the range, dishwasher or other heat sources.
The refrigerator must be installed on a floor that is level and strong enough to support a fully loaded refrigerator.
Consider water supply availability for models equipped with an automatic ice maker. If you do not hook up water to the refrigerator, remember to turn the ice maker off.
Installation
Installation clearances
Allow the following clearances for ease of installation, proper air circulation, and plumbing and electrical connections:
Sides & Top 3/8 inch
Back 1 inch
Toe Grille Installation and Removal
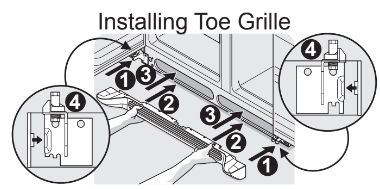
To install toe grille
Open both doors. Slide left and right sides of toe grille over lower hinges of refrigerator.
While pushing toe grille firmly against cabinet, fasten bottom clips of toe grille to cabinet.
Fasten top clips to cabinet.
Close the doors. Fasten right and left side clips into groove of bottom hinge.
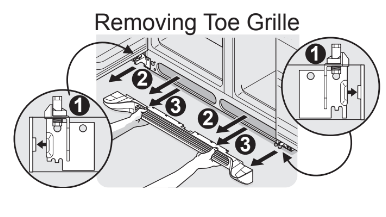
To remove toe grille
With both doors closed, unfasten right and left side clips of toe grille from bottom hinge groove.
Open both doors. Press firmly on top of toe grille until top of toe grille pops off.
Pull toe grille outward toward your body and off of lower hinges.
Door Opening
Your refrigerator should be positioned to allow easy access to a counter or table when removing food. For best use of drawers and freezer baskets, the refrigerator should be in a position where both the refrigerator and freezer doors can be fully opened.
Guidelines for final positioning of your refrigerator:
All four corners of the cabinet must rest firmly on the floor.
The cabinet should be level at the front and rear.
The sides should tilt 1⁄4 inch (6 mm) from front to back (to ensure that doors close and seal properly).
Doors should align with each other and be level.
All of these conditions can be met by raising or lowering the adjustable front rollers.
To level the cabinet using the front rollers:
Open both doors and remove the toe grille (see “Toe Grille Installation and Removal” in the “Installation” section).
Close the doors and use a flat-blade screwdriver or 3 inch socket wrench to raise or lower the front rollers.
Ensure both doors are bind-free with their seals touching the cabinet on all four sides.
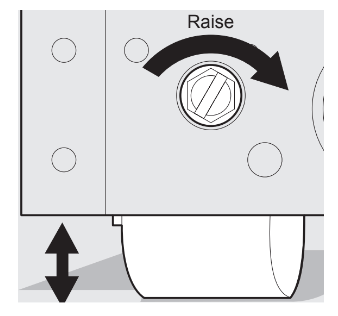
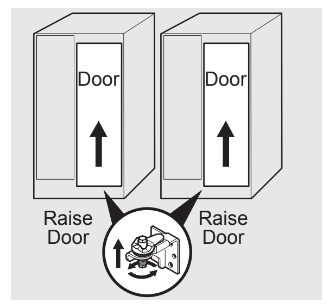
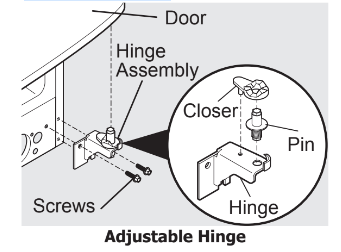
To level the doors using the adjustable lower hinge:
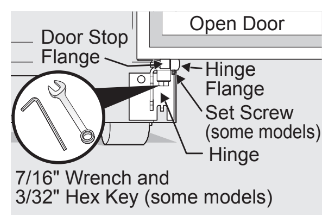
1 Before leveling either door, remove set screw that locks door height into position. (The door cannot be adjusted without set screw removed). 2 If the refrigerator door is lower than the freezer door, raise the refrigerator door by turning the adjustment screw clockwise using a 7/16 inch wrench. (See illustration.) 3 If the freezer door is lower than the refrigerator door, raise the freezer door by turning the adjustment screw clockwise using a 7 /16 inch wrench. (See illustration.)
4 After leveling, verify door stop contacts lower hinge and top of door does not contact upper hinge through full movement of door (from fully closed to fully open). 5 Reinstall set screw, locking the door height.
6 Replace the toe grille by fitting it into place (see “Toe Grille Installation and Removal” in the “Installation” section).
DOOR REMOVAL INSTRUCTIONS
To prepare for removing the doors:
Make sure the electrical power cord is unplugged from the wall outlet.
Open both doors and remove the toe grille (as explained in the Installation Instructions that came with your appliance).
Remove any food from the door shelves.
Close the doors.
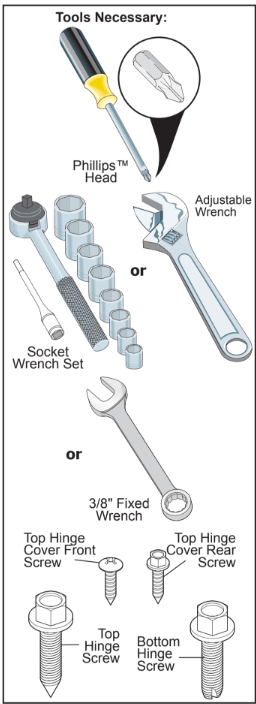
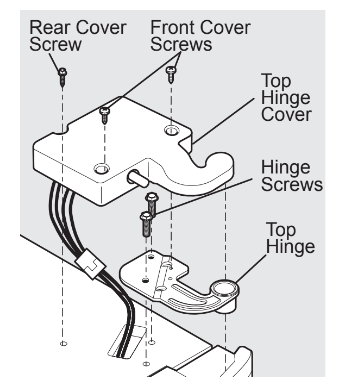
To remove the refrigerator top hinge cover:
Remove the three screws from each cover over the top door hinges.
Lift hinge cover straight up and off.
To remove the refrigerator door:
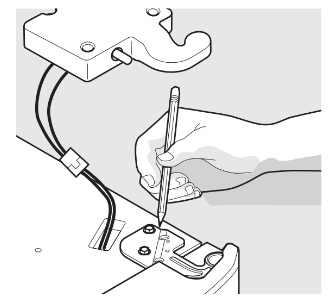
1 Trace lightly around the door’s top hinge with a pencil. This makes reinstallation easier.
2 Remove the two screws from the top hinge. Lift the door off of the bottom hinge and set it aside.
3 Remove the two bottom hinge screws and hinge if necessary.
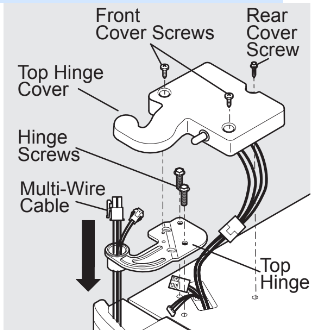
To reinstall the refrigerator door, reverse the above steps. To remove the freezer top hinge cover: 1 Remove the two screws from each cover over the top door hinges. 2 Lift hinge cover straight up and off.
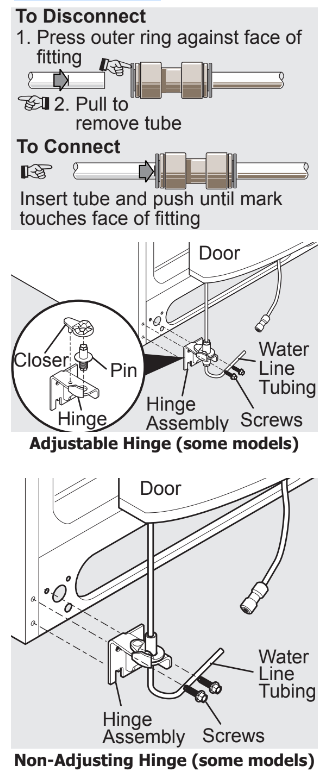
To remove the freezer door: 1 Detach the multi-wire cable connector located above the top hinge. Grasp both sides of the connector firmly and pull apart.
2 Trace lightly around the hinge with a pencil. This makes reinstallation easier.
3 Detach the water tube from the connector located below the freezer door. The connector releases when you press its outer sleeve inward. 4 Remove the screws from the top hinge and pull the multi-wire cable through it. Lift the door off of the bottom hinge. 5 Remove the two bottom hinge screws and hinge if necessary.
6 Lay the door on its side to avoid damage to the water tube extending from the bottom hinge. To reinstall the freezer door, reverse the above steps.
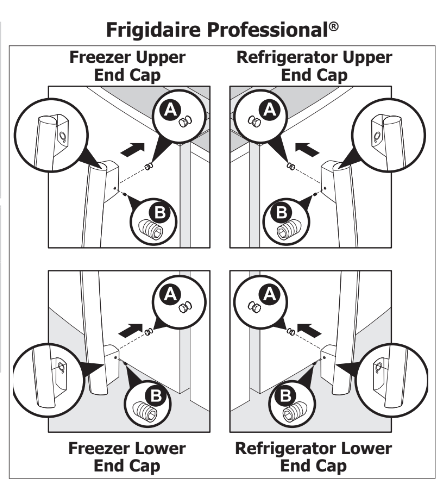
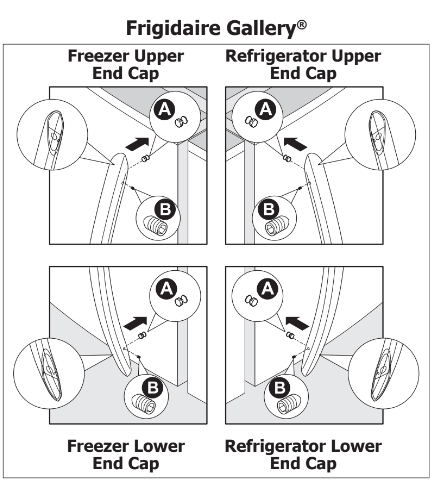
HANDLE INSTALLATION
Remove handles from carton and any other protective packaging.
Position freezer handle end caps over upper and lower pre-installed shoulder bolts (A) that are fastened into door, ensuring the holes for the set screws are facing towards the refrigerator door.
While holding handle firmly against door, fasten upper and lower Allen set screws (B) with supplied Allen wrench.
Repeat steps 2 and 3 to install refrigerator handle. Ensure the holes for the set screws are facing towards the freezer door.
CONNECTING THE WATER SUPPLY
Before Installing The Water Supply Line, You Will Need: • Basic Tools: adjustable wrench, flat-blade screwdriver, and PhillipsTM screwdriver • Access to a household cold water line with water pressure between 30 and 100 psi. • A water supply line made of 1⁄4 inch (6.4mm) OD, copper or stainless steel tubing. To determine the length of tubing needed, measure the distance from the ice maker inlet valve at the back of the refrigerator to your cold water pipe. Then add approximately 7 feet (2.1 meters), so the refrigerator can be moved out for cleaning (as shown).
• A shutoff valve to connect the water supply line to your household water system. DO NOT use a self-piercing type shutoff valve. • Do not re-use compression fitting or use thread seal tape. • A compression nut and ferrule (sleeve) for connecting a copper water supply line to the ice maker inlet valve.
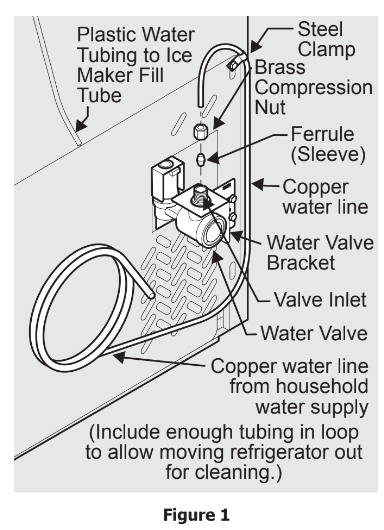
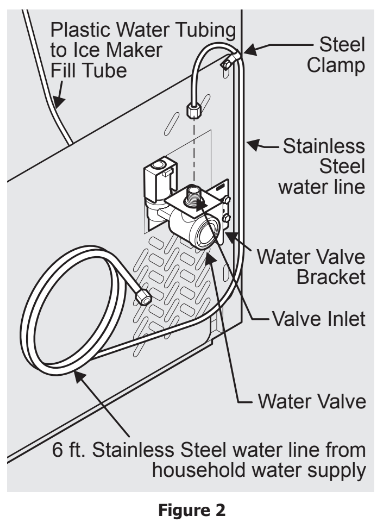
To Connect Water Supply Line To Ice Maker Inlet Valve 1 Disconnect refrigerator from electric power source. 2 Place end of water supply line into sink or bucket. Turn ON water supply and flush supply line until water is clear. Turn OFF water supply at shutoff valve. 3 Remove plastic cap from water valve inlet and discard cap. 4 If you use copper tubing - Slide brass compression nut, then ferrule (sleeve) onto water supply line. Push water supply line into water valve inlet as far as it will go (1⁄4 inch/6.4 mm). Slide ferrule (sleeve) into valve inlet and finger tighten compression nut onto valve. Tighten another half turn with a wrench; DO NOT over tighten. See Figure 1. If you use stainless steel tubing - The nut and ferrule are already assembled on the tubing. Slide compression nut onto valve inlet and finger tighten compression nut onto valve. Tighten another half turn with a wrench; DO NOT over tighten. See Figure 2.
5 With steel clamp and screw, secure water supply line (copper tubing only) to rear panel of refrigerator as shown. 6 Coil excess water supply line (copper tubing only), about 21⁄2 turns, behind refrigerator as shown and arrange coils so they do not vibrate or wear against any other surface. 7 Turn ON water supply at shutoff valve and tighten any connections that leak. 8 Reconnect refrigerator to electrical power source. 9 To turn ice maker on, lower wire signal arm (side mounted) or set the ice maker’s On/Off power switch to the “I” position (rear mounted).
CONTROLS
Allowing Cooling Time Before Use To ensure safe food storage, allow your refrigerator to operate with the doors closed for at least 8 to 12 hours before placing food inside. During this cooling period, you do not need to adjust the controls, which are preset at the factory. Setting Cooling Temperatures
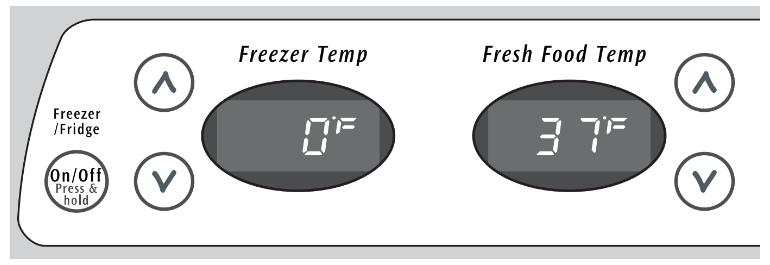
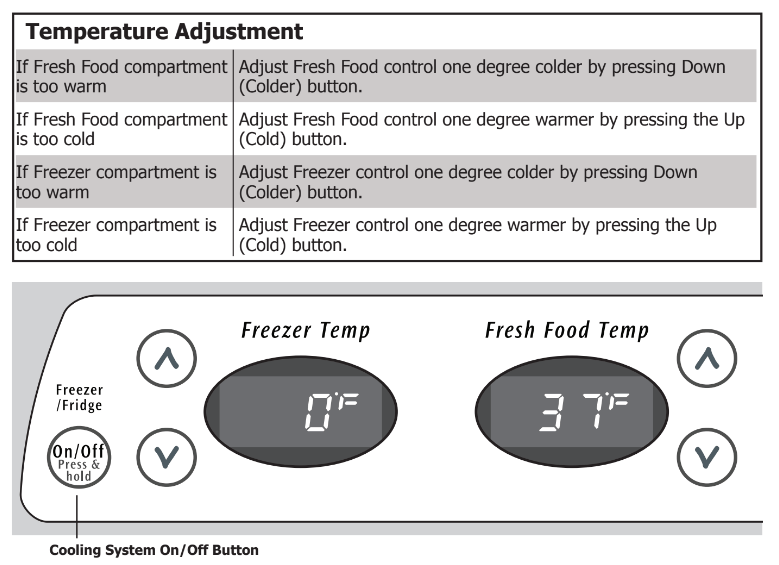
Your refrigerator comes with a state-of-the-art electronic digital control system. The system’s control panel is located at the top of the fresh food compartment. The two digital displays on the left half of the control panel indicate the current settings or temperatures of your freezer and fresh food compartments. The models with a two-digit temperature display are for reference only, and do not display the current accurate compartment temperature. Should you desire to see what the current accurate temperature is, place a separate thermometer inside the freezer or fresh food compartment in the desired location.
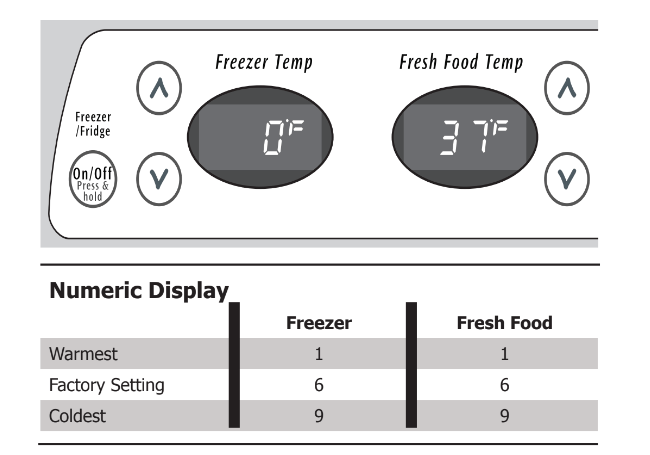
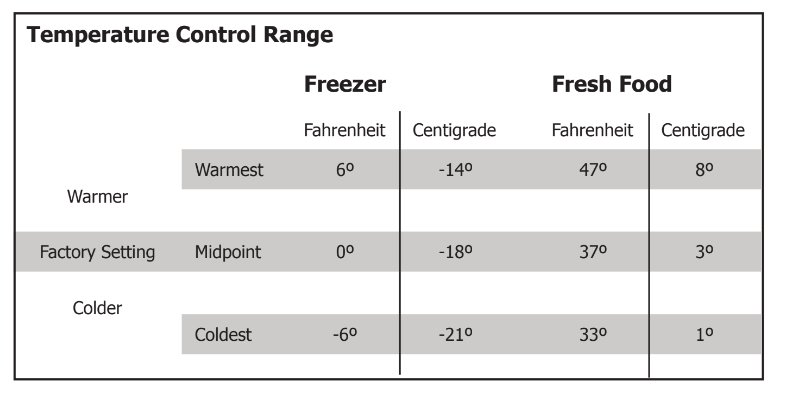
TEMPERATURE ADJUSTMENT To adjust the temperature to a higher or lower setting, press the Up (Cold) or Down (Colder) button closest to the display. The first time you press the button, the display shows current setting you entered. Each press of the button after that changes the setting by one. The display shows your new setting momentarily, then changes back to the current temperature.
ALARMS Power Fail In the event of a power failure, the ‘power fail’ alarm will sound three times. The ‘power fail’ alarm is an audible alarm only and does not display in the control panel. High Temperature When a warm refrigerator is first powered on, the ‘power fail’ alarm will sound and the current set points will be displayed for a few seconds. After 20 minutes the ‘high temp’ alarm will sound if the freezer temperature is above 26°F or if the fresh food temperature is above 55°F (or both are above). If the unit is above the temperatures mentioned in the paragraph above, the affected compartment temperature display (fresh food, freezer or both) on the control panel will display ‘HI’ and an alarm will sound. To disable the alarm press any key on the control panel. After which the control panel will then show the display temperature. The unit will continue to monitor the product temperatures for ‘high temp’ condition every 20 minutes. If the ‘high temp’ condition persists, the alarm will sound again and can be reset again. Contact a customer service representative if the high temp alarm continues. The audible portion of the alarm will silence itself once the product temperature is below 26°F for the freezer temperature and 55°F for the fresh food temperature. The control panel will still show ‘HI’ until it is acknowledged by the user by pressing any key on the control panel. After which the control panel will then show the display temperature. Door Ajar If the door has been left open for an extended period of time an alarm will sound. (Some models will have a ‘door ajar’ indicator on the control panel). The alarm will continue to sound until the door is closed. Alarm Mute Alarms can be muted (except ‘power fail’) by pressing a key combination on the control panel. Press and hold the ‘freezer temperature up’ key while at the same time pressing the ‘fresh food temperature down’ key three times. This sequence must be completed within 5 seconds for the alarms to be muted. Once the alarms have been muted, they will stay muted even if the refrigerator is powered down. To turn the alarm sounds back on, use the same key combination that was used to mute alarms.
IF TEMPERATURE DISPLAYS FLASH... If ever you see “OP” or “SH” flashing, it may indicate that the control system has detected a performance problem. Call your service representative, who can interpret the flashing message. To maintain temperatures, a fan circulates air in the refrigerator and freezer compartments. For good circulation, do not block cold air vents with food items.
Turning the Cooling system on and off You can disable the cooling system in your refrigerator by pressing the On/Off button located on the left side of the temperature control panel. To ensure that you do not accidentally turn off the cooling system, the button does not work unless you press and hold it for three seconds. Once you disable the cooling system, all refrigeration to the freezer and fresh food compartments stops. To turn the cooling system back on, you must again press and hold the On/Off button for three more seconds. Controls will display OF°F/OF°F when turned off.
CARE & CLEANING
Protecting your investment Keeping your refrigerator clean maintains appearance and prevents odor build-up. Wipe up any spills immediately and clean the freezer and fresh food compartments at least twice a year. When cleaning, take the following precautions: • Never use CHLORIDE or cleaners with bleach to clean stainless steel. • Do not wash any removable parts in a dishwasher. • Always unplug the electrical power cord from the wall outlet before cleaning. • Remove adhesive labels by hand. Do not use razor blades or other sharp instruments which can scratch the appliance surface. • Do not remove the serial plate. Do not use abrasive cleaners such as window sprays, scouring cleansers, brushes, flammable fluids, cleaning waxes, concentrated detergents, bleaches or cleansers containing petroleum products on plastic parts, interior doors, gaskets or cabinet liners. Do not use paper towels, metallic scouring pads, or other abrasive cleaning materials or strong alkaline solutions.
Part
What To Use
Tips and Precautions
Interior & Door Liners
• Soap and water • Baking soda and water
Use two tablespoons of baking soda in one quart of warm water. Be sure to wring excess water out of sponge or cloth before cleaning around
controls, light bulb or any electri- cal part.
Door Gaskets
• Soap and water
Wipe gaskets with a clean soft cloth.
Drawers & Bins
• Soap and water
Use a soft cloth to clean drawer run- ners and tracks.
Glass Shelves
• Soap and water • Glass cleaner • Mild liquid sprays
Allow glass to warm to room tempera- ture before immersing in warm water.
Toe Grille
• Soap and water • Mild liquid sprays • Vacuum attachment
Vacuum dust from front of toe grille. Remove toe grille (see Installation Instructions). Vacuum backside, wipe with sudsy cloth or sponge. Rinse and dry.
Exterior & Handles
• Soap and water • Non Abrasive Glass Cleaner
Do not use commercial household cleaners containing ammonia, bleach or alcohol to clean handles. Use a soft cloth to clean smooth handles. DO NOT use a dry cloth to clean smooth doors.
Exterior & Handles (Stainless Steel Models Only)
• Soap and water • Stainless Steel Cleaners
Never use CHLORIDE or cleaners with bleach to clean stainless steel. Clean stainless steel front and handles with non-abrasive soapy water and a dishcloth. Rinse with clean water and a soft cloth. Use a non-abrasive stainless steel cleaner. These cleaners can be purchased at most home improvement or major department stores. Always follow manufacturer’s instructions. Do not use household cleaners containing ammonia or bleach. NOTE: Always clean, wipe and dry with the grain to prevent scratch- ing. Wash the rest of the cabinet with warm water and mild liquid detergent. Rinse well, and wipe dry with a clean soft cloth.
Replacing Light Bulbs
• Unplug refrigerator • Wear gloves • Remove light cover • Replace old bulb • Replace light cover • Plug in the refrigerator
CAUTION: Wear gloves when
replacing light bulbs to avoid get- ting cut.
Use same wattage when replacing bulb.
BEFORE YOU CALL
CONCERN
CAUSE
SOLUTION
AUTOMATIC ICE MAKER
Ice maker is not making any ice.
• Ice maker wire signal arm is in the “up” or OFF position. • Ice maker power switch is Off. • Ice maker has small cube caught in mechanism. • Saddle valve on cold water pipe is clogged or restricted by foreign material.
• Move wire signal arm to the “down” or ON position (side mounted). • Turn power switch to On (“I”) position (rear mounted). • Remove small cube from ice maker. The ice and water filter cartridge may be clogged. Replace filter cartridge. • Turn off household water line valve. Remove valve. Ensure that valve is not a self-piercing saddle valve. Clean valve. Replace valve if necessary.
Ice maker is not making enough ice.
• Ice maker is producing less ice than you expect.
• Check to see if water dispenser is dispensing slower than normal. • Freezer control is set too warm.
• Side mounted ice maker should produce 4 to 4.5 pounds (approximately 4 quarts) of ice every 24 hours. A rear mounted ice maker should produce 3 to 4 pounds (approximately 31⁄2 quarts) of ice every 24 hours. Quick Ice option should produce up to 50% more ice every 24 hours. • If it is, replace the ice and water filter cartridge.
• Set freezer control to colder setting to im- prove performance of the ice maker. Allow
24 hours for temperature to stabilize.
Ice maker will
not stop mak- ing ice.
• Ice maker wire signal arm is being held down by some item in the freezer.
• Move item and release wire signal arm. Remove any ice cubes that are frozen together over the wire signal arm.
Ice cubes are freezing to- gether.
• Ice cubes are not being used frequently enough. • Ice cubes are hollow (partially frozen cubes with water inside). • Freezer control is set too warm.
• Remove ice container and discard ice from container. Ice maker will produce fresh supply. • The ice and water filter cartridge may be clogged. Replace filter cartridge. • Set freezer control to colder setting. Allow 24 hours for temperature to stabilize.
DISPENSER (Ice & Water)
Dispenser will not dispense ice.
• Dispenser lock out is engaged. • There is no ice in the bin to be dispensed. • The refrigerator doors are not completely closed. • Dispenser paddle has been pressed too long and the dispenser motor has overheated.
• Press and hold control lock for three seconds. • See the “Ice maker is not making any ice” section above.
• Be sure the refrigerator doors are com- pletely closed.
• The motor overload protector will reset in about three minutes and then ice can be dispensed.
Ice dispenser is jammed.
• Ice has melted and frozen around auger due to infrequent use, temperature fluctuations, and/or power outages. • Ice cubes are jammed between ice maker and back of ice container.
• Remove ice container, thaw, and empty the contents. Clean container, wipe dry, and replace in proper position. When new ice is made, dispenser should operate. • Remove ice cubes that are jamming the dispenser.
Dispenser will not dispense water.
• Dispenser lock out is engaged. • Water filter not seated properly. • Water filter is clogged. • Household water line valve is not open.
• Press and hold control lock for three seconds. • Remove and reinstall the water filter. Be sure to push the filter firmly so that you hear it lock solidly into position. • Replace filter cartridge. Be sure to remove protective caps and push the filter firmly so that you hear it lock solidly into position.
• Open household water line valve. See CON- CERN column AUTOMATIC ICE MAKER.
Water has an odd taste and/ or odor.
• Water has not been dis- pensed for an extended
period of time.
• Unit not properly con- nected to cold water line.
• Draw and discard 10-12 glasses of water to freshen the supply.
• Connect unit to cold water line that sup- plies water to the kitchen faucet.
Water pressure is extremely low.
• Cut-off and cut-on pres- sures are too low (well
systems only). • Reverse osmosis system is in regenerative phase.
• Have someone turn up the cut-off and cut-on pressure on the water pump sys- tem (well systems only).
• It is normal for a reverse osmosis system to be below 20 psi during the regenerative phase.
Water not cold enough.
• As warmer tap water goes through the filter and enters the water tank the chilled water is pushed through to the dispenser. Once the chilled water is used up it will take several hours to bring the freshly replaced water to a cooler temperature.
• Add ice to cup or container before dis- pensing water.
OPENING/CLOSING OF DOORS/DRAWERS
Door(s) will not close.
• Door was closed too hard, causing other door to open slightly. • Refrigerator is not level. It rocks on the floor when moved slightly. • Refrigerator is touching a wall or cabinet.
• Close both doors gently.
• Ensure floor is level and solid, and can ad- equately support the refrigerator. Contact
a carpenter to correct a sagging or sloping floor.
• Ensure floor is level and solid, and can ad- equately support the refrigerator. Contact
a carpenter to correct a sagging or sloping floor.
Drawers are difficult to move.
• Food is touching shelf on top of drawer. • Track that drawers slide on is dirty.
• Remove top layer of items in drawer. • Ensure drawer is properly installed on track. • Clean drawer, rollers, and track. See Care & Cleaning.
RUNNING OF REFRIGERATOR
Compressor does not run.
• Freezer control is set to “OF” or “0”. • Refrigerator is in defrost cycle. • Plug at electrical outlet is disconnected. • House fuse blown or tripped circuit breaker. • Power outage.
• Set freezer control. • This is normal for a fully automatic defrost
refrigerator. The defrost cycle occurs peri- odically, lasting about 30 minutes.
• Ensure plug is tightly pushed into outlet.
• Check/replace fuse with a 15 amp time- delay fuse. Reset circuit breaker.
• Check house lights. Call local electric company.
Refrigerator runs too much or too long.
• Room or outside weather is hot. • Doors are opened too frequently or too long. • Fresh Food/freezer door may be slightly open. • Freezer control is set too cold. • Fresh Food/freezer gasket is dirty, worn, cracked, or poorly fitted. • Condenser is dirty.
• It’s normal for the refrigerator to work longer under these conditions. • Warm air entering the refrigerator causes it to run more. Open doors less often.
• Ensure refrigerator is level. Keep food and con- tains from blocking door. See PROBLEM column
OPENING/CLOSING OF DOORS/DRAWERS. • Set Fresh Food control to warmer setting until refrigerator temperature is satisfactory. Allow 24 hours for temperature to stabilize. • Clean or change gasket. Leaks in door seal will cause refrigerator to run longer in order to maintain desired temperatures. • Clean condenser. See Care & Cleaning.
Compressor goes off and on frequently.
• Thermostat keeps the
refrigerator at a con- stant temperature.
• This is normal. Refrigerator goes on and off to keep temperature constant.
DIGITAL TEMPERATURE DISPLAY
Digital temper- ature displays are flashing.
• Electronic control system has detected a perfor- mance problem.
• Call your Frigidaire service representative,who can interpret any messages or num- ber codes flashing on the digital displays.
WATER/MOISTURE/FROST INSIDE REFRIGERATOR
Moisture col- lects on inside of refrigerator walls.
• Weather is hot and humid. • Door is slightly open.
• The rate of frost buildup and internal sweating increases. • See PROBLEM column OPENING/CLOSING OF DOORS/DRAWERS.
Water collects on bottom side of drawer cover.
• Vegetables contain and give off moisture.
• It is not unusual to have moisture on the bottom side of the cover. • Move humidity control (some models) to lower setting.
Water collects in bottom of drawer.
• Washed vegetables and fruit drain while in the drawer.
• Dry items before putting them in the drawer. Water collecting in bottom of drawer is normal.
WATER/MOISTURE/FROST OUTSIDE REFRIGERATOR
Moisture col- lects on outside of refrigerator or between doors.
• Weather is humid. • Door is slightly open, causing cold air from in- side refrigerator to meet warm air from outside.
• This is normal in humid weather. When hu- midity is lower, the moisture should disappear.
• See PROBLEM column OPENING/CLOSING OF DOORS/DRAWERS.