Loading ...
Loading ...
Loading ...
12
NS-OTR16WH8(-C) / NS-OTR16BS8(-C) / NS-OTR16SS8(-C)
www.insigniaproducts.com
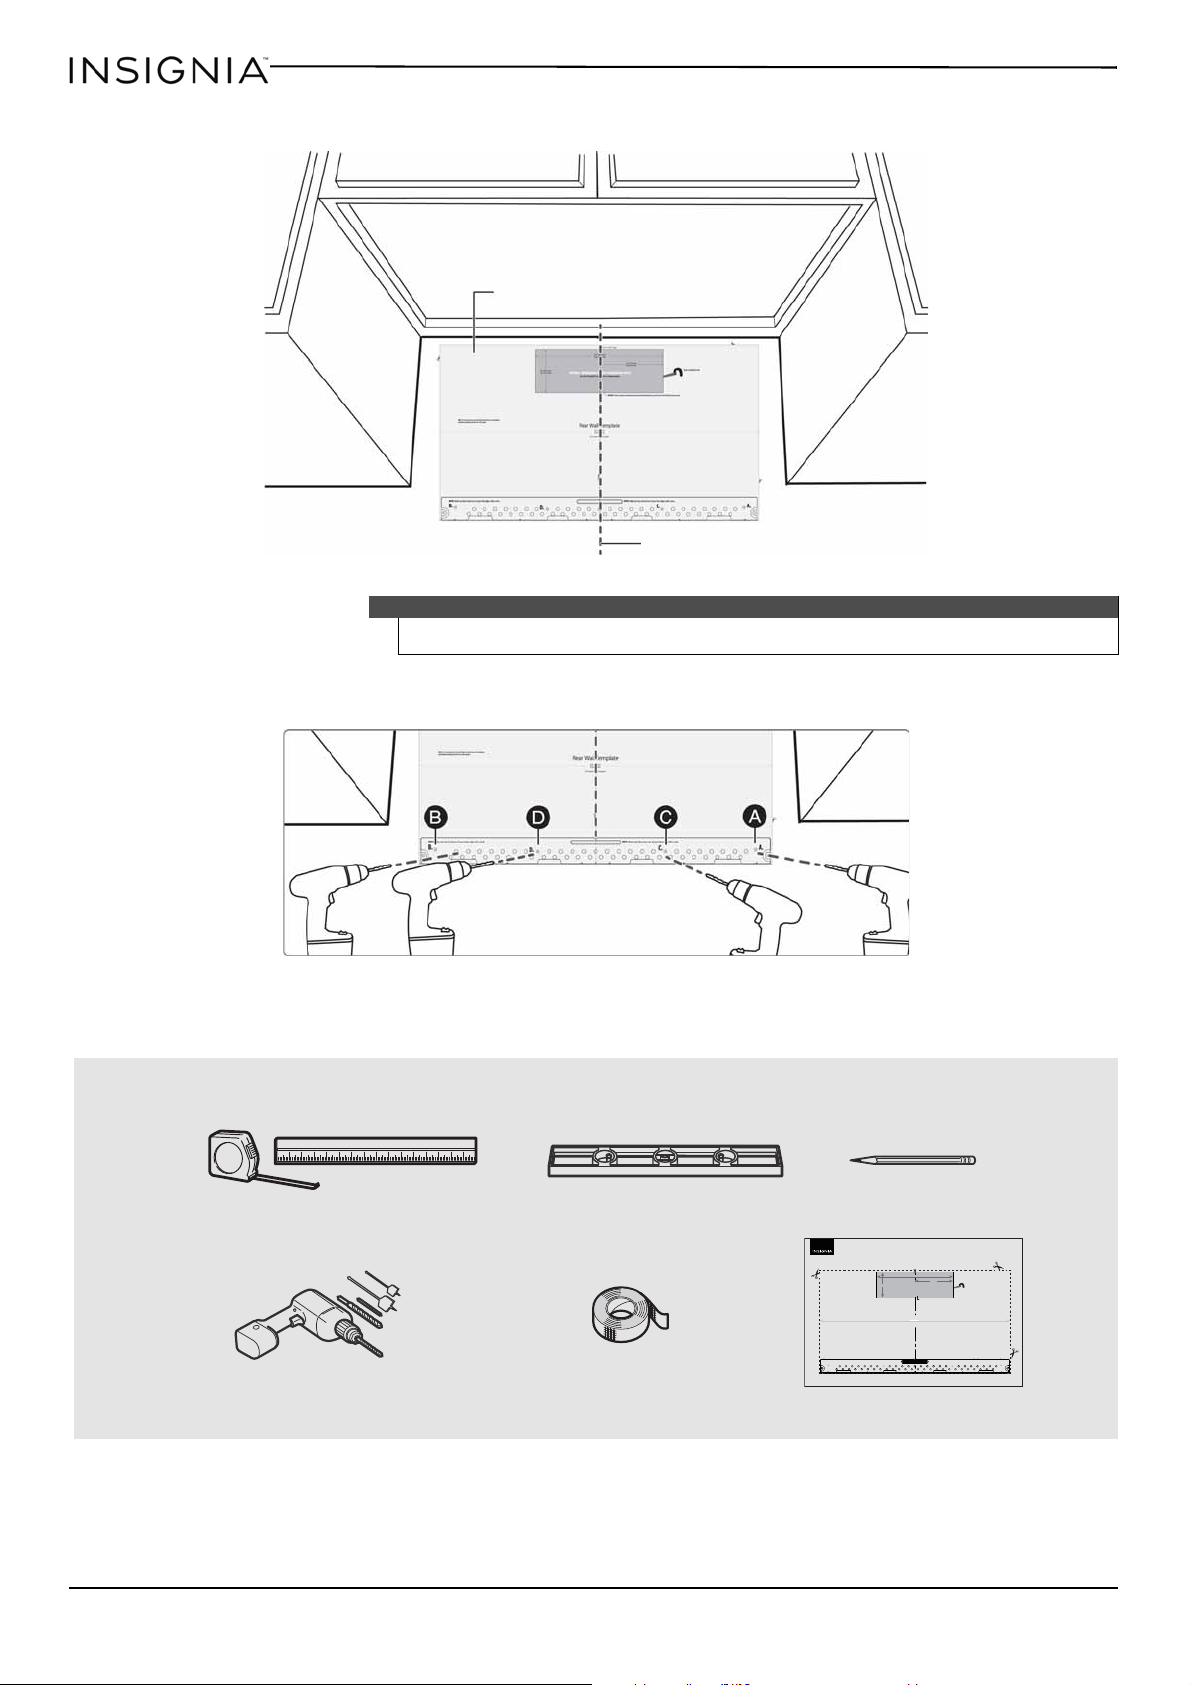
5 Tape the template in place so that it is centered on the vertical line and the top edge is aligned with the
horizontal line.
6 Find a hole that aligns with a stud (this is C or D).
7 Drill holes through the template at points A, B, and C or D. If the hole lines up with a stud, drill a 3/16” hole.
Otherwise, drill a 5/8" hole for the toggle bolts. You must use at least three holes for mounting.
CAUTION
You must mount to at least one stud.
You’ll need:
Vertical line in the center
Top of the template aligned
with the horizontal line
Note: Depending on your stud locations, your installation may look
different. You should mount to at least one stud.
Rear wall template
Pencil
Duct tape
Electric drill with 3/16” and 5/8” bits
Level
Ruler or tape measure
Saber or keyhole saw
Scie à main
Serrucho de punta
6 in. (152.4 mm)
6 po (152,4 mm)
4 in. (101.6 mm)
4 po (101,6 mm)
0.38 in. (9.7 mm) to edge / 0,38 po (9,7 mm) jusqu'au rebord / 0.38 pulg. (9.7 mm) hasta el borde
Rear Wall Template / Gabarit pour mur arrière / Plantilla de pared posterior
NS-OTR16WH8/NS-OTR16WH-C/NS-OTR16BS8/NS-OTR16BS8-C/NS-OTR16SS8/NS-OTR16SS8-C
OPTION B: OUTSIDE BACK EXHAUST (HORIZONTAL DUCT):
Cut a hole through the rear wall for the exhaust adapter.
OPTION B : CONDUIT D'ÉVACUATION EXTÉRIEUR ARRIÈRE (CONDUIT HORIZONTAL) :
Forer un orice dans le mur arrière pour l'adaptateur du conduit d'évacuation.
OPCIÓN B: CONDUCTO DE ESCAPE EXTERIOR DE LA PARTE POSTERIOR (CONDUCTO HORIZONTAL):
Taladre un agujero a través de la pared posterior para el adaptador de escape.
It is very important to read and follow the directions in the Installation Guide before proceeding with this rear wall template.
Il est essentiel de lire et de suivre les instructions du Guide d'installation avant de procéder à l'utilisation de ce gabarit pour mur arrière.
Es muy importante de leer y seguir las instrucciones en la Guía de instalación antes de usar esta plantilla para pared posterior.
Rear Wall Template / Gabarit pour mur arrière /Plantilla de pared posterior
30 in. (762 mm)
30 po (762 mm)
30" minimum width required
Largeur minimal requise 30 po
Anchura mínima de 30 pulg. requerida
Center line
Ligne de centre
Línea central
CAUTION: If exhaust adapter is positioned outside recommended dimension, grease-laden air will discharge into you house.
ATTENTION : Si l'adaptateur du conduit d'évacuation n'est pas conçu conformément aux dimensions recommandées, de l'air graisseux sera réparti dans le domicile.
CUIDADO: Si el adaptador de escape se hace más grande que las dimensiones recomendadas, aire saturado de grasa se despedirá en su hogar.
NOTE: It is very important to read and follow the directions in the Installation
Guide before proceeding with this rear wall template.
REMARQUE : Il est essentiel de lire et de suivre les instructions du Guide
d'installation avant de procéder à l'utilisation de ce gabarit pour mur arrière.
NOTA: Es muy importante de leer y seguir las instrucciones en la Guía de
instalación antes de usar esta plantilla para pared posterior.
NOTE: Make sure that at least one of your holes aligns with a stud.
REMARQUE : Vérier qu'au moins un des orices soit aligné avec un montant.
NOTA: Asegúrese de que por lo menos uno de los oricios sea alineado con una viga.
NOTE: Make sure that at least one of your holes aligns with a stud.
REMARQUE : Vérier qu'au moins un des orices soit aligné avec un montant.
NOTA: Asegúrese de que por lo menos uno de los oricios sea alineado con una viga.
12 in. (304.8 mm)
12 po (304,8 mm)
V1 17-0432
B.
D.
C.
A.
Loading ...
Loading ...
Loading ...