
16" STAND FAN WITH REMOTE
MODEL: FS40-16JR
READ AND SAVE THESE INSTRUCTIONS
OWNER’S MANUAL

Read Rules for Safe Operation and Instructions Carefully.
CAUTION
1.This appliance has a polarized plug (one blade is wider than the
other). To reduce the risk of electric shock, this plug is intended
to fit in a polarized outlet only one way. If plug does not fit fully in
the outlet, reverse the plug. If it still does not fit, contact a qualified
electrician. Do not attempt to defeat this safely feature.
2.To reduce the risk of fire or electric shock, do not use this fan with
any solid-state speed control device.
WARNING
1. Never insert fingers, pencils, or any other object through the grille
when fan is running.
2. Disconnect fan when moving from one location to another.
3. Disconnect fan when removing grilles for cleaning.
4. Be sure fan is on a stable surface when operating to avoid
overturning.
5. Do not use fan in window. Rain may create electrical hazard.
6. Ensure that the fan is switched off from the supply mains before
removing the grille.
The rules about cord and plug are below:
1. This product employs overload protection (fuse). A blown fuse
indicates an overload or short-circuit situation. If the fuse blows,
unplug the product from the outlet. Replace the fuse as per the
user servicing instructions (follow product marking for proper fuse
rating) and check the products. If the replacement fuse blows, a
short-circuit may be present and the product should be discarded
or returned to an authorized service facility for examination and/or
repair.
2. Do not operate any fan with a damaged cord or plug. Discard fan
or return to an authorized service facility for examination and/or
repair.
3. Do not run cord under carpeting. Do not cover cord with throw
rugs, runners, or similar coverings. Do not route cord under
furniture or appliances. Arrange cord away from traffic area and
where it will be tripped over.
RULES FOR SAFE OPERATION
1
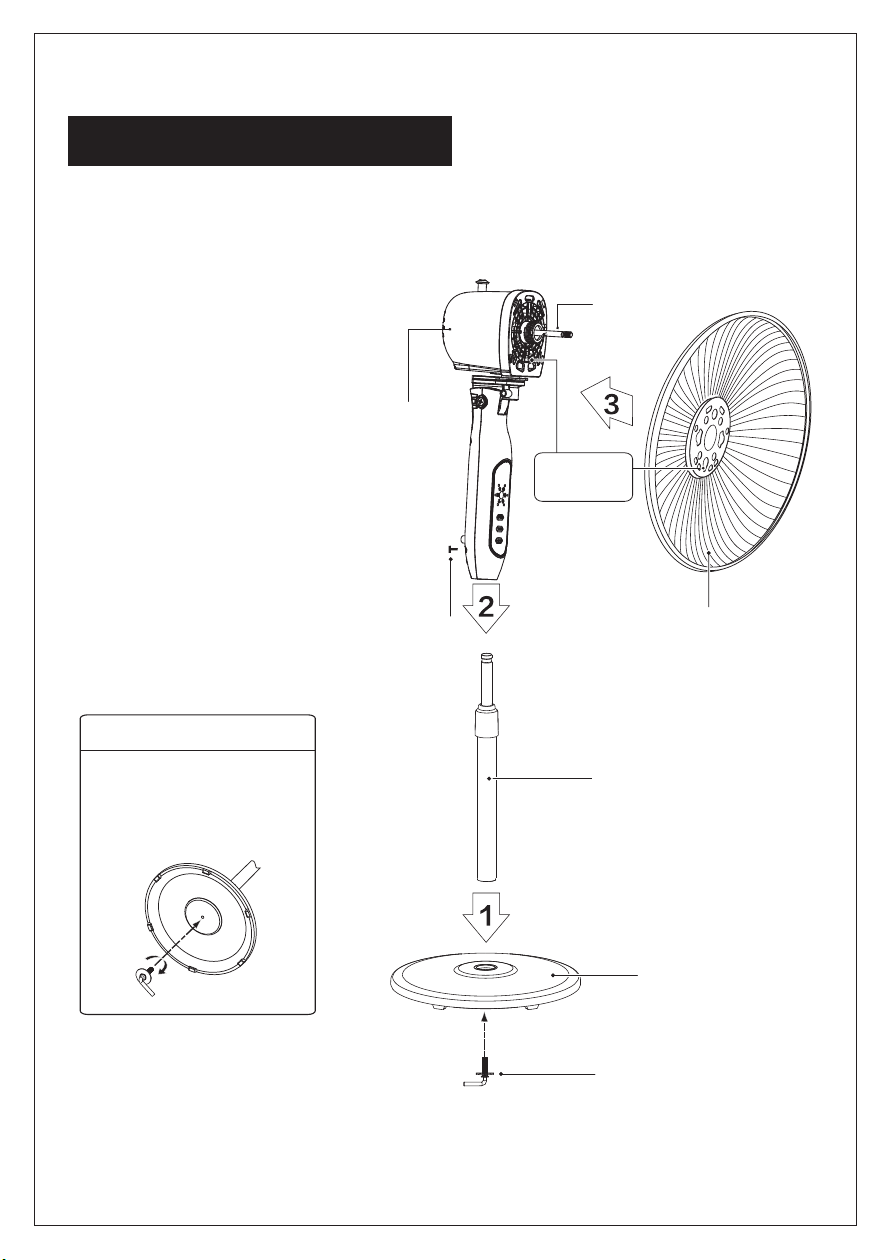
INSTALLATION INSTRUCTIONS
Name of components
①
②
Considerate Hint:
Remove ①②parts from the
component before performing
installation.
Base Installation
Align the column with the
groove on the base and
fix them together using a
right-angle bolt.
Pole
Rear grill
Tighten
knob
Right-angle bolt
Base
Motor
Motor shaft
Install by
aligning
2
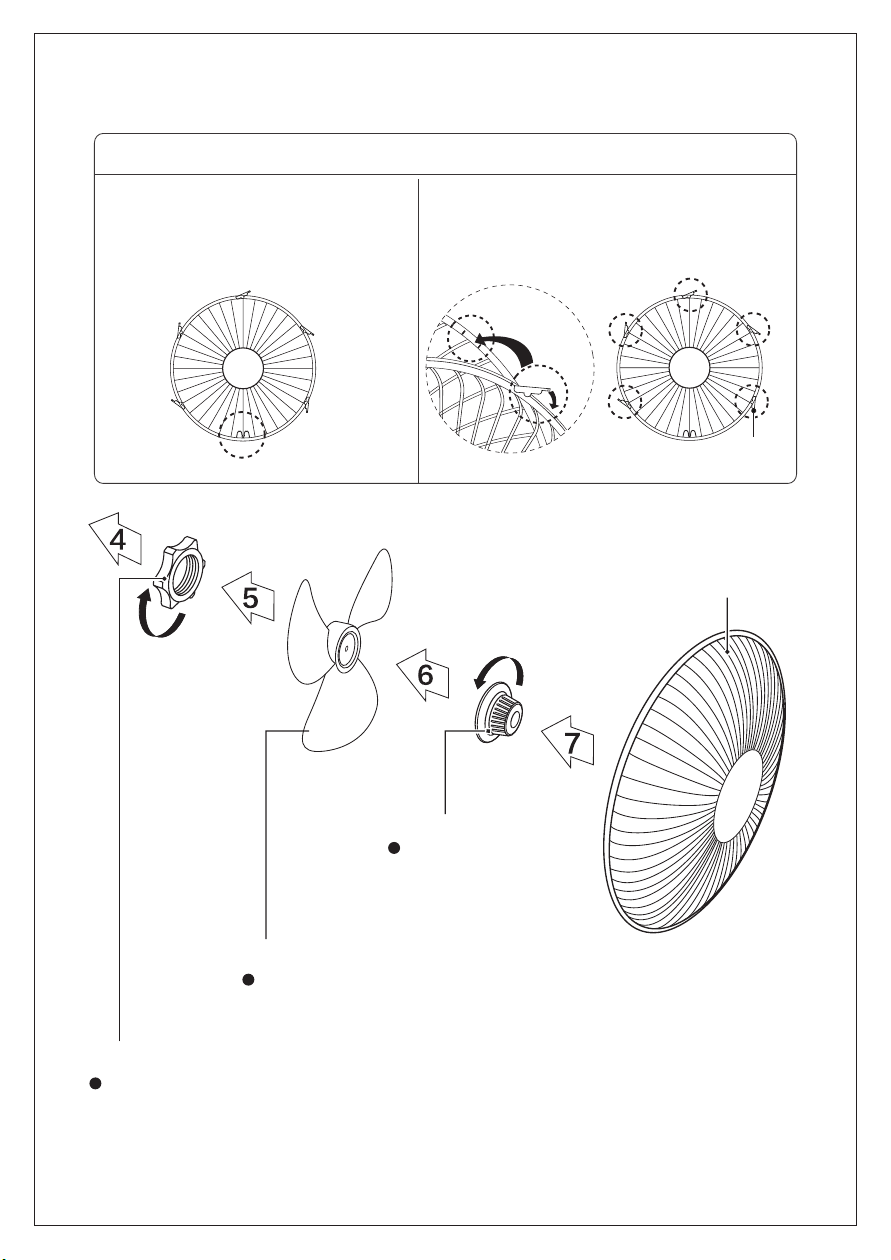
1. Align Screw Holes on the outer ring
of both the Front and Rear Guards,
with the Positioning Clip aligned as
illustrated.
2. Press down all the Buckles to fasten the
Front Guard with the Rear Guard. At the
Screw Holes, tighten the separated screw
and nut.
Front and Rear Guard Installation
Lock nut of grill
Lock nut of blade
Blade
Screw the lock nut of grill clockwise,
and in the meantime, fix the rear grill.
Lock nut of blade
anticlockwise,
and then install the
front fan cover.
Pull the blade to rotate after installing,
so as to ensure that the blade can be
normally rotated.
Front grill
Buckle
3
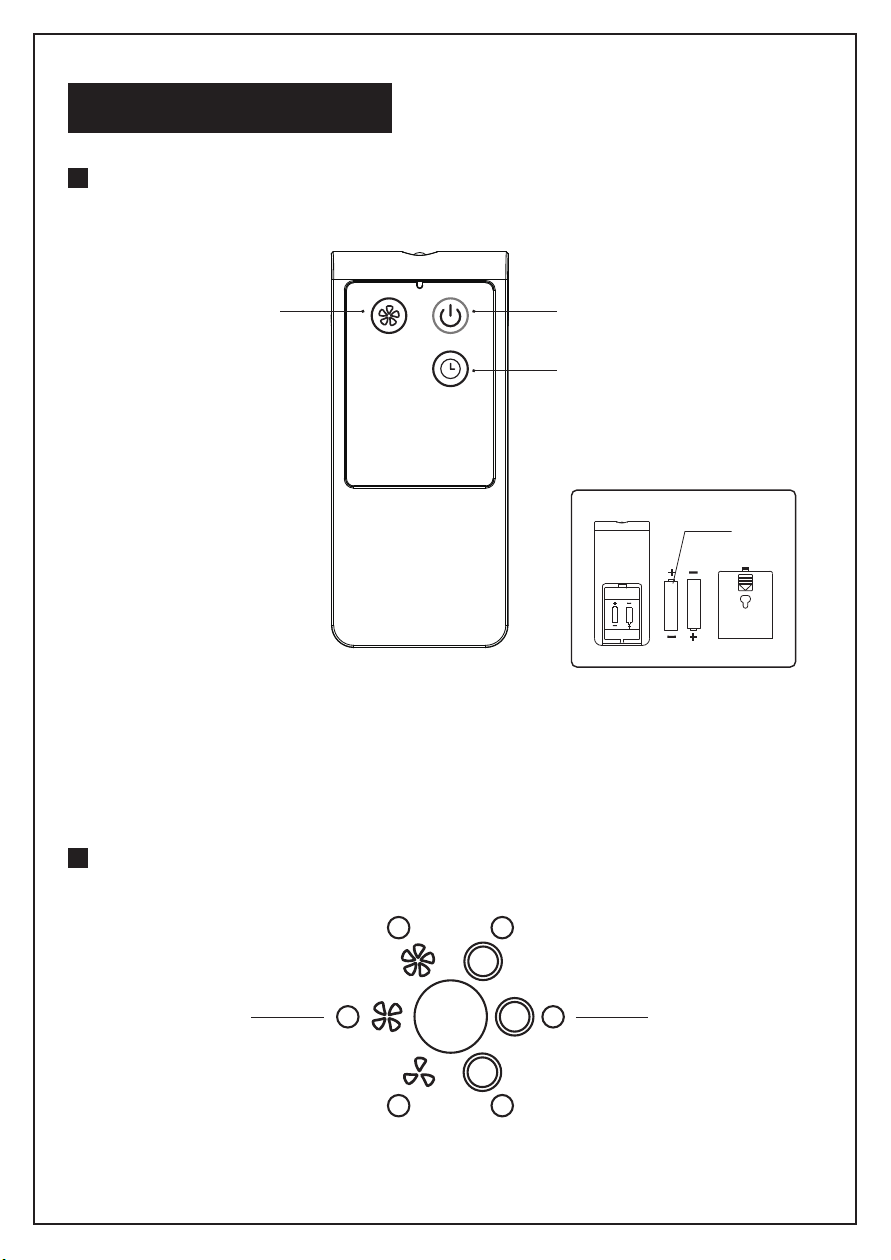
Speed display Timer display
4h
2h
1h
Instructions for key of remote controller
Instructions for display of body
INSTRUCTIONS FOR USE
Considerate Hint:
Effective Range of Remote Control: within 5m distance and
30°deflection in front of Product.
Battery
“ON/OFF” key
“TIMER”key
“SPEED” key
4
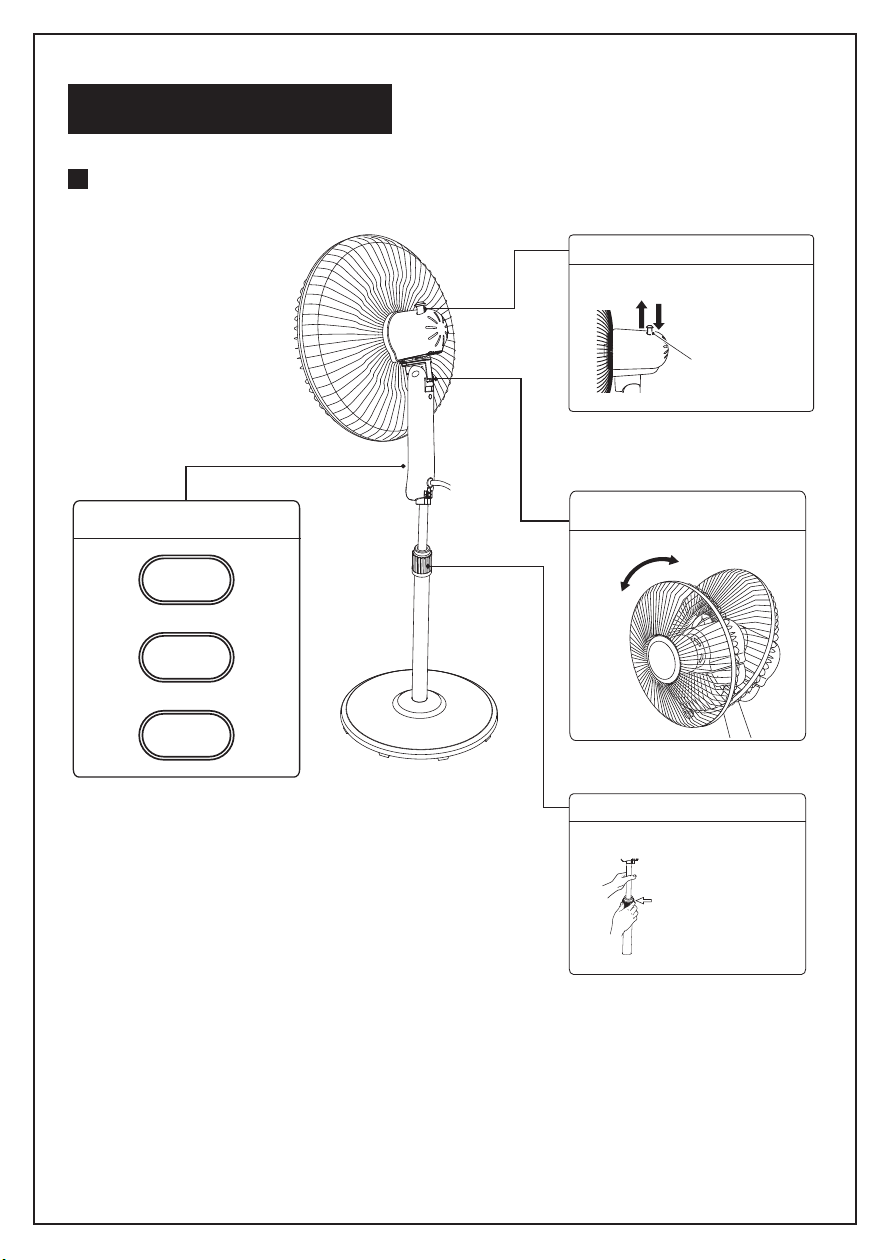
Instructions for operation of body
INSTRUCTIONS FOR USE
Body key
Turn counterclockwise and loosen for
performing height adjustment.
Height Adjustment
Height Adjustment Key
Tilt Adjustment
Manual
Swing Pull-knob
Push-down to swing
Pull-up for static
Horizontal Swing
SPEED
TIMER
ON/OFF
5
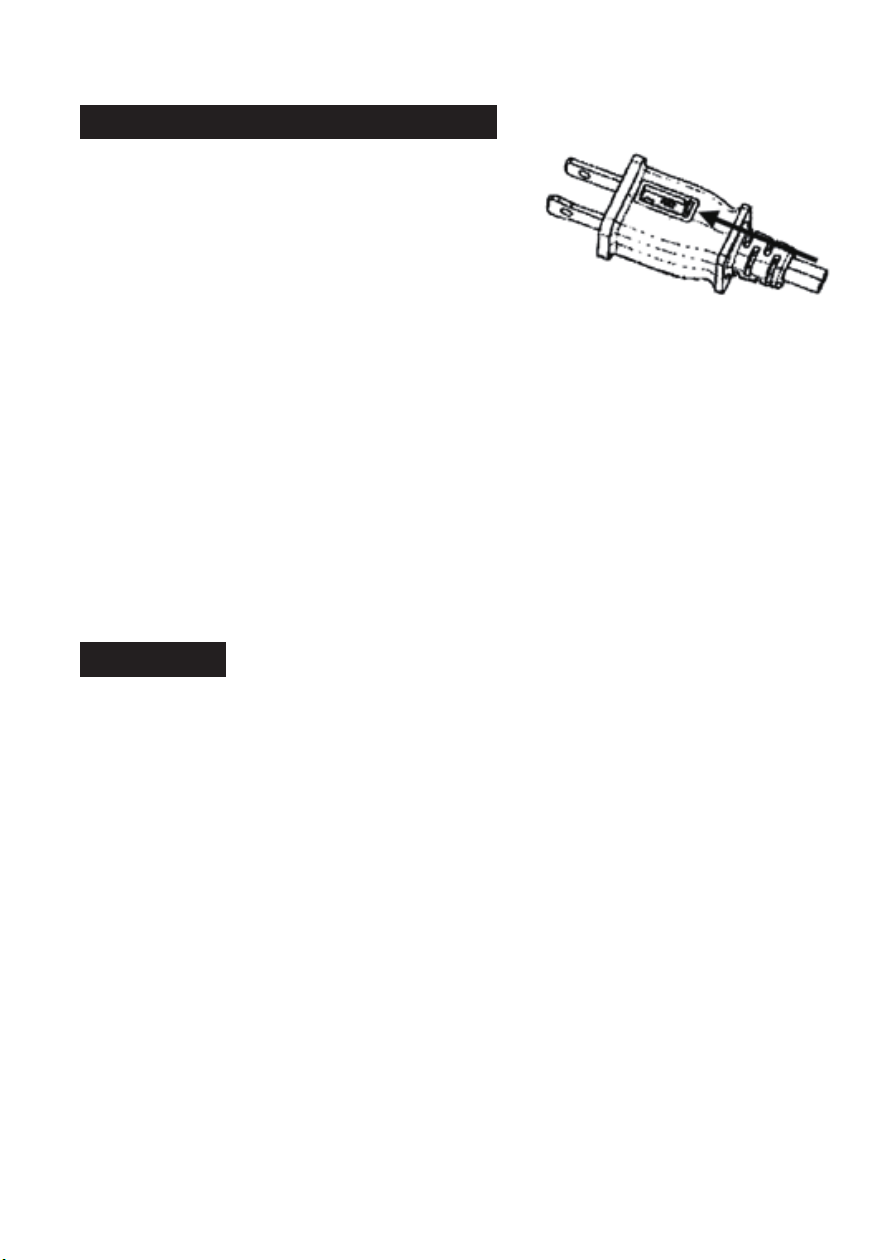
a) Grasp plug and remove from the receptacle or
other outlet device. Do not unplug by pulling
on cord.
b) Open fuse cover. Slide open fuse access
cover on top of attachment plug towards blades.
c) Remove fuse carefully. Insert the tip of your tool
into fuse slot (close with the terminal), then prize
the fuse gradually and slowly, but not overexert. If you feel tight, you can try it at
several times and prize the fuse little by little. When one side of the fuse has
been prized, then you can get the fuse out entirely.
d) Risk of fire. Replace fuse only with 2.5 Amp, 125 Volt fuse.
e) Close fuse cover. Slide closed the fuse access cover on top of attachment plug.
f) Risk of fire. Do not replace attachment plug. Contains a safety device (fuse) that
should not be removed. Discard product if the attachment plug is damaged.
Notice:
1. When you replace the fuse, please don’t operate suddenly or overexert, or else
the product will be damaged or cause accident.
2. When you feel it hard to be operated, please make sure you have got the right
way.
USER SERVICING INSTRUCTIONS
CLEANING
1. Be sure to unplug from the electrical supply source before cleaning.
2. Plastic parts should be cleaned with mild soap and a damp cloth or sponge.
Thoroughly to remove soap film with clean water.
3. Be sure not to make water or other liquid enter inside of motor.
6

SERVICE & SUPPORT
In the event of a warranty claim or if service is required for this product, please contact us at the
following:
Toll Free: 1-866-646-4332
Email us at: [email protected]
For questions or comments, please write to:
Midea America Corporation
Customer Care Center
11411 NW 107th Street,
Suite 12 Miami, FL 33178
For your records, staple your sales receipt to this manual and record the following:
DATE OF PURCHASE:
PLACE OF PURCHASE:
(STAPLE SALES RECEIPT HERE)
NOTE: PROOF OF PURCHASE IS REQUIRED FOR ALL
WARRANTY CLAIMS
7

ONE (1) YEAR LIMITED WARRANTY
● Please read all instructions before attempting to use this product.
● Please return the Warranty Registration card within fifteen (15) days from the
date of purchasing this product.
Midea America Corporation, referred to hereafter as Midea America, warrants as
limited herein to the original purchaser of retail that each new Pelonis Fan, shall be
free of defects in material and workmanship for a period of one (1) year from the
date of original purchase. This one (1) year warranty is limited to the fan motor,
fan blades, and electric control circuit board.
Midea America makes no further warranties or representations, express or implied
except those contained herein. No representative or dealer is authorized to
assume any other liability regarding the Pelonis Fan. The duration of the implied
warranty granted under State law, including warranties of merchantability and
fitness for particular purpose are limited in duration should the duration of the
express warranty grant it hereunder. Midea America shall in no event be liable for
direct, indirect, special or consequential damages.
Some states do not allow limitations on how long an implied warranty lasts,
and/or the above limitations or exclusion may not apply to you. This warranty
gives you specific legal rights and you may have other rights, which vary from
state to state.
Should your Pelonis Fan fail to operate under the terms of this
limited warranty, contact Midea America at 1-866-646-4332
(M-F 9:00am to 5:00pm CST).
In the event of malfunctions or failure of your Pelonis Fan, simply deliver or send
the product, postage prepaid along with PROOF OF PURCHASE, within the
warranty period of one (1) year, to Midea America. Midea America reserves the right
to inspect the claimed defective part or parts to determine if the defect or malfunction
complaint is covered by this warranty. Midea America shall, within sixty (60) days after
receipt of the product, at its option, repair and/or replace the defective part or parts
free of charge. This warranty shall only cover defects arising from normal usage.
Midea America assumes no responsibility whatsoever if the Pelonis Fan
should fail during the warranty period by reasons of:
● Misuse, negligence, physical damage or accidents.
● Lack of maintenance (see cleaning).
● Repair by any unauthorized party during the warranty period.
● Damage caused by connection to an improper input voltage (see specifications).
8