

InstallationManualforEasySuiterange
xxHFL3x10T
xxHFL3x10W
Status: final
Version: 1.0
Date: May2015
Author: GerritWeiden

1
Contents
1. Requirementsbeforestartingtheinstallation..........................................................................................................3
2. FindoutthestateoftheTV......................................................................................................................................4
3. Re‐installTV..............................................................................................................................................................5
4. Installationwizard.....................................................................................................................................................8
5. Channeloptions......................................................................................................................................................19
6.ConsumerSetupMenu...........................................................................................................................................................................23
7.ProfessionalSettings...............................................................................................................................................................................24
8. WelcomeLogo........................................................................................................................................................46
8.1SmartInfo
.................................................................................................................................................................46
8.2SmartInfoShow.......................................................................................................................................................47
8.3SmartInfoBrowser..................................................................................................................................................47
9. Clone.......................................................................................................................................................................48
10.Featuresettings.......................................................................................................................................................50
11.CSM(ConsumerSetupmenu).................................................................................................................................55

2
Notice
2015 ©TP Vision Netherlands B.V. All rights reserved. Specifications are subject to change without notice.
TrademarksarethepropertyofKoninklijkePhilipsElectronicsN.Vortheirrespectiveowners.TPVisionNetherlands
B.V.reservestherighttochangeproductsatanytimewithoutbeingobligedtoadjustearliersuppliesaccordingly.
TPVision
NetherlandsB.V.cannotbeheldresponsibleneitherforanyerrorsinthecontentofthisdocumentnorfor
anyproblemsasaresultofthecontentinthisdocument.ErrorsreportedtoPhilipswillbeadaptedandpublishedon
thePhilipssupportwebsiteassoonaspossible.
Helpandsupport
VisitthePhilipssupportwebsiteatwww.support.philips.com/supportfor:
‐ Leafletandproductdocumentation
‐ DownloadaprintablePDFversionoftheusermanual
‐ Contactdetailsofthehelpdesk.
Definitions,AcronymsandAbbreviations
Coldstart: UnplugtheTVfrommainspower.ConnectTVagaintothemainspower.
GuestRC: GuestRemotecontrolsuppliedwiththeTV
OSD: OnScreenDisplay
CSM: ConsumerSetupMenu
OOB: Outoftheboxstate–TheTVisunboxedandnooptionorfeatureswereconfigured
[]: ThevaluesbetweenbracketsarereferringtoaTVmenuitem
“ ”: Thevaluesbetweenquotationmarksarereferringtoaremotecontrolbutton
FTA: FreeToAir
DVB‐T: DigitalVideoBroadcasting–Terrestrial
DVB‐C: DigitalVideoBroadcasting–Cable
OAD: OvertheAirDownload

3
1. Requirementsbeforestartingtheinstallation
Beforestartingtheinstallation,makesurethatyouhaveeverythingyouneedathand.
Masterremotecontrol22AV8573 or Guestremotecontrol22AV1409A/12
And
USBstick
Toaccessthe[ProfessionalSetup]menuwiththemasterremotecontrol,pressthe“RC6SETUP”keyandthenpress
the “Home/Menu” button. Using the guest remote control, press the following keys sequential:
“3,1,9,7,5,3,MUTE”.
Note:Thesequence:“3,1,9,7,5,3,MUTE”willnotshowthe[ProfessionalSetupMenu]ifthe[HighSecurity]
option
isenabled.
Forthebestguestexperienceitishighlyrecommendedtousethelatestsoftwareversionavailable.
Goto:http://www.support.philips.com/support
Enter the model number and download the latest software version available. Unzip the software and follow the
instructionshowtoupgradethesoftwareontheTV.TheUSBdriveusedforsoftwareupgrademustbeformattedas
FAT32 and preferably empty to avoid and accidental upload of wrong settings andsoftware.
It isrecommendedto
firstupgradetheTVandafterwardsperform theinstallation.
The latest software version and cloning data can be stored on the same USB drive for a 2 in 1 action: software
upgradeandcloningduringtheinstantinitialcloning.

4
2. FindoutthestateoftheTV
ItisimportanttoknowifaTVisin‘virginmode’(outofthebox)orhasbeeninstalledbefore.
Ifyoucanseethisscreenbelow,youknowthattheTVisin‘outofthebox’stateandyoucaninstallthesetbyusing
theprocedure
describedinchapter4ofthismanual.
Ifyoupoweronthesetandthenpressthe‘Home’buttonontheguestremote,youwillseethisscreenappearifthe
TValreadyhasbeeninstalledorifthewizardwasalreadyskipped.
ProfessionalSettingON ProfessionalSettingOFF
YoucanstarttheinstallationwizardagainbyreinstallingtheTVasexplainedinchapter3ofthismanual.
DisabletheProfessionalSettings
Access the setup menu press the “RC6 SETUP” key, and then press the “Home/Menu” button. With the guest
remotecontrol,pressthefollowingkeysinsequence:“3,1,9,7,5,3,
MUTE”.
Goto[ProfessionalMode]andselectthe[OFF]optionandconfirmwith“OK”.Press“HOME”andselecttheoption
StoreandRestartNow,Confirmwith“OK”.AfterrestartingtheTVthePROFESSIONALSETTINGSmodewillbesetto
OFF.
5
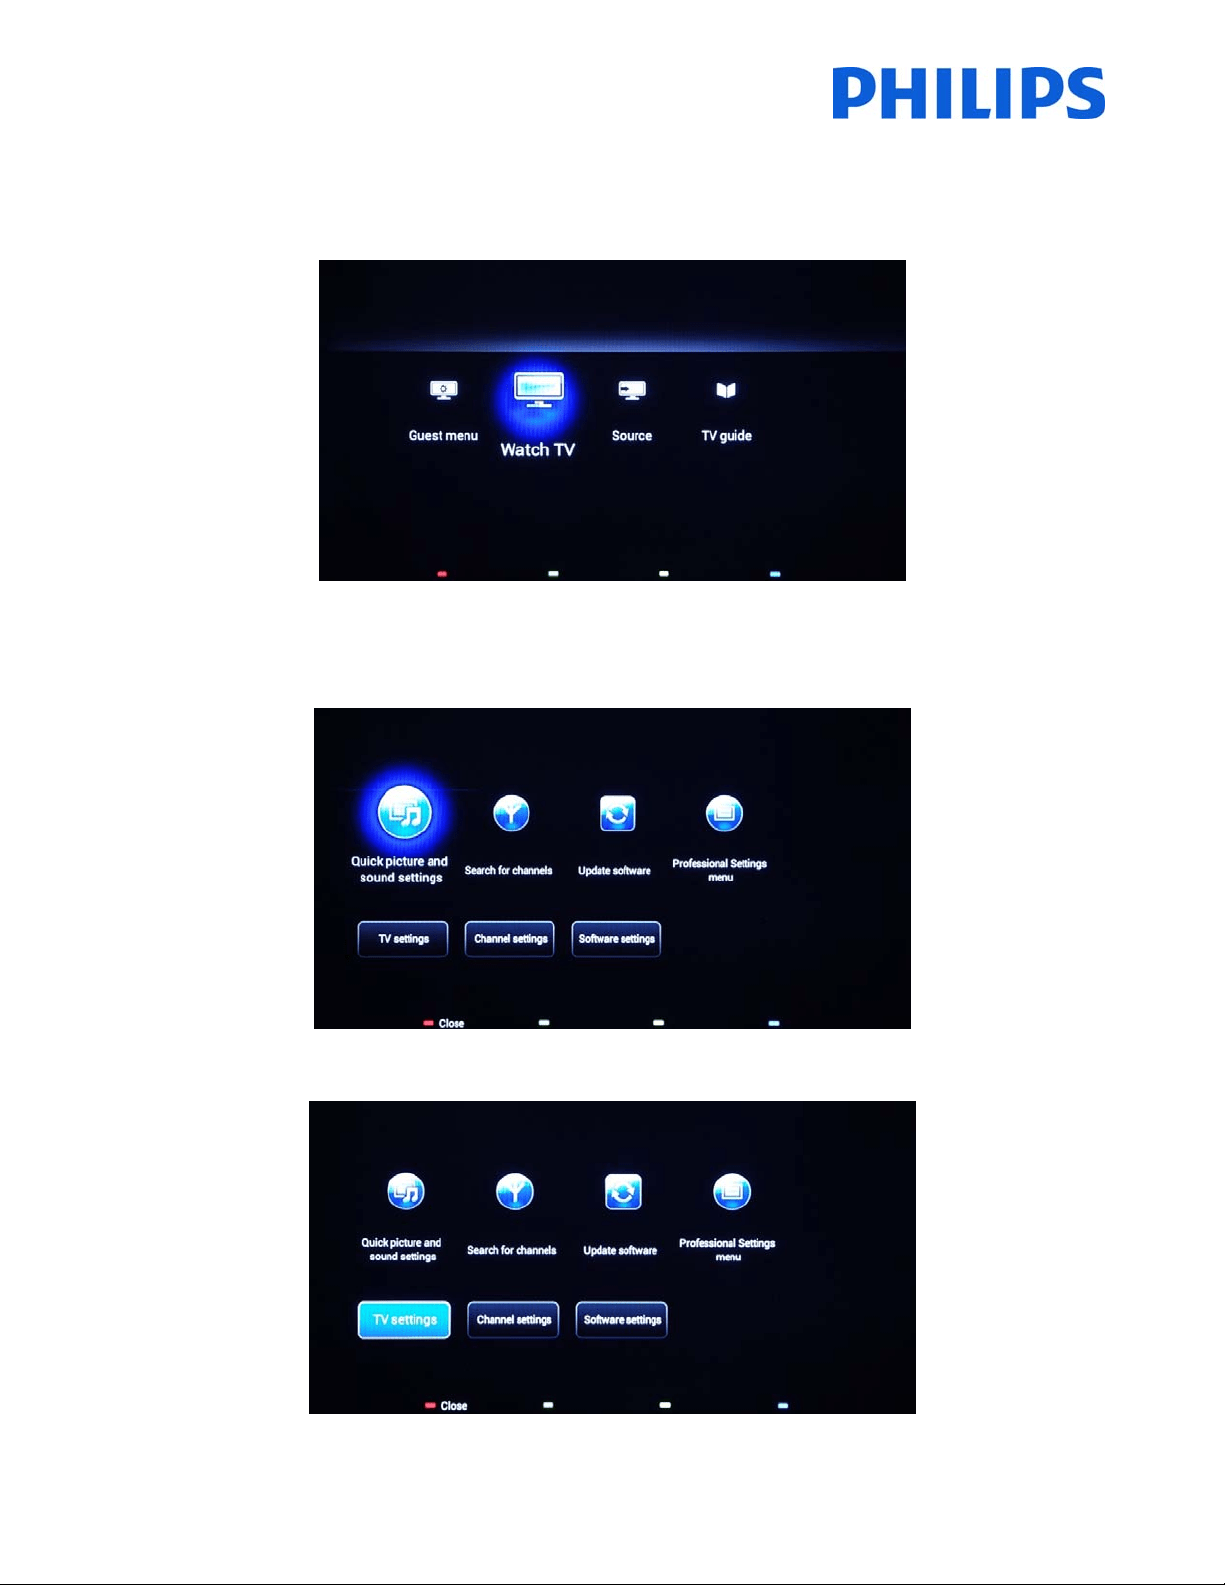
3. Re‐installTV
If you want to start an installation from scratch you can always re‐install the TV.This can be done by using the
option:Re‐installTVset.TheGuestmenuisofferingaccesstooptionslikesubtitle,picturesettings,audiosettings,
alarm,sourceandTVguideisdisplayedbelow:
IftheProfessional mode is activeyoucanaccessthesetupmenubypressing the“RC6 SET UP” keyand thenpress
the“Home/Menu”button.Fortheguestremo tecontro l,pressthefollowingkeysinsequence:“3,1,9,7,5,3,MUTE”.
ThismenuprovidesaccesstotheConsumerSetupMenuandProfessionalSetupMenu
.
Selecttheoption[TVsettings]andpress“OK”toaccessthesubmenu.
6
The[TVsettings]menucontains[Picture]settings,[Sound]settingand[Generalsettings].
Usingthearrowkeytonavigateto[GeneralSettings].Toaccesstheitemsfromtherightmenuusethe“right
arrow”key.
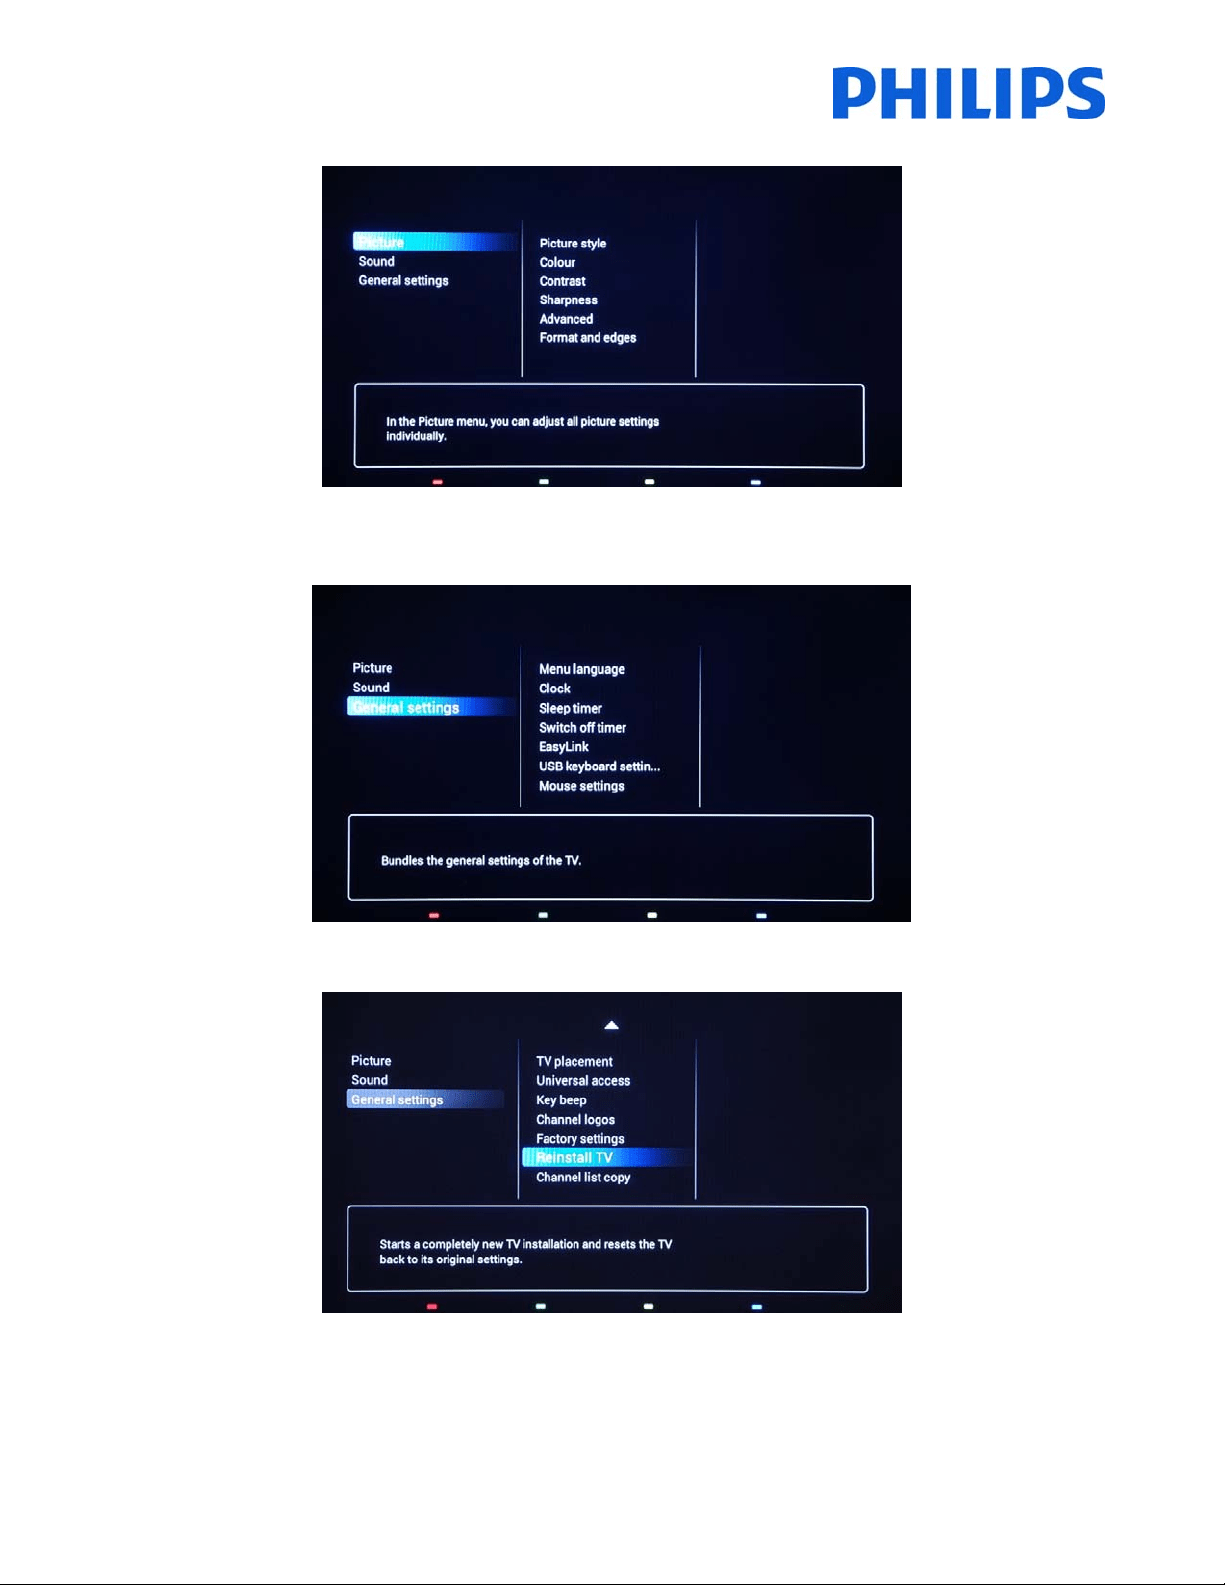
Navigatewiththe“downarrow”keytothe[ReinstallTV]option.
Press“OK”tostartthereinstallationprocedure.ToavoidanypotentialmistakestheTVwillrequestaconfirmation
tostarttheReinstallprocedure.
7
AfterthisoperationtheTVwillpoweroffandonanddisplaytheinstallationwizard.
Note:Allsettingsareatdefaultvaluesandnochannelplanisavailable.
8
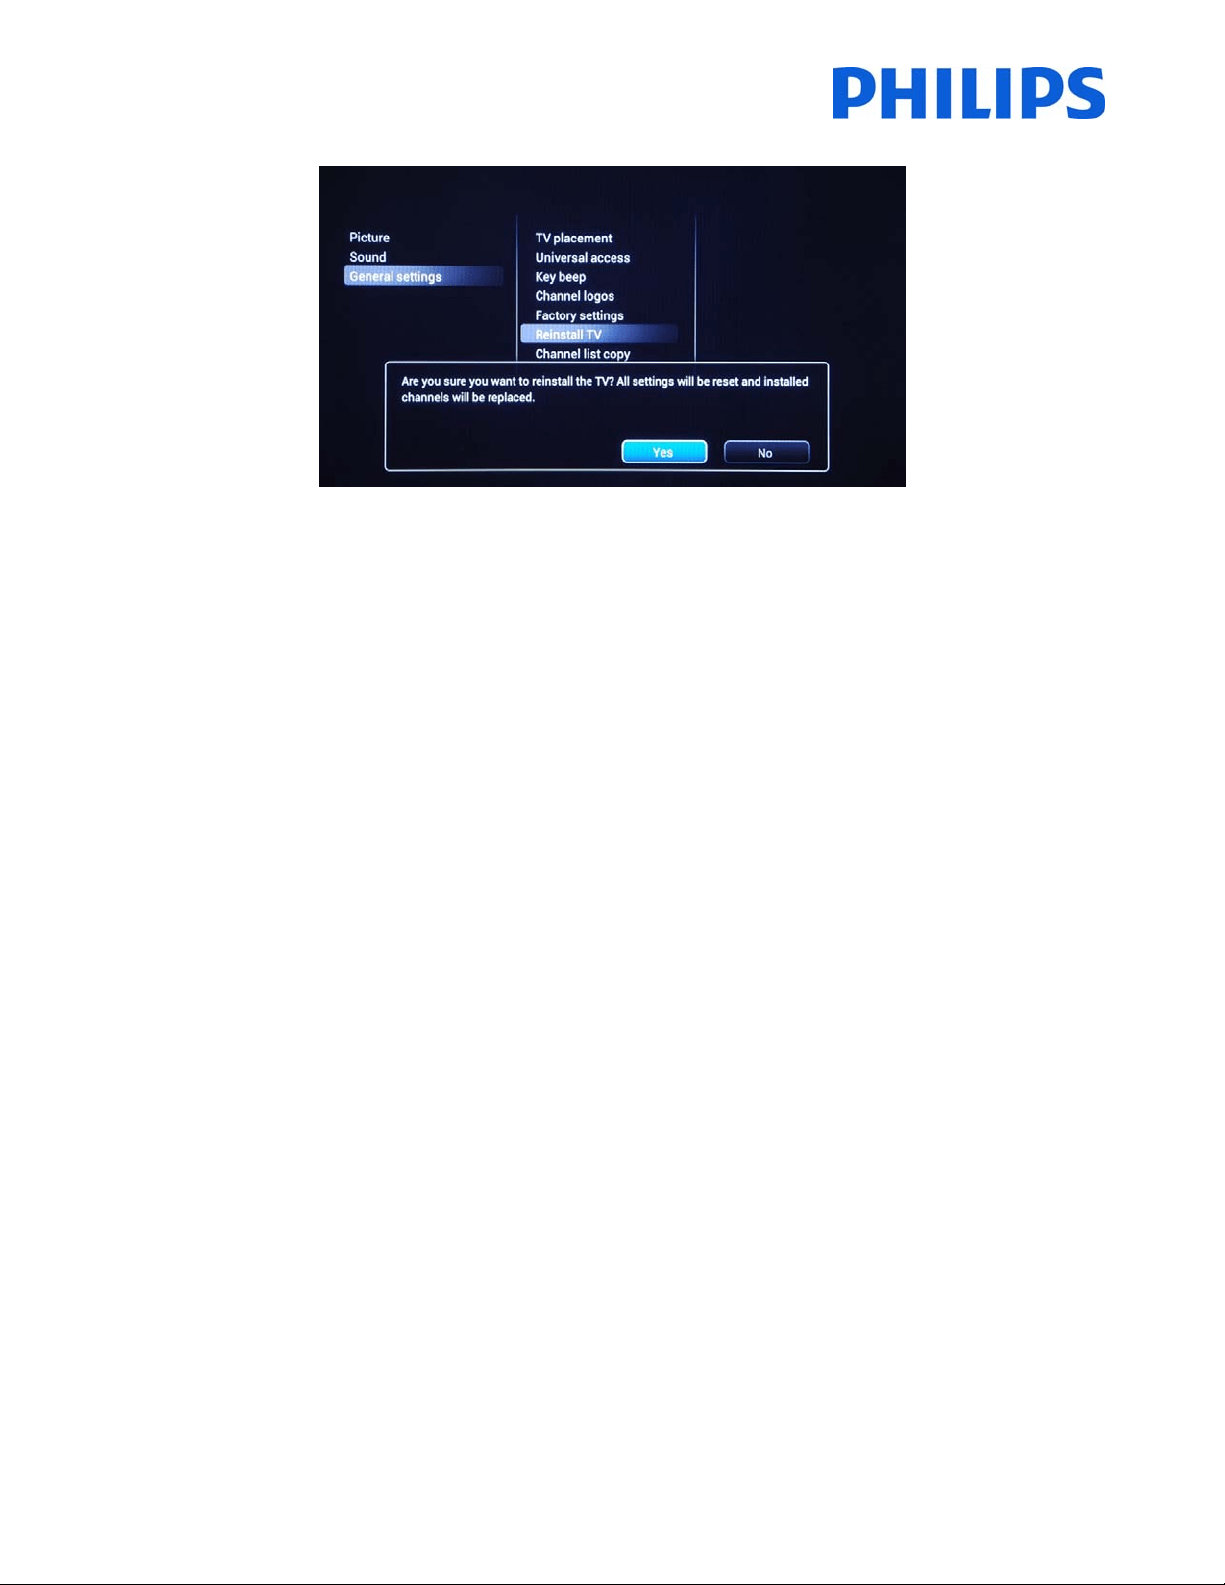
4. Installationwizard
WhenyouturnontheTVforthefirsttime,oryouhavereinstalledtheTV,youshouldseethefollowingscreen.
The TV is indicating that a search process for cloning data on USB key is taking place. If there is no cloning data
availabletheprocesscanbe
skipped. IftheTV doesnot find data for cloning,it willcontinuetothenextstep,the
installationwizard.
Here you will needto select your preferred language.The language selected will be used for the Consumer Setup
menu and for subtitle and audio language preferences. The language can
be change at any moment from the [TV
settings]menu.Pleaseselectwiththe“UpandDownarrow”keysandconfirmwith“OK” orpressthe“leftarrow”
key.
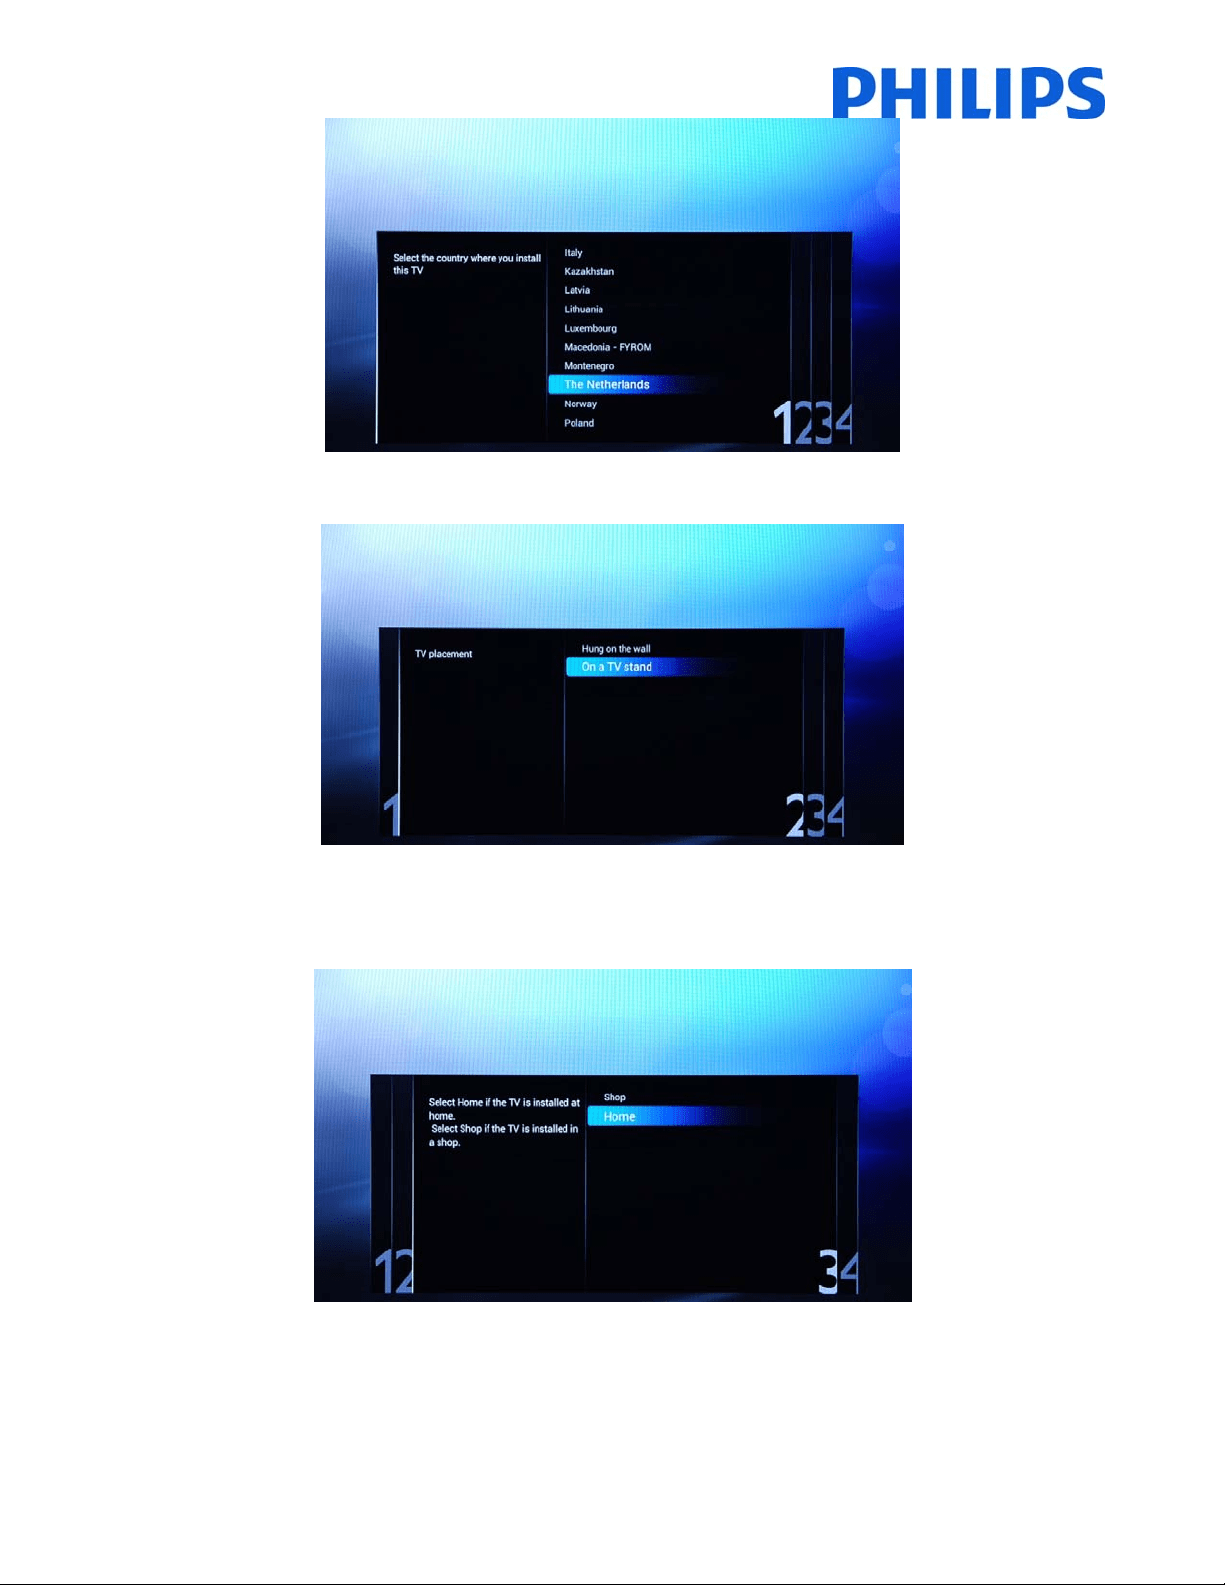
Afterthis,youwillneedtoselectthecountry.Dependingonthecountryselection,somepre‐definedsettingswillbe
activated,because
oflocalbroadcastrequirements.Example:digital/analogchannelscouldbedisabled;reordering
anddeletingchannelscaninsomecasesnotbepossible.
Note:Ifyouareexperiencingsomeissuesafterselectingyourcountry,pleaseselect‘Other s’inthemenu.
9
The nextstep is toselect the placement of theTV, “Hung onthe wall” or “On a TV stand”.Thisoptionwill affect
imageandsoundsettingsbasedontheselection.
Thenextstepistochoosebetweentheoptions[Shop]and[Home].Pleaseselectthe[Home]optionforinstallation,
ifyouselect[SHOP]acommercialbanner willbedisplayedontheTV.Thisisforcommercialpurposeonlyonshops.
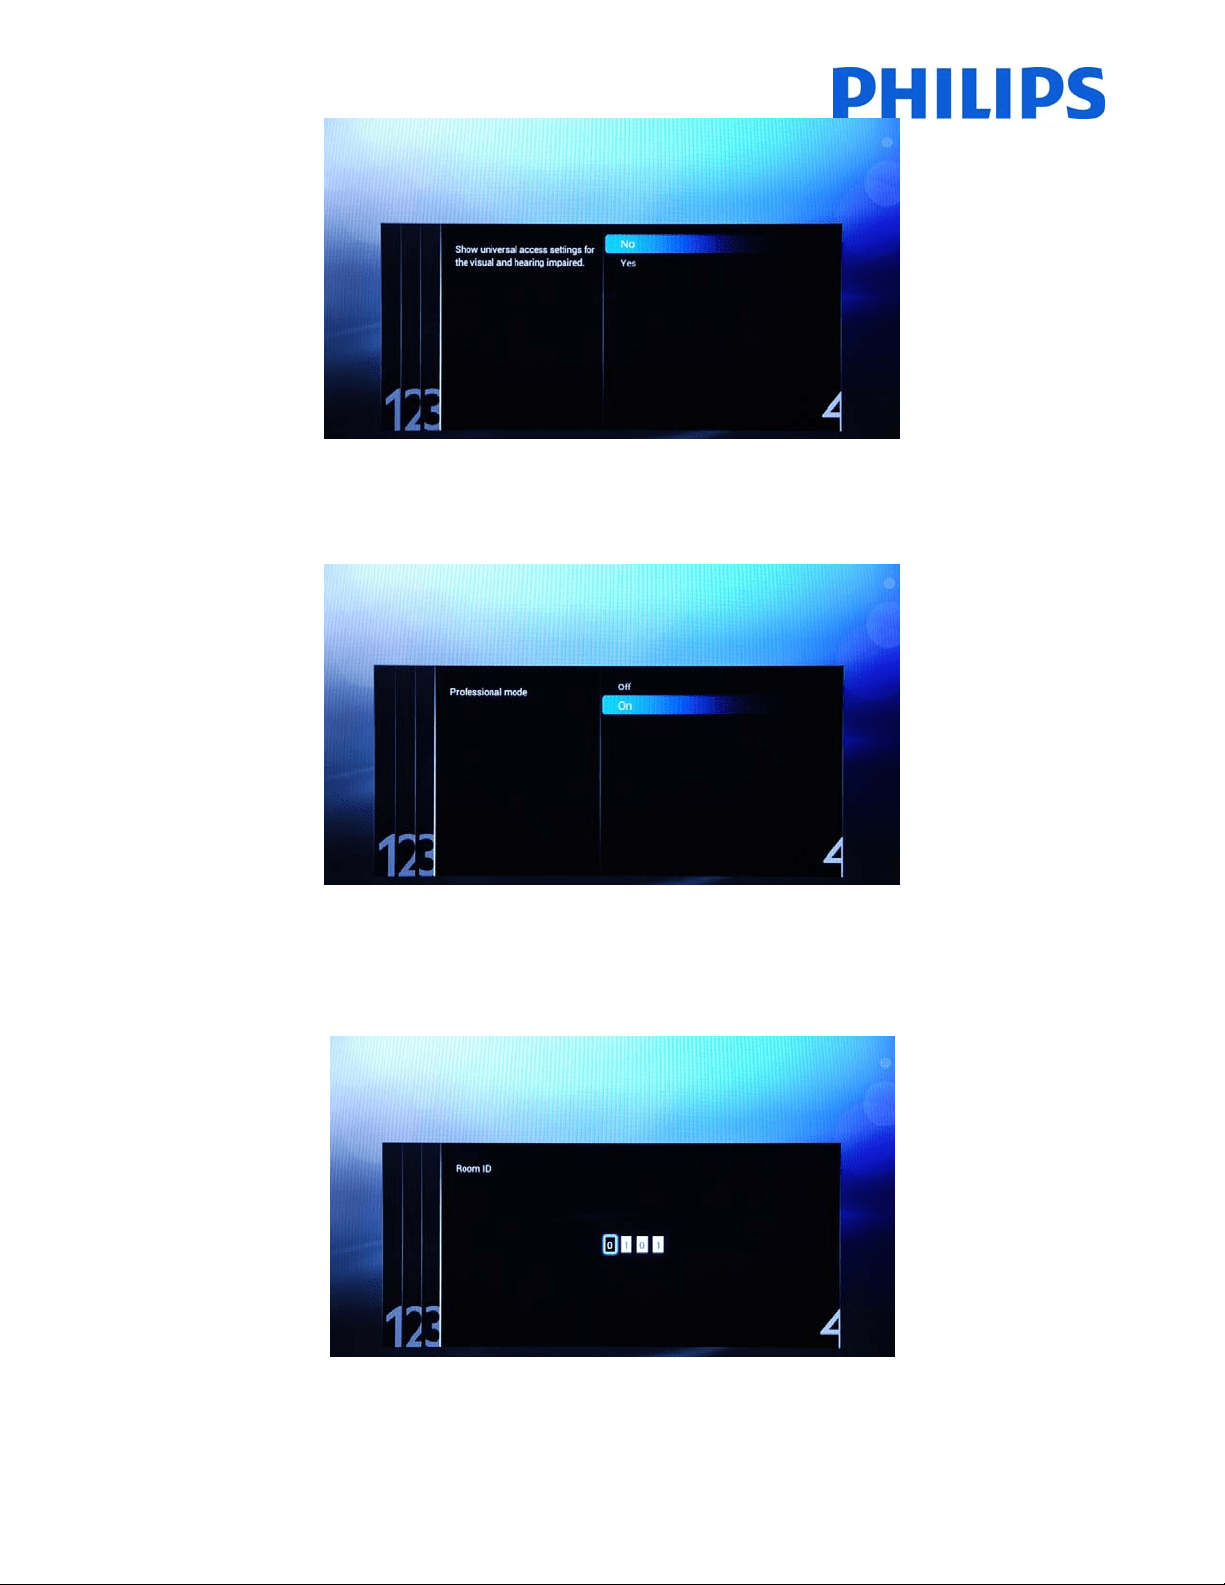
Nowyoucanselect thevisualand hearing impairedoptions. If you select[Yes],yourTVwillautomatically turn on
settingstohelpvisualand
hearingimpairedpeople.THEMOSTCOMMONOPTIONISTOTURNTHISFUNCTIONOFF,
byselecting[No].
10
[Professionalmode]canbeenabledordisabledbyselectingonoftheoptions.Iftheselectedoptionis[ON]TVwill
enable all the professional settings and will require the master remote control or the key sequence to access the
ConsumerorProfessionalSettingsmenu.Iftheselectedoptionis
[OFF]TVwillbehaveasaconsumerTVset.
Nextpagewillallowyoutosetthe[RoomID]option.TheRoomIDisusedtoallocatetheTVtoaspecificroom,a
processwhichismandatoryfortheSmartInstallupgradeprocedure.Usingthe“Digitnumbers”you
candefinethe
RoomID.IfnoRoomIDisneeded,justcontinuewith“OK”.
TheinitialsetupoftheTViscompleteandTVwilldisplaythemenufrombelow.Pleaseselectthe[Start]optionand
press“OK”tomoveforwardatchannelinstallation.

11
Thesecondpartoftheinstallationprocesswillguideyouthroughchannelinstallation,optimizetheTVpictureand
soundandadddeviceslike:DVDplayers,consolesorotherAVinputdevices.
Forthechannelinstallations,select[InstallTVchannels]andpress“OK”.ThiswillbringtheTVchannelsinstallation
wizard.
TVrequiresconfirmationbeforestartingtheprocess of installingTVchannels.Select[Continue] and press“OK”to
continue. If you want to skip this step just select [Skip] and press “OK”, this action will require additional user
interactiontoinstallTVchannels.
12
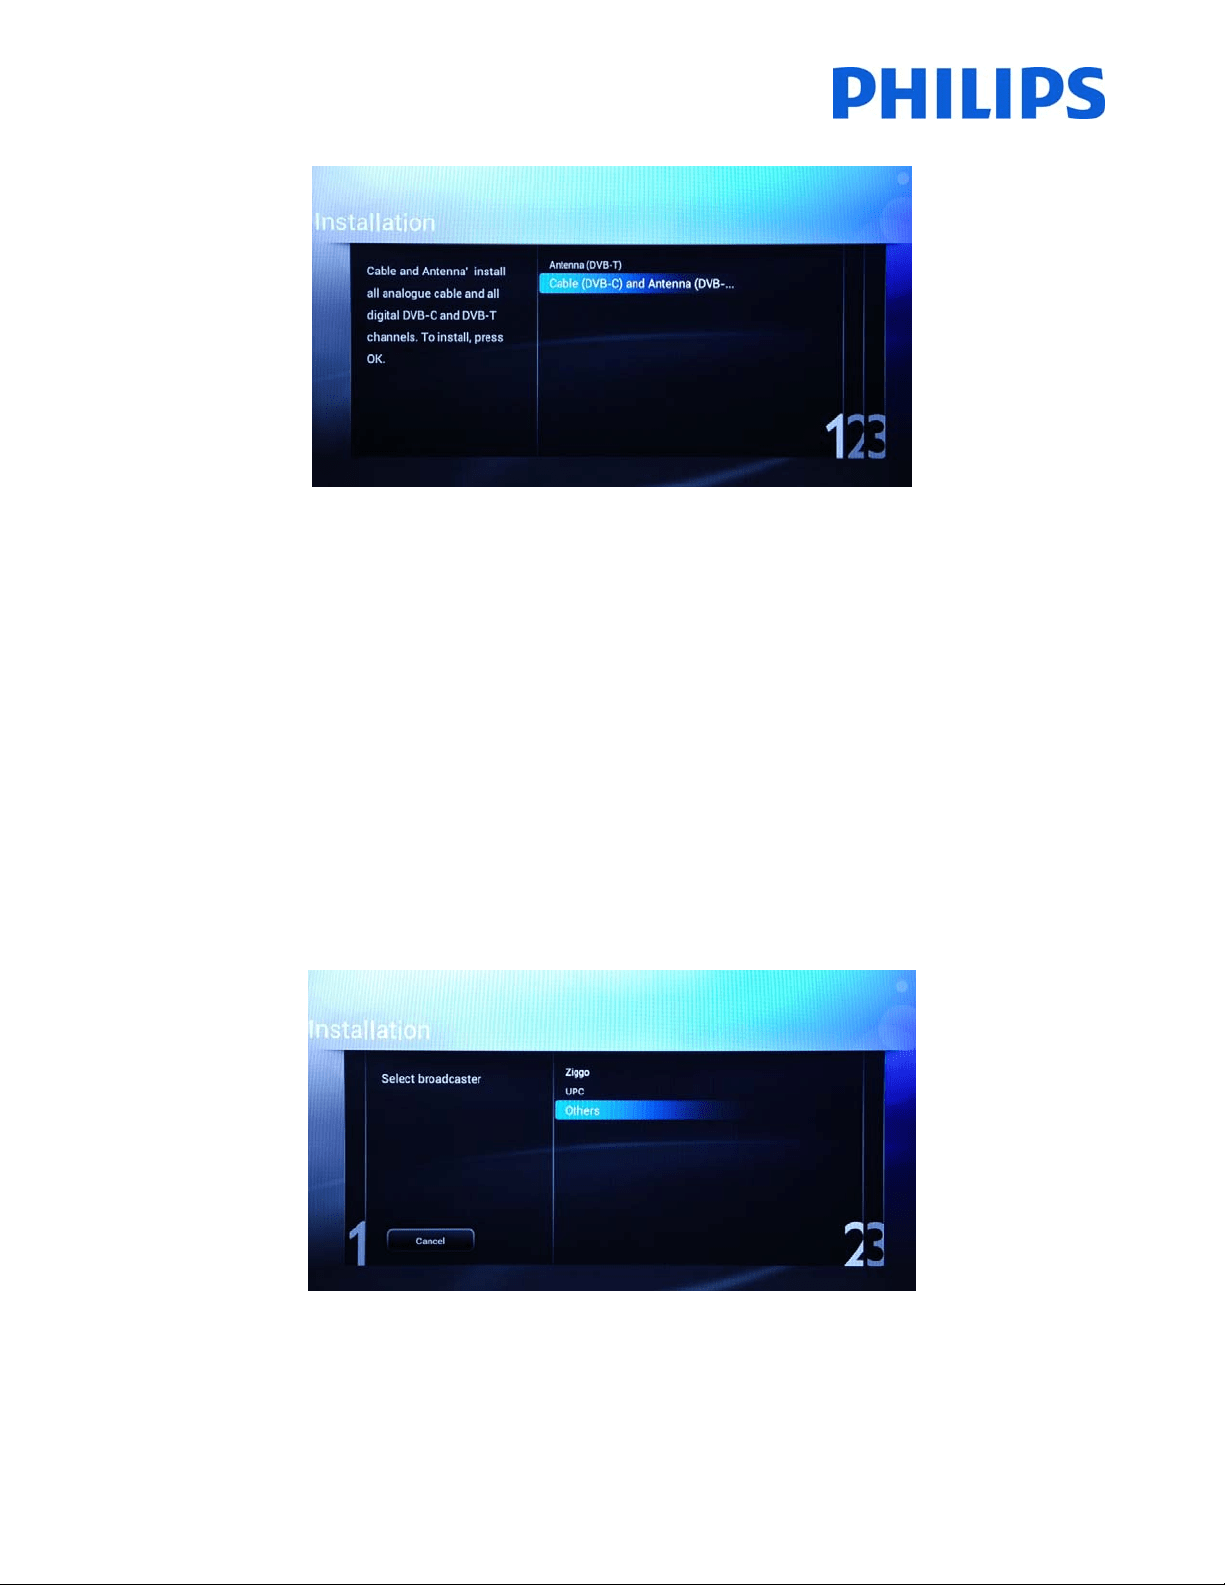
Hereyoucanselectthetypeofchannelsyouwouldliketoinstallandwhatpreferenceyouwilluse.
Theoptionsavailableare:
[Antenna(DVB‐T)]:TheTVwillinstallallanalogueandalldigitalvideobroadcastterrestrialchannels(DVB‐T).
And
[Cable(DVB‐C)andAntenna(DVB‐T)]:
TheTVwillinstallallanaloguecable,alldigitalvideobroadcastcable
channels(DVB‐C)anddigit alvideobroadcastterrestrialchannels(DVB‐T).
Note:Ifyoudonotknowwhattypesofchannelsareavailable,selectthesecondoptionbecausetheTV
searchesforalltypesofTVchannels.
Thenext
menuwillallowyoutoselectthebroadcasteroftheTVchannels.Ifyouselectoneofthebroadcastersyou
need to provide valuesfor Network ID and Network Frequency. These values allow the broadcaster to decide the
order and position of every channel. Be aware that using this option
might disable the possibility of rearranging
channels. Ifyoudon’t know the broadcaster or channels are provided by head‐end selectthe option [Others] and
press“OK”tomoveforward.

13
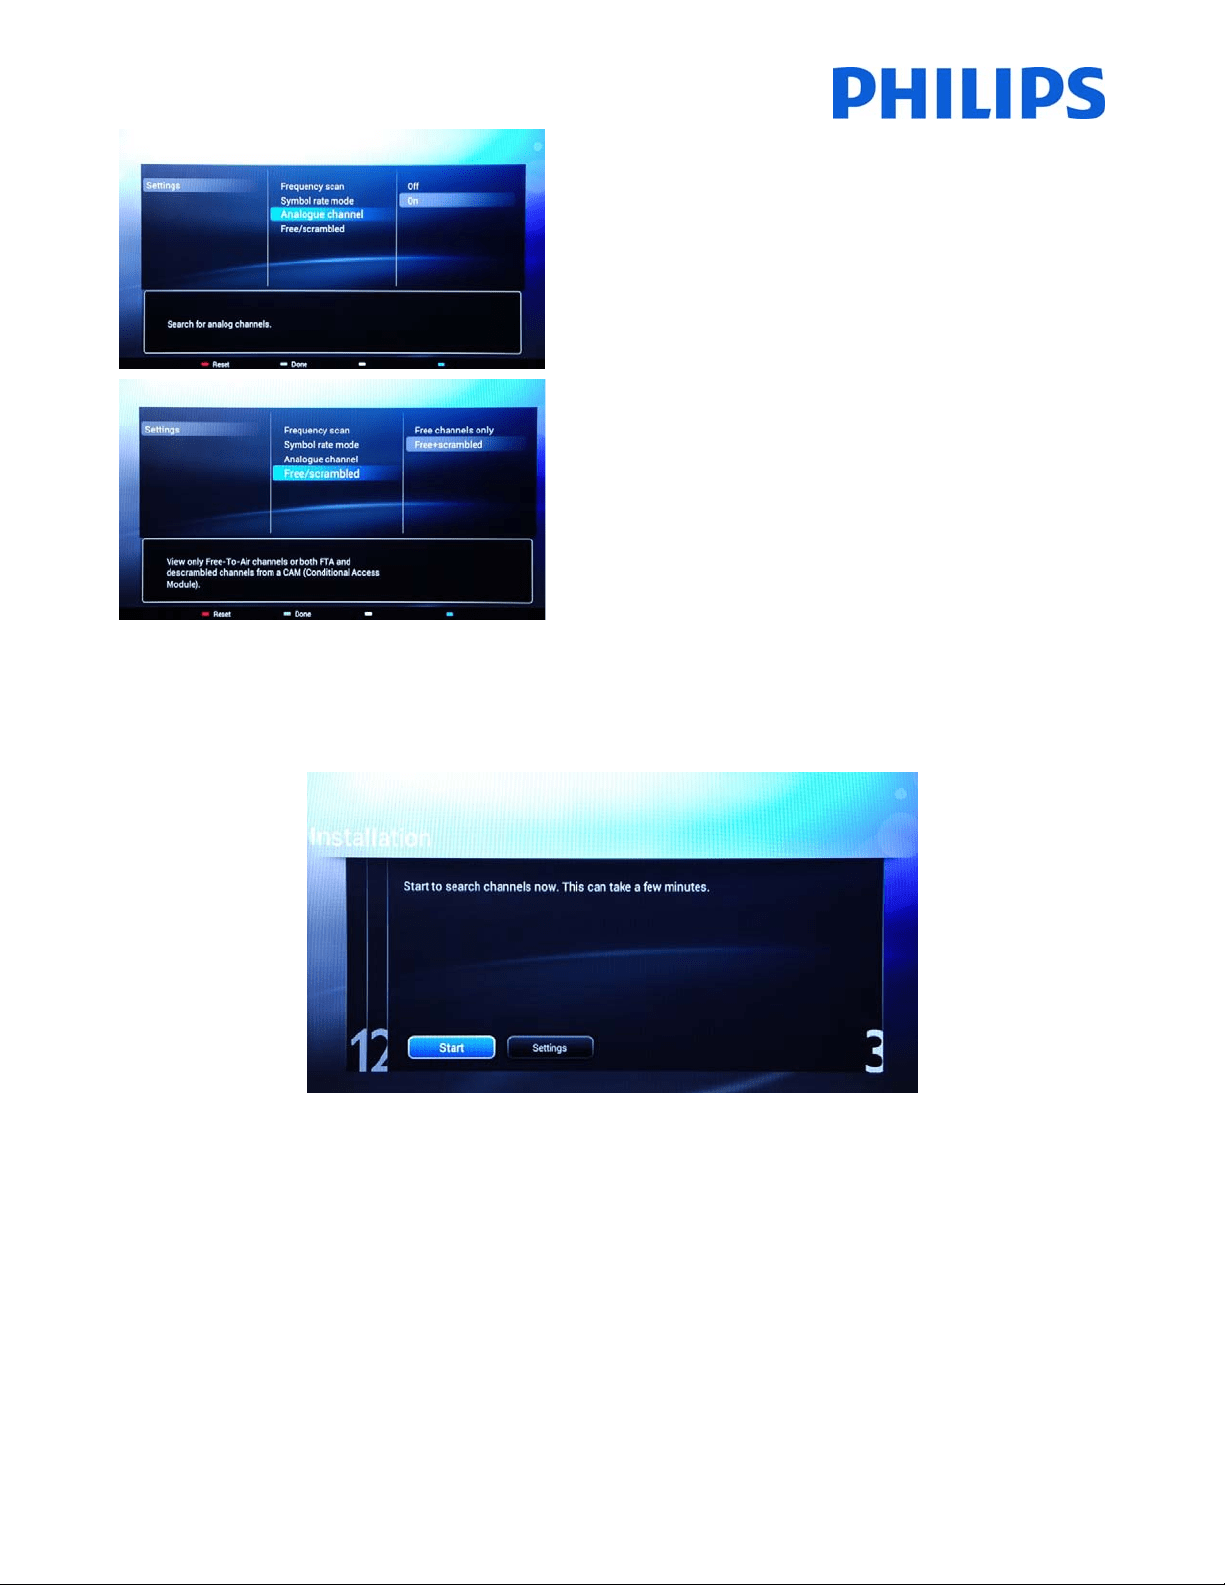
Beforestartingthesearchprocessitisadvisabletocheckthe[Settings]forsearchparametersandoptions.
Theoptionsfromthe[Settings]menuare:
[Frequencyscan] containsthree options:
‐ [Quick]: this is a fast method to search channels but it might
skipsomechannels(dependingonthenetwork).
‐ [Full]:thescanwillsearchonallfrequenciesandwillstore all
channels available. Thisis the safe method if you don’t know
thenetwork
parameters,butittakesmoretime.
‐ [Advanced]:IfyouknowthenetworkparameterslikeNetwork
ID,NetworkFrequency,youcanusethisoption,otherwisethe
safeoptionistousetheFulloption.
Note:Theoptionsaredependingontheselectionofthecountrysetting
(page9)
[SymbolRate]optionsare:
[Automatic]and[Manual].Ifyoudonotknowthecorrectvaluesfor
thisoption,pleaseusetheAutomaticoption.
14
[Analoguechannel]
Ifyoudon’thaveoryoudon’twanttoinstallanaloguechannels,you
candisablethesearchforthistypeofchannels.
[Free/scrambled] optionsare:
[Freechannelsonly]:TheTVwillsearchonlyforfreetoair(FTA)
channelsskippingthescrambledchannels.
[Free+scrambled]:TheTVwillsearchforfreetoair(FTA)and
scrambledchannels.
Afteryouhavecheckedorchangedsettings,pressthe“GreenButton”toconfirmthesettingsandtogobackto
pagefromwhichthesearchforchannelscanbestarted.Select[Start]andpress“OK”tostarttheinstallation
process.
Duringthechannelsearchyoucanseetheprogress
barandhowmanychannelsarefoundatthattime.

15
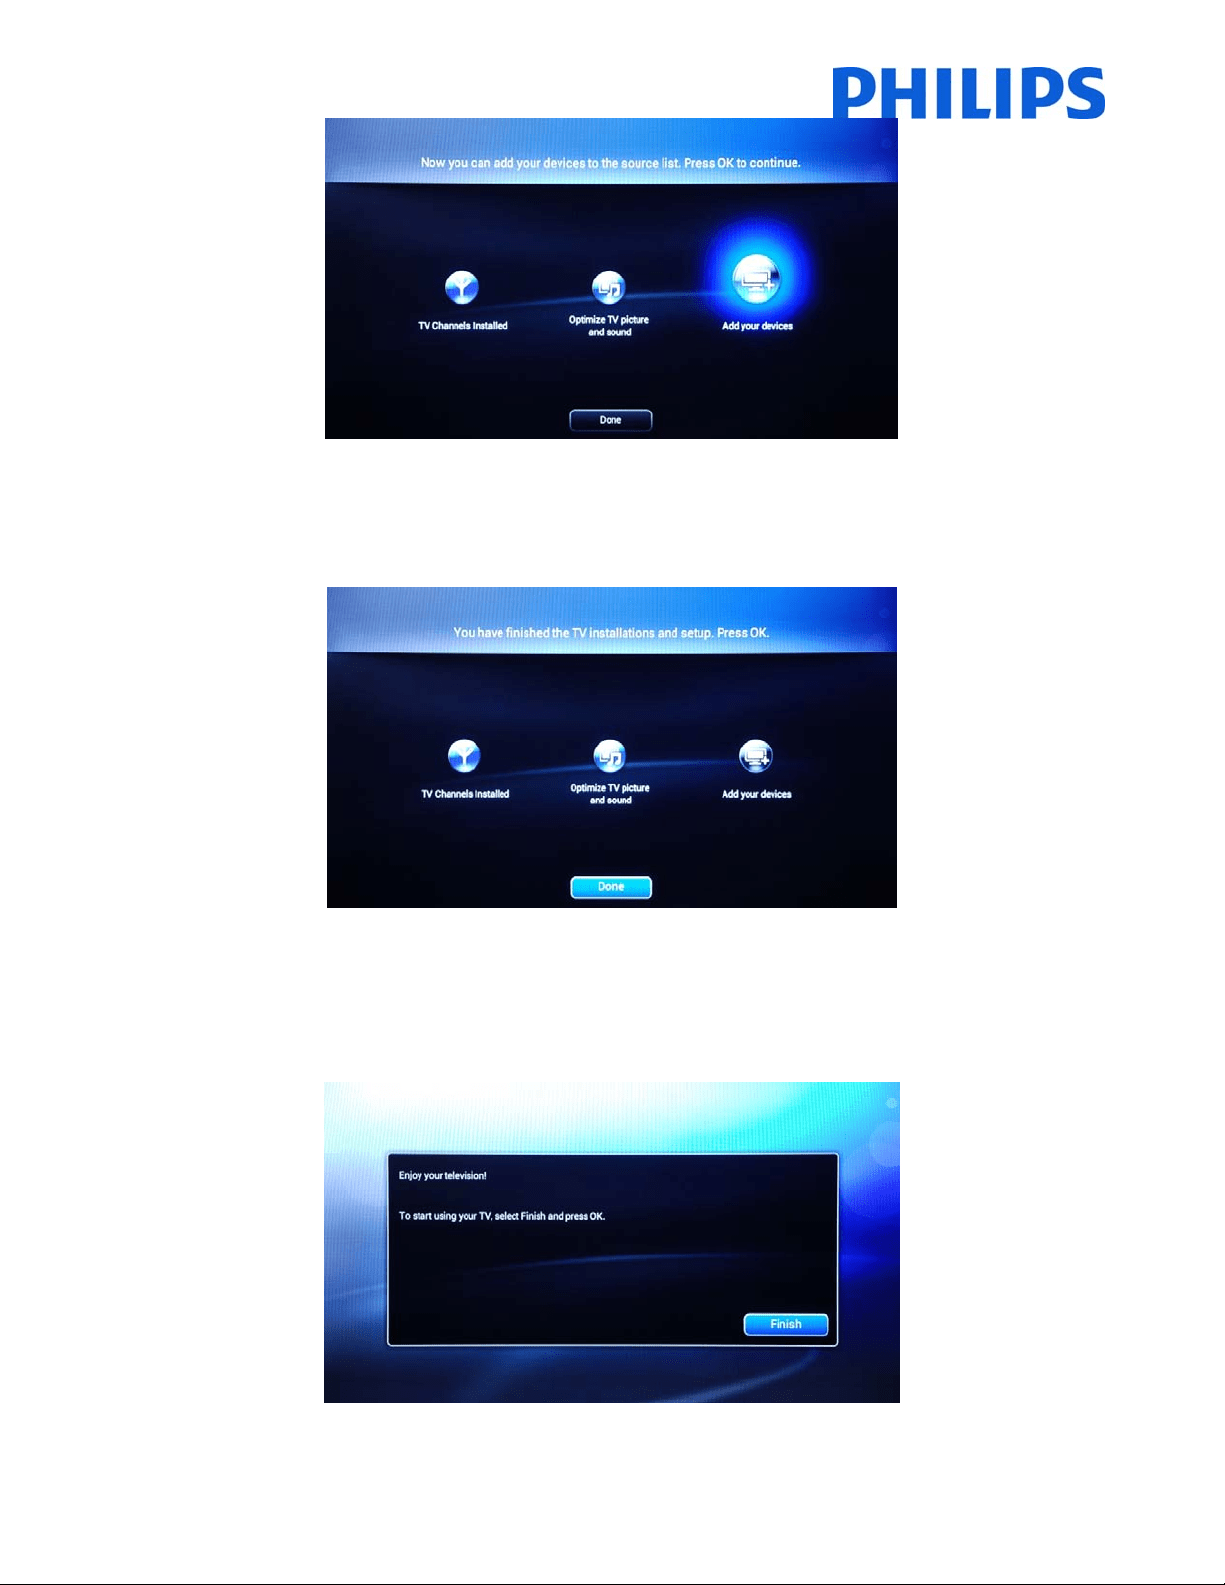
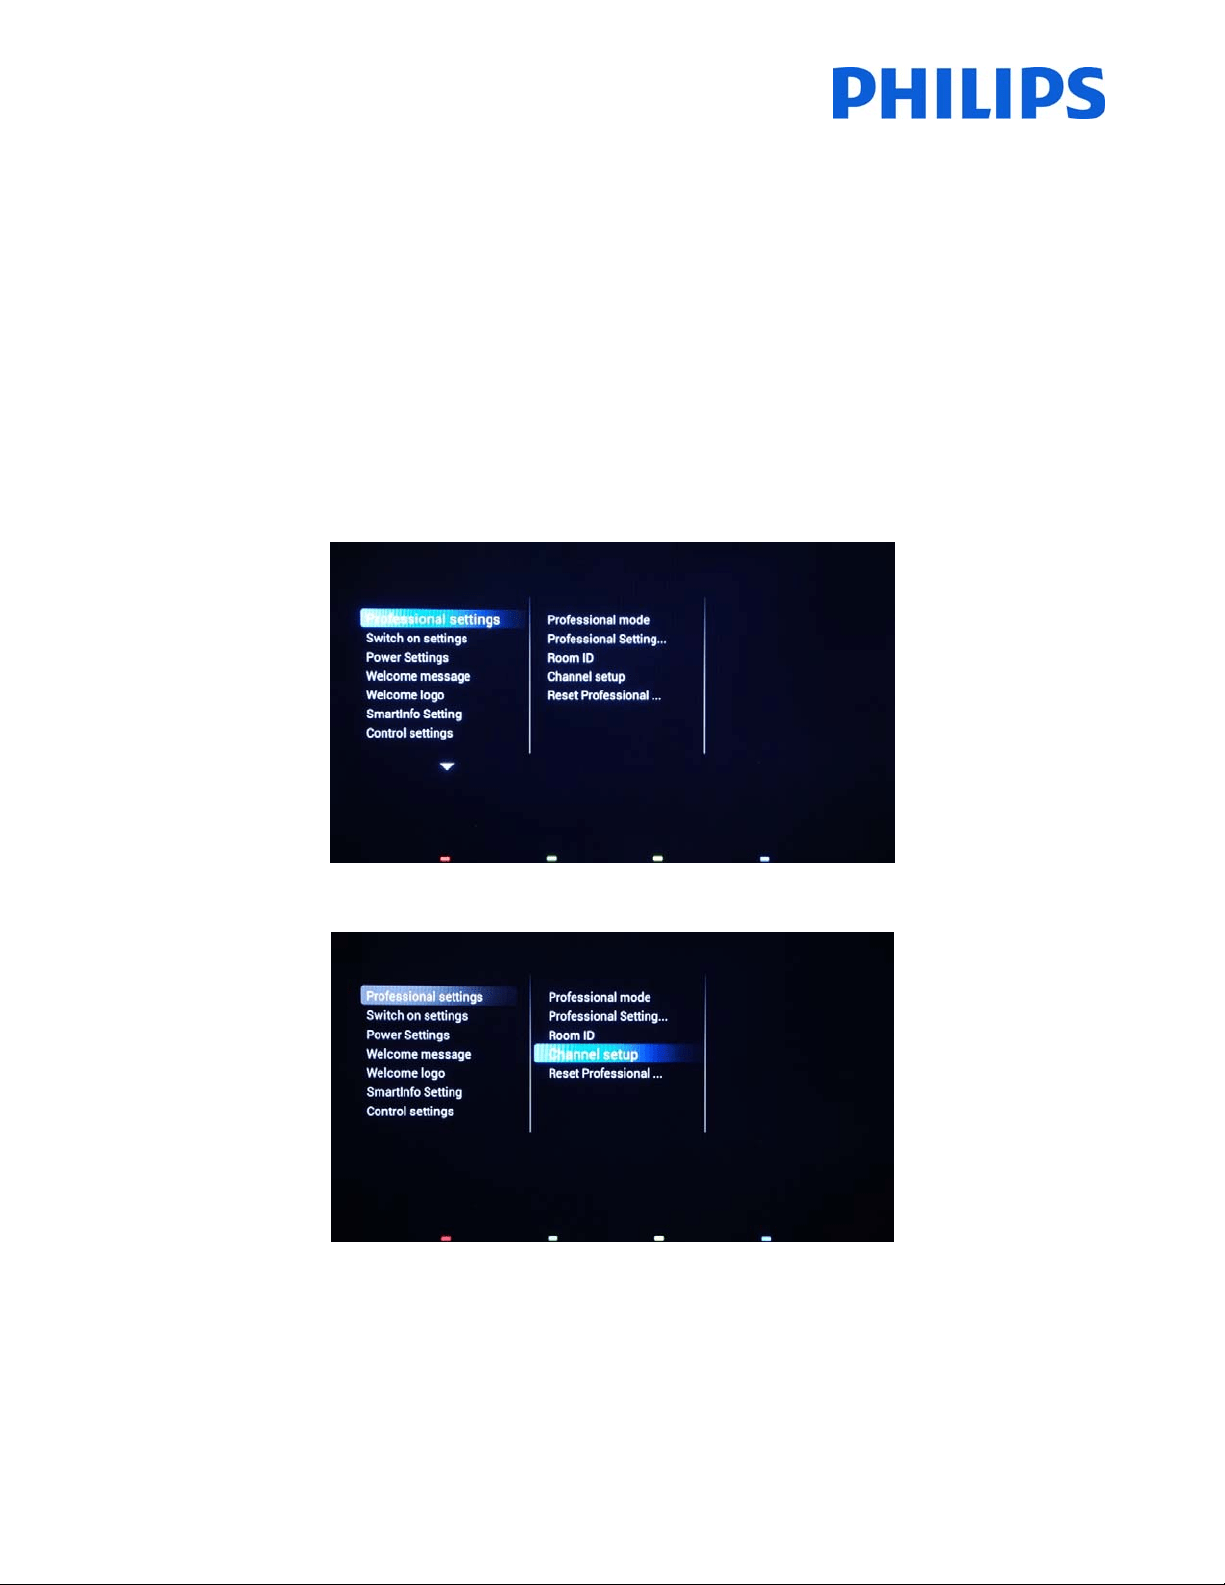
Whenthesearchisdone,youshouldsee[Channelsearchcomplete]andasummaryofthechannelsfound.
Press“OK”buttonontheremotecontrolto[Finish]thesearch.
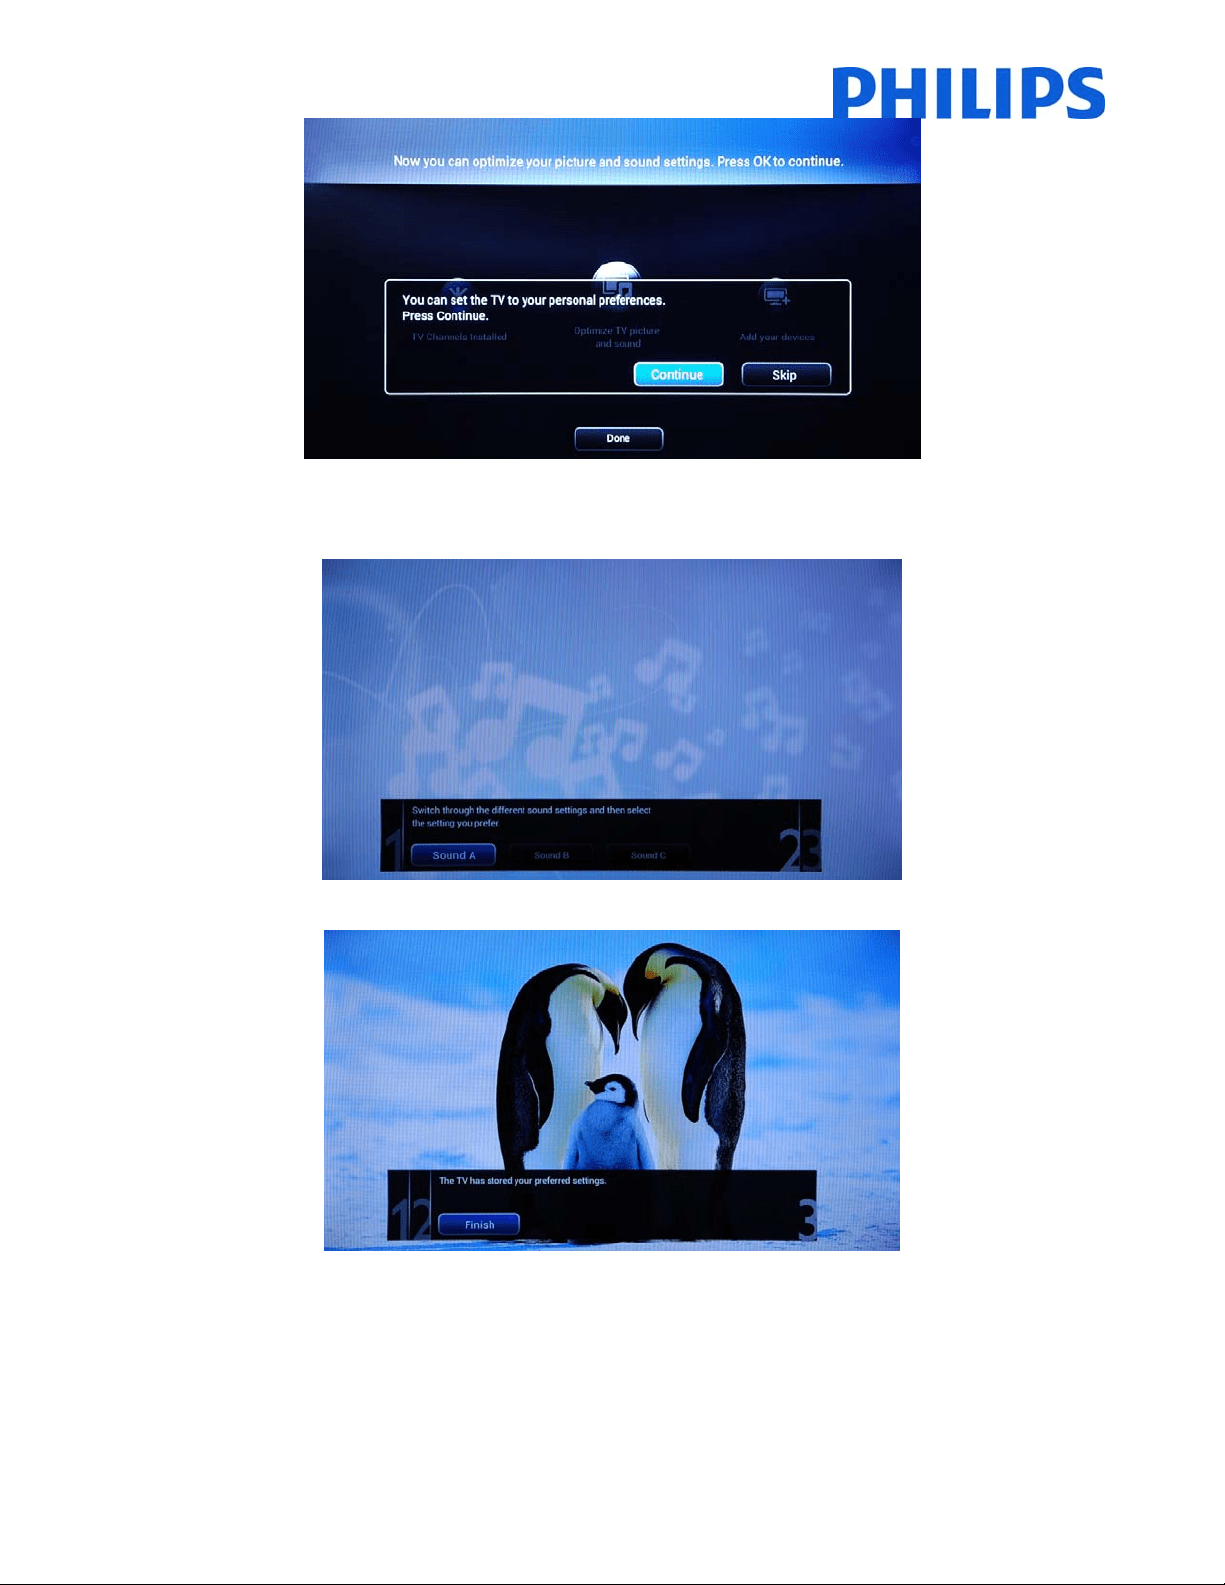
Ifyouwouldliketochangethepictureandsoundsettings,youcangoto[OptimizeTVpictureand
sound]andpress
the“OK”buttonontheremotecontrol.
AwizardwillstarttoguideyouthroughtheprocessofsettingthesoundandpictureontheTVset.Alltheoptions
presentedbythisguidecanbefoundintheConsumerSetupmenuat[Picture]and[Sound]settings.
Select
[Continue]tostartthewizardandpressthe“OK”buttonontheremotecontrol.
16
Thewizardwillaskyousomequestionsaboutwhichimageyouprefer,selecttheoptionyoudesireandpress“OK”
ontheremotecontrol.
Oncethiswizardisdone,youwillreturntotheinstallationmenuagain.
Thelastoptioninthismenuis[Addyourdevices].
ThiscanbedoneifyouwouldliketoaddaDVDplayerorSTB.
17
Whenyouaredonewiththis,select[Done]andpress“OK”ontheremotecontrol.
Afterpressing[Done]youhavecompletedtheinstallationoftheTVandyoushouldseethisscreen.Press“OK”on
theremotecontroltoexitthiswizard.
Note:Thiswizardwillnotbe
availableanymorewhenyoustarttheTVthenexttime.Theonlywaytore‐use
thiswizardistoreinsta lltheTVset.

18
TheinitialsetupoftheTViscomplete.TVisdisplayingtheGuestmenu.Pressing[WatchTV]themenuwillbeclose
andTVwillshowfirstTVchannel.
Continuewithchannel(re)orderingandsetupoftheProfessionalmenuforacompleteinstallationoftheTVset.
19
5. Channeloptions
BeforecontinuingwiththeCo nsumerandProfessionalmenusetupitisrecommendedtosettheTVchannelsgrid.
Basedonchannelgr idoptionslike[SwitchONChannel],[ClockDownloadProgram]and[MyChoice]packagescan
beeasilysetup.
To reorder the TV channels, hide or rename the TV channels yo u
need to access the channel plan from the
ProfessionalSettings menu. In theGuest menu youcannot rearrange channels. To accessthe[Professional Setup]
menuwithmasterremotecontrol,pressthe“RC6SETUP”keyandthenpressthe“Home/Menu”button,followed
by “OK”key. Using the guestremote control, press the
following keys sequence:“3,1,9,7,5,3,MUT E” followed by
“OK”key.
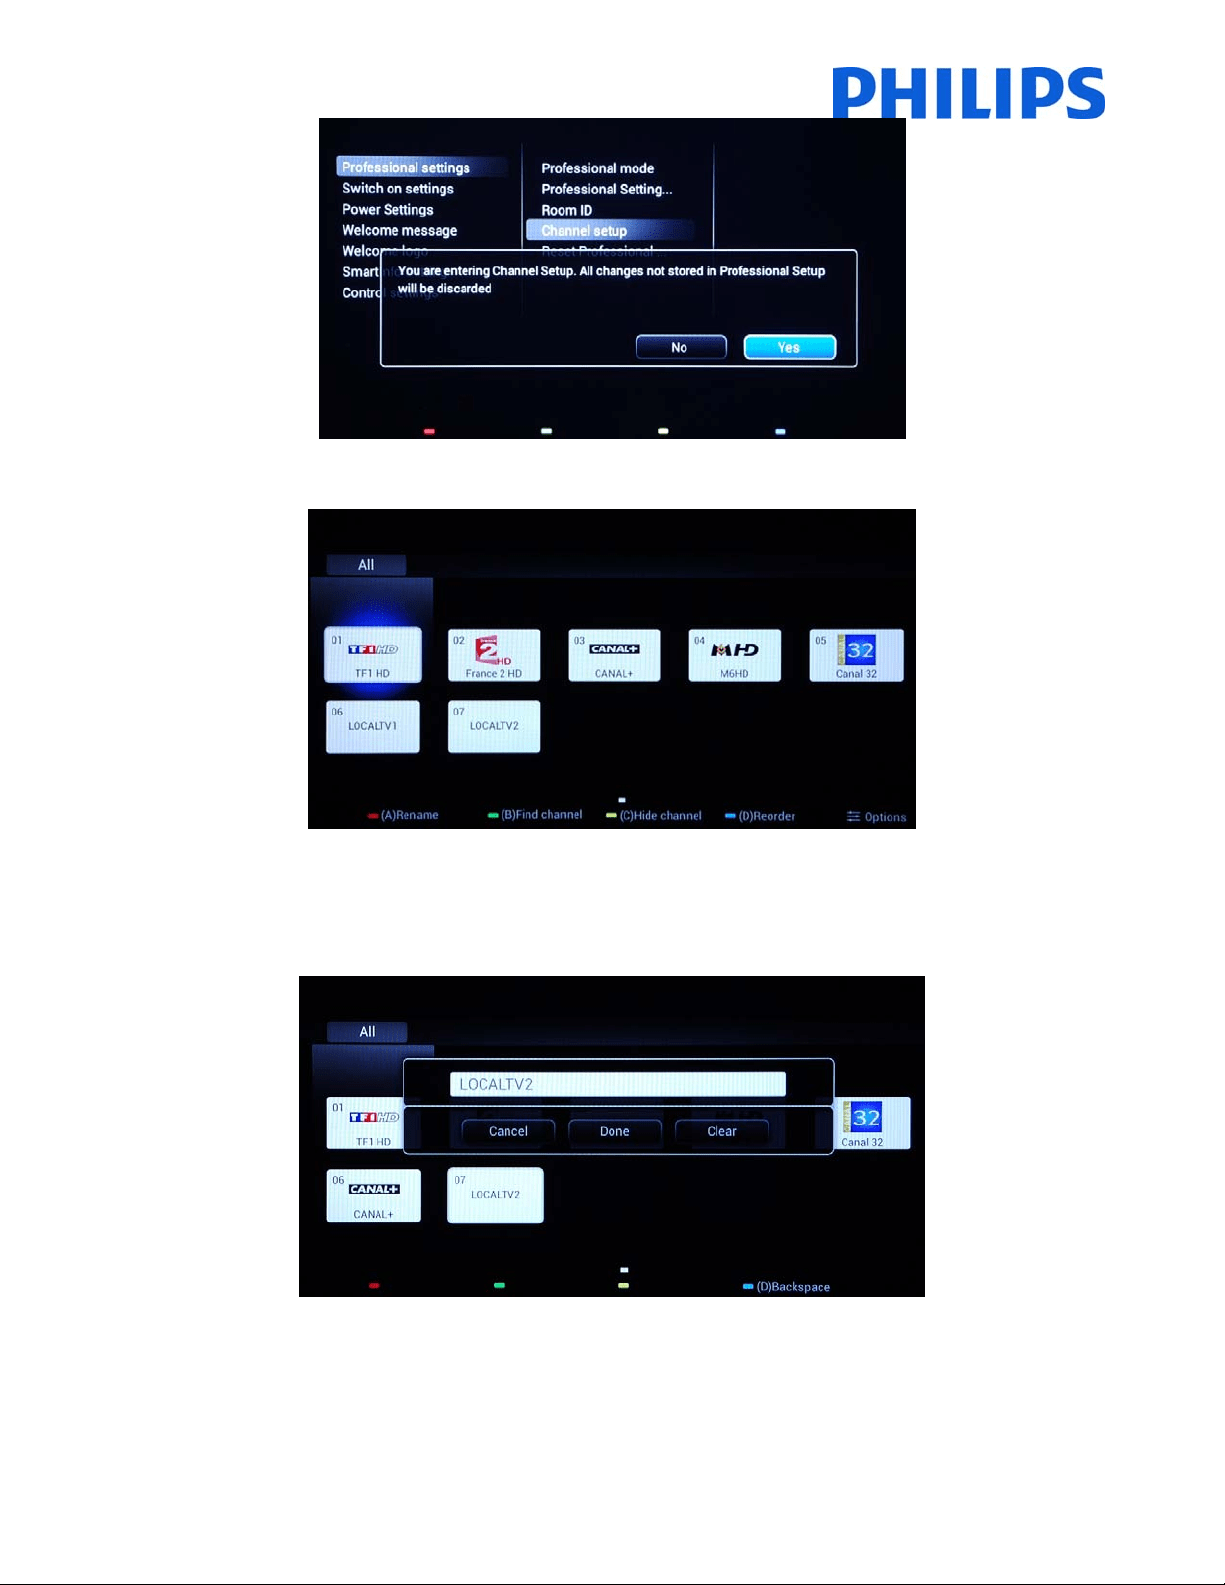
The[ProfessionalSettings]menuwillbedisplayedlikeinthepicturebelow.
Gotothe[Channelsetup] optionandpress“OK”toaccessthesubmenu.
Thewarningmessagewhichinformsyouthat“allunsavedchangeswillbediscarded”willpopup.Select
[Yes]and
pressthe“OK”toconfirm.
20
Thechannelgridwithallinstalledchannelswillbedisplayed.
Alltheoptionsavailableinthismenuaredisplayedonthebottompartofthescreenandcanbeaccessedbypressing
thecorrespondingcolorontheremote.
Renamechannelsallowsyoutochangethenameofthechannelby
pressingthe“Red”buttonontheremote.
Thenameofthechannelwillbedisplayed.Pressingthe“OK”buttonwillbringuptheonscreenkeyboardwhichcan
beusedtoeasilychangethenameofthechannel.Usingthecolorbuttonsmentionedonthebottompartofthe
screen
youcanuseadditionaloptionsandcharacters.
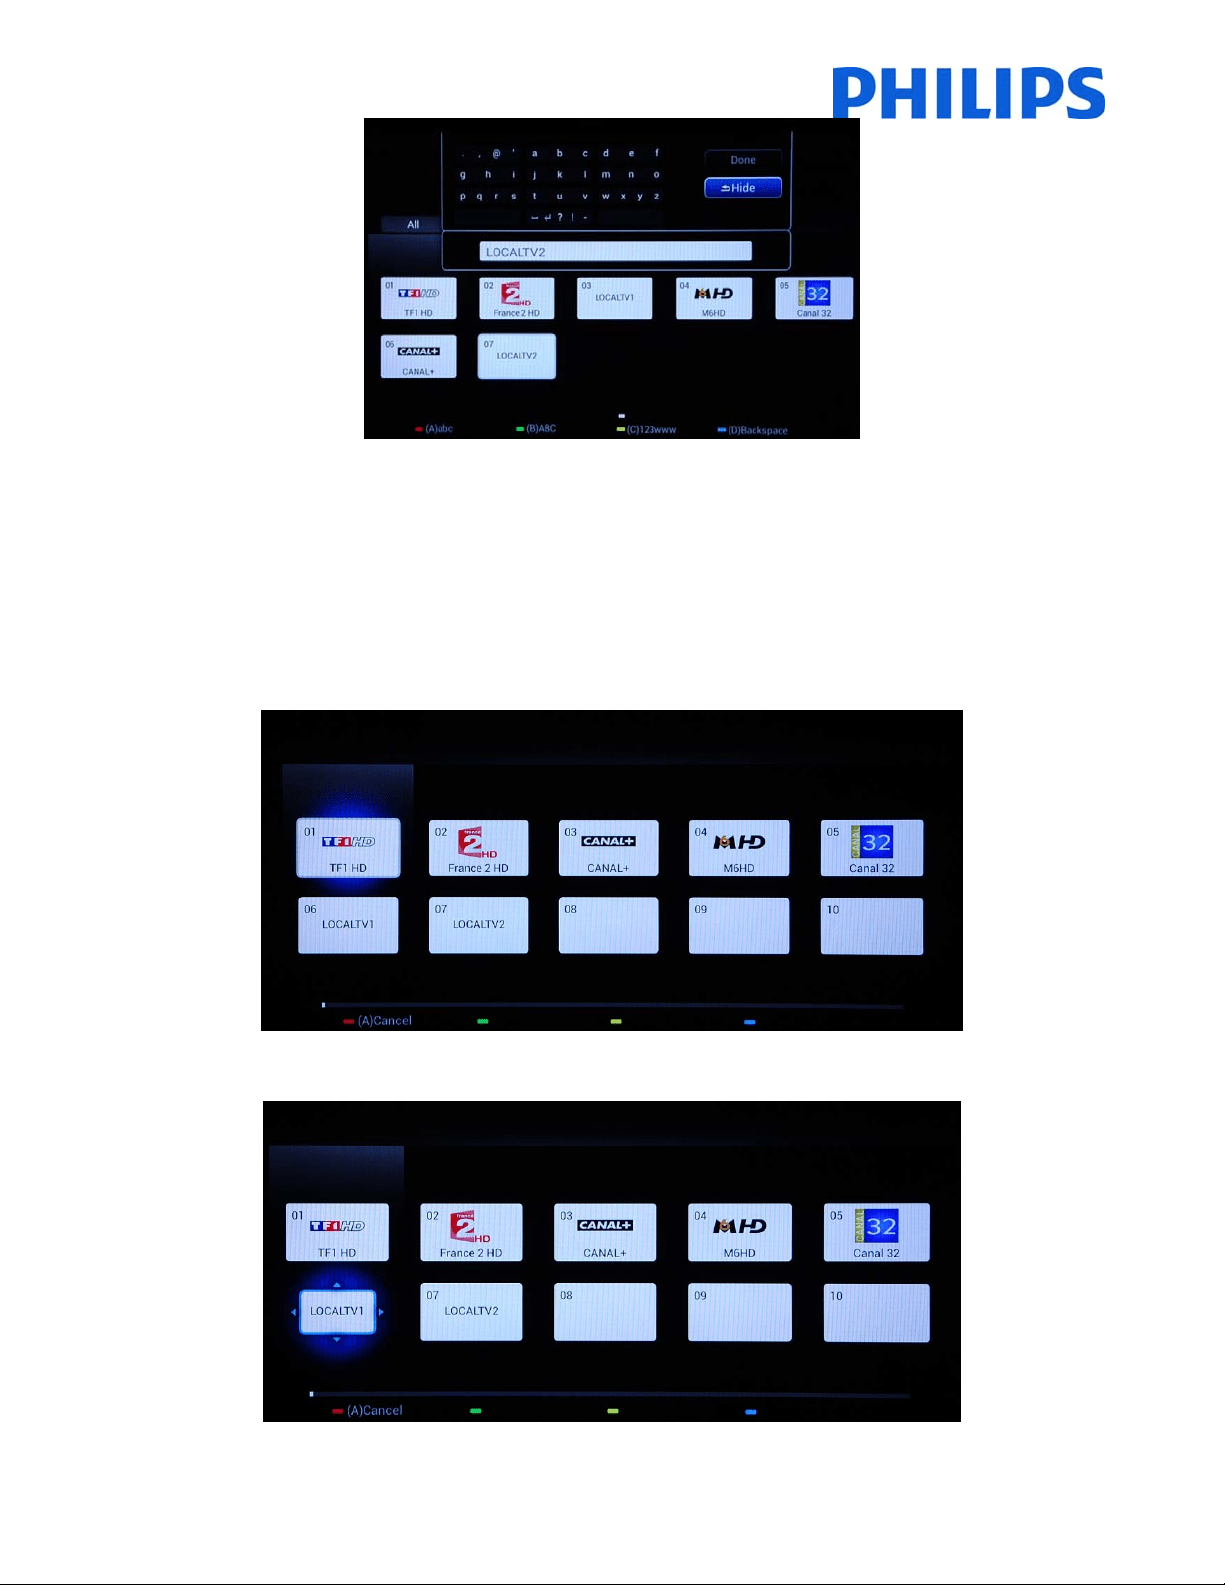
21
IftheTVchannelrenamingactioniscomplete,select[Done]andpress"OK"toreturntothe[Channelsettings].
[Green]buttonwillgivetheoptiontosearchbetweeninstalledchannels.TheTVwillnotsearchfornewchannels.
[Yellow]buttonhasthefunctiontohidechannels.Youcannotdeletechannels
fromthechannelgrid,butyoucan
usethisoptiontohidethechannels.Thechannelswhicharehiddenwillnotbedisplayedinthechannelgridand
cannotbeaccessedwiththeguestremote.
[Blue]buttoncanhelpyoutorearrangethechannelplan.Theblueauradisplayedon
thechannelisyourselection.
Navigatetothechannelthatyouwanttomoveandpress“OK”ontheremotecontroltoselectthatchannel.
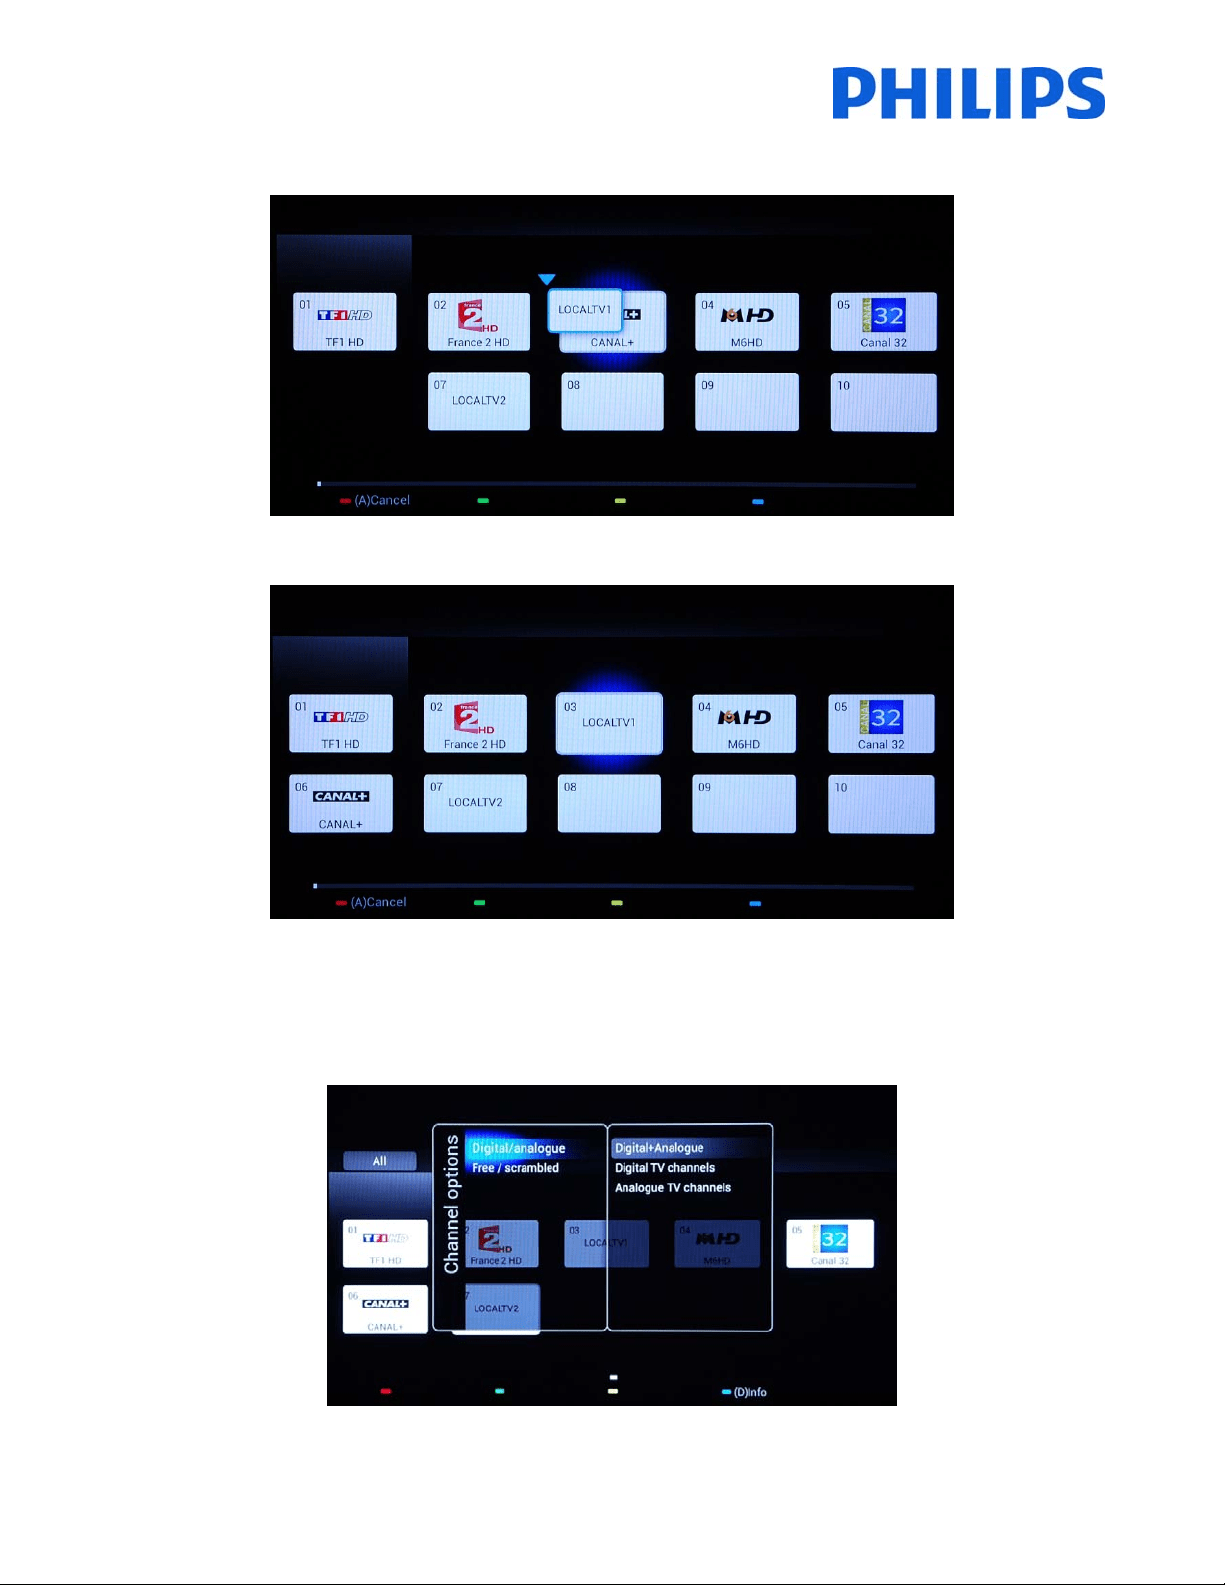
22
Whenthechannelisselectedtheiconissmallerandanarrowisindicatingthatthechannelcanbemoved.Usingthe
[Arrrow]keystonavigatetothenewpositionoftheTVchannelandpresstodeploythechannelonnewposition.
Thechannelmovedwillswappositionwith
thechannelthatwasselected.
The“Options”buttonallowssortingbetweendifferenttypesofchannelsforaneasiermanagingofTVchannels.
WhenallTVchannelsareonthecorrectpositionpressthe“Back”buttontoexitfromallmenus.
23
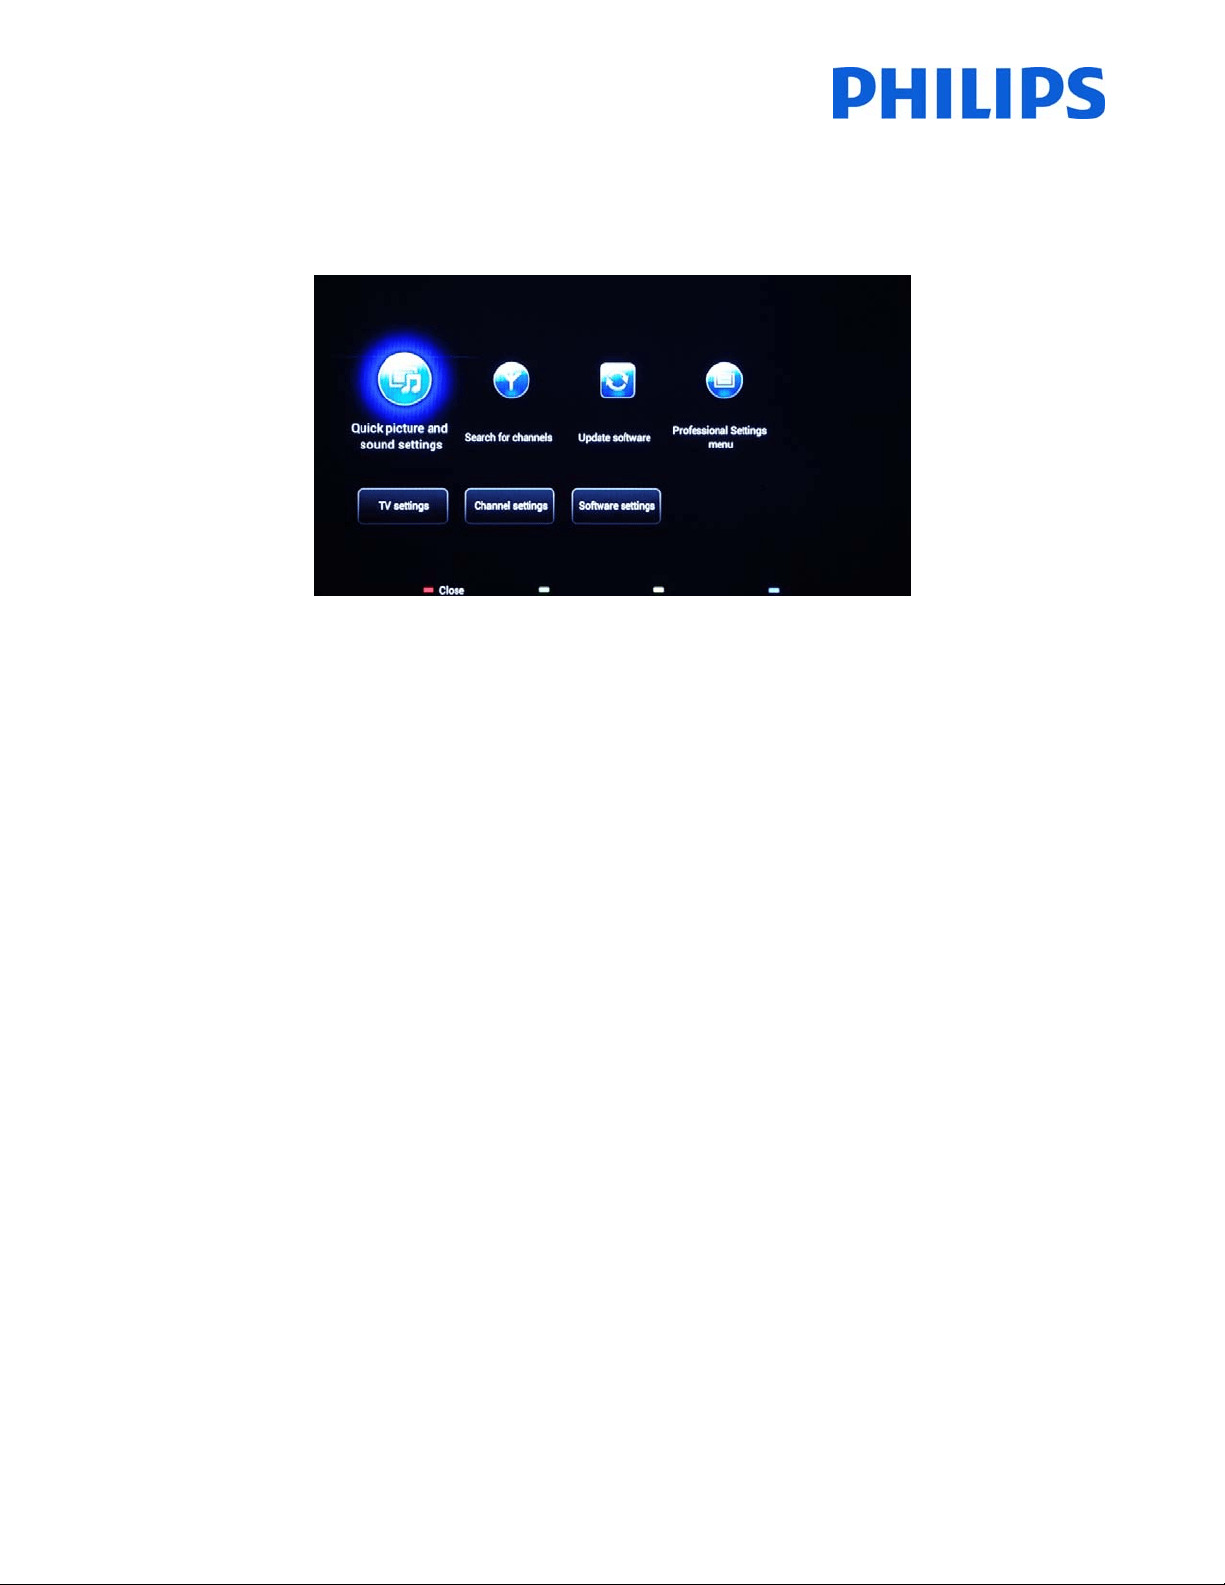
6. ConsumerSetupMenu
UsingthemasterremoteyoucanaccesstheConsumerSetupmenuandProfessionalSettingsmenubypressingthe
“RC6SETUP”keyandthenpressthe“H ome/Menu”button.Withtheguestremotecontrol,pressthefollowingkeys
insequence:“3,1,9,7,5,3,MUTE”.
TheConsumerSetupmenuallowsyoutochangedifferent
settingswhicharenotavailableintheGuestMenu.
Thetoppartcontainswizardsfordifferentitemsandoptions.
[Quickpictureandsoundsettings]:Wizardforbestpictureandsoundbasedoffewpresets.
[SearchforChannels]:Fromthismenuanewsearchforchannelscanbestarted.
[Updatesoftware]:
TVsoftwareupdatecanbeeasilystartedusingthismenu.MakesurethattheUSBdrive
insertedcontainsthelatestsoftware.
[ProfessionalSettingsMenu]:TheprofessionalsettingsoftheTVwhichareexplainedinchapter7.
Thebott ompartoftheConsumermenucontainsallsettingsforpicture;channelsettingsand
softwareupgrade
mechanism.ThesesettingsmighthaveacorrespondentintheProfessionalmenuwhichwillleadasbehavior(e.g:
Automaticchannelupdate)
[TVSettings]:generalsettingsfor“Picture”,“Sound”and“Generalsettings”
[ChannelSettings]:generalsettingsfor“Language”,“Channelinstallation”and“Childlock”
[Softwaresettings]:informationon“currentsoftwareinfo”,
selecting“localupdates”,“lookforOADupdates”(SW)
24
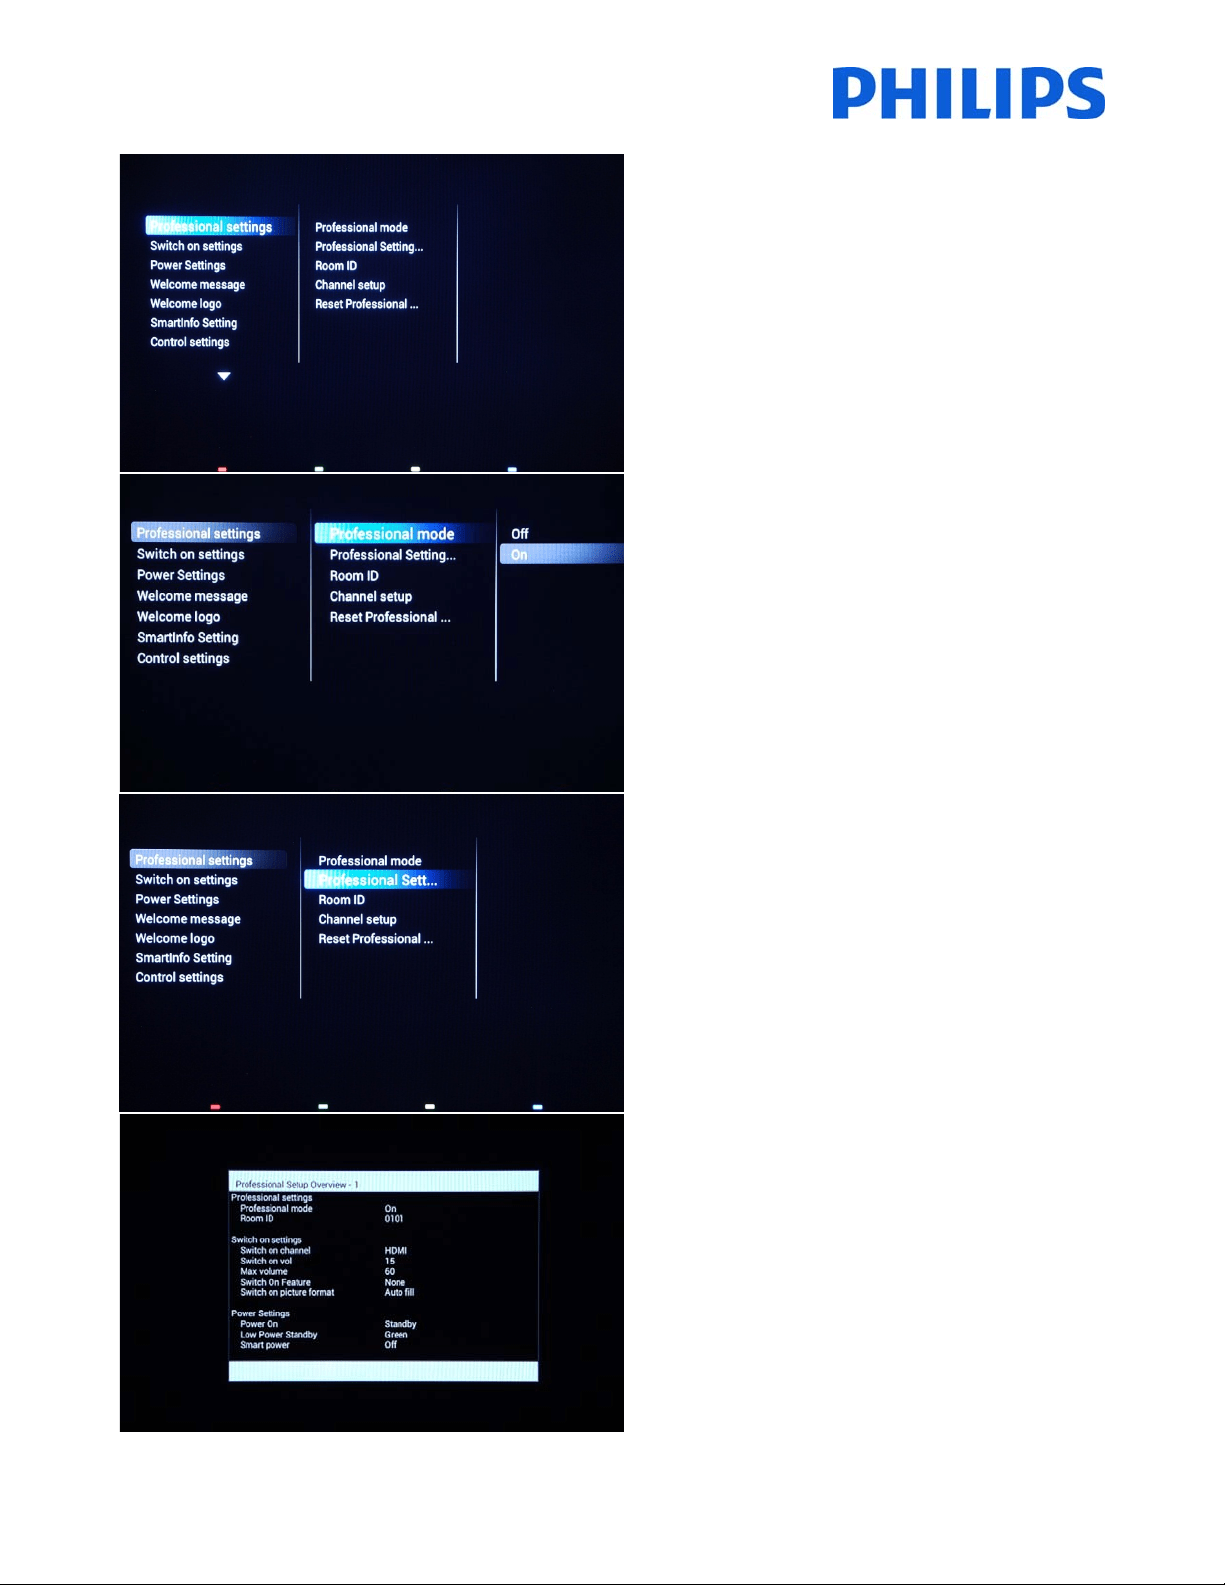
7. ProfessionalSettings
[ProfessionalSettings]
Settingsespeciallydesignatedforhospitality.
[ProfessionalMode]
[Off]:TheTVoperatesasabasic(consumer)TV.
[On]:AllsettingsintheProfessionalSettingsSetupmenu
areactive.
OnlybyswitchingonthismodetheTVwillactasa
HospitalityTV.
[ProfessionalSettingsOverview]
DisplayanoverviewoftheProfessionalsettings.
[ProfessionalSettingsOverview]
ExampleoftheProfessionalSettingsmenu.
Note:Novaluecanbechanged.

25
[RoomID]
Entryfieldtostore4digitstosettheRoomIdentifier.
RoomIDcanbeusedtodistinguishbetweendifferent
floors/rooms/setupswhenusingSmartInstall.
[Channelsetup]
Ashortcuttoenterthechannelgrid(checkChannel
Options).
Inthisgridyoucanreorder,renameandhidechannels.
Note: Using this shortcut will trigger a popup screen which warns
aboutlosingsettingsintheProfessionalsettingsmenuifyouc ontinue.
SelectdiscardifyouwanttostayintheProfessionalsettingsmenuor
continue.
[ResetProfessionalSettings]
ResetallsettingsfromProfessionalmodetodefault
values.
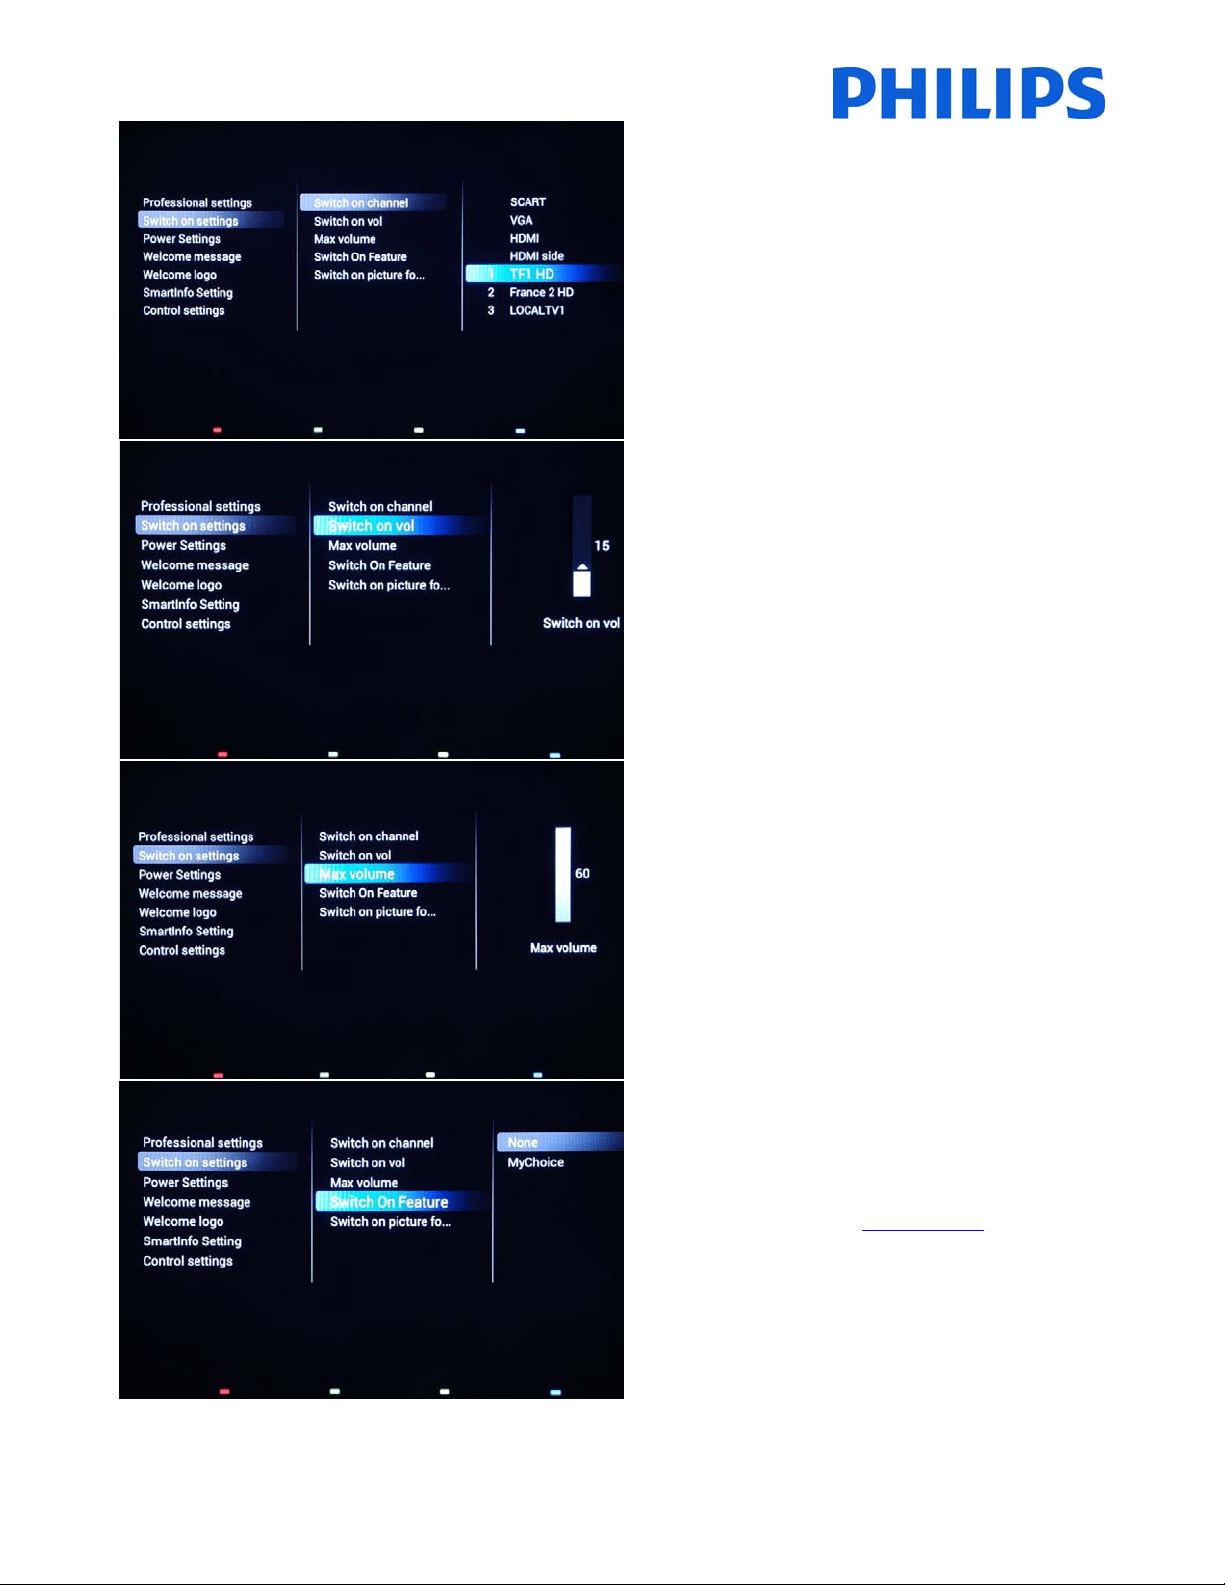
[Switchonsettings]
AllsettingsfromthissubmenuareappliedwhentheTV
setispoweredON.
26
[Switchonchannel]
WhentheTVisswitchedonitwillstartuponthe
specifiedsource/channel.
AvailableEXT1,EXT2,VGA,HDMI,HDMIside,AVsideoroneofthe
installedTVchannels.
[Switchonvolume]
WhentheguestswitchestheTVon,itwillplayatthe
specifiedvolumelevel.
Selectablevaluefrom00until60.
[Maximumvolume]
Thisoptionspecifiesthemaximumallowablevolume
leveloftheTV.
Selectablevaluefrom00until60.
[SwitchOnFeature]
ThisoptioncouldactivateMyChoiceatstartup.
Note:UsethisoptiononlyifyouareusingMyChoiceand
youconfiguredthefeature.Checkpage50.

27
[Switchonpictureformat]
Thissettingallowsyoutosetaswitchonpictureformat.
[PowerSettings]
Allsettingsfromthissubmenuarerelatedtopower
consumptionandbehaviorduringpowercuts.
[PowerOn]
The[PowerOn]functionallowstheTVtoent eraspecific
mode [On] or [Standby] of oper ation when the mains
powerisactivated(coldstart):
[On]: The TV will always turn on (show startup channel)
afterthemainspowerisco nnec ted.
[Standby]:When set,theTV will
always turn to standby
(statusasdefinedinLowpowerstandbyoption)afterthe
mainspowerisconnected.
[Lowpowerstandby]
TheLowpowerstandbyoptiondefinestheTVtoentera
specific standby mode after pressing the On/Off button
ontheremotecontrol.
[Fast]: The TV will quickly turn on (This mode will
consume more power in stand‐by compared to Green
mode).
[Green]: The TV will
turn on less fast. (This mode will
consumelesspowerinstand‐bycomparedtoFastmode).
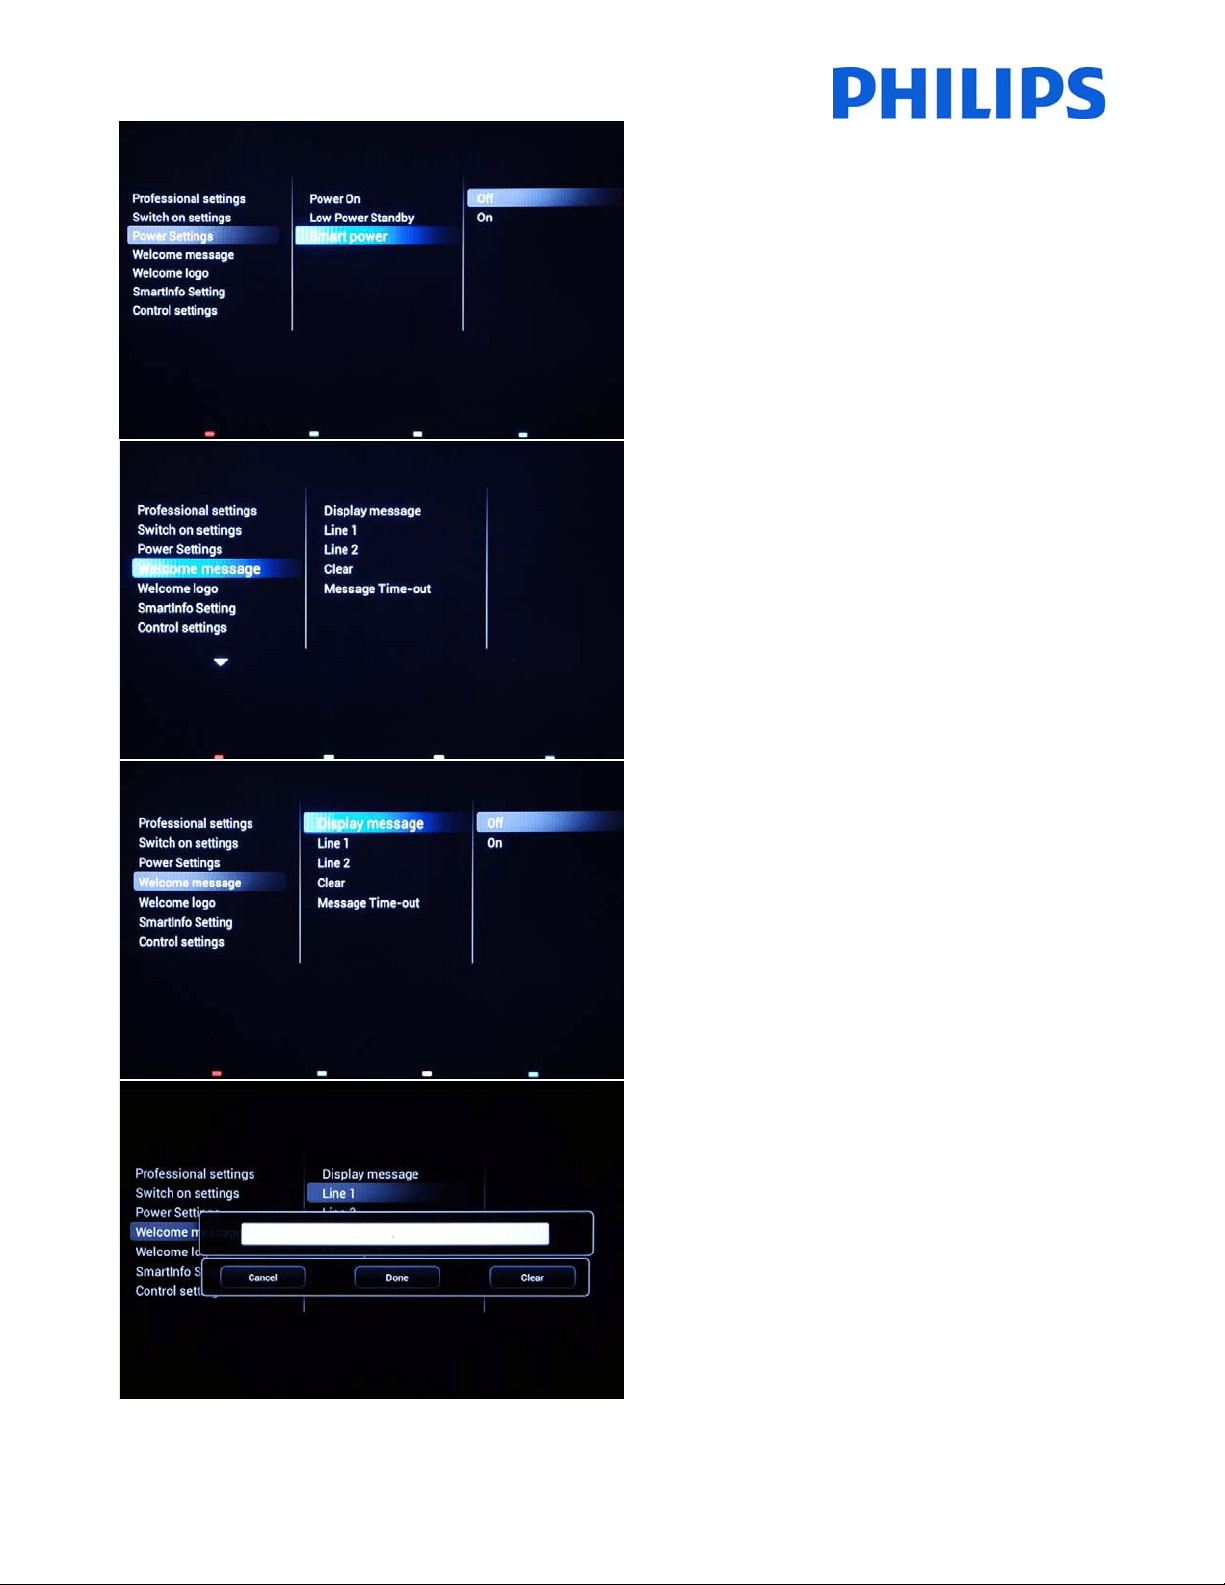
28
[SmartPower]
The power consumption for the Smart power mode is
definedbytheSmartPicturesettingintheTVSetuppart.
[Off]: The TV will start with Standard Smart Picture
setting,butthesettingcanbechangedintheguestsetup
mode.
[On]:The TV willstartwithdefault
Smart Picture setting
andSmartPicturesetupandisnotselectableintheguest
setup.
[Welcomemessage]
Thesettingsfromthissubmenuwillallowyouto
configurethewelcomemessage,whichisdisplayedat
everypowerON.
[Displaymessage]
[On]:Toenablethewelcomemessage.
[Off]:Nowelcomemessage
[Line1]
Line1:Firstlineofthewelcomemessage.
Whenpressingthe“OK”buttonontheremotecontrol
whileeditingline1or2,avirtualkeyboardwillpopupon
thescreen.
Note:Maximum20charactersperline.

29
[Line2]
Line2:Secondlineofthewelcomemessage.
[Clear]
Willdeletethecurrentwelcomemessage.
[MessageTime‐out]
Setstheperiodoftimetodisplaythewelcomemessage
onthescreenwhenTVisturnedonfromstandby.
Selectablevalues:20,25,30seconds.
[Welcomelogo]
Enables/disablestheshowingofthestoredwelcome
Logoatstart‐upwhentheTVstartsupinGreenMode
(seePowerSettings):

30
[Displaylogo]
Enables/disablestoshowthestoredwelcomeLogoat
start‐upwhenTVstartsupinGreenMode(seePower
Settings):
[Off]:WhensettoOff,theTVwillhidetheWelcome
Logoatstart‐up.
[On]:WhensettoOn,theTVwillshowtheWelcome
Logo
atstart‐up.
[USBtoTV]
ThisoptionwilluploadthewelcomelogofromtheUSB
sticktotheTV’sinternalmemory.
Checkpage45
[SmartInfosetting]
ConfiguretheSmartInfofeature.
Checkpage45/46
[SmartInfosetting]
ConfiguretheSmartInfofeature.
Checkpage45/46
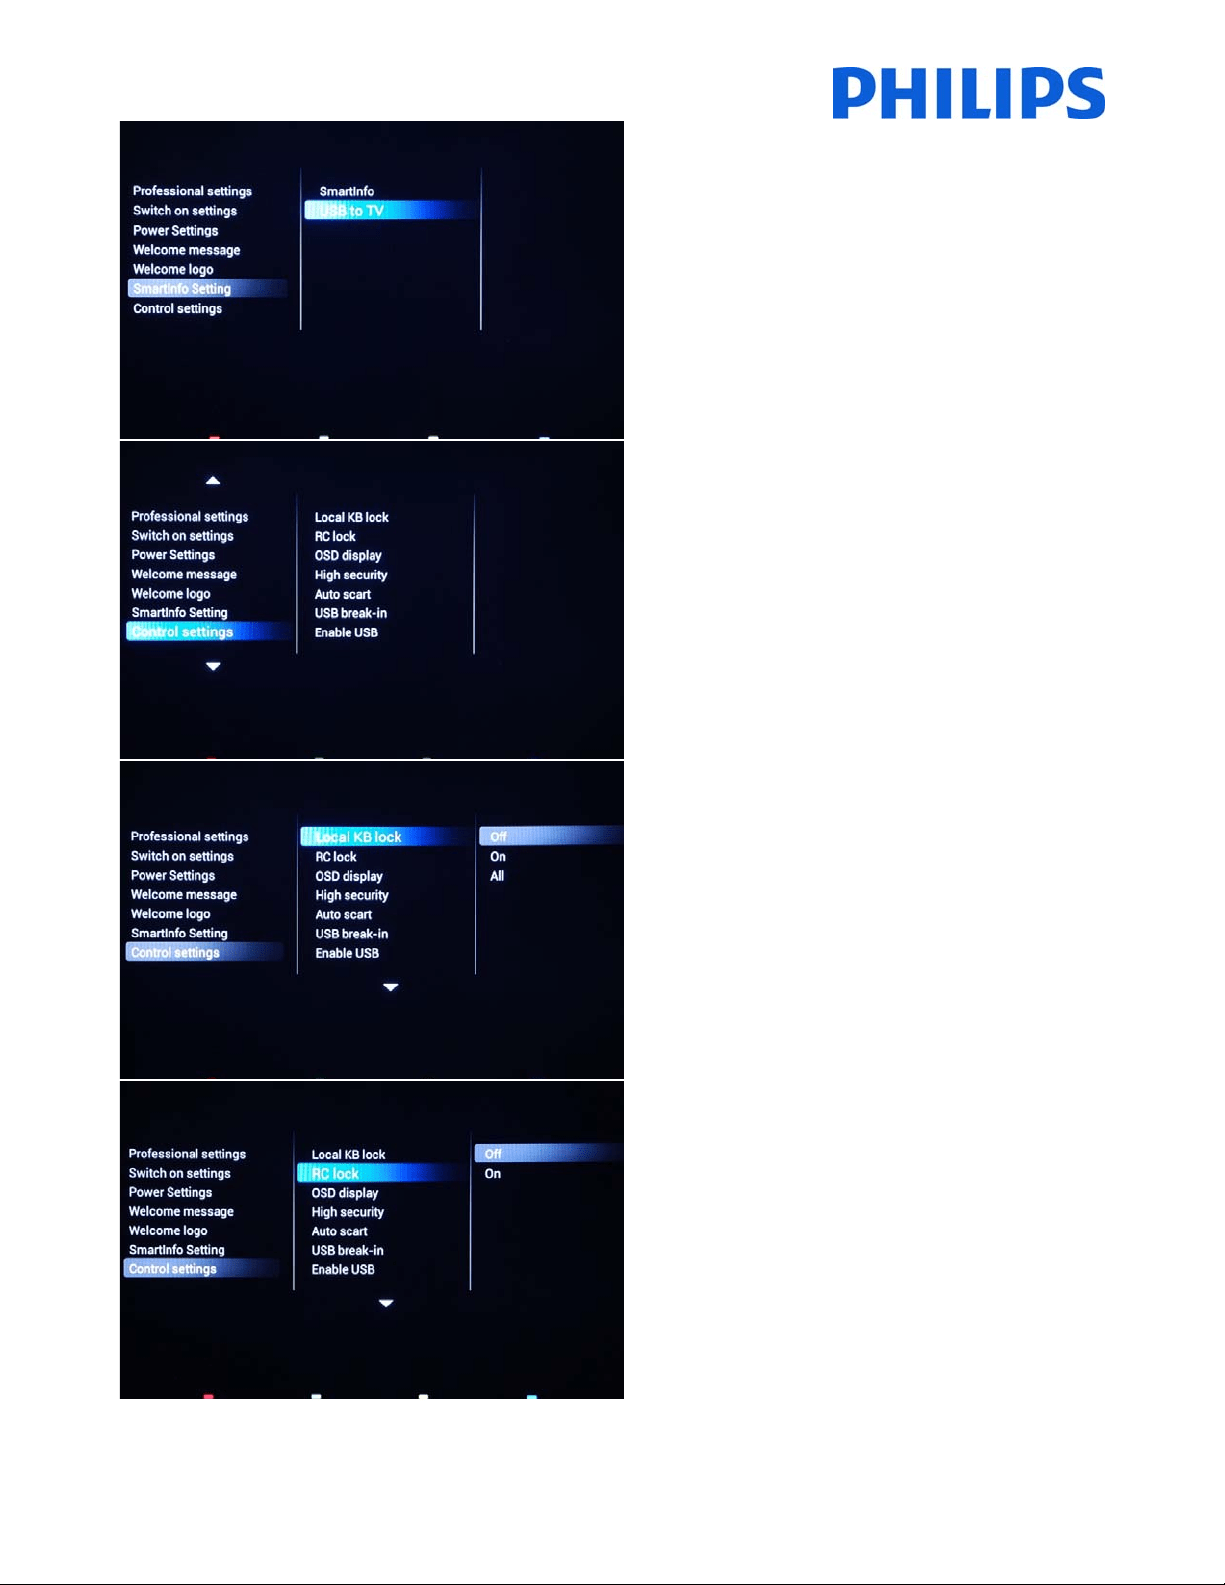
31
[USBtoTV]
Thisoptionuploadsthepicturesorthewebpagesinthe
TVmemory.
YoushouldonlyusethiswhenconfiguringthemasterTV.
SmartInfocontentcanbeclonedviaUSB.
[ControlSettings]
Thesettingsfromthissubmenuwillprovideaccesstothe
functionalityoftheTV
[LocalKBlock]
[Off]:Thelocalkeyboard(controlbuttonsontheTV)is
enabled.
[On]:Thelocalkeyboard(controlbuttonsontheTV)is
disabled,powerbuttonstillenabled.
[All]:Thelocalkeyboards(controlbuttonsontheTV)are
disabled.
[RClock]
[OFF]:AllbuttonsontheGuestremotecontrolwill
functionnormally.
[On]:Allbuttonson theGuestremotecontrolare
disabled.
Masterremotecontrol22AV8573(yellow)orRC2573(green)
commandsarenotaffectedbythissetting.
32
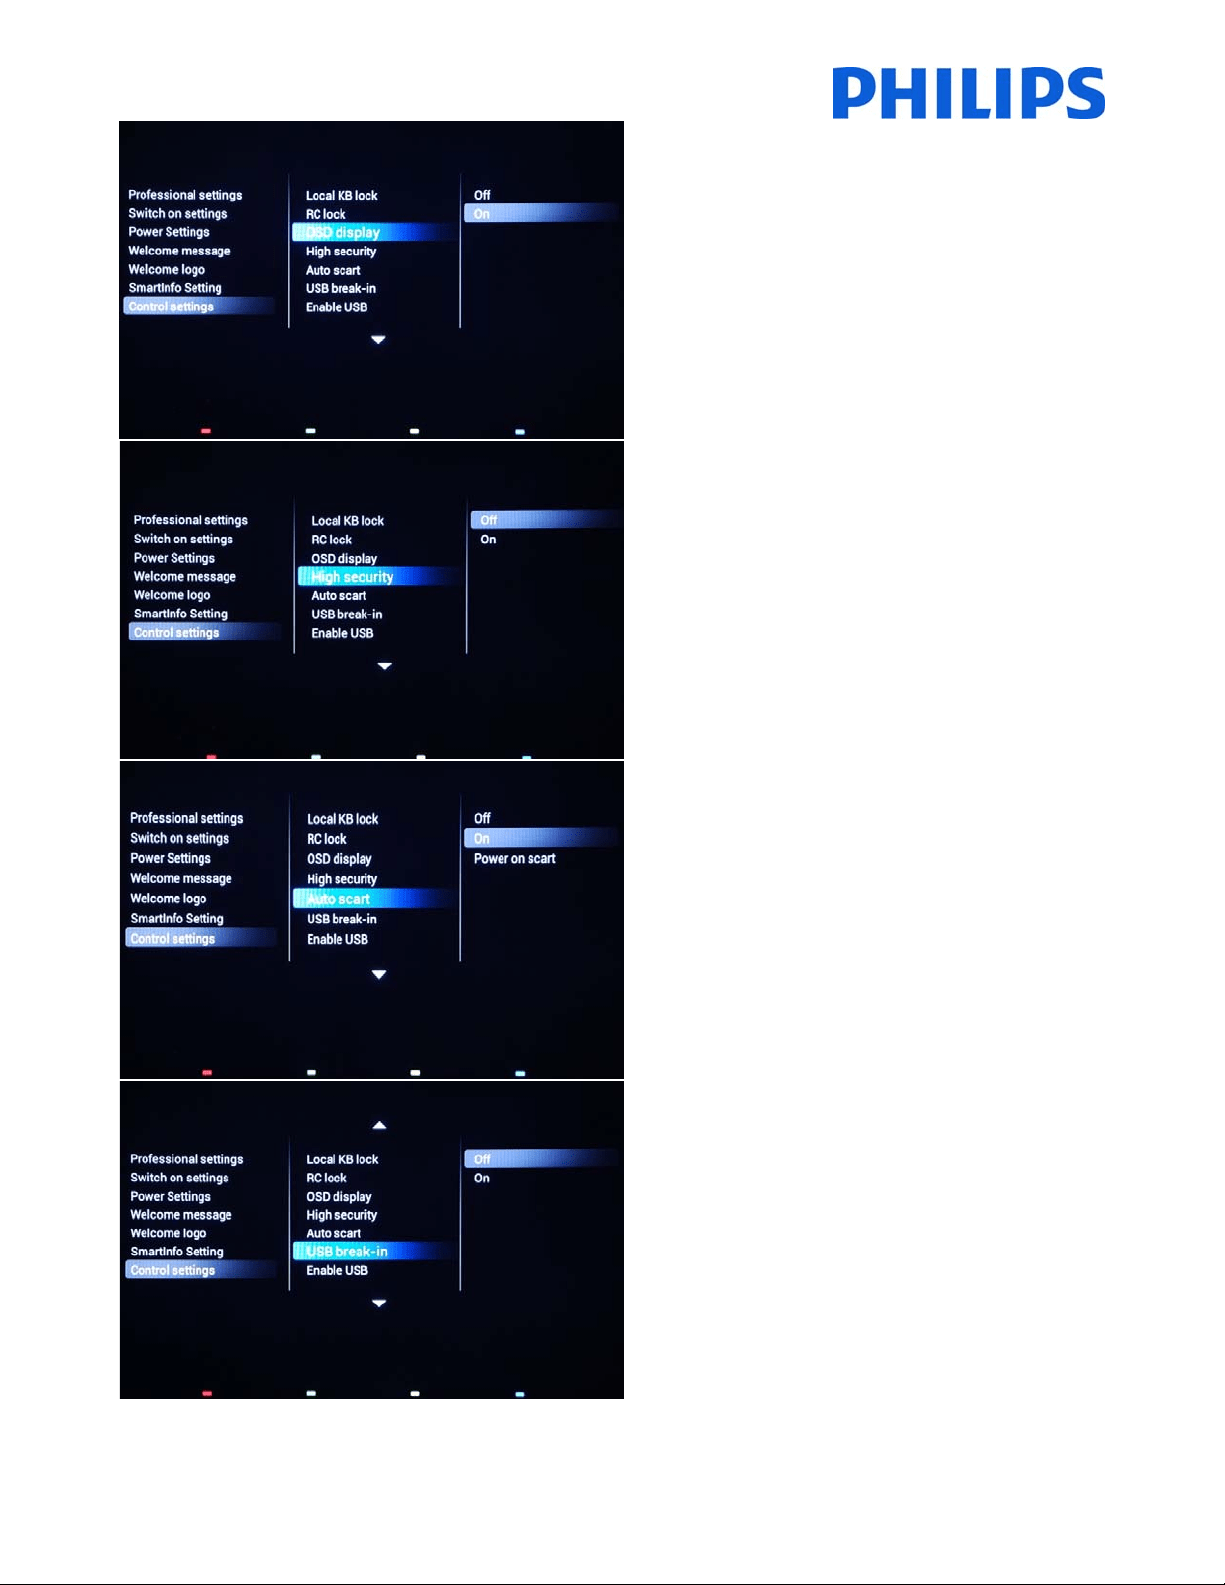
[OSDdisplay]
Setthisfunctiontoshoworhideonscreeninformation.
[Off]:Onscreeninformationissuppressed.
[On]:Normalonscreeninformationisdisplayed.
[Highsecurity]
[Off]: Professional setup menu can be accessed by both
Guest remote control and Master remote control
22AV8573 (yellow) or RC2573 (green). Guest remote
controlaccess to set up menuisonly possiblewithcode
“3,1,9,7,5,3,Mute”
[On]: Professional setup menu can on ly be accessed by
theMasterremote
control22AV8573(yellow)orRC2573
(green).
[Autoscart]
Enablesautoscartswitching(orbreak‐in)inProfessional
mode.
[On]:Enablesautoscartswitchingorbreak‐in.
[Power On Scart]: Enables auto TV start On/Off when
detectingscartbreak‐in.Neverusethisfeaturewithouta
connectedSTB.
[Off]:Disablesauto scartswitchingorbreak‐in.
[USBbreak‐in]
[Off]:WhenaUSBdeviceispluggedin,the[Multimedia]
menuwillnotappearautomatically,butuserscanaccess
[Multimedia] menu from the Consumer menu by
selecting“BrowseUSB”.
[On]:Whena USBdeviceispluggedin,the[Multimedia]
menuappearsautomatical ly.

33
[EnableUSB]
[Off]:DisablesUSBmultimediafunctions.
[On]:EnablesUSBmultimediafunctions.
Feature is not influencing cloning and/or software
upgradeviaUSB.
[SXPBaudrate]
SetstheBaudratefortheSerialExpress
communicationchanneltobe38400or19200
Baud(bitspersecond).
[Enableteletext]
EnablesordisablestheuseofTeletextOSDonpressing
theTeletextbutton:
[Off]:DisablesTeletext.
[On]:EnablesTeletext.
[EnableMHEG]
EnablesordisablestheuseofMHEGOSDonpressingthe
MHEGbutton:
[Off]:DisablesMHEG.
[On]:EnablesMHEG.
34
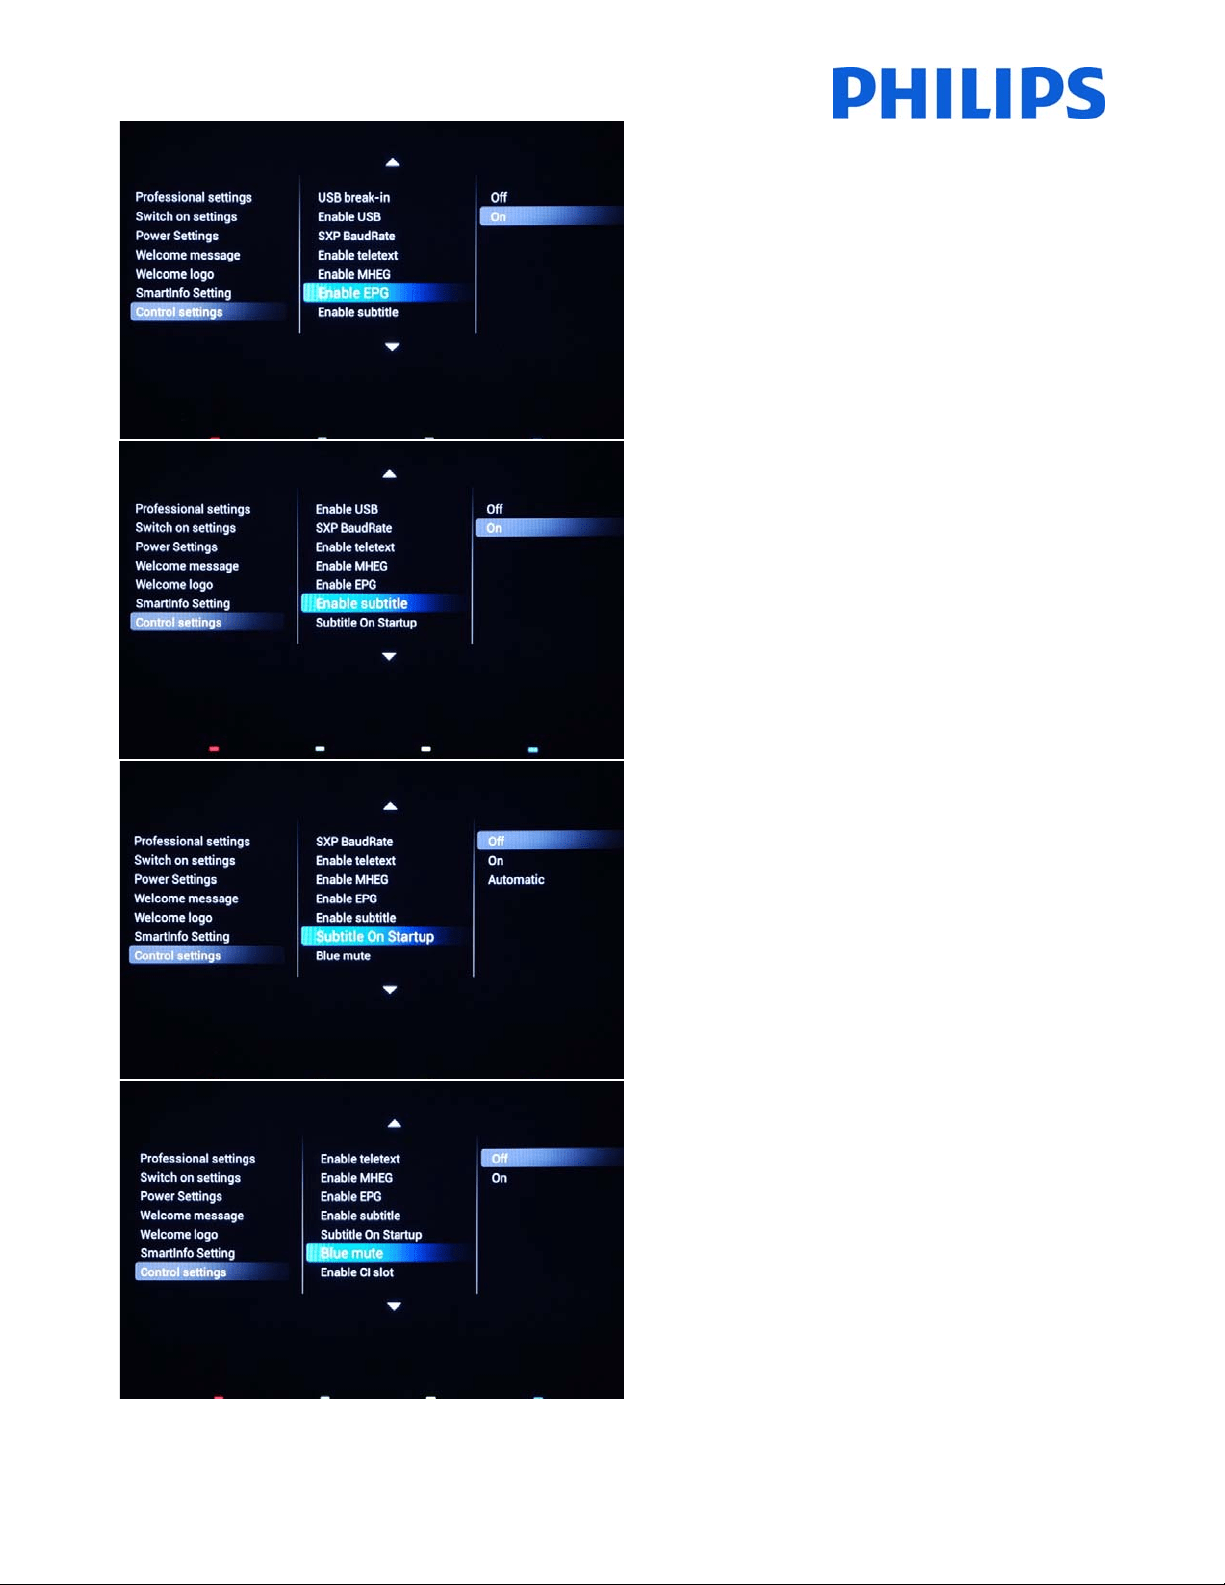
[EnableEPG]
EnablesordisablestheuseofEPGOSDonpressingEPG
button:
[Off]:NoEPGservicesavailable
[ON]:EnableEPGservices
Note:EPGavailabilitydependsonlocalconditions.
[Enablesubtitle]
EnablesordisablestheuseofsubtitlesinaDVB
broadcastchannel:
[Off]:Nosubtitleservicesavailable
[On]:Subtitleservicesavailable
[SubtitleOnStart‐Up]
Enablesordisablestheuseofsubtitlesatstart‐up:
[Off]:Nosubtitlesservicesavailable
[On]:Subtitlesservicesavailable
[Automatic]:SubtitlesserviceswhenTVaudioismuted
[Bluemute]
[Off]:Thebackgroundcolorissettoblackincaseofno
videosignalonselectedsource.
[On]:Thebackgroundcolorissettoblueincaseofno
videosignalonselectedsource.
35
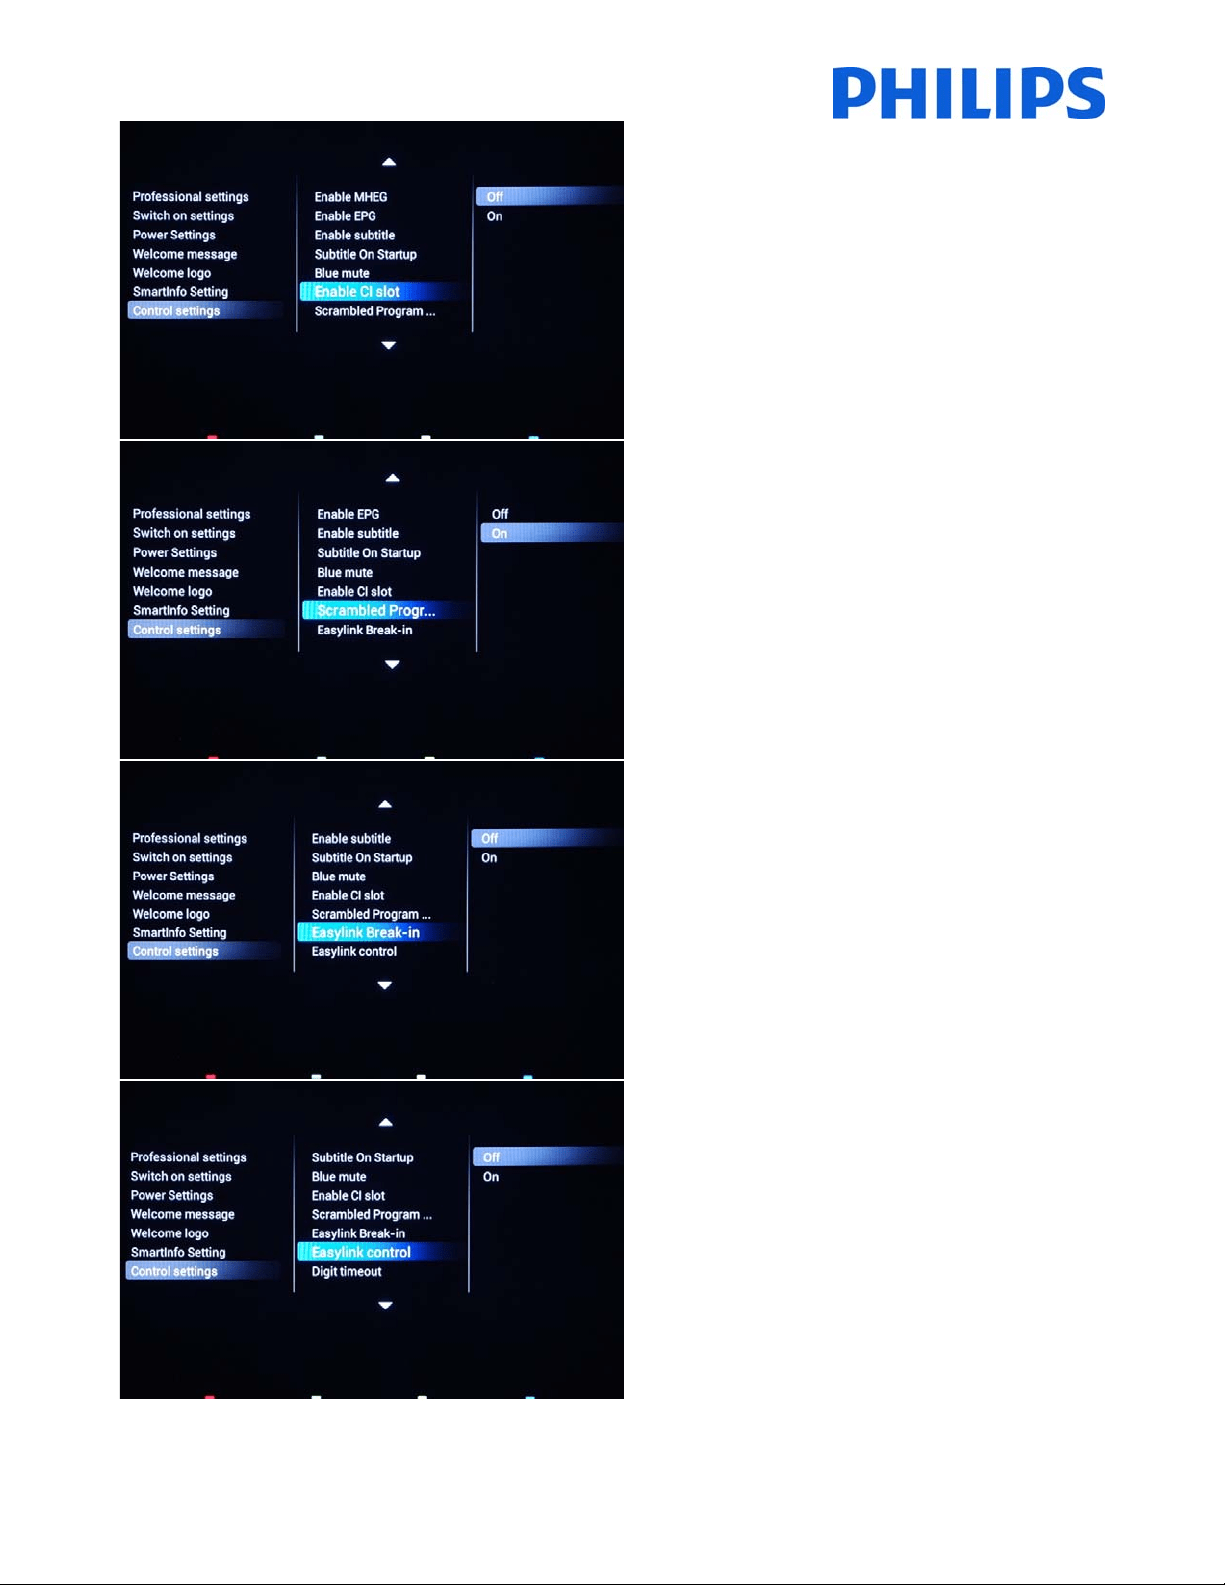
[EnableCI‐slot]
EnablesordisablestheuseoftheintegratedCI/CI+slot:
[Off]:NopassthroughoftheTVinput signalviatheCI
SlotCardispossible;theuseofCICardslotisnot
possible.
[On]:PassthroughoftheTVinputsignalviatheCI‐Slot
Card
ispossible;theuseofCI‐Cardslotispossible.
!!CheckwithyourlocaloperatorifyourCI‐Cardiscompatiblewiththis
TV.
Note:Duethefactthatsomedecryptioncardhavevalidityperiod
Setuptheclockdownloadprogramshouldbeproperconfigured.
[ScrambledProgramDisplay]
OSDmessageisdisplayedifTVchannelisscrambledand
requiresCI+modulefordecryption.
[ON]:Themessagewillbedisplayed
[OFF]:Themessagewillbesuppressedandwillbeno
indicationwhytheTV
[EasylinkBreak‐in]
EnablesordisablestheHDMI‐CECstandbyfeaturein
Professionalmode:
[Off]:NotabletoswitchontheTVbyexternalHDMI‐CEC
devices.
[On]:AbletoswitchontheTVbyexternalHDMI‐CEC
devices.
[Easylinkcontrol]
EnablesordisablestheHDMI‐CEConetouchplayfeature
inProfessionalmode:
[Off]:DisablesTVfunctionalitytocontrolexternalHDMI‐
CECdevices.
[On]:EnablesTVfunctionalitytocontrolexternalHDMI‐
CECdevices.
36
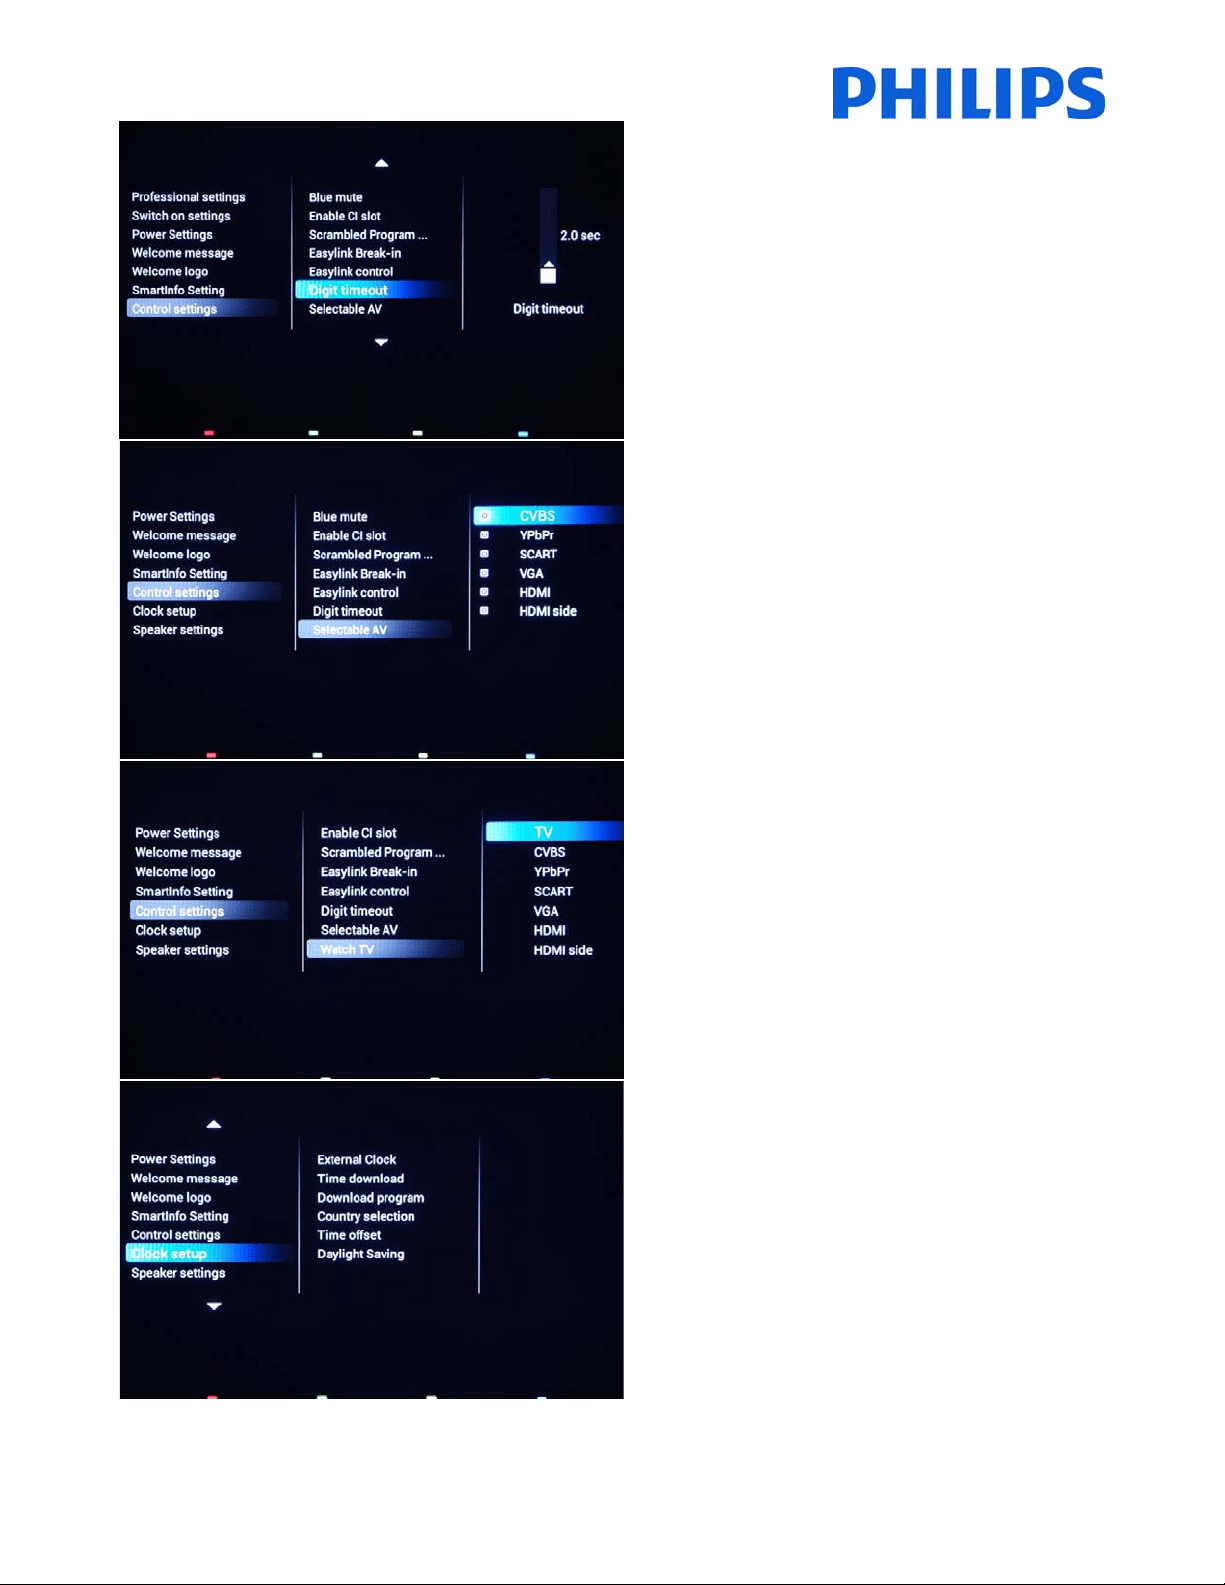
[Digittimeout]
Definesthetimeintervalbetweennumericbuttons
presseswhenuserswillaccesstwoorthreedigits
channels.
Selectablevaluesfrom0.5to9.9seconds.
[SelectableAV]
Allowstheinstallertodefinewhichexternalsourcesto
bedisplayedonthesourcelistwhenpressingAVbutton
ontheGuestremotecontrol.
Note:Onlythesourcesmarked[X]appearinthesourcelist.
[WatchTV]
Selectthefunctionfor“WatchTV”buttonontheremote
control.
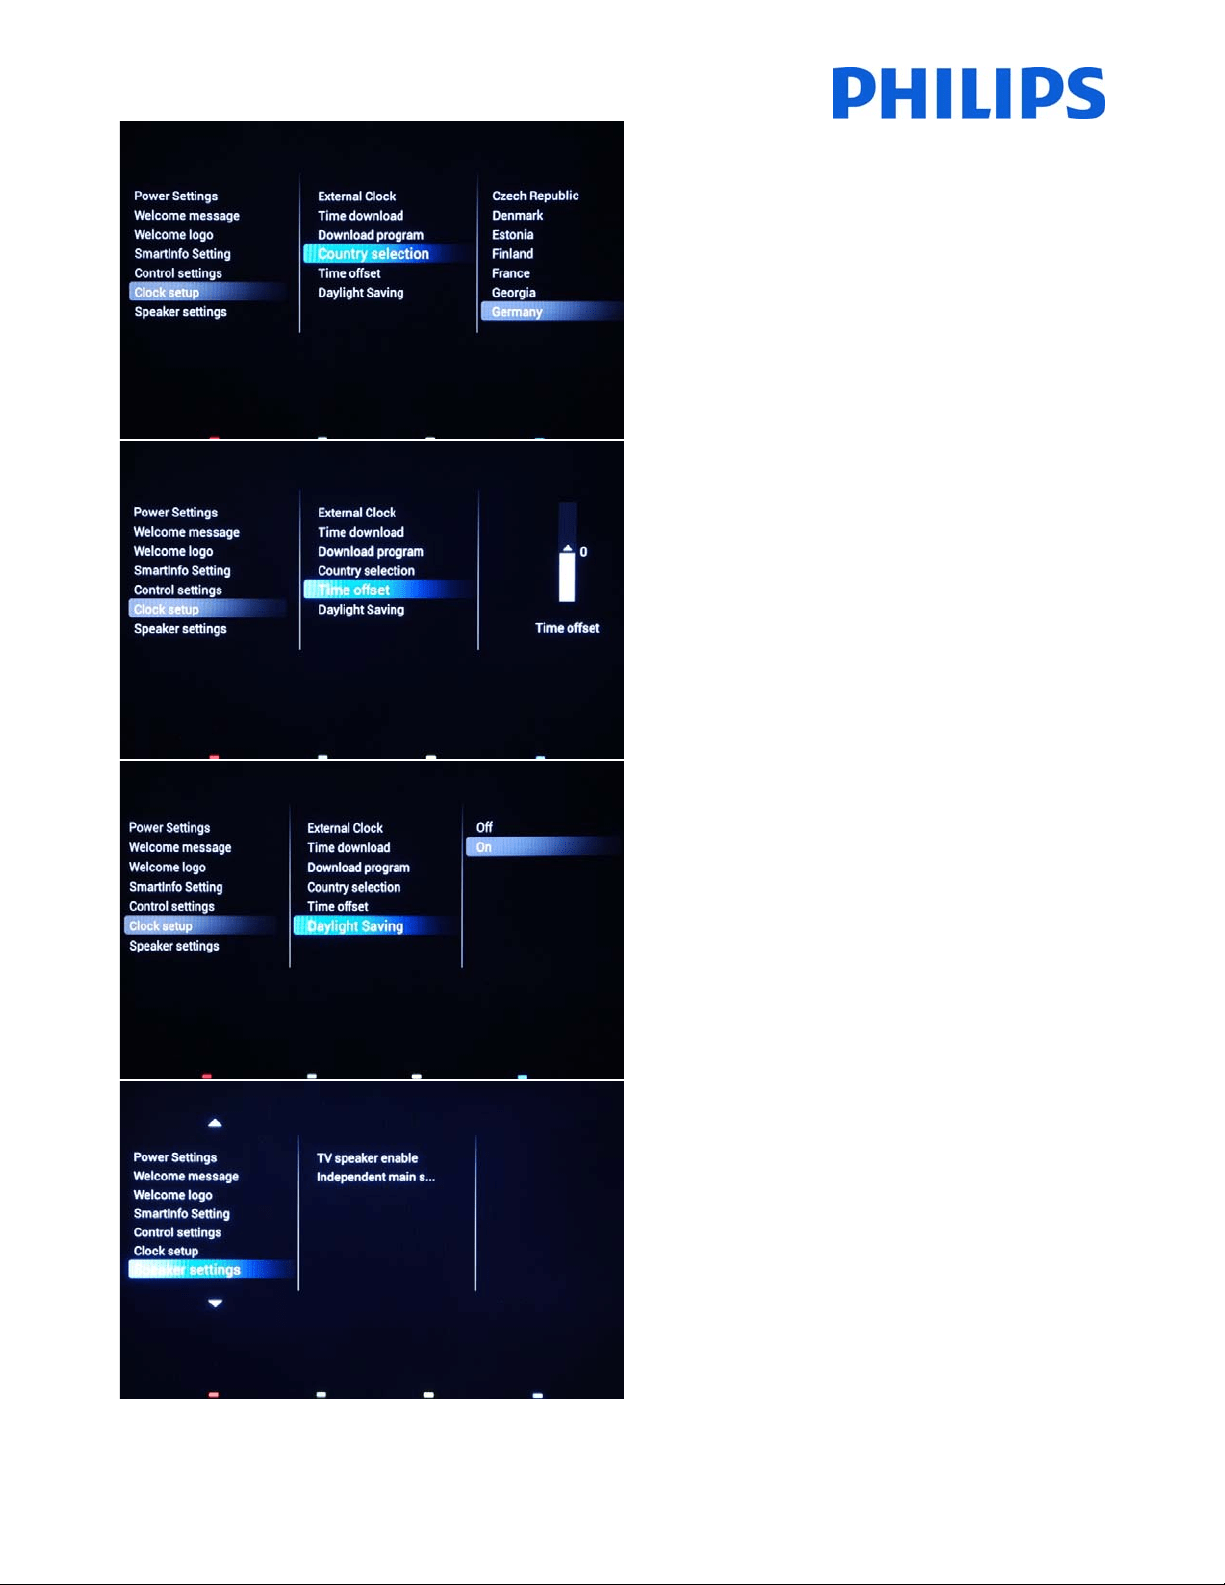
[Clocksetup]
SettingsfortheTVclock.
37
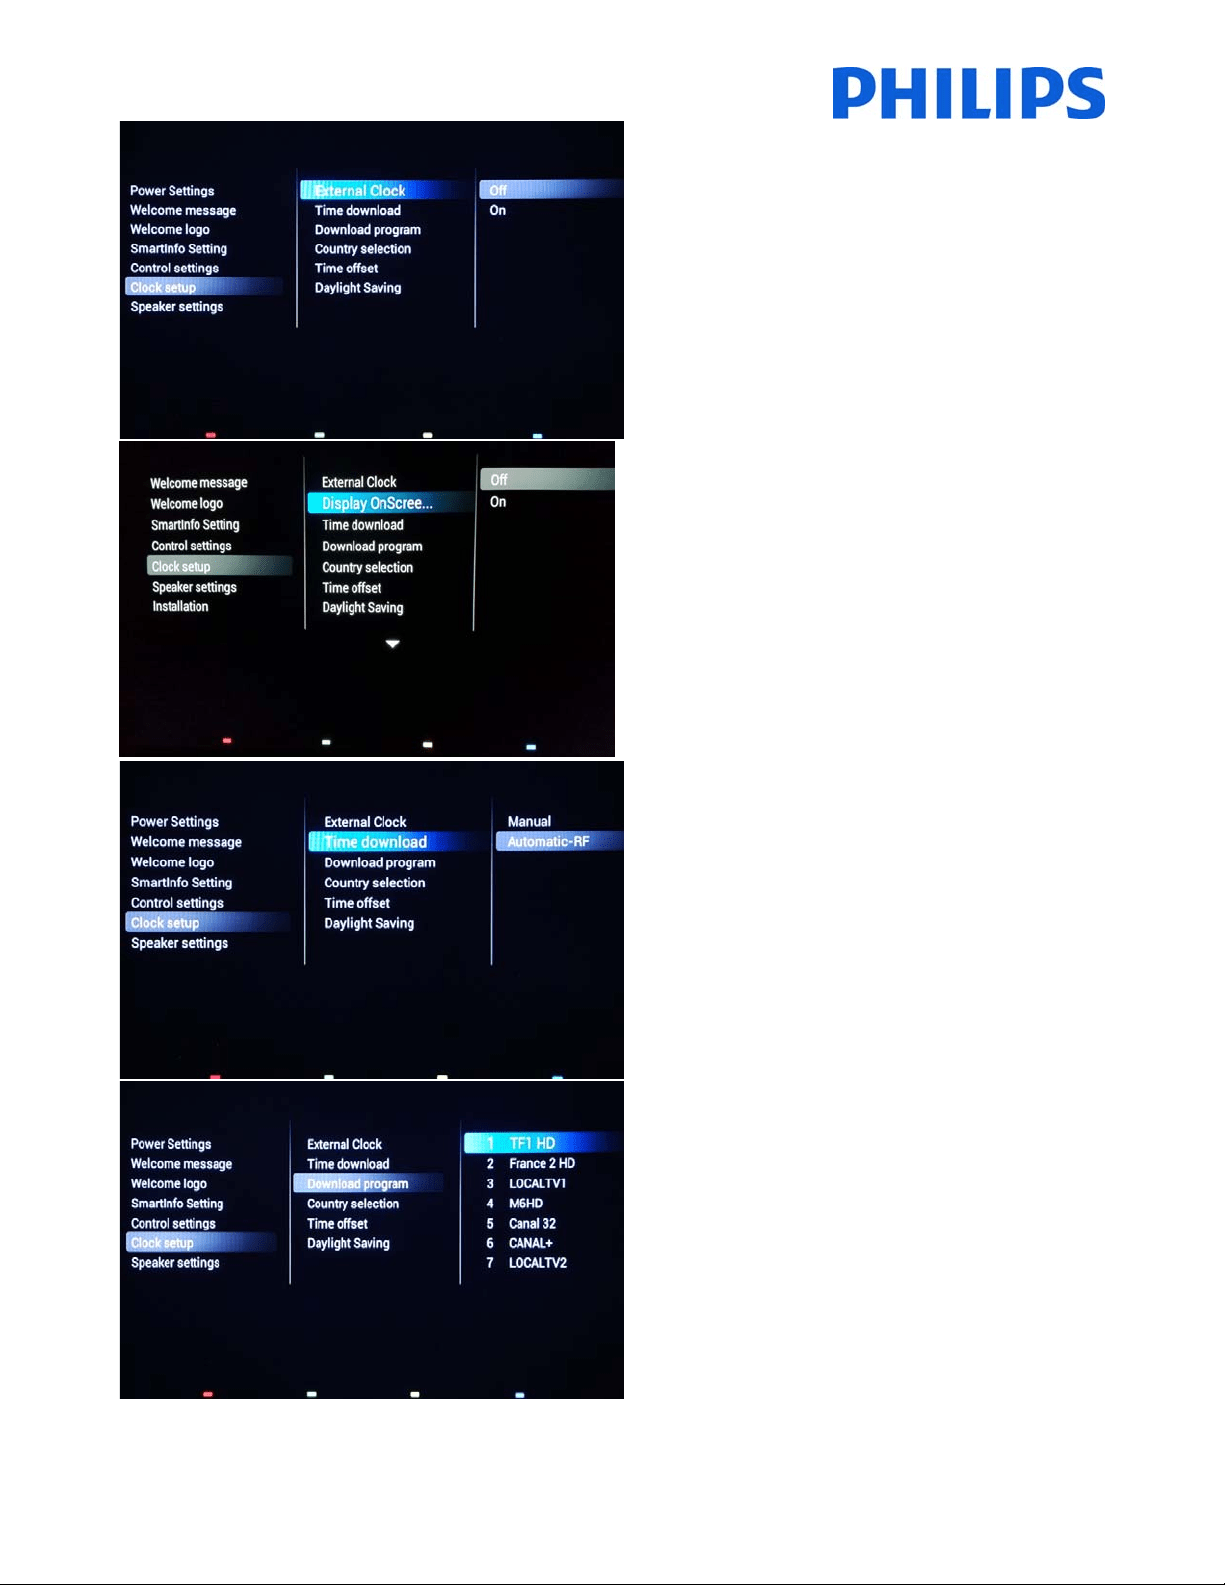
[ExternalClock]
Enableordisabletheexternalclockfunctionality.
[OFF]:USBexternalclockwillnotbeactive.
[ON]:USBexternalclockwilldisplaytime.
[DisplayOnScreenClockinFastStandby
EnableordisabletheOnScreenClockduringStandby
(onlyapplicablewhen[LowPowerStandby]issetto
[Fast).
[OFF]:OnScreenClock(Standby)willnotbeactive.
[ON]:OnScreenClock(Standby)willbeactive.
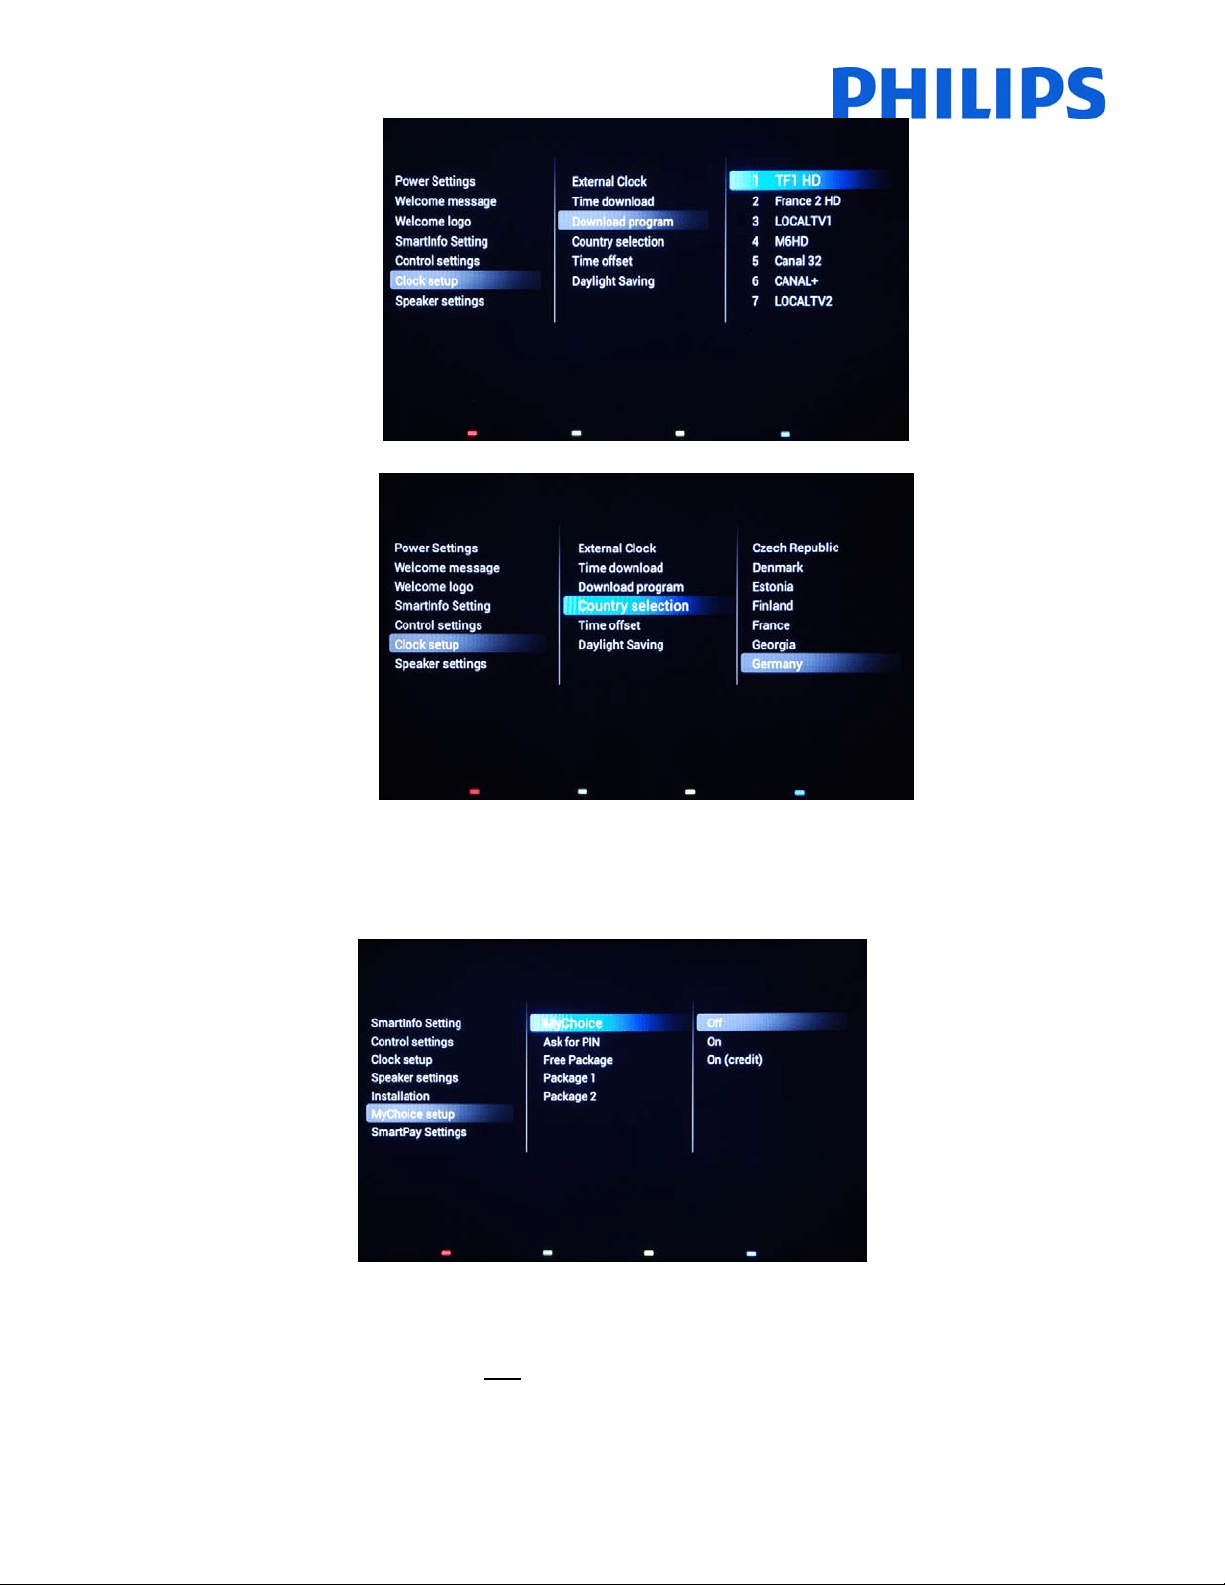
[TimeDownload]
Selectthesourcefortheclocktime:
[Manual]:TheclocktimeissetusingtheTimeSetting
option.
[Automatic‐RF]:Clocktimeisretrievedfromthe
“DownloadProgram”channel.
Note:IfthepowerisdisconnectedtheTVwilllosethetimeset.
[Downloadprogram]
Toselectchanneltodownloadclockinformation.
Note:CorrectclockinformationisrequiredforcorrectEPGdataand
MyChoicefunctionality.
38
[Countryselection]
Toselecttheoriginalcountryfromthechannelchosenat
“Downloadprogram”.
[Timeoffset]
Tosetthetimeoffset.
Incasetheclockdownloadinformationisnotcorrectfor
yourregionyoucansetanoffsetheretocorrectthis.
Note:Selectablevaluebetween‐12and+12.
[Daylightsaving]
EnablestheautomaticswitchbetweenWinterTimeand
SummerTime.
[OFF]:Daylightsavingtimeisdisabled.Notime
correctionwillbeappliedwhileswitc hingbetweenwinter
andsummertime.
[ON]:Daylightsavingtimeisenabled.
[Speakersettings]
Submenuwithspeakersettings.
39
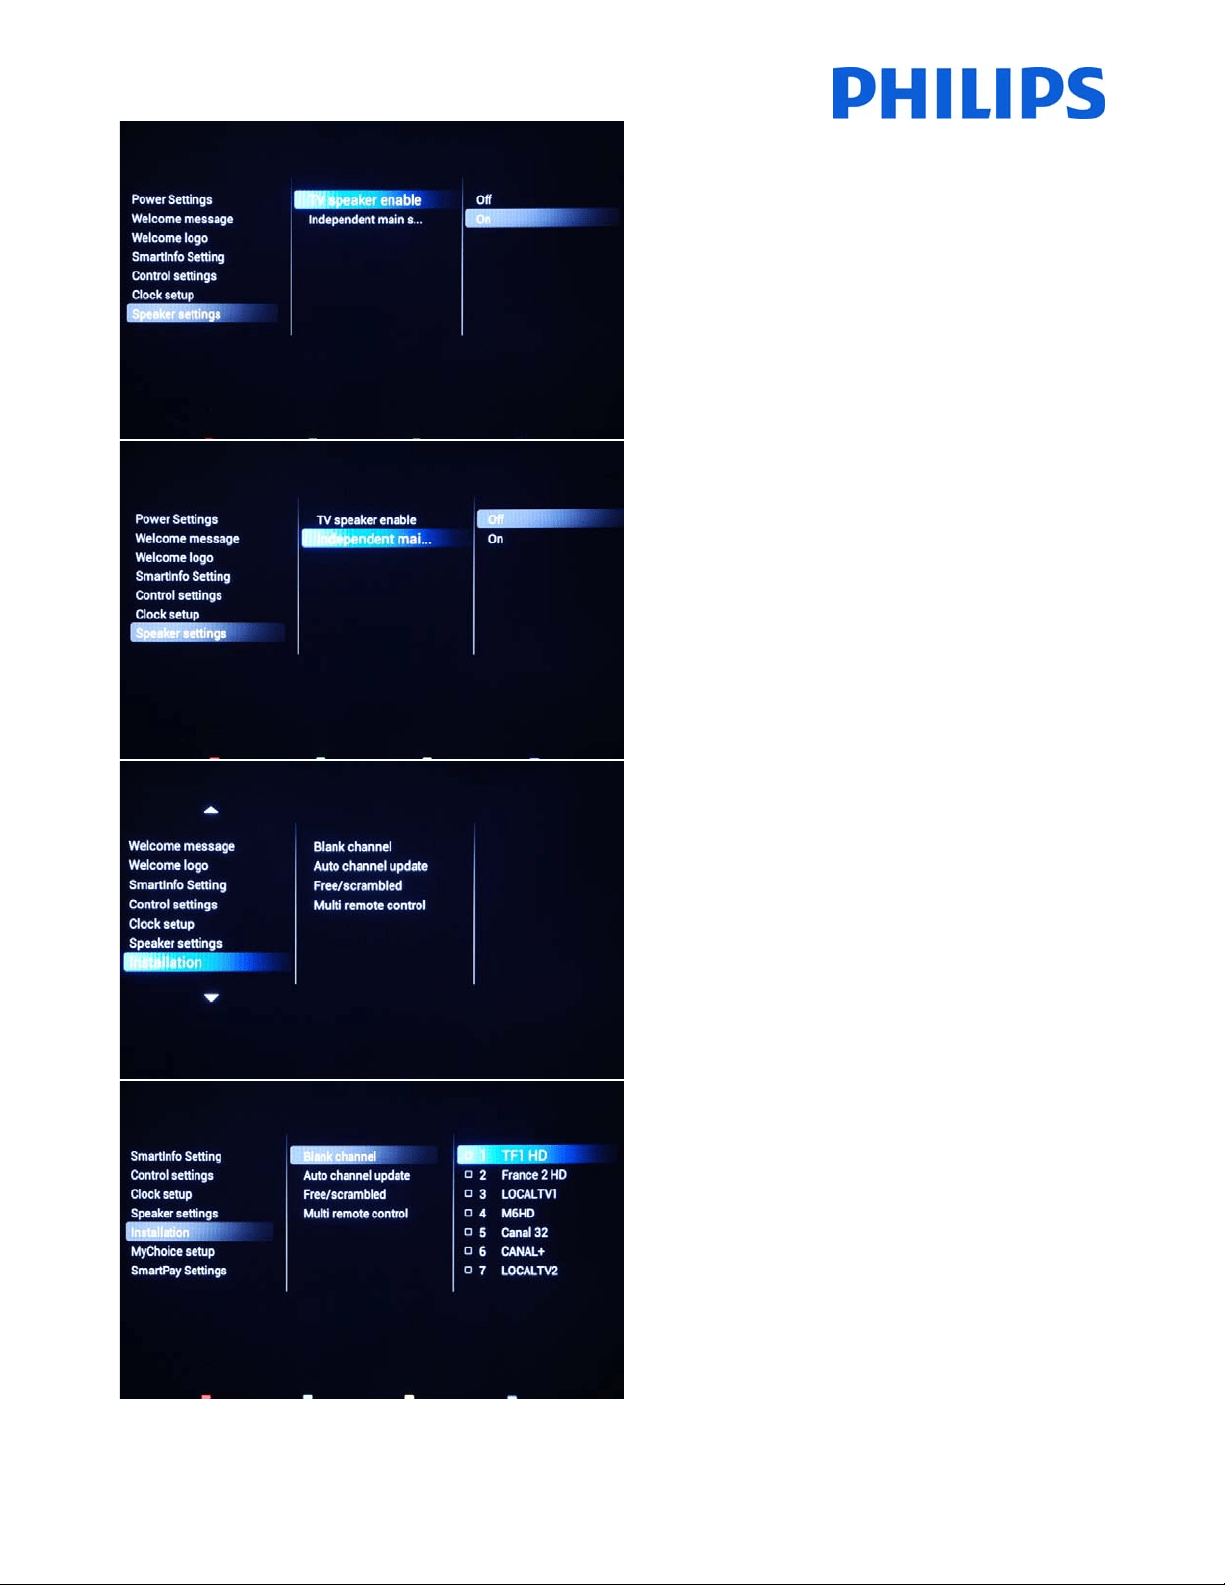
[TVspeakerenable]
[Off]: Disables the TV Main speakers. The headphone
outputisnotaffectedbythissetting.
[On]:EnablestheTVMainspeakers.
[Independentmainspeakers]
[Off]: The volume +/‐ on the Guest remote control will
affect both the TV Main speaker and the headphone
volume.
[On]: The volume +/‐ on the Guest remote control will
affect both the TV Main speaker and the headphone
volume.
After pressing “MUTE”, the volume +/‐ on
the Guest
remote control will not reactivate the TV Main speaker
volume,butwillonlycontroltheheadphonevolume.
[Installation]
Channelsettingsandmultiremotecontrol.
[Blankchannel]
The Blankchannel function disables the display of video
ontheTV,butdoesnotaffecttheaudiooutput.
Selectordeselectcanbedonebypressing“OK”buttonon
theremotecontrol.
Note:ThechannelsmarkedwithXwillnotdisplayvideoontheTV.

40
[Autochannelupdate]
Channelplanisautomaticallychangedwhenthechannel
informationisbroadcastedinthenetwo rk.
[ON]:Enablesautomaticchannelupdate.
[OFF]:Disablesautomaticchannelupdate.
Note:Therecommendedsettingis[OFF]tokeepthe
channellistintheoriginalconfiguration.
[Free/scrambled]
[Freechannelsonly]:Onlyfreechannelsaredisplayedin
thechannellist.
[Free+scrambled]:Allowsscrambledchannelsinthe
channellist.OnscrambledchannelanOSDmessagewill
bedisplayedinformingthestateofthechannel.
[Multiremotecontrol]
TosetthecoloroftheTVinmultiremote.
Guest remote control supports up to 14 televisions
operating in one room without interference from each
other’s remote controls. Each TV and a Guest remote
controlcanbesettomatch.
Checkmulti‐remote
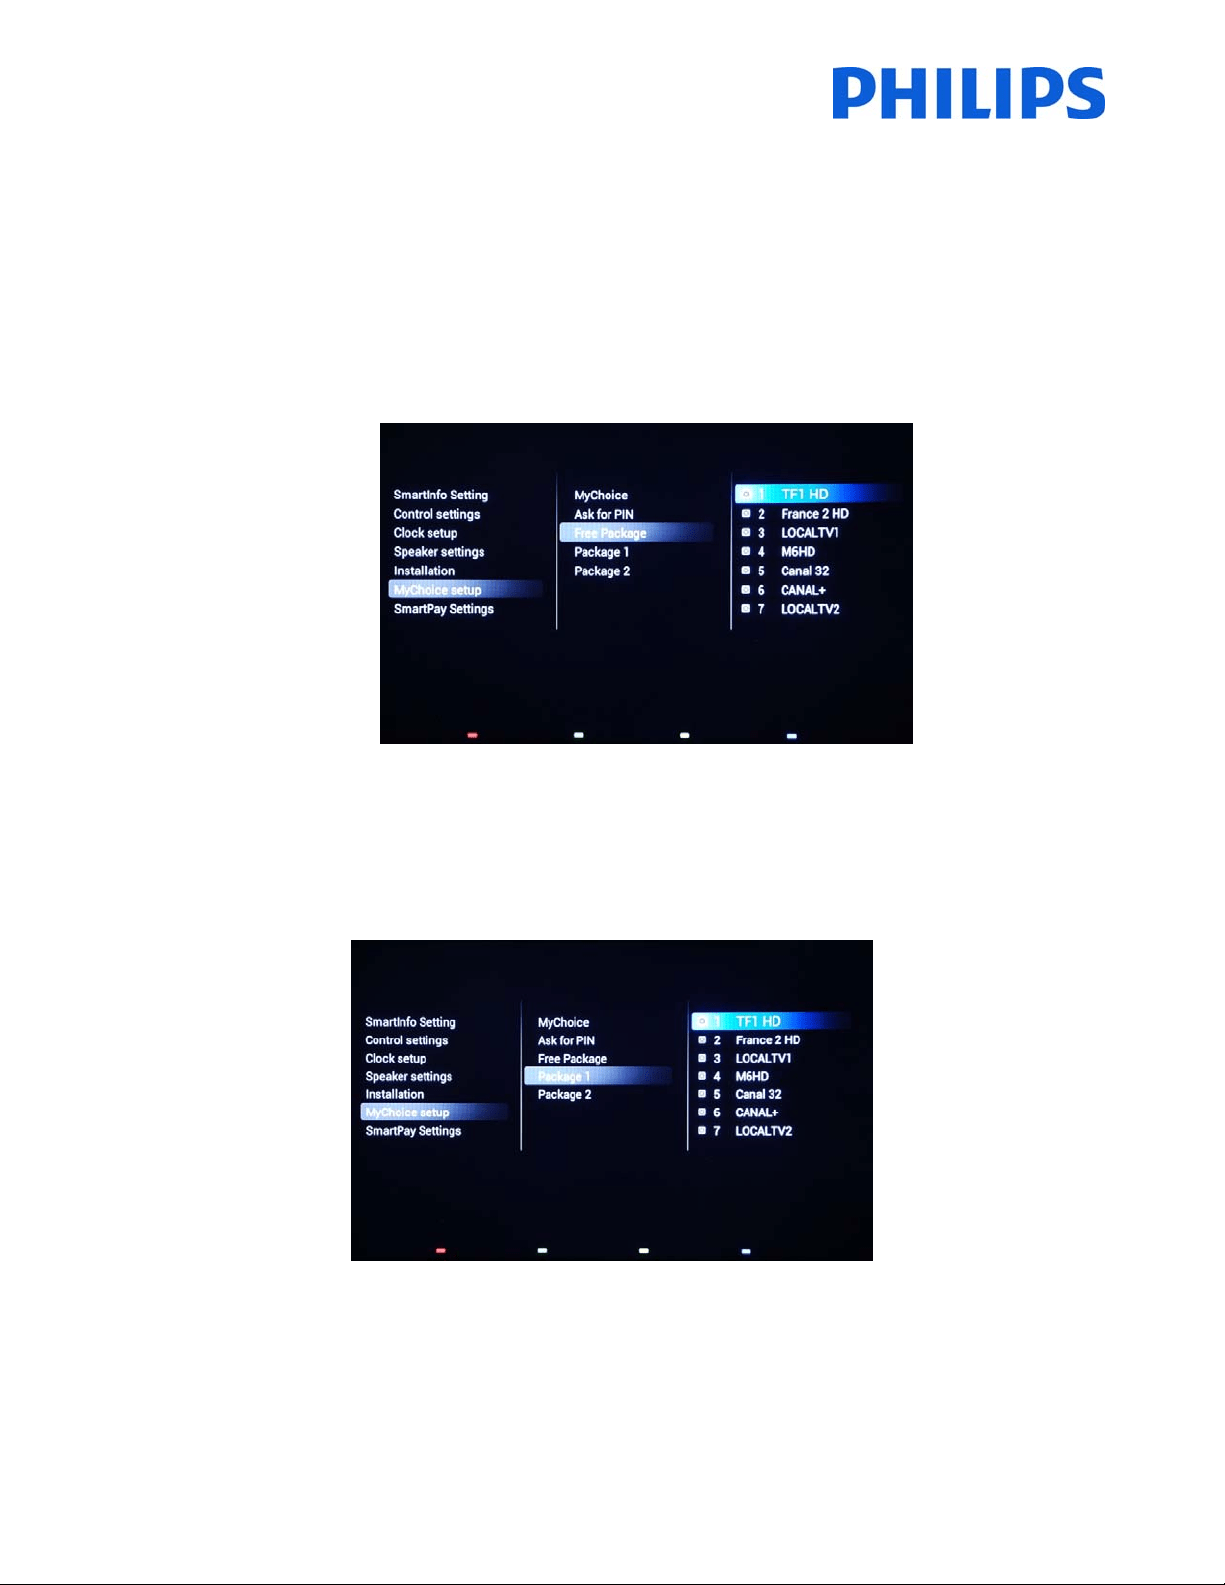
[MyChoice]setupmenu
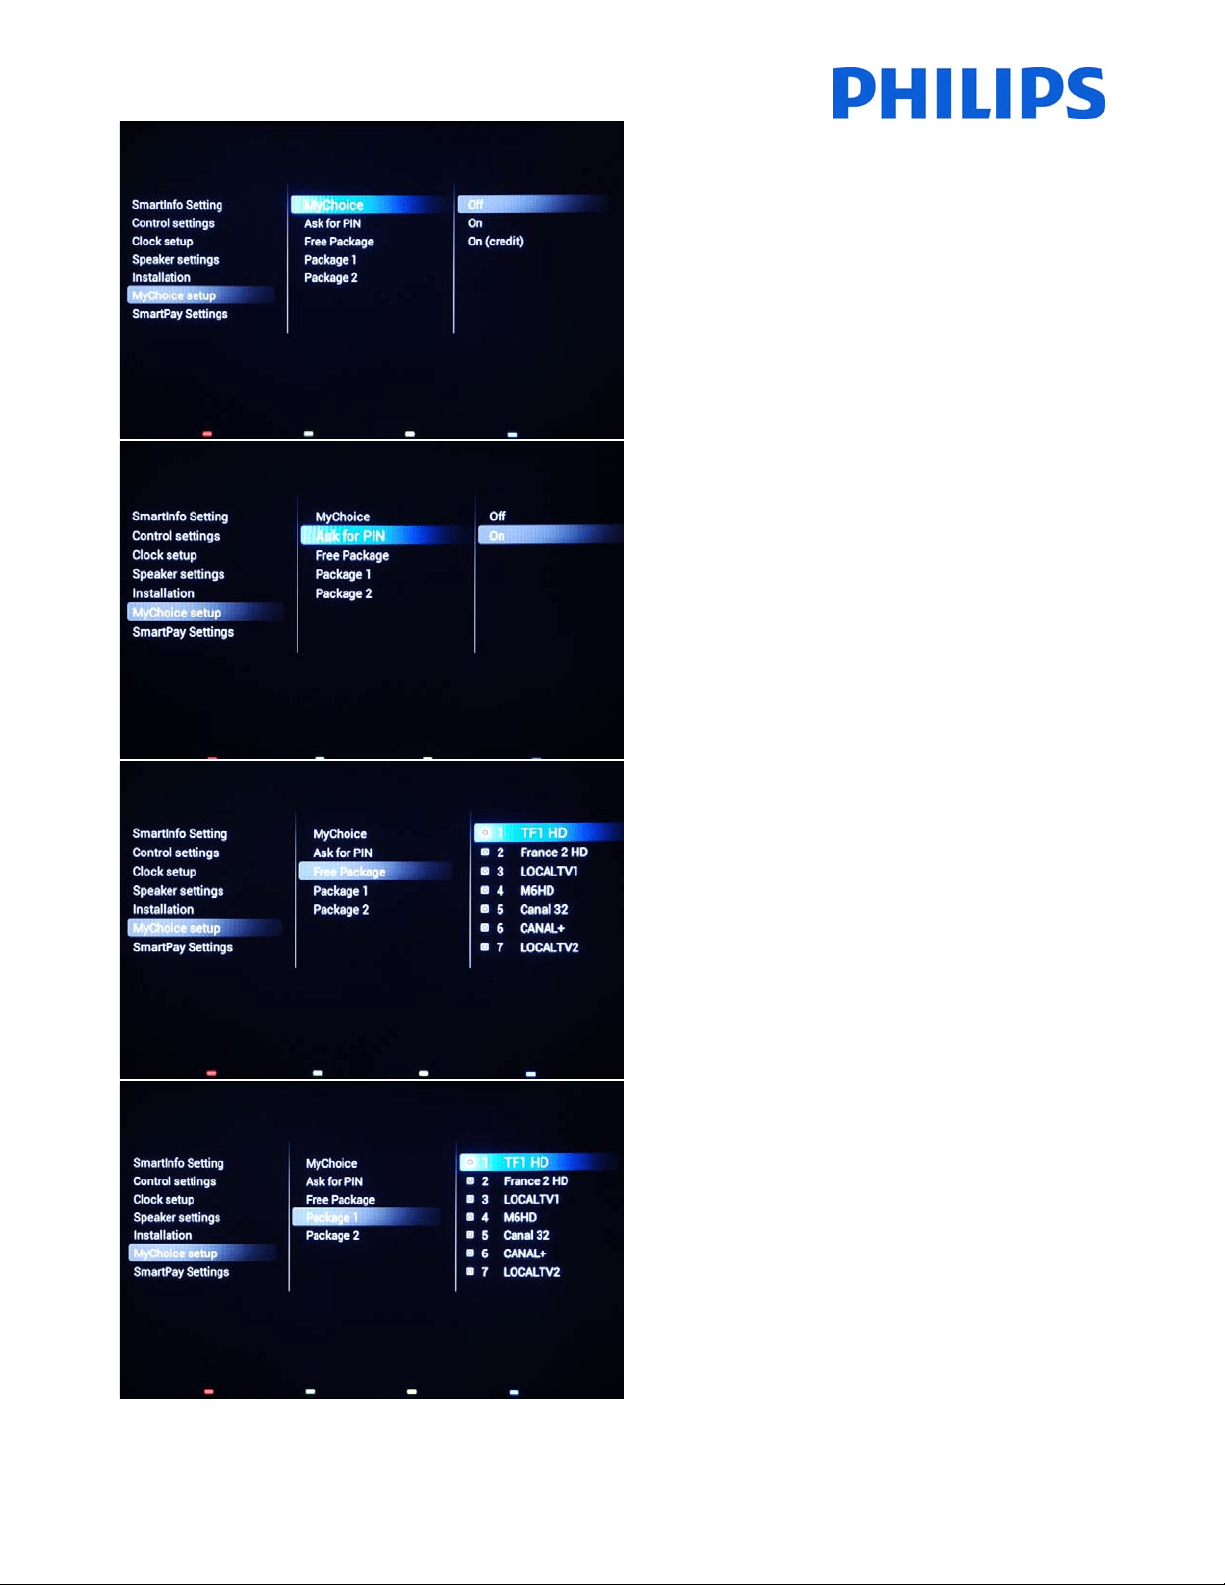
41
[MyChoice]
[Off]:DisablesMyCho icefunction.
[On]:EnablesMyChoicefunctionwithscratchcards.
[ONCredit]:MyChoiceworkswithMyChoiceCredits.
[AskforPIN]
[OFF]:Thecodeisrequ iredonlyonetimeatactivation.A
newcoderequestwillberequestedwhenthevalidityis
expiring.
[ON]:PinCodeisrequiredevertimewhenthefeatureis
used.EverytimewhentheTVsetisswitched[ON],the
featurewillrequirethe
pincode.
MyChoiceconfiguration:
FreePackage:Channelsfreetoview
MyChoiceconfiguration:
[Package1]:TVChannelsincludedinthepackage.
42
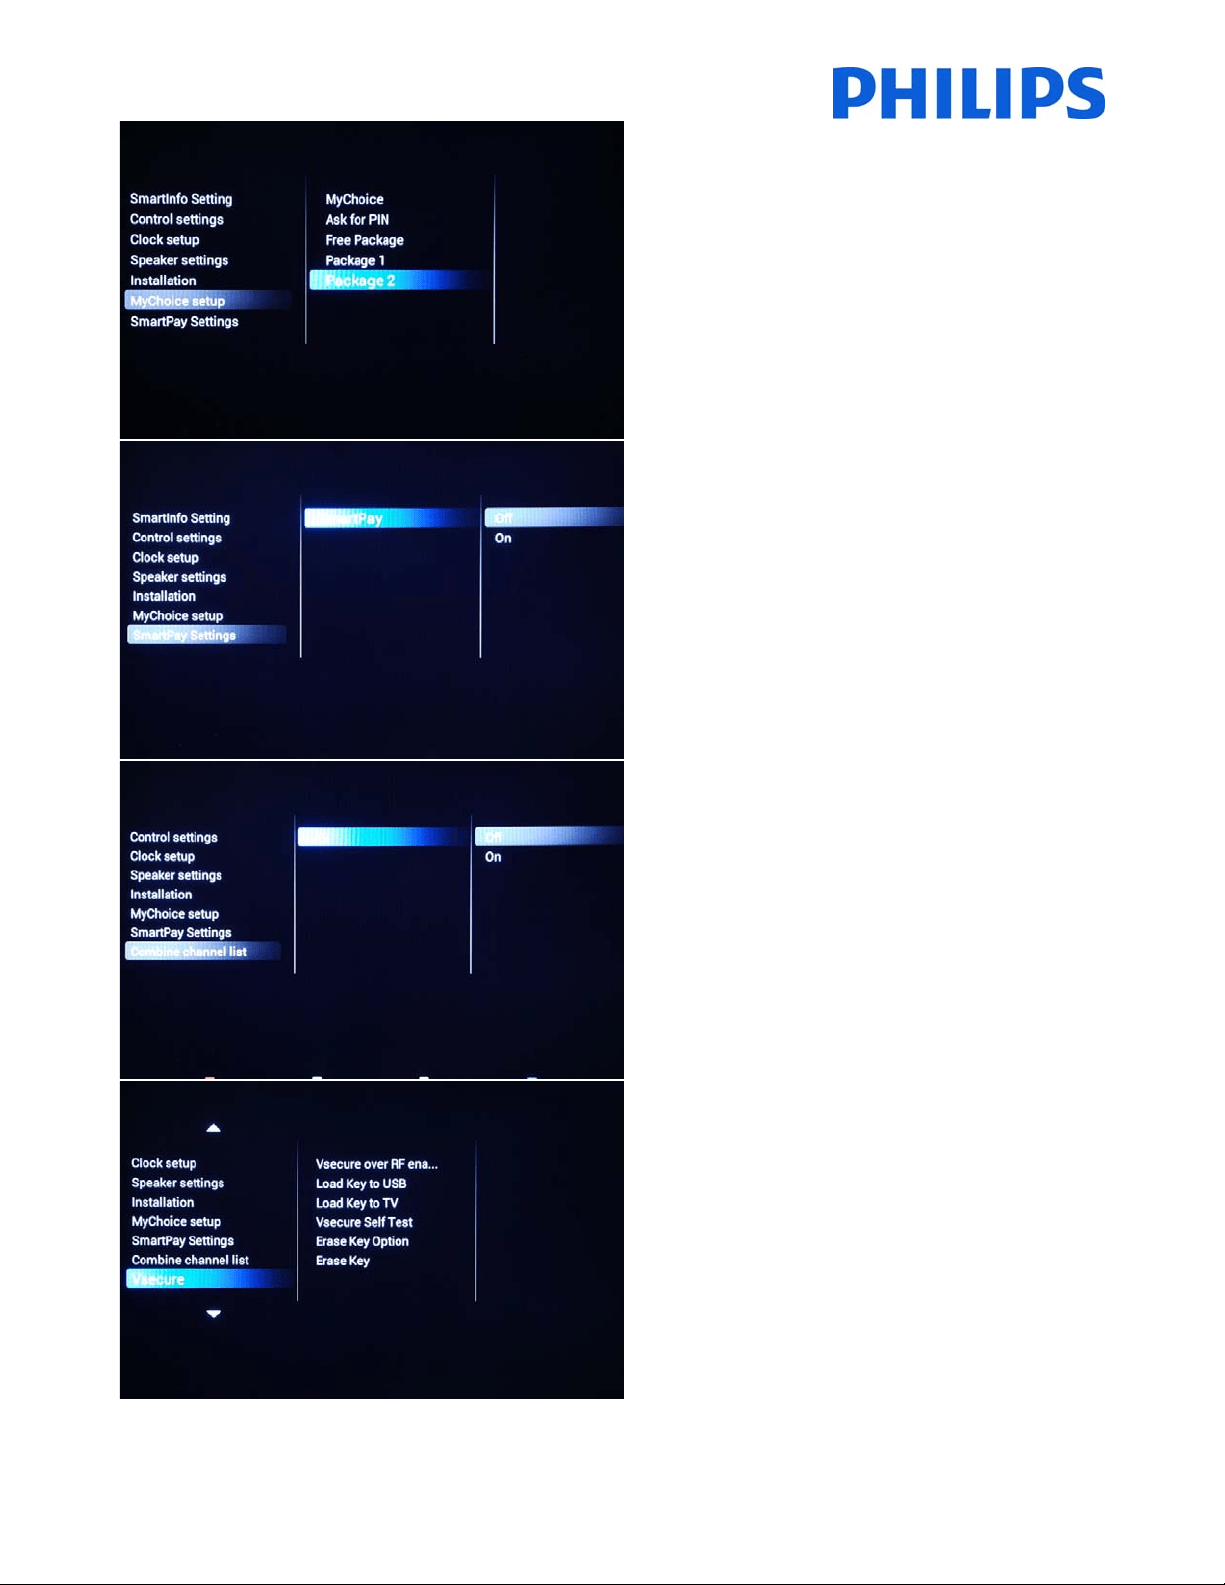
MyChoiceconfiguration:
[Package2]:TVChannelsincludedinthepackage.
[SmartPay]
EnableordisableSmartPay.
[OFF]:Thefeatureisdisabled.
[ON]:Thefeatureisenabled.
[Combinechannellist]
Externalsourceswillbeaddedtothechannellist.
[OFF]:Theexternalsourcesarenotpresentinthe
channellist.
[ON]:Theexternalsourceswillbepresentattheendof
thechannellist.
[VSecure]
VSecure is the hospitality content scrambling method
used by the Philips Hospitality TVs. If you are interested
to use it please contact the local Philips Hospitality TV
salesrepresentative.
43
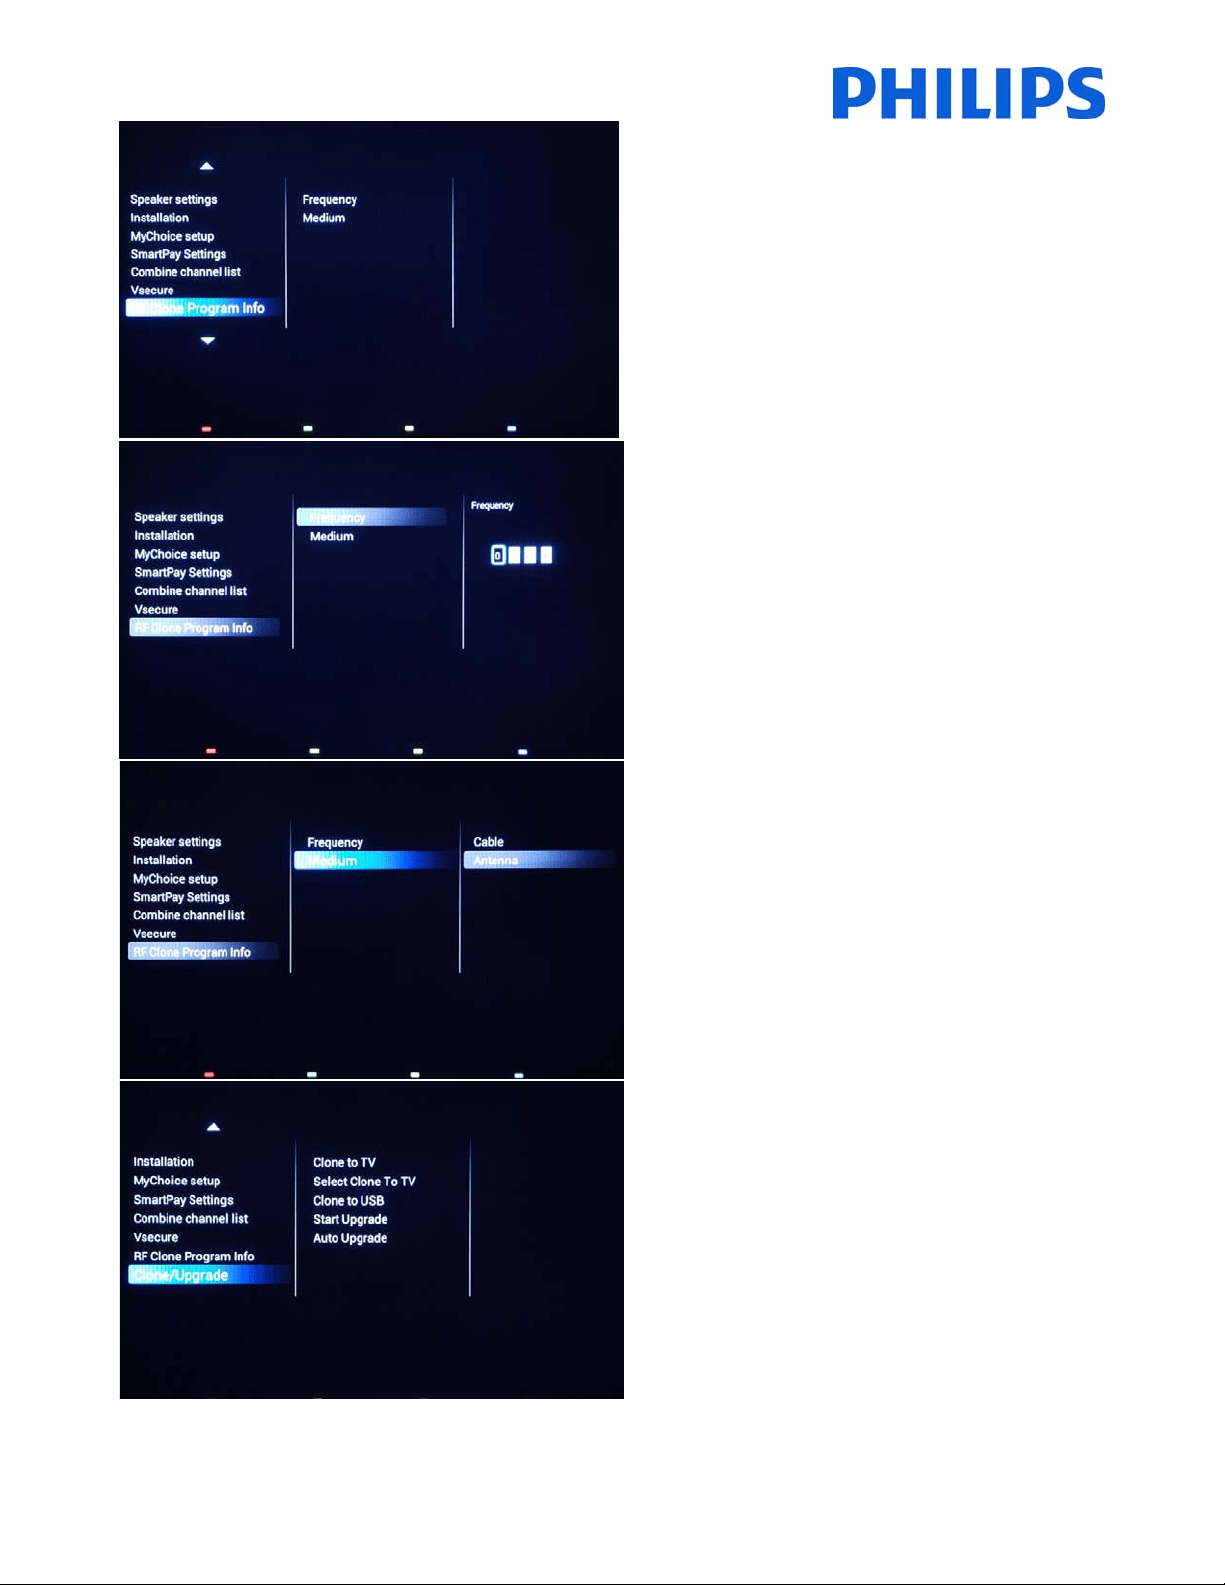
[RFCloneProgramInfo]
Allthesettingsfromthissubmenuareusedfor
SmartInstall.
[Frequency]
ThefrequencyforSmartInstallcanbemodifiedinthis
menu.
Note:Defaultvalueis706MHz
[Medium]
DefinesthetypeofdigitalchannelusedforSmartInstall.
Note:SmartInstal lisworkingonlyviaAntennacabletype
(DVB‐T)
[Clone/Upgrade]
Cloningandupgradeoptionsareavailableinthismenu.

44
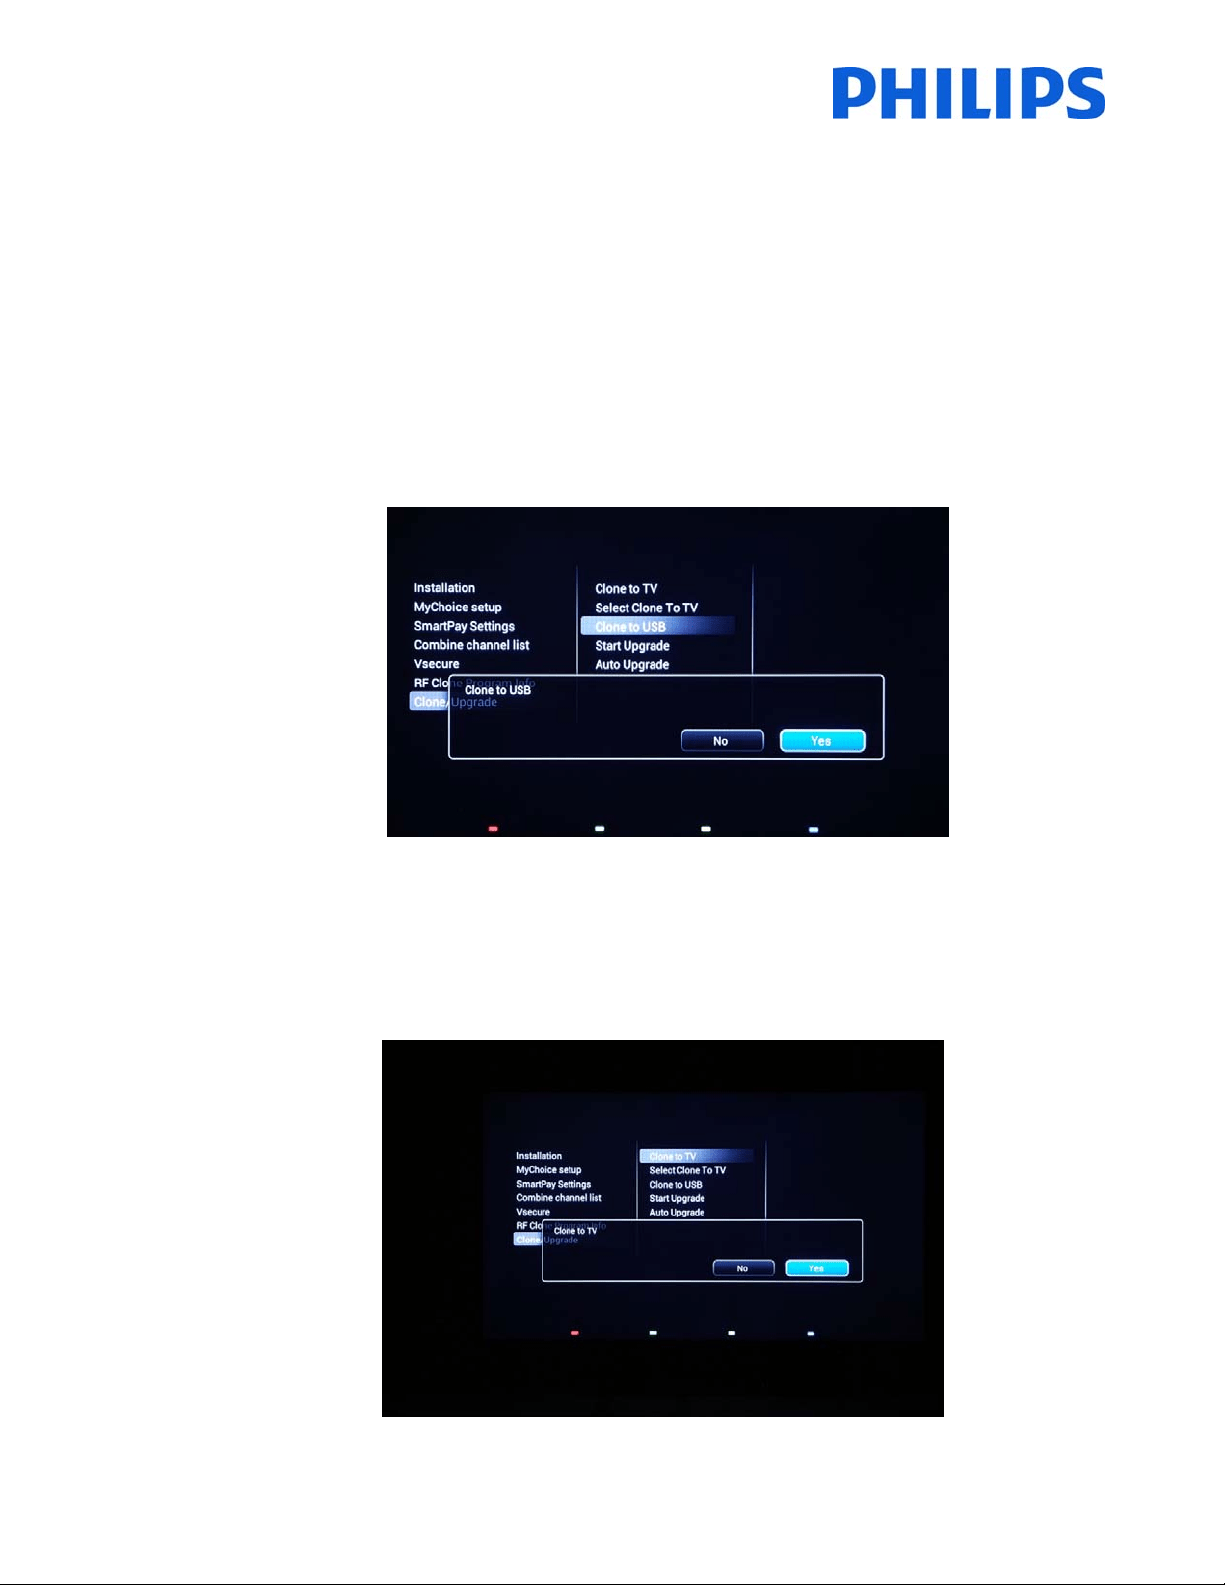
[ClonetoTV]
AllsettingsarecopiedfromUSBdrivetoTV.
[SelectClonetoTV]
Selectthecloningdataforcloningfrommultiplefiles.
[ClonetoUSB]
ClonethesettingsfromtheTVtotheUSB.
[StartUpgrade]
RFupgradecanbemanuallystartedbypressin g“OK”.
TheTVsetwillautoswitchOFFandwillsearchfornew
softwareandcloningdataon RFnetwork.
Note:RFcloningandsoftwareupgradetakesbetween
45‐60minutesdependingonnetworktopologyandwill
startafter
5min.beinginStandby.AslongastheStandby
LEDisblinking,theTVisinupgrademode.

45
[AutoUpgrade]
RFupgradewillbeenabledautomaticallyat4A.M.Ifthe
TVisinstandby,theTVwillsearchforSmartInstall
broadcast.
[OFF]:RFcloningandupgradeviaSmartInstallisdisabled.
[ON]:RFcloningandupgradeviaSmartInstallisenabled.
Tostoresettingspress“HOME”(MENUbutton).Thefollowingmenuwillbedisplayed:
[Discard]:AllchangesintheProfessionalsetupmenuwillbediscardedandTVwillreturntoTVchannel.
[StoreandRestartLater]:AllchangesaresavedbutwillbeappliedonlywhenTVwillrestart.
[Store
andRestartNow]:TVwillstorethesettingsandwillrestarttoapplyallthesettings.
Afterrestartitishighlyrecommendedtocheck thechannellist,settingsandoptionsenabled.Ifthecheckdidnot
revealanyproblemsandallspecificationsareinaccordancewiththerequirements,youcan
proceedtothecloning
masterTVsettingsontherestoftheTVs.Checkhowtoclonesettings.

46
8. WelcomeLogo
IMPORTANT:Totalamount ofsizeforSmartInfoandWelcomeLogoMUSTbesmallerthan64Mb(megabyte)
Thereis1Philipslogodisplayedatstartup.ThelogocanbereplacedbyapictureuploadedviaUSB.
Fileformat:1280x720.pngfile.ThewelcomelogoisdisplayonlyifLowpowerstandbyissettoGreenandTVisin
deepstandbystatebeforeswitchingON.
Note:Below
thestartupprocessisdescribed.Theswitchingtimecanbeinfluencedbythelowpowerstandby,
featuresactivatedatstartupandswitchONchanneltype(HDorSD).
HowtouploadWelcomeLogo
1. Creategraphicsfile:1280x720.pngwithlogo.
2. Filename:TPN142HE_WelcomeLogo.png(Filenameis
case‐sensitive)
3. SaveintotheTVcloningdatafolder“TPN142HE_CloneData\MasterCloneData\”
4. InsertUSBdeviceintoTV
5. Enter[Professionalsettings]menu
6. Go to[Welcomelogo]‐>[USB‐>TV].ThisactionwillloadtheUSBintoTVmemory.
7. Go to[Displaylogo]andsetthe
option[On]toenableWelcomeLogo.
8. Go tothemainmenuandselect[PowerSettings][LowpowerStandby]:SetthevaluetoGreen.
9. Pressthe“HOME/MENU”buttontosaveandexit.Selecttheoption[StoreandRestartnow]andpress
“OK”.TVwillstore thesettingsand
restarttoapplythenewsettings.
8.1SmartInfo
TheSmartInfofeaturecanbeusedintwoways,asapictureslideshoworasuserinteractionpages.Thetwowaysof
usingSmartInfoarenotcomplementaryandcannotbeusedbothatthesametime.SmartInfocandisplaythe
picturesorthewebpagesbypressingthe“SmartInfo”button
ontheremote.TocloseSmartInfopressthe“Menu”
orthe“TV”button.ForbothcasesthepagesarestoredintheTVmemoryandcanbechangedviaUSBflashdriveor
SmartInstall.
Inthe[ProfessionalSettings]menustheoptionsforSmartInfoare:
SmartInfo:OFF‐>SmartInfoisnot
enabled.
SmartInfo:Show‐>SmartInfoisconfiguredaspictureslideshow
SmartInfo:Browser‐>SmartInfoisconfiguredtousewebpages.
Note:DuethefactthatEasySuitedoesn’thaveanetworkinterface,pagesoutsideofTVmemory
cannotbeaccessed.TVmemoryisinmax.64MB.

47
8.2SmartInfoShow
SmartInfo used as Show contains pictures uploaded in the TV memory which are changed by the TV set
automatically atevery8seconds.The picturesaredisplayedin a loop andtheguestcannotinfluencethespeedor
theorderofdisplaying.
HowtouploadpicturesforSmartInfoShow
1.
CreateJPEGgraphicsfileswithamaximumresolutionof1920x1080pixels.Pictureswithlowerresolution
willbeupscaleto1920x1080pixels.
2.Filenameshouldbe:file_01.jpg
a.Formultiplepicturefilesthenamesshouldbeconsecutive.Examplefor4picturesinSmartInfo
Show: file_01.jpg
file_02.jpg
file_03.jpg
file_04.jpg
3.Savethefilesintotofollowingfolder:TPN142HE_CloneData\MasterCloneData\SmartInfoImages\
ThefolderTPN142HE_CloneDatashouldbeintherootoftheUSBflashdrive.
4.SwitchONtheTVandwaituntiltheTVchannelisdisplayed.
4.InserttheUSBflashdriveintotheTVset.IfUSBmediaplayer
isactivatingpressthe“TV”buttontoreturn
totheTVchannel.
5.Enter[Professionalsettings]menu.
6.Goto[SmartInfoSetting]‐>[SmartInfo]:Setthevalue[Show]
7.Goto[SmartInfoSetting]‐>[USB‐>TV]:Press“OK”to uploadthepicturesfromUSBflashdriveto
TV.
8.Press the “HOME/MENU”button tosaveand exit.Selecttheoption [Store and Restart now] and press
“OK”.TheTVwillstorethesettingsandrestarttoapplythenewsettings.
8.3SmartInfoBrowser(onlyMediaSuite&Signature)
SmartInfousedasBrowserwilldisplayHTMLpagesstoredinTVmemory.ThosepagescancontainHTML+CSS3and
JavaScriptandbelinkedtootherpagesfromtheTVmemory.Fornavigationbetweendifferentsectionsofthepage
oranewpage,arrowskeyscouldbeused.
Howtouploadcont ent
forSmartInfoBrowser
1. Createthecontent(HTML+CSS3andJavaScript).Theresolutionofthebrowseris1280x720pixelsand
pageswhichhaveahigherresolutionwillbecomescrollable(sidebarsandpagemovingeffect).
2. Thefirstpagemusthavethenameindex.html.Therestofthecontentcan
belinkedtoindex.html.
3. Savethefilesintotofollowingfolder:TPN142HE_CloneData\MasterCloneData\SmartInfoPages\
4. SwitchONtheTVandwaituntiltheTVchannelisdisplayed.
5. InserttheUSBflashdriveintotheTVset.IfUSBmediaplayerisactivatingpressthe“TV”buttonto
returntotheTV
channel.
6. Enter[Professionalsettings]menu.
7. Goto[SmartInfoSetting]‐>[SmartInfo]:Setthevalue[Browser]
8. Go to[SmartInfoSetting]‐>[USB‐>TV]:Press“OK”touploadthepicturesfromUSBflashdrivetoTV.
9. Pressthe“HOME/MENU”buttontosaveandexit.Select
theoptio n[StoreandRestartnow]andpress
“OK”.TheTVwillstorethesettingsandrestarttoapplythenewsettings.
48
9. Clone
Withcloningitispossibletocopyto/fromaUSBdevicetheTVconfigurationdata,mediacontentandthechannel
listdata.PlaceaUSBMemorystickintheUSBsideconnectoroftheTV.
*TheUSBdeviceshouldbeformattedasFATorFAT32.
AccesstheProfessionalmenuby
pressingthe“RC6SETUP”key,andthenpressthe“Home/Menu”button.Withthe
guestremote control,pressthefollowingkeys in sequence:“3,1,9,7, 5,3,MUTE”.Accessthe[Professionalsettings]
menuandgoto[Clone/Upgrade]:
TocloneallthesettingsfromtheTV,theoption[ClonetoUSB]shouldbeused.
1.
Select[ClonetoUSB]andpress“OK”.
2. TheclonedatawillbeloadedfromtheTVsetintoUSBdevice.
3. WaituntiltheOSDmessagereturnstoitsearlierstatebeforeremovingtheUSBdevice
TocloneallsettingsfromtheUSBtotheTV,theoption
[ClonetoTV]shouldbeused.
1. Select[ClonetoTV]andpress“OK”.
2. TheclonedatawillbeloadedfromtheUSBdeviceintotheTV.Toactivatetheloadedsettings,TVwill
restart.AfterrestartTVwilldisplaytheProfessionalmenuoverview.
3. RemovetheinsertedUSB
drive.
49
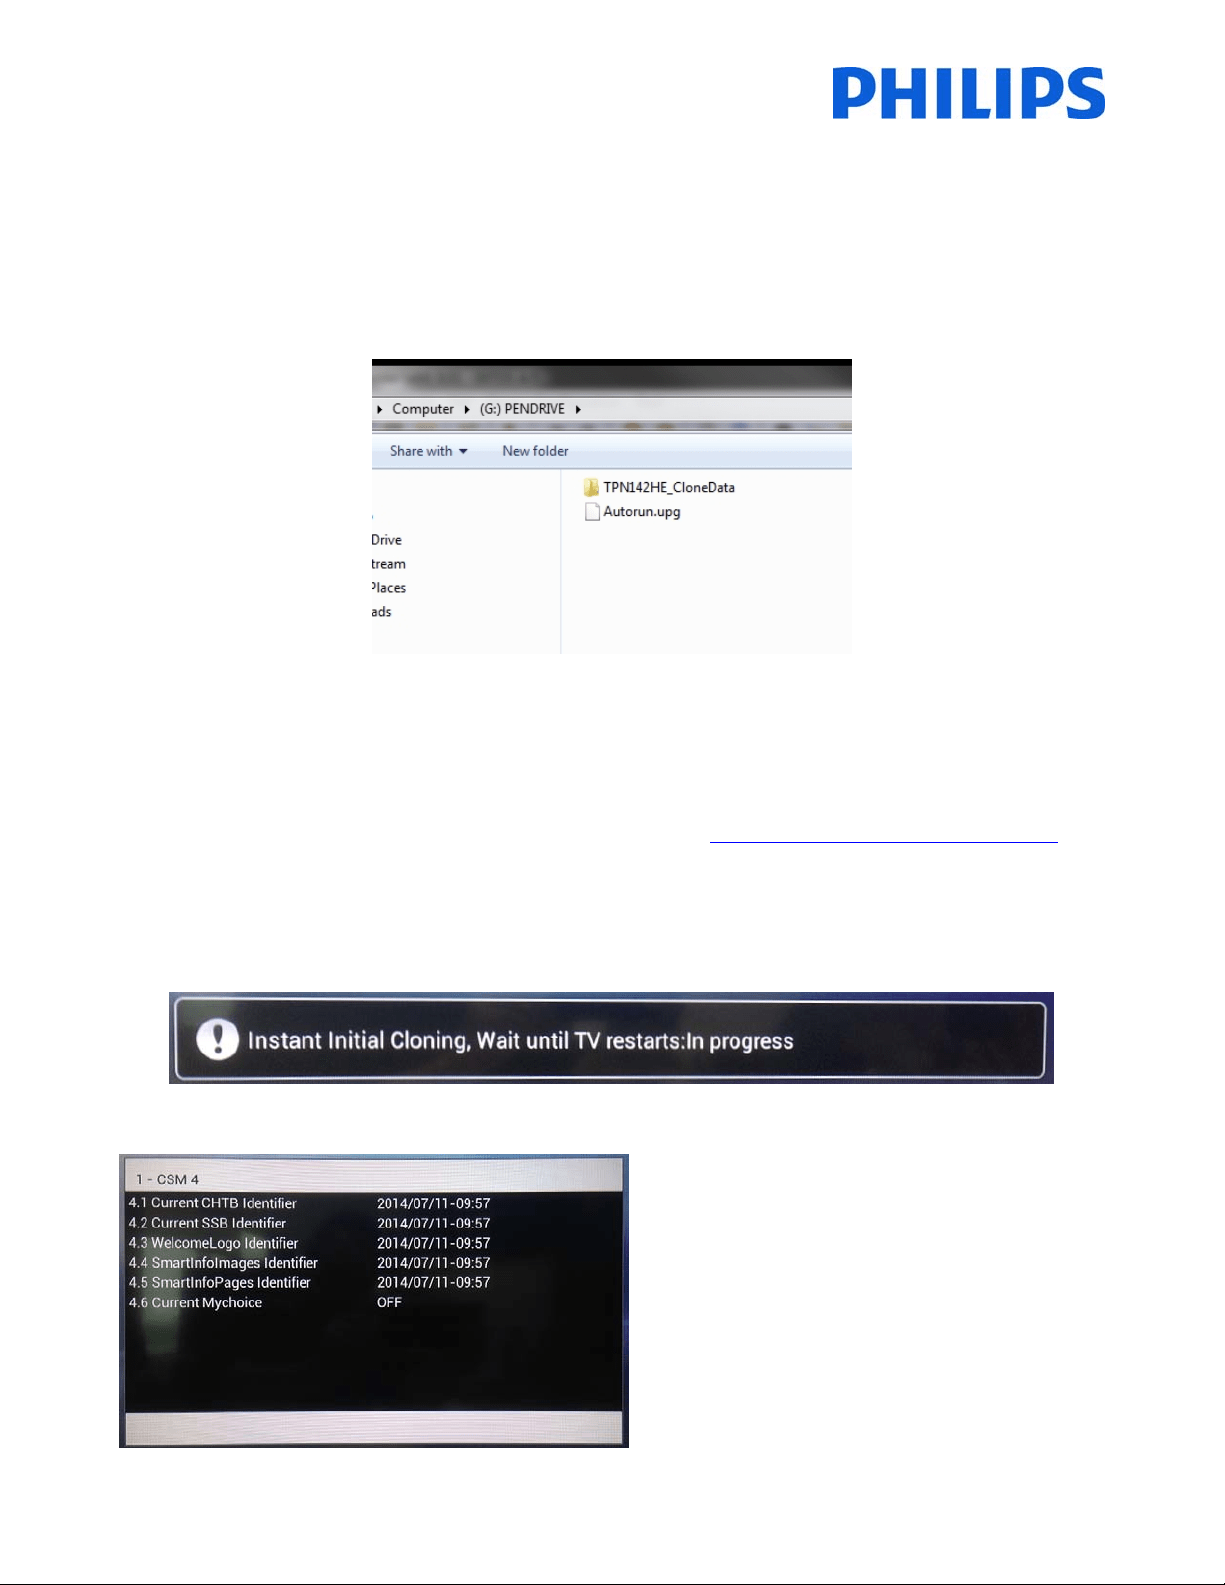
Instantinitialcloningandsoftwareupgrade:
ATV out oftheboxwill triggerasoftware upgrade andthe instant initial cloning mechanism; ifthe files forthose
actionsarenotavailable,theTVwilldisplaytheinstallationwizard.Beforeconnectingthe powerco rdandpowering
on the TV, insert the
USB key with cloning data and the latest software version downloaded from the support
website.AfterpowerontheTVwillsearchontheUSBkeyforanewersoftwareversion,willapplyitandafterwards
willcheckifthecloningdataisavailable.Whenthecloningprocessiscomplete
theTVwilldisplaythesummaryand
timestampsforeac hfilecloned.
ContentofaUSBflashdriverpreparedforsoftwareupgradeandinstantinitialcloning.
TPN14HE_CloneData:containsthecloningdataandCSMinformation
Autorun.upg:isthelatestsoftwareversiondownloadedfromhttp://www.support.philips.com/support
Note:TVwillchecktheversionnumberofthesoftwareavailableontheUSBandwillupgradeonly ifthenumberis
higherthantheoneinstalledonTV.
DuringtheinstantinitialcloningthefollowingOSDmessagewillbedisp layed.
WhentheprocessiscompletetheCSMsummarywill
bedisplayed.
Whenthesummariesaredisplayedpowerdownthe
TVusingthePowerbuttonontheremoteandremove
theUSBkey.PowerontheTVtochecktheresultof
thecloningandcorrectfunctionalityofTV(e.q:
Welcomemessage,welcomelogo,hotelinfo,starting
channel,startupvolume).

50
10. Featuresettings
[MultiRC]
Thisfunctionallowsthatupto14televisionscanbeinstalledinaroomwhereaseveryTVwilllistentoitsownRC.
OncetheTVisset,alsoeveryRCcanbesettorememberitsconn ectedTV:
[Blue]TheTVwilllistentoa‘blue’RC.Pressandholdboththemenuand“blue”buttonontheRCforaboutfiveseconds.
[Green]TheTVwilllistentoa‘green’RC.Pressandholdboththemenuand“green”buttonontheRCforaboutfiveseconds.
[Yellow]
TheTVwilllistentoa‘yellow’RC.Pressandholdboththemenuand“yellow”buttonontheRCforaboutfiveseconds.
[Red]TheTVwilllistentoa‘red’RC.Pressandholdboththemenuand“red”buttonontheRCforaboutfiveseconds.
[TV0]
TheTVwilllistentoa‘0’RC.Pressandholdboththemenuandnumber“0”buttonontheRCforaboutfiveseconds.
[TV1]TheTVwilllistentoa‘1’RC.Pressandholdboththemenuandnumber“1”buttonontheRCforaboutfiveseconds.
[TV2]TheTVwilllistentoa‘2’RC.Pressandholdboththemenuandnumber“2”buttonontheRCforaboutfiveseconds.
[TV3]TheTVwilllistentoa‘3’RC.Pressandholdboththemenuandnumber“3”buttonontheRCforabout
fiveseconds.
[TV4]TheTVwilllistentoa‘4’RC.Pressandholdboththemenuandnumber“4”buttonontheRCforaboutfiveseconds.
[TV5]TheTVwilllistentoa‘5’RC.Pressandholdboththemenuandnumber“5”buttonontheRCfor
aboutfiveseconds.
[TV6]TheTVwilllistentoa‘6’RC.Pressandholdboththemenuandnumber“6”buttonontheRCforaboutfiveseconds.
[TV7]TheTVwilllistentoa‘7’RC.Pressandholdboththemenuandnumber“7”buttononthe
RCforaboutfiveseconds.
[TV8]TheTVwilllistentoa‘8’RC.Pressandholdboththemenuandnumber“8”buttonontheRCforaboutfiveseconds.
[TV9]TheTVwilllistentoa‘9’RC.Pressandholdboththemenuandnumber“9”buttonon
theRCforaboutfiveseconds.
[Off]Thisfunctionisnotused;allTVswilllistentoa‘blue’RC.
PressandholdtheOKbuttonforaboutfivesecondstocheckthecurrentcoloroftheMultiRemotesettingsofTV
anduserremote.
[MyChoice]
InthismanualwewillcoveronlytheconfigurationofMyChoiceontheTV,alldetailsabouttheaccountandcredits
arecoveredinadifferentmanual.PleasecontactyourTPVisioncountrysalesmanagertosetupanaccountandbuy
thecredits.
DuringtheinstallationoftheTVsets
pleasecollectthefollowinginformation:
Roomnumber TVmodel Serialnumber
101 32HFL3010T/12 FZ1A
Roomnumber, TVmodel and serial number arerequiredon MyChoicewebsit e whenrooms areconfigured. Make
surethatallvaluesarecorrectbecausetheMyChoicewebsiteisgeneratingpincodesbasedonthisinformation.You
can gather all these details during the installation and afterwards enter them in the
administration part of the
MyChoicewebsite.
HowtoconfiguretheMyChoiceisdescribedbelow:
1. The most important step for MyChoice is the clock. If the clock is not defined or the TV doesn’t have the
correct time, MyCho ice will display the following message: MyChoice is not available, please contact the
reception.
EntertheProfessionalmenugoto:ClocksetupandconfiguretheDownloadprogram.
51
AfterwardsdefinethecountryinwhichtheTVisinstalled.
AndifitisrequiredtheTimeoffset.
2. GotoInstallationandenableMyChoice.
Inthiscasethreeoptionsareavailable.Theseare:
[OFF]:ThismeansthatMyChoiceisdisabledandthepackagesarenotavailable.
[ON]
:MyChoiceisenabledbutwillonlyworkwithscratchcards.
[ON (Credit)]: MyChoice is enabled and it is accepting the codes generated by the MyChoice website and
alsothecodesgeneratedwithscratchcards.
52
3. [AskforPIN]
[OFF]:Thecodeisrequiredonlyonetimeatactivation.Anewcoderequestwillberequestedwhenthe
validityisexpiring.
[ON]:PinCodeisrequiredevertimewhenthefeatureisused.EverytimewhentheTVsetisswitched[ON],
thefeaturewill
requirethepincode.
4. DefiningthechannelpackagesisthesecondstepintheMyChoiceconfiguration.Basedonthepincodethe
TVchannelswillbedisplayed.Threepackagesareavailable:
Free package:This package will include all channels which are available without any pin code. To add a
channeltoapackageyouhavetoselectthechannelandpressOKtoticktheboxinfrontofthechannel.
Inthiscasethe“Freepackage”containsfivechannels;therestofthechannelswillnotbeavailableifthereis
nocodeentered.
Package
1:Inpackage1youcanaddthechannelswhichwillbeavailablewiththeMyChoicepincode.
KeepinmindthattheMyChoicepincodeforpackage1willenableonlythechannelsfromthispackage.To
haveaproperpackageconfigurationaddallthe“Freechannels”tothis
package.Ifyoudon’taddthe“Free
channels”inthispackageaftertheMyChoiceactivation,thechannelplanwillincludeonlyExtrachannels
withoutpossibilitytoviewthe“Freechannelspackage”.
Package1=FreeChannels+Extrachannels
53
Note:Extrachannelscanconta insomemoviechannelsorsportchannelslike:HBO,ComedyCentral,SkySport.
Package2:InthispackageyoucanaddchannelswhichwillbeactivatedwithadifferentMyChoicepincode.
Thispackagecancontain“Freechannels”,“Package1”andanotherfewchannelswhichwillbeavailable
onlyifthepincodeisvalidforPackage2.
Fewconfigurationspossibleare:
Package
2=Freechannels+VIPChannels
Note:VIPchannelscancontainchannelswhichareincludedinPackage1andafewextra.
Package2=Freechannels+Package1+VIPChannels
Eachpackagecanbeconfiguredindependentlywithouthavinganyinfluenceonotherpackages,butyou
havetokeepinmindthatafteractivationtheTVwillshowonlythechannelswhicharetickedforthis
package.
Press“HOME”button
toexitthe[Professionalmenu]andstoreallsettings.
5. ChecktheMyChoicefu nctionality.
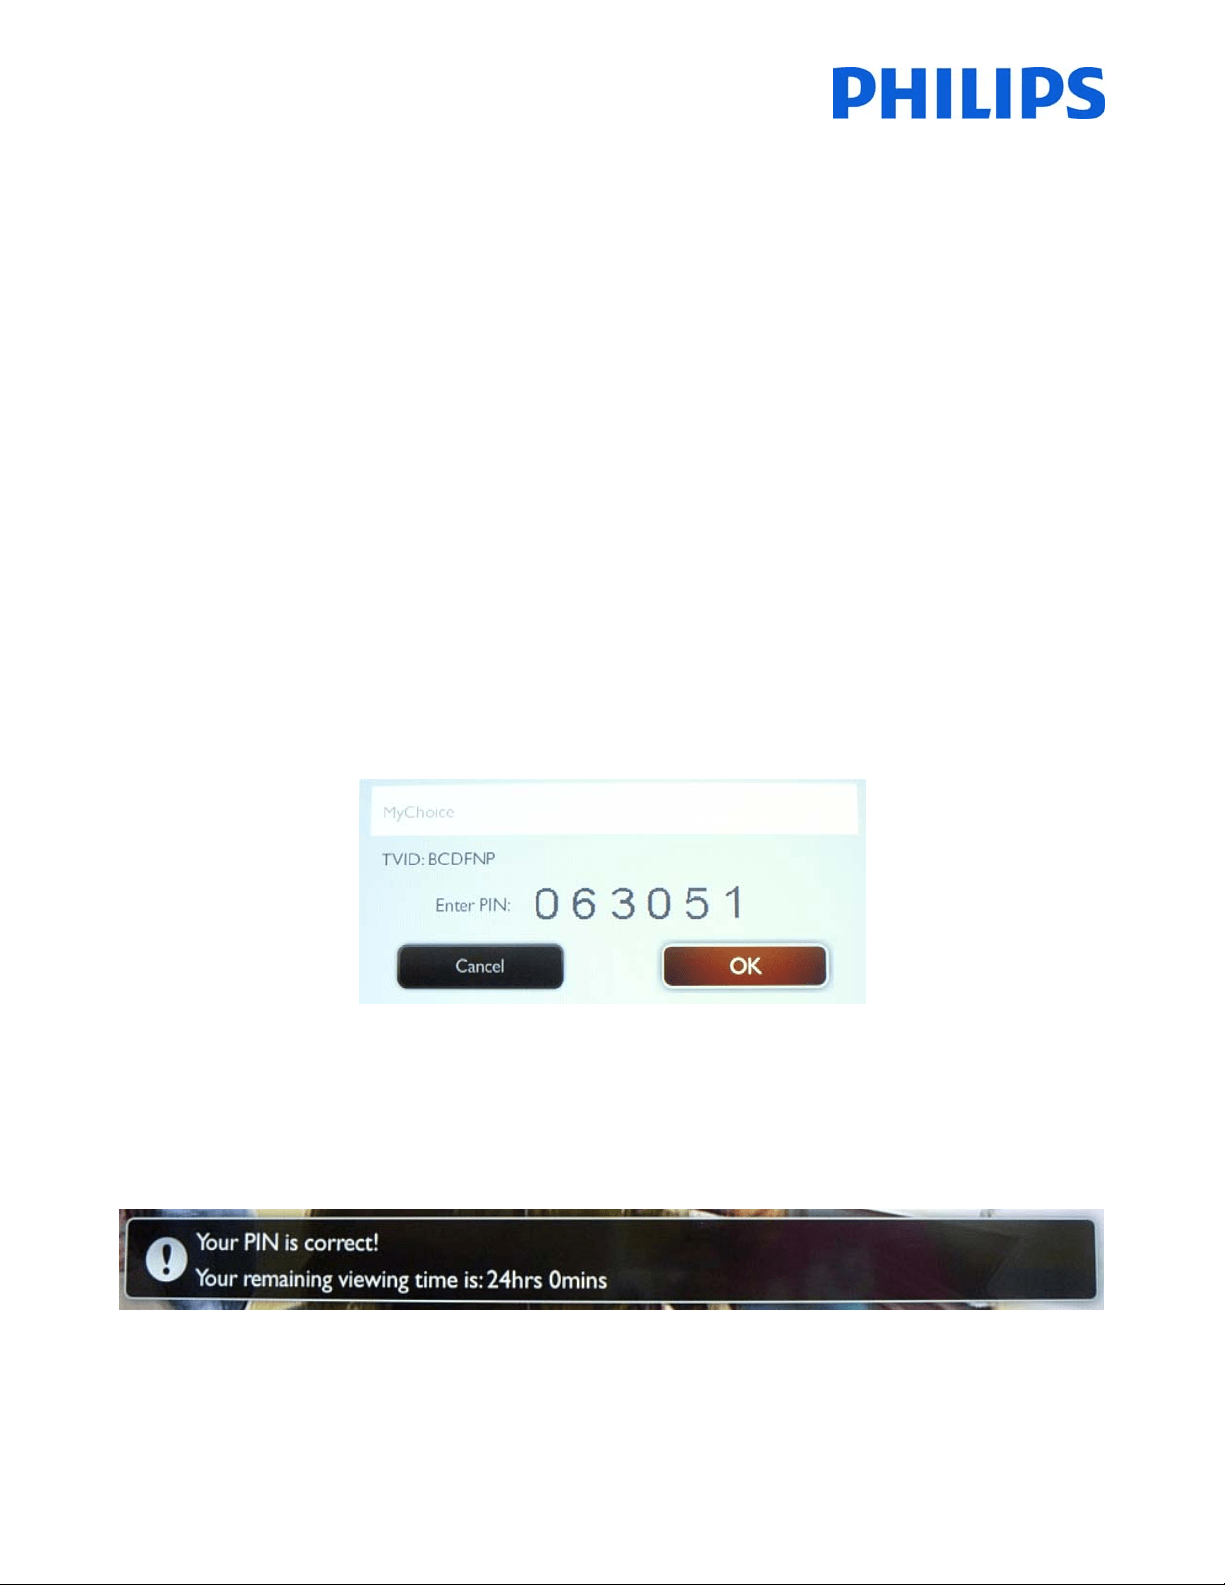
PowerONtheTVandwaittoseetheSwitchonchannel.Pre sstheMyChoicebuttonontheremotecontrol.
ThefollowingwindowwillappearonTV:
Enterthepincodereceivedfromthewebsite
orgeneratedwithascratchcard.AfterenteringthepincodepressOK
tosubmitthecode.
Ifthepincodeiscorrect,thefollowingmessagewillbedisplayed.Alsothemessagewilldisplaytheremaining
viewingtime.
Afterafewsecondsthemessagewilldisappearandthechannelgrid
willpopupshowingallchannelsavailable.The
MyChoicechannelswillhaveastarinsidethebox.
Ifyouenteraninvalidpincodeoranexpiredpincodethefollowingmessagewillbedisplayed.

54
Note:IfyoudoapowercycleoftheTVandpresstheMyChoicebuttonagain,youcanente rthesamepincodeifthis
codeisstillvalid.
Importantremark:Ifyouenteranewpincode,thepreviouscodewillbecomeinvaliddespitethefactthatthecode
couldbestillvalid.
Example:IfyouenterapincodeforPackage1validfor24hoursandafter4hoursyouenteredapincodefor
Package2,thepincodeforPackage1willbecomeinvalid;theTVwillreportthemessageabove.
TheTVwillonly
savethelastpincodeentered;thepreviousoneswillbecomeexpired.

55
11. CSM(ConsumerSetupmenu)
TheCSMcontainsdataabouttheTVsoftware,serialnumberandotherdetails.Themenucanbeaccessedusinga
standardremotecontrolorusingthemasterremotecontrol.
1.Usingthestandardrem otecontrol:pressthefollowingkeysequence“1,2,3,6,5,4”
2.Usingmasterremotecontrol(22AV8753D):PresstheRECALL
buttonfortheCSM.
Notes:ActivationoftheCSMisonlypossibleifthereisno(user)menuonthescreen.
TheCSMdataarealsostoredontheUSBduringthecloningfromUSBtoTV.ThedataarestoredinthefolderCSM
DumpwhichisinsideofthecloningfolderTPN142HE_CloneData.
Thetextfilewhichcontainsallthedatawillhavethenamecomposedfromthemodelnumberand
serialnumberof
theTV.Filecanbeviewedusinganytexteditoranddoesn’taffectthecloningdata.
Contentofthefilelookslikethis:
1.1SetType: 28HFL3010T/12
1.2Productioncode: FZ1A1425043274
1.3Installationdate: 140630
1.4aOptionCode1: 000016067000000000000068
1.4bOptionCode2: 002002064065010014105000
1.5SSB: 905TXESCF0100100SX
1.6Display: 750TBV275A01C2N000
1.7PSU: PLTVDF261XXJ6
2.1CurrentMainSoftware: TPN142HE_005.002.009.128
2.2DevelopmentSWVersion: TPN142HE_005.001.201.037

© 2014 Koninklijke Philips N.V.
All Rights reserved.
Specifications are subject to change without notice.
Trademarks are the property of Koninklijke Philips N.V. or their respective owners.
www.philips.com