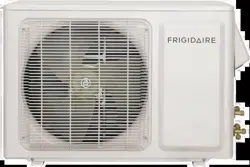
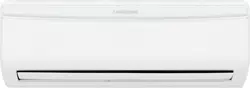
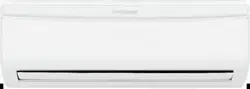
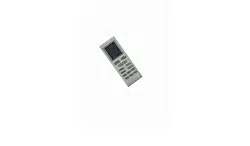
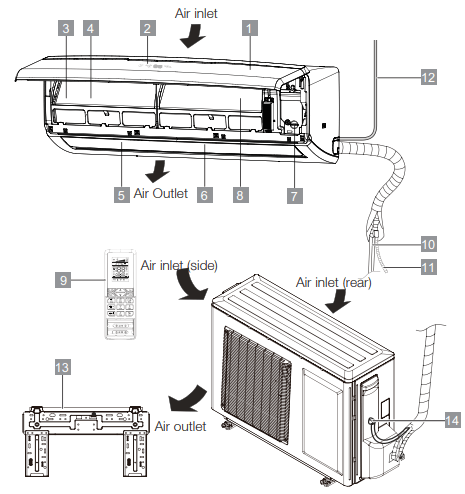
1 Front panel 2 Digital display 3 Air filter 4 Pre-dust filter 5 Horizontal air flow grille 6 Vertical air flow louver (inside) 7 Manual control button 8 Cold plasma generator (if applicable) 9 Remote controller 10 Refregerant pipe 11 Drain hose 12 Power cable 13 Mounting plate 14 Connecting cable
Attention!! All the pictures in this manual are for explanation purpose only. They maybe slightly different from the airconditioner you purchased.
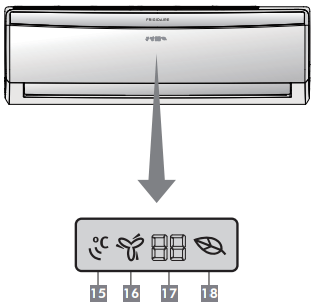
Display panel (indoor unit)
15 I Feel indicator:
Lights up when I Feel feature is activated.
16 Turbo indicator:
Lights up when Turbo feature is activated.
17 DIGITAL SCREEN:
Displays the temperature settings when the air conditioner is operational.
Displays the malfunction code when fault occurs.
18 ECO indicator:
Lights up when Eco feature is activated.
Attention!! The description of the control is based on a typical model.The functions are the same in your air conditioner, even if there are some differences in the appearance.
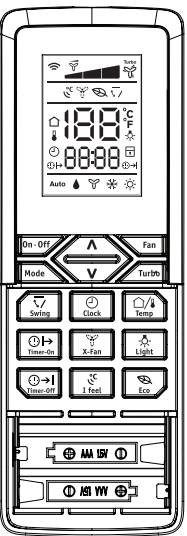
Remote control
Remote control operation
1. Operation mode: Cool, Heat (Only for models with heating function), DRY, FAN, and AUTO (Automatic).
2. 24 hrs Timer.
3. Internal temperature range selection: 61ºF - 86ºF
4. LCD
REMOTE CONTROL SPECIFICATIONS
Rated voltage
3 V
Lowest voltage of CPU emiting signal
2.4 V
Transmission distance
32-4/5'*
Environment
23ºF ~ 140ºF
* With 3 V, reaches 40'
Attention!!
1. The air conditioner will not operate when curtains, doors or other materials block the signals between the remote control and the indoor unit.
2. Avoid spilling any liquid in the remote control. Do not expose to sunlight or any heat source.
3. If the infrared signal receiver in the indoor unit is exposed to sunlight, the air conditioner unit might not work properly. Use curtains or shades to avoid having sunlight directly to the receiver.
4. If other electrical equipments react to the signals sent by the remote control, change their position or consult with you local dealer.
Remote control battery: To use the remote control, it is necessary to install two alkaline AAA batteries.
Remote control description
1 ON/OFF: Press this button to start the unit operation. Push the button again to stop the unit operation.
2 UP/DOWN: Press the button to increase/decrease the temperature. Keep the button pressed for two seconds to accelerate the process. Release the button to set the temperature and the °C/°F icon will be displayed constantly.
In Timer-On/Off or Clock functions, use the button to set the clock or timer adjustment.
3 MODE: Press the button to set the operation mode: AUTO, DRY, FAN, COOl and HEAT*. Default setting: AUTO.
* Note: Only for models with Heat function.
4 SWING: Press this button, the louver will swing up and down automatically. Press again to cancel it and the louver will stay at its last position.
5 TIMER ON: Press the button to set the timer function for switching on the unit. If the TIMER ON symbol ”” blinks, press the UP or DOWN button to set the time. Keep the button pressed for two seconds to accelerate the process. Press the button to set the timer.
Default setting: 8:00 (24-hour mode). Press the button again to cancel the timer function.
6 TIMER OFF: Press the button to set the timer function for switching off the unit. If the TIMER OFF symbol ”” blinks, press the UP or DOWN button to set the time. Keep the button pressed for two seconds to accelerate the process. Press the button to set the timer.
Default setting: 17:00 (24-hour mode). Press the button again to cancel the timer function.
7 I FEEL: Press the button to enable or disable the I FEEl function. If the I FEEl function is enabled, the I FEEl symbol ”” will be shown.
If the I FEEl symbol is enabled, the remote control will send the ambient temperature to the main unit every 10 minutes or when you press one of the buttons.
8 FAN SPEED: Press the button to set the fan speed: AUTO, lOW, MEDIUM and HIGH. Default setting: AUTO. In the DRY mode, only lOW can be set.
9 TURBO: In COOl or HEAT mode, press the button to enable or disable the turbo function. If the turbo function is enabled, the turbo symbol ”” will be shown.
If the turbo function is enabled, the unit will operate at turbo speed to cool or heat rapidly so that the ambient temperature approaches the set temperature as soon as possible.
10 ClOCK: Press the button to set the clock. If the clock symbol ”” blinks, press the UP or DOWN button to set the time. Keep the button pressed for two seconds to accelerate the process. Press the ClOCK button again to set the clock. The clock symbol stops blinking.
11 TEMP: Press this button to change the Indoor Unit temperature Display between Set temperature and Room temperature. After display Room temperature 5s, it will turn into set temperature. When the symbol ”” is shown, the indoor unit displays the Set temperature. When the symbol ”” is shown, the indoor unit displays the Room temperature.
12 LIGHT: Press the button to switch the display of the indoor unit on or off. When switch on, the light symbol ”” will be showed. Default setting: ON.
13 X-FAN: In COOl or DRY mode, press the button to enable or disable the X-FAN function. If the X-FAN function is enabled, the X-FAN symbol ”” will be shown. Default setting: OFF.
14 ECO: In COOl or DRY mode, press this button to enable or disable Eco operation. If the ECO function is enabled, the ECO symbol ”” will be shown. Default setting: OFF. This is ideal for the users to use while sleeping.
Special functions
About LOCK: Press Mode and Fan buttons at the same time, you can lock and unlock the remote controller. The icon "" will display when Lock function is eabled.
To switch between Fahrenheit and Celsius: Turn the remote controller off and the °C/°F can be switched by pressing Mode and DOWN buttons at the same time with keeping for 3 seconds.
How the air conditioner works
Automatic operation
When the Air Conditioner is ready for use, switch on the power and the OPERATION indicator lamp on the display panel of the indoor unit starts illuminating.
1. Use the MODE button to select AUTO.
2. Use the "MODE" button to select Auto. The unit will automatically select Cool, Fan, Heat and Dehumidifying operation depending on the difference ambient temperature and system difference temperature. The temperature can be set within a range of 16ºC/61ºF~30ºC/86ºF in 1ºC/1ºF increments. Keep the button pressed for two seconds to accelerate the process.
3. Press the ON/OFF button again to stop the unit operation.
COOL / HEAT / DRY (DEHUMIDIFICATION) and FAN ONLY operation
1. If the AUTO mode is not comfortable, you may manually override the settings by using COOL, HEAT*, DEHUMIDIFICATION or FAN ONLY** mode.
2. Press the "^"/"v" button to set the desired room temperature. When in COOL mode, the most comfortable settings are 70 ºF or above. When in HEAT mode, the most comfortable settings are 82 ºF or below.
3. Press the FAN to select the FAN mode of AUTO, , or .
4. Press the ON/OFF button, the operation lamp lights and the air conditioner start to operate as your settings. Press the ON/OFF button again to stop this unit operation.
* Note: Only for models with heating function.
**Note: The FAN ONLY mode can not be used to control the temperature. While in this mode, only steps 1,3 and 4 may be performed.
DRY (DEHUMIDIFICATION) operation
The dry mode will automatically select the drying operation based on the difference between the set temperature and the actual room temperature. The temperature is regulated while dehumidifying by repeatedly turning on and off of the cooling operation or fan only. In the Dehumidifying mode, you can not switch the fan speed. It has already been automatically set at low speed.
1. Press the MODE button to select DRY.
2. Press the "∧"/"∨" button to set the desired temperature from 61 ºF to 86 ºF.
3. Press the ON/OFF button, the operation lamp lights and the air conditioner starts to operate in the DRY mode. FAN SPEED is Low. Push the ON/OFF button again to stop this unit operation.
Air flow direction adjustment
Press the SWING button "" once and quickly, the air flow direction setting feature of the louver is activated. The horizontal louver would swing up/down automatically. Press it again to stop at its last place.
Attention!!
Due to the difference between the set temperature of the unit and the actual indoor temperature, the Air Conditioner in DRY mode will automatically switch the operation modes between COOL and FAN ONLY many times.
Attention!!
If the louver oscillates or moves in a position that could affect the cooling or heating (only for models with heating function) of the air conditioner, the direction of the oscillation/movement would alter automatically.
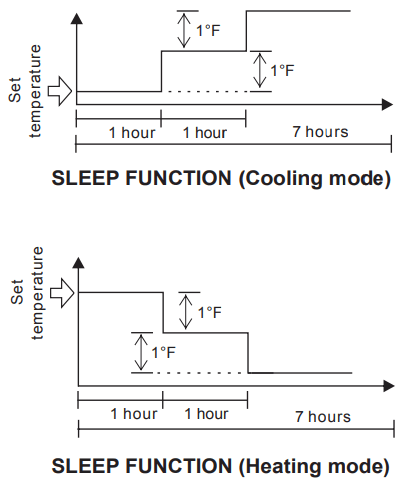
Eco(Sleep) mode
Press the Eco/Sleep button to activate the sleep mode. To deactivate, press the button again.
In cooling mode:
• The fan speed will be automatically controlled.
• The air conditioner will automatically increase 1°F per hour in a 2 hour period(The indoor unit always displays the set temperature). The set temperature will be steady for the next 5 hours, then this mode will be terminated.
In heating mode (only for models with heating function)
• The fan speed will be automatically controlled.
• The air conditioner will automatically decrease 1°F per hour in a 2 hour period.(The indoor unit always displays the set temperature). The set temperature will be steady for the next 5 hours, then this mode will be terminated.
TIMER Operation
TIMER button can set the auto-on time of the unit.
To set the starting time:
1. Press the "TIMER ON" button to activate the auto start timer function.Auto start can be set from 0~24 hours. After pressing "TIMER ON" button, "ON" on the display will blink, and during 5 seconds blinking, the value can be adjusted by pressing "∧"/"∨" button. Every press of this button,1 minute will be increased or decreased, but continuously press the "∧"/"∨" button, 2 seconds later the value will be increased or decreased automalically, and after 10 minutes increase or decreased, the value will be changed 10 minutes every 0.5 second; Press the "TIMER ON" button to conform the time.
2. when repressing the "TIMER ON" button, the "TIMER ON" setting will be canceled.
To set the stopping time
1. Press the "TIMER OFF" button to activate the auto stop timer function.
2. The method of setting is the same as above of"TIMER ON".
Examples:
Optimal operation
To achieve optimal performance, please note the following:
Adjust the air flow direction correctly so that it is not directed on people.
Adjust the temperature to achieve the highest comfort level. Do not adjust the unit to excessive temperature levels.
Close doors and windows on COOL or HEAT (only for models with heating function) mode, or performance may be reduced.
Use TIMER ON button on the remote controller to select a time you want to start your air conditioner.
Do not put any object near air inlet or air outlet, as the efficiency of the air conditioner may be reduced and the air conditioner may stop running.
Clean the air filter periodically, otherwise cooling or heating (only for models with heating function) performance may be reduced.
Do not operate unit with horizontal airflow grille in closed position.
How to use the indoor unit
Adjusting air flow direction
Adjust the air flow direction properly, otherwise it might cause discomfort or uneven room temperatures. Adjust the vertical louver using the remote controller. Adjust the horizontal louver manually.
To set the horizontal air flow direction (left/ right)
Adjust the horizontal louver manually using the lever on the left or right side of the vertical louver arm (Depending on the specific model you choose), or move the lever at the left (or right, or middle which is only for 21400- 36000 Btu's, depending on the specific model you choose) end of the air outlet to the desired position. Perform these adjustments before you start the unit because once it has been started, there is risk of your fingers getting caught on the fan.
To automatically swing the air flow direction (up/down)
Perform this function while the air conditioner is in operation.
Press the "" button on the remote controller.
To stop the function, press the "" button again.
Press "" to lock louver in desired position.
The "" button will be disabled when the air conditioner is not in operation (including when the TIMER ON is set).
Do not operate the air conditioner for long periods with the air flow direction set downward in cooling or dry mode. Otherwise, condensation may occur on the surface of the horizontal louver and drop on to the floor or on furnishings.
Do not move the horizontal louver manually. Always use the "" button. If youmove this louver manually, it may malfunction during operation. If the louver malfunctions, stop the airconditioner and restart it.
Open angle of the horizontal louver should not be set too small, as COOLING or HEATING (only for models with heating function) performance may be impaired due to too restricted air flow area.
Do not operate unit with horizontal louver in closed position.
When the air conditioner is connected to power (initial operation), the horizontal louver may generate a sound for 10 seconds, this is a normal operation.
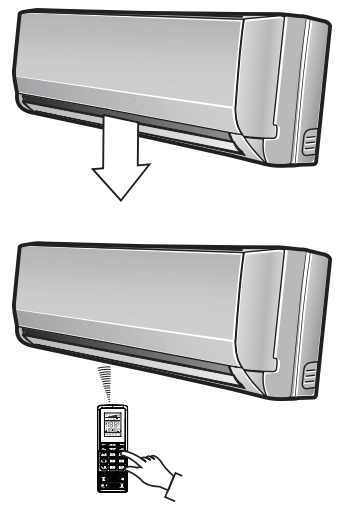
Manual operation (without remote control)
Manual operation can be used temporarily in case you can not find the remote controller or its batteries are exhausted.
1. Open and lift the front panel up to an angle until it remains fixed with a clicking sound.
2. One press of the manual control button will lead to the forced AUTO operation.
3. Close the panel firmly to its original position.
Attention!!
Once you press the manual button, the operation mode is shifted in an order as: AUTO and OFF.
The manual operation is mainly used for testing purpose. Do not choose it unless it is necessary. To return to the remote controller operation, use the remote controller.
Maintenance
Cleaning the indoor unit and remote controller.
It is necessary to stop the air conditioner and disconnect the power supply before cleaning.
Use a dry cloth to wipe the indoor unit and remote controller.
A cloth dampened with cold water may be used on the indoor unit if it is very dirty.
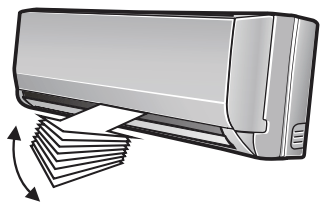
The front panel of the indoor unit can be removed and cleaned with water. Then wipe it with a dry cloth.
Do not use a chemically treated cloth or duster to clean the unit.
Do not use benzine, thinner, polishing powder, or similar solvents for cleaning. These may cause the plastic surface to crack or deform.
Cleaning the air filter
A clogged air filter reduces the cooling efficiency of this unit. Please clean the filter once every 2 weeks.
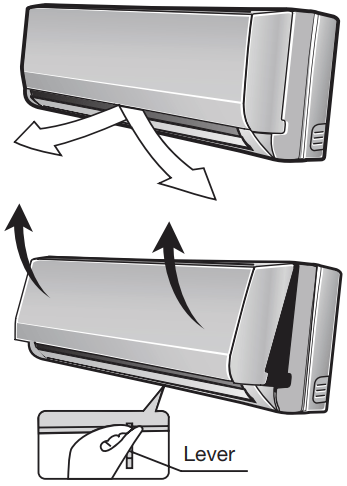
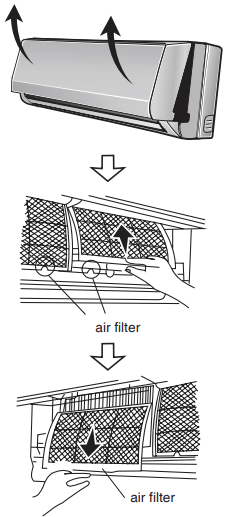
1. Lift the indoor unit panel up to an angle until it stops with a clicking sound.
2. Grab the handle of the air filter and lift it up slightly to take it out from the filter holder, then pull it downwards.
3. Remove the air filter (Fresh air filter if so equipped + support frame) from the unit.
Maintenance
If you plan to idle the unit for a long time, perform the following:
Operate in fan mode for about half a day to dry the inside of the unit.
Stop the air conditioner and disconnect power. Remove the batteries from the remote controller.
The outdoor unit requires periodic maintenance and cleaning. Do not attempt to do this yourself. Contact your dealer or servicer.
If you plan to idle the unit for a long time, perform the following:
Check that the wiring is not broken or disconnected.
Check that the air filter is installed.
Check whether the air outlet or inlet is blocked after the air conditioner has not been used for a long time.
Operation tips
The following events may occur during normal operation.
Protection of the air conditioner.
Compressor protection
This unit comes with a time delay function to help protect the compressor,please allow 3 minutes for the compressor to restart upon turning on the unit.
Anti-cold air (Only for models with heating function)
The unit is designed not to blow cold air in HEAT mode when the indoor heat exchanger is in one of the following three situations and the set temperature has not been reached.
When heating has just starting.
Defrosting.
Low temperature heating.
Defrosting (Only for models with heating function)
Frost may be generated on the outdoor unit during heat cycle when outdoor temperature is low and humidity is high resulting in lower heating efficiency of the air conditioner. During this condition, air conditioner will stop heating operation and start defrosting automatically.
The time of defrosting may vary from 0 to 8 minutes according to the outdoor temperature and the amount of frost buildup on the outdoor unit.
The indoor or outdoor fan will stop running when defrosting (Only for models with heating function).
The indoor unit will display "H1" code when defrosting, it's normal.
A white mist coming out from the indoor unit
A white mist may generate due to a large temperature difference between air inlet and air outlet in COOL mode in an indoor environment that has high relative humidity.
A white mist may generate due to moisture generated from defrosting process when the air conditioner restarts in HEAT mode operation after defrosting.
Low noise of the air conditioner
You may hear a low hissing sound when the compressor is running or has just stopped running. This sound is the sound of the refrigerant flowing or coming to stop.
You can also hear a craching sound when the compressor is running or has just stopped running. This is caused by heat expansion and cold contraction of the plastic parts in the unit when the temperature is changing.
A noise may be heard due to louver returning to its original position when power is first turned on.
Dust is blown out from the indoor unit.
This is a normal condition when the air conditioner has not been used for a long time or during first use of the unit.
A peculiar smell comes out from the indoor unit.
This is because the indoor unit gives off smells permeated from building material, furniture or smoke.
The air conditioner turns to FAN only mode from COOL or HEAT (Only for models with heating function) mode.
When indoor temperature reaches the temperature setting on air conditioner, the compressor will stop automatically, and the air conditioner turns to FAN only mode. The compressor will start again when the indoor temperature rises in COOL mode or falls in HEAT mode (Only for models with heating function) to the set point.
Dripping water condenses on the surface of indoor unit
Dripping water may generate on the surface of the indoor unit when cooling in a high relatively humidity (relative humidity higher than 80%). Adjust the horizontal louver to the maximum air outlet position and select HIGH fan speed.
Heating mode (Only for models with heating function)
The air conditioner draws in heat from the outdoor unit and releases it via the indoor unit during heating operation. When the outdoor temperature falls, heat drawn in by the air conditioner decreases accordingly. At the same time, heat loading of the air conditioner increases due to larger difference between indoor and outdoor temperature. If a comfortable temperature can't be achieved by the air conditioner, we suggest you use a supplementary heating device.
Auto-restart function
Power failure during operation will stop the unit completely. For the unit without Auto-restart feature, when the power restores, the OPERATION indicator on the indoor unit starts illuminating. To restart the operation,press the ON/OFF button on the remote controller. For the unit with Auto-restart feature, when the power restores, the unit restarts automatically with all the previous settings preserved by the memory function.
Lightning or a wireless telephone operating nearby may cause the unit to malfunction.
Disconnect the unit with power and then re-connect the unit with power again. Push the ON/OFF button on the remote controller to restart operation.
Solution for problems
If your air conditioner malfunctions, check the following information to find solutions or probable causes of the failure. Do not try to repair the unit by yourself, if these solutions do not solve the failures, call your local service repair team.
Poor Equipment performance
The air outlet or inlet of outdoor unit is obstructed.
The air outlet or inlet of indoor unit is obstructed.
The outdoor temperature is high due to direct sunlight or another heat source.
A heater or a cooking stove is being used in the same room.
The room is occupied by multiple people, thus raising the heat load.
The air filter is obstructed by dust or is dirty.
Inappropriate temperature adjustment.
The capacity of the equipment is not adequate for the size of the room.
Air conditioner was just turned on.
Windows or doors are open.
The unit does not start
No power supply.
The voltage is not sufficient or incorrect.
Temperature is not adjusted properly.
Fuse may have blown.
The remote control batteries need to be replaced.
The time you have set with timer is incorrect.
Attention!!
Stop the air conditioner immediately if one of the following malfunctions occur
The operation indicator flashes (5 times per second) and the flashing does not stop by disconnecting the power and then restarting the unit.
Fuse blows frequently or circuit breaker trips frequently. (If this occurs, please contact your installer or licensed contractor).

 ” blinks, press the UP or DOWN button to set the time. Keep the button pressed for two seconds to accelerate the process. Press the button to set the timer.
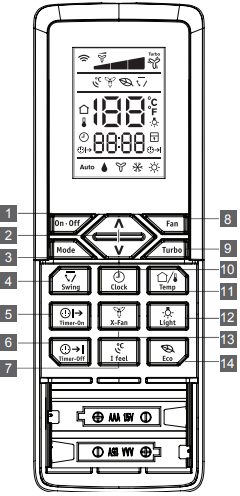
 ” blinks, press the UP or DOWN button to set the time. Keep the button pressed for two seconds to accelerate the process. Press the button to set the timer.
 ” will be shown.
 ” will be shown.
 ” blinks, press the UP or DOWN button to set the time. Keep the button pressed for two seconds to accelerate the process. Press the ClOCK button again to set the clock. The clock symbol stops blinking.
 ” is shown, the indoor unit displays the Set temperature. When the symbol ”
 ” is shown, the indoor unit displays the Room temperature.
 ” will be showed. Default setting: ON.
 ” will be shown. Default setting: OFF.
 ” will be shown. Default setting: OFF. This is ideal for the users to use while sleeping.
 " will display when Lock function is eabled.
 ,
,  or
or  .
. " once and quickly, the air flow direction setting feature of the louver is activated. The horizontal louver would swing up/down automatically. Press it again to stop at its last place.
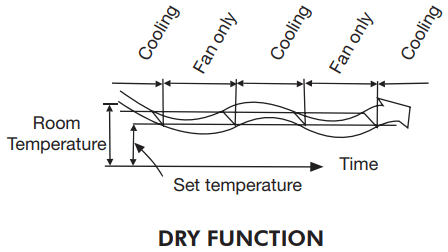

 " button on the remote controller.