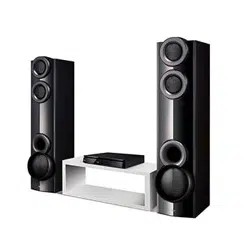
Documents: Go to download!
User Manual
- User Manual - (English)
- Getting Started
- Connecting
- System Setting
- Operating
- Troubleshooting
- Specifications
- Maintenance
Table of contents
User Manual Audio
Getting Started
Introduction
Playable discs and symbols used in this manual
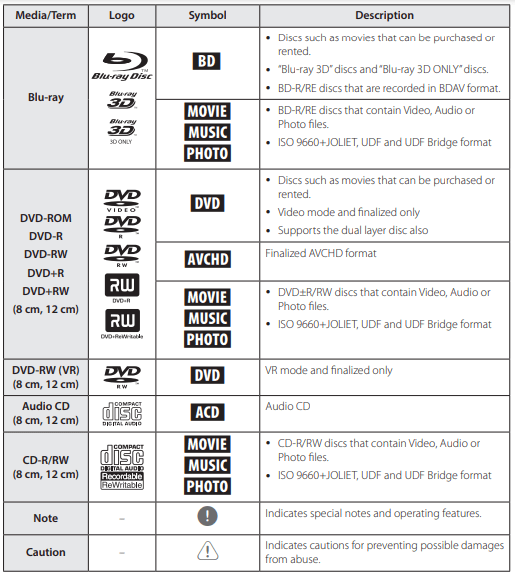
Note :
- Depending on the conditions of the recording equipment or the CD-R/RW (or DVD±R/RW) disc itself, some CD-R/RW (or DVD±R/RW) discs cannot be played on the unit.
- Depending on the recording software & the finalization, some recorded discs (CD-R/RW, DVD±R/RW, BD-R/RE) may not be playable.
- BD-R/RE, DVD±R/RW and CD-R/RW discs recorded using a personal computer or a DVD or CD Recorder may not play if the disc is damaged or dirty, or if there is dirt or condensation on the player’s lens.
- If you record a disc using a personal computer, even if it is recorded in a compatible format, there are cases in which it may not play because of the settings of the application software used to create the disc. (Check with the software publisher for more detailed information.)
- This player requires discs and recordings to meet certain technical standards in order to achieve optimal playback quality.
- Pre-recorded DVDs are automatically set to these standards. There are many different types of recordable disc formats (including CD-R containing MP3 or WMA files) and these require certain pre-existing conditions to ensure compatible playback.
- Customers should note that permission is required in order to download MP3 / WMA files and audio from the Internet. Our company has no right to grant such permission. Permission should always be sought from the copyright owner.
- You have to set the disc format option to [Mastered] in order to make the discs compatible with the LG players when formatting rewritable discs. When setting the option to Live System, you cannot use it on LG player. (Mastered/Live File System : Disc format system for windows Vista)
About the  symbol display
 may appear on your TV display during operation and indicates that the function explained in this owner’s manual is not available on that specific media.
Regional code
This unit has a regional code printed on the unit. This unit can play only BD-ROM or DVD discs labeled same as the unit or “ALL”
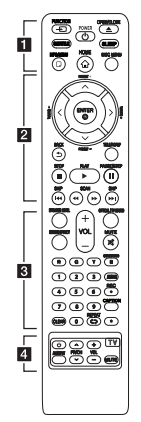
Remote Control
Battery Installation
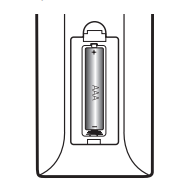
Remove the battery cover on the rear of the Remote Control, and insert R03 (size AAA) battery with  and
and  matched correctly
1. FUNCTION: Changes input mode.
SUBTITLE: Selects a subtitle language.
 (POWER): Switches the player ON or OFF.
 (OPEN/CLOSE): Ejects a disc.
SLEEP: Sets a certain period of time after which the unit will switch to off.
INFO/MENU : Displays or exits On-Screen Display.
HOME  : Displays or exits the [Home Menu].
DISC MENU: Accesses menu on a disc.
2. Direction buttons  : Selects an option in the menu.
PRESET +/- : Selects programme of Radio.
TUNING +/- : Tunes in the desired radio station.
ENTER  : Acknowledges menu selection.
BACK Exits the menu or returns to the previous screen.
TITLE/POPUP: Displays the DVD title menu or BD-ROM’s pop-up menu, if available.
 (STOP): Stops playback.
 (PLAY): Starts playback.
 (PAUSE/STEP): Pauses playback.
 (SKIP): Goes to the next or previous chapter / track / file.
 (SCAN): Searches backward or forward.
3. SPEAKER LEVEL: Sets the sound level of desired speaker.
SOUND EFFECT: Selects a sound effect mode.
VOL +/- : Adjusts speaker volume.
OPTICAL/ TV SOUND : Changes input mode to optical directly.
MUTE: Mute the unit.
Colored (R, G, Y, B) buttons:
- Use to navigate BD-ROM menus. They are also used as shortcut buttons for specific menus.
- B button: Selects mono/ stereo in FM mode.
0-9 numerical buttons: Selects numbered options in a menu.
CLEAR: Removes a mark on the search menu or a number when setting the password.
REPEAT : Repeats a desired section or sequence.
AUDIO: Selects an audio language or audio channel.
 (REC): Records from an Audio CD, FM radio or AUX source to USB.
CAPTION: Turns on or off closed caption function.
 : Marked button is not available.
4. TV Control Buttons: See page 58.
Front Panel
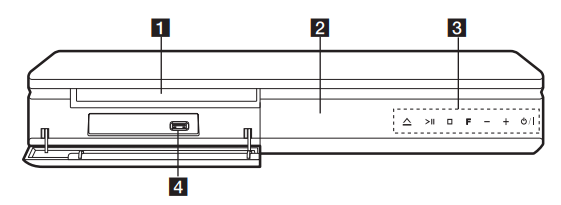
1. Disc Tray
2.Display Window
3. Operation buttons
 (Open / Close)
 (Play / Pause)
 (Stop)
F (Function)
Changes the input source or function.
-/+ (Volume)
 (Power)
4. USB Port
Rear Panel

1. AC power cord
2. Cooling Fan
3. Speakers connectors
4. LAN port
5. HDMI OUT TO TV
6. AUX (L/R) INPUT
7. OPTICAL IN
8. Antenna Connector
Connecting
Positioning the System
The following illustration shows an example of positioning the system. Note that the illustrations in these instructions differ from the actual unit for explanation purposes. For the best possible surround sound, all the speakers other than the subwoofer should be placed at the same distance from the listening position A
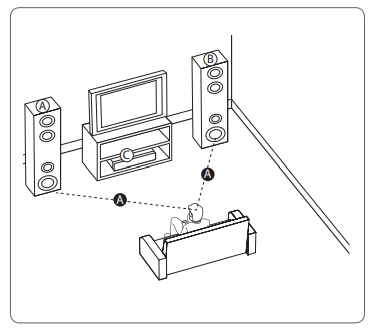
A Front speaker with built in subwoofer (L)
B Front speaker with built in subwoofer (R)
Place the front speakers to the sides of the monitor or screen and as flush with the screen surface as possible
C Unit
Caution :
- Be careful to make sure children not to put their hands or any objects into the *speaker duct.
*Speaker duct: A hole for plentiful bass sound on speaker cabinet (enclosure).
- The speakers contain magnetic parts, so colour irregularity may occur on the CRT TV screen or PC monitor screen. Please use the speakers away from the TV screen or PC monitor screen. y Before using the subwoofer, remove the protective vinyl.
- Be careful not to make scratches on the surface of the Unit /Sub-Woofer when installing or moving them.
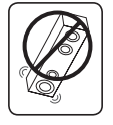
- Do not stack the speakers and be careful that the speaker should not fall down. Otherwise it may result in the speaker malfunction and causing personal injury and/ or property damage.
- Make sure to install the speaker with other people in order to prevent it from falling and causing injuries to the installer.
Speaker Connection
Attaching the speakers to the player
1. Connect the wires to the unit. Match each wire’s colored band (or marking) to the same colored (or marked) connection terminal on the rear of the unit. To connect the cable to the unit, press each plastic finger pad to open the connection terminal. Insert the wire and release the finger pad
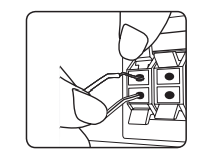
Connect the black stripe of each wire to the terminals marked -(minus) and the other end to the terminals marked + (plus). Connect a woofer cord to the player. When connecting a woofer cord to the player, insert the connector until it clicks
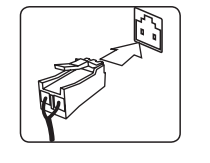
2. In some cases, the wires need to be connected to the speakers. Connect the other end of each wire to the correct speaker according to the color coding or marking:
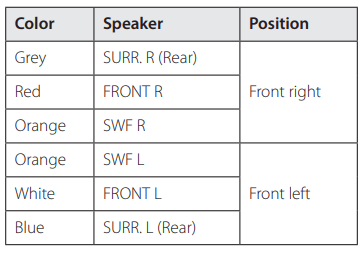
To connect the cable to the speakers, press each plastic finger pad to open the connection terminals on the base of each speaker. Insert the wire and release the finger pad.
Caution :
- Be careful to make sure children do not put their hands or any objects into the *speaker duct.
*Speaker duct : A hole for plentiful bass sound on speaker cabinet (enclosure).
- The speakers contain magnet parts, so color irregularity may occur on the TV screen or PC monitor screen. Please use the speakers far away from either TV screen or PC monitor.
Connecting to Your TV
If you have a HDMI TV or monitor, you can connect it to this player using a HDMI cable (Type A, High speed HDMI™ cable with Ethernet). Connect the HDMI jack on the player to the HDMI jack on a HDMI compatible TV or monitor.
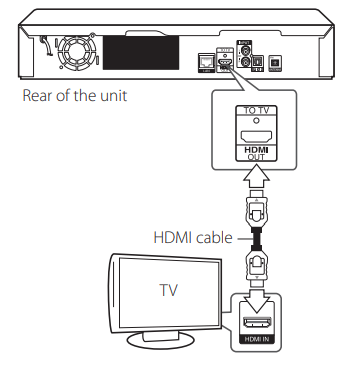
Set the TV’s source to HDMI (refer to TV’s Owner’s manual).
Additional Information for HDMI
- When you connect a HDMI or DVI compatible device make sure of the following:
- Try switching off the HDMI/DVI device and this player. Next, switch on the HDMI/DVI device and leave it for around 30 seconds, then switch on this player.
- The connected device’s video input is set correctly for this unit. - The connected device is compatible with 720 x 480p, 1280 x 720p, 1920 x 1080i or 1920 x 1080p video input.
- Not all HDCP-compatible HDMI or DVI devices will work with this player.
- The picture will not be displayed properly with non-HDCP device.
What is SIMPLINK?

Some functions of this unit are controlled by the TV’s remote control when this unit and LG TV’s with SIMPLINK are connected through HDMI connection. Controllable functions by LG TV’s remote control; Play, Pause, Scan, Skip, Stop, Power Off, etc. Refer to the TV owner’s manual for the details of SIMPLINK function. LG TV’s with SIMPLINK function has the logo as shown above.
ARC (Audio Return Channel) function
The ARC function enables an HDMI capable TV to send the audio stream to HDMI OUT of this player.
To use this function:
- Your TV must support the HDMI-CEC and ARC function and the HDMI
-CEC and ARC must be set to On.
- The setting method of HDMI-CEC and ARC may differ depending on the TV. For details about ARC function, refer to your TV manual.
- You must use the HDMI cable (Type A, High Speed HDMI™ cable with Ethernet).
- You must connect with the HDMI IN that supports the ARC function using the HDMI OUT on this player.
- You can connect only one Home Theater to TV compatible with ARC.
Resolution setting
The player provides several output resolutions for HDMI OUT jack. You can change the resolution using [Settings] menu.
1. Press HOME 
2. Use  to select the [Settings] and press ENTER
 . The [Settings] menu appears.
3. Use  to select [DISPLAY] option then press
  to move to the second level.
4. Use  to select the [Resolution] option then press ENTER
  to move to the third level.
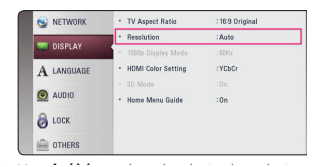
5. Use  to select the desired resolution then press ENTER
  to confirm your selection.

Note :
- If your TV does not accept the resolution you have set on the player, you can set resolution to 480p as follows:
1. Press  to open the disc tray.
2 Press (STOP) for more than 5 seconds.
- If you select a resolution manually and then connect the HDMI jack to TV and your TV does not accept it, the resolution setting is set to [Auto].
- If you select a resolution that your TV does not accept, the warning message will appear. After resolution change, if you cannot see the screen, please wait 20 seconds and the resolution will automatically revert back to the previous resolution.
- The 1080p video output frame rate may be automatically set to either 24 Hz or 60 Hz depending both on the capability and preference of the connected TV and based on the native video frame rate of the content on the BD-ROM disc.
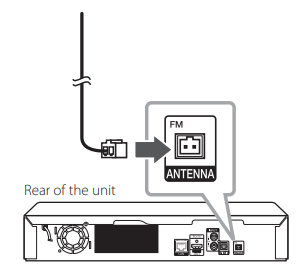
Antenna Connection
Connect the supplied antenna for listening to the radio.
Connections with External Device
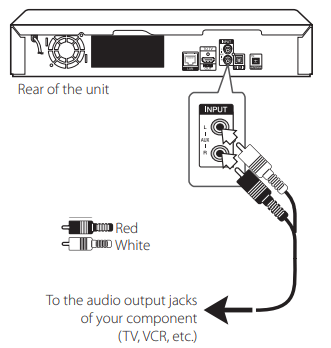
AUX connection
You can enjoy the sound from an external component through the speakers of this system. Connect the analog audio output jacks of your component into the AUX L/R (INPUT) on this unit. And then select the [AUX] option by pressing FUNCTION. You can also use the F (Function) button on the front panel to select the input mode.
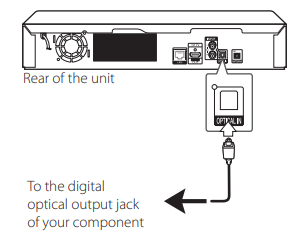
OPTICAL IN connection
You can enjoy the sound from your component with a digital optical connection through the speakers of this system. Connect the optical output jack of your component into the OPTICAL IN jack on the unit. And then select the [OPTICAL] option by pressing FUNCTION. Or press OPTICAL / TV SOUND to select directly. You can also use the F (Function) button on the front panel to select the input mode.
Connecting to Your Home Network
This player can be connected to a local area network (LAN) via the LAN port on the rear panel. By connecting the unit to a broadband home network, you have access to services such as software updates and BD-Live interactivity.
Wired network connection
Using a wired network provides the best performance, because the attached devices connect directly to the network and are not subject to radio frequency interference. Please refer to the documentation for your network device for further instructions. Connect the player’s LAN port to the corresponding port on your Modem or Router using a commercially available LAN or Ethernet cable

Wired network setup
If there is a DHCP server on the local area network (LAN) via wired connection, this player will automatically be allocated an IP address. After making the physical connection, a small number of home networks may require the player’s network setting to be adjusted. Adjust the [NETWORK] setting as follow.
1. Select [Connection Setting] option in the [Settings] menu then press ENTER
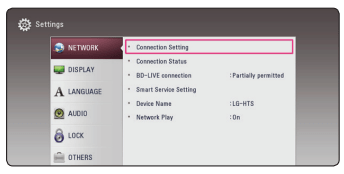
2. Read the preparations for the network settings and then press ENTER  while [Start] is highlighted.
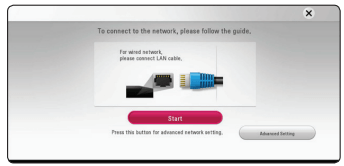
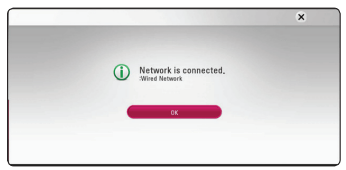
Network will automatically be connected to the unit.
Advanced Setting
If you want to set the network settings manually, use  to select [Advanced Setting] on the [Network Setting] menu and press ENTER
 .
.
1. Use  to select the IP mode between [Dynamic] and [Static]. Normally, select [Dynamic] to allocate an IP address automatically.
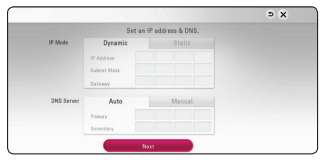
2. Select [Next] and press ENTER  to apply network settings.
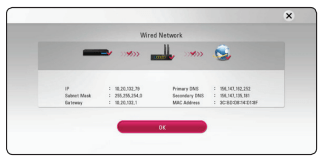
Network connection status is displayed on the screen
3. Press ENTER  while [OK] is highlighted to finish the wired network settings.
System Setting
Initial Setup
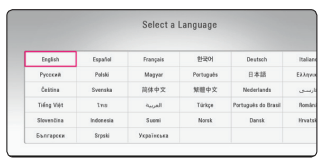
When you turn on the unit for the first time, the initial setup wizard appears on the screen. Set the display language and network settings on the initial setup wizard.
1. Press  . The initial setup wizard appears on the screen.
2. Use to select a display language and press ENTER
3. After checking the Terms of Service, select [Agree] to use the SW Updates. Read and prepare the preparations for the network settings and then press ENTER while [Start] is highlighted.
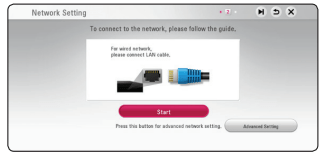
If wired network is connected, the network connection setting will automatically be finished.
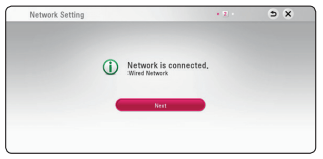
4. Select [Next] and press ENTER  .
.
5. Press ENTER to verify the test tone signals of the speakers.
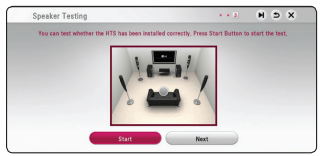
After verifying the test tone signals, press ENTER while [Stop] is highlighted. Select [Next] and press ENTER
  .
.
6. You can listen to TV sound through HTS Speaker automatically when TV is turned on.
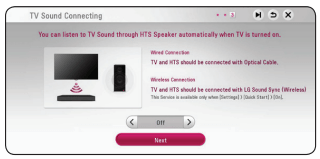
Press to move and press
  to select [On] or [Off ]. Select [Next] and press ENTER
  .
.
7. Check all the settings that you have set in the previous steps.
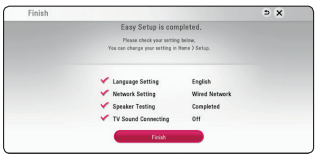
Press ENTER  while [Finish] is highlighted to finish the initial setup settings. If there is any settings to be changed, use
  to select
  and press ENTER
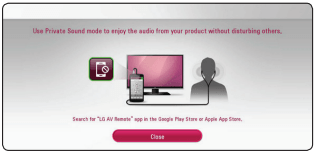
8. Displays private sound mode guide. Press ENTER 
Settings
Adjust the setup settings
You can change the settings of the player in the [Settings] menu.
1. Press HOME
2. Use  to select the [Settings] and press ENTER
  . The [Settings] menu appears
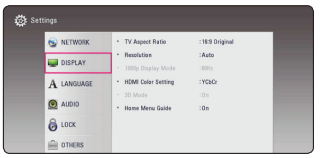
3. Use  to select the first setup option, and press
  to move to the second level.
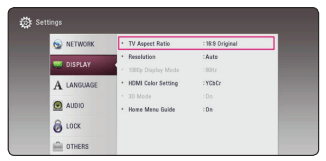
4. Use  to select a second setup option, and press ENTER
  to move to the third level.
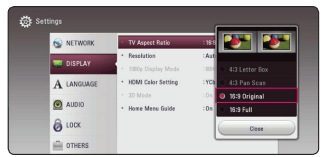
5. Use  to select a desired setting, and press ENTER
  to confirm your selection.
[NETWORK] menu
The [NETWORK] settings are needed to use the software update and BD-Live.
Connection Setting
If your home network environment is ready to connect, the unit needs to be set up via wired connection for network communication. (See “Connecting to Your Home Network” on page 19.)
Connection Status
If you want to check the network status on this player, select the [Connection Status] options and press ENTER  to check whether a connection to the network and the internet have been established.
BD-LIVE connection
You can restrict Internet access when BD-Live functions are used.
[Permitted]
Internet access is permitted for all BD-Live content.
[Partially permitted]
Internet access is permitted only for BD-Live content which have content owner certificates. Internet access and AACS Online functions are prohibited for all BD-Live content without a certificate.
[Prohibited]
Internet access is prohibited for all BD-Live content.
Device Name
You can make a network name using virtual keyboard. This player will be recognized by the name you are entering on your home network.
Network Play
This function allows you to control the playback of media streamed from DLNA media server by a DLNA certified smartphone. Most DLNA certified smartphone has a function to control the playback media on your home network. Set this option to [On] for allowing your smartphone to control this unit. Refer to instructions of your DLNA certified smartphone or the application for more detailed information.
[DISPLAY] menu
TV Aspect Ratio
Select a TV aspect ratio option according to your TV type.
[4:3 Letter Box]
Select when a standard 4:3 TV is connected. Displays theatrical images with masking bars above and below the picture.
[4:3 Pan Scan]
Select when a standard 4:3 TV is connected. Displays pictures cropped to fill your TV screen. Both sides of the picture are cut off.
[16:9 Original]
Select when a 16:9 wide TV is connected. The 4:3 picture is displayed with an original 4:3 aspect ratio, with black bars appearing at the left and right sides.
[16:9 Full]
Select when a 16:9 wide TV is connected. The 4:3 picture is adjusted horizontally (in a linear proportion) to fill the entire screen.
Resolution
Sets the output resolution of the HDMI video signal. Refer to page 16 for details about the resolution setting.
[Auto]
If the HDMI OUT jack is connected to TVs providing display information (EDID), automatically selects the resolution best suited to the connected TV.
[480p]
Outputs 480 lines of progressive video.
[720p]
Outputs 720 lines of progressive video.
[1080i]
Outputs 1080 lines of interlaced video. [1080p] Outputs 1080 lines of progressive video.
1080p Display Mode
When the resolution is set to 1080p, select [24 Hz] for smooth presentation of film material (1080p/24 Hz) with a HDMI-equipped display compatible with 1080p/24 Hz input.
HDMI Color Setting
Select the type of output from the HDMI OUT jack. For this setting, please refer to the manuals of your display device.
[YCbCr]
Select when connecting to a HDMI display device.
[RGB]
Select when connecting to a DVI display device.
3D Mode
Select the type of output mode for Blu-ray 3D disc playback. (This function is activated only when 3D TV is connected.)
[On]
Blu-ray 3D disc playback will output as 3D mode.
[Off]
Blu-ray 3D disc playback will output as 2D mode like a normal BD-ROM disc playback
Home Menu Guide
This function allows you to display or delete the guide bubble on the [HOME] menu. Set this option to [On] for displaying guide.
[LANGUAGE] menu
Display Menu
Select a language for the [Settings] menu and onscreen display.
Disc Menu / Disc Audio / Disc Subtitle
Select the language you prefer for the audio track (disc audio), subtitles, and the disc menu.
[Original]
Refers to the original language in which the disc was recorded.
[Other]
Press ENTER (b) to select another language. Use number buttons then press ENTER (b) to enter the corresponding 4-digit number according to the language code list on page 66.
[Off] (Disc Subtitle only)
Turn off Subtitle.
[AUDIO] menu
Each disc has a variety of audio output options. Set the player’s Audio options according to the type of audio system you use.
Digital Output
[Auto]
Select if you connect this unit’s HDMI OUT jack to a device with LPCM, Dolby Digital, Dolby Digital Plus, Dolby TrueHD, DTS, DTS-HD decoder or digital decoder.
[PCM]
Select if you connect this unit’s HDMI OUT jack to a device with digital decoder.
[DTS Re-Encode]
Select if you connect this unit’s HDMI OUT jack to a device with DTS decoder.
DRC (Dynamic Range Control)
This function allows you to listen to a movie at a lower volume without losing clarity of sound.
[Auto]
The dynamic range of the Dolby TrueHD audio output is specified by itself. And the dynamic range of the Dolby Digital and Dolby Digital Plus are operated as same as the [On] mode.
[On]
Compress the dynamic range of the Dolby Digital, Dolby Digital Plus or Dolby TrueHD audio output.
[Off]
Turns off this function
Speaker Setup
To obtain the best possible sound, use the speaker setup display to specify the volume of the speakers you have connected and their distance from your listening position. Use the test to adjust the volume of the speakers to the same level.
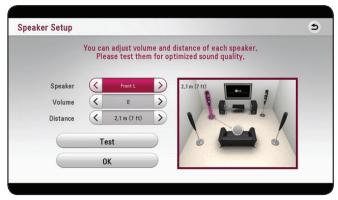
[Speaker]
Select a speaker that you want to adjust.
[Volume]
Adjust the output level of each speaker.
[Distance]
Adjust the distance between each speaker and the listening position.
[Test/ Stop test tone]
The speakers will emit a test tone.
[OK]
Confirms the setting.
HD AV Sync
Sometimes Digital TV encounters a delay between picture and sound. If this happens you can compensate by setting a delay on the sound so that it effectively ‘waits’ for the picture to arrive: this is called HD AV Sync. Use  to scroll up and down through the delay amount, which you can set at anything between 0 and 300 ms.
[LOCK] menu
The [LOCK] settings affect only Blu-ray Disc and DVD playback. To access the any features in [LOCK] settings, you must enter the 4-digit security code you have created. If you have not entered a password yet, you are prompted to do so. Enter a 4-digit password twice, and press ENTER  to create a new password.
Password
You can create or change the password.
[None]
Enter a 4-digit password twice, and press ENTER  to create a new password.
[Change]
Enter the current password and press ENTER  . Enter a 4-digit password twice, and press ENTER
  to create a new password.
If you forget your password
If you forget your password, you can clear it using the following steps:
1. Remove any disc that might be in the player.
2. Highlight [Password] option in the [Settings] menu.
3. Use Number buttons to enter “210499”. The password is cleared.
DVD Rating
Blocks playback of rated DVD based on their content. (Not all discs are rated.)
[Rating 1-8]
Rating one (1) has the most restrictions and rating eight (8) is the least restrictive.
[Unlock]
If you select [Unlock], parental control is not active and the disc plays in full.
Blu-ray Disc Rating
Set an age limit of BD-ROM play. Use number buttons to input an age limit for BD-ROM viewing.
[255]
All BD-ROM can be played.
[0-254]
Prohibits play of BD-ROM with corresponding ratings recorded on them.
Area Code
Enter the code of the area whose standards were used to rate the DVD video disc, based on the list on page 65.
[OTHERS] menu
Quick Start
This player can stay in standby mode with low power consumption, so that the player can instantly boot without delay when you turn on this unit. Set this option to [On] for activating [Quick Start] function.
Auto Power Off
The screen saver appears when you leave the player in Stop mode for about 5 minutes. If you set this option to [On], the unit automatically turns off within 15 minutes since the Screen Saver is displayed. Set this option to [Off ] to leave the screen saver until the unit is operated by the user.
TV Sound Connecting
You can listen to TV sound through this unit’s speaker automatically when TV is turned on.
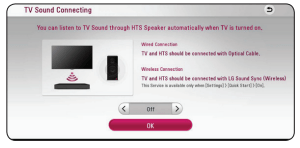
Press  to move and press
  to select [On] or [Off ]. Select [OK] and press ENTER
Initialize
[Factory Set]
You can reset the player to its original factory settings.
[Blu-ray Storage Clear]
Initializes the BD-Live content from the connected USB storage.
Software
[Information]
Displays the current software version.
[OSS Notice]
LGE Open Source Software Notice is displayed.
[Update]
You can update the software by connecting the unit directly to the software update server (page 59).
SIMPLINK/ARC
- The SIMPLINK function allows you to control this unit with LG TV’s remote control.
- The ARC function enables an HDMI capable TV to send the audio stream to HDMI OUT of this player. Set this option to [On] for activating [SIMPLINK/ ARC] function. (page 15)
Closed Caption
Closed caption (CC) is the process of displaying text on a screen to provide additional or interpretive information for the hearing impaired. This function allows you to adjust various settings of closed caption.
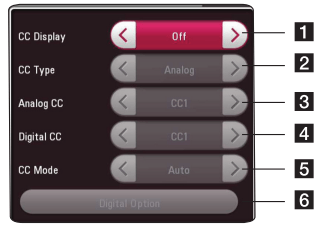
1. [CC Display]
Turns on or off this function
2. [CC Type]
Selects the closed caption type between [Analog] and [Digital]. [Analog] : Select this when you play a disc or some video files that support [Analog] CC type. [Digital] : Select this when you play some video files that support [Digital] CC type.
3. [Analog CC]
(When [CC Type] is selected to [Analog]) Displays the audio portion of a movie as text on the screen. CC1 is the most common mode in use.
4. [Digital CC]
(When [CC Type] is selected to [Digital]) Some video file can be supported this mode.
5. [CC Mode]
(When [CC Type] is selected to [Digital]) Selects the closed caption mode between [Custom] and [Auto].
6. [Digital Option]
(When [CC Mode] is selected to [Custom]) You can adjust detail settings of closed caption.
Adjusting the [Digital Option]
When [CC Mode] is selected to [Custom], you can adjust detail settings of closed caption.
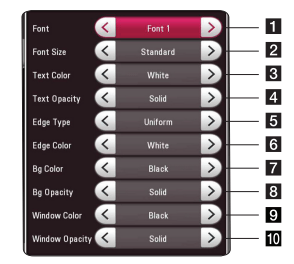
1. Selects a typeface for the text.
Font1 : Default / Font2 : Courier
Font3 : TimesNewRoman / Font4 : Helvetica
Font5 : Arial / Font6 : Casual
Font7 : Cursive / Font8 : SmallCapital
2. b Selects the font size.
3. Selects a color for the text.
4. Adjusts the opacity for the text color.
5. Selects an edge type.
6. Selects a color for the edges.
7. Selects a background color.
8. Adjusts the opacity for the background color.
9. Selects a window color.
10. Adjusts the opacity for the window color.
Terms of Service
Terms of USE for Blu-ray Disc™ Player is displayed. To use the Premium Service and SW Updates, select [Agree].
Audio Guidance
The unit narrates some content displayed on the screen. This function allows the visually impaired to control the playback or adjust various settings.
Operating
Using [HOME] menu
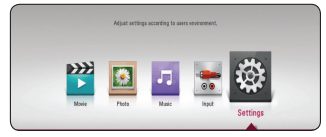
The home menu appears when you press HOME  . Use
. Use  to select a category and press ENTER
  .
.
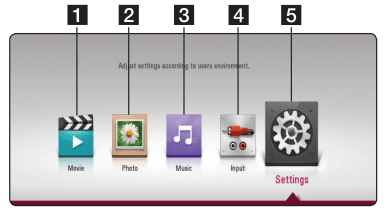
1. [Movie] - Plays video content.
2. [Photo] - Plays photo content.
3. [Music] - Plays audio content.
4. [Input] - Changes input mode.
5. [Settings] - Adjusts the system settings.
Using Home Network Server for PC
Before connecting to PC to play a file, SmartShare PC software should be installed on your PC.
About SmartShare PC Software
SmartShare PC Software is for sharing video, audio and photo files stored on your computer to this unit as a digital media server.
Installing SmartShare PC Software
1. Before installation, close all running programs including firewall and Anti-Virus programs.
2. Unzip and double-click “Setup.exe” to install SmartShare PC Software. The installation is prepared and the installation wizard appears.
3. Follow the directions of the installation wizard displayed on the screen.
4. Click the [Exit] button to complete the installation.
Sharing files and folders
On your computer, you must share the folder containing video, audio and/or photo content to play them on this player. This part explains the procedure for selecting the shared folders on your computer.
1. Double-click the “SmartShare” icon.
2. Click [Movie], [Photo] or [Music] icon on the center, and then click [Settings] on the top right corner of the SmartShare PC software. The [Settings] menu appears on the screen.
3. Click [My Shared Contents] tab, and then click icon. The [Add/Remove Shared Folders] menu appears on the screen.
4. Click the folder containing the files you want to share and then click the [OK]. The checked folder is added to the [My Shared Contents] and then click the [OK] at the bottom of the [Settings] menu.
5. Make sure that the SmartShare service turns on at the [Service] tab.
System requirements
Minimum System
- CPU : Intel® 2.0 GHz or AMD Sempron™ 2000+ processors
- Memory : 1 GB of free RAM
- Graphics card : 64 MB video memory, minimum resolution of 1024 x 768 pixels, and 16 bit color settings
- Free Disk Space : 200 MB
- Windows® XP (Service Pack 2 or higher), Windows Vista®, Windows® 7 or higher
- Windows® Media Player® 11.0 or higher
- Network environment: 100 Mb Ethernet
Recommended System
- CPU : Intel® Core™ Duo or AMD Athlon™ 64X2, 1.7 GHz or better
- Memory : 2 GB of free RAM
- Graphics card : 128 MB video memory, minimum resolution of 1024 x 768 pixels, and 16 bit color settings
- Free Disk Space : 200 MB
- Windows® XP (Service Pack 2 or higher), Windows Vista®, Windows® 7 or higher
- Windows® Media Player® 11.0 or higher
- Network environment: 100 Mb Ethernet
Troubleshooting
General
The unit does not work properly.
- Turn off the power of this unit and the connected external device (TV, Woofer, DVD-player, Amplifier, etc.) and turn it on again.
- Disconnect the power cord of this unit and the connected external device (TV, Woofer, DVD-player, Amplifier, etc.) and then try connecting again.
- Previous setting may not be saved when device power is shut of
The Power does not turned on.
- Plug the power cord into the wall outlet securely.
The unit does not start playback.
- Insert a playable disc. (Check the disc type, color system, and regional code.)
- Place the disc with the playback side down.
- Place the disc on the disc tray correctly inside the guide.
- Clean the disc.
- Cancel the Rating function or change the rating level.
The connected USB storage device is not recognized.
- Try using different USB cable, some USB cables may not support enough current for normal USB operation.
- If you use an USB extension cable or USB HUB, the USB devices may not be recognized.
- An USB device which requires additional program installation when you have connected it to a computer is not supported.
- This unit supports only USB Flash Drive and USB External HDD with FAT32 or NTFS format.
The angle cannot be changed.
- Multi-angles are not recorded on the DVD Video being played
Cannot play video, photo or audio files.
- The files are not recorded in a format that the unit can play.
- The unit does not support the codec of the video file.
The remote control does not work properly.
- The remote control is not pointed at the remote sensor of the unit.
- The remote control is too far from the unit.
- There is an obstacle in the path of the remote control and the unit.
- The batteries in the remote control are exhausted.
The unit is plugged in, but the power will not turn on or of
The unit is not operating normally.
- You can reset the unit as follows. y Unplug the power cord, wait at least five seconds, and then plug it in again.
Network
BD-Live feature does not work.
- The connected USB storage may not have enough space. Connect the USB storage with at least 1GB free space.
- Ensure that the unit is correctly connected to the local area network and can access the internet (page 19).
- Your broadband speed may not fast enough to use the BD-Live features. Contact your Internet Service Provider (ISP) and increase the broadband speed is recommended
- The [BD-LIVE connection] option in the [Settings] menu is set to [Prohibited]. Set the option to [Permitted].
Media servers are not displayed on the device list.
- The firewall or anti-virus software on your media server is running. Turn off the firewall or anti-virus software running on your media server.
- The player is not connected to the local area network that your media server is connected.
Picture
There is no picture.
- Select the appropriate video input mode on the TV so the picture from the unit appears on the TV screen.
- Connect the video connection securely.
- Check the [HDMI Color Setting] in the [Settings] menu is set to the appropriate item that conforms to your video connection.
- Your TV may not support the resolution you have set on the player. Change the resolution that your TV accepts.
- The player’s HDMI OUT jack is connected to a DVI device that does not support copyright protection.
Picture noise appears
- You are playing a disc recorded in a colour system that is different from your TV.
- Set the resolution which your TV accepts.
Blu-ray 3D disc playback does not output 3D views.
- Connect the player to your TV with HDMI cable (Type A, High Speed HDMI™ Cable).
- Your TV may not support “HDMI 3D mandatory format”.
- The [3D Mode] option in the [Settings] menu is set to [Off ]. Set the option to [On].
Sound
There is no sound or the sound is distorted.
- The unit is in scan, slow motion, or pause mode.
- The sound volume is low.
- Check the speaker cable connection. (page 13)
Specifications
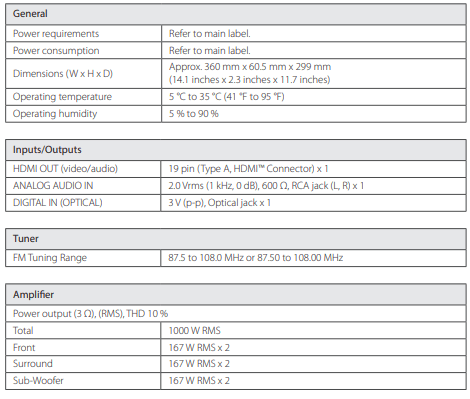
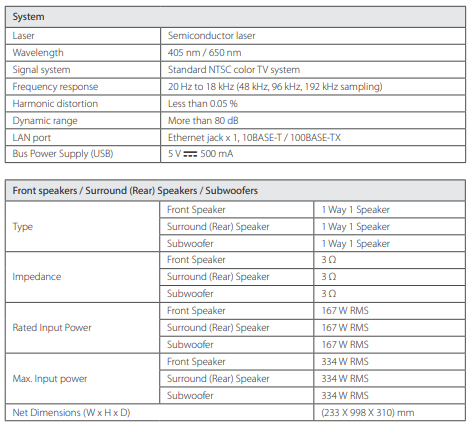
- Design and specifications are subject to change without notice.
Maintenance
Handling the unit
When shipping the unit
Please save the original shipping carton and packing materials. If you need to ship the unit, for maximum protection, re-pack the unit as it was originally packed at the factory.
Cleaning the unit
To clean the player, use a soft, dry cloth. If the surfaces are extremely dirty, use a soft cloth lightly moistened with a mild detergent solution. Do not use strong solvents such as alcohol, benzine, or thinner, as these might damage the surface of the unit. Keeping the exterior surfaces clean
- Do not use volatile liquids such as insecticide spray near the unit.
- Wiping with strong pressure may damage the surface.
- Do not leave rubber or plastic products in contact with the unit for a long period of time.
Maintaining the unit
The unit is a high-tech, precision device. If the optical pick-up lens and disc drive parts are dirty or worn, the picture quality could be diminished. For details, please contact your nearest authorized service center.
Notes on discs
Handling discs
Do not touch the playback side of the disc. Hold the disc by the edges so that fingerprints do not get on the surface. Never stick paper or tape on the disc.
Storing discs
After playing, store the disc in its case. Do not expose the disc to direct sunlight or sources of heat and never leave it in a parked car exposed to direct sunlight.
Cleaning discs
Fingerprints and dust on the disc can cause poor picture quality and sound distortion. Before playing, clean the disc with a clean cloth. Wipe the disc from the center to out. Do not use strong solvents such as alcohol, benzine, thinner, commercially available cleaners, or anti-static spray intended for older vinyl records
See other models: LGAN170 710E 55LV340H 55LW5600 24MP56HQ-P
