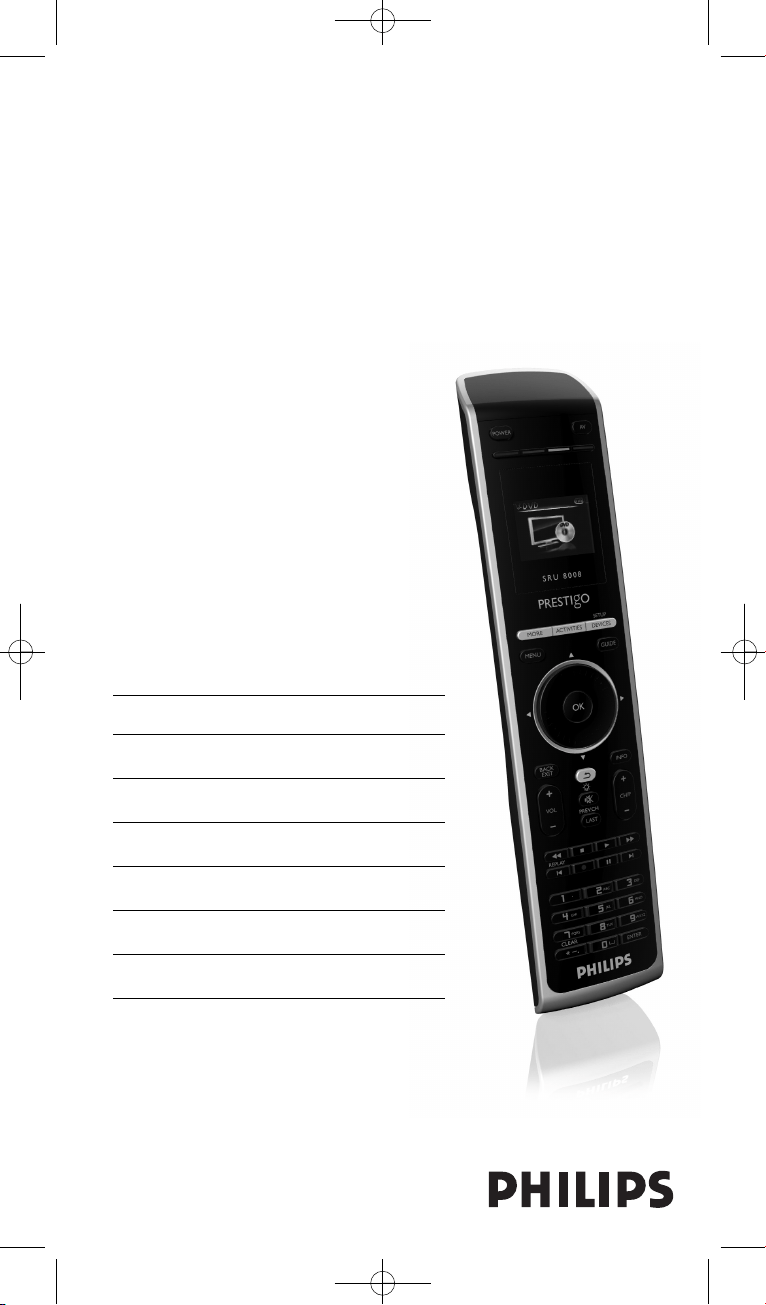
SRU8008
www.philips.com/welcome
EN Instructions for Use 3
FR Mode d’emploi 19
DE Bedienungsanleitung 37
ES Instrucciones de manejo 53
IT Istruzioni per l’uso 69
NL Gebruiksaanwijzing 85
RU Инструкция по использованию 101
SRU8008_IFU_bundel 1 v09.qxd 03-12-2007 11:35 Pagina 1
A
B
C
G
1
2
3
5
6
4
D
E
FH
2
SRU8008_IFU_bundel 1 v09.qxd 03-12-2007 11:35 Pagina 2
Contents
1 Your Philips Prestigo SRU8008 4
1.1 What’s in the Box 4
1.2 Overview SRU8008 4
2 Getting Started 5
2.1 Prepare 5
2.2 Install 6
3 Using Your SRU8008 7
3.1 Selecting a Device 8
3.2 Selecting an Activity 8
3.3 Selecting More Functions 8
4 Getting the Most out of Your SRU8008 9
4.1 Devices 10
4.2 Activities 12
4.3 More Functions 14
4.4 System Settings 15
4.5 Language 16
5 Frequently Asked Questions 17
6 Need help? 18
ENGLISH
Contents 3
SRU8008_IFU_bundel 1 v09.qxd 03-12-2007 11:35 Pagina 3

1 Your Philips Prestigo SRU8008
Welcome to the growing family of owners of Philips products. The Philips
Prestigo SRU8008 universal remote control has been designed to control
your equipment. You can install up to 8 devices, and up to 8 activities.
Select a device and operate the device with the SRU8008’s keys.
Select an activity and automatically start a sequence of key presses, for
instance, to watch a DVD or listen to a CD.
Select more functions and assign more advanced functions to your
remote control.
1.1 What’s in the Box
• The SRU8008
• Quick Start Guide
• Instructions for Use in diverse languages
• Philips Alkaline batteries
Philips recommends Philips Alkaline batteries.
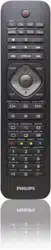
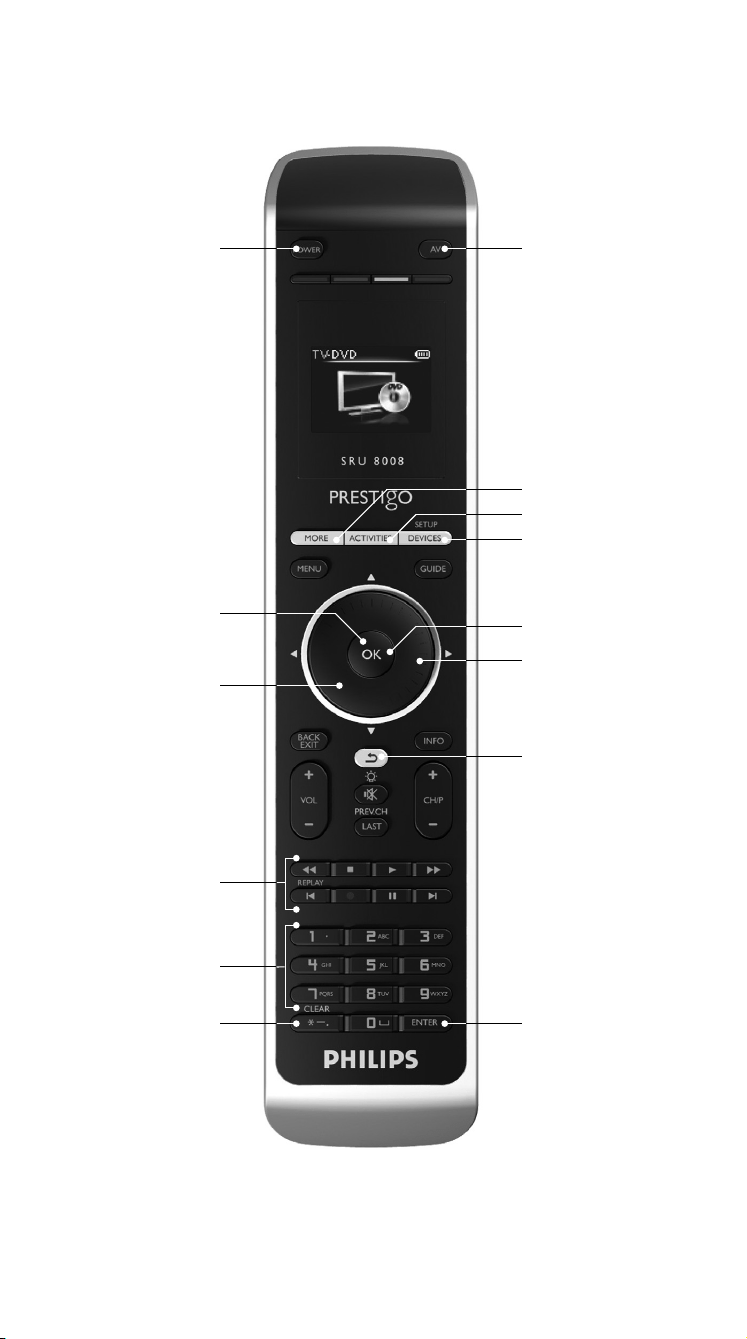
1.2 Overview SRU8008
The image on page 2 gives you a main overview of the SRU8008.
To prepare the SRU8008 for use, see ‘Getting Started’ on page 5.
Black keys for sending signals to your equipment
A Power key
B OK key
C Up, Down, Left and Right keys
D Transport keys
E Alphanumeric keys
F * – . / Clear key
G AV key
H Enter key
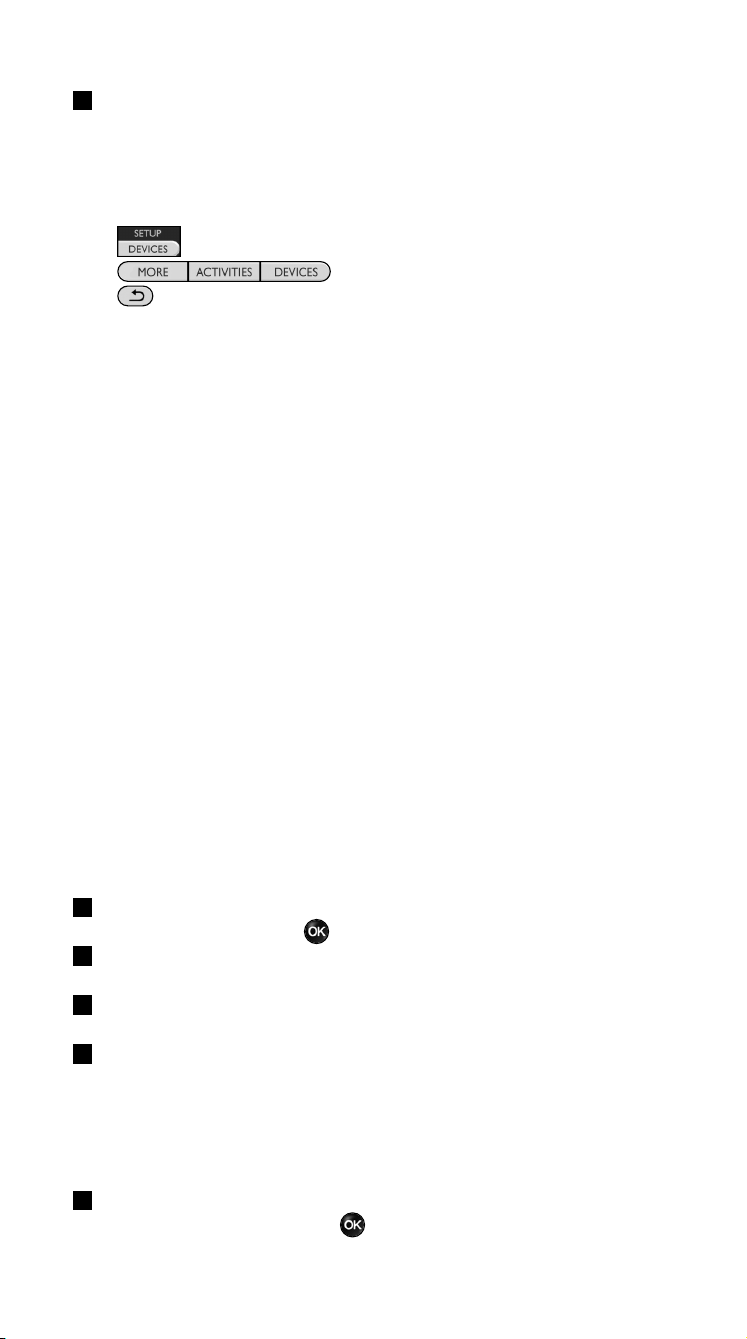
Keys for controlling the SRU8008
1 More key
2 Activities key
3 Devices/Setup key
4 OK key
5 Rotary wheel
6 Back key
Your Philips Prestigo SRU80084
SRU8008_IFU_bundel 1 v09.qxd 03-12-2007 11:35 Pagina 4
1 2 3
Installation wizard –
Language selection
ENGLISH
2 Getting Started
2.1 Prepare
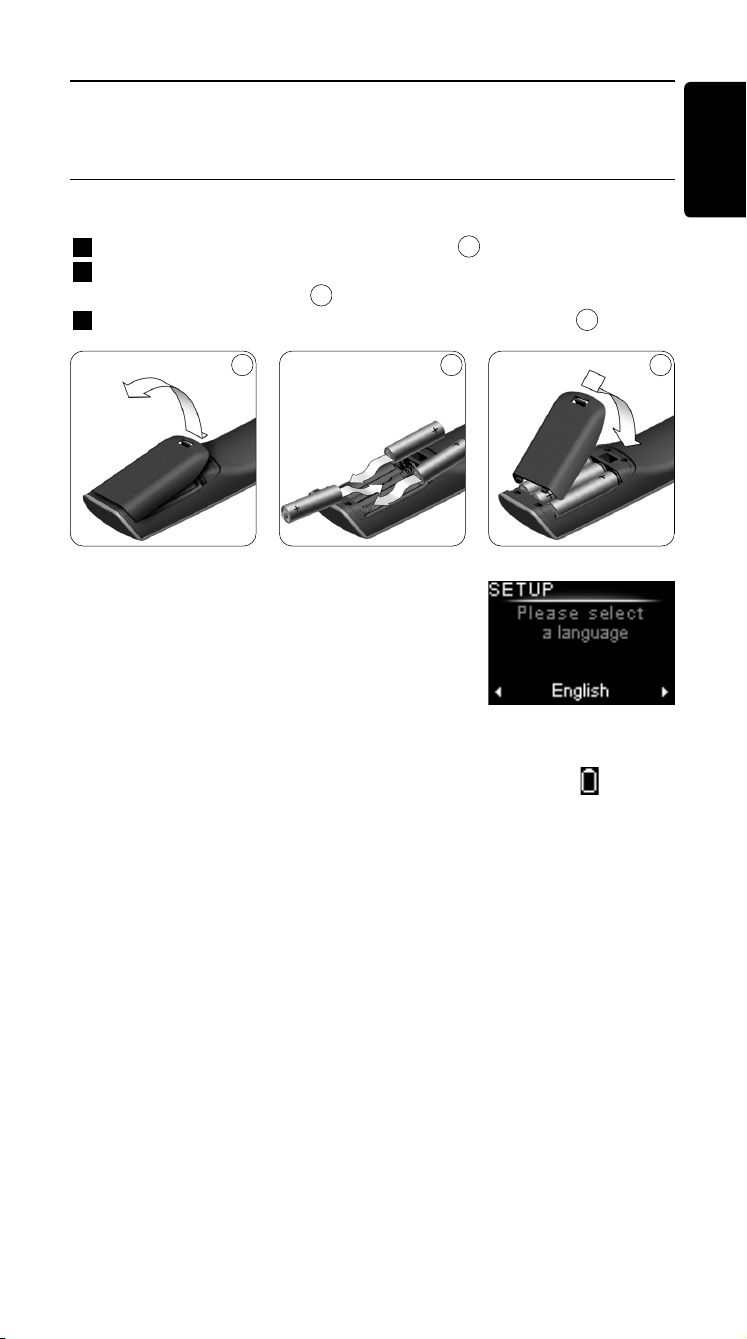
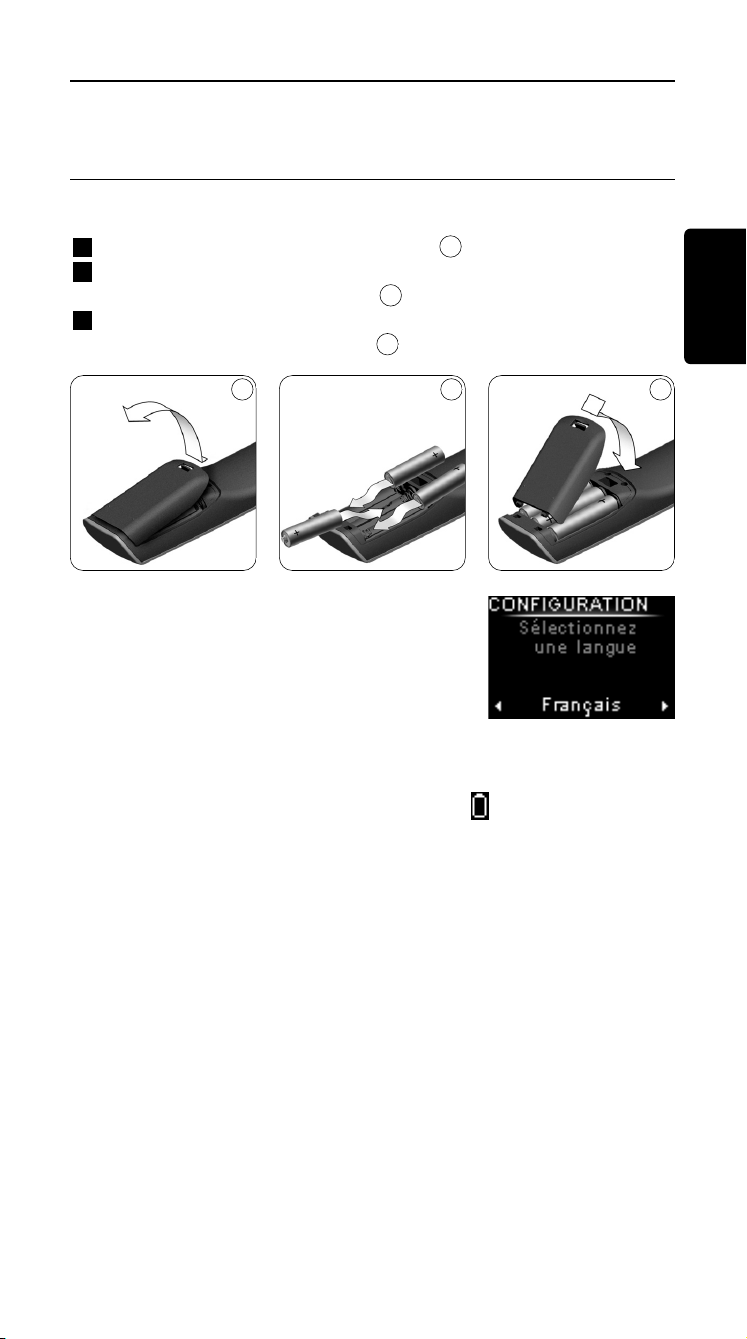
To insert the batteries in the SRU8008:
1 Press the latch down and lift the cover up.
2 Place the three LR6 AA type alkaline batteries into the battery
compartment, as shown.
3 Position the cover and press firmly until you hear a click.
The SRU8008 displays the Philips logo for
3 seconds and continues with the Installation
Wizard to guide you through the installation.
When the batteries are almost empty, the Battery Low icon blinks.
This indicates a critical battery level. You can still operate the SRU8008
control for a short period.
Replace the batteries with new LR6 AA type alkaline batteries and
follow the local regulations for disposal of the empty batteries.
D Note
If the Battery Low icon blinks, you are not able to enter the
Setup menu anymore.
3
2
1
Getting Started
5
SRU8008_IFU_bundel 1 v09.qxd 03-12-2007 11:35 Pagina 5
4 5 6
2.2 Install
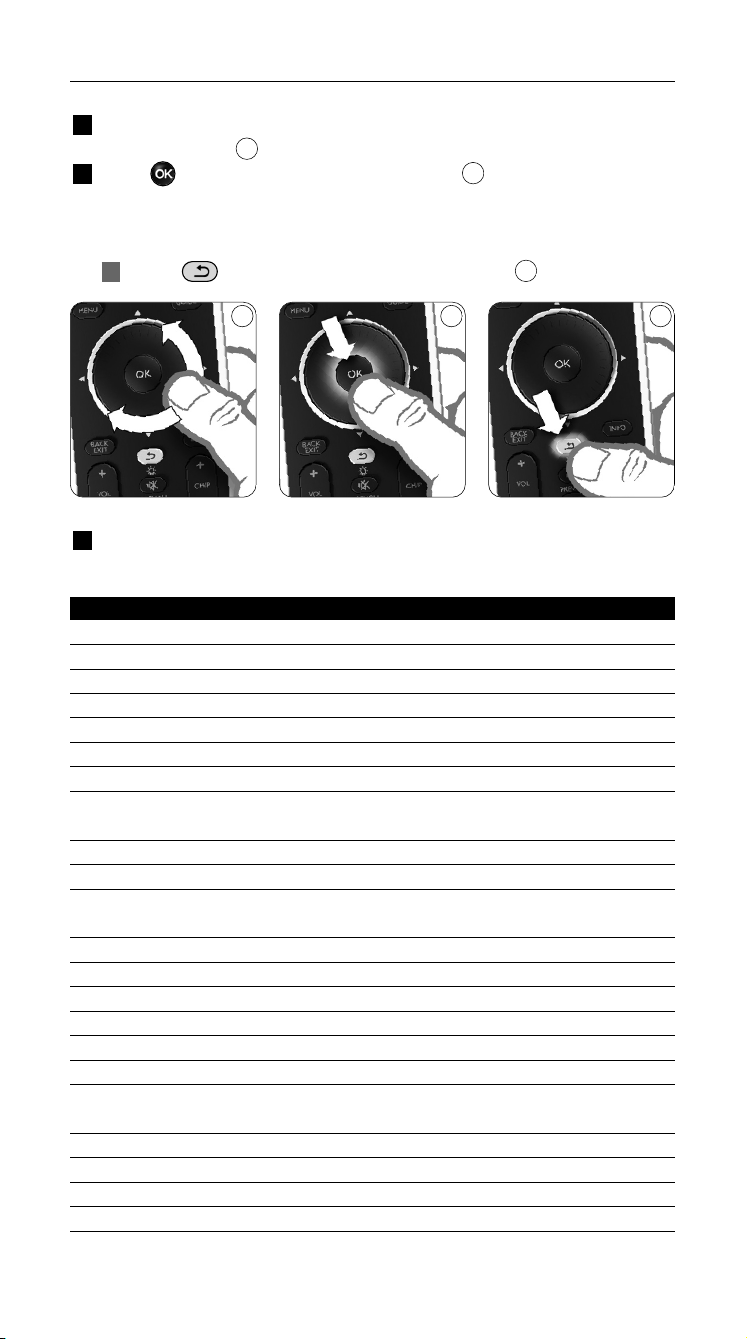
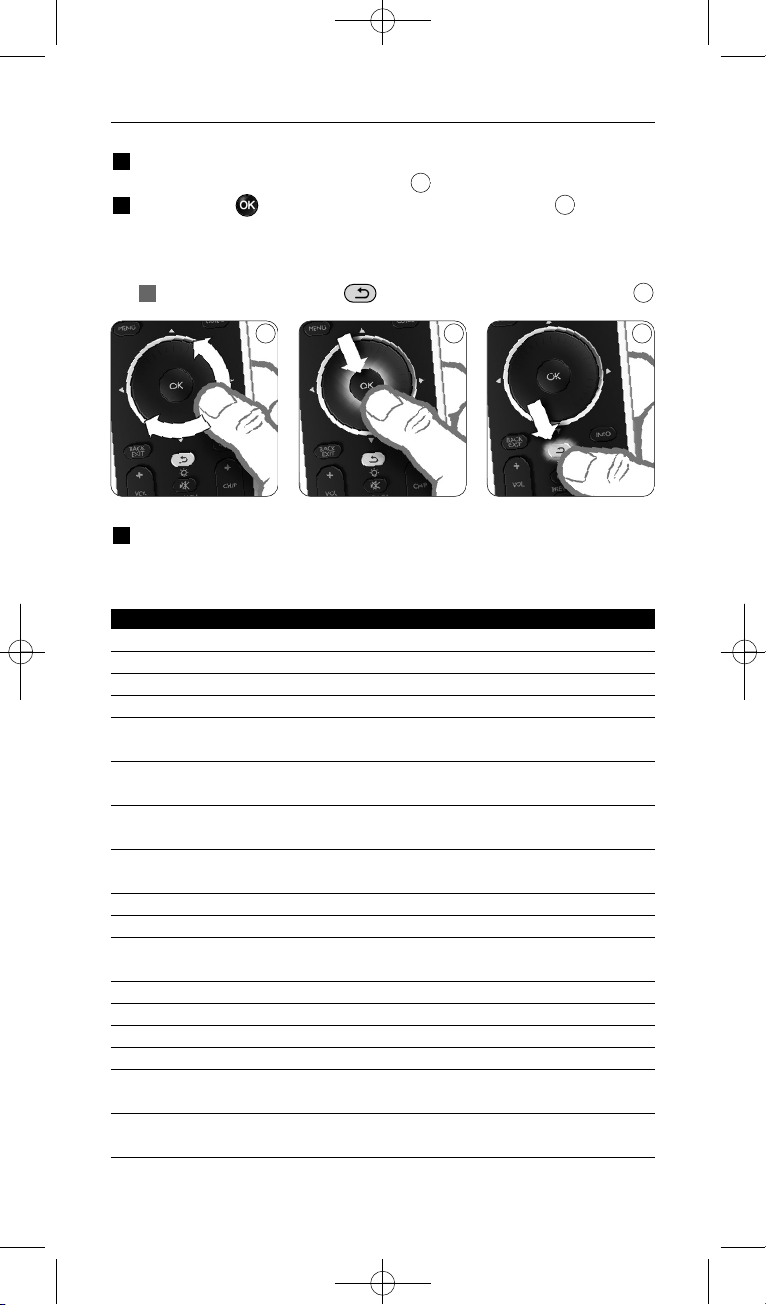
1 In the Installation Wizard, select your preferred language with the
rotary wheel.
2 Press to confirm the selected language.
The SRU8008 guides you through the remainder of the setup process.
You can always go back in the setup process to change a previous
selection:
Press to go back to the previous screen.
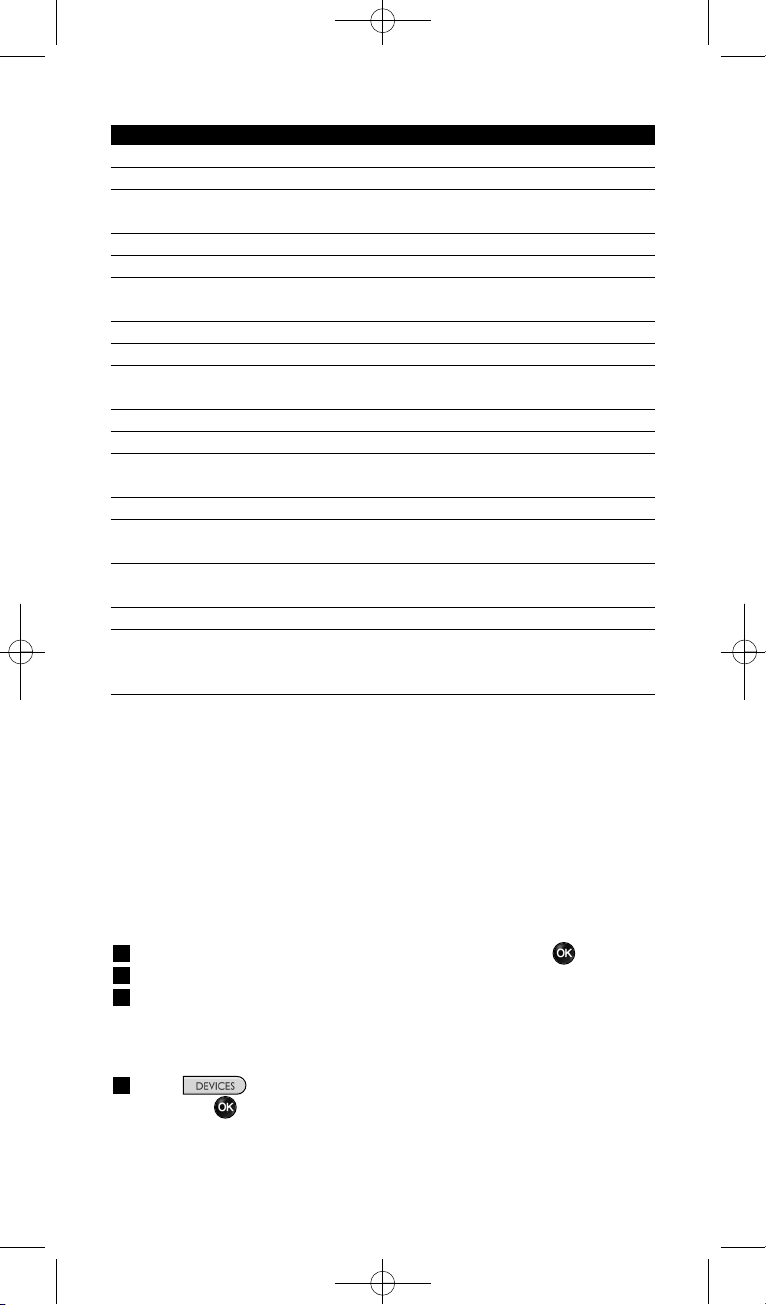
3 Follow the instructions on the SRU8008 to add devices. You can add
up to 8 devices to your SRU8008 from the following list.
Device Name Description
TV Traditional and flat TVs
DVD DVD player and recorder
DVDR DVD player and recorder
VCR Video Cassette player and recorder
SAT Satellite set-top box with or without Hard Disk Drive (HDD)
DSS/DTT Satellite set-top box with or without Hard Disk Drive (HDD)
Cable Cable set-top box with or without Hard Disk Drive (HDD)
DVB-T/S Digital Video Broadcast - Terrestrial (T) or Satellite (S) with or
without Hard Disk Drive (HDD)
AMP Amplifier
AudioSet Receiver = Amplifier + Tuner
HTS Home Theater System = Amplifier + DVD + Tuner +
Surround Sound Speakers
Tuner Radio Tuner
CD CD player and recorder
MD Mini Disk player and recorder
Ta p e Audio Cassette Tape player and recorder
DVR Digital Video Recorder = Analog TV Tuner + Hard Disk Drive (HDD)
Tivo Digital Video Recorder = Analog TV Tuner + Hard Disk Drive (HDD)
DMR Digital Media Receiver = device streaming media content from a PC
to a TV or Audio Receiver
TV-DVD combo TV with integrated DVD
TV-VCR combo TV with integrated VCR
TV-VCR-DVD combo TV with integrated DVD and VCR
DVD-VCR combo DVD and VCR combination
6
5
4
Getting Started
6
SRU8008_IFU_bundel 1 v09.qxd 03-12-2007 11:35 Pagina 6
ENGLISH
Device Name Description
DVDR-HDD combo DVD recorder and Hard Disk Drive (HDD) combination
VCD, Laser Disk Video Compact Disk, Laser Disk, Karaoke
Projector Video Projector
Camera and Camcorder Camera and Camcorder
PC PC (infrared only)
Game DVD player function of Game Console (Infrared only)
Satellite Radio Satellite Radio Receiver
PVR/DVR Personal Video Recorder / Hard disc Recorder
D Note
You can change the settings that you made during this initial
installation or install more function afterwards via the Setup menu.
See ‘Getting the Most out of Your SRU8008’ on page 9.
3 Using Your SRU8008
The SRU8008 has been designed to control your equipment with one
remote control. Simply add your devices, your activities and your extra
functions to start enjoying the SRU8008.
A device is a part of your equipment. As soon as you have installed your
devices, you can control them with the keys on the SRU8008.
Devices can have extra functions in addition to the keys on the SRU8008.
You can select more functions on the display.
An activity is a sequence of key presses you can install. For example, to
watch a DVD you normally would have to:
• Turn on the TV;
• Turn on the DVD;
• Turn on the surround sound system;
• Select the right input on your TV and surround sound system;
• Press the Play button to start the DVD.
With an activity the SRU8008 executes all these steps with just one
press.
Getting Started 7
SRU8008_IFU_bundel 1 v09.qxd 03-12-2007 11:35 Pagina 7
List of installed devices
List of installed
activities
87
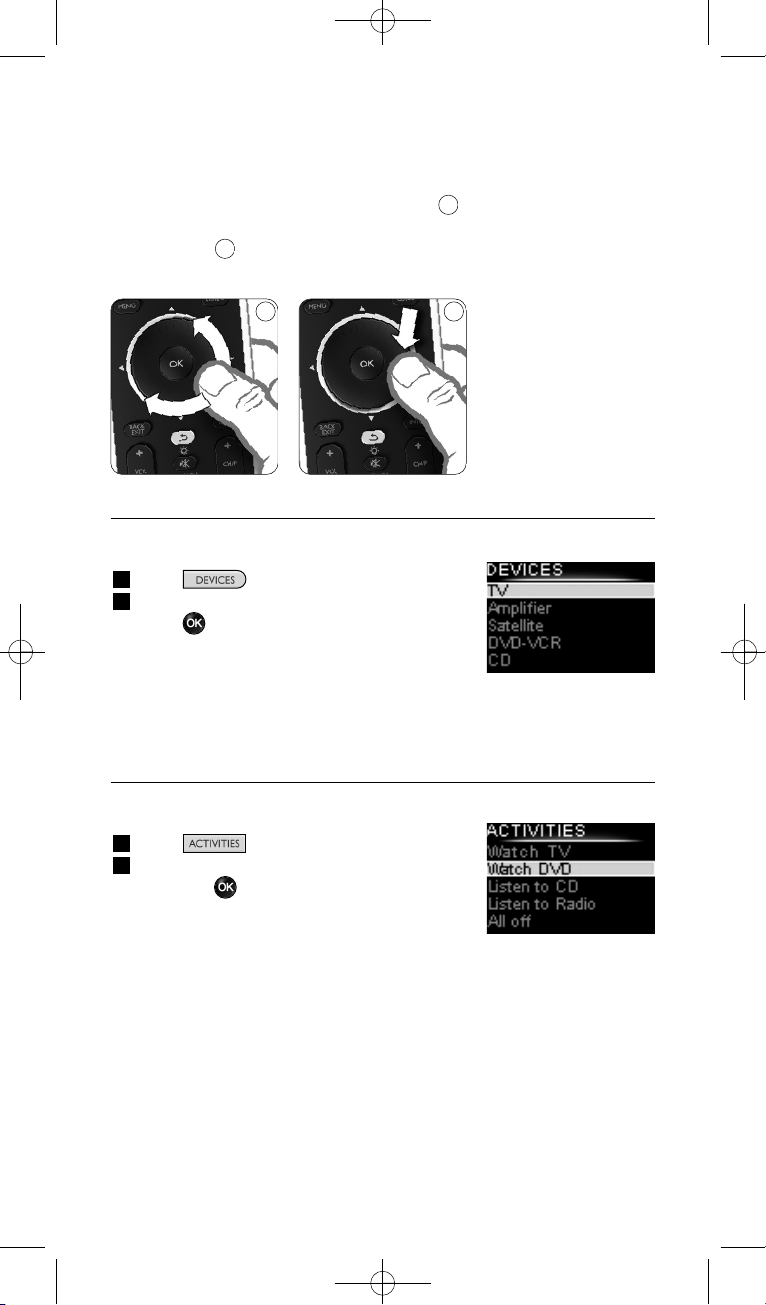
The rotary wheel is an easy-to-use, multifunctional control on your
SRU8008:
• When turning the rotary wheel, you scroll through the different
options on your remote control’s display.
• When pushing the rotary wheel at the top, at the bottom, at the left or
at the right , you navigate through the onscreen menu of the device
(TV, DVD, VCR, etc) you are controlling at that moment.
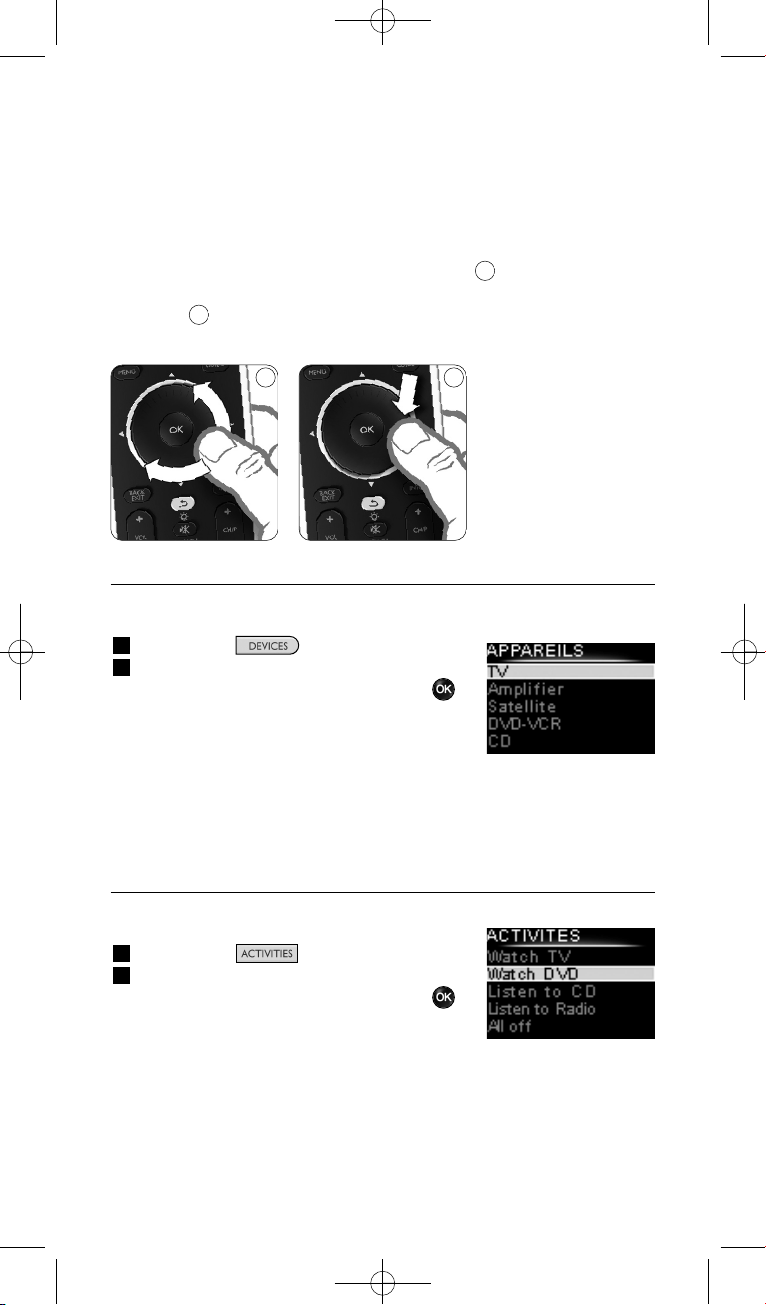
3.1 Selecting a Device
To select your installed devices:
1 Press .
2 Select a device with the rotary wheel and
press to confirm.
The SRU8008 is set to operate the selected
device. You can now control that device with
the black keys on the SRU8008.
To setup your devices, see ‘Add a Device’ on page 10.
3.2 Selecting an Activity
To select your installed activities:
1 Press .
2 Select an activity with the rotary wheel
and press to confirm your choice.
The SRU8008 sends out a sequence of key
presses for the selected activity.
The SRU8008 is set to operate the device
you selected for this activity.
To setup your activities, see ‘Add an Activity’ on page 13.
8
7
Using Your SRU8008
8
SRU8008_IFU_bundel 1 v09.qxd 03-12-2007 11:35 Pagina 8
List of installed
functions
ENGLISH
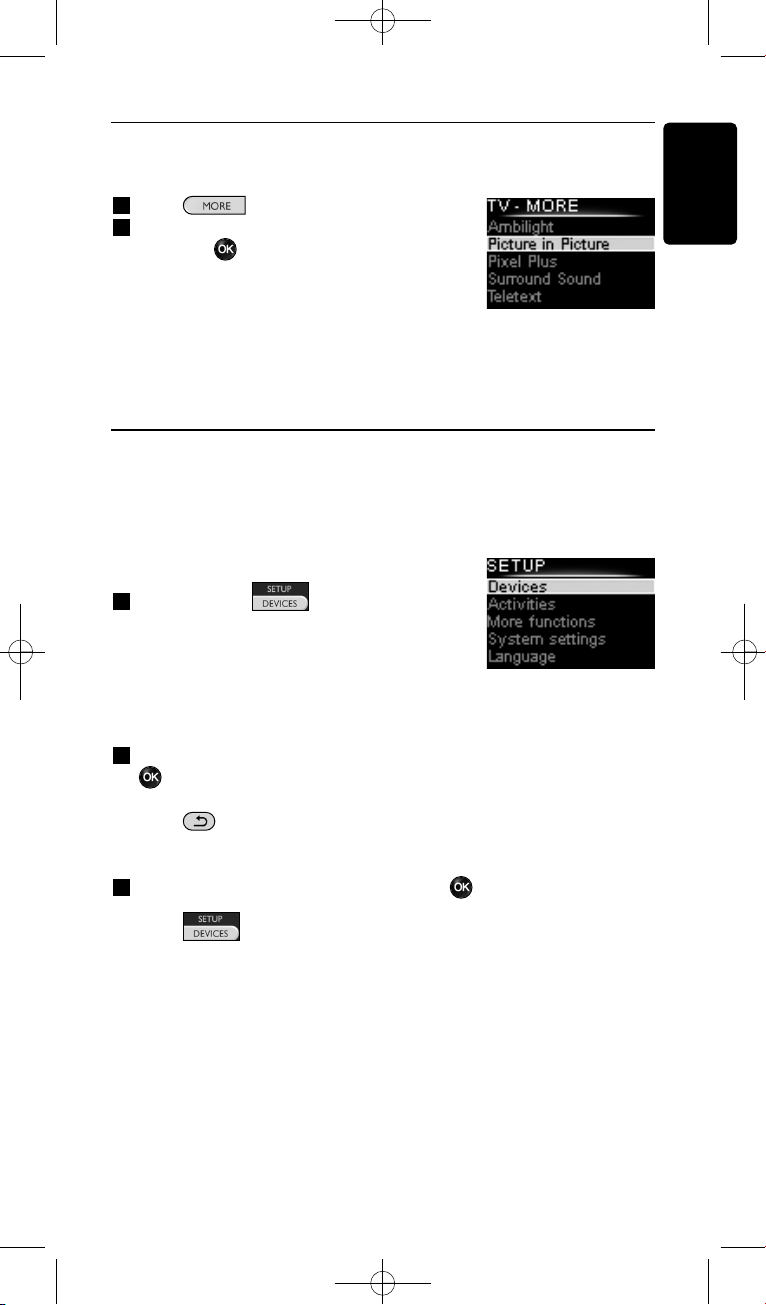
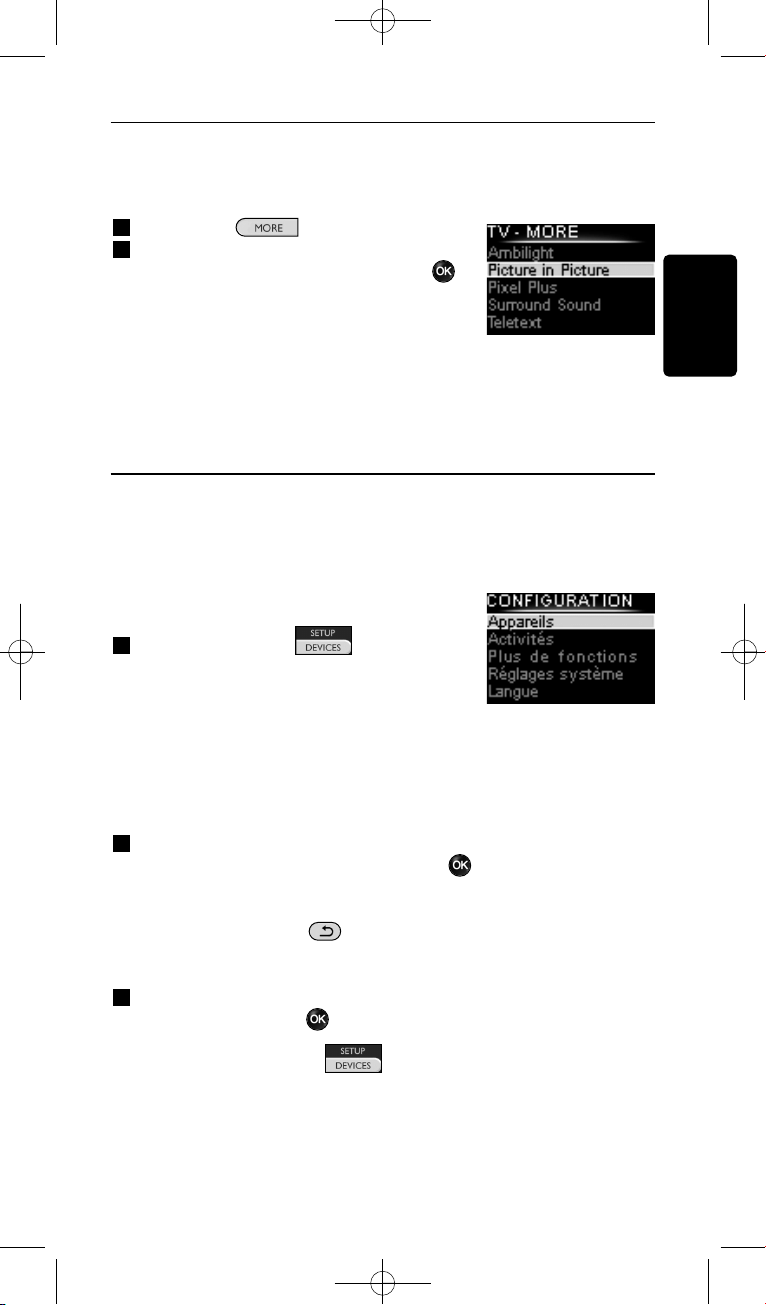
3.3 Selecting More Functions
Devices can have extra functions in addition to the keys on the SRU8008.
To select more installed functions:
1 Press .
2 Select a function with the rotary wheel
and press to confirm your choice.
The SRU8008 sends out the signal for the
selected function.
To setup more functions for your devices,
see ‘Add a Function’ on page 14.
4 Getting the Most out of Your SRU8008
Via the Setup menu you have access to the various advanced features of
the SRU8008.
To enter the Setup menu:
Press and hold for 3 seconds.
D Note
You cannot enter the Setup menu if the
Battery Low icon blinks.
To navigate through the Setup menu:
Select an option in the Setup menu with the rotary wheel and press
to confirm your choice.
-or-
Press to go back to the previous screen.
To exit the Setup menu:
Select Exit in the Setup menu and press .
-or-
Press again.
The following table gives you an overview of the options in the Setup
menu and the pages where you find more information about these options.
Getting the Most out of Your SRU8008 9
SRU8008_IFU_bundel 1 v09.qxd 03-12-2007 11:35 Pagina 9
Setup menu Submenu Description Page
Devices
Add device Adds a new device 10
Fix key Fixes a key that is not working correctly 11
Copy Volume Copies the volume keys from one device
to another 12
Rename Device Renames a device 12
Delete Device Deletes an installed device 12
Activities
Add Activity Adds a sequence of key presses to operate
different devices with one press 13
Rename Activity Renames an activity 13
Delete Activity Deletes an installed activity 14
More Functions
Add Function Adds an extra function by learning it from
your original remote control 14
Rename Function Renames a function 14
Delete Function Deletes an installed function 14
System Settings
Backlight Time-Out Changes the time-out of the backlight
on the SRU8008 15
Key Backlight Turns the key backlight on or off 15
Full Reset Deletes all your personal settings on
SRU8008 15
Language
Changes the language of the instructions
on the SRU8008 16
Exit
Leave the Setup menu 9
4.1 Devices
4.1.1 Add a Device
To operate your specific devices with the SRU8008, you have to add those
devices. You can add up to 8 devices. For a list of all devices, see page 6.
D Note
You can add a device more than once. A second TV will automatically
be named TV2. You can enter a different name if your wish to. See
‘Rename a Device’ on page 12.
1 Go to Setup - Devices, select Add Device and press .
2 Select the device you want to add.
3 Follow the instructions on the SRU8008.
The selected device is installed and added to the SRU8008.
You can now operate your device with the SRU8008:
Press , select the device with the rotary wheel
and press .
Getting the Most out of Your SRU800810
SRU8008_IFU_bundel 1 v09.qxd 03-12-2007 11:35 Pagina 10
9
0.80 - 2 inches
2-5 cm
ENGLISH
4.1.2 Fix a Key
If a key or extra function is not working properly with your device, you
can first of all try to assign that key’s signal to the SRU8008. In case that
does not work, you can copy that key’s signal from your original remote
to the SRU8008.
D Note
When you use the ‘Fix a Key’ option, new data overwrites the data
that is currently stored for that key.
1 Go to Setup - Devices, select Fix a key and press .
2 Select the device for which you want to fix a key.
The SRU8008 automatically checks if the brand of this device is
known in its database.
3 If the brand of your device is known, press and hold the key for
which you want to assign the signal.
The SRU8008 sends out different signals to your device.
4 When the device reacts, immediately release the key and follow the
instructions on the SRU8008.
The key is assigned and fixed.
-or-
If the brand of your device is unknown or the device does not
react to any of the signals, copy the key’s signal from the original
remote:
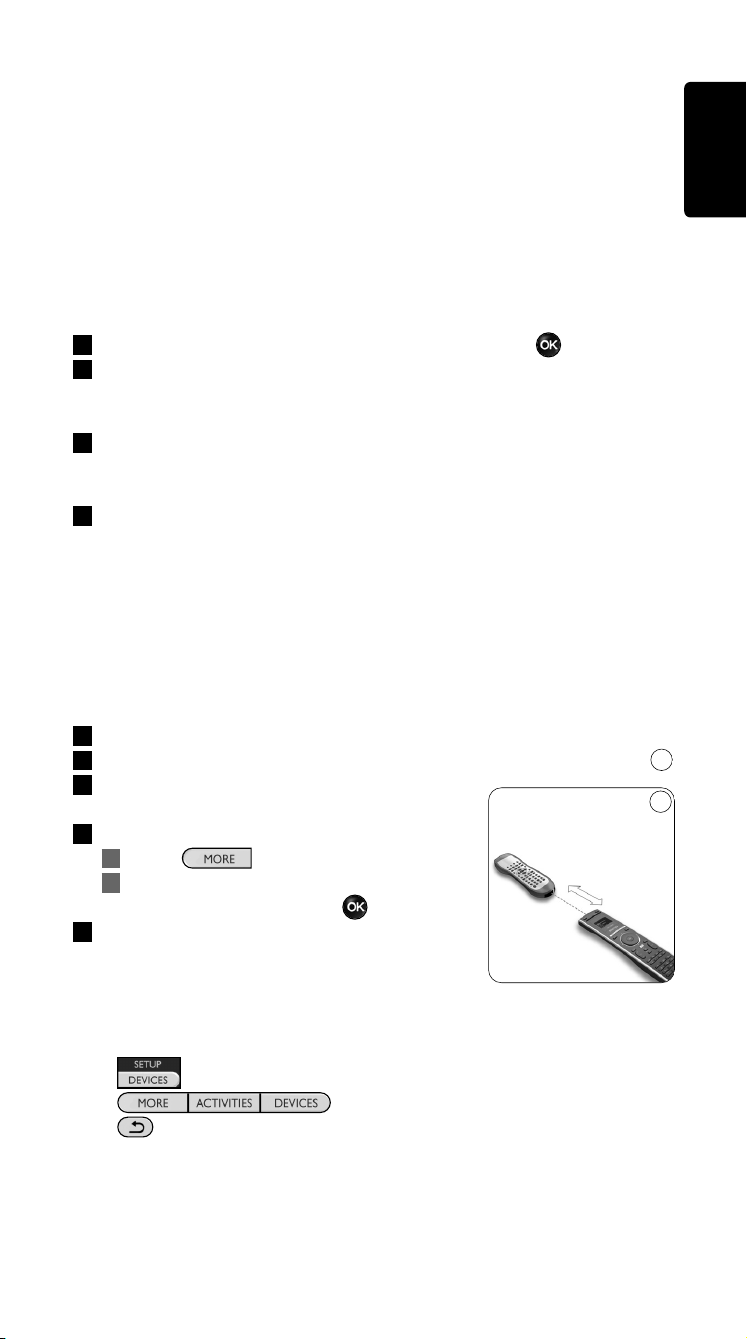
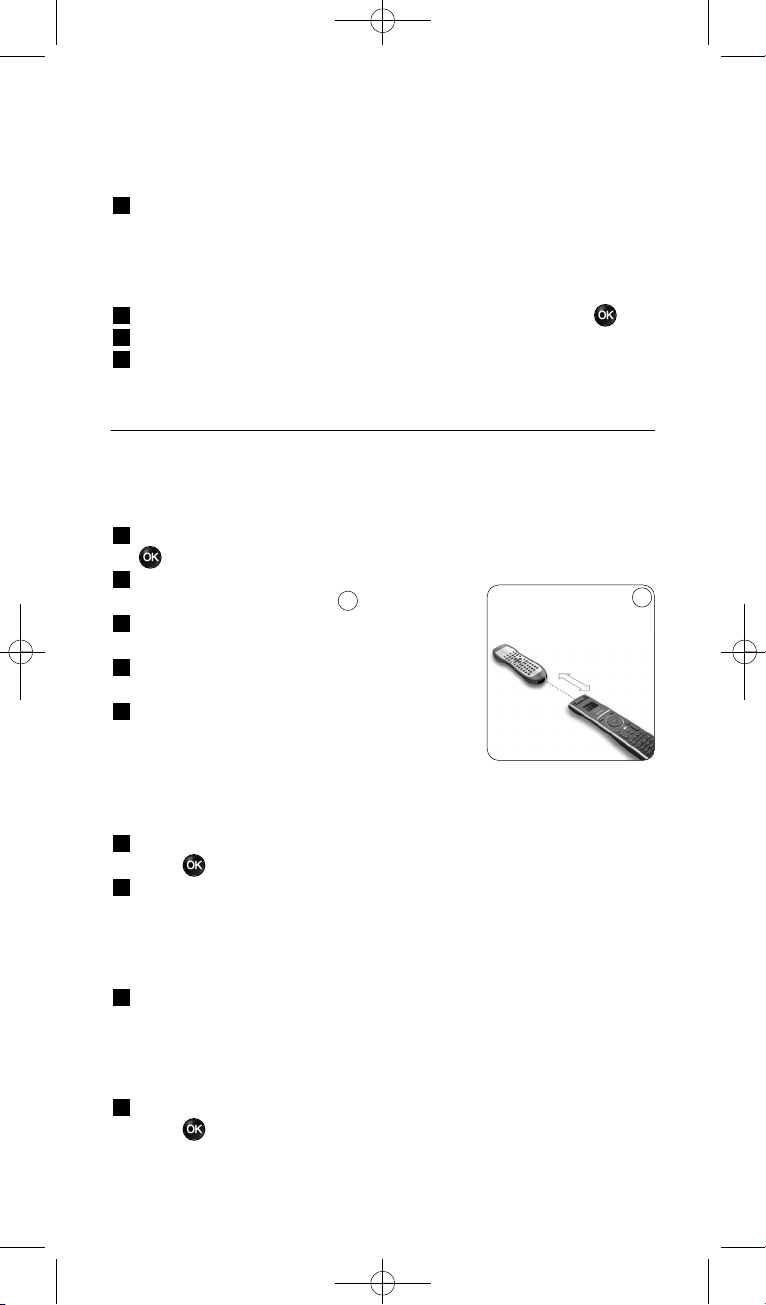
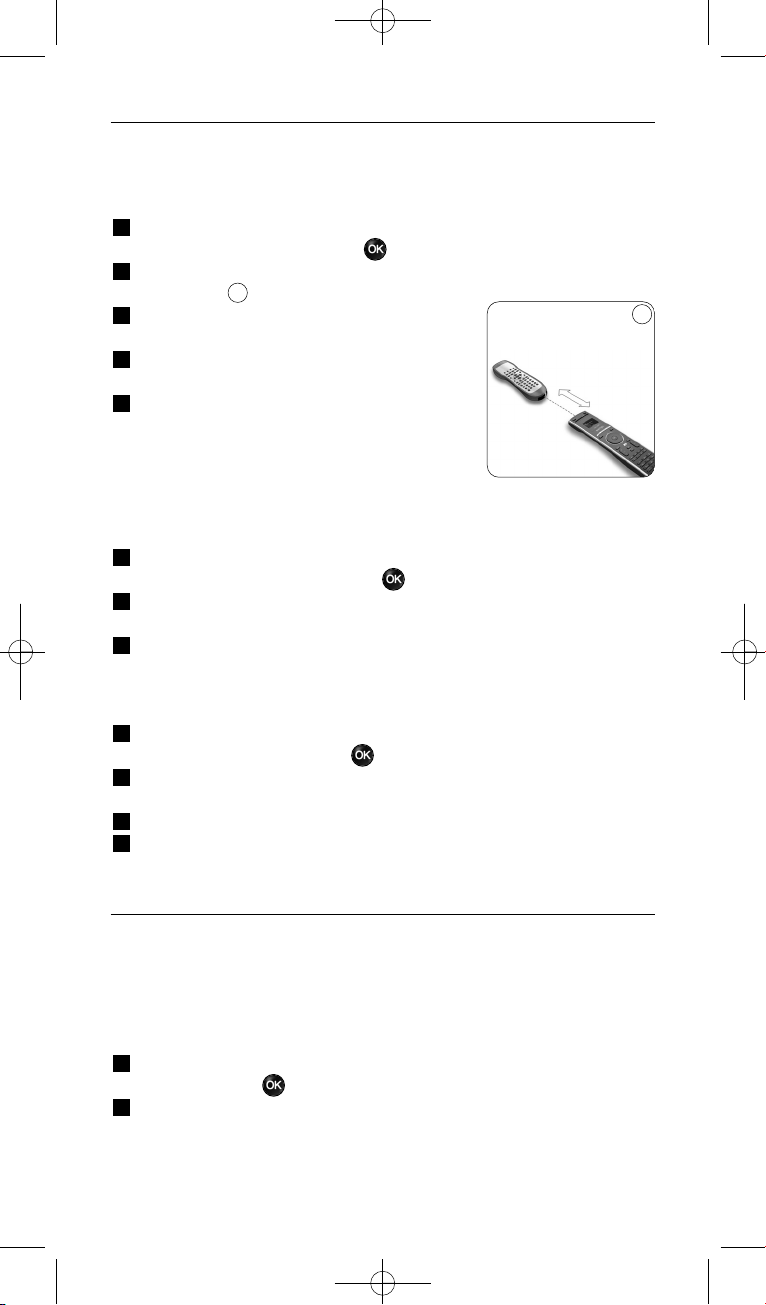
3 Confirm you have the original working remote ready.
4 Position the SRU8008 and your original remote control as shown.
5 Select the key or extra function you
want to fix.
6 To select extra functions:
1 Press .
2 Select the function with the
rotary wheel and press .
7 Follow the instructions on the SRU8008.
The key is copied and fixed.
D Note
All keys can be fixed except:
•
•
•
9
Getting the Most out of Your SRU8008 11
SRU8008_IFU_bundel 1 v09.qxd 03-12-2007 11:35 Pagina 11

12 Getting the Most out of Your SRU8008
4.1.3 Copy the Volume
After you add devices, the SRU8008 automatically copies the volume
settings as follows:
• Video devices, like DVD, DVDR, VCR and Satellite box, use the
volume keys of the TV (provided that you have installed a TV).
• Audio devices, like CD, MD, Tape and Tuner, use the volume keys of
the Amplifier or Receiver (provided that you have installed an
Amplifier or Receiver).
You can change which volume keys are used, for instance when you want
to use the volume keys of the Amplifier for the DVD.
D Notes
• The Copy Volume function overwrites the default volume
settings of the SRU8008.
• Previous volume settings you installed using Copy Volume or
Fix a Key are gone.
• The volume settings are automatically deleted when you delete the
volume source device.
To copy the volume settings:
1 Go to Setup - Devices, select Copy Volume and press .
2 Select the device you want to copy the volume keys from (e.g. TV or
Amp).
3 Select the device you want to copy the volume keys to (e.g. DVD or
SAT box).
4 Confirm you want to copy the volume keys from one device to the
other.
The volume keys are copied.
4.1.4 Rename a Device
To rename a device:
1 Go to Setup - Devices, select Rename Device and press .
2 Enter the new label with the alphanumeric keys.
D Note
You can delete characters with the Clear key and the left cursor.
3 Confirm the new label.
The device is renamed.
4.1.5 Delete a Device
To delete a device:
1 Go to Setup - Devices, select Delete Device and press .
2 Select the device you want to delete.
3 Confirm you want to delete the device.
The device is deleted.
SRU8008_IFU_bundel 1 v09.qxd 03-12-2007 11:35 Pagina 12
13Getting the Most out of Your SRU8008
D Note
Keys of the deleted device that are used elsewhere, e.g. in an activity
or the volume keys you copied, will be deleted as well.
Check the activities you installed and reinstall them if necessary.
See ‘Add an Activity’ on page 13.
Check the volume keys for your devices and reinstall them if
necessary. See ‘Copy the Volume’ on page 12.
4.2 Activities
4.2.1 Add an Activity
You can add activities to the SRU8008. An activity consists of several key
presses that the SRU8008 sends out with just one press.
By default the SRU8008 inserts a delay of 600ms between every key
press to make sure your devices are responding correctly to the IR
signals. You can overwrite this default delay.
• If one of your devices needs a longer delay before receiving the next
IR signal, you can insert a delay of 1, 3, 5, 10 or 15 seconds.
• If an activity needs a long key press, e.g. turn up the volume, you can
select the option Hold last key.
To add an activity:
1 Go to Setup - Activities, select Add Activity and press .
2 Select the label you want to use for the activity.
-or-
Select Not in list to create a new label.
3 Follow the instructions on the SRU8008.
• Select a device with the rotary wheel, press and press a key
to add it to the activity.
• Select 1, 3, 5, 10 or 15 seconds delay with the rotary wheel and
press .
-or-
Select Hold last key with the rotary wheel and press .
4 Repeat step 3 to create another activity.
The activity is added to the SRU8008.
You can now run the activity with the SRU8008:
Press , select the activity with the rotary wheel and
press .
4.2.2 Rename an Activity
To rename an activity:
1 Go to Setup - Activities, select Rename Activity and press .
2 Enter the text for the new label with the alphanumeric keys.
ENGLISH
SRU8008_IFU_bundel 1 v09.qxd 03-12-2007 11:35 Pagina 13
10
0.80 - 2 inches
2-5 cm
D Note
You can delete characters with the Clear key and the left cursor.
3 Confirm the new label.
The activity is renamed.
4.2.3 Delete an Activity
To delete an activity:
1 Go to Setup - Activities, select Delete Activity and press .
2 Select the activity you want to delete.
3 Confirm you want to delete the activity.
The activity is deleted.
4.3 More Functions
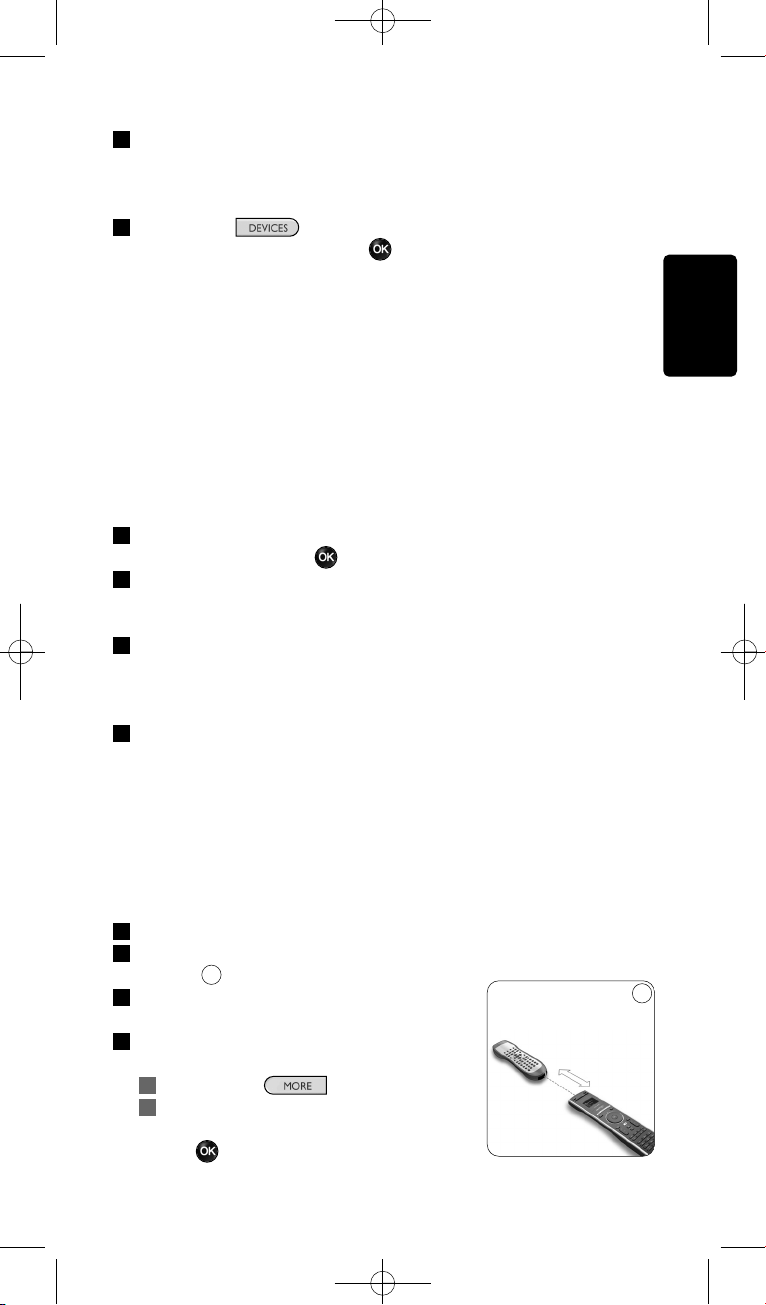
4.3.1 Add a Function
To add more functions:
1 Go to Setup - More Functions, select Add Function and press
.
2 Position the SRU8008 and your original
remote control as shown.
3 Select the device you want to add a
function to.
4 Select the label you want to use for the
extra function.
5 Follow the instructions on the SRU8008 to
copy the function from your original remote.
The function is added to the SRU8008.
4.3.2 Rename a Function
To rename an extra function:
1 Go to Setup - More Functions, select Rename Function and
press .
2 Enter the text for the new label with the alphanumeric keys.
D Note
You can delete characters with the Clear key and the left cursor.
3 Confirm the new label.
The function is renamed.
4.3.3 Delete a Function
To delete an extra function:
1 Go to Setup - More Functions, select Delete Function and
press .
10
Getting the Most out of Your SRU800814
SRU8008_IFU_bundel 1 v09.qxd 03-12-2007 11:35 Pagina 14
ENGLISH
2 Select the device from which you want to delete a function.
3 Select the function you want to delete.
4 Confirm you want to delete the function.
The function is deleted.
4.4 System Settings
4.4.1 Backlight Time-Out
When you use the SRU8008, the backlight turns on. After 5 seconds it
turns off again.
To change this time out:
1 Go to Setup - System Settings, select Backlight Time-Out and
press .
2 Select the preferred backlight time-out with the rotary wheel:
3 seconds, 5 seconds, 10 seconds, 20 seconds.
3 Confirm the new time-out setting.
The backlight time-out is changed.
D Note
The backlight time-out has an impact on the lifetime of the batteries,
the longer the backlight stays on, the faster the batteries drain.
4.4.2 Key Backlight
To turn on and off the key backlight:
1 Go to Setup - System Settings, select Key Backlight and
press .
2 Select On or Off with the rotary wheel.
3 Confirm the new key backlight setting.
The key backlight is turned on or off.
4.4.3 Full Reset
When resetting the SRU8008 completely, all installed devices, activities
and other settings are deleted. After the reset, the SRU8008 needs to be
installed again.
To reset the SRU8008:
1 Go to Setup - System Settings, select Full Reset and
press .
2 Select Ye s with the rotary wheel and press .
3 Press to reconfirm.
The SRU8008 deletes all settings and restarts with the Installation
Wizard. This can take up to one minute.
Getting the Most out of Your SRU8008 15
SRU8008_IFU_bundel 1 v09.qxd 03-12-2007 11:35 Pagina 15

16 Getting the Most out of Your SRU8008
4.5 Language
To change the language of the SRU8008:
1 Go to Setup - Language and press .
2 Select the preferred language with the rotary wheel:
English, Français, Deutsch, Español, Italiano, Nederlands, Русский.
3 Confirm the new language.
The language used in the Setup menu is changed.
5 Frequently Asked Questions
Keys
Why are one or more keys not working with my device?
Not all functions are available in the database of the SRU8008 or the
code behind the key is defect.
You can fix a key by copying the signal from your original remote.
See ‘Fix a key’ on page 11.
How do I operate the Up, Down, Left, Right cursor keys for the
onscreen menu?
The rotary wheel is an easy-to-use, multifunctional control on your
SRU8008:
• When turning the rotary wheel, you scroll through the different
options on your remote control’s display.
• When pushing the rotary wheel at the top, at the bottom, at the left or
at the right, you navigate through the onscreen menu of the device (TV,
DVD, VCR, etc) you are controlling at that moment.
How can I add extra functions to the SRU8008?
See ‘Add a Function’ on page 14.
Brand
Why can I not find the brand of my device in the SRU8008?
Not all brands are available in the database of the SRU8008. When your
brand is not in the list:
• You can copy the keys from your original remote. See ‘Fix a key’ on
page 11.
-Or-
• You can select Not in list to perform a full database search.
The SRU8008 tests all available codes. This can take up to 25 minutes.
SRU8008_IFU_bundel 1 v09.qxd 03-12-2007 11:35 Pagina 16
17Frequently Asked Questions
Activity
Can I go from one activity to another?
No, when an activity is selected you cannot select the same or another
activity once more. You have to switch off all devices before selecting a
new activity from the list.
Volume
Why are the volume keys not working properly?
After adding devices, the SRU8008 automatically copies the volume keys
and Mute key, as follows:
• Video devices, like DVD, DVDR, VCR and Satellite box, use the
volume keys of the TV.
• Audio devices, like CD, DMR and Tuner, use the volume keys of the
Amplifier or Receiver.
If you did not install the source device (TV, Amplifier or Receiver), the
volume keys and the Mute key will not work. To define the volume keys:
• You can install the source device on the SRU8008.
See ‘Add a Device’ on page 11.
-Or-
• You can copy the volume keys of another source device.
See ‘Copy the Volume’ on page 12.
Batteries
Why can I not enter the Setup menu?
When the battery level is too low, you cannot enter the Setup menu.
Replace the batteries with new alkaline batteries.
Why does the SRU8008 not wake up anymore?
The battery level is too low. Replace the batteries with new alkaline
batteries.
Do I loose my data when I replace the batteries?
No. Your data will be saved.
Can I use rechargeable batteries with my SRU8008?
Yes you certainly can. However, bear in mind that rechargeable batteries
tend to drain faster than alkaline batteries.
ENGLISH
SRU8008_IFU_bundel 1 v09.qxd 03-12-2007 11:35 Pagina 17
18 Need help?
6 Need help?
First of all, read this Instruction for Use carefully.
When you have additional questions about the usage, setup or warranty
of the SRU8008, see www.philips.com/support
.
For contact details, see www.philips.com/support
.
Make sure the SRU8008 is at hand when you call our helpline so that our
operators can help you determine whether it is working properly.
The model number of your Philips universal remote control is SRU8008.
For the correct device codes for your remote, see
www.philips.com/URC
.
Date of purchase:
..../..../........ (day/month/year)
SRU8008_IFU_bundel 1 v09.qxd 03-12-2007 11:35 Pagina 18
19Table des matières
FRANÇAIS
Table des matières
1 Votre télécommande Philips Prestigo SRU8008 20
1.1 Contenu 20
1.2 Vue d’ensemble de la SRU8008 20
2 Première approche 21
2.1 Préparation 21
2.2 Installation 22
3 Utilisation de la SRU8008 23
3.1 Sélection d’un appareil 24
3.2 Sélection d’une activité 24
3.3 Sélection des Fonctions+ 25
4 Utilisation optimale de la SRU8008 25
4.1 Appareils 26
4.2 Activités 29
4.3 Fonctions+ 31
4.4 Réglages Système 31
4.5 Langue 32
5 Questions fréquemment posées 33
6 Besoin d’aide? 35
SRU8008_IFU_bundel 1 v09.qxd 03-12-2007 11:36 Pagina 19

1 Votre télécommande
Philips Prestigo SRU8008
Bienvenue dans la famille toujours plus nombreuse des possesseurs de
produits Philips. La télécommande universelle Philips Prestigo SRU8008 a
été conçue pour contrôler votre équipement. Vous pouvez installer
jusqu’à 8 appareils et 8 activités.
Sélectionnez un appareil et faites-le fonctionner avec les touches de la
SRU8008.
Sélectionnez une activité et démarrez automatiquement une séquence
de pressions de touches pour, par exemple, regarder un DVD ou écouter
un CD.
Sélectionnez plus de fonctions et attribuez davantage de fonctions
avancées à votre télécommande.
1.1 Contenu
• La télécommande SRU8008
• Le guide de démarrage rapide
• Les instructions d’utilisation en plusieurs langues
• Des piles alcalines Philips.
Philips recommande l’utilisation de piles alcalines Philips.
1.2 Vue d’ensemble de la SRU8008
La photo à la page 2 vous donne un aperçu de la SRU8008.
Pour préparer la SRU8008 à l’utilisation, voir Première approche, page 21.
Touches noires pour envoyer des signaux à votre équipement
A Touche POWER (Mise sous tension)
B Touche OK
C Touches haut, bas, gauche et droite
D Touches de lecture
E Touches alphanumériques
F Touche *–./ CLEAR (Effacer)
G Touche AV
H Touche ENTER (Entrée)
Touches pour contrôler la télécommande SRU8008
1 Touche MORE (Plus de fonctions)
2 Touche ACTIVITIES (Activités)
3 Touche DEVICES/SETUP (Appareils/Configuration)
4 Touche OK
5 Touche de navigation
6 Touche Précédent
Votre télécommande Philips Prestigo SRU800820
SRU8008_IFU_bundel 1 v09.qxd 03-12-2007 11:36 Pagina 20
1 2 3
2 Première approche
2.1 Préparation
Pour insérer les piles dans la SRU8008 :
1 Appuyez sur le couvercle et soulevez-le.
2 Insérez les trois piles alcalines LR6 AA dans le compartiment
prévu à cet effet, comme illustré.
3 Remettez le couvercle en place et appuyez fermement dessus jusqu’à
ce que vous entendiez un déclic.
Apparaissent le logo Philips pendant
3 secondes puis l’Assistant d’Installation
destiné à vous aider.
Quand les piles sont presque déchargées, l’icône clignote. Ce signal
indique que le niveau de la pile est faible. La SRU8008 continuera
toutefois à fonctionner encore un certain temps.
Remplacez les piles usagées par de nouvelles piles alcalines LR6 AA et
respectez la législation locale en vigueur en matière de système de
collecte des piles usagées.
D Remarque
Si l’icône de Pile Faible clignote, vous ne pouvez plus accéder au
menu Configuration.
3
2
1
Assistant d’installation –
Sélection de la langue
FRANÇAIS
Première approche 21
SRU8008_IFU_bundel 1 v09.qxd 03-12-2007 11:36 Pagina 21
2.2 Installation
1 Dans l’assistant d’installation, sélectionnez la langue d’utilisation à
l’aide de la touche de navigation.
2 Appuyez sur pour confirmer la langue sélectionnée.
La SRU8008 vous guide durant tout le reste de la configuration.
Vous avez toujours la possibilité de revenir en arrière dans le
processus de configuration pour modifier une sélection précédente :
Appuyez sur la touche pour revenir à l’écran précédent.
3 Suivez les instructions sur la télécommande SRU8008 pour ajouter
des appareils. Vous pouvez ajouter jusqu’à 8 appareils de la liste
suivante à la télécommande SRU8008 :
Nom de l’appareil Description
TV Téléviseurs traditionnels et plats muraux
DVD Lecteur et enregistreur DVD
DVDR Lecteur et enregistreur DVD
VCR Lecteur et enregistreur cassettes vidéo
SAT Boîtier décodeur satellite avec ou sans lecteur de disque dur
(Hard Disk Drive)
DSS/DTT Boîtier décodeur satellite avec ou sans lecteur de disque dur
(Hard Disk Drive)
Cable Boîtier décodeur via le câble avec ou sans lecteur de disque dur
(Hard Disk Drive)
DVB-T/S Radiodiffusion numérique - Terrestre (T) ou Satellite (S) avec ou sans
lecteur de disque dur (HDD)
AMP Amplificateur
AudioSet Récepteur = Amplificateur + Syntoniseur
HTS Cinéma maison = Amplificateur + DVD + Syntoniseur +
Haut-parleurs ambiophoniques
Tuner Syntoniseur
CD Lecteur et enregistreur CD
MD Lecteur et enregistreur Mini Disk
Ta p e Magnétophone audio à cassette
DVR Magnétoscope numérique = Syntoniseur analogique + lecteur
de disque dur (Hard Disk Drive)
Tivo Magnétoscope numérique = Syntoniseur analogique + lecteur
de disque dur (Hard Disk Drive)
6
5
4
4 5 6
Première approche
22
SRU8008_IFU_bundel 1 v09.qxd 03-12-2007 11:36 Pagina 22
Nom de l’appareil Description
DMR Passerelle multimédia = contenu multimédia en temps réel
transmis d’un ordinateur à un téléviseur ou à un récepteur audio
TV-DVD Téléviseur avec DVD intégré
TV-VCR Téléviseur avec VCR intégré
TV-VCR-DVD Téléviseur avec DVD et VCR intégrés
DVD-VCR Combinaison DVD et VCR
DVDR-HDD Combinaison enregistreur DVD et lecteur de disque dur
(Hard Disk Drive)
VCD, Laser Disk Disque compact vidéo, Disque optique, Karaoké
Projector Vidéoprojecteur
Camera and Camcorder Caméra et caméscope
PC PC (uniquement infrarouge)
Game Fonction lecteur DVD d’une console de jeu (uniquement infrarouge)
Satellite Radio Récepteur radio satellite
PVR/DVR Enregistreur numérique/Enregistreur avec disque dur
D Remarque
Vous pouvez par la suite modifier les réglages effectués durant
l’installation initiale ou installer d’autres fonctions via le menu
Configuration.
Voir Utilisation optimale de la SRU8008, page 25.
3 Utilisation de la SRU8008
La SRU8008 a été conçue pour contrôler votre équipement avec une
seule télécommande. Ajoutez simplement vos appareils, vos activités, vos
favoris et vos fonctions supplémentaires pour profiter pleinement de la
SRU8008.
Un appareil est un élément de votre équipement. Dès que vous avez
installé vos appareils, vous pouvez les contrôler avec les touches de la
SRU8008.
Les appareils peuvent avoir des fonctions supplémentaires en plus de
celles définies sur les touches de la SRU8008. Vous pouvez sélectionner
Fonctions+ sur l’écran.
Une activité est une séquence de pressions de touches que vous pouvez
définir. Par exemple, pour regarder un DVD, il vous faudrait
normalement :
• allumer le téléviseur,
• allumer le lecteur DVD,
• allumer le système de son surround,
• sélectionner l’entrée appropriée sur votre téléviseur et sur votre
système de son surround,
• appuyer sur la touche de lecture afin de démarrer le DVD.
FRANÇAIS
Première approche 23
SRU8008_IFU_bundel 1 v09.qxd 03-12-2007 11:36 Pagina 23
Grâce à une activité, la SRU8008 exécute toutes ces étapes en une seule
pression sur une seule touche.
La touche de navigation de votre SRU8008 est une commande
multifonctionnelle et simple d’utilisation.
• La touche de navigation vous permet de parcourir les différentes
options de l’afficheur de votre télécommande.
• Appuyez sur la touche de navigation, vers le haut, vers le bas, à gauche ou
à droite , pour parcourir le menu de l’écran de l’appareil (téléviseur,
lecteur/enregistreur de DVD, magnétoscope, etc.) que vous commandez.
3.1 Sélection d’un appareil
Pour sélectionner les appareils installés :
1 Appuyez sur .
2 Sélectionnez un appareil à l’aide de la
touche de navigation et appuyez sur
pour confirmer.
La SRU8008 est paramétrée pour faire
fonctionner l’appareil sélectionné. Vous
pouvez désormais contrôler l’appareil avec
les touches noires de la SRU8008.
Pour configurer vos appareils, voir
Ajouter un appareil, page 26.
3.2 Sélection d’une activité
Pour sélectionner vos activités installées :
1 Appuyez sur .
2 Sélectionnez une activité à l’aide de la
touche de navigation et appuyez sur
pour commencer l’activité.
La SRU8008 transmet une séquence de
pressions de touches définie pour l’activité
sélectionnée. La SRU8008 est opérationnelle
avec l’appareil que vous avez sélectionné
pour cette activité.
Pour configurer vos activités, voir Ajouter une Activité, page 29.
8
7
Liste des appareils
installés
Liste des activités
installées
87
Utilisation de la SRU8008
24
SRU8008_IFU_bundel 1 v09.qxd 03-12-2007 11:36 Pagina 24
3.3 Sélection des Fonctions+
Les appareils peuvent avoir des fonctions supplémentaires en plus de
celles définies sur les touches de la SRU8008.
Pour sélectionner les autres fonctions installées :
1 Appuyez sur .
2 Sélectionnez une fonction à l’aide de la
touche de navigation et appuyez sur
pour confirmer votre choix.
La SRU8008 envoie un signal pour activer
la fonction sélectionnée.
Pour configurer plus de fonctions pour vos
appareils, voir Ajouter une Fonction, page 31.
4 Utilisation optimale de la SRU8008
Dans le menu Configuration, vous pouvez accéder aux diverses
caractéristiques avancées de la SRU8008.
Pour accéder au menu Configuration :
Maintenez le bouton enfoncé
pendant 3 secondes.
D Remarque
Si l’icône de Pile Faible clignote, vous ne pouvez pas accéder au
menu Configuration.
Pour naviguer dans le menu Configuration :
Sélectionnez une option dans Configuration - Menu Princ. à l’aide
de la touche de navigation et appuyez sur pour confirmer votre
choix.
- ou -
Appuyez sur la touche pour revenir à l’écran précédent.
Pour quitter le menu Configuration :
Sélectionnez Quitter Configuration dans Configuration - Menu
Princ. et appuyez sur .
- ou -
Appuyez de nouveau sur .
Le tableau ci-dessous vous donne un aperçu des options du menu
Configuration et indique les pages dans lesquelles vous trouverez de
plus amples informations à ce sujet.
Liste des fonctions
installées
FRANÇAIS
Utilisation de la SRU8008 25
SRU8008_IFU_bundel 1 v09.qxd 03-12-2007 11:36 Pagina 25

Config. - Menu Princ. Sous-menu Description Page
Appareils
Ajouter un Appareil Ajoute un nouvel appareil 26
Réparer une Touche Répare une touche qui ne fonctionne pas
correctement en copiant le signal à partir
de votre télécommande d’origine 27
Copier le Volume Copie les touches de volume d’un appareil
à un autre 28
Renommer un Appareil Renomme un appareil 28
Supprimer un Appareil Supprime un appareil déjà installé 29
Activités
Ajouter une Activité Ajoute une séquence de pressions de
touches permettant de faire fonctionner
différents appareils en appuyant sur une
seule touche 29
Renommer une Activité Renomme une activité 30
Supprimer une Activité Supprime une activité déjà installée 30
Fonctions+
Ajouter une Fonction Ajoute une fonction supplémentaire en
la copiant à partir de votre
télécommande d’origine 31
Renommer une Fonction Renomme une fonction 31
Supprimer une Fonction Supprime une fonction déjà installée 31
Réglages Système
Temporisation Rétroéclair. Modifie la durée de rétroéclairage de
la SRU8008 31
Rétroéclairage Touches Active ou désactive le rétroéclairage
sur les touches 32
Réinitialisation Complète Supprime tous vos réglages personnels
sur la SRU8008 32
Langue
Modifie la langue des informations
affichées sur la SRU8008 32
Quitter
Permet de sortir du menu
Configuration 25
4.1 Appareils
4.1.1 Ajouter un appareil
Pour faire fonctionner vos appareils spécifiques avec la SRU8008, vous
devez ajouter ces appareils. Vous pouvez ajouter jusqu’à 8 appareils.
D Remarque
Vous pouvez ajouter un même appareil deux fois. Si un deuxième
téléviseur est installé, il sera automatiquement nommé TV2. Vous
pouvez cependant le nommer différemment si vous le souhaitez. Voir
Renommer un appareil, page 28.
1 Allez dans Configuration - Appareils, sélectionnez Ajouter un
Appareil et appuyez sur .
2 Sélectionnez l’appareil que vous souhaitez ajouter.
Utilisation optimale de la SRU800826
SRU8008_IFU_bundel 1 v09.qxd 03-12-2007 11:36 Pagina 26
3 Suivez les instructions affichées sur la SRU8008.
L’appareil sélectionné est installé puis ajouté à la SRU8008.
Vous pouvez désormais faire fonctionner votre appareil avec la SRU8008 :
Appuyez sur , sélectionnez l’appareil à l’aide de la touche
de navigation et appuyez sur .
4.1.2 Réparer une touche
Si une touche ou une fonction supplémentaire ne fonctionne pas
correctement avec votre appareil, vous pouvez d’abord essayer
d’attribuer ce signal de touche à la SRU8008. Si cette opération ne
fonctionne pas, vous pouvez copier ce signal de votre télécommande
d’origine sur la SRU8008.
D Remarque
Lorsque vous utilisez l’option Réparer une touche, les nouvelles
données écrasent les données actuelles relatives à cette touche.
1 Sélectionnez Configuration - Appareils, puis Réparer une
touche et appuyez sur .
2 Sélectionnez l’appareil sur lequel vous souhaitez réparer une touche.
La SRU8008 vérifie automatiquement que la marque de l’appareil est
enregistrée dans sa base de données.
3 Si la télécommande reconnaît la marque de votre appareil,
maintenez enfoncée la touche à laquelle vous souhaitez attribuer le
signal.
La SRU8008 transmet différents signaux à votre appareil.
4 Lorsque l’appareil réagit, relâchez immédiatement la touche et suivez
les instructions sur la SRU8008.
La touche est attribuée et réparée.
-ou-
Si la télécommande ne reconnaît pas la marque de votre
appareil ou si l’appareil ne réagit à aucun signal, copiez le signal
de touche de la télécommande d’origine :
3 Confirmez que votre télécommande d’origine est prête.
4 Positionnez la SRU8008 et votre télécommande d’origine comme
illustré.
5 Sélectionnez la touche ou la fonction
supplémentaire que vous souhaitez réparer.
6 Pour sélectionner des fonctions
supplémentaires :
1 Appuyez sur .
2 Sélectionnez la fonction à l’aide de la
touche de navigation et appuyez
sur .
9
9
2-5 cm
FRANÇAIS
Utilisation optimale de la SRU8008 27
SRU8008_IFU_bundel 1 v09.qxd 03-12-2007 11:36 Pagina 27
7 Suivez les instructions sur la SRU8008.
La touche est copiée et réparée.
D Remarque
Toutes les touches peuvent être réparées sauf la suivante :
•
•
•
4.1.3 Copier le volume
Après avoir ajouté vos appareils, la SRU8008 copie automatiquement les
réglages de volume comme suit :
• Le réglage du volume sur les appareils vidéo comme les lecteurs
DVD, les lecteurs DVD-R, les magnétoscopes et les boîtiers satellites se
fait à partir des touches de volume du téléviseur (si vous avez installé
un téléviseur).
• Le réglage du volume des appareils audio comme les CD, les MD, les
cassettes et les tuners se fait à l’aide des touches de l’amplificateur
ou du tuner (si vous avez installé un amplificateur ou un tuner).
Vous pouvez modifier les touches de volume utilisées, par exemple
lorsque vous voulez utiliser celles de l’amplificateur pour le lecteur DVD.
D Remarques
• La fonction Copier le Volume remplace les réglages de volume
par défaut de la SRU8008.
• Les réglages de volume définis auparavant en utilisant Copier le
volume ou Réparer une Touche sont effacés.
• Les réglages de volume sont supprimés automatiquement lorsque
vous supprimez l’appareil source de volume.
Pour copier les réglages de volume :
1 Allez dans Configuration - Appareils, sélectionnez Copier le
Volume et appuyez sur .
2 Sélectionnez l’appareil dont vous souhaitez copier les touches de
volume (par exemple le téléviseur ou l’amplificateur).
3 Sélectionnez l’appareil vers lequel vous souhaitez copier les touches
de volume (par exemple le lecteur DVD ou le boîtier satellite).
4 Confirmez que vous souhaitez copier les touches de volume d’un
appareil vers l’autre.
Les touches de volume sont copiées.
4.1.4 Renommer un appareil
Pour renommer un appareil :
1 Allez dans Configuration - Appareils, sélectionnez Renommer
un Appareil et appuyez sur .
Utilisation optimale de la SRU800828
SRU8008_IFU_bundel 1 v09.qxd 03-12-2007 11:36 Pagina 28
2 Saisissez le nouveau sigle à l’aide des touches alphanumériques.
D Remarque
Vous pouvez supprimer des caractères avec la touche Clear et le
curseur gauche.
3 Confirmez le nouveau sigle.
L’appareil est renommé.
4.1.5 Supprimer un appareil
Pour supprimer un appareil :
1 Allez dans Configuration - Appareils, sélectionnez Supprimer un
Appareil et appuyez sur .
2 Sélectionnez l’appareil que vous souhaitez supprimer.
3 Confirmez que vous souhaitez supprimer cet appareil.
L’appareil est supprimé.
D Remarque
Les touches de l’appareil sélectionné qui sont utilisées ailleurs, par
exemple dans une activité, ou les touches de volume que vous avez
copiées seront supprimées également.
Vérifiez les activités que vous avez installées et réinstallez-les si
nécessaire. Voir Ajouter une activité, page 29.
Vérifiez les touches de volume pour vos appareils et réinstallez-les si
nécessaire. Voir Copier le Volume, page 28.
4.2 Activités
4.2.1 Ajouter une activité
Vous pouvez ajouter des activités sur la SRU8008. Une activité est une
succession de pressions de touches transmise par la SRU8008 à l’aide
d’une seule touche.
Par défaut, la SRU8008 inclut un délai de 600 ms entre chaque pression
de touche pour s’assurer que vos appareils répondent correctement aux
signaux infrarouges. Vous pouvez modifier ce délai par défaut.
• Si l’un de vos appareils a besoin d’un délai plus long avant de recevoir
le signal infrarouge suivant, vous pouvez définir un délai de 1, 3, 5, 10
ou 15 secondes.
• Si une activité nécessite une pression prolongée, par exemple pour
monter le son, vous pouvez sélectionner l’option Maintenir Dernière
Touche.
Pour ajouter une activité :
1 Allez dans Configuration - Activités, sélectionnez Ajouter une
Activité et appuyez sur .
FRANÇAIS
Utilisation optimale de la SRU8008 29
SRU8008_IFU_bundel 1 v09.qxd 03-12-2007 11:36 Pagina 29
2 Sélectionnez le sigle que vous souhaitez utiliser pour cette activité.
- ou -
Sélectionnez l’option Autre pour créer un nouveau sigle.
3 Suivez les instructions affichées sur la SRU8008.
• Sélectionnez un appareil à l’aide de la touche de navigation,
appuyez sur puis appuyez sur une touche pour l’ajouter à
l’activité.
• Sélectionnez un délai de 1, 3, 5, 10 ou 15 secondes à l’aide de la
touche de navigation et appuyez sur .
- ou -
Sélectionnez Maintenir Dernière Touche à l’aide de la touche de
navigation puis appuyez sur .
4 Recommencez l’étape 3 pour créer une nouvelle activité.
L’activité est ajoutée à la SRU8008.
Vous pouvez désormais utiliser l’activité avec la SRU8008.
Appuyez sur , sélectionnez l’activité à l’aide de la touche de
navigation et appuyez sur .
4.2.2 Renommer une activité
Pour renommer une activité :
1 Allez dans Configuration - Activités, sélectionnez Renommer
une Activité et appuyez sur .
2 Saisissez le texte du nouveau sigle à l’aide des touches
alphanumériques.
D Remarque
Vous pouvez supprimer des caractères avec la touche Clear et le
curseur gauche.
3 Confirmez le nouveau sigle.
L’activité est renommée.
4.2.3 Supprimer une activité
Pour supprimer une activité :
1 Allez dans Configuration - Activités, sélectionnez Supprimer
une Activité et appuyez sur .
2 Sélectionnez l’activité que vous souhaitez supprimer.
3 Confirmez que vous souhaitez supprimer l’activité.
L’activité est supprimée.
Utilisation optimale de la SRU800830
SRU8008_IFU_bundel 1 v09.qxd 03-12-2007 11:36 Pagina 30

4.3 Fonctions+
4.3.1 Ajouter une fonction
Pour ajouter d’autres fonctions :
1 Allez dans Configuration - Fonctions+, sélectionnez Ajouter une
Fonction et appuyez sur .
2 Positionnez la SRU8008 et votre
télécommande d’origine comme illustré.
3 Sélectionnez l’appareil pour lequel vous
souhaitez ajouter une fonction.
4 Sélectionnez le sigle que vous souhaitez
utiliser pour cette fonction supplémentaire.
5 Suivez les instructions affichées sur votre
SRU8008 pour copier la fonction à partir
de votre télécommande d’origine.
La fonction est ajoutée à la SRU8008.
4.3.2 Renommer une fonction
Pour renommer une fonction supplémentaire :
1 Allez dans Configuration - Fonctions+, sélectionnez Renommer
une Fonction et appuyez sur .
2 Saisissez le texte du nouveau sigle à l’aide des touches alphanumériques.
3 Confirmez le nouveau sigle.
La fonction est renommée.
4.3.3 Supprimer une fonction
Pour supprimer une fonction :
1 Allez dans Configuration - Fonctions+, sélectionnez Supprimer
une Fonction et appuyez sur .
2 Sélectionnez l’appareil pour lequel vous souhaitez supprimer une fonction.
3 Sélectionnez la fonction que vous souhaitez supprimer.
4 Confirmez que vous souhaitez supprimer la fonction.
La fonction est supprimée.
4.4 Réglages Système
4.4.1 Temporisation rétroéclair.
Quand vous utilisez la SRU8008, l’écran rétroéclairé s’allume. Il s’éteint à
nouveau après 5 secondes.
Pour modifier cette temporisation :
1 Allez dans Configuration - Réglages Systèmes, sélectionnez
Temporisation Rétroéclair. et appuyez sur .
2 Sélectionnez la temporisation de rétroéclairage souhaitée à l’aide de la
touche de navigation : 3 secondes; 5 secondes; 10 secondes; 20 secondes.
3 Confirmez le nouveau réglage de la temporisation.
La temporisation du rétroéclairage est modifiée.
10
10
2-5 cm
FRANÇAIS
Utilisation optimale de la SRU8008 31
SRU8008_IFU_bundel 1 v09.qxd 03-12-2007 11:36 Pagina 31
D Remarque
La temporisation du rétroéclairage a un impact sur la durée de vie
des piles : plus le rétroéclairage reste activé longtemps, plus les piles
s’usent rapidement.
4.4.2 Rétroéclairage touches
Pour activer ou désactiver le rétroéclairage des touches :
1 Allez dans Configuration - Réglages Système, sélectionnez
Rétroéclairage Touches et appuyez sur .
2 Sélectionnez Actif ou Inactif à l’aide de la touche de navigation.
3 Confirmez le nouveau réglage du rétroéclairage des touches.
Le rétroéclairage des touches est activé ou désactivé.
4.4.3 Réinitialisation complète
Lorsque vous réinitialisez complètement la SRU8008, tous les appareils,
activités et autres réglages enregistrés sont supprimés. Après la
réinitialisation, la SRU8008 doit être réinstallée.
Pour réinitialiser la SRU8008 :
1 Allez dans Configuration - Réglages Système, sélectionnez
Réinitialisation Complète et appuyez sur .
2 Sélectionnez Oui à l’aide de la touche de navigation et appuyez sur
.
3 Appuyez pour confirmer à nouveau.
La SRU8008 supprime tous les réglages et redémarre par l’assistant
d’installation. Cette opération peut prendre jusqu’à une minute.
Langue
Pour modifier la langue de la SRU8008 :
1 Allez dans Configuration - Langue et appuyez sur .
2 Sélectionnez la langue d’utilisation à l’aide de la touche de
navigation:
English, Français, Deutsch, Español, Italiano, Nederlands, Русский.
3 Confirmez la nouvelle langue.
La langue utilisée dans Configuration - Menu Princ. est modifiée.
Utilisation optimale de la SRU800832
SRU8008_IFU_bundel 1 v09.qxd 03-12-2007 11:36 Pagina 32

5 Questions fréquemment posées
Touches
Pourquoi une ou plusieurs touches ne fonctionnent-elles pas sur
mon appareil ?
Toutes les fonctions ne sont pas forcément disponibles dans la base de
données de la SRU8008 ou le code défini pour la touche est défectueux.
Vous pouvez réparer une touche en copiant le signal à partir de votre
télécommande d’origine. Voir Réparer une Touche, page 27.
Comment utiliser les touches haut, bas, gauche et droite avec le
menu de l’afficheur de la télécommande ?
La touche de navigation de votre SRU8008 est une commande
multifonctionnelle et simple d’utilisation.
• La touche de navigation vous permet de parcourir les différentes
options de l’afficheur de votre télécommande.
• Appuyez sur la touche de navigation, vers le haut, vers le bas, à gauche
ou à droite, pour parcourir le menu de l’écran de l’appareil (téléviseur,
lecteur/enregistreur de DVD, magnétoscope, etc.) que vous
commandez.
Comment puis-je ajouter des fonctions supplémentaires à la
SRU8008 ?
Voir Ajouter une fonction, page 27.
Marque
Pourquoi la marque de mon appareil n’apparaît-elle pas dans la
SRU8008 ?
Toutes les marques ne sont pas forcément disponibles dans la base de
données de la SRU8008. Si votre marque ne figure pas dans la liste :
• Vous pouvez copier les touches à partir de votre télécommande
d’origine. Voir Réparer une Touche, page 27.
- ou -
• Vous pouvez sélectionner Autre pour effectuer une recherche
complète dans la base de données.
La SRU8008 teste tous les codes disponibles. Cette opération peut
prendre jusqu’à 25 minutes.
FRANÇAIS
Questions fréquemment posées 33
SRU8008_IFU_bundel 1 v09.qxd 03-12-2007 11:36 Pagina 33

Activité
Puis-je passer d’une activité à une autre ?
Non, lorsqu’une activité est sélectionnée, vous ne pouvez pas sélectionner
la même activité de nouveau ou une autre activité en plus. Vous devez
éteindre au préalable tous les appareils avant de sélectionner une
nouvelle activité de la liste.
Volume
Pourquoi les touches de volume ne fonctionnent-elles pas
correctement ?
Après l’ajout d’appareils, la SRU8008 copie automatiquement les touches
de volume et la touche Silence comme suit :
• Les appareils vidéo, comme les lecteurs DVD, les lecteurs DVD-R, les
magnétoscopes et les boîtiers satellites utilisent les touches de volume
du téléviseur.
• Les appareils audio, comme les CD, les DMR et les tuners utilisent les
touches de volume de l’amplificateur ou du tuner.
Si vous n’avez pas installé l’appareil source (téléviseur, amplificateur ou
tuner), les touches de volume et la touche Silence ne fonctionneront pas.
Pour définir les touches de volume :
• Vous pouvez installer l’appareil source sur la SRU8008. Voir Ajouter
un Appareil, page 26.
- ou -
• Vous pouvez copier les touches de volume d’un autre appareil source.
Voir Copier le Volume, page 28.
Piles
Pourquoi ne puis-je pas accéder au menu Configuration ?
Quand le niveau de la pile est trop faible, vous ne pouvez pas accéder au
menu Configuration. Remplacez les piles usagées par des piles alcalines
neuves.
Pourquoi la SRU8008 ne veut-elle plus s’activer ?
Le niveau des piles est trop faible. Remplacez les piles usagées par des
piles alcalines neuves.
Les données sont-elles perdues quand je remplace les piles ?
Non. Vos données seront enregistrées.
Questions fréquemment posées34
SRU8008_IFU_bundel 1 v09.qxd 03-12-2007 11:36 Pagina 34
Puis-je utiliser des piles rechargeables avec ma SRU8008 ?
Bien sûr ! Cependant, n’oubliez pas que les piles rechargeables ont
tendance à se décharger plus vite que les piles alcalines.
Besoin d’aide?
Commencez par lire attentivement les instructions d’utilisation.
Pour toute autre question concernant l’utilisation, la configuration ou la
garantie de la SRU8008, consultez le site www.philips.com/support
.
Pour les coordonnées, consultez le site www.philips.com/support
.
Lorsque vous contactez le service d’assistance par téléphone, assurez-
vous d’avoir la télécommande SRU8008 à portée de main de sorte que
nos opérateurs puissent vous aider à déterminer si elle fonctionne
correctement.
La référence du modèle de votre télécommande universelle Philips est :
SRU8008.
Pour obtenir les codes exacts des appareils pour votre télécommande,
consultez le site www.philips.com/URC
.
Date d’achat : ......../......../........ (jour/mois/année)
FRANÇAIS
Questions fréquemment posées 35
SRU8008_IFU_bundel 1 v09.qxd 03-12-2007 11:36 Pagina 35

Inhalt
1 Ihre Philips Prestigo SRU8008 37
1.1 Was ist in der Verpackung 37
1.2 Übersicht SRU8008 37
2 Erste Schritte 38
2.1 Vorbereiten 38
2.2 Installieren 39
3 Ihre SRU8008 benutzen 40
3.1 Ein Gerät oder eine Aktivität auswählen 40
3.2 Einen Aktivität auswählen 41
3.3 Weitere Funktionen auswählen 42
4 Fortgeschrittene Bedienung mit Ihrer SRU8008 42
4.1 Geräte 43
4.2 Aktivitäten 46
4.3 Weitere Funktionen 48
4.4 Systemeinstellungen 48
4.5 Sprache 49
5 Häufige Fragen (FAQ) 50
6 Brauchen Sie Hilfe? 52
Inhalt36
SRU8008_IFU_bundel 1 v09.qxd 03-12-2007 11:36 Pagina 36

Ihre Philips Prestigo SRU8008
Herzlich Willkommen in der stetig wachsenden Familie der Besitzer von
Philips-Produkten. Mit der Philips Prestigo SRU8008 Universal-
Fernbedienung können Sie Ihre Geräte bequem bedienen. Sie können bis
zu 8 Geräte und bis zu 8 Aktivitäten installieren.
Wählen Sie ein Gerät aus und bedienen Sie es mit den Tasten der
SRU8008.
Mit der Auswahl einer Aktivität starten Sie automatisch eine Folge von
Tastenbefehlen, um z. B. eine DVD anzuschauen oder Musik von einer CD
zu hören.
Wählen Sie weitere Funktionen, und weisen Sie Ihrer Fernbedienung
erweiterte Funktionen zu.
1.1 Was ist in der Verpackung
• Die SRU8008
• Quick Start Guide
• Bedienungsanleitungen in mehreren Sprachen
• Philips Alkalibatterien
Philips empfiehlt Original Philips Alkalibatterien.
1.2 Übersicht SRU8008
Die Abbildung auf Seite 2 gibt Ihnen einen Überblick über die SRU8008.
Wie Sie die SRU8008 für die Verwendung vorbereiten, erfahren Sie im
Kapitel ‘Erste Schritte’ auf Seite 38.
Schwarze Tasten zur Signalübertragung an Ihr Gerät
A Einschalttaste
B OK-Taste
C Pfeiltasten nach oben, unten, links und rechts
D Transporttasten
E Alphanumerische Tasten
F *–./Clear-Taste
G AV-Taste
H Eingabe-Taste
Tasten zur Bedienung der SRU8008
1 More-Taste
2 Activities-Taste
3 Devices-/Setup-Taste
4 OK-Taste
5 Drehknopf
6 Back-Taste
DEUTSCH
Ihre Philips Prestigo SRU8008 37
SRU8008_IFU_bundel 1 v09.qxd 03-12-2007 11:36 Pagina 37

Erste Schritte
2.1 Vorbereiten
Batterien in die SRU8008 einlegen:
1 Drücken Sie die Entriegelung nach unten, und nehmen Sie die
Abdeckung ab.
2 Legen Sie die drei LR6 AA-Alkali-Batterien wie dargestellt in das
Batteriefach.
3 Schließen Sie die Abdeckung und drücken Sie sie fest, bis sie
einrastet.
Das Philips-Logo erscheint 3 Sekunden lang
auf dem Display der SRU8008. Danach startet
der Installationsassistent, der Sie durch die
Einstellungen führt.
Wenn die Batterien fast leer sind, blinkt das Symbol Batterie
Schwach . Es zeigt an, dass Sie die Batterien bald wechseln sollten.
Sie können die SRU8008 noch kurze Zeit bedienen.
Ersetzen Sie die Batterien durch neue LR6 AA-Alkali-Batterien und
beachten Sie die örtlichen Bestimmungen zur Entsorgung leerer
Batterien.
D Hinweis
Wenn das Symbol Batterie Schwach blinkt, können Sie das Setup -
Hauptmenü nicht mehr aufrufen.
3
2
1
1 2 3
Installationsassistent –
Sprachauswahl
Erste Schritte38
SRU8008_IFU_bundel 1 v09.qxd 03-12-2007 11:36 Pagina 38

2.2 Installieren
1 Wählen Sie im Installationsassistenten die gewünschte Sprache mit
dem Drehknopf.
2 Bestätigen Sie die Spracheinstellung mit .
Die SRU8008 führt Sie weiter durch den Setup-Vorgang.
Sie können während des Setup-VorgangEinrichtungsvorgangs jederzeit
beliebig viele Schritte zurückgehen, um vorherige Einstellungen zu
ändern:
Drücken Sie um zum vorherigen Bildschirm zu gelangen.
3 Befolgen Sie die Anweisungen auf der SRU8008, um neue Geräte
hinzuzufügen. Sie können bis zu acht Geräte aus der folgenden Liste
zu Ihrer SRU8008 hinzufügen.
Gerätename Beschreibung
TV Herkömmliche Fernseher und Plasmafernseher
DVD DVD-Spieler und DVD-Rekorder
DVDR DVD-Spieler und DVD-Rekorder
VCR Videospieler und -rekorder
SAT Digitalempfänger (Set-Top-Box) für Satelliten, mit oder ohne
Festplattenlaufwerk
DSS/DTT Digitalempfänger (Set-Top-Box) für Satelliten, mit oder ohne
Festplattenlaufwerk
Cable Digitalempfänger (Set-Top-Box) für Kabel, mit oder ohne
Festplattenlaufwerk
DVB-T/S Digitale Videoübertragung - Terrestrisch (T) oder Satellit (S), mit
oder ohne Festplattenlaufwerk
AMP Verstärker
AudioSet Empfänger = Verstärker + Tuner
HTS Heimkinosystem = Verstärker + DVD + Tuner +
Raumklang-Lautsprecher
Tuner Radio-Tuner
CD CD-Spieler und CD-Rekorder
MD Minidiskspieler und -rekorder
Ta p e Kassettenspieler und Kassettenrekorder
DVR Digitaler Videorekorder = Analoger TV-Tuner + Festplattenlaufwerk
Tivo Digitaler Videorekorder = Analoger TV-Tuner + Festplattenlaufwerk
6
5
4
4 5 6
DEUTSCH
Erste Schritte 39
SRU8008_IFU_bundel 1 v09.qxd 03-12-2007 11:36 Pagina 39

Gerätename Beschreibung
DMR Digitaler Medienempfänger = Gerät zur Übertragung von
Medieninhalten vom Computer zu einem Fernseh- oder
Audioempfänger
TV-DVD combo Fernseher mit integriertem DVD-Spieler
TV-VCR combo Fernseher mit integriertem VCR
TV-VCR-DVD combo Fernseher mit integriertem DVD-Spieler und VCR
DVD-VCR combo Kombination von DVD-Spieler und VCR
DVDR-HDD combo Kombination von DVD-Rekorder und Festplattenlaufwerk
VCD, Laser Disk Video-CD, Laserdisc, Karaoke
Projector Videobeamer
Camera and Camcorder Kamera und Camcorder
PC Computer (nur infrarot)
Game DVD-Spielerfunktion der Spielkonsole (nur infrarot)
Satellite Radio Satelliten-Videoempfänger
PVR/DVR Personal Video Recorder/Festplatten-Recorder
D Hinweis
Sie können die Einstellungen, die Sie während dieser Erstinstallation
festlegen, später ändern oder weitere Funktionen über das Setup-
Menü installieren.
Siehe Kapitel ‘Fortgeschrittene Bedienung mit Ihrer SRU8008’
auf Seite 42.
Ihre SRU8008 benutzen
Mit der SRU8008 können Sie mit nur einer Fernbedienung Ihre Geräte
bedienen. Fügen Sie einfach Ihre Geräte, Ihre Aktivitäten, Ihre Favoriten
und weitere Funktionen hinzu und genießen Sie den Bedienkomfort mit
der SRU8008.
Ein Gerät ist ein Teil Ihrer Anlage. Sobald Sie Ihre Geräte installiert
haben, können Sie sie über die Tasten der SRU8008 bedienen.
Geräte können neben den Tasten der SRU8008 noch weitere Funktionen
besitzen. Sie können diese weiteren Funktionen über das Display
wählen.
Eine Aktivität ist eine Folge von Tastenbefehlen, die Sie programmieren
können. Um z. B. eine DVD anzuschauen, müssen Sie normalerweise
folgendes tun:
• Das TV-Gerät einschalten,
• den DVD-Player einschalten,
• das Surround Sound System einschalten,
• den richtigen Eingang an Ihrem TV-Gerät und Ihrem Surround Sound
System auswählen,
• die Play-Taste drücken, um die DVD zu starten.
Erste Schritte40
SRU8008_IFU_bundel 1 v09.qxd 03-12-2007 11:36 Pagina 40
Mit einer Aktivität führt die SRU8008 all diese Schritte mit nur einem
Tastendruck aus.
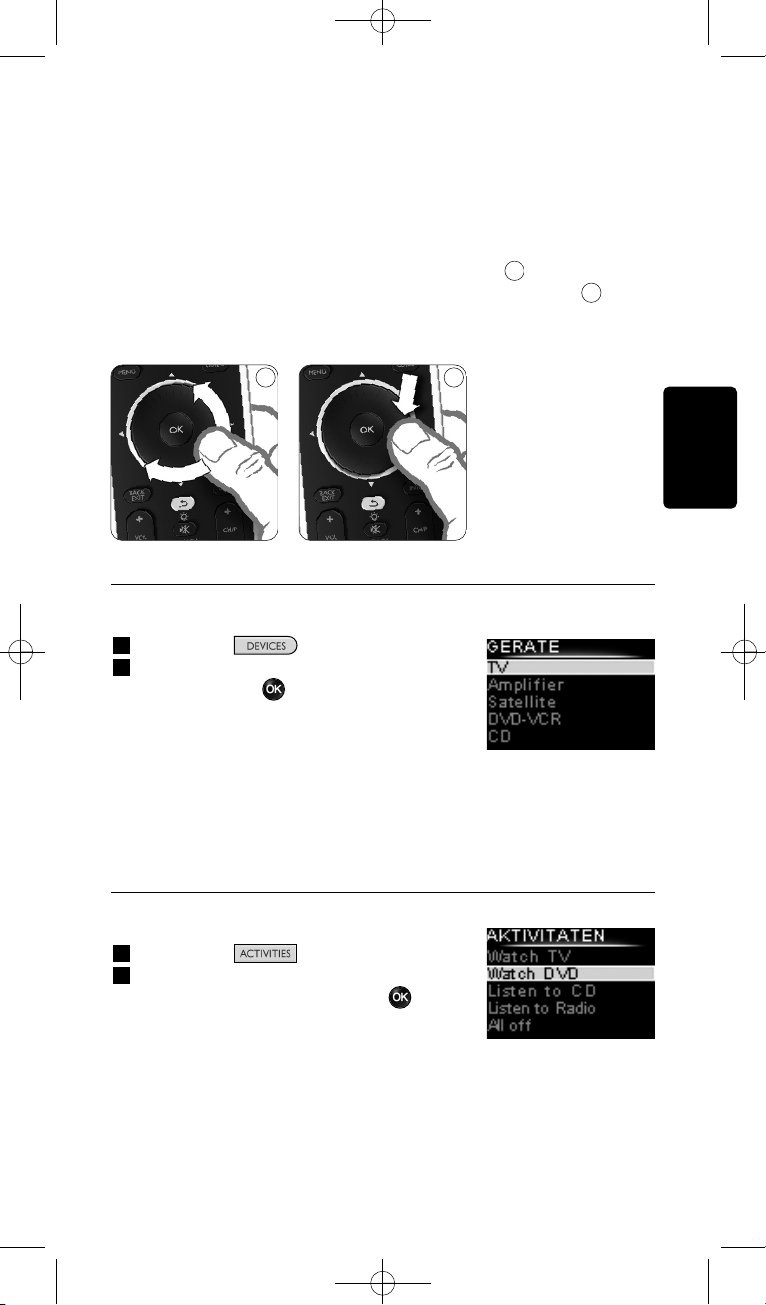
Mit dem Drehknopf können Sie Ihre SRU8008 einfach und
multifunktional bedienen:
• Beim Drehen des Drehknopfs navigieren Sie durch die verschiedenen
Optionen auf dem Bildschirm Ihrer Fernbedienung.
• Wenn Sie den Drehknopf nach oben, unten, links oder rechts
drücken, navigieren Sie durch das Bildschirmmenü des Geräts
(TV, DVD, VCR, etc.), das Sie derzeit verwenden.
3.1 Ein Gerät auswählen
Ihre installierten Geräte wählen:
1 Drücken Sie .
2 Wählen Sie ein Gerät mit dem Drehknopf,
und drücken Sie um Ihre Auswahl zu
bestätigen.
Nun ist die SRU8008 bereit, das ausgewählte
Gerät zu bedienen. Sie können dieses Gerät
mithilfe der schwarzen Tasten auf der
SRU8008 bedienen.
Zum Einrichten von Geräten, siehe Kapitel ‘Gerät Hinzufügen’ auf
Seite 43.
3.2 Einen Aktivität auswählen
So wählen Sie installierte Aktivitäten aus:
1 Drücken Sie .
2 Wählen Sie eine Aktivität mit dem
Drehknopf aus, und drücken Sie um die
Aktivität zu starten.
Die SRU8008 sendet eine Tastenfolge für die
ausgewählte Aktivität. Die SRU8008 wurde
für die Verwendung des für diese Aktivität
ausgewählten Geräts eingestellt.
Weitere Informationen zum Einrichten der Aktivitäten finden Sie unter
‘Aktivität Hinzufügen’ auf Seite 46.
8
7
Liste der installierten
Geräte
Liste der installierten
Aktivitäten
87
DEUTSCH
Ihre SRU8008 benutzen 41
SRU8008_IFU_bundel 1 v09.qxd 03-12-2007 11:36 Pagina 41
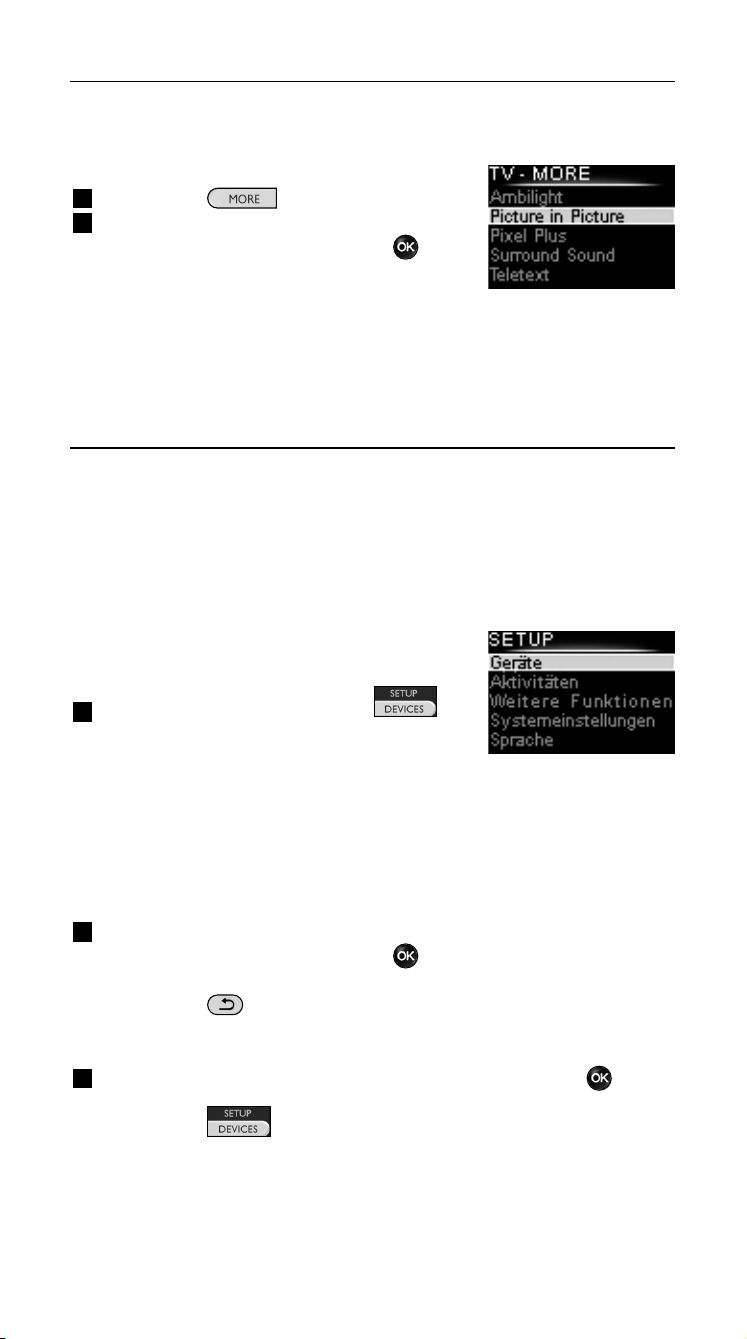
3.3 Weitere Funktionen auswählen
Geräte können neben den Tasten der SRU8008 noch weitere Funktionen
besitzen.
Weitere installierte Funktionen auswählen:
1 Drücken Sie .
2 Wählen Sie eine Funktion mit dem
Drehknopf und bestätigen Sie mit .
Die SRU8008 sendet ein Signal für die
gewählte Funktion.
Zum Einrichten weiterer Funktionen Ihrer
Geräte, siehe Kapitel ‘Funktionen hinzufügen’ auf Seite 48.
4 Fortgeschrittene Bedienung mit Ihrer
SRU8008
Über das Setup-Menü können Sie auf verschiedene fortgeschrittene
Funktionen der SRU8008 zugreifen.
Das Setup-Menü aufrufen:
Halten Sie 3 Sekunden lang die
Taste gedrückt.
D Hinweis
Sie können das Setup-Menü nicht aufrufen, wenn das Symbol
Batterie Schwach blinkt.
Durch das Setup-Menü navigieren:
Wählen Sie eine Option im Setup - Hauptmenü mit dem
Drehknopf und bestätigen Sie mit .
- oder -
Drücken Sie .
Das Setup-Menü verlassen:
Wählen Sie Exit Setup im Setup-Menü und drücken Sie .
- oder -
Drücken Sie ein weiteres Mal.
Die folgende Tabelle gibt Ihnen einen Überblick über die Optionen des
Setup-Menüs und die Seiten, auf denen Sie weitere Informationen zu
diesen Optionen finden.
Liste der installierten
Funktionen
Ihre SRU8008 benutzen42
SRU8008_IFU_bundel 1 v09.qxd 03-12-2007 11:36 Pagina 42
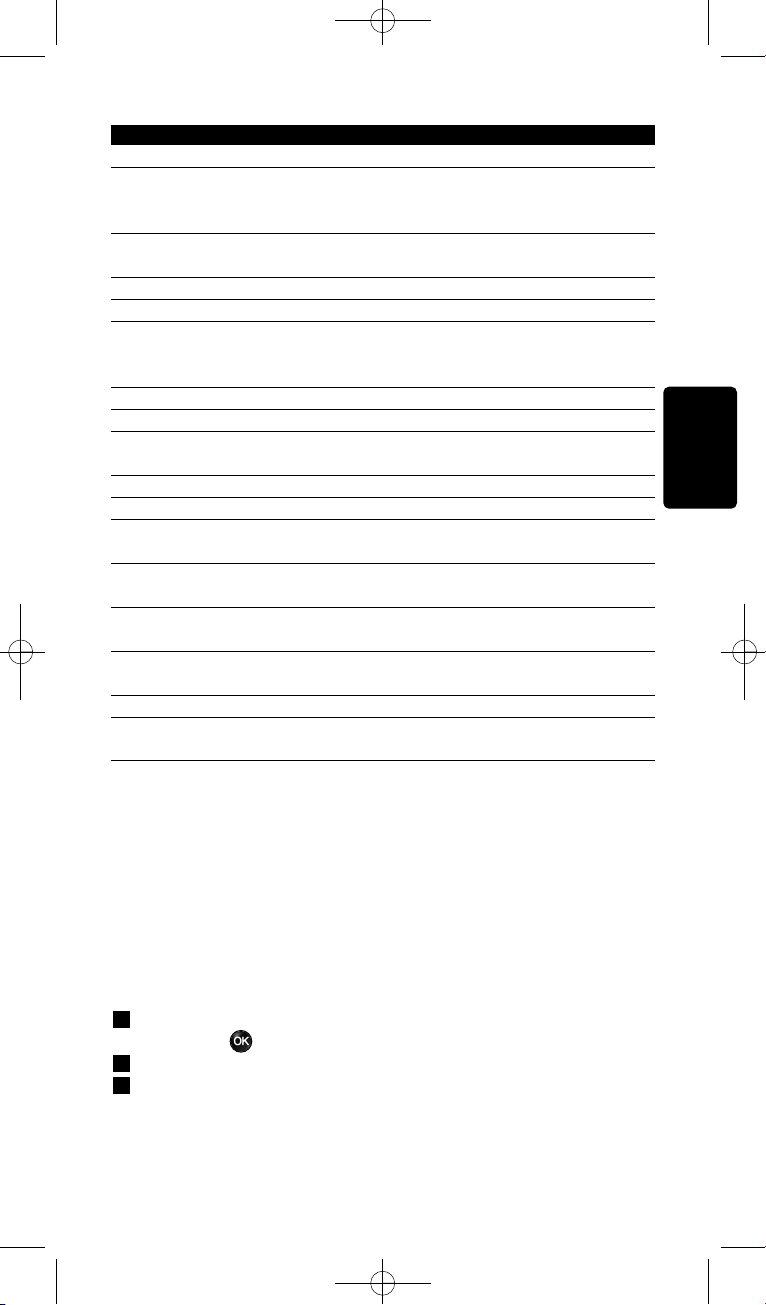
Setup - Hauptmenü Untermenü Beschreibung Seite
Geräte
Gerät Hinzufügen Fügt ein neues Gerät hinzu 43
Taste Reparieren Repariert eine nicht funktionierende Taste
durch Kopieren des Signals von der
Originalfernbedienung 44
Lautstärke Kopieren Kopiert die Lautstärketasten von einem
Gerät auf ein anderes 45
Gerät Umbenennen Gibt einem Gerät einen anderen Namen 45
Gerät Entfernen Entfernt ein installiertes Gerät 46
Aktivitäten
Aktivität Hinzufügen Fügt eine Folge von Tastenbefehlen zur
Bedienung verschiedener Geräte mit nur
einem Tastendruck hinzu 46
Aktivität Umbenennen Gibt einer Aktivität einen neuen Namen 47
Aktivität Entfernen Entfernt eine installierte Aktivität 47
Weitere Funktionen
Funktion Hinzufügen Fügt eine weitere Funktion durch Erlernen
von Ihrer Originalfernbedienung hinzu 48
Funktion Umbenennen Gibt einer Funktion einen neuen Namen 48
Funktion Entfernen Entfernt eine installierte Funktion 48
Einstellung
Beleuchtungszeit Ändert die Einstellung für die Zeitabschaltung
der Beleuchtung der SRU8008 48
Tastenbeleuchtung Schaltet die Tastenbeleuchtung ein
oder aus 49
Initialisieren Löscht alle persönlichen Einstellungen
auf der SRU8008 49
Sprache
Wechselt die Sprache der Anweisungen
auf der SRU8008 49
Exit
Verlässt das Setup-Menü 42
4.1 Geräte
4.1.1 Gerät Hinzufügen
Um Ihre Geräte mit der SRU8008 bedienen zu können, müssen Sie diese
Geräte hinzufügen. Sie können bis zu 8 Geräte hinzufügen.
D Hinweis
Sie können ein Gerät mehr als einmal hinzufügen. Ein zweites TV wird
automatisch TV2 benannt. Sie können dem Gerät auch einen anderen
Namen geben. Siehe Kapitel ‘Gerät Umbenennen’ auf Seite 45.
1 Gehen Sie zu Setup - Geräte, wählen Sie Gerät hinzufügen und
drücken Sie .
2 Wählen Sie das Gerät, das Sie hinzufügen möchten.
3 Folgen Sie den Anweisungen auf der SRU8008.
Das ausgewählte Gerät wird installiert und der SRU8008 hinzugefügt.
DEUTSCH
Fortgeschrittene Bedienung mit Ihrer SRU8008 43
SRU8008_IFU_bundel 1 v09.qxd 03-12-2007 11:36 Pagina 43

Sie können das Gerät nun mit der SRU8008 bedienen:
Drücken Sie , wählen Sie das Gerät mit dem Drehknopf
aus und drücken Sie .
4.1.2 Taste Reparieren
Wenn eine Taste oder eine Zusatzfunktion nicht ordnungsgemäß für Ihr
Gerät funktioniert, können Sie das Signal dieser Taste Ihrer SRU8008
zuweisen. Wenn dadurch der Fehler nicht behoben wurde, können Sie
das Signal der Taste von Ihrer Originalfernbedienung auf die SRU8008
kopieren.
D Hinweis
Wenn Sie die Option ‘Taste Reparieren’ verwenden, werden die
gespeicherten Daten für diese Taste mit den neuen Daten
überschrieben.
1 Gehen Sie zu Setup - Geräte, wählen Sie Taste Reparieren, und
drücken Sie .
2 Wählen Sie das Gerät, für das Sie eine Taste reparieren möchten.
Die SRU8008 überprüft automatisch, ob das Gerät in der Datenbank
gespeichert ist.
3 Wenn das Gerät gespeichert ist, halten Sie die Taste gedrückt, der
ein Signal zugewiesen werden soll.
Die SRU8008 sendet verschiedene Signale an Ihr Gerät.
4 Sobald das Gerät reagiert, lassen Sie die Taste los, und befolgen Sie die
Anweisungen auf der SRU8008.
Die Taste wurde zugewiesen und repariert.
-oder-
Wenn das Gerät nicht gespeichert ist oder auf keine Signale
reagiert, kopieren Sie das Tastensignal der Originalfernbedienung:
3 Stellen Sie sicher, dass die Originalfernbedienung betriebsbereit ist.
4 Positionieren Sie die SRU8008 und die Originalfernbedienung wie
abgebildet.
5 Wählen Sie die Taste oder Zusatzfunktion
aus, die Sie reparieren möchten.
6 So wählen Sie Zusatzfunktionen aus:
1 Drücken Sie .
2 Wählen Sie die Funktion mit dem
Drehknopf aus, und drücken Sie .
7 Befolgen Sie die Anweisungen auf der
SRU8008.
Die Taste wird kopiert und repariert.
9
9
2-5 cm
Fortgeschrittene Bedienung mit Ihrer SRU800844
SRU8008_IFU_bundel 1 v09.qxd 03-12-2007 11:36 Pagina 44
D Hinweis
Alle Tasten können repariert werden, außer:
•
•
•
4.1.3 Lautstärke Kopieren
Nach dem Hinzufügen eines Geräts, kopiert die SRU8008 automatisch die
Lautstärkeeinstellungen folgendermaßen:
• Videogeräte, wie DVD, DVDR, VCR und Satellitenanlagen verwenden
die Lautstärketasten des TV (vorausgesetzt, Sie haben ein Fernsehgerät
installiert).
• Audiogeräte wie CD, MD, Kassettenrekorder und Tuner verwenden
die Lautstärketasten des Verstärkers oder Tuner-Verstärkers
(vorausgesetzt, Sie haben einen Verstärker oder einen Tuner-Verstärker
installiert).
Sie können bestimmen, welche Lautstärketasten verwendet werden
sollen, z. B. wenn Sie die Lautstärketasten des Verstärkers für Ihren DVD-
Player benutzen möchten.
D Hinweise
• Die Funktion Lautstärke Kopieren überschreibt die
Voreinstellungen auf der SRU8008.
• Frühere Lautstärkeeinstellungen, die Sie über Lautstärke Kopieren
oder Taste Reparieren gespeichert haben, gehen verloren.
• Die Lautstärkeeinstellungen werden automatisch gelöscht, wenn Sie
das Quellgerät für die Lautstärke entfernen.
Lautstärkeeinstellungen kopieren:
1 Gehen Sie zu Setup - Geräte, wählen Sie Lautstärke Kopieren
und drücken Sie .
2 Wählen Sie das Gerät, von dem Sie die Lautstärketasten kopieren
möchten (z. B. TV oder Verstärker)
3 Wählen Sie das Gerät, auf das Sie die Lautstärketasten kopieren
möchten (z. B. DVD oder SAT).
4 Bestätigen Sie, dass Sie die Lautstärketasten von dem einen auf das
andere Gerät kopieren möchten.
Die Lautstärketasten werden kopiert.
4.1.4 Gerät Umbenennen
Gerät umbenennen:
1 Gehen Sie zu Setup - Geräte, wählen Sie Gerät Umbenennen
und drücken Sie .
2 Geben Sie die neue Bezeichnung mit den alphanumerischen Tasten
ein.
DEUTSCH
Fortgeschrittene Bedienung mit Ihrer SRU8008 45
SRU8008_IFU_bundel 1 v09.qxd 03-12-2007 11:36 Pagina 45
D Hinweis
Sie können Zeichen löschen, indem Sie die Taste Clear drücken und
den Cursor nach links bewegen.
3 Bestätigen Sie den neuen Namen.
Das Gerät wird umbenannt.
4.1.5 Gerät Entfernen
Gerät entfernen:
1 Gehen Sie zu Setup - Geräte, wählen Sie Gerät Entfernen und
drücken Sie .
2 Wählen Sie das Gerät, das Sie entfernen möchten.
3 Bestätigen Sie, dass Sie das Gerät entfernen möchten.
Das Gerät wird entfernt.
D Hinweis
Die Tasten eines entfernten Geräts, die anderswo verwendet werden,
z. B. in einer Aktivität oder die kopierten Lautstärketasten, werden
ebenfalls gelöscht.
Prüfen Sie Ihre installierten Aktivitäten und programmieren Sie sie
wenn nötig neu. Siehe Kapitel ‘Aktivität Hinzufügen’ auf Seite 46.
Prüfen Sie die Lautstärketasten Ihrer Geräte und programmieren Sie
sie wenn nötig neu. Siehe Kapitel ‘Lautstärke Kopieren’ auf
Seite 45.
4.2 Aktivitäten
4.2.1 Aktivität Hinzufügen
Sie können Ihrer SRU8008 Aktivitäten hinzufügen. Eine Aktivität besteht
aus mehreren Tastenbefehlen, welche die SRU8008 mit nur einem
Tastendruck aussendet.
Die SRU8008 fügt standardmäßig eine Zeitverzögerung von 600 ms
zwischen den einzelnen Tastenbefehlen ein, um sicherzustellen, dass Ihre
Geräte richtig auf die IR-Signale reagieren. Sie können diese
Standardeinstellung überschreiben.
• Wenn eines Ihrer Geräte eine längere Zeitverzögerung benötigt,
bevor es das nächste IR-Signal empfangen kann, können Sie eine
Zeitverzögerung von 1, 3, 5, 10 oder 15 Sekunden einfügen.
• Wenn eine Aktivität einen längeren Tastendruck benötigt, z. B. um die
Lautstärke zu verändern, dann können Sie die Option Letzte Taste
halten wählen.
Eine Aktivität hinzufügen:
1 Gehen Sie zu Setup - Aktivitäten, wählen Sie Aktivität
Hinzufügen und drücken Sie .
Fortgeschrittene Bedienung mit Ihrer SRU800846
SRU8008_IFU_bundel 1 v09.qxd 03-12-2007 11:36 Pagina 46
2 Wählen Sie einen Namen für die Aktivität.
- oder -
Wählen Sie Nicht in der Liste, um einen neuen Namen zu erstellen.
3 Folgen Sie den Anweisungen auf der SRU8008.
• Wählen Sie ein Gerät mit dem Drehknopf, drücken Sie und
drücken Sie eine Taste, die Sie der Aktivität hinzufügen möchten.
• Wählen Sie 1, 3, 5, 10 oder 15 Sekunden Zeitverzögerung mit
dem Drehknopf und drücken Sie .
- oder -
Wählen Sie Letzte Taste Halten mit dem Drehknopf und drücken
Sie .
4 Wiederholen Sie Schritt 3, um eine weitere Aktivität zu erstellen.
Die Aktivität wird der SRU8008 hinzugefügt.
Sie können die Aktivität nun mit der SRU8008 ausführen:
Drücken Sie wählen Sie die Aktivität mit dem Drehknopf
und drücken Sie .
4.2.2 Aktivität Umbenennen
Eine Aktivität umbenennen:
1 Gehen Sie zu Setup - Aktivitäten, wählen Sie Aktivität
Umbenennen und drücken Sie .
2 Geben Sie den Text für die neue Bezeichnung mit den
alphanumerischen Tasten ein.
D Hinweis
Sie können Zeichen löschen, indem Sie die Taste Clear drücken und
den Cursor nach links bewegen.
3 Bestätigen Sie den neuen Namen.
Die Aktivität wird umbenannt.
4.2.3 Aktivität Entfernen
Eine Aktivität entfernen:
1 Gehen Sie zu Setup - Aktivitäten, wählen Sie Aktivität Entfernen
und drücken Sie .
2 Wählen Sie die Aktivität, die Sie entfernen möchten.
3 Bestätigen Sie, dass Sie die Aktivität entfernen möchten.
Die Aktivität wird entfernt.
DEUTSCH
Fortgeschrittene Bedienung mit Ihrer SRU8008 47
SRU8008_IFU_bundel 1 v09.qxd 03-12-2007 11:36 Pagina 47
4.3 Weitere Funktionen
4.3.1 Funktion Hinzufügen
Eine weitere Funktion hinzufügen:
1 Gehen Sie zu Setup - Weitere Funktionen, wählen Sie Funktion
Hinzufügen und drücken Sie .
2 Positionieren Sie die SRU8008 und die Originalfernbedienung wie
dargestellt.
3 Wählen Sie das Gerät, dem Sie eine Funktion
hinzufügen möchten.
4 Wählen Sie einen Namen, den Sie für die
weitere Funktion verwenden möchten.
5 Folgen Sie den Anweisungen auf der SRU8008,
um die Funktion von der
Originalfernbedienung zu kopieren.
Die Funktion wird der SRU8008 hinzugefügt.
4.3.2 Funktion Umbenennen
Eine weitere Funktion umbenennen:
1 Gehen Sie zu Setup - Weitere Funktionen, wählen Sie Funktion
Umbenennen und drücken Sie .
2 Geben Sie den Text für die neue Bezeichnung mit den
alphanumerischen Tasten ein.
3 Bestätigen Sie den neuen Namen. Die Funktion wird umbenannt.
4.3.3 Funktion Entfernen
Eine weitere Funktion entfernen:
1 Gehen Sie zu Setup - Weitere Funktionen, wählen Sie Funktion
Entfernen und drücken Sie .
2 Wählen Sie das Gerät, von dem Sie eine weitere Funktion entfernen
möchten.
3 Wählen Sie die Funktion, die Sie entfernen möchten.
4 Bestätigen Sie, dass Sie die Funktion entfernen möchten.
Die Funktion wird entfernt.
4.4 Systemeinstellungen
4.4.1 Beleuchtungszeit
Wenn Sie die SRU8008 benutzen, schaltet sich die Beleuchtung ein. Nach
5 Sekunden schaltet sie sich wieder aus.
Die Zeitabschaltung ändern:
1 Gehen Sie zu Setup - Einstellungen, wählen Sie Beleuchtungszeit
und drücken Sie .
2 Wählen Sie die gewünschte Beleuchtungszeit mit dem Drehknopf:
3 Sekunden, 5 Sekunden; 10 Sekunden; 20 Sekunden.
10
10
2-5 cm
Fortgeschrittene Bedienung mit Ihrer SRU800848
SRU8008_IFU_bundel 1 v09.qxd 03-12-2007 11:36 Pagina 48
3 Bestätigen Sie die neue Einstellung der Zeitabschaltung.
Die Beleuchtungszeit wird geändert.
D Hinweis
Die Beleuchtungszeit beeinflusst die Lebensdauer der Batterien. Je
länger die Beleuchtung eingeschaltet ist, desto schneller werden die
Batterien entladen.
4.4.2 Tastenbeleuchtung
Die Tastenbeleuchtung ein- und ausschalten:
1 Gehen Sie zu Setup - Einstellungen, wählen Sie
Tastenbeleuchtung und drücken Sie .
2 Wählen Sie Ein oder Aus mit dem Drehknopf.
3 Bestätigen Sie die neue Einstellung der Tastenbeleuchtung.
Die Tastenbeleuchtung wird ein- oder ausgeschaltet.
4.4.3 Initialisieren
Wenn Sie die SRU8008 initialisieren, werden alle Geräte, Aktivitäten und
andere Einstellungen gelöscht. Nach der Initialisierung muss die SRU8008
neu installiert werden.
Die SRU8008 initialisieren:
1 Gehen Sie zu Setup - Einstellungen, wählen Sie Initialisieren und
drücken Sie .
2 Wählen Sie Ja mit dem Drehknopf und drücken Sie .
3 Bestätigen Sie noch einmal.
Die SRU8008 löscht alle Einstellungen und startet den
Installationsassistenten. Dies kann bis zu einer Minute dauern.
4.5 Sprache
Die Spracheinstellung der SRU8008 ändern:
1 Gehen Sie zu Setup - Sprache und drücken Sie .
2 Wählen Sie die gewünschte Sprache mit dem Drehknopf: English,
Français, Deutsch, Español, Italiano, Nederlands, Русский.
3 Bestätigen Sie die neue Spracheinstellung.
Die im Setup - Hauptmenü verwendete Spracheinstellung wird
geändert.
DEUTSCH
Fortgeschrittene Bedienung mit Ihrer SRU8008 49
SRU8008_IFU_bundel 1 v09.qxd 03-12-2007 11:36 Pagina 49

5 Häufige Fragen (FAQ)
Tasten
Warum funktionieren eine oder mehrere Tasten an meinem
Gerät nicht?
Nicht alle Funktionen sind in der Datenbank der SRU8008 verfügbar oder
der Tastencode ist defekt.
Sie können eine Taste reparieren, indem Sie das Signal von der
Originalfernbedienung lernen. Siehe Kapitel ‘Taste Reparieren’ auf
Seite 44.
Wie bediene ich die Pfeiltasten nach oben, unten, links und
rechts für das Bildschirmmenü?
Mit dem Drehknopf können Sie Ihre SRU8008 einfach und
multifunktional bedienen:
• Beim Drehen des Drehknopfs navigieren Sie durch die verschiedenen
Optionen auf dem Bildschirm Ihrer Fernbedienung.
• Wenn Sie den Drehknopf nach oben, unten, links oder rechts drücken,
navigieren Sie durch das Bildschirmmenü des Geräts (TV, DVD, VCR,
etc.), das Sie derzeit verwenden.
Wie kann ich eine weitere Funktion zur SRU8008 hinzufügen?
Siehe Kapitel ‘Funktion Hinzufügen’ auf Seite 48.
Marke
Warum kann ich die Marke meines Geräts nicht in der SRU8008
finden?
Es sind nicht alle Marken in der Datenbank der SRU8008 enthalten. Wenn
Ihre Marke nicht in der Liste ist:
• Sie können die Tasten von der Originalfernbedienung kopieren. Siehe
Kapitel ‘Taste Reparieren’ auf Seite 44.
- oder -
• Sie können Nicht in der Liste wählen und eine Datenbanksuche
durchführen.
Die SRU8008 prüft dann alle verfügbaren Codes. Dies kann bis zu
25 Minuten dauern.
Häufige Fragen (FAQ)50
SRU8008_IFU_bundel 1 v09.qxd 03-12-2007 11:36 Pagina 50

DEUTSCH
Häufige Fragen (FAQ) 51
Aktivität
Kann ich von einer Aktivität in eine andere wechseln?
Nein, sobald eine Aktivität ausgewählt ist, kann diese Aktivität oder eine
andere Aktivität nicht noch einmal ausgewählt werden. Sie müssen zuerst
alle Geräte ausschalten, bevor Sie eine neue Aktivität aus der Liste
auswählen können.
Lautstärke
Warum funktionieren die Lautstärketasten nicht richtig?
Nach dem Hinzufügen eines Geräts kopiert die SRU8008 automatisch die
Lautstärketasten und die Stummschalttaste folgendermaßen:
• Videogeräte wie DVD, DVD-R, VCR und Satellitenanlage verwenden
die Lautstärketasten des TV.
• Audiogeräte wie CD, DMR und Tuner verwenden die
Lautstärketasten des Verstärkers oder Tuner-Verstärkers.
Wenn Sie die Quellgeräte (TV, Verstärker oder Tuner-Verstärker) nicht
installiert haben, funktionieren die Lautstärketasten und die
Stummschalttaste nicht. Die Lautstärketasten definieren:
• Sie können das Quellgerät auf der SRU8008 installieren. Siehe Kapitel
‘Gerät Hinzufügen’ auf Seite 43.
- oder -
• Sie können die Lautstärketasten eines anderen Quellgeräts kopieren.
Siehe Kapitel ‘Lautstärke Kopieren’ auf Seite 45.
Batterien
Warum kann ich das Setup-Menü nicht aufrufen?
Wenn die Batterien zu schwach sind, können Sie das Setup-Menü nicht
aufrufen. Ersetzen Sie die Batterien mit neuen Alkalibatterien.
Warum schaltet sich die SRU8008 nicht mehr ein?
Die Batterien sind zu schwach. Ersetzen Sie die Batterien mit neuen
Alkalibatterien.
Gehen meine Daten verloren, wenn ich die Batterien
austausche?
Nein. Ihre Daten sind gesichert.
Kann ich wiederaufladbare Batterien in der SRU8008 benutzen?
Ja, das können Sie. Denken Sie jedoch daran, dass wiederaufladbare
Batterien sich oft schneller entladen als Alkalibatterien.
SRU8008_IFU_bundel 1 v09.qxd 03-12-2007 11:36 Pagina 51

6 Brauchen Sie Hilfe?
Lesen Sie bitte diese Bedienungsanleitung sorgfältig durch.
Weitere Informationen zur Verwendung, Einrichtung oder Garantie Ihrer
SRU8008 finden Sie unter www.philips.com/support
.
Kontaktdetails finden Sie unter www.philips.com/support
.
Halten Sie die SRU8008 bereit, wenn Sie unseren Kundendienst anrufen,
damit unsere Mitarbeiter Ihnen bei der Lösung des Problems helfen
können.
Die Modellnummer Ihrer Fernbedienung von Philips lautet SRU8008.
Die richtigen Gerätecodes für Ihre Fernbedienung finden Sie unter
www.philips.com/URC
.
Kaufdatum: ......../......../........ (Tag/Monat/Jahr)
Brauchen Sie Hilfe?52
SRU8008_IFU_bundel 1 v09.qxd 03-12-2007 11:36 Pagina 52
Índice
1 Acerca de su Philips Prestigo SRU8008 54
1.1 Contenido del paquete 54
1.2 Descripción general del SRU8008 54
2 Primeros pasos 55
2.1 Preparación del equipo 55
2.2 Instalación 56
3 Uso del SRU8008 57
3.1 Selección de un dispositivo 58
3.2 Selección de una actividad 58
3.3 Selección de funciones adicionales 59
4 Cómo sacarle el máximo partido a su SRU8008 59
4.1 Dispositivos 60
4.2 Actividades 63
4.3 Funciones adicionales 64
4.4 Configuración del sistema 65
4.5 Idioma 66
5 Preguntas frecuentes 66
6 ¿Necesita ayuda? 68
ESPAÑOL
Índice 53
SRU8008_IFU_bundel 1 v09.qxd 03-12-2007 11:36 Pagina 53
1 Acerca de su Philips Prestigo SRU8008
Bienvenido a la creciente familia de propietarios de productos de Philips.
El mando a distancia universal Philips Prestigo SRU8008 ha sido diseñado
para permitirle controlar sus equipos. Podrá instalar hasta 8 dispositivos y
hasta 8 actividades.
Seleccione un dispositivo y seleccione una función del dispositivo
mediante las teclas del SRU8008.
Seleccione una actividad y automáticamente se iniciará una secuencia de
pulsaciones de teclas, por ejemplo, para comenzar a ver un DVD o a
reproducir un CD.
Seleccione Funciones adicionales y asigne más funciones avanzadas al
mando a distancia.
1.1 Contenido del paquete
• El SRU8008
• Guía de inicio rápido
• Instrucciones de uso en distintos idiomas
• Pilas alcalinas de la marca Philips
Philips recomienda usar pilas alcalinas de la marca Philips.
1.2 Descripción general del SRU8008
La imagen en la página 2 le ofrece una descripción general del SRU8008.
Para preparar el SRU8008 para su uso, ‘Primeros pasos’ en la página 55.
Botones negros para enviar señales al equipo
A Botón POWER
B Botón OK
C Botones arriba, abajo, izquierda y derecha
D Botones de desplazamiento
E Teclado alfanumérico
F Botón CLEAR/*–.
G Botón AV
H Botón ENTER
Botones para controlar el SRU8008
1 Botón MORE
2 Botón ACTIVITIES
3 Botón DEVICES/SETUP
4 Botón OK
5 Control giratorio
6 Botón para volver atrás
Acerca de su Philips Prestigo SRU8008 54
SRU8008_IFU_bundel 1 v09.qxd 03-12-2007 11:36 Pagina 54

2 Primeros pasos
2.1 Preparación del equipo
Para colocar las pilas en el SRU8008:
1 Presione el pasador hacia abajo y levante la cubierta.
2 Coloque tres pilas alcalinas LR6 AA en el compartimiento, tal y
como se muestra en la imagen.
3 Coloque la tapa y presiónela con firmeza hasta que escuche un clic.
l SRU8008 muestra el logotipo de Philips
durante 3 segundos y, a continuación, se inicia
el Asistente de Instalación para guiarle a
través de la instalación.
Cuando las pilas estén a punto de agotarse, parpadeará el icono Batería
Baja . Esto indica que el nivel de carga de la batería es muy bajo. No
obstante, todavía podrá utilizar el SRU8008 durante un corto período de
tiempo.
Sustituya las pilas gastadas por pilas alcalinas de tipo LR6 AA nuevas
y siga la normativa aplicable sobre eliminación de residuos para desechar
las pilas usadas.
D Nota
Si aparece parpadeando el icono Batería Baja, ya no podrá entrar
en el menú Configuración - Principal.
3
2
1
Asistente de instalación –
Selección de idioma
ESPAÑOL
Primeros pasos 55
1 2 3
SRU8008_IFU_bundel 1 v09.qxd 03-12-2007 11:36 Pagina 55

2.2 Instalación
1 En el Asistente de instalación, seleccione el idioma que desee usando
la rueda giratoria.
2 Pulse para confirmar el idioma seleccionado.
El SRU8008 le guiará durante el resto del proceso de configuración.
Durante el proceso de configuración puede volver atrás en cualquier
momento para cambiar una selección.
Pulse para volver a la pantalla anterior.
3 Siga las instrucciones del SRU8008 para agregar dispositivos. Puede
agregar al SRU8008 hasta 8 dispositivos de la siguiente lista.
Nombre del dispositivo Descripción
TV Televisiones tradicionales y planas
DVD Reproductor y grabador de DVD
DVDR Reproductor y grabador de DVD
VCR Reproductor y grabador de cintas de vídeo
SAT Receptor satélite con o sin disco duro (HDD)
DSS/DTT Receptor satélite con o sin disco duro (HDD)
Cable Receptor de televisión por cable con o sin disco duro (HDD)
DVB-T/S Emisión de vídeo digital - Terrestre (T) o por Satélite (S) con o sin
disco duro (HDD)
AMP Amplificador
AudioSet Receptor = Amplificador + Sintonizador
HTS Sistema de cine en casa = amplificador + DVD + sintonizador +
altavoces de sonido envolvente
Sintonizador Sintonizador de radio
CD Reproductor y grabador CD
MD Reproductor y grabador de minidiscos
Cinta Reproductor y grabador de casetes de sonido
DVR Grabador de vídeo digital = Sintonizador de TV analógica +
Unidad de disco duro (HDD)
Tivo Grabador de vídeo digital = Sintonizador de TV analógica +
Unidad de disco duro (HDD)
DMR Receptor de medios digitales = dispositivo de distribución de
contenidos desde un PC a una TV o un receptor de sonido
TV-DVD combo TV con DVD integrado
TV-VCR combo TV con VCR integrado
6
5
4
4 5 6
Primeros pasos
56
SRU8008_IFU_bundel 1 v09.qxd 03-12-2007 11:36 Pagina 56
Nombre del dispositivo Descripción
TV-VCR-DVD combo TV con DVD y VCR integrados
DVD-VCR combo Combinación de DVD y VCR
DVDR-HDD combo Combinación de grabador de DVD y unidad de disco duro
(HDD)
VCD, disco láser Disco de vídeo compacto, disco láser, karaoke
Proyector Proyector de vídeo
Cámara y videocámara Cámara y videocámara
PC PC (sólo infrarrojos)
Juego Función de reproducción de DVD de videoconsola
(sólo infrarrojos)
Radio por satélite Receptor de radio por satélite
PVR/DVR Grabador de vídeo personal/grabador con disco duro
D Nota
Podrá cambiar los ajustes que haya realizado durante la instalación
inicial o instalar más funciones posteriormente mediante el menú
Configuración.
Consulte ‘Cómo sacarle el máximo partido a su SRU8008’ en
la página 59.
3 Uso del SRU8008
El SRU8008 ha sido diseñado para controlar todos sus equipos con un
solo mando a distancia. Para comenzar a disfrutar del SRU8008,
simplemente tendrá que añadir los dispositivos, las actividades, los
favoritos y las funciones adicionales que desee.
Un dispositivo es una parte de su equipo. Cuando haya instalado sus
dispositivos, podrá controlarlos mediante las teclas del SRU8008.
Los dispositivos pueden tener funciones adicionales además de las teclas
que figuran en el SRU8008. Podrá seleccionar Más Funciones en la
pantalla.
Una actividad es una secuencia de pulsaciones de teclas que puede
programar. Por ejemplo, para ver un DVD normalmente tendría que hacer
lo siguiente:
• Encender el televisor
• Encender el DVD
• Encender el sistema de sonido envolvente
• Seleccionar la entrada adecuada en el televisor y en el sistema de
sonido
• Pulsar el botón de Reproducción para reproducir el DVD
Al programar una actividad, el SRU8008 ejecuta todos estos pasos con
tan solo pulsar una tecla.
ENGLISH
ESPAÑOL
Primeros pasos 57
SRU8008_IFU_bundel 1 v09.qxd 03-12-2007 11:36 Pagina 57
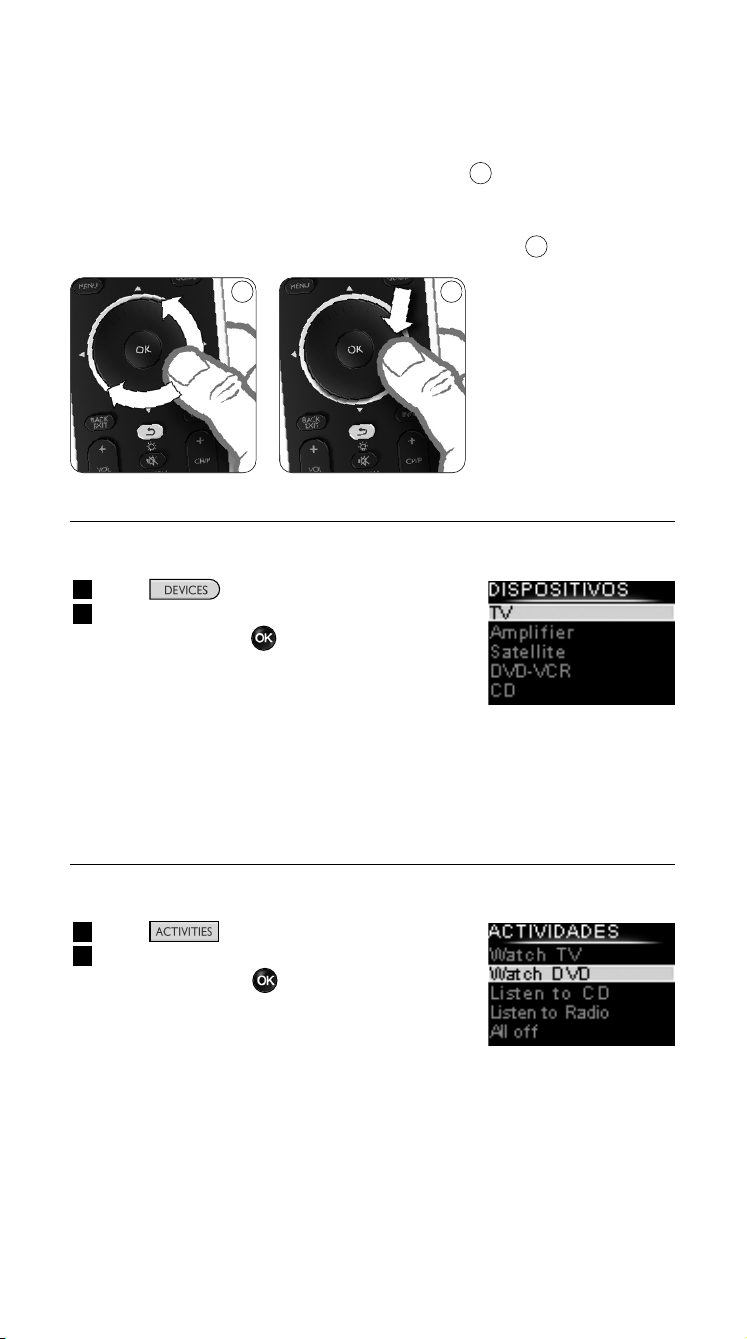
El control giratorio es un control multifuncional del SRU8008 fácil de
usar:
• Al mover el control giratorio, puede desplazarse por las distintas
opciones de la pantalla del mando a distancia.
• Al pulsar el control giratorio hacia arriba, abajo, izquierda o derecha,
puede desplazarse por el menú en pantalla del dispositivo que esté
controlando en ese momento (TV, DVD, vídeo, etc.).
3.1 Selección de un dispositivo
Si desea seleccionar sus dispositivos programados:
1 Pulse .
2 Seleccione un dispositivo mediante la rueda
giratoria y pulse para confirmar.
El SRU8008 se configurará para hacer
funcionar el dispositivo seleccionado. En este
momento, podrá manejar dicho dispositivo
mediante las teclas negras del SRU8008.
Si desea obtener más información sobre cómo configurar sus dispositivos,
consulte ‘Agregar dispositivo’ en la página 60.
3.2 Selección de una actividad
Para seleccionar las actividades instaladas:
1 Pulse .
2 Seleccione una actividad con el control
giratorio y pulse para iniciar la actividad.
El SRU8008 envía una secuencia de botones
correspondiente con la actividad seleccionada.
El SRU8008 está configurado para controlar
el dispositivo seleccionado para esa actividad.
Para configurar las actividades consulte ‘Agregar actividad’ en la
página 63.
8
7
Lista de dispositivos
programados
Lista de actividades
instaladas
87
Uso del SRU8008
58
SRU8008_IFU_bundel 1 v09.qxd 03-12-2007 11:36 Pagina 58
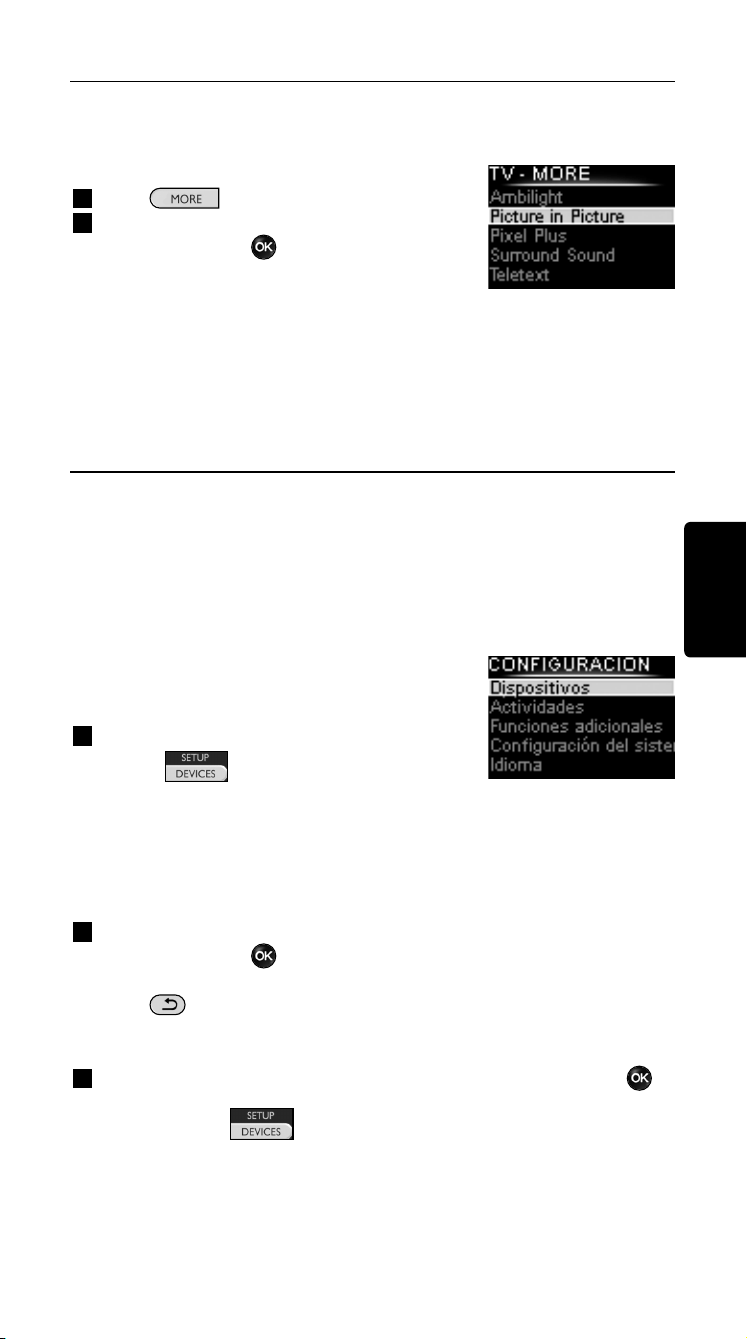
Selección de funciones adicionales
Los dispositivos pueden tener funciones adicionales además de las teclas
que aparecen en el SRU8008.
Para seleccionar más funciones programadas:
1 Pulse .
2 Seleccione una función con la rueda
giratoria y pulse para confirmar su
elección.
El SRU8008 envía la señal para que se
ejecute la función seleccionada.
Si desea obtener más información sobre cómo programar más funciones
para sus dispositivos, consulte ‘Agregar función’ en la página 64.
4 Cómo sacarle el máximo partido a su
SRU8008
Mediante el menú Configuración, podrá acceder a las distintas
funciones avanzadas del SRU8008.
Para entrar en el menú Configuración:
Mantenga pulsada durante 3 segundos
la tecla .
D Nota
No podrá entrar en el menú Configuración, si el icono Batería
Baja está parpadeando.
Para desplazarse por el menú Configuración:
Seleccione una opción en Configuración mediante la rueda
giratoria y pulse para confirmar su elección.
, o bien,
Pulse .
Para salir del menú Configuración:
Seleccione Salir en Configuración - Menú Principal y pulse .
, o bien,
Pulse de nuevo .
En la siguiente tabla, podrá encontrar un resumen de las opciones
disponibles en el menú Configuración junto con la indicación de la
página, donde podrá encontrar más información sobre estas opciones.
ENGLISH
Lista de funciones
instaladas
ESPAÑOL
Uso del SRU8008 59
SRU8008_IFU_bundel 1 v09.qxd 03-12-2007 11:36 Pagina 59
Config. - Menú princ. Submenú Descripción Página
Dispositivos
Agregar Dispositivo Añade un dispositivo nuevo. 60
Fijar una Tecla Fija una tecla que no funciona
correctamente copiando la señal del
mando a distancia original. 61
Copiar Volumen Copia las teclas de volumen de un
dispositivo a otro. 62
Renombrar Dispositivo Cambia el nombre de un dispositivo. 62
Eliminar Dispositivo Elimina un dispositivo programado. 63
Actividades
Agregar Actividad Añade una secuencia de pulsaciones de
teclas para hacer funcionar distintos dispo-
sitivos con tan solo pulsar una tecla. 63
Renombrar Actividad Cambia el nombre de una actividad. 64
Eliminar Actividad Elimina una actividad programada. 64
Funciones
Agregar Función Agrega una función adicional
Adicionales
memorizándola de su mando a
distancia original. 64
Renombrar Función Cambia el nombre de una función. 65
Eliminar Función Elimina una función programada. 65
Configuración
Duración de la Cambia el tiempo durante el que se
del Sistem
Retroilumin mantiene encendida la retroiluminación
del SRU8008. 65
Tecla Retroiluminación Enciende o apaga la retroiluminación. 65
Restablecer Elimina todos los ajustes que haya
Configuración Original realizado en el SRU8008. 66
Idioma
Cambia el idioma de las instrucciones
del SRU8008. 66
Salir
Sale del menú de Configuración. 59
4.1 Dispositivos
4.1.1 Agregar un dispositivo
Para poder manejar sus dispositivos mediante el SRU8008, tendrá que
añadirlos primero. Podrá añadir hasta 8 dispositivos.
D Nota
Podrá añadir un dispositivo más de una vez. Si añade un segundo
televisor, aparecerá automáticamente con el nombre TV2. Podrá
cambiar este nombre, si lo desea. Vea ‘Renombrar un dispositivo’
en la página 62.
1 Vaya a Configuración - Dispositivos, seleccione Agregar
Dispositivo y pulse .
2 Seleccione el dispositivo que desee agregar.
3 Siga las instrucciones que aparecerán en el SRU8008.
El dispositivo seleccionado se instalará y añadirá al SRU8008.
Cómo sacarle el máximo partido a su SRU800860
SRU8008_IFU_bundel 1 v09.qxd 03-12-2007 11:36 Pagina 60
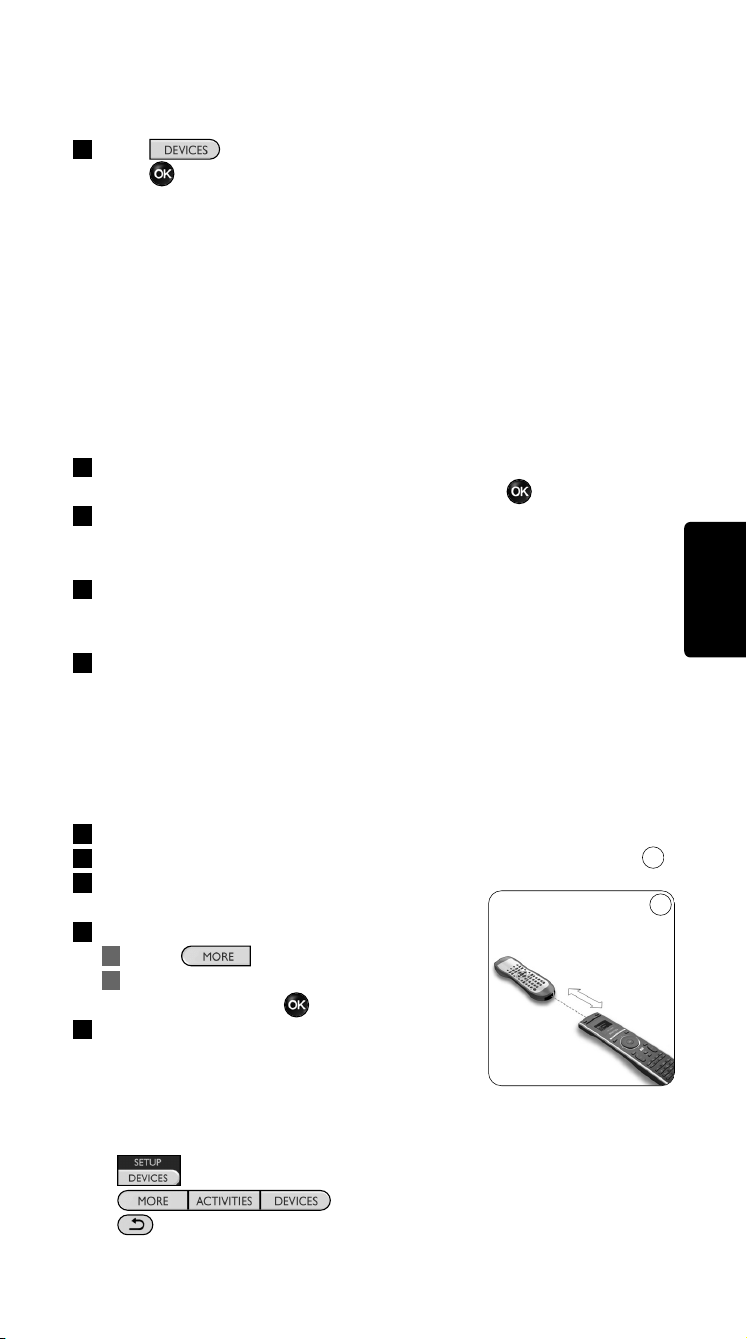
Ahora podrá manejar el dispositivo desde el SRU8008:
Pulse seleccione el dispositivo con la rueda giratoria y
pulse .
4.1.2 Reparar un botón
Si un botón o una función extra no funcionan correctamente con el
dispositivo, puede intentar asignar primero la señal de ese botón al
SRU8008. En caso de que no funcione, puede copiar esa señal del botón
del mando a distancia original al SRU8008.
D Nota
Cuando utilice la opción ‘Reparar un botón’, los nuevos datos
reemplazan a los datos almacenados actualmente en ese botón.
1 En el menú de Configuración, seleccione Dispositivos. Después
seleccione la opción Reparar un botón y pulse .
2 Seleccione el dispositivo para el que quiere reparar un botón.
El SRU8008 comprueba automáticamente si la marca del dispositivo
se encuentra en su base de datos.
3 Si la marca del dispositivo se encuentra en la base de datos,
mantenga pulsado el botón al que quiere asignar la señal.
El SRU8008 envía diferentes señales al dispositivo.
4 Cuando el dispositivo reaccione, suelte el botón inmediatamente y
siga las instrucciones indicadas en el SRU8008.
El botón se ha asignado y reparado.
O bien,
Si la marca del dispositivo no se encuentra en la base de
datos o si el dispositivo no reacciona ante ninguna señal, copie
la señal del botón del mando a distancia original:
3 Prepare el mando a distancia original.
4 Coloque el SRU8008 y el mando a distancia tal y como se indica.
5 Seleccione el botón o la función extra que
desea reparar.
6 Para seleccionar funciones extra:
1 Pulse .
2 Seleccione la función con el control
giratorio y pulse .
7 Siga las instrucciones del SRU8008.
El botón se ha copiado y reparado.
D Nota
Puede fijar cualquier tecla excepto:
•
•
•
9
ESPAÑOL
Cómo sacarle el máximo partido a su SRU8008 61
9
0.80 - 2 pulgadas
2-5 cm
SRU8008_IFU_bundel 1 v09.qxd 03-12-2007 11:36 Pagina 61
4.1.3 Copiar el volumen
Una vez que haya añadido dispositivos, el SRU8008 copiará
automáticamente los ajustes de volumen de la siguiente manera:
• Para los dispositivos de vídeo como DVD, DVD-R, VCR y
sintonizadores de satélite, utilice las teclas de volumen del televisor
(siempre y cuando haya instalado uno).
• Para los dispositivos de audio como CD, MD, casetes y radios, utilice
las teclas de volumen del Amplificador o del Receptor (siempre y
cuando haya instalado un amplificador o un receptor).
Podrá definir las teclas de volumen que desee utilizar, por ejemplo, si
desea utilizar las teclas de volumen del amplificador para el DVD.
D Notas
• La función Copiar Volumen sobrescribe los ajustes de volumen
predeterminados del SRU8008.
• Los ajustes de volumen que haya definido previamente mediante las
funciones Copiar Volumen o Fijar una Tecla se perderán.
• Los ajustes de volumen se borrarán automáticamente, cuando
elimine el dispositivo de origen de este ajuste.
Para copiar los ajustes de volumen:
1 Vaya a Configuración - Dispositivos, seleccione Copiar Volumen
y pulse .
2 Seleccione el dispositivo desde el que desee copiar las teclas de
volumen (por ejemplo, un TV o amplificador).
3 Seleccione el dispositivo al que desee copiar las teclas de volumen
(por ejemplo, un DVD o un sintonizador de satélite).
4 Confirme que desea copiar las teclas de volumen de un dispositivo a
otro.
Se copiarán las teclas de volumen.
4.1.4 Renombrar un dispositivo
Para renombrar un dispositivo:
1 Vaya a Configuración - Dispositivos, seleccione Renombrar
Dispositivo y pulse .
2 Introduzca la nueva etiqueta mediante las teclas alfanuméricas.
D Nota
Podrá borrar caracteres mediante la tecla Clear o con el cursor
izquierdo.
3 Confirme la nueva etiqueta.
Con ello se habrá cambiado el nombre del dispositivo.
Cómo sacarle el máximo partido a su SRU800862
SRU8008_IFU_bundel 1 v09.qxd 03-12-2007 11:36 Pagina 62
4.1.5 Eliminar un dispositivo
Para eliminar un dispositivo:
1 Vaya a Configuración - Dispositivos, seleccione Eliminar
Dispositivo y pulse .
2 Seleccione el dispositivo que desee eliminar.
3 Confirme que desea eliminar el dispositivo.
Se eliminará el dispositivo.
D Nota
Las teclas del dispositivo eliminado que se utilicen en otro lugar, por
ejemplo, en una actividad, o las teclas de volumen copiadas, también
se eliminarán.
Compruebe las actividades que tenía programadas y vuelva a
programarlas, si es necesario. Vea ‘Agregar una actividad’ en la
página 63.
Compruebe las teclas de volumen de sus dispositivos y vuelva a
programarlas, si es necesario. Vea ‘Copiar Volumen’ en la página 62.
4.2 Actividades
4.2.1 Agregar una actividad
Podrá programar actividades nuevas en el SRU8008. Una actividad
consiste en una función que requiere varias pulsaciones de teclas y que el
SRU8008 ejecuta con tan solo pulsar una tecla.
Por defecto, el SRU8008 introduce una demora de 600 ms entre cada
pulsación para asegurarse de que sus dispositivos respondan
correctamente a las señales transmitidas por IR. Podrá sobrescribir esta
demora predefinida.
• En caso de que uno de sus dispositivos necesite una demora mayor
antes de recibir la siguiente señal por IR, podrá introducir una demora
de 1, 3, 5, 10 ó 15 segundos.
• Si una actividad requiere pulsaciones largas, por ejemplo, para subir el
volumen, podrá seleccionar la opción Mantener la Ultima Tecla.
Para agregar una actividad:
1 Vaya a Configurar - Actividades, seleccione Agregar una
Actividad y pulse .
2 Seleccione la etiqueta que desee utilizar para la actividad.
, o bien,
Seleccione Otros para crear una etiqueta nueva.
3 Siga las instrucciones que aparecerán en el SRU8008.
• Seleccione un dispositivo mediante la rueda giratoria, pulse
y pulse una tecla para añadirla a la actividad.
• Seleccione una demora de 1, 3, 5, 10 ó 15 segundos con la
rueda giratoria y pulse .
ESPAÑOL
Cómo sacarle el máximo partido a su SRU8008 63
SRU8008_IFU_bundel 1 v09.qxd 03-12-2007 11:36 Pagina 63
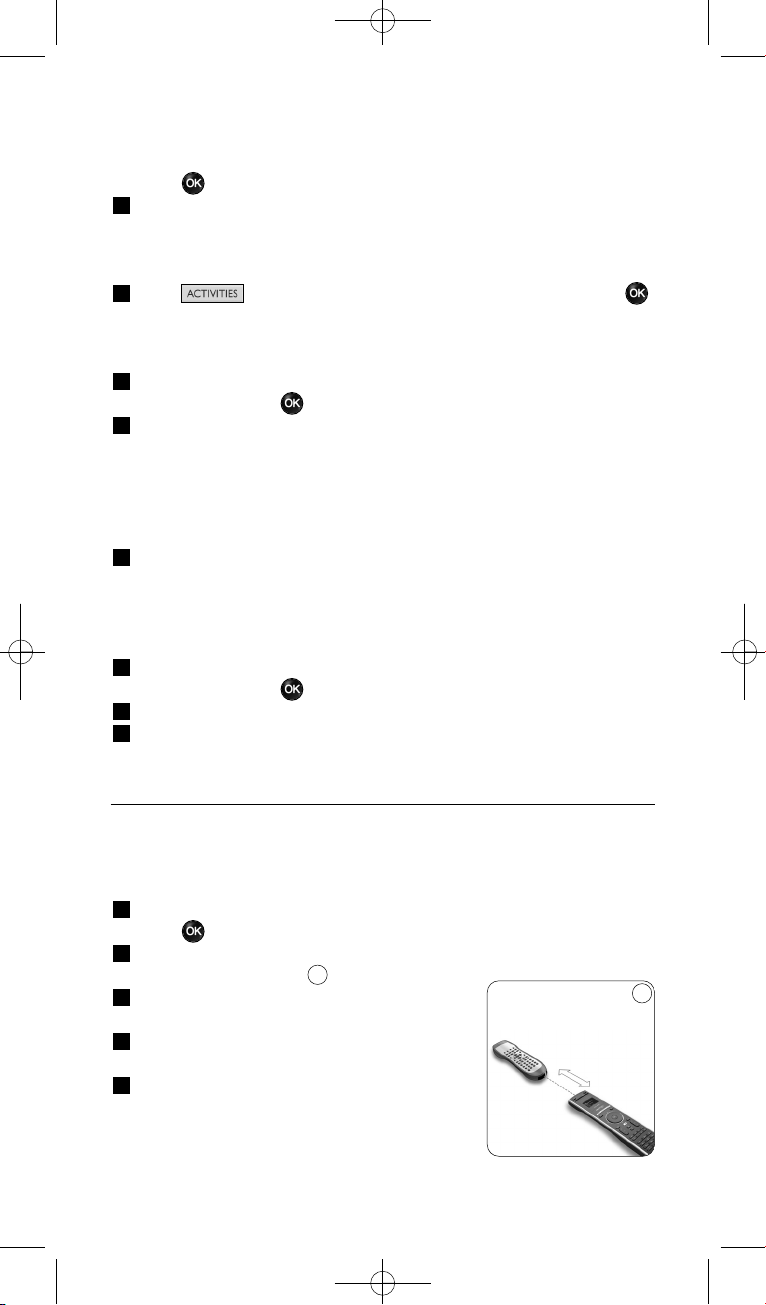
, o bien,
Seleccione Mantener la Ultima Tecla con la rueda giratoria y
pulse .
4 Repita el tercer paso, si desea crear otra actividad.
Se añadirá la actividad al SRU8008.
Desde este momento, podrá ejecutar la actividad desde el SRU8008:
Pulse seleccione la actividad con la rueda giratoria y pulse .
4.2.2 Renombrar una actividad
Para renombrar una actividad:
1 Vaya a Configuración - Actividades, seleccione Renombrar
Actividad y pulse .
2 Introduzca el texto para la nueva etiqueta mediante las teclas
alfanuméricas.
D Nota
Podrá eliminar caracteres mediante la tecla Clear y el cursor izquierdo.
3 Confirme la nueva etiqueta.
Se cambiará el nombre de la actividad.
4.2.3 Eliminar una actividad
Para eliminar una actividad:
1 Vaya a Configuración - Actividades, seleccione Eliminar
Actividad y pulse .
2 Seleccione la actividad que desee eliminar.
3 Confirme que desea eliminar la actividad.
Se eliminará la actividad.
4.3 Funciones adicionales
4.3.1 Agregar una función
Para añadir más funciones:
1 Vaya a Config. - Más Funciones, seleccione Agregar función y
pulse .
2 Coloque el SRU8008 y su mando a distancia original tal y como se
muestra en la imagen.
3 Seleccione el dispositivo al que desee añadir
una función.
4 Seleccione la etiqueta que desee utilizar
para la función adicional.
5 Siga las instrucciones que aparecerán en el
SRU8008 para copiar la función desde su
mando a distancia original.
La función se habrá añadido al SRU8008.
10
Cómo sacarle el máximo partido a su SRU800864
10
0.80 - 2 pulgadas
2-5 cm
SRU8008_IFU_bundel 1 v09.qxd 03-12-2007 11:36 Pagina 64
4.3.2 Renombrar una función
Para renombrar una función adicional:
1 Vaya a Config. - Más Funciones, seleccione Renombrar Función
y pulse .
2 Introduzca el texto para la nueva etiqueta mediante las teclas
alfanuméricas.
3 Confirme la nueva etiqueta.
Se renombrará la función.
4.3.3 Eliminar una función
Para eliminar una función adicional:
1 Vaya a Config. - Más Funciones, seleccione Eliminar Función y
pulse .
2 Seleccione el dispositivo del que desee eliminar una función.
3 Seleccione la función que desee eliminar.
4 Confirme que desea eliminar la función.
Se eliminará la función.
4.4 Configuración del sistema
4.4.1 Duración de la retroiluminación
Cada vez que utilice el SRU8008, se encenderá la retroiluminación.
Al cabo de cinco segundos se volverá a apagar.
Para cambiar este ajuste de tiempo:
1 Vaya a Config. - Config. del Sist., seleccione Duración de la
Retroilumin. y pulse .
2 Seleccione el tiempo de duración de la retroiluminación que desee
con la rueda giratoria:
3 segundos; 5 segundos; 10 segundos; 20 segundos
3 Confirme el nuevo ajuste de duración.
Se cambiará la duración de la retroiluminación.
D Nota
La duración de la retroiluminación influye sobre la vida útil de las
pilas: cuanto más tiempo se mantenga encendida, más rápidamente se
agotarán las pilas.
4.4.2 Tecla Retroiluminación
Para encender y apagar la retroiluminación:
1 Vaya a Config. - Config. del Sist., seleccione Tecla
Retroiluminación y pulse .
2 Seleccione Activado u Desactivado mediante la rueda giratoria.
3 Confirme el nuevo ajuste de la tecla Retroiluminación.
Se activará o desactivará la tecla Retroiluminación.
ESPAÑOL
Cómo sacarle el máximo partido a su SRU8008 65
SRU8008_IFU_bundel 1 v09.qxd 03-12-2007 11:36 Pagina 65
4.4.3 Restablecer configuración original
Cuando restablezca completamente la configuración original del
SRU8008, se borrarán los dispositivos, las actividades y cualquier otro
ajuste que haya realizado. Tras el restablecimiento deberá volver a
programar el SRU8008.
Para restablecer el SRU8008:
1 Vaya a Config. - Config. del Sist., seleccione Restablecer
Configuración Original y pulse .
2 Seleccione Sí con la rueda giratoria y pulse .
3 Pulse para volver a confirmar.
El SRU8008 borrará todos los ajustes y volverá a mostrar el Asistente
de instalación. Esta operación puede tardar hasta un minuto.
4.5 Idioma
Para cambiar el idioma del SRU8008:
1 Vaya a Configuración - Idioma y pulse .
2 Seleccione el idioma que desee con la rueda giratoria.
English, Français, Deutsch, Español, Italiano, Nederlands, Русский.
3 Confirme el nuevo idioma.
Cambiará el idioma utilizado en Configuración - Menú Principal.
5 Preguntas frecuentes
Teclas
¿Por qué no funcionan una o más teclas en mi dispositivo?
No todas las funciones están disponibles en la base de datos del SRU8008
o el código que utiliza la tecla es incorrecto.
Podrá fijar una tecla copiando la señal de su mando a distancia original.
Vea ‘Fijar unaTecla’ en la página 61.
¿Cómo funcionan los botones de arriba, abajo, izquierda y
derecha en el menú en pantalla?
El control giratorio es un control multifuncional del SRU8008 fácil de
usar:
• Al mover el control giratorio, puede desplazarse por las distintas
opciones de la pantalla del mando a distancia.
• Al pulsar el control giratorio hacia arriba, abajo, izquierda o derecha,
puede desplazarse por el menú en pantalla del dispositivo que esté
controlando en ese momento (TV, DVD, vídeo, etc.).
Cómo sacarle el máximo partido a su SRU800866
SRU8008_IFU_bundel 1 v09.qxd 03-12-2007 11:36 Pagina 66

¿Cómo puedo añadir funciones adicionales al SRU8008?
Vea ‘Agregar función’ en la página 64.
Marca
¿Por qué no puedo encontrar la marca de mi dispositivo en el
SRU8008?
No todas las marcas están incluidas en la base de datos del SRU8008.
Si su marca no está en la lista:
• Puede copiar las teclas desde su mando a distancia original. Vea ‘Fijar
una Tecla’ en la página 61.
, o bien,
• Podrá Otros para realizar una búsqueda en toda la base de datos.
El SRU8008 comprobará todos los códigos disponibles. Esta operación
puede tardar hasta 25 minutos.
Actividad
¿Puedo alternar entre una actividad y otra?
No, cuando una actividad está seleccionada, no es posible seleccionar la
misma actividad u otra distinta al mismo tiempo. Debe desactivar todos
los dispositivos antes de seleccionar una actividad nueva de la lista.
Volumen
¿Por qué no funcionan correctamente las teclas de volumen?
Una vez que haya añadido dispositivos, el SRU8008 copiará
automáticamente las teclas de volumen y la tecla Mute (Silencio) de la
siguiente manera:
• Para los dispositivos de vídeo como DVD, DVD-R, VCR y
sintonizadores de satélite, utilice las teclas de volumen del televisor.
• Para dispositivos de audio como CD, DMR y radios, utilice las teclas de
volumen del Amplificador o del Receptor.
Si no ha instalado el dispositivo de origen (TV, amplificador o receptor),
las teclas de volumen y la tecla Mute (Silencio) no funcionarán. Para
configurar las teclas de volumen:
• Puede programar el dispositivo de origen en el SRU8008. Vea ‘Agregar
Dispositivo’ en la página 60.
, o bien,
• Podrá copiar las teclas de volumen desde otro dispositivo de origen.
Vea ‘Copiar Volumen’ en la página 62.
ESPAÑOL
Preguntas frecuentes 67
SRU8008_IFU_bundel 1 v09.qxd 03-12-2007 11:36 Pagina 67
Pilas
¿Por qué no puedo entrar en el menú Configuración?
Cuando el nivel de carga de las pilas sea demasiado bajo, no podrá entrar
en el menú Configuración. Sustituya las pilas por unas pilas alcalinas
nuevas.
¿Por qué no responde el SRU8008?
El nivel de carga de las pilas es demasiado bajo. Sustituya las pilas por
unas pilas alcalinas nuevas.
¿Pierdo los datos al sustituir las pilas?
No. Sus datos quedarán guardados.
¿Puedo utilizar pilas recargables en el SRU8008?
Sí. No obstante, tenga en cuenta que las pilas recargables tienden a
gastarse antes que las pilas alcalinas.
6 ¿Necesita ayuda?
Primero lea detenidamente estas instrucciones de uso.
Si tiene más dudas acerca del funcionamiento, la configuración o la
garantía del SRU8008, vaya a www.philips.com/support
.
La información de contacto está disponible en www.philips.com/support
.
Asegúrese de tener el SRU8008 a mano cuando llame a nuestro servicio
de asistencia para que nuestros operadores puedan ayudarle a determinar
si éste funciona correctamente.
El número de modelo de su mando a distancia universal de Philips es
SRU8008.
Para consultar los códigos correctos de dispositivos para el mando a
distancia, vaya a www.philips.com/URC
.
Fecha de compra: ......../......../........ (día/mes/año)
Preguntas frecuentes68
SRU8008_IFU_bundel 1 v09.qxd 03-12-2007 11:36 Pagina 68

Indice
Indice
1 Il vostro Prestigo SRU8008 di Philips 70
1.1 Contenuto del pacchetto 70
1.2 Panoramica dell’SRU8008 70
2 Inizio 71
2.1 Preparazione 71
2.2 Installazione 72
3 Come utilizzare l’ SRU8008 73
3.1 Selezione di un dispositivo 74
3.2 Selezione di un’attività 74
3.3 Selezione di Più Funzioni 75
4 Come sfruttare al massimo l’SRU8008 75
4.1 Dispositivi 75
4.2 Attività 79
4.3 Più funzioni 80
4.4 Imposta sistema 81
4.5 Lingua 82
5 Domande frequenti 82
6 Bisogno di aiuto? 84
ITALIANO
69
SRU8008_IFU_bundel 1 v09.qxd 03-12-2007 11:36 Pagina 69
Il vostro Prestigo SRU8008 di Philips
1 Il vostro Prestigo SRU8008 di Philips
Benvenuti nella famiglia sempre più numerosa degli utenti dei prodotti
Philips. Il telecomando universale Prestigo SRU8008 di Philips è stato
ideato per controllare i vostri apparecchi. Potete installare fino a
8 dispositivi e fino a 8 attività.
Selezionate un dispositivo e fatelo funzionare con i tasti dell’SRU8008.
Selezionando un’attività, iniziate automaticamente una sequenza di
pressioni di tasti, ad esempio, per iniziare a guardare un DVD o ascoltare
un CD.
Selezionare Altre funzioni per assegnare funzioni avanzate
supplementari al telecomando.
1.1 Contenuto del pacchetto
• SRU8008
• Una guida rapida
• Istruzioni per l’uso in varie lingue
• Batterie alcaline Philips
Philips raccomanda le batterie alcaline Philips.
1.2 Panoramica dell’SRU8008
L’immagine a pagina 2 vi offre una visione generale dell’SRU8008.
Per preparare l’SRU8008 all’uso, cfr. ‘Inizio’ a pagina 71.
Tasti neri per inviare segnali al dispositivo
A Tasto Power (Accensione)
B Tasto OK
C Tasti cursore su, giù, sinistra e destra
D Tasti trasporto
E Tasti alfanumerici
F Tasto *–./Clear (*–./Cancella)
G Tasto AV
H Tasto Enter (Invio)
Tasti per gestire il telecomando SRU8008
1 Tasto More (Altre funzioni)
2 Tasto Activities (Attività)
3 Tasto Devices/Setup (Dispositivi/Installazione)
4 Tasto OK
5 Tasto rotante
6 Tasto Indietro
70
SRU8008_IFU_bundel 1 v09.qxd 03-12-2007 11:36 Pagina 70
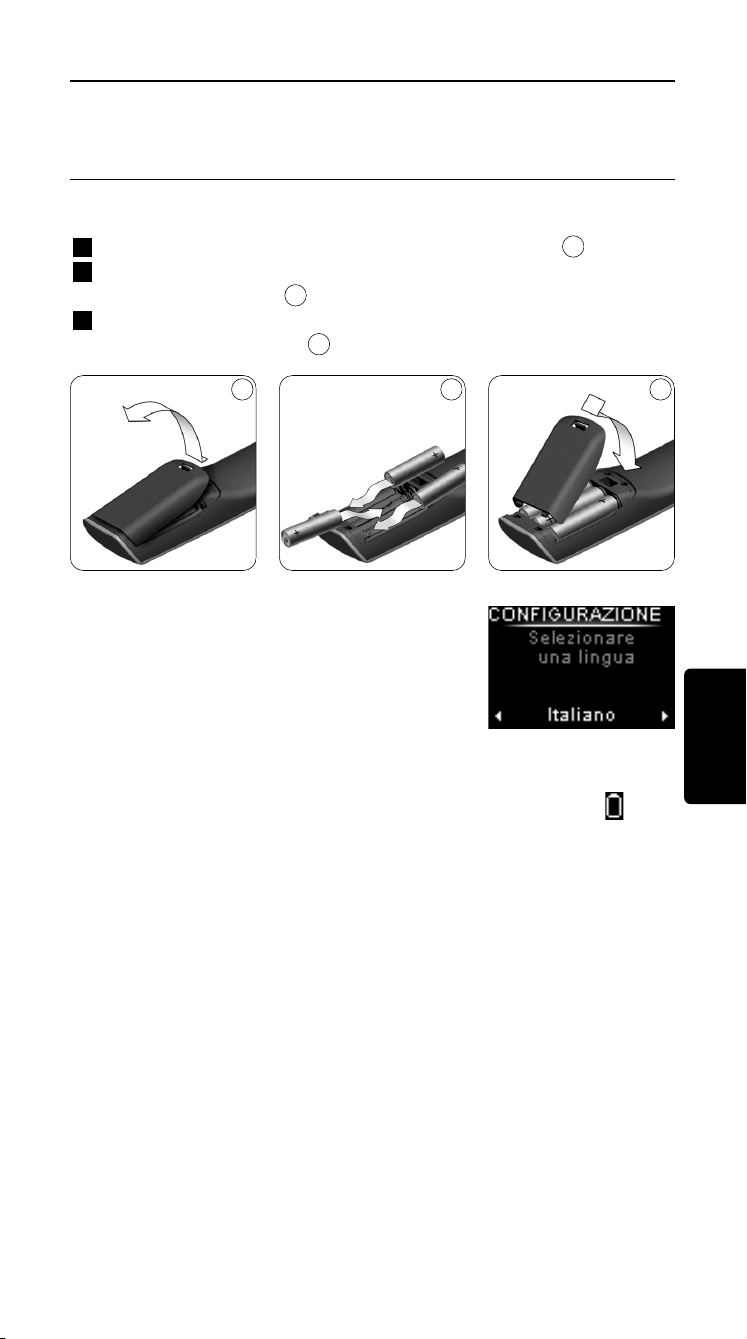
Inizio
2 Inizio
2.1 Preparazione
Per inserire le batterie nell’SRU8008:
1 Premere la linguetta di sblocco e sollevare il coperchio.
2 Inserite le tre batterie alcaline di tipo LR6 AA nel vano batterie come
mostrato nella figura.
3 Chiudete con fermezza il vano batterie con il coperchio finché non
udite il click di chiusura.
Sul display dell’SRU8008 apparirà il logo Philips
per 3 secondi dopodiché la Guida
All’Installazione vi guiderà in tutte le fasi
dell’installazione.
Quando le batterie sono quasi scariche, l’icona Batteria Esigua
inizierà a lampeggiare. Ciò indica un livello di batterie critico. Potete far
funzionare il telecomando SRU8008 ancora per breve tempo.
Sostituite le batterie con batterie alcaline nuove del tipo LR6 AA e
seguite le norme locali relative allo smaltimento delle batterie scariche.
D Nota
Se l’icona Batteria Esigua lampeggia, non potrete più accedere a
Setup - Menu Principale.
3
2
1
Guida all’installazione –
Selezione della lingua
ITALIANO
71
1 2 3
SRU8008_IFU_bundel 1 v09.qxd 03-12-2007 11:36 Pagina 71

Inizio
2.2 Installazione
1 Nella Guida All’Installazione, selezionate la vostra lingua preferita con
il tasto rotante.
2 Premete per confermare la lingua selezionata.
L’SRU8008 vi guida attraverso le fasi rimanenti del processo di
installazione.
Durante la processo di installazione, è possibile tornare indietro in
qualsiasi momento per modificare la scelta precedente:
Premere per tornare alla schermata precedente.
3 Seguire le istruzioni contenute nella presente guida per aggiungere i
dispositivi. È possibile aggiungere fino a 8 tra i dispositivi di seguito
elencati.
Nome dispositivo Descrizione
TV Tutti i televisori, sia tradizionali sia piatti
DVD Lettore e registratore DVD
DVDR Lettore e registratore DVD
VCR Videoregistratore
SAT Set Top Box (STB) satellitare, con o senza disco rigido (HDD)
DSS/DTT Set Top Box (STB) satellitare, con o senza disco rigido (HDD)
Cable Set Top Box (STB) via cavo, con o senza disco rigido (HDD)
DVB-T/S Digital Video Broadcast - terrestre (T) o satellitare (S), con o senza
disco rigido (HDD)
AMP Amplificatore
AudioSet Ricevitore = Amplificatore + Sintonizzatore
HTS Sistema Home Theater = Amplificatore + DVD + Sintonizzatore +
diffusori con effetto audio surround
Tuner Sintonizzatore radio
CD Lettore e registratore CD
MD Mini Disk
Ta p e Riproduttore e registratore di audiocassette
DVR Videoregistratore digitale = Sintonizzatore TV analogico +
Disco rigido (HDD)
Tivo Videoregistratore digitale = Sintonizzatore TV analogico +
Disco rigido (HDD)
6
5
4
4 5 6
72
SRU8008_IFU_bundel 1 v09.qxd 03-12-2007 11:36 Pagina 72

Inizio
Nome dispositivo Descrizione
DMR Ricevitore multimediale digitale (Digital Media Receiver ) =
dispositivo che consente di trasferire contenuti multimediali da
un PC a un televisore o ricevitore audio
TV-DVD combo Televisore con DVD integrato
TV-VCR combo Televisore con videoregistratore integrato
TV-VCR-DVD combo Televisore con DVD e videoregistratore (VCR) integrati
DVD-VCR combo Combo DVD e videoregistratore (VCR)
DVDR-HDD combo Registratore DVD con disco rigido (HDD)
VCD, Laser Disk Video Compact Disk, Laser Disk, karaoke
Projector Videoproiettore
Camera and Camcorder Videocamera e camcorder
PC PC (solo infrarossi)
Game Funzione di riproduzione DVD di una console per giochi
(solo infrarossi)
Satellite Radio Ricevitore radio satellitare
PVR/DVR Videoregistratore / Registratore con hard disk
D Nota
Potete modificare le impostazioni eseguite durante la fase iniziale
d’installazione oppure installare in seguito più funzioni mediante il
menu Setup.
Cfr. ‘Come sfruttare al massimo l’SRU8008’ a pagina 75.
3 Come utilizzare l’ SRU8008
L’SRU8008 è stato ideato per controllare i vostri apparecchi con un solo
telecomando. Per iniziare a utilizzare l’SRU8008 basta aggiungere i
dispositivi, le attività, i vostri canali preferiti ed eventuali funzioni
supplementari.
Un dispositivo è una parte della vostra apparecchiatura. Una volta
installati, potete controllare i vostri dispositivi con i tasti dell’SRU8008.
I dispositivi possono avere più funzioni rispetto ai tasti presenti
sull’SRU8008. Potete selezionare più funzioni sul display.
Un’attività è una sequenza di pressioni di tasti che potete installare.
Ad esempio, per guardare un DVD dovreste normalmente:
• accendere la TV;
• accendere il DVD;
• accendere il sistema audio surround;
• selezionare l’ingresso corretto sulla vostra TV e sistema audio
surround;
• premere il pulsante Play per avviare il DVD.
ITALIANO
73
SRU8008_IFU_bundel 1 v09.qxd 03-12-2007 11:36 Pagina 73
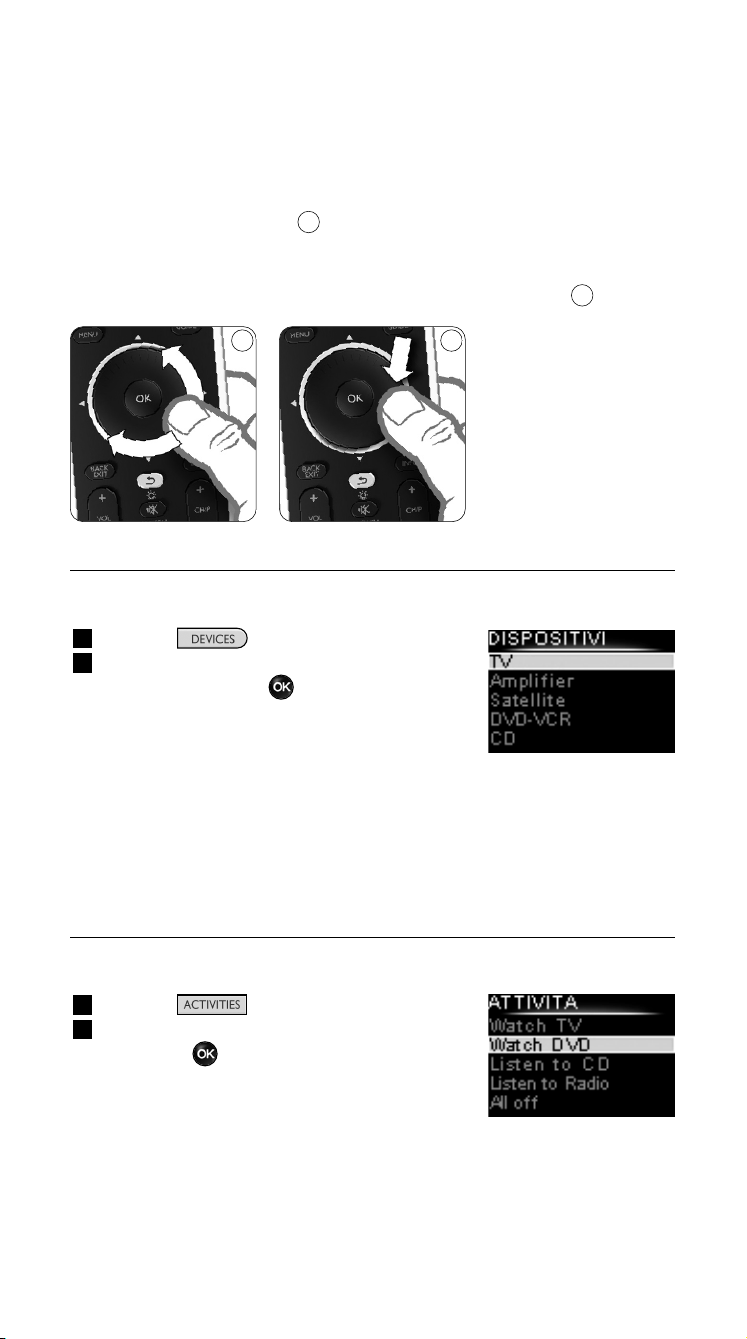
Come utilizzare l’ SRU8008
Con un’attività, l’SRU8008 consente di eseguire tutte queste procedure
premendo un solo tasto.
Il tasto rotante è un dispositivo di controllo multifunzionale e facile da
usare per gestire il telecomando SRU8008:
• Utilizzando il tasto rotante si scorrono le varie opzioni visualizzate sul
display del telecomando.
• Premendo il tasto rotante sulla parte superiore, inferiore, sinistra o
destra, ci si sposta all’interno del menu del dispositivo (TV, DVD, VCR,
ecc.) che viene gestito dal telecomando in quel momento.
3.1 Selezione di un dispositivo
Per selezionare i dispositivi installati:
1 Premere .
1 Selezionare un dispositivo con il tasto
rotante e premere per confermare.
A questo punto il telecomando SRU8008 è
predisposto per gestire il dispositivo
selezionato. Utilizzare i tasti neri sul
telecomando SRU8008 per controllare le
funzioni del dispositivo.
Per installare i dispositivi, consultare ‘Aggiungere Un Dispositivo’ a
pagina 76.
3.2 Selezione di un’attività
Per selezionare le attività installate:
1 Premere .
1 Selezionare un’attività con il tasto rotante
e premere per avviare l’attività.
Il telecomando SRU8008 invia una sequenza
di tasti corrispondenti all’attività selezionata.
A questo punto il telecomando SRU8008 è
predisposto per gestire il dispositivo
selezionato per l’attività prescelta.
Per installare le attività, consultare ‘Aggiungere Un’Attività’ a pagina 79.
8
7
Elenco dei dispositivi
installati
Elenco delle attività
installate
87
74
SRU8008_IFU_bundel 1 v09.qxd 03-12-2007 11:36 Pagina 74
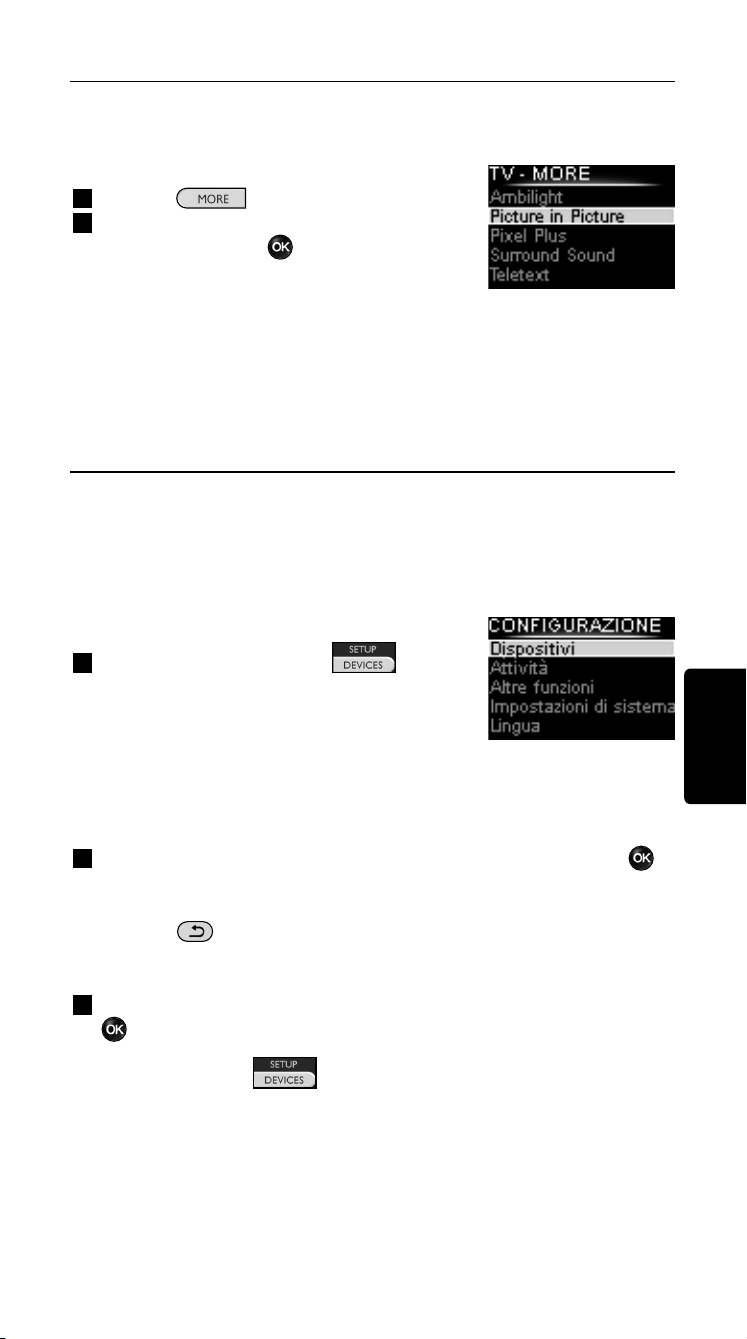
Come utilizzare l’ SRU8008
3.3 Selezione di Più Funzioni
I dispositivi possono avere più funzioni rispetto ai tasti presenti
sull’SRU8008.
Per selezionare più funzioni installate:
1 Premete .
2 Selezionate una funzione con il tasto
rotante e premete per confermare la
vostra scelta.
L’SRU8008 invia il segnale per la funzione
selezionata.
Per impostare più funzioni da assegnare ai vostri dispositivi, cfr.
‘Aggiungere Una Funzione’ a pagina 80.
4 Come sfruttare al massimo l’SRU8008
Mediante il menu Setup potete accedere alle varie funzioni avanzate
dell’SRU8008.
Per accedere al menu Setup:
Premete e tenete premuto per
3 secondi.
D Nota
Non potete accedere al menu Setup se
l’icona Batteria Esigua lampeggia.
Per navigare nel menu Setup:
Selezionate un’opzione in Setup con il tasto rotante e premete
per confermare la vostra scelta.
-oppure-
Premere per tornare alla schermata precedente.
Per uscire dal menu Setup:
Selezionate Uscita Setup in Setup - Menu Principale e premete
.
-oppure-
Premete di nuovo .
La tabella seguente offre una visione generale delle opzioni presenti nel
menu Setup e delle pagine dove potete trovare maggiori informazioni su
queste opzioni.
Elenco delle funzioni
installate
ITALIANO
75
SRU8008_IFU_bundel 1 v09.qxd 03-12-2007 11:36 Pagina 75
Come sfruttare al massimo l’SRU8008
Setup-Menu Princ. Sottomenu Descrizione Pagina
Dispositivi
Aggiungere un Dispositivo Aggiunge un nuovo dispositivo 76
Regola un Tasto Aggiusta un tasto che non funziona
correttamente copiando il segnale dal
vostro telecomando originale 77
Copiare il Volume Copia i tasti del volume da un dispositivo
ad un altro dispositivo 78
Rinominare il Dispositivo Assegna un nuovo nome a un
dispositivo 78
Cancellare un Dispositivo Elimina un dispositivo installato 79
Attività
Aggiungere un’Attività Aggiunge una sequenza di pressioni di
tasti per far funzionare diversi dispositivi
premendo un solo tasto. 79
Rinominare un’Attività Assegna un nuovo nome a un’attività 80
Cancellare un’Attività Elimina un’attività installata 80
Più Funzioni
Aggiungere una Funzione Aggiunge una funzione supplementare
copiandola dal vostro telecomando
originale 80
Rinominare una Funzione Assegna un nuovo nome a una funzione 81
Cancellare una Funzione Elimina una funzione installata 81
Imposta Sistema
Time-Out Retroillumin. Modifica il time-out della
retroilluminazione sull’SRU8008 81
Retroilluminazione Tasto Accende o spegne la retroilluminazione
del tasto 81
Ripristino Completo Elimina tutte le vostre impostazioni
sull’SRU8008 82
Lingua
Cambia la lingua delle istruzioni
sull’SRU8008 82
Uscita
Abbandona il menu Setup 75
4.1 Dispositivi
4.1.1 Aggiungere un dispositivo
Per far funzionare i vostri dispositivi specifici con l’SRU8008, è necessario
aggiungerli. Potete aggiungere fino a 8 dispositivi.
D Nota
Potete aggiungere un dispositivo più di una volta. Una seconda TV sarà
automaticamente chiamata TV2. Potete inserire un nome diverso se lo
desiderate. Cfr. ‘Rinominare un dispositivo’ a pagina 78.
1 Andate su Setup - Dispositivi, selezionate Aggiungere Un
Dispositivo e premete .
2 Selezionate il dispositivo che desiderate aggiungere.
3 Seguire le istruzioni che compaiono sull’SRU8008.
Il dispositivo selezionato è stato installato e aggiunto all’SRU8008.
76
SRU8008_IFU_bundel 1 v09.qxd 03-12-2007 11:36 Pagina 76
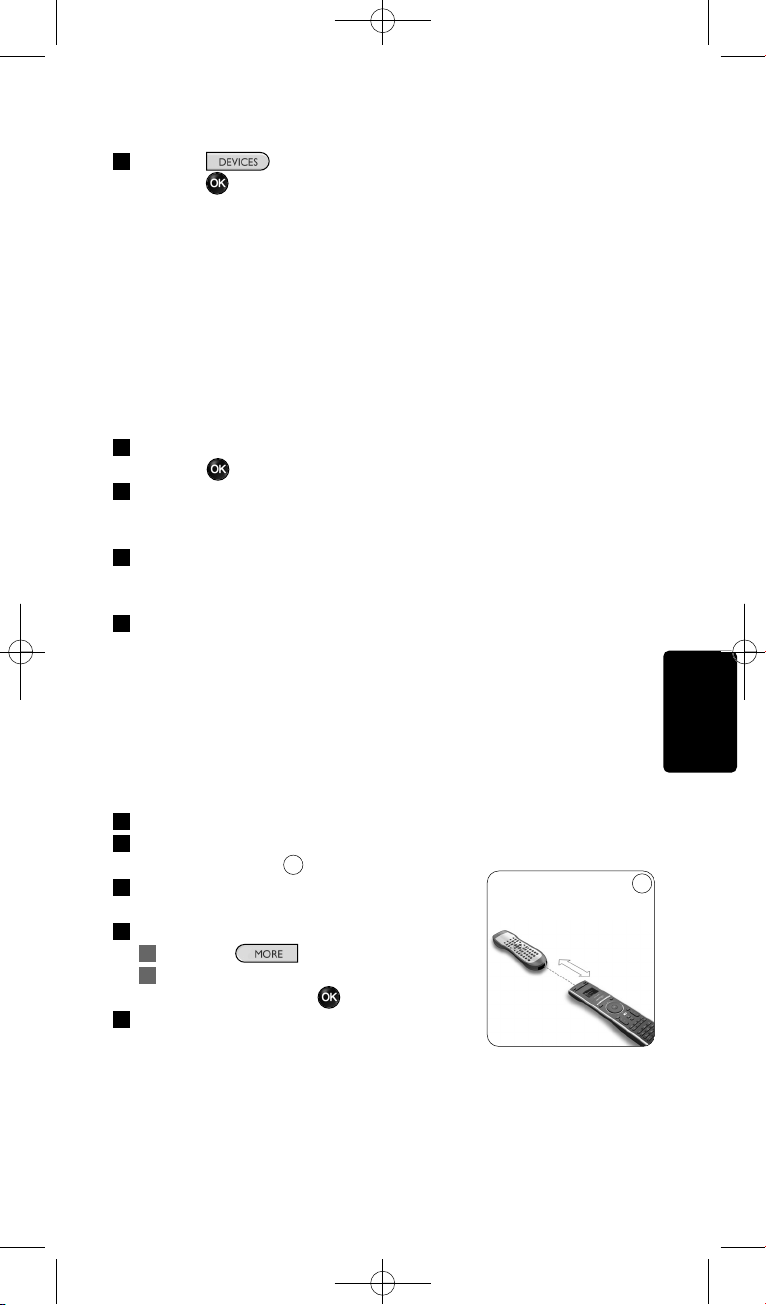
Come sfruttare al massimo l’SRU8008
Ora potete far funzionare il vostro dispositivo con l’SRU8008:
Premete , selezionate il dispositivo con il tasto rotante e
premete .
4.1.2 Regola un tasto
Se un tasto o una funzione extra non funziona correttamente con un
determinato dispositivo, si consiglia innanzitutto di assegnare il segnale
di quel tasto al telecomando SRU8008. Se il problema persiste, copiare il
segnale di quel tasto dal telecomando originale al telecomando SRU8008.
D Nota
Quando viene utilizzata la funzione ‘Regola un tasto’, i nuovi dati
sovrascrivono i dati attualmente memorizzati su quel tasto.
1 Andare su Setup - Dispositivi, selezionare Regola un tasto e
premere .
2 Selezionare il dispositivo per il quale si desidera ripristinare il tasto.
Il telecomando SRU8008 controlla automaticamente se la marca di
tale dispositivo è presente nel proprio database.
3 Se il telecomando riconosce la marca in questione, tenere
premuto il tasto per il quale si desidera assegnare il segnale.
Il telecomando SRU8008 invia diversi segnali al dispositivo.
4 Quando il dispositivo reagisce, rilasciare il tasto e seguire le istruzioni
visualizzate sul display del telecomando SRU8008.
Il tasto è quindi stato assegnato e ripristinato.
In alternativa
Se la marca del dispositivo è sconosciuta o se il dispositivo
non risponde a nessun segnale, copiare il segnale del tasto dal
telecomando originale:
3 Predisporre al funzionamento il telecomando originale.
4 Posizionare il telecomando SRU8008 e il telecomando originale come
mostrato in figura.
5 Selezionare il tasto o la funzione da
ripristinare.
6 Per selezionare le funzioni supplementari:
1 Premere .
2 Selezionare la funzione con il tasto
rotante e premere .
7 Seguire le istruzioni visualizzate sul display
del telecomando.of the SRU8008.
Il tasto è stato copiato e ripristinato.
9
ITALIANO
77
9
0.80 - 2 pollici
2-5 cm
SRU8008_IFU_bundel 1 v09.qxd 03-12-2007 11:36 Pagina 77
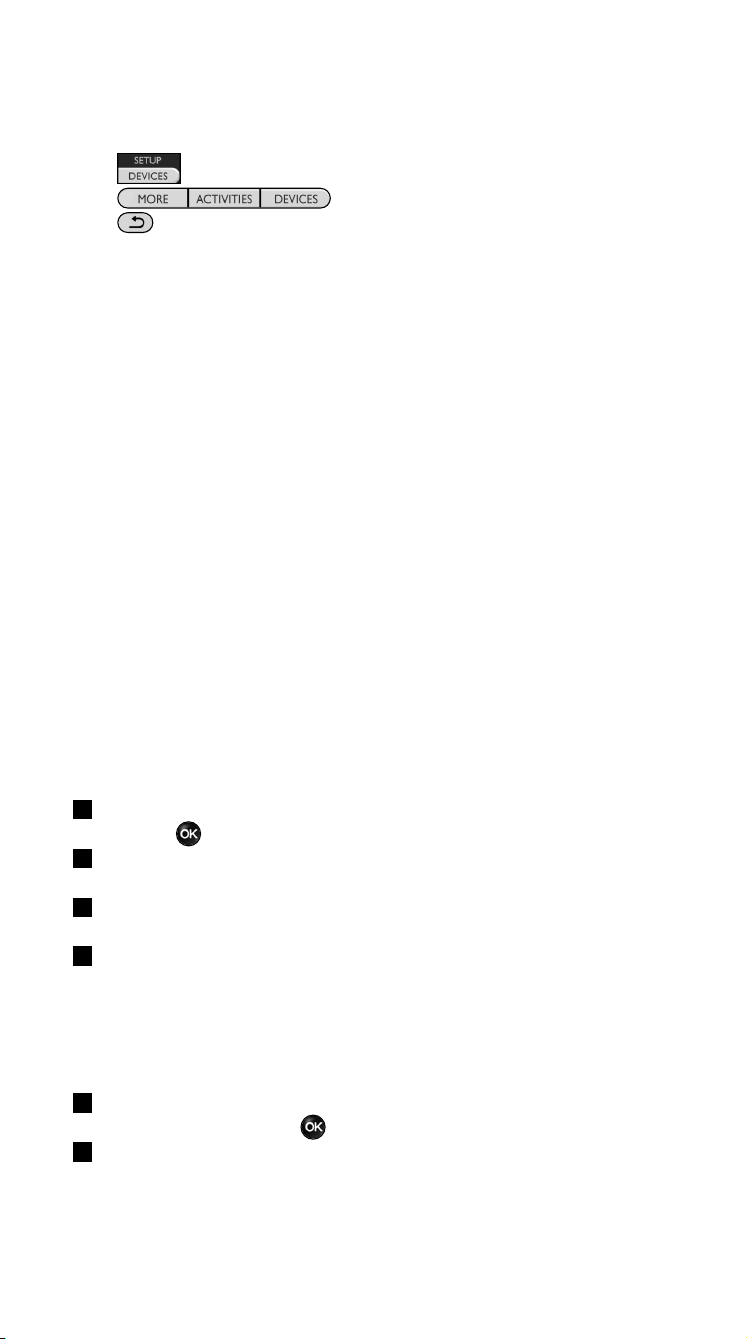
Come sfruttare al massimo l’SRU8008
D Nota
Tutti i tasti possono essere aggiustati tranne:
•
•
•
4.1.3 Copiare il volume
Dopo aver aggiunto i dispositivi, l’SRU8008 copia automaticamente le
impostazioni del volume nel modo seguente:
• I dispositivi video, come DVD, DVD-R, VIDEO e satellitari, utilizzano i
tasti del volume della TV (se avete installato una TV).
• I dispositivi audio, come CD, MD, Tape e Tuner, utilizzano i tasti del
volume dell’Amplificatore o del Tuner-Amp (se avete installato un
Amplificatore o un Tuner-Amp).
Potete modificare i tasti del volume in uso, ad esempio se volete utilizzare
i tasti del volume dell’Amplificatore per il DVD.
D Nota
• La funzione Copiare Il Volume sovrascrive le impostazioni del
volume predefiniti dell’SRU8008.
• Le precedenti impostazioni del volume che avete installato
utilizzando Copiare Il Volume o Aggiustare Un Tasto vengono
eliminate.
• Le impostazioni del volume vengono automaticamente cancellate
quando cancellate il volume del dispositivo originale.
Per copiare le impostazioni del volume:
1 Andate su Setup - Dispositivi, selezionate Copiare Il Volume e
premete .
2 Selezionate il dispositivo da cui desiderate copiare i tasti del volume
(ad es., TV o Amplificatore).
3 Selezionate il dispositivo verso cui desiderate copiare i tasti del
volume (ad es., DVD o SAT).
4 Confermate di voler copiare i tasti del volume da un dispositivo ad un
altro.
I tasti del volume sono stati copiati.
4.1.4 Rinominare un dispositivo
Per rinominare un dispositivo:
1 Andate su Setup - Dispositivi, selezionate Rinominare Un
Dispositivo e premete .
2 Inserite il nuovo nome utilizzando i tasti alfanumerici.
D Nota
Potete cancellare i caratteri con il tasto Clear e il cursore a sinistra.
78
SRU8008_IFU_bundel 1 v09.qxd 03-12-2007 11:36 Pagina 78
Come sfruttare al massimo l’SRU8008
3 Confermate il nuovo nome.
Il dispositivo è stato rinominato.
4.1.5 Cancellare un dispositivo
Per cancellare un dispositivo:
1 Andate su Setup - Dispositivi, selezionate Cancellare Un
Dispositivo e premete .
2 Selezionate il dispositivo che desiderate cancellare.
3 Confermate di voler cancellare il dispositivo.
Il dispositivo è stato cancellato.
D Nota
I tasti del dispositivo cancellato utilizzati per altre funzioni, ad es. in
un’attività o i tasti del volume che avete copiato, saranno ugualmente
cancellati.
Controllate le attività che avete installato e installarle nuovamente se
necessario. Cfr. ‘Aggiungere un’attività’ a pagina 79.
Controllate i tasti del volume dei vostri dispositivi e installarli
nuovamente se necessario. Cfr. ‘Copiare Il Volume’ a pagina 78.
4.2 Attività
4.2.1 Aggiungere un’attività
È possibile aggiungere le attività all’SRU8008. Un’attività consiste di varie
pressioni di tasti che l’SRU8008 invia premendo un solo tasto.
L’SRU8008 osserva un tempo predefinito di 600ms tra ogni pressione
di tasto per garantire che i vostri dispositivi rispondano correttamente ai
segnali IR. Potete riscrivere questo tempo predefinito.
• Se uno dei vostri dispositivi necessita di tempi più lunghi prima di
ricevere il segnale IR successivo, potete inserire un tempo di 1, 3, 5, 10
o 15 secondi.
• Se un’attività necessita di una lunga pressione del tasto, ad esempio per
alzare il volume, potete selezionare l’opzione Tenere Premuto
L’Ultimo Tasto.
Per aggiungere un’attività:
1 Andate su Setup - Attività, selezionate Aggiungere Un’Attività e
premete .
2 Selezionate il nome che volete utilizzare per l’attività.
-oppure-
Selezionate Non Presente Nell’Elenco per creare un nuovo nome.
3 Seguire le istruzioni sull’SRU8008.
• Selezionate un dispositivo con il tasto rotante, premete e
premete un tasto per aggiungerlo all’attività.
• Selezionate un tempo di 1, 3, 5, 10 o 15 secondi con il tasto
rotante e premete .
ITALIANO
79
SRU8008_IFU_bundel 1 v09.qxd 03-12-2007 11:36 Pagina 79
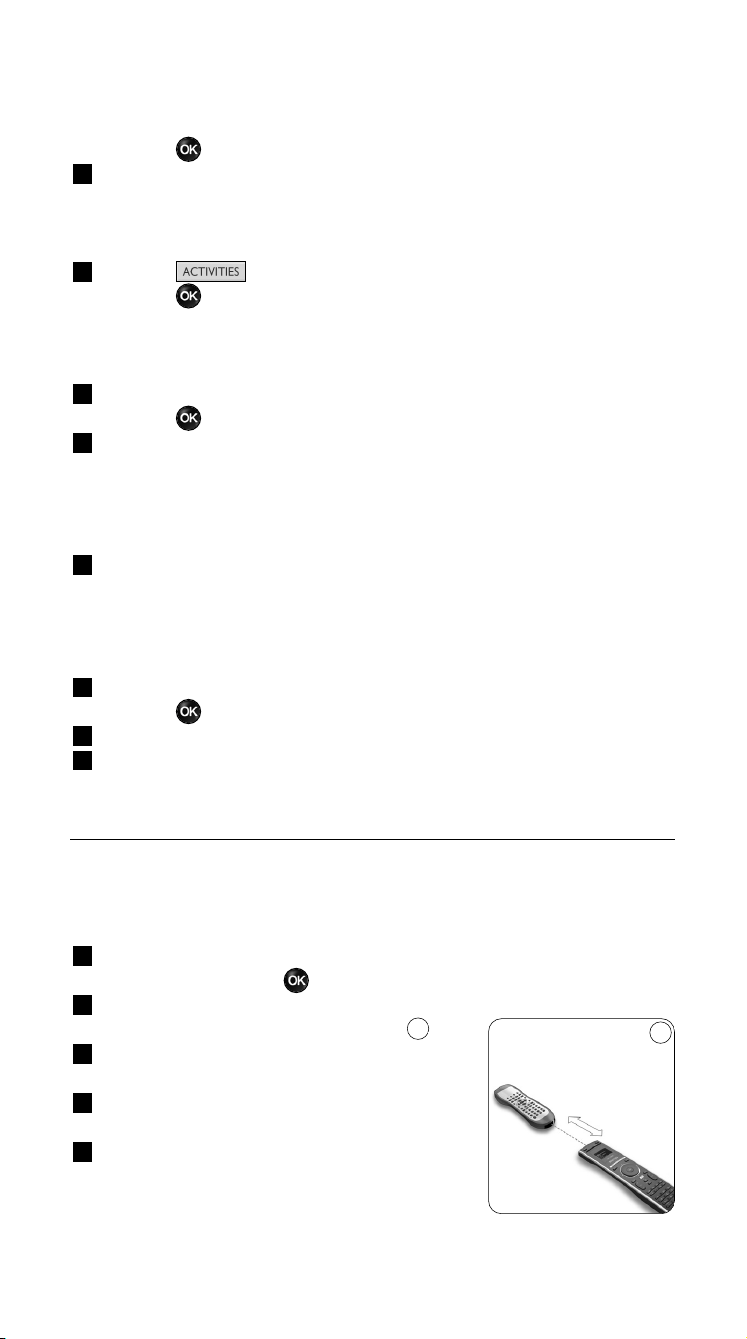
-oppure-
Selezionate Tenere Premuto L’Ultimo Tasto con il tasto rotante e
premete .
4 Ripetete il punto 3 per creare un’altra attività.
L’attività è stata aggiunta all’SRU8008.
Ora potete eseguire l’attività con l’SRU8008.
Premete , selezionate l’attività con il tasto rotante e
premete .
4.2.2 Rinominare un’attività
Per rinominare un’attività:
1 Andate su Setup - Attività, selezionate Rinominare Un’Attività e
premete .
2 Inserire il testo per il nuovo nome con i tasti alfanumerici.
D Nota
Potete cancellare i caratteri con il tasto Clear e il cursore a sinistra.
3 Confermate il nuovo nome.
L’attività è stata rinominata.
4.2.3 Cancellare un’attività
Per cancellare un’attività:
1 Andate su Setup - Attività, selezionate Cancellare Un’Attività e
premete .
2 Selezionate l’attività che volete cancellare.
3 Confermate di voler cancellare l’attività.
L’attività è stata cancellata.
4.3 Più funzioni
4.3.1 Aggiungere una funzione
Per aggiungere più funzioni:
1 Andate su Setup - Più Funzioni, selezionate Aggiungere Una
Funzione e premete .
2 Posizionate l’SRU8008 e il vostro telecomando
originale come illustrato nella figura.
3 Selezionate il dispositivo al quale desiderate
aggiungere una funzione.
4 Selezionate il nome che volete usare per
questa funzione supplementare.
5 Seguite le istruzioni sull’SRU8008 per copiare
la funzione dal vostro telecomando originale.
La funzione è stata aggiunta all’SRU8008.
10
10
0.80 - 2 pollici
2-5 cm
Come sfruttare al massimo l’SRU800880
SRU8008_IFU_bundel 1 v09.qxd 03-12-2007 11:36 Pagina 80
Come sfruttare al massimo l’SRU8008
4.3.2 Rinominare una funzione
Per rinominare una funzione supplementare:
1 Andate su Setup - Più Funzioni, selezionate Rinominare Una
Funzione e premete .
2 Inserite il testo per il nuovo nome con i tasti alfanumerici.
3 Confermate il nuovo nome.
La funzione è stata rinominata.
4.3.3 Cancellare una funzione
Per cancellare una funzione supplementare:
1 Andate su Setup - Più Funzioni, selezionate Cancellare Una
Funzione e premete .
2 Selezionate il dispositivo dal quale desiderate cancellare una funzione.
3 Selezionate la funzione che volete cancellare.
4 Confermate di voler cancellare la funzione.
La funzione è stata cancellata.
4.4 Imposta sistema
4.4.1 Time-Out retroilluminazione
Quando utilizzate l’SRU8008, la retroilluminazione si accende.
Dopo 5 secondi si spegne di nuovo.
Per modificare questo tempo:
1 Andate su Setup - Imposta Sistema, selezionate Time-Out
Retroillumin. e premete .
2 Selezionate il vostro time-out della retroilluminazione mediante il
tasto rotante: 3 secondi, 5 secondi, 10 secondi, 20 secondi.
3 Confermate la nuova impostazione del time-out.
Il time-out della retroilluminazione è stato modificato.
D Nota
Il time-out della retroilluminazione influisce sulla durata delle batterie:
quanto più la retroilluminazione rimane accesa, tanto più rapidamente
si esauriranno le batterie.
4.4.2 Retroilluminazione tasto
Per accendere e spegnere la retroilluminazione del tasto:
1 Andate su Setup - Imposta Sistema, selezionate
Retroilluminazione Tasto e premete .
2 Selezionate On o Off usando il tasto rotante.
Confermate la nuova impostazione della retroilluminazione del tasto.
La retroilluminazione del tasto è accesa o spenta.
ITALIANO
81
SRU8008_IFU_bundel 1 v09.qxd 03-12-2007 11:36 Pagina 81

Come sfruttare al massimo l’SRU8008
4.4.3 Ripristino completo
Al ripristino completo dell'SRU8008, i dispositivi, le attività e le altre
impostazioni sono tutti cancellati. Dopo il ripristino, è necessario
installare nuovamente l'SRU8008.
Per ripristinare l’SRU8008:
1 Andate su Setup - Imposta Sistema, selezionate Ripristino
Completo e premete .
2 Selezionate Sì con il tasto rotante e premete .
3 Premete per confermare.
L’SRU8008 cancella tutte le impostazioni e riavvia la Guida
All’Installazione. Questa operazione può durare fino a un minuto.
4.5 Lingua
Per cambiare la lingua dell’SRU8008:
1 Andate su Setup - Lingua e premete .
2 Selezionate la lingua preferita mediante il tasto rotante.
English, Français, Deutsch, Español, Italiano, Nederlands, Русский.
3 Confermate la nuova lingua.
La lingua usata nel Setup - Menu Principale è stata modificata.
5 Domande frequenti
Tasti
Perché uno o più tasti non funzionano con il mio dispositivo?
Non tutte le funzioni sono disponibili nel database dell’SRU8008 oppure il
codice del tasto è difettoso.
Potete aggiustare un tasto copiando il segnale dal vostro telecomando
originale. Cfr. ‘Regola Un Tasto’ a pagina 77.
Come utilizzare i tasti cursore su, giù, sinistra e destra per il
menu visualizzato sullo schermo?
Il tasto rotante è un dispositivo di controllo multifunzionale e facile da
usare per gestire il telecomando SRU8008:
• Utilizzando il tasto rotante si scorrono le varie opzioni visualizzate sul
display del telecomando.
• Premendo il tasto rotante sulla parte superiore, inferiore, sinistra o
destra, ci si sposta all’interno del menu del dispositivo (TV, DVD, VCR,
ecc.) che viene gestito dal telecomando in quel momento.
Come posso aggiungere funzioni supplementari all’SRU8008?
Cfr. ‘Aggiungere una funzione’ a pagina 80.
82
SRU8008_IFU_bundel 1 v09.qxd 03-12-2007 11:36 Pagina 82
Domande frequenti
Marca
Perché non riesco a trovare la marca del mio dispositivo
nell’SRU8008?
Non tutte le marche sono disponibili nel database dell’SRU8008. Se la
vostra marca non è presente nell’elenco:
• Potete copiare i tasti dal vostro telecomando originale. Cfr. ‘Regola Un
Tasto’ a pagina 77.
-oppure-
• Potete selezionare Non Presente Nell’Elenco per eseguire una
ricerca completa nel database.
L’SRU8008 prova tutti i codici disponibili. Questa operazione può
durare fino a 25 minuti.
Attività
È possibile spostarsi da un’attività all’altra?
No, quando viene selezionata un’attività non è possibile selezionare né la
stessa né altre attività. Prima di selezionare una nuova attività dall’elenco,
è necessario spegnere tutti i dispositivi.
Volume
Perché i tasti del volume non funzionano correttamente?
Dopo aver aggiunto i dispositivi, l’SRU8008 copia automaticamente il
tasto del volume e il tasto del silenziatore, nella maniera seguente:
•I dispositivi video, come DVD, DVDR, VCR e Satellitari, utilizzano i
tasti del volume della TV.
•I dispositivi audio, come CD, DMR e Tuner, utilizzano i tasti del
volume dell’Amplificatore o del Tuner-Amp.
Se non avete installato il dispositivo originale, (TV, Amplificatore o
Tuner-Amp), i tasti del volume e del silenziatore non funzioneranno.
Per definire i tasti del volume:
• Potete installare il dispositivo originale sull’SRU8008. Cfr. ‘Aggiungere
Un Dispositivo’ a pagina 76.
-oppure-
• Potete copiare i tasti del volume di un altro dispositivo originale.
Cfr. ‘Copiare Il Volume’ a pagina 78.
ITALIANO
83
SRU8008_IFU_bundel 1 v09.qxd 03-12-2007 11:36 Pagina 83
Domande frequenti
Batterie
Perché non posso accedere al menu Setup?
Quando il livello delle batterie è troppo basso, non è possibile accedere al
menu Setup. Sostituire le batterie con le nuove batterie alcaline.
Perché l’SRU8008 non si attiva più?
Il livello della batteria è troppo basso. Sostituire le batterie con le nuove
batterie alcaline.
Perdo i miei dati se sostituisco le batterie?
No. I vostri dati saranno salvati.
Posso utilizzare batterie ricaricabili con il mio SRU8008?
Sì, certamente. Tuttavia, ricordatevi che le batterie ricaricabili tendono a
scaricarsi più rapidamente delle batterie alcaline.
6 Bisogno di aiuto?
Prima di tutto, leggete attentamente le presenti Istruzioni per l’Uso.
Per ulteriori informazioni sull’uso, l’installazione e la garanzia del
telecomando SRU8008, consultare il sito Web www.philips.com/support
.
Per informazioni sui contatti, consultare il sito Web
www.philips.com/support
.
Quando ci si rivolge all’assistenza tecnica è opportuno avere a portata di
mano il telecomando SRU8008 per consentire agli operatori di
comprendere il problema.
Il numero del modello del telecomando universale Philips è SRU8008.
Per informazioni sui codici corretti dei dispositivi, consultare il sito
www.philips.com/URC
.
Data di acquisto: ......../......../........ (giorno/mese/anno)
84
SRU8008_IFU_bundel 1 v09.qxd 03-12-2007 11:36 Pagina 84
Inhoudsopgave
1 Jouw Philips Prestigo SRU8008 86
1.1 Wat zit er in de verpakking? 86
1.2 Overzicht van de SRU8008 86
2 Aan de slag 87
2.1 Voorbereiding 87
2.2 Installeren 88
3 Je SRU8008 gebruiken 89
3.1 Een Apparaat kiezen 90
3.2 Een Activiteit kiezen 90
3.3 Extra functies selecteren 91
4 Haal het meeste uit je SRU8008 91
4.1 Apparaten 92
4.2 Activiteiten 95
4.3 Extra functies 96
4.4 Systeeminstellingen 97
4.5 Taal 98
5 Vaak gestelde vragen 98
6 Hulp nodig? 100
NEDERLANDS
Inhoudsopgave 85
SRU8008_IFU_bundel 1 v09.qxd 03-12-2007 11:36 Pagina 85

1 Jouw Philips Prestigo SRU8008
Welkom bij de groeiende familie van eigenaars van Philipsproducten. De
Philips Prestigo SRU8008 universele afstandsbediening is ontworpen om
je apparaten te bedienen. Je kunt hiermee tot 8 apparaten bedienen en
tot 8 activiteiten programmeren.
Selecteer je apparaat en bedien het met de toetsen van de SRU8008.
Door het selecteren van een activiteit start je automatisch een reeks
met toetsdrukken, om bijvoorbeeld een DVD te bekijken of CD’s te
beluisteren.
Selecteer meer functies en wijs meer geavanceerde functies toe aan uw
afstandsbediening.
1.1 Wat zit er in de verpakking?
• De SRU8008
• Een Snelstartgids
• Een meertalige Gebruiksaanwijzing
• Philips alkalinebatterijen
Philips raadt het gebruik van alkalinebatterijen aan.
1.2 Overzicht van de SRU8008
De afbeelding op pagina 2 geeft je een algemeen overzicht van de
SRU8008.
Om de SRU8008 klaar te maken voor gebruik, zie ‘Aan de slag’ op
pagina 87.
Zwarte toetsen voor het verzenden van signalen naar uw
apparatuur
A Power (Aan-uittoets)
B OK-toets
C Toetsen voor omhoog, omlaag, naar links en naar rechts
D Afspeeltoetsen
E Cijfertoetsen
F *–./ Clear-toets (Wissen)
G AV-toets
H Enter-toets
Toetsen voor het bedienen van de SRU8008
1 More-toets (Meer)
2 Activities-toets (Activiteiten)
3 Devices/Setup-toets (Apparaten/instellen)
4 OK-toets
5 Draaitoets
6 Terug toets
Jouw Philips Prestigo SRU800886
SRU8008_IFU_bundel 1 v09.qxd 03-12-2007 11:36 Pagina 86
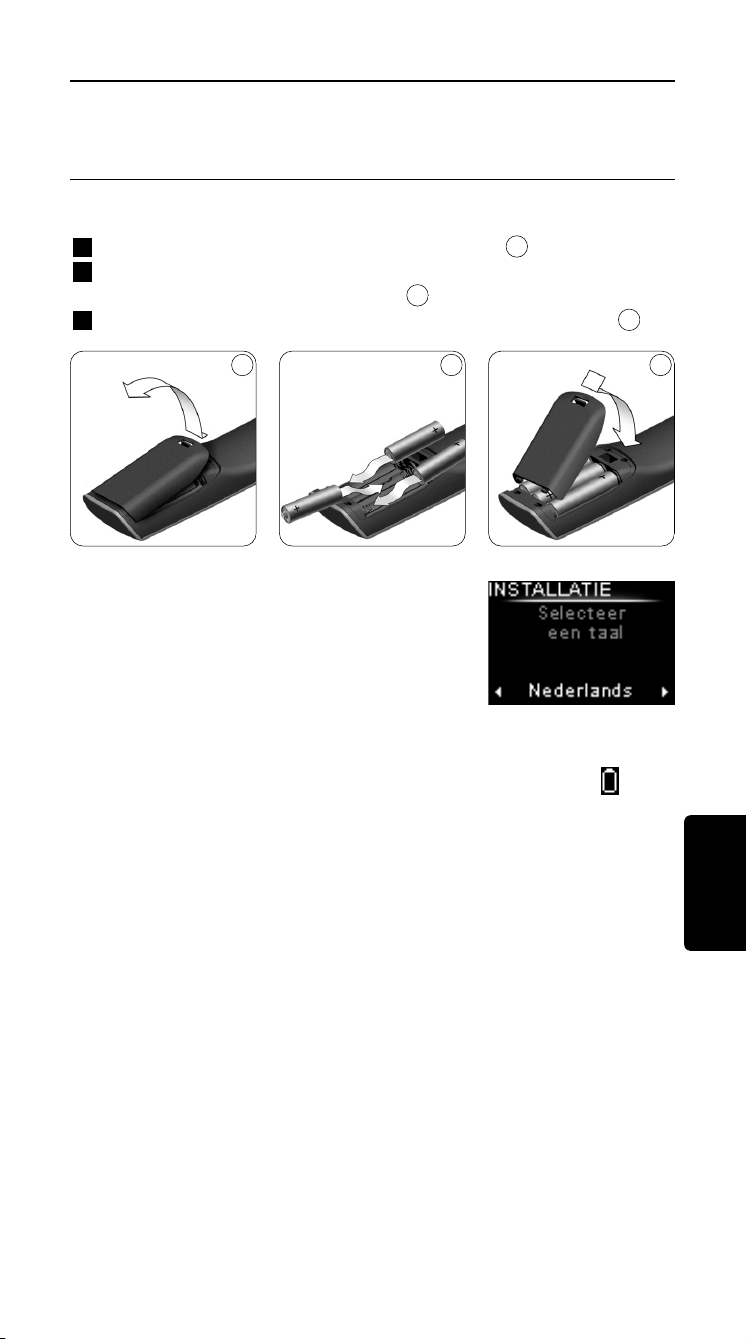
2 Aan de slag
2.1 Voorbereiding
Om de batterijen in de SRU8008 te plaatsen:
1 Druk het lipje naar beneden en til het klepje op.
2 Plaats de drie LR6 of AA alkalinebatterijen in het batterijvak,
zoals weergegeven op de afbeelding.
3 Plaats het klepje en druk er stevig op totdat je een klik hoort.
De SRU8008 toont gedurende 3 seconden het
Philipslogo en start de Installatiewizard die
je helpt bij het installeren.
Bij een laag batterijniveau, knippert het Batterij laag-pictogram .
De batterijen zijn dan bijna volledig leeg. Je kunt dan nog een korte tijd de
SRU8008 gebruiken.
Vervang de batterijen door nieuwe LR6 of AA alkalinebatterijen en
volg de lokale richtlijnen voor batterijafval.
D Opmerking
Wanneer het Batterij laag-pictogram knippert, kun je niet langer
het Setup - Hoofdmenu openen.
3
2
1
Installatiewizard –
Taalkeuze
NEDERLANDS
Aan de slag 87
1 2 3
SRU8008_IFU_bundel 1 v09.qxd 03-12-2007 11:36 Pagina 87
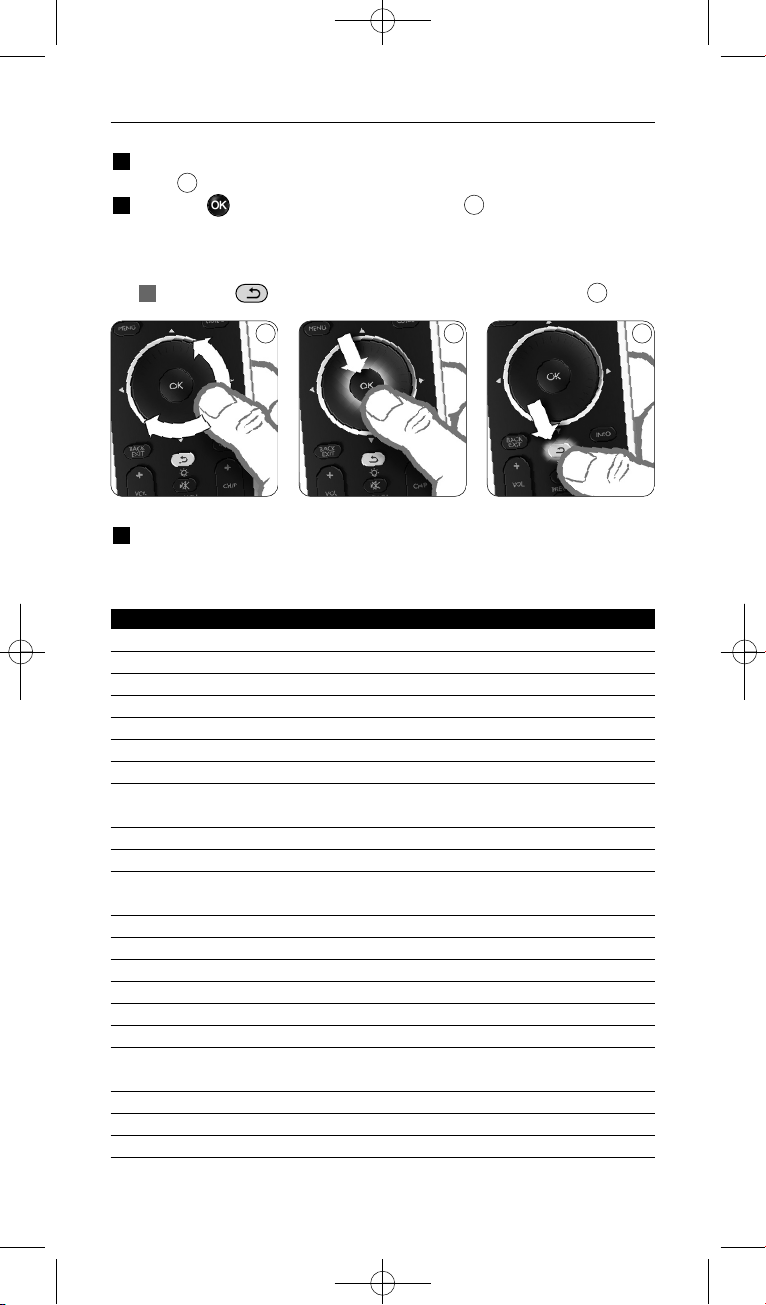
2.2 Installeren
1 Selecteer in de Installatiewizard met het draaiwieltje de gewenste
taal.
2 Druk op om je taalkeuze te bevestigen.
De SRU8008 gidst je door de rest van het setupproces.
U kunt altijd teruggaan in het installatieproces om een voorgaande
selectie te wijzigen:
Druk op om terug te gaan naar het vorige scherm.
3 Volg de instructies op de SRU8008 om apparaten toe te voegen.
U kunt maximaal 8 apparaten uit onderstaande lijst aan uw SRU8008
toevoegen.
Naam apparaat Beschrijving
TV Traditionele televisies en flatscreens
DVD Dvd-speler en -recorder
DVDR Dvd-speler en -recorder
VCR Videocassettespeler en -recorder
SAT Satelliet-settopbox met of zonder harde schijf (HDD)
DSS/DTT Satelliet-settopbox met of zonder harde schijf (HDD)
Cable Kabel-settopbox met of zonder harde schijf (HDD)
DVB-T/S Digital Video Broadcast - Terrestrial (T) of Satellite (S) met of zonder
harde schijf (HDD)
AMP Versterker
AudioSet Receiver = versterker + tuner
HTS Thuisbioscoopsysteem = versterker + dvd + tuner +
surround-soundluidsprekers
Tuner Radiotuner
CD Cd-speler en -recorder
MD Minidiskspeler en -recorder
Ta p e Audiocassettespeler en -recorder
DVR Digitale videorecorder = analoge tv-tuner + harde schijf (HDD)
Tivo Digitale videorecorder = analoge tv-tuner + harde schijf (HDD)
DMR Digitale mediareceiver = apparaat die mediamateriaal van een pc
doorgeeft naar een televisie of audio-receiver
TV-DVD combo Televisie met ingebouwde dvd
TV-VCR combo Televisie met ingebouwde videorecorder
TV-VCR-DVD combo Televisie met ingebouwde dvd en videorecorder
6
5
4
4 5 6
Aan de slag
88
SRU8008_IFU_bundel 1 v09.qxd 03-12-2007 11:36 Pagina 88

Naam apparaat Beschrijving
DVD-VCR combo Combinatie dvd en videorecorder
DVDR-HDD combo Combinatie dvd-recorder en harde schijf (HDD)
VCD, Laser Disk Video-cd, laserdisk, karaoke
Projector Videoprojector
Camera and Camcorder Camera en camcorder
PC Pc (alleen infrarood)
Game Dvd-spelerfunctie van spelconsole (alleen infrarood)
Satellite Radio Satellietradio-ontvanger
PVR/DVR Persoonlijke videorecorder/Digitale videorecorder met harde schijf
D Opmerking
Je kunt de instellingen van je eerste installatie wijzigen of later extra
functies installeren via het Setup-menu.
Zie ‘Haal het meeste uit je SRU8008’ op pagina 91.
3 Je SRU8008 gebruiken
Met de SRU8008 kun je al je apparaten bedienen met slechts één
afstandsbediening. In een handomdraai voeg je in de SRU8008 apparaten,
activiteiten, favorieten en extra functies toe.
Een apparaat is een deel van je installatie. Zodra je je apparaten hebt
geïnstalleerd, kun je ze allemaal bedienen met de toetsen op de SRU8008.
Naast de toetsen kun je met de SRU8008 ook extra functies
programmeren. Selecteer Extra functies op de display.
Een activiteit is een reeks toetsdrukken die je kunt programmeren.
Bijvoorbeeld, om een DVD te bekijken moet je meestal:
• de TV inschakelen;
• de DVD inschakelen;
• het surround sound-systeem inschakelen;
• de juiste ingang op je TV en het surround sound-systeem selecteren;
• op de Play-toets drukken om de DVD te starten.
Met een activiteit in de SRU8008 kun je al deze handelingen uitvoeren
met slechts één druk op de knop.
NEDERLANDS
Aan de slag 89
SRU8008_IFU_bundel 1 v09.qxd 03-12-2007 11:36 Pagina 89
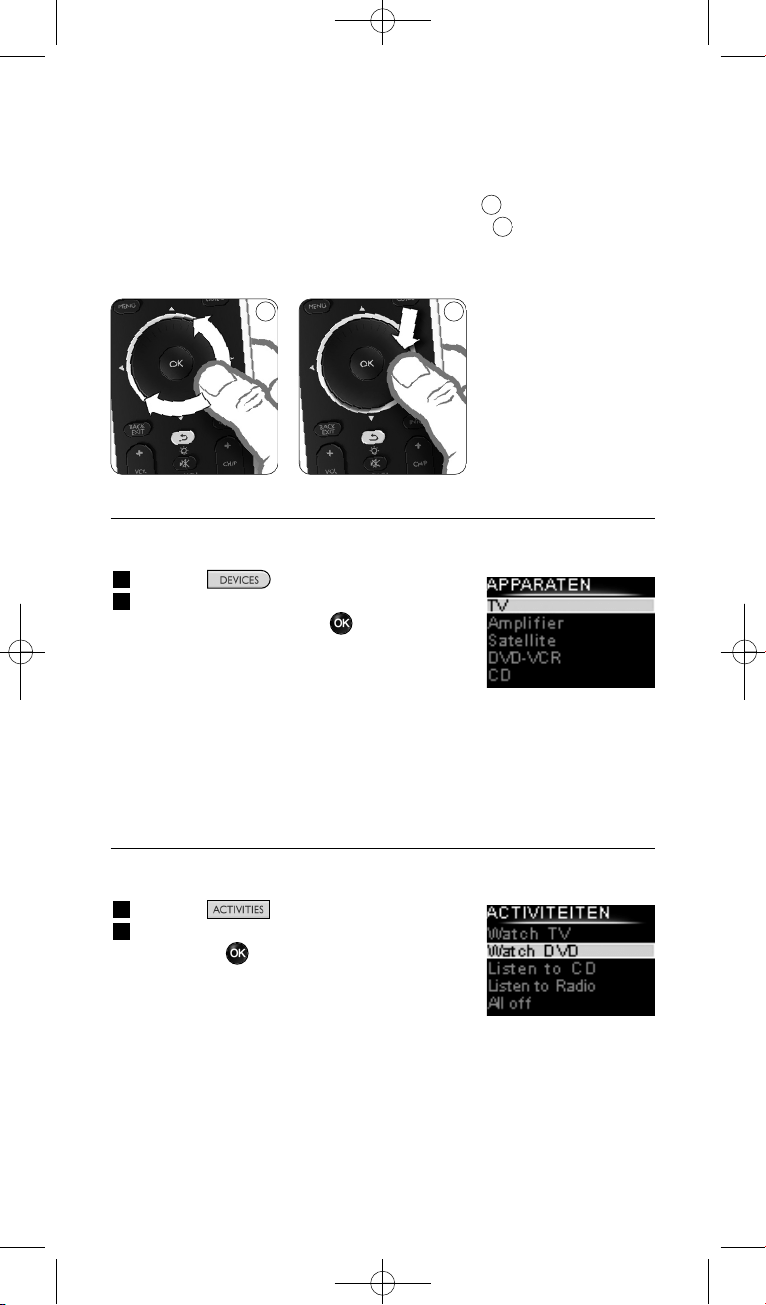
De draaitoets is een gebruiksvriendelijke, multifunctionele toets op uw
SRU8008:
• Door aan deze toets te draaien, kunt u door de verschillende opties op
het scherm van uw afstandsbediening bladeren.
• Als u op de boven-, onder-. linker- of rechterkant van de draaitoets
drukt, navigeert u door het menu op het scherm van het apparaat (TV,
DVD, VCR, enz.) dat u op dat moment bedient.
3.1 Een Apparaat kiezen
Om je geprogrammeerde apparaten te kiezen:
1 Druk op .
2 Selecteer een apparaat met het
draaiwieltje en druk op om je keuze
te bevestigen.
De SRU8008 bedient dan het geselecteerde
apparaat. Je kunt nu dat apparaat bedienen
met de zwarte toetsen op de SRU8008.
Om je apparaten in te stellen, zie ‘Een apparaat toevoegen’ op
pagina 92.
3.2 Een Activiteit kiezen
Uw geïnstalleerde activiteiten selecteren:
1 Druk op .
2 Selecteer een activiteit met de draaitoets
en druk op om de activiteit te starten.
De SRU8008 verzendt de volgorde waarin
de toetsen zijn ingedrukt voor de
geselecteerde activiteit. De SRU8008 is
ingesteld om het apparaat te bedienen dat
u voor deze activiteit hebt geselecteerd.
Raadpleeg voor het instellen van uw activiteiten ‘Een activiteit
toevoegen’ op pagina 95.
7
8
Lijst met
geprogrammeerde
apparaten
Lijst van geïnstalleerde
activiteiten
87
Je SRU8008 gebruiken
90
SRU8008_IFU_bundel 1 v09.qxd 03-12-2007 11:36 Pagina 90

3.3 Extra functies selecteren
Apparaten kunnen extra functies hebben waarvoor er geen toetsen zijn
op de SRU8008.
Om extra functies in te stellen:
1 Druk op .
2 Selecteer een functie met het draaiwieltje
en druk op om je keuze te bevestigen.
De SRU8008 verstuurt een signaal voor
de geselecteerde functie.
Om extra functies voor je apparaten in te
stellen, zie ‘Een functie toevoegen’ op pagina 96.
4 Haal het meeste uit je SRU8008
Via het Installatie-menu heb je toegang tot de diverse geavanceerde
functies van de SRU8008.
Om het Installatie-menu te openen:
Hou de toets gedurende
3 seconden ingedrukt.
D Opmerking
Je kunt het Installatie-menu niet openen wanneer het Batterij
Laag-pictogram knippert.
Om te navigeren in het Installatie-menu:
Selecteer met het draaiwieltje een optie in het Installatie-menu en
druk op om je keuze te bevestigen.
– of –
Druk op om naar het vorige scherm terug te keren.
Om het Installatie-menu te verlaten:
Selecteer Afsluiten in het Installatie-menu en druk op .
– of –
Druk opnieuw op .
Onderstaande tabel geeft je een overzicht van de opties in het
Installatie-menu en de pagina’s waar je meer informatie over deze
opties vindt.
Lijst met
geprogrammeerde
functies
NEDERLANDS
Je SRU8008 gebruiken 91
SRU8008_IFU_bundel 1 v09.qxd 03-12-2007 11:36 Pagina 91
Setup - Hoofdmenu Submenu Beschrijving Pagina
Apparaten
Apparaat Toevoegen Voegt een apparaat toe. 92
Toets Repareren Repareert een toets die niet correct werkt
door het signaal van je originele
afstandsbediening te kopiëren. 93
Volumetoetsen Kopieert de volumetoetsen van het ene
Kopiëren apparaat naar het andere. 94
Apparaat Hernoemen Geeft een nieuwe naam aan een apparaat.
94
Apparaat Verwijderen Verwijdert een geprogrammeerd apparaat.
95
Activiteiten
Activiteit Toevoegen Voegt een reeks toetsdrukken toe om
verschillende apparaten met één toetsdruk
te bedienen. 95
Activiteit Hernoemen Geeft een nieuwe naam aan een activiteit.
96
Activiteit Verwijderen Verwijdert een geprogrammeerde activiteit.
96
Extra Functies
Functie Toevoegen Voegt een extra functie toe die de
SRU8008 leert van je originele
afstandsbediening. 96
Functie Hernoemen Geeft een nieuwe naam aan een functie. 97
Functie Verwijderen Verwijdert een geprogrammeerde functie.
97
Systeem-instellingen
Tijdsint. Wijzigt het tijdsinterval van de
Displayverlicht. displayverlichting op de SRU8008. 97
Toetsverlichting Schakelt de toetsverlichting aan of uit. 97
Alles Wissen Wist al je persoonlijke instellingen op de
SRU8008. 98
Taal
Wijzigt de taal van de instructies op de
SRU8008. 98
Afsluiten
Sluit het Setup-menu af. 91
4.1 Apparaten
4.1.1 Een apparaat toevoegen
Om je apparaten met de SRU8008 te kunnen bedienen, moet je ze eerst
toevoegen. Je kunt tot 8 apparaten programmeren.
D Opmerking
Je kunt een apparaat ook meerdere keren toevoegen. Een tweede TV
wordt automatisch TV2 genoemd. Je kunt ook een ander naam
ingeven. Zie ‘Een apparaat hernoemen’ op pagina 94.
1 Ga naar Setup - Apparaten, selecteer Apparaat Toevoegen en
druk op .
Haal het meeste uit je SRU800892
SRU8008_IFU_bundel 1 v09.qxd 03-12-2007 11:36 Pagina 92
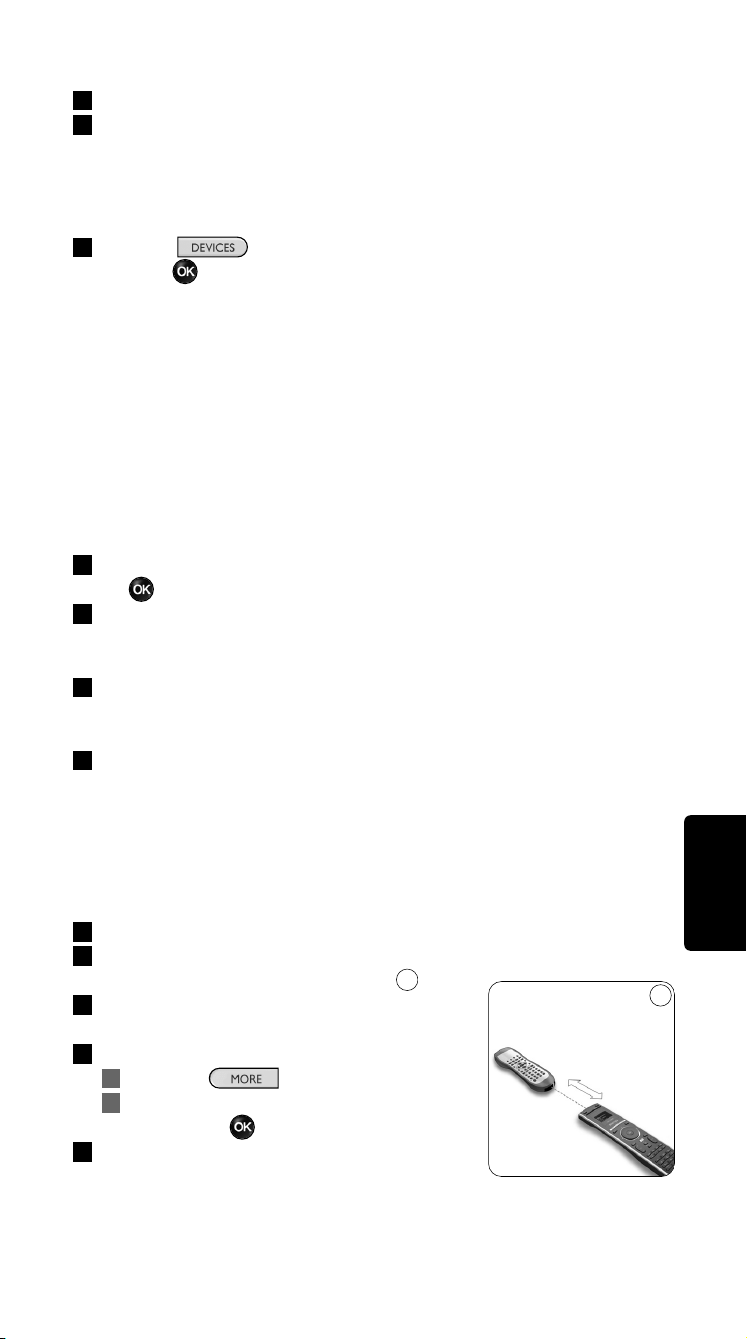
2 Selecteer het apparaat dat je wilt toevoegen.
3 Volg de aanwijzingen op de SRU8008.
Het geselecteerde apparaat is geprogrammeerd en toegevoegd aan de
SRU8008.
Je kunt nu je apparaat bedienen met de SRU8008:
Druk op , selecteer het apparaat met het draaiwieltje en
druk op .
4.1.2 Toets herstellen
Als een toets of functie niet goed werkt met uw apparaat, kunt u
allereerst proberen het signaal van die toets toe te wijzen aan de
SRU8008. Als dit niet werkt, kunt u het signaal van die toets kopiëren
van uw originele afstandsbediening naar de SRU8008.
D Opmerking
Wanneer u de optie Toets herstellen gebruikt, worden de gegevens
die op dat moment voor die toets zijn opgeslagen, overschreven.
1 Ga naar Setup - Apparaten, selecteer Toets herstellen en druk
op .
2 Selecteer het apparaat waarvoor u een toets wilt herstellen.
De SRU8008 controleert automatisch of het merk van dit apparaat
voorkomt in de database.
3 Als het merk van uw apparaat bekend is, houdt u de toets
waaraan u het signaal wilt toewijzen ingedrukt.
De SRU8008 verzendt verschillende signalen naar uw apparaat.
4 Als het apparaat reageert, laat u de toets los en volgt u de instructies
op de SRU8008.
De toets is toegewezen en vastgesteld.
-of-
Als het merk van uw apparaat niet bekend is of als het
apparaat niet reageert op de signalen, kunt u het signaal van de
toets van de originele afstandsbediening kopiëren:
3 Bevestig dat u de originele afstandsbediening bij de hand hebt.
4 Plaats de SRU8008 en uw originele afstandsbediening tegenover elkaar,
zoals weergegeven in de afbeelding.
5 Selecteer de toets of extra functie die u wilt
vaststellen.
6 Extra functies selecteren:
1 Druk op .
2 Selecteer de functie met de draaitoets
en druk op .
7 Volg de instructies op de SRU8008.
De toets is gekopieerd en vastgesteld.
9
NEDERLANDS
Haal het meeste uit je SRU8008 93
9
2-5 cm
SRU8008_IFU_bundel 1 v09.qxd 03-12-2007 11:36 Pagina 93
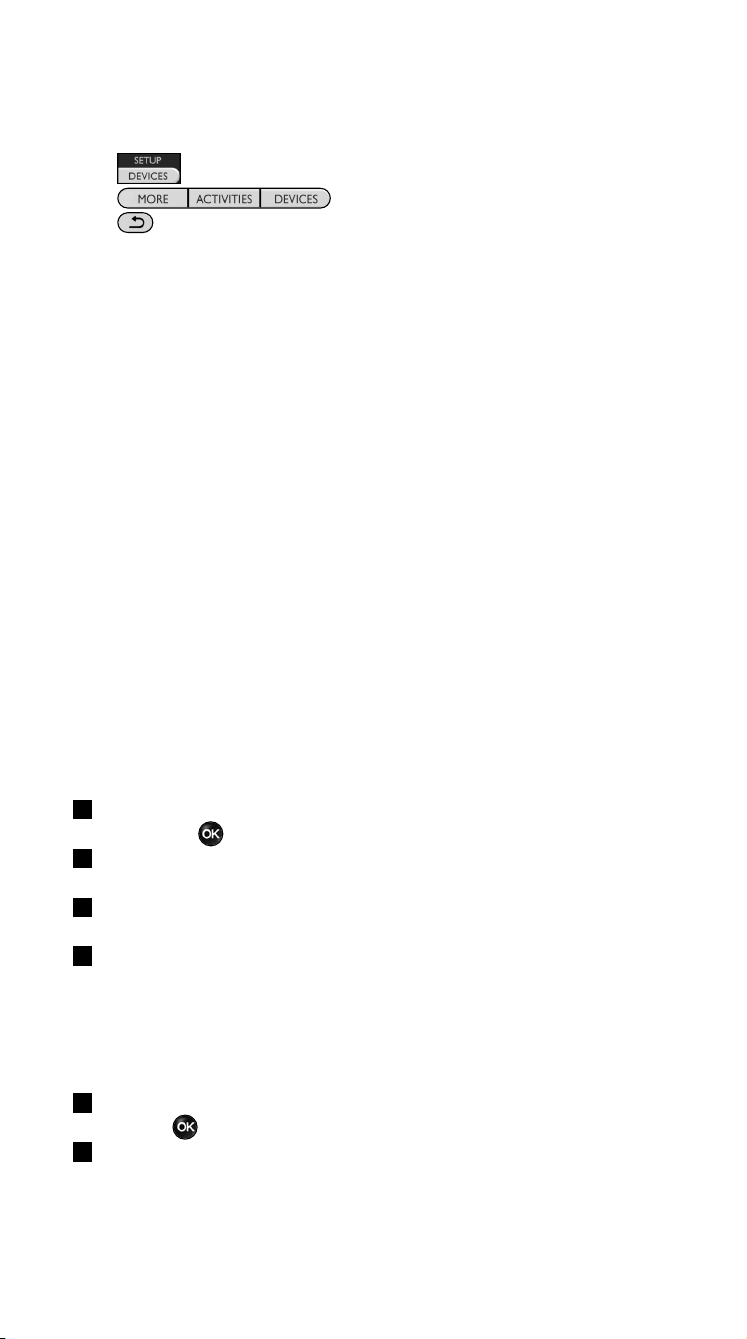
D Opmerking
Alle toetsen kunnen worden gerepareerd, behalve:
•
•
•
4.1.3 Volumetoetsen kopiëren
Nadat je de apparaten toevoegde, kopieert de SRU8008 automatisch de
volumetoetsen als volgt:
• Videoapparaten, zoals DVD, DVDR, VCR en satellietbox gebruiken de
volumetoetsen van de TV (tenminste wanneer je een TV hebt
geprogrammeerd).
• Audioapparaten, zoals CD, MD, cassettespeler en tuner gebruiken de
volumetoetsen van de Versterker of de Ontvanger (tenminste
wanneer je een versterker of ontvanger hebt geprogrammeerd).
Je kunt kiezen welke volumetoetsen worden gebruikt, bv. wanneer je de
volumetoetsen van de Versterker voor de DVD wilt gebruiken.
D Opmerkingen
• Met de functie Volumetoetsen Kopiëren overschrijf je de
standaard volume-instellingen van de SRU8008.
• De vorige volume-instellingen die je met Volumetoetsen
Kopiëren of Toets Repareren hebt gekopieerd, zijn gewist.
• De volume-instellingen worden automatisch gewist wanneer je het
verbonden apparaat verwijdert.
Om de volume-instellingen te kopiëren:
1 Ga naar Setup - Apparaten, selecteer Volumetoetsen Kopiëren
en druk op .
2 Selecteer het apparaat waarvan je de volumetoetsen wilt kopiëren
(bv. TV of Versterker).
3 Selecteer het apparaat waarnaar je de volumetoetsen wilt kopiëren
(bv. DVD of satellietbox).
4 Bevestig dat je de volumetoetsen wilt kopiëren van het ene apparaat
naar het andere.
De volumetoetsen zijn gekopieerd.
4.1.4 Een apparaat hernoemen
Om een apparaat te hernoemen:
1 Ga naar Setup - Apparaten, selecteer Apparaat Hernoemen en
druk op .
2 Voer de nieuwe naam in met de nummertoetsen.
D Opmerking
Je kunt tekens wissen met de Clear-toets en de linkse cursortoets.
Haal het meeste uit je SRU800894
SRU8008_IFU_bundel 1 v09.qxd 03-12-2007 11:36 Pagina 94
3 Bevestig de nieuwe naam.
Het apparaat is hernoemd.
4.1.5 Een apparaat verwijderen
Om een apparaat te verwijderen:
1 Ga naar Setup - Apparaten, selecteer Apparaat Verwijderen en
druk op .
2 Selecteer het apparaat dat je wilt verwijderen.
3 Bevestig dat je dit apparaat wilt verwijderen.
Het apparaat is verwijderd.
D Opmerking
Ook de toetsen van het verwijderde apparaat die elders worden
gebruikt, bv. in een activiteit of de door jou gekopieerde
volumetoetsen, worden verwijderd.
Controleer de activiteiten die je programmeerde en programmeer ze
indien nodig opnieuw. Zie ‘Een activiteit toevoegen’ op pagina 95.
Controleer de volumetoetsen van je apparaten en programmeer ze
indien nodig opnieuw. Zie ‘Volumetoetsen kopiëren’ op pagina 94.
4.2 Activiteiten
4.2.1 Een activiteit toevoegen
Je kunt activiteiten toevoegen aan je SRU8008. Een activiteit bestaat uit
verschillende toetsdrukken die je SRU8008 in slechts één toetsdruk
doorstuurt.
Opdat alle apparaten correct reageren op de IR-signalen, voegt de
SRU8008 standaard een vertraging van 600 ms in tussen elke
toetsdruk. Je kunt deze standaard vertraging wijzigen.
• Indien een van je apparaten een langere vertraging vereist voor de
ontvangst van het volgende IR-signaal, kun je een vertraging van 1, 3, 5,
10 of 15 seconden instellen.
• Wanneer een toets vereist dat je er langer moet op drukken, bv. de
volumetoetsen, kun je de optie Laatste toets vasthouden selecteren.
Om een activiteit toe te voegen:
1 Ga naar Setup - Activiteiten, selecteer Activiteit Toevoegen en
druk op .
2 Selecteer de naam die je voor de activiteit wilt gebruiken.
– of –
Selecteer Niet in de lijst om een nieuwe naam aan te maken.
3 Volg de aanwijzingen op de SRU8008.
• Selecteer een apparaat met het draaiwieltje, druk op en druk
op een toets om het aan de activiteit toe te voegen.
• Selecteer 1, 3, 5, 10 of 15 seconden vertraging met het
draaiwieltje en druk op .
NEDERLANDS
Haal het meeste uit je SRU8008 95
SRU8008_IFU_bundel 1 v09.qxd 03-12-2007 11:36 Pagina 95
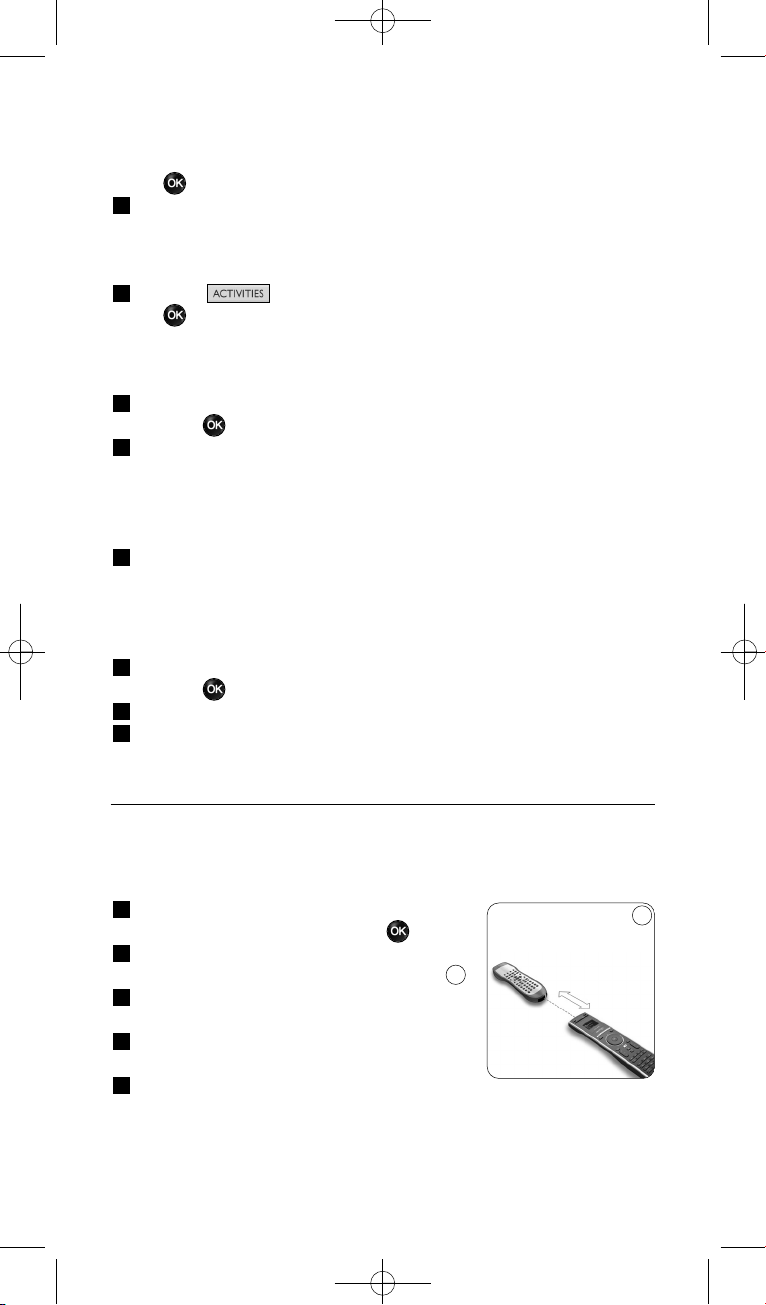
– of –
Selecteer Laatste toets vasthouden met het draaiwieltje en druk
op .
4 Herhaal stap 3 om een andere activiteit te programmeren.
De activiteit is toegevoegd aan de SRU8008.
Je kunt nu de activiteit starten met de SRU8008:
Druk op , selecteer de activiteit met het draaiwieltje en druk
op .
4.2.2 Een activiteit hernoemen
Om een activiteit te hernoemen:
1 Ga naar Setup - Activiteiten, selecteer Activiteit Hernoemen en
druk op .
2 Voer de tekst in voor het nieuwe label met de nummertoetsen.
D Opmerking
Je kunt tekens wissen met de Clear-toets en de linkse cursortoets.
3 Bevestig de nieuwe naam.
De activiteit is hernoemd.
4.2.3 Een activiteit verwijderen
Om een activiteit te verwijderen:
1 Ga naar Setup - Activiteiten, selecteer Activiteit Verwijderen en
druk op .
2 Selecteer de activiteit die je wilt verwijderen.
3 Bevestig dat je de activiteit wilt verwijderen.
De activiteit is nu verwijderd.
4.3 Extra functies
4.3.1 Een functie toevoegen
Om extra functies toe te voegen:
1 Ga naar Setup - Extra Functies, selecteer
Functie Toevoegen en druk op .
2 Plaats de SRU8008 en je originele
afstandsbediening zoals op de afbeelding.
3 Selecteer het apparaat waarvoor je een
functie wilt toevoegen.
4 Selecteer de naam die je voor de extra
functie wilt gebruiken.
5 Volg de aanwijzingen op de SRU8008 om de
functie van je originele afstandsbediening te kopiëren.
De functie is nu toegevoegd aan de SRU8008.
10
10
2-5 cm
Haal het meeste uit je SRU800896
SRU8008_IFU_bundel 1 v09.qxd 03-12-2007 11:36 Pagina 96

4.3.2 Een functie hernoemen
Om een extra functie te hernoemen:
1 Ga naar Setup - Extra Functies, selecteer Functie Hernoemen
en druk op .
2 Voer de tekst in voor de nieuwe naam met de nummertoetsen.
3 Bevestig de nieuwe naam.
De functie is nu hernoemd.
4.3.3 Een functie verwijderen
Om een extra functie te verwijderen:
1 Ga naar Setup - Extra Functie, selecteer Functie Verwijderen en
druk op .
2 Selecteer het apparaat waarvoor je een functie wilt verwijderen.
3 Selecteer de functie je wilt verwijderen.
4 Bevestig dat je de functie wilt verwijderen.
De functie is nu verwijderd.
4.4 Systeeminstellingen
4.4.1 Tijdsinterval van de displayverlichting
Wanneer je de SRU8008 gebruikt, licht de displayverlichting op.
Na 5 seconden schakelt die zichzelf uit.
Om dit tijdsinterval te wijzigen:
1 Ga naar Setup - Syst.-instellingen, selecteer Tijdsint.
Displayverlicht. en druk op .
2 Selecteer de gewenste duur van de displayverlichting met het
draaiwieltje: 3 seconden, 5 seconden, 10 seconden, 20 seconden.
3 Bevestig de nieuwe instelling voor het tijdsinterval.
Het tijdsinterval voor de displayverlichting is nu gewijzigd.
D Opmerking
De duur van de displayverlichting heeft een impact op de levensduur
van de batterijen: hoe langer de displayverlichting oplicht, hoe meer
energie de batterijen verbruiken.
4.4.2 Toetsverlichting
Om de toetsverlichting aan en uit te zetten:
1 Ga naar Setup - Syst.-instellingen, selecteer Toetsverlichting en
druk op .
2 Selecteer Aan of Uit met het draaiwieltje.
3 Bevestig de nieuwe instelling voor de toetsverlichting.
De toetsverlichting is nu aan of uit.
NEDERLANDS
Haal het meeste uit je SRU8008 97
SRU8008_IFU_bundel 1 v09.qxd 03-12-2007 11:36 Pagina 97
4.4.3 Alles wissen
Wanneer je de optie Alles Wissen van de SRU8008 selecteert, worden
alle geprogrammeerde apparaten, activiteiten en andere instellingen
gewist. Nadat je alles hebt gewist, moet je de SRU8008 opnieuw
programmeren.
Om alles op de SRU8008 te wissen:
1 Ga naar Setup - Syst.-instellingen, selecteer Alles Wissen en
druk op .
2 Selecteer Ja met het draaiwieltje en druk op .
3 Druk op om te herbevestigen.
De SRU8008 wist nu alle instellingen en start opnieuw op met de
Installatiewizard. Dit kan een minuut duren.
4.5 Taal
Om de taal van de SRU8008 te wijzigen:
1 Ga naar Setup - Taal en druk op .
2 Selecteer de taal die je wenst met het draaiwieltje.
English, Français, Deutsch, Español, Italiano, Nederlands, Русский.
3 Bevestig je taalkeuze.
De taal van het Setup - Hoofdmenu is nu gewijzigd.
5 Vaak gestelde vragen
Toetsen
Waarom werken een of meerdere toetsen niet met mijn
apparaat?
Niet alle functies zijn beschikbaar in de databank van de SRU8008, of de
code achter de toets is defect.
Je kunt een toets repareren door het signaal te kopiëren van je originele
afstandsbediening. Zie ‘Toets herstellen’ op pagina 93.
Hoe kan ik de toetsen voor omhoog, omlaag, naar links en naar
rechts bedienen in het menu op het scherm?
De draaitoets is een gebruiksvriendelijke, multifunctionele toets op uw
SRU8008:
• Door aan deze toets te draaien, kunt u door de verschillende opties op
het scherm van uw afstandsbediening bladeren.
• Als u op de boven-, onder-. linker- of rechterkant van de draaitoets
drukt, navigeert u door het menu op het scherm van het apparaat (TV,
DVD, VCR, enz.) dat u op dat moment bedient.
Haal het meeste uit je SRU800898
SRU8008_IFU_bundel 1 v09.qxd 03-12-2007 11:36 Pagina 98

Hoe kan ik extra functies toevoegen in de SRU8008?
Zie ‘Een functie toevoegen’ op pagina 96.
Merk
Waarom vind ik het merk van mijn apparaat niet in de
SRU8008?
De databank van de SRU8008 bevat niet alle merken. Wanneer je merk
niet in de lijst staat:
• Je kunt de toetsen van je originele afstandsbediening kopiëren. Zie
‘Toets herstellen’ op pagina 93.
– of –
• Je kunt Niet in de lijst selecteren om een grondige zoekopdracht
in de databank uit te voeren.
De SRU8008 test dan alle beschikbare codes. Dit kan 25 minuten
duren.
Activiteit
Kan ik wisselen tussen de activiteiten?
Nee, als u een activiteit hebt geselecteerd, is het niet mogelijk dezelfde of
een andere activiteit te selecteren. U dient alle apparaten uit te schakelen
voordat u een nieuwe activiteit selecteert in de lijst.
Volume
Waarom werken de volumetoetsen niet correct?
Nadat je de apparaten toevoegde, kopieert de SRU8008 automatisch de
volumetoetsen en Mute-toets als volgt:
• Videoapparaten, zoals DVD, DVDR, VCR en satellietbox gebruiken de
volumetoetsen van de TV.
• Audioapparaten, zoals CD, DMR en tuner gebruiken de
volumetoetsen van de Versterker of de Ontvanger.
Wanneer je het bronapparaat (TV, Versterker of Ontvanger) niet
programmeerde, zullen de volumetoetsen en Mute-toets niet werken.
Om de volumetoetsen in te stellen:
• Je kunt het bronapparaat in de SRU8008 programmeren. Zie ‘Een
apparaat toevoegen’ op pagina 92.
– of –
• Je kunt de volumetoetsen van een ander bronapparaat kopiëren.
Zie ‘Volumetoetsen kopiëren’ op pagina 94.
NEDERLANDS
Vaak gestelde vragen 99
SRU8008_IFU_bundel 1 v09.qxd 03-12-2007 11:36 Pagina 99

Batterijen
Waarom kan ik het Setup-menu niet openen?
Wanneer het batterijniveau te laag is, kun je het Setup-menu niet
openen. Vervang de batterijen door nieuwe alkalinebatterijen.
Waarom start de SRU8008 niet meer op?
Het batterijniveau is te laag. Vervang de batterijen door nieuwe
alkalinebatterijen.
Verlies ik mijn gegevens wanneer ik de batterijen vervang?
Neen, je gegevens blijven bewaard.
Kan ik oplaadbare batterijen gebruiken in mijn SRU8008?
Ja. Hou er echter rekening mee dat oplaadbare batterijen sneller
leeglopen dan alkalinebatterijen.
6 Hulp nodig?
Lees aandachtig deze Gebruiksaanwijzing voor je met ons contact
opneemt.
Als u aanvullende vragen hebt over het gebruik of het instellen van de
SRU8008 of de garantie, raadpleeg dan www.philips.com/support
.
Raadpleeg voor contactgegevens www.philips.com/support
.
Zorg ervoor dat u de SRU8008 bij de hand hebt wanneer u onze hulplijn
belt zodat onze medewerkers u kunnen helpen te bepalen of de
afstandsbediening goed werkt.
Het modelnummer van uw universele afstandsbediening van Philips is
SRU8008.
Raadpleeg voor de juiste apparaatcode van uw afstandsbediening
www.philips.com/URC
.
De aankoopdatum: ......../......../........ (dag/maand/jaar)
Vaak gestelde vragen100
SRU8008_IFU_bundel 1 v09.qxd 03-12-2007 11:36 Pagina 100
Содержание
1 Ваш пульт Philips Prestigo SRU8008 102
1.1 Что входит в комплект 102
1.2 Краткий обзор пульта SRU8008 102
2 Начало работы 103
2.1 Подготовка 103
2.2 Настройка 104
3 Работа с пультом SRU8008 105
3.1 Выбор устройства 106
3.2 Выбор Действия 106
3.3 Выбор дополнительных функций 107
4 Сложные функции пульта SRU8008 107
4.1 Устройства 108
4.2 Алгоритмы 112
4.3 Дополнительные функции 113
4.4 Параметры системы 114
4.5 Язык 115
5 Часто задаваемые вопросы 115
6 Нужна помощь? 117
РУССКИЙ
Содержание 101
SRU8008_IFU_bundel 1 v09.qxd 03-12-2007 11:36 Pagina 101

1 Ваш пульт Philips Prestigo SRU8008
Добро пожаловать в нашу большую семью пользователей продукции
Philips! Универсальный пульт дистанционного управления Philips
Prestigo SRU8008 был специально разработан для управления вашими
устройствами. Вы можете установить до 8 устройств а также до
8 алгоритмов.
Выберите устройство и управляйте им с помощью пульта SRU8008.
Выберите алгоритм и автоматически запустите последовательность
нажатий различных клавиш, например, для того, чтобы просмотреть
DVD или прослушать компакт-диск.
Выберите дополнительные функции и задайте пульту
дополнительные расширенные функции.
1.1 Что входит в комплект
• Пульт SRU8008
• Краткое руководство пользователя
• Инструкция по использованию на различных языках
• Щелочные элементы питания Philips Alkaline
Компания Philips рекомендует использовать щелочные элементы
питания Philips Alkaline.
1.2 Краткий обзор пульта SRU8008
Обзор модели SRU8008 приведен на рисунке на стр. 2.
Чтобы подготовить пульт SRU8008 к работе, перейдите к разделу
‘Начало работы’ Начало работы на стр. 103.
Черные кнопки для отправки команд на оборудование
A Кнопка Power
B Кнопка OK
C Перемещение вверх, вниз, вправо, влево
D Кнопки перемещения
E Алфавитно-цифровые кнопки
F Кнопка *–./ Clear
G Кнопка AV
H Кнопка Enter
Кнопки управления SRU8008
1 Кнопка More
2 Кнопки действий
3 Кнопка Devices/Setup.
4 Кнопка OK
5 Колесико управления
6 Кнопка перехода назад
Ваш пульт Philips Prestigo SRU8008102
SRU8008_IFU_bundel 1 v09.qxd 03-12-2007 11:36 Pagina 102
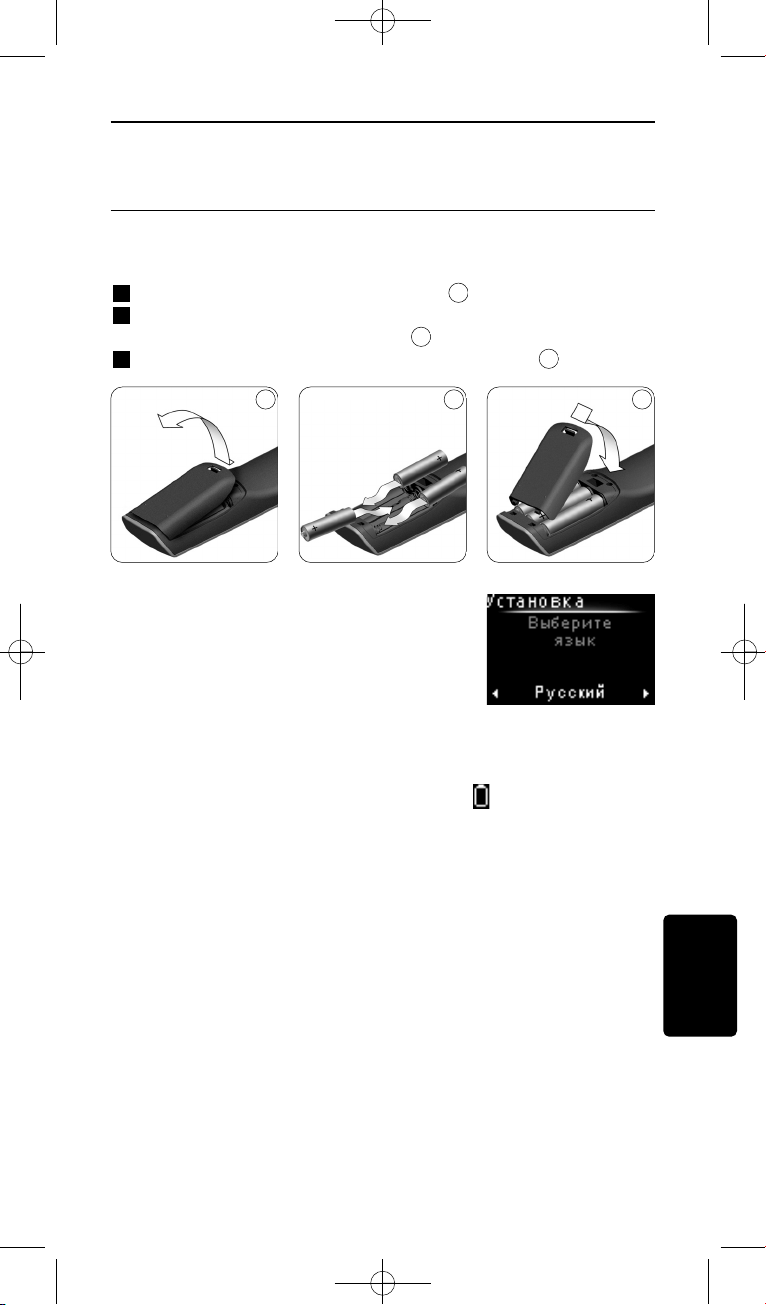
2 Начало работы
2.1 Подготовка
Чтобы вставить элементы питания в пульт SRU8008, выполните
следующее:
1 Нажмите фиксатор и снимите крышку.
2 Установите три щелочных элемента типа LR6 AA в отсек
питания, как показано на рисунке.
3 Установите крышку и зафиксируйте ее до щелчка.
На дисплее пульта SRU8008 на 3 секунды
отобразится логотип компании Philips,
затем запустится Мастер установки
(Installation Wizard), который поможет вам
провести установку.
Когда элементы питания почти разряжены, мигает пиктограмма
Battery Low (Элементы питания разряжены) . Она означает
критический уровень заряда элементов питания. После ее появления
вы сможете работать с пультом SRU8008 непродолжительное время.
Рекомендуется заменять разряженные элементы новыми
щелочными элементами типа LR6 AA и утилизировать
разряженные элементы в соответствии с местным
законодательством.
D Примечание
Если мигает пиктограма Battery Low (Элементы питания
разряжены), вы не сможете войти в раздел Setup (Установка)
Главного меню.
3
2
1
Мастер установки –
Выбор языка
РУССКИЙ
Начало работы 103
1 2 3
SRU8008_IFU_bundel 1 v09.qxd 03-12-2007 11:37 Pagina 103
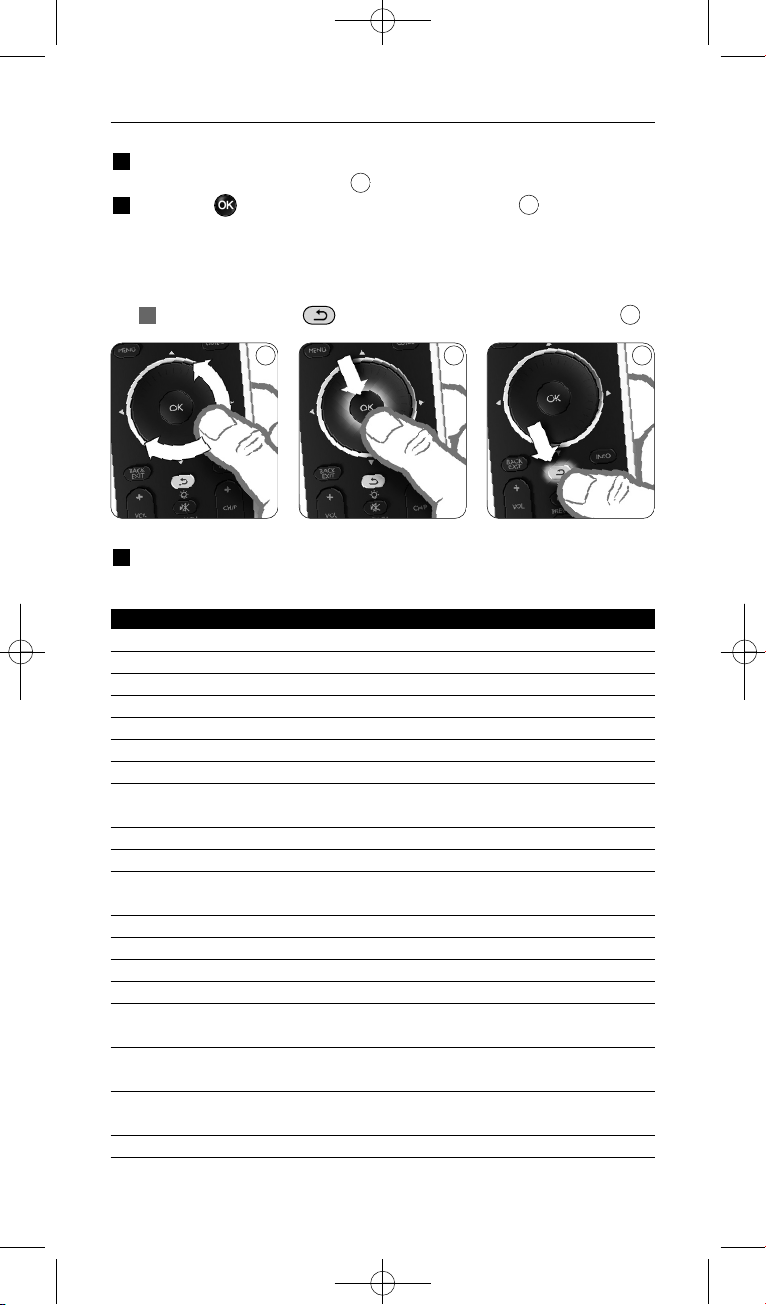
2.2 Настройка
1 Когда запустится Мастер установки, с помощью поворотного
колесика выберите язык.
2 Нажмите для подтверждения выбора языка.
Инструкции на дисплее пульта SRU8008 помогут вам провести
процесс настройки.
В любой момент можно вернуться в установку для изменения
выбранных параметров:
Нажмите кнпоку для возврата к предыдущему окну.
3 Для добавлелния устройств следуйте инструкциям на SRU8008. К
SRU8008 можно добавить до 8 устройств из слседующего списка.
Название устройства Описание
TV Обычные и “плоские” телевизоры
DVD DVD-плеер и рекордер
DVDR DVD-плеер и рекордер
VCR Видеоплеер и видеомагнитофон
SAT Спутниковая приставка с жестким диском (HDD) или без него
DSS/DTT Спутниковая приставка с жестким диском (HDD) или без него
Cable Кабельная приставка с жестким диском (HDD) или без него
DVB-T/S Цифровое видеовещание - наземное (T) или спутниковое (S)
с жестким диском (HDD) или без него
AMP Усилитель
AudioSet Приемник = Усилитель + Тюнер
HTS Домашний кинотеатр: Усилитель + DVD-система + Тюнер +
громкоговорители кругового звука
Tuner Радиотюнер
CD CD-плеер и рекордер
MD Плеер и рекордер мини-дисков
Ta p e Аудиоплеер и магнитофон
DVR Цифровой видеомагнитофон = Аналоговый телетюнер +
жесткий диск (HDD)
Tivo Цифровой видеомагнитофон = Аналоговый телетюнер +
жесткий диск (HDD)
DMR Цифровой медиа-приемник = устройство, передающее медиа
контент с ПК на телевизор или аудиоприемник
TV-DVD combo Телевизор со встроенной DVD-системой
6
5
4
4 5 6
Начало работы
104
SRU8008_IFU_bundel 1 v09.qxd 03-12-2007 11:37 Pagina 104

Начало работы
Название устройства Описание
TV-VCR combo Телевизор со встроенным видеомагнитофоном
TV-VCR-DVD combo
Телевизор со встроенным видеомагнитофоном и DVD системой
DVD-VCR combo Комбинация видеомагнитофона и DVD-системы
DVDR-HDD combo DVD-рекордер с жестким диском (HDD)
VCD, Laser Disk Видео-CD, лазерный диск, караоке
Projector Видеопроектор
Camera and Camcorder Фото- и видеокамера
PC ПК (только ИК)
Game Функция DVD-плеера игровой консоли (только ИК)
Satellite Radio Спутниковый радиоприемник
PVR/DVR Personal Video Recorder (Видеорекордер) / Hard disc
Recorder (Рекордер с HD)
D Примечание
С помощью меню Setup (Установка) вы сможете позже
изменить первоначальные установки, сделанные на данном этапе,
или добавить другие функции.
См. главу ‘Сложные функции пульта SRU8008’ на стр. 107.
3 Работа с пультом SRU8008
Пульт дистанционного управления SRU8008 был специально
разработан для управления всем вашим оборудованием с помощью
одного пульта. Просто добавьте устройства, алгоритмы, любимые
каналы и дополнительные функции и наслаждайтесь работой с
пультом SRU8008.
Под словом ‘устройство’ подразумевается часть вашего
оборудования. Как только вы установите свои устройства, вы
сможете управлять ими с помощью пульта SRU8008.
Ваши устройства могут иметь дополнительные функции, помимо тех,
которые управляются клавишами пульта SRU8008. Для их установки
выберите на дисплее пункт More Functions (Дополнительные
функции).
Алгоритм – это заданная последовательность нажатий различных
кнопок. Например, чтобы посмотреть DVD, обычно требуется
выполнить следующие действия:
включить телевизор;
• включить DVD-проигрыватель;
• включить систему объёмного звучания Surround;
• выставить нужный уровень входного сигнала на телевизоре и
системе объемного звучания;
• нажать клавишу Play (Воспроизведение) для запуска DVD.
При использовании алгоритма пульт SRU8008 может выполнить все
эти действия нажатием одной клавиши.
РУССКИЙ
105
SRU8008_IFU_bundel 1 v09.qxd 03-12-2007 11:37 Pagina 105

Колесико управления является простым в использовании,
универсальным средством управления SRU8008:
• При вращении колесика управления, происходит прокрутка
различных опций на дисплее пульта ДУ.
• При нажатии на колесико управления сверху, снизу, справа или
слева вы перемещаетесь по экранному меню устройства, (ТВ, DVD,
телеприставки и т.д.) которым вы управляете в этот момент.
3.1 Выбор устройства
Выбор установленного устройства
1 Нажмите .
2 Выберите устройств с помощью
колесика управления и нажмите для
подтверждения.
SRU8008 настроен для управления
выбранным устройством. Теперь
управление этим устройством
осуществляется с помощью черных
кнопок SRU8008.
О настройке устройств см. в Добавление устройств на стр. 108.
3.2 Выбор Действия
Выбор установленного действия:
1 Нажмите .
2 Выберите действие с помощью
колесика управления и нажмите для
запуска действия.
SRU8008 отправит последовательность
команд для выбранного действия.
SRU8008 настроен для управления
выбранным устройством для этого действия.
Порядок установки действий см. в Добавление алгоритма на
стр. 112.
8
7
Список установленных
устройств
Список установленных
действий
87
Работа с пультом SRU8008
106
SRU8008_IFU_bundel 1 v09.qxd 03-12-2007 11:37 Pagina 106

3.3 Выбор дополнительных функций
Ваши устройства могут иметь дополнительные функции, помимо тех,
которые управляются клавишами пульта SRU8008.
Для того, чтобы выбрать установленные вами дополнительные
функции, выполните следующее:
1 Нажмите .
2 С помощью поворотного колесика
выберите функцию и нажмите для
подтверждения.
Пульт SRU8008 отправит команду,
соответствующую выбранной функции.
Для установки дополнительных функций
см. главу ‘Добавление функций’ на стр. 113.
4 Сложные функции пульта SRU8008
С помощью меню Setup (Установка) вы можете получить доступ к
различным сложным функциям пульта SRU8008.
Чтобы войти в меню Setup (Установка),
выполните следующее:
Нажмите и удерживайте
в течение 3 секунд клавишу .
D Примечание
Если мигает пиктограма Элементы питания разряжены
(Battery Low), вы не сможете войти в меню Setup (Установка).
Для перехода между пунктами меню Setup (Установка), выполните
следующее:
С помощью поворотного колесика выберите пункт меню Setup
(Установка) и нажмите для подтверждения.
-или-
Нажмите кнпоку для возврата к предыдущему окну.
Для выхода из меню Установка (Setup), выполните следующее:
Выберите пункт Exit (Выйти из установки) в меню Setup - Main
Menu (Установка - Главное меню) и нажмите .
-или-
Еще раз нажмите .
В приведенной таблице кратко описываются функции меню Setup
(Установка) и указываются страницы, на которых вы можете найти
дополнительную информацию об этих функциях.
Список установленных
функций
РУССКИЙ
Работа с пультом SRU8008 107
SRU8008_IFU_bundel 1 v09.qxd 03-12-2007 11:37 Pagina 107
Установка - Подменю Описание Стр.
Главное меню
Устройства Добавить устройство Добавляется новое устройство. 108
Настроить клавишу Настраивается клавиша, которая
работает ненадлежащим образом, путем
копирования сигнала с оригинального
пульта управления устройством. 109
Копировать громкость Копируются кнопки громкости с одного
устройства на другое устройство. 110
Переименовать Переименовывается устройство 111
устройство
Удалить устройство Удаляется установленное устройство. 111
Алгоритмы Добавить алгоритм Вводится порядок нажатия клавиш для
управления различными устройствами
нажатием одной клавиши 111
Переименовать алгоритм Переименовывается алгоритм 112
Удалить алгоритм Удаляется установленный алгоритм 113
Дополнительные Добавить функцию Добавляется дополнительная функция
функции путем копирования с оригинального
пульта управления устройством 113
Переименовать Переименовывается функция
функцию 113
Удалить функцию Удаляется установленная функция 113
Параметры Интервал отключения Изменяется интервал отключения
системы дисплея дисплея пульта SRU8008 114
Подсветка клавиш Включается и отключается подсветка
клавиш 114
Полная перезагрузка Удаляются все ваши настройки пульта
SRU8008. 114
Язык Изменяется язык отображения
инструкций на пульте SRU8008 115
Выход из меню Установка Происходит выход из режима
настроек 107
4.1 Устройства
4.1.1 Добавление устройств
Для управления устройствами с помощью пульта SRU8008
необходимо добавить эти устройства. Можно добавить до
8 устройств. Список устройств приведен на стр. 104.
D Примечание
Одно и то же устройство можно добавлять более одного раза.
Второй телевизор будет автоматически назван TV2. При желании
вы можете ввести другое название. См. главу ‘Переименование
устройств’ на стр. 17.
Сложные функции пульта SRU8008108
SRU8008_IFU_bundel 1 v09.qxd 03-12-2007 11:37 Pagina 108
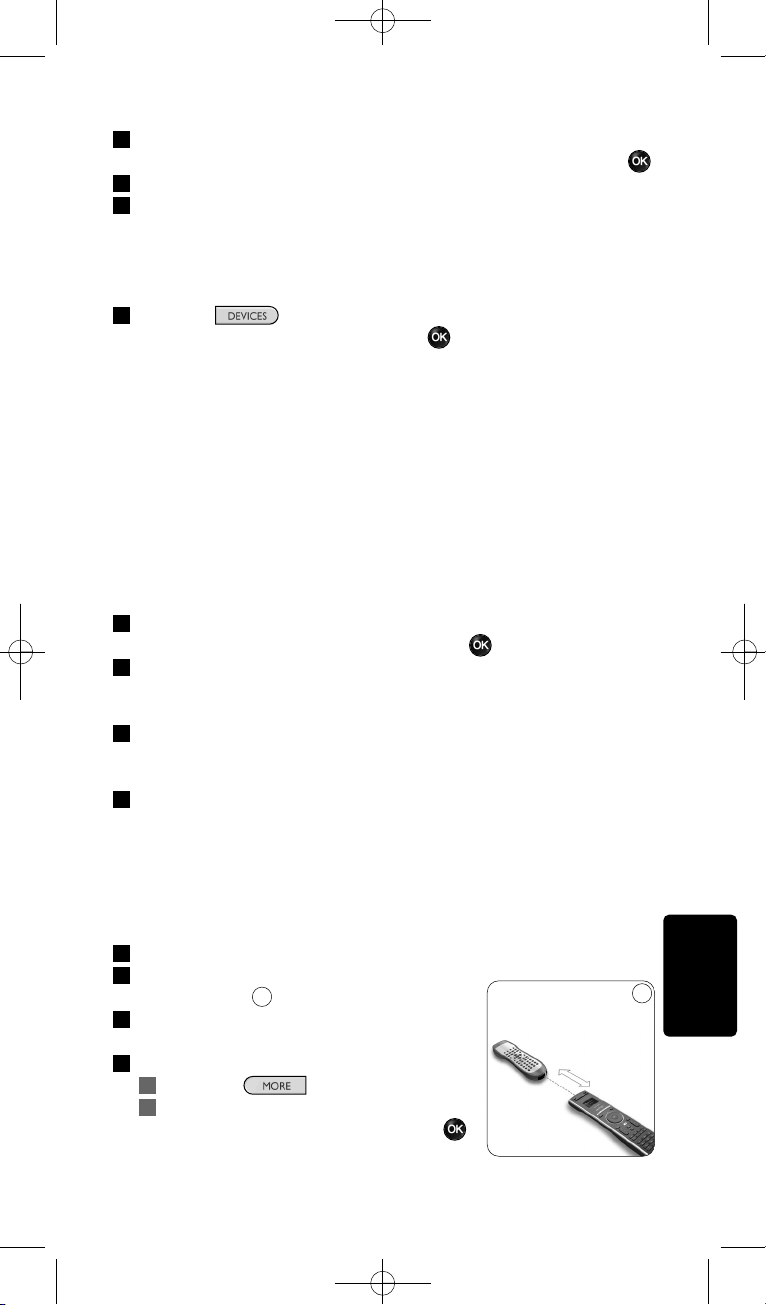
1 Войдите в меню Setup - Devices (Установка - Устройства),
выберите пункт Add Device (Добавить устройство) и нажмите .
2 Выберите устройство, которое вы хотите добавить.
3 Следуйте инструкциям на экране пульта.
Выбранное устройство установлено и добавлено в пульт SRU8008.
Теперь вы можете использовать его для управления данным
устройством:
Нажмите , выберите устройство с помощью
поворотного колесика и нажмите .
4.1.2 Назначить кнопку
Если кнопка или дополнительная функция не работают должным
образом для вашего устройства, сначала можно попробовать
присвоить сигнал этой кнопки для SRU8008. Если это не сработало,
можно cкопировать сигнал этой кнопки с вашего исходного пульта
на SRU8008.
D Примечание
При использовании опции Назначить кнопку новые данные
заменяют текущие данные этой кнопки.
1 Перйдите к пункту Setup - Devices, (Установка - Устройства)
выберите Назначить кнопку и нажмите .
2 Выберите устройство для которого вы хотите назначиь кнопку.
SRU8008 автоматически проверяет наличие марки устройства в
базе данных.
3 Если марка устройства находится в базе данных, нажмите
и удерживайте кнопку, которой вы хотите присвоить сигнал.
SRU8008 отправляет различные сигналы на ваше устройства.
4 Если устройство реагирует, немедленно отпустите кнопку и
следуйте инструкциям на SRU8008.
Кнопке присвоен сигнал.
-или-
Если марки устройства нет в базе данных или устройство
не реагирует на сигналы, скопируйте сигнал кнопки с
исходного пульта:
3 Убедитесь, что исходный пульт готов к работе.
4 Установите SRU8008 и исходный пульт,
как показано.
5 Выберите кнопку или дополнительную
функцию, которую необходимо назначить.
6 Выбор дополнительных функций
1 Нажмите .
2 Выберите функцию с помощью
колесика управления и нажмите .
9
РУССКИЙ
Сложные функции пульта SRU8008 109
9
2-5 см
SRU8008_IFU_bundel 1 v09.qxd 03-12-2007 11:37 Pagina 109
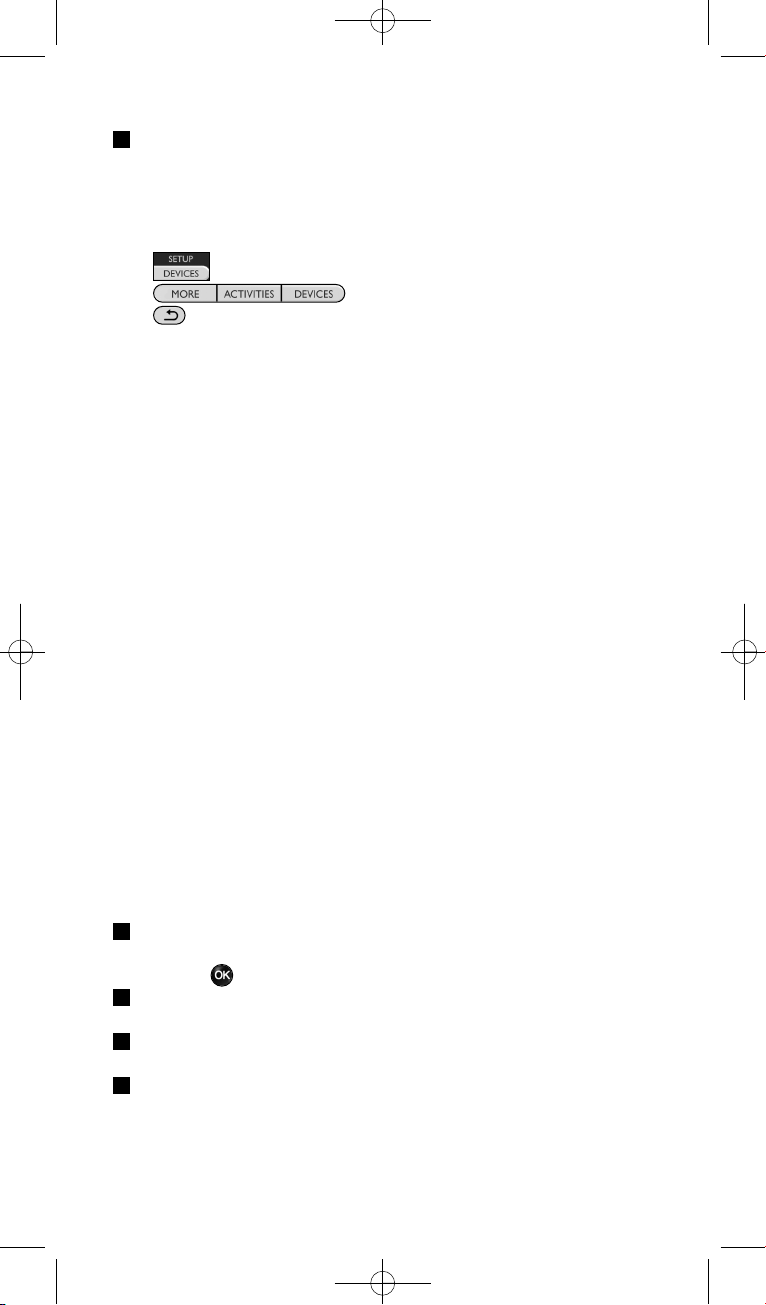
7 Следуйте инструкциям на SRU8008.
Кнопка скопирована и ей присвоено действие.
D Примечание
Можно настроить все клавиши за исключением следующих:
•
•
•
4.1.3 Копирование громкости
После добавления устройств пульт SRU8008 автоматически копирует
настройки громкости следующим образом:
• Видеоустройства, такие как DVD, DVDR, VCR и приставка
Satellite box, используют клавиши громкости ТВ (при условии, что
телевизор настроен).
• Аудиоустройства, такие как проигрыватели CD, MD, магнитофон
и тюнер, используют клавиши громкости усилителя или
приемника (при условии, что усилитель или приемник настроен).
Можно изменить состав используемых клавиш громкости, например,
если вы хотите использовать клавиши громкости усилителя для
проигрывателя DVD.
D Примечания
• Функция Copy Volume (Копировать громкость) изменяет
изначальные установки управления громкостью пульта SRU8008.
• Предыдущие настройки громкости, которые вы установили с
помощью функций Copy Volume (Копировать громкость) или
Fix a Key (Настроить клавишу), будут удалены.
• Настройки громкости автоматически удаляются при удалении
устройства, с которого они были скопированы.
Чтобы скопировать настройки управления громкостью, выполните
следующее:
1 Войдите в меню Setup - Devices (Установка - Устройства),
выберите пункт Copy Volume (Скопировать громкость) и
нажмите .
2 Выберите устройство, с которого вы хотите скопировать
настройки громкости (например, телевизор или усилитель).
3 Выберите устройство, на которое вы хотите скопировать
настройки громкости (например, DVD или SAT).
4 Подтвердите, что хотите скопировать клавиши управления
громкостью с одного устройства на другое.
Клавиши управления громкостью скопированы.
Сложные функции пульта SRU8008110
SRU8008_IFU_bundel 1 v09.qxd 03-12-2007 11:37 Pagina 110
4.1.4 Переименование устройств
Для того, чтобы переименовать устройство, выполните следующее:
1 Войдите в меню Setup - Devices (Установка - Устройства),
выберите пункт Rename Device (Переименовать устройство) и
нажмите .
2 Введите новое название с помощью клавиш с буквами и
цифрами.
D Примечание
Вы можете стирать символы с помощью клавиши Clear
(Очистить) и клавиши со стрелкой влево.
3 Подтвердите новое название.
Устройство переименовано.
4.1.5 Удаление устройств
Для того, чтобы удалить устройство, выполните следующее:
1 Войдите в меню Setup - Devices (Установка - Устройства),
выберите пункт Delete Device (Удалить устройство) и нажмите
.
2 Выберите устройство, которое вы хотите удалить.
3 Подтвердите, что хотите удалить это устройство.
Устройство удалено.
D Примечание
Клавиши удаленного устройства, которые используются в других
режимах, например в алгоритме, или кнопки громкости, которые
были скопированы, также удаляются.
Проверьте установленные алгоритмы и при необходимости
введите их заново. См. главу ‘Добавление алгоритма’ на стр. 112.
Проверьте клавиши управления громкостью, установленные для
вашего устройства, и при необходимости введите их заново. См.
главу ‘Копирование громкости’ на стр. 110.
4.2 Алгоритмы
4.2.1 Добавление алгоритма
Вы можете добавлять алгоритмы в пульт SRU8008. Алгоритм состоит
из нажатий нескольких клавиш, которые пульт SRU8008 приводит в
действие нажатием всего одной клавиши.
По умолчанию пульт SRU8008 вводит задержку 600 мс между
нажатиями кнопок, чтобы проконтролировать правильность реакции
всех устройств на сигналы. Такую временную задержку можно
изменить.
РУССКИЙ
Сложные функции пульта SRU8008 111
SRU8008_IFU_bundel 1 v09.qxd 03-12-2007 11:37 Pagina 111
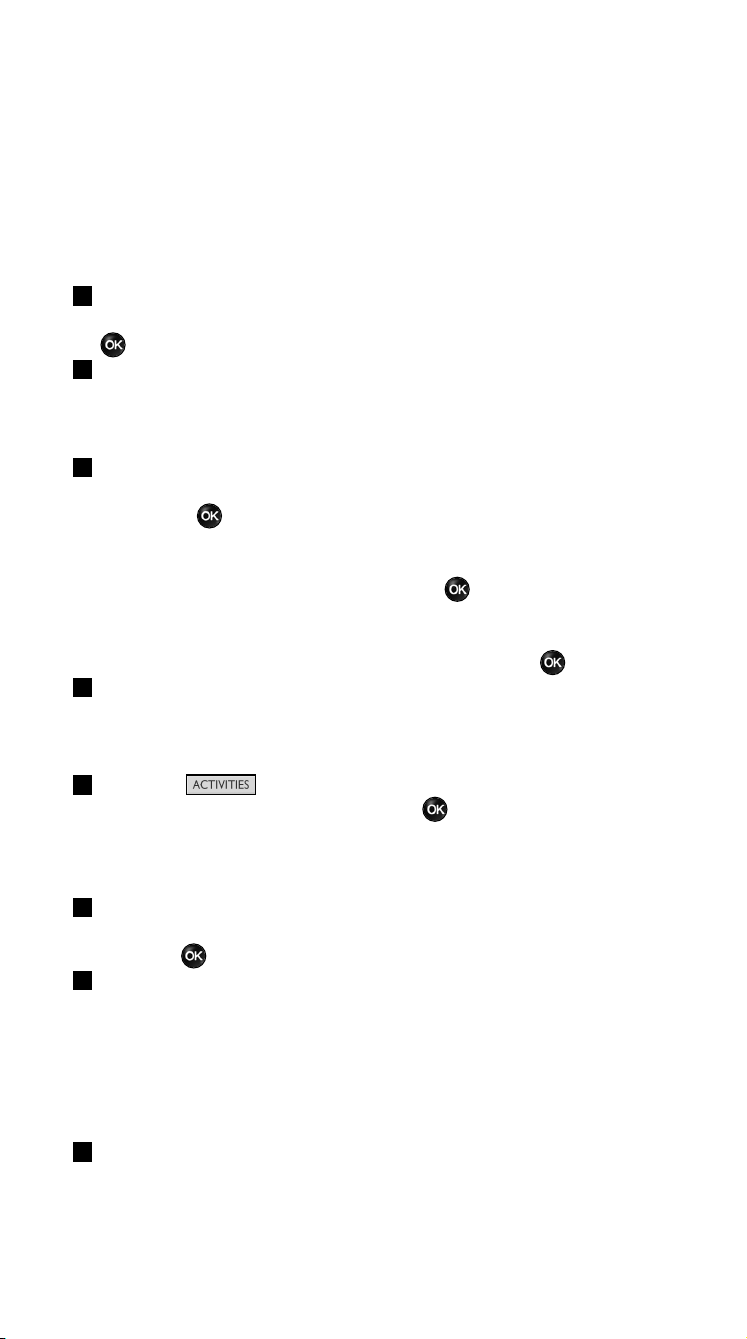
• Если для одного из устройств требуется более длительная
задержка перед получением следующего ИК-сигнала, можно
ввести задержку 1, 3, 5, 10 или 15 секунд.
• Если для выполнения той или иной функции требуется длительное
нажатие клавиши, вы можете выбрать функцию Hold last key
(Удерживать последнюю клавишу).
Чтобы добавить алгоритм, выполните следующее:
1 Войдите в меню Setup - Activities (Установка - Алгоритмы),
выберите пункт Add an Activity (Добавить алгоритм) и нажмите
.
2 Выберите ярлык, который вы хотите использовать для
добавленного алгоритма.
-или-
Для создания нового ярлыка выберите Not in list (Нет в списке).
3 Следуйте инструкциям на экране.
• С помощью поворотного колесика выберите устройство,
нажмите , а затем нажмите клавишу, которую необходимо
добавить в алгоритм.
• С помощью поворотного колесика выберите задержку в
1, 3, 5, 10 или 15 секунд и нажмите .
-или-
С помощью поворотного колесика выберите функцию Hold last
key (Удерживать последнюю клавишу) и нажмите .
4 Для создания другого алгоритма повторите шаг 3.
Алгоритм добавлен в пульт SRU8008.
Теперь вы можете запустить алгоритм с помощью пульта SRU8008:
Нажмите , выберите алгоритм с помощью
поворотного колесика и нажмите .
4.2.2 Переименование алгоритма
Чтобы переименовать алгоритм, выполните следующее:
1 Войдите в меню Setup - Activities (Установка - Алгоритмы),
выберите пункт Rename Activity (Переименовать алгоритм) и
нажмите .
2 Введите текст нового ярлыка с помощью клавиш с буквами и
цифрами.
D Примечание
Вы можете стирать символы с помощью клавиши Clear
(Очистить) и клавиши со стрелкой влево.
3 Подтвердите новое название.
Алгоритм переименован.
Сложные функции пульта SRU8008112
SRU8008_IFU_bundel 1 v09.qxd 03-12-2007 11:37 Pagina 112

4.2.3 Удаление алгоритма
Чтобы удалить алгоритм, выполните следующее:
1 Войдите в меню Setup - Activities (Установка - Алгоритмы),
выберите пункт Delete Activity (Удалить алгоритм) и нажмите .
2 Выберите алгоритм, который нужно удалить.
3 Подтвердите, что хотите удалить этот алгоритм.
Алгоритм удален.
4.3 Дополнительные функции
4.3.1 Добавление функций
Для того, чтобы добавить дополнительные функции, выполните
следующее:
1 Войдите в меню Setup - More Functions (Установка -
Дополнительные функции), выберите пункт Add Function
(Добавить функцию) и нажмите .
2 Разместите пульт SRU8008 и ваш
оригинальный пульт, как показано на
рисунке.
3 Выберите устройство, для которого вы
хотите добавить функцию.
4 Выберите обозначение, которое вы
хотите использовать для добавленной
функции.
5 Скопируйте функции с оригинального
пульта управления устройством, следуя инструкциям на дисплее
пульта SRU8008.
Функция добавлена в пульт SRU8008.
4.3.2 Переименование функции
Чтобы переименовать дополнительную функцию, выполните
следующее:
1 Войдите в меню Setup - More Functions (Установка -
Дополнительные функции), выберите пункт Rename Function
(Переименовать функцию) и нажмите .
2 Введите текст нового ярлыка с помощью клавиш с буквами и
цифрами.
3 Подтвердите новое название.
Функция переименована.
4.3.3 Удаление функций
Чтобы удалить дополнительную функцию, выполните следующее:
1 Войдите в меню Setup - More Functions (Установка -
Дополнительные функции), выберите пункт Delete Function
(Удалить функцию) и нажмите .
10
РУССКИЙ
Сложные функции пульта SRU8008 113
10
2-5 см
SRU8008_IFU_bundel 1 v09.qxd 03-12-2007 11:37 Pagina 113
2 Выберите устройство, функцию для которого вы хотите удалить.
3 Выберите функцию, которую вы хотите удалить.
4 Подтвердите, что хотите удалить эту функцию.
Функция удалена.
4.4 Параметры системы
4.4.1 Интервал отключения дисплея
При использовании пульта SRU8008 включается подсветка дисплея.
Через 5 секунд она снова выключается.
Чтобы изменить интервал отключения дисплея, выполните
следующее:
1 Войдите в меню Setup - System Settings (Установка -
Параметры системы), выберите пункт Backlight Time-out
(Интервал отключения дисплея) и нажмите .
2 С помощью поворотного колесика выберите
предпочтительный интервал отключения: 3 секунды, 5 секунд,
10 секунд, 20 секунд.
3 Подтвердите новый интервал отключения.
Интервал отключения дисплея изменен.
D Примечание
От интервала отключения подсветки дисплея зависит срок
службы элементов питания: чем дольше не отключается
подсветка, тем быстрее разрядятся элементы питания.
4.4.2 Подсветка клавиш
Чтобы включить или выключить подсветку клавиш, выполните
следующее:
1 Войдите в меню Setup - System Settings (Установка -
Параметры системы), выберите пункт Key Backlight (Подсветка
клавиш) и нажмите .
2 С помощью поворотного колесика выберите On (Включить)
или Off (Выключить).
3 Подтвердите новые настройки подсветки клавиш.
Подсветка клавиш включена (выключена).
4.4.3 Полная перезагрузка
При полной перезагрузке пульта SRU8008 удаляются все
установленные устройства, алгоритмы, любимые каналы и другие
настройки. После перезагрузки пульт необходимо снова настроить.
(Удаление слова избранное).
Чтобы перезагрузить пульт SRU8008, выполните следующее:
1 Войдите в меню System Settings (Установка - Параметры
системы), выберите пункт Full Reset (Полная перезагрузка) и
нажмите .
Сложные функции пульта SRU8008114
SRU8008_IFU_bundel 1 v09.qxd 03-12-2007 11:37 Pagina 114
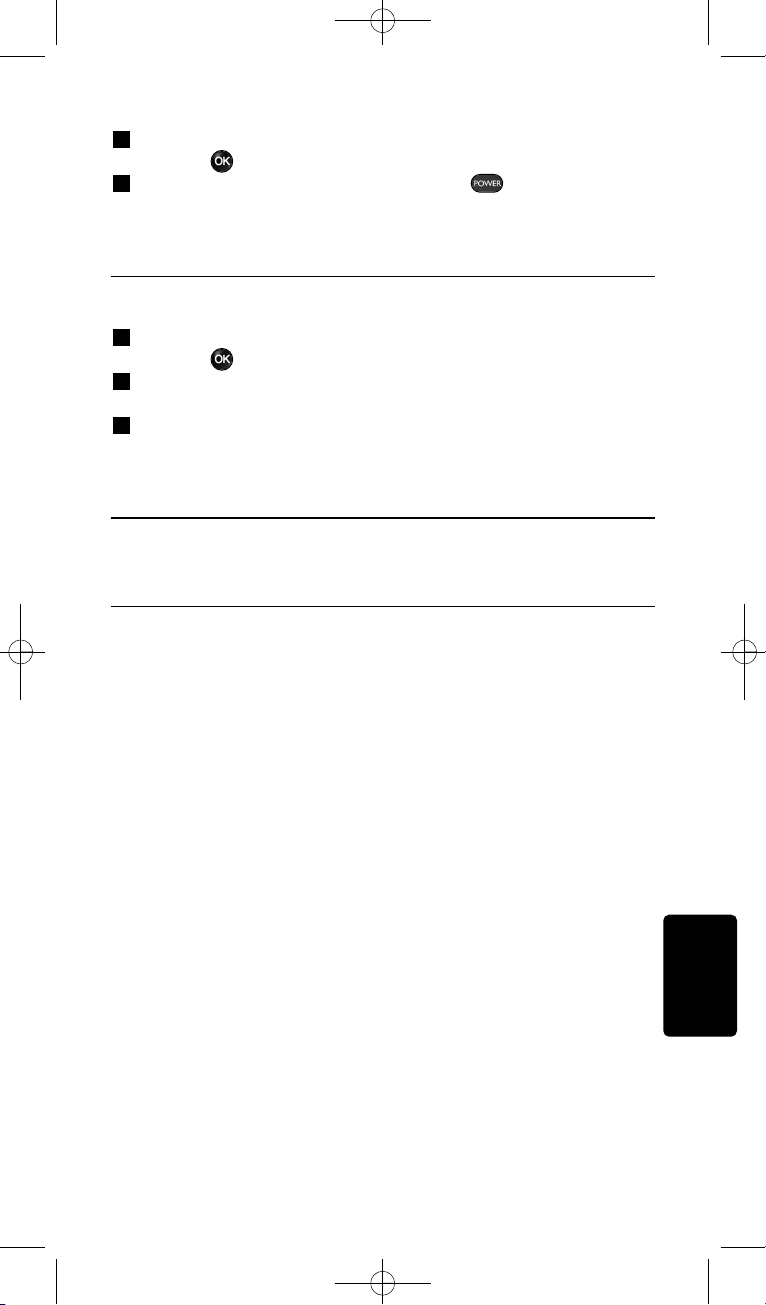
2 С помощью поворотного колесика выберите Ye s (Да) и
нажмите .
3 Для повторного подтверждения нажмите .
Пульт SRU8008 удалит все настройки и запустит Мастер
установки. Это может занять до 1 минуты.
4.5 Язык
Чтобы изменить язык меню пульта SRU8008, выполните следующее:
1 Войдите в меню Setup - Language (Установка - Язык) и
нажмите .
2 С помощью поворотного колесика выберите предпочтительный
язык: English, Franзais, Deutsch, Espaсol, Italiano, Nederlands, Русский.
3 Подтвердите выбор языка.
Язык меню Setup - Main Menu (Установка - Главное меню)
изменен.
5 Часто задаваемые вопросы
Клавиши
Почему одна или несколько клавиш не работают с моим
устройством?
В базе данных пульта SRU8008 доступны не все функции или
поврежден код клавиши.
Вы можете настроить клавишу, скопировав сигнал с оригинального
пульта управления устройством. См. Главу ‘Настройка клавиш’ на
стр. 109.
Как пользоваться кнопками вверх, вниз, вправо, влево для
перемещения по экранному меню?
Колесико управления является простым в использовании,
универсальным средством управления SRU8008:
• При вращении колесика управления, происходит прокрутка
различных опций на дисплее пульта ДУ.
• При нажатии на колесико управления сверху, снизу, справа или
слева вы перемещаетесь по экранному меню устройства, (ТВ, DVD,
телеприставки и т.д.) которым вы управляете в этот момент.
Как можно добавить в пульт SRM7500 дополнительные
функции?
См. главу ‘Добавление функций’ на стр. 103.
РУССКИЙ
Сложные функции пульта SRU8008 115
SRU8008_IFU_bundel 1 v09.qxd 03-12-2007 11:37 Pagina 115

Марка устройства
Почему я не могу найти в пульте SRU8008 марку своего
устройства?
В базе данных пульта SRU8008 указаны не все устройства. Если
вашего устройства нет в списке, выполните следующее:
• Вы можете скопировать клавиши с оригинального пульта
управления устройством. См. главу ‘Настройка клавиш’ на стр. 109.
-или-
• Вы можете выбрать пункт Not in list (Нет в списке), чтобы
выполнить поиск по базе данных.
Пульт SRU8008 испробует все доступные коды. Это может занять
до 25 минут.
Действие
Можно ли переходить с одного действия на другое?
Нет, после выбора действия, выбрать его же или другое действие
еще раз невозможно. Перед выбором другого действия из списка
необходимо выключить все устройства.
Громкость
Почему клавиши управления громкостью не работают
должным образом?
После добавления устройств пульт SRU8008 автоматически копирует
клавиши управления громкостью и клавишу Mute (Отключение звука)
следующим образом:
• Видеоустройства, такие как DVD, DVDR, VCR и приставка
Satellite box, используют клавиши громкости ТВ.
• Аудиоустройства, такие как CD, DMR и тюнер, используют
клавиши громкости усилителя или приемника.
Если вы еще не установили исходное устройство (ТВ, усилитель
или радиоприемник), клавиши управления громкостью и клавиша
Mute (Отключение звука) не будут работать. Чтобы определить
клавиши управления громкостью, выполните следующее:
• Вы можете установить исходное устройство в пульт SRU8008.
См. главу ‘Добавление устройств’ на стр. 104.
-или-
• Вы можете скопировать клавиши управления громкостью другого
исходного устройства. См. главу ‘Копирование громкости’ на
стр. 110.
Часто задаваемые вопросы116
SRU8008_IFU_bundel 1 v09.qxd 03-12-2007 11:37 Pagina 116
117Часто задаваемые вопросы
РУССКИЙ
Элементы питания
Почему я не могу войти в меню Setup (Установка)?
При низком уровне заряда элементов питания зайти в меню Setup
(Установка) нельзя. Замените элементы питания на новые щелочные
батареи.
Почему пульт SRU8008 не работает?
Слишком большая разрядка элементов питания. Замените элементы
питания на новые щелочные батареи.
Будут ли удалены мои данные при замене элементов
питания?
Нет. Ваши данные сохранятся.
Можно ли использовать с пультом SRU8008 перезаряжаемые
аккумуляторы?
Да, можно. Однако имейте в виду, что перезаряжаемые
аккумуляторы разряжаются быстрее, чем обычные щелочные батареи.
6 Нужна помощь?
Прежде всего, внимательно прочтите Инструкцию по
использованию.
При возникновении дополнительных вопросов об использовании,
установке или гарантии на SRU8008, см. www.philips.com/support
.
Сведения о контактах см. в www.philips.com/support
.
При звонке в службу поддержки SRU8008 должен быть под рукой,
чтобы наши операторы могли помочь Вам определить правильно ли
работает устройство.
Номер модели универсального пульта ДУ Philips - SRU8008.
Для обнаружения правильного кода для вашего пульта см.
www.philips.com/URC
.
Дата приобретения: ................/................../................ (число/месяц/год)
SRU8008_IFU_bundel 1 v09.qxd 03-12-2007 11:37 Pagina 117
118 Only for US - FCC Compliancy
Only for US - FCC Compliancy
This device complies with Part 15 of the FCC Rules. Operation is subject
to the following two conditions:
• This device may not cause harmful interference.
• This device must accept any interference received, including
interference that may cause undesired operation.
This equipment has been tested and found to comply with the limits for a
Class B digital device, pursuant to part 15 of the FCC rule and ICES 003
in Canada.
These limits are designed to provide reasonable protection against
harmful interference in residential installations. This equipment generates,
uses, and can radiate radio frequency energy and, if not installed and used
in accordance with the instructions, may cause harmful interference to
radio communications.
However, there is no guarantee that interference will not occur in a
particular installation. If the equipment does cause harmful interference to
radio or television reception, which can be determined by turning thee
equipment off and on, the user is encouraged to try to correct the
interference by using one or more of the following measures:
• Reorient or relocate the receiving antenna.
• Increase the separation between the equipment and receiver.
• Connect the equipment into to an outlet on a different circuit from the
receiver.
• Consult the dealer or an experienced radio/TV technician for help.
C CAUTION:
User changes or modifications not expressly approved by the party
responsible for compliance may void the user’s authority to operate
the equipment.
Notice for Canada / Remark pour le Canada
This class B digital apparatus complies with Canadian ICES-003.
Cet appareil numerique de la Classe B est conforme a la norme NMB-
003 du Canada.
SRU8008_IFU_bundel 1 v09.qxd 03-12-2007 11:37 Pagina 118

119Only for US - One Year Limited Warranty
Only for US - One Year Limited Warranty
Philips warrants that this product shall be free from defects in material,
workmanship and assembly, under normal use, in accordance with the
specifications and warnings, for a period of one year from the date of
purchase. This warranty extends only to the original purchaser of the
product, and is not transferable. To exercise your rights under this
warranty, you must provide proof of purchase in the form of an original
sales receipt that shows the product name and the date of purchase.
For customer support or to obtain warranty service, please visit our
website http://www.philips.com/welcome
or call toll nr 919-573-7854.
THERE ARE NO OTHER EXPRESS OR IMPLIED WARRANTIES.
Philips’ liability is limited to repair or, at its sole option, replacement of
the product. Incidental, special and consequential damages are disclaimed
where permitted by law. This warranty gives you specific legal rights. You
may also have other rights that vary from state to state.
ENGLISH
SRU8008_IFU_bundel 1 v09.qxd 03-12-2007 11:37 Pagina 119
120 Only for Europe - WEEE Regulation
Only for Europe - WEEE Regulation
Dutch Verwijdering van uw oude product
Uw product is vervaardigd van kwalitatief hoogwaardige materialen en
onderdelen, welke gerecycled en opnieuw gebruikt kunnen worden.
Als u op uw product een doorstreepte afvalcontainer op wieltjes ziet, betekent
dit dat het product valt onder de EU-richtlijn 2002/96/EC.
Win inlichtingen in over de manier waarop elektrische en elektronische
producten in uw regio gescheiden worden ingezameld.
Neem bij de verwijdering van oude producten de lokale wetgeving in acht en
plaats deze producten niet bij het gewone huishoudelijke afval. Als u oude
producten correct verwijdert voorkomt u negatieve gevolgen voor het milieu en
de volksgezondheid.
English Disposal of your old product
Your product is designed and manufactured with high quality materials and
components, which can be recycled and reused.
When this crossed-out wheeled bin symbol is attached to a product it means
the product is covered by the European Directive 2002/96/EC.
Please inform yourself about the local separate collection system for electrical
and electronic products.
Please act according to your local rules and do not dispose of your old products
with your normal household waste. The correct disposal of your old product will
help prevent potential negative consequences for the environment and human
health.
French Mise au rebut des produits en fin de vie
Ce produit a été conçu et fabriqué avec des matériaux et composants
recyclables de haute qualité.
Le symbole d’une poubelle barrée apposé sur un produit signifie que ce dernier
répond aux exigences de la directive européenne 2002/96/EC.
Informez-vous auprès des instances locales sur le système de collecte des
produits électriques et électroniques en fin de vie.
Conformez-vous à la législation en vigueur et ne jetez pas vos produits avec les
déchets ménagers. Seule une mise au rebut adéquate des produits peut
empêcher la contamination de l’environnement et ses effets nocifs sur la santé.
German Entsorgung Ihres alten Geräts
Ihr Gerät wurde unter Verwendung hochwertiger Materialien und Komponenten
entwickelt und hergestellt, die recycelt und wieder verwendet werden können.
Befindet sich dieses Symbol (durchgestrichene Abfalltonne auf Rädern) auf dem
Gerät, bedeutet dies, dass für dieses Gerät die Europäischen Richtlinie
2002/96/EG gilt.
Informieren Sie sich über die geltenden Bestimmungen zur getrennten Sammlung
von Elektro- und Elektronik-Altgeräten in Ihrem Land.
Richten Sie sich bitte nach den geltenden Bestimmungen in Ihrem Land, und
entsorgen Sie Altgeräte nicht über Ihren Haushaltsabfall. Durch die korrekte
Entsorgung Ihrer Altgeräte werden Umwelt und Menschen vor möglichen
negativen Folgen geschützt.
SRU8008_IFU_bundel 1 v09.qxd 03-12-2007 11:37 Pagina 120

121
Italian Smaltimento di vecchi prodotti
Il prodotto è stato progettato e assemblato con materiali e componenti di alta
qualità che possono essere riciclati e riutilizzati.
Se su un prodotto si trova il simbolo di un bidone con ruote, ricoperto da una
X, vuol dire che il prodotto soddisfa i requisiti della Direttiva comunitaria
2002/96/CE
Informarsi sulle modalità di raccolta, dei prodotti elettrici ed elettronici, in vigore
nella zona in cui si desidera disfarsi del prodotto.
Attenersi alle normative locali per lo smaltimento dei rifiuti e non gettare i
vecchi prodotti nei normali rifiuti domestici. Uno smaltimento adeguato dei
prodotti aiuta a prevenire l’inquinamento ambientale e possibili danni alla salute
Spanish Desecho del producto antiguo
El producto se ha diseñado y fabricado con materiales y componentes de alta
calidad, que se pueden reciclar y volver a utilizar.
Cuando este símbolo de contenedor de ruedas tachado se muestra en un
producto indica que éste cumple la directiva europea 2002/96/EC.
Obtenga información sobre la recogida selectiva local de productos eléctricos y
electrónicos.
Cumpla con la normativa local y no deseche los productos antiguos con los
desechos domésticos. El desecho correcto del producto antiguo ayudará a evitar
consecuencias negativas para el medioambiente y la salud humana.
Only for Europe - Warranty
For warranty information and product support please visit
http://www.philips.com/welcome
.
Only for Europe - WEEE Regulation
SRU8008_IFU_bundel 1 v09.qxd 03-12-2007 11:37 Pagina 121
122
......................................................
......................................................
......................................................
......................................................
......................................................
......................................................
......................................................
......................................................
......................................................
......................................................
......................................................
......................................................
......................................................
......................................................
......................................................
......................................................
......................................................
......................................................
......................................................
......................................................
......................................................
......................................................
......................................................
.....................................................
SRU8008_IFU_bundel 1 v09.qxd 03-12-2007 11:37 Pagina 122

123
......................................................
......................................................
......................................................
......................................................
......................................................
......................................................
......................................................
......................................................
......................................................
......................................................
......................................................
......................................................
......................................................
......................................................
......................................................
......................................................
......................................................
......................................................
......................................................
......................................................
......................................................
......................................................
......................................................
.....................................................
SRU8008_IFU_bundel 1 v09.qxd 03-12-2007 11:37 Pagina 123

© Copyright 2007 Royal Philips Electronics,
Interleuvenlaan 74-76, 3001 Leuven (Belgium)
3139 225 5449.1
SRU8008_IFU_bundel 1 v09.qxd 03-12-2007 11:37 Pagina 124