2
ENGLISH_index
Warning! Safety Instructions
CAUTION
RISK OF ELECTRIC SHOCK
DO NOT OPEN
CAUTION: TO REDUCE THE RISK OF ELECTRIC SHOCK, DO NOT
REMOVE COVER (OR BACK). NO USER-SERVICEABLE PARTS INSIDE.
REFER TO QUALIFIED SERVICE PERSONNEL.
This symbol is intended to alert the user to the presence of
uninsulated “dangerous voltage” within the product’s
enclosure that may be of sucient magnitude to constitute a risk
of electric shock to persons.
This symbol is intended to alert the user to the presence of
important operating and maintenance (servicing)
instructions in the literature accompanying the appliance.
WARNING: TO REDUCE THE RISK OF FIRE AND ELECTRIC SHOCK, DO
NOT EXPOSE THIS PRODUCT TO RAIN OR MOISTURE.
• TO PREVENT THE SPREAD OF FIRE, KEEP CANDLES OR OTHER ITEMS
WITH OPEN FLAMES AWAY FROM THIS PRODUCT AT ALL TIMES.
• Do not place the TV and/or remote control in the following
environments:
- Keep the product away from direct sunlight.
- An area with high humidity such as a bathroom
- Near any heat source such as stoves and other devices that
produce heat.
- Near kitchen counters or humidiers where they can easily be
exposed to steam or oil.
- An area exposed to rain or wind.
- Do not expose to dripping or splashing and do not place objects
lled with liquids, such as vases, cups, etc. on or over the
apparatus (e.g., on shelves above the unit).
- Near ammable objects such as gasoline or candles, or expose
the TV to direct air conditioning.
- Do not install in excessively dusty places.
Otherwise, this may result in re, electric shock, combustion/
explosion, malfunction or product deformation.
• Ventilation
- Install your TV where there is proper ventilation. Do not install in
a conned space such as a bookcase.
- Do not install the product on a carpet or cushion.
- Do not block or cover the product with cloth or other materials
while unit is plugged in.
• Take care not to touch the ventilation openings. When watching
the TV for a long period, the ventilation openings may become hot.
• Protect the power cord from physical or mechanical abuse, such as
being twisted, kinked, pinched, closed in a door, or walked upon.
Pay particular attention to plugs, wall outlets, and the point where
the cord exits the device.
• Do not move the TV whilst the Power cord is plugged in.
• Do not use a damaged or loosely tting power cord.
• Be sure do grasp the plug when unplugging the power cord. Do
not pull on the power cord to unplug the TV.
• Do not connect too many devices to the same AC power outlet as
this could result in re or electric shock.
• Disconnecting the Device from the Main Power
- The power plug is the disconnecting device. In case of an
emergency, the power plug must remain readily accessible.
• Do not let your children climb or cling onto the TV. Otherwise, the
TV may fall over, which may cause serious injury.
• Outdoor Antenna Grounding (Can dier by country):
- If an outdoor antenna is installed, follow the precautions below.
An outdoor antenna system should not be located in the vicinity
of overhead power lines or other electric light or power circuits,
or where it can come in contact with such power lines or circuits
as death or serious injury can occur.
Be sure the antenna system is grounded to provide some
protection against voltage surges and built-up static charges.
Section 810 of the National Electrical Code (NEC) in the U.S.A.
provides information with respect to proper grounding of the
mast and supporting structure, grounding of the lead-in wire
to an antenna discharge unit, size of grounding conductors,
location of antenna discharge unit, connection to grounding
electrodes and requirements for the grounding electrode.
Antenna grounding according to the National Electrical Code,
ANSI/NFPA 70

3
ENGLISH_index
• Grounding (Except for devices which are not grounded.)
- TV with a three-prong grounded AC plug must be connected to
a three-prong grounded AC outlet. Ensure that you connect the
earth ground wire to prevent possible electric shock.
• Never touch this apparatus or antenna during a lightning storm.
You may be electrocuted.
• Make sure the power cord is connected securely to the TV and wall
socket if not secured damage to the Plug and socket may occur and
in extreme cases a re may break out.
• Do not insert metallic or inammable objects into the product. If a
foreign object is dropped into the product, unplug the power cord
and contact the customer service.
• Do not touch the end of the power cord while it is plugged in. You
may be electrocuted.
• If any of the following occur, unplug the product
immediately and contact your local customer service.
- The product has been damaged.
- If water or another substance enters the product (like an AC
adapter, power cord, or TV).
- If you smell smoke or other odors coming from the TV
- When lightning storms or when unused for long periods of time.
Even the TV is turned o by remote control or button, AC power
source is connected to the unit if not unplugged in.
• Do not use high voltage electrical equipment near the TV (e.g., a
bug zapper). This may result in product malfunction.
• Do not attempt to modify this product in any way without written
authorization from LG Electronics. Accidental re or electric shock
can occur. Contact your local customer service for service or repair.
Unauthorized modication could void the user’s authority to
operate this product.
• Use only an authorized attachments / accessories approved by
LG Electronics. Otherwise, this may result in re, electric shock,
malfunction, or product damage.
• Never disassemble the AC adapter or power cord. This may result in
re or electric shock.
• Handle the adapter carefully to avoid dropping or striking it. An
impact could damage the adapter.
• To reduce the risk of re or electrical shock, do not touch the TV
with wet hands. If the power cord prongs are wet or covered with
dust, dry the power plug completely or wipe dust o.
• Batteries
- Store the accessories (battery, etc.) in a safe location out of the
reach of children.
- Do not short circuit, disassemble, or allow the batteries to
overheat. Do not dispose of batteries in a re. Batteries should
not be exposed to excessive heat.
• Moving
- When moving, make sure the product is turned o, unplugged,
and all cables have been removed. It may take 4 or more people
to carry larger TVs. Do not press or put stress on the front panel
of the TV. Otherwise, this may result in product damage, re
hazard or injury.
• Keep the packing anti-moisture material or vinyl packing out of the
reach of children.
• Do not allow an impact shock, any objects to fall into the product,
and do not drop anything onto the screen.
• Do not press strongly upon the panel with a hand or a sharp
object such as a nail, pencil, or pen, or make a scratch on it. It may
causedamage to screen.
• Cleaning
- When cleaning, unplug the power cord and wipe gently with a
soft/dry cloth. Do not spray water or other liquids directly on the
TV. Do not clean your TV with chemicals including glass cleaner,
any type of air freshener, insecticide, lubricants, wax (car,
industrial), abrasive, thinner, benzene, alcohol etc., which can
damage the product and/or its panel. Otherwise, this may result
in electric shock or product damage.
4
ENGLISH_index
Preparing
• If the TV is turned on for the rst time after it was shipped from the
factory, initialization of the TV may take a few minutes.
• Image shown may dier from your TV.
• Your TV’s OSD (On Screen Display) may dier slightly from that
shown in this manual.
• The available menus and options may dier from the input source
or product model that you are using.
• New features may be added to this TV in the future.
• The device must be easily accessed to a location outlet near the
access. Some devices are not made by turning on / o button,
turning o the device and unplugging the power cord.
• The items supplied with your product may vary depending on the
model.
• Product specications or contents of this manual may be changed
without prior notice due to upgrade of product functions.
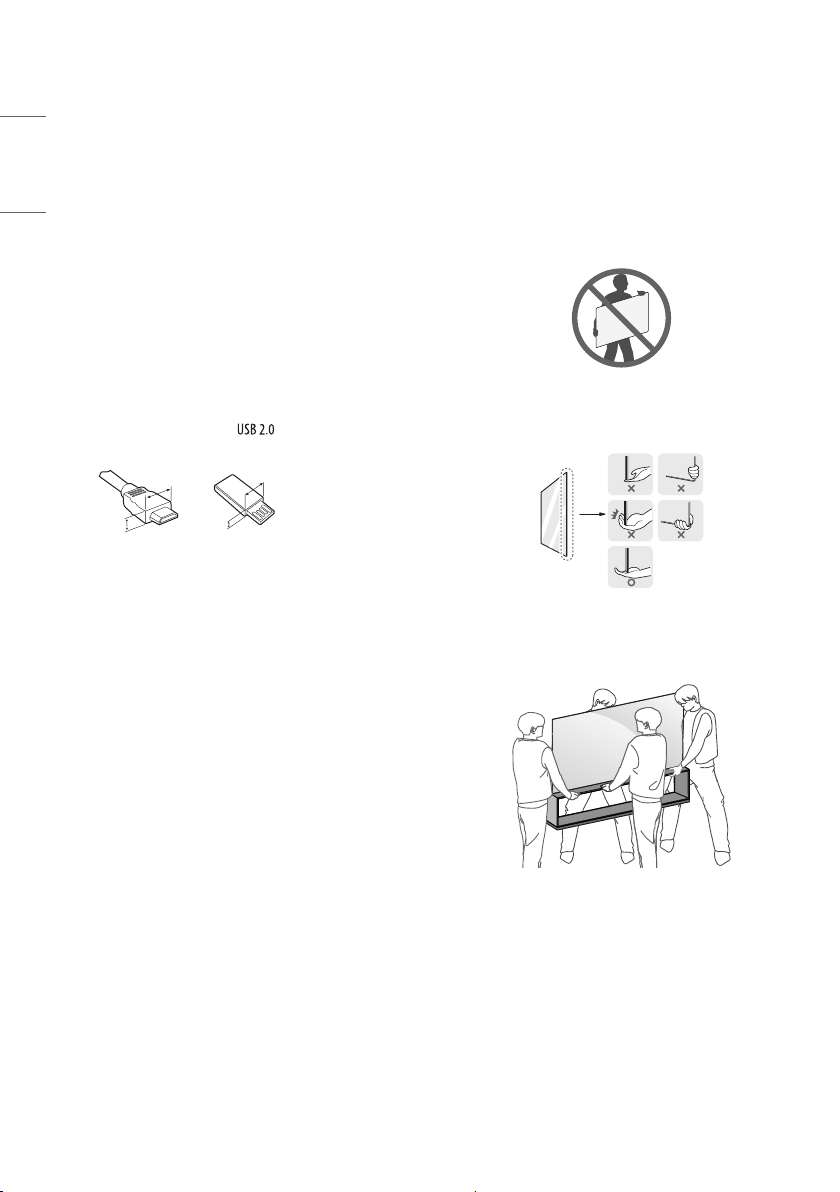
• For an optimal connection, HDMI cables and USB devices should
have bezels less than 10mm thick and 18mm width. Use an
extension cable that supports if the USB cable or USB
memory stick does not t into your TV’s USB port.
A
B
A
B
*A
<
=
10 mm
*B
<
=
18 mm
• Use a certied cable with the HDMI logo attached.
• If you do not use a certied HDMI cable, the screen may not display
or a connection error may occur. (Recommended HDMI Cable Types)
- Ultra High Speed HDMI
®
/™ cable (3 m or less)
Lifting and moving the TV
Please note the following advice to prevent the TV from being scratched
or damaged and for safe transportation regardless of its type and size.
• It is recommended to move the TV in the box or packing material
that the TV originally came in.
• Before moving or lifting the TV, disconnect the power cord and
all cables.
• When holding the TV, the screen should face away from you to
avoid damage.
• Make sure not to hold the transparent part, speaker, or speaker
grill area.
• When transporting a large TV, there should be at least 4 people.
• When transporting the TV by hand, hold the TV as shown in the
following illustration.
When transporting the TV, do not expose the TV to jolts or excessive
vibration.
• When transporting the TV, keep the TV upright, never turn the TV
on its side or tilt towards the left or right.
• Do not apply excessive pressure to cause exing / bending of frame
chassis as it may damage screen.
• When handling the TV, be careful not to damage the protruding
buttons.
5
ENGLISH_index
• Avoid touching the screen at all times, as this may result in
damage to the screen.
• Please do not pile the stu up or press strongly the
speaker. This may result in product damage or degradation.
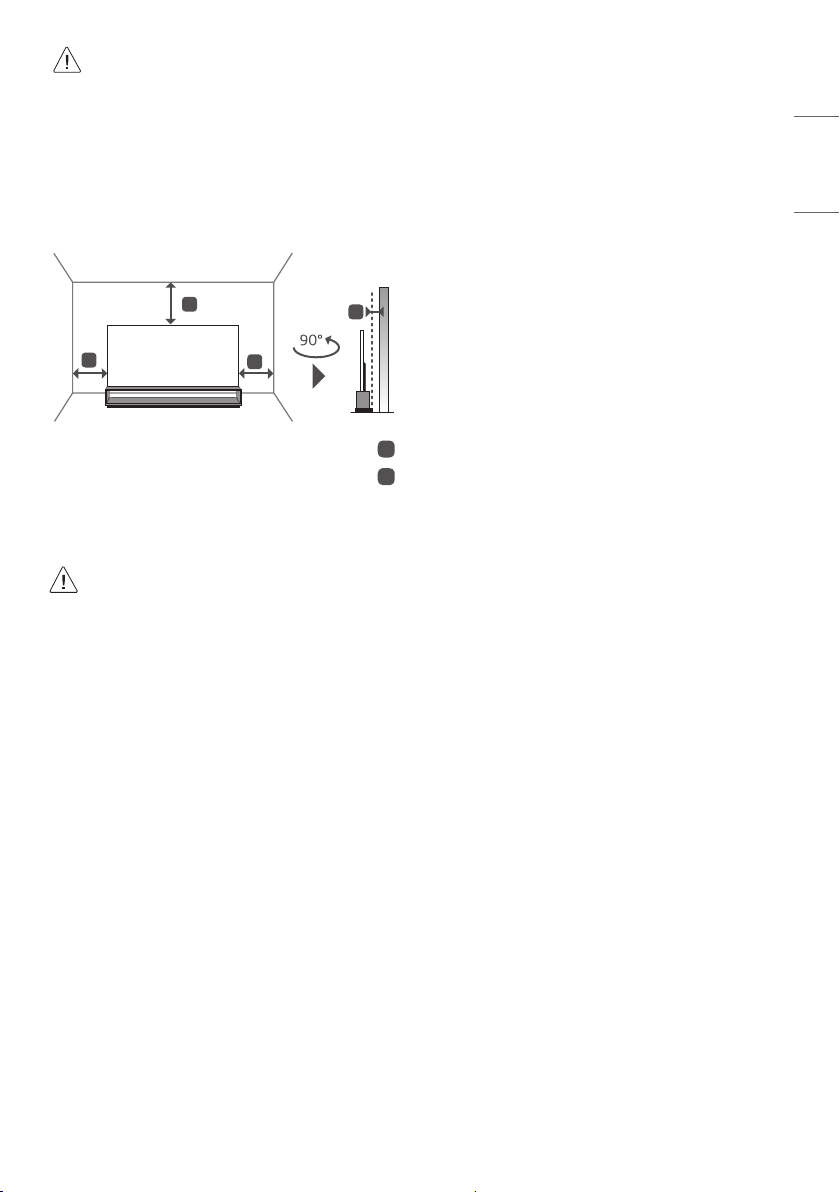
Installation
A
A
A
B
10 cm
<
=
A
2 cm
<
=
B
• It is recommended to install the product on the oor.
• Do not apply foreign substances (oils, lubricants, etc.) to
the screw parts when assembling the product. (Doing so
may damage the product.)
• If you install the TV on a stand, you need to take actions
to prevent the product from overturning. Otherwise, the
product may fall over, which may cause injury.
• Do not use any unapproved items to ensure the safety and
product life span.
• Any damage or injuries caused by using unapproved items
are not covered by the warranty.
• Make sure that the screws are inserted correctly and
fastened securely. (If they are not fastened securely
enough, the TV may tilt forward after being installed.)
Do not use too much force and over tighten the screws;
otherwise screw may be damaged and not tighten
correctly.
Connections
Connect various external devices to the TV and switch input modes to
select an external device. For more information of external device’s
connection, refer to the manual provided with each device.
• Certain 8K input/decoding standards may not be supported.
An additional device may be necessary to support certain 8K
standards. Upscaled and enhanced 8K images will vary depending
on the source content.
• The product label is attached under the external device connection
terminal cover.
• Do not use more than one power plug at the same time, but be
sure to use an outlet with a rated voltage and current.
Antenna/Cable
Connect the TV to a wall antenna socket with an RF cable (75Ω).
• Use a signal splitter to use more than 2 TVs.
• If the image quality is poor, install a signal amplier properly to
improve the image quality.
• If the image quality is poor with an antenna connected, try to
realign the antenna in the correct direction.
• An antenna cable and converter are not supplied.
• For a location that is not supported with ULTRA HD broadcasting,
this TV cannot receive ULTRA HD broadcasts directly.
Satellite dish
Connect the TV to a satellite dish to a satellite socket with a satellite RF
cable (75Ω). (Depending on model)

6
ENGLISH_index
CI module
View the encrypted (pay) services in digital TV mode. (Depending on
model)
• Check if the CI module is inserted into the PCMCIA card slot in the
right direction. If the module is not inserted properly, this can
cause damage to the TV and the PCMCIA card slot.
• If the TV does not display any video and audio when CI+ CAM is
connected, please contact to the Terrestrial/Cable/Satellite Service
Operator.
Other connections
Connect your TV to external devices. For the best picture and audio
quality, connect the external device and the TV with the HDMI cable.
Some separate cable is not provided.
HDMI
• When connecting the HDMI cable, the product and external devices
should be turned o and unplugged.
• Supported HDMI Audio format :
(Depending on model)
DTS (44.1 kHz, 48 kHz, 88.2 kHz, 96 kHz),
DTS HD (44.1 kHz, 48 kHz, 88.2 kHz, 96 kHz, 176.4 kHz, 192 kHz),
True HD (48 kHz),
Dolby Digital / Dolby Digital Plus (32 kHz, 44.1 kHz, 48 kHz),
PCM (32 kHz, 44.1 kHz, 48 kHz, 96 kHz, 192 kHz)
(Only UHD models)
• → ( ) → [Picture] → [Additional Settings] → [HDMI
ULTRA HD Deep Colour]
- 8K: Support 8K @ 60 Hz (4:2:0), 8K @ 30 Hz (4:4:4, 4:2:2, 4:2:0)
- 4K: Support 4K @ 50/60 Hz (4:4:4, 4:2:2, 4:2:0)
- O: Support 4K @ 50/60 Hz 8 bit (4:2:0)
If the device connected to Input Port also supports ULTRA HD Deep
Colour, your picture may be clearer. However, if the device doesn’t
support it, it may not work properly. In that case, change the TV’s
[HDMI ULTRA HD Deep Colour] setting to o.
USB
Some USB Hubs may not work. If a USB device connected using a USB
Hub is not detected, connect it to the USB port on the TV directly.
External Devices
Available external devices are: Blu-ray player, HD receivers, DVD players,
VCRs, audio systems, USB storage devices, PC, gaming devices, and
other external devices.
• The external device connection may dier from the model.
• Connect external devices to the TV regardless of the order of the
TV port.
• If you record a TV program on a Blu-ray/DVD recorder or VCR, make
sure to connect the TV signal input cable to the TV through a DVD
recorder or VCR. For more information of recording, refer to the
manual provided with the connected device.
• Refer to the external equipment’s manual for operating
instructions.
• If you connect a gaming device to the TV, use the cable supplied
with the gaming device.
• In PC mode, there may be noise associated with the resolution,
vertical pattern, contrast or brightness. If noise is present, change
the PC output to another resolution, change the refresh rate to
another rate or adjust the brightness and contrast on the PICTURE
menu until the picture is clear.
• In PC mode, some resolution settings may not work properly
depending on the graphics card.
• If ULTRA HD content is played on your PC, video or audio may
become disrupted intermittently depending on your PC’s
performance.
• When connecting via a wired LAN, it is recommended to use a CAT
7 cable. (Only when port is provided.)
7
ENGLISH_index
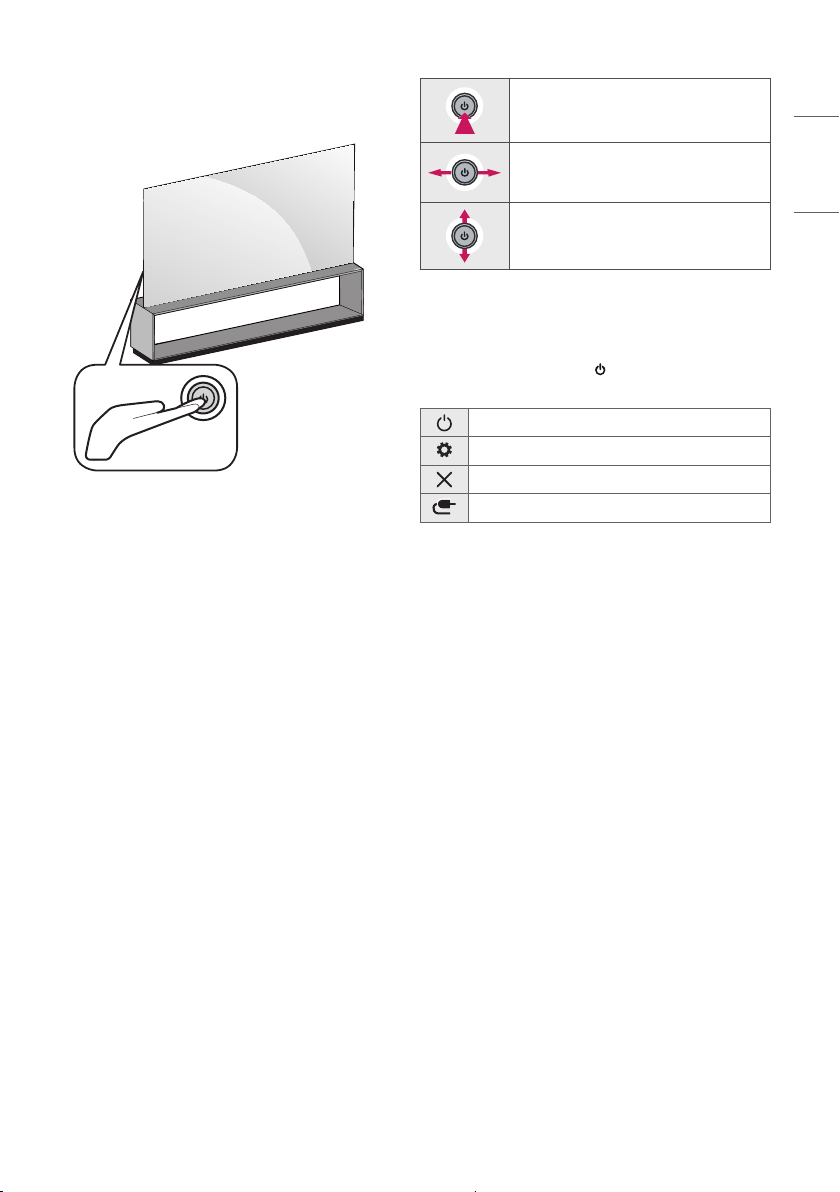
Using Button
You can simply operate the TV functions, using the button.
Basic functions
Power On (Press)
Power O
1
(Press and hold)
Volume Control
Programmes Control
1 All running apps will close, and any recording in progress will stop.
(Depending on country)
Adjusting the menu
When the TV is turned on, press the button one time. You can adjust
the Menu items using the button.
Turns the power o.
Accesses the settings menu.
Clears on-screen displays and returns to TV viewing.
Changes the input source.
8
ENGLISH_index
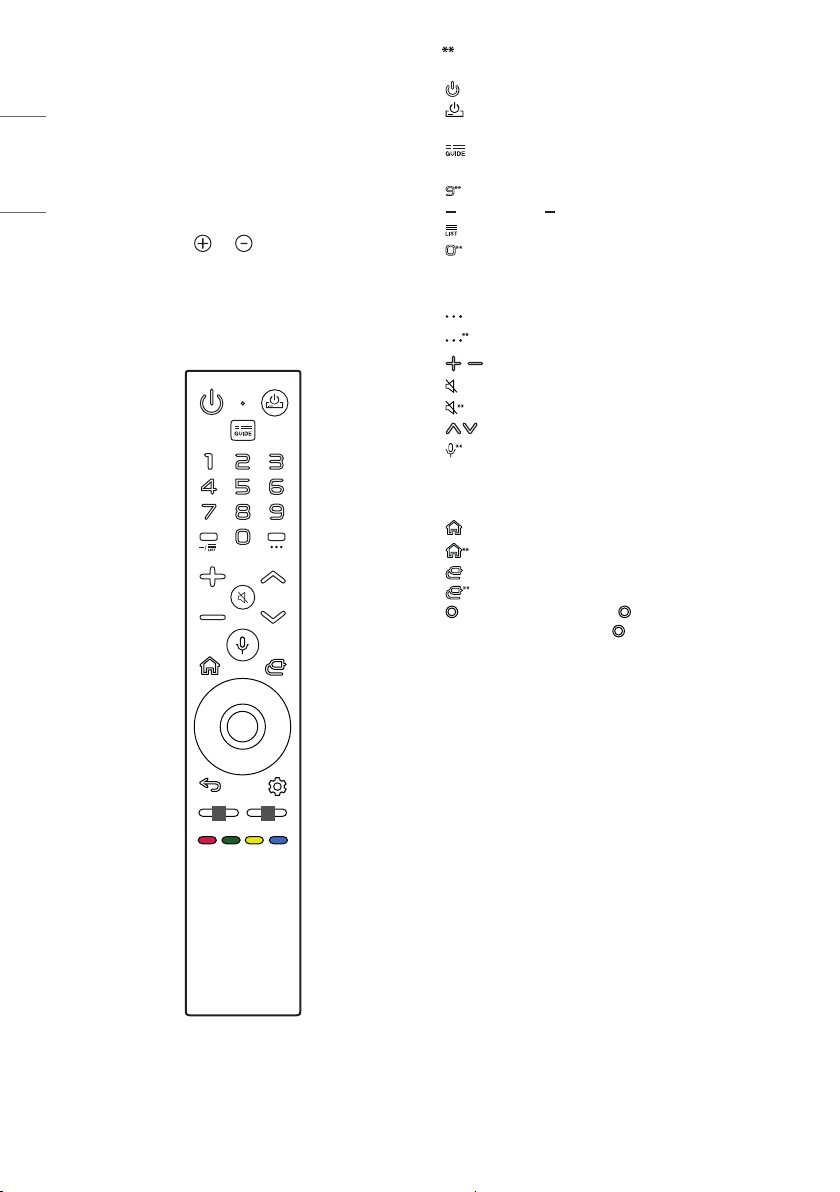
Using Magic Remote
Control
The descriptions in this manual are based on the buttons on the remote
control. Please read this manual carefully and use the TV correctly.
When the message [Magic Remote battery is low. Please change the
battery.] is displayed, replace the battery.
To replace batteries, open the battery cover, replace batteries
(1.5V AAA) matching the and ends to the label inside the
compartment, and close the battery cover. Be sure to point the Magic
Remote toward the remote control sensor on the TV. To remove the
batteries, perform the installation actions in reverse.
(If you lose the supplied pin, you can use a pointed object instead.)
11
(Some buttons and services may not be provided depending on models
or regions.)
To use the button, press and hold for more than 1 second.
(POWER) Turns the TV on or o.
(STB POWER) You can turn your set-top box on or o by adding
the set-top box to the universal remote control for your TV.
Shows programme guide.
Number buttons Enters numbers.
Accesses the [QUICK HELP].
(DASH) Inserts a between numbers such as 2-1 and 2-2.
Accesses the saved programmes list.
Edits QUICK ACCESS.
- QUICK ACCESS is a feature that allows you to enter a specied app
or Live TV directly by pressing and holding the number buttons.
(MORE ACTIONS) Displays more remote control functions.
(MORE ACTIONS) Audio descriptions function will be enabled.
Adjusts the volume level.
(MUTE) Mutes all sounds.
(MUTE) Accesses the [Accessibility] menu.
Scrolls through the saved programmes.
(Voice recognition) Network connection is required to use the
voice recognition function. Once the voice display bar is activated on
the TV screen, press and hold the button and speak your command
out loud.
(HOME) Accesses the Home menu.
(HOME) Shows the previous history.
(INPUT) Changes the input source.
(INPUT) Accesses the [HOME DASHBOARD].
Wheel (OK) Press the center of button to select a menu. You
can change programmes by using button.
- Do not move the wheel on the remote control right or left. This
may cause the malfunction of the product.
up/down/left/right Press the up, down, left or right button to scroll
the menu. If you press the up, down, left or right button while the
pointer is in use, the pointer will disappear from the screen and Magic
Remote will operate like a general remote control. To display the
pointer on the screen again, shake Magic Remote to the left and right.
9
ENGLISH_index
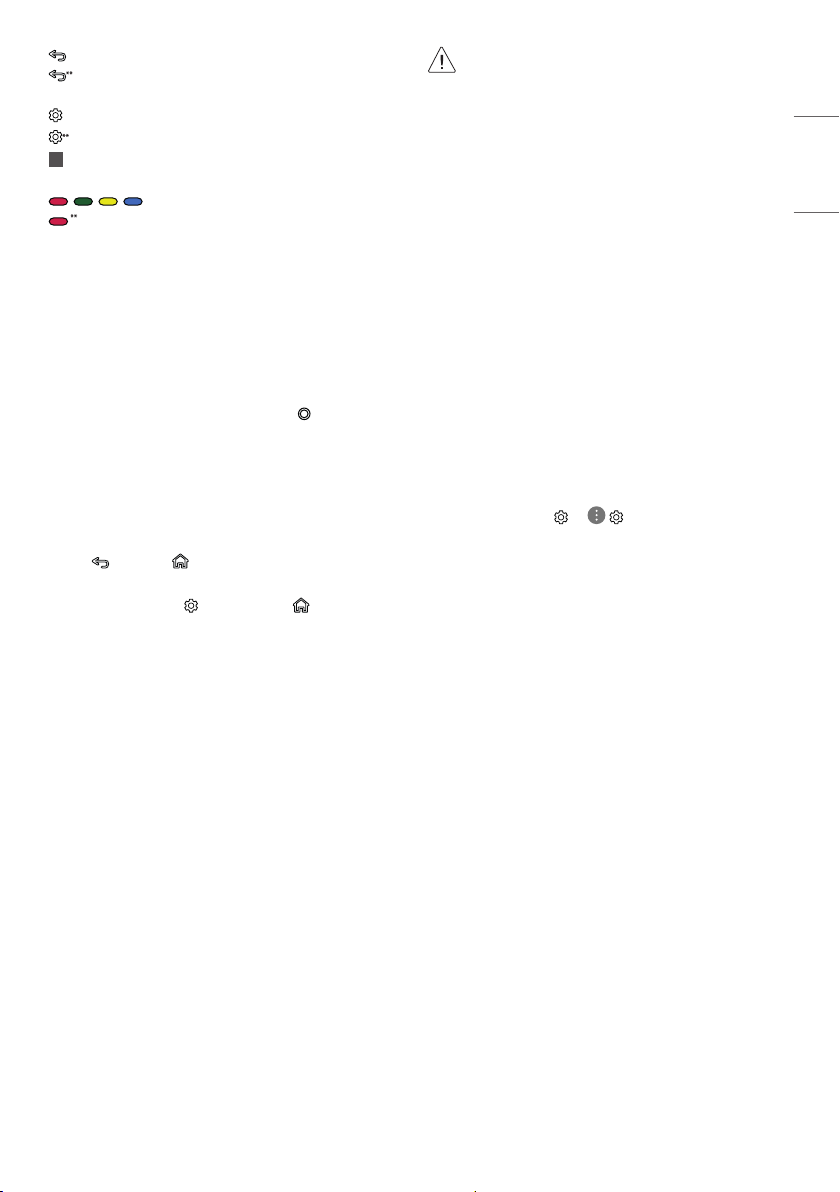
(BACK) Returns to the previous level.
(BACK) Clears on-screen displays and returns to last input
viewing.
(Q. Settings) Accesses the Quick Settings.
(Q. Settings) Displays the [All Settings] menu.
1
Streaming Service buttons Connects to the Video Streaming
Service.
, , , These access special functions in some menus.
Runs the record function.
Registering Magic Remote Control
How to register the Magic remote control
To use the Magic Remote, rst pair it with your TV.
1 Put batteries into the Magic Remote and turn the TV on.
2 Point the Magic Remote at your TV and press the Wheel (OK) on
the remote control.
* If the TV fails to register the Magic Remote, try again after turning
the TV off and back on.
How to deregister the Magic Remote
Control
Press the (BACK) and (HOME) buttons at the same time, for
ve seconds, to unpair the Magic Remote with your TV.
* Pressing and holding the (Q. Settings) and (HOME) buttons
will let you cancel and re-register Magic Remote at once.
• It is recommended that an Access Point (AP) be located
more than 0.2m away from the TV. If the AP is installed
closer than 0.2m, the Magic remote control may not
perform as expected due to frequency interference.
• Do not mix new batteries with old batteries. This may
cause the batteries to overheat and leak.
• Failure to match the correct polarities of the battery
may cause the battery to burst or leak, resulting in re,
personal injury, or ambient pollution.
• This apparatus uses batteries. In your community there
might be regulations that require you to dispose of these
batteries properly due to environmental considerations.
Please contact your local authorities for disposal or
recycling information.
• Batteries inside or inside the product shall not be
exposed to excessive heat such as sunshine, re or the
like.
User Guide
For more information about this TV, read the USER GUIDE embedded in
the product.
• To open the USER GUIDE → ( ) → [General] → [About This
TV] → [User Guide]

10
ENGLISH_index
Troubleshooting
Cannot control the TV with the remote control.
• Check the remote control sensor on the product and try again.
• Check if there is any obstacle between the product and the remote
control.
• Check if the batteries are still working and properly installed (
to , to ).
No image display and no sound is produced.
• Check if the product is turned on.
• Check if the power cord is connected to a wall outlet.
• Check if there is a problem in the wall outlet by connecting other
products.
The TV turns o suddenly.
• Check the power control settings. The power supply may be
interrupted.
• Check if the auto-o function is activated on the settings related
time.
• If there is no signal while the TV is on, the TV will turn o
automatically after 15 minutes of inactivity.
When connecting to the PC (HDMI), no signal is detected.
• Turn the TV o/on using the remote control.
• Reconnect the HDMI cable.
• Restart the PC with the TV on.
Abnormal Display
• If the product feels cold to the touch, there may be a small “icker”
when it is turned on. This is normal, there is nothing wrong with
product.
• This panel is an advanced product that contains millions of pixels.
You may see tiny black dots and/or brightly coloured dots (white,
red, blue or green) at a size of 1ppm on the panel. This does not
indicate a malfunction and does not aect the performance and
reliability of the product.
This phenomenon also occurs in third-party products and is not
subject to exchange or refund.
• You may nd dierent brightness and colour of the panel
depending on your viewing position(left/right/top/down).
This phenomenon occurs due to the characteristic of the panel.
It is not related with the product performance, and it is not
malfunction.
Generated Sound
• “Cracking” noise: A cracking noise that occurs when watching or
turning o the TV is generated by plastic thermal contraction due
to temperature and humidity. This noise is common for products
where thermal deformation is required.
• Electrical circuit humming/panel buzzing: A low level noise is
generated from a high-speed switching circuit, which supplies a
large amount of current to operate a product. It varies depending
on the product.
This generated sound does not aect the performance and
reliability of the product.
• Make sure to wring any excess water or cleaner from
the cloth.
• Do not spray water or cleaner directly onto the TV screen.
• Make sure to spray just enough of water or cleaner onto a
dry cloth to wipe the screen.
11
ENGLISH_index
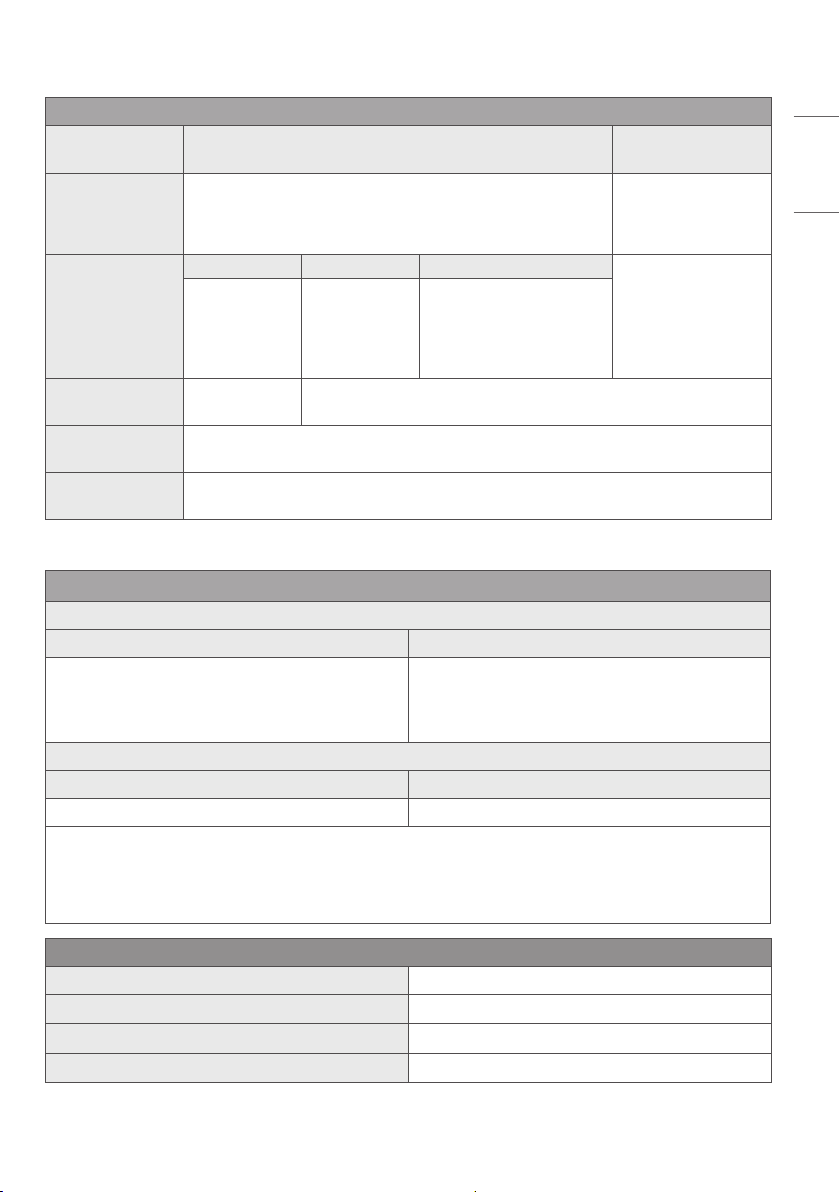
Specications
Broadcasting Specifications
Digital TV
(Depending on country)
Analogue TV
(Depending on country)
Television system
DVB-T/T2
DVB-C
DVB-S/S2
PAL B/B, PAL B/G,
PAL D/K, PAL-I,
SECAM B/G, SECAM D/K,
NTSC-M
Program coverage
DVB-S/S2
1
DVB-C
1
DVB-T/T2
1
46 ~ 862 MHz
950 ~ 2150 MHz 46 ~ 890 MHz
VHF III : 174 ~ 230 MHz
UHF IV : 470 ~ 606 MHz
UHF V : 606 ~ 862 MHz
S Band II : 230 ~ 300 MHz
S Band III : 300 ~ 470 MHz
Maximum number of
storable programmes
6,000 3,000
External antenna
impedance
75 Ω
CI Module
(W x H x D)
100.0 mm x 55.0 mm x 5.0 mm
1 Only DVB-T2/C/S2 support model only.
Wireless module(LGSBWAC92)Specifications
Wireless LAN (IEEE 802.11a/b/g/n/ac)
Frequency range Output power(Max.)
2400 to 2483.5 MHz
5150 to 5725 MHz
5725 to 5850 MHz (Not for EU)
18 dBm
18 dBm
12 dBm
Bluetooth
Frequency range Output power(Max.)
2400 to 2483.5 MHz 8 dBm
As band channels can vary per country, the user cannot change or adjust the operating frequency. This product is congured for the regional
frequency table.
For consideration of the user, this device should be installed and operated with a minimum distance of 20 cm between the device and the body.
* IEEE 802.11ac is not available in all countries.
Environment condition
Operating Temperature 0 °C to 40 °C
Operating Humidity Less than 80 %
Storage Temperature -20 °C to 60 °C
Storage Humidity Less than 85 %

12
ENGLISH_index
Open Source Software
Notice Information
To obtain the source code under GPL, LGPL, MPL, and other open source
licenses, that is contained in this product, please visit
http://opensource.lge.com.
In addition to the source code, all referred license terms, warranty
disclaimers and copyright notices are available for download.
LG Electronics will also provide open source code to you on CD-ROM
for a charge covering the cost of performing such distribution (such
as the cost of media, shipping, and handling) upon email request to
.
This oer is valid for a period of three years after our last shipment of
this product. This oer is valid to anyone in receipt of this information.
Licenses
(Magic Remote supported models only)

13
ENGLISH_index
Important Information for
Preventing Image Retention
OLED is a self-emissive technology, which brings many signicant
benets to image quality and performance. As with any self-emitting
display, it is possible for users of OLED TVs to experience temporary
image retention under certain conditions, such as when displaying a
static image on the screen for a long time. LG OLED TVs incorporate
dedicated functions that protect the screen from possible image
retention.
If a static image persists on screen, screen brightness is automatically
reduced in specic areas of, or across the entire screen. Once the static
image disappears, screen brightness will automatically return to its
prior setting. This is not a product malfunction.
Examples of Images that may Cause
Image Retention
• Still images or xed images containing certain information
that are displayed uninterrupted on the screen, such as channel
numbers, station logos, program titles, news or movie subtitles,
and headlines.
• Fixed menu or icons for video game consoles or broadcasting
set-top boxes.
• Black bars shown on the left, right, top, or bottom of the screen,
such as in images with a 4:3 or 21:9 ratio.
Recommended Measures for
Preventing Image Retention
• Avoid watching a video displaying an image as listed above for
extended periods of time.
• Adjust your TV settings as below when turning on a video
exhibiting an image as listed above for extended periods of time.
- [Picture] → [Picture Mode Settings] → [Picture Mode] →
[Eco]
- [Picture] → [Picture Mode Settings] → [OLED LIGHT] → Adjust
to lower value
- [Picture] → [Additional Settings] → [OLED Panel Settings] →
[Logo Luminance Adjustment] → [High]
• Turn o the menu bar of an external device, such as a set-top
box, to prevent long-term display of the menu bar of such device.
(Please refer to the manual of the applicable external device for
instructions.)
• Adjust the settings as below when watching a video constantly
showing black bars on the left, right, top or bottom, in order to
remove the black bars.
- [Picture] → [Aspect Ratio Settings] → [Aspect Ratio] →
[Vertical Zoom] or [All-Direction Zoom]
Information on Functions
Supporting Image Quality in
Relation to Temporary Image
Retention
• LG OLED TVs provide a feature called Pixel Refresher, which helps to
prevent temporary image retention.
• When the accumulated television viewing time reaches 2,000
hours or more (this is equivalent to watching TV for ve hours a
day over the course of a year), Pixel Refresher will be automatically
activated once your TV is turned o. When turning o your TV, a
notice will appear on the screen informing the activation of Pixel
Refresher. This feature will run for 1.5 hours while your TV is turned
o. A horizontal line may appear at the top or bottom of the screen
when the process is almost nished.
• You may also manually activate Pixel Refresher via the TV menu:
→ ( ) → [Picture] → [Additional Settings] → [OLED
Panel Settings] → [Pixel Refresher].
• Whenever you watch your TV for more than four cumulative hours,
Pixel Refresher will be automatically activated for a few minutes
once your TV is turned o. (Note: Pixel Refresher will not be
activated if the power cord of your TV is not plugged in or the main
power is o.)
MODEL
SERIAL NO.
The model and serial number of the product are located
on the back and on one side of the product. Record
them below in case you ever need service.

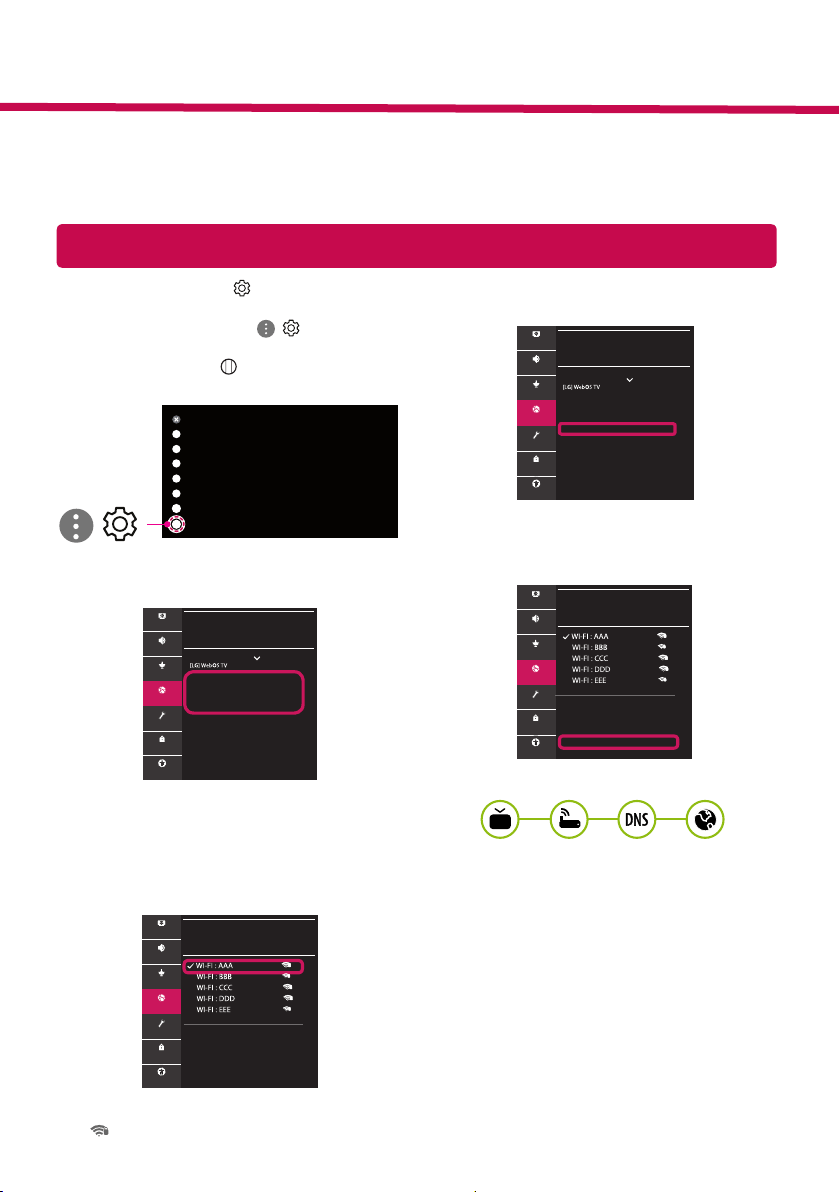
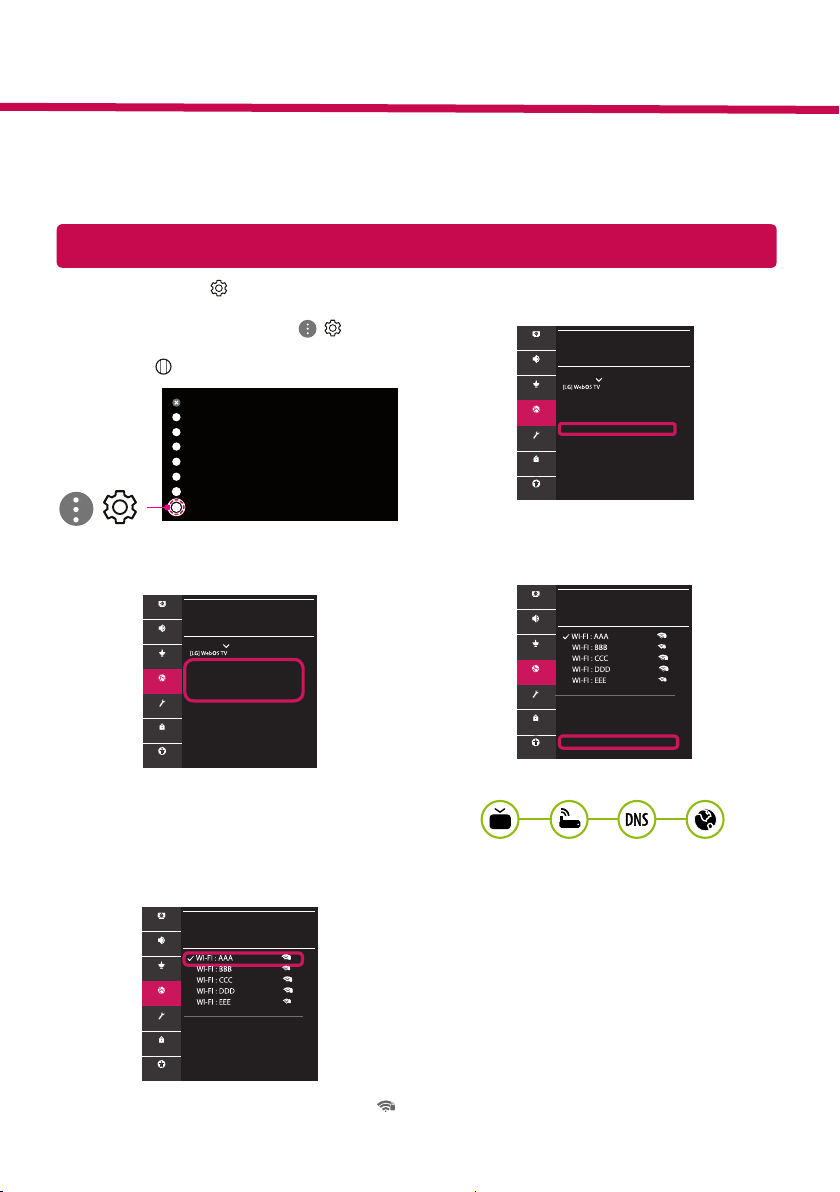
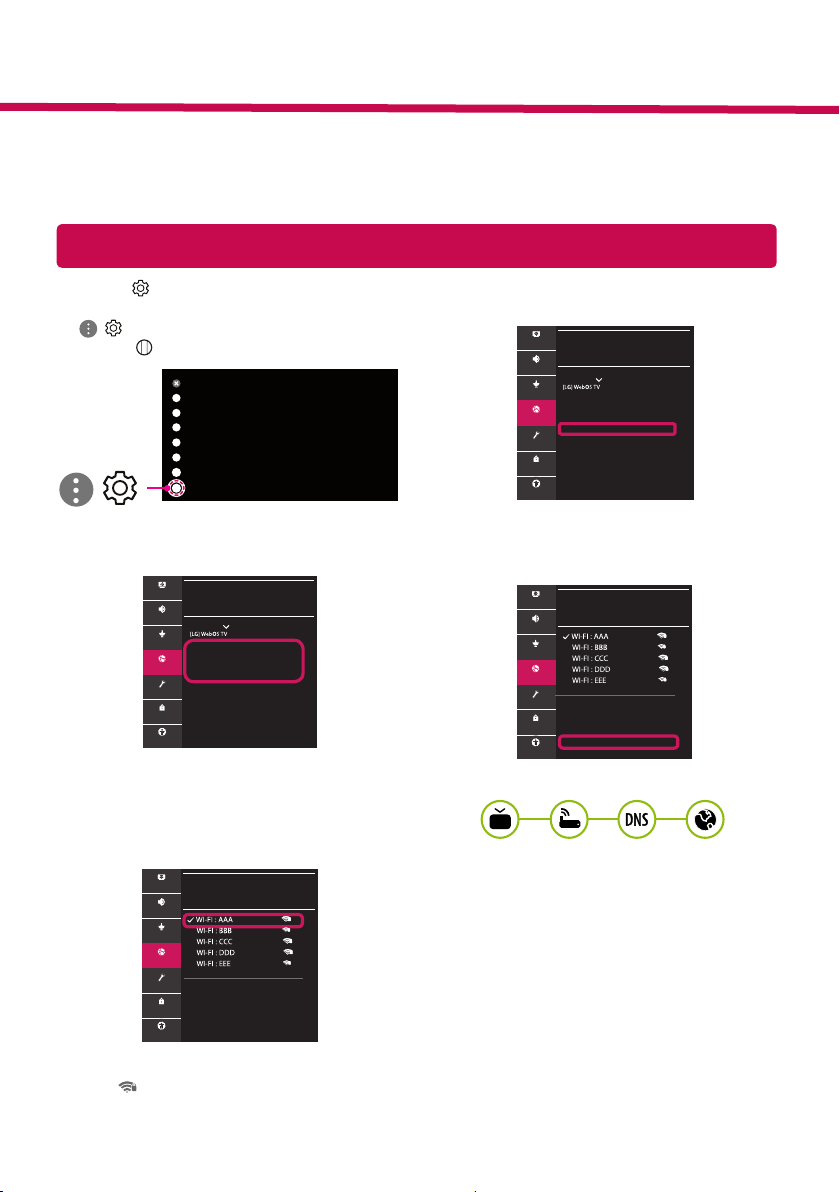
Network Settings
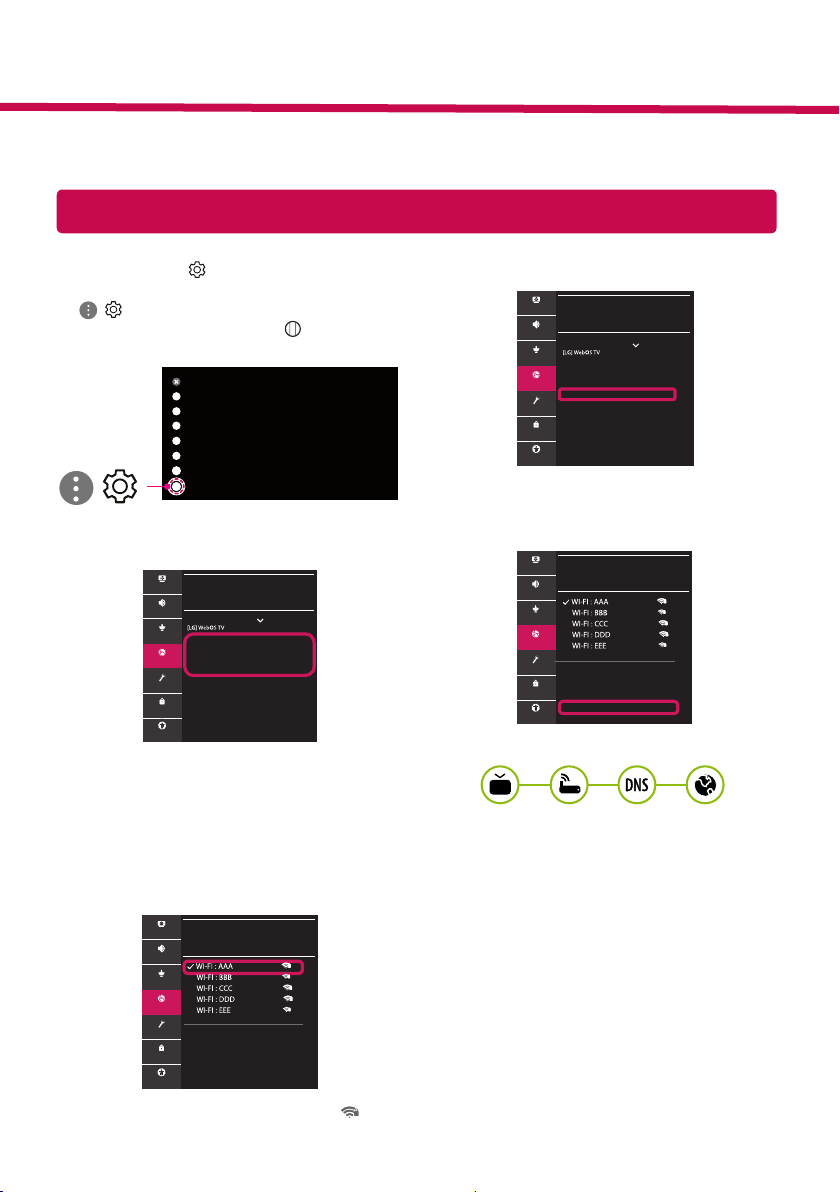
1 Press the (Settings) on the remote to
access the settings menu. Point the ( ) [All
Settings] icon and select by pressing the
Wheel (OK) button on the remote.
All Settings
(
)
2 Select the [Connection] → [Wired
Connection(Ethernet)] or [Wi-Fi Connection].
CONNECTION
TV Name
Wired Connection (Ethernet)
Not Connected
Wi-Fi Connection
Not Connected
Device Connector
Mobile TV on
Screen Share Settings
HDMI Device Settings
Picture
Sound
Programmes
Connection
General
Safety
Accessibility
3 The device automatically tries to connect to the
network available (wired network rst).
When you select the [Wi-Fi Connection], the
network list available is displayed. Choose the
network you wish to use.
WI-FI CONNECTION
Connection /
Add a Hidden Wireless Network
Connect via WPS PBC
Connect via WPS PIN
Advanced Wi-Fi Settings
Picture
Sound
Programmes
Connection
General
Safety
Accessibility
For wireless AP (Router) that have the symbol,
you need to enter the security key.
4 If the connection is successful, the "[Connected
to Internet]" is displayed.
CONNECTION
TV Name
Wired Connection (Ethernet)
Not Connected
Wi-Fi Connection
Connected to Internet
Device Connector
Mobile TV on
Screen Share Settings
HDMI Device Settings
Picture
Sound
Programmes
Connection
General
Safety
Accessibility
You can check the status of connection in [Ad-
vanced Wi-Fi settings].
WI-FI CONNECTION
Connection /
Add a Hidden Wireless Network
Connect via WPS PBC
Connect via WPS PIN
Advanced Wi-Fi Settings
Picture
Sound
Programmes
Connection
General
Safety
Accessibility
* Image shown may differ from your TV.
* Image shown on a PC or mobile phone may vary depending on the OS(Operating System).
* App icon positions may vary on the platform, depending on the software version.
SMART TV Quick Setup Guide
www.lg.com
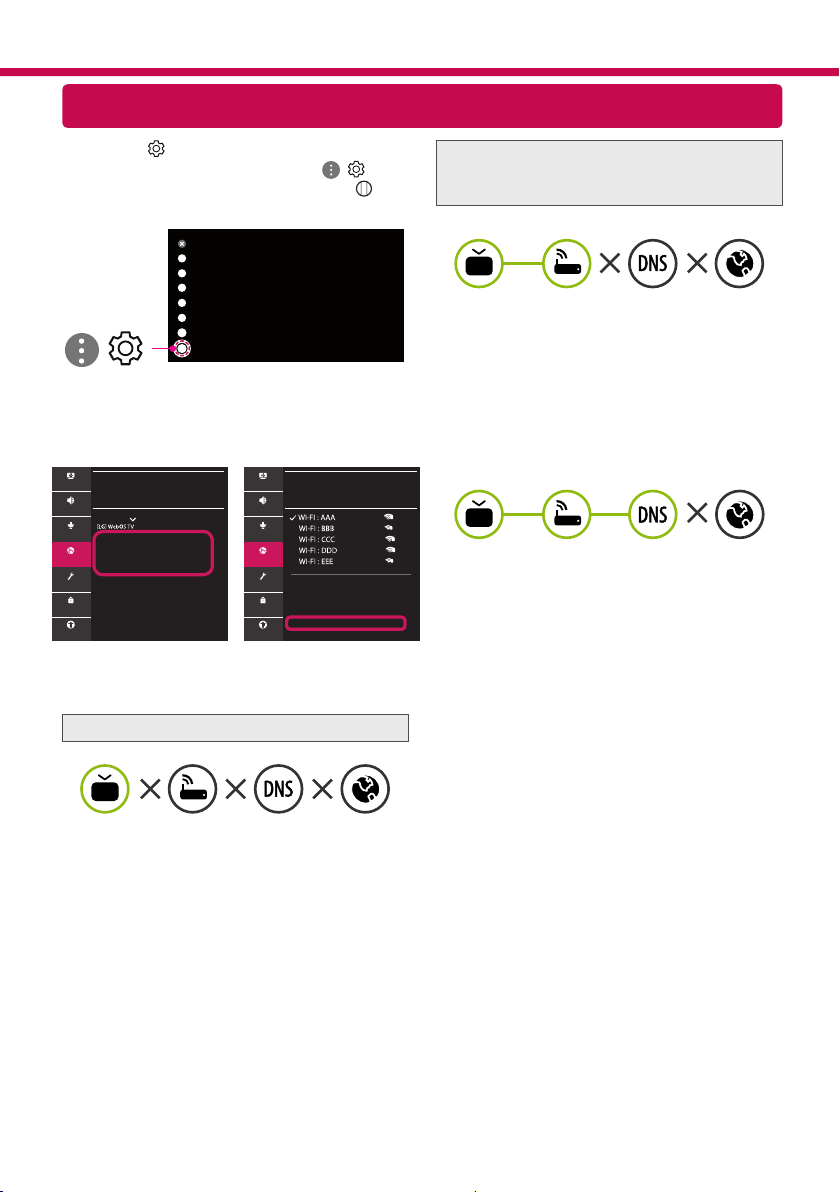
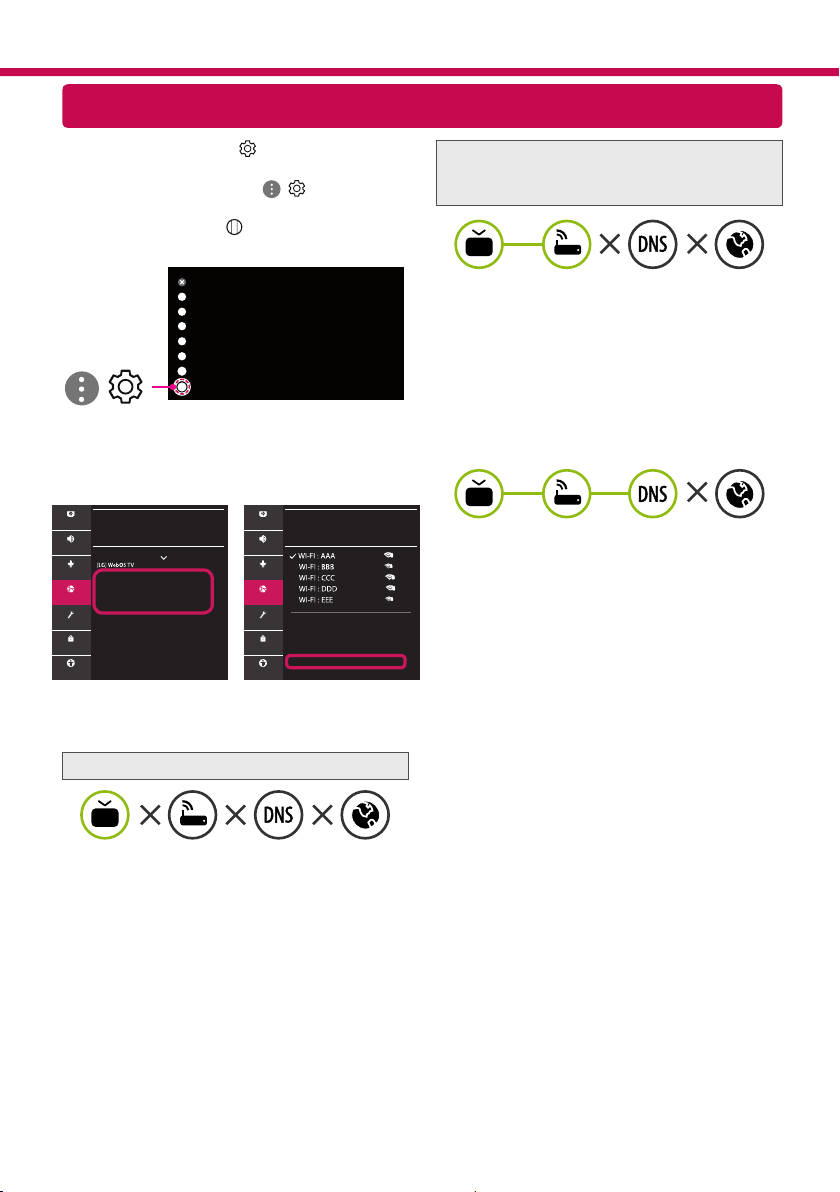
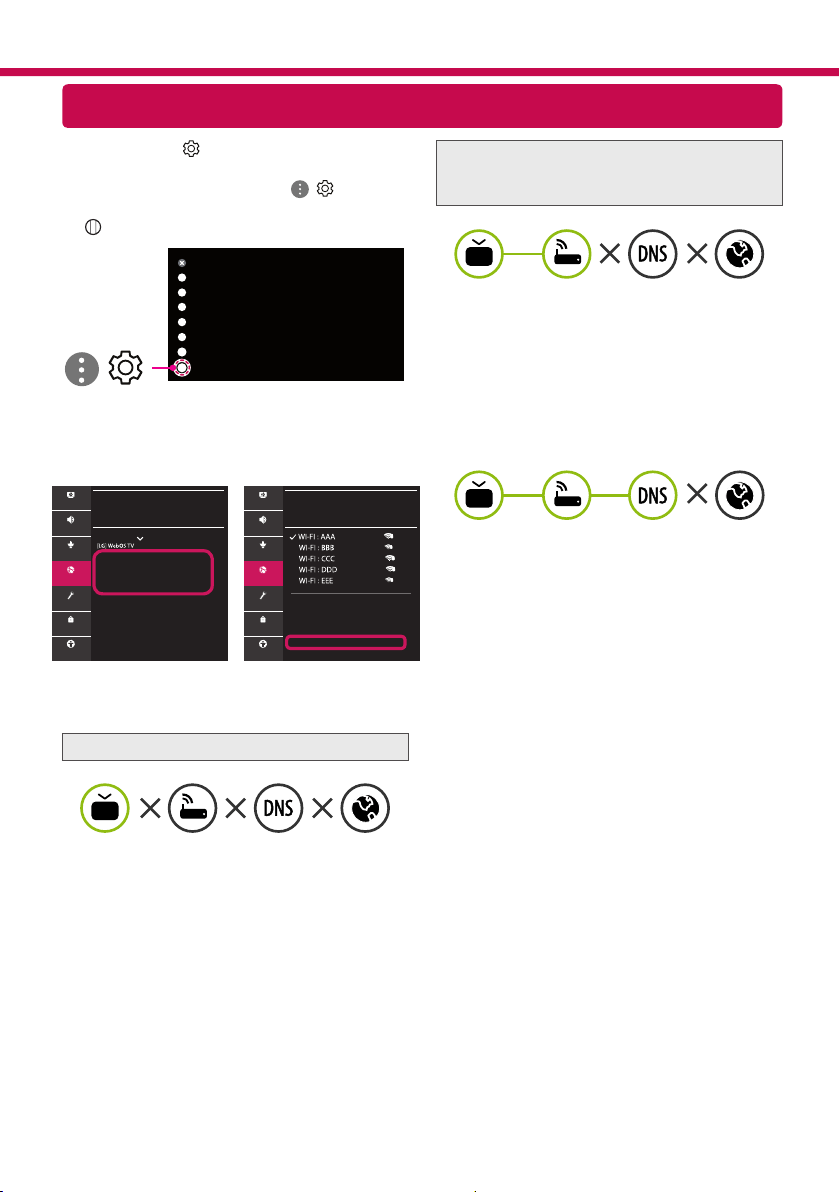
Troubleshooting Network Problems
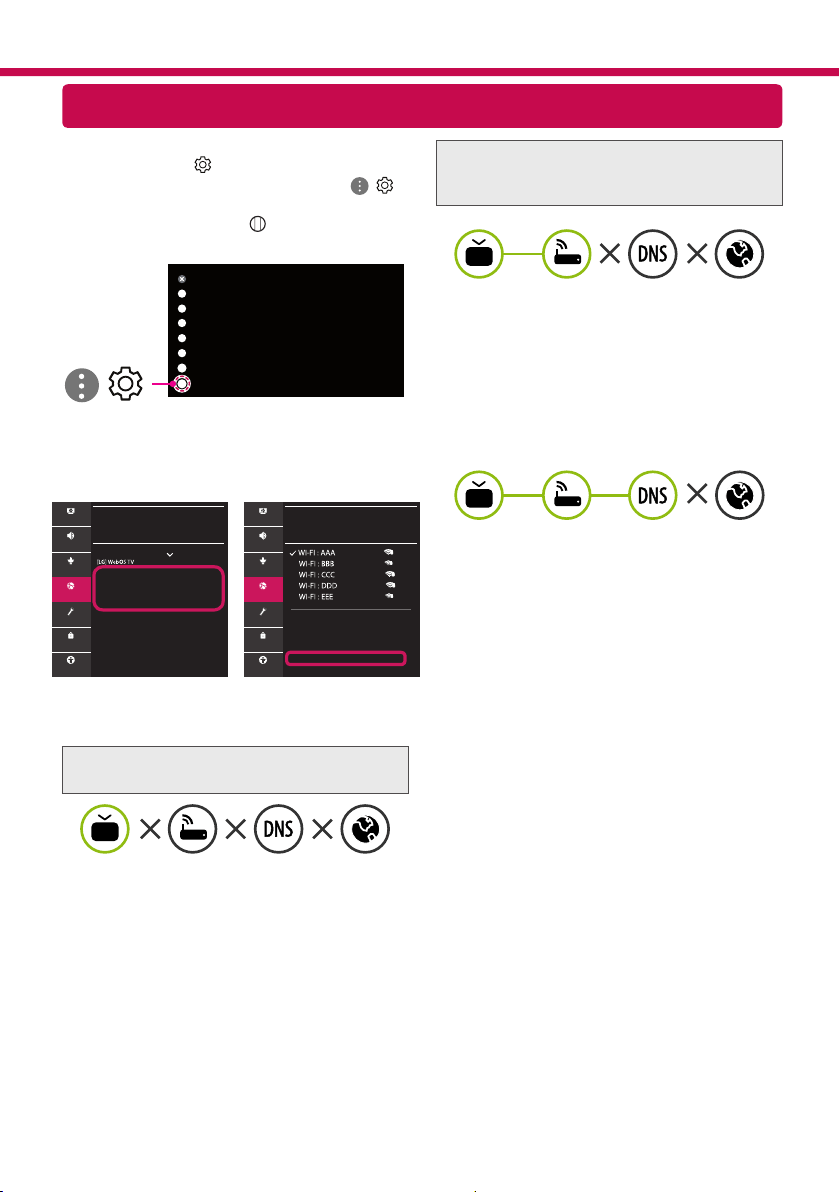
1 Press the (Settings) on the remote to
access the settings menu. Point the ( ) [All
Settings] icon and select by pressing the
Wheel (OK) button on the remote.
All Settings
(
)
2 Select the [Connection] → [Wired Connection
(Ethernet)] or [Wi-Fi Connection] → [Advanced
Wi-Fi Settings].
CONNECTION
TV Name
Wired Connection (Ethernet)
Not Connected
Wi-Fi Connection
Not Connected
Device Connector
Mobile TV on
Screen Share Settings
HDMI Device Settings
WI-FI CONNECTION
Connection /
Add a Hidden Wireless Network
Connect via WPS PBC
Connect via WPS PIN
Advanced Wi-Fi Settings
Picture Picture
Sound Sound
Programmes Programmes
Connection Connection
General General
Safety Safety
Accessibility Accessibility
Follow the instructions below that correlate to your
network status.
Check the TV or the AP (Router).
When X appears next to TV:
1
Check the connection status of the TV, AP
(Router).
2
Power off and power on the TV, AP (Router).
3
If you are using a static IP, enter the IP directly.
4
Contact internet service provider or AP (Router)
company.
Check the AP (Router) or consult your Internet
service provider.
When X appears next to Gateway:
1
Unplug the power cord of the AP (Router) and
try to connect after 5 seconds.
2
Initialize (Reset) the AP (Router).
3
Contact internet service provider or AP (Router)
company.
When X appears next to DNS:
1
Unplug the power cord of the AP (Router) and
try to connect after 5 seconds.
2
Initialize (Reset) the AP (Router).
3
Check that the MAC address of the TV/AP (Router)
is registered with your Internet service provider.
(The MAC address displayed on the right
pane of the network status window should be
registered with your Internet service provider.)
4
Check the AP (Router) manufacturer’s website
to make sure your router has the latest firmware
version installed.
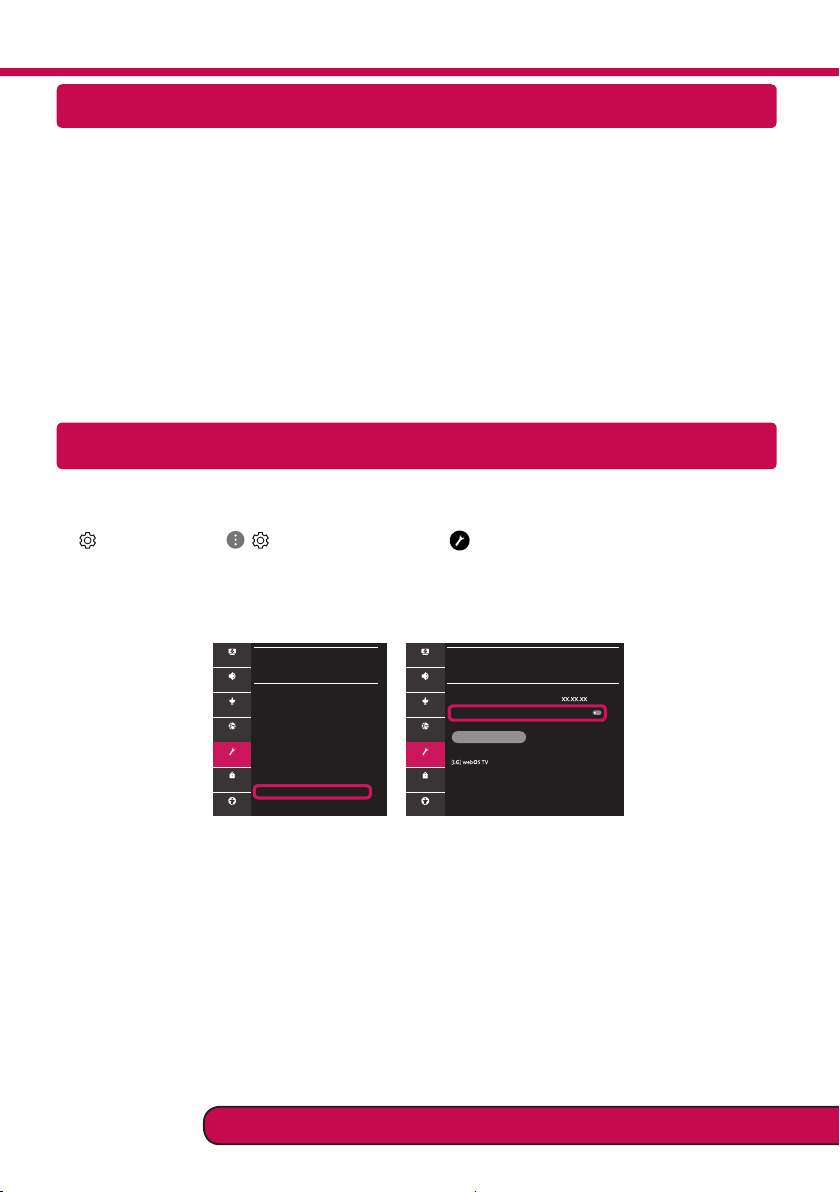
SmartShare Connection to Smartphone
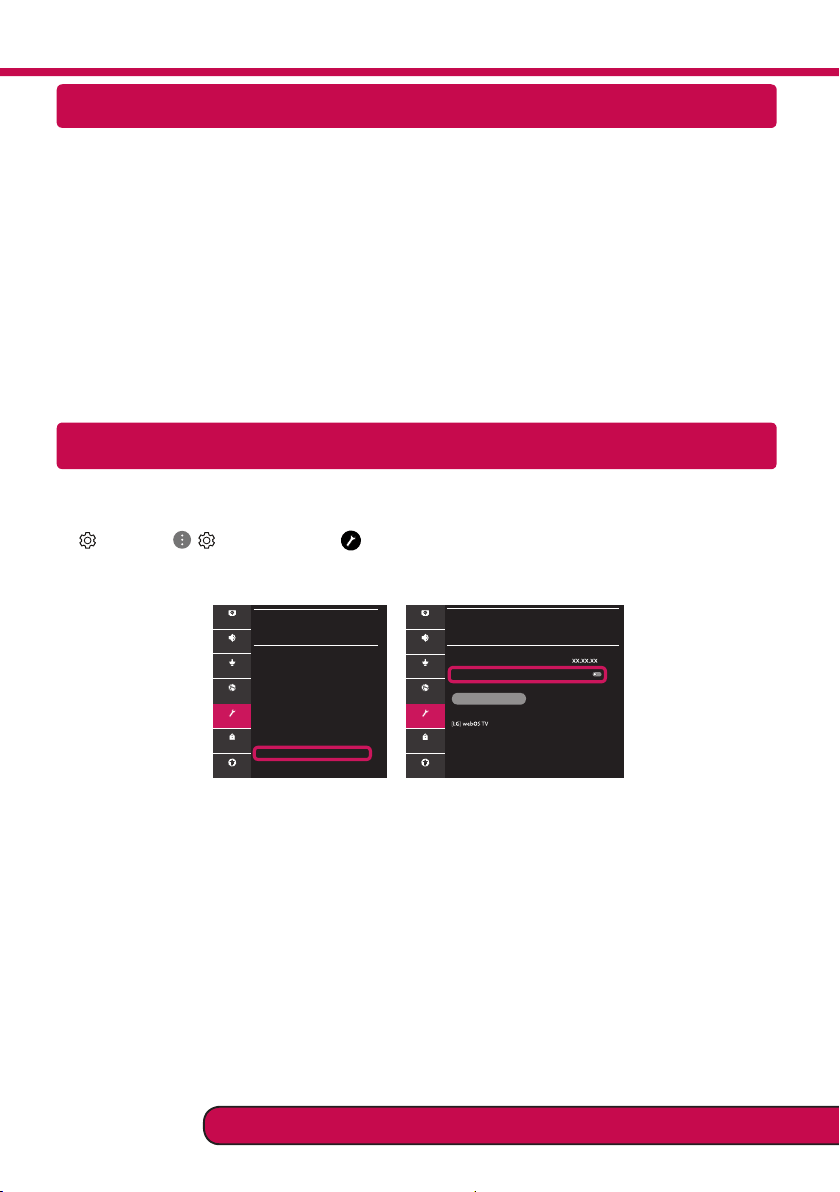
Updating the TV Firmware
* If the TV is turned on for the first time after it was shipped from the factory, initialization of the TV may
take a few minutes.
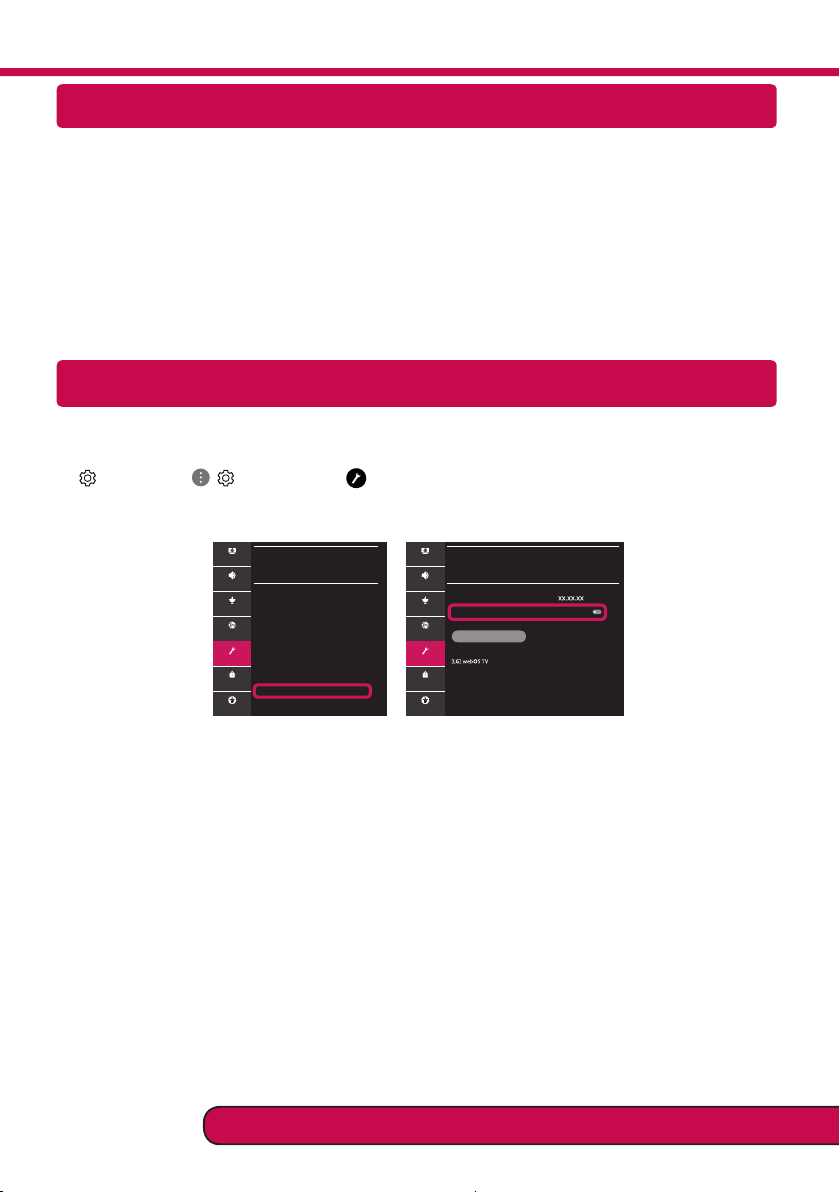
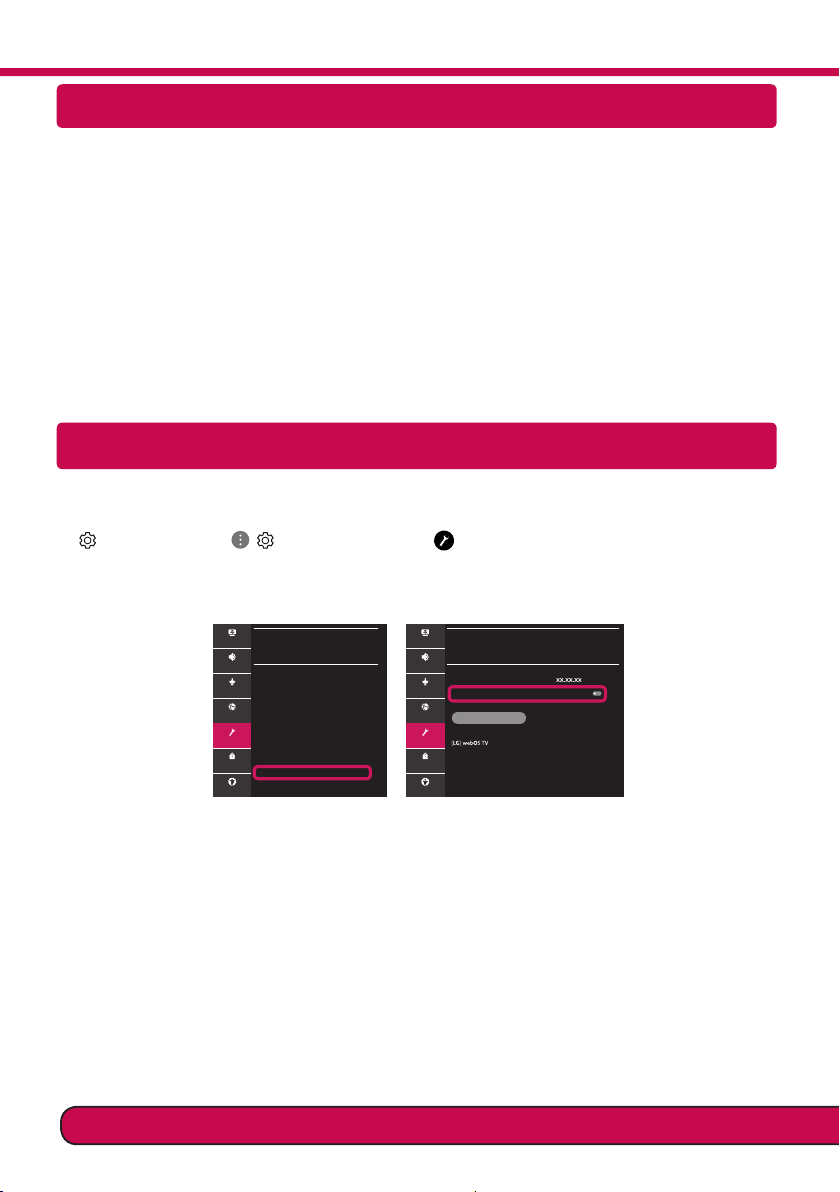
1 (Settings) →
( )
[All Settings] → [General] → [About This TV] → [CHECK FOR UPDATES]
2 After checking the version of the software, update it.
If you check the "[Allow Automatic Updates]", you can update the software automatically.
GENERAL
Language
Location
Time & Date
Timers
AI Service
Account Management
Eco Mode
About This TV
Additional Settings
Picture
Sound
Programmes
Connection
General
Safety
Accessibility
ABOUT THIS TV
General /
Software Version
Allow Automatic Updates
CHECK FOR UPDATES
TV Information
Notifications
User Guide
Quick Help
Picture
Sound
Programmes
Connection
General
Safety
Accessibility
1 Check that Wi-Fi is enabled on your smartphone. To use SmartShare, both devices must on the
same local network.
2 Install/run the app for sharing content on your smartphone (It's called LG TV Plus on LG phones).
3 Enable your smartphone to share content les with other devices.
4 Select the le type you want to play (movie, audio or photo).
5 Select a movie, music or photo le to play on the TV.
6 Play the media le to view and enjoy it on your TV.
Please call LG Customer Service if you experience any problems.
Netzwerkeinstellungen
1 Drücken Sie zur Anzeige des Einstellungen-
Menüs die Taste (Einstellungen) auf der
Fernbedienung. Wählen Sie das Symbol
( ) [Alle Einstellungen] aus und bestätigen
Sie es durch Drücken der Taste Rad (OK) auf
der Fernbedienung.
Alle Einstellungen
(
)
2 Wählen Sie [Anschluss] → [Drahtgebundene
Verbindung (Ethernet)] oder [Wi-Fi-Verbindung].
ANSCHLUSS
Name des TV-Geräts
Drahtgebundene Verbindung (Ethernet)
Nicht verbunden
Wi-Fi-Verbindung
Nicht verbunden
Geräteanschluss
TV-Gerät per Mobilgerät einschalten
Einstellungen für den Screen Share
HDMI-Geräteeinstellungen
Bild
Ton
Sender
Anschluss
Allgemein
Sicherheit
Barrierefreiheit
3 Das Gerät versucht automatisch, eine Verbin-
dung zu dem verfügbaren Netzwerk her-
zustellen (zuerst über das kabelgebundene
Netzwerk).
Wenn Sie die [Wi-Fi-Verbindung] auswählen, wird
eine Liste mit den verfügbaren Wi-Fi-Netzwerken
angezeigt. Wählen Sie das gewünschte Netzwerk
aus.
WI-FI-VERBINDUNG
Anschluss /
Verstecktes W-LAN hinzufügen
Über WPS-PBC verbinden
Über WPS-PIN verbinden
Erweiterte Wi-Fi-Einstellungen
Bild
Ton
Sender
Anschluss
Allgemein
Sicherheit
Barrierefreiheit
Für kabellose AP (Router) mit dem Symbol müs-
sen Sie den Sicherheitsschlüssel eingeben.
4 Wenn die Verbindung hergestellt wurde, wird
„[Mit dem Internet verbunden]“ angezeigt.
ANSCHLUSS
Name des TV-Geräts
Drahtgebundene Verbindung (Ethernet)
Nicht verbunden
Wi-Fi-Verbindung
Mit dem Internet verbunden
Geräteanschluss
TV-Gerät per Mobilgerät einschalten
Einstellungen für den Screen Share
HDMI-Geräteeinstellungen
Bild
Ton
Sender
Anschluss
Allgemein
Sicherheit
Barrierefreiheit
Sie können den Verbindungsstatus unter [Erwei-
terte Wi-Fi-Einstellungen] prüfen.
WI-FI-VERBINDUNG
Anschluss /
Verstecktes W-LAN hinzufügen
Über WPS-PBC verbinden
Über WPS-PIN verbinden
Erweiterte Wi-Fi-Einstellungen
Bild
Ton
Sender
Anschluss
Allgemein
Sicherheit
Barrierefreiheit
* Ihr TV-Gerät kann von der Abbildung möglicherweise leicht abweichen.
* Auf PC oder Mobiltelefon angezeigte Bilder können je nach Betriebssystem leicht abweichen.
* Die Positionen der Anwendungssymbole können auf der Plattform je nach Softwareversion variieren.
Kurzanleitung zur Einrichtung des SMARTTV
www.lg.com
Behebung von Netzwerkproblemen
1 Drücken Sie zur Anzeige des Einstellungen-
Menüs die Taste (Einstellungen) auf der
Fernbedienung. Wählen Sie das Symbol (
) [Alle Einstellungen] aus und bestätigen Sie es
durch Drücken der Taste Rad (OK) auf der
Fernbedienung.
Alle Einstellungen
(
)
2 Wählen [Anschluss] → [Drahtgebundene Ver-
bindung (Ethernet)] oder [Wi-Fi-Verbindung] →
[Erweiterte Wi-Fi-Einstellungen].
ANSCHLUSS
Name des TV-Geräts
Drahtgebundene Verbindung (Ethernet)
Nicht verbunden
Wi-Fi-Verbindung
Nicht verbunden
Geräteanschluss
TV-Gerät per Mobilgerät einschalten
Einstellungen für den Screen Share
HDMI-Geräteeinstellungen
WI-FI-VERBINDUNG
Anschluss /
Verstecktes W-LAN hinzufügen
Über WPS-PBC verbinden
Über WPS-PIN verbinden
Erweiterte Wi-Fi-Einstellungen
Bild Bild
Ton Ton
Sender Sender
Anschluss Anschluss
Allgemein Allgemein
Sicherheit Sicherheit
Barrierefreiheit Barrierefreiheit
Befolgen Sie je nach Netzwerkstatus die nachfol-
genden Anweisungen.
Prüfen Sie das Fernsehgerät oder den
AP (Router).
Wenn ein X neben dem TV-Gerät erscheint:
1
Überprüfen Sie den Verbindungsstatus von
Fernsehgerät und AP (Router).
2
Schalten Sie das Fernsehgerät und den AP
(Router) aus und wieder ein.
3
Wenn Sie eine feste IP verwenden, geben Sie die
IP direkt ein.
4
Wenden Sie sich an Ihren Internetanbieter oder
den Hersteller des AP (Routers).
Prüfen Sie den Router, oder wenden Sie sich an
Ihren Internetanbieter.
Wenn ein X neben dem Gateway erscheint:
1
Trennen Sie das Stromkabel des AP (Router)
und versuchen Sie nach 5 Sekunden erneut
eine Verbindung herzustellen.
2
Setzen Sie den AP (Router) zurück.
3
Wenden Sie sich an Ihren Internetanbieter oder
den Hersteller des AP (Routers).
Wenn ein X neben DNS erscheint:
1
Trennen Sie das Stromkabel des AP (Router)
und versuchen Sie nach 5 Sekunden erneut
eine Verbindung herzustellen.
2
Setzen Sie den AP (Router) zurück.
3
Prüfen Sie, ob die MAC-Adresse des
Fernsehgerätes/ AP (Router) bei Ihrem
Internetanbieter registriert ist. (Die MAC-
Adresse, die im rechten Bereich des
Netzwerkstatusfensters angezeigt wird, muss
bei Ihrem Internetanbieter registriert sein.)
4
Prüfen Sie auf der Website des Routerherstellers,
ob die neueste Firmwareversion auf Ihrem AP
(Router) installiert ist.
SmartShare-Verbindung zum Smartphone
Aktualisierung der TV-Firmware
* Wenn das Fernsehgerät nach der Auslieferung das erste Mal eingeschaltet wird, kann die Initialisierung
einige Minuten dauern.
1 (Einstellungen) →
( )
[Alle Einstellungen] → [Allgemein] → [Info zu diesem TV-Gerät] →
[AUF UPDATES PRÜFEN]
2 Sie können die Softwareversion prüfen und aktualisieren.
Wenn Sie „[Automatische Updates zulassen]“ aktivieren, wird die Software automatisch aktualisiert.
ALLGEMEIN
Sprache
Standort
Zeit & Datum
Timer
AI-Dienst
Kontoverwaltung
Eco-Modus
Info zu diesem TV-Gerät
Zusätzliche Einstellungen
Bild
Ton
Sender
Anschluss
Allgemein
Sicherheit
Barrierefreiheit
INFO ZU DIESEM TV-GERÄT
Allgemein /
Softwareversion
Automatische Updates zulassen
AUF UPDATES PRÜFEN
TV-Informationen
Benachrichtigungen
Benutzeranleitung
Schnellhilfe
Bild
Ton
Sender
Anschluss
Allgemein
Sicherheit
Barrierefreiheit
1 Prüfen Sie, ob auf Ihrem Smartphone Wi-Fi aktiviert ist. Zum Verwenden von SmartShare müssen
beide Geräte im gleichen lokalen Netzwerk eingebunden sein.
2 Installieren Sie die App zur Freigabe von Inhalten auf Ihrem Smartphone bzw. führen Sie diese App
aus (auf LG-Smartphones hat diese die Bezeichnung LG TV Plus).
3 Aktivieren Sie die Freigabe von Inhalten für andere Geräte auf Ihrem Smartphone.
4 Wählen Sie den Dateityp, den Sie abspielen möchten (Film, Audio oder Foto).
5 Wählen Sie eine Film-, Musik- oder Fotodatei aus, die Sie auf dem Fernsehgerät abspielen möchten.
6 Starten Sie die Mediendatei, um diese über Ihr Fernsehgerät abzuspielen.
Wenn es weiterhin zu Problemen kommt, wenden Sie sich bitte an den LG Kundendienst.
Paramètre Réseau
1 Appuyez sur le bouton (Paramètres) de
la télécommande pour accéder au menu
Paramètres. Mettez l'icône ( ) [Tous les
paramètres] en surbrillance et sélectionnez-
la en appuyant sur la Molette(OK) de la
télécommande.
Tous les paramètres
(
)
2 Sélectionnez [Connexion] → [Connexion laire
(Ethernet)] ou [Connexion Wi-Fi].
CONNEXION
Nom du téléviseur
Connexion filaire (Ethernet)
Non connecté
Connexion Wi-Fi
Non connecté
Connectique de périphérique
TVMobile activée
Paramètres ScreenShare
Paramètres du périphériqueHDMI
Image
Son
Chaînes
Connexion
Général
Sécurité
Accessibilité
3 Le périphérique essaye automatiquement de se
connecter au réseau disponible (prioritairement
au réseau laire).
Lorsque vous sélectionnez [Connexion Wi-Fi], la
liste des réseaux s'ache à l'écran. Sélectionnez
le réseau que vous souhaitez utiliser.
CONNEXION WI-FI
Connexion /
Ajouter un réseau sans fil masqué
Connexion via WPS PBC
Connexion via WPS PIN
Paramètres Wi-Fi avancés
Image
Son
Chaînes
Connexion
Général
Sécurité
Accessibilité
Pour connecter un routeur AP sans l doté du sym-
bole , vous devez saisir une clé de sécurité.
4 Une fois la connexion eectuée, la mention
"[Connecté à Internet]" s'ache à l'écran.
CONNEXION
Nom du téléviseur
Connexion filaire (Ethernet)
Non connecté
Connexion Wi-Fi
Connecté à Internet
Connectique de périphérique
TVMobile activée
Paramètres ScreenShare
Paramètres du périphériqueHDMI
Image
Son
Chaînes
Connexion
Général
Sécurité
Accessibilité
Vous pouvez vérier l'état de la connexion dans
les [Paramètres Wi-Fi avancés].
CONNEXION WI-FI
Connexion /
Ajouter un réseau sans fil masqué
Connexion via WPS PBC
Connexion via WPS PIN
Paramètres Wi-Fi avancés
Image
Son
Chaînes
Connexion
Général
Sécurité
Accessibilité
* L'image affichée peut être différente de celle de votre téléviseur.
* L'image affichée sur un ordinateur ou un téléphone portable peut être différente selon le système d'ex-
ploitation.
* La position des icônes d'application peut varier sur la plateforme selon la version du logiciel que vous uti-
lisez.
Guide de démarrage rapide SMART TV
www.lg.com
Dépannage des problèmes de réseau
1 Appuyez sur le bouton (Paramètres) de
la télécommande pour accéder au menu
Paramètres. Mettez l'icône ( ) [Tous les
paramètres] en surbrillance et sélectionnez-
la en appuyant sur la Molette(OK) de la
télécommande.
Tous les paramètres
(
)
2 Sélectionnez [Connexion] → [Connexion laire
(Ethernet)] ou [Connexion Wi-Fi] → [Paramètres
Wi-Fi avancés].
CONNEXION
Nom du téléviseur
Connexion filaire (Ethernet)
Non connecté
Connexion Wi-Fi
Non connecté
Connectique de périphérique
TVMobile activée
Paramètres ScreenShare
Paramètres du périphériqueHDMI
CONNEXION WI-FI
Connexion /
Ajouter un réseau sans fil masqué
Connexion via WPS PBC
Connexion via WPS PIN
Paramètres Wi-Fi avancés
Image Image
Son Son
Chaînes Chaînes
Connexion Connexion
Général Général
Sécurité Sécurité
Accessibilité Accessibilité
Suivez les instructions ci-dessous en fonction de
l'état de votre réseau.
Vérifiez l'état de la TV ou du routeur.
Lorsque X apparaît à côté du téléviseur:
1
Vérifiez l'état de la connexion de la TV ou du
point d'accès (routeur).
2
Allumez puis éteignez la TV ou le point d'accès
(routeur).
3
Si vous utilisez une adresse IP statique, saisissez-
la directement.
4
Contactez votre fournisseur de services Internet
ou le fabriquant de votre routeur AP.
Vérifiez l'état du routeur ou contactez votre
fournisseur de services Internet.
Lorsque X apparaît à côté de la passerelle:
1
Débranchez le cordon d'alimentation du point
d'accès (routeur) patientez 5 secondes, puis
rebranchez-le.
2
Initialisez (Réglages usine) le point d'accès
(routeur).
3
Contactez votre fournisseur de services Internet
ou le fabriquant de votre routeur AP.
Lorsque X apparaît à côté de DNS:
1
Débranchez le cordon d'alimentation du point
d'accès (routeur) patientez 5 secondes, puis
rebranchez-le.
2
Initialisez (Réglages usine) le point d'accès
(routeur).
3
Vérifiez que l'adresse MAC de votre TV/du
routeur a bien été enregistrée auprès de votre
fournisseur de services Internet. (L'adresse
MAC est inscrite sur le panneau de droite de
la fenêtre de l'état du réseau et doit avoir été
enregistrée auprès de votre fournisseur de
services Internet.)
4
Consultez le site Web du fabricant de votre
routeur pour savoir si votre routeur bénéficie de
la dernière version du micrologiciel.

Connexion SmartShare pour smartphone
Mise à jour du micrologiciel de la TV
* Si le téléviseur est mis sous tension pour la première fois depuis son expédition depuis l’usine, l’initialisa-
tion peut prendre quelques minutes.
1 (Paramètres) →
( )
[Tous les paramètres] → [Général] → [À propos de ce téléviseur] →
[Rechercher les mises à jour]
2 Vous pouvez vérier la version du logiciel et la mettre à jour.
Si vous choisissez l'option "[Autoriser les mises à jour automatiques]", les mises à jour seront eectuées
automatiquement.
GÉNÉRAL
Langue
Lieu
Heure et date
Minuteurs
Service d'AI
Gestion des comptes
Mode Éco
À propos de ce téléviseur
Paramètres supplémentaires
Image
Son
Chaînes
Connexion
Général
Sécurité
Accessibilité
À PROPOS DE CE TÉLÉVISEUR
Général /
Version logicielle
Autoriser les mises à jour automatiques
RECHERCHER LES MISES À JOUR
Informations sur le téléviseur
Notifications
Guide de l'utilisateur
Aide rapide
Image
Son
Chaînes
Connexion
Général
Sécurité
Accessibilité
1 Vériez que la fonction Wi-Fi est activée sur votre smartphone. Pour utiliser SmartShare, les deux
périphériques doivent être connectés au même réseau local.
2 Installez/exécutez l'application de partage de contenus sur votre smartphone (fonction LG TV Plus sur
les téléphones LG).
3 Autorisez le partage de chiers avec d'autres périphériques sur votre smartphone.
4 Sélectionnez le type de chier que vous souhaitez lire (lms, chiers audio ou photos).
5 Sélectionnez un lm, une musique ou une photo pour diuser le chier sur votre téléviseur.
6 Lancez la lecture du chier multimédia sur votre téléviseur.
Veuillez appeler le service clientèle de LG en cas de problème.
Impostazione Rete
1 Premere il pulsante (Impostazioni) sul
telecomando per accedere al menu delle
impostazioni. Evidenziare l'icona ( ) [Tutte
le impostazioni] e selezionarla premendo il
pulsante la Rotella (OK) sul telecomando.
Tutte le impostazioni
(
)
2 Selezionare [Connessione] → [Connessione
cablata (Ethernet)] o [Connessione Wi-Fi].
CONNESSIONE
Nome TV
Connessione cablata (Ethernet)
Non connesso
Connessione Wi-Fi
Non connesso
Connettore dispositivo
Mobile TV attivo
Impostazioni Screen Share
Impostazioni dispositivo HDMI
Immagine
Audio
Canali
Connessione
Generale
Sicurezza
Accessibilità
3 Il dispositivo tenta automaticamente la con-
nessione alla rete disponibile (prima alla rete
cablata).
Quando si seleziona la [Connessione Wi-Fi],
viene visualizzato l'elenco delle reti disponibili.
Scegliere la rete che si desidera utilizzare.
CONNESSIONE WI-FI
Connessione /
Aggiungere una rete wireless nascosta
Connetti tramite WPS PBC
Connetti tramite PIN WPS
Impostazioni Wi-Fi avanzate
Immagine
Audio
Canali
Connessione
Generale
Sicurezza
Accessibilità
Per l'AP wireless (router) che presenta il simbolo ,
è necessario immettere la chiave di protezione.
4 Al termine della connessione, viene visualizzato
il messaggio "[Connesso a Internet]".
CONNESSIONE
Nome TV
Connessione cablata (Ethernet)
Non connesso
Connessione Wi-Fi
Connesso a Internet
Connettore dispositivo
Mobile TV attivo
Impostazioni Screen Share
Impostazioni dispositivo HDMI
Immagine
Audio
Canali
Connessione
Generale
Sicurezza
Accessibilità
È possibile vericare lo stato della connessione
in [Impostazioni Wi-Fi avanzate].
CONNESSIONE WI-FI
Connessione /
Aggiungere una rete wireless nascosta
Connetti tramite WPS PBC
Connetti tramite PIN WPS
Impostazioni Wi-Fi avanzate
Immagine
Audio
Canali
Connessione
Generale
Sicurezza
Accessibilità
* L’immagine mostrata può risultare differente rispetto alla TV in uso.
* L'immagine mostrata su un PC o su un cellulare può variare a seconda del sistema operativo.
* A seconda della versione del software, la posizione dell'icona App può variare sulla piattaforma.
SMART TV - Guida alla congurazione rapida
www.lg.com

Risoluzione dei problemi relativi alla rete
1 Premere il pulsante (Impostazioni) sul
telecomando per accedere al menu delle
impostazioni. Evidenziare l'icona ( ) [Tutte
le impostazioni] e selezionarla premendo il
pulsante la Rotella (OK) sul telecomando.
Tutte le impostazioni
(
)
2 Selezionare [Connessione] → [Connessione
cablata (Ethernet)] o [Connessione Wi-Fi] →
[Impostazioni Wi-Fi avanzate].
CONNESSIONE
Nome TV
Connessione cablata (Ethernet)
Non connesso
Connessione Wi-Fi
Non connesso
Connettore dispositivo
Mobile TV attivo
Impostazioni Screen Share
Impostazioni dispositivo HDMI
CONNESSIONE WI-FI
Connessione /
Aggiungere una rete wireless nascosta
Connetti tramite WPS PBC
Connetti tramite PIN WPS
Impostazioni Wi-Fi avanzate
Immagine Immagine
Audio Audio
Canali Canali
Connessione Connessione
Generale Generale
Sicurezza Sicurezza
Accessibilità Accessibilità
Attenersi alle istruzioni riportate di seguito relative
allo stato della rete.
Controllare il TV o l'AP (router).
Se appare una X accanto al TV:
1
Verificare lo stato della connessione del TV, AP
(Router).
2
Spegnere e accendere il TV, AP (Router).
3
Se si utilizza un IP statico, immetterlo
direttamente.
4
Contattare il provider di servizi Internet o le
società dell'AP (Router).
Controllare il router oppure consultare il proprio
provider di servizi Internet.
Se appare una X accanto al Gateway:
1
Scollegare il cavo di alimentazione dell'AP
(router) e provare a connettersi nuovamente
dopo 5 secondi.
2
Inizializzare (Reset) l'AP (Router).
3
Contattare il provider di servizi Internet o le
società dell'AP (Router).
Se appare una X accanto alla DNS:
1
Scollegare il cavo di alimentazione dell'AP
(router) e provare a connettersi nuovamente
dopo 5 secondi.
2
Inizializzare (Reset) l'AP (Router).
3
Verificare che l'indirizzo MAC della TV o del
router sia registrato presso il proprio provider di
servizi Internet. (L’indirizzo MAC visualizzato nel
riquadro di destra della finestra dello stato della
rete deve essere registrato presso il proprio
provider di servizi Internet.)
4
Controllare il sito Web del produttore per
assicurarsi che sul router sia installata la
versione più recente del firmware.
Connessione SmartShare allo smartphone
Aggiornamento firmware TV
* Se il televisore viene acceso per la prima volta dopo essere stato spedito dalla fabbrica, l’inizializzazione
potrebbe richiedere alcuni minuti.
1 (Impostazioni) →
( )
[Tutte le impostazioni] → [Generale] → [Informazioni sulla TV] → [CON-
TROLLA AGGIORNAMENTI]
2 È possibile controllare la versione del software e aggiornarla.
Se si seleziona l'opzione "[Consentire gli aggiornamenti automatici]" il software viene aggiornato auto-
maticamente.
GENERALE
Lingua
Posizione
Ora e data
Timer
Servizio AI
Gestione account
Modalità Eco
Informazioni sulla TV
Impostazioni aggiuntive
Immagine
Audio
Canali
Connessione
Generale
Sicurezza
Accessibilità
INFORMAZIONI SULLA TV
Generale /
Versione software
Consentire gli aggiornamenti automatici
CONTROLLA AGGIORNAMENTI
Informazioni TV
Notifiche
Manuale d'uso
Assistenza rapida
Immagine
Audio
Canali
Connessione
Generale
Sicurezza
Accessibilità
1 Vericare che sullo smartphone sia attivato il Wi-Fi. Per utilizzare SmartShare, entrambi i dispositivi si
devono trovare sulla stessa rete locale.
2 Sullo smartphone, installare/eseguire l'applicazione per la condivisione dei contenuti (sui cellulari LG
tale applicazione si chiama LG TV Plus).
3 Consentire allo smartphone di condividere le di contenuto con altri dispositivi.
4 Selezionare il tipo di le che si desidera riprodurre (lmato, audio o foto).
5 Selezionare un le di lmato, musica o foto da riprodurre sul TV.
6 Riprodurre il le multimediale e visualizzarlo sul TV.
Chiamare il servizio clienti LG se si vericano problemi.

CONFIGURACIÓN DE RED
1 Pulse el botón (Configuración) del
mando a distancia para acceder al menú de
conguración. Resalte el icono ( ) [Toda la
conguración] selecciónelo pulsando el botón
Rueda (OK) del mando a distancia.
Toda la configuración
(
)
2 Seleccione [Conexión] → [Conexión cableada
(Ethernet)] o [Conexión Wi-Fi].
CONEXIÓN
Nombre TV
Conexión cableada (Ethernet)
No conectado
Conexión Wi-Fi
No conectado
Conector de dispositivo
TV Móvil activada
Configuración de Screen Share
Configuración de dispositivo HDMI
Imagen
Sonido
Canales
Conexión
General
Seguridad
Accesibilidad
3 El dispositivo intenta conectarse automática-
mente a la red disponible (a la red con cables
primero).
Cuando seleccione la [Conexión Wi-Fi], se
mostrará la lista de Conexiónes disponibles.
Seleccione la red que desea utilizar.
CONEXIÓN WI-FI
Conexión /
Agregar una red inalámbrica oculta
Conectarse a través de WPS PBC
Conectarse a través de WPS PIN
Configuración Wi-Fi avanzada
Imagen
Sonido
Canales
Conexión
General
Seguridad
Accesibilidad
Para los AP (routers) inalámbricos que tienen el
símbolo , debe introducir la clave de seguridad.
4 Si la conexión tiene éxito, se muestra el estado
"[Conectado a Internet]".
CONEXIÓN
Nombre TV
Conexión cableada (Ethernet)
No conectado
Conexión Wi-Fi
Conectado a Internet
Conector de dispositivo
TV Móvil activada
Configuración de Screen Share
Configuración de dispositivo HDMI
Imagen
Sonido
Canales
Conexión
General
Seguridad
Accesibilidad
Puede comprobar el estado de la conexión en
[Conguración Wi-Fi avanzada].
CONEXIÓN WI-FI
Conexión /
Agregar una red inalámbrica oculta
Conectarse a través de WPS PBC
Conectarse a través de WPS PIN
Configuración Wi-Fi avanzada
Imagen
Sonido
Canales
Conexión
General
Seguridad
Accesibilidad
* La imagen mostrada puede ser diferente a la que aparece en la TV.
* La imagen mostrada en un PC o teléfono móvil puede variar en función del SO (sistema operativo).
* Las posiciones de los iconos de las aplicaciones pueden variar en la plataforma, dependiendo de la ver-
sión del software.
Guía de instalación rápida de SMART TV
www.lg.com
Solución de problemas de red
1 Pulse el botón (Configuración) del
mando a distancia para acceder al menú de
conguración. Resalte el icono ( ) [Toda la
conguración] selecciónelo pulsando el botón
Rueda (OK) del mando a distancia.
Toda la configuración
(
)
2 Seleccione [Conexión] → [Conexión cableada
(Ethernet)] o [Conexión Wi-Fi] → [Conguración
Wi-Fi avanzada].
CONEXIÓN
Nombre TV
Conexión cableada (Ethernet)
No conectado
Conexión Wi-Fi
No conectado
Conector de dispositivo
TV Móvil activada
Configuración de Screen Share
Configuración de dispositivo HDMI
CONEXIÓN WI-FI
Conexión /
Agregar una red inalámbrica oculta
Conectarse a través de WPS PBC
Conectarse a través de WPS PIN
Configuración Wi-Fi avanzada
Imagen Imagen
Sonido Sonido
Canales Canales
Conexión Conexión
General General
Seguridad Seguridad
Accesibilidad Accesibilidad
Siga las instrucciones indicadas a continuación que
establecen el estado de la red.
Compruebe la TV o el AP (router).
Si aparece una X al lado de la TV:
1
Compruebe el estado de la conexión del
televisor y el AP (router).
2
Apague y encienda el televisor y el AP (router).
3
Si utiliza una IP estática, introdúzcala.
4
Póngase en contacto con su proveedor de
Internet o del AP (router).
Compruebe el router o consulte con su provee-
dor de servicios de Internet.
Si aparece una X al lado de la puerta de enlace:
1
Desenchufe el cable de alimentación del AP
(router) e intente conectar de nuevo cuando
transcurran 5 segundos.
2
Inicialice (Reajuste) el AP (router).
3
Póngase en contacto con su proveedor de
Internet o del AP (router).
Si aparece una X al lado de DNS:
1
Desenchufe el cable de alimentación del AP
(router) e intente conectar de nuevo cuando
transcurran 5 segundos.
2
Inicialice (Reajuste) el AP (router).
3
Compruebe que la dirección MAC de la TV/
router está registrada con su proveedor
de servicios de Internet. (La dirección MAC
mostrada en el panel derecho de la ventana
de estado de red se debe registrar con su
proveedor de servicios de Internet.)
4
Compruebe el sitio web del fabricante del
router para asegurarse de que su router tiene la
versión más reciente de firmware instalada.

Conexión mediante Smartshare con un Smartphone
Actualización del firmware de la TV
* La primera vez que se encienda la TV tras su envío, puede tardar unos minutos en iniciarse.
1 (Configuración) →
( )
[Toda la conguración] → [General] → [Acerca de esta TV] → [BUSCAR
ACTUALIZACIONES]
2 Puede comprobar la versión de software y actualizarla.
Si marca la opción "[Permitir actualizaciones automáticas]", el software se actualizará automáticamente.
GENERAL
Idioma
Ubicación
Fecha y hora
Temporizadores
Servicio AI
Administración de cuenta
Modo Eco
Acerca de esta TV
Configuración adicional
Imagen
Sonido
Canales
Conexión
General
Seguridad
Accesibilidad
ACERCA DE ESTA TV
General /
Versión de software
Permitir actualizaciones automáticas
BUSCAR ACTUALIZACIONES
Información de TV
Notificaciones
Guía del usuario
Ayuda rápida
Imagen
Sonido
Canales
Conexión
General
Seguridad
Accesibilidad
1 Compruebe que la red Wi-Fi está habilitada en su teléfono inteligente. Para usar SmartShare, ambos
dispositivos deben estar conectados a la misma red local.
2 Instale/ejecute la aplicación de contenido compartido en su teléfono inteligente (denominada LG TV
Plus en los teléfonos LG).
3 Habilite su teléfono inteligente para compartir archivos de contenido con otros dispositivos.
4 Seleccione el tipo de archivo que desea reproducir (película, audio o foto).
5 Seleccione un archivo de película, música o foto para reproducirlo en la TV.
6 Reproduzca el archivo multimedia para verlo y disfrutarlo en la TV.
Llame al centro de atención al cliente de LG si experimenta algún problema.
Setări pentru reţea
1 Apăsaţi (Setări) de pe telecomandă pentru a
accesa meniul de setări. Evidenţiaţi pictograma
( ) [Toate setările] și selectaţi apăsând
butonul Disc (OK) de pe telecomandă.
Toate setările
(
)
2 Selectaţi [Conexiune] → [Conexiune cu r
(Ethernet)] sau [Conexiune Wi-Fi].
CONEXIUNE
Nume TV
Conexiune cu fir (Ethernet)
Neconectat
Conexiune Wi-Fi
Neconectat
Conector dispozitiv
Mobile TV pornit
Setări Screen Share
Setări dispozitiv HDMI
Imagine
Sunet
Canale
Conexiune
General
Siguranţă
Accesibilitate
3 Dispozitivul încearcă automat să se conecteze la
reţeaua disponibilă (mai întâi la reţeaua cu r).
Când selectaţi [Conexiune Wi-Fi], este așată
lista de reţele disponibilă. Alegeţi reţeaua pe
care doriţi să o utilizaţi.
CONEXIUNE WI-FI
Conexiune /
Adăugaţi o reţea fără fir ascunsă
Conectare prin intermediul WPS PBC
Conectare prin intermediul PIN WPS
Setări Wi-Fi avansate
Imagine
Sunet
Canale
Conexiune
General
Siguranţă
Accesibilitate
Pentru punctul de acces fără r (router) care are
simbolul , trebuie să introduceţi cheia de secu-
ritate.
4 În cazul în care conexiunea se realizează cu suc-
ces, este așată reţeaua „[Conectat la internet]”.
CONEXIUNE
Nume TV
Conexiune cu fir (Ethernet)
Neconectat
Conexiune Wi-Fi
Conectat la internet
Conector dispozitiv
Mobile TV pornit
Setări Screen Share
Setări dispozitiv HDMI
Imagine
Sunet
Canale
Conexiune
General
Siguranţă
Accesibilitate
Puteţi verica starea conexiunii în [Setări Wi-Fi
avansate].
CONEXIUNE WI-FI
Conexiune /
Adăugaţi o reţea fără fir ascunsă
Conectare prin intermediul WPS PBC
Conectare prin intermediul PIN WPS
Setări Wi-Fi avansate
Imagine
Sunet
Canale
Conexiune
General
Siguranţă
Accesibilitate
* Imaginea ilustrată poate fi diferită de televizorul dvs.
* Imaginea ilustrată pe un PC sau pe un telefon mobil poate varia în funcţie de SO (Sistemul de Operare).
* Poziţiile pictogramei aplicaţiei pot varia pe platformă, în funcţie de versiunea de software.
Ghid rapid de instalare SMART TV
www.lg.com

Depanarea problemelor de reţea
1 Apăsaţi (Setări) de pe telecomandă pentru a
accesa meniul de setări. Evidenţiaţi pictograma
( ) [Toate setările] și selectaţi apăsând
butonul Disc (OK) de pe telecomandă.
Toate setările
(
)
2 Selectaţi [Conexiune] → [Conexiune cu r
(Ethernet)] sau [Conexiune Wi-Fi] → [Setări Wi-Fi
avansate].
CONEXIUNE
Nume TV
Conexiune cu fir (Ethernet)
Neconectat
Conexiune Wi-Fi
Neconectat
Conector dispozitiv
Mobile TV pornit
Setări Screen Share
Setări dispozitiv HDMI
CONEXIUNE WI-FI
Conexiune /
Adăugaţi o reţea fără fir ascunsă
Conectare prin intermediul WPS PBC
Conectare prin intermediul PIN WPS
Setări Wi-Fi avansate
Imagine Imagine
Sunet Sunet
Canale Canale
Conexiune Conexiune
General General
Siguranţă Siguranţă
Accesibilitate Accesibilitate
Urmaţi instrucţiunile de mai jos care sunt corelate
cu starea reţelei dvs.
Verificaţi televizorul sau punctul de acces (router).
Când X apare în dreptul televizorului:
1
Verificaţi starea conexiunii televizorului, punctul
de acces (router).
2
Opriţi şi porniţi televizorul, punctul de acces
(router).
3
Dacă utilizaţi un IP static, introduceţi IP-ul direct.
4
Contactaţi furnizorul de servicii de internet sau
compania pentru punctul de acces (router).
Verificaţi punctul de acces (router) sau consultaţi
furnizorul dvs. pentru servicii de internet.
Când X apare în dreptul Gateway:
1
Scoateţi din priză cablul de alimentare al
punctului de acces (router) şi încercaţi
conectarea după 5 secunde.
2
Iniţializaţi (resetaţi) punctul de acces (router).
3
Contactaţi furnizorul de servicii de internet sau
compania pentru punctul de acces (router).
Când X apare în dreptul DNS:
1
Scoateţi din priză cablul de alimentare al
punctului de acces (router) şi încercaţi
conectarea după 5 secunde.
2
Iniţializaţi (resetaţi) punctul de acces (router).
3
Verificaţi ca adresa MAC a televizorului/punctului
de acces (router) să fie înregistrată la furnizorul
dvs. de servicii de internet. (Adresa MAC afişată
pe panoul din dreapta al ferestrei cu starea
reţelei trebuie să fie înregistrată la furnizorul de
servicii de internet.)
4
Verificaţi site-ul web al producătorului punctului
de acces (router) pentru a vă asigura că routerul
dvs. are cea mai recentă versiune instalată.
Conectarea SmartShare la smartphone
Actualizarea firmware-ului televizorului
* Dacă televizorul este pornit pentru prima dată după livrarea din fabrică, iniţializarea acestuia poate dura
câteva minute.
1 (Setări) →
( )
[Toate setările] → [General] → [Despre acest TV] → [VERIFICAI ACTUALIZĂRILE]
2 După vericarea versiunii software-ului, actualizaţi-l.
Dacă bifaţi „[Permite actualizările automate]”, puteţi actualiza software-ul automat.
GENERAL
Limba
Locaţie
Ora și data
Temporizatoare
Serviciu AI
Gestionare cont
Modul Eco
Despre acest TV
Setări suplimentare
Imagine
Sunet
Canale
Conexiune
General
Siguranţă
Accesibilitate
DESPRE ACEST TV
General /
Versiune de software
Permite actualizările automate
VERIFICAȚI ACTUALIZĂRILE
Informaţii TV
Notificări
Manual de utilizare
Ajutor rapid
Imagine
Sunet
Canale
Conexiune
General
Siguranţă
Accesibilitate
1 Asiguraţi-vă că funcţia Wi-Fi este activată pe smartphone-ul dvs. Pentru a utiliza SmartShare, ambele
dispozitive trebuie să e conectate la aceeași reţea locală.
2 Instalaţi/rulaţi aplicaţia pentru partajare de conţinut pe smartphone (Se numește LG TV Plus pe tele-
foanele LG).
3 Activaţi smartphone-ul pentru a partaja șiere cu diferite conţinuturi cu alte dispozitive.
4 Selectaţi tipul de șier pe care doriţi să-l redaţi (video, audio sau fotograi).
5 Selectaţi șierul video, de muzică sau fotograi care va redat pe televizor.
6 Redaţi șierul media pentru a-l vizualiza și a vă bucura de el pe televizor.
Apelaţi centrul de service pentru clienţi LG dacă întâmpinaţi probleme.