Loading ...
Loading ...
Loading ...
FORTE III
First introduced in 1985, the Forte III quickly established itself as
the most popular Klipsch Heritage model. The elegant design and
outstanding performance made the Forte III a standout among
its competitors in the industry for over a decade. In 2017, Klipsch
re-introduced the Forte with upgraded cosmetics, a new midrange
horn & compression driver, and a re-designed 12” woofer & 15”
passive radiator. The new Forte III still maintains all the original
charm that made this loudspeaker so popular - But it now uses the
latest technology that really brings the Forte III into the 21 century.
UNPACKING & ASSEMBLY
HERESY III, FORTE III AND CORNWALL III
The Heresy III and Cornwall III models are large, heavy speakers.
It is recommended that two people unpack and install these models.
Open the top carton flaps, invert the carton and pull it up and off of
the speaker. Remove the internal packing and save for future use.
KLIPSCHORN AND LASCALA II
The Klipschorn and La Scala II low and high frequency cabinets are
shipped in two separate cartons. These are large, heavy speakers.
Unpacking and setup will require two people.
The Klipschorn and LaScala II high and low frequency
cabinets are matched by serial number for proper acoustic
performance. Please take care to match upper and lower
cabinet serial numbers when assembling these loudspeakers.
KLIPSCHORN
Open the flaps of the larger low frequency carton labeled “Open
This End”, invert the carton and lift it off of the speaker cabinet
and remove the inner packing. The top of the cabinet, with its
three rubber spacers, should be facing up (See Figure 1). Slide
the bass cabinet into the corner where it will be placed for a
test fit and make note of any obstructions that interfere with a
tight fit. Remove the cabinet from the corner to install the high
frequency cabinet. There is a left and a right low frequency cabinet
withrespect to the input panel. This allows the speaker’s binding
posts to be oriented toward the electronics to minimize the length
of speaker wire. In preparation for hookup, position the speaker
near, but not tight into, the corner and remove the low frequency
grille (two wing nuts) on the input panel side of the cabinet and set
aside until the connection process is complete.
Open the top flaps of the smaller high frequency carton marked
“Open This End” and remove the packing pad. Lift the high
frequency cabinet out of the carton and set it on top of the low
frequency cabinet. Align the three rubber bumpers on the top of
the low frequency cabinet with the three recesses on the underside
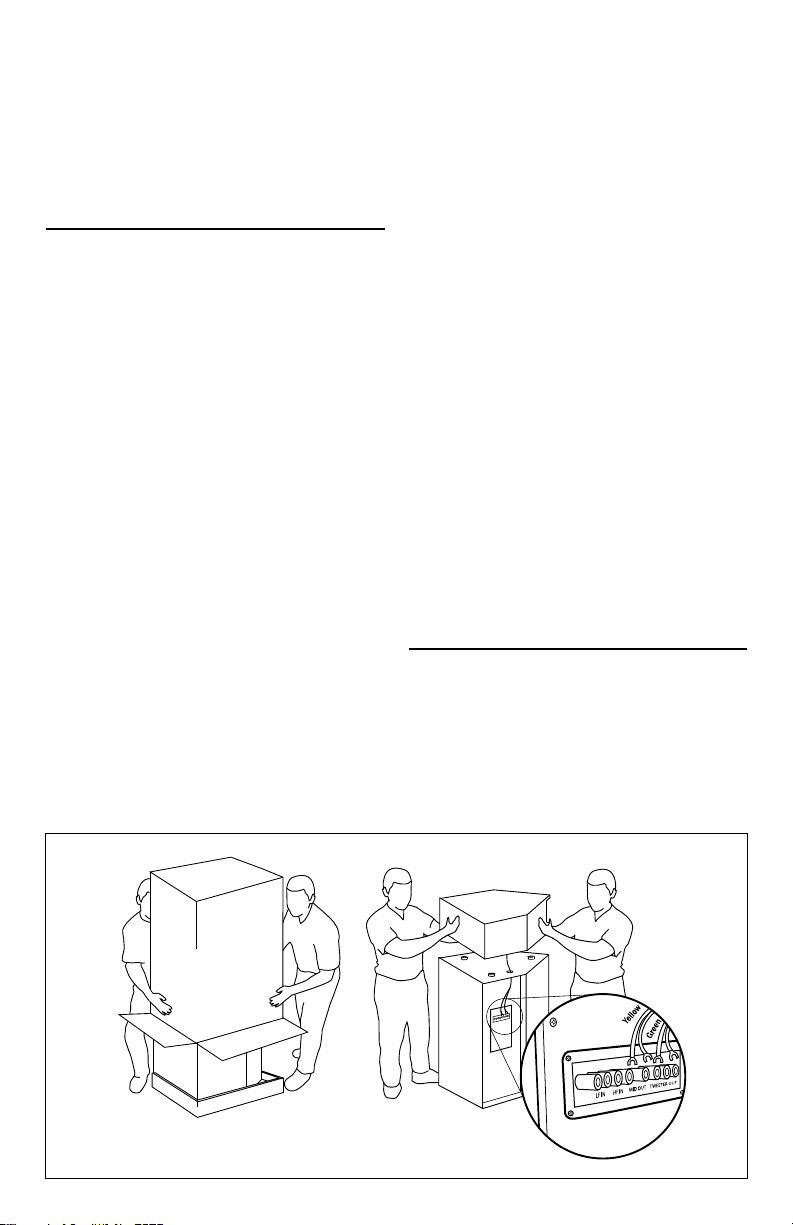
of the high frequency cabinet. Thread the high and mid frequency
driver leads in the upper cabinet through the hole in the cabinet’s
lower panel. Connect the Green (+) tagged pair of wires to the pair
of binding posts labeled “Tweeter Out.” Take care to match the Red
(+) and Black (-) binding posts with the Green (+) and Black (-)
sleeves on the ends of these wires. Follow this same procedure to
connect the Yellow tagged pair of wires to the pair of binding posts
labeled “Mid Out.” (See Figure 5.)
LA SCALA II
Open the flaps of the larger low frequency carton labeled “Open
This End.” Invert the carton, lift it off of the speaker cabinet and
remove the inner packing. The top of the cabinet, with its three
rubber spacers, should be facing up (See Figure 2).
For the La Scala II high frequency cabinet, open the top flaps of
the smaller carton marked “Open This End,” and remove the inner
packing pad. The bottom of the cabinet should be facing up with
the low frequency connection cable attached to it. Free this cable,
invert the carton and lift it off the cabinet. With assistance, lift the
high frequency cabinet off the floor and place it on top of the low
frequency cabinet while placing the low frequency cable toward
the rear and out the gap between the cabinets. Align the recesses
on the bottom surface of the high frequency cabinet with the
rubber bumpers on the top of the low frequency cabinet. Connect
the low frequency cable to the two screw barrier strip on the rear
of the low frequency cabinet. Be sure to observe proper polarity
by connecting the wire with the Red Indicator to the terminal with
the Red marking and the wire with the Black indicator to the other
terminal.
PLACEMENT
Your Klipsch Heritage loudspeakers will perform well in a
variety of locations but best results will be achieved using the
following general guidelines:
• All: Place on a common wall 6 to 15 feet apart.
• La Scala, Cornwall, Heresy: Position them equidistant from the wall
behind the speakers.
• Heresy: Equidistant height above the floor with the high frequency
drivers at seated ear height if wall or cabinet mounted.
2" x 4" FRAME
122cm
approx. 48"
1
/2" PLYWOOD
3
/4" PLYWOOD
98-132cm
39"-52"+
Figure 1
Loading ...
Loading ...
Loading ...