ELECTRIC RANGE
Slide-in models
f
ESTUFA ELECTRICA
Modelos deslizables
_" _" I •_ _ _ _ _i,.
1,11_;._. I dtl U,,. _I[ u
Model Nos.
r
790.46822
790.46823
790.46824
790.46829
Sears Roebuck and Co., Hoffman Estates, IL 60179 U.S.A. P/N 318200829 Rev.E (0209)
www.sears.com
Table of Contents
Slide-in Range Warranty ........................................................... 2
IMPORTANT SAFETY INSTRUCTIONS ................................. 3-5
Product Record ......................................................................... 5
Serial Plate Location ................................................................. 5
Range Features ......................................................................... 6
Setting Surface Controls ..................................................... 7-10
General Cooktop Information .............................................. 7
Operating Single Radiant Surface Elements ...................... 8
Operating Dual Radiant Surface Element .......................... 9
Operating Bridge Radiant Surface Element .................. 9-10
Surface Cooking ................................................................. 10-11
Use correct cookwars ....................................................... 10
Setting Warmer Zone Controls .......................................... 11
Before Setting Oven Controls ................................................ 12
Air Circulation in the Oven ..................................................... t 2
Setting Warmer Drawer Controls ........................................... t 3
Control Pad Features .............................................................. 14
Minimum and Maximum Control Pad Settings ...................... 14
Setting the Clock ................................................................ 15-16
Setting the Clock ............................................................... 15
Changing between 12 or 24 Hour Display ....................... 15
Continuous Bake or Twelve Hour Energy Saving Mode .. 16
Kitchen Timer ..................................................................... 16
Consumer Defined Control Feature ................................. 17-18
Oven Lockout .................................................................... f 7
Temperature Display ......................................................... 18
Silent Control Operation .................................................... f 8
Setting Oven Controls ........................................................ t9-25
Preheat .............................................................................. f 9
Bake .................................................................................. 20
Timed Bake ....................................................................... 21
Delayed Time Bake ........................................................... 22
Broil & Searing Gril ............................................................ 23
Food Categories (Meats, Cakes & Breads) ...................... 24
Convection Bake ............................................................... 25
Oven Cleaning .................................................................... 26-29
Preparing for the Self-Clean Cycle ................................... 26
Self-Clean Cycle ............................................................... 27
Delayed Self-Clean Cycle ............................................ 28-29
Adjusting Oven Temperature ................................................. 29
General Cleaning ................................................................ 30-33
Oven Lights .............................................................................. 34
CookingTables ........................................................................ 34
Before You Call for Service ............................................... 35-36
Recipes ............................................................................... 37-38
Espa_ol .................................................................................... 39
Sears Service .......................................................... Back Cover
Slide-in Range Warranty
FULL ONE YEAR WARRANTY ON ALL PARTS
If, within one year from the date of installation, any part fails to function properly due to a defect in material or
workmanship, Sears will repair or replace it, at our option, free of charge.
Your ceramic glass smoothtop is covered by an additional 2rid through 5th year limited warranty. This warranty
provides for replacement for any defective surface heating element, deteriorated rubberized-silicone seal, or
glass smoothtop that cracks due to thermal breakage. Damage or breakage due to customer abuse is not covered
by this warranty.
If the product is subjected to other than private residential use, the above warranty is effective for only 90 days.
WARRANTY SERVICE IS AVAILABLE BY CONTACTING SEARS AT 1-800-4-MY-HOME®.
This warranty gives you specific legal rights, and you may also have other rights which vary from state to state.
Master Protection Agreements
Congratulations on making a smart purchase.
Your new Kenmore appliance isdesigned and manufactured for years
of dependable operation. But like all products, it may require preven-
tive maintenance or repair from time to time.That's when having a
Master Protection Agreement can save you money and aggravation.
Purchase a Master Protection Agreement now and protect yourself
from unexpected hassle and expense.
The Master Protection Agreement also helps extend the life of your
new appliance. Here's what's included in the Agreement:
• Expert service by our 12,000 professional repair specialists.
• Unlimited service and no charge for parts and labor on all
covered repairs.
• "No-lemon" guarantee replacement of your covered product
if more than three product failures occur within twelve months.
• Product replacement if your covered product can't be fixed.
• Annual Preventive Maintenance Check at your request no
extra charge.
• Fast help by phone non-technical and instructional assistance
on products repaired in your home, plus convenient repair
scheduling.
• Power surge protection against electrical damage due to power
fluctuations.
• Rental reimbursement if repair of your covered product takes
longer than promised.
Once you purchase the Agreement, a simple phone call isall that it
takes for you to schedule service.You can call anytime day or night,
or schedule a service appointment online.
Sears has over 12,000 professional repair specialists, who have
access to over 4.5 million quality parts and accessories. That's the
kind of professionalism you can count on to help prolong the life of
your new purchase for years to come. Purchase your Master Protec-
tion Agreement today!
Somelimitationsand exclusionsapply.
Forpricesand additional informationcall
1-800-827-6655.
Sears Installation Service
For Searsguaranteedprofessional installation
of home appliancesand itemslike garagedoor
openersand water heaters,in the U.S.A.call
1-800-4-MY-HOME®.
2
Important Safety Instructions
Read all instructions before using this appliance.
Save these instructions for future reference.
This manual contains important safety symbols and instructions. Please pay attention to these symbols and follow all instructions
given.
• All ranges can tip.
• Injuryto persons could result.
• Install anti-tip device packed with range.
• See Installation Instructions.
®
®
To reduce the risk of tipping, the
range must be secured by properly
installed anti-tip bracket(s) provided
with the range. To check if the
bracket(s) isinstalled properly,
remove the lower panel or storage
drawer and verify that the anti-tip
bracket(s) is engaged. Refer to the
Installation Instructions for proper
anti-tip bracket(s) installation.
Remove all tape and packaging before using the range.
Destroy the carton and plastic bags after unpacking the
range. Never allow children to play with packaging material.
Proper Installation-Be sure your appliance is properly
installed and grounded by a qualified technician in
accordance with the National Electrical Code ANSI/NFPA
No. 70--latest edition, and local code requirements, install
only per installation instructions provided in the literature
package for this range.
Ask your dealer to recommend a qualified technician and an
authorized repair service. Know how to disconnect the
power to the range at the circuit breaker or fuse box in case
of an emergency.
User servicing--Do not repair or replace any part of the
appliance unless specifically recommended in the
manuals. All other servicing should be done only by a
qualified technician, This may reduce the risk of personal
injury and damage to the range.
Never modify or alter the construction of a range by
removing leveling legs, panels, wire covers, anti-tip
brackets/screws, or any other part of the product.
_ Stepping, leaning or sitting on the door or
drawer of this range can result in serious injuries and also
cause damage to the range. Do not allow children to climb or
play around the range. The weight of a child on an open door
may cause the range to tip, resulting in serious burns or other
injury. An open drawer, when hot, may cause burns.
_Do not use the oven or warmer drawer (if
equipped) for storage.
Do not store items of interest to children in
the cabinets above a range. Children climbing on the range to
reach items could be seriously injured.
_ Never use your appliance for warming up or
heating up the room.
Storage in or on appliance--Flammable materials should Z
not be stored in an oven, near surface units or in the
drawer (if equipped). This includes paper, plastic and cloth _,
items, such as cookbooks, plasticware and towels, as well
as flammable liquids. Do not store explosives, such as Z
aerosol cans, on or near the appliance. Flammable mated-
als may explode and result in fire or property damage.
Do not leave children alone--Children should not be left
alone or unattended in the area where appliance is in use.
They should never be allowed to sit or stand on any part of
the appliance.
DO NOTTOUCH SURFACE UNITS, AREAS NEAR THESE
UNITS, OVEN HEATING ELEMENTS OR INTERIOR
SURFACES OFTHE OVEN OR WARMER DRAWER (if
equipped). Both surface and oven heating elements may be
hot even though they are dark in color. Areas near surface
units may become hot enough to cause burns. During and
after use, do not touch, or let clothing or other flammable
materials touch these areas until they have had sufficient
time to cool. Among these areas are the cooktop, surfaces
facing the cooktop, the oven vent openings and surfaces
near these openings, oven door and window.
Wear proper apparel--Loose-fitting or hanging garments
should never be worn while using the appliance. Do not
let clothing or other flammable materials contact hot sur-
faces.
Do not use water or flour on grease fires---Smother the
fire with a pan lid, or use baking soda, a dry chemical or
foam-type extinguisher.
When heating fat or grease, watch it closely. Fat or grease
may catch fire if allowed to become too hot.
Use only dry potholders--Moist or damp potholders on
hot surfaces may result in burns from steam. Do not let
potholders touch hot heating elements. Do not use a towel
or other bulky cloth instead of a potholder.
3
Important Safety Instructions
Do not heat unopened food containers---Buildup of
pressure may cause container to burst and result in
injury.
Remove the oven door from any unused range if it is to
be stored or discarded,
IMPORTANT--Do not attempt to operate the oven during a
power failure. If the power fails, always turn the oven off. tf the
oven is not turns off and the power resumes, the oven may
begin to operate again. Food left unattended could catch fire or
spoil. Once the power resumes, reset the clock and oven
function.
Fi_ Electronic controllers can be damaged by
cold temperatures. When you use your appliance for the first
time, or if it has not been used for a long period of time, make
sure that it has been exposed to a temperature above 0°C/
32°F for at least 3 hours before connecting it to the power
supply.
IMPORTANT INSTRUCTIONS FOR USING
YOUR COOKTOP
Know which knob controls each surface heating unit.
Use proper pan size. This appliance is equipped with one
or more surface units of different sizes. Select utensils
having flat bottoms large enough to cover the surface unit.
The use of undersized utensils will expose a portion of the
surface heating unit to direct contact and may result in
ignition of clothing. Proper relationship of utensil to the
surface unit will also improve efficiency.
Utensil handles should be turned inward and not extend
over adjacent surface units--To reduce the risk of burns,
ignition of flammable materials, and spillage due to uninten-
tional contact with the utensil. The handle of the utensil
should be positioned so that it is turned inward, and does
not extend over adjacent surface unit.
Never leave surface burners unattended at high heat
settings--Boilovers cause smoking and greasy spiliovers
that may ignite, or a pan that has boiled dry may melt.
FOR GLASS COOKTOPS ONLY
DO not clean or operate a broken cooktop_tf cooktop
should break, cleaning solutions and spillovers may
penetrate the broken cooktop and create a risk of electric
shock. Contact a qualified technician immediately.
Clean cooktop glass with caution--If a wet sponge or cloth
is used to wipe spills on a hot cooking area, be careful to
avoid a steam bum. Some cleaners can produce harmful
fumes if applied to a hot surface.
Avoid scratching the cooktop glass with sharp objects.
IMPORTANT INSTRUCTIONS FOR USING
YOUR OVEN
Use care when opening oven door or warmer drawer (if
equipped_--Stand to the side of the range when opening
the door of a hot oven. Let hot air or steam escape before
you remove or replace food in the oven / warmer drawer.
Keep oven vent ducts unobstructed. The oven vent is
located at the rear of the cooktop on the right side. Touching
the surfaces in this area when the oven is operating may
cause severe burns. Also, do not place plastic or heat-
sensitive items on or near the oven vent. These items could
melt or ignite.
Placement of oven/warmer drawer (if equipped) Racks.
Always place oven racks in desired location while oven/
warmer drawer (if equipped) iscool. If rack must be moved
while oven is hot use extreme caution. Use potholders and
grasp the rack with both hands to reposition. Do not let
potholders contact the hot heating elements in the oven/
warmer drawer (if equipped). Remove all utensils from the
rack before moving.
Do not use the broiler pan without its insert. The broiler
pan and its insert allow dripping fat to drain and be kept
away from the high heat of the broiler.
Do not cover the broiler insert with aluminum foil. Ex-
posed fat and grease could ignite.
Protective liners--Do not use aluminum foil to line oven
bottom or any other part of the appliance. Only use alumi-
num foil as recommended for baking if used as a cover
placed on the food. Any other use of protective liners or
aluminum foil may result in a risk of electric shock or fire or
short circuit.
Do not touch a hot light bulb with a damp cloth. Doing so
could cause the bulb to break. Disconnect the appliance or
turn off the power to the appliance before removing and
replacing light bulb.
Glazed cooking utensils--Only certain types of glass, glass/
ceramic, ceramic, earthenware, or other glazed utensils are
suitable for rangetop service without breaking due to the
sudden change in temperature. Check the manufacturer's
recommendations for cooktop use.
Do not use decorative surface element covers, if an
element is accidentally turned on, the decorative cover will
become hot and possibly melt. Burns will occur ifthe hot
covers are touched. Damage may also be done to the
cooktop.
4
Important Safety Instructions
IMPORTANT INSTRUCTIONS FOR CLEAN-
ING YOUR RANGE
Clean the range regularly to keep all parts free of grease
that could catch fire, Exhaust fan ventilation hoods and
grease filters should be kept clean. Do not allow grease to
accumulate on hood or filter. Greasy deposits in the fan
could catch fire. When you are flaming food under the hood,
turn the fan on. Refer to the hood manufacturer's instructions
for cleaning.
Kitchen cleaners and aerosols--Always follow the
manufacturer's recommended directions for use. Be aware
that excess residue from cleaners and aerosols may ignite
causing damage and injury.
SELF CLEANING OVENS
In the self-cleaning cycle, only clean the parts listed in
this Use and Care Guide. Before self cleaning the oven,
remove the broiler pan and any utensils or foods from the
oven.
Do not use oven cleaners--No commercial oven cleaner or
oven liner protective coating of any kind should be used in
or around any part of the oven.
Do not clean door gasket--The door gasket is essential for a
good seal. Care should be taken not to rub, damage or move
the gasket.
Remove oven racks. Oven racks color will change if left in
the oven during a self-cleaning cycle.
_The health of some birds is extremely sensitive to
the fumes given off during the self-cleaning cycle of any range.
Move birds to another well ventilated room.
IMPORTANT SAFETY NOTICE
The California Safe Drinking Water and Toxic Enforcement Act
requires the Governor of California to publish a list of
substances known to the state to cause cancer, birth defects or
other reproductive harm, and requires businesses to warn
customers of potential exposure to such substances.
m
z
r
Product Record
(See Serial Plate Location below)
Model No. 790.
Serial No.
Date of Purchase
READ AND SAVE THESE INSTRUCTIONS.
Save your sales receipt for future reference.
Serial Plate Location
You will find the model and serial number printed on the serial
plate. The serial plate is located on the left side of the oven
front frame behind the oven door.
Please see the illustration for exact location. Remember to
record the serial number for future reference (See Product
Record above).
Open the door.
Serial plate is
located here.
5
Your
Electric
Slide-In
Range
Features
At a Glance
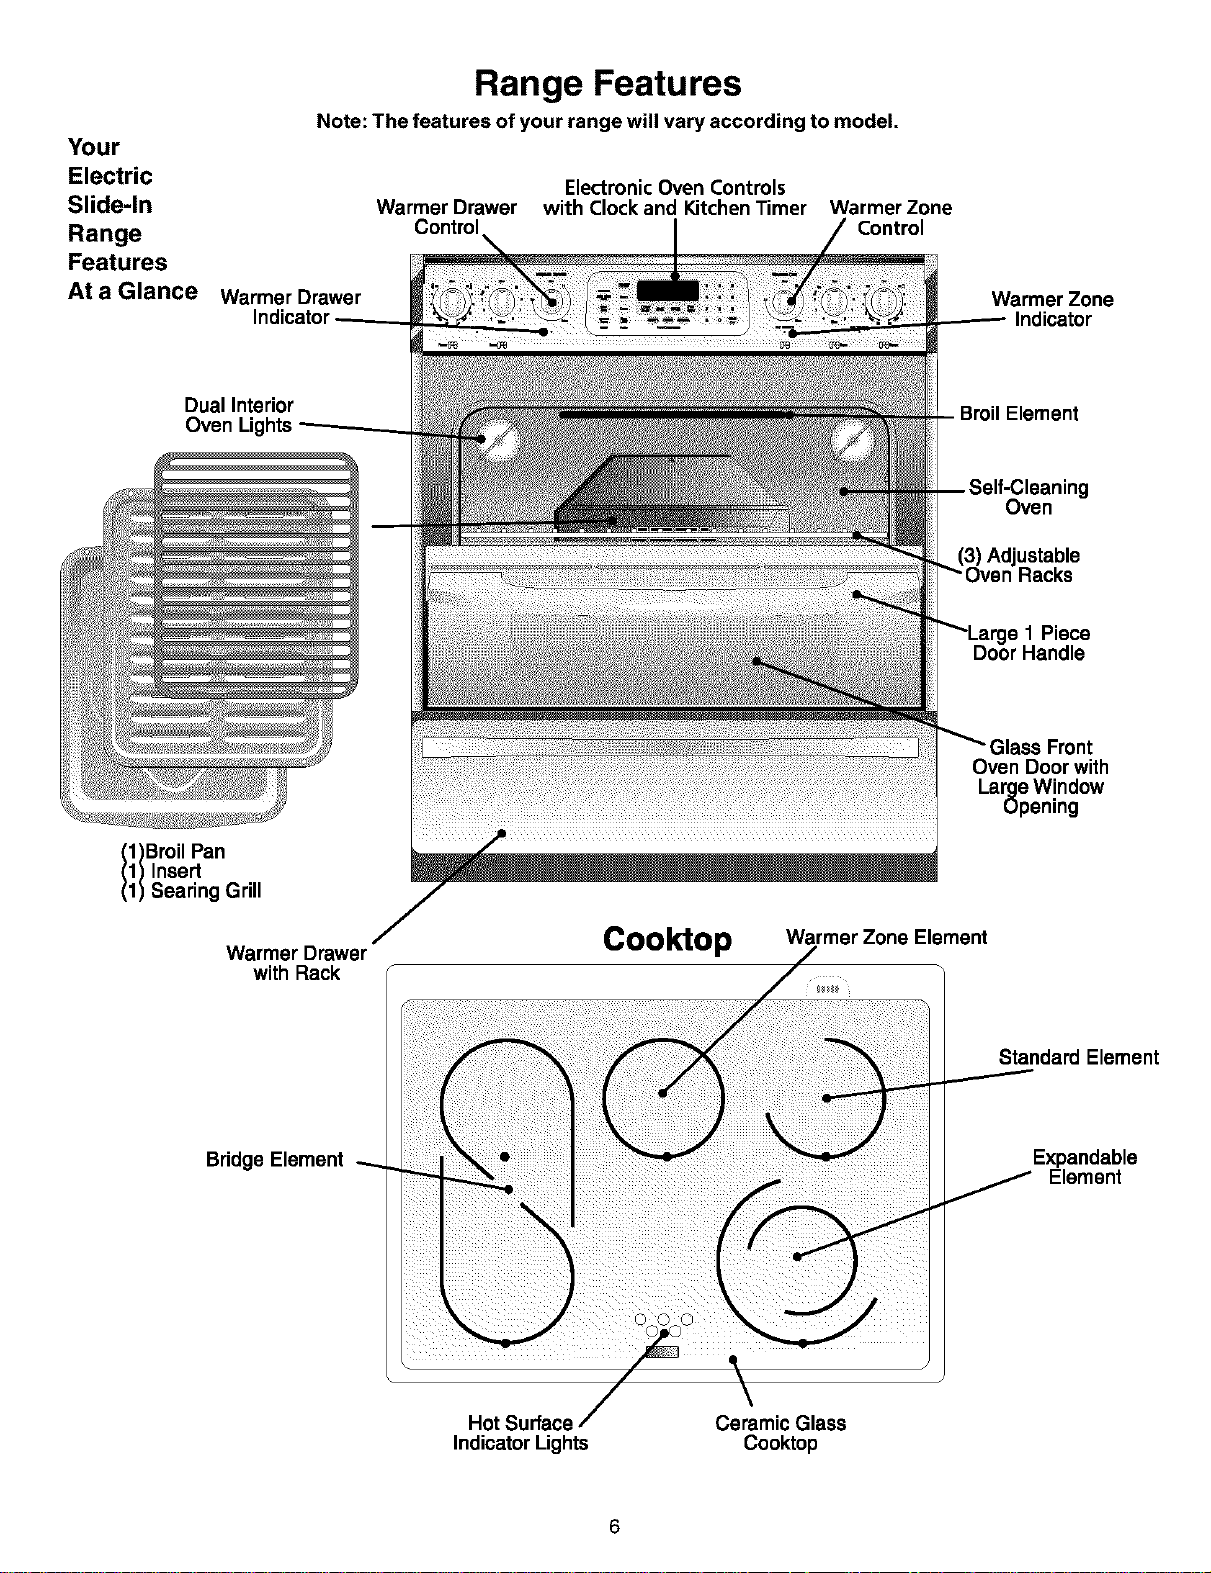
Range Features
Note: The features of your range will vary according to model.
Electronic Oven Controls
Warmer Drawer with Clock and Kitchen Timer Warmer Zone
Control Control
Warmer Drawer
Warmer Zone
Indicator
Dual Interior
Oven Lights
g
Oven
Jstable
s 1 Piece
1)Broil Pan
1) Insert
1) Searing Grill
Warmer Drawer
with Rack
Cooktop
Oven Door with
Large W!ndow
upenmg
Warmer Zone Element
Standard Element
Bridge Element
Expandable
Element
Hot Surface
Indicator Lights
Ceramic Glass
Cooktop
6
Setting Surface Controls
FEATURE OVERVIEW
• General Cooktop Information
• About Radiant Surface Burners
• Locations of the Radiant Surface
Elements and Controls
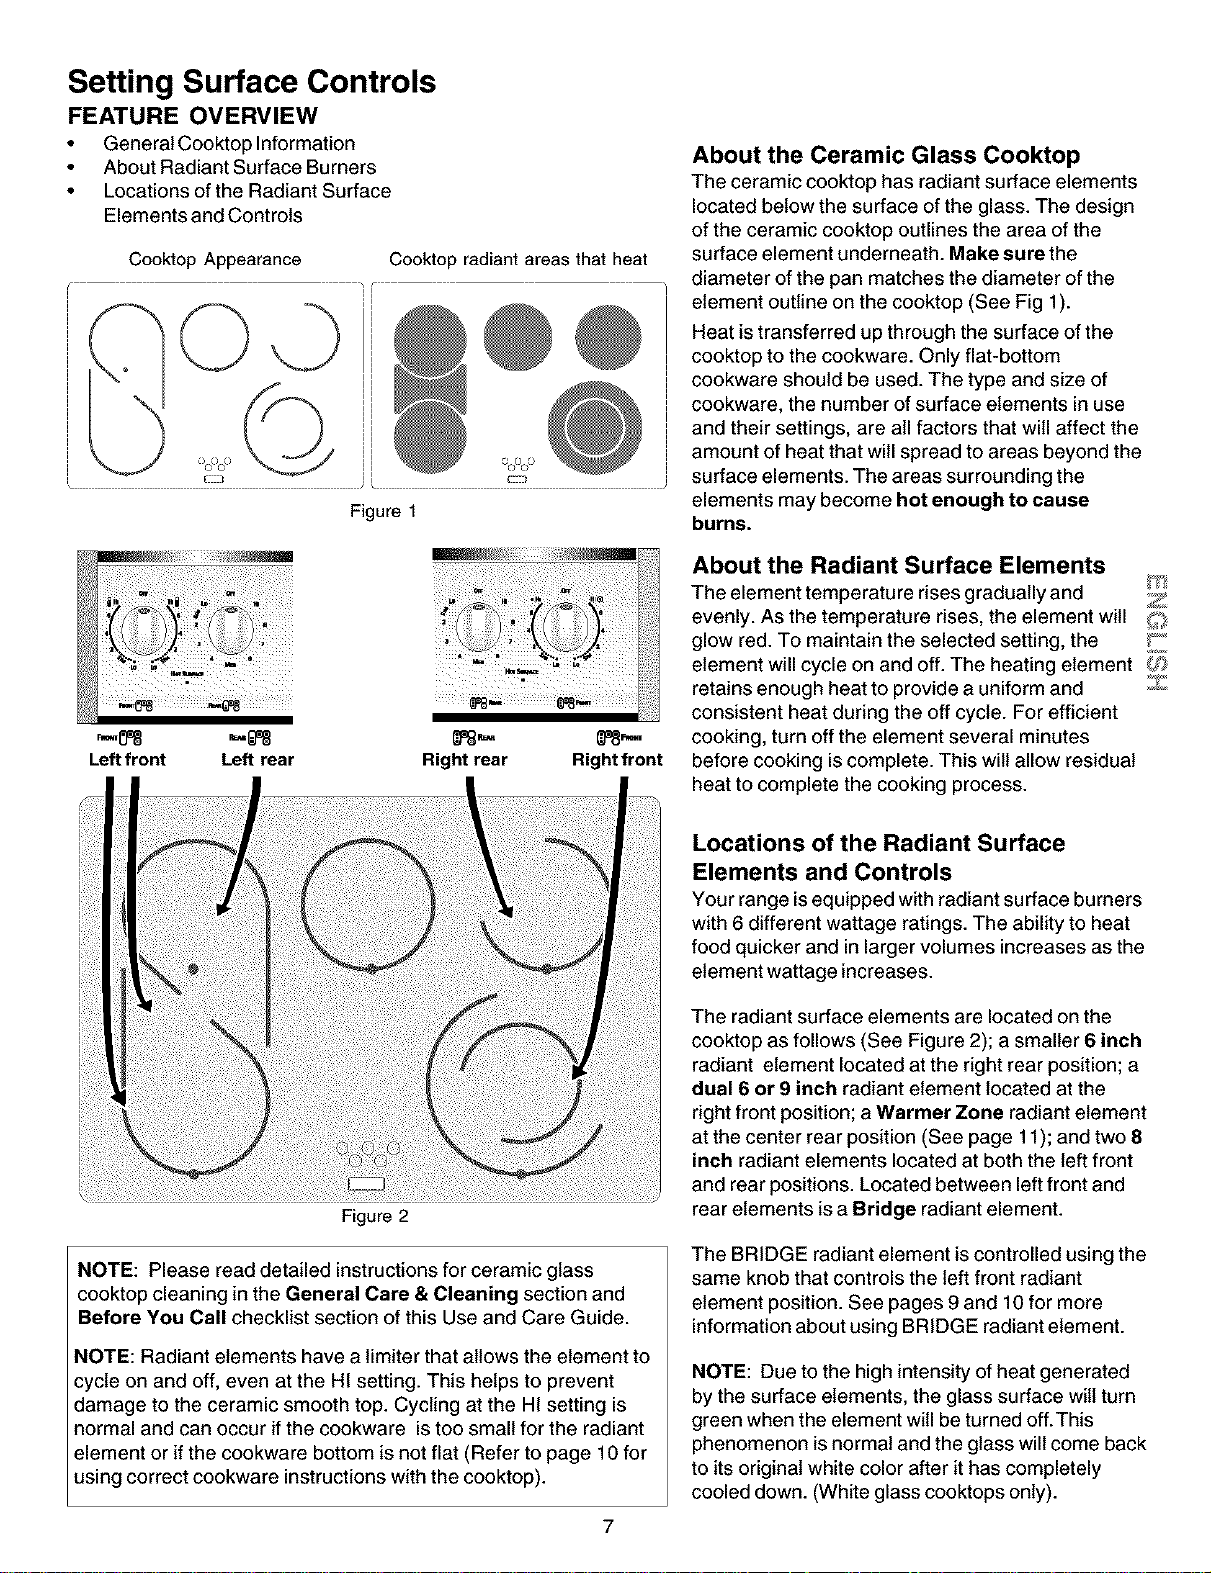
Cooktop Appearance Cooktop radiant areas that heat
©
c/coco _ OCf/C_)
Figure 1
Leftfront Left rear
Right rear Rightfront
About the Ceramic Glass Cooktop
The ceramic cooktop has radiant surface elements
located below the surface of the glass. The design
of the ceramic cooktop outlines the area of the
surface element underneath. Make sure the
diameter of the pan matches the diameter of the
element outline on the cooktop (See Fig 1).
Heat istransferred up through the surface of the
cooktop to the cookware. Only flat-bottom
cookware should be used. The type and size of
cookware, the number of surface elements in use
and their settings, are atl factors that will affect the
amount of heat that will spread to areas beyond the
surface elements. The areas surrounding the
elements may become hot enough to cause
burns.
About the Radiant Surface Elements
The element temperature rises gradually and Z
evenly. As the temperature rises, the element witl
glow red. To maintain the selected setting, the F"
element will cycle on and off. The heating element ;SI_
retains enough heat to provide a uniform and Z
consistent heat during the off cycle. For efficient
cooking, turn off the element several minutes
before cooking is complete. This wilt allow residual
heat to complete the cooking process.
Figure
NOTE: Please read detailed instructions for ceramic glass
cooktop cleaning in the General Care & Cleaning section and
Before You Call checklist section of this Use and Care Guide.
NOTE: Radiant elements have a limiter that allows the element to
cycle on and off, even at the HI setting. This helps to prevent
damage to the ceramic smooth top. Cycling at the HI setting is
normal and can occur ifthe cookware is too small for the radiant
element or ifthe cookware bottom is not flat (Refer to page 10 for
using correct cookware instructions with the cooktop).
7
Locations of the Radiant Surface
Elements and Controls
Your range isequipped with radiant surface burners
with 6 different wattage ratings. The ability to heat
food quicker and in larger volumes increases as the
element wattage increases.
The radiant surface elements are located on the
cooktop as follows (See Figure 2); a smaller 6 inch
radiant element located at the right rear position; a
dual 6 or 9 inch radiant element located at the
right front position; a Warmer Zone radiant element
at the center rear position (See page 11); and two 8
inch radiant elements located at both the left front
and rear positions. Located between left front and
rear elements is a Bridge radiant element.
The BRIDGE radiant element is controlled using the
same knob that controls the left front radiant
element position. See pages 9 and 10 for more
information about using BRIDGE radiant element.
NOTE: Due to the high intensity of heat generated
by the surface elements, the glass surface witl turn
green when the element witl be turned off.This
phenomenon is normal and the glass will come back
to its original white color after it has completely
cooled down. (White glass cooktops only).
Setting Surface Controls
FEATURE OVERVIEW
• Surface Cooking Settings
• Operating Single Surface Radiant Elements
Surface Cooking Settings
Use the chart (Fig. 1) to determine the correct setting for the kind of food you are
preparing. The Simmer settings are used tosimmer and keep larger quantities of foods
warm such as stews and soups. The lower Simmer settings are ideal for delicate foods
and melting chocolate or butter.
Note: The size and type of cookware used will influence the setting needed for best
cooking results.
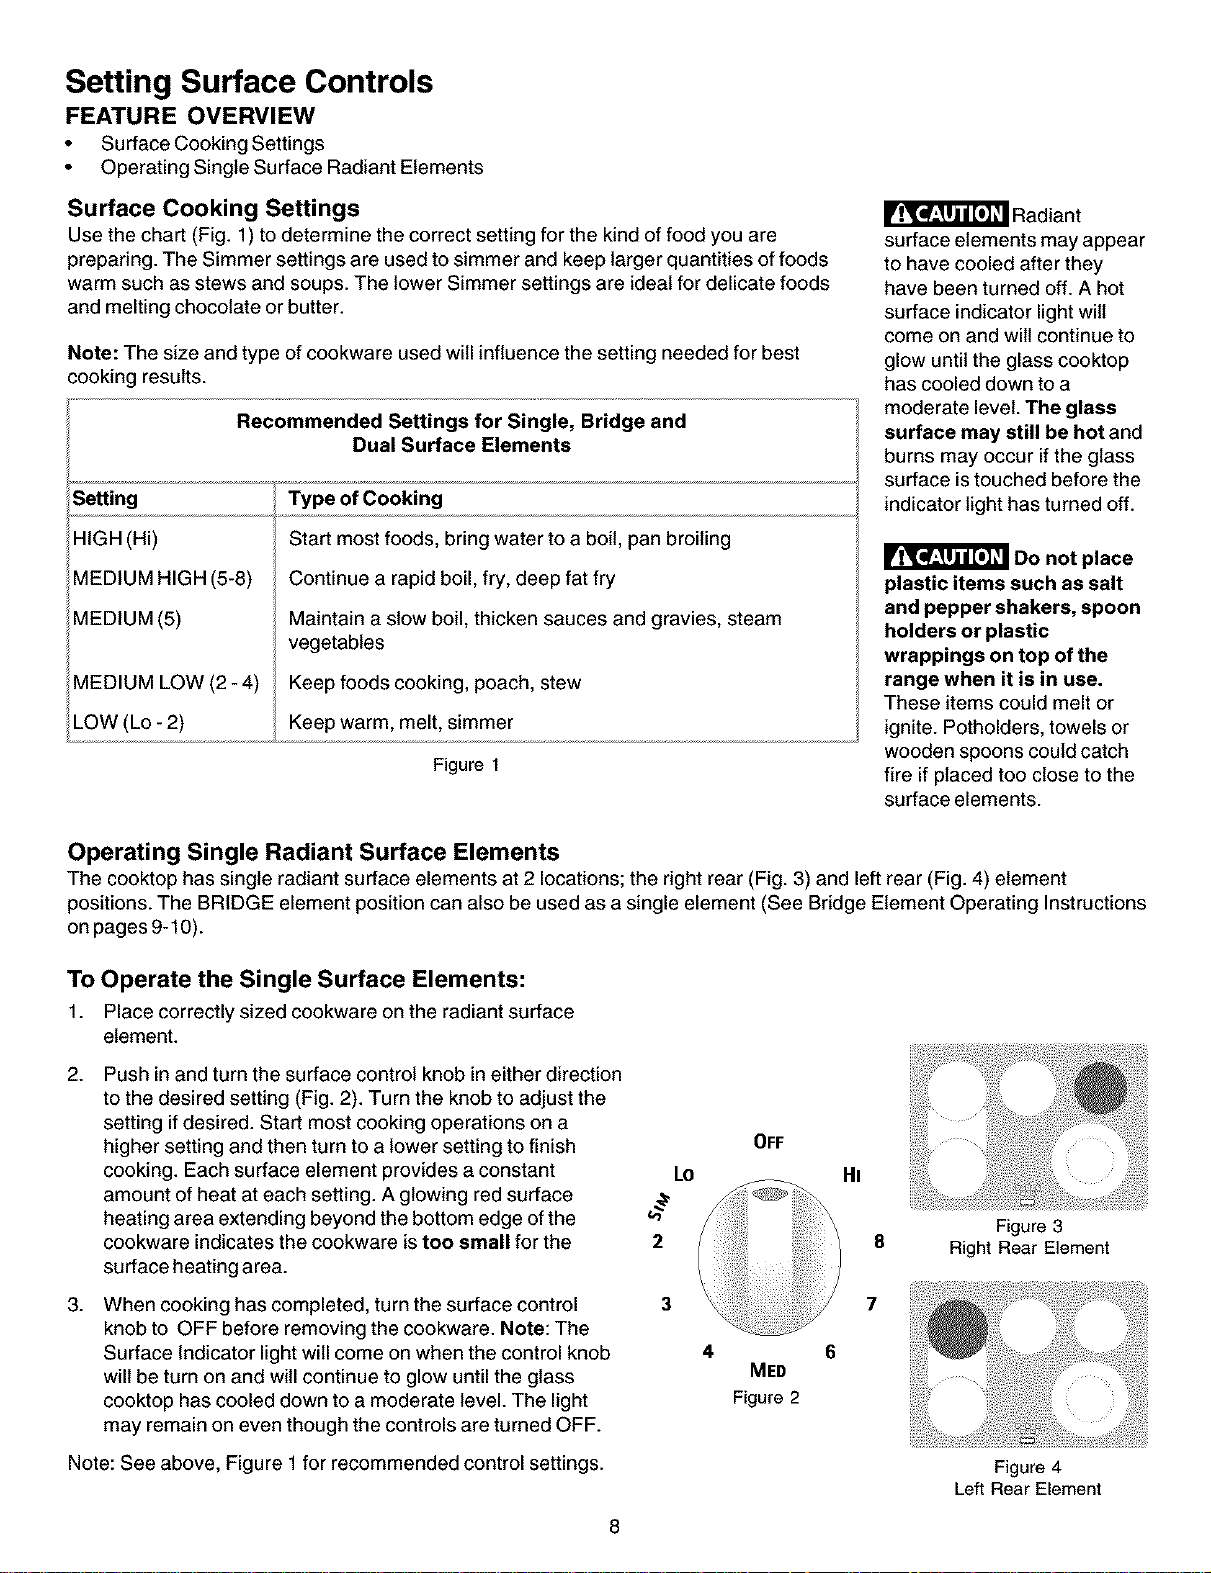
Recommended Settings for Single, Bridge and
Dual Surface Elements
Setting
HIGH (Hi)
MEDIUM HIGH (5-8)
MEDIUM (5)
MEDIUM LOW (2 - 4)
LOW (Lo- 2)
Type of Cooking
Start most foods, bring water to a boil, pan broiling
Continue a rapid boil, fry, deep fat fry
Maintain a slow boil, thicken sauces and gravies, steam
vegetables
Keep foods cooking, poach, stew
Keep warm, melt, simmer
Figure 1
Radiant
surface elements may appear
to have cooled after they
have been turned off. A hot
surface indicator light wilt
come on and wilt continue to
glow until the glass cooktop
has cooled down to a
moderate level. The glass
surface may still be hot and
burns may occur if the glass
surface is touched before the
indicator light has turned off.
Do not place
plastic items such as salt
and pepper shakers, spoon
holders or plastic
wrappings on top of the
range when it is in use.
These items could melt or
ignite. Potholders, towels or
wooden spoons could catch
fire if placed too close to the
surface elements.
Operating Single Radiant Surface Elements
The cooktop has single radiant surface elements at 2 locations; the right rear (Fig. 3) and left rear (Fig. 4) element
positions. The BRIDGE element position can also be used as a single element (See Bridge Element Operating Instructions
on pages 9-10).
To Operate the Single Surface Elements:
1. Place correctly sized cookware on the radiant surface
element.
2.
.
Push in and turn the surface control knob in either direction
to the desired setting (Fig. 2). Turn the knob to adjust the
setting if desired. Start most cooking operations on a
higher setting and then turn to a lower setting to finish
cooking. Each surface element provides a constant
amount of heat at each setting. A glowing red surface
heating area extending beyond the bottom edge of the
cookware indicates the cookware is too small for the
surface heating area.
When cooking has completed, turn the surface control
knob to OFF before removing the cookware. Note: The
Surface Indicator light will come on when the control knob
will be turn on and will continue to glow until the glass
cooktop has cooled down to a moderate level. The light
may remain on even though the controls are turned OFF.
Note: See above, Figure 1 for recommended control settings.
Lo
b'
2
3
4
OFF
MED
Figure 2
HI
8
7
8
Figure 3
Right Rear Element
Figure 4
Left Rear Element
Setting Surface Controls
FEATURE OVERVIEW
• Operating the Dual Radiant Element Surface Control
• Operating the Bridge Radiant Element Surface
Control
oHm
HI@
Figure 1 Figure 4
OFF OFF
• Hi HI @ • Hi HI 0
LO LO
Figure 2
LO LO
Figure 5
Figure 3 Figure 6
Figure 7 Figure 9
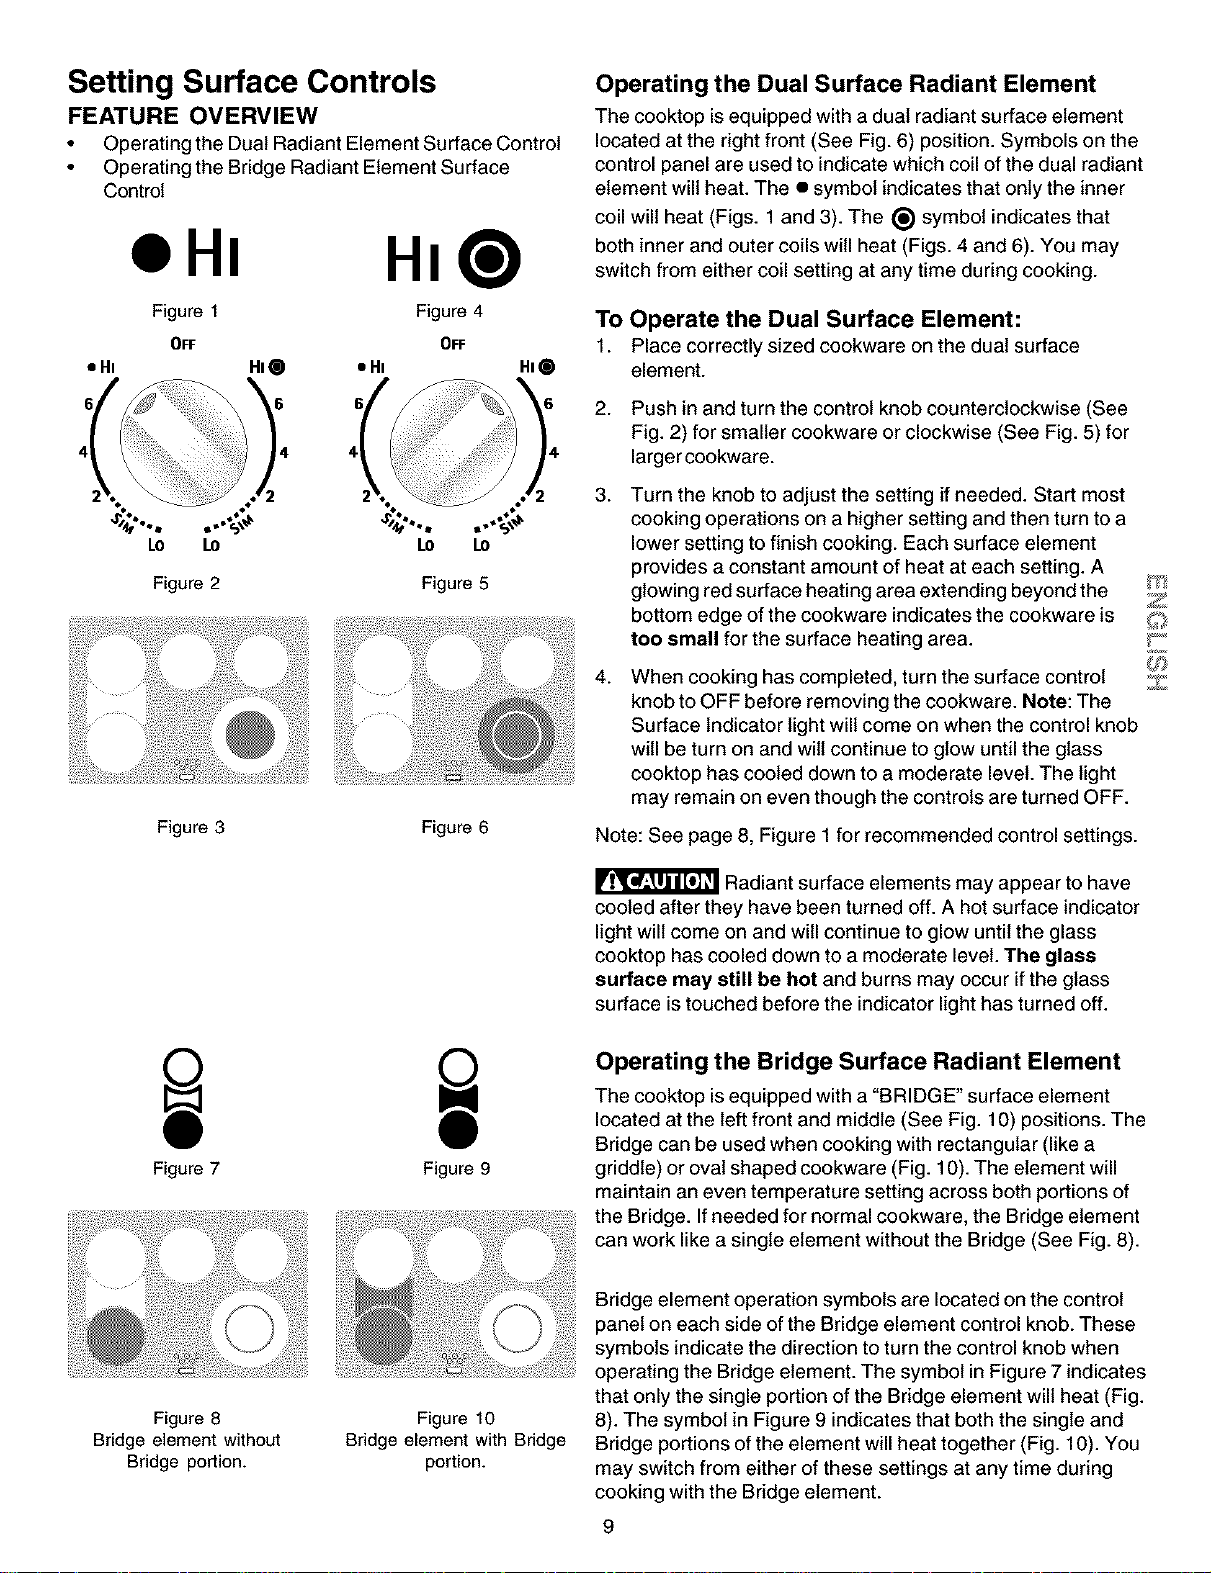
Operating the Dual Surface Radiant Element
The cooktop is equipped with a dual radiant surface element
located at the right front (See Fig. 6) position. Symbols on the
control panel are used to indicate which coil of the dual radiant
element will heat. The • symbol indicates that only the inner
coil will heat (Figs. 1 and 3). The (_ symbol indicates that
both inner and outer coils will heat (Figs. 4 and 6). You may
switch from either coil setting at any time during cooking.
To Operate the Dual Surface Element:
1. Place correctly sized cookware on the dual surface
element.
2.
.
4.
Push in and turn the control knob counterclockwise (See
Fig. 2) for smaller cookware or clockwise (See Fig. 5) for
larger cookware.
Turn the knob to adjust the setting if needed. Start most
cooking operations on a higher setting and then turn to a
lower setting to finish cooking. Each surface element
provides a constant amount of heat at each setting. A
glowing red surface heating area extending beyond the
bottom edge of the cookware indicates the cookware is
too small for the surface heating area.
When cooking has completed, turn the surface control
knob to OFF before removing the cookware. Note: The
Surface Indicator light will come on when the control knob
will be turn on and wilt continue to glow until the glass
cooktop has cooled down to a moderate level. The light
may remain on even though the controls are turned OFF.
Note: See page 8, Figure 1 for recommended control settings.
Radiant surface elements may appear to have
cooled after they have been turned off. A hot surface indicator
light will come on and will continue to glow until the glass
cooktop has cooled down to a moderate level. The glass
surface may still be hot and burns may occur ifthe glass
surface istouched before the indicator light has turned off.
Z
Z
Operating the Bridge Surface Radiant Element
The cooktop is equipped with a "BRIDGE" surface element
located at the left front and middle (See Fig. 10) positions. The
Bridge can be used when cooking with rectangular (like a
griddle) or oval shaped cookware (Fig. 10). The element will
maintain an even temperature setting across both portions of
the Bridge. If needed for normal cookware, the Bridge element
can work like a single element without the Bridge (See Fig. 8).
Figure 8
Bridge element without
Bridge portion.
Figure 10
Bridge element with Bridge
portion.
Bridge element operation symbols are located on the control
panel on each side of the Bridge element control knob. These
symbols indicate the direction to turn the control knob when
operating the Bridge element. The symbol in Figure 7 indicates
that only the single portion of the Bridge element will heat (Fig.
8). The symbol in Figure 9 indicates that both the single and
Bridge portions of the element will heat together (Fig. 10). You
may switch from either of these settings at any time during
cooking with the Bridge element.
9
Setting Surface Controls
FEATURE OVERVIEW
• Operating the Bridge Radiant Element Surface
Control (cont'd)
OFF OFF
,it it, ,it
Lo Lo Lo Lo
Figure 1 Figure 3
Figure 2 Figure 4
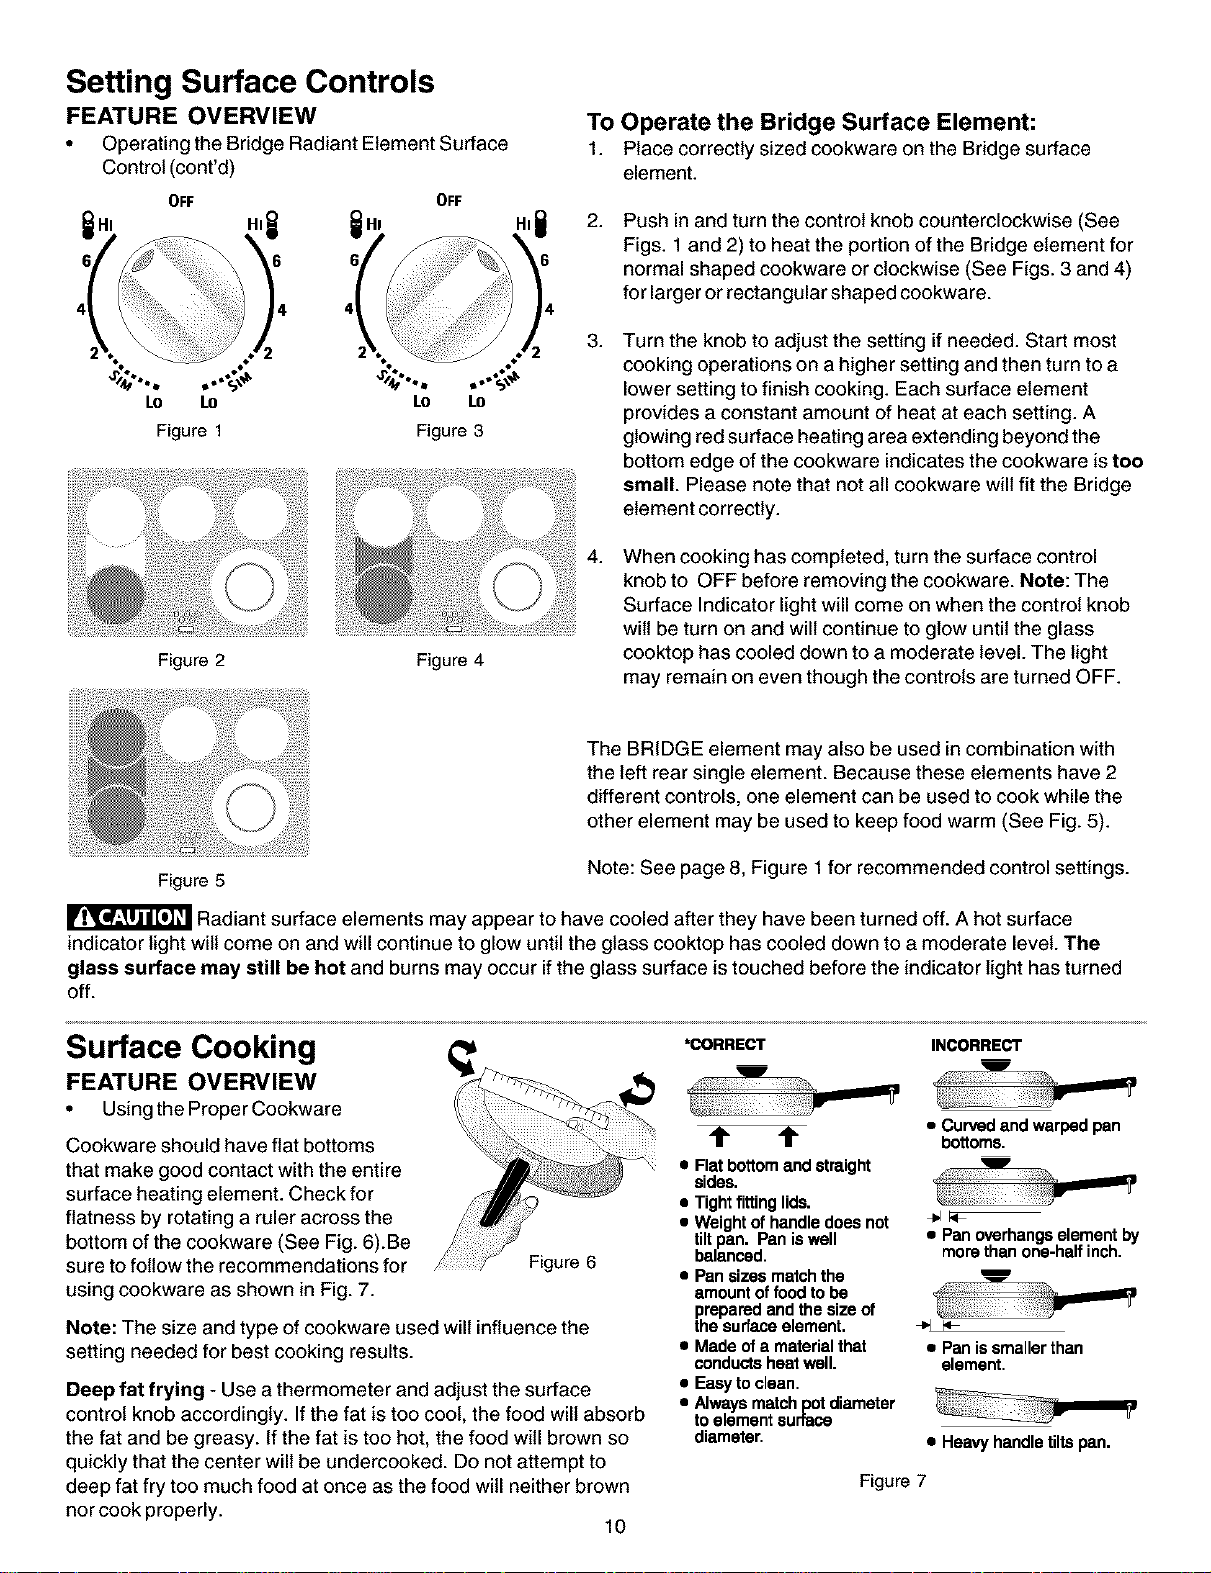
To Operate the Bridge Surface Element:
1. Place correctly sized cookware on the Bridge surface
element.
2.
Push in and turn the control knob counterclockwise (See
Figs. 1 and 2) to heat the portion of the Bridge element for
normal shaped cookware or clockwise (See Figs. 3 and 4)
for larger or rectangular shaped cookware.
.
Turn the knob to adjust the setting if needed. Start most
cooking operations on a higher setting and then turn to a
lower setting to finish cooking. Each surface element
provides a constant amount of heat at each setting. A
glowing red surface heating area extending beyond the
bottom edge of the cookware indicates the cookware is tee
small. Please note that not all cookware will fit the Bridge
element correctly.
4.
When cooking has completed, turn the surface control
knob to OFF before removing the cookware. Note: The
Surface Indicator light will come on when the control knob
wilt be turn on and will continue to glow until the glass
cooktop has cooled down to a moderate level. The light
may remain on even though the controls are turned OFF.
The BRIDGE element may also be used in combination with
the left rear single element. Because these elements have 2
different controls, one element can be used to cook while the
other element may be used to keep food warm (See Fig. 5).
Figure 5 Note: See page 8, Figure 1 for recommended control settings.
Radiant surface elements may appear to have cooled after they have been turned off. A hot surface
indicator light wilt come on and will continue to glow until the glass cooktop has cooled down to a moderate level. The
glass surface may still be hot and burns may occur if the glass surface is touched before the indicator light has turned
off.
Surface Cooking
FEATURE OVERVIEW
• Using the Proper Cookware
Cookware should have flat bottoms
that make good contact with the entire
surface heating element. Check for
flatness by rotating a ruler across the
bottom of the cookware (See Fig. 6).Be
sure to follow the recommendations for
using cookware as shown in Fig. 7.
Figure 6
Note: The size and type of cookware used will influence the
setting needed for best cooking results.
Deep fat frying - Use a thermometer and adjust the surface
control knob accordingly. If the fat is too cool, the food will absorb
the fat and be greasy. If the fat is too hot, the food will brown so
quickly that the center will be undercooked. Do not attempt to
deep fat fry too much food at once as the food will neither brown
nor cook properly. 10
*CORRECT
m
I
t t
• Flat bottomand straight
sides.
• Tightfitting lids.
• Weightofhandle doesnot
tiltpan. Pan iswell
balanced.
• Pansizes matchthe
amount offood tobe
prepared and the size of
the surfaceelement.
• Made of a materialthat
conductsheatwell.
• Easyto clean.
• Alwaysmatchpotdiameter
toelement surtace
diameter.
INCORRECT
• Curvedandwarpedpan
bottoms.
• Panoverhangselementby
morethanone-halfinch.
• Panissmallerthan
element.
• Heavy handletiltspan.
Figure 7
Surface
Cooking
FEATURE
OVERVIEW
• Setting WarmerZone
Controls
WARMER ZONE
OFF
Hi
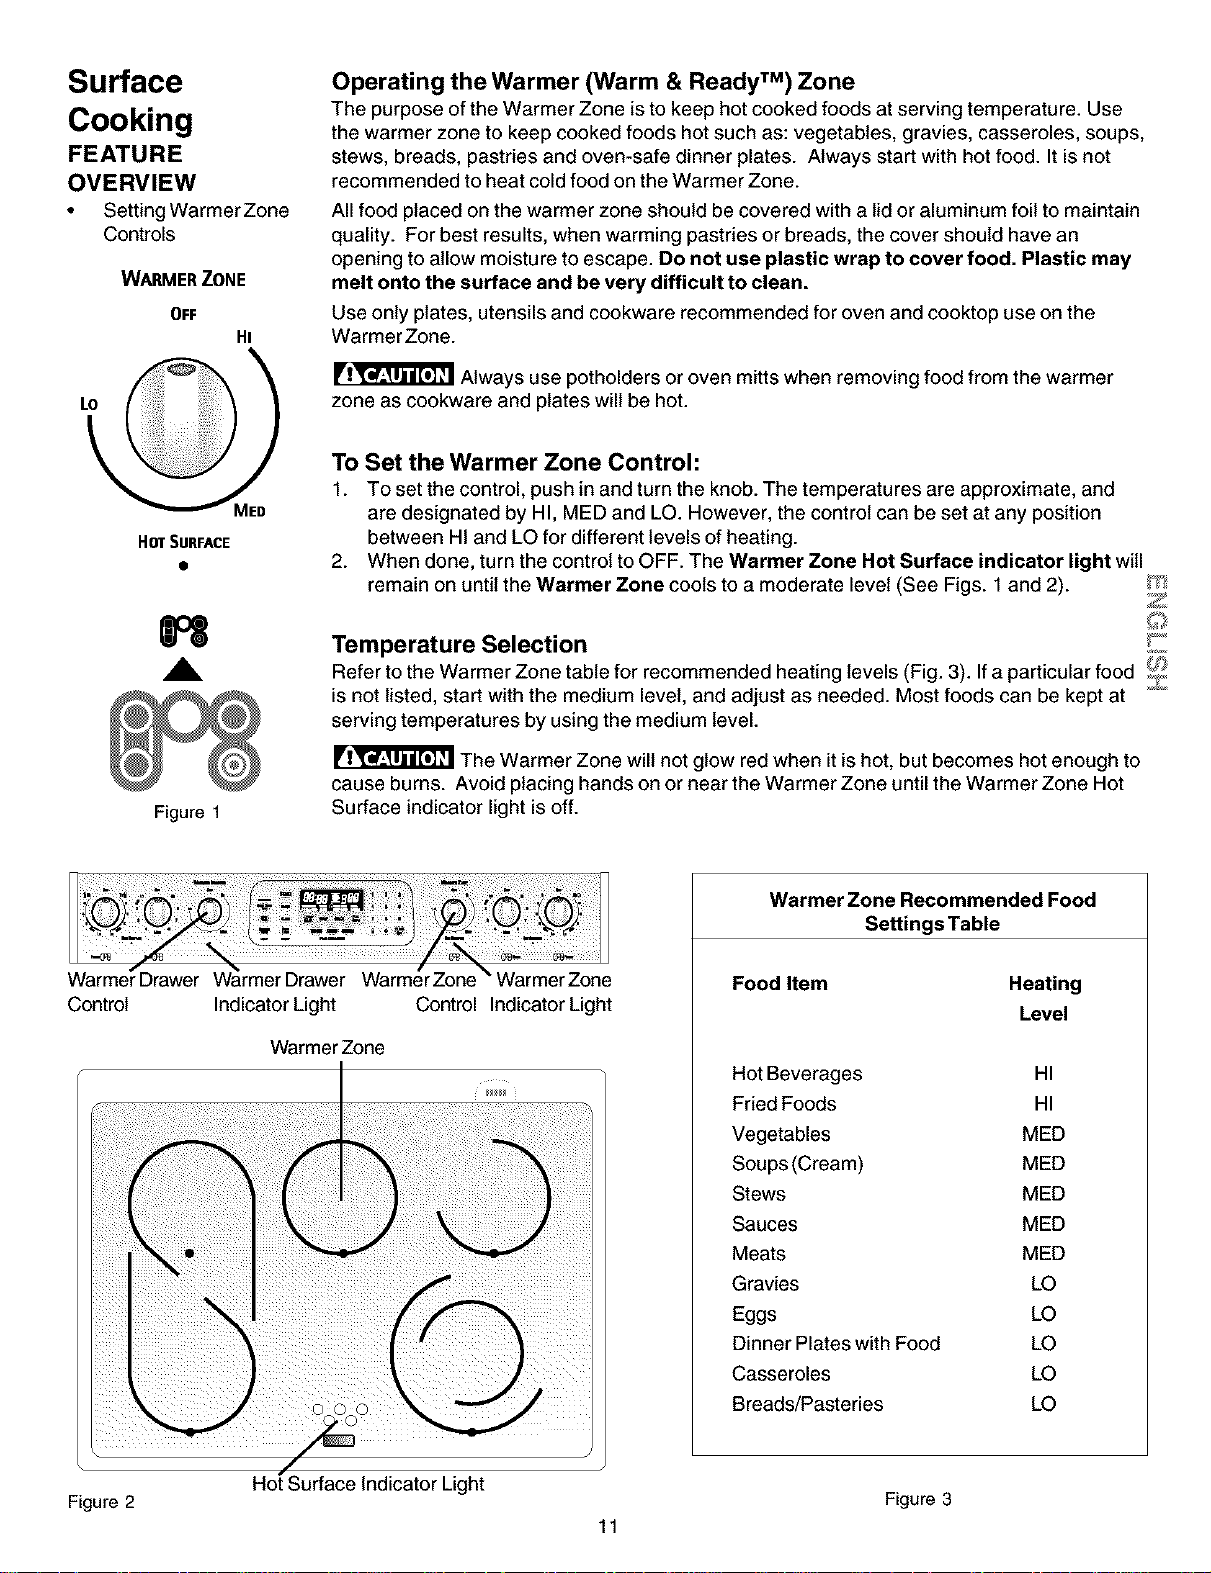
Operating the Warmer (Warm & Ready TM) Zone
The purpose of the Warmer Zone is to keep hot cooked foods at serving temperature. Use
the warmer zone to keep cooked foods hot such as: vegetables, gravies, casseroles, soups,
stews, breads, pastries and oven-safe dinner plates. Always start with hot food. It is not
recommended to heat cold food on the Warmer Zone.
All food placed on the warmer zone should be covered with a lid or aluminum foil to maintain
quality. For best results, when warming pastries or breads, the cover should have an
opening to allow moisture to escape. De not use plastic wrap to cover food. Plastic may
melt onto the surface and be very difficult to clean.
Use only plates, utensils and cookware recommended for oven and cooktop use on the
WarmerZone.
Always use potholders or oven mitts when removing food from the warmer
zone as cookware and plates will be hot.
HOTSURFACE
H
,A
Figure 1
To Set the Warmer Zone Control:
1. To set the control, push in and turn the knob. The temperatures are approximate, and
are designated by HI, MED and LO. However, the control can be set at any position
between HI and LO for different levels of heating.
2. When done, turn the control to OFF. The Warmer Zone Hot Surface indicator light witl
remain on until the Warmer Zone cools to a moderate level (See Figs. 1 and 2). V_I
Z
Temperature Selection !:_
Refer to the Warmer Zone table for recommended heating levels (Fig. 3). If a particular food _
is not listed, start with the medium level, and adjust as needed. Most foods can be kept at
serving temperatures by using the medium level.
The Warmer Zone will not glow red when it is hot, but becomes hot enough to
cause burns. Avoid placing hands on or near the Warmer Zone until the Warmer Zone Hot
Surface indicator light is off.
Control
Indicator Light
Warmer Zone
Control IndicatorLight
Warmer Zone Recommended Food
Settings Table
Food Item
Heating
Level
Hot Beverages HI
Fried Foods HI
Vegetables MED
Soups (Cream) MED
Stews MED
Sauces MED
Meats MED
Gravies LO
Eggs LO
Dinner Plates with Food LO
Casseroles LO
Breads/Pasteries LO
Figure 2 Figure 3
11

Before Setting Oven Controls
Arranging Oven Racks
ALWAYS ARRANGE OVEN RACKS WHEN THE OVEN IS
COOL (PRIOR TO OPERATING THE OVEN). Always use
oven mitts when the oven is hot.
Oven Vent Location
The oven vent is located at rear of the
ceektep on the right side. When the
oven is on, hot air is released through
the vents. This venting is necessary
for proper air circulation in the oven and
good baking results.
Removing and Replacing Oven
Racks
To remove, pull the rack forward until
itstops. Lift up front of rack and slide
out. To replace, fit the rack onto the
guides on the oven walls. Tilt the front
of the rack upward and slide the rack
back into place.
Arranging Oven Racks
To bake on a single rack, place the
rack in position 2 or 3. To bake on 2
racks, place the racks in positions 2
and 3.
1st Rack
Rack
positions
RECOMMENDED RACK POSITIONS FOR
BROILING, BAKING & ROASTING
Food Rack position
Broiling meats, chicken or fish 1 or 2
Cookies, cakes, pies, biscuits &muffins 2 or 3
Frozen pies, angel food cake, yeast, bread, 4
casseroles, small cuts of meat or poultry
Turkey, roast or hem 4
Note: Always use caution when removing food.
Air Circulation in the Oven
If using 1 rack, place in center of oven. If using multiple
racks, stagger cookware as shown.
For best air circulation and baking results allow 2-4" (5-10 cm)
around the cookware for proper air circulation and be sure
pans and cookware do not touch each other, the oven door,
sides or back of the oven cavity. The hot air must circulate
around the pans and cookware in the oven for even heat to
reach around the food.
12
1 Oven Rack
Multiple Oven Racks
Setting Warmer
Drawer Controls
FEATURE
OVERVIEW
• Arranging Warmer
Drawer Racks
• Operating & Setting
Warmer Drawer
Controls
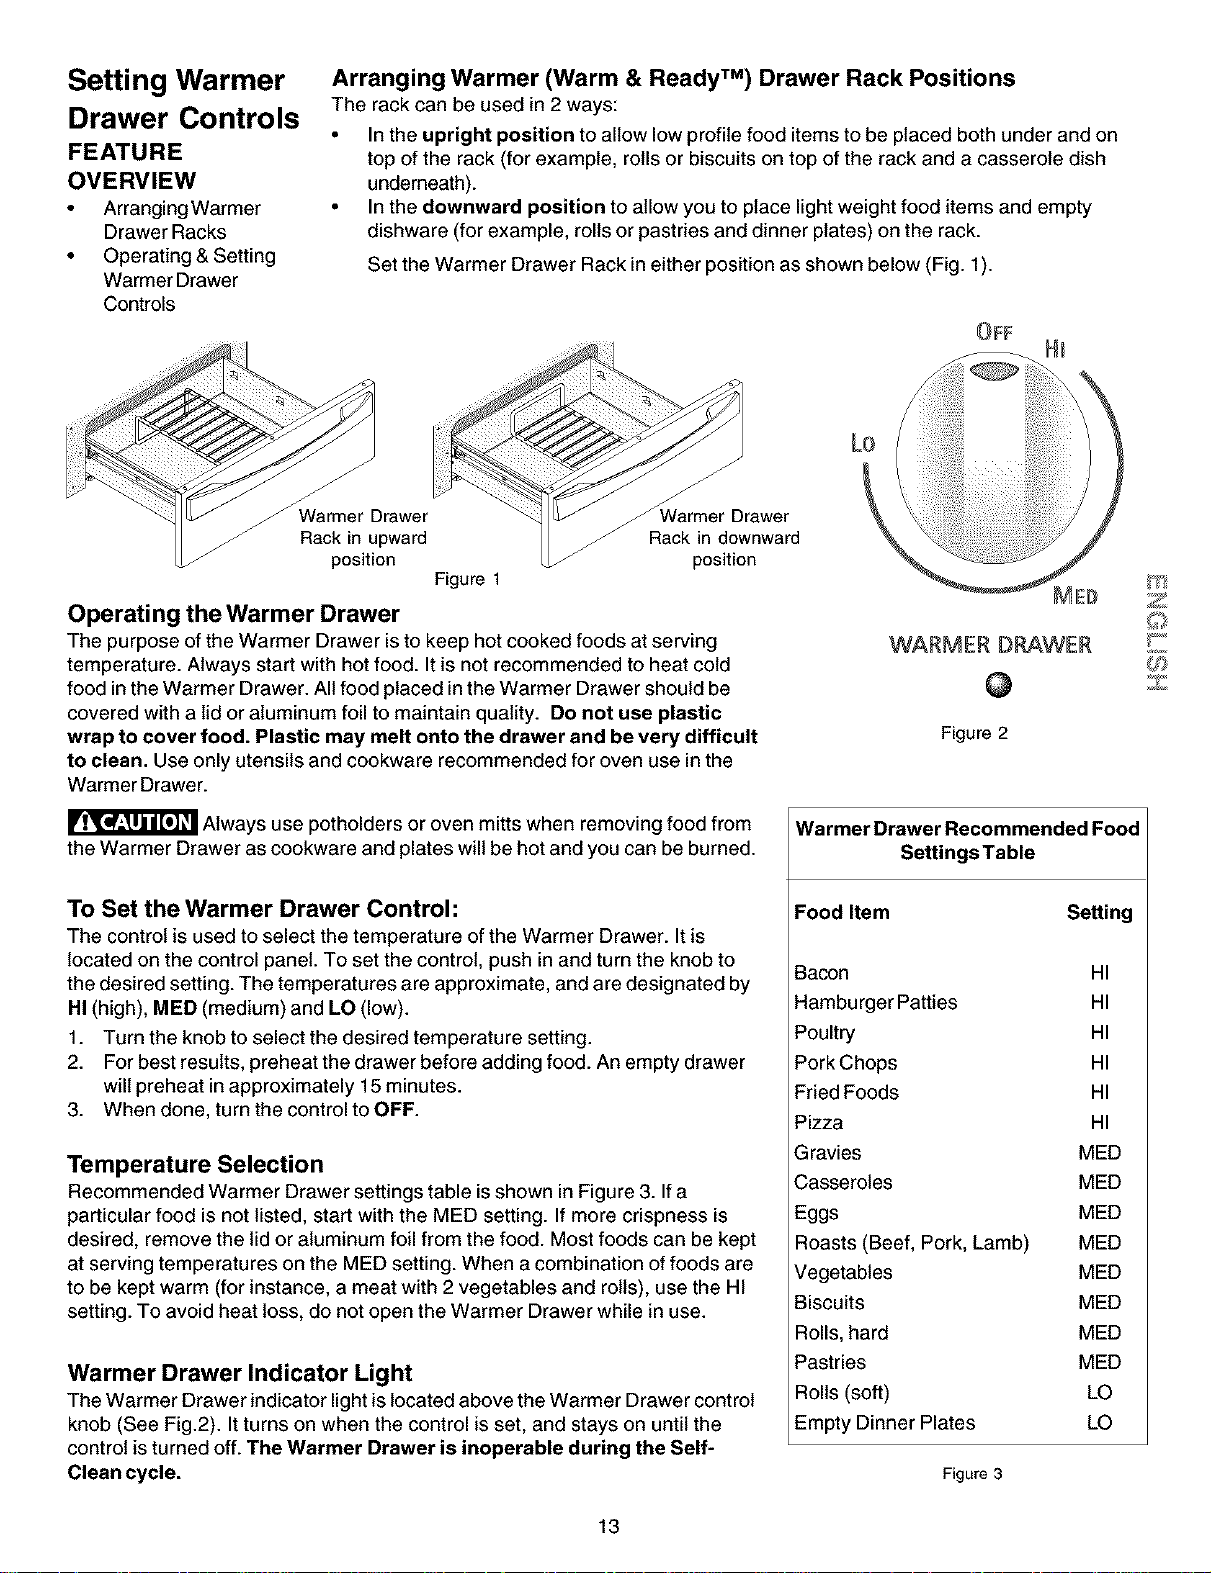
Arranging Warmer (Warm & Ready TM) Drawer Rack Positions
The rack can be used in 2 ways:
• In the upright position to allow low profile food items to be placed both under and on
top of the rack (for example, rolls or biscuits on top of the rack and a casserole dish
underneath).
• In the downward position to allow you to place light weight food items and empty
dishware (for example, rolls or pastries and dinner plates) on the rack.
Set the Warmer Drawer Rack in either position as shown below (Fig. 1).
Warmer Drawer
Rack in upward
position
Figure 1
Operating the Warmer Drawer
rawer
f Rack in downward
position
The purpose of the Warmer Drawer is to keep hot cooked foods at serving
temperature. Always start with hot food. It is not recommended to heat cold
food in the Warmer Drawer. All food placed in the Warmer Drawer should be
covered with a lid or aluminum foil to maintain quality. Do not use plastic
wrap to cover food. Plastic may melt onto the drawer and be very difficult
to clean. Use only utensils and cookware recommended for oven use in the
Warmer Drawer.
WARMER DRAWER
@
Figure 2
Always use potholders or oven mitts when removing food from
the Warmer Drawer as cookware and plates will be hot and you can be burned.
To Set the Warmer Drawer Control:
The control is used to select the temperature of the Warmer Drawer. It is
located on the control panel. To set the control, push in and turn the knob to
the desired setting. The temperatures are approximate, and are designated by
HI (high), MED (medium) and LO (low).
1. Turn the knob to select the desired temperature setting.
2. For best results, preheat the drawer before adding food. An empty drawer
will preheat in approximately 15 minutes.
3. When done, turn the control to OFF.
Temperature Selection
Recommended Warmer Drawer settings table is shown in Figure 3. If a
particular food is not listed, start with the MED setting. If more crispness is
desired, remove the lid or aluminum foil from the food. Most foods can be kept
at serving temperatures on the MED setting. When a combination of foods are
to be kept warm (for instance, a meat with 2 vegetables and rolls), use the HI
setting. To avoid heat loss, do not open the Warmer Drawer while in use.
Warmer Drawer Indicator Light
The Warmer Drawer indicator light is located above the Warmer Drawer control
knob (See Fig.2). It turns on when the control is set, and stays on until the
control is turned off. The Warmer Drawer is inoperable during the Self-
Clean cycle.
Warmer Drawer Recommended Food
SettingsTable
Food Item Setting
Bacon HI
Hamburger Patties HI
Poultry HI
Pork Chops HI
Fried Foods HI
Pizza HI
Gravies MED
Casseroles MED
Eggs MED
Roasts (Beef, Pork, Lamb) MED
Vegetables MED
Biscuits MED
Rolls, hard MED
Pastries MED
Roils (soft) LO
Empty Dinner Plates LO
Figure 3
Z
Z
13
Control Pad
Features
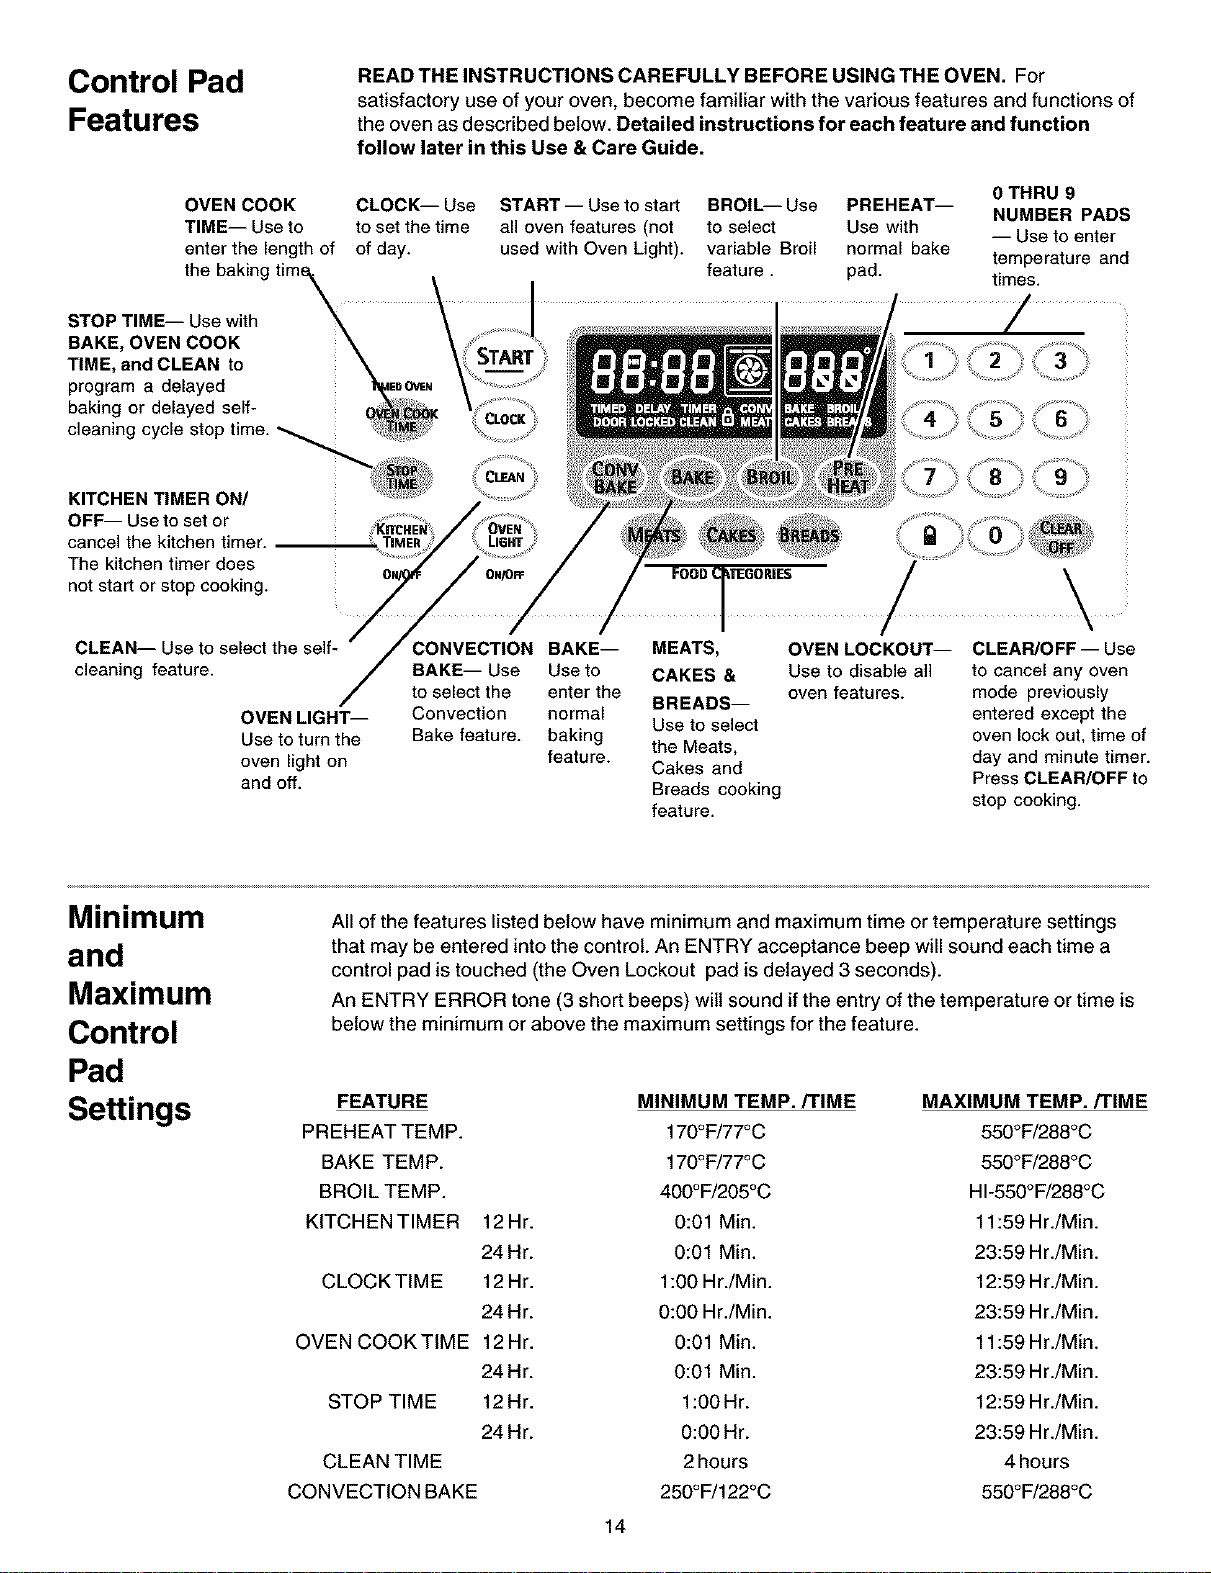
READ THE INSTRUCTIONS CAREFULLY BEFORE USING THE OVEN. For
satisfactory use of your oven, become familiar with the various features and functions of
the oven as described below. Detailed instructions for each feature and function
follow later in this Use & Care Guide.
OVEN COOK CLOCK-- Use
TIME-- Use to to set the time
enter the length of of day.
the baking tim_
STOP TIME-- Use with
BAKE, OVEN COOK
TIME, and CLEAN to
program a delayed _EDOWN
baking or delayed self-
cleaning cycle stop time.
START -- Use to start
all oven features (not
used with Oven Light).
BROIL-- Use PREHEAT--
to select Use with
variable Broil normal bake
feature, pad.
0 THRU 9
NUMBER PADS
-- Use toenter
temperature and
times.
/
KITCHEN TIMER ON/
OFF-- Useto set or
cancel the kitchen timer.
The kitchen timer does
not start or stop cooking.
CLEAN-- Use to select the self-
cleaning feature.
OVEN LIGHT--
Use to turn the
oven light on
and off.
CONVECTION BAKE-- MEATS,
BAKE-- Use Use to CAKES &
to select the enter the
BREADS--
Convection normal
Use to select
Bake feature, baking
feature, the Meats,
Cakes and
Breads cooking
feature.
\
OVEN LOCKOUT-- CLEAR/OFF-- Use
Use to disable a]] to cancel any oven
oven features, mode previously
entered except the
oven lock ouL time of
day and minute timer.
Press CLEAR/OFF to
stop cooking.
Minimum
and
Maximum
Control
Pad
Settings
All of the features listed below have minimum and maximum time or temperature settings
that may be entered into the control. An ENTRY acceptance beep will sound each time a
control pad is touched (the Oven Lockout pad is delayed 3 seconds).
An ENTRY ERROR tone (3 short beeps) wilt sound if the entry of the temperature or time is
below the minimum or above the maximum settings for the feature.
FEATURE MINIMUM TEMP./TIME MAXIMUM TEMP./TIME
PREHEAT TEMP. 170°F/77°C 550°F/288°C
BAKE TEMP. 170°F/77°C 550°F/288°C
BROIL TEMP. 400°F/205°C HI-550°F/288°C
KITCHENTIMER 12Hr. 0:01 Min. 11:59Hr./Min.
24Hr. 0:01 Min. 23:59 Hr./Min.
CLOCK TIME 12 Hr. 1:00 Hr./Min. 12:59 Hr./Min.
24 Hr. 0:00 Hr./Min. 23:59 Hr./Min.
OVEN COOK TIME 12 Hr. 0:01 Min. 11:59 Hr./Min.
24Hr. 0:01 Min. 23:59 Hr./Min.
STOP TIME 12Hr. 1:00Hr. 12:59 Hr./Min.
24 Hr. 0:00 Hr. 23:59 Hr./Min.
CLEAN TIME 2 hours 4 hours
CONVECTION BAKE 250°F/122°C 550°F/288°C
14
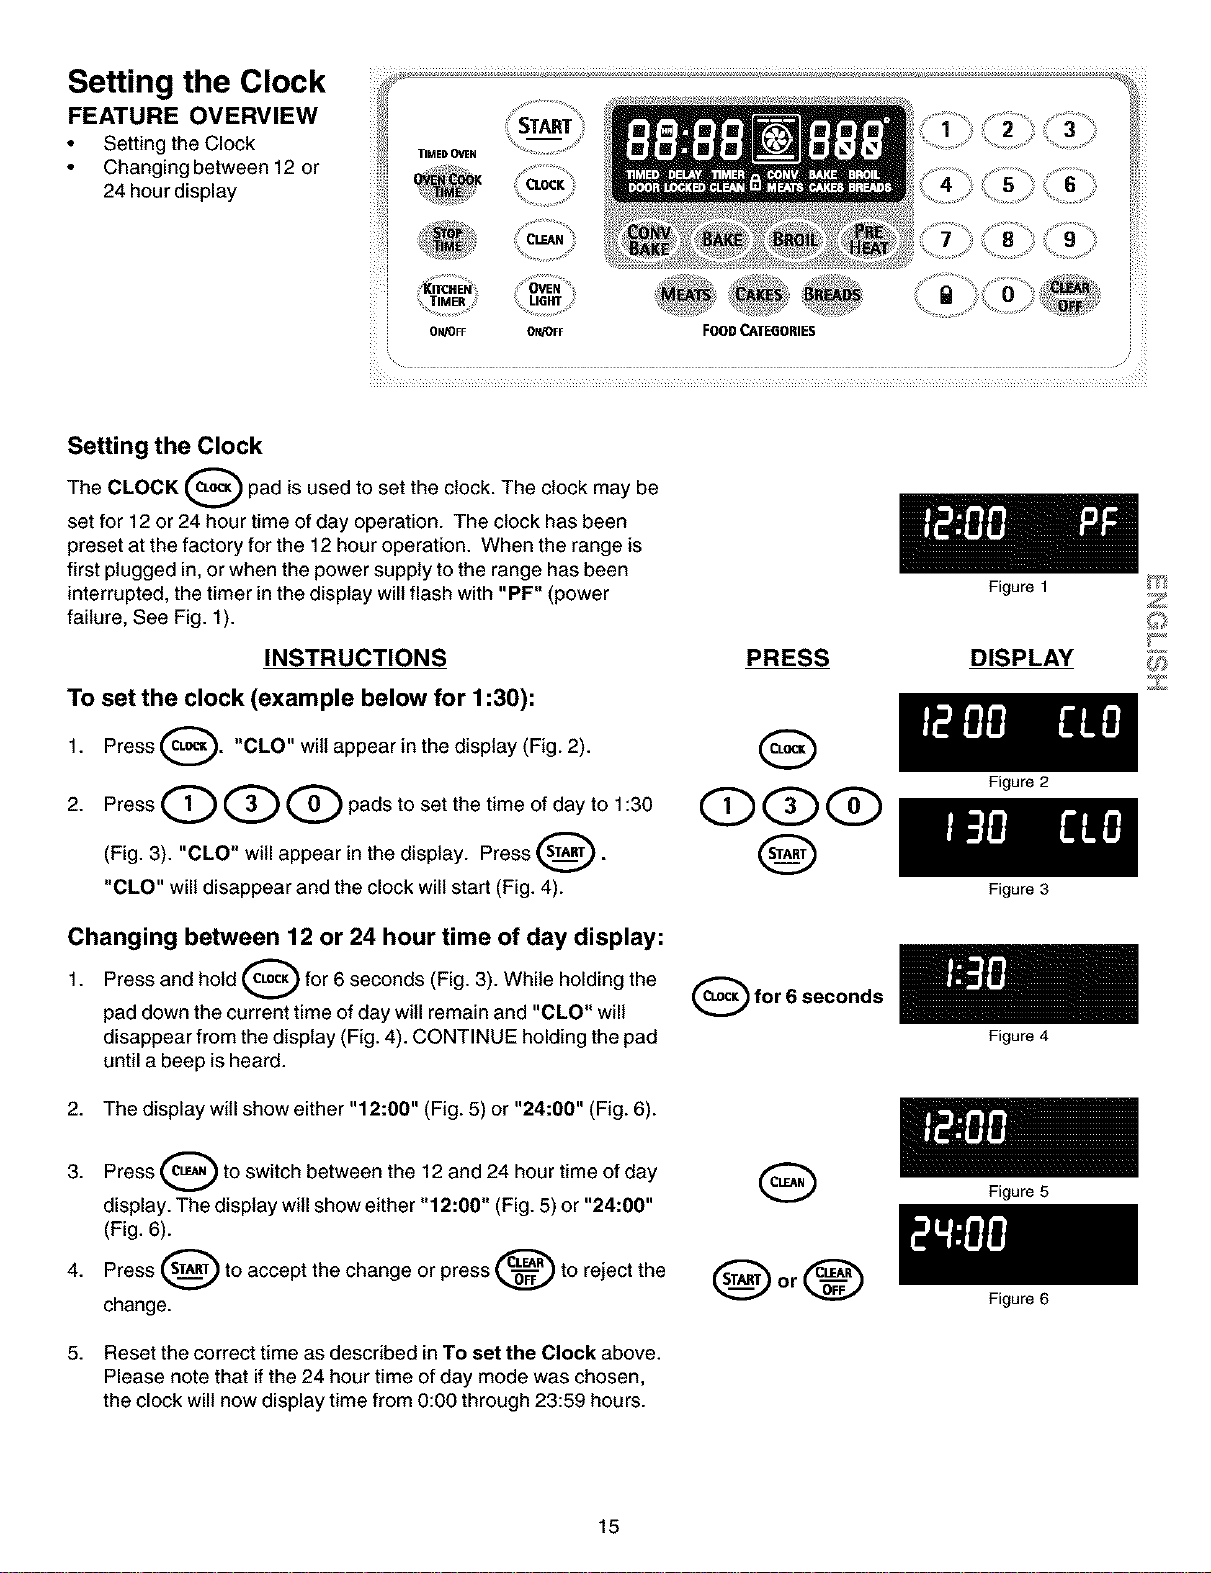
Setting the Clock
FEATURE OVERVIEW
• Setting the Clock
• Changing between 12 or
24 hour display
_ _ ¸¸¸4¸
_i ¸ _ , __ _._ ._ ._ ._
i_i START 2 3
TIMEDOVeN _ .....
........... %
• _ocK
_;_.__.___ _._,_:, __,i_,_
TIMER
ON/OFF ON/OFF FOOD CAI"E6ORIE$
Setting the Clock
The CLOCK _--_ pad is used to set the clock. The clock may be
set for 12 or 24 hour time of day operation. The clock has been
preset at the factory for the 12 hour operation. When the range is
first plugged in, or when the power supply to the range has been
interrupted, the timer in the display will flash with "PF" (power
failure, See Fig. 1).
INSTRUCTIONS
To set the clock (example below for 1:30):
1. Press _. "CLO" wiltappear in the
display (Fig. 2).
2. Press Q Q Q pads to set the time of day to 1:30
(Fig. 3). "CLO" will appear in the display. Press 0"
"CLO" will disappear and the clock will start (Fig. 4).
Changing between 12 or 24 hour time of day display:
Press and hold O for 6 seconds (Fig. 3). While holding the
1.
pad down the current time of day will remain and "CLO" will
disappear from the display (Fig. 4). CONTINUE holding the pad
until a beep is heard.
2. The display will show either "12:00" (Fig. 5) or "24:00" (Fig. 6).
3. Press (_L_,_) to switch between the 12 and 24 hour time of
day
display. The display will show either "12:00" (Fig. 5) or "24:00"
(Fig. 6).
Press _ to accept the change or press _ to reject the
4.
change.
5. Reset the correct time as described in To set the Clock above.
Please note that if the 24 hour time of day mode was chosen,
the clock will now display time from 0:00 through 23:59 hours.
PRESS
QQQ
Q
O for 6 seconds
Figure 1
DISPLAY
Figure 2
Figure 3
Figure 4
Figure 5
Figure 6
Z
Z
15
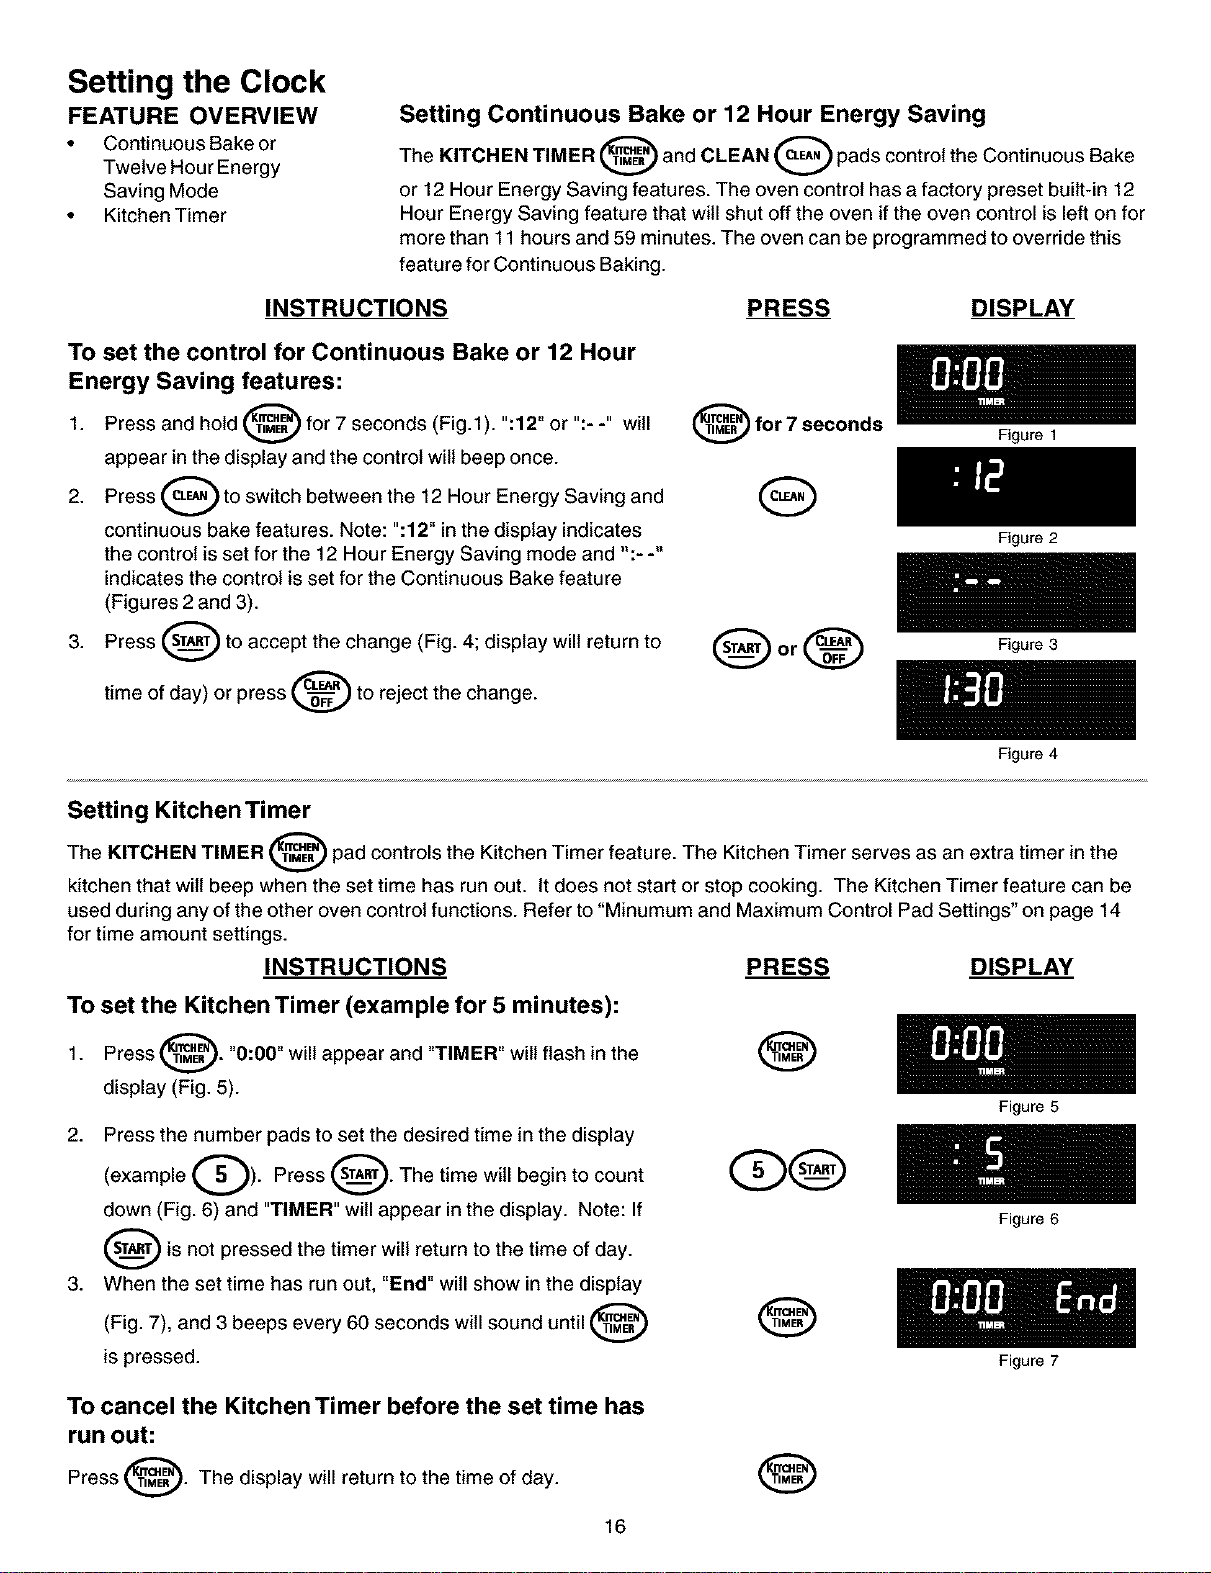
Setting the Clock
FEATURE OVERVIEW
• Continuous Bake or
Twelve Hour Energy
Saving Mode
• Kitchen Timer
Setting Continuous Bake or 12 Hour Energy Saving
The KITCHEN TIMER _ and CLEAN _ pads control the Continuous Bake
I I
or 12 Hour Energy Saving features. The oven control has a factory preset built-in 12
Hour Energy Saving feature that will shut off the oven if the oven control is left on for
more than 11 hours and 59 minutes. The oven can be programmed to override this
feature for Continuous Baking.
INSTRUCTIONS PRESS DISPLAY
To set the control for Continuous Bake or 12 Hour
Energy Saving features:
1. Press and hold _ for 7 seconds (Fig.l). ":12" or ":- -" will
I
appear in the display and the control wilt beep once.
2. Press _ to switch between the 12 Hour Energy Saving and
continuous bake features. Note: ":12" in the display indicates
the control is set for the 12 Hour Energy Saving mode and ":- -"
indicates the control is set for the Continuous Bake feature
(Figures 2 and 3).
3. Press _ to accept the change (Fig. 4; display will return to
time of day) or press _ to reject the change.
_for 7 seconds
G
Figure 1
Figure 2
Q or _ Figure3
Figure 4
Setting Kitchen Timer
The KITCHEN TIMER _ pad controls the Kitchen Timer feature. The Kitchen Timer serves as an extra timer in the
kitchen that wilt beep when the set time has run out. It does not start or stop cooking. The Kitchen Timer feature can be
used during any of the other oven control functions. Refer to "Minumum and Maximum Control Pad Settings" on page 14
for time amount settings.
INSTRUCTIONS PRESS DISPLAY
To set the Kitchen Timer (example for 5 minutes):
Press @. "0:00" will appear and "TIMER" wilt flash in the
1.
display (Fig. 5).
2. Press the number pads to set the desired time in the display
(example Q). Press _. The time will begin to count
I
down (Fig. 6) and "TIMER" will appear in the display. Note: If
_is not pressed the timer return to the time of day.
will
3. When the set time has run out, "End" will show in the display
and 3 beeps every 60 seconds will sound until
(Fig. 7),
is pressed.
®
To cancel the Kitchen Timer before the set time has
run out:
Press (1_:_. The display will return to the time of day.
v
®
16
Figure 5
Figure 6
Figure 7
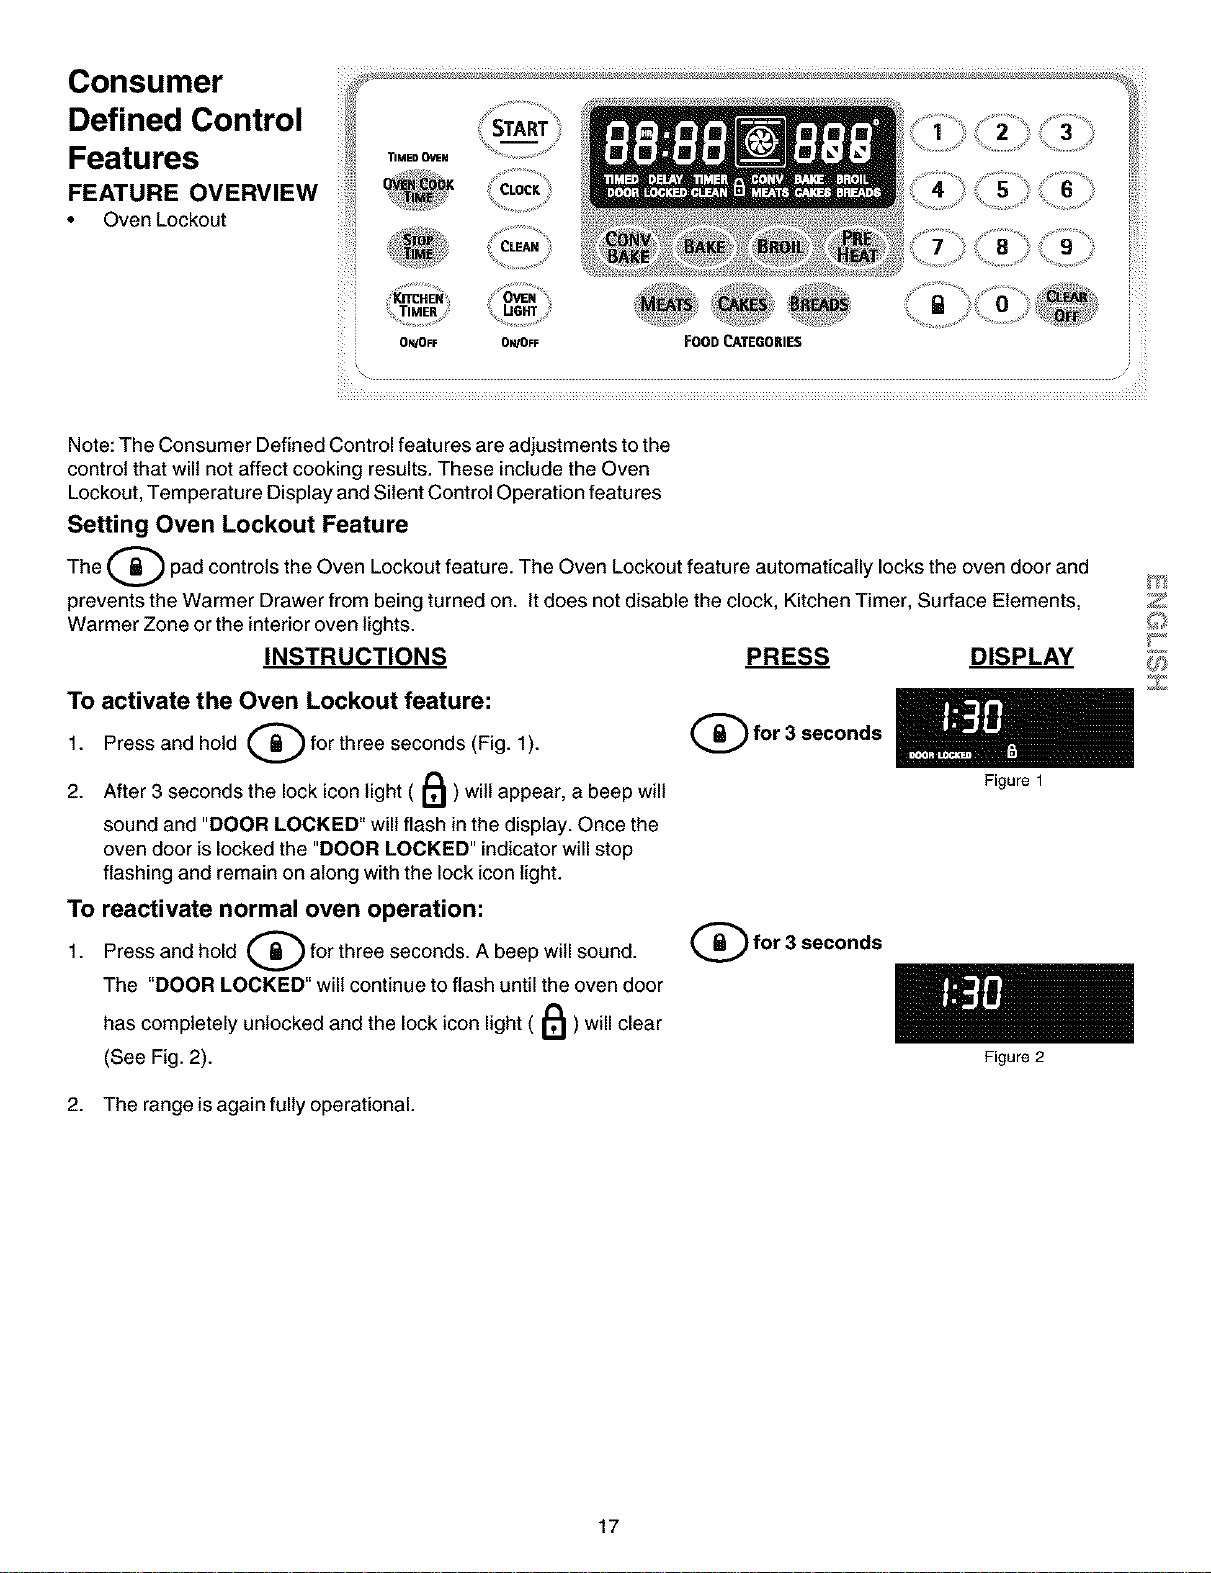
Consumer _ ........'_ ':_ .................._<_'_"_'_'__'''_'''_.................... _,_
_ /_¸¸
Defined Control ,_,, START 3 _
Features _!,__..o.. ...............
FEATURE OVERVIEW CLOCK : 6
Oven Lockout
z_TIMER } U6RT
: ON/OFF ON/OFF FOOD CATEGORIES
Note: The Consumer Defined Control features are adjustments to the
control that will not affect cooking results. These include the Oven
Lockout, Temperature Display and Silent Control Operation features
Setting Oven Lockout Feature
The (_ pad controls the Oven Lockout feature. The Oven Lockout feature automatically locks the oven door and
prevents the Warmer Drawer from being turned on. It does not disable the clock, Kitchen Timer, Surface Elements,
Warmer Zone or the interior oven lights.
INSTRUCTIONS PRESS DISPLAY
To activate the Oven Lockout feature:
Press and hold (_ for three seconds (Fig. 1).
1.
2. After 3 seconds the lock icon light ( II_ ) wilt appear, a beep will
sound and "DOOR LOCKED" will flash in the display. Once the
oven door is locked the "DOOR LOCKED" indicator will stop
flashing and remain on along with the lock icon light.
To reactivate normal oven operation:
Press and hold _ for three seconds. A beep will sound.
1.
The "DOOR LOCKED" will continue to flash until the oven door
has completely unlocked and the lock icon light ( I1_ ) will clear
(See Fig. 2).
(_for 3 seconds
(_for 3 seconds
2. The range is again fully operational.
Figure 1
Figure 2
Z
17
Consumer Defined Control Features
FEATURE OVERVIEW
• Temperature Display
• Silent Control Operation
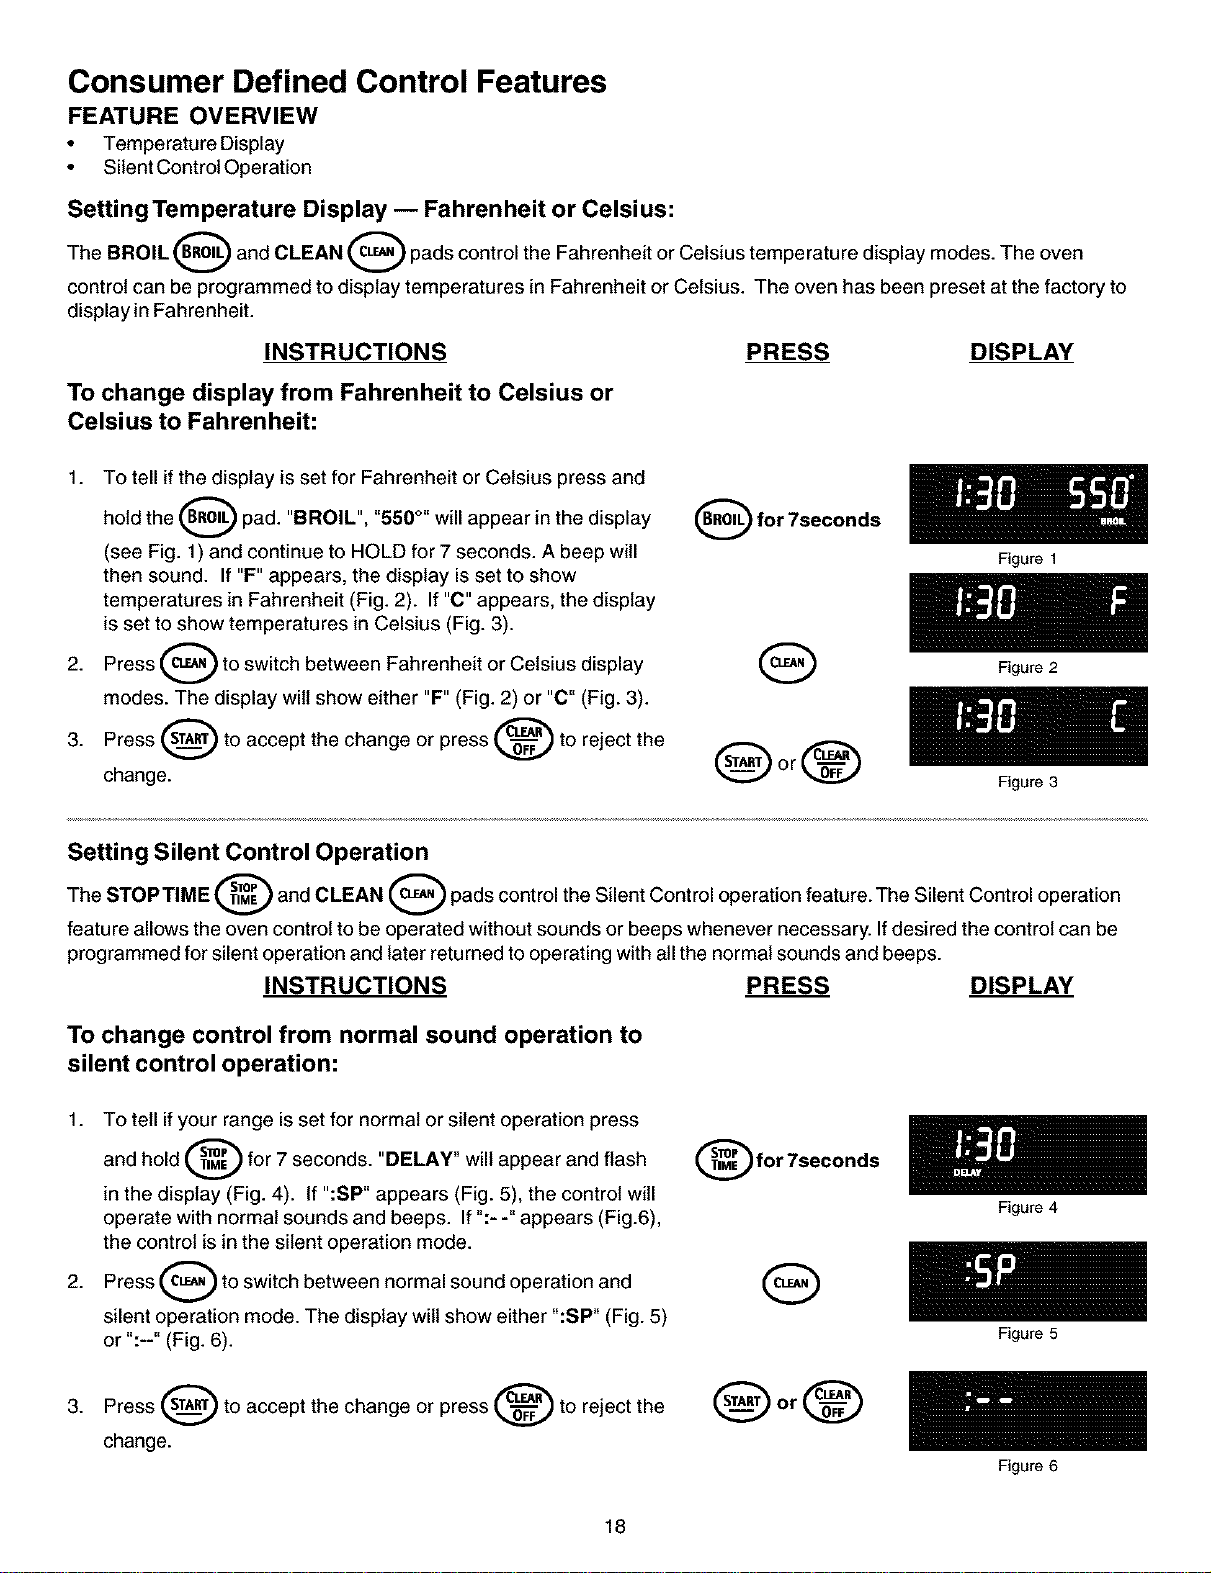
Setting Temperature Display -- Fahrenheit or Celsius:
The BROIL (_ and CLEAN O pads control the Fahrenheit or Celsius temperature display modes. The oven
A
control can be programmed to display temperatures in Fahrenheit or Celsius. The oven has been preset at the factory to
display in Fahrenheit.
INSTRUCTIONS PRESS DISPLAY
To change display from Fahrenheit to Celsius or
Celsius to Fahrenheit:
1. To tell if the display is set for Fahrenheit or Celsius press and
hold the (_ pad. "BROIL", "550 °" will appear in the display
(see Fig. 1) and continue to HOLD for 7 seconds. A beep will
then sound. If "F" appears, the display is set to show
temperatures in Fahrenheit (Fig. 2). If "C" appears, the display
is set to show temperatures in Celsius (Fig. 3).
Press _ to switch between Fahrenheit or Celsius display
2.
modes. The display wilt show either "F" (Fig. 2) or "C" (Fig. 3).
3. Press _ to accept the change or press _ to reject the _
change.
(_) for 7seconds
Figure 1
Figure 2
Figure 3
Setting Silent Control Operation
The STOP TIME _ and CLEAN _ pads control the Silent Control operation feature. The Silent Control operation
A A
feature allows the oven control to be operated without sounds or beeps whenever necessary. If desired the control can be
programmed for silent operation and later returned to operating with all the normal sounds and beeps.
INSTRUCTIONS PRESS DISPLAY
To change control from normal sound operation to
silent control operation:
1. To tell if your range is set for normal or silent operation press
and hold _ for 7 seconds. "DELAY" will appear and flash
in the display (Fig. 4). If ":SP" appears (Fig. 5), the control will
operate with normal sounds and beeps. If ":- -" appears (Fig.6),
the control is in the silent operation mode.
2. Press _ to switch between normal sound operation and
silent operation mode. The display wilt show either ":SP" (Fig. 5)
or ":--" (Fig. 6).
for 7seconds
Q
3. Press _ to accept the change or press _ to reject the
change.
18
Figure 4
Figure 5
Figure 6
Setting Oven
Controls
FEATURE OVERVIEW
• Preheat
i O_ FF 0'_FF FOOD _IE(IORIE5
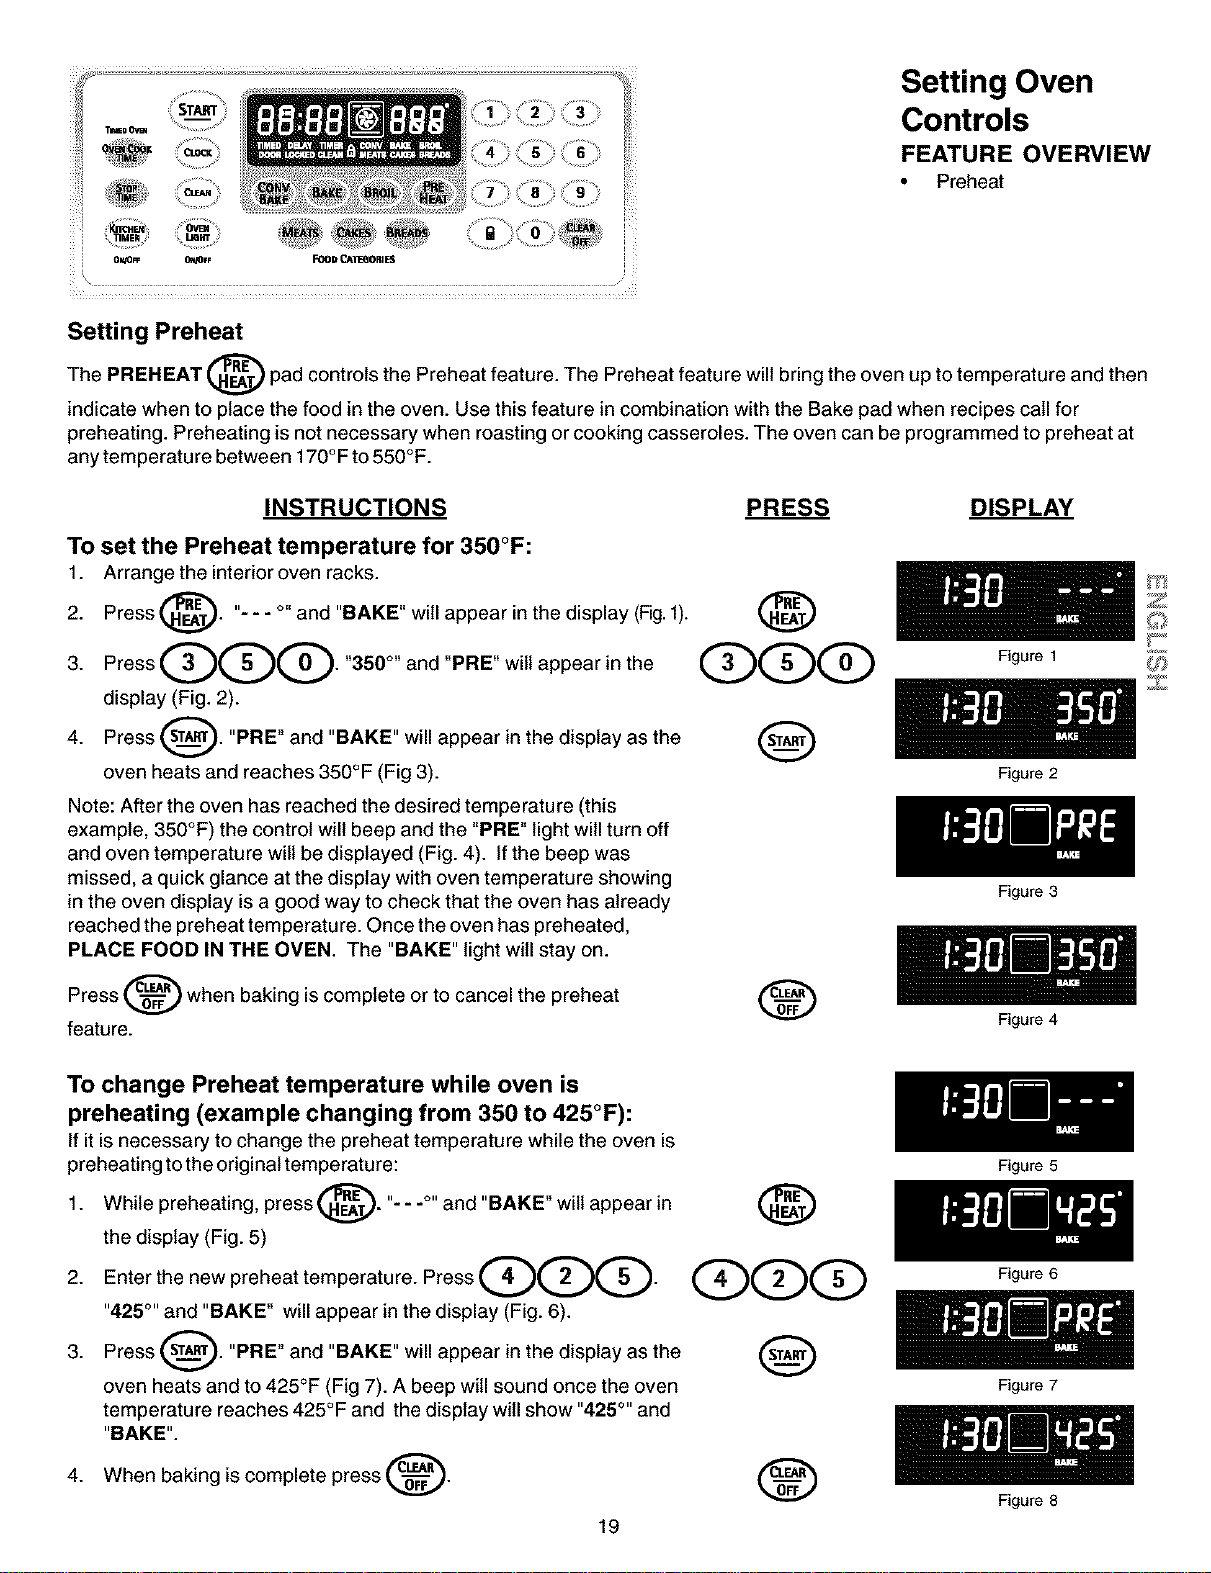
Setting Preheat
The PREHEAT @ pad controls the Preheat feature. The Preheat feature will bring the oven up to temperature and then
indicate when to place the food in the oven. Use this feature in combination with the Bake pad when recipes call for
preheating. Preheating is not necessary when roasting or cooking casseroles. The oven can be programmed to preheat at
any temperature between 170°F to 550°F.
INSTRUCTIONS PRESS DISPLAY
To set the Preheat temperature for 350°F:
1. Arrange the interioroven racks.
Press @. "- - - °" and "BAKE" will appear in the display (Fig.f).
2.
3PressQQQ350°andPBEw,,ap0ear,nthe
display (Fig. 2).
4. Press _. "PRE" and "BAKE" will appear in the display as the
v
oven heats and reaches 350°F (Fig 3).
Note: After the oven has reached the desired temperature (this
example, 350°F) the control will beep and the "PRE" light will turn off
and oven temperature wilt be displayed (Fig. 4). If the beep was
missed, a quick glance at the display with oven temperature showing
in the oven display is a good way to check that the oven has already
reached the preheat temperature. Once the oven has preheated,
PLACE FOOD IN THE OVEN. The "BAKE" light will stay on.
Press _ when baking is complete or to cancel the preheat
feature.
To change Preheat temperature while oven is
preheating (example changing from 350 to 425°F):
If it is necessary to change the preheat temperature while the oven is
preheating to the original temperature:
1. While preheating, press _. "- - -°" and "BAKE" wilt appear in
the display (Fig. 5)
2. Enterthenewpreheattemperature. PressQO Q.
"425°'' and "BAKE" will appear in the display (Fig. 6).
3. Press sT_. "PRE" and "BAKE" will appear in the display as the
oven heats and to 425°F (Fig 7). A beep will sound once the oven
temperature reaches 425°F and the display will show "425°'' and
"BAKE".
When baking is complete press _.4.
@
@qDqD
@
®
19
Figure 1
Figure 2
Figure 3
Figure 4
Figure 5
Figure 6
Figure 7
Figure 8
Z
Z
Setting Oven
Controls
FEATURE
OVERVIEW
• Bake
/_¸¸
START 3 _'
TIMEDO'_N ............
CLOC_ 6
;_ TIMER
: O_/OFF 0N/OFF FOODCATEGORIES
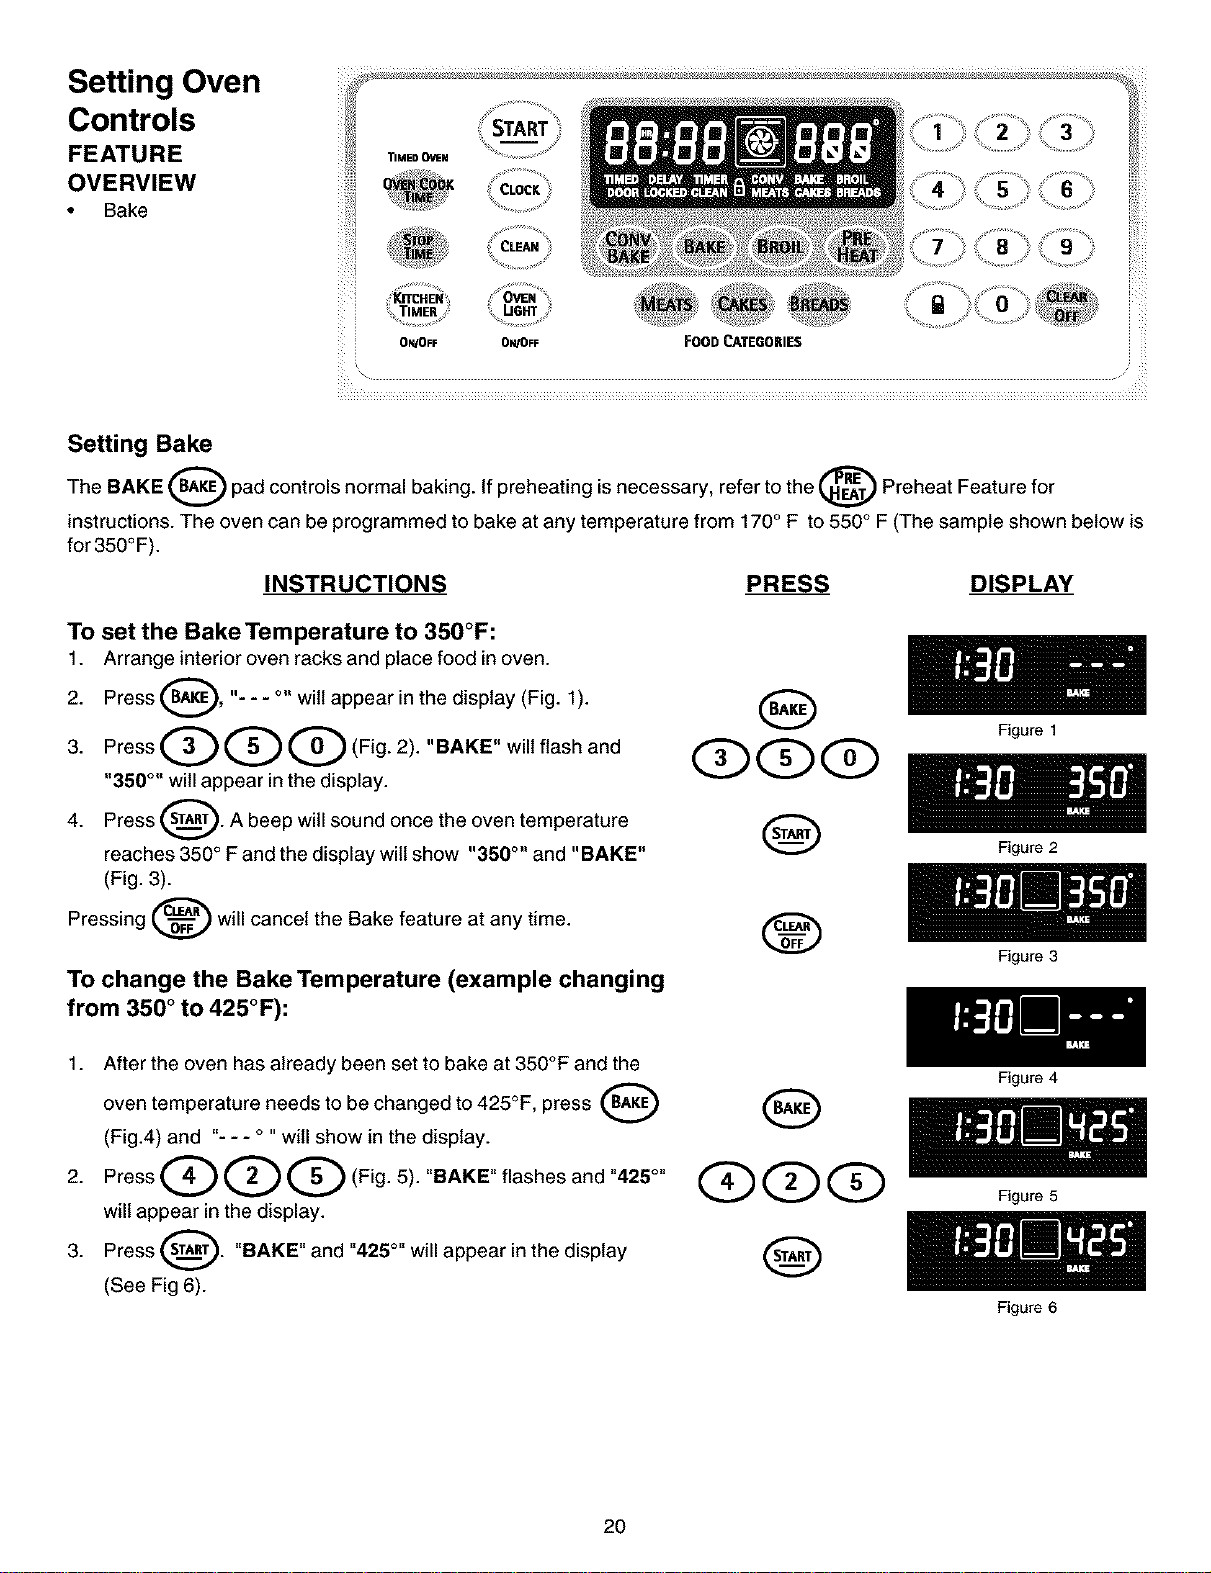
Setting Bake
The BAKE _ pad controls normal baking. If preheating is necessary, refer to the _ Preheat Feature for
instructions. The oven can be programmed to bake at any temperature from 170° F to 550° F (The sample shown below is
for350°F).
INSTRUCTIONS PRESS DISPLAY
To set the Bake Temperature to 350°F:
1. Arrange interior oven racks and place food in oven.
Press _, "- - - °" wilt appear in the display (Fig. 1).
2.
3. Press Q Q Q (Fig. 2). "BAKE" will flash and
"350 °" will appear in the display.
Press _. A beep will sound once the oven temperature
4.
reaches 350 ° Fand the display wilt show "350 °" and "BAKE"
(Fig. 3).
Pressing d_==_ will cancel the Bake feature at any time.
To change the Bake Temperature (example changing
from 350 ° to 425°F):
Figure 1
Figure 2
1. After the oven has already been set to bake at 350°F and the
oven temperature needs to be changed to 425°F, press
(Fig.4) and "- - - ° "will show in the display.
2. Press Q Q Q (Fig. 5). "BAKE" flashes and "425°"
will appear in the display.
3. Press _. "BAKE" and "425 °" will appear in the display
(See Fig 6).
®
2O
QQQ
Figure 3
Figure 4
Figure 5
Figure 6
Setting Oven Controls
FEATURE OVERVIEW
• Timed Bake
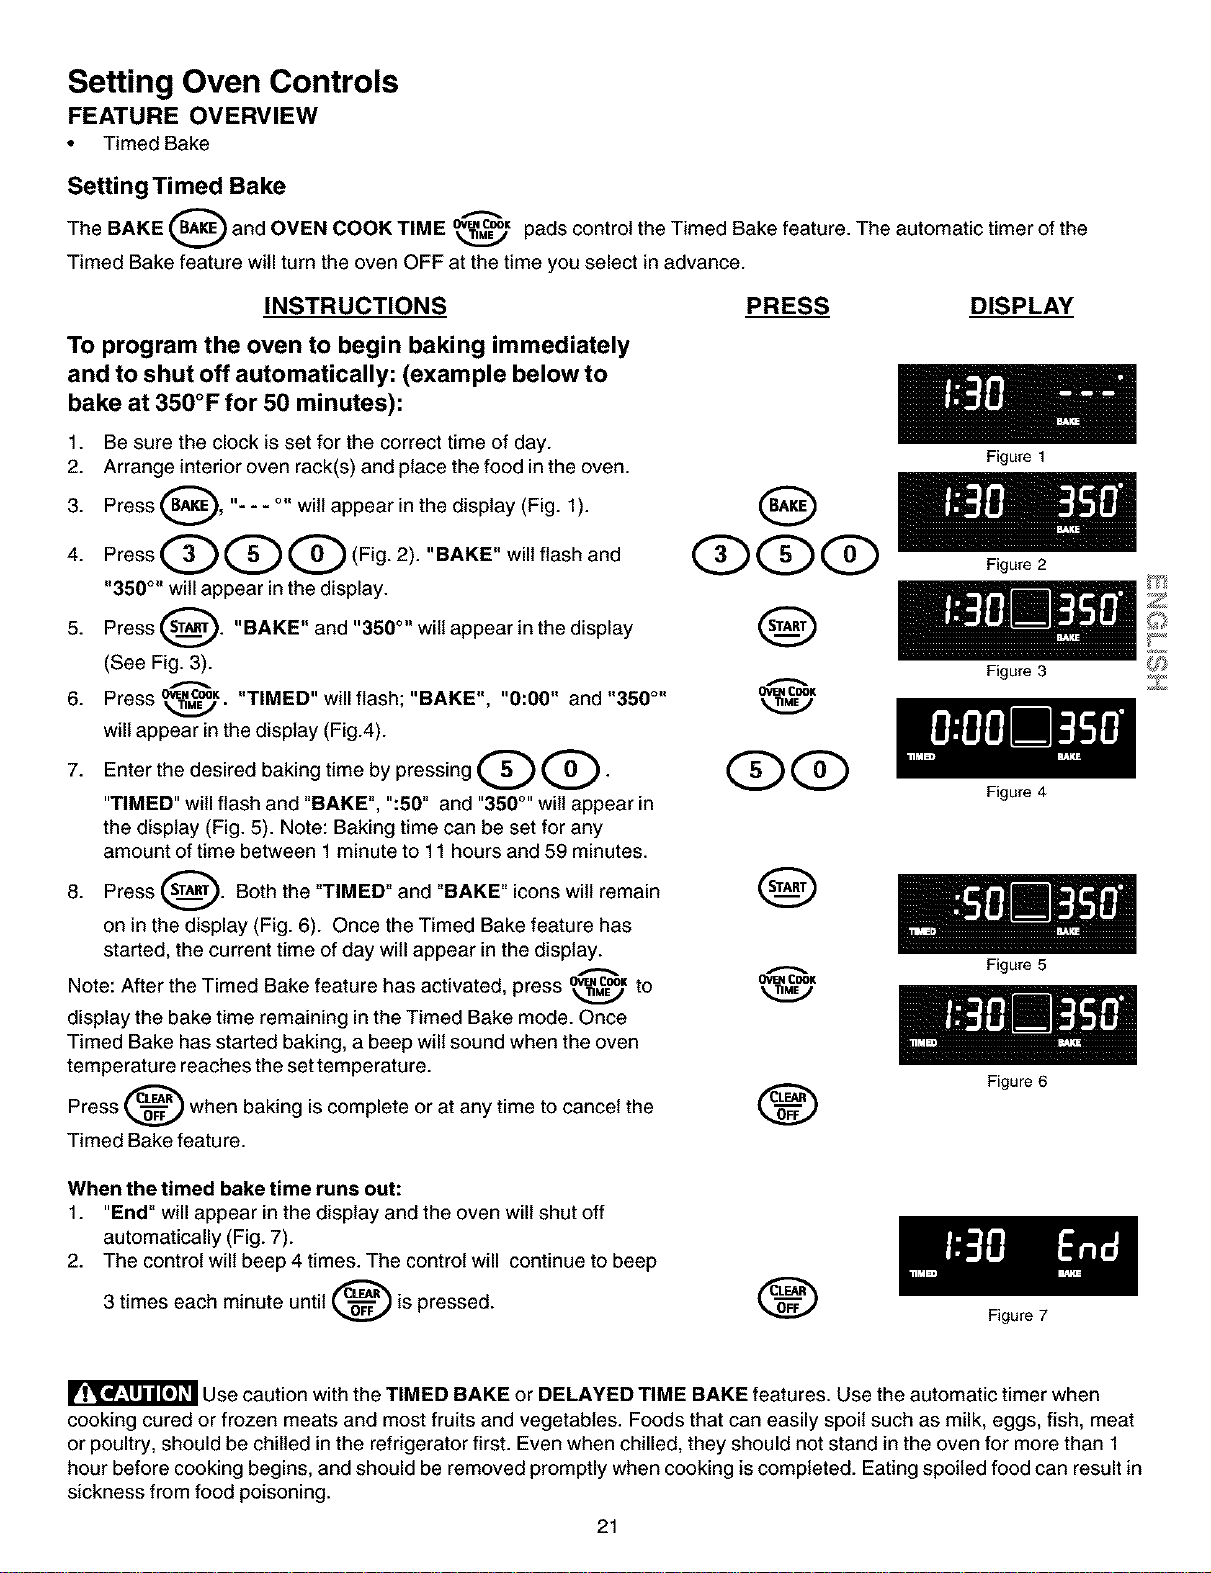
Setting Timed Bake
The BAKE _ and OVEN COOK TIME _K pads control the Timed Bake feature. The automatic timer of the
Timed Bake feature witl turn the oven OFF at the time you select in advance.
INSTRUCTIONS
To program the oven to begin baking immediately
and to shut off automatically: (example below to
bake at 350°F for 50 minutes):
PRESS DISPLAY
1. Be sure the clock is set for the correct time of day.
2. Arrange interior oven rack(s) and place the food in the oven.
3. Press _B_, "-- - °" wilt appear in the display (Fig. 1).
i
4. Press Q Q G (Fig. 2). "BAKE" will flash and QQQ
"350 °" will appear in the display.
5. Press 8" "BAKE" and "350 °" wilt appear in the display
(See Fig. 3).
6. Press o_.c®_ ,, , o_a_c®K
. "TIMED" will flash; BAKE , "0:00" and "350 °"
will appear in the display (Fig.4).
7. Enter the desired baking time by pressing Q Q. QQ
"TIMED" witl flash and "BAKE", ":50" and "350°''wilt appear in
the display (Fig. 5). Note: Baking time can be set for any
amount of time between 1 minute to 11 hours and 59 minutes.
8. Press _. Both the "TIMED" and "BAKE" icons wilt remain
X
V
on in the display (Fig. 6). Once the Timed Bake feature has
started, the current time of day will appear in the display.
Note: After the Timed Bake featu re has activated, press o_._coo=to o_._coo=
display the bake time remaining in the Timed Bake mode. Once
Timed Bake has started baking, a beep will sound when the oven
temperature reaches the set temperature.
Press _ when baking is complete or at any time to cancel the
A
Timed Bake feature.
When the timed bake time runs out:
1. "End" will appear in the display and the oven will shut off
automatically (Fig. 7).
2. The control will beep 4 times. The control will continue to beep
3 times each minute until _-_ is pressed.
Figure 1
Figure 2
Figure 3
Figure 4
Figure 5
Figure 6
Figure 7
Z
Z
Use caution with the TIMED BAKE or DELAYED TIME BAKE features. Use the automatic timer when
cooking cured or frozen meats and most fruits and vegetables. Foods that can easily spoil such as milk, eggs, fish, meat
or poultry, should be chilled in the refrigerator first. Even when chilled, they should not stand in the oven for more than 1
hour before cooking begins, and should be removed promptly when cooking is completed. Eating spoiled food can result in
sickness from food poisoning.
21

Setting Oven Controls
FEATURE OVERVIEW
• Delayed Time Bake
Setting Delayed Time Bake
The BAKE _, OVEN COOK TIME _ K and STOP TIME _ pads
control the Delayed Time Bake feature. The automatic timer of the Delayed
Time Bake will turnthe oven on and off at the time you select in advance.
INSTRUCTIONS
To program the oven for a delayed bake start time and
to shut off automatically (example for baking at 350°F
for 50 minutes and finishing at 5:30):
1. Be sure that the clock is set with the correct time of day.
2. Arrange interior oven rack(s) and place the food in the oven.
3. Press _. "- - -°" wilt appear in the display (Fig. 1
).
4. Press Q Q Q (Fig. 2). "BAKE" will flash and "350°''
will appear in the display.
5. Press _. "BAKE" and "350 °'' will appear in the display (See
Fig. 3).
6. Press 0W,COOK"TIMED" wilt flash; "BAKE", "0:00" and "350 °" will
T,_-
appear in the display (Fig.4).
7. Enter the desired baking time using the number pads by pressing
Q. "TIMED" will flash; "BAKE", ":50" and "350°"
wi{{
v
appear in the display (Fig. 5). Note: Baking time can be set for any
amount of time from 1 minute to 11 hours and 59 minutes.
8 Press _. "TIMED", "BAKE" and "350 °" will show (Fig.6).
9. Press _. Enter the desired stop time using the number pads
QQQ Fig 7)
10. Press sT(_._). When Delayed Time Bake starts, the set oven
temperature will disappear, "TIMED DELAY", "BAKE" and the
current time of day will appear in the display (Fig. 8).
Note: Once Delayed Time Bake has 0_.C00K
started, press _ to display
the bake time remaining. Once Timed Bake has started baking, a
beep will sound when the oven temperature reaches the set
temperature. Press _ when baking has completed or at any time
A
to cancel the Delayed Time Bake feature.
When the set bake time runs out:
1. "End" will appear in the display and the oven will shut off
automatically (Fig. 9).
2. The control will beep 4 times. The control wilt continue to beep 3
times each minute until _'_-="_')is pressed.
PRESS DISPLAY
Figure 1
Figure 2
OVENCOOK
Figure 3
Q Q Figure 4
Q
@
QQQ
Q
OVEN COOK
22
®
®
Figure 5
Figure 6
Figure 7
Figure 8
Figure 9
Setting Oven Controls
FEATURE OVERVIEW
• Broil
Setting
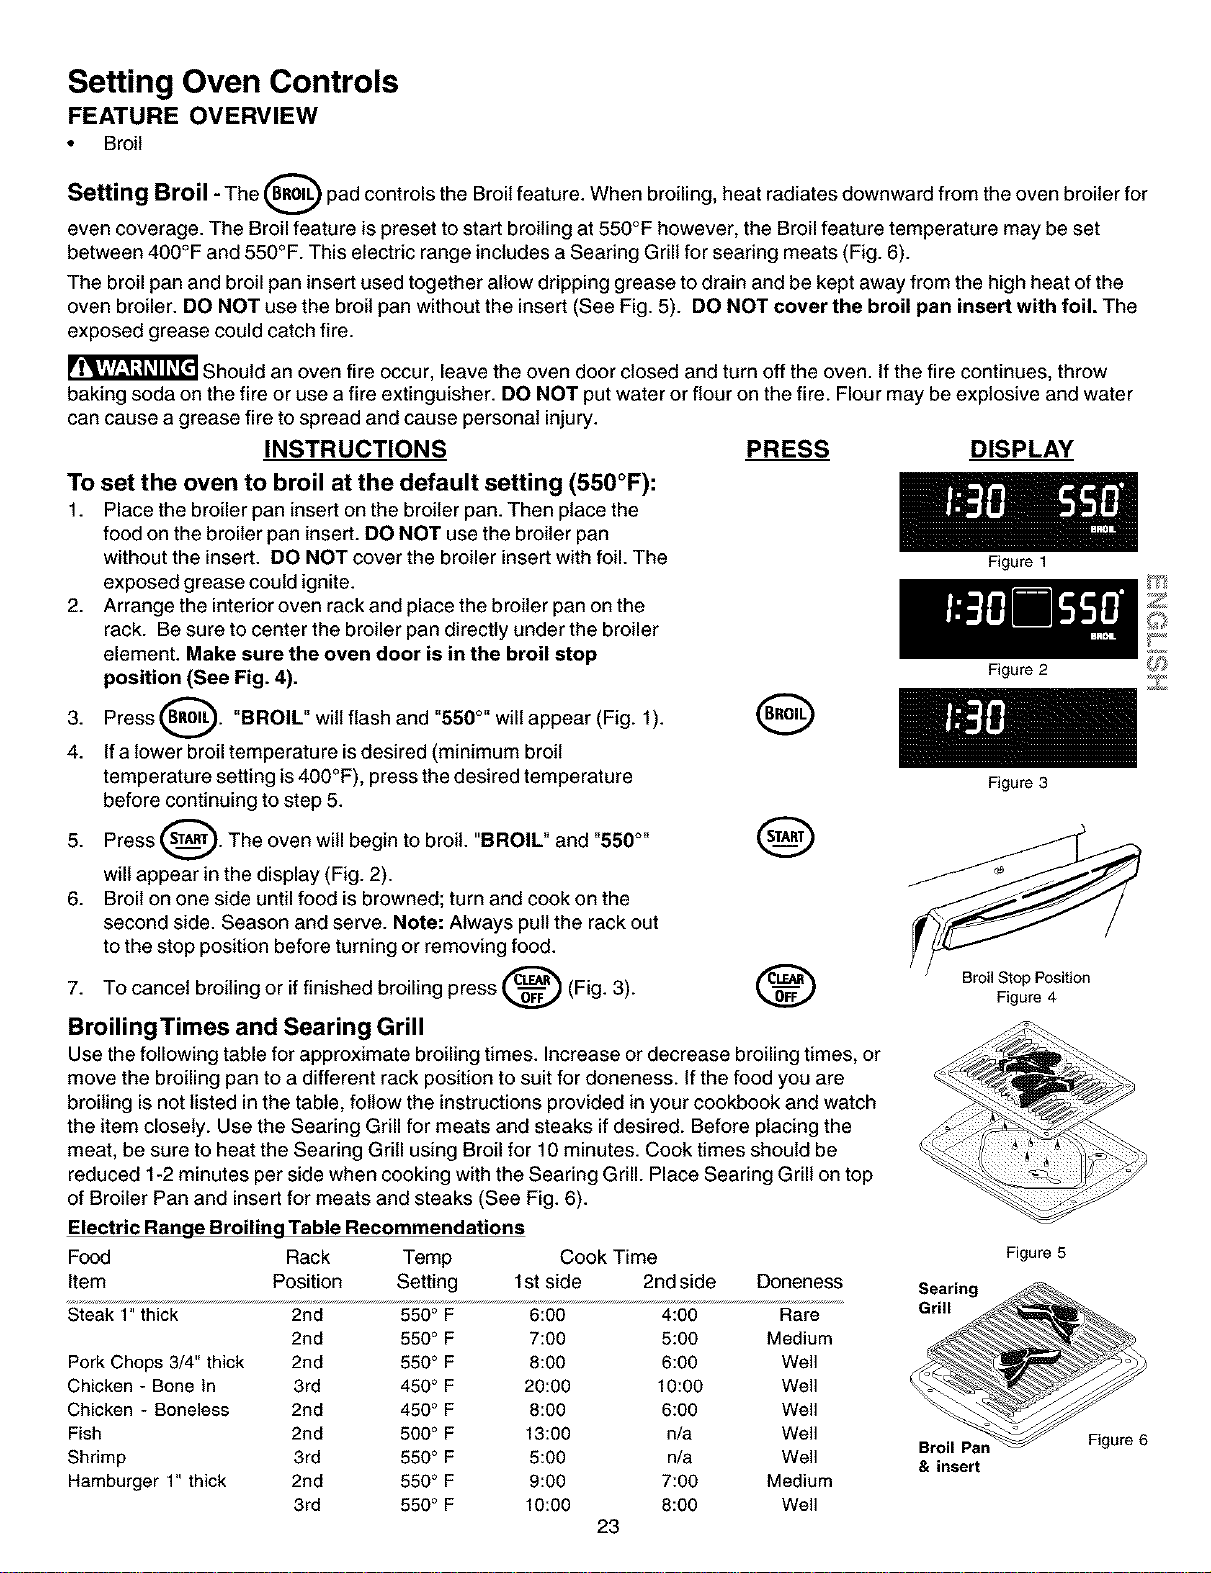
Broil - The (BRoIL_ pad controls the Broil feature. When broiling, heat radiates downward from the oven broiler for
V
even coverage. The Broil feature is preset to start broiling at 550°F however, the Broil feature temperature may be set
between 400°F and 550°F. This electric range includes a Searing Grill for searing meats (Fig. 6).
The broil pan and broil pan insert used together allow dripping grease to drain and be kept away from the high heat of the
oven broiler. DO NOT use the broil pan without the insert (See Fig. 5). DO NOT cover the broil pan insert with foil. The
exposed grease could catch fire.
Should an oven fire occur, leave the oven door closed and turn off the oven. If the fire continues, throw
baking soda on the fire or use a fire extinguisher. DO NOT put water or flour on the fire. Flour may be explosive and water
can cause a grease fire to spread and cause personal injury.
INSTRUCTIONS PRESS DISPLAY
To set the oven to broil at the default setting (550°F):
1. Place the broiler pan insert on the broiler pan. Then place the
food on the broiler pan insert. DO NOT use the broiler pan
without the insert. DO NOT cover the broiler insert with foil. The Figure1
exposed grease could ignite.
2. Arrange the interior oven rack and place the broiler pan on the
rack. Be sure to center the broiler pan directly under the broiler
element. Make sure the oven door is in the broil stop
position (See Fig. 4). Figure2
3. Press(_. "BROIk" wilt flash and "550°" will appear (Fig. 1). O
4. If a lower broil temperature is desired (minimum broil
temperature setting is 400°F), press the desired temperature Figure3
before continuing to step 5.
5" Press _" The °yen will begin t° br°it" "BROIL" and "550°"__ --_
will appear in the display (Fig. 2).
6. Broil on one side until food is browned; turn and cook on the
second side. Season and serve. Note: Always pull the rack out
to the stop position before turning or removing food.
7. To cancel broiling or if finished broiling press _ (Fig. 3). _ Figure4
BroilingTimes and Searing Grill
Use the following table for approximate broiling times. Increase or decrease broiling times, or
move the broiling pan to a different rack position to suit for aloneness. If the food you are
broiling is not listed in the table, follow the instructions provided in your cookbook and watch
the item closely. Use the Searing Grill for meats and steaks if desired. Before placing the
meat, be sure to heat the Searing Grill using Broil for 10 minutes. Cook times should be
reduced 1-2 minutes per side when cooking with the Searing Grill. Place Searing Grill on top
of Broiler Pan and insert for meats and steaks (See Fig. 6).
Electric Range Broiling Table Recommendations
Food Rack Temp Cook Time
Item Position Setting 1st side 2nd side Doneness
Steak 1" thick 2rid 550° F 6:00 4:00 Rare
2rid 550 ° F 7:00 5:00 Medium
Pork Chops 3/4" thick 2rid 550° F 8:00 6:00 Well
Chicken - Bone In 3rd 450° F 20:00 10:00 Well
Chicken - Boneless 2rid 450° F 8:00 6:00 Well
Fish 2rid 500 ° F 13:00 n/a Well
Shrimp 3rd 550 ° F 5:00 n/a Well
Hamburger 1" thick 2rid 550 ° F 9:00 7:00 Medium
3rd 550 ° F 10:00 8:00 Well
23
Figure 5
Searing
Grill
Broil Pan
& insert
Z
Z
Figure 6
Setting Oven Controls
FEATURE OVERVIEW
• Food Categories (Meats/Cakes/Breads)
• Roasting Instructions for Meat Pad
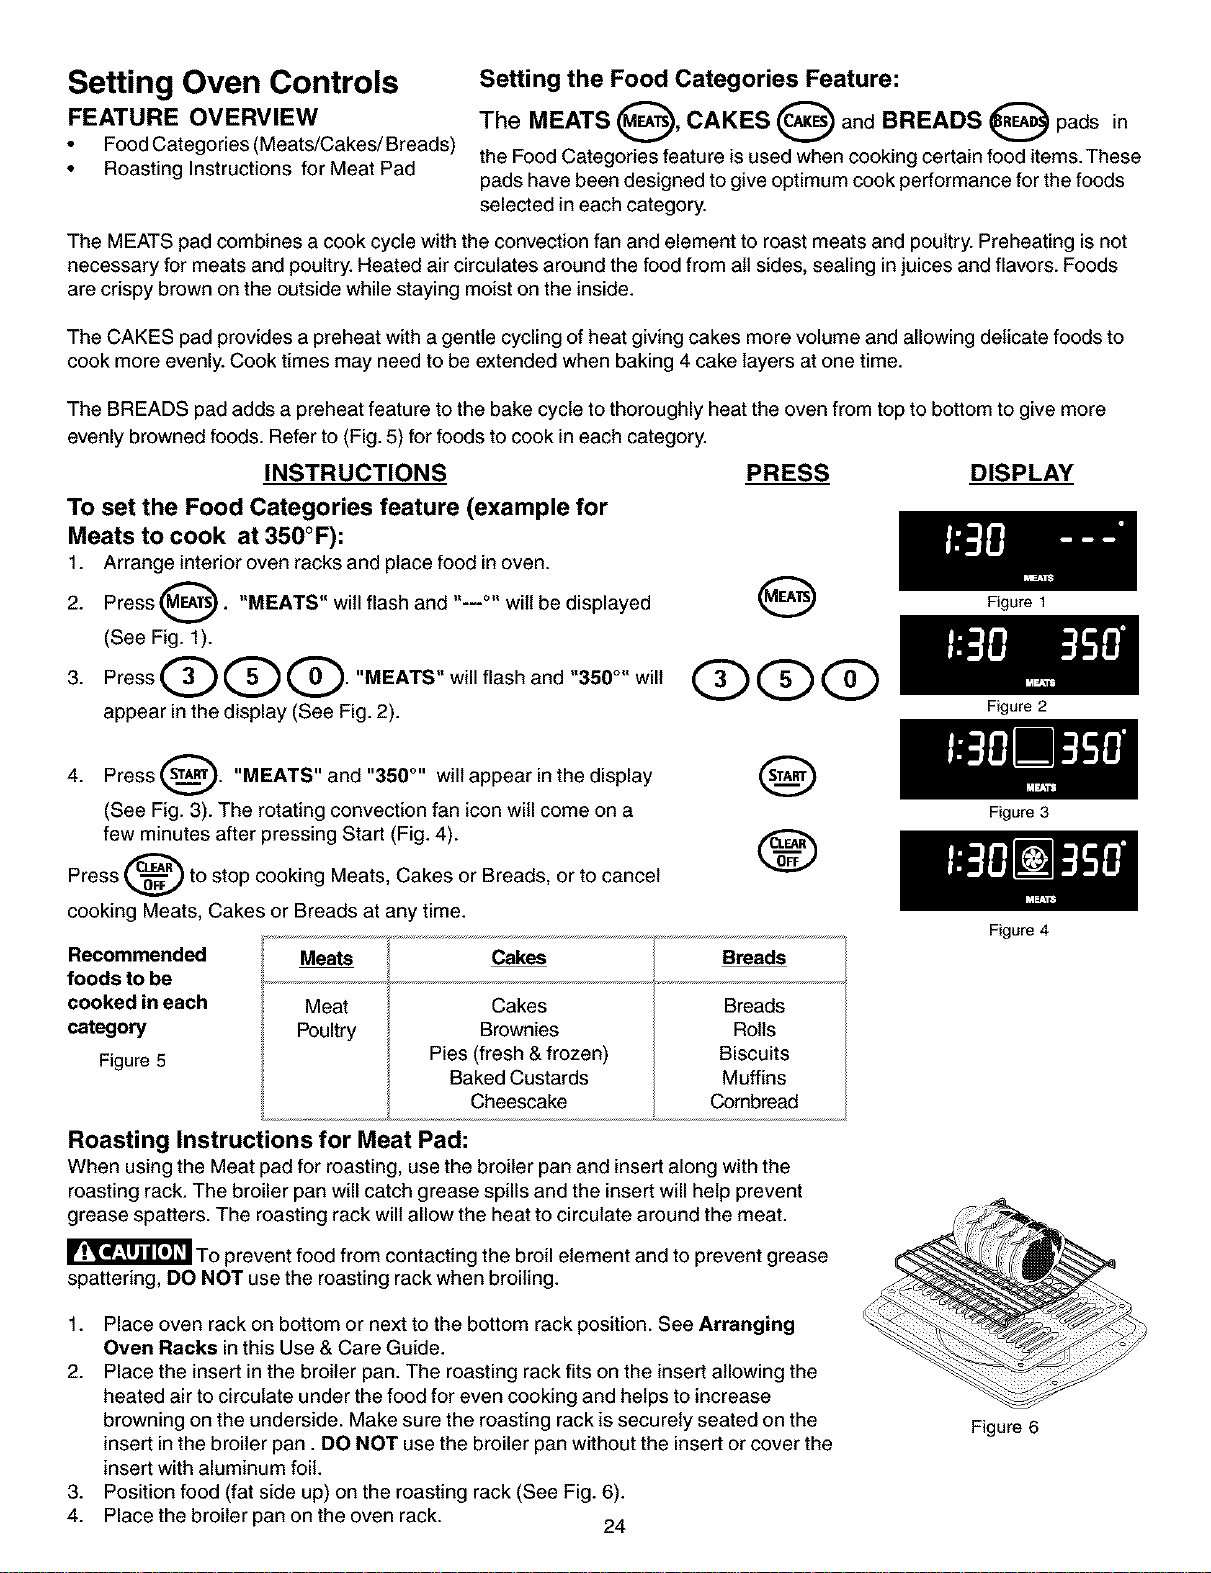
Setting the Food Categories Feature:
The MEATS O' CAKES O and BREADS O pads in
the Food Categories feature is used when cooking certain food items. These
pads have been designed to give optimum cook performance for the foods
selected in each category.
The MEATS pad combines a cook cycle with the convection fan and element to roast meats and poultry. Preheating is not
necessary for meats and poultry. Heated air circulates around the food from all sides, sealing in juices and flavors. Foods
are crispy brown on the outside while staying moist on the inside.
The CAKES pad provides a preheat with a gentle cycling of heat giving cakes more volume and allowing delicate foods to
cook more evenly. Cook times may need to be extended when baking 4 cake layers at one time.
The BREADS pad adds a preheat feature to the bake cycle to thoroughly heat the oven from top to bottom to give more
evenly browned foods. Refer to (Fig. 5) for foods to cook in each category.
INSTRUCTIONS
To set the Food Categories feature (example for
Meats to cook at 350°F):
1. Arrange interior oven racks and place food in oven.
Press _. "MEATS" will flash and ,._o, wilt be displayed
2.
(See Fig. 1).
3. Press Q Q Q. "MEATS" will flash and "350°" will
appear in the display (See Fig. 2).
PRESS DISPLAY
4.
Press ST(_). "MEATS" and "350 °'' will appear in the display
(See Fig. 3). The rotating convection fan icon will come on a
few minutes after pressing Start (Fig. 4).
Press _ to stop cooking Meats, Cakes or Breads, or to cancel
cooking Meats, Cakes or Breads at any time.
Recommended
foods to be
cooked in each
category
Figure 5
Meats
Meat
Poultry
Cakes
Cakes
Brownies
Pies (fresh & frozen)
Baked Custards
Cheescake
Breads
Breads
Rolls
Biscuits
Muffins
Combread
Roasting Instructions for Meat Pad:
When using the Meat pad for roasting, use the broiler pan and insert along with the
roasting rack. The broiler pan will catch grease spills and the insert will help prevent
grease spatters. The roasting rack will allow the heat to circulate around the meat.
To prevent food from contacting the broil element and to prevent grease
spattering, DO NOT use the roasting rack when broiling.
1. Place oven rack on bottom or next to the bottom rack position. See Arranging
Oven Racks in this Use & Care Guide.
2. Place the insert in the broiler pan. The roasting rack fits on the insert allowing the
heated air to circulate under the food for even cooking and helps to increase
browning on the underside. Make sure the roasting rack is securely seated on the
insert in the broiler pan. DO NOT use the broiler pan without the insert or cover the
insert with aluminum foil.
3. Position food (fat side up) on the roasting rack (See Fig. 6).
4. Place the broiler pan on the oven rack. 24
Figure 1
Figure 2
Figure 3
Figure 4
Figure 6
Setting Oven Controls
FEATURE OVERVIEW
• Convection Bake
• Setting Convection Bake
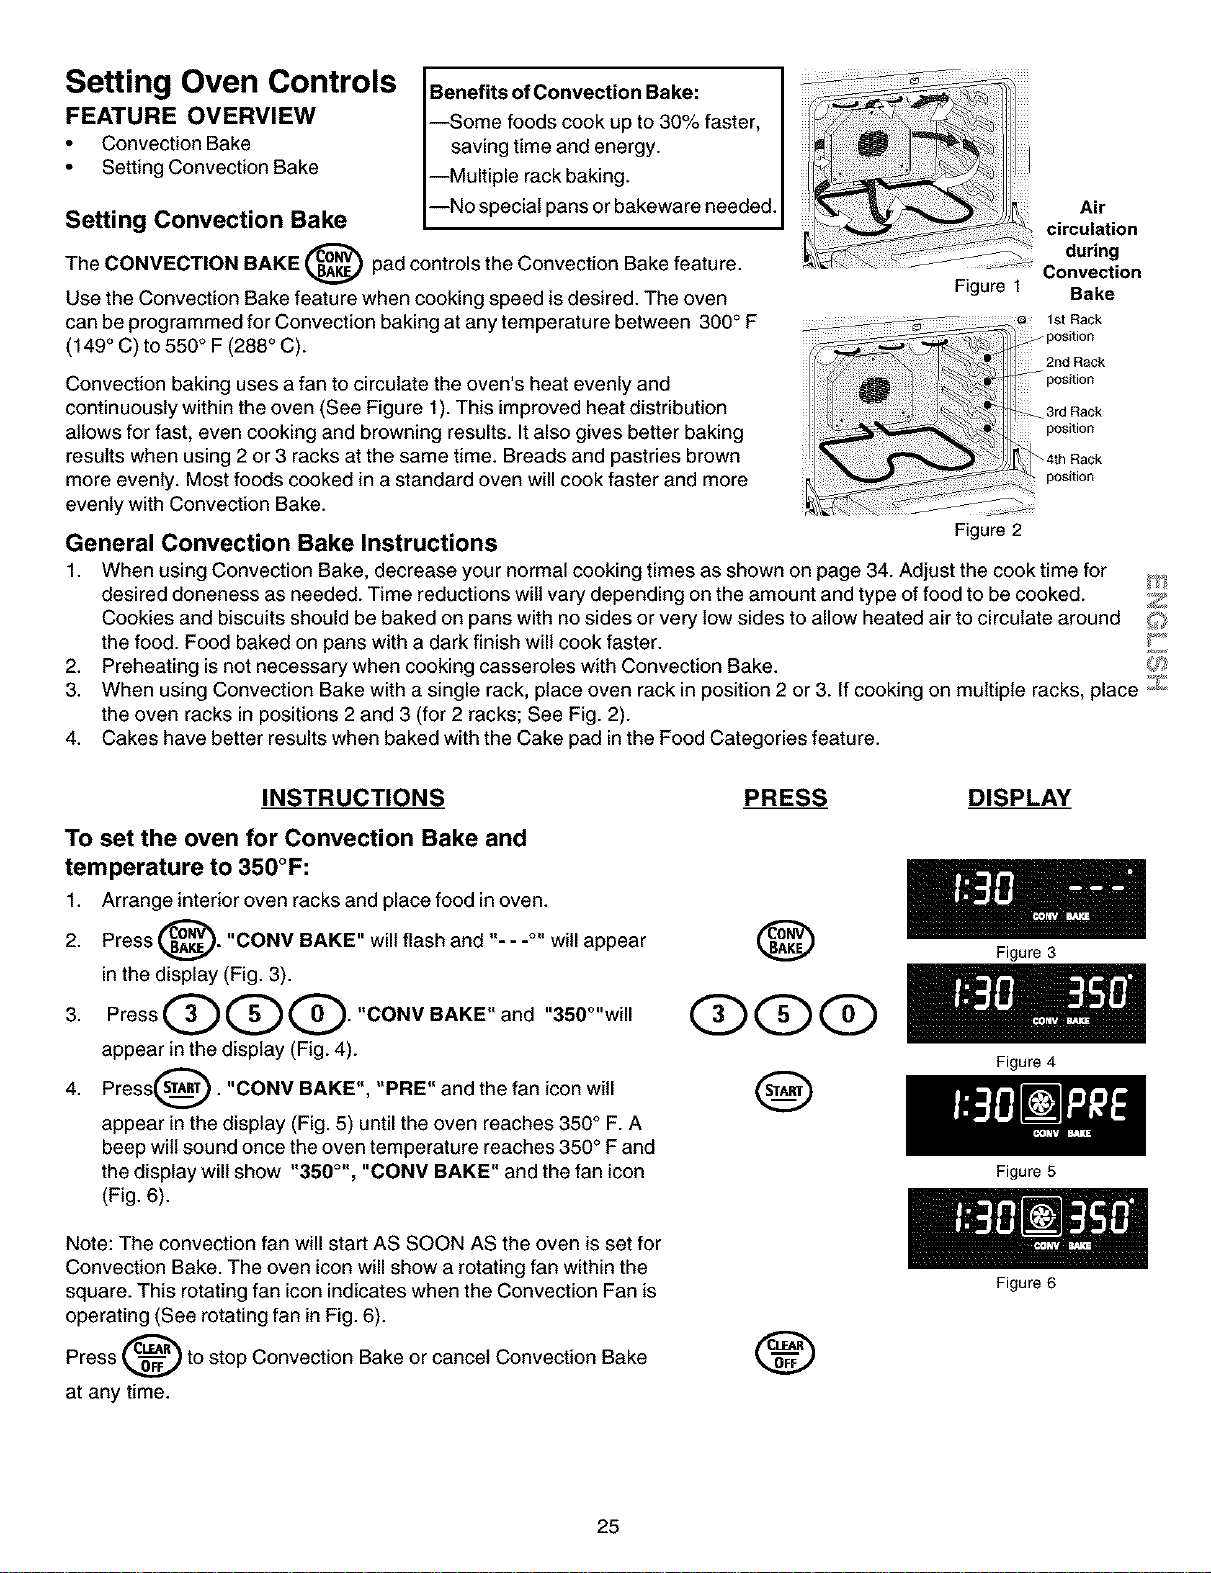
Setting Convection Bake
Benefits of Convection Bake:
--Some foods cook up to 30% faster,
saving time and energy.
--Multiple rack baking.
--No special pans or bakeware needed.
The CONVECTION BAKE (_._ pad controls the Convection Bake feature.
Use the Convection Bake feature when cooking speed is desired. The oven
can be programmed for Convection baking at any temperature between 300 ° F
(149 ° C) to 550 ° F (288 ° C).
Figure 1
Air
circulation
during
Convection
Bake
Convection baking uses a fan to circulate the oven's heat evenly and
continuously within the oven (See Figure 1). This improved heat distribution
allows for fast, even cooking and browning results. It also gives better baking
results when using 2 or 3 racks at the same time. Breads and pastries brown
more evenly. Most foods cooked in a standard oven will cook faster and more
evenly with Convection Bake.
General Convection Bake Instructions
Figure 2
1. When using Convection Bake, decrease your normal cooking times as shown on page 34. Adjust the cook time for
desired doneness as needed. Time reductions wilt vary depending on the amount and type of food to be cooked. Z
Cookies and biscuits should be baked on pans with no sides or very low sides to allow heated air to circulate around
the food. Food baked on pans with a dark finish will cook faster. Y'_
2. Preheating is not necessary when cooking casseroles with Convection Bake.
3. When using Convection Bake with a single rack, place oven rack in position 2 or 3. If cooking on multiple racks, place _::}_
the oven racks in positions 2 and 3 (for 2 racks; See Fig. 2).
4. Cakes have better results when baked with the Cake pad in the Food Categories feature.
INSTRUCTIONS
To set the oven for Convection Bake and
temperature to 350°F:
1. Arrange interior oven racks and place food in oven.
2. Press _'_. "CONV BAKE" will flash and "- - -°" will appear
in the display (Fig. 3).
3. PressQQQ."CONVBAKE"and "350°"will
appear in the display (Fig. 4).
Press_. "CONV BAKE", "PBE" and the fan icon
4. wi{[
appear in the display (Fig. 5) until the oven reaches 350 ° F. A
beep wilt sound once the oven temperature reaches 350 ° F and
the display will show "350 °', "CONV BAKE" and the fan icon
(Fig. 6).
Note: The convection fan will start AS SOON AS the oven is set for
Convection Bake. The oven icon will show a rotating fan within the
square. This rotating fan icon indicates when the Convection Fan is
operating (See rotating fan in Fig. 6).
Press _ to stop Convection Bake or cancel Convection Bake
at any time.
PRESS DISPLAY
@
@@@
@
®
25
Figure 3
Figure 4
Figure 5
Figure 6
Oven Cleaning
FEATURE
OVERVIEW
• Preparing for the Self-
Clean Cycle
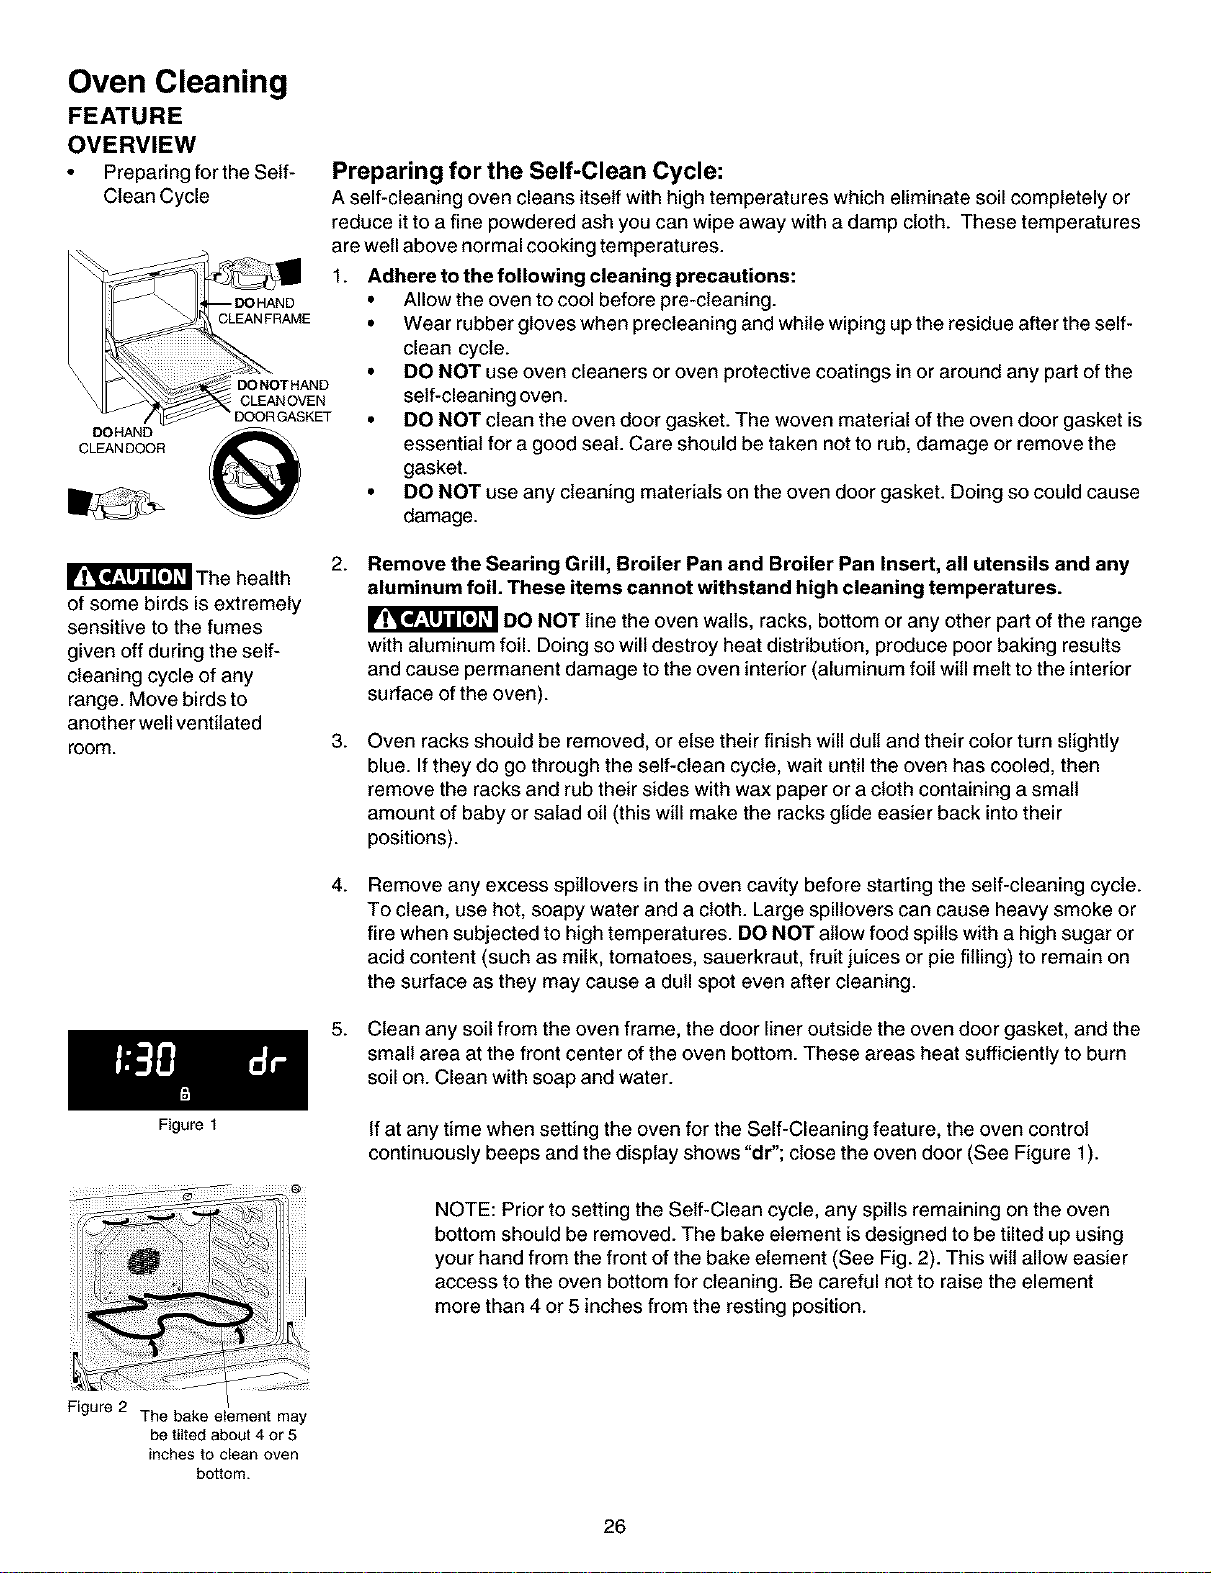
Preparing for the Self-Clean Cycle:
A self-cleaning oven cleans itself with high temperatures which eliminate soil completely or
reduce it to a fine powdered ash you can wipe away with a damp cloth. These temperatures
are well above normal cooking temperatures.
Adhere to the following cleaning precautions:
• Allow the oven to cool before pre-cteaning.
• Wear rubber gloves when precteaning and while wipingup the residue after the self-
clean cycle.
• DO NOT use oven cleaners or oven protective coatings in or around any part ofthe
self-cleaning oven.
• DO NOT clean the oven door gasket. The woven material of the oven door gasket is
essential for a good seat. Care should be taken not to rub, damage or remove the
gasket.
• DO NOT use any cleaning materials on the oven door gasket. Doing so could cause
damage.
The health
of some birds is extremely
sensitive to the fumes
given off during the self-
cleaning cycle of any
range. Move birds to
another well ventilated
room.
Figure 1
2.
Remove the Searing Grill, Broiler Pan and Broiler Pan Insert, all utensils and any
aluminum foil. These items cannot withstand high cleaning temperatures.
DO NOT line the oven walls, racks, bottom or any other part of the range
with aluminum foil. Doing so willdestroy heat distribution, produce poor baking results
and cause permanent damage tothe oven interior (aluminum foil will melt to the interior
surface ofthe oven).
.
Oven racks should be removed, or else their finish will dull and their color turn slightly
blue. If they do go through the self-clean cycle, wait until the oven has cooled, then
remove the racks and rub their sides with wax paper or a cloth containing a small
amount of baby or salad oil (this will make the racks glide easier back into their
positions).
4.
Remove any excess spitlovers in the oven cavity before starting the self-cleaning cycle.
To clean, use hot, soapy water and a cloth. Large spillovers can cause heavy smoke or
fire when subjected to high temperatures. DO NOT allow food spills with a high sugar or
acid content (such as milk, tomatoes, sauerkraut, fruit juices or pie filling) to remain on
the surface as they may cause a dull spot even after cleaning.
5. Clean any soil from the oven frame, the door liner outside the oven door gasket, and the
small area at the front center of the oven bottom. These areas heat sufficiently to burn
soil on. Clean with soap and water.
If at any time when setting the oven for the Self-Cleaning feature, the oven control
continuously beeps and the display shows "dr"; close the oven door (See Figure 1).
NOTE: Prior to setting the Self-Clean cycle, any spills remaining on the oven
bottom should be removed. The bake element is designed to be tilted up using
your hand from the front of the bake element (See Fig. 2). This wilt allow easier
access to the oven bottom for cleaning. Be careful not to raise the element
more than 4 or 5 inches from the resting position.
Figure 2 The bake element may
be tilted about 4 or 5
inches to clean oven
bottom.
26

Oven Cleaning
FEATURE OVERVIEW
• Starting the Self-Clean
Cycle
To Start the Self-Clean Cycle
The CLEAN (_ pad controls the Self-Cleaning feature. If you are planning to use the oven directly after a self-clean
cycle remember to allow time for the oven to cool down and the oven door to unlock. This normally takes about one hour.
So to self-clean for 3 hours will actually take about 4 hours to complete.
*It is recommend to use a 2 hour self-clean cycle for light soils, a 3 hour cycle for average soils, and a 4 hour cycle for
heavy soils (to assure satisfactory results).
During the self-cleaning cycle, the outside of the range can become very hot to the touch. DO NOT leave
small children unattended near the appliance; they may be burned if they touch the hot oven door surfaces.
Ir_r'al_'_'_{_! DO NOT force the oven door open. This can damage the automatic door locking system. Use care when
opening the oven door after the self-cleaning cycle. Stand to the side of the oven when opening the door to allow hot air or
steam to escape. The oven may still be VERY HOT.
INSTRUCTIONS PRESS DISPLAY
To set the controls for a 3 hour Self-Cleaning cycle
to start immediately and shut off automatically:
1. Be sure the clock is set with the correct time of day and the
oven door is closed.
Press _---"_. "CLEAN" will flash and "3:00" will show in the
2.
display (Fig. 1). The control witl automatically clean for a 3 hour
period (default self-cleaning cycle time). Note: If a 2 or 4 hour
clean time is desired, press Q for 2 hour or press Q
i
for a 4 hour clean time. Set the cleaning time based on the
amount of soil; light, medium or heavy (*See above).
3. Press _ .The "DOOR LOCKED" icon will flash; "CLEAN"
icon and the letters "CLn" wilt remain on in the display (Fig. 2).
4. As soon as the control is set, the motor driven oven door lock
will begin to close automatically. Once the door has been
locked the "DOOR LOCKED" indicator light will stop flashing
and remain on. Also, the oven icon will appear in the display
(Fig. 3).
Qo,Q
Q
Figure 1
Figure 2
Figure 3
Figure 4
Z
Z
Note: Allow about 15 seconds for the oven door lock to close.
When the Self-Clean Cycle is Completed:
1. The time of day, the "DOOR LOCKED" and "CLEAN" icon wilt
remain in the display (Fig. 4).
2. Once the oven has cooled down for approximately 1HOUR, and
the "DOOR LOCKED" icon is no longer displayed, the oven
door can then be opened (Fig. 5).
Stopping or Interrupting a Self-Cleaning Cycle:
If it becomes necessary to stop or interrupt a self-cleaning cycle
due to excessive smoke or fire in the oven:
1.
2.
Press _.
Once the oven has cooled down for approximately 1 HOUR and
the "DOOR LOCKED" icon is no longer displayed,the oven door
can then be opened (Fig. 5).
®
27
Figure 5
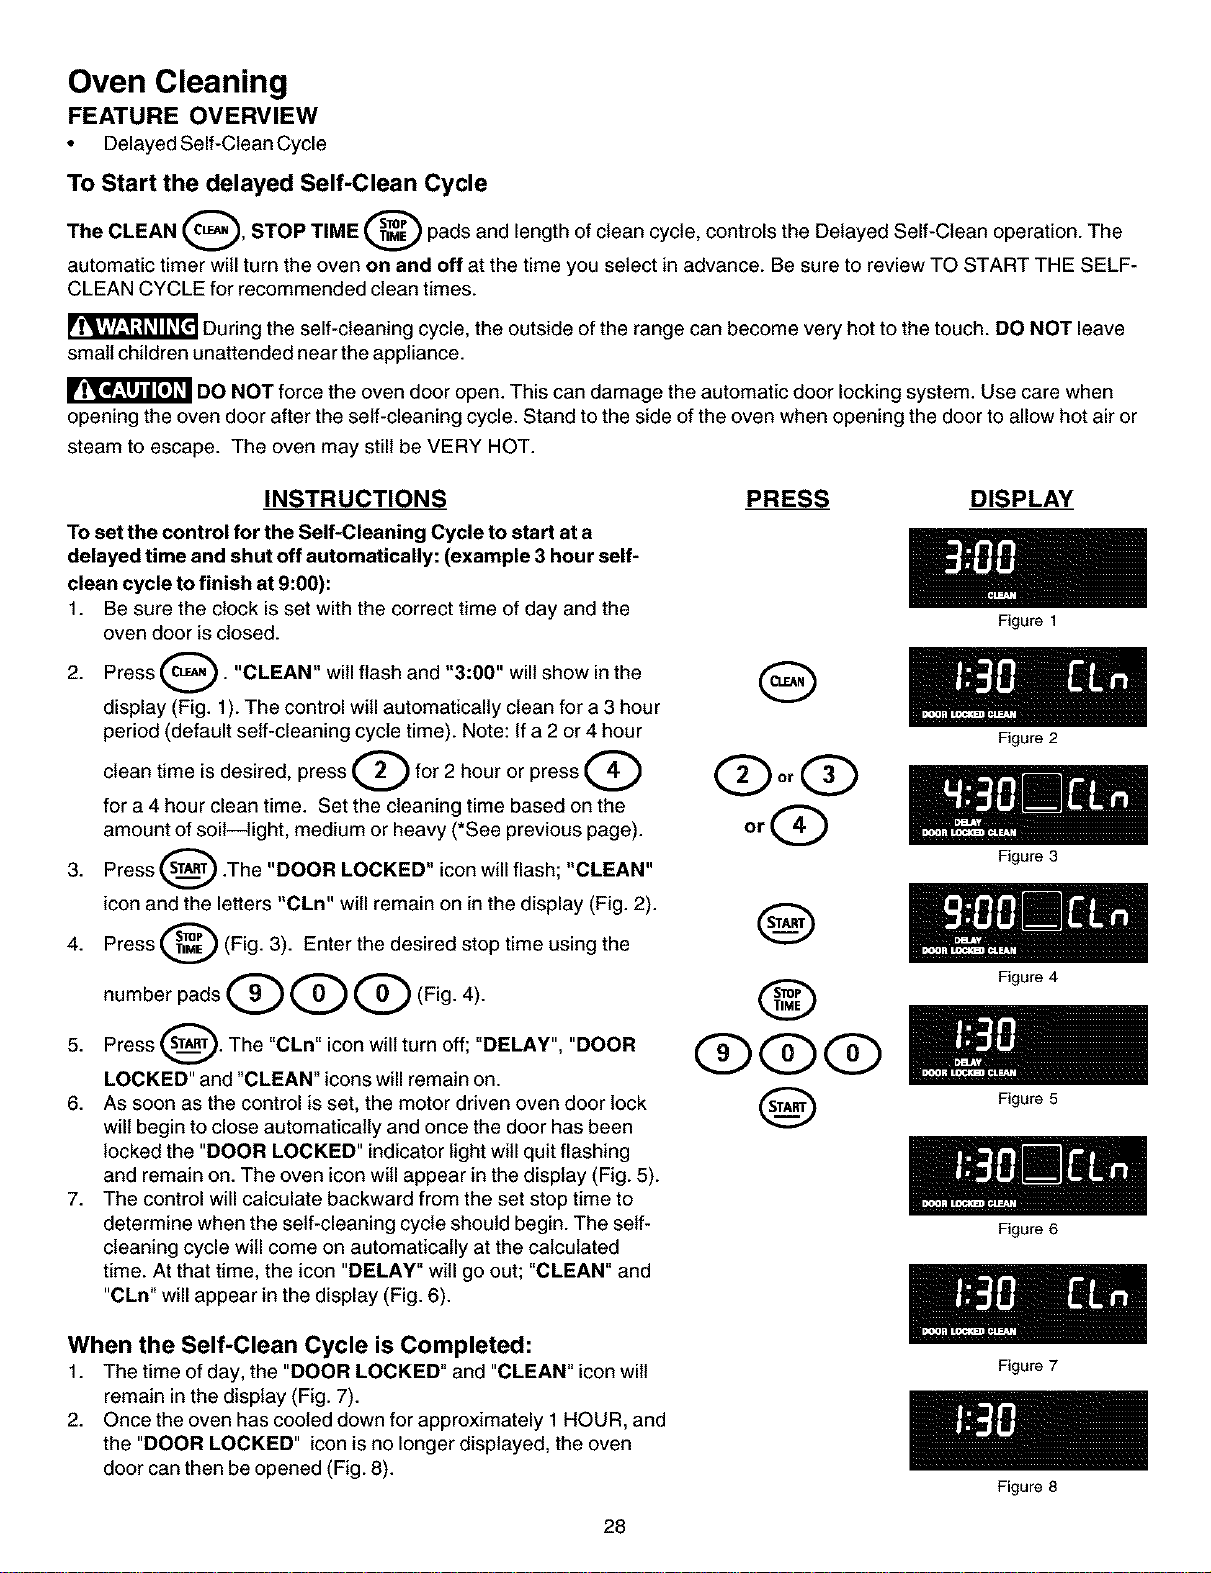
Oven Cleaning
FEATURE OVERVIEW
• Delayed Self-Clean Cycle
To Start the delayed Self-Clean Cycle
The CLEAN Q, STOP TIME _ pads and length of clean cycle, controls the Delayed Self-Clean operation. The
automatic timer will turn the oven on and off at the time you select in advance. Be sure to review TO START THE SELF-
CLEAN CYCLE for recommended clean times.
During the self-cleaning cycle, the outside of the range can become very hot to the touch. DO NOT leave
small children unattended near the appliance.
DO NOT force the oven door open. This can damage the automatic door locking system. Use care when
opening the oven door after the self-cleaning cycle. Stand to the side of the oven when opening the door to allow hot air or
steam to escape. The oven may still be VERY HOT.
INSTRUCTIONS
To set the control for the Self-Cleaning Cycle to start at a
delayed time and shut off automatically: (example 3 hour self-
clean cycle to finish at 9:00):
1. Be sure the clock is set with the correct time of day and the
oven door is closed.
2. Press _'_. "CLEAN" will flash and "3:00" will show in the
display (Fig. 1). The control will automatically clean for a 3 hour
period (default self-cleaning cycle time). Note: If a 2 or 4 hour
clean time is desired, press O for 2 hour or press Q
for a 4 hour clean time. Set the cleaning time based on the
amount of soil--light, medium or heavy (*See previous page).
3. Press _ .The "DOOR LOCKED" icon will flash; "CLEAN"
icon and the letters "CLn" will remain on in the display (Fig. 2).
Press _ (Fig. 3). Enter the desired stop time using the
4.
number pads Q G Q (Fig. 4).
5. Press _. The "CLn" icon will turn off; "DELAY",
"DOOR
LOCKED" and "CLEAN" icons will remain on.
6. As soon as the control is set, the motor driven oven door lock
will begin to close automatically and once the door has been
locked the "DOOR LOCKED" indicator light will quit flashing
and remain on. The oven icon will appear in the display (Fig. 5).
7. The control will calculate backward from the set stop time to
determine when the self-cleaning cycle should begin. The self-
cleaning cycle will come on automatically at the calculated
time. At that time, the icon "DELAY" will go out; "CLEAN" and
"CLn" will appear in the display (Fig. 6).
PRESS DISPLAY
G
®
Q@@
@
When the Self-Clean Cycle is Completed:
1. The time of day, the "DOOR LOCKED" and "CLEAN" iconwilt
remain in the display (Fig. 7).
2. Once the oven has cooled down for approximately 1HOUR, and
the "DOOR LOCKED" icon is no longer displayed, the oven
door can then be opened (Fig. 8).
Figure 1
Figure 2
Figure 3
Figure 4
Figure 5
Figure 6
Figure 7
28
Figure 8
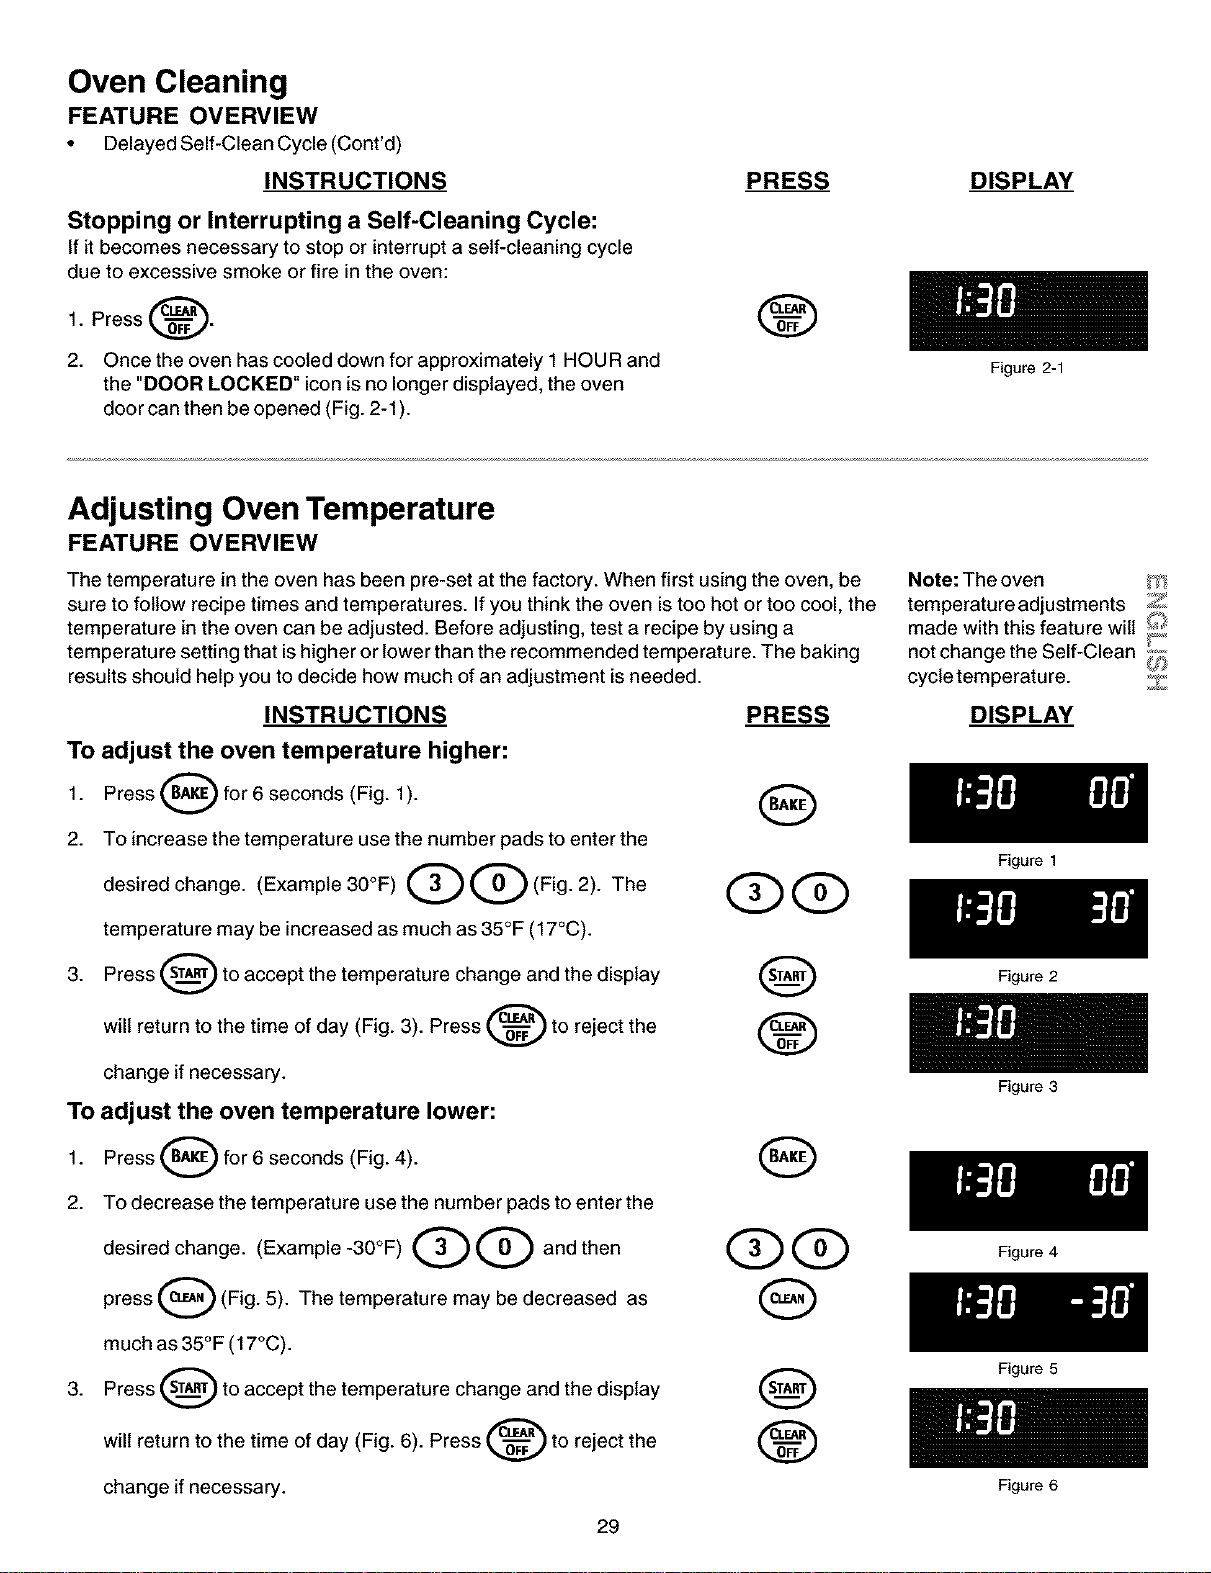
Oven Cleaning
FEATURE OVERVIEW
• Delayed Self-Clean Cycle (Cont'd)
INSTRUCTIONS
Stopping or Interrupting a Self-Cleaning Cycle:
If it becomes necessary to stop or interrupt a self-cleaning cycle
due to excessive smoke or fire in the oven:
1. Press _.
2. Once the oven has cooled down for approximately 1HOUR and
the "DOOR LOCKED" icon is no longer displayed, the oven
door can then be opened (Fig. 2-1).
PRESS
®
DISPLAY
Adjusting Oven Temperature
FEATURE OVERVIEW
The temperature in the oven has been pre-set at the factory. When first using the oven, be
sure to follow recipe times and temperatures. Ifyou think the oven is too hot or too cool, the
temperature in the oven can be adjusted. Before adjusting, test a recipe by using a
temperature setting that is higher or lower than the recommended temperature. The baking
results should help you to decide how much of an adjustment is needed.
INSTRUCTIONS PRESS
To adjust the oven temperature higher:
1. Press _ for 6 seconds (Fig. 1). (_)
2. To increase the temperature use the number pads to enter the
desired change. (Example 30°F)Q Q (Fig. 2). The QQ
temperature may be increased as much as 35°F (17°C).
3. Press _ to accept the temperature change and the display
will return to the time of day (Fig. 3). Press _ to reject the
change if necessary.
To adjust the oven temperature lower:
Press (_ for 6 seconds (Fig. 4).1.
O
2. To decrease the temperature use the number pads to enter the
desired change. (Example -30°F) Q Q and then
press Q (Fig. 5). The temperature may be decreased as
much as 35°F (17°C).
3. Press _ to accept the temperature change and the display
will return to the time of day (Fig. 6). Press _ to reject the
change if necessary.
29
Figure 2-1
Note: The oven _'_
temperature adjustments Z
made with this feature wilt _'_
not change the Self-Clean L,,_''I
_P
cycle temperature. Z
DISPLAY
Figure 1
Figure 2
Figure 3
Figure 4
Figure 5
Figure 6
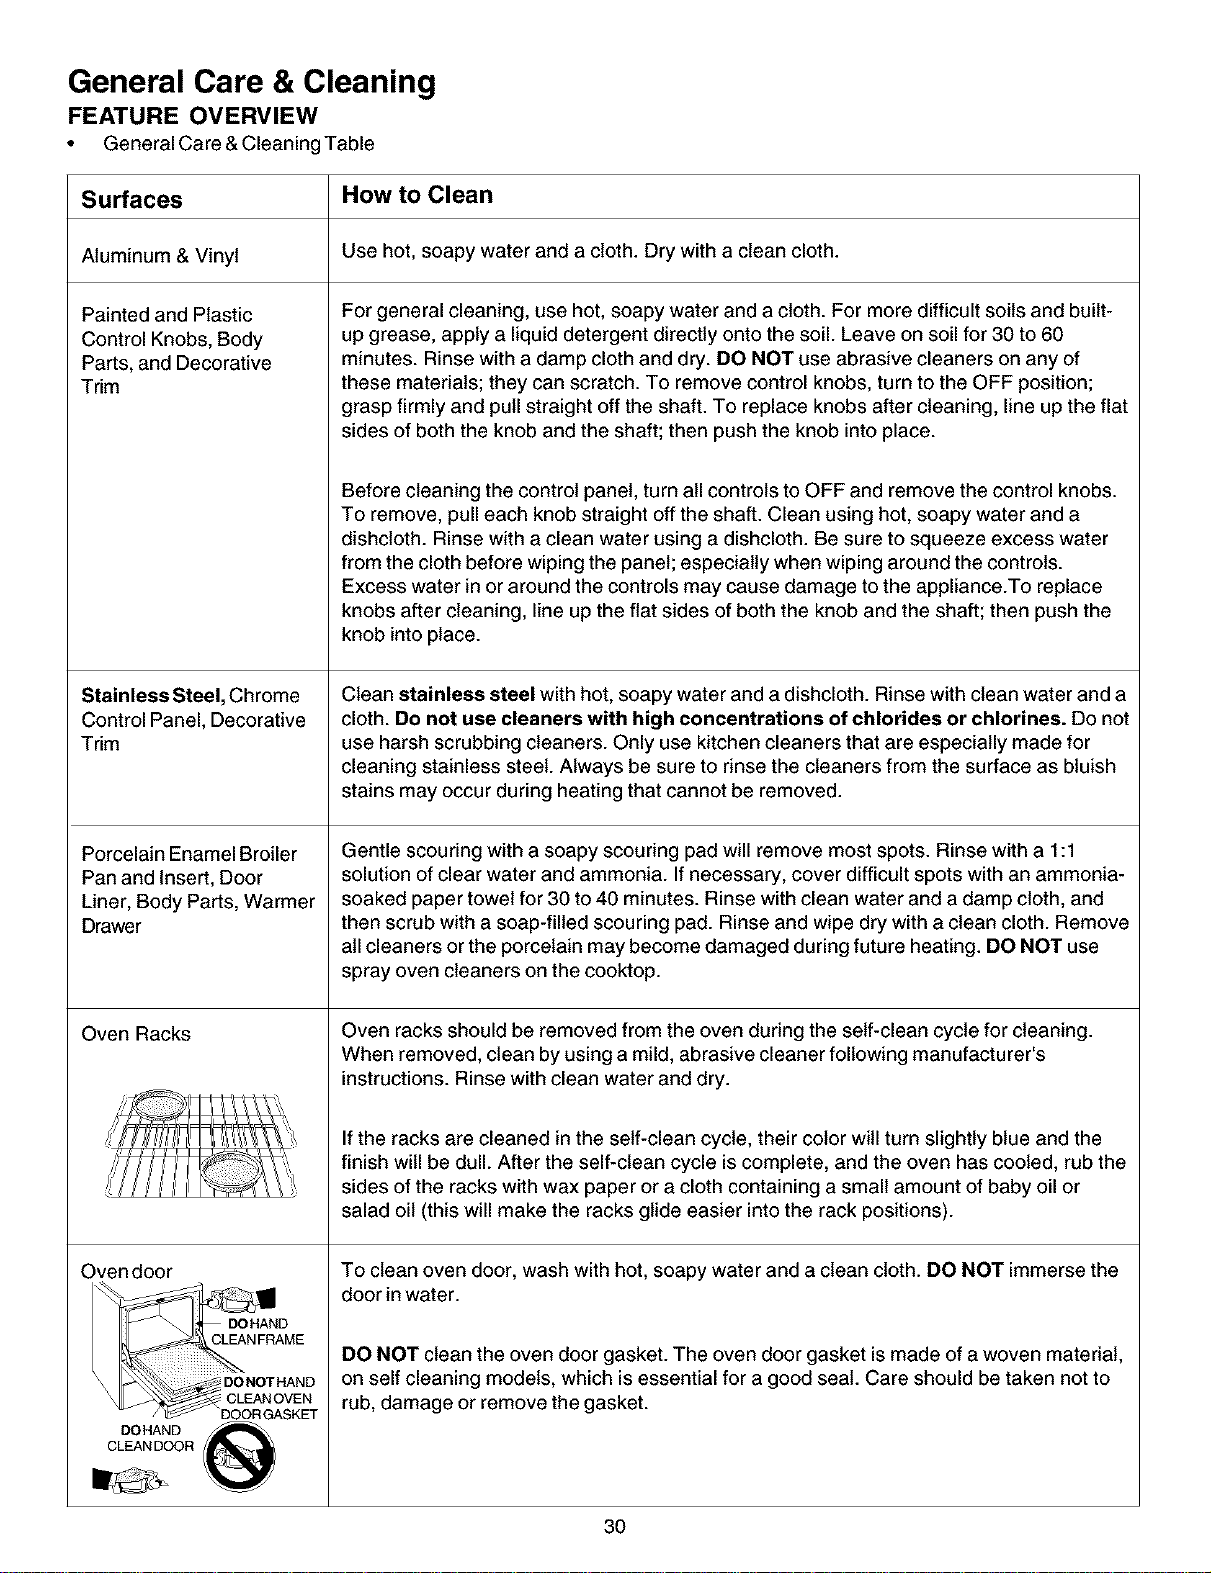
General Care & Cleaning
FEATURE OVERVIEW
• General Care & Cleaning Table
Surfaces How to Clean
Aluminum & Vinyl Use hot, soapy water and a cloth. Dry with a clean cloth.
Painted and Plastic
Control Knobs, Body
Parts, and Decorative
Trim
Stainless Steel, Chrome
Control Panel, Decorative
Trim
Porcelain Enamel Broiler
Pan and Insert, Door
Liner, Body Parts, Warmer
Drawer
Oven Racks
Oven door
DOHAND
CLEAN FRAME
S
\ DONOTHAND
DOHAND _ _
CLEAN DOOR
For general cleaning, use hot, soapy water and a cloth. For more difficult soils and built-
up grease, apply a liquid detergent directly onto the soil. Leave on soil for 30 to 60
minutes. Rinse with a damp cloth and dry. DO NOT use abrasive cleaners on any of
these materials; they can scratch. To remove control knobs, turn to the OFF position;
grasp firmly and pull straight off the shaft. To replace knobs after cleaning, line up the flat
sides of both the knob and the shaft; then push the knob into place.
Before cleaning the control panel, turn all controls to OFF and remove the control knobs.
To remove, pull each knob straight off the shaft. Clean using hot, soapy water and a
dishcloth. Rinse with a clean water using a dishcloth. Be sure to squeeze excess water
from the cloth before wiping the panel; especially when wiping around the controls.
Excess water in or around the controls may cause damage to the appliance.To replace
knobs after cleaning, line up the flat sides of both the knob and the shaft; then push the
knob into place.
Clean stainless steel with hot, soapy water and a dishcloth. Rinse with clean water and a
cloth. De not use cleaners with high concentrations of chlorides or chlorines. Do not
use harsh scrubbing cleaners. Only use kitchen cleaners that are especially made for
cleaning stainless steel. Always be sure to rinse the cleaners from the surface as bluish
stains may occur during heating that cannot be removed.
Gentle scouring with a soapy scouring pad will remove most spots. Rinse with a 1:1
solution of clear water and ammonia. If necessary, cover difficult spots with an ammonia-
soaked paper towel for 30 to 40 minutes. Rinse with clean water and a damp cloth, and
then scrub with a soap-filled scouring pad. Rinse and wipe dry with a clean cloth. Remove
all cleaners or the porcelain may become damaged during future heating. DO NOT use
spray oven cleaners on the cooktop.
Oven racks should be removed from the oven during the self-clean cycle for cleaning.
When removed, clean by using a mild, abrasive cleaner following manufacturer's
instructions. Rinse with clean water and dry.
If the racks are cleaned in the self-clean cycle, their color will turn slightly blue and the
finish will be dull. After the self-clean cycle is complete, and the oven has cooled, rub the
sides of the racks with wax paper or a cloth containing a small amount of baby oil or
salad oil (this will make the racks glide easier into the rack positions).
To clean oven door, wash with hot, soapy water and a clean cloth. DO NOT immerse the
door in water.
DO NOT clean the oven door gasket. The oven door gasket is made of a woven material,
on self cleaning models, which is essential for a good seat. Care should be taken not to
rub, damage or remove the gasket.
3O
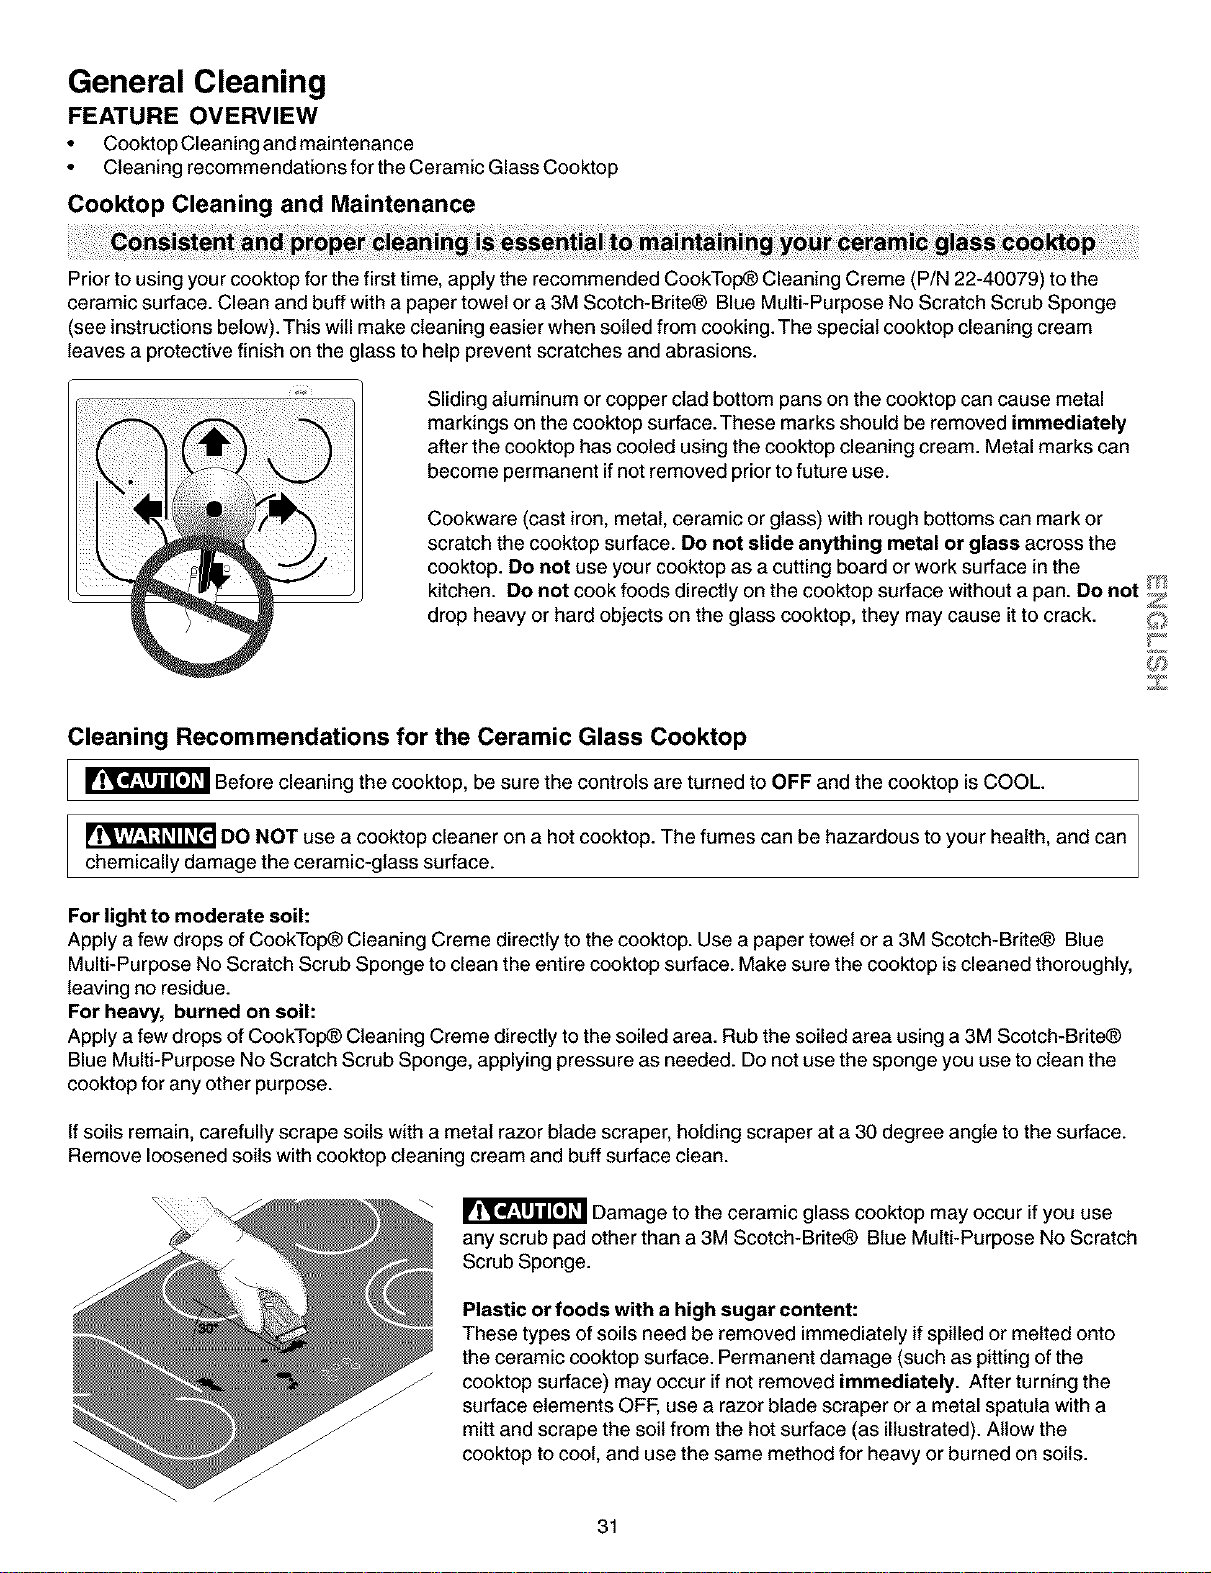
General Cleaning
FEATURE OVERVIEW
• Cooktop Cleaning and maintenance
• Cleaning recommendations for the Ceramic Glass Cooktop
Cooktop Cleaning and Maintenance
Prior to using your cooktop for the first time, apply the recommended CookTop_ Cleaning Creme (P/N 22-40079) to the
ceramic surface. Clean and buff with a paper towel or a 3M Scotch-Brite® Blue Multi-Purpose No Scratch Scrub Sponge
(see instructionsbelow). This will make cleaning easier when soiled from cooking. The special cooktop cleaning cream
leaves a protective finish on the glass to help prevent scratches and abrasions.
Sliding aluminum or copper clad bottom pans on the cooktop can cause metal
markings on the cooktop surface.These marks should be removed immediately
after the cooktop has cooled using the cooktop cleaning cream. Metal marks can
become permanent if not removed prior to future use.
Cookware (cast iron, metal, ceramic or glass) with rough bottoms can mark or
scratch the cooktop surface. Do net slide anything metal or glass across the
cooktop. Do net use your cooktop as a cutting board or work surface in the
kitchen. Do net cook foods directly on the cooktop surface without a pan. Do net/"_t
Z
drop heavy or hard objects on the glass cooktop, they may cause it to crack.
Z
Cleaning Recommendations for the Ceramic Glass Cooktop
_ Before cleaning the cooktop, be sure the controls are turned to OFF and the cooktop isCOOL.
DO NOT use a cooktop cleaner on a hot cooktop. The fumes can be hazardous to your health, and can
chemically damage the ceramic-glass surface.
For light to moderate soil:
Apply a few drops of CookTop_ Cleaning Creme directly to the cooktop. Use a paper towel or a 3M Scotch-Brite_ Blue
Multi-Purpose No Scratch Scrub Sponge to clean the entire cooktop surface. Make sure the cooktop is cleaned thoroughly,
leaving no residue.
For heavy, burned on soil:
Apply a few drops of CookTop_ Cleaning Creme directly to the soiled area. Rub the soiled area using a 3M Scotch-Brite®
Blue Multi-Purpose No Scratch Scrub Sponge, applying pressure as needed. Do not use the sponge you use to clean the
cooktop for any other purpose.
If soils remain, carefully scrape soils with a metal razor blade scraper, holding scraper at a 30 degree angle to the surface.
Remove loosened soils with cooktop cleaning cream and buff surface clean.
Damage to the ceramic glass cooktop may occur if you use
any scrub pad other than a 3M Scotch-Brite® Blue Multi-Purpose No Scratch
Scrub Sponge.
Plastic or foods with a high sugar content:
These types of soils need be removed immediately ifspilled or melted onto
the ceramic cooktop surface. Permanent damage (such as pitting of the
cooktop surface) may occur if not removed immediately. After turning the
surface elements OFF, use a razor blade scraper or a metal spatula with a
mitt and scrape the soil from the hot surface (as illustrated). Allow the
cooktop to cool, and use the same method for heavy or burned on soils.
31
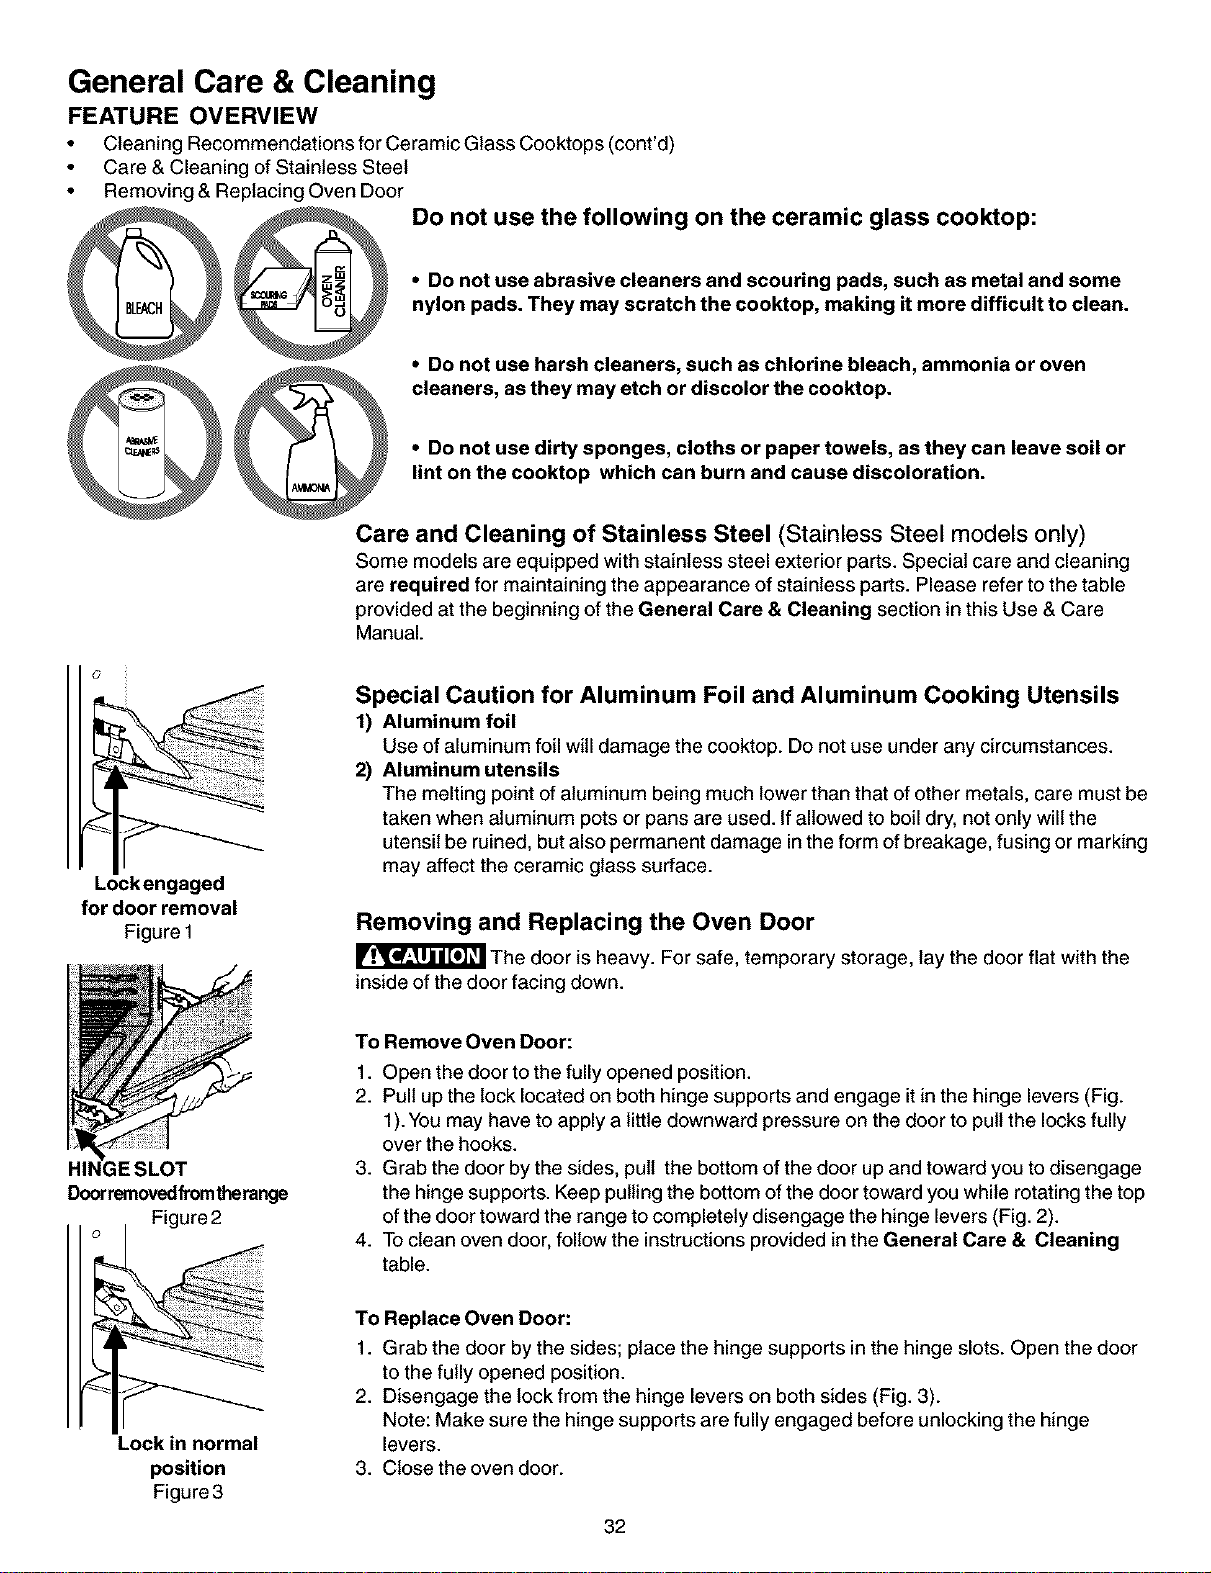
General Care & Cleaning
FEATURE OVERVIEW
• Cleaning Recommendations for Ceramic Glass Cooktops (cont'd)
• Care & Cleaning of Stainless Steel
• Removing & Replacing Oven Door
DO not use the following on the ceramic glass cooktop:
• Do not use abrasive cleaners and scouring pads, such as metal and some
nylon pads. They may scratch the cooktop, making it more difficult to clean.
• Do not use harsh cleaners, such as chlorine bleach, ammonia or oven
cleaners, as they may etch or discolor the cooktop.
• Do not use dirty sponges, cloths or paper towels, as they can leave soil or
lint on the cooktop which can burn and cause discoloration.
Care and Cleaning of Stainless Steel (Stainless Steel models only)
Some models are equipped with stainless steel exterior parts. Special care and cleaning
are required for maintaining the appearance of stainless parts. Please refer to the table
provided at the beginning of the General Care & Cleaning section in this Use & Care
Manual.
Lockengaged
for door removal
Figure 1
HII
Doorremovedfromtherange
Figure 2
Special Caution for Aluminum Foil and Aluminum Cooking Utensils
1) Aluminum foil
Use of aluminum foil will damage the cooktop. Do not use under any circumstances.
2) Aluminum utensils
The melting point of aluminum being much lower than that of other metals, care must be
taken when aluminum pots or pans are used. If allowed to boil dry, not only will the
utensil be ruined, but also permanent damage in the form of breakage, fusing or marking
may affect the ceramic glass surface.
Removing and Replacing the Oven Door
The door is heavy. For safe, temporary storage, lay the door flat with the
inside of the door facing down.
To Remove Oven Door:
1. Open the door to the fully opened position.
2. Pull up the lock located on both hinge supports and engage it inthe hinge levers (Fig.
1). You may have to apply a little downward pressure on the door to pullthe locks fully
over the hooks.
3. Grab the door by the sides, pull the bottom of the door up and toward you to disengage
the hinge supports. Keep pullingthe bottom ofthe door toward you while rotating the top
ofthe door toward the range to completely disengage the hinge levers (Fig. 2).
4. To clean oven door, follow the instructionsprovided in the General Care & Cleaning
table.
Lock in normal
position
Figure 3
To Replace Oven Door:
1. Grab the door by the sides; place the hinge supports in the hinge slots. Open the door
to the fully opened position.
2. Disengage the lock from the hinge levers on both sides (Fig. 3).
Note: Make sure the hinge supports are fully engaged before unlocking the hinge
levers.
3. Close the oven door.
32
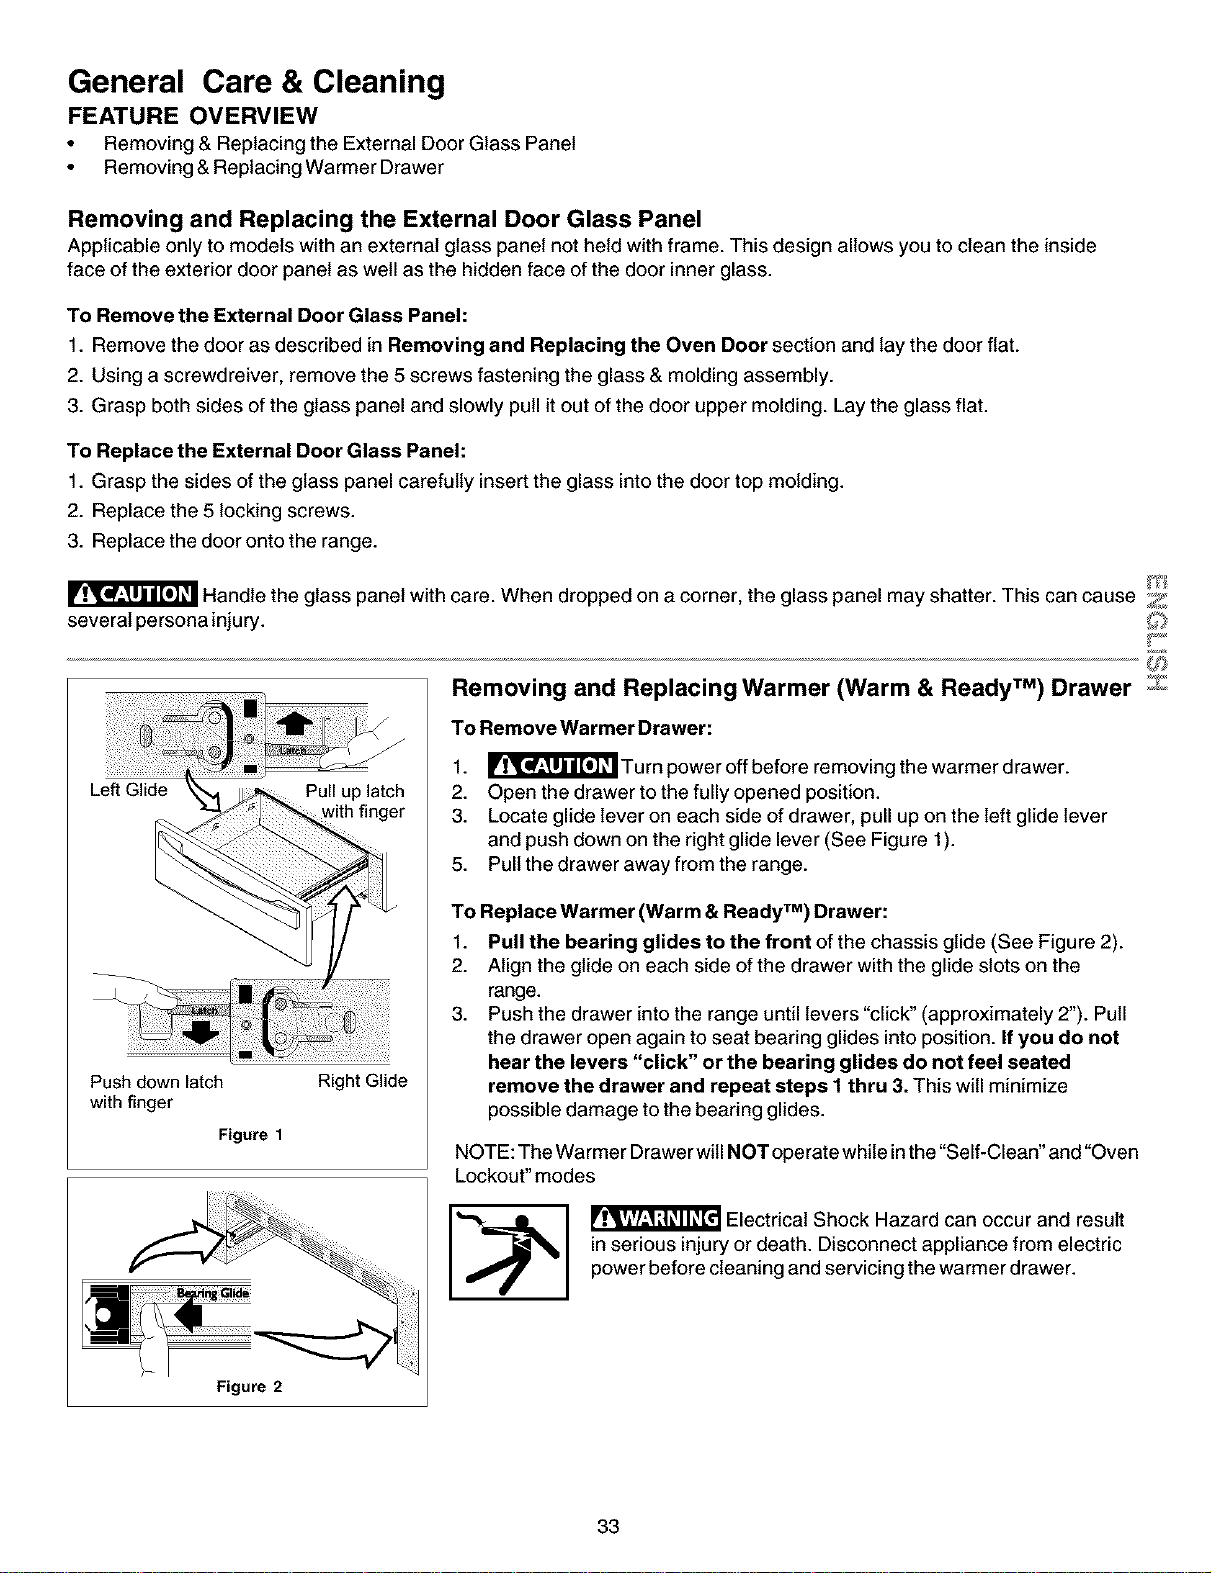
General Care & Cleaning
FEATURE OVERVIEW
• Removing & Replacing the External Door Glass Panel
• Removing &Replacing Warmer Drawer
Removing and Replacing the External Door Glass Panel
Applicable only to models with an external glass panel not held with frame. This design allows you to clean the inside
face of the exterior door panel as well as the hidden face of the door inner glass.
To Remove the External Door Glass Panel:
1. Remove the door as described in Removing and Replacing the Oven Door section and lay the door flat.
2. Using a screwdreiver, remove the 5 screws fastening the glass & molding assembly.
3. Grasp both sides of the glass panel and slowly pull it out of the door upper molding. Lay the glass flat.
To Replace the External Door Glass Panel:
1. Grasp the sides of the glass panel carefully insert the glass into the door top molding.
2. Replace the 5 locking screws.
3. Replace the door onto the range.
Handle the glass panel with care. When dropped on a corner, the glass panel may shatter. This can cause Z
several persona injury.
Push down latch
with finger
Figure 1
Right Glide
Figure 2
Removing and Replacing Warmer (Warm & Ready TM) Drawer z
To Remove Warmer Drawer:
1. _['_ Turn power off before removing the warmer drawer.
2. Open the drawer to the fully opened position.
3. Locate glide lever on each side of drawer, pull up on the left glide lever
and push down on the right glide lever (See Figure 1).
5. Pull the drawer away from the range.
To Replace Warmer (Warm & Ready TM) Drawer:
1. Pull the bearing glides to the front of the chassis glide (See Figure 2).
2. Align the glide on each side of the drawer with the glide slots on the
range.
3. Push the drawer into the range until levers "click" (approximately 2"). Pull
the drawer open again to seat bearing glides into position. If you do not
hear the levers "click" or the bearing glides do not feel seated
remove the drawer and repeat steps 1 thru 3. This will minimize
possible damage to the bearing glides.
NOTE: The Warmer Drawer will NOT operate while inthe "Self-Clean" and "Oven
Lockout" modes
_1 _ Electrical Shock Hazard can occur and result
in serious injury or death. Disconnect appliance from electric
power before cleaning and servicing the warmer drawer.
33
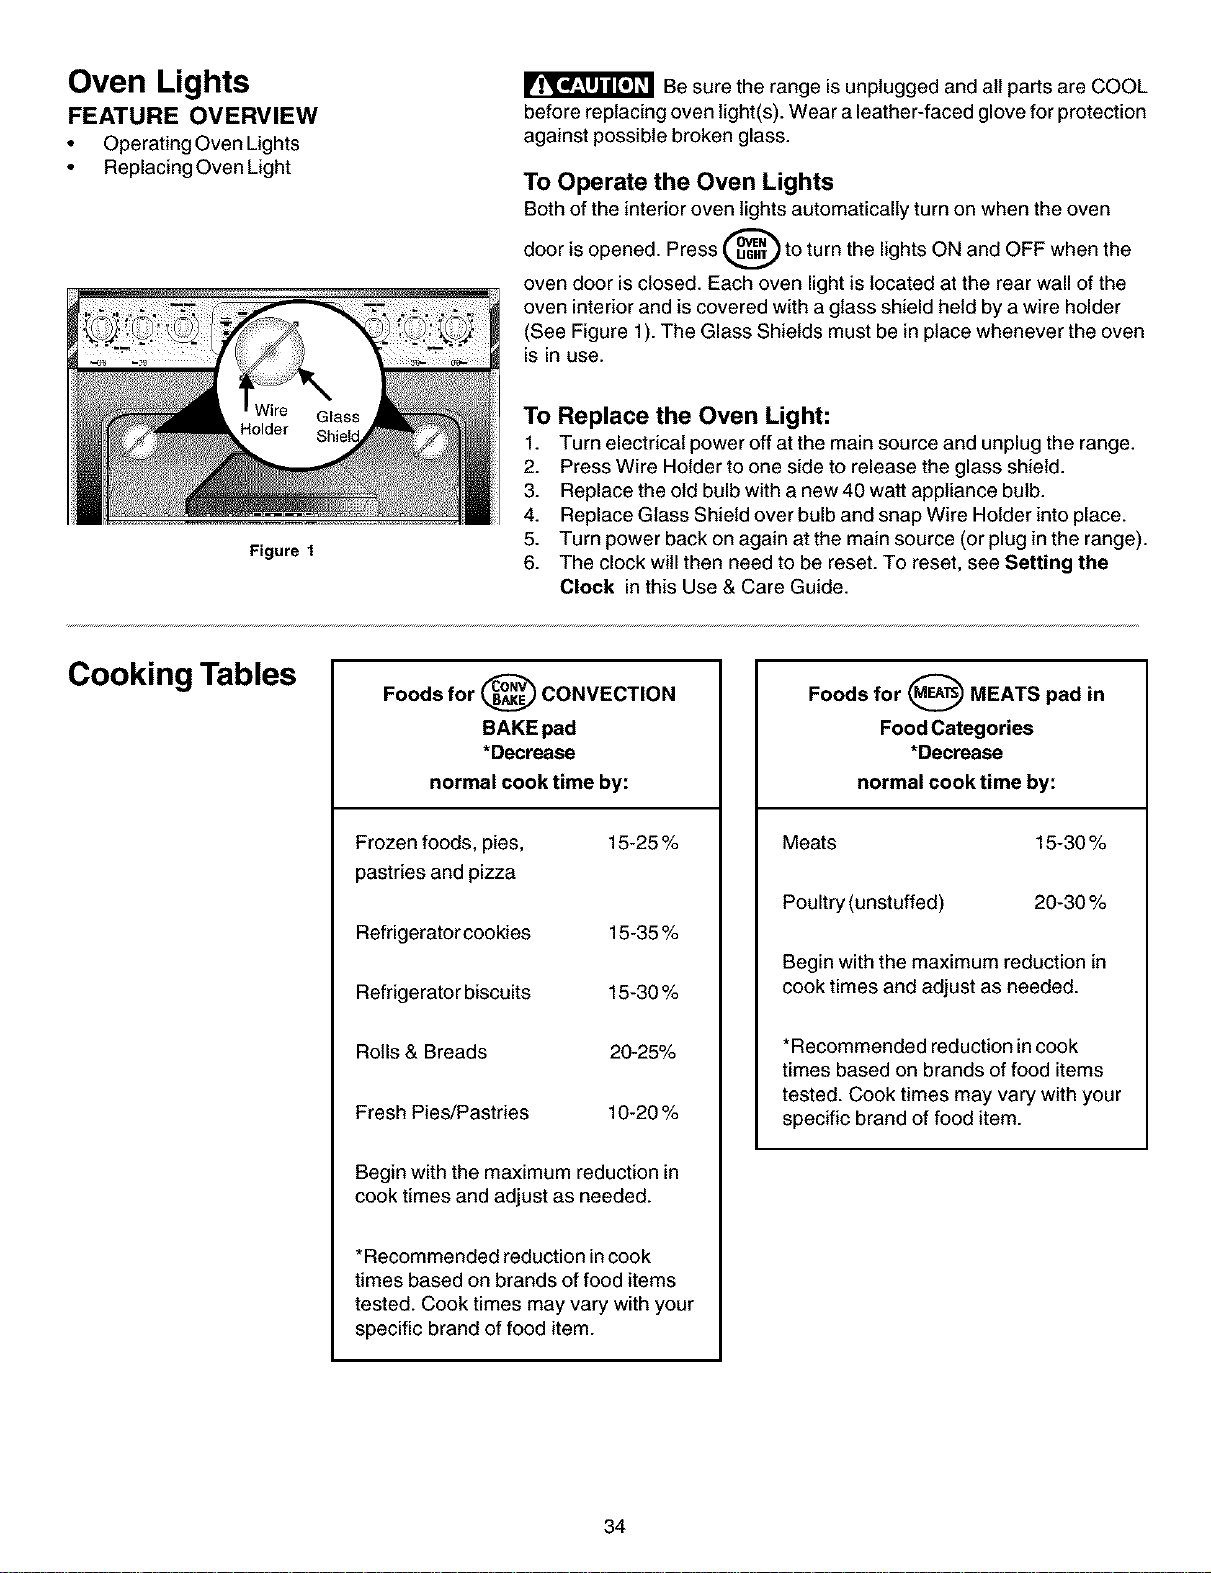
Oven Lights
FEATURE OVERVIEW
• Operating Oven Lights
• Replacing Oven Light
Be sure the range is unplugged and all parts are COOL
before replacing oven light(s). Wear a leather-faced glove for protection
against possible broken glass.
To Operate the Oven Lights
Bothof the interior oven lights automatically turn on when the oven
door is opened. Press _ to turn the lights ON and OFF when the
oven door is closed. Each oven light is located at the rear wall of the
oven interior and is covered with a glass shield held by a wire holder
(See Figure 1). The Glass Shields must be in place whenever the oven
is in use.
Figure 1
To Replace the Oven Light:
1. Turn electrical power off at the main source and unplug the range.
2. Press Wire Holder to one side to release the glass shield.
3. Replace the old bulb with a new 40 watt appliance bulb.
4. Replace Glass Shield over bulb and snap Wire Holder intoplace.
5. Turn power back on again at the main source (or plug in the range).
6. The clock will then need to be reset. To reset, see Setting the
Clock in this Use & Care Guide.
Cooking Tables
Foods for _ CONVECTION
BAKE pad
*Decrease
normal cook time by:
Frozen foods, pies, 15-25 %
pastries and pizza
Refrigerator cookies 15-35 %
Refrigerator biscuits 15-30 %
Rolls & Breads 20-25%
Fresh Pies/Pastries 10-20 %
Begin with the maximum reduction in
cook times and adjust as needed.
*Recommended reduction incook
times based on brands of food items
tested. Cook times may vary with your
specific brand of food item.
Foods for _ MEATS pad in
Food Categories
*Decrease
normal cook time by:
Meats 15-30 %
Poultry (unstuffed) 20-30 %
Begin with the maximum reduction in
cook times and adjust as needed.
*Recommended reduction in cook
times based on brands of food items
tested. Cook times may vary with your
specific brand of food item.
34

Before You Call
Solutions to Common Problems
Before you call for service, review this list. It may save you time and expense. The list includes common occurrences
that are not the result of defective workmanship or materials in this appliance.
OCCURRENCE POSSIBLE CAUSE/SOLUTION
Range is not level. Poor installation. Place oven rack in center of oven. Place a level on the oven
rack. Adjust leveling legs at base of range until the rack is level. When range is
level, cooktop may appear out of alignment if countertop is not level.
Weak, unstable floor. Be sure floor is level and can adequately support range.
Contact a carpenter to correct sagging or sloping floor.
Kitchen cabinet misalignment may make range appear to be unleveL Be sure
cabinets are square and have sufficient room for range clearance.
Cannot move appliance easily.
Appliance must be accessible for
service.
Cabinets not square or are built in too tight. Contact a cabinet maker to correct
the problem.
Contact builder or installer to make appliance accessible.
Carpeting interferes with range. Provide sufficient space so range can be lifted
over carpet.
Entire range or oven does not
operate.
Make sure cord/plug is tightly intooutlet.
Service wiring is not complete. Call 1-800-4-MY-HOME® (See back cover).
Power outage. Check house lights to be sure. Call your local electric company
for service.
* Oven control beeps and displays F1,
F2, F3 or F9
This oven is equipped with a state of the art electronic oven controller. Among
the many features is a full time oven circuit diagnostics system. The controller
constantly monitors the internal circuitry as well as several crucial oven
circuits to insure they are all operating correctly. If at any time one of these
systems fails, the controller will immediately stop the current operation and
beep continuously (flashing an error code of "F1, F2, F3", or "F9" in the
controller display window.
Electronic control has detected a fault condition. Press CLEAR/OFF to clear
the display and stop the beeping. Reprogram oven. Iffault remains, record fault
number. Press CLEAR/OFF and call 1-800-4-MY-HOME® (See back cover).
Oven light does not work. Replace or tighten bulb. See Changing Oven Light in this owner's Guide for
instructions.
Surface unit does not heat. No power to the appliance. Check steps under "Entire Range or Oven Does Not
Operate" in this Avoid Service Checklist.
Incorrect control setting. Make sure the correct control is on for the surface
unit to be used.
Scratches or abrasions on cooktop Coarse particles such as salt or sand between cooktop and utensils can cause
surface, scratches. Be sure cooktop surface and bottoms of utensils are clean before
usage. Small scratches do not affect cooking and wilt become less visible with
time.
Cleaning materials not recommended for ceramic-glass cooktop have been
used. See "To Clean the Cooktop Glass" section under General Cleaning.
Cookware with rough bottom has been used. Use smooth, flat-bottomed
cookware.
Z
Z
35
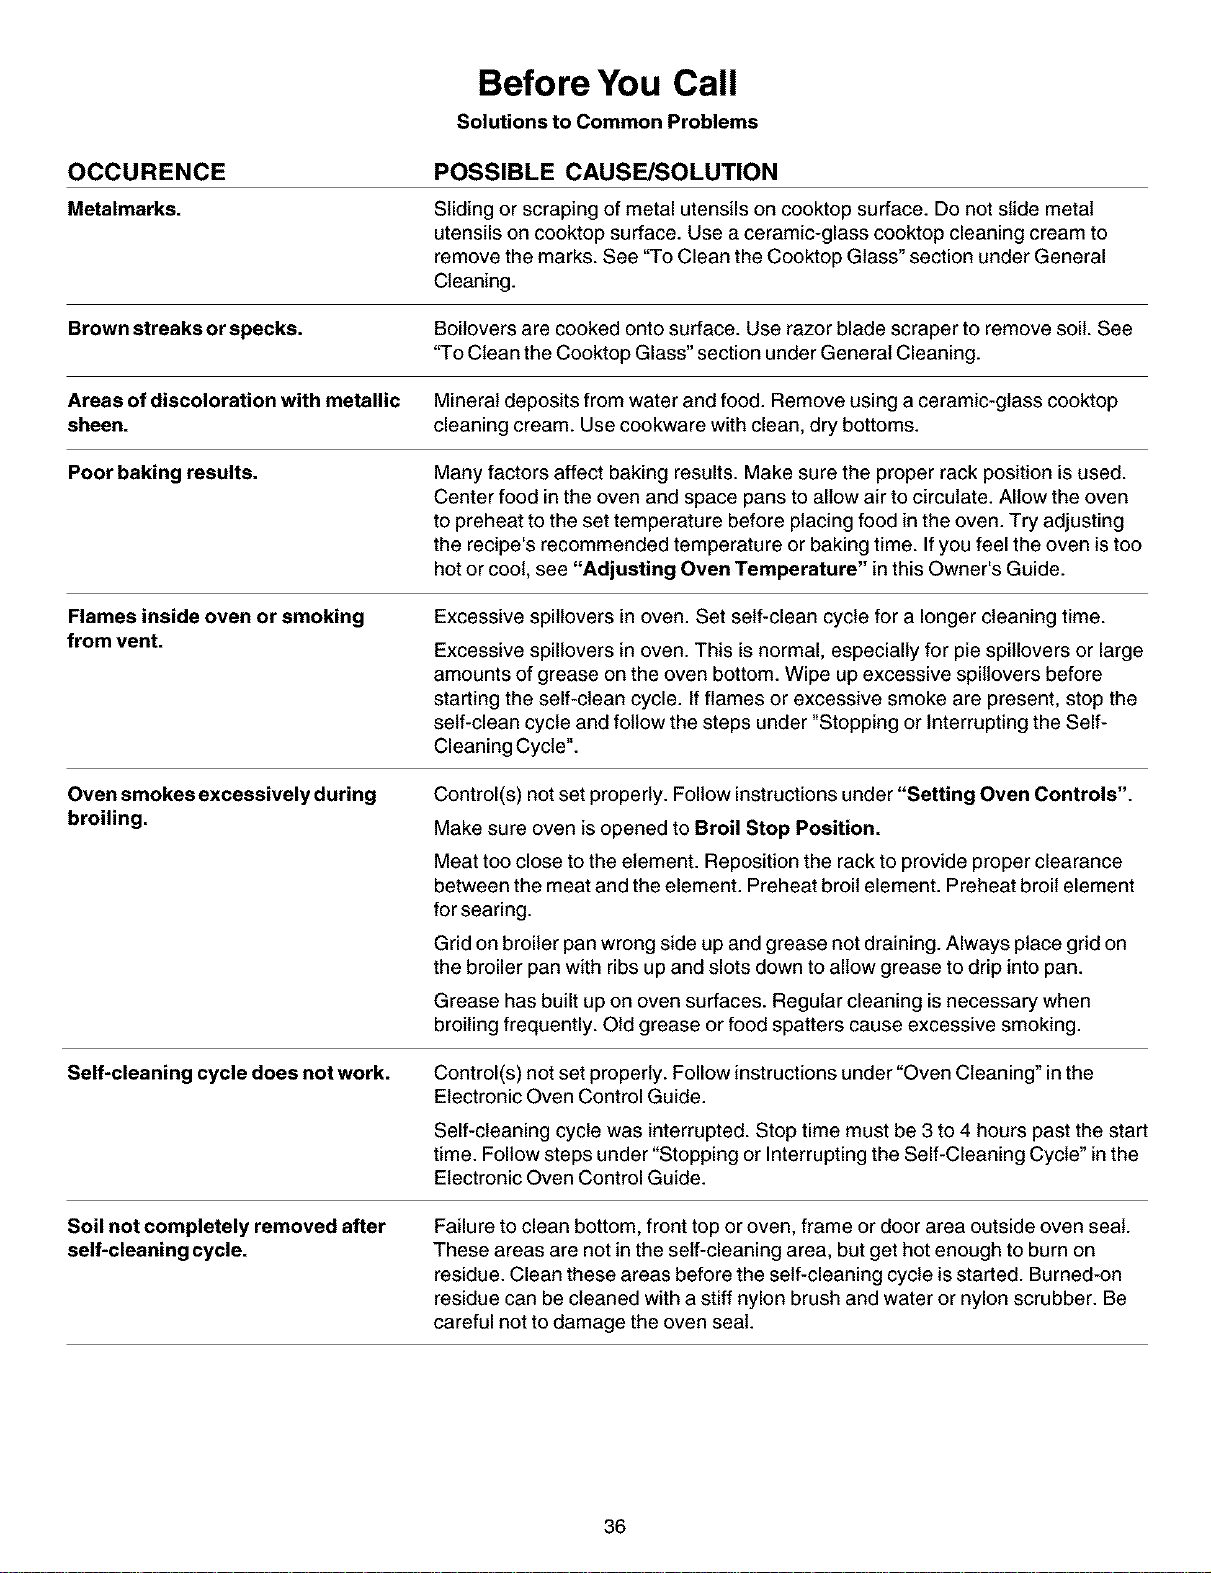
Before You Call
Solutions to Common Problems
OCCURENCE POSSIBLE CAUSE/SOLUTION
Metalmarks. Sliding or scraping of metal utensils on cooktop surface. Do not slide metal
utensils on cooktop surface. Use a ceramic-glass cooktop cleaning cream to
remove the marks. See "To Clean the Cooktop Glass" section under General
Cleaning.
Brown streaks or specks. Believers are cooked onto surface. Use razor blade scraper to remove soil. See
"To Clean the Cooktop Glass" section under General Cleaning.
Areas of discoloration with metallic Mineral deposits from water and food. Remove using a ceramic-glass cooktop
sheen, cleaning cream. Use cookware with clean, dry bottoms.
Poor baking results. Many factors affect baking results. Make sure the proper rack position is used.
Center food in the oven and space pans to allow air to circulate. Allow the oven
to preheat to the set temperature before placing food in the oven. Try adjusting
the recipe's recommended temperature or baking time. If you feel the oven is too
hot or cool, see "Adjusting Oven Temperature" in this Owner's Guide.
Flames inside oven or smoking Excessive spiltovers in oven. Set self-clean cycle for a longer cleaning time.
from vent. Excessive spillovers in oven. This is normal, especially for pie spillovers or large
amounts of grease on the oven bottom. Wipe up excessive spillovers before
starting the self-clean cycle. If flames or excessive smoke are present, stop the
self-clean cycle and follow the steps under "Stopping or Interrupting the Self-
Cleaning Cycle".
Oven smokes excessively during
broiling.
Control(s) not set properly. Follow instructions under "Setting Oven Controls".
Make sure oven is opened to Broil Stop Position.
Meat too close to the element. Reposition the rack to provide proper clearance
between the meat and the element. Preheat broil element. Preheat broil element
for searing.
Grid on broiler pan wrong side up and grease not draining. Always place grid on
the broiler pan with ribs up and slots down to allow grease to drip into pan.
Grease has built up on oven surfaces. Regular cleaning is necessary when
broiling frequently. Old grease or food spatters cause excessive smoking.
Self-cleaning cycle does not work. Control(s) not set properly. Follow instructions under "Oven Cleaning" in the
Electronic Oven Control Guide.
Self-cleaning cycle was interrupted. Stop time must be 3 to 4 hours past the start
time. Follow steps under "Stopping or Interrupting the Self-Cleaning Cycle" in the
Electronic Oven Control Guide.
Soil not completely removed after
self-cleaning cycle.
Failure to clean bottom, front top or oven, frame or door area outside oven seat.
These areas are not in the self-cleaning area, but get hot enough to burn on
residue. Clean these areas before the self-cleaning cycle is started. Burned-on
residue can be cleaned with a stiff nylon brush and water or nylon scrubber. Be
careful not to damage the oven seat.
36
Bacon Cheese Crescents
Recipes
Special Recipes as seen in the Video
Rib Roast w/Gravy (cont'd)
1 - 8oz. cream cheese, softened
8 bacon slices, crisply cooked, crumbled
1/3 cup Parmesan cheese
1/4 cup finely chopped onion
2 tbsp. parsley flakes
1 egg
1 tbsp. milk
2 can refrigerator crescent rolls (8oz. each)
1 egg, beaten
1 tsp. cold water
Combine cream cheese, bacon, Parmesan cheese, onion,
parsley, egg and milk at medium speed with electric mixer
until well blended. Separate dough into 8 rectangles; firmly
press perforations together to seal. Cut each rectangle to
make 6 triangles. Spread each triangle with 1 teaspoon of
bacon cheese mixture. Roll up triangle starting at long end.
Place on greased cookie sheet (non-stick spray). Beat egg
and cold water together, and brush each crescent with
mixture. Using your convection feature, preheat oven to
375 ° F. When oven is preheated, place 3 pans in the oven
on rack positions 1,2 and 4. Bake for 10 to 12 minutes, or
until golden brown. Can be refrigerated and reheated, if
needed. Makes 4 dozen.
Rib Roast w/Gravy
26 to 29 min./lb., Well (150° F) - 30 to 33 min./lb.
For gravy - Melt butter in saucepan over medium-low heat. Stir
in flour, salt and pepper. Cook over medium-low heat until
smooth and bubbly. Slowly stir in milk. Heat until thickened,
stirring constantly. Add marinade and minced garlic. Blend
well; keep warm until ready to serve.
Makes 10to 12 servings.
Roasted Potatoes
3 Ibs. small red potatoes
1Acup olive oil
6 cloves garlic, minced
2 tbsp. dried rosemary, crushed
salt
pepper /%
Z
Cut each potato in half and place in a 9" xl 3" baking dish with {_J_
olive oil.Toss potatoes with spoon, making sure to well coat _J'_'
potatoes with oil. Add minced garlic and remaining ingredi- _E
ents, tossing again. Place on second rack position, above the
roast about an hour before the roast is to be ready. Green
beans will be added when prepared.
If cooking separately, set oven temperature to 400° F and
roast for 50 minutes. Stir once or twice while potatoes are
cooking.
5-6 lb. Rib Roast with bone
1,_cup commercial seasoned marinade
1 tbsp. garlic, minced
2 tbsp. butter or margarine
2 tbsp. all=purpose flour
1,_tsp. salt
Dash of pepper
1 cup whole milk
Place roast on roasting rack on top of pan with insert.
Position pan in oven on roasting shelf. Press "Meat" pad
and set temperature to 325 ° E Roast meat for 2 V2hours or
23 to 26 minutes per pound for rare doneness. For medium
or well doneness, use the following recommendation:
Medium (140° F)-
Angel Biscuits
1 pkg. dry yeast
1/2cup warm water
5 cups Bisquick
3 tbsp. sugar
1-3Acups buttermilk
Combine yeast and water in a measuring cup, allowing 5
minutes to dissolve. Mix dry ingredients in large bowl. Add
yeast mixture and buttermilk. Stir just until dry ingredients are
moistened.
Turn dough out onto a lightly floured surface; knead 6-10
times. Roll dough into Y2"thickness. Cut with a 2 inch round
cutter. Place on lightly greased baking sheet. Let rise for 20
minutes. Press "Bread" pad and preheat oven to 400 E Bake
biscuits for 12 minutes or until lightly browned.
Yield: 5 dozen.
37
Recipes
Green Beans with Walnut Vinaigrette Sauce
3 Ibs. fresh green beans, or frozen whole green beans
3 cups water
2 tbsp. butter
_,_tsp. hickory salt
1 _hcups walnuts, chopped
3 tbsp Parmesan cheese freshly grated
3Acup safflower oil
2 tbsp. olive oil
_,_cup balsamic vinegar
1 garlic clove, minced
1tsp. tarragon, fresh, chopped
(This can be done ahead of time and stored inthe refrigera-
tor till ready to use.)
Melt butter with salt. Pour into small baking dish, stirring in
walnuts and bake in 350 ° F oven for 5 minutes.
Sprinkle, and coat with Parmesan cheese. Bake 4 to 5
minutes longer until cheese is lightly brown. Remove from
oven and allow to cool.
Bring 3 cups water to boil in Dutch oven. Add beans, cover
and reduce heat. Cook about 6 minutes.
Drain in colander and rinse with cold water. Arrange green
beans in casserole dish.
Combine safflower oil, olive oil, balsamic vinegar, garlic,
and tarragon. Pour on top of green beans. Top green beans
with walnut mixture. Cover with aluminum foil and place in
oven on second rack position, next to potatoes, about 30
minutes before roast is ready. If cooking separately, cover
and heat for 25 to 30 minutes at 350° E Makes 12 servings.
Apple Bourbon Pie
_hcup raisins
_hcup bourbon
3 Ibs. cooking apples
3Acup sugar
2 tbsp. all purpose flour
1 tsp. ground cinnamon
1/8 tsp. nutmeg
_Atsp. salt
_/_cup chopped walnuts, toasted
1 (15oz.) pkg. refrigerated pie crust
2 tsp. apricot preserves
1 tbsp. buttermilk
1 tbsp. sugar
Combine raisins and bourbon in bowl and soak for at least
2 hour. Peel apples, and cut into Y2"slices. Steam apple
slices in a pan with a steamer basket for 10 minutes or
until apples are tender.
Apple Bourbon Pie cont'd
Mix together sugar, flour, cinnamon, nutmeg, salt in large
bowl. Stir in apples, raisin mixture, and walnuts.
Combine well.
Press piecrust into 9-inch pie plate. Brush apricot preserves
over piecrust. Spoon apple mixture into piecrust. Place the
remaining piecrust on top of filling, fluting the edges to-
gether. Brush top of pie with buttermilk and sprinkle with
sugar. Make 4 or 5 small slits in the top of the piecrust.
Press "Cake" pad and preheat oven to 375° F and bake for
45 to 50 minutes.
Chocolate Dipped Strawberries
8 oz. box semisweetchocolatepieces
2 pints fresh strawberries, chilled
Melt chocolate pieces in a 1-1/2 quart saucepan on a very
low heat. Once melted, dip tips of the strawberries in the
chocolate. Lay chocolate dipped strawberries on a piece of
wax paper to harden.
Cajun Shrimp Stirfry
4 slices
2 tsp.
1/2tsp.
1/3 cup
1-1/21bs
2 tsp.
I each
1/2 cup
1 14oz can
bacon
cornstarch
fish flavored bouillon granules
water
peeled shrimp
Creole seasoning
small green pepper
small yellow pepper
small red pepper
small onion
diced celery
Cajun-style stewed tomatoes, drained
Cooked Rice
Cook bacon in large wok until crisp; remove reserving 3
tablespoons of drippings. Crumble bacon, and set aside.
Combine cornstarch, bouillon granules and water; set aside.
Sprinkle peeled shrimp with creole seasoning. Pour 2
tablespoons reserved bacon drippings around top of
preheated wok, coating the sides. Heat at high for 1 minute.
Add shrimp; stir fry 2 to 3 minutes or until shrimp is pink.
Remove shrimp, and set aside.
Pour remaining 1tablespoon reserved drippings into wok;
add peppers, onion and celery. Stir fry 2 to 3 minutes. Add
tomatoes and stir fry 2 minutes. Return shrimp to wok and
add cornstarch mixture; bring to a boil. Cook, stirring
constantly for 1 minute. Sprinkle with crumbled bacon.
Serves 4.
38
Tabla de materias
Garantia de la estufa deslizable ............................................. 39
IMPORTANTES INSTRUCCIONES DE SEGURIDAD ........ 40-42
Registro del Producto ............................................................. 42
Ubicacibn de la placa de serie ............................................... 42
Caracteristicas de la estufa ................................................... 43
Ajuste de los Controles Superiores ..................................... 44-
Informaci6n General sobre la Cubierta ............................ 44
Funcionamiento de los Elementos Superiores
Radiantes Sencillos .......................................................... 45
Funcionamiento del Control Superior
del Elemento Radiante Doble ........................................... 46
Funcionamiento del Control Superior
del Elemento Radiante de Puente ............................... 46-47
Cocinando en la Estufa ........................................................... 47
Use el Utensilio Correcto .................................................. 47
Ajuste del Control del Area Calentadora .......................... 48
Antes de Ajustar los Controles del Homo ............................ 49
Ajuste de los Controles de la Gaveta Calentadora .............. 50
Funciones de las Teclas de Control ....................................... 51
Ajustes M_ximos y Minimos de los Controles ..................... 51
Programaci6n del Reloj ..................................................... 52-53
Programaci6n del Reloj .................................................... 62
Cambio entre Despliegue de 12 o 24 Horas .................... 52
Homeado Continuo o Modo de Ahorro de
Energia de 12 Horas ......................................................... 53
• Contador de Tiempo .......................................................... 53
Caracteristicas de control
definidas por el consumidor .............................................. 54-55
• Bloqueo del Homo ............................................................ 64
• Depliegue de la Temperatura ........................................... 55
• Funcionamiento Silencioso de los Controles ................... 55
Ajuste de los Controles del Horno .................................... 56-62
Precalantar ........................................................................ 56
Homear ............................................................................. 57
Homeado Programado ..................................................... 58
Horneado Programado Diferido ....................................... 59
Asar a la Parrilla ................................................................ 60
Categoffas de Alimentos (Carnes/Pasteles/Panes) ......... 61
Homeado por Convecci6n ................................................ 62
Limpieza del horno ............................................................. 63-66
• Preparaci6n para el Ciclo de Autolimpieza ...................... 63
• Ciclo de Autolimpieza ....................................................... 64
• Ciclo de Autolimpieza Diferido .................................... 65-66
Ajuste de laTemperatura del Homo ...................................... 66
Cuidado y Limpieza General ............................................. 67-71
Tablas de Coeinar ................................................................... 71
Antes de Solieitar Servicio ................................................ 72-73
Recetas ............................................................................... 74-75
Servicio Sears ................................................. Cubierta trasera
Garantia de la Estufa Deslizable
GARANTIA COMPLETA DE UN AI_O PARA TODAS LAS PIEZAS
Si dentro de un a_o desde la fecha de instalad6n, alguna de las piezas no fundona en forma adecuada debido a un defecto de material o
fabricad6n, Sears la reemplazar_ o reparar_, a nuestra opd6n, gratuitamente.
Su cubierta de viddo cer_mico est_ protegida pot una garant[a limitada adicional desde el 2_° al 5_°a5o. Esta garantia le propordona
reemplazo de cualquiera de los elementos calefactores supedores que resulte defectuoso, de la junta de silicona cauchotada deteriorada o
de la cubierta de viddo que se agdete debido a rotura t_rmica. Esta garantfa no cubre el da5o o rotura debido a mal uso del cliente.
Si este producto se usa para otros prop6sitos que no sean los normales del hogar, la garantia antedor es s61ov_lida durante 90 dias.
ELSERVICIOBAJO LA GARANTIA ESTADISPONIBLEPONIENDOSEEN CONTACTO SEARSAL 1-888-SU-HOGAR SM.
Esta garantia le otorga ciertos derechos legales especificos y usted tambi_n puede tenet otros derechos que varian de un estado a otto. (_
Sears Roebuck and Co., Dept. 817WA Hoffman Estates, IL 60179 ,_
CONVENCIONES PRINCIPALES DE PROTECCION
Felicitaciones por una sabia compra.
Su nuevo electrodom_stico Kenmore est_ dise5ado y fabdcado para
durar pot muchos a5os. Pero, como todo producto requiere un
mantenimiento preventivo peri6dico. Aqui es cuando poseer una
Convend6n Principal de Protecd6n es de suma utilidad.
Adquiera una Convend6n Principal de Protecci6n ahora y prot_jase
de problemas y gastos inesperados.
• Protection contra sobrecarga el_ctrica debida a fluctuadones _
de energia el_ctrica.
• Rembolso pot alquiler si la reparad6n de su producto dura m_s
que Io previsto.
Una vez que adquiera el Acuerdo, todo Io que toma es una simple
Ilamada al servico de reparaci6n. Puede Ilamar de dia o de noche y
obtener una cita en linea.
La Convenci6n Principal de Protecci6n tambi_n le ayuda a prolongar
la vida de su aparato. A continuad6n Io que incluye el Acuerdo:
• Servido de experienda con sus 12 000 espedalistas profesio-
nales
• Servido ilimitado sin costo alguno para piezas y mano de obra
en toda reparaci6n cubierta pot el plan.
• Garant[a "No lemon" que remplaza su producto si ha necesi-
tado m_s de 3 reparaciones en los 01timos 12 meses.
• Remplazo de producto si el producto cubierto pot el plan no
puede set reparado.
• Mantenimiento preventivo anual si Io desea y sin costo algu-
no.
• Ayuda telef6nica para reparadones en su casa y adem_s, ob-
tenet una dta conveniente.
Sears posee m_s de 12 000 specialistas quienes tienen acceso a
unos 4.5 milones de piezas y accesorios de calidad. Este esel tippo
de profesional con los cuales Usted puede contar para prolongar la
vida de su producto, iAdquiera su Convenci6n Principal de
Protecd6n hoy mismo!
Ciertas condiciones y exclusiones seaplican.
Para informacion adicional y sobre los precios Ilame al
1-800-827-6655.
SERVICIO DE INSTALACION SEARS
Parael servicioprofesional de instalaci6nSears
de electrodomesticosy aparatoscomo abridoresde puertasde
garageycalentadoresde agua,en los EUIlameal
1-800-4-MY-HOME®.
39
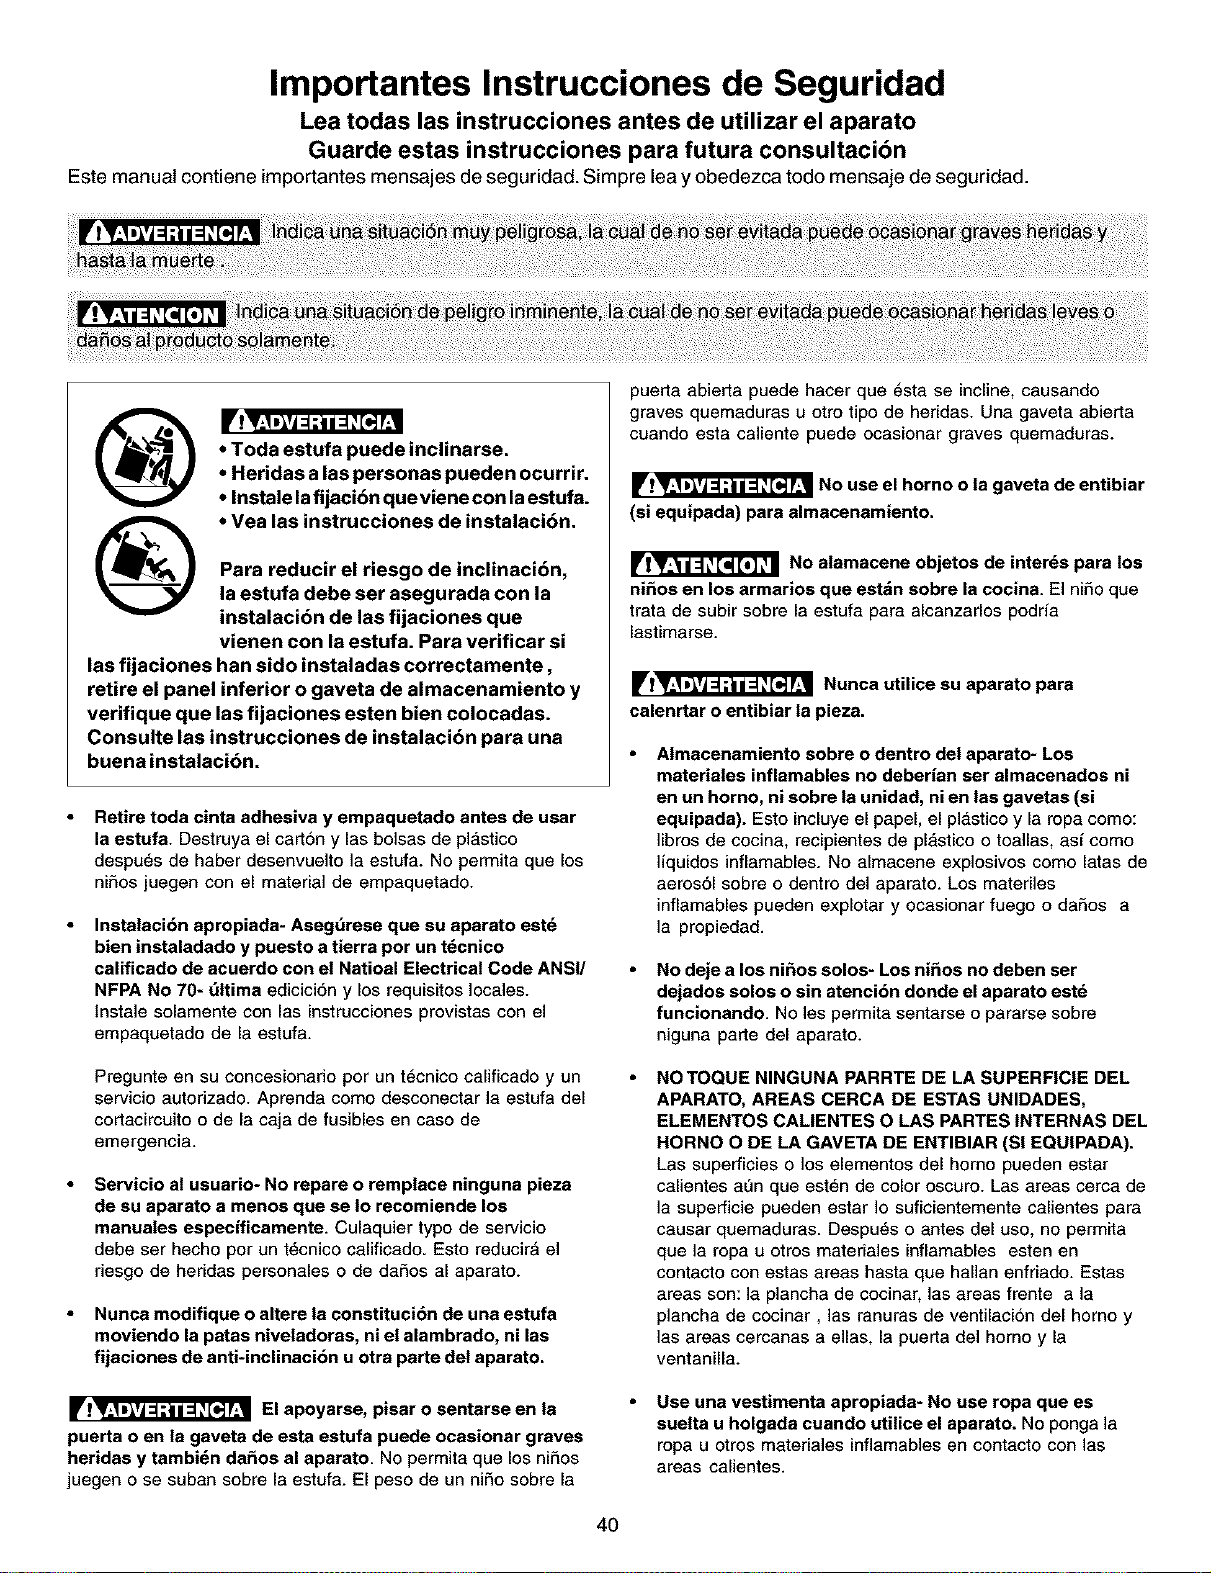
Importantes Instrucciones de Seguridad
Lea todas las instrucciones antes de utilizar el aparato
Guarde estas instrucciones para futura consultacibn
Este manual contiene importantes mensajes de seguridad. Simpre lea y obedezca todo mensaje de seguridad.
®
®
* Toda estufa puede inclinarse.
* Heridas a ias personas pueden ocurrir.
* Instale la fijacibn que viene con la estufa.
* Vea las instrucciones de instalacibn.
Para reducir el riesgo de inclinacibn,
la estufa debe ser asegurada con la
instalacibn de las fijaciones que
vienen con la estufa. Para verificar si
las fijaciones han sido instaiadas correctamente,
retire el panel inferior o gaveta de aimacenamiento y
verifique que las fijaciones esten bien colocadas.
Consulte las instrucciones de instalacibn para una
buena instalaci6n.
Retire toda cinta adhesiva y empaquetado antes de usar
la estufa. Destruya el cart6n y las bolsas de plastico
despu_s de haber desenvuelto la estufa. No perrnita que los
ni£_osjuegen con el material de empaquetado.
Instalaci6n apropiada- Asegdrese que su aparato est_
bien instaladado y puesto a tierra por un tdcnico
calificado de acuerdo con el Natioal Electrical Code ANSI/
NFPA No 70- dltima edicici6n y los requisitos locales.
lnstale solamente con las instrucciones provistas con el
empaquetado de la estufa.
puerta abierfa puede hacer que 6sta se incline, causando
graves quemaduras u otro tipo de heridas. Una gaveta abierla
cuando esta caliente puede ocasionar graves quemaduras.
_JJ_ NO use el horno o la gaveta de entibiar
(si equipada) para almacenamiento.
No alamacene objetos de interns para los
nifios en los armarios que estdn sobre la cocina. El niSo que
trata de subir sobre la estufa para alcanzarlos podrfa
lastimarse.
llFl_ Nunca utilice su aparato para
calenrtar o entibiar la pieza.
AImacenamiento sobre o dentro del aparato- Los
materiales inflamables no deberian ser almacenados ni
en un horno, ni sobre la unidad, ni en las gavetas (si
equipada). Esto incluye el papel, el plastico y la ropa como:
]ibros de cocina, recipientes de plastico o toallas, asf como
]iquidos inflamables. No almacene explosivos como latas de
aeros61 sobre o dentro del aparato. Los materiles
inflamables pueden explotar y ocasionar fuego o dafios a
la propiedad.
No deje a los nifios solos- Los nifios no deben ser
dejados solos o sin atenci6n donde el aparato estd
funcionando. No les perrnita sentarse o pararse sobre
niguna parte del aparato.
Pregunte en su concesionario por un t_cnico calificado y un
servicio autorizado. Aprenda como desconectar la estufa del
cortacircuito o de la caja de fusibles en caso de
emergencia.
Servicio at usuario- No repare o remplace ninguna pieza
de su aparato a menos que se Io recomiende los
manuates especificamente. Culaquier typo de servicio
debe ser hecho por un t6cnico calificado. Esto reducir_ el
riesgo de heridas personales o de dafios al aparato.
Nunca modifique o altere la constituci6n de una estufa
moviendo la patas niveladoras, ni el alambrado, ni las
fijaciones de anti-inclinaci6n u otra parte del aparato.
NOTOQUE NINGUNA PARRTE DE LA SUPERFICIE DEL
APARATO, AREAS CERCA DE ESTAS UNIDADES,
ELEMENTOS CALIENTES O LAS PARTES INTERNAS DEL
HORNO O DE LA GAVETA DE ENTIBIAR (SI EQUIPADA).
Las superficies o los elementos del homo pueden estar
calientes alan que est6n de color oscuro. Las areas cerca de
]a superficie pueden estar Io suficientemente calientes para
causar quemaduras. Despu_s o antes del uso, no permita
que la ropa u otros materiales inflamables esten en
contacto con estas areas hasta que hallan enfriado. Estas
areas son: la plancha de cocinar, las areas frente a la
plancha de cocinar, las ranuras de ventilaci6n del homo y
]as areas cercanas a elias, la puerta del horno y la
ventanilla.
El apoyarse, pisar o sentarse en la
puerta o en la gaveta de esta estufa puede ocasionar graves
heridas y tambi_n dafios al aparato. No permita que los niSos
juegen o se suban sobre la estufa. El peso de un nifio sobre la
Use una vestimenta apropiada- No use ropa que es
suelta u holgada cuando utilice el aparato. No ponga la
ropa u otros materiales inflamables en contacto con las
areas calientes.
4O
Importantes Instrucciones de Seguridad
No utilice agua o harina para apagar un fuego- Apague el
fuego con la tapa de una sartdn o use soda cdustica, un
quimico seco o un extinguidor en aeros6L
Cuando caliente substancias grasosas, tenga cuidado.
Puede ocasionar un fuego si es calentado por mucho
tiempo.
Utilice unicamente los soportes para recipientes que
est_n secos- Los soportes que est_n hdmedos o
mojados puden ocasionar quemaduras a causa del vapor.
No permita que los soportes est6n en contacto con las
superficies calientes. No utilice una toalla o un papel para
remplazar al soporfe.
No caliente recipientes de comida que estdn cerrados-
La presi6n al interior de estos puede hacerlos explotar y
ocasionar heridas.
Retire la puerta del homo de toda estufa inutilizada si
esta va ser almacenada o destruida.
IMPORTANTE- No trate de utilizar el horno durante un corte
de electricidad. Si no hay electricidad, apaga su estufa. Si no
apaga el homo y que la electricidad es restablecida, el homo
puede seguir funcionando. La comida que deja sin cuidado
puede quemarse o deteriorarse.
Los controles el_ctricos pueden ser
dafiados con frias temperaturas. Cuando utilice su estufa
por la primera vez, o si no ha sido utilizada por mueho
tiempo asegdrese que no haya sido expuestas a
temperaturas mds altas que 0°C/32°F por m_s de 3 horas
antes de conectar su estufa al suministro el_ctrico.
INSTRUCCIONES IMPORTANTES PARA
UTILIZAR SU PLANCHA DE COCINAR.
Saber que perillas controlan cada una de los
quemadores.
Utilice una sart_n de tamafio apropiado. Este aparato esta
equipado con quemadores de diferentes tamafios. Elija
utensilios con las bases aplanadas y Io suficientemente
grandes para cubrir todo el area del quemador. Utilizar
utensilios m_s pequefios puede exponer parte del
quemador y ocasionar quemaduras de las prendas que
Ileva puesta.
Los mangos de los utensilios deben ser colocados hacia
el interior y no sobre otras unidades de superficie- Para
reducir el riesgo de quemaduras, el encendido de
matedales inflamables y los derrames ocasionados de
casualidad. El mango del utensilio debe ser colocado hacia
el interior y no sobre otras unidades de superficie.
Nunca deje los quemadoreas con alta temperatura sin
cuidado- Los derrames ocasionan humo y derrames
grasosos que pueden encenderse, o una sart6n que ha
calentado por mucho tiempo puede derretirse.
Delineadores protectores- No utilice pelicula de aluminium
a la base del homo u otra parte del aparato. S61o utilizela
para cubrir la comida cuando est6 coci_,ndola. Cualquier
otra utilizaci6n puede ocasionar un incendio, una
electrocuci6n o un cortocircuito.
Utensilios de cocina envidriados- S61o algunos tipos de
utensilios de vidrio, de vidrio/cer_mica, de cer_,mica pueden
resistir la temperatura del quemador de su plancha de
cocinar. Verifique las recomendaciones del fabricante sobre
el uso con las planchas de cocinar.
No utilice cubiertas decorativas- Si un quemador es
encendido accidentalmente, la cubierta decorativa se
calentard y podria derretirse. Las cubiertas calientes podran
ocasionar quemaduras si las toca. La plancha de cocinar
tambi6n podria ser da£_ada.
PARA PLANCHAS DE COCINAR
SOLAMENTE
• No limpie o utilice una plancha de cocinar que est& rota-
Si la plancha de cocinar se rompe, los productos de
limpieza o los derrames pueden penetrar en ella y producir
un riesgo de electrocucion. Uame a un t_cnico ca]ificado
inmediatamente.
Limpie el vidrio de la plancha de cocinar con cuidado- Si
utiliza una esponja mojada para limpiar derrames en una
superficie caliente, tenga cuidado de no quemarse con el
vapor. Algunos productos de limpieza puden producir
peligrosas emanaciones si se les usa sobre areas muy
calientes.
• Evite de raspar el vidrio de la ptancha de cocinar con
objetos muy filados,
INSTRUCCIONES IMPORTANTES PARA
UTILIZAR SU HORNO.
• Tenga cuidado cuando abra la puerta del horno o la
gaveta de entibiar (si equipada). Parese al lade de la
estufa cuando abra la puerta de un homo caliente. Permita
que el humo y el vapor se escapen antes de retirar o de
colocar comida en el horno/gaveta de entibiar.
Mantenga el conducto de ventilaci6n del homo sin
obstrucci6n. La rejilla del homo est', ubicada detr_s de la
plancha de cocinar a la derecha. Tocar estas areas cuando
el homo estA encendido puede ocasionar graves
quemaduras. No coloque objetos de pl_,stico o sensibles a]
calor cerca del conducto de ventilaci6n. Estos pueden
derretirse o encenderse.
Colocacibn de las rejillas del horno/gaveta de entibiar (si
equipada). Siempre coloque las rejillas del homo en la
posici6n deseada cuando el homo o la gaveta esten fries. Si
]a rejilla debe ser desplazada cuando el homo est6
funcionando tenga bastante cuidado. Utilice unos soportes
para recipientes y coja la rejilla con ambas manes hasta
recolocarla. No permita que estos soportes est6n en
contacto con los elementos calientes del homo o de la
gaveta de entibiar. Retire todo utensilio de la rejilla antes de
moverla.
m
41
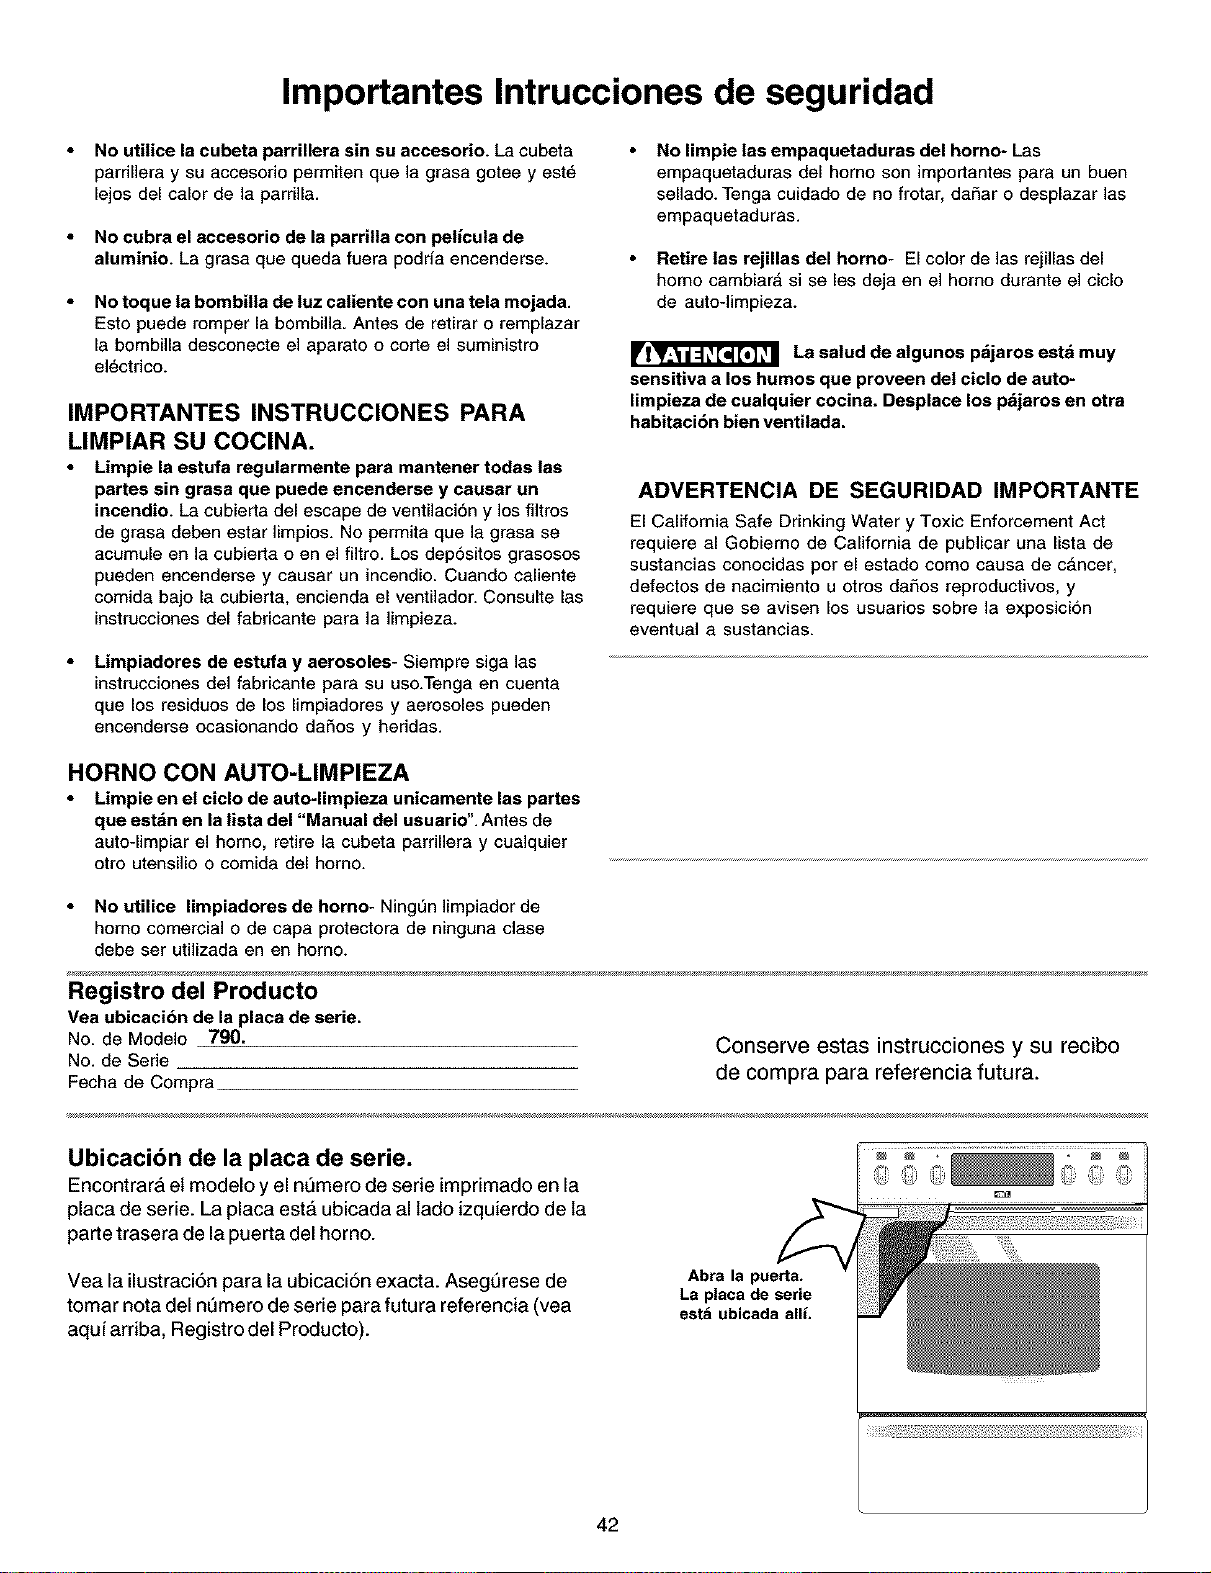
Importantes Intrucciones de seguridad
No utilice la cubeta parrillera sin su accesorio. La cubeta
pardllera y su accesorio permiten que la grasa gotee y est_
lejos del calor de la parrilla.
No cubra el accesorio de la parrilia con pelicu|a de
aluminio. La grasa que queda fuera podrfa encenderse.
No toque la bombilia de luz caliente con una tela mojada.
Esto puede romper la bombilla. Antes de retirar o remplazar
la bombilla desconecte el aparato o code el suministro
el_ctrico.
IMPORTANTES INSTRUCCIONES PARA
LIMPIAR SU COClNA.
Limpie la estufa regularmente para mantener todas las
partes sin grasa que puede encenderse y causar un
incendio. La cubierta del escape de ventilaci6n y los filtros
de grasa deben estar limpios. No permita que la grasa se
acumule en la cubierta o en el filtro. Los depositos grasosos
pueden encenderse y causar un incendio. Cuando caliente
comida bajo la cubierta, encienda el ventilador. Consulte las
instrucciones del fabricante para la limpieza.
Limpiadores de estufa y aerosoles- Siempre siga las
instrucciones del fabricante para su uso.Tenga en cuenta
que los residuos de los limpiadores y aerosoles pueden
encenderse ocasionando dafios y heridas.
No limpie las empaquetaduras del homo- Las
empaquetaduras del homo son importantes para un buen
sellado. Tenga cuidado de no frotar, dafiar o desplazar las
empaquetaduras.
Retire las rejillas del homo- El color de las rejillas del
homo cambiarA si se les deja en el homo durante el ciclo
de auto-limpieza.
La salud de atgunos pdjaros estd muy
eensitiva a los humos que proveen del ciclo de auto-
limpieza de cualquier cocina. Desplace los pdjaros en otra
habitaci6n bien ventilada,
ADVERTENCIA DE SEGURIDAD IMPORTANTE
El California Safe Drinking Water y Toxic Enforcement Act
requiere al Gobierno de California de publicar una lista de
sustancias conocidas por el estado como causa de cancer,
defectos de nacimiento u otros dafios reproductivos, y
requiere que se avisen los usuarios sobre la exposicion
eventual a sustancias.
HORNO CON AUTO-LIMPIEZA
Limpie en el ciclo de auto-limpieza unieemente las partee
que estAn en la lieta del "Manual del usuario". Antes de
auto-limpiar el homo, retire la cubeta parrillera y cua]quier
otro utensilio o comida del horno.
No utilice limpiadores de homo- NingL_nlimpiador de
homo comercial o de capa protectora de ninguna clase
debe ser utilizada en en horno.
Registro del Producto
Vea ubicaei6n de la place de serie.
NO.de Modelo 790. Conserve estas instrucciones y su recibo
No. de Serie
Fecha de Compra de compra para referencia futura.
Ubicacibn de la placa de serie.
Encontrara et modelo y el nt_mero de serie imprimado en la
placa de serie. La placa est& ubicada al lado izquierdo de la
parte trasera de la puerta del homo.
Vea la ilustraci6n para la ubicaciSn exacta. Asegt_rese de
tomar nota del nt_mero de serie para futura referencia (vea
aqui arriba, Registro del Producto).
Abra la puerta,
La placa de serie
est_ ubicada alli.
42

Caracteristicas
Generales
de la Estufa
a Gas
Caracteristicas de la estufa
Nota: Las caracteristicas de su estufa variardn segdn el modelo.
Controles de horno electr6nico
Control de gaveta con relojy contador de tiempo Control de zona
de entibiado de entibiado
Indicator de gaveta
de entibiado
Indicador de zona
de entibiado
LucesInteriores
Doblesdel homo
Elemento
de asado
pieza
(3) Rejillasde
horno adjustables
de puerta de 1 pieza
(1)Cubetta parillera
(1) Piezaadjunta de cubeta parillera
(1) Parrillapara grillar
Gaveta de entibiado'
con rejilla
Plancha de cocinar
defrente de
pueKade horno con
g_ndeabeKu_
de ventana
Zona de entibiado
Elemento
Elemento
de puente
Elemento
Superficiecaliente
Lucesindicadoras
Planchade cocinar
cer._micaa gas
43
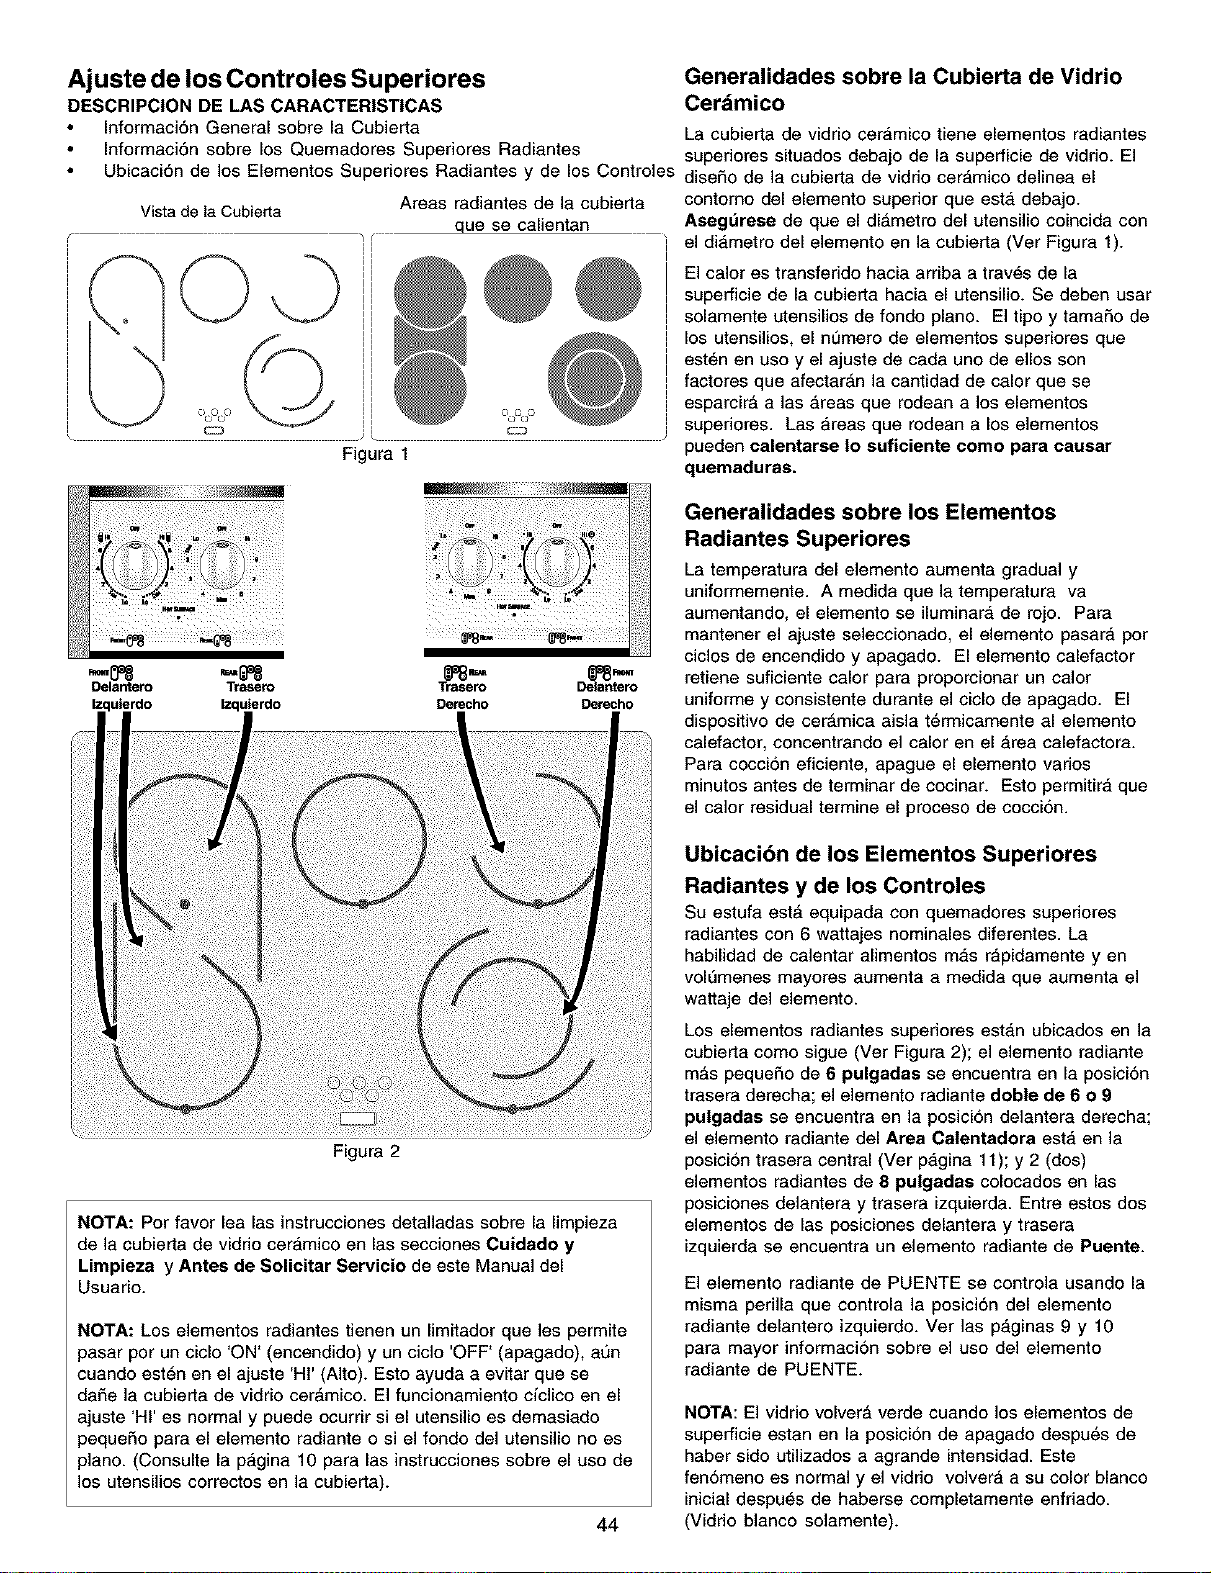
Ajuste de los Controles Superiores
DESCRIPCION DE LAS CARACTERISTICAS
Informaci6n General sobre la Cubierta
Informaci6n sobre los Quemadores Superiores Radiantes
Ubicaci6n de los Elementos Superiores Radiantes y de los Controles
Vista de la Cubierta Areas radiantes de la cubierta
que se calientan
Figura 1
Generalidades sobre la Cubierta de Vidrio
Cerdmico
La cubierta de vidrio ceramico tiene elementos radiantes
superiores situados debajo de la superficie de vidrio. El
dise_o de la cubierta de vidrio cerAmico delinea el
contorno del elemento superior que estA debajo.
Asegt_rese de que el diAmetro del utensilio coincida con
el diAmetro del elemento en la cubierta (Ver Figura 1).
El calor es transferido hacia arriba a tray,s de la
superficie de la cubierta hacia el utensilio. Se deben usar
solamente utensilios de fondo piano. El tipo y tamaSo de
los utensilios, el numero de elementos superiores que
est_n en uso y el ajuste de cada uno de ellos son
factores que afectarAn la cantidad de calor que se
esparcirA alas Areas que rodean a los elementos
superiores. Las Areas que rodean a los elementos
pueden oalentarse Io suficiente come para oausar
quemaduras.
Delantero Trasero
Izquierdo Izquierdo
Figura 2
Trasero Delardero
NOTA: Por favor lea las instrucciones detalladas sobre la limpieza
de la cubierta de vidrio cerAmico en las secciones Cuidado y
Lirnpieza y Antes de Solicitar Servieio de este Manual del
Usuario.
NOTA: Los elementos radiantes tienen un limitador que les permite
pasar por un ciclo 'ON' (encendido) y un ciclo 'OFF' (apagado), aun
cuando est_n en el ajuste 'HI' (Alto). Esto ayuda a evitar que se
daf_e ]a cubierta de vidrio cerAmico. El funcionamiento ciclico en el
ajuste 'HI' es normal y puede ocurrir si el utensilio es demasiado
pequeSo para el elemento radiante o si el fondo del utensilio no es
piano. (Consulte la pagina 10 para las instrucciones sobre el uso de
los utensilios correctos en la cubierta).
44
Generalidades sobre los Elementos
Radiantes Superiores
La temperatura del elemento aumenta gradual y
uniformemente. A medida que la temperatura va
aumentando, el elemento se iluminara de rojo. Para
mantener el ajuste seleccionado, el elemento pasara por
ciclos de encendido y apagado. El elemento calefactor
retiene suficiente calor para proporcionar un calor
uniforme y consistente durante el ciclo de apagado. El
dispositivo de cerAmica aisla t_rrnicamente al elemento
calefactor, concentrando el calor en el Area calefactora.
Para coccion eficiente, apague el elemento varios
minutos antes de terminar de cocinar. Esto permitira que
el calor residual termine el proceso de coccion.
Ubicacibn de los Elementos Superiores
Radiantes y de los Controles
Su estufa estA equipada con quemadores superiores
radiantes con 6 wattajes nominales diferentes. La
habilidad de calentar alimentos mas rapidamente yen
voIL'Jmenesmayores aumenta a medida que aumenta el
wattaje del elemento.
Los elementos radiantes superiores estan ubicados en la
cubierta como sigue (Ver Figura 2); el elemento radiante
mAs peque£_ode 6 pulgadas se encuentra en la posicion
trasera derecha; el elemento radiante doble de 6 o 9
pulgadas se encuentra en la posicion delantera derecha;
el elemento radiante del Area Calentadora estA en la
posicion trasera central (Ver pagina 11); y 2 (dos)
elementos radiantes de 8 pulgadas colocados en las
posiciones delantera y trasera izquierda. Entre estos dos
elementos de las posiciones delantera y trasera
izquierda se encuentra un elemento radiante de Puente.
El elemento radiante de PUENTE se controla usando la
misma perilla que controla la posiciOn del elemento
radiante delantero izquierdo. Ver las paginas 9 y 10
para mayor informaci6n sobre el uso del elemento
radiante de PUENTE.
NOTA: El vidrio volverA verde cuando los elementos de
superficie estan en la posicion de apagado despu6s de
haber sido utilizados a agrande intensidad. Este
fenomeno es normal y el vidrio volvera a su color blanco
inicial despu_s de haberse completamente enfriado.
(Vidrio blanco solamente).
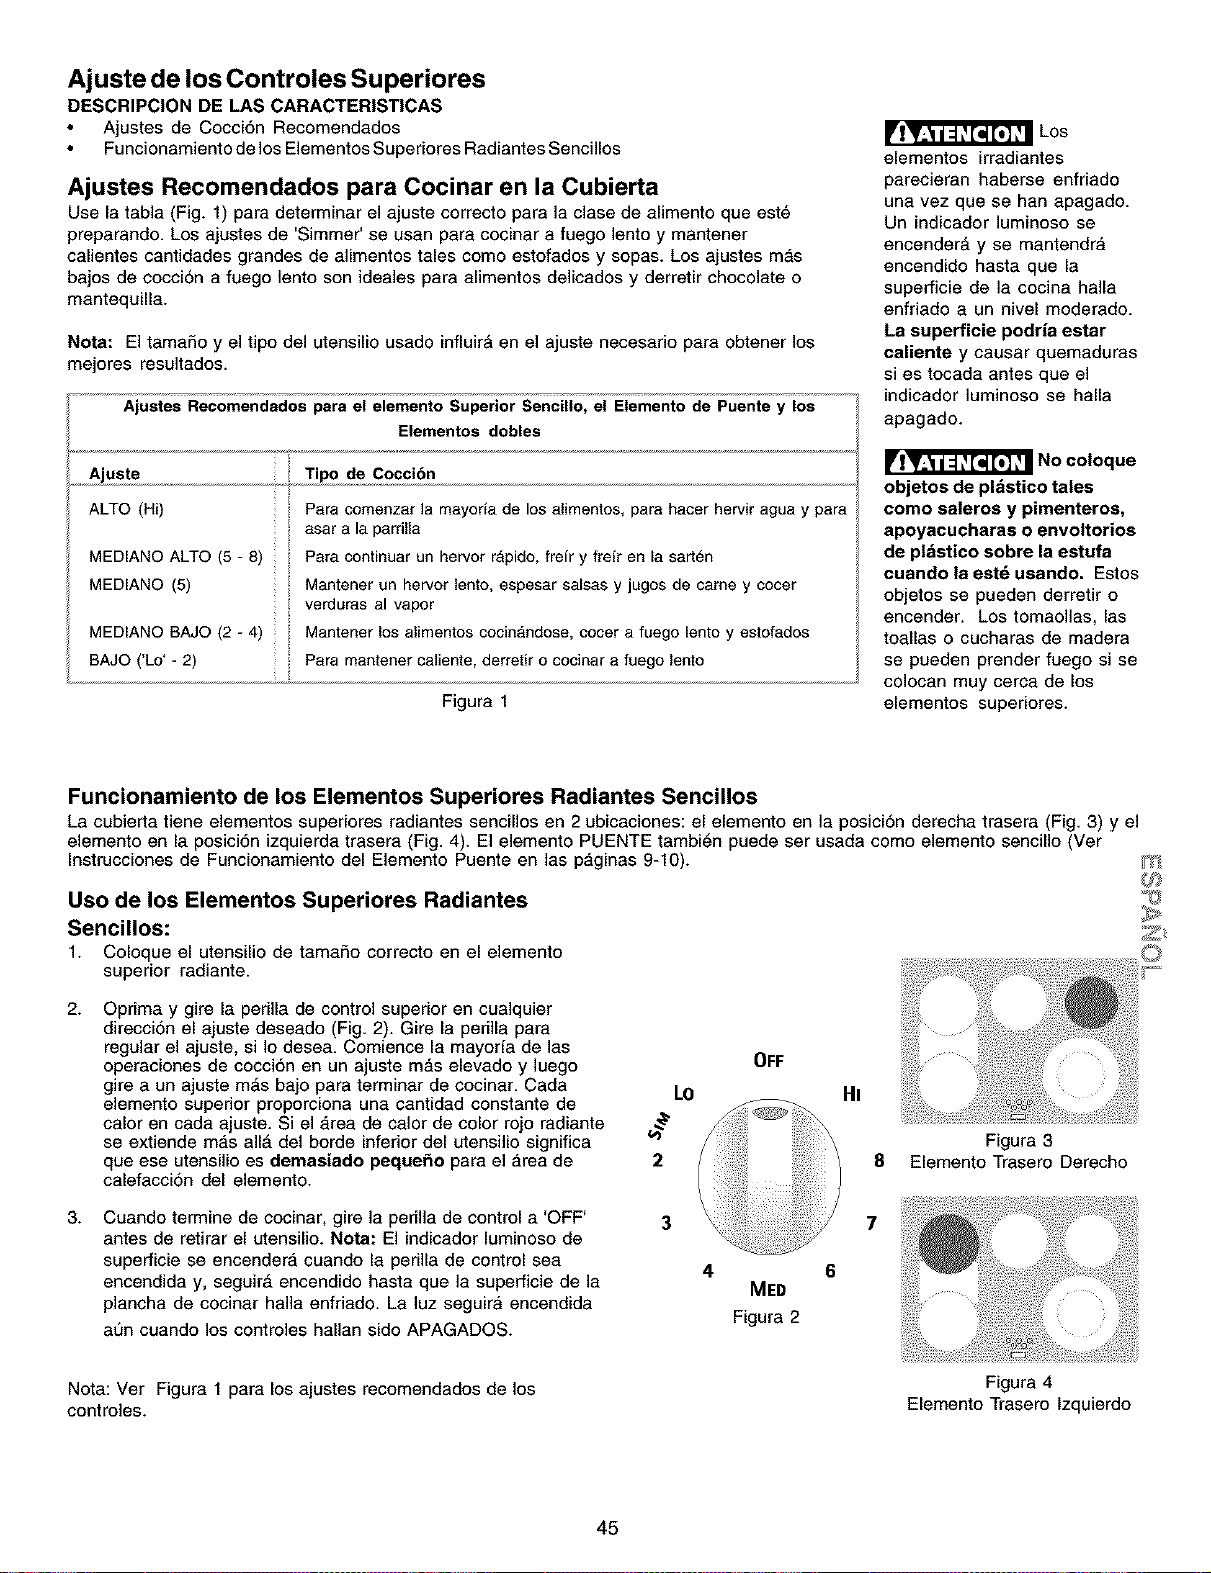
Ajuste de los Controles Superiores
DESCRIPCION DE LAS CARACTERISTICAS
Ajustes de Cocci6n Recomendados
Funcionamiento de los Elementos Superiores Radiantes Sencillos
Ajustes Recomendados para Cocinar en la Cubierta
Use la tabla (Fig. 1) para determinar el ajuste correcto para la clase de alimento que est6
preparando. Los ajustes de 'Simmer' se usan para cocinar a fuego lento y mantener
calientes cantidades grandes de alimentos tales como estofados y sopas. Los ajustes m_,s
bajos de cocci6n a fuego lento son ideales para alimentos delicados y derretir chocolate o
mantequilla.
Nora: El tamaffo y el tipo del utensilio usado influir_ en el ajuste necesario para obtener los
mejores resultados.
Ajustes Recomendados pars el elemento Superior Sencillo, el Elemento de Puente y los
Elementos dobles
Ajuste Tipo de Cocci6n
ALTO (Hi) Para comenzar ]a mayoria de los a[imentos, para hacer hervir agua y para
asar a la parfilla
MEDIANO ALTO (5 - 8) Para continuar un hervor rApido, freir y freir en la sart_n
MEDIANO (5) Mantener un hervor lento, espesar sa[sas y jugos de came y cocer
verduras al vapor
MEDIANO BAJO (2 - 4) Mantener los alimentos cocin_ndose, cocer a fuego lento y estofados
BAJO ('Lo' - 2) Para mantener caliente, derretir o cocinar a fuego lento
Figura I
Los
elementos irradiantes
parecieran haberse enfriado
una vez que se han apagado.
Un indicador ]uminoso se
encender_ y se mantendra
encendiclo hasta que la
superficie de la cocina halla
enfriado a un nivel moderado.
La superficie podria estar
caliente y causar quemaduras
si es tocada antes que el
indicador luminoso se halla
apagado.
No coloque
objetos de pl&stico tales
como saleros y pimenteros,
apoyacucharas o envoltorios
de pl&stico sobre la estufa
cuando la est_ usando. Estos
objetos se pueden derretir o
encender. Los tomaolias, las
toallas o cucharas de madera
se pueden prender fuego si se
colocan muy cerca de los
elementos superiores.
Funcionamiento de los Elementos Superiores Radiantes Sencillos
La cubierta tiene elementos superiores radiantes sencilios en 2 ubicaciones: el elemento en la posici6n derecha trasera (Fig. 3) y el
elemento en la posici6n izquierda trasera (Fig. 4). El elemento PUENTE tambi6n puede ser usada como elemento sencillo (Ver
Instrucciones de Funcionamiento del Elemento Puente en las paginas 9-10).
Uso de los Elementos Superiores Radiantes
Sencillos:
1. Coloque el utensilio de tamaffo correcto en el elemento
superior radiante.
m
2.
3.
Oprima y gire la periila de control superior en cualquier
direccion el ajuste deseado (Fig. 2). Gire la periila para
regular el ajuste, si Io desea. Comience la mayoria de las
operaciones de cocci0n en un ajuste m_,s elevado y ]uego
gire a un ajuste m_s bajo para terminar de cocinar. Cada
elemento superior proporciona una cantidad constante de
calor en cada ajuste. Si el _,rea de calor de color rojo radiante
se extiende mas all_ del borde inferior del utensilio significa
que ese utensilio es demasiado pequefio para el area de
calefaccion del elemento.
Cuando termine de cocinar, gire la perilia de control a 'OFF'
antes de retirar el utensilio. Nora: El indicador luminoso de
superficie se encendera cuando la perilla de control sea
encendida y, seguir_ encendido hasta que la superficie de la
plancha de cocinar haila enffiado. La luz seguira encendida
a0n cuando los controles halian sido APAGADOS.
LO
2
3
4
OFF
MED
Figura 2
HI
8
7
Nota: Ver Figura 1 para los ajustes recomendados de los
controles.
45
Figura 3
Elemento Trasero Derecho
Figura 4
Elemento Trasero lzquierdo
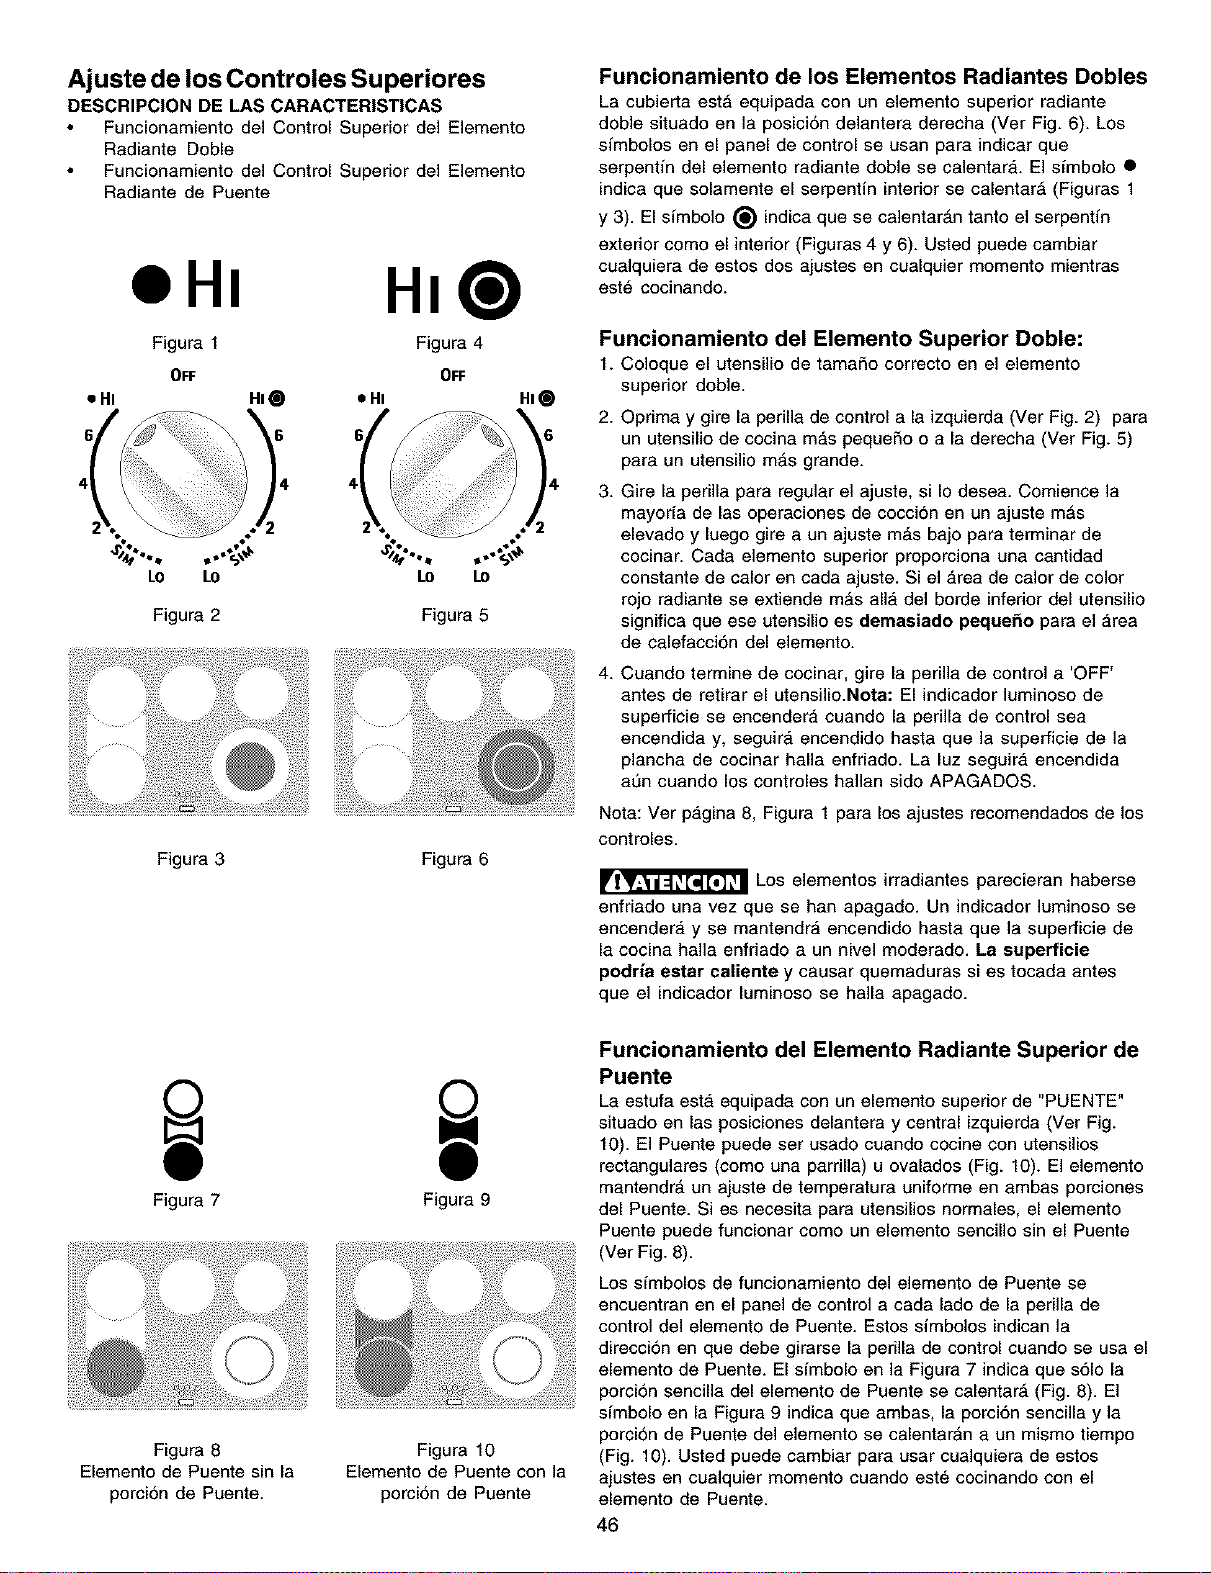
Ajuste de los Controles Superiores
DESCRIPCION DE LAS CARACTERISTICAS
Funcionamiento del Control Superior del Elemento
Radiante Doble
Funcionamiento del Control Superior del Elemento
Radiante de Puente
HI@
Figura I Figura 4
OFF OFF
• HI HI_ • HI HI
o
LO to
Figura 2
Figura 3 Figura 6
Funcionamiento de los Elementos Radiantes Dobles
La cubierta est_ equipada con un elemento superior radiante
doble situado en la posicion delantera derecha (Ver Fig. 6). Los
sfmbolos en el panel de control se usan para indicar que
serpentin del elemento radiante doble se calentar_,. El simbolo •
indica que solamente el serpentfn interior se calentar_ (Figuras 1
y 3). El simbolo _) indica que se calentarAn tanto el serpentfn
exterior como el interior (Figuras 4 y 6). Usted puede cambiar
cualquiera de estos dos ajustes en cualquier momento mientras
est6 cocinando.
Funcionamiento del Elemento Superior Doble:
1. Coloque el utensilio de tamafio correcto en el elemento
superior doble.
2. Oprima y gire la perilla de control a la izquierda (Ver Fig. 2) para
un utensilio de cocina m_,s pequefio o a la derecha (Ver Fig. 5)
para un utensilio mAs grande.
3. Gire la perilla para regular el ajuste, si Io desea. Comience la
mayoria de las operaciones de cocci6n en un ajuste mAs
elevado y luego gire a un ajuste mAs bajo para terminar de
cocinar. Cada elemento superior proporciona una cantidad
constante de calor en cada ajuste. Si el Area de calor de color
rojo radiante se extiende mAs all_, del borde inferior del utensilio
significa que ese utensilio es demasiado pequefio para el Area
de calefacci6n del elemento.
4. Cuando termine de cocinar, gire la perilla de control a 'OFF'
antes de retirar el utensilio.Nota: El indicador luminoso de
superficie se encendera cuando la perilla de control sea
encendida y, seguir_, encendido hasta que ]a superficie de la
plancha de cocinar halla enfriado. La luz seguira encendida
aun cuando los controles hallan sido APAGADOS.
Nota: Ver pagina 8, Figura 1 para los ajustes recomendados de los
controles.
Los elementos irradiantes parecieran haberse
enfriado una vez que se han apagado. Un indicador luminoso se
encendera y se mantendra encendido hasta que la superficie de
la cocina halla enfriado a un nivel moderado. La supefficie
podria eetar caliente y causar quemaduras si es tocada antes
que el indicador luminoso se halla apagado.
Figura 7
Figura 8
Elemento de Puente sin la
porcion de Puente.
Figura 9
Figura 10
Elemento de Puente con la
porci6n de Puente
Funcionamiento del Elemento Radiante Superior de
Puente
La estufa est,, equipada con un elemento superior de "PUENTE"
situado en las posiciones delantera y central izquierda (Ver Fig.
10). El Puente puede ser usado cuando cocine con utensilios
rectangulares (como una parrilla) u ovalados (Fig. 10). El elemento
mantendrA un ajuste de temperatura uniforme en ambas porciones
del Puente. Si es necesita para utensilios normales, el elemento
Puente puede funcionar como un elemento sencillo sin el Puente
(Ver Fig. 8).
Los simbolos de funcionamiento del elemento de Puente se
encuentran en el panel de control a cada lado de la perilla de
control del elemento de Puente. Estos simbolos indican la
direccion en que debe girarse la perilla de control cuando se usa el
elemento de Puente. El simbolo en la Figura 7 indica que s61o la
porcion sencilla del elemento de Puente se calentarA (Fig. 8). El
simbolo en la Figura 9 indica que ambas, la porci6n sencilla y la
porcion de Puente del elemento se calentar_n a un mismo tiempo
(Fig. 10). Usted puede cambiar para usar cualquiera de estos
ajustes en cuaiquier momento cuando est_ cocinando con el
elemento de Puente.
46
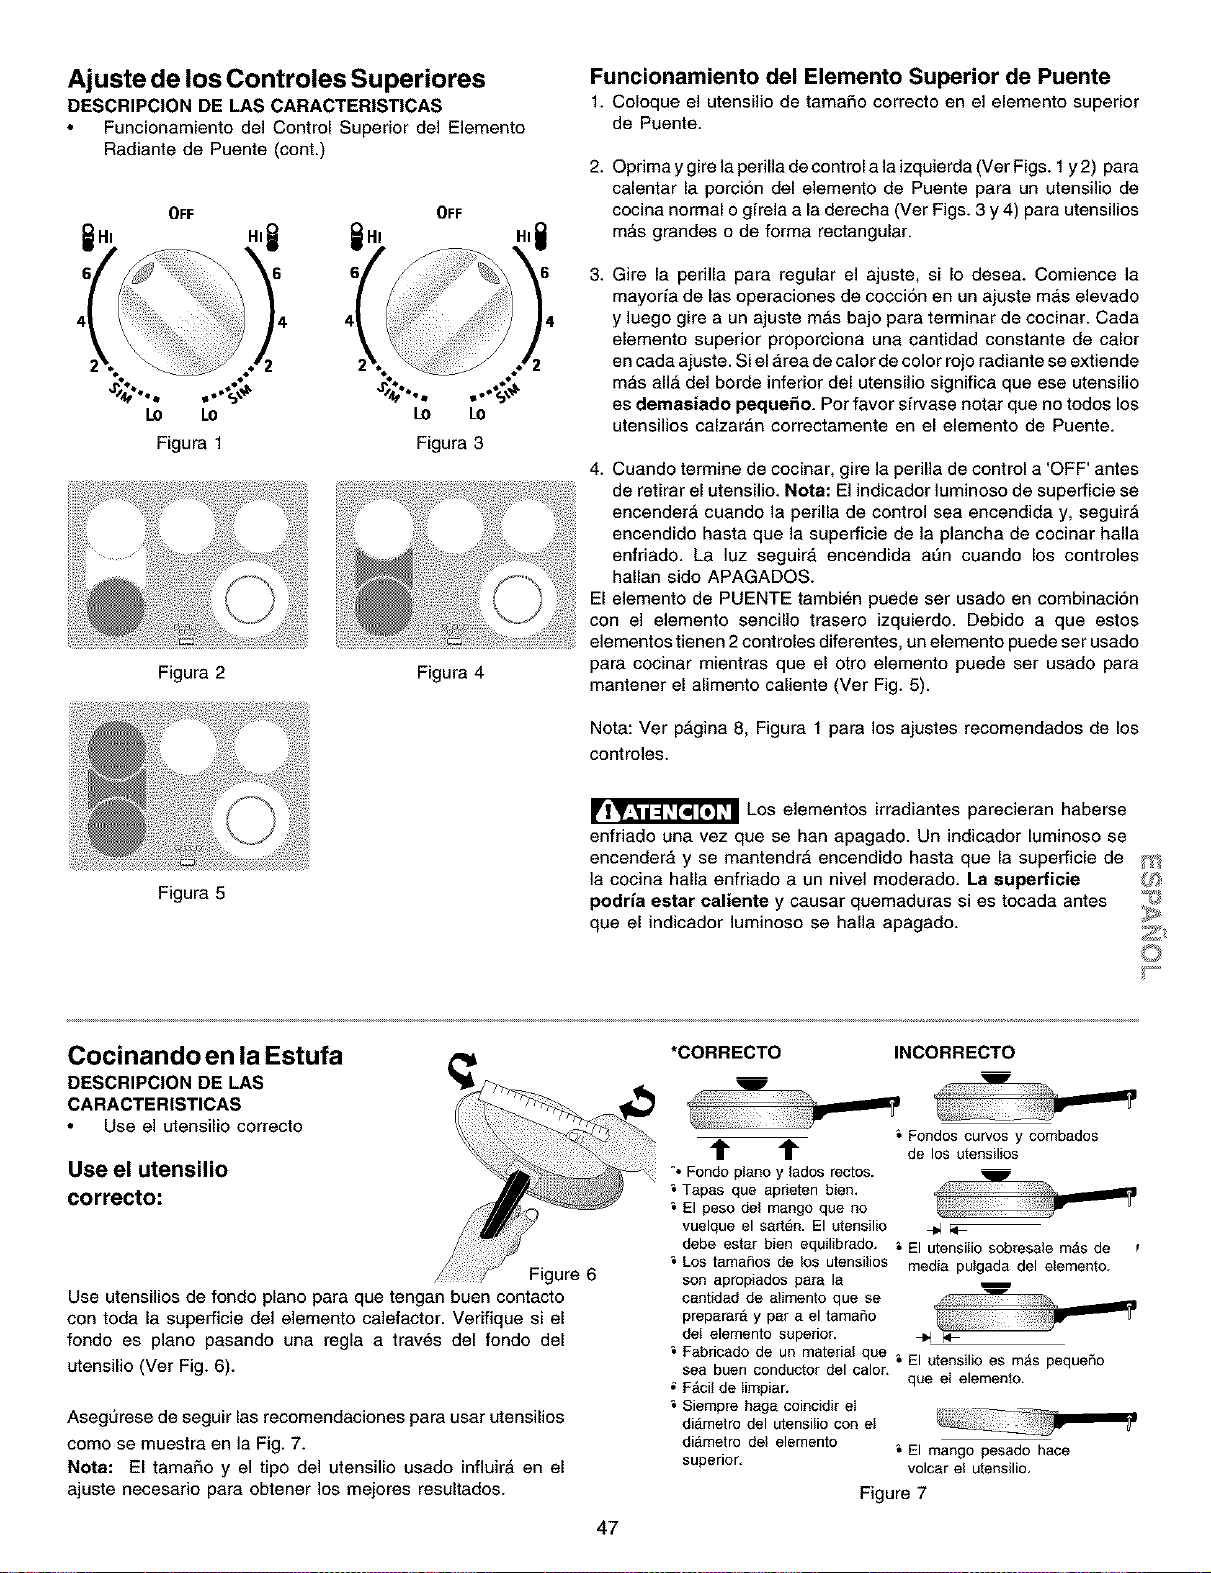
Ajuste de los Controles Superiores
DESCRIPCION DE LAS CARACTERISTICAS
Funcionamiento del Control Superior del Elemento
Radiante de Puente (cont.)
OFF OFF
.,@ 1,
° °.._,,t,
LO LO LO LO
Figura I Figura 3
Figura 2 Figura 4
Figura 5
Funcionamiento del Elemento Superior de Puente
1. Coloque el utensiliode tama£_ocorrectoen el elementosuperior
de Puente.
2.
Oprima y gire la perilla de control ala izquierda (Ver Figs. 1y 2) pare
calentar la porcion del elemento de Puente para un utensilio de
cocina normal o girela ala derecha (Ver Figs. 3 y 4) para utensilios
m_s grandes o de forma rectangular.
3.
Gire la perilla pare regular el ajuste, si Io desea. Comience la
mayoria de las operaciones de coccion en un ajuste m_,selevado
y luego gire a un ajuste m_s bajo pare terminar de cocinar. Cada
elemento superior proporciona una cantidad constante de calor
en cada ajuste. Si el _,rea de calor de color rojo radiante se extiende
mas all_ del borde inferior del utensilio significa que ese utensilio
es demasiado peque_o. Per favor sirvase notar que no todos los
utensilios calzar_,n correctamente en el elemento de Puente.
4. Cuando termine de cocinar, gire la perilla de control a 'OFF' antes
de retirar el utensilio. Note: El indicador luminoso de superficie se
encender_ cuando la perilla de control sea encendida y, seguir_
encendido haste que la superficie de la plancha de cocinar halle
enfriado. La luz seguir_, encendida ann cuando los controles
hallan side APAGADOS.
El elemento de PUENTE tambi_n puede ser usado en combinaci6n
con el elemento sencillo trasero izquierdo. Debido a que estos
elementos tienen 2 controles diferentes, un elemento puede ser usado
para cocinar mientras que el otro elemento puede ser usado para
mantener el alimento caliente (Ver Fig. 5).
Nota: Ver p_gina 8, Figure 1 para los ajustes recomendados de los
controles.
Los elementos irradiantes parecieran haberse
enfriado una vez que se han apagado. Un indicador luminoso se
encendera y se mantendr_ encendido haste que la superficie de
]a cocina halla enfriado a un nivel moderado. La supefficie
podrie ester ealiente y causar quemaduras si es tocada antes
que el indicador ]uminoso se halla apagado.
Cocinando en la Estufa
DESCRIPCION DE LAS
CARACTERISTICAS
Use el utensilio correcto
Use el utensilio
correcto:
Figure 6
Use utensilios de fondo piano para que tengan buen contacto
con toda la superficie del elemento calefactor. Verifique si el
fondo es piano pasando una regla a trav_s del fondo del
utensilio (Ver Fig. 6).
Asegurese de seguir las recomendaciones para user utensilios
come se muestra en la Fig. 7.
Note: El tamaSo y el tipo del utensilio usado influirA en el
ajuste necesario para obtener los mejores resultados.
47
*CORRECTO INCORRECTO
m
t t
°*Fondopianoy lades rectos.
Tapes que aprieten bien.
El peso del mango que no
vuelque el sarten. El utensilio
debe ester bien equilibrado.
Los tamales de los utensilios
son apropiadosparela
centidad de atimentoque se
preperarAy par ael tamaSo
deI elemento superior.
m
u
&Fondoscurves y combados
de los utensilios
El utensilio sobresale m_s de t
media pulgada del elemento.
Fabricado de un material que _ El utensilio es m_s pequeSo
sea buen conductor del calor.
F_cil de Iimpiar. que el elemento.
Siempre hege coincidir el
di_metro del utensilio con el
di_.metro del elemento _ El mango pesado hace
superior, volcar el utensilio,
Figure 7
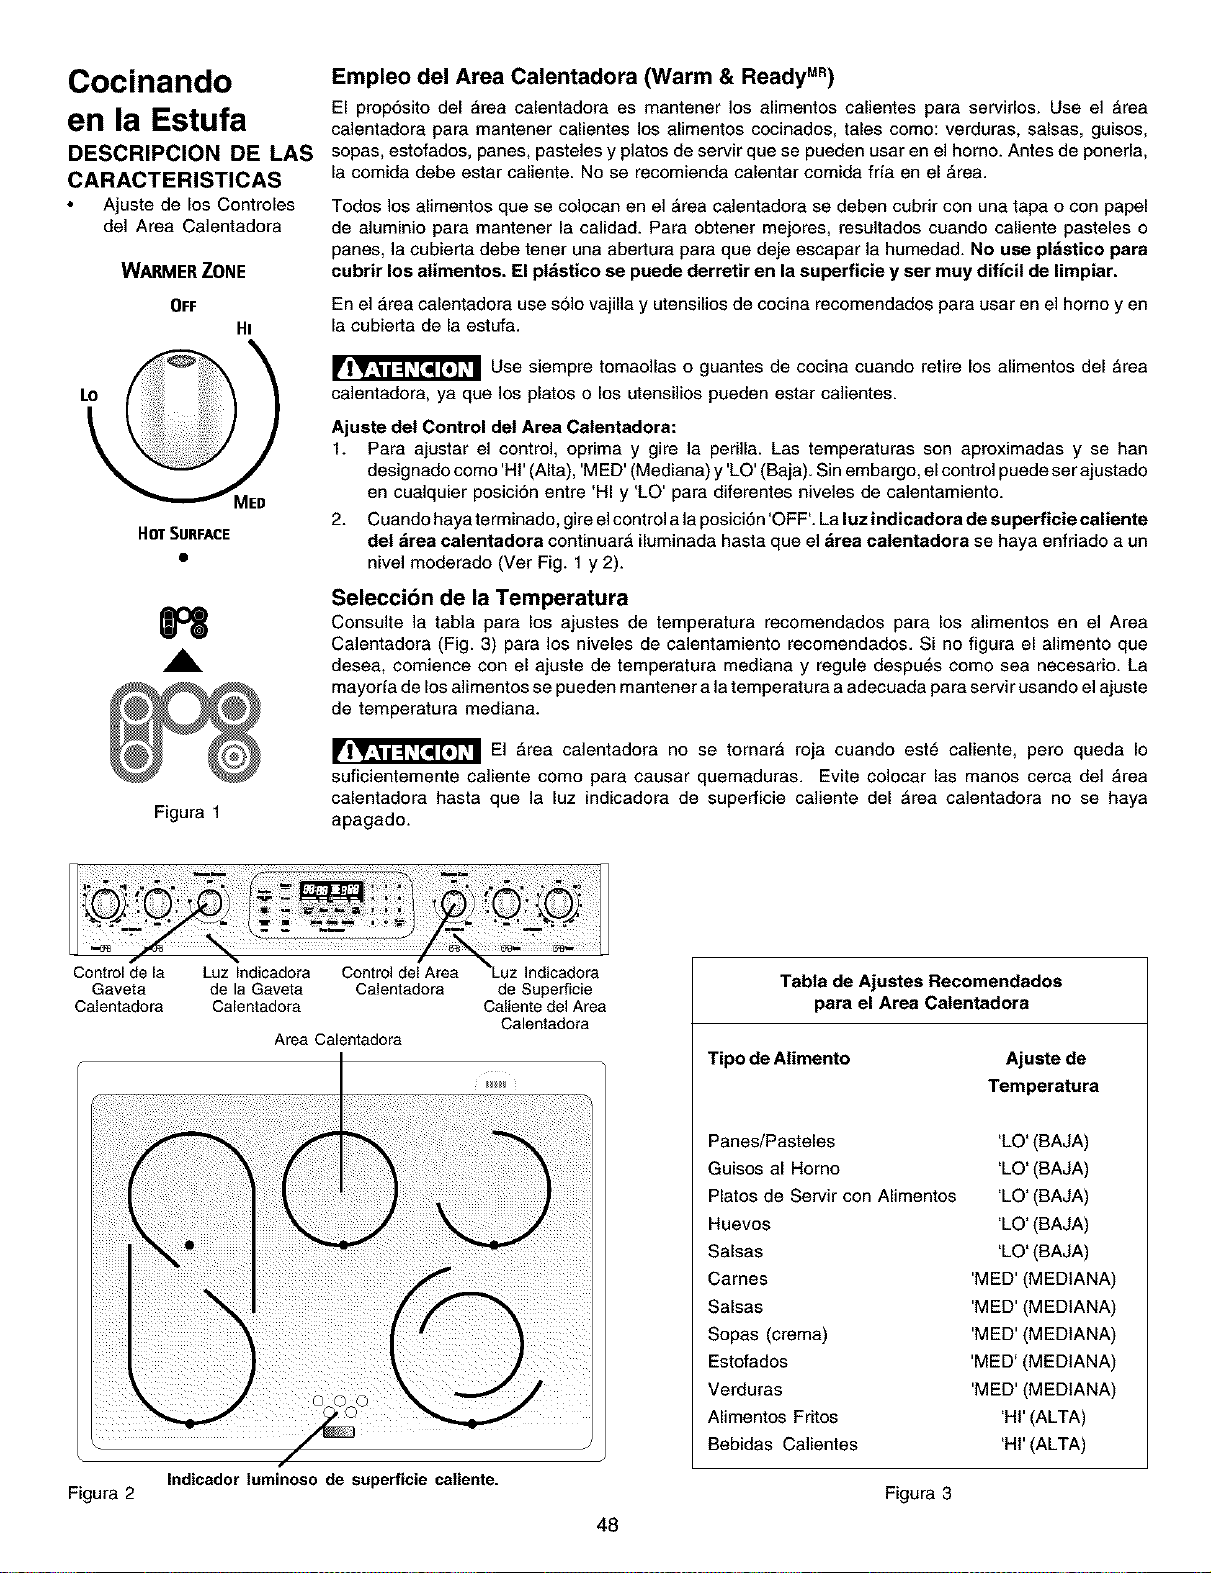
Cocinando
en la Estufa
DESCRIPCION DE LAS
CARACTERISTICAS
Ajuste de los Controles
clel Area Calentadora
WARMER ZONE
OFF
Hi
HOT SURFACE
H
A
Figura 1
Empleo del Area Calentadora (Warm & Ready M")
El propSsito del area calentadora es mantener los alimentos calientes para servirlos. Use el _rea
calentadora para mantener calientes los alimentos cocinados, tales como: verduras, salsas, guisos,
sopas, estofados, panes, pasteles y platos de servir que se pueden usar en el homo. Antes de ponerla,
la comida debe estar caliente. No se recomienda calentar comida fria en el _rea.
Todos los alimentos que se colocan en el _rea ca]entadora se deben cubrir con una tapa o con papel
de aluminio para mantener la calidad. Para obtener mejores, resultados cuando caliente pasteles o
panes, la cubierta debe tener una abertura para que deje escapar la humedad. No use pl_stico para
cubrir los alimentos. El ptdstico se puede derretir en la superficie y ser muy dificil de limpiar.
En el _,rea calentadora use solo vajilla y utensilios de cocina recomendados para usar en el homo yen
la cubierta de la estufa.
Use siempre tomaollas o guantes de cocina cuando retire los alimentos del _rea
ca]entadora, ya que los platos o los utensilios pueden estar ca]ientes.
Ajuste del Control del Area Calentadora:
1. Para ajustar el control, oprima y gire la perilla. Las temperaturas son aproximadas y se hart
designado como 'HI' (AIta), 'MED' (Mecliana) y 'LO' (Baja). Sin embargo, el control puede ser ajustado
en cualquier posici6n entre 'HI y 'LO' para diferentes niveles de calentamiento.
2. Cuand_ haya terminad__ gire e_c_ntr__a _ap_sici6n __FF__La _uzindicad_ra de superficie ca_iente
del &rea calentadora continuar_ iluminada hasta que el &rea calentadora se haya enfriado a un
nivel moderado (Ver Fig. 1 y 2).
Seleccion de la Temperatura
Consulte la tabla para los ajustes de temperatura recomendados para los alimentos en el Area
Calentadora (Fig. 3) para los niveles de calentamiento recomendados. Si no figura el alimento que
desea, comience con el ajuste de temperatura mediana y regule despu6s como sea necesario. La
mayorfa de los alimentos se pueden mantener a la temperatura a adecuada para servir usanclo el ajuste
de temperatura mediana.
El _rea calentadora no se tornar_ roja cuando est6 caliente, pero queda Io
suficientemente caliente como para causar quemaduras. Evite colocar las manos cerca del _,rea
calentadora hasta que la luz indicadora de superficie caliente del _rea calentadora no se haya
apagado.
Gaveta de la Gaveta Calentadora
Calentadora Calentadora
Area Calentadora
Indicador luminoeo de superficie caliente.
de Superficie
Caliente del Area
Calentaclora
Tabta de Ajustes Recomendados
para el Area Catentadora
Tipo de Alimento Ajuste de
Temperatura
Panes/Pasteles
Guisos al Homo
Platos de Servir con Alimentos
Huevos
Salsas
Cames
Salsas
Sopas (crema)
Estofados
Verduras
Alimentos Fritos
Bebidas Calientes
'LO' (BAJA)
'LO' (BAJA)
'LO' (BAJA)
'LO' (BAJA)
'LO' (BAJA)
'MED' (MEDtANA)
'MED' (MEDtANA)
'MED' (MEDtANA)
'MED' (MEDtANA)
'MED' (MEDIANA)
'HI' (ALTA)
'HI' (ALTA)
Figura 2 Figura 3
48

Antes de Ajustar los Controles del Horno
Disposicion de las Parrillas del Homo -
COLOQUE StEMPRE LAS PARRILLAS CUANDO EL HORNO
ESTE FRIO (ANTES DE ENCENDERLO). Use siempre guantes
de cocina cuando use el homo.
Ubicacibn del Respiradero del Homo
El respiradero del homo se encuentra
debajo del protector trasero. Cuando el
homo est_ encendido, sale aire tibio a
trav6s de este respiradero. Esta
ventilacion es necesaria para una
circulacion adecuada del aire en el homo
y para obtener buenos resuitados del
homeado.
Para Quitar y Colocar las Parrillas
del Horno
Para quitar, tire de la parrilla hacia
adelante hasta el tope. Levante la parte
delantera de la parrilla y deslicela hacia
afuera. Para colocar, inserte la parrilla en
las guias de las paredes del homo.
Levante la parte delantera de la parrilla y
deslicela a su lugar.
Disposici6n de las parrilles del
horno
Para hornear en una parrilla,
col6quela en la posici6n 2 o 3. Para
hornear en 2 parrillas, coloque las
parrillas en las posiciones 2 y 3.
F'osioiones
de las Parrillas
POSICIONES RECOMENDADAS DE LAS PARRtLLAS
PARA ASAR A LA PARRILLA, HORNEAR Y ASAR
Alimento Posici6n de la Parrilla
Asar a la parrilla carnes, polio o pescado 1o 2 _
Galletas, pasteles, tartas, bizcochos y panquecitos 2 o 3
Tartas congeladas, pastel esponjoso, levadura, 4 _
pan, caserolas, trozos de came peque£_os o polio
Pavo, asado o jamon 4
Nota: Siempre tenga cuidado cuando retire alimentos que est_n en las parrillas
inferiores.
Circulacibn del Aire en el Horno
Si se usa 1 parrilla, colSquela en el centro del horno. Si se
usan varias parrillas, alt6rnelas como se muestra en la
ilustraciSn.
Para mejor circulaci6n del aire y obtener mejores resultados del
homeado deje alrededor de 2" a 4" (5 a 10 cm) alrededor del
utensilio para circulacion adecuada del aire y asegurese de
que las fuentes no se toquen entre si, no toquen la puerta del
homo, ni los lados o la parte trasera de la cavidad del homo. El
aire caliente debe circular alrededor de las fuentes en el horno
para que Ilegue calor uniforme alrededor de todo el alimento.
49
1 Parrilla del Homo
E
E
m
Varias Parrillas del Homo
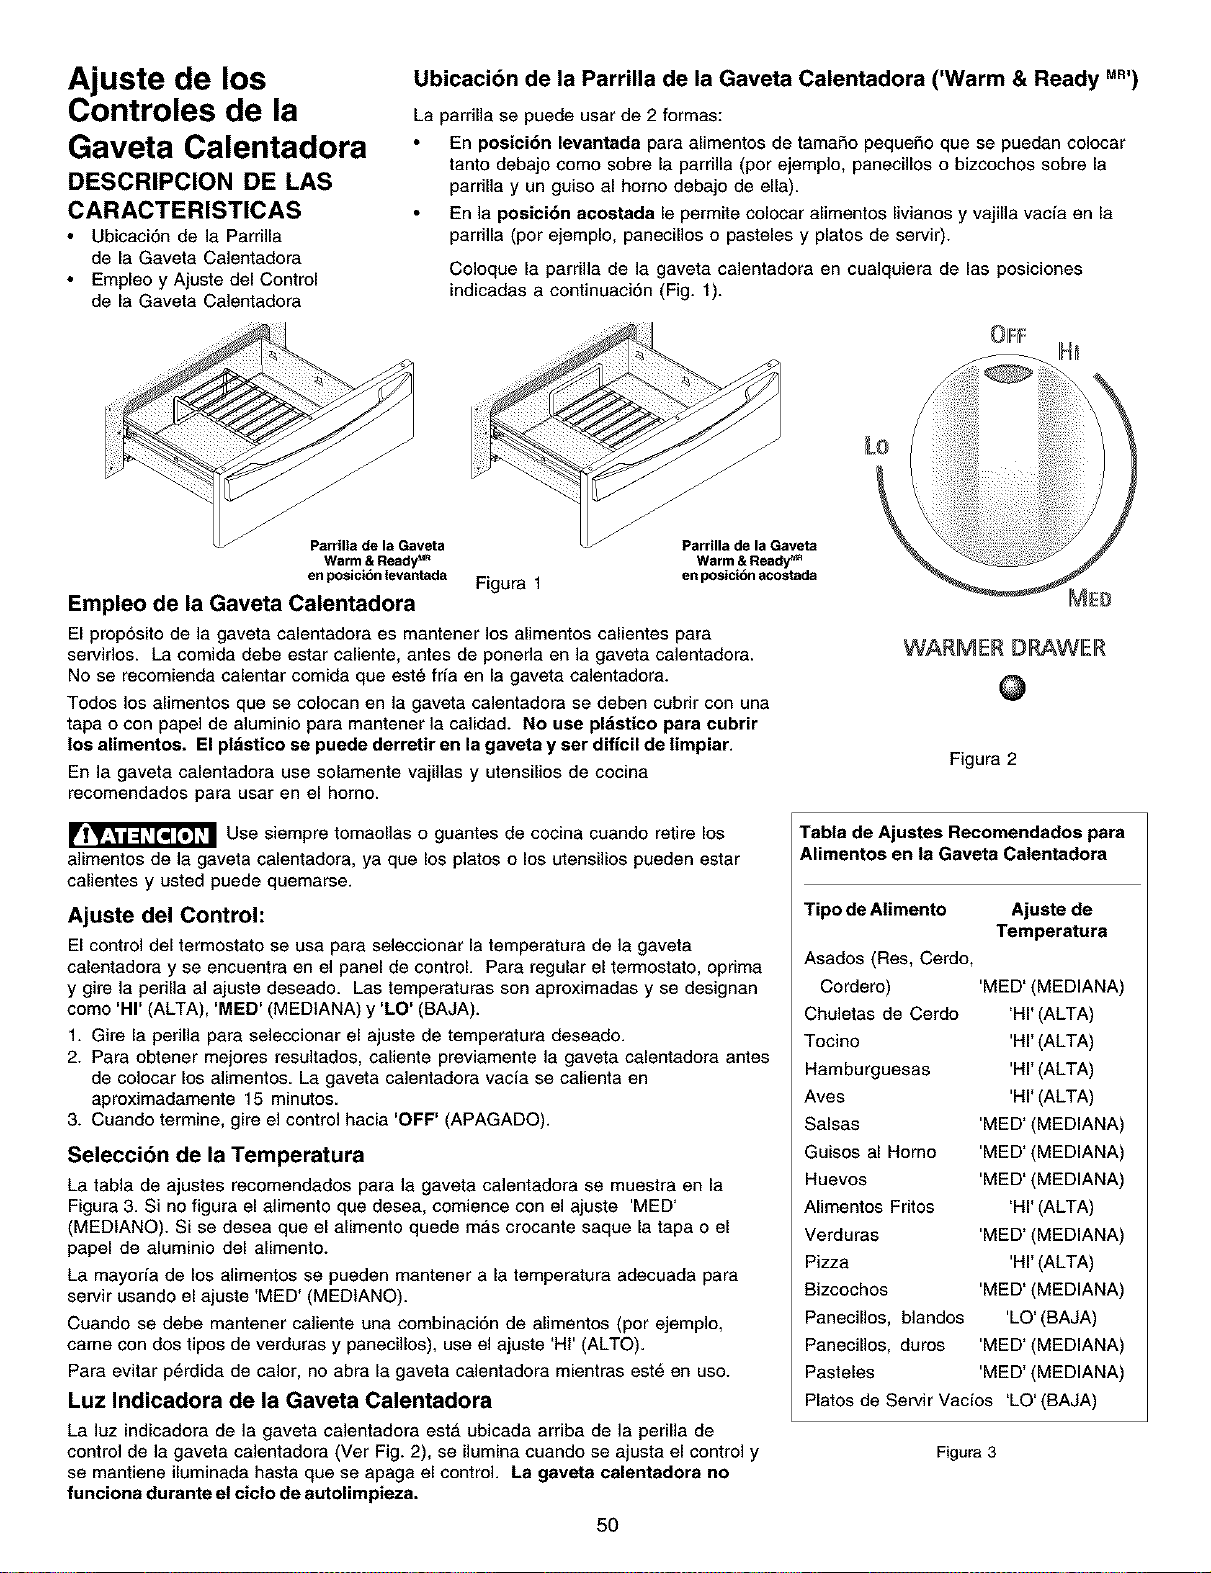
Ajuste de los
Controles de la
Gaveta Calentadora
DESCRIPCION DE LAS
CARACTERISTICAS
Ubicaci6n de la Parrilla
de la Gaveta Calentadora
Empleo y Ajuste del Control
de la Gaveta Calentadora
Ubicaci6n de la Parrilla de la Gaveta Calentadora ('Warm & Ready Mn,)
La parrilla se puede usar de 2 formas:
En posici6n levantada para alimentos de tamaSo peque£_oque se puedan colocar
tanto debajo como sobre la parrilla (por ejemplo, panecillos o bizcochos sobre la
pardlla y un guiso al homo debajo de ella).
En la posici6n acostada le permite colocar alimentos livianos y vajilla vacia en la
pardlla (por ejemplo, panecillos o pasteles y platos de servir).
Coloque la parrilla de la gaveta calentadora en cualquiera de las posiciones
indicadas a continuaci6n (Fig. 1).
Parrilla de la Gaveta Parrilla de la Gaveta
Warm & Ready u" Warm & Ready _
en posicibn levantada Figura 1 en posicibn acostada
Empleo de la Gaveta Calentadora
El proposito de la gaveta calentadora es mantener los alimentos calientes para
servidos. La comida debe estar caliente, antes de poneda en la gaveta calentadora.
No se recomienda calentar comida que est_ fda en la gaveta calentadora.
Todos los alimentos que se colocan en la gaveta calentadora se deben cubrir con una
tapa o con papel de aluminio para mantener ]a calidad. No use pl_istico para cubrir
los alimentos. El pl_istieo se puede derretir en la gaveta y ser dificil de limpiar.
En la gaveta calentadora use solamente vajillas y utensilios de cocina
recomendados para usar en el homo.
Use siempre tomaollas o guantes de cocina cuando retire los
alimentos de la gaveta calentadora, ya que los platos o los utensilios pueden estar
calientes y usted puede quemarse.
Ajuste del Control:
El control del termostato se usa para seleccionar la temperatura de la gaveta
calentadora y se encuentra en el panel de control. Para regular el termostato, oprima
y gire la perilla al ajuste deseado. Las temperaturas son aproximadas y se designan
como 'HI' (ALTA), 'MED' (MEDtANA) y 'LO' (BAJA).
1. Gire la perilla para seleccionar el ajuste de temperatura deseado.
2. Para obtener mejores resultados, caliente previamente la gaveta calentadora antes
de colocar los alimentos. La gaveta calentadora vacia se calienta en
aproximadamente 15 minutos.
3. Cuando termine, gire el control hacia 'OFF' (APAGADO).
Selecci6n de la Temperatura
La tabla de ajustes recomendados para la gaveta calentadora se muestra en 18
Figura 3. Si no figura el alimento que desea, comience con el ajuste 'MED'
(MEDtANO). Si se desea que el alimento quede mas crocante saque la tapa 0 el
papel de aluminio del alimento.
La mayoda de los alimentos se pueden mantener a la temperatura adecuada para
servir usando el ajuste 'MED' (MEDtANO).
Cuando se debe mantener ca]iente una combinaci6n de alimentos (por ejemplo,
came con dos tipos de verduras y panecillos), use el ajuste 'HI' (ALTO).
Para evitar p6rdida de calor, no abra la gaveta calentadora mientras est6 en uso.
Luz Indicadora de la Gaveta Calentadora
La luz indicadora de la gaveta calentadora estA ubicada arriba de la perilla de
control de la gaveta calentadora (Ver Fig. 2), se ilumina cuando se ajusta el control y
se mantiene iluminada hasta que se apaga el control. La gaveta ealentadora no
funciona durante el ciclo de autolimpieza.
5O
WARMER DRAWER
@
Figura 2
Tabla de Ajustes Recomendados para
Alimentos en la Gaveta Catentadora
Tipo de Alimento Ajuste de
Temperatura
Asados (Res, Cerdo,
Cordero)
Chuletas de Cerdo
Tocino
Hamburguesas
Aves
Salsas
Guisos al Homo
Huevos
Alimentos Fritos
Verduras
Pizza
Bizcochos
Panecillos, blandos
Panecillos, duros
Pasteles
'MED' (MEDIANA)
'HI' (ALTA)
'HI' (ALTA)
'HI' ALTA)
'HI' ALTA)
'MED' MEDIANA)
'MED' MEDIANA)
'MED' MEDIANA)
'HI' ALTA)
'MED' MEDIANA)
'HI' ALTA)
'MED' MEDIANA)
'LO' (BAJA)
'MED' (MEDIANA)
'MED' (MEDIANA)
Platos de Servir Vacfos 'LO' (BAJA)
Figura3
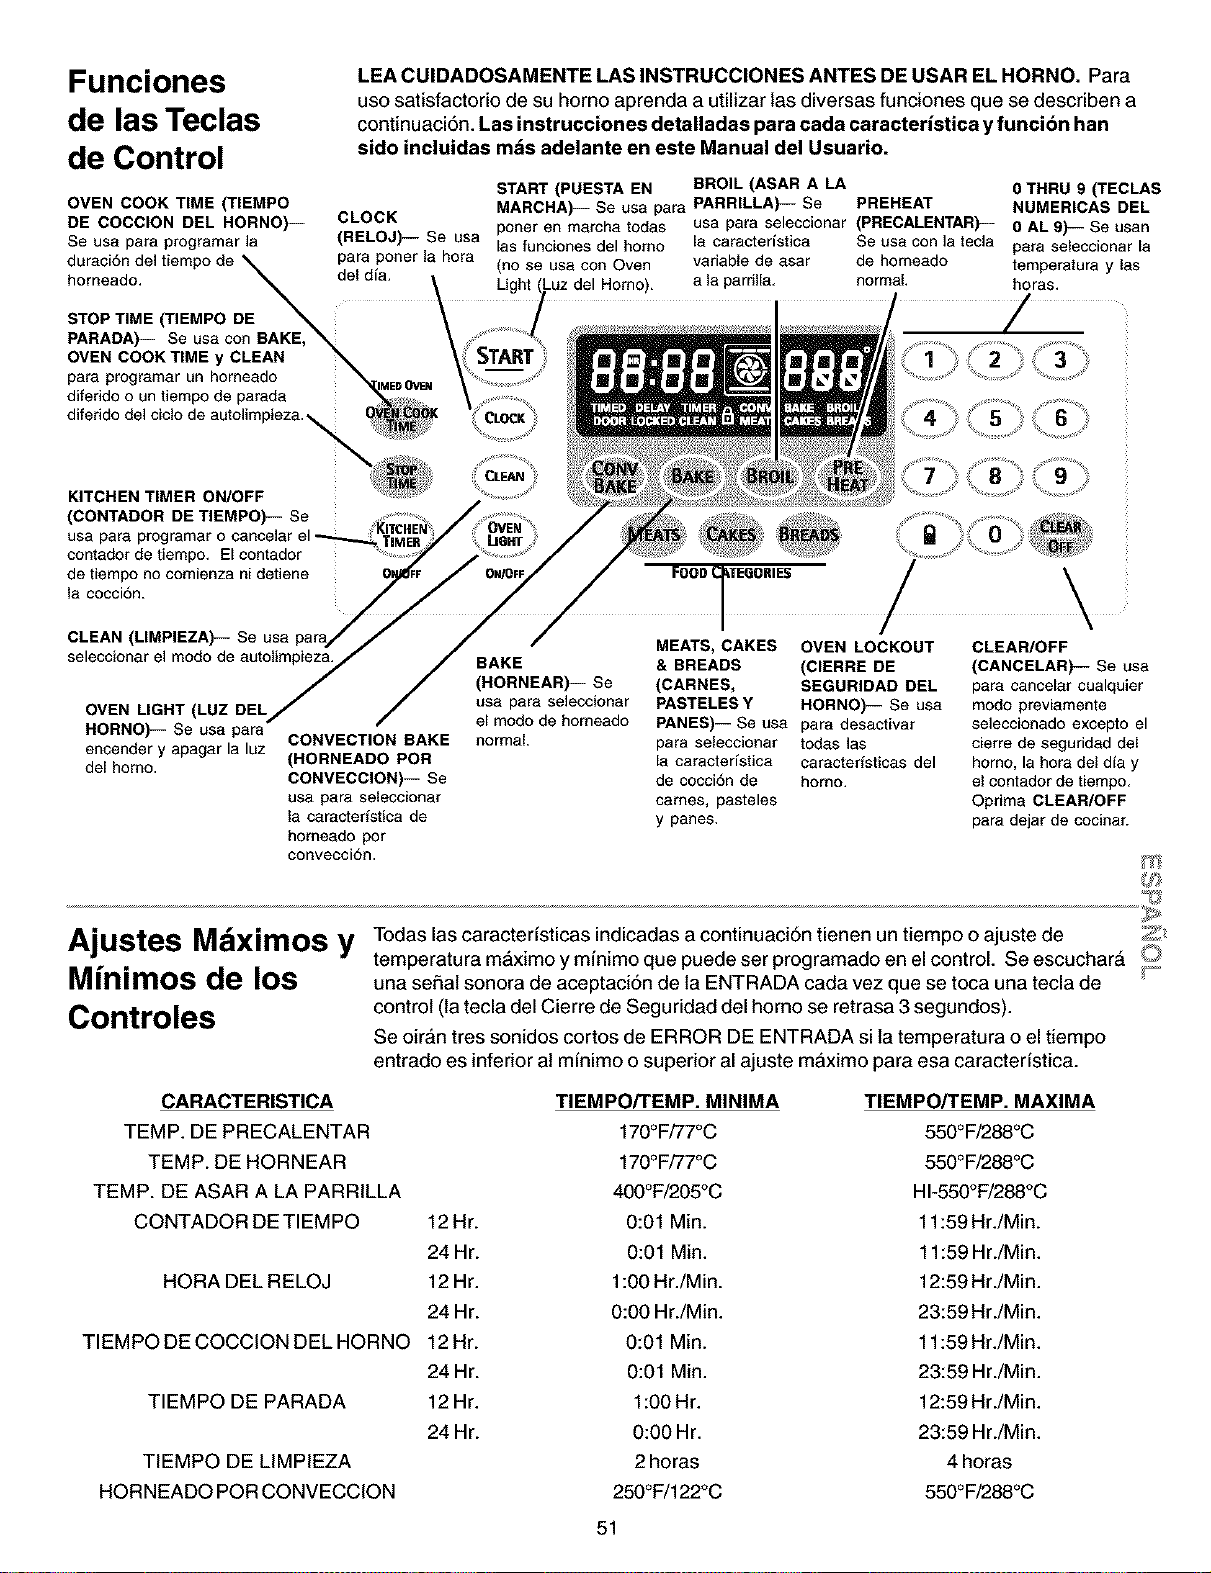
Funciones
de las Teclas
de Control
LEA CUIDADOSAMENTE LAS INSTRUCCIONES ANTES DE USAR EL HORNO. Para
uso satisfactorio de su homo aprenda a utilizar Ins diversas funciones que se describen a
continuaci6n. Las instrucciones detalladas para cada caracterfstica yfunci6n han
sido incluidas mds adelante en este Manual del Usuario.
OVEN COOK TIME (TIEMPO
DE COCClON DEL HORNO)--
Se usa para programar ]a
para porter la hora
duraciSn del tiempo de _
homeado. _ del din.
STOP TIME (TIEMPO DE _ :
PARADA)-- Se usa con BAKE,
OVEN COOK TIME y CLEAN
para programar un homeado _=ME, OVa_
diferido o un tiempo de parada _;!#,
diferido del ciclo de autolimpiez& _ _:_
START (PUESTA EN BROIL (ASAR A LA 0 THRU 9 (TECLAS
CLOCK MARCHA)-- Se usa para PARRILLA)-- Se PREHEAT NUMERICAS DEL
porter an marcha todas usa para saleccionar (PRECALENTAR)-- 0 AL 9)-- Se usan
(RELOJ)-- Se usa [as funciones del homo [a caractedstica Se usa con la tecla para seleccionar [a
(no se usa con Oven variable de asar de homeado temperatura y las
Light Homo). a la parriHa, normal, horas.
/
KITCHEN TIMER ON/OFF
(CONTADOR DE TIEMPO)-- Sa
usa para programar o
contador de tiempo. E[ contador
de tiempo no comienza ni detiene
la cocci6n.
CLEAN (LIMPIEZA)-- Se usa
seleccionar el modo de autolimpieza.
OVEN LIGHT (LUZ DEL
HORNO)-- Se usa para
encender y apagar la luz
de[ homo.
CONVECTION BAKE
(HORNEADO POR
CONVECClON)-- Se
usa para seleccionar
la caractedstica de
homeado pot
conveccion.
BAKE
(HORNEAR)-- Se
usa para seleccionar
e[ modo de homeado
normal
MEATS, CAKES OVEN LOCKOUT
& BREADS (ClERRE DE
(CARNES, SEGURIDAD DEL
PASTELES Y HORNO)-- Se usa
PANES)-- Se usa para desactivar
para seleccionar todas las
la caracteristica caracterfsticas del
de cocci6n de homo.
cames, pasteles
y panes.
\
CLEAR/OFF
(CANCELAR)-- Se usa
para cance[ar cualquier
modo previamente
seleccionado excepto el
cierre de seguridad del
homo. la hera del dia y
el contador de tiempo.
Oprima CLEAR/OFF
para dejar de cocinar.
Todas las caracterfsticas indicadas a continuacidn tienen un tiempo o ajuste de _;_
Ajustes Mdximos y temperatura maximo y mfnimo que puede ser programado en el control. Se escuchard O
M(nimos de los una seSat sonora de aceptaci6n de la ENTRADA cada vez que se toca una tecla de _'_
Controles
control (la tecla del Cierre de Seguridad del homo se retrasa 3 segundos).
Se oir&n tres sonidos cortos de ERROR DE ENTRADA si la temperatura o el tiempo
entrado es inferior at mfnimo o superior al ajuste maximo para esa caracterfstica.
CARACTERISTICA
TEMP. DE PRECALENTAR
TEMP. DE HORNEAR
TEMP. DE ASAR A LA PARRILLA
CONTADOR DETIEMPO
12Hr.
24 Hr.
12Hr.
24 Hr.
HORA DEL RELOJ
TIEMPO DE COCCION DEL HORNO 12 Hr.
24 Hr.
TIEMPO DE PARADA 12 Hr.
24 Hr.
TIEMPO DE LIMPIEZA
HORNEADO POR CONVECCION
TIEMPO/TEMP. MINIMA
170°F/77°C
170°F/77°C
400°F/205°C
0:01 Min.
0:01 Min.
1:O0Hr./Min.
0:0O Hr./Min.
0:01 Min.
0:01 Min.
1:O0Hr.
0:O0 Hr.
2 horas
250°F/122°C
51
TIEMPO/TEMP. MAXIMA
550°F/288°C
550°F/288°C
HI-55O°F/288°C
11:59 Hr./Min.
11:59 Hr./Min.
12:59 Hr./Min.
23:59 Hr./Min.
11:59 Hr./Min.
23:59 Hr./Min.
12:59 Hr./Min.
23:59 Hr./Min.
4 horas
550°F/288°C

Reglaje del reloj
DESCRIPCION DE
LAS
CARACTERISTICAS
• Reloj
• Cambio entre despliegue
de 12 o 24 horas
_ _ ¸¸¸4¸
_i ¸ _ , __ _._ ._ ._ ._
i_i START 2 3
TIMEDOVeN _ .....
........... %
• _ocK
_;_.__.__ _ _,i_,_
TIMER
ON/OFF ON/OFF FOOD CAI"E6ORIE$
Reloj
La tecla RELOJ O se usa para programar el reloj. El reloj
puede ser programado para 12 o 24 horas de operaci6n. El retoj ha
sido preajustado en la f;&brica para funcionamiento de 12 horas.
Cuando la estufa se enchufa por primera vez o cuando se ha
interrumpido et suministro de energfa a la estufa, el contador de
tiempo en la pantatta destellar;& Las letras "PF" (fatto de energfa, Ver
Fig. 1).
INSTRUCCIONES
Programaci6n del Reloj :(ejemplo 1:30)
1. Oprima_. "CLO" aparecera en et indicador visual (Fi9. 2)
2. Oprima las teclas Q Q Q para poner la hora del
dfa a la 1:30. (Fig. 3). "CLO" aparecer;& en el indicador visual.
Oprima _ ."CLO" desaparecer;& y et reloj comenzar& a
funcionar (Fig. 4).
OPRIMA
QQG
O
Figura 1
INDICADOR
Cambio del despliegue de la hora del dia entre 12 o
24 horas:
Oprima y mantenga oprimida la tecta _ durante 6 segundos
1.
(Fig. 3). Mientras la tecla est;&oprimida, la hora correcta det alia
permanecer;& desplegada y la palabra "CLO" desaparecer;& det
indicador visual (Fig. 4). CONTINUE oprimiendo la tecta hasta
que se escuche una sei_at sonora.
2. El indicador visual mostrar& "12:00" (Fig. 5) o "24:00" (Fig. 6).
3. Oprima _ para cambiar el despliegue de la hora del
alia
entre 12y24horas. El indicador mostrar&yasea"12:00" (Fig.
5) o "24:00" (Fig. 6).
4. Oprima _ para aceptar el cambio uoprima _ para
rechazar el cambio.
5. Coloque la hora correcta como se describe arriba en
Programacibn del Reloj. Sfrvase notar que si se eligi6 et
modo de 24 horas, et reloj ahora desplegar& la hora desde 0:00
hasta 23:59 horas.
Q durante 6
segundos
G
Qo®
52
Figura 2
Figura 3
Figura 4
Figura 5
Figura 6
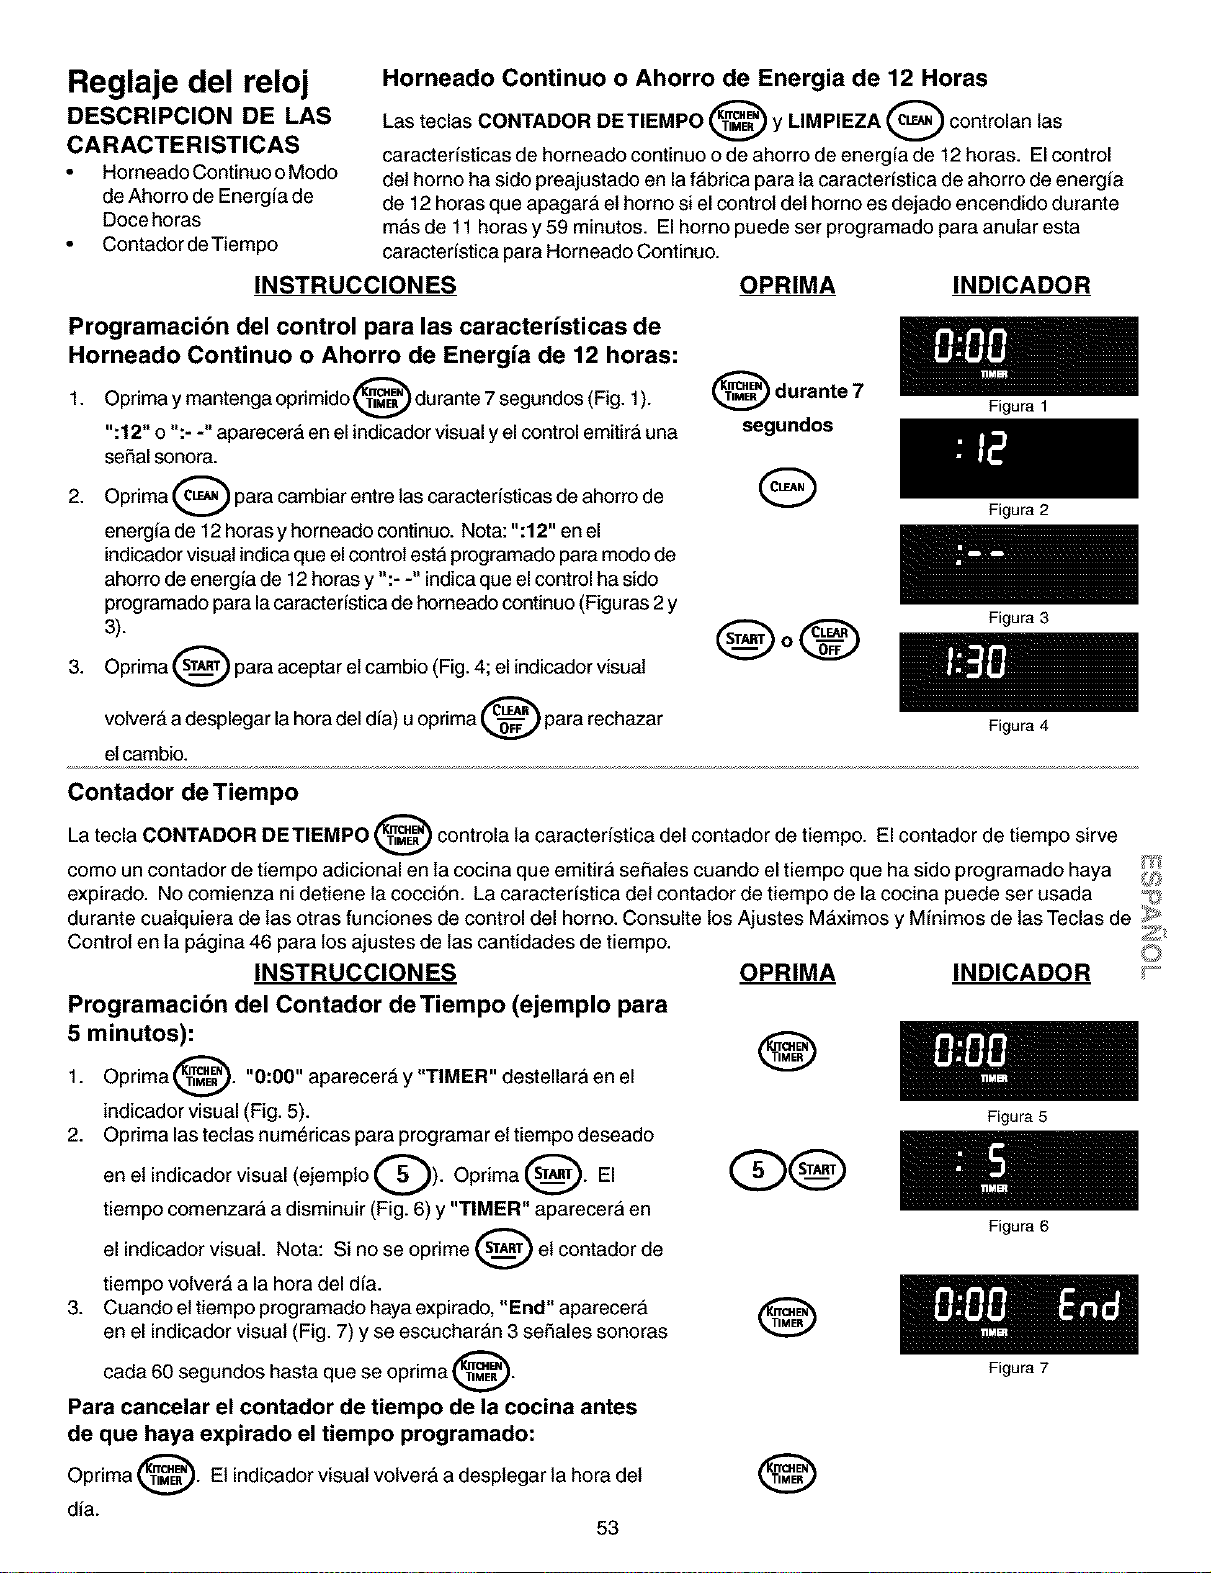
Reglaje del reloj
DESCRIPCION DE LAS
CARACTERISTICAS
• Horneado Continuo oModo
de Ahorro de Energia de
Doce horas
• Contador de Tiempo
Horneado Continuo o Ahorro de Energia de 12 Horas
Las teclas CONTADOR DETIEMPO _ y LIMPIEZA _ controlan las
caracterfsticas de horneado continuo o de ahorro de energfa de 12 horas. El control
del homo ha sido preajustado en la fabrica para la caracterfstica de ahorro de energia
de 12 horas que apagara et homo si el control det homo es dejado encendido durante
mas de 11 horas y 59 minutos. El homo puede ser programado para anular esta
caracterfstica para Homeado Continuo.
INSTRUCCIONES OPRIMA INDICADOR
Programacibn del control para las caractedsticas de
Horneado Continuo o Ahorro de Energia de 12 horas:
Oprima y mantenga oprimido _ durante 7 segundos (Fig. 1).
1.
":12" o ":- -" aparecera en el indicador visual yel control emitira una
seSal sonora.
2. Oprima _ para cambiar entre las caracteristicas de ahorro de
energfa de 12 horas y horneado continuo. Nota: ":12" en el
indicador visual indica que el control esta programado para modo de
ahorro de energfa de 12 horas y ":- -" indica que el control ha sido
programado para lacaracteSstica de horneado continuo (Figuras 2 y
3).
3. Oprima _ para aceptar el cambio (Fig. 4; el indicador visual
volver& a desplegar la hora del dia) u oprima _ para rechazar
etcambio.
@ durante 7
segundos
Q
QoQ
Figura 1
Figura 2
Figura 3
Figura 4
Contador de Tiempo
La tecla CONTADOR DETIEMPO _ controla la caracteristica del contador de tiempo. El contador de tiempo sirve
como un contador de tiempo adicional en la cocina que emitira sei_ates cuando el tiempo que ha sido programado haya _,j
expirado. No comienza ni detiene la cocci6n. La caracterfstica del contador de tiempo de la cocina puede ser usada _j_"
durante cuatquiera de las otras funciones de control del horno. Consulte los Ajustes MAximos y Mfnimos de las Teclas de _>'
Control en la p_gina 46 para los ajustes de las cantidades de tiempo. _
INSTRUCCIONES OPRIMA INDICADOR _°
Programacibn del Contador de Tiempo (ejemplo para
5 minutos):
Oprima @. "0:00" aparecer& y "TIMER" destellar;& en el
1.
indicador visual (Fig. 5).
2. Opdma las teclas numericas para programar et tiempo deseado
en et indicador visual (ejemplo Q). Oprima _.
El
tiempo comenzarA a disminuir (Fig. 6) y "TIMER" aparecerA en
el indicador visual. Nota: Si no se oprime _ et contador de
tiempo volver& a la hora del dfa.
3. Cuando ettiempo programado haya expirado, "End" aparecerA
en el indicador visual (Fig. 7) y se escucharAn 3 seSales sonoras
carla 60 segundos hasta que se oprima @.
Para cancelar el contador de tiempo de la cocina antes
de que haya expirado el tiempo programado:
Oprima _. Et indicador visual volvera a desplegar la hora det
dia.
53
®
®
Figura 5
Figura 6
Figura 7
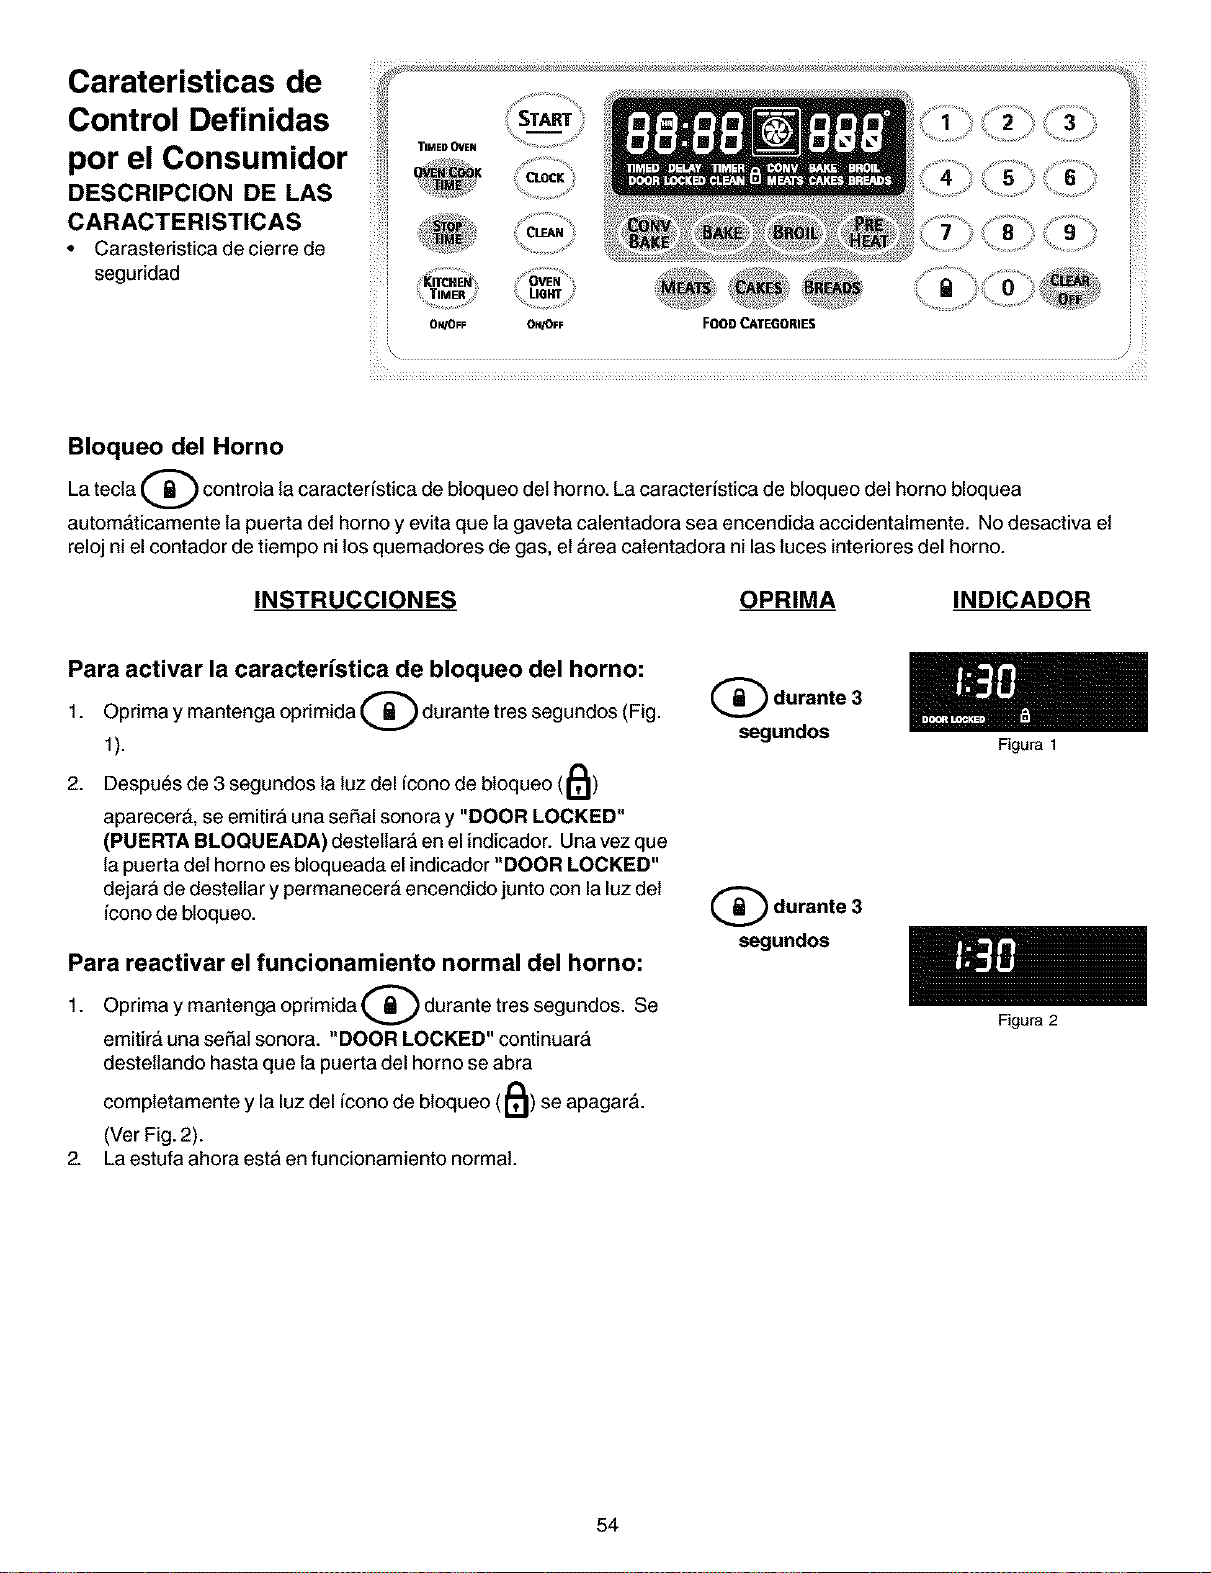
Carateristicas de
Control Definidas
por el Consumidor
DESCRIPCION DE LAS
CARACTERISTICAS
• Carasteristica decierre de
seguridad
..............,0
'_i_ _ _
O_VOFF ON_FF FOOO _TE_ORIES
Bloqueo del Horno
Latecta _ controla la caracteristica de bloqueo det homo. La caracteristica de bloqueo del homo bloquea
autom&ticamente la puerta det horno y evita que la gaveta calentadora sea encendida accidentalmente. No desactiva et
reloj ni el contador de tiempo ni los quemadores de gas, et &rea calentadora ni las luces interiores del horno.
INSTRUCCIONES OPRIMA INDICADOR
Para activar la caracterfstica de bloqueo del horno:
Opdma y mantenga oprimida Q durante tres segundos (Fig.
1.
1).
2. Despues de 3 segundos la luz del icono de bloqueo (11_)
aparecer&, se emitir;&una seSal sonora y "DOOR LOCKED"
(PUERTA BLOQUEADA) destetlar;& en el indicador. Una vez que
la puerta del horno es bloqueada el indicador "DOOR LOCKED"
dejar;&de destellar y permanecer& encendido junto con la luz det
iconode bloqueo.
Para reactivar el funcionamiento normal del horno:
Oprima y mantenga oprimida (_) durante tres segundos.
1. Se
emitir_ una se_at sonora. "DOOR LOCKED" continuar;&
destetlando hasta que la puerta del horno se abra
completamente y la luz del icono de bloqueo (11_) se apagar&.
(Ver Fig. 2).
2. La estufa ahora estA en funcionamiento normal.
Q durante 3
segundos
(_ durante 3
segundos
54
Figura 1
Figura 2
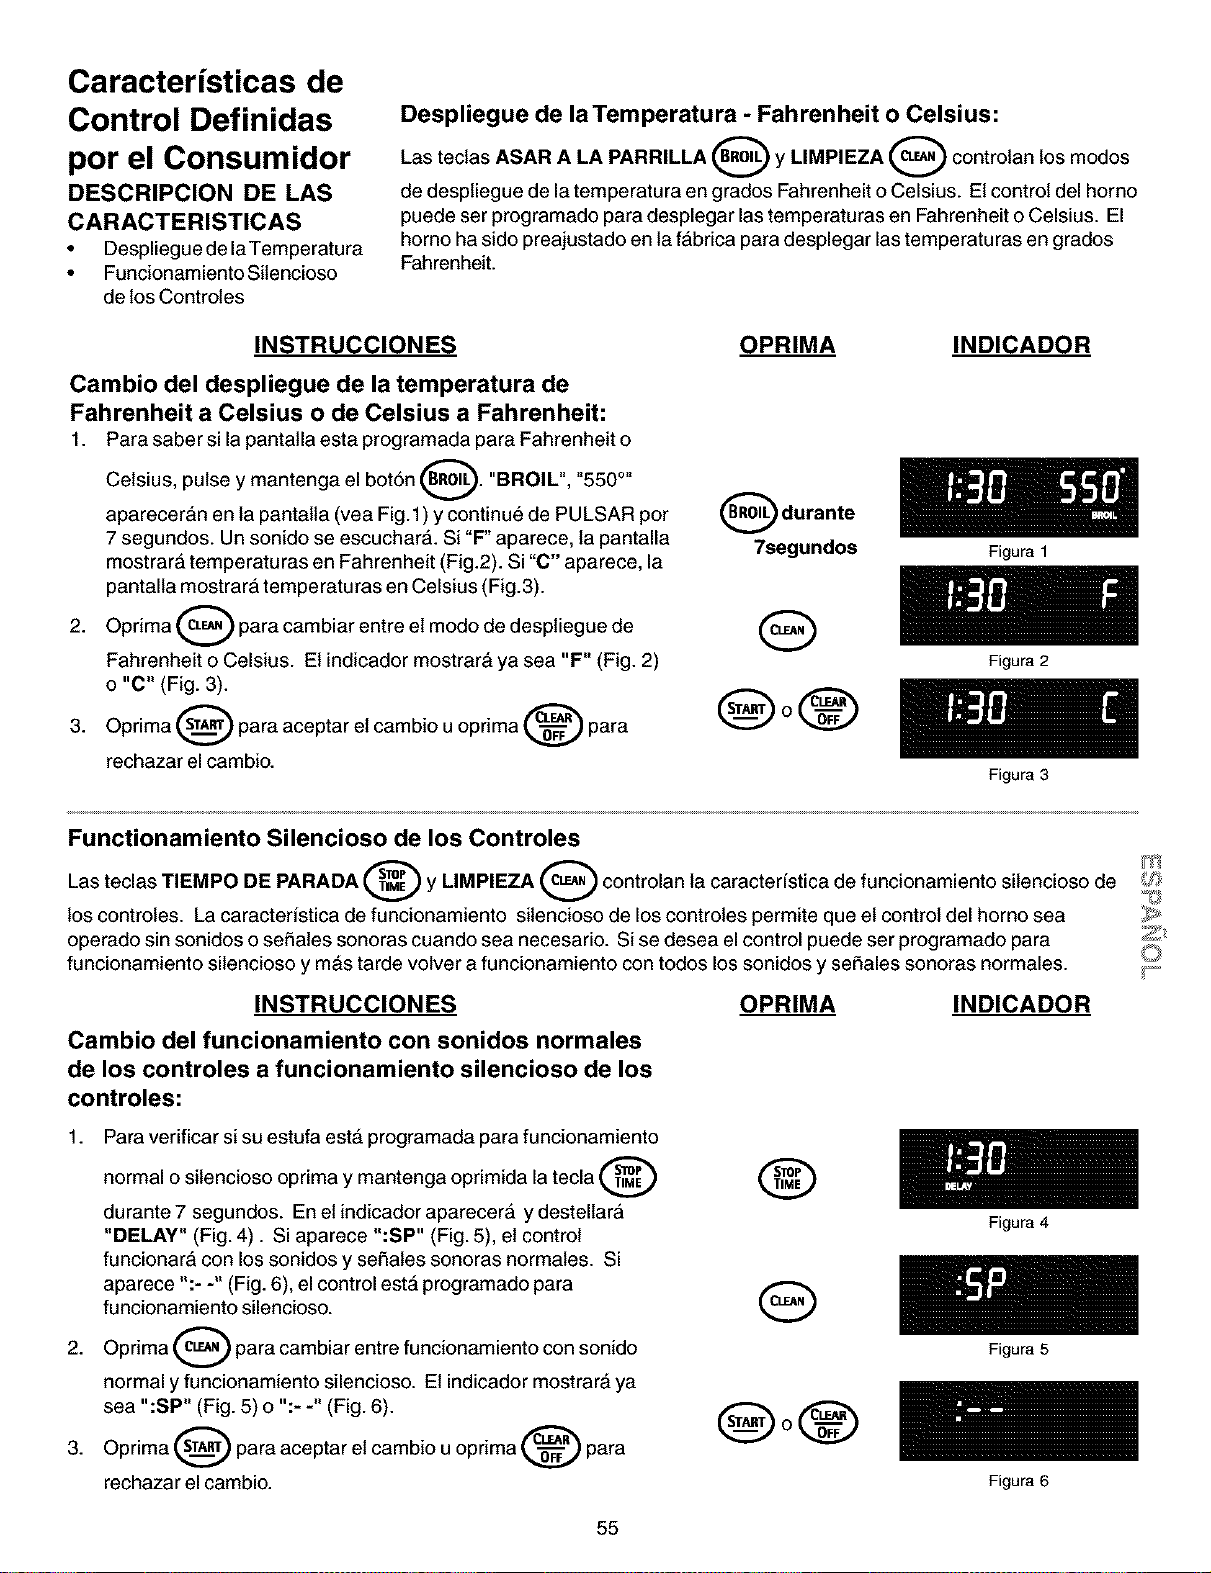
Caracteristicas de
Control Definidas
por el Consumidor
DESCRIPCION DE LAS
CARACTERISTICAS
• Despliegue de laTemperatura
• Funcionamiento Sitencioso
de los Controles
Despliegue de laTemperatura - Fahrenheit o Celsius:
Las teclas ASAR A LA PARRILLA _ y LIMPIEZA _ controlan los modos
de despliegue de la temperatura en grados Fahrenheit o Celsius. Et controldel homo
puede ser programado para desplegar las temperaturas en Fahrenheit o Celsius. El
homo ha sido preajustado en la fabrica para desplegar las temperaturas engrados
Fahrenheit.
INSTRUCCIONES
Cambio del despliegue de la temperatura de
Fahrenheit a Celsius o de Celsius a Fahrenheit:
1. Para saber si la pantatla esta programada para Fahrenheit o
Celsius, pulse y mantenga el bot6n _. "BROIL",
_550 O_
aparecer&n en la pantalta (vea Fig.1 ) y continue de PULSAR per
7 segundos. Un sonido se escuchar;&. Si "F" aparece, la pantalla
mostrar& temperaturas en Fahrenheit (Fig.2). Si "C" aparece, la
pantalla mostrar;& temperaturas en Celsius (Fig.3).
2. Oprima _ para cambiar entre el mode de despliegue de
Fahrenheit o Celsius. Et indicador mostrar& ya sea "F" (Fig. 2)
o "C" (Fig. 3).
3. Oprima _ para aceptar et cambio uoprima _ para
rechazar el cambio.
OPRIMA
(_ durante
7segundos
Q
®o®
INDICADOR
Figura 1
Figura 2
Figura 3
Functionamiento Silencioso de los Controles
Las teclas TIEMPO DE PARADA y LIMPIEZA controlan la caracteristica de funcionamiento silencioso de _
los controles. La caracteristica de funcionamiento sitencioso de los controles permite que et control del homo sea
operatic sin sonidos o se_ates sonoras cuando sea necesario. Si se desea el control puede ser programatic para _;_
funcionamiento silencioso y m_s tarde volver a funcionamiento con todos los sonidos y se_ales sonoras normales, y_
INSTRUCCIONES OPRIMA INDICADOR
Cambio del funcionamiento con sonidos normales
de los controles a funcionamiento silencioso de los
controles:
1. Para verificar si su estufa est& programada para funcionamiento
normal o sitencioso oprima y mantenga oprimida la tecla
durante 7 segundos. En et indicador aparecerA y destellar;&
"DELAY" (Fig.4). Si aparece ":SP" (Fig. 5), et control
funcionar& con los sonidos y seSates sonoras normales. Si
aparece ":- -" (Fig. 6), el control est& programatic para
funcionamiento silencioso.
Oprima O para cambiar entre funcionamiento con sonido
2.
normal y funcionamiento silencioso. Et indicador mostrar& ya
sea ":SP" (Fig. 5) o ":- -" (Fig. 6).
3. Oprima _ para aceptar et cambio uoprima _ para
rechazar el cambio.
®
Q
@o®
Figura 4
Figura 5
Figura 6
55
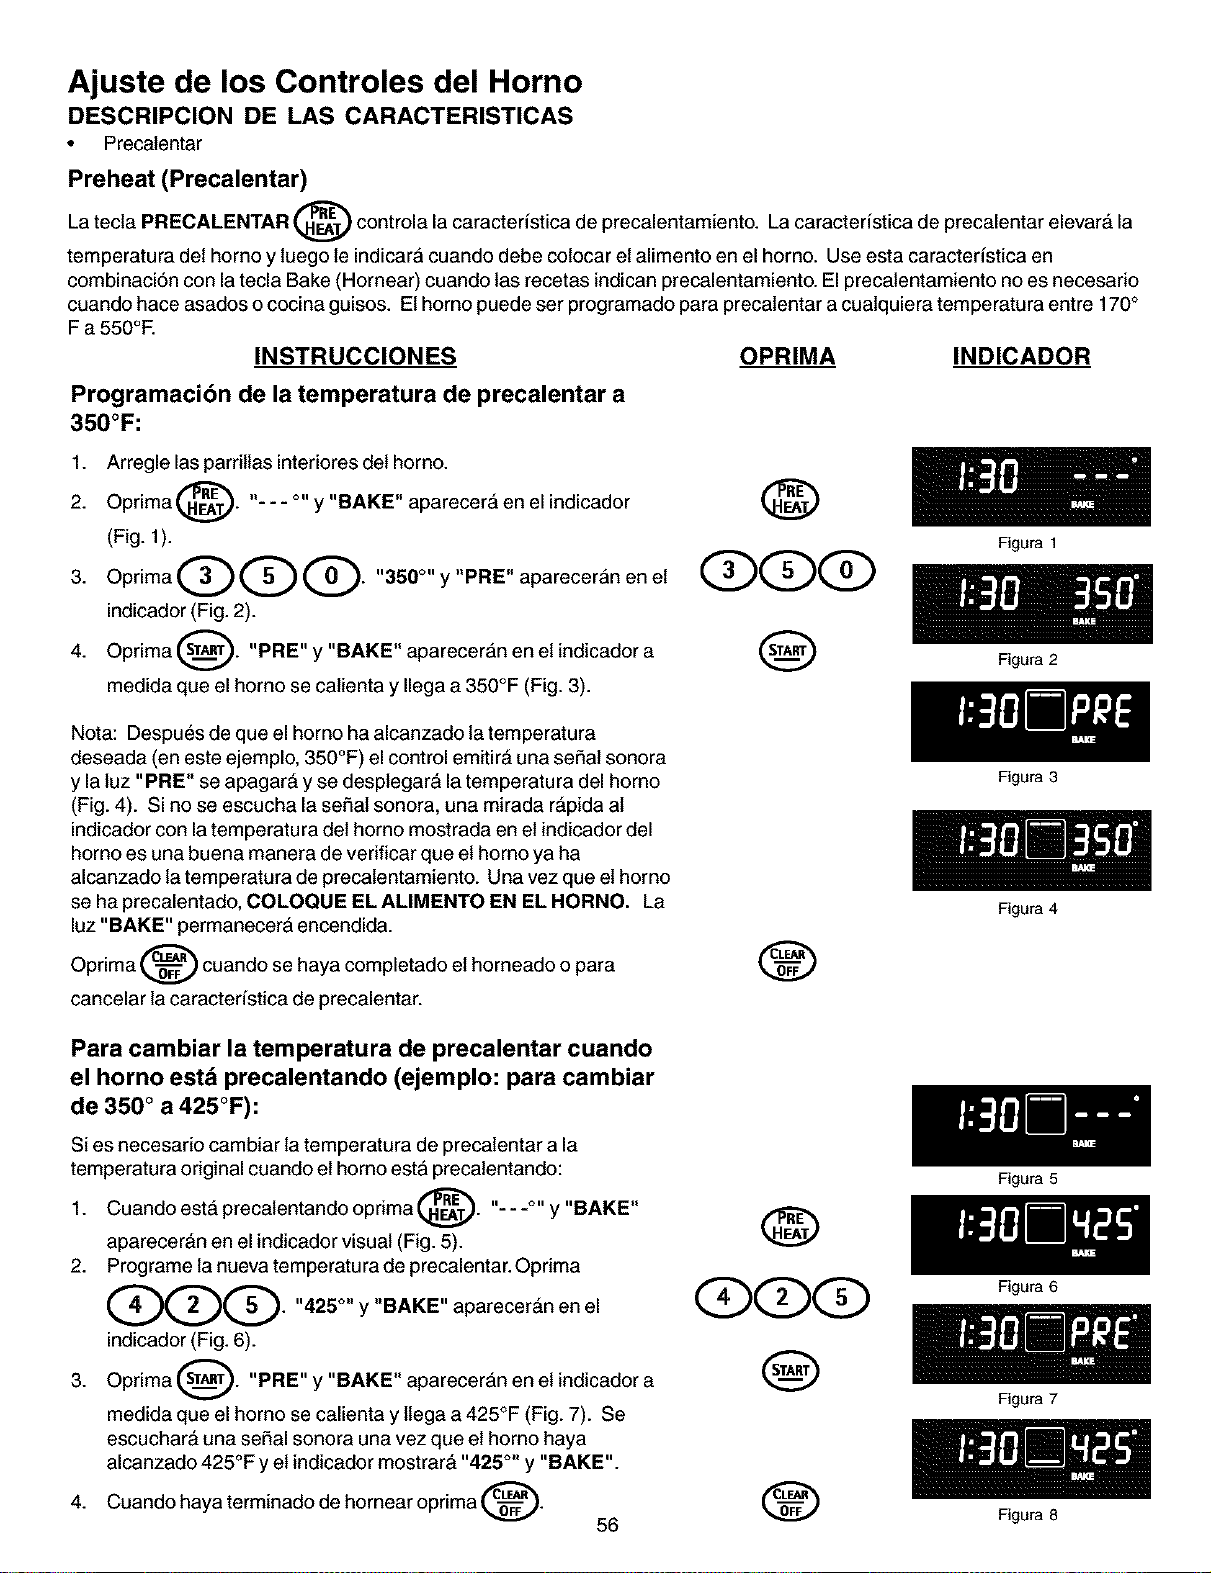
Ajuste de los Controles del Horno
DESCRIPCION DE LAS CARACTERISTICAS
• Precalentar
Preheat (Precalentar)
La tecta PRECALENTAR @ controla la caracteristica de precalentamiento. La caracteristica de precalentar elevar_ la
temperatura det homo y luego le indicara cuando debe colocar et alimento en el homo. Use esta caracteristica en
combinaci6n con la tecla Bake (Hornear) cuando las recetas indican precalentamiento. Elprecalentamiento no es necesario
cuando hace asados o cocina guisos. Ethomo puede ser programado para precatentar a cuatquiera temperatura entre 170°
F a 550°E
INSTRUCCIONES OPRIMA INDICADOR
Programacibn de la temperatura de precalentar a
350°F:
1. Arregle las parritlas interiores det homo.
Oprima _"_. "- - - °" y "BAKE" aparecer& en
2.
el indicador
(Fig. 1).
3. OprimaQQQ. "350°"y"PRE"aparecer;&nenet
indicador (Fig. 2).
Oprima (_). "PRE" y "BAKE" aparecer;&n en et indicador a
4.
medida que el homo se catienta y Ilega a 350°F (Fig. 3).
@
Q(S>q
@
Nota: Despues de que el homo ha alcanzado la temperatura
deseada (en este ejemplo, 350°F) el control emitir& una seSat sonora
y la luz "PRE" se apagar& y se desplegar& la temperatu ra del homo
(Fig. 4). Si no se escucha la seSal sonora, una mirada r&pida at
indicador con la temperatura det homo mostrada en et indicador del
homo es una buena manera de verificar que et homo ya ha
alcanzado la temperatura de precatentamiento. Una vez que el homo
se ha precalentado, COLOQUE EL ALIMENTO EN EL HORNO. La
luz "BAKE" permanecerA encendida.
Oprima _ cuando se haya completado et horneado o para
cancelar la caracteristica de precalentar.
®
Para cambiar la temperatura de precalentar cuando
el horno estd precalentando (ejemplo: para cambiar
de 350 ° a 425°F):
Si es necesario cambiar la temperatura de precalentar a la
temperatura original cuando et homo est;&precatentando:
1. Cuando est& precalentando oprima _"_. "- - -°" y "BAKE"
v
aparecer&n en el indicador visual (Fig. 5).
2. Programe la nueva temperatura de precalentar.Oprima
QOG" "425°" Y "BAKE" aparecer&n en el
indicador (Fig. 6).
3. Oprima _. "PRE" y "BAKE" aparecer;&n en et indicador a
medida que el homo se calienta y ltega a 425°F (Fig. 7). Se
escuchar& una seSal sonora una vez que et homo haya
alcanzado 425°F y et indicador mostrar& "425 °" y "BAKE".
haya terminado de hornear oprima _.
4.
Cuando
56
@
QqDqD
@
0
Figura 1
Figura 2
Figura 3
Figura 4
Figura 5
Figura 6
Figura 7
Figure 8
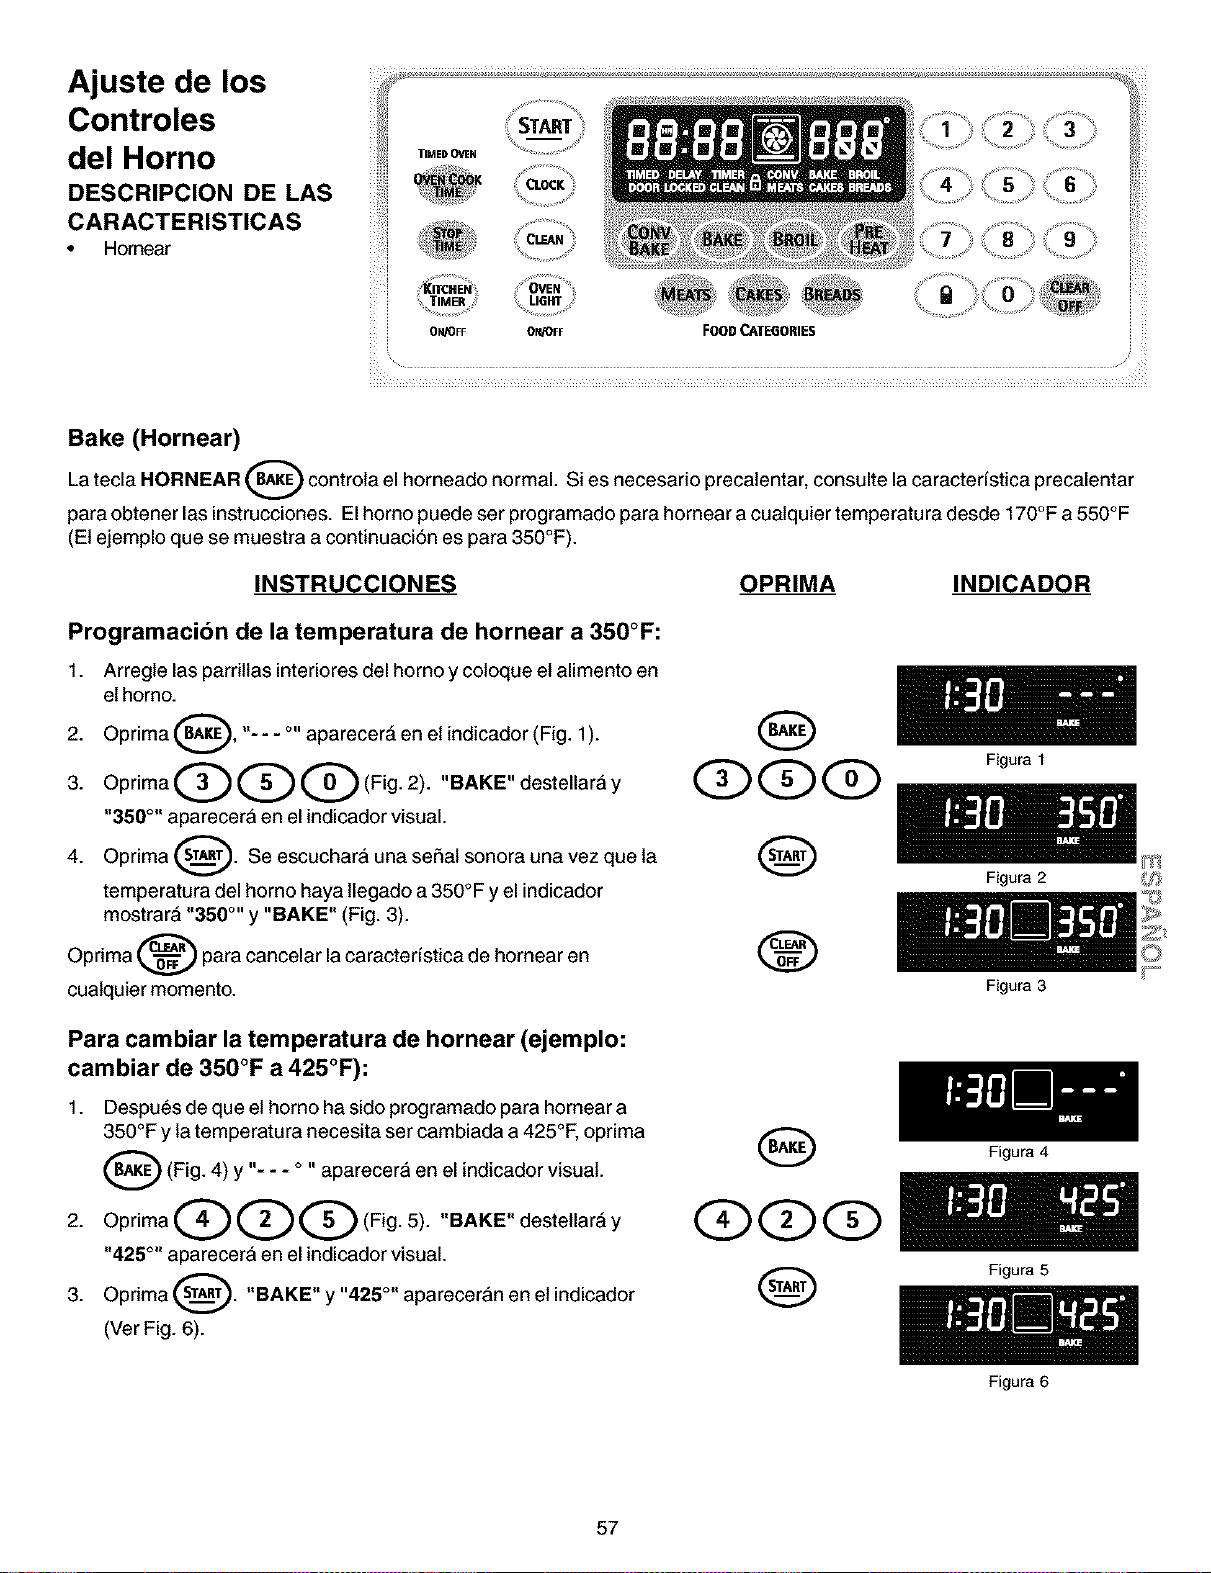
Ajuste de los
Controles
del Horno
DESCRIPCION DE LAS
CARACTERISTICAS
• Hornear
_ _ ¸¸¸4¸
_i ¸ _ , __ _._ ._ ._ ._
i_i START 2 3
TIMEDOVeN _ .....
........... %
• _ocK
TIMER
ON/OFF ON/OFF FOOD CAI"E6ORIE$
Bake (Hornear)
Latecla HORNEAR _ controlael homeado normal. Si es necesario precatentar, consulte lacaracteristica
precalentar
para obtener las instrucciones. El homo puede ser programado para hornear a cualquier temperatura desde 170°F a 550°F
(El ejemplo que se muestra a continuacibn es para 350°F).
INSTRUCCIONES OPRIMA INDICADOR
Programacibn de la temperatura de hornear a 350°F:
1. Arregle las parritlas interiores del homo y coloque et alimento en
el horno.
Oprima _, "- - - °" aparecer& en et indicador (Fig. 1).
2.
3. OprimaQQQ(Fig. 2). "BAKE"destellar_'ly
"350 °" aparecerA en el indicador visual.
Oprima _. Se escucharA una sehal sonora una vez que la
4.
temperatura del homo haya llegado a350°F y el indicador
mostrar& "350 °'' y "BAKE" (Fig. 3).
Oprima _ para cancelar la caracteristica de hornear en
cuatquier momento.
Q
Q
Para cambiar la temperatura de hornear (ejemplo:
cambiar de 350°F a 425°F):
1. Despu_s de que el homo ha sido programado para hornear a
350°F y la temperatura necesita ser cambiada a 425°F, oprima
_(Fig. 4) y -- aparecerA en
I1=
o II
el indicador visual.
2. OprimaQQQ(Fig. 5). "BAKE"destetlar&y
"425 °" aparecer& en el indicador visual.
3. Oprima _. "BAKE" y "425 °" aparecer&n en et indicador
(Ver Fig. 6).
O
(Z)(D(Z)
Q
Figura 1
Figura 2
Figura 3
Figura 4
Figura 5
Figura 6
m
57
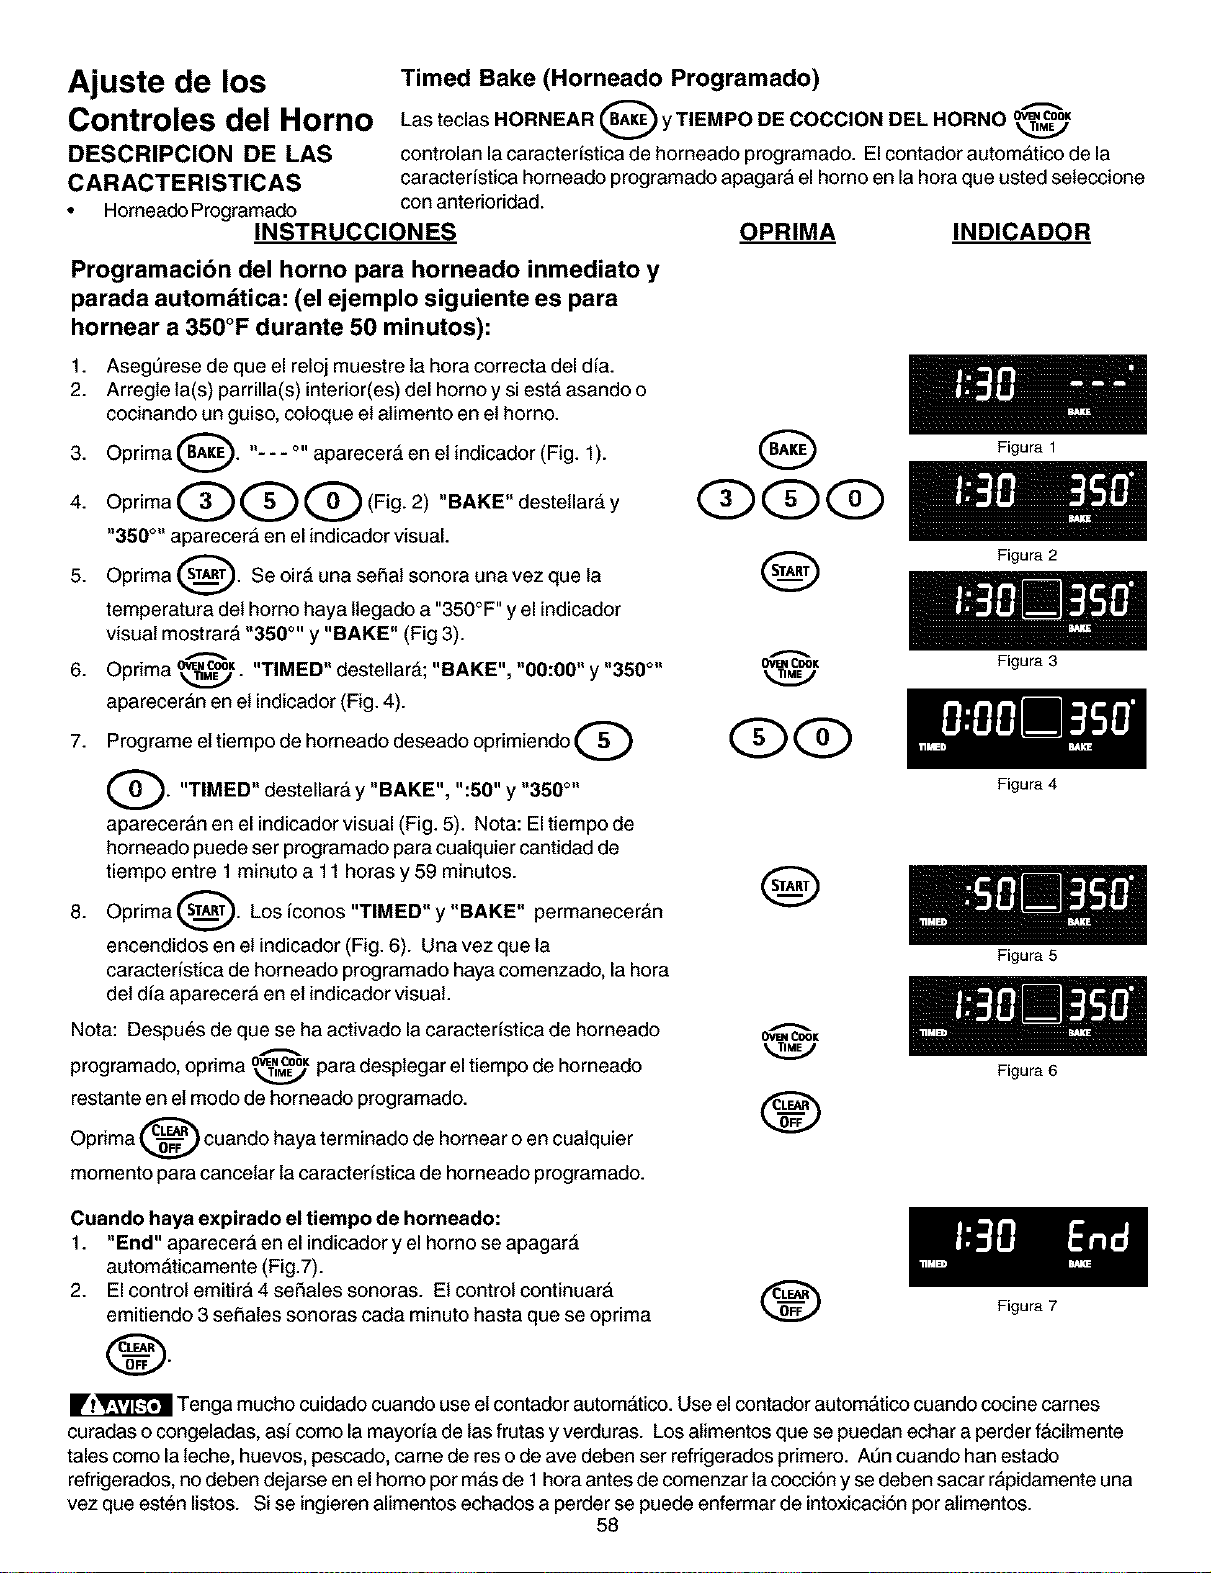
Ajuste de los
Controles del Horno
DESCRIPCION DE LAS
CARACTERISTICAS
• Horneado Programado
Timed Bake (Horneado Programado)
Q ---
_ L'_OK
Las teclas HORNEAR y TIEMPO DE COCClON DEL HORNO
controlan la caracter(stica de horneado programado. Elcontador automatico de la
caracter(stica horneado programado apagara el homo en la horaque usted seteccione
con anterioridad.
INSTRUCCIONES
Programacibn del horno para horneado inmediato y
parada automdtica: (el ejemplo siguiente es para
hornear a 350°F durante 50 minutos):
1. Asegt3rese de que el reloj muestre la hora correcta del dia.
2. Arregle la(s) parrilla(s) interior(es) del horno y si est;&asando o
cocinando un guiso, coloque et alimento en et horno.
3. Oprima _. "- - - o,,aparecer_ en et indicador (Fig. 1).
40primaQQQ Fi02,"BAKE"deste,ar y
"350 °" aparecer;& en el indicadorvisual.
5. Oprima _. Se oir& una seSat sonora una vez que la
temperatura det horno haya ltegado a "350°F ''y el indicador
visual mostrar& "350 °'' y "BAKE" (Fig 3).
6. Opnma" ow,c®_k,_. "TIMED" destellar_; "BAKE", "00:00" y "350 °"
aparecer;&n en et indicador (Fig. 4).
7. Programe el tiempo de horneado deseado oprimiendo Q
G. y "BAKE", ":50" y "350 °"
UT_MED'I
destellar&
aparecer;&n en el indicador visual (Fig. 5). Nota: El tiempo de
horneado puede ser programado para cualquier cantidad de
tiempo entre 1 minuto a 11 horas y 59 minutos.
8. Oprima _. Los (conos "TIMED" y "BAKE" permanecer_n
encendidos en el indicador (Fig. 6). Una vez que la
caracter(stica de horneado programado haya comenzado, la hora
det d(a aparecer;& en et indicador visual.
Nota: Despues de que se ha activado la caracter(stica de horneado
programado, oprima _K para desplegar el tiempo de horneado
restante en el modo de horneado programado.
Oprima _ cuando haya terminado de hornear o en cuatquier
momento para cancetar la caracter(stica de horneado programado.
OPRIMA INDICADOR
Figura 1
Q Figura 2
ovr_cook Figura 3
O
_K
Cuando haya expirado el tiempo de horneado:
1. "End" aparecera en el indicadory el homo se apagar&
automaticamente (Fig.7).
2. El control emitir;&4 seSales sonoras. Et control continuara
emitiendo 3 seSates sonoras carla minuto hasta que se oprima
®.
®
Figura 4
Figura 5
Figura 6
Figura 7
Tenga mucho cuidado cuando use el contador autom&tico. Use el contador autom&tico cuando cocine carnes
curadas o congeladas, as( como la mayor(a de las frutas y verduras. Los alimentos que se puedan echar a perder facilmente
tales como la leche, huevos, pescado, came de res o de ave deben ser refrigerados primer(>. At3ncuando hart estado
refrigerados, no deben dejarse en el homo por mas de 1 hora antes de comenzar la cocci6n y se deben sacar r&pidamente una
vez que esten listos. Si se ingieren alimentos echados a perder se puede enfermar de intoxicaci6n por alimentos.
58
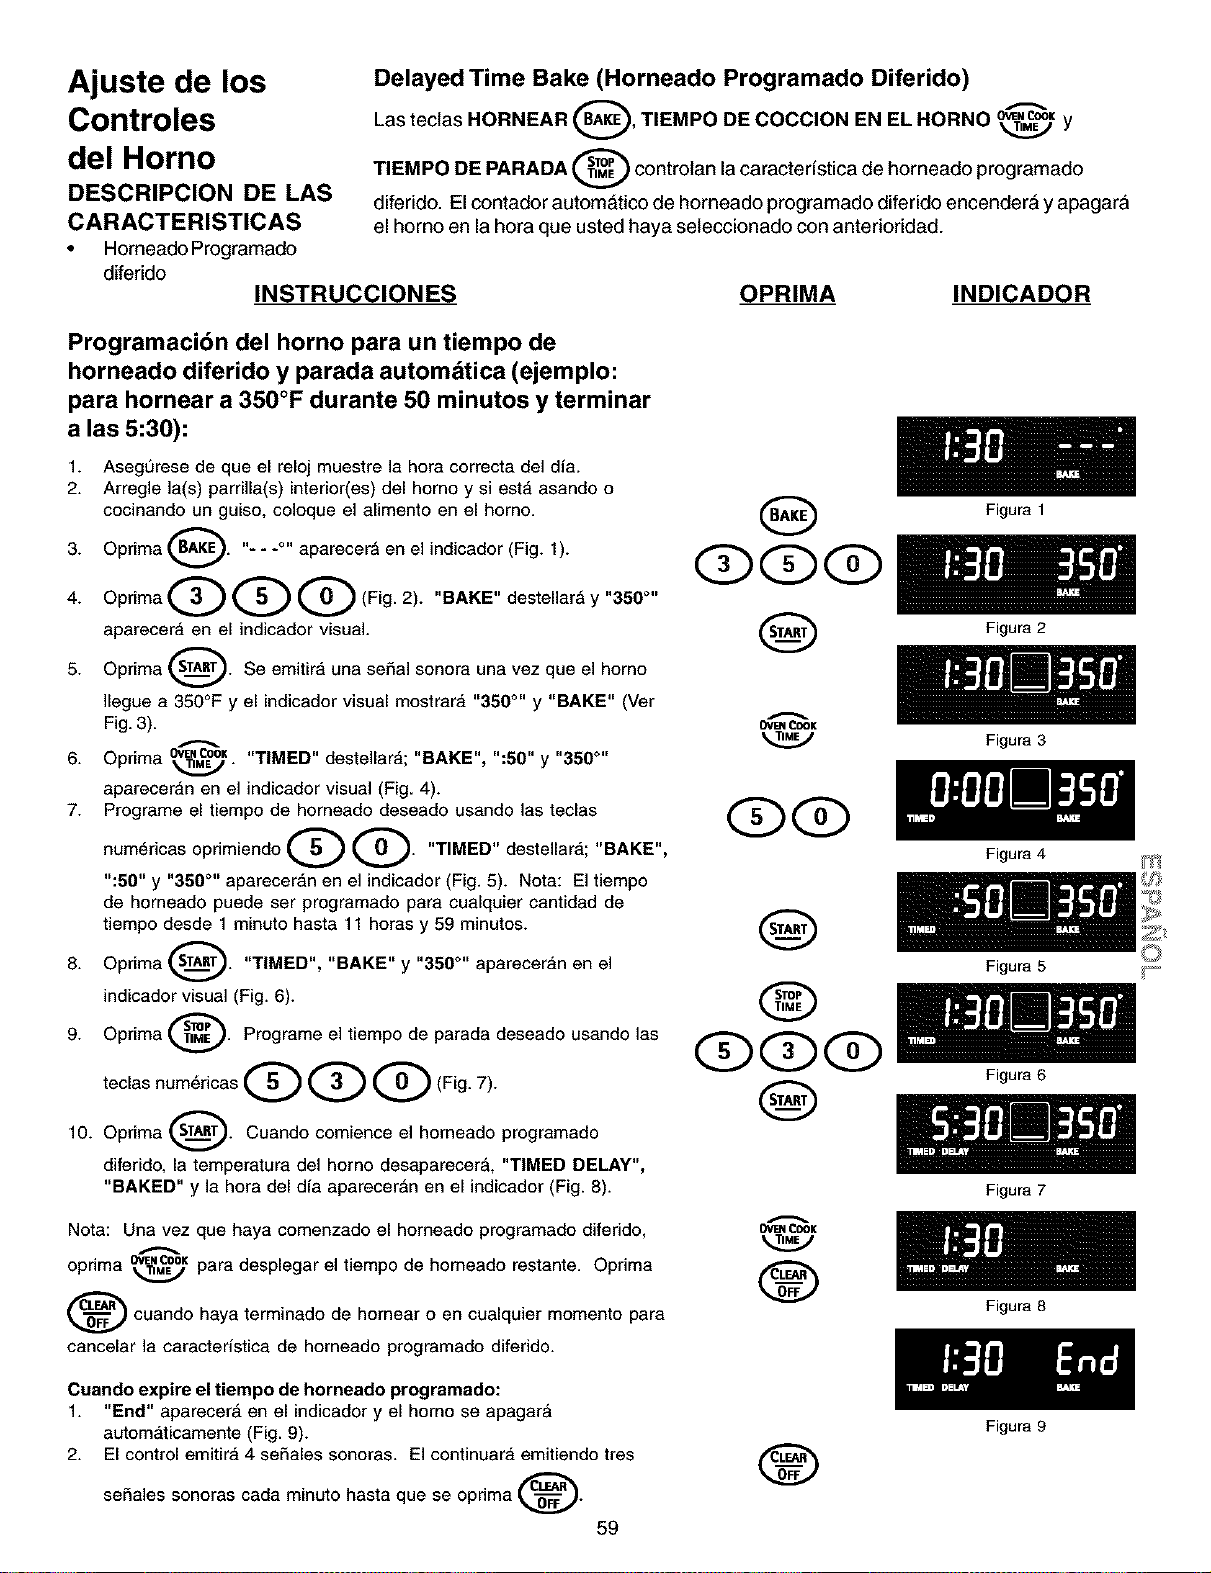
Ajuste de los
Controles
del Horno
DESCRIPCION DE LAS
CARACTERISTICAS
• Horneado Programado
diferido
INSTRUCCIONES
Delayed Time Bake (Horneado Programado Diferido)
0 "-"
Las teclas HORNEAR , TIEMPO DE COCClON EN EL HORNO OWNCOOK___j y
controlan la caracteristica de horneado programado
TIEMPO DE PARADA
diferido. El contador autom_tico de horneado programado diferido encender_ y apagara
el homo en la hora que usted haya seleccionado con anterioridad.
OPRIMA INDICADOR
Programacibn del horno para un tiempo de
horneado diferido y parada automdtica (ejemplo:
para hornear a 350°F durante 50 minutos y terminar
a las 5:30):
1. Asegurese de que el reloj muestre la hora correcta del dia.
2. Arregle ]a(s) parrilla(s) interior(es) del homo y si est,, asando o
cocinando un guiso, coloque el alimento en el homo.
3. Oprima BA_. "---°" aparecer_ en el indicador (Fig. 1).
4. OprimaQQQ(Fig. 2). "BAKE"destellar, y"350 °"
aparecera en el indicador visual.
5. Oprima _. Se emitira una se£_a]sonora una vez que el homo
A
]legue a 350°F y el indicador visual mostrara "350 °" y "BAKE" (Ver
Fig. 3).
• OW.COOK"TIMED" destellara; "BAKE", ":50" y "350 °"
6. Opnma _.,/.
apareceran en el indicador visual (Fig. 4).
7. Programe el tiempo de horneado deseado usando las teclas
num6ricas opdmiendo Q Q. "TIMED" destellara; "BAKE",
":50" y "350 °'' aparecer_,n en el indicador (Fig. 5). Nota: El tiempo
de horneado puede ser programado para cualquier cantidad de
tiempo desde 1 minuto hasta 11 horas y 59 minutos.
8. Oprima _. "TIMED", "BAKE" y "350 °'' apareceran en el
indicador visual (Fig. 6).
9. Oprima sn_._. Programe el tiempo de parada deseado usando las
teclas num,ricas Q Q Q (Fig. 7).
10. Oprima _. Cuando comience el horneado programado
diferido, la temperatura del homo desaparecer_, "TIMED DELAY",
"BAKED" y la hora del dia aparecer_n en el indicador (Fig. 8).
Nora: Una vez que haya comenzado el homeado programado diferido,
opnma" ow,_cooKpara desplegar el tiempo de homeado restante. Oprima
_ cuando haya terminado de hornear o en cualquier momento para
cancelar la caracteristica de horneado programado diferido.
Q
OVENCOOK
Q
O
QQQ
Q
Ovr=NCOOK
®
Figura 1
Figura 2
Figura 3
Figura 4
Figura 5
Figura 6
Figura 7
Figura 8
m
Cuando expire el tiempo de horneado programado:
1. "End" aparecer_ en el indicador y el homo se apagar_
autom_,ticamente (Fig. 9).
2. El control emitira 4 seSales sonoras. El continuara emitiendo tres
seSales sonoras cada minuto hasta que se oprima _.
59
®
Figura 9
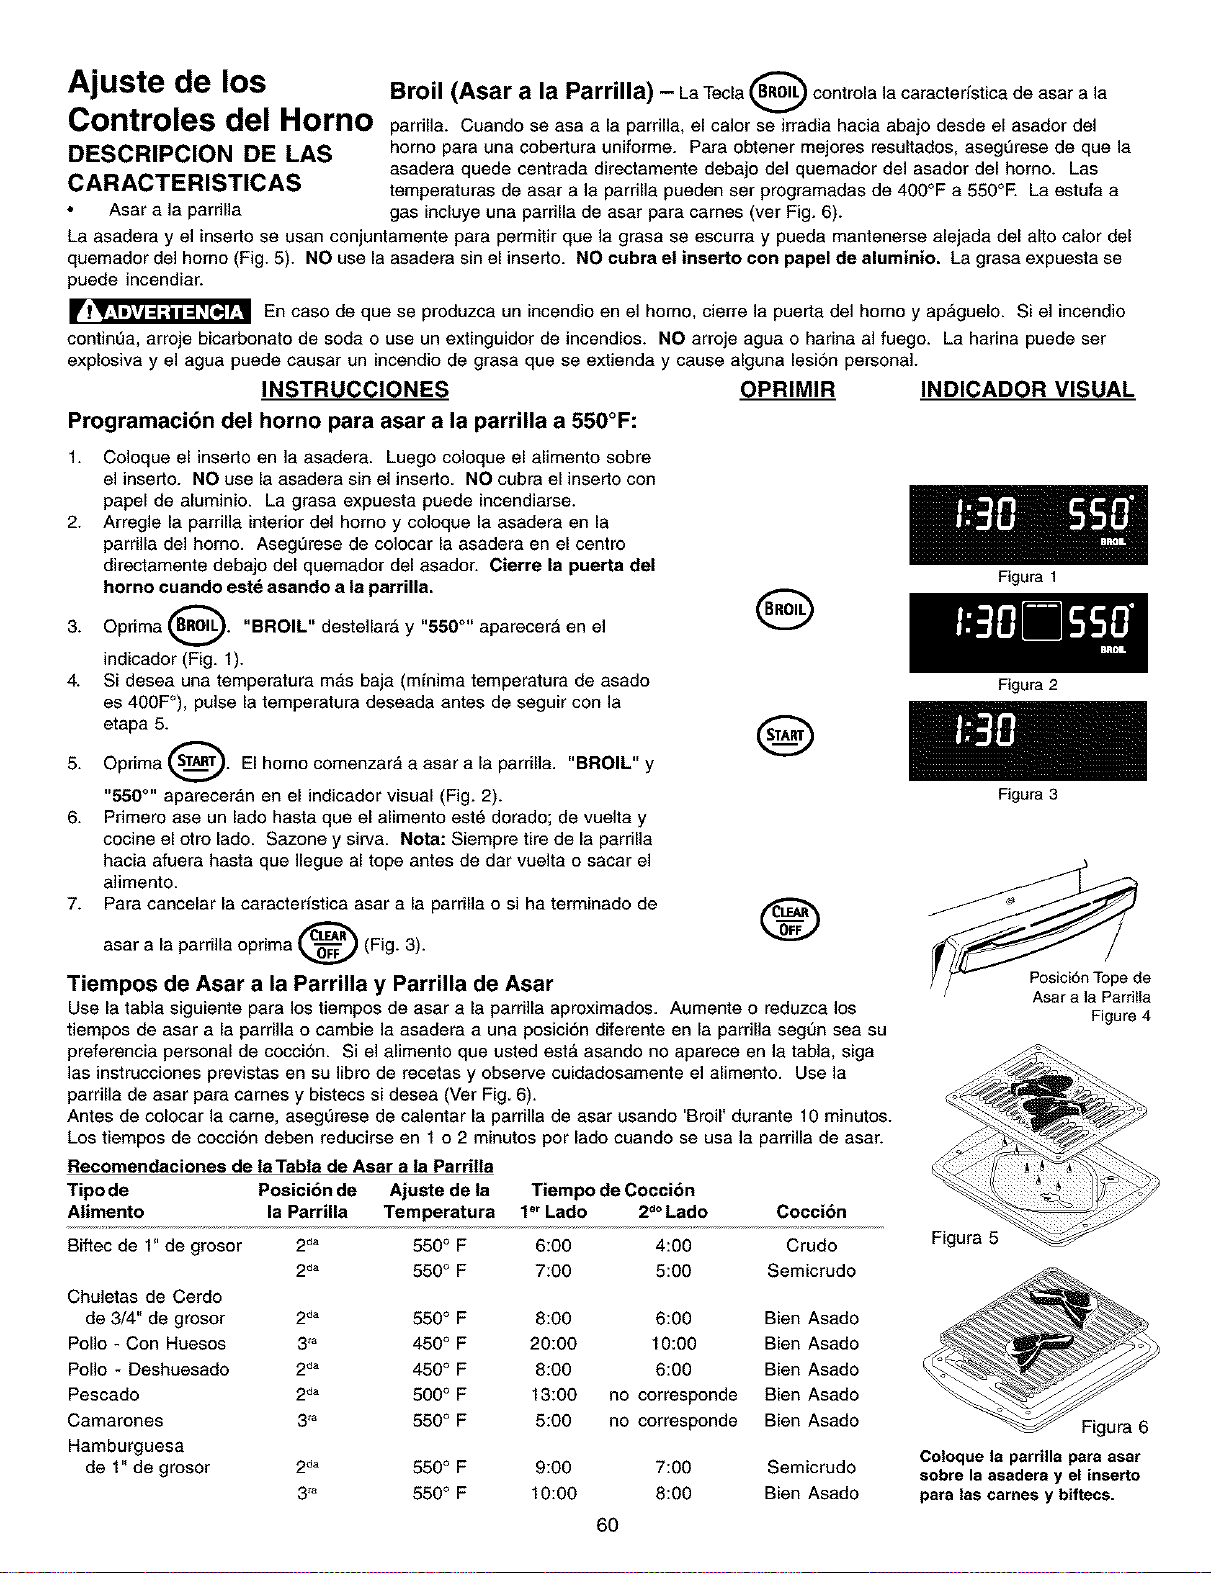
^="'Mju=t= de los Broil (Asar a la Parrilla) - La Tecia _(.BRoIL)controla ]a caracteristica de asar a ]a
Controles del Homo parriila. Cuando se asa a ]a parriila, el ca]orVse irradia hacia abajo desde el asador del
DESCRIPCION DE LAS homo para una cobertura uniforme. Para obtener mejores resuitados, asegL_rese de que ]a
asadera quede centrada directamente debajo del quemador del asador del horno. Las
CARACTERISTICAS temperaturas de asar a ]a parrilla pueden ser programadas de 400°F a 550°E La estufa a
Asar a la pardila gas inciuye una pardila de asar para carnes (ver Fig. 6).
La asadera y el inserto se usan conjuntamente para permitir que ]a grasa se escurra y pueda mantenerse alejada del alto calor del
quemador del homo (Fig. 5). NO use ]a asadera sin el inserto. NO cubra el inserto con papel de aluminio. La grasa expuesta se
puede incendiar.
En caso de que se produzca un incendio en el homo, cierre la puerta del homo y ap_gue]o. Si el incendio
continL_a, arroje bicarbonato de soda o use un extinguidor de incendios. NO arroje agua o harina al fuego. La harina puede ser
expiosiva y el agua puede causar un incendio de grasa que se extienda y cause aiguna ]esi6n personal.
INSTRUCCIONES OPRIMIR INDICADOR VISUAL
Programaci6n del homo para asar a la parrilla a 550°F:
1. Co]oque el inserto en ]a asadera. Luego co]oque el alimento sobre
el inserto. NO use ]a asadera sin el inserto. NO cubra el inserto con
papel de aluminio. La grasa expuesta puede incendiarse.
2. Arregle la parrilla interior del homo y coloque la asadera en la
parrilla del homo. AsegL_rese de co]ocar ]a asadera en el centro
directamente debajo del quemador del asador. Cierre la puerta del
horno cuando est_ asando a la parrilla.
3. Oprima _. "BROIL" desteHar_ y "550 °" aparecer_ en el
indicador (Fig. 1).
4. Si desea una temperatura mas baja (minima temperatura de asado
es 400F°), pulse ]a temperatura deseada antes de seguir con ]a
etapa 5._
5. Oprima _. El homo comenzara a asar a la parrilla. "BROIL" y
"650 °" apareceran en el indicador visual (Fig. 2).
6. Primero ase un lado hasta que el alimento est_ dorado; de vuelta y
cocine el otro lado. Sazone y sirva. Nota: Siempre tire de la parrilla
hacia afuera hasta que ]legue al tope antes de dar vueita o sacar el
alimento.
7. Para cancelar la caracteristica asar a la parrilia o si ha terminado de
asar a la parri]la oprima _ (Fig. 3).
Tiempos de Asar a la Parrilla y Parrilla de Asar
Use la tabla siguiente para los tiempos de asar a la parrilla aproximados. Aumente o reduzca los
tiempos de asar a la parri]ia o cambie ]a asadera a una posici6n diferente en la parrilia segun sea su
preferencia personal de cocciSn. Si el alimento que usted est_ asando no aparece en ]a tabla, siga
]as instrucciones previstas en su ]ibro de recetas y observe cuidadosamente el alimento. Use ]a
parrilia de asar para carnes y bistecs si desea (Ver Fig. 6).
Antes de colocar ]a came, asegL_rese de calentar la parrilla de asar usando 'Broil' durante 10 minutos.
Los tiempos de coccion deben reducirse en 1 o 2 minutos por lado cuando se usa ]a parrilla de asar.
Recomendaciones de la Tabla de Asar a la Parrilla
Tipo de Posicibn de Ajuste de la Tiempo de Coccibn
Alimento la Parrina Temperatura 1°r Lado 2d°Lado
Coccibn
Biftec de 1" de grosor
2da 550 ° F 6:00 4:00 Crudo
2da 550 ° F 7:00 5:00 Semicrudo
Chuletas de Cerdo
de 3/4" de grosor 2 d" 550 ° F 8:00 6:00 Bien Asado
Polio - Con Huesos 3'_ 450° F 20:00 10:00 Bien Asado
Polio - Deshuesado 2d" 450° F 8:00 6:00 Bien Asado
Pescado 2d" 500° F 13:00 no corresponde Bien Asado
Camarones 3'_ 550° F 5:00 no corresponde Bien Asado
Hamburguesa
de 1" de grosor 2 d" 550 ° F 9:00 7:00 Semicrudo
3'_ 550° F 10:00 8:00 Bien Asado
Figura 1
Figura 2
Figura 3
Figure 4
Figura 5
Figura 6
Coloque la parrUla para asar
sobre la asadera y el inserto
para las cames y biftecs.
6O
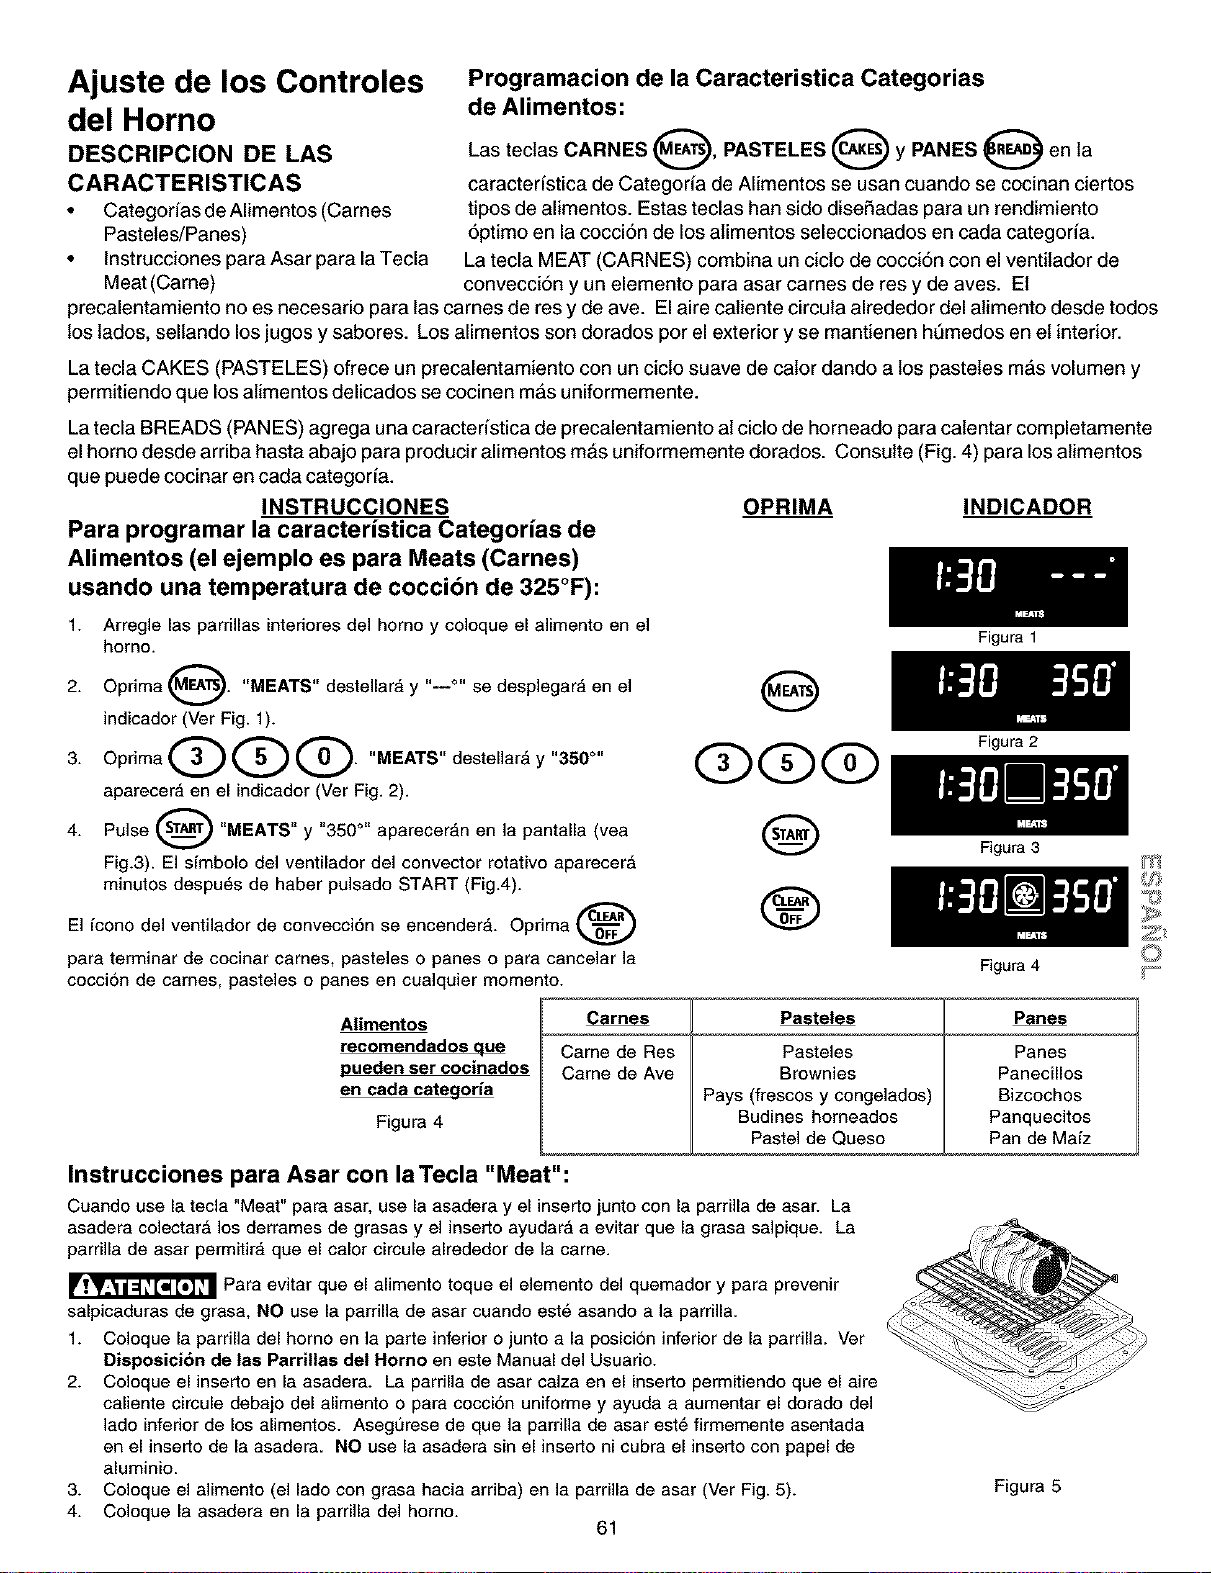
Ajuste de los Controles
del Horno
DESCRIPCION DE LAS
CARACTERISTICAS
• Categorias de Alimentos (Carnes
Pasteles/Panes)
• Instrucciones para Asar para la Tecla
Meat (Came)
Programacion de la Caracteristica Categorias
de Alimentos:
Las tectas CARNES O, PASTELES O y PANES O en la
caracteristica de Categoria de Alimentos se usan cuando se cocinan ciertos
tipos de alimentos. Estas teclas han sido diseSadas para un rendimiento
6primo en la cocci6n de los atimentos seleccionados en cada categoria.
La tecla MEAT (CARNES) combina un cicto de cocci6n con el ventitador de
convecci6n y un elemento para asar carnes de res y de ayes. Et
precalentamiento no es necesario para las carnes de res y de ave. El aire caliente circula alrededor del alimento desde todos
los lades, sellando los jugos y sabores. Los alimentos son dorados per el exterior y se mantienen ht_medos en et interior.
La tecla CAKES (PASTELES) ofrece un precalentamiento con un cicto suave de cator dando a los pasteles mas volumen y
permitiendo que los atimentos delicados se cocinen mas uniformemente.
La tecla BREADS (PANES) agrega una caracteristica de precalentamiento at ciclo de horneado para catentar completamente
el homo desde arriba hasta abajo para producir alimentos m&s uniformemente dorados. Consulte (Fig. 4) para los atimentos
que puede cocinar en carla categoria.
INSTRUCCIONES OPRIMA INDICADOR
Para prograrnar la caracteristica Categorias de
Alimentos (el ejemplo es para Meats (Carnes)
usando una ternperatura de cocci6n de 325°F):
1. Arregle las parrillas intedores del homo y coloque el a]imento en el
homo.
2. Oprima (_. "MEATS" destellara y "--°" se desplegara en el
i
indicador (Ver Fig. 1).
3. OprimaQQQ. "MEATS"destellar, y"350 °"
aparecera en el indicador (Ver Fig. 2).
4. Pulse _ "MEATS" y "350 °" aparecer_,n en la pantalla (vea
Fig.3). El simbolo del ventilador del convector rotativo aparecer_
minutos despu_s de haber pulsado START (Fig.4).
El icono del ventilador de convecci6n se encender_,. Oprima
para terminar de cocinar carnes, pasteles o panes o para cancelar la
cocci6n de carnes, pasteles o panes en cualquier momento.
@
Q@@
@
®
Alimentos
recomendados que
pueden ser cocinados
en cada categoria
Figura 4
Carnes
Came de Res
Came de Ave
Pasteles
Pasteles
Brownies
Pays (frescos y congelados)
Budines homeados
Pastel de Queso
Figura 1
Figura 2
Figura 3
Figura 4
Panes
Panes
Panecillos
Bizcochos
Panquecitos
Pan de Maiz
Instrucciones para Asar con la Tecla "Meat":
Cuando use la tecla "Meat" para asar, use la asadera y el Jnserto junto con la parrilla de asar. La
asadera colectar_ los derrames de grasas y el inserto ayudar_, a evitar que la grasa saipique. La
parrilla de asar permitira que el calor circule alrededor de la came.
_Para evitar que el alimento toque el elemento del quemador y para prevenir
salpicaduras de grasa, NO use la parrilla de asar cuando est6 asando a la parrilla.
1. Coloque la parrilla del homo en la parts inferior o junto a la posici6n inferior de la parrilla. Ver
Disposici6n de las Parrillas del Rome en este Manual del Usuario.
2. Coloque el inserto en la asadera. La parrilla de asar calza en el inserto permitiendo que el aire
caliente circule debajo del alimento o para cocci6n uniforme y ayuda a aumentar el dorado del
lado infedor de los alimentos. Asegt_rese de que la parrilla de asar est6 firmemente asentada
en el inserto de la asadera. NO use la asadera sin el inserto ni cubra el inserto con papel de
aluminio.
3. Coloque el alimento (el lado con grasa hacia arriba) en la parrilla de asar (Ver Fig. 5).
4. Coloque la asadera en la parrilla del horno.
61
Figura 5
m
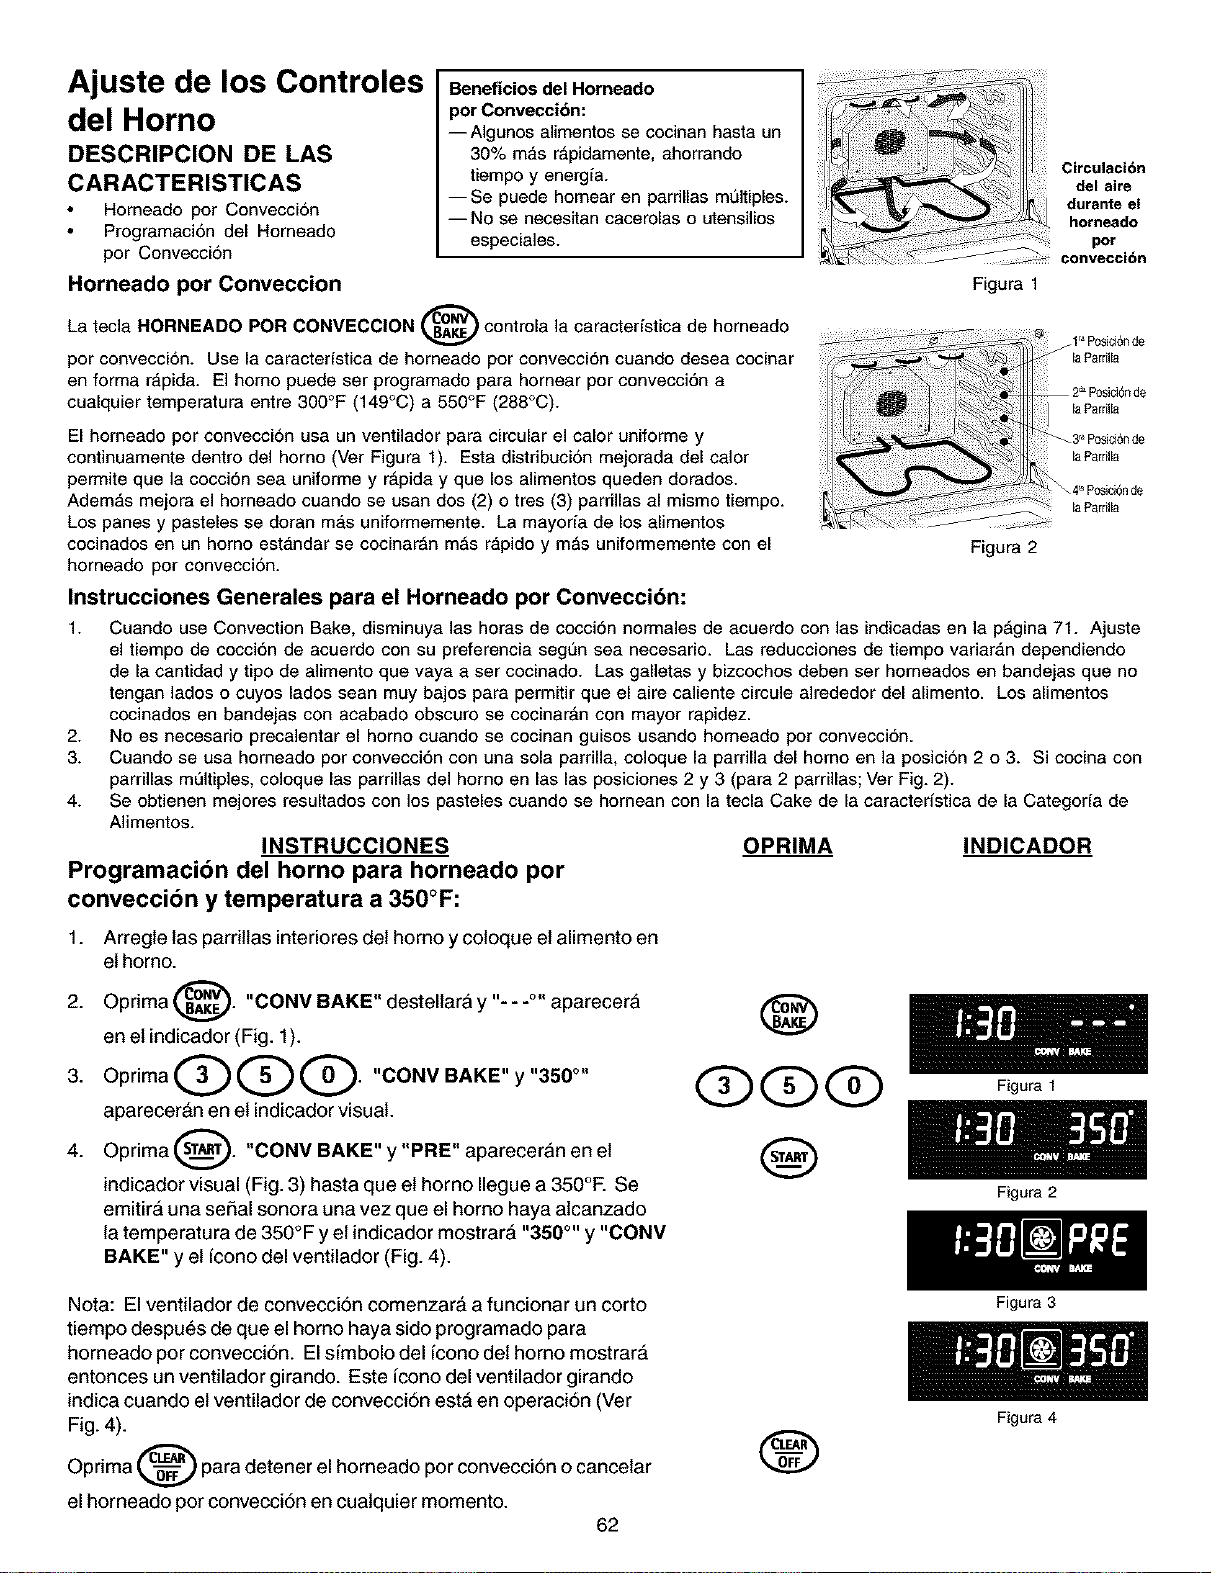
Ajuste de los Controles
del Horno
DESCRIPCION DE LAS
CARACTERISTICAS
Horneado por Convecci6n
Programacidn del Horneado
por Conveccidn
Beneficios del Horneado
per Convecci6n:
--AIgunos alimentos se cocinan hasta un
30% mas r_pidamente, ahorrando
tiempo y energia.
--Se puede homear en parrinas multiples.
--No se necesitan cacerolas o utensilios
especiales.
Horneado por Conveccion
La tecla HORNEADO POR CONVECClON _ controla la caracterfstica de horneado
v
por convecci6n. Use la caracterfstica de horneado por convecci6n cuando desea cocinar
en forma r4,pida. El homo puede ser programado para hornear por convecci6n a
cualquier temperatura entre 300°F (149°C) a 550°F (288°C).
El homeado por convecci6n usa un ventilador para circular el calor uniforme y
continuamente dentro del homo (Ver Figura 1). Esta distribuci6n mejorada del calor
perrnite que la cocci6n sea uniforme y r4,pida y que los alimentos queden dorados.
Adem4,s mejora el homeado cuando se usan dos (2) o tres (3) parrillas al mismo tiempo.
Los panes y pasteles se doran m4,s uniformemente. La mayoria de los alimentos
cocinados en un homo estandar se cocinar_n m_s rapido y m_s uniforrnemente con el
horneado por convecci6n.
Instrucciones Generales para el Horneado por Conveccibn:
Circulaci6n
del aire
durante el
horneado
por
convecci6n
Figura 1
Figura 2
1. Cuando use Convection Bake, disminuya las horas de cocci6n normales de acuerdo con las indicadas en la p_gina 71. Ajuste
el tiempo de cocci6n de acuerdo con su preferencia segun sea necesario. Las reducciones de tiempo variar4,n dependiendo
de la cantidad y tipo de alimento que vaya a ser cocinado. Las galletas y bizcochos deben ser horneados en bandejas que no
tengan lados o cuyos lados sean muy bajos para permitir que el aire caliente circule alrededor del alimento. Los alimentos
cocinados en bandejas con acabado obscuro se cocinar4,n con mayor rapidez.
2. No es necesario precalentar el homo cuando se cocinan guisos usando homeado por convecciSn.
3. Cuando se usa homeado por convecciSn con una sola parrilla, coloque la parrilla del homo en la posiciSn 2 o 3. Si cocina con
parrillas m01tiples, coloque las parrillas del homo en las las posiciones 2 y 3 (para 2 parrillas; Ver Fig. 2).
4. Se obtienen mejores resultados con los pasteles cuando se homean con la tecla Cake de la caracteristica de la Categoria de
Alimentos.
INSTRUCCIONES OPRIMA INDICADOR
Programacibn del horno para horneado por
conveccibn y temperatura a 350°F:
1. Arregle las parritlas interiores del homo y coloque et alimento en
el horno.
2. Oprima _. "CONV BAKE" destellarA y "---°" aparecerA
v
en et indicador (Fig. 1).
3. OprimaQQQ. "CONVBAKE"y"350 °"
aparecer&n en et indicador visual.
4. Oprima _. "CONV BAKE" y "PRE" apareceran en et
indicador visual (Fig. 3) hasta que et homo Ilegue a 350°F. Se
emitir& una serial sonora una vez que el horno haya alcanzado
la temperatura de 350°F y et indicador mostrar& "350 °'' y "CONV
BAKE" y el fcono del ventilador (Fig. 4).
@
@@@
@
Nota: El ventilador de convecciSn comenzar& a funcionar un corto
tiempo despu_s de que el homo haya sido programado para
horneado por convecciSn. El sfmbolo del fcono det homo mostrar&
entonces un ventilador girando. Este fcono del ventilador girando
indica cuando el ventilador de convecciSn est& en operaciSn (Ver
Fig. 4).
Oprima co_F para detener el horneado por convecciSn o cancetar
el horneado por convecciSn en cuatquier momento.
62
®
Figura 1
Figura 2
Figura 3
Figura 4
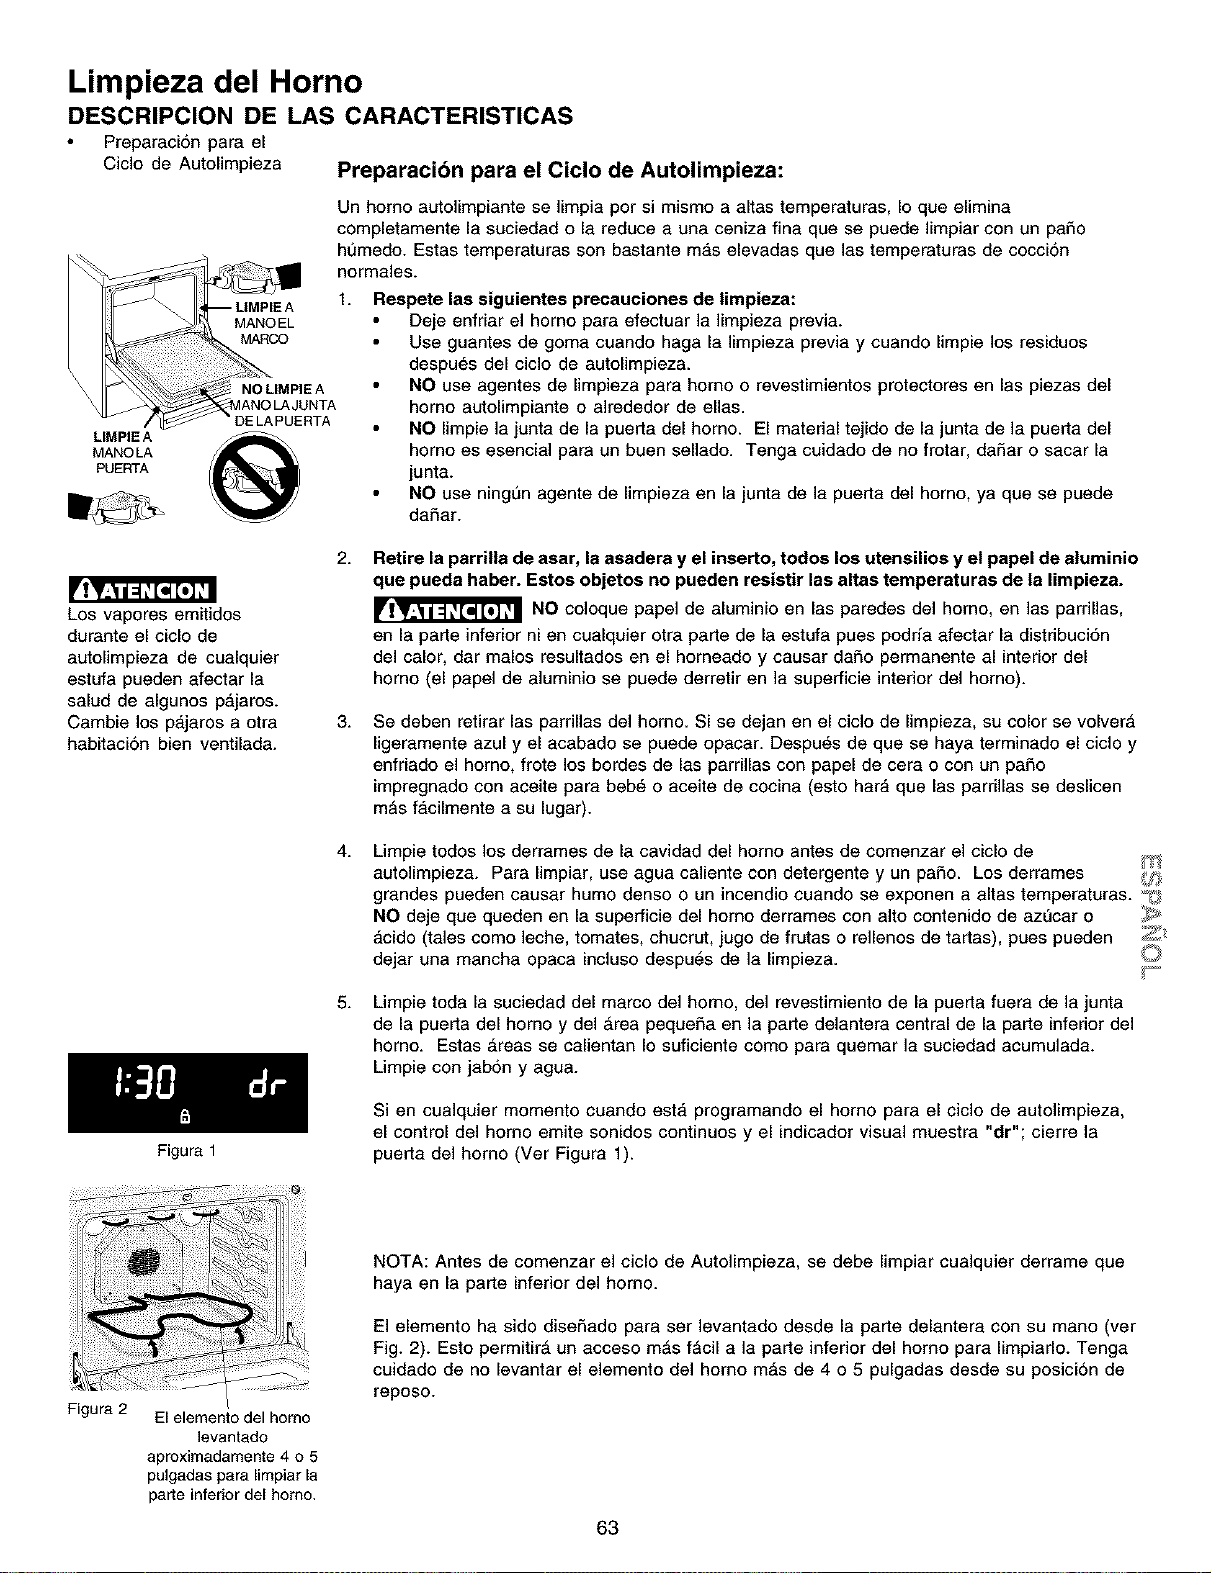
Limpieza del Horno
DESCRIPCION DE LAS CARACTERISTICAS
Preparacion para el
Ciclo de Autolimpieza Preparacion para el Ciclo de Autolimpieza:
Un homo autolimpiante se limpia pot si mismo a altas temperaturas, Io que elimina
completamente la suciedad o la reduce a una ceniza fina que se puede limpiar con un patio
humedo. Estas temperaturas son bastante m_is elevadas que las temperaturas de coccidn
normales.
f. Respete las siguientes precauciones de limpieza:
• Deje enfriar el homo para efectuar la limpieza previa.
• Use guantes de goma cuando haga la limpieza previa y cuando limpie los residuos
despues del ciclo de autolimpieza.
_ NOLIMPIEA • NO use agentes de limpieza para homo o revestimientos protectores en las piezas del
_ANOLAJUNTA homo autohmp_ante o alrededor de elias.
" DE LAPUERTA • NO limpie la junta de la puerta del horno. El matedal tejido de la junta de la puerta del
LIMPIE A
MANOLA homo es esenciai para un buen sellado. Tenga cuidado de no frotar, dafiar o sacar la
PUERTA junta.
NO use ningun agente de limpieza en la junta de la puerta del horno, ya que se puede
dafiar.
Los vapores emitidos
durante el ciclo de
autolimpieza de cualquier
estufa pueden afectar la
salud de algunos p_,jaros.
Cambie los p_,jaros a otra
habitacion bien ventilada.
Figura 1
2.
Retire la parrilla de asar, la asadera y el inserto, todos los utensilios y el papel de aluminio
que puede haber. Estos objetos no pueden resistir las altas temperaturas de le limpieze.
NO coloque papel de aluminio en las paredes del homo, en las parrillas,
en la parte inferior ni en cualquier otra parte de la estufa pues podrfa afectar la distdbuci6n
del calor, dar malos resultados en el horneado y causar dafio permanente al interior del
homo (el papel de aluminio se puede derretir en la superficie interior del homo).
3.
Se deben retirar las parrillas del homo. Si se dejan en el ciclo de limpieza, su color se volverA
ligeramente azul y el acabado se puede opacar. Despu_s de que se haya terminado el ciclo y
enfriado el homo, frote los bordes de las parrillas con papel de cera o con un patio
impregnado con aceite para beb6 o aceite de cocina (esto har_i que las parrillas se deslicen
mAs f_icilmente a su lugar).
4.
5.
Limpie todos los derrames de la cavidad del homo antes de comenzar el ciclo de
autolimpieza. Para limpiar, use agua caliente con detergente y un patio. Los derrames _,_f)
grandes pueden causar humo denso o un incendio cuando se exponen a altas temperaturas. -_
NO deje que queden en la superficie del homo derrames con alto contenido de az_car o _
_,cido (tales como leche, tomates, chucrut, jugo de frutas o rellenos de tartas), pues pueden _
dejar una mancha opaca incluso despu6s de la limpieza.
Limpie toda la suciedad del marco del homo, de1 revestimiento de la puerta fuera de la junta
de la puerta del homo y del Area pequefia en la parle delantera central de la parte inferior de1
homo. Estas Areas se calientan Io suficiente como para quemar la suciedad acumulada.
Limpie con jabdn y agua.
Si en cualquier momento cuando est,, programando el homo para el ciclo de autolimpieza,
el control del homo emite sonidos continuos y el indicador visual muestra "dr"; cierre la
puer[a de1 homo (Ver Figura 1).
Figura 2
El elemento del homo
levantado
aproximadamente 4 o 5
pulgadas para limpiar la
parte inferior del homo.
NOTA: Antes de comenzar el ciclo de Autolimpieza, se debe limpiar cualquier derrame que
haya en la parte inferior del homo.
El elemento ha sido disefiado para ser levantado desde la parte delantera con su mano (ver
Fig. 2). Esto permitirA un acceso mAs fAcil a la parte inferior del homo para limpiarlo. Tenga
cuidado de no levantar el elemento de1 homo mAs de 4 o 5 pulgadas desde su posicion de
reposo.
63
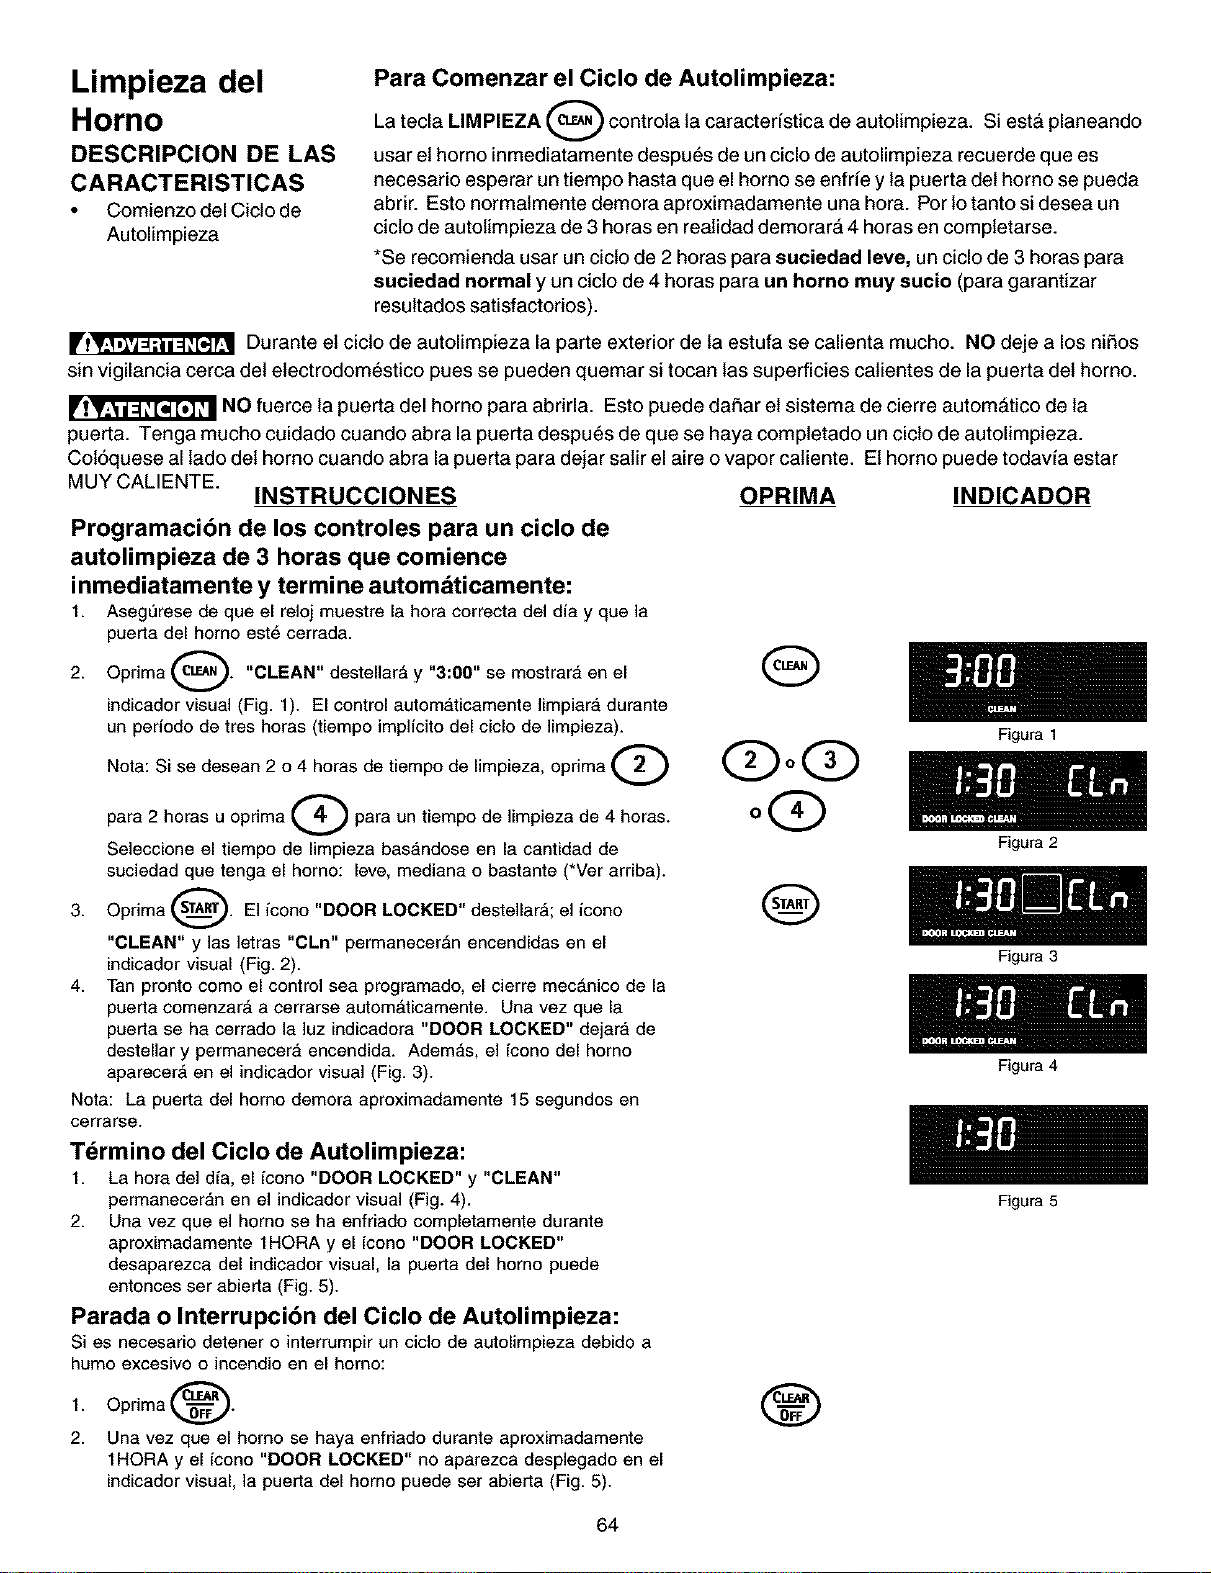
Limpieza del
Horno
DESCRIPCION DE LAS
CARACTERISTICAS
• Comienzo del Ciclo de
Autolimpieza
Para Comenzar el Ciclo de Autolimpieza:
La tecla LIMPIEZA (_ controla la caracteristica de autolimpieza. Si est_ planeando
usar et homo inmediatamente despu_s de un ciclo de autolimpieza recuerde que es
necesario esperar un tiempo hasta que el homo se enfrie y la puerta det homo se pueda
abrir. Esto normalmente demora aproximadamente una hora. Por 1otanto si desea un
cicto de autolimpieza de 3 horas en realidad demorar& 4 horas en completarse.
*Se recomienda usar un cicto de 2 horas para suciedad leve, un ciclo de 3 horas para
suciedad normal y un cicto de 4 horas para un homo muy sucio (para garantizar
resultados satisfactorios).
rl_ Durante et cicto de autolimpieza la parte exterior de la estufa se calienta mucho. NO deje a los niSos
sin vigilancia cerca del etectrodom_stico pues se pueden quemar si tocan las superficies catientes de la puerta det horno.
NO fuerce la puerta del homo para abrirla. Esto puede daSar et sistema de cierre autom&tico de la
puerfa. Tenga mucho cuidado cuando abra la puerta despu_s de que se haya completado un cicto de autolimpieza.
Col6quese al lado det homo cuando abra la puerta para dejar satir el aire o vapor catiente. Et homo puede todavia estar
MUY CALIENTE.
INSTRUCCIONES OPRIMA INDICADOR
Programacibn de los controles para un ciclo de
autolimpieza de 3 horas que comience
inmediatamente y termine autom6ticamente:
1. Aseg_rese de que el reloj muestre la hora correcta del dia y que la
puerta del homo est6 cerrada.
2. Oprima e_.._. "CLEAN" destellar_ y "3:00" se mostrara en el
indicador visual (Fig. 1). El control automaticamente limpiar_, durante
un periodo de tres horas (tiempo implicito del ciclo de limpieza).
Nota: Si se desean 2 o 4 horas de tiempo de limpieza, oprima
para 2 horas u opdma _ para un tiempo de limpieza de 4 horas.
Seleccione el tiempo de limpieza bas_,ndose en la cantidad de
suciedad que tenga el homo: leve, mediana o bastante (*Ver arriba).
3. Oprima _. El icono "DOOR LOCKED" destellar_; el icono
"CLEAN" y las letras "CLn" permanecer_n encendidas en el
indicador visual (Fig. 2).
4. Tan pronto como el control sea programado, el cierre mecAnico de la
puerta comenzar_ a cerrarse autom_ticamente. Una vez que la
puerta se ha cerrado la ]uz indicadora "DOOR LOCKED" dejar_, de
destellar y permanecera encendida. Ademas, el icono del homo
aparecer_ en el indicador visual (Fig. 3).
Nota: La puerta del homo demora aproximadamente 15 segundos en
cerrarse.
G
QoQ
oQ
Q
T_rmino del Ciclo de Autolimpieza:
1. La hora del dia, el icono "DOOR LOCKED" y "CLEAN"
permaneceran en el indicador visual (Fig. 4).
2. Una vez que el homo se ha enfriado completamente durante
aproximadamente 1HORA y el icono "DOOR LOCKED"
desaparezca del indicador visual, la puerta del homo puede
entonces ser abierta (Fig. 5).
Parada o Interrupcibn del Ciclo de Autolimpieza:
Si es necesario detener o interrumpir un ciclo de autolimpieza debido a
humo excesivo o incendio en el homo:
1.
2.
Oprima _.
Una vez que el homo se haya enfriado durante aproximadamente
1HORA y el icono "DOOR LOCKED" no aparezca desplegado en el
indicador visual, la puerta del homo puede ser abierta (Fig. 5).
®
64
Figura 1
Figura 2
Figura 3
Figura 4
Figura 5
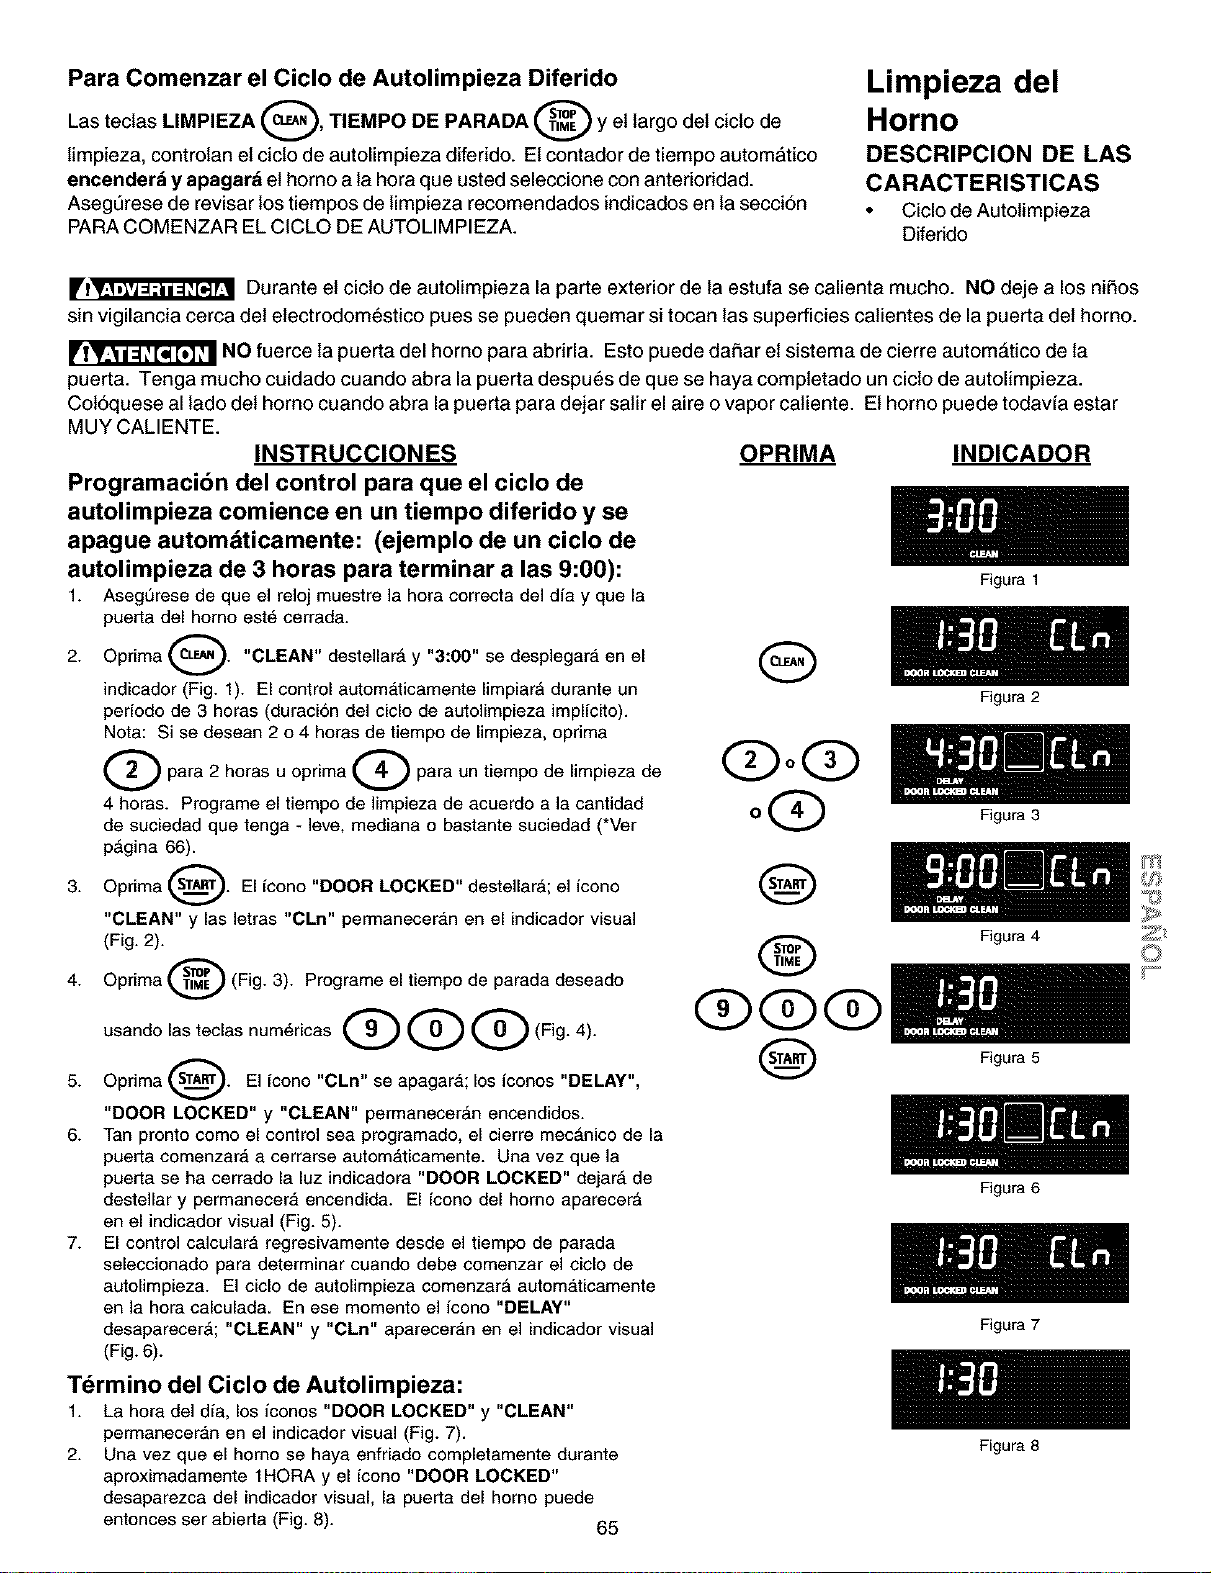
Para Comenzar el Ciclo de Autolimpieza Diferido
Las tectas LIMPIEZA (_, TIEMPO DE PARADA @ y et largo det cicto de
limpieza, controlan et ciclo de autolimpieza diferido. Et contador de tiempo automatico
encenderd y apagar_ et homo a la hora que usted seleceione con anterioridad.
Asegt3rese de revisar los tiempos de limpieza reeomendados indicados en la secci6n
PARA COMENZAR EL CICLO DE AUTOLIMPIEZA.
Limpieza del
Horno
DESCRIPCION DE LAS
CARACTERISTICAS
• Ciclo de Autolimpieza
Diferido
rl_ Durante et cicto de autolimpieza la parte exterior de la estufa se calienta mucho. NO deje a los nifios
sin vigilancia cerca del etectrodom6stico pues se pueden quemar si tocan las superficies catientes de la puerta det horno.
NO fuerce la puerta del horno para abrirla. Esto puede dafiar et sistema de cierre autom&tico de la
puerfa. Tenga mucho cuidado cuando abra la puerta despu6s de que se haya completado un cicto de autolimpieza.
Col6quese al lado det homo cuando abra la puerta para dejar satir el aire o vapor catiente. Et homo puede todavia estar
MUY CALIENTE.
INSTRUCCIONES
Prograrnaci6n del control para que el cicIo de
autolimpieza comience en un tiempo diferido y se
apague automdticamente: (ejemplo de un cicIo de
autolimpieza de 3 horas para terrninar a las 9:00):
1. Asegurese de que el reloj muestre la hora correcta del dia y que la
puerla del homo est_ cerrada.
2. Oprima cL_. "CLEAN" destellard y "3:00" se desplegara en el
indicador (Fig. 1). El control autom_,ticamente limpiarA durante un
periodo de 3 horas (duraci6n del ciclo de autolimpieza implicito).
Nora: Si se desean 2 o 4 horas de tiempo de limpieza, optima
Q para 2 horas u oprima _ para un tiempo de limpieza de
4 horas. Programe el tiempo de limpieza de acuerdo a la cantidad
de suciedad que tenga - ]eve, mediana o bastante suciedad (*Ver
p_gina 66).
3. Oprima _. El icono "DOOR LOCKED" destellarA; el icono
"CLEAN" y las letras "CLn" perrnaneceran en el indicador visual
(Fig. 2).
4. Oprima @ (Fig. 3). Programe el tiempo de parada deseado
usando las teclas num6ricas Q Q Q (Fig. 4).
5. Oprima _. El icono "CLn" se apagara; los iconos "DELAY",
"DOOR LOCKED" y "CLEAN" permanecer_n encendidos.
6. Tan pronto como el control sea programado, el cierre mec_nico de la
puerta comenzar4, a cerrarse autom4,ticamente. Una vez que la
puerta se ha cerrado la luz indicadora "DOOR LOCKED" dejar_ de
destellar y permanecera encendida. El icono del homo aparecer_
en el indicador visual (Fig. 5).
7. El control calculara regresivamente desde el tiempo de parada
seleccionado para determinar cuando debe comenzar el ciclo de
autolimpieza. El ciclo de autolimpieza comenzar_ automaticamente
en la hora calculada. En ese momento el icono "DELAY"
desaparecer_; "CLEAN" y "CLn" apareceran en el indicador visual
(Fig. 6).
OPRIMA INDICADOR
G
(DOG)
oQ
Q
@
QQQ
Q
Figura 1
Figura 2
Figura 3
Figura 4
Figura 5
Figura 6
Figura 7
Tdrmino del Ciclo de Autolimpieza:
1. La hora del dia, los iconos "DOOR LOCKED" y "CLEAN"
permaneceran en el indicador visual (Fig. 7).
2. Una vez que el homo se haya enfriado completamente durante
aproximadamente 1HORA y el icono "DOOR LOCKED"
desaparezca del indicador visual, la puerta del homo puede
entonces ser abierta (Fig. 8). 65
Figura 8
m
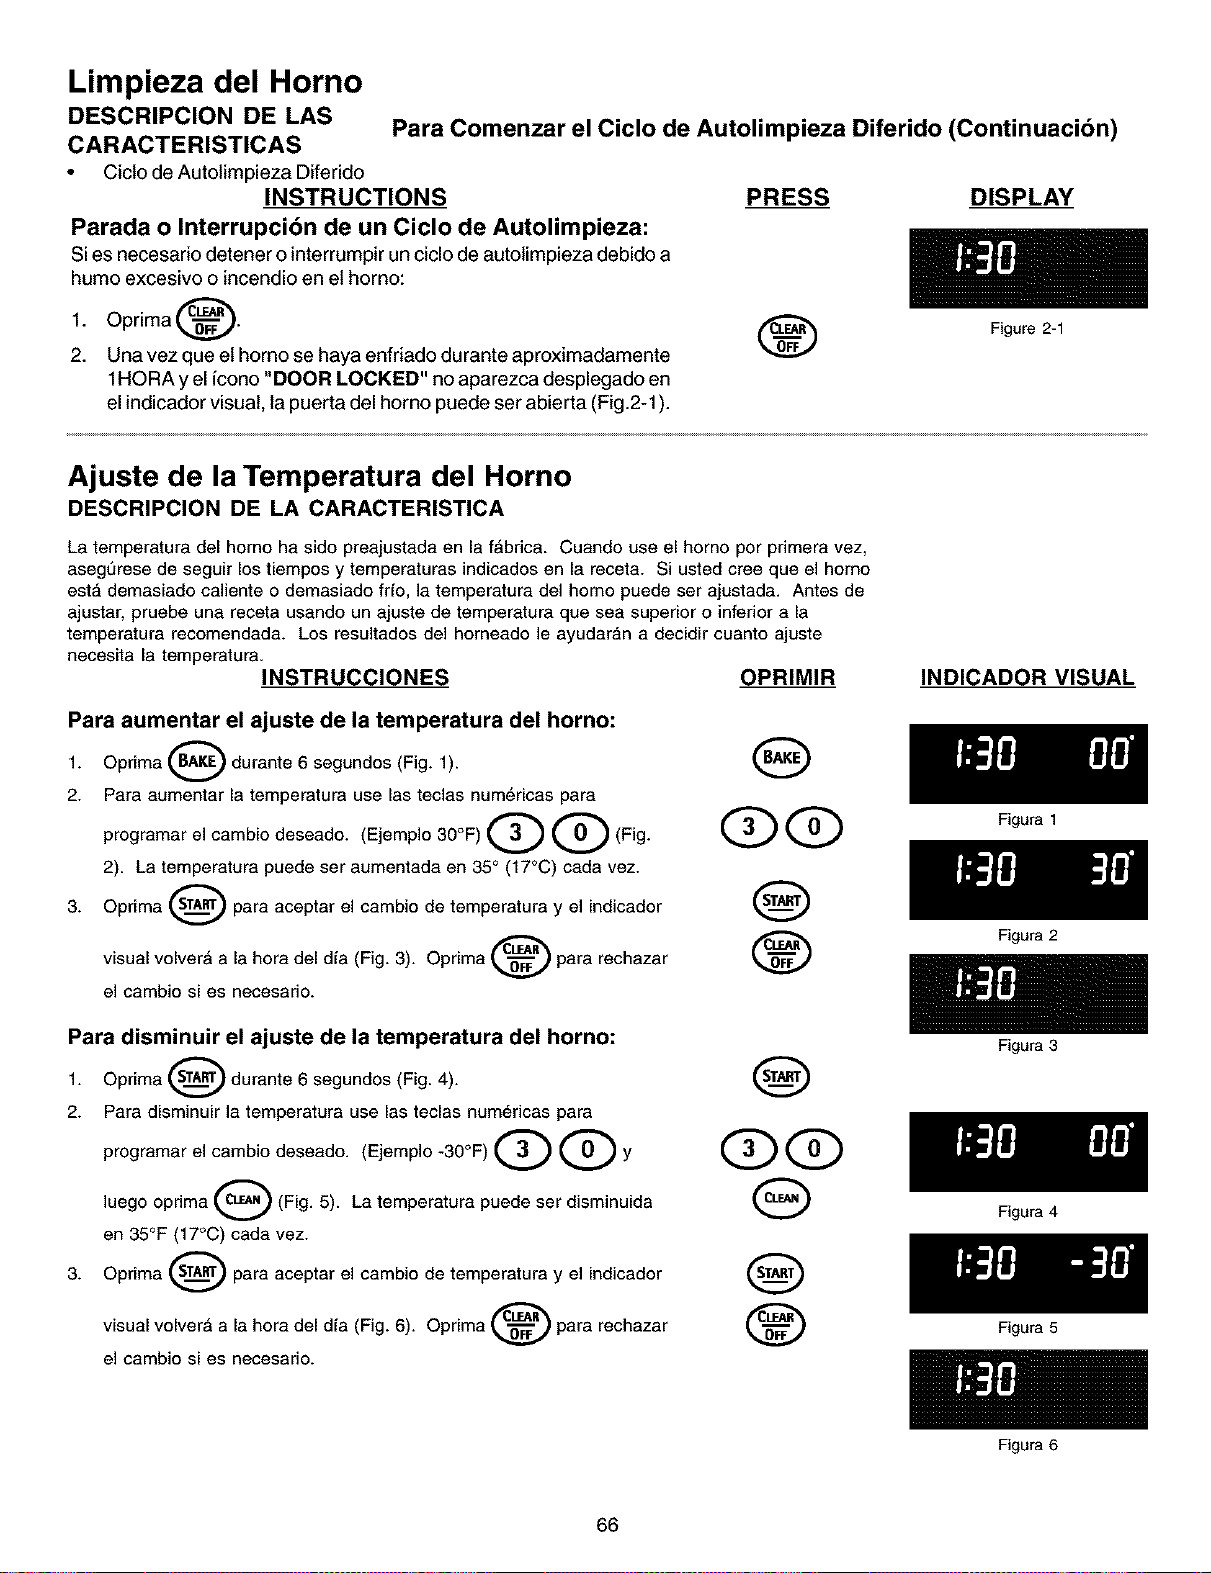
Limpieza del Horno
DESCRIPCION DE LAS Para Comenzar el Ciclo de Autolimpieza Diferido (Continuacibn)
CARACTERISTICAS
• Cicto de Autolimpieza Diferido
INSTRUCTIONS PRESS DISPLAY
Parada o Interrupcibn de un Ciclo de Autolimpieza:
Si es necesario detener o interrumpirun ciclo de autolimpieza debido a
humo excesivo o incendio en et homo:
1.
2.
Oprima _.
Una vez que et homo se haya enfriado durante aproximadamente
1HORA y el icono "DOOR LOCKED" no aparezca desplegado en
el indicadorvisual, la puerta del homo puede ser abierta (Fig.2-1).
Figure 2-1
Ajuste de la Temperatura del Horno
DESCRIPCION DE LA CARACTERISTICA
La temperatura del homo ha side preajustada en la fAbrica. Cuando use el homo por primera vez,
asegl._rese de seguir los tiempos y temperaturas indicados en la receta. Si usted cree que el homo
est,, demasiado caliente o demasiado fdo, la temperatura del homo puede ser ajustada. Antes de
ajustar, pruebe una receta usando un ajuste de temperatura que sea superior o inferior a la
temperatura recomendada. Los resultados del horneado le ayudaran a decidir cuanto ajuste
necesita la temperatura.
INSTRUCCIONES OPRIMIR
Para aumentar el ajuste de la temperatura del horno:
1. Oprima_durante6segundos(Fig. 1).
2. Para aumentar la temperatura use las teclas num6ricas para
programar el cambio deseado. (Ejemplo 30°F) Q Q (Fig. QQ
2). La temperatura puede ser aumentada en 35° (17°C) cada vez.
3. Oprima _ para aceptar el cambio de temperatura y el indicador
visual volver_ a la hora del d,a (Fig. 3). Oprima _ para rechazar
el cambio si es necesario.
Para disminuir el ajuste de la temperatura del horno:
1. Oprima _ durante 6 segundos (Fig. 4).
2. Para disminuir la temperatura use las teclas num6ricas para
programar el cambio deseado. (Ejemplo -30°F) Q Q y OQ
luego oprima Q (Fig. 5). La temperatura puede ser disminuida G
en 35°F (17°C) cada vez.
3. Oprima _ para aceptar el cambio de temperatura y el indicador Q
visual volver_ a la hora del d,a (Fig. 6). Oprima _ para rechazar
el cambio si es necesario.
INDICADOR VISUAL
66
Figura 1
Figura 2
Figura 3
Figura 4
Figura 5
Figura 6
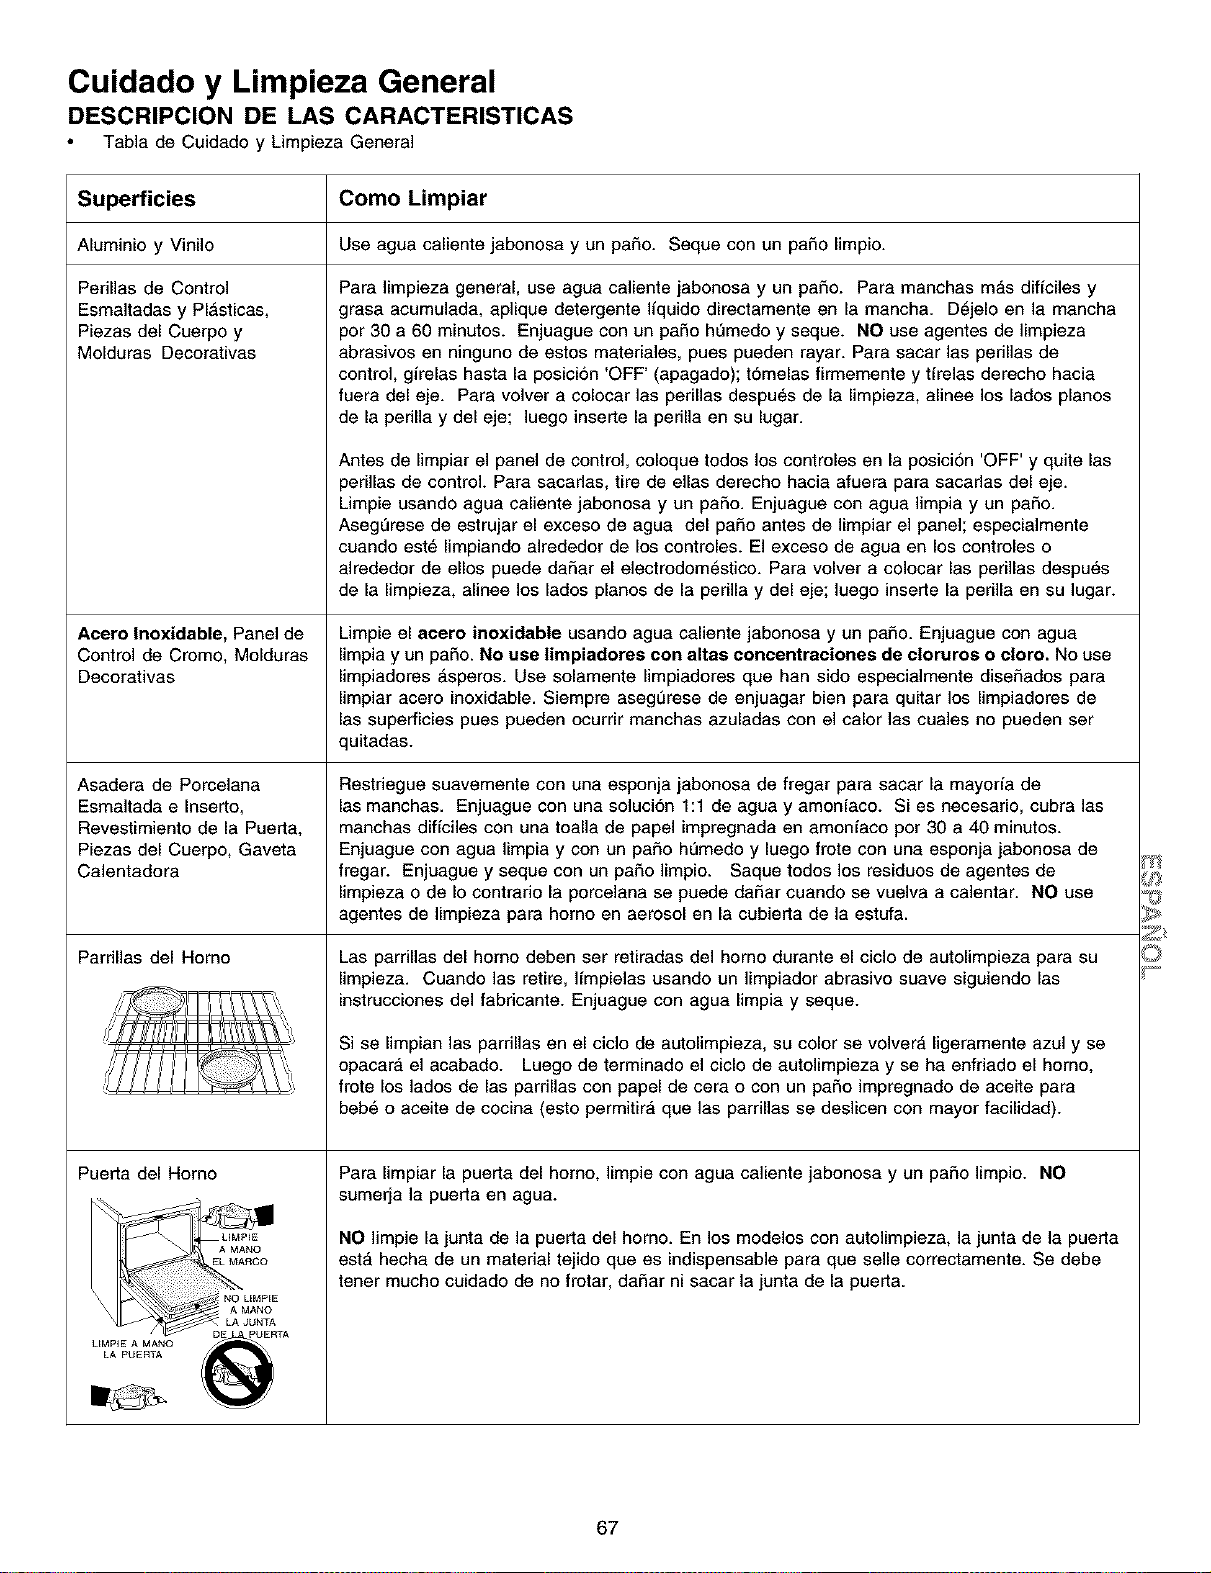
Cuidado y Limpieza General
DESCRIPCION DE LAS CARACTERISTICAS
Tabla de Cuidado y Limpieza General
Superficies
Aluminio y Viniio
Perillas de Control
Esmaltadas y Pl_sticas,
Piezas del Cuerpo y
Molduras Decorativas
Acero Inoxidable, Panel de
Control de Cromo, Molduras
Oecorativas
Asadera de Porcelana
Esmaltada e Inserto,
Revestimiento de la Puerta,
Piezas del Cuerpo, Gaveta
Calentadora
Pardlias del Homo
@!,
,}
Puerta del Homo
Como Limpiar
Use agua calientejabonosay un paso. Seque conun paso limpio.
Para ]impieza general, use agua caliente jabonosa y un pa£_o. Para manchas m_,s dificiles y
grasa acumulada, aplique detergente liquido directamente en la mancha. D_jelo en la mancha
por 30 a 60 minutos. Enjuague con un paso hL_medo y seque. NO use agentes de limpieza
abrasivos en ninguno de estos materiales, pues pueden rayar. Para sacar las perillas de
control, girelas hasta la posicion 'OFF' (apagado); t6melas firmemente y tirelas derecho hacia
fuera del eje. Para volver a colocar ]as perillas despu_s de la limpieza, alinee los lados pianos
de la pedlla y del eje; ]uego inserte la pedlla en su lugar.
Antes de limpiar el panel de control, coloque todos los controles en la posici6n 'OFF' y quite las
perillas de control. Para sacadas, tire de elias derecho hacia afuera para sacadas del eje.
Limpie usando agua caliente jabonosa y un paso. Enjuague con agua limpia y un paso.
AsegL_rese de estrujar el exceso de agua del paso antes de limpiar el panel; especialmente
cuando est_ limpiando alrededor de los controles. El exceso de agua en los controles o
alrededor de ellos puede daSar el electrodom_stico. Para volver a colocar las perillas despu_s
de la limpieza, alinee los lados pianos de la perilla y del eje; luego inserte la perilla en su ]ugar.
Limpie el aoero inoxidable usando agua caliente jabonosa y un pa£_o.Enjuague con agua
limpia y un paso. No use limpiadores con altas concentraciones de cloruros o oloro. No use
limpiadores _.speros. Use solamente limpiadores que han sido especiaimente dise£_ados para
limpiar acero inoxidable. Siempre asegurese de enjuagar bien para quitar los limpiadores de
las superficies pues pueden ocurrir manchas azuladas con el calor las cuales no pueden ser
quitadas.
Restriegue suavemente con una esponja jabonosa de fregar para sacar la mayoria de
las manchas. Enjuague con una soluci6n 1:1 de agua y amoniaco. Si es necesario, cubra las
manchas dificiles con una toalla de papel impregnada en amoniaco por 30 a 40 minutos.
Enjuague con agua limpia y con un pa£_ohL_medo y luego frote con una esponja jabonosa de
fregar. Enjuague y seque con un pa£_olimpio. Saque todos los residuos de agentes de
limpieza o de Io contrario la porcelana se puede daSar cuando se vuelva a calentar. NO use
agentes de limpieza para homo en aerosol en la cubierta de la estufa.
Las parrillas del homo deben ser retiradas del homo durante el ciclo de autolimpieza para su
limpieza. Cuando las retire, ]impielas usando un limpiador abrasivo suave siguiendo las
instrucciones del fabricante. Enjuague con agua limpia y seque.
Si se limpian las parrillas en el ciclo de autolimpieza, su color se volver_, ligeramente azul y se
opacar_, el acabado. Luego de terminado el ciclo de autolimpieza y se ha enfriado el homo,
frote los lados de las parrillas con papel de cera o con un paso impregnado de aceite para
beb6 o aceite de cocina (esto permitira que las parrillas se deslicen con mayor facilidad).
Para limpiar la puerta del homo, limpie con agua caliente jabonosa y un pa£_olimpio. NO
sumerja la puerta en agua.
NO ]impie la junta de la puerta del horno. En los modelos con autolimpieza, la junta de la puerta
est,, hecha de un material tejido que es indispensable para que selle correctamente. Se debe
tener mucho cuidado de no frotar, daSar ni sacar la junta de la puerta.
67
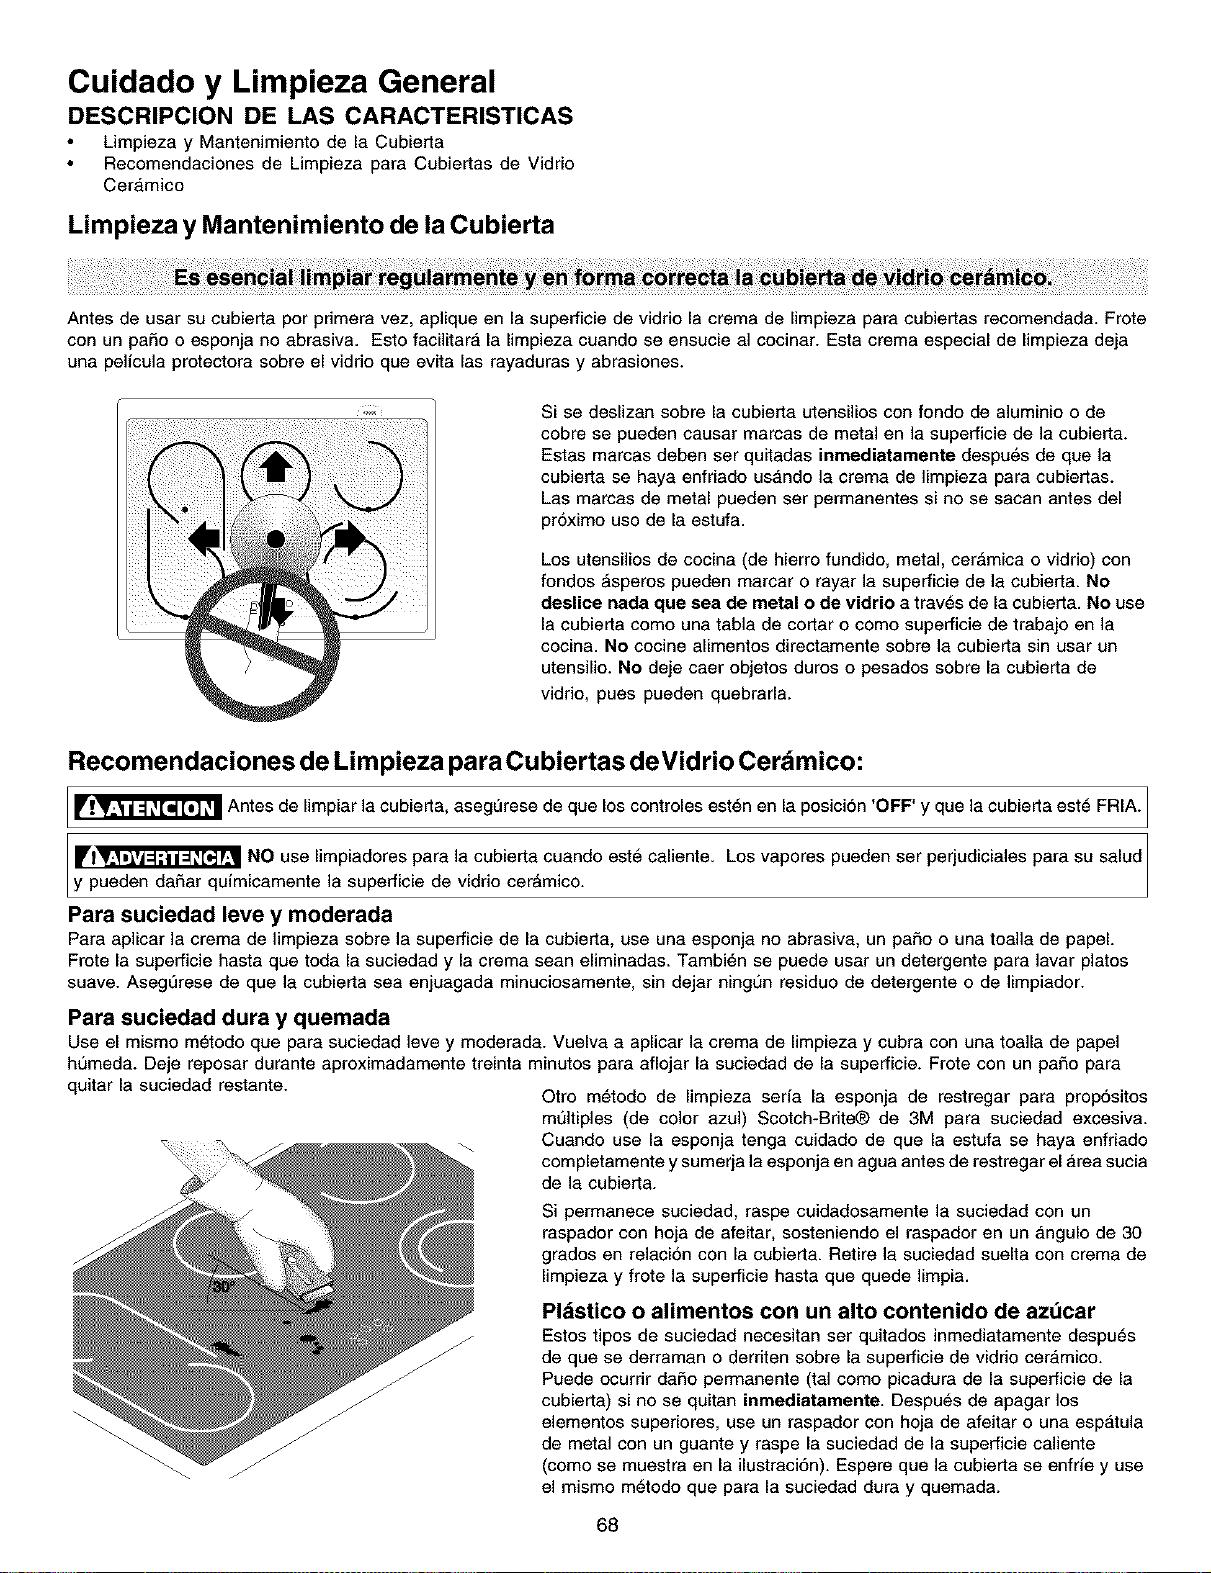
Cuidado y Limpieza General
DESCRIPCION DE LAS CARACTERISTICAS
Limpieza y Mantenimiento de la Cubierta
Recomendaciones de Limpieza para Cubiertas de Vidrio
Cer_,mico
Limpieza y Mantenimiento de la Cubierta
Antes de usar su cubierta per primera vez, aplique en la superficie de vidrio la crema de limpieza para cubierlas recomendada. Frote
con un paso o esponja no abrasiva. Esto facilitar_, la limpieza cuando se ensucie al cocinar. Esta crema especial de limpieza deja
una pelicula protectora sobre el vidrio que evita las rayaduras y abrasiones.
Si se deslizan sobre la cubierta utensilios con fondo de aluminio o de
cobre se pueden causar marcas de metal en la superficie de la cubierta.
Estas marcas deben ser quitadas inrnediatamente despu6s de que la
cubierta se haya enfriado us_,ndo la crema de Iimpieza para cubiertas.
Las marcas de metal pueden ser permanentes si no se sacan antes del
proximo uso de la estufa.
Los utensilios de cocina (de hierro fundido, metal, cer_mica o vidrio) con
fondos _speros pueden marcar o rayar la superficie de la cubierta. No
deslice nada que sea de metal o de vidrio a trav_s de la cubierta. No use
la cubierta come una tabla de cortar o come superficie de trabajo en la
cocina. No cocine alimentos directamente sobre la cubierta sin usar un
utensilio. No deje caer objetos duros o pesados sobre la cubierta de
vidrio, pues pueden quebrarla.
Recomendaciones de Limpieza para Cubiertas deVidrio Cer mico:
[_ Antes de limpiar la cubierta, asegL_rese de los controles est_n en la posici6n 'OFF' la cubierta est_ FRIA.
que Yque
Ilrl_ NO use limpiadores para la cubierta cuando est6 caliente. Los vapores pueden ser perjudiciales para su salud
y pueden da£1ar qufm camente a superfce de vdro cerAm co.
Para suciedad leve y rnoderada
Para aplicar la crema de limpieza sobre la superficie de la cubierta, use una esponja no abrasiva, un pa£_oo una toalla de papel.
Frote la superficie hasta que toda la suciedad y la crema sean eliminadas. Tambi_n se puede usar un detergente para lavar platos
suave. AsegL_rese de que la cubierta sea enjuagada minuciosamente, sin dejar ningun residuo de detergente o de limpiador.
Para suciedad dura y quemada
Use el mismo m_todo que para suciedad leve y moderada. Vuelva a aplicar la crema de limpieza y cubra con una toalla de papel
humeda. Deje reposar durante aproximadamente treinta minutos para aflojar la suciedad de la superficie. Frote con un pa£_opara
quitar la suciedad restante.
Otro m_todo de limpieza serfa la esponja de restregar para prop6sitos
multiples (de color azul) Scotch-Brite_ de 3M para suciedad excesiva.
_ Cuando use la esponja tenga cuidado de que la estufa se haya enfriado
completamente y sumerja la esponja en agua antes de restregar el Area sucia
de la cubierta.
Si permanece suciedad, raspe cuidadosamente la suciedad con un
raspador con hoja de afeitar, sosteniendo el raspador en un _,ngulo de 30
grades en relaci6n con la cubierta. Retire la suciedad suelta con crema de
limpieza y frote la superficie hasta que quede limpia.
Plbstico o alimentos con un alto contenido de azt_car
Estos tipos de suciedad necesitan ser quitados inmediatamente despu6s
de que se derraman o derriten sobre la superficie de vidrio cer_,mico.
Puede ocurrir daSo perrnanente (tal como picadura de la superficie de la
cubierta) si no se quitan inmediatamente. Despu_s de apagar los
elementos superiores, use un raspador con hoja de afeitar o una espatula
de metal con un guante y raspe la suciedad de la superficie caliente
(como se muestra en la ilustraci6n). Espere que la cubierta se enfrfe y use
el mismo m6todo que para la suciedad dura y quemada.
68
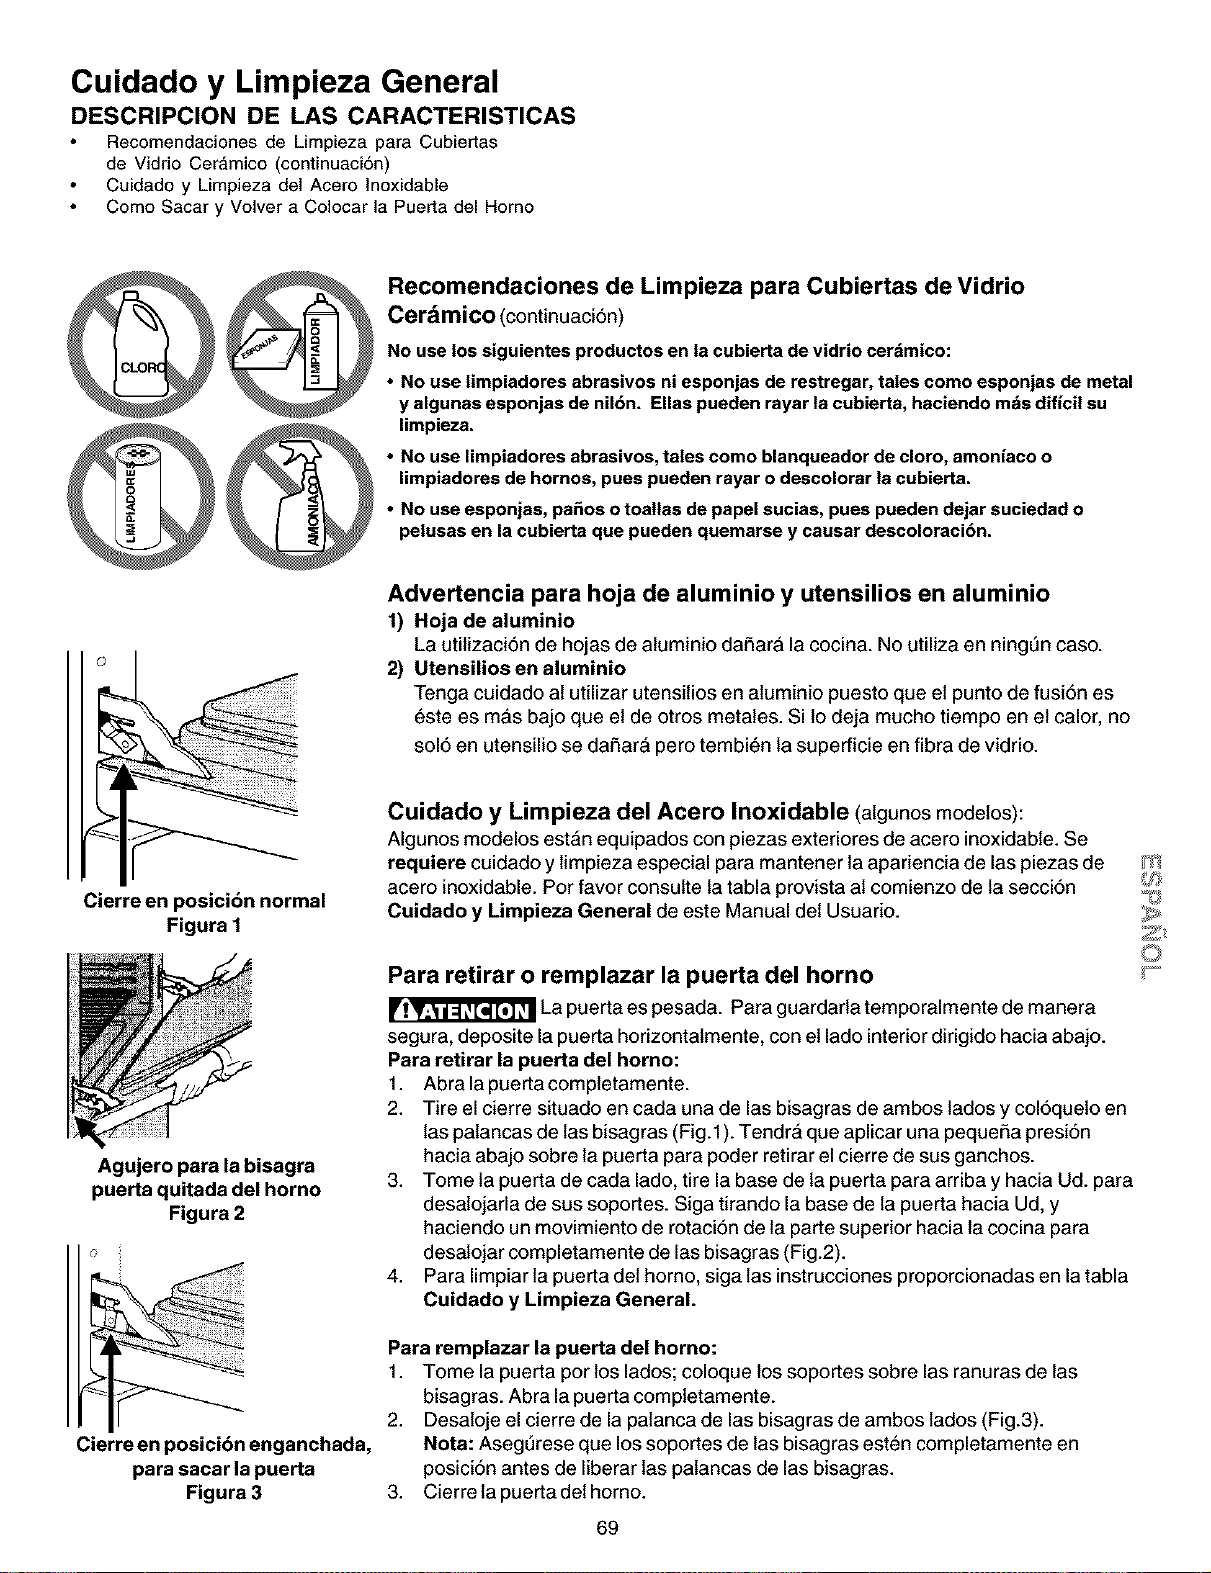
Cuidado y Limpieza General
DESCRIPCION DE LAS CARACTERISTICAS
Recomendaciones de Limpieza para Cubiertas
de Vidrio Cer_,mico (continuaci6n)
Cuidado y Limpieza del Acero lnoxidable
Como Sacar y Volver a Colocar la Puerta del Homo
@@
Recomendaciones de Limpieza para Cubiertas de Vidrio
Cerdmico (continuaci6n)
No uselos siguientes productos en la cubierta de vidrio cerdmico:
• No use limpiadores abrasivos ni esponjas de restregar,tales como esponjas de metal
y algunas esponjas de nil6n. Elias pueden rayar la cubierta,haciendo mdsdificil su
limpieza.
• No use limpiadores abrasivos,tales como blanqueador de cloro, amoniaco o
limpiadores de hornos, pues pueden rayar o descolorar la cubierta.
• No use esponjas, pa£=osotoatlas depapel sucias, pues pueden dejar suciedad o
pelusas en la cubierta que pueden quemarse y causar descoloracibn.
Advertencia para hoja de aluminio y utensilios en aluminio
1) Hoja de aluminio
La utilizaci6n de hojas de atuminio daSarA la cocina. No utiliza en ningQn case.
2) Utensilios en aluminio
Tenga cuidado at utilizar utensitios en aluminio puesto que et punto de fusi6n es
6ste es mAs bajo que el de otros metates. Silo deja mucho tiempo en el calor, no
sol6 en utensilio se daSar& pero tembi6n la superficie en fibra de vidrio.
Cierre en posicibn normal
Figura I
Agujero para la bisagra
puerta quitada del horno
Figura 2
Cierre en posici6n enganchada,
para sacar la puerta
Figura 3
Cuidado y Limpieza del Acero Inoxidable (algunos modetos):
Algunos modelos est&n equipados con piezas exteriores de acero inoxidable. Se
requiere cuidado y limpieza especial para mantener la apariencia de las piezas de
acero inoxidable. Por favor consulte la tabla provista al comienzo de la secci6n
Cuidado y Limpieza General de este Manual det Usuario.
Para retirar o remplazar la puerta del horno
La puerta es pesada. Para guardarla temporalmente de manera
segura, deposite la puerta horizontatmente, con et lado interior dirigido hacia abajo.
Para retirar la puerta del homo:
1. Abralapuertacompietamente.
2. Tire el cierre situado en carla una de las bisagras de ambos lades y col6queto en
las paiancas de las bisagras (Fig.1). Tendr& que aplicar una pequeSa presi6n
hacia abajo sobre la puerta para poder retirar el cierre de sus ganchos.
3. Tome la puerta de carla lado, tire la base de la puerta para arriba y hacia Ud. para
desalojarla de sus soportes. Siga tirando la base de la puerta hacia Ud, y
haciendo un movimiento de rotaci6n de la parte superior hacia la cocina para
desalojar completamente de las bisagras (Fig.2).
4. Para limpiar la puerta det homo, siga las instrucciones proporcionadas en la tabla
Cuidado y Limpieza General.
Para remplazar la puerta del horno:
1. Tome la puerta per los lades; coloque los soportes sobre las ranuras de las
bisagras. Abra la puerta compietamente.
2. Desaioje el cierre de la patanca de las bisagras de ambos lades (Fig.3).
Nota: Aseg_rese que los soportes de las bisagras esten completamente en
posici6n antes de liberar las patancas de las bisagras.
3. Cierrela puertadethorno.
69
m
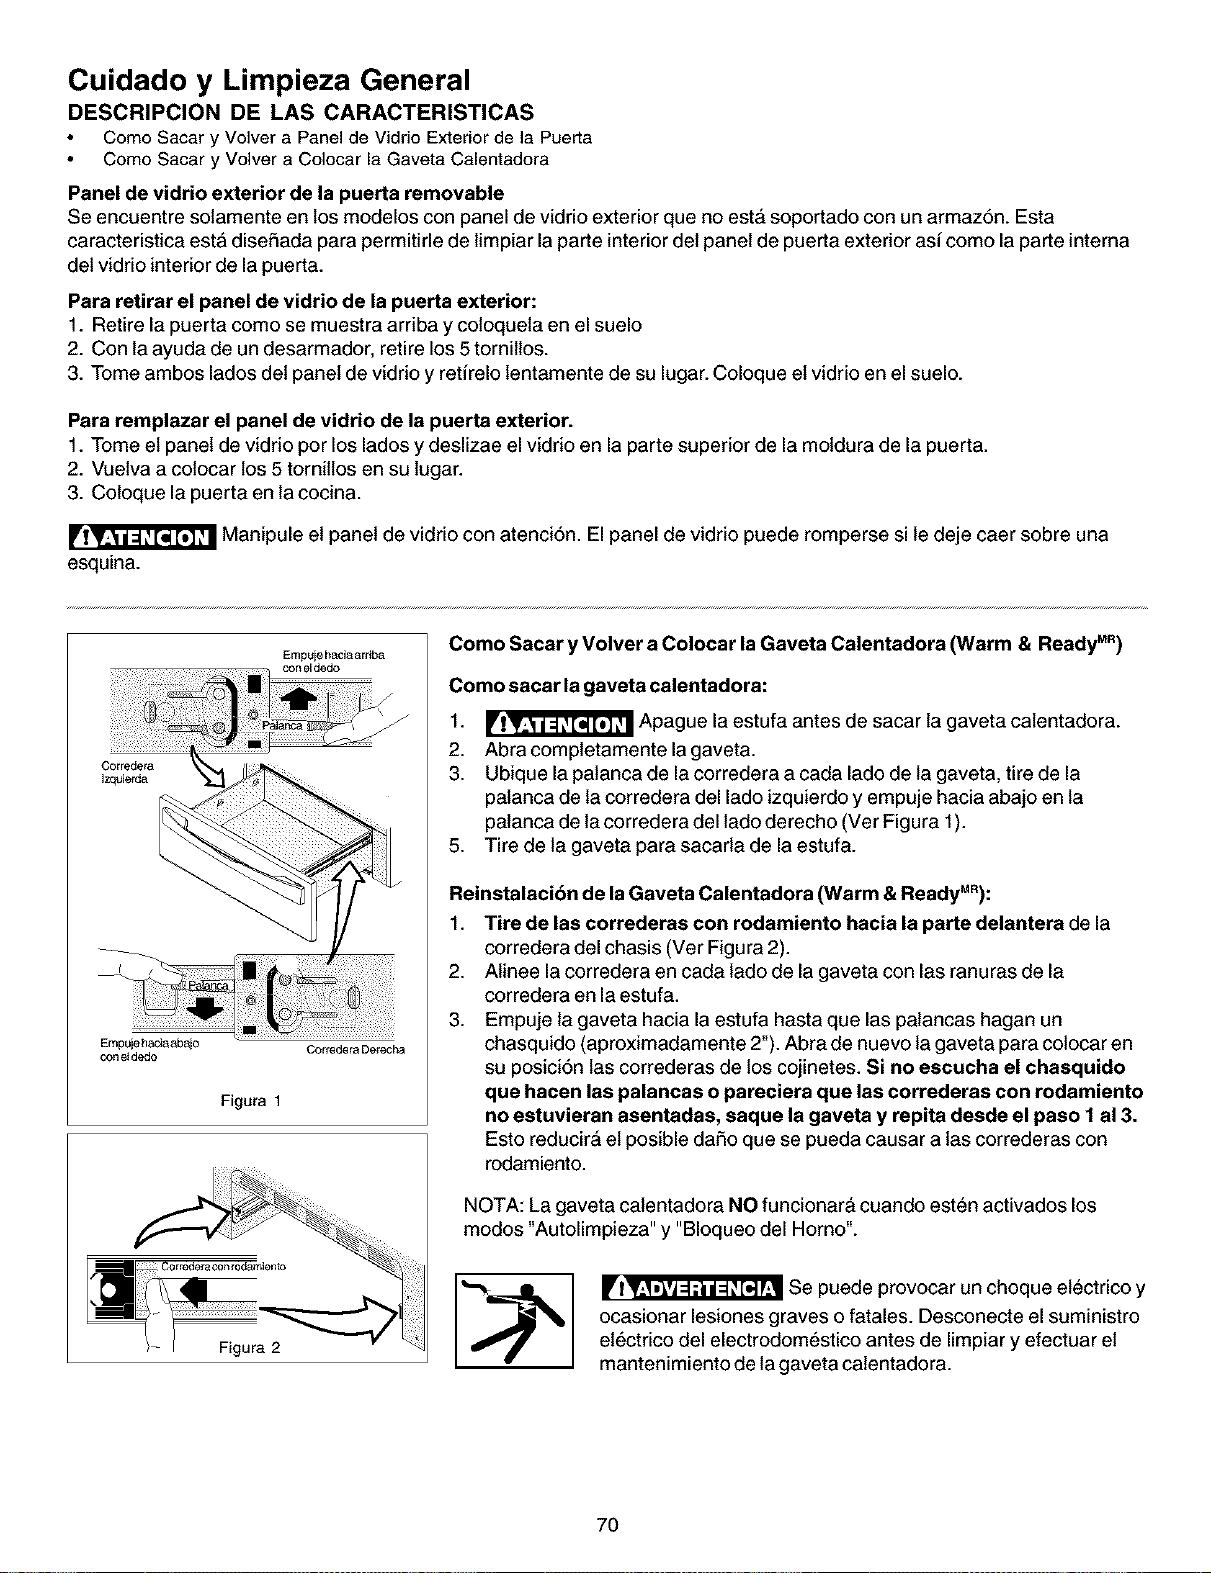
Cuidado y Limpieza General
DESCRIPCION DE LAS CARACTERISTICAS
Como Sacar y Volver a Panel de Vidrio Exterior de la Puerta
Como Sacar y Volver a Colocar la Gaveta Calentadora
Panel de vidrio exterior de la puerta removable
Se encuentre solamente en los modelos con panel de vidrioexterior que no est_ soportado con un armaz6n. Esta
caracteristica esta disehada para permitirle de limpiar la parte interior det panel de puerta exterior asi come la parte interna
det vidrio interior de la puerta.
Para retirar el panel de vidrio de la puerta exterior:
1. Retire la puerta como se muestra arriba y coloqueta en el suelo
2. Con la ayuda de un desarmador, retire los 5 torniltos.
3. Tome ambos lados det panel de vidrio y retirelo lentamente de su lugar. Coloque et vidrio en el suelo.
Para remplazar el panel de vidrio de la puerta exterior.
1. Tome et panel de vidrio por los lados y deslizae el vidrio en la parte superior de la moldura de la puerta.
2. Vuetva a colocar los 5 tornitlos en su lugar.
3. Coloque la puerta en la cocina.
Manipule et panel de vidrio con atenci6n. El panel de vidrio puede romperse si le deje caer sobre una
esquina.
Empuje haciaardba
Empuje haciaabajo Corredera Derecha
con eldedo
Figura 1
Como Sacar y Volver a Colocar laGaveta Calentadora (Warm & Ready MR)
Como sacar la gaveta calentadora:
1. _ Apague la estufa antes de sacar la gaveta catentadora.
2. Abracompletamentelagaveta.
3. Ubique la patanca de la corredera a carla lado de la gaveta, tire de la
palanca de la corredera del lado izquierdo y empuje hacia abajo en la
palanca de la corredera del lade derecho (Ver Figura 1).
5. Tire de la gaveta para sacarla de la estufa.
Reinstalacibn de la Gaveta Calentadora (Warm & ReadyMR):
1. Tire de las correderas con rodamiento hacia la parte delantera de la
corredera del chasis (Ver Figura 2).
2. Alinee la corredera en carla lade de la gaveta con las ranuras de la
corredera en la estufa.
3. Empuje la gaveta hacia la estufa hasta que las palancas hagan un
chasquido (aproximadamente 2"). Abra de nuevo la gaveta para colocar en
su posici6n las correderas de los cojinetes. Si no escucha el chasquide
que hacen las palancas o pareciera que las correderas con rodamiento
no estuvieran asentadas, saque la gaveta y repita desde el paso 1 al 3.
Esto reducir_ et posible dai_o que se pueda causar a las correderas con
rodamiento.
NOTA: La gaveta calentadora NO funcionar& cuando esten activados los
modes "Autolimpieza" y "Bloqueo del Homo".
Se puede provocar un choque etectrico y
ocasionar lesiones graves o fatales. Desconecte el suministro
et_ctrico del electrodom_stico antes de limpiar y efectuar et
mantenimiento de la gaveta catentadora.
7O
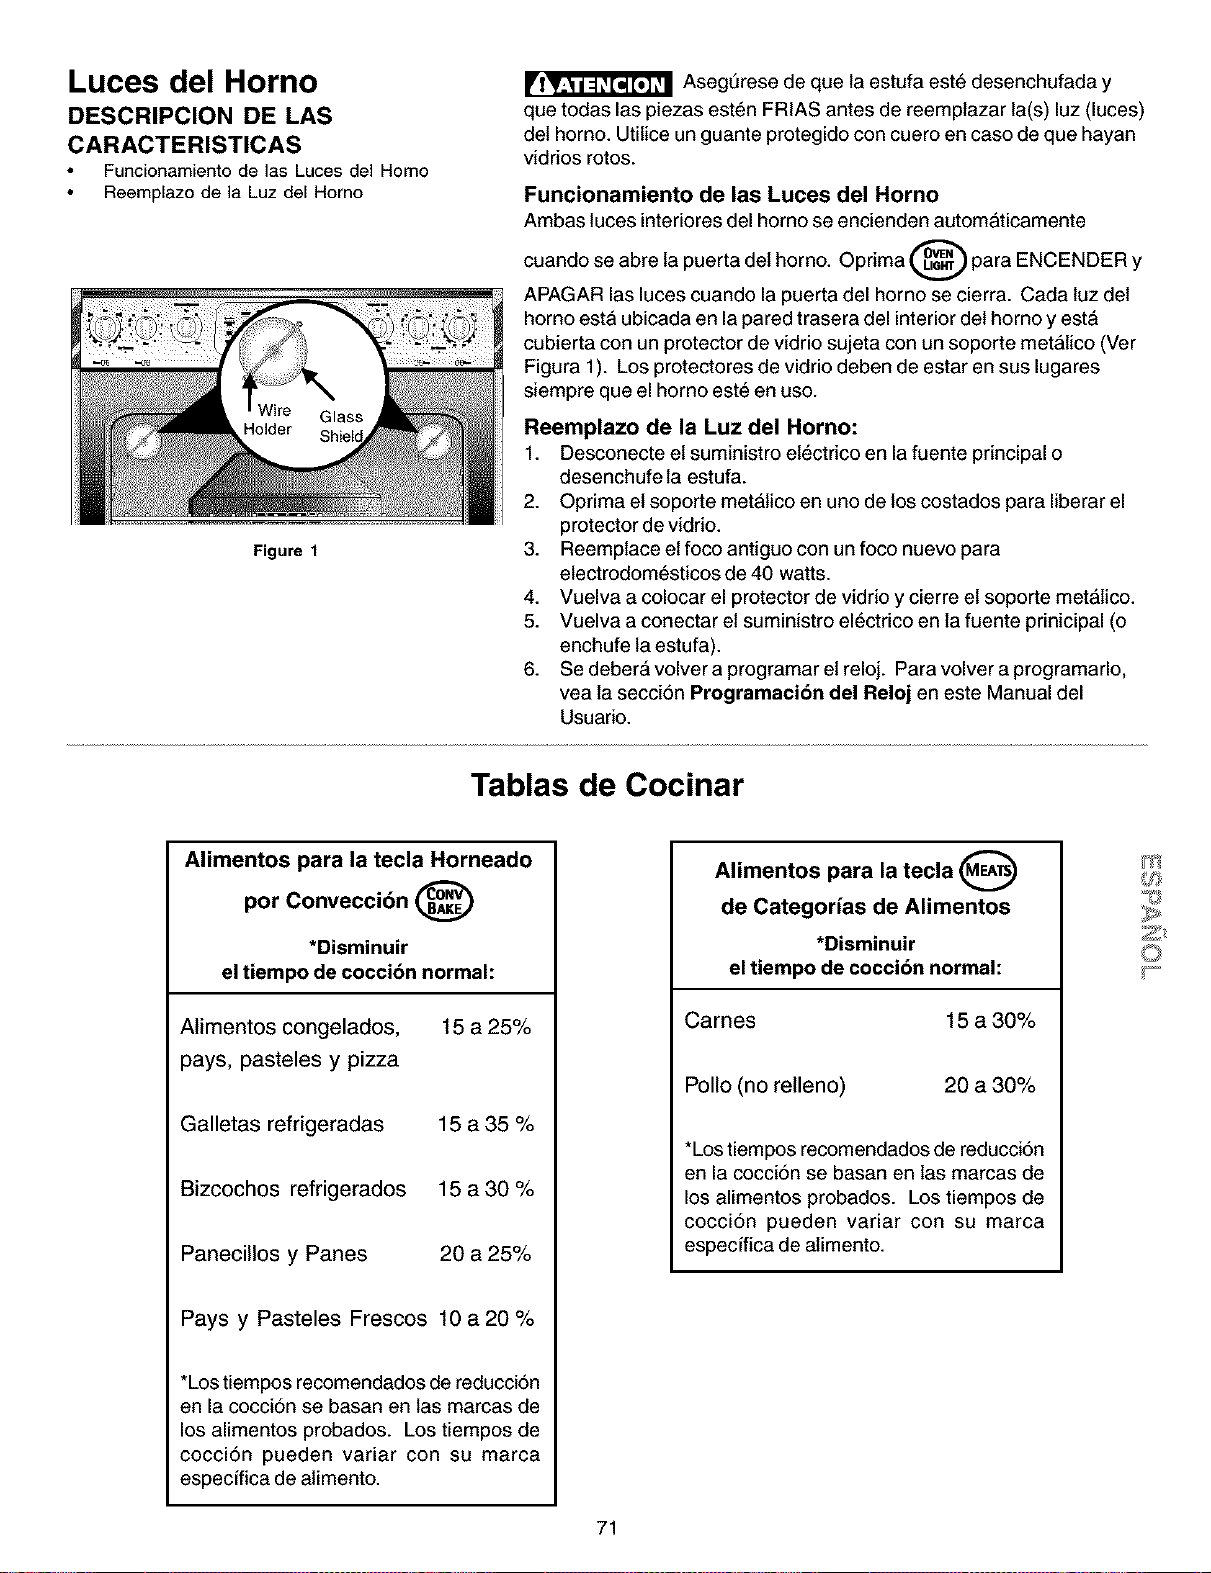
Luces del Horno
DESCRIPCION DE LAS
CARACTERISTICAS
Funcionamiento de las Lucesdel Homo
Reemplazo de la Luz del Homo
Figure 1
Asegt_rese de que la estufa est6 desenchufada y
que todas las piezas est6n FRIAS antes de reemplazar la(s) luz (luces)
del horno. Utilice un guante protegido con cuero en caso de que hayan
vidrios rotos.
Funcionamiento de las Luces del Horno
Ambas luces interiores del horno se encienden automaticamente
cuando se abre la puerta det horno. Oprima _ para ENCENDER Y
APAGAR las luces cuando la puerta del homo se cierra. Cada luz det
homo esta ubicada en la pared trasera del interior det homo y est&
cubierta con un protector de vidrio sujeta con un soporte met;fitico (Ver
Figura 1). Los protectores de vidrio deben de estar en sus lugares
siempre que el horno este en uso.
Reemplazo de la Luz del Homo:
1. Desconecte et suministro et6ctrico en la fuente principal o
desenchufe la estufa.
2. Oprima et soporte metatico en uno de los costados para liberar el
protector de vidrio.
3. Reemplace et foco antiguo con un foco nuevo para
etectrodom6sticos de 40 watts.
4. Vuelva a colocar el protector de vidrio y cierre el soporte metatico.
5. Vuelva a conectar et suministro el6ctrico en la fuente prinicipal (o
enchufe la estufa).
6. Se deber& volver a programar et reloj. Para volver a programarlo,
vea la secci6n Programacibn del Reloj en este Manual del
Usuario.
Tablas de Cocinar
Alimentos para la tecla Horneado
por Conveccibn @
*Disminuir
el tiempo de cocci6n normal:
Alimentos congelados, 15 a 25%
pays, pasteles y pizza
Galletas refrigeradas 15 a 35 %
Bizcochos refrigerados 15 a 30 %
Panecillos y Panes 20 a 25%
Pays y Pasteles Frescos 10 a 20 %
*Lostiempos recomendados de reducci6n
en la cocci6n se basan en las marcas de
los alimentos probados. Los tiempos de
cocci6n pueden variar con su marca
especffica de alimento.
Alimentos para la tecla (MEA_)
v
de Categorias de Alimentos
*Disminuir
el tiempo de cocci6n normal:
Cames 15 a 30%
Polio (no relleno)
20 a 30%
*Los tiempos recomendados de reducci6n
en la cocci6n se basan en las marcas de
los alimentos probados. Los tiempos de
cocci6n pueden variar con su marca
especffica de alimento.
m
71
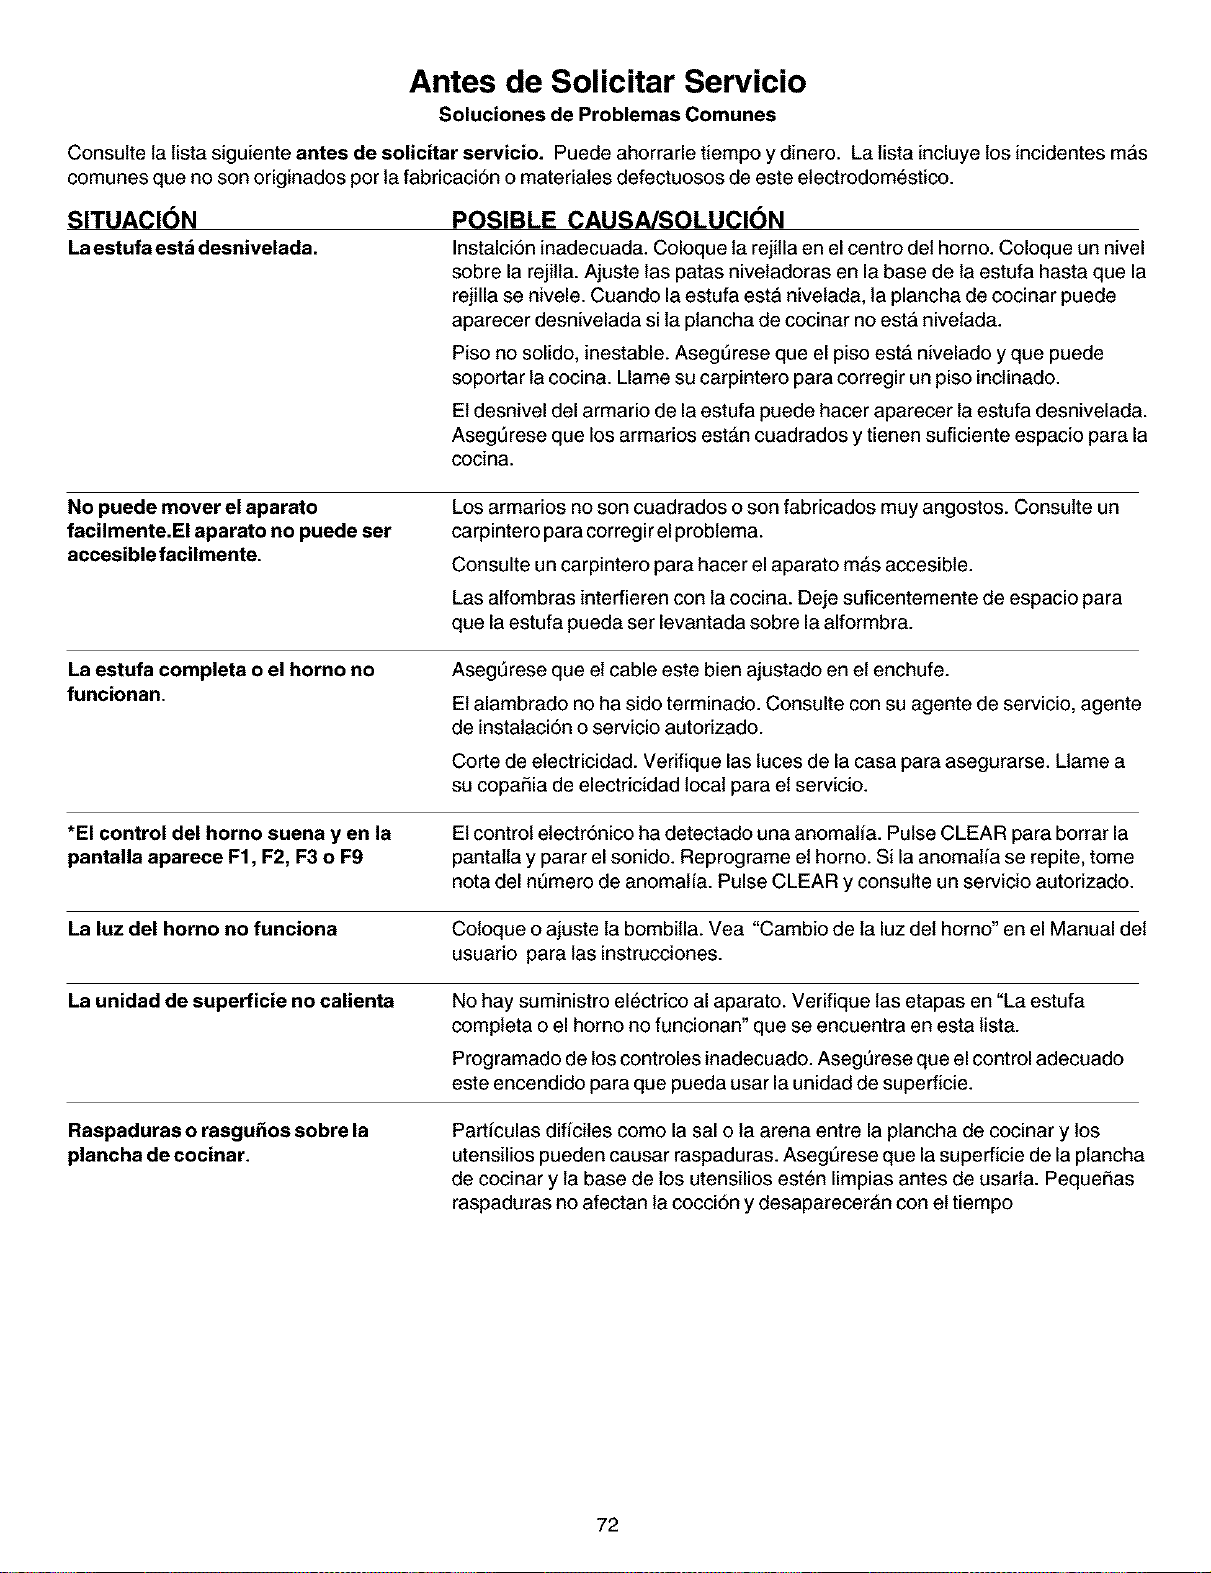
Antes de Solicitar Servicio
Soluciones de Problemas Comunes
Consulte la lista siguiente antes de solicitar servicio. Puede ahorrarle tiempo y dinero. La lista incluye los incidentes m&s
comunes que no son originados por la fabricaci6n o materiates defectuosos de este etectrodomestico.
SITUACION
Laestufa estd desnivelada.
POSIBLE CAUSA/SOLUCION
Instalci6n inadecuada. Coloque la rejitla en elcentro det homo. Coloque un nivel
sobre la rejitla. Ajuste las patas nivetadoras en la base de la estufa hasta que la
rejilla se nivele. Cuando la estufa est& nivetada, la plancha de cocinar puede
aparecer desnivelada si la plancha de cocinar no est& nivetada.
Piso no solido, inestable. Aseg_rese que el piso est& nivelado y que puede
soportar la cocina. Llame su carpintero para corregir un piso inclinado.
Etdesnivel del armario de la estufa puede hacer aparecer la estufa desnivelada.
Aseg_rese que los armarios est&n cuadrados y tienen suficiente espacio para la
cocina.
No puede mover el aparato
facilmente.EI aparato no puede set
accesible facilmente.
Los armarios no son cuadrados o son fabricados muy angostos. Consulte un
carpintero para corregir el problema.
Consulte un carpintero para hacer el aparato m&s accesible.
Las alfombras interfieren con la cocina. Deje suficentemente de espacio para
que la estufa pueda ser levantada sobre la alformbra.
La estufa completa o el horno no
funcionan.
AsegQrese que el cable este bien ajustado en et enchufe.
Etalambrado no ha sido terminado. Consulte con su agente de servicio, agente
de instataci6n o servicio autorizado.
Corte de etectricidad. Verifique las luces de la casa para asegurarse. Llame a
su copafiia de electricidad local para et servicio.
*El control del horno suena yen la Etcontrol electr6nico ha detectado una anomatia. Pulse CLEAR para borrar la
pantalla aparece F1, F2, F3 o F9 pantatta y parar el sonido. Reprograme et homo. Si la anomatia se repite, tome
nota del n6mero de anomatfa. Pulse CLEAR y consulte un servicio autorizado.
La luz del homo no funciona Coloque o ajuste la bombitla. Vea "Cambio de la luz det horno" en el Manual det
usuario para las instrucciones.
La unidad de superficie no calienta No hay suministro electrico al aparato. Verifique las etapas en "La estufa
completa o el horno no funcionan" que se encuentra en esta lista.
Programado de los controles inadecuado. Aseg_rese que el control adecuado
este encendido para que pueda usar la unidad de superficie.
Raspaduras o rasgu_os sobre la Particulas dificiles como la sal o la arena entre la plancha de cocinar y los
plancha de cocinar, utensilios pueden causar raspaduras. Aseg6rese que la superficie de la plancha
de cocinar y la base de los utensilios esten limpias antes de usarla. Pequefias
raspaduras no afectan la cocci6n y desaparecer&n con ettiempo
72
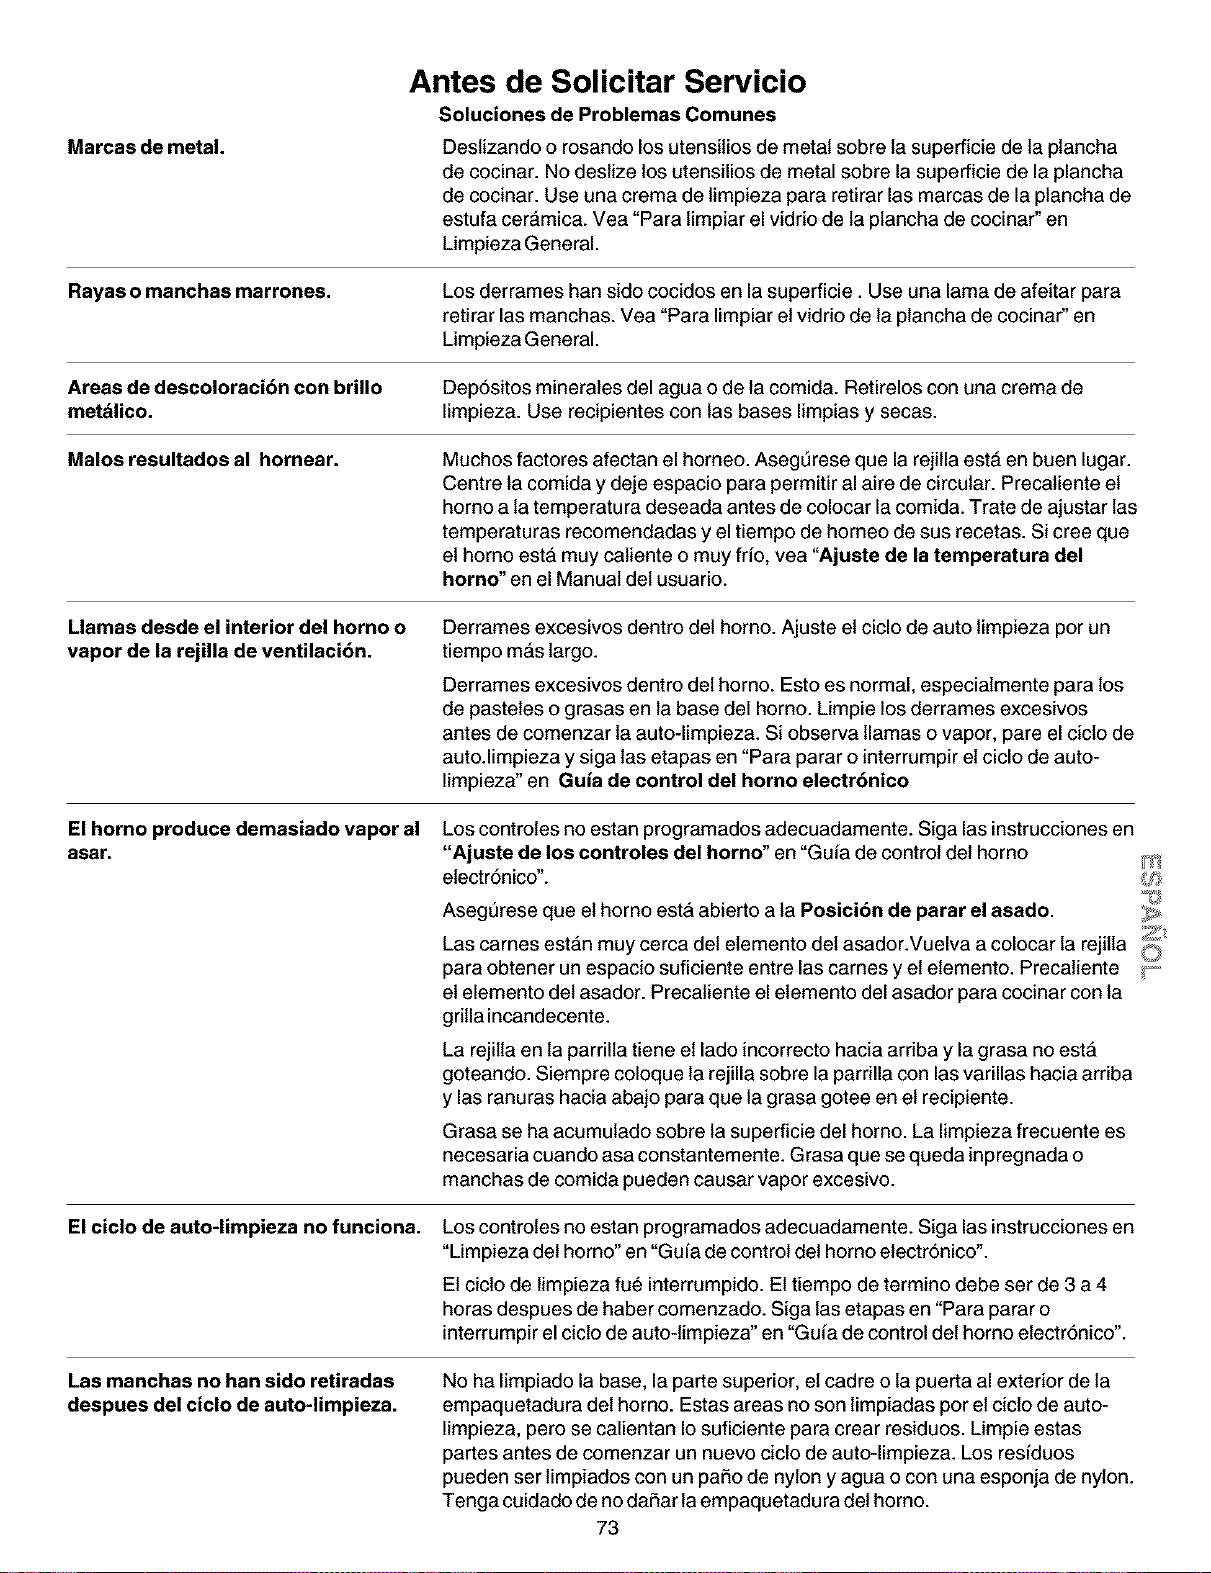
Marcas de metal.
Antes de Solicitar Servicio
Soluciones de Problemas Comunes
Deslizando o rosando los utensitios de metal sobre la superficie de la plancha
de cocinar. No deslize los utensilios de metal sobre la superficie de la plancha
de cocinar. Use una crema de limpieza para retirar las marcas de la plancha de
estufa cer&mica. Vea "Para limpiar el vidrio de la plancha de cocinar" en
Limpieza General.
Rayas o manchas marrones. Losderrames han side cocidos en la superficie. Use una lama de afeitar para
retirar las manchas. Vea "Para limpiar et vidrio de la plancha de cocina¢' en
Limpieza General.
Areas de desceloraci6n con brillo Dep6sitos minerates del agua o de la comida. Retirelos con una crema de
met_lice, limpieza. Use recipientes con las bases limpias y secas.
Males resultados al hernear. Muchos factores afectan el horneo. Asegdrese que la rejitla est& en buen lugar.
Centre la comida y deje espacio para permitir al aire de circular. Precatiente et
homo a la temperatura deseada antes de colocar la comida. Trate de ajustar las
temperaturas recomendadas y el tiempo de homeo de sus recetas. Si cree que
et homo estA muy catiente o muy frio, vea "Ajuste de la temperatura del
homo" en el Manual det usuario.
Llamas desde el interior del horno o
vapor de la rejilla de ventilacibn.
Derrames excesivos dentro del horno. Ajuste et ciclo de auto limpieza per un
tiempo m&s largo.
Derrames excesivos dentro det homo. Esto es normal, especialmente para los
de pastetes o grasas en la base del horno. Limpie los derrames excesivos
antes de comenzar la auto-limpieza. Si observa llamas o vapor, pare el cicto de
auto.limpieza y siga las etapas en "Para parar o interrumpir el ciclo de auto-
limpieza" en Guia de control del horno electr6nico
El horno produce demasiado vapor al
asar.
Los controles no estan programados adecuadamente. Siga las instruccionesen
"Ajuste de los controles del homo" en "Gufa de control det homo _
etectrSnico". _,_f_
AsegSrese que et homo est& abierto a la Posicibn de parar el asade.
Las carnes est&n muy cerca det elemento det asador.Vuelva a colocar la rejitla _
©
para obtener un espacio suficiente entre las carnes y et etemento. Precatiente _-_
et elemento det asador. Precatiente el etemento del asador para cocinar con la
gritla incandecente.
La rejilta en la parrilla tiene et lade incorrecto hacia arriba y la grasa no est&
goteando. Siempre coloque la rejilla sobre la pardlla con las varillas hacia arriba
y las ranuras hacia abajo para que la grasa gotee en et recipiente.
Grasa se ha acumulado sobre la supefficie del homo. La limpieza frecuente es
necesaria cuando asa constantemente. Grasa que se queda inpregnada o
manchas de comida pueden causar vapor excesivo.
El ciclo de auto-limpieza no funciona. Los controles no estan programados adecuadamente. Siga las instruccionesen
"Limpieza det homo" en "Gufa de control det horno etectr6nico".
Et cicto de limpieza fu_ interrumpido. Et tiempo de termino debe ser de 3 a 4
horas despues de haber comenzado. Siga las etapas en "Para parar o
interrumpir el cicto de auto-timpieza" en "Gufa de control det homo etectr6nico".
Las manchas no han side retiradas
despues del ciclo de auto-limpieza.
No ha limpiado la base, la parte superior, et cadre o la puerta al exterior de la
empaquetadura det homo. Estas areas no son limpiadas per et cicto de auto-
limpieza, pero se calientan Io suficiente para crear residues. Limpie estas
partes antes de comenzar un nuevo ciclo de auto-limpieza. Los resfduos
pueden ser limpiados con un patio de nylon y agua o con una esponja de nylon.
Tenga cuidado de no dafiar la empaquetadu ra del homo.
73
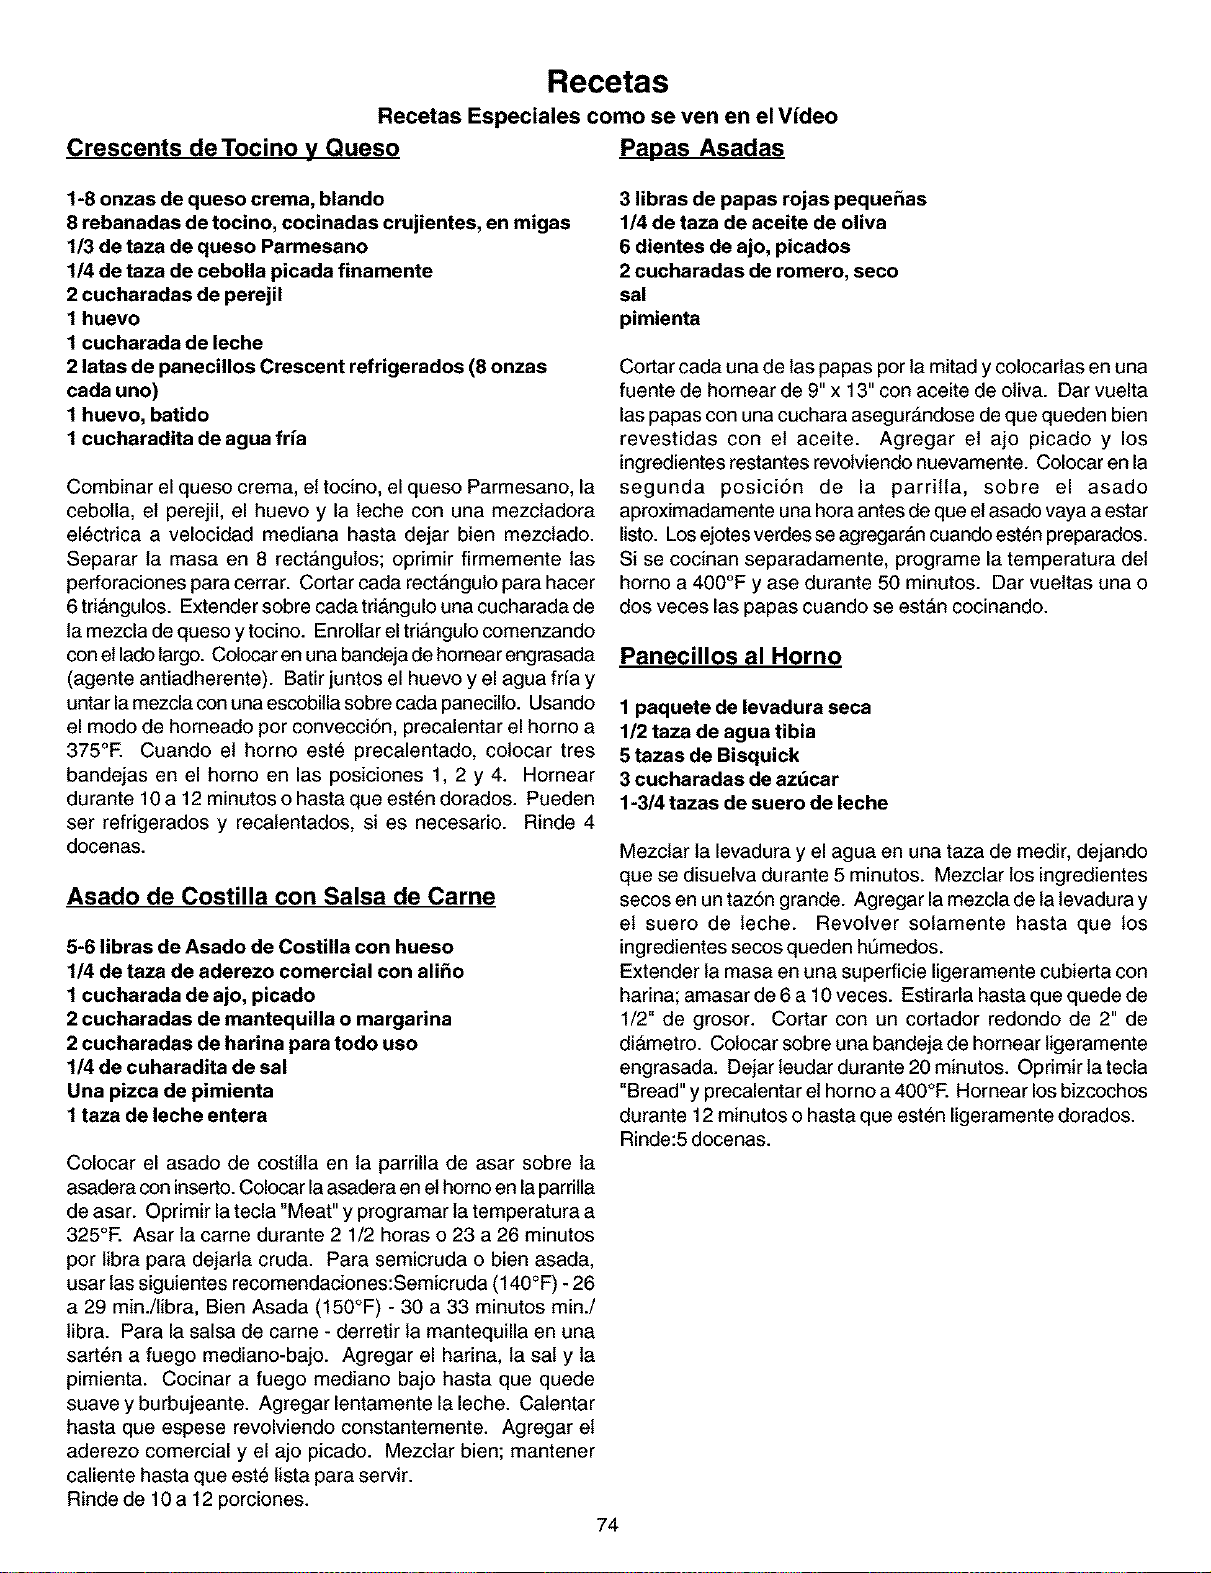
Recetas
Recetas Especiales como se ven en el Vfdeo
Crescents deTocino y Queso Papas Asadas
1-8 onzas de queso crema, blando
8 rebanadas de tocino, cocinadas crujientes, en migas
1/3 de taza de queso Parmesano
1/4 de taza de cebolla picada finamente
2 cucharadas de perejil
1 huevo
1 cucharada de leche
2 latas de panecillos Crescent refrigerados (8 onzas
cada uno)
1 huevo, batido
1 cucharadita de agua fria
Combinar el queso crema, et tocino, el queso Parmesano, la
cebolla, et perejil, el huevo y la leche con una mezcladora
el_ctrica a velocidad mediana hasta dejar bien mezctado.
Separar la masa en 8 rect&ngulos; oprimir firmemente las
perforaciones para cerrar. Cortar cada rect&ngulo para hacer
6 tri&ngulos. Extender sobre cada tri&ngulo una cucharada de
la mezcla de queso y tocino. Enrollar el tri&ngulo comenzando
con etlado largo. Colocar en una bandeja de homear engrasada
(agente antiadherente). Batir juntos el huevo y el agua frfa y
untar la mezcla con una escobilla sobre cada panecillo. Usando
el modo de horneado por convecci6n, precalentar el homo a
375°E Cuando el horno este precalentado, colocar tres
bandejas en el homo en las posiciones 1, 2 y 4. Homear
durante 10 a 12 minutos o hasta que est_n dorados. Pueden
set refrigerados y recatentados, si es necesario. Rinde 4
dooenas.
Asado de Costilla con Salsa de Carne
5-6 libras de Asado de Costilla con hueso
1/4 de taza de aderezo comercial con ali_o
1 cucharada de ajo, picado
2 cucharadas de mantequilla o margarina
2 cucharadas de harina para todo uso
1/4 de cuharadita de sal
Una pizca de pimienta
1 taza de leche entera
Mezctar la levadura y el agua en una taza de medir, dejando
que se disuelva durante 5 minutos. Mezclar los ingredientes
secos en un taz6n grande. Agregar lamezcla de la levadura y
et suero de leche. Revolver solamente hasta que los
ingredientes secos queden ht_medos.
Extender la masa en una superficie ligeramente cubierta con
harina; amasar de 6 a 10 veces. Estirada hasta que quede de
1/2" de grosor. Cortar con un cortador redondo de 2" de
di&metro. Colocar sobre una bandeja de homear ligeramente
engrasada. Dejar leudar durante 20 minutos. Oprimir la tecla
"Bread" y precalentar el homo a 4OO°E Hornear los bizcochos
durante 12 minutos o hasta que esten ligeramente dorados.
Rinde:5 docenas.
3 libras de papas rojas peque_as
1/4 de taza de aceite de oliva
6 dientes de ajo, picados
2 cucharadas de romero, seco
sal
pimienta
Cortar cada una de las papas por la mitad y colocarlas en una
fuente de hornear de 9" x 13" con aceite de oliva. Dar vuelta
las papas con una cuchara asegur&ndose de que queden bien
revestidas con et aceite. Agregar et ajo picado y los
ingredientes restantes revolviendo nuevamente. Colocar en la
segunda posici6n de la parrilla, sobre el asado
aproximadamente una hora antes de que el asado vaya a estar
listo. Losejotes verdes se agregar&n cuando esten preparados.
Si se cocinan separadamente, programe la temperatura det
homo a 4OO°F y ase durante 50 minutos. Dar vuettas una o
dos veces las papas cuando se est&n cocinando.
Panecillos al Horno
1 paquete de levadura seca
1/2 taza de agua tibia
5 tazas de Bisquick
3 cucharadas de azt_car
1-3/4 tazas de suero de leche
Colocar el asado de costitla en la parrilla de asar sobre la
asadera con inserto. Colocar la asadera en ethomo en la parrilla
de asar. Oprimir la tecla "Meat" y programar la temperatura a
325°E Asar la came durante 2 1/2 horas o 23 a 26 minutos
por libra para dejarla cruda. Para semicruda o bien asada,
usar las siguientes recomendaciones:Semicruda (140°F) - 26
a 29 min./libra, Bien Asada (150°F) - 30 a 33 minutos min./
libra. Para la salsa de came - derretir la mantequilla en una
sart_n a fuego mediano-bajo. Agregar el harina, la sal y la
pimienta. Cocinar a fuego mediano bajo hasta que quede
suave y burbujeante. Agregar lentamente la leche. Calentar
hasta que espese revolviendo constantemente. Agregar et
aderezo comercial y el ajo picado. Mezctar bien; mantener
caliente hasta que este lista para servir.
Rinde de 10 a 12 porciones.
74
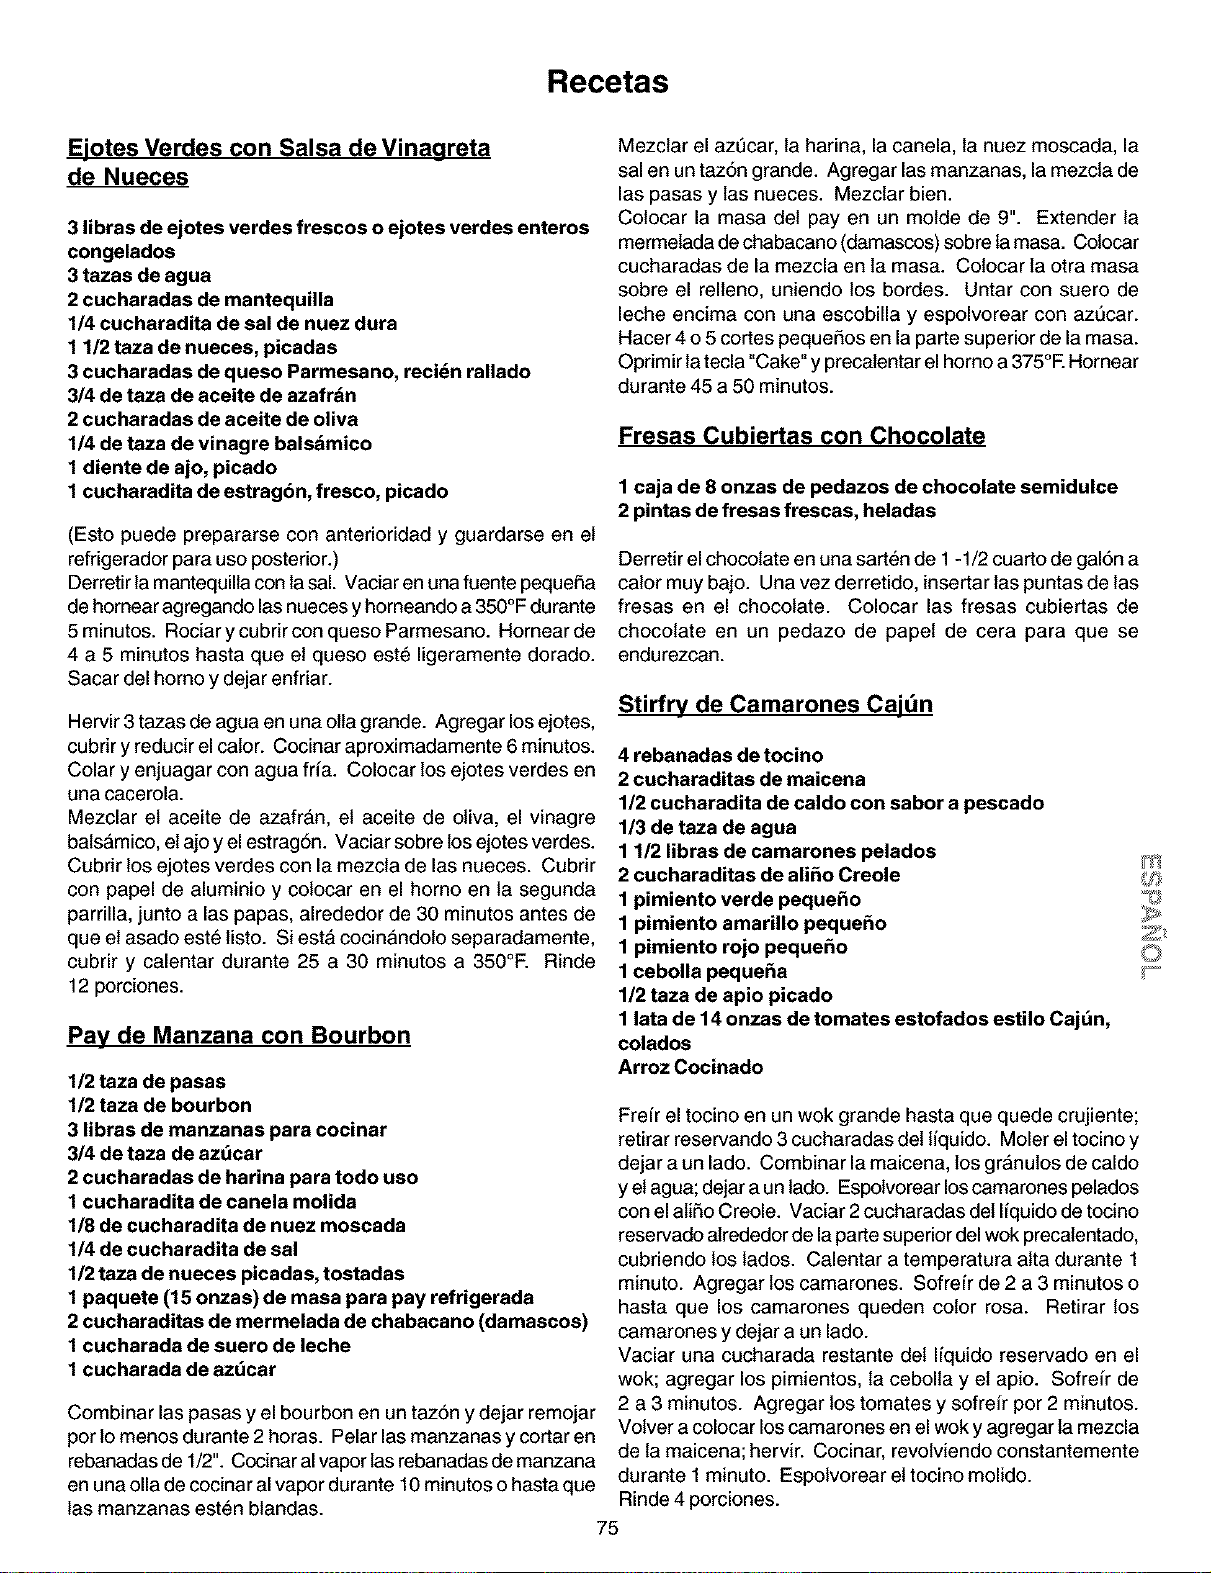
Recetas
E!otes Verdes con Salsa de Vinagreta
de Nueces
3 libras de ejotes verdes frescos o ejotes verdes enteros
congelados
3 tazas de agua
2 cucharadas de mantequilla
1/4 cucharadita de sal de nuez dura
1 1/2 taza de nueces, picadas
3 cucharadas de queso Parmesano, reci_n rallado
3/4 de taza de aceite de azafrdn
2 cucharadas de aceite de oliva
1/4 de taza de vinagre balsdmico
1 diente de ajo, picado
1 cucharadita de estrag6n, fresco, picado
(Esto puede prepararse con anterioridad y guardarse en el
refrigerador para uso posterior.)
Derretir la mantequilla con la sal. Vaciar enuna fuente pequeSa
de hornear agregando las nueces y homeando a 350°F durante
5 minutos. Rociar y cubdr con queso Parmesano. Hornear de
4 a 5 minutos hasta que el queso est_ ligeramente dorado.
Sacar del homo y dejar enfriar.
Hervir 3 tazas de agua en una olla grande. Agregar los ejotes,
cubrir y reducir el cator. Cocinar aproximadamente 6minutos.
Colar y enjuagar con agua fria. Colocar los ejotes verdes en
una cacerola.
Mezclar et aceite de azafrAn, et aceite de oliva, el vinagre
balsAmico, el ajo y el estragSn. Vaciar sobre los ejotes verdes.
Cubrir los ejotes verdes con la mezcla de las nueces. Cubrir
con papel de aluminio y colocar en el homo en la segunda
parrilla, junto alas papas, alrededor de 30 minutos antes de
que et asado est_ listo. Si est_ cocinAndolo separadamente,
cubrir y calentar durante 25 a 30 minutos a 350°E Rinde
12 porciones.
Pay de Manzana con Bourbon
1/2 taza de pasas
1/2 taza de bourbon
3 libras de manzanas para cocinar
3/4 de taza de azdcar
2 cucharadas de harina para todo uso
1 cucharadita de canela molida
1/8 de cucharadita de nuez moscada
1/4 de cucharadita de sal
1/2 taza de nueces picadas, tostadas
1 paquete (15 onzas) de masa para pay refrigerada
2 cucharaditas de mermelada de chabacano (damascos)
1 cucharada de suero de leche
1 cucharada de azdcar
Combinar las pasas y el bourbon en un taz6n y dejar remojar
por lo menos durante 2 horas. Pelar las manzanas y cortar en
rebanadas de 1/2". Cocinar al vapor las rebanadas de manzana
en una olla de cocinar al vapor durante 10 minutos o hasta que
las manzanas esten blandas.
Mezctar el azQcar, la harina, la canela, la nuez moscada, la
sal en un tazSn grande. Agregar las manzanas, la mezcla de
las pasas y las nueces. Mezctar bien.
Colocar la masa del pay en un molde de 9". Extender la
mermelada de chabacano (damascos) sobre la masa. Colocar
cucharadas de la mezcla en la masa. Colocar la otra masa
sobre el relleno, uniendo los bordes. Untar con suero de
leche encima con una escobilla y espolvorear con azQcar.
Hacer 4 o 5 cortes pequeSos en la parte superior de la masa.
Oprimir la tecla "Cake" y precalentar el homo a 375°E Hornear
durante 45 a 50 minutos.
Fresas Cubiertas con Chocolate
1 caja de 8 onzas de pedazos de chocolate semidulce
2 pintas de fresas frescas, heladas
Derretir el chocolate en una sarten de 1 -1/2 cuarto de gal6n a
calor muy bajo. Una vez derretido, insertar las pontas de las
fresas en el chocolate. Colocar las fresas cubiertas de
chocolate en un pedazo de papet de cera para que se
endurezcan.
Stirfry de Camarones Caidn
4 rebanadas de tocino
2 cucharaditas de maicena
112cucharadita de caldo con saber a pescado
1/3 de taza de agua
1 1/2 libras de camarones pelados
2 cucharaditas de ali_o Creole
1 pimiento verde pequefio
1 pimiento amarillo peque_o
1 pimiento rojo peque_o
1 cebolla pequeSa
1/2 taza de apio picado
1 lata de 14 onzas de tomates estofados estilo Cajdn,
colados
Arroz Cocinado
Frefr el tocino en un wok grande hasta que quede crujiente;
retirar reservando 3 cucharadas del liquido. Moler eltocino y
dejar a un lado. Combinar la maicena, los granulos de caldo
y et agua; dejar a un lado. Espolvorear los camarones pelados
con el atiSoCreole. Vaciar 2 cucharadas del Ifquido de tocino
reservado alrededor de la parte superior del wok precalentado,
cubriendo los lados. Calentar a temperatura atta durante 1
minuto. Agregar los camarones. Sofrefr de 2 a 3 minutos o
hasta que los camarones queden color rosa. Retirar los
camarones y dejar a un lado.
Vaciar una cucharada restante det Ifquido reservado en el
wok; agregar los pimientos, la cebolla y et apio. Sofreir de
2 a 3 minutos. Agregar los tomates y sofreir por 2 minutos.
Volver a colocar los camarones en el wok y agregar la mezcla
de la maicena; hervir. Cocinar, revolviendo constantemente
durante 1 minuto. Espolvorear el tocino molido.
Rinde 4 porciones.
75
m

Your Home
For repair-in your home-of all major brand appliances,
lawn and garden equipment, or heating and coolingsystems,
no matter who made it, no matter who sold it!
For the replacement parts, accessories and
owner's manuals that you need to do-it-yourself.
For Sears professional installation of home appliances
and items like garage door openers and water heaters.
1-800-4-MY-HOME ® (1-800.4694663)
Call anytime, day or night(U.S.A. and Canada)
www.sears.com www.sears.ca
Our Home
For repair of carry-in items like vacuums, lawn equipment,
and electronics, call or go on-line for the location of your nearest
Sears Parts & Repair Center.
1-800-488-1222
Call anytime, day or night (U.S.A. only)
www.sears.com
To purchase a protection agreement (U.S.A.)
or maintenance agreement (Canada) on a product serviced by Sears:
1-800-827-6655 (U.S.A.) 1-800-361-8665 (Canada)
Para pedir servicio de reparacibn
a domicilio,y para ordenar piezas:
l"888"SU'HOGAR _
(1-888-784-6427)
Au Canada pour service en fran_ais:
I"800"LE'FOYER Mc
(1-800-533-6937)
www.sears.ca
SEARS
® Registered Trademark / _MTrademark / saService Mark of Sears, Roebuck end Co.
® Marce Registrada / TM Mama de Fdbdce/ su Marca de Servicio de Sears, Roebuck and Co.
MC MD
Marque de commerce / Marque ddpos_e de Seam, Roebuck and Co. ® Seam, Roebuck and Co.

