User manual Warming Drawer
Intended use
Read these instructions carefully. Only then will you be able to operate your appliance safely and correctly. Retain the instruction manual and installation instructions for future use or for subsequent owners.
Check the appliance for damage after unpacking it. Do not connect the appliance if it has been damaged in transport.
This appliance is intended for domestic use and the household environment only. The appliance should be used for keeping food warm and warming plates only.
This appliance is intended for use up to a maximum height of 4000 metres above sea level.
This appliance may be used by children over the age of 8 years old and by persons with reduced physical, sensory or mental capabilities or by persons with a lack of experience or knowledge if they are supervised or are instructed by a person responsible for their safety how to use the appliance safely and have understood the associated hazards.
Children must not play with, on, or around the appliance. Children must not clean the appliance or carry out general maintenance unless they are at least 15 years old and are being supervised.
Keep children below the age of 8 years old at a safe distance from the appliance and power cable.
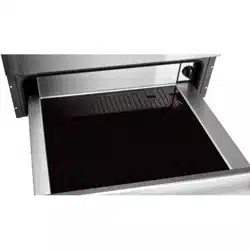
Getting to know your appliance
You can use the warming drawer to preheat ovenware or to keep food warm.
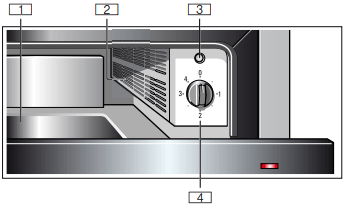
 Heating plate
 Fan and heater
run when the 4 preheatovenware setting is selected
 "Power-on" indicator light
The indicator light flashes when you switch on the appliance. It lights up when the drawer is closed.
 Function selector
0 = Off
1 = Proving yeast pastry, defrosting
2 = Keeping bread warm, defrosting, preheat
drink containers
3 = Keeping food warm
4 = Preheating ovenware
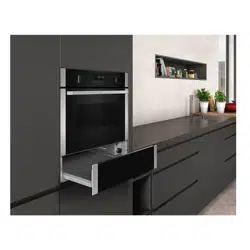
Opening and closing
For appliances with no handle:
Press the middle of the drawer to open or close it.
When opening, the drawer pops out slightly. You can then pull it out towards you.
Operating the appliance
Preheating ovenware
Food stays warm for longer in preheated ovenware. Drinks also remain warm for longer.
General ovenware
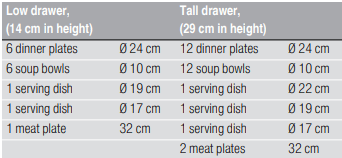
Only load the warming drawer up to 25 kg. You can preheat dinnerware for 6 or 12 people, for example.
Arranging ovenware
As far as possible, distribute the ovenware over the entire surface. It takes longer to warm through tall stacks of plates than individual pieces of ovenware, e.g. 2 serving dishes.
Drinks containers
Always heat drinks containers, e.g. espresso cups, using setting 2.
Method
- Place the ovenware in the drawer.
- Set the function selector to setting 4. Always heat drinks containers using setting 2. The "power on" indicator light flashes.
- Close the warming drawer. The "power on" indicator light lights up. The appliance heats up.
How long does preheating take
The length of time required for preheating depends on the material the ovenware is made of and its thickness, as well as the quantity, height and arrangement of the ovenware. As far as possible, distribute the ovenware over the entire surface.
It takes approximately 15-25 minutes to preheat dinnerware for 6 people.
Switching off
Open the drawer. Switch off the function selector.
Removing ovenware
Remove ovenware from the drawer using oven gloves or an oven cloth.
Keeping food warm
Do not place hot saucepans or pans on the glass surface of the warming drawer immediately after removing them from the hot drawer. This could damage the glass surface.
Do not fill the ovenware to such an extent that food spills over.
Cover the food with a heat-resistant lid or aluminium foil.
It is recommended that you do not keep food warm for longer than an hour.
Suitable foods: The appliance is suitable for keeping meat, poultry, fish, sauces, vegetables, side dishes and soups warm.
Method
- Place the ovenware in the drawer.
- Set the function selector to setting 3 and preheat the appliance for 10 minutes.
- Add the food to the preheated ovenware.
- Close the drawer again. The "power on" indicator light lights up. The appliance heats up.
Switching off
Switch off the function selector. Remove the food from
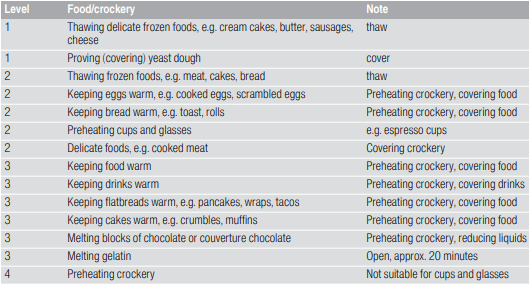
Settings table and tips
The table lists the various uses of your warming drawer. Turn the function selector to the desired level. Preheat crockery if it is listed in the table.
Slow cooking
Slow cooking is the ideal cooking method for all tender pieces of meat which are to be cooked rare or very rare. The meat remains very juicy and turns out as soft as butter. Advantage: this gives you flexibility when planning meals, since the cooking times for slow cooking are generally longer. Slow-cooked meat can be kept warm easily.
Suitable ovenware: Use ovenware made out of glass, porcelain or ceramic and with a lid, e.g. a glass roasting dish.
Method
- Preheat the warming drawer containing the ovenware at setting 4.
- Rapidly heat a little fat in a pan. Sear the meat over a high heat and then place it directly in the warmed ovenware. Place the lid on top.
- Put the ovenware with the meat back in the warning drawer and complete the cooking. Set the function selector to setting 3.
Notes on slow cooking
Only use high-quality, fresh meat for this. Carefully remove sinews and fat. Fat develops a strong, distinct taste during slow cooking.
The meat should not be turned even if it is a large joint.
You can cut the meat immediately after slow cooking. It is not necessary to leave the meat to stand.
This particular cooking method always leaves the inside of the meat medium rare. However, this does not mean that it is raw or not properly cooked.
Meat that has been slow-cooked is not as hot as meat that has been cooked conventionally. Serve the sauce very hot. Place the plates in the warming drawer for the last 20-30 minutes.
Turn the oven back to setting 2 after slow cooking in order to keep the slow-cooked meat warm. You can keep small pieces of meat warm for up to 45 minutes, and large pieces for up to two hours.
Table
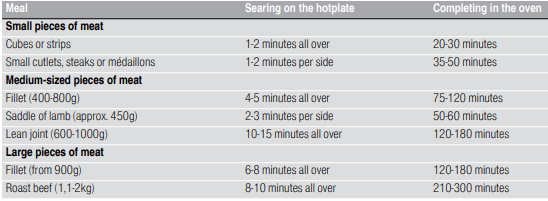
All tender joints of beef, pork, veal, lamb, game and poultry are suitable for slow cooking. Searing and braising times depend on the size of the piece of meat. The times for searing refer to the meat being placed in hot fat.
Cleaning
Do not use high-pressure cleaners or steam jets. Only clean the appliance when it is switched off. Function selector: Position = 0.
Appliance exterior
Wipe the appliance with water and a little detergent. Then dry it with a soft cloth.
Caustic or abrasive cleaning products are not suitable. If a caustic or abrasive substance comes into contact with the frontage, wash it off immediately with water.
Stainless steel surfaces
Always remove any spots of limescale, grease, cornflour and egg white immediately. Corrosion can form under such spots. Clean the appliance using water and a little detergent. Then dry the surface with a soft cloth.
Appliances with glass fronts
Clean the glass front with glass cleaner and a soft cloth. Do not use a glass scraper.
Heating plate
Clean the heating plate using warm water and a little detergent.
Troubleshooting
Malfunctions often have simple explanations. Please read the following notes before calling the after-sales service:
| The crockery or food stays cold. |
Check whether:
■ The appliance is switched on
■ There is a power cut
■ The drawer is completely closed
|
| The crockery or food does not get warm enough. |
It may be that:
■ The crockery or food has not been warmed for long enough
■ The drawer was open for a long time
|
| The operating indicator light is flashing. |
Check whether the drawer is completely closed. |
| The indicator light is flashing quickly when the warming drawer is closed. |
Call the after-sales service. |
| The operating indicator light does not light up. |
The indicator light is defective. Consult the after-sales service. |
| The fuse in the fuse box blows. |
Pull out the mains plug and consult the after-sales service. |