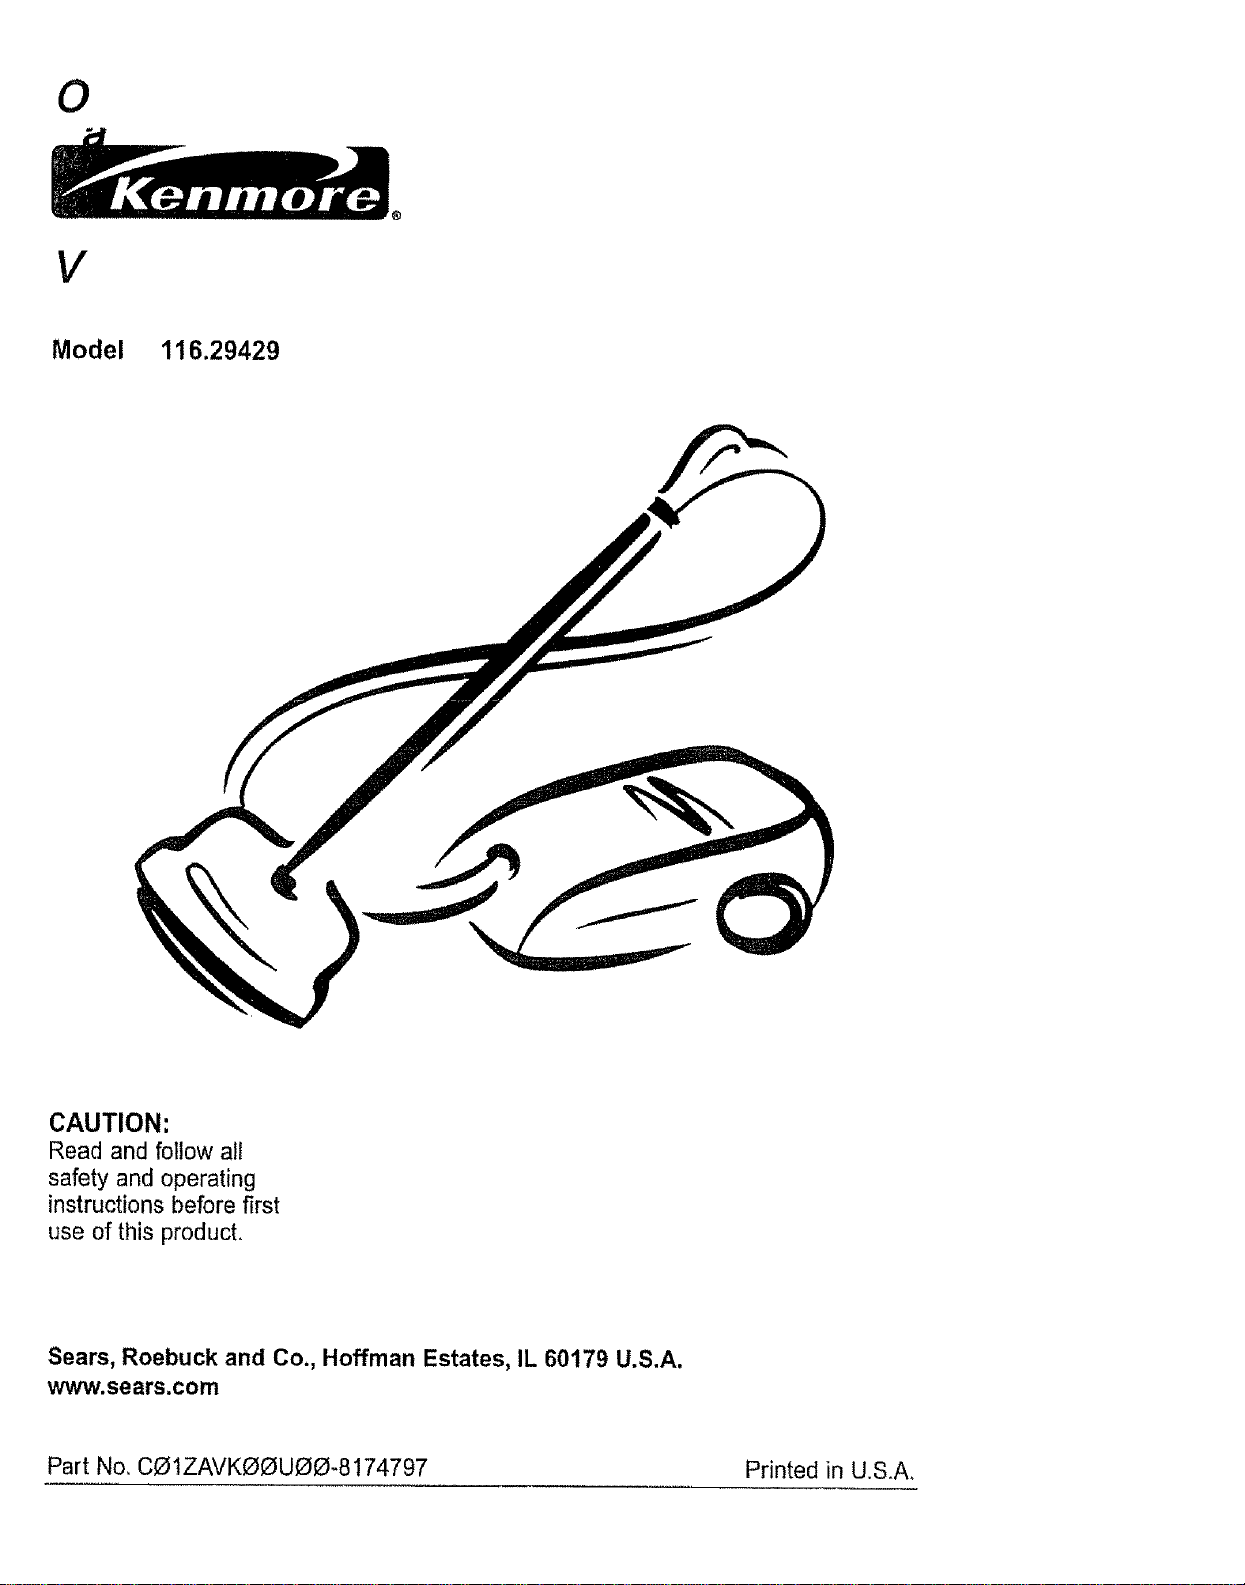
O
V
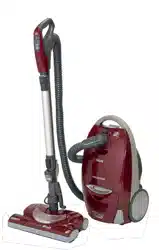
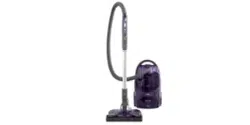
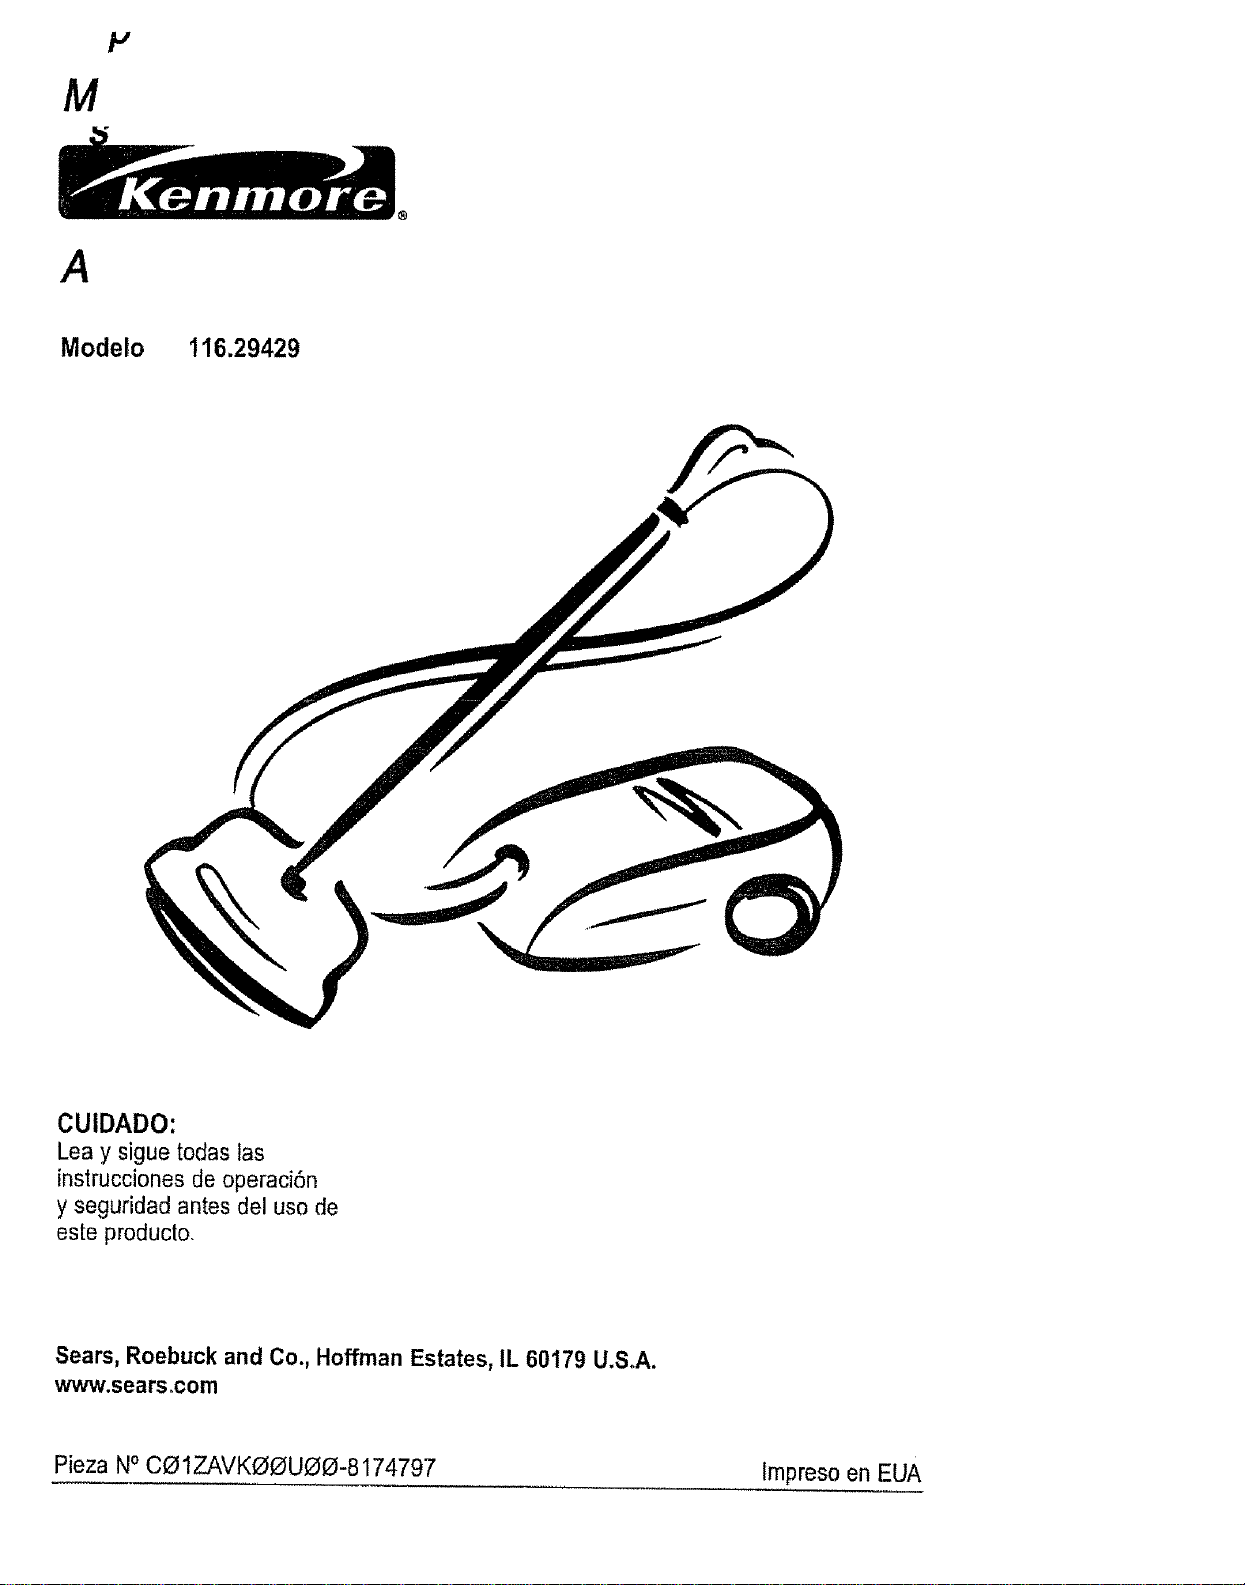
Model 1t6.29429
CAUTION:
Read and follow all
safety and operating
instructions before first
use of this product.
Sears, Roebuck and Co., Hoffman Estates, IL 60179 U.S.A.
www.sears.com
Part No, COIZAVKOOU00-8 !74797 Printed in U.S.A.
Before Using Your New Vacuum ........ 2
Kenmore Vacuum Cleaner Warranty .... 2
Important Safety Instructions ......... 3
Parts and Features .................. 4-5
Assembly ........................ 6-7
Use ................................ 8
How to Start ............................ 8
Vacuuming Tips ...................... 9
Suggested Pits Height Settings ............ 9
Attachments ....................... 10
Attachment Use Chart ............... 10
Performance Features 11
How Your Vacuum Works ......... 12
Canister Care ..................... t2
Bag Changing ................... 12
Motor Safety Filter Cleaning ......... 13
Cleaning Exterior and Attachments ..... 13
Power-Mate TM Care ........................ 14
LightBulb Changing ................ 14
Belt Changing and Brush Cleaning ,__14-15
Brush Servicing ....................... 16
Brush Assembly ................... 16
Troubleshooting ..................... 17
Requesting Assistance Or Service 18
Please read this guide. It will help you assemble and operate your new Kenmore vacuum in
the safest and most effective way..
For more information about the care and operation, call your nearest Sears store. You will
need the complete model and serial numbers when requesting information. Your vacuum's
model and serial numbers are located on the Model and Serial Number Plate.
Use the space below to record the model number and serial number of your new Kenmore
vacuum.
Model No..
Serial No.
Date of Purchase
Keep this book and your sales check (receipt) in a safe place for future reference.
LIMITED ONE YEARWARRANTY ON KENMORE VACUUM CLEANER
This warranty is for one year from the date of purchase, and includes only private household
vacuum cleaner use. During the warranty year, when this vacuum cleaner is operated and
maintained according to the owner's manual instructions, Sears will repair any defects in
material or workmanship free of charge.
This warranty excludes vacuum bags, belts, light bulbs, and filters, which are expendable parts
and become worn during normal use.
For warranty service, return this vacuum cleaner to the nearest Sears Service Center in
the United States.
This warranty applies only while this product is in use in the United States This warranty gives
you specific legal rights, and you may also have other rights which vary from state to state.
Sears, Roebuck and Co., D!817 WA, Hoffman Estates, IL 60179
WARNING
Your safety is important to us. To reduce the risk of fire, electrical shock, injury to
persons or damage when using your vacuum cleaner, follow basic safety precau-
tions including the following:
Read this manual before assembling or
using your vacuum cleaner,
Use your cleaner only as described in this
manual. Use only with Sears recommended
attachments°
To reduce the risk of electrical shock - Do
not use outdoors or on wet surfaces.
Disconnect electrical supply before servic-
ing or cleaning out brush area. Failure to do
so could result in electrical shock or brush
suddenly starting_
Always turn cleaner off before connecting or
disconnecting the hose or POWER-MATE _.
Always turn cleaner off before unplugging.
Do not unplug by pulling on cord_ To unplug,
grasp the plug, not the cord
Hold plug when rewinding onto cord reel..
Do not allow plug to whip when rewinding.
Do not use with damaged cord or plug. If
cIeaner is not working as it should, has been
dropped, damaged, left outdoors, or dropped
into water, return it to a Sears Service
Center/DepartmenL
Do not pull or carry by cord, use cord as a
handle, close door on cord, or pull cord
around sharp edges or corners. Do not run
cleaner over cord. Keep cord away from
heated surfaces°
Do not leave cleaner when plugged in_
Unplug from outlet when not in use and
before servicing.
Do not allow to be used as a toy° Close
attention is neces§ary when used by or near
children.
Do not handle plug or cleaner with wet
hands.
Do not operate the cleaner with a punctured
hose_, The hose contains electrical wires
Replace if cut or worn. Avoid picking up
sharp objects_
Do not put any objects into openings_
Do not use with any opening blocked; keep
free of dust, tint, hair and anything that may
reduce air flow.
Keep hair, loose cIothing, fingers, and all
parts of body away from openings and mov-
ing parts.
Do not use cleaner without dust bag andlor
filters in place°
Always change the dust bag after vacuum-
ing carpet cleaners or freshener, powders
and fine dust° These products clog the bag,
reduce airflow and can cause the bag to
burst. Failure to change bag could cause
permanent damage to the cleaner.
Do not use the cleaner to pick up sharp hard
objects, small toys, pins, paper clips, etc_
They may damage the cleaner or dust bag.
Do not pick up anything that is burning or
smoking, such as cigarettes, matches, or hot
ashes
Do not use cleaner to pick up flammable or
combustible liquids (gasoline, cleaning fluids,
perfumes, etc.), or use in areas where they
may be present. The fumes from these sub-
stances can create a fire hazard or explo-
siono
Use extra care when cleaning on stairs. Do
not put on chairs, tables, etc, Keep on floor.
You are responsible for making sure that
your vacuum cleaner is not used by anyone
unable to operate it properly,.
SAVE THESE INSTRUCTIONS
Proper assembly and safe use of your vacuum cleaner are your responsibilities. Your cleaner
is intended onty for household use. Read this Owner's Manual carefully for important use and
safety information. This guide contains safety statements under warning and caution symbols_
Please pay special attention to these boxes and follow any instructionsgiven° WARNING
statements alert you to such dangers as fire, electrical shock, burns and personal injury. CAU.
TION statements alert you to such dangers as personal injury andlor property damage_
NI'NIIIIIINIINIHHI'1,I ' I .....................
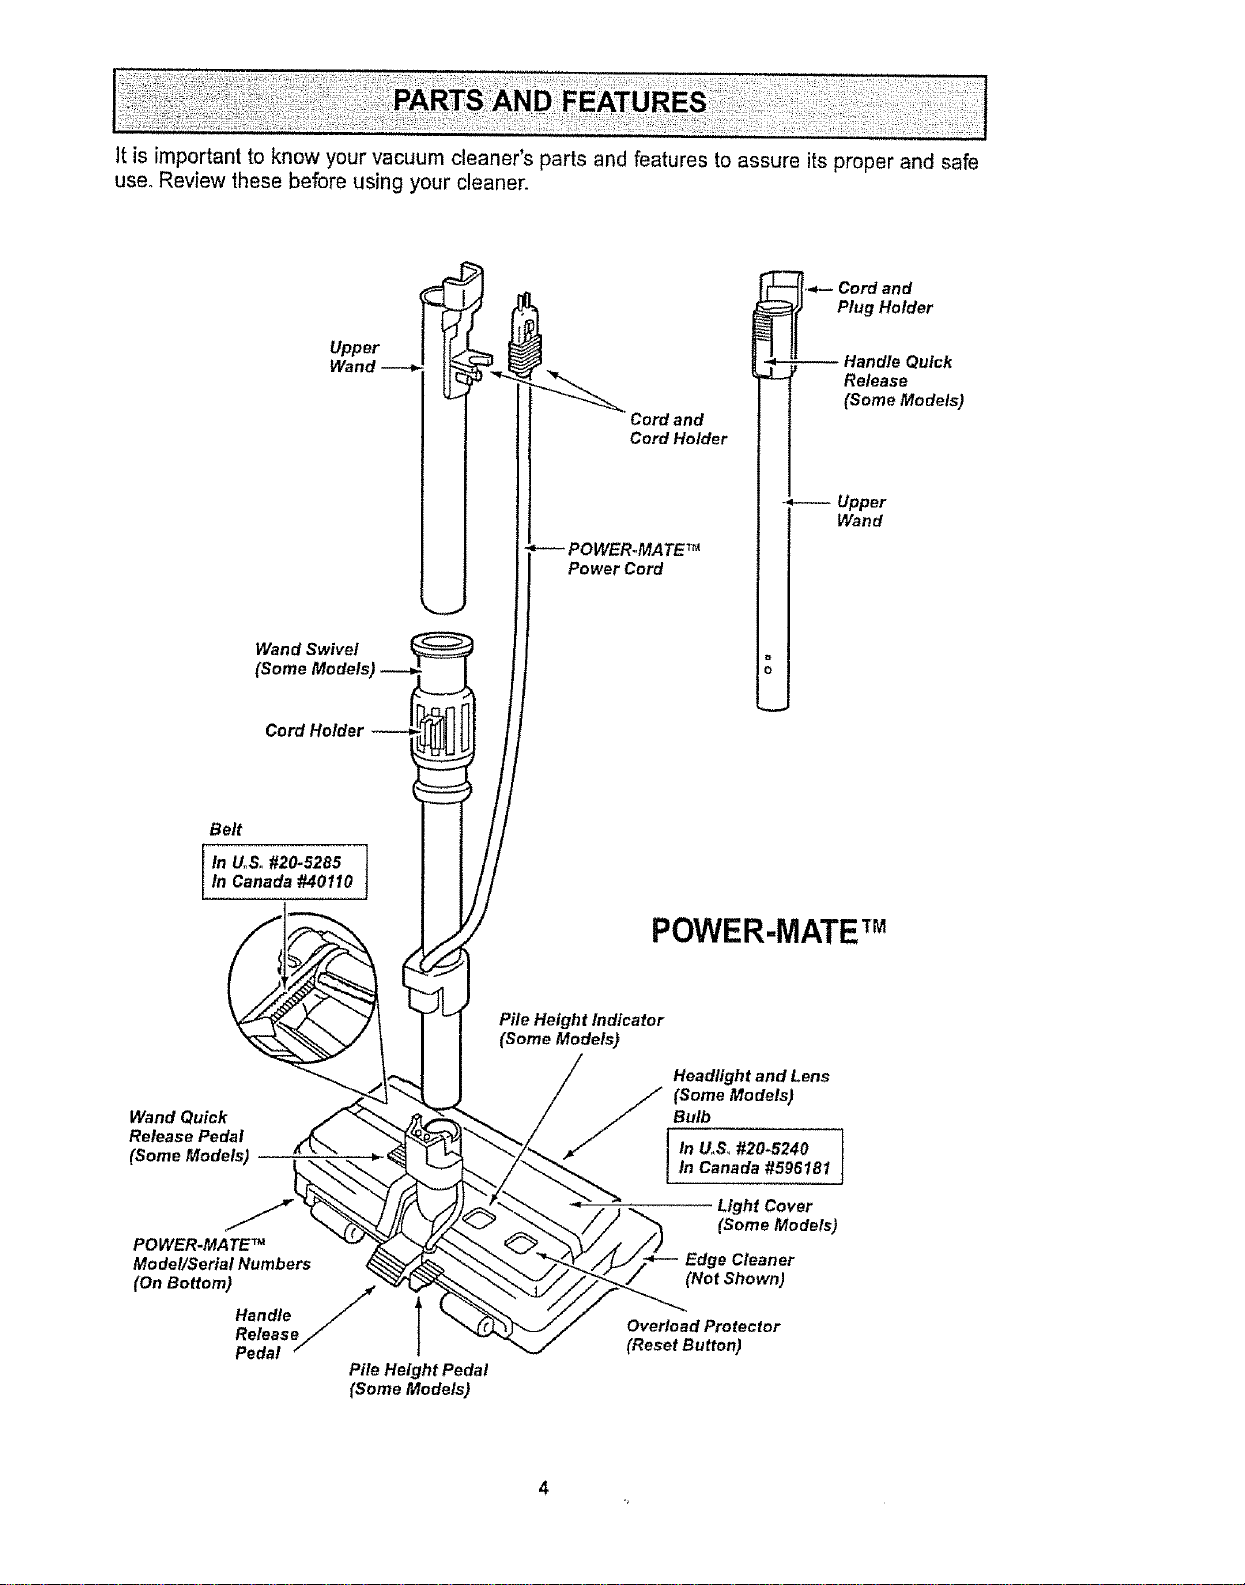
It is important to know your vacuum cleaner's parts and features to assure its proper and safe
use. Review these before using your cleaner.
Upper
Wand Swivel
(Some Models
Cord Holder
Cord and
Cord Holder
POWER,,MATE TM
Power Cord
,._- Cord and
Plug Holder
- Upper
Wand
o
o
Belt
IIn UoSo#20-5285
Canada #40110
POWER-MATETM
Wand Quick
Release Pedal
(Some Models)
POWER.MATE TM
Mo det/Serial Numbers
(OnB°tt°m)Handle/l
ReleaseJ
Pedal
Pile Height Pedal
(Some Models)
Pile Height Indicator
(Some Models)
Headlight and Lens
(Some Models)
Bulb
In U.S_ #20.5240
In Canada #596181
Light Cover
(Some Models)
Edge Cleaner
(Not Shown)
Overload Protector
(Reset Button)
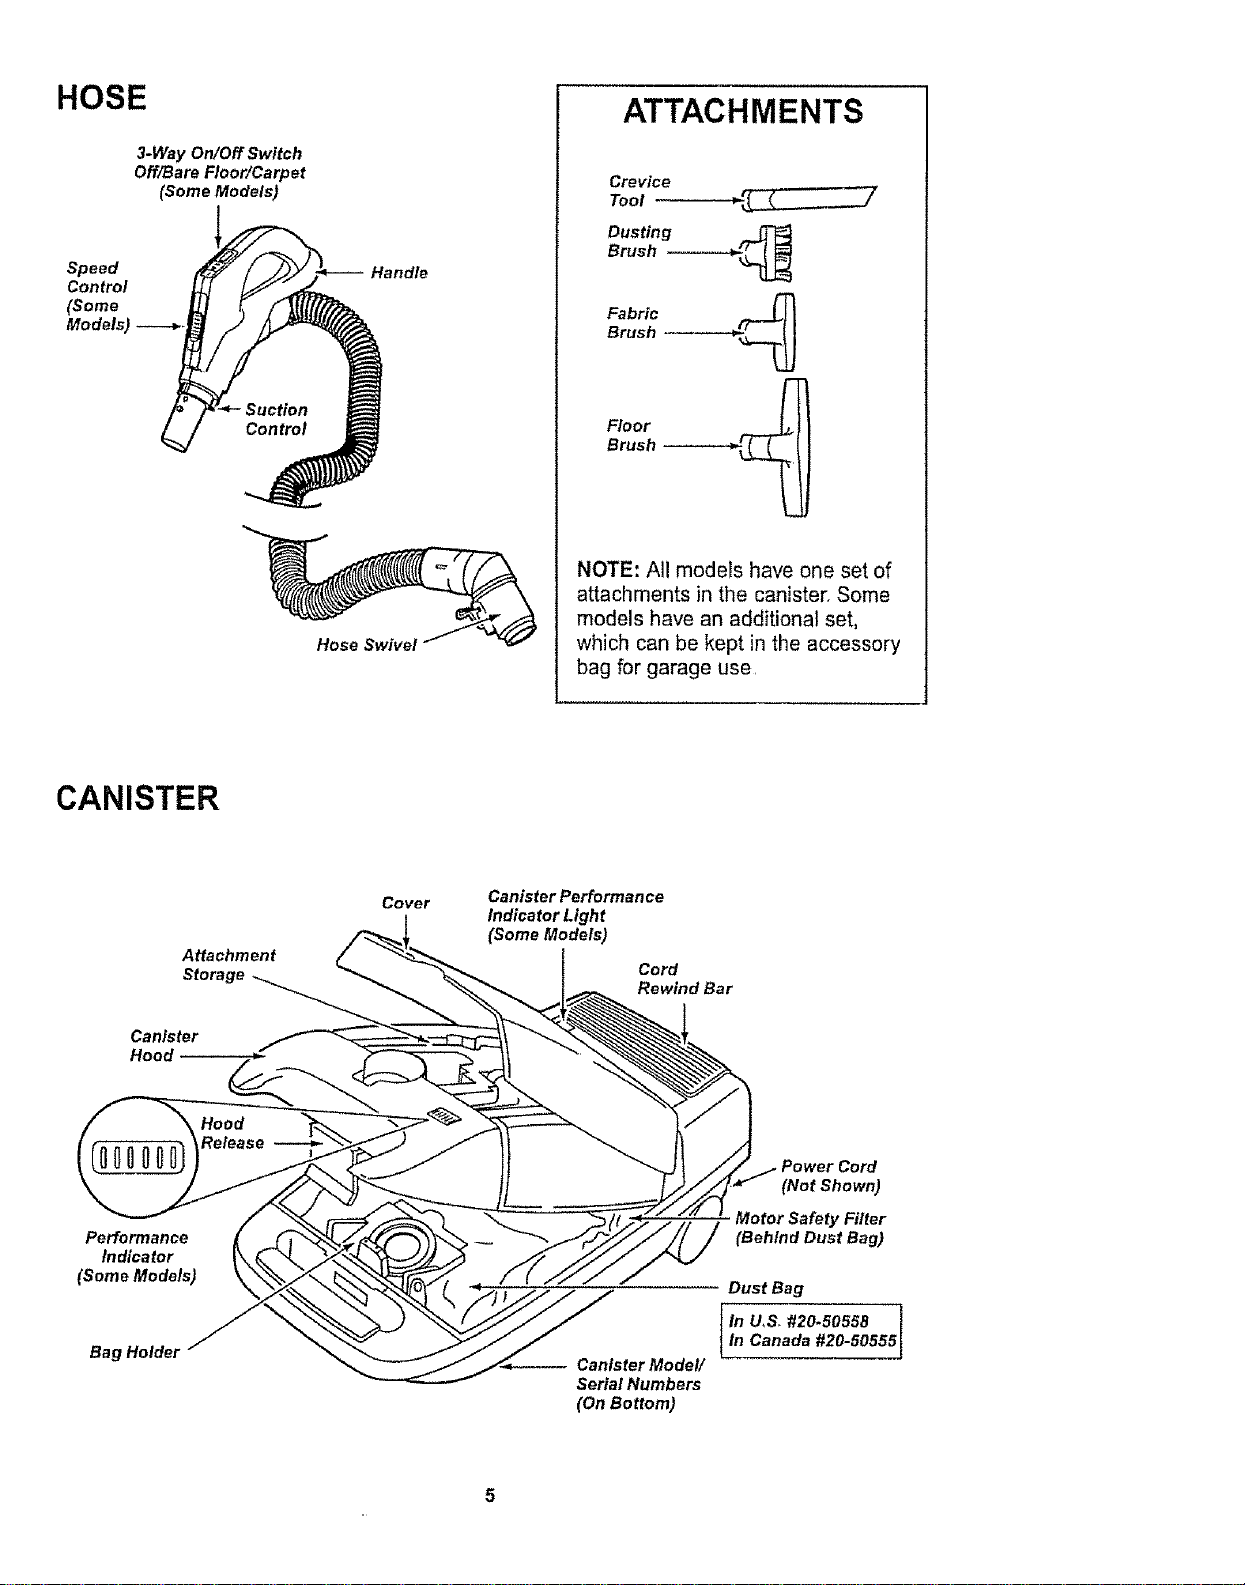
HOSE
3-Way On/Off Switch
Off/Bare Floor/Carpet
(Some Models)
Control
(Some
Models) .---__ _ /
Handle
Hose Swivel
ATTACHMENTS
Crevice
Tool
Dusting ._
Brush ----.-.--_
Fabric _.........__
Brush
Floor
Brush -------_
NOTE: All models have one set of
attachments in the canisten Some
models have an additional set,
which can be kept in the accessory
bag for garage use,
CANISTER
Attachment
Storage
Canister
Hood
Cover
Canister Performan ce
Indicator Light
(Some Models)
Cord
Rewind Bar
Performance
Indicator
(Some Models)
Bag HoldeJ
-- Canister Model/
Serial Numbers
(On Bottom)
(Not Shown)
Motor Safety Filter
(Behind Dust Bag)
Dust Bag
In U,S_ #20.50558
In Canada #20-50555
Before assembling vacuum, check the
PACKING LIST on the cover of the separate
Repair Parts List. Use this list to verify that
you have received all the components of
your new Kenmore vacuum.
Electrical Shock Hazard
DO NOT plug into electrical supply
until assembly is complete. Failure
to do so could result in electrical
shock or injury.
ii IIIl_llnl, II I i,
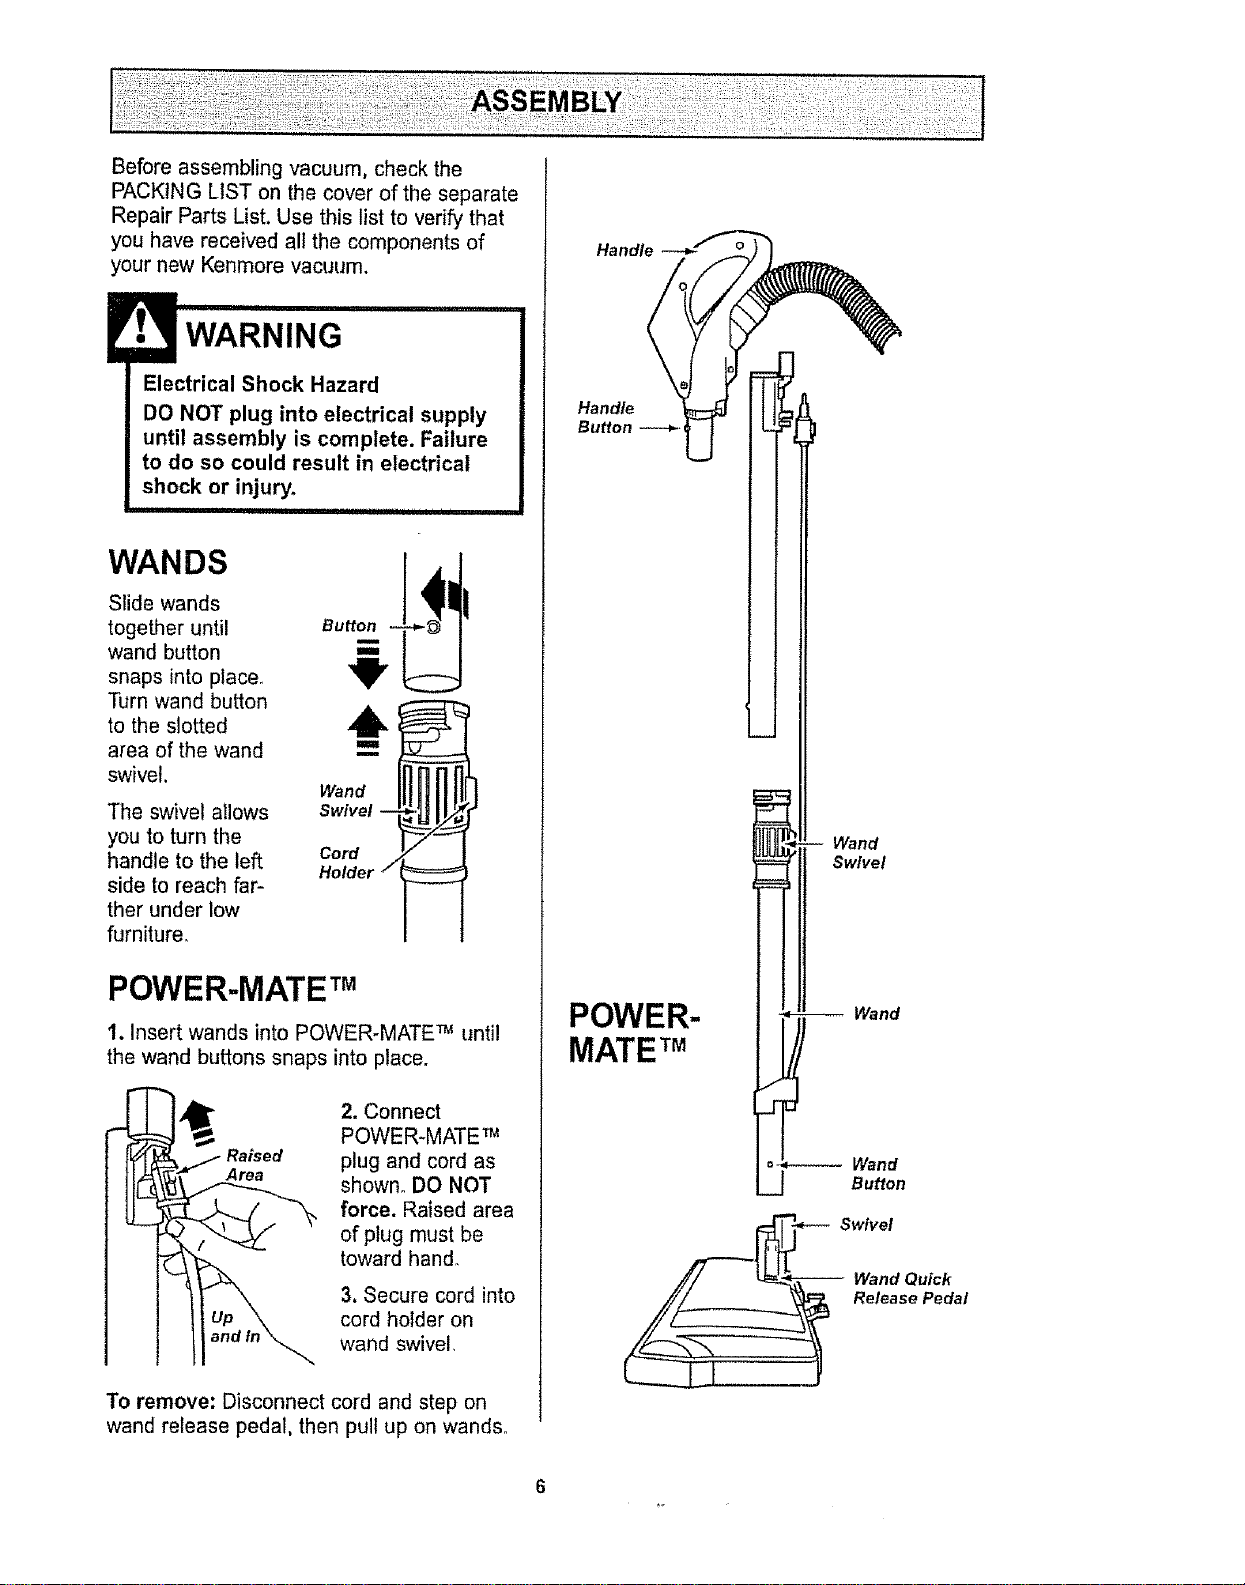
WANDS
Slide wands
together until
wand button
snaps into place.
Turn wand button
to the slotted
area of the wand
swivel.
The swivel allows
you to turn the
handle to the left
side to reach far-
ther under low
furniture°
Button
6
i
Wand
Swivel --
Cord
Holder /
POWER-MATE TM
1. Insert wands into POWER*MATE _ until
the wand buttons snaps into place.
Raised
Area
2. Connect
POWER-MATE _
plug and cord as
shown° DO NOT
force. Raised area
of plug must be
toward hand.
3. Secure cord into
cord ho_der on
wand swivel,
To remove; Disconnect cord and step on
wand release pedal, then pull up on wands.
Handle
Button _ ___
Wand
Swivel
POWER-
MATE TM
Wand
Wand
Button
Swivel
Wand Quick
Release Pedal
6
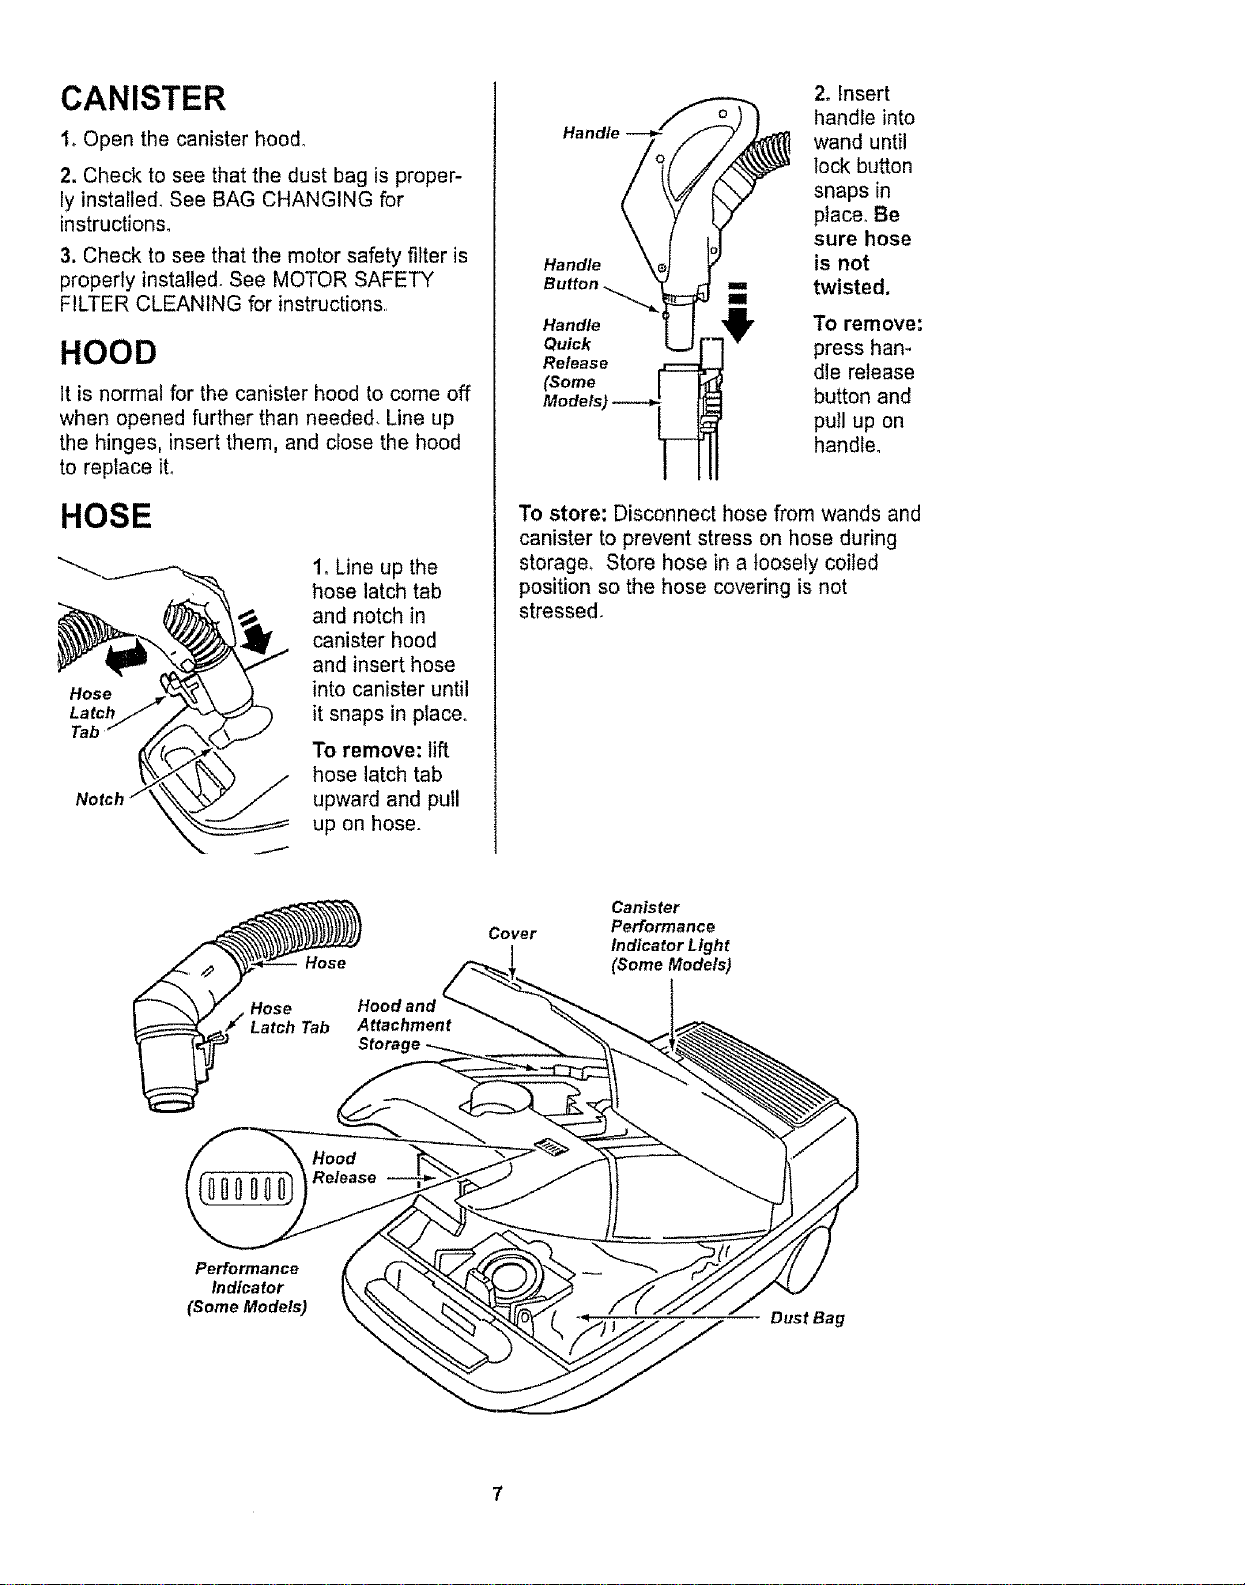
CANISTER
1oOpen the canister hood°
2. Check to see that the dust bag is proper-
ly installed, See BAG CHANGING for
instructions,
3. Check to see that the motor safety filter is
properly installed. See MOTOR SAFETY
FILTER CLEANING for instructions.
HOOD
It is normal for the canister hood to come off
when opened further than needed. Line up
the hinges, insert them, and close the hood
to replace it,
HOSE
Notch
1oLine up the
hose latch tab
and notch in
canister hood
and insert hose
into canister until
it snaps in place,.
To remove: lift
hose latch tab
upward and pull
up on hose.
Hat
Handle
Button
Handle
Quick
Release
(Some
2. Insert
handle into
wand until
lock button
snaps in
place° Be
sure hose
is not
twisted.
To remove:
press han-
dle release
button and
pull up on
handle°
To store: Disconnect hose from wands and
canister to prevent stress on hose during
storage, Store hose in a loosely coiled
position so the hose covering is not
stressed.
HOOE
Attachment
Storage
Cover
Canister
Performance
indicator Light
(Some Models)
Performance
Indicator
(Some Models)
Dust Bag
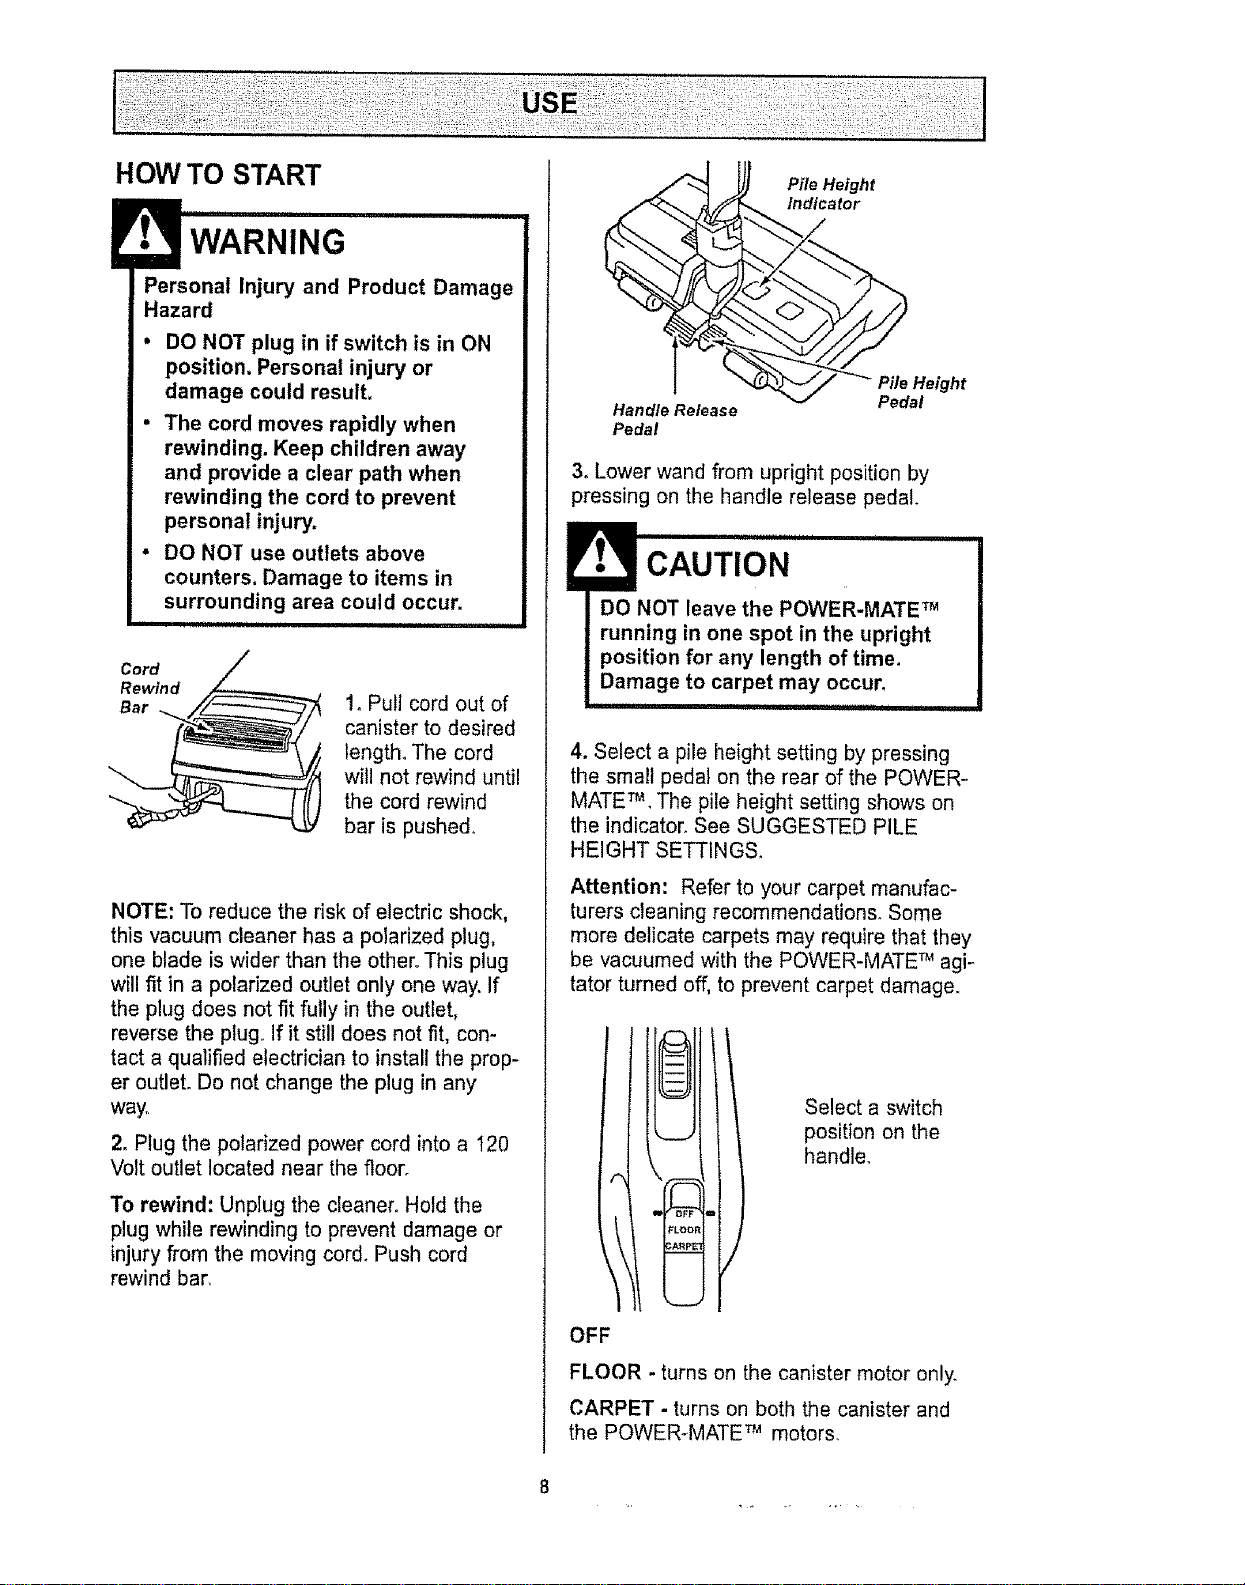
HOW TO START
E WARNING
Personal Injury and Product Damage
Hazard
• DO NOT plug in if switch is in ON
position. Personal injury or
damage could result.
o The cord moves rapidly when
rewinding. Keep children away
and provide a clear path when
rewinding the cord to prevent
personal injury.
, DO NOT use outlets above
counters. Damage to items in
surrounding area could occur.
i i,
Cord
Rewin d
Bar
1, Pull cord out of
canister to desired
length° The cord
will not rewind until
the cord rewind
bar is pushe&
NOTE: To reduce the risk of electric shock,
this vacuum cleaner has a polarized plug,
one blade is wider than the other,, This plug
will fit in a polarized outlet only one way. If
the plug does not fit fully in the outlet,
reverse the plug., If it still does not fit, con-
tact a qualified electrician to install the prop-
er outlet. Do not change the plug in any
way.,
2, Plug the polarized power cord into a 120
Volt outlet located near the floor,
To rewind: Unplug the cleaner, Hold the
plug while rewinding to prevent damage or
injury from the moving cord, Push cord
rewind bar,
Handle Release
Pedal
Pile Height
Indicator
Pite Height
Pedal
3, Lower wand from upright position by
pressing on the handle release pedal.
4, Select a pile height setting by pressing
the small pedal on the rear of the POWER-
MATE _, The pile height setting shows on
the indicator, See SUGGESTED PILE
HEIGHT SETTINGS.
Attention: Refer to your carpet manufac-
turers cleaning recommendations. Some
more delicate carpets may require that they
be vacuumed with the POWER-MATE T_agi-
tator turned off, to prevent carpet damage.
OFF
Select a switch
position on the
handle,
FLOOR - turns on the canister motor only,
CARPET - turns on both the canister and
the POWER-MATE _ motors,
8
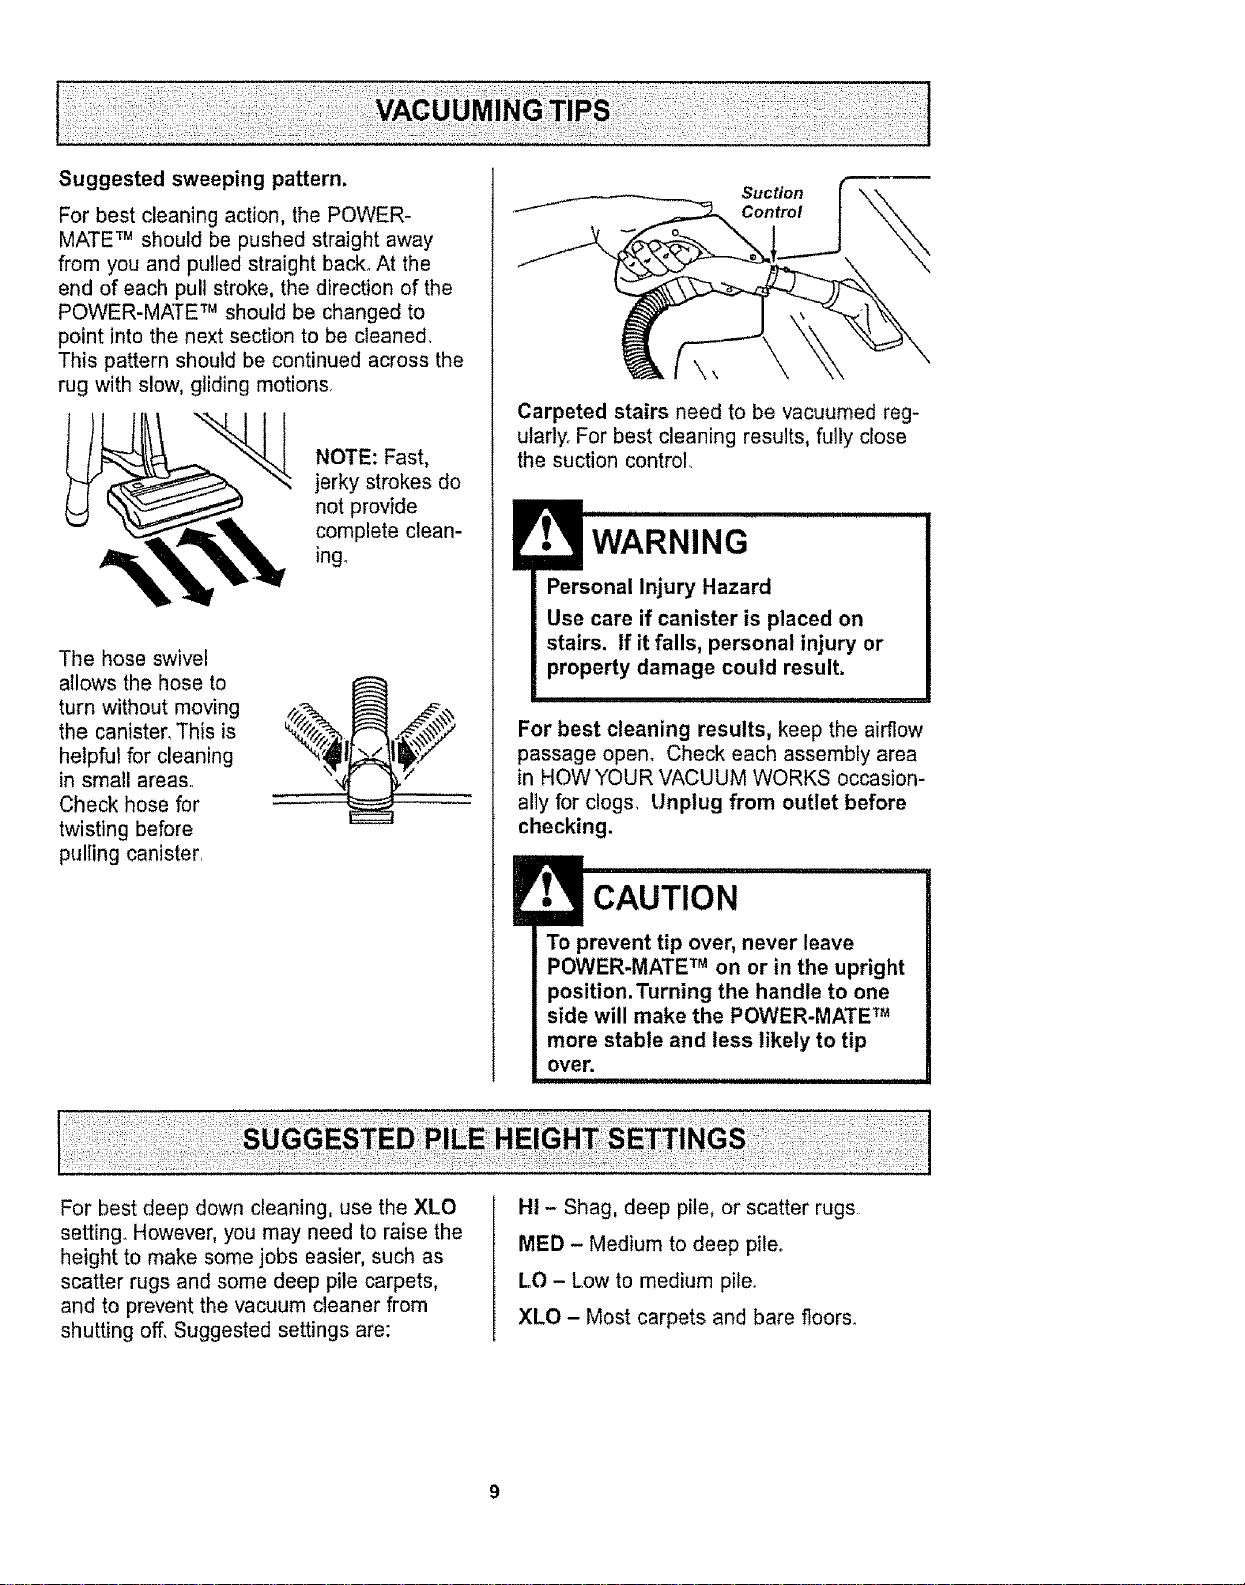
Forbestcleaningaction,thePOWER-
MATETM should be pushed straight away
from you and pulled straight back., At the
end of each pull stroke, the direction of the
POWER-MATE TM should be changed to
point into the next section to be cleaned,
This pattern shoutd be continued across the
rug with slow, gliding motions,
NOTE: Fast,
jerky strokes do
not provide
complete clean-
ingo
The hose swivel
allows the hose to
turn without moving
the canister, This is
helpful for cleaning
in small areas..
Check hose for
twisting before
pulling canister,
Suction
Control
Carpeted stairs need to be vacuumed reg-
utarlyo For best cleaning results, fully close
the suction control
Personal Injury Hazard
Use care if canister is placed on
stairs, if it falls, personal injury, or
property damage could result.
For best cleaning results, keep the airflow
passage open, Check each assembly area
in HOW YOUR VACUUM WORKS occasion-
ally for clogs, Unplug from outlet before
checking.
To prevent tip over, never leave
POWER-MATE TM on or in the upright
position.Turning the handle to one
side will make the POWER-MATE TM
more stable and less likely to tip
over.
For best deep down cleaning, use the XLO
setting_ However, you may need to raise the
height to make some jobs easier, such as
scatter rugs and some deep pile carpets,
and to prevent the vacuum cleaner from
shutting off, Suggested settings are:
HI - Shag, deep pile, or scatter rugs
MED - Medium to deep pileo
LO - Low to medium pite_
XLO - Most carpets and bare floors_
E _ =11
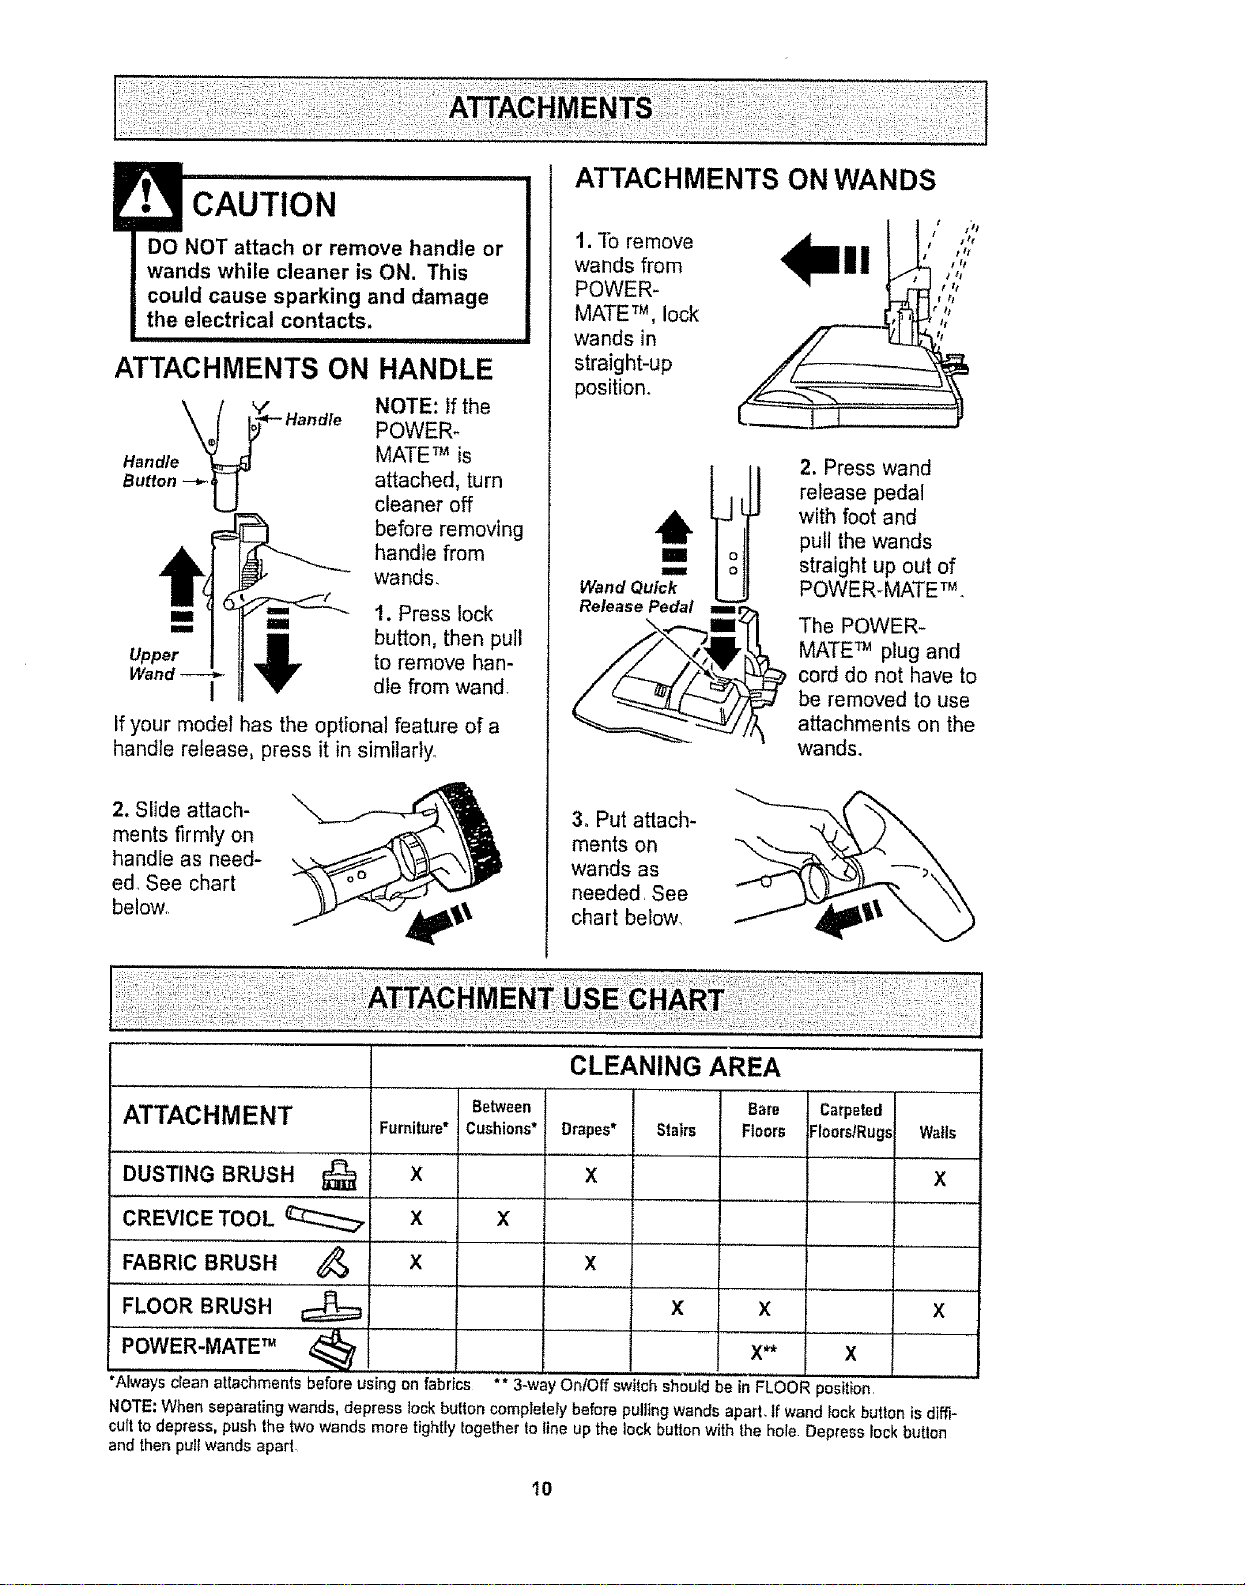
CAUTION
DO NOT attach or remove handle or
wands while cleaner is ON. This
could cause sparking and damage
the electrical contacts.
ii ii1,1,1111,,i I i
ATTACHMENTS ON HANDLE
NOTE: if the
POWER_
Handle MATE TM is
Button --_ attached, turn
cleaner off
before removing
handle from
wands,
I
1. Press lock
button, then pull
to remove han-
dle from wand.
If your model has the optional feature of a
handle release, press it in similarly°
2. Slide attach-
ments firmly on
handle as need-
ed_ See chart
below,.
ATTACHMENTS ON WANDS
t. To remove
wands from
POWER-
MATE TM, lock
wands in
straight-up
position.
Wand Quick
Release Pedal
2. Press wand
release pedal
with foot and
pull the wands
straight up out of
POWER-MATE TM.
The POWER-
MATE TM plug and
cord do not have to
be removed to use
attachments on the
wands.
3. Put attach-
ments on
wands as
needed, See
chart below_
..... ,,, , ,.............
CLEANING AREA
ATTACHMENT Between Bare Carpeted
Furniture* Cushions* Drapes* Stairs Floors ;Ioors/Rug._ Walls
DUSTING BRUSH 1_ X
X
X
CREVICE TOOL _ X X I
........... , , , ,
FABRIC BRUSH X
FLOOR BRUSH X
POWER-MATE TM
_'" ,,
, ,,,,,,,,,, ,
*Always clean attachments before using on fabrics ** 3-wa'
X
x x
X** X
' OnlOff switch should be in FLOOR position
NOTE; When separating wands, depress tock button complelely before pulling wands apart, tf wand lock button is diffi-
cult to depress, push the two wands more tightly logether to line up the lock button with the hole. Depress lock butlon
and then pull wands apart
10
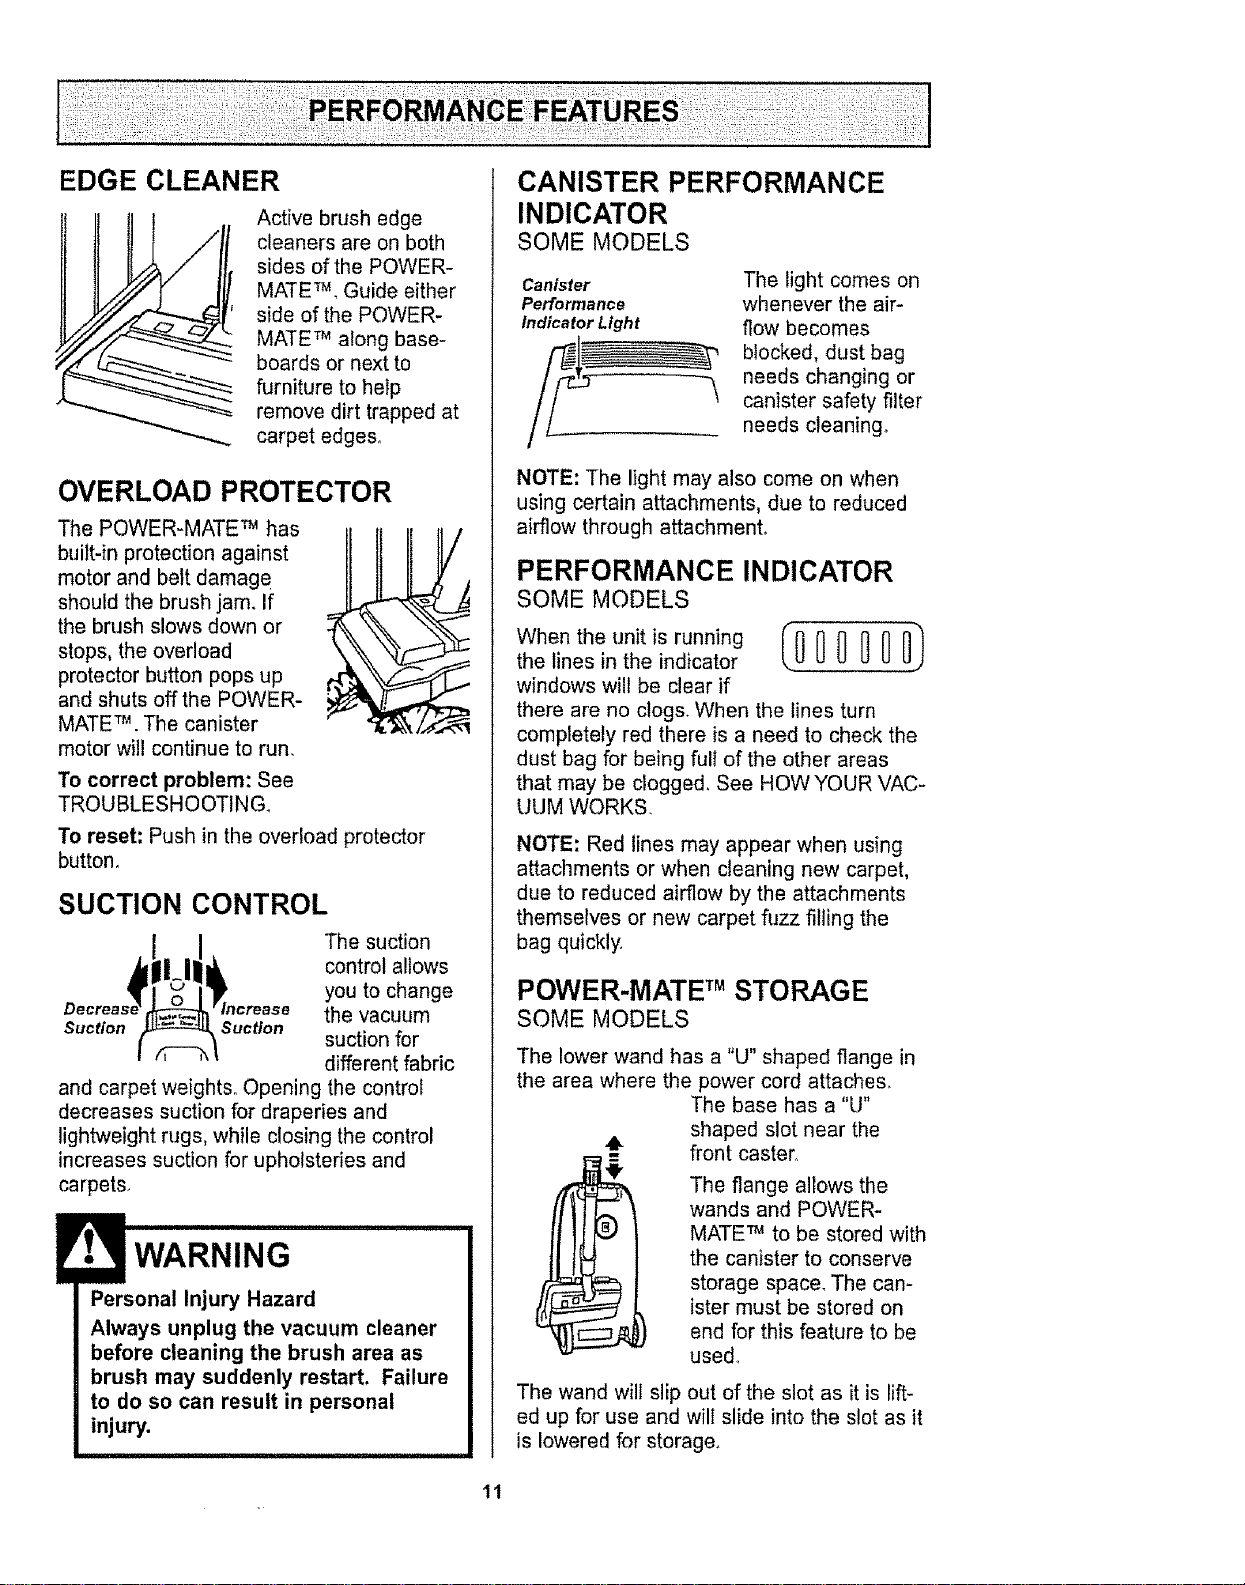
EDGE CLEANER
Active brush edge
cleaners are on both
sides of the POWER-
MATE TM,Guide either
side of the POWER-
MATE 7Malong base-
boards or next to
furniture to help
remove dirt trapped at
carpet edges°
OVERLOAD PROTECTOR
The POWER-MATE _ has
buiIt-in protection against
motor and belt damage
should the brush jam, If
the brush slows down or
stops, the overload
protector button pops up
and shuts off the POWER-
MATE TM.The canister
motor will continue to run.
i
r,
To correct problem: See
TROUBLESHOOTING.
To reset: Push in the overload protector
button.
I
SUCTION CONTROL
The suction
control allows
you to change
the vacuum
Suction Suction suction for
different fabric
and carpet weights.. Opening the control
decreases suction for draperies and
lightweight rugs, while closing the control
increases suction for upholsteries and
carpets.
• WARNING .........
Personal Injury Hazard
Always unplug the vacuum cleaner
before cleaning the brush area as
brush may suddenly restart. Failure
to do so can result in personal
injury.
CANISTER PERFORMANCE
INDICATOR
SOME MODELS
Canister
Performance
Indicator Light
The light comes on
whenever the air-
flow becomes
blocked, dust bag
needs changing or
canister safety filter
needs cleaning°
NOTE: The light may also come on when
using certain attachments, due to reduced
airflow through attachmenL
PERFORMANCE INDICATOR
SOME MODELS
Who ,hooo,,,s, no, 0/00000 )
the lines in the indicator
windows will be clear if
there are no clogs. When the lines turn
completely red there is a need to check the
dust bag for being fuli of the other areas
that may be clogged. See HOW YOUR VAC-
UUM WORKS.
NOTE: Red lines may appear when using
attachments or when cleaning new carpet,
due to reduced airflow by the attachments
themselves or new carpet fuzz filling the
bag quickly.
POWER-MATE TMSTORAGE
SOME MODELS
The lower wand has a "U" shaped flange in
the area where the power cord attaches_
The base has a %1"
shaped slot near the
front caster1.
The flange allows the
wands and POWER-
MATE _ to be stored with
the canister to conserve
storage space_ The can-
ister must be stored on
end for this feature to be
used°
The wand will slip out of the slot as it is lift-
ed up for use and will slide into the slot as it
is lowered for storage,
tl
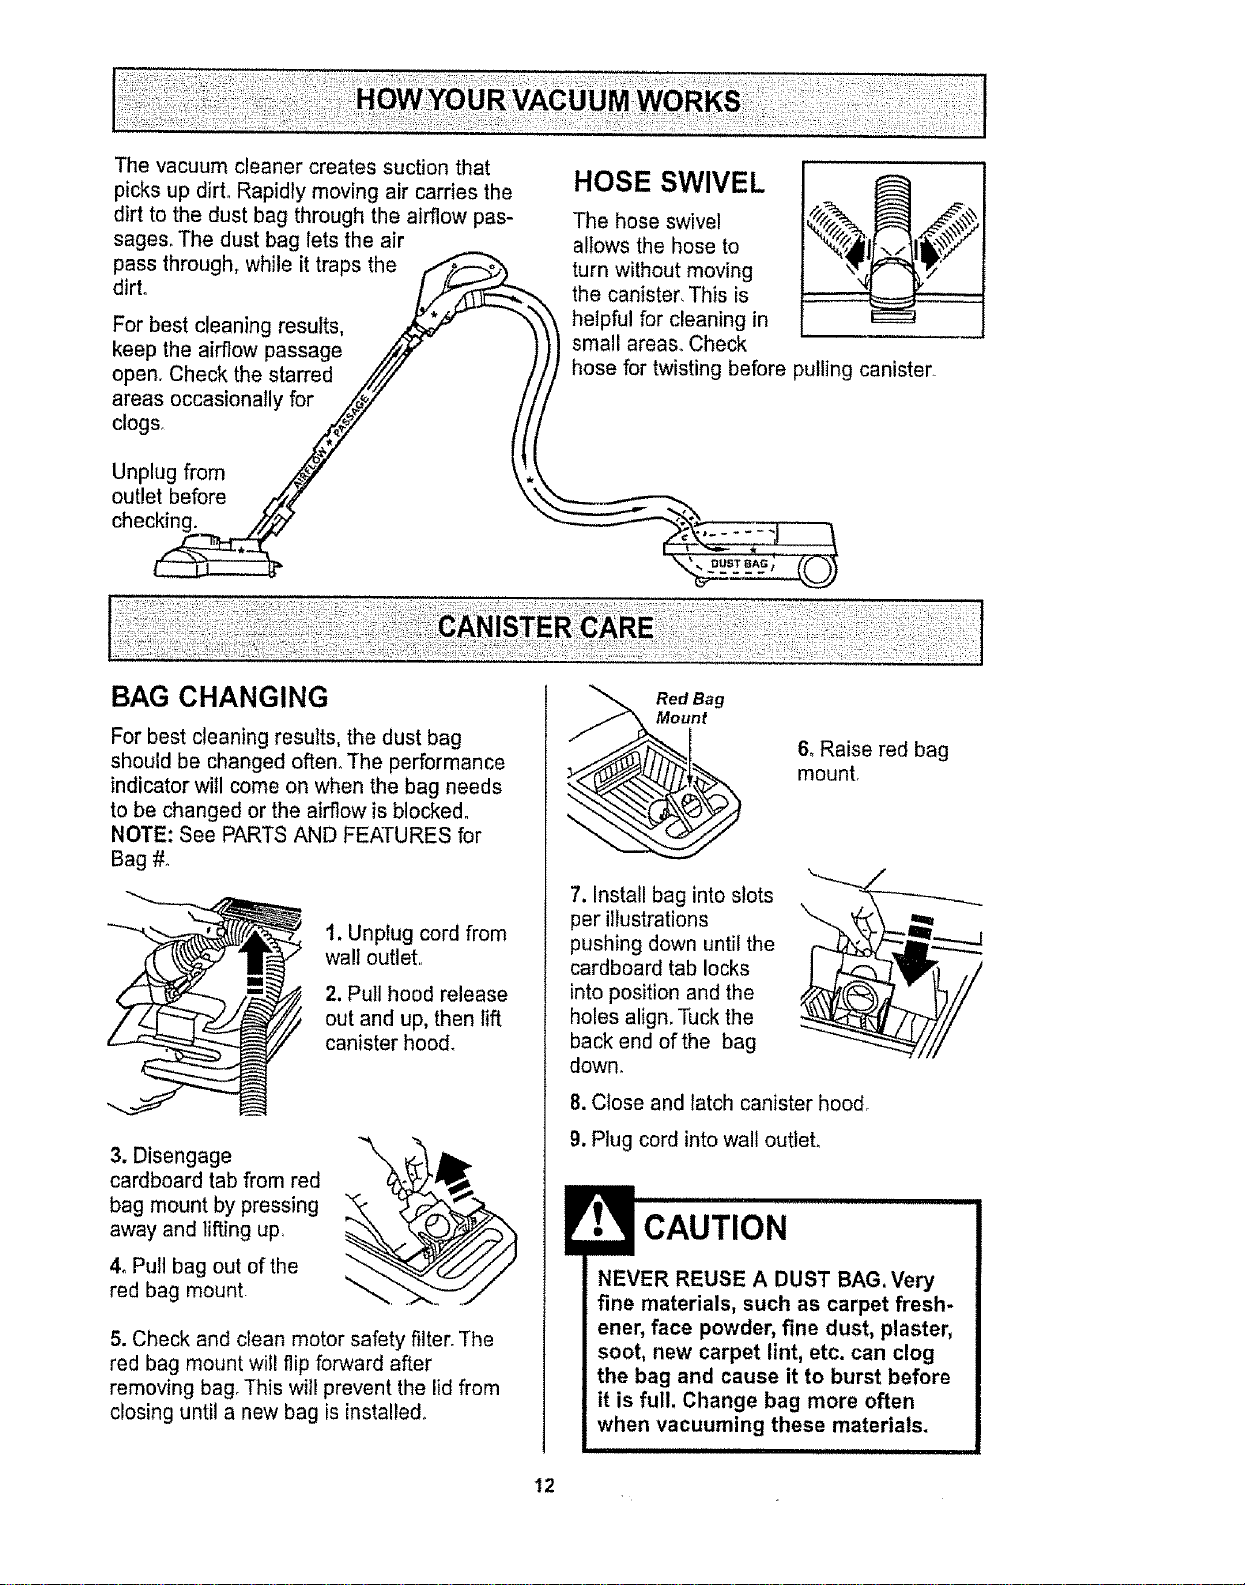
The vacuum cleaner creates suction that
picks up dirt° Rapidly moving air carries the HOSE SWIVEL ___ _
dirt to the dust bag through the airflow pas- The hose swivel _/_'/ ]_!_
sages. The dust bag lets the air allows the hose to
pass through, while it traps the /-_"_ turn without moving
dirt° /.._-"-_--------_ the canister, This is
For best cleaning results, _ "_'_t helpful for cleaning in
the airflow passage
keep .,_/,_/ ))) small areas.. Check
pullingstarred
open. Check the //// I// hose for twisting before canister.
areas occasionally for .z_iz //!/
c,o0 , j !{(
Unplug from _/_ \'._
outlet before ,/_4f \',,_"..__,
chec_ "--___
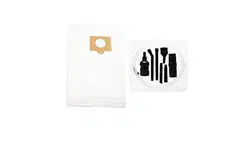
BAG CHANGING
For best cleaning results, the dust bag
should be changed often° The performance
indicator will come on when the bag needs
to be changed or the airflow is blocked°
NOTE: See PARTS AND FEATURES for
Bag #.
1. Unplug cord from
wall outlet.
2. Pull hood release
out and up, then lift
canister hood.
3. Disengage
cardboard tab from red
bag mount by pressing
away and lifting up.
4_ Pull bag out of the
red bag mount
\
5. Check and clean motor safety filter. The
red bag mount will flip forward after
removing bag, This wil! prevent the lid from
closing until a new bag is insta!le&
Red Bag
t
6, Raise red bag
mount,
7. Install bag into slots
per illustrations
pushing down until the
cardboard tab locks
into position and the
holes align. Tuck the
back end of the bag
down,
8. Close and latch canister hood,
9. Plug cord into wall outlet.
CAUTION
NEVER REUSE A DUST BAG. Very
fine materials, such as carpet fresh-
ener, face powder, fine dust, plaster,
soot, new carpet lint, etc. can clog
the bag and cause it to burst before
it is full. Change bag more often
when vacuuming these materials.
i
12
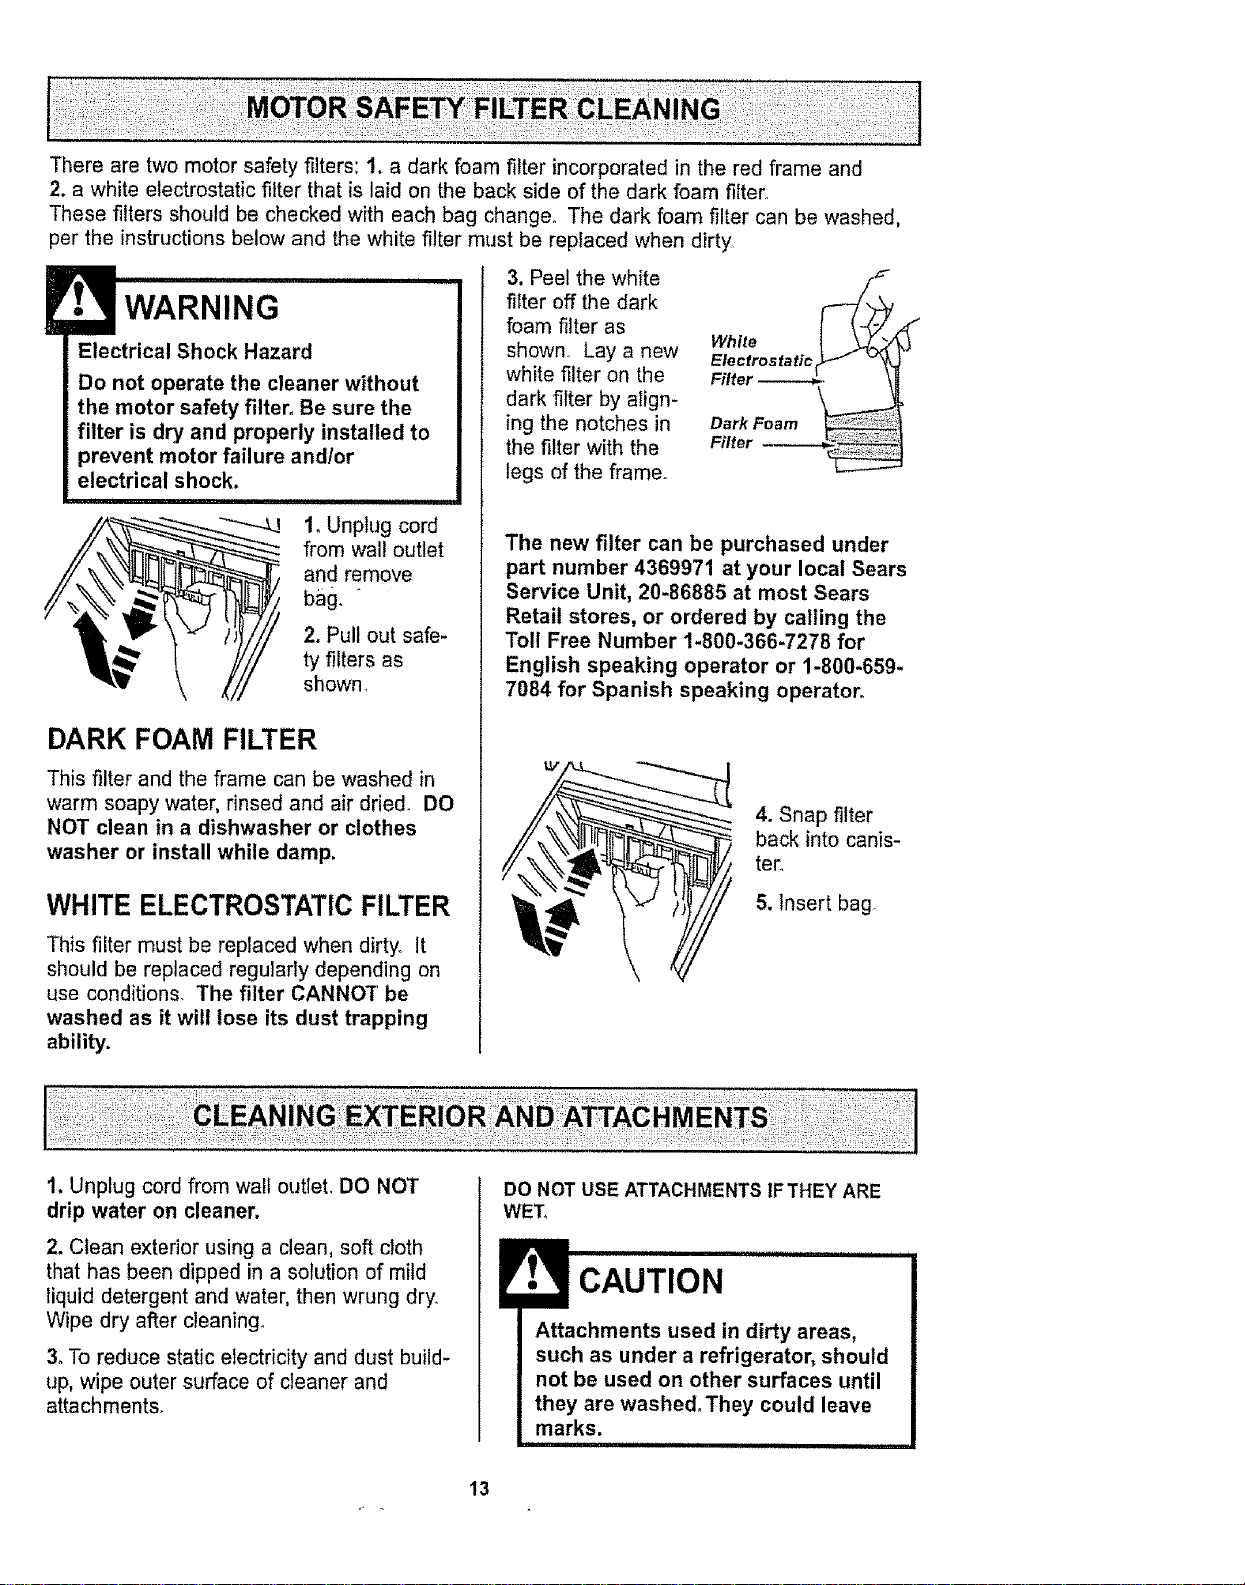
There are two motor safety filters: 1. a dark foam filter incorporated in the red frame and
2. a white electrostatic filter that is laid on the back side of the dark foam filter
These filters should be checked with each bag change. The dark foam filter can be washed,
per the instructions below and the white filter must be replaced when dirty
WARNING
Electrical Shock Hazard
Do not operate the cleaner without
the motor safety filter. Be sure the
filter is dry and properly installed to
prevent motor failure and/or
electrical shock.
I. Unplug cord
from wall outlet
and remove
2, Pull out safe-
ty filters as
shown
DARK FOAM FILTER
This filter and the frame can be washed in
warm soapy water, rinsed and air dried. DO
NOT clean in a dishwasher or clothes
washer or install while damp.
WHITE ELECTROSTATIC FILTER
This filter must be replaced when dirty. It
should be replaced regularly depending on
use conditions. The filter CANNOT be
washed as it wilt lose its dust trapping
ability.
3, Peel the white
filter off the dark
foam filter as
shown Lay a new
white filter on the
dark filter by align-
ing the notches in
the filter with the
tegs of the frame.
White
Electrostaticr_ .i _
Filter '.
Dark Foam
Filter
f
The new filter can be purchased under
part number 4369971 at your local Sears
Service Unit, 20-86885 at most Sears
Retail stores, or ordered by calling the
Toll Free Number 1-800-366-7278 for
English speaking operator or 1-800-659.
7084 for Spanish speaking operator°
4. Snap filter
back into canis-
ter.
5. Insert bag
1. Unplug cord from wall outlet. DO NOT
drip water on cleaner.
2. Clean exterior using a clean, soft cloth
that has been dipped in a solution of mild
liquid detergent and water, then wrung dry.
Wipe dry after cleaning.
3. To reduce static electricity and dust build-
up, wipe outer surface of cleaner and
attachments.
DO NOT USE ATTACHMENTS 1FTHEY ARE
WET_
CAUTION
I ttachments used in dirty areas,
such as under a refrigerator, should
not be used on other surfaces until
they are washed.They could leave
marks.
13
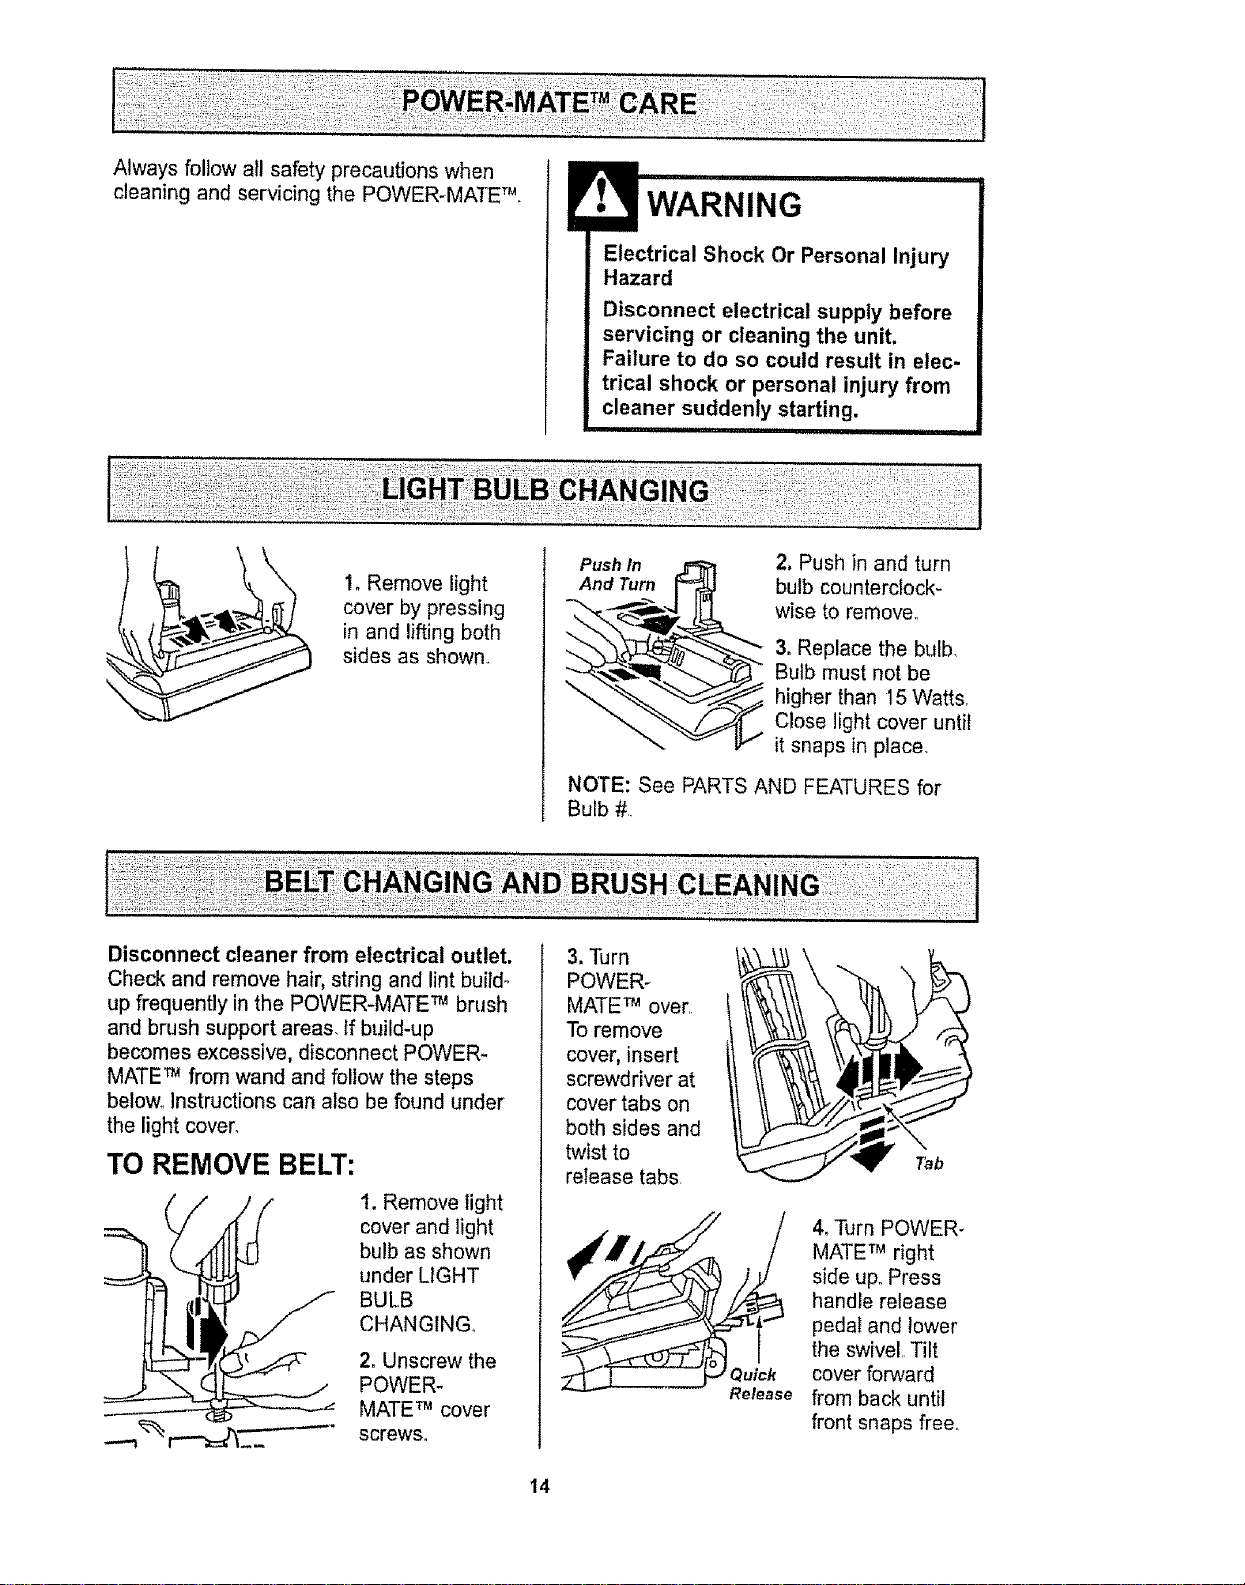
cleaningandservicingthePOWER-MATETM
WARNING
Electrical Shock Or Personal Injury
Hazard
Disconnect electrical supply before
servicing or cleaning the unit,
Failure to do so could result in elec-
trical shock or personal injury from
cleaner suddenly starting,
1, Remove light
cover by pressing
in and lifting both
sides as shown_
•!iiiii!!ii!ii!i!iTM !!iTMil
Push In
And Turn
2, Push in and turn
bulb counterclock-
wise to remove_
3. Replace the bulb,
Bulb must not be
higher than 15 Watts
Close light cover until
it snaps in place.
NOTE: See PARTS AND FEATURES for
Bulb #
Disconnect cleaner from electrical outlet.
Check and remove hair, string and lint buildo
up frequently in the POWER-MATE TM brush
and brush support areas, tf build-up
becomes excessive, disconnect POWER-
MATE TM from wand and follow the steps
below_ Instructions can also be found under
the light cover,
TO REMOVE BELT:
--'-I
1. Remove light
cover and light
bulb as shown
under LIGHT
BULB
CHANGING.
2. Unscrew the
POWER-
MATE TM cover
screws.
3. Turn
POWER-
MATE TM over.
To remove
cover, insert
screwdriver at
cover tabs on
both sides and
twist to
release tabs.
4, Turn POWER-
MATE TM right
side uF Press
handle release
pedal and lower
the swivel Tilt
cover forward
from back until
front snaps free,
14
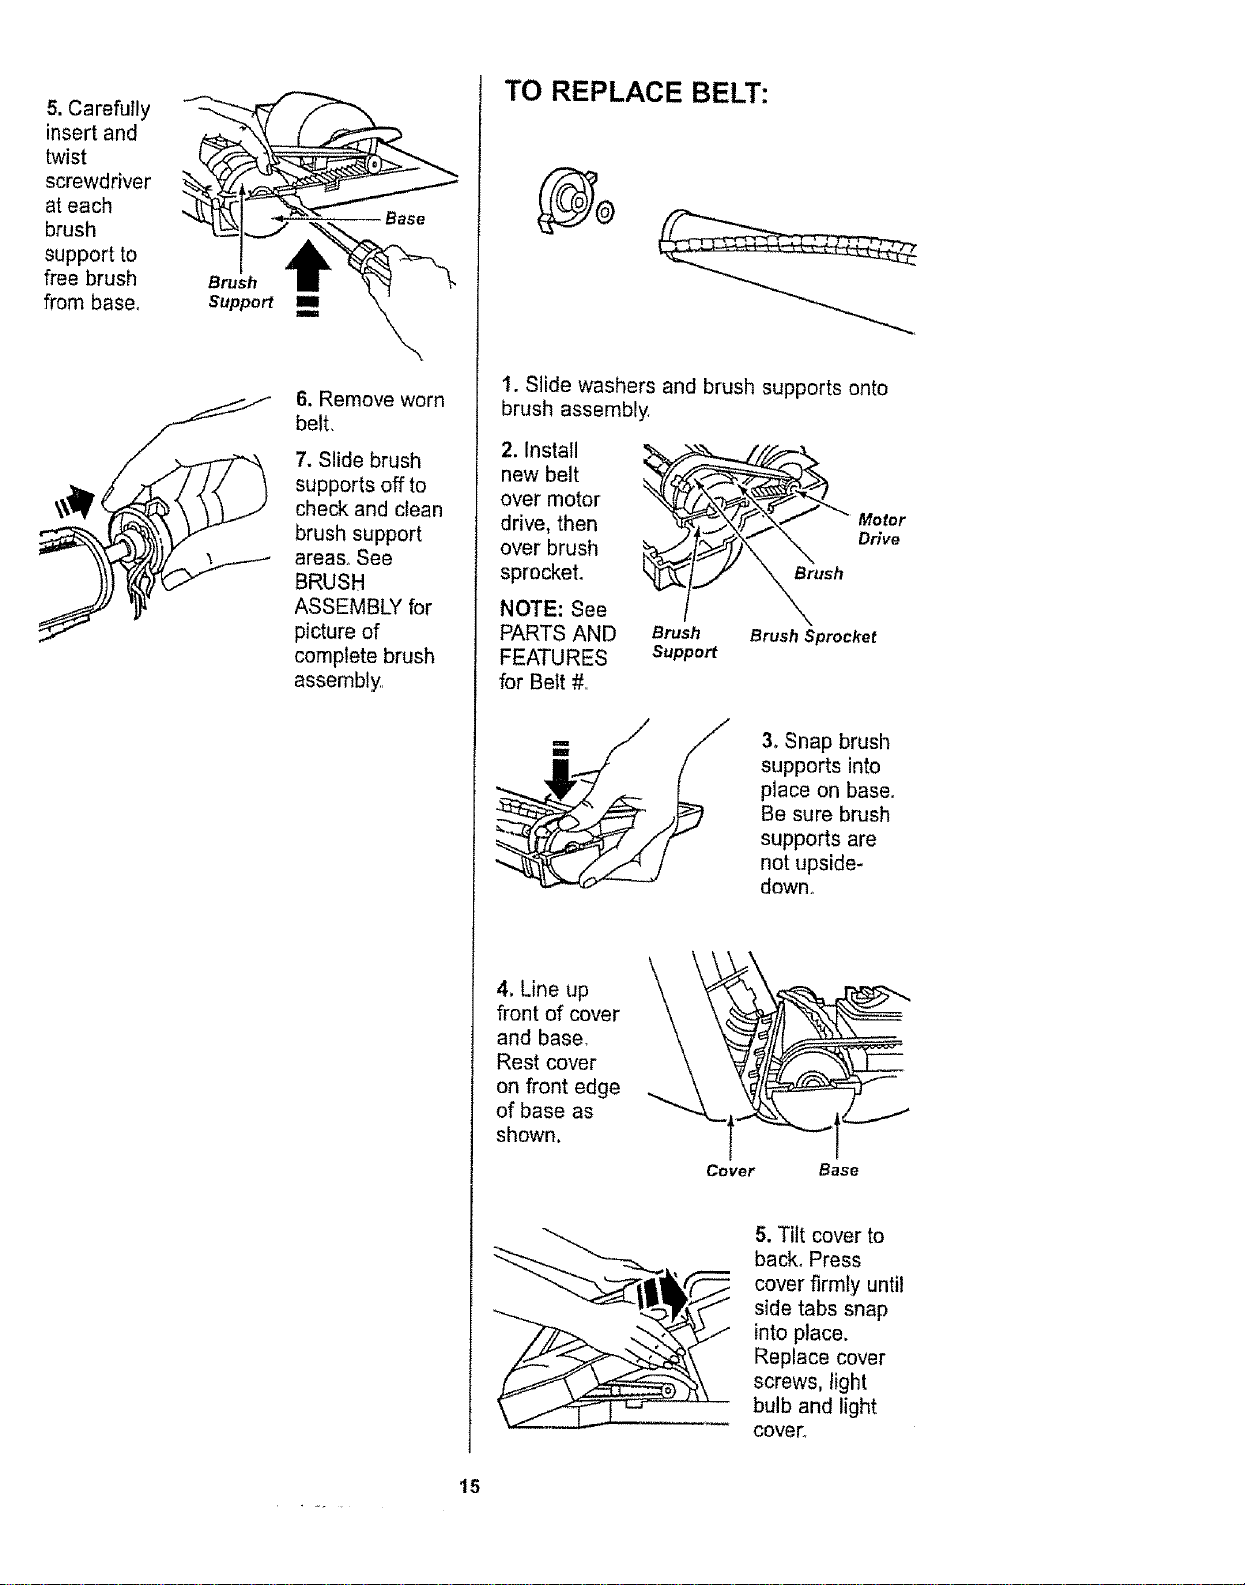
5. Carefully
insert and
twist
screwdriver
at each
brush
support to
free brush
from base.
Brush
Support
i
i
Base
6. Remove worn
belt.
7. Slide brush
supports off to
check and clean
brush support
areas. See
BRUSH
ASSEMBLY for
picture of
complete brush
assembly
TO REPLACE BELT:
1. Slide washers and brush supports onto
brush assembly
2. Install
new belt
over motor
drive, then
over brush
sprocket.
NOTE: See
PARTS AND
FEATURES
for Bett #
Brush
Support
Brush Sprocket
Motor
Drive
3. Snap brush
supports into
place on base.
Be sure brush
supports are
not upside-
down.
4. Line up
front of cover
and base.
Rest cover
on front edge
of base as
shown.
L_
Cover Base
5. Tilt cover to
back° Press
cover firmly until
side tabs snap
into place.
Replace cover
screws, light
bulb and light
COVeL
15
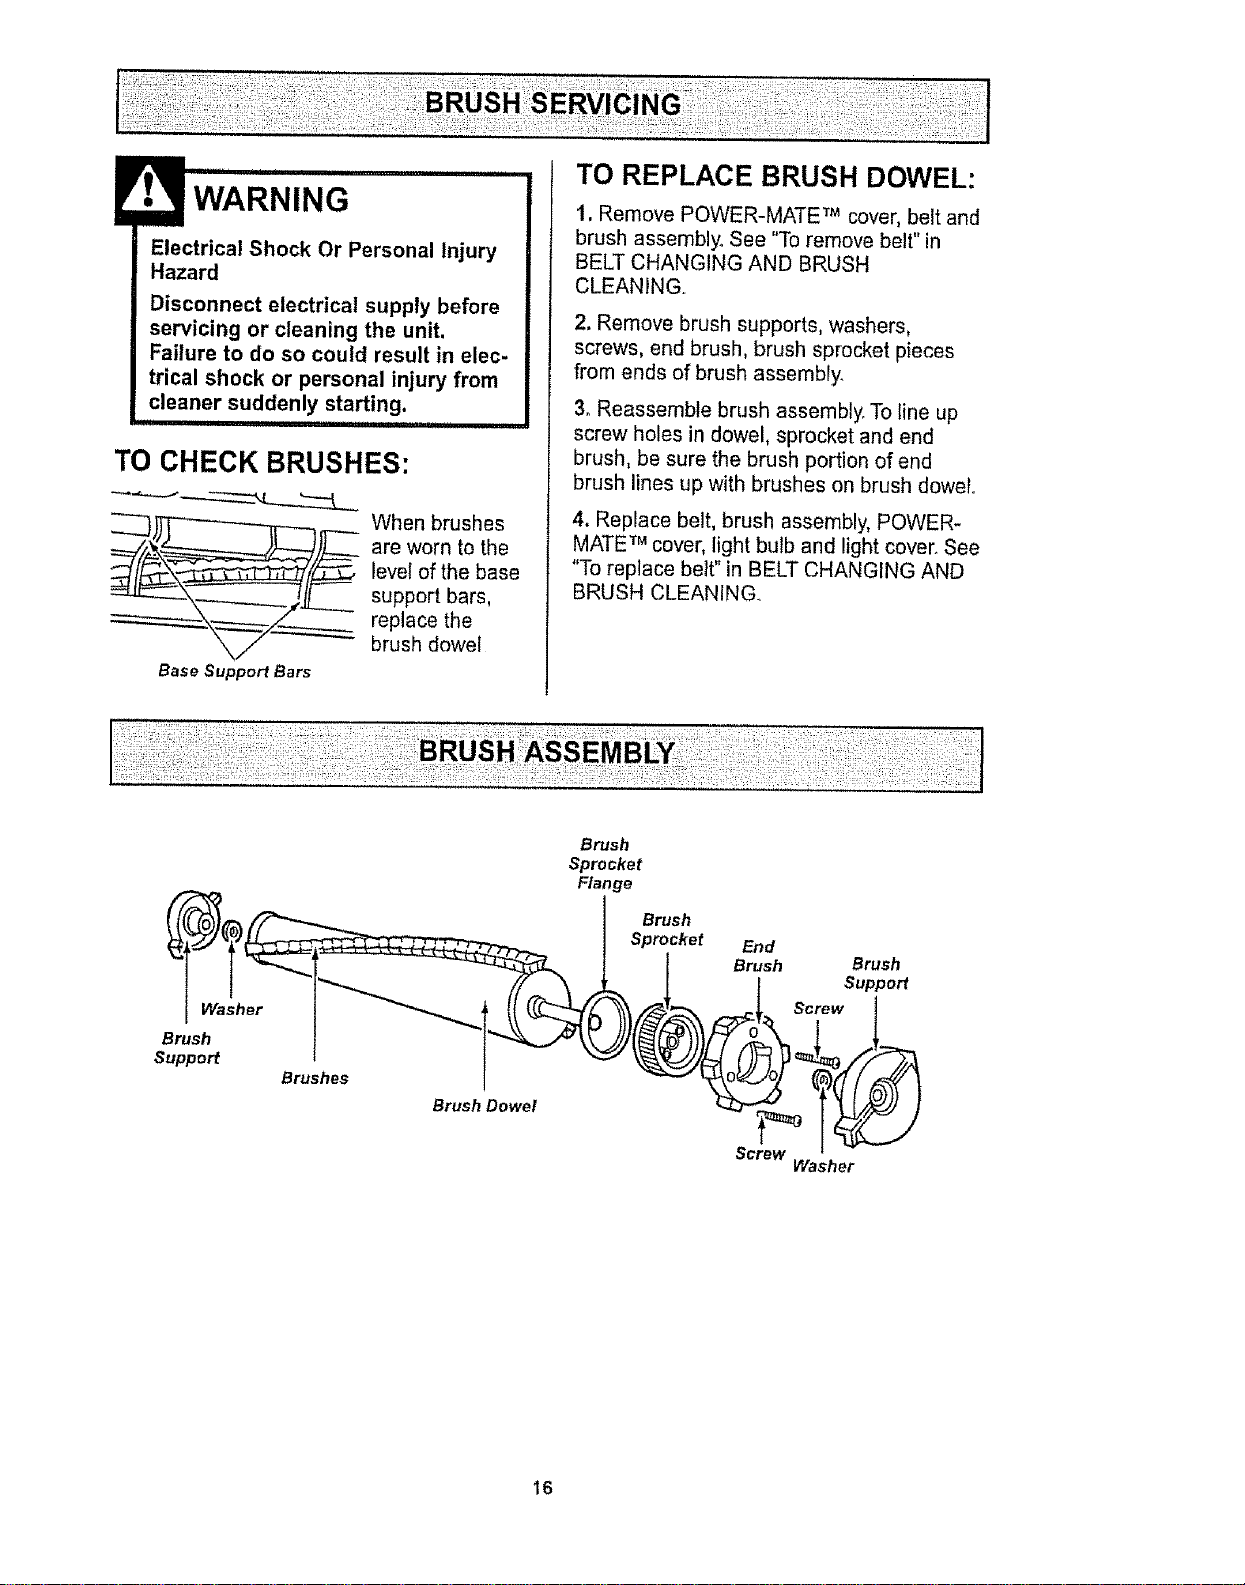
Electrical Shock Or Personal Injury
Hazard
Disconnect electrical supply before
servicing or cteaning the unit.
Failure to do so could result in elec-
trical shock or personal injury from
cleaner suddenly starting.
U'll III '1 IIII I'1
TO CHECK BRUSHES:
whenb ushes
are worn to the
level of the base
support bars,
replace thebrush dowel
Base Support Bars
TO REPLACE BRUSH DOWEL:
1. Remove POWER-MATE TM cover, belt and
brush assembly° See "To remove belt" in
BELT CHANGING AND BRUSH
CLEANING..
2. Remove brush supports, washers,
screws, end brush, brush sprocket pieces
from ends of brush assembly.
3oReassemble brush assembly. To line up
screw holes in dowel, sprocket and end
brush, be sure the brush portion of end
brush lines up with brushes on brush dowel
4. Replace belt, brush assembly, POWER*
MATE TM cover, light bulb and light cover. See
"To replace belt" in BELT CHANGING AND
BRUSH CLEANING..
Washer
Brush
Support
Brushes
Brush Dowel
Brush
Sprocket
Flange
Brush
Sprocket
End
Brush Brush
Support
Screw
Screw
Washer
16

Review this chart to find do-it-yourself solutions for minor performance problems. Any ser-
vice needed, other than those described in this owner's manual, should be performed by
an authorized service representative.
........... Failure to do so co,ul,,?' resu,l,l,,in electrical sho?,k ?,,[,,,,perso?,,?I injury_
Cleaner won't start- I. Unplugged at wall outlet,
2. Tripped cimuil breaker/blown fuse
at household service panel
3+ Loose hose electrical connections
4,, Tripped overload protector in
POWER-MATE TM.
Poorjob of dirt 1+
pick-up. 2.
3+
4_
5.
6.
7,
8.
9.
10,
Cleanerstarts but
cutsoff°
POWER-MATETM will not
run when attached.
Performance indicator,
somemodels,is red,
Cleanerpicksupmoveable
rugs ,or- POWER-MATETM
)ushee toohard,
Fullor cloggeddust bag.
Cloggedairflow passages
Dirtymotorsafetyfilter
Wrong pile heightsetting
Open auctioncontrol
Holein hose
Worn POWER-MATETM brushes
Worn or broken belt
Dirtybrush orbrushsupports
Canisterhoodopen
'L Hose or hood electrical connections
Tripped overload proteclor in
POWER.MATEm,,
Trippedoverloadprotector
in canister
1. POWER-MATE TM connections
unplugged.
2. Worn or broken belt.
3, Dirty brush or brush supports
4. Tripped ovedoad protecior in
POWER-MATE _'-
Io Furlorcloggeddust bag
2_ Dirtyfilter
3. Cloggedairflow passage.
4, Certainattachmenttools
t. Wrong pile height setting
2. Suction too strong
Lightwon'twork. 1. Burned outlightbulb
Cordwor_'trewind+ 1, Dirty powercOrdr
2o Cordjammed.
Cleanerleaves marks I+ Wrongvacuumingpattern
on carpet
17
1. Plug in firmly, push ONtOFF switch to ON
2. Reset circuit breaker or replace fuse
3. Reconnecthoseends, (page7)
4. Clean brushand brush supports,
thenreset,(pages 14, 15)
1. Change bag, (page 12)
2o Clear airflow passages, (page 12)
3. Clean filter, (page 13).
4. Adjust setting, (page 9),
5+ Adjust control,(page 11)
6. Replace hose
7. Change brushes, (page 16},
8 & 9+ See BELT CHANGING AND BRUSH
CLEANING, (pages 14, 15)+
10. Close and latch hood_
1.
Checkconnections,reconnect hose
ends,(page7).
2+ Removeany items thatmay becaught
orjammed, thenreset. If cleanerstarts
andstops again+cleanbrush andbrush
supports,thenreset,(pages"_4,_,5)
3. Changedust bag, clearairflowblockage,
(page 12). Wait 20 minutesfor motor
tocool andautomaticallyreset.
2&3o
4+
Plug in firmly, (page 6).
See BELT CHANGING AND BRUSH
CLEANING, (pages 14, 15).
Check brush area for excessive lint
build-up or jamming CIean brush and
brush supports, then reset, (pages 14, 15)
1+ Change bag, (page t2)
2. Change tiller, (page 13)
3. Clear clog from airflow passage, (page 12)
4+ This is normal Light should go off
when loo_is removed
1. Adjustsetting,(page9)
2+Open suctioncontrol,(page 11)
1+Change lightbulb,(page14)
1. Cleanthe powercord
2, Pulloulcordand rewind
1_SeeVACUUMING"rIPS,(page 9)..
:ili _,_4i_!i:ii_!:ii_::!i_
!iii!_!_i:ili:;!i!!_'
:_'_!ii!_,i!__i_
For
repair of major brand appliances in your own home...
no matter who made it, no matter who sold it!
1-800-4-MY-HOME ® Anytime, day or night
(1-800-469-4663) (US,A. and Canada)
www.sears.com wwwosearsoca
For repair of carry-in products like vacuums, lawn equipment, and
electronics, call for the nearest Sears Parts and Repair Center.
1-800-488-1222 Anytime, day or night (US.A only)
www,sears.com
"i¸¸_!_:i
.:: ::
=: :::=
7!:'i
};: i!:i
i;; ii?i
For the replacement parts, accessories and owner's manuals
that you need to do-it-yourself, call Sears PartsDirect_M!
1-800-366-PART
(1-800-366-7278)
6 aom.- 11 p.m, 7 days a week
(U.SA only)
www.sears_com!partsdirect
To pumhase or inquire about a Sears Service Agreement
or Sears Maintenance Agreement:
1-800-827-6655 (U,S Ao) 1-800-361-6665 (Canada)
7 a.mo- 5 pmo, CST, Mon.- SaL 9 a.m.- 8 pro. EST, M - F,4 pore.Sat.
Pare pedir servicio de reparaci6n a
domicilio, y para ordenarpiezas:
t-888.-SU-HOGAR sM
(1-888-784-6427)
Au Canada pour service en frangais:
1-800-LE-FOYER_c
(1-800-533-6937)
www,sears,ca
i_¸ ! i
© Sears, Roebuck and Co,
® Registered Trademark I TMTrademark / SMService Mark of Sears, Roebuck and Co
® Marea Registrada / Tt_Marca de F_brica / s_ Marca de Servicio de Sears, Roebuck and Co
MCMarque de commerce f _o Marque d_pos_e de Sears, Roebuck and Co
18
p,
M
A
Modelo 116.29429
CUIDADO:
Lea y sigue todas las
instrucciones de operaci6n
y seguridad antes del uso de
este producto,
Sears, Roebuck and Co., Hoffman Estates, IL 60179 U.S.A.
www.sears,com
Pieza NOCOIZAVKOOUOO-8174797 Impresoen EUA
Antes de usar su aspiradora nueva .... 2
Garantia de la aspiradora de Kenmore ,2
tnstrucciones importantes de
seguridad ......................... 3
Piezas y caracteristicas .......... 4-5
Armada .................... 6-7
Use ............................................ 8
Para comenzar ...................... 8
Sugerenciaspara aspirar .............. 9
Sugerenciassabree!ajuste de nivelde
pelo de la alfombra ..................... 9
Accesorios ........................ 10
Use de los accesorios ...................... 10
Caracteristicasde rendimiento ........... 11
Funcionamiento de su aspiradora ...... 12
Cuidado del receptbculo .... 12
Cambiode la botsa ................ 12
Limpiezadetf_ltrode seguridaddeImotor 13
Limpieza del exteriory de losaccesorios •13
Cuidado de la Power.Mate TM ..... 14
Cambio de la bombilla ............. 14
Cambio de iacorrea y limpieza
del cepifIo ..................... 14-15
Cuidadodel cepi!lo ....................... 16
Ensambiedel cepi]to ............. 16
Reconocimiento de problemas .......... 17
Informaci6n de assistancia
o servicio ........................... t8
Per favorlea estaguia que le ayudara a assemblary operar su aspkadora nuevade Kenmoreen una manera
m,_sseguray effectiva
Para mas informaci6nacerca del cuidadoy operaci6nde esta aspirador,Ilamea su tiendaSears mas cercana_
Cuandoprequnteper informaci6nusted necisitar_ el n_mero compietode seriey modelo de laaspiradoraqua
est_ Iocadoen ia placade los n_merosde modeto y serie..
Use et espaciode abajopara registrarel nt_merode modeFoyserie para su nuevaaspiradorade Kenmore.
N_merode Medelo
Numero de Serie
Fechade Compra_
Matenga este libray su reciboen u lugarseguropara refarenciasfuturas
GARANTJALIMITADADE UN ANO DE LA ASPIRADORAKENMORE
Estagarantia esper un afrodesde la fechade compra,e incluyesolamenteel usa de la aspiradoraen hogares
privados.Duranteel aSode garantia, cuandola aspiradoraesoperaday mantenidade acuerdo a!manualde
instruccionesdel dueSo,Searsreparar_cualquier defectoen materialeso fabricaci6nlibre de cargo.
Estagarantia excluyelas balsas de colecoi6n,correas, lamparilPas,yfiltros, las cualesson partes gastablesque
sedeteriorancon eluse normal.
Para elservictode garantia,retorneesta aspiradora alCentre deServicioSears m_s cercanoen los
Estados Unidos.
Estagarantfase aplicasoiamentemientraseste producto estben useen losEstadosUnidos Esta garantiate
da a ustedderechos{egalesespecificos, y usted puedetenettambi6notros derechosloscuales variande
estado a estado.
Sears,Roebuckand Co,,D/817WA, HoffmanEstates,IL 60179
ADVERTENClA
Su segurldades muy importantepara nosotros.Parareducir el riesgo de incendio,choque
el_ctrico,lest6ncorporal o daSosal utilizarsu asptradora,actue de acuerdo con precauciones
b_stcas de seguridad,entre ellas:
Leaeste manualantesde armaro utilizar su aspi-
radora.
Use suaspiradoraL_nicamenteen la formadescrita
en este manual.Use On[camenteconaccesorios
recomendadospotSears.
Parareducirel riesgode choqueel_ctrico, no use
su aspiradoraal airelibra ni sobresuperficies
mojadas.
Deseonecte e!cordSnel_ctricoantes de
componero limpiarel &readel cepitlo.Deto
contrario,el cepiltopodria arrancarde form
imprevistao podria producirseunchoqueelectrico
Siempre debe apagar laaspiradoraantes de
conectaro desconectarta manguerade la
POWER-MATE_
Siempre debe apagarsu aspiradoraantes de des-
conectarla
No desconectela aspiradoratirandodelcord6n
el6ctrico.Para desconectarta,hale elenchufe,no
el cord6n
Sujete el enchufaconla manoal enroliar el cord6n
el_ctrico Para desconectada,hale enenchufe,no
el cord6n.
No use la aspiradorasiel cord6no elenchufe est;_
daSado Si laaspiradorano est_ funcionandoade-
cuadamenteo si se ha dejado caer,est_ daSada,
se hadejado expuestaa la intemperieo se ha
dejadocaeren agua,devu_tvalaa unCen-
trotDepartamentodeserviciode Sears
No hale ni transportela aspiradoraporel cordSn;
no useel cord6ncomo mango;no cierrepuertas
sobree!cord6n;no hale el cord6nsobre rebordes
agudosni esquinas Nopase la aspiradorasobre
el cord6n,Mantengaelcord6nalejado de superfi-
ciescalienles.
Noabandone laaspiradoracuandoest6 conec-
tada Descon6ctelacuandono taest_ usandoy
antesde darle servicio.
Nopermitaque seautilizada comojuguete Se
requieretenermayorcuidadocuandosea utilizada
enla proximidadde niSoso por niSos
No toquela aspiradorani el enchufe con las
manosmojadas.
No usela aspiradorasi lamangueraest_ rota.La
mangueracontiene alambreset6ctricos.C&mbiela
si est&rotao desgastad& Evite aspirarobjetos
agudos
No coloqueobjetos en 1asaberturas.
No utificelaaspiradorasi alguna aberturaesta blo-
queada;mant_ngalalibrade polvo,pelusa,cabe-
Ilosy cualquieracosaqua podria disminuirel flujo
de aire.
Mantengael cabello, ropasuelta,dedos y todas
taspartes del cuerpo alejadosde las aberturasy
plazasmec_nicas..
Nousela aspiradorasintener instaladala bolsa
para polvoy/o los filtros.
Cambie siempre la boisapara polvodespu_sde
aspirar limpiadoresde alfombraso desodorantes,
talcosy pofvost_nos.Estosproductosatascanfa
bolsa, reducenetflujo de aire y puedencausar qua
6sta se romp& Si nocambialabolsa podrtaoca-
sionardaSopermanente a la aspiradora.
No use la aspiradorapara levantarobjelosagudos,
juguetespequefos,alfileres,sujetapapeles,etc,
PoddandaSar]aaspiradorao la bofsapara polvo
No levanteninguna cosaquaseest_ quemandoo
emitiendohume, como cigarrillos,cerillos o ceni-
zas calientes.
No usela aspiradorapara aspirarliquidos inflama-
bleso combustibles(gasolina,liquidospara lim-
pieza,perfumes,etc.) n{ lauseen lugaresdonde
_stospodrian estar presentes.Losvaporesde
estassustanciaspueden crearun peligrode incen-
dioo exptosi6no
Tenga cuidadoespecial al utilizar la aspiradora
enescalones.No tacoloquesobresilias, mesas,
etc Mant_ngalaen etpiso
Usted es responsablede asegurarqua suaspira-
dora no sea utilizadaporningunapersonaque no
pueda manejadacorrectamente.
GUARDE ESTAS INSTRUCCIONES
Elarmadoy usosegurode suaspiradorasonsu responsabifidadEsta aspiradoraha sido diseSada
exclusivamenteparauso dom6stico.La aspiradoradeber&almacenarseen un lugarseco yen el interior
Lea este Manualdel propietariodetenidamente,pues contieneinformaciSnimportantesobreseguridady
uso.Estaqu[acontiene informaci6nsobreseguridaddebajode simbolosde advertienciacu]dado. Pot
favorpongaatenci6nespecial aestasinstruccionesdadasoAdvertencia: Esteinformaci6nle alertar&con
el poligrode fuego,choques electricos,quemadasylesiones Cuidado: Este informaci6nle alerlaraa
peligroscomo lesionesy daSosde propledad.
I i!!tl III I iiii i,i i
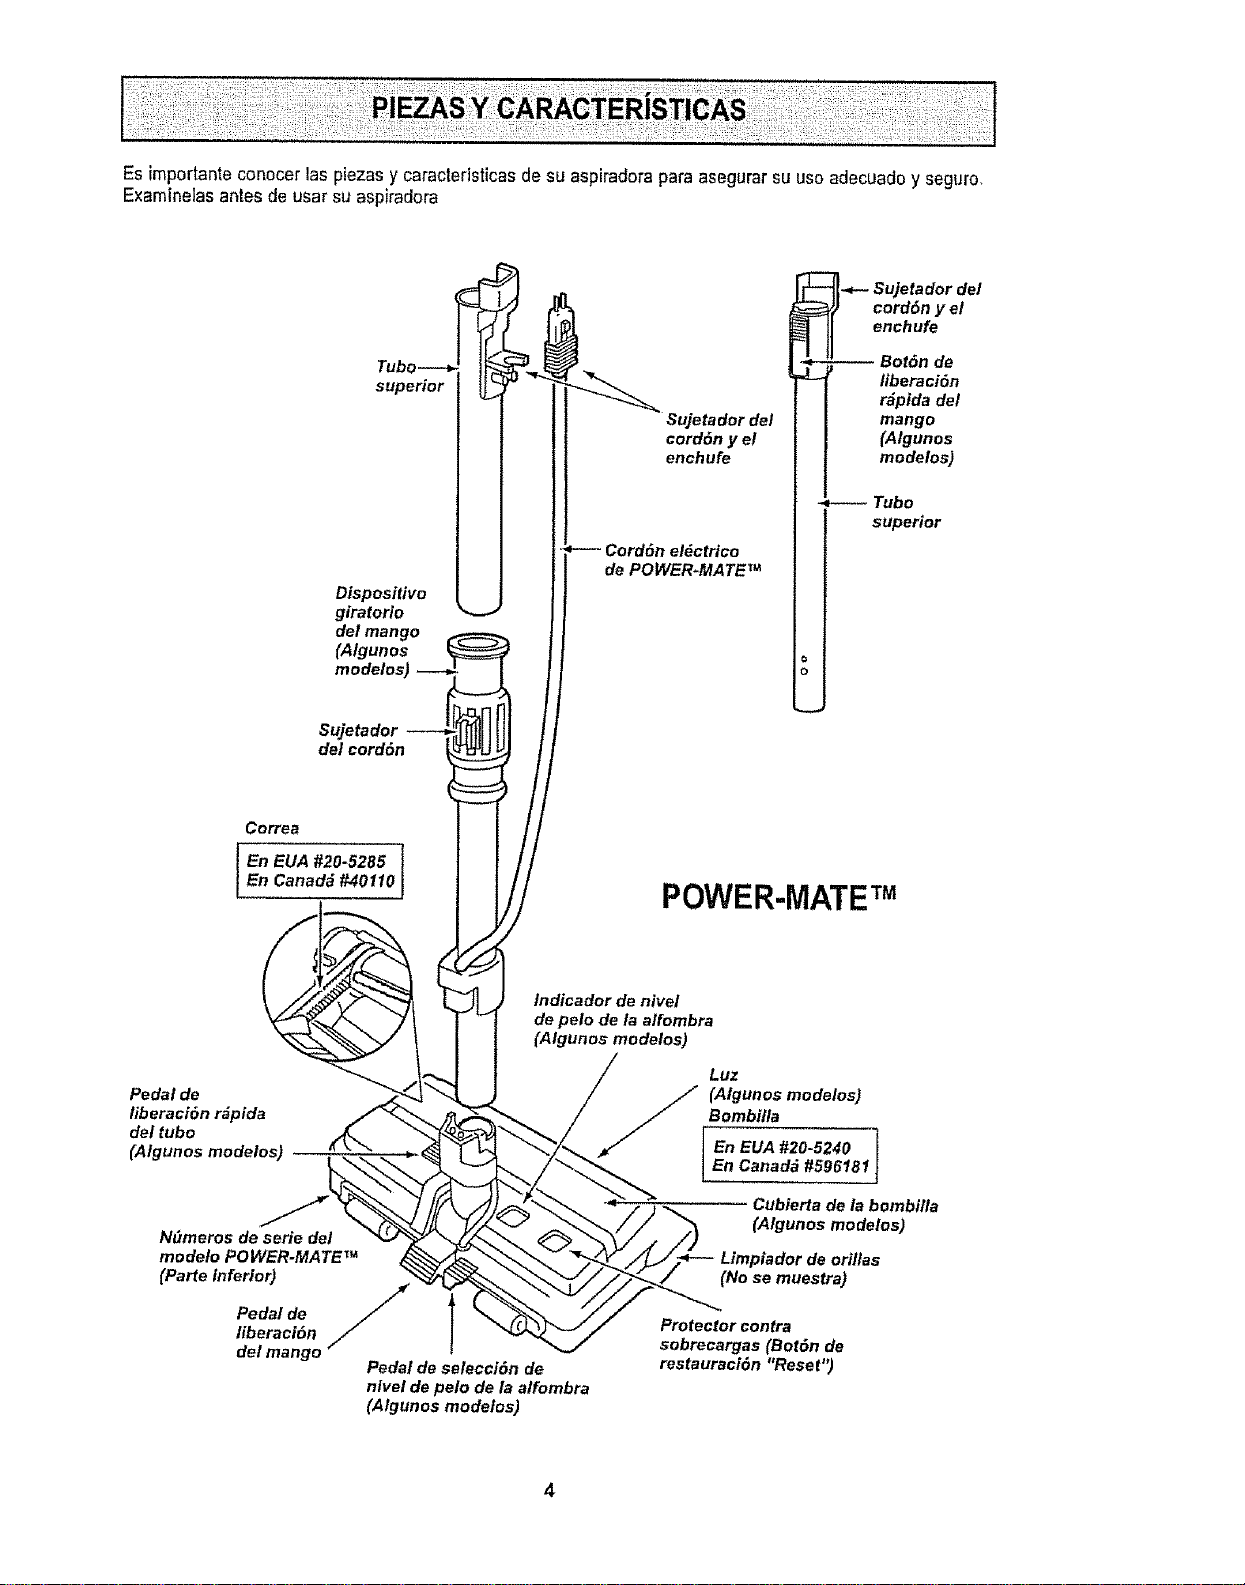
Es importanteconocer las piezasy caractedsticasde su aspiradorapara asegurarsu usoadecuadoy seguro,
E×aminelasantes de usar su aspiradora
supedor
Dispositivo
giratorio
del mango
(Algunos
modelos)
Suje_dor
deleord6n
Sujetador del
eord6n y el
enehufe
Cord6n eldctrico
de POWER-MATE TM
Sujetador de!
cord6n y el
enchufe
-- Bot6n de
liberaci6n
r_pida de/
mango
(Algunos
modelos)
Tubo
superior
Co_ea
I En EUA #20-5285 i
En Canada#40110
POWER-MATETM
Pedal de
liberaci_n r_pida
del tubo
(Algunos modelos)
Ndmeros de serie del
modeto POWER-MATE TM
(Parte inferior)
Pedal de
libe_c_n
delmango
Indicador de nivel
de pelo de/a alfombra
(Algunos modetos)
/
Pedal de selecci_n de
nlvel de pelo de la alfombra
(Algunos modelos)
Luz
//[ (Algunos modelos)
Bombitla
En EUA #20-5240 1
En Canad_ #59618_
Cubierta de la bombilla
(Algunos modelos)
Limpiador de orillas
(No se muestra)
Protector contra
sobrecargas (Bot6n de
restauraci6n "Reset")
4
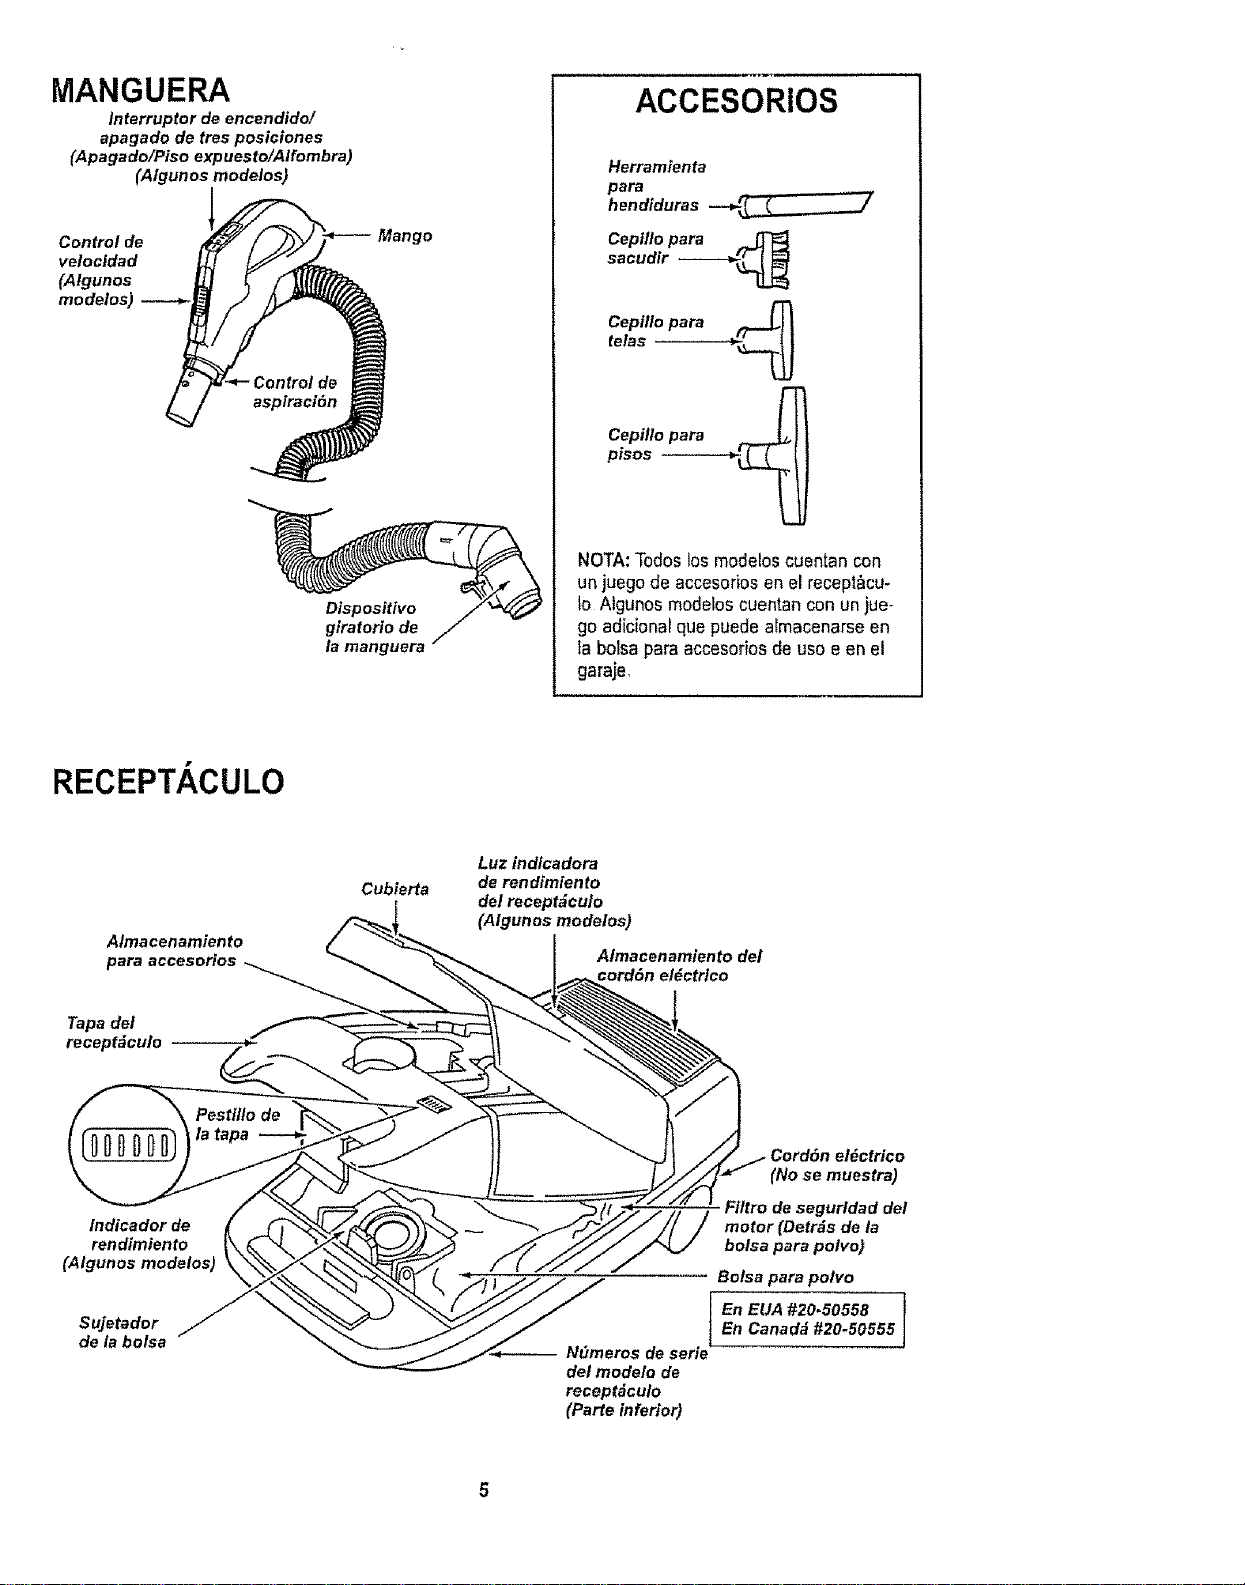
MANGUERA
Interruptor de encendido/
apagado de tres posiciones
(Apagado/Piso expuesto/Alfombra)
(Atgunos modeios)
velocidad i
(AIgunos J
Dispositivo
giratorio de
la manguera
ACCESORiOS
Herramienta
para
hendiduras -.-_i _,_
Cepiflo para ,_
sacudir ------_
telasCepilt°para _
Cepillo para __
pisos --
NOTA:Todoslos modeloscuentan con
un juegode accesoriosen el recept&cu-
to Atgunos modeloscuentanconun jue-
go adicionarque puedealmacenarseen
la botsapara accesoriosde uso e en el
garaje,
RECEPTACULO
Almacenamiento
para accesorios
Tapa det
recept_culo
Cubierta
Luz indicadora
de rendimiento
del recept_culo
(Algunos modelos)
Almacenamiento del
eord&n el_ctrlco
lndicador de
ren dimiento
(Algunos modelos)
Sujetador
de la bolsa N_meros de seriet
det mode!o de
recept_culo
(Parte inferior)
Cord6n el_ctrico
(No se muestra)
Fi/tro de segur/dad del
motor (Detr_s de la
bolsa para polvo)
Bolsa para polvo
En EUA #20_50558 I
En Canada #20-50555
J
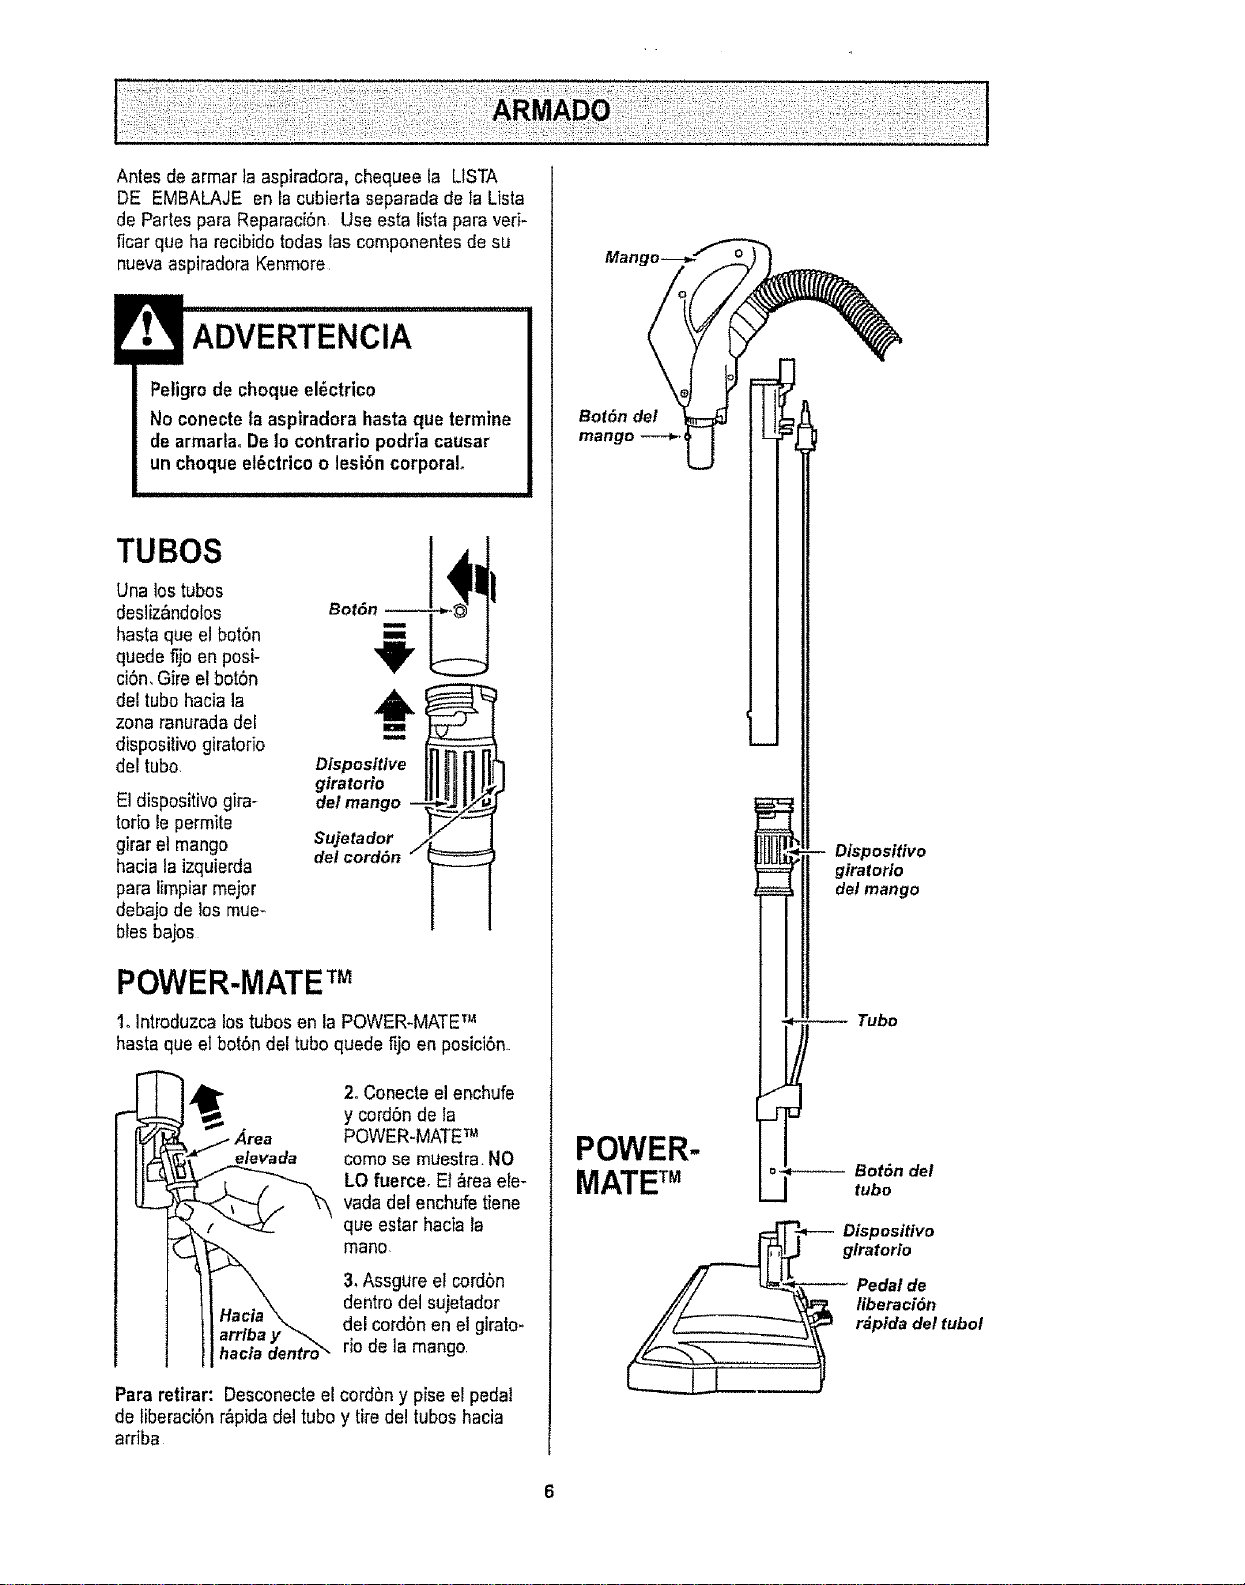
Antes de armar iaaspiradora,chequeela LISTA
DE EMBALAJE en {acubierta separada de ]aLista
de Partes paraReparaci6n Use esta fistapara veto
ficar qua ha recibidotodas las componentesde su
nuevaaspiradoraKenmore
ADVERTENCIA
Petigrode choqueel_ctrico
Noconecte faaspiradora hastaque termine
dearmarlaoDe Io contrariopodriacausar
un choqueel6ctricoo lesi6n corporal
TUBOS
Unalos tubos
desliz_ndolos
hasta que elbot6n
quede fijo en posi-
ciSn,Gire el botSn
del tubo haciala
zona ranuradadel
dispositivo giratorio
del tubo,
El dispositivogira-
torb lepermite
girar el mango
haciala izquierda
para limpiarmajor
debajo de los mue-
biasbajos
,,o,,o__,i,,
Disposltlve
giratorto
del mango -- _.:/__
Sujetador
del cord6n j
POWER-MATETM
1oIntroduzca lostubas en la POWER_MATETM
hasta que elbot6ndel tubo quede fijo en posici6n
elevada
hacla dentro_
2oConecteel enchufe
y cord6nde la
POWER-MATETM
como se muestra.NO
LO fuerce, El &teaele-
vada del enchufe tiene
qua estar hacia la
mane.
3. Assgure el cord6n
dentro del sujetador
del cord6nen el girato-
rio de la mango
Para retirar: Desconectee!cordbn y pise el pedal
de liberaci6n r&pidadel tuboy tire del tubos hacia
arriba
Mang
Bot6n det
POWER-
MATE TM
Dispositivo
gtratorio
Pedal de
liberacl6n
. r_pida del tubot
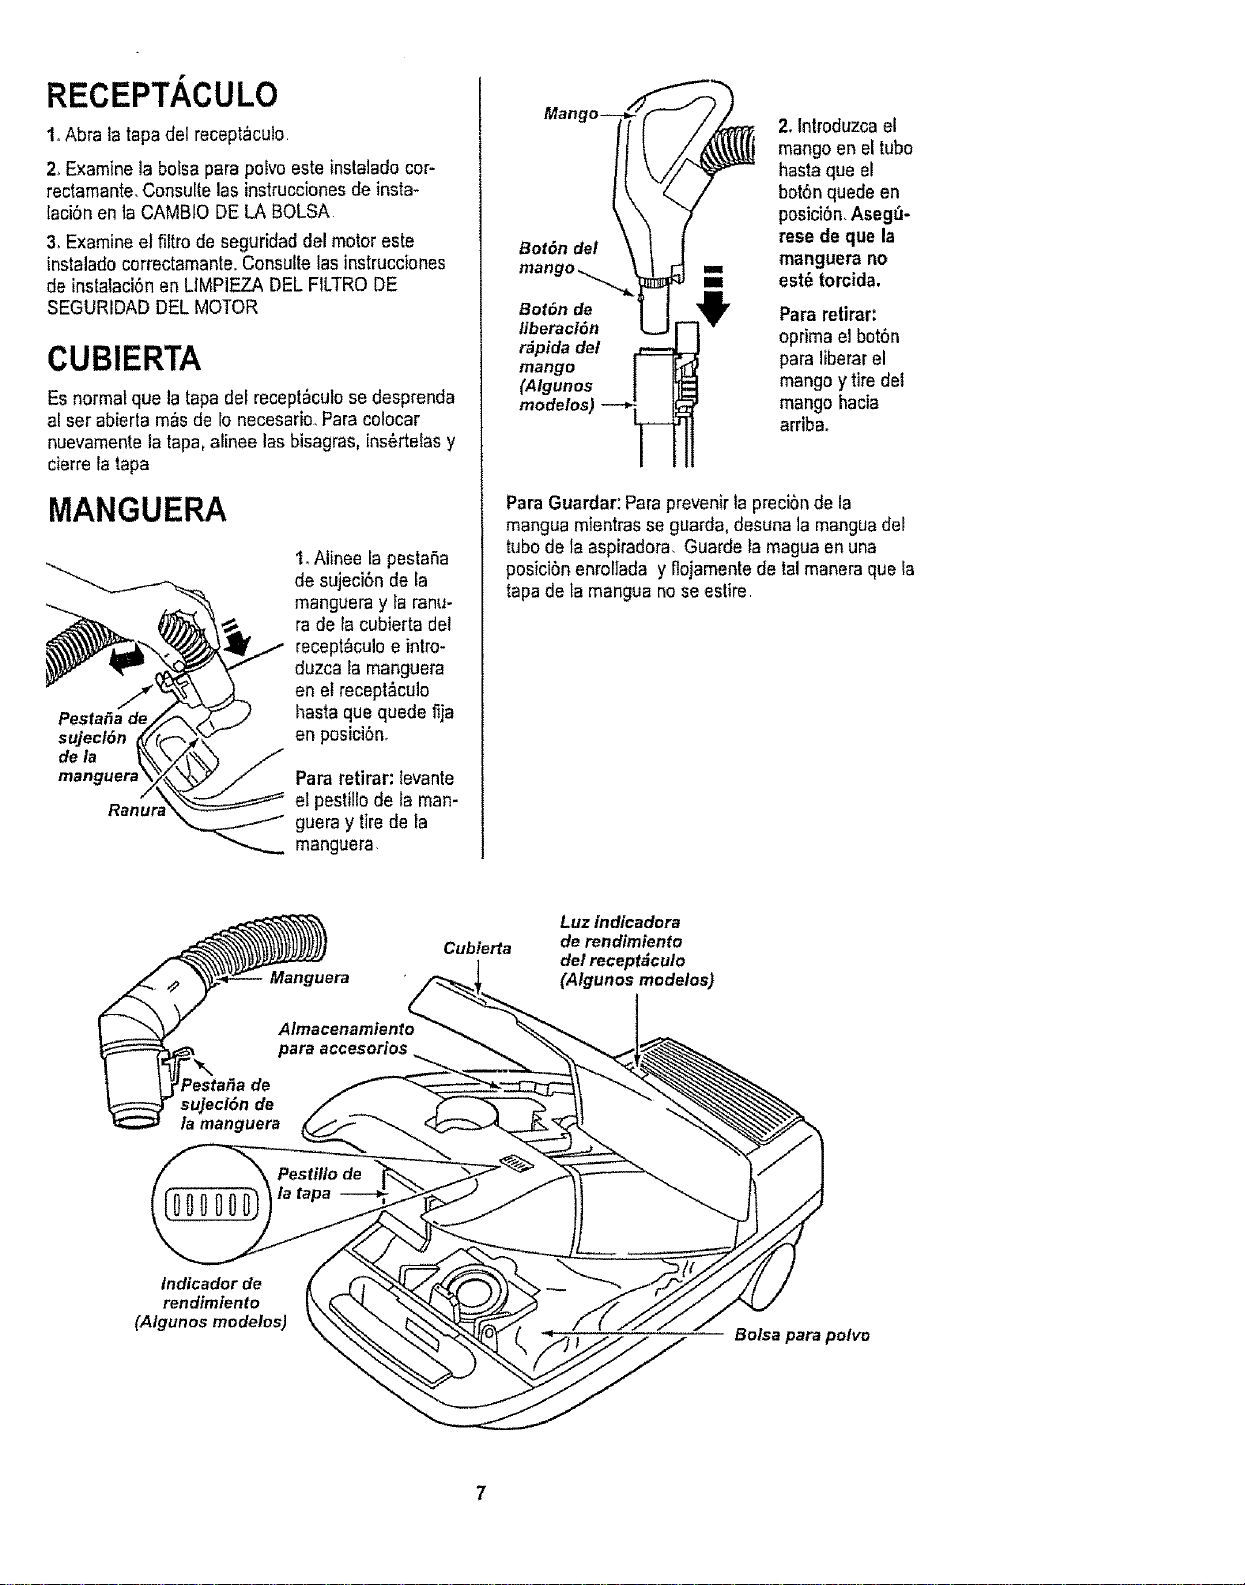
RECEPTACULO
1oAbra la tapadel recept_cula
2_Examinela bofsapara poEvoeste instaladocor-
rectamante,Consultelas instrucc[onesde insta*
lacibnen taCAMBIODE LA BALSA
3, Examineel filtro de seguridaddel motor este
instalado correctamante.Consuttelasinstrucciones
de instaiaci_nen LiMPIEZADEL FILTRODE
SEGURIDADDELMOTOR
CUBIERTA
Esnormalqua la tapadef recept_culose desprenda
al set abiertam_s de 1onecesario_Para colocar
nuevamentela tapa, atineelas bisagras,ins_rtelas y
cierreIatapa
MANGUERA
PestaSade
sujecl6n
dela
manguerz
1oAlinee la pestaSa
de sujeci6n de fa
mangueray la ranu-
rade la cubierta del
recept_culoe intro-
duzca la manguera
en el recept&culo
basraque quede fija
en posici6n_
Pararetirar: levante
el pestillode la man-
guera y tire de la
manguera
Bot6n del
2.Introduzcaet
mangoen el tuba
hastaqua el
bot6nquedeen
posici6n,Aseg_-
rese de qua la
manguera no
est@torcida.
Bot6n de Pararetirar:
liberaci6n optima el bot6n
r_pida det
mango para liberarel
(Algunos mangoy tire del
modelos) mango hacia
arriba,
Para Guardar:Paraprevenirla precibnde la
mangua mientrasse guarda,dasunala manguadel
tuba de la aspiradora, Guarde la maguaen una
posicibn enroliada y flojamentede ta! maneraqua ia
tapa de la manguano seestire
Cubierta
AlmacenamientoL_
para accesorios "_
Luz indicadora
de rendimiento
del receptdculo
(Algunos modelos)
Indicador de
rendimiento
(Algunos modelos)
Balsa para polvo
PARA COMENZAR
Peligrode lesi6n personaly dar_oal
producto
, NOenchufe la aspiradora si el
interruptorest_ en la posici6nON,
Podriacausar lesi6n personalo dafio
al producto,
. El cord6n el_ctrico se mueve
r_pidamentedurante elenrol?amientoo
Mantenga alejados a los nifiosy
asegureespacio libre suficientepara
evitar lesiones personalesal enrotlar
el cord6n,
, NO use clavijasubicadas arriba de
mostradores. Podria causardafio a
los objetoscercanos.
1.Tfre del cord6n
para sacadodel
recept&culobasra
tenorla Iongilud
deseadaoEl cord6n
no seenroliar_ has-
ta queoptima laba-
rra paraenrotiarlo,
NOTA:Parareducirel riesgode choqueer_ctrico,
esta aspiradoracuentacon una clavija potarizada,
uno de loscontactoses m_s anchoque el otro,La
davija s6ropuedeintroducirsede una maneraen e!
enchufe,Si la clavijano cabe bienen el enchufe,
invi_rtala,SiaSn no cabe, Ilamea un electricista
paraque instaleun enchufecorredo. Noaltere la
clavijade ningunamanera.
2. Conecteel cord6neI_ctricopolarizadoen un
enchufede 120 vo[tiosque se encuentrecerca del
piso
Paraenrollar:desconecte laaspiradora,Sujeteel
enchufemientras enrollael cord6npara impedir
daSoo fesiSncorporalpor el movimientodotcord6n
Empujela barra para enrollar el cord6nel_ctrico.
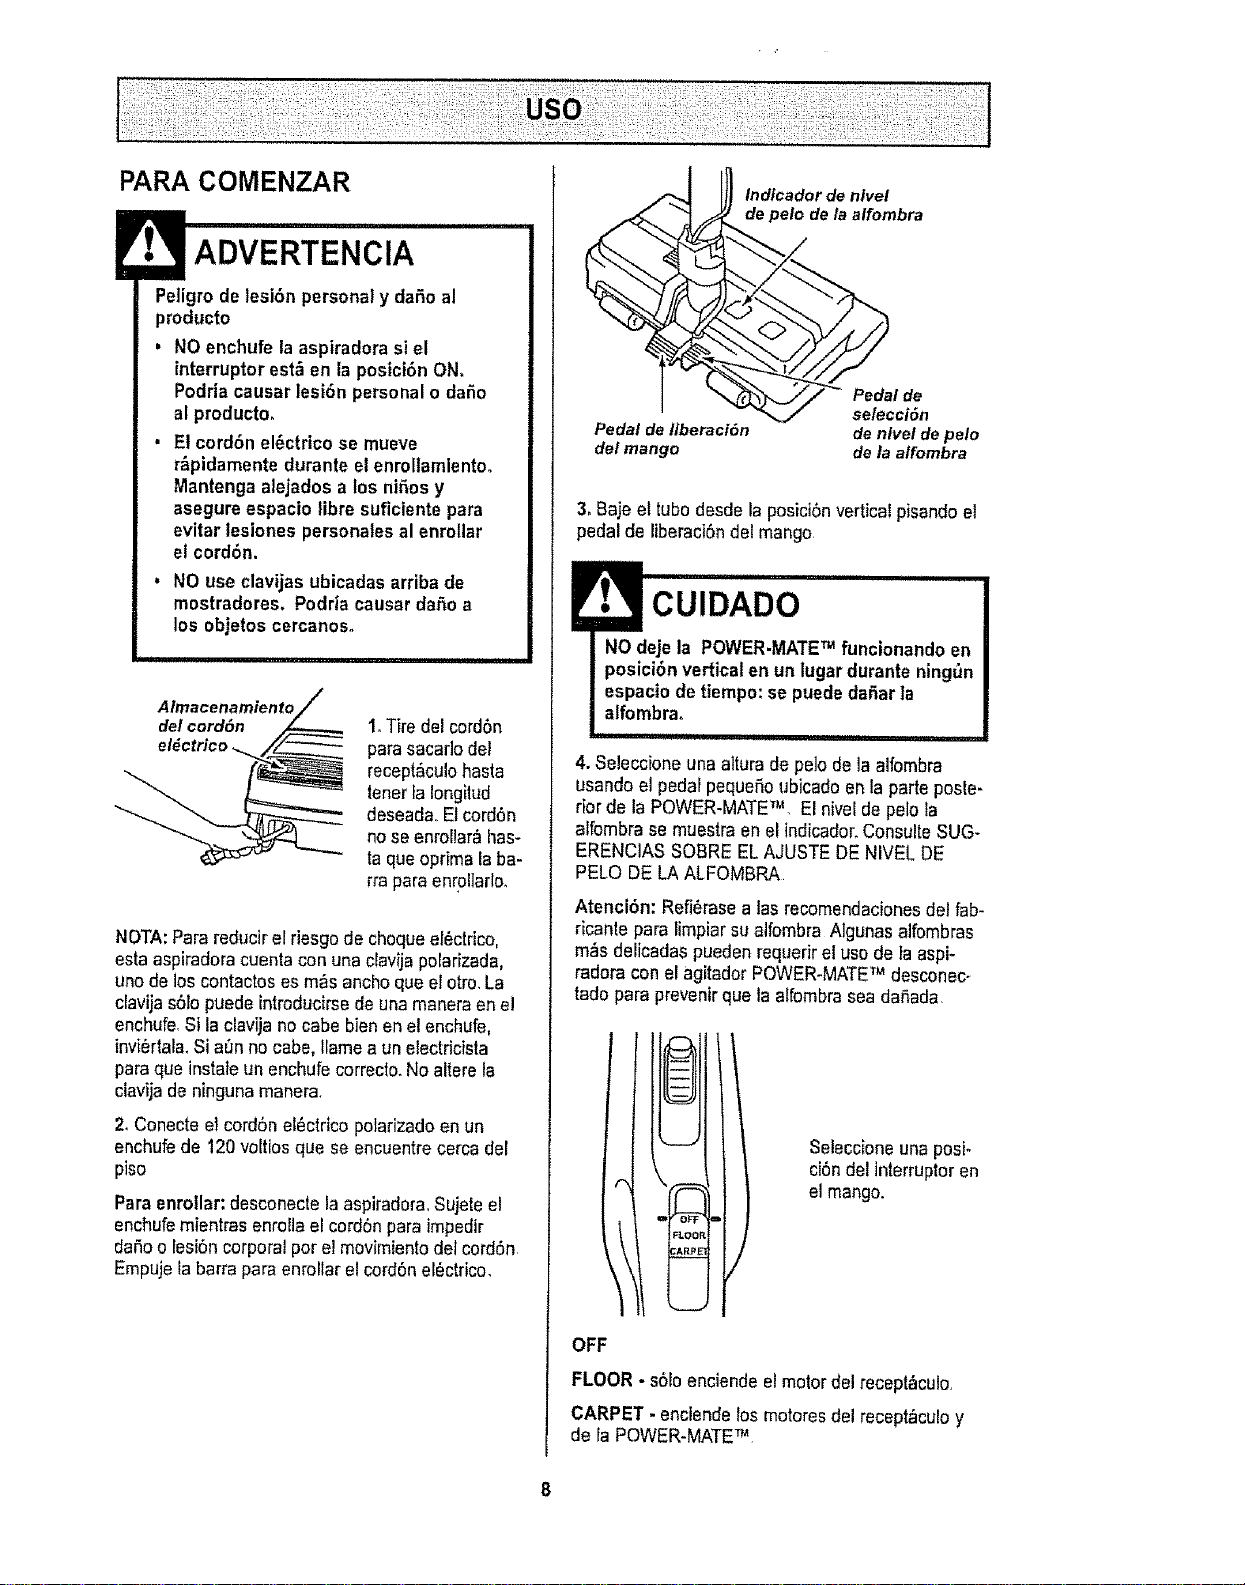
Indieador de nlvel
de polo de la alfombra
Pedal de
selecci6n
Pedal de liberaci6n de nivet de pelo
del mango de la alfombra
3_Baje el tubodesde la posiciSnvertical pisandoet
pedal de liberaci6ndel mango
4. SeleccFoneuna alturade pe]o de laalfombra
usandoel pedarpequeSoubicadoen la parteposle-
riorde la POWER-MATETM El nivelde polo la
alfembra se muestraen el indicador.ConsulteSUG-
ERENCIASSOBREEL AJUSTEDE NIVEL DE
PELO DELA ALFOMBRA
Atenci6n: Refi,._rasea tasrecomendacionesdel fab-
ricante para limpiarsualfombra Algunasalfombras
mrs delicadas pueden requerirel usode la aspi-
radora con el agitadorPOWER-MATETM desconec-
tado para prevenirque la affombrasea da_,ada,
Seleccioneuna posi_
ci6ndel interruptoren
el mango.
OFF
FLOOR - s61oenciendeel motor del recept_culo,
CARPET - enctendelosmotoresdel recept_cu!oy
de faPOWER-MATETM

Esti|ode limpiezasugerido,
Para obtener ]amajor acciSnde fimpiezase recto
mienda empujarla POWER-MATETM en direcciSn
directamente opuesla a ustedyjalarlaenlinea
recta AI final de cada pasadade regreso,cambiela
direcci6n de la POWER-MATETM hacla lasiguiente
secciSna limpia[ ContinUeasi a tray,s de toda fa
alfombra de una maneralentay deslizante
NOTA:las pasa-
das r&pidasy
jalonadas no
Iogranuna lim-
pieza compteta.
El dispositivogiratofio
de la manguerapermi-
te que 6sta gire sin ne-
cesidad de moverel
recept&culo,Estoes
muy t_tilpara limpiaren
&teas pequeSas.Ase-
g_rese de qua la man-
guera no est_ torc_da
antesde jalar el recep-
t&culo,
Control de
\\
Los escalonesalfombrados requieren fimpieza
peri6dica.Cierre par completoet controlde aspira-
ciSnpara lagrar los mejores resultadosde limpieza.
ADVERTENCIA
Peligrode lesibn personal
Tangocuidadosi colocae! recept_culo
sabre escalones. Si se cae,podria causar
lesi6n personalo daSoa ta propiedad,
Mantengael paso de aire abierto para Iograr los
mejores resuffados de limpieza° Examinede vez
en cuandocada una de las_reas de uniSnen FUN-
CIONAMIENTODE SUASPIRADORA para asegu-
rarsede qua no ast_n bloqueadas. Desconectela
aspiradora antes de revisar.
CUIDADO
Paraevitar volcaduras,nuncadeje la
POWER-MATETM encendida oen posici6n
vertical Girandoelmangoa un lado, la
POWER-MATETM se hallar_en unaposici6n
m_sestablay ser_ m&sdific|l que se
vuelque,
Useel ajuste XLO (bajo) paraobtenerla major ]im-
piezaa fondo_Parotra parte,quiz&sse requieraele-
vat el nive] para facilitaralgunastareas,coma par
ejemplocuando se tratade tapetesy algunasalfom-
brasde pelo largo,y paraimpedirque la aspiradora
se apague Se sugieren Iossiguientesajustes:
HI - Pelomuy largo y suelto,tapetes,alfombras
muy acojinadas
MED - Pe]omedianoa largo,
LO - Pelocorto a mediano..
XLO - La mayoria de las alfombrasy pisos
descubiertos,.
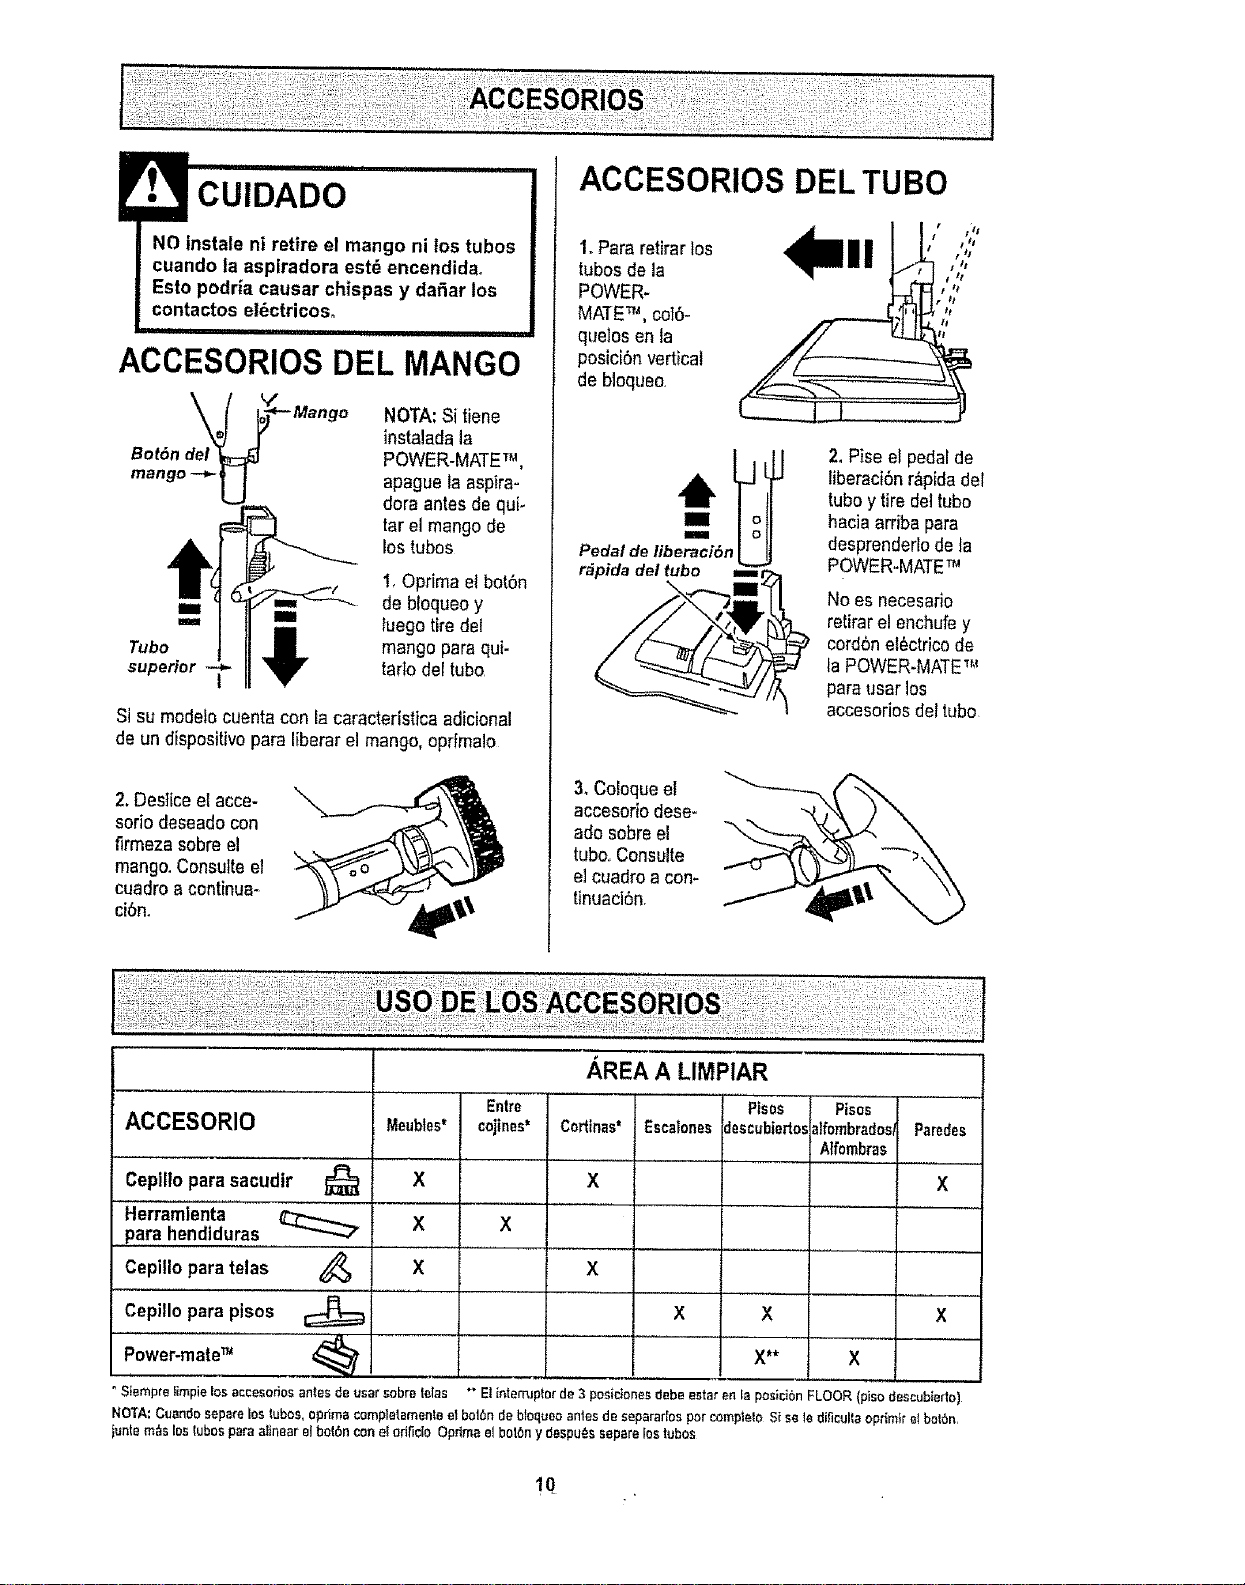
_ INI,II iiii i
CUIDADO
NO instale ni retire el mango ni los tubas
cuando la aspiradora est_ encendidao
Esto podria causer chispas y daSar los
contactos el_ctricos.
,i,ii i
ACCESORIOS DEL MANGO
_"*-- Mango
Bot6n del
mango -+'U
NOTA:Sitiene
instaladala
POWER-MATETM,
apague la aspira-
dora antesdequi-
tarel mango de
los tubas
!, OprimaelbotSn
iI de bIoqueoy
"" _i tuego tiredel
Tuba _r mango parequi-
superior T tartodel tuba
Si su modelocuentacon la caractertsticaadicional
de un dispositivopare liberar el mango,opt|male
2. Desliceel acce-
soda deseadocon
firmezasabre el
mango.Consults el
cuadroa continua-
ci6n.
ACCESORIOS DEL TUBe
1,Para retirar los
tubasde la
POWER-
MATE_, coT6-
queIos en la
posici6nvertical
de bloqueo,
t tIt
Pedal de Iiberaci6n
r&pida del tuba m
2. Piseel pedalde
liberaciSnr_pida del
tuba ytire deltuba
hacia arriba pare
desprenderlodela
POWER-MATET_
No es necesario
retirarel enchufey
cord6nel6ctricode
la POWER-MATE_,_
pareuser los
accesoriosdel tuba
3, Coloqueel
accesoriodese-
ado sabreel
tuba.,Consults
el cuadroa con-
tinuaci6n,
ACCESORIO
Cepilloparasacudir
Herramienta
pare hendtduras
Cepillopara telas
Cepitlopare pisos
Entre
Meubles* cojines*
X
X X
X
° S{empre iimpie los accesorios antes de user sabre tales
_,REA"A"'LIMPIAR
............... Pisos
Coriinas*
X
Pisos
alfombredos_
Atfombras
Escalonesdescubiertos
X X
X**
X
X
X
Parades
X
" E! intemJpter de 3 pesidone_ debe estar en la posicibn FLOOR (piso descubiedo)
NOTA:Cuandoseparelostubas,oprimBcompletsmenlaetbolbn debloque_antesde sapararfasparcomplelc,S{sele dificultaoprimtreIbotbn,
juntam_slosIubosparealinaarelboIbnconel eriI_cioOprimaelbotbny daspu_ssepareIostubes
!0_
/
_3
Activelos cepillos lim-
piadoresde orillas a
cada lado de fa
POWER-MATETM
Pasela POWER-
MATETM junto alas
paradeso juntoa los
muebles paraayudar
a eliminarlatierra
acumufadaen lasori-
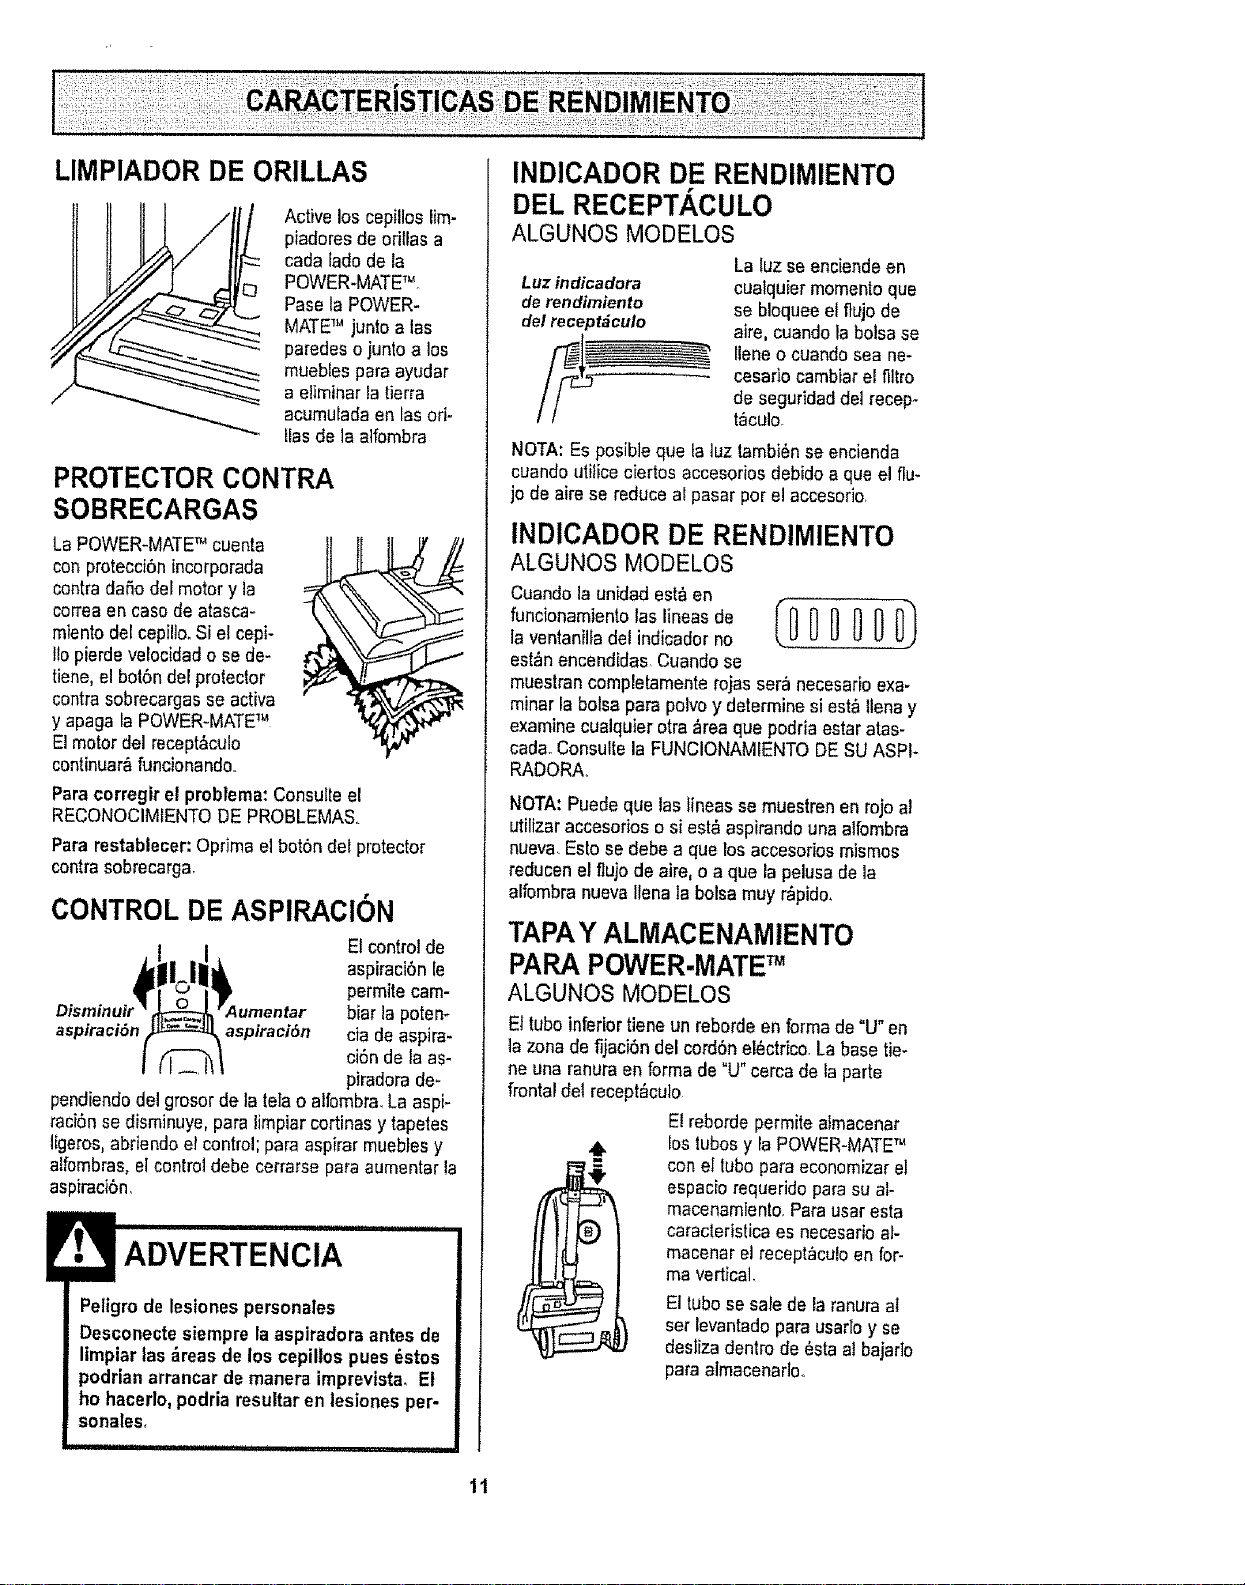
tiesde la atfombra
PROTECTORCONTRA
SOBRECARGAS
La POWER-MATE_'cuenta
conprotecci6nincorporada
contra dafio del motory la
correaen case de atasca-
miento del cepillo.Si etcepi-
lio pierdevetocidado se da-
rlene,el bot6ndel protector
contrasobrecargasse activa
y apaga faPOWER-MATETM
El motor del recept&culo
continuar_,funcionando.
Para corregir el pmblema: Consufleel
RECONOCIMIENTODE PROBLEMAS,
Para restablecer: Oprimael bot6ndel protector
contra sobrecarga,
CONTROL DE ASPIRACION
El control de
aspiraci6nIe
permite cam-
bier la potem
aspfraci6n aspiraciSn ciade aspira-
ci6nde la as-
piradorade-
pendiendodel grosorde la tefao alfombra.La aspi-
raci6nsedisminuye,pare limpiarcortinasy tapetes
tigeros,abriendo elcontrol;pare aspirar mueblesy
alfombras,el controldebe cerrarse pareaumentar le
aspJracibn.
Peligrode lesiones personales
Desconectesiempre laaspiradoraantes de
I|mpiarlas _,reasde los cepiltospues _stos
podrian arrancar de manera imprevista_El
ho hacerlo,podria resultaren lestonesper-
sonales,
INDICADOR DE RENDIMIENTO
DELRECEPT.&,CULO
ALGUNOS MODELOS
La luz seenciendeen
Luz indicadora cualquier momentoqua
derendtmlenlo se bloqueeel flujo de
del recept_culo aire, cuandola bolsase
llene ocuandosea ne-
cesado cambiarel filtro
de seguridaddel recep-
taculo.
NOTA:Esposiblequa la tuztambi6nse encienda
ouandoutilice ciertos accesoriosdebidoaqua el flu-
jo de aire se reduce alpasar porel accesorio,
INDICADOR DE RENDIMIENTO
ALGUNOS MODELOS
Cuando la unidad est'_en
, oo,onom,oo,o,o,,,oo ooo
la ventanilladel indicadorno
est_nencendidas Cuandose
muestrancompletamenterojas ser&necesarioexa-
minarla boise para polvo y determinesi est&tlenay
examinecualquiarotra _rea qua podria estaratas-
cadaoConsultela FUNCIONAMIENTODE SUASPI*
RADORAo
NOTA:Puede qua tealineas se muestrenenrojoa!
utilizeraccesorios o si est&aspirandounaalfombra
nueva Esto se debe a qua losaccesorios mismos
reducenel ftujo de aire,o a que la pelusade la
alfombranuevaliana la bolsamuy r_pido,
TAPAY ALMACENAMIENTO
PARAPOWER-MATETM
ALGUNOS MODELOS
Eltuboinferior tieneun reborde enforma de °U"en
la zonede fijacibn del cord6nel6ctrico,La base tie-
ne una ranura en forma de "U" cerca delaparte
frontal del recept_culo
El reborde permitealmacenar
lostubos y la POWER=MATETM
con el lubo pare economizerel
espaciorequerido paresu al-
macenamiento,Parauser esta
caracteristica es necesarioal-
macenarel recept_culoen for-
me vedical,
E1tubo sesale de la ranuraaI
set levantadopare usarloy se
desliza dentrode 6sta al bajarlo
pare almacenadoo
11
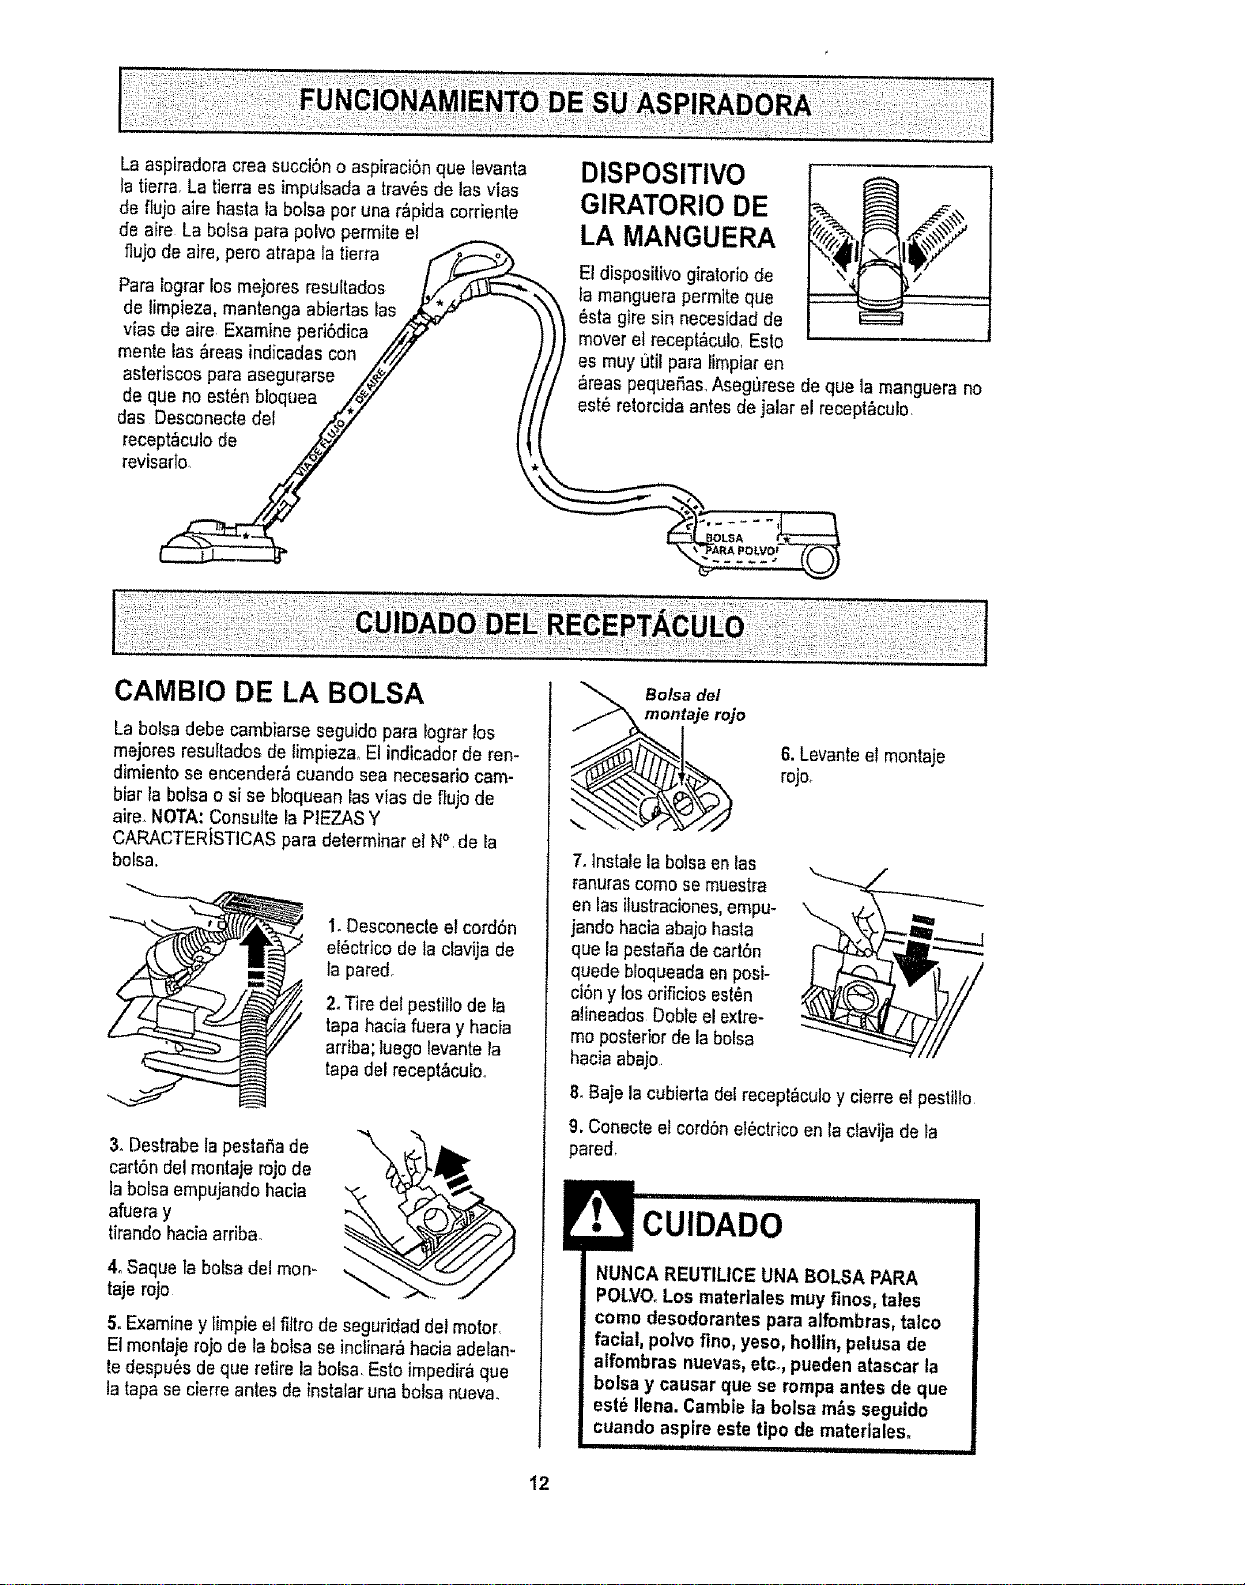
Laaspiradoracreasucci6noaspiraci6nquelevanta
latierra,Latierraesimpulsadaa trav6sde las vias
de fluio aire hasta labolsa peruna r&pidacorrienle
de aire La bofsa parapolvopermits el
flujo de aire, pero atrapala tierra
ParaIograrlos mejores resuEtados
de limpieza,mantenga abiertas las
vfas de airs Examineperi6dica ,,_
mentelas &reasindicadas con //'_
asteriscospara asegurarse ,/_#/"
de que noest6nbloquea /,_Y /
das Desconectedel .,,_oY
revts_
DISPOSITIVO
GIRATORIO DE
LA MANGUERA
El dispositivogiratoriode
l a manguerapermlteque
6sta gire sin necesrdadde
moveret recept6cu!o,Esto
es muy 0til para limpiaren
_reas pequefias,Aseg0rese de que la manguerano
est6retorcidaantesde jalarel recept_culo,
CAMBIO DE LA BOLSA
La bolsadebe cambiarseseguidopara lograrlos
mejores resufladosde limpieza_El indicadorde ren-
dimientose encender,_cuando sea necesariocam-
biar la bo}sao si sebloquean las v}asde fiujo de
aire.NOTA:Consutte la PIEZASY
CARACTERISTICASparddeterminarel Nc' de _a
bolsa°
t
,.=_
1.Desconecteetcord6n
el6ctrlco de la clavija de
la pared.
2.Tire del pestilIode la
tapa haciafueray hacia
arriba;tuegolevantela
tapa del recept&culo
3. Oestrabela pesta6ade
cart6n del montajerojode
la bolsaempujandehacia
afueray
tirandohaciaarfiba
4oSaque la boisadel mon-
tajerojo
5oExaminey timpieelfiltro de seguridaddel motor.
El montaierojo de tabo_sase inclinar_hacia adelan-
tedespu6s deque retirelabolsa. Estoimpedir_que
la tapase cierreantes de instalaruna bolsa nueva.
Bolsa del
montaje rojo
6. Levanteel montaje
rojo_
7.tnstatela bolsaen las
_anurascome semuestra
en lasilustraciones,empu-
jandohaciaabajo basra
que la pestafiadecart6n
quedebloqueadaenposi-
cibny tosorificiosest6n
aiineadosDebtsel extre-
meposteriorde 19bolsa
haciaabajo
BeBaje tacubierta del recept_culoy cierreel pestilto
9. Conecteetcord6nel6ctricoen la cfavijade la
pared,
! IH' H'HIIH'II
CUIDADO
NUNCA REUTILICEUNABOLSAPARA
POLVOoLosmaterlales muy fines, tales
come desodorantes para alfombras,talco
facial, polvofine, yeso, hollin,pelusade
alfombras nuevas,etc. puedenafascar la
bolsa y causar que se rompaantes de que
est6 Ilena.Cambieta bolsam_s seguido
cuando aspireeste tipo de materiales.
iiiii i i if1 , IIIHJ jlllllll i _1111
12
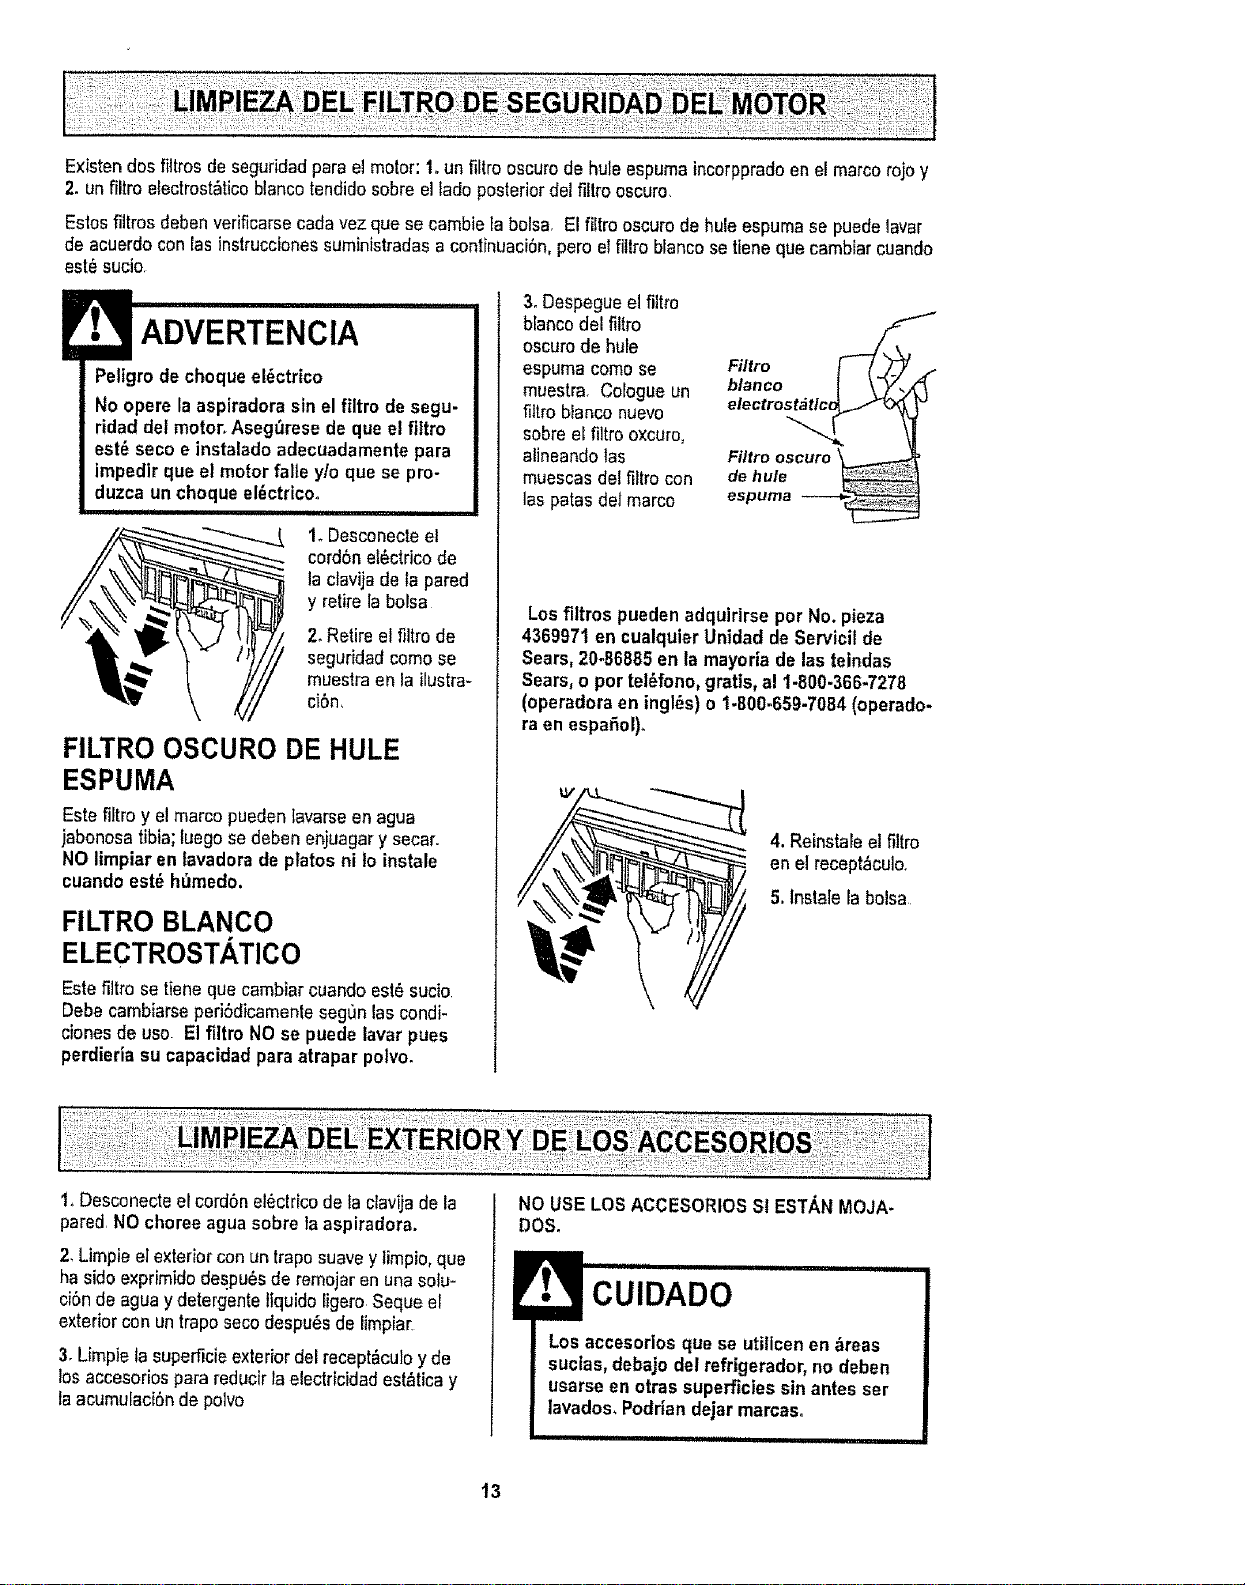
Existendos_tresdeseguridadparaelmotor:1.unfiltrooscurode hule espumaincorppradoen el marcorojo y
2. un filtro e[ectrost_ticoblancotendidosobreel lade posteriordel filtroescuro
Esios filtros debenverificarsecadavez que secambie la bolsa, El filtro oscurode huleespuma se puedelavar
de acuerdocon las instruccionessuministradasa continuaci6n,pete el fittroblancosetlene que cambiarcuando
est6 sucio
Peltgrodecheque el6ctrico
No opere la aspiradorasin el filtro de segu-
ridad del motor. Asegfiresede que el flltro
est6 seco e instaladoadecuadarnente para
irnpedirque el motor falle y/o que se pro-
duzca un chequeel_ctricoo
i
1. Desconecteel
cordSnel6ctricode
la clavija deIa pared
y retire la bolsa
2_Retireel filtro de
segurJdadcornose
muestraen la ilustra-
ci6n,
FILTRO OSCURO DE HULE
ESPUMA
Este filtro y elmarcopuedenlavarseen agua
jabonosatibia;tuegose deben eniuagary secar.
NOlimpiar en tavadera de plates ni io instale
cuandoest_ hfirnedo,
FILTRO BLANCO
ELECTROSTATICO
Este fittrose tiene que cambJarcuando est6sucio
Debecarnbiarseperi6dicamentesegOnlaseondi-
cionesde use El filtro NOse puede lavar pues
perdieria su capacidadpara atrapar potvo.
3oDespegueel filtro
blancodel filtro
oscurode hufe
espuma come se
muestra. Cologue un
filtro blanconuevo
sobreel filtro oxcuro,
alineandolas
muescasdel filtrocon
las patas del marco
Filtro
electr°s_c_ _
Filtro oscuro
de hule
espuma
Los filtros pueden adquirirse per No. pieza
4369971 en cualquierUnidad deServicil de
Sears,20-66885 en la rnayoria de lasteindas
Sears,o per tel_fono,gratis,al 1-800-366-7278
(operadoraen ingles) o 1-800=659-7084(operado-
ra en espa_ol)_
kV
4. Reinstaleel filtro
en el recept_culo_
5. lnstale la bolsa
1. Desconecteelcordonelectricode la clavijade la
pared NOchoreeagua sobre la aspiradora.
2, Limpieelexteriorcon un traposuavey limpio,que
ha side exprimidodespu6sde remojaren una solu-
ciSnde aguaydetergente tlquidoligero Seque el
exteriorcon un traposeco despu_sde limpiar
3. Limpietasuperficieexterior delrecept&cu]oy de
los accesoriospara reducirla electficidad est_ticay
la acumulaci6nde polvo
NO USELOSACCESORIOSSI ESTANMeJA-
Des.
Los accesoriosque se utilicenen ,_reas
suctas,debajo del refrigerador,no deben
usarseen otras superficiessunantesser
lavados,Podrian dejar rnarcas,
13
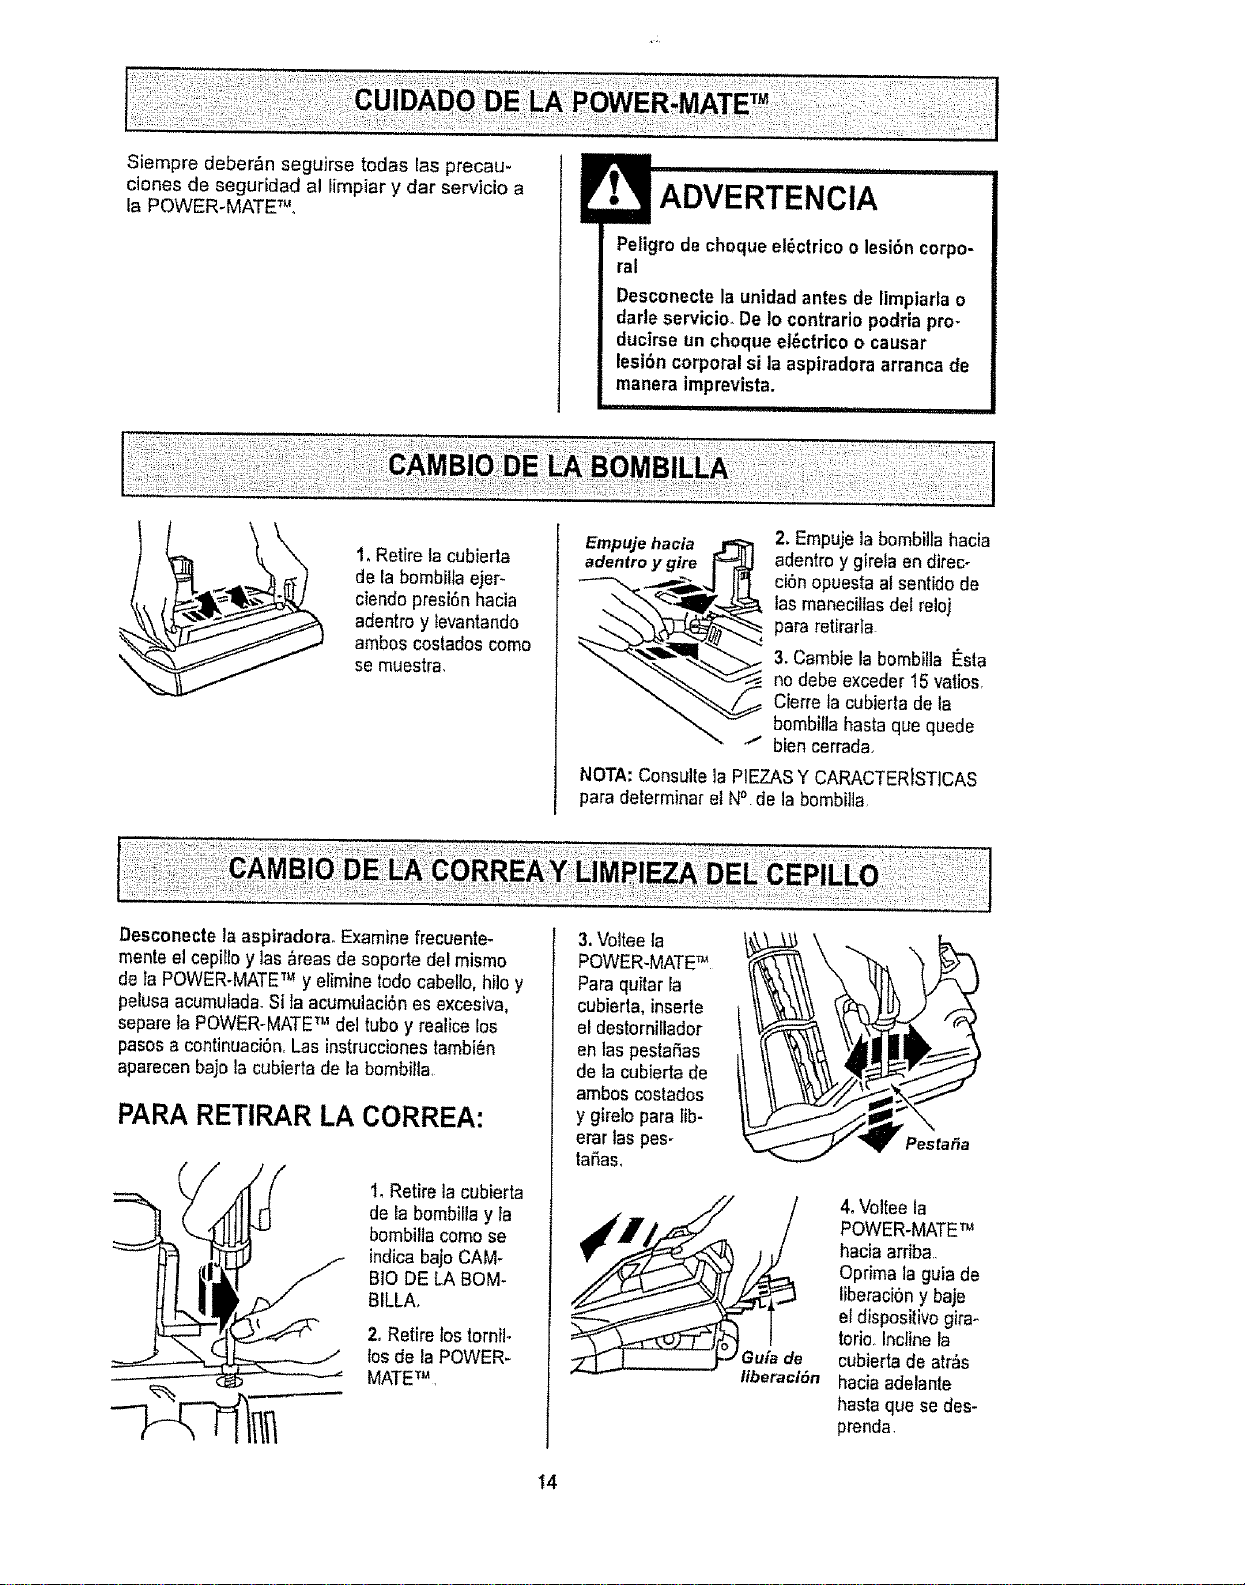
Siempredeber&nseguirsetodaslasprecau-
cionesdeseguridadaliimpiarydarservicioa
la POWER-MATE_,L
ADVERTENCIA
Peligrode chequeel_ctricoo lesibn corpo-
ral
Desconectela unidadantes de limpiarla o
darteservicio. De Io contrario podriapro-
ducirse un chequeel_ctrico o causar
lesibn corporalsi la aspiradoraarrancade
manera imprevista.
1, Retire tacubierta
de la bombillaejer-
ciendopresi6n hacia
adentroy tevantando
ambos costadoscome
se muestra,
Empuje ha¢ia
adentro y gire
2. Empujela bombillahacia
adentroy girela en direc-
ciSnopuestaal sentido de
las manecillasdel reloi
para retirafla
3. Cambie la bombilia t_sta
no debe exceder 15varies,
Cierre la cubierta deta
bombilla hastaque quede
bien cerrada
NOTA:Consulte]a P1EZASY CARACTERDSTICAS
para determinar elN° de la bombilta
Desconecte la aspiradora. Examine [recuente-
mente el cepi_loy las &reasde soporte del mismo
de taPOWER-MATETMy elimine rodecabello, hilo y
pelusaacumulada.Si la acumuJaci6nes excesiva,
separela POWER-MATETM del tubey realicelos
pasosa centinuaci6n,Las instruccionestambi_n
aparecenbajo la cubierta de la bembilla
PARARETIRAR LA CORREA:
1,Retire ]a cubierta
de la bombillay la
bombillacome se
indica bajo CAM.
BIO DE LA BOM-
BILLA.
2, Retire lostornil-
los dela POWER-
MATETu
3.Volteeta
POWER-MATETM
Para quitar la
cubierta, inserte
eldestorniilador
en tas pestaSas
de la cubierta de
ambos costados
y gire]o para lib-
erar las pes-
taSas,
/1
Pesla_a
4. Volteela
POWER-MATETM
haciaarriba,,
Optima la guia de
liberaci6ny baje
el dispositivo gira-
torio, Incline la
cubierta de atr_s
haciaadelante
hasta que se des-
prenda.
t4
5,Inserte el
destorniHador
cuidadosamenle
en cadasoporte
del cepilFoy
gtrelo pararetirar
etcepillo de la
base.
Soporte
del cepillo i
i
6, Retire la banda
desgastada
7, Retire los
soportesdel cepi-
liD;examine y lira-
pie las &teasde
soporte dei cepillo
En la ENSAMBLE
DELCEPILLO se
proporcionauna
ilustraci6nde lode
el ensambledeK
cepillo
PARA CAMBIAR LA CORREA:
I. Reinstalelasarandelas y los soportesdel cepiiJo
en el ensambfe,
2. Instateuna
correa nueva
sobreel
imputsordel
motory tuego
sobrela rueda
dentadade}
cep[lto,
/
Soporte
(]elcepitlo
tmpu/sor
_ motor
_ Cepilto
Rueda dentada
cel ceplllo
NOTA:Consulte laPfEZASY CARACTERISTICAS
para determinar el N°, de correa.
3. Instatelossoportes
delcepiliosobreta
base Aseg_resede
que lossoportes no
est6n invertides,
4, Alinee ta
parle frontal de
fa cubierta con
la base,.
CoIoqueta
cubierta sobre
el borde
delanterode la
basecome se
muestra.
Cubierta Base
5ofnclinelacubierta
haciaarras Ejerza
presi6nfirme sobre
la cubierta basraque
IaspestaSaslat-
eralesqueden f_jas
en posici6n,Instale
lostornilrosde ta
cubierta,la bombiFla
y la cubierta dela
bombflla
15
ADVERTENCIA
Petigrode choque et_ctricoo lesi6n corpo-
ral
Desconectela unidadantesde limpiarlao
dafle servicio, De Io contrario podrtapro-
ducirse un choque el_ctrico ocausar
lesi6n corpora]si la aspiradoraarrancade
manera imprevista,
PARAEXAMINAR EL CEPILLOS:
Cambie mazodei
cepittocuando
estSndesgastados
hasta el hive1de
las barrasde
soporte de rabase
Barra de soporte
de la base
PARA CAMBIAR MAZO DEL
CEPILLO:
1. Retire la cubierta,correa y ensambJedel cepillo
de la POWER-MATETM Consulte"Para retirarla cor-
rea"bajo CAMBIO DELA CORREAY LIMPIEZA
DEL CEPtLLQ.
2.Retire la soportedel cepillo,arandelas,torni!los,
topedel cepillo,ruede dentadadel cepillosla topes
de _asensambledel cepillo
3.Arme el ensambredel cepillo.Paraalinearlosori-
ficiosde rostornillosdel mazo,la rueda dentaday el
tope del cepillo,asegOresede que la perle de la
cepitlode1topedetcepilloest_atineadaconias
cepiilos del mazodel cepii!o.
4. Cambiela correa,elensambiedel cepillo,la cu-
bierla de la POWER-MATETM, Iabombitlay la cu-
bierta de la bombilla.Consuite"Paracambiarla
correa"baio CAMBIODE LA CORREAY LIMPIEZA
DEL CEPILLO.
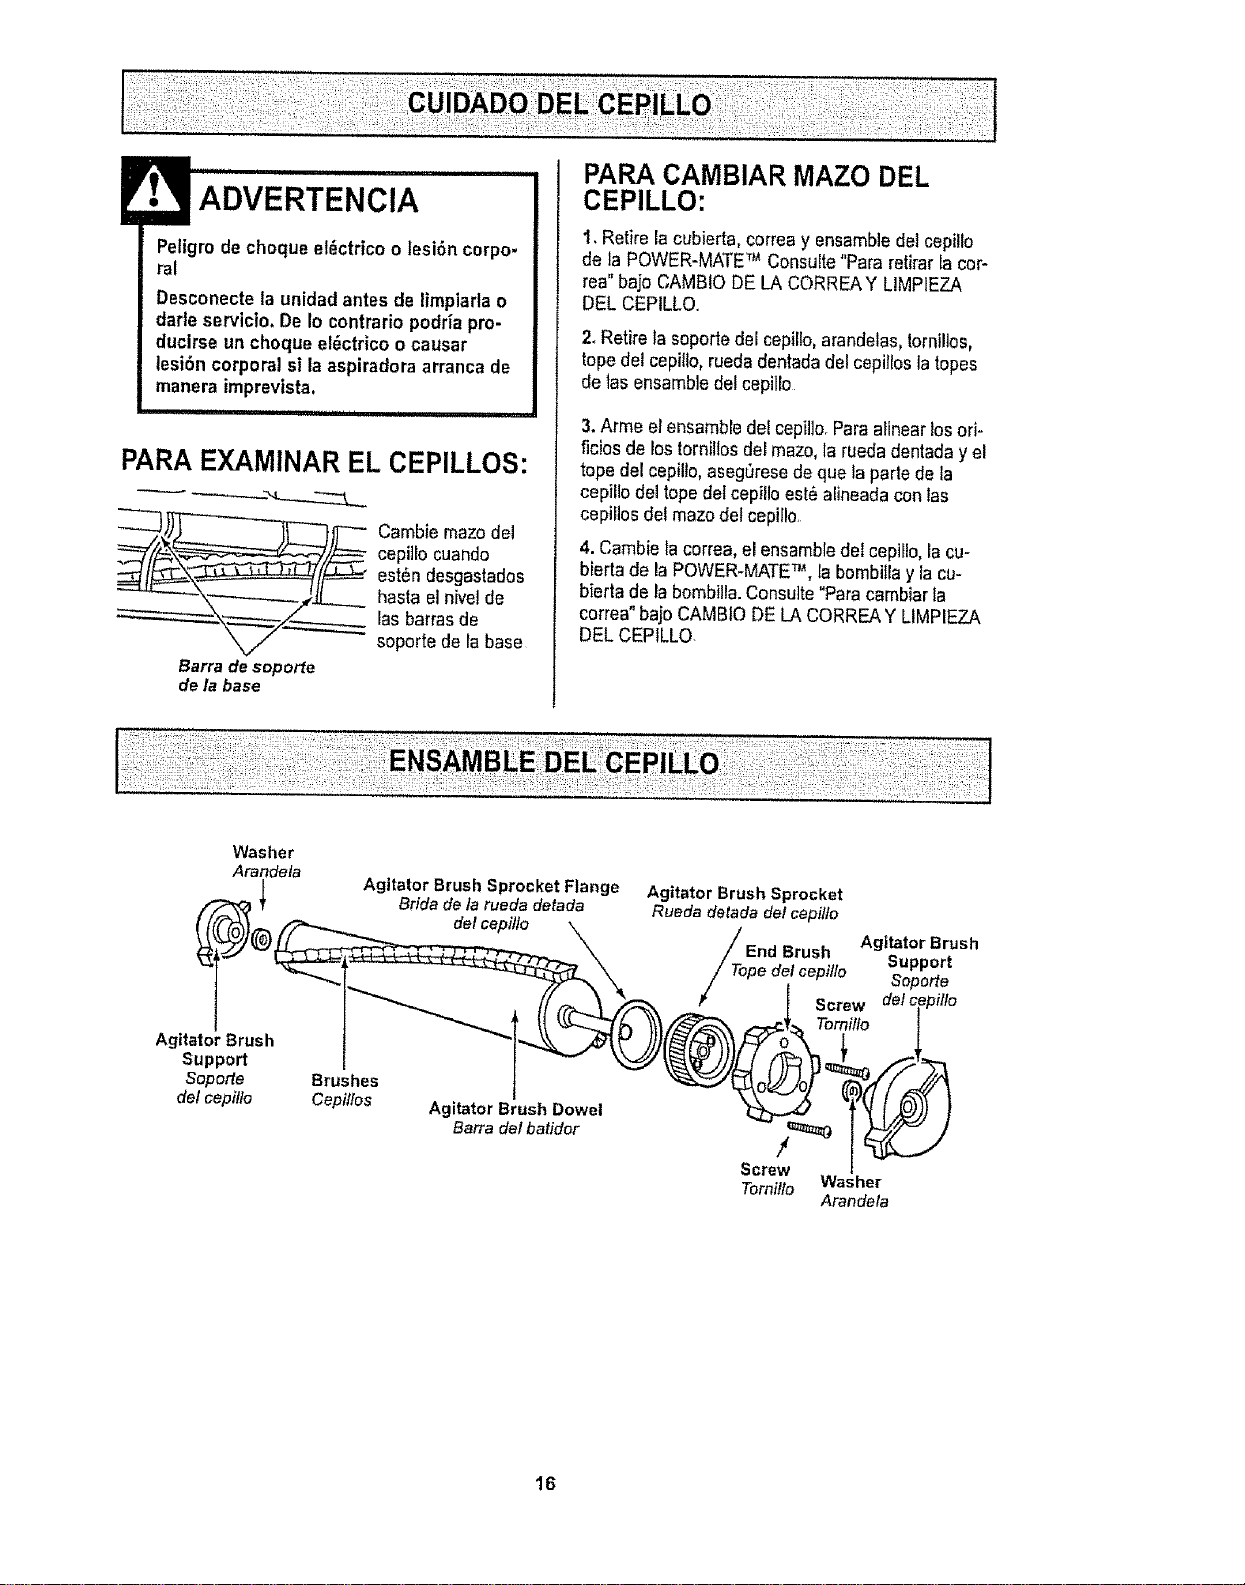
Washer
Arandeta
Agitator Brush
Support
Soporte
delcepillo
Agitator Brush Sprocket Flange
Brida de la rueda detada
delcepillo
Brushes
Cepi/Ios
Agitator Brush Dowel
Barra del batidor
Agitator Brush Sprocket
Rueda detada det cepitlo
Brush Agitator Brush
Support
Tope det cepillo Soperte
/€ Screw delc
Tornillo
/
Screw
Torniflo Washer
Arandela
16
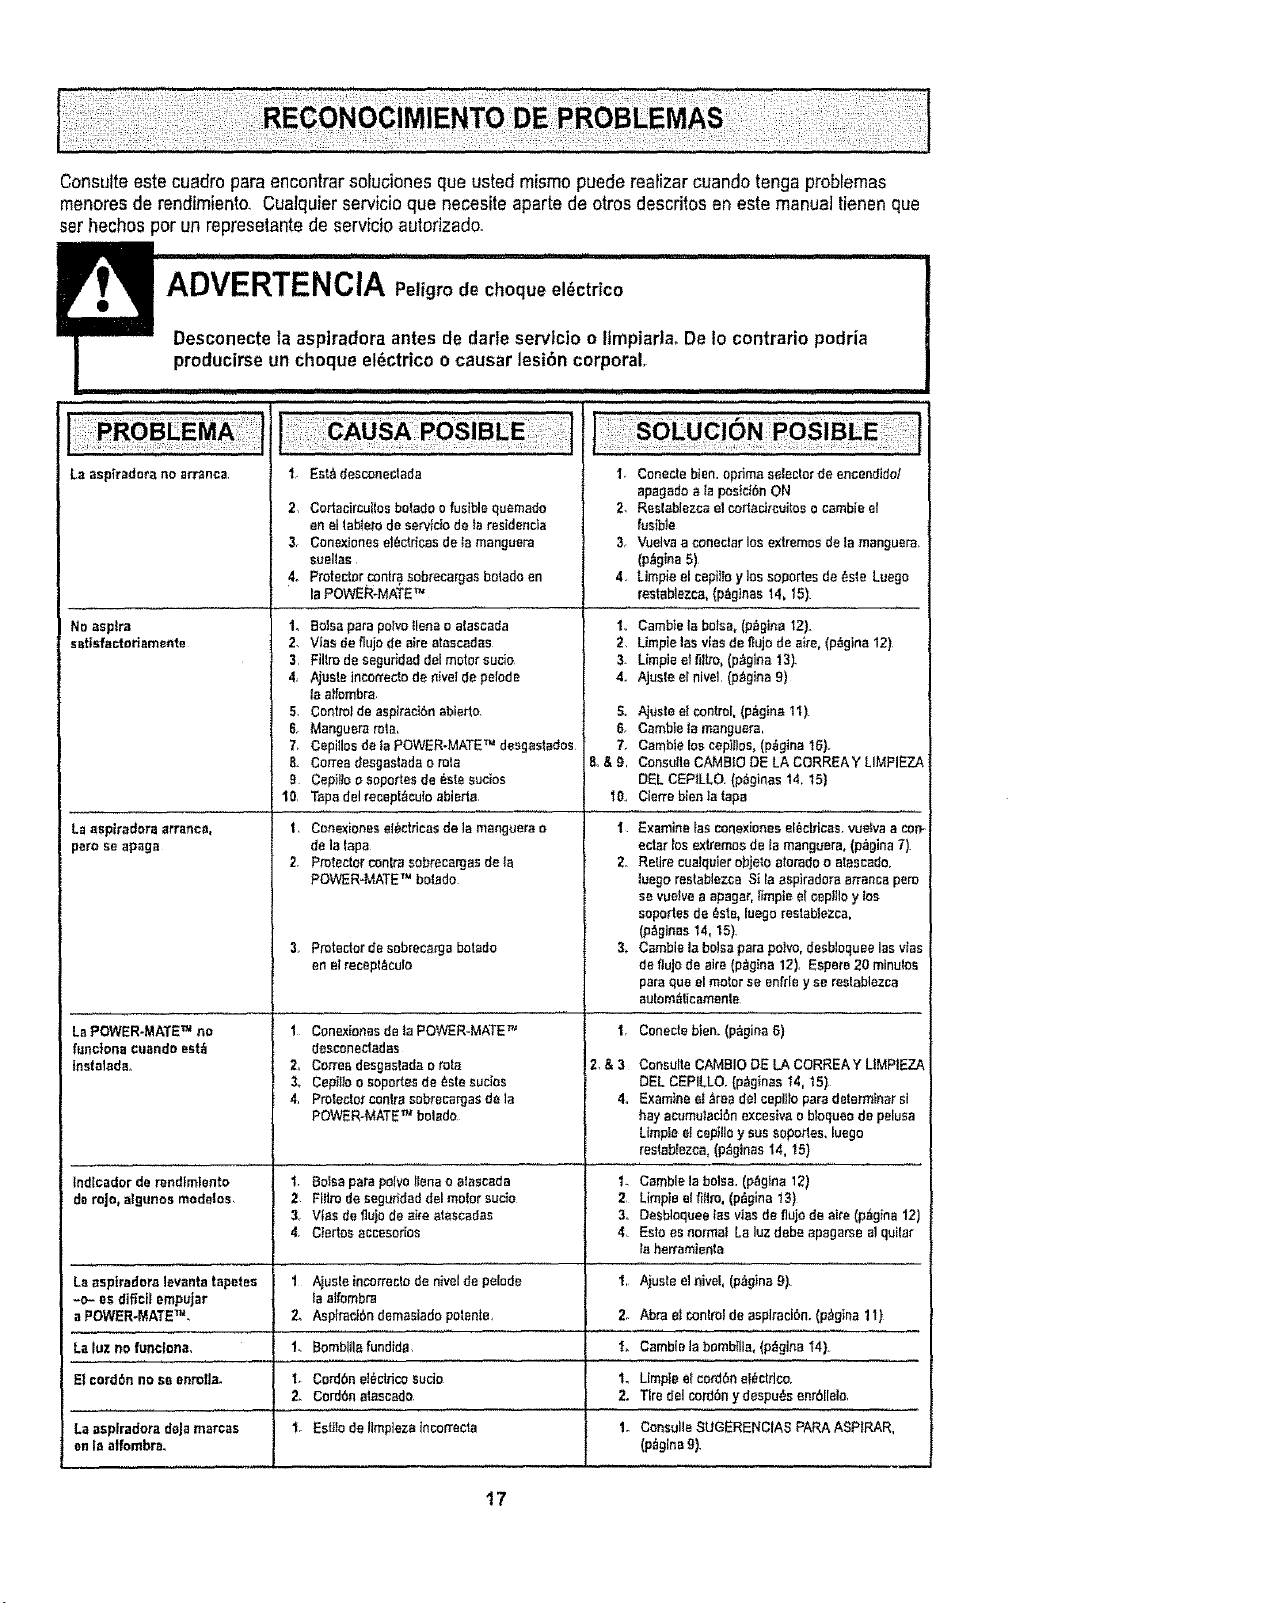
Consulteestecuadropara encontrarsofucionesque ustedmismopuede reafizarcuandotenga probremas
menoresde rendimiento. Cualquierservicioque necesiteapartede otros descritos en este manualtienen que
set hechos per un represetantede servicioautorizado.
I iiii I I _1,11 ii , i , i................................................................
ADVERTENClA r'e,grodochequee, ctr co
"1 "-''=-'= Desconectela aspiradoraantes de darleservlcio o limp|aria° De1ocontrario podria
producirseun cheque el_ctrico ocausar lesibn corporal.
La asptredora no arranca
No aspire
satisfacteriamente
La aspkadora errancy,
pare aeapaga
La POWER-MATE TM no
fLIncione cuando eat_
|nsiatada_
1, Est_ descone[_tada
2, Cortacircuitos be!ado e fusible quemado
an el tab!ere de aervldo de |a reaideoda
3. Conexiones eric!rices de la manguera
euelias
4. Protector contra sobreeargas botado en
la POWER-MATE TM
14 Botsa pare potvo _lena o a|ascada
2, VIes de fiujo de sire ataacadas
3 FiHro de seguHdad del motor sucio
4, Ajuste incon'eoto de hive] de polede
la alfombra
5. Control de aspiraciSnablerto.
6. Manguera rote,
7_ Cepillos de ta POWER-MATE TM desgastodos
8 Cortes desgestada o role
9 Cepit_o o soportes de _ste eucios
10, Tspa del recept_cuto abiert_
1 Conexionea elSe!rices de la manguera s
de la lapa
2, Protecto_' conlre sobrecargas de la
POWER-MATE TM betide
3, Protectordesebrecargabetide
enelrecept_cuto
I Conexionesde |aPOWER-MATE _=
desconectadas
2. C_ee desgastada o rots
3. Cepillo o soportes de _ste sucios
4, Protector can|re sebrecargas de le
POWER-MATE TM boiado
I, Conectebien.optima selectorde encendidol
apagedoala psslci6nON
2. Reslablezcael corlacireuitoso eatableel
fusible
3, Vuelvaa conectarlos extremesde tamanguera.
(p_gina5)
4, Utopia elcepHFoy losaoportesde_.steLuegs
reetablezca,(p_glnas14_15)
1,. CambieIs boise,(p_gina 12},
2. Limpieleavlasde fiujode eke,(p_gina 12)
3. Utopiaet51!re,(p;_gina13).
4. Ajusteel hive1,(p_gina9)
S, Ajuste e! controi, (p_g|ne 11).
6. Camble _a manguera,
7. Carnbte _eecepH!os, (p_gina 16}.
8,&g, Consulle CAMB!o DE LA CORREA Y LIMPIEZA
DEL CEP!LLO. (p_ginas 14, 15)
10. Cierre bien !a tape
i Examine }as conexiones el_ctr[cas, vuelva a con-
ectar los exb'emos de lamanguera, (p_gina 7).
2, Retire cualqoier objeto atorado o aleseado,
luego res!ablezca S| la _pkadors arrenca pore
se vuelve a apagar, timpte st cop|lie y toe
soportes de _ste, luego reslablezca,
(p_,gir_es14, 15).
3, Cambie Is boise pare polvo, deebloquee lea vies
de flujo de airs (p_gina 12), Espere 20 minutes
pare qua el motor se en[_Iey se re_tablozca
autom_i!icamen!e
1,
2,&3
4_
Conecte blen.(p_gina 6)
Cone_lteCAMBIODELA CORREAY LIMPIEZA
DELCEPILLO,{p,'_gtoas14,15)
ExamineetAreade!cop|lieparedeterminersl
hayaoumulactanexceslvae bloqueodepelusa
Lfmpte_fceptlloy suasopor_es,luego
res!ab_e_ca,(p_gtnas14, 15)
Indfcador de r_nd!mtento t. 8o_eepare polvo Henso atoscada 1. Gamble !a boise. (p_gIna 12)
deroje, algunosmedalos, 2 Filirodesegur|daddelmotorsucio 2 Limpiealfifiro,(p_gina13)
3 Vies de flu_ode sire ataecadas 3. Desbloquee los vies de fl_jo de site (p_g!na 12)
4, Clertos accesorioe 4, Este es norms! Ls toz debe apagarse al quilar
ta herramienta
La esptradors levanta !spates 1 Ajua!e incorrecto de nivel de pelode 'f, Ajuste el nive_, (p_gina 9).
-o- es dificfl empujar la atfombra
a POWER-MATE TM, 2_ AspS'acOrndemaslado paten!e, 2o Abra el con!mf de esplradSn. (p,'_gIna1I}
La luz no funclona_ 1. BomblHa fundida, I. Gamble _abomb{lla, (p_gina I4},
E_cerdSn no se onrolte. 1. Cordbn e]_ctfico eucio t. LImpie e! cord6n et_ctflco.
2. Cordbn a!aeeade. 2. Tire del cord6n ydespu6s enrbllelo,
La asplradora deja marcas 1. Es_Io de llmp{ezatncorrecta 1o Consulto SUGERENCIAS PARA ASPIRAR,
en la alfombra, (p_glna 9).
17
Get'it fixed, at your home or curse
For repair of major brand appliances in your own home...
no matter who made it, no matter who sold it!
1-800-4-MY-HOME ® Anytime, day or night
(1-800-469-4663) (U.S,A. and Canada)
www.sears.com www.sears.ca
For repair of carry-in products like vacuums, lawn equipment, and
electronics, call for the nearest Sears Parts and Repair Center.
1-800-488-1222 Anytime, day or night (US.Ao only)
www.sears.com
For the replacement parts, accessories and owner's manuals
that you need to do-it-yourself, call Sears PartsDirectSMt
1-800-366-PART
(1-800-366-7278)
6 a°m,- 11 p.m, 7 days a week
(US,A. on|y)
v_,t,sears.com]pa rtsdirect
• ili!ii ii'!iilL
To purchase or inquire about a Sears Service Agreement
or Sears Maintenance Agreement:
1-800-827-6655 (U.S.A) 1-800-361-6665 (Cadada)
7 a,m.- 5 pm., CST, Mono- Sat. 9 am. - B p.moEST, M - F, 4 p m Sat.
Para pedir servicio de reparacl6n a
domicilio, y para ordenar piezas:
1-888.SU-HOGAR sM
(t -888-784-6427)
Au Canada pour service en fran_ais:
1-800-LE-FOYER _c
(1-800-533-6937
www.sears ca
© Sears, Roebuck and Co,
® Regislered Trademark I Trademark I Service Mark ol Sears, Roebuck and Co
® Marca Registrada / "rMMarca de F_,brica / sM Marca de Servfcio de Sears, Roebuck and Co
Mc Marque de commerce / MoMarque d_pos_e de Sears, Roebuck and Co
18