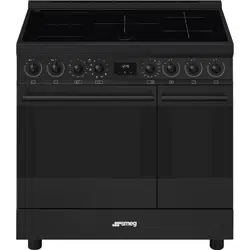
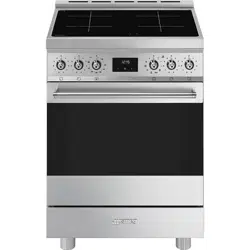
User manual Cooker
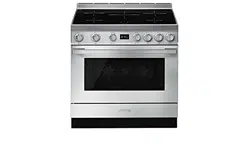
Description
Control panel
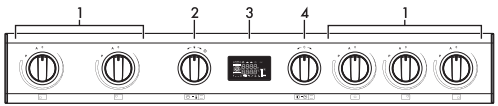
1 Hob cooking zone knobs
Useful for controlling the cooking zones of the induction hob.
Turn the knobs clockwise to adjust the operating power of the hot plate from a minimum of 1 to a maximum of 9.
The working power is indicated on the display on the hob.
2 Temperature knob
This knob allows you to select the cooking time and temperature, set programmed cooking and the current time as well as turn the light inside the oven on and off.
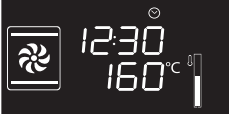
3 Display
Displays the current time, the selected cooking temperature and function and any time set.
4 Function knob
This knob allows you to turn the appliance on and off and select the cooking function.
Use
First use
1. Remove any protective film from the outside or inside of the appliance, including accessories.
2. Remove any labels (apart from the technical data plate) from the accessories and from the oven cavity.
3. Remove and wash all the appliance accessories (see 4 Cleaning and maintenance).
4. Heat the empty appliance to the maximum temperature to burn off any residues left by the manufacturing process.
Using the accessories
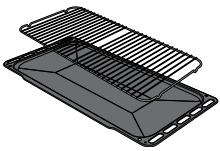
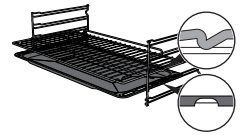
Tray rack
The tray rack has to be inserted into the tray. In this way fat can be collected separately from the food which is being cooked.
Racks and trays
Racks and trays have to be inserted into the side guides until they come to a complete stop.
The mechanical safety locks that prevent the rack from being taken out accidentally have to face downwards and towards the oven back.
Rotisserie (on some models only)
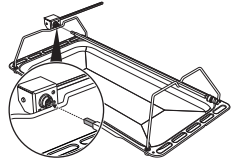
1. Insert the 4 supplied bushings in the 4 corner holes of the deep tray and screw them onto the ring nuts with a suitable tool (such as a screwdriver).
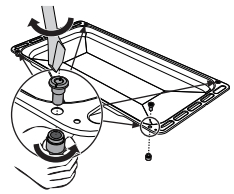
2. Position the rotisserie supports in the bushings as shown in the figure below.
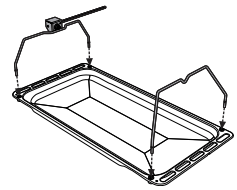
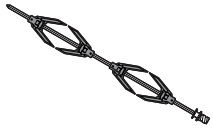
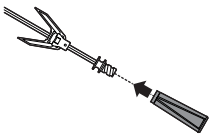
3. Prepare the rotisserie rod with the food using the clip forks provided. The clip forks can be tightened using the fastening screws.
4. Once you have prepared the rotisserie rod, place it on the supports. Insert the tip of the rod in the housing of the mechanism on the left-hand support until it stops.
5. Place the tray on the first runner (see “General Description”).
6. Insert the tip of the rod in the rotisserie motor housing on the left of the rear wall of the oven.

7. To activate the rotisserie, turn the function knob to select the  +
+  function and use the temperature knob to set a cooking temperature.
8. When cooking is complete, remove the tray with the rotisserie.
9. Screw on the handle provided so that you can handle the rotisserie rod more easily
Suitable cookware:
- Enamelled steel cookware with thick bases.
- Cast iron cookware with an enamelled base.
- Cookware in multilayer stainless steel, ferritic stainless steel and aluminium with a special base.
Unsuitable cookware:
-
Copper, stainless steel, aluminium, fireproof glass, wood, ceramic and terracotta cookware.
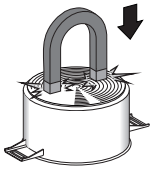
To see whether the pan is suitable, bring a magnet close to the bottom: if it is attracted, the pan is suitable for induction cooking. If you do not have a magnet, you can put a small amount of water in the pan, place it on a cooking zone and start the hot plate. If the symbol  appears on the display, it means the pan is not suitable.
Cookware recognition
When there is no saucepan on a cooking zone or if the saucepan is too small, no energy will be transmitted and the symbol will appear on the display.
If there is a suitable saucepan on the cooking zone, the recognition system notices it and turns on the hob to the power level set using the knob. Energy transmission is also interrupted when the saucepan is removed from the cooking zone (the symbol will be shown on the display).
If the cookware recognition function is activated in spite of the saucepan or frying pan on the cooking zone being smaller than the zone itself, only the necessary energy will be transmitted.
Cookware recognition limits: The minimum diameter of the pan base is indicated by a circle inside the cooking zone. Pans with smaller diameters risk not being detected and therefore not activating the inductor.
Heating accelerator
This function allows the selected power to be achieved in the shortest amount of time.
1. Turn the knob anticlockwise to position A and then release it. The display shows the symbol  .
.
2. Select the required heating power (1 - 8) within 3 seconds. The selected power and symbol will flash alternately on the display.
The power level can be increased at any moment. The “maximum power” period will automatically be modified.
Once the acceleration period is over the power level will remain the same as the one previously selected.
Keep warm
To activate the Keep Warm function:
- Turn the knob for the required cooking zone until the symbol
 appears on the corresponding display.
Booster function
- Turn the knob clockwise to the P position for two seconds and then release.
The display shows the symbol  . After 5 minutes the Booster function will automatically be disabled and cooking will continue at power level 9 (on zones 2 and 3 only).
Power control
The hob is fitted with a power control module that optimises/limits consumption. If the overall set power level exceeds the maximum limit permitted, the electronic circuit board will automatically manage the power supplied by the hot plates.
The module tries to maintain the maximum deliverable power levels. Levels set by the automatic control will appear on the display.
The flashing of a power level indicates that it will be automatically limited to a new level selected by the power control module.

Setting the time
When using the appliance for the first time, or after a power failure, the  symbol will flash on the display. To be able to start any cooking function, the current time must be set.
1. Turn the temperature knob to set the displayed time (keep the knob turned to produce a faster increase or decrease).
2. Press the temperature knob.
3. Turn the temperature knob to set the minutes (keep the knob turned to produce a faster increase or decrease).
4. Press the temperature knob to finish adjustment.
Cooking functions
1. Press and turn the function knob to select the required cooking function.
2. Press and turn the temperature knob to modify the cooking temperature.
3. Press the function knob to start traditional cooking.
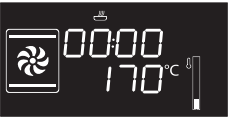
Preheating stage
Cooking itself is preceded by a preheating stage, which allows the appliance to heat to the cooking temperature more quickly.
The temperature level indicator flashes to indicate that this stage is in progress.

When the preheating stage is complete, temperature level reached indication will remain lit steadily and a buzzer sounds to indicate that the food can be placed inside the oven.

Functions list
 Eco
Eco
This function is particularly suitable for cooking on a single shelf with low energy consumption. Ideal for cooking meat, fish and vegetables. It is not recommended for leavened foods.
To obtain maximum energy savings and reduce cooking times, it is recommended to place food in the oven without preheating.
 Static
As the heat comes from above and below at the same time, this system is particularly suitable for certain types of food. Traditional cooking, also known as static cooking, is suitable for cooking just one dish at a time. Perfect for all types of roasts, bread and cakes, and in any case, particularly suitable for fatty meats such as goose and duck.
 Grill
Grill
The heat coming from the grill element gives perfect grilling results above all for thin and medium thickness meat and, in combination with the rotisserie (where fitted), gives the food an even browning at the end of cooking. Perfect for sausages, spare ribs and bacon. This function enables large quantities of food, particularly meat, to be grilled evenly.
 Lower element
The heat coming just from the bottom allows you to complete the cooking of foods that require a higher bottom temperature, without affecting their browning. Perfect for cakes, pies, tarts and pizzas.
 Fan assisted
The operation of the fan, combined with traditional cooking, ensures consistent cooking even with complex recipes. Perfect for biscuits and cakes, even when simultaneously cooked on several levels. (For multiple-level cooking, we recommend using the 2nd and 4th shelf).
 Fan with grill
The air produced by the fan softens the strong heatwave generated by the grill, grilling perfectly even very thick foods. Perfect for large cuts of meat (e.g. shin of pork).
 Fan + lower element
The combination of the fan with just the lower heating element allows cooking to be completed more rapidly. This system is recommended for sterilising or for finishing off the cooking of foods which are already well-cooked on the surface, but not inside, which therefore need a little more heat. Perfect for any type of food.
 Circulaire
The combination of the fan and the circulaire heating element (incorporated in the rear of the oven) allows you to cook different foods on several levels, as long as they need the same temperatures and same type of cooking. Hot air circulation ensures instant and even distribution of heat. It will be possible, for instance, to cook fish, vegetables and biscuits simultaneously (on different levels) without odours and flavours mingling.
 Turbo
Turbo
The combination of fan assisted cooking and traditional cooking allows different foods to be cooked on several levels extremely quickly and efficiently, without odours and flavours mingling. Perfect for large volumes that call for intense cooking.
Minute minder
1. Press the temperature knob once (twice if cooking is already in progress). The display shows and the indicator light  flashes.

2. Turn the temperature knob to set the duration (from 1 minute to 4 hours). After a few seconds, the indicator light stops flashing and the countdown starts.
3. Select the required cooking function and wait for the buzzer to sound, indicating that the cooking time is over. The indicator light flashes.
4. To deactivate the buzzer, press or turn one of the two knobs.
5. To select a further minute minder, turn the temperature knob.
Timed cooking
1. After selecting a cooking function and temperature, press the temperature knob three times. The display shows and the indicator light  flashes.
2. Turn the temperature knob right or left to set the cooking duration from 00:01 to 12:59. Keep the knob turned to produce a faster increase or decrease.
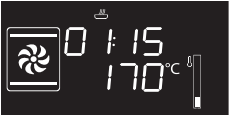
3. A few seconds after the required duration is set, the indicator light stops flashing and timed cooking starts.
4. At the end of cooking,  is shown on the display and a buzzer sounds.

5. To deactivate the buzzer, press or turn one of the two knobs or open the door.
Modifying the data set during timed cooking
During operation, it is possible to modify timed cooking duration:
1. When the indicator light is steady and cooking is in progress inside the appliance, press the temperature knob twice. The indicator light starts flashing.
2. Turn the temperature knob right or left to change the previously set cooking duration.
Modifying the data set during programmed cooking
During operation, it is possible to modify programmed cooking duration:
1. When the indicator lights and  are lit steadily and the appliance is waiting for cooking to start, press the temperature knob twice. The indicator light starts flashing.
2. Turn the temperature knob right or left to change the previously set cooking duration.
3. Press the temperature knob again. The indicator light switches off and the indicator light starts flashing. The display shows the cooking end time.
4. Turn the temperature knob right or left to delay the cooking end time.
5. After a few seconds the indicator lights and stop flashing and programmed cooking resumes its operation with the new settings.
To save energy
- Stop cooking a few minutes before the time normally used. Cooking will continue for the remaining minutes with the heat which has accumulated inside the oven.
- Reduce any opening of the door to a minimum to avoid heat dispersal.
- Keep the inside of the appliance clean at all times.
- (Where fitted) When it is not being used, remove the pizza stone from the base of the oven.
Special functions
Defrost by time
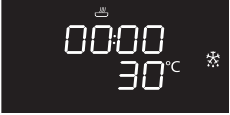
1. Place the food inside the oven.
2. Press and turn the function knob to select the defrost by time function  .
.
3. Turn the temperature knob to set the duration (from 1 to 99 minutes).
4. Press the temperature knob to confirm the set duration.  flashes.
5. Press the function knob to start the defrost by time function.
6. At the end,  is displayed and a buzzer sounds.
7. To deactivate the buzzer, press or turn one of the two knobs or open the door.
8. Press and hold the function knob for at least 3 seconds to exit the function.
Proving

1. Position the dough for proving on the second shelf.
2. Press and turn the function knob to select the proving function  . flashes.
3. Press the function knob to start the proving function.
4. At the end, is displayed and a buzzer sounds.
5. To deactivate the buzzer, press or turn one of the two knobs or open the door.
6. Press and hold the function knob for at least 3 seconds to exit the function.
Child lock mode
This mode allows the appliance to lock the controls automatically after one minute of normal operation without any intervention from the user.


During normal operation it is indicated by the indicator light  coming on.
To release the lock temporarily during cooking, hold the temperature knob down for 5 seconds. One minute after the last setting the lock will become active again.
Timed light (Eco-light) mode
For greater energy savings, the light is automatically deactivated one minute from the start of cooking.

To stop the appliance from automatically deactivating the light after one minute, set this mode to OFF.

Using the storage compartment
There is a storage compartment located at the bottom of the cooker; this can be used to store pans or metal objects required for its use.
1. To open the storage compartment, press lightly on the left-hand side of the door until it clicks.
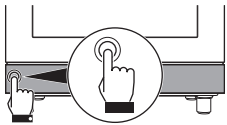
2. Gently release the storage compartment door.
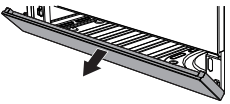
3. To close the storage compartment again, lift the door until it clicks.
Cleaning and maintenance
Cleaning and maintenance
Cleaning the glass ceramic hob
To keep the surfaces in good condition, they should be cleaned regularly after use. Let them cool first.
Light coloured marks from pans with aluminium bases can be easily cleaned off with a cloth moistened in vinegar.
Remove any burnt-on residue after cooking; rinse with water and dry thoroughly with a clean cloth.
Dirt which may have fallen on the hob while cleaning lettuce or potatoes can scratch the hob when moving pans.
Consequently, remove any dirt from the cooking surface immediately.
Changes in colour do not affect the operation and stability of the glass. These are not alterations to the material of the hob but just residues which have not been removed and have then carbonised.
Shiny surfaces can form due to the bases of pans, especially aluminium ones, rubbing on the surface, and due to the use of unsuitable detergents. They are difficult to remove using conventional cleaning products. It may be necessary to repeat the cleaning process several times. Use of corrosive detergents or rubbing of pan bases can wear away the decoration on the hob over time and contribute to the formation of stains.
Ordinary daily cleaning
Always and only use specific products that do not contain abrasives or chlorine-based acids.
Pour the product onto a damp cloth and wipe the surface, rinse thoroughly and dry with a soft cloth or a microfibre cloth.
Weekly cleaning
Clean and maintain the hob once a week using an ordinary glass ceramic cleaning product. Always follow the manufacturer’s instructions. The silicon in these products creates a protective, water-repellent membrane which also resists dirt. All marks stay on the membrane and can therefore be removed easily. After cleaning, dry the surface with a clean cloth. Make sure that there is no detergent left on the cooking surface as it might undergo an aggressive reaction when heated up and could modify the structure of the cooking surface.
Food stains or residues
Do not use steel sponges and sharp scrapers as they will damage the surface.
Use normal, non-abrasive products and a wooden or plastic tool, if necessary. Rinse thoroughly and dry with a soft cloth or a microfibre cloth.
Do not allow residues of sugary foods (such as jam) to set inside the oven. If left to set for too long, they might damage the enamel lining of the oven.
Cleaning the door
The glass in the door should always be kept thoroughly clean. Use absorbent kitchen roll. In case of stubborn dirt, wash with a damp sponge and an ordinary detergent.
Removing the door
For easier cleaning it is recommended to remove the door and place it on a tea towel.
To remove the door proceed as follows:
1. Open the door completely and insert two pins into the holes on the hinges indicated in the figure.

2. Grasp the door on both sides with both hands, lift it forming an angle of around 30° and remove it.
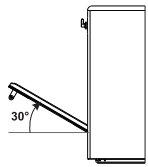
3. To reassemble the door, put the hinges in the relevant slots in the oven, making sure that grooved sections A are resting completely in the slots. Lower the door and once it is in place remove the pins from the holes in the hinges.

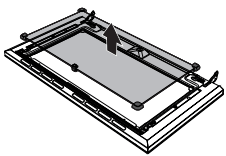
Removing the internal glass panes
For easier cleaning the internal glass panes of the door can be removed.
1. Pull the rear part of the internal glass pane gently upwards, following the movement indicated by the arrows (1).
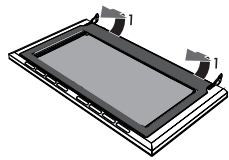
2. Remove the internal glass pane from the front strip (2) to remove it from the door.
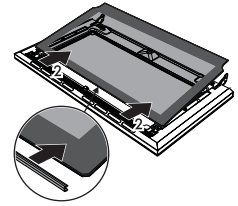
3. Remove the intermediate glass pane by lifting it upwards.
4. Clean the external glass pane and the panes removed previously. Use absorbent kitchen roll. In case of stubborn dirt, wash with a damp sponge and neutral detergent.
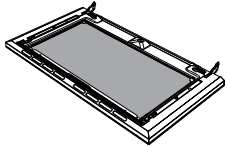
5. When you have finished cleaning, reinsert the intermediate glass pane in its housing in the door.
6. To reposition the internal glass pane, slide the upper part into the door strip and insert the two rear pins into their seats by pressing lightly.
Installation
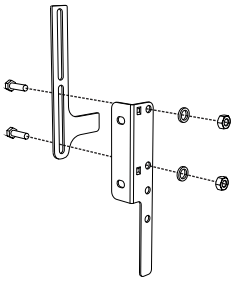
Fastening to the wall
1. Screw the wall fastening plate to the rear of the appliance.
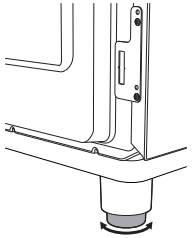
2. Adjust the height of the 4 feet.
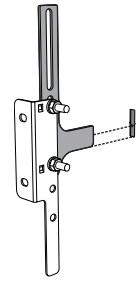
3. Assemble the fastening bracket.
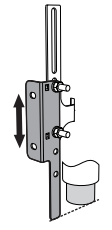
4. Align the base of the hook on the fastening bracket with the base of the slot on the wall fastening plate.
5. Align the base of the fastening bracket with the ground and tighten the screws to fix the measurements.
6. Use 50 mm for the distance from the side of the appliance to the bracket holes.
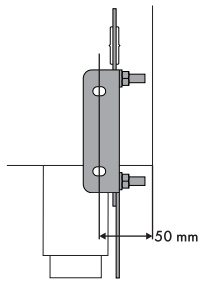
7. Move the bracket onto the wall and mark the position of the holes to be drilled in the wall.
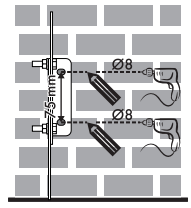
8. After drilling the holes in the wall, use wall plugs and screws to fasten the bracket to the wall.
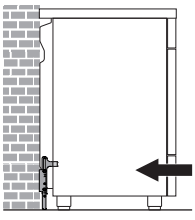
9. Push the cooker towards the wall, and at the same time, insert the bracket in the plate fastened to the rear of the appliance.
Installing the front plinth
The front plinth must always be positioned and secured correctly on the appliance.
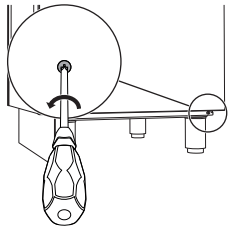
1. Use a screwdriver to remove the front screws underneath the storage compartment.
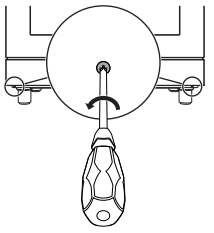
2. Position the front plinth at the bottom of the appliance and line up the side holes of the front plinth with the holes on the base of the appliance.
3. Fasten the front plinth to the appliance using the previously removed screws.
Installing the side plinths
After installing the front plinth, the side plinth can be fastened correctly to the appliance.
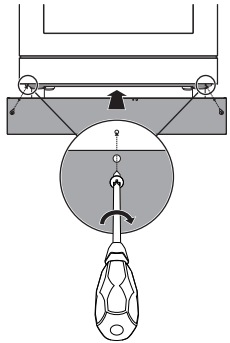
1. Use a screwdriver to remove the front screws underneath the storage compartment.
2. Position the side plinth on the lower side section of the appliance below the storage compartment.
3. Insert the tabs on the side plinth into the slots on the rear part of the front plinth.
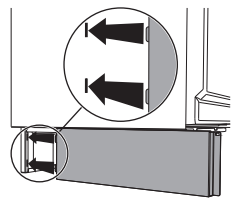
4. Line up the hole on the side plinth with the rear hole on the base of the appliance.
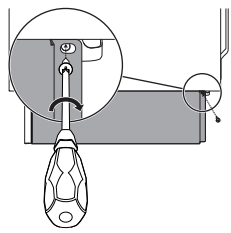
5. Fasten the side plinth to the appliance using the previously removed screw.
6. Repeat the operations described above for the other side plinth section.
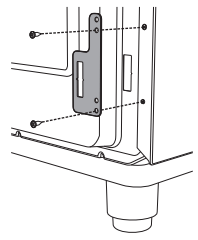
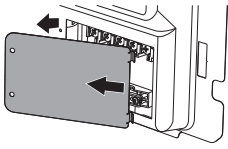
Accessing the terminal board
To connect the power supply cable, you must access the terminal board on the rear casing:
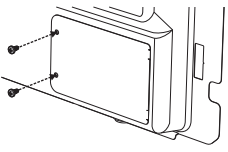
1. Remove the screws fastening the plate to the rear casing.
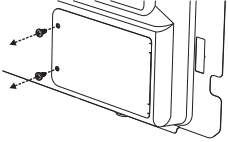
2. Gently rotate the plate and remove it from its seat.
3. Proceed with installation of the power supply cable.
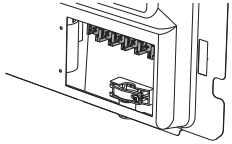
4. When finished, replace the plate on the rear casing and secure it in place using the screws that were previously removed.
Instructions for the installer
- The plug must be accessible after installation. Do not bend or trap the power cable.
- The appliance must be installed according to the installation diagrams.
- If the appliance does not work correctly after having carried out all the checks, contact your local Authorised Service Centre.
- Once the appliance has been installed, please explain to the user how to use it correctly.