Getting Started
When using your watch the first time, you should complete these tasks to set it up and get to know the basic features.
- 1 Press LIGHT to turn on the watch (Buttons, page 1).
- 2 Follow the on-screen instructions to complete the initial setup. During the initial setup, you can pair your smartphone with your watch to receive notifications, set up your Garmin Pay™ wallet, and more (Pairing Your Smartphone with Your Watch, page 1).
- 3 Charge the device completely (Charging the Device, page 2).
- 4 Start an activity (Starting an Activity, page 2).
Buttons
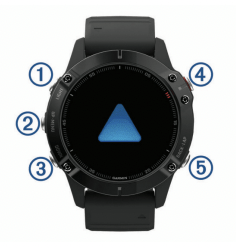
 LIGHT
LIGHT
• Press to turn the backlight on and off.
• Press to turn the device on.
• Hold to view the controls menu.
 UP·MENU
• Press to scroll through the widget loop and menus.
• Hold to view the menu.
 DOWN
DOWN
• Press to scroll through the widget loop and menus.
• Hold to view the music controls from any screen.


• Press to view the activity list and start or stop an activity.
• Press to choose an option in a menu.
 BACK·LAP
• Press to return to the previous screen.
• Press to record a lap, rest, or transition during a multisport activity.
• Hold to view the watch face from any screen.
Using the Watch
• Hold LIGHT to view the controls menu. The controls menu provides quick access to frequently used functions, such as opening the Garmin Pay wallet, turning on do not disturb mode, and turning the watch off.
• From the watch face, press UP or DOWN to scroll through the widget loop.
Your watch comes preloaded with widgets that provide at-aglance information. More widgets are available when you pair your watch with a smartphone.
• From the watch face, press to start an activity or open an app (Activities and Apps, page 2).
• Hold MENU to customize the watch face, adjust settings, and pair wireless sensors.
Viewing the Controls Menu
The controls menu contains options, such as turning on do not disturb mode, locking the keys, and turning the device off. You can also open the Garmin Pay wallet.
NOTE: You can add, reorder, and remove the options in the controls menu (Customizing the Controls Menu, page 34).
1 From any screen, hold LIGHT.
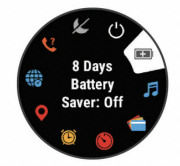
2 Press UP or DOWN to scroll through the options.
Viewing Widgets
Your device comes preloaded with several widgets, and more are available when you pair your device with a smartphone.
• Press UP or DOWN. The device scrolls through the widget loop and displays summary data for each widget.
• Press to view widget details.
TIP: You can press DOWN to view additional screens for a widget, or press to view additional options and functions for a widget.
• From any screen, hold BACK to return to the watch face.
• If you are recording an activity, press BACK to return to the activity data pages.
Customizing the Watch
• From the watch face, hold MENU to change the watch face.
• From the widget screens, hold MENU to customize the widget options.
• From the controls menu, hold MENU to add, remove, and reorder the controls.
• From any screen, hold MENU to change additional settings.
Pairing Your Smartphone with Your Watch
To use the connected features on your watch, you must pair it directly through the Garmin Connect™ app, instead of from the Bluetooth® settings on your smartphone.
- 1 From the app store on your smartphone, install and open the Garmin Connect app.
- 2 Bring your smartphone within 10 m (33 ft.) of your watch.
- 3 Press LIGHT to turn on the watch.
The first time you turn on the watch, it is in pairing mode.
TIP: You can hold LIGHT, and select to manually enter pairing mode.
- 4 Select an option to add your watch to your Garmin Connect account:
• If this is the first time you are pairing a device with the Garmin Connect app, follow the on-screen instructions.
• If you already paired another device with the Garmin Connect app, from the or
or menu, select Garmin Devices > Add Device, and follow the on-screen instructions.
Charging the Device
WARNING This device contains a lithium-ion battery. See the Important Safety and Product Information guide in the product box for product warnings and other important information.
NOTICE To prevent corrosion, thoroughly clean and dry the contacts and the surrounding area before charging or connecting to a computer. Refer to the cleaning instructions in the appendix.
- 1 Plug the small end of the USB cable into the charging port on your device.
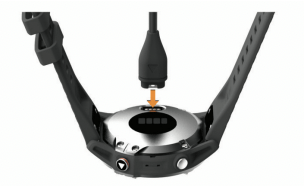
- 2 Plug the large end of the USB cable into a USB charging port.
- 3 Charge the device completely.
Setting Up Garmin Express
- 1 Connect the device to your computer using a USB cable.
- 2 Go to garminexpress.
- 3 Follow the on-screen instructions.
Solar Charging
The fēnix 6X Pro Solar watch has a transparent solar charging lens that charges your watch while you use it.
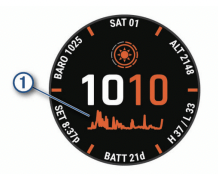
Solar Watch Face
The watch face displays a graph of the intensity of solar input for the last 6 hours . You can customize the appearance of the watch face by holding MENU, and selecting the layout, colors, and additional data.
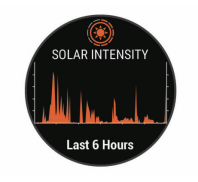
Viewing the Solar Widget
- 1 From the watch face, press UP or DOWN to scroll to the solar widget.
- 2 Press to view a graph of the intensity of solar input for the last 6 hours.
Tips for Solar Charging
The fēnix 6X Pro Solar watch has a transparent solar charging lens that charges your watch while you use it. To maximize the battery life of your watch, follow these tips.
• When you are wearing the watch, avoid covering the face with your sleeve.
• When you are not wearing the watch, point the face toward a source of bright light, such as sunlight or fluorescent light. The watch will charge faster when exposed to sunlight, because the solar charging lens is optimized for the spectrum of sunlight.
• For maximum battery performance, charge the watch in bright sunlight.
NOTE: The watch protects itself from overheating and stops charging automatically if the internal temperature exceeds the solar charging temperature threshold (Specifications, page 39).
NOTE: The watch does not solar charge when connected to an external battery source or when the battery is full.
Connected Features
Connected features are available for your fēnix device when you connect the device to a compatible smartphone using Bluetooth technology. Some features require you to install the Garmin Connect app on the connected smartphone. Go to garminapps for more information. Some features are also available when you connect your device to a wireless network.
Phone notifications: Displays phone notifications and messages on your fēnix device.
LiveTrack: Allows friends and family to follow your races and training activities in real time. You can invite followers using email or social media, allowing them to view your live data on a Garmin Connect tracking page.
GroupTrack: Allows you to keep track of your connections using LiveTrack directly on screen and in real time.
Activity uploads to Garmin Connect: Automatically sends your activity to your Garmin Connect account as soon as you finish recording the activity.
Connect IQ: Allows you to extend your device features with new watch faces, widgets, apps, and data fields.
Software Updates: Allows you to update your device software.
Weather: Allows you to view current weather conditions and weather forecasts.
Bluetooth sensors: Allows you to connect Bluetooth compatible sensors, such as a heart rate monitor.
Find my phone: Locates your lost smartphone that is paired with your fēnix device and currently within range.
Find my device: Locates your lost fēnix device that is paired with your smarphone and currently within range.
Enabling Bluetooth Notifications
Before you can enable notifications, you must pair the fēnix device with a compatible mobile device (Pairing Your Smartphone with Your Watch, page 1).
- 1 Hold MENU.
- 2 Select Phone > Smart Notifications > Status > On.
- 3 Select During Activity.
- 4 Select a notification preference.
- 5 Select a sound preference.
- 6 Select Not During Activity.
- 7 Select a notification preference.
- 8 Select a sound preference.
- 9 Select Privacy.
- 10 Select a privacy preference.
- 11 Select Timeout.
- 12 Select the amount of time the alert for a new notification appears on the screen.
- 13 Select Signature to add a signature to your text message replies.
Viewing Notifications
- 1 From the watch face, press UP or DOWN to view the notifications widget.
- 2 Press .
- 3 Select a notification.
- 4 Press DOWN for more options.
- 5 Press BACK to return to the previous screen.
Receiving an Incoming Phone Call
When you receive a phone call on your connected smartphone, the fēnix device displays the name or phone number of the caller.
• To accept the call, select Accept.
NOTE: To talk to the caller, you must use your connected smartphone.
• To decline the call, select Decline.
• To decline the call and immediately send a text message reply, select Reply, and select a message from the list.
NOTE: This feature is available only if your device is connected to an Android™ smartphone.
Replying to a Text Message
NOTE: This feature is available only for smartphones with Android. When you receive a text message notification on your fēnix device, you can send a quick reply by selecting from a list of messages. You can customize messages in the Garmin Connect app.
NOTE: This feature sends text messages using your phone. Regular text message limits and charges from your carrier and phone plan may apply. Contact your mobile carrier for more information about text message charges or limits.
- 1 From the watch face, press UP or DOWN to view the notifications widget.
- 2 Press , and select a text message notification.
- 3 Press DOWN.
- 4 Select Reply.
- 5 Select a message from the list. Your phone sends the selected message as an SMS text message.
Managing Notifications
You can use your compatible smartphone to manage notifications that appear on your fēnix device. Select an option:
• If you are using an iPhone® device, go to the notifications settings to select the items to show on the device.
• If you are using an Android smartphone, from the Garmin Connect app, select Settings > Smart Notifications.
Turning Off the Bluetooth Smartphone Connection
You can turn off the Bluetooth smartphone connection from the controls menu.
NOTE: You can add options to the controls menu (Customizing the Controls Menu, page 34).
- 1 Hold LIGHT to view the controls menu.
- 2 Select to turn off the Bluetooth smartphone connection on your fēnix device. Refer to the owner's manual for your mobile device to turn off Bluetooth technology on your mobile device.
Turning On and Off Smartphone Connection Alerts
You can set the fēnix device to alert you when your paired smartphone connects and disconnects using Bluetooth wireless technology.
NOTE: Smartphone connection alerts are turned off by default.
- 1 Hold MENU.
- 2 Select Phone > Alerts.
Locating a Lost Mobile Device
You can use this feature to help locate a lost mobile device that is paired using Bluetooth wireless technology and currently within range.
1 Hold LIGHT to view the controls menu.
2 Select  .
.
The fēnix device begins searching for your paired mobile device. An audible alert sounds on your mobile device, and the Bluetooth signal strength displays on the fēnix device screen. The Bluetooth signal strength increases as you move closer to your mobile device.
3 Select BACK to stop searching.
Garmin Connect
Your Garmin Connect account allows you to track your performance and connect with your friends. It gives you the tools to track, analyze, share, and encourage each other. You can record the events of your active lifestyle, including runs, walks, rides, swims, hikes, golf games, and more.
You can create your free Garmin Connect account when you pair your device with your phone using the Garmin Connect app. You can also create an account when you set up the Garmin Express application
Store your activities: After you complete and save a timed activity with your device, you can upload that activity to your Garmin Connect account and keep it as long as you want.
Analyze your data: You can view more detailed information about your fitness and outdoor activities, including time, distance, heart rate, calories burned, cadence, an overhead map view, and pace and speed charts. You can view more detailed information about your golf games, including scorecards, statistics, and course information. You can also view customizable reports.
NOTE: To view some data, you must pair an optional wireless sensor with your device (Pairing Your Wireless Sensors, page 37).
Track your progress: You can track your daily steps, join a friendly competition with your connections, and meet your goals.
Share your activities: You can connect with friends to follow each other's activities or post links to your activities on your favorite social networking sites.
Manage your settings: You can customize your device and user settings on your Garmin Connect account.
Wi‑Fi® Connected Features
Activity uploads to your Garmin Connect account: Automatically sends your activity to your Garmin Connect account as soon as you finish recording the activity.
Audio content: Allows you to sync audio content from thirdparty providers.
Software updates: Your device downloads and installs the latest software update automatically when a Wi‑Fi connection is available.
Workouts and training plans: You can browse for and select workouts and training plans on the Garmin Connect site. The next time your device has a Wi‑Fi connection, the files are wirelessly sent to your device.
Connecting to a Wi‑Fi Network
You must connect your device to the Garmin Connect app on your smartphone or to the Garmin Express application on your computer before you can connect to a Wi‑Fi network.
- 1 Hold MENU.
- 2 Select Wi-Fi > My Networks > Add Network. The device displays a list of nearby Wi‑Fi networks.
- 3 Select a network.
- 4 If necessary, enter the password for the network. The device connects to the network, and the network is added to the list of saved networks. The device reconnects to this network automatically when it is within range.
Music
You can download audio content to your device from your computer or from a third-party provider, so you can listen when your smartphone is not nearby. To listen to audio content stored on your device, you must connect headphones with Bluetooth technology.
You can use the music controls to control music playback on your smartphone or to play music stored on your device.
Connecting to a Third-Party Provider
Before you can download music or other audio files to your compatible watch from a supported third-party provider, you must connect to the provider using the Garmin Connect app.
- 1 From the Garmin Connect app, select
 or
or  .
. - 2 Select Garmin Devices, and select your device.
- 3 Select Music.
- 4 Select an option:
• To connect to an installed provider, select a provider, and follow the on-screen instructions.
• To connect to a new provider, select Get Music Apps, locate a provider, and follow the on-screen instructions.
Downloading Audio Content from a Third-Party Provider
Before you can download audio content from a third-party provider, you must connect to a Wi‑Fi network (Connecting to a Wi‑Fi Network, page 11).
- 1 Hold DOWN from any screen to open the music controls.
- 2 Hold MENU.
- 3 Select Music Providers.
- 4 Select a connected provider.
- 5 Select a playlist or other item to download to the device.
- 6 If necessary, select BACK until you are prompted to sync with the service, and select Yes.
NOTE: Downloading audio content can drain the battery. You may be required to connect the device to an external power source if the battery is low
Downloading Audio Content from Spotify®
Before you can download audio content from Spotify, you must connect to a Wi‑Fi network (Connecting to a Wi‑Fi Network, page 11).
- Hold DOWN from any screen to open the music controls.
- Hold MENU.
- Select Music Providers > Spotify.
- Select Add music & podcasts.
- Select a playlist or other item to download to the device.
NOTE: Downloading audio content can drain the battery. You may need to connect the device to an external power source if the remaining battery life is insufficient.
The selected playlists and other items are downloaded to the device.
Changing the Music Provider
- Hold DOWN from any screen to open the music controls.
- Hold MENU.
- Select Music Providers.
- Select a connected provider.
Disconnecting from a Third-Party Provider
- From the Garmin Connect app, select or .
- Select Garmin Devices, and select your device.
- Select Music.
- Select an installed third-party provider, and follow the onscreen instructions to disconnect the third-party provider from your device.
Listening to Music
- Hold DOWN from any screen to open the music controls.
- Connect your headphones with Bluetooth technology (Connecting Bluetooth Headphones, page 13).
- Hold MENU.
- Select Music Providers, and select an option:
- To listen to music downloaded to the watch from your computer, select My Music (Downloading Personal Audio Content, page 12).
- To control music playback on your smartphone, select Control Phone.
- To listen to music from a third-party provider, select the name of the provider.
5 Select to open the music playback controls.
Music Playback Controls
 |
Select to manage content from some third-party providers. |
 |
Select to browse the audio files and playlists for the selected source. |
 |
Select to adjust the volume |
 |
Select to play and pause the current audio file. |
 |
Select to skip to the next audio file in the playlist. Hold to fast forward through the current audio file. |
 |
Select to restart the current audio file. Select twice to skip to the previous audio file in the playlist. Hold to rewind through the current audio file. |
 |
Select to change the repeat mode. |
 |
Select to change the shuffle mode. |
Connecting Bluetooth Headphones
To listen to music loaded onto your fēnix device, you must connect headphones using Bluetooth technology.
- Bring the headphones within 2 m (6.6 ft.) of your device.
- Enable pairing mode on the headphones.
- Hold MENU.
- Select Music > Headphones > Add New.
- Select your headphones to complete the pairing process
Changing the Audio Mode
You can change the music playback mode from stereo to mono.
- Hold MENU.
- Select Music > Audio.
- Select an option.
Heart Rate Features
The fēnix device has a wrist-based heart rate monitor and is also compatible with chest heart rate monitors (sold separately). You can view heart rate data on the heart rate widget. If both wrist-based heart rate and chest heart rate data are available, your device uses the chest heart rate data.
Wrist-based Heart Rate
Wearing the Device
• Wear the device above your wrist bone.
NOTE: The device should be snug but comfortable. For more accurate heart rate readings, the device should not move while running or exercising. For pulse oximeter readings, you should remain motionless.
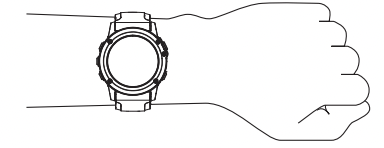
NOTE: The optical sensor is located on the back of the device.
• See Tips for Erratic Heart Rate Data, page 13 for more information about wrist-based heart rate.
• See Tips for Erratic Pulse Oximeter Data, page 20 for more information about the pulse oximeter sensor.
• For more information about accuracy, go to garmin/ataccuracy.
Tips for Erratic Heart Rate Data
If the heart rate data is erratic or does not appear, you can try these tips.
• Clean and dry your arm before putting on the device.
• Avoid wearing sunscreen, lotion, and insect repellent under the device.
• Avoid scratching the heart rate sensor on the back of the device.
• Wear the device above your wrist bone. The device should be snug but comfortable.
• Wait until the icon is solid before starting your activity.
• Warm up for 5 to 10 minutes and get a heart rate reading before starting your activity.
NOTE: In cold environments, warm up indoors.
• Rinse the device with fresh water after each workout.
• While exercising, use a silicone band.
Viewing the Heart Rate Widget
1 From the watch face, press UP or DOWN to view the heart rate widget.
NOTE: You may need to add the widget to your widget loop (Customizing the Widget Loop, page 33).
2 Press to view your current heart rate in beats per minute (bpm) and a graph of your heart rate for the last 4 hours.
3 Press DOWN to view your average resting heart rate values for the last 7 days.
Broadcasting Heart Rate Data to Garmin Devices
You can broadcast your heart rate data from your fēnix device and view it on paired Garmin devices.
NOTE: Broadcasting heart rate data decreases battery life.
1 From the heart rate widget, hold MENU.
2 Select Options > Broadcast Heart Rate. The fēnix device starts broadcasting your heart rate data, and appears.
NOTE: You can view only the heart rate widget while broadcasting heart rate data from the heart rate widget.
3 Pair your fēnix device with your Garmin ANT+® compatible device.
NOTE: The pairing instructions differ for each Garmin compatible device. See your owner's manual.
TIP: To stop broadcasting your heart rate data, press any button, and select Yes.
Broadcasting Heart Rate Data During an Activity
You can set up your fēnix device to broadcast your heart rate data automatically when you begin an activity. For example, you can broadcast your heart rate data to an Edge® device while cycling, or to a VIRB® action camera during an activity.
NOTE: Broadcasting heart rate data decreases battery life
1 From the heart rate widget, hold MENU.
2 Select Options > Broadcast During Activity.
3 Begin an activity (Starting an Activity, page 2). The fēnix device starts broadcasting your heart rate data in the background.
NOTE: There is no indication that the device is broadcasting your heart rate data during an activity.
4 If necessary, pair your fēnix device with your Garmin ANT+ compatible device.
NOTE: The pairing instructions differ for each Garmin compatible device. See your owner's manual.
TIP: To stop broadcasting your heart rate data, stop the activity (Stopping an Activity, page 3).
Setting an Abnormal Heart Rate Alert
You can set the device to alert you when your heart rate exceeds a certain number of beats per minute (bpm) after a period of inactivity.
- From the heart rate widget, hold MENU.
- Select Options > Abnormal HR Alert > Status > On.
- Select Alert Threshold.
- Select a heart rate threshold value.
Each time you exceed the threshold value, a message appears and the device vibrates.
Turning Off the Wrist-based Heart Rate Monitor
The default value for the Wrist Heart Rate setting is Auto. The device automatically uses the wrist-based heart rate monitor unless you pair an ANT+ heart rate monitor to the device.
NOTE: Disabling the wrist-based heart rate monitor also disables the wrist-based pulse oximeter sensor. You can perform a manual reading from the pulse oximeter widget.
- From the heart rate widget, hold MENU.
- Select Options > Status > Off.
Customizing Your Device
Activities and App Settings
These settings allow you to customize each preloaded activity app based on your needs. For example, you can customize data pages and enable alerts and training features. Not all settings are available for all activity types. Hold MENU, select Activities & Apps, select an activity, and select the activity settings
D Distance: Calculates your distance traveled using your elevation change and your horizontal movement over ground.
D Speed: Calculates your speed using your elevation change and your horizontal movement over ground (3D Speed and Distance, page 31).
Accent Color: Sets the accent color of each activity to help identify which activity is active.
Alerts: Sets the training or navigation alerts for the activity.
Auto Climb: Enables the device to detect elevation changes automatically using the built-in altimeter.
Auto Lap: Sets the options for the Auto Lap® feature (Auto Lap, page 31).
Auto Pause: Sets the device to stop recording data when you stop moving or when you drop below a specified speed Enabling Auto Pause, page 31).
Auto Run: Enables the device to detect ski runs automatically using the built-in accelerometer.
Auto Scroll: Enables you to move through all of the activity data screens automatically while the timer is running (Using Auto Scroll, page 32).
Auto Set: Enables the device to start and stop exercise sets automatically during a strength training activity.
Background Color: Sets the background color of each activity to black or white.
Big Numbers: Changes the size of the numbers on the golf hole information screen.
ClimbPro: Displays ascent planning and monitoring screens while navigating.
Club Prompt: Displays a prompt that enables you to enter which club you used after each detected shot while playing golf.
Countdown Start: Enables a countdown timer for pool swimming intervals.
Data Screens: Enables you to customize data screens and add new data screens for the activity (Customizing the Data Screens, page 30).
Driver Distance: Sets the average distance the ball travels on your drive while playing golf.
Edit Weight: Allows you to add the weight used for an exercise set during a strength training or cardio activity.
Golf Distance: Set the unit of measure used while playing golf.
GPS: Sets the mode for the GPS antenna (Changing the GPS Setting, page 32).
Handicap Scoring: Enables handicap scoring while playing golf. The Local Handicap option allows you to enter the number of strokes to be subtracted from your total score. The Index/Slope option allows you to enter your handicap and the course slope rating so the device can calculate your course handicap. When you enable either handicap scoring option, you can adjust your handicap value.
Lap Key: Enables you to record a lap or a rest during the activity.
Lock Keys: Locks the keys during multisport activities to prevent accidental key presses.
Map: Sets the display preferences for the map data screen for the activity (Activity Map Settings, page 30).
Metronome: Plays tones at a steady rhythm to help you improve your performance by training at a faster, slower, or more consistent cadence (Using the Metronome, page 4).
Pool Size: Sets the pool length for pool swimming.
Power Mode: Sets the default power mode for the activity.
Power Save Timeout: Sets the power-save timeout options for the activity (Power Save Timeout Settings, page 32).
Recording Interval: Sets the frequency for recording track points during an expedition (Changing the Track Point Recording Interval, page 7).
Record After Sunset: Sets the device to record track points after sunset during an expedition.
Rename: Sets the activity name.
Repeat: Enables the Repeat option for multisport activities. For example, you can use this option for activities that include multiple transitions, such as a swimrun.
Restore Defaults: Allows you to reset the activity settings.
Routing: Sets the preferences for calculating routes for the activity (Routing Settings, page 31).
Scoring: Enables or disables scorekeeping automatically when you start a round of golf. The Always Ask option prompts you when you begin a round.
Scoring Method: Sets the scoring method to stroke play or Stableford scoring while playing golf.
Segment Alerts: Enables prompts that alert you to approaching segments.
Stat Tracking: Enables statistics tracking while playing golf.
Stroke Detect.: Enables stroke detection for pool swimming.
Tournament Mode: Disables features that are not allowed during sanctioned tournaments.
Transitions: Enables transitions for multisport activities.
Customizing the Data Screens
You can show, hide, and change the layout and content of data screens for each activity.
- Hold MENU.
- Select Activities & Apps.
- Select the activity to customize.
- Select the activity settings.
- Select Data Screens.
- Select a data screen to customize.
- Select an option:
- Select Layout to adjust the number of data fields on the data screen.
- Select a field to change the data that appears in the field.
- Select Reorder to change the location of the data screen in the loop.
- Select Remove to remove the data screen from the loop.
8. If necessary, select Add New to add a data screen to the loop. You can add a custom data screen, or select one of the predefined data screens.
Adding a Map to an Activity
You can add the map to the data screens loop for an activity.
- Hold MENU.
- Select Activities & Apps.
- Select the activity to customize.
- Select the activity settings.
- Select Data Screens > Add New > Map.
Alerts
You can set alerts for each activity, which can help you to train toward specific goals, to increase your awareness of your environment, and to navigate to your destination. Some alerts are available only for specific activities. There are three types of alerts: event alerts, range alerts, and recurring alerts.
Event alert: An event alert notifies you once. The event is a specific value. For example, you can set the device to alert you when you reach a specified elevation.
Range alert: A range alert notifies you each time the device is above or below a specified range of values. For example, you can set the device to alert you when your heart rate is below beats per minute (bpm) and over 210 bpm.
Recurring alert: A recurring alert notifies you each time the device records a specified value or interval. For example, you can set the device to alert you every 30 minutes.
Device Maintenance
Device Care
NOTICE
- Do not use a sharp object to clean the device.
- Avoid chemical cleaners, solvents, and insect repellents that can damage plastic components and finishes.
- Thoroughly rinse the device with fresh water after exposure to chlorine, salt water, sunscreen, cosmetics, alcohol, or other harsh chemicals. Prolonged exposure to these substances can damage the case.
- Avoid pressing the keys under water.
- Keep the leather band clean and dry. Avoid swimming or showering with the leather band. Exposure to water or sweat can damage or discolor the leather band. Use silicone bands as an alternative.
- Avoid extreme shock and harsh treatment, because it can degrade the life of the product.
- Do not store the device where prolonged exposure to extreme temperatures can occur, because it can cause permanent damage.
Cleaning the Device
NOTICE Even small amounts of sweat or moisture can cause corrosion of the electrical contacts when connected to a charger. Corrosion can prevent charging and data transfer.
1 Wipe the device using a cloth dampened with a mild detergent solution.
2 Wipe it dry. After cleaning, allow the device to dry completely.
Cleaning the Leather Bands
1 Wipe the leather bands with a dry cloth.
2 Use a leather conditioner to clean the leather bands.
Changing the QuickFit® Bands
1 Slide the latch on the QuickFit band, and remove the band from the watch.
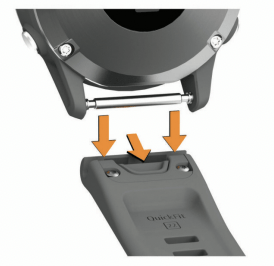
2 Align the new band with the watch.
3 Press the band into place.
NOTE: Make sure the band is secure. The latch should close over the watch pin.
4 Repeat steps 1 through 3 to change the other band.
Metal Watch Band Adjustment
If your watch includes a metal watch band, you should take your watch to a jeweler or other professional to adjust the length of the metal band.
Troubleshooting
My device is in the wrong language
You can change the device language selection if you have accidently selected the wrong language on the device.
- Hold MENU.
- Scroll down to the last item in the list, and press .
- Press .
- Select your language.
Is my smartphone compatible with my device?
The fēnix device is compatible with smartphones using Bluetooth wireless technology.
Go to garmin/ble for compatibility information.
My phone will not connect to the device
If your phone will not connect to the device, you can try these tips.
- Turn off your smartphone and your device, and turn them back on again.
- Enable Bluetooth technology on your smartphone.
- Update the Garmin Connect app to the latest version.
- Remove your device from the Garmin Connect app and the Bluetooth settings on your smartphone to retry the pairing process.
- If you bought a new smartphone, remove your device from the Garmin Connect app on the smartphone you intend to stop using.
- Bring your smartphone within 10 m (33 ft.) of the device.
- On your smartphone, open the Garmin Connect app, selector , and select Garmin Devices > Add Device to enter pairing mode.
- From the watch face, hold MENU, and select Phone > Pair Phone.
Can I use my Bluetooth sensor with my watch?
The device is compatible with some Bluetooth sensors. The first time you connect a sensor to your Garmin device, you must pair the device and sensor. After they are paired, the device connects to the sensor automatically when you start an activity and the sensor is active and within range.
- Hold MENU.
- Select Sensors & Accessories > Add New.
- Select an option:
- Select Search All Sensors.
- Select your sensor type.
You can customize the optional data fields (Customizing the Data Screens, page 30).
My headphones will not connect to the device
If your headphones were previously connected to your smartphone using Bluetooth technology, they may connect to your smartphone before connecting to your device. You can try these tips.
- Turn off Bluetooth technology on your smartphone. Refer to the owner's manual for your smartphone for more information.
- Stay 10 m (33 ft.) away from your smartphone while connecting headphones to your device.
- Pair your headphones with your device (Connecting Bluetooth Headphones, page 13).
My music cuts out or my headphones do not stay connected
When using a fēnix device connected to headphones using Bluetooth technology, the signal is strongest when there is a direct line of sight between the device and the antenna on the headphones.
- If the signal passes through your body, you may experience signal loss or your headphones may become disconnected.
- It is recommended to wear your headphones with the antenna on the same side of your body as your fēnix device.
Restarting Your Device
- Hold LIGHT until the device turns off.
- Hold LIGHT to turn on the device.
Resetting All Default Settings
You can reset all of the device settings to the factory default values.
- Hold MENU.
- Select System > Reset.
- Select an option:
- To reset all of the device settings to the factory default values and save all user-entered information and activity history, select Reset Default Settings.
- To delete all activities from the history, select Delete All Activities.
- To reset all distance and time totals, select Reset Totals.
- To reset all of the device settings to the factory default values and delete all user-entered information and activity history, select Delete Data and Reset Settings.
NOTE: If you have set up a Garmin Pay wallet, this option deletes the wallet from your device. If you have music stored on your device, this option deletes your stored music.
Acquiring Satellite Signals
The device may need a clear view of the sky to acquire satellite signals. The time and date are set automatically based on the GPS position.
TIP: For more information about GPS, go to garmin aboutGPS.
- Go outdoors to an open area. The front of the device should be oriented toward the sky.
- Wait while the device locates satellites. It may take 30–60 seconds to locate satellite signals.
Improving GPS Satellite Reception
- Frequently sync the device to your Garmin Connect account:
- Connect your device to a computer using the USB cable and the Garmin Express application.
- Sync your device to the Garmin Connect app using your Bluetooth enabled smartphone.
- Connect your device to your Garmin Connect account using a Wi‑Fi wireless network.While connected to your Garmin Connect account, the device downloads several days of satellite data, allowing it to quickly locate satellite signals.
- Take your device outside to an open area away from tall buildings and trees.
- Remain stationary for a few minutes.
The temperature reading is not accurate
Your body temperature affects the temperature reading for the internal temperature sensor. To get the most accurate temperature reading, you should remove the watch from your wrist and wait 20 to 30 minutes.
You can also use an optional tempe external temperature sensor to view accurate ambient temperature readings while wearing the watch.
Maximizing the Battery Life
You can do several things to extend the life of the battery.
- Change the power mode during an activity (Changing the Power Mode, page 3).
- Turn on the battery saver feature from the controls menu (Viewing the Controls Menu, page 1).
- Reduce the backlight timeout (Changing the Backlight Settings, page 37).
- Reduce the backlight brightness.
- Use UltraTrac GPS mode for your activity (UltraTrac, page 32).
- Turn off Bluetooth technology when you are not using connected features (Connected Features, page 8).
- When pausing your activity for a longer period of time, use the resume later option (Stopping an Activity, page 3).
- Turn off activity tracking (Turning Off Activity Tracking, page 22).
- Use a watch face that is not updated every second.
For example, use a watch face without a second hand (Customizing the Watch Face, page 34).
- Limit the smartphone notifications the device displays (Managing Notifications, page 8).
- Stop broadcasting heart rate data to paired Garmin devices (Broadcasting Heart Rate Data to Garmin Devices, page 13).
- Turn off wrist-based heart rate monitoring (Turning Off the Wrist-based Heart Rate Monitor, page 14).
NOTE: Wrist-based heart rate monitoring is used to calculate vigorous intensity minutes and calories burned.
- Turn on manual pulse oximeter readings (Turning Off Automatic Pulse Oximeter Readings, page 20)
Activity Tracking
For more information about activity tracking accuracy, go to garmin.
My daily step count does not appear
The daily step count is reset every night at midnight.
If dashes appear instead of your step count, allow the device to acquire satellite signals and set the time automatically.
My step count does not seem accurate
If your step count does not seem accurate, you can try these tips.
- Wear the device on your non-dominant wrist.
- Carry the device in your pocket when pushing a stroller or lawn mower.
- Carry the device in your pocket when actively using your hands or arms only.
NOTE: The device may interpret some repetitive motions, such as washing dishes, folding laundry, or clapping your hands, as steps.
The step counts on my device and my Garmin
Connect account don't match
The step count on your Garmin Connect account updates when you sync your device.
- Select an option:
- Sync your step count with the Garmin Connect application (Using Garmin Connect on Your Computer, page 9).
- Sync your step count with the Garmin Connect app (Manually Syncing Data with Garmin Connect, page 9).
2. Wait while the device syncs your data. Syncing can take several minutes.
NOTE: Refreshing the Garmin Connect app or the Garmin Connect application does not sync your data or update your step count.
The floors climbed amount does not seem accurate
Your device uses an internal barometer to measure elevation changes as you climb floors. A floor climbed is equal to 3 m ft.).
- Avoid holding handrails or skipping steps while climbing stairs.
- In windy environments, cover the device with your sleeve or jacket as strong gusts can cause erratic readings.
Getting More Information
You can find more information about this product on the Garmin website.
- Go to supportgarmin for additional manuals, articles, and software updates.
- Go to buygarmin, or contact your Garmin dealer for information about optional accessories and replacement parts.
- Go to garminataccuracy. This is not a medical device.

