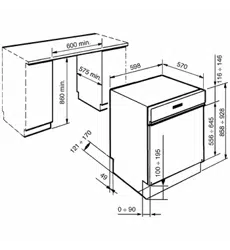
Position the appliance in the desired place of installation. The back or sides of the dishwasher may be placed up against walls or other furniture units. If the dishwasher is installed near a heat source, fit the special insulating panel to prevent overheating and malfunction of the appliance. To ensure stability, install integrated or built-under dishwashers only under continuous worktops, and screw them to the adjacent units. To facilitate the installation procedure, the intake and drain hoses can be positioned in any direction; make sure that the hoses are not kinked, crushed or pulled too tightly. Make sure to tighten the locking ring-nut once the pipes have been placed in the direction required. A hole at least 8 cm in diameter is required to allow the power supply cable and pipes to pass. Before putting the dishwasher into its definitive position, turn on the water tap and check that there are no leaks from the tap connection, the dishwasher connection or the hose.
Level the appliance on the floor using its adjustable feet. This operation is essential for ensuring correct operation of the dishwasher.
NOTE
Some models are equipped with only one adjustable foot at the rear, which can be adjusted by turning the screw on the lower front part of the appliance.
CAUTION
Building-in a dishwasher underneath a hob is absolutely forbidden.
Moreover, dishwashers may not be installed directly touching appliances which are not conventional built-in kitchen appliances (e.g. fireplaces, stoves, etc.).
When installing the dishwasher in a compartment next to one or more other appliances, it is essential to comply with all the recommendations provided by the appliance’s manufacturer (minimum distances, installation procedures, etc.).
Water supply connection
NOTE
Preventing the risk of clogging or damage: if the water pipe is new or has not been used for a long time, before connecting to the water supply check that the water is clear and free of impurities, to prevent damage to the appliance.
The dishwasher must always be connected to the water system with new hoses; old or used hoses must never be reused.
CONNECTING TO THE WATER SUPPLY
Connect the intake hose to a cold water supply with 3⁄4” gas thread, inserting the filter A supplied with the dishwasher. Take care to screw the hose firmly into place with your hands and then complete by tightening about 1⁄4 of a turn with pliers.
In dishwashers equipped with the ACQUASTOP device, the filters is already fitted inside the threaded ring.
The dishwasher can also be connected to a hot water supply not exceeding 60°C. Supplying the appliance with hot water cuts down the washing time by approximately 20 minutes, but slightly reduces its effectiveness. Make the connection to the domestic hot water supply using the same procedure described for connecting to the cold water supply.
DRAIN CONNECTION
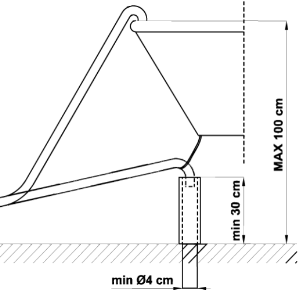
Insert the dishwasher’s drain hose into a drain pipe having a diameter of at least 4 cm, or alternatively, place it inside the kitchen sink using the plastic support provided, taking care not to crush or excessively bend the hose. It is important to prevent the hose from coming loose and falling. For this purpose, the plastic support is equipped with a hole for tying it to the wall or water tap.
The free end should be positioned at a height of between 30 and 100 cm, and should never be submerged in water. If a horizontal drain extension hose is used (for a maximum of 3 m) the drain hose can be placed at a maximum height of 85 cm from the ground.
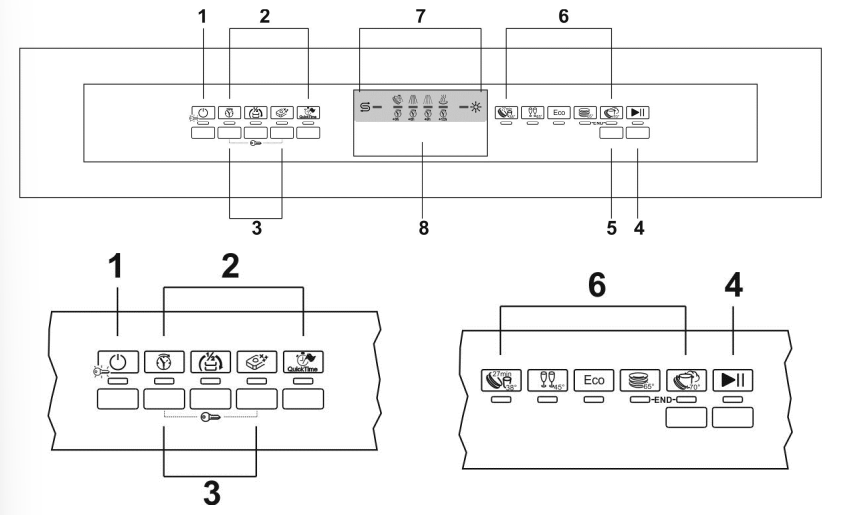
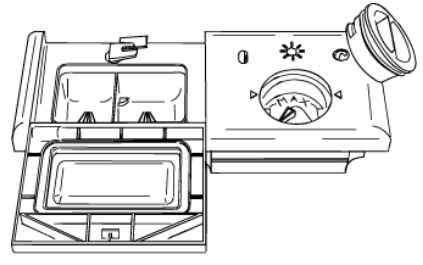
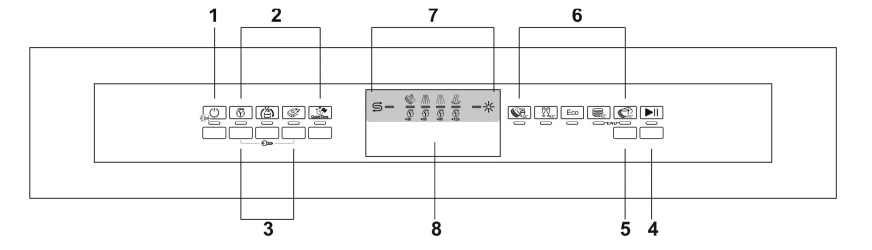
CONTROL PANEL
Front panel
1 ON/OFF BUTTON AND WARNING LIGHT 2 OPTION SELECTION BUTTONS AND WARNING LIGHTS 3 “CHILD LOCK” ACTIVATION BUTTONS 4 START/PAUSE BUTTON 5 PROGRAM SELECTION BUTTON 6 PROGRAM LIGHTS 7 LEDS: salt / rinse aid, program phases and delayed start. 8 HANDLE TO OPEN THE DOOR
Control leds
In this area there are control LEDs for the washing progression state, salt and rinse aid lack warning, and delayed start.
Salt lack warning indicator (on some models only) Water hardness adjustment on indicator light (on some models only)
Rinse aid lack warning indicator
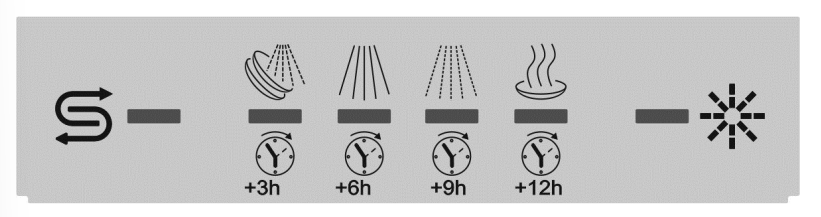
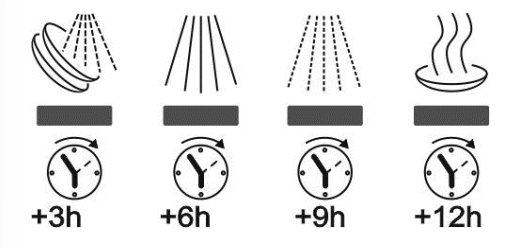
The four LEDs have double function: - Once the program is running, they highlight the following phases: pre-wash (if present), wash, rinse, drying. - Before the start of the washing cycle they highlight if the delayed start has been selected (3, 6, 9, or 12 hour delay).
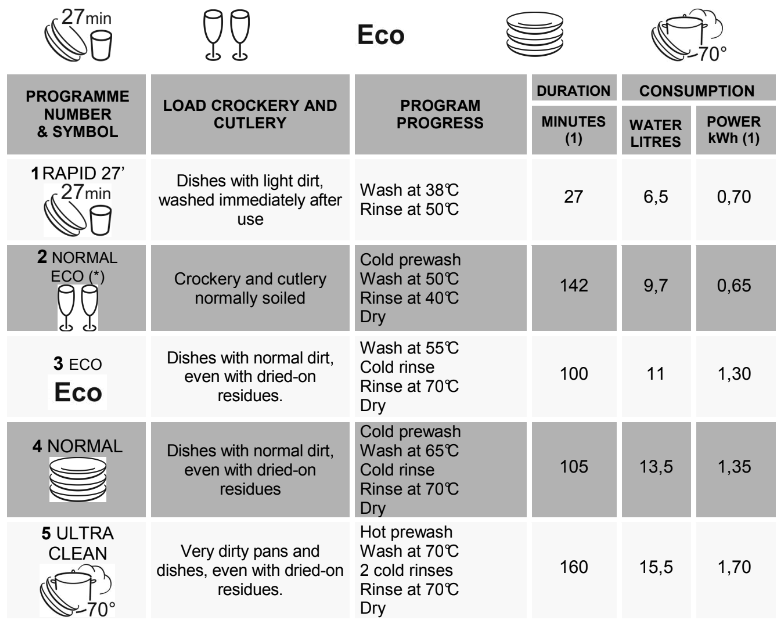
PROGRAM
PROGRAMS TABLE
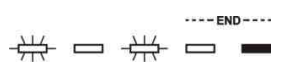
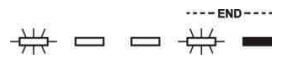
The ULTRA CLEAN program terminate with an extra anti-bacteria rinse that ensures a further reduction in the bacteria level. If the temperature falls during this stage of the program (e.g. because the door is opened or due to a power blackout), the program lights (6) flash to warn that the anti-bacteria effect is not guaranteed.
Reference program as per AS/NZS 2007.
During the comparative tests the dishwasher shall to be setted as follow:
ENERSAVE option (if present) DISABLED
At the end of the cycle the door must be opened about 15 cm.
Only run the soak program with partial loads.
(1) The cycle duration and power consumption may vary according to the water and room temperatures, and the type and amount of dishes.
NOTE
The washing cycle will not take place if the dishwasher door is left open or not properly closed.
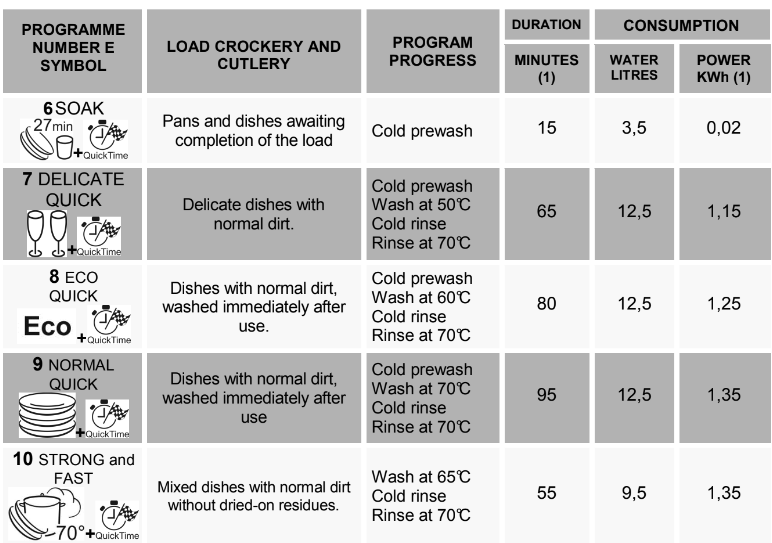
QUICK TIME PROGRAMS (ENERSAVE option non available)
(1) The cycle duration and power consumption may vary according to the water and room temperatures, and the type and amount of dishes.
Washing programs
The dishwasher is equipped with a control panel, described in chapter
Description of the controls", from which it is possible to carry out all the power switch-on, switch-off and programming operations.
Before starting a washing program make sure that:
The water supply tap is open.
The correct amount of detergent has been added to the dispenser.
The baskets have been correctly loaded.
The spray arms are able to rotate freely and without obstruction.
The dishwasher door is securely closed.
Warning: during the initial phase of the washing program, the operation of sprayers is not perceived because they start rotating about 5 minutes after the start. This is the normal operation of the washing cycle.
SWITCHING ON When the ON/OFF button (1) is pressed, the dishwasher switches on. The indicator lights will display the dishwasher's "status".
PROGRAMMING Programming operations are only possible with the door closed. As long as the door is open, the PROGRAMS (6) lights remain off.
PROGRAM SELECTION Press the PROGRAM SELECTION button (5) several times until the light of the program required comes on.
STARTING THE PROGRAM To start the dishwasher, press the START/PAUSE button (4) for a few seconds, until the light of the selected program starts to flash (confirmation beep). The light will flash as long as the program is in progress, to indicate that it is being performed.
END OF PROGRAM At the end of the program the beeper sounds briefly and the program lights 4 and 5 (marked "end") flash.
INTERRUPTION A PROGRAM To interrupt a program in progress: • press the START/PAUSE button (4); the light of the program in progress remains on (confirmation beep); • you may now restart the program by pressing button (4) again until it restarts, or change or annul the program
CHANGING A PROGRAM To change the running program it is necessary: • to interrupt the running program • select the new program; • start the program
ANNULLING A PROGRAM To annul the program, keep the START/PAUSE button (4) pressed until the program is interrupted (light on and confirmation beep). Press button (4) again and keep it pressed until the lights 4 and 5 (marked "end") come on.
The water in the tank will be pumped out and the program will end at the point where it was interrupted.
NOTE
In case that the door is opened during the operation, to the next door closing it is going to be necessary to start the program as shown in paragraph “STARTING THE PROGRAM”. The program will resume from the point in which it was interrupted.
In case that the tub temperature is higher than 50°C the program will start about 30 seconds later.
PROGRAM DELAY The PROGRAM DELAY button can be pressed to delay the start of the washing program by 3,6,9 or 12 hours. This function allows you to set the dishwasher to work at your preferred time of day.
After selecting the delay, start the program.
The appliance will prewash the dishes, after which the “program delay” set previously will come into effect (light indicating the time left before the start of the program and light indicating the program set flash).
NOTE.: It is not possible to select the PROGRAM DELAY option once the cycle has begun.
SAVING ENERGY
After 5 minutes of waiting (washing cycle completed, stopped or set but not started) the dishwasher switches to a standby state to reduce energy consumption.
In this state, the dishwasher indicator panel (lights or display depending on model) functions more slowly (switch-on once every 5 seconds).
TO SAVE ON ENERGY! ... AND PROTECT THE ENVIRONMENT • Always try to run the dishwasher fully loaded. • Do not wash the dishes in running water. • Use the washing program that is most appropriate for each type of load. • Do not carry out any preliminary rinsing. • If available, connect the dishwasher to a hot water supply up to 60°C. TO CUT DOWN ON DETERGENT CONSUMPTION! ... AND PROTECT THE ENVIRONMENT The phosphates contained in dishwasher detergents are harmful to the environment. To avoid using excessive amounts of detergent and to save on electricity, observe the following: • separate the more delicate items from dishes that are more resistant to aggressive detergents and high temperatures; • do not pour the detergent directly on the dishes.
OPERATING INSTRUCTIONS
Once the dishwasher has been correctly installed, prepare for use as follows:
Adjust the water softening system (on some models only);
Add the regenerating salt (on some models only);
Add the rinse aid and detergent.
Using the water softening system
The amount of scale contained in the water (water hardness index) can cause whitish staining on the dry dishes, which tend to become dull over time. The dishwasher is equipped with an automatic softening system which uses a special regenerating salt to reduce the hardness of the water.
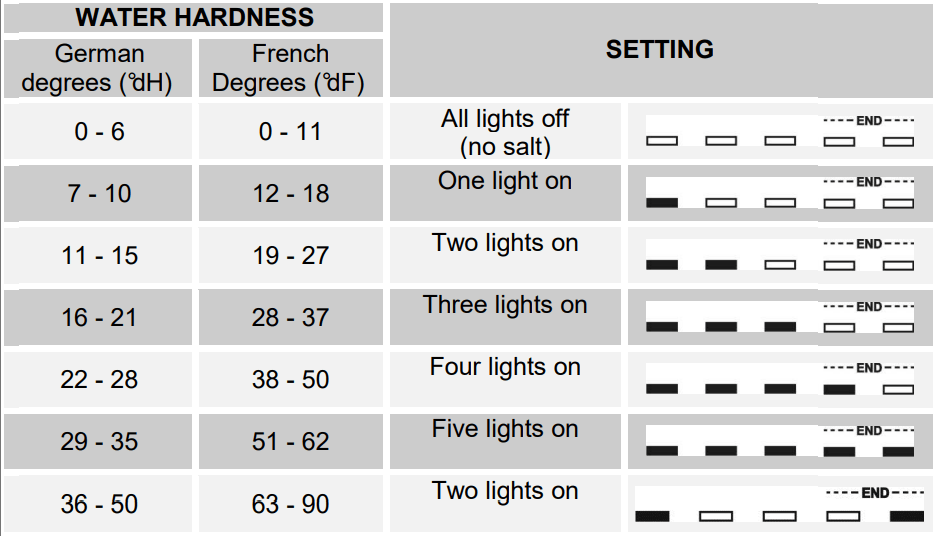
The dishwasher is factory set for water hardness level 3 (average hardness).
When using water of medium hardness, the regenerating salt container should be refilled after approximately 20 washing cycles. The salt container can hold approximately 1.7 Kg of salt in grains. The container is situated at the bottom of the dishwasher. After removing the lower basket, unscrew the salt container cap by turning it anticlockwise and pour in the salt using the funnel supplied with the dishwasher. Before replacing the cap, remove any salt residues from around the opening.
NOTE
When using the dishwasher for the first time, in addition to the salt it is also necessary to add one litre of water to the container.
Each time the salt container is refilled, make sure that the cap is securely closed. The mixture of water and detergent must never penetrate the salt container, as this would compromise the operation of the regeneration system. In the event of this occurring, the warranty will be invalidated.
Only use regenerating salt specially formulated for domestic dishwashers. If using salt tablets, do not fill the container completely.
Do not use table salt as it contains insoluble substances which, over time, may damage the water softening system.
When necessary, refill the regenerating salt container before starting the washing program. In this way, the excess saline solution will be immediately removed by the water; the prolonged presence of salt water inside the tank may lead to corrosion.
CAUTION Be careful not to confuse the salt and detergent packages; adding detergent to the salt container will damage the water softening system.
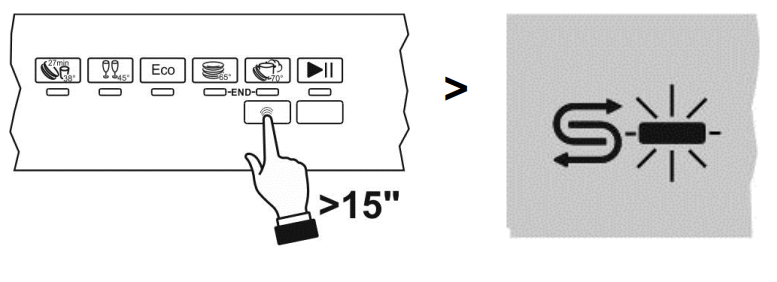
ADJUSTING THE WATER SOFTENING SYSTEM
The dishwasher is equipped with a device which allows the softener setting to be varied to suit the hardness of the mains water. The hardness is set using the PROGRAM SELECTION BUTTON (5).
To access the setting function, hold the button down for more than 15 seconds. The WATER HARDNESS ADJUSTMENT INDICATOR LIGHT flashes, while the SELECTED PROGRAM INDICATOR LIGHTS (6) show the current setting. Each pressure on the button changes the setting following the sequence in the table below:
WATER HARDNESS TABLE
Rinse aid and detergent dispensers
The detergent and rinse aid dispensers are situated on the inner part of the door: the detergent dispenser is on the left, and the rinse aid dispenser is on the right.
NOTE
With the exception of the SOAK program, before every washing cycle it is necessary to add the required amount of detergent to the detergent dispenser. The rinse aid, on the other hand, should only be added as required.
ADDING THE RINSE AID
The rinse aid helps the dishes dry faster and prevents the formation of scale deposits and staining; it is automatically added to the water during the final rinse cycle, from the container situated on the inner side of the door.
To add rinse aid:
Open the door.
Rotate the container cap anticlockwise by 1⁄4 of a turn and remove it.
Add the rinse aid until the container is full (approximately 140 cc).
The optical level indicator on the side of the cap should be completely obscured. Refill the rinse aid when the optical level indicator becomes clear again, or when the rinse aid warning light illuminates.
Replace the cover and turn it in a clockwise direction.
Use a cloth to remove any spillage of rinse aid which might lead to the formation of excess foam.
ADJUSTING THE RINSE AID DISPENSER SETTING
The dishwasher is factory set for medium water hardness. However it possible to change the setting by turning the dispenser’s selector to the desired position: the amount of rinse aid dispensed is proportional to the selector position.
To adjust the rinse aid setting, rotate the dispenser cap through a quarter turn in an anticlockwise direction and remove it.
Then use a screwdriver to rotate the rinse aid selector to the desired position.
Replace the cap, turning it clockwise.
NOTE
The amount of rinse aid must be increased if the washed dishes appear dull or feature circular stains.
If, on the other hand, the dishes are sticky or have white streaks, it is necessary to reduce the rinse aid setting.
ADDING THE DETERGENT
To open the detergent dispenser cap, lightly press the button P. Add the detergent and close the cap carefully.
During the washing cycle, the dispenser will be opened automatically.
NOTE
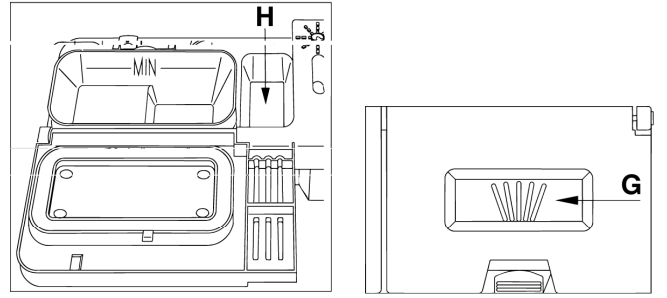
When a program with hot prewash is selected (see program table), extra detergent must be placed in the cavity G/H (depending on models).
Use only detergents specially formulated for dishwashers. For optimal washing results it is important to use a good quality detergent.
The detergent packs must be sealed and stored in a dry place to prevent the formation of lumps which may negatively affect washing results. Once opened the detergent packs should not be kept for too long, otherwise the detergent loses its effectiveness.
Do not use detergents formulated for washing dishes by hand, because they produce a great deal of foam and may negatively affect the operation of the dishwasher.
Add the correct amount of detergent. An insufficient amount of detergent will result in a partial removal of dirt from the dishes, whereas an excessive amount is wasteful and does not improve the washing results.
The market offers liquid and powder detergents with differing chemical compositions, which may contain phosphates, or be phosphate-free but contain natural enzymes.
Detergents containing phosphates are more effective against grease and starch at temperatures above 60°C .
Enzyme detergents, on the other hand, are also effective at lower temperatures (from 40 to 55°C ) and are more easily biodegradable. With enzyme detergents it is possible to obtain at low temperatures comparable results to those which can only be achieved at 65°C using traditional detergents.
For the safeguarding of the environment we recommend the use of phosphate- and chlorine free detergents.
MAINTENANCE & CLEANING
CLEANING THE WATER INTAKE FILTER
The water intake filter A located at the outlet of the water supply tap needs to be cleaned periodically.
After having closed the water supply tap, unscrew the end of the water intake hose, remove the filter A and clean it delicately under running water. Reassemble filter A in its seat and carefully screw the water intake hose back into position.
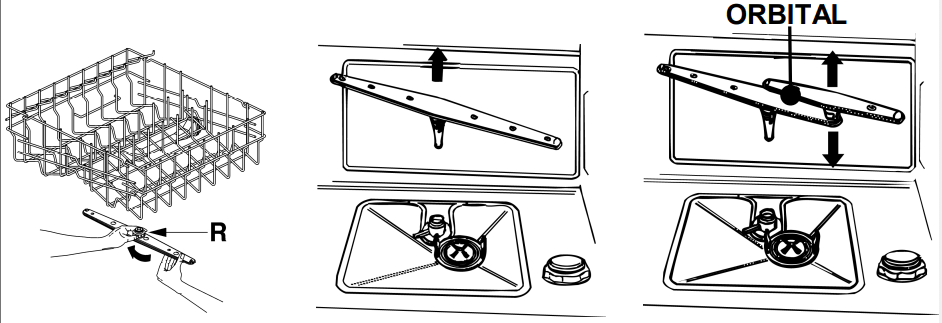
CLEANING THE SPRAY ARMS
The spray arms can be easily removed for periodic cleaning of the nozzles, to prevent possible clogging. Wash them under running water and carefully replace them in their seats, checking that their rotary movement is in no way impeded.
To remove the upper spray arm, unscrew locking ring R.
To remove the lower spray arm, simply lift it up, pulling by the central part.
To remove the orbital spray arm assembly, take hold of the longer arm and pull the orbital unit upward. Wash the arms under a jet of running water and return them carefully to their seat. After reassembly, check that the spray arms turn freely. Otherwise, check that they have been installed correctly.
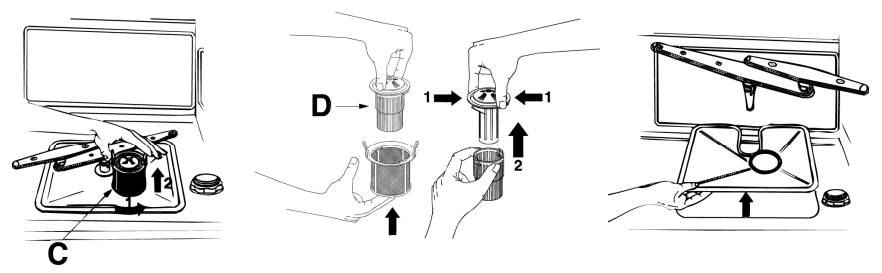
CLEANING THE FILTER UNIT
It is advisable to periodically inspect the centre filter C and, if necessary, to clean it. To remove the filter, grip the tabs, turn them anticlockwise and lift upwards;
push the centre filter D from the underside to remove it from the micro-filter:
separate the two parts which make up the plastic filter by pressing the body of the filter in the zone shown by the arrows;
remove the centre filter by lifting it upwards.
IMPORTANT WARNINGS AND RECOMMENDATIONS
The filters should be cleaned under running water using a stiff brush.
When removing the filter, take care that there are no food residues on it. If any residues fall into the washing pit they might block hydraulic components, or foul the spray arm nozzles.
It is essential to thoroughly clean the filters according to the above instructions: the dishwasher cannot function if the filters are clogged.
Carefully replace the filters in their seats, to avoid damaging the wash pump.
PROLONGED DISUSE:
Run the soak program twice in succession.
Unplug the power cord from the socket.
Leave the door slightly open, in order to prevent the formation of unpleasant odours inside the washing tank.
Fill the rinse aid dispenser.
Shut off the water supply tap.
BEFORE STARTING THE DISHWASHER AFTER PROLONGED DISUSE:
Check that there are no deposits of sludge or rust inside the water pipe: if there are, allow the water to run from the water supply tap for a few minutes.
Plug the power cord back into the socket.
Reconnect the water intake hose and open the tap again.
TROUBLESHOOTING
TROUBLESHOOTING MINOR PROBLEMS
In some cases it is possible to remedy minor problems by referring to the following instructions:
If the program fails to start, check that: the dishwasher is connected to the electrical power supply; there is no power failure; the water tap is open; the dishwasher door is properly closed.
If water remains inside the dishwasher, check that: the drain hose is not kinked; the drain siphon is not obstructed; the dishwasher filters are not clogged.
If the dishes are not being cleaned properly, check that: the correct amount of detergent has been added; there is regenerating salt inside the special container; the dishes are being loaded correctly; the selected program is suitable for the dish types and their degree of soiling; all the filters are clean and positioned correctly; the spray arm nozzles are not obstructed; there is no object obstructing the rotation of the spray arms.
If the dishes fail to dry or remain dull, check that: there is rinse aid inside the special container; the rinse aid dispenser setting is correct; the detergent used is of good quality and has not lost its effectiveness (for example, through incorrect storage, with the box left open).
If the dishes show signs of streaking, staining, etc., check that: the rinse aid dispenser setting is not too high.
If there are visible traces of rust inside the tank: the tank is made of steel, and therefore any rust marks are due to external elements (fragments of rust from the water pipes, pots, cutlery, etc.). Special products are commercially available to remove such marks; check that the amount of detergent being used is correct. Certain detergents can be more corrosive than others. check that the cap of the salt container is securely closed, and that the water softening setting is correct.
ERROR CODE
The dishwasher is capable of signalling a number of faults through the simultaneous illumination of several indicator lights, with the following meanings:
E1
Acquastop failure The anti-flooding system has been activated (for the relevant models only). The system is tripped in case of water leaks. Contact the after-sales service.
E2
Safety level The system which limits the water level inside the dishwasher has been tripped. Interrupt the program and switch off the dishwasher. Switch the dishwasher back on, program it again and start the washing cycle. If the problem persists, contact the after-sales service.
E3
Water heating malfunction The water is not heated or the heating parameters are not correct. Repeat the washing program; if the problem persists, contact the after-sales service.
E4
Water temperature monitoring malfunction Interrupt the program and switch off the dishwasher. Switch the dishwasher back on, program it again and start the washing cycle. If the problem persists, contact the after-sales service.
E5
Water intake malfunction The appliance does not take in water or does not do so correctly. Check that the water connections are correct, the water intake tap is turned on and the filter is not fouled. If the problem persists, contact the after-sales service.
E6
Water pump-out malfunction The appliance does not pump out the water or does not do so correctly. Check that the drain hose is not kinked or crushed and that the siphon and filter are
not fouled. If the problem persists, contact the after- sales service.
E7
Turbine flow-regulator malfunction (for the relevant models only) The appliance is not able to "measure" the amount of water loaded accurately. Interrupt the program and switch off the dishwasher. Switch the dishwasher back on, program it again and start the washing cycle. If the problem persists, contact the after-sales service.
E8
Alternate washing system malfunction Interrupt the program and switch off the dishwasher. Switch the dishwasher back on, program it again and start the washing cycle. If the problem persists, contact the after-sales service.
E9
Water intake system malfunction Contact the after-sales service.
If an alarm occurs the appliance interrupts the program in progress and signals a fault.
Alarms E1, E2, E3, E4, E8 and E9 interrupt the current program immediately.
The E5, E6 alarms interrupts the running program once the cause is resolved, it will bring bach the execution of the program.
The alarm E7 is visualized at the end of the cycle that comes, however, brought to the end since the operation of the dishwasher is not harmed.
To “reset” an alarm is necessary:
Open and close the door, or turn off and on the machine. At this point is possible to program the dishwasher again.

 DISHWASHER USING GUIDE