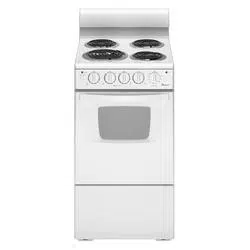
This manual covers several different models. The range you have purchased may have some or all of the items listed. The locations and appearances of the features shown here may not match those of your model.
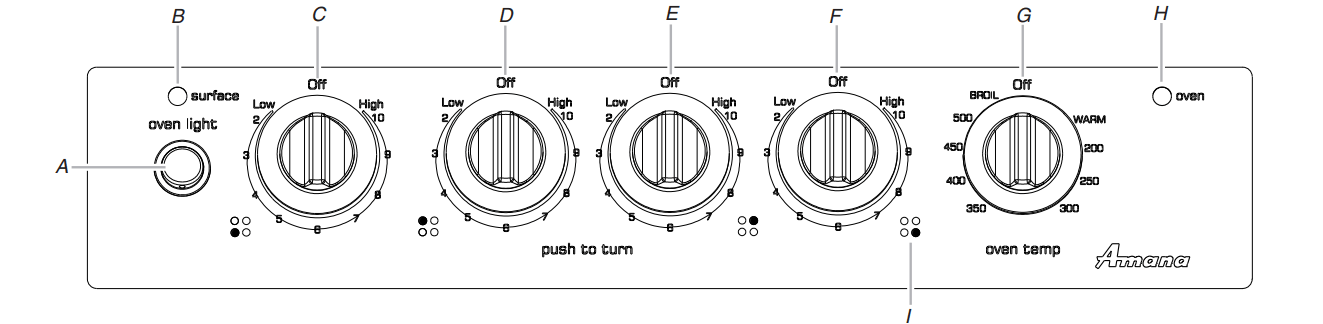
A. Oven light (on some models)
B. Surface heating indicator light
C. Left front control knob
D. Left rear control knob
E. Right rear control knob
F. Right front control knob
G. Oven temperature control knob
H. Oven heating indicator light
I. Surface area locator
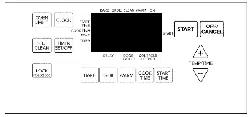
Cooktop Controls
WARNING
Fire Hazard
Turn off all controls when done cooking.
Failure to do so can result in death or fire.
The control knobs can be set to anywhere between High and Low. Push in and turn to setting. On some models, the surface cooking area locator shows which element is turned on. Use the following chart as a guide when setting heat levels.
SETTING RECOMMENDED USE
HIGH
Start food cooking.
Bring liquid to a boil.
Medium High Between Medium and HIGH
Hold a rapid boil.
Quickly brown or sear food.
Medium (6)
Maintain a slow boil.
Fry or sauté foods.
Cook soups, sauces and gravies.
Medium Low Between Medium and LOW
Stew or steam food.
Simmer.
LOW
Keep food warm.
Melt chocolate or butter.
Coil Elements and Burner Bowls
Coil elements should be level for optimal cooking results. Burner bowls, when clean, reflect heat back to the cookware. They also help catch spills.
Cookware should not extend more than ½" (1.3 cm) over the coil element. If cookware is uneven or too large, it can produce excess heat, causing the burner bowl to change color. For more information, see the “General Cleaning” section.
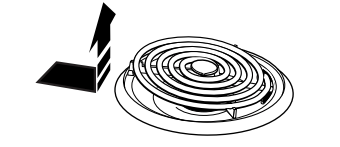
NOTE: Before removing or replacing coil elements and burner bowls, make sure they are cool and the control knobs are in the Off position.
To Remove:
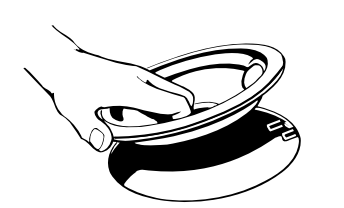
1. Push in the edge of coil element toward the receptacle. Then lift it enough to clear the burner bowl.
2. Pull the coil element straight away from the receptacle.
3. Lift out the burner bowl.
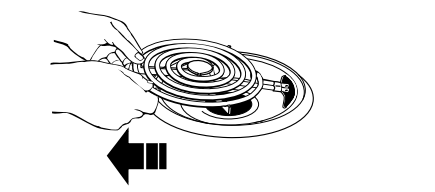
To Replace:
1. Line up openings in the burner bowl with the coil element receptacle.
2. Holding the coil element as level as possible, slowly push the coil element terminal into the receptacle.
3. When the terminal is pushed into the receptacle as far as it will go, push down the edge of the coil element opposite the receptacle.
Home Canning
When canning for long periods, alternate the use of elements between batches. This allows time for the most recently used areas to cool.
Center the canner on the element. Canners should not extend more than ½" (1.3 cm) beyond the element.
Do not place canner on 2 elements at the same time.
For more information, contact your local agricultural department. Companies that manufacture home canning products can also offer assistance.
Cookware
IMPORTANT: Do not leave empty cookware on a hot surface cooking area, element or surface burner.
Ideal cookware should have a flat bottom, straight sides and a well-fitting lid, and the material should be of medium-to-heavy thickness.
Rough finishes may scratch the cooktop or grates. Aluminum and copper may be used as a core or base in cookware. However, when used as a base they can leave permanent marks on the cooktop or grates.
Cookware material is a factor in how quickly and evenly heat is transferred, which affects cooking results. A nonstick finish has the same characteristics as its base material. For example, aluminum cookware with a nonstick finish will take on the properties of aluminum.
Cookware with nonstick surfaces should not be used under the broiler.
Use the following chart as a guide for cookware material characteristics.
COOKWARE -CHARACTERISTICS
Aluminum
Heats quickly and evenly.
Suitable for all types of cooking.
Medium or heavy thickness is best for most cooking tasks.
Cast iron
Heats slowly and evenly.
Good for browning and frying.
Maintains heat for slow cooking.
Ceramic or Ceramic glass
Follow manufacturer’s instructions.
Heats slowly, but unevenly.
Ideal results on low to medium heat settings.
Copper
Heats very quickly and evenly.
Earthenware
Follow manufacturer’s instructions.
Use on low heat settings.
Porcelain enamel-on steel or cast iron
See stainless steel or cast iron.
Stainless steel
Heats quickly, but unevenly.
A core or base of aluminum or copper on stainless steel provides even heating.
OVEN USE
Odors and smoke are normal when the oven is used the first few times, or when it is heavily soiled.
IMPORTANT: The health of some birds is extremely sensitive to the fumes given off. Exposure to the fumes may result in death to certain birds. Always move birds to another closed and well ventilated room.
Oven Temperature Control
IMPORTANT: Do not use a thermometer to measure oven temperature because opening the oven door and element or burner cycling may give incorrect readings.
The oven provides accurate temperatures; however, it may cook faster or slower than your previous oven.
To Set Oven Temperature:
Push in and turn oven control knob to desired temperature setting.
Aluminum Foil
IMPORTANT: To avoid permanent damage to the oven bottom finish, do not line the oven bottom with any type of foil or liner.
For best cooking results, do not cover entire rack with foil because air must be able to move freely.
To catch spills, place foil on rack below dish. Make sure foil is at least ½" (1.3 cm) larger than the dish and that it is turned up at the edges.
Positioning Racks and Bakeware
IMPORTANT: To avoid permanent damage to the porcelain finish, do not place food or bakeware directly on the oven door or bottom.
RACKS
Position racks before turning on the oven.
Do not move racks with bakeware on them.
Make sure racks are level.
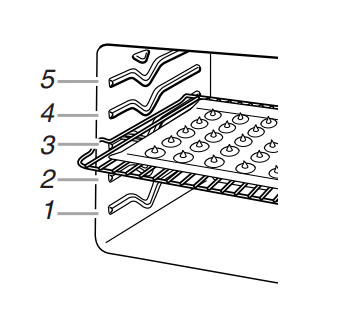
To move a rack, pull it out to the stop position, raise the front edge, then lift out. Use the following illustration and chart as a guide.
FOOD
RACK POSITION(S)*
Large roasts, turkeys, angel food, bundt cakes, quick breads, pies
1 or 2
Yeast breads, casseroles, meat andpoultry
2
Cookies, biscuits, muffins, cakes
2 or 3
*On models with the CleanBake feature, foods may be placed on a lower rack position.
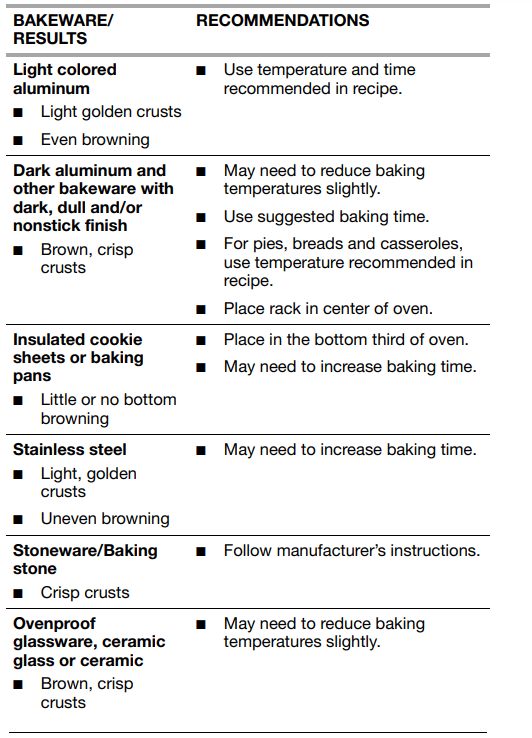
BAKEWARE
Hot air must be able to circulate around food to cook evenly, so allow 2" (5 cm) of space around bakeware and oven walls. Use the following chart as a guide.
NUMBER OF PAN(S)
POSITION ON RACK
1
Center of rack.
2
Side by side or slightly staggered.
3 or 4
Opposite corners on each rack. Make sure that no bakeware piece is directly over another.
Bakeware
The bakeware material affects cooking results. Follow manufacturer’s recommendations and use the bakeware size recommended in the recipe. Use the following chart as a guide.
Meat Thermometer
A meat thermometer is not supplied with this appliance. Follow manufacturer's directions for using a meat thermometer. On models without a temperature probe, use a meat thermometer to determine whether meat, poultry and fish are cooked to the desired degree of doneness. The internal temperature, not appearance, should be used to determine doneness.
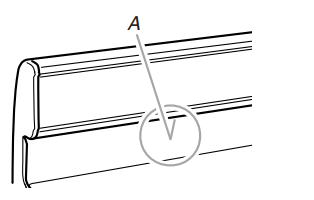
Oven Vent
A. Oven vent
The oven vent releases hot air and moisture from the oven, and should not be blocked or covered. Blocking or covering the oven vent will cause poor air circulation, affecting cooking and cleaning results. Do not set plastics, paper or other items that could melt or burn near the oven vent.
Baking and Roasting
Before baking and roasting, position the racks according to the “Positioning Racks and Bakeware” section. When roasting, it is not necessary to wait for the oven to preheat before putting food in, unless recommended in the recipe.
To Bake or Roast:
1. Push in and turn the oven control knob to the desired temperature setting. The Oven Heating light will turn on and remain on until the oven reaches the set temperature.
2. Place food in oven. The bake element will turn on and off to maintain cooking temperature. The Oven Heating light will turn on and off with the element.
3. Turn oven control knob to OFF when finished.
Broiling
Broiling uses direct radiant heat to cook food. Changing the temperature when broiling allows more precise control. The lower the temperature, the slower the cooking. Thicker cuts and unevenly shaped pieces of meat, fish and poultry may cook better at lower broiling temperatures.
For best results, use a broiler pan and grid. They are designed to drain juices and help avoid spatter and smoke.
If you would like to purchase a broiler pan, one may be ordered. See “Assistance or Service” section to order.
For proper draining, do not cover the grid with aluminum foil. The bottom of the pan may be lined with aluminum foil for easier cleaning.
Trim excess fat to reduce spattering. Slit the remaining fat on the edges to avoid curling.
Pull out oven rack to stop position before turning or removing food. Use tongs to turn food to avoid the loss of juices. Very thin cuts of fish, poultry or meat may not need to be turned.
After broiling, remove the pan from the oven when removing the food. Drippings will bake onto the pan if left in the heated oven, making cleaning more difficult.
Before broiling, position rack according to the Broiling Chart. It is not necessary to preheat the oven before putting food in unless recommended in the recipe.
To Broil:
1. Position food on grid in the broiler pan then place it in the center of the oven rack.
2. Close the door.
3. Push in and turn oven control knob to BROIL.
4. After broiling, turn the oven control knob to OFF.
BROILING CHART
For best results, place food 3" (7 cm) or more from the broil element. Times are guidelines only and may need to be adjusted for individual foods and tastes. Recommended rack positions are numbered from the bottom (1) to the top (5). For diagram, see the “Positioning Racks and Bakeware” section.
FOOD
RACK POSITION
COOK TIME (in minutes)
Side 1
Side 2
Steak
1" (2.5 cm) thick medium rare
medium
well-done
4
14-15
7-8
4
15-16
8-9
4
18-19
9-10
Ground meat patties
34" (2 cm) thick well-done
4
13-14
7-8
Pork chops
1" (2.5 cm) thick
4
20-22
10-11
Ham slice, precooked
1/2" (1.25 cm) thick
4
8-10
4-5
Frankfurters
4
5-7
3-4
Lamb chops
1" (2.5 cm) thick
4
14-17
8-9
Chicken
bone-in pieces
3
17-20
17-20
boneless breasts
4
11-16
11-16
Fish Fillets
1/4-1/2" (0.6-1.25 cm) thick
4
8-10
4-5
Fish Steaks
3/4-1" (2-2.5 cm) thick
4
16-18
8-9
RANGE CARE
General Cleaning
IMPORTANT: Before cleaning, make sure all controls are off and the oven and cooktop are cool. Always follow label instructions on cleaning products.
Soap, water and a soft cloth or sponge are suggested first unless otherwise noted.
EXTERIOR PORCELAIN ENAMEL SURFACES
Food spills containing acids, such as vinegar and tomato, should be cleaned as soon as the entire range is cool. These spills may affect the finish.
Cleaning Method:
Glass cleaner, mild liquid cleaner or nonabrasive scrubbing pad:
Gently clean around the model and serial number plate because scrubbing may remove numbers.
affresh® Kitchen and Appliance Cleaner Part Number W10355010 (not included):
See “Assistance or Service” section to order.
COOKTOP CONTROLS
To avoid damage to the cooktop controls, do not use steel wool, abrasive cleansers or oven cleaner.
To avoid damage, do not soak knobs.
When replacing knobs, make sure knobs are in the OFF position. On some models, do not remove seals under knobs.
Cleaning Method:
Warm, soapy water:
Pull knobs straight away from control panel to remove.
CONTROL PANEL
To avoid damage to the control panel, do not use abrasive cleaners, steel-wool pads, gritty washcloths or abrasive paper towels.
Cleaning Method:
Glass cleaner and soft cloth or sponge:
Apply glass cleaner to soft cloth or sponge, not directly on panel.
affresh® Kitchen and Appliance Cleaner Part Number W10355010 (not included):
See “Assistance or Service” section to order.
COIL ELEMENTS
Do not clean or immerse in water. Soil will burn off when hot. For more information, see the “Coil Elements and Burner Bowls.” section
Cleaning Method:
Damp cloth: Make sure control knobs are off and elements are cool.
BURNER BOWLS
Cleaning Method:
Chrome burner bowls
Wash frequently in warm, soapy water. (It is not recommended to wash chrome bowls in a dishwasher). A mild abrasive cleaner and a plastic scrubber can be used to remove stubborn stains. For heavily soiled bowls, place an ammonia soaked paper towel on the stains and allow to soak for a short time, then gently scrub with a plastic scrubber.
Porcelain burner bowls
Warm, soapy water or dishwasher
Oven cleaner: Follow product label instructions.
Gas Grate and Drip Pan Cleaner (not included): See the “Assistance or Service” section to order.
OVEN DOOR EXTERIOR
Cleaning Method:
Glass cleaner and paper towels or nonabrasive plastic scrubbing pad: Apply glass cleaner to soft cloth or sponge, not directly on panel.
affresh® Kitchen and Appliance Cleaner (not included): See the “Assistance or Service” section to order.
OVEN CAVITY
Oven cleaner: Follow product label instructions.
Food spills should be cleaned when oven cools. At high temperatures, foods react with porcelain and staining, etching, pitting or faint white spots can result.
On some models, the oven door can be removed. See the “Oven Door” section first.
Cleaning Method:
Steel-wool pad
OVEN AND ROASTING RACKS
Cleaning Method:
Steel-wool pad
BROILER PAN AND GRID (on some models)
Cleaning Method:
Wash in warm sudsy water. (It is not recommended to wash the chrome grid in a dishwasher.)
A mild abrasive cleaner and a plastic scrubber can be used to remove stubborn stains.
For heavily soiled bowls, place an ammonia soaked paper towel on the stains and allow to soak for a short time, then gently scrub with a plastic scrubber.
Porcelain enamel only
Warm soapy water or dishwasher
Oven cleaner: Follow product label instructions.
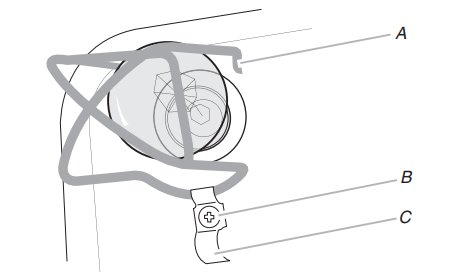
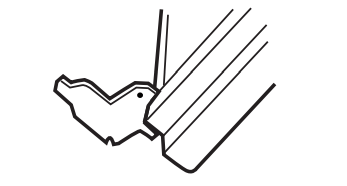
Oven Light
The oven light is a standard 40-watt maximum appliance bulb. Before replacing, make sure the oven and cooktop are cool and the control knobs are in the Off position.
To Replace Oven Light:
1. Unplug range or disconnect power.
2. Remove screw and clip to release bulb protector in the back of the oven.
A. Bulb protector
B. Screw
C. Clip
3. Turn bulb counterclockwise to remove from socket.
4. Replace bulb and bulb protector. Place clip over the bulb protector and screw into place.
5. Plug in range or reconnect power.
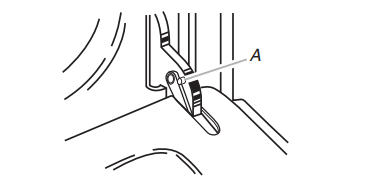
Oven Door
For normal range use, it is not suggested to remove the oven door. However, if removal is necessary, make sure the oven is off and cool. Then, follow these instructions. The oven door is heavy.
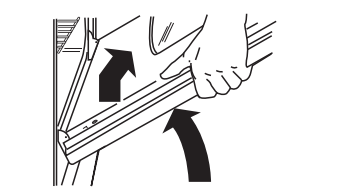
To Remove:
1. Open the oven door. Insert hinge pins, included with your range, into both hinge hangers. Do not remove the pins while the door is removed from the range.
A. Hinge pin
2. Grasp the door on the sides with your fingers on the front of the door and your thumbs on the inside surface.
3. Pull door straight up, then toward you. Do not remove hinge pins until the door is replaced on the range.
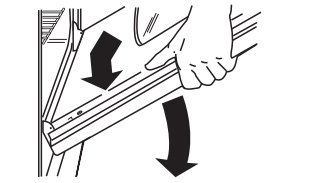
To Replace:
1. Grasp the door on the sides with your fingers on the front of the door and your thumbs on the inside surface.
2. Hold oven door so that the top edge of each door slot is horizontal. Insert door hinge into the hinge slots.
3. Tilt top of door toward range. Insert bottom door hinge notch down onto front frame edge.
4. Open the door completely and remove the hinge pins. Save hinge pins for future use.
5. Close the door slowly to assure door side panel clearance and proper hinge engagement.
TROUBLESHOOTING
Try the solutions suggested here first in order to avoid the cost of an unnecessary service call.
Nothing will operate
Has a household fuse blown, or has a circuit breaker tripped?
Replace the fuse or reset the circuit breaker. If the problem continues, call an electrician.
Cooktop will not operate
Is the control knob set correctly?
Push in knob before turning to a setting.
On coil element models, is the element inserted properly?
See “Coil Elements and Burner Bowls” section.
Excessive heat around cookware on cooktop
Is the cookware the proper size?
Use cookware about the same size as the surface cooking area, element or surface burner. Cookware should not extend more than ¹⁄₂" (1.3 cm) outside the cooking area.
Cooktop cooking results not what expected
Is the proper cookware being used?
See “Cookware” section.
Is the control knob set to the proper heat level?
See “Cooktop Controls” section.
Is the range level?
Level the range. See the Installation Instructions.
On coil element models, is the element inserted properly?
See “Coil Elements and Burner Bowls” section.
Oven will not operate
Is the oven temperature knob set correctly?
See “Oven Temperature Control” section.
Oven indicator lights flash
Do the OVEN HEATING indicator lights flash?
See “Assistance or Service” section.
Results not what expected
Was the oven preheated?
Wait for oven to preheat before placing food in oven.
Are the racks positioned properly?
See “Positioning Racks and Bakeware” section.
Is there proper air circulation around bakeware?
See “Positioning Racks and Bakeware” section.
Is the batter evenly distributed in the pan?
Check that batter is level in the pan.
Is the range level?
Level the range. See the Installation Instructions.
Are baked items too brown on the bottom?
Decrease oven temperature 10° F to 30°F (5°C to 15°C).
Are crust edges browning early?
Use aluminum foil to cover the edge of the crust and/or reduce baking temperature.
Was the oven preheated?
Wait for oven to preheat before placing food in oven.
Is there proper air circulation around bakeware?
See “Positioning Racks and Bakeware” section.
Is the proper length of time being used?
Increase baking or roasting time.
Is the proper temperature set?
Increase temperature 25°F (15°C).
Has the oven door been opened while cooking?
Peeking into the oven while cooking releases oven heat and can result in longer cooking times.