Installation Manual
Model:
HILS65205, HILS75205, HILS86205
Interactive Flat Panel Display
65” 75” 86”

2
QUICK SETUP GUIDE
For further information, see the user manual.
Please contact directly if you have questions on the use of the touch monitor after
reading the Installation Manual and User Manual.
IMPORTANT:
Please read the precautions, safety instructions and this installation manual carefully
before installing the touch monitor.
CAUTION:
Changes or modifications not expressly approved by the party responsible for
compliance with the FCC Rules could void the user’s authority to operate this
equipment.
1. Precautions and safety instructions
Before using the touch monitor, please read this quick setup guide thoroughly to help
protect against damage to your own and other people‘s property and ensure your own
and other people‘s personal safety.
Be sure to observe the following instructions.
For your safety, be sure to observe the warnings contained in this guide.
For installation or adjustment, please follow this quick setup guide and refer all
servicing to qualified service personnel.
Safety Precautions
If smoke or a peculiar smell comes from the monitor, remove the power plug from the
socket immediately.
Failure to do above, it may result in an electric shock.
Contact your dealer for inspection.
If the monitor has been turned on but there isn’t a picture, remove the power plug
from the socket immediately. Failure to do above, it may result in an electric shock.
Contact your dealer for inspection.
If water is spilled or objects are dropped inside the monitor, remove the power plug
from the socket immediately.
Failure to do above, it may result in an electric shock.
Contact your dealer for inspection.
If the monitor is dropped or the cabinet is damaged, remove the power plug from the
socket immediately.
Failure to do above, it may result in an electric shock.
Contact your dealer for inspection.
To turn off the power of the monitor completely, remove the power plug from the
socket
If the power cord or plug is damaged or becomes hot, turn off the main power switch
of the monitor, make sure the plug has cooled down and remove the plug from the
socket. If the monitor is still used in this condition, it may cause an electric shock.
Contact your dealer for replacement.
3
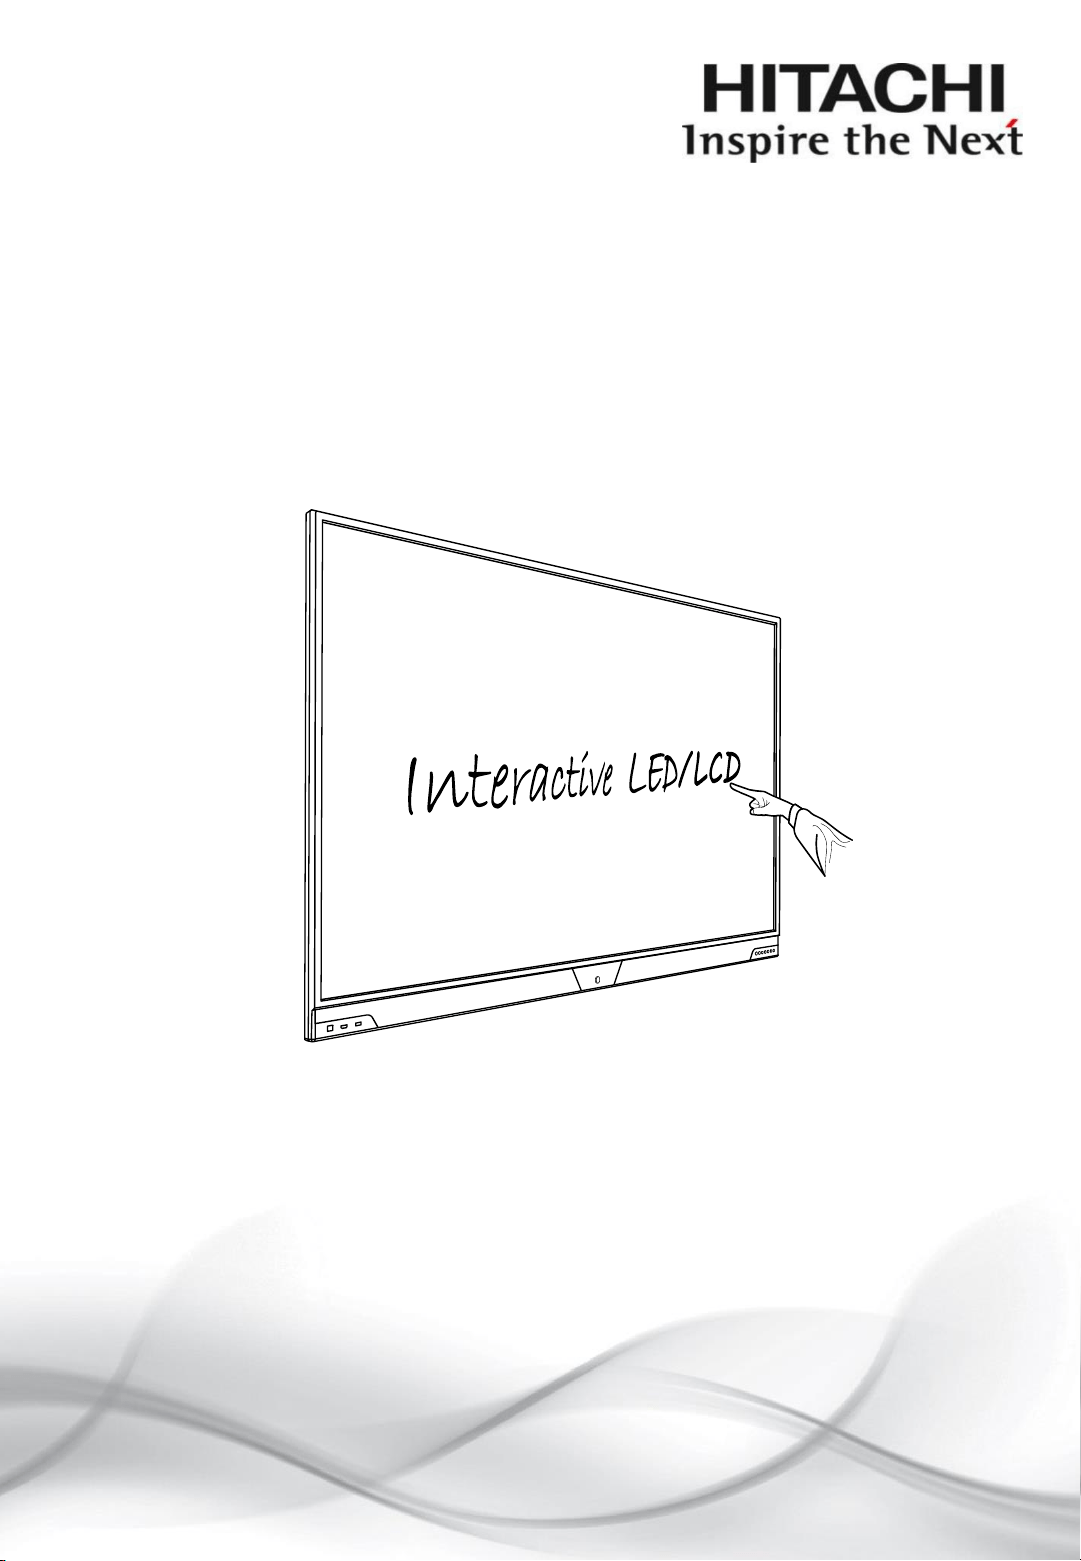
Moving and Carrying Notice
Moving Notice:
Moving the monitor requires at least four people. If not, it may drop and a serious
injury may result.
Carrying Notice:
This monitor is heavy; please follow the instructions below when you are ready to
carry the monitor. Failure to do, it may cause injury.

4
Installation
Don‘t install in a high-temperature environment.
If the monitor is used in a high-temperature environment or in direct sunlight, it may
cause the case or other parts to become distorted or damaged resulting in
overheating or electric shock. Don‘t install in a high-humidity environment. This may
cause overheating or electric shock.
Don‘t install near any heat sources such as radiators, hot-air outlets, stoves, or other
apparatus that produce heat. This may cause an electric shock.
Don‘t overload sockets or cables beyond electrical capacity. Don‘t use extension
leads, otherwise this may cause an electric shock.
Don‘t insert the power plug into a socket other than 100~240V AC.
This may cause an electric shock.
• Don’t use a damaged power plug or worn socket.
• Don‘t insert the wrong plug as it may cause an electric shock.
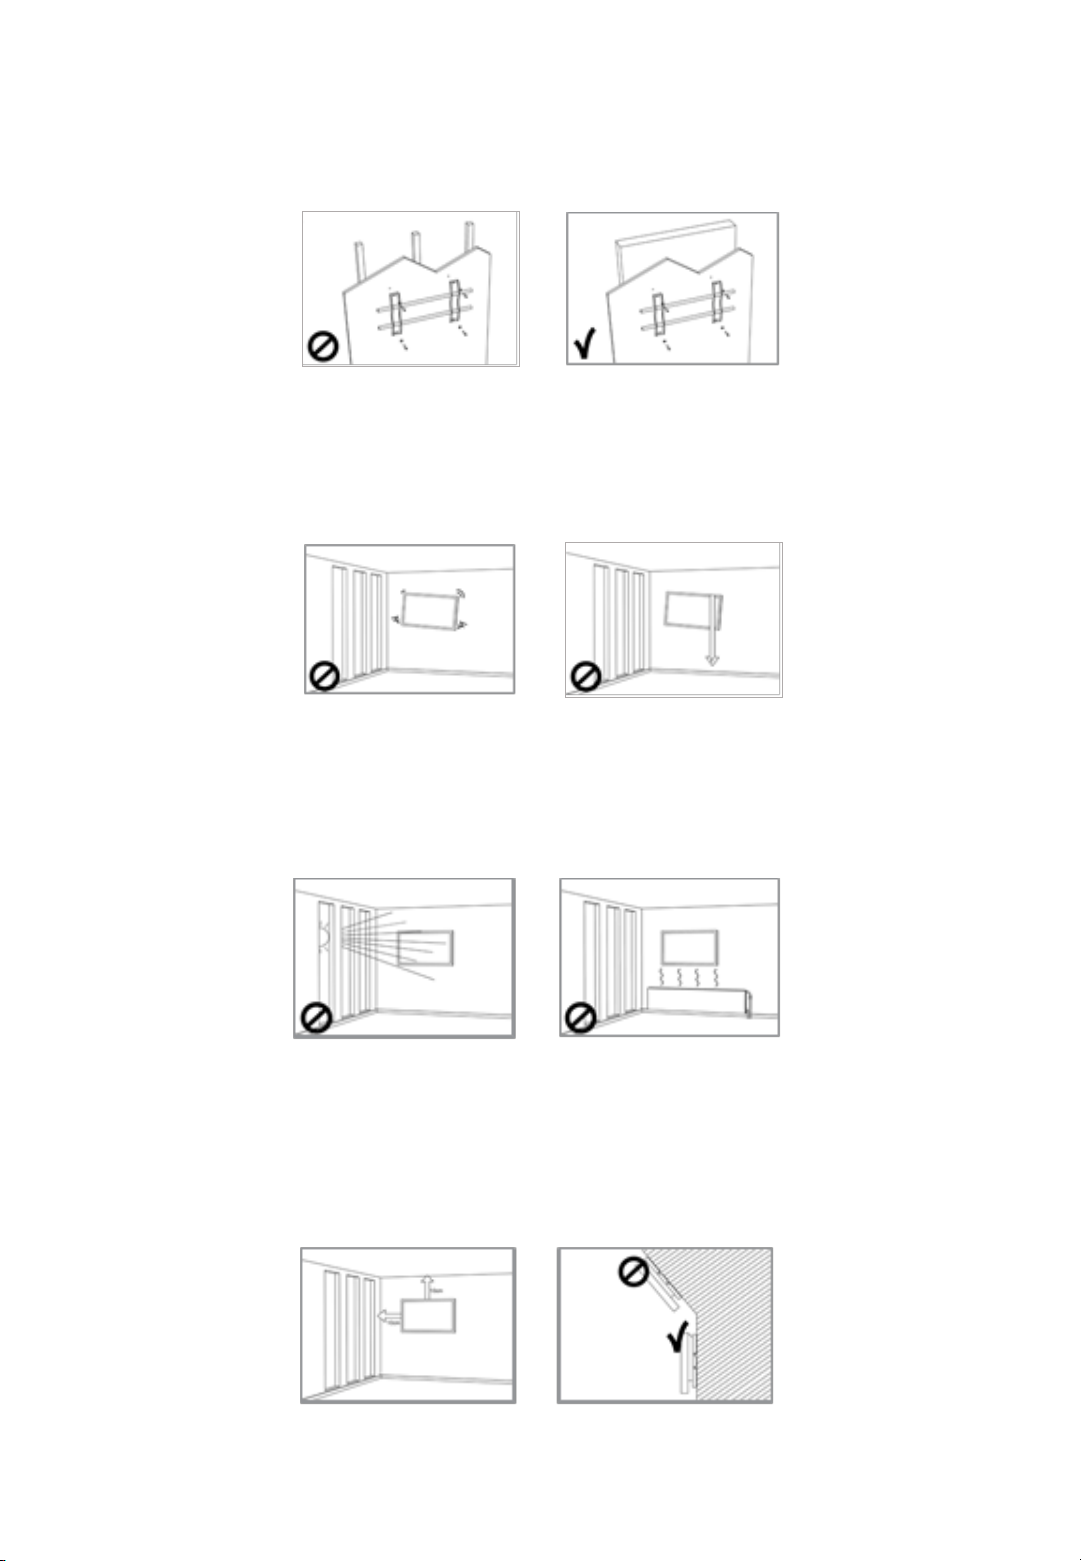
Do not place monitors on unstable shelves or surfaces. They could collapse and
cause damage. Only install the unit on vertical, stable and level surfaces.
Don‘t place objects on the touch monitor.
• If the touch monitor is covered or the vents are blocked, the monitor could overheat
and cause a fire.
• If metal or liquid gets into the monitor, it may cause an electric shock.
• Do not place heavy objects on the monitor as they may fall causing injury.
• Please keep a minimum distance of 10 cm between the monitor and the other
objects for sufficient ventilation.
Don‘t move the touch monitor when it is connected to the power cord and AV cables.
• When moving the monitor, make sure you remove the plug and cables from the
socket or source.
• When unpacking or carrying the monitor, at least 4 people are needed. Make sure
the monitor is carried upright.
• Transport the monitor upright. Avoid placing the monitor face up or face down.
• Handle the monitor gently. Do not drop.
5
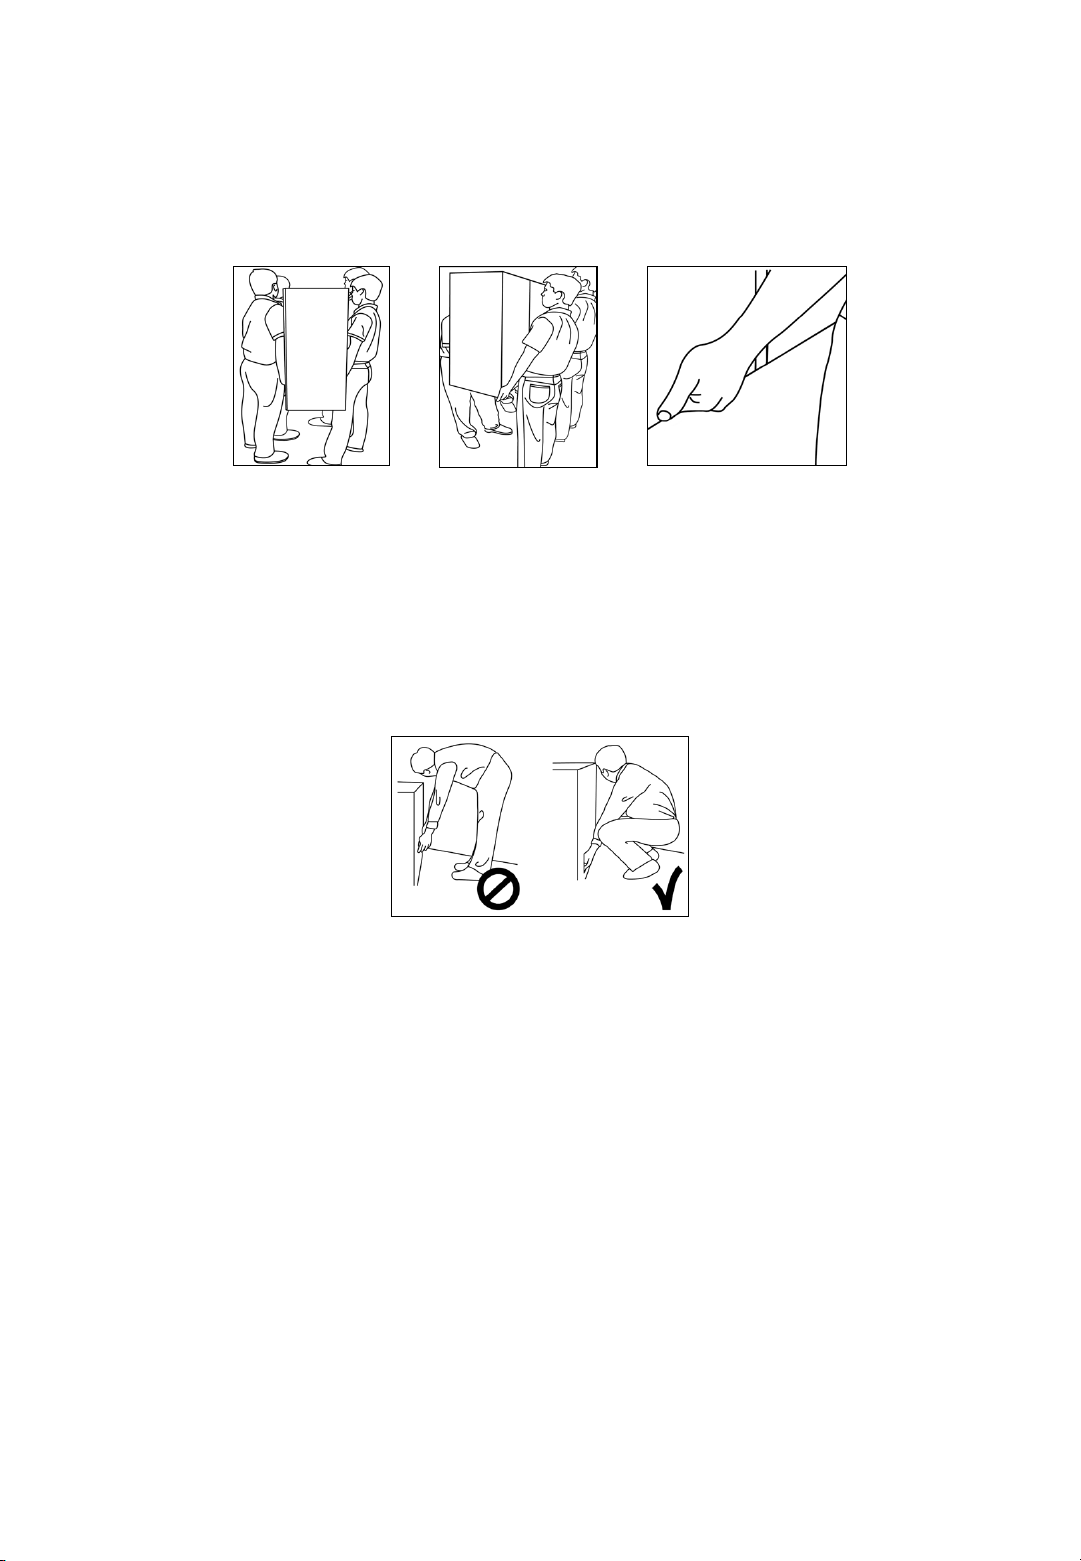
Wall mounting safety notes
Please make sure the bracket is fixed to a solid wall.
After assembling, please don‘t pull or shake violently.
Please don‘t install the bracket in direct sunlight or areas of humidity / high
temperature for fear that the quality is affected
Install the bracket at a minimum distance of 10 cm from other objects / walls on either
side. Only attach to vertical walls.

6
2. Package contents
Packing list
Item
Q’ty
1. Interactive monitor
1
2. Carton
1
3. Bottom cushion
2
4.
Top cushion
65’’-2 / 75’’,86’’-3
5.
Packing bag 1
6. Accessories box
1
Unpacking
1. Set the LCD Monitor box in front and upright position.
2. Cut the banding and take off 6 clips
3. Open from the top of the box before removing the top cushions.
4. Remove the top cushion and take the accessories box out.
5. Take vinyl bag off and assembled bracket if it needs
Contents of the Accessories box
1. Power cord
2. Remote controller (2x AAA batteries included)
3. USB cable
4. HDMI cable
5. Pen x2, Pen tip
6. CD
7. Warranty card
7
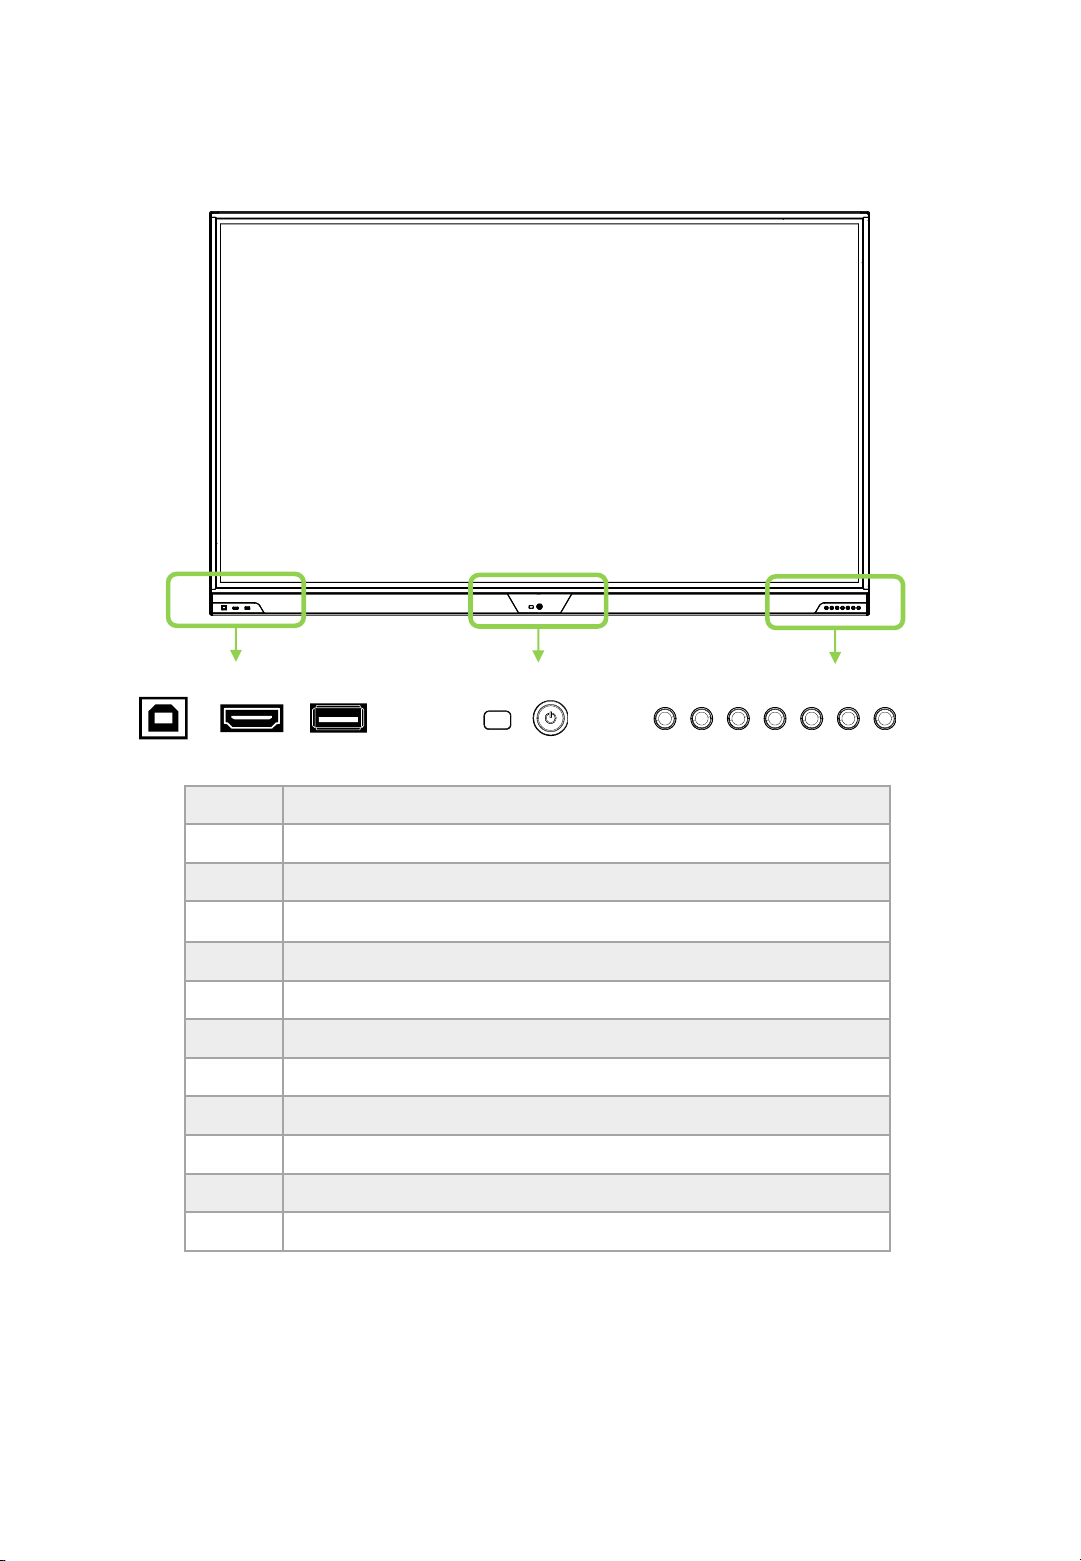
3. Description
Important Notice
◆ The USB cable (3m) that we provide with this accessory box is for the Touch USB at the
back. Therefore, in case of connecting the USB cable to Touch USB port in front,
separate USB cable is required and the length of cable is strongly recommended to be
less than 3m to make sure the signal intensity of touch sensor works properly.
① ② ③ ④ ⑤ ⑥ ⑦ ⑧ ⑨ ⑩ ⑪ ⑫
① Touch-USB
②
Front HDMI
③
USB
④
Remote control reception
⑤
Power On/Off Switch, Power indicator (On : Blue, Off : Red)
⑥
SOURCE
⑦
MENU
⑧
VOL –
⑨
VOL +
⑩
◁(Left)
⑪
▷(Right)
⑫
Touch ON/OFF

8
① Power Control and AC IN
② Rear Panel Connectors
1 AC IN 100V~240V 50/60Hz
2 ON / OFF Switch ( I : ON, O : OFF)
④
③
①
②
1
2
61 4 752 3
1 Camera USB (Common USB)
2 USB (PC-less Only)
3 LAN (Ethernet)
4 Touch USB ( HDMI 1, 2, 3 )
5 HDMI Input 2.0 X 3
6 Display Port (DP)
7 Touch USB ( DP, VGA)
③ Rear Panel Connections
9
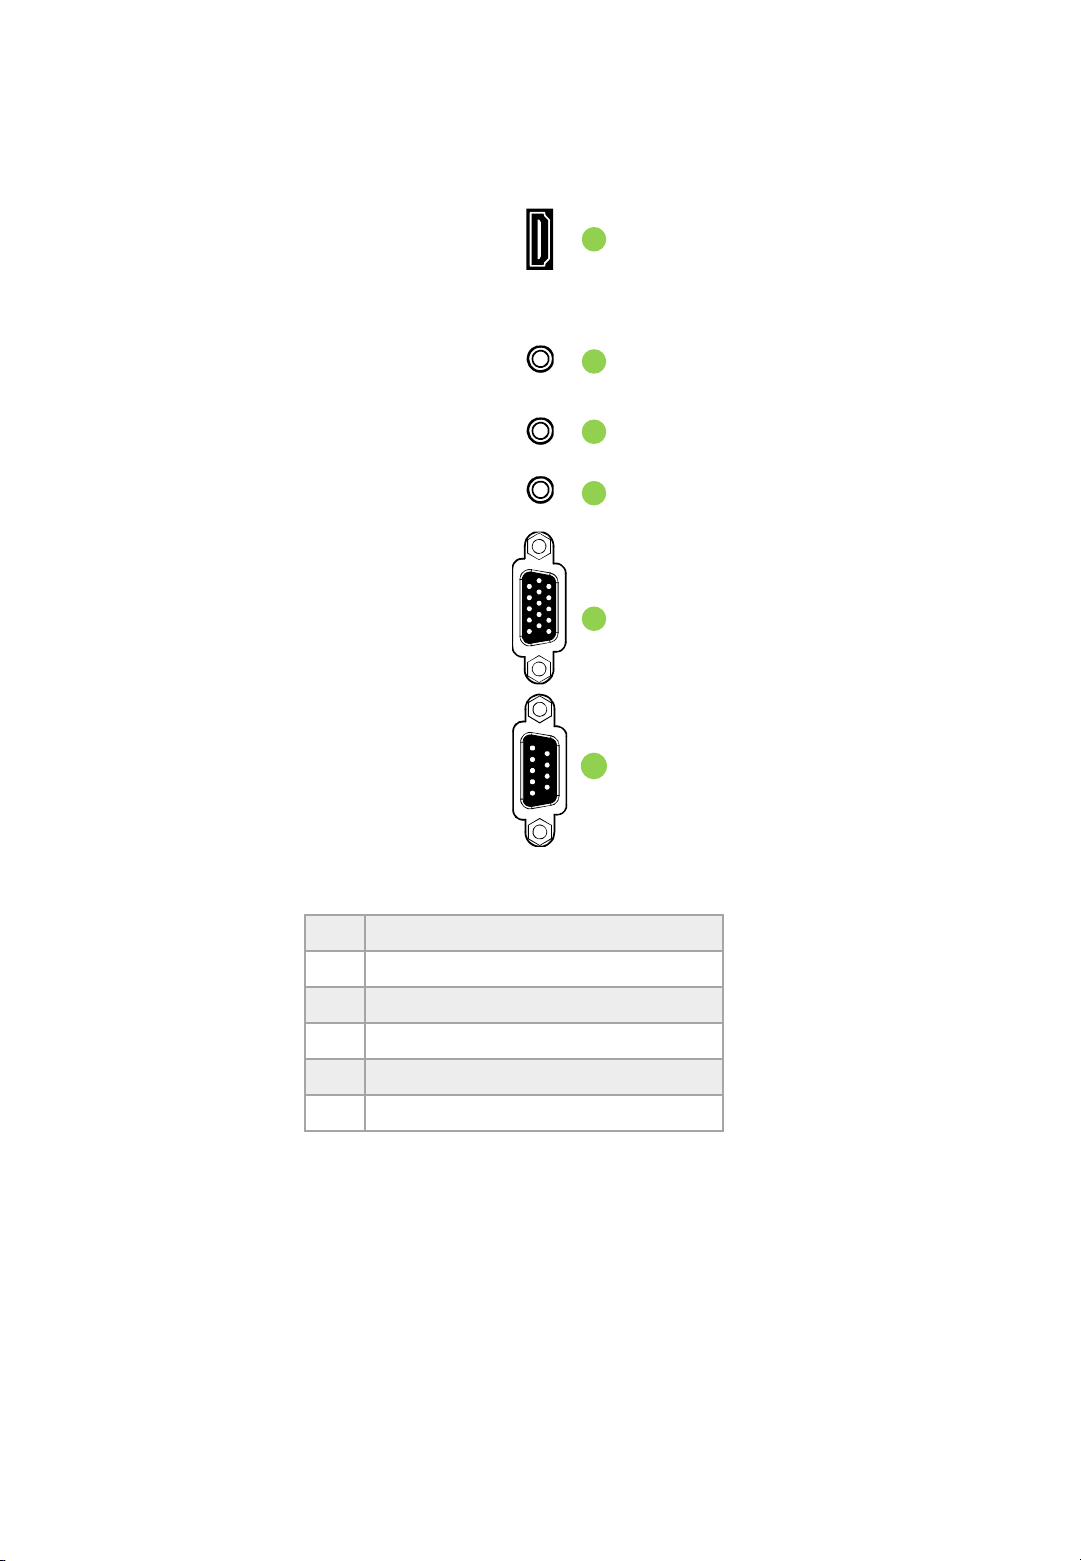
④ Installing an OPS PC
There is a slot on ④ for OPS PC. When you need to install an OPS PC, remove screws and
existing cover first and screw up again after mounting OPS PC in the slot.
1 HDMI Output
2 Audio Output (Earphone)
3 MIC Input
4 VGA audio input
5 VGA input
6 RS232C(Serial communication)
2
3
4
5
6
1
10
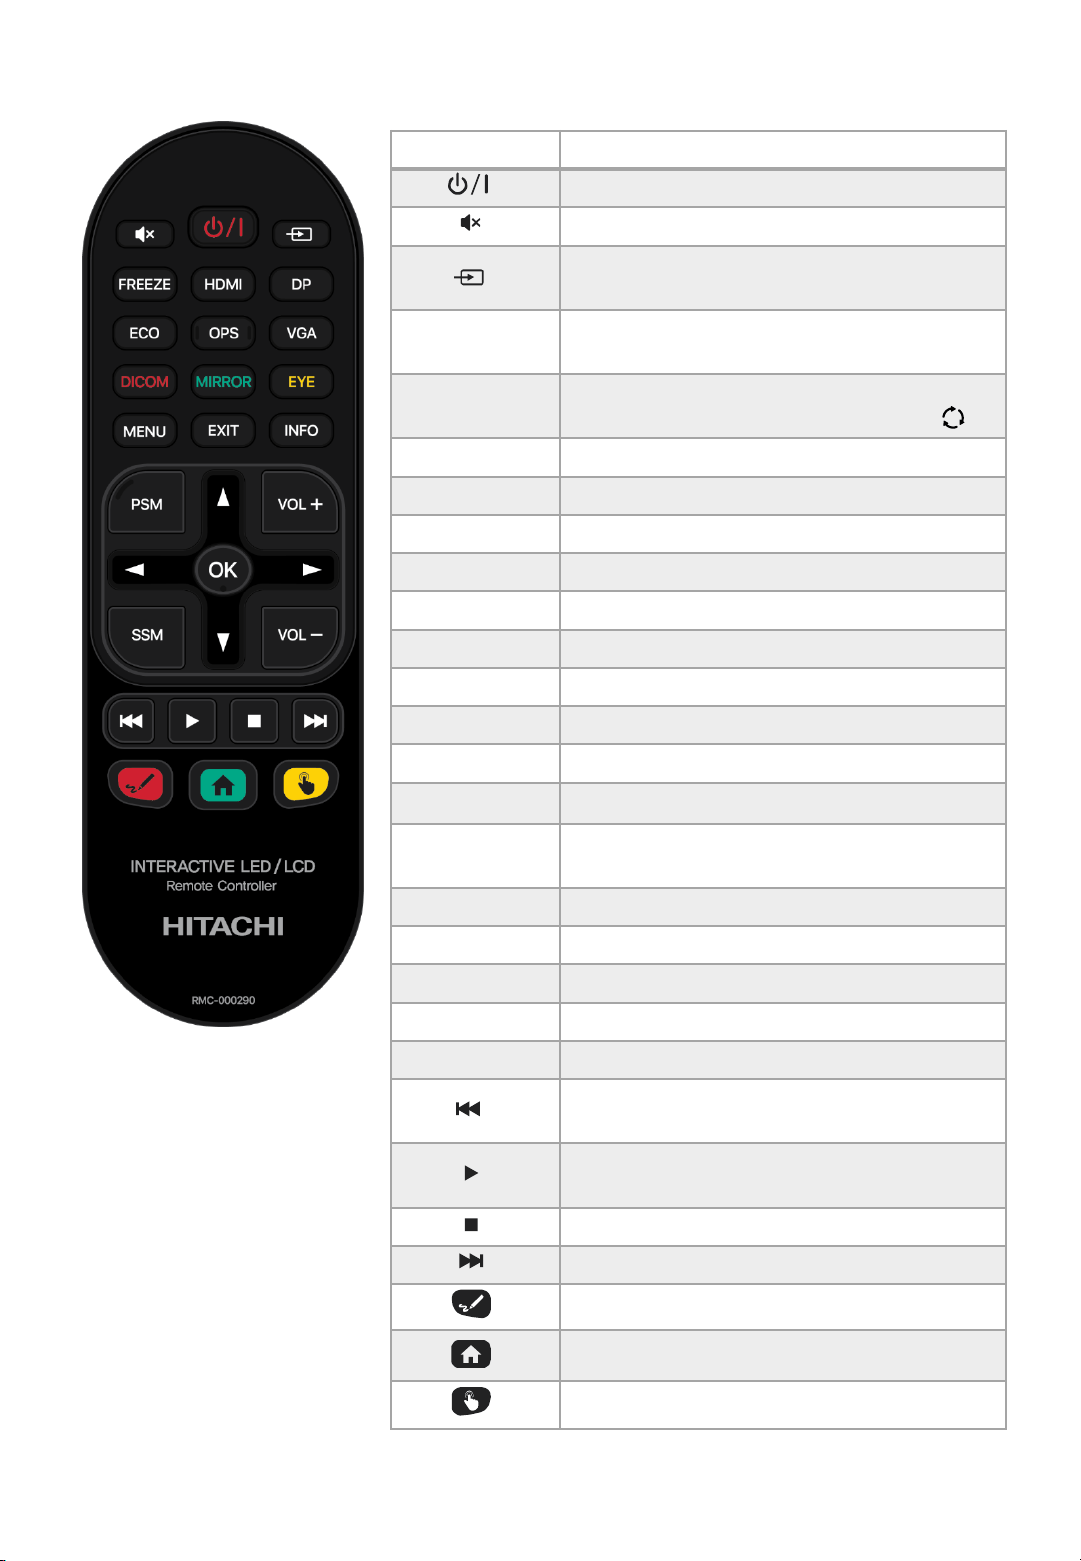
4. Remote Controller(RCU) Instructions
Key name
Description
Power ON/OFF
Mute
Activates OSD menu of input source selecting.
Navigates input source downwards.
FREEZE
Allows you to capture and freeze an image from a
moving image that you are watching.
HDMI
HDMI Input select
Front HDMI →HDMI1→HDMI2→HDMI3
DP DISPLAY PORT
ECO Adjust screen bright ( 3 steps)
OPS OPS PC select
VGA VGA input select
DICOM DICOM On / OFF
MIRROR
Mirroring with Eshare
EYE
Eye Protection On /Off
MENU
Activates main OSD menu.
EXIT
Closes main OSD menu.
INFO
Shows the current external input.
▲ ◀ ▼ ▶
Press these to adjust or select TV menu, or select
APP under PC-less system
OK
Select the highlighted menu option.
PSM
Standard/Soft/Bright
SSM
Standard/Light ton/Bass
VOL +
Volume Up
VOL -
Volume Down
Press this key to go to the previous chapter or song
Press this key to start to pause the playback in
media and PC-less
Press this key to stop back
Press this key to go to the next chapter or song
Activates Floating Menu
Activates Home Screen
TOUCH ON/OFF
11
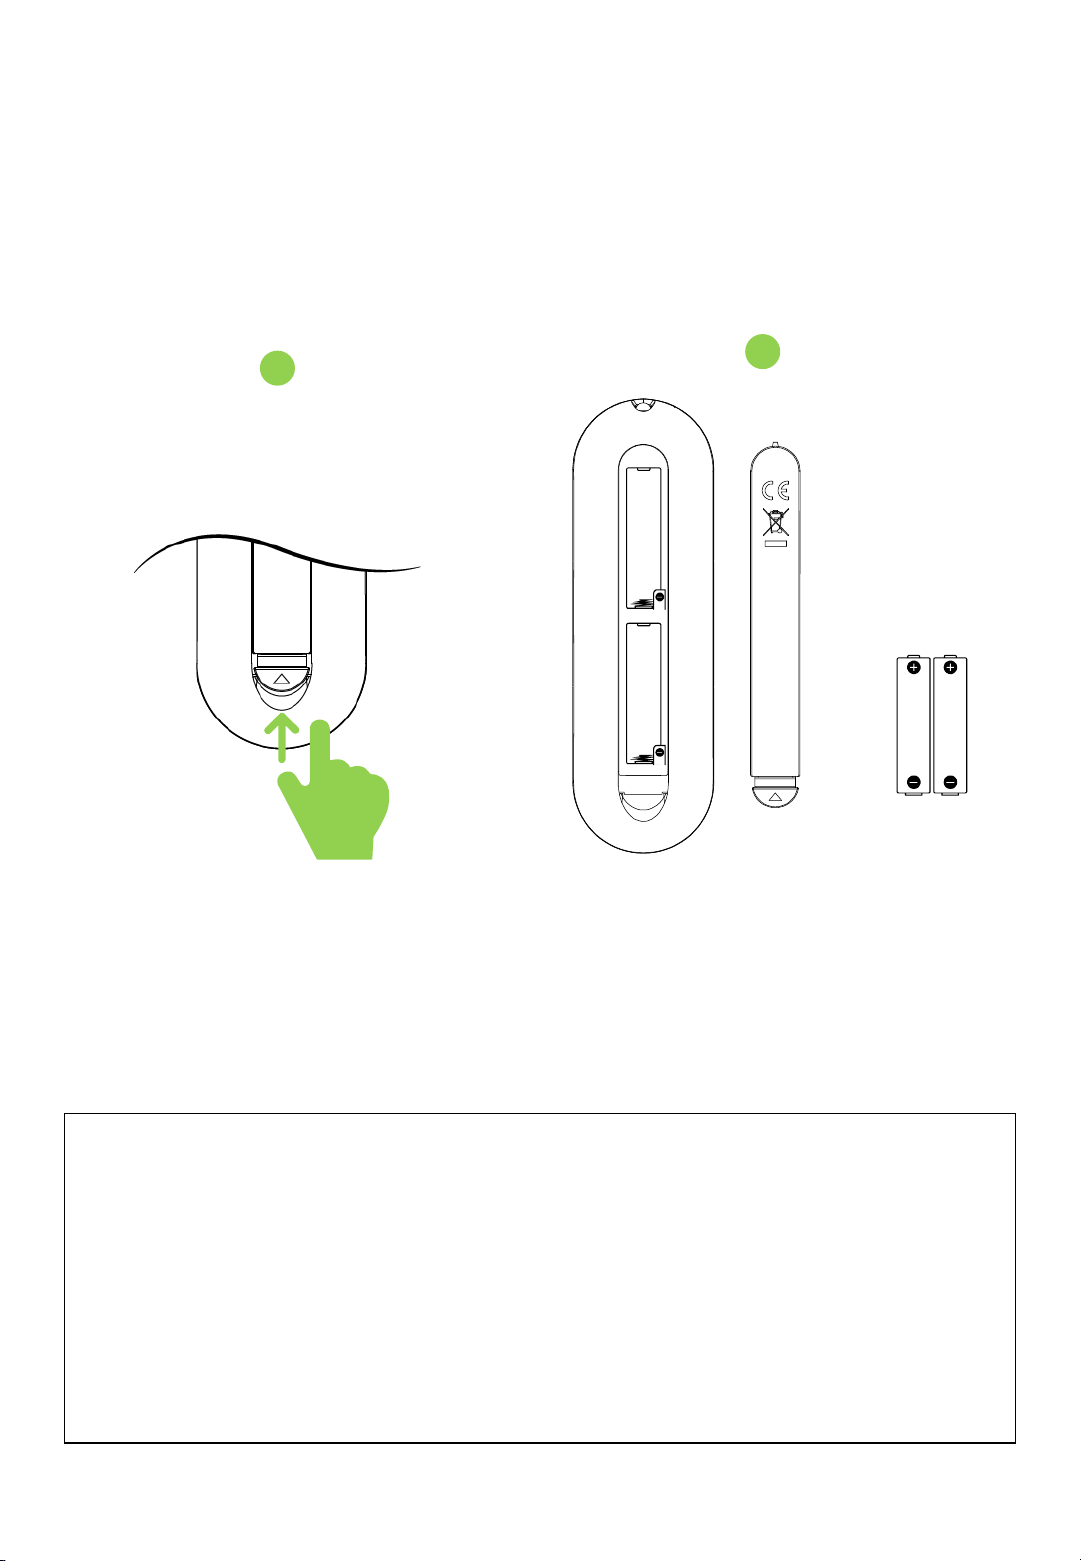
Battery Precautions
These precautions should be followed when using batteries in this device:
• The batteries may last approximately one year depending on how much the remote control is used. Replace batteries when the remote operation
becomes erratic.
• Use only the size and type of batteries specified.
• Be sure to follow the correct polarity when installing the batteries as indicated in the battery compartment. Reversed batteries may cause damage
to the device.
• Do not mix different types together (e.g. Alkaline, Carbon-zinc or Rechargeable) or old batteries with fresh ones.
• If the device is not to be used for a long period of time, remove the batteries to prevent damage or injury from possible battery leakage.
• Do not try to recharge batteries not intended to be recharged; they can overheat and rupture. (Follow battery manufacturer's directions.)
• Please use caution when inserting batteries to avoid battery damage. If the spring terminal in the remote control remains in contact with a side of a
damaged battery it can cause a short circuit. Never use damaged batteries as they can become very hot and are dangerous.
• Never expose batteries(battery pack or batteries installed) to excessive heat such as sunshine, fire or the like.
Insert the battery into proper polarities
Battery model: Alkaline Battery 1.5V(AAA)
1
2

12
Display Mode
Turning the monitor on
1. Correctly insert the power cord into the monitor and into the power socket.
2. Press the power button on the bottom of monitor or front control panel.
Turning the monitor off
With the power on, press the power button on the remote or control keypad to place
the monitor backside in a standby mode. To turn off power completely, disconnect the
AC power cord or turn power switch off.
Selecting the input source
1. Using the remote, press SOURCE on the monitor backside keypad and toggle the
source button until you have reached the desired source, and press ENTER (VGA,
OPS, HDMI 2, HDMI 1, DP)
2. If the monitor cannot find a source, a “No signal” message will be appeared.

13
5. Touch Operation
No calibration is required first-time use. However, the touch system might need
calibration over time or when for instance a different resolution is used. Please find
calibration instructions below for the different operating systems:
Installation
1. Connect the signal cable to the monitor and then turn on the monitor.
2. Connect one side of the USB cable (type-B USB connector) on the monitor side.
(See “chapter 3, Signal Source Input” for exact location)
3. Connect the other side of the USB cable (type-A USB connector) to the computer.
4. Turn the computer on.
Windows 7, 8, 10 and Mac OSX (Version 10.10 ~ 10.12)
Window System: No need to install the driver and calibration, but if need to detail
calibration or improve performance, please install the driver.
MAC System: (Should be install the driver, if not, touch function is not working)
Windows 7 , 8, 10 and Mac OSX Calibration Procedure
1. Install and run the “Touch Win Setup” configuration program on the computer.
2. Press “Calibration”.
3. A black screen with one green and eight white calibration points appears.
4. Tap the green calibration point with your finger or Ergonomic Stylus shortly.
5. The cursor will move to the next calibration point. Repeat action 4 and move on to
the next indicated calibration point.
6. Repeat action 4 until you get to the last calibration point in the lower right-hand
corner.
7. When you complete the nine-point calibration, a conformation window appears.
Click done to accept the calibration; click Cancel or do nothing (in which case the
calibration window automatically disappears after five seconds) to cancel the
calibration.
8. The front B-type USB is for laptop touch. An USB is automatically connected
when you connect a laptop. The rear B-type USB is for PC. An USB is
automatically connected to laptop when you connect a laptop and PC at the same
time. Remove the laptop USB if you want to use a PC.
14
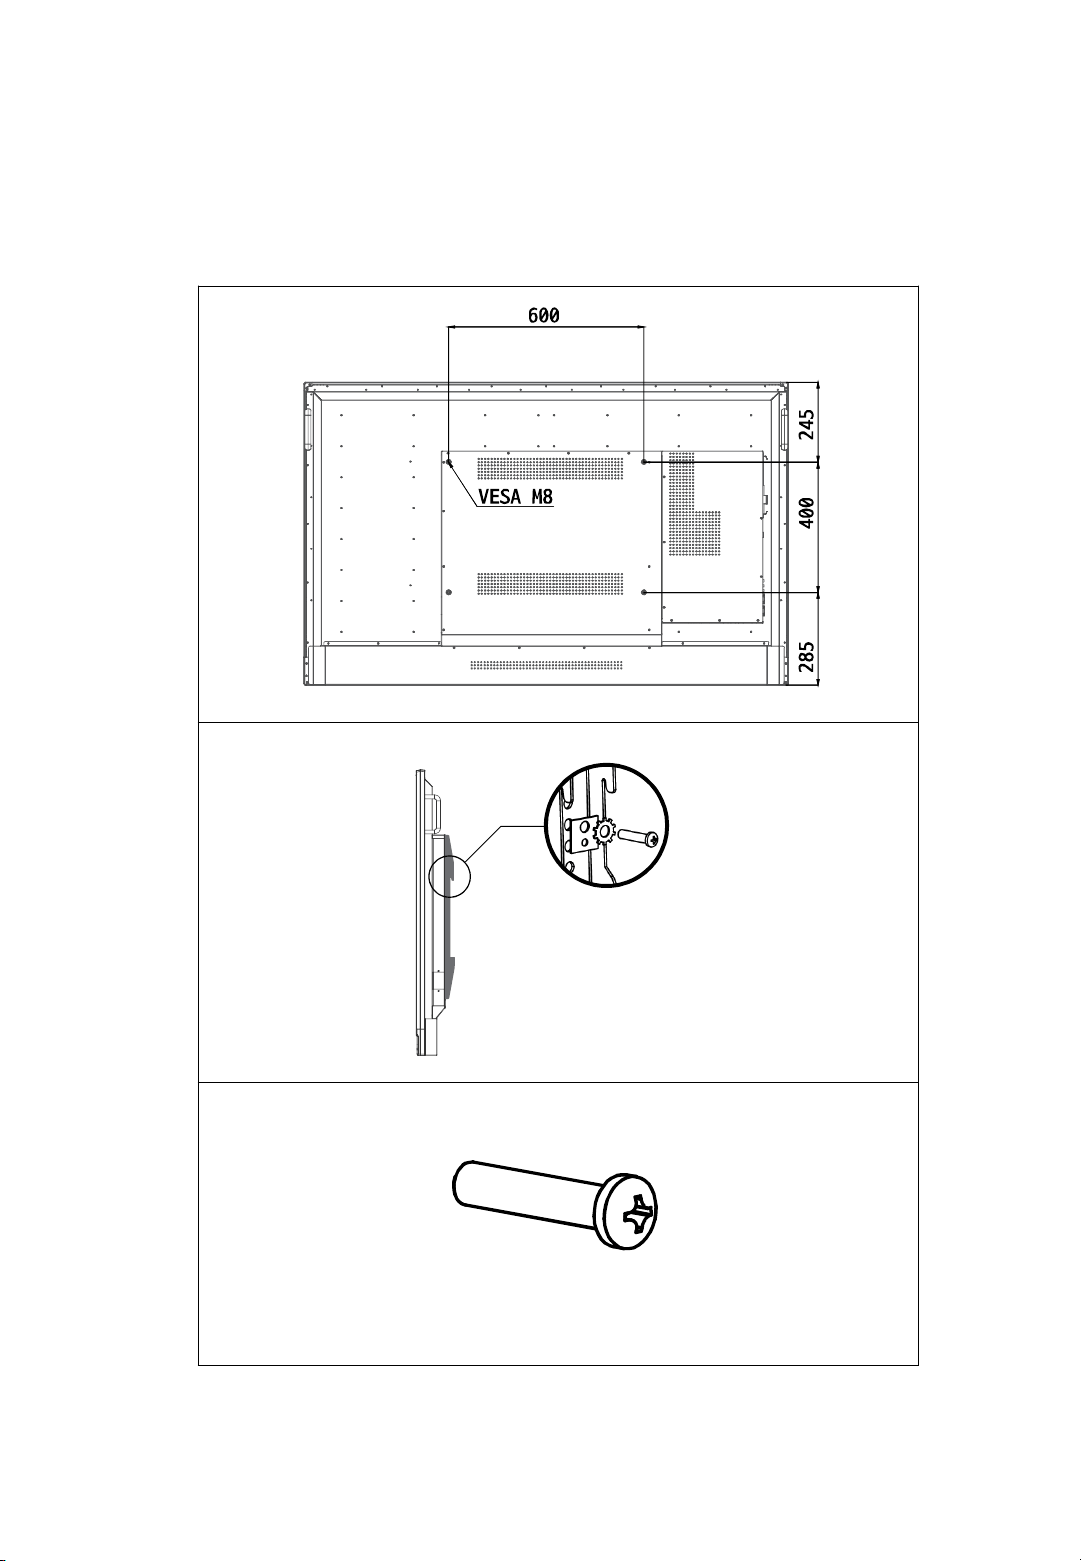
6. Wall Mounting
65”
VESA mount size: 600(W) x 400(H) mm
Separate wall mount screw and pipe from Monitor.
As shown below, wall mount bracket is assembled with screw and pipe. Pipe only use
the upper left and right and fixing screw is assembled attention to the screw length.
Screw Machine M8x25mm(4Pcs)

15
75”
VESA mount size: 600(W) x 400(H) mm
Separate wall mount screw and pipe from Monitor.
As shown below, wall mount bracket is assembled with screw and pipe. Pipe only use
the upper left and right and fixing screw is assembled attention to the screw length.
Screw Machine M8x25mm(4Pcs)

16
86”
VESA mount size: 800(W) x 400(H) mm
Separate wall mount screw and pipe from Monitor.
As shown below, wall mount bracket is assembled with screw and pipe. Pipe only use
the upper left and right and fixing screw is assembled attention to the screw length.
Screw Machine M8x25mm(4Pcs)
17
7. Trouble Shooting
Before calling service personnel, please check the following chart for a possible
cause to the trouble you are experiencing.
Perform the adjustments according to the instructions on the “Operating the monitor
page”. If the problem you have experienced isn’t described below or you can’t correct
the problem, stop using the monitor and call service personnel or your dealer.
Problem
Check these things
No Display
Ensure the power plug is installed correctly at
both ends. Make sure the signal cable is
installed correctly at both ends. Check that
source equipment is operating correctly. Check if
the input signal is compatible with this display.
The image is not centered
Chec
k if the input signal is compatible with this
display.
The image is not locked
correctly
Chec
k if the input signal is compatible with this
display
If the
remote control
doesn’t work,
make sure the batteries are new
and installed correctly.
Ensure the remote is aimed at the IR sensor on
the front of
the display
The picture color looks poor
Check the picture settings and reset the display

18
8. Compliance and regulatory information
FCC Compliance Statement:
This equipment has been tested and found to comply with the limits for a Class A
digital device, pursuant to part 15 of the FCC Rules. These limits are designed to
provide reasonable protection against harmful interference when the equipment is
operated in a commercial environment. This equipment generates, uses and
can radiate radio frequency energy and, if not installed and used in accordance with
the quick setup guide and user manual, may cause harmful interference to radio
communications. Operation of this equipment in a residential area is likely to cause
harmful interference in which case the user will be required to correct the interference
at their own expense.
Warning
This is a Class A product. In a domestic environment this product may cause radio
interference in which case the user may be required to take adequate measures.
This device complies with Part 15 of the FCC Rules.
Operation is subject to the following two conditions :
1) this device may not cause harmful interference, and
2) this device must accept any interference received, including interference that may
cause undesired operation

Rev 001.HAUL