Owner's Guide Dishwashers
OPERATING INSTRUCTIONS - STARTING A WASH
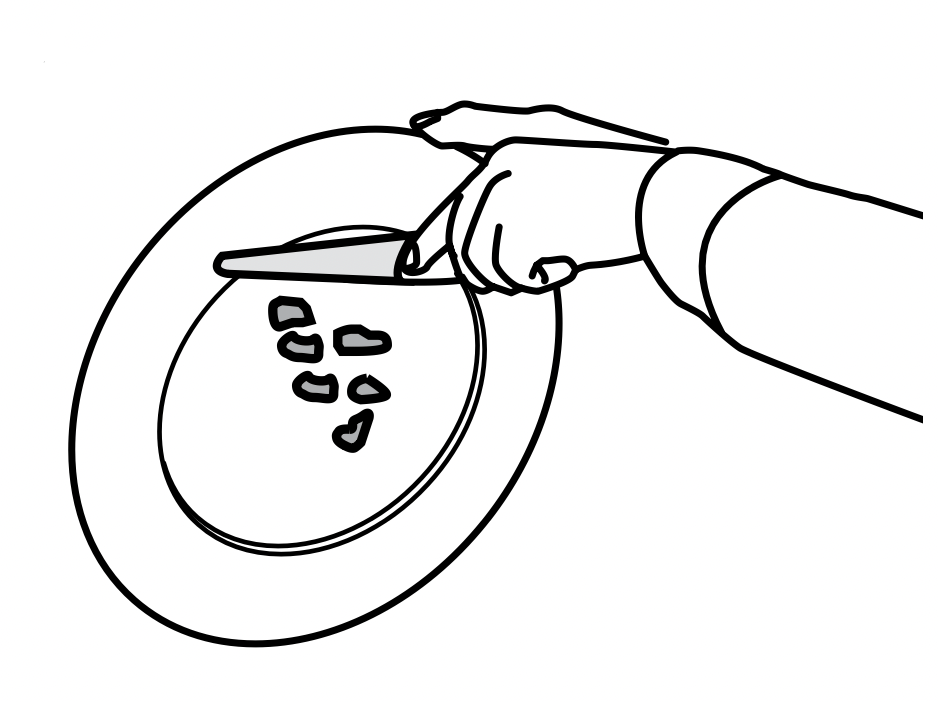
- Discard scraps
Scrape large food particles off (e.g. bones, fruit stones) and remove any foreign objects (e.g. toothpicks, strings, paper).
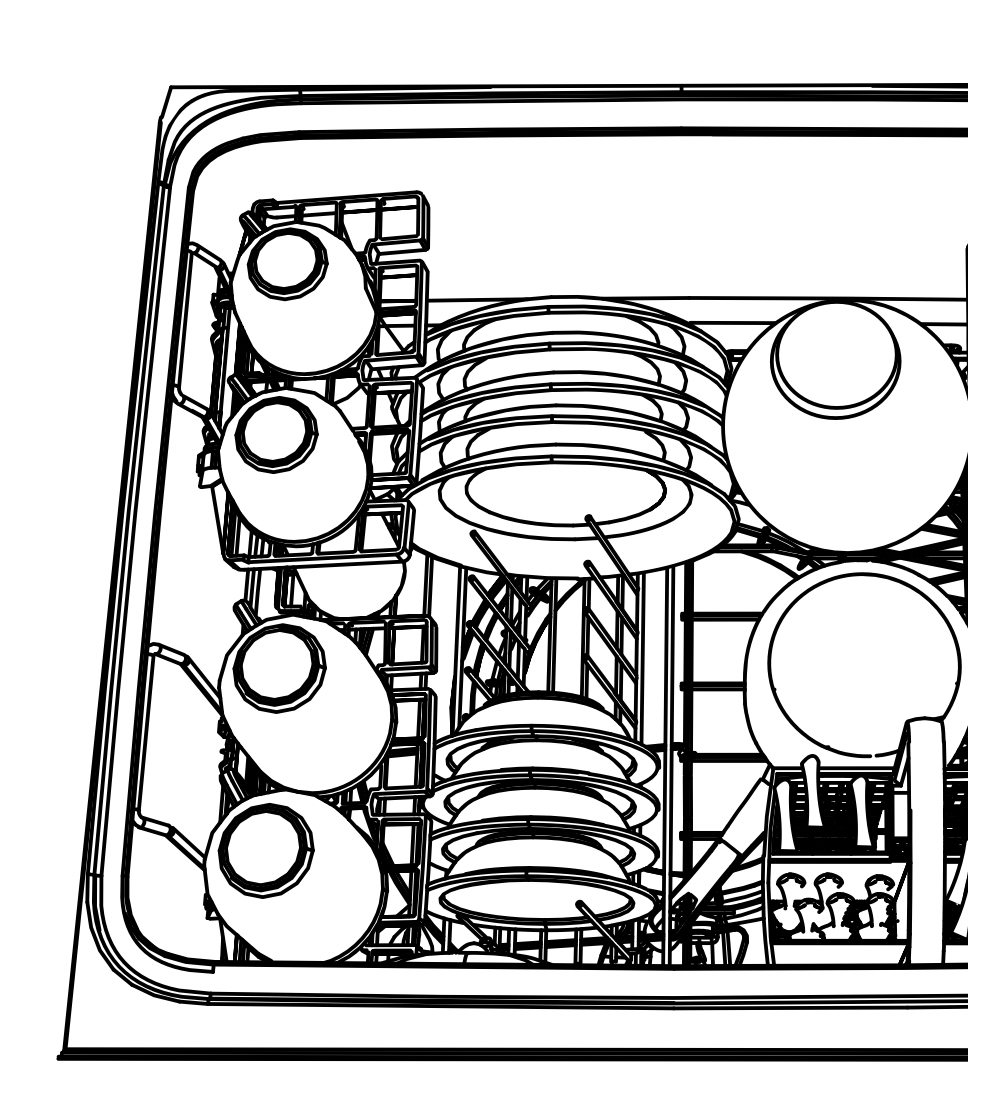
- Load dishes carefully
To help with wash performance, arrange dishes so they are evenly spaced and not nesting.
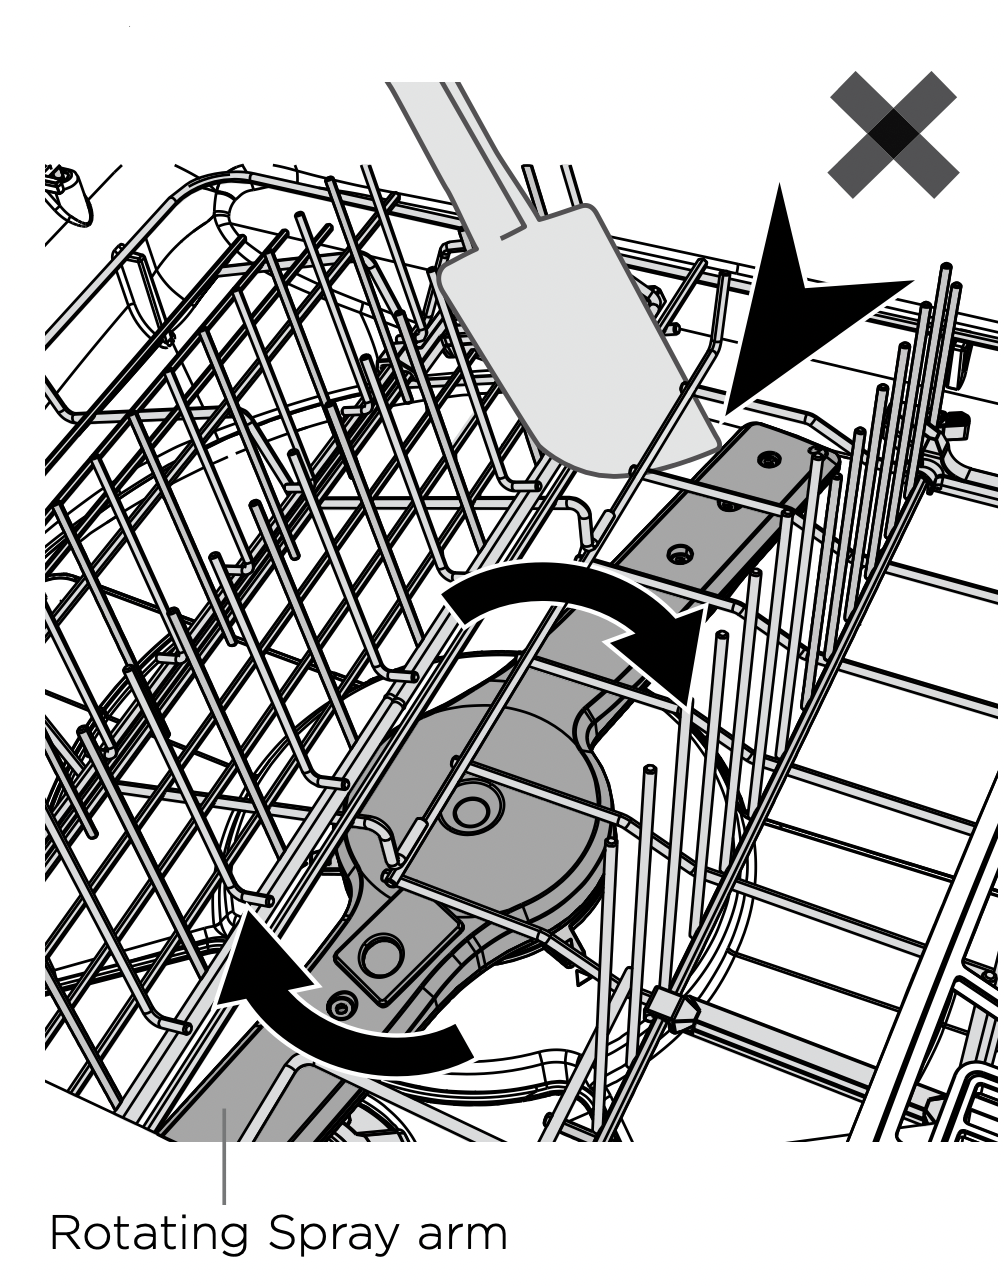
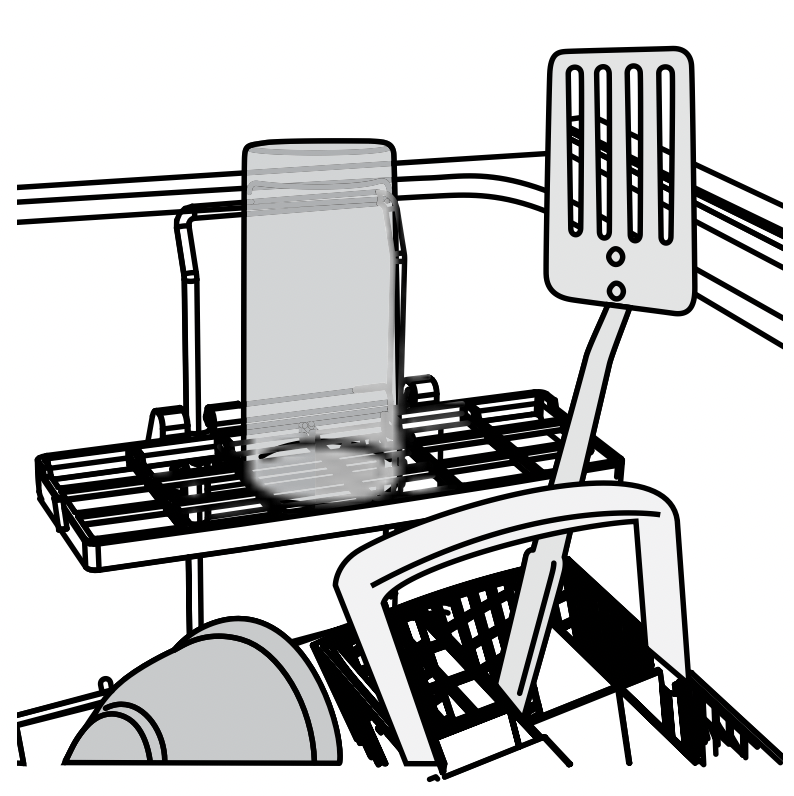
- Check spray arm(s) are mounted correctly and can rotate fully around
Check the spray arm is mounted correctly by physically rotating it around with your hand.
Before a wash, ensure there are no items blocking the spray arm(s) from rotating.
- Add detergent
Fill the detergent dispenser (A) with powdered detergent and close the dispenser door.
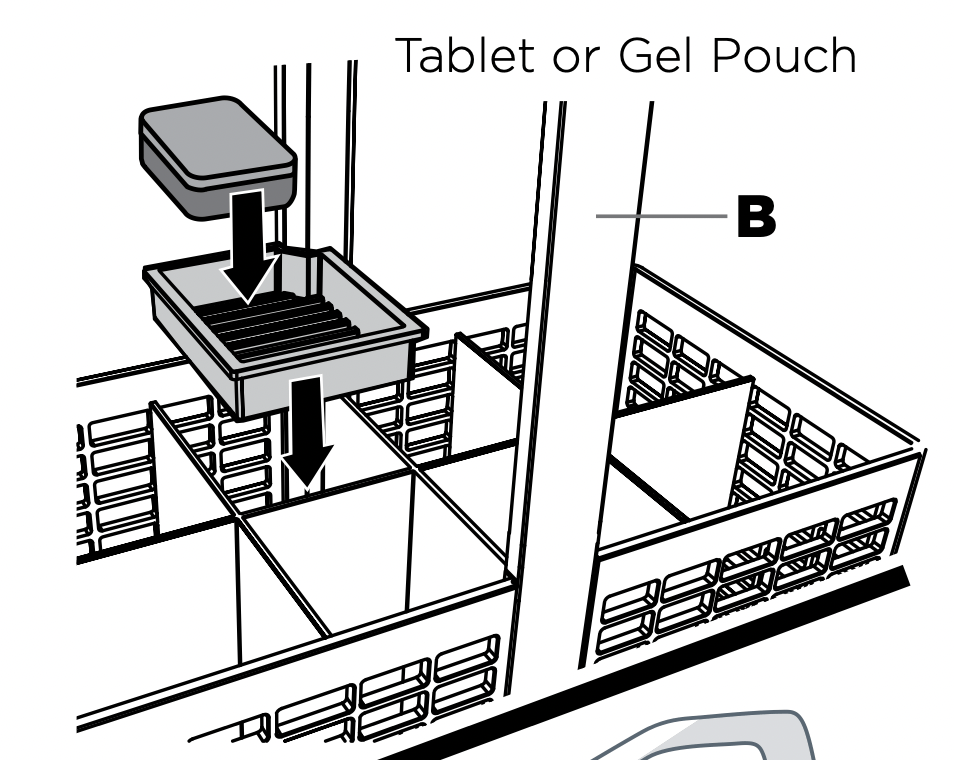
IMPORTANT! Do not place liquid detergent or tablets in the detergent dispenser.

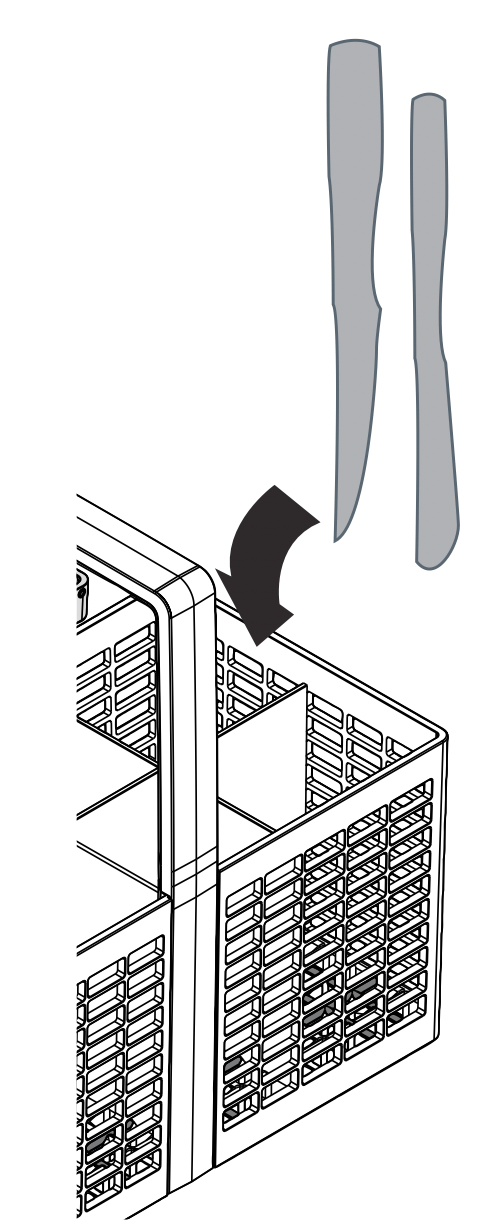
If using a tablet or gel pouch, place it in the cutlery basket (B) or at the bottom of the drawer.
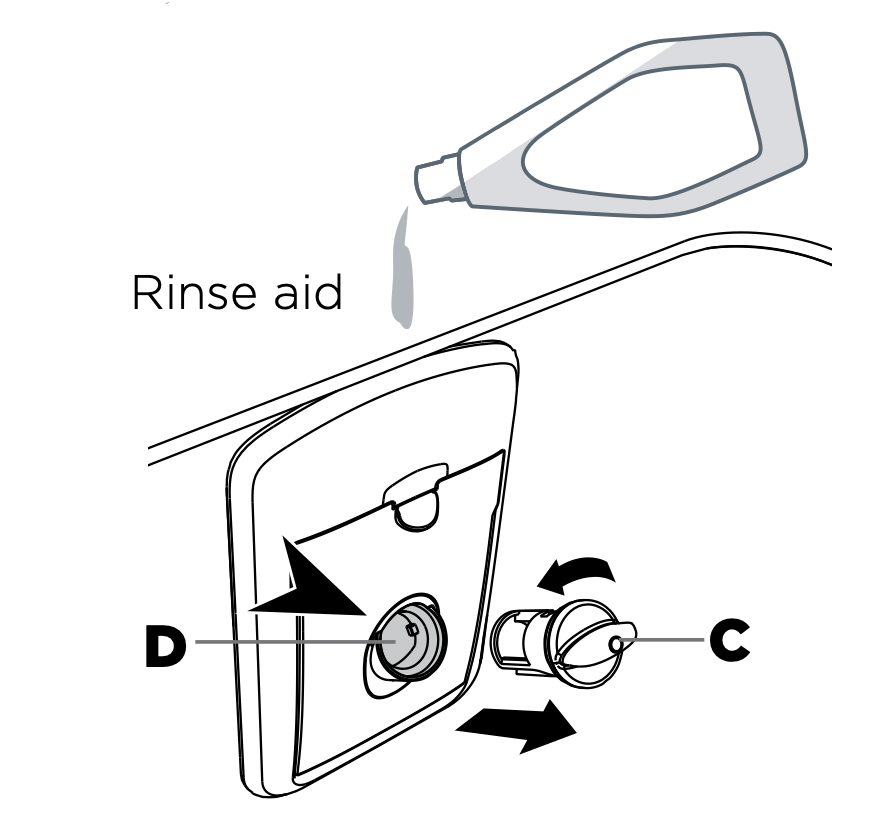
Check rinse aid
If the indicator on its plug (C) glows bright red, refill the rinse aid dispenser (D) with liquid rinse aid. Make sure you then refit the rinse aid plug back into its original position, by rotating the plug back into an upright position.
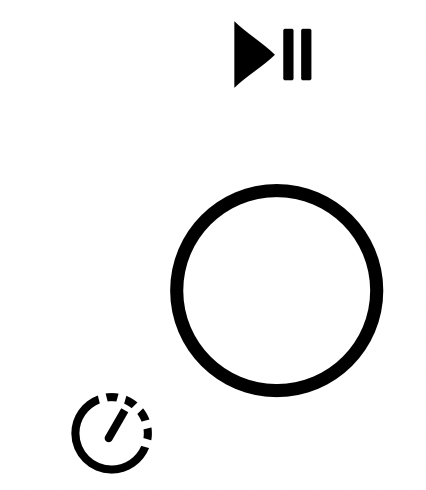
- Select wash
Power the dishwasher on  then select wash program
  .
.

- Start wash or set Delay start
To start wash: Close the drawer and press  .
.
To set delay start: Press and hold  to enter delay start, then press and hold
  again to increase the delay start time.
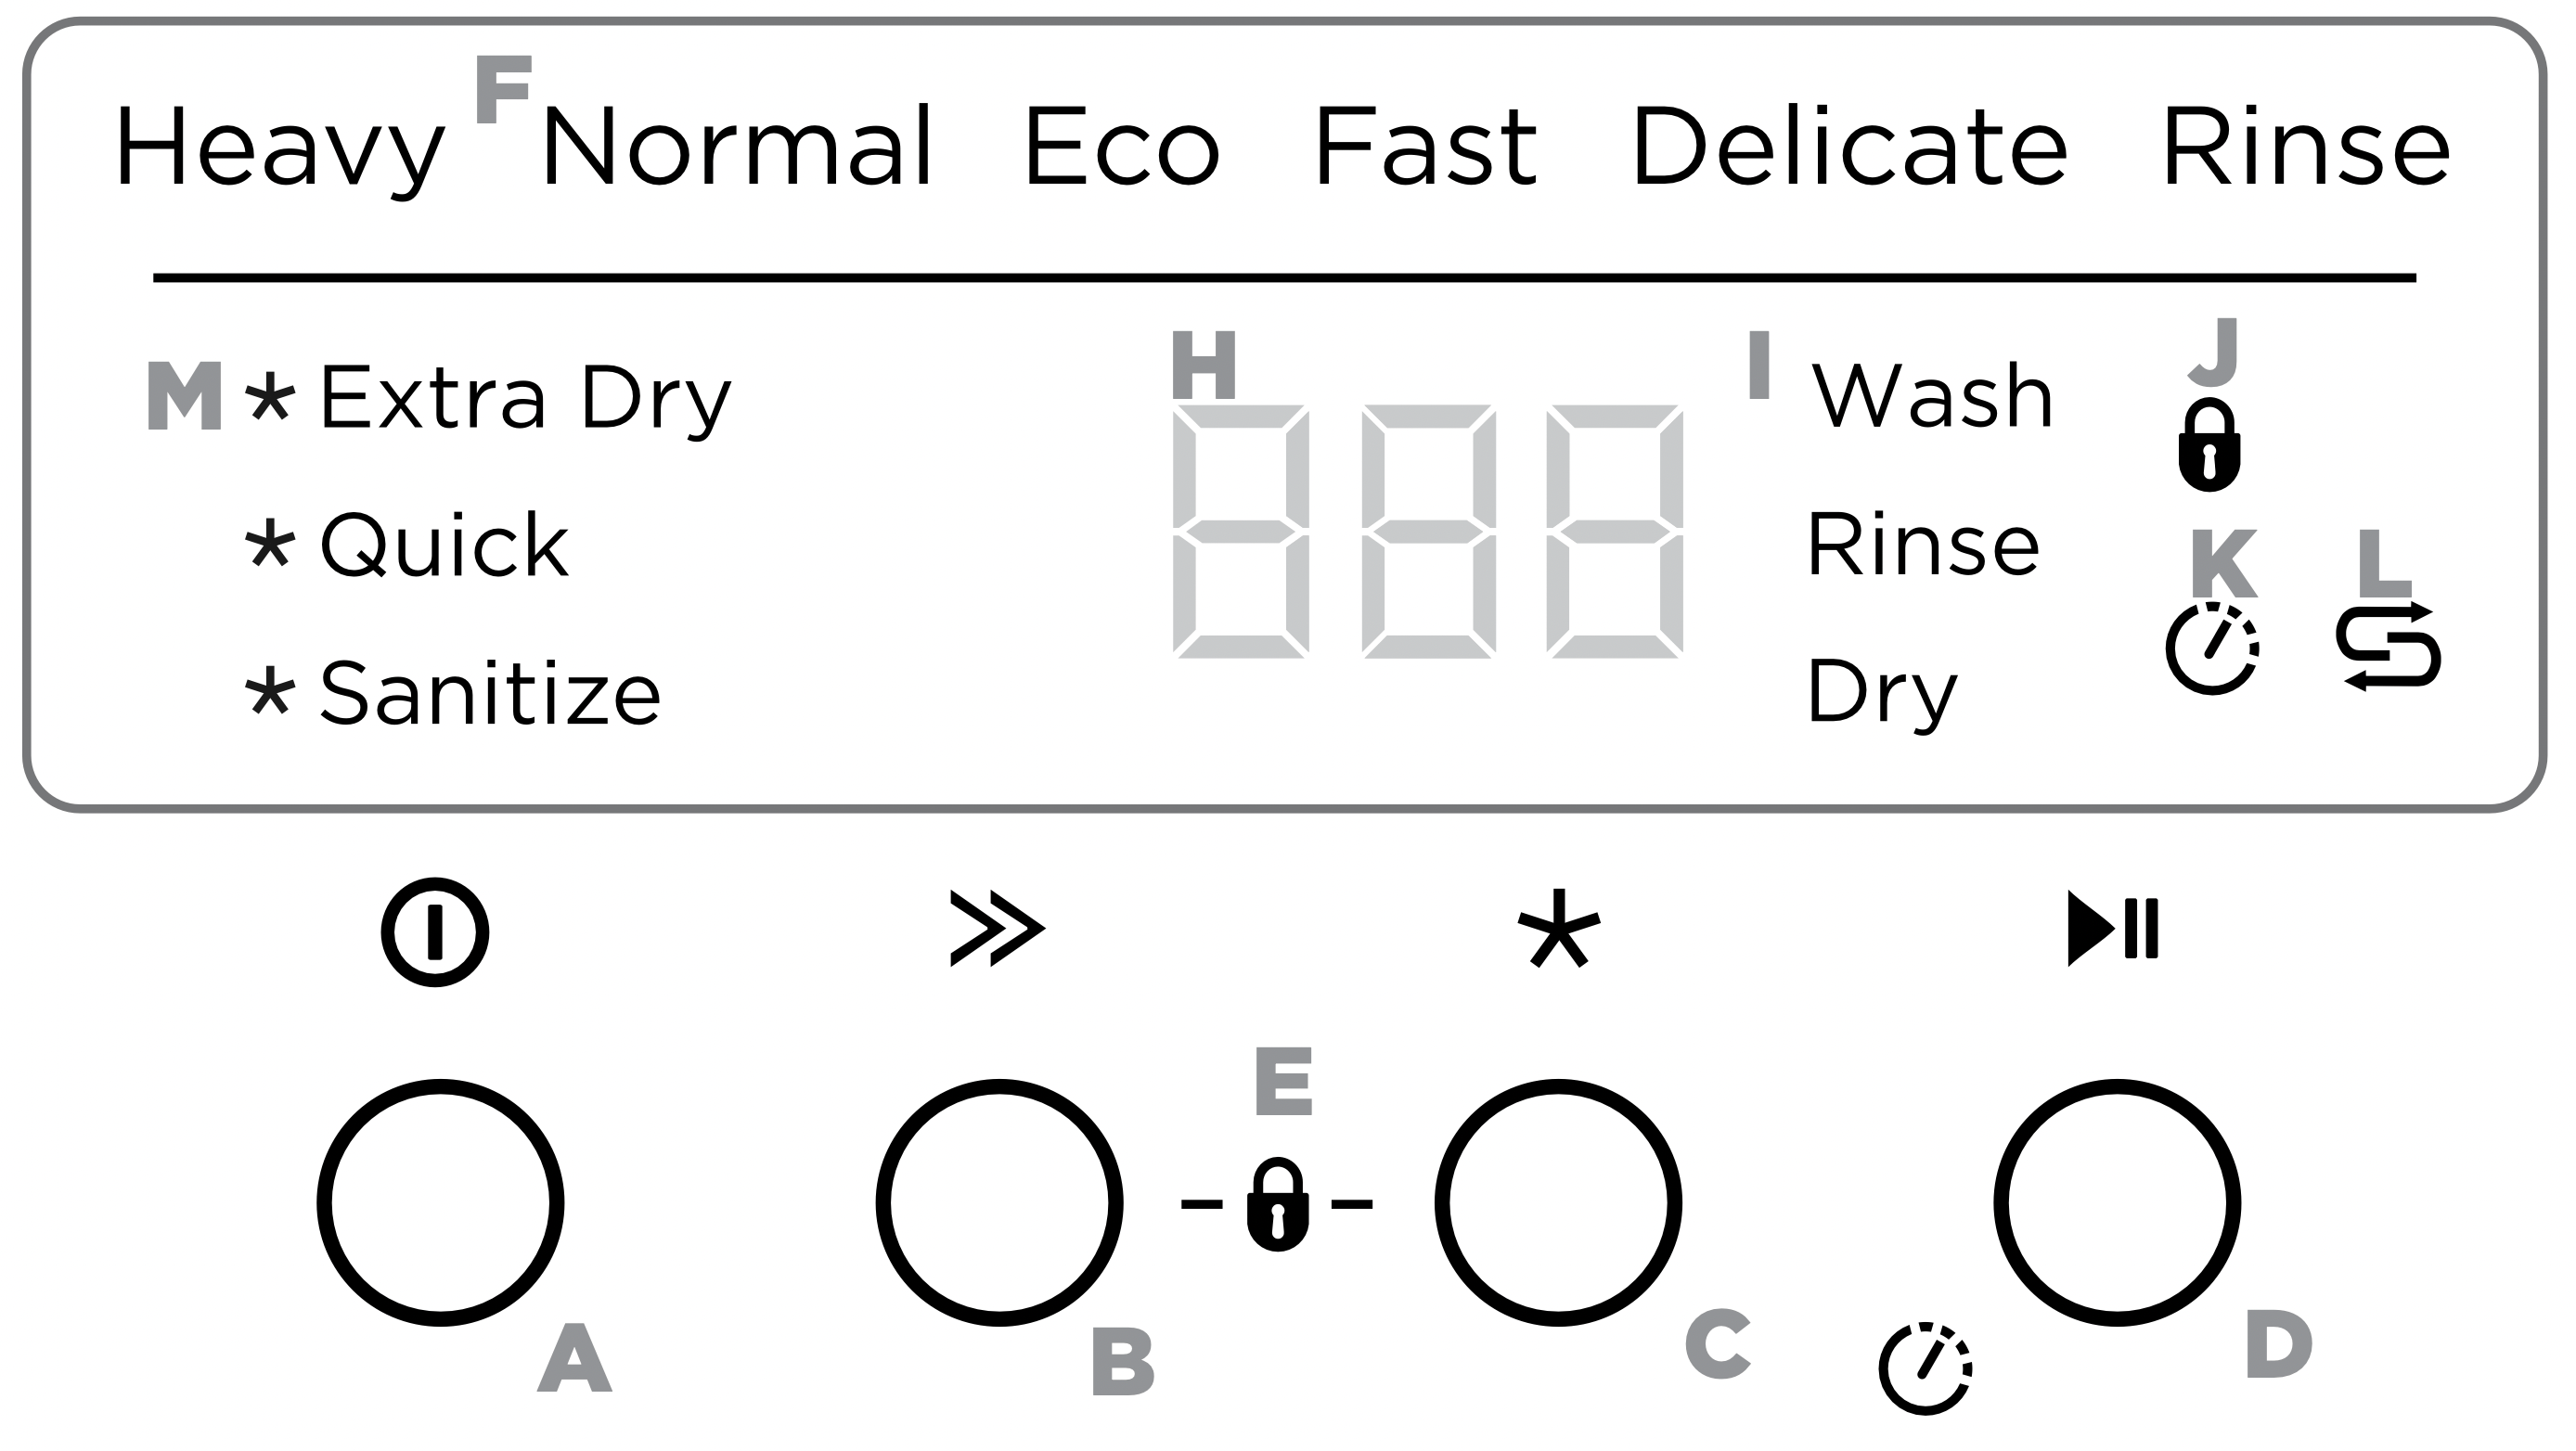
CONTROLS AND DISPLAY
Single models
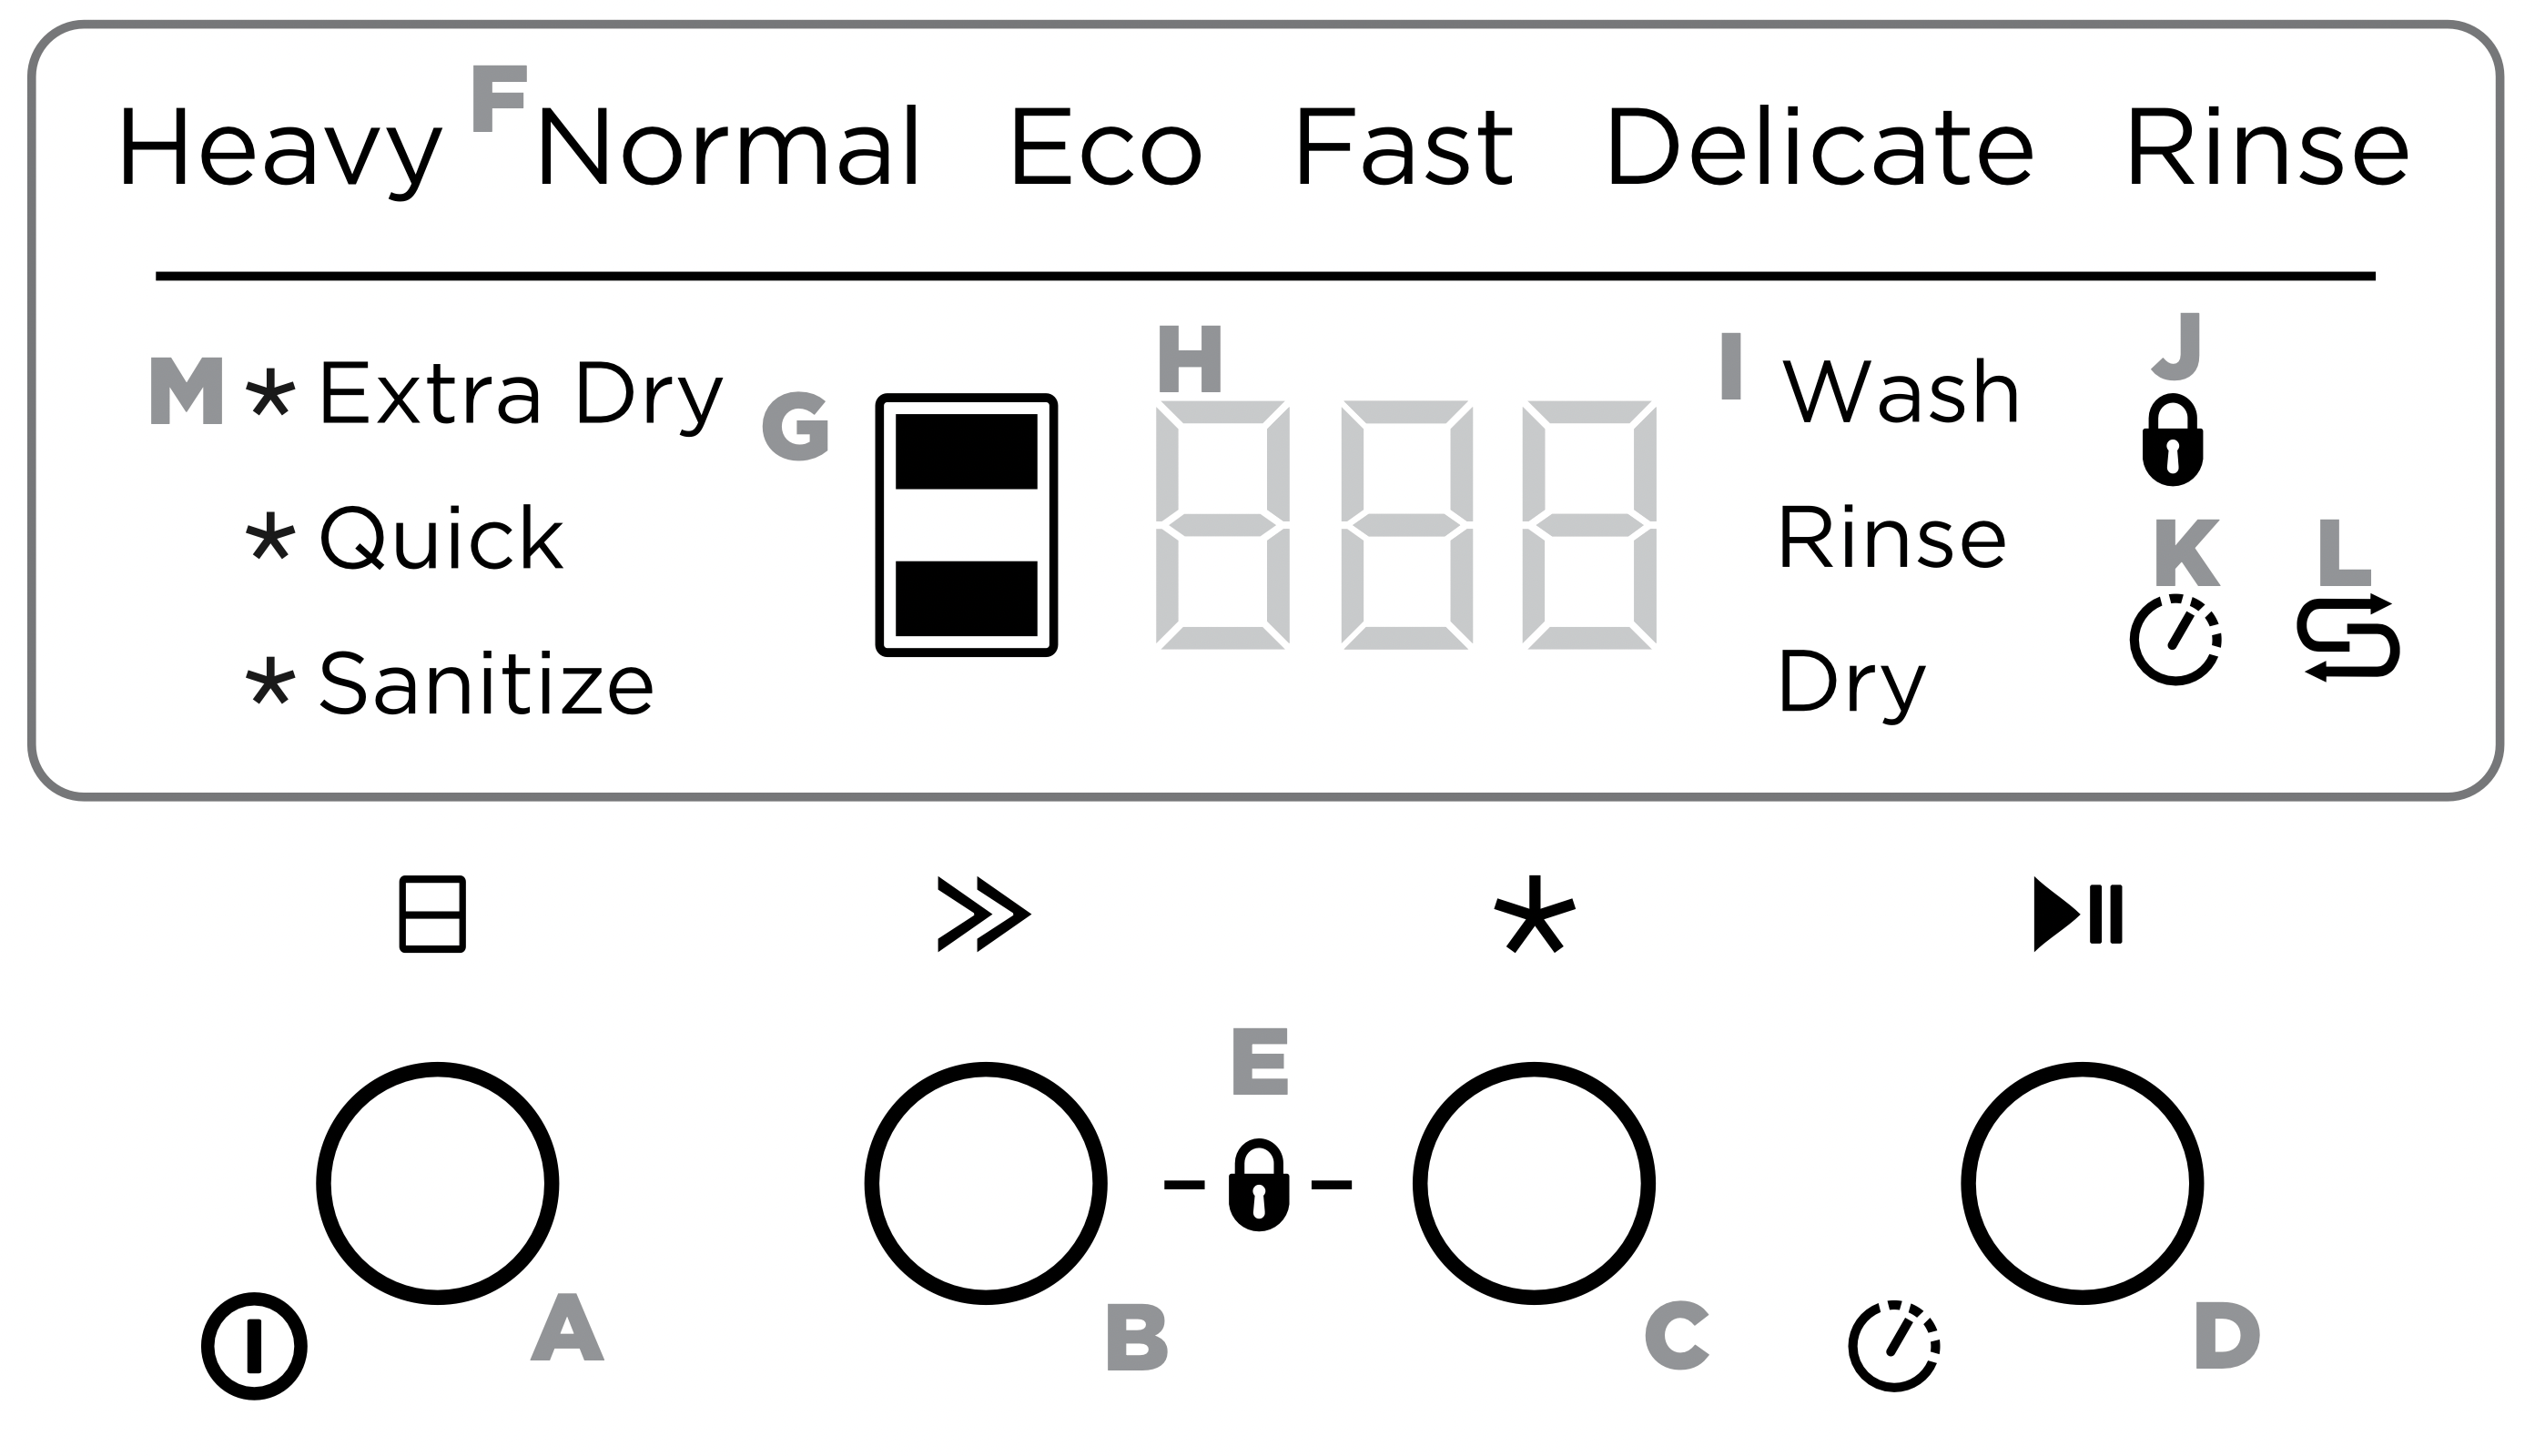
Double models
Controls Description
A. Off/On
Opening the drawer will automatically turn the dishwasher on.
Single models:
Press  to turn the dishdrawer on or off.
Double models:
- Press
 to turn the dishdrawer on.
- Press and hold
 to turn the dishdrawer off.
Drawer selector (Double models only)
Press  to scroll between drawers.
B. Wash selector
Press  to scroll through wash program options.
C. Wash modifiers selector
Press  to scroll through the wash modifier options.
Note: Not all modifiers are available for all wash programs.
D. Start / Delay Start
Press  to start the wash.
To pause: Press  again. The wash stage indicator and
  (Double models) will flash.
- Wait for the 3 short and one long tone before opening the drawer. Forcing it open mid cycle may cause damage or injury.
- If the drawer is not restarted within 7 minutes it will tone intermittently until it is restarted.
To Delay start 
- Press and hold
 until
until  appears on the display, then release. You are now in Delay start mode.
- Press
 until the display shows the number of hours you want to delay the start of a wash by (1 to 12 hours).
- Note: If you scroll past 12 hours the dishwasher will exit Delay start mode. To re-enter delay start follow step 1 above.
- The wash will start once the delay time is over, provided the drawer is closed.
DD24 models only
If the drawer is opened after delay start has been set (for example if you need to load more dishes), delay start will be paused after the drawer is closed.
To restart delay start:
Close the drawer.
- Single models:
 will flash.
- Double models:
 and
and  will flash.
- Press
 to resume.
Cancel wash / Cancel Delay start
Single models:
Press  to cancel a wash that has already started or to cancel the Delay start setting.
Double models:
Press and hold  to cancel a wash that has already started or to cancel the delay start setting.
- If there is any water in the drawer, it will automatically drain before the dishwasher turns off.
E. Keylock
Keylock disables all the buttons helpful when cleaning the dishwasher.
To activate: press and hold  and
and  together until you hear one tone. The keylock indicator
  will come on.
To cancel: press and hold  and
and  together until you hear another tone and the keylock indicator stops flashing and goes out
Childlock
Childlock disables all the buttons and locks the drawer closed, preventing unauthorized use by children.
To activate: press and hold  and
and  together until you hear a second tone. The keylock indicator
  will come on.
To cancel: press and hold  and
and  together until you hear another tone and the keylock indicator stops flashing and goes out.
F. Wash program indicators
These show which program is selected.
G. Drawer indicator (Double models only)
White: drawer is running and selected.
Dim: drawer is running but not selected.
Flashing: drawer is paused
H. Display
- Time remaining (minutes)
- Fault code numbers (see ‘If there is a fault’ in User guide).
I. Wash stage indicators
(See ‘During and after the wash cycle’).
J. Keylock/Childlock indicator
If lit: keylock or childlock is activated.
K. Delayed start indicator
If lit: delayed start is set.
L. Salt indicator
(Water softener models only)
If lit: salt reservoir is empty.
M. Wash modifiers indictors
If lit: wash modifier is selected.
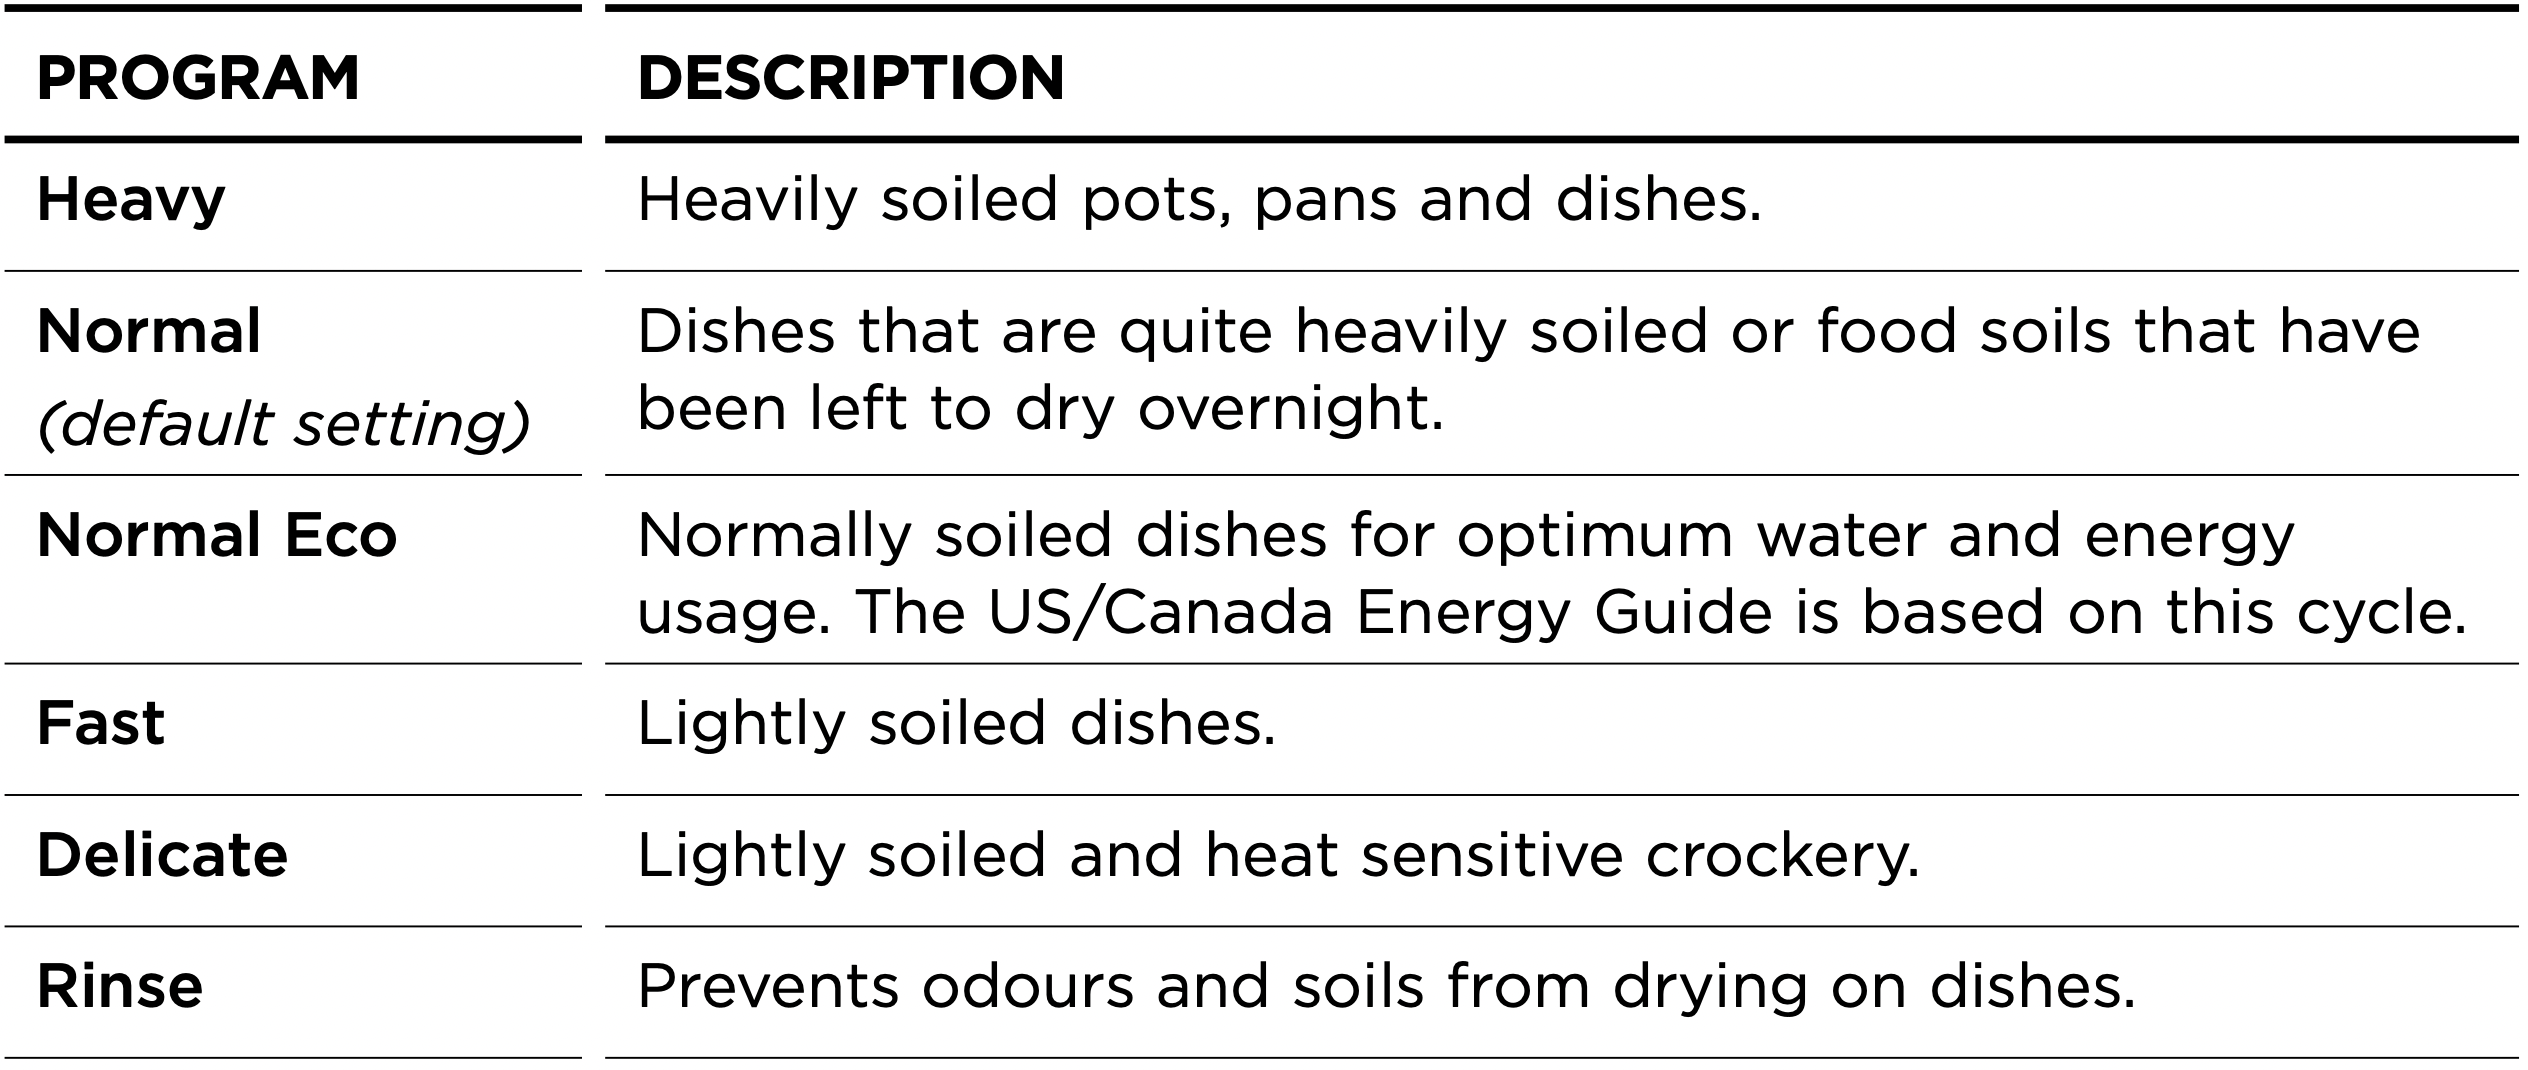
WASH PROGRAMS
Double models interface shown
Wash program indicators
These show which program is selected.
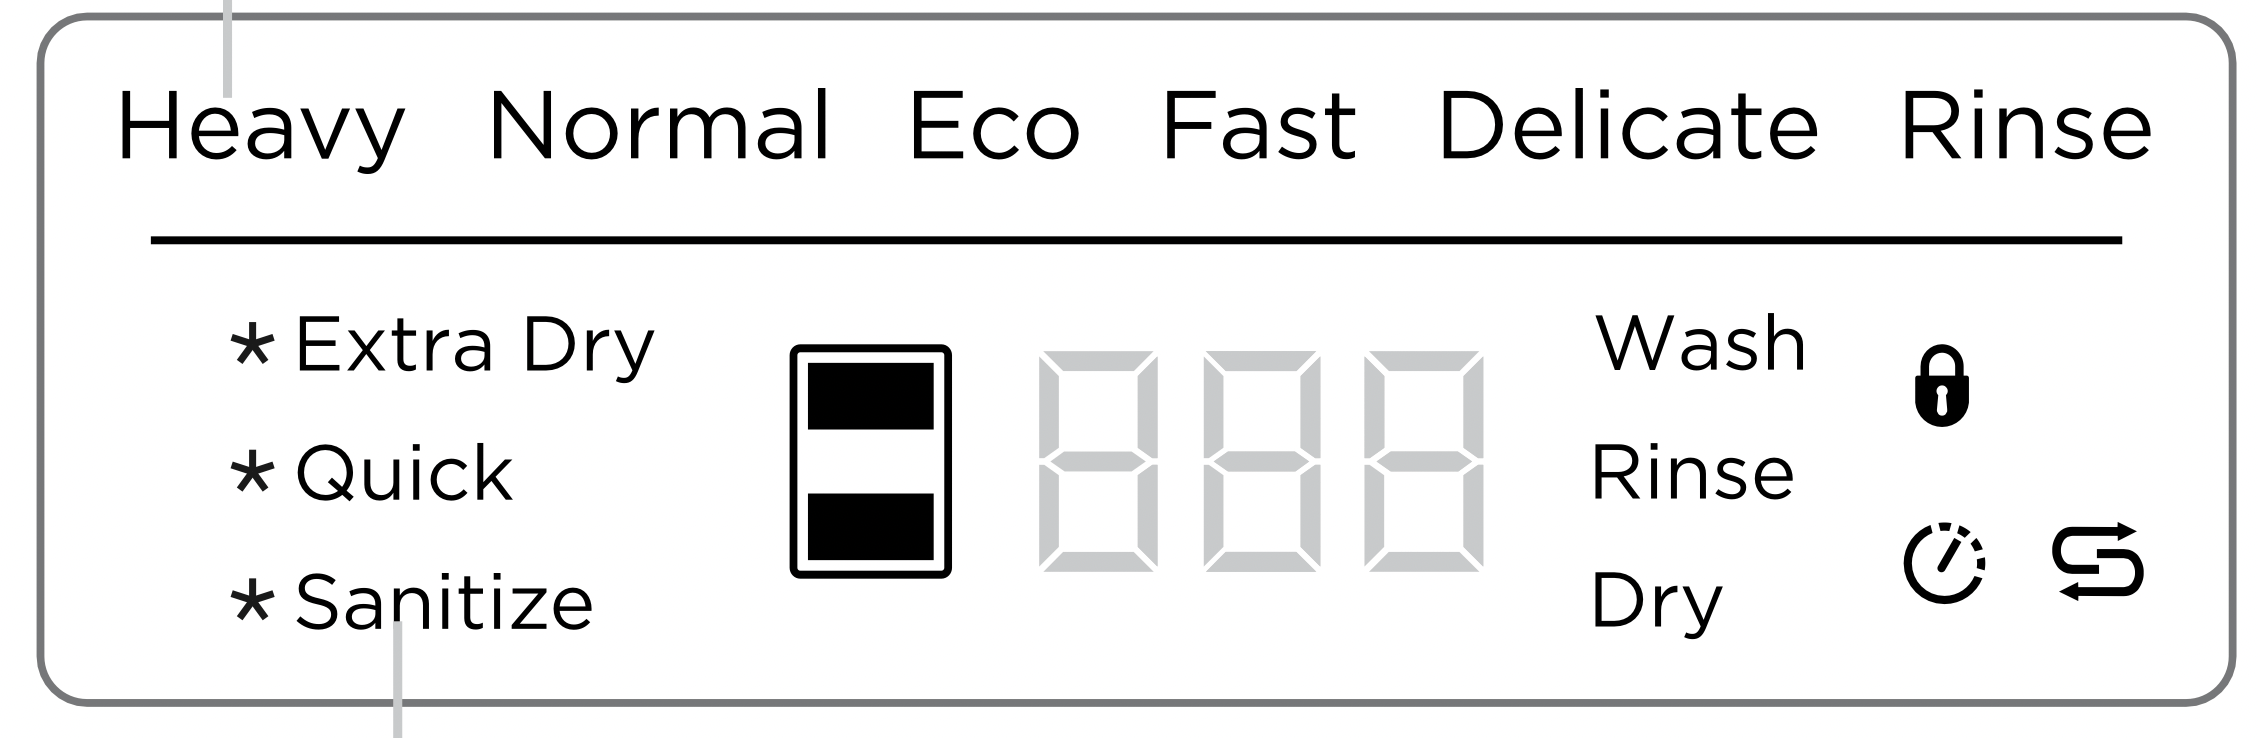
Wash program modifiers (optional)
These show which wash modifier is selected (see ‘Setting wash modifiers’ in your User guide).
DURING AND AFTER THE WASH
As the wash progresses, the display will count down the minutes remaining and show what stage the program is at. When the program has finished, the display will show  and the dishwasher will sound a tone.
After 30 seconds the display will go out.
You may notice the following noises at the end of the wash. These are all part of normal operation:
- Both drawers may be draining simultaneously.
- The drying fan may continue to run after a wash program has finished for a set time or until the drawer is opened.
The fan assists with drying and uses negligible amounts of energy.
For best drying results, we recommend unloading the dishes once they have cooled.
DOS AND DON’TS OF LOADING
| DOS |
DON’TS |
|
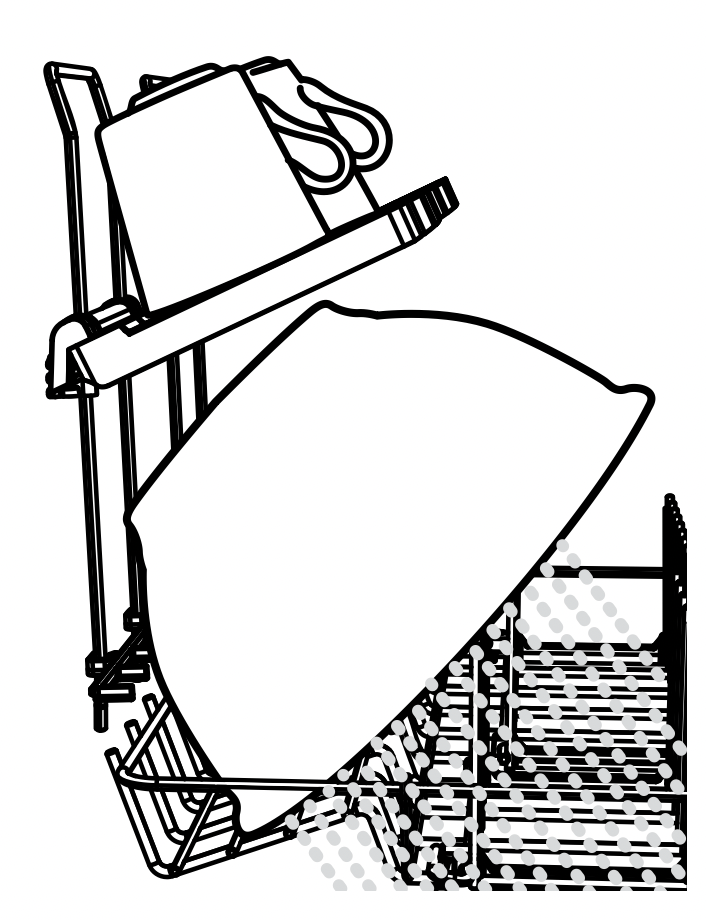
Sharp or pointed items must be placed horizontally or with sharp edges/points facing down to avoid risk of injury.
|
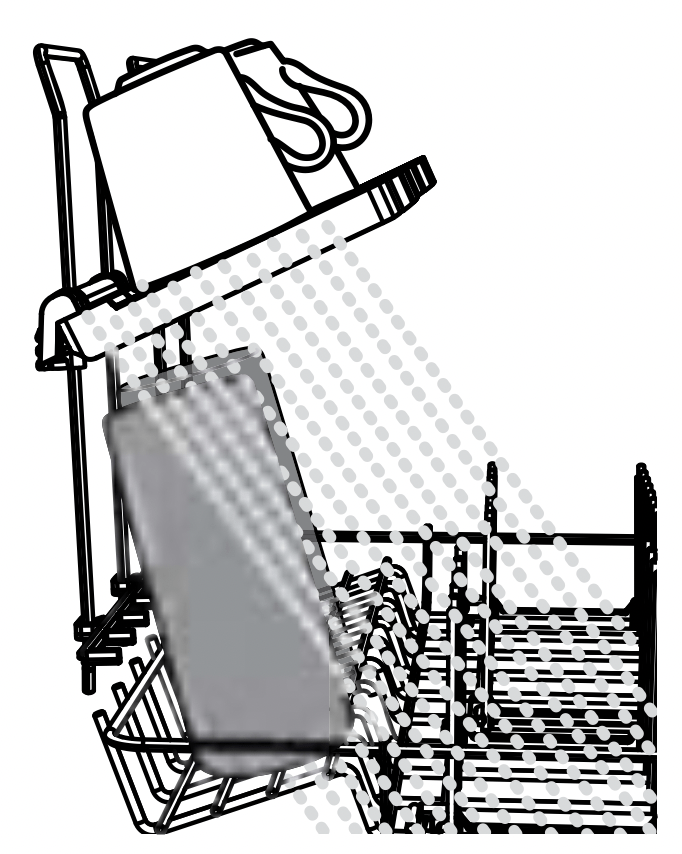
Protruding items will stop the internal lid of the dishwasher from sealing properly, which could result in a service call.
|
|
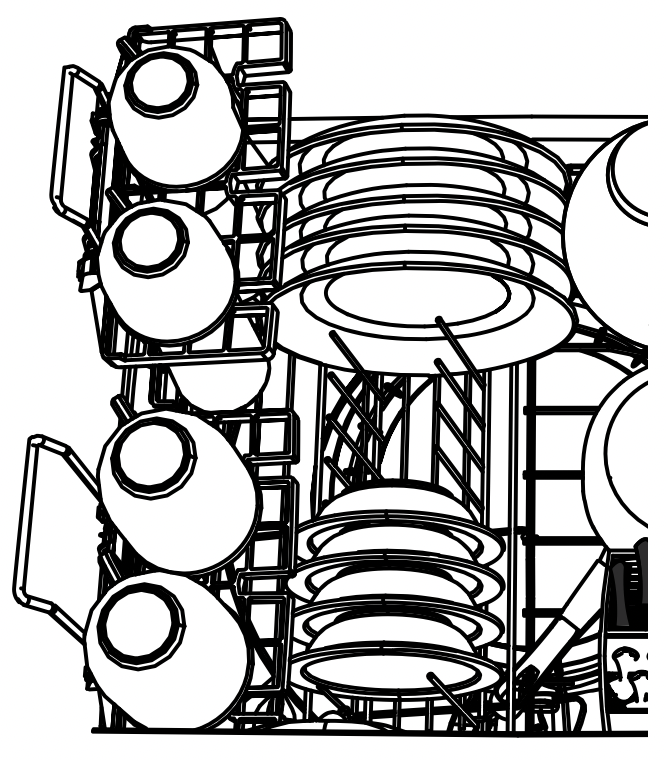
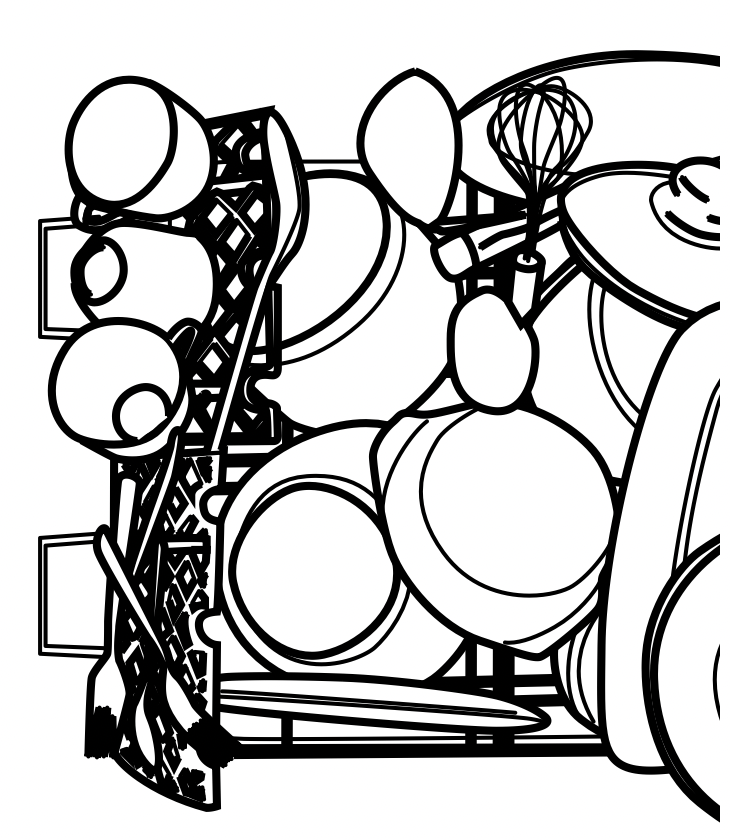
A neatly arranged load with evenly spaced dishes helps wash performance.
|
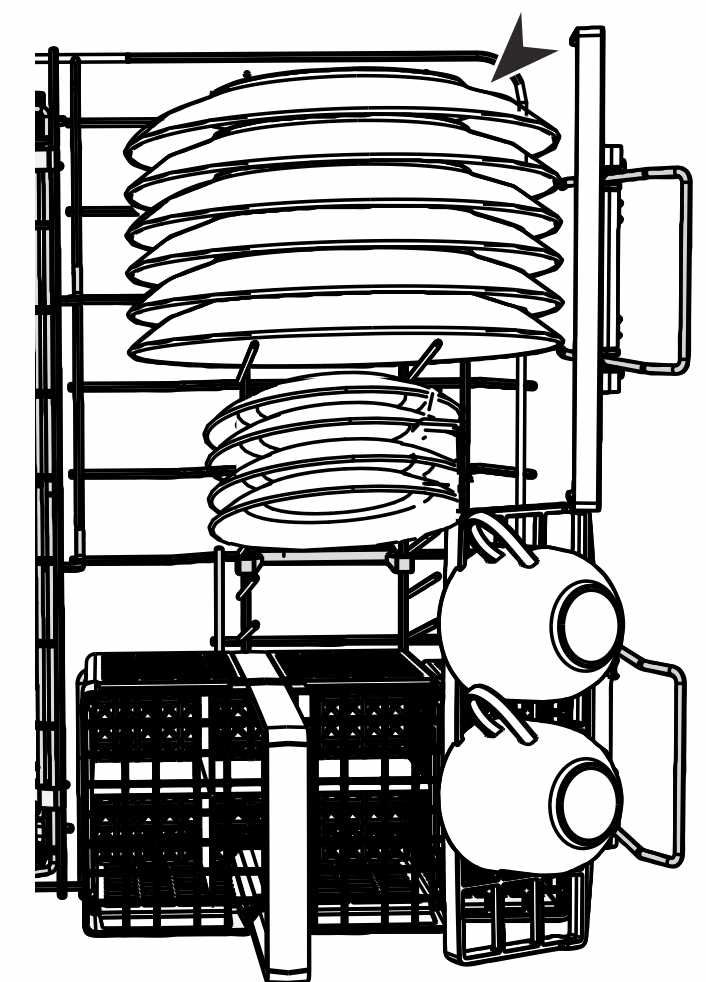
Overcrowding reduces wash performance.
|
|
Ensure there is enough space between plates. Mix spoons, knives and forks within the cutlery basket to prevent them from nesting.
|
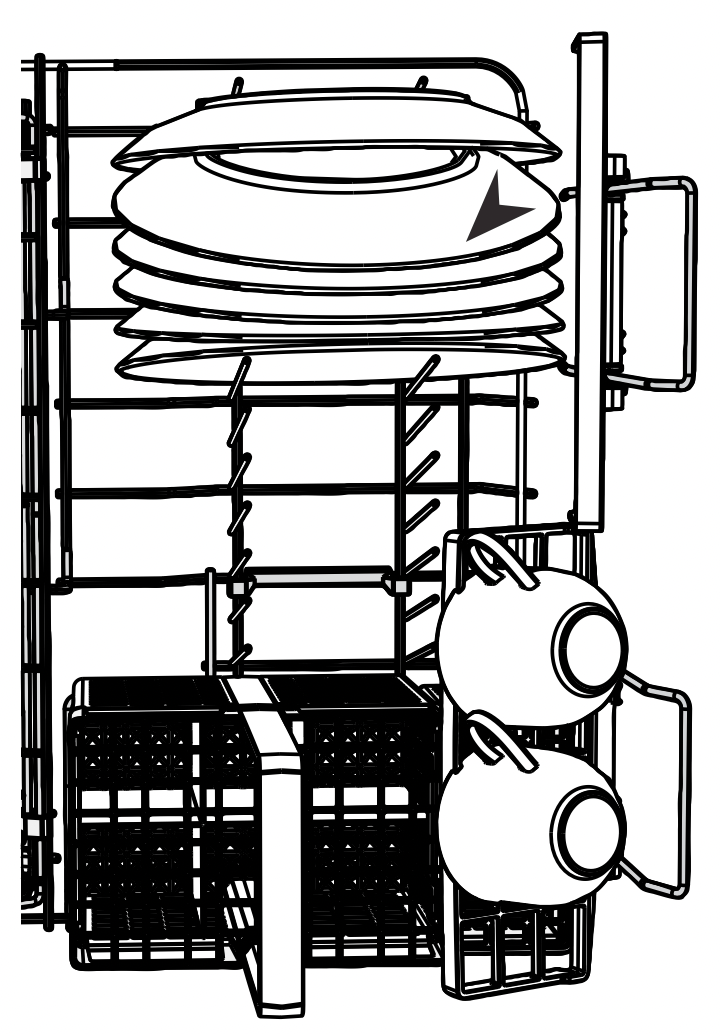
If plates and cutlery are nesting, they are less likely to be cleaned well.
|
|
Ensure that water reaches all items on the racks.
|
Dishware is blocking water from reaching items on the racks.
|
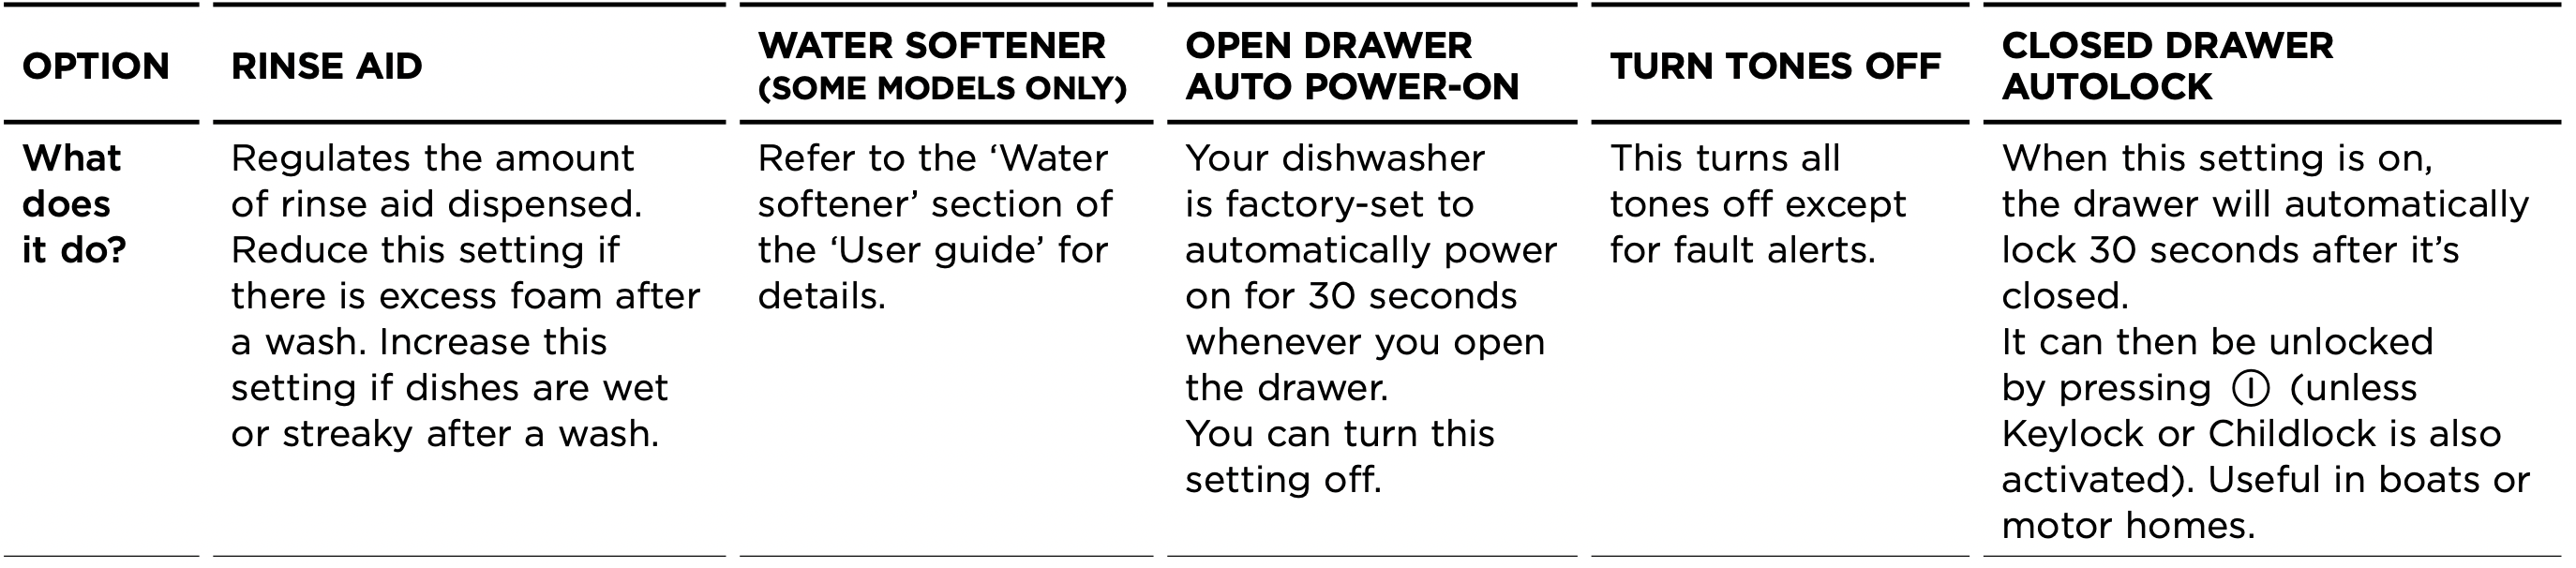
PREFERENCE OPTIONS
You can change the setting of these options to suit your preferences or circumstances. We recommend selecting the most suitable settings before you start using your dishwasher.
How to change the setting of an option
- CHECK
Check that there is no wash underway, press 
- ENTER MENU & SCROLL TO OPTION
To enter the menu: Press and hold the  and
and  together for four seconds.
You are now in the Rinse aid option of the preference options menu.
If you want to change the Rinse aid setting, go to step 3 now.
If you want to change the setting of another option, you will need to scroll to that option first.
To scroll to the next option: press  . To know which option you’re in, watch the letters in the display (see table below). When you have scrolled to the end of the sequence, the menu will start again with Rinse aid.
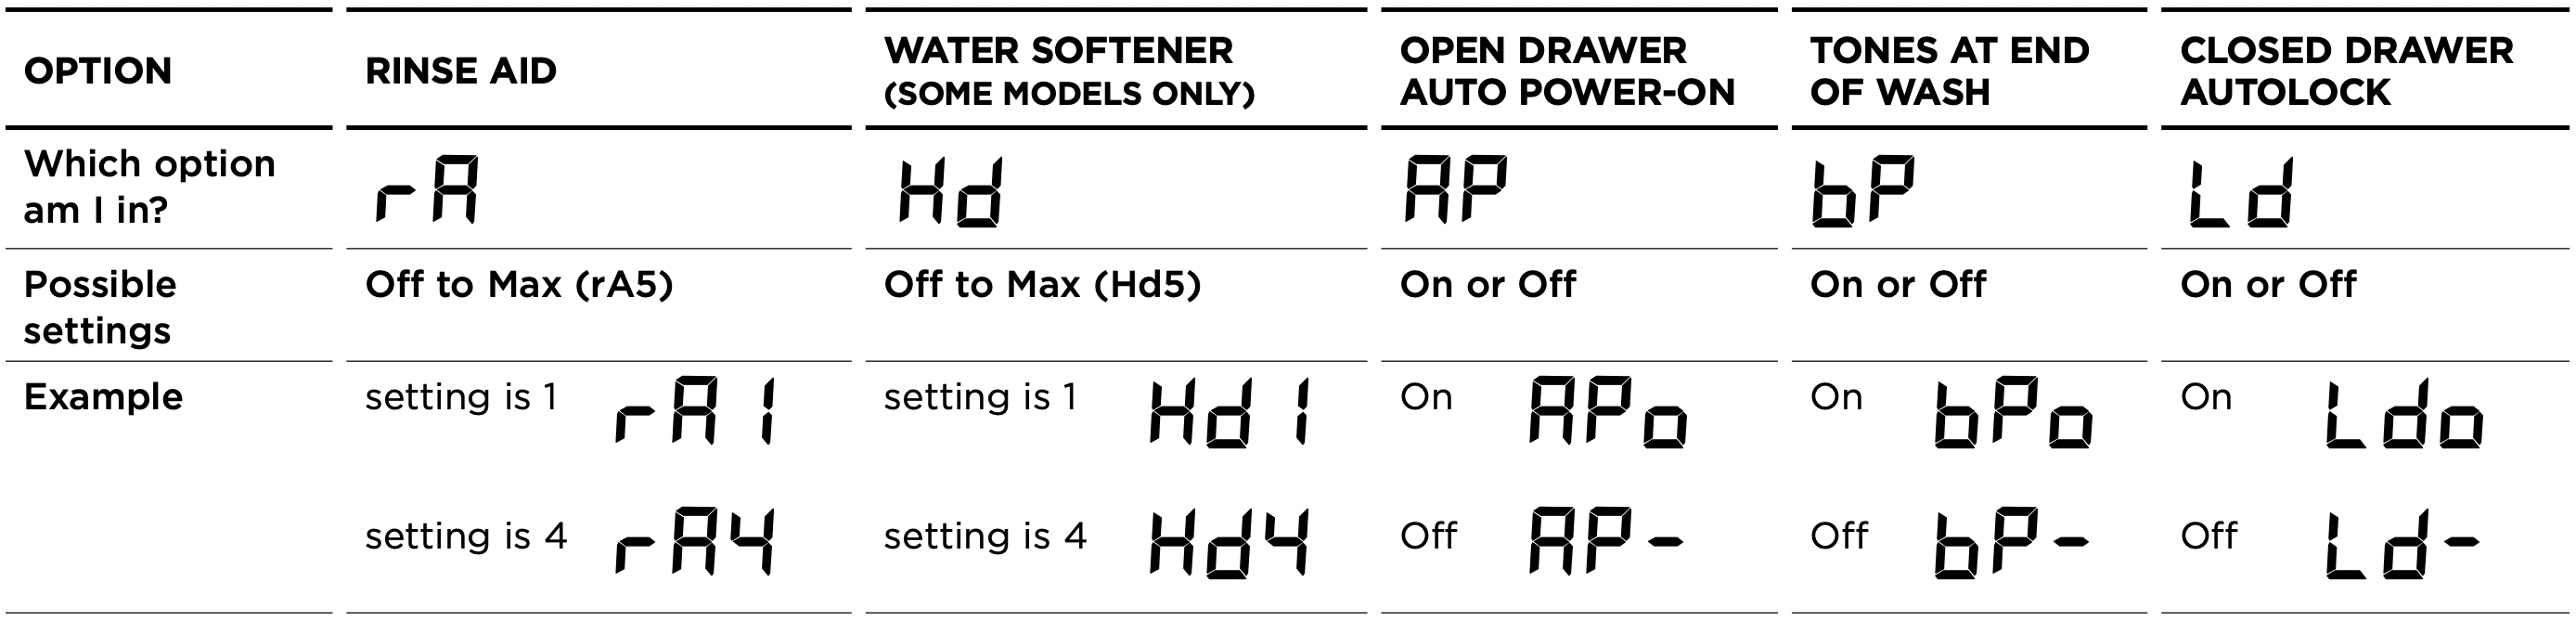
- CHANGE SETTING
Press  to change the setting within an option. For example, to change the Rinse aid setting from 4 (factory default) to 2, you need to press
  3 times.
- SAVE SETTING & QUIT MENU
Press  . This will save the new setting and quit the preference options menu.