1
MODEL: NH02-180
CUSTOMER SERVICE: 888.363.5523 | customerser[email protected]
NH02-180
180° GRILL
+
PANINI PRESS
MULTI-FUNCTIONAL
USER
GUIDE

2
MODEL: NH02-180
1 Safety Instructions
4 Features
5 Operating Instructions
11 Cleaning and Maintenance
12 Notes
15 Terms and Conditions
16 Warranty Card
Contents
Congratulations on your purchase!
Every New House Kitchen™ product is manufactured to the highest standards of performance
and safety, and we are condent that you will be so satised with your purchase that New
House Kitchen™ will be your go-to company for appliances in the future.
Customer satisfaction is a key element of our company’s philosophy. The New House
Kitchen™ brand exists to provide consumers with a truly value-focused kitchen appliance to
ensure cooking is always seamless. By questioning and adding value and innovation at every
touch point in the manufacturer to end user journey, New House Kitchen™ provides home
chefs with the tools they need to achieve picture-perfect results with maximum eciency. In
addition to manufacturing appliances that are dependable, aordable, and built with intuitive
features to enhance your kitchen experience, we pride ourselves on providing top-of-the line
post purchase support, including a comprehensive manufacturer's 1-year warranty as well as
outstanding after-sales service support through our dedicated customer service team.
In the unlikely event that your product does not operate as described in the manual please
feel free to call or email our helpline for assistance. We understand that sometimes products
can malfunction, so if you feel that your appliance is not operating as it should, warranty
claims can be made within one year from the date of purchase when accompanied by a
dated receipt.
This guarantee is in addition to your statutory rights; your statutory rights are not aected.
This limited warranty does not apply in cases of damage caused by accident, improper use,
abuse or force majeure.
This warranty gives you specic legal rights. Rights may vary depending on your state or
province of residence. Some locations do not allow limitations on implied warranties or
special incidental, or consequential damages, so the limitations may not apply to you. This
limited warranty will be invalidated if the appliance is tampered with in any way whatsoever.
Our telephone helpline (888) 363-5523 is available for questions or technical assistance—
Monday-Friday 9 am to 5 pm EST.
Customers can also receive support via email: customerser[email protected].
READ ALL INSTRUCTIONS BEFORE USE
For your safety and continued enjoyment of this product, always read the instruction manual before using.

2
MODEL: NH02-180
1 Safety Instructions
4 Features
5 Operating Instructions
11 Cleaning and Maintenance
12 Notes
15 Terms and Conditions
16 Warranty Card
Contents
Congratulations on your purchase!
Every New House Kitchen™ product is manufactured to the highest standards of performance
and safety, and we are condent that you will be so satised with your purchase that New
House Kitchen™ will be your go-to company for appliances in the future.
Customer satisfaction is a key element of our company’s philosophy. The New House
Kitchen™ brand exists to provide consumers with a truly value-focused kitchen appliance to
ensure cooking is always seamless. By questioning and adding value and innovation at every
touch point in the manufacturer to end user journey, New House Kitchen™ provides home
chefs with the tools they need to achieve picture-perfect results with maximum eciency. In
addition to manufacturing appliances that are dependable, aordable, and built with intuitive
features to enhance your kitchen experience, we pride ourselves on providing top-of-the line
post purchase support, including a comprehensive manufacturer's 1-year warranty as well as
outstanding after-sales service support through our dedicated customer service team.
In the unlikely event that your product does not operate as described in the manual please
feel free to call or email our helpline for assistance. We understand that sometimes products
can malfunction, so if you feel that your appliance is not operating as it should, warranty
claims can be made within one year from the date of purchase when accompanied by a
dated receipt.
This guarantee is in addition to your statutory rights; your statutory rights are not aected.
This limited warranty does not apply in cases of damage caused by accident, improper use,
abuse or force majeure.
This warranty gives you specic legal rights. Rights may vary depending on your state or
province of residence. Some locations do not allow limitations on implied warranties or
special incidental, or consequential damages, so the limitations may not apply to you. This
limited warranty will be invalidated if the appliance is tampered with in any way whatsoever.
Our telephone helpline (888) 363-5523 is available for questions or technical assistance—
Monday-Friday 9 am to 5 pm EST.
Customers can also receive support via email: customerservice@newhousekitchen.com.
READ ALL INSTRUCTIONS BEFORE USE
For your safety and continued enjoyment of this product, always read the instruction manual before using.

1
2
MODEL: NH02-180 MODEL: NH02-180
WARNING: When using electrical appliances especially when children are
present, basic safety precautions should always be followed to reduce the risk of
re, electric shock, and/or injury to persons, including the following:
1. READ ALL INSTRUCTIONS BEFORE USING.
2. The cord to this appliance should be plugged into a 120VAC electrical outlet
only.
3. To protect against risk of electric shock, do not immerse the cord plug or
cooking unit in water or any other liquid.
4. Do not touch hot surfaces. Use handles.
5. This appliance is not intended for use of persons (including children) with
reduced physical, sensory and mental capabilities, or lack of experience and
knowledge, unless they have been given supervision or instruction concerning
the use of the appliance by a person responsible for their safety.
6. Close supervision is necessary when the appliance is used by or near
children.
7. Unplug from the wall outlet when is not in use and before cleaning. Allow to
cool before cleaning or storing this appliance.
8. Never yank the cord to disconnect the cooking unit from the electric outlet.
Instead, grasp the plug and pull to disconnect.
9. Do not operate any appliance if the cord is damaged. Do not use this
appliance if the unit malfunctions, if it is dropped or has been damaged in any
manner. In order to avoid the risk of electric shock, never try to repair the unit
yourself. Bring it to a qualied technician for examination, repair or electrical
or mechanical adjustment. An incorrect assembly could present a risk of
electric shocks when the unit is used.
10. The use of accessories or attachments not recommended by the
manufacturer may cause re, electrical shocks or injury.
11. Do not use outdoors or for commercial purposes.
12. Do not use this appliance for purposes other than the one for which it was
designed.
SAFETY INSTRUCTIONS
SAFETY INFORMATION
SAFETY INSTRUCTIONS
13. Do not let the electrical cord hang over the edge of the table or countertop, or
touch hot surface.
14. Do not place on or near a hot gas, electric burner or heated oven.
15. Use on a heat-resistant at level surface only.
16. Use extreme caution when moving any appliance containing hot food, water,
oil or other liquids.
17. To disconnect, turn the control to "OFF," then remove plug from outlet.
18. Always unplug after use. The appliance will remain "ON" unless it is
unplugged.
19. CAUTION HOT SURFACES: This appliance generates heat during use. Proper
precautions must be taken to prevent the risk of burns, re or other damage
to persons or property.
20. When using this appliance, provide adequate ventilation above and on all
sides for air circulation. Do not allow this appliance to touch curtains, wall
coverings, clothing, dishtowels or other ammable materials during use.
21. Use with wall plug receptacle only.
22. Do not use for other than intended use.
23. Always preheat for approximately 3 minutes.
SAVE THESE INSTRUCTIONS
FOR HOUSEHOLD USE ONLY

3
4
MODEL: NH02-180 MODEL: NH02-180
SAFETY INSTRUCTIONS
SHORT CORD INSTRUCTIONS
A short power supply cord is provided to reduce the hazards resulting from
entanglement or tripping over a longer cord. Longer detachable power-supply
cords or extension cords are available and may be used if care is exercised in
their use. If a longer detachable power-supply extension cord is used:
1. The marked electrical rating of the cord set or extension cord should be at
least as great as the electrical rating of the appliance, and:
2. The cord should be arranged so that it will not drape over the counter
top or tabletop where it can be pulled on by children or tripped over
unintentionally.
LINE CORD SAFETY TIPS
1. Never pull or yank on cord or the appliance.
2. To insert plug, grasp it rmly and guide it into outlet.
3. To disconnect appliance, grasp plug and remove it from outlet.
4. Before each use, inspect the line cord for cuts and/or abrasion marks. If
any are found, this indicates that the appliance should be serviced and the
line cord replaced. Please return it to an authorized service representative.
5. Never wrap the cord tightly around the appliance, as this could place undue
stress on the cord where it enters the appliance and cause it to fray and
break.
DO NOT OPERATE APPLIANCE IF THE LINE CORD SHOWS ANY
DAMAGE OR IF APPLIANCE WORKS INTERMITTENTLY OR STOPS
WORKING ENTIRELY.
This appliance must be grounded while in use.
CAUTION: To ensure continued protection against risk of electric shock,
connect to properly grounded outlets only.
IMPORTANT
During the rst few minutes of initial use, you may notice smoke and/or a
slight odor. This is normal and should quickly disappear. It will not recur after
appliance has been used a few more times.
This appliance is not intended for use by persons (including children) with
reduced physical, sensory or mental capabilities, or lack of experience and
knowledge, unless they have been given supervision or instruction concerning
use of the appliance by a person responsible for their safety.
1
2
3
4
567
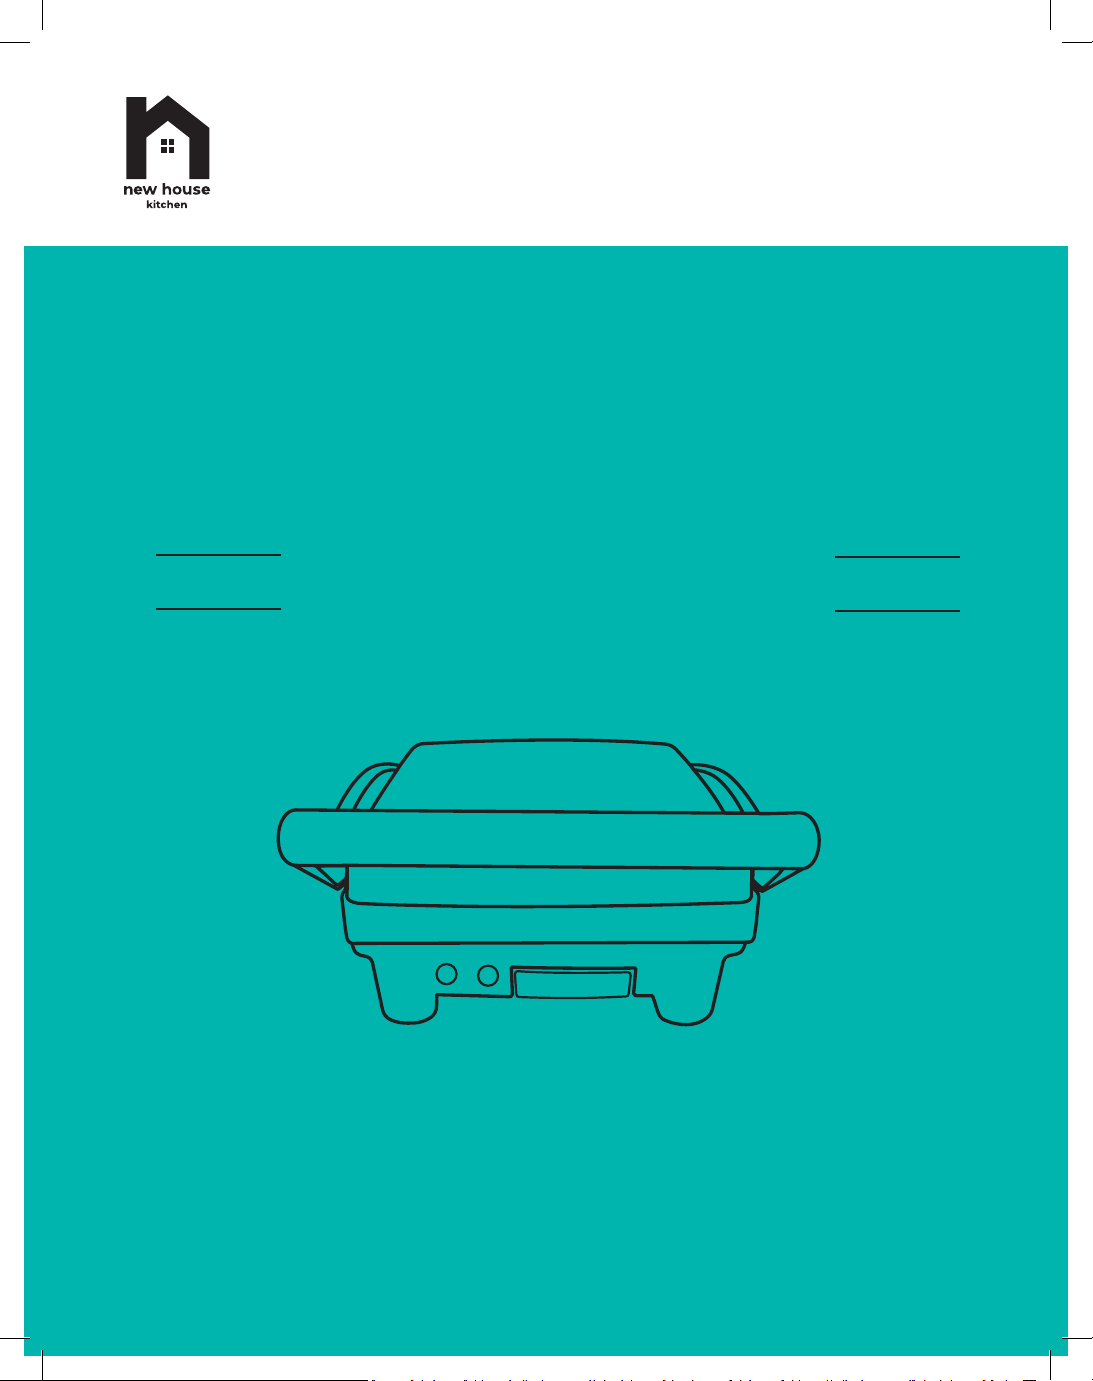
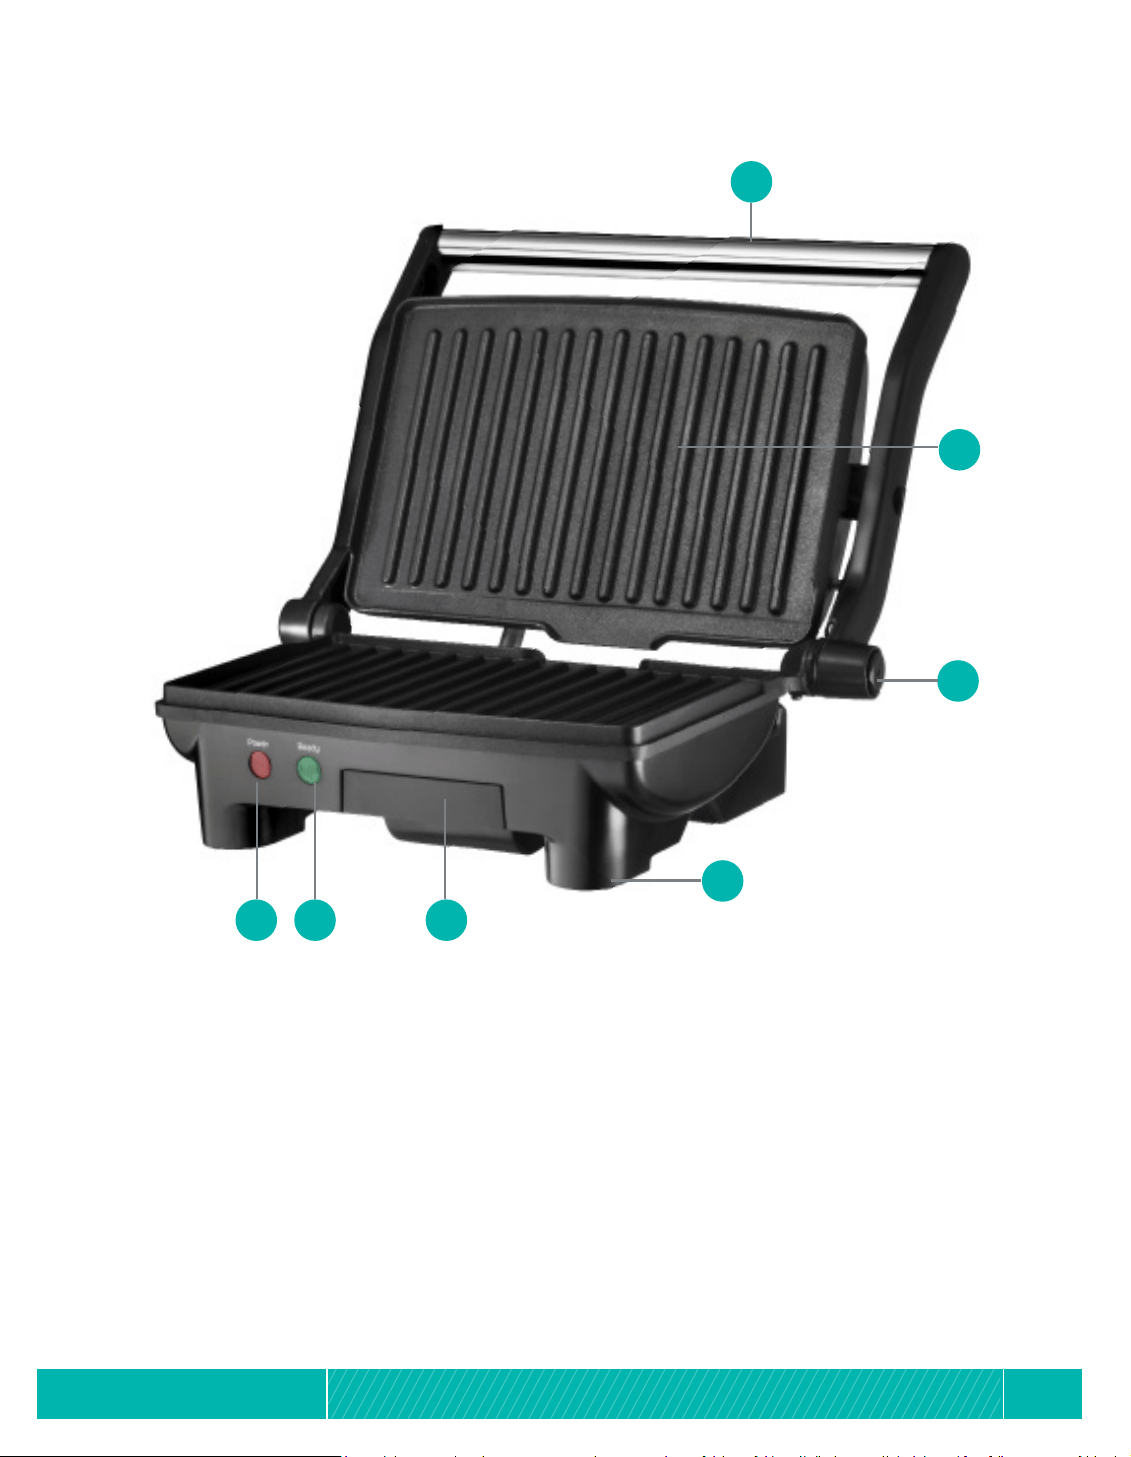
Features
1. Handle
2. Non-stick grill plates
3. Lay-at release button
4. Pull-out tilting feet
5. Removable drip tray
6. Ready light
7. Power light
3
4
MODEL: NH02-180 MODEL: NH02-180
SAFETY INSTRUCTIONS
SHORT CORD INSTRUCTIONS
A short power supply cord is provided to reduce the hazards resulting from
entanglement or tripping over a longer cord. Longer detachable power-supply
cords or extension cords are available and may be used if care is exercised in
their use. If a longer detachable power-supply extension cord is used:
1. The marked electrical rating of the cord set or extension cord should be at
least as great as the electrical rating of the appliance, and:
2. The cord should be arranged so that it will not drape over the counter
top or tabletop where it can be pulled on by children or tripped over
unintentionally.
LINE CORD SAFETY TIPS
1. Never pull or yank on cord or the appliance.
2. To insert plug, grasp it rmly and guide it into outlet.
3. To disconnect appliance, grasp plug and remove it from outlet.
4. Before each use, inspect the line cord for cuts and/or abrasion marks. If
any are found, this indicates that the appliance should be serviced and the
line cord replaced. Please return it to an authorized service representative.
5. Never wrap the cord tightly around the appliance, as this could place undue
stress on the cord where it enters the appliance and cause it to fray and
break.
DO NOT OPERATE APPLIANCE IF THE LINE CORD SHOWS ANY
DAMAGE OR IF APPLIANCE WORKS INTERMITTENTLY OR STOPS
WORKING ENTIRELY.
This appliance must be grounded while in use.
CAUTION: To ensure continued protection against risk of electric shock,
connect to properly grounded outlets only.
IMPORTANT
During the rst few minutes of initial use, you may notice smoke and/or a
slight odor. This is normal and should quickly disappear. It will not recur after
appliance has been used a few more times.
This appliance is not intended for use by persons (including children) with
reduced physical, sensory or mental capabilities, or lack of experience and
knowledge, unless they have been given supervision or instruction concerning
use of the appliance by a person responsible for their safety.
1
2
3
4
567
Features
1. Handle
2. Non-stick grill plates
3. Lay-at release button
4. Pull-out tilting feet
5. Removable drip tray
6. Ready light
7. Power light

5
6
MODEL: NH02-180 MODEL: NH02-180
Operating Instructions
BEFORE USING FOR THE FIRST TIME
1. Carefully unpack the panini maker and remove all labels, packaging and
materials.
2. Before using your panini maker for the rst time, wipe the cooking plates
with a damp cloth to remove all dust, and then dry.
WARNING: Never use metal scouring pads, harsh or abrasive cleaners on
any part of the panini maker.
3. Wipe outer surfaces with a slightly damp, soft cloth or sponge.
4. For best results, pour a teaspoon of vegetable oil onto an absorbent kitchen
towel. Spread onto the non-stick grill plates. Wipe o any excess oiI.
CAUTION: Take care to prevent water from running into the appliance.
NEVER IMMERSE THE PANINI MAKER IN WATER OR ANY OTHER LIQUIDS.
5. Slide the removable drip tray into the bottom front of the unit. Push rmly to
ensure the drip tray is securely installed.
6. Set the appliance on a dry, clean and at surface. Keep the panini maker
closed untiI use.
OPERATING INSTRUCTIONS
The panini maker can be used in the open position to grill burgers, thin
boneless pieces of meat, sh, fruits, and vegetables easily. Use the panini
maker in the closed position to make grilled pressed sandwiches.
IMPORTANT: Always preheat the panini maker closed.
1. Optional: Before using the panini maker, use a pastry brush to lightly coat
the top and bottom grilling plates with vegetable oil.
IMPORTANT: Do not use non-stick sprays as they can cause build-up on
the cooking plate.
2. IMPORTANT: Make sure removable drip tray is in the position before use.
3. Use the tilt-up feet to raise the front two legs of the cooking plate. That will
allow the grease to run to the drain at the back of the closed panini maker.
4. Turn the panini maker over to the underside. The feet will be in the lowered
(at) position.
5. Press the center tab of each of the feet. Lift each foot upwards to the raised
position. With the front part raised, turn the panini maker over and replace
onto the work area.
6. Use the handle to lower the top grill plate.
7. Preheat the panini maker. Operate the unit in a closed position during
preheat.
8. Check to make sure that the cord is fully unwrapped and does not come
in contact with any exterior parts of the unit. Plug unit into a 120 VAC
electrical outlet. The red (POWER) light will illuminate and remain lighted
during use.
9. While preheating, prepare the Panini (s) or food to be grilled.
10. After approximately 2 minutes, the green (READY) light will illuminate,
indicating the unit is preheated and is ready for use .
NOTE: When the panini maker is heated for the rst time, it may emit a slight
smoke or odor; this is normal and should disappear after 1 or 3 uses. That
does not aect the safety of the appliance.
TO USE AS A PRESS GRILL (CLOSED POSITION)
NOTE: Follow step 1 through 9 of the Operating Instructions. Preheat the panini
maker following the detailed Instructions described.
NOTE: When cooking more than one panini, prepare so that the thickness of
each sandwich is consistent. This will allow both panini(s) to cook it quickly,
evenly and produces a rich grill marks both top and bottom.
1. Place the panini, put the oiled side down and centered on the bottom grill
plate.
2. Using a pot holder or oven mitt putdown the handle and gently lowers the
top grill plate.
3. To ensure a perfectly grilled panini, all sandwiches placed on the panini
maker at the same time must be the same thickness. Look to make sure
that the top grill plate lies evenly on the top of the bread. Make sure the
sandwiches are centered on the grill plate. If desired, press the handle
down several times while cooking.
Operating Instructions

7
8
MODEL: NH02-180 MODEL: NH02-180
4. During cooking, the green (READY) indicator light will cycle on and o during
cooking. This indicates that the thermostat is maintaining the proper cooking
temperature.
5. Using an oven mitt or pot holder, grasp the handle and carefully lift the top grill
plate. Continue griIIing until the bread is toasted, and food is cooked to your
liking.
6. To remove your grilled panini sandwiches, always use a plastic or wooden
spatula.
7. WARNING: Never use a sharp or metal object as it may damage the
non-stick surface of the grill plates.
CAUTION: Do not leave appliance unattended during use.
8. Remove the plug from the wall outlet.
9. Allow the panini to cool to a safe handling temperature before slicing.
TO USE AS A FULL CONTACT GRILL (OPEN POSITION)
NOTE: Follow step 1 through 9 of the Operating Instructions. Preheat the panini
maker, following detailed instructions described.
NOTE: When grilling more than one piece of food, prepare so that the thickness
of food items is consistent. This will allow the food to cook it quickly, evenly and
produces a rich grill marks.
1. Press the hinge button to create a full ribbed contact grill. Wear protective oven
mitts. Grasp the handle and open the panini maker.
2. Following the procedures outlined in the "Operating Instruction," raise the front
to tilt up feet. This will enable the oil to ow into the grease drain in the center
of the attened grill plates, and then into the drip tray.
3. When the grill plates are in an opened, at position, it may be necessary to
adjust the angle of the upper grill plate. Press the grill plate down on the center
grease drain to adjust the angle.
CAUTION: Always wear protective oven mitts when pressing on a hot surface.
4. Center food on an open grill plate(s).
Operating Instructions Operating Instructions
CAUTION: To prevent risk of burns, always use oven mitts. Be careful not to
touch any hot surfaces such as the top housing or grill plates, or any hot liquid
in the drip tray. Extreme care must be taken when operating this appliance as
the surface temperatures get extremely hot.
5. Allow the food on the panini maker to grill for 3 to 8 minutes, according to
recipe directions. The green (READY) light will cycle on and o as the unit
maintains baking temperatures.
6. Most recipes will vary in cook time and brownness. Note the perfect grill
times for each food for future use.
7. Wearing oven mitts, remove grilled food from the cooking plate(s) using a
non-metallic utensil. A plastic spatula will help to remove delicate food in
one piece. Tongs are helpful when grilling meat or sausages.
8. NOTE: If additional food is to be grilled, close the panini maker to retain
heat. Follow the detailed instructions outlined previously to open the grill
and continue cooking.
9. When grilling is nished, remove the plug from the wall outlet and allow
panini maker to cool before removing the drip tray for cleaning the unit.

9
10
MODEL: NH02-180 MODEL: NH02-180
Operating Instructions
PANINI HINTS FOR BEST RESULTS
• It is best to prepare panini(s) from a hearty loaf of bread. However, panini(s)
made from the store, sliced breads or rolls can be delicious and simple to make.
Experiment with a variety of breads, tortillas, atbreads, even pitas.
• For health-conscious cooks, the non-stick coating of grill plates assures a crisp
and delicious toasting without the use of oil or butter. The raised ridges and tilted
bottom plate, allow grease and other liquids to drip o into the drip tray and
away from your food.
• With the panini maker's non-stick griII plates, it is not necessary to use butter
or oil the outside of the bread. However, spreading a small amount of butter or
olive oil is recommended to encourage even browning of the bread.
• NOTE: Do not use non-stick sprays as they can cause build-up on the grill plates.
Use olive oil instead.
• WARNING: Do not use non-fat spreads. They may burn and damage the non-
stick grill plates.
• Always preheat the panini maker before each use.
• Have all the ingredients at hand before preparing the panini.
• When using soft or liquid llings, use thicker slices of breads. Try removing the
inside of the bread to create a cup form in which ling can be added.
• Most fresh fruits release juice when heated. If a recipe calls for canned fruit, drain
and dry the fruit with a clean paper towel.
• Avoid using processed cheeses, as they tend to melt under high temperatures.
• A teaspoon of sugar sprinkled on the buttered side make the grilled panini more
crispier and adds avor when using sweet llings.
• Whole grain and sweet breads will grill faster than white breads and should be in
the grill for less time.
• After you have removed the nished panini, close the top grill plate to retain heat
while assembling of more sandwiches.
• To avoid food contamination, wear oven mitts and use a soft absorbent paper
towel to wipe the grill plates, and clean after each use.
Cleaning and Maintenance
USER MAINTENANCE INSTRUCTIONS
The appliance requires little maintenance. It contains no user serviceable
parts. Do not try to x it yourself. Contact a qualied appliance repair
technician if the product requires servicing.
CARE & CLEANING INSTRUCTIONS
CAUTION: Unplug from the electrical outlet and allow cooling thoroughly
before removing the drip tray or cleaning the unit.
1. The panini maker does not disassemble for cleaning.
2. Never immerse this appliance in water or other liquids. Never place panini
maker in dishwasher.
3. Slide the removable drip tray out from the bottom of the unit. Clean it with
hot soapy water.
NOTE: The removable drip tray is top rack dishwasher safe.
IMPORTANT: Always clean the drip tray before use. NEVER OPERATE THE
PANINI MAKER WITHOUT THE DRIP TRAY PROPERLY IN PLACE.
4. The panini cooking plates should be cleaned and conditioned before each
heating.
5. Brush non-stick cooking plates with a clean soft pastry brush or cloth, to
condition the plates; lightly coat the cooking surfaces with solid vegetable
shortening or vegetable oil. Carefully follow suggested cleaning procedures
below. After a time, if the panini(s) show signs of sticking, recondition as
needed.
6. To protect the premium quality non-stick surfaces, use only plastic, nylon or
wooden utensils.

11
12
MODEL: NH02-180 MODEL: NH02-180
Cleaning and Maintenance
7. To remove any butter baked onto the cooking plate, pour a small amount
of cooking oil onto the hardened butter. Allow to set for 5 minutes, and then
wipe softened butter o with a paper towel or soft cloth. To remove
stubborn stains use a plastic mesh pu or pad. A clean toothbrush works
well to remove baked-on butter from the grids. For best results, use only
products with directions stating they are safe for cleaning non-stick cooking
surfaces. Do not use steel wool or coarse scouring pads.
8. The exterior nish should be cleaned with a non-abrasive cleaner and a
soft, damp cloth. Dry thoroughly.
STORING INSTRUCTIONS
1. Make sure unit is unplugged and fully cooled.
2. Turn the panini maker over. The feet will be in a raised position.
3. Press the center tab of each the feet. Each foot will tilt back and t into the
recessed area.
Notes

13
14
MODEL: NH02-180 MODEL: NH02-180
Notes Notes

13
14
MODEL: NH02-180 MODEL: NH02-180
Notes Notes

15
16
MODEL: NH02-180 MODEL: NH02-180
New House Kitchen™ warrants, subject to the conditions stated below, that from the date of purchase, this product will
be free from mechanical defects for a period of ONE (1) year. New House Kitchen™, at its option, will repair or replace
this product found to be defective during the warranty period. Should this product become defective by reason of
improper workmanship or material defect during the specied warranty period, New House Kitchen™ will repair or
replace the same eecting all necessary parts replacements for a period of one year from the date of purchase.
If product is no longer available we will replace it with a product of equal value.Transportation charges on parts, or
products in whole, submitted for repair or replacement, under this warranty, must be borne by the purchaser. This
warranty is void if the product is used for other than single-family household use or subjected to any voltage and
waveform other than as specied on the rating label (e.g., 120V ~ 60 Hz).
This warranty is available to consumers only. You are a consumer if you own a New House Kitchen™ product that
was purchased at retail for personal, family or household use. Except as otherwise required under applicable law, this
warranty is not available to retailers or other commercial purchasers or owners.
CONDITIONS: This warranty is valid for the original USA and Canada retail purchaser from the date of initial retail
purchase and is not transferable. Keep the original sales receipt. Proof of purchase is required to obtain warranty
service or replacement. Dealers, service centers, or retail stores do not have the right to alter, modify or in any way,
change the terms and conditions of this warranty. Warranty registration is not necessary to obtain warranty on New
House Kitchen™ Products. Save your proof of purchase receipt.
ABOUT YOUR PRODUCT WARRANTY: Most warranty repairs are handled routinely, but sometimes requests for
warranty service may not be appropriate. For example, warranty service would NOT apply if the product damage
occurred because of misuse, lack of routine maintenance, shipping, handling, 3rd party warehousing or improper
installation. Similarly, the warranty is void if the manufacturing date or the serial number on the product has been
removed or the equipment has been altered or modied. During the warranty period, the authorized service dealer, at
its option, will repair or replace any part that, upon examination, is found to be defective under normal use and service.
NORMAL WEAR: This warranty does not cover normal wear of parts or damage resulting from any of the following:
negligent use or misuse of the product; improper voltage or current; use contrary to the operation instructions; deviation
from instructions regarding storage and transportation; repair or alteration by anyone other than New House Kitchen™
or an authorized service center. Further, the warranty does not cover Acts of God, such as re, ood, hurricanes and
tornadoes. New House Kitchen™ LLC shall not be liable for any incidental or consequential damages caused by the
breach of any express or implied warranty. Except to the extent prohibited by applicable law, any implied warranty of
merchantability or tness for a particular purpose is limited in duration to the duration of the above warranty. Some
states, provinces or jurisdictions do not allow the exclusion or limitation of incidental of consequential damages or
limitations on how long an implied warranty lasts, so the above limitations or exclusion may not apply to you. This
warranty gives you specic legal rights, and you may also have other rights that vary from state to state or province to
province.
HOW TO OBTAIN WARRANTY SERVICE: If your New House Kitchen™ product should prove to be defective within
the warranty period, we will repair it, or if we think necessary, replace it. To obtain warranty service, simply email
customerser[email protected] or call our toll-free number 1-888-363-5523 for additional information
from our Customer Service Representatives, or send the defective product to Customer Service at New House
Kitchen™, 1 Sharp Plaza, Mahwah, NJ 07495.
This warranty is eective for the time periods listed above and subject to the conditions provided for within this policy.
CALIFORNIA RESIDENTS ONLY:
California law provides that for In-Warranty Service, California residents have the option of returning a nonconforming
product (A) to the store where it was purchased or (B) to another retail store which sells New House Kitchen™ products
of the same type. The retail store shall then, at its discretion, either repair the product, refer the consumer to an
independent repair facility, replace the product, or refund the purchase price less the amount directly attributable to the
consumer’s prior usage of the product. If the above two options do not result in the appropriate relief to the consumer,
the consumer may then take the product to an independent repair facility if service or repair can be economically
accomplished. New House Kitchen™ and not the consumer will be responsible for the reasonable cost of such service,
repair, replacement, or refund for nonconforming products under warranty.
New House Kitchen™ is a registered trademark of RJ BRANDS, LLC.
Terms and Conditions
Limited Warranty
Warranty
Phone lines available Monday to Friday, 9am-5pm EST
1-YEAR LIMITED WARRANTY
Description of Malfunction:
Return your completed warranty card to:
RJ Brands
200 Performance Drive
Suite 207
Mahwah, NJ
07495
All data elds are required in order for us to process your request:
Model Number:
Full Name:
Address:
Phone:
Date of Purchase*:
Retail Store of Purchase:
*We recommend you keep the receipt with this warranty card
Email: (If applicable)
180°GRILL
+
PANINI PRESS
Multi-Functional
888.363.5523
customerservice@newhousekitchen.com
MODEL: NH02-180
Multi-Functional
180
°
GRILL
+
PANINI PRESS

15
16
MODEL: NH02-180 MODEL: NH02-180
New House Kitchen™ warrants, subject to the conditions stated below, that from the date of purchase, this product will
be free from mechanical defects for a period of ONE (1) year. New House Kitchen™, at its option, will repair or replace
this product found to be defective during the warranty period. Should this product become defective by reason of
improper workmanship or material defect during the specied warranty period, New House Kitchen™ will repair or
replace the same eecting all necessary parts replacements for a period of one year from the date of purchase.
If product is no longer available we will replace it with a product of equal value.Transportation charges on parts, or
products in whole, submitted for repair or replacement, under this warranty, must be borne by the purchaser. This
warranty is void if the product is used for other than single-family household use or subjected to any voltage and
waveform other than as specied on the rating label (e.g., 120V ~ 60 Hz).
This warranty is available to consumers only. You are a consumer if you own a New House Kitchen™ product that
was purchased at retail for personal, family or household use. Except as otherwise required under applicable law, this
warranty is not available to retailers or other commercial purchasers or owners.
CONDITIONS: This warranty is valid for the original USA and Canada retail purchaser from the date of initial retail
purchase and is not transferable. Keep the original sales receipt. Proof of purchase is required to obtain warranty
service or replacement. Dealers, service centers, or retail stores do not have the right to alter, modify or in any way,
change the terms and conditions of this warranty. Warranty registration is not necessary to obtain warranty on New
House Kitchen™ Products. Save your proof of purchase receipt.
ABOUT YOUR PRODUCT WARRANTY: Most warranty repairs are handled routinely, but sometimes requests for
warranty service may not be appropriate. For example, warranty service would NOT apply if the product damage
occurred because of misuse, lack of routine maintenance, shipping, handling, 3rd party warehousing or improper
installation. Similarly, the warranty is void if the manufacturing date or the serial number on the product has been
removed or the equipment has been altered or modied. During the warranty period, the authorized service dealer, at
its option, will repair or replace any part that, upon examination, is found to be defective under normal use and service.
NORMAL WEAR: This warranty does not cover normal wear of parts or damage resulting from any of the following:
negligent use or misuse of the product; improper voltage or current; use contrary to the operation instructions; deviation
from instructions regarding storage and transportation; repair or alteration by anyone other than New House Kitchen™
or an authorized service center. Further, the warranty does not cover Acts of God, such as re, ood, hurricanes and
tornadoes. New House Kitchen™ LLC shall not be liable for any incidental or consequential damages caused by the
breach of any express or implied warranty. Except to the extent prohibited by applicable law, any implied warranty of
merchantability or tness for a particular purpose is limited in duration to the duration of the above warranty. Some
states, provinces or jurisdictions do not allow the exclusion or limitation of incidental of consequential damages or
limitations on how long an implied warranty lasts, so the above limitations or exclusion may not apply to you. This
warranty gives you specic legal rights, and you may also have other rights that vary from state to state or province to
province.
HOW TO OBTAIN WARRANTY SERVICE: If your New House Kitchen™ product should prove to be defective within
the warranty period, we will repair it, or if we think necessary, replace it. To obtain warranty service, simply email
customerservice@newhousekitchen.com or call our toll-free number 1-888-363-5523 for additional information
from our Customer Service Representatives, or send the defective product to Customer Service at New House
Kitchen™, 1 Sharp Plaza, Mahwah, NJ 07495.
This warranty is eective for the time periods listed above and subject to the conditions provided for within this policy.
CALIFORNIA RESIDENTS ONLY:
California law provides that for In-Warranty Service, California residents have the option of returning a nonconforming
product (A) to the store where it was purchased or (B) to another retail store which sells New House Kitchen™ products
of the same type. The retail store shall then, at its discretion, either repair the product, refer the consumer to an
independent repair facility, replace the product, or refund the purchase price less the amount directly attributable to the
consumer’s prior usage of the product. If the above two options do not result in the appropriate relief to the consumer,
the consumer may then take the product to an independent repair facility if service or repair can be economically
accomplished. New House Kitchen™ and not the consumer will be responsible for the reasonable cost of such service,
repair, replacement, or refund for nonconforming products under warranty.
New House Kitchen™ is a registered trademark of RJ BRANDS, LLC.
Terms and Conditions
Limited Warranty
Warranty
Phone lines available Monday to Friday, 9am-5pm EST
1-YEAR LIMITED WARRANTY
Description of Malfunction:
Return your completed warranty card to:
RJ Brands
200 Performance Drive
Suite 207
Mahwah, NJ
07495
All data elds are required in order for us to process your request:
Model Number:
Full Name:
Address:
Phone:
Date of Purchase*:
Retail Store of Purchase:
*We recommend you keep the receipt with this warranty card
Email: (If applicable)
180°GRILL
+
PANINI PRESS
Multi-Functional
888.363.5523
customerser[email protected]
MODEL: NH02-180
Multi-Functional
180
°
GRILL
+
PANINI PRESS

NH02-180
Limitless
meal options!
CONTACT GRILL • PANINI PRESS • INDOOR GRILL