User Manual Summit AL750L Wide All-Refrigerator
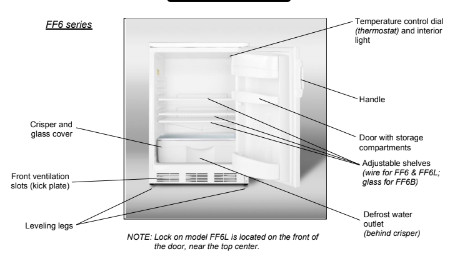
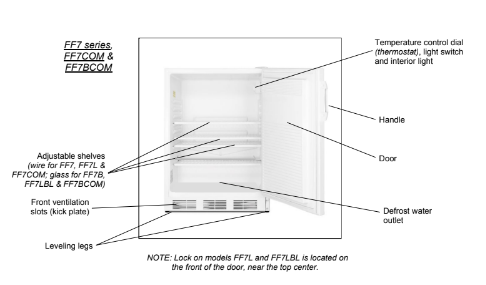
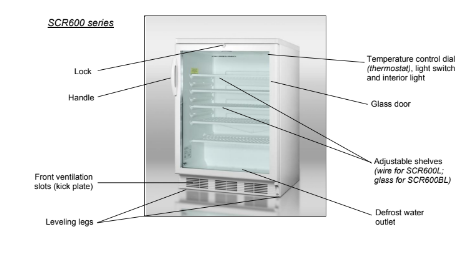
Location of Parts
Installation Instructions
Before Using Your Appliance:
- Remove the exterior and interior packing.
- Before connecting the unit to a power source, let it stand for approximately 2 hours. This will reduce the possibility of a malfunction in the cooling system from handling during transportation.
- Remove the shelves and clean them and the interior surfaces of the unit with lukewarm water using a soft cloth.
Installing the Refrigerator:
- Place the unit on a floor that is strong enough to support the appliance when it is fully loaded. To level the unit, adjust the two leveling legs at the front.
- Your appliance is designed to be free-standing only and not recessed or built into an enclosure. When installing, allow at least 4” (102mm) of space at the sides, top and rear of the unit to allow for proper air circulation to cool the compressor and condenser. Take care that the air vents at the front of the appliance are never covered or blocked in any way.
- Locate the unit away from direct sunlight and sources of heat (oven, heater, radiator, etc.). Direct sunlight may affect the acrylic coating and heat sources may increase electrical consumption. Extremely cold ambient temperatures may also affect the unit's performance.
- Avoid locating the unit in moist areas. Too much moisture in the air will cause frost to form quickly on the evaporator, requiring more frequent defrosting of the interior.
- Plug the unit into an exclusive, properly installed and grounded wall outlet. Do not under any circumstances cut or remove the third (ground) prong from the power cord. Any questions concerning power and/or grounding should be directed toward a certified electrician or authorized service center.
Electrical Connection:
This unit should be properly grounded for your safety. The power cord of this unit is equipped with a three-prong plug which mates with a standard three-prong wall outlet to minimize the possibility of electrical shock.
Do not under any circumstances cut or remove the third ground prong from the power cord supplied. For personal safety, this appliance must be properly grounded.
This unit requires a standard 115-volt AC/60Hz electrical outlet with three-prong ground. Have the wall outlet and circuit checked by a qualified electrician to make sure the outlet is properly grounded. When a standard 2-prong wall outlet is encountered, it is your responsibility and obligation to have it replaced with a properly grounded 3-prong wall outlet. To prevent accidental injury, the cord should be secured behind the unit and not left exposed or dangling.
The unit should always be plugged into its own individual electrical outlet which has a voltage rating that matches the rating label on the appliance. This provides the best performance and also prevents overloading house wiring circuits that could cause a fire hazard from overheated wires. Never unplug the unit by pulling on the power cord.
Always grip the plug firmly and pull straight out from the receptacle. Repair or replace immediately any power cord that has become frayed or otherwise damaged. Do not use a cord that shows cracks or abrasion damage along its length or at either end. When moving the unit, be careful not to damage the power cord.
Extension Cord:
Do not use an extension cord with this appliance. If the power cord is too short, have a qualified electrician or service technician install an outlet near the appliance.
Reversing the Door Swing:
If you find the direction of opening the door of the appliance inconvenient, you can change it. Holes on the opposite side have already been prepared at the factory.
This appliance can be opened from either the right side or the left. By default, the door hinge is on the right side. If you prefer it on the left, please follow the appropriate instructions:
For models FF6B, FF7, FF7COM, FF7B and FF7BCOM:
- Take off the upper hinge cover from the door and remove the screws that hold the top hinge.
- Lift the hinge straight up to free the hinge pin from the socket in the top of the door.
- Lift the door up and away to free its bottom socket from the hinge pin.
- Remove the screws to the bottom hinge.
- Remove the decorative caps from the opposite side and plug the holes from the original side with the decorative caps.
- Move the bottom hinge to the opposite side and tighten the screws. Use any lock washers or nuts if they were installed in the original installation.
- Replace door onto the hinge pin on the bottom hinge. Place top hinge pin into door. Insert screws into the top hinge and tighten.

For models FF6, FF6L, FF7L, FF7LBL, SCR600L and SCR600BL:
NOTES: See illustration below.
All of the parts that are removed must be kept for the reinstallation of the door.
- Unscrew the lower hinge and take off the door.
- Push the kick plate to the right in the new position.
- Undo the upper hinge fastener and fix it to the opposite side of the housing, where you have already removed and replaced the fastener with the hole to the opposite side.
- Put the door on the upper hinge fastener.
- Fix the lower hinge in the new position.
- Unscrew the handle and place it on the opposite side.
- Some screws are covered with caps. Take off these caps before undoing the screws.
- Check the door gasket. It should not be creased and should seal well.

Door Handle Installation:
The door has two screw holes on each side, allowing you to install a handle (included). To do so, align the handle with the screw holes on the side you prefer. Fix the handle in place with the included screws, then cover the screw heads with the handle seal (included).
Operating Your Refrigerator
Temperature Control:
- Your appliance’s evaporator system is out of sight behind the interior rear wall.
- The interior temperature is controlled with a thermostat knob located inside the unit, towards the upper right-hand corner. Turn the knob clockwise from the STOP (0) position toward the higher numbers for colder temperatures. Higher settings on the knob (higher numbers) mean lower temperatures colder) in the refrigerator.
- On the coldest settings, temperatures in some spots inside the cabinet may drop below 32°F. Use higher thermostat settings only when required or recommended. When the ambient temperature is normal, we recommend a medium setting.
- Changes in the ambient temperature affect the temperature inside the refrigerator so choose an appropriate setting of the thermostat knob, depending on ambient conditions.
- In the STOP (0) position, the appliance does not operate (the cooling system is switched off), yet the power supply is not interrupted (the light still works).
- The temperature inside the refrigerator also depends on how often you open the door.
- In all small refrigerators without interior fans, temperatures are coldest near the bottom, and occasionally near the rear. Place contents accordingly. It is best not to operate these units mostly empty. If temperatures are erratic, try putting some water bottles inside to create a load for the compressor.
NOTES:
1. Shelves are adjustable. Certain models include glass shelves (see Technical Information, page 5). These shelves stop short an inch before the back wall, which is essential for air flow and the proper operation of the automatic defrost system. Do not block these gaps.
2. a) Interior lighting on the FF6 series models is controlled by a switch that is activated by the opening and closing of the refrigerator door.
b) Lights on the other models are controlled by a manually-operated rocker switch. To maintain the proper interior temperature, keep the light on only as long as necessary.
3. If the refrigerator is unplugged, has lost power, or is turned off, you must wait 3 to 5 minutes before restarting it. If you attempt to restart before this time delay, the unit will not start.
Defrosting Your Appliance:
This appliance operates with an automatic defrost system, so the refrigerator defrosts itself. While the compressor is operating, ice will build along the rear cold wall (the evaporator plate is behind the wall). During the compressor’s off-cycle, ice will melt, drip down, collect in the trough at the bottom and drain through a small hole into a tray above the compressor; where the compressor’s heat will evaporate the water. If you notice excessive ice build-up on the rear wall, try setting the thermostat to a slightly warmer setting; be sure that the door gasket is sealing well and that there is no obstruction of the drain hole at the bottom rear of the interior cabinet.
Care and Maintenance
Cleaning Your Appliance:
- Unplug the appliance, turn the thermostat to STOP (0) and remove all contents, including shelves.
- Wash the inside surfaces with a solution of lukewarm water and vinegar. Wipe dry with a clean, soft cloth.
- Wash the shelves, drip tray and crisper with a mild detergent solution, then rinse and dry thoroughly.
- Wash the outside cabinet with a solution of warm water and mild liquid detergent. Rinse well and wipe dry with a clean soft cloth.
- Wring excess water out of the sponge or cloth before cleaning the area of the temperature control or any electrical parts.
- From time to time, wipe the condenser on the rear wall with a soft non-metallic brush or vacuum cleaner.
- After you have cleaned the appliance, reconnect it to the power supply, reset the thermostat and return all contents to their place.
CAUTION: Failure to unplug the unit could result in electrical shock or personal injury.
Power Failure:
Most power failures are corrected within a few hours and should not affect the temperature of your appliance if you minimize the number of times the door is opened. If the power is going to be off for a longer period of time, you need to take the proper steps to protect your chilled items.
Vacation Time:
During long absences, remove all contents. Unplug the appliance, clean it and leave the door open slightly to avoid possible formation of condensation, mold or odors.
Moving Your Appliance:
- Remove the contents.
- Securely tape down all shelving inside your unit.
- Turn the leveling legs up to the base to avoid damage.
- Tape the door shut.
- Be sure the appliance stays secure in the upright position during transportation.
Energy-Saving Tips:
- The unit should be located in the coolest area of the room, away from heat-producing appliances or heating ducts and out of direct sunlight.
- Try not to open the door too often, especially when the weather is damp and hot.
- Once you open the door, close it as soon as possible.
- Occasionally check if the appliance is sufficiently ventilated (adequate air circulation behind the appliance).
- Set the thermostat from higher to lower settings as soon as possible (depending on how loaded the appliance is, ambient temperature, etc.).
- Before loading items into the unit, be sure they have cooled to ambient temperature.
Troubleshooting
When using this appliance, you may come across some problems that in many cases result from improper handling and can easily be eliminated.
TROUBLESHOOTING GUIDE
The appliance fails to operate after being connected to the power source.
- Check whether the power supply is active and that the thermostat is not set to the STOP (0) position.
The compressor is running continuously.
- The door was opened frequently or it was left open too long.
- The door is not properly closed (the door may sag, the gasket may be dirty or damaged).
- The power supply has been interrupted for a long period of time.
- The appliance may have been overloaded with items above room temperature.
- There may be inadequate ventilation of the compressor and condenser. (Assure there is adequate air circulation behind the appliance and wipe the dust from the condenser.)
Noise
- Cooling in refrigeration appliances is enabled by the refrigerating system with a compressor, which produces noise. How noisy the appliance is depends on where it is placed, how it is used and how old the appliance is.
- During the operation of the compressor, the noise of liquid is heard and when the compressor is not operating, the refrigerant flow is heard. This is a normal condition and has no influence whatsoever on the lifetime of the appliance.
- After starting the appliance, the operation of the compressor and the refrigerant flow may be louder. This does not mean that something is wrong. Gradually the noise is reduced.
- Sometimes a louder noise is heard, which is unusual for the appliance. This noise is often a consequence of improper placement of the unit. (The unit should be placed and leveled firmly on a solid base and it should not touch the wall or cabinets standing next to it.)
Limited Warranty
ONE-YEAR LIMITED WARRANTY
Within the 48 contiguous United States, for one year from the date of purchase, when this appliance is operated and maintained according to instructions attached to or furnished with the product, warrantor will pay for factory-specified parts and repair labor to correct defects in materials or workmanship. Service must be provided by a designated service company. Outside the 48 states, all parts are warranted for one year from manufacturing defects. Plastic parts, shelves and cabinets are warranted to be manufactured to commercially acceptable standards, and are not covered from damage during handling or breakage.
5 - YEAR COMPRESSOR WARRANTY
- The compressor is covered for 5 years.
- Replacement does not include labor.
ITEMS WARRANTOR WILL NOT PAY FOR:
- Service calls to correct the installation of your appliance, to instruct you how to use your appliance, to replace or repair fuses or to correct wiring or plumbing.
- Service calls to repair or replace appliance light bulbs or broken shelves. Consumable parts (such as filters) are excluded from warranty coverage.
- Damage resulting from accident, alteration, misuse, abuse, fire, flood, acts of God, improper installation, installation not in accordance with electrical or plumbing codes, or use of products not approved by warrantor.
- Replacement parts or repair labor costs for units operated outside the United States.
- Repairs to parts or systems resulting from unauthorized modifications made to the appliance.
- The removal and reinstallation of your appliance if it is installed in an inaccessible location or is not installed in accordance with published installation instructions.
DISCLAIMER OF IMPLIED WARRANTIES – LIMITATION OF REMEDIES
CUSTOMER'S SOLE AND EXCLUSIVE REMEDY UNDER THIS LIMITED WARRANTY SHALL BE PRODUCT REPAIR AS PROVIDED HEREIN. IMPLIED WARRANTIES, INCLUDING WARRANTIES OF MERCHANTABILITY OR FITNESS FOR A PARTICULAR PURPOSE, ARE LIMITED TO ONE YEAR. WARRANTOR SHALL NOT BE LIABLE FOR INCIDENTAL OR CONSEQUENTIAL DAMAGES. SOME STATES DO NOT ALLOW THE EXCLUSION OR LIMITATION OF INCIDENTAL OR CONSEQUENTIAL DAMAGES, OR LIMITATIONS ON THE DURATION OF IMPLIED WARRANTIES OF MERCHANTABILITY OR FITNESS, SO THESE EXCLUSIONS OR LIMITATIONS MAY NOT APPLY TO YOU. THIS WARRANTY GIVES YOU SPECIFIC LEGAL RIGHTS AND YOU MAY ALSO HAVE OTHER RIGHTS, WHICH VARY FROM STATE TO STATE.