W10636453B
TOP-LOADING
WASHER
USE AND CARE GUIDE
Table of Contents
WASHER SAFETY ��������������������������������������������������������������2
SPECIFICATIONS ���������������������������������������������������������������2
CONTROL PANEL AND FEATURES ���������������������������������3
CYCLE GUIDE ��������������������������������������������������������������������5
USING YOUR WASHER �����������������������������������������������������6
WASHER MAINTENANCE �������������������������������������������������9
TROUBLESHOOTING ������������������������������������������������������11
Índice
SEGURIDAD DE LA LAVADORA �������������������������������������15
ESPECIFICACIONES �������������������������������������������������������15
PANEL DE CONTROL Y CARACTERÍSTICAS ���������������16
GUÍA DE CICLOS �������������������������������������������������������������18
USO DE SU LAVADORA ��������������������������������������������������19
MANTENIMIENTO DE LA LAVADORA ���������������������������22
SOLUCIÓN DE PROBLEMAS ������������������������������������������24
LAVADORA DE CARGA
SUPERIOR MANUAL DE
USO Y CUIDADO
This manual contains useful information; read it before operating your washer.
Este manual contiene información útil; por favor léalo antes de operar su lavadora.
2
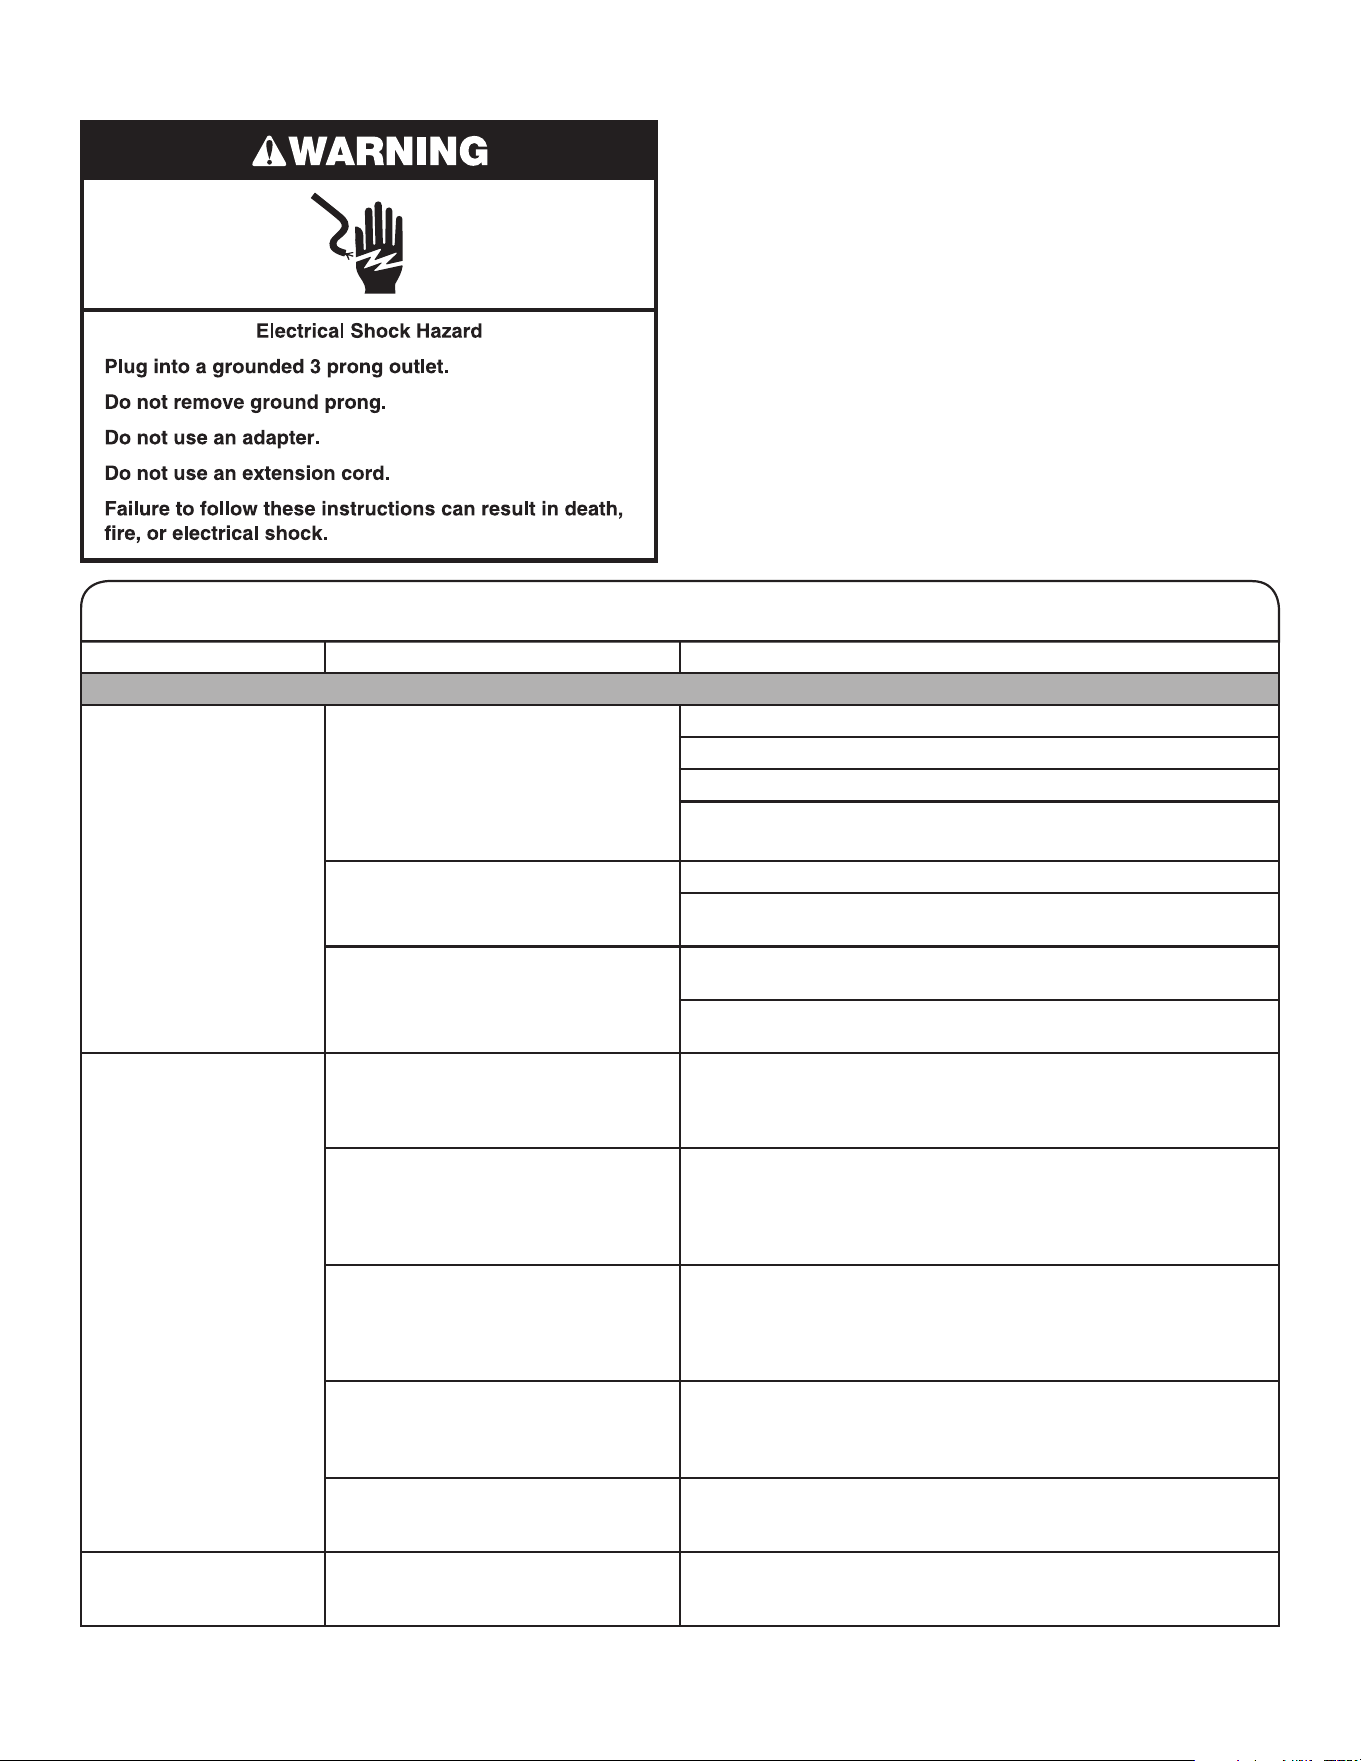
WASHER SAFETY
SPECIFICATIONS
The units described in this Use and Care Guide are sold in multiple regions
with different requirements for measuring capacity�
Capacity Measure
Models
1CWTW4800,1CWTW4740 1CWTW4840
Dry Linen Capacity: A weight measure that reects a
maximum load size that can be loaded into the washer.
15 kg (33 lb)
NOM Capacity: A weight measure based on the Mexican
norm (NMX-J-521/1). This standard also applies in Colombia.
15 kg (33 lb) 17 kg (37 lb)
3
7
3
4
1
5
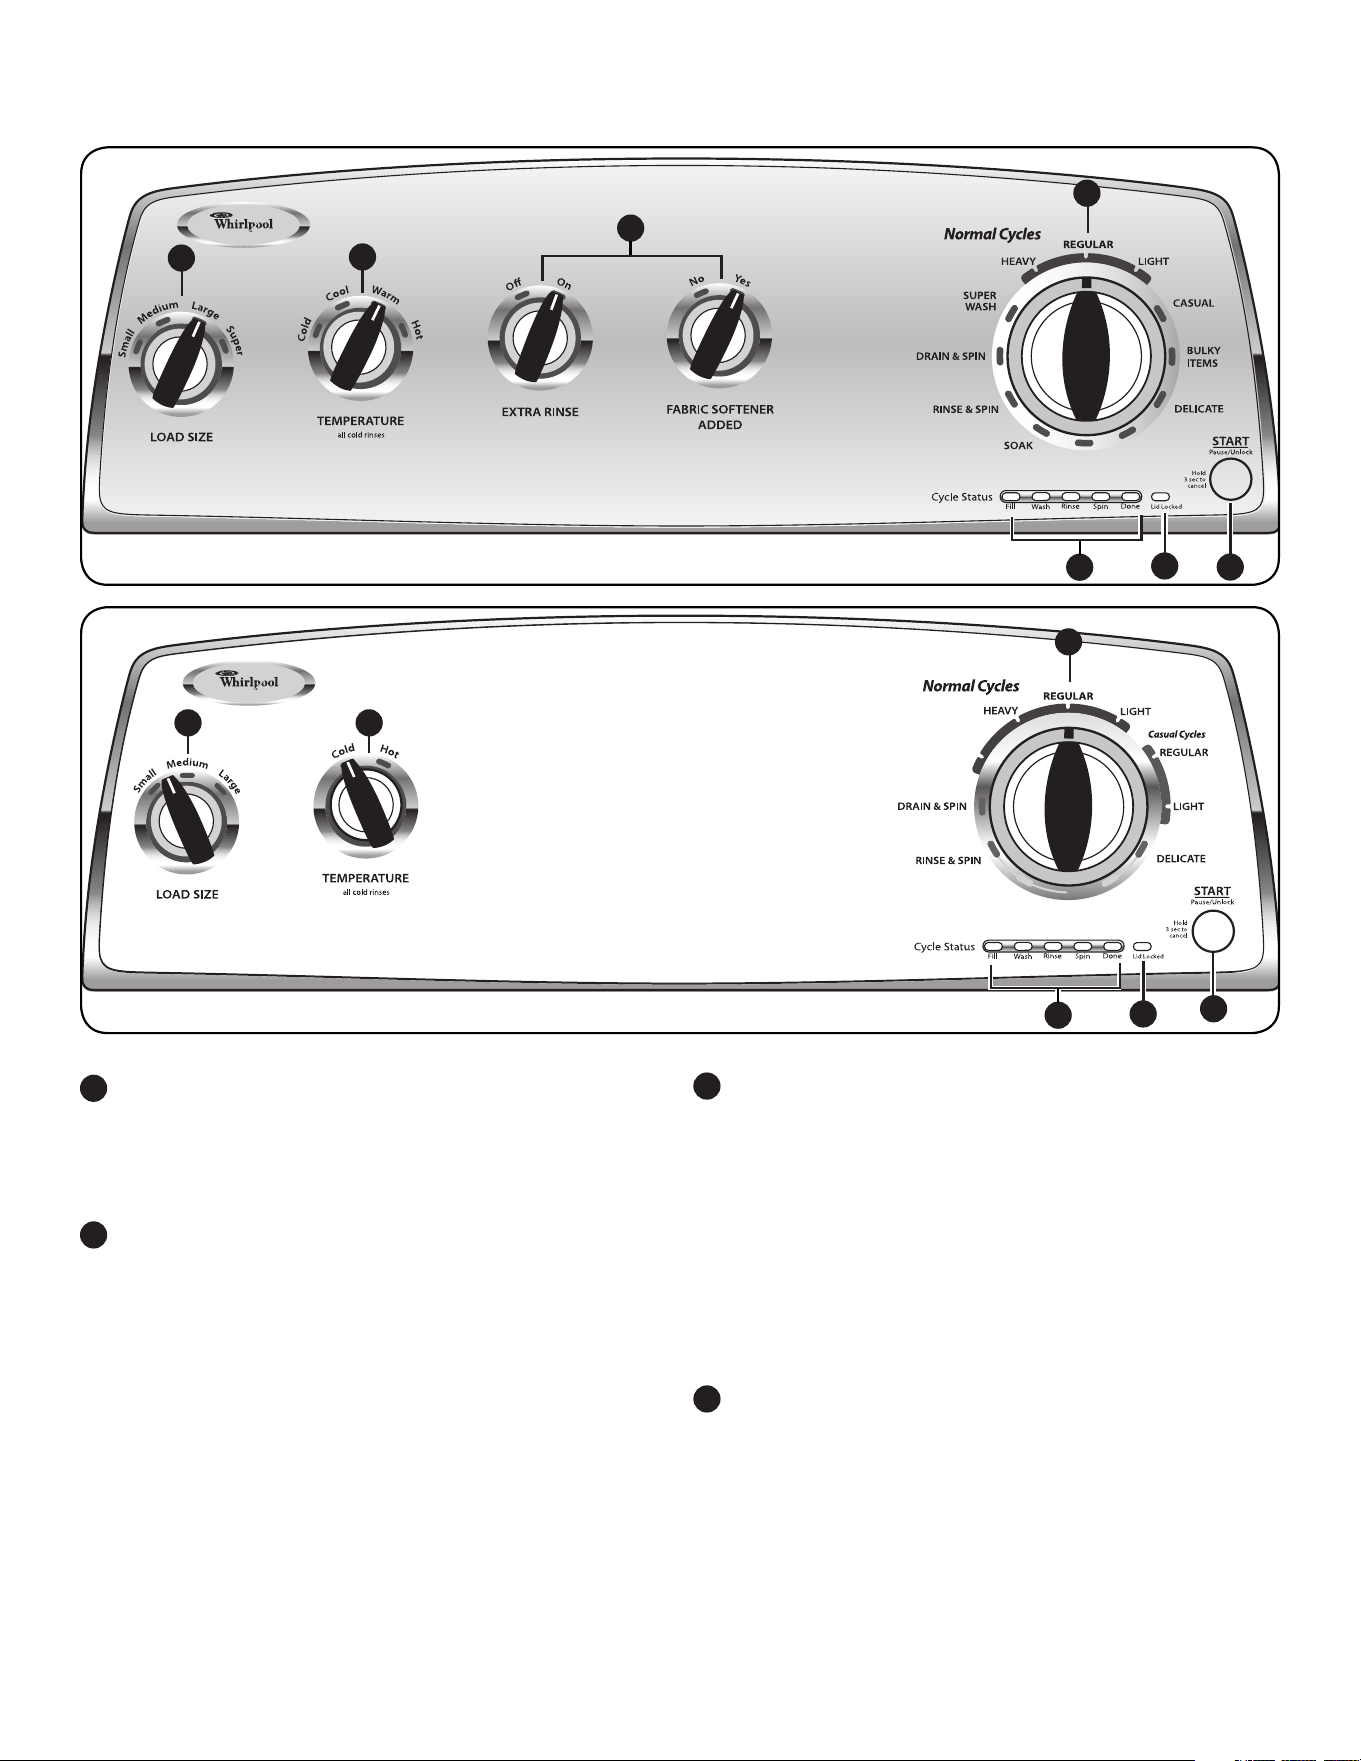
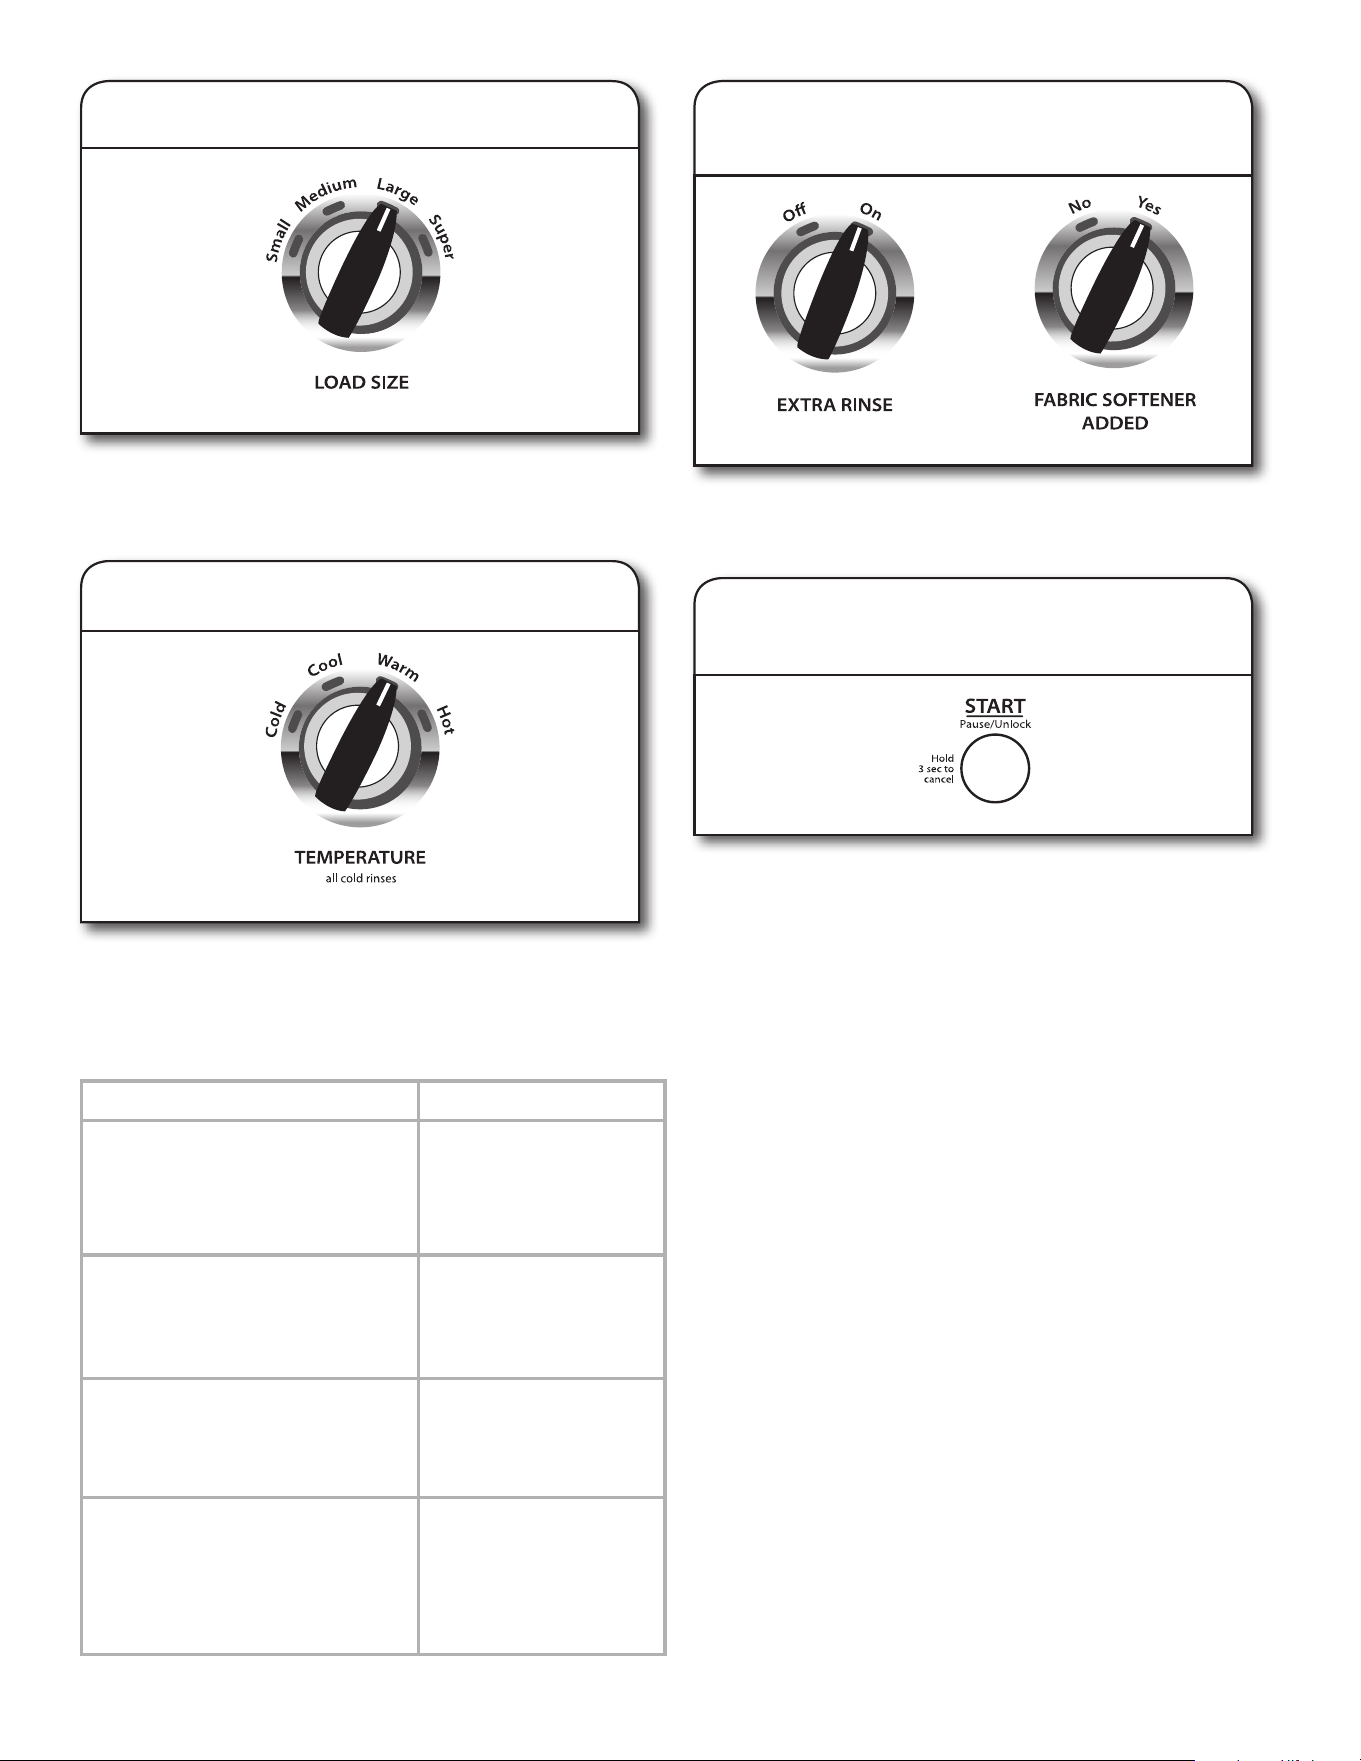
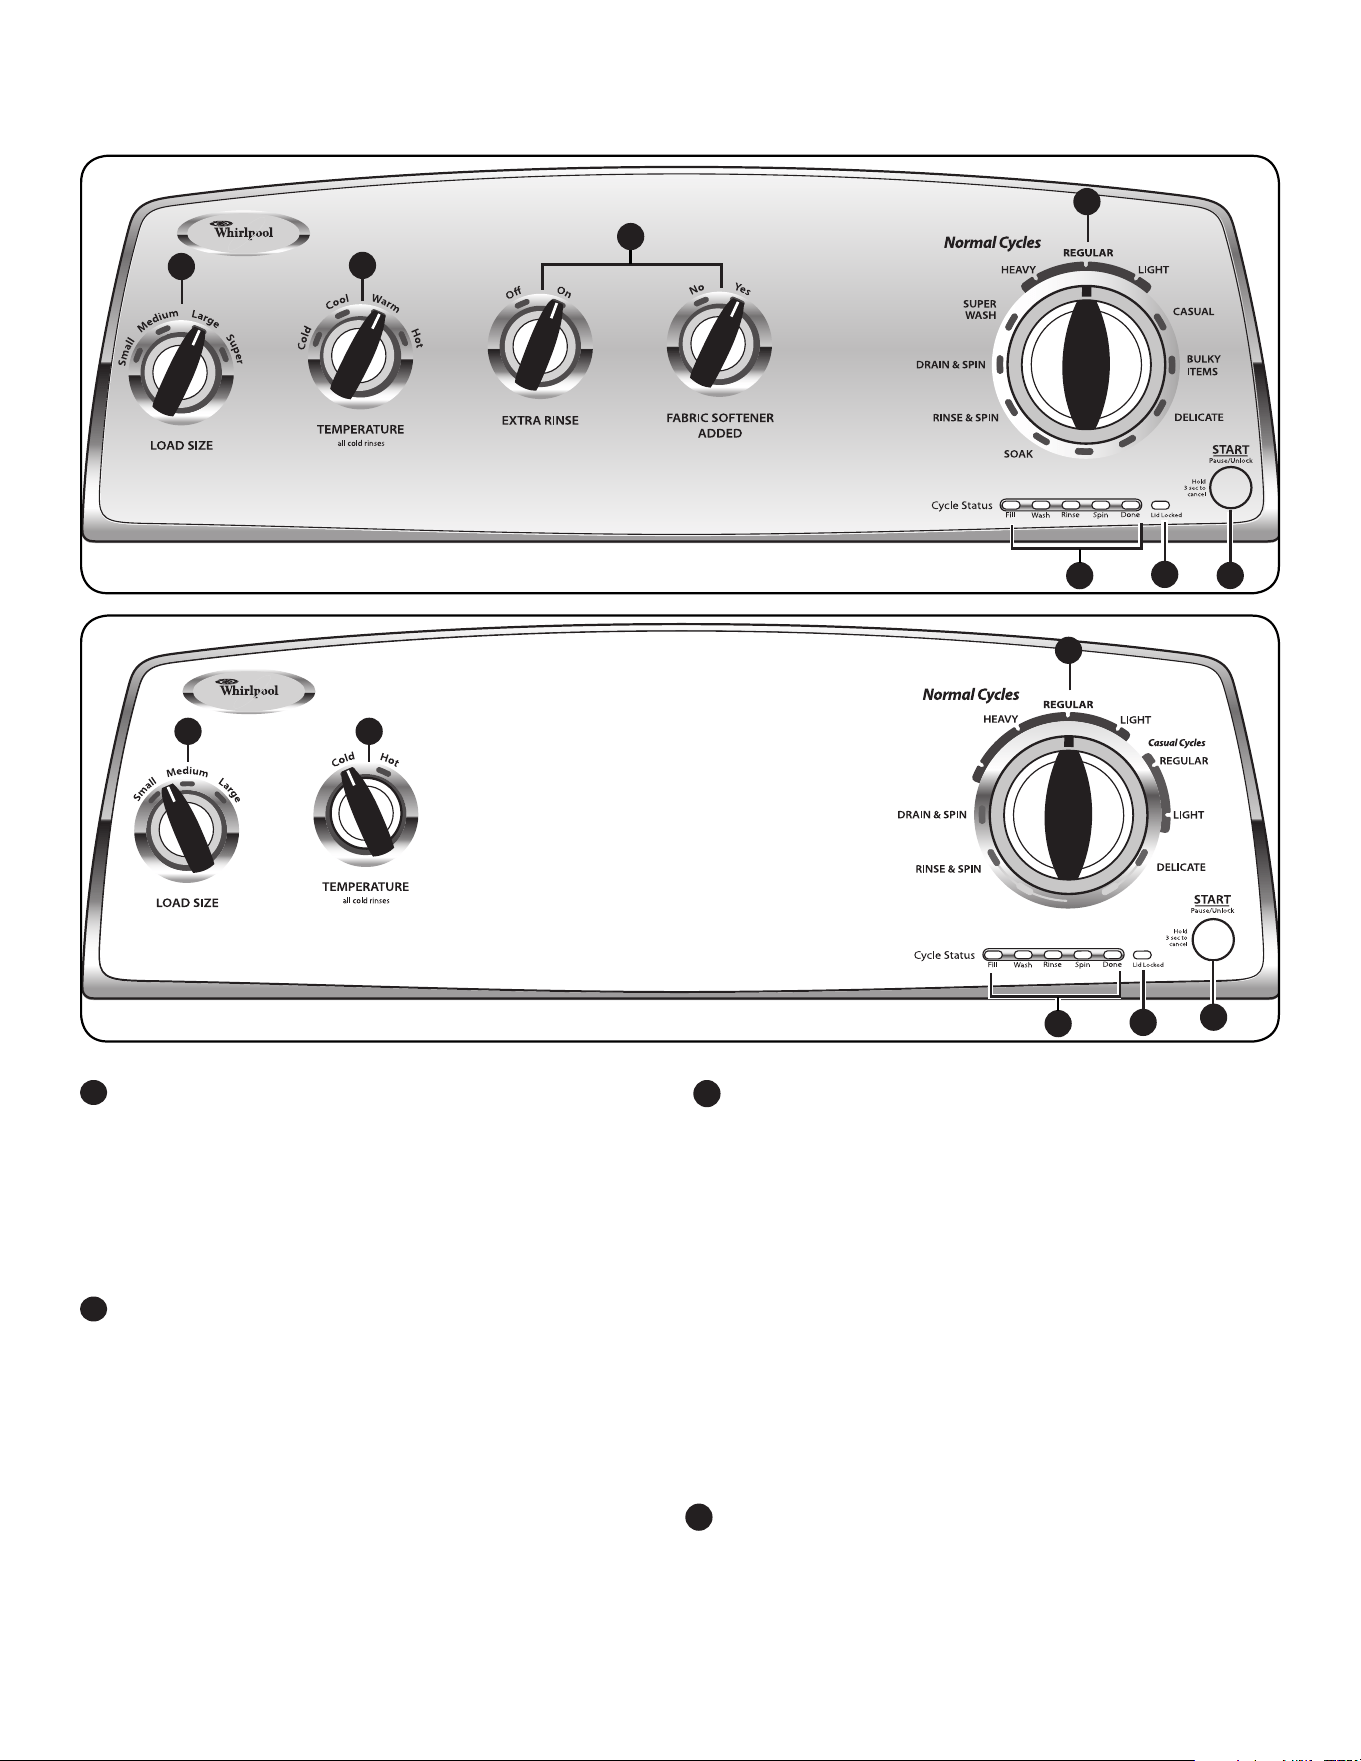
CONTROL PANEL AND FEATURES
2
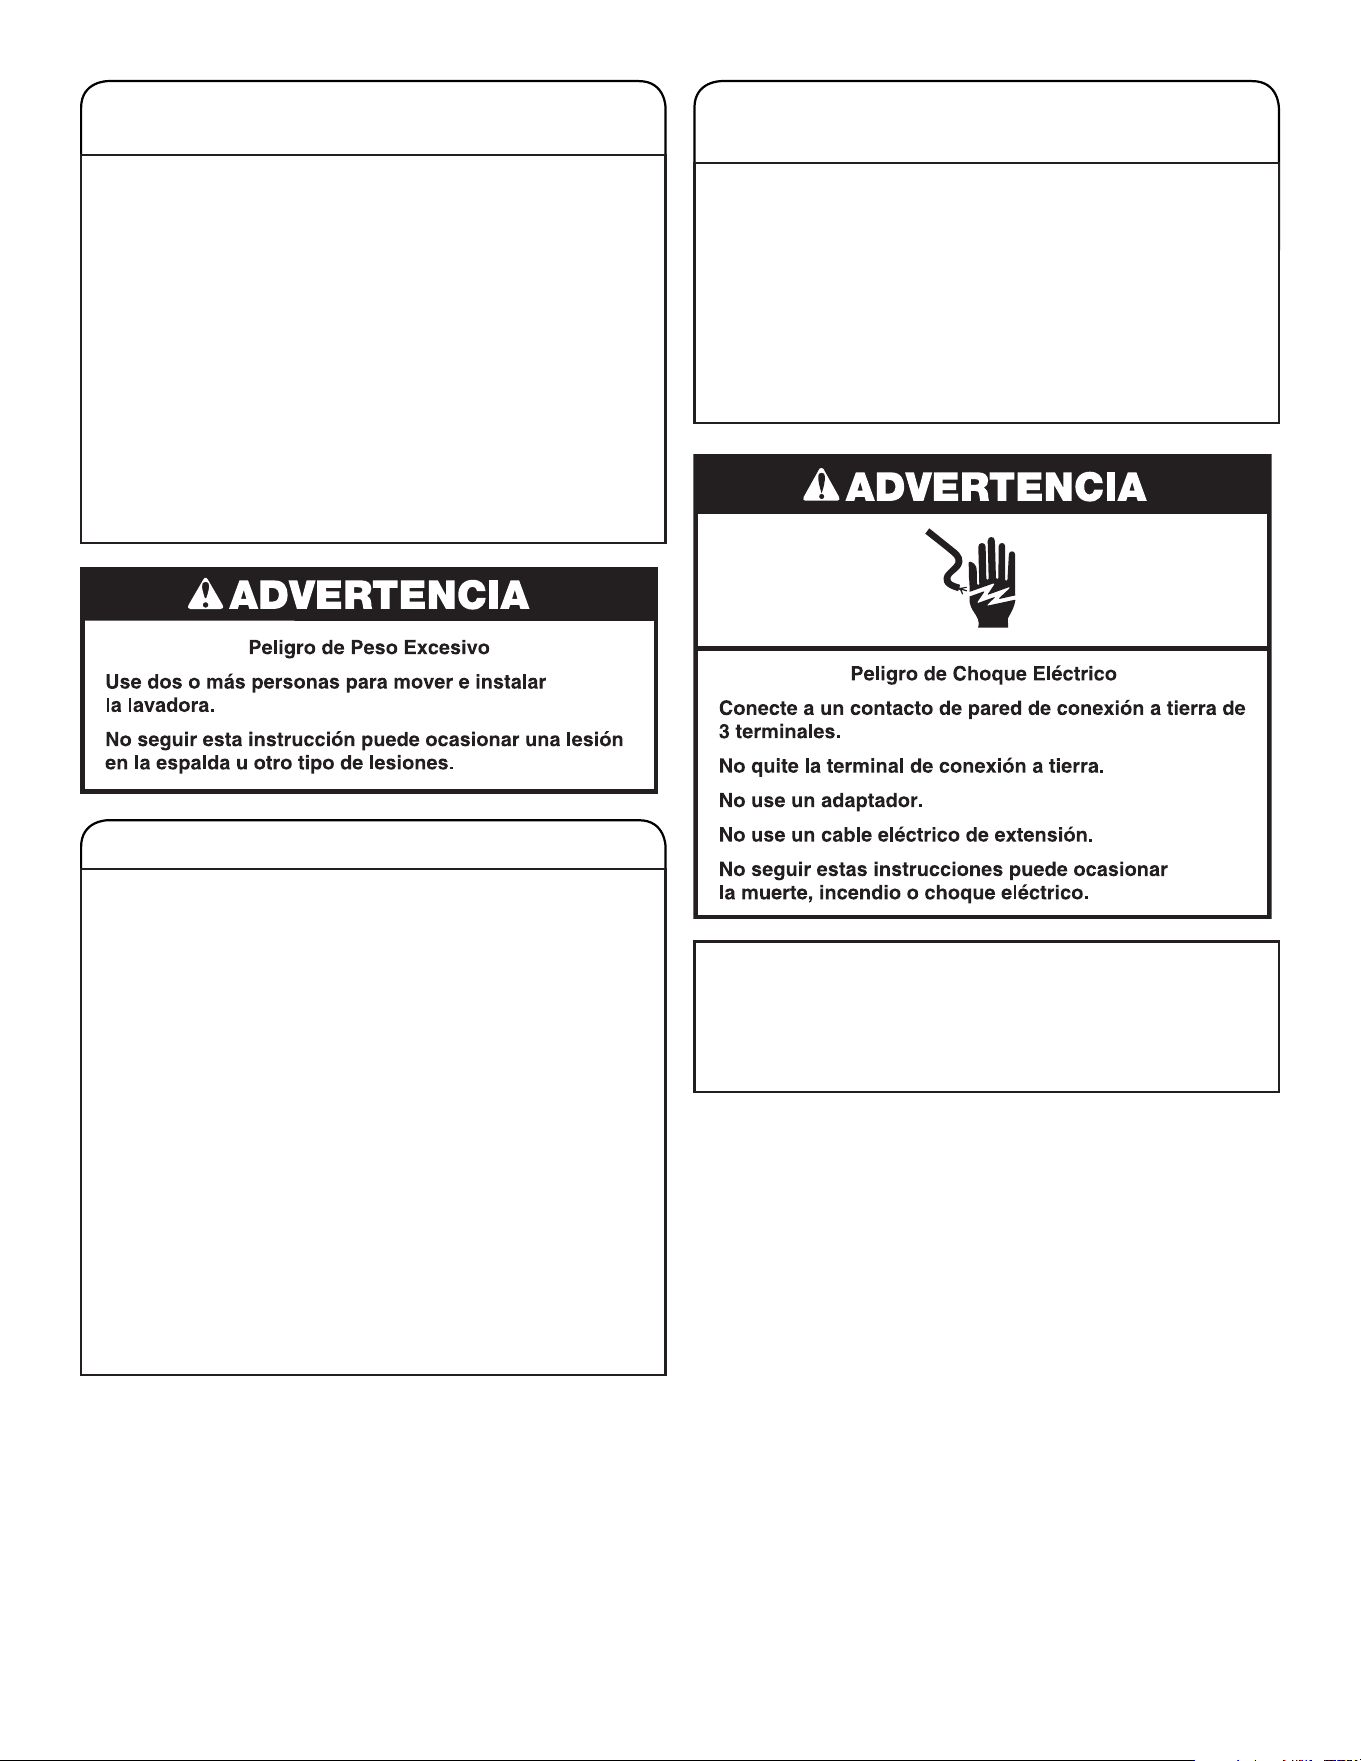
LOAD SIZE
Select the setting most suitable for your load. Small will add
a low amount of water for smaller loads and Super will add
the most amount of water for large or bulky loads. Items need
to move freely. Tightly packing can lead to poor cleaning
performance, and may increase wrinkling and tangling.
TEMPERATURE
Temperature control senses and maintains uniform water
temperatures by regulating incoming hot and cold water.
Select a wash temperature based on the type of fabric
and soils being washed. For best results and following
the garment label instructions, use the warmest wash
water safe for your fabric.
• Warm and hot water will be cooler than what your
previous washer provided.
• Even in a cold and cool water wash, some warm water
may be added to the washer to maintain a minimum
temperature.
1
2
OPTIONS (on some models)
The following options may be added to most cycles.
EXTRA RINSE
This option can be used to automatically add a second
rinse to most cycles.
FABRIC SOFTENER ADDED-YES
This option must be selected if using fabric softener
during a cycle. It ensures that fabric softener is added
at the correct time in the rinse for even distribution.
FABRIC SOFTENER ADDED with EXTRA RINSE
This option turns on both the Fabric Softener and the
Extra Rinse options.
WASH CYCLE KNOB
Use the Wash Cycle knob to select available cycles on your
washer. Turn the knob to select a cycle for your laundry load.
See “Cycle Guide” for detailed descriptions of cycles.
3
4
Not all features and options are available on all models.
4
1
5
2
Model 1CWTW4840
Model 1CWTW4740
6
7
6
4
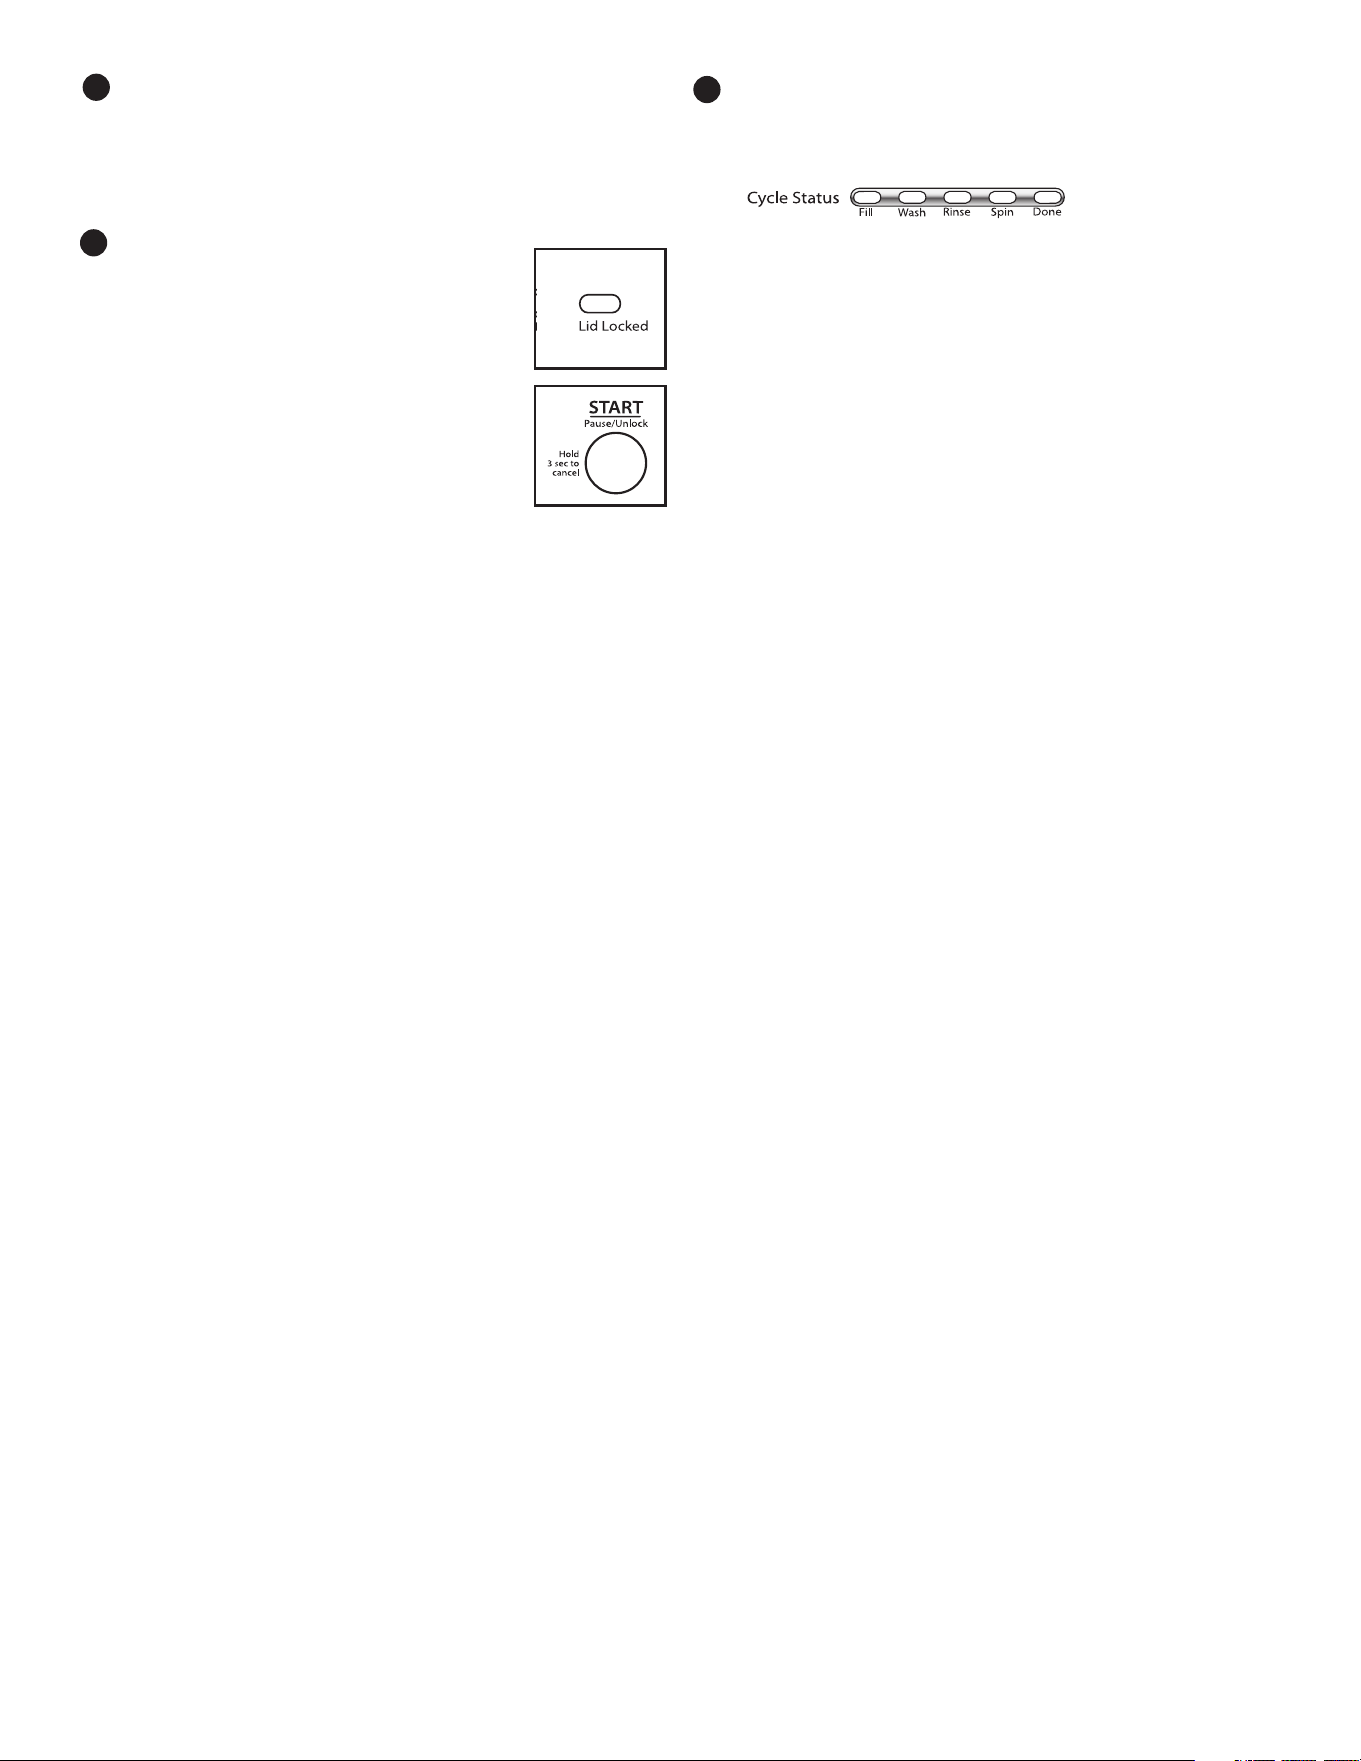
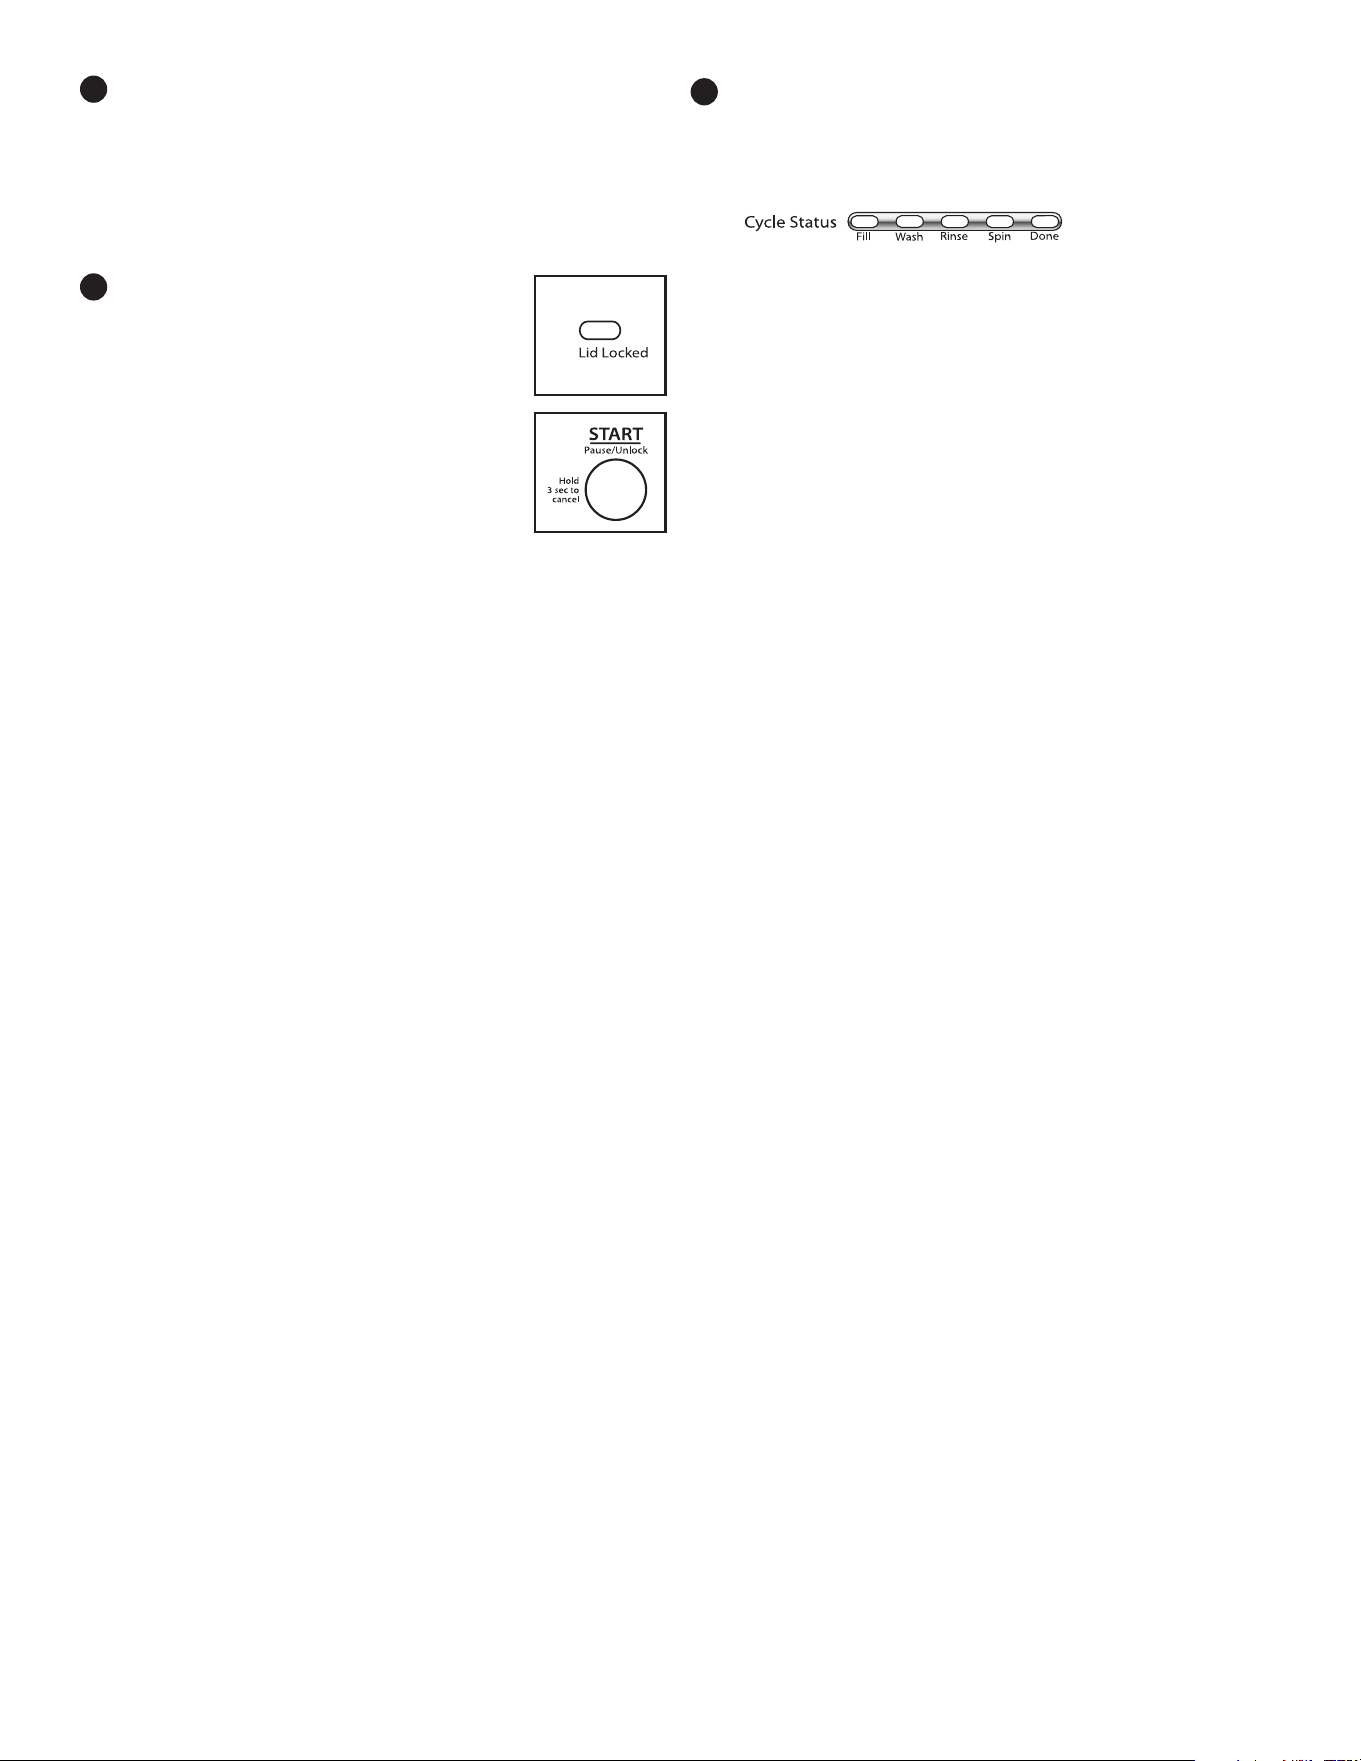
CYCLE STATUS INDICATORS
The Cycle Status Lights show the progress of a cycle.
At each stage of the process, you may notice sounds or
pauses that are different from traditional washers.
FILL/SENSING
When the START/PAUSE button is pressed, the washer
will ll to the selected water level. If the lid is closed
when the machine is done lling the lid will lock and the
machine will begin operation.
If the lid is open when the water stops entering the
machine, the cycle will not begin until the lid has been
closed and the START/PAUSE button is pressed. If the
cycle has not been started within 10 minutes of the water
lling the washer, the washer will pump out the water.
WASH
You will hear the agitator moving the load. The motor
sounds may change at different stages in the cycle.
RINSE
You will hear sounds similar to the wash cycle as the
washer rinses and moves the load. You may hear the
motor turning on briey (short hum) to move the basket
while lling. Fabric softener will be added if the Fabric
Softener Added-Yes option was selected.
Some cycles use spray rinsing. After draining and
spinning out wash water, the washer will continue to
spin and spray in rinse water for the entire rinse time.
SPIN
The washer spins the load at increasing speeds for
proper water removal, based on the selected cycle
and spin speed.
DONE
Once the cycle is complete, this light will come on.
Remove the load promptly for best results.
7
START/PAUSE/UNLOCK BUTTON
Press to start the selected cycle; press again to pause the
cycle and unlock the lid.
NOTE: If the washer is spinning, it may take several
minutes to unlock the lid. Press and hold for 3 seconds
to cancel a cycle.
LID LOCKED
To allow for proper spin operation,
the lid will lock and the Lid Lock light
will turn on. This light indicates that
the lid is locked and cannot be opened.
If you need to open the lid, press
START/Pause/Unlock. The lid will
unlock once the washer movement
has stopped. This may take several
minutes if the load was spinning at
high speed. Press START/Pause/
Unlock again to resume the cycle.
5
6
5
CYCLE GUIDE
Items to wash:
Cycle:
Wash
Temperature*:
Spin
Speed:
Cycle Details:
No-iron fabrics,
cottons, perm
press, linens,
synthetics
Cottons, linens,
sheets, and mixed
garment loads
Lightly-soiled
no-iron fabrics
and synthetics
Sturdy fabrics,
colorfast items,
towels, jeans
Casual or
Casual
Regular
Normal
Regular
Casual
Light
Normal
Heavy
Use this cycle to wash loads of no-iron fabrics such as
sport shirts, blouses, casual business clothes, permanent
press, and blends.
Use this cycle for normally soiled cottons and mixed fabric
loads. This cycle uses spray rinses only.
Use this cycle to wash lightly-soiled loads of no-iron fabrics
such as sport shirts, blouses, casual business clothes,
permanent press, and blends.
Use this cycle for heavily soiled or sturdy items. This cycle
uses spray rinses only. Use this cycle for cleaning the
interior of the washer. See “Washer Care.”
Hot
Warm
Cool
Cold
Hot
Warm
Cool
Cold
Hot
Warm
Cool
Cold
Hot
Warm
Cool
Cold
Low
High
Low
High
For best fabric care, choose the cycle that best ts the load being washed.
Not all cycles and options are available on all models.
Lightweight
cotton fabrics
Normal
Light
Use this cycle for lightly soiled mixed loads. This cycle
uses spray rinses only.
Hot
Warm
Cool
Cold
High
Machine-wash
silks, lingerie,
washable wools
Delicate Low
Heavily soiled
fabrics
Soak
Use this cycle to wash lightly soiled garments indicating
“Machine Washable Silks” or “Gentle” cycle on the care
label. Place small items in mesh garment bags before
washing.
Use this cycle to soak small spots of set in stains on
fabrics. The washer will use intermittent agitation and
soaking. After time has expired, water will drain, but the
washer will not spin. Cycle is complete.
Hot
Warm
Cool
Cold
No Spin
Hot
Warm
Cool
Cold
NOTE: Be sure to select Fabric Softener Added-Yes, if adding fabric softener to load (depending on model).
*All rinses are cold.
Swimsuits and
items requiring
rinsing without
detergent
Rinse &
Spin
Combines a rinse and high speed spin for loads requiring
an additional rinse cycle or to complete a load after a power
failure. Also use for loads that require rinsing only.
Cold rinse only High
Dripping wet or
hand-washed
items
Drain &
Spin
This cycle uses a spin to shorten drying times for heavy
fabrics or special-care items washed by hand. Use this
cycle to drain washer after cancelling a cycle or completing
a cycle after a power failure.
HighN/A
Sturdy fabrics,
colorfast items,
towels, jeans
Super
Wash
Provides maximum wash time and action for tough stains
and soils. Use this cycle for heavily soiled or sturdy items.
Water-level sensing process may take longer for some
items than for others because they will absorb more water
than other fabric types.
Hot
Warm
Cool
Cold
High
Large items such
as sleeping bags,
small comforters,
jackets
Bulky
Items
Use this cycle to wash large items such as jackets and
small comforters. The washer will ll with enough water
to wet down the load before the wash portion of the cycle
begins. Do not tightly pack basket.
Hot
Warm
Cool
Cold
Low
6
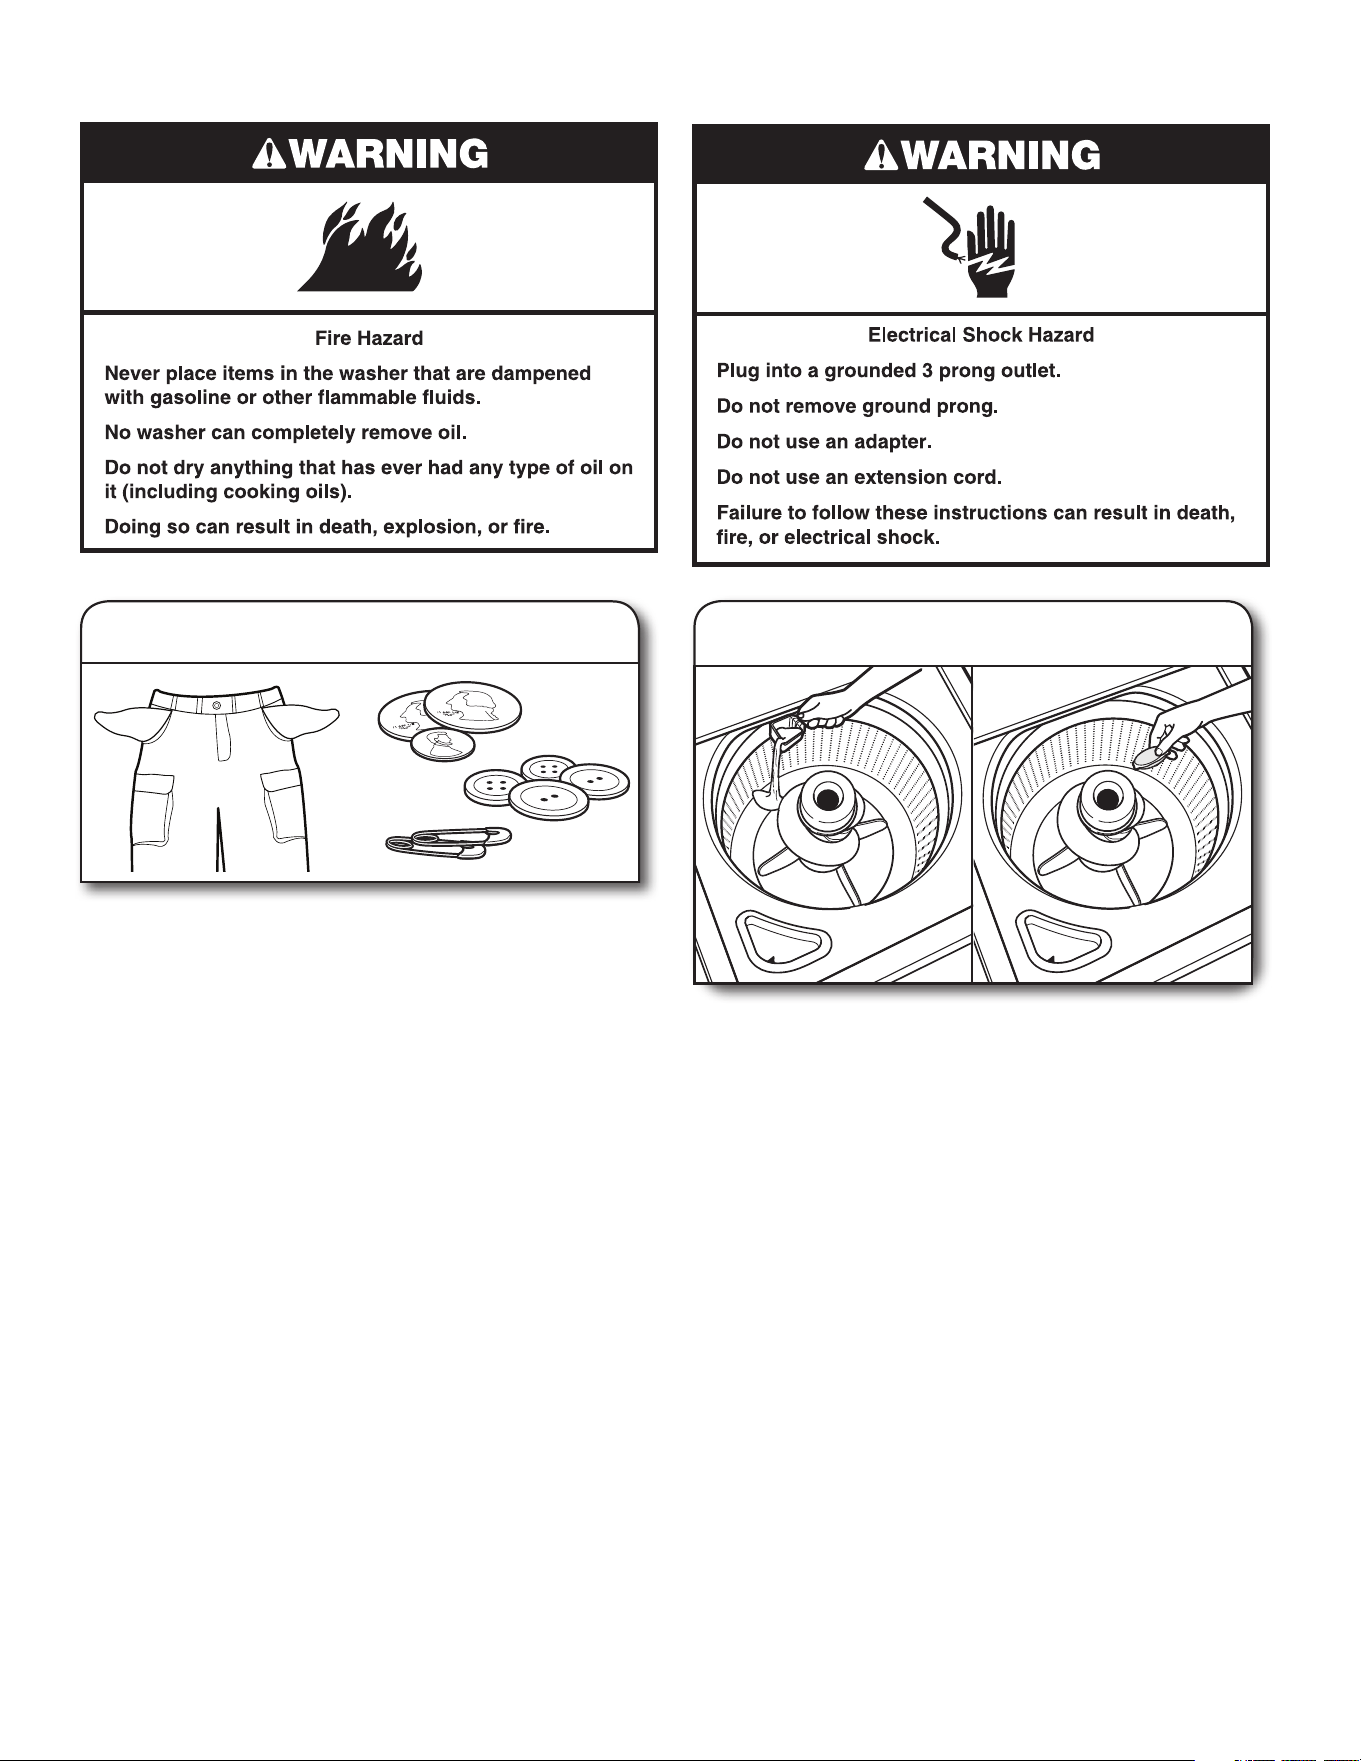
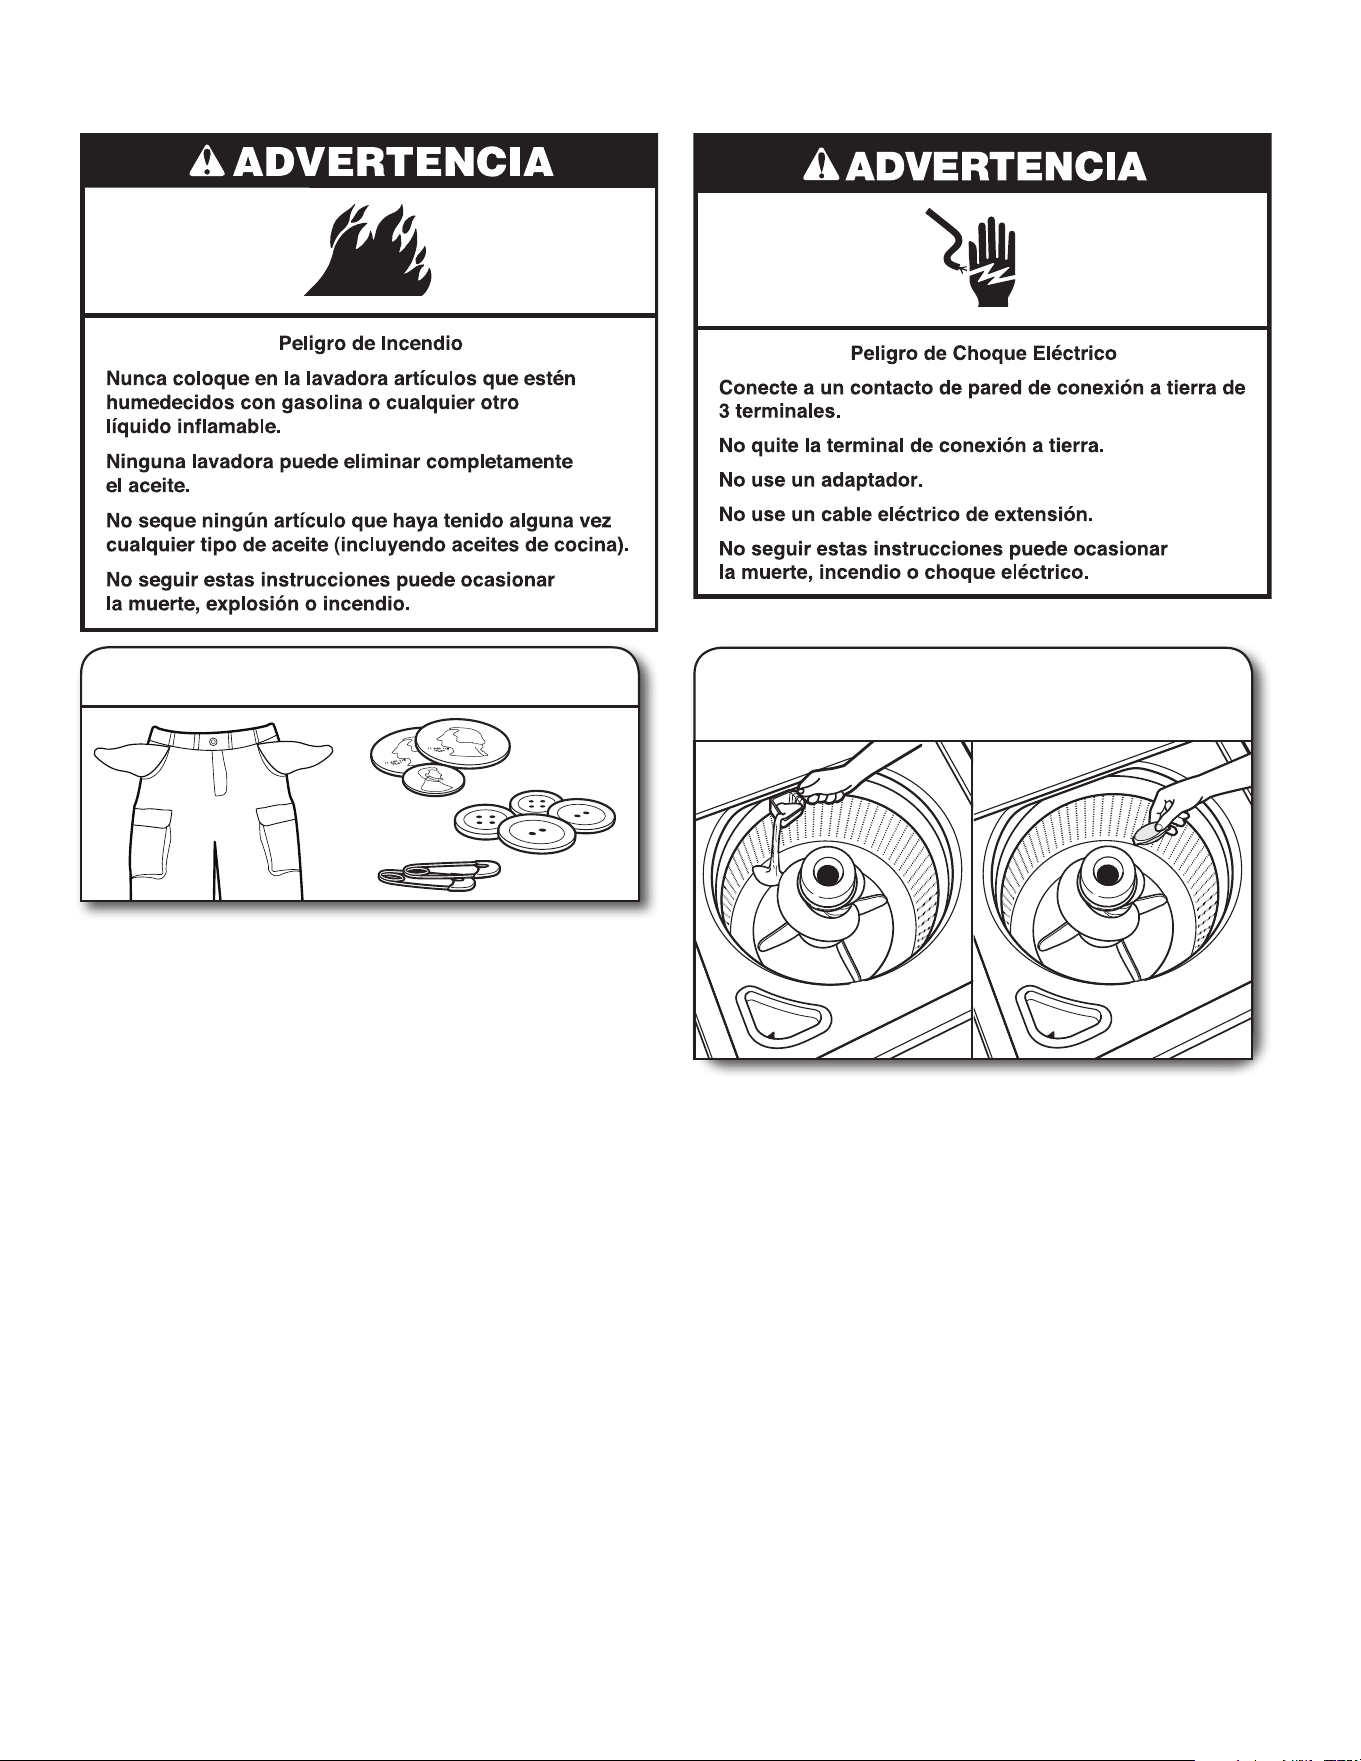
• Empty pockets. Loose change, buttons, or any small
object can pass under the agitator and become trapped,
causing unexpected sounds.
• Sort items by recommended cycle, water temperature,
and colorfastness.
• Separate heavily soiled items from lightly soiled.
• Separate delicate items from sturdy fabrics.
• Do not dry garments if stains remain after washing,
because heat can set stains into fabric.
• Treat stains promptly.
• Close zippers, fasten hooks, tie strings and sashes, and
remove non-washable trim and ornaments.
• Mend rips and tears to avoid further damage to items
during washing.
Helpful Tips:
• When washing water-proof or water-resistant items,
load evenly.
• Use mesh garment bags to help avoid tangling when
washing delicate or small items.
• Turn knits inside out to avoid pilling. Separate lint-takers
from lint-givers. Synthetics, knits, and corduroy fabrics will
pick up lint from towels, rugs, and chenille fabrics.
NOTE: Always read and follow fabric care label instructions to
avoid damage to your garments.
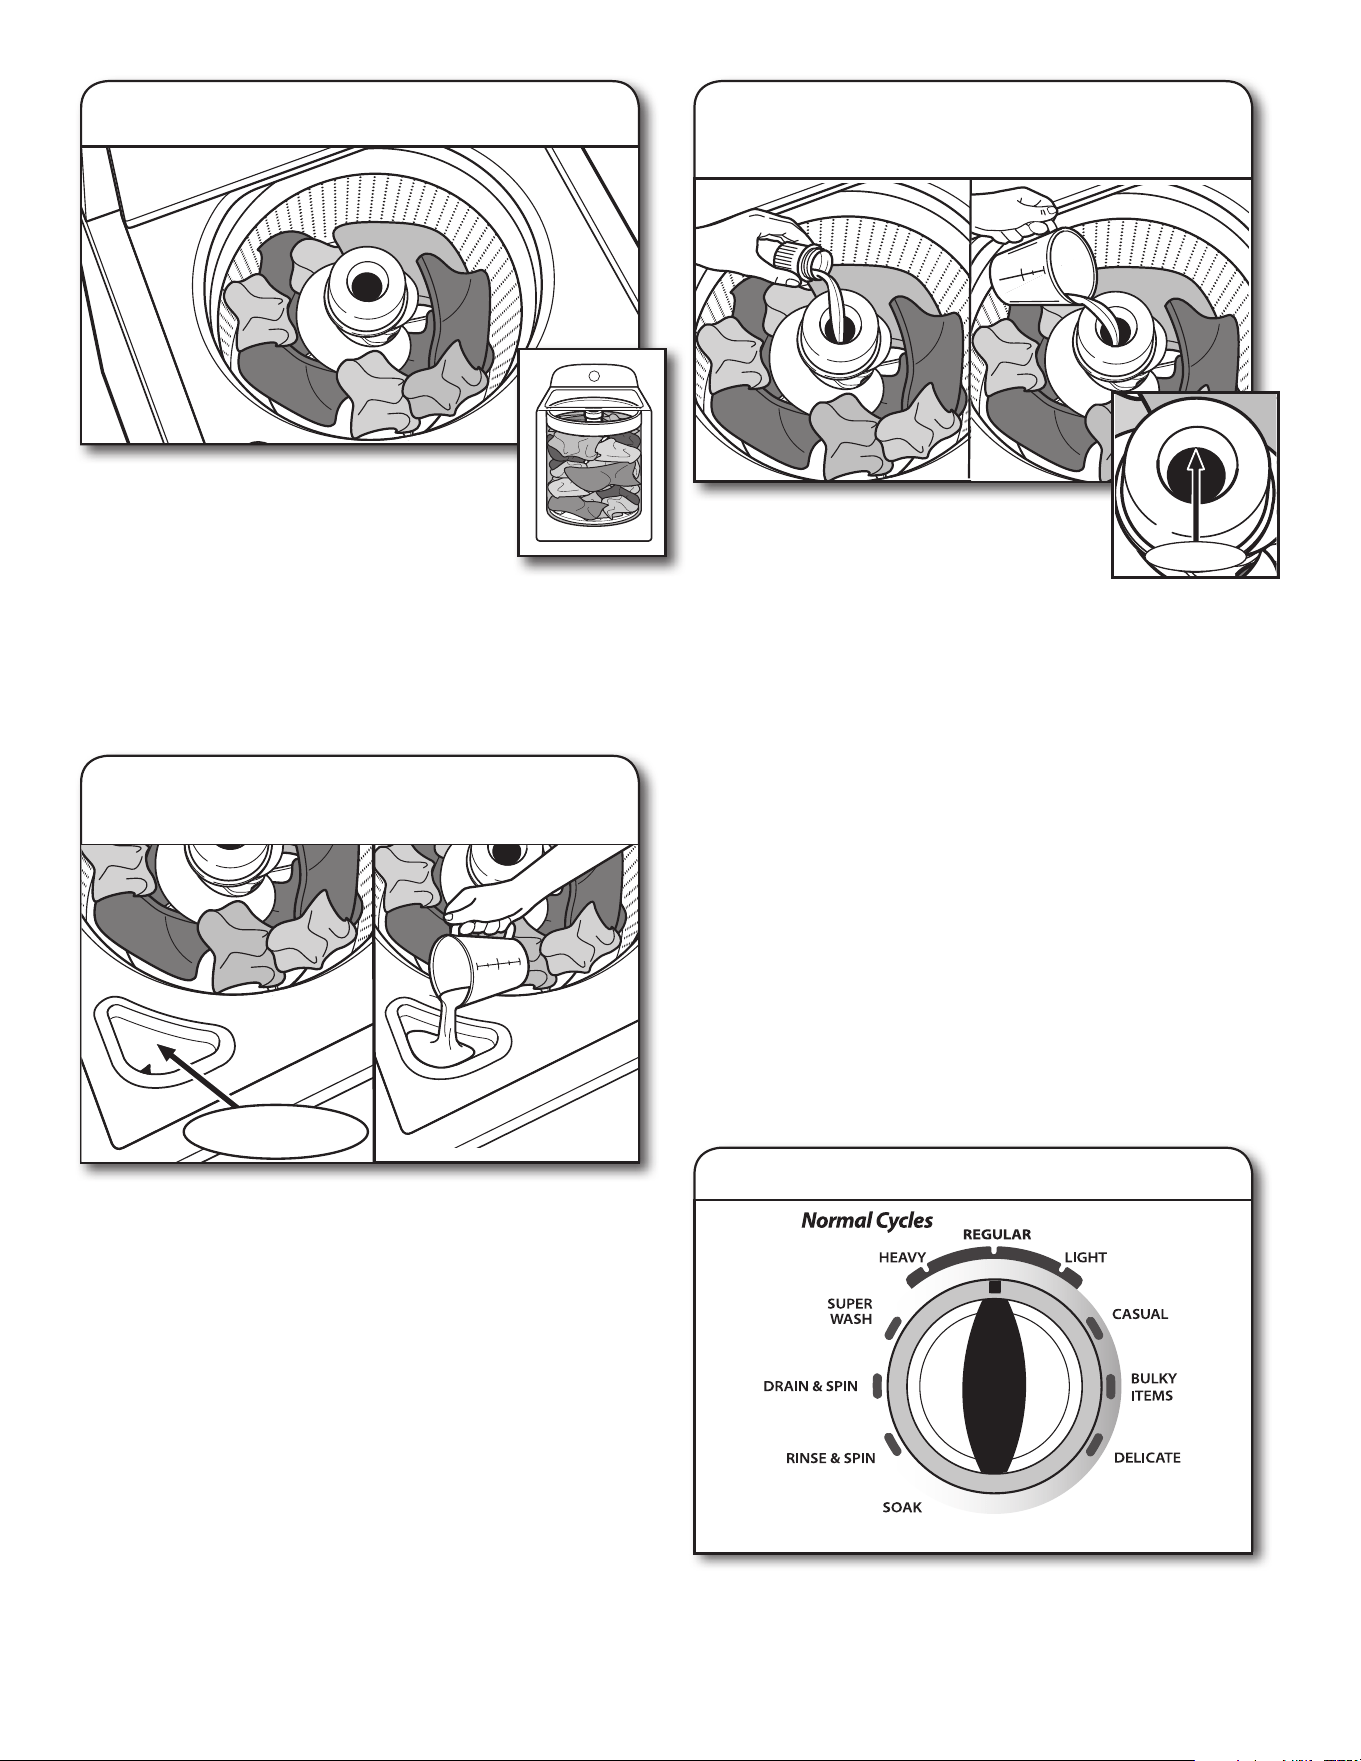
1� Sort and prepare your laundry
USING YOUR WASHER
Add a measured of amount of detergent or single-dose laundry
packet into the basket.
If using Oxi-type boosters, color-safe bleach, or fabric softener
crystals, add to the bottom of the washer basket before adding
clothes.
NOTE: Follow the manufacturer’s instructions to determine the
amount of laundry products to use.
2� Add laundry products
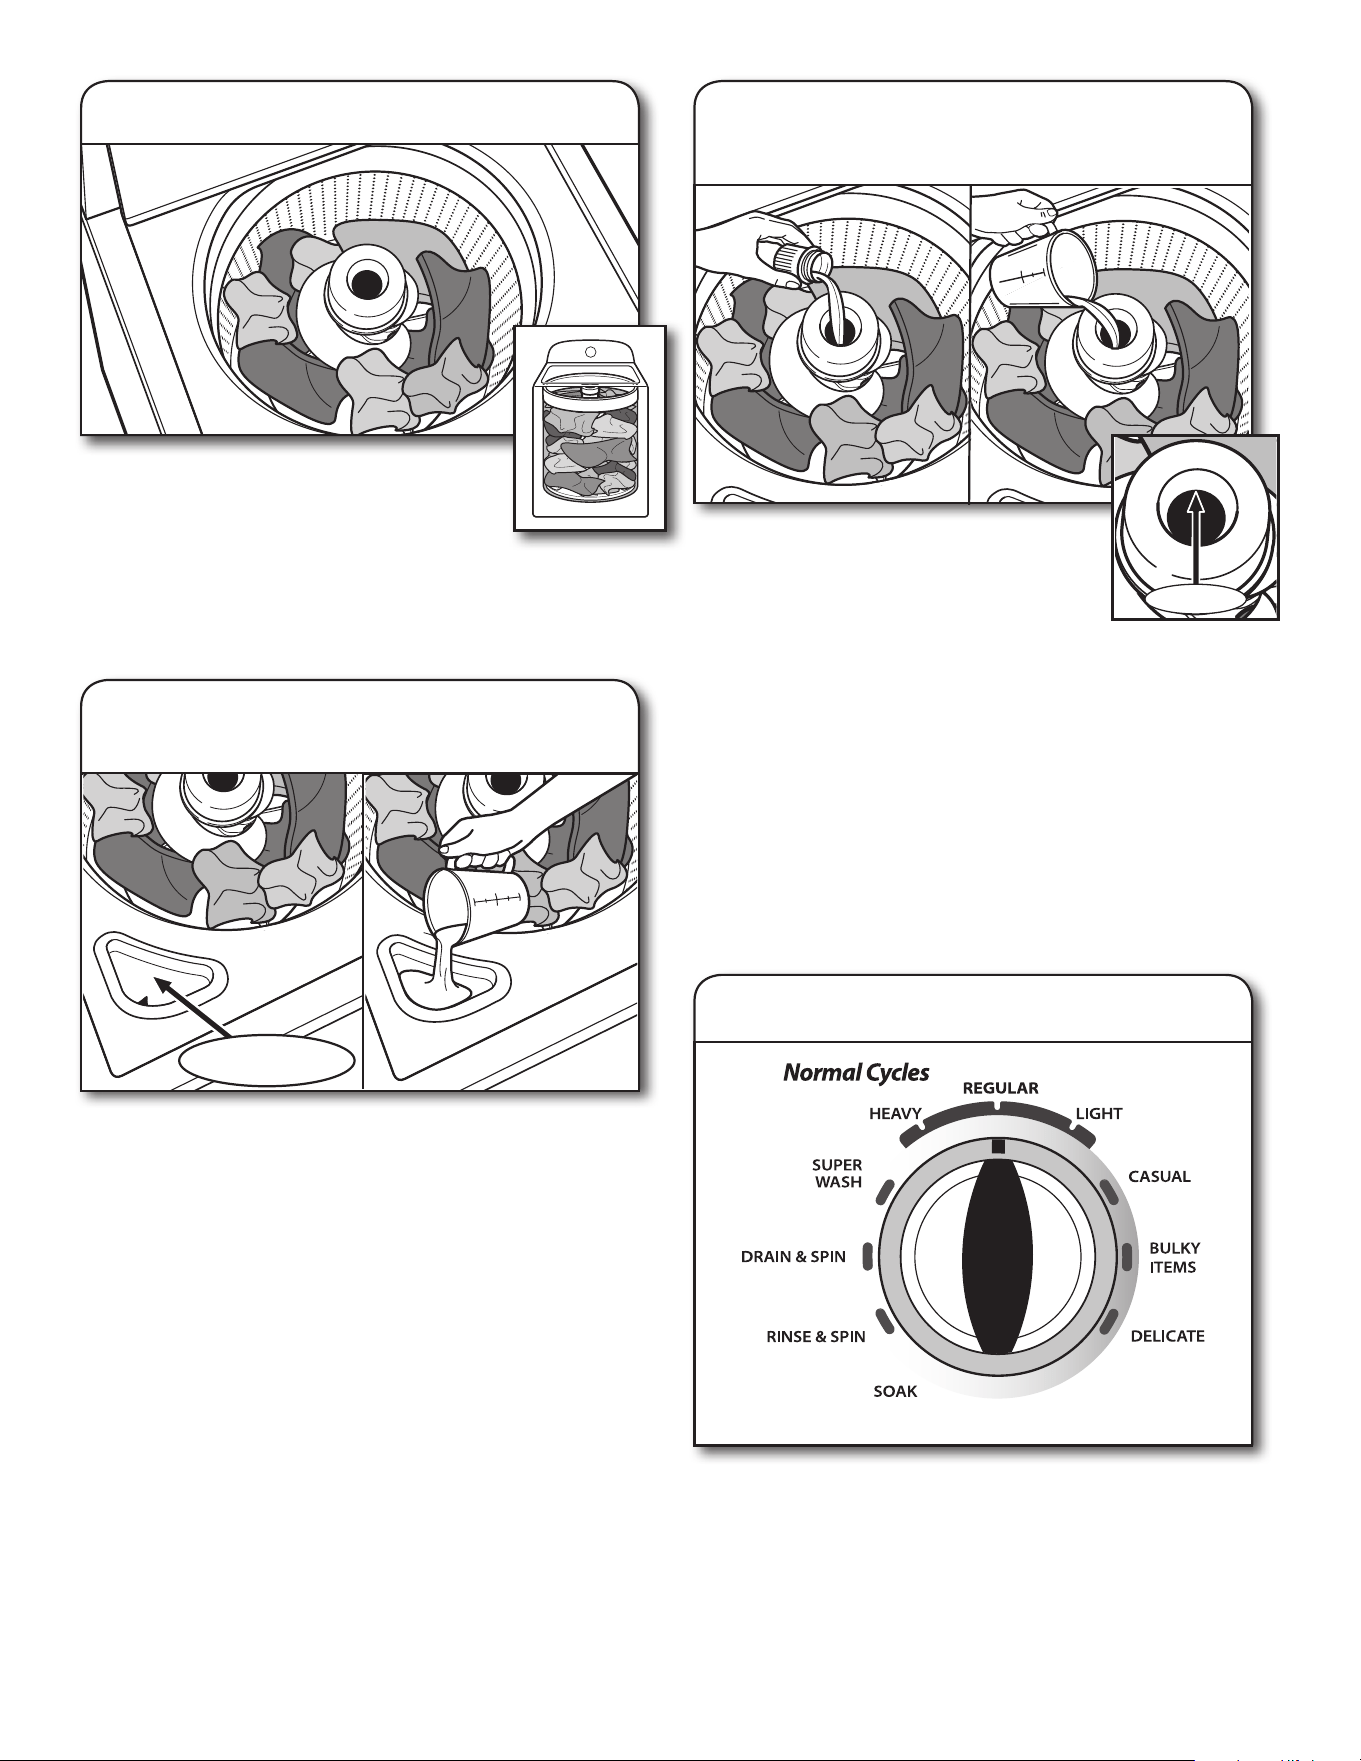
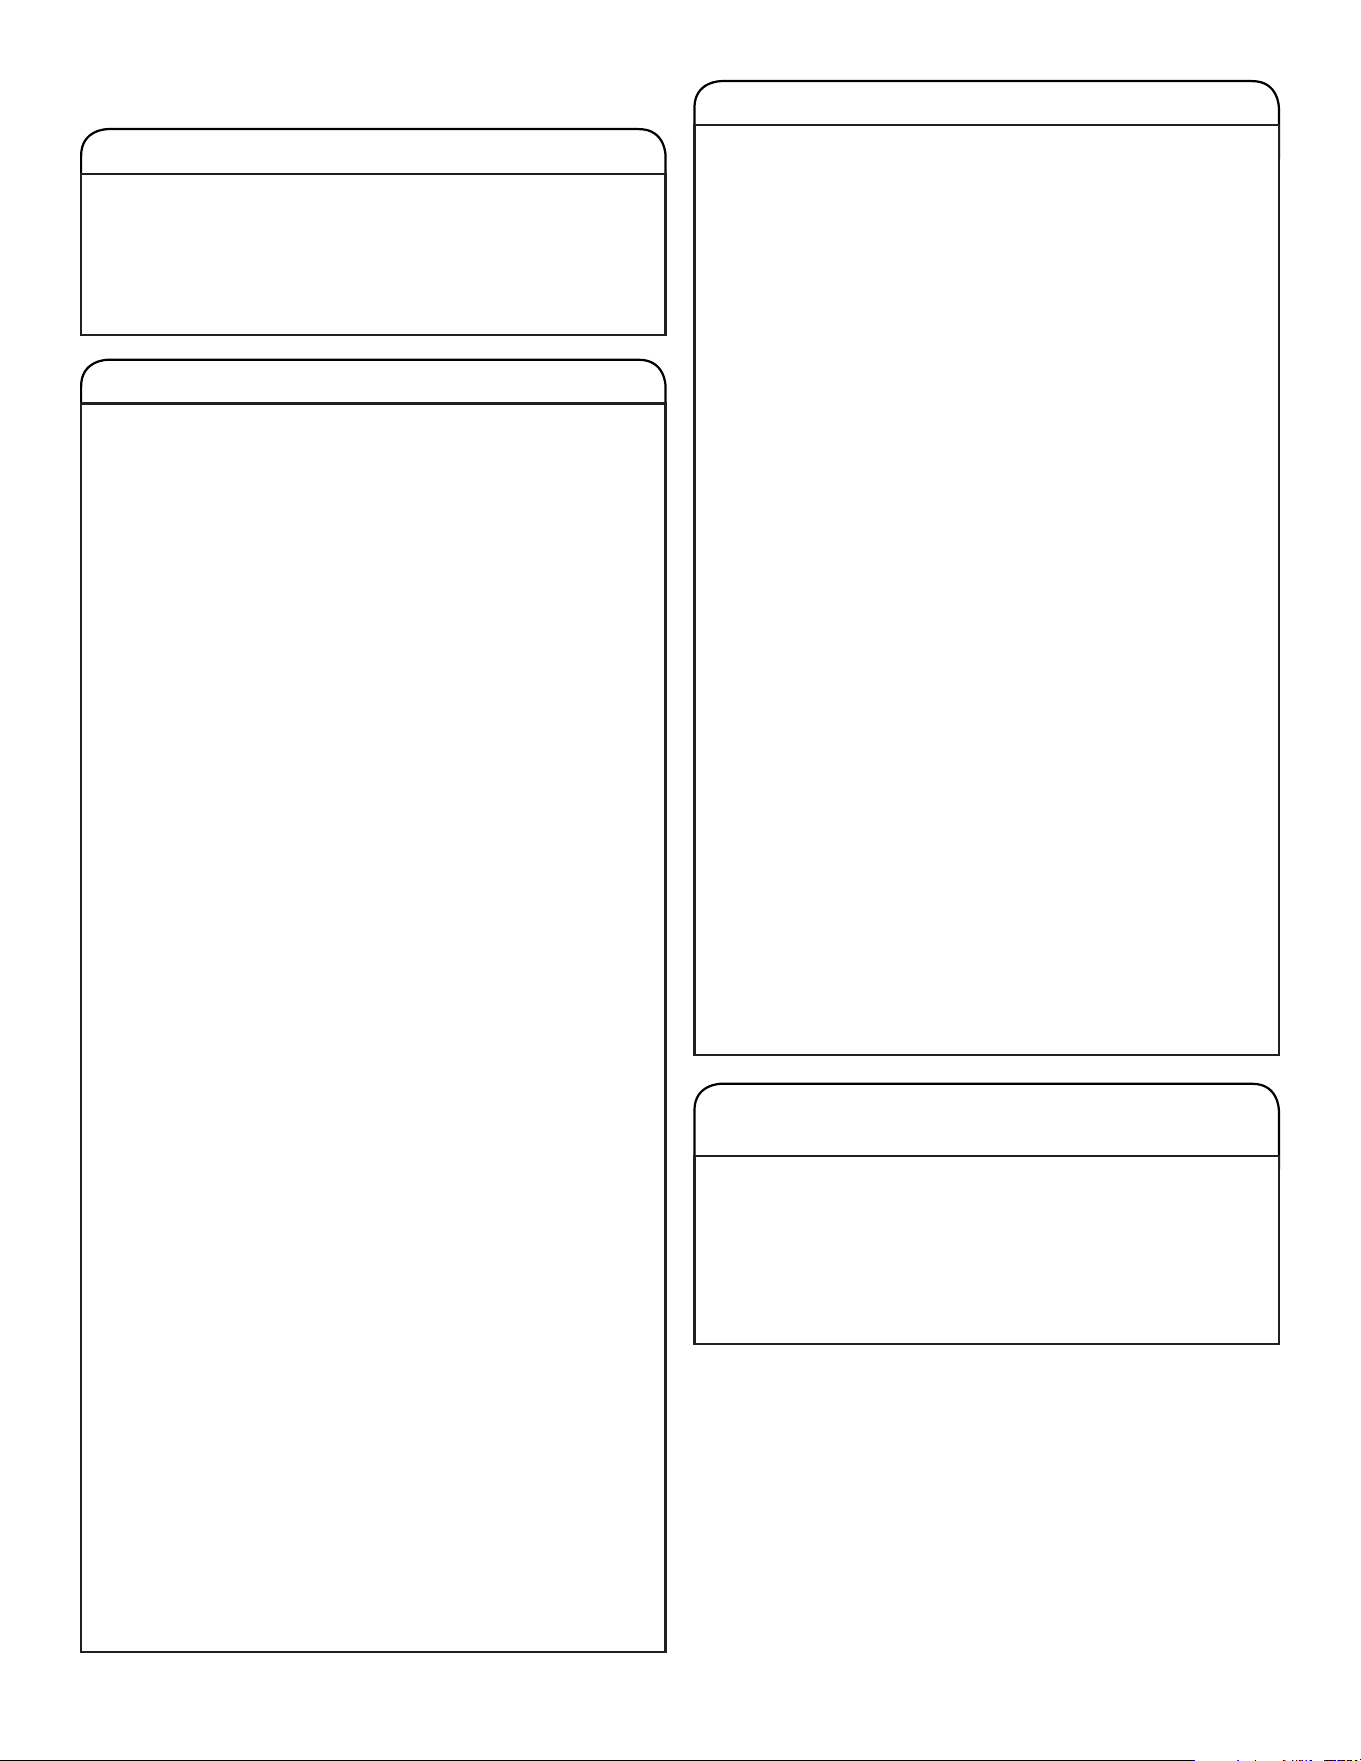
7
5� Add fabric softener to dispenser
(on some models)
Pour a measured amount of liquid fabric
softener into dispenser; always follow
manufacturer’s directions for correct amount
of fabric softener based on your load size.
IMPORTANT:
• Dilute liquid fabric softener by lling the dispenser with
warm water until liquid reaches the underside of the rim. See
max ll line arrows. Then select Fabric Softener Added-Yes
option or Fabric Softener Added with Extra Rinse option.
• Fabric Softener Added option must be selected to “Yes” to
ensure proper distribution at correct time in cycle.
Adding Liquid Fabric Softener Manually to Wash Load
During the nal rinse, wait until the washer has completed
lling, press the START/Pause/Unlock button to pause the
washer. Lift the lid and add the measured recommended
amount of liquid fabric softener. Do not use more than the
recommended amount. Close the lid and press the START/
Pause/Unlock button again to start the washer.
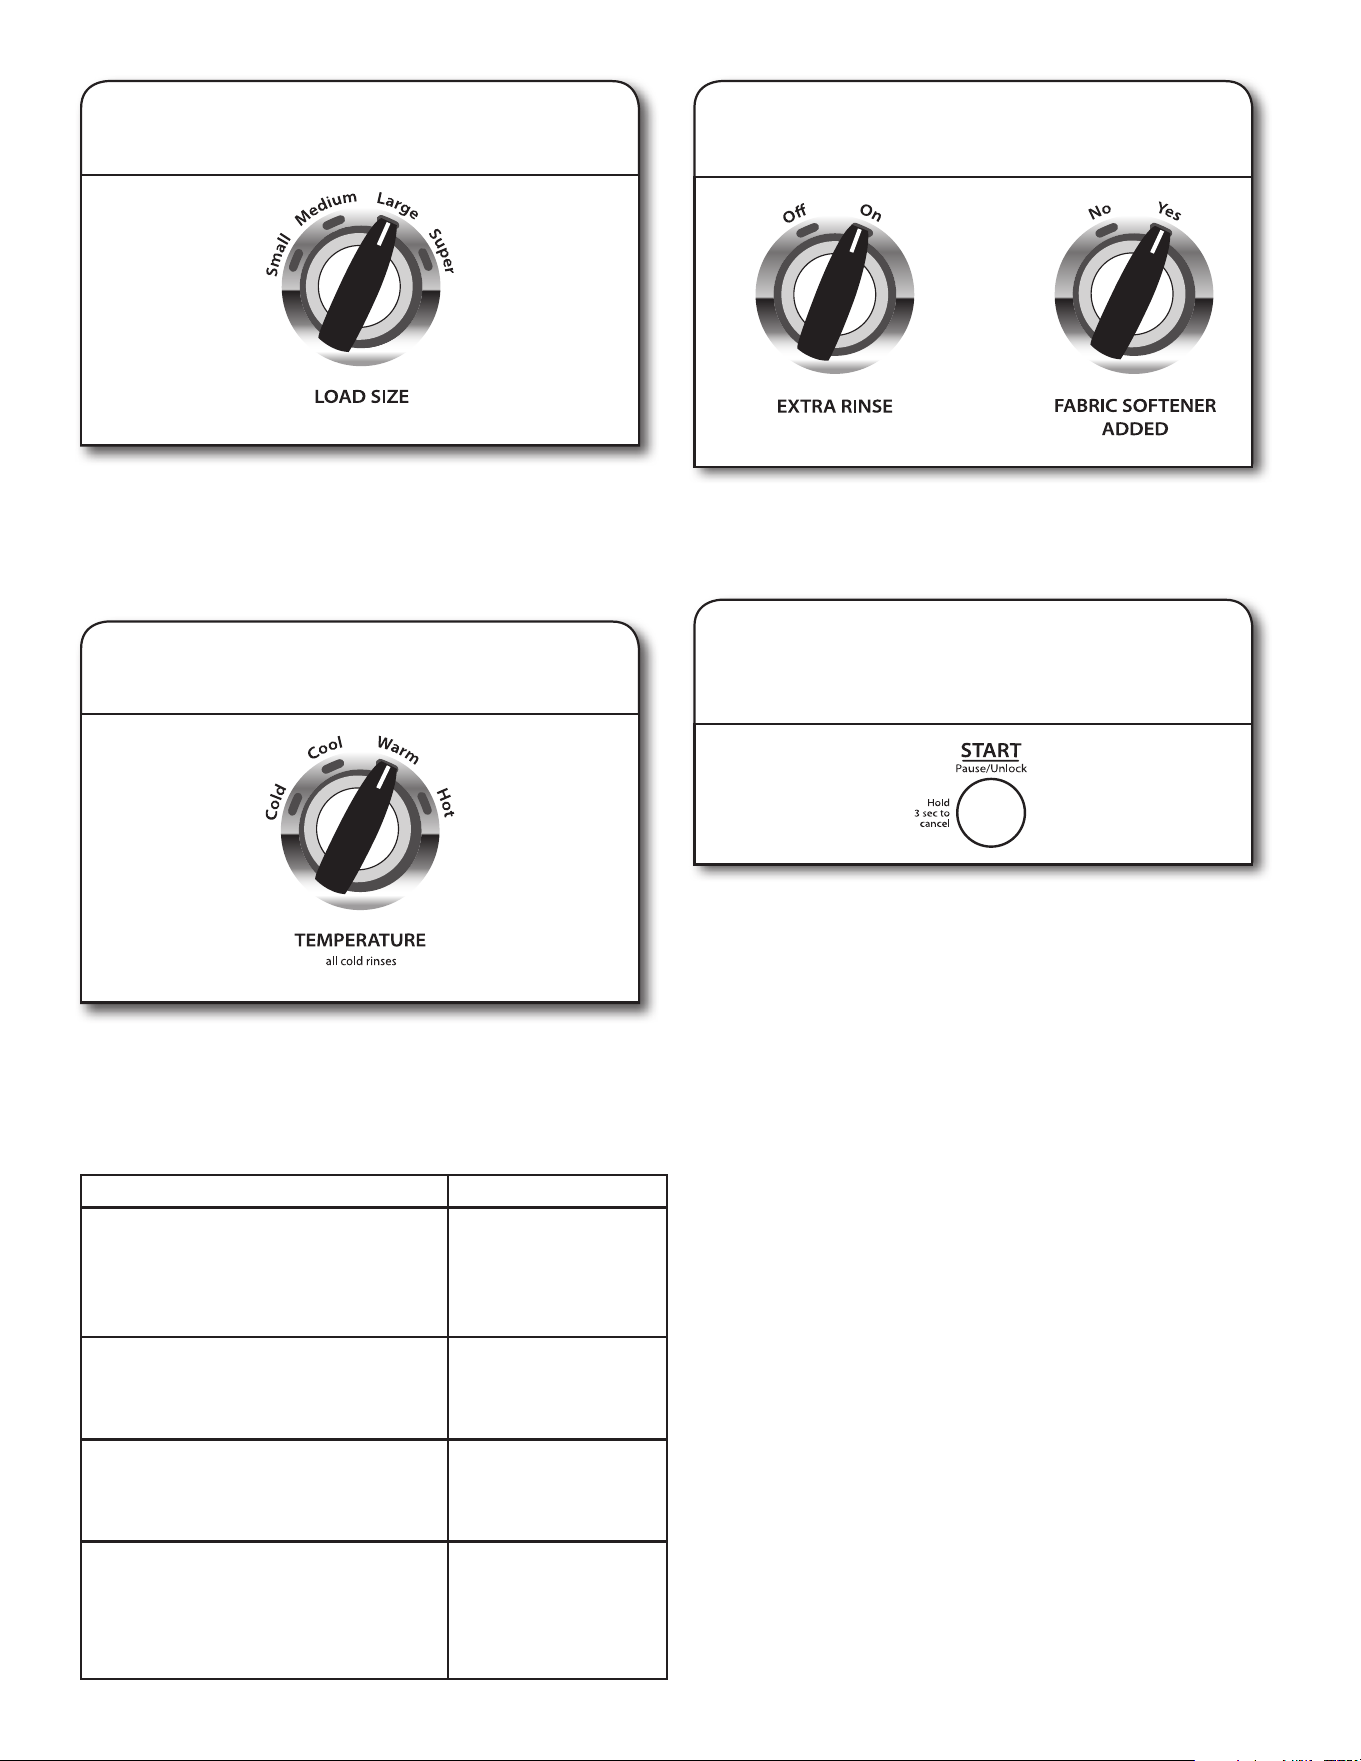
4� Add liquid chlorine bleach
to dispenser
Liquid
Chlorine Bleach
Do not overll, dilute, or use more than 1 cup (250 mL).
Do not use color-safe bleach or Oxi products in the same
cycle with liquid chlorine bleach.
Load garments in loose heaps evenly around
basket wall. For best results, do not pack the
load tightly. Do not wrap large items such as
sheets around the agitator; load them in loose
piles around the sides of the basket. Try mixing
different sized items to reduce tangling.
IMPORTANT: Do not tightly pack or force items into washer.
Items need to move freely for best cleaning and to reduce
wrinkling and tangling.
3� Load laundry into washer
MAX FILL
Turn cycle knob to choose your wash cycle. For more
information, see “Cycle Guide”.
6� Select cycle
Model 1CWTW4840 shown
8
Wash Temp
Hot
Some cold water is added to save
energy. This will be cooler than your
hot water heater setting.
Warm
Some cold water will be added, so
this will be cooler than what your
previous washer provided.
Cool
Warm water may be added to
assist in soil removal and to help
dissolve detergents.
Cold
This is the temperature from your
faucet. If your tap cold water is very
cold, warm water may be added
to assist in soil removal and help
dissolve detergent.
Suggested Fabrics
8� Select TEMPERATURE
Once you select a cycle, select the desired wash temperature by
turning the Temperature knob to the appropriate setting based
on your load. All rinses are tap cold.
NOTE: Always read and follow fabric care label instructions
to avoid damage to your garments.
10� Press START/Pause/Unlock
to begin wash cycle
Press the START/Pause/Unlock button to start the wash
cycle. When the cycle has nished, the DONE indicator will
light. Promptly remove garments after cycle has completed
to avoid odor, reduce wrinkling, and rusting of metal hooks,
zippers, and snaps.
IMPORTANT: After the washer basket lls to the selected
water level, the lid must be closed before the wash cycle
can start. If lling stops with the lid open, close the lid and
press START button.
Unlocking the lid to add garments
If you need to open the lid to add 1 or 2 missed garments:
Press START/Pause/Unlock; the lid will unlock once the
washer movement has stopped. This may take several
minutes if the load was spinning at high speed. Then close
lid and press START/Pause/Unlock again to restart the cycle.
If lid is left open for more than 10 minutes, the water will pump
out automatically.
Select the desired cycle options. If you are using fabric
softener, be sure to select one of the Fabric Softener
Added-Yes options.
Whites and pastels
Durable garments
Heavy soils
Bright colors
Moderate to light soils
Colors that bleed
or fade
Light soils
Dark colors that
bleed or fade
Light soils
9� Select options, if desired
(on some models)
Model 1CWTW4840 shown
Model 1CWTW4840 shown
Select the load size setting most suitable for your load. Small will
add a low amount of water for smaller loads and Super will add
the most amount of water for large or bulky loads. Items need to
move freely.
7� Select LOAD SIZE
Model 1CWTW4840 shown
9
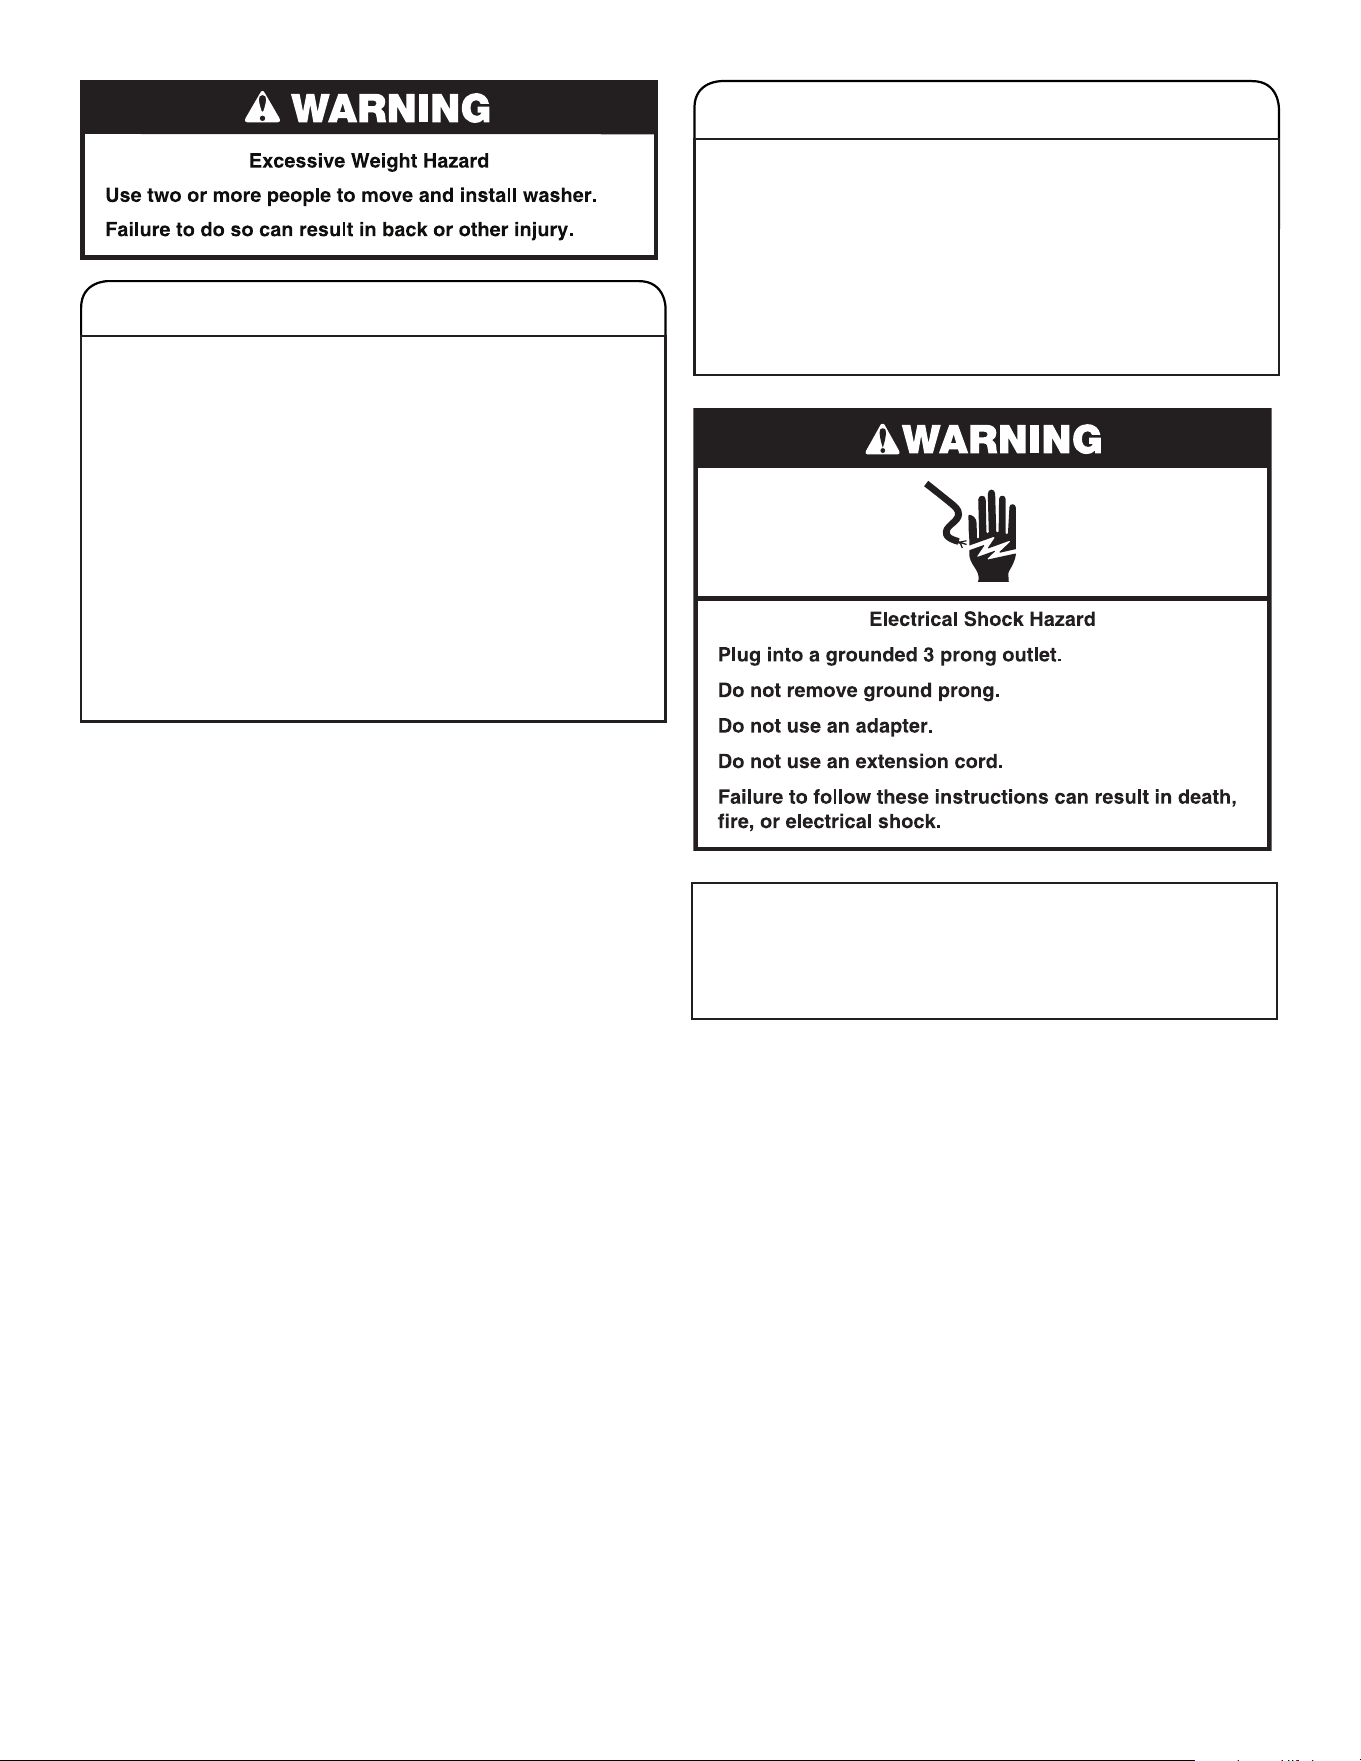
Operate your washer only when you are home. If moving, or not
using your washer for a period of time, follow these steps:
1� Unplug or disconnect power to washer.
2� Turn off water supply to washer, to avoid ooding due
to water pressure surge.
WINTER STORAGE CARE
IMPORTANT: To avoid damage, install and store washer
where it will not freeze. Because some water may stay in
hoses, freezing can damage washer. If storing or moving
during freezing weather, winterize your washer.
To winterize washer:
1� Shut off both water faucets; disconnect and drain water
inlet hoses.
2� Put 1 qt. (1 L) of R.V.-type antifreeze in basket and run washer
on RINSE & SPIN cycle for about 30 seconds
to mix antifreeze and remaining water.
3� Unplug washer or disconnect power.
NON-USE AND VACATION CARE
Replace inlet hoses after 5 years of use to reduce the risk of hose
failure. Periodically inspect and replace inlet hoses if bulges,
kinks, cuts, wear, or leaks are found.
When replacing your inlet hoses, mark the date of replacement on
the label with a permanent marker.
WATER INLET HOSES
WASHER MAINTENANCE
WASHER CARE
Recommendations to Help Keep Your Washer Clean
and Performing at its Best
1� Always follow the detergent manufacturer’s instructions
regarding the amount of detergent to use. Never use more
than the recommended amount because that may increase
the rate at which detergent and soil residue accumulate
inside your washer, which in turn may result
in undesirable odor.
2� Use warm and hot wash water settings sometimes (not
exclusively cold water washes), because they do a better
job of controlling the rate at which soils and detergent
accumulate.
3� Always leave the washer lid open between uses to help dry
out the washer and prevent the buildup of odor-causing
residue.
Cleaning Your Top Loading Washer
Read these instructions completely before beginning the
routine cleaning processes recommended below. This Washer
Maintenance Procedure should be performed, at a minimum,
once per month or every 30 wash cycles, whichever occurs
sooner, to control the rate at which soils and detergent may
otherwise accumulate in your washer.
Cleaning the Inside of the Washer
To keep your washer odor-free, follow the usage instructions
provided above, and use this recommended monthly cleaning
procedure:
Recommended Cycle for Cleaning the Washer
Refer to the “Cycle Guide” for the optimal cycle for cleaning
the inside of the washer. Use this cycle with washer cleaner
or liquid chlorine bleach as described below.
Begin procedure
1� Washer Cleaner Cycle Procedure (Recommended for
Best Performance):
a� Open the washer lid and remove any clothing or items.
b� Place a washer cleaner tablet in the bottom of the
washer basket.
c� Do not place a washer cleaner tablet in the detergent
dispenser.
d� Do not add any detergent or other chemical to the
washer when following this procedure.
e� Close the washer lid.
f� Select the cycle recommended for cleaning the inside
of the washer.
g� Press the START/PAUSE button to start the cycle.
NOTE: For best results, do not interrupt cycle. If cycle
must be interrupted, press START/PAUSE once or twice
(depending on model). After the cycle has stopped, run a
RINSE & SPIN cycle to rinse cleaner from washer.
WASHER CARE (cont�)
2� Chlorine Bleach Procedure (Alternative):
a� Open the washer lid and remove any clothing
or items.
b� Add 1 cup (236 mL) of liquid chlorine bleach
to the bleach compartment.
NOTE: Use of more liquid chlorine bleach than is
recommended above could cause washer damage
over time.
c� Close the washer lid.
d� Do not add any detergent or other chemical
to the washer when following this procedure.
e� Select the cycle recommended for cleaning the inside
of the washer.
f� Press the START/PAUSE button to start the cycle.
NOTE: For best results, do not interrupt cycle. If cycle
must be interrupted, press START/PAUSE once or twice
(depending on model). After the cycle has stopped, run a
RINSE & SPIN cycle to rinse cleaner from washer.
Cleaning the Dispensers
After a period of using your washer, you may nd some
residue buildup in the washer’s dispensers. To remove
residue from the dispensers, wipe them with a damp cloth
and towel dry. Do not attempt to remove the dispensers or
trim for cleaning. The dispensers and trim are not removable.
If your model has a dispenser drawer, however, remove the
drawer and clean it before or after you run the Clean Washer
cycle. Use an all-purpose surface cleaner, if needed.
Cleaning the Outside of the Washer
Use a soft, damp cloth or sponge to wipe away any spills.
Use only mild soaps or cleaners when cleaning external
washer surfaces.
IMPORTANT: To avoid damaging the washer’s nish, do not
use abrasive products.
10
TRANSPORTING YOUR WASHER
1� Shut off both water faucets. Disconnect and drain water
inlet hoses.
2� If washer will be moved during freezing weather, follow
Winter Storage Care directions before moving.
3� Disconnect drain from drain system and drain any
remaining water into a pan or bucket. Disconnect drain hose
from back of washer.
4� Unplug power cord.
5� Place inlet hoses and drain hose inside washer basket.
6� Drape power cord over edge and into washer basket.
7� Place packing tray from original shipping materials back inside
washer. If you do not have packing tray, place heavy blankets
or towels into basket opening. Close lid and place tape over
lid and down front of washer. Keep lid taped until washer is
placed in new location.
REINSTALLING/USING WASHER AGAIN
To reinstall washer after non-use, vacation, winter storage,
or moving:
1� Refer to Installation Instructions to locate, level, and
connect washer.
2� Before using again, run washer through the following
recommended procedure:
To use washer again:
1� Flush water pipes and hoses. Reconnect water inlet hoses.
Turn on both water faucets.
2� Plug in washer or reconnect power.
3� Run washer through Casual or Casual Regular cycle to
clean washer and remove antifreeze, if used. Use half the
manufacturer’s recommended amount of detergent for a
medium-size load.
11
TROUBLESHOOTING
If you experience Possible Causes Solution
Vibration or Off-Balance
Check the following for
proper installation or
see “Using Your
Washer” section.
Feet may not be in contact with
the oor and locked.
Front and rear feet must be in rm contact with oor, and washer
must be level to operate properly.
Washer may not be level.
Check oor for exing or sagging. If ooring is uneven, a 19 mm (3/4")
piece of plywood under your washer will reduce sound.
See “Level the Washer” in Installation Instructions.
Load could be unbalanced.
Load dry items in loose heaps evenly around basket wall.
Adding wet items to washer or adding more water to basket could
unbalance washer.
Wash smaller loads to reduce imbalance.
Do not tightly pack. Avoid washing single items.
Use Normal Regular cycle and Super or Large load size for
oversized, non-absorbent items such as small comforters or
poly-lled jackets.
See “Cycle Guide” and “Using Your Washer” in this Use and
Care Guide.
Noises
Clicking or metallic
noises
Objects caught in washer drain
system.
Empty pockets before washing. Loose items such as coins could fall
between basket and tub or may block pump. It may be necessary to
call for service to remove items.
It is normal to hear metal items on clothing such as metal snaps,
buckles, or zippers touch against the stainless steel basket.
Gurgling or humming Washer may be draining water. It is normal to hear the pump making a continuous humming sound
with periodic gurgling or surging as nal amounts of water are
removed during the Drain & Spin cycles.
Humming Load sensing may be occurring. You may hear the hum of the sensing spins after you have started the
washer. This is normal.
Water Leaks
Check the following for
proper installation:
Washer not level.
Water may splash off basket if washer is not level. Check that load is not
unbalanced or tightly packed.
Fill hoses not attached tightly. Tighten ll-hose connection.
Fill hose washers. Make sure all four ll hose at washers are properly seated.
Drain hose connection. Pull drain hose from washer cabinet and properly secure it to
drainpipe or laundry tub.
Do not place tape over drain opening.
Check household plumbing for
leaks or clogged sink or drain.
Water can back up out of a clogged sink or drainpipe. Check all
household plumbing for leaks (laundry tubs, drain pipe, water pipes,
and faucets.)
Washer not loaded as
recommended.
An unbalanced load can cause basket to be out of alignment and
cause water to splash off tub. See “Using Your Washer” for loading
instructions.
Washer not performing as expected
Washer won’t run
or ll, washer stops
working or wash light
remains on (indicating that
the washer was
unable to ll
appropriately)
Check for proper water supply. Both hoses must be attached and have water owing to inlet valve.
Both hot and cold water faucets must be turned on.
Check that inlet valve screens have not become clogged.
Check for any kinks in inlet hoses, which can restrict water ow.
First try the solutions suggested here to possibly avoid the cost of a service call.
12
TROUBLESHOOTING
If you experience Possible Causes Solution
Washer not performing as expected (cont�)
Washer won’t run
or ll, washer stops
working or wash light
remains on (indicating that
the washer was unable to
ll appropriately) (cont.)
Check proper electrical supply. Plug power cord into a grounded 3-prong outlet.
Do not use an extension cord.
Ensure there is power to outlet.
Reset a tripped circuit breaker. Replace any blown fuses.
NOTE: If problems continue, contact an electrician.
Normal washer operation. Lid must be closed for washer to run.
Washer will pause during certain phases of cycle.
Do not interrupt cycle.
Washer may be tightly packed. Remove several items, rearrange load evenly in basket, and add
detergent. Close lid and press START/Pause/Unlock.
Do not add more than 1 or 2 additional items after cycle has started
to avoid tightly packing or unbalancing.
Washer not draining/
spinning, loads are still
wet, or spin light remains
on (indicating that the
washer was unable
to pump out water within
10 minutes)
Small items may have been caught
in pump or between basket and tub,
which can slow draining.for small
items.
Empty pockets and use garment bags for small items.
Use a cycle with a low spin speed. Cycles with lower spin speeds remove less water than cycles
with high spin speeds. Use the recommended cycle/speed spin
for your garment. To remove extra water in the load, select Drain &
Spin. Load may need to be rearranged to allow even
distribution of the load in the basket.
Washer may be tightly packed or
unbalanced.
Tightly packed or unbalanced loads may not allow the washer
to spin correctly, leaving the load wetter than normal. Evenly
arrange the wet load for balanced spinning. Select the Drain & Spin
cycle to remove excess water. See “Using Your Washer”
for loading recommendations.
Check plumbing for correct drain hose
installation. Drain hose extends into
standpipe farther than 114 mm (4.5").
Check drain hose for proper installation. Use drain hose form
and securely attach to drainpipe or tub. Do not tape over drain
opening. Lower drain hose if end is higher than 1,22 m (48").
Remove any clogs from drain hose.
Too much detergent causing suds to
slow or stop draining and spinning.
Always measure and follow detergent directions for your
load. To remove extra suds, select Rinse & Spin. Do not
add detergent.
Dry spots on load
after cycle
High speed spins extract more
moisture than traditional top-load
washers.
The high spin speeds combined with air ow during the nal
spin can cause items near the top of the load to develop dry spots
during the nal spin. This is normal.
First try the solutions suggested here to possibly avoid the cost of a service call.
13
TROUBLESHOOTING
First try the solutions suggested here to possibly avoid the cost of a service call.
If you experience Possible Causes Solution
Washer not performing as expected (cont�)
Incorrect or wrong wash
or rinse temperatures
Check for proper water supply. Make sure hot and cold inlet hoses are not reversed.
Both hoses must be attached to both washer and faucet, and have
both hot and cold water owing to inlet valve.
Check that inlet valve screens are not clogged.
Remove any kinks in hoses.
Energy-saving controlled wash
temperatures.
This washer uses cooler wash and rinse water temperatures than your
previous washer. This includes cooler hot and warm washes.
Load not rinsed Check for proper water supply. Make sure hot and cold inlet hoses are not reversed.
Both hoses must be attached and have water owing to the inlet valve.
Both hot and cold water faucets must be on.
Inlet valve screens on washer may be clogged.
Remove any kinks in the inlet hose.
Using too much detergent. The suds from too much detergent can keep washer from operating
correctly. Always measure detergent and follow detergent directions
based on load size and soil level.
Washer not loaded as recommended. The washer is less efcient at rinsing when load is tightly packed.
Load garments in loose heaps evenly around the basket wall. Load with
dry items only.
Use cycle designed for the fabrics being washed.
Add only 1 or 2 additional garments after washer has started.
Using too low a load size/water level
selection.
Choose a load size (water level) that matches the load being washed.
Sand, pet hair, lint, etc.
on load after washing
Heavy sand, pet hair, lint, and
detergent or bleach residues may
require additional rinsing.
Add an Extra Rinse (on some models) to the selected cycle.
Load is tangling Washer not loaded as recommended. See “Using Your Washer” section.
Select a cycle with a slower wash action and spin speed; however,
items will be wetter than those using a higher speed spin. See the
“Cycle Guide” to match your load with the best cycle.
Load garments in loose heaps evenly around the basket wall.
Reduce tangling by mixing types of load items. Use the recommended
cycle for the type of garments being washed.
Not cleaning or
removing stains
Washer not loaded as recommended. Washer is less efcient at cleaning when load is tightly packed.
Load garments in loose heaps evenly around the basket wall.
Load with dry items only.
Add only 1 or 2 garments after washer has started.
Adding detergent on top of load. Add detergent, oxi products, and color-safe bleach to the bottom of the
basket before adding the load items.
Using too low a load size/water
level selection.
Choose a load size (water level) that matches the load being washed.
Using too much detergent. The suds from too much detergent can keep washer from operating
correctly. Always measure detergent and follow manufacturer’s
directions based on load size and soil level.
Not using correct cycle for fabric
type.
Use a higher soil level cycle option and warmer wash temperature to
improve cleaning.
Use Heavy cycle for tough cleaning. See the “Cycle Guide” to match
your load with the best cycle.
Not using dispensers. Use dispensers to avoid chlorine bleach and fabric softener staining.
Load dispensers before starting a cycle. Select Fabric Softener Added-
Yes (on some models) when using fabric softener.
Do not add products directly onto load.
14
TROUBLESHOOTING
Before calling for assistance or service, please check “Troubleshooting”. It may save you the cost of a service call. If you still need help,
contact the dealer from whom you purchased the washer or an authorized service company. When calling, please know the
purchase date and the complete model and serial number of your washer. The information will help us to better respond to your
request.
If you experience Possible Causes Solution
Washer not performing as expected (cont�)
Not cleaning or removing
stains (cont.)
Not washing like colors together. Wash like colors together and remove promptly after the cycle
is complete to avoid dye transfer.
Incorrect dispenser
operation
Clogged dispenser. Use only liquid chlorine bleach in the bleach dispenser. Use only
fabric softener in the fabric softener dispenser.
Fabric Damage Sharp items were in pockets during
wash cycle.
Empty pockets, zip zippers, and snap or hook fasteners before
washing to avoid snags and tears.
Strings and straps could have tangled. Tie all strings and straps before starting wash load.
Items may have been damaged before
washing.
Mend rips and broken threads in seams before washing.
Fabric damage can occur if the load is
tightly packed.
Load garments in loose heaps evenly around the washplate.
Do not load garments directly over the center of the washplate.
Use cycle designed for the fabrics being washed.
Add only 1 or 2 additional garments after washer has started.
Liquid chlorine bleach may have been
added incorrectly.
Do not pour liquid chlorine bleach directly onto load. Wipe up
bleach spills.
Undiluted bleach will damage fabrics. Do not use more than
recommended by manufacturer.
Do not place load items on top of bleach dispenser when
loading and unloading washer.
Garment care instructions may not
have been followed.
Always read and follow garment manufacturer’s care label
instructions. See the “Cycle Guide” to match your load with the best
cycle.
Odors Clean washer maintenance not done as
recommended.
See “Cleaning Your Washer” in Washer Maintenance.
Unload washer as soon as cycle is complete.
Using too much detergent. Be sure to measure correctly. Always follow the manufacturer’s
directions.
See “Cleaning your Washer” section.
Lid locked light is ashing The lid is not closed. Close the lid. The washer will not start or ll with the lid open.
A cycle was stopped or paused
using the Start/Pause/Unlock button.
The washer may still be spinning. The lid will not unlock until the
basket has stopped spinning. This may take several minutes if
washing large loads or heavy fabrics.
First try the solutions suggested here to possibly avoid the cost of a service call.
15
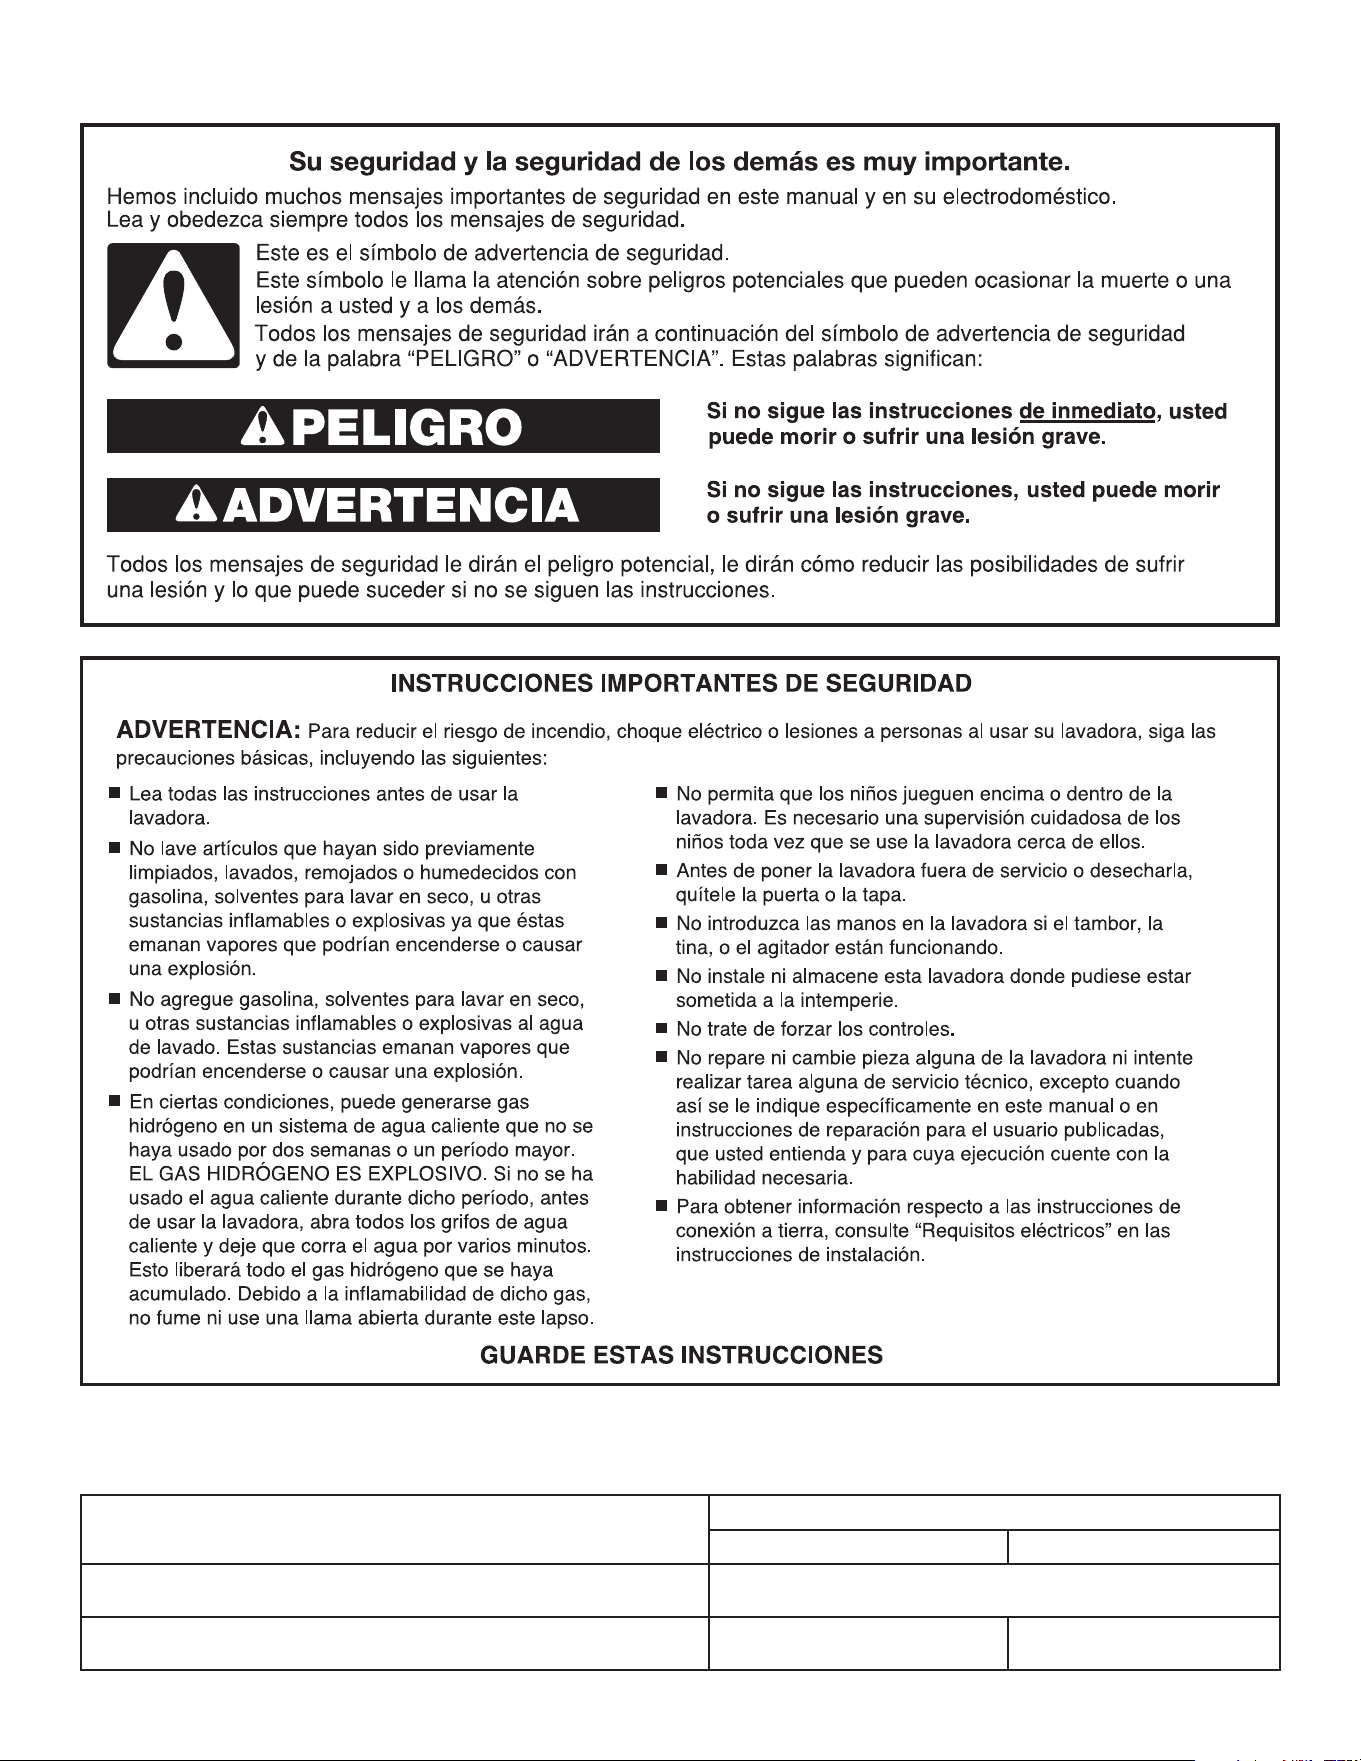
SEGURIDAD DE LA LAVADORA
ESPECIFICACIONES
Las unidades que se describen en el Manual de uso y cuidado se venden en varias regiones
con requisitos diferentes para medir la capacidad�
Medida de capacidad
Modelos
1CWTW4800,1CWTW4740 1CWTW4840
Capacidad “Dry Linen”: Medida de capacidad que reeja a carga
máxima que puede ser usada en un ciclo de lavado.
15 kg (33 lb)
Capacidad NOM: Medida de peso basada en la norma mexicana
(NMX-J-521/1). Este estándar también se aplica en Colombia.
15 kg (33 lb) 17 kg (37 lb)
16
PANEL DE CONTROL Y CARACTERÍSTICAS
LOAD SIZE (Tamaño de la carga)
Seleccione el ajuste más adecuado para su carga. En el
nivel de agua para carga Small (Pequeña) se agregará una
pequeña cantidad de agua para las cargas pequeñas y en
el de Super se agregará la mayor cantidad de agua para las
cargas grandes o voluminosas. Los artículos deben moverse
libremente. El cargar de manera apretada puede resultar
en un rendimiento de limpieza insuciente e incrementar la
formación de arrugas y los enredos.
TEMPERATURE (Temperatura)
El control de Temperature (Temperatura) detecta y mantiene
temperaturas de agua uniformes, regulando el agua fría y
caliente que entra.
Seleccione una temperatura de lavado según el tipo de tela que
esté lavando y el nivel de suciedad. Para obtener los mejores
resultados y siguiendo las instrucciones de las etiquetas de
las prendas, use el agua de lavado más caliente que las telas
puedan resistir.
• El agua tibia y caliente tendrá una temperatura menor
a la que su lavadora anterior proveía.
• Aun en un lavado con agua fría y fresca, un poco de agua
tibia puede agregarse a la lavadora para mantener una
temperatura mínima.
1
2
Opciones (en algunos modelos)
Las siguientes opciones se pueden añadir a la mayoría de
los ciclos.
EXTRA RINSE (Enjuague adicional)
Esta opción se puede usar para agregar automáticamente
un segundo enjuague a la mayoría de los ciclos.
FABRIC SOFTENER ADDED - YES
(Suavizante de telas agregado – Sí)
Esta opción deberá ser seleccionada si va a usar
suavizante de telas durante un ciclo. La misma asegura
que el suavizante de telas sea agregado en el momento
apropiado durante el enjuague, para que se distribuya
uniformemente.
FABRIC SOFTENER ADDED with EXTRA RINSE
(Suavizante de telas agregado con Enjuague adicional)
Esta opción enciende las opciones de Fabric Softener
(Suavizante de telas) y Extra Rinse (Enjuague adicional).
Perilla de ciclos de lavado
Use la perilla de ciclos de lavado para seleccionar entre
los ciclos disponibles en su lavadora. Gire la perilla para
seleccionar un ciclo para su carga. Consulte “Guía de ciclos”
para ver descripciones detalladas de los ciclos.
3
4
No todas las características y opciones están disponibles en todos los modelos.
7
3
4
1
5
2
4
1
5
2
Modelo 1CWTW4840
Modelo 1CWTW4740
6
7
6
17
5
START/PAUSE/UNLOCK (Botón de Inicio/Pausa/
Desbloqueo)
Presiónelo para iniciar el ciclo seleccionado; presiónelo
nuevamente para hacer una pausa en el ciclo y desbloquear
la tapa.
NOTA: Si la lavadora está exprimiendo, puede tomar varios
minutos para que se desbloquee la tapa. Oprima y sostenga por
3 segundos para anular un ciclo.
LID LOCKED (Tapa bloqueada)
Para permitir un funcionamiento adecuado
de la carga, la tapa se bloqueará y se
encenderá la luz de Lid Lock (Bloqueo de
la tapa). Esta luz indica que la tapa está
asegurada y no se puede abrir.
Si necesita abrir la tapa, presione
START/PAUSE/Unlock Lid (Inicio/Pausa/
Desbloqueo de la tapa). La tapa se
desbloqueará una vez que se haya
detenido el movimiento de la lavadora.
Esto puede tomar varios minutos si
la carga estaba exprimiéndose a alta
velocidad. Oprima START/PAUSE/Unlock Lid (Inicio/Pausa/
Desbloqueo de la tapa) nuevamente para reanudar el ciclo.
6
Indicador de luces del estado del ciclo
Las luces de estado del ciclo muestran el progreso de un
ciclo. Es posible que note sonidos o pausas en cada etapa
del proceso, los cuales son diferentes a los de las lavadoras
tradicionales.
FILL/SENSING (Llenado/Detección)
Cuando se presione el botón de START/PAUSE/Unlock
Lid (Inicio/Pausa/Desbloqueo de la tapa), la lavadora se
llenará hasta el nivel de agua seleccionado. Si se cierra
la tapa cuando la máquina haya terminado de llenarse, la
tapa se bloqueará y la máquina comenzará a funcionar.
Si se abre la tapa cuando el agua deja de ingresar a la
máquina, el ciclo no comenzará hasta que la tapa se
haya cerrado y se presione el botón de START/PAUSE/
Unlock Lid (Inicio/Pausa/Desbloqueo de la tapa). Si no ha
comenzado el ciclo en menos de 10 minutos de haberse
llenado la lavadora con agua, el agua será bombeada
hacia fuera de la lavadora.
WASH (Lavado)
Escuchará el agitador moviendo la carga. Los sonidos
del motor pueden cambiar en las diferentes etapas del
ciclo.
RINSE (Enjuague)
Escuchará sonidos similares a los del ciclo de lavado
mientras la lavadora enjuaga y mueve la carga. Podrá
escuchar el motor encendiéndose brevemente (zumbido
corto) para mover la canasta mientras la lavadora e llena.
Se agregará suavizante de telas si se ha seleccionado la
opción de
Fabric Softener Added – Yes (Suavizante de telas
agregado – Sí)
.
En algunos ciclos se usa un enjuague con rociado.
Después de que la lavadora haya drenado y exprimido
el agua, continuará exprimiendo y rociando agua para
enjuagar durante toda la duración del enjuague.
SPIN (Exprimido)
La lavadora exprime la carga a velocidades cada vez
mayores para la remoción adecuada de agua, según
el ciclo seleccionado y la velocidad de exprimido.
DONE (Listo)
Una vez que se haya terminado el ciclo, se encenderá
esta luz. Saque la carga de inmediato para obtener los
mejores resultados.
7
18
GUÍA DE CICLOS
Para lograr el mejor cuidado de las telas, elija el ciclo que sea el más adecuado para la carga que va a lavar.
No todos los ciclos y opciones están disponibles en todos los modelos.
NOTA: Asegúrese de que seleccionar Fabric Softener Added-Yes (Suavizante de telas agregado – Sí), si va a agregar suavizante
de telas a la carga (dependiendo del modelo).
*Todos los enjuagues son con agua fría.
Artículos a lavar:
Ciclo
:
Temperatura
de Lavado
*:
Velocidad de
exprimido**:
Detalles de los ciclos
:
Telas resistentes,
prendas que no
destiñen, toallas y
pantalones vaqueros
Super Wash
(Lavado
Súper)
Hot (Caliente)
Warm (Tibia)
Cool (Fresca)
Cold (Fría)
High
(Alta)
Provee el tiempo y la acción de lavado máximos para remover
las manchas y la suciedad intensas. Use este ciclo para artículos
resistentes o con suciedad profunda. El proceso de detección de
agua puede tomar más tiempo para algunos artículos que para
otros, ya que algunos tipos de telas absorben más agua que
otros.
Telas resistentes,
prendas que no
destiñen, toallas
y pantalones de
mezclilla
Normal
Heavy
(Normal
Intenso)
Hot (Caliente)
Warm (Tibia)
Cool (Fresca)
Cold (Fría)
High
(Alta)
Use este ciclo para artículos resistentes o con suciedad
profunda. Este ciclo usa enjuagues con rocío solamente. Use
este ciclo para limpiar el interior de la lavadora. Vea “Cuidado
de la lavadora”.
Telas de algodón, lino,
sábanas y cargas de
prendas mezcladas
Normal
Regular
(Normal
Común)
Hot (Caliente)
Warm (Tibia)
Cool (Fresca)
Cold (Fría)
High
(Alta)
Use este ciclo para las prendas de algodón y cargas de telas
mixtas con suciedad normal. Este ciclo usa enjuagues con
rociado.
Telas de algodón
livianas
Normal
Light
(Normal
Ligero)
Hot (Caliente)
Warm (Tibia)
Cool (Fresca)
Cold (Fría)
High
(Alta)
Use este ciclo para cargas mixtas con suciedad ligera. Este ciclo
usa enjuagues con rocío solamente.
Telas inarrugables, de
algodón, planchado
permanente, lino y
telas sintéticas
Casual or
Casual
Regular
(Informal
o Informal
Común)
Hot (Caliente)
Warm (Tibia)
Cool (Fresca)
Cold (Fría)
Low
(Baja)
Use este ciclo para lavar cargas con telas inarrugables como
camisas deportivas, blusas, ropa de ocina informal, bras de
planchado permanente y mezclas.
Telas inarrugables con
poca suciedad y telas
sintéticas
Casual Light
(Informal
Ligero)
Hot (Caliente)
Warm (Tibia)
Cool (Fresca)
Cold (Fría)
Low
(Baja)
Use este ciclo para lavar cargas de telas inarrugables con
suciedad ligera como camisas deportivas, blusas, ropa de
negocios informal, bras de planchado permanente y mezclas.
Artículos grandes
como sacos para
dormir, edredones
pequeños, chaquetas
Bulky Items
(Artículos
voluminosos)
Hot (Caliente)
Warm (Tibia)
Cool (Fresca)
Cold (Fría)
Low
(Baja)
Use este ciclo para lavar artículos grandes como pueden ser
chaquetas y edredones pequeños. La lavadora se llenará con
suciente agua para mojar la carga antes de que comience
la etapa de lavado del ciclo. No cargue la canasta de manera
apretada.
Artículos de seda
lavables, lencería,
lana lavable
Delicate
(Ropa
delicada)
Hot (Caliente)
Warm (Tibia)
Cool (Fresca)
Cold (Fría)
Low
(Baja)
Use este ciclo para lavar prendas con suciedad ligera cuya
etiqueta de cuidado indique que se use el ciclo “Sedas lavables
a máquina” o “Suave”. Coloque los artículos pequeños en bolsas
de malla para prendas antes de lavarlos.
Telas con suciedad
profunda
Soak
(Remojo)
Cold (Fría)
No Spin
(Sin
exprimido)
Use este ciclo para remojar manchas pequeñas de suciedad
impregnada a las telas. La lavadora hará una agitación y un
remojo intermitentes. Después de que el tiempo haya terminado,
el agua se drenará pero la lavadora no escurrirá.
Se termina el ciclo.
Trajes de baño y
artículos que deban
enjuagarse sin
detergente
Rinse & Spin
(Enjuague y
exprimido)
Enjuague
con agua fría
solamente
High
(Alta)
Combina un enjuague y un exprimido a alta velocidad para las
cargas que requieran un ciclo de enjuague adicional o para
terminar de lavar una carga después de un corte de corriente.
Úselo también para las cargas que solamente necesitan
enjuagarse.
Artículos lavables
a mano o artículos
empapados
Drain & Spin
(
Desagüe y
exprimido
)
N/A
High
(Alta)
Este ciclo usa un exprimido para acortar los tiempos de secado
de las telas pesadas o para los artículos de cuidado especial
que se laven a mano. Use este ciclo para desaguar la lavadora
después de anular un ciclo o para completar un ciclo después de
un corte de corriente.
19
USO DE SU LAVADORA
• Vacíe los bolsillos. Las monedas, los botones o cualquier
objeto pequeño suelto puede pasar debajo de la placa de
lavado y atorarse, provocando sonidos no esperados.
• Separe los artículos según el ciclo recomendado, la
temperatura del agua y la resistencia a perder el color.
• Separe los artículos con mucha suciedad de los que tienen
poca suciedad.
• Separe los artículos delicados de las telas resistentes.
• No seque las prendas si aún hay manchas después
del lavado ya que el calor puede volver las manchas
permanentes.
• Trate las manchas inmediatamente.
• Cierre las cremalleras, abroche los ganchos, ate los cordones
y las fajas, y quite los adornos y ornamentos que no sean
lavables.
• Remiende lo que esté roto y desgarrado para evitar más
daños a los artículos durante el lavado.
Consejos útiles:
• Cuando lave artículos a prueba o resistentes al agua,
colóquelos de modo parejo.
• Use bolsas de malla para prendas, para ayudar a prevenir
los enredos cuando lave artículos delicados o pequeños.
• Vuelva al revés las prendas de tejido para evitar que se
formen motitas. Separe las prendas que sueltan pelusa de
las que la atraen. A las prendas de telas sintéticas, los
tejidos, y la pana se les pegará la pelusa de las toallas, los
tapetes y la felpilla.
NOTA: Siempre lea y siga las instrucciones en las etiquetas de
cuidado de las telas para evitar daños a sus prendas.
1� Separe y prepare su ropa
Agregue una cantidad medida de detergente o un paquete de
lavandería de una dosis única dentro de la canasta.
Si va a usar productos para realzar el lavado tales como Oxi,
blanqueador no decolorante o cristales de suavizante de
telas, agréguelos al fondo de la canasta de la lavadora antes
de agregar las prendas.
NOTA: Siga las instrucciones del fabricante para determinar
la cantidad de los productos de lavandería que debe usar.
2� Agregue los productos de
lavandería
20
5� Agregue suavizante de telas al
depósito (en algunos modelos)
Vierta una cantidad medida de suavizante de
telas líquido en el depósito; siempre siga
las instrucciones del fabricante para usar
la cantidad correcta de suavizante de telas
según el tamaño de la carga.
IMPORTANTE:
• Diluya el suavizante líquido de telas llenando el depósito con
agua tibia hasta que el líquido llegue a la parte inferior del
borde. Vea las echas de la línea máxima de llenado. Luego
seleccione la opción de Fabric Softener Added – Yes
(Suavizante de telas agregado – Sí) o la de Fabric Softener
Added with Extra Rinse (Suavizante de telas agregado con
Enjuague adicional).
• La opción de Fabric Softener Added (Suavizante de telas
agregado) se debe seleccionar en “Yes” (Sí) para asegurar
la distribución apropiada en el momento oportuno durante
el ciclo.
Cómo agregar manualmente el suavizante de telas líquido
a la carga de lavado
Durante el último enjuague, espere hasta que la lavadora se haya
llenado por completo, presione el botón de START/Pause/Unlock
(Inicio/Pausa/Desbloqueo) para hacer una pausa en la lavadora.
Levante la tapa y agregue la cantidad medida recomendada
de suavizante de telas líquido. No utilice más de la cantidad
recomendada. Cierre la tapa y presione el botón de START/Pause/
Unlock (Inicio/Pausa/Desbloqueo) nuevamente para poner en
marcha la lavadora.
4� Agregue blanqueador líquido
con cloro al depósito
Liquid
Chlorine Bleach
No sobrellene, diluya ni utilice más de 1 taza (250 ml). No
utilice blanqueador no decolorante ni productos Oxi en el mismo
ciclo con blanqueador líquido con cloro.
Gire la perilla de los ciclos para elegir su ciclo de lavado.
Para obtener más información, vea “Guía de ciclos”.
6� Seleccione un ciclo
Cargue las prendas de modo uniforme en
montones ojos alrededor de la pared de la
canasta. Para obtener los mejores resultados,
no cargue la ropa de manera apretada. No
envuelva los artículos grandes tales como
sábanas alrededor del agitador; cárguelos en montones ojos
alrededor de la pared de la canasta. Pruebe mezclar artículos de
distintos tamaños para que éstos se enreden menos.
IMPORTANTE: No cargue la lavadora de manera apretada ni
coloque los artículos a la fuerza en la misma. Para obtener una
mejor limpieza y para reducir la formación de arrugas y enredos,
los artículos deben moverse libremente.
3�
Cargue las prendas en la lavadora
Blanqueador
líquido con cloro
MAX FILL
Llenado
máximo
Se muestra el modelo 1CWTW4840
21
7� Seleccione el LOAD SIZE
(Tamaño de la carga)
Seleccione el ajuste de Load Size (Tamaño de la carga) más
adecuado para su carga. El ajuste para carga Small (Pequeña)
agregará una pequeña cantidad de agua para las cargas
pequeñas, y el ajuste Super agregará la mayor cantidad de agua
para las cargas grandes o voluminosas. Los artículos deben
moverse libremente.
8� Seleccione la TEMPERATURE
(Temperatura)
Una vez que haya seleccionado un ciclo, seleccione la temperatura
de lavado deseada girando la perilla de Temperature (Temperatura)
hacia el ajuste apropiado, según la carga. Todos los enjuagues son
con agua fría del grifo.
NOTA: Siempre lea y siga las instrucciones en las etiquetas de
cuidado de las telas para evitar daños a sus prendas.
9� Seleccione las opciones
(en algunos modelos)
Seleccione las opciones que desee para el ciclo. Si va a
utilizar suavizante de telas, asegúrese de seleccionar una
de las opciones de Fabric Softener Added – Yes (Suavizante de
telas agregado – Sí).
Se muestra el modelo 1CWTW4840
Se muestra el modelo 1CWTW4840
Se muestra el modelo 1CWTW4840
Temperatura de lavado Telas sugeridas
Hot (Caliente)
Se agrega un poco de agua fría para
ahorrar energía. El agua estará más fría
que la del ajuste de agua caliente de su
calentador de agua.
Ropa blanca y de color
pastel
Prendas durables
Suciedad profunda
Warm (Tibia)
Se agregará un poco de agua fría, de
modo que el agua estará más fría que el
agua provista por su lavadora anterior.
Colores vivos
Suciedad entre
moderada y ligera
Cool (Fresca)
Se agrega agua tibia para ayudar
a remover la suciedad y disolver el
detergente.
Colores que destiñen
o se opacan
Suciedad ligera
Cold (Fría)
Ésta es la temperatura del agua de
su grifo. Si el agua fría del grifo está
muy fría, puede que se agregue agua
tibia para ayudar con la remoción de
suciedad y para disolver el detergente.
Colores oscuros que
destiñen o que se
opacan
Suciedad ligera
10� Presione START/PAUSE/Unlock
(Inicio/Pausa/Desbloqueo) para
comenzar el ciclo de lavado
Presione el botón de START/Pause/Unlock (Inicio/Pausa/
Desbloqueo) para comenzar el ciclo de lavado. Cuando se haya
terminado el ciclo, se encenderá la luz indicadora de DONE (Listo).
Saque las prendas inmediatamente después de que se haya
terminado el ciclo para evitar olores, reducir la formación de
arrugas y evitar que se herrumbren los ganchos de metal,
cremalleras y broches a presión.
IMPORTANTE: Después de que la canasta de la lavadora se llene
hasta el nivel de agua seleccionado, la tapa deberá cerrarse antes
de que pueda comenzar el ciclo de lavado. Si se detiene el llenado
con la tapa abierta, ciérrela y presione el botón de START (Inicio).
Cómo desbloquear la tapa para agregar prendas:
Si usted necesita abrir la tapa o agregar 1 ó 2 prendas que se le
hayan olvidado:
Presione START/Pause/Unlock (Inicio/Pausa/Desbloqueo); la tapa
se desbloqueará una vez que la lavadora haya dejado de moverse.
Esto puede tomar varios minutos si la carga estaba exprimiéndose
a alta velocidad. Luego cierre la tapa y presione nuevamente
START/Pause/Unlock (Inicio/Pausa/Desbloqueo) para volver a
comenzar el ciclo.
Si se deja la tapa abierta por más de 10 minutos, el agua será
drenada automáticamente.
22
MANTENIMIENTO DE LA LAVADORA
Reemplace las mangueras de entrada después de 5 años de uso
para reducir el riesgo de que fallen. Inspeccione periódicamente
y cambie las mangueras si se hallan protuberancias, torceduras,
cortes, desgaste o pérdidas de agua.
Cuando reemplace sus mangueras de entrada de agua, anote la
fecha de reposición en la etiqueta con un marcador permanente.
MANGUERAS DE ENTRADA DE AGUA
Ponga a funcionar su lavadora únicamente cuando esté
en casa. Si va a mudarse o no va a usar la lavadora durante
cierto período, siga esos pasos:
1� Desenchufe la lavadora o desconecte el suministro
de energía a la misma.
2� Cierre el suministro de agua a la lavadora para evitar
inundaciones debidas a aumentos en la presión del agua.
CUIDADO DURANTE LA FALTA
DE USO Y LAS VACACIONES
CUIDADO DE LA LAVADORA
Recomendaciones para ayudar a que su lavadora limpie
y rinda de la mejor manera
1� Siempre siga las instrucciones del fabricante del detergente
sobre la cantidad que debe usar. Nunca use más de la
cantidad recomendada, ya que puede acelerar la acumulación
de residuos de detergente y suciedad en la lavadora, lo que
puede causar un olor no deseado.
2� Use a veces lavados con agua tibia o caliente (no solamente
lavados con agua fría), ya que los mismos pueden hacer un
mejor trabajo al controlar el ritmo en el cual se acumulan la
suciedad y el detergente.
3� Deje siempre la tapa de la lavadora abierta entre un uso
y otro, para ayudar a que se termine de secar la lavadora
y evitar la acumulación de residuos causantes de olores.
Limpieza de la lavadora de carga superior
Lea estas instrucciones completamente antes de comenzar el
proceso de limpieza de rutina que se recomienda a continuación.
El proceso deberá efectuarse una vez al mes o cada 30 ciclos
de lavado como mínimo, lo primero que ocurra, para controlar el
ritmo en el cual puedan acumularse la suciedad y el detergente en
la lavadora.
Cómo limpiar el interior de la lavadora
Para mantener la lavadora libre de olores, siga las instrucciones
de uso detalladas arriba y utilice este procedimiento mensual de
limpieza que recomendamos a continuación:
Ciclo recomendado para limpiar la lavadora
Consulte la sección “Guía de ciclos” para seleccionar el mejor
ciclo de limpieza del interior de la lavadora. Utilice este ciclo con
el limpiador para lavadora o el blanqueador líquido con cloro
como se describe a continuación:
Comience el procedimiento
1� Procedimiento del ciclo con limpiador para lavadora
(se recomienda para el mejor desempeño):
a� Abra la tapa de la lavadora y saque la ropa o artículos
de la misma.
b� Coloque una pastilla del limpiador para lavadora en
el fondo de la canasta de lavado.
c� No agregue la pastilla del limpiador para lavadora en
el depósito del detergente.
d� No agregue detergente ni ningún otro producto químico
a la lavadora cuando siga este procedimiento.
e� Cierre la tapa de la lavadora.
f� Seleccione el ciclo recomendado para la limpieza del
interior de la lavadora.
g� Presione el botón START/PAUSE (Inicio/Pausa) para
comenzar el ciclo.
NOTA: Para obtener los mejores resultados, no interrumpa
el ciclo. Si debe interrumpir el ciclo, presione START/PAUSE
(Inicio/Pausa) una o dos veces (según el modelo). Después
de que se detenga, ponga en marcha un ciclo de RINSE &
SPIN (Enjuague y exprimido) para enjuagar el limpiador de la
lavadora.
CUIDADO DE LA LAVADORA (cont�)
2� Procedimiento con blanqueador con cloro (alternativa):
a� la tapa de la lavadora y saque la ropa o artículos de
la misma.
b� Agregue 1 taza (236 mL) de blanqueador líquido con cloro
al depósito del blanqueador.
NOTA: El usar más blanqueador líquido con cloro de
lo recomendado anteriormente puede ocasionar daños
en la lavadora con el paso del tiempo.
c� Cierre la tapa de la lavadora.
d� No agregue detergente ni ningún otro producto químico
a la lavadora cuando siga este procedimiento.
e� Seleccione el ciclo recomendado para la limpieza del
interior de la lavadora.
f� Presione el botón START/PAUSE (Inicio/Pausa) para
comenzar el ciclo.
NOTA: Para obtener los mejores resultados, no interrumpa
el ciclo. Si debe interrumpir el ciclo, presione START/PAUSE
(Inicio/Pausa) una o dos veces (según el modelo). Después
de que se detenga, ponga en marcha un ciclo de RINSE &
SPIN (Enjuague y exprimido) para enjuagar el limpiador de
la lavadora.
Limpieza de los depósitos
Después de usar la lavadora durante cierto tiempo, es posible que
encuentre acumulación de residuos en los depósitos de la misma.
Para quitar los restos de los depósitos, límpielos con un paño
húmedo y seque con una toalla. No intente sacar los depósitos ni
el borde para la limpieza. Los depósitos y el borde no se pueden
sacar. Si su modelo tiene un cajón de depósito, sin embargo,
saque el cajón y límpielo antes o después de poner en marcha el
ciclo de CLEAN WASHER (Limpiar la lavadora). Use un limpiador
multiuso para supercies, si es necesario.
Cómo limpiar el exterior de la lavadora
Use un paño suave y húmedo o una esponja para limpiar
cualquier derrame. Utilice sólo limpiadores o jabones suaves para
limpiar las supercies externas de la lavadora.
IMPORTANTE: Para evitar dañar el acabado de la lavadora,
no use productos abrasivos.
23
CUIDADO PARA EL ALMACENAMIENTO
DURANTE EL INVIERNO
IMPORTANTE: Para evitar daños, instale y guarde la
lavadora en un lugar donde no se congele. Debido a que queda
un poco de agua en las mangueras, el congelamiento de la
misma podría dañar la lavadora. Si va a almacenar
o mover su lavadora durante una temporada de invierno
riguroso, acondiciónela para el invierno.
Para acondicionar la lavadora para el invierno:
1� Cierre ambos grifos de agua; desconecte y escurra
el agua de las mangueras de llenado.
2� Vierta un 1 cuarto (1 L) de anticongelante tipo R.V. en
la canasta y ponga a funcionar la lavadora en un ciclo
de RINSE & SPIN (Enjuague y exprimido) durante unos
30 segundos para mezclar el anticongelante con el agua
restante.
3� Desenchufe la lavadora o desconecte el suministro de
energía.
TRANSPORTE DE LA LAVADORA
1� Cierre ambos grifos de agua. Desconecte y elimine el agua
de las mangueras de entrada de agua.
2� Si se va a trasladar la lavadora durante una temporada
de invierno riguroso, siga las instrucciones descritas en
Cuidado para el almacenamiento durante el invierno antes
de la mudanza.
3� Desconecte el desagüe del sistema de desagüe y drene el
agua restante en una olla o cubeta. Desconecte la manguera
de desagüe de la parte posterior de la lavadora.
4� Desenchufe el cable eléctrico.
5� Ponga las mangueras de entrada y la manguera de
desagüe en el interior de la canasta de la lavadora.
6� Pase el cable eléctrico sobre el borde y colóquelo dentro
de la canasta de la lavadora.
7� Coloque la bandeja de empaque de los materiales de
envío originales nuevamente en el interior de la lavadora.
Si no cuenta con bandeja de empaque, coloque mantas
o toallas pesadas en la abertura de la canasta. Cierre la
tapa y coloque cinta sobre la misma hacia el frente a la
lavadora. Mantenga la tapa pegada con cinta adhesiva hasta
que se coloque la lavadora en su nuevo lugar.
CÓMO REINSTALAR O USAR
LA LAVADORA NUEVAMENTE
Para reinstalar la lavadora después de la falta de uso,
vacaciones, almacenamiento durante el invierno o mudanza:
1� Consulte las Instrucciones de instalación para ubicar,
nivelar y conectar la lavadora.
2� Antes de usar la lavadora nuevamente, póngala a funcionar
siguiendo el procedimiento recomendado a continuación:
Para volver a usar la lavadora:
1� Deje correr el agua por los tubos y las mangueras. Vuelva
a conectar las mangueras de entrada de agua. Abra ambos
grifos de agua.
2� Enchufe la lavadora o reconecte el suministro de energía.
3� Ponga a funcionar la lavadora en el ciclo de Casual (Informal)
o Casual Regular (Informal común) para limpiarla y para
quitar el anticongelante, de haberlo usado. Use la mitad de
la cantidad recomendada por el fabricante para una carga
de tamaño mediano.
24
SOLUCIÓN DE PROBLEMAS
Si experimenta
lo siguiente
Causas posibles Solución
Vibración o desequilibrio
Verique lo siguiente para
la instalación adecuada o
vea la sección “Uso de la
lavadora”.
Es posible que las patas no estén
haciendo contacto con el piso
y no estén seguras.
Las patas frontales y posteriores deberán hacer contacto rme con
el piso y la lavadora deberá estar nivelada para funcionar
adecuadamente.
Es posible que la lavadora no esté
nivelada.
Revise si el piso está irregular o hundido. Si el piso no está parejo,
el colocar una pieza de madera de 3/4" (19 mm) debajo de la
lavadora reducirá el sonido.
Vea “Nivelación de la lavadora” en las Instrucciones de instalación.
La carga podría estar desequilibrada. Cargue los artículos secos de modo uniforme en montones ojos
alrededor de la pared de la canasta. El agregar artículos mojados o
agregar más agua a la canasta podría causar un desequilibrio en la
lavadora.
Lave cargas más pequeñas para reducir el desequilibrio.
No cargue de manera apretada. Evite lavar un solo artículo.
Use el ciclo Normal Regular (Común normal) y el tamaño de carga
Super (Súper) o Large (Grande) para los artículos muy grandes no
absorbentes, tales como edredones pequeños o chaquetas con
relleno de poliéster.
Vea “Guía de ciclos” y “Uso de la lavadora” en este Manual de uso
y cuidado.
Ruidos
Chasquidos o ruidos
metálicos
Objetos atrapados en el sistema de
desagüe de la lavadora.
Vacíe los bolsillos antes del lavado. Los artículos sueltos, tales
como monedas, podrían caer entre la canasta y la tina o bloquear
la bomba. Tal vez sea necesario solicitar servicio técnico para quitar
los artículos.
Es normal escuchar el ruido de los artículos de metal en las
prendas, tales como broches a presión de metal, hebillas o cierres
cuando tocan la canasta de acero inoxidable.
Gorgoteo o zumbido La lavadora puede estar
desaguándose.
Es normal escuchar que la bomba haga un sonido continuo de
zumbido, con gorgoteos periódicos o repentinos, a medida que
salen los últimos restos de agua durante los ciclos de Drain & Spin
(Desagüe y exprimido).
Zumbido
Es posible que esté en marcha una
detección de la carga.
Puede ser que escuche el zumbido de los giros de detección
después de haber puesto en marcha la lavadora. Esto es normal.
Fugas de agua
Verique que lo
siguiente esté instalado
adecuadamente:
La lavadora no está nivelada. Es posible se salpique agua de la canasta si la lavadora no está
nivelada. Verique que la carga no esté desequilibrada ni se haya
cargado apretada.
Las mangueras de llenado no están
bien sujetas.
Apriete la conexión de la manguera de llenado.
Arandelas de la manguera de llenado. Cerciórese de que estén debidamente colocadas las cuatro
arandelas planas de las mangueras de llenado.
Conexión de la manguera de desagüe. Jale la manguera de desagüe de la carcasa de la lavadora y
asegúrela correctamente al tubo vertical o tina de lavadero.
No coloque cinta adhesiva sobre la abertura del desagüe.
Revise las tuberías de la casa para
ver si hay fugas o si el fregadero o el
desagüe están obstruidos.
Es posible que el agua se salga de un lavadero o tubo vertical
bloqueado. Revise todas las tuberías de la casa y fíjese si hay
fugas de agua (tinas de lavadero, tubo de desagüe, tubos de agua
y grifos).
La lavadora no se ha cargado
adecuadamente.
El cargar inadecuadamente puede hacer que la canasta quede
desalineada y que salpique agua fuera de la tina. Vea “Uso de
su lavadora” para las instrucciones de carga.
Primero intentar las soluciones sugeridas y evitar posiblemente el costo de una visita de servicio técnico.
25
SOLUCIÓN DE PROBLEMAS
Primero intentar las soluciones sugeridas y evitar posiblemente el costo de una visita de servicio técnico.
Si experimenta
lo siguiente
Causas posibles Solución
La lavadora no funciona como se esperaba
La lavadora no funciona
o no llena, la lavadora se
detiene o la luz del lavado
permanece encendida (lo
que indica que la lavadora
no pudo llenarse
apropiadamente)
Verique si hay el suministro adecuado
de agua.
Deberán sujetarse ambas mangueras y tener ujo de agua a
la válvula de llenado.
Los grifos de agua fría y caliente deben estar abiertos.
Revise que los ltros de la válvula de entrada no se hayan obstruido.
Revise si hay torceduras en las mangueras de entrada, las
cuales pueden restringir el ujo de agua.
Verique que el suministro eléctrico sea
el adecuado.
Conecte el cable eléctrico a un contacto de pared de conexión
a tierra de 3 terminales.
No use un cable eléctrico de extensión.
Cerciórese de que haya suministro eléctrico en el contacto.
Reposicione el cortacircuitos si se ha disparado. Reemplace los
fusibles que se hayan quemado.
NOTA: Si los problemas continúan, contacte a un electricista.
Funcionamiento normal de la
lavadora.
La tapa deberá estar cerrada para que funcione la lavadora.
La lavadora hará una pausa durante ciertas fases del ciclo.
No interrumpa el ciclo.
No se ha cargado la lavadora según lo
recomendado.
Saque varios artículos, vuelva a arreglar la carga uniformemente en
la canasta y agregue el detergente. Cierre la tapa y presione START/
Pause/Unlock (Inicio/Pausa/Desbloqueo).
No agregue más de 1 ó 2 artículos adicionales después de que
haya comenzado el ciclo, para evitar cargar de manera apretada o
desequilibrar la lavadora.
La lavadora no
desagua/exprime,
las cargas todavía
están mojadas o
la luz de exprimido
permanece encendida (lo
que indica que
la lavadora no pudo
drenar el agua en
menos de 10 minutos)
Es posible que los artículos pequeños
hayan quedado atrapados en la bomba
o entre la canasta y la tina, lo que
puede enlentecer el desagüe.
Vacíe los bolsillos y use bolsas para prendas para los artículos
pequeños.
Use un ciclo con una velocidad baja de
exprimido.
Los ciclos con velocidades de exprimido más bajas quitan
menos agua que los ciclos con velocidades de exprimido
más altas. Use el ciclo/la velocidad de exprimido recomendados
para la prenda. Para remover el agua adicional de la carga,
seleccione Drain & Spin (Desagüe y exprimido). Tal vez deba
reacomodarse la carga para permitir una distribución uniforme
de la carga en la canasta.
26
SOLUCIÓN DE PROBLEMAS
Si experimenta
lo siguiente
Causas posibles Solución
La lavadora no funciona como se esperaba (cont�)
La lavadora no
desagua/exprime,
las cargas todavía
están mojadas o
la luz de exprimido
permanece encendida
(lo que indica que
la lavadora no pudo
drenar el agua en
menos de 10 minutos)
(cont.)
La lavadora puede estar cargada de
manera apretada o desequilibrada.
El cargar apretadamente o las cargas desequilibradas no permitirán que
la lavadora exprima correctamente, dejando la carga más mojada de lo
normal. Acomode la carga mojada de manera uniforme para que la carga
esté equilibrada durante el exprimido. Seleccione el ciclo de Drain & Spin
(Desagüe y exprimido) para sacar el agua en exceso. Vea “Uso de la
lavadora” para obtener recomendaciones sobre cómo cargar.
Revise las tuberías para ver si está
instalada correctamente la
manguera de desagüe. La manguera
de desagüe se extiende dentro del
tubo vertical más de 4,5" (114 mm).
Revise la manguera de desagüe para ver si está instalada correctamente.
Use el molde de la manguera de desagüe y sujételo bien al tubo vertical
o a la tina. No ponga cinta adhesiva sobre la abertura del desagüe. Baje
la manguera de desagüe si el extremo está a más de 1,22 m (48") por
encima del piso. Quite lo que esté obstruyendo la manguera de desagüe.
Se ha agregado demasiado
detergente, ocasionando espuma
excesiva que enlentece o detiene
el desagüe y el exprimido.
Mida siempre el detergente y siga las instrucciones del mismo para
su carga. Para quitar el exceso de espuma, seleccione Rinse & Spin
(Enjuague y exprimido). No agregue detergente.
Partes secas en la
carga después del
ciclo
Los exprimidos a alta velocidad
quitan mayor humedad que en las
lavadoras tradicionales de carga
superior.
Las altas velocidades de exprimido, combinadas con el ujo de aire
durante el exprimido nal, pueden hacer que partes de los artículos
que están cerca de la parte superior de la carga se sequen durante
el exprimido nal. Esto es normal.
Temperaturas
incorrectas o
equivocadas de
lavado o enjuague
Verique si hay el suministro
adecuado de agua.
Cerciórese de que no estén invertidas las mangueras de entrada de agua
caliente y agua fría.
Ambas mangueras deberán sujetarse a la lavadora y al grifo, y deberán
tener ujo de agua caliente y fría a la válvula de entrada.
Revise que los ltros de la válvula de entrada no estén
obstruidos.
Enderece las torceduras que pueda haber en las mangueras.
Temperaturas de lavado con control
de ahorro de energía.
Esta lavadora usa temperaturas de agua y enjuague más frías que su
lavadora anterior. Esto incluye lavados con agua no tan tibia ni tan
caliente.
La carga no está
enjuagada
Verique si hay el suministro
adecuado de agua.
Cerciórese de que no estén invertidas las mangueras de entrada
de agua caliente y agua fría.
Deberán sujetarse ambas mangueras y tener ujo de agua a la válvula
de llenado.
Deberán estar abiertos los grifos de agua fría y caliente.
Es posible que estén obstruidos los ltros de la válvula de entrada
en la lavadora.
Enderece las torceduras que pueda haber en la manguera de entrada.
Se está usando demasiado
detergente.
Es posible que la espuma ocasionada por usar mucho detergente impida
que la lavadora funcione correctamente. Mida siempre el detergente y
siga las instrucciones del mismo según el tamaño de la carga y el nivel
de suciedad.
No se ha cargado la lavadora según
lo recomendado.
La lavadora es menos ecaz en el enjuague cuando la carga está
apretada.
Cargue las prendas de modo uniforme en montones ojos alrededor de
la pared de la canasta. Cargue solamente con artículos secos.
Use el ciclo diseñado para las telas que se van a lavar.
Agregue solamente 1 ó 2 artículos después de que la lavadora haya
comenzado.
Se está usando una selección de
tamaño de carga muy pequeña/nivel
de agua muy bajo.
Elija un tamaño de carga (nivel de agua) que sea adecuado para la carga
que se va a lavar.
Primero intentar las soluciones sugeridas y evitar posiblemente el costo de una visita de servicio técnico.
27
SOLUCIÓN DE PROBLEMAS
Primero intentar las soluciones sugeridas y evitar posiblemente el costo de una visita de servicio técnico.
Si experimenta
lo siguiente
Causas posibles Solución
La lavadora no funciona como se esperaba (cont�)
Hay arena, pelo de
mascotas, pelusa, etc.
en la carga después
del lavado
La arena, pelo de mascotas, pelusa
o los restos de detergente o
blanqueador excesivos pueden
requerir enjuague adicional.
Agregue un Extra Rinse (Enjuague adicional) (en algunos modelos) al ciclo
seleccionado.
La carga está enredada No se ha cargado la lavadora según
lo recomendado.
Vea la sección “Uso de la lavadora”.
Seleccione un ciclo con una acción de lavado y velocidad de exprimido
más lenta; los artículos estarán más mojados que aquéllos que usan un
exprimido a velocidad más alta. Consulte la “Guía de ciclos” para ver cuál
es el mejor ciclo para su carga.
Cargue las prendas de modo uniforme en montones ojos alrededor de
la pared de la canasta.
Reduzca los enredos mezclando diferentes tipos de artículos en la carga.
Use el ciclo recomendado para el tipo de prendas que se van a lavar.
No limpia ni quita las
manchas
La lavadora no se ha cargado
adecuadamente.
La lavadora es menos ecaz en el enjuague cuando la carga está
apretada.
Cargue las prendas de modo uniforme en montones ojos alrededor de
la pared de la canasta. Cargue solamente con artículos secos.
Agregue solamente 1 ó 2 artículos después de que la lavadora haya
comenzado.
Agregado de detergente sobre
la carga.
Agregue el detergente, los productos Oxi y el blanqueador no decolorante
al fondo de la canasta antes de poner las prendas en la misma.
Se está usando una selección de
tamaño de carga muy pequeña/nivel
de agua muy bajo.
Elija un tamaño de carga (nivel de agua) que sea adecuado para la carga
que se va a lavar.
Se está usando demasiado
detergente.
Es posible que la espuma ocasionada por usar mucho detergente impida
que la lavadora funcione correctamente. Mida siempre el detergente y
siga las instrucciones del fabricante según el tamaño de la carga y el nivel
de suciedad.
No está usando el ciclo correcto
para el tipo de tela.
Use una opción de ciclo con nivel de suciedad más alto y temperatura de
lavado más caliente para mejorar la limpieza.
Use el ciclo Heavy (Intenso) para una limpieza intensa. Consulte la “Guía
de ciclos” para ver cuál es el mejor ciclo para su carga.
No está usando los depósitos. Use los depósitos para evitar que el blanqueador con cloro y el suavizante
de telas manchen la ropa.
Cargue los depósitos antes de comenzar un ciclo. Seleccione Fabric
Softener Added - Yes (Suavizante de telas agregado – Sí) (en algunos
modelos) cuando use suavizante de telas.
No agregue productos directamente a la carga.
No está lavando los colores
similares juntos.
Lave los colores similares juntos y quite la carga inmediatamente después
de que se termine el ciclo, para evitar la transferencia de tinte.
Funcionamiento
incorrecto del depósito
El depósito está obstruido. Use solamente blanqueador con cloro líquido en el depósito para el
blanqueador. Use solamente suavizante de telas en el depósito para
el suavizante.

SOLUCIÓN DE PROBLEMAS
Antes de solicitar ayuda o servicio técnico, por favor consulte la sección “Solución de problemas”. Esto le podría ahorrar el costo
de una visita de servicio técnico. Si aún necesita ayuda, póngase en contacto con el distribuidor donde ha adquirido la lavadora o
con una compañía de servicio técnico autorizada. Cuando llame, tenga a mano la fecha de compra y el número completo del modelo
y de la serie de su lavadora. La información nos ayudará a atender mejor a su pedido.
W10636453B 02/14
Printed in U.S.A.
Impreso en EE.UU.
©2014 Whirlpool.
All rights reserved.
Todos los derechos reservados.
Si experimenta
lo siguiente
Causas posibles Solución
La lavadora no funciona como se esperaba (cont�)
Daños en las telas Había objetos losos en los bolsillos
duranteel ciclo de lavado.
Vacíe los bolsillos, cierre las cremalleras, los broches de presión y los
corchetes antes del lavado para evitar enganches y rasgaduras.
Es posible que se hayan enredado
los cordones y las fajas.
Ate todos los cordones y las fajas antes de comenzar a lavar la carga.
Los artículos pueden haberse
dañado antes del lavado.
Remiende lo que esté roto y descosido antes del lavado.
Si la carga está apretada, las telas
pueden dañarse.
Cargue las prendas de modo uniforme en montones ojos alrededor de
la pared de la canasta. Cargue solamente con artículos secos.
Use el ciclo diseñado para las telas que se van a lavar.
Agregue solamente 1 ó 2 artículos después de que la lavadora haya
comenzado.
El blanqueador líquido con
cloro puede haberse agregado
incorrectamente.
No vierta el blanqueador líquido con cloro directamente en la carga.
Limpie los derrames del blanqueador.
El blanqueador no diluido daña los tejidos. No use más de lo
recomendado por el fabricante.
No coloque los artículos sobre el depósito del blanqueador cuando ponga
o quite la ropa de la lavadora.
Tal vez no se hayan seguido las
instrucciones de las etiquetas
de las prendas.
Lea y siga siempre las instrucciones de la etiqueta de cuidado
proporcionadas por el fabricante de la prenda. Consulte la “Guía de
ciclos” para ver cuál es el mejor ciclo para su carga.
Olores No se ha hecho el mantenimiento
de Limpiar de la lavadora según lo
recomendado.
Vea “Cómo limpiar su lavadora” en Mantenimiento de la lavadora.
Descargue la lavadora en cuanto termine el ciclo.
Se está usando demasiado
detergente.
Cerciórese de medirlo correctamente. Siga siempre las indicaciones del
fabricante.
Vea la sección “Cómo limpiar la lavadora”.
La Lid Locked (lud de
tapa bloqueada) está
destellando
La tapa no está cerrada. Cierre la tapa. La lavadora no se pondrá en marcha ni se llenará con
la tapa abierta.
Un ciclo se ha detenido o puesto en
pausa con el botón de Start/Pause/
Unlock (Inicio/Pausa/ Desbloqueo).
Puede ser que la lavadora aún esté exprimiendo. La tapa no se
desbloqueará hasta que la canasta haya dejado de girar. Esto puede
tomar varios minutos si se están lavando cargas grandes o telas pesadas.
Primero intentar las soluciones sugeridas y evitar posiblemente el costo de una visita de servicio técnico.