2
en-us Safety Definitions
Table of Contents
Installation instructions
Safety Definitions 2
IMPORTANT SAFETY INSTRUCTIONS 3
Appliance Handling Safety 3
Safety Codes and Standards 3
Electric Safety 3
Related Equipment Safety 4
State of California Proposition 65 Warnings 4
Before you begin 5
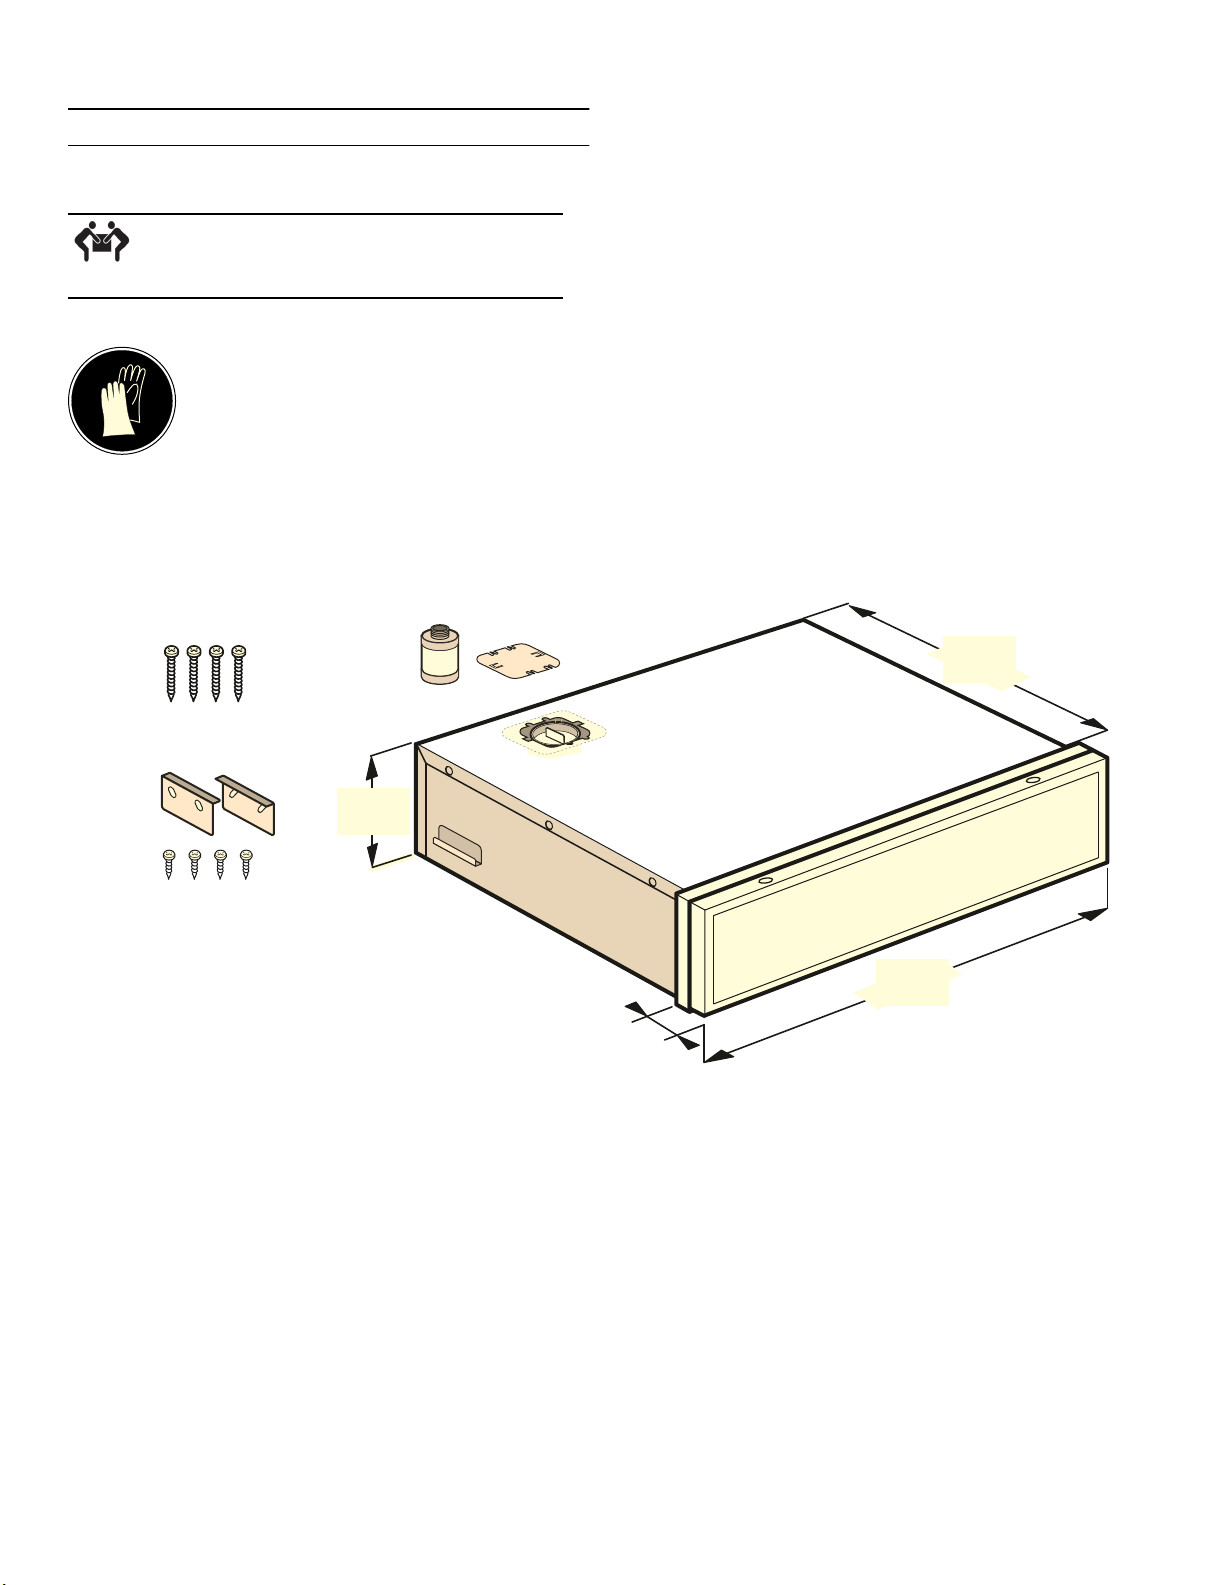
Tools and parts needed 5
Parts included 5
Before the installation 5
Prepare Installation Space 7
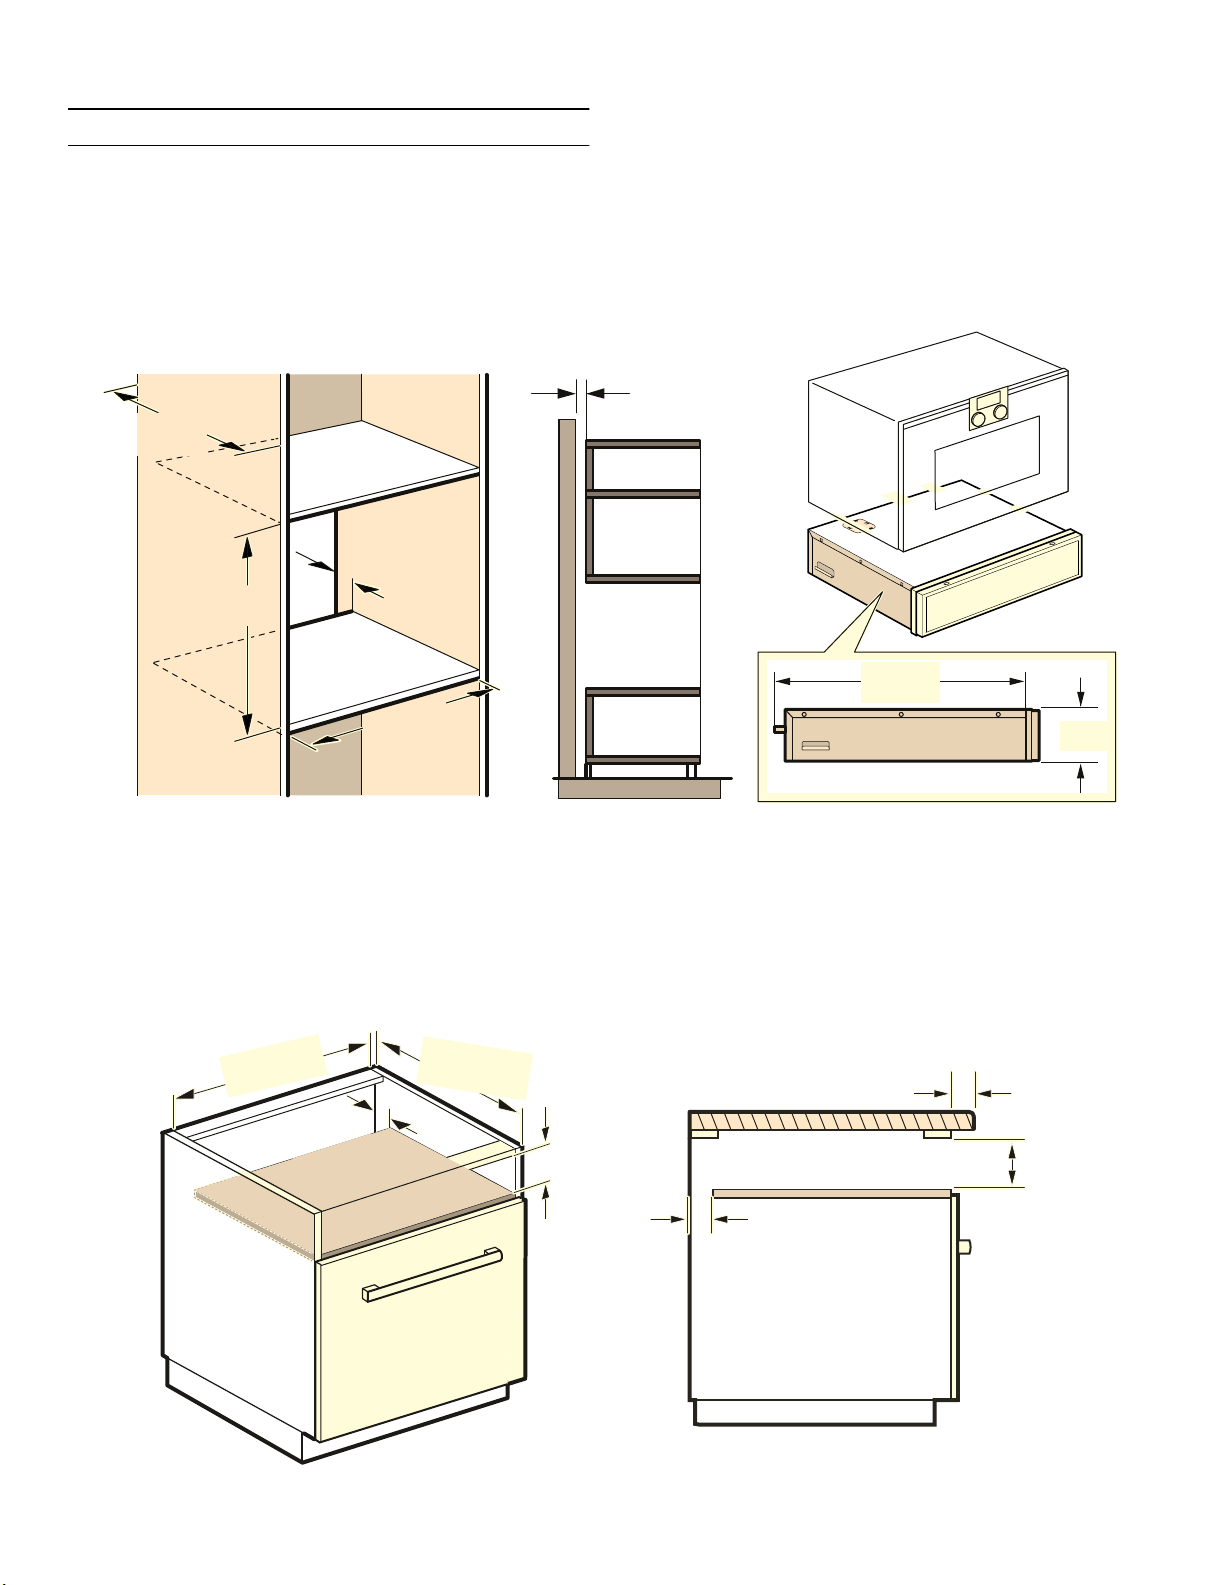
Built-in units 7
When installing below the worktop 7
Installation Procedure 8
Installing the appliance 8
Electrical connection 9
Customer Service 10
Additional information on products, accessories,
replacement parts and services can be found at
www.gaggenau.com and in the online shop
www.gaggenau.com/zz/store
Safety Definitions
Safety Definitions
9 WARNING
This indicates that death or serious injuries may
occur as a result of non-observance of this
warning.
9 CAUTION
This indicates that minor or moderate injuries may
occur as a result of non-observance of this
warning.
NOTICE
This indicates that damage to the appliance or property
may occur as a result of non-compliance with this
advisory.
Note: This alerts you to important information and/or
tips.

3
9 IMPORTANT SAFETY INSTRUCTIONS
READ AND SAVE THESE INSTRUCTIONS
IMPORTANT SAFETY INSTRUCTIONS
READ AND SAVE THESE INSTRUCTIONS
9 WARNING
If the information in this manual is
not followed exactly, fire or shock
may result causing property damage
or personal injury.
9 WARNING
Do not repair, replace or remove any
part of the appliance unless
specifically recommended in the
manuals. Improper installation,
service or maintenance can cause
injury or property damage. Refer to
this manual for guidance. All other
servicing should be done by an
authorized servicer.
Appliance Handling Safety
Hidden surfaces may have sharp edges.
Use caution when reaching behind or
under appliance.
Safety Codes and Standards
This appliance complies with the latest
version of one or more of the following
standards:
▯ UL 963- Sealing, Wrapping, and
Marking Equipment
▯ CSA C22.2 No. 64 - Household
Cooking and Liquid-Heating
Appliances
It is the responsibility of the owner and
the installer to determine if additional
requirements and/or standards apply to
specific installations.
Electric Safety
9 WARNING
Before you plug in an electrical cord
or turn on power supply, make sure
all controls are in the OFF position.
For appliances equipped with a cord and
plug, do not cut or remove the ground
prong. It must be plugged into a matching
grounding type receptacle to avoid
electrical shock. If there is any doubt as
to whether the wall receptacle is properly
grounded, the customer should have it
checked by a qualified electrician.
If required by the National Electrical
Code (or Canadian Electrical Code), this
appliance must be installed on a separate
branch circuit.
Installer – show the owner the location of
the circuit breaker or fuse. Mark it for
easy reference.
INSTALLER: LEAVE THESE
INSTRUCTIONS WITH THE APPLIANCE
AFTER INSTALLATION IS COMPLETE.
IMPORTANT: SAVE THESE
INSTRUCTIONS FOR THE LOCAL
ELECTRICAL INSPECTOR'S USE.
Before installing, turn power OFF at the
service panel. Lock service panel to
prevent power from being turned ON
accidentally.
Refer to data plate for more information.
See “Data Plate” under “Service” for data
plate location.

9 IMPORTANT SAFETY INSTRUCTIONS
READ AND SAVE THESE INSTRUCTIONS
4
Be sure your appliance is properly
installed and grounded by a qualified
technician. Installation, electrical
connections and grounding must comply
with all applicable codes.
Related Equipment Safety
Remove all tape and packaging before
using the appliance. Destroy the
packaging after unpacking the appliance.
Never allow children to play with
packaging material
Never modify or alter the construction of
the appliance. For example, do not
remove leveling legs, panels, wire covers
or anti-tip brackets/screws.
9 CAUTION
For units with glass panels, use care
when handling glass to avoid
breaking. Broken glass could cause
a laceration type injury.
State of California Proposition 65
Warnings:
9 WARNING
This product can expose you to
chemicals including vinyl chloride,
which is known to the State of
California to cause cancer and birth
defects or other reproductive harm.
For more information go to
www.P65Warnings.ca.gov.

5
Before you begin en-us
Before you begin
Before you begin
Tools and parts needed
▯ Torx head screwdriver
▯ Flat-head screwdriver
▯ Pencil
▯ Pliers
▯ Tape Measure
Parts included
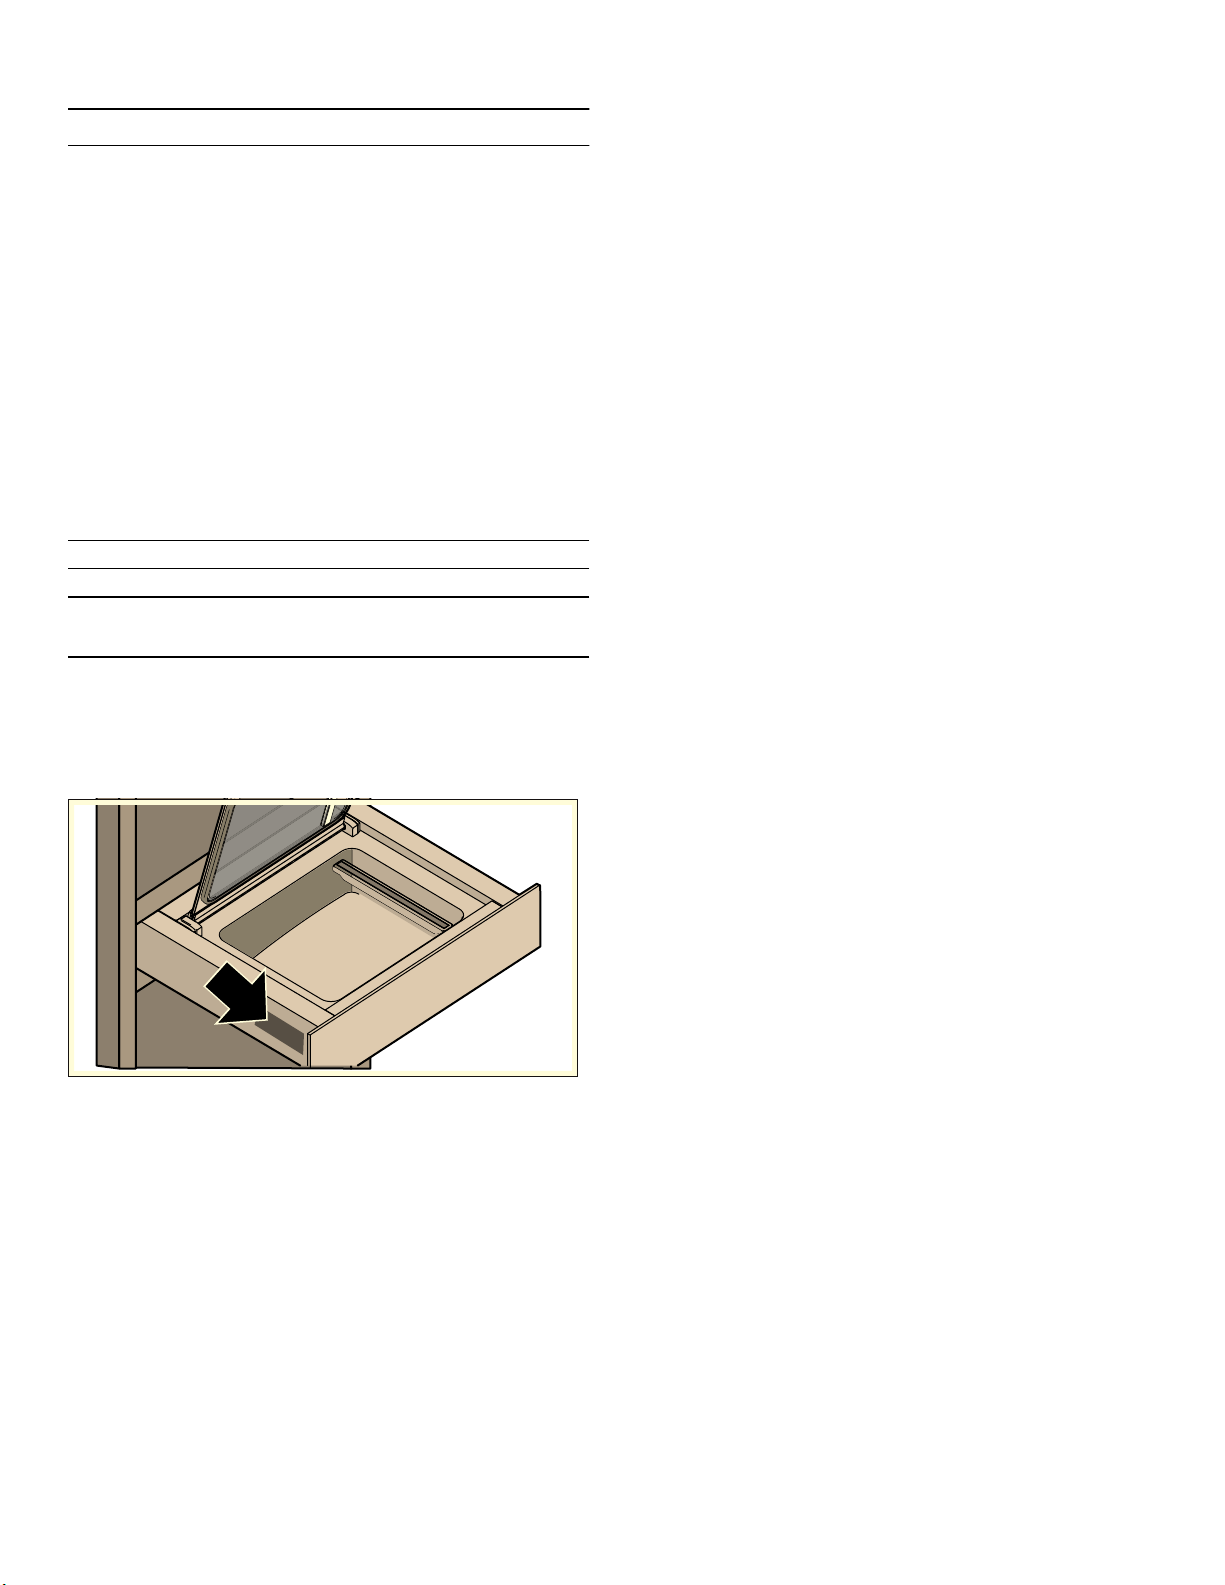
Before the installation
Notes
▯ A pump that contains oil is installed in the appliance.
If the incline is too great, this oil may flow out of the
pump. Do not tip the appliance or upend it.
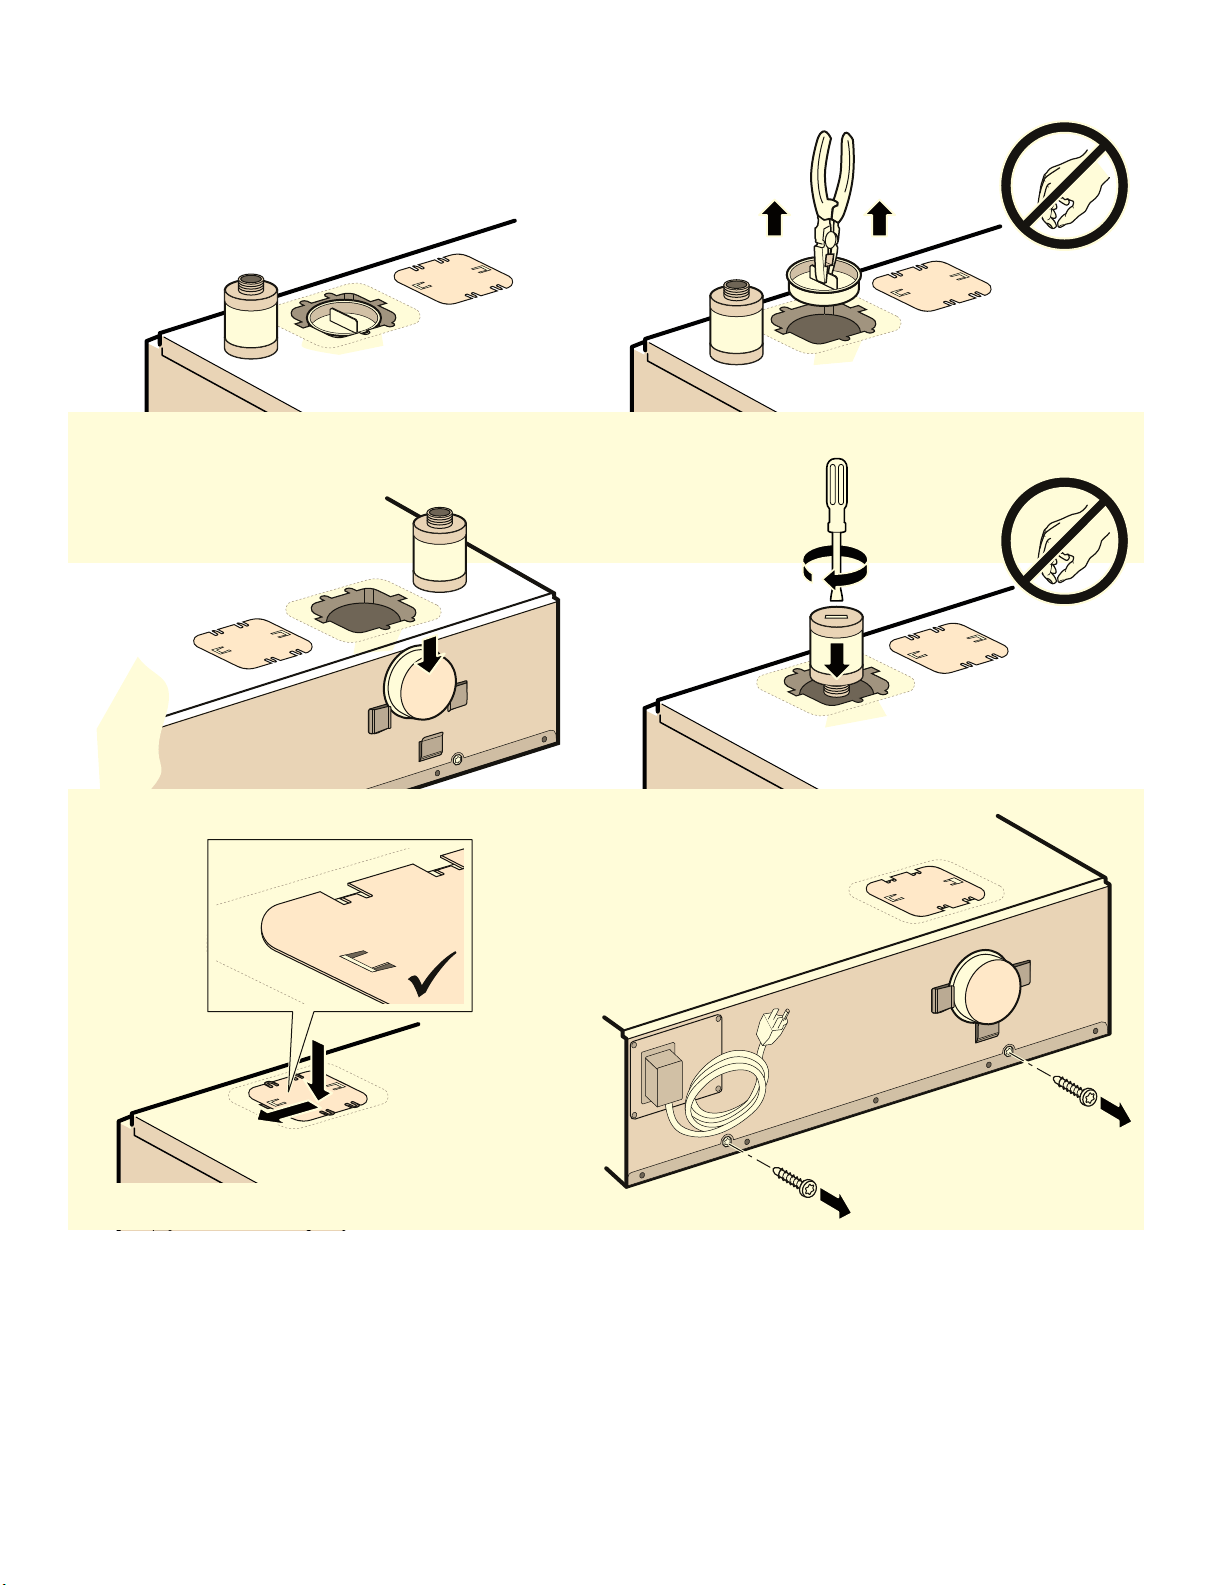
▯ Use a suitable tool to remove the transport locks and
install the oil filter.
▯ Do not move the appliance if the transport locks for
the pump are not installed. The oil from the vacuum
pump may leak out when it is tipped or tilted, and may
damage the appliance. When uninstalling the
appliance, re-attach the transport locks before moving
it.
1. Carefully lift the appliance out of the packaging 1a.
2. Remove the transport lock for the pump from the top
of the appliance 1b.
The transport lock can be secured to the rear of the
appliance for future use 1c.
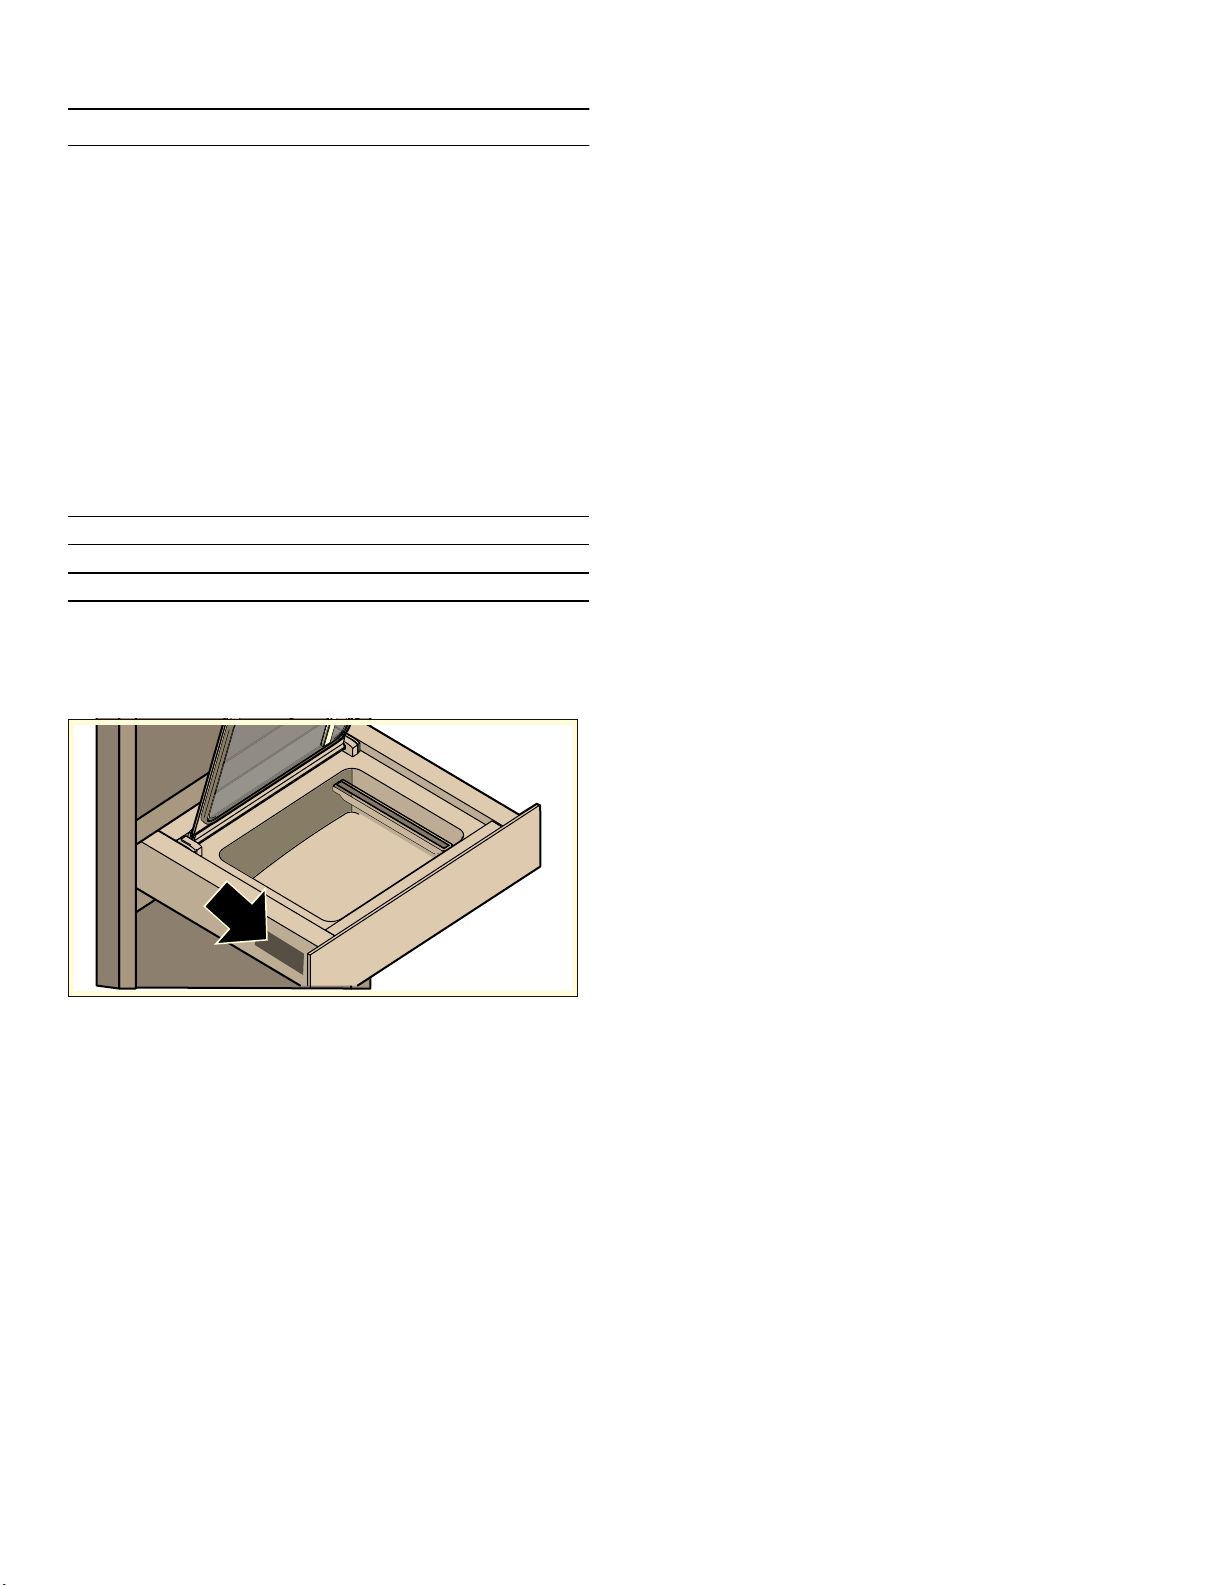
3. Install the oil filter 1d.
4. Place the lid into the opening and move it to the
left 1e.
5. Remove the transport lock screws 1f.
Heavy load
Requires 2 people to carry
[
[
[
PP
PP
PP
PP

6
en-us Before you begin
D E
F G
H I
7
Prepare Installation Space en-us
Prepare Installation Space
Prepare Installation Space
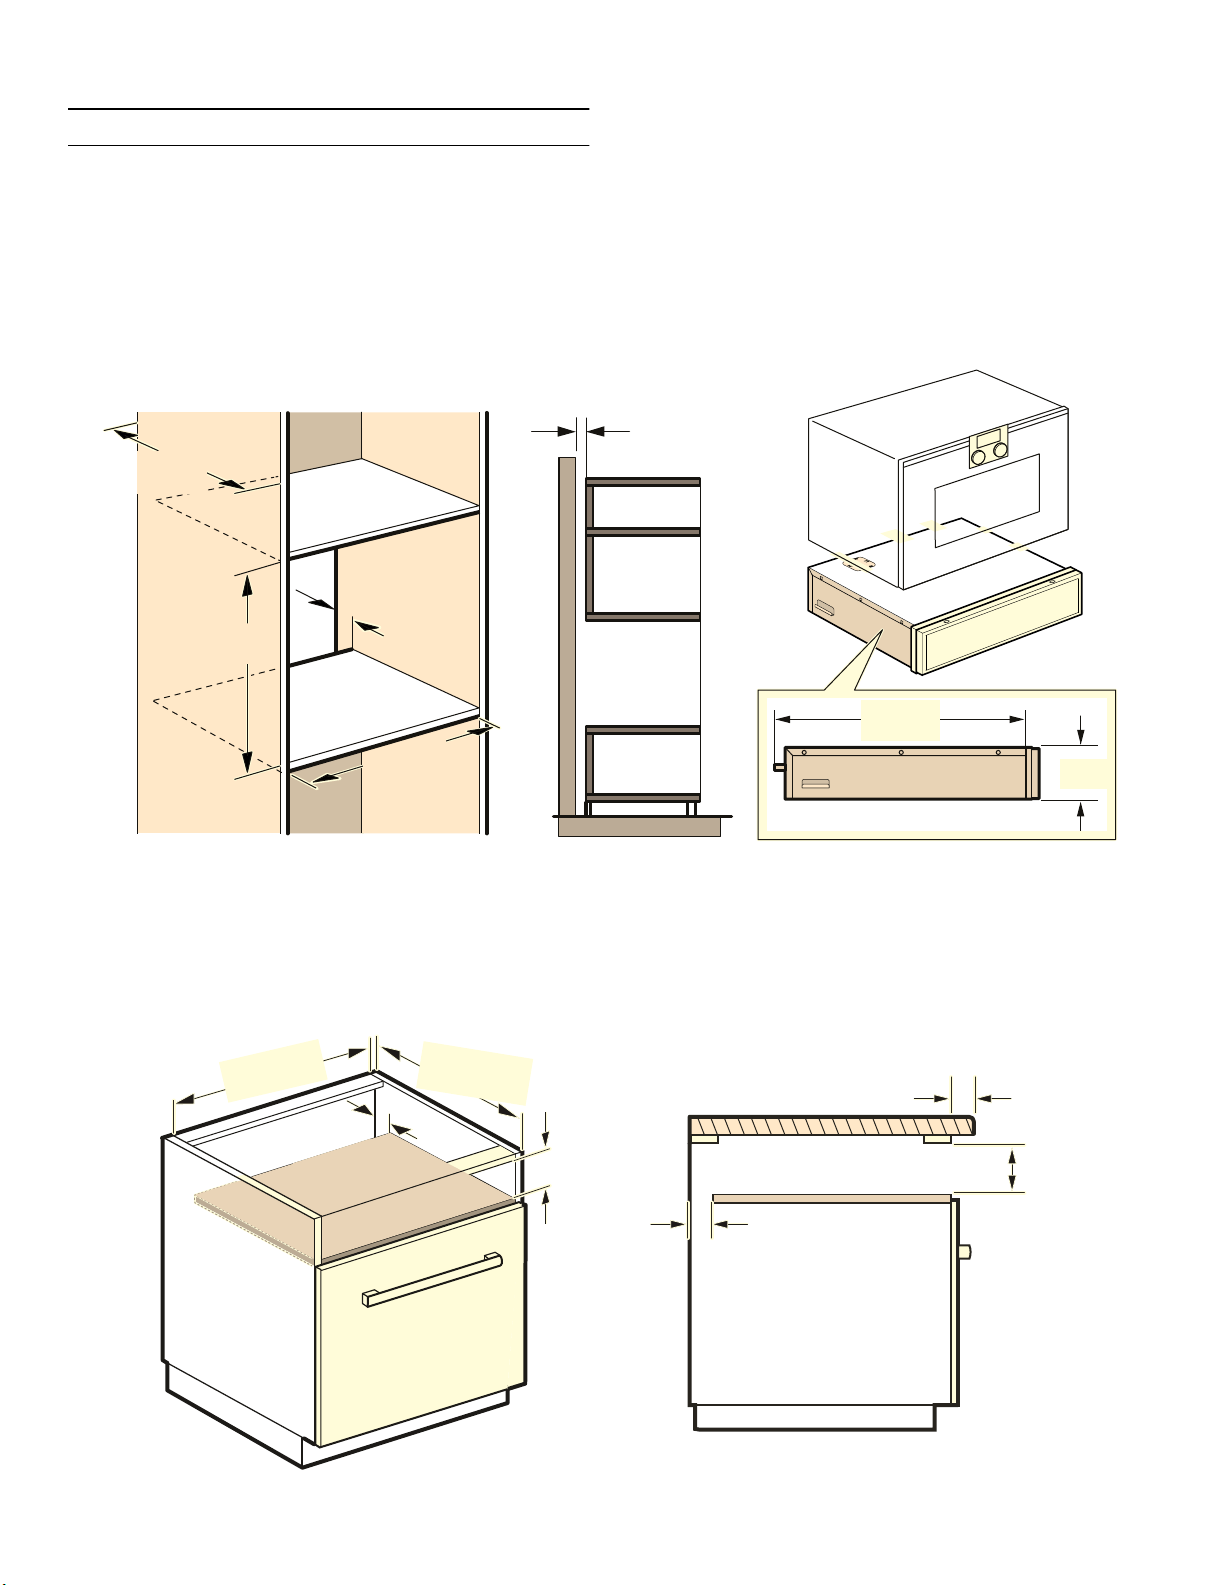
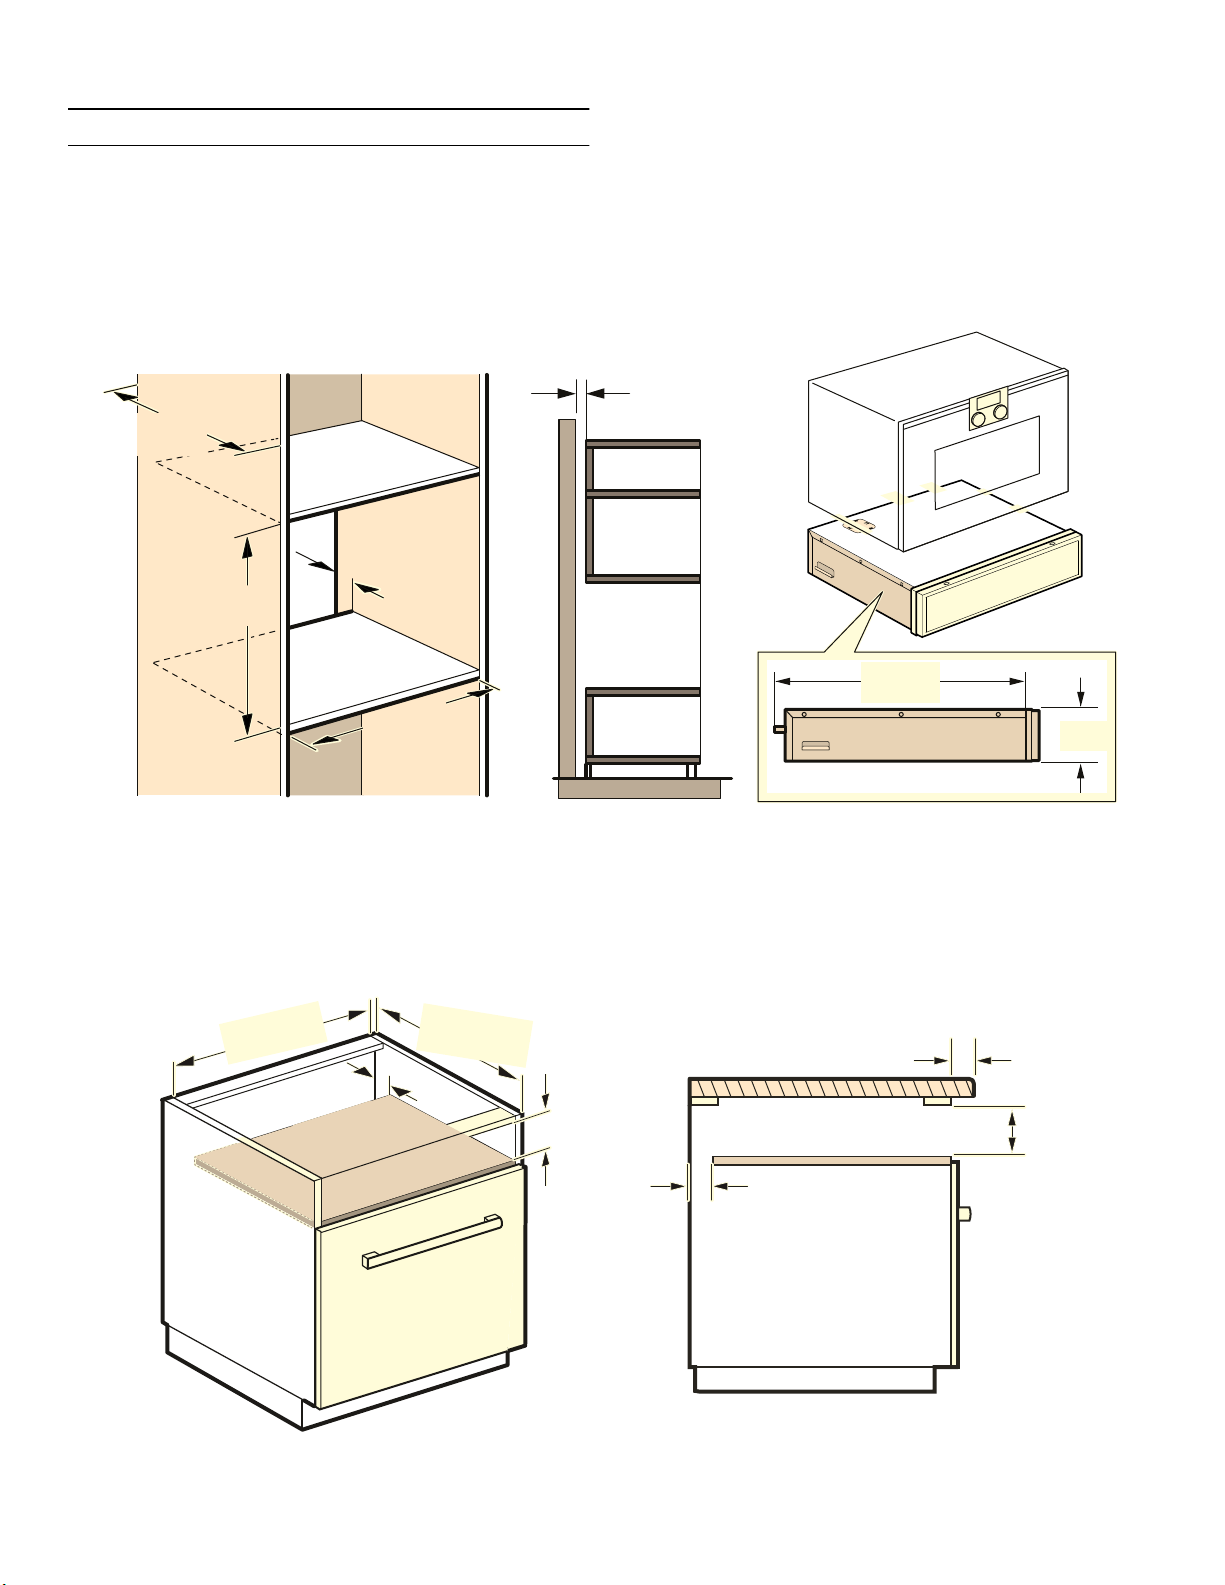
Built-in units
Do not install the appliance behind a cabinet door.
Follow the appliance installation instructions on how it is
to be combined with the drawer.
When installing below the worktop
If the worktop overlaps with the furniture cavity by more
than the value stated in the drawings in this section, this
may lead to collisions with the glass cover in the vacuum-
sealing drawer. Observe the maximum possible
dimension indicated in the drawings.
PLQ
PP
PLQ
PP
PP
PP
PLQ
PP
PP
PP
PP
PP
PLQ
PP
PLQ
PP
PD[
PP
PP
PLQ
PP

8
en-us Installation Procedure
Installation Procedure
Installation Procedure
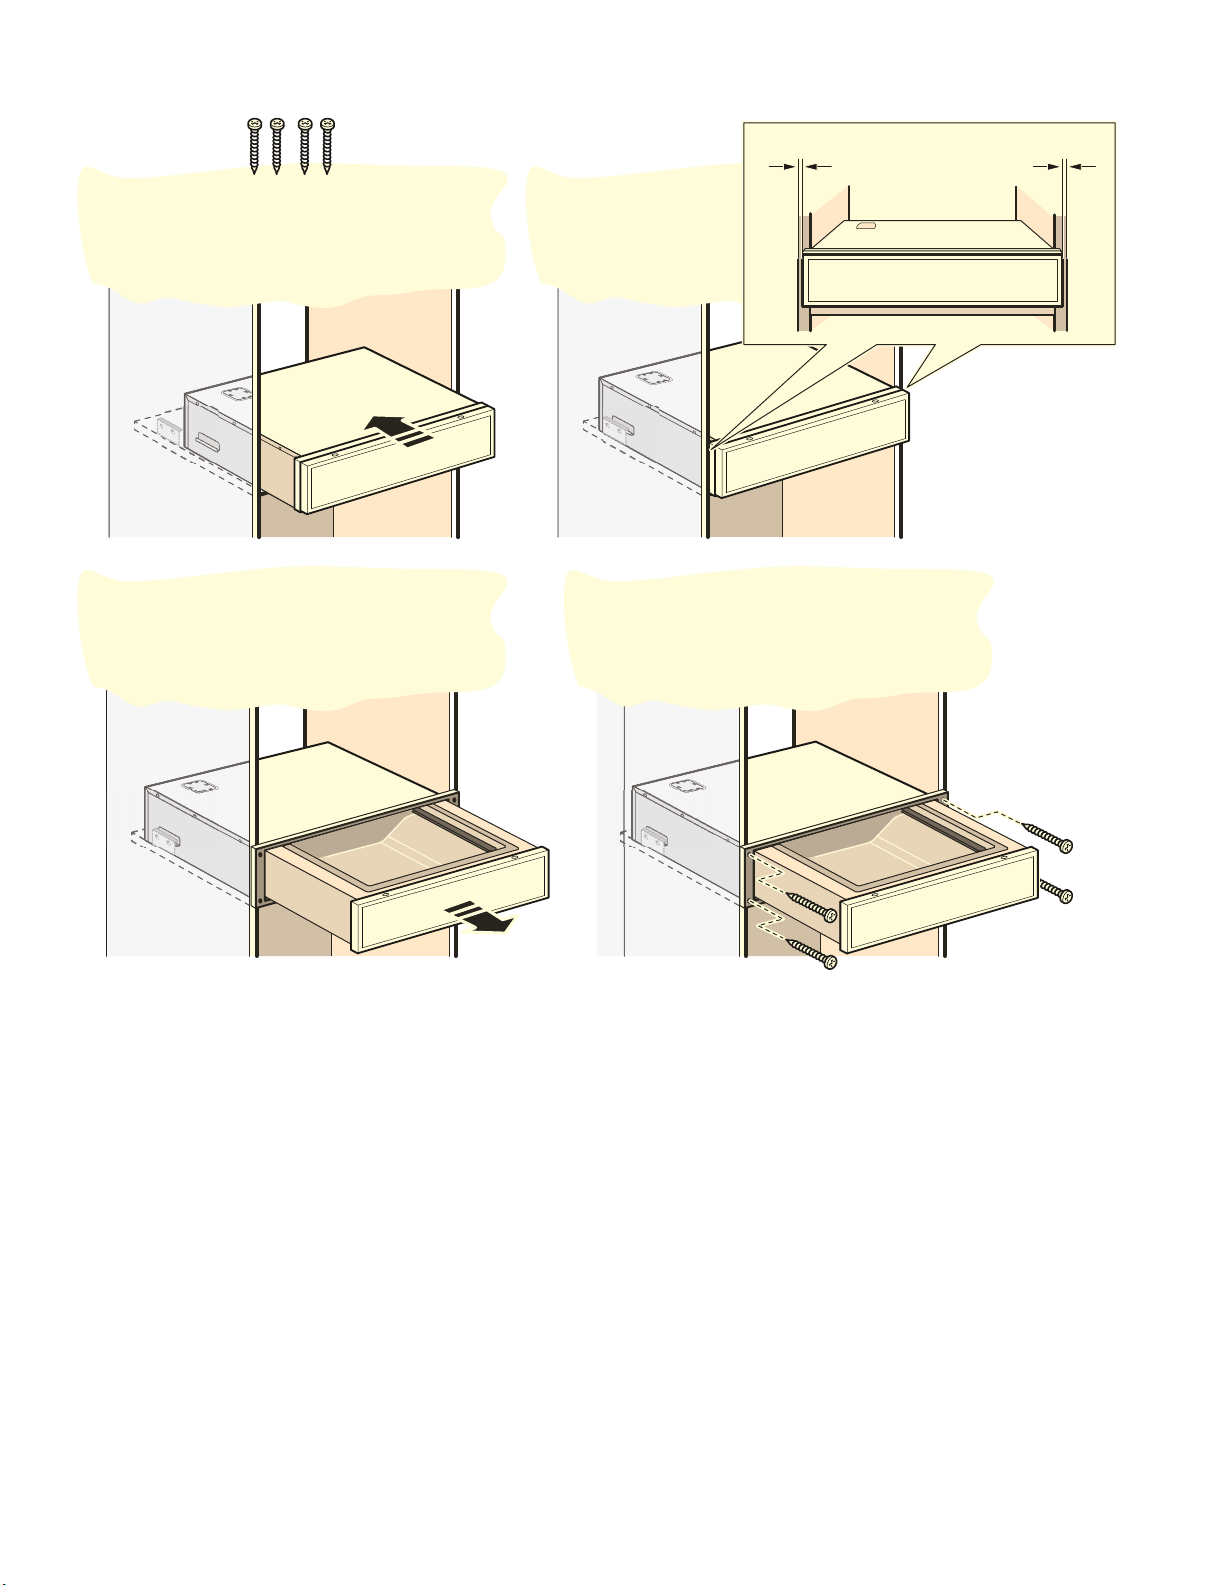
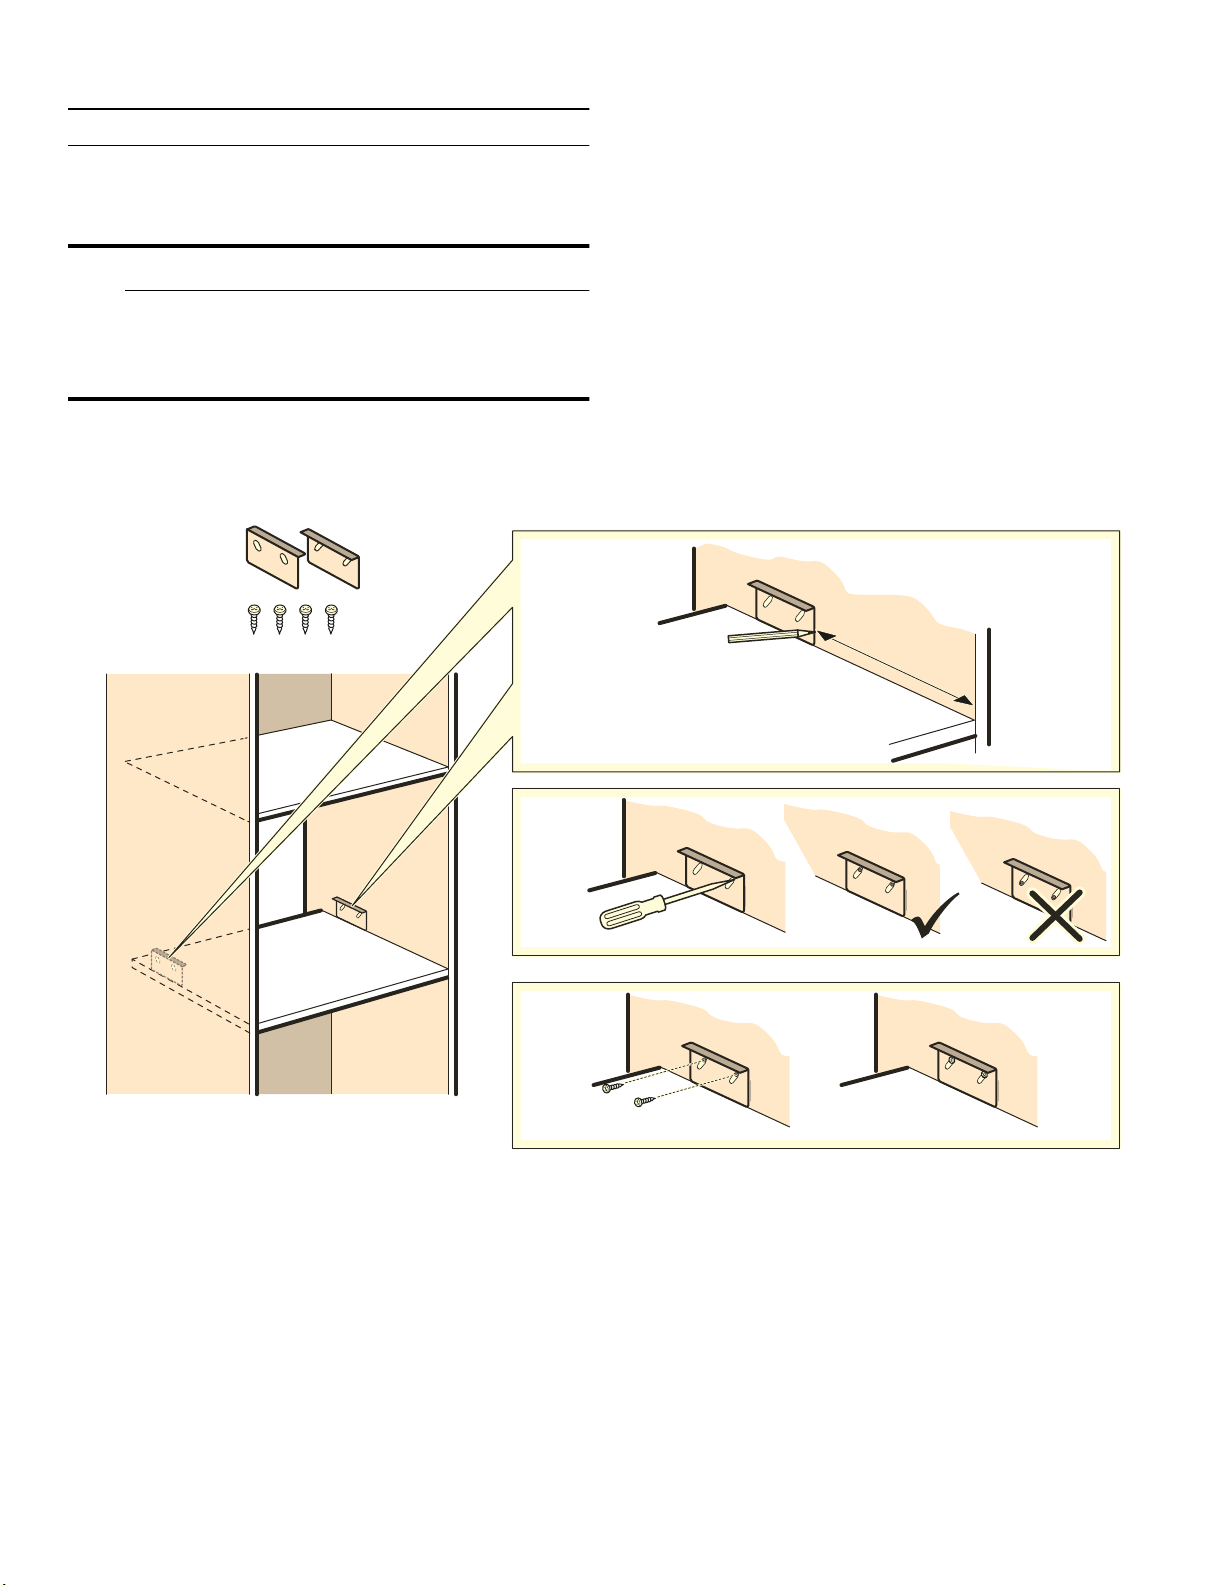
Installing the appliance
9 CAUTION
Tilt protection MUST be installed, otherwise the
appliance will tip when the drawer is open. Only
open the drawer if the tilt protection is installed.
Procedure
1. Install the tilt protection (2a - 2d).
Note: The height of the tilt protection can be adjusted
to make it easier to slide the appliance into the
kitchen unit.
2. Connect the appliance.
3. Slide the appliance into the unit (3a).
Note: Make sure that the power cable is not pinched,
trapped or kinked.
4. Center the appliance (3b).
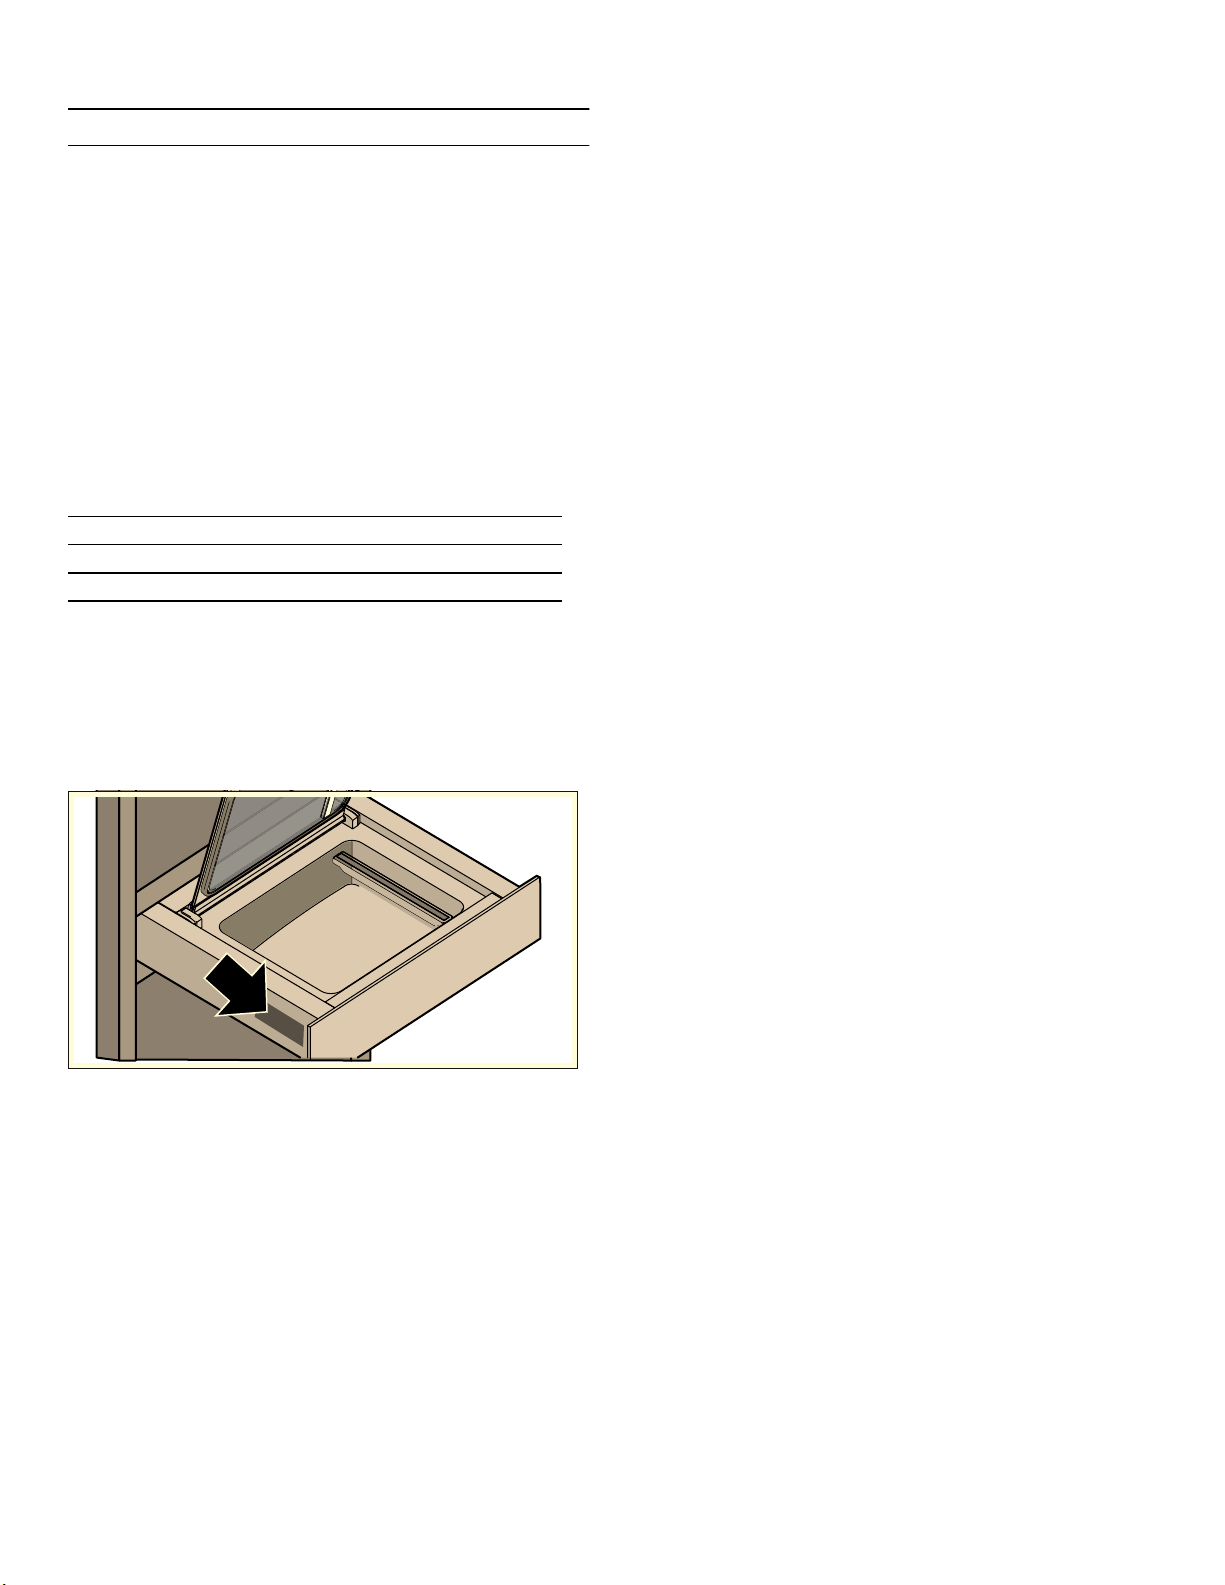
5. Carefully open the drawer. Check whether the
appliance is properly protected against tilting (3c).
6. Screw the appliance into place (3d).
D
[
[
E
PP
F
G
9
Installation Procedure en-us
Electrical connection
The appliance must only be connected to a type B socket
(NEMA 5-15) that has been correctly installed. Only a
qualified electrician may install a socket or replace the
connecting cable, taking the appropriate regulations into
account.
Do not use multi-socket adaptors, power strips or
extension cords. Overloading causes a risk of fire.
The plug must still be accessible after installation.
E
F
G
D
[
10
en-us Installation Procedure
Customer Service
If your appliance needs repairs, our Customer Service is
there for you. We work hard to help solve problems
quickly and without unnecessary service calls, getting
your appliance back up and running correctly in the least
amount of time possible.
When you call, please indicate the product number
(E-Nr.) and serial number (FD-Nr.) so that we can support
you in a qualified manner. You will find the type plate with
these numbers at the inside of the appliance door. To
avoid having to search for the information when you need
it, you can enter your appliance data and the customer
support telephone number here.
Please read the use and care manual provided with your
appliance. Failure to do so may result in an error in using
the appliance. This could result in a service call that
instead of fixing a mechanical issue is only needed for
customer education. Such calls are not covered by the
appliance warranty.
Please find the contact data of all countries in the
enclosed customer service list.
To book an engineer visit and product advice
You can rely on the manufacturer’s expertise. Rest
assured that the repair will be handled by trained service
technicians who have the original replacement parts for
your appliance.
E-Nr. FD-Nr.
Customer Service O
USA 877 442 4436
toll-free
CANADA 877 442 4436
toll-free

11
Définitions de sécurité fr-ca
Table des matières
Notice de montage
Définitions de sécurité 11
CONSIGNES DE SÉCURITÉ IMPORTANTES 12
Sécurité de manutention des appareils 12
Codes et normes de sécurité 12
Sécurité électrique 12
Sécurité apparentée concernant l´équipement 13
Avertissement issue de la proposition 65
de l’État de la Californie 13
Avant de commencer 14
Outils et pièces nécessaires 14
Pièces comprises 14
Avant l'encastrement 14
Préparation des meubles 16
Meuble d'encastrement 16
Lors de l'encastrement sous le plan de travail 16
Procédure d'installation 17
Mise en place de l'appareil 17
Raccordement électrique 18
Service après-vente 19
Vous trouverez des informations supplémentaires
concernant les produits, accessoires, pièces de
rechange et services sur Internet sous :
www.gaggenau.com et la boutique en ligne :
www.gaggenau.com/zz/store
Définitions de sécurité
Définitions de sécuri té
9 AVERTISSEMENT
Ceci indique que le non-respect de cet
avertissement peut entraîner des blessures graves,
voire la mort.
9 ATTENTION
Ceci indique que le non-respect de cet
avertissement peut entraîner des blessures légères
ou de gravité moyenne.
AVIS
Ceci indique que la non-conformité à cet avis de sécurité
peut entraîner des dégâts matériels ou endommager
l'appareil.
Remarque : Ceci vous signale des informations et/ou
indications importantes.

9 CONSIGNES DE SÉCURITÉ IMPORTANTES
LIRE ET CONSERVER CES INSTRUCTIONS
12
CONSIGNES DE SÉCURITÉ IMPORTANTES
LIRE ET CONSERVER CES INSTRUCTIONS
9 AVERTISSEMENT
Si l’information de ce guide n’est
pas suivie exactement, il peut en
résulter un incendie ou un choc
électrique causant des dommages à
la propriété, des blessures ou la
mort.
9 AVERTISSEMENT
Ne réparez, remplacez, ni ne retirez
aucune partie de l'appareil, excepté
si les manuels recommandent de le
faire. Une installation, un entretien
ou une inspection incorrects peuvent
occasionner des blessures ou des
dommages matériels. Reportez-vous
au présent manuel pour obtenir des
indications. Toute autre intervention
doit être effectuée par un technicien
agréé.
Sécurité de manutention des
appareils
Certaines surfaces peuvent avoir des
bords tranchants. Faire attention en
étendant le bras derrière l’appareil ou en
dessous.
Codes et normes de sécurité
Cet appareil est conforme aux plus
récentes versions de l'une ou plus des
normes suivantes :
▯ Norme UL963 : Équipement de
scellement, de conditionnement et de
marquage
▯ CSA C22.2 No. 64 - Appareils de
cuisson domestique et de chauffage
des liquides (Household Cooking and
Liquid-Heating Appliances)
Il incombe au propriétaire et à
l'installateur de déterminer si des
exigences et/ou normes additionnelles
s'appliquent pour des installations
spécifiques.
Sécurité électrique
9 AVERTISSEMENT
Avant tout raccordement de cordon
électrique ou toute mise sous
tension, assurez-vous que toutes les
commandes sont en position OFF
(d'arrêt).
Pour les appareils dotés d'un cordon et
d'une fiche, ne pas couper ou enlever la
broche de mise à la terre. Le cordon doit
être branché dans une prise de courant
adaptée de type mise à la terre pour
éviter tout risque d'électrocution. S'il y a
un doute en ce qui concerne la mise à la
terre de la prise murale, le client devra
s'adresser à un électricien qualifié.
S'il y a lieu, conformément au Code
national de l'électricité (ou au Code
canadien de l'électricité), cet appareil
doit être installé sur un circuit de
dérivation séparé.
Installateur – Indiquer au propriétaire
l’emplacement du disjoncteur ou du
fusible. Identifier sa position pour pouvoir
le retrouver facilement.

13
9 CONSIGNES DE SÉCURITÉ IMPORTANTES
LIRE ET CONSERVER CES INSTRUCTIONS
INSTALLATEUR : LAISSEZ CES
INSTRUCTIONS AVEC L'APPAREIL
APRÈS UNE FOIS L'INSTALLATION
TERMINÉE.
IMPORTANT : CONSERVER CES
INSTRUCTIONS POUR L'USAGE DE
L'INSPECTEUR ÉLECTRIQUE LOCAL.
Avant l'installation, mettre l'appareil hors
service au panneau de service.
Verrouiller le panneau d'entrée
d'électricité pour éviter que le courant ne
soit accidentellement rétabli.
Pour plus d´informations, se reporter à la
plaque signalétique. Pour connaître
l´emplacement de la plaque signalétique,
voir “Plaque signalétique“ sous
“Entretien“.
S'assurer que l'appareil est installé et mis
à la terre par un technicien qualifié.
L'installation, les connexions électriques
et la mise à la terre doivent être
conformes à tous les codes applicables.
Sécurité apparentée concernant
l´équipement
Retirer le ruban adhésif et l´emballage
avant d´utiliser l´appareil. Détruiere
l´emballage après avoir déballé
l´appareil. Ne jamais laisser les enfants
jouer avec les matériaux de
conditonnement.
Ne jamais modifier ni altérer la
configuration de l´appareil. Par exemple,
ne pas retirer les pieds de nivellement,
les panneaux, les couvercles de câblage
ou les fixations/vis antibasculement.
9 ATTENTION
Pour les unités dotées de panneaux
en verre, manipulez le verre avec
précaution pour éviter qu'il ne se
brise. Les éclats de verre peuvent
blesser quelqu'un.
Avertissement issue de la
proposition 65 de l’État de la
Californie :
9 AVERTISSEMENT
Ce produit peut vous exposer à des
produits chimiques, comme du
chlorure de vinyle, reconnus par
l’État de la Californie comme
causant le cancer, des malformations
congénitales ou d’autres effets
nocifs sur la reproduction. Pour de
plus amples renseignements,
consultez www.P65Warnings.ca.gov.

14
fr-ca Avant de commencer
Avant de commencer
Avant de commencer
Outils et pièces nécessaires
▯ Tournevis à tête Torx
▯ Tournevis plat
▯ Crayon
▯ Pinces
▯ Ruban à mesurer
Pièces comprises
Avant l'encastrement
Remarques
▯ L'appareil contient une pompe remplie d'huile. En cas
d'inclinaison trop importante, l'huile de la pompe peut
s'écouler. Ne renversez pas l'appareil et ne le mettez
pas debout.
▯ Utilisez un outil approprié lors du retrait de la cale de
transport et du montage du filtre à huile.
▯ Ne déplacez pas l'appareil lorsque la cale de
transport de la pompe n'est pas en place. L'huile de la
pompe à vide pourrait s'écouler en cas d'inclinaison
ou de basculement et endommager l'appareil.
Remettez la cale de transport en place après le
démontage et avant le déplacement.
1. Sortez l'appareil avec précaution de l'emballage 1a.
2. Retirez la cale de transport pour la pompe sur la face
supérieure de l'appareil 1b.
La cale de transport peut être fixée à l'arrière de
l'appareil pour une utilisation ultérieure 1c.
3. Montez le filtre à huile 1d.
4. Placez le couvercle dans l'orifice et poussez-le vers la
gauche 1e.
5. Dévissez les vis de sécurité pour le transport 1f.
Charge lourde
Nécessite 2 personnes pour le déplacement.
[
[
[
PP
PP
PP
PP

15
Avant de commencer fr-ca
D E
F G
H I
16
fr-ca Préparation des meubles
Préparation des meubles
Préparation des meubles
Meuble d'encastrement
Ne pas installer l'appareil derrière une porte de meuble. Observer la notice de montage de l'appareil censé être
combiné avec le tiroir.
Lors de l'encastrement sous le plan de
travail
Un dépassement trop important du plan de travail par
rapport au corps du meuble peut entraîner des collisions
avec le couvercle en verre dans le tiroir sous-vide. Veillez
à la cote maximale possible.
PLQ
PP
PLQ
PP
PP
PP
PLQ
PP
PP
PP
PP
PP
PLQ
PP
PLQ
PP
PD[
PP
PP
PLQ
PP

17
Procédure d’installation fr-ca
Procédure d'installation
Procédure d’installation
Mise en place de l'appareil
9 ATTENTION
Une sécurité anti-basculement doit être installée,
sinon l'appareil bascule avec le tiroir ouvert.
N'ouvrez le tiroir qu'une fois que la sécurité anti-
basculement est montée.
Procédure
1. Montez la sécurité anti-basculement (2a - 2d).
Remarque : La sécurité anti-basculement peut être
réglée en hauteur pour pouvoir pousser plus
facilement l'appareil dans le meuble.
2. Branchez l’appareil.
3. Poussez l'appareil dans le meuble (3a).
Remarque : Veillez à ce que le cordon d'alimentation
secteur ne soit pas pincé ni plié.
4. Centrez l'appareil (3b).
5. Ouvrez le tiroir avec précaution. Vérifiez si la
protection contre le basculement est assurée (3c).
6. Vissez l'appareil (3d).
D
[
[
E
PP
F
G

18
fr-ca Procédure d’installation
Raccordement électrique
L'appareil électroménager doit uniquement être branché
à une prise de type B (NEMA 5-15) correctement
installée. Seul un électricien qualifié peut installer une
prise ou remplacer le câble de raccordement en tenant
compte de la réglementation adéquate.
N’utilisez pas d'adaptateurs, de blocs ou de rallonges
multiprises. Une surcharge pourrait entraîner un risque
d'incendie.
La prise doit toujours être accessible après l'installation.
E
F
G
D
[
19
Procédure d’installation fr-ca
Service après-vente
Si votre appareil doit être réparé, notre service après-
vente est à votre disposition. Nous trouvons toujours une
solution adaptée, y compris pour éviter les visites inutiles
de techniciens.
Lors de votre appel, indiquez le numéro du produit (n° E)
et le numéro de série (n° FD) afin que nous puissions
vous donner une réponse précise. La plaquette
d'identification comportant ces numéros se trouve à
l’intérieur de la porte de l'appareil. Pour ne pas avoir à
chercher longtemps en cas de besoin, vous pouvez
inscrire ici les références de l'appareil et le numéro de
téléphone du service après-vente.
N'oubliez pas qu'en cas de fausse manœuvre, la visite
d'un technicien d'après-vente n'est pas gratuite, même
pendant la garantie.
Vous trouverez les données de contact pour tous les pays
dans l'annuaire ci-joint du service après-vente.
Demande de réparation et conseils en cas de
dysfonctionnement
Faites confiance à la compétence du fabricant. Ainsi vous
êtes assurés que la réparation sera effectuée par des
techniciens formés qui possèdent les pièces de
rechange d’origine pour votre appareil.
N° E N° FD
Service après-vente O
CA 877 442 4436
toll-free

20
es-mx Definiciones de seguridad
Índice
Instrucciones de instalación
Definiciones de seguridad 20
INSTRUCCIONES DE SEGURIDAD IMPORTANTES 21
Seguridad de manejo del electrodoméstico 21
Códigos y normas de seguridad 21
Seguridad eléctrica 21
Seguridad de los equipos relacionados 22
Advertencia en virtud de la Proposición 65
del estado de California: 22
Antes de empezar 23
Herramientas y piezas necesarias 23
Piezas incluidas 23
Antes del montaje 23
Preparación de los muebles de montaje 25
Muebles empotrados 25
Montaje debajo de la encimera 25
Procedimiento de instalación 26
Introducir el aparato 26
Conexión eléctrica 27
Servicio de atención al cliente 28
Encontrará más información sobre productos,
accesorios, piezas de repuesto y servicios en internet:
www.gaggenau.com y también en la tienda online:
www.gaggenau.com/zz/store
Definiciones de seguridad
Definiciones de seguri dad
9 ADVERTENCIA
Esto indica que pueden producirse heridas graves
o incluso la muerte si no se cumple con esta
advertencia.
9 ATENCION
Esto indica que pueden producirse heridas leves o
moderadas si no se cumple con esta advertencia.
AVISO
Esto indica que pueden producirse daños en el aparato o
en los bienes si no se cumple con este aviso.
Nota: Esto alerta sobre información o sugerencias
importantes.

21
9 INSTRUCCIONES DE SEGURIDAD IMPORTANTES
LEA Y CONSERVE ESTAS INSTRUCCIONES
INSTRUCCIONES DE SEGURIDAD IMPORTANTES
LEA Y CONSERVE ESTAS INSTRUCCIONES
9 ADVERTENCIA
Si no sigue la información de este
manual exactamente, se puede
ocasionar un incendio o una
descarga eléctrica que puede
causar daños materiales o lesiones
personales.
9 ADVERTENCIA
No reparar, sustituir ni quitar
ninguna pieza del electrodoméstico
a menos que se recomiende de
forma específica en los
manuales.Una instalación, servicio o
mantenimiento inadecuados pueden
causar lesiones o daños materiales.
Consultar este manual para recibir
ayuda. Todos los demás servicios
debe realizarlos un agente
autorizado.
Seguridad de manejo del
electrodoméstico
Las superficies ocultas pueden tener
bordes filosos. Proceda con cuidado al
intentar tomar el electrodoméstico por la
parte trasera o desde abajo.
Códigos y normas de seguridad
Este electrodoméstico cumple con la
última versión de una o varias de las
siguientes normas:
▯ UL 963: material de sellado, envasado
y marcado
▯ CSA C22.2 N.° 64 - Electrodomésticos
para cocinar y para calentar líquidos de
uso doméstico (Household Cooking
and Liquid-Heating Appliances)
Es responsabilidad del propietario y del
instalador determinar si se aplican otros
requisitos o normas en instalaciones
específicas.
Seguridad eléctrica
9 ADVERTENCIA
Antes de enchufar un cable eléctrico
o activar el suministro eléctrico,
asegurarse de que todos los
controles están en la posición OFF.
Para los electrodomésticos equipados
con cable y enchufe, no corte ni retire la
espiga de conexión a tierra. Debe
enchufarse en un receptáculo de
conexión a tierra compatible para evitar
descargas eléctricas. Si tiene alguna
duda respecto de si el receptáculo de
pared está correctamente conectado a
tierra, el cliente debe solicitar la
verificación de un electricista calificado.
Si el Código Nacional Eléctrico (o el
Código Eléctrico Canadiense) así lo
requiere, este electrodoméstico debe
instalarse en un circuito derivado por
separado.
El instalador debe mostrar al propietario
la ubicación del disyuntor o el fusible.
Márquela para recordarla más fácilmente.

9 INSTRUCCIONES DE SEGURIDAD IMPORTANTES
LEA Y CONSERVE ESTAS INSTRUCCIONES
22
INSTALADOR: DEJE ESTAS
INSTRUCCIONES CON EL
ELECTRODOMÉSTICO CUANDO HAYA
FINALIZADO LA INSTALACIÓN.
IMPORTANTE: CONSERVE ESTAS
INSTRUCCIONES PARA USO DEL
INSPECTOR DE ELECTRICIDAD
LOCAL.
Antes de realizar la instalación, apague la
alimentación eléctrica en el panel de
servicio. Trabe el panel de servicio para
impedir que se encienda accidentalmente
la alimentación eléctrica.
Para obtener más información, consulte
la placa de datos. Para conocer la
ubicación de la placa de datos, sonsulte
la sección "Placa de datos" debajo de
"Servicio tecnico".
Asegúrese de que el electrodoméstico
sea correctamente instalado y conectado
a tierra por un técnico calificado. La
instalación, las conexiones eléctricas y la
conexión a tierra deben cumplir con
todos los códigos correspondientes.
Seguridad de los equipos
relacionados
Retire toda la cinta y el embalaje antes de
usar el electrodoméstico. Destruya el
embalaje después de desembalar el
electrodoméstico. Nunca deje que los
niños jueguen con el material de
embalaje.
Nunca modifique ni altere la construcción
del electrodoméstico. Por ejemplo, no
retire las patas niveladoras, paneles,
cubiertas para cables ni soportes/
tornillos antivuelco.
9 ATENCION
En el caso de unidades con paneles
de cristal, tener cuidado al
manejarlos para evitar que se
rompan. El cristal roto puede causar
una lesión tipo laceración.
Advertencia en virtud de la
Proposición 65 del estado de
California:
9 ADVERTENCIA
Este producto puede exponerlo a
sustancias químicas, incluyendo
cloruro de vinilo, que el estado de
California sabe que provocan
cáncer, defectos congénitos u otro
daño reproductivo. Para obtener más
información, ir a la página web:
www.P65Warnings.ca.gov.
23
Antes de empezar es-mx
Antes de empezar
Antes de empezar
Herramientas y piezas necesarias
▯ Punta de desarmador Torx
▯ Desarmador plano
▯ Lápiz
▯ Pinzas
▯ Cinta métrica
Piezas incluidas
Antes del montaje
Notas
▯ Colocar en el aparato una bomba que contenga
aceite. Si la inclinación es muy grande, el aceite
puede derramarse fuera de la bomba.No inclinar el
aparato ni colocarlo de canto.
▯ Utilizar la herramienta apropiada para retirar el seguro
de transporte y para montar el filtro de aceite.
▯ No mover el aparato sin haber instalado previamente
el seguro de transporte para la bomba. El aceite de la
bomba de vacío podría derramarse si esta se inclina o
vuelca, y con ello dañar el aparato. Volver a colocar el
seguro de transporte tras desmontarlo y antes de
moverlo.
1. Sacar el aparato del embalaje tirando de él hacia
arriba 1a.
2. Retirar el seguro de transporte para la bomba de la
parte superior del aparato 1b.
El seguro de transporte puede fijarse en la parte
posterior del aparato para un uso futuro 1c.
3. Montar el filtro de aceite 1d.
4. Colocar la tapa en la abertura y desplazar hacia la
izquierda 1e.
5. Retirar los tornillos de fijación para el transporte 1f.
Carga pesada
Se requieren dos personas para su
transporte.
[
[
[
PP
PP
PP
PP
24
es-mx Antes de empezar
D E
F G
H I
25
Preparación de los muebles de montaje es-mx
Preparación de los muebles de montaje
Preparación de los muebles de montaje
Muebles empotrados
No instalar el aparato detrás de una puerta del mueble. Tener en cuenta las instrucciones de montaje del aparato
que debe combinarse con el cajón.
Montaje debajo de la encimera
Si la encimera sobresale en exceso de la cavidad del
mueble pueden producirse colisiones con la tapa de
cristal del cajón de envasado al vacío.Tener en cuenta las
dimensiones máximas.
PLQ
PP
PLQ
PP
PP
PP
PLQ
PP
PP
PP
PP
PP
PLQ
PP
PLQ
PP
PD[
PP
PP
PLQ
PP
26
es-mx Procedimiento de instalación
Procedimiento de instalación
Procedimiento de instalación
Introducir el aparato
9 ATENCION
Debe instalarse un seguro contra vuelco, de lo
contrario el aparato volcará cuando se abra el
cajón. Abrir el cajón solo cuando se haya instalado
el seguro contra vuelco.
Procedimiento
1. Montar el seguro contra vuelco (2a - 2d).
Nota: El seguro contra vuelco puede ajustarse en
altura para que sea más fácil introducir el aparato en
el mueble.
2. Conectar el aparato.
3. Introducir el aparato en el mueble (3a).
Nota: Tener cuidado para que el cable de conexión
no quede aprisionado ni doblado.
4. Centrar el aparato (3b).
5. Abrir el cajón con cuidado. Comprobar si el seguro
contra vuelco está correctamente montado (3c).
6. Atornillar el aparato (3d).
D
[
[
E
PP
F
G

27
Procedimiento de instalación es-mx
Conexión eléctrica
El electrodoméstico solo puede estar conectado a un
enchufe de tipo B (NEMA 5-15) que esté instalado
correctamente. Solo un electricista calificado debe
instalar un enchufe o sustituir el cable de conexión,
considerando las regulaciones apropiadas.
No utilizar adaptadores de varios enchufes,
multicontactos ni extensiones. Existe riesgo de incendio
en caso de sobrecarga.
El enchufe debe seguir siendo accesible después de la
instalación.
E
F
G
D
[
28
es-mx Procedimiento de instalación
Servicio de atención al cliente
Si su aparato necesita una reparación, nuestro servicio
de atención al cliente estará encantado de ayudarle.
Siempre encontramos la solución adecuada, incluso para
evitar visitas innecesarias de los técnicos.
Cuando llame por teléfono, indique la referencia del
producto (Nº E) y el número de fabricación (Nº FD) para
que podamos ofrecerle un servicio cualificado. La placa
de identificación con los números correspondientes los
encontrará en el interior de la puerta del aparato. Para
evitar tener que buscar los datos de su aparato cuando
los precise, es aconsejable anotarlos aquí conjuntamente
con el número de teléfono del Servicio de atención al
cliente.
Tenga en cuenta que la visita del técnico del servicio de
atención al cliente no es gratuito en caso de que el mal
funcionamiento sea debido a un manejo incorrecto del
aparato.
Las señas de las delegaciones internacionales figuran en
la lista adjunta de centros y delegaciones del Servicio de
Asistencia Técnica Oficial.
Solicitud de reparación y asesoramiento en caso de
averías
Confíe en la competencia del fabricante. De esa forma se
asegura de que la reparación se lleva a cabo por
personal técnico debidamente instruido, equipado con
las piezas originales y de repuesto necesarias para su
aparato.
Nº E. Nº FD.
Servicio de atención al cliente O
US 877 442 4436
toll-free


*DJJHQDX
%6++RPH$SSOLDQFH&RUSRUDWLRQ
0DLQ6WUHHW6XLWH
,UYLQH&$
86$
ZZZJDJJHQDXXVDFRP
%6++RPH$SSOLDQFHV
*DJJHQDX+DXVJHUlWH*PE+
&DUO:HU\6WUDH
0QFKHQ
*(50$1<
*9001237969*
9001237969 (970704)
en-us, es-mx, fr-ca