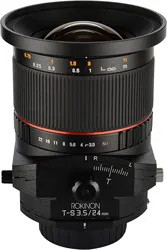
T-S24mm F3.5 ED AS UMC
FOUR-THIRDS
(4/3")
(4 / 3 " )
16 ELEMENTS IN 11 GROUPS (2 ASPHERICAL LENS)
110mm 107mm 108mm 109mm 136mm 136mm 128mm 139mm 115mm 134mm
667g
Mount: CW 90° (30° per step)
Between the tilt unit and the shift unit: CW 90° (30° per step)
647g 646g 656g 737g 745g 727g 734g 720g 730g
Image sensor size
Angle of view
Instruction Manual
Thank you for purchasing the T-S24mm F3.5 ED AS UMC lens.
We believe that you will have a special photographic experience with this new
T-S24mm F3.5 ED AS UMC lens for video recording.
The T-S24mm F3.5 ED AS UMC lens is a retrofocus type lens which corrects and
emphasizes perspective, and also adjusts the depth of field. The T-S24mm F3.5 ED
AS UMC lens completes an optical system based on superior optical technologies,
and maintains excellent resolution both at the center and around the periphery of the
lens by adopting a high performance Glass Molding ASP lens and UMC (Ultra Multi
Coating).
The tilt shift unit controls the depth of field to the subject and the shooting area. This
lens compensates for image distortion and allows you to capture a variety of images
that were never possible with the existing lenses.
Advantages of the T-S24mm F3.5 ED AS UMC lens
1. 35mm full frame image size.
2. It compensates for optical aberrations using a high performance aspherical glass
lens.
3. In the fully open position it produces a high resolution and high contrast at the
center of the lens, as well as around the periphery.
4. The UMC (Ultra Multi Coating) design suppresses flare and ghost images.
The T-S24mm F3.5 ED AS UMC lens is designed with its own mount, so you can take
photographs easily by mounting the lens directly onto the camera, without installing
an additional adaptor.
Read this manual carefully to familiarize yourself with your lens for correct use.
※ Please read the Safety Precautions at the back of this instruction manual prior to
use.
Please read this instruction manual prior to use.
1. Component Names
① Mount
② Shift scale
③ Shift locking knob
④ Tilt reference line
⑤ Tilt scale
⑥ Aperture ring
⑦ Focusing ring
⑧ Distance scale
⑨ Tilt locking knob
⑩ Tilt rotation lever
⑪ Mount rotation lever
⑫ Shift reference line
⑬ Shift knob
⑭ Tilt knob
Figure
2. Attaching and Detaching 4. Brightness Control
5. Tilt & Shift Adjustment
5-1. Tilt control
Canon Mount
Mirrorless Cameras (Canon M, Samsung NX, Sony E, Fujifilm X)
5-3. Lens rotation
5-2. Shift control
3. Focus Adjustment
6. Camera Settings
When attaching or detaching the T-S24mm F3.5 ED AS UMC lens, make sure that
the tilt scale and the shift scale are positioned at ‘0’ and are locked.
Failure to do so will make it difficult to attach a lens to the camera since the tilt or shift
part moves.
【
Attaching】
Hold the tilt area of the lens gently and align the lens mounting reference point or line
with the lens ring mount of the camera. Push the lens into the camera and gently
turn the lens in the attachment direction until it makes a clicking sound.
【
Detaching】
Hold the tilt area of the lens gently, press the lens release button on the camera, turn
the lens in the opposite direction to that for attaching, and pull it out.
You can set the desired brightness by turning the aperture ring when using the
T-S24mm F3.5 ED AS UMC lens. You can set the F stops from 3.5 to 22.
When using the tilt/shift function, vignetting or a slight color change may occur.
Vignetting is a phenomenon where the corners of the image darken. To reduce this,
close the aperture or compensate the exposure prior to shooting. Experience is
required when determining the correct exposure using the tilt/shift function. It is
recommended to test shoot until you feel comfortable with the exposure.
The tilt/shift unit controls the depth of field to the subject and the shooting area. This
lens compensates for image distortion and allows you to capture a variety of images
that were never possible with general lenses.
The
T-S24mm F3.5 ED AS UMC lens allows you to express the depth of field to the
subject in various ways using the tilt unit. It is recommended to use a tripod for
proper shooting.
Make sure to differentiate the knob for tilting. The tilting knob is black and the
locking knob is gray. Use the black knob to adjust the tilting and rotate the gray
knob in the L direction to hold it in place.
※ Caution
When you use the tilt function, make sure that you do not touch the sensitive parts
of the tilt unit.
Do not turn the knobs with excessive force. Doing so may damage the knobs.
The T-S24mm F3.5 ED AS UMC lens allows you to correct distortion of the subject
by using the shift unit. It is recommended to use a tripod for proper shooting.
Make sure to differentiate the knob for shifting.
You can adjust the focus by turning the focusing ring when using the T-S24mm F3.5
ED AS UMC lens, as it is a Manual Focus (MF) adjustment lens. When using the
tilt/shift function, you cannot check if the focus is correct using the distance scale of
the lens.
If you have a camera which allows you to view images through the viewfinder or to
capture a live view, check the focus while looking at an enlarged image. If you
change the tilt and shift values after setting the focus, the subject will be out of focus.
【
Nikon Mount】
① To change the focus from a subject that is far away to a subject that is close, turn
the focusing ring to the left (from ∞ to 0.2 m) and focus on the clearest subject by
using the indication signal on the camera or by checking visually.
② To change the focus from a subject that is close to a subject that is far away, turn
the focusing ring to the left (from 0.2 m to ∞) and focus on the clearest subject by
using the indication signal on the camera or by checking visually.
【
Sony α / Canon Mount】
① To change the focus from a subject that is far away to a subject that is close, turn
the focusing ring to the left (from 0.2 m to ∞) and focus on the clearest subject by
using the indication signal on the camera or by checking visually.
② To change the focus from a subject that is close to a subject that is far away, turn
the focusing ring to the left (from ∞ to 0.2 m) and focus on the clearest subject by
using the indication signal on the camera or by checking visually.
The shifting knob is black and the locking knob is gray. Use the black knob to adjust
the shifting and rotate the gray knob in the L direction to hold it in place.
The tilt/shift direction can be changed by turning the tilt/shift unit.
If you pull the mount rotation lever and the tilt rotation lever when the lens is
mounted on the camera, you can rotate the tilt/shift unit. 90° rotation is available for
the mount and tilt units. The lens is half secured at every 30 degrees
and fully
secured at 90 degrees. When rotation starts you can remove your hand from the
rotation unlocking knob, since the rotation will continue.
If the lens is secured at 90 degrees, press the knob and turn it.
Please note that there is a danger of pinching your finger in the locking lever when
you rotate the tilt/shift unit quickly.
Some cameras require special settings when using this lens.
1) Set the camera mode dial to M.
2) Adjust the shutter speed to achieve the appropriate exposure for the
brightness.
2) Set the focusing lever of the camera to MF.
1) Set the camera mode dial to M.
2) Set the focus adjustment lever of the camera to MF.
3) Adjust the shutter speed to achieve the appropriate exposure for the
brightness by turning the dial.
The diaphragm of the T-S24mm F3.5 ED AS UMC Canon mount is not compatible
with the camera. If the brightness is set to F8 or above, you may not be able to set
the correct focus due to a difficulty in viewing the subject through the camera
viewfinder. Turn the aperture ring so it is fully open when attaching the lens to the
camera, and then set the depth of field and brightness you want prior to shooting.
【 Samsung NX Mount 】
1) Set the camera mode dial to M.
2) Adjust the shutter speed by turning the dial to achieve the appropriate exposure
for the brightness.
【 Sony E Mount 】
1) Set the camera mode dial to M.
2) Adjust the shutter speed by turning the dial to achieve the appropriate exposure
for the brightness.
【 Four Thirds 】
1) Hold down the MODE button and turn the dial until it is set to M. (shooting
conditions)
MODE + control dial ▶ M mode setting (manual shooting)
2) Hold down the AF button and turn the dial until it is set to MF. (Focusing)
AF + control dial ▶ MF setting (manual focusing)
3) Adjust the shutter speed to achieve the appropriate exposure for the brightness
by turning the dial.
2) Press the MENU/OK button, and select ON at 'Shooting without lens' in the
shooting menu.
(The procedures above are for the X-Pro1. The settings for the camera or the menu
may vary based on the camera model or due to a functional upgrade. Refer to the
camera instruction manual or contact the camera manufacturer for detailed
information.)
(The procedures above are for the Canon M. The settings for the camera or the
menu may vary
based on the camera model or due to a functional upgrade. Refer
to the camera instruction manual or contact the camera manufacturer for detailed
information.)
【 FUJIFILM X Mount 】
1) Set the focus mode to M.
The diaphragms of the T-S24mm F3.5 ED AS UMC Canon M, Fujifilm X, Samsung
NX and Sony E mounts are not compatible with the cameras.
If the brightness is set to F8 or above, you may not be able to set the correct focus
due to a difficulty in viewing the subject through the camera viewfinder. Turn the
aperture ring so it is fully open when attaching the lens to the camera, and then set
the depth of field and brightness you want prior to shooting.
【 Canon M Mount 】
1) Set the exposure to manual exposure (M) and change the focus mode to MF.
The diaphragm of the T-S24mm F3.5 ED AS UMC Nikon mount is not compatible
with the camera.
If the brightness is set to F8 or above, you may not be able to set the correct focus
due to a difficulty in viewing the subject through the camera viewfinder. Turn the
aperture ring so it is fully open when attaching the lens to the camera, and then set
the depth of field and brightness you want prior to shooting.
(The procedures above are for the D8000. The settings for the camera or the menu
may vary based on the camera model or due to a functional upgrade. Refer to the
camera manual or contact the camera manufacturer for detailed information.)
The diaphragm of the T-S24mm F3.5 ED
AS UMC Pentax (Samsung GX) K mount
is not compatible with the camera.
If the brightness is set to F8 or above, you may not be able to set the correct focus
due to a difficulty in viewing the subject through the camera viewfinder. Turn the
aperture ring so it is fully open when attaching the lens to the camera, and then set
the depth of field and brightness you want prior to shooting.
1) Set the mode dial of the camera to Av.
If the amount of shift is large, the lighting may be different at the top or bottom of the
image, or on the left or right of the image. Therefore it is recommended to reduce
the aperture value when shooting.
(The procedures above are for the α350. The settings for the camera or the menu
may vary based on the model or due to a functional upgrade. Refer to the camera
instruction manual or contact the camera manufacturer for detailed information.)
※ For some Canon cameras, if you set the camera mode dial to Av and set the
brightness by turning the aperture ring on the lens, the camera automatically
changes the shutter speed. You don't need to adjust the shutter speed as well,
which is required in M mode.
(The procedures above are for the 40D. The settings for the camera or the menu
may vary based on the model or due to a functional upgrade. Refer to the
camera
instruction manual or contact the camera manufacturer for detailed information.)
※ For some Samsung (NX) cameras, if you set the camera mode dial to A and set
the brightness by turning the aperture ring on the lens, the camera automatically
changes the shutter speed. Therefore you don't need to adjust the shutter speed
as well, which is required in M mode.
(The procedures above are for the NEX-200. The settings for the camera or the
menu may vary based on the model or due to a functional upgrade. Refer to the
camera manual or contact the camera manufacturer for detailed information.)
※ For some Olympus (MFT) and Panasonic (MFT) cameras, if you set the camera
mode dial to A and set the brightness by turning the aperture ring on the lens, the
camera automatically changes the shutter speed. Therefore you don't need to
adjust the shutter speed as well, which is required in M mode.
(The procedures above are for the E-P2. The settings for the camera or the menu
may vary based on the camera model or due to a functional upgrade. Refer to the
camera manual or contact the camera manufacturer for detailed information.)
※ For some Four Thirds cameras, if you set the camera mode dial to A and set the
brightness by turning the aperture ring on the lens, the camera automatically
changes the shutter speed. Therefore you don't need to adjust the shutter speed
as well, which is required in M mode.
(The procedures above are for the Olympus E-3. The settings for the camera or the
menu may vary based on the camera model or due to a functional upgrade. Refer
to the camera manual or contact the camera manufacturer for detailed information.)
【 Micro Four Thirds Mount 】
1) Set the camera mode dial to M.
※ For some Sony E cameras, if you set the camera mode dial to A and set the
brightness by turning the aperture ring on the lens, the camera automatically
changes the shutter speed. Therefore you don't need to adjust the shutter speed
as well, which is required in M mode.
(The procedures above are for the NEX-5. The settings for the camera or the menu
may vary based on the model or due to a functional upgrade. Refer to the camera
manual or contact the camera manufacturer for detailed information.)
Nikon Mount
Pentax (Samsung GX) K Mount
Sony (Minolta) α Mount
(The procedures above are for the K20D. The settings for the camera or the menu
may vary based on the model or due to a functional upgrade. Refer to the camera
instruction manual or contact the camera manufacturer for detailed information.)
The diaphragm of the T-S24mm F3.5 ED AS UMC Sony (Minolta) α mount is not
compatible with the camera.
If the brightness is set to F8 or above, you may not be able to set the correct focus
due to a difficulty in viewing the subject through the camera viewfinder. Turn the
aperture ring so it is fully open when attaching the lens to the camera, and then set
the depth of field and brightness you want prior to shooting.
Four Thirds, Micro Four Thirds Mount
WARNING! CAUTION!
The diaphragms of the T-S24mm F3.5 ED AS UMC Four Thirds and Micro Four
Thirds mounts are not compatible with the cameras. If the brightness is set to F8 or
above, you may not be able to set the correct focus due to a difficulty in viewing the
subject through the camera viewfinder. Turn the aperture ring so it is fully open
when attaching the lens to the camera, and then set the depth of field and
brightness you want prior to shooting.
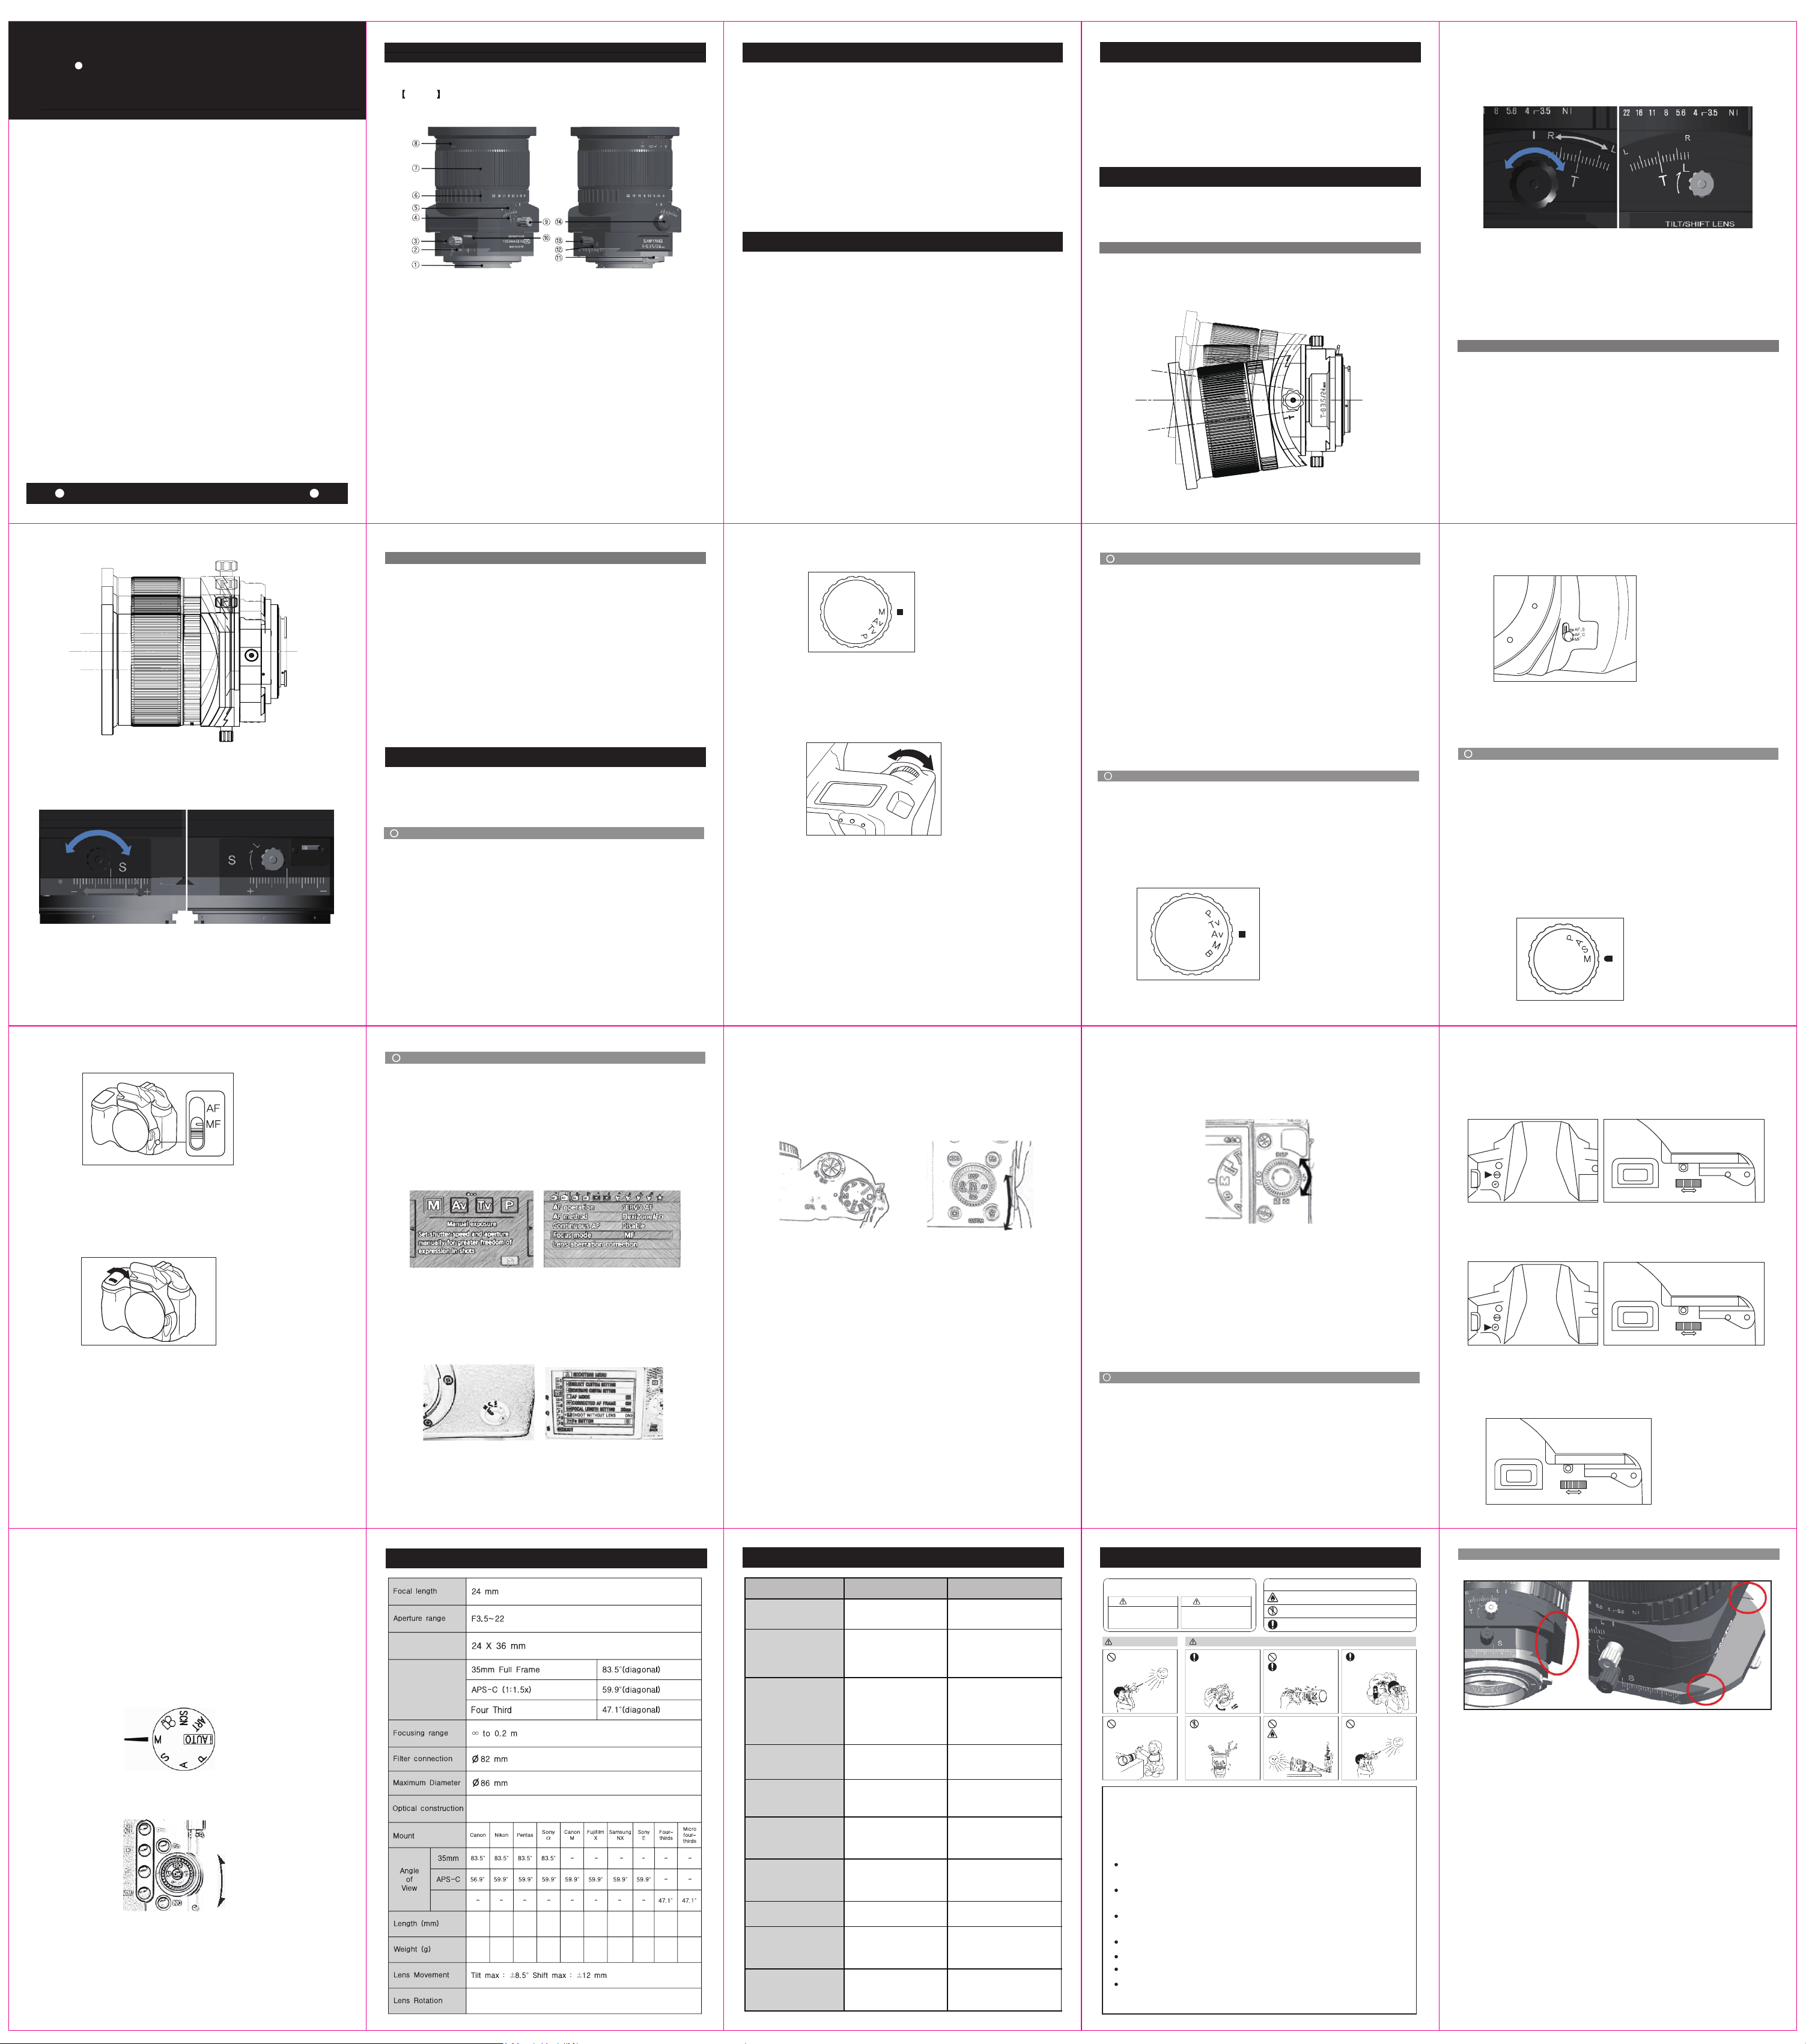
When using the tilt and shift functions, please be cautious and avoid
touching the sharp surfaces of the lens as shown above picture.
2) Adjust the shutter speed by turning the dial to achieve the appropriate exposure
for the brightness.
7. Specifications 8. Troubleshooting 9. Safety Precautions
Issue Causes Corrective Action
A lens cannot be attached to
the camera.
The attachment reference point on the
lens is not aligned with the lens
attachment reference point on the
camera.
Align the attachment reference point on
the lens with the lens attachment
reference point on the camera.
Automatic focusing does not
work properly.
A manual focusing lens has trouble
with automatic focusing.
Use the focusing ring to adjust the focus.
Dark or too bright pictures.
Inappropriate exposure
Adjust the aperture adjustment ring
accordingly.
Zoom failure.
This lens is a single lens.
This lens cannot be mounted
on other cameras.
This lens is designed for its own
mount.
Purchase the designated lens mount.
You want to attach our 2X or
1.4X converter lens.
Our converter is designed for the T
(M42 screw) mount only. Therefore it
cannot be used with this lens.
Use each company's own mount
converter. However, be aware that auto
focusing is unavailable.
The camera flash is not
functioning.
The manual control lens may not be
compatible, depending on the camera.
See the camera manual.
The camera finder indication
or the display does not
display.
This lens does not have an electric
contact signal, so there is no
communication with the camera
through electric signals.
No problem with shooting.
A lens cannot be detached
from the camera.
Incorrect rotation direction for
detaching the lens.
If you turn the lens while holding the
camera, it may cause damage to the
lens.
Press the lens release button on the
camera, and gently turn the lens to the
lens attaching/detaching reference points,
in the direction as marked on the camera,
and then pull the lens forward.
Blurry images
Incorrect focusing
Insufficient shutter speed or camera
shake.
Turn the focusing ring while checking the
indication or checking an object visually,
set the focus until it becomes clear, and
then press the shutter.
Steady the camera and take a photograph
at a shutter speed of 1/125 secs.
WARNING!
Do not wet this product or expose it to a moist environment. It may cause a
fire or electric shock.
CAUTION!
Do not use this product or store it close to devices that generate heat i.e.,
heaters, thermal regulators, stoves or stereo amplifiers.
Do not leave the lens in conditions where drastic temperature changes can
occur.
Do not touch the surface of the lens by hand, and avoid making contact with
sharp objects.
Avoid dropping the lens.
Do not soak the lens in water, and avoid water splashing onto the lens.
If there are foreign bodies on the lens, use a lens cleaning kit only.
If the lens hood is cut by the user, it may cause damage to the surface of the
lens, as the surface of the lens may make contact with the floor.
WARNING CAUTION
Don't look at the sun
through the lens. It may
cause blindness.
Attach the lens to the
camera correctly and
ensure the lens is held in place
properly; otherwise the lens may
not be removable, or may
become loose and cause an
accident.
Don't put excessive pressure
on the lens attached to the
camera; otherwise it may
cause damage to the lens or
to the camera mount. Be sure to
hold the lens when operating or
moving.
Ensure that the camera
operates properly by
checking the lens beforehand or by
test shooting for important events
such as a
wedding
ceremony
and an
overseas
trip.
Don't leave the lens within
reach of babies, as it may
cause injury to the baby if the
lens falls or is dropped.
Don't attempt to modify or
alter the lens. It may lead
to failure of the camera. Modified
or altered lenses may not be
repaired.
Don't leave the lens in
direct sunlight. It may
cause a fire, depending on
lenses that concentrate
light on
a close object.
Don't look at the sun
directly through a camera
with a lens attached. It may
cause damage to
one's eyesight.
Tick
WARNING
CAUTION
If this instruction is not
followed, it may cause death
or severe injury to the user.
If this instruction is not
followed, it may cause death
or severe injury to the user.
The following precautions are divided into two types
according to the level of danger.
The following pictograms are used in the below precautions:
Requires caution. Inside the pictogram it shows contents of precautions.
(It shows outbreak of fire in the pictogram on the left.)
Shows prohibition. Inside the pictogram it shows contents of prohibition.
(It shows prohibition of dismantling in the pictogram on the left.)
Shows instruction. Inside the pictogram it shows contents of instructions.
(It shows instruction of precaution in the pictogram on the left.)