Loading ...
Loading ...
Loading ...
21 GB
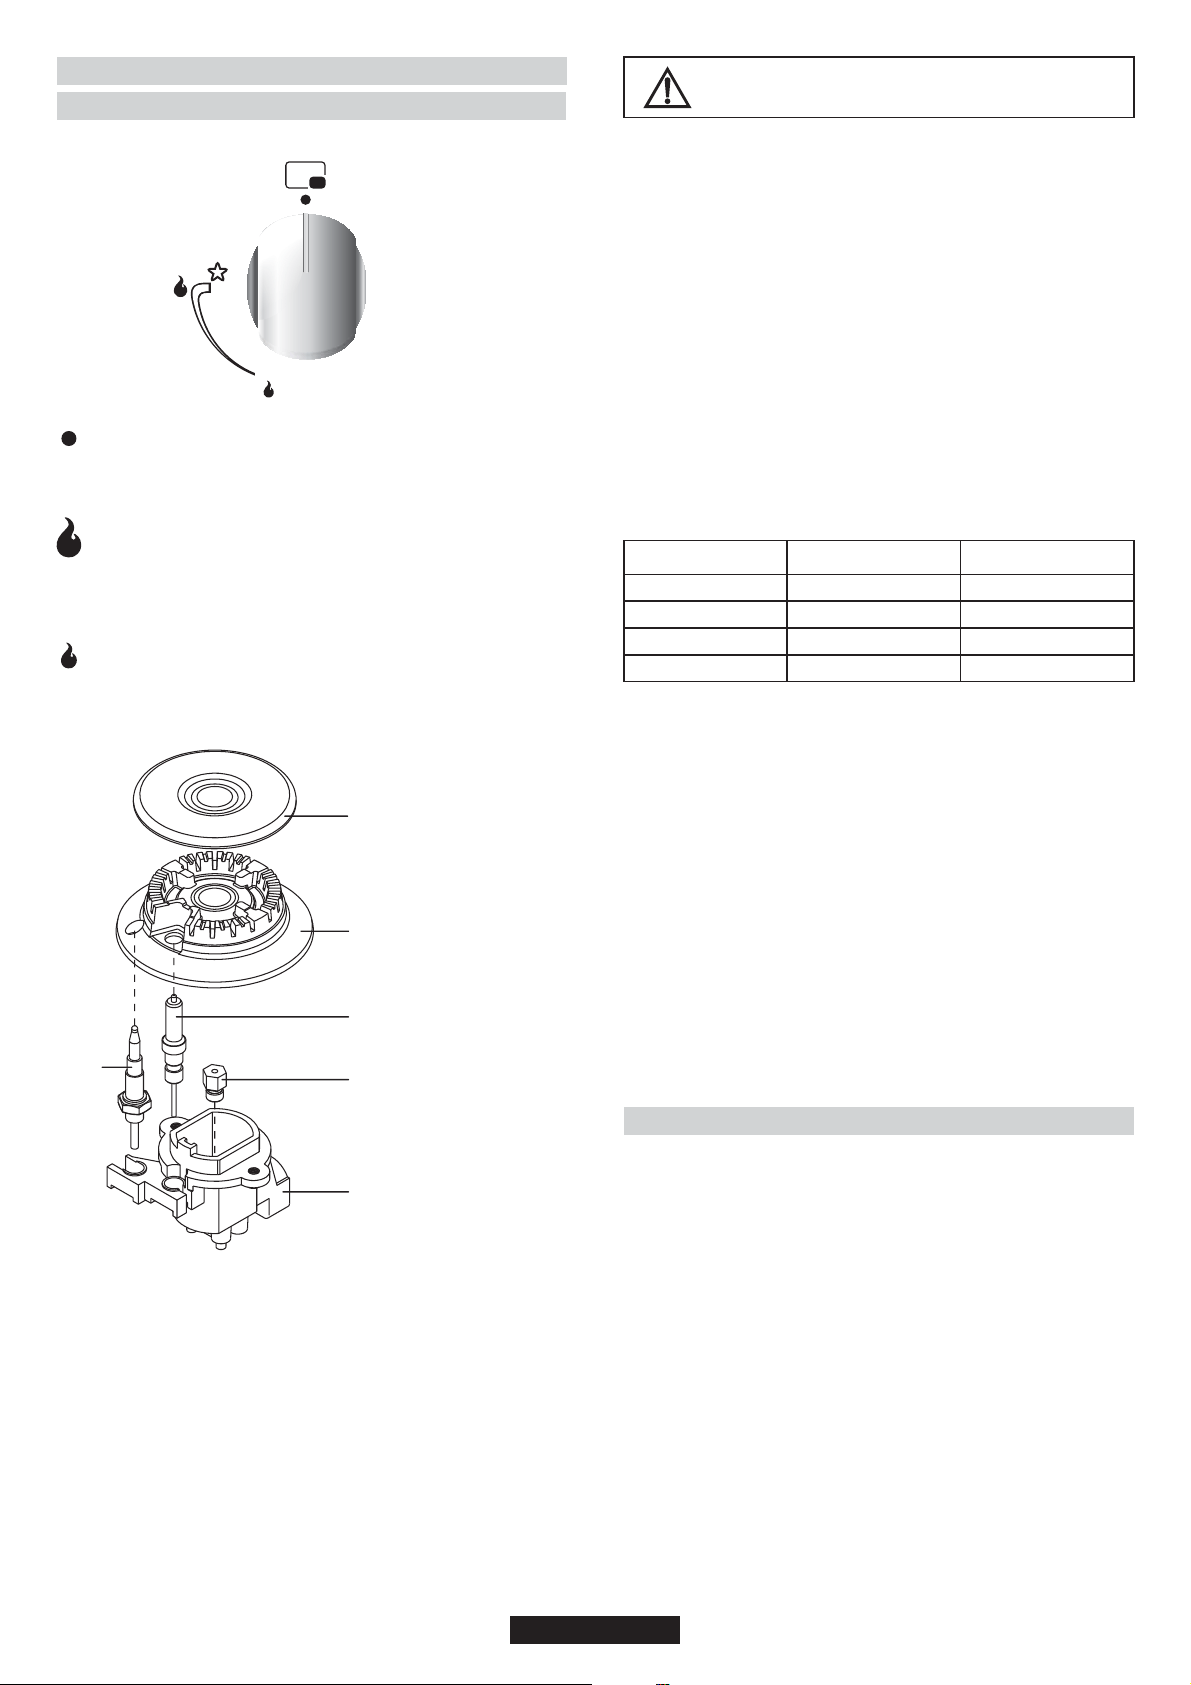
Off Position
When the knob is turned so that the 'dot' symbol faces towards
the panel, it is in the Off position and the gas valve is closed and
the flame will go out.
Maximum Gas Flow
Press the burner knob and turn it to the left till the 'dot' symbol
faces towards the large flame symbol.
The flame is on full at this position.
In this position, the gas valve is completely open.
Minimum Gas Flow
The flame can be decreased by turning the knob so that the 'dot'
symbol faces towards the small flame symbol. The valve will be
partially open and the burner will then be on low.
A - Burner Lid
B - Burner
C - Electrode
D - Injector ( Jet )
E - Burner body
F - Safety device
A
B
C
D
E
F
Figure 8
Make sure that the gas is actually burning after this
step! If there is no flame, repeat the procedure
After ignition, adjust the flame to the size required.
Manual ignition (if the electricity supply is not available)
Hold a flame (a match or a lit taper or a hand-operated gas lighter),
near the burner.
WARNING! to wait 1 minute between two ignition tentative.
Press and turn the knob of the burner you want to ignite as far as the
large flame symbol. If the burner does not catch fire at the first attempt,
try again pressing the knob a little longer. When the burner is lit, adjust
the flame to the required level.
If the burner does not light after several attempts, check the correct
position of the burner and its cap.
Turn the knob clockwise to the “O” position in order to close the gas
flow. If the burner accidentally stops burning, wait at least one minute
before attempting to relight it.
Some cookers have a flame safety device (see the picture above,
safety device F). If the flame goes out, the gas supply is automatically
cut off.
Minimum and maximum diameters of the cooking pan bases :
Burner
Auxiliary Burner
Semi Rapid Burner
Rapid Burner
Ultra rapid Burner
Min. Diameter [mm]
Ø 240 mm
Ø 180 mm
Ø 120 mm
Ø 240 mm
Max. Diameter [mm]
Ø 280 mm
Ø 240 mm
Ø 180 mm
Ø 280 mm
•The outer surface of the flame is hotter than the inner part. The tips of
the flames must touch the bottom of the pan. Flames extending
outside the pan cause unnecessary gas consumption.
•Gas burners, unlike the electrical hot plates, do not need flat
bottomed pans. Flames touching the base of the pan conduct the heat
completely.
•Although there is no need for special pans for gas burners, pans
made of thinner material conduct the heat faster than those in thicker
material.
•Some parts of the food may be heated while others remain cold due
to the uneven distribution of heat under the pan. Therefore,
continuous stirring of the food being cooked is necessary in the case
of thin-bottomed pans. Heat is more effectively and evenly distributed
with thick-based pans.
•Use of very small pans is not recommended. Wider, low-sided pans
are more suitable for more effective and quicker cooking than small,
deep pans.
•You cannot shorten cooking time by using a small pan over a large
burner. You will only waste gas in this way. However, a pan with a lid
will save energy.
Turn the knob to the position for the required temperature of the hot
plate. The indicator light of the hot plate will come on and the hot plate
will start to heat.
When cooking is completed, turn the knob to the “O” position. Do not
leave the hot plate turned on without a pan on it. The diameter and the
base of the pan you use is critical. The minimum diameter of the pan
base is 14 cm and the base should be flat.
Leave the hot plate to heat up for 5 minutes before placing a pan on it
the first time you use it. This will allow the heat resistant coating of the
plate to harden due to burning.
Use a wet cloth and detergent for cleaning the hot plates. Do not
remove food residues from the hot plates with a knife or any other
hard, sharp object.
Turn on the hot plate for a few moments to dry it after cleaning.
However, it must never be left on for more than a few moments without
a pan on top.
3.2. USE OF COOKTOP ELECTRICAL PLATES
Ignition of the Burners
Cooktop Gas Burners
The burner must be ignited before a pan is placed over it.
For models with automatic ignition, the 'spark' button must be pressed.
Press the knob controlling the burner you want to ignite and then turn it
left to the big flame symbol. Press the ignition button. On models with
ignition-thru knobs, press and turn the knob controlling the burner you
want to ignite as far as the star symbol; the electrode will be
automatically activated. All the electrodes will be activated
automatically and the burner to which gas is supplied (that relative to
the knob pressed) will ignite.
Oven Gas Burners
The button must not be kept pressed down for more than 15 sec. If the
burner has not ignited after 15 sec. release the button and open the
compartment door and/or wait at least 1min. before attempting again.
For other models the gas is ignited by means of the control knobs.
3. USE OF COOKTOP BURNERS
The knobs which control the burners are positioned on the control panel.
3.1. USE OF COOKTOP GAS BURNERS
Figure 7
Loading ...
Loading ...
Loading ...