Home
Bookmarks
Home
Gaggenau
Gaggenau VG232220CA User Manual
Page 2
Gaggenau VG232220CA Gas Cooktop
User Manual - Page 2
For VG232220CA.
PDF File Manual
,
8 pages
,
Read Online
|
Download pdf file
VG 232 220 CA
Important notes
: Risk of injury!
: Risk of gas escape!
Ensure sufficient air exchange in the room where the appliance is installed. Up to 11 kW total output:
Up to 18 kW total output:
Caution!
Installation accessories
Preparing the furniture
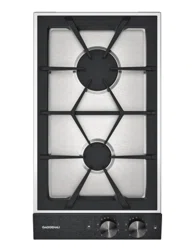
Fitting the appliance
1. Secure the appliance cover VD 200 020 (special accessory to be ordered separately) on the appliance before installation.
2. If the appliance is not being covered, seal the openings on the back of the appliance using the cover caps supplied.
3. Insert the appliance evenly into the cut-out. Push it down firmly into the cut-out.
Note
Removing the appliance
Caution!
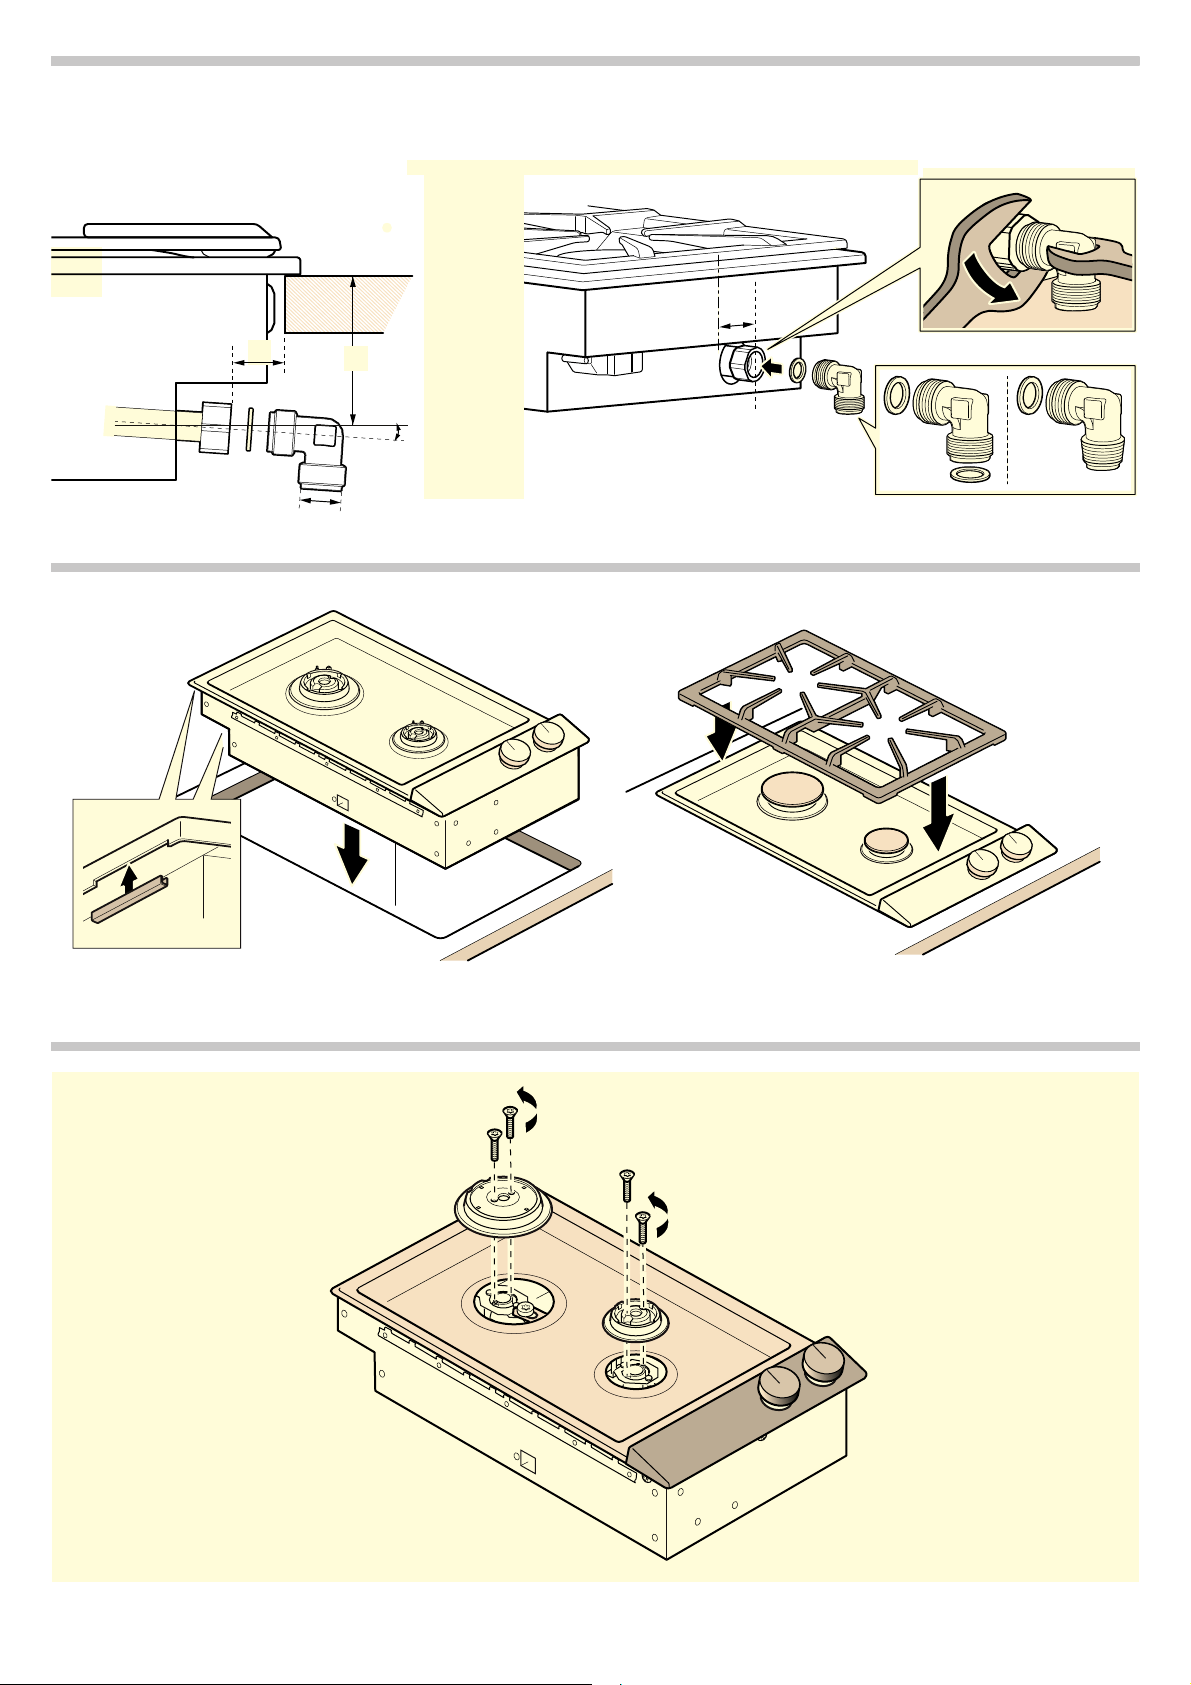
Gas connection
Electrical connection
Technical data
Changing the gas type
Replacing the main nozzles
1. Remove the pan support and all burner parts.
2. Undo the fastening screws on the burners (two screws on each burner). Lift the burners upwards and remove them.
3. Undo the earthing screw on the rear burner. Carefully lift the hob upwards and remove it.
4. Remove the control knobs.
5. Undo the fastening screws on the control panel. Remove the control panel and disconnect the connection cable on the back of the control panel.
6. Replace the nozzles. You can obtain a key from our after-sales service (order number 00424699). Take care not to break the nozzles when (un)screwing them.
7. Screw the new nozzles in as far as possible to obtain a tight seal.
: Risk of damage!
Assembly
1. Connect the connection cable on the back of the control panel. Put the control panel in place and screw it down evenly.
2. Attach the control knobs.
3. Put the hob in place and screw in the earthing screw on the rear burner.
4. Put the burners in place and screw them on, making sure that the seal is seated correctly.
5. Put the burner parts and pan support in place, making sure they are positioned correctly.
Note
ÿ 安裝說明
重要注意事項
: 受傷風險!
: 瓦斯外洩風險!
請確保電器安裝環境的通風條件。最大總輸出達11 kW:
最大總輸出達18 kW:
注意!
安裝配件
準備家具
安裝電器
1. 安裝前,請先固定不鏽鋼爐蓋VD 200 020(此特殊配件須另行 購買)。
2. 若電器未加蓋,請使用電器提供的蓋子封住後方開口。
3. 把電器水平放入開孔中。然後確實推入開孔。
提示
拆除電器
注意!
瓦斯連接
電源連接
技術規格
更換瓦斯類型
更換主要噴嘴
1. 移除爐架與所有燃燒器零件。
2. 拆下燃燒器上的固定螺絲(每個燃燒器兩個)。將燃燒器抬起並 拆下。
3. 拆下後燃燒器的接地螺絲。小心抬起爐盤並拆下。
4. 移除控制旋鈕。
5. 拆下控制面板燃燒器上的固定螺絲。移除控制面板並拔下控制面 板後方的連接線。
6. 更換噴嘴。您可以向我們的售後服務中心購買套筒扳鉗(訂購編 號00424699)。旋緊或鬆開噴嘴時請注意不要損壞嘴噴嘴。
7. 確實旋緊新噴嘴以保持氣密。
: 損壞風險!
組裝
1. 連接控制面板後方的連接線。將控制面板放回並平均地鎖入。
2. 裝上控制旋鈕。
3. 將爐盤放回並鎖上後燃燒器上的接地螺絲。
4. 將燃燒器放回並鎖上,確認密封環位置正確。
5. 將燃燒器零件和爐架裝回並確認位置正確。
提示
Page 2/8
Page 1
Page 2
Page 3
Page 4
Page 5
Page 6
Page 7
Page 8
Contents
Table of Contents
Search
Previous
Next
Bookmarks
Loading ...
ê
Loading ...
Loading ...
Loading ...
File type: PDF
File name: 73613032_vg232220ca.pdf
File size: 727.43 KB
File Language: English, Chinese
Pages: 8
Author: Gaggenau
File created: 2018-12-11
Published: 2021-06-11
Updated: 2023-08-27
Verified by
Shany D'Amore
on 2023-08-27
Download File
Table of Contents
×
VG 232 220 CA
1
Important notes
5
: Risk of injury!
5
: Risk of gas escape!
5
Ensure sufficient air exchange in the room where the appliance is installed. Up to 11 kW total output:
5
Up to 18 kW total output:
5
Caution!
5
Installation accessories
5
Preparing the furniture
5
Fitting the appliance
6
1. Secure the appliance cover VD 200 020 (special accessory to be ordered separately) on the appliance before installation.
6
2. If the appliance is not being covered, seal the openings on the back of the appliance using the cover caps supplied.
6
3. Insert the appliance evenly into the cut-out. Push it down firmly into the cut-out.
6
Note
6
Removing the appliance
6
Caution!
6
Gas connection
6
Electrical connection
6
Technical data
6
Changing the gas type
6
Replacing the main nozzles
6
1. Remove the pan support and all burner parts.
6
2. Undo the fastening screws on the burners (two screws on each burner). Lift the burners upwards and remove them.
6
3. Undo the earthing screw on the rear burner. Carefully lift the hob upwards and remove it.
6
4. Remove the control knobs.
6
5. Undo the fastening screws on the control panel. Remove the control panel and disconnect the connection cable on the back of the control panel.
6
6. Replace the nozzles. You can obtain a key from our after-sales service (order number 00424699). Take care not to break the nozzles when (un)screwing them.
6
7. Screw the new nozzles in as far as possible to obtain a tight seal.
6
: Risk of damage!
6
Assembly
6
1. Connect the connection cable on the back of the control panel. Put the control panel in place and screw it down evenly.
6
2. Attach the control knobs.
6
3. Put the hob in place and screw in the earthing screw on the rear burner.
6
4. Put the burners in place and screw them on, making sure that the seal is seated correctly.
6
5. Put the burner parts and pan support in place, making sure they are positioned correctly.
6
Note
6
ÿ 安裝說明
7
重要注意事項
7
: 受傷風險!
7
: 瓦斯外洩風險!
7
請確保電器安裝環境的通風條件。最大總輸出達11 kW:
7
最大總輸出達18 kW:
7
注意!
7
安裝配件
7
準備家具
7
安裝電器
7
1. 安裝前,請先固定不鏽鋼爐蓋VD 200 020(此特殊配件須另行 購買)。
7
2. 若電器未加蓋,請使用電器提供的蓋子封住後方開口。
7
3. 把電器水平放入開孔中。然後確實推入開孔。
7
提示
7
拆除電器
7
注意!
7
瓦斯連接
7
電源連接
7
技術規格
7
更換瓦斯類型
8
更換主要噴嘴
8
1. 移除爐架與所有燃燒器零件。
8
2. 拆下燃燒器上的固定螺絲(每個燃燒器兩個)。將燃燒器抬起並 拆下。
8
3. 拆下後燃燒器的接地螺絲。小心抬起爐盤並拆下。
8
4. 移除控制旋鈕。
8
5. 拆下控制面板燃燒器上的固定螺絲。移除控制面板並拔下控制面 板後方的連接線。
8
6. 更換噴嘴。您可以向我們的售後服務中心購買套筒扳鉗(訂購編 號00424699)。旋緊或鬆開噴嘴時請注意不要損壞嘴噴嘴。
8
7. 確實旋緊新噴嘴以保持氣密。
8
: 損壞風險!
8
組裝
8
1. 連接控制面板後方的連接線。將控制面板放回並平均地鎖入。
8
2. 裝上控制旋鈕。
8
3. 將爐盤放回並鎖上後燃燒器上的接地螺絲。
8
4. 將燃燒器放回並鎖上,確認密封環位置正確。
8
5. 將燃燒器零件和爐架裝回並確認位置正確。
8
提示
8
Search:
×
Search