Operating and installation instructions
Steam oven with microwave
To prevent the risk of accidents or damage to the appliance, it is
essential to read these instructions before it is installed and used for
the first time.
en-AU, NZ M.-Nr. 11 234 160

Contents
2
Warning and Safety instructions.......................................................................... 6
Caring for the environment ................................................................................ 18
Overview............................................................................................................... 19
Steam oven ........................................................................................................... 19
Accessories supplied ............................................................................................ 20
Controls................................................................................................................ 22
On/Off sensor........................................................................................................ 23
Display................................................................................................................... 23
Sensor controls ..................................................................................................... 23
Symbols................................................................................................................. 25
Operating principles............................................................................................ 26
Selecting a menu option ....................................................................................... 26
Changing a setting in a list .................................................................................... 26
Changing the setting with a segment bar ............................................................. 26
Selecting a function............................................................................................... 27
Entering numbers .................................................................................................. 27
Entering letters ...................................................................................................... 28
Activating MobileStart ........................................................................................... 28
Description of the functions............................................................................... 29
Steam cooking function ........................................................................................ 29
Water container ................................................................................................ 29
Temperature ..................................................................................................... 29
Duration............................................................................................................ 29
Noises............................................................................................................... 29
Heating-up phase............................................................................................. 30
Cooking phase ................................................................................................. 30
Steam reduction ............................................................................................... 30
Microwave power.................................................................................................. 31
How it works..................................................................................................... 31
Suitable crockery.............................................................................................. 31
Glass tray .............................................................................................................. 36
Oven interior lighting ............................................................................................. 36
Before using for the first time ............................................................................ 37
Miele@home.......................................................................................................... 37
Standard settings .................................................................................................. 38
Cleaning for the first time ...................................................................................... 39
Setting the correct boiling point for water............................................................. 40

Contents
3
Settings ................................................................................................................ 41
Settings overview .................................................................................................. 41
Opening the “Settings” menu................................................................................ 43
Language ........................................................................................................... 43
Time....................................................................................................................... 43
Date ....................................................................................................................... 44
Lighting.................................................................................................................. 44
Display................................................................................................................... 44
Volume................................................................................................................... 45
Units ...................................................................................................................... 45
Quick MW.............................................................................................................. 46
Popcorn................................................................................................................. 46
Keeping warm ....................................................................................................... 46
Steam reduction .................................................................................................... 47
Recommended temperatures................................................................................ 47
Recommended power levels................................................................................. 47
Water hardness ..................................................................................................... 48
Safety .................................................................................................................... 49
Miele@home.......................................................................................................... 50
Remote control...................................................................................................... 51
Activating MobileStart ...................................................................................... 51
Remote update...................................................................................................... 51
Software version.................................................................................................... 52
Showroom programme.......................................................................................... 52
Factory default....................................................................................................... 52
Minute minder...................................................................................................... 53
Main and sub-menus .......................................................................................... 55
Operation.............................................................................................................. 57
Changing values and settings for a cooking programme...................................... 58
Changing the temperature................................................................................ 59
Changing the microwave power level .............................................................. 59
Setting cooking durations ................................................................................ 60
Changing the set cooking durations ................................................................ 61
Deleting the set cooking durations................................................................... 62
Interrupting the cooking process for functions which use microwave power....... 62
Interrupting the cooking process for functions involving steam ........................... 63
Cancelling cooking................................................................................................ 64
Quick MW and Popcorn ...................................................................................... 65
Quick MW.............................................................................................................. 65
Popcorn................................................................................................................. 66

Contents
4
General notes on steam cooking ....................................................................... 67
The advantages of cooking with steam ................................................................ 67
Suitable containers................................................................................................ 67
Glass tray .............................................................................................................. 67
Shelf level .............................................................................................................. 68
Frozen.................................................................................................................... 68
Temperature .......................................................................................................... 68
Duration................................................................................................................. 68
Cooking with liquid................................................................................................ 68
Your own recipes................................................................................................... 68
Steam cooking..................................................................................................... 69
Eco Steam cooking ............................................................................................... 69
Notes on the cooking charts ................................................................................. 69
Vegetables............................................................................................................. 70
Fish........................................................................................................................ 73
Meat ...................................................................................................................... 76
Rice ....................................................................................................................... 78
Grains .................................................................................................................... 79
Pasta/Noodles....................................................................................................... 80
European dumplings ............................................................................................. 81
Dried pulses .......................................................................................................... 82
Hen's eggs ........................................................................................................... 84
Fruit ....................................................................................................................... 85
Sausages............................................................................................................... 85
Shellfish ................................................................................................................. 86
Mussels ................................................................................................................. 87
Menu cooking........................................................................................................ 88
Sous-vide (vacuum) cooking .............................................................................. 90
Other applications ............................................................................................... 98
Reheat with steam................................................................................................. 98
Defrost with steam .............................................................................................. 101
Blanch ................................................................................................................. 104
Bottling ................................................................................................................ 104
Disinfect items .................................................................................................... 107
Prove yeast dough .............................................................................................. 107
Heat damp towels ............................................................................................... 108
Dissolve gelatine ................................................................................................. 108
Decrystallise honey ............................................................................................. 109
Melt chocolate..................................................................................................... 109
Make yoghurt ...................................................................................................... 110
Render fat............................................................................................................ 111

Contents
5
Sweat onions....................................................................................................... 111
Extracting juice.................................................................................................... 112
Skinning fruit and vegetables.............................................................................. 113
Preserving apples ............................................................................................... 113
Preparing custard royale ..................................................................................... 113
Rapid steam cooking ........................................................................................ 114
Cooking new potatoes (firm) ............................................................................... 115
Cooking rice ........................................................................................................ 116
Microwave defrosting and reheating............................................................... 117
Defrost................................................................................................................. 118
Reheat ................................................................................................................. 122
Automatic programmes .................................................................................... 127
Categories ........................................................................................................... 127
Using Automatic programmes............................................................................. 127
User programmes.............................................................................................. 128
Cleaning and care ............................................................................................. 131
Cleaning the steam oven front ............................................................................ 132
Cleaning the oven compartment......................................................................... 132
Cleaning the water container .............................................................................. 133
Accessories ........................................................................................................ 133
Cleaning the shelf runners................................................................................... 134
Maintenance........................................................................................................ 134
Descaling the steam oven .............................................................................. 134
Soak ............................................................................................................... 135
Problem solving guide ...................................................................................... 136
Optional accessories ........................................................................................ 141
Service................................................................................................................ 142
Contact in case of fault ....................................................................................... 142
Warranty .............................................................................................................. 142
Installation.......................................................................................................... 143
Safety instructions for installation ....................................................................... 143
Building-in dimensions........................................................................................ 144
Installation in a tall unit................................................................................... 144
Installation in a base unit................................................................................ 145
Side view ........................................................................................................ 146
Connection and ventilation............................................................................. 147
Installing the steam oven..................................................................................... 148
Electrical connection ........................................................................................... 149

Warning and Safety instructions
6
The steam oven with microwave is referred to in the following instructions as
steam oven.
This appliance complies with all current local and national safety
requirements. However, inappropriate use can lead to personal
injury and damage to property.
Please read these operating and installation instructions carefully
before using the steam oven for the first time. They contain
important information on safety, installation, use and maintenance
of the appliance. This prevents both personal injury and damage to
the steam oven.
In accordance with standard IEC60335-1, Miele expressly and
strongly advises that you read and follow the instructions in
“Installation”, as well as in the “Warning and Safety instructions”.
Miele cannot be held liable for injury or damage caused by non-
compliance with these instructions.
Keep these instructions in a safe place and pass them on to any
future owner.

Warning and Safety instructions
7
Correct application
This steam oven is designed for domestic use and for use in
similar environments by guests in hotel or motel rooms, bed &
breakfasts and other typical living quarters. This does not include
common/shared facilities or commercial facilities within hotels,
motels or bed & breakfasts.
The steam oven is not suitable for outdoor use.
The steam oven is intended only to steam, defrost, reheat and
cook food.
Any other use is not permitted.
Fire hazard due to flammable materials.
If flammable items were dried using microwave power, the moisture
in the items would evaporate. This could cause the materials to dry
out and possibly self-ignite.
Never use the steam oven to store or dry items which could ignite
easily.
This appliance is not intended for use by persons (including
children) with reduced physical, sensory or mental capabilities, or
lack of experience and knowledge, unless they have been given
supervision or instruction concerning its use by a person responsible
for their safety, and are able to recognise the dangers of misuse.
The oven compartment is equipped with special lamps to cope
with particular conditions (e.g. temperature, moisture, chemical
resistance, abrasion resistance and vibration). These special lamps
must only be used for the purpose for which they are intended. They
are not suitable for room lighting. Replacement lamps may only be
fitted by a Miele authorised technician or by Miele.

Warning and Safety instructions
8
Safety with children
Activate the system lock to ensure that children cannot switch on
the steam oven inadvertently.
Young children must not be allowed to use this appliance.
Older children may only use the appliance if its operation has
been clearly explained to them and they are able to use it safely.
They must be able to understand and recognise the possible
dangers caused by incorrect operation.
Cleaning may only be carried out by older children under the
supervision of an adult.
Please supervise children in the vicinity of the steam oven and do
not let them play with it.
Risk of suffocation from packaging material. Whilst playing,
children may become entangled in packaging material (such as
plastic wrapping) or pull it over their head with the risk of suffocation.
Keep packaging material away from children.
Risk of injury caused by hot surfaces and steam. Children's skin is
far more sensitive to high temperatures than that of adults. During
operation, steam will escape out of the ventilation outlet. The door
glass and control panel of the steam oven heat up.
Do not let children touch the steam oven when it is in operation.
Keep children well away from the steam oven until it has cooled
down and there is no danger of injury.
Risk of injury from the open door. The oven door can support a
maximum weight of 8kg. Children could injure themselves on an
open door.
Do not let children sit on the open door, lean against it or swing on it.

Warning and Safety instructions
9
Technical safety
Unauthorised installation, maintenance and repairs (including
removal of any cover) can cause considerable danger for the user.
Installation, maintenance and repairs must only be carried out by a
Miele authorised technician.
Radiation by microwaves:
Service or repairs which necessitate the removal of any casing or the
door must only be carried out by a suitably trained service
technician.
A damaged appliance is dangerous. Check the appliance for any
visible damage. Never install or attempt to use a damaged
appliance.
Check the door and door seal for any sign of damage. If any
damage is noticed, the oven should not be used again in any oven
function using microwave power until the fault has been rectified by
a service technician.
Operating a damaged appliance can result in microwave leakage
and present a hazard to the user. Do not use the steam oven if:
– the door is warped,
– the front of the oven compartment is dented or bowed,
– the door hinges are loose,
– holes or cracks are visible in the casing, the door, the door seal or
the oven interior walls,
– there is moisture between the door panes.
Reliable and safe operation of this oven can only be assured if it
has been connected to the mains electricity supply.

Warning and Safety instructions
10
The electrical safety of this appliance can only be guaranteed
when continuity is complete between it and an effective earthing
system. It is most important that this basic safety requirement is
present and tested regularly and, where there is any doubt, the
household wiring system should be inspected by a qualified
electrician.
Before connecting the appliance to the mains supply, ensure that
the connection data on the data plate (voltage and frequency)
matches the mains electricity supply. This data must correspond in
order to avoid the risk of damage to the appliance. Consult a
qualified electrician if in any doubt.
Do not connect the appliance to the mains electricity supply by a
multi-socket adapter or an extension lead. These do not guarantee
the required safety of the appliance (e.g. danger of overheating).
For safety reasons, this appliance may only be used after it has
been built in.
This appliance must not be installed and operated in mobile
installations (e.g. on a ship).
Tampering with electrical connections or components and
mechanical parts is highly dangerous to the user and can cause
operational faults. Do not open the outer casing of the appliance.
The manufacturer's warranty will be invalidated if the appliance is
not repaired by a Miele approved service technician.
Faulty components must only be replaced by genuine Miele spare
parts. The manufacturer can only guarantee the safety of the
appliance when Miele replacement parts are used.
If the plug has been removed or the connection cable is not
supplied with a plug, the steam oven must be connected to the
mains supply by a suitably qualified electrician.

Warning and Safety instructions
11
If the mains connection cable is damaged, it must be replaced
with a special mains connection cable (see “Installation – Electrical
connection”).
During installation, maintenance and repair work, the appliance
must be disconnected from the mains electricity supply. It is only
completely isolated from the electricity supply when:
– it is switched off at the mains circuit breaker, or
– it is switched off at the wall socket and the plug is withdrawn from
the socket. Do not pull the mains connection cable but the mains
plug to disconnect your appliance from the mains electricity
supply.
If the steam oven is installed behind a furniture front (e.g. a door),
do not close the furniture front while the steam oven is in use. Heat
and moisture can build up behind a closed furniture door. This can
result in damage to the steam oven, the housing unit and the floor.
Leave the furniture door open until the steam oven has cooled down
completely.
In areas which may be subject to infestation by cockroaches or
other vermin, pay particular attention to keeping the appliance and
its surroundings clean at all times. Any damage caused by
cockroaches or other vermin will not be covered by the warranty.

Warning and Safety instructions
12
Correct use
Risk of injury caused by hot surfaces and steam. The steam oven
gets hot during operation. You could burn yourself on the oven
compartment, shelf runners, accessories, food or steam.
Wear oven gloves when placing food in the oven or removing it, and
when adjusting oven shelves etc. in a hot oven.
Risk of injury caused by hot food.
Food may spill or splash around when placing it into the oven or
removing it. The food can cause burns.
When placing cooking containers in the oven or removing them,
make sure that the hot food does not spill.
Risk of injury due to hot water.
At the end of a cooking programme, hot water left in the steam
generator is pumped back into the water container. Take care not to
tip the water container when taking it out of the appliance.
Do not use the steam oven to heat up or bottle food in sealed tins.
Pressure will build up inside them and they can explode causing
damage to the appliance, as well as the risk of injury and scalding.
Plastic dishes which are not heat-resistant and steam-resistant
melt at high temperatures and can damage the appliance.
Use only heat-resistant (to 100°C) and steam-resistant plastic
dishes for steam cooking. Follow the manufacturer’s instructions.
Food which is left in the oven compartment can dry out and the
moisture released can lead to corrosion damage in the steam oven.
Do not leave food in the oven compartment and do not use any
cooking containers which are susceptible to corrosion.
Risk of injury from the open door. You could bang into the open
door or trip over it. Avoid leaving the door open unnecessarily.

Warning and Safety instructions
13
The door can support a maximum load of 8kg. Do not sit on or
lean against an open door, and do not place heavy objects on it.
Also make sure that nothing can get trapped between the door and
the oven compartment. The steam oven could get damaged.
When using a small electrical appliance, e.g. a hand-held blender,
near the steam oven, care should be taken that the cable of the
appliance cannot get trapped by the steam oven door. The insulation
on the cable could become damaged, giving rise to an electric shock
hazard.
Microwave function
Please be aware that durations when using microwave power are
often considerably shorter when cooking, reheating and defrosting
than when using functions without microwave power. Excessively
long cooking times can lead to food drying out and burning or could
even cause it to catch fire.
The Microwave function is used to reheat food and
beverages. Do not use the Microwave function for drying
flowers, herbs, bread or other flammable materials which could
catch fire and cause injury by burning.
It is important that the temperature in the food being cooked is
evenly distributed and sufficiently high.
This can be achieved by stirring or turning the food, and observing a
sufficiently long standing time (see charts), which should be added
to the time needed for reheating, defrosting or cooking.
During the standing time, the temperature is distributed evenly in the
food.

Warning and Safety instructions
14
Risk of injury caused by hot food. When heating food up, the heat
is created directly in the food itself. For this reason, the crockery will
remain cooler than the food (except when using ovenproof
stoneware). The crockery is only warmed by the heat of the food.
Before serving, always check the temperature of the actual food
itself after taking it out of the oven. The temperature of the container
is not an indication of the temperature of the food or liquid in it. This
is particularly important when heating food for babies, children,
and the elderly or infirm. After reheating food, especially food for
babies and small children, stir the food or shake the container and
check that the temperature does not pose any danger of burning.
Double check after it has been left to stand.
The Microwave function is not suitable for cleaning or
disinfecting items because it may involve high temperatures. There is
a risk of burning when items are removed from the oven.
Risk of injury from increased pressure in sealed containers or
bottles. Pressure can build up when reheating food or drinks in
sealed containers, jars or bottles, which can cause them to explode.
Never cook or reheat food or liquids in sealed containers or bottles.
Open containers beforehand. In the case of baby bottles, the screw
top and teat must be removed.
When heating food, and in particular liquids, using the
Microwavefunction, the boiling point may be reached without
the production of typical bubbles. Liquids do not boil evenly
throughout. This boiling delay can result in the liquid boiling over
explosively. Take care when taking the container out of the oven, as
the hot liquid can cause severe scalding. Under certain
circumstances, the pressure can be so high that the door opens
automatically.
Stir liquids well before reheating or cooking. After heating, wait at
least 20seconds before removing the container from the oven. In
addition, a glass rod or similar item, if available, can be placed in the
container during heating.

Warning and Safety instructions
15
Eggs can be cooked without their shells using microwave power
only if the yolk membrane has been punctured several times first.
The pressure could otherwise cause the egg yolk to explode.
Eggs in their shells will explode if cooked with microwave power,
even after taking them out of the oven.
They can only be cooked in their shells using the Steam cooking
function or in an appropriate Automatic programme. Hard-boiled
eggs must not be reheated with microwave power either as they too
will explode, even after taking them out of the oven.
Food with a thick skin or peel, such as tomatoes, sausage,
potatoes and eggplants can burst when heated or cooked.
Pierce or score the skin of these types of food several times to allow
steam to escape.
Do not use the Microwave function to heat up cushions or
pads filled with cherry kernels, wheat grains, lavender or gel, such as
those used in aromatherapy. These pads can ignite when heated
even after they have been removed from the oven.
To avoid fuelling any flames, do not open the oven door if there is
smoke inside the steam oven. Interrupt the programme by switching
the steam oven off and disconnect it from the mains electricity
supply. Do not open the door until the smoke has dispersed.
Crockery and lids with hollow handles or knobs can collect
moisture in the hollow spaces. When the moisture evaporates,
pressure can build up and the item can explode. If the hollow recess
is sufficiently ventilated, the item can be used.
Do not use crockery with hollow knobs or handles when using the
Microwave function.

Warning and Safety instructions
16
Non-microwave safe plastic dishes can sustain damage or
damage the steam oven if used with the Microwave function and
microwave functions.
Do not use any containers or cutlery made from or containing metal,
aluminium foil, lead crystal glassware, temperature-sensitive plastics,
wooden utensils or cutlery, metal clips or plastic or paper covered
wire ties. Do not use bowls with milled rims, or plastic pots with the
foil lid only partially removed (see “Microwave operation - Suitable
containers for microwave use”).
Fire hazard due to containers made of flammable materials.
Plastic disposable containers must meet the requirements specified
for crockery in “Microwave operation - Suitable containers for
microwave use”.
Do not leave the steam oven unattended when heating or cooking
food in disposable containers made of plastic, paper or other
inflammable materials.
Heat-retaining bags usually contain a thin layer of aluminium foil
that reflects microwave radiation. Because of this, the paper
surrounding the aluminium foil can become so hot that it combusts.
Do not use heat-retaining packaging, such as bags for grilled
chicken, for warming food with functions that use microwave power.
If the steam oven is used without food or the food is loaded
incorrectly when using the Microwave function or functions that
use microwave power, the steam oven can become damaged. Do
not use the Microwave function or functions that use microwave
power to pre-heat crockery or to dry herbs. Never start the
Microwave function when the oven compartment is empty.

Warning and Safety instructions
17
Cleaning and care
Risk of injury due to electric shock. The steam from a steam
cleaning appliance could reach electrical components and cause a
short circuit. Never use a steam cleaner for cleaning.
Scratches on the door glass can result in the glass breaking.
Do not use abrasive cleaners, hard sponges, brushes or sharp metal
tools to clean the door glass.
The shelf runners can be removed (see “Cleaning and care –
Cleaning the shelf runners”).
Refit the shelf runners correctly.
The shelf runners fit into plastic bushes. Check the bushes
carefully for damage. If the bushes are damaged, do not use any
microwave functions until the bushes have been replaced.
Try to avoid the interior walls being splashed with food or liquids
containing salt. If it does happen, wipe these away thoroughly to
avoid corrosion on the stainless steel surface.
Accessories
Use only genuine original Miele spare parts. If spare parts or
accessories from other manufacturers are used, the warranty will be
invalidated, and Miele cannot accept liability.

Caring for the environment
18
Disposal of the packing
material
The transport and protective packaging
has been selected from materials which
are environmentally friendly for
disposal, and can normally be recycled.
Recycling the packaging reduces the
use of raw materials in the
manufacturing process and also
reduces the amount of waste in landfill
sites. Ensure that any plastic
wrappings, bags etc. are disposed of
safely and kept out of the reach of
babies and young children. Danger of
suffocation.
Disposing of your old
appliance
Electrical and electronic appliances
often contain valuable materials. They
also contain specific materials,
compounds and components, which
were essential for their correct function
and safety. These could be hazardous
to human health and to the environment
if disposed of with your domestic waste
or if handled incorrectly. Please do not,
therefore, dispose of your old appliance
with your household waste.
Please dispose of it at your local
community waste collection / recycling
centre for electrical and electronic
appliances. You are also responsible for
deleting any personal data that may be
stored on the appliance prior to
disposal. Please ensure that your old
appliance poses no risk to children
while being stored prior to disposal.
Overview
19
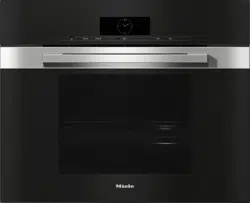
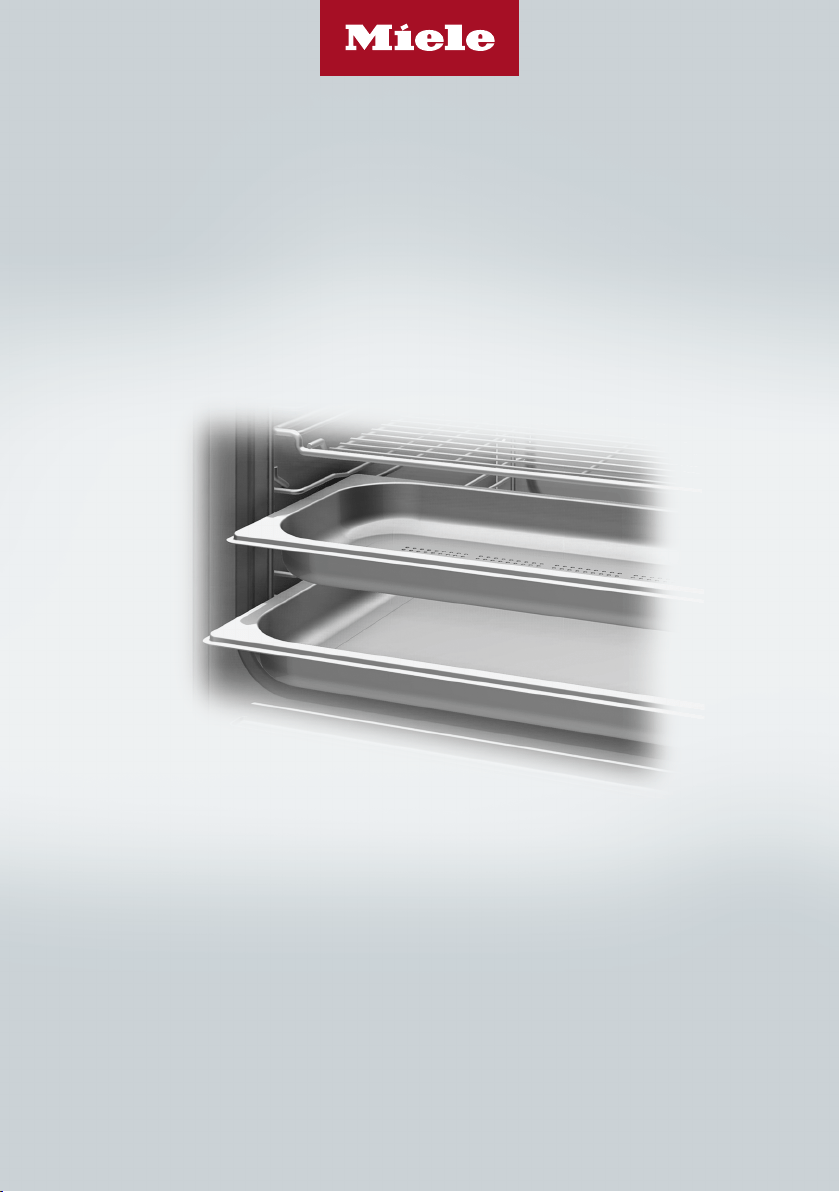
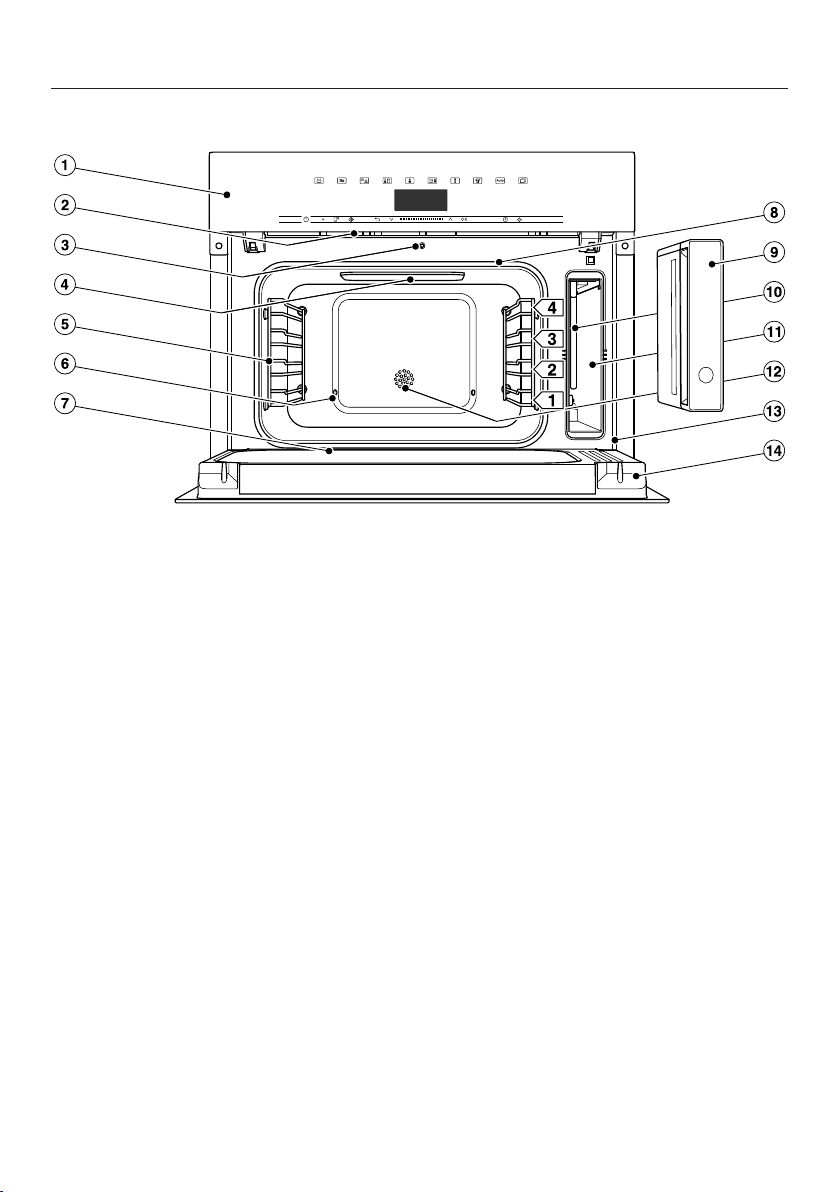
Steam oven
a
Control panel
b
Ventilation outlet
c
Automatic door release for steam reduction
d
LED oven interior lighting
e
Shelf runners with 4 shelf levels
f
Steam outlet
g
Drip channel
h
Door seal
i
Water container with removable spill guard
j
Suction tube
k
Compartment for water container
l
Temperature sensor
m
Front frame with data plate
n
Door

Overview
20
A list of the models described in these
operating and installation instructions
can be found on the back page.
Data plate
The data plate located on the front
frame of the oven is visible when the
door is open.
The data plate states the model
number, the serial number as well as
connection data (voltage, frequency
and maximum rated load).
Have this information available if you
need to contact Miele so that any
issues can be rectified as quickly as
possible.
Accessories supplied
The accessories supplied with your
appliance, as well as a range of optional
ones, are available to order from Miele
(see “Optional accessories”).
DMGS 1/1-30L
1 glass tray
The glass tray is suitable for use with all
cooking functions.
Use the glass tray to catch dripping
liquid when cooking with steam.
In the Microwave function, always
use the glass tray as a surface to place
containers on.
375x394x30mm (WxDxH)
The maximum load for the glass tray
is 8kg.
The glass tray can be damaged by
large temperature fluctuations.
Do not place the hot glass tray on a
cold surface, such as a tiled or
granite worktop. Use a suitable mat
or pot rest.
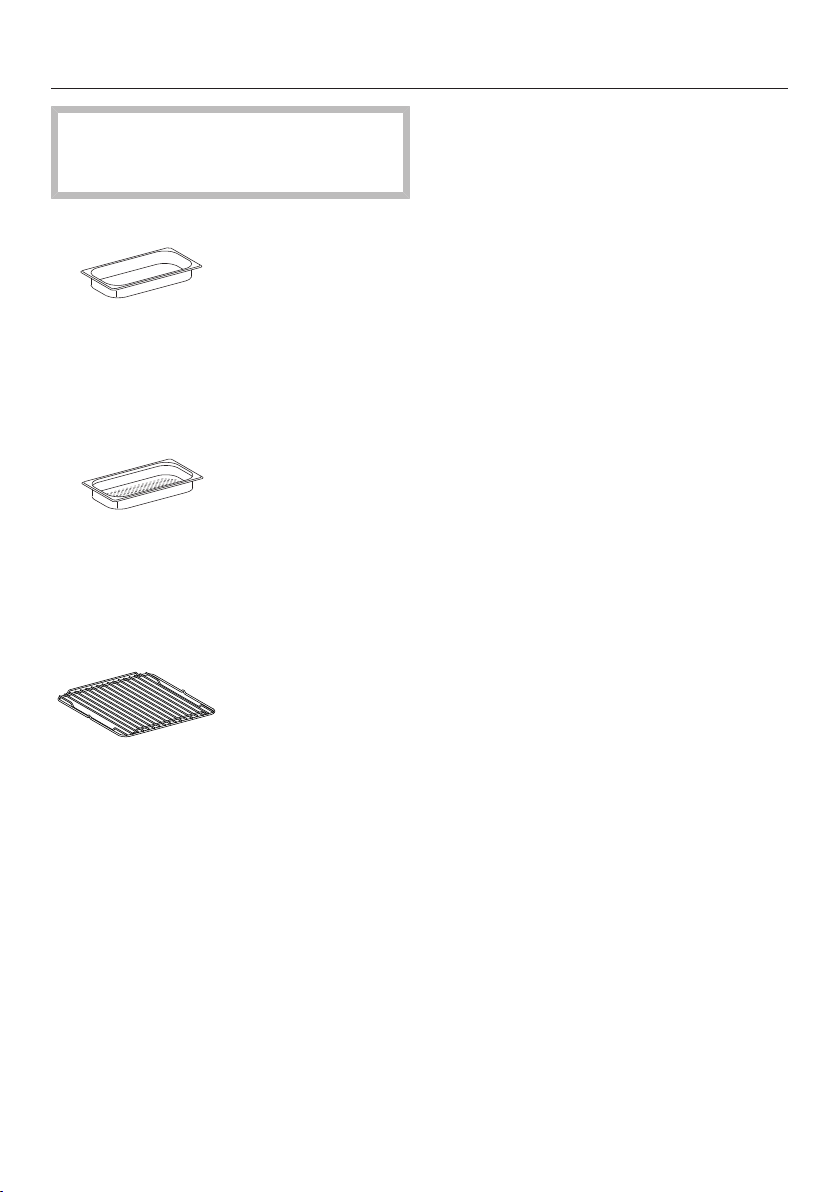
Overview
21
The cooking containers provided and
the rack are not suitable for use in
the Microwave function.
DGG 1/2-40L
1 solid cooking container
Gross capacity 2.2litres /
Useable capacity 1.6litres
375 x 197 x 40mm (W x D x H)
DGGL 1/2-40L
2 perforated cooking containers
Gross capacity 2.2litres /
Useable capacity 1.6litres
375x197x40mm (W x D x H)
DMSR 1/1L
1 rack for placing your own cooking
containers on
Descaling tablets
For descaling the appliance.
Miele steam oven cookbook
A selection of the best recipes from the
Miele test kitchen.
Miele cooking and reheating
cookbook
A selection of the best recipes from the
Miele test kitchen.

Controls
22
a
Recessed On/Off sensor
For switching the steam oven on and
off
b
Optical interface
(for Miele service technicians only)
c
sensor
For controlling the steam oven via
your mobile device
d
sensor
For starting the Quick MW function
e
Display
For displaying the time of day and
information on operation
f
sensor
For going back a step and for
changing menu options during a
cooking programme
g
Navigation area with andarrow
sensors
For scrolling through lists and for
changing values
h
OK sensor
For calling up functions and saving
settings
i
sensor
For setting a minute minder, the
cooking duration or the start or finish
time for the cooking programme
j
sensor
For switching the oven interior
lighting on and off
k
Sensor controls
For selecting functions, Automatic
programmes and settings

Controls
23
On/Off sensor
The On/Off sensor is recessed and
reacts to touch.
Use this sensor to switch the steam
oven on and off.
Display
The display is used for showing the
time of day or information about
functions, temperatures, cooking
durations, Automatic programmes and
settings.
After switching the steam oven on with
the On/Off sensor, Select functionwill
appear in the main menu.
Sensor controls
The sensors react to touch. Every touch
on the sensors is confirmed by a
keypad tone. This keyapd tone can be
switched off by selecting theVolume|
Keypad tone| Offsetting.
If you want the sensor controls to
respond even when the steam oven is
switched off, select the Display|
QuickTouch| Onsetting.
Sensor controls above the display
For information on the oven functions
and further functions, see “Main and
sub-menus”, “Settings”, “Automatic
programmes” and “Other applications”.

Controls
24
Sensor controls under the display
Sensor Function
If you want to control the steam oven from your mobile device,
you must have the Miele@home system, switch on the Remote
controlsetting and touch this sensor. The sensor then lights up
orange and the MobileStart function is available.
As long as this sensor is illuminated, you can control the steam
oven via your mobile device (see “Settings – Miele@home”).
Use this sensor to start the Quick MW function. The cooking
programme runs with the maximum power level (1000W) and a
cooking duration of 1minute (see “Quick MW”). Touching the
sensor control repeatedly increases the cooking duration in
increments.
This function can only be used when no other cooking
programmes are in use.
Depending on which menu you are in, this sensor control will
take you back a level or back to the main menu.
If a cooking programme is in progress at the same time, use this
sensor control to change values and settings such as the
temperature or cooking duration for the programme, or to cancel
the programme.
In the navigation area, use the arrow sensors or the area
between them to scroll up and down in the selection lists. The
menu options will be highlighted one after the other as you scroll
through them. The desired menu option must be highlighted
before you can select it.
You can change the values or settings that are highlighted by
using the arrow sensors or the area between them.

Controls
25
Sensor Function
OK Functions highlighted in the display can be selected by touching
the OKsensor. The selected function can then be changed.
Confirm withOK to save changes.
If information appears in the display, selectOK to confirm the
message.
If no cooking programme is in progress, you can use this sensor
to set a minute minder (e.g. when boiling eggs on the cooktop) at
any point.
While a cooking programme is in progress, you can set a minute
minder, the cooking duration and a start or finish time for the
programme.
Select this sensor to switch the oven interior lighting on and off.
Depending on the setting selected, the oven interior lighting
switches off after 15seconds or remains constantly switched on
or off.
Symbols
The following symbols may appear in the display:
Symbol Meaning
This symbol indicates that there is additional information and
advice about using the appliance. Select OK to confirm the
information.
Minute minder
A tick indicates the option which is currently selected.
Some settings, e.g. display brightness and signal tone volume,
are selected using a segment bar.
The system lock prevents the steam oven being switched on by
mistake (see “Settings – Safety”).

Operating principles
26
Use the and arrow sensors or the
area between them in the
navigation area to operate the steam
oven.
The OK sensor lights up orange as soon
as a value, setting or prompt needs to
be confirmed.
Selecting a menu option
Touch the or arrow sensor or
swipe to the right or left in the
area until the desired menu
option is highlighted.
Useful tip: If you press and hold the
arrow sensor, the list continues scrolling
automatically until you release the arrow
sensor.
Confirm your selection withOK.
Changing a setting in a list
Touch the or arrow sensor or
swipe to the right or left in the
area until you reach the
desired value or the desired setting is
highlighted.
Useful tip: A tick will appear beside
the current setting.
Confirm with OK.
The setting is now saved. This will take
you back to the previous menu.
Changing the setting with a
segment bar
Some settings are represented by a
bar with seven segments. If
all of the segments are illuminated, the
maximum value is selected.
If none or only one of the segments is
illuminated, the minimum value is
selected or the setting is switched off
altogether (e.g. volume).
Touch the or arrow sensor or
swipe to the right or left in the
area until you reach the
desired setting.
Confirm your selection withOK.
The setting is now saved. This will take
you back to the previous menu.

Operating principles
27
Selecting a function
The sensor controls for the functions
are located above the display (see
“Operation” and “Settings”).
Touch the sensor for the desired
function.
The sensor on the control panel will
light up orange.
Under Other, scroll through the
lists until the desired menu option is
highlighted.
Set the values for the cooking
programme.
Confirm with OK.
Changing the function
You can change to another function
during a cooking programme.
The sensor for the previously selected
function lights up orange.
Touch the sensor for the new
function.
SelectChange function?| Yes and
confirm withOK, if required.
The new function appears in the display
with its corresponding recommended
values.
The sensor for the new function lights
up orange.
Under Other, scroll through the
lists until you reach the desired menu
option.
Entering numbers
Numbers that can be changed are
highlighted.
Touch the or arrow sensor or
swipe to the right or left in the
area until the desired number
is highlighted.
Useful tip: If you press and hold an
arrow sensor, the numbers continue
scrolling automatically until you release
the arrow sensor.
Confirm with OK.
The changed number is now saved.
This will take you back to the previous
menu.

Operating principles
28
Entering letters
Letters are entered via the navigation
area. It is best to select short,
memorable names.
Touch the or arrow sensor or
swipe to the right or left in the
area until the desired
character is highlighted.
The character you have selected will
appear in the top line of the display.
Useful tip: A maximum of 10 characters
can be used.
You can delete the characters one at a
time with.
Select further characters.
Once you have entered the name,
select.
Confirm with OK.
The name is now saved.
Activating MobileStart
Select the sensor to activate
MobileStart.
The sensor lights up. You can
operate your steam oven remotely with
the Miele@mobile App.
Directly operating the steam oven via
the touch display takes priority over
operating it via the remote control
function on the App.
You can use MobileStart as long as
the sensor is lit up.

Description of the functions
29
Steam cooking function
Water container
The maximum filling volume is 1.5litres
and the minimum is 0.5litre. There are
markings on the water container. The
upper marking must never be
exceeded.
Water consumption depends on the
type of food and the cooking duration.
The water may need to be topped up
during cooking. Water consumption is
increased if the door is opened during
cooking.
The water container is removed using a
push/pull system: push gently on the
water container to remove it.
At the end of a cooking programme, hot
water left in the steam generator is
pumped back into the water container.
The water container must be emptied
after each use involving steam.
Temperature
Some functions are allocated with a
recommended temperature. The
recommended temperature can be
altered within the given range for an
individual cooking programme or
programme stage, or for every time that
programme is used You can alter the
recommended temperature in 5°C
increments, or 1°C increments in sous-
vide cooking (see “Settings –
Recommended temperatures”).
Duration
You can set the cooking duration from
1minute (00:01) to 10hours (10:00). If
the cooking duration exceeds
59minutes, you have to enter it in hours
and minutes. Example: Cooking
duration 80minutes = 1:20.
During steam cooking, the cooking
duration does not begin until the set
temperature is reached.
Noises
You will hear a pumping sound when
the appliance is switched on, during
use and after switching it off. This is the
sound of water being pumped through
the system and is quite normal.
When the steam oven is in use, you will
hear a fan noise.

Description of the functions
30
Heating-up phase
During the heating-up phase the display
will show Heating up and the
temperature in the oven compartment
as it rises.
The duration of the heating-up phase
with steam cooking will depend on the
quantity and temperature of the food. In
general, the heating-up phase will take
approx. 7minutes. It will be longer if
you are cooking refrigerated or frozen
food. The heating-up phase may also
take longer when cooking at lower
temperatures and when cooking with
the Sous-vide function.
Cooking phase
The cooking phase begins when the set
temperature is reached. During the
cooking phase, the duration remaining
will be shown in the display.
Steam reduction
If you are cooking at a temperature
above approx. 80°C, the steam oven
door will automatically open a little
shortly before the end of the cooking
duration to allow some of the steam to
escape. Steam reduction appears in the
display. The door will then close
automatically.
Steam reduction can be switched off
(see “Settings - Steam reduction”).
When steam reduction is switched off, a
large amount of steam will escape when
the door is opened.

Description of the functions
31
Microwave power
How it works
The steam oven contains a magnetron
that converts electrical energy into
electromagnetic waves (microwaves).
These microwaves are distributed
evenly throughout the oven
compartment and are reflected off the
metal appliance walls.
The microwaves penetrate the food
from all sides. Food consists of many
molecules. When subjected to
microwave energy, these molecules
(particularly the water molecules) start
to oscillate. This heats the food from
the outside to the inside. The more
water a food contains, the faster it is
heated or cooked.
Advantages of the microwave oven
– Food can generally be cooked with
little or no liquid or cooking oil.
– The times for defrosting, reheating or
cooking are shorter than with a
cooktop or oven.
Suitable crockery
In order for microwaves to reach the
food, they must be able to penetrate the
crockery being used. Microwaves can
pass through porcelain, glass,
cardboard and plastics, but not metal.
Therefore, do not use metal containers
or crockery that contains metal. Metal
reflects the microwaves which can
create sparks and the microwaves are
not absorbed by the metal.
Risk of injury from increased
pressure in sealed containers or
bottles.
Pressure can build up when
reheating food or drinks in sealed
containers, jars or bottles, which can
cause them to explode.
Never cook or reheat solid or liquid
food in sealed containers or bottles.
Open containers beforehand. In the
case of baby bottles, the screw top
and teat must be removed.
Fire hazard due to using
unsuitable crockery in the
Microwave function.
Non-microwave safe dishes used in
microwave mode can suffer damage
or cause damage to the steam oven.
Only use microwave safe crockery in
the Microwave function.
The material and shape of containers
used affect cooking results and times.
Heat distribution is more even in round
and oval shaped flat containers than in
rectangular containers, providing better
results.

Description of the functions
32
Suitable containers
Fire hazard due to inflammable
materials.
Disposable containers made out of
plastic, paper or other inflammable
materials can ignite, causing damage
to the steam oven.
Do not leave the steam oven
unattended when reheating or
cooking food in disposable
containers made of plastic, paper or
other inflammable materials.
You can use the following crockery and
material:
– Heat-resistant glass and ceramic
glass
Exception: crystal glass as it contains
lead and may crack.
– Porcelain
– Without metallic decoration
Metallic decoration (e.g. gold rims
or cobalt blue) can cause sparking.
– Without hollow knobs and handles
Moisture can gather in the hollow
knobs and handles. When the
moisture evaporates, pressure can
build up and the item can explode.
– Unpainted stoneware and stoneware
with underglaze paints
Risk of injury caused by hot
crockery.
Earthenware can get very hot and
may crack.
Wear oven gloves when using
stoneware.
– Plastic containers and plastic
disposable containers with the
Microwavefunction
Useful tip: To protect the environment,
avoid the use of disposable containers.
Plastic dishes and bags that are not
heat-resistant may deform and fuse
with the food inside.
Only use plastic containers or bags
that are heat-resistant. The plastic
containers and bags must be able to
withstand temperatures of at least
110°C.
– Microwave safe plastic containers
Special plastic containers designed
for use in microwave ovens are
available from retail outlets.
– Styrofoam containers
For briefly heating food.
– Plastic boiling bags
For cooking and reheating. They
should be pierced beforehand. The
holes allow the steam to escape. This
prevents a build-up of pressure from
forming and the bag from bursting.
There are also special bags available
for steam cooking which do not need
to be pierced. Please follow the
instructions given on the packet.
– Roasting bags and tubes
Please follow the manufacturer's
instructions.

Description of the functions
33
Fire hazard due to metal parts.
Metal parts such as metal clips or
plastic and paper ties that have wire
running through them can heat
inflammable materials until they burn.
Do not use metal clips, or plastic and
paper ties containing wire.
– The rack and cooking containers
supplied are only suitable for
cooking programmes in the Rapid
steam cooking function and in
functions that do not use microwave
power.
– Aluminium foil trays without lids for
defrosting and reheating ready meals
The food is only heated from the top.
If you remove the food from the
aluminium foil container and transfer
it to crockery suitable for use in a
microwave oven, the heat distribution
will generally be more even.
Using aluminium foil trays and
aluminium foil can cause crackling
and sparks.
Place aluminium foil trays on the
glass tray.
Aluminium foil and aluminium foil
trays must not touch the oven
compartment walls and must remain
at least 2cm from the walls at all
times.
– Metal meat skewers or clamps
The size of the cut of meat must be
much larger than the metal skewers
and clamps.
Unsuitable containers
Crockery and lids with hollow
handles or knobs can collect
moisture in the hollow spaces. When
the moisture evaporates, pressure
can build up and the item can
explode. If the hollow recess is
sufficiently ventilated, the item can
be used.
Do not use crockery with hollow
knobs or handles for cooking.
Do not use the following crockery and
material:
– Metal racks (including the supplied
rack) are not suitable for use with the
Microwavefunction.
– Containers made from metal and
stainless steel (including the cooking
containers supplied) are not suitable
for use with the Microwave
function.
– Aluminium foil
Exception: for even defrosting,
reheating or cooking unevenly
shaped cuts of meat, e.g. poultry,
small pieces of aluminium foil may be
used to cover thin parts for the last
few minutes of the programme.
– Metal clips, plastic or paper ties
containing wire
– Plastic containers where the
aluminium lid has not been
completely removed
– Crystal glass
– Cutlery and crockery with metallic
decoration (e.g. gold rims, cobalt
blue)

Description of the functions
34
– Crockery with hollow handles
– Plasticware made of melamine
Melamine absorbs microwave energy
and gets hot.
When purchasing plasticware, make
sure that it is suitable for use in a
microwave oven.
– Non-heat-resistant plastic containers
and bags
– Wooden dishes
Water contained in wood evaporates
during the cooking programme. This
causes the wood to dry and crack.
Placing a dish in the oven
Place the glass tray on shelf level1.
The dish containing the food should
be placed in the middle of the glass
tray.
Placing the food directly on the floor
of the oven would give unsatisfactory
and uneven results as the microwaves
would not be able to reach the food
from below.

Description of the functions
35
Cover
Useful tip: Covers are available from
retail outlets.
– A cover prevents too much steam
escaping, especially when cooking
foods which need longer to cook.
– It speeds up the heating process of
the food.
– It prevents food from drying out.
– It helps keep the oven interior clean.
Use a glass or plastic cover suitable
for microwave use for cooking
programmes with the
Microwavefunction.
Alternatively, use a cling film suitable
for use in a microwave oven. Heat can
cause normal cling film to distort and
fuse with the food.
The cover should not form a seal
with the container. If the container
has a narrow diameter, the steam
may not be able to escape. The
cover could get too hot and start to
melt.
Use containers with a sufficiently
large diameter.
Do not use a cover for reheating the
following types of food:
– Food coated in breadcrumbs
– Food that needs to be heated or
cooked using the Rapid steam
cooking function

Description of the functions
36
Glass tray
Functions/Applications involving steam:
When using perforated containers,
place the glass tray on shelf level1.
This collects any drops of liquid and
allows it to be removed easily.
The condensate cannot evaporate
properly if the glass tray is on the
floor of the steam oven.
Place the glass tray on shelf level1.
Microwave function:
Always use the glass tray on shelf
level1 as a surface to place containers
on.
Oven interior lighting
For energy saving reasons, the oven
interior lighting has been set at the
factory to go out after the programme
has begun.
If you want the lighting to remain on
during cooking, the relevant setting
needs to be changed (see “Settings -
Lighting”).
If the door is left open at the end of a
cooking programme, the oven lighting
will switch off automatically after
5minutes.
The lighting can be switched on for
15seconds by pressing the button
on the control panel.

Before using for the first time
37
Miele@home
Your steam oven is equipped with an
integrated Wi-Fi module.
In order to use it, you need:
– a Wi-Fi network
– the Miele@mobile App
– a Miele user account. The user
account can be created via the
Miele@mobile App.
The Miele@mobile App will guide you
as you connect your steam oven to your
home Wi-Fi network.
Once your steam oven is connected to
your Wi-Fi network, you can use the
App for a number of actions, including
the following:
– Call up information on the operating
status of your steam oven
– Retrieve information on cooking
processes that are in progress
– End cooking programmes that are in
progress
Connecting your steam oven to your
Wi-Fi network will increase energy
consumption, even when the steam
oven is switched off.
Make sure that the signal of your Wi-
Fi network is sufficiently strong in the
place where your steam oven is
installed.
Availability of the Wi-Fi connection
The Wi-Fi connection shares a
frequency range with other appliances
(including microwave ovens and remote
control toys). This may result in
sporadic or even complete connection
failures. Therefore, a constant
availability of featured functions cannot
be guaranteed.
Miele@home availability
The ability to use the Miele@mobile App
depends on the availability of the
Miele@home service in your country.
The Miele@home service is not
available in every country.
For information about availability,
please visit www.miele.com.
Miele@mobile App
You can download the Miele@mobile
App from the Apple App Store
®
or the
Google Play Store™ free of charge (only
functional in selected countries).

Before using for the first time
38
Standard settings
The following settings must be made
before starting up for the first time. You
can change these settings again at a
later time (see “Settings”).
Risk of injury caused by hot
surfaces.
The steam oven gets hot during
operation.
For safety reasons, the steam oven
may only be used when it has been
fully installed.
The steam oven will switch on
automatically when it is connected to
the electricity supply.
Setting the language
Select the language you want.
Confirm with OK.
If you have accidentally selected a
language that you don't understand,
proceed as described in “Settings –
Language”.
Setting the country
Select the country you want.
Confirm with OK.
Setting up Miele@home
Set up Miele@home appears in the
display.
To set up Miele@home immediately,
selectContinue and confirm withOK.
To set it up at a later date, selectSkip
and confirm withOK.
See “Settings – Miele@home” for
information on setting up at a later
date.
To set up Miele@home immediately,
select the desired connection
method.
You will then be guided by the display
and the Miele@mobile App.
Setting the date
Set the year, then the month, and
finally the day.
Confirm with OK.
Setting the time of day
Set the time of day in hours and
minutes.
Confirm with OK.

Before using for the first time
39
Setting the water hardness level
Contact your local water supplier to
find out your local water hardness
range if necessary.
See the “Settings - Water hardness”
for more information.
Set the water hardness level for your
area.
Confirm with OK.
Completing the commissioning
process
Follow any further instructions in the
display.
The appliance is now ready for use.
Cleaning for the first time
Remove any protective foil and
stickers, except the data plate, from
the oven and accessories.
The appliance has undergone a
function test in the factory. Residual
water from this testing may have
trickled back into the cabinet during
transportation.
Cleaning the water container
Remove the water container.
Remove the spill guard.
Rinse the water container by hand.
Cleaning the accessories/oven
compartment
Take all accessories out of the oven
compartment.
Wash the accessories in a mild
solution of washing-up liquid and hot
water or in the dishwasher.
The interior of the steam oven has
been treated at the factory with a
conditioning agent.
To remove this, clean the oven
interior with a mild solution of
washing-up liquid and warm water
applied with a soft sponge, and then
dry thoroughly with a soft cloth.

Before using for the first time
40
Setting the correct boiling
point for water
Before cooking food for the first time,
you must adjust the boiling temperature
of the water, which varies depending on
the altitude of where the steam oven is
located. This procedure also flushes out
the waterways.
This procedure must be carried out
to ensure efficient functioning of your
appliance.
Distilled or carbonated water or other
liquids could damage the steam
oven.
Only use cold, fresh tap water
(below 20°C).
Remove the water container and fill it
up to the maximum marker.
Push the water container into the
appliance.
Run the steam oven for 15minutes
using the Steam cooking function
(100°C). Proceed as described in
“Operation”.
Setting the correct boiling point for
water following a house move
If you move house, the boiling point for
the water in the steam oven will need to
be reset for the new altitude if this
differs from the old one by 300m or
more. To do this, descale the appliance
(see “Cleaning and care – Descaling the
steam oven”).

Settings
41
Settings overview
Menu option Available settings
Language ...| deutsch| english| ...
Country
Time Show
On*| Off| Night dimming
Clock format
12 h| 24 h*
Set
Date
Lighting On
On for 15 seconds*
Off
Display Brightness
*
QuickTouch
On| Off*
Volume Buzzer tones
Melodies *
Solo tone *
Keypad tone
*
Welcome melody
On*| Off
Units Weight
g*| lb/oz| lb
Temperature
°C*| °F
Quick MW Power level
Duration
Popcorn Duration
Keeping warm Steam cooking
On | Off *
Microwave
On | Off *
Steam reduction On*
Off
* Factory settings

Settings
42
Menu option Available settings
Recommended
temperatures
Recommended power
levels
Water hardness 1° dH| ...| 15° dH*| ...| 70° dH
Safety Sensor lock
On| Off*
System lock
On| Off*
Miele@home Activate| Deactivate
Connection status
Set up again
Reset
Set up
Remote control On*
Off
Remote update On*
Off
Software version
Showroom programme Demo mode
On| Off*
Factory default Appliance settings
User programmes
Rec. power levels
Recommended temps
* Factory settings

Settings
43
Opening the “Settings” menu
In the Other| Settings menu, you
can personalise your steam oven by
adapting the factory default settings to
suit your requirements.
Select Other.
Select Settings .
Select the desired setting.
You can check settings or change them.
Settings cannot be altered while a
cooking programme is in progress.
Language
You can set the language and the
country.
After selecting and confirming your
choice, the language you have selected
will appear in the display.
Useful tip: If you have selected the
wrong language by mistake, select the
sensor. Follow the symbol to get
back to the Language sub-menu.
Time
Show
Select how you want the time of day to
appear in the display when the steam
oven is switched off:
– On
The time is always visible in the
display.
If you also select the Display|
QuickTouch| On setting, all sensors
react to touch as normal.
If you also select the Display|
QuickTouch| Off setting, the steam
oven has to be switched on before it
can be used.
– Off
The display is dark to save energy.
The steam oven has to be switched
on before you can use it.
– Night dimming
To save energy, the time is only
visible in the display between
5:00am and 11:00pm. The display
remains dark at all other times.

Settings
44
Clock format
The time of day can be displayed in the
24 or 12-hour format (24 hor12 h).
Set
Set the hours and then the minutes.
If there is a power cut, the current time
of day will reappear once power has
been restored. The time of day is saved
for approx. 150hours.
If the steam oven has been connected
to a Wi-Fi network and signed into the
Miele@mobile App, the time will be
synchronised based on the country
setting in the Miele@mobile App.
Date
Set the date.
Lighting
– On
The oven interior lighting is switched
on during the entire cooking period.
– On for 15 seconds
The oven interior lighting switches off
15seconds after a cooking
programme has begun. Press the
sensor to switch the oven interior
lighting on again for 15seconds.
– Off
The oven interior lighting is switched
off. Press the sensor to switch on
the oven interior lighting for
15seconds.
Display
Brightness
The display brightness is represented
by a segment bar.
–
Maximum brightness
–
Minimum brightness
QuickTouch
Select how the sensors should respond
when the steam oven is switched off:
– On
If you have also selected the Time|
Show| On or Night dimming setting, the
sensors will also respond when the
steam oven is switched off.
– Off
Independently of the Time| Show
setting, the sensors only respond
when the steam oven is switched on,
as well as for a certain amount of
time after switching it off.

Settings
45
Volume
Buzzer tones
If buzzers are switched on, a buzzer will
sound when the set temperature is
reached and at the end of a set time.
Melodies
At the end of a process, a melody will
sound several times at intervals.
The volume of the melody is
represented by a segment bar.
–
Maximum volume
–
Melody is switched off
Solo tone
At the end of a process, a continuous
tone will sound for a period of time.
The pitch of this continuous tone is
represented by a segment bar.
–
Maximum pitch
–
Minimum pitch
Keypad tone
The volume of the tone that sounds
each time you touch a sensor is
represented by a segment bar.
–
Maximum volume
–
Keypad tone is switched off
Welcome melody
The melody that sounds when you
touch the On/Off sensor can be
switched on or off.
Units
Weight
For Automatic programmes, you can set
the weight of food in grams (g), pounds/
ounces (lb/oz) or pounds (lb).
Temperature
You can set the temperature in degrees
Celsius (°C) or degrees Fahrenheit (°F).

Settings
46
Quick MW
The maximum microwave power level
of 1000W and the maximum cooking
duration of 1minute are preset for
starting the microwave function
immediately.
– Power level
The following microwave power
levels can be selected: 80W, 150W,
300W, 450W, 600W, 850W or
1000W.
– Duration
The maximum cooking duration that
can be set depends on the
microwave power level selected:
80–300W: maximum 10minutes
450–1000W: maximum 5minutes
Popcorn
A microwave power level of 850W and
a cooking duration of 2:50minutes is
preset so that you can start cooking a
bag of microwave popcorn immediately.
These settings match the
manufacturer’s instructions on most
bags of microwave popcorn.
The maximum cooking duration that
can be set is 4minutes.
The microwave power level is set and
cannot be modified.
Keeping warm
Using the Keeping warm function, you
can keep food warm after cooking.
Food is kept warm at a preset
temperature or microwave power for a
maximum of 15 minutes. You can
cancel the keeping warm process by
opening the door or touching the
sensors.
Please note that delicate food,
especially fish, can continue cooking
whilst being kept warm.
Steam cooking
– On
The Keeping warmfunction is switched
on. If a temperature of at least 80°C
is selected, this function will switch
on after approx. 5minutes. The food
is kept warm using a temperature of
70°C.
– Off
The Keeping warmfunction is switched
off.
Microwave
– On
The Keeping warmfunction is switched
on. When a microwave power level of
at least 450W and a cooking
duration of at least 10minutes have
been selected, this function will
switch on after approx. 5minutes.
The food is kept warm with a
microwave power level of 150W.
– Off
The Keeping warmfunction is switched
off.

Settings
47
Steam reduction
– On
If you have cooked at a temperature
above approx. 80°C, the steam oven
door will automatically open a little
shortly before the end of the cooking
duration. This is to prevent a large
amount of steam escaping when the
door is opened. The door will then
close automatically.
– Off
If steam reduction is switched off, the
Keeping warm function is also
automatically switched off. When
steam reduction is switched off, a
large amount of steam will escape
when the door is opened.
Recommended temperatures
If you frequently cook with different
temperatures, it makes sense to change
the recommended temperatures.
After selecting this option, a list of oven
functions will appear in the display.
Select the function you want.
The recommended temperature will
appear together with the range within
which it can be changed.
Change the recommended
temperature.
Confirm with OK.
Recommended power levels
If you frequently cook with different
power levels, it makes sense to change
the recommended microwave power
levels.
You can change the recommended
power levels for the Microwave
function and for the Rapid steam
cooking function combining steam
cooking and microwave cooking.
After selecting this option, a list of
functions will appear in the display
together with their recommended
power levels.
– Microwave:
80W, 150W, 300W, 450W, 600W,
850W, 1000W
– Rapid steam cooking:
80W, 150W, 300W
Select the function you want.
Change the recommended power
level.
Confirm with OK.
Settings
48
Water hardness
To ensure that the steam oven works
correctly and to ensure that descaling is
carried out at the correct interval, it
must be set to the local water hardness
level. The harder the water is, the more
frequently the steam oven needs to be
descaled.
Contact your local water supplier to find
out your local water hardness range if
necessary.
If you are using bottled drinking water,
e.g. mineral water, use non-carbonated
water. Select settings according to the
calcium content. The calcium content is
given on the label of the bottle in mg/l
Ca
2+
or ppm (mg Ca
2+
/l).
The degree of hardness can be set
between 0.2mmol/l (1°dH) and
12.5mmol/l (70°dH). The hardness level
is set to 2.7mmol/l (15°dH) at the
factory.
Set the water hardness level for your
area.
Confirm with OK.
Water hardness Calcium content
mg/lCa
2+
or
ppm (mgCa
2+
/l)
Setting
°dH mmol/l
1 0.2 7 1
2 0.4 14 2
3 0.5 21 3
4 0.7 29 4
5 0.9 36 5
6 1.1 43 6
7 1.3 50 7
8 1.4 57 8
9 1.6 64 9
Water hardness Calcium content
mg/lCa
2+
or
ppm (mgCa
2+
/l)
Setting
°dH mmol/l
10 1.9 71 10
11 2.0 79 11
12 2.2 86 12
13 2.3 93 13
14 2.5 100 14
15 2.7 107 15
16 2.9 114 16
17 3.1 121 17
18 3.2 129 18
19 3.4 136 19
20 3.6 143 20
21 3.8 150 21
22 4.0 157 22
23 4.1 164 23
24 4.3 171 24
25 4.5 179 25
26 4.7 186 26
27 4.9 193 27
28 5.0 200 28
29 5.2 207 29
30 5.4 214 30
31 5.6 221 31
32 5.8 229 32
33 5.9 236 33
34 6.1 243 34
35 6.3 250 35
36 6.5 257 36
37-45 6.6-8.0 258–321 37-45
46-60 8.2-10.7 322–429 46-60
61-70 10.9-12.5 430-500 61-70

Settings
49
Safety
Sensor lock
The sensor lock prevents the cooking
programme being switched off by
mistake or settings being changed.
Apart from the On/Off sensor, the
activated sensor lock prevents the
sensors and fields in the display from
working a few seconds after a
programme has been started.
– On
The sensor lock is switched on.
Touch the OKsensor for at least
6seconds to deactivate the sensor
lock for a short period of time.
– Off
The sensor lock is deactivated. All
sensor controls react to touch as
normal.
If you want to switch off the oven with
the sensor lock activated, touch the
On/Off sensor until the oven
switches off.
System lock
The system lock prevents the appliance
being switched on by mistake.
The minute minder and the MobileStart
function can still be used when the
system lock is active.
The system lock will remain activated
even after a power failure.
– On
The system lock is switched on.
Before you can use the steam oven,
touch the OKsensor for at least
6seconds.
– Off
The system lock is deactivated. You
can use the steam oven as normal.

Settings
50
Miele@home
The steam oven is a Miele@home
compatible appliance. Your steam
oven is fitted ex-works with a Wi-Fi
communication module and is suitable
for wireless communication.
There are a number of ways of
connecting your steam oven to your Wi-
Fi network: We recommend connecting
your steam oven to your Wi-Fi network
with the help of the Miele@mobile App
or via WPS.
After installing the Miele@mobile App
on a mobile device, you can do the
following, depending on your appliance:
– Operate your appliance remotely
– Call up information on the operating
status of your appliance
– Call up information on the
programme sequence of your
appliance
– Set up a Miele@home network with
other Wi-Fi enabled Miele appliances
– Activate
This setting is only visible if
Miele@home is deactivated. The Wi-
Fi function is reactivated.
– Deactivate
This setting is only visible if
Miele@home is activated.
Miele@home remains set up, the Wi-
Fi function is switched off.
– Connection status
This setting is only visible if
Miele@home is activated. The display
shows information such as the Wi-Fi
reception quality, network name and
IP address.
– Set up again
This setting is only visible if a Wi-Fi
network has already been set up.
Reset the network settings and
immediately set up a new network
connection.
– Reset
This setting is only visible if a Wi-Fi
network has already been set up. The
Wi-Fi function is deactivated and the
Wi-Fi network will be reset to the
factory default. You must set up a
new connection to the Wi-Fi network
to be able to use Miele@home.
– Set up
This setting is only visible if there is
no existing Wi-Fi network. You must
set up a new connection to the Wi-Fi
network to be able to use
Miele@home.

Settings
51
Remote control
If you have installed the Miele@mobile
App on your mobile device, have
access to the Miele@home system and
have activated the remote control
function (On), you can use the
MobileStart function to retrieve
information on steam oven cooking
programmes currently in progress or to
end a programme in progress.
Activating MobileStart
Select the sensor to activate
MobileStart.
The sensor lights up. You can
operate your steam oven remotely with
the Miele@mobile App.
Directly operating the steam oven via
the touch display takes priority over
operating it via the remote control
function on the App.
You can use MobileStart as long as
the sensor is lit up.
Remote update
The Remote updatemenu option is only
displayed and can only be selected if
the requirements for using
Miele@home have been met (see
“Before using for the first time –
Miele@home” or “Settings”).
The RemoteUpdate function is used for
updating the software in your steam
oven. If an update is available for your
steam oven, it will automatically
download it. Updates will not be
installed automatically. They must be
initiated manually.
If you do not install an update, you can
continue to use your steam oven as
usual. However, Miele recommends
installing updates.
Switching on/Switching off
RemoteUpdate is switched on as
standard. Available updates will be
downloaded automatically and will only
be installed if you initiate it.
Switch off RemoteUpdate if you do not
wish any updates to be downloaded.

Settings
52
Running a RemoteUpdate
Information about the content and
scope of an update is provided in the
Miele@mobile App.
A message will appear in your steam
oven display if a software update is
available.
You can install the update immediately
or postpone this until later. When the
steam oven is switched on again, you
will be reminded about the update.
Switch RemoteUpdate off if you do not
wish to install updates.
The update can take several minutes.
Please note the following information
about the RemoteUpdate function:
– You will only receive a message when
an update is available.
– Once an update has been installed, it
cannot be undone.
– Do not switch the steam oven off
during the update. Otherwise, the
update will be aborted and will not be
installed.
– Some software updates can only be
carried out by a Miele service
technician.
Software version
The software version menu option is for
use by Miele service technicians. You
do not need this information for
domestic use.
Showroom programme
This function enables the steam oven to
be demonstrated in showrooms without
heating up. Do not activate this setting
for domestic use.
Demo mode
If you have activated Demo mode,
Demo mode is activated. The appliance will
not heat up will appear when you
switch the steam oven on.
– On
Touch the OKsensor for at least
4seconds to activate Demo mode.
– Off
Touch the OKsensor for at least
4seconds to deactivate Demo mode.
You can use the steam oven as
normal.
Factory default
– Appliance settings
Any settings that have been altered
will be reset to the factory default
settings.
– User programmes
All User programmes will be deleted.
– Rec. power levels
Microwave power levels which have
been changed will be reset to the
factory default settings.
– Recommended temps
Any recommended temperatures that
have been changed will be reset to
the factory default settings.

Minute minder
53
Using the Minute
minderfunction
The minute minder can be used to
time other activities in the kitchen,
e.g.boiling eggs on the cooktop.
The minute minder can also be used at
the same time as a cooking programme
for which the cooking duration start and
finish times have been set (e.g. as a
reminder to stir the food or add
seasoning, etc.).
The maximum minute minder time
that can be set is 59minutes and
59seconds.
Setting the minute minder
If you have selected the Display|
QuickTouch| Offsetting, you will need
to switch the steam oven on before
setting the minute minder. The minute
minder can then be seen counting
down in the display when the steam
oven is switched off.
Example: You want to boil some eggs
and set a minute minder time of 6
minutes and 20 seconds.
Select the sensor.
Select Minute minder if a cooking
programme is in progress at the same
time.
The prompt Set00:00min will appear.
Using the navigation area, set 06:20.
Confirm with OK.
The minute minder duration is now
saved.
When the steam oven is switched off,
the minute minder time will count down
in the display and will appear instead
of the time of day.
If you are cooking at the same time,
and the minute minder time will
appear at the bottom of the display.
If you are in a menu, the minute minder
will count down in the background.
At the end of the minute minder time
will flash, the time will start counting
up and a buzzer will sound.
Select the sensor.
If required, confirm withOK.
The buzzer will stop and the symbols in
the display will go out.
Changing the time set for the minute
minder
Select the sensor.
Select Minute minder if a cooking
programme is in progress at the same
time.
Select Change.
Confirm with OK.
The minute minder time selected
appears.
Change the time set for the minute
minder.
Confirm with OK.
The altered minute minder time is now
saved.

Minute minder
54
Cancelling the minute minder
Select the sensor.
Select Minute minder if a cooking
programme is in progress at the same
time.
Select Delete.
Confirm with OK.
The minute minder is now cancelled.
Main and sub-menus
55
Menu Recommen-
ded value
Range
Oven functions
Steam cooking 100 °C 40–100 °C
Microwave 1000 W 80–1000 W
Rapid steam cooking
300 W
100 °C
80–300 W
80–100 °C
Sous-vide 65 °C 45–90 °C
User programmes
Reheat
Steam cooking 100 °C 80–100 °C
Microwave 450 W 450–1000 W
Defrost
Steam cooking 60 °C 50–60 °C
Microwave 150 W 80–150 W
Popcorn
Automatic programmes
Other
Blanch – –
Bottling 90 °C 80–100 °C
Disinfect items – –
Prove yeast dough – –
Eco Steam cooking 100 °C 40–100 °C

Main and sub-menus
56
Menu Recommen-
ded value
Range
Other
Maintenance
Descale
Soak
Settings

Operation
57
Switch the steam oven on.
The main menu will appear.
If you want to cook using a steam
function, fill the water container and
fit it back in place.
Distilled or carbonated water or other
liquids could damage the steam
oven.
Only use cold, fresh tap water
(below 20°C).
Place the food in the oven.
Select the function you want.
The function will appear in the display.
Based on the function you have
selected, the recommended power
level, recommended temperature and
cooking duration will appear one after
the other on the display.
Change the recommended values for
the cooking programme and set the
cooking duration if required.
Using the sensor, you can change
the recommended values later if
needed.
Confirm each entry withOK.
Confirming the temperature starts the
cooking process for functions which
do not use microwave power.
For functions which use microwave
power, a summary of the settings
appears and Startis highlighted in the
display.
Use the OKsensor to start the
cooking process for functions which
use microwave power.
The set values appear and the cooking
duration counts down in the display for
all functions.
If you have set a temperature, you will
see the temperature increasing. A
buzzer will sound when the set
temperature is reached for the first time.
The oven stops generating microwave
power when you interrupt the cooking
programme or open the door. You can
continue the programme with the
OKsensor.
After cooking, select the sensor for
the selected function to end the
cooking programme.
Risk of injury due to hot steam.
When using a cooking programme
involving steam, a lot of hot steam
can escape if the door is opened.
The steam can cause burns.
Step back and wait until the hot
steam has dissipated.
Take the food out of the oven.
Switch the steam oven off.

Operation
58
Cleaning the steam oven
Risk of injury due to hot water.
At the end of a steam cooking
programme, hot water left in the
steam generator is pumped back into
the water container.
Take care not to tip the water
container when taking it out of the
appliance.
Remove the water container as
required.
Remove the spill guard and empty
the water container.
After each use, clean and dry the
whole appliance as described in
“Cleaning and care”.
Make sure the spill guard engages
correctly when installing it.
Leave the appliance door open until
the oven interior is completely dry.
Refilling the water
If water needs replenishing during the
cooking programme, a tone will sound
and the display will prompt you to refill
the container with fresh water.
Remove the water container and fill it
with fresh tap water.
Push the water container into the
appliance.
The cooking programme will continue.
Changing values and settings
for a cooking programme
Depending on the function, as soon as
a cooking programme is in progress,
you can use the sensor to change
the values or settings for this
programme.
Select the sensor.
Depending on the function, the
following settings appear:
– Temperature
– Power level
– Duration
Changing values and settings
Select the desired value or setting
and confirm withOK.
Change the value or setting and
confirm withOK.
The cooking programme will continue
with the new values and settings.

Operation
59
Changing the temperature
You can permanently reset the
recommended temperature to suit
your cooking preferences by selecting
Other| Settings| Recommended
temperatures.
Select the sensor.
Select Temperature and confirm with
OK.
Change the target temperature via the
navigation area.
Confirm with OK.
The cooking programme will restart with
the new target temperature.
Changing the microwave power level
You can change the microwave power
level in the Microwave and Rapid
steam cooking functions.
Select Other| Settings|
Recommended power levels to
permanently set the recommended
power level to suit your personal
cooking preferences.
Select the sensor.
Select Power level and confirm with
OK.
Change the microwave power level
via the navigation area.
You can set the microwave power
level to 80W, 150W, 300W, 450W,
600W, 850W, 1000W, depending on
the function in question.
Confirm with OK.
Start will be highlighted.
Select the OKsensor.
The process will restart with the new
microwave power level.

Operation
60
Setting cooking durations
Cooking results can be adversely
affected if there is a long delay
between the food being placed in the
oven and the start of cooking. Fresh
food can change colour and even
spoil.
Select as short a time as possible
until the start of the cooking process.
Example: You have placed the food in
the oven compartment, selected a
function and the required settings such
as the temperature.
By entering Duration, Finish at or Start at
via the sensor, you can automatically
switch the cooking programme off or on
and off.
– Duration
Enter the required cooking duration
for the food. The heating will switch
off automatically once this duration
has elapsed. The maximum cooking
duration that can be set depends on
the function that you have selected.
– Finish at
Specify when you want the cooking
programme to finish. The oven
heating will switch off automatically
at the time you have set.
– Start at
This function will only appear in the
menu if you have set aDuration or
Finish attime. WithStart at, you have
to specify when you want the
cooking programme to start. The
oven heating will switch on
automatically at the time you have
set.
Select the sensor.
Set the required times.
Confirm with OK.
Touch the sensor to return to the
menu of the selected function.
Tip: In functions involving steam, you
can also adjust the cooking duration
directly using the navigation area.
For cooking programmes involving
steam, the cooking duration does not
begin until the set temperature is
reached.

Operation
61
If you are cooking at a temperature of
approx. 80°C or above, Steam
reduction will appear in the display
shortly before the end of the cooking
duration and the door will
automatically open a little. The door
will then automatically close.
Wait until Steam reduction goes out in
the display before opening the door
and removing the food from the oven.
A new cooking programme can only
be started if the automatic door
release is retracted into its original
position. Do not push it in manually
as this could damage it.
Changing the set cooking durations
Select the sensor.
Select the time you want.
Confirm with OK.
Select Change.
This menu option does not appear if
you want to change the cooking
duration for functions which use
microwave power, as these functions
always require a set cooking duration.
The time will be highlighted.
Change the set time.
Confirm with OK.
Touch the sensor to return to the
menu of the selected function.
Use the OKsensor to continue the
cooking programme for functions
which use microwave power.
These settings will be deleted in the
event of a power failure.
Useful tip: You can also change the
cooking duration via the navigation
area.

Operation
62
Deleting the set cooking durations
For a function which uses microwave
power, you can only delete the set
times forFinish at and Start at. The
cooking duration must always be set.
Select the sensor.
Select the time you want.
Confirm with OK.
Select Delete.
Confirm with OK.
Touch the sensor to return to the
menu of the selected function.
If you delete Durationfor a function
which does not use microwave
power, the set times for Finish atand
Start atare also deleted.
If you delete Finish atorStart at, the
cooking programme will start using
the cooking duration set.
Useful tip: In functions involving steam,
you can also clear the cooking duration
using the navigation area.
Interrupting the cooking
process for functions which
use microwave power
You can interrupt cooking when using
the Microwave and Rapid steam
cooking functions and pause the
cooking duration.
During the cooking duration, Stopwill be
highlighted.
Select the OKsensor.
Cooking is interrupted and the cooking
duration is paused.
Start will be highlighted.
Select the OKsensor.
The cooking programme resumes and
the cooking duration continues to count
down.

Operation
63
Interrupting the cooking
process for functions involving
steam
In functions involving steam, opening
the door will interrupt the cooking
programme. The oven heating switches
off. Set cooking durations will be saved.
Risk of injury due to hot steam.
A great deal of hot steam can escape
when the door is opened. The steam
can cause burns.
Step back and wait until the hot
steam has dissipated.
Risk of injury caused by hot
surfaces and food.
The steam oven gets hot during
operation. You could burn yourself
on the oven compartment, shelf
runners, accessories or the food
itself.
Wear oven gloves when placing food
in the oven or removing it and when
adjusting oven shelves etc. in a hot
oven.
When placing cooking containers in
the oven or removing them, make
sure that the hot food does not spill.
The cooking programme will resume
when the door is closed.
When the door is closed, the pressure
has to equalise, which can cause a
whistling sound.
The steam oven will heat up again and
the display will show the temperature in
the cooking compartment as it rises.
Once the set temperature has been
reached, the display will show the time
left as it counts down.
The cooking process will be ended
early if the door is opened in the last
minute of cooking time.

Operation
64
Cancelling cooking
You can cancel a cooking programme
using the function sensor that lights up
orange or using the sensor.
The oven compartment heating and
lighting will then switch off. Any cooking
durations set will be deleted.
Touch the function sensor to return to
the main menu.
Cancelling a cooking programme
without a set cooking duration
Touch the sensor for the selected
function.
The main menu will appear.
Or: select the sensor.
Select Cancel process.
Confirm with OK.
Cancelling a cooking programme
with a set cooking duration
Touch the sensor for the selected
function.
Cancel cooking? appears in the display.
Select Yes.
Confirm with OK.
Or: select the sensor.
Select Cancel process.
Confirm with OK.
Select Yes.
Confirm with OK.

Quick MW and Popcorn
65
These functions can only be used
when no other cooking programmes
are in use.
Always use the glass tray.
Quick MW
If you select the sensor, the oven
starts with a set microwave power level
and cooking duration, e.g. to reheat a
drink.
The maximum power level of 1000W
and a maximum duration of 1minute
are preset.
You can change the microwave power
level and the cooking duration. The
maximum cooking duration that can be
set depends on the microwave power
level selected (see “Settings – Quick
MW”).
Select the sensor.
Touching it repeatedly increases the
cooking duration in increments.
The time left will appear in the display.
You can interrupt and resume the
cooking programme at any time by
touching the OKsensor or cancel it
with the sensor.
At the end of the cooking programme,
Finishedappears in the display and a
buzzer sounds.
Select the sensor.
The main menu will appear.

Quick MW and Popcorn
66
Popcorn
If you select the sensor, the oven
starts with a set microwave power level
and cooking duration.
A microwave power level of 850W and
a maximum cooking duration of
2:50minutes are preset. These settings
match the manufacturer’s instructions
on most bags of microwave popcorn.
The maximum cooking duration that
can be set is 4minutes. The microwave
power level is set and cannot be
modified (see “Settings – Popcorn”).
Follow the manufacturer’s
instructions regarding the cooking
duration on the packaging. Change
the preset time if necessary.
Select the sensor.
The time left will appear in the display.
You can interrupt and resume the
cooking programme at any time by
touching the OKsensor or cancel it
with the sensor.
Disposable containers made out of
paper or other inflammable materials
can ignite, causing damage to the
steam oven.
Do not leave the steam oven
unattended during this programme
and make sure you follow the
instructions on the packaging.
At the end of the cooking programme,
Finishedappears in the display and a
buzzer sounds.
Select the sensor.
The main menu will appear.

General notes on steam cooking
67
This section contains general
information. You will find more detailed
information about particular foods and
how to cook them in the other sections.
The advantages of cooking
with steam
Almost all vitamins and minerals are
retained as the food is not immersed in
water.
Cooking with steam also retains the
true taste of the food better than
conventional cooking. We therefore
recommend seasoning the food after it
has been cooked. Food also retains its
fresh, original colour.
Suitable containers
Cooking containers
This steam oven is supplied with
stainless steel cooking containers.
Other containers, in a variety of sizes,
both perforated and solid, are available
as optional extras (see “Optional
accessories”). This enables you to
choose the most suitable container for
the food you are preparing.
Where possible, it is best to use
perforated cooking containers for steam
cooking. The steam can reach the food
from all sides and the food is cooked
evenly.
Your own containers
You can also use your own containers.
However, please note the following:
– Containers must be heat-resistant to
100°C and able to withstand steam.
With plastic containers, please check
with the manufacturer that they are
suitable for use in a steam oven.
– Thick-sided containers made from
porcelain, ceramic, or stoneware are
not very suitable for using with
steam. Due to their thick sides, they
do not conduct heat well and as a
result cooking durations will be
considerably longer than those given
in the charts.
– Place the cooking container on the
rack or in a suitable container, and
not on the oven floor.
– Ensure that there is a gap between
the upper rim of the container and
the top of the cooking compartment
to allow sufficient steam into the
container.
Glass tray
When using perforated containers,
place the glass tray on shelf level1.
This collects any drops of liquid and
allows it to be removed easily.
The condensate cannot evaporate
properly if the glass tray is on the
floor of the steam oven.
Place the glass tray on shelf level1.

General notes on steam cooking
68
Shelf level
You can select any shelf level for the
cooking containers and the rack. You
can also cook on several levels at the
same time. This will not alter the
cooking duration.
When using more than one deep
container at the same time for steam
cooking, it is best to offset them on
their runners and to leave at least one
level free in between them.
Always insert cooking containers, the
rack and the glass tray between the
rails of the shelf runners so that they
cannot tip.
Frozen
The heating-up phase for frozen food is
longer than for fresh food. The greater
the quantity of frozen food, the longer
the heating-up phase.
Temperature
During steam cooking, the temperature
does not exceed 100°C. Almost all
foods can be cooked at this
temperature. Some types of food, such
as berries, need to be cooked at lower
temperatures to prevent them from
bursting. See the relevant sections in
these operating instructions for more
details.
Duration
During steam cooking, the cooking
duration does not begin until the set
temperature is reached.
In general, the cooking durations for
cooking with steam are the same as for
cooking food in a saucepan. More
information about any factors which
may affect the cooking duration is given
in the relevant sections.
The quantity of food does not affect the
cooking duration. 1kg of potatoes will
take the same time to cook as 500g of
potatoes.
Cooking with liquid
When cooking with liquid, only fill the
cooking container ²/₃ full to prevent the
liquid spilling when the cooking
container is removed from the oven.
Your own recipes
Food which is cooked in a pot or a pan
can also be cooked in the steam oven.
The cooking durations in the steam
oven will be the same. Please note that
food will not be brown or crisp when
cooking with steam.

Steam cooking
69
Eco Steam cooking
You can use the Eco Steam cooking
function to save energy during steam
cooking. This function is suitable mainly
for cooking fish and vegetables.
We recommend using the cooking
durations and temperatures given in the
chart under “Steam cooking”.
You can cook for longer if necessary.
When cooking starchy foods such as
potatoes, rice and pasta, the best
function to use is Steam cooking.
Setting
Other | Eco Steam cooking
Notes on the cooking charts
Follow the instructions on cooking
durations, temperatures and cooking
notes.
Selecting the cooking duration
The cooking durations given are
guidelines only.
We recommend selecting the shorter
duration initially. You can cook for
longer if necessary.

Steam cooking
70
Vegetables
Fresh
Prepare fresh vegetables in the usual
way, i.e. wash, clean and cut them up.
Frozen food
Frozen vegetables do not need to be
defrosted beforehand. Exception: the
vegetables have been frozen together in
a block.
Frozen and fresh vegetables which take
the same length of time to cook can be
cooked together.
If vegetables have frozen together in
clumps, break these up before cooking
with steam. Follow the manufacturer’s
instructions on the packaging regarding
cooking duration.
Cooking containers
Food such as peas or asparagus
spears, which have little or no space
between them, will take longer to cook
because the steam has less space to
work in. For an even result, it is best to
use a shallow container for these types
of food, and only fill it about 3 - 5cm
deep. When cooking large quantities,
divide the food between 2 or 3 shallow
containers rather than using one deep
one.
Different types of vegetables which take
the same length of time to cook can be
cooked together in one cooking
container.
Use solid containers for vegetables
which are cooked in liquid, e.g.
cabbage.
Shelf level
When cooking vegetables with a
distinctive colour (e.g. beetroot) in a
perforated container at the same time
as cooking other foods in other
containers, place the solid tray directly
underneath the perforated container to
catch any drips and therefore avoid any
colour transfer.
Duration
The cooking duration depends on the
size of the food and how well cooked
you want it, just as it does with
conventional cooking methods.
Example:
Firm potatoes, cut into quarters:
approx. 12minutes
Firm potatoes, cut in half:
approx. 17minutes
Settings
Automatic programmes | Vegetables
| ... |
or
Steam cooking
Temperature: 100°C
Duration: see chart

Steam cooking
71
Vegetables [min.]
Artichokes 32–38
Cauliflower, whole 27–28
Cauliflower, florets 8
Beans, green 6–8
Broccoli, florets 2–4
Chantenay carrots, whole 7–8
Chantenay carrots, halved 5–6
Chantenay carrots, chopped 4
Chicory, halved 4–5
Chinese cabbage, chopped 3
Peas 2
Fennel, halved 10–12
Fennel, sliced 4–5
Kale, chopped 23–26
Firm potatoes, peeled
whole
halved
quartered
20–25
15–20
10–15
Fairly firm potatoes, peeled
whole
halved
quartered
23–28
18–23
14–18
Soft potatoes, peeled
whole
halved
quartered
25–30
20–25
15–20
Kohlrabi, cut into batons 6–7
Pumpkin, diced 4–8
Corn on the cob 10–15
Silverbeet, chopped 2–3

Steam cooking
72
Vegetables [min.]
Capsicum, diced or sliced 2
New potatoes, firm 20–25
Mushrooms 2
Leeks, sliced 2–4
Leeks, halved lengthways 4–6
Romanesco, whole 22–25
Romanesco, florets 5–7
Brussels sprouts 10–12
Beetroot, whole 50–60
Red cabbage, chopped 15–20
Black salsify, whole 9–10
Celeriac, cut into batons 6–7
Asparagus, green 2–4
Asparagus, white 5–10
Carrots, chopped 6
Spinach 1–2
Spring cabbage, chopped 10–11
Celery, chopped 2–5
Turnips, chopped 6–7
White cabbage, chopped 12
Savoy cabbage, chopped 10–11
Zucchini, sliced 2–3
Sugar snap peas 2–3
Duration

Steam cooking
73
Fish
Fresh
Prepare fresh fish in the usual way, i.e.
clean, gut and fillet.
Frozen
Fish does not need to be fully defrosted
before cooking. Defrost so that the
surface is sufficiently thawed to take
herbs and seasoning. Depending on the
thickness of the fish, 2–5 minutes
should be enough.
Preparation
Add some lemon or lime juice to fish
before cooking. The citric acid helps the
flesh stay firm.
It is not necessary to season fish when
cooking with steam as this method
retains the minerals which give the fish
its unique flavour.
Cooking containers
If using a perforated container, grease it
first or line it with baking paper.
Shelf level
When cooking fish in a perforated
container at the same time as cooking
other types of food in other containers,
place the container with the fish directly
above the glass or collecting tray
(depending on the model) to catch any
liquid and so avoid any transfer of
flavours to other food.
Temperature
85°C – 90°C
For gently cooking delicate types of
fish, such as flounder.
100°C
For cooking firmer types of fish, e.g.
salmon.
Also for cooking fish in sauce or stock.
Duration
The cooking duration depends on the
thickness and the texture of the fish,
and not on the weight. The thicker the
fish, the longer the cooking duration. A
3cm thick piece of fish weighing 500g
will take longer to cook than a 2 cm
thick piece of fish weighing 500g.
The longer fish cooks, the firmer its
flesh will become. Use the cooking
durations given in the chart. If you find
that the fish is not cooked sufficiently,
only cook it for a few minutes more.
When cooking fish in sauce or stock,
we recommend that you increase the
cooking duration quoted by a few
minutes.

Steam cooking
74
Useful tips
– Adding herbs and spices, such as
dill, will help bring out the full flavour
of the fish.
– Cook large fish in the swimming
position. To help maintain the
structure of the fish, place a small
cup or similar upside down in the
cooking container. Arrange the fish
bellyside down over the cup.
– You can use any fish scraps, e.g. fish
heads, bones, tails etc. to make a
fish stock. Place the fish scraps
together with some mixed vegetables
in a solid cooking container and add
cold water. Cook at 100°C for 60 to
90minutes. The longer the cooking
duration, the stronger the stock.
– Preparing fish au bleu is a method
involving cooking the fish in water
with vinegar, at different proportions
depending on the recipe. It is
important not to damage the skin of
the fish. This method is suitable for
cooking trout, tench, eel and salmon.
Settings
Automatic programmes | Fish | ... |
or
Steam cooking
Temperature: see chart
Duration: see chart

Steam cooking
75
Fish [°C] [min.]
Eel 100 5–7
Perch fillet 100 3–5
Bream/Snapper fillet 85 3–5
Trout, 250g 90 8–12
Halibut/Trumpeter fillet 85 4–6
Blue eye trevalla/Ling fillet 100 6
Salmon fillet 100 4–8
Salmon steak 100 8–10
Australian salmon 90 8–10
Basa fillet 85 3
Rosefish fillet 100 6–8
Jackass morwong/Terakihi fillet 100 4–6
Flounder fillet 85 4–5
Stargazer/Monkfish fillet 85 6–8
Sole fillet 85 3
Turbot fillet 85 5–8
Tuna fillet 85 4–8
Pikeperch fillet 85 4
Temperature, duration

Steam cooking
76
Meat
Fresh
Prepare the meat in the usual way.
Frozen
Meat should be thoroughly defrosted
before cooking in the steam oven (see
“Special applications - Defrosting with
steam”).
Preparation
Meat which needs to be seared before
being cooked, e.g. stewing steak,
should be seared in a pan on the
cooktop.
Duration
The cooking duration depends on the
thickness and the texture of the meat,
and not on the weight. The thicker the
piece of meat, the longer the cooking
duration. A piece of meat weighing 500
g which is 10 cm thick will take longer
to cook than a piece of meat weighing
500 g which is 5 cm thick.
Useful tips
– To retain the flavourings, use a
perforated cooking container. Place
an unperforated cooking container
underneath in order to collect the
concentrate. You can use the
concentrate to enhance your sauces
or freeze it for later use.
– Boiling chicken, back or top rib and
meat bones can be used to make
stock. Place the meat together with
the bones and some mixed
vegetables in a cooking container
and add cold water. The longer the
cooking duration, the stronger the
stock.
Settings
Automatic programmes | Meat | ... |
or
Steam cooking
Temperature: 100°C
Duration: see chart

Steam cooking
77
Meat [min.]
Beef shin, covered with water 110–120
Pork knuckle 135–140
Chicken breast fillet 8–10
Knuckle 105–115
Beef soup bones 110–120
Veal for stewing 3–4
Gammon steaks 6–8
Lamb stew 12–16
Turkey roulade 12–15
Turkey schnitzel 4–6
Rib of beef, covered with water 130–140
Beef stew 105–115
Boiling chicken, covered with water 80–90
Silverside 110–120
Duration

Steam cooking
78
Rice
Rice swells when cooked and needs to be cooked in liquid. The proportion of rice
to liquid will vary depending on the type of rice.
The rice absorbs all the liquid during the cooking process so that none of the
nutrients are lost.
Settings
Automatic programmes | Rice | ... |
or
Steam cooking
Temperature: 100°C
Duration: see chart
Ratio
Rice : Liquid
[min.]
Basmati rice 1:1.5 15
Parboiled rice 1:1.5 23–25
Arborio rice
Milk rice
Risotto rice
1:2.5
1:2.5
30
18–19
Brown rice 1:1.5 26–29
Wild rice 1:1.5 26–29
Duration

Steam cooking
79
Grains
Grain swells when cooked and needs to be cooked in liquid. The proportion of
grain to liquid will vary depending on the type of grain.
Grain can be cooked whole or cracked.
Settings
Automatic programmes | Grains | ... |
or
Steam cooking
Temperature: 100°C
Duration: see chart
Ratio
Grain : Liquid
[min.]
Amaranth 1:1.5 15–17
Bulgur 1:1.5 9
Green spelt, whole 1:1 18–20
Green spelt, cracked 1:1 7
Oats, whole 1:1 18
Oats, cracked 1:1 7
Millet 1:1.5 10
Polenta 1:3 10
Quinoa 1:1.5 15
Rye, whole 1:1 35
Rye, cracked 1:1 10
Wheat, whole 1:1 30
Wheat, cracked 1:1 8
Duration

Steam cooking
80
Pasta/Noodles
Dry pasta and noodles
Dry pasta and noodles swell when they are cooked and need to be cooked in
liquid. The liquid must cover the pasta or noodles. Using hot liquid gives better
results.
Increase the cooking time stated by the manufacturer by approx. 1/3.
Fresh food
Fresh pasta and noodles, such as those you can buy from the supermarket chilled
counter, do not need to absorb water. Cook in a greased, perforated container.
Separate any pieces of pasta or noodles which have stuck together and spread
them out in the cooking container.
Settings
Automatic programmes | Pasta | ... |
or
Steam cooking
Temperature: 100°C
Duration: see chart
Fresh pasta / noodles [min.]
Gnocchi 2
Knöpfli 1
Ravioli 2
Spätzle 1
Tortellini 2
Dry pasta / noodles,
covered with water
Flat noodles / Fettuccine 14
Vermicelli 8
Duration

Steam cooking
81
European dumplings
Ready-made dumplings in wrappers need to be covered completely with water.
Otherwise they will not absorb enough water and will fall apart, even if steeped in
water prior to cooking.
Cook fresh dumplings in a greased, perforated container.
Settings
Automatic programmes | Pasta | ... |
or
Steam cooking
Temperature: 100°C
Duration: see chart
[min.]
Steamed dumplings 30
Yeast dumplings 20
Boil-in-the-bag potato dumplings 20
Boil-in-the-bag bread dumplings 18–20
Duration
Steam cooking
82
Dried pulses
Soak pulses for at least 10 hours in cold water before cooking. Soaking makes the
pulses more digestible and shortens the cooking duration required. Soaked pulses
must be covered with liquid during cooking.
Lentils do not need to be soaked before cooking.
With unsoaked pulses a certain ratio of pulses to liquid is required.
Settings
Automatic programmes | Pulses | ... |
or
Steam cooking
Temperature: 100°C
Duration: see chart
Soaked
[min.]
Beans
Kidney beans 55–65
Adzuki beans 20–25
Black beans 55–60
Borlotti beans 55–65
Haricot beans 34–36
Peas
Yellow split peas 40–50
Green peas, shelled 27
Duration
Steam cooking
83
Unsoaked
Ratio
Pulses : Liquid
[min.]
Beans
Kidney beans 1:3 130–140
Adzuki beans 1:3 95–105
Black beans 1:3 100–120
Borlotti beans 1:3 115–135
Haricot beans 1:3 80–90
Lentils
Brown lentils 1:2 13–14
Red lentils 1:2 7
Peas
Yellow split peas 1:3 110–130
Green peas, shelled 1:3 60–70
Duration

Steam cooking
84
Hen's eggs
Use a perforated container to prepare boiled eggs in the steam oven.
The eggs do not need to be pierced before cooking as they are gradually warmed
during the heating-up phase and so do not burst when they are cooked with
steam.
When using a solid container for preparing egg dishes, remember to grease it first.
Settings
Automatic programmes | Hen's eggs | ... |
or
Steam cooking
Temperature: 100°C
Duration: see chart
[min.]
Small (S)
soft
medium
hard
3
5
9
Medium (M)
soft
medium
hard
4
6
10
Large (L)
soft
medium
hard
5
6–7
12
Extra large (XL)
soft
medium
hard
6
8
13
Duration

Steam cooking
85
Fruit
Cook fruit in a solid container so that
none of the juice is lost. If you wish to
cook fruit in a perforated container,
place a solid container directly
underneath it to collect the juice.
Useful tip: You can use the collected
juice to prepare a glaze for a fruit flan.
Settings
Automatic programmes | Fruit | ... |
or
Steam cooking
Temperature: 100°C
Duration: see chart
[min.]
Apple chunks 1–3
Pear chunks 1–3
Cherries 2–4
Mirabelle plums 1–2
Nectarine/Peach chunks 1–2
Plums 1–3
Quinces, diced 6–8
Rhubarb chunks 1–2
Gooseberries 2–3
Duration
Sausages
Settings
Automatic programmes | Sausages
| ... |
or
Steam cooking
Temperature: 90°C
Duration: see chart
Sausages [min.]
Frankfurters 6–8
Sausages 6–8
White sausages 6–8
Duration

Steam cooking
86
Shellfish
Preparation
Defrost frozen shellfish before cooking with steam.
Peel, remove and discard the intestines, and then wash the shellfish.
Cooking containers
If using a perforated container, grease it first or line it with baking paper.
Duration
The longer shellfish are cooked, the tougher they become. Use the cooking
durations given in the chart.
When cooking shellfish in sauce or stock, we recommend that you increase the
cooking duration quoted by a few minutes.
Settings
Automatic programmes | Shellfish | ... |
or
Steam cooking
Temperature: see chart
Duration: see chart
[°C] [min.]
Crevettes 90 3
Prawns 90 3
King prawns 90 4
Small shrimps 90 3
Crayfish 95 10–15
Large shrimps 90 3
Temperature, duration

Steam cooking
87
Mussels
Fresh food
Danger of food poisoning from spoiled mussels.
Spoiled mussels can cause food poisoning.
Only cook mussels which are closed.
Do not eat mussels which have not opened after being cooked.
Steep fresh mussels in water for a few hours before cooking to rinse out any sand.
Then scrub the mussels thoroughly to clean them.
Frozen
Defrost frozen mussels before cooking.
Duration
The longer mussels are cooked, the harder they become. Use the cooking
durations given in the chart.
Settings
Automatic programmes | Mussels and clams | ... |
or
Steam cooking
Temperature: see chart
Duration: see chart
[°C] [min.]
Goose barnacles 100 2
Cockles 100 2
Blue mussels 90 12
Scallops 90 3
Razor clams 100 2–4
Vongole 90 2–4
Temperature, duration

Steam cooking
88
Menu cooking
Before cooking meals with the
manual Menu cooking function,
switch off steam reduction (see
“Settings – Steam reduction”).
Menu cooking involves cooking various
foods with different cooking times in
order to serve them all together in one
meal, e.g. rosefish fillet with rice and
broccoli.
Foods are placed in the steam oven at
different times so that they are all ready
at the same time.
Shelf level
Place foods that produce a lot of liquids
(e.g. fish) or have a distinctive colour
(e.g. beetroot) directly above the glass
tray or condensate tray (depending on
the model). This avoids any transfer of
flavour or colour to other food by
preventing liquid dripping onto food
below it.
Temperature
Whole meals should be cooked at a
temperature of 100°C as this is the
temperature required to cook the
majority of foods.
Do not cook a whole meal at the lowest
temperature when different
temperatures are required for different
types of food, e.g. 85°C for seabream
and 100°C for potatoes.
If the recommended cooking
temperature for the food is 85°C for
example, try cooking it at 100°C and
testing the result. Some delicate types
of fish with a soft structure, e.g.
flounder will become very firm when
cooked at 100°C.
Duration
If you increase the recommended
temperature, shorten the cooking
duration by approx. ¹/₃.
Example:
Food cooking durations
(see cooking charts in “Steam cooking”)
Parboiled rice 24 minutes
Rosefish fillet 6 minutes
Broccoli 4 minutes
Calculation of set cooking durations:
24minutes minus
6minutes=18minutes (1stcooking
duration: rice)
6minutes minus 4minutes=2minutes
(2ndcooking duration: rosefish fillet)
Remaining time=4 minutes
(3rdcooking duration: broccoli
Duration 24min. – rice
6 min. - rosefish
fillet
4 min. -
broccoli
Setting 18 min. 2 min. 4 min.

Steam cooking
89
Cooking a whole menu
Place the rice in the oven first.
Set the first cooking duration:
18minutes.
After the 18minutes, place the fish in
the oven.
Set the second cooking duration:
2minutes.
After the 2minutes, place the
broccoli in the oven.
Set the third cooking duration:
4minutes.

Sous-vide (vacuum) cooking
90
With this gentle cooking method, food
is cooked slowly and at a low, constant
temperature in vacuum packaging.
With vacuum cooking, no moisture
evaporates during cooking and all
nutrients and flavours are retained.
The cooking result has an intensive
taste and food is cooked evenly.
Use only fresh food which is in a
good condition.
Ensure hygienic conditions and that
food has not been out of the
refrigerator too long, e.g. during
transportation.
Use only heat-stable, boiling-
resistant vacuum bags.
Do not cook food in the sales
packaging, such as vacuum-packed
frozen food as it is possible that the
packaging used is not suitable for
vacuum cooking.
Do not use the vacuum bag more
than once.
Vacuum-seal the food in a chamber
system vacuum sealer only.

Sous-vide (vacuum) cooking
91
Important notes on use
For an optimum cooking result:
– Use herbs and spices more sparingly
than with conventional methods
because the impact on the taste of
the food will be stronger.
You can also cook the food
unseasoned and add seasoning after
cooking.
– The cooking duration is reduced
when salt, sugar, and liquids are
added.
– The food becomes firmer if acidic
foods, such as lemon or vinegar are
added.
– Do not use alcohol or garlic as this
can cause an unpleasant taste.
– Only use vacuum sealing bags that
match the size of the food. If the
vacuum bag is too big, too much air
can remain inside.
– If you want to cook several pieces of
food in one vacuum bag, put them
side by side in the bag.
– If you want to cook food in several
vacuum sealing bags at once, put the
bags side by side on the rack.
– The cooking durations depend on the
thickness of the food.
– With higher temperatures and/or
longer cooking durations, the
appliance may run low on water.
Check the display from time to time.
– Keep the door closed during the
cooking process. Opening the door
extends the cooking process and can
change the cooking result.
– Cooking at a lower temperature and
for a longer duration can result in
increased residual water in the
cooking compartment. This does not
affect the cooking results.
– Temperatures and cooking durations
from sous-vide recipes cannot
always be emulated exactly. Alter the
settings to achieve the degree of
cooking you want.

Sous-vide (vacuum) cooking
92
Useful tips
– In order to reduce cooking times, you
can vacuum seal food items 1–2 days
before the cooking programme. Store
the vacuum-sealed food in the
refrigerator at no more than 5°C. In
order to preserve quality and flavour,
the food should be cooked no later
than 2 days afterwards.
– Freeze liquids such as marinades
before vacuum sealing to prevent
them from escaping from the bag.
– Fold the edges of the vacuum sealing
bag outwards for filling. This will give
you clean, perfect weld seams.
– If you do not want to eat the food
straight after cooking, put it in iced
water immediately and allow it to cool
down completely. After this, store the
food at temperatures no greater than
5°C.
This way, you can retain the food’s
quality and flavour while keeping it
fresh for longer.
Exception: Poultry must be eaten
straight after the cooking programme.
– After cooking, cut the vacuum bag on
all sides for easier access to the
food.
– Briefly fry meat and firm types of fish
(such as salmon) before serving. This
will help to develop a roasted aroma.
– Use the brine or marinade of
vegetables, fish, or meat to make a
sauce.
– Serve the food on pre-warmed
plates.

Sous-vide (vacuum) cooking
93
Using the Sous-videfunction
Rinse the food with cold water and
dry it.
Place the food in a vacuum bag and
add spices or liquid if desired.
Vacuum seal the food in a chamber
system vacuum sealer.
Place the glass tray on shelf level1.
For the best cooking results, place
the rack on shelf level2.
Place the vacuum-sealed food on the
rack (next to each other if there are
several bags).
Select Sous-vide.
Change the recommended
temperature if necessary.
Confirm with OK.
Set further settings as necessary (see
“Operation”).
Possible causes for poor
results
The vacuum bag has opened:
– The weld seam was not clean or
stable enough and came undone.
– The bag was damaged by a sharp
bone.
The food has an unpleasant or strange
taste:
– Incorrect storage of the food; the
food was kept out of the refrigerator
for too long.
– The food was contaminated with
bacteria before it was vacuum
sealed.
– Too much of ingredients such as
spices were added.
– The bag or weld seam were not in
perfect order.
– The vacuum was insufficient.
– The food was not eaten or chilled
immediately after cooking.
Sous-vide (vacuum) cooking
94
The cooking durations given in the tables are guidelines only. We recommend
selecting the shorter duration initially. You can cook for longer if necessary. The
cooking duration only begins when the set temperature is reached.
Food Added in advance [°C] [min.]
Sugar Salt
Fish
Blue eye trevalla/Ling fillet, 2.5 cm thick x 54 35
Salmon fillet, 2–3cm thick x 52 30
Stargazer/Monkfish fillet x 62 18
Pikeperch fillet, 2cm thick x 55 30
Vegetables
Cauliflower florets, medium to large x 85 40
Hokkaido pumpkin, sliced x 85 15
Kohlrabi, sliced x 85 30
White asparagus, whole x x 85 22–27
Sweet potato, sliced x 85 18
Fruit
Pineapple, sliced x 85 75
Apples, sliced x 80 20
Baby bananas, whole 62 10
Peaches, halved x 62 25–30
Rhubarb chunks 75 13
Plums, halved x 70 10–12
Other
Beans, white, soaked at a 1:2 ratio
(beans to liquid)
x 90 240
Prawns, peeled and deveined x 56 19–21
Hen's egg, whole 65–66 60
Scallops, removed from shell 52 25
Shallots, whole x x 85 45–60
Temperature, duration

Sous-vide (vacuum) cooking
95
Food Added in
advance
[°C] [min.]
Sugar Salt Medium* Well-
done*
Meat
Duck breast, whole x 66 72 35
Saddle of lamb (on the bone) 58 62 50
Beef tenderloin, 4cm thick 56 61 120
Beef rump steak, 2.5cm thick 56 – 120
Pork fillet, whole x 63 67 60
Temperature, duration
* Degree of doneness
The “Well-done” degree of doneness has a higher core temperature than “Medium,” but
is not cooked through in the classical sense.

Sous-vide (vacuum) cooking
96
Reheating
Only reheat brassicas, such as kohlrabi
and cauliflower, in combination with a
sauce. Without sauce, an unpleasant
cabbage-like taste and grey-brown
colour may develop.
Foods with a short cooking time and
those which have a different degree of
doneness when reheated, e.g. fish, are
not suited to being reheated.
Preparation
Immediately after cooking, place the
food in ice cold water and leave for
approximately one hour. The rapid
cooling inhibits continued cooking of
the food. This means the ideal degree
of doneness of the food remains as it is.
Store the food afterwards in the
refrigerator at max. 3°C.
Please note that the quality of food
deteriorates the longer it is stored.
We recommend storing food in the
refrigerator for no longer than five
days before reheating it.
Settings
Sous-vide
Temperature: see chart
Duration: see chart
Sous-vide (vacuum) cooking
97
Reheating in the Sous-vide function
The durations specified in the chart are guidelines only. You can make the duration
longer if necessary. The cooking duration only begins when the set temperature is
reached.
Food [°C]
2
[min.]
Medium
1
Well-
done
1
Meat
Saddle of lamb (on the bone) 58 62 30
Beef tenderloin, 4cm thick 56 61 30
Beef rump steak, 2.5cm thick 56 – 30
Pork fillet, whole 63 67 30
Vegetables
Cauliflower florets, medium to large
3
85 15
Kohlrabi, sliced
3
85 10
Fruit
Pineapple, sliced 85 10
Other
Beans, white, soaked at a 1:2 ratio
(beans to liquid)
90 10
Shallots, whole 85 10
Temperature, duration
1
Degree of doneness
The “Well-done” degree of doneness has a higher core temperature than “Medium,” but
is not cooked through in the classical sense.
2
The durations apply to vacuum-sealed food with an initial temperature of approx. 5°C
(refrigerator temperature).
3
Reheat only in sauce.

Other applications
98
Reheat with steam
To reheat food which was cooked
using the sous-vide method, use the
Sous-vide function (see “Sous-vide
– Reheating”).
The steam oven is very effective at
reheating food gently, without drying it
out or cooking it further. The food
reheats evenly and does not need to be
stirred during the reheating process.
You can reheat individual dishes or
plated meals which have been prepared
previously (e.g. meat, vegetables and
potatoes).
Suitable containers
Small quantities can be reheated on a
plate, larger quantities should be placed
in a cooking container.
Duration
The number of plates or containers has
no bearing on the time.
The times listed in the table relate to an
average portion per plate. Increase the
duration for larger quantities.
Useful tips
– Do not reheat large items, such as a
joint of roast meat, whole. Divide it
into portions and reheat these as
plated meals.
– Compact items, such as stuffed
capsicum, roulades or dumplings,
should be cut in half.
– Reheat sauces separately. Exceptions
are dishes such as goulash, which is
cooked in sauce.
– Cover food when reheating it. This
will avoid steam condensing on the
crockery.
– Please note that breaded items, such
as schnitzel, will not retain their
crispness when they are reheated.
Heating food
Cover the food being warmed up with
a plate or foil that is resistant to
temperatures up to 100°C and to
steam.
Place the food on the rack or in a
cooking container.
Settings
Reheat | Steam cooking
or
Steam cooking
Temperature: 100°C
Duration: see chart
Other applications
99
The durations specified in the chart are guidelines only. We recommend selecting
the shorter duration initially. You can make the duration longer if necessary.
Food * [min.]
Vegetables
Carrots
Cauliflower
Kohlrabi
Beans
6–7
Side dishes
Pasta
Rice
3–4
Potatoes, halved lengthways 12–14
European dumplings 15–17
Meat and poultry
Sliced meat, 1.5cm thick
Roulades, sliced
Goulash
Lamb stew
5–6
Meatballs 13–15
Chicken schnitzel
Turkey schnitzel
7–8
Fish
Fish fillets, 2cm thick 6–7
Fish fillets, 3cm thick 7–8
Plated meals
Spaghetti with tomato sauce 13–15
Roast pork, potatoes, vegetables 12–14
Stuffed capsicum (halved), rice 13–15
Chicken fricassee, rice 7–8
Vegetable soup 2–3
Creamy soup 3–4

Other applications
100
Food * [min.]
Consommé 2–3
Casserole 4–5
Duration
* These times apply to food heated on a plate and covered with a plate.

Other applications
101
Defrost with steam
It is much quicker to defrost items in the
steam oven than at room temperature.
Risk of infection from bacteria.
Bacteria such as salmonella can
cause life-threatening food
poisoning.
It is particularly important to observe
food hygiene rules when defrosting
fish and meat, and in particular when
defrosting poultry.
Do not use the liquid produced
during defrosting.
Process the food as required as soon
as it has been defrosted.
Temperature
60°C is the best temperature for
defrosting.
Exceptions: 50°C for minced meat and
game.
Before and after defrosting
Remove any packaging before
defrosting.
Exceptions: Leave bread, biscuits and
cakes in their packaging as otherwise
they will absorb moisture and become
soft.
Allow food to stand at room
temperature for a few minutes after
defrosting. The standing time is
necessary to allow the even distribution
of heat from the outside to the inside.
Cooking containers
Use a perforated container with a glass
tray or condensate tray (depending on
model) underneath it when defrosting
food which will drip, such as poultry.
This way food will not be lying in
defrosted liquid.
Foods which do not drip can be
defrosted in a solid cooking container.
Useful tips
– Fish does not need to be fully
defrosted before cooking. Defrost so
that the surface is sufficiently thawed
to take herbs and seasoning.
Depending on the thickness of the
fish, 2–5 minutes is generally enough.
– When defrosting food which has
frozen together, e.g. berries and meat
portions, separate them half-way
through the defrosting time.
– Do not refreeze food once it has
thawed.
– Defrost frozen ready meals according
to the instructions on the packaging.
Settings
Defrost | Steam cooking
or
Steam cooking
Temperature: see chart
Defrosting duration: see chart
Standing time: see chart
Other applications
102
The durations specified in the chart are guidelines only. We recommend selecting
the shorter defrosting duration initially. You can make the defrosting duration
longer if necessary.
Frozen food Quantity [°C] [min.] [min.]
Dairy products
Sliced cheese 125 g 60 15 10
Quark 250 g 60 20–25 10–15
Cream 250 g 60 20–25 10–15
Soft cheese 100 g 60 15 10–15
Fruit
Apple sauce 250 g 60 20–25 10–15
Apple pieces 250 g 60 20–25 10–15
Apricots 500 g 60 25–28 15–20
Strawberries 300 g 60 8–10 10–12
Raspberries/Red/
Blackcurrants
300 g 60 8 10–12
Cherries 150 g 60 15 10–15
Peaches 500 g 60 25–28 15–20
Plums 250 g 60 20–25 10–15
Gooseberries 250 g 60 20–22 10–15
Vegetables
Frozen in a block 300 g 60 20–25 10–15
Fish
Fish fillets 400 g 60 15 10–15
Trout 500 g 60 15–18 10–15
Lobster 300 g 60 25–30 10–15
Small shrimps 300 g 60 4–6 5
Ready meals
Meat, vegetables, sides /
Casserole / Soup
480 g 60 20–25 10–15
Other applications
103
Frozen food Quantity [°C] [min.] [min.]
Meat
Roast meat slices 125–150g each 60 8–10 15–20
Minced meat
250 g 50 15–20 10–15
500 g 50 20–30 10–15
Stew
500 g 60 30–40 10–15
1000 g 60 50–60 10–15
Liver 250 g 60 20–25 10–15
Saddle of hare 500 g 50 30–40 10–15
Roebuck saddle 1000 g 50 40–50 10–15
Schnitzel/Chops/Sausages 800 g 60 25–35 15–20
Poultry
Chicken 1000 g 60 40 15–20
Chicken thighs 150 g 60 20–25 10–15
Chicken fillet 500 g 60 25–30 10–15
Turkey drumsticks 500 g 60 40–45 10–15
Baked goods
Puff pastries/Yeast buns – 60 10–12 10–15
Creamed mixture cakes/
biscuits
400 g 60 15 10–15
Bread/Rolls
Bread rolls – 60 30 2
Rye bread, sliced 250 g 60 40 15
Whole grain bread, sliced 250 g 60 65 15
White bread, sliced 150 g 60 30 20
Temperature Defrosting duration Standing time

Other applications
104
Blanch
Blanch fruit and vegetables before
freezing them. Blanching helps maintain
the quality of the produce when it is
frozen.
Blanching vegetables also helps them
retain their original colour.
Put the prepared vegetables
(cleaned, washed, chopped etc.) into
a perforated cooking container and
place in the steam oven.
Once blanched, plunge the
vegetables into ice cold water to cool
them down quickly. Drain them well.
Settings
Other | Blanch
or
Steam cooking
Temperature: 100°C
Blanching time: 1minute
Bottling
Only use unblemished, fresh produce
which is in good condition.
Glass jars
Use clean glass jars and accessories
and check them for any defects. Glass
jars with twist off lids or glass lids with a
rubber seal are suitable.
Make sure that all the glass jars are the
same size so that bottling is carried out
evenly.
After you have filled the jars with the
bottled produce, clean the glass rims
with a clean cloth and hot water and
then seal the jars.
Fruit
Sort fruit carefully, rinse it briefly but
thoroughly and allow it to drain. Take
great care when cleaning soft fruit as it
is very delicate and squashes easily.
Remove any peel, stalks, cores or
stones. Cut up large fruit. For example,
cut apples into slices.
If you are bottling fruit with stones (e.g.
plums, apricots) without removing the
stones, pierce the fruit several times
with a fork or wooden skewer as
otherwise it will burst.

Other applications
105
Vegetables
Rinse, clean and cut up vegetables.
Vegetables should be blanched before
bottling to help them retain their colour
(see “Special applications –
Blanching”).
Fill volume
Fill the glass jars with produce up to no
more than 3cm below the rim. Do not
pack it down as this will damage the
cell walls of the produce. Tap the jar
gently onto a cloth to help distribute the
contents evenly. Fill the jars with liquid.
The produce must be completely
covered.
Use a sugar solution for fruit and a salt
or vinegar solution for vegetables.
Meat and sausages
Briefly fry or cook the meat before
bottling. Use the juices with some
added water, or the broth in which the
meat was cooked, as the liquid content
of the jars. Make sure there is no grease
on the rim of the jars.
When bottling sausages, only fill the
jars to halfway as the meat will rise
during the bottling process.
Useful tips
– Make use of residual heat by leaving
the jars in the oven for 30minutes
after it has switched off.
– Then cover the jars with a cloth and
allow to cool for approx. 24hours.
Bottling food
Place the rack on shelf level1.
Place the closed jars on the rack. The
jars must not touch each other.
Settings
Other | Bottling
or
Steam cooking
Temperature: see chart
Bottling duration: see chart

Other applications
106
Food [°C] * [min.]
Berries
Red / Blackcurrants 80 50
Gooseberries 80 55
Cranberries 80 55
Fruit with stones
Cherries 85 55
Mirabelle plums 85 55
Plums 85 55
Peaches 85 55
Greengage plums 85 55
Fruit with pips
Apples 90 50
Apple sauce 90 65
Quinces 90 65
Vegetables
Beans 100 120
Broad beans 100 120
Gherkins 90 55
Beetroot 100 60
Meat
Pre-cooked 90 90
Roasted 90 90
Temperature, Duration
* Bottling durations apply to 1.0l jars. If using 0.5l jars, reduce the duration by 15minutes.
If using 0.25l jars, reduce the duration by 20 minutes.

Other applications
107
Disinfect items
The steam oven will disinfect baby
bottles and other containers so that at
the end of the programme they are as
germ free as they would have been if
boiled. Check beforehand that all parts,
teats etc. are declared by the
manufacturer to be heat resistant to
100°C and also that they can withstand
hot steam.
Dismantle, clean and thoroughly rinse
baby bottles. Reassemble the bottles
only after they have completely dried.
This prevents recontamination.
Place the individual items on the rack
or in a perforated container (on their
sides or with the opening facing
downwards) ensuring that they do not
touch one another. This will allow hot
steam to reach them from all sides.
Settings
Other | Disinfect items
Duration: 1minute to 10hours
or
Steam cooking
Temperature: 100°C
Duration: 15minutes
Prove yeast dough
Prepare the dough according to the
recipe.
Place the dough in a bowl on the
rack.
Settings
Other | Prove yeast dough
Duration: as per recipe instructions
or
Steam cooking
Temperature: 40°C
Duration: as per recipe instructions

Other applications
108
Heat damp towels
Moisten towels and then roll them up.
Place them beside one another in a
perforated cooking container.
Settings
Automatic programmes | Special | Heat
damp towels
or
Steam cooking
Temperature: 70°C
Duration: 2minutes
Dissolve gelatine
Soften gelatine leaves by leaving
them in a bowl of cold water for
5minutes. The gelatine leaves have
to be fully covered with water.
Remove the gelatine leaves from the
bowl and squeeze them out. Empty
the bowl. Place the squeezed gelatine
leaves back in the bowl.
Gelatine powder: Place the gelatine
powder in a bowl and add water
according to the instructions on the
packaging.
Cover the bowl and place on the
rack.
Settings
Automatic programmes | Special |
Dissolve gelatine
or
Steam cooking
Temperature: 90°C
Cooking duration: 1minute

Other applications
109
Decrystallise honey
Loosen the lid and place the jar of
honey in a perforated cooking
container.
Stir the honey once during the
process.
Settings
Automatic programmes | Special |
Decrystallise honey
or
Steam cooking
Temperature: 60°C
Duration: 90minutes (irrespective of the
size of jar or the amount of honey in the
jar)
Melt chocolate
You can use the steam oven for melting
any type of chocolate.
When using a cake glaze, place it in a
perforated cooking container, leaving it
in its packaging.
Break the chocolate into small
pieces.
Place large quantities in a solid
container and small quantities in a
cup or a bowl.
Cover the container or the dish with a
lid or with foil that is resistant to
temperatures up to 100°C and to hot
steam.
Stir large quantities once during
cooking.
Settings
Automatic programmes | Special | Melt
chocolate
or
Steam cooking
Temperature: 65°C
Duration: 20minutes

Other applications
110
Make yoghurt
To prepare yoghurt, you will need milk
and live culture or yoghurt starter
powder, e.g. from a health food store.
Use natural yogurt with live culture and
without additives. Do not use heat-
treated yogurt.
The yoghurt must be fresh (short
storage time).
You can use either unchilled long-life
milk or fresh milk.
Long-life milk can be used as it is – no
further preparation is required. Fresh
milk must first be heated to 90°C (do
not boil it) and then cooled down to
35°C. Fresh milk will give a better set
than long-life milk.
The yoghurt and milk should have the
same percentage fat.
Do not move or shake the jars while the
yoghurt is fermenting.
Immediately after preparation, leave the
yoghurt to cool in the fridge.
The firmness, fat content and cultures
used in the yoghurt starter all affect the
consistency of homemade yoghurt. Not
all yoghurts are equally suitable as
yoghurt starters.
Useful tip: If you are using yoghurt
starter powder, you can prepare the
yoghurt from a mixture of milk and
cream. For that, mix ³/₄ litre milk with ¹/₄
litre cream.
Mix 100 g yoghurt with 1litre of milk
or make up the mixture with yoghurt
enzyme, following the instructions on
the packaging.
Pour the mixture into glass jars and
seal the jars.
Place the sealed jars in a perforated
cooking container or on the rack. The
jars must not touch each other.
Straight after the cooking duration
has finished, place the jars in the
refrigerator. Take care not to shake
the jars unnecessarily.
Settings
Automatic programmes | Special |
Make yoghurt
or
Steam cooking
Temperature: 40°C
Duration: 5:00hours
Possible causes for poor results
Yoghurt is not set:
Incorrect storage of the yoghurt starter,
too much time out of the refrigerator,
packaging was damaged, milk was
insufficiently heated.
Liquid has not been removed:
Jars were moved, the yoghurt cooled
down too slowly.
Yoghurt is grainy:
The milk was heated too high, it was
not free of imperfections, the milk and
yoghurt starter were not stirred evenly.

Other applications
111
Render fat
The bacon will not become brown.
Place the bacon (diced or rashers) in
a solid cooking container.
Cover the container with foil that is
temperature-resistant up to 100°C
and resistant to steam.
Settings
Automatic programmes | Special |
Render fat
or
Steam cooking
Temperature: 100°C
Duration: 4minutes
Sweat onions
Sweating means cooking the onions in
their own juices, with the addition of a
little fat if necessary.
Cut the onions up into small pieces
and place them in a solid cooking
container with a little butter.
Cover the container with foil that is
temperature-resistant up to 100°C
and resistant to steam.
Settings
Automatic programmes | Special |
Sweat onions
or
Steam cooking
Temperature: 100°C
Duration: 4minutes

Other applications
112
Extracting juice
This appliance is ideal for extracting
juice from soft, firm and hard fruit.
It is best to use overripe fruit, as the
riper the fruit, the greater the quantity of
juice produced. Very ripe fruit will also
produce a more intense flavour.
Preparation
Sort and rinse the fruit, and cut out any
blemishes.
Remove the stalks from grapes and
morello cherries as these are bitter.
Berries do not need to have their stalks
removed.
Dice larger fruit such as apples into
approximately 2cm cubes. The harder
the fruit, the smaller the pieces should
be.
Useful tips
– Try experimenting with mild and tart
flavours. For example, mix apples
with elderberries.
– Adding sugar will increase the
quantity of juice produced and
improve the flavour. Sprinkle the fruit
with sugar and leave to absorb for a
few hours before juicing. For 1kg of
sweet fruit add 50–100g of sugar,
and for 1kg of tart fruit add 100–
150g of sugar.
– If you wish to bottle the juice rather
than consume it straight away, pour it
whilst hot into hot, sterilised bottles
up to the rim, and then seal
immediately with sterilised rubber
tops.
Extracting juice from fruit
Put the prepared fruit (cleaned,
washed, chopped etc.) into a
perforated cooking container.
Place a solid container or a glass tray
or condensate tray (depending on the
model) underneath to catch the juice.
Settings
Steam cooking
Temperature: 100°C
Duration: 40-70minutes

Other applications
113
Skinning fruit and vegetables
Cut a cross in the top of tomatoes,
nectarines etc. This will allow the skin
to be removed more easily.
Place the fruit/vegetables in a
perforated cooking container.
To blanch almonds, it is important to
plunge them into cold water as soon
as they are taken out of the oven as
otherwise the skin cannot be
removed.
Settings
Steam cooking
Temperature: 100°C
Duration: see chart
Produce [min.]
Apricots 1
Almonds 1
Nectarines 1
Capsicum 4
Peaches 1
Tomatoes 1
Duration
Preserving apples
You can treat homegrown apples in the
steam oven to increase the length of
time for which you can store them.
Once treated, the apples will keep for 5
to 6 months when stored in a dry, cool
and well-ventilated place. This method
is only suitable for apples and not for
other types of fruit.
Settings
Automatic programmes | Fruit | Apples |
Whole
or
Steam cooking
Temperature: 50°C
Preserving time: 5minutes
Preparing custard royale
Stir 6eggs into 375ml milk (do not
beat into a foam).
Season the egg/milk mixture and
pour into a solid cooking container
greased with butter.
Settings
Steam cooking
Temperature: 100°C
Duration: 4minutes

Rapid steam cooking
114
You can defrost, reheat and cook food with a combination of steam and
microwave power in the Rapid steam cooking function.
During the heating-up phase, the oven compartment is initially heated to the set
temperature using just steam power. As soon as this temperature is reached, the
microwave switches on so that the steam generator and magnetron are both
switched on throughout the entire cooking phase.
Just like cooking with steam only, the cooking duration does not begin until the set
temperature is reached.
The combined Rapid steam cooking function has a number of advantages,
including the following:
– Food takes less time to cook, as it cooks more quickly than using the steam
function alone
– Food will not overcook or dry out as it can with microwave power
– Food can be defrosted and reheated in a single process
– Food does not need to be stirred during the cooking process
Defrosting and reheating in the Rapid steam cooking function
[W] [min.] [°C] Container
Reheating plated meals
1, 2
Pasta with tomato sauce, 400g
(ratio 5:3)
300 7–8 90 Deep plate
Rissoles with mashed potato and
red cabbage, 450g
300 11 85 Deep plate
Defrosting and reheating
1, 2
Frozen casseroles/soups
250g
300 10–11 95 Bowl
Frozen casseroles/soups
500g
300 15–16 90 Bowl
Microwave power, Duration, Temperature
1
Do not use a cover.
2
Place the food in the glass tray on shelf level1.
Rapid steam cooking
115
Cooking new potatoes (firm)
Place the glass tray on shelf level1.
Place the washed new potatoes adjacent to each other in a perforated cooking
container.
Settings
Automatic programmes | Vegetables | Potatoes | New potatoes | Firm | ... | Rapid
steam cooking
or
Rapid st. cooking
Microwave power/Temperature: 80W + 100°C
Duration: see chart
Size of potatoes Quantity [min.]
Small (40–60g) 200g (4) 2 15
600g (12) 2 18
1000g (20) 2 21
Medium (90–110g) 200g (2) 2 18
600g (6) 2 21
1000g (10) 2 24
Large (140–160g) 300g (2) 2 22
600g (4) 2 25
900g (6) 2 29
Shelf level, Cooking duration

Rapid steam cooking
116
Cooking rice
Rice swells when cooked and needs to be cooked in liquid. The proportion of rice
to liquid will vary depending on the type of rice.
The rice absorbs all the liquid during the cooking process so that none of the
nutrients are lost.
Add the rice with the liquid in a solid cooking container.
Settings
Automatic programmes | Rice | ... | Rapid steam cooking
or
Rapid st. cooking
Microwave power/Temperature: see chart
Duration: see chart
Ratio
Rice : liquid
To add
[W]
[min.]
[°C]
Basmati rice 1 : 2 Salt 2 300 9 100
Parboiled rice 1 : 2 Salt 2 150 17 100
Milk rice 1 : 3
Sugar
1
2 150 21 100
Shelf level, Microwave power, Cooking duration, Temperature
1
Added after the cooking process.

Microwave defrosting and reheating
117
We recommend using the following microwave power levels to defrost or reheat
foods:
[W] Defrost
80 Very delicate food:
butter, cream and butter cream gateaux, cheese
150 All other types of food
Reheat
450 Food for babies and children
600 Various types of food;
frozen ready meals which do not need browning
850
1000 Drinks
Microwave power
The time required depends on the nature of the food, its initial temperature and the
amount to be cooked. The durations can be found in the charts on the following
pages.

Microwave defrosting and reheating
118
Defrost
Gentle defrosting of frozen goods
means that the vitamins and minerals
are generally retained.
Risk of infection from bacteria.
Bacteria such as salmonella can
cause life-threatening food
poisoning.
It is particularly important to observe
food hygiene rules when defrosting
fish and meat, and in particular when
defrosting poultry.
Do not use the liquid produced
during defrosting.
Process the food as required as soon
as it has been defrosted.
Useful tips
– Place the food to be defrosted on the
glass tray without its packaging. For
larger food quantities, place the
frozen goods in a microwave safe
container and place this onto the
glass tray.
– Frozen ready meals can be defrosted
and then heated at the same time.
Follow the instructions on the
packaging.
Defrosting frozen food
Only use heat-resistant containers
which are microwave safe.
Place the frozen food on the glass
tray and place on shelf level1.
If necessary, cover the frozen food.
Select Defrost.
Select Microwave and confirm with
OK.
Change the recommended power
level, if necessary, and confirm with
OK.
Change the defrosting duration, if
necessary, and confirm with OK.
Start will be highlighted.
Start the programme using the OK
sensor.
During defrosting:
Stir, turn or rearrange the food once
again. Stir the food from the outside
towards the middle, as food heats
more quickly from the outside.
During the standing time, the
temperature is distributed evenly in the
food.
After defrosting, allow the food to
stand at room temperature for a few
minutes to enable the heat to spread
evenly throughout the food.

Microwave defrosting and reheating
119
Alternative settings
Microwave
Microwave power: see chart
Defrosting chart: see chart
Standing time: see chart
Notes on the chart
Take note of the recommended
microwave power levels, durations and
standing times. These take the
consistency, the quantity and the initial
temperature of the food into account.
Selecting durations
You are generally advised to select a
duration in the middle of those given
in the chart.

Microwave defrosting and reheating
120
Defrosting in microwave mode
Frozen food Quantity
[W]
[min.]
[min.]
Stir/Turn/
Rearrange
Cover
Dairy products
Cream 250 ml 80 14 10–15
Every
5minutes
Yes
Butter 250 g 80 12–14 5–10
At the
halfway
stage
Yes
Cheese slices 250 g 80 6–7
10–15;
Fan out the
cheese
slices
After
3minutes
No
Milk 500 ml 150 22–23 5–10
Twice
every
7minutes
Yes
Cakes/Biscuits
Sand cake
(1slice)
100 g 150 1–2 5–10 – Yes
Sand cake
(1slice)
300 g 150 3–4 10–15
At the
halfway
stage
Yes
Fresh fruit cake
(3slices)
3x100g 150 9–10 10–15
After
5minutes
Yes
Butter cake
(3slices)
3x100g 150 5–6 10–15
At the
halfway
stage
Yes
Cream cake
(1slice)
100 g 80 3–4 10–15 – Yes
Cream cake
(3slices)
3x100g 80 5.5–6.5 10–15
At the
halfway
stage
Yes
Bread rolls (4) 4x
approx.
50g
150 4–5 5–10
At the
halfway
stage
No
Fruit
Strawberries,
raspberries
150 g 80 11–12 5–10
At the
halfway
stage
Yes

Microwave defrosting and reheating
121
Frozen food Quantity
[W]
[min.]
[min.]
Stir/Turn/
Rearrange
Cover
Red /
Blackcurrants
250 g 80 13–14 5–10
At the
halfway
stage
Yes
Plums 500 g 150 13–15 5–10
At the
halfway
stage
Yes
Meat
Minced beef 500 g
150
+
80
8–9
+
17–19
10–15
Twice
every
10minutes
No
Chicken 1000 g 150 25–28 10–15
Every
10minutes
No
Vegetables
Peas 250 g 150 9–10 5–10
At the
halfway
stage
Yes
Asparagus 250 g 150 11–12 5–10
After
5minutes
Yes
Beans 500 g 150 16–17 5–10
Twice
every
5minutes
Yes
Red cabbage (in
mini portions)
500 g 150 18–19 5–10
Twice
every
5minutes
Yes
Spinach (in mini
portions)
300 g 150 14–15 10–15
Twice
every
5minutes
Yes
Microwave power level, Defrosting duration, Standing time

Microwave defrosting and reheating
122
Reheat
It is essential that “Warning and Safety
instructions - Correct use” is observed.
Risk of injury caused by hot
food.
If food for babies and children is
heated at too high a temperature,
they can burn themselves.
Only heat food for babies and
children for 60–90seconds at 450W.
After heating food, especially food
for babies and small children, stir the
food or shake the container and
taste the food so that children do not
get burned.
Risk of injury from increased
pressure in sealed containers or
bottles.
Pressure can build up when
reheating food or drinks in sealed
containers, jars or bottles, which can
cause them to explode.
Never cook or reheat food or liquids
in sealed containers or bottles. Open
containers beforehand. In the case of
baby bottles, the screw top and teat
must be removed.
Risk of injury caused by hot liquids.
When heating food, and in particular
liquids, using the
Microwavefunction, the boiling
point may be reached without the
production of typical bubbles.
Liquids do not boil evenly
throughout.
This boiling delay can result in the
liquid boiling over explosively. Take
care when taking the container out of
the oven, as the hot liquid can cause
severe scalding. Under certain
circumstances, the pressure can be
so high that the door opens
automatically.
Stir liquids well before reheating or
cooking.
After heating, wait at least
20seconds before removing the
container from the oven.
In addition, a glass rod or similar
item, if available, can be placed in
the container during heating.

Microwave defrosting and reheating
123
Useful tips
– Always cover food when reheating it,
except when reheating beverages or
meat/fish coated in breadcrumbs.
– Please note that foods with an initial
temperature of approx.5°C
(refrigerated temperature) need
longer to heat up than those at room
temperature.
– If you are in any doubt that a
sufficiently high food temperature has
been reached, continue heating for a
little longer.
– Frozen ready meals can be defrosted
and then heated at the same time.
Follow the instructions on the
packaging.
Heating food
Only use heat-resistant containers
which are microwave safe.
Place the food that is to be heated in
the glass tray on shelf level 1.
If necessary, cover the food.
Select Reheat.
Select Microwave and confirm with
OK.
Change the recommended power
level, if necessary, and confirm with
OK.
Change the duration, if necessary,
and confirm with OK.
Start will be highlighted.
Start the programme using the OK
sensor.
During heating:
Stir, turn or rearrange the food once
again. Stir the food from the outside
towards the middle, as food heats
more quickly from the outside.

Microwave defrosting and reheating
124
Risk of burning due to hot
surfaces.
The steam oven gets hot during
operation. You could burn yourself
on the oven compartment, shelf
runners or accessories. Droplets of
water may have accumulated
underneath the crockery.
Use oven gloves when working in the
hot oven compartment and when
removing the crockery.
During the standing time, the
temperature is distributed evenly in the
food.
After heating, allow the food to stand
at room temperature for a few
minutes to enable the heat to spread
evenly throughout the food.
Alternative settings
Microwave
Microwave power: see chart
Duration: see chart
Standing time: see chart
Notes on the chart
Take note of the recommended
microwave power levels, durations and
standing times. These take the
consistency, the quantity and the initial
temperature of the food into account.
Selecting durations
You are generally advised to select a
duration in the middle of those given
in the chart.

Microwave defrosting and reheating
125
Reheating in microwave mode
Food Quantity
[W]
[min:s]
[min.]
Stir/Turn/
Rearrange
Cover
Drinks
1
Coffee, drinking
temperature 60–65°C
1 cup
(200ml)
1000 1:10–1:20 – Before
heating
No
Milk, drinking
temperature 60–65°C
1 cup/
mug
(200ml)
1000 1:20–1:30 – Before
heating
No
Water, bringing to the
boil
1 cup
(125ml)
1000 1:40–1:50 – Before
heating
No
Baby bottle (milk) Approx.
200ml
450 1:30–1:40 1 Before
serving
No
Mulled wine, grog,
drinking temperature
60–65°C
1 cup/
mug
(200ml)
1000 1:00–1:10 – Before
heating
No
Food
2
Baby food (room
temperature)
1 jar
(190g)
450 1:10–1:20 1 Before
serving
No
Cutlets, cooked 200 g 600 4:20–4:50 1 At the
halfway
stage
No
Fish fillet, cooked 200 g 600 3:50–4:20 1 At the
halfway
stage
No
Roast meat in gravy 200 g 600 4:50–5:20 1 At the
halfway
stage
Yes
Side dishes 250 g 600 3:40–4:10 1 At the
halfway
stage
Yes
Vegetables 250 g 600 3:50–4:20 1 At the
halfway
stage and
before
serving
Yes

Microwave defrosting and reheating
126
Food Quantity
[W]
[min:s]
[min]
Stir/Turn/
Rearrange
Cover
Gravy 250 g 600 4:10–4:40 1 At the
halfway
stage and
before
serving
Yes
Soup/Casserole
250 g 600 4:00–4:30 1 At the
halfway
stage and
before
serving
Yes
500 g 600 7:00–7:30 1 At the
halfway
stage and
before
serving
Yes
Microwave power level, Duration, Standing time
1
A boiling delay can be avoided by stirring liquids before reheating them. After heating, wait at least
20seconds before removing the container from the oven. In addition, a glass rod or similar item, if
available, can be placed in the container during heating.
2
The durations apply to food with an initial temperature of approx. 5°C. For food not normally
refrigerated, durations apply to food at room temperature of approx. 20°C. With the exception of
baby food and delicate whisked sauces, food should be heated to a temperature of 70–75°C.

Automatic programmes
127
The wide range of Automatic
programmes enable you to achieve
excellent results with ease.
Categories
The Automatic programmes are
sorted into categories to provide a
better overview. Simply select the
appropriate Automatic programme for
the type of food you are cooking and
follow the instructions in the display.
Using Automatic programmes
Select Automatic programmes.
A list will appear.
Select the desired food category (e.g.
Fish).
The Automatic programmes available
for the food type selected will then
appear.
Select the Automatic programme that
you want to use.
Follow the instructions in the display.
Usage notes
– The degree of cooking is represented
by a bar with seven segments. You
can set the desired degree of
cooking using the navigation area.
– The weights specified in the
Automatic programmes refer to the
weight per piece. For example, you
can cook just one piece of salmon
weighing 250g or 10 pieces of
salmon, each weighing 250g, at the
same time.
– The oven interior needs to be at room
temperature before starting an
Automatic programme.
– When you place food in the hot oven
compartment, be careful when
opening the door. Hot steam may
escape. Step back and wait until the
steam has dissipated. Avoid contact
with hot steam, and do not touch the
hot oven compartment walls. Danger
of burning and scalding.
– For some Automatic programmes the
start time can be delayed using Start
at or Finish at.
– Select the sensor to cancel an
Automatic programme. When Cancel
process? appears, select Yes and
confirm with OK.
– If by the end of an Automatic
programme the food is not cooked
enough, select Continue cooking.
– Automatic programmes can also be
saved as User programmes. To do this,
select the sensor after an
Automatic programme has finished.

User programmes
128
You can create and save up to 20 of
your own programmes.
– You can combine up to 9cooking
stages to accurately programme your
favourite or most frequently used
recipes. In each cooking stage, you
can select settings such as the
function, temperature and cooking
duration.
– You can enter the name of the
programme for your recipe.
When you call up and start your
programme the next time, it will run
automatically.
There are different ways of creating a
User programme:
– At the end of an Automatic
programme or Special application,
save it as a User programme.
– After running a programme with a set
duration, save it.
Then name the programme.
Creating a User programme
Select User programmes.
Select Create programme.
You can now specify the settings for the
first cooking stage.
Follow the instructions in the display:
Select and confirm the desired
settings.
Select Complete cooking stage.
All settings for the first cooking stage
have now been set.
You can add more cooking stages, for
example, if you want to add another
cooking function to follow on from the
first.
If additional cooking stages are
required, select Add cooking stage and
proceed as you did for the first
cooking stage.
If you want to check the settings or to
change them at a later date, select the
cooking stage in question.
When you have finished setting all the
cooking stages, select Save.
Enter the programme name.
Select .
A message will appear in the display
confirming that the new name has been
saved.
Confirm with OK.
You can start the saved programme
immediately, delay the start or change
the cooking stages.

User programmes
129
Starting a User programme
Place the food in the oven.
Select User programmes.
Select the required programme.
Select Allow.
Depending on the programme settings,
the following menu options will appear
in the display:
– Start now
The programme will start
immediately. The oven heating will
switch on immediately.
– Finish at
Specify the time at which the
programme should finish. The oven
heating will switch off automatically
at the time you have set.
– Start at
Specify the time at which you want
the programme to start. The oven
heating will switch on automatically
at the time you have set.
– Show cooking stages
A summary of your settings will
appear in the display.
Select the required menu option.
The programme selected will begin
straight away or at the time set.
At the end of the programme, select
the sensor.
Changing cooking stages
Cooking stages in an Automatic
programme that you have renamed as
a User programme cannot be
changed.
Select User programmes.
Select the programme you want to
change.
Select Change programme.
Select the cooking stage that you
want to change orAdd cooking stage
to add another cooking stage.
Select and confirm the desired
settings.
If you want to start the modified
programme without changing it,
selectStart programme.
SelectSave when you have changed
all the settings.
A message will appear in the display
confirming that the new name has been
saved.
Confirm with OK.
The saved programme has been
changed and you can start it
immediately or delay the start.

User programmes
130
Changing a name
Select User programmes.
Select the programme you want to
change.
Select Change name.
Change the programme name.
Select .
A message will appear in the display
confirming that the new name has been
saved.
Confirm with OK.
The programme has been renamed.
Deleting User programmes
Select User programmes.
Select the programme you want to
delete.
Select Delete programme.
Confirm the request with Yes.
The programme is deleted.
Go to Other| Settings| Factory
default| User programmes to delete all
User programmes at the same time.

Cleaning and care
131
Risk of injury caused by hot
surfaces.
The steam oven gets hot during
operation. You could burn yourself
on the oven compartment, shelf
runners or accessories.
Allow the oven compartment, shelf
runners and accessories to cool
before cleaning.
Risk of injury due to electric
shock.
The steam from a steam cleaning
appliance could reach electrical
components and cause a short
circuit.
Never use a steam cleaner for
cleaning.
All surfaces could be discoloured or
damaged if unsuitable cleaning
agents are used.
All surfaces of this appliance are
susceptible to scratching. Scratches
on glass surfaces could cause a
breakage in certain circumstances.
Only use cleaning agents designed
for domestic use.
Remove all cleaning agent residues
immediately.
Do not use cleaning agents or
washing-up liquids containing
aliphatic hydrocarbons as these
could cause the seals to swell.
Stubborn soiling could damage the
steam oven in certain circumstances.
Once the oven has cooled, clean the
oven compartment, the inside of the
door and the door seal. Waiting too
long can make cleaning
unnecessarily difficult and in some
cases impossible.
Operating a damaged appliance can
result in microwave leakage and
present a hazard to the user.
Check the door and door seal for any
sign of damage. If any damage is
noticed, the oven should not be used
again with microwave functions until
the fault has been rectified by a
service technician.
The appliance and accessories
should be cleaned and dried
thoroughly after each use.
Leave the appliance door open until
the oven interior is completely dry.
Useful tip: If the steam oven is not
going to be used for a longer period of
time, it should be thoroughly cleaned
and dried beforehand to prevent the
build-up of odours and so on. Leave the
door open afterwards.

Cleaning and care
132
Unsuitable cleaning agents
To avoid damaging the surfaces of your
appliance, do not use:
– cleaning agents containing soda,
alkalines, ammonia, acids or
chlorides
– cleaning agents containing descaling
agents
– abrasive cleaning agents, e.g.
powder cleaners and cream cleaners
– solvent-based cleaning agents
– stainless steel cleaning agents
– dishwasher cleaner
– glass cleaning agents
– cleaning agents for ceramic cooktops
– hard, abrasive brushes or sponges,
e.g. pot scourers, brushes or
sponges which have been previously
used with abrasive cleaning agents
– dirt erasers
– sharp metal scrapers
– steel wool or metal scourers
– stainless steel spiral pads
– spot cleaning with mechanical
cleaning agents
– oven cleaners and sprays
Cleaning the steam oven front
Clean the appliance front with a
clean, soft sponge and a solution of
warm water and washing-up liquid.
After cleaning, wipe the surfaces dry
using a soft cloth.
Useful tip: A clean, damp microfibre
cloth without cleaning agent can also
be used.
Cleaning the oven
compartment
The oven compartment, the door seal,
the inside of the door and the drip
channel should be cleaned and dried
after each use.
Remove:
– condensate using a sponge or
absorbent cloth,
– light, greasy soiling with a sponge
and a solution of washing-up liquid
and hot water.
After cleaning, wipe the surface with
clean water to remove any cleaning
agent residues.
Then wipe the surfaces dry using a
cloth.

Cleaning and care
133
Cleaning the Automatic door opener
Ensure that the door opener does
not become soiled with food
residues.
Wipe away soiling immediately with
a clean sponge and a solution of
washing-up liquid and hot water.
After cleaning, wipe the surface with
clean water to remove any cleaning
agent residues.
Cleaning the water container
Take out the water container after
each use involving steam.
Remove the spill guard.
Empty the water container.
Rinse the water container by hand
and then dry it to prevent limescale.
Refit the spill guard on the water
container. Make sure the spill guard
engages correctly.
Accessories
All accessories are dishwasher-safe.
Cleaning the glass tray, rack and
cooking containers
Wash and dry the glass tray, rack and
cooking containers after each use.
Any bluish discolouration on the
cooking containers can be removed
with vinegar. Rinse afterwards with
clean water.
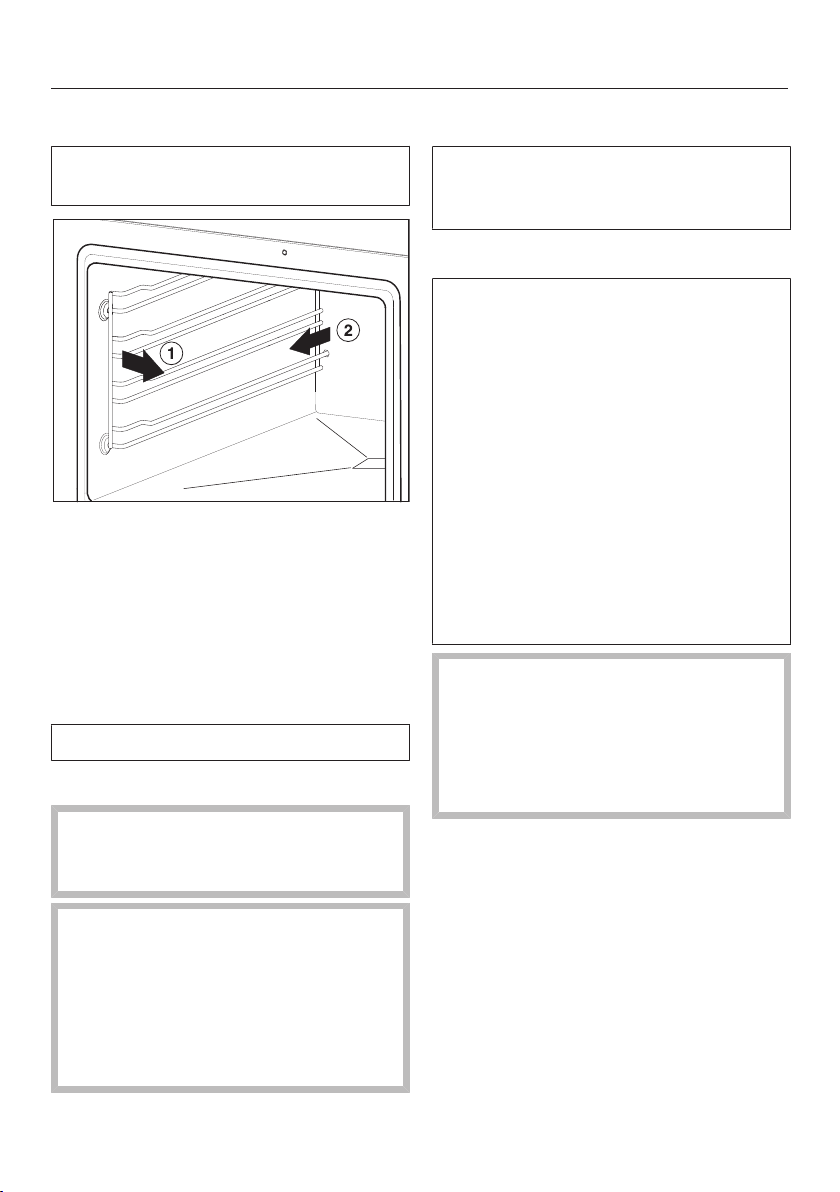
Cleaning and care
134
Cleaning the shelf runners
The shelf runners are suitable for
cleaning in a dishwasher.
Pull the runners out of the holder (1)
at the front of the oven and then pull
them out of the oven (2).
The shelf runners can be washed in
the dishwasher or by hand with a
solution of warm water and a little
washing-up liquid applied with a
clean sponge or cloth.
Refit in the reverse order.
Refit the shelf runners carefully.
If the shelf runners are not correctly
inserted, there is no anti-tip
protection.
The shelf runners are fitted in plastic
bushings. Check the bushings for
damage.
If the bushings are damaged, do not
use any functions involving
microwave power until the bushings
have been replaced.
Maintenance
The Finish at and Start at functions are
not available in maintenance
programmes.
Descaling the steam oven
We recommend using Miele descaling
tablets (see “Optional accessories”) to
descale the appliance. These have
been specially developed for use with
Miele appliances to optimise the
descaling process. Other descaling
agents, which contain other acids
besides citric acid and/or other
undesirable substances, such as
chlorides, could cause damage to the
product. Moreover, the descaling
result required could not be
guaranteed if the descaling solution
was not of the appropriate
concentration.
Do not spill descaling agent onto
metal surfaces. This can cause
marks to appear.
However, should any descaling
agent get onto these surfaces, wipe
it away immediately.
The steam oven has to be descaled
after a certain number of operating
hours. When the time comes to descale
it, the number of uses remaining lights
up in the display. Only cooking
processes that use steam are counted.
The appliance will lock after the last
remaining cooking process.
We recommend that you descale the
appliance before it locks out.

Cleaning and care
135
During the descaling process, the water
container must be rinsed out and
refilled with fresh water.
Switch the steam oven on and select
Other | Maintenance | Descale.
The message Please wait will appear on
the display. The descaling process is
being prepared. This may take several
minutes. As soon as the appliance is
ready, you will be prompted to fill the
water container.
Fill the water container with lukewarm
fresh tap water up to the level
marker and drop 2Miele descaling
tablets in it.
Wait until the descaling tablets have
dissolved.
Push the water container into the
appliance.
Confirm with OK.
The time remaining will appear in the
display. The descaling process will now
begin.
Do not switch the steam oven off
during the descaling process,
otherwise the whole process will have
to be started from the beginning
again.
During the course of the descaling
process, the water container needs to
be rinsed and filled with fresh water
twice.
Follow the instructions in the display.
Confirm each with OK.
Once the time remaining has elapsed,
Finishedwill appear in the display and a
buzzer will sound.
Switch the steam oven off.
Remove the water container and
remove the spill guard.
Empty and dry the water container.
Let the oven cavity cool down.
Then dry the oven compartment.
Leave the appliance door open until
the oven interior is completely dry.
Soak
Stubborn soiling can be soaked using
this maintenance programme.
Let the oven cavity cool down.
Remove all accessories from the
oven.
Remove coarse soiling with a cloth.
Fill the water container.
Select Other | Maintenance | Soak.
The soaking process takes approx.
10minutes.

Problem solving guide
136
With the help of the following guide, minor faults in the performance of the
appliance, some of which may result from incorrect operation, can be remedied
without contacting Miele. This will save you time and money because you won't
need a service call.
Please note that a call-out charge will be applied to unnecessary service visits
where the problem could have been rectified as described in these operating
instructions.
Problem Possible cause and remedy
You cannot switch the
appliance on.
The circuit breaker has tripped.
Reset the circuit breaker in the mains fuse box
(see data plate for minimum fuse rating).
There may be a technical fault.
Disconnect the appliance from the mains
connection for approximately 1minute by:
– switching off at the wall socket and withdrawing
the plug, or
– switching off the mains circuit breaker or residual
current device.
If, after switching the circuit breaker or residual
current device back on, the steam oven will still
not switch on, contact a qualified electrician or
Miele.
The oven does not heat
up.
Demo mode is active.
The steam oven can be operated, however the
heating elements will not work.
Deactivate Demo mode (see “Settings -
Showroom programme”).
The oven cavity has been warmed up by a warming
drawer in operation underneath it.
Open the door and let the oven cool down.

Problem solving guide
137
Problem Possible cause and remedy
The sensors do not
respond.
You have selected the Display| QuickTouch| Off setting.
Therefore, when the steam oven is switched off, the
sensors do not respond.
As soon as the steam oven is switched on, the
sensors will respond. If you want the sensors to
always respond even when the steam oven is
switched off, select the Display| QuickTouch|
Onsetting.
The steam oven is not connected to the power
supply.
Check that the steam oven plug is correctly
inserted into the socket.
Check if the circuit breaker has tripped. Contact a
qualified electrician or Miele.
There is a fault with the control unit.
Touch and hold the On/Off sensor until the
display switches off and the steam oven restarts.
The fan can still be
heard after the
appliance has been
switched off.
The fan is still running.
The appliance is fitted with a fan which removes
steam from the oven. The fan will continue to run for
a while after the appliance has been switched off. It
will switch itself off automatically after a while.
A humming sound can
be heard after switching
on the appliance, during
operation and after
switching off the
appliance.
This is not a fault. It is made by water being pumped
through the system.
After moving house, the
appliance no longer
switches from the
heating-up phase to the
cooking phase.
Altitude affects the boiling point of water. If you move
house, the appliance will need to be reset for the new
altitude if this differs from the old one by more than
300m.
To adjust the boiling temperature, you need to
descale the steam oven (see “Cleaning and care –
Descaling the steam oven”).

Problem solving guide
138
Problem Possible cause and remedy
During operation an
unusually large amount
of steam escapes or
steam escapes from
parts of the steam oven
where it does not
usually.
The door is not properly closed.
Close the door.
The door seal is not correctly fitted.
If necessary, press it in all the way round the door
to make sure it is fitted evenly.
The door seal is damaged, e.g. cracked.
The door seal needs to be replaced.
Call Miele.
Do not use any microwave functions until the door
seal has been replaced.
A whistling sound is
heard when the
appliance is switched
on again.
When the door is closed, the pressure has to
equalise, which can cause a whistling sound. This is
not a fault.
The Start at and Finish at
functions are not
available.
The temperature in the oven compartment is too high,
e.g. after a programme has finished.
Open the door and let the oven cool down.
These functions are not generally available in
maintenance programmes.
After long cooking
cycles with microwave
power , there are
high levels of moisture
in the cavity.
The steam oven with microwave is a fully fledged
steam oven. The cavity is therefore completely
steam-tight. In contrast, a conventional microwave
oven is not air-tight. As a result of the steam-tight
cavity, during long cooking cycles with microwave
power , condensate will develop on the side walls
and the inner door panel. The quantity of condensate
depends on the cooking duration and the level of
moisture in the food.

Problem solving guide
139
Problem Possible cause and remedy
The food is not
sufficiently heated or is
not cooked at the end
of a set duration when
using the
Microwave function.
The oven was not restarted after interrupting a
cooking programme.
Restart the cooking programme to ensure the food
is heated or cooked properly.
When cooking or heating with microwave power, the
duration set was too short.
Check that the correct duration is selected for the
microwave power level. The lower the microwave
power level, the longer the cooking duration.
With a very small amount of food, the steam oven
automatically reduces the power level to suit the
actual amount of food as a safety precaution. The
display still shows the previously set initial power
level.
Restart the programme with a lower microwave
power level to ensure the food is heated or cooked
properly.
Food has cooled down
too quickly after being
heated or cooked using
the Microwave
function.
When cooked by microwaves, food begins to cook
from the outside first, the inside of the food relying on
the slower conduction of heat. If food is cooked at a
high microwave power level, it is possible that the
heat may not have reached the centre of the food, so
it is hot on the outside but cold in the centre. During
the standing time, the heat is transferred to the centre
of the food.
When reheating food with different densities, such
as with menu cooking, it is sensible to start with a
low microwave power level and select a longer
reheating duration.
Less than half of the
popcorn has popped
when using the
Popcorn function.
The oven interior was too warm and/or too damp.
Allow the oven compartment to cool and/or dry it
with a towel.
The cooking duration was too short.
Change the preset time. The maximum cooking
duration that can be set is 4minutes (see “Settings
– Popcorn”).
The oven lighting
doesn't come on.
The lamp needs to be replaced.
Call Miele to have the lamp replaced.

Problem solving guide
140
Problem Possible cause and remedy
F44 Communication fault.
Switch the steam oven off and then back on again
after a few minutes.
If the same message appears again, call Miele.
F and other fault codes Technical fault.
Switch the appliance off and call Miele.

Optional accessories
141
Miele offers a range of useful
accessories, as well as cleaning and
conditioning products for your
appliance.
These products can be ordered from
the Miele online shop.
They can also be ordered directly from
Miele (see end of this booklet for
contact details).
Containers
Miele offers a wide range of cooking
containers. These have all been
optimised in terms of functionality and
dimensions for Miele appliances.
Detailed information on each of our
products can be found on the Miele
website.
The cooking containers provided and
the rack are not suitable for use with
the Microwave function.
– Perforated cooking containers in
various sizes
– Solid cooking containers in various
sizes
Cleaning and care products
– Descaling tablets
– All purpose microfibre cloth
for removing finger marks and light
soiling
Other
The rack is not suitable for use with
the Microwavefunction.
– Rack
– Glass tray

Service
142
Contact in case of fault
In the event of any faults which you
cannot remedy yourself, please contact
Miele.
Contact information for Miele can be
found at the end of this booklet.
Please quote the model and serial
number of your appliance when
contacting Miele. This information can
be found on the data plate.
The data plate is visible on the front
frame of the oven, with the door fully
open.
Warranty
The manufacturer's warranty for this
appliance is 2years.
For further information, please refer to
your warranty booklet.

Installation
*
I
N
S
T
A
L
L
A
T
I
O
N
*
143
Safety instructions for installation
Risk of damage from incorrect installation.
Incorrect installation can cause damage to the steam oven.
The steam oven must only be installed by a qualified person.
The connection data (frequency and voltage) on the steam oven’s
data plate must correspond with those of the electricity supply in
order to ensure that no damage can occur to the steam oven.
Compare this data before connecting the appliance. If in any doubt,
consult a qualified electrician.
Multi-socket adapters and extension leads do not guarantee the
required safety of the appliance (fire hazard). Do not use them to
connect the steam oven to the power supply.
The socket and on-off switch should be easily accessible after the
steam oven has been installed.
The steam oven must be positioned so that you can see the
contents of a cooking container placed on the top shelf level.
Otherwise there is a risk of injuries or spillages of hot food.
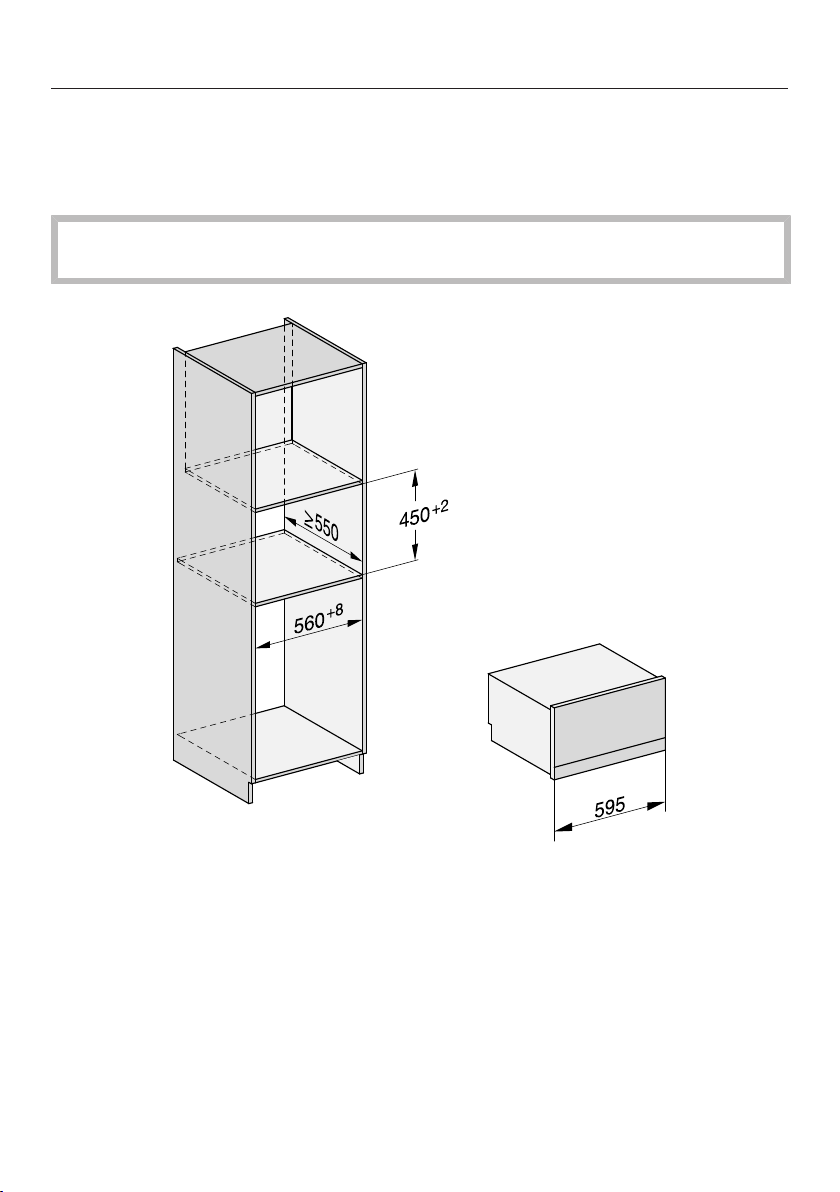
Installation
*
I
N
S
T
A
L
L
A
T
I
O
N
*
144
Building-in dimensions
All dimensions are given in mm.
Installation in a tall unit
The furniture housing unit must not have a back panel fitted behind the
building-in niche.
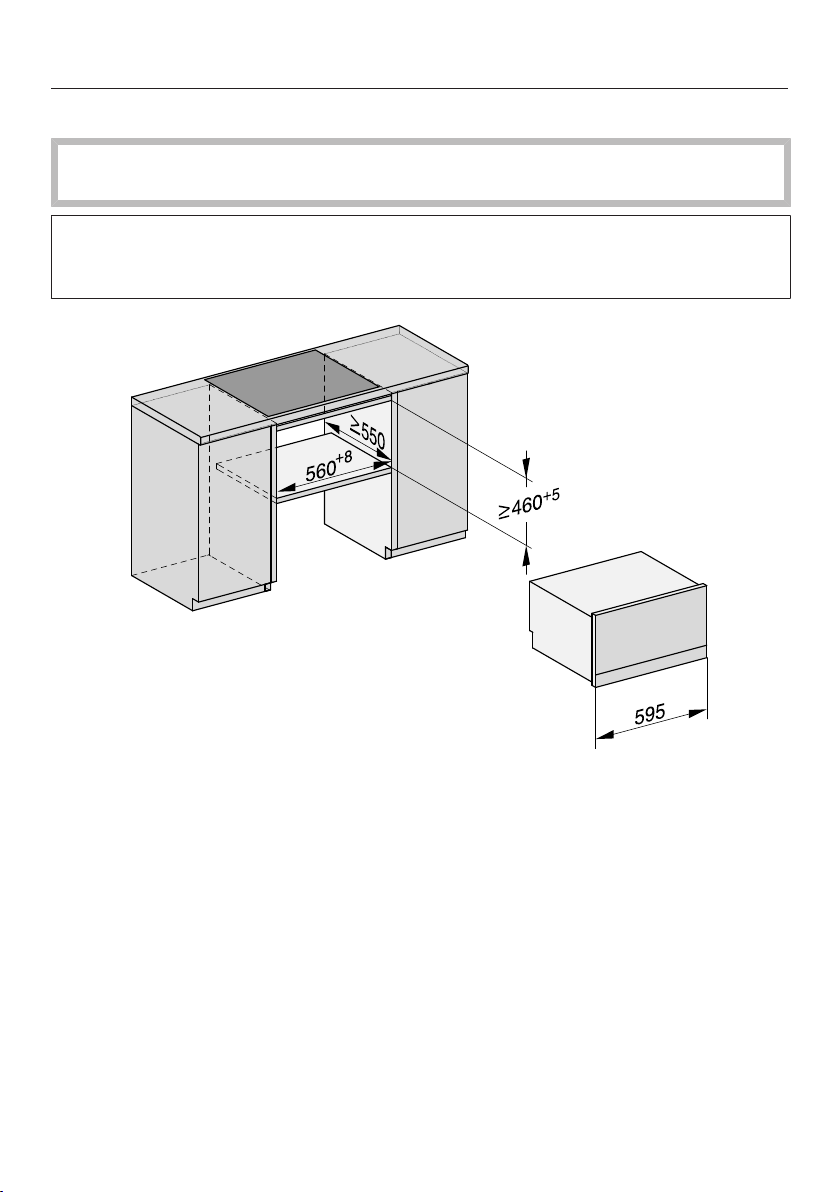
Installation
*
I
N
S
T
A
L
L
A
T
I
O
N
*
145
Installation in a base unit
The furniture housing unit must not have a back panel fitted behind the
building-in niche.
If the steam oven is to be installed in a base unit underneath an electric or
induction cooktop, please also observe the installation instructions for the
cooktop as well as the building-in height required for the cooktop.
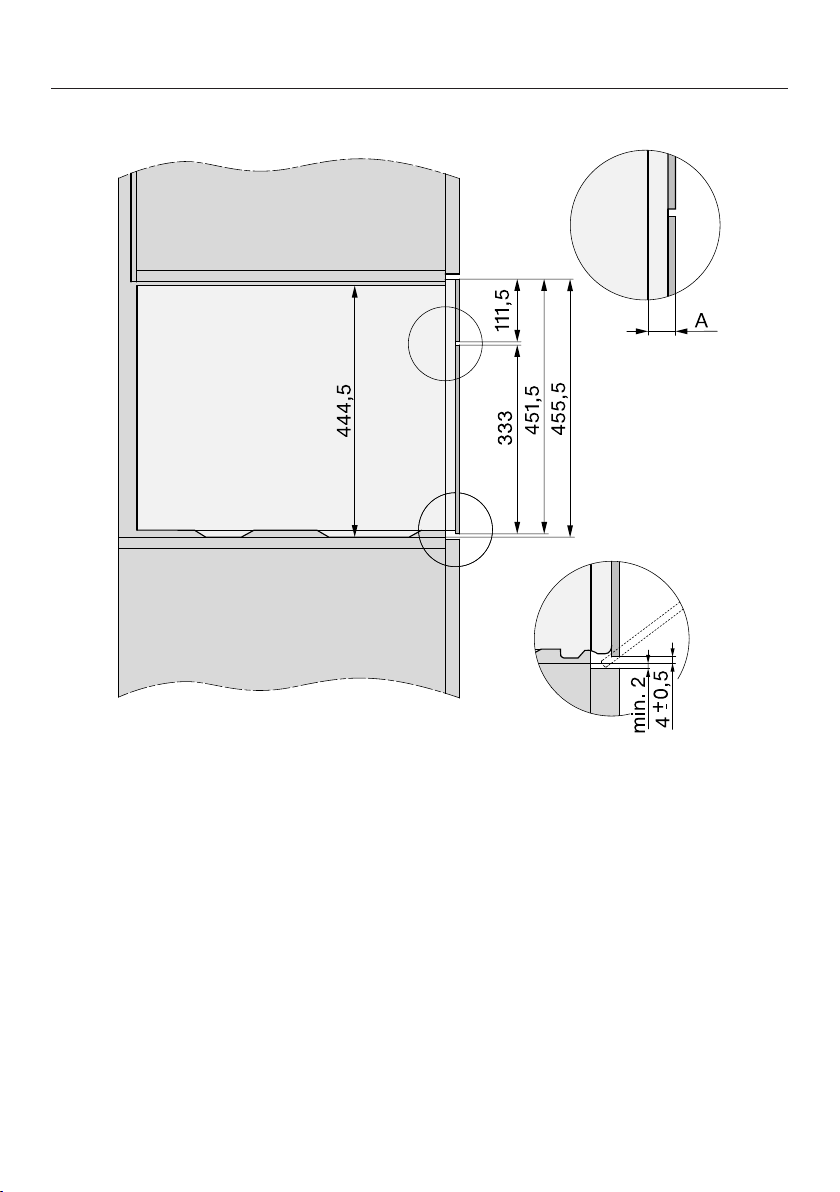
Installation
*
I
N
S
T
A
L
L
A
T
I
O
N
*
146
Side view
A Glass front: 22mm
Metal front: 23.3mm
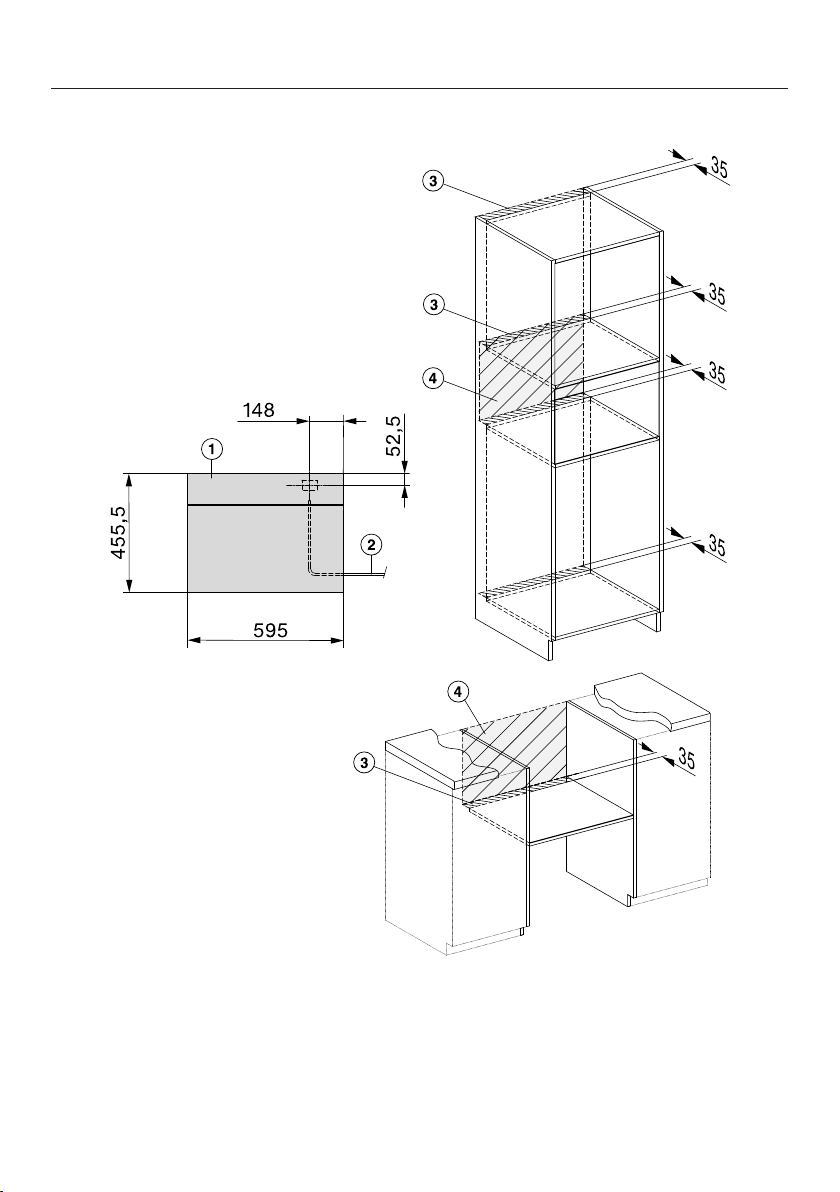
Installation
*
I
N
S
T
A
L
L
A
T
I
O
N
*
147
Connection and ventilation
a
Front view
b
Mains connection cable, L = 2000 mm
c
Ventilation cut-out, min. 180cm
2
d
No connections permitted in this area
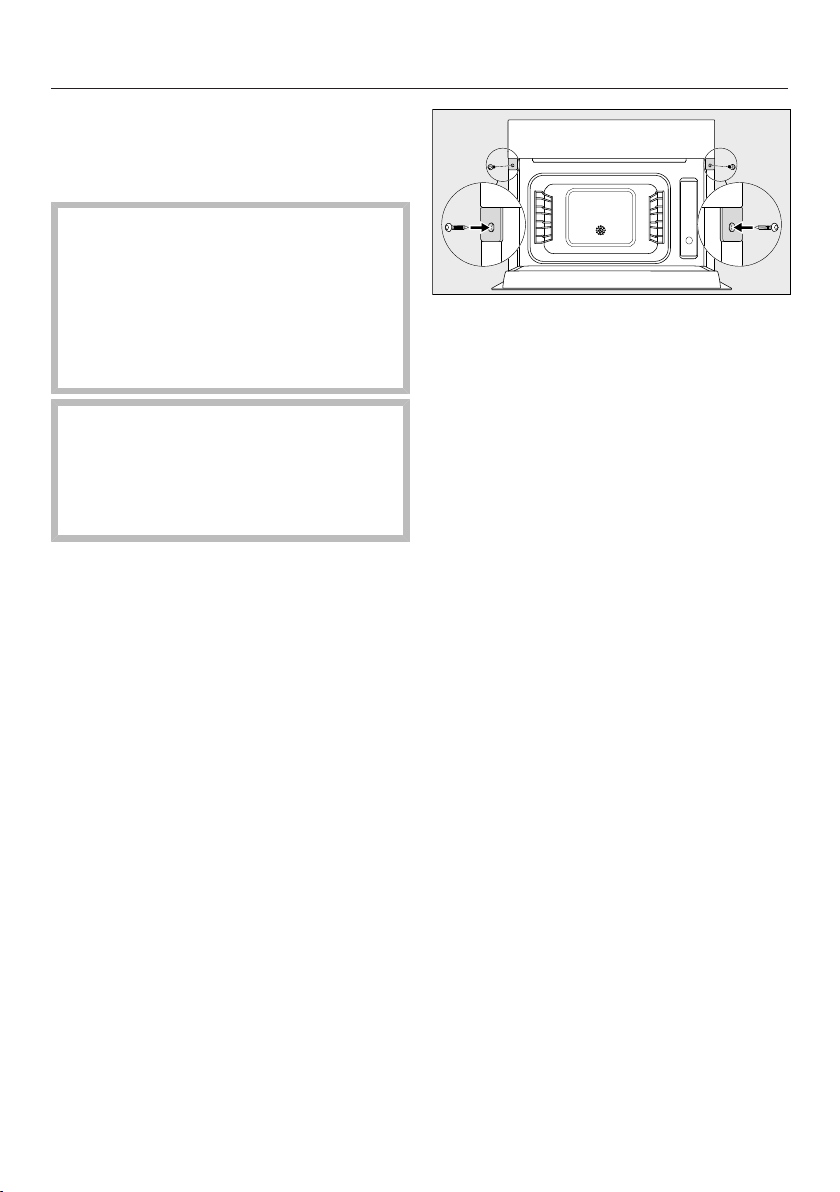
Installation
*
I
N
S
T
A
L
L
A
T
I
O
N
*
148
Installing the steam oven
Connect the mains connection cable
to the appliance.
Risk of damage from incorrect
transportation.
Lifting the steam oven by the door
handle could cause damage to the
door.
Use the handle cut-outs on the side
of the casing to lift the appliance.
The steam generator may
malfunction if the steam oven is not
on a level surface.
The maximum deviation from the
horizontal that can be tolerated is 2°.
Push the steam oven into the housing
unit and align it.
When doing so, make sure that the
mains connection cable does not get
trapped or damaged.
Open the door.
Secure the steam oven to the side
walls of the unit using the wood
screws supplied (3.5x25mm).
Connect the appliance to the mains
electricity supply.
Check the appliance for correct
function in accordance with the
operating instructions.

Installation
*
I
N
S
T
A
L
L
A
T
I
O
N
*
149
Electrical connection
We recommend that you connect the
steam oven to the electricity supply
using a suitable switched electrical
socket. This simplifies servicing. The
socket must be easily accessible after
the steam oven has been installed.
Risk of damage from incorrect
connection.
Danger of injury! Miele cannot be
held liable for unauthorised
installation, maintenance and repair
work as this can be dangerous to
users.
Miele cannot be held liable for
damage or injury (e.g. electric shock)
caused by the lack of or inadequacy
of an on-site earthing system.
If the plug is removed from the
connection cable or if the cable is
supplied without a plug, the steam
oven must be connected to the
electrical supply by a suitably
qualified and competent electrician.
If the socket is no longer accessible,
or if a hard-wired connection is
planned, an additional means of
disconnection must be provided for
all poles. Suitable means of
disconnection include switches with
an all-pole contact gap of at least
3mm. These include miniature circuit
breakers, fuses and relays. The
connection data is given on the data
plate. Please ensure this information
matches the household mains
electricity supply.
After installation, ensure that all
electrical components are shielded
and cannot be accessed by users.
Total power output
See data plate.
Connection data
The connection data is given on the
data plate. Please ensure this
information matches the household
mains supply.
Residual current device
For extra safety, it is advisable to
protect the steam oven with a suitable
residual current device (RCD) with a trip
range of 30mA.
Replacing the mains connection
cable
If replacing the mains connection cable,
it must be replaced with a cable type
H05VV-F, available from Miele.
Disconnecting from the mains
Risk of electric shock!
There is a risk of electric shock if the
appliance is connected to the mains
electricity supply during repair or
service work.
After disconnection, ensure the
appliance cannot be switched back
on by mistake.


www.miele.com.au
Miele Experience Centre and
Head Office Melbourne:
1 Gilbert Park Drive
Knoxfield, VIC 3180
Miele Experience Centre South Melbourne:
206-210 Coventry Street
South Melbourne, VIC 3205
Miele Experience Centre and Office Sydney:
3 Skyline Place
Frenchs Forest, NSW 2086
Miele Experience Centre and Office Brisbane:
Tenancy 4C, 63 Skyring Terrace
Newstead, QLD 4006
Miele Experience Centre and Office Perth:
83-85 Sir Donald Bradman Drive
Hilton, SA 5033
205-207 Stirling Highway
Claremont, WA 6010
Miele Experience Centre and Office Adelaide:
Miele Australia Pty. Ltd.
Miele New Zealand Limited
Level 2, 10 College Hill
Freemans Bay, Auckland 1011
Miele Experience Centre
Auckland:
8 College Hill
Freemans Bay, Auckland 1011
Telephone:
0800 464 353 (0800 4 MIELE)
www.miele.co.nz
Miele Global Headquarters
Germany
Miele & Cie. KG
Carl-Miele-Straße 29
33332 Gütersloh
Federal Republic of Germany
Head Office:
IRD 98 463 631
ACN 005 635 398
ABN 96 005 635 398
Miele Experience Centre Gold Coast:
131 Ferry Road
Southport, QLD 4215

M.-Nr. 11 234 160 / 00en-AU, NZ
DGM7340, DGM7440