Loading ...
Loading ...
Loading ...
4
7. Das Gerät vollständig in den Ausschnitt einsetzen.
8. Die Schienen zum Boden hin ausrichten und
seitlich befestigen .
→Abb.
7
9. Die Schienen am Schrankboden festschrauben.
→Abb.
8
10.Den Lüfterkasten und das Gehäuse verschrauben.
→Abb.
9
11.Die nicht benötigten Öffnungen für die Auffangbe-
hälter zukleben.
→Abb.
10
12.Je nach Einbausituation den Kunststoffstutzen
festschrauben.
→Abb.
11
13.Je nach Einbausituation die Abdeckbleche und
die Haltewinkel festschrauben.
→Abb.
12
14.Je nach Einbausituation den Lüfterkasten fest-
schrauben.
→Abb.
13
15.Die Auffangbehälter einsetzen und einrasten.
16.Die Verrohrung herstellen, siehe Installationsanlei-
tung des Geräts.
Am versetzbaren Lüfterkasten die Verrohrung mit
einem Flachkanal herstellen.
17.Am Gerät die Kabel mit den Verlängerungskabeln
verbinden und am Lüfterkasten einstecken.
→Abb.
14
→Abb.
15
en
General information
¡ Read this instruction manual carefully.
¡ Keep the instruction manual and the
product information safe for future refer-
ence or for the next owner.
¡ The appliance can only be used safely if it
is correctly installed according to the
safety instructions. The installer is re-
sponsible for ensuring that the appliance
works perfectly at its installation location.
¡ This instruction manual is intended for the
installer of the optional accessory.
¡ Only a licensed expert may connect the
appliance.
¡ Switch off the power supply before carry-
ing out any work.
Safe installation
WARNING‒Risk of suffocation!
Children may put packaging material over their
heads or wrap themselves up in it and suffocate.
▶
Keep packaging material away from children.
▶
Do not let children play with packaging material.
WARNING‒Risk of injury!
Components inside the appliance may have sharp
edges.
▶
Wear protective gloves.
Included with the appliance
After unpacking all parts, check for any damage in
transit and completeness of the delivery.
→Fig.
1
→Fig.
2
Installing the movable fan box
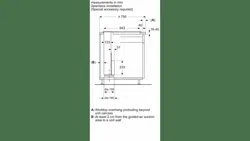
Requirement:In order to freely access the fan box
for servicing, select an easy-to-reach installation site.
1. On the hob cover, seal the openings for the drip
tray that are not required.
→Fig.
3
Note:Use the hob cover from the scope of deliv-
ery for the optional accessory.
2. Screw the covering plate in tightly, depending on
the installation situation.
→Fig.
4
Note:To ensure that the appliance is not yet fully
inserted into the cut-out, place a slat below the
short side of the appliance in each case.
4. Insert the appliance into the cut-out in the worktop
from above.
→Fig.
5
Insert the appliance evenly so that it is not tilted.
5. Slide the placeholders for the fan box into the
guides and screw them in tightly.
→Fig.
6
6. Support the appliance from below and remove the
slats.
7. Insert the appliance fully in the cut-out.
8. Align the rails to the bottom and attach to the
side .
→Fig.
7
9. Screw the rails onto the bottom of the unit.
→Fig.
8
10.Screw in the fan box and the housing.
→Fig.
9
11.Seal the openings for the drip tray that are not re-
quired.
→Fig.
10
12.Tighten the plastic fittings depending on the in-
stallation situation.
→Fig.
11
13.Depending on the installation situation, screw the
covering sheets and the angle brackets in tightly.
→Fig.
12
14.Screw the fan box firmly back in place depending
on the installation situation.
→Fig.
13
15.Insert the drip tray and snap it into place.
16.Establish the pipework, see the installation instruc-
tions for the appliance.
On the movable fan box, establish the pipework
using a flat duct.
17.Connect the cable on the appliance with the ex-
tension cables and plug in the fan box.
→Fig.
14
→Fig.
15
sv
Allmänna anvisningar
¡ Läs igenom anvisningen noga.
¡ Förvara bruksanvisningen och produktin-
formationen för senare användning eller
till nästa ägare.
¡ Säker användning av enheten kräver fack-
mässig montering enligt monteringsanvis-
ningen. Installatören ansvarar för en felfri
funktion på uppställningsplatsen.
¡ Anvisningen riktar sig till den som monte-
rar extratillbehöret.
Loading ...
Loading ...
Loading ...