User Manual Vizio VM190XVT Televisions
Chapter 1 Setting Up Your HDTV
Attaching the TV Stand
Unpack the TV and stand base:
- Remove the remote control, batteries, base, and AC/DC power adapter.
- Remove the TV from the box and lay it face down on a clean, flat surface.
Note: Make sure that the surface is free of debris to prevent the TV screen from getting scratched.
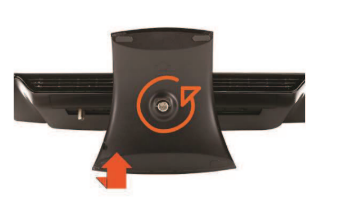
Attach the TV stand base:
- Push the stand base onto the stand neck (already connected to TV) making sure the arrow on the base points toward the front of the TV.
On the bottom of the base, tighten the wing screw. Move the TV into an upright position. 
Wall Mounting Your HDTV
Your HDTV can be mounted on the wall for viewing. If you choose to mount your HDTV on the wall, follow the instructions below.
1. Write down the serial number located on the back of your HDTV in the space provided on page 1 to have it handy if you need to call for support.
2. Remove the stand base and neck:
a. Disconnect the cables from your HDTV.
b. Place your HDTV face down on a soft, flat surface to prevent damage to the screen.
c. Flip the base 90 degrees.In this manner, the stand neck will be out of view after the base is removed.
d. Loosen the wing screw and remove the stand base.
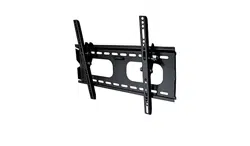
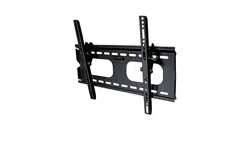
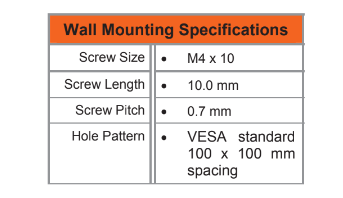
3. Mount your HDTV on the wall:
a. Attach your HDTV to a wall mount (sold separately) using the mounting holes in the back panel of your HDTV (see illustration at the right).
b. Read the instructions that came with your specific wall mount to properly hang your HDTV.
Chapter 3 VIZIO Remote Control
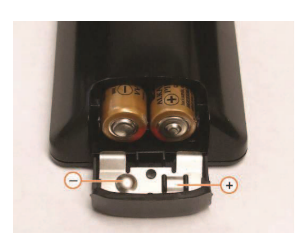
Installing the Batteries
- Remove the battery cover.
- Insert two AAA batteries into the remote control. Make sure that you match the (+) and (-) symbols on the batteries with the (+) and (-) symbols inside the battery compartment.
- Replace the battery cover.
Precautionary Tips for Inserting the Batteries:
- Only use Alkaline AAA batteries.
- Do not mix new and old batteries. This may result in cracking or leakage that may cause a fire or lead to personal injury.
- Inserting the batteries incorrectly may also result in cracking or leakage that may cause a fire or lead to personal injury.
- Dispose of batteries according to local hazardous waste regulations. x Keep the batteries away from children and pets.
Remote Control Range
- Point the remote control directly at this sensor for the best response to the remote signal.
- Do not place any obstacles between the remote control and the remote control sensor.
- The effective range of the remote control is approximately 22 feet (7 meters) from the front of the remote control sensor, 30° to the left and right, 20° up and down.
VIZIO Remote Control Precautions
- The remote control should be kept dry and away from heat sources. Avoid humidity.
- If the TV responds erratically to the remote control or does not respond at all, check the batteries. If the batteries are low or exhausted, replace them with fresh batteries.
- When not using the remote control for a long period of time, remove the batteries.
- Do not take the batteries apart, heat them, or throw them into a fire.
- Do not subject the remote control to undue physical stress, such as striking or dropping it.
- Do not attempt to clean the remote control with a volatile solvent. Wipe it with a clean, damp cloth.
Chapter 4 Getting Started
Your HDTV has a built-in setup App that runs when you turn on your TV for the first time. Follow the on- screen directions to easily setup your new HDTV.
- Insert the batteries into the remote control.
- Connect the power cord to the power cord connector on the back of your HDTV, and then plug the AC-DC Power Block into an AC wall socket.
- Connect your devices to your HDTV (see Chapter 2 for detailed steps).
- Turn on your TV. The Setup App will automatically play and guide your thru the initial setup of your HDTV. Use the Arrow and OK buttons to navigate through the setup App. During the setup process you will:
- Choose your Menu language
- Set the TV to Home Mode for the best picture and most efficient energy useage.
- Set your Time Zone and Daylight Savings preferences
- Add your TV channels (unless you have a Cable/Satellite Set-Top Box)

Chapter 5 Using your HDTV for the first time
Watching a TV Program
Before you start watching TV, please make sure that any cable, satellite or off-air antenna connections are secure. Also, verify that the AC/DC power adapter is plugged into a correctly grounded electrical outlet or surge protector.
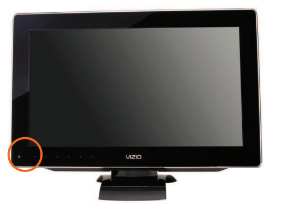
1. Press the power button on the remote control. The VIZIO logo on the front will light up white.
2. Select the input to which your device is connected that provides TV programming (i.e. TV, HDMI, COMP).
Note: You should be able to see a picture. If you do not, make sure that all of your HDTV connections are secure and you have selected the correct video input source. Each press of the INPUT button on the remote control will cycle through the available inputs. Press the button until the input associated with the device you want to view is shown.
3. When using the TV input, press the channel buttons on the remote control or the CH Ÿ or ź buttons to change the channel. The Channel buttons and on the remote, control will not work if you are watching a program using HDMI, Component, or AV (S-Video or Composite) inputs.
Chapter 6 Connecting Equipment
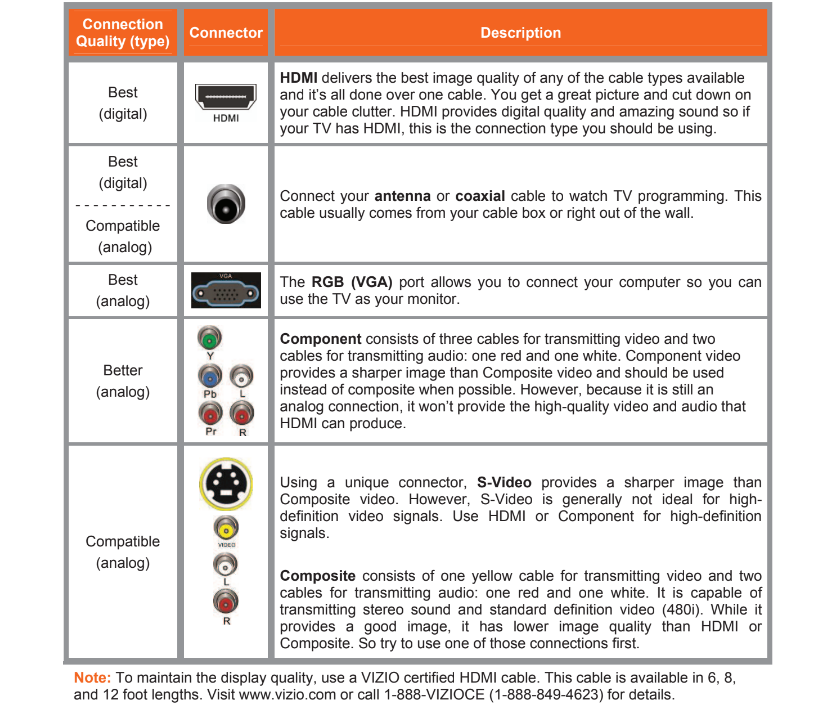
Which Video Connection Should I Use ?
You have six options for connecting your video equipment box to your HDTV from a basic connection to the most advanced for digital displays. Based on your Home Theater configuration, you can decide which option is the right one for you.
Connecting Your Cable or Satellite Box
Using HDMI (Best)

Cable and Satellite Boxes that have a HDMI digital interface should be connected using HDMI for optimal results. To maintain image quality, use a VIZIO certified HDMI cable. This cable is available in 6, 15, and foot lengths. See www.VIZIO.com or call 877-MYVIZIO (877-698-4946) for details.
- Turn off your HDTV and Cable/Satellite Box.
- Connect an HDMI cable to the HDMI output of your HDTV Set-Top Box and the other end to the HDMI 1 or HDMI 2 input on your HDTV.
- Turn on the power to your HDTV and your Cable/Satellite Box.
- Select HDMI-1 or HDMI-2 using the INPUT button on the remote control, or directly by pressing the HDMI button on the remote control.
Note:
- The HDMI input on your HDTV supports High-bandwidth Digital Content Protection (HDCP). HDCP encrypts the transmission between the video source and the digital display for added security and protection.
- Refer to your Cable/Satellite Set-Top Box user manual for more information about the video output requirements of the product or consult your cable or satellite operator.
HDMI Connections for Cable or Satellite Boxes with DVI

- Turn off the power to your HDTV and HDTV Set-Top Box.
- Using a HDMI-DVI cable, connect the DVI end to your HDTV Set-Top Box and the HDMI end to the HDMI 2 input on your HDTV.
- Using an audio cable, connect the cable to the audio output connectors associated with the DVI output on your HDTV Set-Top Box and connect the other end to the audio connectors associated with the HDMI input on your HDTV.
- Turn on the power to your HDTV and your Cable/Satellite Box.
- Select HDMI-2 using the INPUT button on the remote control, or directly by pressing the HDMI button on the remote control.
Using Component Video (Better)

- Turn off your HDTV and Cable/Satellite Box.
- Connect the component cables (green, blue, and red) from your Cable/Satellite Box to the COMPONENT jacks on your HDTV.
- Connect the audio cables (white and red) from your Cable/Satellite Box to the COMPONENT L and R Audio jacks on your HDTV.
- Turn on your HDTV and Cable/Satellite Box.
- Select Comp using the INPUT button on the remote control, or directly by pressing the COMP button on the remote control.
Using S-Video (Better)

- Turn off your HDTV and Cable/Satellite Box.
- Connect the S-VIDEO cable from your Cable/Satellite Box to the S-VIDEO jack on your HDTV.
- Connect the audio cables (white and red) on your Cable/Satellite Box to the corresponding L and R AUDIO jacks on your HDTV.
- Turn on your HDTV and Cable/Satellite Box.
- Select AV using the INPUT button on the remote control, or directly by pressing the AV button on the remote control.
Using Composite Video (Compatible)

- Turn off your HDTV and Cable/Satellite Box.
- Connect the video cable (yellow) from your Cable/Satellite Box to the AV jack (yellow) on your HDTV.
- Connect the audio cables (white and red) from your Cable/Satellite Box to the corresponding L and R AUDIO jacks on your HDTV.
- Turn on your HDTV and Cable/Satellite Box.
- Select AV using the INPUT button on the remote control, or directly by pressing the AV button on the remote control.
Using Coaxial (Antenna) (Compatible)

- Turn off the power to your HDTV.
- Connect the coaxial (RF) connector from your Cable Set-Top Box or Satellite Set Top Box to the DTV/TV connector on your HDTV.
- Turn on the power to your HDTV.
- Select TV using the INPUT button on the remote control, or directly by pressing the TV button on the remote control.
- Perform an Auto Channel scan. See Adjusting Your HDTV/TV Settings for more information.
Chapter 7 Viewing pictures
Connect a USB flash drive to the USB port on your HDTV to view photos.
- USB drives that are USB 2.0 and FAT or FAT32 are supported. The USB Port does not support external hard drives or USB hubs.
- If your USB drive is oversized and does not physically fit in the USB port, use a USB extension cable. Connect one end of the cable to your USB drive and the other end to the USB port.
- Supported file extensions include .jpg and .jpeg.
Note: Even the supported format files listed above may or may not play properly or completely, depending on the USB device, bit rate stream, and other content characteristics, as well as other factors.
Chapter 8 Adjusting Your HDTV Settings
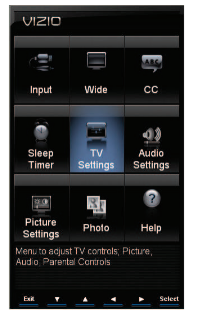
Using the HDTV Settings App
The remote control or the buttons on the front of the TV can control all the function settings. The HDTV Settings App allows you to adjust contrast, brightness and other settings. The TV will save changes made to the settings, even if the TV is turned off. The HDTV Settings App consists of several menu options. The main menu options may vary depending on your selected input source.
Note: Some of the main menu options may have additional submenus, for example, the TV Rating submenu for Parental Controls.
- Press the OK button on the remote control. The HDTV Settings App opens.
- Use the navigation keys around the OK button to select one of the menu options.
- Press OK to select the option or feature you want to adjust.
- Once the menu option is displayed, press Up or Down Navigation buttons to select one of the items to adjust.
- Press OK to select, and then press Up, Down. Left, or Right Navigation buttons to adjust the selection.
- Press LAST once to return to the previous screen or repeatedly to exit the On Screen Menu completely when finished making adjustments.
- Press EXIT to close the HDTV Settings App.
Wide
Select how the picture displays on the screen. As you select an option, you will see the screen adjusting to the different sizes. The options vary depending on the selected input and the TV program:
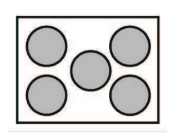
Normal Mode
The original 4:3 aspect ratio (1.33:1 source) is preserved, so black bars are added to the left and right of the display image. Standard TV broadcasts are displayed with a 4:3 Aspect Ratio. Movies in 4:3 Aspect Ratio may be referred to as pan-and-scan or full frame. These movies were originally filmed in 16:9 (widescreen), and then modified to fit a traditional TV screen (4:3).
Full
Full mode allows you to view the entire picture. Recommended for HDMI and RGB / Computer viewing so you can see the complete picture without the image overstretching beyond the viewing area. If you experience “noise” along the border switch to Zoom 1. For 720p, 1080i, 1080p only.
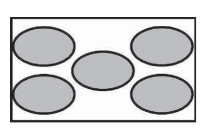
Stretch Mode
When watching a widescreen program (1.78:1 source) with black bars on the sides, the display image will stretch to fill the TV screen. People will appear wider than they really are. If you are watching a widescreen (1.85:1 or 2.35:1 source) program or movie, there will still be black bars at the top and bottom. This mode is available only when watching a widescreen program.
Panoramic Mode
When watching a standard broadcast or full frame movie in this mode, the 4:3 Aspect Ratio (1.33:1 source) display image is stretched horizontally on the left and right sides to fill the TV screen. The center of the image is not stretched.
Audio Settings Menu
Audio Mode
Choose from Flat, Rock, Pop, Classic or Jazz.
Note: The Audio Mode adjustment will only be available when SRS TruSurround HD is set to Off.
Balance
Adjust the sound to the left or the right.
TV Speakers
Turn the internal speakers On or Off. You may want to turn the internal speakers off when listening to the audio through your Home Theater System.
Optical Audio Out
This option allows selection of the type of processing for the SPDIF (Optical connector) when used with a Home Theater system. Select to choose from Auto or Force PCM. Auto passes Dolby Digital (if broadcast) or PCM. If your Home Theatre supports only PCM, use Force PCM and the TV will pass all Optical Output in the PCM format.

Advanced Audio
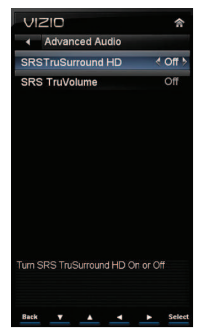
SRS TruSurround HDTM
This option sets the SRS TruSurround HD surround sound process. Choose from On or Off.
Note: When SRS TruSurround HD is ON, Equalizer adjustments are not available.
SRS TruSurround HDTM creates an immersive, feature-rich surround sound experience from two speakers, complete with rich bass, high frequency detail and clear dialog.
SRS TruVolume
When the programming switches to a commercial or when changing from channel to channel, volume fluctuations occur.
When turned ON, SRS TruVolumeTM provides the listener with a comfortable and consistent volume level. VIZIO recommends turning TruVolume off when listening to music content.
Equalizer
Choose Flat, Rock, Pop, Classical, or Jazz. You can also adjust Bass and Treble.
Note: The Equalizer adjustment will only be available when SRS TruSurround HD is set to Off.
Reset Audio Mode
Return all Audio settings to factory default. A screen will come up to confirm your selection or to cancel it.
Press Left or Right Navigation buttons to make the selection, and then press OK to accept it.
Note: Only settings under the Audio menu will be reset.
Picture Settings Menu
Ambient Light Sensor
Choose On or Off. When set to On, your HDTV will automatically adjust to light changes in the room.
Picture Mode
Choose from Standard, Movie, Game, Vivid, or Custom. Each input (i.e.HDMI, COMP, etc) remembers the custom setting you created. Select Custom to manually adjust Backlight, Brightness, Contrast, Color, Tint,Sharpness, and to access the More menu where further adjustments can be made.
Backlight
Adjust the LED brightness to affect the overall brilliance of the picture not the Brightness (black level) or Contrast (white level) of the picture.
Note: Backlight is only available when Picture Mode is set to Custom.
Brightness
Adjust black levels in the picture. If the brightness is too low you will not be able to see the detail in darker parts of the picture and if the brightness is too high the picture will look washed out.
Note: Brightness is only available when Picture Mode is set to Custom.
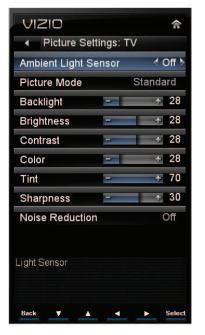
Contrast
Adjust the white levels in the picture. If the contrast is too low the picture will look washed out and if the contrast is too high you will not be able to see any detail in the bright parts of a picture.
Note: Contrast is only available when Picture Mode is set to Custom.
Color
Adjust the amount of color in the picture.
Note: Color is only available when Picture Mode is set to Custom.
Tint
Adjust the hue of the picture. The easiest way to set tint is to look at flesh tones and adjust for a realistic appearance. In most cases, the default middle position is correct. If people’s faces look too orange try reducing the level of color first.
Note: Tint is only available when Picture Mode is set to Custom.
Sharpness
Adjust the sharpness of the edges of elements in the picture. It does not produce detail that otherwise does not exist. This adjustment is helpful when viewing Standard Definition sources.
Note: Sharpness is only available when Picture Mode is set to Custom.
Noise Reduction
This feature diminishes picture artifacts caused by the digitizing of image motion content that may be present in the picture. Choose from Off, Low, Medium, or High.
More
Select More to adjust advanced options for fine tuning the picture.
Note: The More menu is only available when Picture Mode is set to Custom.
Chapter 9 Maintenance and Troubleshooting
Cleaning the TV and Remote Control
- Remove the power adapter cable from the TV.
- Use a soft cloth moistened with diluted neutral cleaner to clean the TV and remote control. VIZIO recommends using an HDTV cleaning solution which can be purchased at any major retailer.
- Wring liquid out of the cloth before cleaning to prevent water from penetrating into the housing.
- Wipe the TV and remote control with a dry cloth after cleaning.
Important:
- Do not use volatile solvent (such as toluene, rosin and alcohol). Such chemicals may damage the housing, screen glass, and remote control, and cause labeling to peel.
- The screen glass is very fragile. Do not scrape it with any sharp object.
- Do not press or tap the screen to avoid cracking.
Troubleshooting Guide
If the TV fails or the performance changes dramatically, check the display in accordance with the following instructions. Remember to check the peripherals to pinpoint the source of the failure. If the display still fails to perform as expected, contact the VIZIO for assistance by calling 1-877-MYVIZIO
General TV Problems
1. Receive the error message "No Signal.”
- Press the INPUT button on the remote control to select a different input source.
- If you are using cable connected directly to the TV or an antenna, scan for channels from the Tuner menu in the on-screen menu.
2. No power.
- Make sure the power button is ON (VIZIO logo glows white). x Make sure AC/DC power adapter is securely connected to the AC socket.
- Plug another electrical device to the power outlet to verify that the outlet is working.
3. No sound.
- Press Volume + (Up) on the remote control.
- Press MUTE on the remote control to make sure that MUTE is not ON.
- Check your audio settings. The audio may be set to SAP, or the speakers are set to off.
- Make sure that headphones are not connected.
- Check the audio connections of external devices that may be connected to your HDTV.
- If you are using an antenna, the signal strength of the channel may be low. Make sure your antenna is connected securely to the TV and move the antenna around the room or close to a window.
4. If the screen is black.
- Make sure the power button is ON (VIZIO Logo glows white).
- Press the INPUT button on the remote control to select a different input source.
- Check the connections of external devices that may be connected to your HDTV.
5. Power is ON but there is no image on the screen.
- Make sure all cables attached to your HDTV are connected to the correct output on the external device.
- Adjust brightness, contrast or backlight.
- Press the INPUT button on the remote control to select a different input source.
6. Wrong or abnormal colors appear.
- Check Color and Tint settings in Picture Menu.
- Reset Picture settings.
- Check the video cables to make sure they are securely connected.
- If you are using an antenna, the signal strength of the channel may be low.
- Make sure your antenna is connected securely to the TV and move the antenna around the room or close to a window.
7. Control buttons do not work.
- Press only one button at a time.
8. Remote control does not work.
- Point the remote control directly at the remote sensor on your TV.
- Remove any obstacles between the remote control and the remote sensor.
- Replace dead batteries with new ones.
- Make sure you have selected TV mode on the remote control.
9. There appear to be image quality issues.
- If you are using an antenna, the signal strength of the channel may be low.
9. Make sure your antenna is connected securely to the TV and move the antenna around the room or close to a window.
- For best image quality, view HD wide-screen programs where possible.
- If HD content is not available view “Standard Definition” from a digital source.
- Standard, analog TV will always be noticeably inferior to HD because your digital flat panel TV has video that is many times better than old TV so you will see interference and deficiencies you did not know you had.
10. You cannot see a picture.
- Make sure the power button is ON (VIZIO logo glows white).
- Make sure AC/DC power adapter is securely connected to the AC socket.
- Press the INPUT button on the remote control to select a different input source.
- Check the connections of external devices that may be connected to your HDTV.
- If your HDTV is connected to a computer, press any button on your keyboard to wake” your computer.
- If you are using an antenna, the signal strength of the channel may be low.Make sure your antenna is connected securely to the TV and move the antenna around the room or close to a window.
11. You see a distorted picture or hear unusual sound.
- You may be getting interference from electrical appliances, cars, motorcycles, or fluorescent lights. If you have not mounted it on the wall, try moving your HDTV to another location to see if this is the cause of the problem.
12. The picture has abnormal patterns.
- Check the connections of external devices that may be connected to your HDTV.
- Make sure the specifications of external devices meet the specifications of your HDTV (i.e. resolution).
- If you are using an antenna, the signal strength of the channel may be low. Make sure your antenna is connected securely to the TV and move the antenna around the room or close to a window.
13. The display image does not cover the entire screen.
- If you are in RGB mode (Computer), make sure that H-Size and V-Position in the on-screen menu are set correctly.
- If you are using TV, AV1, AV2 or Component with 480i input, press WIDE button on the remote control to scroll through various screen modes.
14. You can see a picture but you cannot hear sound.
- Press Volume + (Up) on the remote control.
- Press MUTE on the remote control to make sure that MUTE is not ON.
- Check your audio settings. The audio may be set to SAP, or the speakers are set to off.
- Make sure that headphones are not connected. x Check the audio connections of external devices that may be connected to yourHDTV.
15. The TV has pixels (dots) that are always dark or colored.
- Your HDTV is manufactured using an extremely high level of precision technology, however, sometimes some pixels of your HDTV may not display.
- Pixel defects within industry specifications are inherent to this type of product and do not constitute a defective product.
16. You see “noise” or “trash” on the screen.
- When your HDTV’s digital capabilities exceed a digital broadcast signal, the signal is up-converted (increased) to match your TV’s display capabilities. Up- converting can cause noise or trash.
- If you are using an antenna, the signal strength of the channel may be low. Make sure your antenna is connected securely to the TV and move the antenna around the room or close to a window.
17. You switch to a different input and the volume changes.
- The TV remembers the volume level from the last time you adjusted it. If the sound level is higher or lower from another source, then the volume will change.
18. You switch to a different input and the screen size changes.
- The TV remembers the viewing mode from the last time you used a particular input (AV-1, AV-2, Component, HDMI and TV).
19. Tips for High-Definition Users.
- Your HDTV is an ideal platform for viewing High Definition Content.
- Best image quality will be achieved by HDMI. The next best is Component, followed by Composite. x Due to variances in broadcast practices, it is possible some image distortions can occur.
20. Tips for Letterbox Content Users.
- Some Letterboxed (or “Widescreen”) versions of DVD movies are formatted for standard 4:3 Televisions. Your HDTV has the ability to expand this content so the entire screen is filled at the expense of image accuracy.
Media Viewer Problems
1. USB device is not recognized.
- Make sure the device is correctly inserted.
- Make sure the device is FAT or FAT32 x Make sure it contains the supported files.
- Make sure files are .jpg or .jpeg only.
2. Image is interrupted or distorted.
- Make sure the device is correctly inserted.
- Make sure that the file complies with the supported format, bit rate and/or profile. Also check the file for damage.
- Some files that comply with the supported format may not play back or display properly.
3. Slideshow doesn’t start.
- Make sure the viewer isn’t in pause, rotation, or zoom mode.