
www.lg.com
MFL69382201 (1.0)
USER GUIDE
ENGLISH
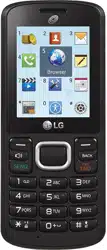
LG 108C
BC
www.lg.com
Printed in China
GUÍA DEL USUARIO
ESPAÑOL
LG 108C


•
Screen displays and illustrations may differ from those you see on actual phone.
•
Actual displays and the color of the phone may vary.
•
Some of the contents of this guide may not apply to your phone, depending on the
software and your service provider. All information in this document is subject to
change without notice.
•
This handset is not suitable for people who have a visual impairment due to the
touch screen keyboard.
•
Copyright
©
2015 LG Electronics, Inc. All rights reserved. LG and the LG logo are
registered trademarks of LG Group and its related entities.
All other trademarks are the property of their respective owners.
User Guide
ENGLISH

2
Phone Overview ................................... 4
Menus Overview .................................. 6
Menu Access ...................................... 6
Getting Started with Your Phone ......... 9
The Battery ......................................... 9
Charging the Battery ......................... 11
Charging with a USB cable ................ 11
Battery Temperature Protection ......... 12
Battery Charge Level ........................ 12
Signal Strength ................................. 12
Turning the Phone On and Off ........... 12
Making Calls ..................................... 13
Redialing Calls .................................. 13
Screen Icons ..................................... 13
Quick Access to Convenient Features 14
Sounds Off........................................ 14
Mute Function .................................. 14
Call Waiting ...................................... 14
3-way call ........................................ 15
Caller ID ........................................... 15
Voice commands .............................. 16
Entering and Editing Information ...... 17
Text Input ......................................... 17
Contacts in Your Phone’s Memory .... 18
Storing Basics .................................. 18
Customizing Individual Entries .......... 18
Speed Dial ........................................ 19
Storing a Number with Pauses .......... 19
Adding Another Phone Number ......... 21
Changing Saved Information ............. 21
Changing the Default Number ........... 22
Deleting ............................................ 22
Speed Dialing ................................... 23
Using the Phone Menus ..................... 24
Contacts ........................................... 24
1. New contact ...............................24
2. Contact list .................................24
3. Favorites ....................................25
4. Groups .......................................26
5. Speed dials ................................27
Messages ......................................... 27
1. New TXT message ......................28
2. Inbox ..........................................29
3. Sent ...........................................30
4. Drafts .........................................31
5. Voicemail ....................................31
6. Templates ...................................32
Messages settings ..........................32
Contents

3
Erasing messages...........................33
Recent call ....................................... 34
1. Missed calls ...............................34
2. Received calls .............................34
3. Dialed calls .................................35
4. All calls ......................................35
5. Call timer ...................................36
Browser ............................................ 36
Notepad ........................................... 37
Multimedia ....................................... 37
1. Record voice ...............................37
2. Pictures ......................................38
3. Ringtones ...................................40
Tools ................................................. 41
1. Voice commands ........................42
2. Ez tip calculator ..........................44
3. Eco-calculator.............................45
4. Info search .................................46
5. Stopwatch ..................................46
6. Unit converter .............................47
My schedule ..................................... 47
1. Calendar ....................................47
2. Alarm clock ................................48
Calculator ......................................... 49
Accessibility ..................................... 49
1. Readout .....................................50
2. Invert color .................................52
3. Large text ...................................52
4. Mono audio ................................52
5. Turn off all sounds .......................52
6. Hearing aid .................................53
Settings ............................................ 53
1. Sounds settings ..........................53
2. Display settings ..........................58
3. Phone settings ...........................61
4. Call settings................................67
5. Memory .....................................70
6. Phone info ..................................70
For your safety ................................... 72
FCC Hearing-Aid Compatibility (HAC)
Regulations for Wireless Devices .....73
4
Phone Overview
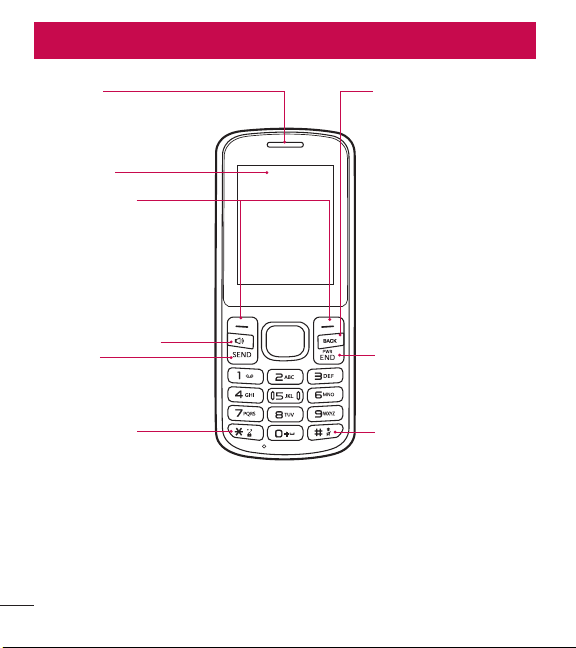
Phone Overview
Earpiece
LCD Screen
Speakerphone Key
Clear/Voice Commands
Key
Deletes single spaces or
characters with a quick
press. Press and hold to
delete entire words while
entering text. Press once
to back out of menus,
one level at a time. For
quick access to Voice
commands, press this key
once from the idle screen.
Power/End Key
Silent Mode Key
Allows you to access
the symbols mode while
entering text. While idle,
press and hold to enable
and disable silent mode.
Send Key
Lock Mode Key
Allows you to change the
text entry mode while
entering text. While idle,
press and hold to lock the
keypad.
Selection keys
Each of these keys
performs the functions
indicated by the text on
the display immediately
above them.

5
Phone Overview
Charger/Accessory Port Connects the phone to the charger or other
compatible accessories.
Charging with PC & USB cable: You can use your computer
to charge your phone. Connect one end of a USB cable to the
Charger/ Accessory Port on your phone and the other end to
a high-power USB port on your PC (commonly located on the
front panel of the computer).
6
Menus Overview
Menu Access
While in standby mode, press the Left Selection Key [Menu] to access your
phone’s menus. There are two methods of accessing menus and submenus:
•
Use the Directional Keys to highlight a menu/option and press to select it.
•
Press the number key on the keypad to activate the corresponding menu/option.
Menus Overview
Contacts
1. New contact
2. Contact list
3. Favorites
4. Groups
5. Speed dials
Messages
1. New TXT message
2. Inbox
3. Sent
4. Drafts
5. Voicemail
6. Templates
Recent call
1. Missed calls
2. Received calls
3. Dialed calls
4. All calls
5. Call timer
Browser
Notepad
Multimedia
1. Record voice
2. Pictures
1. My pictures
2. Default pictures
3. Buy graphics
3. Ringtones
1. My sounds
2. Default ringtones
3. Buy ringtones
Tools
1. Voice commands
1. Call <Name or
Number>
2. Send msg to <Name or
Number or Group>
3. Go to <Menu>
4. Check <Item>

7
Menus Overview
5. Contacts <Name>
6. Redial
7. Help
2. Ez tip calculator
3. Eco-calculator
4. Info search
5. Stopwatch
6. Unit converter
1. Area
2. Length
3. Mass
4. Temperature
5. Volume
6. Velocity
My Schedule
1. Calendar
2. Alarm clock
Calculator
Accessibility
1. Readout
1. Full Readout
2. Menu Readout
3. Digit dial Readout
4. Caller ID Readout
5. Passwords Readout
6. Speech rate
2. Invert color
3. Large text
4. Mono audio
5. Turn off all sounds
6. Hearing aid
Settings
1. Sounds settings
1. Volumes
1. Master volume
2. Readout volume
3. Keypad volume
2. Call sounds
1. Call ringtone
2. Call vibrate
3. Caller ID Readout
3. Alert sounds
1. TXT message
2. Voicemail
3. Emergency tone
4. Missed call
4. Service alerts
1. Call connect
2. Call disconnect
3. Charge complete
5. Power on/off
1. Power on
2. Power off
6. Senior mode
2. Display settings
1. Backlight timer
2. Brightness
3. Wallpaper
1. My pictures
2. Slide show
4. Menu style
1. Grid(Default)
2. List
5. Font type
6. Font size
7. Clock format

8
Menus Overview
8. Name match for dialing
3. Phone settings
1. Airplane mode
2. Set directional keys
3. Voice commands
1. Confi rm choices
2. Sensitivity
3. Train voice
4. Prompts
4. Language
5. Location
6. Auto key lock
7. Security
8. System select
4. Call settings
1. Answer options
2. TTY mode
3. One touch dial
4. Voice privacy
5. DTMF tones
5. Memory
1. Memory usage
2. My pictures
3. My sounds
4. My contacts
6. Phone info
1. My number
2. ESN/MEID
3. Icon glossary
4. SW/HW version
9
Getting Started with Your Phone
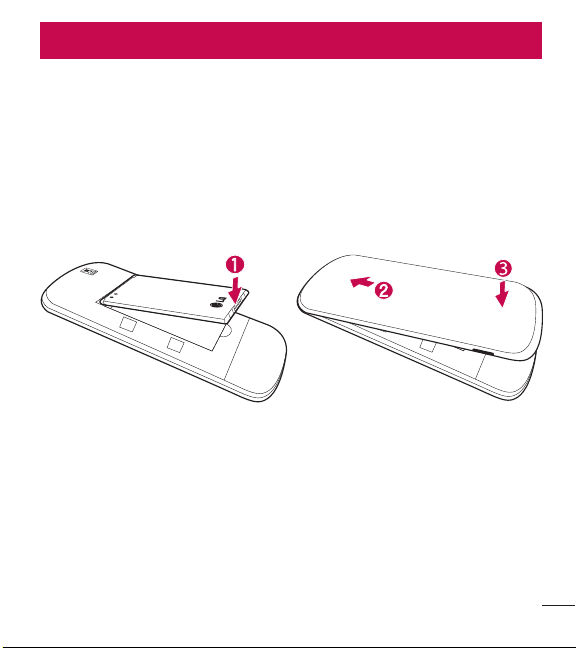
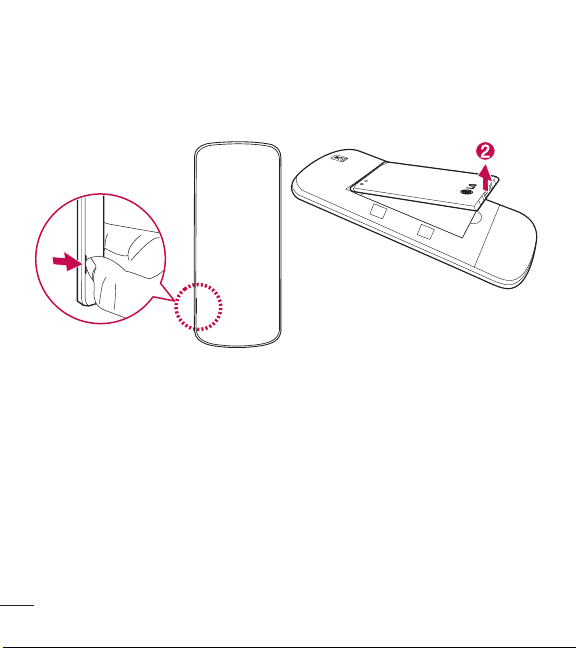
The Battery
Installing the Battery
1 Use the fingernail cutout at the bottom left of the back cover to lift and remove
the cover.
2 Align the battery contacts with the terminals near the top of the battery
compartment and insert the battery into the compartment.
3 Align the back cover and press it downwards until it clicks into place.
Getting Started with Your Phone
10
Getting Started with Your Phone
Removing the Battery
1 Turn the phone off.
2 Use the notch at the bottom left of the back cover to lift and remove the cover.
3 Use the fingertip opening near the bottom of the battery compartment to lift the
battery out.
11
Getting Started with Your Phone
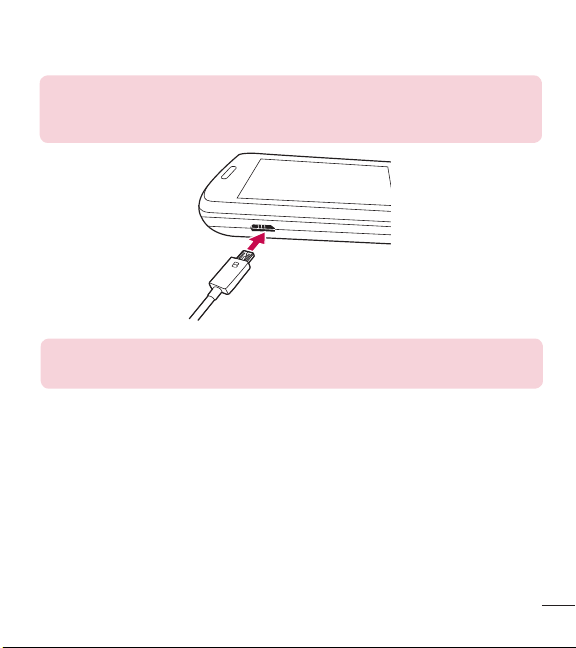
Charging the Battery
Use the charger provided with your phone.
WARNING: Use only the charger provided with the phone. Using any
charger other than the one included with the phone may damage your
phone or battery.
NOTICE: Please make sure that the 'B' side faces up before inserting a
charger or USB cable into the Charger/Accessory Port of your phone.
Plug one end of the charging adapter into the phone’s Charger/Accessory Port and
the other end into an electrical outlet.
The charge time varies depending upon the battery level.
Charging with a USB cable
You can use your computer to charge your phone. To be able to charge with the USB
cable, you may need to have the necessary USB driver installed on your PC first.
Connect one end of the USB cable to the Charger/Accessory Port on your phone and
the other end to the USB port on your PC.

12
Getting Started with Your Phone
NOTE: Low-power USB ports are not supported, such as the USB ports
on your keyboard or bus-powered USB hub.
Battery Temperature Protection
If the battery gets overheated, the phone will automatically turn off. When you turn
the phone back on, a message pops up alerting you that the phone was powered off
for your safety.
Battery Charge Level
You can find the battery charge level at the top right corner of the LCD screen.
When the charge level becomes low, the battery sensor sounds a warning tone,
blinks the battery icon, and/or displays a warning message.
If the battery charge level becomes exceedingly low, the phone automatically
switches off and any function in progress is not saved.
Signal Strength
Call quality depends on the signal strength in your area. You can tell how much
signal strength you have by the number of bars next to the signal strength icon
: the more bars, the stronger the signal. If you’re having problems with signal quality,
move to an open area or, when inside a building, try moving near a window.
Turning the Phone On and Off
Turning the Phone On
1 Insert the battery and connect the phone to an external power source if the
battery level is low.

13
Getting Started with Your Phone
2 Press the Power/End Key until the LCD screen lights up.
Turning the Phone Off
Press and hold the Power/End Key
until the LCD screen turns off.
Making Calls
1 Make sure the phone is turned on.
2 Enter the phone number.
3 Press the Send Key to dial the call.
4 Press the Power/End Key to end the call.
NOTE: Your phone has a Voice commands feature that also lets you
make calls by saying a phone number or contact name.
Correcting Dialing Mistakes
While entering a phone number, press the Clear Key
once to erase the last
digit entered. You can also hold it down for at least two seconds to delete all the
digits you entered.
Redialing Calls
When you are on the Home screen, press the Send Key once to access all
calls. Highlight the number you want to call, then press the Send Key
again.
Screen Icons
When the phone is on, the top line of the LCD screen displays phone status icons.
To see the icon glossary, go to
Menu > Settings > Phone info >
Icon glossary and select the desired category.

14
Quick Access to Convenient Features
Quick Access to Convenient Features
Sounds Off
Quickly deactivate your phone's sounds when you're in a place where phone sounds
would be disruptive.
From standby mode press and hold the
for 3 seconds. To return to normal
sounds mode, press and hold the
.
Mute Function
The Mute Function prevents the transmission of your voice to the caller. To quickly
activate Mute while on a call, press the Left Selection Key
[Mute]. To unmute,
press the Left Selection Key
[Unmute] again.
Call Waiting
During a call, one beep indicates another incoming call. Press the Send Key to
answer it and put the first call on hold. Press the Send Key
again to return to
the first call.

15
Quick Access to Convenient Features
3-way call
You can talk with two people at the same time with a three-way conversation on
your wireless phone. Airtime and other charges, which may include toll or long
distance charges, will apply for all simultaneous calls until you end one call.
1 While on the first call, dial the 10-digit number of the second person.
2 Press the Send Key . The first person is automatically put on hold while the
call is made.
3 When the second person answers, press [Merge] to create a conference
call.
4 If the second person does not answer, press the Send Key once to end the
connection and go back to the first person.
5 To end both conversations completely, press the Power/End Key .
Caller ID
Caller ID displays the number and/or name and picture (if applicable) of the person
calling when your phone rings.

16
Quick Access to Convenient Features
Voice commands
Voice commands allow you to do things by verbal command (e.g., make calls, check
Voicemail, etc.). Press the Voice Commands Key
on the keypad.
1 Call Say "Call" and then call someone simply by saying the name or phone
number.
2 Send msg to Say "Send message" and the command will prompt you for the
type of message.
3 Go to This allows you to access a menu within the phone.
4 Check This allows you to check out a wide range of items such as Phone status,
Voicemail, Messages, Missed calls, Time, Signal strength, Battery level, Volume
and My number.
5 Contacts You can look up names in your Contacts as well as manage your
Contact List including creating, erasing or modifying.
6 Redial Say "Redial" and the phone will redial the last phone number.
7 Help Provides a general guideline to using Voice commands.
17
Entering and Editing Information
Text Input
The following key functions are available to help with text entry:
Left Selection Key: Press to change the text input mode.
Shift: Press to change capitalization (initial cap, caps lock, lowercase).
Right Selection Key: Press to display other matching words in the database in
T9 word mode.
Space: Press to complete a word and insert a space.
Clear: Press to delete a single space or character. Hold to delete the entire text.
Punctuation: Press to insert punctuation symbols.
Text Input Modes
In a text field, press the Left Selection Key
to select a text input mode:
T9 Word/ Abc/ ABC/ 123/ T9 Palabra/ Symbols/ Templates
NOTE: T9 Palabra is the Spanish counterpart of T9 Word which utilizes
accents, tildes, etc. for correct Spanish word spelling.
Entering and Editing Information
18
Contacts in Your Phone’s Memory
Storing Basics
1 Enter a number (max. 48 digits), then press the Left Selection Key [Save].
2 Use the Directional Key to highlight Add new contact/ Update existing,
then press
.
3 Use the Directional Key to highlight Mobile 1/ Home/ Business/ Mobile 2/
Fax, then press
.
4 Enter a name (max. 32 characters), and any additional information, then press
[Save].
NOTE: If you selected Update existing after you select the number type,
the contact information is automatically updated.
Customizing Individual Entries
1 Press Left Selection Key [Menu].
2 Press Contacts.
3 Press Contact list.
4 Use the Directional Key to highlight a Contact entry, then press the Left
Selection Key
[Edit].
5 Use the Directional Key to highlight the information you want to customize.
6 Change the entry as you want, then press [Save] to save your changes.
Contacts in Your Phone’s Memory
19
Contacts in Your Phone’s Memory
Speed Dial
Allows you to set up your Speed dials.
1 Press Left Selection Key [Menu].
2 Press Contacts.
3 Press Contact list.
4 Use the Directional Key to highlight a Contact entry, then press the Left
Selection Key
[Edit].
5 Use the Directional Key to highlight a phone number, then press the Right
Selection Key
[Options].
6 Use the Directional Key to highlight Set speed dial, then press .
7 Select a Speed dial digit.
•
Enter a digit using the keypad, then press [Set].
•
Use the Directional Key to highlight the Speed dial digit, then press
[Set].
8 Press Yes to confirm, then press [Save] to update your contact entry.
Storing a Number with Pauses
Pauses allow you to enter additional series of numbers to access automated
systems such as Voicemail or credit billing numbers. Pause types are:
Wait (W) The phone stops dialing until you press the Left Selection Key
[Release] to advance to the following series of numbers.
2-Sec Pause (P) The phone waits two seconds before dialing the next string of
digits.
1 Enter the phone number, then press the Right Selection Key [Options].
2 Use the Directional Key to highlight Add 2-sec pause or Add wait, then
press
.

20
Contacts in Your Phone’s Memory
3 Enter the additional number(s) (e.g., pin number, credit card number, etc.).
4 Press the Left Selection Key [Save].
5 Choose Add new contact/ Update existing.
6 Choose Mobile 1/ Home/ Business/ Mobile 2/ Fax.
7 Continue entering information for the Contact entry as necessary.
NOTE: If you selected Update existing after you select the number type,
the contact information is automatically updated. You do not have the
option to enter additional information.
8 Press [Save] to update your contact entry.
Adding a Pause to an Existing Contact Entry
1 Press Left Selection Key [Menu].
2 Press Contacts.
3 Press Contact list.
4 Use the Directional Key to highlight a Contact entry, then press the Left
Selection Key
[Edit].
5 Use the Directional Key to highlight the number, then press the Right
Selection Key
[Options].
6 Press Add 2-sec pause or Add wait.
7 Enter the additional number(s), then press [Save] to update your contact
entry.
21
Contacts in Your Phone’s Memory
Adding Another Phone Number
From standby mode
1 Enter a phone number, then press the Left Selection Key [Save].
2 Use the Directional Key to highlight Update existing, then press .
3 Use the Directional Key to highlight an existing entry then press to
update your contact entry.
4 Use the Directional Key to highlight Mobile 1/ Home/ Business/ Mobile 2/
Fax, then press
to update your contact entry.
From the Contact list Screen
1 Press Left Selection Key [Menu].
2 Press Contacts.
3 Press Contact list.
4 Use the Directional Key to highlight an entry, then press the Left Selection
Key
[Edit].
5 Use the Directional Key to highlight the phone number field you wish to add.
Then enter the number and press
[Save] to update your contact entry.
Changing Saved Information
To edit any information you stored, access the Edit Contact screen:
1 Press Left Selection Key [Menu].
2 Press Contacts.
3 Press Contact list.
4 Use the Directional Key to highlight a Contact entry, then press the Left
Selection Key
[Edit].
5 Use the Directional Key to highlight the field you want to change.
6 Make the changes, then press [Save] to update your contact entry.
22
Contacts in Your Phone’s Memory
Changing the Default Number
The Default Number is the phone number you first entered when you created the
Contact. However, another number can be saved as the Default number.
1 Press Left Selection Key [Menu].
2 Press Contacts.
3 Press Contact list.
4 Use the Directional Key to highlight an entry.
5 Press the Left Selection Key [Edit].
6 Use the Directional Key to highlight a phone number, then press the Right
Selection Key
[Options].
7 Use the Directional Key to highlight Set as default, then press .
8 Press [Yes] to confirm the new number as the default.
A confirmation message is displayed.
9 Press [Save] to update your contact entry.
Deleting
Deleting a Contact Entry
1 Press Left Selection Key [Menu].
2 Press Contacts.
3 Press Contact list.
4 Use the Directional Key to highlight an entry.
5 Press the Right Selection Key [Options].
6 Press Erase.
7 Press [Yes] to confirm.
Removing a Speed Dial
1 Press Left Selection Key [Menu].
23
Contacts in Your Phone’s Memory
2 Press Contacts.
3 Press Contact list.
4 Use the Directional Key to highlight a Contact entry to edit and press
[View].
5 Highlight the phone number with the speed dial, then press the Right Selection
Key
[Options].
6 Press Remove speed dial.
7 Press [Yes] to confirm.
Speed Dialing
Allows you to make phone calls quickly and easily to numbers stored in Contacts.
NOTE: Speed dial 1 is reserved for Voicemail.
Single Digit Speed dials
Press and hold the speed dial digit. Your phone recalls the phone number from your
Contacts, displays it, and dials it for you.
Multiple Digit Speed dials
When you press and hold a number key, it signals the phone to call a Speed dial. To
dial Speed dials with multiple digits, press the first digit(s), then press and hold the
last digit. For example, to call Speed dial 25, press
, then press and hold .
NOTE: You can also enter the Speed dial digit(s) and press the Send Key
.
24
Using the Phone Menus
Contacts
The Contacts menu allows you to store names, phone numbers and other
information in your phone’s memory.
1. New contact
Allows you to add a new contact to your Contact list.
NOTE: Using this submenu, the number is saved as a new Contact, not
into an existing Contact.
1 Press Left Selection Key [Menu].
2 Press Contacts.
3 Press New contact.
4 Enter the name and press the Directional Key downward until the phone
number type you want is highlighted.
5 Enter the number and any additional contact information and press [Save] to
update your contact entry.
2. Contact list
Allows you to view your Contact list.
1 Press Left Selection Key [Menu].
2 Press Contacts.
3 Press Contact list.
Using the Phone Menus
25
Using the Phone Menus
4 Use the Directional Key to scroll through your Contacts alphabetically.
•
Press the Right Selection Key [Options] to select one of the following:
New contact/ Erase/ New TXT message/ Call/ Manage contacts/
Set as favorite/ Search entry mode
•
Press the Left Selection Key [Edit] to edit the contact.
•
Press [View] to view the entry details.
TIP: Use the Go to field, for quick access to an entry without scrolling.
For example, to go to "Vet", enter the letter V.
3. Favorites
Allows you to add Contact entries or Contact groups to your list of Favorites to easily
view, call, or send messages.
1 Press Left Selection Key [Menu].
2 Press Contacts.
3 Press Favorites.
4 Press [Add].
TIP: You can add up to 10 Contacts and/or Contact groups as Favorites
to easily make calls, send messages, and view messages.
5 Select whether you want to add a favorite from your Contacts or Groups.
6 Use the Directional Key to scroll through your Contacts or Groups
alphabetically and press
[Mark].
26
Using the Phone Menus
7 Press the Left Selection Key [Done]. Once you have added Contacts to the
Favorites list, the following options will become available in the Favorites menu:
Left Selection Key
: View
OK Key
: New TXT message
Right Selection Key
: Options
Move position/ Remove/ Remove all
4. Groups
Allows you to view your grouped Contacts, add a new group, change the name of a
group, delete a group, or send a message to everyone in the selected group.
1 Press Left Selection Key [Menu].
2 Press Contacts.
3 Press Groups.
The following options are available:
•
View a group
Use the Directional Key
to highlight a group, then press [View].
•
Add a new group
Press the Left Selection Key
[New] to add a new group to the list. Enter a
name, insert a picture (if necessary), and press
[Save].
•
Group's options
Press the Right Selection Key
[Options] to select one of the following:
New TXT message/ Edit group name & ID/ Edit members / Erase group/ Set
as favorite/ Search entry mode
Adding contacts to a group
1 From Groups submenu, press [View] and press [Add].
2 Highlight a desired contact and press [Mark].
3 Press Left Selection Key [Done] to add the contact to the group.
27
Using the Phone Menus
5. Speed dials
Allows you to view your list of Speed dials or designate Speed dials for numbers
entered in your Contacts.
1 Press Left Selection Key [Menu].
2 Press Contacts.
3 Press Speed dials.
4 Use the Directional Key to highlight the Speed dial position, or enter the
Speed dial digit and press
[Set].
5 Use the Directional Key to highlight the Contact and press [Set]. (For
Contacts with multiple numbers, highlight the number for the Speed dial, then
press
.)
6 Press [Yes] to confirm.
A confirmation message is displayed.
Messages
Depending on the content and size of your messages, the phone can store up to
520 messages (including a max. of 300 text messages, 100 emergency alerts, in
the Inbox; 100 text messages and in the Sent; 20 text messages and in Drafts).
Content stored in the message may be limited by phone model and service
capability. Other limits to available characters per message may exist. Please check
with your service provider for system features and capabilities.
•
When viewing a received message, you can call the sender back by pressing the
Send Key
.
New text message alert
Your phone can alert you when you have new messages. Options include:
1 The phone displays a message on the screen.

28
Using the Phone Menus
2 The message icon ( ) is displayed on the screen. In the case of a high priority
message, the icon (
) will flash.
1. New TXT message
This menu allows you to send messages.
The Basics of Sending a Text Message
1 Press Left Selection Key [Menu].
2 Press Messages.
3 Press New TXT message.
4 Enter a phone number or a recipient's name in the To field.
As you enter the phone number or a recipient's name, matching contacts appear.
You can choose a suggested recipient or continue entering the phone number.
5 Press to access the text field.
6 Use the keypad to enter your message.
7 Press [Send].
Select Recipient(s) Using the Add Function
1 Press Left Selection Key [Menu].
2 Press Messages.
3 Press New TXT message.
4 With the To field highlighted, press the Right Selection Key Add.
5 Select an option and press .
From contacts To select a recipient from your Contact list.
From recent calls To select a recipient from Recent calls.
Favorites To select a recipient from Favorites.
Groups To select a recipient from your Groups.
To contacts To save the number to your Contacts (only displayed when an
unsaved phone number or email is entered).

29
Using the Phone Menus
6 Use the keypad to enter your message.
7 Press [Send].
2. Inbox
The phone alerts you in up to 3 ways when you receive a new message:
•
By displaying a notification message on the screen.
•
By sounding a tone or vibration, if set.
•
By displaying (The icon will be when you get a high priority message.)
Viewing Your Inbox
1 Press Left Selection Key [Menu].
2 Press Messages.
3 Press Inbox.
4 Highlight a message. The following options are available.
•
Press [Open] to view the message.
•
Press the Left Selection Key [Erase] to erase the highlighted message.
•
Press the Right Selection Key [Options] to access the following options:
Reply Replies to the sender's address of the received message.
Reply with copy Replies to the sender's address with a copy of the original
message text included.
Forward Forwards the message to other destination address(es).
Add to contacts Stores the callback number, email address, and numbers from
the address of the received message into your Contacts.
Extract addresses Allows you to extract the message's contact addresses and
save them (if desired).
Message info Allows you to check the received message information.
Manage inbox Allows you to manage (lock, erase and more) multiple messages.
30
Using the Phone Menus
Sort by sender/time Allows you to sort messages alphabetically by sender's
name or by time received.
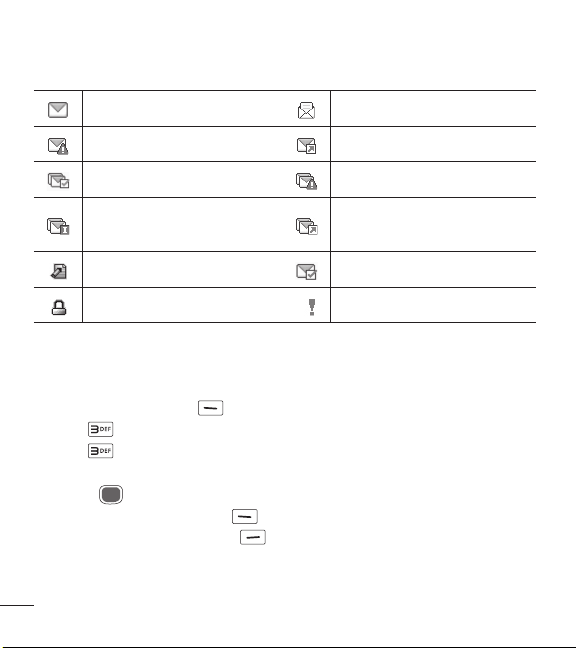
Message Icon Reference
New text message Read text message
Massage failed Message sent
Multiple messages delivered Multiple messages failed
Multiple messages delivery
incomplete
Multiple messages sent
Text message draft Message delivered
Lock High priority
3. Sent
The Sent menu stores your sent messages.
1 Press Left Selection Key [Menu].
2 Press Messages.
3 Press Sent.
4 Highlight a message. The following options are available.
•
Press [Open] to view the message.
•
Press the Left Selection Key [Erase] to erase the message.
•
Press the Right Selection Key [Options] for the following options.
Forward/ Send/ Add to contacts/ Message info/ Manage sent/ Sort by
recipient

31
Using the Phone Menus
5 While viewing a message, choose for the following options:
Forward/ Lock/ Save as template/ Add to contacts/ Message info
4. Drafts
Saved message drafts are stored here.
1 Press Left Selection Key [Menu].
2 Press Messages.
3 Press Drafts.
4 Highlight a message. The following options are available.
•
Press [Edit] to continue editing the message.
•
Press the Left Selection Key [Erase] to erase the message.
•
Press the Right Selection Key [Options] for the following options.
Send Sends the selected message.
Add to contacts Stores the number, email address, and numbers from the
address included in the message into your Contacts.
Manage drafts Allows you to manage (erase or lock) messages.
Message Icon Reference
Text Message Draft
5. Voicemail
Allows you to view the number of new voice messages recorded in the Voicemail
box. Once you exceed the storage limit, old messages are overwritten. When you
have a new voice message, your phone will alert you.
Checking Your Voicemail Box
1 Press Left Selection Key [Menu].
2 Press Messages.
32
Using the Phone Menus
3 Press Voicemail.
4 The following options are available.
•
Press the Left Selection Key [Clear] to clear the Voicemail counter. Then
press
[Yes].
•
Press the Send Key or [Call] to listen to the message(s).
OR
Press and hold
from your phone, as a speed dial to your voicemail.
6. Templates
Allows you to manage your text templates.
1 Press Left Selection Key [Menu].
2 Press Messages.
3 Press Templates.
4 Select a message to view its content and edit it. Press [Save] to save it.
Messages settings
Allows you to configure settings for your messages.
1 Press Left Selection Key [Menu].
2 Press Messages.
3 Press the Left Selection Key [Settings].
4 Use the Directional Key to highlight one of the settings and press to
select it.
Message Settings Options
1 Entry mode
Select T9 Word, Abc, ABC, 123, T9 Palabra to be your default input method.

33
Using the Phone Menus
2 Messages font size
Allows you to select Small, Normal or Large for the size of the text characters.
3 TXT instant reply
Select On to text a reply instantly. Or, select Off.
4 TXT auto scroll
Select On to automatically scroll text down while viewing messages.
Or, select Off.
5 CMAS alert
Set your configuration for receiving emergency alerts. This menu has three options:
Receive alerts/ Alert reminder/ Alert tone/ Alert vibrate
6 Signature
Select Custom to create/edit a signature to automatically send with your messages.
Select None for no signature.
Erasing messages
You can erase messages stored in your inbox, sent, or drafts folders. You can also
erase all messages at the same time.
1 Press Left Selection Key [Menu].
2 Press Messages.
3 Press the Right Selection Key [Options] then select one of the following:
Erase inbox/ Erase sent/ Erase drafts/ Erase all
4 Press [Yes] to confirm the deletion or select which messages you want to
delete.
A confirmation message is displayed.
34
Using the Phone Menus
Recent call
The Recent call menu has lists of phone numbers and/or Contacts entries for
calls you placed, accepted, or missed. It is continually updated as new numbers
are added to the beginning of the list and the oldest entries are removed from the
bottom of the list.
1. Missed calls
Allows you to view the list of missed calls; up to 90 entries.
1 Press Left Selection Key [Menu].
2 Press Recent call.
3 Press Missed calls.
4 Use the Directional Key to highlight an entry, then
•
Press [Open] to open the entry.
•
Press the Send Key to place a call to the number.
•
Press the Right Selection Key [Options] to select:
Save to contacts(Contact info)/ Erase/ Lock(Unlock)/ Erase all/
Call timer
•
Press the Left Selection Key [Message] to send a message to the number.
2. Received calls
Allows you to view the list of incoming calls; up to 90 entries.
1 Press Left Selection Key [Menu].
2 Press Recent call.
3 Press Received calls.
4 Use the Directional Key to highlight an entry, then
•
Press [Open] to open the entry.
35
Using the Phone Menus
•
Press the Send Key to place a call to the number.
•
Press the Right Selection Key [Options] to select:
Save to contacts(Contact info)/ Erase/ Lock(Unlock)/ Erase all/
Call timer
•
Press the Left Selection Key [Message] to send a message to the number.
3. Dialed calls
Allows you to view the list of outgoing calls; up to 90 entries.
1 Press Left Selection Key [Menu].
2 Press Recent call.
3 Press Dialed calls.
4 Use the Directional Key to highlight an entry, then
•
Press [Open] to open the entry.
•
Press the Send Key to place a call to the number.
•
Press the Right Selection Key [Options] to select:
Save to contacts(Contact info)/ Erase/ Lock(Unlock)/ Erase all/
Call timer
•
Press the Left Selection Key [Message] to send a message to the number.
4. All calls
Allows you to view the list of all calls; up to 270 entries.
1 Press Left Selection Key [Menu].
2 Press Recent call.
3 Press All calls.
4 Use the Directional Key to highlight an entry, then
•
Press [Open] to open the entry.
36
Using the Phone Menus
•
Press the Send Key to place a call to the number.
•
Press the Right Selection Key [Options] to select:
Save to contacts(Contact info)/ Erase/ Lock/ Erase all/Call timer
•
Press the Left Selection Key [Message] to send a message to the number.
SHORTCUT: To view a quick list of all your recent calls, press the Send
Key
from standby mode.
5. Call timer
Allows you to view the duration of selected call types.
1 Press Left Selection Key [Menu].
2 Press Recent call.
3 Press Call timer.
4 Use the Directional Key to highlight a call timer.
Last call/ All calls/ Received calls/ Dialed calls/ Roaming calls/
Last reset/ Lifetime calls
5 Press the Left Selection Key [Reset] to reset the highlighted timer.
6 Reset all the recorded timers by pressing the Right Selection Key [Reset all].
NOTE: Lifetime Calls cannot be reset.
Browser
Allows you to access news, sports, weather, and email from your device.
Accessibility and selections within this feature are dependent upon your service
provider. For specific information on Internet access through your phone, contact
your service provider.
37
Using the Phone Menus
1 Press Left Selection Key [Menu].
2 Press Browser.
Notepad
Allows you to add, read, edit, and erase notes to yourself.
1 Press Left Selection Key [Menu].
2 Press Notepad.
3 Press Notepad.
4 Press the Left Selection Key [Add] to write a new note.
5 Press the Left Selection Key to change the entry mode. Or press the Right
Selection Key
[Options] to Copy text and Paste or to Cancel the notepad
entry.
6 After filling in the note, press [Save] to save it.
Multimedia
Allows you to access all of your multimedia while you’re on the go.
1. Record voice
Allows you to record voice.
1 Press Left Selection Key [Menu].
2 Press Multimedia.
3 Press Record voice.
4 Press to start recording and then press to [Stop] to stop the recording.
38
Using the Phone Menus
2. Pictures
This menu allows you to view all of your pictures and buy graphics.
Access and Options
1 Press Left Selection Key [Menu].
2 Press Multimedia.
3 Press Pictures.
4 Browse the submenus.
2.1 My pictures
Allows you to view and manage photos stored in the phone.
1 Press Left Selection Key [Menu].
2 Press Multimedia.
3 Press Pictures.
4 Press My pictures.
5 Highlight a picture with the Directional Key .
The following options are available:
•
Press [View] to view it.
•
Press the Left Selection Key [Erase] to delete it.
•
Press the Right Selection Key [Options] to select from the following options:
Set as Allows you to set the picture as your wallpaper or picture ID for a contact.
Slide show Plays all pictures as a slide show.
Manage pictures Allows you to mark multiple pictures to be erased or locked/
unlocked.
Rename Allows you to change the file name.
Lock Allows you to lock or unlock. Locked files can't be erased accidentally.
File info Allows you to view information for the image file.
39
Using the Phone Menus
Editing a Picture
Access My pictures, then use the Directional Key
to highlight a picture. Press
[View] and then press the Right Selection Key [Options] and select Edit to
zoom, rotate and crop the photo.
2.2 Default pictures
Allows you to view and manage default photos stored in the phone.
1 Press Left Selection Key [Menu].
2 Press Multimedia.
3 Press Pictures.
4 Press Default pictures.
5 Highlight a picture with the Directional Key .
The following options are available:
•
Press [View] to view it.
•
Press the Right Selection Key [Options] to access the option to set the image
as your wallpaper.
2.3 Buy graphics
This menu allows you to buy images.
1 Press Left Selection Key [Menu].
2 Press Multimedia.
3 Press Pictures.
4 Press Buy graphics.
40
Using the Phone Menus
3. Ringtones
Personalize your phone with ringtones. A wide variety of choices are available, such
as current hits, pop, hip-hop, and more.
3.1 My sounds
Allows you to record a new sound or select a desired sound.
How to record a new sound
1 Press Left Selection Key [Menu].
2 Press Multimedia.
3 Press Ringtones.
4 Press My sounds.
5 Press Record new and press to start recording, then press [Stop]
to end recording.
How to select a sound
1 Press Left Selection Key [Menu].
2 Press Multimedia.
3 Press Ringtones.
4 Press My sounds.
5 Use the Directional Key to scroll and highlight a preloaded sound.
Options with a sound file highlighted:
•
Press the Left Selection Key [Set as] to set it as the Ringtone, Contact ID or
Alert sounds.
•
Press [Play] to play the sound.
•
Press the Right Selection Key [Options] to select:
Rename/ Lock(Unlock)/ Erase/ Erase all/ File info.
41
Using the Phone Menus
3.2 Default ringtones
Allows you to manage your preloaded sounds.
1 Press Left Selection Key [Menu].
2 Press Multimedia.
3 Press Ringtones.
4 Press Default ringtones.
5 Use the Directional Key to highlight a ringtone and press [Play] to play
the ringtone or the Left Selection Key
[Set as] to set the ringtone as:
•
Ringtone: Sets the ringtone for your incoming calls.
•
Contact ID: Highlight and select the Contact to be identified by the
ringtone you selected.
•
Alert sounds: Press the corresponding number key to set the ringtone for
one of the following:
All messages/ TXT message/ Voicemail
3.3 Buy ringtones
This menu allows you to buy ringtones.
1 Press Left Selection Key [Menu].
2 Press Multimedia.
3 Press Ringtones.
4 Press Buy ringtones.
Tools
Your phone tools include Voice commands, Ez tip calculator, Eco-calculator, Info
search, Stopwatch, and Unit converter.
1 Press Left Selection Key [Menu].
2 Press Tools.

42
Using the Phone Menus
1. Voice commands
This feature provides you with the following options equipped with AVR (Advanced
Voice Recognition) technology. Each option has its detailed information on the phone
and you can check it out by pressing the Left Selection Key
[Info].
1 Press Left Selection Key [Menu].
2 Press Tools.
3 Press Voice commands.
Access and Options
When the phone is idle, press the Voice Commands Key
on the keypad.
The Voice commands feature has several settings which allow you to customize how
you want to use it. Access Voice commands, then press the Right Selection Key
[Settings].
Confirm choices Allows you to choose if the command system prompts you with
a list of potential matches. Choose from Automatic/ Always confirm/ Never
confirm.
Sensitivity Allows you to control how the system filters for matches. Choose from
More sensitive/ Automatic/ Less sensitive.
Train voice This option allows you to train the phone to recognize your voice
patterns. Choose from Train words/ Train digits.
Prompts Allows you to set how you are notified by the voice commands system
and the duration in which you can respond. Choose from Mode/ Audio playback/
Timeout.
•
For Mode, set Prompts/ Readout + Alerts/ Readout/ Tones only.
•
For Audio playback, set Speakerphone or Earpiece.
•
For Timeout, set 5 Seconds or 10 Seconds.
43
Using the Phone Menus
1.1 Start command
1 Press Left Selection Key [Menu].
2 Press Tools.
3 Press Voice commands.
NOTE: You can also press the Voice Commands Key from standby
mode to quickly access the Voice commands feature.
1.1.1 Call <Name or Number>
Say "Call" and then call someone simply by saying the name or phone number.
Please speak clearly and say the name or number exactly as it is entered in your
Contact List. When you have more than one contact number, you can state the
name and number type of the contact (for example, 'Call John Work').
1.1.2 Send msg to <Name or Number or Group>
Say "Send Message" and the command will prompt you for the type of message.
After choosing the message type, you will be prompted for the contact name, number
or group. It will automatically start a message. If you say a full-sentence command,
such as 'Send Message to Bob', it will automatically start a text message without
asking for the message type. When using 'Send Message' command, speak clearly
and say the name, number or group exactly as it is entered in your Contact List.
1.1.3 Go to <Menu>
The 'Go to' command allows you to access a menu within the phone (for example,
'Go to Calendar').
If no menu option is stated, a list of options will be provided.

44
Using the Phone Menus
1.1.4 Check <Item>
The ‘Check’ command allows you to check out a wide range of items such as Phone
status, Voicemail, Messages, Missed calls, Time, Signal strength, Battery level,
Volume and My number.
1.1.5 Contacts <Name>
You can look up names in your Contacts (for example, 'Contacts John') as well as
manage your Contact List including creating, erasing or modifying.
1.1.6 Redial
Say "Redial" and the phone will redial the last phone number.
1.1.7 Help
Provides a general guideline to using Voice commands.
2. Ez tip calculator
Allows you to quickly and easily calculate bill amounts using the bill total, tip % and
number of people as variables.
1 Press Left Selection Key [Menu].
2 Press Tools.
3 Press Ez tip calculator.
4 Enter the variable fields (Total Bill, Tip (%), Split) and the corresponding calculation
fields (tip and total for each person) appear automatically.
5 Press the Left Selection Key [Reset] for another calculation.
45
Using the Phone Menus
3. Eco-calculator
Allows you to keep track of your walking and cycling distances. The amount of CO
2
that is decreased by walking and cycling is displayed for you to see.
1 Press Left Selection Key [Menu].
2 Press Tools.
3 Press Eco-calculator.
4 Select the Walking or Cycling fields to edit the hours and miles.
NOTE: The decreasing CO
2
amount is automatically updated when you
enter the hour or mile amounts.
5 Press the Left Selection Key [Settings] to set the following settings.
•
Mode Allows you to switch the Eco-Calculator home screen animation to
Person or Tree. Depending on what information you entered last (Walking
or Cycling) an animation will appear. The number of trees in the animation is
calculated depending on the amount of CO
2
decreased.
•
Character Allows you to change the character to Man, Woman, or Man &
Woman. This option is unavailable when Tree is set as the Mode.
•
Unit Allows you to change the unit amount to Hour or Mile.
•
My car Allows you to select the type of fuel your car uses and the fuel
efficiency (mpg) of your car to measure the amount of CO
2
discharged.

46
Using the Phone Menus
4. Info search
Allows you to search items stored on the phone.
1 Press Left Selection Key [Menu].
2 Press Tools.
3 Press Info search.
4 Enter two or more characters in the search field and press [Search].
5 By default, the phone will search all the categories. To specify the categories,
highlight All and press the Left Selection Key
[Set]. Use the Directional Key
to highlight a category and press [Mark] to mark/unmark the category.
After specifying the categories, press the Left Selection Key
[Done].
6 To view a search result, highlight the desired results and press [View]. If you
want to retry the search, press the Right Selection Key
[Retry]. If you want
to start a new search, press the Left Selection Key
[Search], enter your key
word, then press
.
7 If no results are found, you will be prompted to try again. Choose Yes to try again
or No to return to the Tools menu.
5. Stopwatch
Allows you to use your phone as a typical stopwatch.
1 Press Left Selection Key [Menu].
2 Press Tools.
3 Press Stopwatch.
4 Press [Start].
5 Pressing [Stop] will stop or resume Stopwatch time.
•
While measuring time, press the Left Selection Key [Lap] to record a lap.
•
After time has stopped, press the Right Selection Key [Reset].

47
Using the Phone Menus
6. Unit converter
Allows you to converts units to desired units.
1 Press Left Selection Key [Menu].
2 Press Tools.
3 Press Unit converter.
4 Choose from Area/ Length/ Mass/ Temperature/ Volume/ Velocity.
5 Select the known unit type and enter the quantity you would like to convert. The
conversion will occur upon entering the desired quantity.
My schedule
Allows you to keep your agenda convenient and easy to access. Simply store your
appointments and your phone will alert you with a reminder you set.
1. Calendar
Allows you to keep your agenda convenient and easy to access. Simply store your
appointments and your phone will alert you with a reminder you set.
1 Press Left Selection Key [Menu].
2 Press My schedule.
3 Press Calendar.
4 Use the Directional Key to highlight the scheduled day.
Left: Previous day
Right: Next day
Up: Previous week
Down: Next week
5 Press the Left Selection Key [Add].
6 Enter the subject, then scroll down to set the remaining settings.
48
Using the Phone Menus
7 Highlight a Calendar setting field, then press the Left Selection Key [Set]. For
each Calendar event you can set:
• Start date • Start time
• End date • End time
• Repeat • Until
• Alerts • Tones
• Vibrate
8 Use the Directional Key to highlight the setting you want, then press .
9 Press [Save] when Calendar information is complete.
Editing and Deleting calendar entries
1 From the calendar entry list, press [View].
2 Press [Edit] to edit the calendar entry or press the Left Selection Key
[Erase] to delete the calendar entry.
2. Alarm clock
Allows you to set up to 10 alarms. At the alarm time, your alarm will be displayed on
the LCD screen and the alarm will sound.
1 Press Left Selection Key [Menu].
2 Press My schedule.
3 Press Alarm clock.
4 Press the Left Selection Key [Add].
5 Use the Directional Key to highlight the information you want to set, then
press the Left Selection Key
[Set] to view your setting choices.
Enter the alarm information including:
• Turn on/off • Set time
• Repeat • Ringtone
49
Using the Phone Menus
6 Press [Save] after setting all of the Alarm fields as necessary.
How to delete alarms
1 From the Alarm clock list, press the Right Selection Key [Options] to view
the available options.
2 Press Erase to delete an alarm or Erase all to delete all alarm entries.
3 Press [Yes].
How to edit alarms
1 From the Alarm Clock list, press [View] and then press [Edit].
Calculator
Allows you to perform simple mathematical calculations.
1 Open the flip and press Left Selection Key [Menu].
2 Press Calculator.
3 Press Calculator.
4 Enter the numbers to get the value you want. To clear entered items, press the
Left Selection Key
[Clear].
5 Use the Right Selection Key [Operators] to add other operators.
6 Use the Directional Key to enter an operation between numbers and press
[ = ] for the result.
Accessibility
Allows you to set the Accessibility settings.
1 Press Left Selection Key [Menu].
2 Press Accessibility.
50
Using the Phone Menus
1. Readout
Allows you to set the Readout settings.
1 Press Left Selection Key [Menu].
2 Press Accessibility.
3 Press Readout.
1.1 Full Readout
Allows your phone to read the screens out loud for blind and low-vision users or
when your eyes are busy.
1 Press Left Selection Key [Menu].
2 Press Accessibility.
3 Press Readout.
4 Press Full Readout.
5 Use the Directional Key to highlight a setting, then press [Set].
1.2 Menu Readout
Allows you to set the phone to read out menus.
1 Press Left Selection Key [Menu].
2 Press Accessibility.
3 Press Readout.
4 Press Menu Readout.
5 Use the Directional Key to highlight a setting, then press [Set].
1.3 Digit dial Readout
Allows you to set the phone to read out the digits entered in the dialing screen.
1 Press Left Selection Key [Menu].
2 Press Accessibility.
3 Press Readout.
51
Using the Phone Menus
4 Press Digit dial Readout.
5 Use the Directional Key to highlight a setting, then press [Set].
1.4 Caller ID Readout
Allows you to set how you want the Caller ID to be read out.
1 Press Left Selection Key [Menu].
2 Press Accessibility.
3 Press Readout.
4 Press Caller ID Readout.
5 Use the Directional Key to highlight a setting, then press [Set].
1.5 Passwords Readout
Allows the phone to read out your passwords.
1 Press Left Selection Key [Menu].
2 Press Accessibility.
3 Press Readout.
4 Press Passwords Readout.
5 Use the Directional Key to highlight a setting, then press [Set].
1.6 Speech rate
Allows you to set the menu readout speech rate.
1 Press Left Selection Key [Menu].
2 Press Accessibility.
3 Press Readout.
4 Press Speech rate.
5 Use the Directional Key to highlight a setting, then press [Set].
52
Using the Phone Menus
2. Invert color
Allows you to invert the color theme.
1 Press Left Selection Key [Menu].
2 Press Accessibility.
3 Press Invert color.
4 Use the Directional Key to highlight a setting, then press [Set].
3. Large text
Allows you to use larger font for menus.
1 Press Left Selection Key [Menu].
2 Press Accessibility.
3 Press Large text.
4 Use the Directional Key to highlight a setting, then press [Set].
4. Mono audio
Allows you to play the same sounds to both earpieces so you can hear everything
with just one ear.
1 Press Left Selection Key [Menu].
2 Press Accessibility.
3 Press Mono audio.
4 Use the Directional Key to highlight a setting, then press [Set].
5. Turn off all sounds
This menu turns off all of device's sounds.
1 Press Left Selection Key [Menu].
2 Press Accessibility.
53
Using the Phone Menus
3 Press Turn off all sounds.
4 Use the Directional Key to highlight a setting, then press [Set].
6. Hearing aid
Allows you to activate or deactivate Hearing Aid Compatibility for this device.
1 Press Left Selection Key [Menu].
2 Press Accessibility.
3 Press Hearing aid.
4 Use the Directional Key to highlight a setting, then press [Set].
Settings
This menu allows you to set various phone settings and view phone information.
1. Sounds settings
Provides options to customize the phone’s sounds.
1.1 Volumes
Allows you to quickly set the main Sounds settings for incoming calls and messages
(text and Voicemail).
1 Press Left Selection Key [Menu].
2 Press Settings.
3 Press Sounds settings.
4 Press Volumes.
5 Adjust the volume with the Directional Key and press [Set] to save the
setting.
54
Using the Phone Menus
1.1.1 Master volume
Allows you to set the Master volume.
1 Press Left Selection Key [Menu].
2 Press Settings.
3 Press Sounds settings.
4 Press Volumes.
5 Press Master volume.
1.1.2 Readout volume
Allows you to set the Readout volume.
1 Press Left Selection Key [Menu].
2 Press Settings.
3 Press Sounds settings.
4 Press Volumes.
5 Press Readout volume.
1.1.3 Keypad volume
Allows you to set the keypad volume.
1 Press Left Selection Key [Menu].
2 Press Settings.
3 Press Sounds settings.
4 Press Volumes.
5 Press Keypad volume.
55
Using the Phone Menus
1.2 Call sounds
Allows you to set how the phone alerts you for types of incoming calls.
1 Press Left Selection Key [Menu].
2 Press Settings.
3 Press Sounds settings.
4 Press Call sounds.
1.2.1 Call ringtone
Allows you to set the ringtones for incoming calls.
1 Press Left Selection Key [Menu].
2 Press Settings.
3 Press Sounds settings.
4 Press Call sounds.
5 Press Call ringtone.
6 Hightlight a submenu and press to open it.
7 Use the Directional Key to highlight a ringtone, then press [Set] to save
the sound.
TIP: To hear a ringtone before you set it, press the Left Selection Key
[Play].
1.2.2 Call vibrate
Allows you to set the phone to vibrate when you receive an incoming call.
1 Press Left Selection Key [Menu].
2 Press Settings.
3 Press Sounds settings.
4 Press Call sounds.
5 Press Call vibrate.
56
Using the Phone Menus
6 Use the Directional Key to highlight a setting, then press [Set].
1.2.3 Caller ID Readout
Allows you to set how you want the Caller ID to be read out.
1 Press Left Selection Key [Menu].
2 Press Settings.
3 Press Sounds settings.
4 Press Call sounds.
5 Press Caller ID Readout.
6 Use the Directional Key to highlight a setting, then press [Set].
1.3 Alert sounds
Allows you to select the alert type sounds.
1 Press Left Selection Key [Menu].
2 Press Settings.
3 Press Sounds settings.
4 Press Alert sounds.
5 Select TXT message/ Voicemail/ Emergency tone/ Missed call.
These submenus have the following options: Tone/ Vibrate/ Reminder
The exception for this is the Emergency tone menu. This menu includes the
following options: Alert/ Vibrate/ Off.
1.4 Service alerts
Allows you to set any of the three available service alerts.
1 Press Left Selection Key [Menu].
2 Press Settings.
3 Press Sounds settings.
4 Press Service alerts.
57
Using the Phone Menus
5 Select an alert option.
Call connect Alerts you when the call is connected.
Call disconnect Alerts you when the call is disconnected.
Charge complete Alerts you when the battery is completely charged.
6 Use the Directional Key to highlight a setting, then press [Set].
1.5 Power on/off
Allows you to select the sounds when turning the phone on and off.
1 Press Left Selection Key [Menu].
2 Press Settings.
3 Press Sounds settings.
4 Press Power on/off.
5 Press Power on or Power off.
6 Use the Directional Key to highlight a setting, then press [Set].
1.6 Senior mode
Allows you to set the phone to automatically adapt to noisy environments by
adjusting the listening level and improving speech intelligibility.
NOTE: The Senior mode feature is automatically disabled when you use
the speakerphone or the hands-free devices.
1 Press Left Selection Key [Menu].
2 Press Settings.
3 Press Sounds settings.
4 Press Senior mode.
5 Use the Directional Key to highlight a setting, then press [Set].
58
Using the Phone Menus
2. Display settings
Provides options to customize the phone’s display screen.
1 Press Left Selection Key [Menu].
2 Press Settings.
3 Press Display settings.
2.1 Backlight timer
Allows you to set the duration for illuminating the backlight for the main display, front
display, and keypad. Each is set separately.
1 Press Left Selection Key [Menu].
2 Press Settings.
3 Press Display settings.
4 Press Backlight timer.
5 Use the Directional Key to highlight a setting, then press [Set].
•
5 Seconds/ 10 Seconds/ 20 Seconds/ 30 Seconds/ 60 Seconds
2.2 Brightness
Allows you to set the backlight levels.
1 Press Left Selection Key [Menu].
2 Press Settings.
3 Press Display settings.
4 Press Brightness.
5 Use the Directional Key to highlight a setting, then press [Set].
NOTE: Brightness level can be 1 to 7.
59
Using the Phone Menus
2.3 Wallpaper
Allows you to choose the kind of background to be displayed on the phone's LCD in
standby mode.
1 Press Left Selection Key [Menu].
2 Press Settings.
3 Press Display settings.
4 Press Wallpaper.
5 Highlight a Wallpaper submenu and press .
6 Highlight a picture and press [Set] to set it as the wallpaper.
2.4 Menu style
Allows you to choose between the different themes for the phone's menus.
1 Press Left Selection Key [Menu].
2 Press Settings.
3 Press Display settings.
4 Press Menu style.
5 Use the Directional Key to highlight a setting, then press [Set].
NOTE: Press the Left Selection Key [Preview] to preview the
selected display theme. The default setting is Grid.
2.5 Font type
Allows you to set the font type.
1 Press Left Selection Key [Menu].
2 Press Settings.
3 Press Display settings.
4 Press Font type.
60
Using the Phone Menus
5 Use the Directional Key to highlight a setting, then press [Set].
NOTE: Press the Left Selection Key [Preview] to preview the
selected font type.
2.6 Font size
Allows you to set the font size for Dial digits, Menu & List and Message. This setting
is helpful for those who need the text to display a little bit larger.
1 Press Left Selection Key [Menu].
2 Press Settings.
3 Press Display settings.
4 Press Font size.
5 Use the Directional Key to highlight Dial digits/ Menu & list/ Message.
6 Press the Directional Key left and right to scroll through the settings, then
press
[Set].
Dial digits: Small/ Normal/ Large
Menu & list: Small/ Normal/ Large
Message: Small/ Normal/ Large
NOTE: Press the Left Selection Key [Preview] to preview the
selected font size.
2.7 Clock format
Allows you to choose the kind of clock to be displayed on the front and main LCD
screens.
1 Press Left Selection Key [Menu].
2 Press Settings.
3 Press Display settings.
61
Using the Phone Menus
4 Press Clock format.
5 Use the Directional Key to highlight a setting, then press [Set].
NOTE: Press the Left Selection Key [Preview] to preview the
selected clock format.
2.8 Name match for dialing
Allows you to display names when entering matching phone numbers to dial.
1 Press Left Selection Key [Menu].
2 Press Settings.
3 Press Display settings.
4 Press Name match for dialing.
5 Use the Directional Key to highlight a setting, then press [Set].
3. Phone settings
The Phone Settings menu allows you to designate specific settings to customize
how you use your phone.
3.1 Airplane mode
Turning on Airplane mode will disable all wireless communications.
1 Press Left Selection Key [Menu].
2 Press Settings.
3 Press Phone settings.
4 Press Airplane mode.
5 Use the Directional Key to highlight a setting, then press [Set].
62
Using the Phone Menus
3.2 Set directional keys
NOTE: To access these shortcuts press the Directional Key in the
direction (up,down,left,right) set from standby mode for the Shortcut you
want to access.
1 Press Left Selection Key [Menu].
2 Press Settings.
3 Press Phone settings.
4 Press Set directional keys.
5 Use the Directional Key to highlight a shortcut key you want to set.
6 Press [Set] to display the available shortcuts. Use the Directional Key to
highlight one, then press
[Set].
3.3 Voice commands
Please refer to page 42 for details.
3.4 Language
Allows you to set your preferred language (English or Spanish).
1 Press Left Selection Key [Menu].
2 Press Settings.
3 Press Phone settings.
4 Press Language.
5 Use the Directional Key to highlight a setting, then Press [Set].
63
Using the Phone Menus
3.5 Location
Allows you to set GPS (Global Positioning System: Satellite assisted location
information system) mode.
1 Press Left Selection Key [Menu].
2 Press Settings.
3 Press Phone settings.
4 Press Location.
5 Use the Directional Key to highlight a setting, then press [Set].
NOTES:
•
GPS satellite signals are not always received by the phone, especially
under bad atmospheric and environmental conditions, indoors, etc.
•
When in Airplane Mode, services supporting Location On functionality
will be suspended.
3.6 Auto key lock
The Auto key lock menu allows you to prevent your phone keys from being pushed
accidentally.
1 Press Left Selection Key [Menu].
2 Press Settings.
3 Press Phone settings.
4 Press Auto key lock.
3.7 Security
The Security menu allows you to secure the phone electronically.
1 Press Left Selection Key [Menu].
2 Press Settings.
3 Press Phone settings.

64
Using the Phone Menus
4 Press Security.
5 Enter the four-digit lock code.
The lock code is the last 4 digits of your mobile phone number if it is set. The
lock code is the last 4 digits of your MEID if your mobile phone number is not set.
3.7.1 Edit codes
Allows you to enter a new four-digit lock code.
1 Press Left Selection Key [Menu].
2 Press Settings.
3 Press Phone settings.
4 Press Security.
5 Enter the four-digit lock code.
6 Press Edit codes.
7 Select Phone only or Calls & services.
8 Enter your new four-digit lock code.
9 For confirmation, you will be prompted to enter the new lock code again.
3.7.2 Restrictions
Allows you to set separate restrictions for calls, text and data.
1 Press Left Selection Key [Menu].
2 Press Settings.
3 Press Phone settings.
4 Press Security.
5 Enter the four-digit lock code.
6 Press Restrictions.
7 Enter the four-digit service code.
8 Select a Restrictions menu, then press .
65
Using the Phone Menus
9 Use the Directional Key to highlight the restriction then press .
Calls: Incoming calls Allow all/ Contacts only/ Block all
Calls: Outgoing calls Allow all/ Contacts only/ Block all
Text msgs: Incoming messages Allow all/ Contacts only/ Block all
Text msgs: Outgoing messages Allow all/ Contacts only/ Block all
Data Allow all/ Block all
3.7.3 Phone lock setting
Keeps your phone from unauthorized use. Once the phone is locked, it's in restricted
mode until the lock code is entered. You can still receive phone calls and make
emergency calls. You can modify the lock code using Edit codes submenu within the
Security menu.
1 Press Left Selection Key [Menu].
2 Press Settings.
3 Press Phone settings.
4 Press Security.
5 Enter the four-digit lock code.
6 Press Phone lock setting.
7 Highlight an option and press [Set].
Unlocked The phone remains unlocked, by default.
On power up The phone is locked when it is turned on.
3.7.4 Lock phone now
Allows you to lock your phone immediately.
1 Press Left Selection Key [Menu].
2 Press Settings.
3 Press Phone settings.
4 Press Security.
66
Using the Phone Menus
5 Enter the four-digit lock code.
6 Press Lock phone now.
NOTE: To unlock the phone from standby mode, press the Right
Selection Key
[Unlock] and enter the four-digit lock code.
3.7.5 Reset default
Allows you to reset your phone to the factory default settings.
1 Press Left Selection Key [Menu].
2 Press Settings.
3 Press Phone settings.
4 Press Security.
5 Enter the four-digit lock code.
6 Press Reset default.
7 Press after reading the warning message.
8 Highlight Revert and press .
A confirmation message is displayed briefly before the phone resets itself.
3.8 System select
Allows you to set up the phone management environment. Leave this setting as
the default unless you want to alter system selection as instructed by your service
provider.
1 Press Left Selection Key [Menu].
2 Press Settings.
3 Press Phone settings.
4 Press System select.
5 Use the Directional Key to highlight a setting, then press [Set].
67
Using the Phone Menus
4. Call settings
The Call settings menu allows you to set various configurations for calling features.
4.1 Answer options
Allows you to determine how the phone will answer an incoming call.
1 Press Left Selection Key [Menu].
2 Press Settings.
3 Press Call settings.
4 Press Answer options.
5 Use the Directional Key to select a option you want to use.
NOTE: Auto with handsfree is available when any external device is
connected to your phone or speaker is set to on.
4.2 TTY mode
Allows you to attach a TTY device enabling you to communicate with parties also
using a TTY device. A phone with TTY support is able to translate typed characters to
voice. Voice can also be translated into characters and then displayed on the TTY.
1 Press Left Selection Key [Menu].
2 Press Settings.
3 Press Call settings.
4 Press TTY mode.
5 An explanation message is displayed.
6 Press to continue.
7 Use the Directional Key to highlight a setting, then press [Set].
TTY full: Users who cannot talk or hear send and receive a text message through
TTY equipment.
68
Using the Phone Menus
TTY + talk: Users who can talk but cannot hear receive a text message and send
voice through TTY equipment.
TTY + hear: Users who can hear but cannot talk send a text message and
receive voice through TTY equipment.
TTY off: Users send and receive without TTY equipment.
Connecting TTY Equipment and a Terminal
1 Connect a TTY cable to TTY connection on the terminal (TTY connection location
is the same as a headset jack).
2 Enter the phone menu and set the desired TTY mode.
3 After setting a TTY mode, check the LCD screen of the phone for the TTY icon.
4 Connect the TTY equipment to the power source and turn it on.
5 Make a phone connection to the desired number.
6 When connection is made, use the TTY equipment to type in and send a text
message or send voice.
7 The voice or text message from the receiver end displays on the TTY equipment
display.
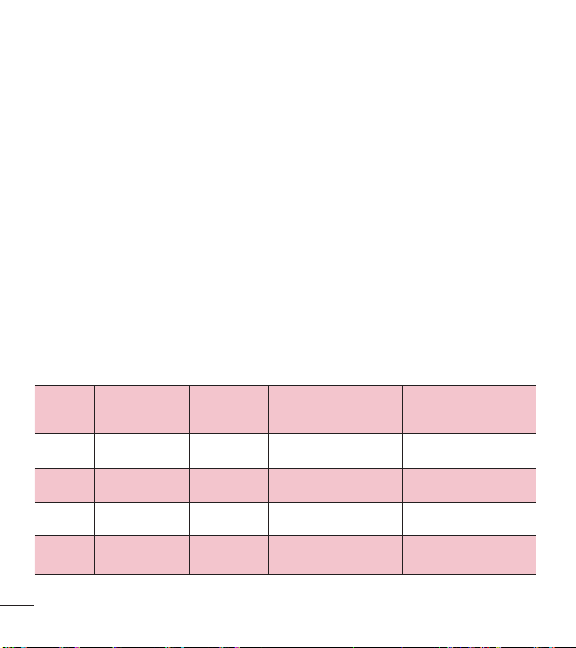
TTY mode (Teletypewriter)
Menu User Menu
Transmission/
Receiving Mode
When making
communications with a
non-TTY terminal
TTY full
For hearing-/
verbally- impaired
Text message transmission,
text message receiving
Operator
required
TTY + talk
For hearing-
impaired
Able to talk
Voice transmission, text
message receiving
Operator required
TTY +
hear
For verbally-
impaired
Audible
Text message transmission,
voice receiving
Operator required
TTY off
Voice transmission, voice
receiving
69
Using the Phone Menus
4.3 One touch dial
Allows you to initiate a speed dial call by pressing and holding the speed dial digit. If
set to Off, Speed dial numbers designated in your Contacts will not function.
1 Press Left Selection Key [Menu].
2 Press Settings.
3 Press Call settings.
4 Press One touch dial.
5 Use the Directional Key to highlight a setting, then press [Set].
4.4 Voice privacy
Allows you to set the voice privacy feature for CDMA calls. CDMA offers inherent
voice privacy. Check with your service provider for availability.
1 Press Left Selection Key [Menu].
2 Press Settings.
3 Press Call settings.
4 Press Voice privacy.
5 Use the Directional Key to highlight a setting, then press [Set].
4.5 DTMF tones
Allows you to set the DTMF tone length.
1 Press Left Selection Key [Menu].
2 Press Settings.
3 Press Call settings.
4 Press DTMF tones.
5 Use the Directional Key to highlight a setting, then press [Set].
70
Using the Phone Menus
5. Memory
Allows you to check your phone’s internal memory. Shows the memory information
saved in your phone.
1 Press Left Selection Key [Menu].
2 Press Settings.
3 Press Memory.
4 Use the Directional Key to select a submenu, then press to view the
memory used.
6. Phone info
Allows you to view the information specific to your phone and software.
1 Press Left Selection Key [Menu].
2 Press Settings.
3 Press Phone info.
6.1 My number
Allows you to view your phone number.
1 Press Left Selection Key [Menu].
2 Press Settings.
3 Press Phone info.
4 Press My number.
6.2 ESN/MEID
Allows you to view your phone's ESN/ MEID number.
1 Press Left Selection Key [Menu].
2 Press Settings.
3 Press Phone info.

71
Using the Phone Menus
4 Press ESN/MEID.
6.3 Icon glossary
Allows you to view all the icons and their meanings.
1 Press Left Selection Key [Menu].
2 Press Settings.
3 Press Phone info.
4 Press Icon glossary.
5 Select a submenu and browse through the icons.
6.4 SW/HW version
Allows you to view the versions of various applications such as SW, PRL, Browser,
AVR, MMS, hardware version.
1 Press Left Selection Key [Menu].
2 Press Settings.
3 Press Phone info.
4 Press SW/HW version.

72
For your safety
The highest SAR value for this model phone when tested for use at the ear is 1.27
W/kg and when worn on the body, as described in this user guide, is 1.18 W/kg
(body-worn measurements differ among phone models, depending upon available
accessories and FCC requirements).
While there may be differences between SAR levels of various phones and at various
positions, they all meet the government requirement for safe exposure.
The FCC has granted an Equipment Authorization for this model phone with
all reported SAR levels evaluated as in compliance with the FCC RF emission
guidelines.
SAR information on this model phone is on file with the FCC and can be found under
the Display Grant section of http://www.fcc.gov/oet/ea/fccid/ after searching on FCC
ID ZNF109C.
•
To reduce risk of fire or burns, do not expose to temperature above 45 °C / 113
°F, or dispose of in fire.
•
To reduce risk of fire or burns, do not dispose of in fire or water.
•
Do not disassemble or open crush, bend or deform, puncture or shred.
•
There is a danger of explosion if battery is incorrectly replaced. To reduce risk
of fire or burns, do not disassemble, crush, puncture, short external contacts,
expose to temperature above 45 °C / 113 °F, or dispose of in fire or water. Keep
this product away from excessive moisture and extreme temperatures. Keep the
battery or device dry and away from water or any liquid as it may cause a short
circuit.
•
Avoid using your phone near strong electromagnetic sources, such as microwave
ovens, sound speakers, TV and radio.
For your safety

73
For your safety
•
Use only original manufacturer-approved accessories, or accessories that do not
contain any metal. Please only use an approved charging accessory to charge your
LG phone. Improper handling of the Accessory/Charger Port, as well as the use of
an incompatible charger, may cause damage to your phone and void the warranty.
•
Only use the approved battery charger. Otherwise, you may cause serious damage
to your phone.
FCC Hearing-Aid Compatibility (HAC) Regulations for
Wireless Devices
On July 10, 2003, the U.S. Federal Communications Commission (FCC) Report and
Order in WT Docket 01-309 modified the exception of wireless phones under the
Hearing Aid Compatibility Act of 1988 (HAC Act) to require digital wireless phones
be compatible with hearing-aids. The intent of the HAC Act is to ensure reasonable
access to telecommunications services for persons with hearing disabilities.
While some wireless phones are used near some hearing devices (hearing aids and
cochlear implants), users may detect a buzzing, humming, or whining noise. Some
hearing devices are more immune than others to this interference noise, and phones
also vary in the amount of interference they generate.
The wireless telephone industry has developed a rating system for wireless phones,
to assist hearing device users to find phones that may be compatible with their
hearing devices. Not all phones have been rated. Phones that are rated have the
rating on their box or a label located on the box.
The ratings are not guarantees. Results will vary depending on the user’s hearing
device and hearing loss. If your hearing device happens to be vulnerable to
interference, you may not be able to use a rated phone successfully. Trying out
the phone with your hearing device is the best way to evaluate it for your personal
needs.

74
For your safety
M-Ratings: Phones rated M3 or M4 meet FCC requirements and are likely to
generate less interference to hearing devices than phones that are not labeled. M4
is the better/ higher of the two ratings.
T-Ratings: Phones rated T3 or T4 meet FCC requirements and are likely to generate
less interference to hearing devices than phones that are not labeled. T4 is the
better/ higher of the two ratings.
Hearing devices may also be rated. Your hearing device manufacturer or hearing
health professional may help you find this rating.
Higher ratings mean that the hearing device is relatively immune to interference
noise.
The hearing aid and wireless phone rating values are then added together. A sum of
5 is considered acceptable for normal use. A sum of 6 is considered for best use.
In the example to the left, if a hearing aid meets the M2 level
rating and the wireless phone meets the M3 level rating, the
sum of the two values equal M5. This should provide the
hearing aid user with “normal usage” while using their
hearing aid with the particular wireless phone. “Normal usage” in this context is
defined as a signal quality that’s acceptable for normal operation.
The M mark is intended to be synonymous with the U mark. The T mark is intended
to be synonymous with the UT mark. The M and T marks are recommended by the
Alliance for Telecommunications Industries Solutions (ATIS).
The U and UT marks are referenced in Section 20.19 of the FCC Rules. The
HAC rating and measurement procedure are described in the American National
Standards Institute (ANSI) C63.19 standard. To ensure that the Hearing Aid
Compatibility rating for your phone is maintained, secondary transmitters such as
Bluetooth and WLAN components must be disabled during a call.
When you’re talking on a cell phone, it’s recommended that you turn the BT
(Bluetooth) or WLAN mode off for HAC.

75
For your safety
For information about hearing aids and digital wireless phones
Wireless Phones and Hearing Aid Accessibility
http://www.accesswireless.org/
Gallaudet University, RERC
http://tap.gallaudet.edu/Voice/
FCC Hearing Aid Compatibility and Volume Control
http://www.fcc.gov/cgb/dro/hearing.html
The Hearing Aid Compatibility FCC Order
http://hraunfoss.fcc.gov/edocs_public/attachmatch/FCC-03-168A1.pdf
Hearing Loss Association of America [HLAA]
http://hearingloss.org/content/telephones-and-mobile-devices
Warranty Laws
The following laws govern warranties that arise in retail sales of consumer goods:
•
The California Song-Beverly Consumer Warranty Act [CC §§1790 et seq],
•
The California Uniform Commercial Code, Division Two [Com C §§2101 et seq],
and
•
The federal Magnuson-Moss Warranty Federal Trade Commission Improvement
Act [15 USC §§2301 et seq; 16 CFR Parts 701– 703]. A typical Magnuson-Moss
Act warranty is a written promise that the product is free of defects or a written
promise to refund, repair, or replace defective goods. [See 15 USC §2301(6).]
Remedies include damages for failing to honor a written warranty or service
contract or for violating disclosure provisions. [See 15 USC §2310(d).] Except for
some labeling and disclosure requirements, the federal Act does not preempt state
law. [See 15 USC §2311.]
The Consumer Warranty Act does not affect the rights and obligations of parties
under the state Uniform Commercial Code, except the provisions of the Act prevail

76
For your safety
over provisions of the Commercial Code when they conflict. [CC §1790.3.]
For purposes of small claims actions, this course will focus on rights and duties
under the state laws.

•
Las visualizaciones e ilustraciones de la pantalla pueden variar de las que ve en
el teléfono.
•
Las pantallas reales y el color del teléfono pueden variar.
•
Es posible que parte del contenido de esta guía no aplique a su teléfono, eso
dependerá del software y de su proveedor de servicios. Toda la información de
este documento está sujeta a cambios sin previo aviso.
•
Este teléfono no es adecuado para personas con alguna discapacidad visual ya
que cuenta con un teclado en pantalla táctil.
•
Copyright
©
2015 LG Electronics, Inc. Todos los derechos reservados. LG y el
logotipo de LG son marcas registradas de LG Group y sus entidades relacionadas.
Todas las demás marcas son propiedad de sus respectivos titulares.
Guía del usuario
ESPAÑOL

2
Descripción general del teléfono ........ 4
Descripción general de menús ........... 6
Acceso al menú .................................. 6
Introducción a su teléfono .................. 9
Batería................................................ 9
Cargar la batería ............................... 11
Cargar con un cable USB .................. 11
Protección de la temperatura de la
batería .............................................. 12
Nivel de carga de la batería .............. 12
Potencia de la señal .......................... 12
Encender y apagar el teléfono ........... 13
Hacer llamadas ................................. 13
Remarcar llamadas ........................... 14
Iconos de la pantalla ......................... 14
Acceso rápido a características
convenientes ...................................... 15
Sonidos desactivados ....................... 15
Función Silencio ............................... 15
Llamada en espera ........................... 15
Llamada de conferencia.................... 16
Identifi cación de llamada .................. 16
Comandos de voz ............................. 16
Introducir y editar información ......... 18
Entrada de texto ............................... 18
Contactos en la memoria de su
teléfono .............................................. 19
Principios básicos de almacenamiento 19
Personalizar entradas individuales .... 19
Marcación rápida .............................. 20
Almacenar un número con pausas .... 20
Agregar otro número de teléfono ...... 22
Modifi car la información guardada .... 22
Cambiar el número predeterminado .. 23
Eliminar ............................................ 23
Marcación rápida .............................. 24
Uso de menús del teléfono ................ 26
Contactos ......................................... 26
1. Nuevo contacto ...........................26
2. Lista de contactos .......................26
3. Favoritos ....................................27
4. Grupos .......................................28
5. Marcación rápida ........................29
Mensajes .......................................... 29
1. Nuevo mensaje de TXT ................30
2. Entrada ......................................31
3. Enviado ......................................33
4. Borradores .................................33
Contenido

3
5. Buzón de voz ..............................34
6. Plantillas ....................................35
Ajustes de mensajes .......................35
Borrar mensajes .............................36
Llamadas recientes .......................... 36
1. Perdidas .....................................37
2. Recibidas ...................................37
3. Marcadas ...................................38
4. Todas .........................................38
5. Tiempo de llamadas ....................39
Acceso web ...................................... 40
Cuaderno de notas............................ 40
Multimedia ....................................... 40
1. Grabar voz ..................................40
2. Fotos..........................................41
3. Timbres ......................................43
Herramientas .................................... 45
1. Comandos de voz .......................45
2. Ez propina ..................................48
3. Eco-calculadora ..........................48
4. Búsqueda de info ........................49
5. Cronómetro ................................50
6. Convertidor de unidades ..............51
Mi agenda ........................................ 51
1. Calendario ..................................51
2. Reloj despertador ........................53
Calculadora ...................................... 54
Accesibilidad .................................... 54
1. Lectura ......................................54
2. Invertir color ...............................57
3. Texto grande ...............................57
4. Audio mono ................................57
5. Desactivar todos los sonidos ........58
6. Prótesis auditiva .........................58
Confi guración ................................... 58
1. Programación de sonidos ............58
2. Programación de pantalla ............63
3. Programación de teléfono ............67
4. Programación de llamada ............73
5. Memoria.....................................76
6. Información de teléfono ...............77
Por su seguridad ................................ 79
Reglamentaciones de compatibilidad
con audífonos (HAC) para dispositivos
inalámbricos ................................... 80
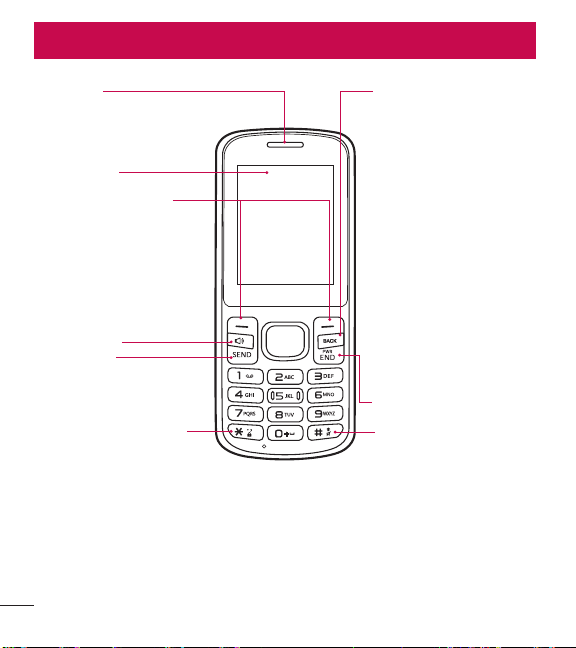
4
Descripción general del teléfono
Descripción general del teléfono
Auricular
Pantalla LCD
Tecla Altavoz
Tecla Borrar/Comandos
de voz
Elimina espacios o caracteres
individuales con solo
presionar rápidamente.
Manténgala presionada para
eliminar palabras completas
en pantallas de entrada de
texto. Presiónela una vez
para retroceder menús, un
nivel por vez. Para acceder
rápidamente a los comandos
de voz, presione esta tecla
una vez desde la pantalla de
espera.
Tecla Encender/Finalizar
Tecla Modo silencioso
Permite cambiar el modo
de símbolos al introducir
texto. Mientras está
en el modo de espera,
mantenga presionada
para activar y desactivar el
modo de silencio.
Tecla Enviar
Tecla Modo de bloqueo
Permite cambiar el
modo de entrada de
texto al introducir texto.
Mientras está en el modo
de espera, mantenga
presionada para bloquear
el teclado.
Teclas de Selección
Cada una de estas teclas
realiza las funciones
indicadas por el texto
mostrado encima de ellas
en la pantalla.
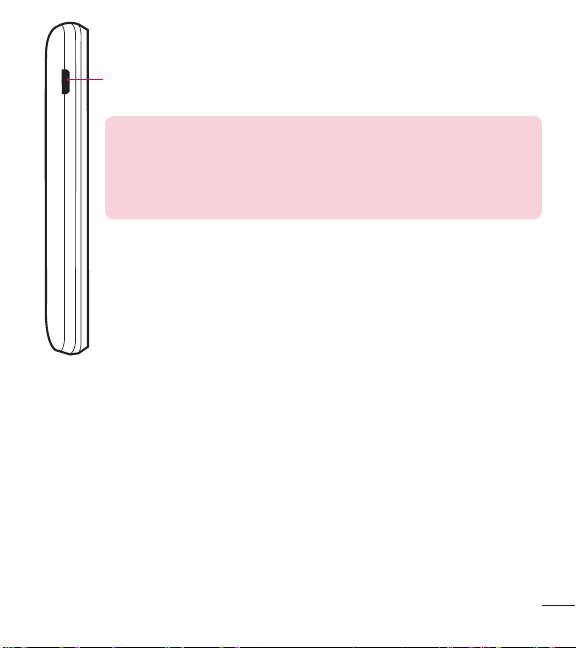
5
Descripción general del teléfono
Puerto para cargador/accesorios Conecta el teléfono al cargador u
otros accesorios admitidos.
Cargar con el cable USB y PC: Puede usar su computadora
para cargar el teléfono. Conecte uno de los extremos del cable
USB al puerto para cargador/accesorios del teléfono y el otro
extremo a un puerto USB con alta potencia de la PC (por lo
general, ubicado en el panel frontal de la computadora).
6
Descripción general de menús
Acceso al menú
En el modo de espera, presione la Tecla de selección izquierda [Menú] para
acceder a los menús del teléfono. Existen dos métodos para acceder a los menús y
submenús:
•
Use las Teclas Direccionales para resaltar un menú o una opción y presione
para seleccionarlo.
•
Presione la tecla numérica en el teclado para activar el menú/opción
correspondiente.
Descripción general de menús
Contactos
1. Nuevo contacto
2. Lista de contactos
3. Favoritos
4. Grupos
5. Marcación rápida
Mensajes
1. Nuevo mensaje de TXT
2. Entrada
3. Enviado
4. Borradores
5. Buzón de voz
6. Plantillas
Llamada recientes
1. Perdidas
2. Recibidas
3. Marcadas
4. Todas
5. Tiempo de llamadas
Acceso web
Cuaderno de notas
Multimedia
1. Grabar voz
2. Fotos
1. Mis fotos
2. Predetermin. fotos
3. Comprar gráfi cos
3. Timbres
1. Mis sonidos
2. Predetermin. timbres
3. Comprar timbres
Herramientas
1. Comandos de voz

7
Descripción general de menús
1. Llamar <Nombre o
Número>
2. Enviar msj a <Nombre o
Número o Grupo>
3. Ir a <Menú>
4. Verifi car <Elemento>
5. Contactos <Nombre>
6. Remarcar
7. Ayuda
2. Ez propina
3. Eco-calculadora
4. Búsqueda de info
5. Cronómetro
6. Convertidor de unidades
1. Área
2. Longitud
3. Masa
4. Temperatura
5. Volumen
6. Velocidad
Mi agenda
1. Calendario
2. Reloj despertador
Calculadora
Accesibilidad
1. Lectura
1. Lectura completa
2. Lectura de menú
3.
Lectura de dígito
marcado
4. Lectura de ID de
llamador
5. Lectura de contraseñas
6. Velocidad de voz
2. Invertir color
3. Texto grande
4. Audio mono
5. Desactivar todos los
sonidos
6. Prótesis auditiva
Confi guración
1. Programación de sonidos
1. Volúmens
1. Volumen maestro
2. Volumen de lectura
3. Volumen del teclado
2. Sonidos de llamada
1. Timbre de llamada
2. Vibrar de llamada
3. Lectura de ID de
llamador
3. Sonidos de alerta
1. Mensaje de TXT
2. Buzón de voz
3. Timbre de emergencia
4. Llamadas perdidas
4. Alertas de servicio
1. Conexión de llamada
2. Desconectar llamada
3. Cargar completado
5. Encendido/apagado
1. Encendido
2. Apagado
6. Modo senior
2. Programación de pantalla
1. Temporizador de la luz
de fondo

8
Descripción general de menús
2. Brillo
3. Fondo de pantalla
1. Mis fotos
2. Presentación de
diapositivas
4. Estilo de menú
1. Cuadrícula
(Predeterminado)
2. Lista
5. Tipo de fuente
6. Tamaño de fuente
7. Formato de reloj
8. Coincidencia de nombre
para marcación
3. Programación de teléfono
1. Modo avión
2. Establecer teclas
direccionales
3. Comandos de voz
1. Confi rmar selecciones
2. Sensibilidad
3. Entrenar de voz
4. Avisos
4. Idioma
5. Ubicación
6. Bloqueo automático del
teclado
7. Seguridad
8. Selección de sistema
4. Programación de llamada
1. Opciones de contestar
2. Modo TTY
3. Marcado oprimiendo un
botón
4. Privacidad de voz
5. Tonos DTMF
5. Memoria
1. Uso de la memoria
2. Mis fotos
3. Mis sonidos
4. Mis contactos
6. Información de teléfono
1. Mi número
2. ESN/MEID
3. Glosario de iconos
4. Versión SW/HW
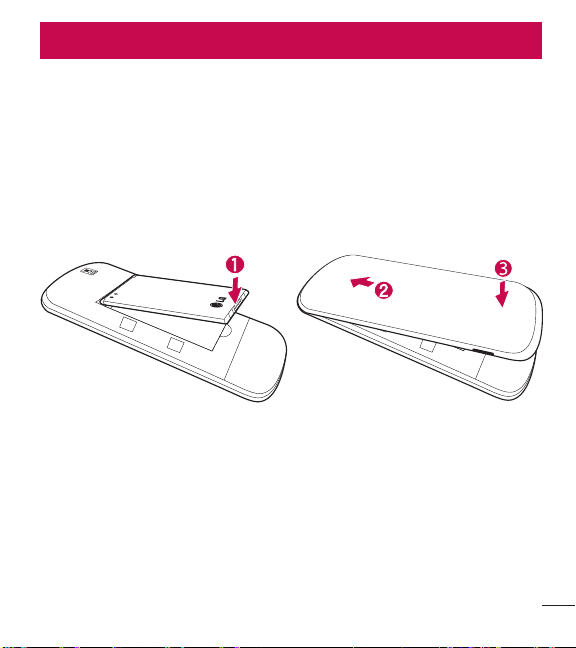
9
Introducción a su teléfono
Batería
Instalar la batería
1 Utiliza la ranura en la parte inferior izquierda de la tapa posterior para levantar y
retirar la tapa.
2 Alinee los contactos de la batería con los terminales cerca de la parte superior
del compartimiento de la batería e inserte la batería dentro del compartimiento.
3 Alinee la tapa posterior y presiónela hacia abajo hasta que encaje en su lugar.
Introducción a su teléfono
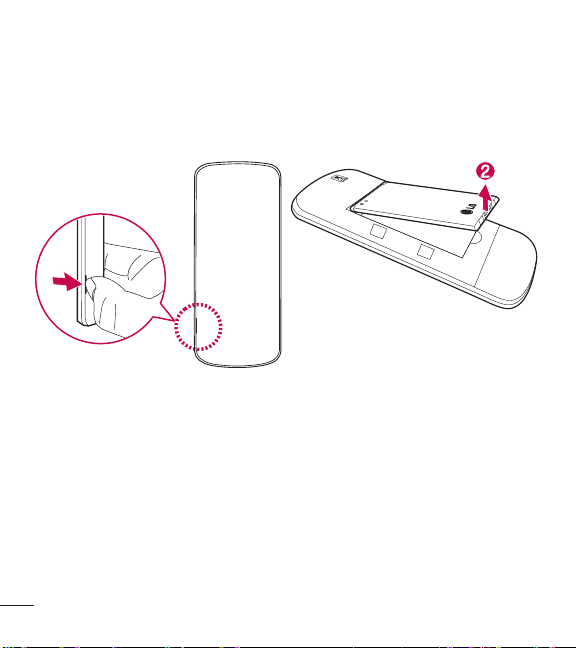
10
Introducción a su teléfono
Extraer la batería
1 Apague el teléfono.
2 Utiliza la ranura en la parte inferior izquierda de la tapa posterior para levantar y
retirar la tapa.
3 Use la abertura para dedo que se encuentra cerca de la parte inferior del
compartimiento de la batería para levantarla.
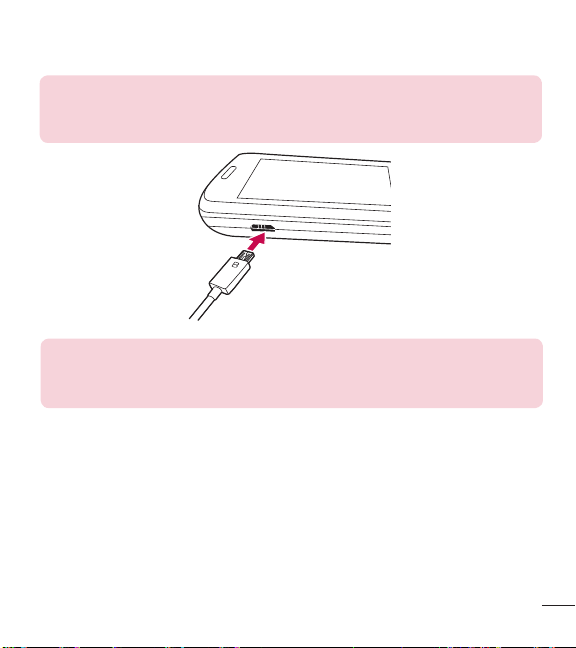
11
Introducción a su teléfono
Cargar la batería
Use el cargador incluido con su teléfono.
ADVERTENCIA: Use únicamente el cargador que viene incluido con el
teléfono. El uso de cualquier cargador distinto del que viene incluido con
el teléfono puede dañar el teléfono o la batería.
AVISO: Por favor asegúrese de que el lado 'B' esté orientado hacia arriba
antes de insertar el cargador o cable USB en el puerto para cargador/
accesorios de su teléfono.
Enchufe un extremo del adaptador de carga en el puerto para cargador/accesorios
del teléfono y el otro extremo en un toma corrientes.
El tiempo de carga varía dependiendo del nivel de la batería.
Cargar con un cable USB
Puede usar la computadora para cargar el teléfono. Para poder cargar con el cable
USB, primero debe tener el controlador USB adecuado instalado en su PC. Conecte
un extremo del cable USB al puerto para cargador/accesorios en el teléfono y el otro
extremo al puerto USB de la PC.

12
Introducción a su teléfono
NOTA: No se admiten puertos USB con poca potencia, como los puertos
USB del teclado o el nodo USB alimentado desde el bus.
Protección de la temperatura de la batería
Si la batería se sobrecalienta, el teléfono se apagará en forma automática. Cuando
vuelve a encender el teléfono, aparece un mensaje de alerta avisando que el
teléfono se apagó por seguridad.
Nivel de carga de la batería
Puede ver el nivel de carga de la batería en la esquina superior derecha de
la pantalla LCD. Cuando baja el nivel de carga, el sensor de la batería emite un
tono de advertencia, el icono de la batería parpadea y/o aparece un mensaje de
advertencia.
Si el nivel de cargar la batería baja demasiado, el teléfono se apaga
automáticamente y no se guarda ninguna de las funciones en curso.
Potencia de la señal
La calidad de la llamada depende de la potencia de la señal en su área. Puede
determinar la intensidad de la señal al observar el número de barras al lado del
icono de intensidad de señal
: más barras se traduce en una mejor señal. Si
tiene problemas con la calidad de la señal, desplácese a un área abierta, si está
dentro de un edificio, o intente acercarse a una ventana.

13
Introducción a su teléfono
Encender y apagar el teléfono
Encender el teléfono
1 Si el nivel de carga de la batería es bajo, inserte la batería y conecte el teléfono a
un tomacorriente externo.
2 Presione la Tecla Encender/Finalizar hasta que se encienda la pantalla
LCD.
Apagar el teléfono
Mantenga presionada la Tecla Encender/Finalizar
hasta que se apague la
pantalla LCD.
Hacer llamadas
1 Verifique que el teléfono esté encendido.
2 Introduzca el número de teléfono.
3 Presione la Tecla Enviar para marcar la llamada.
4 Presione la Tecla Encender/Finalizar para finalizar la llamada.
NOTA: El teléfono dispone de una función de Comandos de voz que
también le permite hacer llamadas al decir un número de teléfono o
nombre de contacto.
Corrección de errores de marcación
Mientras ingresa un número de teléfono, presione la Tecla Borrar
una vez para
borrar el último dígito introducido. También puede mantener la tecla presionada por
dos segundos para borrar todos los dígitos introducidos.

14
Introducción a su teléfono
Remarcar llamadas
Cuando está en la pantalla principal, presione la Tecla Enviar una vez para
acceder a todas las llamadas. Resalta el número que desea marcar y luego presione
la Tecla Enviar
otra vez.
Iconos de la pantalla
Cuando el teléfono está encendido, la línea superior de la pantalla LCD muestra los
iconos de estado del teléfono.
Para ver el glosario de iconos, abra el teléfono y vaya a
Menú >
Configuración >
Información de teléfono > Glosario de iconos y
seleccione la categoría deseada.

15
Acceso rápido a características convenientes
Acceso rápido a características convenientes
Sonidos desactivados
Desactive rápidamente los sonidos del teléfono cuando usted se encuentre en un
lugar en el que los sonidos perturbarían el ambiente.
Desde el modo de espera toque y mantenga presionada
por 3 segundos. Para
regresar al modo de sonidos normales, presione y mantenga presionada la tecla
.
Función Silencio
La función Silencio evita la transmisión de su voz a quien llama. Para activar
rápidamente el Silencio mientras está en una llamada, presione la Tecla de selección
izquierda
[Mudo]. Para cancelar el silencio, presione la Tecla de
selección izquierda
[No mudo] nuevamente.
Llamada en espera
Durante una llamada, un pitido indica otra llamada entrante. Presione la Tecla
Enviar
para responderla y poner en espera la primera llamada. Vuelva a
presionar la Tecla Enviar
para reanudar la primera llamada.

16
Acceso rápido a características convenientes
Llamada de conferencia
Puede conversar con dos personas al mismo tiempo mediante una llamada de
conferencia en su teléfono inalámbrico. Se pueden aplicar cargos por tiempo de
difusión y otros cargos, que pueden incluir tasas o cargos por llamadas de larga
distancia, entre otros, por todas la llamadas simultáneas hasta que finalice una
llamada.
1 Mientras está en la primera llamada, marque el número de 10 dígitos de la
segunda persona.
2 Presione la Tecla Enviar . La primera persona se pone automáticamente en
espera mientras realiza la llamada.
3 Cuando responda la segunda persona, presione [Fundir] para crear una
llamada de conferencia.
4 Si la segunda persona no responde, presione la Tecla Enviar una vez para
finalizar la conexión y reanudar la conversación con la primera persona.
5 Para finalizar ambas conversaciones, presione la Tecla Encender/Finalizar .
Identificación de llamada
La identificación de llamada muestra el número y/o el nombre y la foto (si
corresponde) de la persona que llama cuando suena el teléfono.
Comandos de voz
La opción Comandos de voz permite ejecutar funciones mediante comandos
orales (por ejemplo, realizar llamadas, revisar el correo de voz, etc.). Presione la
Tecla Comandos de voz
en el teclado.
1 Llamar: Diga "Llamar" y luego llame a alguien con solo pronunciar el nombre o
el número de teléfono.

17
Acceso rápido a características convenientes
2 Enviar msj a: Diga "Enviar mensaje" y el comando le preguntará por el tipo de
mensaje.
3 Ir a: Esta opción le permite acceder a un menú en el teléfono.
4 Verificar: Le permite verificar varios elementos, como el estado del teléfono,
buzón de voz, mensajes, llamadas perdidas, hora, fuerza de señal, nivel de
batería, volumen y el número del teléfono.
5 Contactos: Puede buscar nombres en sus Contactos, así como también
administrar su Lista de contactos al crear, borrar o modificar.
6 Remarcar: Diga "Remarcar" y el teléfono marcará nuevamente el último
número.
7 Ayuda: Proporciona los lineamientos generales para usar los comandos de voz.
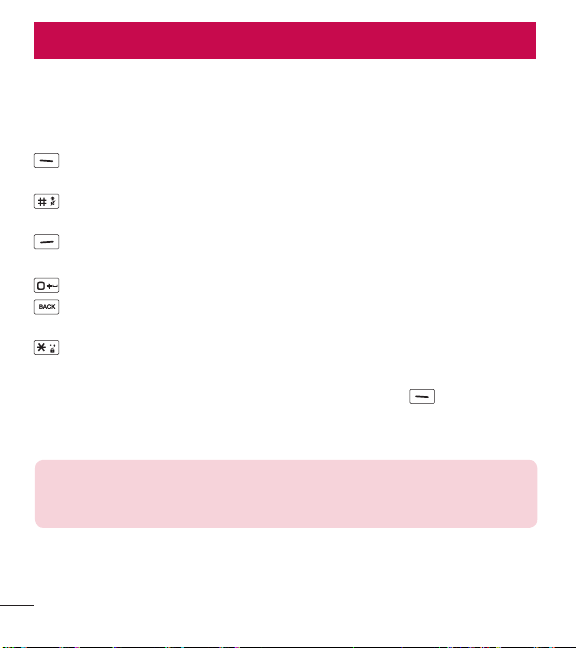
18
Introducir y editar información
Entrada de texto
Las siguientes funciones de teclas están disponibles para ayudarle a ingresar
texto:
Tecla de selección izquierda: Presiónela para cambiar el modo de entrada
de texto.
Mayúscula: Presiónela para cambiar el uso de mayúsculas (mayúscula inicial,
todas mayúsculas, minúsculas).
Siguiente: Presiónela para ver otras palabras coincidentes en la base de datos
cuando usa el modo de palabras T9.
Espacio: Presiónela para finalizar una palabra e insertar un espacio.
Borrar: Presiónela para eliminar un espacio o carácter individual. Mantenga
presionada para borrar el texto entero.
Puntuación: Presiónela para insertar signos de puntuación.
Modos de entrada de texto
En un campo de texto, presione la Tecla de selección izquierda
para seleccionar
un modo de entrada de texto:
T9 Palabra/ Abc/ ABC/ 123/ T9 Word/ Símbolos/ Plantillas
NOTA: T9 Palabra es el equivalente español de la función T9 Word
que utiliza acentos, tildes, etc. para obtener una ortografía en español
correcta.
Introducir y editar información
19
Contactos en la memoria de su teléfono
Contactos en la memoria de su teléfono
Principios básicos de almacenamiento
1 Introduzca un número (máx. 48 dígitos), luego presione la Tecla de selección
izquierda
[Grdr].
2 Use la Tecla Direccional para resaltar Nuevo contacto/ Actualizar existente
y luego presione
.
3 Use la Tecla Direccional para resaltar Móvil 1/ Casa/ Negocio/ Móvil 2/
Fax y luego presione
.
4 Ingrese un nombre (32 caracteres máximo) y cualquier información adicional y
después presione
[Grdr].
NOTA: Si seleccionó Actualizar existente después de seleccionar
el tipo de número, la información de contacto se actualiza de manera
automática.
Personalizar entradas individuales
1 Presione la Tecla de selección izquierda [Menú].
2 Presione Contactos.
3 Presione Lista de contactos.
4 Use la Tecla Direccional para resaltar una entrada de contacto y luego
presione la Tecla de selección izquierda
[Corregir].
5 Use la Tecla Direccional para resaltar la información que desea personalizar.
6 Modifique la entrada como desee y luego presione [Grdr] para guardar los
cambios.
20
Contactos en la memoria de su teléfono
Marcación rápida
Le permite configurar sus Marcación rápida.
1 Presione la Tecla de selección izquierda [Menú].
2 Presione Contactos.
3 Presione Lista de contactos.
4 Use la Tecla Direccional para resaltar una entrada de contacto y luego
presione la Tecla de selección izquierda
[Corregir].
5 Use la Tecla Direccional para resaltar un número de teléfono y luego
presione la Tecla de selección derecha
[Opciones].
6 Use la Tecla Direccional para resaltar Fijar marcado rápido y luego presione
.
7 Seleccione un dígito de marcación rápida.
•
Ingrese un dígito con el teclado y luego presione [Ajust].
•
Use la Tecla Direccional para resaltar el dígito de marcación rápida y luego
presione
[Ajust].
8 Presione Sí para confirmar y luego [Grdr] para actualizar la entrada del
contacto.
Almacenar un número con pausas
Las pausas le permiten introducir series de números adicionales para acceder a
sistemas automatizados, como el Correo de voz o los números de facturación de
tarjeta de crédito. Los tipos de pausa son:
Esperar (E): El teléfono deja de marcar hasta que presione la Tecla de selección
izquierda
[Liberar] para avanzar a la serie de números siguientes.
Pausa de 2 seg. (P): El teléfono espera dos segundos antes de marcar la siguiente
cadena de dígitos.
21
Contactos en la memoria de su teléfono
1 Introduzca el número telefónico, luego presione la Tecla de selección derecha
[Opciones].
2 Use la Tecla Direccional para resaltar Añadir 2-seg pausa o Añadir espera
y luego presione
.
3 Ingrese los números adicionales (por ejemplo, número de PIN, número de tarjeta
de crédito, etc.).
4 Presione la Tecla de selección izquierda [Grdr].
5 Elija Nuevo contacto/ Actualizar existente.
6 Elija Móvil 1/ Casa/ Negocio/ Móvil 2/ Fax.
7 Según sea necesario, siga ingresando información para la entrada del contacto.
NOTA: Si seleccionó Actualizar existente después de seleccionar
el tipo de número, la información de contacto se actualiza de manera
automática. Usted no puede ingresar información adicional.
8 Presione [Grdr] para actualizar la entrada del contacto.
Agregar una pausa a una entrada de contacto existente
1 Presione la Tecla de selección izquierda [Menú].
2 Presione Contactos.
3 Presione Lista de contactos.
4 Use la Tecla Direccional para resaltar una entrada de contacto y luego
presione la Tecla de selección izquierda
[Corregir].
5 Use la Tecla Direccional para resaltar el número y luego presione la Tecla de
selección derecha
[Opciones].
6 Presione Añadir 2-seg pausa o Añadir espera.
7 Ingrese los números adicionales y luego presione [Grdr] para actualizar la
entrada del contacto.
22
Contactos en la memoria de su teléfono
Agregar otro número de teléfono
Desde el modo de espera
1 Introduzca el número telefónico y luego presione la Tecla de selección izquierda
[Grdr].
2 Use la Tecla Direccional para resaltar Actualizar existente y luego presione
.
3 Use la Tecla Direccional para resaltar una entrada existente y luego presione
para actualizar la entrada del contacto.
4 Use la Tecla Direccional para resaltar Móvil 1/ Casa/ Negocio/ Móvil 2/
Fax y luego presione
para actualizar la entrada del contacto.
En la pantalla de Lista de contactos
1 Presione la Tecla de selección izquierda [Menú].
2 Presione Contactos.
3 Presione Lista de contactos.
4 Use la Tecla Direccional para resaltar una entrada y luego presione la Tecla
de selección izquierda
[Corregir].
5 Use la Tecla Direccional para resaltar el campo de número de teléfono que
desea agregar. A continuación, ingrese el número y presione
[Grdr] para
actualizar la entrada del contacto.
Modificar la información guardada
Para editar cualquier información que haya guardado, acceda a la pantalla Editar
contacto:
1 Presione la Tecla de selección izquierda [Menú].
2 Presione Contactos.
3 Presione Lista de contactos.
23
Contactos en la memoria de su teléfono
4 Use la Tecla Direccional para resaltar una entrada de contacto y luego
presione la Tecla de selección izquierda
[Corregir].
5 Use la Tecla Direccional para resaltar el campo que desea modificar.
6 Realice los cambios y presione [Grdr] para actualizar la entrada de contacto.
Cambiar el número predeterminado
El número predeterminado es el número de teléfono que ingresó primero cuando
creó el contacto. Sin embargo, puede guardar otro número como número
predeterminado.
1 Presione la Tecla de selección izquierda [Menú].
2 Presione Contactos.
3 Presione Lista de contactos.
4 Use la Tecla Direccional para resaltar una entrada.
5 Presione la Tecla de selección izquierda [Corregir].
6 Use la Tecla Direccional para resaltar un número de teléfono y luego
presione la Tecla de selección derecha
[Opciones].
7 Use la Tecla Direccional para resaltar Fijar como predet y presione .
8 Presione [Sí] para confirmar el nuevo número como predeterminado.
Aparecerá un mensaje de confirmación.
9 Presione [Grdr] para actualizar la entrada del contacto.
Eliminar
Eliminar una entrada de contacto
1 Presione la Tecla de selección izquierda [Menú].
2 Presione Contactos.
3 Presione Lista de contactos.
24
Contactos en la memoria de su teléfono
4 Use la Tecla Direccional para resaltar una entrada.
5 Presione la Tecla de selección derecha [Opciones].
6 Presione Borrar.
7 Presione [Sí] para confirmar.
Eliminar un número de marcación rápida
1 Presione la Tecla de selección izquierda [Menú].
2 Presione Contactos.
3 Presione Lista de contactos.
4 Use la Tecla Direccional para resaltar una entrada de contacto que desee
editar y presione
[Ver].
5 Resalte el número de teléfono con marcación rápida y luego presione la Tecla de
selección derecha
[Opciones].
6 Presione Borrar marcado rápido.
7 Presione [Sí] para confirmar.
Marcación rápida
Le permite hacer llamadas de teléfono rápido y fácilmente a los números
almacenados en Contactos.
NOTA: El número 1 de marcación rápida está reservado para el buzón de
voz.
Marcados rápidos de un dígito
Mantenga presionado el dígito de marcación rápida. El teléfono recuerda el número
de teléfono de sus contactos, lo muestra y lo marca por usted.

25
Contactos en la memoria de su teléfono
Marcación rápida de varios dígitos
Cuando mantiene presionada una tecla numérica, esta le indica al teléfono que
llame a un número de marcación rápida. Para llamar a un número de marcación
rápida de más de un dígito, presione los primeros dígitos y luego mantenga
presionado el último dígito. Por ejemplo para el número 25 de marcación rápida,
presione
y luego mantenga presionada .
NOTA: También puede ingresar dígitos de marcación rápida y presionar la
Tecla Enviar
.
26
Uso de menús del teléfono
Contactos
El menú Contactos le permite almacenar nombres, números de teléfono y otra
información en la memoria del teléfono.
1. Nuevo contacto
Le permite agregar un nuevo contacto a la lista de contactos.
NOTA: Usando este submenú, el número se guarda como un nuevo
contacto, no en un contacto existente.
1 Presione la Tecla de selección izquierda [Menú].
2 Presione Contactos.
3 Presione Nuevo contacto.
4 Ingrese el nombre y presione la Tecla Direccional hacia abajo hasta resaltar
el tipo de número de teléfono que desea usar.
5 Ingrese el número y cualquier información de contacto adicional y presione
[Grdr] para actualizar la entrada del contacto.
2. Lista de contactos
Le permite ver su lista de contactos.
1 Presione la Tecla de selección izquierda [Menú].
2 Presione Contactos.
3 Presione Lista de contactos.
Uso de menús del teléfono
27
Uso de menús del teléfono
4 Use la Tecla Direccional para desplazarse por sus contactos en orden
alfabético.
•
Presione la Tecla de selección derecha [Opciones] para seleccionar una
de las siguientes opciones:
Nuevo contacto/ Borrar/ Nuevo mensaje de TXT/ Llamada/ Administrar
contactos/ Fijar como favorito/ Modo de ingreso de la búsqueda
•
Presione la Tecla de selección izquierda [Corregir] para editar el contacto.
•
Presione [Ver] para ver los detalles de la entrada.
SUGERENCIA: Use el campo Ir a para acceder rápidamente a una
entrada sin necesidad de desplazarse. Por ejemplo, para ir a la entrada
"Veterinario", ingrese la letra V.
3. Favoritos
Le permite agregar entradas de contactos o grupos de contactos a su lista de
Favoritos para ver, llamar o enviar mensajes fácilmente.
1 Presione la Tecla de selección izquierda [Menú].
2 Presione Contactos.
3 Presione Favoritos.
4 Presione [Añadir].
SUGERENCIA: Puede agregar hasta 10 contactos y/o grupos de
contactos como Favoritos para realizar llamadas, enviar y revisar mensajes
fácilmente.
5 Seleccione si desea agregar un favorito desde sus Contactos o Grupos.
6 Use la Tecla Direccional para desplazarse por sus contactos o grupos en
forma alfabética y presione
[Subry].
28
Uso de menús del teléfono
7 Presione la Tecla de selección izquierda [Hecho]. Después de agregar los
contactos a la lista de favoritos, tendrá las siguientes opciones disponibles en el
menú Favoritos:
Tecla de selección izquierda
: Ver
Tecla OK
: Nuevo mensaje de TXT
Tecla de selección derecha
: Opciones
Mover posición/ Quitar/ Quitar todo
4. Grupos
Le permite ver sus contactos agrupados, agregar un nuevo grupo, cambiar el
nombre de un grupo, eliminar un grupo o enviar un mensaje a todos los contactos
de un grupo seleccionado.
1 Presione la Tecla de selección izquierda [Menú].
2 Presione Contactos.
3 Presione Grupos.
Las siguientes opciones están disponibles:
•
Ver un grupo
Use la Tecla Direccional
para resaltar un grupo y luego presione [Ver].
•
Agregar un nuevo grupo
Presione la Tecla de selección izquierda
[Nuevo] para agregar un nuevo
grupo a la lista. Introduzca un nombre, inserte una foto (si es necesario) y presione
[Grdr].
•
Opciones de grupo
Presione la Tecla de selección derecha
[Opciones] para seleccionar una de
las siguientes opciones:
Nuevo mensaje de TXT/ Editar grupo nombre & ID/ Corregir miembros/
Borrar grupo/ Fijar como favorito/ Modo de ingreso de la búsqueda
29
Uso de menús del teléfono
Agregar contactos a un grupo
1 En el submenú Grupos, presione [Ver] y luego [Añadir].
2 Resalte el contacto deseado y presione [Subry].
3 Presione la Tecla de selección izquierda [Hecho] para agregar el contacto
al grupo.
5. Marcación rápida
Le permite ver su lista de números de Marcación rápida o designar Marcación
rápida para números ingresados en sus Contactos.
1 Presione la Tecla de selección izquierda [Menú].
2 Presione Contactos.
3 Presione Marcación rápida.
4 Use la Tecla Direccional para resaltar la posición de marcación rápida o
ingresar el dígito de marcación rápida y presione
[Ajust].
5 Use la Tecla Direccional resaltar el contacto y presione [Ajust]. (Para
contactos que tienen varios números, resalte el número de marcación rápida y
luego presione
.)
6 Presione [Sí] para confirmar.
Aparecerá un mensaje de confirmación.
Mensajes
Dependiendo del contenido y tamaño de sus mensajes, el teléfono podrá almacenar
hasta 520 mensajes (incluyendo un máximo de 300 mensajes de texto, 100 alertas
de emergencia, en el buzón de Entrada; 100 mensajes de texto en el buzón de
Enviado; 20 mensajes de texto en Borradores). El contenido almacenado en el
mensaje puede verse limitado por el modelo del teléfono y la capacidad del servicio.
Puede haber otros límites a los caracteres disponibles por mensaje. Compruebe con

30
Uso de menús del teléfono
su proveedor de servicio las funciones y capacidades del sistema.
•
Cuando vea un mensaje recibido, puede llamar al remitente presionando la Tecla
Enviar
.
Alerta de nuevo mensaje de texto
El teléfono puede alertarle cuando recibe nuevos mensajes. Las opciones incluyen:
1 El teléfono muestra un mensaje en la pantalla.
2 Aparece el icono de mensaje ( ) en la pantalla. En el caso de un mensaje de
alta prioridad, el icono (
) parpadeará.
1. Nuevo mensaje de TXT
Este menú le permite enviar mensajes.
Aspectos básicos del envío de un mensaje de texto
1 Presione la Tecla de selección izquierda [Menú].
2 Presione Mensajes.
3 Presione Nuevo mensaje de TXT.
4 Ingrese un número de teléfono o el nombre de un destinatario en el campo Para.
Mientras los ingresa, aparecen contactos coincidentes. Puede elegir un
destinatario sugerido o seguir ingresando el número de teléfono.
5 Presione para acceder al campo de texto.
6 Use el teclado para escribir el mensaje.
7 Presione [Env].
Seleccionar destinatarios con la función Agregar
1 Presione la Tecla de selección izquierda [Menú].
2 Presione Mensajes.
3 Presione Nuevo mensaje de TXT.

31
Uso de menús del teléfono
4 Seleccione el campo Para, presione la Tecla de selección derecha Añadir.
5 Seleccione una opción y presione .
De contactos Para seleccionar un destinatario de su lista de contactos.
De llamadas rctes Para seleccionar un destinatario de llamadas recientes.
Favoritos Para seleccionar un destinatario de Favoritos.
Grupos Para seleccionar un destinatario de sus grupos.
A contactos Para guardar el número a sus Contactos (sólo se muestra cuando
se ingresa un número telefónico o correo electrónico no guardado).
6 Use el teclado para escribir el mensaje.
7 Presione [Env].
2. Entrada
El teléfono le avisa de tres formas cuando recibe un nuevo mensaje:
•
Al mostrar un mensaje de notificación en la pantalla.
•
Al emitir un tono o una vibración, si los configura.
•
Al mostrar (el icono aparece cuando recibe un mensaje de alta prioridad.)
Visualización de la bandeja de entrada
1 Presione la Tecla de selección izquierda [Menú].
2 Presione Mensajes.
3 Presione Entrada.
4 Resalte un mensaje. Están disponibles las opciones siguientes.
•
Presione [Abrir] para ver el mensaje.
•
Presione la Tecla de selección izquierda [Borrar] para eliminar el mensaje
resaltado.
32
Uso de menús del teléfono
•
Presione la Tecla de selección derecha [Opciones] para acceder a las
siguientes opciones:
Contestar Responde a la dirección del remitente del mensaje recibido.
Responder con copia Responde a la dirección del remitente con una copia
del texto del mensaje original incluida.
Adelantar Reenvía el mensaje a otras direcciones de destino.
Añadir a contactos Guarda el número de devolución, la dirección de
correo electrónico y los números de la dirección del mensaje recibido en sus
Contactos.
Extraer direcciones Permite extraer las direcciones de contacto del mensaje
y guardarlas (si desea).
Info. mensaje Le permite revisar la información del mensaje recibido.
Administrar entrada Le permite administrar (bloquear, eliminar y más) varios
mensajes.
Ordenar por remitente/Ordenado por tiemp Le permite ordenar los
mensajes en forma alfabética por el nombre del remitente o la hora de
recepción.
Referencia de iconos de mensajes
Nuevo mensaje de texto Mensaje de texto leído
Error de envío Múltiples mensajes enviados
Múltiples mensajes entregados Múltiples mensajes con error
Envío de múltiples mensajes
incompleto
Múltiples mensajes enviados
33
Uso de menús del teléfono
Borrador de mensaje de texto Mensaje entregado
Bloquear Alta prioridad
3. Enviado
El menú Enviado almacena todos los mensajes enviados.
1 Presione la Tecla de selección izquierda [Menú].
2 Presione Mensajes.
3 Presione Enviado.
4 Resalte un mensaje. Las siguientes opciones están disponibles.
•
Presione [Abrir] para ver el mensaje.
•
Presione la Tecla de selección izquierda [Borrar] para borrar el mensaje.
•
Presione la Tecla de selección derecha [Opciones] para las siguientes
opciones.
Adelantar/ Enviar/ Añadir a contactos/ Info. mensaje/ Administrar
enviado/ Ordenado por destinatario
5 Mientras ve un mensaje, elija las siguientes opciones:
Adelantar/ Bloquear/ Guardar como plantilla/ Añadir a contactos/ Info. mensaje
4. Borradores
Los borradores de mensajes guardados se almacenan aquí.
1 Presione la Tecla de selección izquierda [Menú].
2 Presione Mensajes.
3 Presione Borradores.
4 Resalte un mensaje. Están disponibles las opciones siguientes.
•
Presione [Crrgr] para seguir editando el mensaje.
34
Uso de menús del teléfono
•
Presione la Tecla de selección izquierda [Borrar] para eliminar el mensaje.
•
Presione la Tecla de selección derecha [Opciones] para acceder a las
siguientes opciones:
Enviar Envía el mensaje seleccionado.
Añadir a contactos Guarda el número, la dirección de correo electrónico y los
números de la dirección incluida en el mensaje en sus Contactos.
Administrar borradores Le permite administrar (borrar o bloquear) mensajes.
Referencia de iconos de mensajes
Borrador de mensaje de texto
5. Buzón de voz
Le permite ver la cantidad de nuevos mensajes de voz grabados en el buzón de
correo de voz. Cuando exceda el límite de almacenamiento, los mensajes antiguos
se sobrescribirán. Cuando reciba un nuevo mensaje de voz, el teléfono le avisará.
Consultar su buzón de correo de voz
1 Presione la Tecla de selección izquierda [Menú].
2 Presione Mensajes.
3 Presione Buzón de voz.
4 Están disponibles las opciones siguientes.
•
Presione la Tecla de selección izquierda [Anular] para borrar el contador
de buzón de voz. Luego presiona
[Sí].
•
Presione la Tecla Enviar o [Llmd] para escuchar los mensajes.
O
Mantenga presionada
en el teléfono para activar el marcación rápida a su
correo de voz.
35
Uso de menús del teléfono
6. Plantillas
Permite administrar las plantillas de texto.
1 Presione la Tecla de selección izquierda [Menú].
2 Presione Mensajes.
3 Presione Plantillas.
4 Seleccione un mensaje para ver su contenido y editarlo. Presione [Grdr] para
guardarlo.
Ajustes de mensajes
Le permite configurar los ajustes de sus mensajes.
1 Presione la Tecla de selección izquierda [Menú].
2 Presione Mensajes.
3 Presione la Tecla de selección izquierda [Prog].
4 Use la Tecla Direccional para resaltar uno de los ajustes y presione para
seleccionarlo.
Opciones de ajustes de mensajes
1 Mod ingrs
Seleccione T9 Palabra, Abc, ABC, 123, T9 Word para que sea su método de
entrada predeterminado.
2 Tamaño de fuente de mensajería
Permite seleccionar Pequeña, Normal, Grande para indicar el tamaño de los
caracteres del texto.
3 Respuesta instantánea de TXT
Seleccione Encendido para escribir una respuesta en forma instantánea. De lo
contrario, seleccione Apagado.

36
Uso de menús del teléfono
4 Auto-dsplz TXT
Seleccione Encendido para desplazarse automáticamente hacia abajo por el texto
mientras ve los mensajes o seleccione Apagado.
5 Alerta CMAS
Ajuste su configuración para recibir alertas de emergencia. Este menú le ofrece tres
opciones: Recibir alertas/ Recordatorio de alerta/ Alerta tono/ Alerta vibración
6 Firma
Seleccione Personalizada para crear/editar una firma para enviar en forma
automática con los mensajes. Seleccione Ninguno para no enviar mensajes con
firma.
Borrar mensajes
Puede borrar los mensajes almacenados en las carpetas Entrada, Enviados o
Borradores. También puede borrar todos los mensajes de una vez.
1 Presione la Tecla de selección izquierda [Menú].
2 Presione Mensajes.
3 Presione la Tecla de selección derecha [Opciones] y seleccione una de las
siguientes opciones:
Borrar entrada/ Borrar enviado/ Borrar borradores/ Borrar todo
4 Presione [Sí] para confirmar la eliminación o seleccione los mensajes que
desea eliminar. Aparecerá un mensaje de confirmación.
Llamadas recientes
El menú Llamadas reciente tiene listas de números de teléfono y/o entradas de
contactos de las llamadas que realiza, acepta o pierde. Se actualiza continuamente
a medida que se agregan nuevos números al principio de la lista y se eliminan las
entradas más antiguas desde la parte inferior de la lista.
37
Uso de menús del teléfono
1. Perdidas
Le permite ver la lista de llamadas perdidas; hasta 90 entradas.
1 Presione la Tecla de selección izquierda [Menú].
2 Presione Llamadas reciente.
3 Presione Perdidas.
4 Use la Tecla Direccional para resaltar una entrada y luego
•
Presione [Abrir] para abrir la entrada.
•
Presione la Tecla Enviar para llamar al número.
•
Presione la Tecla de selección derecha [Opciones] para seleccionar:
Guardar en contactos (Info de contacto)/ Borrar/ Asegurar (Abrir)/ Borrar
todo/ Tiempo de llamadas
•
Presione la Tecla de selección izquierda [Mensaje] para enviar un
mensaje al número..
2. Recibidas
Le permite ver la lista de llamadas entrantes; hasta 90 entradas.
1 Presione la Tecla de selección izquierda [Menú].
2 Presione Llamadas reciente.
3 Presione Recibidas.
4 Use la Tecla Direccional para resaltar una entrada y luego
•
Presione [Abrir] para abrir la entrada.
•
Presione la Tecla Enviar para llamar al número.
•
Presione la Tecla de selección derecha [Opciones] para selecionar:
Guardar en contactos (Info de contacto)/ Borrar/ Asegurar (Abrir)/ Borrar
todo/ Tiempo de llamadas
38
Uso de menús del teléfono
•
Presione la Tecla de selección izquierda [Mensaje] para enviar un
mensaje al número.
3. Marcadas
Le permite ver la lista de llamadas salientes; hasta 90 entradas.
1 Presione la Tecla de selección izquierda [Menú].
2 Presione Llamadas reciente.
3 Presione Marcadas.
4 Use la Tecla Direccional para resaltar una entrada y luego
•
Presione [Abrir] para abrir la entrada.
•
Presione la Tecla Enviar para llamar al número.
•
Presione la Tecla de selección derecha [Opciones] para seleccionar:
Guardar en contactos (Info de contacto)/ Borrar/ Asegurar (Abrir)/ Borrar
todo/ Tiempo de llamadas
•
Presione la Tecla de selección izquierda [Mensaje] para enviar un
mensaje al número.
4. Todas
Le permite ver la lista de todas las llamadas; hasta 270 entradas.
1 Presione la Tecla de selección izquierda [Menú].
2 Presione Llamadas reciente.
3 Presione Todas.
4 Use la Tecla Direccional para resaltar una entrada y luego
•
Presione [Abrir] para abrir la entrada.
•
Presione la Tecla Enviar para llamar al número.
39
Uso de menús del teléfono
•
Presione la Tecla de selección derecha [Opciones] para seleccionar:
Guardar en contactos (Info de contacto)/ Borrar/ Asegurar (Abrir)/ Borrar
todo/ Tiempo de llamadas
•
Presione la Tecla de selección izquierda [Mensaje] para enviar un
mensaje al número.
ACCESO DIRECTO: Para ver una lista rápida de todas sus llamadas
recientes, presione la Tecla Enviar
desde el modo de espera.
5. Tiempo de llamadas
Le permite ver la duración de los tipos de llamada seleccionados.
1 Presione la Tecla de selección izquierda [Menú].
2 Presione Llamadas reciente.
3 Presione Tiempo de llamadas.
4 Use la Tecla Direccional para resaltar un contador de llamada.
Última llamada/ Todas las llamadas/ Llamadas recibidas/ Llamadas
marcadas/ Llamadas roaming/ Último reajuste/ Total de llamadas
5 Presione la Tecla de selección izquierda [Reaj] para restablecer el
temporizador resaltado.
6 Restablezca todos los temporizadores registrados al presionar la Tecla de
selección derecha
[Reaj tod].
NOTA: El contador Total de llamadas no se puede restablecer.
40
Uso de menús del teléfono
Acceso web
Le permite acceder a noticias, deportes, información del clima y correo electrónico
desde su dispositivo. El acceso y las selecciones dentro de esta función dependen
de su proveedor de servicios. Para obtener información específica sobre el acceso a
Internet desde el teléfono, comuníquese con su proveedor de servicios.
1 Presione la Tecla de selección izquierda [Menú].
2 Presione Acceso web.
Cuaderno de notas
Le permite agregar notas para usted mismo, leerlas, editarlas y borrarlas.
1 Presione la Tecla de selección izquierda [Menú].
2 Presione Cuaderno de notas.
3 Presione Cuaderno de notas.
4 Presione la Tecla de selección izquierda [Añadir] para crear una nueva nota.
5 Presione la Tecla de selección izquierda para cambiar el modo de entrada.
O presione la Tecla de selección derecha
[Opciones] para Copiar texto y
Pegar o Cancelar la entrada del cuaderno de notas.
6 Después de escribir la nota, presione [Grdr] para guardarla.
Multimedia
Permite acceder su multimedia mientras está en movimiento.
1. Grabar voz
Le permite grabar su voz.
1 Presione la Tecla de selección izquierda [Menú].
2 Presione Multimedia.

41
Uso de menús del teléfono
3 Presione Grabar voz.
4 Presione para comenzar a grabar y luego presione [Alto] para detener
la grabación.
2. Fotos
Este menú le permite ver todas las fotos y comprar gráficos.
Acceso y opciones
1 Presione la Tecla de selección izquierda [Menú].
2 Presione Multimedia.
3 Presione Fotos.
4 Explore los submenús.
2.1 Mis fotos
Le permite ver y administrar las fotos almacenadas en el teléfono.
1 Presione la Tecla de selección izquierda [Menú].
2 Presione Multimedia.
3 Presione Fotos.
4 Presione Mis fotos
5 Resalte una imagen con la Tecla Direccional .
Están disponibles las siguientes opciones:
•
Presione [Ver] para verla.
•
Presione la Tecla de selección izquierda [Borrar] para eliminarla.
•
Presione la Tecla de selección derecha [Opciones] para seleccionar de las
siguientes opciones:
Fijar como Permite establecer la foto como su fondo de pantalla o identificador
de foto para un contacto.
42
Uso de menús del teléfono
Presentación de diapositivas Reproduce todas las imágenes como una
presentación de diapositivas.
Administrar fotos Le permite marcar varias imágenes para borrarlas, enviarlas o
bloquearlas/desbloquearlas.
Renombrar Le permite cambiar el nombre del archivo.
Aseg Le permite bloquear o desbloquear. Los archivos bloqueados no pueden
borrarse accidentalmente.
Info de arch Permite ver información del archivo de imagen.
Editar una foto
Vaya a Mis fotos y use la Tecla Direccional
para resaltar una imagen. Presione
[Ver] y luego presione la Tecla de selección derecha [Opciones] y
seleccione Editar para realizar zoom, girar y recortar la fotografía.
2.2 Predetermin. fotos
Le permite ver y administrar las fotos predeterminadas almacenadas en el teléfono.
1 Presione la Tecla de selección izquierda [Menú].
2 Presione Multimedia.
3 Presione Fotos.
4 Presione Predetermin. fotos.
5 Resalte una imagen con la Tecla Direccional .
Están disponibles las siguientes opciones:
•
Presione [Ver] para verla.
•
Presione la Tecla de selección derecha [Opciones] para acceder la opción
para establecer la imagen como fondo de pantalla.
43
Uso de menús del teléfono
2.3 Comprar gráficos
Este menú le permite comprar imágenes.
1 Presione la Tecla de selección izquierda [Menú].
2 Presione Multimedia.
3 Presione Fotos.
4 Presione Comprar gráficos.
3. Timbres
Personalice su teléfono con tonos de timbre. Está disponible una amplia variedad de
opciones, como hits, hip-hop, y más.
3.1 Mis sonidos
Le permite grabar un nuevo sonido o seleccionar el sonido que desee.
Grabar un nuevo sonido
1 Presione la Tecla de selección izquierda [Menú].
2 Presione Multimedia.
3 Presione Timbres.
4 Presione Mis sonidos.
5 Presione Grabar nuevo y luego para iniciar la grabación; después,
presione
[Alto] para finalizar la grabación.
Seleccionar un sonido
1 Presione la Tecla de selección izquierda [Menú].
2 Presione Multimedia.
3 Presione Timbres.
4 Presione Mis sonidos.
5 Use la Tecla Direccional para desplazarse y seleccionar un sonido
precargado.
44
Uso de menús del teléfono
Opciones con un archivo de sonido resaltado:
•
Presione la Tecla de selección izquierda [Fij como] para establecer como
Timbre, Contacto ID o Sonidos de alerta.
•
Presione [Escu] para escuchar el sonido.
•
Presione la Tecla de selección derecha [Opciones] para seleccionar:
Renombrar/ Aseg (Abrir)/ Borrar/ Borrar todo/ Info de arch
3.2 Predetermin. timbres
Permite administrar los sonidos precargados.
1 Presione la Tecla de selección izquierda [Menú].
2 Presione Multimedia.
3 Presione Timbres.
4 Presione Predetermin. timbres.
5 Use la Tecla Direccional para resaltar un tono de timbre y presione
[Escu] para reproducir el tono de timbre o la Tecla de selección izquierda
[Fij como] para establecer el tono de timbre como:
•
Timbre: Establece el tono de timbre para las llamadas entrantes.
•
Contacto ID: Resalta y selecciona el contacto que identificará el tono de
timbre que seleccione.
•
Sonidos de alerta: Presione la tecla numérica correspondiente para
definir el tono de timbre para una de las siguientes opciones:
Todo mensaje/ Mensaje de TXT/ Buzón de voz

45
Uso de menús del teléfono
3.3 Comprar timbres
Este menú le permite comprar timbres.
1 Presione la Tecla de selección izquierda [Menú].
2 Presione Multimedia.
3 Presione Timbres.
4 Presione Comprar timbres.
Herramientas
Las herramientas de su teléfono incluyen comandos de voz, calculadora de propinas
EZ, calculadora ecológica, buscador de información, cronómetro y conversor de
unidades.
1 Presione la Tecla de selección izquierda [Menú].
2 Presione Herramientas.
1. Comandos de voz
Esta función brinda las siguientes opciones con tecnología de reconocimiento de voz
avanzado (AVR). Cada opción le ofrece información detallada en el teléfono a la que
puede acceder presionando la Tecla de selección izquierda
[Info].
1 Presione la Tecla de selección izquierda [Menú].
2 Presione Herramientas.
3 Presione Comandos de voz.
Acceso y opciones
Presione la Tecla Comandos de voz
en el teclado.
La función Comandos de voz tiene varios ajustes que le permiten personalizar
cómo desea usarla. Acceda a Comandos de voz y presione la Tecla de selección
derecha
[Prog].

46
Uso de menús del teléfono
Confirmar selecciones Permite elegir si desea que el sistema de comandos le
solicite con una lista de coincidencias potenciales. Elija entre Automático/ Siempre
confirmar/ Nunca confirmar.
Sensibilidad Permite controlar cómo el sistema filtra las coincidencias. Elija entre
Más sensible/ Automático/ Menos sensible.
Entrenar de voz Esta opción le permite entrenar el teléfono para que reconozca los
patrones de voz. Elija entre Entrenar palabras/ Entrenar dígitos.
Avisos Permite establecer cómo es notificado por el sistema de comandos de voz
y la duración que se le permite responder. Elija entre Modo/ Reproducción de
audio/ Tiempo de espera.
•
Para Modo, establezca Avisos/ Lectura + Alertas/ Lectura/ Sólo tonos.
•
Para Reproducción de audio, establezca Altavoz o Auricular.
•
Para Tiempo de espera, establezca 5 Segundos o 10 Segundos.
1.1 Iniciar Comando de voz
1 Presione la Tecla de selección izquierda [Menú].
2 Presione Herramientas.
3 Presione Comandos de voz.
NOTA: También puede presionar la Tecla Comandos de voz desde
el modo de espera para acceder a la función de Comandos de voz
rápidamente.
1.1.1 Llamar <Nombre o Número>
Diga "Llamar" y luego llame a alguien con solo pronunciar el nombre o el número
de teléfono. Hable claramente y diga el nombre o el número exactamente como lo
ingresó en su Lista de contactos. Si tiene más de un número de contacto, puede decir
el nombre y el tipo de número del contacto (por ejemplo, "Llamar a Juan - Oficina").

47
Uso de menús del teléfono
1.1.2 Enviar msj a <Nombre o Número o Grupo>
Diga "Enviar mensaje" y el comando le pedirá que defina el tipo de mensaje. Una
vez elegido el tipo de mensaje, se le solicitará el nombre, número o grupo del
contacto. El mensaje se iniciará automáticamente. Si dice un comando de oración
completa, como "Enviar mensaje a Roberto", el sistema iniciará automáticamente
un mensaje de texto sin preguntar el tipo de mensaje. Al usar el comando "Enviar
mensaje", hable claro y mencione el nombre, el número, o el nombre del grupo
exactamente como se ingresó en la Lista de contactos.
1.1.3 Ir a <Menú>
El comando "Ir a" le permite acceder a un menú en el teléfono (por ejemplo, "Ir a
Calendario").
Si no se menciona ninguna opción de menú, se proporcionará una lista de opciones.
1.1.4 Verificar <Elemento>
El comando "Verificar" le permite verificar varios elementos, como el Estado del
teléfono, Buzón de voz, Mensajes, Llamadas perdidas, Hora, Fuerza de la señal,
Nivel de batería, Volumen y Mi número.
1.1.5 Contactos <Nombre>
Puede buscar nombres en sus Contactos (por ejemplo, "Contactos Juan") así como
también administrar su lista de contactos al crear, borrar o modificar.
1.1.6 Remarcar
Diga "Remarcar" y el teléfono marcará nuevamente el último número.
1.1.7 Ayuda
Proporciona los lineamientos generales para usar los comandos de voz.

48
Uso de menús del teléfono
2. Ez propina
Le permite calcular las cantidades de una cuenta fácilmente y rápidamente
utilizando el total de la cuenta, el % de propina y el número de personas como
variables.
1 Presione la Tecla de selección izquierda [Menú].
2 Presione Herramientas.
3 Presione Ez propina.
4 Ingrese los campos variables (Cuenta, Propina (%), Dividir) y los campos de
cálculo correspondientes (Propina ($) y Cada) aparecerán en forma automática.
5 Presione la Tecla de selección izquierda [Reaj] para hacer otro cálculo.
3. Eco-calculadora
Le permite hacer seguimiento de sus distancias a pie o en bicicleta. Le muestra la
cantidad de CO
2
que se reduce al caminar y andar en bicicleta.
1 Presione la Tecla de selección izquierda [Menú].
2 Presione Herramientas.
3 Presione Eco-calculadora.
4 Seleccione los campos Caminata o Ciclismo para editar las horas y millas.
NOTA: La cantidad de CO
2
decreciente se actualiza en forma automática
cuando ingresa la cantidad de horas o millas.
49
Uso de menús del teléfono
5 Presione la Tecla de selección izquierda [Prog] para ajustar los siguientes
ajustes.
•
Modo Le permite cambiar la animación de la pantalla principal de la
ecocalculadora a Persona o Arbol. Dependiendo de la información que ingresó
por última vez (Caminata o Ciclismo), aparecerá una animación. El número de
árboles en la animación se calcula según la cantidad de CO
2
que se redujo.
•
Caracter Le permite cambiar el caracter a Hombre, Hombre & Mujer y
Mujer. Esta opción no está disponible cuando define el modo como Árbol.
•
Unidad Le permite cambiar la unidad a Hora o Milla.
•
Mi carro Le permite seleccionar el tipo de combustible que utiliza su auto y la
eficiencia de combustible (mpg) de su auto con el fin de medir la cantidad de
CO
2
descargado.
4. Búsqueda de info
Le permite buscar elementos almacenados en el teléfono.
1 Presione la Tecla de selección izquierda [Menú].
2 Presione Herramientas.
3 Presione Búsqueda de info.
4 Ingrese dos o más caracteres en el campo de búsqueda y presione
[Buscar].
5 De forma predeterminada, el teléfono buscará todas las categorías. Para
especificar las categorías, seleccione Todo y presione la Tecla de selección
izquierda
[Fijado]. Use la Tecla Direccional para resaltar una categoría
y presione
[Subry] para marcar/desmarcar la categoría. Después de
especificar las categorías, presione la Tecla de selección izquierda
[Hecho].
50
Uso de menús del teléfono
6 Para ver un resultado de búsqueda, resalte los resultados deseados y presione
[Ver]. Si desea reintentar la búsqueda, presione la Tecla de selección
derecha
[Reintentar]. Si desea iniciar una nueva búsqueda, presione la
Tecla de selección izquierda
[Búsqueda], ingrese la palabra clave y presione
.
7 Si no se encuentran resultados, se le solicitará volver a intentarlo. Elija Sí para
volver a intentarlo o No para regresar al menú Herramientas.
5. Cronómetro
Le permite usar el teléfono como un cronómetro típico.
1 Presione la Tecla de selección izquierda [Menú].
2 Presione Herramientas.
3 Presione Cronómetro.
4 Presione [Cmnzr].
5 Al presionar [Alto] se detendrá o reanudará el tiempo del cronómetro.
•
Mientras calcula el tiempo, presione la Tecla de selección izquierda
[Vuelta] para registrar una vuelta.
•
Una vez que el tiempo se ha detenido, presione la Tecla de selección derecha
[Reaj].

51
Uso de menús del teléfono
6. Convertidor de unidades
Permite convertir unidades a las unidades deseadas.
1 Presione la Tecla de selección izquierda [Menú].
2 Presione Herramientas.
3 Presione Convertidor de unidades.
4 Elija entre Área/ Longitud/ Masa/ Temperatura/ Volumen/ Velocidad.
5 Seleccione el tipo de unidad conocida e introduzca la cantidad que desea
convertir. La conversión ocurre al introducir la cantidad deseada.
Mi agenda
Le permite mantener la conveniencia y la facilidad de acceso a su agenda. Sólo
tendrá que almacenar sus citas y el teléfono le avisará con un recordatorio.
1. Calendario
Le permite mantener la conveniencia y la facilidad de acceso a su agenda. Sólo
tendrá que almacenar sus citas y el teléfono le avisará con un recordatorio.
1 Presione la Tecla de selección izquierda [Menú].
2 Presione Mi agenda.
3 Presione Calendario.
4 Use la Tecla Direccional para resaltar el día programado.
Izquierda: Día anterior
Derecha: Día siguiente
Arriba: Semana anterior
Abajo: Semana siguiente
5 Presione la Tecla de selección izquierda [Añadir].
52
Uso de menús del teléfono
6 Introduzca el asunto y desplácese hacia abajo para configurar los ajustes
restantes.
7 Resalte un campo de ajuste en el Calendario y presione la Tecla de selección
izquierda
[Ajustar]. Para cada evento del Calendario, puede ajustar lo
siguiente:
• Fecha de inicio • Hora de comienzo
• Fecha de término • Hora de término
• Repetir • Hasta
• Alerta • Tonos
• Vibrar
8 Use la Tecla Direccional para resaltar el ajuste que desea y luego presione
.
9 Presione [Grdr] cuando termine de ingresar la información en el Calendario.
Editar y eliminar entradas del calendario
1 En la lista de entradas del calendario, presione [Ver].
2 Presione [Crrgr] para editar la entrada del calendario o presione la Tecla de
selección izquierda
[Borrar] para eliminar la entrada.
53
Uso de menús del teléfono
2. Reloj despertador
Le permite configurar hasta 10 alarmas. A la hora de la alarma, su alarma
aparecerá en la pantalla LCD y sonará la alarma.
1 Presione la Tecla de selección izquierda [Menú].
2 Presione Mi agenda.
3 Presione Reloj despertador.
4 Presione la Tecla de selección izquierda [Añadir].
5 Use la Tecla Direccional para resaltar la información que desea configurar y
luego presione la Tecla de selección izquierda
[Ajustar] para ver sus ajustes.
Ingrese la información de la alarma, incluida:
• Encender/apagar • Fijar tiemp
• Periodicidad • Timbre
6 Presione [Grdr] después de configurar todos los campos de Alarma, según
sea necesario.
Eliminar alarmas
1 En la lista Alarma, presione la Tecla de selección derecha [Opciones] para
ver las opciones disponibles.
2 Presione Borrar para eliminar una alarma o Borrar todo para eliminar
todas las entradas de alarma.
3 Presione [Sí].
Editar alarmas
1 En la lista Alarma, presione [Ver] y luego presione [Crrgr].
54
Uso de menús del teléfono
Calculadora
Permite realizar cálculos matemáticos simples.
1 Presione la Tecla de selección izquierda [Menú].
2 Presione Calculadora.
3 Presione Calculadora.
4 Introduzca los números para obtener el valor que desea. Para borrar los
elementos ingresados, presione la Tecla de selección izquierda
[Despejar].
5 Utilice la Tecla de selección derecha [Operadores] para agregar otros
operadores.
6 Use la Tecla Direccional tpara introducir una operación con números y luego
presione
[ = ] para obtener el resultado.
Accesibilidad
Le permite configurar los ajustes de Accesibilidad.
1 Presione la Tecla de selección izquierda [Menú].
2 Presione Accesibilidad.
1. Lectura
Le permite establecer los ajustes de lectura.
1 Presione la Tecla de selección izquierda [Menú].
2 Presione Accesibilidad.
3 Presione Lectura.
55
Uso de menús del teléfono
1.1 Lectura completa
Permite que el teléfono lea las pantallas en voz alta para personas ciegas y con
poca visión o para cuando sus ojos estén ocupados.
1 Presione la Tecla de selección izquierda [Menú].
2 Presione Accesibilidad.
3 Presione Lectura.
4 Presione Lectura completa.
5 Use la Tecla Direccional para resaltar un ajuste y luego presione
[Fijado].
1.2 Lectura de menú
Permite que el teléfono lea los menús en voz alta.
1 Presione la Tecla de selección izquierda [Menú].
2 Presione Accesibilidad.
3 Presione Lectura.
4 Presione Lectura de menú.
5 Use la Tecla Direccional para resaltar un ajuste y luego presione
[Fijado].
1.3 Lectura de dígito marcado
Permite que el teléfono lea los dígitos introducidos en la pantalla de marcación en
voz alta.
1 Presione la Tecla de selección izquierda [Menú].
2 Presione Accesibilidad.
3 Presione Lectura.
4 Presione Lectura de dígito marcado.
5 Use la Tecla Direccional para resaltar un ajuste y luego presione
[Fijado].
56
Uso de menús del teléfono
1.4 Lectura de ID de llamador
Permite establecer cómo desea que el teléfono lea la identificación de llamada en
voz alta.
1 Presione la Tecla de selección izquierda [Menú].
2 Presione Accesibilidad.
3 Presione Lectura.
4 Presione Lectura de ID de llamador.
5 Use la Tecla Direccional para resaltar un ajuste y luego presione
[Fijado].
1.5 Lectura de contraseñas
Permite que el teléfono lea las contraseñas en voz alta.
1 Presione la Tecla de selección izquierda [Menú].
2 Presione Accesibilidad.
3 Presione Lectura.
4 Presione Lectura de contraseñas.
5 Use la Tecla Direccional para resaltar un ajuste y luego presione
[Fijado].
1.6 Velocidad de voz
Permite establecer la velocidad de voz de la lectura de menú.
1 Presione la Tecla de selección izquierda [Menú].
2 Presione Accesibilidad.
3 Presione Lectura.
4 Presione Velocidad de voz.
5 Use la Tecla Direccional para resaltar un ajuste y luego presione
[Fijado].
57
Uso de menús del teléfono
2. Invertir color
Permite invertir el tema de color.
1 Presione la Tecla de selección izquierda [Menú].
2 Presione Accesibilidad.
3 Presione Invertir color.
4 Use la Tecla Direccional para resaltar un ajuste y luego presione
[Fijado].
3. Texto grande
Permite utilizar fuente más grande para los menús.
1 Presione la Tecla de selección izquierda [Menú].
2 Presione Accesibilidad.
3 Presione Texto grande.
4 Use la Tecla Direccional para resaltar un ajuste y luego presione
[Fijado].
4. Audio mono
Permite reproducir el mismo sonido de ambos auriculares para que puedas
escuchar todo con una sola oreja.
1 Presione la Tecla de selección izquierda [Menú].
2 Presione Accesibilidad.
3 Presione Audio mono.
4 Use la Tecla Direccional para resaltar un ajuste y luego presione
[Fijado].
58
Uso de menús del teléfono
5. Desactivar todos los sonidos
Este menú desactiva todos los sonidos del teléfono.
1 Presione la Tecla de selección izquierda [Menú].
2 Presione Accesibilidad.
3 Presione Desactivar todos los sonidos.
4 Use la Tecla Direccional para resaltar un ajuste y luego presione
[Fijado].
6. Prótesis auditiva
Le permite activar o desactivar la compatibilidad de audífonos para este dispositivo.
1 Presione la Tecla de selección izquierda [Menú].
2 Presione Accesibilidad.
3 Presione Prótesis auditiva.
4 Use la Tecla Direccional para resaltar un ajuste y luego presione
[Fijado].
Configuración
Este menú le permite establecer varios ajustes del teléfono y ver información del
teléfono.
1. Programación de sonidos
Ofrece opciones para personalizar los sonidos del teléfono.
59
Uso de menús del teléfono
1.1 Volúmens
Le permite ajustar rápidamente la configuración de sonidos principales para
llamadas entrantes y mensajes (texto y correo de voz).
1 Presione la Tecla de selección izquierda [Menú].
2 Presione Configuración.
3 Presione Programación de sonidos.
4 Presione Volúmens.
5 Ajuste el volumen con la Tecla Direccional and presione [Fijado] para
guardar la configuración.
1.1.1 Volumen maestro
Le permite ajustar el volumen maestro.
1 Presione la Tecla de selección izquierda [Menú].
2 Presione Configuración.
3 Presione Programación de sonidos.
4 Presione Volúmens.
5 Presione Volumen maestro.
1.1.2 Volumen de lectura
Le permite ajustar el volumen de lectura.
1 Presione la Tecla de selección izquierda [Menú].
2 Presione Configuración.
3 Presione Programación de sonidos.
4 Presione Volúmens.
5 Presione Volumen de lectura.
60
Uso de menús del teléfono
1.1.3 Volumen del teclado
Le permite ajustar el volumen del teclado.
1 Presione la Tecla de selección izquierda [Menú].
2 Presione Configuración.
3 Presione Programación de sonidos.
4 Presione Volúmens.
5 Presione Volumen de teclado.
1.2 Sonidos de llamada
Le permite ajustar la manera en que el teléfono le avisa sobre los tipos de llamada
entrantes.
1 Presione la Tecla de selección izquierda [Menú].
2 Presione Configuración.
3 Presione Programación de sonidos.
4 Presione Sonidos de llamada.
1.2.1 Timbre de llamada
Permite establecer timbres para llamadas entrantes.
1 Presione la Tecla de selección izquierda [Menú].
2 Presione Configuración.
3 Presione Programación de sonidos.
4 Presione Sonidos de llamada.
5 Presione Timbre de llamada.
6 Resalte un submenú y presione para abrirlo.
7 Use la Tecla Direccional para resaltar un tono de timbre y luego presione
[Fijado] para guardar el sonido.
61
Uso de menús del teléfono
SUGERENCIA: para escuchar un tono de timbre antes de establecerlo,
presione la Tecla de selección izquierda
[Escu].
1.2.2 Vibrar de llamada
Permite establecer que el teléfono vibre cuando recibe una llamada entrante.
1 Presione la Tecla de selección izquierda [Menú].
2 Presione Configuración.
3 Presione Programación de sonidos.
4 Presione Sonidos de llamada.
5 Presione Vibrar de llamada.
6 Use la Tecla Direccional para resaltar un tono de timbre y luego presione
[Fijado] para guardar el sonido.
1.2.3 Lectura de ID de llamador
Permite establecer cómo desea que el teléfono lea la identificación de llamada en
voz alta.
1 Presione la Tecla de selección izquierda [Menú].
2 Presione Configuración.
3 Presione Programación de sonidos.
4 Presione Sonidos de llamada.
5 Presione Lectura de ID de llamador.
6 Use la Tecla Direccional para resaltar un tono de timbre y luego presione
[Fijado] para guardar el sonido.
1.3 Sonidos de alerta
Le permite seleccionar los sonidos de los tipos de alerta.
1 Presione la Tecla de selección izquierda [Menú].
2 Presione Configuración.
3 Presione Programación de sonidos.
62
Uso de menús del teléfono
4 Presione Sonidos de alerta.
5 Seleccione Mensaje de TXT/ Buzón de voz/ Timbre de emergencia/
Llamadas perdidas.
El menú Sonidos de alerta ofrece las siguientes opciones: Tono/ Vibrar/
Recordatorio
La excepción es el menú Tono de emergencia. Este menú incluye las siguientes
opciones: Alerta/ Vibrar/ Apagado.
1.4 Alertas de servicio
Permite establecer cualquiera de las alertas de servicio disponibles.
1 Presione la Tecla de selección izquierda [Menú].
2 Presione Configuración.
3 Presione Programación de sonidos.
4 Presione Sonidos de llamada.
5 Presione Alertas de servicio.
6 Seleccione una opción de alerta.
Conexión de llamada Le avisa cuando la llamada se conecta.
Desconectar llamada Le avisa cuando la llamada se desconecta.
Cargar completado Le avisa cuando la batería está completamente cargada.
7 Use la Tecla Direccional para seleccionar un ajuste y luego presione
[Fijado].
1.5 Encendido/apagado
Permite seleccionar los sonidos escuchados cuando apaga y enciende el teléfono.
1 Presione la Tecla de selección izquierda [Menú].
2 Presione Configuración.
3 Presione Programación de sonidos.
4 Presione Encendido/apagado.
63
Uso de menús del teléfono
5 Presione Encendido o Apagado.
6 Use la Tecla Direccional para resaltar un ajuste y luego presione [Fijado].
1.6 Modo senior
Le permite ajustar el teléfono para que se adapte en forma automática a entornos
ruidosos al ajustar el nivel de sonido y mejorar la inteligibilidad de la voz.
NOTA: La función del Modo senior está deshabilitada automáticamente
cuando usa el altavoz o los dispositivos de manos libres.
1 Presione la Tecla de selección izquierda [Menú].
2 Presione Configuración.
3 Presione Programación de sonidos.
4 Presione Modo senior.
5 Use la Tecla Direccional para resaltar un ajuste y luego presione
[Fijado].
2. Programación de pantalla
Ofrece opciones para personalizar la pantalla del teléfono.
1 Presione la Tecla de selección izquierda [Menú].
2 Presione Configuración.
3 Presione Programación de pantalla.
2.1 Temporizador de luz de fondo
Permite establecer la duración de la luz de fondo de la pantalla principal, la pantalla
frontal y el teclado. Cada uno se establece por separado.
1 Presione la Tecla de selección izquierda [Menú].
2 Presione Configuración.
64
Uso de menús del teléfono
3 Presione Programación de pantalla.
4 Presione Temporizador de luz de fondo.
5 Use la tecla Direccional para resaltar una configuración, luego presione [Fijado]
•
5 Segundos/ 10 Segundos/ 20 Segundos/ 30 Segundos/ 60 Segundos
2.2 Brillo
Le permite establecer los niveles de la luz de fondo.
1 Presione la Tecla de selección izquierda [Menú].
2 Presione Configuración.
3 Presione Programación de pantalla.
4 Presione Brillo.
5 Use la Tecla Direccional para seleccionar un ajuste y luego presione
[Fijado].
NOTA: El nivel de brillo va del 1 al 7.
2.3 Fondo de pantalla
Le permite elegir el tipo de fondo que mostrará la pantalla LCD del teléfono en el
modo de espera.
1 Presione la Tecla de selección izquierda [Menú].
2 Presione Configuración.
3 Presione Programación de pantalla.
4 Presione Fondo de pantalla.
5 Resalte un submenú de Fondo de pantalla y presione .
6 Resalte una foto y presione [Fijado] para para establecerla como fondo de
pantalla.
65
Uso de menús del teléfono
2.4 Estilo de menú
Le permite elegir entre distintos temas para los menús del teléfono.
1 Presione la Tecla de selección izquierda [Menú].
2 Presione Configuración.
3 Presione Programación de pantalla.
4 Presione Estilo de menú
5 Resalte una foto y presione [Fijado] para para establecerla como fondo de
pantalla.
NOTA: Presione la Tecla de selección izquierda [Avance] para
obtener una vista previa del tema de pantalla seleccionado. El ajuste
predeterminado es Cuadrícula.
2.5 Tipo de fuente
Le permite establecer el tipo de fuente.
1 Presione la Tecla de selección izquierda [Menú].
2 Presione Configuración.
3 Presione Programación de pantalla.
4 Presione Tipo de fuente.
5 Resalte una foto y presione [Fijado] para para establecerla como fondo de
pantalla.
NOTA: Presione la Tecla de selección izquierda [Avance] para
previsualizar el tipo de fuente seleccionado.
66
Uso de menús del teléfono
2.6 Tamaño de fuente
Permite establecer el tamaño de la fuente para Dígitos de marcación, Menú & lista y
Mensaje. Esta configuración es útil para quienes necesitan mostrar el texto un poco
más grande.
1 Presione la Tecla de selección izquierda [Menú].
2 Presione Configuración.
3 Presione Programación de pantalla.
4 Presione Tamaño de fuente.
5 Use la Tecla Direccional para resaltar Dígitos de marcación/ Menú & lista/
Mensaje.
6 Presione la Tecla Direccional hacia la izquierda y derecha para desplazar por
los ajustes y presione
[Fijado].
Dígitos de marcación: Pequeña/ Normal/ Grande
Menú & lista: Pequeña/ Normal/ Grande
Mensaje: Pequeña/ Normal/ Grande
NOTA: Presione la Tecla de selección izquierda [Avance] para
previsualizar el tamaño de fuente seleccionado.
2.7 Formato de reloj
Le permite elegir el tipo de reloj que aparecerá en las pantallas LCD frontal y
principal.
1 Presione la Tecla de selección izquierda [Menú].
2 Presione Configuración.
3 Presione Programación de pantalla.
4 Presione Formato de reloj.
67
Uso de menús del teléfono
5 Use la Tecla Direccional para resaltar un ajuste y luego presione
[Fijado].
NOTA: Presione la Tecla de selección izquierda [Avance] para
previsualizar el formato de reloj seleccionado.
2.8 Coincidencia de nombre para marcación
Le permite mostrar nombres al ingresar números de teléfono que coincidan para
marcarlos.
1 Presione la Tecla de selección izquierda [Menú].
2 Presione Configuración.
3 Presione Programación de pantalla.
4 Presione Coincidencia de nombre para marcación.
5 Use la Tecla Direccional para resaltar un ajuste y luego presione
[Fijado].
3. Programación de teléfono
El menú Programación de teléfono le permite designar ajustes específicos para
personalizar la manera en que usa el teléfono.
3.1 Modo avión
Si se activa el modo avión, se desactivarán todas las comunicaciones inalámbricas.
1 Presione la Tecla de selección izquierda [Menú].
2 Presione Configuración.
3 Presione Programación de teléfono.
4 Presione Modo avión.
5 Use la Tecla Direccional para resaltar un ajuste y luego presione
[Fijado].
68
Uso de menús del teléfono
3.2 Establecer teclas direccionales
NOTA: Para acceder a estos accesos directos presione la tecla
Direccional
en la dirección (arriba, abajo, izquierda, derecha) ajustada
desde el modo en espera para el acceso directo que desea acceder.
1 Presione la Tecla de selección izquierda [Menú].
2 Presione Configuración.
3 Presione Programación de teléfono.
4 Presione Establecer teclas direccionales.
5 Use la Tecla Direccional para resaltar una tecla de acceso directo que desee
ajustar.
6 Presione [Jg de] para ver los accesos directos disponibles. Use la Tecla
Direccional
para resaltar uno y luego presione [Fijado].
3.3 Comandos de voz
Para obtener detalles, consulte la páginapage 45 .
3.4 Idioma
Permite establecer el idioma preferido (inglés o español).
1 Presione la Tecla de selección izquierda [Menú].
2 Presione Configuración.
3 Presione Programación de teléfono.
4 Presione Idioma.
5 Use la Tecla Direccional para resaltar un ajuste y luego presione
[Fijado].
69
Uso de menús del teléfono
3.5 Ubicación
Permite ajustar el modo de GPS (Sistema de posicionamiento global: sistema de
información de ubicación asistido por satélite).
1 Presione la Tecla de selección izquierda [Menú].
2 Presione Configuración.
3 Presione Programación de teléfono.
4 Presione Ubicación.
5 Use la Tecla Direccional para resaltar un ajuste y luego presione
[Fijado].
NOTAS:
•
El teléfono no siempre recibe las señales satelitales de GPS,
especialmente si las condiciones atmosféricas no son buenas o se
encuentra dentro de un edificio, etc.
•
Durante el modo avión, se suspenderán los servicios que admiten la
funcionalidad Ubicación activada.
3.6 Bloqueo automático del teclado
El menú de Bloqueo automático del teclado le permite evitar que las teclas de su
teléfono sean tocadas accidentalmente.
1 Presione la Tecla de selección izquierda [Menú].
2 Presione Configuración.
3 Presione Programación de teléfono.
4 Presione Bloqueo automático del teclado.
3.7 Seguridad
El menú Seguridad permite proteger el teléfono en forma electrónica.
1 Presione la Tecla de selección izquierda [Menú].

70
Uso de menús del teléfono
2 Presione Configuración.
3 Presione Programación de teléfono.
4 Presione Seguridad.
5 Ingrese el código de bloqueo de cuatro dígitos.
Si está configurado, el código de bloqueo consta de los 4 últimos dígitos de su
número de teléfono móvil. El código de bloqueo consiste en los últimos 4 dígitos
de su MEID, si no configura su número de teléfono móvil.
3.7.1 Editar códigos
Le permite ingresar un nuevo código de bloqueo de cuatro dígitos.
1 Presione la Tecla de selección izquierda [Menú].
2 Presione Configuración.
3 Presione Programación de teléfono.
4 Presione Seguridad.
5 Introduzca el código de bloqueo de cuatro cifras.
6 Presione Editar códigos.
7 Seleccione Sólo teléfono o Llamadas & servicios.
8 Ingrese su nuevo código de bloqueo de cuatro dígitos.
9 Para confirmar la acción, se le solicitará que introduzca el código nuevo otra vez.
3.7.2 Restricciones
Permite establecer restricciones separadas para llamadas, mensajes de texto y
multimedia y datos.
1 Presione la Tecla de selección izquierda [Menú].
2 Presione Configuración.
3 Presione Programación de teléfono.
4 Presione Seguridad.
5 Introduzca el código de bloqueo de cuatro cifras.
6 Presione Restricciones.

71
Uso de menús del teléfono
7 Ingrese el código de bloqueo de cuatro dígitos.
8 Seleccione un menú de Restricciones, y presione .
9 Use la Tecla Direccional para resaltar la restricción y luego presione .
Llamadas: Llamadas entrantes Permitir todas/ Solo de contactos/ Bloquear
todas
Llamadas: Llamadas salientes Permitir todas/ Solo de contactos/ Bloquear
todas
Texto msjs: Mensajes entrantes Permitir todas/ Solo de contactos/ Bloquear
todas
Texto msjs: Mensajes salientes Permitir todas/ Solo de contactos/ Bloquear
todas
Datos: Permitir todas/ Bloquear todas
3.7.3 Programación de bloqueo de teléfono
Protege el teléfono contra el uso no autorizado. Cuando se bloquea el teléfono, este
permanece en el modo restringido hasta que se ingresa el código de bloqueo.
Podrá recibir llamadas telefónicas y realizar llamadas de emergencia. Sólo puede
modificar el código de bloqueo en el submenú Editar códigos del menú Seguridad.
1 Presione la Tecla de selección izquierda [Menú].
2 Presione Configuración.
3 Presione Programación de teléfono.
4 Presione Seguridad.
5 Introduzca el código de bloqueo de cuatro cifras.
6 Presione Programación de bloqueo de teléfono.
7 Resalte una opción y presione [Fijado].
Desbloqueado Se mantiene desbloqueado en forma predeterminada.
Al encender el teléfono El teléfono se bloquea cuando se enciende.
72
Uso de menús del teléfono
3.7.4 Bloquear teléfono ahora
Le permite establecer el ajuste de Bloquear teléfono ahora del teléfono.
1 Presione la Tecla de selección izquierda [Menú].
2 Presione Configuración.
3 Presione Programación de teléfono.
4 Presione Seguridad.
5 Introduzca el código de bloqueo de cuatro cifras.
6 Presione Bloquear teléfono ahora.
NOTA: Para desbloquear el teléfono desde el modo de espera, presione
la Tecla de selección derecha
[Abrir] e ingrese el código de bloqueo
de cuatro dígitos.
3.7.5 Restablecer implícito
Le permite restaurar el teléfono a la configuración predeterminada de fábrica.
1 Presione la Tecla de selección izquierda [Menú].
2 Presione Configuración.
3 Presione Programación de teléfono.
4 Presione Seguridad.
5 Introduzca el código de bloqueo de cuatro cifras.
6 Presione Restablecer implícito.
7 Presione después de leer el mensaje de advertencia.
8 Resalte Revertir y presione .
Aparecerá brevemente un mensaje de confirmación antes de que el teléfono se
restablezca.
73
Uso de menús del teléfono
3.8 Selección de sistema
Permite configurar el entorno de administración del teléfono. Deje este ajuste como
predeterminado a menos que desee alterar la selección del sistema según las
instrucciones de su proveedor de servicios.
1 Presione la Tecla de selección izquierda [Menú].
2 Presione Configuración.
3 Presione Programación de teléfono.
4 Presione Selección de sistema.
5 Use la Tecla Direccional para seleccionar un ajuste y luego presione
[Fijado].
4. Programación de llamada
El menú Programación de llamada le permite establecer varias configuraciones para
las funciones de llamadas.
4.1 Opciones de contestar
Le permite determinar cómo responderá el teléfono a una llamada entrante.
1 Presione la Tecla de selección izquierda [Menú].
2 Presione Configuración.
3 Presione Programación de llamada.
4 Presione Opciones de contestar.
5 Use la Tecla Direccional para seleccionar una opción que desee usar.
NOTA: La opción Auto con manos libres está disponible cuando conecta
cualquier dispositivos externo al teléfono o el altavoz está activado.
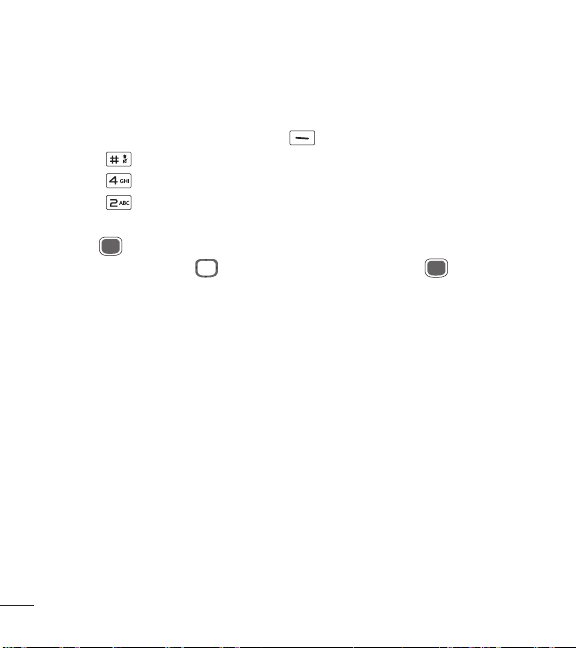
74
Uso de menús del teléfono
4.2 Modo TTY
Le permite conectar un dispositivo TTY para comunicarse con otras personas
que también estén usando uno de ellos. Un teléfono con compatibilidad TTY
puede traducir los caracteres escritos en voz. También se puede traducir la voz a
caracteres y después mostrarse en el TTY.
1 Presione la Tecla de selección izquierda [Menú].
2 Presione Configuración.
3 Presione Programación de llamada.
4 Presione Modo TTY.
5 Aparecerá un mensaje de explicación.
6 Presion para continuar.
7 Use la Tecla Direccional para resaltar un ajuste y presione [Fijado].
TTY completo: Sirve para que las personas que no pueden oír o hablar envíen
mensajes de texto mediante el equipo TTY.
TTY + charla: Sirve para que las personas que pueden hablar, pero no pueden
oír, reciban mensajes de texto y envíen mensajes de voz mediante el equipo TTY.
TTY + oír: Sirve para que las personas que no pueden hablar pero sí oír envíen
mensajes de texto y reciban mensajes de voz mediante el equipo TTY.
TTY apagado: Sirve para que las personas sin problemas para hablar ni auditivos
envíen y reciban mensajes sin usar el equipo TTY.
Conexión de un equipo TTY y un terminal
1 Conecte un cable TTY a una conexión TTY en el terminal (la ubicación de la
conexión TTY es la misma que la toma para auriculares).
2 Ingrese en el menú del teléfono y configure el modo TTY que desee.
3 Una vez establecido el modo TTY, compruebe que el icono TTY esté en la pantalla
LCD del teléfono.
4 Conecte el equipo TTY a la fuente de alimentación y enciéndalo.
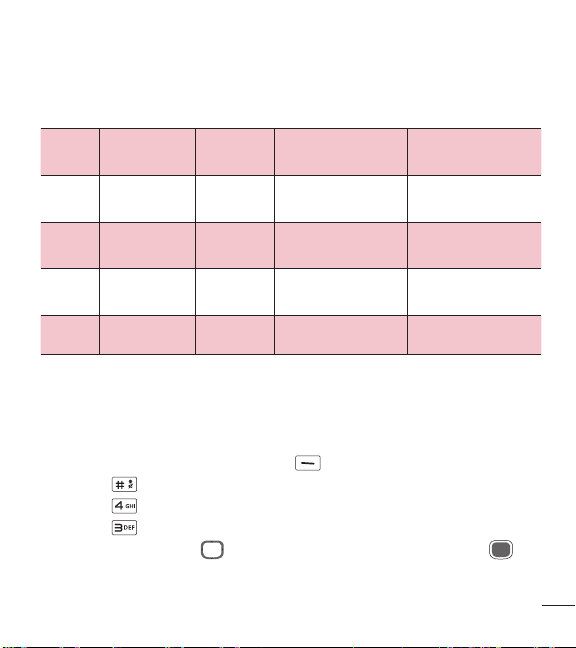
75
Uso de menús del teléfono
5 Realice una conexión telefónica con el número que desee.
6 Una vez establecida la conexión, use el equipo TTY para escribir y enviar un
mensaje de texto o de voz.
7 El mensaje de texto o de voz que reciba se verá en la pantalla del equipo TTY.
Modo TTY (Teletypewriter)
Menú Usuario Menú
Modo de transmisión/
recepción
Cuando se establece
comunicación con un
terminal no TTY
TTY
completo
Para que personas
con discapacidad
auditiva/verbal
Transmitan y reciban
mensajes de texto
Debe intervenir el operador
TTY +
charla
Para personas
con problemas
auditivos
Que pueden
hablar
Transmisión de voz,
recepción de mensajes
de texto
Debe intervenir un operador
TTY + oír
Para que personas
con discapacidad
verbal
Que pueden oír
Transmitan mensajes de
texto y reciban voz
Debe intervenir un operador
TTY
apagado
Transmisión de voz,
recepción de voz
4.3 Marcado oprimiendo un botón
Le permite iniciar una llamada de marcación rápida al mantener presionado el
dígito de marcación rápida. Si está ajustado en Apagado, los números de Marcación
rápida designados en sus Contactos no funcionarán.
1 Presione la Tecla de selección izquierda [Menú].
2 Presione Configuración.
3 Presione Programación de llamada.
4 Presione Marcado oprimiendo un botón.
5 Use la Tecla Direccional para seleccionar un ajuste y luego presione
[Fijado].
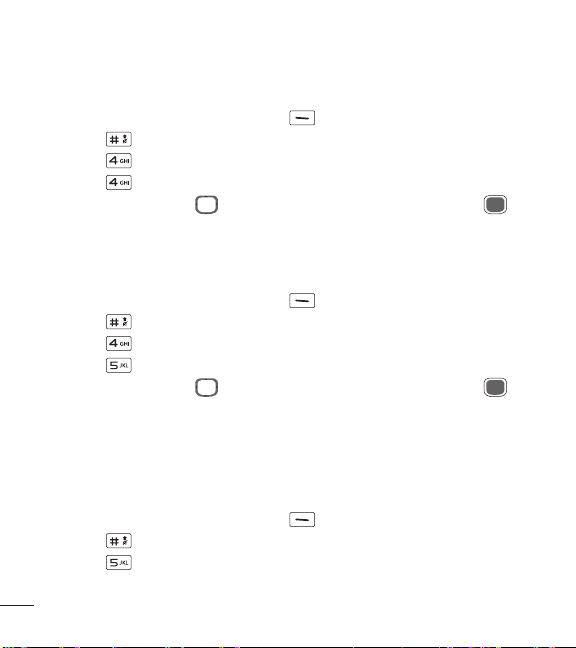
76
Uso de menús del teléfono
4.4 Privacidad de voz
Le permite ajustar la función de privacidad de voz para llamadas CDMA. CDMA
ofrece en forma inherente privacidad de voz. Si necesita más información, consulte
a su proveedor de servicios.
1 Presione la Tecla de selección izquierda [Menú].
2 Presione Configuración.
3 Presione Programación de llamada.
4 Presione Privacidad de voz.
5 Use la Tecla Direccional para seleccionar un ajuste y luego presione
[Fijado].
4.5 Tonos DTMF
Le permite establecer la longitud de los tonos DTMF.
1 Presione la Tecla de selección izquierda [Menú].
2 Presione Configuración.
3 Presione Programación de llamada.
4 Presione Tonos DTMF.
5 Use la Tecla Direccional para seleccionar un ajuste y luego presione
[Fijado].
5. Memoria
Permite comprobar la memoria interna del teléfono. Muestra la información de
memoria guardada en el teléfono.
1 Presione la Tecla de selección izquierda [Menú].
2 Presione Configuración.
3 Presione Memoria.
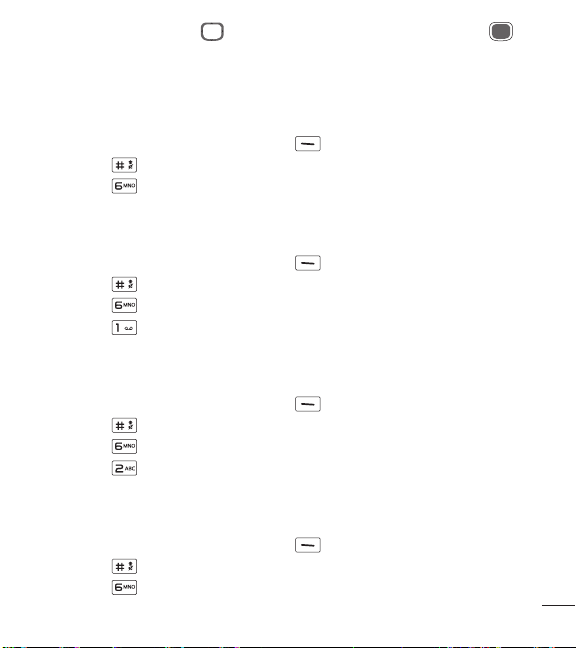
77
Uso de menús del teléfono
4 Use la Tecla Direccional para seleccionar un ajuste y luego presione
[OK].
6. Información de teléfono
Le permite ver información específica de su teléfono y del software.
1 Presione la Tecla de selección izquierda [Menú].
2 Presione Configuración.
3 Presione Información de teléfono.
6.1 Mi número
Le permite ver su número de teléfono.
1 Presione la Tecla de selección izquierda [Menú].
2 Presione Configuración.
3 Presione Información de teléfono.
4 Presione Mi número.
6.2 ESN/MEID
Le permite ver el número ESN/MEID de su teléfono.
1 Presione la Tecla de selección izquierda [Menú].
2 Presione Configuración.
3 Presione Información de teléfono.
4 Presione ESN/MEID.
6.3 Glosario de iconos
Le permite ver todos los iconos y su significado.
1 Presione la Tecla de selección izquierda [Menú].
2 Presione Configuración.
3 Presione Información de teléfono.

78
Uso de menús del teléfono
4 Presione Glosario de iconos.
5 Seleccione un submenú y navegue por los iconos.
6.4 Versión SW/HW
Le permite ver las versiones de distintas aplicaciones como software, PRL, Acceso
Web, AVR, MMS, Bluetooth y hardware.
1 Presione la Tecla de selección izquierda [Menú].
2 Presione Configuración.
3 Presione Información de teléfono.
4 Presione Versión SW/HW.

79
Por su seguridad
El valor más elevado de la SAR para este modelo de teléfono cuando se lo probó
para usarse en el oído es de 1,27 W/kg y cuando se lo usa sobre el cuerpo, según
lo descrito en esta guía del usuario, es de 1,18 W/kg (las mediciones del uso en
el cuerpo varían en función de los modelos de los teléfonos y dependen de los
accesorios disponibles y los requisitos de la FCC).
Aun cuando puede haber diferencias entre los niveles de SAR de varios teléfonos
y en varias posiciones, todos ellos cumplen el requisito gubernamental para una
exposición segura.
La FCC ha otorgado una Autorización de equipo para este modelo de teléfono
con todos los niveles de SAR reportados y evaluados en cumplimiento de los
lineamientos de emisión de RF de la FCC. La información de la SAR sobre este
modelo de teléfono está archivada en la FCC y puede encontrarse en la sección
Display Grant de http://www.fcc.gov/oet/ea/fccid/ después de buscar FCC ID
ZNF109C.
•
Para reducir el riesgo de incendios o quemaduras, no exponga el dispositivo a una
temperatura mayor que 45 °C / 113 °F ni deseche en fuego o agua.
•
Para reducir el riesgo de incendios o quemaduras, no deseche el dispositivo en
fuego o agua.
•
No desarme, abra, aplaste, doble, deforme, perfore ni raye el teléfono.
•
Existe peligro de explosión si se reemplaza la batería en forma inadecuada.
Para reducir el riesgo de incendios o quemaduras, no desarme, aplaste, perfore,
cause cortocircuito a los contactos externos, exponga a una temperatura mayor
que 45 °C / 113 °F o deseche en fuego o agua. Mantenga este producto alejado
de la humedad excesiva y de temperaturas extremas. Mantenga la batería o
el dispositivo secos y alejados del agua o cualquier líquido, dado que puede
ocasionar un cortocircuito.
Por su seguridad

80
Por su seguridad
•
Evite usar el teléfono cerca de fuentes electromagnéticas intensas como hornos
microondas, altoparlantes, televisores y radios.
•
Use solo accesorios originales aprobados por el fabricante o accesorios que no
contengan metales. Utilice solamente accesorios de carga aprobados para cargar
el teléfono LG. La manipulación inadecuada del puerto de carga/accesorio y el uso
de un cargador no compatible pueden ocasionarle daños al teléfono y anular la
garantía.
•
Use sólo el cargador de batería aprobado. De lo contrario, podría ocasionar un
daño grave en su teléfono.
Reglamentaciones de compatibilidad con audífonos
(HAC) para dispositivos inalámbricos
El 10 de julio de 2003, el informe y orden de la Comisión Federal de
Comunicaciones (FCC) de los EE. UU. en el expediente sobre comunicaciones
inalámbricas 01-309 modificó la excepción de los teléfonos inalámbricos en virtud
de la Ley de Compatibilidad con Audífonos (Ley HAC, por su sigla en inglés) de
1988 para exigir que los teléfonos inalámbricos digitales sean compatibles con
los audífonos. La intención de la Ley HAC es garantizar que las personas con
discapacidades auditivas puedan acceder en forma razonable a los servicios de
telecomunicaciones.
Al usar ciertos teléfonos inalámbricos cerca de algunos dispositivos auditivos
(audífonos e implantes cocleares), es posible que los usuarios detecten un ruido
de zumbido, murmullo o chirrido. Algunos dispositivos para la audición son más
inmunes que otros a este ruido de interferencia, y los teléfonos también varían en la
cantidad de interferencia que generan.
La industria de los teléfonos inalámbricos ha desarrollado un sistema de
clasificación de teléfonos inalámbricos con el fin de ayudar a los usuarios de
dispositivos auditivos a encontrar teléfonos que puedan ser compatibles con sus

81
Por su seguridad
dispositivos auditivos. No se han clasificado todos los teléfonos. Los teléfonos
clasificados incluyen la clasificación en su caja o llevan una etiqueta en la caja.
Las clasificaciones no son garantías. Los resultados variarán en función del
dispositivo auditivo del usuario y su pérdida de audición. Si su dispositivo
auditivo resultara ser vulnerable a la interferencia, es posible que no pueda usar
satisfactoriamente un teléfono clasificado. Probar el teléfono con su dispositivo
auditivo es la mejor forma de evaluarlo para sus necesidades personales.
Clasificaciones M: los teléfonos con clasificación M3 o M4 cumplen los requisitos
de la FCC y probablemente generen menos interferencia con los dispositivos
auditivos que los teléfonos no etiquetados. M4 la mejor o más alta de las dos
clasificaciones.
Clasificaciones T: Los teléfonos clasificados como T3 o T4 cumplen con los
requisitos de la FCC y es probable que generen menos interferencia a los
dispositivos para la audición que los teléfonos que no están etiquetados. T4 la mejor
o más alta de las dos clasificaciones.
Los dispositivos auditivos también pueden tener una clasificación. El fabricante
del dispositivo auditivo o un otorrinolaringólogo pueden ayudarlo a encontrar esta
clasificación. Las clasificaciones más altas significan que el dispositivo auditivo es
relativamente inmune al ruido de interferencia.
Los valores de clasificación del audífono y del teléfono inalámbrico se suman. Una
suma de 5 se considera aceptable para el uso normal. Una suma de 6 se considera
que corresponde a un uso óptimo.

82
Por su seguridad
En el ejemplo de la izquierda, si un audífono cumple con la
clasificación de nivel M2 y el teléfono inalámbrico cumple con la
clasificación de nivel M3, la suma de los dos valores es igual a M5.
Esto debería proporcionarle al usuario del audífono un “uso normal” mientras usa su
audífono con ese teléfono inalámbrico en particular. En este contexto, “uso normal”
se define como una calidad de señal que es aceptable para la operación normal.
La marca M es sinónimo de la marca U. La marca T es sinónimo de la marca UT.
La Alianza para Soluciones de la Industria de las Telecomunicaciones (ATIS, por
su siglas en inglés) recomienda las marcas M y T. La sección 20.19 de las reglas
de la FCC hace referencia a las marcas U y UT. El procedimiento de clasificación y
medición de la HAC se encuentra descrito en el estándar C63.19 del Instituto de
Estándares Nacionales de los EE. UU. (ANSI, por su sigla en inglés).
Al hablar por un teléfono celular, se recomienda apagar el modo BT (Bluetooth) o
WLAN para HAC.
Información sobre audífonos y teléfonos inalámbricos digitales
Accesibilidad de prótesis auditivas y teléfonos móviles
http://www.accesswireless.org/
Gallaudet University, RERC
http://tap.gallaudet.edu/Voice/
Compatibilidad de prótesis auditivas y control de volume de la FCC
http://www.fcc.gov/cgb/dro/hearing.html
Orden de compatibilidad de prótesis auditivas de la FCC
http://hraunfoss.fcc.gov/edocs_public/attachmatch/FCC-03-168A1.pdf
Hearing Loss Association of America [HLAA]
http://hearingloss.org/content/telephonesand-mobile-devices

83
Por su seguridad
Legislación sobre la garantía
Las leyes siguientes rigen las garantías que surgen en virtud de las ventas minorista
de productos para el consumidor:
•
Ley Song-Beverly de Garantía del Consumidor de California [CC, Sección 1790 y
siguientes]
•
El Código Uniforme de Comercio de California, División Dos [Cód. de Comercio,
Sección 2101 y siguientes], y
•
La Ley Federal de Mejora de Garantías Magnuson-Moss de la Comisión Federal
de Comercio (Magnuson-Moss Warranty Federal Trade Commission Improvement
Act) [Sección 2301 y siguientes del Código de los Estados Unidos (USC); Título 16
del Código de Reglamentos Federales (CFR) Partes 701– 703]. Una garantía típica
de la Ley Magnuson-Moss es una promesa escrita de que el producto no presenta
defectos o una promesa escrita de devolver el dinero, reparar o reemplazar los
productos defectuosos. [Ver el Título 15 del Cód. de los Estados Unidos, Sección
2301(6)]. Entre los resarcimientos se incluyen los daños y perjuicios por incumplir
con una garantía escrita o un contrato de servicios o por violar las disposiciones
sobre divulgación. [Ver el Título 15 del Cód. de los Estados Unidos, Sección
2310(d)]. Con excepción de determinados requisitos respecto de divulgación y
difamación, la ley federal no prevalece sobre la ley estatal. [Ver el Título 15 del
Cód. de los Estados Unidos, Sección 2311].
La Ley de Garantía del Consumidor no afecta los derechos y las obligaciones de
las partes en virtud del Código Uniforme de Comercio, con la excepción de que las
disposiciones de la Ley prevalecen sobre las disposiciones del Código de Comercio
en caso de surgir un conflicto. [CC §1790.3.]
A los fines de demandas de menor cuantía, este curso se enfocará en los derechos
y obligaciones en virtud de las leyes estatales.