Loading ...
ABOUT WIFI
WI-FI CONNECTION
Before using your Wi-Fi thermostat for the first me, you must configure the
Wi-Fi signal and srngs through your smartphone or tablet. This will allow
communicaon between your connected devices.
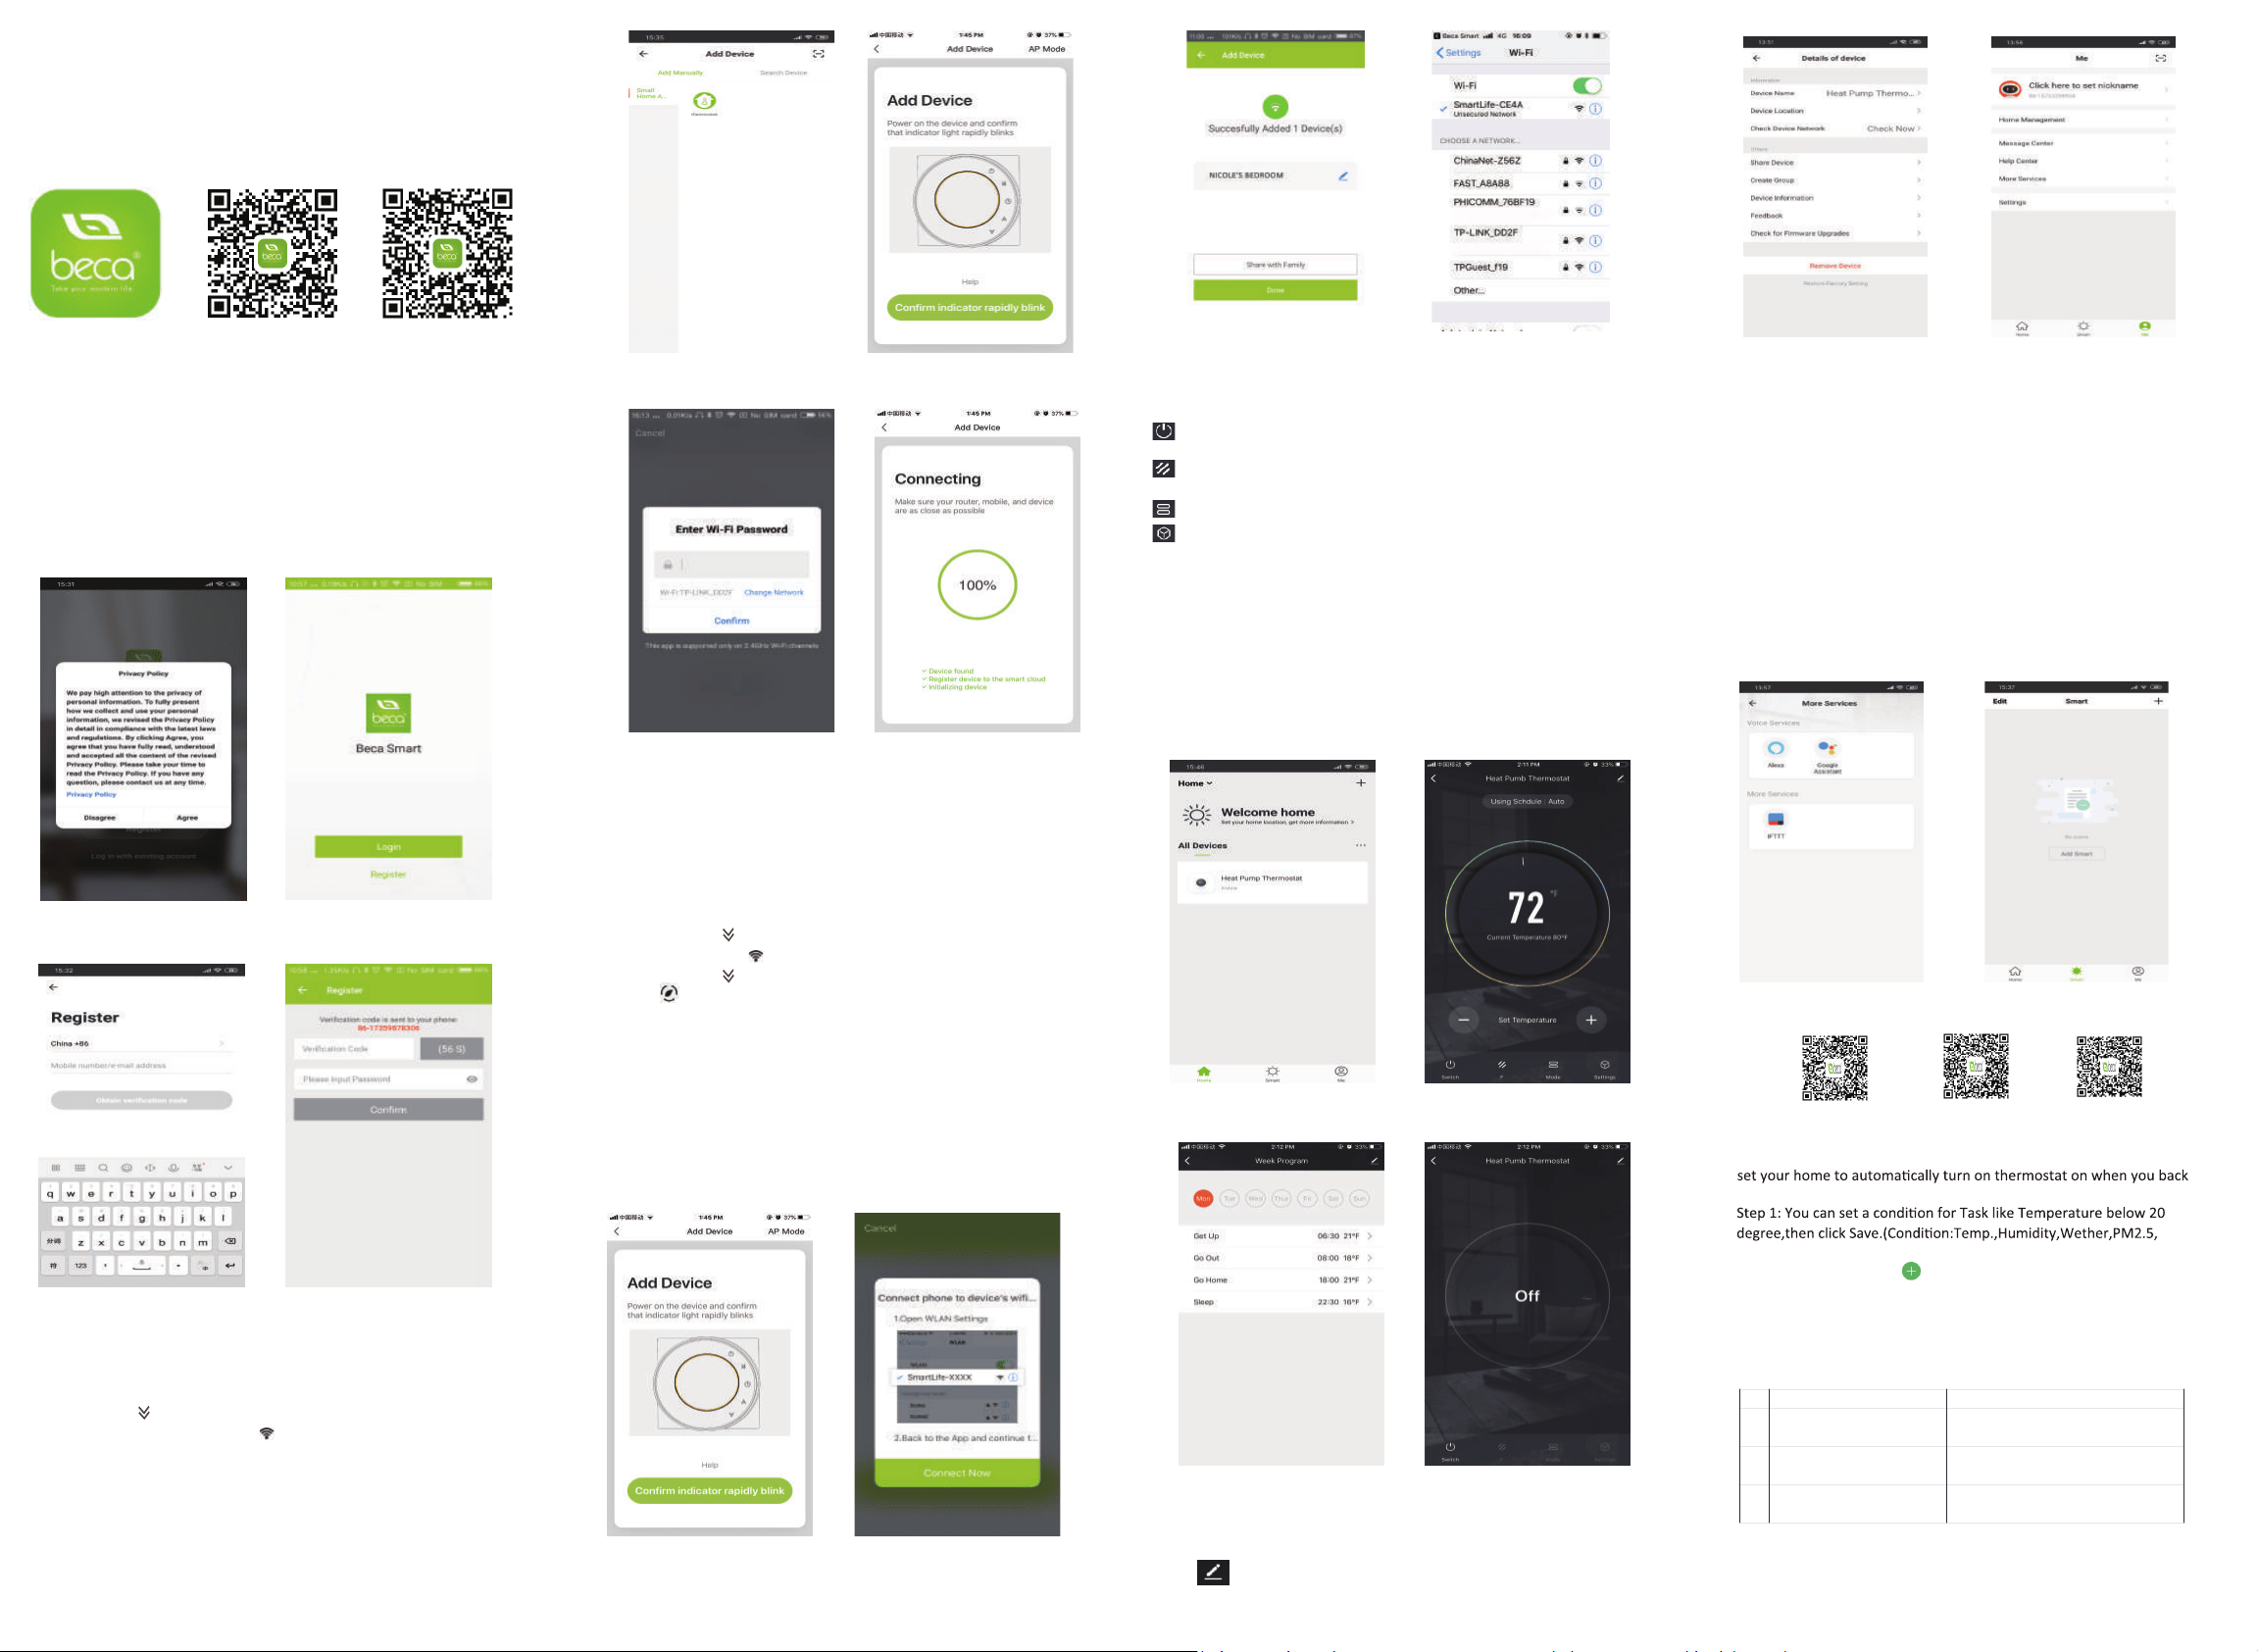
Step 1 Download your APP (Fig 1-1)
Fig 1-1 Fig 1-2 IOS Fig 1-3 Android
For IOS devices, search for My BecaSmart in Apple Store and download.
Alternavely, scan the relevent QR code here (Fig 1-2)
For Android devices, search for My BecaSmart in Google play and download.
Alternavely, scan the relevent QR code here (Fig 1-3)
Step 2 Register your account
Open your BecaSmart, you will get a piece of noficaon (Fig 2-1)
Click Allow to go into your page of register (Fig 2-2). Press register and enter
your phone no. or email (Fig 2-3) then you can get a verificaon code. Input
your password and confirm (Fig 2-4) to complete your registeraon. If you have
account, please log in.
Fig 2-1 Fig 2-2
Fig 2-3 Fig 2-4
Step 3 Connect your Wi-Fi signal
On your thermostat
》
Press and hold the arrow for eight (8) seconds.
The backlight will be on and the icon will flash one time per sec..
Then, go back to the home page of your app
Press the
+
on the upper right corner of the page (see Fig 3-1) to add
your device. Click Confirm indicator rapidly blink (Fig 3-2) then select
your network and back to your app to enter the password of your
wireless router (Fig 3-3) and confirm. The app will connect automatically
(Fig 3-4). This may typically take up to 5~90 seconds to complete.
Your room name could be edited when the device is connected (Fig 4-4).
Fig 3-1 Fig 3-2
Fig 3-3 Fig 3-4
This is EZ mode which provides fast network connection between your app and
your device. If your router doesn’t support it or your wifi signal is weak or you
can not connect by EZ mode, press the AP Mode on the upper right corner in
Fig 3-2.
If you have connected your thermostat successfully, please ignore the AP
seng as below.
On your thermostat
Press and hold the arrow for eight (8) seconds. The backlight
》
will be on and the icon will flash one me per sec..
Press and hold the arrow for eight (8) seconds agian.
The icon will flash one time every (3) seconds.
》
Then, go back to the home page of your app
Click Confirm indicator slowly blink (Fig 4-1) then select your network and back
to your app to enter the password of your wireless router (Fig 3-3) and confirm.
The app will go into the page in Fig 4-2.
Press Connect now to select the wifi signal Smartlife-CE4A of your
thermostat (Fig 4-3).
Go back to your app and click Connect now then the app will connect
automatically (Fig 3-4)
This may typically take up to 5~90 seconds to complete.
Your room name could be edited when the device is connected (Fig 4-4).
Fig 4-1 Fig 4-2
Fig 4-3 Fig 4-4
PROGRAMMING YOUR THERMOSTAT
*
at the applicaon center interface.
* When in Program mode, click on the seng symbol (at the bottom of
the page) to be taken to the schedule page. (See Fig 5-2)
* You can set the temperature for a week and for different periods of the day.
(Fig 5-3 )
* Once your schedule has been set, click on SAVE and the app will send the
programming to your thermostat and confirm the schedule has been saved.
Fig 5-1 Fig 5-2
Fig 5-3
Fig 5-4
Fig 6-1 Fig 6-2
The one who create this group can control all the rooms at the same me.
How to share your device with your family member?
Way 1: Menoned in the above.
You can see the sharing account you have sent and the device you have
shared in this sharing page.
Except create the group, in this menu page, you can also modify your
device name, share your device, get the informaon of your device.
Note
Way 2: Click your Profile at the right boom of your main page (Fig 6-2).
Select Device Sharing then add the account you want to share.
How to connect your device to Amazon Echo or Google Home?
In your profile, click Intergraon into the using page. Press Use Now >
(Fig 7-1) for your Amazon Echo or Google Home or Tmall Genie or IFTTT
then you can see the operation steps.
You don’t need to do anything if you are the one shared.
You can add as many as rooms you want.
What is your Smart Scene and How to use it?
Customize your own personal scenes to suit your needs.For example,
home (Fig 7-2).Press
+
button into the setting.
Air Quality,Sunrise/Sunset,Device)
Step 2: Add a task. Press to Select Device (Power,Set Temp,Lock
Mode) to act, then Save.If you want to delete the scene,you can press
Delete in the end.
SIMPLE EXCEPTION HANDLING
No. Phenomenons Handling
1 Power is on but without display. * Check if the terminals between LCD panel and
Power Unit Box is loosen.
2 Without output but display works. * Use a new LCD panel or new Power Unit Box to
replace the old one.
3 Room Temp. Is a little different from
the actual.
* Do temperature calibration in item 1 of high
senior options
SERVICE
Your thermostat carries an 24 months warranty from date
of purchase. Service outwith the warranty period may
incur a charge. More detail please contact with us directly.
NOTE: The room sound could be turned on/off in PROFILE-SETTING-
SOUND. The sound is matched with the default of your system .
Fig 7-1 Fig 7-2
Power on/off buon. When the screen is bright, it is power on;
when the screen is dark, it is power off.
When your room is established successfully, it will display on the home screen
(Fig 5-1).Click the line into begining programming our thermostat.
Press - + to adjust the temperature. The adjusted temperature will be displayed
This symbol represents funcon and you can choose Permanent Hold/Temparary
Hold/Using Schedule/Holiday Hold.
Mode,press it you can choose Auto/ Cool/Heat/Emer/Off.
This is the seng symbol. You can set the device name, locaon, greate group and
so on.
How to create a group?
Press (5-4) then click Create Group (Fig 6-1).
Select all the rooms you want and confirm.
Scan the following QR code to see user guide of Amazon Echo, Google Home
and IFTTT.
Amazon Echo Google Home IFTTT
⑳
Up Buon