©2007 Sony Corporation
3-196-613-12(1)
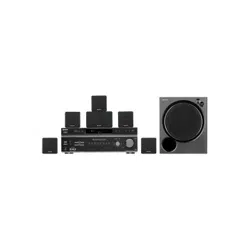
Multi Channel AV
Receiver/
Home Theatre
System
HDMI CONTROL Guide
Guide de la fonction HDMI CONTROL
GBGBGB
FR

2
GB
Using the HDMI
CONTROL function for
‘BRAVIA’ Theatre Sync
To use ‘BRAVIA’ Theatre Sync, set the
HDMI CONTROL function as explained
below.
By connecting Sony components that are
compatible with the HDMI CONTROL
function with a HDMI cable (not supplied),
operation is simplified as below:
• One-Touch Play: When you play back a
component such as a DVD/Blu-ray Disc
Player, the receiver and the TV are turned on
automatically and switch to the appropriate
HDMI input.
• System Audio Control: While watching TV,
you can select to output the sound from the
TV speaker or the speakers connected to the
receiver.
• System Power Off: When you turn off the
TV, the receiver and connected components
are also turned off simultaneously.
HDMI CONTROL is a mutual control
function standard used by HDMI CEC
(Consumer Electronics Control) for HDMI
(High-Definition Multimedia Interface).
The HDMI CONTROL function
does not work in the following
cases:
• When you connect the receiver to a
component which is not correspond with
Sony’s HDMI CONTROL function.
• When you connect the receiver and
components using other than HDMI
connection.
We recommend that you connect the receiver
to products featuring ‘BRAVIA’ Theatre
Sync.
Note
Depending on the connected component, the HDMI
CONTROL function may not work. See the
operating instructions of the component.
3
GB
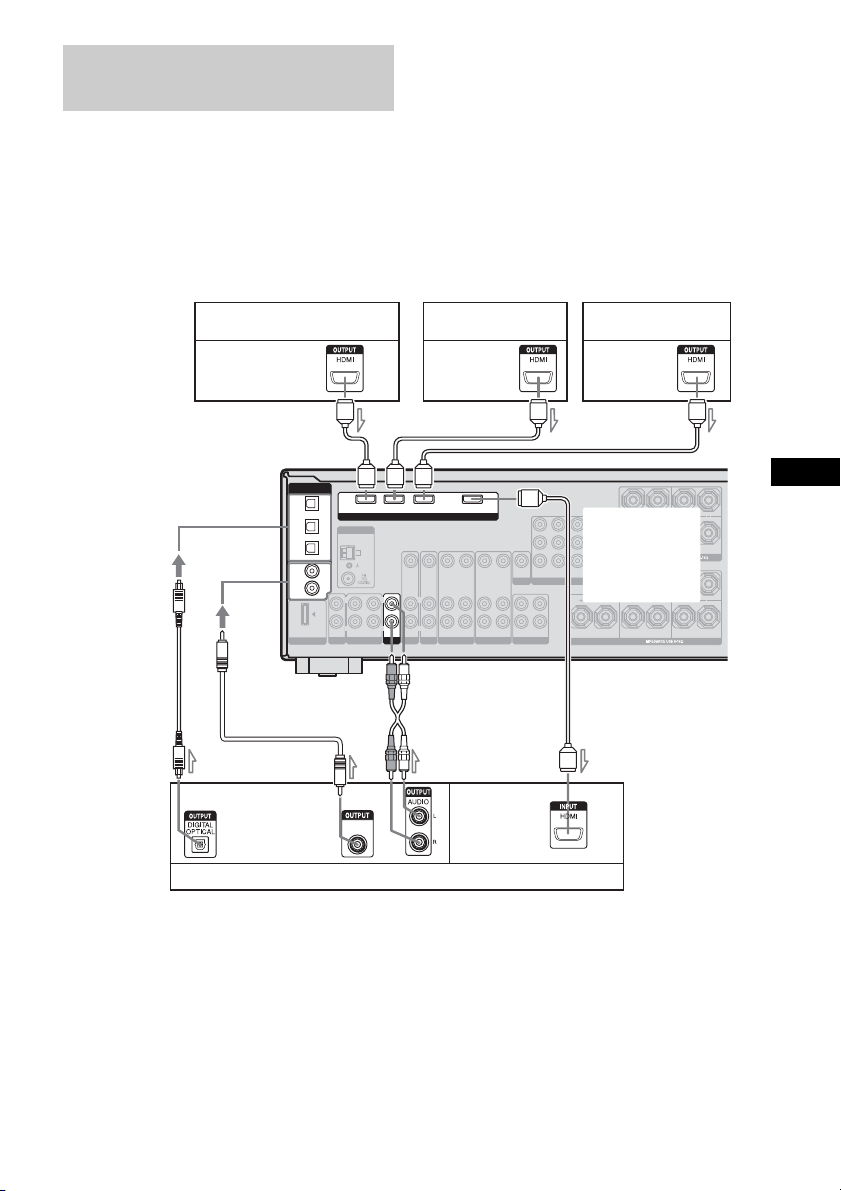
Connect audio and video cords according to
the jacks of your receiver and components.
The illustration below is used as reference for
connection purposes only.
To enjoy TV multi channel
surround sound broadcasting
You can listen to TV multi channel surround
sound broadcasting from the speakers
connected to the receiver.
Connect the digital audio output jack of the TV
to any of the DIGITAL IN jacks of the
receiver. Then, reassign the connected jack to
TV input. For details, refer to the DIGITAL
ASSIGN function on the separate operating
instructions supplied with the receiver.
a)
Connect to at least one of the audio cords (B, C
or D).
b)
Refer to the “Supplied accessories” in the
operating instructions of your receiver for details.
Note
The shape, location, label and number of jacks will
vary according to models and areas.
Connecting a TV and other
components
DMPORT
ANTENNA
AUX
MONITOR
COMPONENT VIDEO
DVD VIDEO 2/BD VIDEO 1 SUB WOOFER
IN INOUT AUDIO OUTAUDIO IN AUDIO IN
VIDEO IN
SAT IN DVD IN VIDEO 2/BD IN
OUT
VIDEO IN
VIDEO OUT
VIDEO OUT
VIDEO OUT
SAT IN DVD IN
VIDEO IN
VIDEO IN
VIDEO 1 IN
MONITOR OUT
AUDIO OUT AUDIO OUTAUDIO IN
L
R
L
R
L
R
L
R
Y
P
B
/C
B
P
R
/C
R
FRONT B
L
R
FRONT A
L
R
AM
SA-CD/CD/CD-R
SPEAKERS
SPEAKERS
SURROUND
L
R
SURROUND BACKCENTER
L
R
DIGITAL
(ASSIGNABLE)
SAT
IN
VIDEO 2/
BD IN
COAXIAL
DVD
IN
SA-CD/
CD/CD-R
IN
HDMI
L
R
OPTICAL
VIDEO 1
IN
DIGITAL
COAXIAL
AA
C
BAD
A
SAT
AUDIO IN
TV
IN
Satellite tuner/Set-top box
A HDMI cable (not supplied)
We recommend that you use a Sony HDMI cable.
B Optical digital cord (not supplied)
a)
C Coaxial digital cord
a)b)
D Audio cord (not supplied)
a)
DVD player Blu-ray disc player
Audio/video
signals
Audio/video
signals
Audio/video
signals
Audio
signals
Audio/video
signals
TV, etc.
To one of the
COAXIAL IN jacks
To one of the
OPTICAL IN
jacks
For rear panel
illustration, refer
to the operating
instructions of
your receiver.
GBGBGB

4
GB
Preparing for HDMI
CONTROL function
Before you use the HDMI CONTROL
function, be sure you have performed the
following procedures. For details on setting
the TV and connected components, see the
operating instructions of the respective
components.
1 Make sure that the receiver is connected to
the TV and components (compatible with
HDMI CONTROL function) via HDMI
connection.
2 Turn on the receiver, TV and connected
components.
3 Set the respective HDMI CONTROL
function for the receiver and TV to on.
See “To set HDMI CONTROL” below.
4 Select the HDMI input of the receiver and
TV to match the HDMI input of the
connected component, so that the image
from the connected component is displayed.
5 Set the HDMI CONTROL function for the
connected component to on.
6 Repeat step 5 for other components that you
want to use the HDMI CONTROL function.
1 (For remote RM-AAP016/
RM-AAP017 only)
Press RECEIVER, then press
MENU.
The RECEIVER indicator lights up and
receiver operation is activated.
“1-LEVEL” appears on the display.
(For remote RM-AAU014/
RM-AAU015/RM-AAU017 only)
Press AMP MENU.
“1-LEVEL” appears on the display.
2 Press V/v repeatedly to select
“6-VIDEO”.
3 Press or b to enter the
menu.
4 Press V/v repeatedly to select
“CONTROL”.
“HDMI” flashes on the display.
5 Press or b to enter the
parameter.
6 Press V/v repeatedly to select
“CTRL ON”.
HDMI CONTROL function is activated.
To set HDMI CONTROL

5
GB
Watching a DVD
(One-Touch Play)
Play back a connected component.
The receiver and the TV are turned on
automatically and switch to the appropriate
HDMI input.
Note
Depending on the TV, the start of the content may
not be output.
Watching a DVD by simple
operation
You can also select a connected component,
such as a DVD/Blu-ray Disc Player using the
TV menu. In this case, the receiver and the TV
switch to the appropriate HDMI input.
Enjoying the TV sound
from the speakers
connected to the receiver
(System Audio Control)
You can enjoy the TV sound from the speakers
connected to the receiver by a simple
operation.
If you turn on the receiver while the TV is
turned on, the System Audio Control function
will automatically be set to on and the TV
sound will output from the speakers connected
to the receiver. However, if you turn off the
receiver, the sound will output from the TV
speakers.
You can also operate this function using the
TV menu. For details, see the operating
instructions of the TV.
Notes
• When “CONTROL” is set to “CTRL ON”, the
“AUDIO” settings in the VIDEO menu will set
automatically depending on the System Audio
Control settings.
• When you connect a TV that does not have System
Audio Control function, the System Audio Control
function does not work.
• If the TV is turned on before turning on the
receiver, the TV sound will not be output for a
moment.
Notes for models other than
STR-DG910
• When you switch to an input other than HDMI or
TV, the System Audio Control function will
automatically be set to off.
• If you switch from other input to HDMI or TV
input, the System Audio Control function will
automatically be set to on.

6
GB
Turning off the receiver
with the TV
(System Power Off)
When you turn the TV off by using the
POWER button on the TV’s remote, the
receiver and the connected components turn
off automatically.
You can also use the receiver’s remote to turn
off the TV.
(For remote RM-AAP016/
RM-AAP017 only)
Press TV, then press AV ?/1.
(For remote RM-AAU014/
RM-AAU015/RM-AAU017 only)
Press TV and TV ?/1 at the same
time.
The TV, receiver and connected components
are turned off.
Notes
• Set the TV Standby Synchro to “ON” before using
the System Power Off function. For details, see the
operating instructions of the TV.
• Depending on the status, the connected
components may not be turned off. For details, see
the operating instructions of the connected
components.
RM-AAP016/
RM-AAP017
RM-AAU014/
RM-AAU015/
RM-AAU017
TV
AV ?/1
TV ?/1
TV

7
GB
Troubleshooting
If you experience any of the following
difficulties while using the HDMI CONTROL
function, use this troubleshooting guide to
help you remedy the problem.
The HDMI CONTROL function does not
work.
• Check the HDMI connection (page 3).
• Make sure “CONTROL” is set to “CTRL
ON” in VIDEO menu.
• Make sure the connected component is
compatible with the HDMI CONTROL
function.
• Check the HDMI CONTROL settings on
the connected component. See the
operating instructions of the connected
component.
• If you change the HDMI connection,
connect/disconnect the AC power cord, or
there is a power failure, repeat the
procedures of “Preparing for HDMI
CONTROL function” (page 4).
No sound is output from the receiver
and TV speaker while using the System
Audio Control function.
• Make sure the TV is compatible with the
System Audio Control function.
• If the TV does not have System Audio
Control function, set the “AUDIO”
settings in VIDEO menu to
– “TV+AMP” if you want to listen to the
sound from the TV speaker and
receiver.
– “AMP” if you want to listen to the
sound from the receiver.

2
FR
Utilisation de la fonction
HDMI CONTROL pour
‘BRAVIA’ Theatre Sync
Pour utiliser ‘BRAVIA’ Theatre Sync, réglez
la fonction HDMI CONTROL ainsi qu’il est
décrit ci-dessous.
En raccordant les appareils Sony compatibles
avec la fonction HDMI CONTROL
au moyen d’un câble HDMI (non fourni), le
fonctionnement est simplifié de la façon
suivante :
• One-Touch Play (Lecture par simple
pression sur une touche) : lorsque vous
effectuez une lecture sur un appareil comme
un lecteur DVD/de disques Blu-ray, l’ampli-
tuner et le téléviseur sont automatiquement
mis sous tension et commutent sur l’entrée
HDMI appropriée.
• System Audio Control (Contrôle audio du
système) : pendant que vous regardez la
télévision, vous pouvez choisir d’émettre le
son par le haut-parleur du téléviseur ou par
les enceintes raccordées au ampli-tuner.
• System Power Off (Mise hors tension du
système) : lorsque vous mettez le téléviseur
hors tension, l’ampli-tuner et les appareils
raccordés sont également mis hors tension
simultanément.
HDMI CONTROL est une norme de fonction
de commande mutuelle utilisée par HDMI
CEC (Consumer Electronics Control) pour
HDMI (High-Definition Multimedia
Interface).
La fonction HDMI CONTROL est
inopérante dans les cas
suivants :
• Lorsque vous raccordez l’ampli-tuner sur un
appareil qui n’est pas compatible avec la
fonction HDMI CONTROL de Sony.
• Lorsque vous raccordez le récepteur et les
appareils avec un raccordement autre qu’un
raccordement HDMI.
Il est recommandé de raccorder l’ampli-tuner
à des produits compatibles ‘BRAVIA’ Theatre
Sync.
Remarque
Selon l’appareil raccordé, la fonction HDMI
CONTROL risque de ne pas fonctionner. Reportez-
vous au mode d’emploi de l’appareil.
3
FR
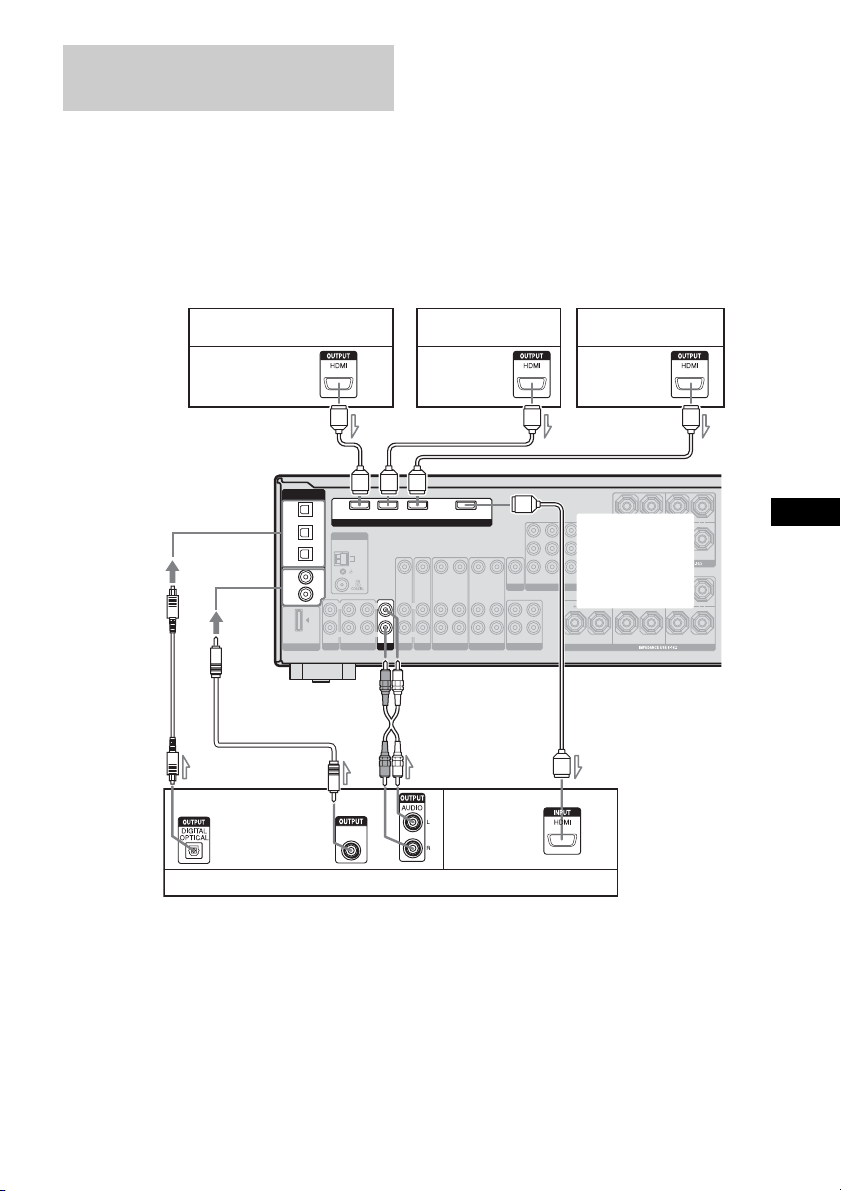
Raccordez les cordons audio et vidéo en
fonction des prises de votre ampli-tuner et de
vos appareils.
L’illustration ci-dessous est utilisée comme
référence à des fins de raccordement
uniquement.
Pour profiter du son surround
multicanal du téléviseur
Vous pouvez écouter le son surround
multicanal du téléviseur à partir des enceintes
raccordées à l’ampli-tuner.
Raccordez la prise de sortie audio numérique
de votre téléviseur à l’une des prises DIGITAL
IN de l’ampli-tuner. Réaffectez ensuite la prise
raccordée à l’entrée TV. Pour plus
d’informations, reportez-vous à la fonction
DIGITAL ASSIGN dans le mode d’emploi
séparé fourni avec l’ampli-tuner.
a)
Raccordez-le à au moins l’un des cordons audio
(B, C ou D).
b)
Pour plus d’informations, reportez-vous à la
section « Accessoires fournis » du mode d’emploi
de votre ampli-tuner.
Remarque
La forme, l’emplacement, le nom et le nombre de
prises varient en fonction des modèles et des zones.
Raccordement d’un téléviseur
et d’autres appareils
DMPORT
ANTENNA
AUX
MONITOR
COMPONENT VIDEO
DVD VIDEO 2/BD VIDEO 1 SUB WOOFER
IN INOUT AUDIO OUTAUDIO IN AUDIO IN
VIDEO IN
SAT IN DVD IN VIDEO 2/BD IN
OUT
VIDEO IN
VIDEO OUT
VIDEO OUT
VIDEO OUT
SAT IN DVD IN
VIDEO IN
VIDEO IN
VIDEO 1 IN
MONITOR OUT
AUDIO OUT AUDIO OUTAUDIO IN
L
R
L
R
L
R
L
R
Y
P
B
/C
B
P
R
/C
R
FRONT B
L
R
FRONT A
L
R
AM
SA-CD/CD/CD-R
SPEAKERS
SPEAKERS
SURROUND
L
R
SURROUND BACKCENTER
L
R
DIGITAL
(ASSIGNABLE)
SAT
IN
VIDEO 2/
BD IN
COAXIAL
DVD
IN
SA-CD/
CD/CD-R
IN
HDMI
L
R
OPTICAL
VIDEO 1
IN
DIGITAL
COAXIAL
AA
C
BAD
A
SAT
AUDIO IN
TV
IN
Tuner satellite/Décodeur
A Câble HDMI (non fourni)
Il est recommandé d’utiliser un câble HDMI Sony.
B Cordon numérique optique (non fourni)
a)
C Cordon numérique coaxial
a)b)
D Cordon audio (non fourni)
a)
Lecteur DVD
Lecteur de disques
Blu-ray
Signaux audio/
vidéo
Signaux audio/
vidéo
Signaux audio/
vidéo
Signaux
audio
Signaux
audio/vidéo
Téléviseur, etc.
Vers l’une des prises
COAXIAL IN
Vers l’une des
prises
OPTICAL IN
Pour l’illustration
du panneau
arrière, reportez-
vous au mode
d’emploi de votre
ampli-tuner.
FR

4
FR
Préparatifs pour la
fonction HDMI CONTROL
Avant d’utiliser la fonction HDMI
CONTROL, vérifiez que vous avez exécuté
les procédures suivantes. Pour plus
d’informations sur le réglage du téléviseur et
des appareils raccordés, reportez-vous au
mode d’emploi fourni avec chaque appareil.
1 Vérifiez que l’ampli-tuner est raccordé au
téléviseur et aux appareils (compatibles
avec la fonction HDMI CONTROL) au
moyen d’une connexion HDMI.
2 Mettez l’ampli-tuner, le téléviseur et les
appareils raccordés sous tension.
3 Activez la fonction HDMI CONTROL de
l’ampli-tuner et du téléviseur.
Reportez-vous à la section « Pour activer
HDMI CONTROL » ci-dessous.
4 Sélectionnez l’entrée HDMI de l’ampli-
tuner et du téléviseur afin qu’elle
corresponde à à l’entrée HDMI de l’appareil
raccordé, de sorte que l’image de l’appareil
raccordé s’affiche.
5 Activez la fonction HDMI CONTROL des
autres appareils raccordés.
6 Répétez l’étape 5 pour les autres appareils
dont vous souhaitez utiliser la fonction
HDMI CONTROL.
1 (Pour la télécommande
RM-AAP016/ RM-AAP017
uniquement)
Appuyez sur RECEIVER, puis
sur MENU.
Le témoin RECEIVER s’allume et
l’ampli-tuner est activé.
« 1-LEVEL » apparaît sur l’afficheur.
(Pour la télécommande
RM-AAU014/RM-AAU015/
RM-AAU017 uniquement)
Appuyez sur AMP MENU.
« 1-LEVEL » apparaît sur l’afficheur.
2 Appuyez plusieurs fois sur V/v
pour sélectionner « 6-VIDEO ».
3 Appuyez sur ou sur b pour
entrer dans le menu.
4
Appuyez plusieurs fois sur
V
/
v
pour sélectionner « CONTROL ».
« HDMI » clignote dans la fenêtre
d’affichage.
5 Appuyez sur ou b pour
saisir le paramètre.
6 Appuyez plusieurs fois sur V/v
pour sélectionner « CTRL ON ».
La fonction HDMI CONTROL est
activée.
Pour activer HDMI CONTROL

5
FR
Lecture d’un DVD
(One-Touch Play)
Lancez la lecture sur l’appareil
raccordé.
L’ampli-tuner et le téléviseur se mettent
automatiquement sous tension et commutent
sur l’entrée HDMI appropriée.
Remarque
Selon le téléviseur, le début du contenu risque de ne
pas être émis.
Lecture d’un DVD par une
simple opération
Vous pouvez également sélectionner un
appareil raccordé comme un lecteur DVD/de
disques Blu-ray à l’aide du menu du téléviseur.
Dans ce cas, l’ampli-tuner et le téléviseur
commutent automatiquement sur l’entrée
HDMI appropriée.
Profiter du son du
téléviseur au moyen des
enceintes raccordées à
l’ampli-tuner
(System Audio Control)
Vous pouvez profiter du son du téléviseur à
partir des enceintes raccordées à l’ampli-tuner
par une simple opération.
Si vous mettez l’ampli-tuner sous tension
lorsque le téléviseur est sous tension, la
fonction Contrôle audio du système est
automatiquement activée et le son du
téléviseur est émis via les enceintes raccordées
à l’ampli-tuner. Toutefois si vous mettez
l’ampli-tuner hors tension, le son est émis via
les enceintes du téléviseur.
Vous pouvez également utiliser cette fonction
à l’aide du menu du téléviseur. Pour plus
d’informations, reportez-vous au mode
d’emploi du téléviseur.
Remarques
• Lorsque « CONTROL » est réglé sur « CTRL
ON », les réglages « AUDIO » du menu VIDEO
sont réglés automatiquement en fonction des
réglages de la fonction Contrôle audio du système.
• Lorsque vous raccordez un téléviseur qui n’est pas
doté de la fonction Contrôle audio du système, la
fonction Contrôle audio du système ne fonctionne
pas.
• Si le téléviseur est mis sous tension avant la mise
l’ampli-tuner, le son du téléviseur n’est pas émis
pendant quelques instants.
Remarques pour les modèles autres
que le STR-DG910
• Lorsque que vous sélectionnez une autre entrée que
l’entrée HDMI ou que l’entrée TV, la fonction
Contrôle audio du système est automatiquement
désactivée.
• Lorsque vous passez d’une autre entrée à l’entrée
HDMI ou à l’entrée TV, la fonction Contrôle audio
du système est automatiquement activée.

6
FR
Mise hors tension de
l’ampli-tuner avec le
téléviseur
(System Power Off)
Lorsque vous mettez le téléviseur hors tension
à l’aide de la touche POWER de la
télécommande du téléviseur, l’ampli-tuner et
les appareils raccordés s’éteignent
automatiquement.
Vous pouvez également utiliser la
télécommande de l’ampli-tuner pour mettre le
téléviseur hors tension.
(Pour la télécommande
RM-AAP016/ RM-AAP017
uniquement)
Appuyez sur TV, puis sur AV ?/1.
(Pour la télécommande
RM-AAU014/RM-AAU015/
RM-AAU017 uniquement)
Appuyez simultanément sur TV et
TV ?/1.
Le téléviseur, l’ampli-tuner et les appareils
raccordés sont mis hors tension.
Remarques
• Réglez Standby Synchro TV sur « ON » avant
d’utiliser la fonction System Power Off (mise hors
tension du système). Pour plus d’informations,
reportez-vous au mode d’emploi du téléviseur.
• En fonction du statut, il se peut que les appareils
raccordés ne puissent pas être mis hors tension.
Pour plus d’informations, reportez-vous au mode
d’emploi des appareils raccordés.
RM-AAP016/
RM-AAP017
RM-AAU014/
RM-AAU015/
RM-AAU017
TV
AV ?/1
TV ?/1
TV

7
FR
Dépannage
Si l’un des problèmes suivants survient
pendant l’utilisation de la fonction HDMI
CONTROL, reportez-vous à ce guide
dépannage pour résoudre le problème.
La fonction HDMI CONTROL ne
fonctionne pas.
• Vérifiez le raccordement HDMI (page 3).
• Vérifiez que « CONTROL » est réglé sur
« CTRL ON » dans le menu VIDEO.
• Vérifiez que l’appareil raccordé est
compatible avec la fonction HDMI
CONTROL.
• Vérifiez les réglages de la fonction HDMI
CONTROL sur l’appareil raccordé.
Reportez-vous au mode d’emploi de
l’appareil raccordé.
• Si vous modifiez le raccordement HDMI,
branchez/débranchez le cordon
d’alimentation ou, en cas de coupure de
courant, répétez les procédures de la
section « Préparatifs pour la fonction
HDMI CONTROL » (page 4).
Aucun son n’est émis par l’ampli-tuner
et les enceintes du téléviseur lorsque
la fonction Contrôle audio du système
est activée.
• Assurez-vous que le téléviseur est
compatible avec la fonction Contrôle
audio du système.
• Si le téléviseur n’est pas doté de la
fonction Contrôle audio du système,
réglez les paramètres « AUDIO » du menu
VIDEO sur
– « TV+AMP » si vous souhaitez écouter
le son à partir des enceintes du
téléviseur et de l’ampli-tuner.
– « AMP » si vous souhaitez écouter le
son à partir de l’ampli-tuner.


(1)
Sony Corporation Printed in Malaysia