User Manual
USER MAINTENANCE INSTRUCTIONS
IMPORTANT!
Disconnect the dishwasher from the power supply (unplug or switch off at the circuit breaker) and allow all its parts to cool before any cleaning or maintenance.
Holiday time
- If the dishwasher is not going to be used for some time, we recommend you leave it clean and empty. Leave the drawers ajar to allow air to circulate. Turn off both the power and water supply to the dishwasher. When using your dishwasher for the first time after a long period away, we recommend pouring 3 cups of water into the drawer before loading and starting a wash. This is to lubricate components that may have dried out during non-use.
- If the dishwasher is installed in a cold climate where temperatures fall below zero, we also recommend winterizing.
Winterizing (Cold climates only)
- Disconnect the dishwasher from the power supply,
- Turn off the water supply and disconnect the water inlet pipe from the water valve.
- Drain water from the inlet pipe and water valve, using a bucket or pan to collect the water.
- Reconnnect the water inlet pipe to the water valve.
- Remove the drain filter and the filter plate from the bottom of the drawer and use a sponge to remove any remaining water underneath.
- Replace the drain filter and the filter plate, and completely dry all water from inside the dishwasher.
- Disconnect the drain hose(s) from the sink drain pipe and completely drain all remaining water from the hose(s). Reconnect the drain hose(s) to the sink drain pipe.
Cleaning the surfaces
- Wipe with a clean damp cloth. Take care not to wet the LCD display (DD*A & DD*C models only)
- Dry with a clean lint-free cloth.
IMPORTANT!
We do not recommend the use of the following cleaning aids on your dishwasher as they may damage the surfaces:
- Plastic or stainless steel scouring pads
- Abrasive, solvent, household cleaners
- Acid or alkaline cleaners
- Hand washing liquids or soap
- Stainless steel cleaners or polishes
- Laundry detergents or disinfectants
Cleaning the drain filter, spray arm and filter plate
- We recommend that the drain filter and filter plate in each drawer are removed and cleaned about once a month in normal use or whenever there is evidence of food particles.
- The spray arm in normal use should require cleaning less frequently.
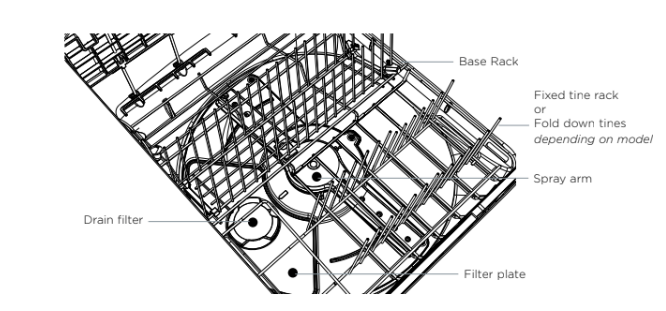
Cleaning the drain filter and filter plate
IMPORTANT!
- If a dishwasher cleaner / descaler is used, you must run a wash programme with detergent immediately afterward to prevent any damage to your dishwasher.
- The dishwasher must be used with the filter plate, drain filter and spray arm correctly in place.
- We recommend that you always use the dishwasher with the right hand fixed tine rack or fold down tine rack (depending on model) in place.
Remove the fixed tine rack and/or the base rack first
1. Unplug the dishwasher or turn it off at the power supply.
Note: For ease of access to the drain filter and filter plate you may find it easier to remove the whole base rack (including tine racks) first. To remove the whole base rack: lift the rack up from the back first to prevent it knocking against the detergent and rinse aid dispenser and lift out.
2. If the base rack is left in - to then access the drain filter:
- Remove the cutlery basket
- Lift the trap door up
- Lift the front of the fixed tine rack to unclip it from the base rack
- Slide the fixed tine rack forward clear of the rear anchoring loop and lift out.

|
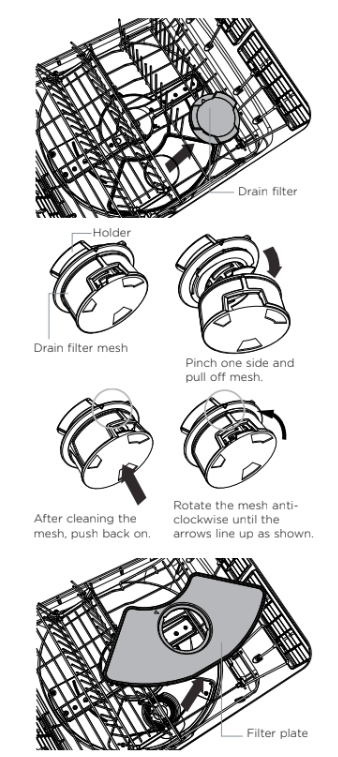
Removing the drain filter and filter plate to clean
3. Twist the circular drain filter anti/counter- clockwise and lift to remove. It is normal to find some water under it.
4. Remove the drain filter mesh by pinching one side only and pulling it off, as shown. Note: Do not attempt to remove the drain filter mesh by pinching two opposing sides together as this may damage the drain filter mesh.
5. Wash both parts of the drain filter in hot soapy water and rinse thoroughly under running water.
6. Carefully lift the filter plate out. Remove any foreign material on either side, wash in hot soapy water and rinse thoroughly in clean water, then wipe with a damp cloth.
Replacing the filter plate and drain filter
7. Carefully replace the filter plate. Ensure it is fully pushed into position.
8. Refit the circular drain filter:
a) Push the drain filter mesh back onto the holder. It should click into place.
b) Rotate the drain filter mesh until the arrow on the mesh filter lines up with the arrow on the holder.
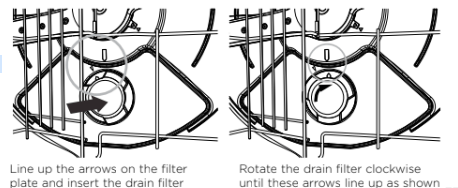
c) Refit the drain filter into the drain hole by lining up the arrow on the top of the drain filter with the arrow on the filter plate.
d) Rotate the drain filter clock wise until the arrow on the drain filter lines up with the arrow on the base of the drawer.
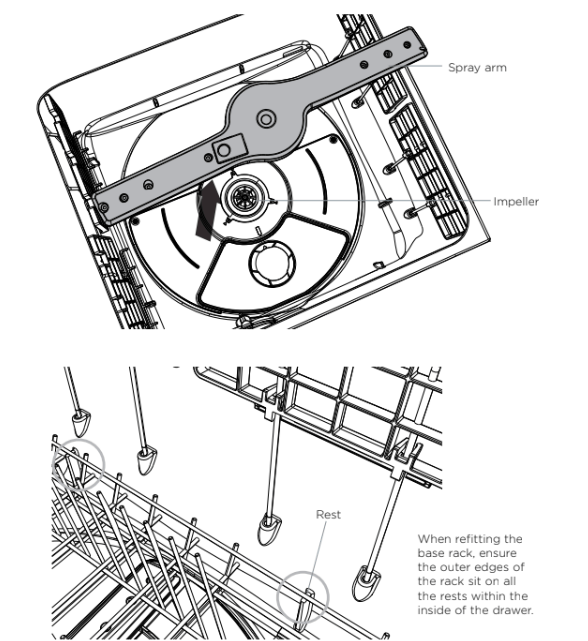
9. Either replace the whole base rack (if removed) and/or replace the fixed tine rack. Ensure the rack is replaced correctly the rear of the rack sits underneath the anchoring loop and the right side rail of the fixed tine rack sits inside the stop as shown on previous page).
|
|
 |
|
10. Fold down the trap door so it is resting on the fixed tine rack and replace the cutlery basket.
|
|
 |
Cleaning the spray arm
- Unplug the dishwasher or turn it off at the power supply.
- Unclip the glass supports (if fitted) from the rack wires and fold up all the foldaway cup racks, so that they are all upright and close to the top.
- Remove the base rack carefully. Lift from the back first to prevent knocking the detergent and rinse aid dispenser.
- Lift the spray arm and shake any foreign material out. Rinse it clean under running water and wipe with a damp cloth.
- Replace the spray arm back onto the impeller. Check the spray arm is firmly seated and turns freely.
- Replace the base rack, lowering its front edge into position first.
- Plug the dishwasher back in or turn it on at the power supply.
Note: Where there is broken crockery or glass in the drawer, it must be carefully removed to prevent damage to the dishwasher.
TROUBLESHOOTING
Unclean dishes
- Wash program unsuitable for the load.
- See your ‘Quick start guide’ for a suitable wash program, or the soils were too heavily baked on and dishes may need soaking.
- Spray arm unable to rotate.
- Ensure no items are obstructing the spray arm path. Make sure the spray arm is mounted correctly and free to rotate.
- Drawer overloaded/ incorrectly loaded.
- Refer to the section on loading.
- Filter plate/drain filter is incorrectly inserted.
- See section ‘User maintenance instructions’.
- Detergent put in the wrong compartment of the dispenser.
- Detergent must be placed in the large compartment. See section ‘Adding detergent’ for information.
- Excess food not removed from dinnerware prior to loading.
- Scrape all food scraps off dinnerware prior to loading.
- Unsuitable detergent. Use detergents suitable for automatic dishwashers. See section ‘Adding detergent’ for examples of suitable and unsuitable detergent types.
- Not enough detergent. See section ‘Wash programs and detergent quantities’ or follow the detergent manufacturer’s instructions.
- Spray arm holes are blocked.
- Filter plate/drain filter is blocked.
- Clean the filter plate and drain filter.
Hard water
Increase the rinse aid setting and the amount of detergent. See section ‘Water hardness and dishwashing’.
Models with built-in water softener ( 'H’ models only): Increase the water softener setting. See section ‘Water softener’.
Models without built-in water softener: If living in an area with very hard water, consult a plumber on installing a household water softener.
Foaming
- Wrong type of detergent used
- ONLY use dishwasher detergent. See ‘Adding detergent’.
- Incorrect amount of detergent.
- See section ‘Wash programs and detergent quantities’ or follow the detergent manufacturer’s instructions.
- Too much egg left on plates.
- Rinse off excess egg prior to loading. Increase the amount of detergent.
- Rinse aid setting too high.
- Decrease the rinse aid setting.
- Rinse aid dispenser plug not closed properly.
- Ensure that the rinse aid dispenser plug is fully closed, with its hand grip pointing vertically. See section ‘Using rinse aid’.
Water leaking
- Drain hose disconnected from waste pipe.
- Reconnect the drain hose to the waste pipe.
- Water inlet hose not properly connected.
- Ensure the inlet hose is connected securely.
- Other leaks.
- Turn water and power supplies to the dishwasher off. Call Customer Care or your Authorised Service Centre. See your 'Service and warranty’ booklet for contact details.
- Rinse aid dispenser plug not closed properly.
- Ensure that the rinse aid dispenser plug is fully closed, with its hand grip pointing vertically. See section ‘Using rinse aid’.
Dishwasher does not recognize when I knock on the door to pause or unlock it (DD*I models only)
- Not knocking hard enough.
- Ensure you are knocking firmly on the door, rather than using a light tap.
- Door knock sensor is incorrectly installed or calibrated.
Dishwasher is registering taps and bumps as knocks and pausing inadvertently (DD*I models only)
- Door knock sensor is incorrectly installed or calibrated.
Drawer will not open (no beeping no wash in progress)
- Childlock feature is on.
- Turn the Childlock off. See your Quickstart guide for instructions.
- Closed drawer auto lock is on.
- Press any button and open drawer within 30 seconds. DD*I models only: Knock once on the door and open drawer within 30 seconds
Power failure during wash program
- Power outage in your home or area.
- Wait until power resumes, program will restart in same part of wash program.
Continuous beeping with A/ F code in display (DD*C & DD*A models only) flashing wash modifier indicators (DD*I & DD*D models only)
- A fault has occurred.
- Refer to section ‘If there is a fault’.
Intermittent beeping
- Dishwasher is in pause mode.
- DD*C, DD*A and DD*D models: Close the dishwasher and press the
 button to resume the program. DD*I & DD*D models: Press
  on the control panel then close the drawer to resume the program.
Dishwasher will not start
- Power supply is not connected.
- Connect the power supply.
- The drawer is not closed properly.
- Ensure the drawer is firmly closed.
- Keylock or Childlock feature is on.
- Turn the Keylock or Childlock off. See your Quickstart guide for instructions.
- / button not pressed.
- Press the / button.
- Dishdrawer is in "Showroom mode”.
Fan noise coming from the dishwasher after a wash program has finished
- This is normal. The drying fan continues to run for a set period of time after a program has finished to assist with drying.
- No action required. The fan will automatically stop after the set time is over, or when the drawer is opened. In some cases, the fan may resume when the drawer is closed again.
Fan noise starts up when I close the drawer, even though I didn’t start a new wash
- This is normal. In some cases, the drying fan will run whenever the drawer is closed for a set period of time after a program has finished.
- No action required. The fan will automatically stop after the set time is over.
No powdered detergent dispensed
- Detergent dispenser was wet when loaded.
- Clean the dispenser and ensure it is dry before adding detergent.
The wash program seems to have finished (the dishwasher is idle), but the end of wash beeps haven’t sounded and the drawer cannot be opened
- The wash program is still in progress. It is in a ‘quiet’ phase that is needed for ensuring the best wash results.
- No action required. The program will transition into a more audible phase after the ‘quiet’ phase is over.
Water pooling on inner rim of drawer after a wash
- This is normal condensation.
Water under the drain filter
- This is normal and needs no action.
Excess water in the drawer
- Drain hose(s) bent or kinked.
- Straighten the drain hose(s).
- Blocked filters.
- Clean the filter plate/drain filter. Refer to "User maintenance instructions’.
Water marks on the dishes
- Rinse aid depleted.
- Refill the rinse aid dispenser.
- Rinse aid setting too low or off.
- Increase/turn on the rinse aid setting.
- Dishwasher overloaded/ incorrectly loaded.
- Refer to the section on loading.
Drawer interior is stained
- Some foods, like tomato based products, may stain the inside of the drawer.
- Pre-rinse dishes before placing in the drawer. Alternatively, using the Rinse program after adding the dishes may minimise staining.
Dishes did not dry
- Incorrect loading.
- Ensure the dishes are not nesting together.
- Dishes were left in the drawer for several hours after a wash.
- We recommend unloading the dishes within a few hours after a wash program has finished, as the small amount of vapour left after the wash may - with time - resettle on dishes as condensation. Using rinse aid or increasing its setting may also help with drying.
- Rinse aid depleted.
- Refill the rinse aid dispenser.
- Rinse aid setting too low.
- Increase the rinse aid setting.
- Normal Eco/Eco program used.
- Choose a different wash program.
- Items that require a longer drying time, e.g. plastic utensils and containers
- Some models only: Set the wash program with Extra dry. only available on some wash programs).
Program is taking much longer than usual
- Wrong type of detergent used. Auto recovery program has been triggered to stop the dishwasher overflowing and to disperse excess foam.
- No action required. Allow the program to finish. Note: you may need to run your chosen wash program again with the correct detergent if the dishes are not clean at the end of the recovery program.
Excessive motor noise
- No water in the motor area.
- This usually occurs on the first use or when the dishwasher has not been used for long periods of time. Pour 3 cups of water into the drawer before running a wash program.
HOW TO ATTEND TO A FAULT (DD*A & DD*C MODELS)
How do I know if there is a fault?
- Your dishwasher will beep continuously and a fault code will flash in the display.
- Note down the fault code.
- You may be able to fix some faults yourself - see the table on the following page.
- If you cannot clear the fault, contact Customer Care for support or to organize a visit by a service technician (See ‘Service and warranty’ booklet for contact details).
|
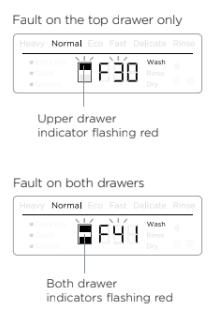
Double models only:
- The drawer indicator will also flash to show which drawer has a fault.
- If there is a fault in both drawers, both drawer indicators will flash.
- Press
 to scroll between the drawers. to scroll between the drawers.
- Note down the fault codes for each drawer. There may be two different codes flashing if the faults are different in each drawer.
Note:
- If a fault occurs in one drawer only you are still able to use the other drawer.
- if you have paused a drawer during a wash program, and the other drawer then faults, the paused drawer indicator will continue flashing but will be dimmed.
|
|
 |
'F’ fault codes
If the display is showing an  fault code, you may be able to clear the fault by resetting the dishwasher - see the steps below. If the fault persists, note down the code before disconnecting the dishwasher from the water and power supplies and contact Customer Care.
To attempt to clear the fault code
- Press to stop the beeping. Press
 again to turn the dishwasher off.
- Wait a few seconds. Press again to turn the dishwasher back on.
If the fault code has disappeared then the fault has been reset and you can continue to use your dishwasher.
'A’ fault codes
If the display is showing an ‘A’ fault code, follow the steps below to try and fix the issue.
If the fault persists, note down the code before disconnecting the dishwasher from the water and power supplies and contact Customer Care.

Water supply fault
- Ensure the water supply is turned on.
- Press once to stop the beeping, and then again to clear the fault.
- Press to resume the wash program.

Drawer cannot drain. The drainage hose may be blocked or kinked, or the connection to drainage pipe may be blocked.
- Ensure the drainage hose and connection to pipes are not blocked.
- Press once to stop the beeping, and then again to clear the fault.
- Press to resume the wash program.

The spray arm has loosened or come off its mounting, or water pressure is too low.
- Open the drawer and check the spray arm.
- If the spray arm has loosened or come off its mounting, re-fit it. Check that it is firmly seated and turns freely (See “User maintenance instructions”).
- Press once to stop the beeping, and then again to clear the fault.
- Press to resume the wash program.

Auto recovery program: Dishwasher has detected excess foam in the drawer.
- Let the auto recovery program run until it is complete. The wash program will resume when the auto recovery program has completed.
- Check that you are using the right detergent before running another wash program.
- If the drawer is still filled with foam at the end of the wash program, contact customer care.
 (DD*C models only)
Sanitize cycle hasn’t met temperature needed to sanitize dishes.
- Check if the water supply has been turned off or the wash program interrupted.
- Press once to stop the beeping, and then again to clear the fault.
- Run the sanitize cycle again.
How do I know if there is a fault?
- Your dishwasher will beep continuously and the indicators on the control panel will light up and flash.
- Note down which indicators are lit and flashing. There are two types of fault code - 'A’ and ‘F’. See below for which type of code your dishwasher is displaying.
- You may be able to fix some faults yourself - see the table on following page.
- If you cannot clear the fault, contact Customer Care for support or to organize a visit by a service technician (See ‘Service and warranty’ booklet for contact details).
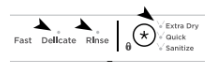
'A’ fault codes
If only the wash modifier indicators are flashing, it is an ‘A’ fault.
Note: Also one or more wash program indicators are lit.

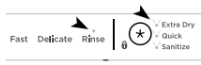
'F’ fault codes
If the wash modifier and the lock indicators are flashing, it is an ‘F’ fault.
Note: Also one or more wash program indicators are lit.

Double models only:
- There may be a fault in one or both of the drawers.
- Note down which indicators are flashing or lit in each drawer. These may be different if the faults are different in each drawer.
Note:
- If a fault occurs in only one drawer you are still able to use the other drawer.
'F’ fault codes
If an F fault code is indicated, you may be able to clear the fault by re-setting the dishwasher - see the steps below. If the fault persists, note down the code before disconnecting the dishwasher from the water and power supplies, and contact Customer Care.
To attempt to clear the fault code
- Press to stop the beeping. Press again to turn the dishwasher off.
- Wait a few seconds. Press again to turn the dishwasher back on.
If the flashing indicators have disappeared then the fault has been reset and you can continue to use your dishwasher.
'A’ fault codes
If an A fault code is indicated, follow the steps below to try and fix the issue. If the fault persists, note down the code before disconnecting the dishwasher from the water and power supplies and contact Customer Care.
A1: Water Supply fault
- Ensure the water supply is turned on.
- Press once to stop the beeping, and then again to clear the fault.
- Press / to resume the wash program.
A3: Drawer cannot drain. The drainage hose may be blocked or kinked, or the connection to drainage pipe may be blocked.
- Ensure the drainage hose and connection to pipes are not blocked.
- Press once to stop the beeping, and then again to clear the fault.
- Press / to resume the wash program.
A6: The spray arm has loosened or come off its mounting, or water pressure is too low.
A combination of low water pressure and excessive foaming may also trigger an A6 fault.
- Open the drawer and check the spray arm.
- If the spray arm has loosened or come off its mounting, re-fit it. Check that it is firmly seated and turns freely (See ‘User maintenance instructions’).
- Press once to stop the beeping, and then again to clear the fault.
- Press / to resume the wash program.
- If the fault code persists, check the filter on the inlet hose is not blocked, and clear if needed. Note: if the drawer is filled with foam when you open it, contact Customer Care.

A7: Auto recovery program: Dishwasher has detected excess foam in the drawer.
- Let the auto recovery program run until it is complete. The wash program will resume when the auto recovery program has completed.
- Check that you are using the right detergent before running another wash program.
- If the drawer is filled with foam at the end of the wash program, contact Customer Care.
A09: Sanitize cycle hasn’t met temperature needed to sanitize dishes.
- Check if the water supply has been turned off or the wash cycle interrupted.
- Press once to stop the beeping, and then again to clear the fault.
- Run the sanitize cycle again.
WARRANTY AND SERVICE
Before you call for service or assistance ...
Check the things you can do yourself. Refer to the installation instructions and your user guide and check that:
- Your product is correctly installed.
- You are familiar with its normal operation.
If after checking these points you still need assistance or parts, please refer to the Service & Warranty book for warranty details and your nearest Authorised Service Centre, Customer Care, or contact us through our website www.fisherpaykel.com.
Requirements of EEC Directive 93/68.
European directive 2002/96/EC on Waste Electrical and Electronic Equipment (WEEE) for European Union countries only) GB This appliance is marked according to the European directive 2002/96/EC on Waste Electrical and Electronic Equipment (WEEE). By ensuring this product is disposed of correctly, you will help prevent potential negative consequences for the environment and human health, which could otherwise be caused by inappropriate waste handling of this product.
The symbol  on the product, or on the documents accompanying the product, indicates that this appliance may not be treated as household waste. Instead it shall be handed over to the applicable collection point for the recycling of electrical and electronic equipment. Disposal must be carried out in accordance with local environmental regulations for waste disposal. For more detailed information about treatment, recovery and recycling of this product, please contact your local city office, your household waste disposal service or the shop where you purchased the product