Loading ...
Loading ...
Loading ...

English Controls/Power Supply
Congratulations on your purchase and
welcome to Philips!
To fully benifit from the support that
Philips offers, register your product at
www.philips.com/welcome.
Supplied Accessories
– 1 x AC/DC certified switching adapter
(Model No.: ED4120090060A,
Input: 230V~ 50Hz, 70mA,
Output: 9V, 600mA)
– Audio cable
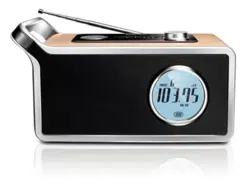
Top & front panels (see 1 )
1
PRESET
–
stores and recalls 10 FM and 10 MW sta-
tions
1 / 2
TUNING
+/–
– in FM/MW mode, fine tunes a station
SOURCE
–
selects FM, MW, or AUX mode
2
2
–
switches on/off the standby mode
3
MEMORY/AUTO SCAN
– in FM/MW
mode,
scans stations
and stores them as presets automatically
4
DBB/SET TIME
– in
standby mode, sets the clock
–
switches DBB sound effect on or off
5
TIMER
– sets the time to switch on or off the set
automatically
6
SLEEP
–
switches the set off automatically after the
set time
7 VOLUME +/– – adjusts volume level
8
LCD display
–
displays FM/MW radio and time information
Back panel (see 1)
9
Telescopic antenna
–
improves FM reception
0
p
– 3.5 mm stereo headphone socket
!
DC jack
– inlet for power cord
@
AUX IN
– inlet for external sound source
CAUTION
High voltage! Do not open.You run
the risk of getting an electric shock.
The machine does not contain any
user-serviceable parts.
Modification of the product could
result in hazardous radiation of
EMC or other unsafe operation.
This set complies with the radio
interference requirements of the
European Union.
Power Supply
Whenever convenient, use the mains supply
cord if you want to conserve battery life.
Make sure you remove the plug from the set
and wall outlet before inserting batteries.
Batteries (not included)
1 Open the battery door and insert 6 batteries,
type R-14, UM-2 or C-cells, (preferably
alkaline) with the correct polarity as indicated
by the "+" and "–" symbols inside the com-
partment (See 1).
2 Replace the battery door, making sure the bat-
teries are firmly and correctly in place.The set is
now ready to operate.
• Incorrect use of batteries can cause electrolyte
leakage and will corrode the compartment or
cause the batteries to burst:
• Do not mix battery types: e.g. alkaline with car-
bon zinc. Only use batteries of the same type
for the set.
• When inserting new batteries, do not try to mix
old batteries with the new ones.
• Remove the batteries if the set is not to be used
for a long time.
Batteries contain chemical substances, so
they should be disposed of properly.
Power Supply General Information
Using AC power
1 Check if the power voltage, as shown on
the type plate located on the rear of
the set, corresponds to your local power
supply. If it does not, consult your dealer or
service center.
2 Connect the supplied switching adapter to
the wall socket and the DC jack on the set.
The set is now ready to use.
3 To switch the set off completely, withdraw the
power cord from the wall socket.
• Install the unit near the AC outlet and where
the power plug can be easily reached.
• Disconnect the power cord from the wall
socket to protect your set during heavy thun-
derstorms.
• AC power cord is used as the disconnect
device. It shall remain readily operable and
should not be obstructed during intended
use. To be completely disconnected the appa-
ratus from supply mains, the power cord of
the apparatus shall be disconnected from the
mains socket outlet completely.
The type plate is located on the
rear of the set.
General information
Antennas
• For FM, extend, incline and turn the telescop-
ic antenna for best reception. Reduce its
length if the signal is too strong.
• For MW, the set uses a built-in antenna.
Direct this antenna for best reception by
turning the whole set.
Connecting earphones
• You can connect headphones to the head-
phone socket.
➜ The loudspeakers will then be switched
off.
DBB sound effect
You can enhance bass by enabling DBB sound
effect.
• To enable or disable DBB sound effect, press
DBB/SET TIME repeatedly.
➜ appears when DBB sound effect is
enabled.
DBB
Basic operation
1 Connect the supplied switching adapter to
the wall outlet and the DC jack on the set
or insert batteries as described in Power
Supply.
➜
The clock information is displayed. (See
2
)
• Press
2
to switch on the set.
• Press
2
again to switch to standby mode.
2 To adjust volume, turn VOLUME +/–.
Helpful hints:
– When there is no power supply for the set,
time information can still be displayed for a
few minutes.
– After a few minutes, appears and flashes
and then time information is cleared.
Resetting to the factory setting
1 Press and hold DBB/SET TIME and
TIMER at the same time when connecting
the set to AC power supply or inserting bat-
teries.
➜ The software version is displayed.
➜ The set enters testing mode.
2 To reset, press POWER.
➜ All icons are displayed on the LCD dis-
play.
. ➜ The set is reset.
Switching on radio
1 Press
2
to switch on the set.
2 Press SOURCE to select FM or MW wave-
band.
➜ Waveband and radio frequency are dis-
played
(see
3
and
4
).
Auto tuning
1 In FM/MW mode, press and hold MEMO-
RY/AUTO SCAN until SCAN appears.
➜ The set scans stations with strong signal
strength and stores them as preset sta-
tions automatically.
2 Press TUNING +/- and hold it for one sec-
ond; the set searches a station automatically.
➜ Sr ch appears.
➜ When a station is received, search stops
and Sr ch disappears.
Helpful hints:
– You can press any button except power to
exit auto search.
Manual tuning
By using this feature, it is possible to manually
tune to a specific channel frequency. In addi-
tion to antenna orienting for better radio
reception, the optimum reception can also be
obtained by using this feature.
1 In FM/MW mode, press TUNING +/- to
tune to stations.
2 Press and hold TUNING +/- to adjust fre-
quency fast.
Basic Operation Radio
Storing preset stations
You can store up to 10 FM stations and 10
MW stations respectively on
PRESET
for
easy access.
1 In FM/MW mode, tune to your desired radio
station (See "Auto tuning" and “Manual tun-
ing”).
2 Press
MEMORY/AUTO SCAN
once, and
then turn
VOLUME +/-
to select preset
numbers.
3 Press
MEMORY/AUTO SCAN
once to
store the preset station.
Helpful hints:
– If you have already saved a FM or MW station
in that preset number, it will be overwritten
by a new station.
– Preset FM stations and MW stations do not
overwrite each other.
Selecting a preset station
1 In FM/MW mode, press
PRESET
repeatedly
until your desired station is displayed.
2 Press and hold
PRESET
to switch between
stations fast.
Setting time
You can only set time in standby mode.
1 Press and hold DBB/SET TIME until hour
digit flashes.
2 Turn VOLUME +/- to set hour.
3 Press DBB/SET TIME once to confirm
➜ The minute digit flashes.
4 Turn VOLUME +/- to set minute.
5 Press DBB/SET TIME once to confirm.
➜ The set exits time setting.
Helpful hints:
– During setting time, if you press any other
button or do not operate for more than 10
seconds, the set automatically exits time set-
ting.
Setting timer
You can only set timer in standby mode.
1 Press and hold TIMER until appears
and hour digit flashes.
2 Turn VOLUME +/- to set hour.
3 Press TIMER once to confirm
➜ Minute digit flashes.
4 Turn VOLUME +/- to set minute.
5 Press TIMER once to confirm.
➜ appears.
➜ Hour digit flashes.
6 Turn VOLUME +/- to set hour.
7 Press TIMER once to confirm.
➜ Minute digit flashes.
8 Turn VOLUME +/- to set minute.
9 Press TIMER once to confirm.
➜ FM or MW flashes.
10 Turn VOLUME +/- to select sound source
for timer.
11 Press TIMER once to confirm.
➜ Volume level digit flashes.
12 Turn VOLUME +/- to set the volume level
for timer.
13 Press TIMER once to confirm and exit
timer setting.
When the set ON time is reached, the set
– jumps to the selected waveband and preset
station if the set is on.
– is switched on the set and jumps to the
selected waveband and preset station if the
set is off.
– flashes for one minute.
When the set OFF time is reached, the set
– does not act if it is off.
– is switched off automatically if it is on.
– flashes for one minute.
OFF
ON
OFF
ON
Radio Clock/Timer
Loading ...
Loading ...
Loading ...