1
Questions or Concerns? (855) 686-3835 • support@etekcity.com
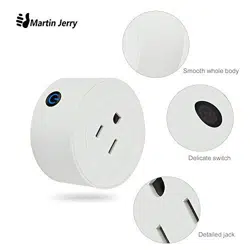
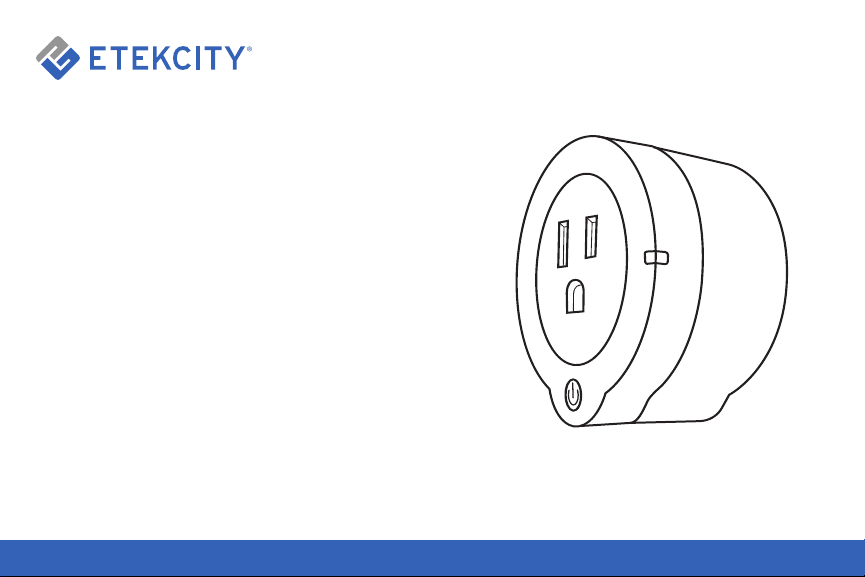
Voltson Smart Wi-Fi Outlet
Model No.: ESW01-USA

2
Thank You.
Thank you for purchasing the Smart Wi-Fi Outlet
by Etekcity. We are dedicated to providing our
customers with quality products to build on better
living. Should you have any questions or concerns
about using your new product, feel free to reach
out to our helpful customer support team by email
at (855) 686-3835 or by email at support@etekcity.
com. We hope you enjoy your new product!

Package Contents
1 x Voltson Smart Wi-Fi Outlet
1 x Quick Start Guide
Table of Contents
Safety Information 3
Function Diagram 4
iOS Set-Up & Configuration 5
Operation 10
Android Set-Up & Configuration 16
Operation 21
Re-configuring a Device 27
Deleting/Sharing a Device, Logging Out 28
Connect with Alexa 29
Specifications 35
Troubleshooting 36
Warranty 37
Customer Support 38

3
Safety Information
IMPORTANT: Please read, understand, and comply
with all of the instructions provided in this manual
before using the device. Failure to comply with the
instructions given in this manual and/or using the
device in ways other than the ones mentioned in
this manual may result in serious injury and/or
damage to the product.
• DO NOT exceed the maximum load current of
10A (approximately 1100W). Always check the
electrical power before use to avoid potential
damage to the device.
• DO NOT use for or near space heaters or air
conditioning units.
• Keep out of reach of children.
• The outlet is for indoor use only. Avoid exposure
to high-temperature sources, direct sunlight and
moisture. The outlet is best used in areas with
good air circulation.
• To avoid short circuiting, keep the outlet out of
direct/indirect contact with water and liquids.
• DO NOT install the outlet in washrooms,
restrooms, and any other damp environments.
• When cleaning, use a dry cloth to wipe the
outlet’s surface.
• The VeSync home automation app is only
compatible with Android 4.0 / iOS 7.0 operating
systems and above.
• The app does not support every phone/tablet.
Only use Android 4.0 / iOS 7.0 or above.
• The outlet does not support 2G/3G/4G networks
for configuration.
• Before configuration, make sure the wireless
network is operating normally in order to avoid
adverse effects on the product operation.
4
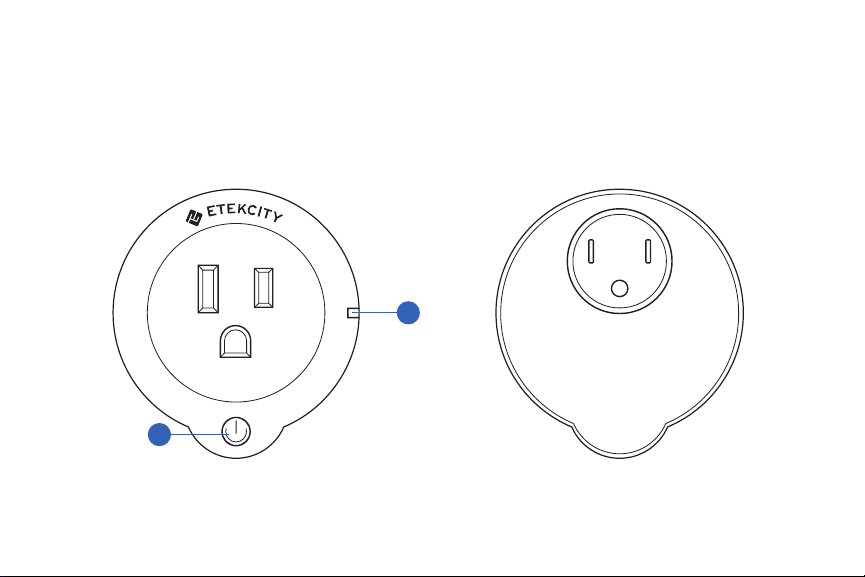
Function Diagram
1. Power Button
2. Indicator Light
1
2
5
Setup
iOS Setup & Configuration
NOTE: Wi-Fi outlet configuration only supports a 2.4GHz Wi-Fi network. If you connect your smartphone/tablet to a 5GHz
Wi-Fi network, please reconnect to 2.4GHz. A 5GHz router supports both 2.4GHz and 5GHz networks at the same time, please
make sure the names of the networks are different, and then connect to the 2.4GHz network.
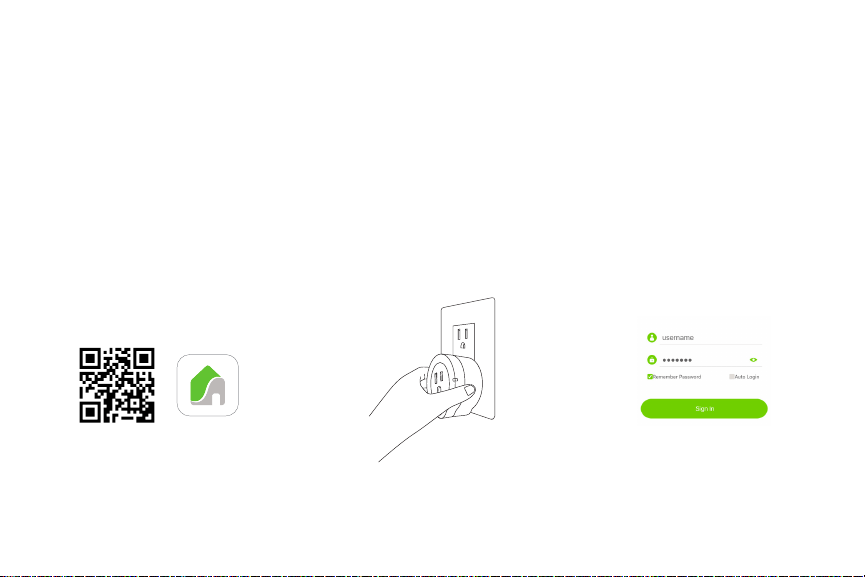
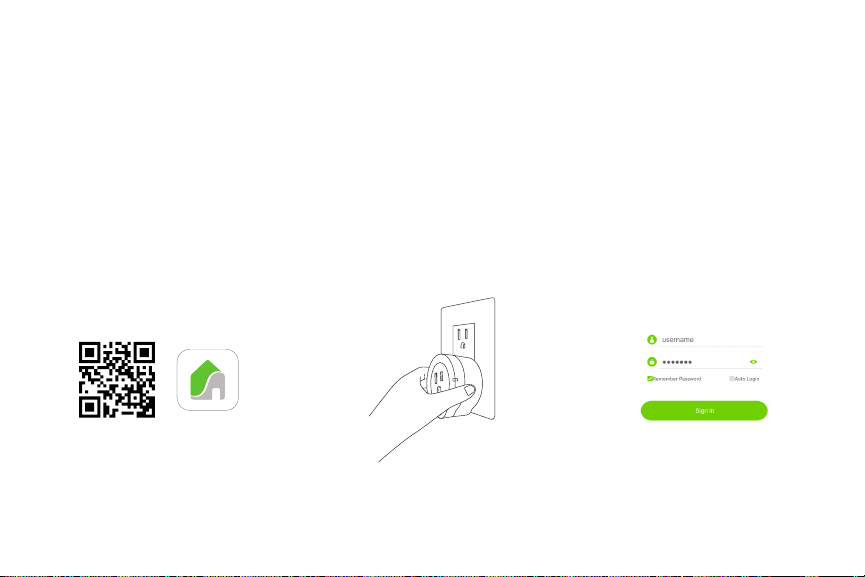
1. Download and install the
VeSync app to your device by
searching “Vesync app” in the
App Store, or by scanning the
QR code below.
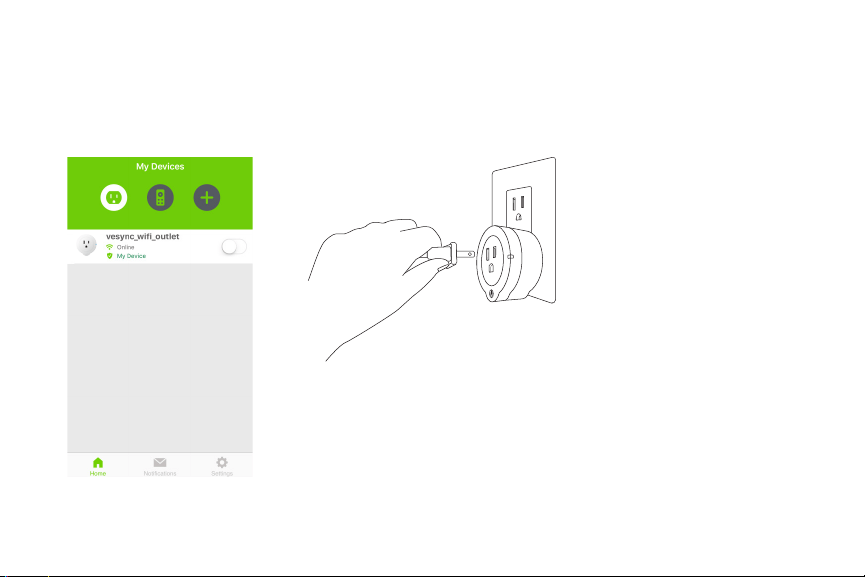
2. Plug the smart outlet into a
powered socket or power strip.
A solid blue light will appear.
NOTE: If a blue light does not appear,
follow the reconfiguration steps on
page 27.
NOTE: Only one account can be
created per device. The outlet
configuration can be shared to other
accounts connected to the same
network once the first account has
been created.
3. Once downloaded, open the
VeSync app. Tap “Sign Up” to
create an account. Enter your
User ID and password and tap
“Sign In”.
App Store
6
Configuration
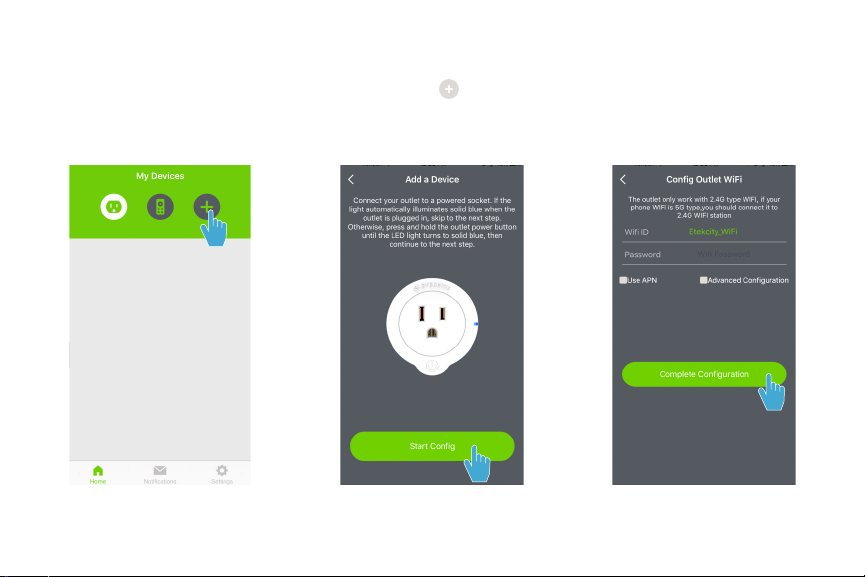
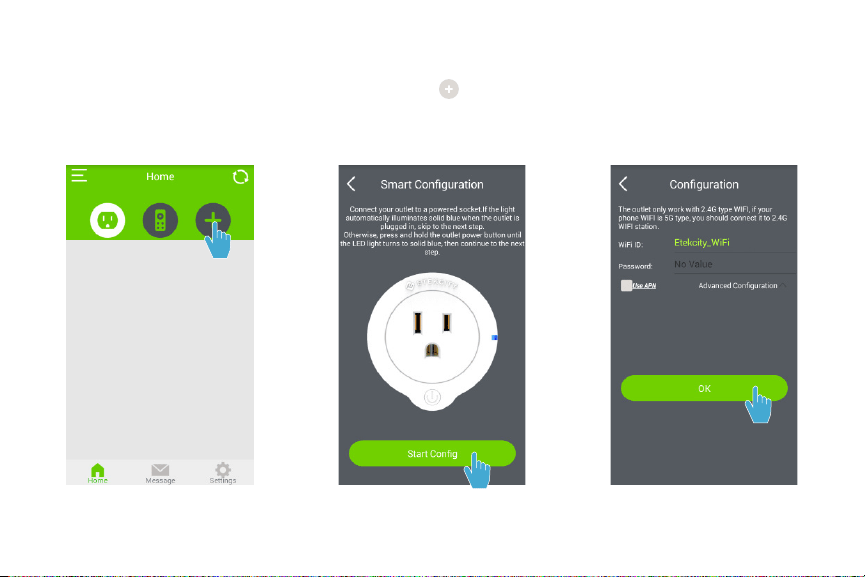
1. To begin configuration for the smart outlet, tap the button on
the top right corner of the home screen, then tap “Start Config”.
2. Input your Wi-Fi network
ID and password and tap
“Complete Configuration”.
7
3. Once configuration is
complete, the outlet will
appear on the app home
screen.
4. Connect the desired appliance
to the smart outlet. Keep
your appliance ON in order to
control it through the VeSync
app.
NOTE: If configuration fails, retry
connection through APN mode. (see
pages 8-9)
8
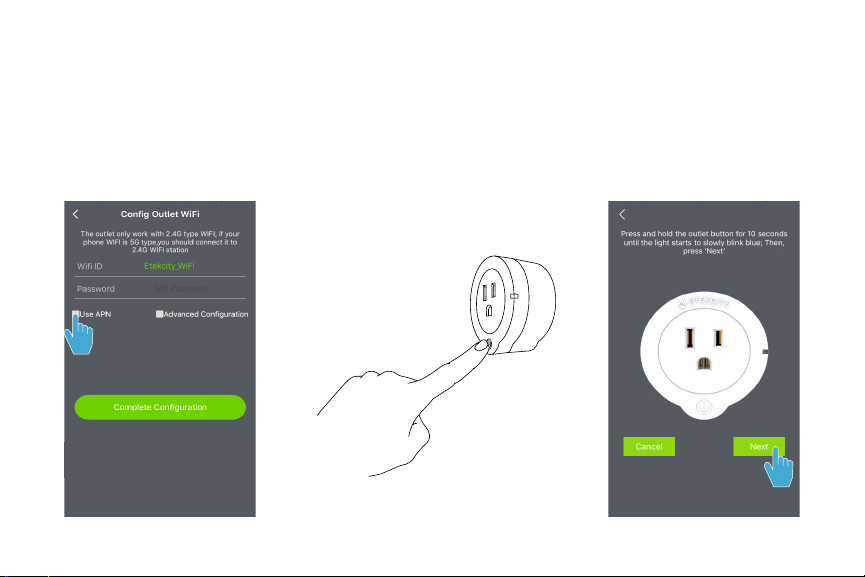
APN Mode
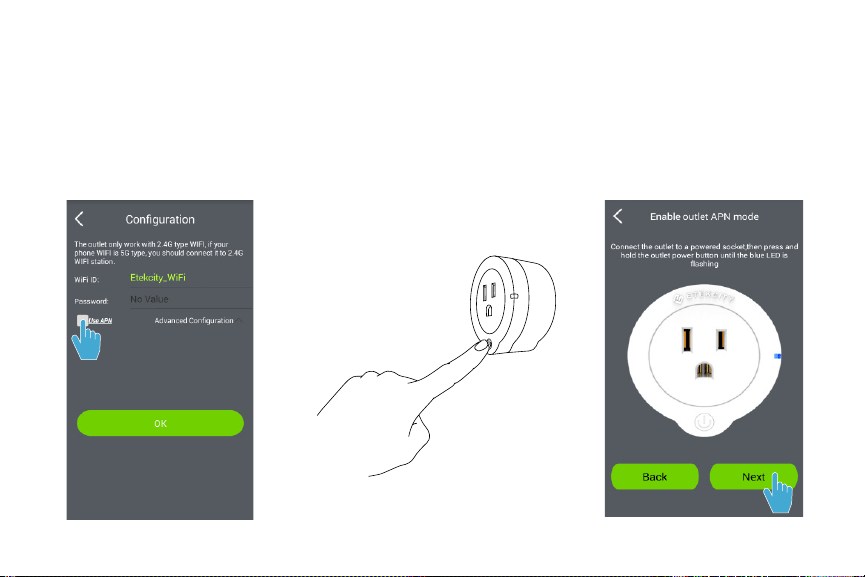
Skip to page 10 if your outlet is already configured.
1. While in the configuration
menu, tap “Use APN”.
2. Press and hold the outlet
power button for about 10
seconds and release when the
LED light starts to slowly blink
blue.
3. Tap “Next”.
9
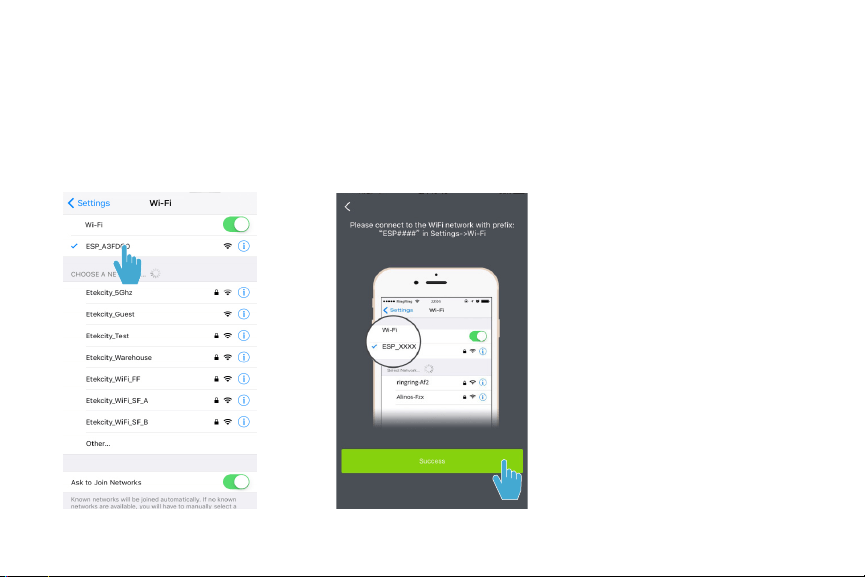
4. Navigate to your list of
available Wi-Fi networks and
connect to “ESP####”. Once
you are connected, return to
the VeSync app.
5. Tap “Success” and input
your Wi-Fi network ID and
password, then tap “Complete
Configuartion”. Once
configuration is complete, the
outlet will appear on the app
home screen.
10
The device is OFF.
The device is ON.
Operation
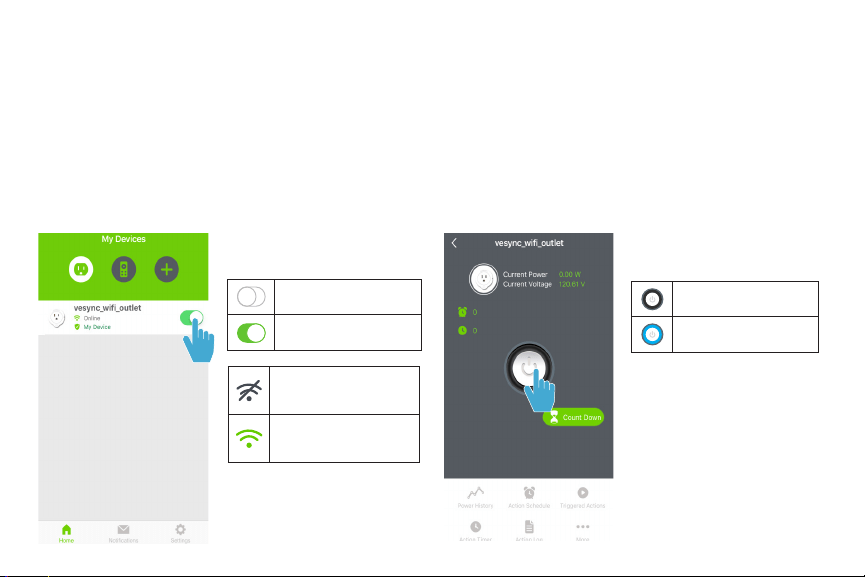
Turning Devices ON/OFF
Method 1
While at the VeSync app home screen, tap the slider
next to the desired outlet to turn it on or off.
Method 2
Tap on the desired outlet to access the outlet
control settings. Tap the power button on the
center of the screen to turn the device on or off.
The device is OFF.
The device is ON.
The device is
offline.
The device is
online.
11
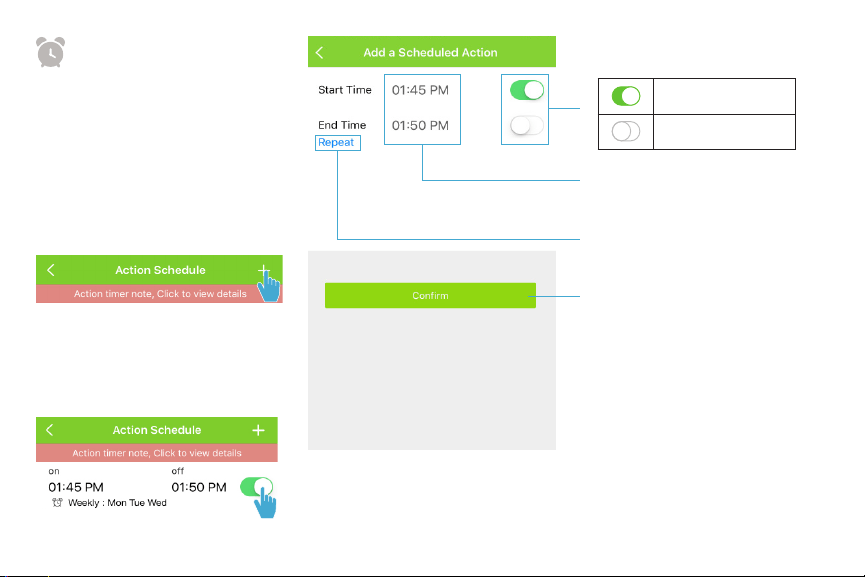
Action Schedule
Action Schedule lets you schedule
and repeat an action such as
turning a device on or off on
desired days and times.
To add a new scheduled action:
Tap the + button on the top right
corner of the screen.
NOTE: While in the Action Schedule
menu, use the activation switches to
quickly turn on or off a saved action
schedule.
Turn device ON.
Turn device OFF.
Tap to set the hours and
minutes of the desired actions.
Tap to select which days to
repeat the action.
Tap to confirm your scheduled
action.
12
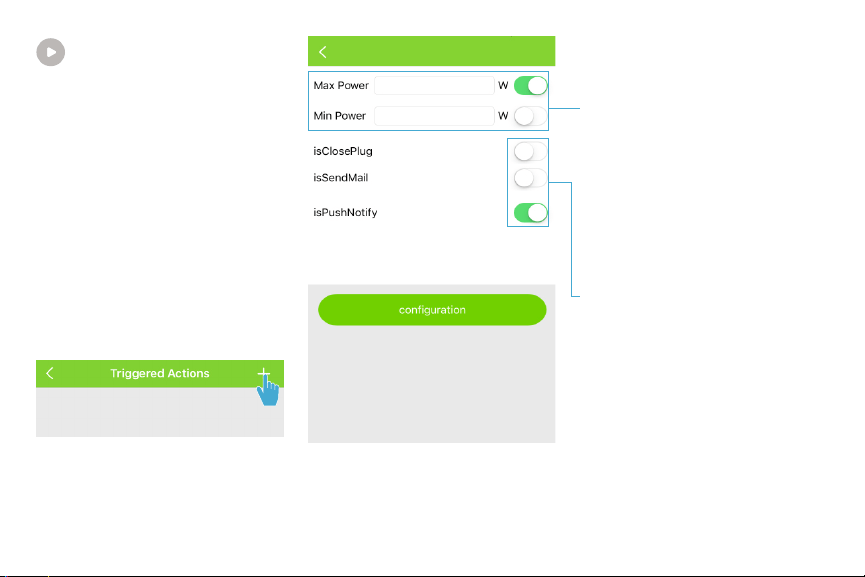
Triggered Actions
You can set a minimum or
maximum power that an outlet
can accommodate and trigger
specific actions, such as switching
off an outlet, receiving an
email, or notification on your
smartphone, when this power
setting is exceeded.
To add a new triggered action:
Tap the + button on the top right
corner of the screen.
To set the maximum or
minimum power (units in W)
of an outlet, tap on the data
field next to Max Power or Min
Power and a numpad pops up
so you can input your desired
power rating. Tap ‘Done’ when
you’ve inputted your desired
power rating and configure
them/turn off configuration by
tapping on the slider button.
To select the triggering actions,
tap on the slider button located
to the right of each triggering
action.
13
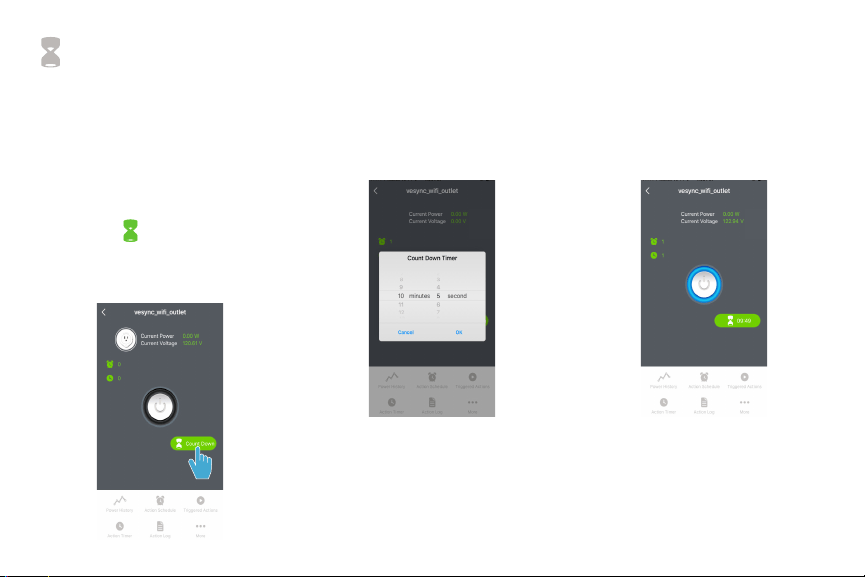
Countdown
To conserve energy, you can
schedule a countdown for an
outlet before it automatically
turns off.
To schedule a countdown:
1. Tap the button on the
main screen and a Countdown
Timer dialog box will pop up.
2. Scroll on the data fields to
set the desired countdown
for your outlet. When
you’re finished setting the
countdown, tap ‘OK’ to
schedule it.
3. Your outlet will automatically
switch off after the countdown
ends.
14
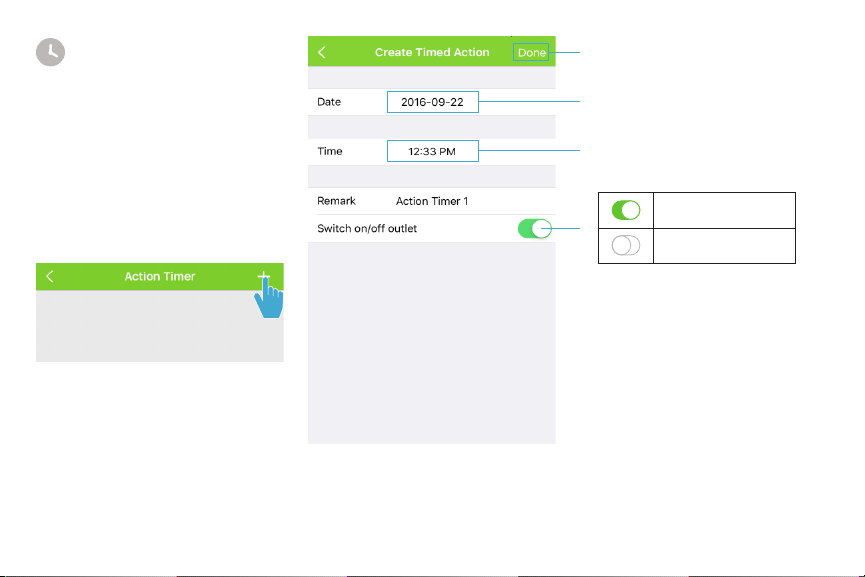
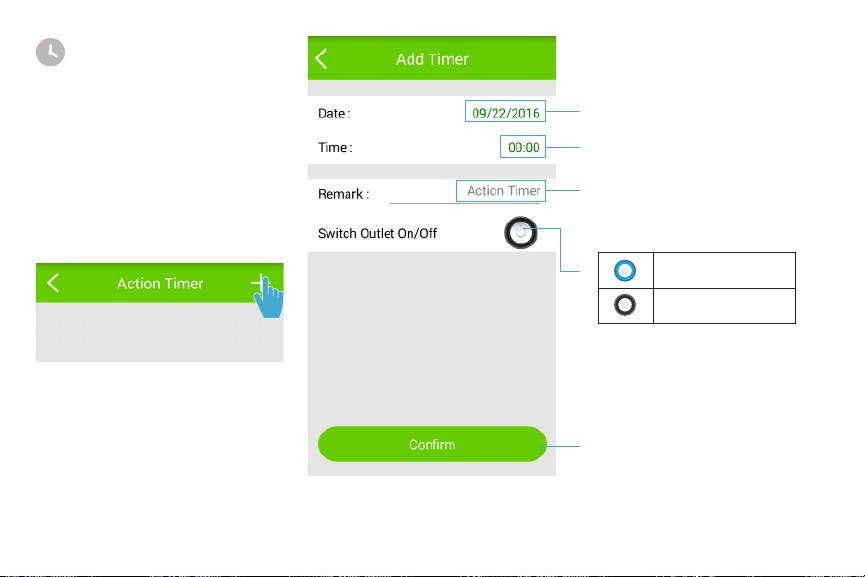
Action Timer
The Action Timer allows you to
switch an outlet on/off on a single
scheduled date and time.
To add a timed action:
Tap the + button on the top right
corner of the screen.
Tap to confirm your timed action.
Tap to set the date of the
desired action.
Tap to set the time of the
desired action.
Turn device ON.
Turn device OFF.
15
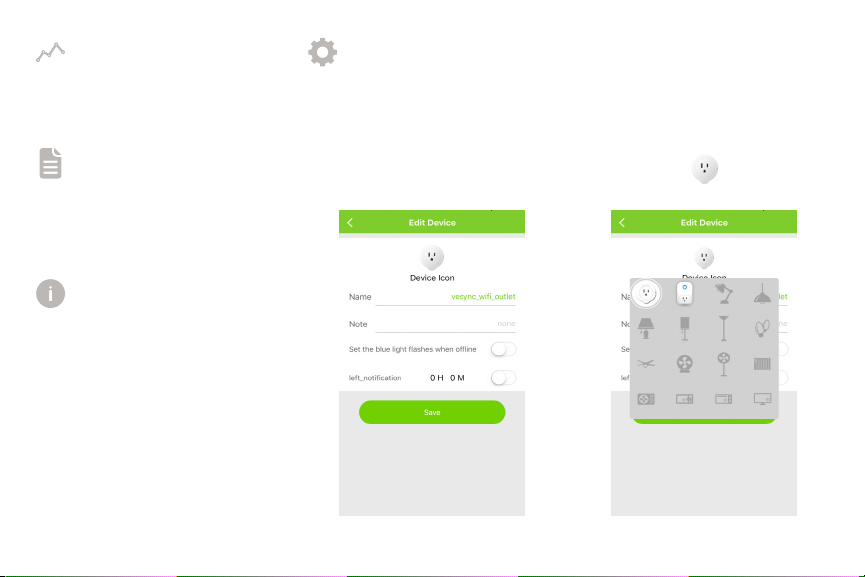
Power History Edit Device
Action Log
Information
Tap “Power History” to view a
device’s power consumption.
To edit the device name and
information, tap “More”, then tap
“Edit Device”.
To change the device icon, tap
the current icon, then select what
device you are controlling.
To see the usage and action
history of a device, tap “Action
Log”.
To download the latest firmware
updates, tap “More”, then tap
“Information”.
Device Icon
Device Icon
16
Setup
Android Setup & Configuration
NOTE: Wi-Fi outlet configuration only supports a 2.4GHz Wi-Fi network. If you connect your smartphone/tablet to a 5GHz
Wi-Fi network, please reconnect to 2.4GHz. A 5GHz router supports both 2.4GHz and 5GHz networks at the same time, please
make sure the names of the networks are different, and then connect to the 2.4GHz network.
1. Download and install the
VeSync app to your device
by searching “Vesync app”
in Google Play Store, or by
scanning the QR code below.
2. Plug the smart outlet into a
powered socket or power strip.
A solid blue light will appear.
NOTE: If a blue light does not appear,
follow the reconfiguration steps on
page 27.
NOTE: Only one account can be
created per device. The outlet
configuration can be shared to other
accounts connected to the same
network once the first account has
been created.
3. Once downloaded, open the
VeSync app. Tap “Sign Up” to
create an account. Enter your
User ID and password and tap
“Sign In”.
Google Play
17
Configuration
1. To begin configuration for the smart outlet, tap the button on
the top right corner of the home screen, then tap “Start Config”.
2. Input your Wi-Fi network ID
and password and tap “OK”.

18
3. Once configuration is
complete, the outlet will
appear on the app home
screen.
4. Connect the desired appliance
to the smart outlet. Keep
your appliance ON in order to
control it through the VeSync
app.
NOTE: If configuration fails, retry
connection through APN mode (see
pages 19-20).
19
APN Mode
Skip to page 21 if your outlet is already configured.
1. While in the configuration
menu, tap “Use APN”.
2. Press and hold the outlet
power button for about 10
seconds and release when the
LED light starts to slowly blink
blue.
3. Tap “Next”.
20
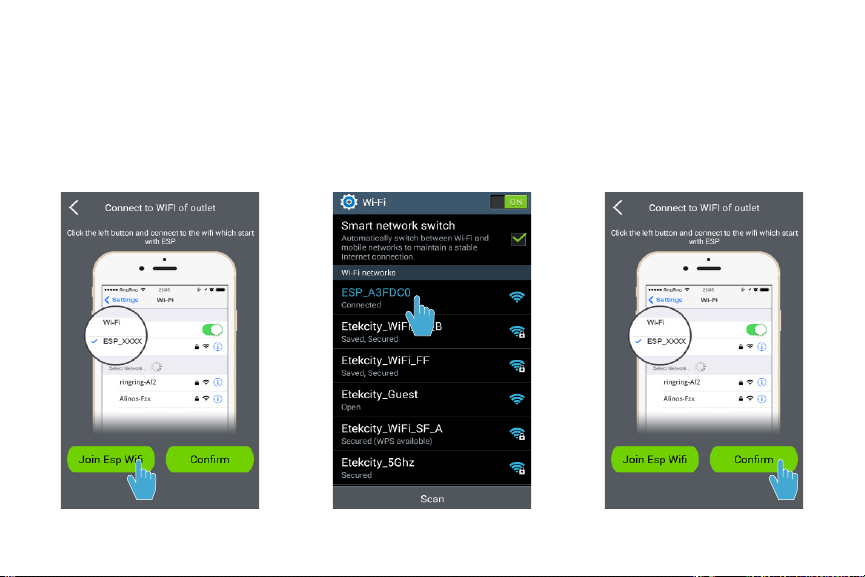
5. In your list of available Wi-Fi
networks, connect to “ESP
XXXXXX”. Once you are
connected, return to the
VeSync app.
6. Tap “Confirm” and input
your Wi-Fi network ID and
password, then tap “OK”.
Once configuration is
complete, the outlet will
appear on the app home
screen.
4. Tap “Join Esp Wifi”.

21
The device is OFF.
The device is ON.
Operation
Turning Devices ON/OFF
Method 1
While at the VeSync app home screen, tap the power
button next to the desired outlet to turn it on or off.
Method 2
Tap on the desired outlet name to access outlet
control settings. Tap the power button on the
center of the screen to turn the device on or off.
The device is OFF.
The device is ON.
The device is
offline.
The device is
online.
22
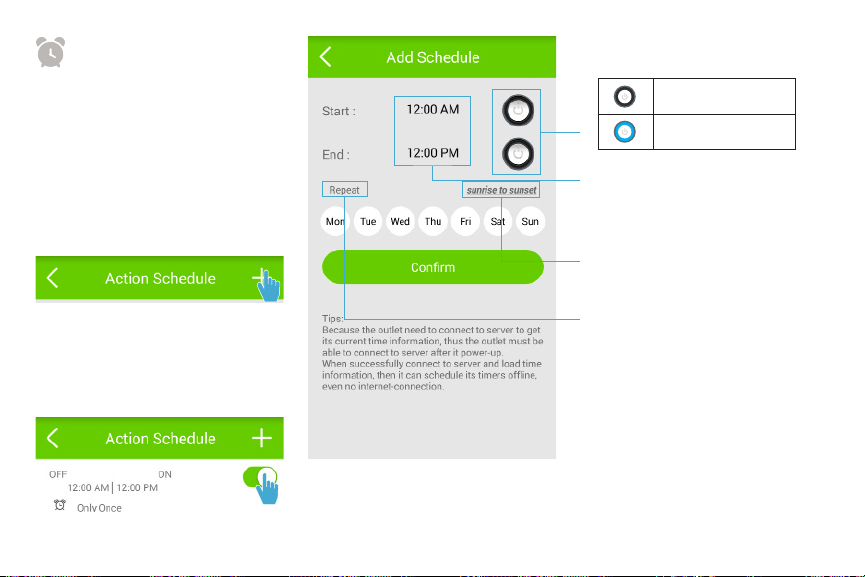
Action Schedule
Action Schedule lets you schedule
and repeat an action such as
turning a device on or off on
desired days and times.
To add a new scheduled action:
Tap the + button on the top right
corner of the screen.
NOTE: While in the Action Schedule
menu, use the activation switches to
quickly turn on or off a saved action
schedule.
Turn device OFF.
Turn device ON.
Tap to set the hours and
minutes of the desired actions.
Repeat action everyday from
sunrise to sunset (05:59AM to
08:06PM).
Select which days to repeat the
action.
23
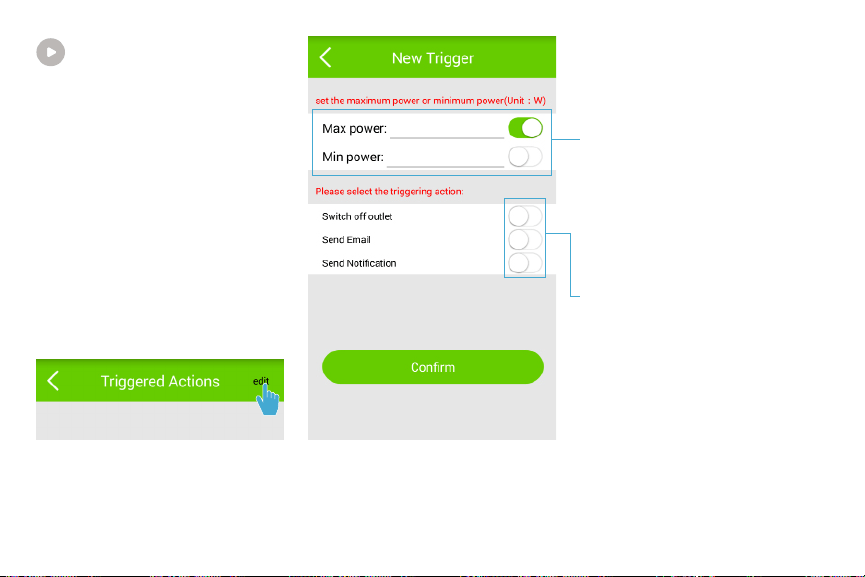
Triggered Actions
You can set a minimum or
maximum power that an outlet
can accommodate and trigger
specific actions, such as switching
off an outlet, receiving an
email, or notification on your
smartphone, when this power
setting is exceeded.
To add a new triggered action:
Tap the “edit” button on the top
right corner of the screen.
To set the maximum or
minimum power (units in W)
of an outlet, tap on the data
field next to Max Power or Min
Power and a numpad pops up
so you can input your desired
power rating. Tap ‘Done’ when
you’ve inputted your desired
power rating and configure
them/turn off configuration by
tapping on the slider button.
To select the triggering actions,
tap on the slider button located
to the right of each triggering
action.
24
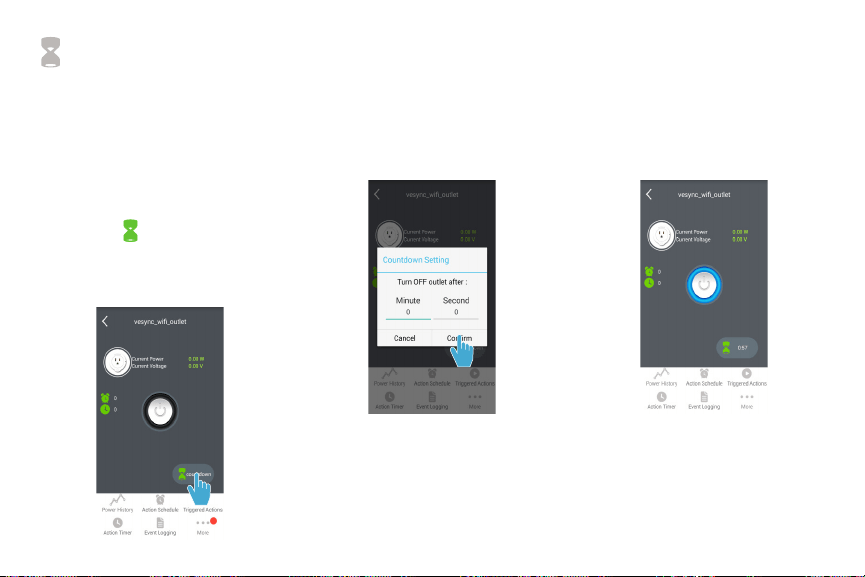
Countdown
To conserve energy, you can
schedule a countdown for an
outlet before it automatically
turns off.
To schedule a countdown:
1. Tap the button on the
main screen and a Countdown
Setting dialog box will pop up.
2. Tap on the Minute and
Second data fields to set the
desired countdown for your
outlet. When you’re finished
setting the countdown, tap on
“Confirm” to schedule it.
3. Your outlet will automatically
switch off after the countdown
ends.
25
Action Timer
The Action Timer allows you to
switch an outlet on/off on a single
scheduled date and time.
To add a timed action:
Tap the + button on the top right
corner of the screen.
Tap to set the date of the
desired action.
Tap to set the time of the
desired action.
Tap to give the timed action a
name.
Tap to confirm your timed
action.
Turn device ON.
Turn device OFF.

26
Power History Device Editor
Event Logging
Device Info
Tap “Power History” to view a
device’s power consumption.
To edit the device name and
information, tap “More”, then tap
“Device Editor”.
To change the device icon, tap
the current icon, then select what
device you are controlling.
To see the usage and action
history of a device, tap “Event
Logging”.
To download the latest firmware
updates, tap “More”, then tap
“Device Info”.
Icon
27
Re-configuring a Device
1. Press and hold the outlet
power button for about 5
seconds and release when the
LED light illuminates with a
solid blue light.
2. Tap the + button on the top
right corner of the screen.
3. Input your Wi-Fi network ID
and password, then tap “OK”
to confirm. Once configuration
is complete, the outlet will
appear on the app home
screen.

28
Deleting a Device Logging Out Share a Device
iOS
To delete a device, swipe the
desired device left, then tap
Delete.
iOS
While in the main menu of the
app, tap Settings on the bottom
right, then tap Logout.
iOS
While in the main menu of the
app, swipe the desired device left,
then tap Share and type in the
account name of the person you
wish to share the device with.
Input another account to share
your device’s controls and
settings.
Android
To delete a device, tap and hold
the desired device icon for 3
seconds, then tap Delete.
Android
While in the main menu of the
app, tap the button on the
upper left-hand corner of the
screen to log out. Alternatively,
you may also tap Settings on the
bottom right, then tap Logout.
Android
While in the main menu of the
app, tap and hold the device that
you wish to share, then tap Share
and type in the account name of
the person you wish to share the
device with.
29
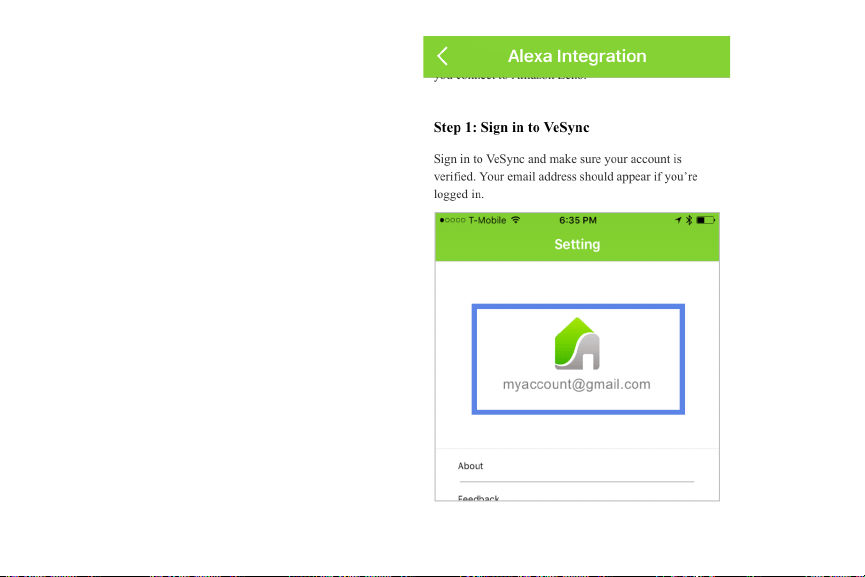
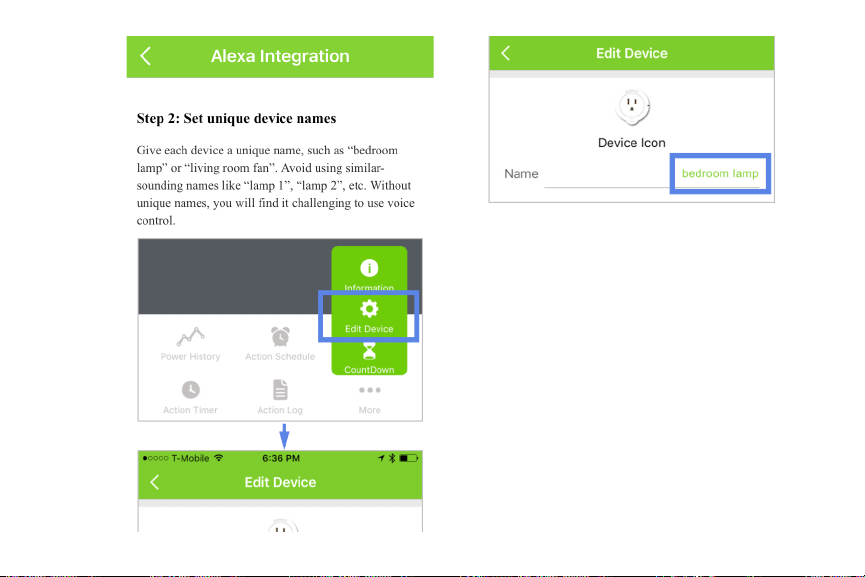
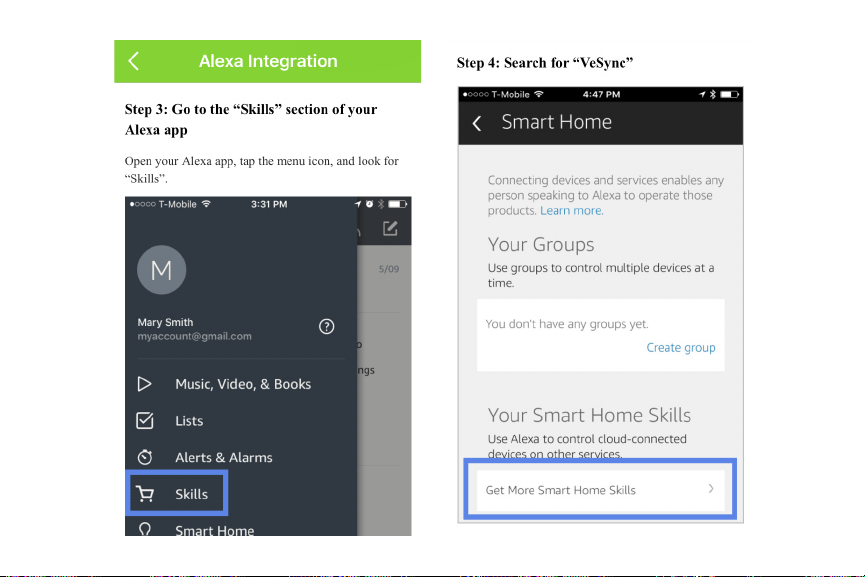
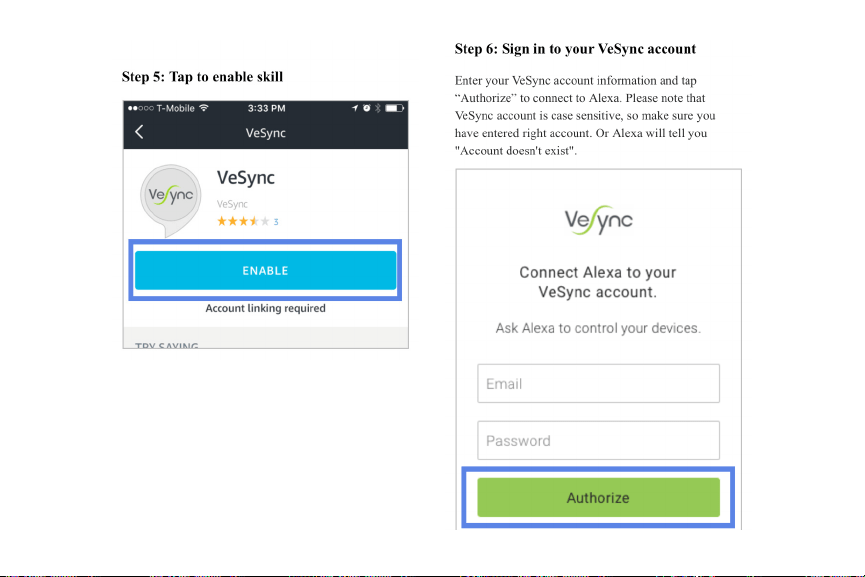
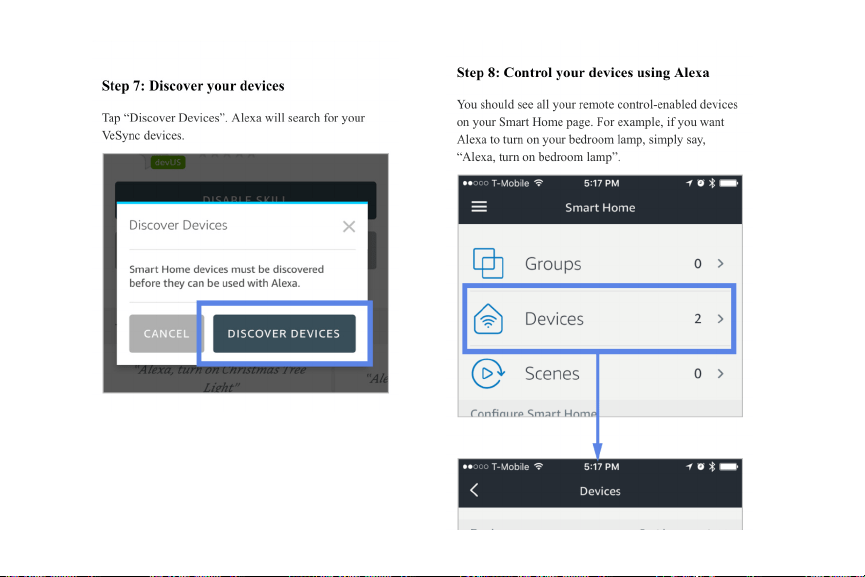
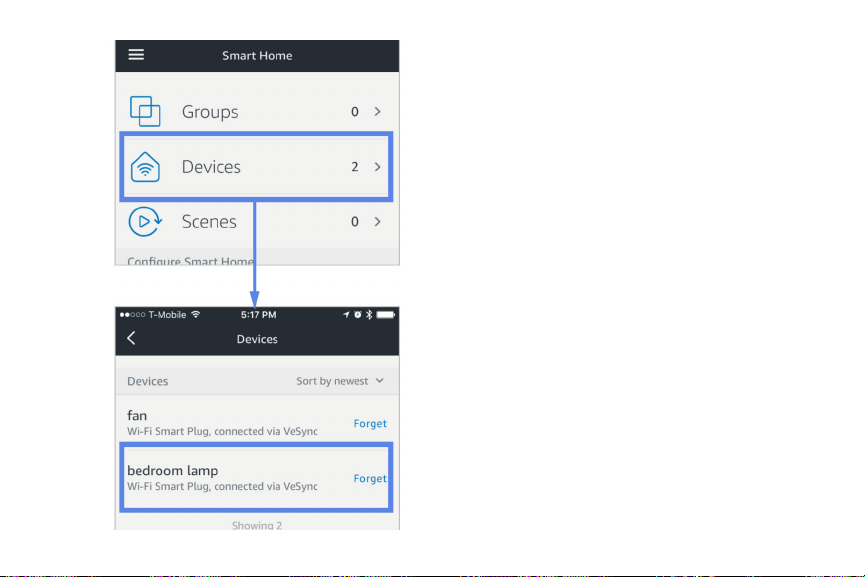
Connect with Alexa
Note: You must create a VeSync account
to connect with Alexa.
To view these instructions in the VeSync
app, tap “More” on the My Devices
page, the tap “Connect with Alexa.”
30
31
32
33
34

35
Specifications
Communication Mode IEEE802.11b/g/n (Wi-Fi)
Communication Frequency 2400 - 2483.5 MHz
Wireless Distance (Outlet to Router) 98 - 164 feet | 30 - 50 meters
(max visible range)
Maximum Switch Current 10A
AC Power Supply Range & Supply Frequency 120V, 50/60Hz
Rf PA Power 25 dBm
Power Consumption 0.7 - 1.2 W
Operating Environment 14°F ~ 104°F | -10°C ~ 40C°
Storage & Transportation Environment -4°F ~ 104°F | -20°C ~ 60C°
Size 102mm x 62mm x 30mm
Compatible Systems Android 4.0 or higher | iOS 7.0 or higher
NOTE: Your outlet Wi-Fi signal range may be shortened or adversely affected by one or more of the following: your Wi-Fi
network operation power rate, the Wi-Fi sensitivity of the receiving device, thick building walls and surrounding electrical
devices.
36
Troubleshooting
Issue Solution
Why won’t my device respond to my
app remote commands?
Ensure that your Wi-Fi network is working normally and that the
outlet is fully and properly plugged in and connected to a device.
Why won’t the power usage data
update in the app even when my
outlet is in use?
Sometimes it takes some time for the power usage data to update.
If you’re using a low power consumption appliance, data may take
longer to transfer.
Why won’t the VeSync app allow me
to add a device?
Follow the re-configuration steps on page 27.
If the device network was set up by another user, have the primary
user “Share” the device to you so you may configure it to your own
smart device.
Make sure your device’s firmware is updated to the latest version.
Make sure the password and account ID you’re inputting are correct.
Try configuration using APN mode.
Remove the outlet from its power supply; wait a few seconds and
plug the outlet back in and re-attempt configuration.
After adding a device, why won’t
the device icon appear on the main
screen of the VeSync app?
Refresh the main menu screen and the device should then normally
appear on the screen.
37
Warranty
Terms & Policy
Etekcity warrants all products to be of the highest quality in material, craftsmanship and service for a
minimum of 1 year effective from the date of purchase. Warranty lengths may vary between product
categories.
Should you encounter any issues or have any questions regarding your new product, feel free to contact our
helpful Customer Support Team. Your satisfaction is ours!
After moving an outlet to another
socket, it’s appearing as offline/the
light is slowly blinking blue. Why is
this happening?
Check to make sure the device isn’t placed too far from the network
wireless router. It must be within a 164 ft (50m) visible range from
the router.
Check to make sure the network hasn’t changed and is functioning
normally.
Reset the outlet by pressing and holding the outlet power button for
20 seconds and releasing when the indicator light begins to flash
quickly. Then, re-configure the outlet with the network.
Please scan here for the full warranty.

38
Customer Support
Should you encounter any issues or have any questions regarding your new product, feel free to contact our
helpful Customer Support Team. Your satisfaction is ours!
Customer Support
Etekcity Corporation
1202 N Miller St. Suite A
Anaheim, CA 92806
Toll-Free: (855) 686-3835
Fax: (657) 202-1693
Local: (657) 500-1872
Email: support@etekcity.com
Support Hours
Monday - Friday:
9:00 am - 5:00 pm PST
*Please have your order number ready before
contacting customer support.

Connect with us @Etekcity.
Scan here to join the community!
Visit us at www.etekcity.com
Building on better living.