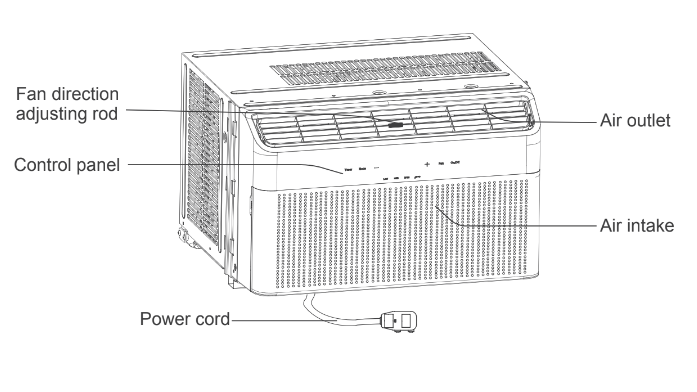
Parts
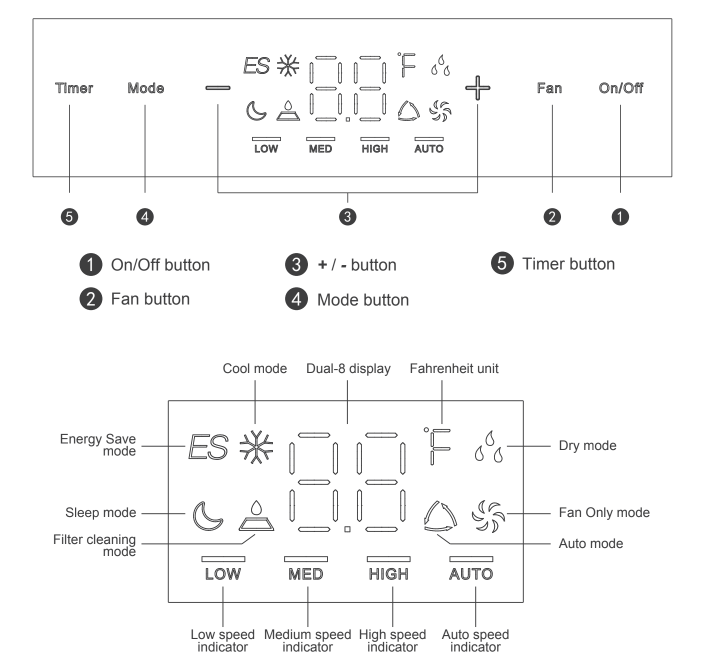
Control Panel
NOTICE: “  ” when fan has operated for 250h accumulatively, filter cleaning icon is on to remind user for cleaning filter; when filter cleaning icon is on (fan has operated for 250h accumulatively), Press and hold “Time” button and “-” button simultaneously for 3s to clear accumulative operation time of filter and then filter cleaning icon is off.
1. ON/OFF Button
Press to power the air conditioner ON or OFF. When turning the unit on via the control panel, the unit will operate in Energy Saving mode until you change the operating mode using the Mode button.
2. Fan Button
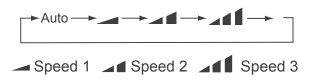
Pressing this button will cycle the fan speed through one of 4 fan modes, as shown
below:

3. +/- Button
- Pressing this button will allow you to change the temperature setting. Holding either button will increase or decrease automatically. It will take 3 seconds for the temperature settings to be confirmed by the machine.
- After pressing the timer button, the +/- buttons will adjust the timer setting from 05.-24 hours in 0.5-hour increments. After the 10-hour mark, the +/- button will adjust the timer setting in 1-hour increments. It will take 5 seconds for the timer settings to be confirmed by the machine.
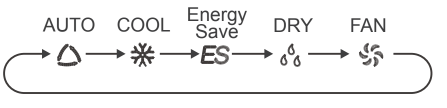
4. Mode Button
Pressing this button will cycle through one of the 5 function modes, as shown below:
5. Timer Button
When the unit is running, press this button to schedule when the unit will power off by using the +/- button to adjust the length of time before powering off. When the unit is not running, press this button to schedule when the unit will power on by using the +/- button to adjust the length of time before powering on.
Remote Control
This is a universal remote control for a variety of models. If your model does not have a function listed on the remote control, there will be no changes in the operation of your unit. The max range of the remote control is approx. 25 feet with no obstacles or interference from other devices, such as wireless phones or fluorescent lamps.

1. ON/OFF Button
Press to power the air conditioner ON or OFF. The unit will start in Energy Saving mode after first being powered on. When the unit is powered off the set temperature will be saved until the unit is powered back on. In the event of a power outage, the unit will return to the last saved settings before the unit lost power.
2. Mode Button
Press this button to cycle through the five operating modes. A corresponding logo indicator on the left side of the remote will be shown.

- Auto mode: the air conditioner will operate according to ex-factory setting. The set temperature cannot be adjusted.
- Cool mode: standard cooling mode. The set temperature and fan speed can both be adjusted.
- Energy Saving mode: an automatic mode to save on energy costs. The set temperature cannot be adjusted. The fan speed can be adjusted.
- Dry mode: the unit will run on low speed for dehumidification. The fan speed cannot be adjusted.
- Fan Only mode: the air conditioner will not produce cool air, only blow air from the outside. The fan speed can be adjusted, but you cannot use the “Auto” fan speed setting.
3. +/- Button
- Pressing the “+” or “-” button will increase/decrease the set temperature by 1°F. Release the button once your desired temperature is reached.
- After pressing the Timer button, each press of the +/- button will increase/decrease the time by 0.5 hours. Release the button once your desired time setting has been reached.
4. Swing Button
Press this button to turn the swing feature on or off. When on, the air flow will swing back and forth vertically.
Note: Swing button is not available for this model.
5. Fan Button
Press this button to cycle through the Auto mode and 3 fan speeds (Low, Medium, High)
6. Sleep Button
Press this button to enter the sleep operation mode. While in sleep mode, you can only use the Cool, Energy Saving, or Dry modes. When in sleep mode, the AC temperature will automatically increase by 2°F per hour up to 86°F.
7. Timer Button
When the unit is running, press this button to schedule when the unit will power off by using the +/- button to adjust the length of time before powering off. When the unit is not running, press this button to schedule when the unit will power on by using the button to adjust the length of time before powering on. Press the timer button a second time to confirm the timer setting. If you have confirmed a time setting, you can press this button again to cancel the timer mode.
8. "I Feel” Button
Pressing this button will use a sensor located in the remote control to determine the temperature setting of your air conditioner. The remote controller will send a temperature update to the air conditioner every 10 minutes for better accuracy in your room. If the air conditioner does not receive an update from the remote control after 11 minutes, it will revert to using a sensor on the air conditioner itself to adjust the temperature settings. In the case of a power outage, this setting will not be saved.
You will need to manually reset the I Feel mode after a power outage.
9. Light Button
Press this button to turn off the lights on the display panel of your air conditioner.
Press the button again to turn the light back on.
Notice: Change Between °F and °C
With the remote powered off, press the Mode and “-“ buttons simultaneously to switch between Fahrenheit and Celsius displays.
Replacing the Batteries
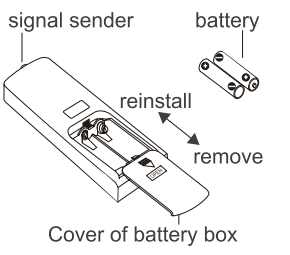
- Press the back side of the remote control battery cover and slide out following the engraved arrow.
- Replace with two new AAA (1.5V) batteries of the same make and model. Make sure the polarities (+ & -) are aligned correctly.
- Reinstall the battery cover box.
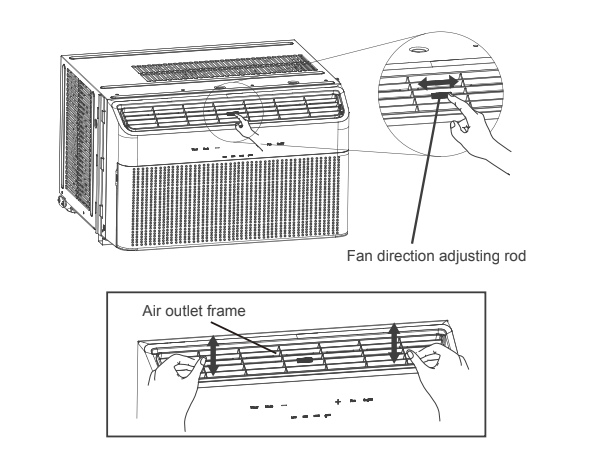
Changing the Wind Direction
Move the adjusting rod with your fingers to change the wind direction from left to right.
Move the adjusting air outlet frame to change the window direction from up to down.
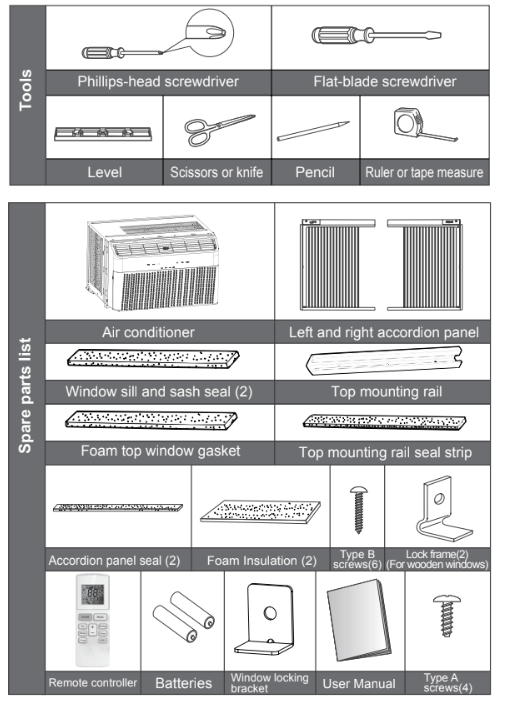
Installation
Tools Required
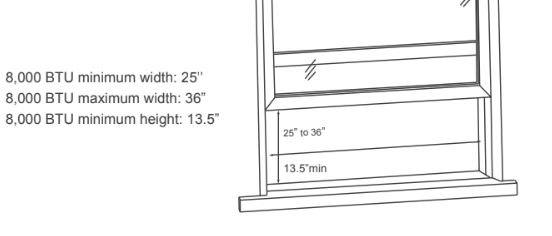
Window Requirements
The instructions outlined below are for standard, vertical-sliding windows. If you have a different window type (e.g. horizontal-sliding window) you may need to choose a different window or use a different installation procedure.
If you are installing this air conditioner in a smaller window, you may not need the accordion subassembly. Please refer to the window size requirements for more details.
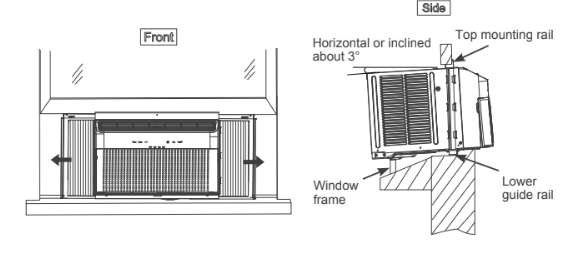
In some cases, you may need to put a small wooden block under the air conditioner to ensure that the unit is not tilting towards the inside of your home. If the unit is tilted towards the inside of your home, water may drain into your home and damage the window frame, wall, or flooring. A slight angle of 5° is all it takes to ensure that water does not drain into your home.
Installation Procedure
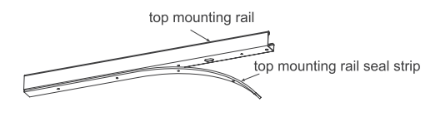
Step 1: Install the top mounting rail
1. Remove the adhesive from the top mounting rail seal strip. Align strip to the four (4) holes and stick to the side of the mounting rail which attaches to your air conditioner.
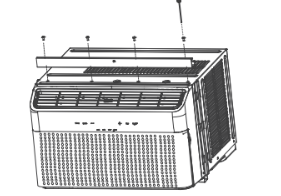
2. Use four (4) included Type A screws to fix the top mounting rail to the outer case of the air conditioner. The flat edge with a single hole in the middle should be closest to you.
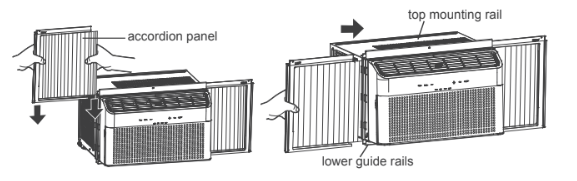
Step 2: Install accordion panels
1. Remove the accordion panel seal from the paper backing. With the LEFT and RIGHT text visible, apply the panel seal as shown in the figure below.
2. With the LEFT and RIGHT text facing towards you, pull the accordion panel towards the unit. Align the end of the accordion panel with plastic groove on the unit and slide to bottom. Slide the plastic framing of the accordion panel into the top mounting rail and the lower guide rail.
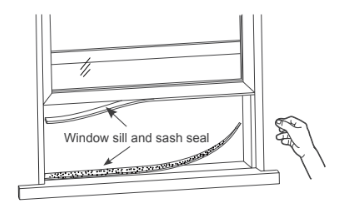
Step 3: Attach the window sill seal and sash seals
1. Cut the window sill and sash seal strips to proper length. Tear off the paper backing and stick to the lowest part of the window sill. Repeat for the top of sliding window.
Step 4: Install the air conditioner unit
1. With two people, align the lower guide rail to the edge of the window sill. After placing, close the window so that the top mounting rail is aligned with the inside edge of the window.
2. Unfold the accordion panels from both sides. Use five (5) included Type B screws to fix the frame of the accordion panel to the window frame and window sill. There are three (3) pre-drilled holes on the top. Use the two (2) included frame locking brackets to secure the bottom of the accordion panel to the window sill.

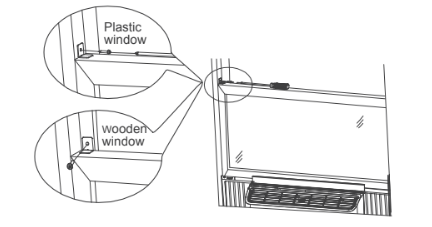
Step 5: Install the window locking bracket
1. To keep the unit from falling out the window, secure the window locking bracket once the window is resting against the top mounting rail.
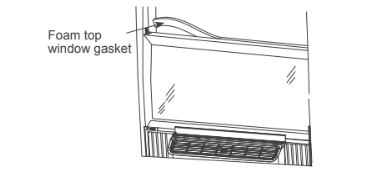
Step 6: Plug the gap of the top window with foam
1. Cut foam top window gasket to the proper length. Use this to plug the gap between the windows to prevent rain or insects from getting into the room.
Adding Foam to Accordion Panels
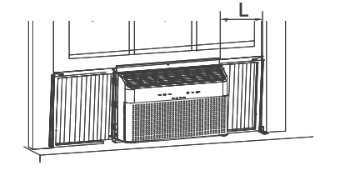
1. After completing installation of your unit, measure the length between the air conditioner and the edge of the window frame.
2. Cut the included foam insulation to length.
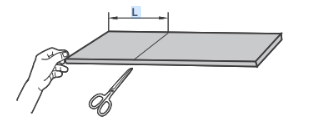
3. Place the foam insulation along the accordion panel. If there is any excess foam, it can be tucked into the frame or trimmed off with scissors.

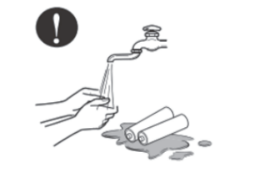
Proposition 65 Notice
California Safe Drinking Water and Toxic Enforcement Act of 1986 requires us to notify customers that this product contains chemicals known to the State of California to cause cancer and birth defects or other reproductive harm. Please wash your hands after finishing installation of this product.
Cleaning
To avoid electric shock, turn off the air conditioner and disconnect from power before cleaning. Do not wash or douse the air conditioner with water. Do not use volatile liquids to clean the air conditioner.
Cleaning the filter
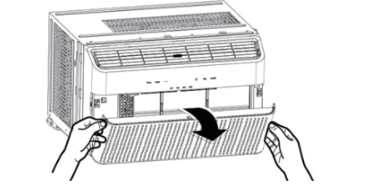
1. Open the front panel
Locate the groove on either side of the front panel and pull towards you as shown in the figure on the right. Some force may be required.
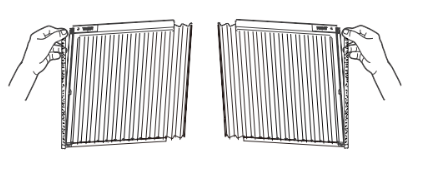
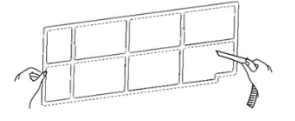
2. Remove the filter
Locate the filter and remove from the air conditioner. You may need to move the filter around to loosen.
3. Clean the filter
After removing, use the dust attachment of your vacuum or warm water mixed with a mild detergent.
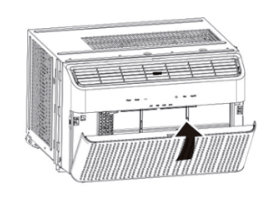
4. Reinstall the filter
After the filter has dried completely, reinstall back into the air conditioner.
Notes:
- Clean the filter every three months, or once the filter indicator light illuminates on your air conditioner
- Do not touch the metal fins in the air conditioner after removing the filter, as they may cause personal injury
- Do not attempt to dry the filter with hair dryer or other heating element as this may deform or ignite the filter.
- Do not operate the air conditioner if the air filter is missing
Cleaning the display panel
If the surface of the panel is dirty, please wipe with a soft cloth soaked in warm water and a mild detergent. Do not remove the plastic panel to clean.
Cleaning the outer case
We recommend that you check the outer case of the air conditioner once or twice per year to look for rust or other damage. In order to reduce damage and prevent rust during the off-month, you can cover the air conditioner with plastic or other protective covering.
Maintenance Checklists
Pre-Season Maintenance Checklist
- Check the power cord for any cuts or exposed wiring
- Check the ground prong is still on your power plug
- Clean the air filter
- Check the outer air grille for damage
Post-Season Maintenance Checklist
- Disconnect unit from power outlet
- Clean air filter and exterior case
- If keeping in window during winter, wrap with protective cover
Long-Term Storage Checklist
- Disconnect unit from power outlet
- Clean air filter and exterior case
- Wrap and/or cover the unit to prevent the accumulation of dust within the unit
Troubleshooting
Air conditioner is not operating. Controls cannot be set
- Not a high enough voltage supplied from your wall power outlet
- Power plug is loose or in TEST mode
Temperature cannot be changed
- The temperature cannot be adjusted while in auto mode
- You are trying to exceed the temperature range of 61-86°F
Noise suddenly rises during operation.
- Might be some interference from storm or radio
- Compressor has just powered on
- Unit is not firmly placed in your window
Room temperature does not drop
- Air filter is dirty
- Close doors and windows in the room
When first operating, the air emitted has a strange odor
- This is normal when the unit just starts operation. Give it some time and the smell will disappear
Air conditioner is giving off some weird noises
- Normal sounds from the refrigerant flowing inside the air conditioner
- Panel may have shrunk/expanded due to the temperate changing rapidly
Air conditioner cannot receive signal from the remote control
- Out of the 25 foot range
- Interference from radio, fluorescent lamp, or other source
- Batteries are low in remote controller
Malfunction Codes
Code F1/F2/F4
- Temperature sensor
- Compressor stops operation, but the fan continues to operate
Code E2
- Antifreeze Protection
- In Cool, Energy- Saving, or Dry modes: the compressor stops operating but fan continues to run
Code E8
- Overload Malfunction
- Indoor fan operates while compressor, outdoor fan, and water condensation tray stop operation.
Code H3
- System Overload Protection
- Compressor stops operation, but the fan continues to operate
Code F0
- Refrigerant Lacking Protection
- Compressor stops operation, but the fan continues to operate
⇒ Solution: Remove from power source for a few minutes to reset the unit. Plug the unit back in to determine if the Malfunction Code is still present.
If that doesn’t work, contact TOSOT support via email at wb support tosotdirect