Read all instructions carefully to avoid any damage or issues with the washing machine and to clothes. ALWAYS follow instructions on fabric care labels on clothing articles for proper care.
WARNING: DO NOT leave items to be washed in the washing machine for long periods of time. Items left in the machine may get moldy and get spots. Clothes may also become discolored if they are not washed according to the stated washing temperature and instructions.
SELECTING DETERGENT
• Low foaming powdered detergent is recommended for use with the washing machine.
• Some detergents may not completely dissolve if there is too much detergent or if the water temperature is too low.
• Bleach can damage clothes. Use bleach with caution and follow detergent and clothing article care instructions.
Washing method is based on weight of clothes, soil level, local water hardness as well as the recommendations from the detergent manufacturers.
NOTE: DO NOT place or store laundry products, such as detergent, bleach, or liquid fabric softener, on top of your washer/dryer combo unit. Wipe up any spills immediately. These products can damage the finish and controls. Keep all laundry products in a safe, dry space out of reach of children.
SEPARATE CLOTHES TO BE WASHED
Classify clothes to be washed into cottons, blended fibers, synthetic fibers, silks, wools, etc. Light and dark clothes should also be separated.
NOTE: New, colored fabrics should be washed separately.
• Accessories: Loose accessories on some clothes may become damaged and/or damage the washing machine. Clothes that contain buttons or embroideries should be turned inside-out before being washed.
• Fasteners: Zippers must be closed and buttons or hooks must be firmly affixed. Any loose bands or ribbons should be tied together before being washed.
• Water-proof materials: It is not recommended to wash water-proof fabrics as they may become damaged and/or cause damage to the washing machine and other items being washed.
REMOVE ALL LOOSE OBJECTS FROM CLOTHES
Check all pockets/compartments of clothes to be washed and remove any loose items such as coins. Loose items may damage the washing machine.
BALANCING THE LOAD
Washing large, heavy garments, such as towels, jeans, jackets etc., may cause an unbalanced load. It is suggested to add one or two more items to balance the load to allow smooth and complete draining
OPERATING INSTURCTIONS
CONTROL PANEL (FOR MCSCWD27W5 ONLY)
a. On/Off: Press [On/Off] to turn the unit ON. Press the button again to turn the unit OFF.
b. Start/Pause: Press [Start/Pause] to start a wash cycle. Press [Start/Pause] again to pause the cycle when the washer is running. Press [Start/Pause] once more to resume. To add a garment after the wash cycle has started, push this button for 3 seconds before the drum has filled with water. This can only be done in the beginning of the cycle before the water reached the bottom of the door. Wait for the drum to stop and the door to unlock, then add item(s). Close door and press [Start/Pause] to continue washing.
c. Wash Cycles
1. My Cycle: Select this option to save a commonly used washing program as a preset.
• To program, select the settings you wish to use, and then press and hold [Spin] for 3 seconds to save.
2. Quick Wash: Select this option to wash small loads of clothing that are not very dirty quickly.
3. Delicates: Select this option for delicate fabrics such as dress shirts, nylons, etc.
• Wash cycle operates at a lower temperature.
4. Wool: Only use this option to wash wool clothing articles labeled “Machine Washable”.
• Proper detergent and water temperature must be selected for wool textiles.
• Lower spin speed and less agitation
5. Baby Wear: For washing infant clothing
6. Sanitary: Uses hot water to allow enzymes in detergent to work more efficiently for hard to clean or heavily soiled items.
7. Normal/Cotton: Select this option for regularly used cottons and fabrics.
• Extended wash cycle with stronger intensity
• Recommended fabrics: cotton, linens, bed sheets, t-shirts, towels, jeans, etc.
• Dry cycle can be added.
8. Perm Press: Moderate strength wash cycle. Used to reduce wrinkles in clothes from washing.
9. Heavy Duty: Select this option for washing heavy clothing.
• Dry cycle can be added.
10. Bulky/Large: Select this option for bulky/large items.
• Extended wash cycle
11. Sports Wear: Select this option for sportswear.
• Wash cycle cleans heavily soiled clothes.
12. Spin Only: Select this option to spin a load separately from a regular wash cycle.
• Soap water or rinse water must be drained before spinning.
13. Rinse & Spin: Select this option to rinse and spin a load separately from a regular wash cycle.
• This can be helpful in preventing fresh stains from setting in fabrics.
14. Tub Clean: Select this option to clean the wash tub. This program uses high temperatures to sterilize the tub while removing built up detergent and residues. Add bleach for a better clean. This program should be used at least once a month with regular use. DO NOT add any clothes or wash items for this program.
d. Dry Cycles
• Auto Dry: Select this option to have dry cycle automatically set based on the load. Auto Dry program has a 12 minute spin cycle and 45 minute cool air cycle. It is recommended to dry in multiple, smaller loads to allow for better for performance.
• Timed Dry: Select this option to set dry cycle time manually. Timed Dry programs include a 12 minute spin and 25 minute cool period. It is recommended to dry in multiple, smaller loads to allow for better for performance
For Wash only, unit can be filled to the Max. Washing Capacity, however, load sizes less than the Max. Wash Capacity can improve performance and efficiency.
For Wash cycles plus Dry cycles or Dry only cycles, unit should not be filled over the Max. Dry Capacity to allow the dry function to work effectively. Load sizes less than the maximum capacity will improve the drying performance of the combo unit.
DO NOT cut off water supply or remove hose attachments during dry cycle. This is a ventless unit that releases moisture during dry cycles. The dryer is equipped with a door-locking safety feature to ensure safe temperatures and avoid burns and other safety hazards. The door will remain LOCKED during dry cycle until the unit reaches a safe temperature. After a safe temperature is reached, the door should open and function normally.
e. Time Save: Press [Time Save] to decrease the washing time.
• See Wash Cycle Parameters Table for programs that can use Time Save.
f. Delay: Press [Delay] to set a delay time for the wash to begin.
• The delay start light will flash to indicate the delay time. You can delay the start time of the cycle from 1 - 24 hours.
• Set Wash program, Press Delay to set the number of hours to delay wash cycle, then push Start/Pause.
• To cancel the delay time, press Delay button until time shows 0H.
g. Temp.: Press [Temp.] to set your desired washing temperature.
• Press button to set desired wash temp (Hot+, Hot, Warm, Eco, Cold) h
h. Spin: Press [Spin] to increase spin speed.
• Washer drum spins at a speed up to 1300 RPM which reduces drying time and saves energy.
• Press the button until desired speed is lit (No Spin, Low, Med, High, Highest).
• Some fabrics (i.e. delicates) require a slower spin speed.
• High spin speeds are not available on all cycles.
i. Soil: Press [Soil] to increase time for heavier soiled items.
• There are three (3) soil levels options.
• Each bar increases the base wash time by 15 minutes.
j. Dry Level: Press the Dry button continuously to choose the dry level: Extra Dry/Normal Dry/Gentle Dry.
k. Child Lock: Press [Delay] and [Temp] at the same time for 3 seconds to Unlock/Lock the control panel. • On/Off Button will still function.
l. Extra Rinse: Press the [Temp.] and [Spin] button at the same time to add an extra rinse to the selected cycle.
m. My Cycle: After a wash cycle is modified, hold down [Spin] to save your settings.
• You can quickly choose this cycle for your next wash by turning the dial to My Cycle.
• Override saved settings by holding the [Spin] button down again after a different cycle and options are selected.
n. Sound: Press the [Soil] button for 3 seconds to turn the sound on or off.
DISPLAY (FOR MCSCWD27W5 ONLY)
a. Cycle Indicator: Indicates stage of wash/dry cycle.
• : Prewash
• : Wash
• : Rinse
• : Spin
• : Time Save
• : Extra Rinse
• : Dry
b. Clock: Indicates time left until the end of wash/dry cycle.
c. Feature Indicator: Indicates features that are active.
• Sound: Indicates that sounds are on. When unlit, unit is muted.
• Door Lock: Machine is locked for duration of cycle.
• Child Lock: Child lock is on.
• Add a Garment
d. Water Temperature: Indicates the selected temperature.
e. Spin Speed: Indicates the selected spin speed.
f. Soil Level Indicator: Indicates the selected soil level.
g. Dry Level: Indicated the selected dry level.
• Extra Dry
• Normal Dry
• Gentle Dry
WASH CYCLE PARAMETERS
WASH CYCLE PARAMETERS (FOR MCSCWD27W5 ONLY)
NOTE: Maximum drying load size is smaller than wash load size.
NOTE: is Optional Function.
NOTE: is Dry function.
CARE AND MAINTENANCE
Before doing any maintenance, be sure to remove the power plug from the outlet and close the tap.
CLEANING AND MAINTENANCE OF WASHING MACHINE CABINET
Proper maintenance on the washing machine can extend its working life. The surface can be cleaned with diluted non-abrasive neutral detergents when necessary. If there is any water overflow, use a cloth to wipe it off immediately. DO NOT allow sharp items to strike the cabinet.
NOTE: DO NOT use formic acid and its diluted solvents or equivalent.
CLEANING THE INTERNAL DRUM
Any rust left inside the drum by the metal articles should be cleaned out immediately with chlorine-free detergents. DO NOT use steel wool.
CLEAN DETERGENT BOX
Open Detergent box.
Press down the arrow and slide out assembly. (Figure 17-1)
Lift the clip and remove softener cover and wash all sections with water. (Figure 17-2)
Replace the softener cover and push the drawer back into position. (Figure 17-3)
CLEAN INLET FILTER
Inlet filter maybe need to be cleaned if there is insufficient or no water in when the tap is opened.
To clean the filter:
Close the tap.
Select any procedure except “Wash” or “Drain” procedure.
Press the button “Start/Pause” and keep the procedure running for about 40 seconds.
Remove the inlet pipe from the tap.
Wash the filter with water 6. Reconnect the inlet pipe
WASHING THE FILTER IN WASHING MACHINE
Remove the inlet pipe from the rear of the machine.
Pull out the filter with needle nose pliers rinse with water.
Put the filter back into place.
Reconnect the inlet pipe.
Open the tap and make sure there is no water leakage.
Close the tap.
REMOVING FOREIGN ITEMS FROM DRAIN PUMP FILTER
The drain pump filter can filter small foreign matters from clothing being washed. Clean the filter periodically to ensure the normal operation of washing machine. Figure 18 The pump should be inspected if the machine does not empty and/or spin, or if it makes unusual noises during draining due to objects (such as, coins etc.) blocking the pump.
To access and clean the filter:
1. Open the lower access cover. (Figure 19)
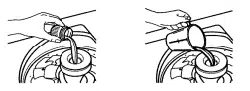
2. Remove the emergency drain hose cap and let water drain out. It is recommended to have a vessel ready to catch remaining water. (Figure 20)
3. Replace emergency drain hose, and open the filter by turning counter-clockwise. (Figure 21)
4. Remove any objects in filter and replace, locking in by turning clockwise. (Figure 22)
WARNING: To avoid burning, it shall be done after the hot water inside the machine cools down.
WARNING: When the appliance is in use and depending on the program selected there may be hot water in the pump. Never remove the pump cover during a wash cycle, always wait until the appliance has finished the cycle, and is empty. When replacing the cover, ensure it is securely in place.
THAW A FROZEN WASHING MACHINE
If the temperature drops below zero and your washing machine gets frozen, you may:
Disconnect the power supply for the washing machine.
Wash the tap connection with warm water to loosen inlet pipe.
Remove the inlet pipe and immerse it in warm water.
Pour warm water into washing drum and wait for 10 minutes.
Reconnect inlet pipe to the tap and check whether inlet and outlet are working normally
TO PREVENT FREEZING
If your washing machine is located in the room where it can get frozen easily, please drain the remaining water inside drain pipe and inlet pipe thoroughly.
Remove the remaining water in inlet pipe:
Close the tap.
Screw off the inlet pipe from tap and put its end into the container.
Start up any procedure except single Wash or Drain procedure. Water will be drained out of inlet pipe if any for about 40 seconds.
Reconnect the inlet pipe to tap
EMERGENCY DOOR RELEASE
In the case of a power failure or other circumstances and door cannot be opened, if it is necessary to open the door, pull down on the cord inside the access panel. Be sure to restore the pull cord after opening the door.
CAUTION: The emergency switch pull cord cannot be used during washing. If unit is in operation, wait for it to stop and for the interior to cool to a safe temperature before opening door.
TROUBLESHOOTING
ALARM CODE DETECTION
Alarm Code
Cause of Problem
Solution
E30
Door is not properly closed.
Check if clothes are stuck in door.
Close door and restart
E10
Problem with water flow.
Check if the water pressure is too low.
Make sure inlet hose is not bent or blocked.
Check if the inlet valve filter is blocked.
E21
Water taking too long to drain.
Check if the drain hose is blocked.
E12
Water overflow.
Restart the washer.
EXX Other
Restart machine to clear.
Call customer service if code persists.
NOTE: After trying the solution, restart the washing machine. If code persists, contact customer service.
When the washing machine needs servicing, please contact our customer service department, and a representative will try to diagnose the issue. Please do not dismantle the washing machine without prior permission. Doing so will void your warranty.
If the washing machine fails to operate properly, or it sounds an alarm, please check the following guidelines for possible solutions to common problems or alarm indicators.
LIST OF PROBLEMS AND POSSIBLE SOLUTIONS
Problem
Cause
Solution
Washing machine will not start .
Check if the door is closed tightly.
Check if power plug is properly inserted.
Check if water supply is open.
Check if “On/Off” button is pressed.
Check if “Start/Pause” button is pressed.
Door cannot be opened.
Safety lock is engaged.
Disconnect the power.
Heating fault
NTC thermistor is damaged and heating pipe is worn.
Contact customer service
Water leakage
The connection between inlet pipe or outlet hose and tap or washing machine is not tight.
Check and fasten water pipes.
Drain pipe is blocked.
Clean up outlet hose and drain.
Water overflowing from the bottom of the Machine
The inlet pipe is not connected firmly.
Fix the inlet pipe.
Outlet hose has water leakage.
Replace the drain hose.
Indicator or display do not light.
Power is disconnected.
Check if plug is connected correctly and power is on.
PC board has problems.
Contact customer service.
Harness has connection problem.
Detergent residue in the detergent box
Washing powder is damp and hardened.
Clean and wipe the box.
Use liquid detergents or the detergents special for hi efficiency front load washer
Clothes not clean enough
The clothes are too dirty.
Select a proper washing program.
Insufficient detergent quantity
Make sure to follow instructions for adding detergent amount.
Abnormal noises or vibration
Make sure the transport bolts are removed.
Make sure cabinet is installed on solid, level surface.


 : Prewash
 : Wash
 : Rinse
 : Spin
 : Time Save
 : Extra Rinse
 : Dry
: Dry Sound: Indicates that sounds are on. When unlit, unit is muted.
 Door Lock: Machine is locked for duration of cycle.
 Child Lock: Child lock is on.
 Add a Garment
 Extra Dry
 Normal Dry
 Gentle Dry
 is Optional Function.
  is Dry function.