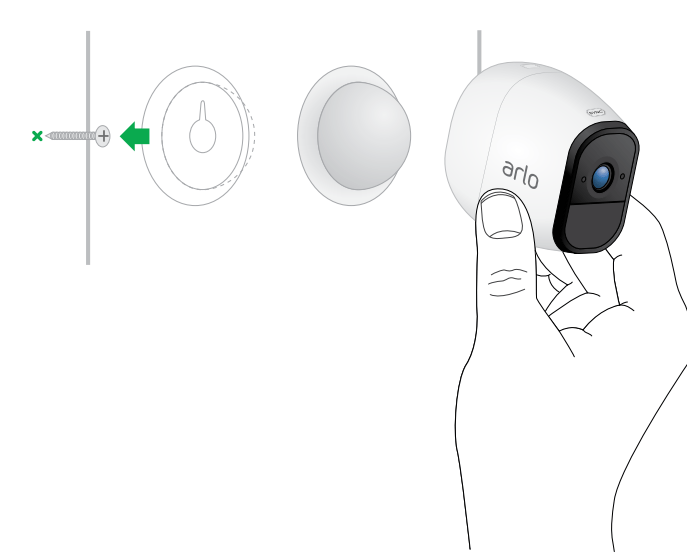
You can place your camera on a shelf or other flat surface, or you can mount it to the wall.
1. Fasten the mounting screw into the wall, and hang the magnetic mount from the screw. 2. If you’re mounting the camera to drywall, be sure to use the plastic drywall anchors that are provided. Note: You can also use double-sided tape instead of screws.
Position Your Cameras
Arlo’s Position mode allows you to see what your camera sees. Using Position mode, you can make sure that your Arlo camera is positioned to monitor the precise area that you want. For more information, see Position Mode on page 15.
It’s important to keep distance in mind when placing your Arlo cameras:
Maximum. You can place your Arlo camera a maximum of 300 feet (90 meters) from the base station. In indoor installations, the range might be less if metal objects or thick walls and ceilings are between a camera and the base station.
Note: Check the Camera LED on the base station. If it’s blinking amber, the base station detects a low data rate, a sign that a camera is too far from the base station.
Minimum. Place your Arlo cameras at least 10 feet from the base station, and allow at least 61⁄2 feet (2.1 meters) between cameras. Follow these guidelines to prevent WiFi signals between the devices from interfering with each other.
When positioning your Arlo camera, keep these tips in mind:
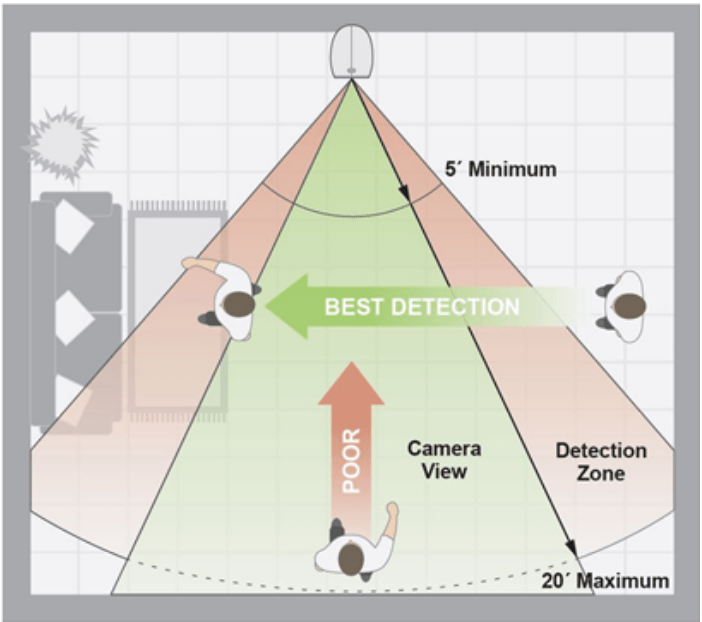
Keep active locations in the camera’s field of view. Your Arlo camera provides a 130-degree viewing angle. Position your camera so that the space that you want to monitor is within the camera’s field of view.
Aim with the cloud. Use Arlo’s Position mode to send video to the cloud as quickly as possible. This allows you to aim the camera while watching the video feed on your Arlo smartphone app to make near real-time adjustments to the camera’s position. Go to your camera’s Settings to turn on Position mode. After the camera is in place, you can turn off Position mode, or it automatically turns off after five minutes. For more information, see Position Mode on page 15.
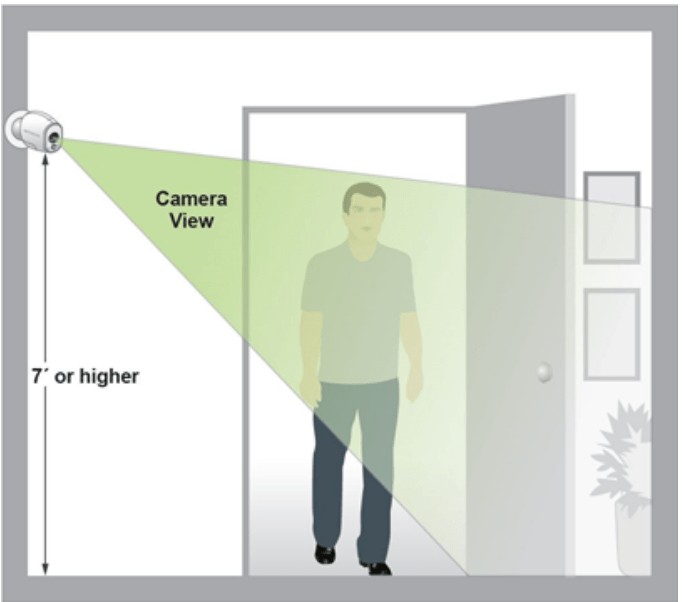
Elevate your camera. Mount your Arlo motion-detection camera at least 7 feet (2 meters) above the floor and aim it slightly downward for the best sensor performance.
Ensure that side-to-side traffic crosses Arlo’s field of view. Arlo’s motion sensor is much more sensitive to side-to-side movement across its field of view than to movement directly toward or away from the camera. The best area for motion detection is 5 feet to 20 feet (1.5 to 6 meters) from the camera position.
For best results, position the camera so that the path of expected motion crosses Arlo’s field of view and does not head directly into or away from the camera. For example, if you want to detect motion near a couch, place the camera to the side of the couch, rather than above it or opposite it.
You can use the Motion Detection Test to verify if motion can be detected in a camera’s current placement. The camera’s LED flashes amber when motion is detected. Go to your camera’s Settings to turn on the Motion Detection Test.
Position Mode
Position mode is available only when the camera is not streaming, recording motion, or in Motion Detection mode.
To place your camera in Position mode:
Tap the Arlo icon on your mobile device.
If you are using a computer, enter arlo.netgear.com in the address bar of a browser.
If you are using a mobile device that supports Touch ID, you are prompted to enable Touch ID or skip.
Tap or click Settings. The Settings page displays.
Under Camera Settings, select the camera to position.
Tap or click Position Mode. The camera starts streaming video.
Note: In Position mode, the camera streams video as fast as possible, without buffering, so that you can aim the camera while watching on a smartphone and make near real-time adjustments to the camera position. This means that you might see lower-quality video while the camera is in Position mode.
FEATURES
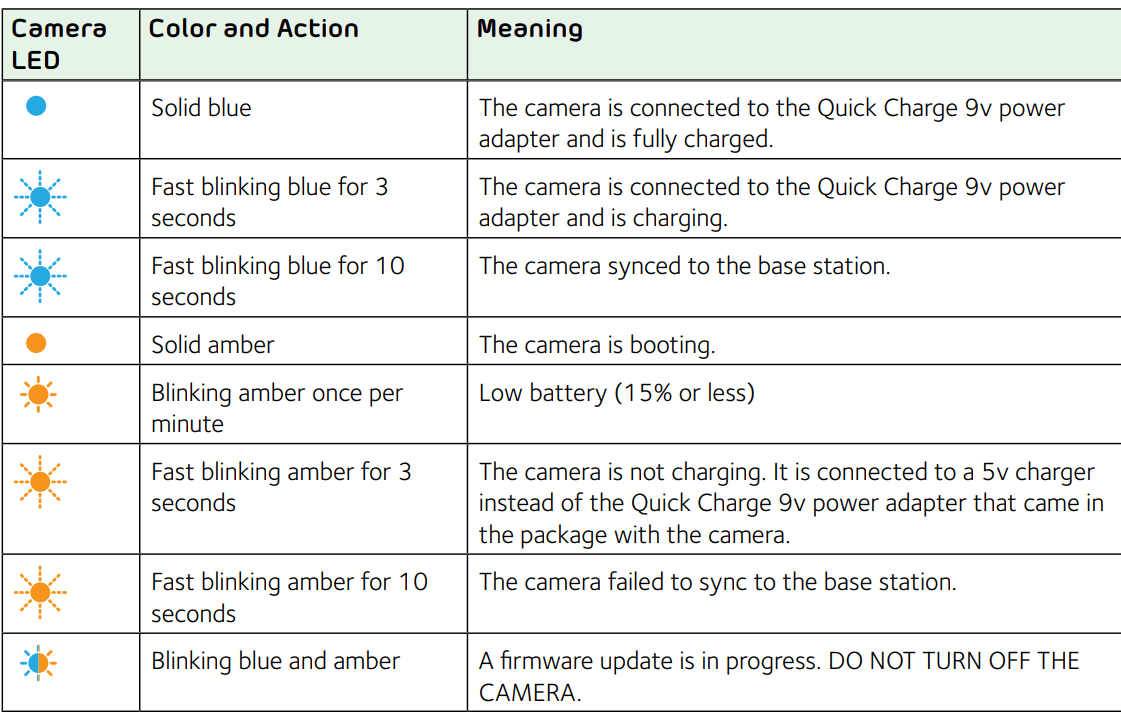
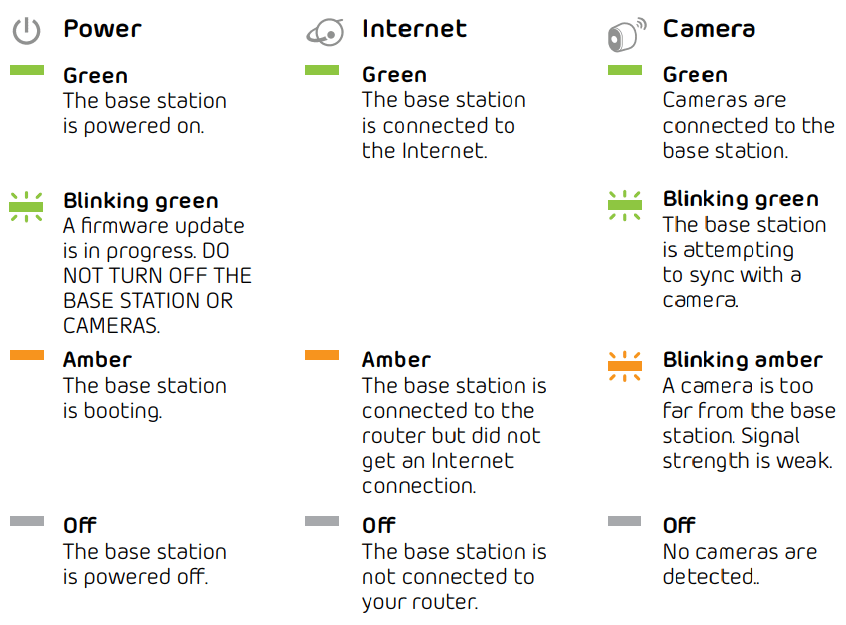
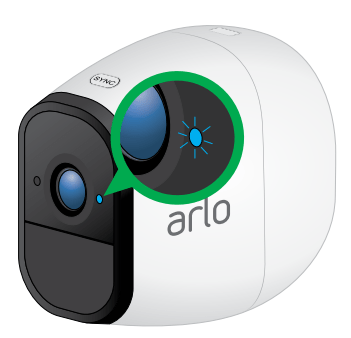
Arlo Pro Camera LED
The LED on the camera lights when the camera is powered on. The LED changes color and blinks depending on the battery charge and to indicate the status of activities such as syncing the camera and updating the camera firmware.
See the following table for explanations for the Camera LED.
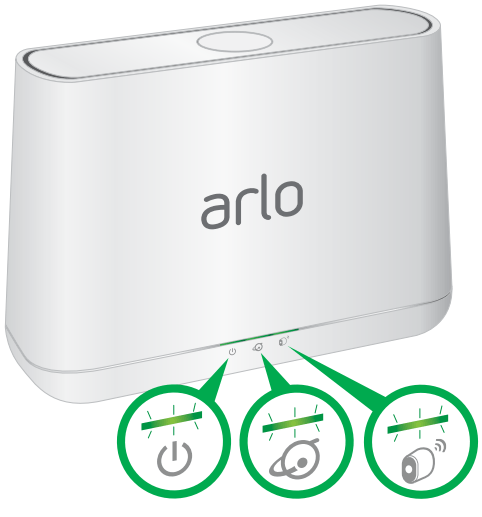
Arlo Base Station LEDs
SET UP
Step 1 Insert the Battery Into Your Camera
Step 2 Get the Arlo App
Note: If you already use the Arlo app, make sure that you are using the latest version. To find out if an update is available, go to the app store and search for Arlo.
Get an Account
Tap the Arlo icon on your mobile device.
If you are using a computer, enter arlo.netgear.com in the address bar of a browser.
If you are using a mobile device that supports Touch ID®, you are prompted to enable Touch ID or skip.
To use Touch ID, tap Enable Touch ID.
If you tap Skip, you can turn on the Arlo app fingerprint ID login later.
Tap or click New System Setup.
Select Arlo (Wire-Free).
After the app discovers your device, select your base station’s serial number from the menu.
Select your time zone from the menu.
Tap or click Continue.
Complete the required fields for account setup.
Tap or click Continue.
Select a subscription plan.
Step 3 Connect Your Base Station to the Internet
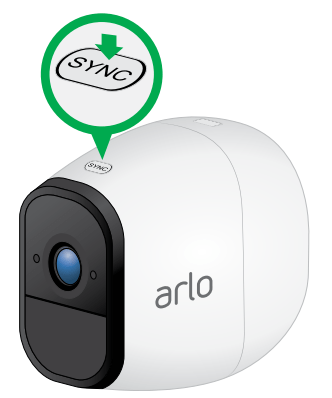
Step 4 Sync Your Cameras With the Base Station
1. Bring the camera within one to three feet (30 –100 centimeters) of the base station. Note: Cameras must be synced one at a time.
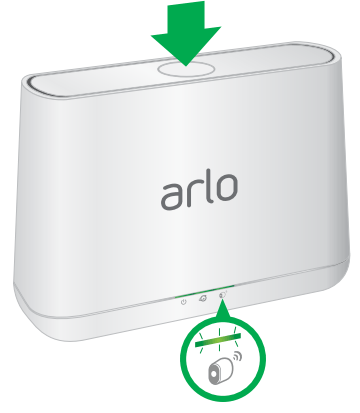
2. Press the Sync button on the top of the base station for about two seconds and then release the button.
3. Wait for the Sync status LED to blink green.
4. Press the Sync button on top of the camera for about two seconds and then release the button.
The LED on the camera LED lights blue and blinks rapidly to confirm syncing.
The LED lights amber and blinks rapidly for 10 seconds if the sync is not successful. You must repeat the sync process.
5. Repeat for each camera.
Add a Camera From Another Arlo Account
Tap the Arlo icon on your mobile device.
If you are using a computer, enter arlo.netgear.com in the address bar of a browser.
The Devices page displays.
Log in to the old Arlo account.
Tap or click Settings. The Settings page displays.
Tap or click My Devices. A list of cameras displays.
Tap or click the camera. Set Up Your System The settings for the camera display.
Scroll down and Tap or click Remove Device. The camera is removed from your account.
Log out of the Arlo app.
Sync the camera to the base station.
OPERATIONS
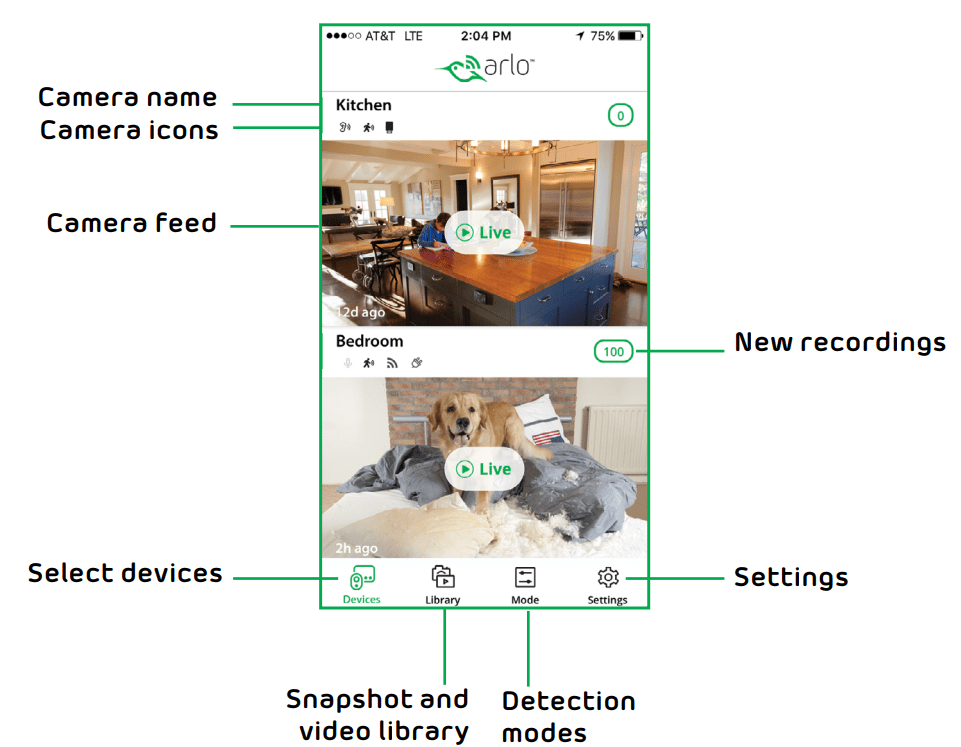
View Your Content
Record Clips From Live Video
Tap the Arlo icon on your mobile device.
If you are using a computer, enter arlo.netgear.com in the address bar of a browser.
The Devices page displays.
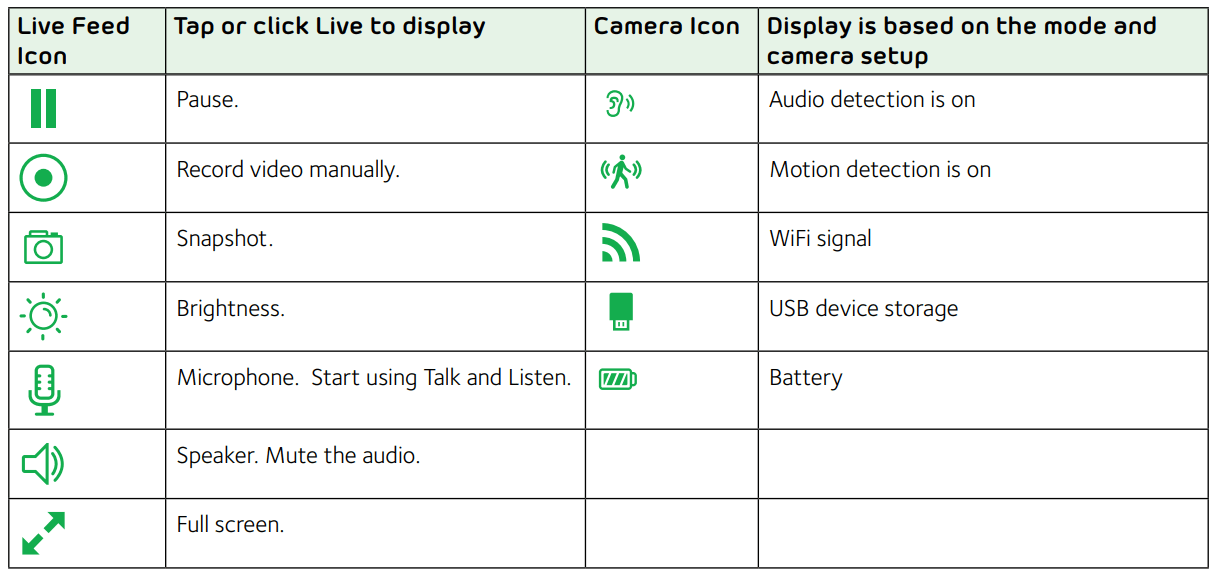
Tap or click Live in the camera feed image. The camera feed icons display at the bottom of the camera feed image.
Tap or click Record Video . This icon turns red to indicate that you are recording the live feed.
To stop recording, Tap or click Record Video . The recording is saved in your library.
Talk and Listen
Tap the Arlo icon on your mobile device.
If you are using a computer, enter arlo.netgear.com in the address bar of a browser.
The Devices page displays.
Tap or click Live in the camera feed image. The camera feed icons display at the bottom of the camera feed image.
Tap or click Microphone . A microphone button displays.
Wait for the button to turn bright green. This can take up to five seconds. When the button is bright green, Talk and Listen is ready.
Press and hold or click and hold the Microphone button and speak.
USB Device Storage With Arlo Pro
Connect a USB Storage Device
Plug a USB storage device into a USB port on the Arlo Pro base station.
Tap the Arlo icon on your mobile device.
If you are using a computer, enter arlo.netgear.com in the address bar of a browser.
The Devices page displays.
Tap or click Settings > My Devices. The base station and a list of cameras displays.
Tap or click the base station.The Device Settings page displays.
Tap or click Local Storage.
The Local Storage page displays.
The USB Device status shows whether the USB storage device is ready, must be formatted, or is full.
Format a USB Storage Device
The Arlo app displays a pop-up message to let you know if it is necessary to format the USB storage device. The Arlo Pro base station can format the USB storage device.
To format a USB storage device:
If you want to save files on the USB storage device, make sure to save or copy the files in another location before you format the USB storage device.
Formatting a USB storage device deletes files on the device.
Connect the USB storage device to a USB port on the Arlo Pro base station.
Tap the Arlo icon on your mobile device.
If you are using a computer, enter arlo.netgear.com in the address bar of a browser.
The Devices page displays.
Tap or click Settings > My Devices. The base station and a list of cameras displays.
Tap or click the base station.The Device Settings page displays.
Tap or click Local Storage.The Local Storage page displays.
If you see the message Requires Formatting next to USB Device 1 or USB Device the USB storage device is not in the correct format (FAT32). You must format the USB storage device before you can use it for local storage.
Warning: Formatting the USB storage device erases all data from the device. If you want to keep any files that are on the USB storage device, copy those files to another location before you format the USB storage device.
Tap or click > next to the USB storage device that you want to format.
Tap or click Format USB Device.
Wait for USB Device Status to change from Formatting to Ready.
Warning: Do not remove the USB storage device while it is formatting. The USB storage device might become permanently unusable.
MODES, RULES AND SMART ALERTS
Modes
Modes let you tell your Arlo cameras to respond differently at different times.
For example, you probably don’t want to receive an alert about motion in the living room while you’re doing yoga in the living room. You might want to turn on a different mode when you’re away on vacation than when you’re just out at the store for an hour. Arlo modes give you complete control over how your cameras respond to motion or sound.
You can create your own modes, but Arlo Pro comes with the following modes:
Armed. Detection is on for this camera.
Disarmed. Detection is off for this camera.
Schedule. Manage detection based on a schedule.
Geofencing. You can use geofencing to arm, disarm, or resume a schedule mode when you arrive at or leave a given location based on your mobile device.
If you add new modes, the Custom Mode icon . displays.
You can customize the Armed and Schedule modes and you can add new modes.
You might want to create a mode in which some motion sensors and cameras are active but others are not. For example, when you are sleeping, you might want your exterior cameras to be active, but your interior cameras to be inactive.
Note: You can create different modes for the same camera, but the camera can use only one mode at a time.
Rules
Each mode consists of one or more rules that provide detailed instructions for your Arlo system. For each mode, you can set the following options:
Trigger device. The trigger device is the camera that detects motion or sound.
Trigger. Triggers can be motion detection, sound detection on Arlo Pro Wire-
Free cameras. You can adjust the camera’s sensitivity to motion and sound to minimize false alarms.
Devices. Motion or sound detection on one camera can trigger another camera to record video or take a snapshot. For example, you might want to have your back yard camera or your driveway camera trigger your door camera to start recording video.
Action. Each device that responds to motion or sound can record video, take a snapshot, or do nothing. You can adjust the length of the video recording from a minimum of ten seconds to a maximum of two minutes. If you are using an Arlo Pro base station, you can also tell your Arlo Pro base station to turn on the siren in response to a trigger. The siren has four duration options and three loudness options.
Notifications. When a trigger is detected, Arlo can send you push notifications, email alerts, or both. You can also choose to send email alerts to friends, family members, pet sitters, or anyone who might need to respond when a camera is triggered.
The Arlo mobile and web apps guide you through the process of setting up your
Arlo system and telling it what you want it to do, but the Arlo knowledge base also has detailed instructions to help you get the most out of your Arlo Smart Home Security System.
Schedule Your Camera Rules
You can set a schedule to activate and deactivate cameras automatically. Schedules recur weekly. For example, the schedule for Tuesday is repeated every Tuesday as long as the schedule is turned on. Arlo is preconfigured with the following schedule:
Monday through Friday, 8:00 a.m. to 5:00 p.m. All motion sensors are on.
All other times. All motion sensors are off.
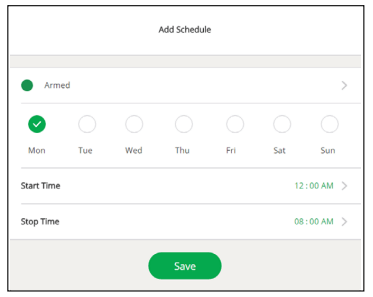
Add a Schedule
To add a schedule for a camera:
Tap the Arlo icon on your mobile device.
If you are using a computer, enter arlo.netgear.com in the address bar of a browser.
The Devices page displays.
Tap or click Mode. A list of cameras displays.
Tap or click the Arlo Pro camera. A list of available modes displays.
Tap or click Schedule . The Schedule mode is selected.
Tap or click Edit next to Schedule.
Tap or click + Add.
Set the days and times and then Tap or click Save.
The schedule is saved.
Add a Rule with A Siren Trigger
To add a rule that includes a siren trigger, you must add a new mode or edit an existing mode.
Note: Only Arlo Wire-Free and Arlo Pro Wire-Free cameras connected to an Arlo Pro base station can trigger the siren.
Tap the Arlo icon on your mobile device.
If you are using a computer, enter arlo.netgear.com in the address bar of a browser.
The Devices page displays.
Tap or click Mode.A list of devices displays.
Tap or click the Arlo Pro base station.
Tap or click > next to the mode.
Under Rules, tap or click Edit next to the camera.
Select the Turn Siren ON check box.
Tap or click > next to Sound Alarm.
Set the sliders for Siren Duration and Siren Loudness.
Tap < Edit Rule or click Back.
Tap Done or click Save.
Note: Note: This rule is not active until you activate the mode to which you added the siren trigger.
Add a Mode With Different Rules for Each Camera
With Arlo Pro Wire-Free, you can create multiple rules within the same mode so that each camera performs different actions and sends different alerts.
You can also use schedule mode to activate modes automatically at different times of the day or week. For more information about schedule mode, see Add a Schedule on page 48.
To add a mode with different actions or alerts for different cameras:
Tap the Arlo icon on your mobile device.
If you are using a computer, enter arlo.netgear.com in the address bar of a browser.
The Devices page displays.
Tap or click Mode.A list of cameras displays.
Tap or click the camera.
Tap or click Add a Mode.The New Mode page displays.
Enter a name for the mode and Tap or click Next.The Trigger Device page displays.
Tap or click an Arlo-Pro camera to select it as the trigger device for a rule and then tap or click Next.
If you want the camera to perform an action when motion or audio is detected, tap or click Next. Otherwise, clear the check box for the trigger that you do not want to use.
If you selected motion as a trigger, set the Motion Sensitivity using the slider and tap or click Next.
If you are using an Arlo Pro Wire-Free camera and you selected audio as a trigger, set the Audio Detection Sensitivity using the slider and click or tap Next.
When prompted, specify what you want the trigger device to do when motion or audio is detected. Note: You can select Record video, Take snapshot, or Do nothing.
To turn on the Arlo-Pro base station siren when the device detects motion or sound, select the Turn Siren ON check box.
If you selected Record video, use the slider to specify how long you want your device to record for when motion or audio is detected and tap or click Next.
If you selected Turn Siren ON, set the sliders for Siren Duration and Siren Loudness and tap or click Next. Note: The base station siren is very loud. Prolonged exposure to the siren might cause permanent hearing loss. Exercise caution when creating siren triggers.
Select the notifications that you want to receive and tap or click Next.
If you selected Email Alerts, enter the email addresses where you want to receive alerts and tap or click Next.
Review the summary of your settings and tap or click Save. Your new mode is saved.
From the mode menu, tap or click > next to the mode that you just created.
Tap or click Add Rule.
Repeat steps 6-16 to add an additional rule with different trigger devices, actions, and alerts. You can add one rule for each Arlo Pro Wire-Free camera that is connected to the same base station.
TROUBLESHOOTING
Battery FAQs
How can I recharge the Arlo Pro battery?
Your Arlo Pro battery is fully charged when it leaves the factory. You can use the power adapter cable to plug the camera into an electrical outlet to charge the battery. You can also use the Arlo Pro Charging Station (sold separatey) to charge the battery. For uninterrupted Arlo Pro camera use, you can purchase a spare battery and the charging station. Then you can put the fully charged spare battery into the Arlo Pro camera while you recharge the battery. The charging station can recharge two batteries simultaneously.
What do I need to know about using Arlo cameras in cold weather?
Cold temperatures can affect any battery’s capacity, due to the chemistry of batteries. This means that if you install your Arlo camera outside in cold temperatures, you might notice a shorter battery duration for the camera, or a faster than expected drop in the displayed battery capacity.
Why does one Arlo camera battery drain faster than another Arlo camera battery?
Your Arlo camera is flexible and you can use it in a wide range of environments.
Your environment might include elements that affect battery life. Some of the places that you might place your Arlo camera use more battery power than others.
Note the following examples.
Arlo cameras work well in the dark. They use infrared sensors to monitor motion in the dark. These use more battery power than cameras monitoring motion in a well- lit room.
Arlo cameras work well when they are as far away as 300 feet from the base station. Cameras positioned farther away from the base station use more battery power than cameras positioned close to the base station.
Arlo cameras let you choose the quality level of the videos that they record.
Cameras set to high-quality video recording use more battery power than cameras set to low-quality video recording.
Will my WiFi environment affect my Arlo camera battery?
Yes. If you are in a noisy WiFi environment, your Arlo camera battery might drain faster. Use a WiFi analyzer to test the WiFi noise in your environment.
What is the battery life for NETGEAR Arlo Pro rechargeable batteries?
The NETGEAR Arlo Pro camera rechargeable battery life is 4 to 6 months with normal usage and can be extended for optimal usage if you use key settings and follow certain tips. The Arlo Pro cameras offer the best battery life when set up to record when they detect motion.
How long does it take to charge the Arlo Pro rechargeable battery?
Charging an Arlo Pro rechargeable battery inserted into the camera from 0 to fully charged takes about 2.5 hours. One Arlo Pro rechargeable battery inserted into the Arlo Pro Charging Station takes about 2.74 hours to charge. Two Arlo Pro rechargeable batteries inserted into the Arlo Pro Charging Station take about 5.43 hours to charge.
How can I extend the NETGEAR Arlo Pro camera’s battery life?
To extend the battery life, follow these tips:
Check your NETGEAR Arlo Pro Wire-Free camera’s Power Management settings.
To extend your battery life, select the Best Battery Life setting. This setting trades video quality for improved battery life. For best video quality, select the Best Video setting. This setting reduces battery life but provides the highest quality images. To balance the battery life and video quality, select the Optimized setting. To access your Power Management settings, log in to your Arlo account, select Settings > Camera Settings, and select a camera.
Normal usage is defined as four minutes of viewing or recording per day with the Arlo Pro Wire-Free Camera in the Optimized setting.
Depending on your specific usage, you might see different results. Also note that a NETGEAR Arlo Pro Wire-Free Camera’s distance from the base station can affect its battery life.
Manage Bandwidth for Streaming
Depending on the Power Management setting, the bitrate and upstream bandwidth requirement adjusts. The frame rate depends whether you are in night-vision mode or not. The default behavior for each power management setting is as follows.
Each power management setting starts with a particular bit rate and frame rate.
Day Mode
Best video. 600 kbps @ 24 fps
Optimized. 300kbps @ 24 fps
Best battery life. 200 kbps @ 24 fps
Night Mode
Best video. 600 kbps @ 15 fps
Optimized. 300 kbps @15 fps
Best battery life. 200 kbps @15 fps
Depending on the available bandwidth and how much of the buffer is full, the Arlo
Pro Wire-Free system either increases the bit rate or decreases the bit rate and frame rate.
Can’t See Video Streams in a Browser
The Arlo web client uses the Adobe Flash plug-in to display your camera streams in a browser. Make sure that your browser is not blocking the plug-in and that you are using the latest version of Adobe Flash.
Your router might be blocking the ports to which Arlo sends data. To ensure that Arlo can stay connected, you must keep the ports 443 and 80 open on your router.
To troubleshoot problems with the video stream, check for the conditions in following sections.
WiFi Signal Interference
Environments with multiple WiFi networks, WiFi devices, or frequencies can cause signal interference with your Arlo system. Minimize the number of networks,
WiFi devices, and transmitted frequencies in the area where you place your base station and cameras.
Also, place your camera at least 10 feet (3 meters) from the base station, and allow at least 61⁄2 feet (2 meters) between cameras. Follow these guidelines to prevent
WiFi signals between the devices from interfering with each other.
Out of Range
Make sure that your wire-free camera is no farther than 300 feet (90 meters) from the base station. The range might be less if metal objects or thick walls and ceilings are between a camera and the base station.
Make sure that your cameras display three or four bars of signal strength in the area where you intend to install them. The cameras can work when signal strength is at one or two bars, but they might go out of range intermittently due to fluctuations in the environment.
Low Battery
Recharge or change the battery in the Arlo Pro camera to make sure that the battery level is no less than two bars. A low battery can cause the camera to stream intermittently.
Not Receiving Push Notifications
You must be logged in to the Arlo app to receive Arlo alerts on your smartphone or mobile device. Arlo registers your device for push notification when you log in. If you used the logout option instead of simply exiting the app, you must log back in to the app. You receive Arlo alerts even if your device is sleeping.
If you did all of the following and are still not getting Arlo alerts, contact NETGEAR support.
Check the Rules Settings for Armed Modes
Check the rules in your modes. Make sure that Push Notification is enabled in the
Armed mode or in a custom mode if you created one.
To check push notification in the Armed mode setting:
1 Tap the Arlo icon on your mobile device.
If you are using a computer, enter arlo.netgear.com in the address bar of a browser.
The Devices page displays.
2 Tap or click the Mode button.A list of cameras displays.
3 Select the camera. A list of modes displays.
4 Tap or click the Edit icon next to Armed. The Edit Rule page displays.
5 Under Alert, make sure that the Push Notification check box is selected.
6 If you made changes, tap or click Save. Your settings are saved.
Check the Arlo App Settings on an iOS Device
Make sure that you allow the Arlo app to receive push notifications. The Arlo app push notifications can be disabled on iOS and Android devices.
To allow Arlo push notifications on iOS devices:
Tap the Settings icon for your iOS device.
Tap Notifications > Arlo. The Arlo notification settings display.
Make sure that Allow Notification is selected.
If you made changes, tap Save. Your settings are saved.
Check the Arlo App Settings on an Android Device
To allow Arlo push notifications on Android devices:
Tap the Settings icon for your Android device.
Tap Application Manager > Arlo. The Arlo notification settings display.
Make sure that the Show Notifications setting is enabled.
If you made changes, tap Save. Your settings are saved.
If You Said No to Push Notifications at Installation
When you install the Arlo app for the first time, to receive alerts, you must select Allow when asked if you want Arlo to send you push notifications. For iOS apps, after you respond to this alert, it is not presented again unless the device is restored or the app is uninstalled for at least a day.
If you said no on an iOS device, uninstall the app, wait for a day, and then reinstall it, and allow notifications. If you do not want to wait a day before you reinstall the app, you can use the system clock on your device to simulate a day.
Set the system clock forward a day or more, turn your device off, and then turn the device back on. After you reinstall the app, return the system clock to the correct setting.
Verify That the Arlo Base Station Is Online
To determine whether your base station is online, check the Internet LED on the front of the base station:
If the Internet LED is solid green, the base station is connected to the Internet.
If the Internet LED is amber, the base station is not connected to the Internet. If you are not at the same location as your Arlo base station, log in to your Arlo account:
If you can review the video feed from each of your Arlo Wire-Free Cameras, your base station is connected to the Internet.
If you see an error message (such as “Base Station Offline” or something similar) instead of video feed, your base station is not connected to the Internet.
Base Station Is Offline
If you are not sure whether the base station is offline, see Verify That the Arlo
Base Station Is Online on page 73.
To troubleshoot the base station Internet connection:
1 Check the Ethernet cable.
Make sure that it’s securely connected to the back of your base station and to your router. Also make sure that you’re using the Ethernet cable that came with your system.
2 Check the power adapter.
Make sure that the power adapter is securely connected to the back of your base station and securely plugged into an outlet.
3 Try to connect to the Internet from another device that is connected directly to your router.
Be sure to try an Ethernet-connected device, not a device that is connected using WiFi (you can turn WiFi off on the device to ensure that the device is connecting via the Ethernet cable). Make sure that you can browse the
Internet from this device by doing the following:
If you cannot browse the Internet from this device, you must restore your router’s connection to the Internet.
If you can browse the Internet from this device, continue troubleshooting.
4 Power cycle your base station.
Unplug the power adapter from the outlet, wait one minute, and reconnect the power adapter to the outlet. The base station takes one to two minutes to start. When the Power LED and Internet LED light solid green, your base station is connected to the Internet. If the Internet LED is amber, continue troubleshooting.
5 Check your router’s DHCP settings and client list.
Ensure that DHCP is enabled and that router’s DCHP client list supplied an IP address to the base station. (If it did, the base station appears in the client list.)
For more information, see your router documentation.
6 If you were previously able to connect your base station to the Internet but now cannot connect, check the router’s security settings and firmware to ensure that no changes were made since the last time it successfully connected.
You might want to temporarily lower the security settings on the router or temporarily place the base station in the DMZ to rule out any firewall restrictions. If you make these changes, power cycle your base station as described in Step 4.
7 Check to make sure that ports 443 and 80 are open on your router.
Note: If you do not manage your Internet environment, contact your IT department for assistance with any firewall or router configurations. The Arlo base station cannot connect through most proxy servers. Check with your IT team and Internet service provider (ISP) about ways to bypass any proxy servers. Ask your IT team to ensure that ports 443 and 80 are open.
8 Perform a factory reset on your base station.
If you are still unable to get your base station to connect, visit support.arlo.com and submit a support case describing the steps you took and provide the following information:
Base station serial number
User name (email address used to register Arlo account)
Internet service provider (ISP) name
Internet connection type (DSL, cable, and so on) and speed (Arlo requires at least 1 Mbps upstream)
Internet router model
List of other devices connected directly to your router
The last time and place that your base station successfully connected to the Internet
Signal Strength
If an Arlo Pro Wire-Free camera’s signal to the base station is weak, recording delays might occur when motion is detected.
To test whether the camera signal is strong enough, check the camera LED on the base station; if it’s blinking amber, the base station detects a low data rate, which means that a camera is too far from the base station.
Follow these tips to increase signal strength:
Position your base station so that it is central to all of your cameras.
Position your camera a maximum of 300 feet (90 meters) from the base station.
The maximum line-of-sight range of 300 feet is reduced by each wall, ceiling, or other large obstruction between the camera and base station. The following materials reduce signal strength the most:
Unusually thick walls and ceilings
Brick
Concrete
Stone
Ceramic
Glass, especially mirrors
Metal
Large quantities of water, such as the water in a fish tank or water heater
Mount your cameras away from devices such as cordless phone bases, baby monitors, and microwave ovens.
Do not place your Arlo system near multiple WiFi routers. Other WiFi-enabled devices can interfere with Arlo’s wireless signal.
Reset the Arlo Base Station to Factory Settings
Performing a factory reset returns your base station values to the default settings. It also removes the serial number from your Arlo account.
To perform a factory reset on your base station:
1 Use a straightened paper clip to press and hold the Reset button on the back of the base station for about 10 seconds.
When the base station reset completes, the LEDs on the front of the base station blink amber. When the LEDs stop blinking amber, your base station reboots. The base station is removed from your Arlo account.
2 When the Power and Internet LEDs both light solid green, tap the Arlo icon on your mobile device and log in to your Arlo account.
If you are using a computer, enter netgear.com in the address bar of a browser.
3 Tap or click New System Setup.
4 Follow the setup instructions.
RECHARGEABLE BATTERY SAFETY
Safety Rules for Arlo Pro Rechargeable Batteries
Arlo Pro Wire-Free HD Security Cameras use rechargeable batteries and can go wherever you need them. But ALL batteries can EXPLODE, CATCH FIRE, and CAUSE BURNS if disassembled, punctured, cut, crushed, short-circuited, incinerated, or exposed to water, fire, or high temperatures, so you need to handle them with care.
To use Arlo Pro rechargeable batteries safely, follow these guidelines:
ALWAYS store spare batteries in a cool, dry, ventilated area.
ALWAYS make sure that the battery compartment is clean and free of any debris before inserting new batteries.
ALWAYS make sure the battery contacts are aligned.
ALWAYS keep all batteries away from children.
ALWAYS follow local waste and recycling laws when throwing used batteries away.
ALWAYS use an Arlo Pro power adapter or an Arlo Pro Charging Station (sold separately) to charge Arlo Pro rechargeable batteries.
NEVER place Arlo Pro rechargeable batteries in a pocket, purse, or other receptacle, especially those containing metal objects.
NEVER store Arlo Pro rechargeable batteries with hazardous or combustible materials.
NEVER let an Arlo Pro rechargeable battery or battery compartment get wet—before, during, or after installation. (Remember your camera itself is weatherproof, but its interior battery compartment and batteries aren’t).
NEVER disassemble, cut, crush, puncture, short-circuit, dispose of in fire or water, or expose your Arlo Pro rechargeable battery to temperatures above C (140°F).
Rechargeable Battery Safety
Safety Rules for Arlo Pro Charging Station
The Arlo Pro Charging Station is sold separately. You can use the charging station to charge one or two Arlo Pro rechargeable batteries. For more information about the Arlo Pro Charging Station, see the instructions that are included in the Arlo Pro
Charging Station package.
When using the Arlo Pro Charging Station, follow these guidelines to avoid personal injury and property damage from, but not limited to, the risk of electric shock or fire:
Charge only Arlo Pro Rechargeable Batteries compatible with the Arlo Pro
Charging Station. Charging other batteries may cause them to leak, rupture, or explode.
Use the charger only in dry locations. Keep away from rain, snow, or excessive moisture.
Do not operate the charging station if it or its cord is damaged.
Do not disassemble, modify, or attempt to use the charging station as a power source.
Do not disassemble the battery, dispose of the battery in fire, put the battery in backward, mix it with used or other battery types, or short circuit the battery. The battery might ignite, explode, leak, or get hot, causing injury.
#4 How do you know when to change/charge the batteries and how long does it take to charge? What is the life of the battery?
They will tell you the batteries last up to 6 months but I need to charge mine every 10 days and it has been that way since the day they were installed. I have 3 cameras and they all behave the same way regardless of how much they record.


 . This icon turns red to indicate that you are recording the live feed.
 . A microphone button displays.
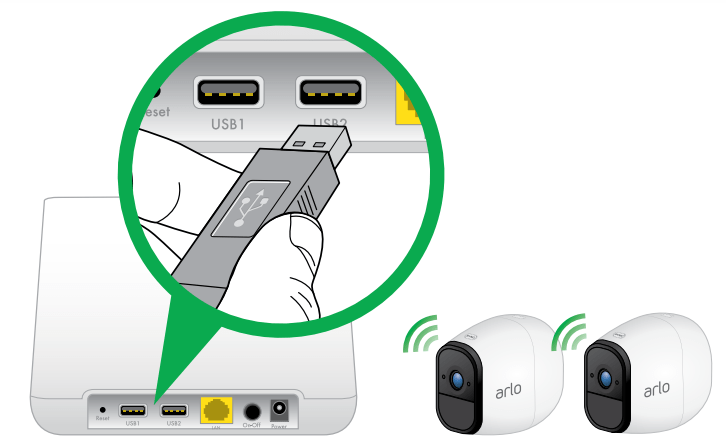
 Armed. Detection is on for this camera.
 Disarmed. Detection is off for this camera.
 Schedule. Manage detection based on a schedule.
 Geofencing. You can use geofencing to arm, disarm, or resume a schedule mode when you arrive at or leave a given location based on your mobile device.
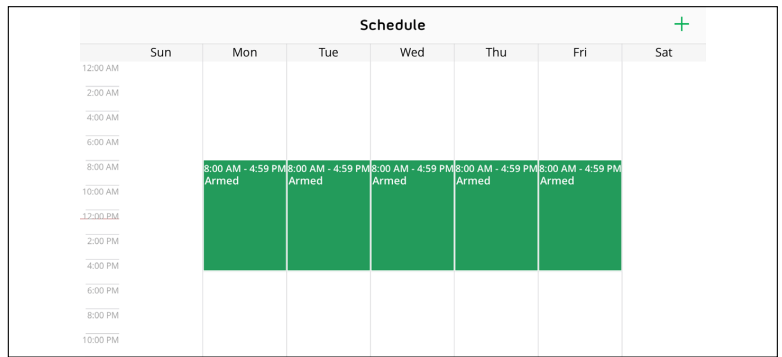
 on your mobile device.